

Page 1
USER GUIDE
DELTA DRONE
Page 2

/kaiserbaas
Tag us & share the love.
Need help?
www.kaiserbaas.com/support
For the full Kaiser Baas
product range visit
www.kaiserbaas.com
Page 3

TABLE OF CONTENTS
Delta Drone User Guide 4
DISCLAIMERS AND WARNINGS 4
Safety Warnings and Operating Guidelines 6
Included Equipment 8
Optional Accessories – sold separately 8
Drone Specifications 9
Low Voltage Alert 10
Failsafe Mode 10
Transmitter Specifications 11
Gimbal Dial 16
Gyro Calibration 17
Battery 18
Charging 18
Battery Safety Warnings 20
Rotor Blades 21
Rotor Guards 23
Pre-Flight and Flight Planning 25
Powering-on the Drone 26
Flight 26
Arm the Motors 27
Flight Conditions 29
Landing 29
Post-Flight 30
Camera Mounts 31
Development 32
PRODUCT SPECIFICATIONS 33
FAQ 34
CONTACT US 36
Page 4

4
EN
DELTA DRONE USER GUIDE
We advise you to regularly check the Delta Drone product page at www.
kaiserbaas.com
This page is updated regularly with product information, updates and
manual User Guide edits and can be accessed from the main menu.
Kaiser Baas reserves the right to make changes to this User Guide
if required. This User Guide is subject to change without notice.
If you have any questions or concerns regarding your product,
please contact your Retailer or the Kaiser Baas Customer
Service Team – helpdesk@kaiserbaas.com
DISCLAIMERS AND WARNINGS
Please read this section carefully before using your Kaiser Baas Delta
Drone.
By operating this product, you hereby agree to these disclaimers and
signify that you have read and understood the warnings and conditions
fully.
THIS PRODUCT IS NOT SUITABLE FOR PEOPLE UNDER THE AGE OF 18.
The Delta Drone is designed for Drone Pilots both experienced and novice.
It provides excellent self-levelling and altitude-holding and you will find
this takes the stress out of Drone piloting.
Despite our eorts to make the operation of the Transmitter and Drone
as safe as possible, when the battery is connected, we strongly
recommend that you remove all Rotor Blades when handling the Delta
Drone.
Always observe the safe flying instructions within this User Guide, as well
as the guidelines and regulations of your local aviation authorities.
Above all, maintain a safe distance from people and property when
operating your Delta Drone – a safe distance of 10m is recommended.
Kaiser Baas accepts no liability for damage(s) or injuries incurred directly
Page 5

5
EN
or indirectly from the use of this product, including but not limited to the
following conditions:
• Failure to follow the full instructions and cautions in the User Guide,
pertaining to correct assembly and safe operation.
• Damage(s) or injuries caused by erratic operation or poor piloting
decisions.
• Damage(s) or injuries caused by mechanical failures caused by neglect,
including the erosion and aging of product components.
• Damage(s) or injuries caused by the Drone being flown in the following
conditions:
• Unfavourable lighting, where the Pilot’s ability to see the Drone clearly is
diminished.
• Inclement weather; moderate to high winds, rain, snow or hail.
• Flying near electrical hazards, such as power lines or towers.
• Flying in or near fire, floods, tsunamis, ice, avalanche, landslide,
earthquake, etc.
• Damage(s) or injuries incurred due to users’ under the influence of drugs
or alcohol, suering dizziness, fatigue, nausea and any other condition;
physical or mental that could impair their ability to fly responsibly and
within the boundaries of the law.
• Damage(s) or injuries caused by malfunctions or “hacks”, refits or the
replacement of original components with non-Kaiser Baas provided
accessories and/or parts.
• Damage(s) or injuries caused by the misuse or incorrect operation of the
battery, protection circuits, Transmitter or battery charger.
• Damage(s) or injuries caused by flying the Drone in abnormal conditions
and allowing external substances to come into contact with the Drone
e.g. water, oil, soil, sand or any other material that could enter the Drone
and its internal compartments, including the battery.
• Damage(s) or injuries caused by continued flight after the Low Voltage
Alarm is triggered.
• Damage(s) or injuries caused by flying in areas such as those with:
a) magnetic interference
b) radio interference
c) government regulated no-fly zones or airports
• Any other losses that are not covered by the scope of Kaiser Baas
liability.
•
Page 6

6
EN
SAFETY WARNINGS AND OPERATING GUIDELINES
This Product is not intended for use by persons (including children) with
reduced physical, sensory or mental capabilities or lack of experience
and knowledge, unless they have been given supervision or instruction
concerning use of the Product by a person responsible for their safety.
Children should be supervised to ensure that they do not have access to
the Product.
Even though the Delta Drone may look small and light, there are
important safety considerations to bear in mind when operating this
device. A Drone of this class has motors which are capable of developing
a maximum output in excess of 186 watts, rotating at 10,000 RPM. This
makes the Rotor Blades VERY DANGEROUS when they are in motion.
They are more than capable of injuring people and damaging property.
For these reasons, always observe the following guidelines:
• DO NOT fly the Drone within 10m of people anywhere. Remember,
your Drone weighs nearly 1 kilogram and is more than capable of hurting
someone severely or damaging the environment around it. Consider
your personal liability when you choose to operate your Delta Drone.
• DO NOT attempt to handle or catch the Drone while it is in operation.
• DO NOT attempt to handle the Drone while the Rotor Blades are still
spinning.
• DO NOT allow others to approach the Drone while it is in operation
and the Rotor Blades are in motion.
• Always make sure that you have completely “disarmed” the Drone
and removed each Rotor Blade before handling.
• Always maintain Visual Line-of-Sight (VLOS) with the Drone.
• Always fly between ocial sunrise and ocial sunset, local time.
• Always stay below 330ft (100m) in height.
• Always ensure that your visibility has a range of at least 1.8 miles (3km).
• Never engage in careless or reckless manoeuvres. Consider the
impact reckless behaviour might have on other Drone enthusiasts
and future Pilots.
• Always conduct a pre-flight inspection based on the Pre-Flight Checklist
included with your Delta Drone. Always carry your Pre-Flight Checklist
on your person, when you intend to operate your Drone.
Page 7

7
EN
• Never operate your Drone when intoxicated or when you are
incapacitated in any other way.
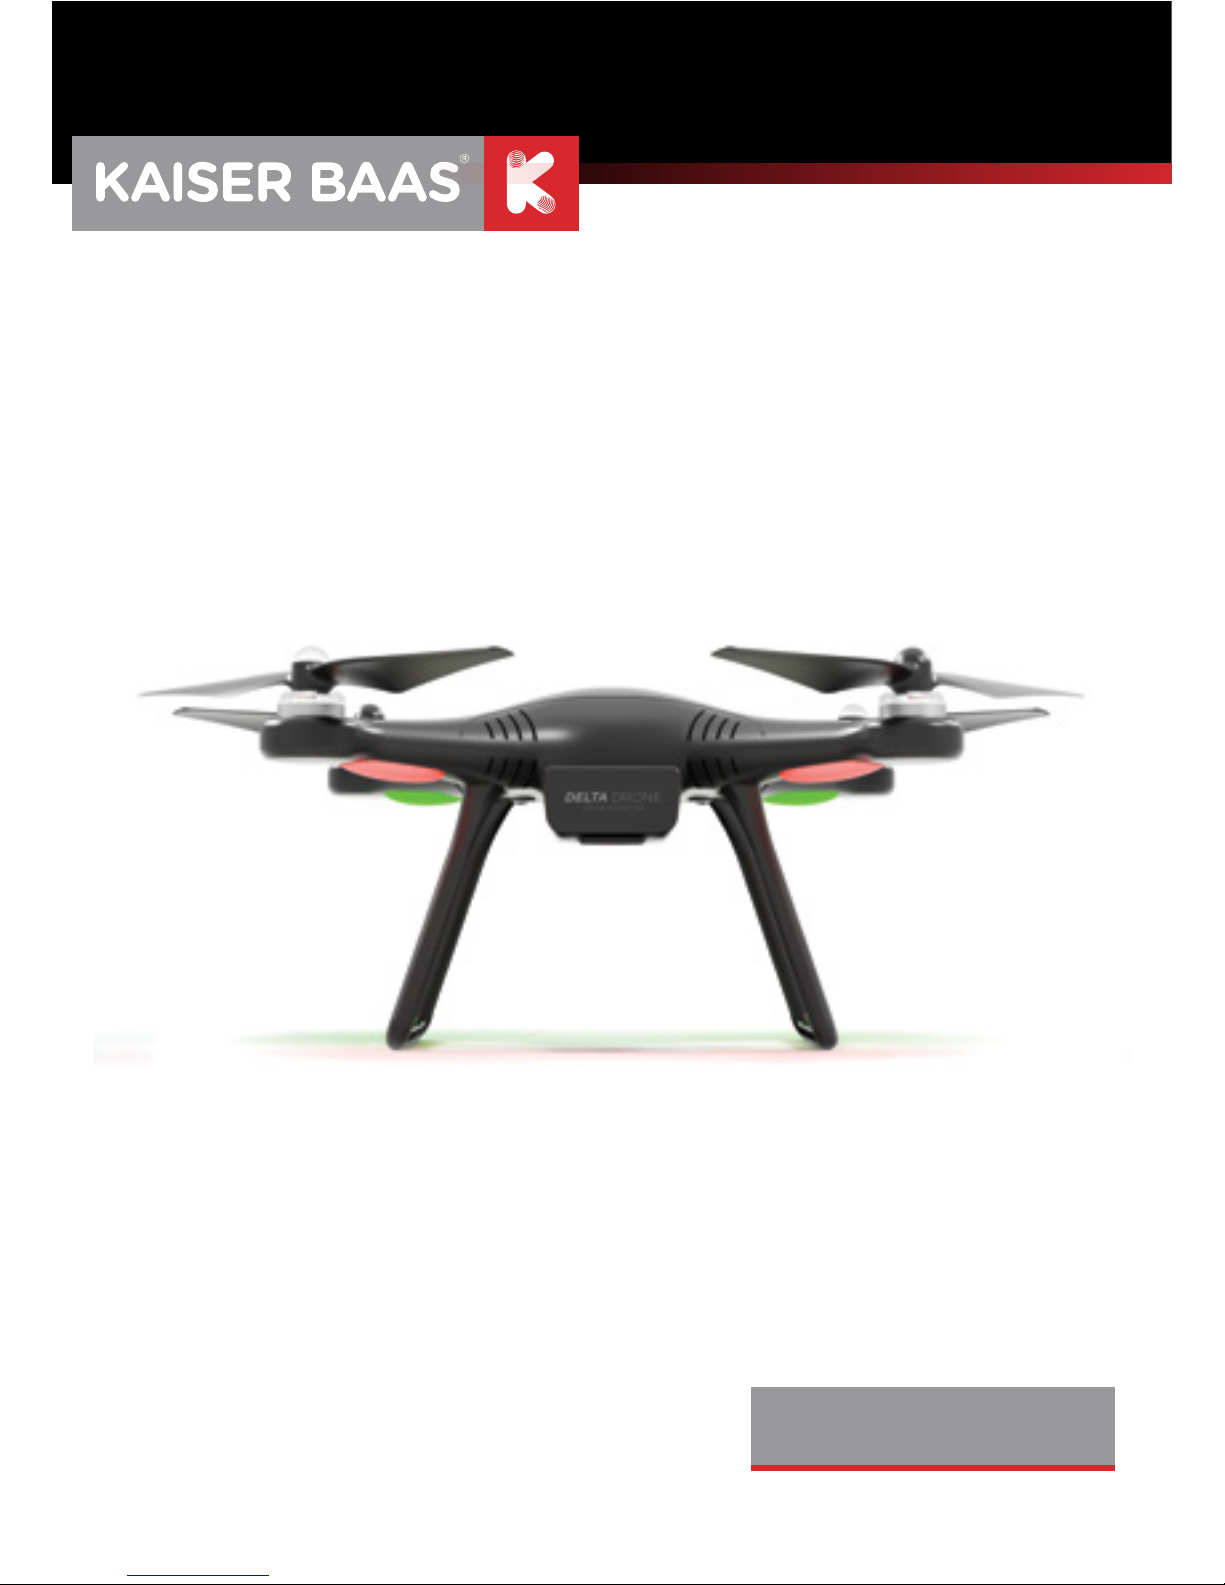
Delta Drone Features.
The Delta Drone is an easy to fly, GPS enabled Quadcopter.
Suitable for both new Pilot’s and experienced Drone flyers, alike.
If you are new to the fun of flying Drones, you can expect to be up
and flying in a short time. Of course you need to familiarise yourself
with the safety, operating and controls of the Delta Drone first!
Give yourself time to become accustomed to the feel of the Drone
and eect of the controls.
If you ever suspect that you are losing control of your Drone, you can
simply hit the Return to Home button (RTH) and your Drone should
return to its Take-o Location, accurate to 5 metres.
The Delta Drone features 3 modes:
1) Manual Mode
2) GPS Position Hold
3) Smart Orientation Mode (SOM)
These three modes are accessed by using the switch on the top right
of the Delta Drone Transmitter.
The Transmitter also hosts the Return to Home Button. This is located
in the centre of the Transmitter and has an image of a house on it.
When the Mode Switch, the Left Throttle Stick and the Return to Home
button are not in the correct position, you will not be able to ‘arm’ your
Drone and the Transmitter’s smart alarms will sound to warn you.
The Transmitter also features a Battery Light, located under the RTH
button. This light will change colour as the batteries in the Transmitter
run down. The Delta Drone Transmitter is powered by 4 x AA batteries
(not included).
The Delta Drone battery is capable of powering the Drone for up to 17
minutes of flight time. This will be dependent on the manner in which the
Drone is piloted and the conditions of the flight.
Page 8

8
EN
The Delta Drone has removable Rotor Blades for easy transport, storage
and most of all, increased safety.
You can mount any GoPro™ or Kaiser Baas Action Camera to the bottom of
the Delta Drone, to record your flight and capture aerial footage.
For optimised and smoother footage, the Delta Drone also has an optional
Gimbal (KBA15008 - sold separately) that supports the GoPro Hero 3™ &
Hero 3+™ and Hero 4™.
INCLUDED EQUIPMENT
• Delta Drone
• Delta Drone 2200mAh Battery
• Delta Drone Transmitter
• 4 Rotor Blades (2 Black Nut & 2 Silver nut)
• GoPro™/Kaiser Baas Compatible Camera Mount
• Compatible Camera Cradle for GoPro™ Hero 3™, Hero 3+™ and Hero 4™
• AC/DC Battery Charger
• 1 Power Cable
• Rotor Blade Removal Tool
• Allen Key Set
• Decal/Livery Set
OPTIONAL ACCESSORIES – SOLD SEPARATELY
• KBA15008 - Delta Drone Camera Gimbal and Stabilisers (GoPro™ Hero
3™, Hero 3+™ and Hero 4™ Compatible)
• KBA15001 - Delta Drone Rotor Guards and Safety Line
ONE FU
Page 9
9
EN
DRONE SPECIFICATIONS
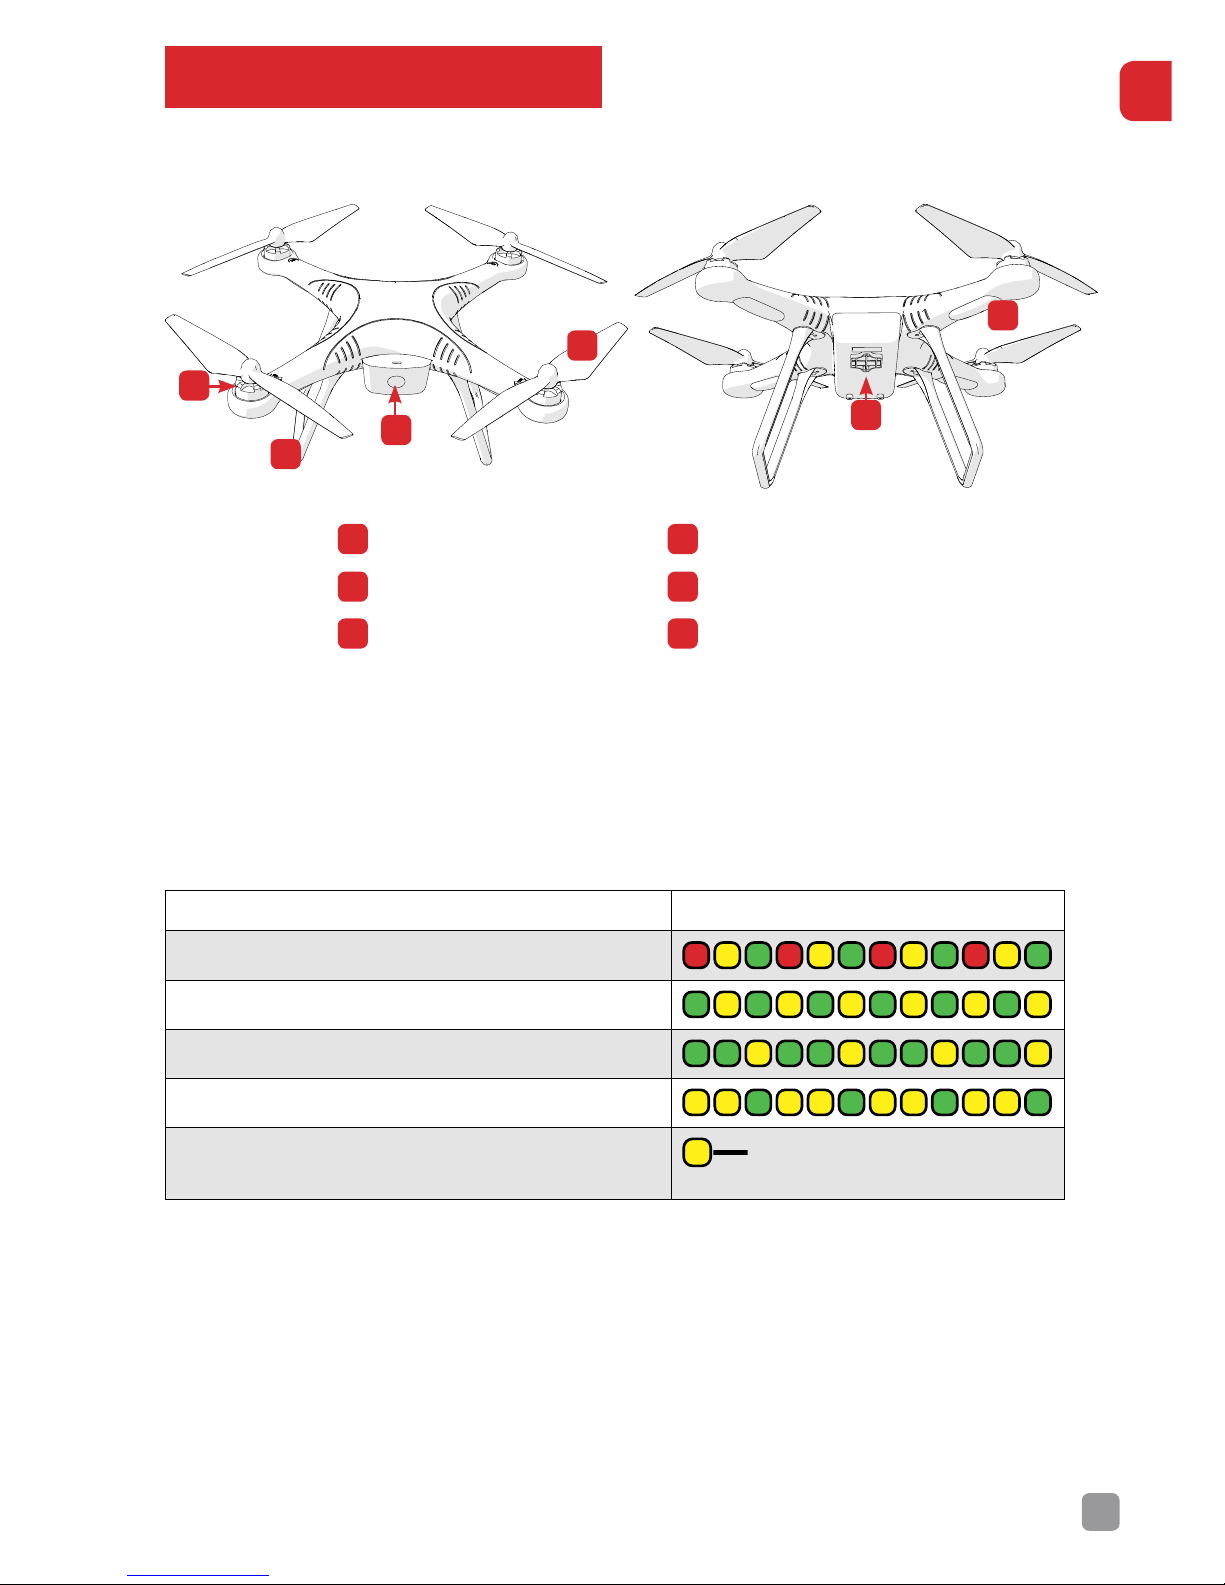
Delta Drone Diagram:
Delta Drone Lighting
The Delta Drone features LED lights under each arm. These are the best
way of telling which way the Delta Drone is oriented.
SYSTEM STATUS LED FLASHING
System self-checking (No GPS)
Finish Self-checking
Gyro calibration
Compass problem
GPS Lock and Take-o Location
recorded
The rear of the Drone is fitted with Green LED lights and the front of the
Drone is fitted with Red LED lights.
The LED lights also function as a Drone Health Warning System. You
should always monitor the LED lights on the Delta Drone because they are
the primary warning indicator if a problem occurs or if the Low Voltage
Alert (LVA) has been triggered.
DELTA DRONE
GPS QUADCOPTER
A
B
D
E
F
C
A
Motor
D
Rotor Blade
B
Landing Gear
E
Gimbal Mount
C
LED Status Display
F LED Lights
Page 10

10
EN
LOW VOLTAGE ALERT
The Low Voltage Alert is trigged when the battery has less than 2 minutes
of flight time left. When the LVA is triggered, the Drone should be landed
as soon as possible to prevent an unexpected loss in power. If the Drone
loses power completely, the Drone will hard-land which can damage the
Drone and its components.
[WARNING] Failure to land the Drone when the LVA is triggered may result
in a significant reduction of battery longevity and re-charge ability.
FAILSAFE MODE
The Drone features a Failsafe Mode that will return the Drone to its Take-o
Location in the event that the Drone:
• Loses Transmitter signal.
• Is flown beyond the range of the Transmitter.
• The RTH (Return to Home) button is pressed.
If one of these events is triggered, the Drone will enter RTH Mode and
return to its Take-o Location.
[WARNING] Failsafe Mode will only engage if the Drone has correctly
acquired GPS Lock (indicated by a solid Yellow LED Status Light).
[WARNING] Taking-o without acquiring GPS Lock will prevent the
Failsafe Mode from activating and may cause the Drone to crash
or be lost upon landing.
Page 11
11
EN
TRANSMITTER SPECIFICATIONS
Transmitter Diagram:
The Transmitter features a number of dierent modes to control the Drone.
There are 3 mode switch positions on the Transmitter:
Position 1 Manual Mode
This Mode allows the Drone be flown under
full manual control, without GPS assistance.
The altitude and position of the Delta Drone
is determined completely by the Pilot. The
Drone will orient according to the direction it
was placed prior to being ‘armed’.
[WARNING] The rear of the Drone is always
the side with the circular Status LED. Take
note of which direction the Drone is facing,
especially when in Manual Mode.
Manual Mode is required to arm the motors and to Lock GPS.
Always start in Manual Mode when you turn on your Drone.
If the Drone is not in Manual Mode for arming and GPS lock,
the smart alarm will sound.
DELTA DRONE
GPS QUADCOPTER
1. START/TAKE OFF
2. GPS HOVER MODE
3. SMART ORIENTATION MODE
GIMBAL
HOLD HERE
TO LOCK GPS
A
C
D
E
F
G
H
B
A
Power Button
E
Lanyard Attachment
B
Speaker
F
Gimbal Dial
C
Battery Indicator
G Flight Mode Switch
D
Return to Home
H Battery Compartment
Page 12
12
EN
Position 2 GPS Position Hold.
GPS Position Hold does not change the way the
Drone is oriented. It simply locks the position
of the aircraft in place – in a hover. The altitude
is fixed when the Throttle is at 50%. It will only
increase or decrease in altitude when the Throttle
is pushed repectively to the 70% or 30% position.
Position 3 Smart Orientation Mode.
Smart Orientation Mode (SOM) is a special
function that changes the way the Drone handles
orientation. It utilises the internal compass and
GPS co-ordinates and will lock the orientation
of the Drone in place, relative to the direction
the Drone was facing when it was first turned
on and armed.
Smart Orientation Mode enables you to control
the movement of the Delta Drone from your
point of view regardless of which way the Drone
is facing. You will find this mode useful for quick
positioning and returning the Drone to you when needed.
New Pilots who have not mastered Pitch and Roll movements will enjoy
using this mode because it allows you to fly in any direction without
having to worry about orientation.
So how does SOM work?
Smart Orientation Mode allows you to control the Drone relative to its
direction from the Take-o Location (i.e. where it was armed) but this
requires GPS Lock. This is why it is always important to allow the Drone
to obtain GPS Lock before take-o (indicated by a solid Yellow LED Light
Status).
Smart Orientation Mode uses the Drone’s position relative to where you
first armed the motors. This means no matter where the Drone is, pulling
the Pitch (Right Stick) back will cause it to return towards its Take-o
Location, regardless of the Drone’s actual heading. This applies no matter
where the Drone is, even when it flies behind the Pilot/Take-o Location.
Page 13

13
EN
If the Pilot holds full Right Roll, the Drone will fly in a circle, clockwise
around the Pilot (although the circle’s radius may tend to grow slightly with
each orbit due to “lag”)
Also, remember that GPS is only accurate to around 10 metres, so close flybys of the Take-o Location should be avoided.
To avoid confusion, you should ensure the controls are correct from takeo. You should arm the Drone while you are standing behind it, so that
both you and Drone are both facing in the same direction. Please note,
SOM can be turned on while in flight.
Return to Home
The Return to Home function is triggered by
pressing the RTH button on the Transmitter,
indicated by the image of a house.
This button will only trigger the RTH function
when the Drone has been initialised with GPS
Lock.
When the RTH button is pressed, the Drone
will lift to a height of approximately 15 metres
and begin to return to its Take-o Location.
[WARNING] RTH does not detect obstacles and the Pilot should ALWAYS
be aware of any obstructions. Please note, you will be able to manoeuvre
the Drone in this mode to safely land. Ensure that you have given a
clearance area of 5m (Safe Landing Zone) before attempting to land the
Drone.
Transmitter Operation.
The Transmitter has two control sticks, Left (Throttle/Yaw) and Right
(Pitch/Roll).
1. START/TAKE OFF
2. GPS HOVER MODE
3. SMART ORIENTATION MODE
HOLD HERE
TO LOCK GPS
DELTA DRONE
GPS QUADCOPTER
1. START/TAKE OFF
2. GPS HOVER MODE
3. SMART ORIENTATION MODE
GIMBAL
HOLD HERE
TO LOCK GPS
Throttle Down
Throttle Up
Yaw Left Yaw Right
Pitch Down
Pitch Up
Roll Left Roll Right
Page 14

14
EN
Left Stick
The Left Stick is known as the Throttle.
This controls the Drone’s Elevation and Yaw.
Elevation
Yaw
To engage the Throttle and control the Drone’s elevation and power, the
Left Stick uses a North/South movement. North to ascend and South to
descend.
To change the Yaw of the Drone, the Left Stick uses an East/West
movement. East to Yaw right and West to Yaw left.
[WARNING] In Manual Mode (Position 1) pushing the Throttle down
completely to 0% will stop the motors spinning and cause the Drone to
drop dramatically in-flight and even crash. Take EXTREME PRECAUTION
as this may damage persons, property and the Drone itself.
N
S
EW
N
S
EW
N
S
EW
N
S
EW
Page 15

15
EN
[WARNING] Unless using SOM, take special note when changing the
Drone’s Yaw (heading) as this will aect how the Drone reacts when using
the Right Stick.
Right Stick
The Right Stick is also known as the Elevator/Aileron.
This controls the Pitch and Roll of the Drone.
Pitch
Roll
The Elevator/Aileron controls the forwards and backwards (Pitch)
movement and the left and right (Roll) movement of the Drone.
N
EW
N
EW
N
S
EW
N
S
EW
N
EW
N
EW
Page 16

16
EN
GIMBAL DIAL
The left side of the Transmitter features a Gimbal Control Dial.
[Important] The Gimbal is an optional accessory, purchased separately
(KBA15008)
The Gimbal Dial only functions when a Gimbal is attached and connected
to the Drone. See Gimbal User Guide.
When connected, the Gimbal Dial allows the Pilot to control the tilt of the
attached camera.
DELTA DRONE
GPS QUADCOPTER
1. START/TAKE OFF
2. GPS HOVER MODE
3. SMART ORIENTATION MODE
GIMBAL
HOLD HERE
TO LOCK GPS
DELTA DRONE
GPS QUADCOPTER
1. START/TAKE OFF
2. GPS HOVER MODE
3. SMART ORIENTATION MODE
GIMBAL
HOLD HERE
TO LOCK GPS
Page 17
17
EN
GYRO CALIBRATION
The Drone may need its Gyroscope to be re-calibrated if it has become
misaligned after a flight or error. This is usually most beneficial when the
Drone is starting to fly strangely or is behaving erratically.
To reset the Gyro:
Place the Delta Drone on flat, stable ground and disconnect the battery.
Wait for a few seconds, then re-connect the battery and start your Drone
as normal.
Page 18

18
EN
BATTERY
It is imperative that only a Kaiser Baas Delta Drone Battery is used inside
the Delta Drone. DO NOT use any third-party or unknown accessories or
batteries.
Always ensure your Delta Drone battery is charged before flight.
CHARGING
Connect the Delta Drone charger to the wall using the supplied power
cable.
Connect the Delta Drone battery to the supplied charger. Please note, the
White connector of the battery can only be inserted one way, be sure to
connect correctly.
Wait until charging is complete before disconnecting the Battery from
the Charger. This will be indicated by all three LED Lights on the Charger,
displaying Green.
Page 19

19
EN
Charge Time
The Delta Drone battery should take approximately 3 hours to charge.
Battery Life
To ensure the longevity of your Delta Drone battery, never run the battery
too low as this will impact the battery health and future flight time. Your
Delta Drone battery should have a life of over 400 cycles, provided proper
charging and maintenance is employed.
Battery Life - Flight Time
The Delta Drone flight time is determined by a number of factors; weather,
temperature, altitude and flight-style are all major contributors to how long
the Drone can remain in-flight.
Under optimal conditions, you should get approximately 15-17 minutes of
flight time.
The age and quality of a battery are also key components to ensuring
longer flight times.
Please follow all recommended battery care and charging instructions
within this User Guide.
Page 20

20
EN
BATTERY SAFETY WARNINGS
DO NOT disassemble the battery.
DO NOT short-circuit the battery.
DO NOT ever poke or puncture the battery with any blunt or sharp
implement [WARNING] There is a high risk of it igniting!
DO NOT ever leave the battery near an open flame or heat source.
DO NOT immerse the battery in water, unless performing the discard
process
DO NOT charge the battery in direct sunlight.
Never leave a charging battery unattended.
Only remove the battery from its supplied charger when the charging
cycle is complete.
DO NOT reverse charge or over-charge the battery.
Always charge the battery in a designated space, away from people and
animals.
If the battery becomes bloated or appears to be inflated - DISCARD THE
BATTERY IMMEDIATELY – Instructions - place the bloated battery in a
bucket filled with salt water (200 grams salt to 1 Litre water) and leave
the battery in the solution for three days. You can now dispose of the
battery through your local recycling centre. Never use your battery after
conducting the discard process.
If the battery has a high surface temperature, leave it to cool before you
try to re-charge it.
Always ensure the battery is free from all damage and deformation before
use.
If you see any sign of smoke coming from the Drone or battery area
- STOP OPERATING IMMEDIATELY – when safe, disconnect the Drone
battery.
DO NOT use the battery with unspecified equipment.
DO NOT touch a leaking battery directly. Never let battery contents touch
your skin or clothing. If contact occurs, seek medical advice immediately.
DO NOT throw or cause any trauma to the battery.
DO NOT put the battery in a microwave or high pressure container.
DO NOT charge the battery if the ambient temperature is below 0°C or
above 45°C.
Always use the supplied charger and observe charging requirements.
Always store the battery in a safe and cool place and never store the
battery fully charged.
Page 21

21
EN
ROTOR BLADES
It is important that only Kaiser Baas Delta Drone Rotor Blades are fitted to
the Delta Drone. Never use any third party accessories or tools.
The Delta Drone has two types of Rotor Blade.
The first has a Silver Nut and the second features a Black Nut. These
colours are to signify which motor each Rotor Blade should be fitted to.
The Silver and Black nuts correspond to a motor with the same colour top.
Installation
Before installation, remove all warning labels from the Drone motors before
attaching the Rotor Blades.
Attach the Rotor Blade with the correct coloured nut, to the corresponding
motors with Silver/Black tops.
Page 22

22
EN
Refer to the icon on the Rotor Blade to determine which direction to
tighten the blade in. Rotor Blades should be tightened by hand only.
[WARNING] Never use the Rotor Blade Removal Tool to tighten the
blades. The Blades are self-tightening and do not require much force
to install. Over-tightening may damage the thread and cause instability
during flight.
Removal
Please use the included Rotor Blade Removal Tool to detach the
blades. Fit the Rotor Blade Removal Tool into the motor housing to stop
unnecessary movement and then simply unscrew the Rotor Blade in the
OPPOSITE direction to the icon on the blade.
Page 23

23
EN
Rotor Blade Warning
Never use Rotor Blades with any signs of damage or wear and tear. This
includes chips, scratches and cracks. Damaged Rotor Blades can cause the
Drone to fail in-flight and may result in damage to persons or property.
ALWAYS ENSURE that the correct Rotor Blade is matched to the correct
motor, using the nut colour as a guide.
Never touch the Drone or the Rotor Blades when the motors are spinning.
ROTOR GUARDS
New Pilots are strongly advised to purchase the Delta Drone Rotor Guards
and Safety Line accessory (KBA15011 - Sold Separately).
The Rotor Guards and Safety Line will provide some protection for the
Rotor Blades, preventing them from coming into contact with obstacles
and causing additional damage.
They will also protect the Rotor Blades from damage in the event of a false
take-o.
It is important never to lift the Drone by the Rotor Guards or Safety Line.
Installation of Rotor Guards
Step 1. Remove two screws from the bottom of the motors
Page 24

24
EN
Step 2. Place the Rotor Guards in the designated slots
Step 3. Use the larger screws provided to fix
the Rotor Guards in place
Page 25

25
EN
Step 4. Attach the Safety Line through the allocated points to add
another level of protection and structural stability to the Drone.
PRE-FLIGHT AND FLIGHT PLANNING
Please consult the Pre-Flight Checklist before EVERY flight.
At a minimum:
• Ensure that you are at least 5.5kms from any airfield and you are adhering
to any regulations and laws laid out by your local aviation authority.
• Do a COMPLETE check of your surroundings, look for hazards above, in
front and behind you.
• Be especially aware of things like power lines and nearby people and
animals. If these hazards exist, DO NOT deploy your Alpha Delta Drone
and consider a new Take-o Location.
Page 26

26
EN
POWERING-ON THE DRONE
Open the battery compartment and insert the Delta Drone battery all the
way, with the Yellow and White battery connections facing outwards.
Connect the Yellow battery power lead to the Drone. You will hear a beep,
signalling the battery has been connected successfully.
Neatly and carefully push the all connections into the compartment and
close the cover.
Place the Drone on unobstructed, stable ground. Ensure you have
followed the Pre-Flight Checklist completely and are adhering to your local
regulations.
Ensure the Status LED is facing towards you. This ensures the Drone is
starting in the same direction and orientation as you, the Pilot.
Please wait until the Status LED indicates it has finished the System-Check
and acquired GPS Lock.
FLIGHT
Again, please consult the Pre-Flight Checklist before EVERY flight.
It is highly recommended that you have an experienced Drone Pilot
accompany you for supervision. Ensure that you have followed the
guidelines and done your own research on where it is safe and permitted to
fly the Drone.
To take-o you must ensure that the Transmitter is set to Position 1 (Manual
Mode). Turn on your Transmitter.
Ensure that the Throttle is in the lowest position.
Page 27

27
EN
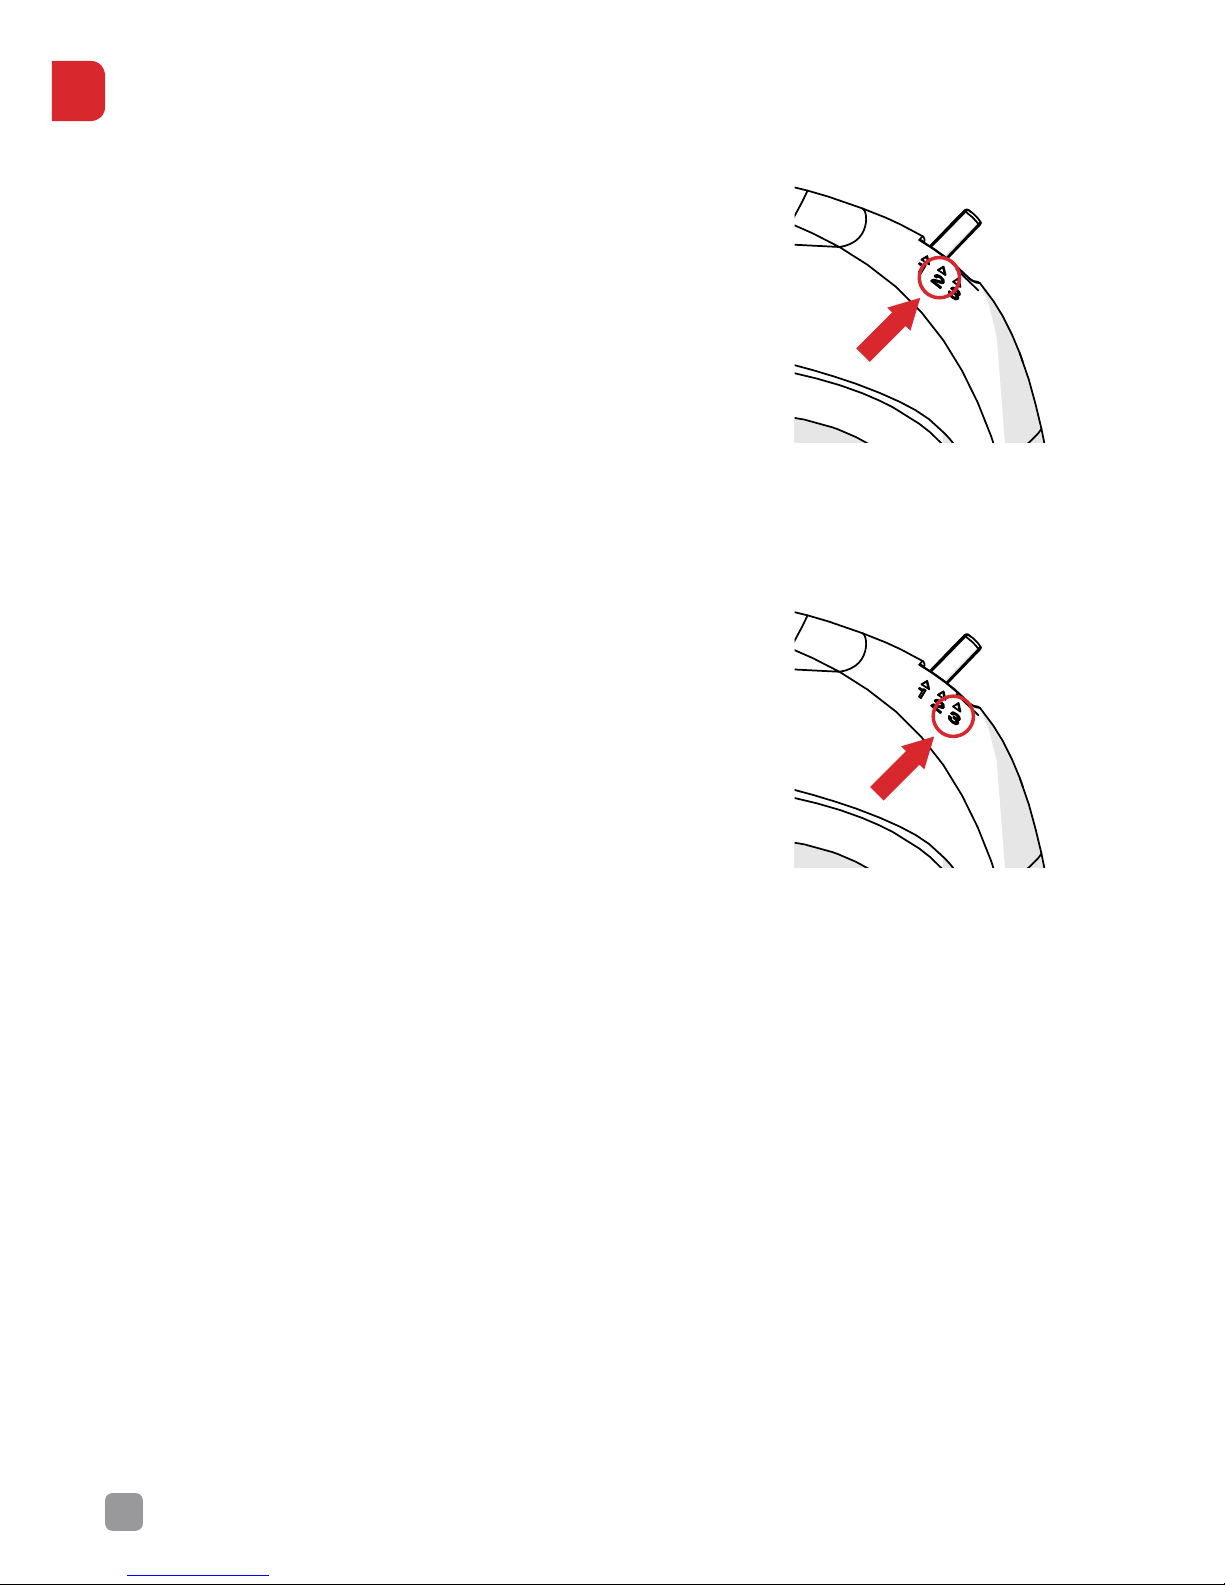
ARM THE MOTORS
The Drone must first be armed and the motors unlocked prior to take-o.
To arm the motors, move the Throttle to the far bottom right (see markings
on the Transmitter) and hold for 5 seconds. The LED indicator will flash and
change to solid Yellow – indicating GPS Lock.
The motors will start to spin, indicating they have been armed.
Take-O
Ensure the area is open and any spectators have been briefed. Ensure no
spectator is within the 10m Safe Landing Zone.
The Status LED should be facing the Pilot. This is the rear of the Drone.
Any control in Position 1 (Manual Mode) or Position 2 (GPS Position Hold)
will correspond to the direction the Drone is facing, so be aware of any
changes in the Yaw angle.
DELTA DRONE
GPS QUADCOPTER
1. START/TAKE OFF
2. GPS HOVER MODE
3. SMART ORIENTATION MODE
GIMBAL
HOLD HERE
TO LOCK GPS
Throttle Down
ARM
Throttle Up
Yaw Left Yaw Right
Page 28

28
EN
You are strongly encouraged to wait for GPS Lock before take-o.
Failure to lock satellites will prevent Mode 2 and Mode 3 from being able
to be used and will also prohibit the Drone from determining a Take-o
Location. This may result in the loss of your Drone, should it venture out of
Visual-Line-of-Sight (VLOS).
NOTE: if your Drone is inactive on the ground for a period of over 10
seconds, you will need to re-arm, using the Throttle and markings on the
Transmitter.
Lift the Left Stick to engage the Throttle smoothly, while keeping the
Yaw/Pitch centred. The Drone needs to be 1 metre above the ground to
prevent any “Ground Eect” or ‘backwash’ of air from disrupting the flight.
When the Drone is near the ground, pay special attention to its position to
prevent serious harm to persons or property.
New Pilots are strongly advised to switch the Transmitter to Position 2
(GPS Position Hold) or Position 3 (SOM) for ease of flight.
Only proceed with flight if you have performed all the Pre-flight checks and
are familiar with all the functions of the Delta Drone. If needed, re-read the
User Guide and other instructions regularly.
[WARNING] Please note that attaching the Gimbal will change the way
the Drone flies, as it is now bearing more weight. Pay extra attention
during take-o to ensure that the Aircraft does not tip over in a false takeo. Always used the included Stablisers.
Page 29

29
EN
FLIGHT CONDITIONS
Always follow legislation set by local authorities on the rules and
regulations surrounding where you are permitted to operate your Drone.
Never fly your Drone in adverse weather conditions including rain, snow,
fog or winds exceeding 10 knots.
Never fly your Drone near large crowds or above unwilling spectators.
Make sure that you have the full permission of people within flying range of
your Delta Drone and DO NOT fly your Drone where people have not given
permission or have requested that you not fly.
Flight Limits and Geo-Fencing
The maximum range of the Delta Drone is 1,312ft (400m).
Your Delta Drone is equipped with a pre-programmed geo-fence that limits
the flight-distance of the Drone to 984ft (300m) horizontally and 328ft
(100m) vertically, from the Transmitter. This geo-fence programming has
been fitted for the safety of you and others and prevents your Delta Drone
from venturing out of your VLOS.
LANDING
The safest way for new Pilots to land the Drone is to use the RTH button on
the Transmitter.
Please note that when the RTH button has been engaged, that the Drone
will not automatically be able to avoid obstacles. You should take special
care to manoeuvre the Drone to a safe landing position.
Position 2 (GPS Position Hold) allows the Pilot to safely descend and land
the Drone. Always be mindful of how fast the Drone is descending, to
ensure a safe landing.
When landing in Position 1 (Manual Mode), be very careful when lowering
the Throttle, as flicking the toggle straight down will disarm the motors,
causing an immediate loss of power.
[WARNING] When landing with the Gimbal, please be aware that the
Drone will handle dierently. We strongly advise that you land on soft
terrain, to ensure the attached camera and gimbal are not damaged in the
event of a false landing.
Page 30

30
EN
POST-FLIGHT
Disarm the Motors.
To disarm the motors, push the Throttle to its lowest position and then
push it to the far bottom left and hold for approximately 5 seconds.
The motors will disarm and the status LED will change, flashing Green and
Yellow.
DELTA DRONE
GPS QUADCOPTER
1. START/TAKE OFF
2. GPS HOVER MODE
3. SMART ORIENTATION MODE
GIMBAL
HOLD HERE
TO LOCK GPS
Throttle Down
DISARM
Throttle Up
Yaw Left Yaw Right
Page 31

31
EN
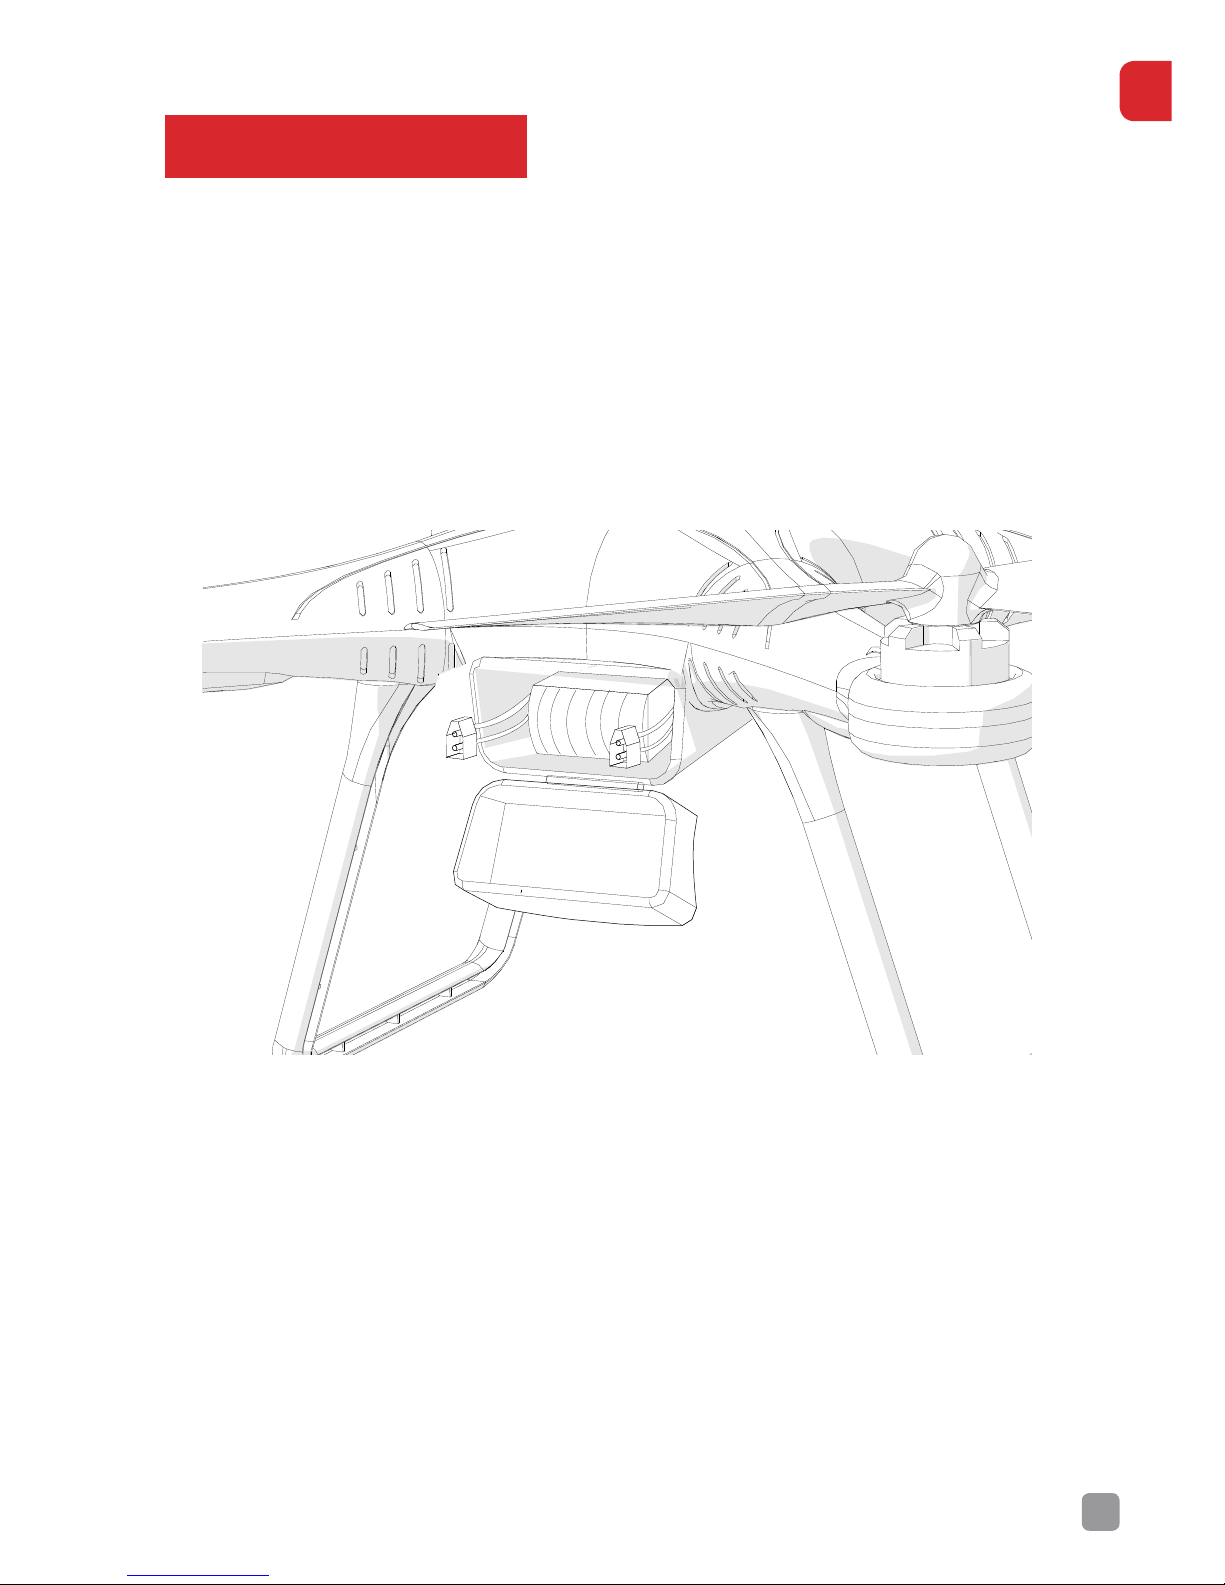
CAMERA MOUNTS
The Delta Drone comes with three options for mounting a camera (like a
GoPro™ or Kaiser Baas X-Series Action Camera).
Option one: GoPro™ Mount.
Ax a GoPro™ or Kaiser Baas Action Camera to the standard mount
(included).
Exo-Shells or Skeleton Mounts are sometimes used to save weight.
Option two: Camera Cradle.
Place a GoPro™ or other compatible camera into the included camera
cradle and ax it to the mount at the bottom of the Delta D
Page 32

32
EN
Option 3: Gimbal Mount – purchased separately
Please refer to the Kaiser Baas website for more information on the
Gimbal Accessory.
DEVELOPMENT
We are always developing new and exciting accessories and upgrades for
your Delta Drone.
Check with the Kaiser Baas website regularly, to see any new exciting
news about your Delta Drone.
Page 33
33
EN
PRODUCT SPECIFICATIONS
Delta Drone Specification
Max Ascent Speed: 6m per sec
Hover Accuracy: 0.8m
Max Flight Speed: 15m per sec
Motors: 920 KV brushless
Battery 3S LiPo, 11.1 V/2200 mAh
Flying Weight: 810g
Flight Time: Up to 17 minutes
Size 290 x 290 x 185 mm
Rotor Blades: 9043 Self Tightening
Gimbal Adapter: Optional Accessory
Remote Transmitter Specification
Channels: 6 Channel
Operating Frequency: 2.4-2.48GHZ
Bandwidth: 500KHZ
Motors: 920 KV brushless
Channel Resolution: 1024
Weight: 335g
Input Power: 6V AA Batteries
Size 174 x 89 x 190 mm
Page 34

34
EN
FAQ
Q1. My Drone does not take-o?
A1. Make sure that your Delta Drone is powered-on and the motors are
armed, as per the User Guide instructions. Refer to the User Guide for
detailed information on how to operate the Drone safely.
A2. The battery may be flat. Please ensure the Drone battery is fully
charged and that the Transmitter batteries are fresh.
Q2. My Transmitter is beeping. Make it stop!
A1. Ensure that the Transmitter is set to Mode 1 (Manual Mode) and the
Return to Home button is not de-pressed. Also check that the Throttle
(Left Stick) is completely down, in the lowest position.
Q3. My Drone is beeping! What does this mean?
A1. If the Drone is beeping, this more than likely means that the battery
is close to being empty. What you are hearing is the Low Voltage Alarm.
Please refer to the User Guide for further details.
A2. The Drone could also be beeping to let you know the Position on the
Transmitter is incorrect or the RTH button is de-pressed. Set your Delta
Drone Transmitter to Position 1 (Manual Mode) and check the RTH button.
Q4. My Drone keeps tipping when I take-o!
A1. It is often dicult for new Pilots to get used to the take-o procedure.
To take-o without tipping, give the Drone a smooth lift of power with the
Throttle, rather than a quick movement. Once in the air, keep the Drone
level using the Right Stick (Elevator/Aileron). Please go to our YouTube
page for tips on how to safely and easily pilot your Delta Drone.
Page 35

35
EN
Q5. My Drone is not stable in the air.
A1. Always arm the motors after the Drone has acquired GPS Lock. Be sure
to place the Drone on level ground before you connect the Drone battery.
Make sure you are using GPS Position Hold or Smart Orientation Mode
(SOM) once in the air.
A2. Make sure the weather conditions are calm and are not interfering with
the stability of the Drone.
A3. There may be other environmental interference. Please ensure you are
in an area free from strong electromagnetic interference.
Q6. I’m not sure where to fly my Drone?
A1. If you are in doubt of where you can fly, always check the local laws and
regulations first! Please follow your local aviation authorities’ guidance on
where, when and how you can fly your Drone. Many areas have designated
RC flying fields where you can fly safely and legally. DO NOT fly in a
confined area, like a small backyard or balcony.
A2. Choose an open, outdoor area away from people, buildings and
airports.
Q7. My Drone freaks me out. What can I do?
A1. Visit our YouTube page and follow our comprehensive tutorials. The
Delta Drone can be quite intimidating but, always make sure you have
read the User Guide entirely and are familiar with all features and safety
precautions before you start flying.
A2. If possible, ask a friend with experience to help you fly.
Q8. A dog is chasing my drone!
A1. Don’t land! That is almost certainly going to either hurt the dog or
cause further stress. Animals are prone to notice Drones when they are
flying close to the ground. We recommend that you raise the Drone
to a higher altitude. You will find this almost always causes animals to
lose interest. Then you can go about bringing the Drone back to you or
continuing the flight.
Page 36

36
EN
Q9. Can I attach other cameras to my Drone?
A1. The Delta Drone is designed to support either GoPro™ or Kaiser Baas
Action Cameras. We do not recommend that you attempt to attach any
other camera type to this Drone, as it may seriously aect the balance
or load-bearing ability of your Drone, possibly causing damage to
components, property or people.
CONTACT US
Need further assistance? Please visit:
www.kaiserbaas.com/support
Or email:
helpdesk@kaiserbaas.com
For the full Kaiser Baas product range visit
www.kaiserbaas.com
Page 37

Page 38

 Loading...