

FOR SAFETY MEASUREMENTS!!
WARNING
INTRODUCTION
2. SPECIFICATIONS
3. NAME ILLUSTRATION
4. SAFETY PRECAUTIONS
1. UNPACKING AND INSPECTIONS
(23℃±5℃、<80%RH in non-condensing)
Σ
1
2
3
4
To prevent an electrical shock hazard to the operator and/or damage to the
instruments, read this instruction manual carefully before using the Digital
Multimeter. WARNINGS with the symbol on the Digital Multimeter and
this instruction manual are highly important.
Important Symbols
The symbol listed in IEC 61010-1 and ISO 3864 means "Caution
(refer to instruction manual)".
WARNING : The symbol in t his manual advises the user of an
electrical shock hazard that could result in serious injury or even
death.
CAUTION : The symbol in this manual advises the user of an
electrical shock hazard that could cause injury or material damages.
KU-2600 is designed to comply with CAT Ⅱ 600V. But, do not measure High
Power Line of more than 3kVA power. High Power Line sometimes includes
High Surge Voltage that could possibly induce dangerous arcs of explosive
short in the instrument and could result in serious injury to the operator. Even
if it is Low Power Line, use extreme care when measuring high voltage.
Thank you for purchasing KAISE "MODEL KU-2600 DIGITAL MULTIMETER".
To obtain the maximum performance of this instrument, read this Instruction
Manual carefully, and take safe measurement.
Inspect the instrument and acessories for transport damage. If any damage or
missing items are found, ask your local dealer for replacement.
Confirm that the following items are contained in the package.
2-1. GENERAL SPECIFICATIONS
2-2. MEASUREMENT SPECIFICATIONS
1. Digital Multimeter and Test Leads
2. Two 1.5V R6P Batteries (Installed and spare)
3. Two Spare Fuses (0.5A/250V, 10A/250V)
4. Holster
5. Instruction Manual
1. DISPLAY (LCD)
a. Numerical Display : 4000 count LCD, 12mm high
b. Units and Symbols :
2. OPERATING PRINCIPLE : ⊿ conversion
3. RANGE SELECTION : Auto-Ranging / Range Hold
4. SAMPLING RATE : 2 times per second
5. POLARITY : Auto-Polarity ("ー"symbol appears in minus)
6. OVERRANGE INDICATION : "OL" symbol appears. (excluding DC/AC 600V)
7. DIFFERENCE MEASUREMENT (Zero Adjustment) : Press REL△Key to
make Difference Measurement and Zero Adjustment.
8. DISPLAY HOLD : Press HOLD Key.
9. BATTERY WARNING : symbol appears when battery voltage goes down
below approx. 2.4V.
10. OPERATING TEMPERATURE & HUMIDITY : 0℃ to 40℃, less than 75% RH
in non-condensing.
11. STORAGE TEMPERATURE & HUMIDITY : −20℃ to 60℃ less than 80%
RH in non-condensing.
12. POWER SUPPLY : Two 1.5V R6p Batteries.
13. POWER CONSUMPTION : 4.5mW typically.
DIGITAL
MULTIMETER
KU-2600
INSTRUCTION MANUAL
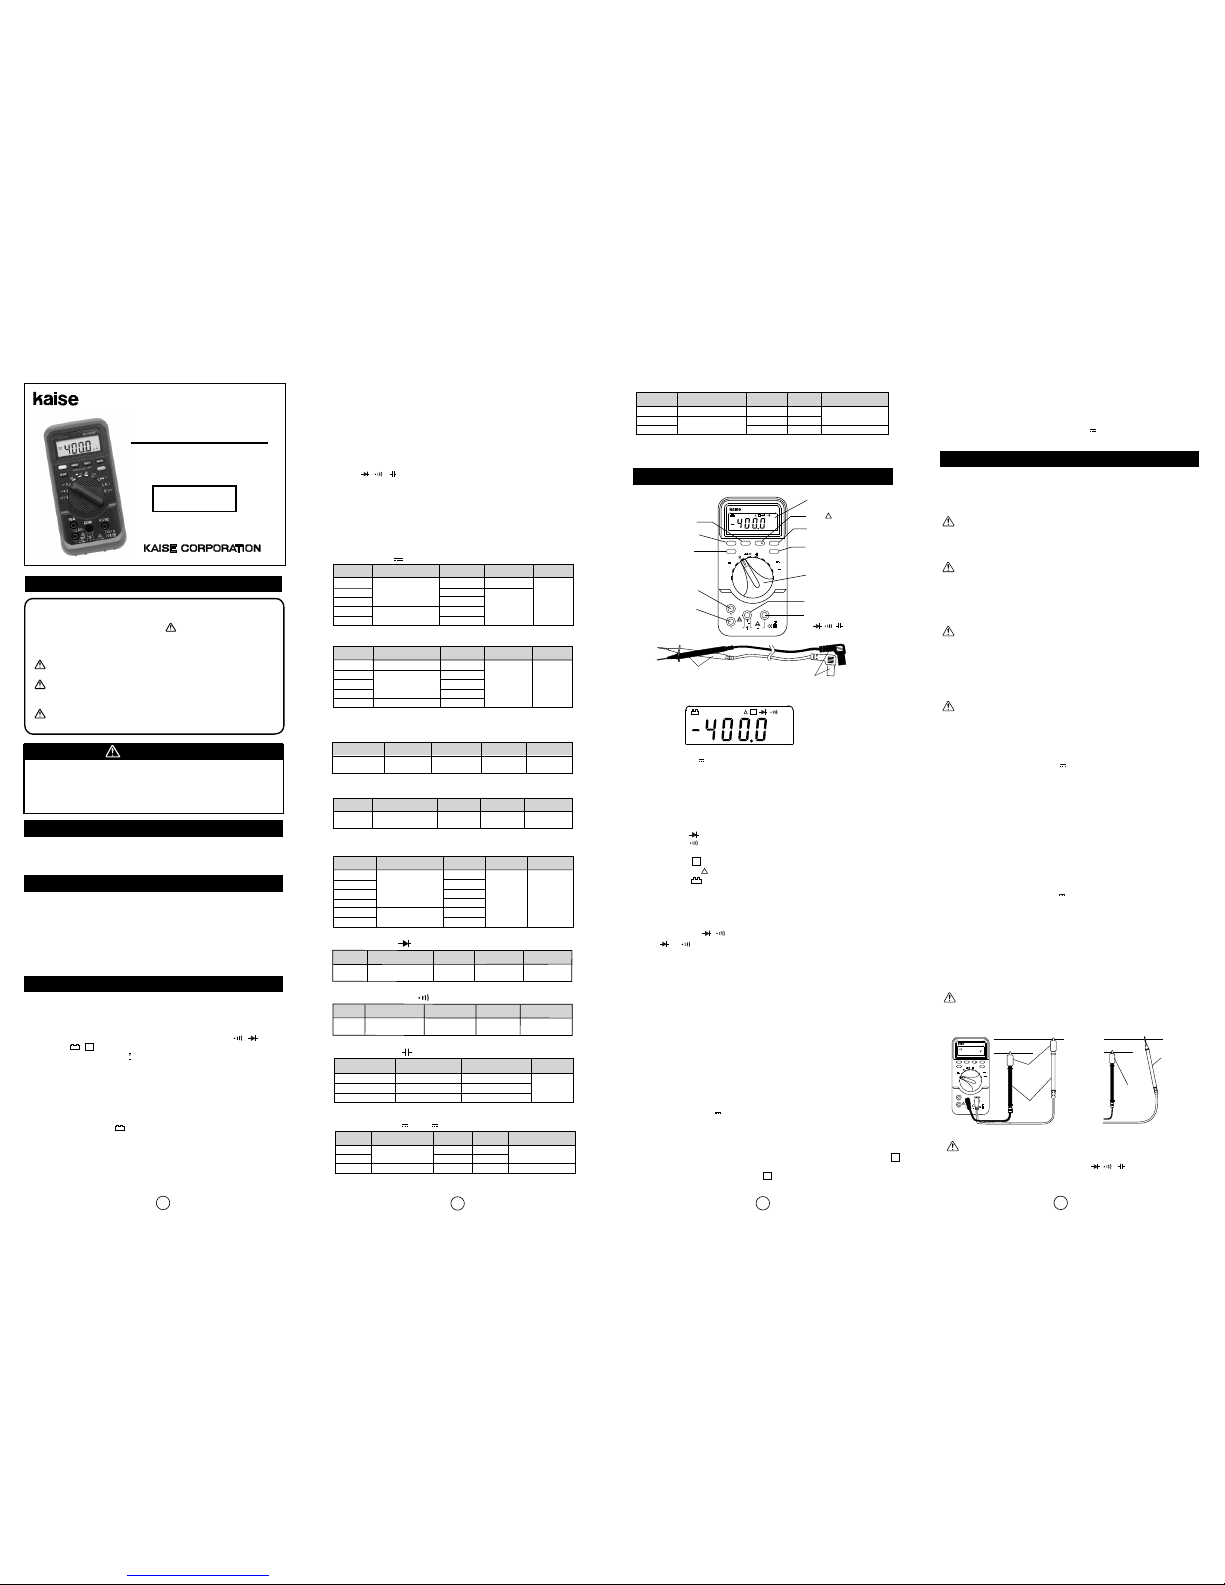
1. LCD
2. FUNCTION Switch
3. SELECT Key
( / or DC/AC selection)
4. RANGE Key
5. REL△ Key
6. HOLD Key
7. RESET Key
8. Hz/Duty Key
14. BATTERY LIFE : 150 hours continuous operation.
15. AUTO POWER OFF : Power turns off automatically in 15 minutes after any
switch operation.
16. DIELECTRIC STRENGTH : 3.7kV rms for one minuite between input
Terminal and Cases.
17. FUSES :
18. OVERLOAD PROTECTION :
a. V : 1000V DC or 750V AC rms max. for 1 minute.
(400mV Range is 500V rms )
b. Ω/ / / : 250V rms max. for 1 minute.
19. DIMENSIONS & WEIGHT : 155×75×29 mm, 180g
20. SAFETY LEVEL : IEC-61010-1, Overvoltage CAT.Ⅱ 600V, CATⅢ300V.
21. ACCESSORY : One Pair of Test Leads, Batteries (Installed), Carrying Case,
Instruction Manual
22. OPTIONAL ACCESSORY : 940 Alligator Clips.
−+
−+
mV, V, Hz, %, Ω, kΩ, MΩ, nF, μF, , , mA, A,
REL△, , H , OL, AUTO, AC, DC, − and decimal point.
mA Function : Fast Active 0.5A/250V, 5×20mm
10A Function : Fast Active 10A/250V, 6×30mm
9. DC Current ( mA / A )
0.0%
〜99.9%
0.1%
1V RMS
±0.2%rdg±2dgt
250V
AC rms
4. Duty Cycle ( %)
Range
Resolution
Accuracy
Max. Input
Voltage
Input
Sensitivity
400
.
0Ω
≒0.
44V
≒
1m sec
les
s
t
han 50Ω
25
0V
DC
/
A
C
rms
7.
C
o
n
t
in
u
it
y
T
ests
(
)
Ra
ng
e
B
uz
z
er
S
ou
nd
O
ve
r
lo
a
d
Pr
o
te
ct
io
n
250V
DC/AC rms
250V
DC/AC rms
Overload
Protection
Overload
Protection
O
p
e
n
C
ir
cu
it
Volt
a
g
e
Re
sp
o
n
se
T
im
e
4.000V
≦1
.
5V
≦0.5mA
6. Diode Tests ( )
Range
Accuracy
8. Capacitance ( )
400.0 Ω
4.000kΩ
40.00kΩ
400.0kΩ
4.000MΩ
40.00MΩ
0.1 Ω
1 Ω
10 Ω
100 Ω
1 kΩ
10 kΩ
≒0.44V
±1.8%rdg±3dgt
±5.0%rdg±3dgt
5. Resistance ( Ω)
Range
Resolution
Accuracy
Open Circuit
Voltage
Open Circuit
Voltage
Test
Current
±1.0%rdg±3dgt
0.1nF〜40nF
40nF〜40μF
40μF〜200μF
0.001nF〜nF
nF〜μF
μF
±5.0%rdg±5dgt
±3.0%rdg±5dgt
±4.0%rdg±5dgt
≒1.2V
Range
Resolution
Accuracy
Test
Current
10. AC Current ( 〜mA / 〜A )
400.0mV
4.000 V
40.00 V
400.0 V
600 V
100μV
1mV
10mV
100mV
1 V
400.0 mV
4.000 V
40.00 V
400.0 V
600 V
1mV
10mV
100mV
1 V
≧100MΩ
≒10MΩ
±1.0%rdg±4dgt
600V DC
1. DC Voltage ( V )
Range
Resolution
Accuracy
Max Input
Voltage
Max Input
Voltage
Input
Impedance
±0.5%rdg±4dgt
≒10MΩ
600V
AC rms
2. AC Voltage ( 〜V )
Range
Resolution
Accuracy
Input
Impedance
±1.2%rdg±5dgt
±4.0%rdg±8dgt
±1.5%rdg±5dgt
Frequency Scope :
1Hz〜1kHz
Overload Protection :
250V DC/AC rms
3. Frequency ( Hz )
9.999Hz
〜9.999MHz
1V RMS
0.01Hz
〜1.0kHz
±0.2%rdg
±1dgt
250V
AC rms
Range
Resolution
Accuracy
Max. Input
Voltage
Input
Sensitivity
Frequency Response : 50Hz~500Hz. 500Hz~1000Hz : ±3.5%rdg±5dgt.
*400.0mV Range : 5mV~400mV.
0.1 mV
40.00 mA
400.0 mA
10.00 A
10μA
100μA
10 mA
200mV
max.2.0V
1.0V
Range
Resolution
Voltage
Drop
Accuracy
400mA
10A(within15sec.)
40.00mA, 400.0mA : 0.5A/250V Fuse Protected
10.00A : 10A/250V Fuse Protected
40.00mA, 400.0mA : 0.5A/250V Fuse Protected
10.00A : 10A/250V Fuse Protected
±2.5%rdg±4dgt
±2.0%rdg±4dgt
40.00 mA
400.0 mA
10.00 A
10μA
100μA
10 mA
200mV
max.2.0V
1.0V
Range
Resolution
Voltage
Drop
Accuracy
400mA
10A(within15sec.)
±3.0%rdg±5dgt
±2.5%rdg±5dgt
NOTE :
NOTE :
Max. Input Voltage
Max. Input Voltage
Direct Current
Alternative Current (AC)
Minus Symbol when polarity is minus
Units of Voltage
Unit of Frequency
Unit of Duty Cycle
Units of Resistance
Units of Capacitance
Diode Tests
Continuity Tests
Auto-ranging
Display Hold
Difference Measurements
Battery Warning Symbol
:
:
:
:
:
:
:
:
:
:
:
:
:
:
−
mV, V
Hz
%
Ω, kΩ, MΩ
nF, μF
AUTO
H
REL
HOLD Key
REL Key
LCD
Hz / DUTY Key
SELECT Key
RANGE Key
RESET Key
10A Terminal
Test Leads
Test Prods
Test Plugs
mA Terminal
COM Terminal
FUNCTION SWITCH
VΩHz Terminal
( )
DC ( )
AC (〜)
−+
RS232
AC
DC
AUTO
H
REL
nmFVA
%
KMΩH
z
μ
COMmAVΩHz
10A
FUSED
500mA MAX
FUSED
10A/15sec MAX
600V MAX
300V
MAX
Auto Power OFF
OFFOFF
V
Hz
〜
V mA
A
〜
〜
〜
〜
KU-2600
CAT
.
SELECT RANGE REL HOLD
Hz/DUTYRESET
−+
RS232
AC
DC
AUTO
H
REL
nmFVA
%
KMΩH
z
μ
fig.1
Set FUNCTION Switch to desired position.
Just press RANGE Key several times to select a desired range watching the
position of decimal point. The decimal point moves from the lowest range to
the highest range and circulates with each press.
When taking voltage, resistance or mA measurements, press RANGE Key.
The range to which the input value belongs is held and AUTO symbol turns off.
To cancel Range Hold, press RANGE Key for more than 1 second and AUTO
symbol turns on.
To cancel Range Hold, press RANGE Key for more than 1 second and AUTO
symbol turns on.
1.
2.
When measuring capacitance, press REL△ Key to make zero adjustment. In the
other func tions, (〜V, V, Ω, mA, A) press this Key to mak e difference
measurements.
To cancel this Key, press it again and REL△ symbol disappears.
Select or , and DC or AC.
−+
Press HOLD Key while measuring, a measuring value is held on LCD with H
symbol shown.
To cancel this Key, press it again and H symbol disappears on LCD.
Press this Key to reset the operation of the function. This Key is used when
operation is mistaken in the measurment.
Press this Key to select Hz or Duty on 〜V, V, Hz, mA and A positions.
When making voltage, resistance or mA measurements, press RANGE Key to
select Range Hold. AUTO symbol turns off from LCD. There are two ways in
Range Hold.
Alligator
Clip
Alligator
Clip
Red
Test Prod
Test Prod
COM
mA
10A
FUSED
500mA MAX
FUSED
10A/15sec MAX
600V MAX
300V
MAX
Auto Power OFF
OFFOFF
V
Hz
〜
V mA
A
〜
〜
〜
〜
KU-2600
CAT
.
SELECT RANGE REL HOLD
Hz/DUTYRESET
Do not attempt to measure voltage that might exceed 600V AC or DC, the
specified maximum input of this instrument.
fig.3fig.2
WARNING 5. Maximum Input Observance
WARNING 1. Checks of Body and Test Lead
WARNING 3. Warning for High Voltage Measurements
WARNING 4. Dangerous Voltage Measurement Procedure
WARNING 2. Warning for High Power Line Measurements
4-1. WARNINGS
Correct knowledge of electric measurements is essential to avoid unexpected
danger such as operator's injury or damage to the instrument. Read carefully and
observe the following precautions for safety measurements.
Before measurement, confirm the body of this instrument and handle insulators of
the Test Leads have no cracks or any other damages. Dust, grease and moisture
must be removed.
High Power Line (High Energy Circuits) such as Distribution Transformers, Bus
Bars and Large Motors are very dangerous. High Power Line sometimes includes
High Surge Voltage that could cause explosive short in the instrument and could
result in shock hazard. For voltage measurement of High Power Line, do not
touch Clamp Meter, its Test Leads, and any part of the circuit.
Even for Low Energy Circuits of electric/electronic appliances, such as heating
elements, small motors, line cords and plugs, High Voltage Measurements are
very dangerous. Do not touch Clamp Meter, Test Leads, and any part of the
circuit. Generally, shock hazard could occur when the current between the circuit,
that involves more than 33V rms or 46.7V DC or peak, and ground goes up to
0.5mA or more.
For dangerous voltage measurement, strictly observe the following procedure.
Before measurement, turn off the power of the circuit to be measured.
Plug Black Test Lead into COM terminal and Red Test Lead into VΩHz
terminal.
Attach Black and Red Alligator clips (optional) to Test Lead pins.
Set FUNCTION Switch to 〜V or V.
Confirm the power of the circuit to be measured is turned off. Connect Black
Alligator Clip to − (earth) side and Red Alligator Clip to + (positive) side.
(Refer to fig.2)
Place the Digital Multimeter away from your body not holding it in your hands.
Take safety distance from power source or circuit not to touch the dangerous
voltage.
Turn on the power of the circuit. Read the measurement value on LCD.
After measurement, turn off the power of the circuit and discharge the all
capacitors.
Disconnect Alligator Clips (with Test Leads) from the circuit.
1.
2.
3.
4.
5.
6.
7.
8.
9.
In case of live-line measurement, observe the following procedure.
Place the Digital Multimeter away from your body not holding it in your hands.
Set FUNCTION Switch to 〜V or V.
Attach Black Alligator Clip to Black Test Lead pin. Connect it to − (earth) side
of the circuit to be measured.
Take safety distance from power source or circuit not to touch the dangerous
voltage.
Hold Red Test Lead with one hand and connect it to + (positive) side. (Refer
to fig. 3)
Read the measurement value on LCD.
After measurement, disconnect Red Test Lead and Black Alligator Clip from
the circuit.
1.
2.
3.
4.
5.
6.
7.
When taking measurement, always confirm that FUNCTION Switch is set to
correct position. Do not measure voltage on Ω, , , , mA and A positions.
WARNING 6. Correct Selection of FUNCTION Switch

70-1201-2600-2 0707
Product specifications and appearance are subject to change without notice due to
continual improvements.
Prior to use, read INSTRUCTION MANUAL carefully and acquaint yourself with
the specifications and functions of the instrument. Especially, read and observe
strictly the「4. SAFETY PRECAUTIONS」.
5-1. PREPARATION FOR USE
5-2. VOLTAGE, FREQUENCY, DUTY CYCLE ( 〜V / V / Hz / % )
MEASUREMENTS
5-3. RESISTANCE ( Ω) MEASUREMENTS
5-4. DIODE ( ) TEST
5-5. CONTINUITY ( ) TEST
5-6. CAPACITANCE ( ) MEASUREMENTS
5-7. FREQUENCY (Hz) and DUTY CYCLE (%)
MEASUREMENTS
5-8. CURRENT (mA /A ) MEASUREMENTS
1. INSTRUCTION MANUAL
The following symbols shown on instrument and in the instruction manual are
listed in IEC 61010-1 and ISO 3864.
If input value exceeds 4050 counts, the maximum value of the range being used,
OL symbol appears on LCD. In case more than 600V AC or DC is measured in
Auto-ranging or in Range Hold, OL symbol does not appear.
2. OVERLOAD INDICATION
After 15 minutes of last operation of FUNCTION Switch, or any other Keys, power
turns off automatically (goes down in sleep condition with 0.01mW consumption)
with LCD displayed off. This function prevents battery consumption when power
off is forgotten.
3. AUTO POWER OFF
4. SYMBOL MARK
422 Hayashinogo, Ueda City, Nagano Pref., 386-0156 Japan
TEL : +81-268-35-1600 (REP.) / FAX : +81-268-35-1603
E-mail : sales@kaise.com
http://www.kaise.com
5
6
7
8
5. MEASUREMENT PROCEDURES
6. MAINTENANCE
WARNING
Do not measur e High Power Line o f more than 3kVA p ower with this
instrument. Maximum Input Voltage of Voltage Function is 600V.
Do not measure voltages that might exceed 600V to avoid electrical shock
hazard and/or damage to the instrument. Prior to use, read carefully 「4.
SAFETY PRECAUTIONS」of this instruction manual.
WARNING
Do not measure Voltage on Ω position. This will cause shock hazard to the
operator and/or damage to the instrument. In case in-circuit resistance is
measured, turn off power to the circuit being measured and discharge all
capacitors in the circuit. Prior to measurements, read carefully「4. SAFETY
PRECAUTIONS」of this instruction manual.
WARNING
If the diode is connected in a circuit, turn off power to the circuit an d
discharge all capacitors in the circuit. Disconnect one side of the diode and
test it. Do not measure Voltage on position.
WARNING
Do not measure Voltage on position.
This will cause electrical shock hazard to the operator and/or damage to the
instrument. In case continuity test is made, turn off power to the circuit being
measured and discharge all capacitors in the circuit.
WARNING
Do not measure voltage or current that might exceed the maximum allowable
Voltage or Current of the function being used to avoid electrical shock hazard
and/or damage to the instrument.
Maximum Input Curre nt is 400mA on mA position and 10 A within 15
seconds on A position. Do no t measure the cur rent that exceeds the
maximum value of the function being used to avoid electrical shock hazard
and/or damage to the instrument. Use extreme care t o use appropriate
Terminals.
When taking current measurements, always connect the instrument
IN SERIES with the circuit being measured.
Use Alligator Clips connected with Test Prods when desired.
WARNING
To prevent electrical shock / hazard, turn the power off and disconnect
Test Leads before removing Battery Case Cover.
WARNING
WARNING
Do not measure Voltage on position.
That will cause electrical shock hazard to the operator and damage to the
instrument. Before taking Capacitance measurements, remove power to the
circuit being measured and discharge all capacitors.
Prior to changing FUNCTION Switch to another position when measuring, or
opening Rear Case for replacement of batteries or fuse, always dieconnect Test
Leads from the circuit being measured.
Do not let the children use the instrument or those people
who are unable to recognize the dangers of electric measurements.
WARNING 7. Test Leads Disconnection
WARNING 1.
Do not make electric measurements in a naked or
barefooted state. This will give electric shock hazard to the operator.
WARNING 2.
The points of Test Prods are sharp and dangerous. Do not
get hurt with them.
WARNING 3.
Do not polish the meter case, or attempt to clean it with any
cleaning fluid, gasoline, benzine, etc. If necessary, use silicon oil or antistatic
fluid.
CAUTION 1.
Avoid severe mechanical shock or vibration, extreme
temperature or very strong magnetic field.
CAUTION 2.
4-2. GENERAL WARNINGS AND CAUTIONS
Connect Black Test Prod to − (earth) side and Red Test Prod of Probe Tester
to + (High potential) side of the circuit to be measured.
NOTE :
NOTE :
Reads the voltage on LCD.
Hz and % : When measuring 〜V or V, press Hz/DUTY Key once to
measure Hz and press once again to measure % (Duty Cycle).
RANGE Key, REL△ Key, HOLD Key and RESET Key are available.
After measurements, set FUNCTION Switch to OFF position.
For safety measurements, connect Alligator Clips (optional) to Test
Prods of Probe Tester.
When taking voltage measurements, always connect the instrument
IN PARALLEL with the circuit being measured.
Set FUNCTION Switch to Ω position.
If the resistor to be measured is connected in a circuit, turn off power to the
circuit and discharge all capacitors in the circuit.
Open one side of the resistor to be measured and connect Test Prods to both
sides of the resistor (or circuit).
Read the resistance on LCD.
RANGE Key, REL△Key, HOLD Key and RESET Key are available.
When measureme nts are finished, re move Test Prods from the resistor
(circuit) and set FUNCTION Switch to OFF position. Then restore the circuit as
it was.
DCAC
V
COM
mA
10A
FUSED
500mA MAX
FUSED
10A/15sec MAX
600V MAX
300V
MAX
Auto Power OFF
OFFOFF
V
Hz
〜
V mA
A
〜
〜
〜
〜
KU-2600
CAT
.
SELECT RANGE REL HOLD
Hz/DUTYRESET
COM
mA
10A
FUSED
500mA MAX
FUSED
10A/15sec MAX
600V MAX
300V
MAX
Auto Power OFF
OFFOFF
V
Hz
〜
V mA
A
〜
〜
〜
〜
KU-2600
CAT
.
SELECT RANGE REL HOLD
Hz/DUTYRESET
Wall Outlet
Set FUNCTION Switch to position. symbol appears on LCD.
If the diode is connected in a circuit, turn off power to the circuit and discharge
all capacitors in the circuit and disconnect one side of diode from the circuit.
Connect Black Test Prod to Anode and Red Test Prod to Cathode of the diode
being measured. This is Reverse Connection. Confirm that the LCD displays
OL symbol. Refer to the figure 5.
Reverse Test Prod connection to the diode being tested. This is Forward
Connection. Test results are good if the following voltage values are indicated
on LCD.
Silicon diodes....0.4V to 0.7V
Germanium diodes....0.1V to 0.4V
When measurements are finished, remove Test Prods from the diode and set
FUNCTION Switch to OFF position.
fig.4
fig.5
fig.7
fig.8
fig.6
Reverse Connection
Anode
Cathode
Anode
Cathode
2.
3.
4.
5.
6.
Set FUNCTION Switch to 〜V or V position.
NOTE :
Under this no input condition, random numerals may appear on LCD.
This phenomena is caused by high intern al resista nce of the
instrument and not the trouble.
1.
1.
2.
3.
4.
5.
1.
2.
3.
4.
5.
1.
2.
3.
4.
5.
6.
7.
8.
1.
2.
3.
4.
5.
6.
7.
1.
2.
3.
4.
5.
6.
Set FUNCTION Switch to position.
Auto -----nF symbol appears on LCD.
Press REL△ Key once to display 0±2digit on LCD in case it shows more
digits.
Remove power to the circuit being tested and discharge all capacitors in the
circuit.
Connect Test Prods to the capacitor being measured.
Read capacitance on LCD.
After measurements, set FUNCTION Switch to OFF position.
To measure 4000mA and less current, insert Black Test Plug into COM
Terminal and Red Test Plug into mA Terminal. To measure 10A within 15
seconds and less current, insert Black Test Plug into COM Terminal and Red
Test Plug into 10A Terminal.
Set FUNCTION Switch to mA (max. 4000mA ) position or A (max.10A
position according to the current value to be measured.
Press SELECT Key to select DC ( ) or AC (〜).
Remove power to the circuit being measured and open the circuit in which
current is to be measured.
Connect Black Test Prod to the negative side of the circuit being measured
and Red Test Prod to the positive side.
NOTE :
NOTE :
Turn on the power to the circuit being measured and read the current on
LCD.
Disconnect Test Prods of Test Leads from the circuit and reconnect the circuit
that was being measured.
SELECT Key, RANGE Key, REL△ Key, HOLD Key, RESET Key and
Hz/DUTY Key are available. RANGE Key does not work on A position as it
consists of only one range.
Set FUNCTION Switch to position.
Press SELECT Key once to display symbol on LCD.
Turn off power to the circuit and discharge all capacitors in the circuit.
Connect Test Prods of Probe Tester to the circuit to be tested. Buzzer sounds
when the resistance value is less than approx. 50Ω.
When measurements are finished, remove Test Prods from the circuit and set
FUNCTION Switch to OFF position.
1.
2.
3.
4.
5.
6.
Set FUNCTION Switch to Hz position.
Connect Test Prods to the circuit to be measured.
Read the measurement value on LCD.
NOTE : Connect the instrument IN PARALLEL with the measuring circuit.
Press Hz/DUTY Key for Duty Cycle measurement.
HOLD Key (Duty Cycle only) and RESET Key are available.
After measurement, set FUNCTION Switch to OFF.
NOTE : Frequency and Duty Cycle are also measurable by pressing Hz/DUTY
Key during AC/DC Voltage.
1.
2.
3.
Unscrew Battery Case Cover.
Remove the exhausted batteries and insert new 1.5V R6P (AA or any
equivalent) batteries in correct polarity.
Fix Battery Case Cover and tighten the screw.
1.
2.
3.
4.
Two fuses are installed. 0.5A/250V fuse is for protecting mA function and
10A/250V fuse is for 10A function. If one of them is blown, the function
concerned becomes null.
Remove Rear Case unscrewing the 2 screws at the bottom.
Take out the blown fuse from Fuse Holder and place a specified one in it.
Fuse for mA : Fast acting 0.5A/250V 5×20 mm
Fuse for 10A : Fast acting 10A/250V 6×30 mm
CAUTION : Always use fuses that have the same specifications as above.
Replace Rear Case and screw the 2 screws.
COM
mA
10A
FUSED
500mA MAX
FUSED
10A/15sec MAX
600V MAX
300V
MAX
Auto Power OFF
OFFOFF
V
Hz
〜
V mA
A
〜
〜
〜
〜
KU-2600
CAT
.
SELECT RANGE REL HOLD
Hz/DUTYRESET
AUTO
Foward Connection
DCAC
V
COM
mA
10A
FUSED
500mA MAX
FUSED
10A/15sec MAX
600V MAX
300V
MAX
Auto Power OFF
OFFOFF
V
Hz
〜
V mA
A
〜
〜
〜
〜
KU-2600
CAT
.
SELECT RANGE REL HOLD
Hz/DUTYRESET
Capacitor
6-1. BATTERY REPLACEMENT
6-2. FUSE REPLACEMENT
Caution (refer to instruction manual.)
Alternating Current (AC)
Direct Current (DC)
Earth (Ground)
Double Insulation
〜
KU-2600 is warra nted in it s entire ty agai nst any de fects of materia l or
workmanship under normal use and service within a period of one year from the
date of purchase of the original purchaser. Warranty service is available at KAISE
AUTHORIZED SERVICE AGENCY through your local dealer. Their obligation
under this warranty is limited to repairing or replacing KU-2600 returned intact or
in warrantable defect with proof of pu rchase and transport charges prepaid.
KAISE AUTHORIZED DEALER and the manufacturer, KAISE CORPORATION,
shall not be liable for any consequential damages, loss or otherwise. The
foregoing warranty is exclusive and in lieu of all other warranties including any
warranty of merchantability, whether expressed or implied.
This warranty shall not apply to any instrument or other article of equipment which
shall have been repaired or altered outside of KAISE AUTHORIZED SERVICE
AGENCY, nor which have been subject to misuse, negligence, accident, incorrect
repair by users, or any installation or use not in accordance with instructions
provided by the manufacturer.
Check the battery connection, polarity, and the rest capacity (exhausted or
not).
Confirm that FUNCTION Switch is set to the correct position.
Confirm that the body of this instrument and handle insulators of the Test
Leads have no cracks or any other damages.
Check if any noise affects the instrument. This instrument is fully shielded
against noise, but possibly to be affected by very strong noise.
Periodical check and calibration is necessary to make safety measurements and
to maintain the specified accuracy. The recommended check and calibration term
is once a year and after the repair service. This service is available at KAISE
AUTHORIZED SERVICE AGENCY through your local dealer.
Repair service is available at KAISE AUTHORIZED SERVICE AGENCY through
your local dealer. Pack the instrument secure ly with your name, address,
telephone number and problem details, and ship prepaid to your local dealer.
KAISE AUTHORIZED DEALER
6-3. PERIODICAL CHECK AND CALIBRATION
6-4. REPAIR
WARRANTY
1.
2.
3.
4.
Check the following items before asking repair service.
Installed battery is for inspection purpose and might be exhausted earlier
than the new battery.
*
AC
AUTO
V
nF
〜
〜
〜
〜
〜
〜
〜
〜 〜
NOTE : Measurement time takes longer to measure higher capacitance.
Mother Board
0.5A/250V fuse
10A/250V fuse
Lot No.
MADE IN CHINAKU-2608
001127
1.5V
1.5V
Lot No.
MADE IN CHINAKU-2608
001127
Lot No.
MADE IN CHINAKU-2608
001127
Battery Case Cover
1.5V
1.5V
 Loading...