

Page 1

Operating Instructions
for Kahr MK Series
MK9, 9mm
MK40, .40 S&W
Pistols
Warning!
Read and fully understand this manual
before removing this firearm from its package.
This firearm, like many revolvers and autoloading pistols, is designed
without any external manual safety or internal magazine disconnect.
THIS PISTOL WILL FIRE IF THE TRIGGER IS PULLED!
It should be considered loaded and ready to fire until the magazine
has been removed and the chamber has been checked to verify
Discharging firearms in poorly ventilated areas, cleaning firearms, or
handling ammunition may result in exposure to lead or other substances known to
the State of California to cause birth defects, reproductive harm, and other seri-
ous physical injury. Have adequate ventilation at all times. Wash hands thorough-
“Important Safety Instructions” shown in red type.
that the firearm is unloaded.
ly after exposure.
Be sure to read and fully understand all
Page 2
Contents Page
General Instructions . . . . . . . . . . . . . . . 2
General Description . . . . . . . . . . . . . . . . 3
Primary Features. . . . . . . . . . . . . . . . . . . 3
Technical Data . . . . . . . . . . . . . . . . . . . . 4
Standard Equipment . . . . . . . . . . . . . . . 4
Parts Listing . . . . . . . . . . . . . . . . . . . . . . 4
Parts Schematic . . . . . . . . . . . . . . . . . . . 5
How The Kahr Pistol Functions . . . . . . . . 6
Safety Devices . . . . . . . . . . . . . . . . . . . . 7
Sights & Sight Adjustment . . . . . . . . . . . 7
Loading & Firing. . . . . . . . . . . . . . . . . . . 8
Unloading . . . . . . . . . . . . . . . . . . . . . . . . 9
Break-In Period . . . . . . . . . . . . . . . . . . . . 9
Dismantling & Reassembly . . . . . . . . . 10
Magazine Disassembly,
Maintenance & Reassembly . . . . . . . . 12
Checking Safety Devices . . . . . . . . . . . 13
Cleaning & Lubrication . . . . . . . . . . . . 14
Notes on Reliability. . . . . . . . . . . . . . . . 14
Warranty & Liability Exclusions . . . . . . 15
Service Assistance . . . . . . . . . . . . . . . . 15
Shipping Firearms For Service . . . . . . . 16
Notes. . . . . . . . . . . . . . . . . . . . . . . . . 17-19
Warranty Statement. . . . . . . . Back Cover
The Kahr Pistol is covered by
U.S. Patents: #5,359,799;
#5,412,894; #5,415,075;
#5,502,914; #5,678,340
General Instructions
Always assume that the KAHR Pistol or
any other firearm is loaded and capable
of being discharged until you, the handler, have personally verified the fact.
Until the magazine is removed and you
have inspected the chamber and completed the unloading procedure as presented on page 9, the firearm must be
considered loaded and capable of being
fired. Never transport a loaded firearm.
To reduce the possibility of an unintentional discharge, do not place your finger on the trigger until the firearm is
pointed at the target and you intend to
fire. When handling, carrying or holstering the pistol be sure that the trigger
cannot be snagged by a foreign object.
This can discharge the pistol.
If you don’t want the firearm to fire, keep
your finger off the trigger.
When firing with a two hand grip, keep
the thumb of the weak hand on the weak
hand side of the firearm, never behind
the slide.
Before using the KAHR Pistol, completely
read and fully understand the operating
instructions and safety information in
this manual. If you have difficulty understanding anything in this manual, call
Kahr Technical Support at (508) 791-3919
or seek qualified instruction in the safe
use of the KAHR Pistol and other handguns.
Important Safety Information
Caution:
Law enforcement, military personnel and
certain individuals may choose, for self
defense purposes, to disregard or override several of the following safety
instructions. To assure safety under
these special situations, proper initial
combat oriented training with periodically scheduled retraining, which stresses
safe tactical procedures, is strongly recommended.
2
Caution:
Failure to observe safety instructions in
this manual can result in property damage, personal injury or death.
Caution:
Prior to loading and firing, carefully read
and understand this instruction manual.
It gives basic advice on the proper handling and functioning of the KAHR Pistol.
Page 3

Any firearm, including the KAHR Pistol, is
a dangerous device. All firearms must be
safely stored to prevent access by unauthorized persons, especially children.
Always store ammunition separately
from firearms.
This manual is applicable only to the
KAHR Pistol with which it was included.
All instructions, warnings and precautions are not applicable to any other
make or model.
For all sales contracts with KAHR, the
place of jurisdiction shall be Delaware,
and Delaware State Law shall be applicable.
General Description
The KAHR Pistol, with its all-steel design,
incorporates the key features most
desired in a personal defensive handgun:
• Low overall weight
• Extremely compact size
• Outstanding quality of
materials and workmanship
The KAHR Pistol is a mechanicallylocked, recoil operated pistol with a passive striker block and a trigger-cocking
(D/A Only) action.
Each round is automatically loaded until
the magazine is empty. The slide is then
held open by the slide release lever.
Primary Features
The KAHR Pistol trigger system allows
the shooter to quickly bring the pistol into
action by eliminating the need to operate
any manual safeties. Once the target has
been selected and identified, simply
pulling the trigger fires the pistol.
The striker is automatically held under
partial tension after each round and is
fully secured by a passive striker block
until the trigger is fully depressed.
The slide release lever and the magazine catch are easily operated with the
shooting hand.
The KAHR Pistol frame is uniquely
designed to position the shooting hand
as close to the center line of the bore as
possible. This provides the benefit of
greater control and a perceived reduction in recoil.
The all-steel construction and sophisticated computerized manufacturing technology employed in the construction of
the KAHR Pistol assure superior quality
and reliability.
Technical specifications may be altered
without notice.
Important Safety Information
Caution:
Your safety and the safety of your family
and others depends on your safe and
mature adoption, development and consistent employment of SAFE FIREARMS
HANDLING PRACTICES.If you are unfamiliar with firearms, seek further advice
through safe handling courses run by
your local gun clubs, approved instructor,
or similar qualified organizations.
Warning:
It is possible that a live round may remain
in the chamber when the magazine has
been removed or inserted. Any round in
the chamber will discharge upon pulling
the trigger regardless of whether the magazine is inserted or removed. Therefore,
never leave the pistol unattended, even if
the magazine is removed and exercise
extreme caution after removing the magazine.
3
Page 4

Operation:
Locked breech, modified “Browning-type” recoil
lug
Safety Systems:
Trigger cocking (DA) only, passive striker block.
No magazine disconnect or external manual
safeties
Ammunition:
9mm (9x19 Para) / .40 S&W
Trigger Weight:
7 - 9 pounds
Sights:
Drift-adjustable, white bar-dot combat sights.
Tritium night sights optional
Length O/A:
5.5”
Barrel :
3.0”, 1-10 RH twist, polygonal rifling / 9mm
3.0”, 1-16 RH twist, polygonal rifling / .40 S&W
Height:
4.0“
Weight – Unloaded:
Pistol: 22.0 oz.; Magazine 1.9 oz. / 9mm
Pistol: 23.0 oz.; Magazine 1.9 oz. / .40 S&W
Magazine Capacity:
6-Rd with flush mag., 7-Rd with extended mag. / 9mm
5-Rd with flush mag., 6-Rd with extended mag. / .40 S&W
Grips:
Wraparound, textured nylon
Material:
Stainless steel
Finish:
Matte stainless steel
Standard Equipment
• Protective Polymer Case, Trigger Lock
• 2 Magazines: one flush baseplate
& one grip extension baseplate
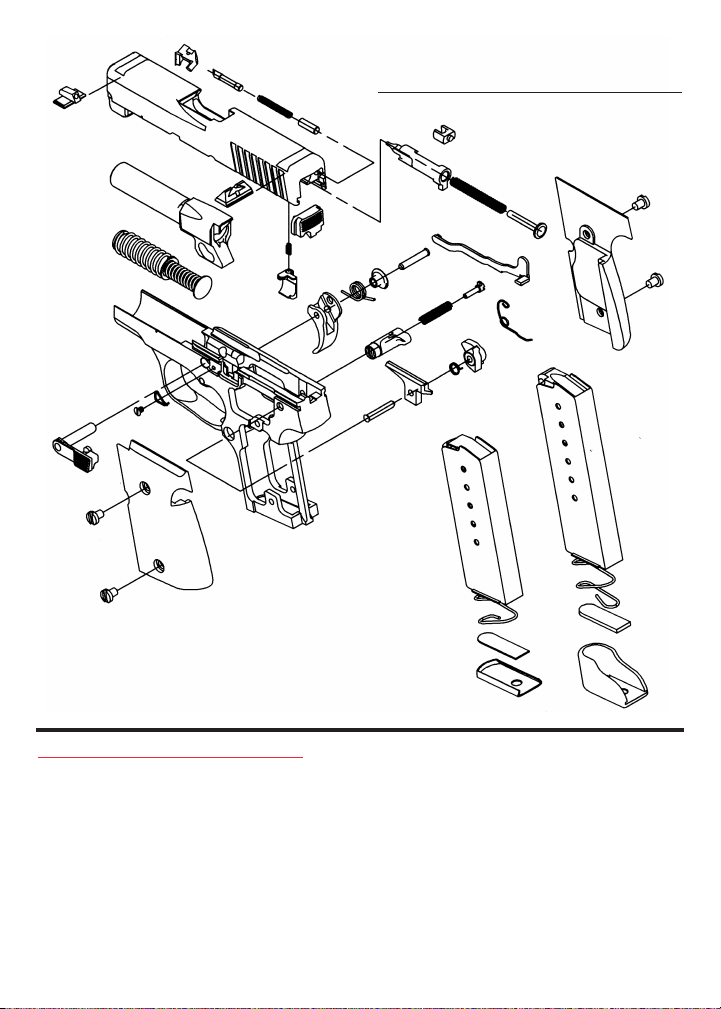
Parts ListTechnical Data
Key & Part Name Part #
1. Frame . . . . . . . . . . . . . . . . . . . . . . . . . . . . . M001
2. Barrel . . . . . . . . . . . . . . . . . . . . . . . . . . . . . M002
3. Slide . . . . . . . . . . . . . . . . . . . . . . . . . . . . . . M003
4. Slide Back. . . . . . . . . . . . . . . . . . . . . . . . . . M004
5. Recoil Spring Assembly . . . . . . . . . . . . . . . M005
6. Striker Block . . . . . . . . . . . . . . . . . . . . . . . . M006
7. Striker Block Spring . . . . . . . . . . . . . . . . . . M007
8. Trigger. . . . . . . . . . . . . . . . . . . . . . . . . . . . . M008
9. Trigger Spring . . . . . . . . . . . . . . . . . . . . . . M009
10. Trigger Spacer . . . . . . . . . . . . . . . . . . . . . . M010
11. Trigger Pivot Pin . . . . . . . . . . . . . . . . . . . . . M011
12. Trigger Bar . . . . . . . . . . . . . . . . . . . . . . . . . M012
13. Trigger Bar Spring . . . . . . . . . . . . . . . . . . . M013
14. Cocking Cam . . . . . . . . . . . . . . . . . . . . . . . M014
15. Cocking Cam Spring . . . . . . . . . . . . . . . . . M015
16. Magazine Catch Body . . . . . . . . . . . . . . . . M016
17. Magazine Catch Spring. . . . . . . . . . . . . . . M017
18. Magazine Catch Lock Pin . . . . . . . . . . . . . M018
19. Striker . . . . . . . . . . . . . . . . . . . . . . . . . . . . . M019
20. Striker Spacer. . . . . . . . . . . . . . . . . . . . . . . M020
21. Striker Spring . . . . . . . . . . . . . . . . . . . . . . . M021
22. Striker Spring Guide . . . . . . . . . . . . . . . . . M022
23. Extractor . . . . . . . . . . . . . . . . . . . . . . . . . . . M023
24. Extractor Spring . . . . . . . . . . . . . . . . . . . . . M024
25. Extractor Pin - Front . . . . . . . . . . . . . . . . . . M025
26. Extractor Pin - Back . . . . . . . . . . . . . . . . . . M026
27. Slide Release Lever . . . . . . . . . . . . . . . . . . M027
28. Slide Release Spring . . . . . . . . . . . . . . . . . M028
29. Slide Release Spring Screw . . . . . . . . . . . M029
30. Unibody Ejector . . . . . . . . . . . . . . . . . . . . . M030
31. Cocking Cam Pivot Pin . . . . . . . . . . . . . . . M031
32. Rear Sight. . . . . . . . . . . . . . . . . . . . . . . . . . M032
33. Front Sight . . . . . . . . . . . . . . . . . . . . . . . . . M033
34. Magazine Tube (6-round). . . . . . . . . . . . . . M034
35. Magazine Spring (6-round) . . . . . . . . . . . . M035
36. Magazine Base Lock (6-round) . . . . . . . . . M036
37. Magazine Base (6-round) . . . . . . . . . . . . . M037
38. Magazine Follower (6-round). . . . . . . . . . . M038
39. Magazine Tube (7-round). . . . . . . . . . . . . . M039
40. Magazine Spring (7-round) . . . . . . . . . . . . M040
41. Magazine Base Lock (7-round) . . . . . . . . . M041
42. Magazine Base (7-round) . . . . . . . . . . . . . M042
43. Magazine Follower (7-round). . . . . . . . . . . M043
44. Grip Screw (4) . . . . . . . . . . . . . . . . . . . . . . M044
45. Grips – Nylon (left & right). . . . . . . . . . . . . M045
Important Safety Information
You must personally verify that the chamber is empty before field-stripping the
firearm for cleaning or any other reason.
Never place your finger on or near the trigger when operating the slide.
Warning:
If the KAHR Pistol or any other firearm is
carelessly or improperly handled, the user
could cause an unintentional discharge
which could result in death, serious injury,
and/or property damage.
4
Caution:
This KAHR product is classified by the
Bureau of Alcohol, Tobacco and Firearms a s
a firearm or dangerous weapon. It is
therefore, potentially lethal!
Read this entire instruction manual carefully. It is essential to follow the safety
instructions for your safety and the safety
of others.
Page 5
23
25
33
3
KAHR MK SERIES
24
26
Micro-Compact Autoloading Pistol
20
2
5
1
29
27
44
44
32
7
6
8
28
45
Important Safety Information
Warning:
The KAHR Pistol has several design features and internal mechanical safeties
designed to prevent unintentional discharges in the event that the pistol is
dropped or receives a severe blow.
Like any mechanical device, when subjected to extreme forces not normally
encountered in sporting, law enforcement, or military use, a part
19
4
11
10
9
17
16
30
31
21
22
12
18
13
14
43
15
38
39
34
35
36
37
failure can occur. Therefore, extra care
and strict adherence to the safety instructions and other instructions contained in
this manual is mandatory to minimize the
risk of accidents.
Caution:
The proper and safe function of the
KAHR Pistol cannot be assured if any
parts have been altered or modified.
44
44
45
40
41
42
5
Page 6

How the Kahr Pistol Functions
FOR TESTING FUNCTION, ALWAYS USE
AN UNLOADED PISTOL WITH AN
EMPTY CHAMBER AND WITHOUT THE
MAGAZINE INSERTED.
(described immediately below)
1. Without placing finger on the Trigger,
remove the Magazine. Make sure that
there is no round in the chamber by
pulling the Slide fully to the rear and
carefully checking that the chamber is
empty. The pistol is now unloaded with
the Magazine out.
2. Keeping finger off the Trigger, cock the
pistol by pulling the Slide fully to its
rearmost position and letting it run forward. The pistol is now partially cocked,
i.e. the Striker Spring is partially tensioned. The Trigger is fully forward.
The following describes the functioning of
the KAHR Pistol when it is loaded and
fires:
As the Trigger is pulled (pressed to the
rear), the internal passive Striker Block is
released, i.e. a protrusion on the
Cocking Cam lifts the Striker Block so
that it no longer blocks the Striker from
moving forward past the breech face to
fire a chambered round. Simultaneously
with this action, the Cocking Cam pulls
the Striker back from half-cock to a fully
cocked position under full spring tension.
Completing the rearward pull of the
Trigger allows the Cocking Cam to
release the Striker. With the Striker Block
lifted, the Striker is free to move fully forward to contact and fire the cartridge.
The recoil impulse of the fired cartridge
moves the Barrel and Slide backwards.
After approximately
1/2 inch of movement to the rear,
the camming action of the recoil lug of
the Barrel and the pin on the Slide
Release Lever in the Frame pulls the rear
of the Barrel down to unlock it from the
Slide. Unlocked, the Slide continues
fully to the rear of its travel. During this
rearward travel, the cartridge is pulled
out of the chamber by the Extractor and
is then thrown out to the right by the
Ejector.
A ramp in the Slide rails disengages the
Trigger Bar from the Cocking Cam. This
allows the Cocking Cam to reset itself
and reactivates the Striker Block.
The Recoil Spring begins to move the
Slide forward toward its original locked
position.
As the Slide moves forward:
1. a loaded round is pushed out of the
magazine into the chamber;
2. the Striker is caught and put under
partial tension by the Cocking Cam, and 3.
the Barrel is pushed forward and
upward, locking it with the Slide.
Important Safety Information
Warning:
The KAHR Pistol has no external, manual safety lever and no grip safety. It is
fired like a double-action revolver by
pressing the trigger. Always keep the
firearm unloaded until you are ready to
shoot. When the firearm is loaded do
not touch the trigger unless you intend
to fire!
6
Warning:
If the KAHR Pistol appears to be operating improperly for any reason, danger
of an unintentional discharge exists.
The firearm must be immediately
unloaded and not used until it is
repaired. Make sure that the pistol is
properly repaired and checked by
KAHR ARMS or an authorized gunsmith
before using it again.
Page 7

UTION: THE PISTOL WILL NOW FIRE
CA
IF THE TRIGGER IS PULLED.
After the last round has been fired and
ejected, the Slide is held open by the
Slide Release Lever.
NOTE REGARDING SLIDE RELEASE
OPERATION: When the Slide is held
open on an empty Magazine, the Slide
Release Lever is very hard to depress.
This warns the shooter that the
Magazine is empty.
To easily release the Slide, either remove
the empty Magazine or replace it with a
loaded Magazine. Depressing the Slide
Release Lever will then be much easier.
Safety Devices
The KAHR Pistol has no conventional,
externally-located safety lever.
Therefore, the Trigger should only be
touched when you intend to discharge
the pistol.
STRIKER BLOCK:
In the pre-tensioned position, a springloaded Striker Block projects into a
recess in the Striker, preventing it from
moving forward. The Striker Block is
only released when the Trigger is fully to
the rear.
SAFETY FUNCTION OF THE COCKING
CAM DESIGN AND POSITION:
The forward movement of the Striker is
blocked by the Cocking Cam. Due to the
design and positioning of the Cocking
Cam, there is no way for the Striker to
move forward past the Cocking Cam
under normal use unless the Trigger is
pulled.
Sights & Sight Adjustment
These consist of a Rear Sight which has
a white bar insert under the sighting
notch and a Front Sight which has a
white dot insert.
Windage adjustments are normally
made with the Rear Sight Only.
Both the Front and Rear Sights are held
in place by the tight fit of the Sight to the
dovetail. Windage (side to side) adjustments are made by pressing the Rear
Sight in the direction that you want the
bullet placement to move. For example, if
the pistol groups to the left of your aiming point, move the Rear Sight to the
right. This will move the bullet placement
to the right.
Note: Sight adjustments should be made
with a sight adjustment tool that is
designed to move the Sight without damaging the Slide, dovetail cut or the Sight
itself. When pressing the Sights to make
an adjustment, use a non-marring material against the Sight and the Slide to
avoid damage.
Important Safety Information
Safety Rules:
1. Always handle any firearm as if it
were loaded to avoid unintended discharges.
2. Never point any firearm at anything
you do not intend to shoot.
3. Never take anyone’s word that any
firearm is unloaded. Check for yourself,
with fingers off the trigger, and the
firearm pointed in a safe direction.
4. Always be sure barrel and action are
clear of obstructions. First remove the
magazine and unload the pistol, then
clear obstructions immediately so that
the firearm will function correctly and
safely.
5. Never squeeze the trigger or put your
finger in the trigger guard until you are
aiming at the target you intend to shoot.
7
Page 8

Loading & Firing
WHEN LOADING THE KAHR PISTOL,
ALWAYS BE SURE THAT THE PISTOL IS
POINTED IN A SAFE DIRECTION AND
THAT THE TRIGGER FINGER IS OUTSIDE OF THE TRIGGER GUARD AND
WELL AWAY FROM THE TRIGGER.
USE ONLY AMMUNITION OF THE
PROPER CALIBER AS SPECIFIED ON
THE FIREARM.
The Magazine is filled by pushing individual rounds, base first, into the front of
the Magazine. First press the round
down to overcome the pressure of the
Magazine Spring, then push the partially
inserted round fully to the rear.
Photo 1
Note: be sure that all rounds are pressed
fully to the back of the Magazine.
Insert the Magazine into the magazine
well at the base of the Grip until the
Magazine Catch engages fully.
Pull the Slide fully to the rear and allow
it to spring forward into the locked position. Do not impede the forward travel of
the Slide or attempt to ease the Slide forward. The full spring tension of the
Recoil Spring is required to assure proper feeding of the round from the
Magazine.
The trigger finger must remain outside
the trigger guard until the target has
been identified and you
intend to shoot.
Note: Do not load an
individual round into the
chamber and then close the
Slide. This can damage the
Extractor. Only chamber
rounds from the Magazine
as described above.
The KAHR Pistol is now
ready to fire.
IF YOU PULL THE TRIGGER,
THE PISTOL WILL FIRE.
After the last round has
been fired, the Slide will
remain open.
Important Safety Information
6. Never store a loaded firearm. Unload
the KAHR Pistol as described on page 9.
After verifying that the firearm is empty
and magazine out, point the firearm in a
safe direction and pull the trigger. Store
the KAHR Pistol in this condition only.
8
7. Never shoot at a hard surface, such as
a rock, or a liquid surface, such as water.
A bullet may ricochet and travel in any
direction to strike you or an object that
you cannot see.
8. Always be sure your backstop is adequate to stop and contain bullets before
shooting so that you do not hit anything
outside the range area.
Page 9

Remove the empty Magazine by pushing
the Magazine Catch on the front of the
left Grip (see photo #1) and pulling the
Magazine from the magazine well. Insert
a full Magazine and then push the Slide
Release Lever downward, The KAHR
Pistol is again ready to fire.
Unloading
WHEN UNLOADING THE KAHR PISTOL,
ALWAYS BE SURE THAT THE PISTOL IS
POINTED IN A SAFE DIRECTION AND
THAT THE TRIGGER FINGER IS OUTSIDE OF THE TRIGGER GUARD AND
WELL AWAY FROM THE TRIGGER.
Photo 2
Remove the Magazine by depressing the
Magazine Catch on the front of the left
Grip (see photo #1) and pulling the
Magazine from the magazine well. Pull
the Slide fully to the rear (see photo #2)
to eject the round which may be in the
chamber. Visually check to ensure that
no round remains in the chamber.
Allow the Slide to spring forward by
releasing it.
After making absolutely sure that the
Magazine is removed and the chamber
is empty, point the pistol in a safe direction and pull the Trigger to release tension on the Striker.
CAUTION:
ALWAYS UNLOAD YOUR
KAHR PISTOL IMMEDIATELY
AFTER USE AND PRIOR TO
CLEANING AND STORAGE
TO MINIMIZE THE RISK OF
UNINTENTIONAL DISCHARGE.
Break-In Period
The KAHR Pistol must run
through an initial break-in
period before achieving fully
reliable feeding and functioning. The pistol should
not be considered fully reliable until after it has fired
200 rounds.
Important Safety Information
9. Always be sure of your target and the
area behind it before you shoot. A bullet
can travel through or past your target up
to 1 mile. If in doubt, do not shoot.
10. Always put a responsible and compe-
tent person in charge to maintain safety
and discipline when a group is firing on
a range to reduce the likelihood of accidents.
11. Always carry a firearm empty and
open while at a public, or private range,
until you are ready to fire. Keep it pointed towards the backstop during loading,
firing, and unloading.
12. Never leave a firearm unattended.
Anyone, especially a child, may fire it.
9
Page 10

Dismantling & Reassembly
BEFORE DISMANTLING OR CLEANING
THE KAHR PISTOL, BE ABSOLUTELY
SURE THE PISTOL IS UNLOADED
(Follow the unloading instructions on
page 9).
For normal cleaning, the KAHR Pistol
should only be dismantled into its main
components:
• Slide
• Barrel
• Recoil Spring Assembly
• Frame
• Magazine
DO NOT DISMANTLE THE PISTOL FURTHER THAN THE MAIN COMPONENTS
DESCRIBED ABOVE (except Magazine),
To do so may create an unsafe condition
and affect the pistol’s Warranty.
For maintaining and cleaning the KAHR
Pistol, use only high quality, commercially available cleaning equipment, solvents and lubricants.
Dismantling
The KAHR Pistol is dismantled to its main components
in the following steps:
1. Remove the Magazine
and visually check to be
sure that the chamber is
empty by pulling back the
Slide. (see photo #1 and
#2)
Photo 3
2. Draw the Slide back about 1⁄2 inch so
that the small witness marks on the Slide
and Frame align (see circled area in photo
#3) and internal projection on the Slide
Release Lever can be seen through the
rear semi-circular relief cut in side of the
Slide (see photo #3).
3. Push the pin of the Slide Release Lever
out of the pistol from right to left. (Use a
light, non-marring hammer or plastic
screwdriver handle if necessary).
4. Ease the Slide forward under Recoil
Spring tension.
5. With the Slide Release Lever removed,
pull the Trigger to release the Striker,
then relax pressure on the Trigger and
push the Slide forward off of the Frame.
6. Removal of the Barrel (see photos #4
& #5) is carried out as follows:
Push the rear of the Recoil Spring
Assembly slightly forward with the thumb
and lift it clear of the recoil lug.
Important Safety Information
13. Never use a firearm that fails to func-
tion properly and never force a jammed
action, as the jammed round may discharge.
14. Always transport the KAHR Pistol
unloaded with the trigger untensioned
(See page 9) in a locked case.
10
15. Failure to fire:
Keep the firearm pointed toward the target and wait 30 seconds after it fails to
fire. If a hangfire (slow ignition) has
occurred, the round should fire within 30
seconds. If it does not fire, remove the
magazine, eject the round and check for
an obstruction. Then, examine the
primer. If the firing pin indent on the
primer is light or nonexistent, have the
firearm examined by a competent gun-
Page 11

CAUTION: PROTECT EYES WHEN
REMOVING THE RECOIL SPRING
ASSEMBLY. THE ASSEMBLY MAY BE
UNDER TENSION AND MAY POP OUT
OF POSITION AND CAUSE INJURY!
7. Carefully remove the Recoil Spring
Assembly (see photo #4).
NOTE: DO NOT ATTEMPT TO DISMANTLE THE RECOIL SPRING ASSEMBLY.
THIS IS A FACTORY ASSEMBLED COMPONENT. THE ASSEMBLY IS UNDER
TENSION AND MAY POP OUT OF POSITION AND CAUSE INJURY!
8. Grasp the recoil lug of the Barrel and
push it slightly forward, then lift and
pull it rearward out of the Slide (see
photo #5).
Reassembly
First, assemble the Slide components
reversing the order in which they were
dismantled. Then, before installing the
Slide onto the Frame, do the following:
Make sure that the Recoil Spring
Assembly is parallel to the Slide rails
and not off to one side. Note: Be sure
that the large flat disc at the rear of the
Recoil Spring Assembly is positioned in
the circular cut in the front of the Barrel’s
recoil lug.
Next, without depressing the Trigger,
move the assembled Slide just far
enough onto the Frame to partially insert
the pin of the Slide Release Lever
through both the Frame and the slot in
the Barrel’s recoil lug.
Note: Carefully press down on the front
of the Ejector as the Slide Back passes
over it to avoid interference as the Slide
moves onto the Frame. Then, pull the
Slide rearward to line up the small witness marks on the Slide and Frame (see
circled area in photo #3). Finally, push
the Slide Release Lever in until it clicks
into position. If problems occur during
assembly, remove the Slide and recheck
the instructions above.
If the Slide will not go smoothly onto the
Frame, do not force it as this could cause
damage and may void the Warranty.
Photo 4
Photo 5
Important Safety Information
smith. If the firing pin indent on the
primer appears normal (like similar previously fired rounds) the ammunition
may be at fault. Segregate any misfired
rounds from other live ammunition and
empty cases, and continue firing.
Note: Dispose of misfired rounds in
accordance with ammunition
manufacturer’s instructions.
16. Never discharge a firearm near an
animal unless it is trained to accept the
noise. A startled animal could injure
itself or cause an accident.
17. Never walk, climb, follow a companion or hunt with your pistol in your hand
and ready to fire (in battery).
11
Page 12

Magazine Disassembly, Maintenance & Reassembly
Disassembly
Ensure that the Magazine is unloaded.
Insert a 1/8” or smaller pin (or length of
stiff wire, etc.) through the bottom sight
holes in the Magazine Tube (A), between
coils of the Magazine Spring (D). This will
contain most of the spring tension during
disassembly. Using a small punch (or
ball-point pen or similar expedient),
depress the locking stud of the
Magazine Base Lock (B) through the
hole in the bottom of the Magazine Base
(C) (see photo #6).
UTION! THE MAGAZINE SPRING IS
CA
UNDER PRESSURE. Be sure to contain
the Spring when withdrawing the pin to
prevent damage and/or injury.
Remove the Magazine Spring and
Magazine Follower (E) through the bottom of the Magazine Tube.
The Magazine is now completely disassembled (see photo #7). Clean all parts
thoroughly with solvent. Wipe all parts
lightly with lubricant-moistened cloth
before reassembly.
Photo 7
Photo 6
Push the Magazine Base forward off the
Magazine Tube. The pin previously inserted in the bottom sight holes of the
Magazine Tube now contains the
Magazine Spring under some compression. Point the bottom of the Magazine
Tube in a safe direction, contain the
Spring’s free end protruding from the bottom with your thumb, and carefully withdraw the pin from the Magazine sight
holes.
Important Safety Information
18. When preparing to fire, be sure that
the area behind the slide is free of
obstructions (watch your thumb) as the
slide will move back sharply upon firing.
19. Never drink alcoholic beverages or
take drugs before or during shooting as
your vision and judgment can be seriously impaired, making your gun handling
unsafe.
D
E
A
B
CA
UTION! DO NOT OVER LUBRICATE.
Lubricant can penetrate the primer of
ammunition and render it inoperative
causing a failure to fire.
Inspect the Magazine Base and
Magazine Base Lock for cracks. Inspect
the Magazine Tube for cracks or voids in
the seam weld area. Inspect Magazine
Follower for chips and cracks. Check the
20. Always seek a doctor’s advice if you
are taking medication to be sure you are
fit to shoot and handle a firearm safely.
21. Always wear ear protection when
shooting, especially on a range. Without
ear protection, the noise of firing can
lead to cumulative long-term and permanent hearing loss.
C
12
Page 13

metal follower pin in the Magazine
Follower for correct depth and tightness
of fit (on the
7-round extended grip Magazine, only).
Ensure that the Magazine Follower
moves freely inside the Magazine Tube.
Replace components as required.
Check the Magazine feed lips for distortion, burrs or nicks, and especially for
smoothness at the magazine catch slot.
Replace any Magazine components as
needed.
Note: Magazines should always be handled with care. If a Magazine becomes
damaged as a result of being dropped
on a hard surface, it should be replaced.
Do not attempt
to repair it.
Reassembly
After cleaning, inspection and lubrication, reassemble the Magazine in
reverse order from disassembly, again
using a pin or wire through the lowest
sight holes to contain the Magazine
Spring for ease of fitting the Magazine
Base Lock and Magazine Base.
Ensure the empty, reassembled
Magazine seats fully when inserted in
the pistol, and ejects freely from its well
when the Magazine Catch is depressed.
Checking Safety Devices
The following safety check is to be carried out at regular intervals and before
the pistol is used:
With the Slide removed and the Barrel
dismantled, the Striker is drawn back
manually about 1/4 inch and then eased
forward again. The tip of the Striker
must not project beyond the breech face
of the Slide.
Correct Wrong!
Note: When easing the Striker forward, be
careful not to depress the Striker Block
which sits next to the Striker.
If it is depressed during the safety check,
it will allow the Striker to project beyond
the breech face.
Note Regarding Primer Indent and Distorted Spent Cases
Upon examining fired cases, you
may notice that the primer indent
appears distorted or elongated.
This is normal for the striker system design of the KAHR pistols. You may
also notice that the spent case becomes
slightly deformed into the shape of a "D"
instead of an "O" shape. This is considered normal for the KAHR pistol and is
caused by the spent case touching the
bottom of the ejection port when exiting
the gun. Neither of these two situations
are a cause for concern and it is not necessary to contact the service department.
Important Safety Information
22. Always wear protective shooting
glasses for eye protection. Do not hold
an autoloading pistol near your eye or
face as the slide will move back sharply
upon firing.
23. Always make sure that any firearm is
unloaded before cleaning, storing or
transporting. When handing the KAHR
Pistol to another person, be sure that the
slide is locked open with the magazine
removed.
24. Always keep clear and keep others
clear of the ejection port, as spent cartridges are ejected with enough force to
cause injury.
25. Never place fingers in the ejection
port; they could be injured by the slide
moving forward unintentionally.
26. Never place fingers on a hot slide
or barrel during or after firing, as they
could be burned by the hot metal.
13
Page 14

Cleaning & Lubrication
Before the initial shooting of the new
KAHR Pistol, the pistol should be
disassembled following the instructions in this manual and cleaned
with a commercial gun cleaning solvent. After each shooting session,
the cleaning process should be
repeated to remove firing residue
from the inside and outside of the
Barrel, Slide, Frame and Magazine.
Once cleaned, all parts should be
lightly lubricated with a commercial
gun lubricant. Follow solvent and
lubricant manufacturer’s instructions.
The handgun should be kept clean
and properly lubricated at all times.
Lubricants can evaporate over time.
Therefore, lightly lubricate the handgun once a month whether or not it
has been fired. Be sure your handgun is FULLY UNLOADED
(Magazine removed and chamber
empty) before performing any cleaning or maintenance.
Note Regarding Lead Bullets:
Lead (unjacketed) bullets can cause
excessive bore fouling. Extra attention to cleaning the bore is recommended after firing lead bullets.
Notes on Reliability
If this firearm is to be used in lawful
self-defense, the user must understand that overall reliability is based
upon the interaction of four factors:
handgun, magazine, ammunition
and user.
A handgun is only a mechanical
device. It can fail to function properly despite the use of the finest materials and the greatest possible care
in its design and manufacture. To
ensure the highest level of reliability,
we suggest that you adhere to the
following guidelines:
1. Obtain the guidance of a qualified or accredited firearms instructor
before using the handgun.
2. Use only the highest quality factory ammunition. Avoid reloads, surplus and budget priced ammunition
as well as any ammunition
designed by its manufacturer for use
in carbines or other shoulder-fired
firearms. At times, a particular
model of handgun will not reliably
function with a specific brand or
loading of ammunition. Selected
ammunition should be test fired (100
rounds minimum) to ensure reliability. Also, ammunition manufacturers
can make changes to their ammuni-
Important Safety Information
27. Only use high-quality commercially
manufactured ammunition, in excellent
condition and in the correct caliber for
your pistol.
The use of reloaded ammunition will void
the Warranty because reloads or poor
quality ammunition may not meet industry specifications (SAAMI and/or NATO),
may exceed pressure limits and could be
unsafe.
14
28. Do not shoot the KAHR Pistol near
any part of your body as the slide will
move back sharply upon firing.
29. Always unload the firearm immediately after firing.
30. Do not allow anyone to handle or
attempt firing the KAHR Pistol until they
have read this manual.
Page 15

tion such as substituting a different
powder or primer. Consequently,
ammunition which proved reliable
in the past may suddenly begin to
cause malfunctions. Inspect all
ammunition for visible defects before
loading it into the Magazine.
3. Use only KAHR ARMS manufactured Magazines. Consider purchasing extra Magazines so that they
may periodically be rotated, allowing the Magazine Spring to relax.
When inserting a Magazine into the
handgun, listen for it to click into
place, then pull down on the
Magazine Base to make sure that it
is seated and locked.
4. Improper shooting technique and
grip can cause a variety of malfunctions such as a failure to properly
eject or feed. Also, some loadings of
ammunition are more sensitive to
improper shooting technique or grip
than others. Maintain a firm but
comfortable grip on the handgun.
The shooting arm should supply
resistance to the handgun rather
than serving as a shock absorber.
Warranty & Liability Exclusions
Not withstanding the provisions contained in any other printed Warranty
statement(s) made by KAHR ARMS
or by one of KAHR ARMS’ affiliates,
the following exclusions from
Warranty, among others, shall
apply:
1. If the pistol is dismantled by the
purchaser or by third parties further
than described in this manual, and
if, as a result of inappropriate handling or incomplete reassembly,
damage or malfunctions are
caused, as a result of which the
safety devices are
rendered ineffective, then the purchaser shall forfeit any claim to
guarantee against damages thereby incurred to persons or property.
2. Any change to the basic construction of the weapon, in particular by
the circumvention of the safety
devices, is strictly prohibited for
safety reasons, and precludes the
use of the weapon.
Service Assistance
Should service be required, call the
KAHR ARMS Customer Service
Dept. at (508) 795-3919 or Fax: (508)
795-7046, giving full details of the
problem you have experienced,
date of purchase and dealer from
whom the pistol was purchased.
If KAHR ARMS Customer Service
recommends that the pistol be
returned to the factory for service,
you will receive a factory “Return
Authorization” Number. Ship the
unloaded pistol, prepaid via UPS or
FEDEX, with a copy of the sales
receipt and “Return Authorization”
Number to:
K.A.I.
130 Goddard Memorial Dr.
Worcester, MA 01603
Attn. Customer Service Dept.,
Phone: (508) 795-3919
Fax: (508) 795-7046
Web Address: www.kahr.com
www.kahrshop.com
E-mail: kahrcs1@aol.com
Refer to the separate “Parts and
Service List” for complete parts and
service pricing and ordering information.
15
Page 16

3. No liability whatsoever can be
accepted in the case of criminal
misuse, negligence, resale, use
under the influence of drugs or alcohol, modifications, careless handling, etc.
4. With the Slide removed, it is not
permitted to tension and release the
Striker forward since this could
damage the Striker Block.
5. No liability whatsoever can be
accepted if the pistol is fired with
any ammunition other than topquality, commercially manufactured
ammunition of the proper caliber
specified on the firearm itself.
Inexpertly manufactured or
reloaded ammunition must not be
used.
NOTE:
All liability is excluded in
the event that the instructions in
this manual are not observed.
Shipping Firearms For Service
Kahr handguns returned to the factory for service or repair should be
sent to:
K.A.I.
130 Goddard Memorial Dr.
Worcester, MA 01603
Attn: Service Dept.
Contact Kahr Arms
Dept. at: (508) 795-3919 to receive a
“Return Authorization” Number
before shipping a firearm to the factory.
F
irearms shipped to the factory must
be sent prepaid. THE KAHR SERVICE DEPARTMENT CAN NOT
ACCEPT COLLECT SHIPMENTS.
Customer Service
The Federal Firearm Control Act
does not prohibit an individual from
shipping a firearm directly to the
manufacturer for service or repair.
However, some states or localities
prohibit this. If you live in such a
location, have a Federally Licensed
Firearms dealer ship the firearm. It
will be returned to the dealer after
being serviced.
Handguns must be shipped prepaid
via UPS AIR or FEDEX.
do not hold a Federal Firearms
License are prohibited by federal
law from shipping a handgun by
mail. Handguns mailed in violation
of the law are impounded by the
Post Office.
Enclose a letter that includes reference to the factory “Return
Authorization” Number, your name,
address, telephone number, and
serial number and model of the
firearm. Describe in detail the trouble you have experienced with your
firearm, or the work you wish to
have done. Stating only that the
firearm “needs repair” is inadequate information. Please enclose
copies of any previous correspondence.
Please do not include holsters, custom grips, or accessories with any
firearm being shipped to the factory
for service.
Service work performed, other than
approved Warranty repairs, will
carry a minimum charge of $15.00
plus a $15.00 return shipping and
handling charge.
Persons who
16
Page 17

Notes:
17
Page 18

Notes:
18
Page 19

Notes:
19
Page 20

Limited Lifetime Warranty
This “LIMITED LIFETIME WARRANTY” has been drafted to comply with the
MAGNUSON-MOSS WARRANTY FEDERAL TRADE COMMISSION IMPROVEMENT ACT which is effective for goods manufactured on or after December 31,
1976. KAHR ARMS warrants that this firearm was originally manufactured free
of defects in material or workmanship.
For the lifetime of the original purchaser, KAHR ARMS agrees to correct any
defect in this firearm for the original purchaser by repair or replacement (with
same or comparable quality model). A service and/or handling charge may be
applied.
THIS WARRANTY IS VOID IF THE FIREARM HAS BEEN ABUSED, MISUSED,
DAMAGED BY ACCIDENT, FIRED WITH HANDLOADED AND/OR RELOADED OR
IMPROPER AMMUNITION OR WITH AN OBSTRUCTION IN THE BARREL, OR
DAMAGED THROUGH FAILURE TO PROVIDE REASONABLE AND NECESSARY
MAINTENANCE AS DESCRIBED IN THIS MANUAL. THIS WARRANTY DOES
NOT APPLY TO NORMAL WEAR OF ANY PARTS, INCLUDING METAL, WOOD,
PLASTIC, RUBBER AND OTHER MATERIAL’S SURFACE FINISH OR IF UNAUTHORIZED REPAIR AND/OR ALTERATION HAS BEEN PERFORMED.
The terms of the Warranty cannot be changed except in writing by an officer of
Kahr Arms.
Wholesalers and Dealers (unless a KAHR ARMS authorized Warranty repair station) are not authorized to make any Warranty repair or adjustment on behalf of
KAHR ARMS.
This Warranty gives only the original retail purchaser specific legal rights. Other
rights may also be available which may vary from state to state.
Should repair be required for this firearm, contact Kahr Customer Service at Tel:
(508) 795-3919 or Fax: (508) 795-7046 and request a “Return Authorization”
Number. Provide full details of the defect or malfunction, date of purchase and
dealer from whom the firearm was purchased. Then, send the unloaded pistol,
prepaid via UPS AIR or FEDEX, with a copy of the sales receipt and “Return
Authorization” Number to:
Kahr Arms – Service Dept.
130 Goddard Memorial Drive
Worcester, MA 01603
Web Address: www.kahr.com / www.kahrshop.com
02103MAP ©2002, Kahr Arms
E-mail: kahrcs1@aol.com
 Loading...