

TR-026S Remote Controller User Manual
BACK
OUTDOOR 3-OUTLET TIMER
WITH REMOTE CONTROL
WARNING:
• The device must be mounted in a vertical position with the receptacle facing
downward and with the receptacle at least 1.4 M above the ground level.
• Let the switch hang downward so moisture does not accumulate in the outlet.
• Suitable for Outdoor Use, Store indoors when not in use. Not for water
immersion or for use were directly exposed to water
INSTALLATION INSTRUCTIONS
Installation
a. Mount the timer onto a wall near a grounded
electrical outlet with the photo sensor facing
outward.
Note: To ensure proper operation of automatic
function, ensure photocell sensor is shielded
from all nighttime sources of light, i.e.
b. Insert nail or screw (not included) into mounting
c. Plug the device cord into any of the three receptacles at the bottom of
OPERATING INSTRUCTIONS
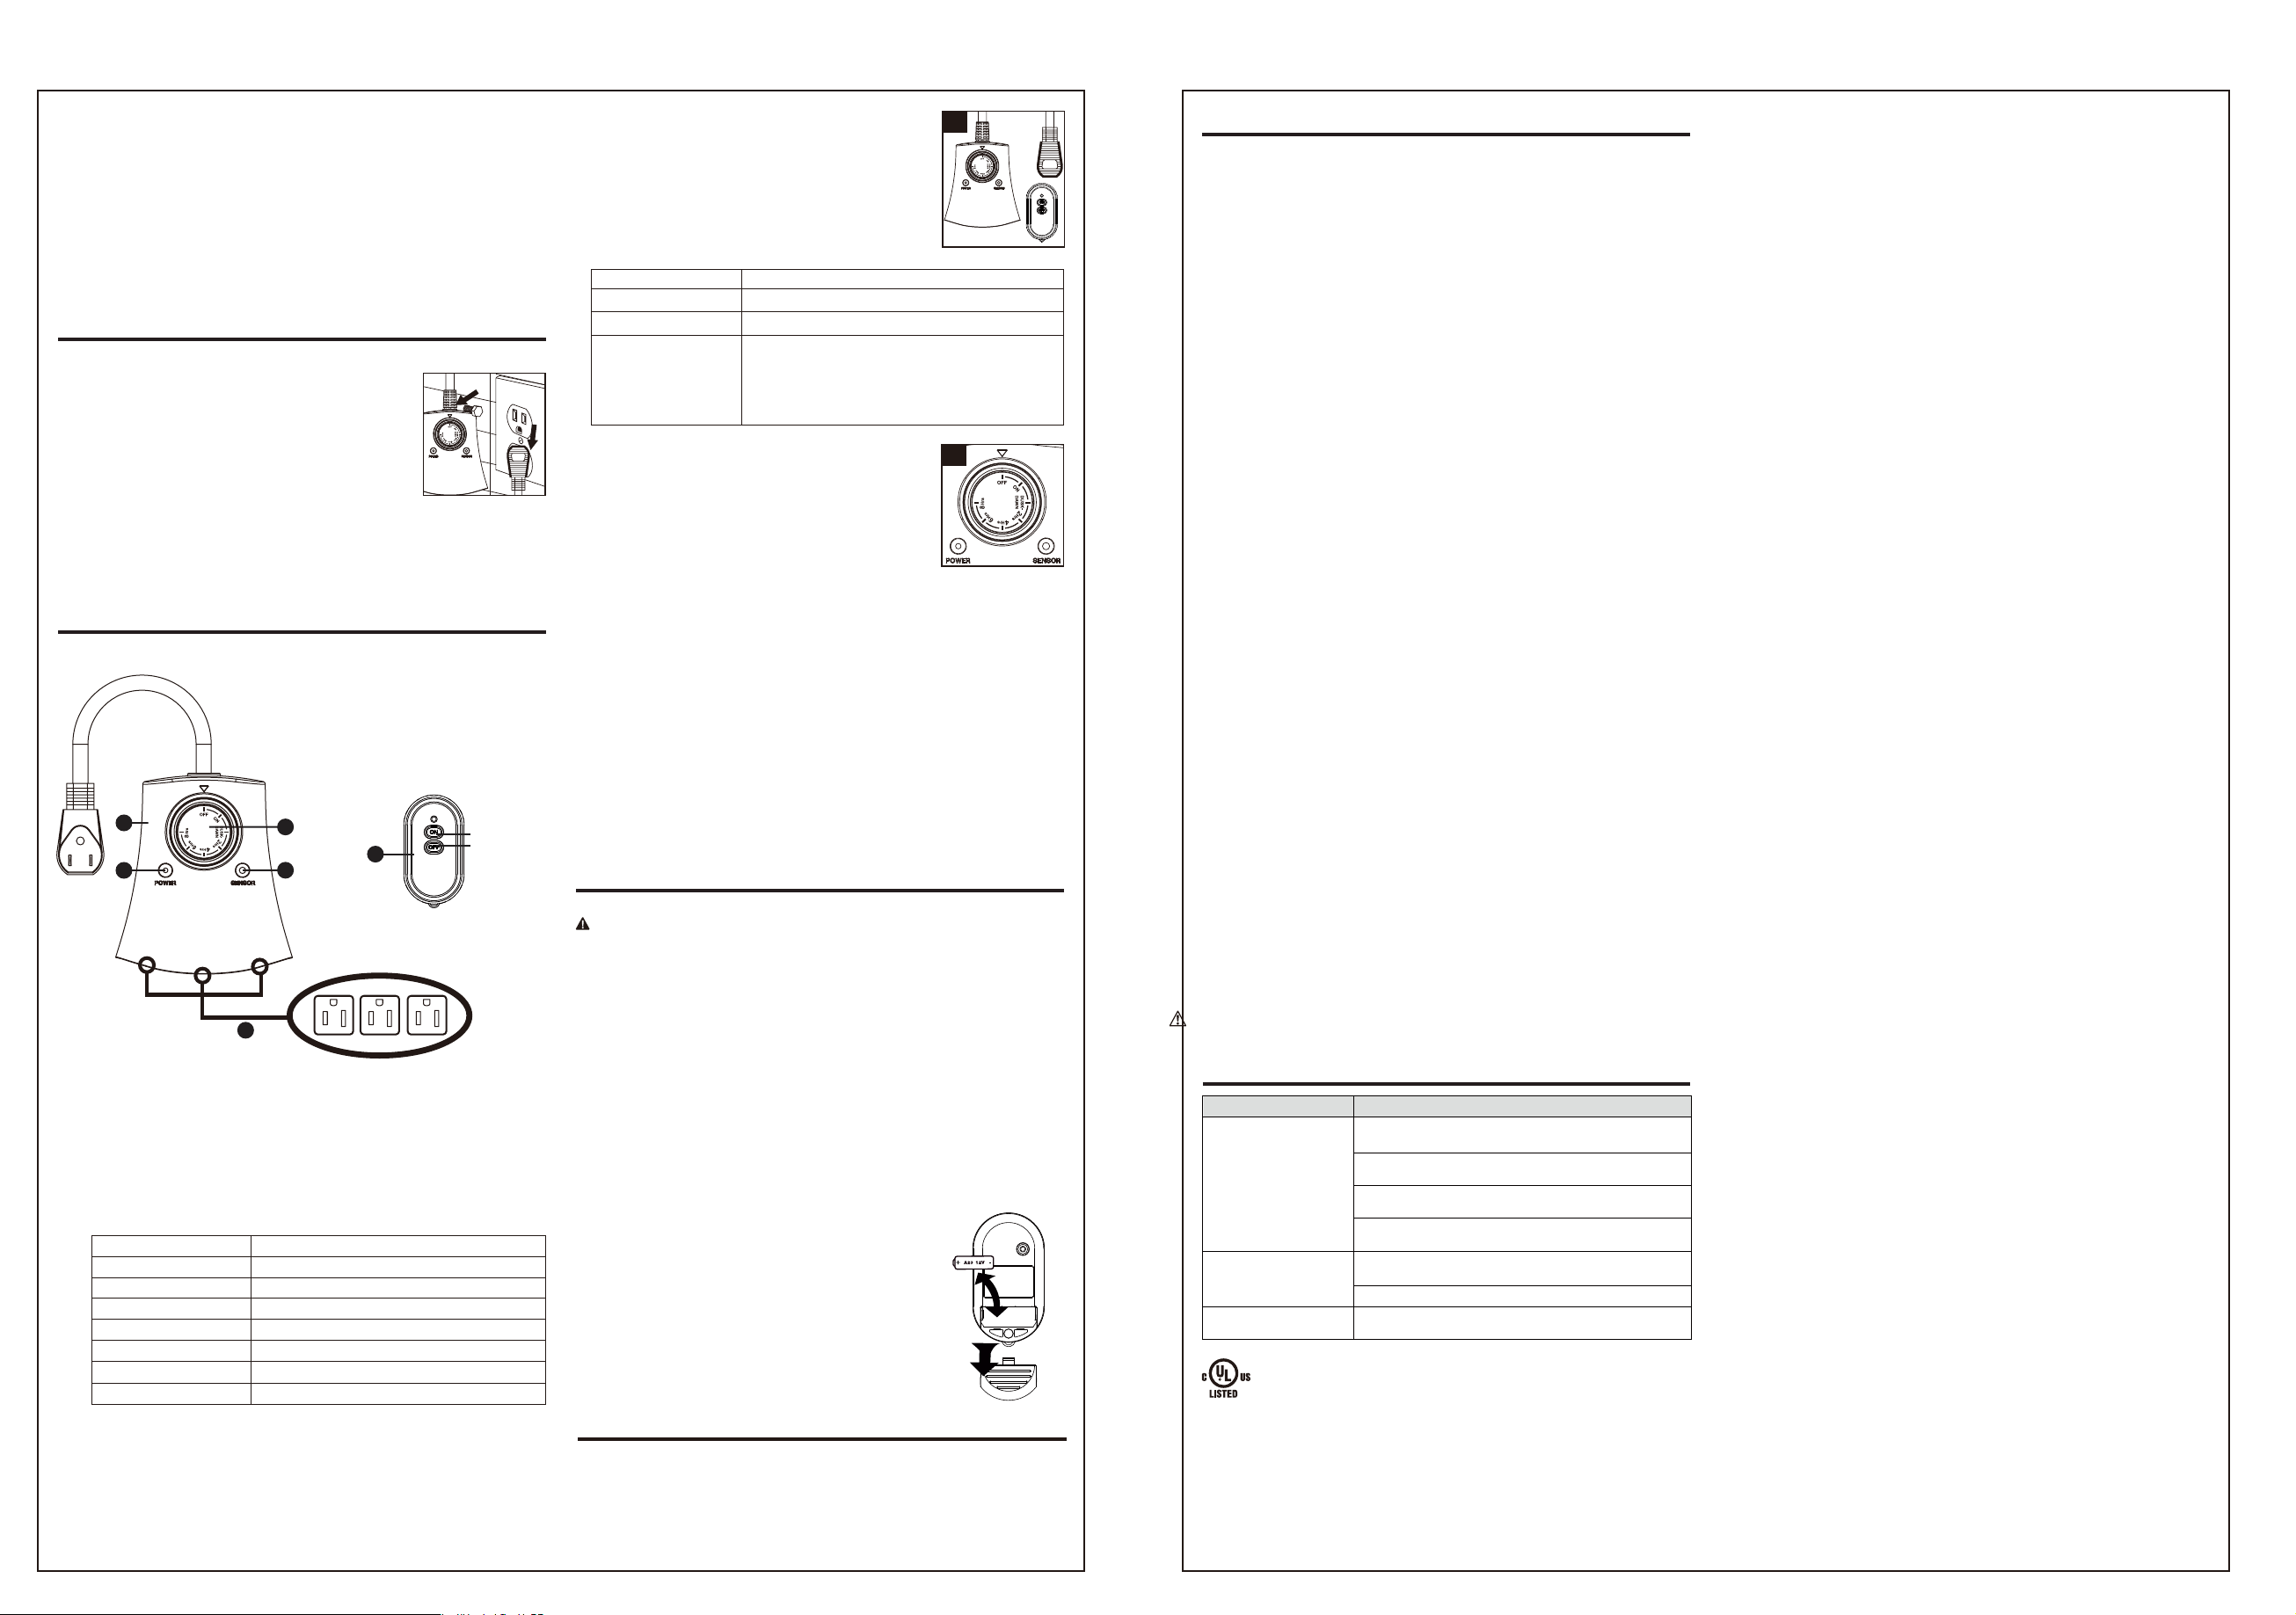
1. Button Layout
1. Timer unit: The timer will control an array of devices by setting the dial.
2. Remote control:
3. Timer dial: Rotate the dial on the timer to select one of the following settings
4. Power indicator light: The power indicator light indicates that the timer is
5. Photo sensor: The sensor will sense for light and dark, and direct the
6. Outlets: The three outlets located on the button of the timer allows the
floodlights.
surface. Nail or screw head must extend at least 3/16 in. out from the
wall. Hang the receiver from the slot on back of the unit onto the nail or
screw. Plug the power supply cord of the receiver into the outlet.
the receiver.
Receiver
1
4
• ON: When the on button is pressed, it will override the timer’s current
program to on function.
• OFF: When the off button is pressed, it will override the timer’s current
program to off function.
• Remote indicator light: The LED light indicates that the ON or OFF
button is being pressed.
Dial position Function
OFF Power OFF
ON Power ON
DUSK-DAWN Powers ON at dusk, OFF at dawn
2 Hrs ON at dusk – OFF in 2 hours
4 Hrs ON at dusk – OFF in 4 hours
6 Hrs ON at dusk – OFF in 6 hours
8 Hrs ON at dusk – OFF in 8 hours
on.
timer to act accordingly.
user to plug an array of devices into it.
3
2
5
Transmitter
6
ON
OFF
2. Timer and remote interaction
Your timer includes a remote control with temporary
override:
• Temporary override ON:
turns the timer ON for desired settings (2, 4, 6 or
8 Hours). Please note that if the timer is set to a 2-,
4-, 6- or 8-hour mode, it will come on at dusk and
will turn off 2, 4, 6, or 8 hours later.
• Temporary override OFF: turns the timer OFF.
Timer Dial position Using the Remote
OFF Press the remote and the timer will turn ON/OFF
ON Press the remote and the timer will turn ON/OFF
DUSK-DAWN
2, 4, 6 or 8 HRS
Press the remote and it will go into a manual
restart mode. The timer will restart from ‘0’ and
count until it reaches the time set on the dial, or
dawn. Please refer to examples below for further
explanation.
3. Examples
• Timer set to DUSK-DAWN When DUSK = 6:00 PM
and DAWN = 5:00 AM.
- If at 4 :00 PM REMOTE activated to ON --> TIMER
OUTPUT ON and stays ON until 5:00 AM.
- Next day, ON at DUSK, OFF at DAWN.
- If at 10:00 PM REMOTE activated to OFF --> TIMER
OUTPUT OFF = 10:00 PM and stays OFF until
DAWN next day.
- Next day ON at DUSK, OFF at DAWN.
• If TIMER setting is 2 HOURS (or 4, 6, 8 HOURS and so on) DAY OR
NIGHT TIME REMOTE ON --> TIMER OUTPUT ON 2 HOURS (4, 6, 8
HOURS) then OFF.
When DUSK --> TIMER OUTPUT ON 2 HOURS (4, 6, 8 HOURS) then
OFF. If DUSK is at 6:00 PM:
(1) If at 5:00 PM REMOTE set ON, then TIMER OUTPUT ON immediately
until 7:00 PM.
(2) TIMER ON = 6:00 PM, TIMER OFF = 8:00 PM. If at 1:00 PM REMOTE
set ON, then TIMER OUTPUT turns ON until 3:00 PM.
(3) TIMER ON = 6:00 PM. If at 7:00 PM REMOTE set ON TIMER OUTPUT
ON until 9:00 PM (as time count restarted at time remote activates to
ON).
(4) TIMER ON = 6:00 PM. If at 7:00 PM REMOTE set OFF, then TIMER
OUTPUT turns OFF immediately until next day.
2
3
MAINTENANCE
Battery Handling and Usage
WARNING:
Keep batteries away from children and pets.
• Follow the battery manufacturer’s safety and usage instructions.
• Insert the battery observing the proper polarity (+/-) as indicated inside
Battery Compartment.
• Remove a spent or discharged battery from the product. Remove the
battery when not using the product for an extended period.
• Never throw batteries into a fire. Do not expose batteries to fire or other
heat sources.
• Dispose or recycle spent / discharged batteries in compliance with all
applicable laws. For detailed information contact your local solid waste
authority.
• Battery contains mercury. Do not put in trash. Recycle or manage as
hazardous waste.
CAUTION: Failure to properly align the battery polarity can cause personal injury and/or
property damage.
Replacing the battery
• Remove the Battery compartment cover from the back
of the remote control by sliding the cover in the
direction that its trends curve.
• Remove the spent battery and place a new DC 12V
Type A23 battery into the Battery Compartment
correctly observing the polarity indications (+/-) inside
the Battery Compartment.
• Replace the Battery Compartment Cover.
• Clear the battery contacts and also those of the device
prior to battery installation
HELPFUL TIPS
• Before using your timer, please read the following instructions carefully.
• When set to “ON”, the timer will provide continual power to attached devices
until the timer is switched to “OFF”, or to any of the other operating modes.
SAFETY INFORMATION
RECEIVER MODEL: TM-069R
TRANSMITTER MODEL: TR-026S
FCC ID: PAGTR-026S
IC: 4494A-TR026S
SPECIFICATIONS:
14/3 AWG SJTW vinyl cord
RATINGS:
125 V ac 60 Hz,
15 A Resistive,
15 A General Use,
1,000 W Tungsten,
500 VA Electronic Ballast,
1/2HP. 120 V ac 60 Hz, 8.3 A Ballast
Federal Communications Commission Interference Statement
This equipment has been tested and found to comply with the limits for Class
B digital device, pursuant to part 15 of the FCC Rules. These limits are
designed to provide reasonable protection against harmful interference in a
residential installation. This equipment generates, uses and can radiate radio
frequency energy and, if not installed and used in accordance with the
instructions, may cause harmful interference to radio or television reception,
which can be determined by turning the equipment off and on, the user is
encouraged to try to correct the interference by one or more of the following
measures:
• Reorient or relocate the receiving antenna.
• Increase the separation between the equipment and the receiver.
• Connect the equipment into an outlet on a circuit different from that to which
the receiver is connected.
• Consult the dealer or an experienced radio/TV technician for help.
This device complies with Part 15 of the FCC Rules. Operation is subject to the
following two conditions: (1) This device may not cause harmful interference,
and (2) this device must accept any interference received, including
interference that may cause undesired operation of the device.
FCC Caution: Any changes or modifications not expressly approved by the
party responsible for compliance could void the user's authority to operate this
equipment.
Industry Canada statement:
This Class B digital apparatus complies with Canadian ICES-003.
This device complies with Industry Canada license-exempt RSS standard(s).
Operation is subject to the following two conditions: (1) this device may not
cause interference, and (2) this device must accept any interference,
including interference that may cause undesired operation of the device.
Le présent appareil est conforme aux CNR d'Industrie Canada applicables
aux appareils radio exempts de licence. L'exploitation est autorisée aux deux
conditions suivantes : (1) l'appareil ne doit pas produire de brouillage, et (2)
l'utilisateur de l'appareil doit accepter tout brouillage radioélectrique subi,
même si le brouillage est susceptible d'en compromettre le fonctionnement.
WARNING:
State of California to cause cancer and birth defects or other
reproductive harm. For more information go to
www.P65Warnings.ca.gov.
TROUBLESHOOTING
The lights do not turn on,
even when the timer is in
the “ON” position.
Problem
The lights do not turn on
2,4,6, or 8 hrs. after dusk.
The lights do not turn on
and off via remote control.
This product can expose you to DINP which is known to the
Solution
Ensure the lights are functional by plugging them directly
into the outlet.
Be sure that the lights are in the “ON” position if they have
their own switch.
Be sure that the outlet that the timer is plugged into is
active.
Be sure that the dial is fully turned to the “ON” position by
listening for the clicking sound.
Confirm that the timer is plugged properly into the outlet,
and that the light is turned on if there is a switch.
Be sure that the timer is not near ambient light sources.
Confirm remote operation after replacing batteries.
Made in China
SAVE THESE INSTRUCTIONS!
SAVE THESE INSTRUCTIONS!
 Loading...