

Page 1

DB1 Series
Programming Instructions
Page 2
Warnings
Failu re to follow t hese instructions coul d result in da mage to t he product and voidthe factory warran ty.
The acc uracy of the door preparation is criti cal for t he proper functioning and security o f this produ ct. Misalignment can cau se performance
degra dation andlessening of securit y.
Finis h Care: This l ockset is designed to provide the high est standard of produc t quality and performance. Care should be tak en to ensure a l onglasti ng finish. When cleaning is required use a soft, dam p cloth. Using lacquer thinner, caustic soaps, abrasiv e cleaners or polishes cou ld damage the
coati ng and resul t in tarnishing.
IMPORTANT: Do not install batteries until th e lock is completely insta lled on door.
1. Mast er PIN Code(4~10 digit): Defaul t master PIN code is “123456 78”,please modify it after inst allation.
2. User P IN Code Number: User PIN codes can be s et up with PIN code numbers (0 0~19).
3. User P IN Code(4~10 digit): User PIN cod es can be set up through Master PIN code or Al fred APP. Each Us er PIN code has only one PIN Code Numbe r.
DB1 Series
Programming Instructions
Alfred INC. reserves all righ ts for the final interpretation to thi s instruction.
All des ign and specifications are subject t o chang e without notice
Introduction
The Alf red DB1 comb ines a robus t lockset with a contempor ary electronic aesthetic.
Users b enefit fro m an interactive touch screen that mak es day-to-day access effortless, as well as o ffering vo ice-guided programming for simpl e
updat es to user information in the event o f staffing c hanges or security breaches. Alfred DB2 is engin eered for qu ick and easy installatio n and fits in
place o f a standard d eadbolt lock door prep.
If this i s an Wireles s-enabled lock,it need s to loca ted within 50-100 feet of an other network controller(Gatew ay).T hat distance is influenc ed by
objec ts between the lock and the controller a nd may be e xpended depending on proximity to ot her network devices. Als o, if the l ock is connected to a
netwo rk control ler, it is recommended that it is programmed through t he cent ralized user interface (PC or hand-held device) t o ensure com munic ation
betwe en the lock and the controller unit.
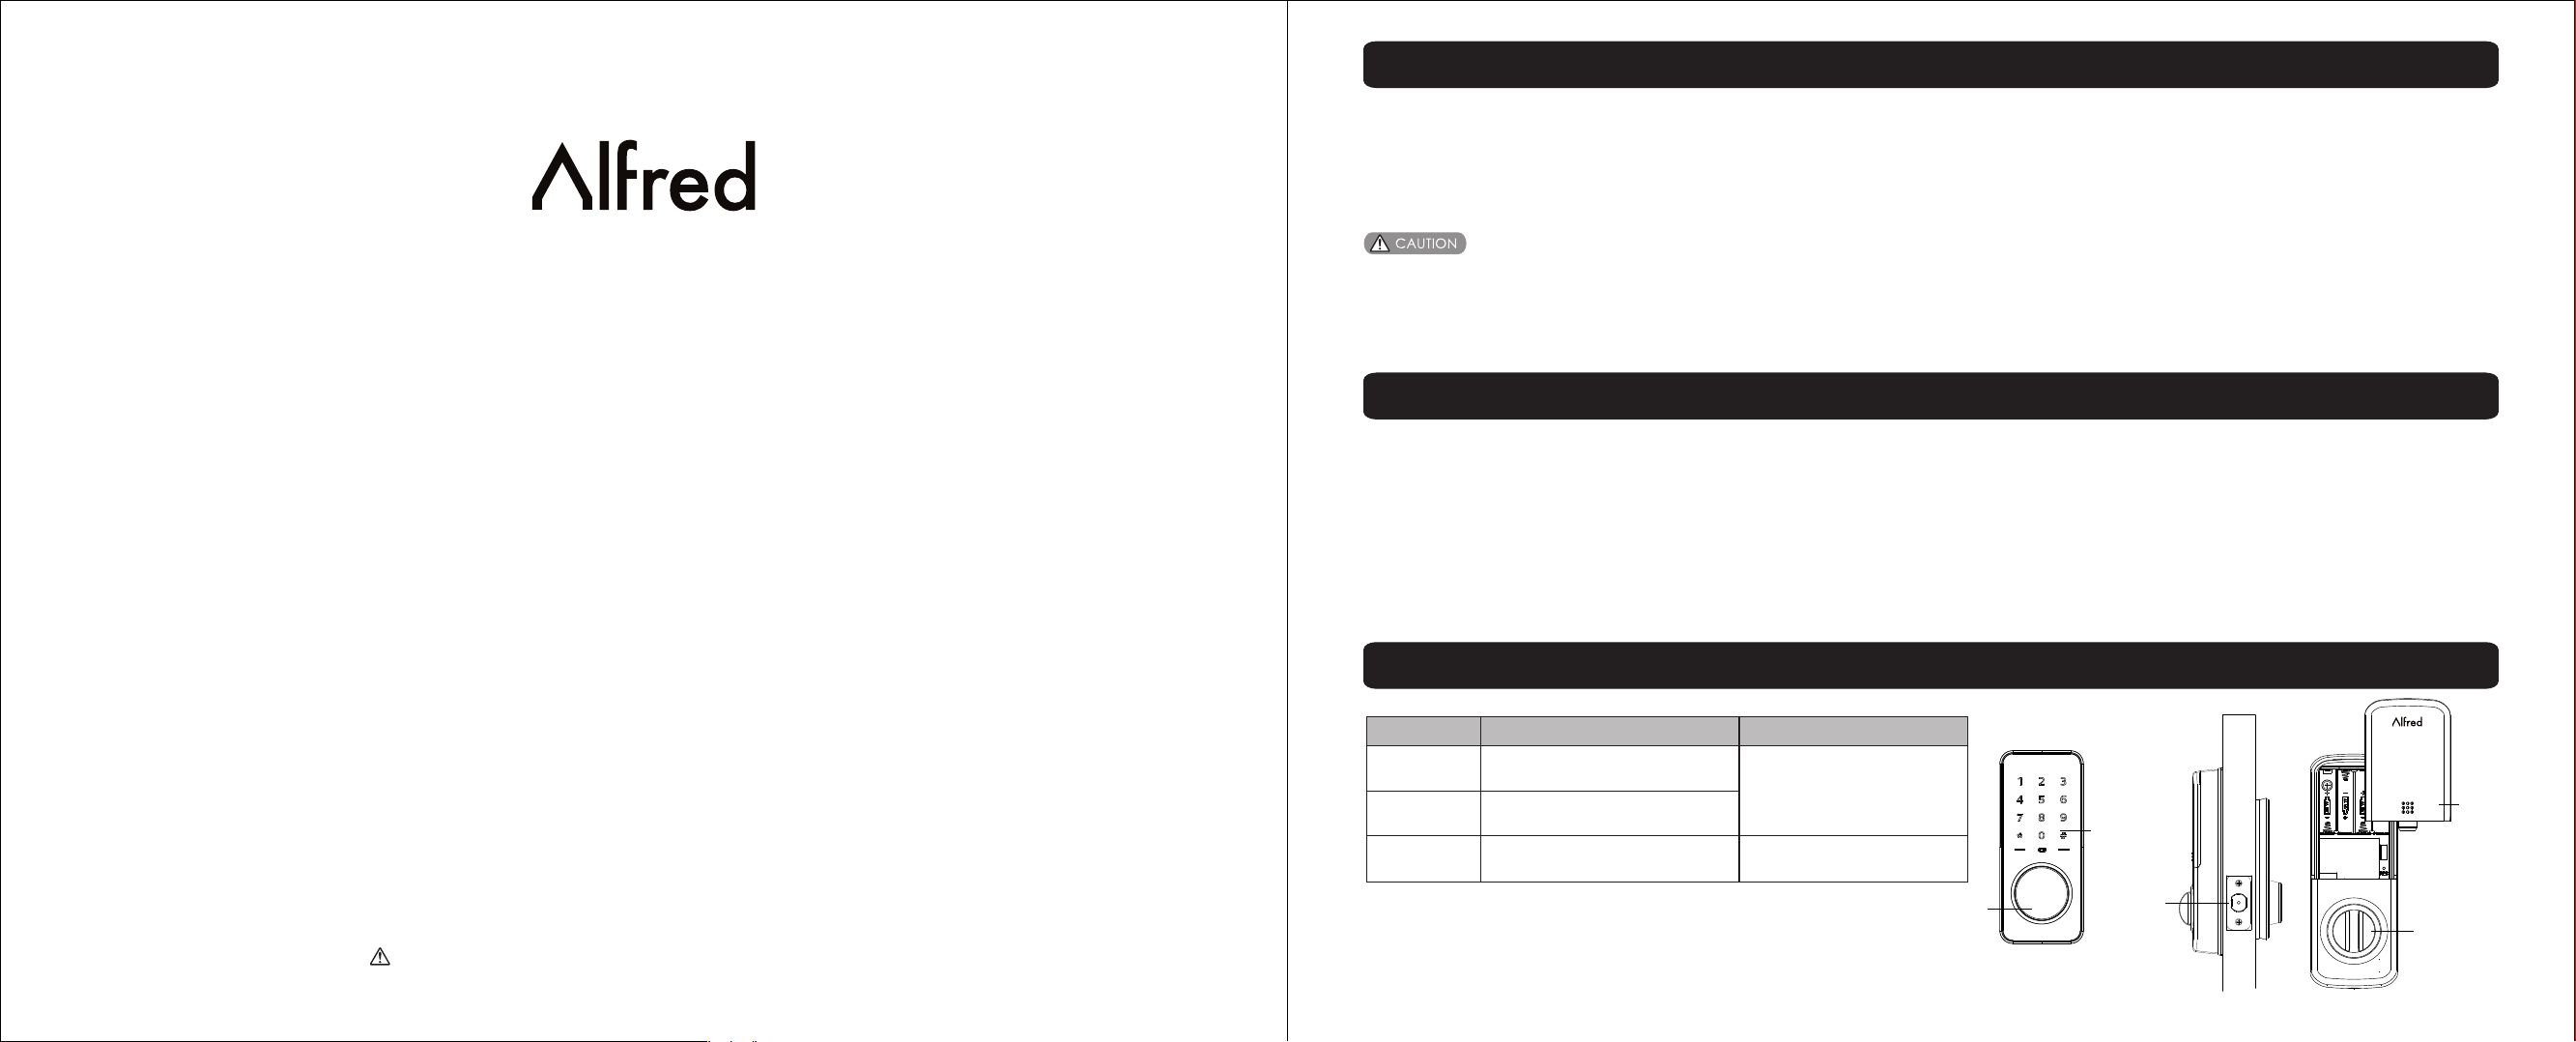
Parts Illustrations
Item
Out sid e
escutc heon
Inside
escutc heon
Batter y
Specifications
150 mm( L) x 65mm(W ) x 14mm(H)
200 mm( L) x 77mm(W ) x 46mm(H)
AA al kal ine batte ry x4
(Opera ting volt age: 3.8~ 6.0 V)
Remarks
Ope rat ion tempe rature: - 30~60C
Last up to o ne year
(10 time s open/cl ose per day )
Cylind er
(optio nal)
Touch screen
keypad
Latch bo lt
Batter y
cover
Thumb tu rn
1/9
Page 3
Programming
Definitions
Master Mo de:
The Mas ter Mode could be entered by entering “* *+Mas ter PIN Code+#” to programming the loc k.
Master PI N code:
The Mas ter PIN Code is used for programming and f or feat ure s ettings.
The def ault Master PIN Code must be change d after installing. The Ma ster PIN Code will also operate the l ock in Away Mo de.
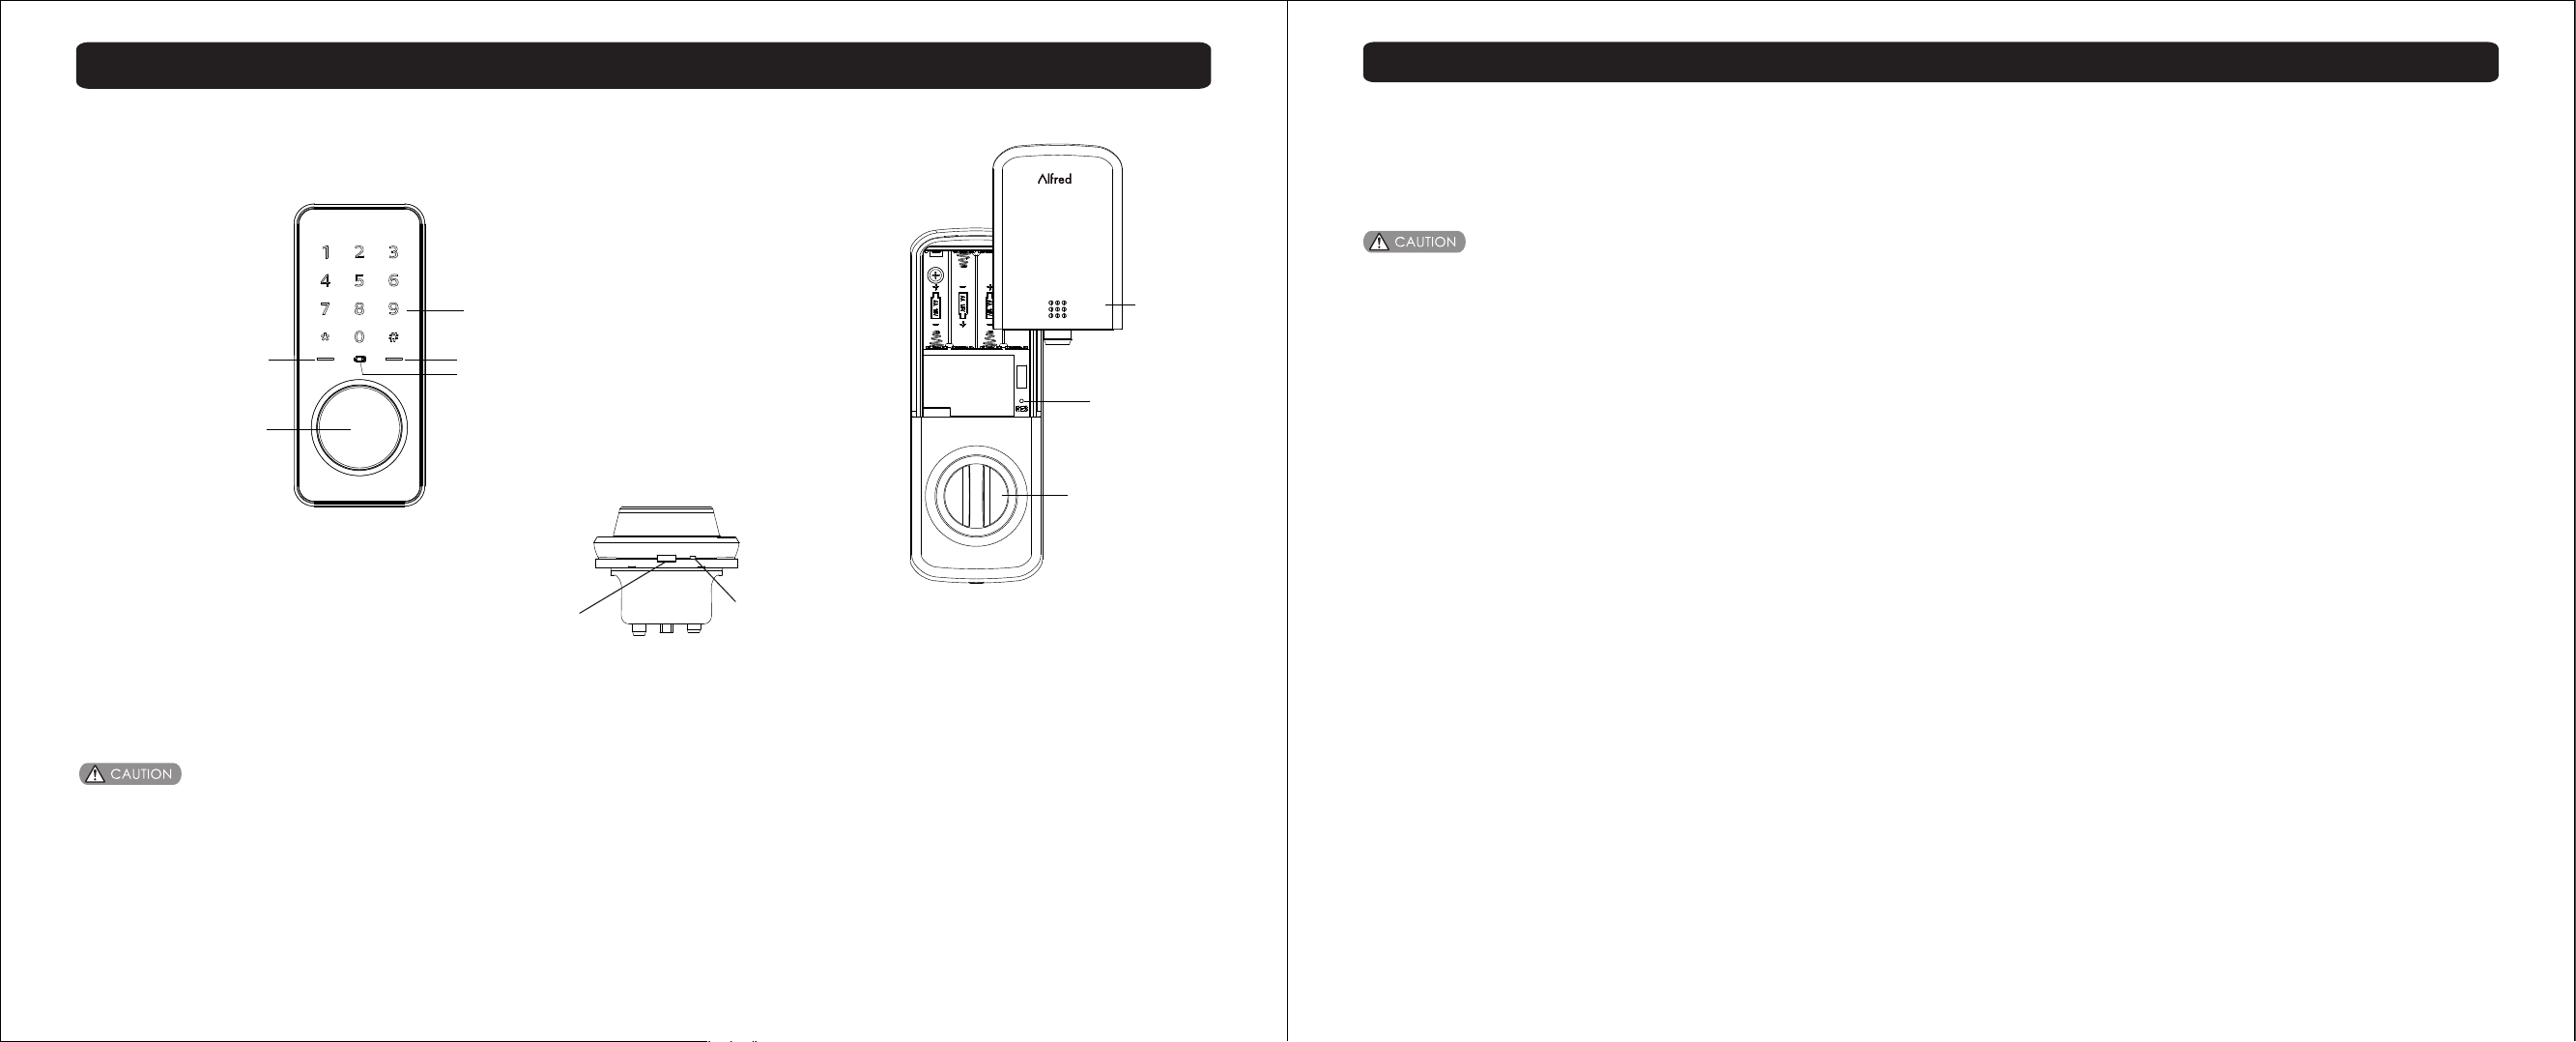
Touch screen keypad
Status indicator(Green) 1#
Status indicator(Red) 2#
Status indicator(Batte ry) 3 #
Reset button
Cylinder(optional)
Thumb turn
Statu s Indicators
1#. Unl ocked or setting succeed
2#. Loc ked or setting failed
3#. Low b attery Warning
Maste r and User PIN code have 4-10 digits, t he default Master PIN code i s [12345678]. Please change it pr ior to progr amming of the lock.
Micro USB
power port
Reboot b utton
Battery
cover
Auto Re-l ock:
After s uccessful PIN Code entry and the un it unlocks, it will automa tically re -lock after 30 seconds. This feat ure i s disab led in default
setti ng. Could be set up in Master Mode or throug h Alfred APP.
Manual Mo de:
Auto Re -lock function could be adjuste d to Manual Mode. In Manual Mo de the lock could be locked only by pressi ng any ke y for 2 seconds from outside
or usin g thumb turn from inside.
One Touch Re- lock:
When th e bolt is retr acted, activating the ke ypad an d pre ss any ke y for 2 seconds will extend th e bolt(during Auto Re-Lo ck dura tion or when Manual
Mode is e nabled)
Shutdow n Time:
The loc k will shutdown for a default of 5 mins a nd not allow operation aft er the wrong c ode entry limit(10 times ) has bee n met. When the unit is in
Shutd own, the screen will flash when you are trying to use ke ypad.
Away Mo de:
This fe ature is ena bled by the Master PIN Code in M aster M ode or Alfred APP, it restricts all user PIN code acce ss, except Master PIN code a nd APP
acces s. This feature will disabled automa tical ly after entering Master P IN Code from o utside or using APP. If some one unl ock the unit by using thumb
turn or k ey override, the lock will a larm fo r 1 min and send a message to user ’s hand-hel d device for warning(requires wireless module).
Silent Mo de:
Enabl ing Silent Mode shuts off the code confi rmati on tone playback for use in qu iet areas. S ilent mode is selected in th e Voice se tting of Master Mode or
Alfred APP.
Status LE D:
Locat ed on outside escutcheon.
User PIN co de:
The Use r PIN code operates the lock. Maxim um number of user PIN codes is 2 0.
2/9
3/9
Page 4
Definitions
Wro ng Code Ent ry Limi t:
After a s pecified number of unsuccessf ul attempts at entering a va lid PIN code the lock will shut down an d not allow operation. Wrong code entry limit is
10 time s.
Reboot bu tton:
When th e system crash down, the lock could b e res tart by p res sing Reboot button on outside esc utcheon.
Reset but ton:
After reset opera tion, the lock will be restored to factory default s ettings, all user credentials will be delet ed. Refer to reset guide.
Lock Operation
-Add Up User PIN Codes
User PIN co des can b e progr ammed throug h the Master PIN Cod e or APP.
1. Touch th e screen wit h your hand to activate.
2. Ente r “*” twice and the Master PIN Code fol lowed by “#”.Lock Respon se:
Succe ed: Beeper sounds “di-di ”, green ind icator flashes.
Faile d: Beeper sounds “di-di- di”, red ind icator flashes.
3. Ente r “2 + User Number(00-19)” follow ed by “#”. Lock Response: Re fer to respo nse upper.
4. Ente r User PIN Code(4-10 digits) foll owed by “#”. Lock Response : Refer to res ponse upper.
5. Do ste p 4 again.
When registerin g User PIN Codes, the code mus t be ente red w ithin 10 seconds or time expires. No matter set ting succeed or failed, th e process
will co mplete and exit Master Mode.
Factory Default Settings
Settings
Master PIN Code
Auto Re-lock
Beeper
Wrong Code Entry Limit
Shutdown Time
Bluetooth
Factory Defaults
12345678
Disabled
Enabled
10 times
5 mins
Disabled(Energy saving)
Lock Operation
-Change Default Mas ter PIN code
1. Touch th e screen wit h your hand to activate.
2. Ente r “*” twice and the 8-digit de fault M aster PIN Code(1234567 8) followed by “#”.
Succe ed: Beeper sounds “di-di ”, green ind icator flashes.
Faile d: Beeper sounds “di-di- di”, red ind icator flashes.
3. Ente r “1+ new Master PIN code + #”, lo ck respons e: Refer to re sponse upper.
4. Ente r “new Master PIN code + #”, loc k response : Refer to res ponse upper.
Before changing d efault Master PIN code, al l other s etting menu are disabled.
You have to c hange Master PIN code first, then d o other lock settings.
4/9
-Delete User PIN Code
User PIN co des can b e progr ammed throug h the Master PIN Cod e or APP.
1. Touch th e screen wit h your hand to activate.
2. Ente r “*” twice and the Master PIN Code fol lowed by “#”. Lock Respons e:
Succe ed: Beeper sounds “di-di ”, green ind icator flashes.
Faile d: Beeper sounds “di-di- di”, red ind icator flashes.
3. Ente r “3+User Number(00-19)” and fo llowed by “#”. Lock Respon se: Refer to lock response upper.
4. To conti nue deleting users, do previous step s from 1-3 aga in.
When de leting User PIN Codes, the User Num ber must be entered within 10 seconds or t ime expire s.
No matt er setting succeed or failed, the p roc ess wil l complete and exit Master M ode.
Delet ing all User PIN codes could be done on ly by resett ing to factory default set tings.
-Auto Re-lock enabl e/disable
Auto Re-l ock fea ture ca n be prog ramme d throu gh the Ma ster PIN Co de or Alf red APP.
1. Touch th e screen wit h your hand to activate.
2. Ente r “*” twice and the Master PIN Code fol lowed by “#”.
3. Ente r “41+ #” to enable Auto Re-lock.
Enter “ 42+ #” to disable Auto Re-lock.(D efault setting)
5/9
Page 5

Lock Operation
-Silent Mode(Beep er enable/disable )
Silent Mo de feat ure can o nly be program med through th e Master PI N Code or A lfred A PP.
1. Touch th e screen wit h your hand to activate.
2. Ente r “*” twice and the Master PIN Code fol lowed by “#”.
3. Ente r “51+ #” to enable beeper.(Defau lt setting)
Enter “ 52+ #” to disable beeper.
-Enable Awa y Mode
Away Mo de feat ure can o nly be program med through th e Master PI N Code or A lfred A PP.
1. Touch th e screen wit h your hand to activate.
2. Ente r “*” twice and the Master PIN Code fol lowed by “#”.
3. Ente r “6” to enable.
In Away Mode, all Use r PIN Code will be disabled te mpora ry, de vice could be unlocked only by Mast er PIN code from outside or APP.
Away Mode will be dis abled automatically af ter ent ering Master PIN Code from outside or AP P access.
If some one unlock the unit by using thumb tu rn or override key(optio nal), the beeper will give alarm.
-Bluetooth settin gs
Feature Programming Through Menu Mode using Master PIN Code
1 Modify Master PIN code
2 Add users
3 Delete users
1 Enable
4 Auto re-lock
2 Disable
1 Enable
Master Mode
5 Beeper
2 Disable
Bluetoo th feat ure can b e progr ammed t hroug h the Mas ter PIN Cod e or Alfred APP. Blueto oth is di sabled in f actor y default s ettin g.
1. Touch th e screen wit h your hand to activate.
2. Ente r “*” twice and the Master PIN Code fol lowed by “#”.
3. Ente r “71+ #” to enable Bluetooth. Blue tooth will work continuo usly after operation
Enter “ 72+ #” to disable Bluetooth, Blue tooth will shut down in 2min s after touch keypad lights off for energy saving, i t will ba ck to work
when to uch keypad wakes up.
-Function extensi on settings (option al)
Netwo rk feature s are includ ed in function extension , can only be programmed through the Master PIN Code. Refer t o Network setting
introduction.
If the lo ck is connected to a network controlle r, it is reco mmended that it is programmed through the centra lized user interface(PC or
hand- held device) to ensure communicati on betw een the lock and the controller.
6/9
6 Enable Away Mode
1 Enable Bluetooth
7 Bluetooth settings
2 Disable Bluetooth
1 Pair
8 Network settings
2 Unpair
7/9
Page 6

How to use
How to use
Unlock the door
1. Unlock t he door f rom out side
- Use PIN c ode key
Us er
PIN c ode
2. Unlock t he door f rom ins ide
- Manua l thumb turn
Turn the thumb tur n on insi de body
Lock the door
1. Lock the d oor from outsi de
Auto Re-l ock Mod e
In Auto re-lock mode, the bolt will be throwed out automatically i n 30 se con ds af ter u nlock.
Manual Mo de
Press and hold any ke y on keypad for 2 seconds.
2. Lock the d oor from insid e
Auto Re-l ock Mod e
In Auto re-lock mod e, the device is locked auto matic ally.
Manual Mo de
Unlock with Fake PIN code
User ca n prevent PI N code exposure from str angers by entering rando m digits before or after PIN code.
Micro USB emerg ency power supply and R eboot button
Power bank(Micro USB)
Door lock can be connected to mi cro USB power bank w hen b att ery w ear s out.
Door lock can be restarted by press Reboot button when crash down.
Micro USB
pow er po rt
Reset to factory defa ult settings
Operations on lock
1. Open the door and keep the lock in “unlock” status
2. Open battery box and find the reset button.
3. Use a sharp thing to press and hold the reset button.
4. Keep holding the reset button and remove a battery from battery box then replace it.
5. Keep holding the reset button until hearing voice guide.
Reboot b utton
In Manu al Mode, the device could be locked b y turning the thumb turn on in side body..
8/9
Function extensio n instruction(Z-w ave,remote co ntrol, etc)
1. Foll ow the user guide of your hub to enter le arning mode.
2. Oper ate on lock following guide below
2.1. Touc h the screen w ith your hand to activate.
2.2. En ter “*” twice and the Master PIN Code f ollowed by “#”.
2.3. En ter “81+ #” to pair.
Enter “ 82+ #” to unpair.
When jo ining a network your controller may or m ay not be a ware of any previ ously saved user codes stored in the lock. It is
recommended tha t all user codes be deleted from the lock pr ior to jo ining a network.
9/9
Page 7

FCC Statement:
This device complies with part 15 of the FCC Rules. Operation is subject to the
following
two conditions: (1) This device may not cause harmful interference, and (2) this
device
must accept any interference received, including interference that may cause
undesired
operation.
This equipment has been tested and found to comply with the limits for a Class B
digital
device, pursuant to part 15 of the FCC Rules. These limits are designed to provide
reasonable protection against harmful interference in a residential installation. This
equipment generates, uses and can radiate radio frequency energy and, if not installed
and used in accordance with the instructions, may cause harmful interference to radio
communications. However, there is no guarantee that interference will not occur in a
particular installation. If this equipment does cause harmful interference to radio or
television reception, which can be determined by turning the equipment off and on,
the
user is encouraged to try to correct the interference by one or more of the following
measures:
—Reorient or relocate the receiving antenna.
—Increase the separation between the equipment and receiver.
—Connect the equipment into an outlet on a circuit different from that to which the
receiver is connected.
—Consult the dealer or an experienced radio/TV technician for help.
Caution: Any changes or modifications not expressly approved by the party
responsible
for compliance could void the user's authority to operate the equipment.
This equipment complies with FCC radiation exposure limits set forth for an
uncontrolled environment. This transmitter must not be co-located or operating in
conjunction with any other antenna or transmitter.
This equipment complies with FCC radiation exposure limits set forth for an uncontrolled
environment.This equipment should be installed and operated with minimum distance 20cm
between the radiator&your body.
 Loading...