

Page 1

Gebrauchsanleitung
Instructions for use
Instructions d’emploi
Gebruiksaanwijzing
Istruzioni per l’uso
Istrucciones para el uso
Wichtig: Unbedingt lesen und aufbewaren!
Important: Read these instructions carefully and then store them in a safe place
Important: Lire attentivement et ranger soigneusement ce mode d’emploi
Belangrijk: Beslist lezen en bewaren
Importante: È necessario leggere attentamente queste istruzioni e conservarle con cura
Importante: Leerlas imprescindiblemente y guardarlas
Integrierte Einbau-KŸhlgerŠte
Integrated refrigerator
Réfrigérateur à intégrer
Integreerbare koelkasten
Frigoriferi integrabili
Frigorífico integrable
t F N I E
p.: 9 - 15 16 - 22 23 - 30 31 - 37 38 - 44
Modell: IKE 188-6 IKE 248-6
2222755-34
Page 2
2 Gedruckt auf umweltschonend hergestelltem Papier
Sicherheitshinweise
D
¥ Speiseeis und EiswŸrfel nicht unmittelbar aus dem
Gefrierfach in den Mund nehmen. Sehr kaltes Eis
kann an Lippen oder Zunge festfrieren und
Verletzungen verursachen.
¥ TiefkŸhlgut nicht mit nassen HŠnden berŸhren. Die
HŠnde kšnnten daran festfrieren.
¥ Tritt eine Stšrung oder ein Defekt ein, versuchen
Sie nicht, das GerŠt selbst zu reparieren.
ElektrogerŠte dŸrfen nur von Elektro-FachkrŠften
repariert werden, da durch unsachgemŠsse
Reparaturen erhebliche FolgeschŠden entstehen
kšnnen. Sich an die nŠchstgelegene
Kundendienststelle wenden und nur OriginalErsatzteile anfordern.
Sicherheit fŸr Kinder
¥ Die Teile des Verpackungsmaterials (z.B.
KunststoffhŸllen, Polystyrol) kšnnen fŸr Kinder
gefŠhrlich werden. Erstickungsgefahr!
¥ Im Falle der Entsorgung des GerŠtes ist das
Anschlusskabel durchzutrennen und der
TŸrverschluss unbrauchbar zu machen, damit sich
spielende Kinder nicht im GerŠt einschlie§en
kšnnen.
Umweltnormen
¥ Das GerŠt darf nicht mit dem HausmŸll oder
SperrmŸll entsorgt werden. Auskunft Ÿber
Abholtermine oder SammelplŠtze gibt die šrtliche
Gemeindeverwaltung an.
Sicherheitshinweise . . . . . . . . . . . . . . . . . . . . . . . . . . . . . . . . . . . . . . . . . . . . . . . . . . . . . . . . . . . . . . . . . . . . . .2
Entsorgung . . . . . . . . . . . . . . . . . . . . . . . . . . . . . . . . . . . . . . . . . . . . . . . . . . . . . . . . . . . . . . . . . . . . . . . . . . . . .3
Gebrauch Vor Inbetriebnahme / Bedienungsblende / Inbetriebnhame . . . . . . . . . . . . . . . . . . . . . . . . . . . . . . .3
Temperaturregelung / KŸhlabteilausstattung / Tipps . . . . . . . . . . . . . . . . . . . . . . . . . . . . . . . . . . . . . . . . . . . . .4
Wartung Abtauen / Reinigung / Innenbeleuchtung . . . . . . . . . . . . . . . . . . . . . . . . . . . . . . . . . . . . . . . . . . . . . .5
Wenn etwas nicht funktioniert . . . . . . . . . . . . . . . . . . . . . . . . . . . . . . . . . . . . . . . . . . . . . . . . . . . . . . . . . . . . .6
Kundendienst und Ersatzteile / Technische Angabe . . . . . . . . . . . . . . . . . . . . . . . . . . . . . . . . . . . . . . . . . . .6
Installation
Aufstellung / Elektrischer Anschluss . . . . . . . . . . . . . . . . . . . . . . . . . . . . . . . . . . . . . . . . . . . . . . . .7
Einbau . . . . . . . . . . . . . . . . . . . . . . . . . . . . . . . . . . . . . . . . . . . . . . . . . . . . . . . . . . . . . . . . . . . . . . . . . . . . . . . . .8
Bevor Sie Ihr neues KŠltegerŠt in Betrieb
nehmen, lesen Sie bitte diese
Gebrauchsanweisung aufmerksam durch.
Diese sind Sicherheitshinweise. Wir ersuchen Sie
daher, die folgenden Punkte vor der Installation
des GerŠtes und seiner Inbetriebnahme
aufmerksam durchzulesen.
Es wird empfohlen, diese Gebrauchsanweisung gut
aufzubewahren und bei einem eventuellen Verkauf
des GerŠtes dem neuen Besitzer auszuhŠndigen.
Benutzung im Haushalt
¥ Die KŸhl- und/oder GefrierschrŠnke sind zur
Einlagerung und/oder zum Einfrieren von
Lebensmitteln bestimmt.
¥ Vor der Installation sicherstellen, dass das GerŠt
nicht beschŠdigt ist. Mšgliche TransportschŠden
sind dem HŠndler unverzŸglich mitzuteilen.
¥
Das GerŠt ist schwer. Scharfe Metallkanten am
GerŠt hinten und unten stellen ein Verletzungsrisiko
dar. Beim Aufstellen oder Verschieben sind
Schutzhandschuhe zu tragen.
¥ Sollte die Installation des GerŠtes eine €nderung
der elektrischen Hausinstallation verlangen, so darf
diese nur von Elektro-FachkrŠften durchgefŸhrt
werden.
¥ Nach Installation des GerŠtes kontrollieren, dass
dieses nicht auf dem Anschlusskabel aufliegt.
¥ Keine ElektrogerŠte (z.B. Eismaschinen) in das
GerŠt stellen.
¥ Es sollten keine kohlensŠurehaltigen GetrŠnke in
das Gefrier- bzw. Frosterfach eingestellt werden,
sie kšnnten platzen.
Inhalt
Page 3
Hinweise zur Benutzung der Gebrauchsanweisung
Die folgenden Symbole erleichtern das Lesen der Gebrauchanweisung:
Sicherheitshinweise bezŸglich der Benutzung des GerŠtes
RatschlŠge fŸr den korrekten Gebrauch und die optimale Ausnutzung des GerŠtes.
Informationen zum Umweltschutz
Entsorgung
Gebrauch
Vor Inbetriebnahme
Man sollte mindestens 2 Std. warten, bevor
das GerŠt in Betrieb genommen wird, damit
das KŠltemittel zurŸckstršmen kann.
¥ Bevor Sie das GerŠt in Betrieb nehmen, beseitigen
Sie den typischen ÇNeugeruchÈ am besten durch
Auswaschen der Innenteile mit lauwarmem Wasser
und einem neutralen Reinigungsmittel. SorgfŠltig
nachtrocknen.
Bitte keine Reinigungs- bzw. Scheuermittel
verwenden, die das GerŠt beschŠdigen
kšnnten.
Das GerŠt sowie Teile der Innenausstattung sind fŸr
den Transport geschŸtzt.
Alle KlebebŠnder sowie Polsterteile aus dem
GerŠteinnenraum entfernen.
Verpackungsmaterialien
¥ die mit dem Symbol gekennzeichneten
Materialien sind recyclingfŠhig.
>PE<=PolyŠthylen
>PS<=Polystyrol
>PP<=Polypropylen
SŠmtliche Verpackungsmaterialien sind
recyclingfŠhig.
In Deutschland kšnnen Sie die Verpackung an den
HŠndler zurŸckgeben, bei dem Sie das GerŠt gekauft
haben.
Entsorgung von AltgerŠten
Informationen bezŸglich der Sammelstellen erhalten
Sie bei Ihrer Gemeindeverwaltung.
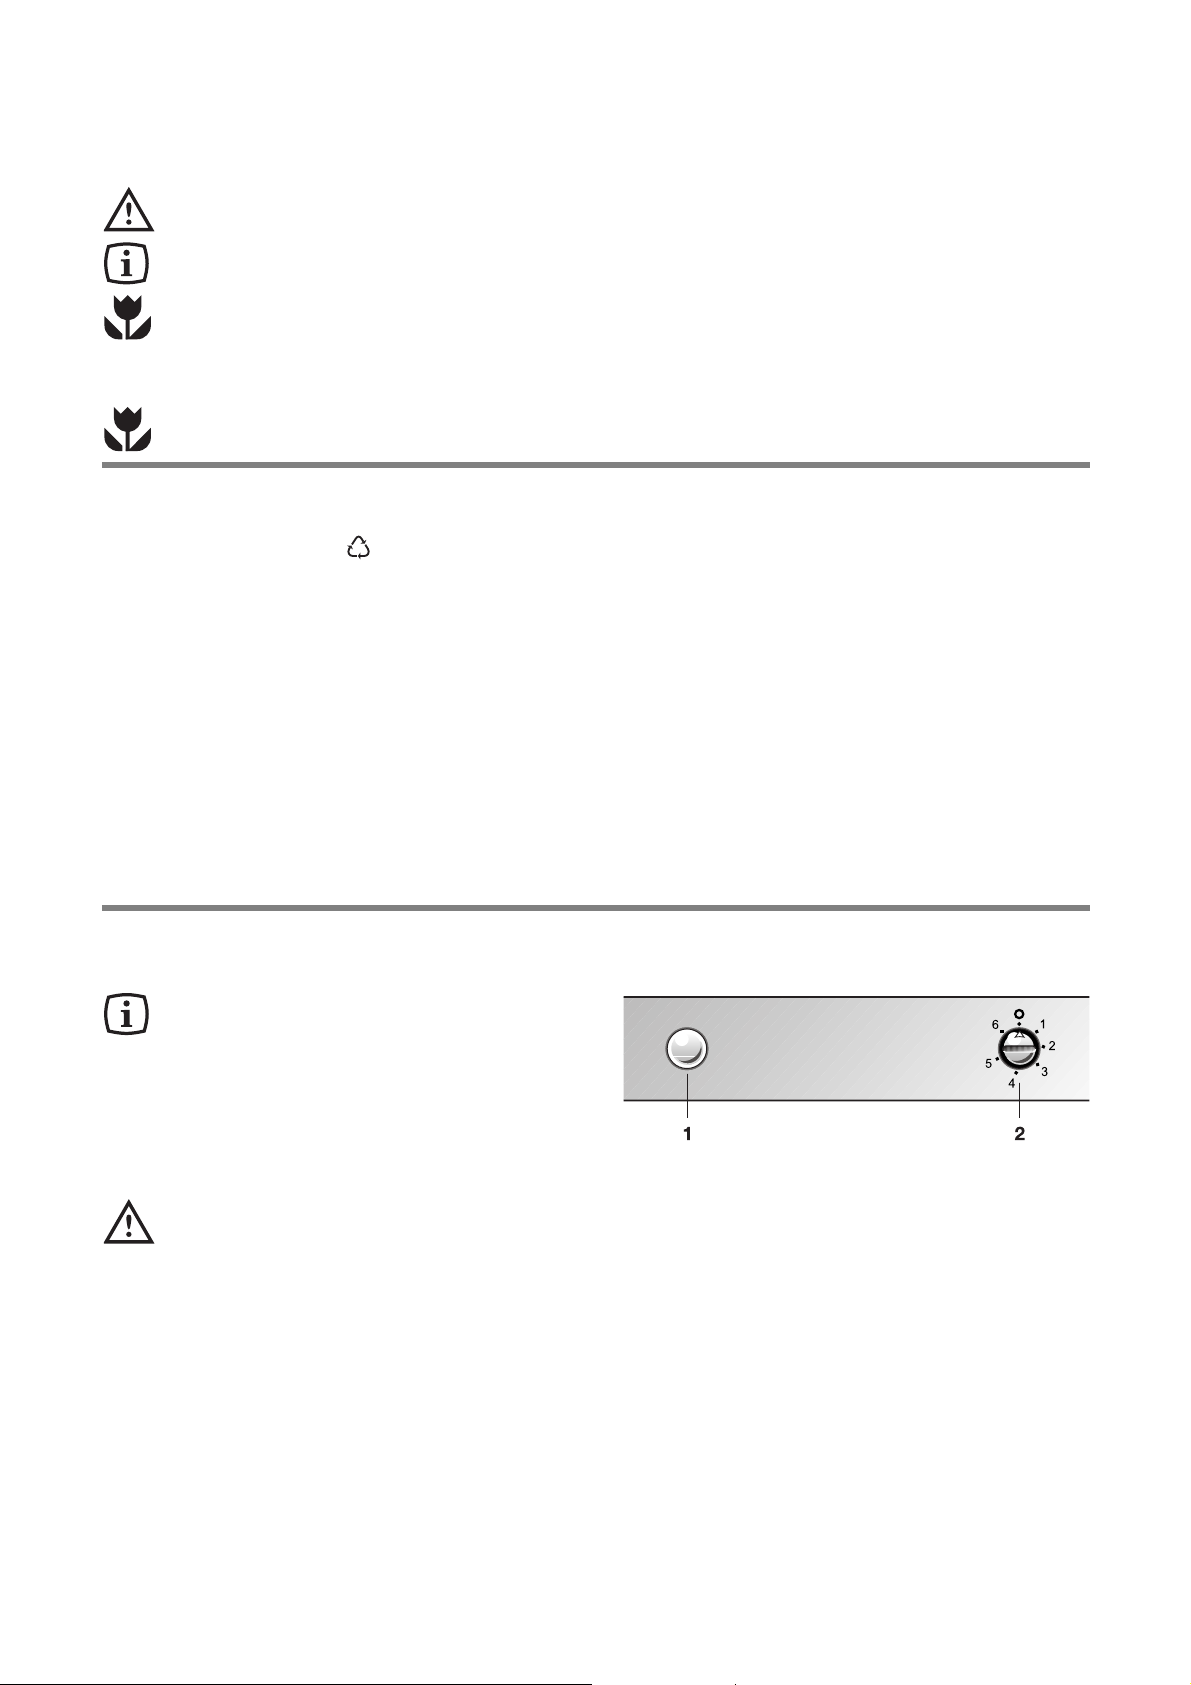
Bedienungsblende
1 Lichtschalter
2 Temperaturregler und EIN/AUS-Schalter
Inbetriebnahme
¥ Der Temperaturregler befindet sich oben am GerŠt
auf der Bedienblende. Er ist zugleich der EIN/AUSSchalter.
¥ Zum Drehen des Temperaturreglers ist eine MŸnze
erforderlich.
¥ Netzstecker in die Steckdose stecken.
¥ Temperaturregler von der Stellung ÇOÈ (STOP)
aus im Uhrzeigersinn drehen.
¥ Das GerŠt ist eingeschaltet. Den Stillstand des
GerŠtes erhŠlt man durch Drehen des
Temperaturreglers auf das Symbol ÇOÈ.
3
Page 4
4
Temperaturregelung
¥ Die richtige Einstellung erhŠlt man, unter
BerŸcksichtigung folgender, die Innentemperatur
beeinflussender Faktoren:
¥ Raumtemperatur
¥ HŠufigkeit des TŸršffnens
¥ Menge der eingelagerten Lebensmittel,
¥ Aufstellung des GerŠtes.
¥ Die Temperatur wird automatisch geregelt.
¥ Stellung ã1Ò = wŠrmste Innentemperatur
¥ Stellung ã6Ò = kŠlteste Innentemperatur
¥ Stellung ãOÒ = KŸhlung aus
Die mittlere Einstellung ist meistens die
geeigneteste.
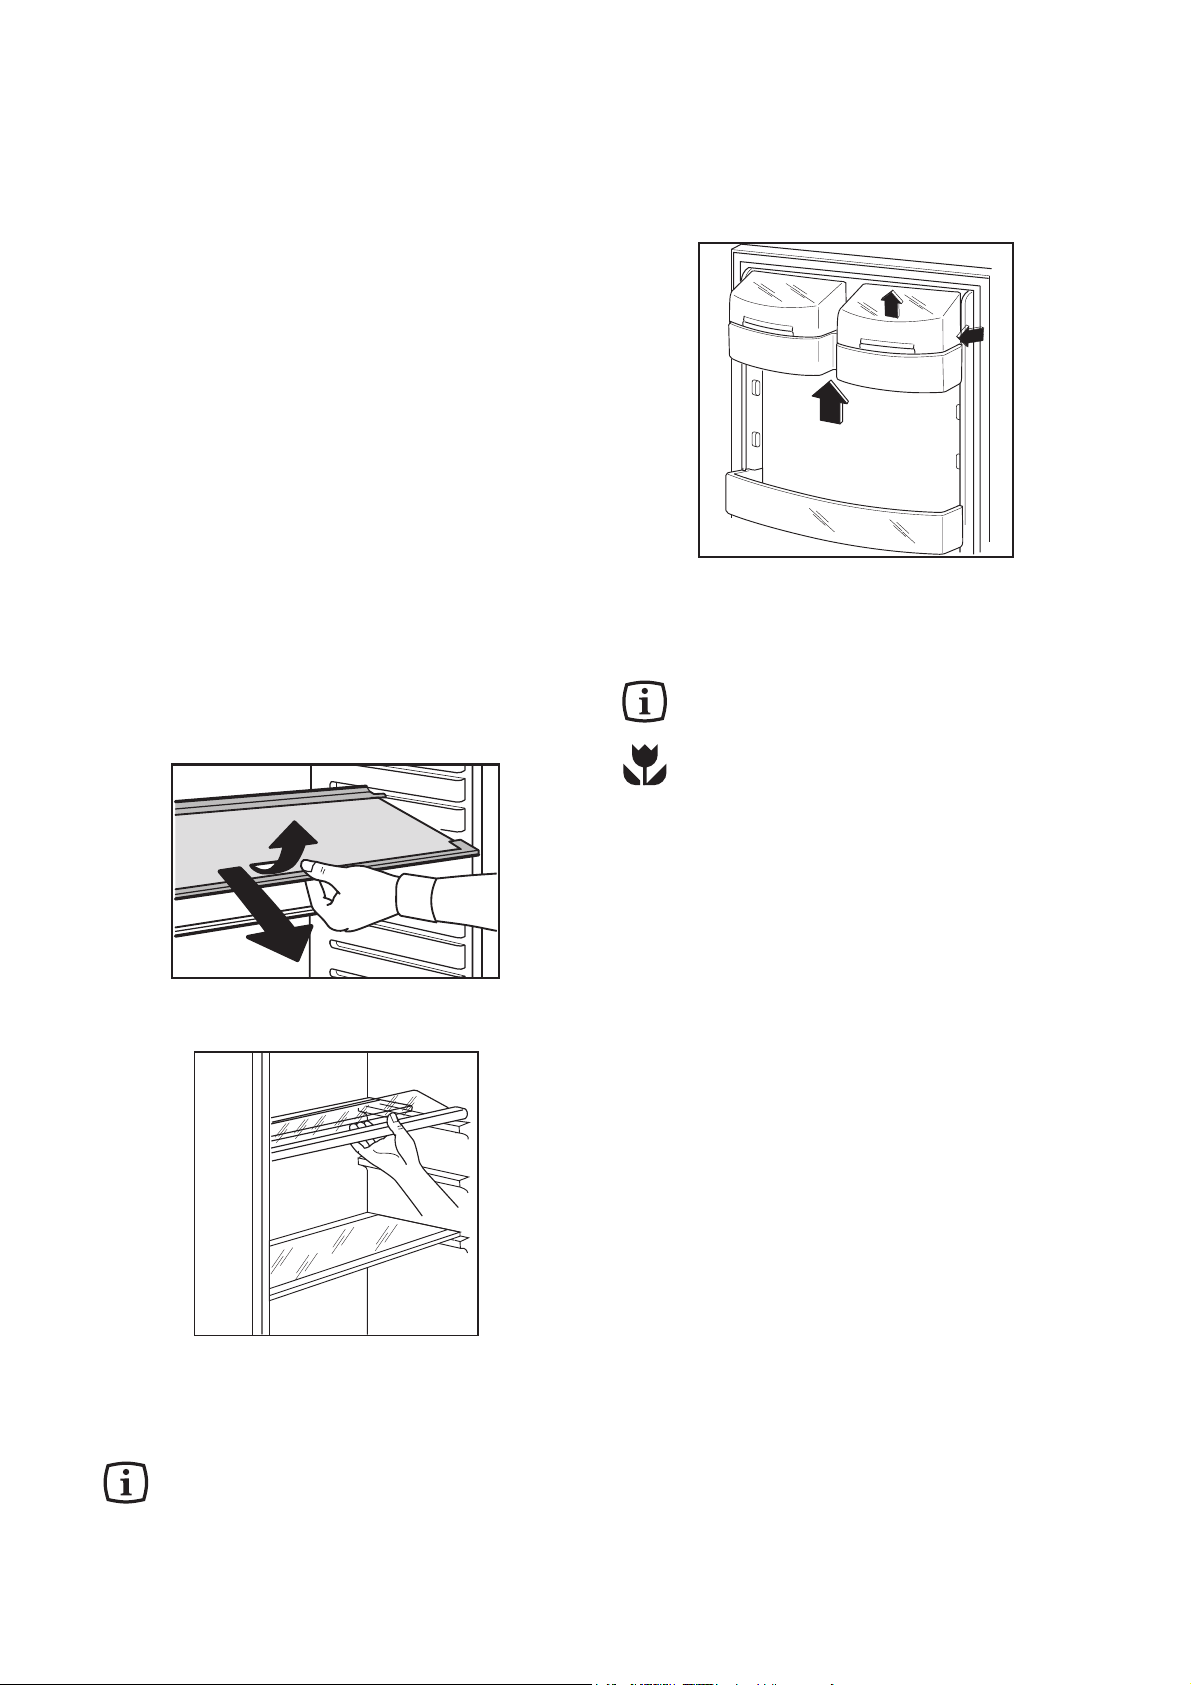
KŸhlabteilausstattung
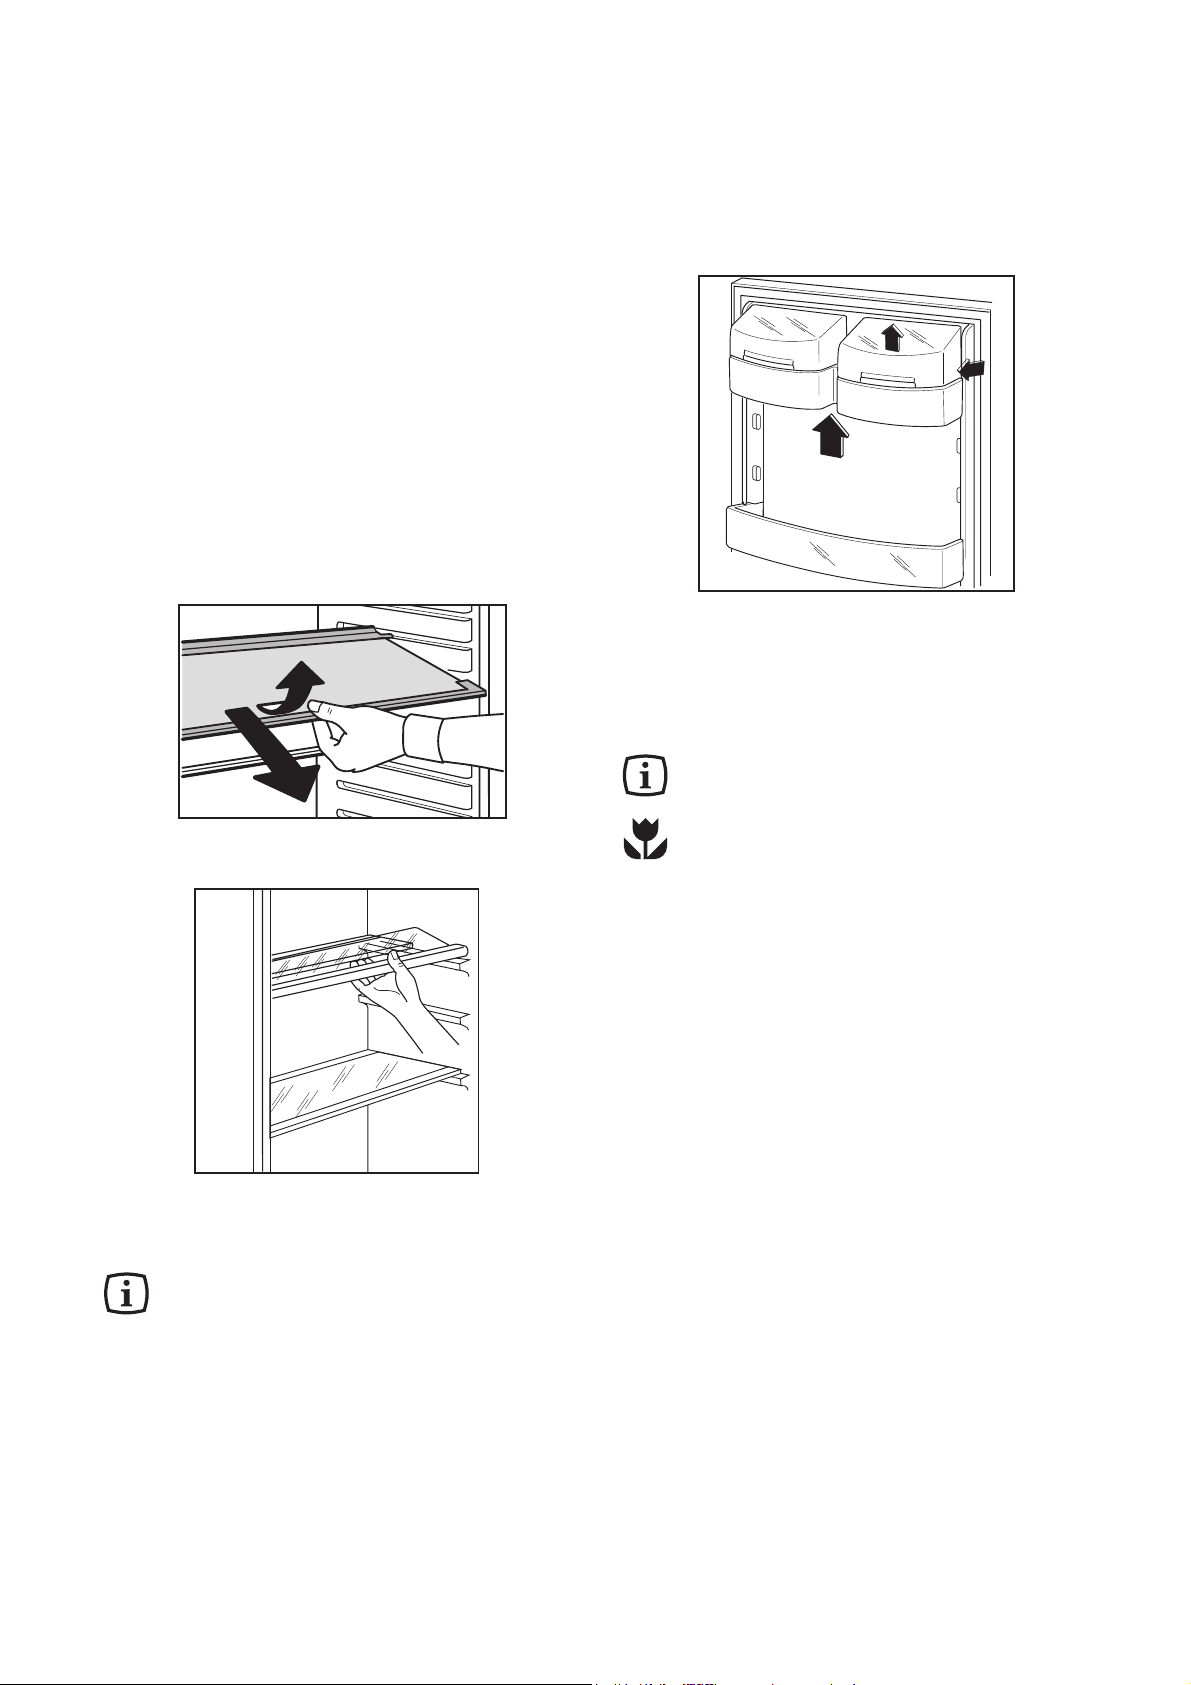
Abstellregale
¥ Zur Einlagerung von Lebensmittel-Packungen
verschiedener Grš§e, sind die Abstellregale
hšhenverstellbar.
¥ Dazu die AbstellflŠche soweit nach vorne ziehen,
bis sie sich nach oben oder unten abschwenken
und herausnehmen lŠ§t.
¥ Das Einsetzen in eine andere Hšhe bitte in
umgekehrter Reihenfolge vornehmen.
¥ Zur besseren Raumnutzung kšnnen die vorderen
Halbteile der Ablagen auf die rŸckwŠrtigen
hinaufgelegt werden.
Die Glasablage Ÿber der GemŸseschale und
die Flascheablage mŸssen immer in der
Stellung verbleiben, um eine korrekte
Luftzirkulation zu gewŠhrleisten.
¥ Die Abstellregale der InnentŸr sind
hšhenverstellbar.
¥ Das Abstellregal stufenweise in Pfeilrichtung
drŸcken bis es frei wird; dann in der gewŸnschten
Hšhe wieder anbringen.
¥ Zur besseren Reinigung kšnnen die obere und die
untere Ablagen ebenfalls herausgenommen
werden.
Tipps
Energie-Einsparung
¥ Das GerŠt nicht in der NŠhe von Herden,
Heizkšrpern oder anderen WŠrmequellen
aufstellen. Bei hoher Umgebungstemperatur lŠuft
der Kompressor hŠufiger und lŠnger. Bitte im
Abschnitt ÒAufstellungÓ nachsehen.
¥ TŸr nur so lange wie nštig gešffnet lassen.
¥ Hšchste KŠlteeinstellung bei hoher
Raumtemperatur und erheblicher
Lebensmittelmenge kann fortdauernden
KŸhlschrank-Betrieb verursachen, dabei kann sich
eine Reif- oder Eisschicht an der hinteren
Innenwand bilden.
In diesem Falle den Thermostatknopf auf wŠrmere
Temperaturen stellen, damit das automatische
Abtauen, mit folglich geringerem Stromverbrauch,
gewŠhrleistet werden kann.
¥ Keine warmen Speisen in das GerŠt stellen.
Warme Speisen erst abkŸhlen lassen.
Richtiges KŸhlen
¥ keine warmen Speisen oder dampfenden
FlŸssigkeiten in den KŸhlschrank einstellen.
¥ Geruchverbreitende Lebensmittel mŸssen
abgedeckt oder eingewickelt werden.
¥ Die Lebensmittel mŸssen so eingelagert werden,
dass die KŠlte um sie frei zirkulieren kann.
Nachstehend einige praktische RatschlŠge:
¥ Fleisch (alle Sorten) in Plastikfolie einpacken und
auf die Glasplatte, die sich Ÿber der GemŸseschale
CP1OEM
D338
Page 5
befindet, legen. In dieser Lage kann das Fleisch
lŠngstens 1-2 Tage aufbewahrt werden.
¥ Gekochte Nahrungsmittel, kalte Platten, usw.
zugedeckt aufbewahren. Sie kšnnen auf jede
beliebige Glasablage gelegt werden.
¥
Obst und GemŸse: nach vorherigem SŠubern und
Waschen in den GemŸseschalen) aufbewahren.
¥ Butter und KŠse: in speziellen BehŠltern
aufbewahren oder in Alu- bzw. Plastikfolie
einpacken, um den Kontakt mit der Luft zu
vermeiden.
¥
Milch in Flaschen: gut verschlossen in den
Flaschenhalter der InnentŸr stellen.
Wenn Bananen, Kartoffeln, Zwiebeln und
Knoblauch nicht verpackt sind, sollten sie nicht
in den KŸhlschrank gegeben werden.
Wartung
Vor jeder Reinigungsarbeit immer den
Netzstecker aus der Steckdose ziehen.
Dieses GerŠt erhŠlt im Kaltekreislauf
Kohlenwasserstoff. Aus diesem Grund darf
die Wartung und das NachfŸllen
ausschlie§lich von autorisierten
Fachpersonal durchgefŸhrt werden.
Abtauen
¥ An der RŸckwand des GerŠtes bildet sich im
Betrieb eine Reifsicht, die in den Stillstandszeiten
des Kompressors von selbst abtaut. Das
Tauwasser lŠuft durch eine Rinne in eine
Plastikschale auf der RŸckseite des GerŠtes (Ÿber
dem Kompressor) und verdunstet dort.
¥ Reinigen Sie regelmŠ§ig das Ablaufloch des
Abtauwassers. Verwenden Sie hierzu den Reiniger,
der sich schon im Ablaufloch befindet.
Reinigung
Bitte keine Reinigungs- bzw. Scheuermittel
verwenden, die das GerŠt beschŠdigen
kšnnten.
Benutzen Sie nie MetallgegenstŠnde um
das GerŠt zu reinigen, da es beschŠdigt
werden kšnnte.
Den Innenraum mit lauwarmem Wasser und einem
neutralen Reinigungsmittel reinigen.
Gut nachwaschen und sorgfŠltig trocknen.
Stillstandszeiten
¥ Den Stecker aus der Steckdose ziehen. Alle
Lebensmittel herausnehmen und GerŠt reinigen.
¥ Die TŸr offen lassen, um im Inneren eine gute
Luftzirkulation zu gewŠhrleisten und somit
Geruchsbildung zu vermeiden.
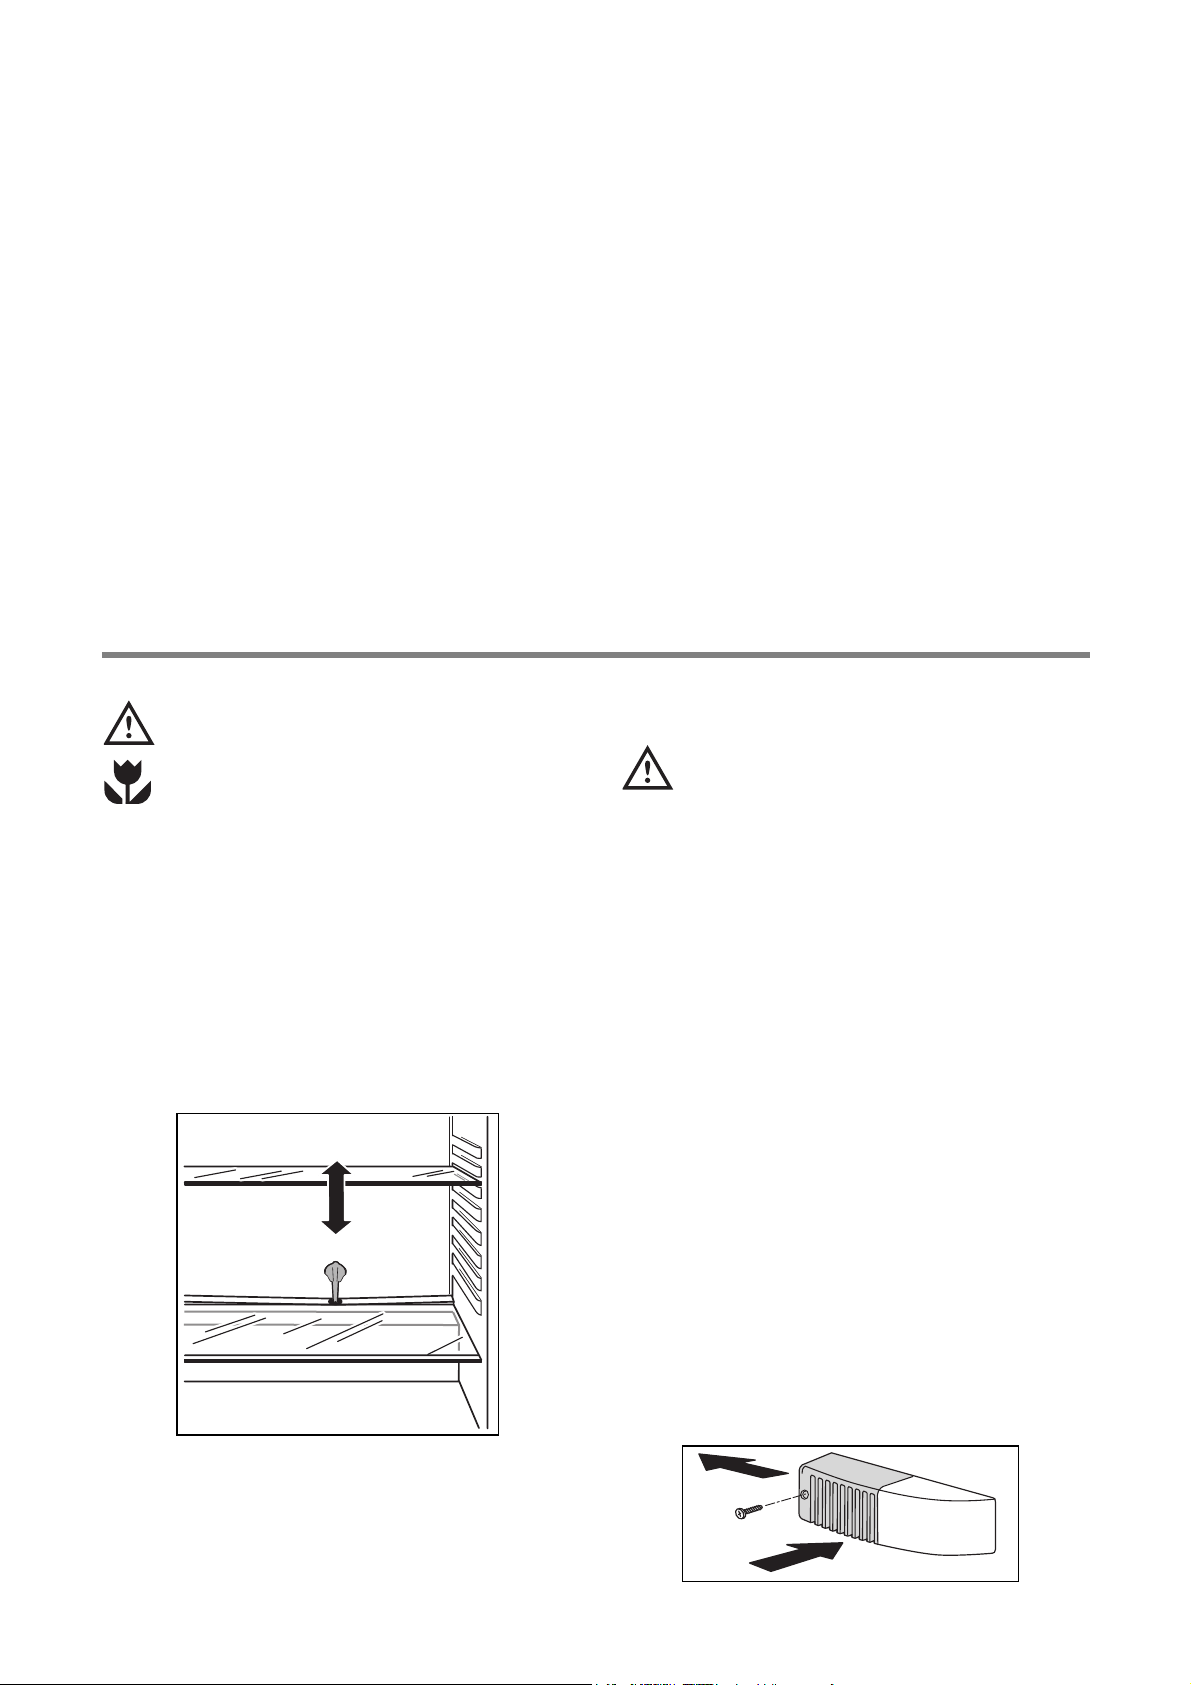
Innenbeleuchtung
¥ Vor dem Lampenwechsel GerŠt abschalten und
den Netzstecker ziehen.
1. Lšsen Sie die Befestigungsschraube der
Lampenabdeckung.
2. Heben Sie den beweglichen Teil ab, indem Sie
wie in der Abbildung gezeigt darauf drŸcken.
3. Defekte Lampe durch eine neue Lampe
gleicher Leistung auswechseln.
5
Page 6
6
Wenn etwas nicht funktioniert
Falls das GerŠt Stšrungen aufweisen sollte, bevor Sie den Kundendienst verstŠndigen, ŸberprŸfen Sie
zuerst folgendes:
Störung Abhilfe
Im GerŠt wird es nicht kalt genug
GerŠt kŸhlt zu stark.
Der Kompressor lŠuft stŠndig
Wasser im KŸhlschrank.
GerŠusche
Der Drehknopf auf kŠltere Temperatur drehen.
Die Lebensmittel mŸssen so eingelagert werden, dass die KŠlte um sie frei zirkulieren
kann.
TŸr richtig schlie§en.
Die Umgebungstemperatur ist zu warm.
Der Drehknopf auf wŠrmere Temperatur drehen.
Der Drehknopf auf niedrigere Zahlen drehen.
Die Umgebungstemperatur ist zu warm.
Achten Sie darauf, dass diese …ffnungen nicht durch Sockelblenden oder Geschirr
abgedeckt werden.
Innerhalb der letzen 24 Std. wurden grš§ere Mengen warmer Lebensmittel eingelagert.
TŸr nur so lange wie nštig gešffnet lassen.
Die Ablaufšffnung an der RŸckwand im GerŠteinnenraum ist verstopft. Mit einem nicht
scharfkantigen Gegenstand reinigen.
Manchmal sind sie charakterstisch fŸr KŠltegerŠte.
Wenn KŠltemittel in dŸnne Rohre einstršmt, kšnnen Sie ein blubberndes oder
plŠtscherndes GerŠusch hšren.
Immer wenn der Kompressor ein- oder ausschaltet, ist ein Klicken zu hšren.
GerŠusche kšnnen durch das Instand setzen der Mšbelstruktur entstehen.
Technische Angabe
Die technischen Angaben sind auf dem Typschild genannt, das auf der linken inneren Seite der Anlage liegt.
Kundendienst und Ersatzteile
Sollten Sie nach o.e. PrŸfungen zu keinem Resultat
kommen, so wenden Sie sich bitte an unseren
nŠchsten Kundendienst.
Um ein rasches Beheben des Schadens zu
ermšglichen, ist es beim Anruf an den Kundendienst
notwendig anzugeben:
¥ Modellbezeichnung
¥ Erzeugnis-Nummer (PNC)
¥ Fertigungs-Nummer (S-No.)
Diese Angaben finden Sie auf dem Typschild links an
der Innenseite des GerŠtes. Damit Sie die Daten
schnell bei der Hand haben, empfehlen wir, sie hier
einzutragen.
Page 7
7
Installation
Aufstellung
¥ Vor der Installation sicherstellen, dass das GerŠt
nicht beschŠdigt ist. Mšgliche TransportschŠden
sind dem HŠndler unverzŸglich mitzuteilen.
¥
Das GerŠt darf nicht in unmittelbarer NŠhe von
Heizkšrpern oder sonstigen WŠrmequelle
aufgestellt werden.
¥ Ein Standort mit direkter Sonneneinstrahlung sollte
vermieden werden.
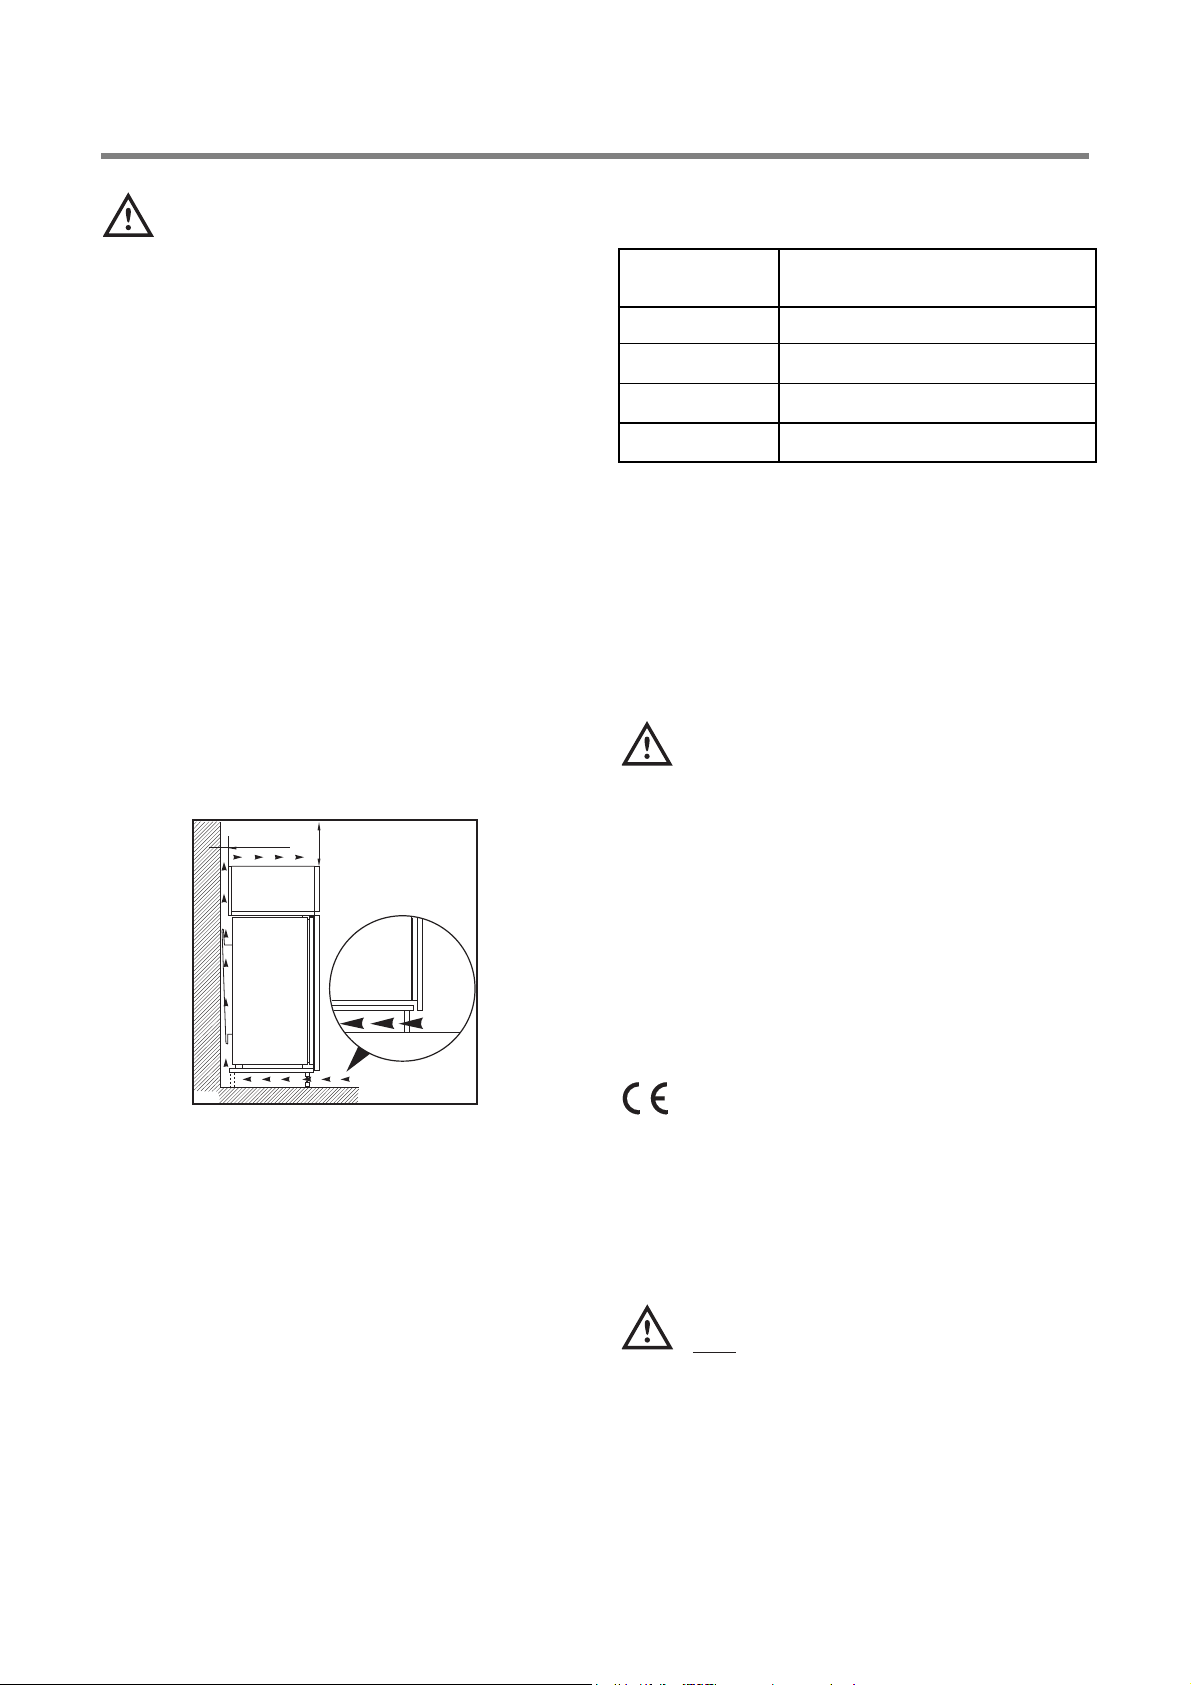
¥ Eine ausreichende Luftzirkulation an der
GerŠterŸckseite muss gewŠhrleistet sein.
¥ FŸr eine optimale BelŸftung des GerŠtes mŸssen
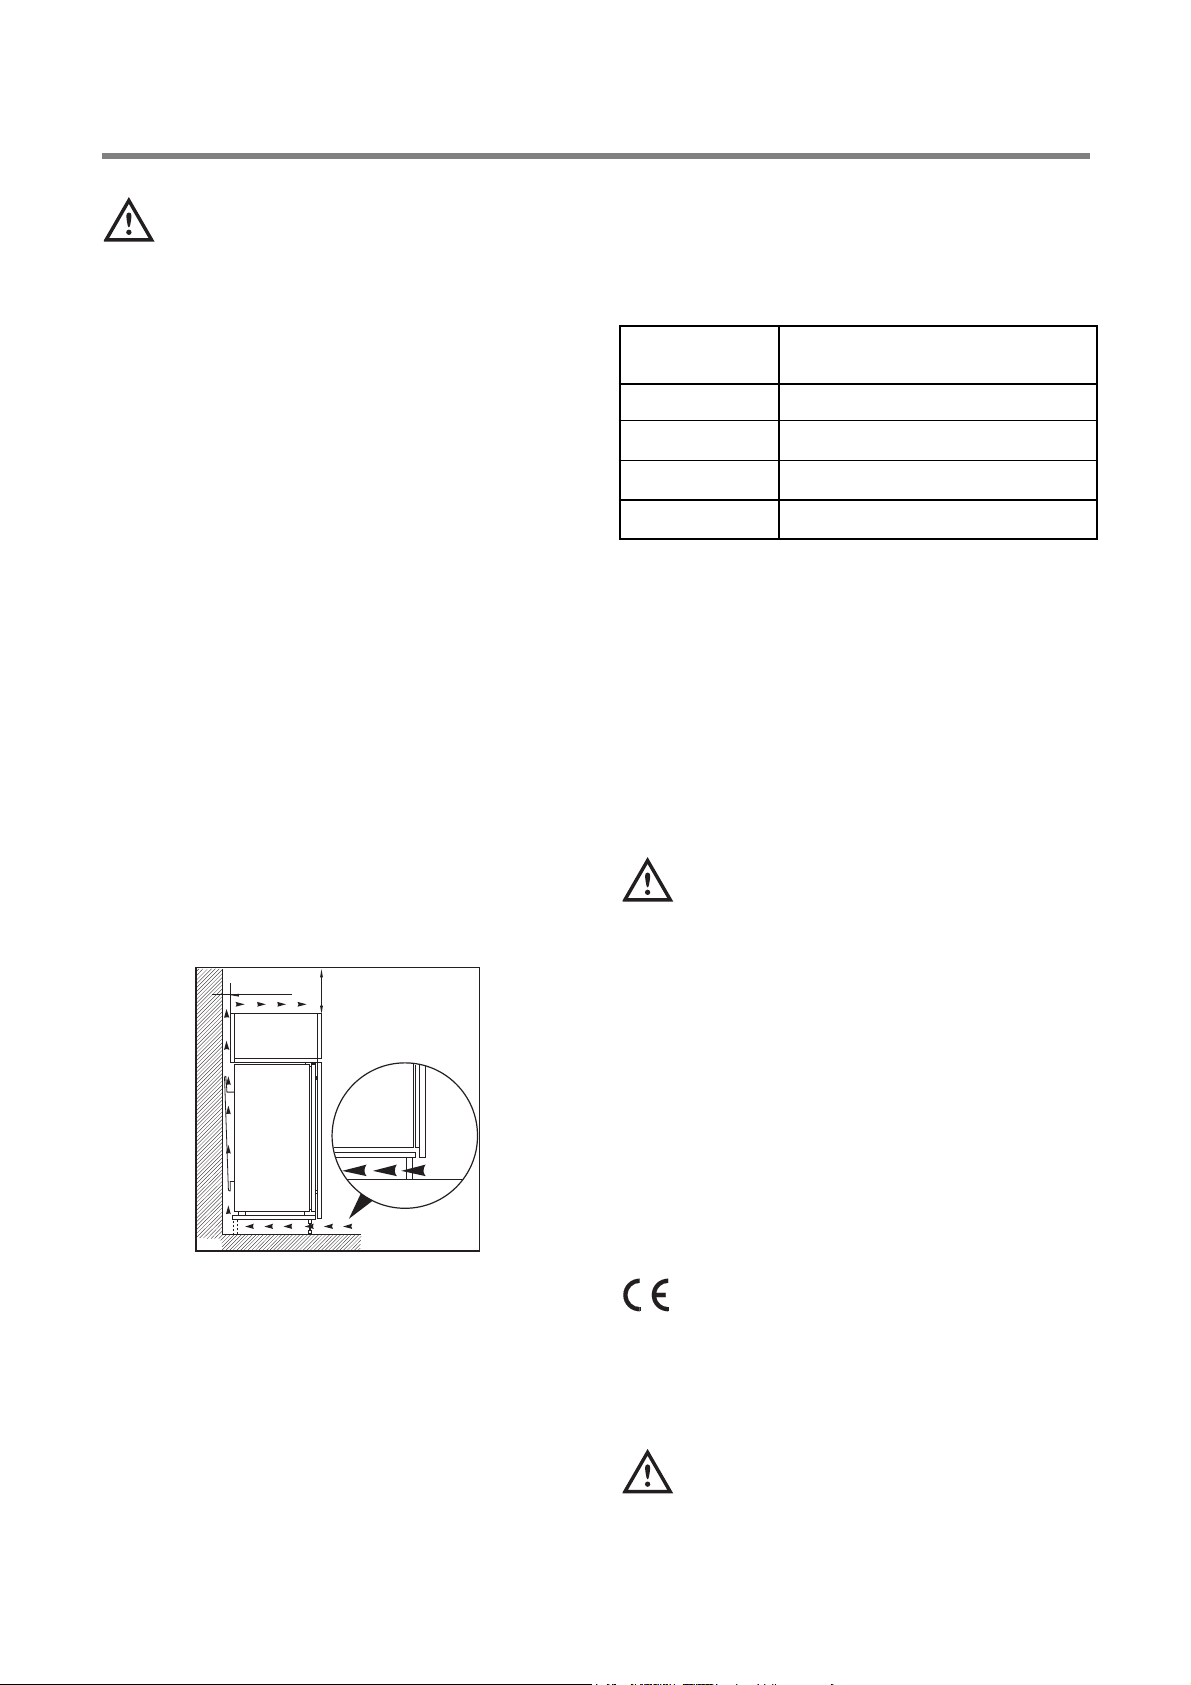
die minimalen LŸftungsquerschnitet (Abb.)
eingehalten werden.
Achtung: Die Ventilations - …ffnungen mŸssen
immer saubergehalten werden.
Ferner ist auch am hinteren Einbauschrankteil ein
LŸftungskamin mit folgenden Massen notwendig:
Tiefe 50 mm
Breite 540 mm
Vor der Installation sicherstellen, dass das
GerŠt nicht beschŠdigt ist. Mšgliche
TransportschŠden sind dem HŠndler
unverzŸglich mitzuteilen.
¥ WŠhrend das GerŠt in Betrieb ist, werden der
VerflŸssiger und der Kompressor, die sich auf der
RŸckseite des GerŠtes befinden, hei§. Aus
GrŸnden der Sicherheit muss eine
MindestbelŸftung gesichert sein. Siehe
Aufstellungsanweisungen.
¥
Wichtig: Beschädigte Versorgungskabel müssen
durch ein Spezialkabel bzw. einen Spezialsatz
ersetzt werden, die beim Hersteller oder dem
Kundendienststellen erhältlich sind.
Die Klimaklasse finden Sie auf dem Typschild, das
sich links im Innenraum des GerŠtes befindet.
Nachstehende Tabelle zeigt, welche
Umgebungstemperatur welcher Klimaklasse
zugeordnet ist:
Klimaklasse
SN +10 bis +32¡C
+16 bis +32¡C
+18 bis +38¡C
+18 bis +43¡C
N
ST
T
fŸr Umgebungstemperatur von
Elektrischer Anschluss
Bevor Sie den Stecker in die Steckdose einstecken,
ŸberprŸfen Sie bitte, dass die auf dem Typschild des
GerŠtes angegebene Spannung sowie Frequenz mit
dem Anschlusswert des Hauses Ÿbereinstimmen.
Eine Abweichung von ±6% von der
Nominalspannung ist zulŠssig.
FŸr die Anpassung des GerŠtes an andere
Spannungen muss ein Spartransformator
angemessener Leistung vorgeschaltet werden.
Wichtig
Das GerŠt muss unbedingt
vorschriftsmŠ§ig geerdet werden.
Zu diesem Zweck ist der Stecker des
Anschlusskabels mit dem dafŸr vorgesehenen
Kontakt versehen. Sollte die Netzleitung im
Haus nicht mit einer Erdleitung versehen sein,
so muss das GerŠt an eine getrennte
Erdleitung vorschriftsmŠ§ig und unter
Hinzuziehung eines Fachmanns
angeschlossen werden.
Die Erzeugerfirma lehnt jede
Verantwortung ab, falls diese
UnfallverhŸtungsvorschrift nicht beachtet
wird.
Dieses GerŠt entspricht der folgende EWG Richtlinie:
- 73/23 EWG vom 19.2.73 (Niederspannung)
und folgende €nderungen;
- 87/308 EWG vom 2.6.87 (Funkentstšrung);
- 89/336 EWG vom 03/05/89 (Elektromagnetische VertrŠglichkeit) und folgende
€nderungen.
Wichtig
Es muss mšglich sein, das GerŠt vom Netz zu
trennen; nach der Installation muss die
Steckdose daher zugŠnglich bleiben.
50 mm
D526
2
min.
200 cm
min.
200 cm
2
Page 8

8
Einbau
Siehe beiliegende Montageanweisung.
PrŸfen Sie bitte nach dem Einbau des GerŠts,
insbesondere nach TŸranschlagwechsel, ob die
TŸrdichtung ringsum richtig abdichtet. Eine undichte
TŸrdichtung kann zu verstŠrkter Reifbildung und
dadurch zu hšherem Energieverbrauch fŸhren.
Achtung!
Bei einer niedrigen Raumtemperatur (z.B. im
Winter) kann es vorkommen, dass die
Dichtung nicht perfekt am Schrank haftet. Die
Wiederherstellung der Dichtung erfolgt
automatisch nach gewisser Zeit. Wollen Sie
aber diesen Prozess beschleunigen, so
genŸgt es die Dichtung mit einem Fšn zu
erwŠrmen.
Page 9
Printed on paper manufactured with environmentally sound proceses 9
Safety Instructions
t
Please read these operating instructions
carefully before installing the appliance. These
warnings are provided in the interests of your
safety. Ensure you fully understand them before
installing or using the appliance. If you are
unsure about the meaning of these warnings
contact the Customer Care Department.
Domestic Use
¥ The domestic refrigerators and freezers are
designed to be used specifically for the storage of
edible foodstuffs only.
¥ Check the appliance for transport damage. Under
no circumstances should a damaged appliance be
installed. In the event of damage please contact
your retailer.
¥ This appliance is heavy. The edges and projecting
parts of the cabinet may be sharp. Be careful when
moving the cabinet and always use gloves.
¥ Any electrical work required to install this appliance
should be carried out by a qualified electrician or
competent person.
¥ Ensure that the appliance does not stand on the
electrical supply cable.
¥ Do not use electrical appliances inside the
appliance.
¥ Do not keep carbonated drinks or bottles in the freezer
compartment. The glass bottles may break.
¥ Ice lollies can cause Ôfrost/freezer burnsÕ if
consumed straight from the freezer.
¥ It is dangerous to try and alter the specifications or
modify this product in any way.
¥ Under no circumstances should you attempt to
repair the appliance yourself. Refer to your local
Service Centre, and always insist on genuine spare
parts.
Child Safety
¥ This appliance is designed to be operated by
adults only. There is a risk of suffocation! Keep
packaging material away from children!
¥ In case of disposal of the appliance, cut off the
supply cable as close as possible and make
thelock unusable, to prevent children from closing
themselves inside the appliances.
Environment Protection
¥ This appliance does not contain gasses which
could damage the ozone layer, in either its
refrigerant circuit or insulation materials. The
appliance shall not be discarded together with the
urban refuse and rubbish. Avoid damaging the
cooling unit, especially at the rear near the heat
exchanger. Information on your local disposal sites
may be obtained from your municipal authorities.
Safety Instructions . . . . . . . . . . . . . . . . . . . . . . . . . . . . . . . . . . . . . . . . . . . . . . . . . . . . . . . . . . . . . . . . . . . . . . .9
Disposal . . . . . . . . . . . . . . . . . . . . . . . . . . . . . . . . . . . . . . . . . . . . . . . . . . . . . . . . . . . . . . . . . . . . . . . . . . . . . . .10
Use and Control Before Use / Control panel / Starting the appliance / Temperature control . . . . . . . . . . . . .10
Internal parts / Hints . . . . . . . . . . . . . . . . . . . . . . . . . . . . . . . . . . . . . . . . . . . . . . . . . . . . . . . . . . . . . . . . . . . .11
Maintenance Defrosting / Cleaning / Changing the light bulb . . . . . . . . . . . . . . . . . . . . . . . . . . . . . . . . . . . . .12
Something not Working . . . . . . . . . . . . . . . . . . . . . . . . . . . . . . . . . . . . . . . . . . . . . . . . . . . . . . . . . . . . . . . . . .13
Customer Service and Spare Parts . . . . . . . . . . . . . . . . . . . . . . . . . . . . . . . . . . . . . . . . . . . . . . . . . . . . . . . . .13
Technical Specifications . . . . . . . . . . . . . . . . . . . . . . . . . . . . . . . . . . . . . . . . . . . . . . . . . . . . . . . . . . . . . . . . .13
Installation
Positioning / Electrical connection . . . . . . . . . . . . . . . . . . . . . . . . . . . . . . . . . . . . . . . . . . . . . . . .14
Building-in . . . . . . . . . . . . . . . . . . . . . . . . . . . . . . . . . . . . . . . . . . . . . . . . . . . . . . . . . . . . . . . . . . . . . . . . . . . .15
Contents
Page 10

10
Instructions for the use of the instructions booklet
Notes which are important for your safety or for the proper functioning of the appliance
Supplementary information regarding operation and practical applications of the appliance.
Tips and notes concerning economical and environmentally sound use of the appliance
Use and Control
Before Use
Wait two hours before connecting the
appliance to allow the oil to flow back in the
compressor.
¥ Before using the appliance for the first time, wash
the interior and all internal accessories with
lukewarm water and some neutral soap so as to
remove the typical smell of a brand-new product,
then dry thoroughly.
Do not use detergents or abrasive
powders, as these will damage the finish.
¥ Remove safety elements used for transportation.
Disposal
Appliance Packaging Information
¥ The materials used on this appliance marked with the symbol are recyclable.
>PE<=polyethylene
>PS<=polystyrene
>PP<=polypropylene
All materials are environmentally sound!
Disposal of old Appliances
Information concerning collection schedules or locations can be obtained from your local Council or
Environmental Health Office.
Control panel
1 Light switch
2 Temperature regulator and ON/OFF switch
Starting the appliance
¥ The temperature regulator is located at the top of
the appliance on the control panel. It is also the
ON/OFF switch.
¥ A coin is required to turn the temperature regulator.
¥ Insert the plug into the wall socket and turn the
thermostat knob clockwise beyond position ÇOÈ
(OFF).
¥ The interior lighting comes on. The compressor
starts and then runs automatically. To switch off the
appliance, turn the temperature regulator to
position ÇOÈ.
Temperature Control
¥ The temperature regulator allows you to adjust the
temperature inside the refrigerator according to use
and external conditions.
¥ The following effects are of significance in respect
of the interior temperature:
¥ Ambient temperature
¥ Quantity and temperature of the food stored;
¥ Frequency with which the door is opened and
how long it is left open
¥ the location of the appliance.
Page 11
¥ The temperature inside the appliance is
automatically adjusted.
¥
Setting ã1Ò = hightest temperature, warmest
setting
¥ Setting ã6Ò = lowest temperature, coldest
setting.
¥ Setting ã¥Ò = Off
A medium setting is generally the most suitable.
11
¥ To permit storage of food packages of various
sizes, the central door shelf can be adjusted in
height.
¥ Gradually pull the shelf in the direction of the
arrows until it comes free, then reposition as
required.
¥ For more thorough cleaning, the top and bottom
door sheves can be removed by pulling them in the
direction of the arrows, then refitting them in
position.
Internal Parts
Storage shelves
¥ The shelves can be removed for cleaning.
¥ To permit storage of food packages of various
sizes, the shelves can be placed at different
heights.
¥ To remove the internal shelf pull forward until it can
be tipped up or down and removed.
¥ Please do the same in reverse to insert the shelf at
a different height.
¥ For better use of space, the front half-shelves can
lie over the rear ones.
The glass shelf above the vegetable drawers
and the bottle shelf should always remain in
position, to ensure correct air circulation.
Hints
Saving Energy
¥ Pay careful attention to where the cabinet is
placed. See the section ÒInstallationÓ. When
installed correctly the cabinet will consume less
energy.
¥ Try to avoid keeping the doors open for long
periods or opening the doors too frequently as
warm air will enter the cabinet and cause the
compressor to switch on unnecessarily often.
¥ If the ambient temperature is high, the thermostat
knob is on the coldest setting (higher numbers) and
the appliance is fully loaded, the compressor may
run continuously, causing frost or ice to form on the
evaporator. If this happens, turn the knob to a
warmer setting (lower numbers) to allow automatic
defrosting and so a saving in electricity
consumption.
¥ Do not place warm foods inside the appliance.
Allow warm foods to cool first.
Hints for refrigeration
¥ Do not store warm food or evaporating liquids in
the refrigerator and do cover or wrap up the food,
particularly if it has a strong smell.
To help you use your refrigerator correctly, here are
some useful hints:
¥ Raw meat (beef, pork, lamb & poultry): wrap in
polythene bags and place on top of the salad
compartment, this being the coldest spot in the
CP1OEM
D338
Page 12

refrigerator. Meat can only be stored safely in
this way for one or two days at the most.
¥ Cooked food, cold cuts, jelly, etc.: these should
be well covered and can be stored on any of the
glass shelves.
¥
Fruit & vegetables: these should be thoroughly
cleaned and placed in the bottom drawer.
¥ Butter & cheese: these should be placed in
special airtight containers or wrapped in aluminium
foil or polythene bags to keep out as much air as
possible.
¥
Milk bottles: these should have a top and should
be stored in the bottle rack on the door.
Bananas, potatoes, onions and garlic, if not
packed, must not be kept in the refrigerator.
12
Maintenance
Unplug the appliance before carrying out
any maintenance operation.
Warning
This appliance contains hydrocarbons in its
cooling unit maintenance and recharging must
therefore only be carried out by authorised
technicians.
Defrosting
¥ Defrosting the refrigerator compartment is
automatic. The defrost water drains out through a
trough into a container at the back of the appliance,
above the motor compressor, where it evaporates.
¥ It is important to periodically clean the defrost
water drain hole.
Cleaning
Never use metal objects for cleaning your
appliance as it may get damaged.
NEVER use detergents, abrasive powders,
highly perfumed cleaning products or wax
polishes to clean the interior as these will
damage the surface and leave a strong
odour.
Clean the inside with warm water and bicarbonate of
soda. Rinse and dry thoroughly.
When the appliance is not in use
Disconnect the appliance from the electricity supply.
Empty all foods and clean the appliance, leaving the
doors ajar to prevent unpleasant smells.
Changing the light bulb
¥ Should the interior light fail to work, first switch off
the appliance and disconnect from the electricity
supply, then replace the bulb as follows:
1. unscrew the light cover securing screws.
2. unhook the moving part by pressing it as shown
in the figure.
3. Replace the bulb by other with another with the
same charcteristics.
Page 13
Problems may be due to causes which can easily be solved before calling the Technical Service. Please
follow these instructions:
Something not Working
Weight surpasses the storage limit of the door shelf so spread weight more evenly or
take some products out.
The appliance is not properly installed. Please look in the ÒBuilding-inÓ section.
Set a lower temperature.
Distribute the food products to allow cold air to circulate around them.
Make sure that the door is completely closed and that the insulating strip is complete
and clean.
The temperature where the cabinet is placed is above normal room temperature.
Set a warmer temperature.
Turn the thermostat knob to a lower number.
The temperature where the cabinet is placed is above normal room temperature.
Check that the ventilation is sufficient and that the ventilation openings are
unobstructed.
The cause could be the introduction of large quantities of food and/or frequent
opening/closing of the door.
Sometimes is normal. During automatic defrosting frost thaws on the cooling plate.
Place the drain hose at the back of the cabinet above the drain bowl.
Sometimes this is normal. Temperature control may cause clicking sounds when the
system is connected or disconnected.
The injected cooling gas may produce a gurgling sound while passing through the
tubes.
The motor may cause a humming noise and/or slight bumping.
The insulation material used has a tendency to slighly increase noise levels, how ever it
allows for much better insulation and a lower energy consumption.
Door does not close
It is too warm inside the refrigerator
It is too cold inside the refrigerator.
The compressor works continuously.
There is water inside/outside the refrigerator.
Water comes out on the floor.
Noises
SYMPTOM SOLUTION
Technical specifications
The technical data is indicated in the rating plate on the left side inside the appliance.
This information can be found on the rating plate
inside the cabenit on the left hand wall. We
recommend that you enter this information here, so
that it is handy if needed.
If you cannot find the remedy for a malfunction in
these operating instructions, please contact your
dealer or our customer service department and
consult the Guarantee card.
Selective ordering of replacement parts can save
unnecessary travel and costs.
For this reason always provide the following
appliance information:
¥ Model Name
¥ Model Number (PNC)
¥ Serial Number (S-No.)
Customer service and spare parts
13
Page 14
14
Installation
Take utmost care when handling your
appliance so as not to cause any damages to
the cooling unit with consequent possible fluid
leakages.
¥ During normal operation, the condenser and
compressor at the back of the appliance heat up
considerably. Always ensure that there is adequate
ventilation as a failure to do this will result in
component failure and possible food loss. See
installation instructions.
¥
Important: if the supply cord is damaged, it must
be replaced by a special cord or assembly available from the manufacturer or its service agent.
The following table shows which ambient
temperature is correct for each climate classification:
Positioning
¥ Unpack the cabinet and check that it is in good
condition and free of any transport damage.
¥
The appliance must not be located close to
radiators or gas cookers.
¥ Avoid prolonged exposure of the appliance to
direct sunlight.
¥ For safety reasons, minimum ventilation must be
as shown in Fig.
Attention: keep ventilation openings clear of
obstruction.
¥ It is necessary that the niche is provided with a
conduct of ventilation having the following
dimensions:
Depth 50 mm
Width 540 mm
The climate classification can be found on the rating
plate, which is located inside the cabinet on the left
hand wall.
Climate
classification
SN +10 to +32¡C
+16 to +32¡C
+18 to +38¡C
+18 to +43¡C
N
ST
T
for an ambient temperature of
Electrical connection
Before plugging in, ensure that the voltage and
frequency shown on the serial number plate
correspond to your domestic power supply.
Voltage can vary by ±6% of the rated voltage.
For operation with different voltages, a suitably sized
auto-transformer must be used.
Important
The appliance must be earthed.
The power supply cable plug is provided with a
contact for this purpose.
If the domestic power supply socket is not
earthed. connect the appliance to a separate
earth in compliance with current regulations,
consulting a specialist technician.
The Manufacturer declines all
responsibility if the above safety
precautions are not observed.
This appliance complies with the following E.E.C.
Directives:
- 87/308 EEC of 2/6/87 relative to radio
interference suppression.
- 73/23 EEC of 19.2.73 (Low Voltage
Directive)
and subsequent modifications.
- 89/336 EEC of 3.5.89 (Electromagnetic
Compatibility Directive) and subsequent
modifications.
Attention!
It must be possible to disconnect the appliance
from the mains power supply; the plug must
therefore be easily accessible after installation.
50 mm
D526
2
min.
200 cm
min.
200 cm
2
Page 15

15
Building-in
See ã Installation InstructionsÒ supplied.
Please check whether, after installing your appliance
and especially after rehingeing the door, the door
seal seals right round. An untight door seal may lead
to heavy frosting and thereby to a higher power consumption.
Warning!
If the ambient temperature is cold (i.e. in
Winter), the gasket may not fit perfectly to the
cabinet. In that case, wait for the natural fitting
of the gasket or accelerate this process by
heating up the part involved with a normal
hairdrier.
Page 16

16 ImprimŽ sur du papier protŽgeant lÕenvironnement
Protection de lÕenvironnement
Le circuit rŽfrigŽrant et lÕisolation de cet appareil ne
contiennent pas de gaz rŽfrigŽrant nocif pour lÕozone.
LÕappareil ne doit •tre ni jetŽ avec les ordures
mŽnag•res ni mis ˆ la casse. Il faudra Žviter
dÕendommager le circuit rŽfrigŽrant, notamment ˆ
lÕarri•re, ˆ proximitŽ du condensateur grillagŽ.
SÕadresser aux services de la commune pour avoir
les renseignements nŽcessaires sur les dŽchetteries.
Avertissements importants
F
Usage domestique
¥ Les rŽfrigŽrateurs/congŽlateurs domestiques sont
destinŽs uniquement ˆ la conservation et/ou ˆ la
congŽlation des aliments.
¥ Contr™ler, avant dÕinstaller lÕappareil, sÕil nÕest pas
endommagŽ. Dans le cas contraire, sÕadresser au
revendeur.
¥ Cet appareil est lourd. Faites attention lors de son
dŽplacement.
¥ Une Žventuelle modification ˆ lÕinstallation
Žlectrique de votre maison qui devrait •tre
nŽcessaire pour lÕinstallation de lÕappareil ne devra
•tre effectuŽe que par du personnel qualifiŽ.
¥ Assurez-vous, apr•s avoir installŽ lÕappareil, que
celui-ci ne repose pas sur le c‰ble dÕalimentation.
¥ Ne pas mettre dÕinstruments Žlectriques ˆ
lÕintŽrieur de lÕappareil (sorbeti•re, par exemple).
¥ Ne placez ni bouteilles ni bo”tes de boissons
gazeuses dans le congŽlateur/compartiment ˆ
basse tempŽrature, elles pourraient Žclater.
¥ Ne touchez pas les aliments surgelŽs avec des
mains humides. Les mains pourraient y rester
collŽes.
¥ Ne jamais essayer de rŽparer lÕappareil vous-
m•me. Les rŽparations effectuŽes par des
incompŽtents peuvent endommager lÕappareil.
SÕadresser au centre de service apr•s-vente le
plus proche et nÕexiger que des pi•ces de
rechange dÕorigine.
SŽcuritŽ enfants
¥ Les ŽlŽments de lÕemballage (par ex. sacs,
pellicules, polystyr•ne) peuvent •tre dangereux
pour les enfants. Ils peuvent sÕŽtouffer!
¥ En cas dÕŽlimination de lÕappareil, couper le c‰ble
dÕalimentation et neutraliser le dispositif de
fermeture de la porte de mani•re ˆ ce que les
enfants ne puissent pas rester enfermŽs ˆ
lÕintŽrieur de lÕappareil.
Sommaire
Avertissements importants . . . . . . . . . . . . . . . . . . . . . . . . . . . . . . . . . . . . . . . . . . . . . . . . . . . . . . . . . . . . . . .16
Elimination . . . . . . . . . . . . . . . . . . . . . . . . . . . . . . . . . . . . . . . . . . . . . . . . . . . . . . . . . . . . . . . . . . . . . . . . . . . .17
Utilisation
Avant la mise en service / Bandeau de commande / Mise en service . . . . . . . . . . . . . . . . . . . . .17
RŽglage de la tempŽrature / Equipement intŽrieur / Conseils . . . . . . . . . . . . . . . . . . . . . . . . . . . . . . . . . . . .18
Entretien DŽgivrage / Nettoyage . . . . . . . . . . . . . . . . . . . . . . . . . . . . . . . . . . . . . . . . . . . . . . . . . . . . . . . . . . .19
Changement de lÕampoule . . . . . . . . . . . . . . . . . . . . . . . . . . . . . . . . . . . . . . . . . . . . . . . . . . . . . . . . . . . . . . .20
Si quelque chose ne va pas ... . . . . . . . . . . . . . . . . . . . . . . . . . . . . . . . . . . . . . . . . . . . . . . . . . . . . . . . . . . . .20
Service apr•s-vente et pi•ces de rechange . . . . . . . . . . . . . . . . . . . . . . . . . . . . . . . . . . . . . . . . . . . . . . . . .20
CaractŽristiques Techniques . . . . . . . . . . . . . . . . . . . . . . . . . . . . . . . . . . . . . . . . . . . . . . . . . . . . . . . . . . . . .21
Installation
Emplacement / Branchement Žlectrique . . . . . . . . . . . . . . . . . . . . . . . . . . . . . . . . . . . . . . . . . . . .21
Encastrement . . . . . . . . . . . . . . . . . . . . . . . . . . . . . . . . . . . . . . . . . . . . . . . . . . . . . . . . . . . . . . . . . . . . . . . . . .22
Ce sont des avertissements de sŽcuritŽ. Nous
vous prions donc de les lire attentivement avant
dÕinstaller et dÕutiliser votre appareil.
Nous recommandons de conserver cette notice afin
de pouvoir la consulter au besoin et de la remettre, le
cas ŽchŽant, au nouveau propriŽtaire de lÕappareil.
Page 17

17
Avant la mise en service
A cause du syst•me de transport, IÕhuile
contenue dans le compresseur pourrait
sÕŽcouler dans le circuit rŽfrigŽrant. Attendez 2
heures au moins avant de brancher lÕappareil
pour permettre ˆ lÕhuile de refluer dans le
compresseur.
¥ L'appareil Žtant convenablement installŽ, nous
vous conseillons de le nettoyer soigneusement
avec de l'eau ti•de savonneuse, pour enlever
l'odeur caractŽristique de ÇneufÈ.
N'utilisez pas de produits abrasifs, poudre
ˆ rŽcurer, Žponge mŽtallique.
LÕappareil et certaines parties de lÕŽquipement
intŽrieur sont protŽgŽs pour le transport.
Enlevez les bandes autocollantes ˆ gauche et ˆ
droite ˆ lÕextŽrieur de la porte et toutes les bandes
autocollantes et rembourrages ˆ lÕintŽrieur de
lÕappareil (sauf la plaque signalŽtique).
Elimination
Utilisation
Comment lire votre notice dÕemploi
Les symboles ci-dessous vous guideront au long de la lecture de votre notice:
Instructions liées à la sécurité lors de l’utilisation de l’appareil.
Conseils pour une utilisation correcte de l’appareil afin d’obtenir les meilleures performances.
Informations liées à la protection de l’environnement.
MatŽriaux de lÕemballage
¥ Les matŽriaux marquŽs du symbole sont
recyclables.
>PE<=polyŽthyl•ne
>PS<=polystyr•ne
>PP<=polypropyl•ne
Tous les matŽriaux de lÕemballage sont recyclables.
Mise au rebut des anciens appareils
SÕadresser aux services de la commune pour avoir
les renseignements nŽcessaires sur les dŽchetteries.
Bandeau de commande
1 Interrupteur d'Žclairage
2 Thermostat et interrupteur MARCHE/ARRET
Mise en service
¥ Le thermostat se trouve en haut sur le bandeau de
commande de l'appareil. Il sert en m•me temps
d'interrupteur MARCHE/ARRET.
¥ Une pi•ce de monnaie est nŽcessaire pour tourner
le thermostat.
¥ Branchez la prise de courant et ouvrez la porte.
Tournez le bouton du thermostat dans le sens des
aiguilles d'une montre au-delˆ de la position ÇOÈ
(arr•t).
¥ L'appareil est ainsi en Žtat de fonctionnement.
Pour arr•ter le fonctionnement, placez l'indicateur
du bouton en correspondance du symbole ÇOÈ.
Page 18

18
RŽglage de la tempŽrature
¥ L'exacte position du thermostat doit •tre repŽrŽe
en considŽrant que la tempŽrature interne dŽpend
des facteurs suivants:
¥ tempŽrature ambiante;
¥ frŽquence d'ouverture des portes;
¥ quantitŽ d'aliments conservŽs;
¥ emplacement de l'appareil.
¥ La tempŽrature est rŽglŽe automatiquement.
¥
Position ã1Ò = tempŽrature la plus ŽlevŽe
¥ Position ã6Ò = tempŽrature la plus basse
¥
Position ã0Ò = arr•t
Une position moyenne est la plus indiquŽe.
Equipement intŽrieur
Tablettes amovibles
¥ Les glissi•res se trouvant sur les parois de la cuve
permettent de positionner les tablettes ˆ diffŽrentes
hauteurs, selon vos besoins.
¥ Tirer la surface de rangement vers lÕavant jusquÕˆ
ce quÕon puisse la faire basculer vers le haut ou
vers le bas et lÕextraire.
¥ Pour le placement ˆ une autre hauteur, procŽder
dans lÕordre inverse.
¥ Pour une meilleure utilisation de lÕespace vous
pouvez superposer les demi-tablettes antŽrieures
sur les demi-tablettes postŽrieures.
Pour permettre une bonne circulation de lÕair
nÕenlevez pas la clayette infŽrieure en verre
au-dessus du/des bac/s ˆ lŽgumes et le
balconnet porte-bouteille.
Balconnets de porte
¥ Il est possible de changer de place le balconnet
central.
¥ DŽgagez le balconnet en agissant dans le sens
indiquŽ par les fl•ches.
¥ Remontez le balconnet ˆ la hauteur dŽsirŽe.
Pour un nettoyage plus soignŽ, les balconnets
supŽrieur et infŽrieur peuvent •tre aisŽment retirŽs et
replacŽs dans la m•me position.
Conseils
ƒconomie dÕŽnergie
¥ NÕinstallez pas lÕappareil ˆ proximitŽ de cuisini•res,
radiateurs ou autres sources de chaleur. Si la
tempŽrature ambiante est ŽlevŽe, le compresseur
fonctionne plus frŽquemment et plus longtemps
(voir chapitre ÒInstallationÓ).
¥ NÕouvrez pas la porte plus longtemps que
nŽcessaire.
¥ Si le thermostat est rŽglŽ sur la position de froid
maximum, lorsque la tempŽrature ambiante est
ŽlevŽe et que l'appareil est plein, il est possible
que le compresseur fonctionne en rŽgime continu.
Dans ce cas, il y a un risque de formation
excessive de givre sur la paroi postŽrieure ˆ
l'intŽrieur de l'appareil. Pour Žviter cet
inconvŽnient, placez le thermostat sur une position
moins ŽlevŽe, de fa•on ˆ permettre un dŽgivrage
automatique et, par consŽquent, des Žconomies de
courant.
¥ Ne placez pas dÕaliments chauds dans lÕappareil.
Attendez que les aliments refroidissent.
¥ Ne rŽglez pas la tempŽrature plus bas que
nŽcessaire.
CP1OEM
D338
Page 19

RŽfrigŽration
¥ N'introduisez pas d'aliments encore chauds ou de
liquides en Žvaporation dans la cuve.
¥ Couvrez les aliments, surtout s'ils sont
aromatiques.
¥ Placez les denrŽes de fa•on ˆ ce que l'air puisse
circuler tout autour.
O• placer les denrŽes?
¥ Viandes (de toutes sortes): enveloppez-la dans
des sachets en plastique et placez-la sur la tablette
en verre au-dessus du bac ˆ lŽgumes.
La pŽriode de conservation est de 1 ˆ 2 jours
au maximum.
¥ Aliments cuits, plats froids, etc.: placez-les, bien
couverts, sur une clayette.
¥ Fruits et lŽgumes: bac(s) ˆ lŽgumes (une fois
nettoyŽs).
¥ Beurre et fromage: enveloppez-les
soigneusement dans des feuilles d'aluminium ou
de polyŽthyl•ne et mettez-les dans les casiers
appropriŽs.
¥ Lait en bouteille: ˆ placer dans l'un des
balconnets de la contreporte.
Bananes, pommes de terre, oignons et ail ne se
conservent pas au rŽfrigŽrateur. Les fromages
fermentŽs ne seront mis au rŽfrigŽrateur que si
lÕon dŽsire arr•ter leur maturation. Ils devront
alors •tre soigneusement enveloppŽs.
Entretien
DŽbranchez lÕappareil avant toute
opŽration.
Attention
Cet appareil contient des hydrocarbures
dans son circuit rŽfrigŽrant; lÕentretien et la
recharge ne doivent donc •tre effectuŽs
que par du personnel qualifiŽ.
DŽgivrage
¥ Le dŽgivrage s'effectue automatiquement, ˆ
chaque arr•t du compresseur. L'eau de dŽgivrage
est ŽvacuŽe dans un bac situŽ ˆ l'arri•re de
l'appareil o• elle s'Žvapore sans intervention.
¥
Nous recommandons de nettoyer
pŽriodiquement l'orifice d'Žcoulement de l'eau
de dŽgivrage se trouvant dans la partie centrale
de la goutti•re du compartiment rŽfrigŽrateur
afin d'Žviter que l'eau, en dŽbordant, ne coule
sur les denrŽes stockŽes dans la cuve. Utilisez
ˆ cet effet le b‰tonnet se trouvant dans l'orifice.
19
Nettoyage
NÕutilisez jamais de produits abrasifs ou
caustiques ni dÕŽponges avec grattoir pour
procŽder au nettoyage de votre appareil.
N'utilisez jamais d'objets mŽtalliques pour
nettoyer l'appareil; vous risquez de
l'endommager.
Pour faciliter le nettoyage les balconnets peuvent
•tre aisŽment enlevŽs.
Nettoyez pŽriodiquement l'intŽrieur de votre appareil
avec de l'eau ti•de et du bicarbonate de soude.
Rincez et sŽchez soigneusement.
Arr•t prolongŽ
¥ DŽbranchez la prise de courant. videz
l'appareil, dŽgivrez-le et nettoyez-le ˆ fond.
¥ Laissez les portes entrouvertes pour faire
circuler de l'air, de fa•on ˆ Žviter les
mauvaises odeurs.
Page 20

20
Changement de l'ampoule
¥ Avant de remplacer lÕampoule, mettez ˆ lÕarr•t
lÕappareil et dŽbranchez-le.
L'ampoule d'Žclairage dans le compartiment
rŽfrigŽrateur est accessible en effectuant les
opŽrations ci-dessous:
1. DŽvissez la vis de fixation du plafonnier.
2. DŽcrochez la partie mobile en exer•ant une
pression sur celle-ci comme indiquŽ dans la figure.
3. Mettez une autre ampoule qui ait la m•me
puissance.
Si quelque chose ne va pas ...
Si l'appareil marche mal, il faut contr™ler:
Dérangement Remède
La tempŽrature ˆ lÕintŽrieur de lÕappareil est
trop chaude.
LÕappareil refroidit trop.
Le compresseur fonctionne sans interruption
Il y a de lÕeau au fond du compartiment
rŽfrigŽrateur ou sur les clayettes.
Bruits
La tempŽrature est mal rŽglŽe. Veuillez consulter la partie "RŽglage de la tempŽrature".
Placez les denrŽes de fa•on ˆ ce que l'air puisse circuler tout autour.
VŽrifiez que la porte soit bien fermŽe.
La tempŽrature ambiante du local est trop elevŽe.
La tempŽrature est rŽglŽe trop bas. Mettre temporairement le rŽgulateur de
tempŽrature sur une tempŽrature plus ŽlevŽe.
Tourner le bouton du thermostat en choisissant une tempŽrature plus basse.
La tempŽrature ambiante du local est trop chaude.
VŽrifier si lÕaŽration de lÕappareil est suffisante et si aucun obstacle nÕemp•che son
acheminement.
De trop grandes quantitŽs dÕaliments ont ŽtŽ entreposŽes au cours des derni•res 24
heures.
NÕouvrez pas la porte plus longtemps que nŽcessaire.
Le trou dÕŽcoulement de lÕeau de dŽgivrage est bouchŽ. Nettoyez l'orifice d'Žcoulement
avec le b‰tonnet se trouvant dans lÕorifice.
Les bruits sont typiques des appareils frigorifiques.
Il nÕest pas anormal dÕentendre le bruit de circulation du fluide frigorig•ne selon son Žtat
liquide, gazeux ou vaporeux.
D•s que le compresseur se met en marche, vous lÕentendrez bourdonner ou claquer.
Certaines sources de bruit sont dus ˆ la mise en place de la structure du meuble.
Service apr•s-vente et pi•ces de rechange
Une fois que tous ces contr™les ont ŽtŽ effectuŽs, si
l'anomalie de fonctionnement persiste, adressezvous au Service Apr•s-Vente le plus proche.
Pour que l'intervention soit plus rapide, au moment
de l'appel, il vaut mieux indiquer:
¥ le mod•le
¥ le numŽro de produit (PNC)
¥ le numŽro de sŽrie (S-No)
Ces indications figurent sur le certificat de garantie
ou sur la plaque signalŽtique situŽe ˆ l'intŽrieur de
l'appareil, ˆ gauche et en bas.
Nous vous conseillons de noter ces indications ici
afin de les avoir rapidement ˆ portŽe de la main.
Page 21

21
CaractŽristiques Techniques
Les donnŽes techniques figurent sur la plaque signalŽtique situŽe sur le c™te gauche ˆ lÕintŽrieur de lÕappareil.
Installation
Lors du transport et de lÕinstallation de
lÕappareil, veiller ˆ nÕendommager aucune
partie du circuit frigorifique.
¥ Pendant le fonctionnement normal, le condenseur
et le compresseur ˆ lÕarri•re de lÕappareil
sÕŽchauffent sensiblement. Pour des raisons de
sŽcuritŽ, la ventilation doit •tre prŽvue comme
indiquŽ dans le paragraphe correspondant.
Veuillez consulter la partie ÒEmplacementÓ.
¥
Important: en cas de dommage du c‰ble
dÕalimentation, il faudra le remplacer avec un c‰ble
spŽcial ou un ensemble disponible chez le
fabricant ou le service apr•s-vente.
Emplacement
¥ A la rŽception de lÕappareil, dŽballez-le ou faites-le
dŽballer immŽdiatement. VŽrifiez son aspect
gŽnŽral.
¥ Placez de prŽfŽrence votre appareil loin d'une
source de chaleur (chauffage, cuisson ou rayons
solaires trop intenses).
¥ LÕappareil ne doit pas •tre situŽ ˆ proximitŽ de
radiateurs ou cuisini•res ˆ gaz.
¥
Veillez ˆ ne pas obstruer les ouvertures de
ventilation.
¥ Pour une aŽration optimale de l'appareil il est
obligatoire de pratiquer une ouverture dans le
socle (voir Fig.).
¥ Il est Žgalement nŽcessaire que la niche soit
ŽquipŽe dÕun conduit dÕareation ayant les mesures
suivantes:
Profondeur 50 mm
Largeur 540 mm
Pour le bon fonctionnement de votre appareil, la
tempŽrature ambiante du local doit •tre comprise
entre la classe climatique (indiquŽe sur la plaque
signalŽtique) pour lequel il est prŽvu. Au delˆ de ces
tempŽratures, ses performances peuvent sÕen
trouver diminuŽes.
Le tableau ci-dessous vous permet de repŽrer les
diffŽrentes classes climatiques existantes et les
tempŽratures ambiantes correspondantes:
Classe
climatique
SN +10 ˆ +32¡C
+16 ˆ +32¡C
+18 ˆ +38¡C
+18 ˆ +43¡C
N
ST
T
pour une tempŽrature
ambiante de
Branchement Žlectrique
Contr™lez, avant de brancher l'appareil, si le voltage
et la frŽquence indiquŽs sur la plaque signalŽtique
correspondent ˆ ceux de votre rŽseau. TolŽrance
admise: 6% en plus ou en moins. Pour l'adaptation
de l'appareil ˆ des voltages diffŽrents, l'adjonction
d'un autotransformateur d'une puissance adŽquate
est indispensable.
Important
VŽrifiez si la prise de courant murale est en
bon Žtat et apte ˆ recevoir la fiche du cordon
d'alimentation du congŽlateur. Cette derni•re
est conforme aux normes en vigueur et
comporte un logement pour mise ˆ la terre.
Cette fiche peut •tre branchŽe sur n'importe
quel socle de prise de courant standard, qui
toutefois doit •tre muni d'une broche
raccordŽe ˆ la terre.
Notre responsabilitŽ ne saurait •tre
engagŽe pour tout incident ou accident
provoquŽ par une mise ˆ la terre
inexistante ou dŽfectueuse.
50 mm
D526
2
min.
200 cm
min.
200 cm
2
Page 22

Cet appareil est conforme aux Directives
Communautaires suivantes:
- 73/23 CEE 19/02/73 (Basse Tension) et
modifications successives;
- 87/308 du 2.6.87 concernant la suppression
des interfŽrences radio-Žlectriques.
- 89/336 CEE 03/05/89 (CompatibilitŽ
ElectromagnŽtique) et modifications
successives.
Important
LÕappareil doit pouvoir •tre dŽbranchŽ du
secteur; il est donc nŽcessaire que la fiche
reste accessible une fois que lÕinstallation est
terminŽe.
22
Encastrement
Voir les instructions de montage ci-jointes.
Apr•s lÕencastrement de lÕappareil, en particulier
apr•s le changement du c™tŽ dÕouverture de la porte,
veuillez vŽrifier si le joint de la porte assure une
ŽtanchŽitŽ correcte tout autour de la porte. Un joint
de porte non Žtanche peut entra”ner une formation
plus forte de givre et donc une consommation plus
ŽlevŽe dÕŽnergie.
Attention!
La rŽversibilitŽ de la porte une fois effectuŽe,
contr™lez ensuite que le joint magnŽtique
adh•re ˆ la carrosserie. Si la tempŽrature ˆ
l'intŽrieur de la pi•ce est trop basse (en hiver,
p.ex.), il se peut que le joint n'adh•re pas
parfaitement. Dans ce cas, si on ne veut pas
attendre que le joint reprenne ses dimensions
naturelles apr•s un certain temps, on pourra
accŽlŽrer ce processus en chauffant la partie
intŽressŽe ˆ l'aide d'un s•che-cheveux.
Page 23

Het is uiterst belangrijk dat de bij het apparaat
behorende gebruiksaanwijzing bewaard blijft.
Zou het apparaat door u aan iemand anders
gegeven of verkocht worden, of zou het apparaat
in het huis van waaruit u verhuist achterblijven,
dan dient de nieuwe gebruik(st)er over de
gebruiksaanwijzing en de daarin opgenomen
waarschuwingen te kunnen beschikken.
Indien dit apparaat in de plaats van een oud
model met haak- of veersluiting opgesteld wordt,
dan is het raadzaam de sluiting van het oude
apparaat, dat terzijde gezet wordt, onbruikbaar te
maken.
Deze waarschuwingen zijn bedoeld voor uw en
andermans veiligheid. U wordt geacht ze gelezen
te hebben, alvorens u het apparaat installeert
en/of in gebruik neemt.
Veiligheid
N
Algemene veiligheid
¥ Dit apparaat is bedoeld en gemaakt voor het
gebruik door volwassenen. Het is gevaarlijk om
kinderen het apparaat te laten bedienen of als
speelgoed te laten gebruiken.
¥ Het is gevaarlijk om, in welke vorm dan ook, dit
apparaat of de eigenschappen daarvan te
veranderen.
¥ Neem v——r u aan ontdooien, schoonmaak-
werkzaamheden of het verwisselen van het,
eventueel aanwezige, verlichtingslampje begint
altijd de stekker uit het stopcontact.
¥ Dit apparaat is zwaar. Delen van randen aan
achter- en onderkant kunnen scherp zijn. Wees
voorzichtig bij het tillen.
¥ Plaats NOOIT explosieve stoffen in het apparaat,
zoals gasvullingen, benzine, ether, aceton
enzovoorts.
¥ Het direct vanuit een vriesvak, vriesgedeelte of
vriezer consumeren van ijslollies en dergelijke, kan
verbranding van de mondhuid tot gevolg hebben;
wacht even.
AFDANKEN. Verwijder de deur(en) of het deksel en
knip het aansluitsnoer af, zodat, in afwachting van
wegbrengen of weghalen, spelende kinderen er zich
niet in op kunnen sluiten of aan een elektrische
schok bloot kunnen staan.
¥ Plaats nooit elektrische apparaten (bijv.
ijsmachines) in de kast.
Onderhoud / Reparatie
¥
Een eventueel noodzakelijke wijziging aan de
elektrische huisinstallatie of het aansluitsnoer, ten
behoeve van de installatie van dit apparaat, mag
uitsluitend door een daartoe bevoegd persoon
uitgevoerd worden. Het betreffende stopcontact
dient, ook na eventuele onder- of inbouw,
gemakkelijk bereikbaar te zijn. Werkzaamheden
die door personen zonder de noodzakelijke kennis
uitgevoerd worden, kunnen schade of letsel tot
gevolg hebben.
¥
Laat inspectie- en/of herstelwerkzaamheden
uitvoeren door een erkend servicecentrum en laat
geen andere dan originele onderdelen plaatsen.
¥
Dit apparaat bevat koolwaterstoffen in de
koudekringloop; het onderhoud en het bijvullen
dient daarom uitsluitend door door het bedrijf
aangewezen deskundig personeel uitgevoerd te
worden.
¥ Tracht, in geval van storing of een defect, dit
apparaat niet zelf te repareren. Reparaties welke
door niet-deskundige personen uitgevoerd worden,
kunnen tot schade of letsel leiden. Raadpleeg het
plaatselijke servicecentrum en vraag altijd om
originele reserveonderdelen.
Gebruik
¥ Huishoudelijke koel- en/of vriesapparaten zijn
uitsluitend bedoeld voor het bewaren en/of
invriezen van eet- of drinkbare producten.
¥ Volg de raadgevingen van de fabrikant op met
betrekking tot waar en hoe u spijzen en dranken
bewaart of invriest. Ontdooide diepvriesproducten
mogen, om gezondheidsredenen, niet wederom
ingevroren worden.
¥ De vriezende binnenwanden of -vlakken in het
apparaat bevatten koelmiddel. Plaats geen
scherpe voorwerpen tegen zoÕn wand of vlak en
schraap evenmin met metalen voorwerpen rijp of
ijs af. Lekkage kan het gevolg zijn, hetgeen een
onherstelbare schade aan het apparaat en bederf
van de levensmiddelen veroorzaakt.
¥ Geen voorwerpen of methodes gebruiken om het
ontdooiproces te versnellen die niet door de
fabrikant zijn aangegeven.
¥ Nooit metalen voorwerpen gebruiken om het
apparaat schoon te maken; dit zou het apparaat
kunnen beschadigen.
¥ Plaats geen koolzuurhoudende of mousserende
dranken in het vriesvak, het vriesgedeelte of de
vriezer; de blikjes of flesjes kunnen door bevriezing
van de inhoud exploderen.
Installatie
¥ Overtuig u er van dat het apparaat niet op het
aansluitsnoer staat.
¥ Plaats het apparaat met zÕn achterkant zo dicht
mogelijk bij een muur. Hiermee voorkomt u
verbrandingsletsel door aanraking van hete tot
zeer hete delen.
Gedrukt op milieuvriendelijk vervaardigd papier 23
Page 24

Milieubescherming
¥ Belangrijk: Dit apparaat bevat, zowel in het
koelcircuit als in de isolatie, geen
ozononvriendelijke stoffen. Het apparaat mag
niet samen met huisvuil of gesloopte apparaten
weggegooid worden. Afgedankte koel- en
vriesapparaten moeten volgens de plaatselijke
regelingen op deskundige wijze verwerkt
worden. Informeer bij uw gemeente naar de
mogelijkheden in uw woonplaats. Voorkom dat
het koelcircuit wordt beschadigd, vooral aan de
achterkant in de buurt van de warmtewisselaar.
24
Aanwijzing voor het gebruik van het
instructieboekje
Met de waarschuwingsdriehoek en/of door
signaalwoorden wordt de aandacht gevestigd
op aanwijzingen die belangrijk zijn voor uw
veiligheid of voor het juist functioneren van het
apparaat.
Na dit symbool wordt uitleg gegeven over de
bediening en het praktisch gebruik van het
apparaat.
Tips en aanwijzingen voor een economisch en
milieuvriendelijk gebruik van het apparaat.
Weggooien
Informatie over de verpakking van het apparaat
¥ De materialen in dit apparaat die voorzien zijn van het symbool zijn geschikt voor recycling.
>PE<=polyethyleen
>PS<=schuimpolystyrol
>PP<=polypropyleen
Alle gebruikte materialen zijn niet schadelijk voor het milieu!
Weggooien van oude apparaten
Informatie over afhaaltijden of inzamelplaatsen zijn te verkrijgen bij de plaatselijke reinigingsdienst of het
gemeentehuis.
Inhoud
Veiligheid . . . . . . . . . . . . . . . . . . . . . . . . . . . . . . . . . . . . . . . . . . . . . . . . . . . . . . . . . . . . . . . . . . . . . . . . . . . . .23
Weggooien . . . . . . . . . . . . . . . . . . . . . . . . . . . . . . . . . . . . . . . . . . . . . . . . . . . . . . . . . . . . . . . . . . . . . . . . . . . .24
Gebruik
Voor ingebruikname / Bedieningspaneel / Ingebruikname / Instellen van de temperatuur . . . . . . . .25
Interieur . . . . . . . . . . . . . . . . . . . . . . . . . . . . . . . . . . . . . . . . . . . . . . . . . . . . . . . . . . . . . . . . . . . . . . . . . . . . . .25
Tips . . . . . . . . . . . . . . . . . . . . . . . . . . . . . . . . . . . . . . . . . . . . . . . . . . . . . . . . . . . . . . . . . . . . . . . . . . . . . . . . .26
Onderhoud Ontdooien / Schoonmaken / Vervangen van de lamp . . . . . . . . . . . . . . . . . . . . . . . . . . . . . . . . .27
Storingen . . . . . . . . . . . . . . . . . . . . . . . . . . . . . . . . . . . . . . . . . . . . . . . . . . . . . . . . . . . . . . . . . . . . . . . . . . . . . . . . . . . . .28
Klantenservice . . . . . . . . . . . . . . . . . . . . . . . . . . . . . . . . . . . . . . . . . . . . . . . . . . . . . . . . . . . . . . . . . . . . . . . . .28
Technische gegevens . . . . . . . . . . . . . . . . . . . . . . . . . . . . . . . . . . . . . . . . . . . . . . . . . . . . . . . . . . . . . . . . . . .28
Installatie
Plaats van opstelling / Elektrische aansluiting . . . . . . . . . . . . . . . . . . . . . . . . . . . . . . . . . . . . . . . . .29
Inbouw . . . . . . . . . . . . . . . . . . . . . . . . . . . . . . . . . . . . . . . . . . . . . . . . . . . . . . . . . . . . . . . . . . . . . . . . . . . . . . .30
Page 25

25
Voor ingebruikname
Wacht, na het plaatsen van het apparaat, ten
minste twee uuren alvorens de stekker in het
stopcontact te steken. Daarmee geeft u de olie
de gelegenheid in de compressor terug te
vloeien.
¥ Voor u de kast in gebruik neemt, dient u de
binnenkant met lauw water en een neutraal
schoonmaakmiddel te reinigen om de typische
geur van een nieuw apparaat weg te nemen.
Droog vervolgens de wanden goed af.
Gebruik geen schurende
schoonmaakmiddelen, waarmee u de
afwerkingen van het apparaat zou kunnen
beschadigen.
Het apparaat en onderdelen van het interieur zijn
voor het transport beschermd.
Plakband links en rechts aan de buitenkant van de
deur verwijderen. Alle plakband en bekledingsdelen
uit het interieur verwijderen.
Gebruik
Bedieningspaneel
1 Lichtschakelaar
2 Temperatuurregelaar en AAN/UIT-schakelaar
Ingebruikname
¥ De temperatuurregelaar bevindt zich bovenaan het
apparaat op het bedieningspaneel. Hij dient
tegelijkertijd als AAN/UIT-schakelaar.
¥ Om de temperatuurregelaar te verdraaien is een
geldstuk nodig.
¥ Steek de stekker in het stopcontact.
¥ Draai de thermostaatknop, rechtsom uit de stand
ÇOÈ (STOP-stand).
¥ De koelkast is nu in werking. De werking van de
kast kan geheel gestopt worden door de knop in de
stand ÇOÈ te draaien.
Instellen van de temperatuur
¥ Bij het instellen van de juiste stand dient u er
rekening mee te houden dat de temperatuur in het
apparaat afhankelijk is van:
¥ de kamertemperatuur;
¥ de frequentie waarmee de deuren geopend
worden;
¥ de hoeveelheid levensmiddelen in de kast;
¥ de plaats van het apparaat.
¥ De temperatuur wordt automatisch geregeld.
¥ Stand ã1Ò = warmste binnentenperatuur
¥ Stand ã6Ò = koudste binnentenperatuur
¥ Stand ã0Ò = koeling uit
Wij adviseren u de knop aanvankelijk op de
middenstand te draaien.
Interieur
Legvlakken
¥Delegvlakken zijn in hoogte verstelbaar.
¥ Daartoe het legvlak zover naar voren trekken tot
het naar boven of onderen bewogen kan worden
en eruit gehaald kan worden.
¥ Om de legvlakken op een andere hoogte te zetten
in omgekeerde volgorde te werk gaan.
¥ Om de ruimte beter te benutten, bij sommige
modellen, kunt u de voorste platen over de
achterste plaatsen.
Het legvlak boven de groentelade en het
flessenrek moeten altijd op hun plek blijven om
een goede luchtcirculatie te waarborgen.
D338
Page 26

26
Deurvakken
¥ De ruimte tussen de centraal deurvakken kan naar
behoefte aangepast worden.
¥ Trek het vak geleidelijk naar de door de pijlen
aangegeven richting totdat het loskomt.
¥ Verplaats daarna het vak naar de gewenste
hoogte.
Voor een goede schoonmaakbeurt kan het bovenste
deurvakje verwijderd worden door het te schuiven,
waarna het weer op zijn plaats gezet wordt.
Tips
Energie besparen
¥ Het apparaat niet in de buurt van kachels,
verwarmingselementen of andere warmtebronnen
plaatsen. Bij een hoge omgevingstemperatuur
werkt de compressor vaker en langer. Zie
hoofdstuk ÒPlaats van opstellingÓ.
¥ Deur slechts zo lang open laten als nodig is.
¥ Het kan voorkomen dat, indien de thermostaatknop
in de koudste stand gedraaid is, bijvoorbeeld ten
gevolge van zeer warme omgevingstemperatuur of
het snel willen koelen van grote hoeveelheden
dranken, de compressor continu loopt, waardoor
automatische ontdooiing van de koelverdamper
niet plaatsvindt en zich daarop ijs afzet. Draai, in
dat geval, de thermostaatknop naar een wat
minder koude stand, zodat automatische
ontdooiing kan plaatsvinden; hierdoor spaart u
tevens energie.
¥ Geen warme spijzen in het apparaat zetten.
Warme spijzen eerst laten afkoelen.
¥ De temperatuur niet lager dan nodig instellen.
Koelen
¥ Plaats geen warme of dampende spijzen of
dranken in de koelruimte.
¥ Dek vooral sterk geurend voedsel af of verpak het.
¥ Plaats de levensmiddelen zo, dat de lucht vrij
eromheen kan circuleren.
Enkele praktische tips:
¥
Vlees (alle soorten): wordt in plastic zakjes op de
glazen plaat boven de groentelade geplaatst.
Bewaar vlees niet langer dan ŽŽn of twee
dagen.
¥ Gekookt voedsel, koude schotels enz.: kunnen,
goed afgedekt, op elk legvlak geplaatst worden.
¥ Fruit en groente: worden schoongemaakt in de
groentelade(n) gelegd.
¥
Boter en kaas: worden, om blootstelling aan de
lucht te voorkomen, in speciale koeldozen bewaard
of in plastic- of aluminiumfolie verpakt.
¥ Flessen melk: worden, goed gesloten, in het
flessenrek geplaatst.
Bewaar niet-luchtdicht verpakte bananen,
aardappelen, uien of knoflook niet in de
koelkast.
CP1OEM
Page 27

27
Onderhoud
Neem voor iedere handeling altijd eerst de
stekker uit het stopcontact.
Belangrijk
Dit apparaat bevat koolwaterstoffen in het
koelcircuit; onderhoud en bijvulling dient
daarom uitsluitend door door de fabrikant
bevoegd personeel uitgevoerd te worden.
Ontdooien
¥ Het ontdooien van de koelkast heeft automatisch
plaats elke keer dat de compressor stopt. Het
dooiwater wordt via een afvoerkanaaltje
opgevangen in een bakje dat zich aan de
achterkant van het apparaat boven de compressor
bevindt. Hier verdampt het water.
¥ Wij raden u aan het gaatje in het afvoerkanaal
regelmatig schoon te maken, om te voorkomen dat
het dooiwater de levensmiddelen nat maakt.
Gebruik voor het doorprikken het staafje dat zich in
het gaatje bevindt.
Schoonmaken
Geen schurende schoonmaakmiddelen
gebruiken.
Nooit metalen voorwerpen gebruiken om
het apparaat schoon te maken; dit zou het
apparaat kunnen beschadigen.
Naar behoefte kunt u de buitenkant van de kast
lappen met lauwwarm water en een neutraal
huishoudschoonmaakmiddel, daarna afnemen met
schoon water.
Het verdient aanbeveling de buitenkant af en toe in
de witte (auto-) was te zetten.
Tijdelijk buiten gebruik stellen
¥ Trek de stekker uit het stopcontact, verwijder dan
alle resterende levensmiddelen en maak de
binnenkant goed schoon (zie ÒVoor
ingebruiknameÓ).
¥ Laat de deur op een kier staan.
Vervangen van de lamp
Voor het vervangen van de lamp het apparaat
uitzetten en de stekker uit het stopcontact trekken.
Het lampje van de koelkast is op de volgende wijze
bereikbaar:
1. Schroef het afschermkapje los.
2. Verwijder het losse deel door er lichte druk op uit
te oefenen (zie afbeelding).
3. Vervang het lampje dan door een lampje met
hetzelfde vermogen. Het vermogen is op het
afschermkapje aangegeven.
Page 28

28
Storingen
Indien de koelkast niet functioneert, controleer dan onderstaande punten, voordat u contact opneemt met onze
service-afdeling:
Storing Oplossing
Temperatuur in het apparaat is te hoog
Apparaat koelt te sterk.
Het koelaggregaat werkt continu
Water op de bodem van de koelruimte of op de
legvlakken.
Geluiden
Temperatuur is niet juist ingesteld. Zie hoofdstuk ÒInstellen van de temperatuurÓ.
Plaats de levensmiddelen zo, dat de lucht vrij eromheen kan circuleren.
Omgevingstemperatuur te hoog.
Temperatuur is te laag ingesteld. Tenmperatuurregelaar tijdelijk op een hogere stand
zetten.
Draai de thermostaatknop naar een lager cijfer.
Omgevingstemperatuur te hoog.
In de laatste 24 uur zijn grotere hoeveelheden warme levensmiddelen opgeslagen.
Deur slechts zo lang open laten als nodig is.
Dooiwaterafvoer is verstopt. Gebruik voor het doorprikken het staafje dat zich in het
gaatje bevindt.
Geluiden zijn karakteristiek voor koelapparaten.
Wanneer het koelmiddel door smalle leidingen stroomt, hoort u een gebubbel of
gegorgel.
Zodra de compressor functioneert, hoort u gezoem. Elke keer als de compressor in- of
uitgeschakeld wordt, hoort u een klik.
Klantenservice
Kunt u de storing niet zelf lokaliseren en verhelpen,
raadpleeg dan onze service-afdeling.
Vermeld de volgende gegevens van het apparaat:
¥ Modelnaam
¥ Productnummer (PNC)
¥ Productienummer (S-No.)
Deze gegevens vindt u op het garantiebewijs of op
het typeplaatje dat zich linksonder aan de
binnenzijde van het apparaat bevindt.
Aanbevolen wordt deze gegevens hier in te vullen
om ze snel bij de hand te hebben.
Technische gegevens
Het typeplaatje met de technische gegevens vindt u aan de linker binnenzijde van het apparaat.
Page 29

29
Installatie
Bij het transport en het opstellen van het
apparaat erop letten dat geen onderdelen van
het koelvloeistofcircuit beschadigd worden.
¥ Tijdens normaal gebruik worden de condensor en
de compressor die zich op de achterkant van het
apparaat bevinden, warm. Om veiligheidsredenen
moet de ventilatie zodanig zijn als aangegeven in
de speciale afbeelding. Zie hoofdstuk ÒPlaats van
opstellingÓ.
¥
Belangrijk: Als het aansluitsnoer beschadigd
raakt, moet het snoer, eventueel met stekkers,
vervangen worden; deze onderdelen zijn
verkrijgbaar bij onze service-afdeling.
Plaats van opstelling
¥ Controleer het koelapparaat op transportschade.
¥ Plaats het apparaat uit de buurt van
warmtebronnen: centrale verwarming, kachels,
felle zonnestralen enz.
¥
Plaats het apparaat niet in de nabijheid van een
centrale verwarming of een gasfornuis.
¥ Ten behoeve van een optimale ventilatie moeten
de minimale oppervlakten voor de ventilatieopeningen volgens figuur in acht genomen worden.
¥ Attentie: zorg ervoor dat de ventilatie
openingen tijdens gebruik niet worden
afgedekt.
De nis moet tevens voorzien zijn van een luchtkanaal
met de volgende afmetningen:
diepte 50 mm
breedte 540 mm
De klimaatklasse staat op het typeplaatje dat zich
links aan de binnenkant van het apparaat bevindt.
De volgende tabel geeft aan welke
omgevingstemperatuur bij welke klimaatklasse
behoort:
Klimaatklasse
SN +10 tot +32¡C
+16 tot +32¡C
+18 tot +38¡C
+18 tot +43¡C
N
ST
T
voor een
omgevingstemperatuur van
Elektrische aansluiting
Overtuig u ervan dat de netspanning en de
netfrequentie, die op het typeplaatje in de kast staan
aangegeven, overeenkomen met de netspanning en
de netfrequentie in uw woning.
Een afwijking op de netspanning tot plus of minus
6% is toegestaan.
Bij aansluiting op een andere spanning dient u een
geschikte transformator te gebruiken.
De stekker mag alleen geplaatst worden in
een geaard stopcontact.
De kast is daarom voorzien van een speciaal
drieaderig snoer, geschikt voor een geaard
stopcontact. Mocht het stopcontact in uw
woning niet geaard zijn, dan dient een erkend
installateur het apparaat volgens de geldende
normen te aarden.
Wij wijzen u er op dat schade of letsel,
veroorzaakt door het niet voldoen aan dit
veiligheidsvoorschrift, niet onder de
verantwoordelijkheid van de fabrikant valt.
Dit apparaat voldoet aan de volgende EU-richtlijnen:
- 73/23 EG-richtlijn van 19/02/73
(Laagspanning) en opeenvolgende
wijzigingen;
- 87/308 EG-richtlijn van 2.6.87 met betrekking
tot de radio-ontstoring;
- 89/336 EG-richtlijn van 03/05/89
(Elektromagnetische compatibiliteit) en
opeenvolgende wijzigingen.
Attentie
Het apparaat moet van de stroomvoorziening
afgesloten kunnen worden; de stekker moet
dus ook na de installatie bereikbaar blijven.
50 mm
D526
2
min.
200 cm
min.
200 cm
2
Page 30

Zie meegeleverde montage-aanwijzing.
Kontroleer na het inbouwen van het toestel, vooral
na overzetten van het deurscharnier, of de
deurafdichting rondom goed afdicht. Een ondichte
deurafdichting kan tot versterkte rijpvorming en
daardoor tot hoger energieverbruik leiden.
Attentie!
Bij een lage omgevingstemperatuur (bijv. in de
winter) kan het voorkomen dat de
deurafdichting niet perfect aan de kast hecht.
De afdichting wordt na een bepaalde tijd
vanzelf in vorm getrokken. Als u dit proces wilt
bespoedigen, is het voldoende om de
afdichting m.b.v. een haardroger te
verwarmen.
30
Inbouw
Page 31

Stampato su carta tollerabile per lÕambiente 31
Sicurezza
Vi preghiamo di leggere attentamente queste
istruzioni prima dÕinstallare e utilizzare
lÕapparecchiatura.
Queste avvertenze sono state redatte per la
Vostra sicurezza e per quella degli altri. é molto
importante che questo libretto istruzioni sia
conservato assieme allÕapparecchiatura per
qualsiasi futura consultazione.
Uso domestico
¥
I frigoriferi e/o congelatori domestici sono destinati
unicamente alla conservazione e/o congelazione
degli alimenti.
¥ Controllare prima dell’installazione che
l’apparecchiatura non sia danneggiata. In caso di
danno chiamare il rivenditore.
¥ LÕapparecchiatura • pesante e alcune parti del
mobile potrebbero essere taglienti. Prestare la
massima attenzione nel maneggiare
lÕapparecchiatura e comunque utilizzare sempre
dei guanti di protezione.
¥ Ogni eventuale modifica che si rendesse
necessaria allÕimpianto elettrico domestico, per
poter installare lÕapparecchiatura, dovrˆ essere
eseguita solo da personale abilitato.
¥ Assicurarsi che lÕapparecchiatura non appoggi sul
cavo di alimentazione.
¥
Non introdurre apparecchi elettrici all’interno
dell’apparecchiatura.
¥ Non mettere mai nello scomparto congelatore
bibite gassate: possono esplodere.
Indice
Sicurezza . . . . . . . . . . . . . . . . . . . . . . . . . . . . . . . . . . . . . . . . . . . . . . . . . . . . . . . . . . . . . . . . . . . . . . . . . . . . . .31
Smaltimento . . . . . . . . . . . . . . . . . . . . . . . . . . . . . . . . . . . . . . . . . . . . . . . . . . . . . . . . . . . . . . . . . . . . . . . . . . .32
Uso
Prima della messa in funzione / Pannello di comando / Messa in funzione . . . . . . . . . . . . . . . . . . . . . . .32
Regolazione della temperatura . . . . . . . . . . . . . . . . . . . . . . . . . . . . . . . . . . . . . . . . . . . . . . . . . . . . . . . . . . . .32
Equipaggiamento interno / Consigli . . . . . . . . . . . . . . . . . . . . . . . . . . . . . . . . . . . . . . . . . . . . . . . . . . . . . . . .33
Manutenzione Sbrinamento / Pulizia / Sostituzione della lampadina . . . . . . . . . . . . . . . . . . . . . . . . . . . . . . .34
Se qualcosa non funziona / Assistenza tecnica e ricambi / Caratteristiche tecniche . . . . . . . . . . . . . . . .35
Installazione
Posizionamento / Collegamento elettrico . . . . . . . . . . . . . . . . . . . . . . . . . . . . . . . . . . . . . . . . . .36
Incasso . . . . . . . . . . . . . . . . . . . . . . . . . . . . . . . . . . . . . . . . . . . . . . . . . . . . . . . . . . . . . . . . . . . . . . . . . . . . . . . .37
¥ Non mettere in bocca i cubetti di ghiaccio appena
estratti dallo scomparto conservatore. Il ghiaccio
pu˜ causare gravi lesioni.
¥ é pericoloso modificare o tentare di modificare le
caratteristiche di questÕ apparecchiatura.
¥
Mai riparare l’apparecchiatura da soli. Le
riparazioni effettuate da persone non competenti
possono provocare dei danni. Contattare il Centro
di Assistenza più vicino ed esigere solo ricambi
originali
.
Sicurezza bambini
¥ QuestÕapparecchiatura • stata progettata per
essere utilizzata da persone adulte. Pericolo di
soffocamento! Tenere il materiale di imballaggio
lontano dalla portata dei bambini!
¥ Prima di rottamare vecchi frigoriferi non pi• in uso,
si raccomanda di renderli inservibili togliendone la
spina e il cavo di alimentazione ed eventualmente
rimuovendone o distruggendone la serratura a
scatto o i lucchetti. In tal modo si eviterˆ che i
bambini possano restare imprigionati allÕinterno
dellÕapparecchio.
Protezione dellÕambiente
¥ Questa apparecchiatura non contiene, nel circuito
refrigerante e nellÕisolamento, gas refrigeranti
nocivi per lÕozono. LÕapparecchiatura non deve
essere smaltita con rifiuti urbani e rottami. Deve
essere evitato il danneggiamento del circuito
refrigerante, soprattutto nella parte posteriore
vicino al condensatore grigliato. Informazioni sui
centri di raccolta vengono forniti dallÕautoritˆ
comunale.
Page 32

32
Guida allÕuso del libretto istruzioni
I seguenti simboli guideranno nella lettura del libretto:
Informazioni legate alla sicurezza nellÕuso dellÕapparecchiatura
Consigli per lÕuso corretto dellÕapparecchiatura e per ottenerne le migliori prestazioni
Informazioni legate alla protezione dellÕambiente
Smaltimento
Prima della messa in funzione
Lasciare lÕapparecchiatura in posizione
verticale almeno 2 ore prima di metterla in
funzione per dar modo allÕolio di refluire nel
compressore.
¥ Prima dell'uso e del collegamento elettrico pulire
tutte le parti interne con acqua tiepida e sapone
neutro allo scopo di togliere il caratteristico odore
di nuovo, indi asciugare accuratamente.
Non usare detersivi n• polveri abrasive che
sono dannose alle finiture.
¥ Togliere nastri adesivi e distanziatori utilizzati per il
trasporto.
Informazione sullÕimballaggio dellÕapparecchio
¥ I materiali usati in questa apparecchiatura
contrassegnati dal simbolo sono riciclabili.
>PE<=polietilene
>PS<=polistirolo schiumoso
>PP<=polipropilene
Tutti i materiali di produzione impiegati sono
tollerabili per lÕambiente!
Smaltimento di apparecchi vecchi
Le informazioni concernenti i termini del ritiro oppure
dei luoghi di raccolta sono da apprendere presso
lÕamministrazione comunale locale.
Uso
Pannello di comando
1 Interruttore dellÕilluminazione
2 Termostato e tasto ON/OFF
Messa in funzione
¥ Il termostato • installato in alto sul pannello di
comando dellÕapparecchio e funge
contemporaneamente da tasto ON/OFF.
¥ Per girare la manopola del termostato • necessario
utilizzare una moneta.
¥ Inserire la spina nella presa di corrente e ruotare in
senso orario la manopola del termostato oltre la
posizione di arresto ÇOÈ.
¥ Selezionare la posizione del termostato in funzione
del freddo desiderato.
Regolazione della temperatura
¥ La posizione corretta, comunque, va individuata
tenendo conto che la temperatura interna dipende
da questi fattori:
¥ la temperatura ambiente
¥ la frequenza di apertura della porta
¥ la quantitˆ di alimenti conservati
¥ la collocazione dell'apparecchio.
¥ La temperatura • regolata automaticamente e pu˜
essere aumentata oppure diminuita.
¥ Posizione ã1Ò = temperatura interna pi• calda
¥ Posizione ã6Ò = temperatura interna pi• fredda
¥ Posizione ã0Ò = raffreddamento disinserito
La posizione intermedia • la pi• indicata.
Page 33

¥ forzare gradualmente la mensola nel senso
indicato dalle frecce fino ad ottenere lo
sganciamento, indi rimontarla nella posizione
desiderata.
¥ Per una pulizia pi• accurata la mensola superiore e
la mensola inferiore possono essere tolte agendo
nel senso indicato dalle frecce e quindi ricollocate
nella loro posizione.
33
Equipaggiamento interno
Ripiani vivande/Mensole
¥ Per una accurata pulizia i ripiani e le mensole
possono essere tolti.
¥ Sulle pareti della cella sono ricavate delle guide
che consentono uno spostamento delle griglie o
dei ripiani in posizioni diverse.
¥ LÕinserimento in unÕaltra altezza avviene nel senso
inverso.
¥ Per un miglior utilizzo degllo spazio, i semiripiani
anteriori possono sovrapporsi a quelli posteriori.
¥ Tirare a questo proposito il ripiano in avanti finch•
questo non si lascia oscillare verso lÕalto oppure il
basso per poterlo estrarre.
Per permettere una corretta circolazione
dellÕaria, non si deve togliere il ripiano vetro
sopra il/i cassetto/i verdura e la mensola
inferiore della porta.
¥La/e mensola/e centrale/i della controporta
pu˜ /possono essere cambiata/e di posizione.
Consigli
Risparmio di energia
¥ Non installare lÕapparecchio in prossimitˆ di cucine,
termosifoni o altre fonti di calore. Se la temperatura
ambiente • elevata, il compressore si inserisce pi•
spesso e pi• a lungo. Vedi capitolo ÒInstallazioneÓ.
¥ Tenere aperta la porta soltanto per il tempo
strettamente necessario.
¥ Non introdurre mai vivande ancora calde
nellÕapparecchio, bens“ lasciare che prima si
raffreddino.
¥ Sulle posizioni di massimo freddo, con temperatura
ambiente elevata, ed una notevole quantitˆ di
alimenti, il funzionamento pu˜ essere continuo, con
formazione di brina o ghiaccio sulla parete
posteriore della cella In tal caso • necessario
ruotare la manopola su una posizione di minor
freddo, in modo da consentire lo sbrinamento
automatico e, di conseguenza, un minor consumo
di energia elettrica.
Consigli per la refrigerazione
¥ Non introdurre nella cella vivande calde o liquidi in
evaporazione;
¥ coprire o avvolgere gli alimenti, specie se
contengono aromi;
¥ disporre gli alimenti in modo che l'aria possa
circolare liberamente attorno ad essi.
Alcuni consigli pratici:
¥
Carne (di tutti i tipi): va avvolta in sacchetti di
plastica e posta sul vetro sopra il cassetto verdura.
In questa posizione si potrˆ conservare per uno
o due giorni al massimo.
CP1OEM
D338
Page 34

¥ Cibi cotti piatti freddi ecc. devono essere ben
coperti e possono essere disposti su qualsiasi
ripiano.
¥ Frutta e verdura: saranno messe, previa pulitura,
nel/nei cassetto/i previsto/i a tale scopo.
¥ Burro e formaggio: devono essere conservati
negli appositi contenitori o avvolti in fogli di plastica
o alluminio per evitare il contatto con l'aria.
¥ Latte in bottiglia: ben chiuse poste nel
portabottiglie.
Banane, patate, cipolla ed aglio, se non sono
confezionati non vanno messi in frigorifero.
34
Manutenzione
Staccare la spina dalla presa di corrente
prima di eseguire qualsiasi operazione.
Attenzione
Questa apparecchiatura contiene idrocarburi
nel circuito refrigerante; pertanto la
manutenzione e la ricarica devono essere
effettuate esclusivamente da personale
autorizzato dall’azienda.
Sbrinamento
¥ Sull'evaporatore dello scomparto refrigerante la
brina viene eliminata automaticamente. L'acqua di
sbrinamento, tramite un apposito convogliatore,
viene raccolta in una bacinella posta nella parte
posteriore sopra il motocompressore
dell'apparecchiatura, da dove evapora.
¥
Si raccomanda di pulire periodicamente il foro
di scarico dell'acqua di sbrinamento, posto
nella parte centrale dell'apposito convogliatore
nello scomparto refrigerante, utilizzando
l'apposito ÇpulitoreÈ che si trova nel foro, per
evitare che l'acqua di sbrinamento cada sui
cibi.
Quando lÕapparecchiatura non • in funzione
Staccare la spina dalla presa di corrente. Togliere
tutti gli alimenti e pulire lÕapparecchiatura lasciando
la porta socchiusa per evitare la formazione di odori
sgradevoli.
Sostituzione della lampadina
¥ Prima di sostituire la lampadina • necessario
disinserire lÕapparecchio ed estrarre la spina dalla
presa di rete, quindi procedere come segue:
1. svitare la vite di fissaggio della plafoniera
2. sganciare la parte mobile esercitando una
pressione su di essa come indicato in figura.
3. sostituire la lampada con una di pari potenza.
Pulizia
Si raccomanda di non impiegare utensili
metallici per pulire onde evitare gravi danni
all'apparecchio.
Non impiegare mai delle sostanze
detergenti graffianti. Non utilizzare prodotti
spray per lo sbrinamento, poichŽ possono
nuocere alla salute e/o contenere sostanze
dannose per i materiali plastici.
¥ Pulire l'interno con acqua tiepida e bicarbonato di
soda. Risciacquare e asciugare accuratamente.
Page 35

35
Temperatura non correttamente regolata; consultare il paragrafo ÒRegolazione della
temperatura.
LÕapparecchiatura • installata accanto ad una fonte di calore; consultare il paragrafo
ÒInstallazioneÓ.
La porta • rimasta aperta a lungo; tenere aperta la porta soltanto per il tempo
strettamente necessario.
NellÕarco delle ultime 24 ore sono state introdotte grandi quantitˆ di vivande calde;
regolare temporaneamente il termostato su una posizione pi• fredda.
Regolare il termostato su una posizione pi• calda.
Regolare il termostato su un numero pi• basso.
Controllare che ci sia unÕadeguata aereazione e che le aperture per la ventilazione siano
libere da ogni ostruzione.
La causa potrebbe essere lÕintroduzione di grandi quantitˆ di vivande e/o frequenti
aperture/chiusure della porta.
A volte ci˜ • normale.
Il foro di scarico dellÕacqua di sbrinamento • ostruito; vedi il paragrafo ÒSbrinamentoÓ
A volte ci˜ • normale. Ogni volta che il compressore si inserisce e disinserisce, si
sentono degli scatti.
Quando la sostanza refrigerante fluisce negli stretti tubi, si possono dei rumori di
gorgogliamento. Anche dopo il disinserimento del compressore • udibile per breve
tempo questo rumore.
Non appena il compressore incomincia a lavorare, si sente il relativo ronzio.
Le derrate sono troppo calde.
LÕapparecchiatura raffredda eccessivamente.
Il compressore lavora continuamente.
Acqua dentro e/o fuori del frigorifero.
Acqua sul fondo dello scomparto frigorifero o
sui piani dÕappoggio.
Rumori di servizio
DISTURBO RIMEDIO
Se qualcosa non funziona
Qualora l'apparecchiatura presentasse qualche disfunzione, è bene controllare:
Assistenza tecnica e ricambi
Dopo le verifiche di cui sopra, se la disfunzione
dovesse permanere, • bene consultare la Vostra
cartolina di garanzia e chiamare il Centro di
Assistenza Tecnica pi• vicino.
Per un sollecito intervento • importante, all'atto della
chiamata, indicare il tipo di difetto e provvedere
sempre le seguenti informazioni relative
allÕapparecchiatura:
¥ Modello
¥ Prod. No. (PNC)
¥ Ser. No. (S-No.)
Queste indicazioni sono riportate sulla targa
matricola situata nellÕinterno dellÕapparecchio.
Allo scopo di aver rapidamente a portata di mano
tutti i dati, si consiglia di annotarli qui.
Caratteristiche tecniche
I dati tecnici sono riportati sulla targhetta matricola posizionata sul lato sinistro interno dellÕapparacchiatura.
Page 36

36
Installazione
Osservare durante il trasporto e lÕinstallazione
dellÕapparecchio che non venga danneggiato
alcun elemento della circolazione della
sostanza refrigerante.
¥ Durante il normale funzionamento il condensatore
ed il compressore, che sono posti sul retro
dellÕapparecchiatura, si riscaldano sensibilmente.
Assicurarsi quindi che lÕinstallazione venga
eseguita come da istruzioni riportate sul libretto.
UnÕaerazione insufficiente comporterˆ sicuramente
un cattivo funzionamento e dei danni
allÕapparecchiatura.
¥
Importante: se il cavo di alimentazione si
danneggiasse, dovrˆ essere sostituito da uno
speciale cavo o assieme disponibili presso il
costruttore o il servizio di assistenza.
Posizionamento
¥ Sballare lÕapparecchiatura e controllare che sia in
buone condizioni e priva di danni provocati dal
trasporto.
¥
LÕapparecchiatura non deve essere collocata
nelle vicinanze di termosifoni o cucine a gas.
¥ Collocare l'apparecchiatura lontana da fonti di
calore, quali: termosifoni, stufe da riscaldamento,
esposizione diretta ai raggi solari ecc.
¥ Mantenere una adeguata ventilazione e le
aperture per la ventilazione libere da ogni
ostruzione.
¥ Inoltre è necessario che la nicchia sia provvista di
un camino d’areazione con le seguenti misure:
profondità: 50 mm
larghezza: 540 mm
La tabella successiva mostra quali temperature
ambientali sono state assegnate alla classificazione
climatica:
La classificazione climatica • riportata sulla targa
matricola situata a sinistra nellÕinterno della cella
dellÕapparecchio.
Classificazione
climatica
SN da +10 fino a +32¡C
da +16 fino a +32¡C
da +18 fino a +38¡C
da +18 fino a +43¡C
N
ST
T
per temperature ambientali di
Collegamento elettrico
Assicurarsi prima di inserire la spina nella presa di
corrente, che la tensione e la frequenza riportate
sulla targhetta matricola corrispondano a quelle
dell'impianto domestico
é ammessa una oscillazione di ±6% sulla tensione
nominale.
Per il funzionamento a tensioni diverse si dovrˆ
utilizzare un autotrasformatore di potenza adeguata.
Importante
é indispensabile che l'apparecchiatura sia
collegata ad una efficiente presa di terra.
A tale scopo la spina del cavo di alimentazione
• dotata dell'apposito contatto.
Qualora la presa di corrente dell'impianto
domestico non sia collegata a terra, allacciare
l'apparecchiatura ad un impianto di terra a
parte, conformemente alle norme in vigore,
consultando in proposito un tecnico
specializzato.
La Casa Costruttrice declina ogni
responsabilitˆ qualora questa norma
antinfortunistica non fosse rispettata.
Questa apparecchiatura • conforme alle
seguenti Direttive Comunitarie:
- 73/23/CEE del 19/02/73 (Bassa Tensione) e
successive modificazioni;
- 87/308/CEE del 2/6/87 (Soppressione dei disturbi
radio).
- 89/336/ CEE del 03/05/89 (Compatibilitˆ
Elettromagnetica) e successive modificazioni.
Importante
LÕapparecchio deve poter essere scollegato
dalla rete; • quindi necessario che la spina
rimanga accessibile ad installazione avvenuta.
50 mm
2
min.
200 cm
min.
2
200 cm
D526
Page 37

37
Incasso
Vedansi le istruzioni di montaggio allegate.
Dopo avere effettuato lÕincorporamento dellÕ
apparecchio, in particolare dopo la modifica della
cernieratura della porta, vi preghiamo di controllare
che la guarnizione della porta garantisca la perfetta
chiusura ermetica tuttÕ intorno alla porta. Se la tenuta
della guarnizione della porta non fosse perfetta, ci˜
causa una maggiore formazione di brina e, di
conseguenza, un pi• alto consumo di energia.
Ultimata la reversibilitˆ della porta, controllare
che la guarnizione magnetica sia aderente al
mobile. Se la temperatura ambiente • fredda
(ad es. in inverno), pu˜ succedere che la
guarnizione non aderisca perfettamente al
mobile. In tal caso attendere il naturale
rinvenimento della guarnizione stessa oppure
accelerare tale processo riscaldando la parte
interessata con un normale asciugacapelli.
Page 38

38 Impreso en papel fabricado que no perjudica al medio ambiente
inmediatamente. El helado puede adherirse en los
labios o en la lengua y ocasionar lesiones.
¥ No tocar productos congelados con las manos
mojadas. La piel de las manos podr’a lesionarse
por congelamiento.
¥ En caso de necesitar reparaciones no intentar
hacerlas personalmente. Las reparaciones
efectuadas por persona no competentes pueden
provocar da–os. Ponerse en contacto con el
Centro de Asistencia m‡s cercano y emplear s—lo
repuestos originales.
Seguridad infantil
¥ Los materiales de embalaje (p. ej., l‡minas, icopor)
son peligrosos para los ni–os. ÁPeligro de asfixia!
¥ Antes de eliminar el aparato frigor’fico antiguo es
preciso inutilizarlo. Desenchufar, cortar el cable de
la red, retirar o destruir eventualmente las
cerraduras de resorte o los cierres de cerrojo
corredizo. Estas medidas preventivas impiden,
p. ej., que ni–os jugando al escondite puedan
quedar atrapados dentro del aparato frigor’fico
(Ápeligro de asfixia!) o arriesgar su vida por motivos
similares.
Protecci—n del ambiente
¥ Este aparato no contiene en el circuito
refrigerante y en el aislamiento, gases
refrigerantes nocivos para el ozono. El aparato
no debe ser eliminado junto con los deshechos
urbanos y chatarras. Se debe evitar el da–o del
circuito refrigerante, sobre todo en la parte
posterior cerca del intercambiador. Las
informaciones sobre los centros de recepci—n
las suministran las autoridades municipales.
Seguridad
E
Seguridad . . . . . . . . . . . . . . . . . . . . . . . . . . . . . . . . . . . . . . . . . . . . . . . . . . . . . . . . . . . . . . . . . . . . . . . . . . . . .38
Eliminaci—n . . . . . . . . . . . . . . . . . . . . . . . . . . . . . . . . . . . . . . . . . . . . . . . . . . . . . . . . . . . . . . . . . . . . . . . . . . . .39
Uso Antes de la puesta en servicio / Panel de mando / Puesta en marcha / Regulaci—n de la temperatura . .39
Equipamiento interior / Consejos . . . . . . . . . . . . . . . . . . . . . . . . . . . . . . . . . . . . . . . . . . . . . . . . . . . . . . . . . .40
Manutenci—n Desescarche / Limpieza / L‡mpara de iluminaci—n . . . . . . . . . . . . . . . . . . . . . . . . . . . . . . . . . .41
Si algo no funciona / Asistencia TŽcnica / Caracteristicas TŽcnicas . . . . . . . . . . . . . . . . . . . . . . . . . . . . .42
Instalac’on
Colocaci—n / Conexi—n elŽctrica . . . . . . . . . . . . . . . . . . . . . . . . . . . . . . . . . . . . . . . . . . . . . . . . . .43
Empotramiento integral . . . . . . . . . . . . . . . . . . . . . . . . . . . . . . . . . . . . . . . . . . . . . . . . . . . . . . . . . . . . . . . . . .44
Es muy importante conservar este libro de
instrucciones junto al aparato por si fuera
necesario consultarlo.
Si el aparato se vendiese o transfiriese a otra
persona, acuŽrdese de entregarlo junto con Žl para
que el nuevo propietario conozca el funcionamiento
de la m‡quina y sus advertencias.
Estas advertencias han sido redactadas para su
seguridad y para la seguridad de los dem‡s. Le
rogamos, por lo tanto, leerlas atentamente antes
de instalar y utilizar el aparato.
En funcionamiento cotidiano
¥ Los fr’gorificos y/o congeladores domŽsticos est‡n
destinados s—lo a la conservaci—n y/o congelaci—n
de alimentos.
¥ Revisar el aparato por si ocurrieron da–os al
transportarlo. Avisar al concesionario en caso de
da–os.
¥ Cualquier modificaci—n que eventualmente fuese
necesaria a la instalaci—n elŽctrica domŽstica para
poder instalar el aparato tiene que ser realizada
s—lo por personal competente.
¥ Estos aparatos son pesados. Tener cuidado en los
desplazamientos.
¥ Una vez instalado el aparato verificar que no estŽ
apoyado sobre el cable de alimentaci—n.
¥ No emplear aparatos elŽctricos (p. ej., m‡quinas
elŽctricas de hacer helado, batidoras, etc.) en el
aparato.
¥ No colocar en el compartimiento de la baja
temperatura (congelador o conservador) bebidas
gaseosas que podr’an explotar.
¥ Helados y cubitos de hielo sacados de la c‡mara
congeladora no deben llevarse a la boca
Indice
Page 39

Como leer estas instrucciones de servicio
Indicaciones importantes para su seguridad personal y para la capacidad funcional del
aparato frigor’fico.
Informaciones adicionales para el manejo y la aplicaci—n pr‡ctica del aparato frigor’fico.
Informaciones para la aplicaci—n rentable y ecol—gica del aparato frigor’fico.
Uso
Antes de la puesta en servicio
Esperar por lo menos dos horas antes de
poner en marche el aparato para dar tiempo a
que el aceite regrese al compresor.
¥ Antes del empleo limpiar todas las partes internas
con agua tibia y jab—n neutro, a fin de eliminar el
caracter’stico olor de nuevo y secarlas luego
cuidadosamente.
No emplear detergentes o polvos abrasivos
que podrian da–ar las superficies.
Retirar todas las cintas adhesivas y piezas
acolchadas del interior del aparato y de transporte.
Eliminaci—n
Materiales de embalaje
¥ Los materiales usados en este aparato marcados con el s’mbolo son reciclables.
>PE<=Polietileno
>PS<=poliestireno espumado
>PP<=Polipropileno
Los materiales de embalaje son reciclables.
Eliminaci—n y reciclaje de aparatos antiguos
Las informaciones sobre los centros de recepci—n san suministradas par las autoridades municipales.
Panel de mando
1 Interruptor de la luz
2 Regulador de temperaturas e interruptor ON/OFF
Puesta en marcha
¥ El regulador de temperaturas se encuentra en el
panel de mando en la parte superior del aparato y
es al mismo tiempo el interruptor ON/OFF.
¥ Para girar el regulador de temperaturas hay que
aplicar una moneda.
¥ Introducir el enchufe en la toma de corriente.
Girar el mando del termostato en sentido horario
hasta una posici—n distinta de la posici—n ÇOÈ
(parada).
¥ El aparato se pone en marche.
El funcionamiento del aparato se interrumpe al
girar el mando en la posic’on ÇOÈ (parada).
Regulaci—n de la temperatura
¥ La regulaci—n de la temperatura se consigue
girando el mando del termostato hasta la posici—n
deseada.
¥ La colocaci—n del mando se determina teniendo en
cuenta que la temperatura interna depende:
¥ de la temperatura ambiente
¥ de la frecuencia de aperatura de la puerta
¥ de la cantidad de alimentos conservados,
¥ de la colocaci—n del aparato.
¥ La temperatura se regula autom‡ticamente.
¥
Posici—n ã1Ò = menos fr’o
¥ Posici—n ã6Ò = m‡s fr’o
¥ Posici—n ã0Ò = parada
La posici—n intermedia es generalmente la m‡s
indicada.
39
Page 40

¥ Empujar gradualmente la repisa en el sentido
indicado por las flechas hasta llegar a
desengancharla, luego volverla a montar en la
posici—n deseada.
¥ Para una limpieza m‡s esmerada se pueden quitar
f‡cilmente las repisas superior y inferior
volviŽndolas a colocar en su posici—n.
40
Equipamiento interior
Estantes movibles
¥ Las paredes internas del frigor’fico tienen gu’as
para colocar los estantes a distintas alturas.
¥ Para ajustarlas hay que tirar hacia adelante del
panel inclin‡ndolo hacia arriba o hacia abajo hasta
que se pueda sacar.
¥ El procedimiento de colocaci—n del panel en una
altura diferente se efectœa a la inversa.
¥ Para usar mejor el espacio, los semi-estantes
anteriores se puede sobreponer a los posteriores.
Es imprescindible colocar un panel en las
ranuras del fondo que se hallan encima de las
cubetas para frutas y verduras. Este panel
siempre ha de permanecer en dicho lugar
para prolongar la conservaci—n de las frutas y
las verduras.
Repisas de la contrapuerta
¥ Se puede cambiar la posici—n de la(s) repisa(s)
centrale(s) de la contrapuerta.
Consejos
Ahorro de energ’a
¥ El aparato frigor’fico no debe colocarse cerca de
cocinas, radiadores u otras fuentes tŽrmicas.
Cuando hay una temperatura ambiental muy
elevada, el compresor funciona con m‡s
frecuencia y durante m‡s tiempo. Consultar el
cap’tulo "Colocaci—n".
¥ Cuando el termostato est‡ regulado en la posici—n
de m‡ximo fr’o, con temperatura ambiente elevada
y una gran cantidad de alimentos, el
funcionamento puede ser continuo, con
consiguiente formaci—n de escarcha en la parte
posterior del compartimiento; en tal caso es
necesario girar el mando a una posici—n de menor
fr’o, a fin de consentir la eliminac’on autom‡tica de
la escarcha y, como consecuencia, obtener un
consumo menor de energ’a elŽctrica.
¥ Dejar la puerta abierta solamente el tiempo
requerido.
¥ No colocar platos calientes en el aparato frigor’fico.
Antes hay que dejarlos enfriar.
¥ No ajustar la temperatura a un grado m‡s fr’o que
lo necesario.
Refrigeraci—n de los alimentos
¥ No introducir en la cuba alimentos calientes o
l’quidos en evaporaci—n,
¥ cubrir o envolver los alimentos (sobre todo si son
arom‡ticos);
¥ no poner en las rejillas papeles o pl‡sticos, que
impidan el paso del aire entra las mismas.
CP1OEM
D338
Page 41

41
Para un correcto uso aconsejamos:
¥ Alimentos cocinados , platos fr’os, etc.: tienen
que conservarse bien cubiertos y se pueden
colocar en cualquier bandeja del frigor’fico.
¥
Fruta y verdura: una vez lavada, ha de colocarse
en el caj—n (cajones) inferior.
¥ Carne cruda (bovina, porcina y aves): debe ser
envuelta en bolsitas de pl‡stico y colocada en el
espacio situado sobre los cajones verdura.
En esta posici—n la carne puede ser
conservada un m‡ximo de 1 a 2 d’as.
¥ Mantequilla y queso: deben colocarse en los
recipientes adecuados o envueltos en hojas de
aluminio o polietileno, a fin de evitar el contacto
con el aire.
¥ Leche en botella: se coloca bien tapada en la
contrapuerta.
Pl‡tanos, patatas, cebolla y ajos, si no son
empaquetados, no deben conservarse en
frigor’fico.
Manutencion
Desenchufar el aparato antes de efectuar
cualquier operaci—n.
Atenci—n
Este aparato contiene hidrocarburos en el
circuito refrigerante; por lo tanto el
mantenimiento y la recarga deben ser
efectuados exclusivamente por personal
autorizado por la empresa.
Desescarche
¥ En el evaporador del compartimento refrigerante la
escarcha se elimina autom‡ticamente cada vez
que se para el motocompresor. El agua de
desescarche, mediante un canal adecuado, se
recoge en un recipiente situado en la parte
posterior, arriba del motocompresor del aparato,
desde donde evapora.
¥ Limpiar peri—dicamente el agujero de desagŸe del
agua de desescarche, situado en la parte central
del canal en el compartimiento refrigerante,
utilizando el ÒlimpiadorÓ adecuado que se
encuentra en el agujero, para evitar que el agua de
desescarche caiga sobre los alimentos.
Limpieza
No emplear detergentes abrasivos.
No utilizar nunca objectos met‡licos para
limpiar el aparato porque podr’a ser
da–ado.
Limpiar el interior con agua templada y bicarbonato y
las partes exteriores esmaltadas. Enjuagar y secar
cuidadosamente.
Periodos de inactividad
¥ Desenchufar el aparato y sacar todos los
alimentos.
¥ Eliminar la escarcha y lavar el interior y todos los
accesorios.
¥ Dejar la puerta entreabierta para facilitar la
circulaci—n del aire en el interior a fin de evitar la
formaci—n de olores desagradables.
L‡mpara de iluminaci—n
¥ Hay que desconectar el aparato y desenchufarlo
antes de efectuar el cambio de bombilla.
1. Desatornillar el tornillo de fijaci—n del cubrel‡mpara.
2. Desenganchar la parte m—vil ejercitando una
presi—n sobre la misma como se indica en la
figura.
3. Sustituya la bombilla quemada con una de igual
potencia.
Page 42

42
Si algo no funciona
Si el aparato presentase anomal’as ser‡ oportuno controlar:
Aver’a Remedio
La temperatura del refrigerador no es
suficiente.
El aparato enfr’a demasiado
El compresor funciona continuamente
Restos de agua en el fondo del refrigerador
Ruidos
Seleccionar temperatura m‡s fr’a.
No poner en las rejillas papeles o pl‡sticos, que impidan el paso del aire entra los
alimentos.
Compruebe que la puerta estŽ cerrada bien.
La temperatura ambiental es m‡s caliente.
Girar el regulador a temperatura m‡s alta.
Girar el regulador a temperatura m‡s fr’a.
La temperatura ambiental es m‡s caliente.
Compruebe que la ventilaci—n del aire no estŽ obstruida.
En las œltimas 24 horas se han introducido grandes cantidades de alimentos calientes.
Dejar la puerta abierta solamente por el tiempo requerido.
Comprobar que el orificio de desagŸe de la escarcha derretida no estŽ obturado (ver
c‡pitulo Desescarche).
A veces son t’picos del aparato frigor’fico cuando est‡ en servicio
Cuando penetre agente refrigerante en los tubos delgados, se escuchar‡ un ruido
similar al burbujeo o chapoteo.
Siempre que el compresor se conecte o desconecte, se escuchar‡ un chasquido.
Tan pronto funcione el compresor se escuchar‡ su zumbido.
Asistencia TŽcnica
DespuŽs de hacer las verificaciones anteriores, si la
anomal’a persiste, llame al Centro de Asistencia
TŽcnica m‡s cercano.
Para una asistencia inmediata es importante, que al
efectuar la llamada, dar los siguientes datos del
aparato frigor’fico:
¥ Denominaci—n del modelo
¥ Nœmero de art’culo (PNC)
¥ Nœmero de fabricaci—n (S-No.)
tom‡ndolos del certificado de garant’a o de la
etiqueta de la matr’cula colocada en el interior del
compartimiento refrigerante, abajo a la izquierda.
Es recomendable tenerlos a mano r‡pidamente.
Caracteristicas tŽcnicas
Los datos tŽcnicos se indican en la placa de serie situada en el lado izquierdo dentro del aparato.
Page 43

43
Instalac’on
Prestar la m‡xima atenci—n durante las
operaciones de desplazamiento para no da–ar
las partes del circuito refrigerante a fin de
evitar las posibles salidas de l’quido.
¥ El aparato se calienta considerablemente en la
proximidad del condensador y del compresor, por lo
tanto hay que verificar que el aire pueda circular
libremente alrededor del mismo. Una ventilaci—n
insuficiente puede causar un mal funcionamiento y
da–os al aparato. Seguir cuidadosamente las
instrucciones que se dan para la instalaci—n.
¥ Importante: en caso de que el cable de
alimentaci—n se da–e, deber‡ ser sustituido con un
cable especial. Ambos cables pueden ser
solicitados al fabricante o al S•rvicio de asistencia.
Colocaci—n
¥ Revisar el refrigerador por si ocurrieron da–os al
transportarlo.
¥ Situar el aparato lejos de fuentes de calor, como:
radiadores, estufas, exposici—n directa a los rayos
del sol, etc.
¥ El aparato no debe ser colocado cerca de termo
o cocinas a gas.
¥ Por motivos de seguridad la ventilaci—n debe ser
como se indica en la Fig.
Atención: mantener las aperturas para la
ventilación libres de cualquier obstáculo.
¥ Es necesario adem‡s que el hueco tenga un
conducto de ventilaci—n con estas medidas:
profundidad 50 mm
ancho 540 mm
La clase clim‡tica est‡ indicada en la placa del lado
izquierdo del interior del aparato frigor’fico.
Las temperaturas ambientales asignadas a las
clases clim‡ticas est‡n determinadas en la tabla
siguiente:
Las mejores prestaciones se obtienen con
temperaturas del ambiente entre los anteriores.
Conexi—n elŽctrica
Antes de enchufar el aparato, asegurarse de que la
tensi—n y la frecuencia indicadas en la tarjeta
matr’cula, correspondan a las de la instalaci—n
domŽstica.
Se admite una oscilaci—n de 6% sobre la tensi—n
nominal. Para el funcionamiento a tensiones
distintas, habr‡ que utilizar un autotransformador de
potencia adecuada.
Asegurarse de que la toma de corriente y el enchufe
sean compatibles entre s’ sin tener que interponer
reducciones ladrones o adaptadores varios. Si fuera
necesario, cambiar la toma de la instalaci—n de la
casa.
Importante
Es indispensable conectar el aparato a una
toma de tierra eficaz.
El enchufe del cable de alimentaci—n est‡ dotado de
un adecuado contacto.
Si la toma de corriente de la instalaci—n domŽstica
no estuviera conectada a tierra, conectar el aparato
a una instalaci—n de tierra, conforme a las leyes en
vigor, consultar con un tŽcnico especializado.
El fabricante declina toda responsabilidad en el
caso que esta norma no sea respetada.
Este aparato es conforme a las siguientes Directivas
Comunitarias:
- 73/23 CEE 19/02/73 (Baja tensi—n) y
modificaciones sucesivas;
- 87/308 CEE 2/6/87 relativa a la supresi—n de
interferencias radio y modificaciones
sucesivas;
- 89/336 CEE 03/05/89 (Compatibilidad
electro-magnŽtica) y modificaciones
sucesivas.
Importante
Se debe poder desenchufar el aparato; por lo
tanto una vez efectuada la instalaci—n es
necesario que el enchufe no quede escondido.
Clase clim‡tica
SN +10 hasta +32¡C
+16 hasta +32¡C
+18 hasta +38¡C
+18 hasta +43¡C
N
ST
T
para temperatura ambiental de
50 mm
D526
2
min.
200 cm
min.
200 cm
2
Page 44

VŽanse las Instrucciones de montaje adjuntas.
DespuŽs de montar el aparato, especialmente tras
cambiar el tope de la puerta, comprobar si la junta
de la puerta hermetiza correctamente. Una junta de
puerta no hermŽtica puede ser la causa de una
excesiva formaci—n de escarcha y por tanto de un
mayor consumo energŽtico.
Atenci—n
Completada la operaci—n de reversibilidad de
la puerta, controlar que la junta magnŽtica
estŽ adherida al mueble. Si la temperatura
ambiente es fr’a (por ejemplo en invierno),
puede suceder que la junta no adhiera
perfectamente al mueble. En este caso
esperar que la misma recupere su forma
natural o bien acelerar dicho proceso
calentando la parte interesada con un normal
secador de cabellos.
44
Empotramiento integral
Page 45

Page 46

Page 47

Page 48

KÜPPERSBUSCH HAUSGERÄTE AG
Postfach 10 01 32, D-45801 Gelsenkirchen, Küppersbuschstr. 16, D-45883 Gelsenkirchen
Telefon: (02 09) 4 01-0, Telefax: (02 09) 4 01-3 03
www.kueppersbusch.de
Küppersbusch Ges. m. b. H.
Eitnergasse 13, 1231 Wien, Telefon: 01 / 8 66 80-0, Telefax: 01 / 8 66 80 72
www.kueppersbusch.at · e-Mail: verkauf@kueppersbusch.at
 Loading...