

Page 1

13440 Orchesterstuhl
FÜR DEN PROFESSIONELLEN EINSATZ
- Vielfältig nutzbar und sehr solide
- Das 4-Fuß-Gestell besteht aus äußerst robustem 20 x 2 mm Stahlrohr
und ist überzogen von einer schwarzen Pulverbeschichtung.
- Verstellbar in Höhe und Neigung
- Die Verstellung des Qualität-Gasdruckliftes erfolgt pneumatisch
und stufenlos per Auslösehebel
- Mit Belüftungslöchern und atmungsaktivem Schaumstoff
- Sitzfläche und Rückenlehne aus schwer entflammbarem Material
- Die 4 Stuhlbeine verfügen über geräuscharme und bewegliche,
sich dem Untergrund anpassende Kunststoffgleiter
- Stapelbar, d.h. platzsparende Aufbewahrung (bis zu 4 Stühle)
- Inklusive Stapelstegen
SICHERHEITSHINWEISE
Vielen Dank, dass Sie sich für dieses Produkt entschieden haben. Diese Anleitung
informiert Sie über alle wich tigen Schritte bei Aufbau und Handhabung. Wir
empfehlen, sie auch für den späteren Gebrauch aufzubewahren.
- Vor und nach Benutzung des Orchesterstuhls bitte Sichtprüfung
- vornehmen und auf Vollständigkeit, Gängigkeit und mögliche
- Schäden überprüfen.
- Ein beschädigter Stuhl darf zunächst nicht weiter eingesetzt
- werden bzw. erst nach qualifizierter Prüfung und
- Wiederinstandsetzung.
- Es dürfen maximal 4 Orchesterstühle gestapelt werden.
- Darüberhinausgehendes Stapeln führt zu Instabilität und
- Überlastung und stellt möglicherweise eine Gefährdung dar.
- Nur auf geeigneten Untergründen verwenden, d.h. auf
- Ebenheit und ausreichende Tragfähigkeit achten
- Pflegliche und sorgsame Behandlung erhält die Funktions-
- tüchtigkeit, Langlebigkeit und dient nicht zuletzt der Sicherheit
- von Stuhl und Nutzer/in.
BEDIENUNGSANLEITUNG
BESTANDTEILE (A.1 - B.4)
Der Karton enthält den bereits vormontierten
A. ORCHESTERSTUHL sowie die
B. RÜCKENLEHNE
Zunächst bitte Sichtprüfung vornehmen, ob beide Teile
vollständig und in Ordnung sind. Beispiele sind u.a.:
A.1. Polster Sitzfläche:Unversehrtheit, Festsitz ...
A.2. Sitzmechanik: Zustand, Schrauben vollständig ...
A.3. Fußgestell: wackelfreier Stand, Pulverüberzug ...
A.4. Bedienhebel: Zustand, Beweglichkeit ...
A.5 Kunststoffgleiter: Vorhandensein, Beweglichkeit ...
B.1. Polster Rückenl.: Unversehrtheit Beweglichkeit ...
B.2. Verschraubung: Vollständigkeit, Festsitz ...
B.3. Halterohr: Zustand, Pulverüberzug ...
B.4. Auszugsicherung: Sitz, Beweglichkeit ...
MONTAGE der RÜCKENLEHNE
1 Klemmschraube der Rückenlehnenaufnahme etwas lösen
2 Halterohr an der Rückenlehnenaufnahme ansetzen ...
3 ... gleichzeitig den Knopf der Auszugsicherung drücken ...
4 ... und Halterohr durch die Öffnung der Aufnahme schieben
4 bis der Knopf der Auszugsicherung wieder ausfährt.
5 Anschließend Klemmschraube wieder festdrehen
DEMONTAGE
6 Ein unter Federdruck stehender Anschlagbolzen verhindert
6 das Entnehmen des Halterohres aus der Aufnahme
6 des Sitzes.
7 Erst durch bewusstes Drücken dieses Anschlagbolzens
7 kann das Halterohr wieder vollständig herausgezogen
7 werden.
7 Das kann z.B. für Transportzwecke sinnvoll sein.
BESTANDTEILE (A.1 - B.4)
MONTAGE der RÜCKENLEHNE (1-7)
Page 2
Material
Rohre: Stahl, gepulvert, schwarz
Sitzmechanik, Gasdruckfeder: Stahl, diverse
Verbindungselemente: Stahl, verzinkt
Kappen, Griffe, Führungen: PA, PE
Polsterbezug: Trevira CS (schwer entflammbar)
Traglast 1 Person, 100 kg (statische Last)
Abmessungen
B x T x H: 545 x 495 (515) x 710 (980) mm
Sitzfläche: 440 x 440 mm; Sitzhöhe: 480 - 530 mm
Karton B x T x H: 600 x 600 x 640 mm
Gewicht netto: 12,5 kg; brutto: 14,7 kg
KÖNIG & MEYER GmbH & Co. KG
Kiesweg 2, 97877 Wertheim, www.k-m.de
13440-000-55 Rev.04 03-80-334-00 8/17
TECHNISCHE DATEN / SPEZIFIKATION
SITZFLÄCHE: Höhe
SITZFLÄCHE: Neigung
RÜCKENLEHNE: Höhe RÜCKENLEHNE: Polster
PRÜFEN, INSTANDHALTEN
- Bei Wartungsarbeiten auf evtl. Gefährdungen achten
- (Einklemmen...)
- Zur Reinigung am besten ein leicht feuchtes Tuch und
- ein nicht scheuerndes Reinigungsmittel benutzen
FEHLERSUCHE (F) und BESEITIGUNG (B)
F: Orchesterstuhl kippelt
F: B: Untergrund auf Eignung prüfen
F: B: Orchesterstuhl in Ordnung? (Fußgestell, Gleiter)
F: Stuhl bzw. Rückenlehne zu hoch/tief/etc.
F: B: Einstellungen ändern (Grenzen beachten)
F: Stühlestapel wackelt
F: B: Maximale Anzahl der Stühle beachten: 4
F: B: Stühle erneut mit Sorgfalt aufeinanderstapeln
F: B: Zustand der Stühle überprüfen
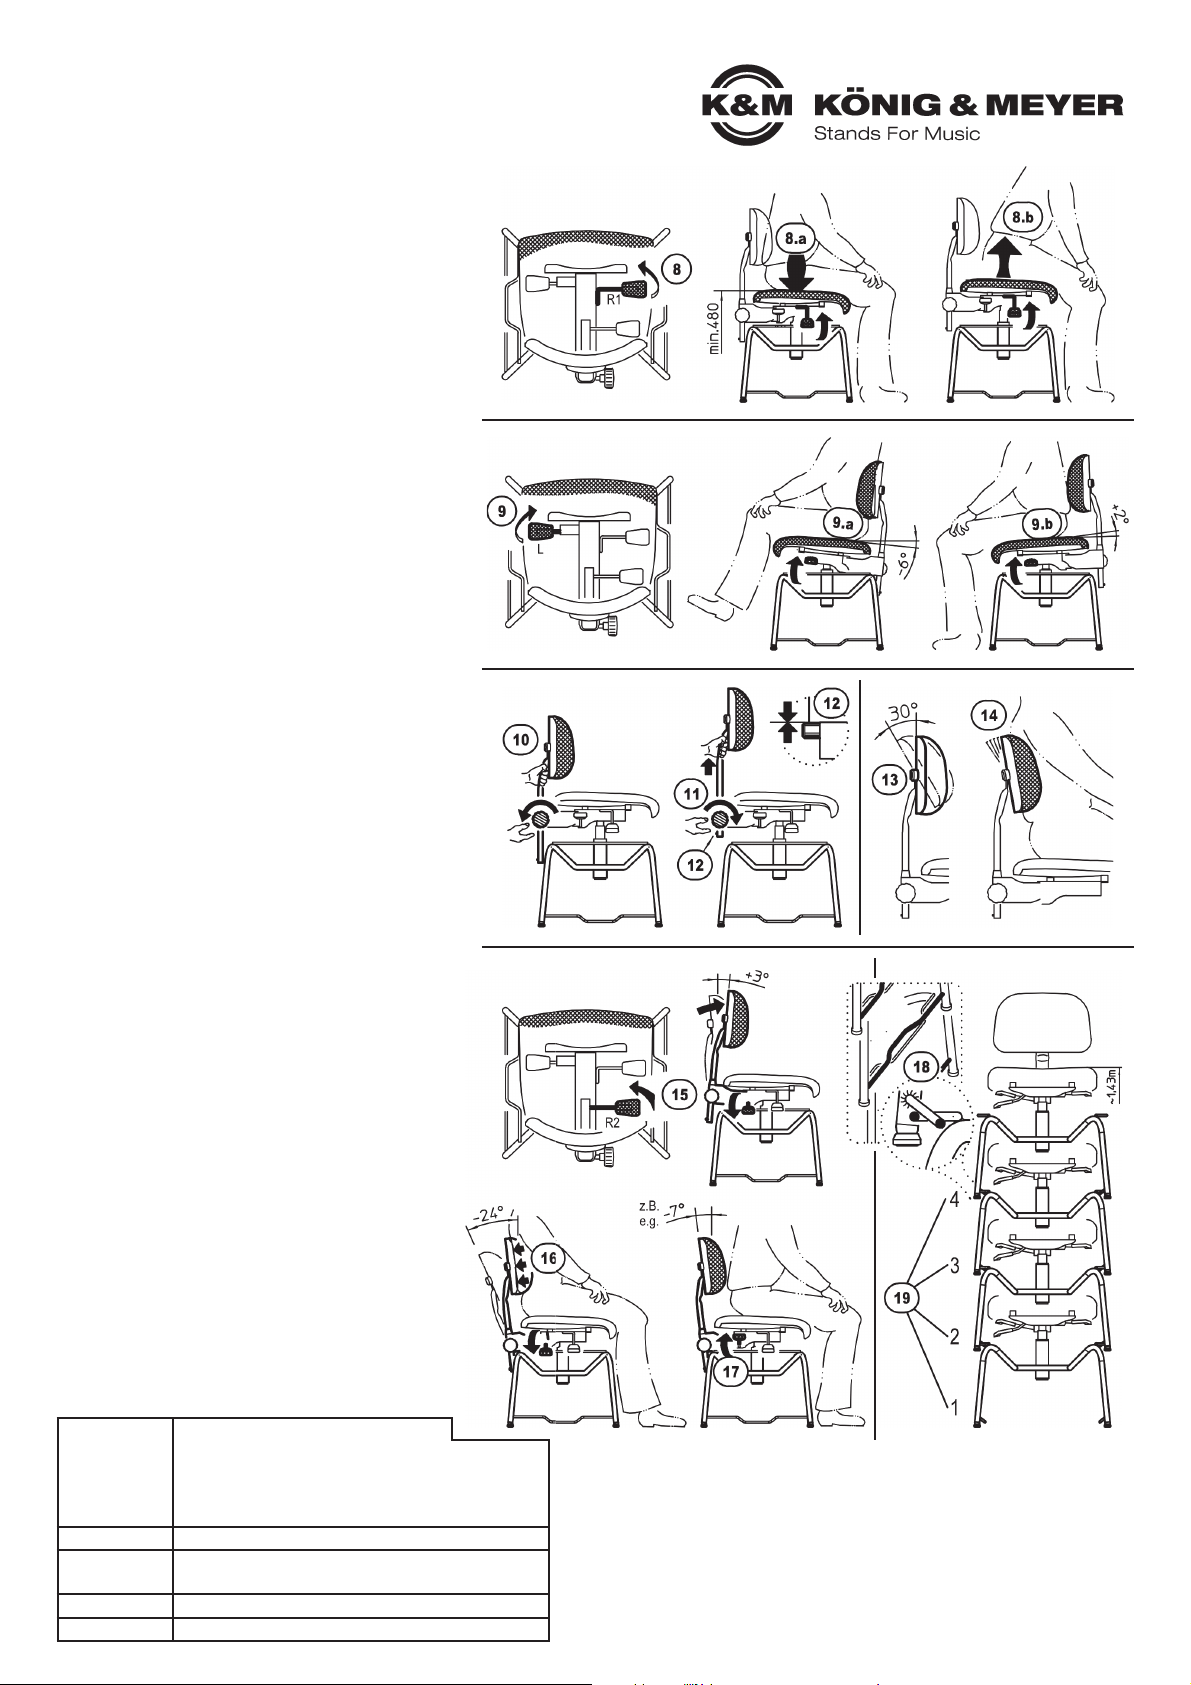
BENUTZERHINWEISE und
FUNKTIONEN (8-19)
EINSTELLUNG der SITZFLÄCHE
HÖHE:
8 Hebel rechts vorne R1 anheben
8 a. EINFAHREN des Sitzes: Sitzfläche BELASTEN
8 b. AUSFAHREN des Sitzes: Sitzfläche ENTLASTEN
BEACHTE: Sobald der Hebel 7 nicht mehr betätigt wird,
verbleibt die Sitzfläche in Position. Das gilt für jegliche
Position zwischen den beiden Endstellungen - stufenlos.
NEIGUNG:
9 Hebel links L kräftig anheben und festhalten und
9 und durch VERLAGERUNG des KÖRPERGEWICHTS
9 den Sitz wie gewünscht neigen:
9 a. nach hinten (-6°) bzw.
9 b. nach vorn (+2°).
BEACHTE: Sobald der Hebel 8 nicht mehr betätigt wird,
verbleibt die Sitzfläche in der gewählten Neigung.
EINSTELLUNG der RÜCKENLEHNE
HÖHE:
10 Rückenlehne festhalten und Klemmschraube lösen.
11 Anschließend Halterohr in gewünschte Höhe
11 schieben und Position der Rückenlehne durch
11 Anziehen der Klemmschraube sichern.
12 Die maximale Höhe der Rückenlehne ist begrenzt
12 durch einen Anschlagbolzen.
12 Siehe auch Kap. MONTAGE, Pos.6
POLSTER:
13 Das Rückenpolster ist fest mit dem Halterohr verbunden,
13 kann aber dennoch um ca. 30° geschwenkt werden.
14 Eine Voreinstellung entfällt, weil sich das Polster
14 automatisch dem Rücken des Benutzers anschmiegt.
NEIGUNG:
15 Hebel rechts hinten R2 nach unten drücken...
15 ...und schon schwingt die Rückenlehne nach vorne.
16 Durch Gegendruck mit dem Rücken wähle man die
16 gewünschte Position (max. -24°), welche dann durch...
17 ...Anheben dieses Hebels R2 fixiert wird.
STAPELN
18 Der Orchesterstuhl eignet sich dank seitlicher
18 Einhängebügel ganz besonders zum Stapeln.
19 Bis zu 4 Orchesterstühle können auf diese Weise
19 professionell und solide gestapelt werden.
RÜCKENLEHNE: Neigung STAPELN (max. 4 Stühle)
Page 3

13440 Orchestra chair
FOR PROFESSIONAL USE
- Versatile uses and very solid
- The four-legged frame consists of extremely robust 20 x 2 mm steel tubes
and is covered in black-powered coating.
- Height and depth adjustable
- The adjustment to the quality gas pressure lift operates pneumatically
and is done variably via the adjustment lever
- With ventilation holes and breathable foam cushion
- Seat and back are made of flame retardant materials
- The 4 legs have low-noise and movable plastic glides
that adjust to the floor
- Stackable, i.e. space-saving storage (up to 4 chairs)
- Including stocking grooves
SAFETY NOTES
Thank you for choosing this product. This instruction manual informs you about the
important steps to set up and handle the product. We recommend to keep the manual
in a separate place for a possible later use.
- Prior and after use of the orchestra chairs please perform visual
- inspection and check for completeness and functionality as well
- as possible damage.
- A damaged chair may not be used i.e. it may only be used after
- a qualified technician has repaired the chair.
- Only a maximum of 4 orchestra chairs may be stacked.
- In addition, stacking results in instability and overloading, which
- represents a possible risk.
- Only use on suitable surfaces, i.e. on even surfaces that are
- load-bearing
- Please ensure that the orchestra chairs are cared for with the
- appropriate diligence to maintain functionally, useful life
- and finally ensures safe use of the chairs for musicians.
INSTRUCTION MANUAL
COMPONENTS (A.1 - B.4)
The box contains the pre-assembled
A. ORCHESTRA CHAIR as well as the
B. BACKREST
First perform a visual inspection, to ensure if the parts are there
and in working condition. Examples include:
A.1. Cushion seat: Intactness, firm seating…
A.2 Seat mechanism: Cushion, all screws are included…
A.3. Base: Stable, powder coating…
A.4. Operating lever: Condition, functionality…
A.5. Plastic glides: Included, functionality…
B.1. Cushion backrest: Intactness, functionality…
B.2. Screws: All parts included, firm seating…
B.3. Seat tube: Condition, powder coating…
B.4. Extension lock: Seat, functionality…
ATTACH the BACKREST
1 Loosen the clamping screw of chair back a bit
2 Place the backrest tube into the holding tube of the chair
back…
3 …at the same time press the extension lock button…
4 …and place the holding tube in the holder opening until the
4 button of the extension lock clicks.
5 Then re-tighten the clamp screw
DISASSEMBLY
6 A pin bolt located under the pneumatic mechanism ensures
6 that the holding tube can be removed from the holder opening
6 of the seat.
7 It can only be completely removed by consciously pressing the
7 locking pin.
7 This can be useful for transport purposes.
COMPONENTS (A.1 - B.4)
ATTACH the BACKREST (1-7)
Page 4

Material
Tubes: Steel, powder coating, black
Seat mechanic, pneumatic spring Steel, diverse
Connection elements: Steel, galvanized
Caps, grips, guides: PA, PE
Cushion covering: Trevira CS (flame retardant)
Load 1 Person, 100 kg (static load)
Dimensions
W x D x H: 545 x 495 (515) x 710 (980) mm
Seat surface: 440 x 440 mm; Seat height: 480 - 530 mm
Box W x D x H: 600 x 600 x 640 mm
Weight net: 12.5 kg; gross: 14.7 kg
KÖNIG & MEYER GmbH & Co. KG
Kiesweg 2, 97877 Wertheim, www.k-m.de
13440-000-55 Rev.04 03-80-334-00 8/17
TECHNICAL DATA
CHAIR SEAT: Height
CHAIR SEAT: Angle
BACKREST: Height BACKREST: Cushion
CHECK, MAINTENANCE, CLEANING
- In the event of maintenance pay attention to possible
- risks (wedging…)
- To care for the product, use a damp cloth and a non-
- abrasive cleaning agent
FAULT-FINDING (F) and REPAIR (R)
F: Orchestra chair is not stable
F: R: Check if the surface is suitable
F: R: Is the orchestra chair in good condition? (Base, gliders)
F: The chair i.e. back rest is too high/low/etc.
F: R: Change the settings (pay attentions to the limits)
F: Chair stack is not stable
F: R: Ensure that only the maximum number of chairs
F: R: are stacked: 4
F: R: Re-stack the chairs carefully
F: R: Check the condition of the chairs
USAGE NOTES
and FUNCTIONS (8-19)
ADJUST the CHAIR SEAT
HEIGHT:
8 Lift the right front lever R1
8 a. Lower the seat: Put weight on the seat
8 b. Lift the seat: Don’t put weight on the seat
NOTE: To select seat position take hand off lever This
applies to all positions. The position can be adjusted
variably.
ANGLE:
9 Pull on the left lever L and hold in place and lean on the
9 chair seat the angle of the seat can be changed:
9 a. body weight back (-6°) i.e.
9 b. body weight front (+2°).
NOTE: To select seat angle let go of the lever 8.
ADJUST the BACKREST
HEIGHT:
10 Hold the backrest and loosen the clamp screw.
11 Then adjust the holding tube to the desired height and
11 secure the position of the backrest by tightening the
11 clamp screw.
12 The maximum height of the backrest is limited by the
12 locking pin.
12 See Section Installation, Pos.6
CUSHION:
13 The backrest cushion is affixed to the holding tube, and
13 can swivel by approx. 30°.
14 A preset position is not necessary because the cushion
14 automatically adjusts to the back of the user.
ANGLE:
15 Press the lever located on the right in the back R2
15 downwards…
15 …and the backrest swings to the front.
16 By pressing your back onto the cushion, the desired
16 position (max. -24°) can be reached, which…
17 …can be set by pulling the lever R2 up.
STACKING
18 The orchestra chair can be stacked thanks to the side
18 support arms.
19 Up to 4 orchestra chairs can be stacked professionally
19 and solidly.
BACKREST: Angle STACKING (up to 4 chairs)
 Loading...