

Page 1
www.kaercher.com/register-and-win
59662420 11/13
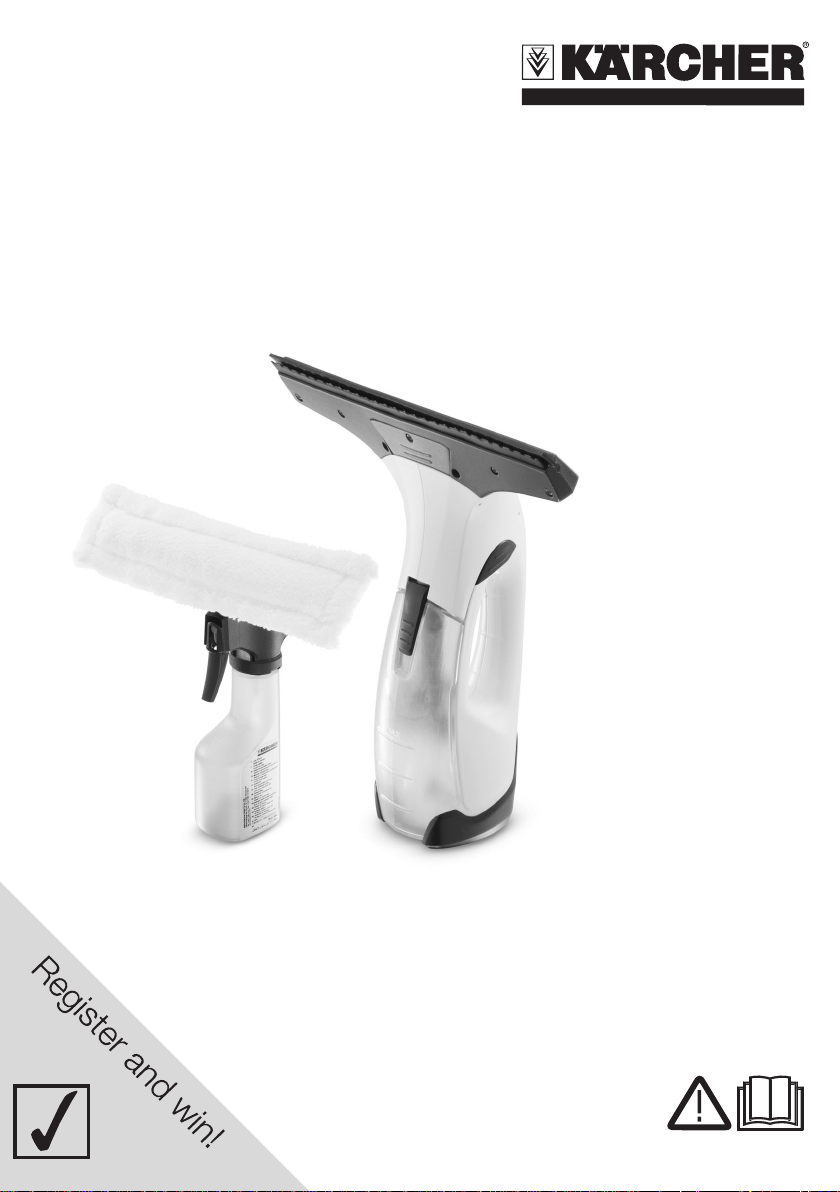
WV 2
WV 2 Plus
WV 2
Deutsch 3
English 9
Français 14
Italiano 20
Nederlands 26
Español 32
Português 38
Dansk 44
Norsk 50
Page 2
2
Page 3

Deutsch
– 3
Sehr geehrter Kunde,
Lesen Sie vor der ersten Be-
nutzung Ihres Gerätes diese
Originalbetriebsanleitung, handeln Sie
danach und bewahren Sie diese für
späteren Gebrauch oder für Nachbesitzer auf.
Das Gerät wird in 2 unterschiedlichen
Ausführungen ausgeliefert.
WV 2
WV 2 Plus inkl. Sprühflasche mit
Wischaufsatz und FensterreinigerKonzentrat.
– Verwenden Sie dieses akku-
betriebene Gerät ausschließlich für private Einsatzzwecke, zur Reinigung von feuchten, glatten Oberflächen wie
Fenster, Spiegel oder von
Fliesen. Es darf kein Staub
aufgesaugt werden.
– Das Gerät ist nicht zum Auf-
saugen größerer Mengen
Flüssigkeiten von horizontalen Oberflächen z.B aus einem umgefallenen Trinkglas
geeignet (max. 25 ml).
– Verwenden Sie dieses Gerät
nur in Verbindung mit herkömmlichen Fensterreinigungsmitteln (kein Spiritus,
kein Schaumreiniger).
– Wir empfehlen: Fensterreini-
ger-Konzentrat von KÄRCHER (siehe Kapitel „Sonderzubehör“).
– Verwenden Sie dieses Gerät
nur mit von KÄRCHER zugelassenem Zubehör und Er-
satzteilen.
Jede darüber hinausgehende
Verwendung gilt als nicht bestimmungsgemäß. Für hieraus
resultierende Schäden haftet
der Hersteller nicht; das Risiko
hierfür trägt allein der Benutzer.
Dieses Gerät ist nicht dafür
bestimmt, durch Personen
mit eingeschränkten physi-
schen, sensorischen oder
geistigen Fähigkeiten oder
mangels Erfahrungen und/
oder mangels Wissen benutzt
zu werden, es sei denn, sie
werden durch eine für ihre Si-
cherheit zuständige Person
beaufsichtigt oder erhielten
von ihr Anweisungen, wie das
Gerät zu benutzen ist und ha-
ben die daraus resultieren-
den Gefahren verstanden.
Kinder dürfen das Gerät nur
dann verwenden, wenn sie
über 8 Jahre alt sind und
wenn sie durch eine für ihre
Sicherheit zuständige Person
Inhaltsverzeichnis
Bestimmungsgemäße Verwen-
dung . . . . . . . . . . . . . . . . . . . . . DE . . .3
Sicherheitshinweise . . . . . . . . . DE . . .3
Inbetriebnahme . . . . . . . . . . . . DE . . .5
Arbeit beenden / Gerät reinigen DE . . .6
Hilfe bei Störungen. . . . . . . . . . DE . . .7
Sonderzubehör. . . . . . . . . . . . . DE . . .7
Technische Daten. . . . . . . . . . . DE . . .8
Bestimmungsgemäße
Verwendung
Sicherheitshinweise
3DE
Page 4
– 4
beaufsichtigt werden oder
von ihr Anweisungen erhielten, wie das Gerät zu benutzen ist und die daraus resultierenden Gefahren verstanden haben.
Kinder dürfen mit dem Gerät
nicht spielen.
Kinder beaufsichtigen, um si-
cherzustellen, dass sie nicht
mit dem Gerät spielen.
Die Reinigung und Anwen-
derwartung dürfen von Kindern nicht ohne Aufsicht
durchgeführt werden.
Keine Gegenstände in die
Abluftöffnung einführen.
Sprühstrahl nicht in die Au-
gen spritzen.
Sprühstrahl nicht direkt auf
Betriebsmittel richten, die
elektrische Bauteile enthalten, wie z.B. der Innenraum
von Öfen.
Vor Anwendung auf empfind-
lichen (hochglänzenden)
Oberflächen MikrofaserWischbezug an einer nicht
sichtbaren Stelle testen.
Hinweise zum Akku
Kurzschlussgefahr! Keine
leitenden Gegenstände (z.B.
Schraubendreher oder Ähnliches) in die Ladebuchse stecken.
Das Laden des Akkus ist nur
mit beiliegendem Originalladegerät oder den von KÄRCHER zugelassenen Ladegeräten erlaubt.
Hinweise zum Ladegerät
Ladegerät mit Ladekabel bei
sichtbarer Beschädigung un-
verzüglich durch Originalteil
ersetzen.
Ladegerät nur in trockenen
Räumen verwenden und la-
gern, Umgebungstemperatur
5 - 40° C.
Den Netzstecker niemals mit
nassen Händen anfassen.
몇 Hinweise zum Transport
Der Akku ist entsprechend
der relevanten Vorschriften
für internationale Beförde-
rung geprüft und darf trans-
portiert / verschickt werden.
Die Verpackungsmaterialien sind
recyclebar. Bitte werfen Sie die
Verpackungen nicht in den Hausmüll, sondern führen Sie diese einer Wiederverwertung zu.
Altgeräte enthalten wertvolle recyclingfähige Materialien und
Stoffe, die nicht in die Umwelt gelangen dürfen. Das Gerät und der
enthaltene Akku dürfen deshalb
nicht mit dem Hausmüll entsorgt
werden. Die Entsorgung kann
kostenlos über lokal verfügbare
Rückgabe- und Sammelsysteme
erfolgen.
Hinweise zu Inhaltsstoffen (REACH)
Aktuelle Informationen zu Inhaltsstoffen finden Sie unter:
www.kaercher.de/REACH
Umweltschutz
4 DE
Page 5

Symbole in der
Betriebsanleitung
Gefahr
Für eine unmittelbar drohende
Gefahr, die zu schweren Körperverletzungen oder zum Tod
führt.
몇 Warnung
Für eine möglicherweise gefährliche Situation, die zu schweren
Körperverletzungen oder zum
Tod führen könnte.
Vorsicht
Für eine möglicherweise gefährliche Situation, die zu leichten
Verletzungen oder zu Sachschäden führen kann.
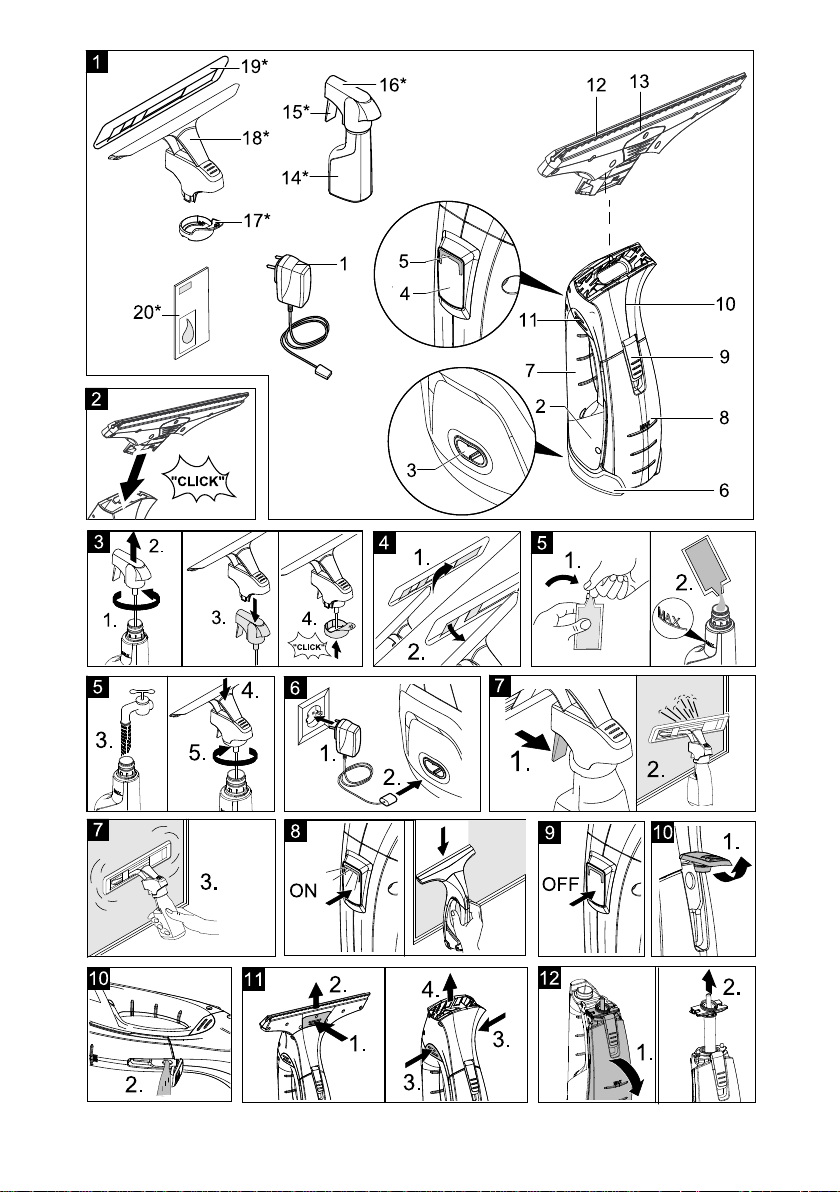
Inbetriebnahme
10 Abscheider
11 Entriegelung, Abscheider
12 Saugdüse, breit
13 Entriegelung, Saugdüse
WV 2 Plus*
14 Sprühflasche
15 Sprühhebel
16 Sprühkopf
17 Fixierring für Wischaufsatz
18 Wischaufsatz
19 Mikrofaser-Wischbezug
20 Fensterreiniger-Konzentrat
* je nach Ausstattung
Gerät montieren
Abbildung
Saugdüse auf Abscheider aufste-
cken, bis diese hörbar einrastet.
Sprühflasche und
Wischaufsatz montieren und
mit Reinigungsmittel füllen*
Gerätebeschreibung
Prüfen Sie beim Auspacken den Packungsinhalt auf fehlendes Zubehör
oder Beschädigungen. Benachrichtigen Sie bei Transportschäden bitte Ihren Händler.
Hinweis:
Abbildungen von Gerät und
Bedienung befinden sich auf
Seite 2.
Abbildung
WV 2
1 Ladegerät mit Ladekabel
2 Grundgerät
3 Ladebuchse
4 Geräteschalter (EIN/AUS)
5 Lade- / Betriebsanzeige
6 Standfuß
7 Handgriff
8 Schmutzwassertank, entnehmbar
9 Verschluss, Schmutzwassertank
* je nach Ausstattung
Hinweis: Bitte beachten Sie, dass bei
der ersten Betätigung des Sprühkopfes die Transportsicherung abfällt.
Wischaufsatz montieren
Abbildung
Sprühkopf von Sprühflasche abdre-
hen.
Wischaufsatz auf Sprühkopf setzen.
Wischaufsatz und Sprühkopf mit Fi-
xierring sichern.
Abbildung
Wischbezug auf Wischaufsatz
spannen und mit Klettband fixieren.
Sprühflasche füllen
Abbildung
Mitgeliefertes Konzentrat (1 x 20 ml) in
Sprühflasche füllen und Flasche mit
klarem Wasser langsam bis zur Markierung „MAX“ auffüllen (ergibt 250 ml
Reinigungsmittellösung).
Flasche verschließen.
– 5
5DE
Page 6
Akku aufladen
Vorsicht
Akku vor dem ersten Gebrauch
komplett aufladen.
Abbildung
Vor Benutzung, Ladegerät in einer
ordnungsgemäßen Steckdose einstecken.
Stecker vom Ladekabel an der
Rückseite des Gerätes einstecken.
Hinweis: Während des Ladevorgangs blinkt die Lade- / Betriebsanzeige. Ist der Akku voll geladen,
leuchtet sie konstant grün.
Mit der Arbeit beginnen
Reinigung mit Sprühflasche und
Wischaufsatz*
* je nach Ausstattung
Abbildung
Zum Auftragen des Reinigungsmit-
tels Sprühhebel der Flasche drücken und Fläche gleichmäßig einsprühen, anschließend mit dem
Wischbezug Schmutz lösen.
Hinweis: Wischbezug nach Bedarf unter fließendem Wasser auswaschen!
Wichtig: Stellen Sie vor der Anwendung sicher, dass die Abziehlippen frei
von Verschmutzungen sind.
Abbildung
Gerät einschalten, Lade- / Betriebs-
anzeige leuchtet konstant grün.
Zum Absaugen der Reinigungsflüs-
sigkeit das Gerät von oben nach
unten ziehen.
Hinweis: Schwer erreichbare Flächen können sowohl quer als auch
über Kopf abgesaugt werden (begrenzte Menge).
Hinweise:
Bei schwachem Akku beginnt die Lade- / Betriebsanzeige langsam zu blin-
ken und das Gerät schaltet nach einer
gewissen Zeit ab. In diesem Fall Akku
aufladen.
Während die Sprühflasche im Einsatz
ist, kann das Gerät abgeschaltet werden. Damit erhöht sich deutlich die Betriebszeit pro Akkuladung.
Reinigung ohne Sprühflasche
Reinigungsmittel nach Hersteller-
angaben auf herkömmliche Art auftragen und Schmutz lösen.
Weitere Vorgehensweise wie bei
„Reinigung mit Sprühflasche und
Wischaufsatz“, Abbildung .
Arbeit unterbrechen
Abbildung
Gerät ausschalten und auf Stand-
fuß abstellen (Parkposition).
Behälter während der Arbeit
entleeren
Ist der max. Füllstand (Markierung)
des Schmutzwassertanks erreicht,
Tank bitte entleeren.
Abbildung
Gerät ausschalten.
Abbildung
Verschluss des Schmutzwasser-
tanks öffnen und Tank entleeren.
Verschluss des Schmutzwasser-
tanks schließen.
Arbeit beenden / Gerät
reinigen
Gerät ausschalten.
Abbildung
Zuerst Saugdüse entriegeln und
von Abscheider abnehmen, dann
den Abscheider entriegeln und
ebenfalls abnehmen.
Abscheider und Saugdüse unter
fließendem Wasser reinigen (nicht
Spülmaschinengeeignet).
6 DE
– 6
Page 7

Abbildung
Achtung: Grundgerät enthält
elektrische Bauteile, dieses
nicht unter fließendem Wasser
reinigen!
Schmutzwassertank abnehmen
und Verschluß herausziehen.
Schmutzwassertank entleeren und
mit Wasser ausspülen. Tank wieder
verschließen.
Wischbezug von Sprühflasche ab-
nehmen und unter fließendem
Wasser auswaschen. Wischbezug
kann auch in der Waschmaschine
bei bis zu 60°C gewaschen werden
(ohne Einsatz von Weichspüler).
Gereinigtes Gerät vor dem Zusam-
menbau trocknen lassen.
Akku aufladen.
Gerät aufbewahren
Gerät stehend in trockenen Räu-
men lagern.
Hilfe bei Störungen
Sprühflasche sprüht nicht
Reinigungsmittel auffüllen.
Pumpenmechanismus in Sprühfla-
sche ist defekt, Händler kontaktieren.
Gerät läuft nicht an
Lade- / Betriebsanzeige prüfen:
Kein Signal bzw. langsam blinken-
des Signal: Akku laden.
Bei schnell blinkendem Signal:
Händler kontaktieren.
Streifen beim Reinigen
Abziehlippe reinigen.
Abgenutzte Abziehlippe wenden:
Abziehlippe aus Silikon seitlich
nach außen ziehen. Silikonlippe im
Bereich der Rundung mit Wasser
oder Reinigungsmittel anfeuchten.
Silikonlippe umgekehrt wieder in
Halterung einschieben.
Abziehlippe bei Bedarf erneuern:
Sind nach dem Wenden der Silikonlippe beide Kanten verschlissen, wird eine neue Silikonlippe
benötigt. Silikonlippe wie oben beschrieben austauschen.
Dosierung des Reinigungsmittels
überprüfen.
Wasser tritt seitlich am Tank
aus
Schmutzwassertank entleeren
(max. 100 ml Inhalt).
Sonderzubehör
Fensterreiniger-Konzentrat
(4 x 20 ml)
Bestell-Nr.: 6.295-302.0
Mikrofaser-Wischbezug (2 Stück)
Bestell-Nr.: 2.633-100.0
Abziehlippe, breit (2 Stück)
Bestell-Nr.: 2.633-005.0
Abziehlippe, schmal (2 Stück)
Bestell-Nr.: 2.633-104.0
Hüfttasche
Bestell-Nr.: 2.633-006.0
– 7
7DE
Page 8
Technische Daten
Schutzart IP X4
Volumen Schmutzwas-
sertank
Betriebszeit bei voller Ak-
kuladung
Nennspannung Akku 3,7 V
Nennleistung Gerät 10 W
Ladezeit bei leerem Akku 140 min
Ausgangsspannung La-
degerät
Ausgangsstrom Ladege-
rät
Schalldruckpegel
(EN 60704-2-1)
Gewicht 0,6 kg
Akkutyp Li-Ion
Technische Änderungen vorbehalten!
100 ml
25 min
5,5 V
600 mA
50 dB(A)
8 DE
– 8
Page 9

Contents
English
Proper use . . . . . . . . . . . . . . . . EN . . .3
Safety instructions . . . . . . . . . . EN . . .3
Start up. . . . . . . . . . . . . . . . . . . EN . . .5
Finish up your work / clean ap-
pliance . . . . . . . . . . . . . . . . . . . EN . . .6
Troubleshooting . . . . . . . . . . . . EN . . .7
Special accessories . . . . . . . . . EN . . .7
Technical specifications . . . . . . EN . . .7
Dear Customer,
Please read and comply with
these original instructions
prior to the initial operation of your appliance and store them for later use or
subsequent owners.
Two models of this appliance are offered.
WV 2
WV 2 Plus incl. spray bottle with wip-
ing attachmentand window-cleaning
concentrate.
Proper use
– Use this battery operated ap-
pliance only for personal use,
for cleaning moist, smooth
surfaces such as windows,
mirrors or tiles. Not meant for
the vacuum of dust.
– The appliance is not intended
to vacuum up larger amounts
of fluids from horizontal surfaces, such as from a tipped
drinking glass (max. 25 ml).
– Only use this appliance with
conventional window cleaners
(no spirit, no foam cleaners).
– We recommend: Window
cleaner concentrate made by
KÄRCHER (see chapter "Accessories").
– Please use this appliance
only with accessories and
spare parts approved by
KÄRCHER.
Any use extending beyond this
is not considered as proper use.
The manufacturer is not liable
for any losses resulting from
this; the user alone bears the
risk for this.
Safety instructions
This appliance is not intended
for use by persons with limit-
ed physical, sensory or men-
tal capacities or lacking expe-
rience and/or skills, unless
such persons are accompa-
nied and supervised by a per-
son in charge of their safety
or they have received precise
instructions on the use of this
appliance and have under-
stood the resulting risks.
Children may only use this
appliance if they are over the
age of 8 and supervised by a
person in charge of their safe-
ty, or if they have received in-
structions on the use of this
appliance and have under-
stood the resulting risks.
Children must not play with
this appliance.
Supervise children to prevent
them from playing with the
appliance.
Cleaning and user mainte-
nance must not be performed
by children without supervi-
sion.
– 3
9EN
Page 10

Do not insert objects in the
exhaust air opening.
Do not spray jet into eyes.
Do not direct the spray jet di-
rectly on equipment containing electrical components,
such as the interior of ovens.
Prior to using this appliance
on sensitive (high shine) surfaces, test the microfibre wiping pad at an inconspicuous
location.
Information regarding the battery
Short circuit hazard! Do not
insert conductive objects
(such as screwdrivers or similar) into the charger plug.
You may recharge the battery
using only the original charger provided with the appliance or a charger approved
by KÄRCHER.
Tips for using the battery
charger
In case of visual damage, re-
place the charger with charger cable immediately by original parts.
Only use and store the charg-
er in dry rooms, ambient temperature 5 - 40° C.
Never touch the mains plug
with wet hands.
몇 Information regarding the
transport
The battery has been tested
as per the relevant directives
for international transport and
can be transported/shipped.
Environmental protection
The packaging material can be
recycled. Please do not place the
packaging into the ordinary refuse for disposal, but arrange for
the proper recycling.
Old appliance contain valuable
recyclable materials and substances that must not be released
into the environment. Thus, the
appliance and the accumulator
contained must not be disposed
of via the domestic waste. The
disposal can take place via locally
available return and collection
systems free of charge.
Notes about the ingredients
(REACH)
You will find current information about
the ingredients at:
www.kaercher.com/REACH
Symbols in the operating
instructions
Danger
Immediate danger that can
cause severe injury or even
death.
몇 Warning
Possible hazardous situation
that could lead to severe injury
or even death.
Caution
Possible hazardous situation
that could lead to mild injury to
persons or damage to property.
10 EN
– 4
Page 11

Start up
Description of the Appliance
When unpacking the product, make
sure that no accessories are missing
and that none of the package contents
have been damaged. If you detect any
transport damages please contact your
dealer.
Note:
Please refer to page 2 for figures
of the appliance and the operation.
Illustration
WV 2
1 Charger with charging cable
2 Basic appliance
3 Charging box
4 ON/OFF switch for appliance
5 Charge/operations display
6 Support leg
7 Handle
8 Dirt water reservoir, removable
9 Lock, dirt water reservoir
10 Separator
11 Unlocking device, separator
12 Suction nozzle, wide
13 Unlocking device, suction nozzle
WV 2 Plus*
14 Spray bottle
15 Spray lever
16 Spray head
17 Fastening ring for the wiper attach-
ment
18 Wiping attachment
19 Micro-fibre wiping pad
20 Window cleaner concentrate
* depending on model
Assemble the appliance
Illustration
Attach the suction nozzle to the
separator until it snaps in place audibly
Attach the spray bottle and
wiper attachment and fill it
with detergent*
* depending on model
Note: Please note that after first activation of the spray head transport lock
will loosen.
Attach the wiping attachment
Illustration
Remove the spray head from the
spray bottle.
Attach the wiper attachment to the
spray head.
Secure the wiper attachment and
the spray head with the fixating ring.
Illustration
Attach the wiper pad to the wiper at-
tachment and secure with Velcro.
Fill the spray bottle
Illustration
Fill the provided concentrate (1 x 20
ml) in the spray bottle and slowly fill
the bottle with clear water up to the
"MAX" marking (makes 250 ml of
detergent solution).
Close the bottle.
Charge the battery
Caution
Before using the first time, fully
charge the battery.
Illustration
Plug the charger into a proper pow-
er outlet prior to use.
Insert the charging cable plug to the
back of the appliance.
– 5
11EN
Page 12
Note: The charging / power indica-
tor flashes during the charging pro-
cess. If the accumulator is fully
charged, it is constantly illuminated
in green.
Start working
Cleaning with spray bottle and
wiper attachment*
* depending on model
Illustration
Press the spray lever on the bottle
to apply the detergent and spray the
surface evenly; after that, loosen
the dirt using the wiping pad.
Note: Rinse pad under running wa-
ter if needed!
Important: Prior to use, ensure that
the squeegees are free of soiling.
Illustration
Switch on the appliance, the charg-
ing / power indicator is constantly il-
luminated in green.
Pull the appliance from the top to
the bottom to vacuum up the deter-
gent.
Note: Hard to reach areas can be
vacuumed vertically or horizontally
(limited areas).
Notes:
If the battery is low, the charging / power indicator starts flashing slowly and
the appliance switches off after a certain time. If this is the case, charge the
battery.
The appliance can be switched off
while the spray bottle is in use. This
significantly increases the operating
time per battery charge.
Cleaning without the spray bottle
Apply the detergent as usual ac-
cording to manufacturer's instruc-
tions and loosen the dirt.
Further procedure same as the
"Cleaning with spray bottle and wiper attachment", see illustration .
Interrupting the work
Illustration
Switch off the appliance and set it down
on the pedestal (parking position).
Emptying the reservoir
during operation
Once the max. fill level (mark) of the
dirt water reservoir is reached, please
empty the tank.
Illustration
Turn off the appliance.
Illustration
Open the closure of the wastewater
tank and empty the tank.
Close the closure of the wastewater
tank.
Finish up your work / clean
appliance
Turn off the appliance.
Illustration
Unlock the suction nozzle first and
remove it from the separator, then
unlock the separator and remove it,
too.
Clean the separator and the suction
nozzle under running water (not
dishwasher safe).
Illustration
Caution: The basic appliance
contains electrical components.
Do not clean this under running
water!
Remove the wastewater tank and
pull out the closure.
Empty the wastewater tank and
rinse it with water. Close the tank
again.
12 EN
– 6
Page 13
Remove the wiping cover from the
spray bottle and rinse it under run-
ning water. The wiping cover can
also be washed in the washing ma-
chine at a temperature of up to
60°C (without the use of fabric sof-
teners).
Let the cleaned appliance dry prior
to assembly.
Charge the battery.
Storing the Appliance
Store the appliance upright in a dry
room.
Troubleshooting
Spray bottle does not spray
Refill detergent.
Pump mechanism in spray botte
defective, contact dealer.
Water is leaking from the side
of the tank
Empty the dirt water reservoir (max.
100 ml content).
Special accessories
Window cleaner concentrate
(4 x 20 ml)
Order No. 6.295-302.0
Micro-fibre wiping pad (2 piece)
Order No. 2.633-100.0
Removable lips, wide (2 ea.)
Order No.: 2.633-005.0
Removable lips, small (2 ea.)
Order No.: 2.633-104.0
Waist bag
Order No.: 2.633-006.0
Technical specifications
Machine does not start
Check the charge/operations display:
No signal or slowly blinking signal:
Charge the battery.
With a rapidly blinking signal: In-
form your dealer.
Streaks while cleaning
Clean the pull-off lip.
Reverse the used pull-off lip:
Pull the silicone squeegee to the
side. Wet the squeegee in the area
of the curve with water or detergent.
Slide the silicone squeegee back in
the holder in reverse order.
Replace the pull-off lip if neces-
sary:
If both edges are worn after turning
the silicone squeegee around, a
new silicone squeegee is required.
Replace silicone squeegee as de-
scribed above.
Adjust the dosing of cleaning solution.
Type of protection IP X4
Volume of dirt water res-
ervoir
Operating time with full
charge
Nominal battery voltage 3,7 V
Rated power of appli-
ance
Charging current for
empty battery
Output voltage, charger 5,5 V
Output current, charger 600 mA
Sound pressure level
(EN 60704-2-1)
Weight 0,6 kg
Battery type Li-Ion
Subject to technical modifications!
– 7
100 ml
25 min
10 W
140 min
50 dB(A)
13EN
Page 14
Table des matières
Français
Table des matières. . . . . . . . . . FR . . .3
Utilisation conforme . . . . . . . . . FR . . .3
Consignes de sécurité . . . . . . . FR . . .3
Mise en service . . . . . . . . . . . . FR . . .5
Terminer le travail / nettoyer
l'appareil. . . . . . . . . . . . . . . . . . FR . . . 7
Assistance en cas de panne . . FR . . .7
Accessoires en option . . . . . . . FR . . .8
Caractéristiques techniques. . . FR . . .8
Cher client,
Lire cette notice originale
avant la première utilisation
de votre appareil, se comporter selon
ce qu'elle requièrt et la conserver pour
une utilisation ultérieure ou pour le propriétaire futur.
L'appareil est livré en 2 versions différentes.
WV 2
WV 2 Plus y compris flacon vaporisa-
teur avec porte-balai et et concentré de
lave vitres
Utilisation conforme
– Utiliser cette appareil fonc-
tionnant avec accumulateur
uniquement à des fins privées, pour le nettoyage de
surfaces humides et lisses
comme les fenêtres, les miroirs ou le carrelage. L'appareil ne doit pas aspirer de
poussières.
– L'appareil n'est pas adapté
pour l'aspiration de grandes
quantités de liquides sur des
surfaces horizontales, par ex.
du liquide provenant d'un
verre renversé (max. 25 ml).
– Utiliser cet appareil unique-
ment en liaison avec des nettoyants à vitre courants dans
le commerce (par d'essence,
pas de détergent moussant).
– Notre recommandation :
concentré de nettoyant à vitre
de Kärcher
®
(cf. chapitre "Ac-
cessoires spéciaux").
– Seuls des accessoires et des
pièces de rechange d’origine
autorisés par Kärcher
®
doivent être utilisés.
Toute utilisation sortant du
cadre donné est considérée
comme non conforme. Le
constructeur décline toute responsabilité pour des dommages
en résultant, seul l'utilisateur en
assume le risque.
Consignes de sécurité
Cet appareil n'est pas destiné
à être utilisé par des per-
sonnes ayant des capacités
physiques, sensorielles ou
mentales réduites ou man-
quant d'expérience et/ou de
connaissances, sauf si ces
mêmes personnes sont sous
la supervision d'une per-
sonne responsable de leur
sécurité ou ont été formées à
l'utilisation de l'appareil.
Des enfants ne peuvent utili-
ser l'appareil que s'ils ont plus
de 8 ans et s'ils sont sous la
surveillance d'une personne
compétence ou s'ils ont reçu
de sa part des instructions
d'utilisation de l'appareil et
14 FR
– 3
Page 15
s'ils ont compris les dangers
qui peuvent en résulter.
Les enfants ne doivent pas
jouer avec l'appareil.
Surveiller les enfants pour
s'assurer qu'ils ne jouent pas
avec l'appareil.
Le nettoyage et la mainte-
nance par l'utilisateur ne
doivent pas être effectués par
des enfants sans surveillance.
Ne pas introduire d'objets
dans l'ouverture d'évacuation.
Ne pas projeter le jet de pul-
vérisation dans les yeux.
Ne pas orienter le jet de pul-
vérisation directement sur les
moyens d'exploitation qui
contiennent des composants
électriques, comme par ex.
l'espace intérieur des fours.
Avant l'application sur des
surfaces sensibles (fortement
brillantes), tester le tampon
d'essuyage en microfibres à
un endroit invisible.
Remarques relatives à l'accumulateur
Risque de court-circuit ! Ne
pas enficher d'objets conducteurs (par ex. tournevis ou
équivalent) dans la douille de
chargement.
Le chargement de l'accumu-
lateur n'est permis que avec
l'appareil de charge original
ci-joint ou avec l'appareil de
charge autorisé par
Kärcher
®
.
Remarques relatives au
chargeur
Remplacer le chargeur avec
le câble de chargement cas
d'endommagement immédia-
tement par des pièces d'ori-
gine.
Utiliser et entreposer le char-
geur uniquement dans des lo-
caux secs, à une température
ambiante comprise entre 5 et
40° C.
Ne jamais saisir le câble d’ali-
mentation avec des mains
mouillées.
몇 Instructions relatives au
transport
L'accu a été contrôlé dans le
respect des directives qui
s'appliquent pour le transport
international et peut être
transporté / expédié.
Protection de
l’environnement
Les matériaux constitutifs de l’emballage sont recyclables. Ne pas jeter les emballages dans les ordures ménagères, mais les remettre à un système de recyclage.
Les appareils ancien modèle
contiennent des matériaux et des
substances de qualité recyclables
qui ne doivent pas être tout simplement jetés. L'appareil et l'accumulateur qu'il contient ne
doivent donc pas être éliminés
dans les ordures ménagères.
L'élimination se fait gratuitement
par des systèmes de reprise et de
collecte disponibles localement.
– 4
15FR
Page 16

Instructions relatives aux ingrédients (REACH)
Les informations actuelles relatives
aux ingrédients se trouvent sous :
www.kaercher.com/REACH
Symboles utilisés dans le mode
d'emploi
Danger
Pour un danger immédiat qui
peut avoir pour conséquence la
mort ou des blessures corporelles graves.
몇 Avertissement
Pour une situation potentiellement dangereuse qui peut avoir
pour conséquence des blessures corporelles graves ou la
mort.
Attention
Pour une situation potentiellement dangereuse qui peut avoir
pour conséquence des blessures légères ou des dommages matériels.
Mise en service
Description de l’appareil
Contrôler le matériel lors du déballage
pour constater des accessoires manquants ou des dommages. Si des dégâts dus au transport sont constatés, il
faut en informer le revendeur.
Remarque :
Voir page 2 pour les illustrations
d’utilisation et des éléments de
l’appareil.
Illustration
WV 2
1 Appareil de charge avec câble de
charge
2 Appareil de base
3 Prise de charge
4 Interrupteur MARCHE/ARRET
5 Affichage de charge / de service
6 Pied
7 Poignée
8 Réservoir d'eau sale, amovible
9 Verrou, réservoir d'eau sale
10 séparateur
11 verrouillage, séparateur
12 buse d'aspiration, large
13 verrouillage, buse d'aspiration
WV 2 Plus*
14 Bouteille de pulvérisation
15 Levier de pulvérisation
16 tête de pulvérisation
17 bague de fixation pour le porte-balai
18 Extension d'essuyage
19 Tampon d'essuyage en microfibre
20 Concentré de nettoyant à fenêtre
* en fonction de l'équipement
Montage de l'appareil
Illustration
Enficher la buse d'aspiration sur le
séparateur jusqu'à ce qu'elle s'en-
clenche audiblement.
Monter la bouteille de
vaporisation et l'extension
d'essuyage et remplir de
détergent*
* en fonction de l'équipement
Remarque : Respecter le fait que la
sécurité de transport est annulée au
premier actionnement de la tête de pulvérisation.
Monter l'extension d'essuyage
Illustration
Dévisser la tête de pulvérisation de
la bouteille de pulvérisation.
Poser l'extension d'essuyage sur la
tête de pulvérisation.
Fixer l'extension d'essuyage et la
tête de pulvérisation avec la bague
de fixation.
16 FR
– 5
Page 17

Illustration
Tendre le tampon d'essuyage sur
l'extension d'essuyage et fixer la
bande velcro.
Remplir la bouteille de
pulvérisation
Illustration
Remplir le concentré fourni (1 x 20
ml) dans le flacon vaporisateur,
puis remplir lentement à l'eau claire
jusqu'au marquage "MAX" (donne
250 ml de solution de nettoyage).
Fermer la bouteille.
Charger l'accumulateur
Attention
Avant la première utilisation,
charger complètement l‘accumulateur.
Illustration
Avant de l'utiliser, brancher le char-
geur dans une prise de courant
adaptée.
Brancher le connecteur du câble de
charge sur le côté arrière de l'appareil.
Remarque : L'indicateur de charge
/ de service clignote pendant le processus de charge. Lorsque l'accumulateur est complètement chargé,
l'indicateur est allumé en continu en
vert.
Commencer le travail
Nettoyage avec bouteille de
pulvérisation et extension
d'essuyage*
* en fonction de l'équipement
Illustration
Pour appliquer le détergent, ap-
puyer sur le levier de pulvérisation
de la bouteille et pulvériser uniformément la surface, ensuite décoller
la saleté avec un tampon d'es-
suyage.
Remarque : Rincer le tampon à
l'eau courante si nécessaire !
Important : Avant d'utiliser l'appareil,
assurez-vous que les lèvres démontables sont exemptes de salissures.
Illustration
Mettre l'appareil en service ; l'indi-
cateur de charge / de service est al-
lumé en continu en vert.
Pour aspirer le détergent, tirer l'ap-
pareil du haut vers le bas.
Remarque : Les surfaces difficiles
à atteindre peuvent être aspirées
aussi bien de manière transversale
que par la tête (quantité limitée).
Remarque :
Lorsque l'accumulateur est faible, l'indicateur de charge / de service commence à clignoter lentement et l'appareil se met au bout d'un certain temps
hors service. Dans ce cas, charger
l'accumulateur.
Pendant que le flacon vaporisateur est
utilisé, l'appareil peut être mis hors service. Ainsi, le temps de fonctionnement
par chargement de la batterie est sensiblement plus élevé.
Nettoyage sans bouteille de
pulvérisation
Appliquer le détergent selon les in-
dications du fabricant de la manière
habituelle et décoller la saleté.
Suite de la procédure comme pour
le « Nettoyage avec bouteille de
pulvérisation et extension
d'essuyage », illustration .
Interrompre le travail
Illustration
Mettre l'appareil hors service et l'ar-
rêter sur le pied d'appui (position de
stationnement).
– 6
17FR
Page 18
Vider la cuve durant le travail
Ranger l’appareil
Si le niveau de remplissage maximal
(repère) du réservoir d'eau sale est atteint, vider le réservoir.
Illustration
Mettre l’appareil hors tension.
Illustration
Ouvrir le verrou du bac d'eau sale
et vider le réservoir.
Fermer le verrou du bac d'eau sale.
Terminer le travail /
nettoyer l'appareil
Mettre l’appareil hors tension.
Illustration
Tout d'abord, déverrouiller la buse
d'aspiration et la retirer du séparateur, puis déverrouiller le séparateur et le retirer également.
Nettoyer le séparateur et la buse
d'aspiration à l'eau courante (non
adapté au lave-vaisselle).
Illustration
Attention : l'appareil de base
contient des composants électriques, ne pas le nettoyer à
l'eau courante !
Retirer le bac d'eau sale et enlever
la fermeture.
Vidanger le bac d'eau sale et le rin-
cer à l'eau. Refermer le réservoir.
Retirer la garniture d'essuyage du
flacon vaporisateur et rincer à l'eau
courante. La garniture d'essuyage
peut également être lavée au lavevaisselle à une température maximale de 60°C (sans adoucissant).
Laisser sécher l'appareil nettoyé
avant de le remonter.
Charger l'accumulateur.
Entreposer l’appareil dans des lo-
caux secs.
Assistance en cas de
panne
La bouteille de pulvérisation
ne pulvérise pas
Faire le plein de détergent.
Le mécanisme de pompe dans la
bouteille de pulvérisation est défec-
tueux, contacter le revendeur.
L'appareil ne démarre pas
Contrôler l'affichage de charge / de
service:
Pas de signal ou signal clignotant
lentement : Charger l'accumula-
teur.
Si le signal clignote rapidement :
Contacter le revendeur.
Stries pendant le nettoyage
Nettoyer la lèvre extensible
Retourner la lèvre usée :
Dégager la lèvre démontable laté-
ralement vers l'extérieur. Humecter
la lèvre en silicone avec de l'eau ou
du détergent au niveau de la partie
arrondie. Insérer la lèvre en silicone
dans le sens inverse dans la fixa-
tion.
Si nécessaire, remplacer la
lèvre :
Si les deux bords sont usés après le
retournement de la lèvre en sili-
cone, cette dernière doit être rem-
placée par une lèvre en silicone
neuve. Remplacer la lèvre en sili-
cone comme décrit ci-dessus.
Contrôler le dosage du détergent.
18 FR
– 7
Page 19

L'eau sort du réservoir sur le
côté
Vider le réservoir d'eau sale (contenance max. 100 ml)
Accessoires en option
Concentré de nettoyant à vitre
(4 x 20 ml)
N° de commande : 6.295-302.0
Tampon d'essuyage en microfibre
(2 pièce)
N° de commande : 2.633-100.0
Lèvre extensible large (2 en tout)
Référence : 2.633-005.0
lèvre démontable, étroite (2 pièces)
Référence : 2.633-104.0
sacoche ventrale
Référence : 2.633-006.0
Caractéristiques
techniques
Type de protection IP X4
Volume réservoir d'eau
sale
Durée de service avec
charge d'accumulateur
totale
Tension nominale accumulateur
Puissance nominale de
l'appareil
Temps de charge d'un
accumulateur vide
Tension de sortie du
chargeur
Courant de sortie du
chargeur
Niveau de pression
acoustique (EN 607042-1)
Poids 0,6 kg
Type d'accumulateur Li-Ion
Sous réserve de modifications
techniques !
100 ml
25 min
3,7 V
10 W
140 min
5,5 V
600 mA
50 dB(A)
– 8
19FR
Page 20

Indice
Italiano
Uso conforme a destinazione. . IT . . .3
Norme di sicurezza . . . . . . . . . IT . . .3
Messa in funzione . . . . . . . . . . IT . . .5
Terminare il lavoro / Pulire l'ap-
parecchio . . . . . . . . . . . . . . . . . IT . . .7
Guida alla risoluzione dei guasti IT . . .7
Accessori optional . . . . . . . . . . IT . . .8
Dati tecnici . . . . . . . . . . . . . . . . IT . . .8
Gentile cliente,
Prima di utilizzare l'apparec-
chio per la prima volta, leggere le presenti istruzioni originali, seguirle e conservarle per un uso futuro o
in caso di rivendita dell'apparecchio.
L'apparecchio è fornito in 2 diverse
versioni.
WV 2
WV 2 Plus compreso nebulizzatore
con sostegno di lavaggio e concentrato
puliscivetro.
Uso conforme a
destinazione
– Utilizzare questo apparecchio
alimentato da un accumulatore esclusivamtente per l'utilizzo privato per la pulizia di superfici umide e lisce quali finestre, specchi o piastrelle.
Non deve essere aspirata alcuna polvere.
– L'apparecchio non è indicato
per l'aspirazione di grandi
quantità di liquidi da superfici
orizzontali quali ad es. da un
bicchiere rovesciato
(max. 25 ml).
– Usare questo apparecchio
solo insieme ai detergenti per
vetri comunemente in com-
mercio (non usare spirito, non
usare alcun detergente schiumogeno).
– Consigliamo: Concentrato
puliscivetro KÄRCHER (vedi
capitolo „Accessori speciali“).
– Utilizzate questo apparecchio
solo con accessori e pezzi di
ricambio KÄRCHER.
Ogni altro utilizzo è considerato
non conforme a destinazione. Il
produttore non risponde per
danni da ciò risultanti e sarà l'utilizzatore ad assumersi qualsiasi
relativo rischio.
Norme di sicurezza
Questo apparecchio non è in-
dicato per essere usato da
persone con delle limitate ca-
pacità fisiche, sensoriali o
mentali e da persone che ab-
biano poca esperienza e/o
conoscenza dell'apparecchio
a meno che non vengano su-
pervisionati per la loro sicu-
rezza da una persona incari-
cata o che abbiano da questa
ricevuto istruzioni su come
usare l'apparecchio e dei pe-
ricoli da esso derivante.
I bambini possono utilizzare
l'apparecchio solo se maggio-
ri dell'età di 8 anni e a meno
che non vengano supervisio-
nati per la loro sicurezza da
una persona incaricata o che
abbiano da questa ricevuto
istruzioni su come usare l'ap-
parecchio e dei pericoli da
esso derivante.
20 IT
– 3
Page 21

I bambini non devono giocare
con l'apparecchio.
Sorvegliare i bambini per as-
sicurarsi che non giochino
con l'apparecchio.
La pulitura e la manutenzione
utente non devono essere
eseguiti dai bambini senza
sorveglianza.
Non introdurre alcun oggetto
nell'apertura dell'aria di scarico.
Non puntare il getto di spruz-
zo negli occhi.
Non puntare il getto di spruz-
zo direttamente sui dispositivi
che contengono componenti
elettrici quali ad es. il vano interno dei forni.
Prima dell'utilizzo su superfici
sensibili (altamente lucenti)
testare il pad di microfibre su
un punto non visibile.
Accumulatore
Pericolo di corto circuito!
Non introdurre oggetti conduttori (p.es. giraviti o simili)
nella presa di carica.
La carica dell'accumulatore è
consentita solo con l'utilizzo
del caricabatterie originale o
con caricabatterie autorizzati
dalla KÄRCHER.
Indicazioni per quanto ri-
guarda l'accumulatore
Se un accumulatore con ri-
spettivo cavo dovesse risultare visibilmente danneggiato,
sostituirlo immediatamente
con un pezzo di ricambio originale.
Usare e conservare il carica-
batterie solo in ambienti
asciutti, temperatura ambien-
te 5 - 40° C.
Non toccare mai la spina di
alimentazione con le mani
bagnate.
몇 Indicazioni sul trasporto
L'accumulatore è testato se-
condo le normative rilevanti
per il trasporto internazionale
e può essere trasportato /
spedito.
Protezione dell’ambiente
Tutti gli imballaggi sono riciclabili.
Gli imballaggi non vanno gettati
nei rifiuti domestici, ma consegnati ai relativi centri di raccolta.
Apparecchi vecchi contengono
materiali di valore riciclabili e sostanze che non devono essere dispersi nell'ambiente. L'apparecchio e l'accumulatore all'interno
non devono perciò essere smaltiti
con i rifiuti domestici. Lo smaltimento può essere eseguito gratuitamente tramite sistemi di consegna e raccolta differenziata disponibili localmente.
Avvertenze sui contenuti (REACH)
Informazioni aggiornate sui contenuti
sono disponibili all'indirizzo:
www.kaercher.com/REACH
– 4
21IT
Page 22

Simboli riportati nel manuale
d'uso
Pericolo
Per un rischio imminente che determina lesioni gravi o la morte.
몇 Attenzione
Per una situazione di rischio
possibile che potrebbe determinare lesioni gravi o la morte.
Attenzione
Per una situazione di rischio
possibile che potrebbe determinare danni leggeri a persone o
cose.
Messa in funzione
Descrizione dell’apparecchio
Durante il disimballaggio controllare
l'eventuale mancanza di accessori o la
presenza di danni del contenuto. Nel
caso in cui si riscontrino danni dovuti al
trasporto, informare immediatamente il
proprio rivenditore.
Avviso:
Le illustrazioni relative all’apparecchio e all’uso si trovano a pagina 2.
Figura
WV 2
1 Caricabatteria con rispettivo cavo
2 Apparecchio base
3 Presa del caricabatterie
4 Interruttore dell'apparecchio (ON/
OFF)
5 Indicatore di ricarica / funzionamento
6 Base
7 Impugnatura
8 Serbatoio dell'acqua sporca, estraibile
9 Chiusura, serbatoio acqua sporca
10 Separatore
11 Sbloccaggio, separatore
12 Bocchetta di aspirazione, larga
13 Sbloccaggio, bocchetta di aspirazione
WV 2 Plus*
14 Nebulizzatore
15 Leva di nebulizzazione
16 Testa nebulizzatrice
17 Anello di fissaggio per inserto di la-
vaggio
18 Sostegno di lavaggio
19 Panno in microfibra
20 Concentrato puliscivetro
* in funzione alla dotazione
Montare l'apparecchio
Figura
Infilare la bocchetta di aspirazione
sul separatore finché ingrana udibil-
mente.
Montare il nebulizzatore ed il
sostegno di lavaggio e
riempire con il detergente*
* in funzione alla dotazione
Avviso: Si prega di osservare che alla
prima attivazione della testa di nebulizzazione cade la sicura di trasporto.
Montare il sostegno di lavaggio
Figura
Svitare la testa di nebulizzazione
dal nebulizzatore.
Inserire il sostegno di lavaggio sulla
testa di nebulizzazione.
Bloccare il sostegno di lavaggio e la
testa di nebulizzazione con l'anello
di fissaggio.
Figura
Tendere il panno sul sostegno e fis-
sarlo con il nastro a velcro.
Riempire il nebulizzatore
Figura
Versare il concentrato compreso
nella fornitura (1 x 20 ml) nel nebu-
lizzatore e riempire il contenitore
lentamente con acqua pulita fino
alla marcatura „MAX“ (risultano 250
ml di soluzione detergente).
Chiudere il contenitore.
22 IT
– 5
Page 23

Caricare l'accumulatore
Attenzione
Caricare completamente la batteria ad acucmulatore prima di
usarla la prima volta.
Figura
Attaccare il caricabatterie in una
presa regolare prima di utilizzarlo.
Inserire la spina del cavo di ricarica
sul retro dell'apparecchio.
Indicazione: Durante la ricarica
lampeggia la spia di ricarica/funzionamento. Quando la batteria è carica, la spia di controllo è accesa
verde.
Iniziare a lavorare
Pulizia con nebulizzatore e
sostegno di lavaggio*
* in funzione alla dotazione
Figura
Per applicare il detergente premere
la leva di nebulizzazione e nebulizzare uniformemente, successivamente rimuovere lo sporco con il
panno.
Nota: All'occorrenza pulire il pad
sotto acqua corrente!
Importante: Prima dell'utilizzo accertarsi che i tergivetro non siano sporchi.
Figura
Accendere l'apparecchio, la spia di
ricarica / funzionamento è costantamente accesa verde.
Per aspirare il liquido detergente ti-
rare l'apparecchio dall'alto verso il
basso.
Nota: Le superfici difficilmente raggiungibili possono essere aspirate
sia in trasversale oppure a testa in
giù (quantità limitata).
Note:
Quando l'accumulatore è scarico l'indicatore di ricarica/funzionamento inizia
a lampeggiare lentamente e l'apparecchio si spegne dopo un determinato
periodo di tempo. In questo caso ricaricare l'accumulatore.
Mentre il nebulizzatore è in funzione,
l'apparecchio può essere spento. In
questo modo aumenta notevolmente la
durata di funzionamento per ogni ricarica.
Pulizia senza nebulizzatore
Applicare il detergente secondo le
indicazioni del produttore nel modo
conforme e rimuovere lo sporco.
Procedere come per „Pulizia con
nebulizzatore e sostegno di lavag-
gio“, Figura .
Interrompere i lavori
Figura
Spegnere l'apparecchio e appog-
giarlo sul piede fisso (posizione di
parcheggio).
Svuotare il contenitore
durante il lavoro
Quando si raggiunge il livello max. di riempimento (contrassegno) del serbatoio dell'acqua sporca, svuotare il serbatoio.
Figura
Spegnere l’apparecchio.
Figura
Aprire il tappo di chiusura del serba-
toio acqua sporca e svuotare il ser-
batoio.
Chiudere il tappo del serbatoio ac-
qua sporca.
– 6
23IT
Page 24

Terminare il lavoro / Pulire
l'apparecchio
Spegnere l’apparecchio.
Figura
Sbloccare dapprima la bocchetta di
aspirazione e rimuoverla dal separatore, poi sbloccare il separatore e
rimuoverlo anche.
Pulire il separatore e la bocchetta di
aspirazione sotto acqua corrente
(non idonei per lavastoviglie).
Figura
Attenzione: L'apparecchio di
base contiene componenti elettrici, non pulirlo sotto acqua corrente!
Rimuovere il serbatoio acqua spor-
ca e estrarre il tappo di chiusura.
Svuotare il serbatoio acqua sporca
e sciacquare con acqua. Richiudere il serbatoio.
Rimuovere il panno dal nebulizza-
tore e pulirlo sotto acqua corrente. Il
panno può essere lavato in lavatrice fino a 60 °C (senza l'aggiunta di
ammorbidente).
Far asciugare l'apparecchio pulito
prima dell'assemblaggio.
Caricare l'accumulatore.
Deposito dell’apparecchio
Conservare l’apparecchio diritto in
luoghi asciutti.
L'apparecchio non si accende
Controllare l'indicatore di ricarica / funzionamento:
Nessun segnale o segnale lampeg-
giante lento: Caricare l'accumulato-
re.
Nel caso in cui lampeggia veloce-
mente: Contattare il rivenditore.
Strisce durante la pulizia
Pulire il tergivetro.
Voltare il tergivetro usurato:
Tirare il tergivetro di silicone lateral-
mente verso l'esterno. Inumidire il
labbro di silicone nella zona dell'ar-
rotondamento con acqua o deter-
gente. Introdurre nuovamente il
labbro di silicone nel sostegno nel
lato inverso.
Sostituire se necessario il tergi-
vetro:
Se dopo aver girato il labbro di sili-
cone i due bordi sono usurati, allora
è necessario usare un labbro di sili-
cone nuovo. Sostituire il labbro di
silicone come descritto sopra.
Controllare il dosaggio del liquido
detergente.
Fuoriesce acqua lateralmente
dal serbatoio
Svuotare il serbatoio dell'acqua
sporca (max. 100 ml contenuto).
Guida alla risoluzione dei
guasti
Il nebulizzatore non spruzza
Aggiungere il detergente
Meccanismo di pompaggio nel ne-
bulizzatore difettoso, contattare il rivenditore.
24 IT
– 7
Page 25

Accessori optional
Concentrato puliscivetro (4 x 20 ml)
Cod. d’ordin.: 6.295-302.0
Panno in microfibra (2 x)
Cod. d’ordin.: 2.633-100.0
Tergivetro, largo (2 pezzi)
N. ordinazione: 2.633-005.0
Labbra tergivetro, stretto (2 pz.)
N. ordinazione: 2.633-104.0
Borsa laterale
N. ordinazione: 2.633-006.0
Dati tecnici
Protezione IP X4
Volume serbatoio di ac-
qua sporca
Tempo di funzionamen-
to a carica massima
Tensione nominale ac-
cumulatore
Potenza nominale appa-
recchio
Tempo di carica, accu-
mulatore scarico
Tensione di uscita cari-
cabatterie
Corrente di uscita cari-
cabatterie
Pressione acustica
(EN 60704-2-1)
Peso 0,6 kg
Tipo accumulatore Li-Ion
Con riserva di modifiche tecniche!
100 ml
25 min
3,7 V
10 W
140 min
5,5 V
600 mA
50 dB(A)
– 8
25IT
Page 26

Inhoud
Nederlands
Doelmatig gebruik . . . . . . . . . . NL . . .3
Veiligheidsinstructies . . . . . . . . NL . . .3
Ingebruikneming. . . . . . . . . . . . NL . . .5
Werk beëindigen / apparaat rei-
nigen . . . . . . . . . . . . . . . . . . . . NL . . .6
Hulp bij storingen . . . . . . . . . . . NL . . .7
Bijzondere toebehoren . . . . . . . NL . . .7
Technische gegevens. . . . . . . . NL . . .8
Beste klant,
Lees vóór het eerste gebruik
van uw apparaat deze originele gebruiksaanwijzing, ga navenant
te werk en bewaar deze voor later gebruik of voor een latere eigenaar.
Het toestel wordt geleverd in twee ver-
schillende uitvoeringen.
WV 2
WV 2 plus incl. sproeifles met wisser-
opzetstuk en concentraat voor het reinigen van ramen.
Doelmatig gebruik
– Gebruik dat accugedreven
toestel aaleen voor private
doeleinden, voor de reiniging
van vochtige, gladde oppervlakken zoals bijvoorbeeld
vensters, spiegels of tegels.
Er mag geen stof opgezogen
worden.
– Het toestel is niet geschikt
voor het opzuigen van grote
hoeveelheden vloeistof van
horizontale oppervlakken, bv.
door een omgevallen drinkglas (max. 25 ml).
– Gelieve het toestel alleen te
gebruiken in combinatie met
traditionele ruitreinigingsmiddelen (geen spiritus, geen
schuimreiniger).
– Wij bevelen aan: geconcen-
treerd ruitreinigingsmiddel
van KÄRCHER (zie hoofdstuk "Speciale accessoires")
– Gebruik voor dit apparaat al-
leen met door KÄRCHER
toegestane accessoires en
onderdelen.
Ieder daarboven uitgaand gebruik geldt als niet volgens de
voorschriften. Voor hieruit resulterende schades is de fabrikant
niet aansprakelijk, het risico
hiervoor draagt alleen de gebruiker.
Veiligheidsinstructies
Dit apparaat mag niet gebruikt
worden door personen met
beperkte fysieke, zintuiglijke
of mentale capaciteiten of met
te weinig ervaring en/of ken-
nis, tenzij ze onder toezicht
staan van een bevoegde per-
soon die instaat voor hun vei-
ligheid of van die persoon in-
structies hebben gekregen
over het gebruik van het appa-
raat en de daaruit resulteren-
de gevaren begrijpen.
Kinderen mogen het appa-
raat enkel gebruiken wanneer
ze ouder zijn dan 8 jaar en
onder toezicht staan van een
persoon die verantwoordelijk
is voor hun veiligheid of van
die persoon instructies heb-
ben gekregen over het ge-
bruik van het apparaat en de
daaruit resulterende gevaren
begrijpen.
26 NL
– 3
Page 27

Kinderen mogen niet met het
apparaat spelen.
Kinderen moeten gecontro-
leerd worden om te garanderen dat ze niet met het apparaat spelen.
De reiniging en het gebrui-
kersonderhoud moegen niet
zonder toezicht door kinderen
uitgevoerd worden.
Geen voorwerpen in de ont-
luchtingsopening stoppen.
Spuitstraal niet op de ogen
richten.
Spuitstraal niet direct op be-
drijfsmiddelen richten die
elektrische componenten bevatten, zoals bijvoorbeeld de
binnenruimte van ovens.
Voor gebruik op gevoelige
(glanzende) oppervlakken
het microvezelpad testen op
een onopvallende plaats.
Aanwijzingen over de accu
Kortsluitingsgevaar! Geen
geleidende voorwerpen (bijv.
schroevendraaier e.d.) in de
laadbus steken.
Het laden van de accu is uit-
sluitend toegestaan met het
meegeleverde originele laadapparaat of met de door KÄRCHER goedgekeurde laadapparaten.
Instructies over het laadap-
paraat
Laadapparaat met laadkabel
bij zichtbare beschadiging
onmiddellijk vervangen door
een origineel onderdeel.
Oplaadapparaat alleen in
droge ruimten gebruiken en
opslaan, omgevingstempera-
tuur 5 - 40° C.
De stekker nooit met natte
handen aanraken.
몇 Instructies betreffende het
transport
De accu is overeenkomstig
de relevante voorschriften
voor internationaal transport
gecontroleerd en mag ge-
transporteerd / verstuurd wor-
den.
Zorg voor het milieu
Het verpakkingsmateriaal is herbruikbaar. Deponeer het verpakkingsmateriaal niet bij het huishoudelijk afval, maar bied het aan
voor hergebruik.
Oude apparaten bevatten waardevolle, voor recycling geschikte
materialen en stoffen, die niet in
het milieu terecht mogen komen.
Het apparaat en de accu mogen
daarom niet met het huisvuil afgevoerd worden. De afvoer kan gratis via de plaatselijk beschikbare
teruggave- en inzamelsystemen
gebeuren.
Aanwijzingen betreffende de inhoudsstoffen (REACH)
Huidige informatie over de inhoudsstoffen vindt u onder:
www.kaercher.com/REACH
– 4
27NL
Page 28

Symbolen in de
gebruiksaanwijzing
Gevaar
Voor een onmiddellijk dreigend
gevaar dat leidt tot ernstige en
zelfs dodelijke lichamelijke letsels.
몇 Waarschuwing
Voor een mogelijks gevaarlijke
situatie die zou kunnen leiden
tot ernstige en zelfs dodelijke lichamelijke letsels.
Voorzichtig
Voor een mogelijks gevaarlijke
situatie die kan leiden tot lichte
lichamelijke letsels of materiële
schade.
Ingebruikneming
Beschrijving apparaat
Controleer bij het uitpakken de inhoud
van de verpakking op ontbrekende toebehoren, of beschadigingen. Neem bij
transportschades contact op met uw
leverancier.
Opmerking:
U vindt afbeeldingen van het apparaat en de bediening ervan op
pagina 2.
Afbeelding
WV 2
1 Laadapparaat met laadkabel
2 Basiseenheid
3 Laadbus
4 Schakelaar van het apparaat (AAN
/ UIT)
5 Ladings- / bedrijfsindicatie
6 Voet
7 Handgreep
8 Vuilwaterreservoir, uitneembaar
9 Vergrendeling vuilwaterreservoir
28 NL
10 Afscheider
11 Ontgrendeling, afscheider
12 Zuigmond, breed
13 Ontgrendeling, zuigmond
WV 2 Plus*
14 Spuitfles
15 Spuithendel
16 Sproeikop
17 Fixeerring voor wisseropzetstuk
18 Veegstuk
19 Microvezelpad
20 Geconcentreerd ruitreinigingsmid-
del
*afhankelijk van de uitvoering
Apparaat monteren
Afbeelding
Zuigmond op afscheider steken, tot
deze hoorbaar inklinkt.
Spuitfles en veegstuk
monteren en vullen met
reinigingsmiddel*
*afhankelijk van de uitvoering
Instructie: Gelieve in acht te nemen
dat de transportbeveiliging bij de eerste bediening van de spuitkop loskomt.
Veegstuk monteren
Afbeelding
Spuitkop van de spuitfles draaien.
Veegstuk op spuitkop plaatsen.
Veegstuk en spuitkop met bevesti-
gingsring borgen.
Afbeelding
Pad op veegstuk spannen en met
klittenband vastzetten.
Spuitfles vullen
Afbeelding
Meegeleverd concentraat (1 x 20
ml) in sproeifles doen en fles met
zuiver water langzaam tot de markering „MAX“ vullen (levert 250 ml
reinigingsmiddeloplossing op).
Fles afsluiten.
– 5
Page 29

Accu opladen
Voorzichtig
Batterij volledig opladen voor
het eerste gebruik.
Afbeelding
Voor gebruik, oplaadapparaat in
een voorgeschreven stopcontact
steken.
Stekker van de laadkabel aan de
achterkant van het toestel insteken.
Tip: Tijdens het opladen knippert
de oplaad- / bedrijfsaanduiding.
Wanneer de accu vol is, brandt die
constant groen.
Beginnen met het werk
ren en het apparaat schakelt na een
bepaalde tijd uit. In dit geval de accu
opladen.
Terwijl de sproeifles in actie is, kan het
apparaat uitgeschakeld worden. Daarmee wordt de bedrijfstijd per acculading duidelijk verhoogd.
Reiniging zonder spuitfles
Reinigingsmiddel volgens de indi-
caties van de fabrikant zoals gebruikelijk aanbrengen en vuil oplossen.
Verder net zo te werk gaan als bij
"Reinigen met spuitfles en wisopzetstuk", Afbeelding .
Werk onderbreken
Reiniging met spuitfles en
veegstuk*
*afhankelijk van de uitvoering
Afbeelding
Om het reinigingsmiddel aan te
brengen de spuithendel van de fles
indrukken en het oppervlak gelijk-
matig inspuiten, vervolgens het vuil
met het veegstuk losmaken.
Instructie: Pad indien nodig onder
stromend water uitwassen!
Belangrijk: Verzeker u voor het gebruik ervan dat de aftreklippen vrij van
vuil zijn.
Afbeelding
Apparaat inschakelen, oplaad- / be-
drijfsaanduiding brandt constant groen.
Voor het opzuigen van de reini-
gingsvloeistof het apparaat van bo-
ven naar beneden trekken.
Instructie: Moeilijk bereikbare op-
pervlakken kunnen zowel dwars als
omgekeerd schoongezogen wor-
den (beperkte hoeveelheid).
Instructies:
Bij zwakke accu begint de oplaad- / bedrijfsaanduiding langzaam te knippe-
Afbeelding
Apparaat uitschakelen en op voet
plaatsen (parkeerstand).
Reservoir tijdens het werk
leegmaken
Wanneer het max. vulniveau (markering) van het vuilwaterreservoir bereikt
is, het reservoir leegmaken a.u.b.
Afbeelding
Apparaat uitschakelen.
Afbeelding
Sluiting van vuilwatertank openen
en tank legen.
Sluiting van vuilwatertank sluiten.
Werk beëindigen / apparaat
reinigen
Apparaat uitschakelen.
Afbeelding
Eerst zuigmond ontgrendelen en
van afscheider afnemen, dan de afscheider ontgrendelen en ook afnemen.
Afscheider en zuigmond onder stro-
mend water reinigen (niet geschikt
voor de afwasmachine).
– 6
29NL
Page 30

Afbeelding
Let op: Basistoestel bevat elektrische componenten die niet
onder stromend water gereinigd
mogen worden!
Vuilwatertank afnemen en sluiting
eruit trekken.
Vuilwatertank legen en met water
uitspoelen. Tank weer sluiten.
Wisserbekleding van sproeifles af-
nemen en onder stromend water
uitwassen. Wisserbekleding kan
ook in de wasmachine tot 60 ge-
wassen worden (zonder gebruik
van wasverzachter).
Gereinigd toestel voor de montage
laten drogen.
Accu opladen.
Apparaat opslaan
Toestel staand en in een droge
ruimte bewaren.
Hulp bij storingen
Strepen bij het reinigen
Aftreklip reinigen
Versleten aftreklip draaien:
Aftreklippen van silicoon zijwaarts
naar buiten trekken. Silicoonlip bij
de ronding met water of reinigingsmiddel bevochtigen. Silicoonlip omgekeerd weer in de houder
schuiven.
Aftreklip indien nodig vernieu-
wen:
Wanneer na het keren van de silicoonlip beide kanten versleten zijn,
is een nieuwe silicoonlip nodig. Silicoonlip zoals boven beschreven
vervangen.
Dosering van het reinigingsmiddel
controleren.
Water ontsnapt zijdelings uit
de tank
Vuilwaterreservoir leegmaken
(max. 100 ml inhoud).
Spuitfles spuit niet
Reinigingsmiddel vullen.
Pompmechanisme in spuitfles is
defect, contact opnemen met de
handelaar.
Apparaat start niet
Ladings- / bedrijfsindicatie controleren:
Geen signaal resp. langzaam knip-
perend signaal: accu opladen.
Bij snel knipperend signaal: hande-
laar contacteren.
30 NL
Bijzondere toebehoren
Geconcentreerd ruitreinigingsmiddel (4 x 20 ml)
Bestelnr. 6.295-302.0
Microvezelpad (2 Stuk)
Bestelnr. 2.633-100.0
Aftreklip, breed (2 stuks)
Bestelnr. 2.633-005.0
Aftreklip, smal (2 stuks)
Bestelnr. 2.633-104.0
Heuptas
Bestelnr. 2.633-006.0
– 7
Page 31

Technische gegevens
Beveiligingsklasse IP X4
Volume vuilwaterreser-
voir
Bedrijfstijd bij volle accu-
lading
Nominale spanning
accu
Nominaal vermogen
toestel
Laadtijd bij lege accu 140 min
Uitgangsspanning laad-
apparaat
Uitgangsstroom laadap-
paraat
Geluidsdrukniveau (EN
60704-2-1)
Gewicht 0,6 kg
Accutype Li-Ion
Technische veranderingen voorbehouden!
100 ml
25 min
3,7 V
10 W
5,5 V
600 mA
50 dB(A)
– 8
31NL
Page 32

Índice de contenidos
Español
Uso previsto . . . . . . . . . . . . . . . ES . . .3
Indicaciones de seguridad . . . . ES . . .3
Puesta en marcha . . . . . . . . . . ES . . .5
Finalizar trabajo / limpiar el apa-
rato . . . . . . . . . . . . . . . . . . . . . . ES . . .7
Ayuda en caso de avería . . . . . ES . . .7
Accesorios especiales . . . . . . . ES . . .8
Datos técnicos . . . . . . . . . . . . . ES . . .8
Estimado cliente:
Antes del primer uso de su
aparato, lea este manual original, actúe de acuerdo a sus indicaciones y guárdelo para un uso posterior o para otro propietario posterior.
El aparato está disponible en 2 acabados diferentes.
WV 2
WV 2 plus incl. botella de pulveriza-
ción con accesorio limpiador y concentrado limpiaventanas
Uso previsto
– Utilice este aparato que fun-
ciona con batería exclusivamente para fines particulares,
para limpiar superficies húmedas, lisas como ventanas,
espejos o azulejos. Está prohibido aspirar polvo.
– El aparato no es apto para
aspirar cantidades de líquido
grandes de superficies horizontales, p. ej. de un vaso de
bebida que se haya caído
(máx. 25 ml).
– Utilice este aparato única-
mente en combinación con
limpiaventanas convencionales (no usar alcohol ni limpiadores en espuma).
– Recomendamos: Concen-
trado de limpiaventanas de
KÄRCHER (véase el capítulo
"accesorios especiales").
– Utilice este aparato sólo con
los accesorios y repuestos
autorizados por KÄRCHER.
Cualquier uso diferente a éstos
se considererá un uso no previsto. El fabricante no se hace responsable de los daños causados por un uso no previsto; el
usuario será el único que correrá con este riesgo.
Indicaciones de seguridad
Este aparato no es apto para
ser manejado por personas
con incapacidades físicas,
sensoriales o intelectuales o
falta de experiencia y/o cono-
cimientos, a no ser que sean
supervisados por una perso-
na encargada o hayan recibi-
do instrucciones de esta so-
bre como usar el aparato y
qué peligros conlleva.
Los niños solo podrán utilizar
el aparato si tienen más de 8
años y siempre que haya una
persona supervisando su se-
guridad o les hayan instruido
sobre como manejar el apa-
rato y los peligros que conlle-
va.
Los niños no pueden jugar
con el aparato.
Supervisar a los niños para
asegurarse de que no jue-
guen con el aparato.
32 ES
– 3
Page 33

Los niños no pueden realizar
la limpieza ni el mantenimiento sin supervisión.
No introducir ningún objeto
en la orificio de ventilación.
No proyectar el chorro pulve-
rizador a los ojos.
No dirigir el chorro directa-
mente sobre equipos de producción que contengan componentes eléctricos, como p.
ej. el interior de hornos.
Antes de su aplicación sobre
superficies sensibles (extra
brillantes), probar la almohadilla de limpieza de microfibra
en un lugar no visible.
Indicaciones sobre la batería
Puede provocar un corto-
circuito! No inserte ningún
objeto conductor (p.ej. destornillador o similar) en clavija
de carga.
Sólo está permitido cargar la
batería con el cargador original suministrado o con el cargador autorizado por KÄRCHER.
Indicaciones sobre el car-
gador
Sustituir inmediatamente el
cargador con el cable por una
pieza original si se aprecia algún tipo de daño.
Usar y almacenar el cargador
solamente en lugar seco,
temperatura ambiente 5 - 40
ºC.
No toque nunca la clavija con
las manos mojadas.
몇 Indicaciones sobre trans-
porte
La batería ha sido sometida a
ensayos en conformidad con
las disposiciones relevantes
para transporte internacional
y puede ser transportada /
enviada.
Protección del medio
ambiente
Los materiales de embalaje son
reciclables. Por favor, no tire el
embalaje a la basura doméstica;
en vez de ello, entréguelo en los
puntos oficiales de recogida para
su reciclaje o recuperación.
Los equipos antiguios contienen
materiales y sustancias valiosas
y aptas para el reciclaje que no
deben entrar en contacto con el
medio ambiente. Por eso, el aparato y la batería que contiene no
se deben eliminar con la basura
doméstica. Se puede eliminar de
forma gratuita a través de los sistema de entrega y recogida locales.
Indicaciones sobre ingredientes
(REACH)
Encontrará información actual sobre
los ingredientes en:
www.kaercher.com/REACH
– 4
33ES
Page 34

Símbolos del manual de
instrucciones
Peligro
Para un peligro inminente que
acarrea lesiones de gravedad o
la muerte.
몇 Advertencia
Para una situación que puede
ser peligrosa, que puede acarrear lesiones de gravedad o la
muerte.
Precaución
Para una situación que puede
ser peligrosa, que puede acarrear lesiones leves o daños materiales.
Puesta en marcha
11 Desbloqueo, separador
12 Boquilla de aspiración, ancha
13 Desbloqueo, boquilla de aspiración
WV 2 Plus*
14 Botella pulverizadora
15 Palanca pulverizadora
16 Cabezal pulverizador
17 Anillo de fijación para el equipo ac-
cesorio limpiador
18 Accesorio limpiador
19 Almohadilla de limpieza de microfi-
bra
20 Concentrado de limpiaventanas
*según equipamiento
Montar aparato
Figura
Insertar la boquilla de aspiración en
el separador hasta que se oiga
como encaja.
Descripción del aparato
Cuando desempaque el contenido del
paquete, compruebe si faltan accesorios o si el aparato presenta daños. Informe a su distribuidor en caso de detectar daños ocasionados durante el
transporte.
Nota:
Las ilustraciones del aparato y
de su manejo se encuentran en
la página 2.
Figura
WV 2
1 Cargador con cable
2 Equipo básico
3 Clavija de carga
4 Interruptor del aparato (ON / OFF)
5 Indicador de carga/funcionamiento
6 Base de apoyo
7 Mango
8 Depósito de agua sucia, extraíble
9 Cierre, depósito de agua sucia
10 Separador
Montar botella pulverizadora
y llenar con detergente*
*según equipamiento
Advertencia: Se debe tener en cuenta
que al accionar por primera vez el cabezal de pulverización, se cae el fusible de transporte.
Montar accesorio limpiador
Figura
Separar, girando, el cabezal pulve-
rizador de la botella pulverizadora.
Colocar accesorio limpiador sobre
cabezal pulverizador.
Asegurar accesorio accesorio lim-
piador y cabezal pulverizador con
anillo de fijación.
Figura
Tensar almohadilla de limpieza en
accesorio limpiador y fijar con vel-
cro.
34 ES
– 5
Page 35

Rellenar botella pulverizadora
Figura
Añadir el concentrado suministrado
(una dosis de 20 ml) a la botella pulverizadora y añadir lentamente
agua limpia hasta la marca "MAX"
(se obtienen 250 ml de solución de
detergente)
Cerrar la botella.
Cargar la batería
Precaución
Cargar totalmente la batería antes del primer uso.
Figura
Antes del uso, introducir el cargador
en el enchufe de forma correcta.
Introducir el enchufe del cable de
recarga en la parte posterior del
aparato.
Indicación: Durante el proceso de
carga el indicador de carga / funcionamiento parpadea. Si la batería
está cargada totalmente, se ilumina
en verde permanentemente.
Comenzar con el trabajo
Limpieza con botella
pulverizadora y accesorio
limpiador*
*según equipamiento
Figura
Para administrar el detergente
apretar la palanca pulverizadora de
la botella y rociar la superficie de
modo uniforme, a continuación eliminar la suciedad con la almohadilla de limpieza.
Indicación: ¡Lavar la almohadilla
con agua si es necesario!
Importante: Antes del uso, asegúrese
de que los racores de extracción están
limpios.
Figura
Conectar el aparato, indicador de
carga / funcionamiento se ilumina
continuamente en verde.
Para aspirar el líquido limpiador es-
tirar el aparato de arriba hacia aba-
jo.
Indicación: Las superficies de difí-
cil acceso se puede aspirar en dia-
gonal o boca abajo (cantidad
limitada).
Notas:
Cuando la batería comienza a descargarse el indicador de carga / funcionamiento empieza a parpadear lentamente y el aparato se desconecta después de cierto tiempo. En ese caso,
cargar la batería.
Mientra la botella pulverizadora estén
en uso, se puede desconectar el aparato. Así se aumenta considerablemente el tiempo de funcionamiento por
carga.
Limpieza sin botella
pulverizadora
Administrar el detergente de modo
convencional según instrucciones
del fabricante y eliminar la sucie-
dad.
Otros procedimientos como en
"Limpieza con botella pulverizadora
y accesorio limpiador", figura .
Interrumpir el trabajo
Figura
Desconectar el aparato y colocarlo
en la base de apoyo (posición de
estacionamiento).
– 6
35ES
Page 36

Vaciar el recipiente durante el
trabajo
Si se ha alcanzado el máximo nivel de
llenado (marca) del depósito de agua
sucia, vaciar el depósito.
Figura
Desconexión del aparato
Figura
Destapar el cierre del depósito de
agua sucia y abrir el depósito.
Cierre la tapa del depósito de agua
sucia.
Finalizar trabajo / limpiar el
aparato
Desconexión del aparato
Figura
Primero desbloquear la boquilla de
aspiración y extraer del separador,
después debloquear el separador y
extraerlo también.
Limpiar el separador y la boquilla
de aspiración con agua corriente
(no apto para lavavajillas).
Figura
Atención: El equipo básico contiene componentes eléctricos.
No limpiar estos con agua corriente.
Extraer el depósito de agua sucia y
extraer el cierre.
Vaciar el depósito de agua sucia y
enjuagar con agua. Cerrar de nuevo el depósito.
Extraer la funda de la botella de pul-
verización y lavar con agua corriente. La funda también se puede lavar
en la lavadora a 60ºC (sin usar suavizante).
Dejar secar el aparato limpio antes
de ensamblarlo.
Cargar la batería.
Almacenamiento del aparato
Almacenar el aparato de pie en un
lugar seco.
Ayuda en caso de avería
La botella pulverizadora no
rocía
Llenar de detergente.
Mecanismo de bombeo de la bote-
lla pulverizadora defectuoso, con-
tactar distribuidor.
El aparato no se pone en
marcha
Comprobar indicador de carga/funcionamiento:
No hay señal o señal con lenta in-
termitencia: Cargar la batería.
En caso de señal con rápida inter-
mitencia: Contactar al distribuidor.
Franjas al limpiar
Limpiar los labios de extracción.
Dar la vuelta al labio de extrac-
ción usado:
Extraer hacia fuera el labio de ex-
tracción de silicona por el lateral.
Humedecer el labio de silicona de
la zona redondeada con agua o de-
tergente. Introducir el labio de sili-
cona al revés de nuevo en el
soporte.
Renovar el labio de extracción si
es necesario:
Si tras darle la vuelta al labio de si-
licona están desgastados ambos
bordes, es necesario colocar un la-
bio de silicona nuevo. Cambiar el
labio de silicona como se describe
más arriba.
Comprobar la dosificación del de-
tergente.
36 ES
– 7
Page 37

El agua sale por el lateral del
depósito
Vaciar el depósito de agua sucia
(máx. 100 ml contenido).
Accesorios especiales
Concentrado de limpiaventanas
(4 x 20 ml)
Nº referencia: 6.295-302.0
Almohadilla de limpieza de microfibra (2 Unidad)
Nº referencia: 2.633-100.0
Labio de extracción, ancho (2 unidades)
Nº referencia: 2.633-005.0
Labio de extracción, estrecho (2
unidades)
Nº referencia: 2.633-104.0
Bolso de cadera
Nº referencia: 2.633-006.0
Datos técnicos
Categoria de protección IP X4
Volumen del depósito de
agua sucia
Tiempo de servicio con
la batería totalmente
cargada
Área de tensión de la
batería
Potencia nominal del
aparato
Tiempo de carga cuando la batería esté vacía
Tensión de salida del
cargador
Corriente de salida del
cargador
Nivel de presión acústica (EN 60704-2-1)
Peso 0,6 kg
Tipo de batería Li-Ion
Reservado el derecho a realizar modificaciones técnicas.
100 ml
25 min
3,7 V
10 W
140 min
5,5 V
600 mA
50 dB(A)
– 8
37ES
Page 38

Índice
Português
Utilização conforme as disposi-
ções . . . . . . . . . . . . . . . . . . . . . PT . . . 3
Avisos de segurança . . . . . . . . PT . . .3
Colocação em funcionamento . PT . . .5
Terminar o trabalho / limpar o
aparelho . . . . . . . . . . . . . . . . . . PT . . .7
Ajuda em caso de avarias . . . . PT . . .7
Acessórios especiais . . . . . . . . PT . . .8
Dados técnicos. . . . . . . . . . . . . PT . . .8
Estimado cliente,
Leia o manual de manual ori-
ginal antes de utilizar o seu
aparelho. Proceda conforme as indicações no manual e guarde o manual
para uma consulta posterior ou para
terceiros a quem possa vir a vender o
aparelho.
O aparelho é fornecido em duas ver-
sões distintas.
WV 2
WV 2 Plus incl. garrafa pulverizadora
com adaptador de limpeza e concentrado de limpa-vidros.
Utilização conforme as
disposições
– Utilize este aparelho, de fun-
cionamento a baterias acumuladoras, apenas para fins
privados, para a limpeza de
superfícies húmidas e lisas
como, por exemplo, janelas,
espelhos ou ladrilhos. Não
pode ser aspirado pó.
– O aparelho não está prepara-
do para a aspiração de grandes quantidades de líquidos
em superfícies horizontais
como, por exemplo, resultantes da queda de um copo
(máx. 25 ml).
– Utilize este aparelho apenas
em combinação com detergentes de limpeza de vidros
convencionais (não utilizar
benzina de lavagem, nem detergentes de espuma).
– Recomendamos: Concen-
trado limpa-vidros da KÄRCHER (ver capítulo "Acessórios especiais").
– Utilize este aparelho apenas
com acessórios e peças de
reposição originais KÄR-
CHER.
Qualquer outra utilização, para
além das aqui indicadas, é considerada como não conforme
com as disposições legais. O fabricante não pode ser responsabilizado por danos daí resultantes. Os riscos devidos a essa
utilização indevida são da exclusiva responsabilidade do utilizador.
Avisos de segurança
Este aparelho não é adequa-
do para a utilização por pes-
soas com capacidades físi-
cas, sensoriais e psíquicas
reduzidas e por pessoas com
falta de experiência e/ou co-
nhecimentos, excepto se fo-
rem supervisionadas por uma
pessoa responsável pela se-
gurança ou receberam instru-
ções sobre o manuseamento
do aparelho e que tenham
percebido os perigos ineren-
tes.
38 PT
– 3
Page 39

As crianças só estão autori-
zadas a utilizar o aparelho se
tiverem uma idade superior a
8 anos e se forem supervisionadas por uma pessoa responsável pela segurança ou
se receberem, por essa pessoa, instruções de utilização
do aparelho e que tenham
percebido os perigos inerentes.
Crianças não podem brincar
com o aparelho.
Supervisionar as crianças, de
modo a assegurar que não
brincam com o aparelho.
A limpeza e manutenção de
aplicação não podem ser realizadas por crianças sem uma
vigilância adequada.
Não inserir objectos nas
aberturas do ar de exaustão.
Não projectar o jacto de pul-
verização contra os olhos
Não direccionar o jacto pulve-
rizador directamente contra
equipamento que contenha
componentes eléctricos como, por exemplo, o interior de
fogões.
Antes de proceder à aplica-
ção em superfícies sensíveis
(de elevado brilho) deve-se
testar o pad de microfibras
num local escondido.
Avisos referentes à bateria
acumuladora
Perigo de curto-circuito!
Não insira objectos comuta-
dores (p. ex. chave de fendas
ou similar) no conector de
carregamento.
O carregamento da bateria
acumuladora só é permitido
com o carregador original in-
cluído no volume de forneci-
mento, ou com carregadores
devidamente autorizados
pela KÄRCHER.
Avisos sobre o carregador
Substitua imediatamente o
carregador juntamente com o
cabo por uma peça original,
sempre que detectar quais-
quer danos.
Utilizar e guardar o carrega-
dor apenas em espaços fe-
chados com uma temperatu-
ra ambiente 5 - 40° C.
Nunca tocar na ficha de rede
com as mãos molhadas.
몇 Avisos para o transporte
A bateria acumuladora foi ve-
rificada, em conformidade
com as prescrições específi-
cas em vigor referentes ao
transporte internacional, e
pode ser transportada/envia-
da.
– 4
39PT
Page 40

Proteção do meio-ambiente
Os materiais de embalagem são
recicláveis. Não coloque as embalagens no lixo doméstico, envie-as para uma unidade de reciclagem.
Os aparelhos usados contêm valiosos materiais recicláveis que
não devem entrar em contacto
com o meio-ambiente. Assim
sendo, o aparelho e a bateria
acumuladora não podem ser eliminados com o lixo doméstico. A
eliminação pode ser efectuada
gratuitamente nos centros de recolha disponíveis.
Avisos sobre os ingredientes
(REACH)
Informações actuais sobre os ingredientes podem ser encontradas em:
www.kaercher.com/REACH
Símbolos no Manual de
Instruções
Perigo
Para um perigo eminente que
pode conduzir a graves ferimentos ou à morte.
몇 Advertência
Para uma possível situação perigosa que pode conduzir a graves ferimentos ou à morte.
Atenção
Para uma possível situação perigosa que pode conduzir a ferimentos leves ou danos materiais.
Colocação em
funcionamento
Descrição da máquina
Verifique o conteúdo da embalagem a
respeito de acessórios não incluídos
ou danos. No caso de danos provocados durante o transporte, informe o
seu revendedor.
Aviso:
na página 2 encontra ilustrações
do aparelho e da utilização.
Figura
WV 2
1 Carregador com cabo
2 Aparelho base
3 Conector fêmea de carregamento
4 Interruptor do aparelho (LIG/DESL)
5 Indicação de carga/operação
6 Pé de apoio
7 Punho
8 Depósito de água suja, amovível
9 Fecho, depósito de água suja
10 Separador
11 Desbloqueamento, separador
12 Bico de aspiração, largo
13 Desbloqueio, bico de aspiração
WV 2 Plus*
14 Garrafa pulverizadora
15 Alavanca de pulverização
16 Cabeça de pulverização
17 Anel de fixação para adaptador de
esfregar
18 Adaptador de esfregar
19 Pad de microfibra
20 Concentrado limpa-vidros
*conforme o modelo
Montar o aparelho
40 PT
Figura
Encaixar o bico de aspiração no se-
parador até encaixar audivelmente.
– 5
Page 41

Montar a garrafa
pulverizadora no adaptador
de esfregar e encher com
detergente*
*conforme o modelo
Aviso: P. f. note que durante o primeiro accionamento da cabeça pulverizadora, a protecção de transporte cai.
Montar o adaptador de esfregar
Figura
Desenroscar a cabeça de pulveri-
zação da garrafa pulverizadora.
Posicionar o adaptador de esfregar
na cabeça pulverizadora.
Fixar o adaptador de esfregar e a
cabeça pulverizadora com o anel
de fixação.
Figura
Fixar o pad de esfregar no respecti-
vo adaptador e fixar com a fita de
velcro.
Encher a garrafa pulverizadora
Figura
Encher o concentrado, incluído no
volume de fornecimento (1 x 20 ml),
na garrafa pulverizadora e encher a
garrafa lentamente com água limpa
até à marca "MAX" (resulta numa
solução de limpeza de 250 ml).
Fechar a garrafa.
Carregar a bateria
acumuladora
Atenção
Antes da primeira utilização,
carregar completamente a bateria.
Figura
Ligar o carregador a uma tomada,
antes de o utilizar.
Inserir a ficha do cabo do carrega-
dor na face traseira do aparelho.
Aviso: durante a fase de carrega-
mento a indicação de carga/opera-
ção pisca. Se a bateria
acumuladora estiver completamen-
te carregada, a lâmpada de contro-
lo brilha continuamente.
Iniciar o trabalho
Limpeza com garrafa
pulverizadora e adaptador de
esfregar*
*conforme o modelo
Figura
Para aplicar o detergente é neces-
sário accionar a alavanca pulveri-
zadora da garrafa, pulverizar uni-
formemente a superfície e, de se-
guida, soltar a sujidade com o pad
de esfregar.
Aviso: Lavar a almofada, sempre
que necessário, sob água corrente!
Importante: Antes de iniciar os trabalhos deve-se assegurar que os lábios
de extracção (rodo) estão limpos.
Figura
Ligar o aparelho, indicação de car-
ga/operação brilha permanente-
mente verde.
Para aspirar o líquido de limpeza é
necessário puxar o aparelho de
cima para baixo.
Aviso: Locais de difícil acesso po-
dem ser aspirados de forma trans-
versal e acima da cabeça
(quantidade limitada).
Avisos:
Com a bateria fraca a indicação de
carga/operação começa a piscar e o
aparelho desliga passado algum tempo. Recarregar as baterias nestas situações.
O aparelho pode ser desligado com a
garrafa pulverizadora em funcionamento. Desta forma aumenta substan-
– 6
41PT
Page 42

cialmente o tempo de serviço com a
carga da bateria.
Limpeza sem garrafa
pulverizadora
Aplicar o detergente de acordo com
as indicações do fabricante, de forma convencional, e dissolver a sujidade.
Futuros procedimentos de acordo
com o ponto "Limpeza com garrafa
pulverizadora e adaptador de esfregar", figura .
Interromper trabalho
Figura
Posicionar o aparelho sobre o pé
de apoio (posição de estacionamento).
Esvaziar o recipiente durante
os trabalhos
Esvaziar o depósito de água suja se
for atingido o nível máximo (marcação).
Figura
Desligar o aparelho.
Figura
Abrir o fecho do depósito de água
suja e esvaziar o depósito.
Fechar o fecho do depósito de água
suja.
Terminar o trabalho /
limpar o aparelho
Desligar o aparelho.
Figura
Destravar primeiro o bico de aspira-
ção e retirar do separador, depois
desbloquear o separador e eventualmente retirar.
Limpar o separador e o bico de as-
piração sob água corrente (não
pode ser lavado na máquina lavaloiça).
Figura
Atenção: aparelho base contém componentes eléctricos.
Este não pode ser limpo sob
água corrente!
Retirar o depósito da água suja e
retirar o fecho.
Esvaziar o depósito da água suja e
lavar com água. Fechar novamente
o depósito.
Retirar a cobertura de limpeza da
garrafa pulverizadora e lavar sob
água corrente. A cobertura de lim-
peza também pode ser lavada na
máquina lava-roupa a 60°C (sem
amaciador).
Deixar secar o aparelho antes de o
voltar a montar.
Carregar a bateria acumuladora.
Guardar a máquina
Guardar o aparelho verticalmente
em locais secos.
Ajuda em caso de avarias
Garrafa pulverizadora não
pulveriza
Encher detergente.
Mecanismo da bomba na garrafa
pulverizadora está com defeito;
contactar o vendedor.
O aparelho não arranca
Verificar a indicação de carga/operação:
Nenhum sinal resp., sinal de inter-
mitência lenta: carregar bateria.
Se o sinal piscar rapidamente: con-
tactar o vendedor.
42 PT
– 7
Page 43

Riscos durante a limpeza
Limpar o rodo.
Virar o rodo desgastado:
Puxar o rodo de silicone lateralmente para fora. Humedecer o rodo
de silicone na zona arredondada
com água ou produto de limpeza.
Inserir o lábio de silicone (rodo) de
modo inverso novamente no suporte.
Se necessário, substituir o rodo:
Se, após virar o rodo de silicone, os
dois cantos estiverem desgastados
é necessário um novo rodo de silicone. Substituir o rodo conforme
supracitado.
Verificar o doseamento do deter-
gente.
Fuga de água na parte lateral
do tanque
Esvaziar depósito de água suja
(máx. 100 ml de conteúdo).
Acessórios especiais
Concentrado limpa-vidros
(4 x 20 ml)
N.º de encomenda: 6.295-302.0
Pad de microfibra (2 Unidades)
N.º de encomenda: 2.633-100.0
Rodo, largo (2 unidades)
N.º de encomenda: 2.633-005.0
Rodo, estreito (2 unidades)
N.º de encomenda: 2.633-104.0
Bolsa tiracolo
N.º de encomenda: 2.633-006.0
Dados técnicos
Tipo de protecção IP X4
Volume do depósito de
água suja
Tempo de operação
com a bateria cheia
Tensão nominal da ba-
teria
Potência nominal do
aparelho
Tempo de carga de uma
bateria acumuladora vazia
Tensão de saída do carregador
Corrente de saída do
carregador
Nível de pressão acústica (EN 60704-2-1)
Peso 0,6 kg
Tipo de acumulador Li-Ion
Reservados os direitos a alterações
técnicas!
100 ml
25 min
3,7 V
10 W
140 min
5,5 V
600 mA
50 dB(A)
– 8
43PT
Page 44

Indholdsfortegnelse
Dansk
Bestemmelsesmæssig anven-
delse. . . . . . . . . . . . . . . . . . DA . . .3
Sikkerhedsanvisninger . . . . DA . . .3
Ibrugtagning . . . . . . . . . . . . DA . . .5
Afslutte arbejdet / rense maski-
nen . . . . . . . . . . . . . . . . . . . DA . . .6
Hjælp ved fejl . . . . . . . . . . . DA . . .7
Ekstratilbehør . . . . . . . . . . . DA . . .7
Tekniske data . . . . . . . . . . . DA . . .8
Kære kunde
Læs original brugsanvisning
inden første brug, følg anvisningerne og opbevar vejledningen til
senere efterlæsning eller til den næste
ejer.
Maskinen kommer i to forskellige modeller.
WV 2
WV 2 plusinkl. sprøjteflaske med vi-
skekomponent og koncentreret vinduesvask.
Bestemmelsesmæssig
anvendelse
– Denne batteridrevne maskine
er kun beregnet til privat brug,
til rengøring af fugtige, glatte
overflader som vinduer, spejl
eller fliser. Der må ikke opsuges støv.
– Maskinen er ikke egnet til op-
sugning af større mængder
væske fra vandrette overflader, f.eks væsker fra et væltet
drikkeglas (max. 25 ml).
– Maskinen må kun bruges i
forbindelse med gængse vinduesvask (ingen spiritus, ingen skumrenser).
– Vi anbefaler: Koncentreret
vinduesvask fra KÄRCHER
(se kapitel "Ekstratilbehør").
– Brug kun denne støvsuger
med tilbehør og reservedele,
der er godkendt af KÄRCHER.
Enhver anvendelse, der går herudover, gælder som ikke-bestemmelsesmæssig.
Producenten er ikke ansvarlig
for skader, der måtte opstå som
følge heraf; risikoen er brugerens alene.
Sikkerhedsanvisninger
Apparatet er ikke beregnet til
at blive brugt af personer (inklusive børn), hvis fysiske,
sensoriske eller åndelige evner er indskrænket eller af
personer med manglende erfaring og/eller kendskab med
mindre disse personer overvåges af en person, som er
ansvarlig for deres sikkerhed,
eller blev trænet i apparatets
håndtering og de evt. resulterende farer.
Børn må kun bruge appara-
tet, hvis de er over 8 år under
opsyn af en person, som er
ansvarlig for deres sikkerhed,
eller hvis de blev indlært/trænet i brugen af apparatet og
de evt. resulterende farer.
Børn må ikke lege med appa-
ratet.
44 DA
– 3
Page 45

Børn skal være under opsyn
for at sørge for, at de ikke leger med maskinen.
Rengøringen og vedligehol-
delsen må ikke gennemføres
af børn uden overvågning.
Der må ikke sættes genstan-
de i ventilationsåbningerne.
Sprøjtestrålen må ikke sprøj-
tes i øjnene.
Sprøjtestrålen må ikke direk-
te rettes imod komponenter
som indeholder elektriske dele, som f.eks den indvendige
del af ovne.
Før brugen på sensitive (høj-
glans) overflader skal mikrofiber-viskepuden testes på et
ikke synligt sted.
Henvisninger til batterier
Fare for kortslutning! Stik
ingen ledende genstande
(f.eks. skruetrækker eller lignende) ind i opladebøsningen.
Opladningen af akkuer er kun
tilladt med vedlagte original
opladeapparat eller opladeapparater som blev godkendt
af KÄRCHER.
Henvisninger til opladeap-
paratet
Ved synlige skader skal opla-
deapparatet med opladekablet omgående erstattes med
originale parter.
Opladeren må kun bruges og
opbevares i tørre rum, omgivelsestemperatur 5 - 40° C.
Rør aldrig ved netstikket med
våde hænder.
몇 Henvisninger til transpor-
ten
Akkumulatoren er afprøvet
iht. til alle relevante forskrifter
til international transport og
må transporteres/fremsendes.
Miljøbeskyttelse
Emballagen kan genbruges.
Smid ikke emballagen ud sammen med det almindelige husholdningsaffald, men aflever den
til genbrug.
Brugte maskiner indeholder værdifulde materialer og stoffer, der
skal recycles, og som ikke må
komme ud i naturen. Maskinen og
batteriet må derfor ikke bortskaffes i normalt affald. De kan bortskaffes gratis via lokale
genbrugsstationer.
Henvisninger til indholdsstoffer
(REACH)
Aktuelle oplysninger til indholdsstoffer
finder du på:
www.kaercher.com/REACH
– 4
45DA
Page 46

Symbolerne i
driftsvejledningen
Risiko
En umiddelbar truende fare,
som kan føre til alvorlige personskader eller død.
몇 Advarsel
En muligvis farlig situation, som
kan føre til alvorlige personskader eller til død.
Forsigtig
En muligvis farlig situation, som
kan føre til personskader eller til
materialeskader.
Ibrugtagning
Beskrivelse af apparatet
Kontroller pakningens indhold for
manglende tilbehør eller beskadigelser, når den pakkes ud. Kontakt Deres
forhandler i tilfælde af transportskader.
Bemærk: Illustrationer af apparatet
og betjeningen findes på side 2.
Figur
WV 2
1 Opladeapparat med opladekabel
2 Basisenheden
3 Opladebøsning
4 Startknap (TÆND/SLUK)
5 Oplade-/driftsindikator
6 Fod
7 Håndtag
8 Snavsevandstank, aftageligt
9 Låg, snavsevandstank
10 Udskiller
11 Oplåsning, udskiller
12 Sugedyse, bred
13 Oplåsning, sugedyse
WV 2 Plus*
14 Sprøjteflaske
15 Sprøjtehåndtag
16 Sprøjtehoved
17 Fikseringsring til viskekomponent
18 Viskekomponent
19 Mikrofiber-viskepude
20 Koncentreret vinduesvask
* afhængig af udstyret
Montere maskinen
Figur
Sæt sugedysen på udskilleren, ind-
til den hørbart går i hak.
Monter sprøjteflasken med
viskekomponenten og fyld
den med rensemiddel*
* afhængig af udstyret
Bemærk: Bemærk venligst, at transportsikringen falder af ved første brug
af sprøjtehovedet.
Montering af viskekomponenten
Figur
Skru sprøjtehovedet fra sprøjtefla-
sken.
Sæt viskekomponenten på sprøjte-
hovedet.
Viskekomponenten og sprøjtehove-
det skal sikres med fikseringsringen.
Figur
Spænd viskepuden på viskekom-
ponenten og fastgør det med velkrobånd.
Påfylde sprøjteflasken
Figur
Fyld det medleverede koncentrat (1
x 20 ml) ind i sprøjteflasken og fyld
så flasken langsomt op med vand til
markeringen "MAX" (giver 250 ml
rensemiddelopløsning).
Luk flasken.
46 DA
– 5
Page 47

Oplade akkuer
Forsigtig
Oplad batterierne helt inden første brug.
Figur
Inden brug skal det vedlagte opla-
deapparat stikkes i en stikdåse.
Sæt stikket fra opladekablet ind i
maskinens bagside.
Bemærk: Under opladningen blin-
ker oplade-/driftsindikatoren. Hvis
batteriet er opladet, lyser den konstant grøn.
Starte med arbejdet
Rengøring med sprøjteflaske
og viskekomponent*
* afhængig af udstyret
Figur
Tryk flaskens sprøjtehåndtag for at
påføre rensemidlet og sprøjt rensemidlet jævnligt på overfladen. Løsn
så snavset med viskekomponenten.
Bemærk: Pad renses efter behov
under flydende vand!
Vigtigt: Sørg inden brug for, at aftrækningslæben er fri for snavs.
Figur
Tænd maskinen, oplade-/driftsindi-
katoren lyser konstant grøn.
Træk maskinen fra oven og nedad
for at opsuge rensemiddelvæsken.
Bemærk: Svær tilgængelige områ-
der kan udsuges på tværs som
også over hovedet (begrænset
mængde).
Bemærk:
Hvis batteriet er svagt starter oplade-/
driftsindikatoren langsomt at blinke og
maskinen slukkes efter et tidsrum. I
dette tilfælde skal batteriet oplades.
Mens sprøjteflasken er i brug, kan maskinen frakobles. Dermed øges driftstiden betydeligt pr. opladning.
Rengøring uden sprøjteflaske
Påfør rensemidlet ifølge producen-
tens anvisninger på traditionel
måde og løsn snavset.
Videre fremgangsmåde som ved
"Rengøring med sprøjteflaske og
viskekomponent", figur .
Afbryde arbejdet
Figur
Sluk maskinen og stil den på foden
(parkeringsposition).
Tømme beholderen under
arbejdet
Hvis snavsevandstankens max. påfyldningstand (markering) blev opnået
skal tanken tømmes.
Figur
Sluk for renseren
Figur
Åbn snavsevandstankens lås og
tøm tanken.
Lås låsen på snavsvandsbeholde-
ren.
Afslutte arbejdet / rense
maskinen
Sluk for renseren
Figur
Løsn først sugedysen og tag den af
udskilleren. Løsn derefter udskilleren og tag den ligeledes af.
Rens udskiller og sugedyse under
flydende vand (ikke egnet til opvaskemaskinen).
Figur
OBS: Basisenheden indeholder
elektriske komponenter, disse
– 6
47DA
Page 48

må ikke renses under flydende
vand!
Tag snavsvandsbeholderen af og
træk låsen ud.
Tøm snavsvandsbeholderen og
skyl den med vand. Sæt låget på
igen.
Træk viskebetrækket af sprøjtefla-
sken og rens den under flydende
vand. Viskebetrækket kan også vaskes i vaskemaskinen på 60°C
(uden skyllemiddel).
Den rensede maskinen skal tørres
inden den samles igen.
Oplade akkuer
Opbevaring af
damprenseren
Maskinen opbevares stående i tør-
re rum.
Hjælp ved fejl
Sprøjteflasken sprøjter ikke
Rensemiddel fyldes på.
Flaskens pumpemekanisme er de-
fekt, kontakt forhandleren.
middel. Skub silikonelæben omvendt tilbage i holderen.
Udskift aftrækningslæben efter
behov:
Hvis begge kanter efter vending af
silikonelæben er slidt, er en ny silikonelæbe nødvendig. Udskift silikonelæben som forklaret foroven.
Kontroller rensemidlets dosering.
Der løber vand ud af siden
på tanken
Tøm snavsevandstanken (max.
100 ml indhold).
Ekstratilbehør
Koncentreret vinduesvask
(4 x 20 ml)
Bestillingsnr.: 6.295-302.0
Mikrofiber-viskepude (2 Styk.)
Bestillingsnr.: 2.633-100.0
Aftrækningslæbe, bred (2 styk)
Bestillingsnr.: 2.633-005.0
Aftrækningslæbe, smal (2 stk.)
Bestillingsnr.: 2.633-104.0
Hoftelomme
Bestillingsnr.: 2.633-006.0
Maskinen starter ikke
Kontroller oplade-/driftsindikatoren:
Intet signal, hhv. et langsomt blin-
kende signal: Oplad batteriet.
Ved hurtigt blinkende signal: Kon-
takt forhandleren.
Striber ved rengøringen
Rens aftrækningslæben.
Vende den brugte aftræknings-
læbe:
Træk silikone-aftrækningslæben fra
siden udad. Fugt silikonelæbens
runding med vand eller rengørings-
48 DA
– 7
Page 49

Tekniske data
Kapslingsklasse IP X4
Volumen snavsevandstank 100 ml
Driftstid ved fuldt batteri 25 min
Nominel spænding batteri 3,7 V
Nominel kapacitet maski-ne10 W
Opladningstid ved tom
akku
Opladeapparatets udgangsspænding
Opladeapparatets udgangseffekt
Lydtryksniveau (EN
60704-2-1)
Vægt 0,6 kg
Akkutype Li-Ion
Forbehold for tekniske ændringer!
140 min
5,5 V
600 mA
50 dB(A)
– 8
49DA
Page 50

Innholdsfortegnelse
Norsk
Forskriftsmessig bruk . . . . . . . . NO . . .3
Sikkerhetsanvisninger . . . . . . . NO . . .3
Igangsetting . . . . . . . . . . . . . . . NO . . .5
Avslutte arbeidet / rengjøre ap-
paratet . . . . . . . . . . . . . . . . . . . NO . . .6
Feilretting . . . . . . . . . . . . . . . . . NO . . .7
Tilleggsutstyr . . . . . . . . . . . . . . NO . . .7
Tekniske data . . . . . . . . . . . . . . NO . . .7
Kjære kunde,
Før første gangs bruk av ap-
paratet, les denne originale
bruksanvisningen, følg den og oppbevar den for senere bruk eller for overlevering til neste eier.
Apparatet blir levert i 2 forskjellige utførelser.
WV 2
WV 2 Plus inkl. sprayflaske med viske-
påsats og konsentrat for vinduspussing.
Forskriftsmessig bruk
– Bruk dette batteridrevne ap-
paratet kun for private formål,
for rengjøring av fuktige, glatte overflater som vindu, speil
eller keramiske fliser. Det må
ikke suges opp støv.
– Apparatet er ikke egnet til å
suge opp større mengder av
væsker fra horisontale overflater, f.eks. fra et vannglass
som er falt om.
– Benytt dette apparatet kun i
forbindelse med vanlige rengjøringsmidler for vindu (ingen alkohol, ingen skumrenser).
– Vi anbefaler: Konsentbsat
for vinduspussing fra KÄRCHER (se kapittel "Ekstrautstyr").
– Apparatet må bare brukes
med reservedeler og tilbehør
som er godkjent av KÄR-
CHER.
All bruk ut over dette anses som
ikke i tråd med hensikten med
apparatet. Produsenten fraskriver seg ansvar for skader som
skyldes slik bruk - denne risikoen hviler på brukeren alene.
Sikkerhetsanvisninger
Dette apparatet er ikke ment
for bruk av personer med re-
duserte fysiske, sensoriske
eller sjelelige evner, eller som
pga. mangel på erfaring og/
eller kunnskap ikke kan be-
nytte apparatet trygt. De skal
da kun bruke apparatet under
oppsyn av en sikkerhetsan-
svarlig person, eller få in-
struksjoner av vedkommende
om bruk av appratet.
Barn skal bare bruke appara-
tet når barnet er over 8 år og
er under oppsyn av en sikker-
hetsansvarlig person, eller får
anvisninger av en person om
hvordan apparatet fungerer
og forstår hva slags farer det
kan medføre.
Barn skal ikke leke med ap-
paratet.
Barn skal holdes under tilsyn
for å sikre at de ikke leker
med apparatet.
50 NO
– 3
Page 51

Rengjøring og bruksvedlike-
hold skal ikke utføres av barn
uten under tilsyn.
Ikke stikk gjenstander inn i ut-
luftingsåpningen.
Ikke rett sprøytestrålen mot
øynene.
Ikke rett sprøytestrålen direkte
på driftsmidler som inneholder
elektriske komponenter, som
f.eks. innsiden av ovner.
Før bruk på ømfintlige over-
flater (med høyglans),test mikrofibermoppen på et ikke
siktbart sted.
Anvisninger for batteri
Fare for kortslutning! Stikk
ingen ledende gjenstander
(f.eks. skrujern eller lignende)
inn i ladekontakten.
Lading av batteriene skal kun
gjøres med vedlagte originale
ladeapparat eller annet ladeapparat godkjent av KÄRCHER.
Anvisninger for batterilader
Ladeapparat og ladekabel
skal ved synlige skader bare
repareres ved å skifte originaldeler.
Batteriladeren må kun brukes
og oppbevares i tørre rom,
omgivelsestemperatur 5 40° C.
Berør aldri støpselet med
våte hender.
몇 Anvisninger for transport.
Batteriet er kontrollert etter
relevante forskrifter for internasjonal bruk og kan transporteres/sendes.
Miljøvern
Materialet i emballasjen kan resirkuleres. Ikke kast emballasjen i
husholdningsavfallet, men lever
den inn til resirkulering.
Brukte maskiner inneholder verdifulle gjenbrukbare materialer og
stoffer som ikke skal ende opp i
naturen. Maskinen og de inkluderte oppladbare batteriene skal
derfor ikke kastes i husholdningsavfallet. Avhending kan gjøres
uten kostnader via lokale returog gjenbrukspunkter.
Anvisninger om innhold (REACH)
Aktuell informasjon om stoffene i innholdet finner du under:
www.kaercher.com/REACH
Symboler i bruksanvisningen
Fare
For en umiddelbar truende fare
som kan føre til store personskader eller til død.
몇 Advarsel
For en mulig farlig situasjon som
kan føre til store personskader
eller til død.
Forsiktig!
For en mulig farlig situasjon som
kan føre til mindre personskader
eller til materielle skader.
– 4
51NO
Page 52

Igangsetting
Beskrivelse av apparatet
Kontroller ved utpakkingen at innholdet
i pakken er komplett og uskadd. Kontakt din forhandler ved eventuelle
transportskader.
Merk:
Illustrasjoner av maskinen og
betjeningen av den finner du på
side 2.
Figur
WV 2
1 Ladeapparat med ladekabel
2 Basisapparat
3 Ladekontakt
4 Hovedbryter (AV/PÅ)
5 Lade- / driftsindikator
6 Ståfot
7 Håndtak
8 Bruktvannstank, avtakbar
9 Forrigling, bruktvannstank
10 Avskiller
11 Lås, avskiller
12 Sugedyse, bred
13 Lås, sugedyse
WV 2 Plus*
14 Sprayflaske
15 Sprøytehendel
16 Sprutehode
17 Feste for viskepåsats
18 Tilbehørsdel
19 Mikrofibermopp
20 Konsentrat for vinduspussing
* avhengig av modell
Montere apparat
Figur
Sett sugedysen på avskilleren, du
skal høre den gå i lås.
Monter sprayflasken og
tilbehørsdelen og fyll den
med rengjøringsmiddel*
* avhengig av modell
Merk: Vennligst pass på at transportsikringen falle rav ved første bruk av
spruteholdet.
Montering av tilbehørsdelen
Figur
Drei sprøytehodet av sprøyteflasken.
Sett tilbehørsdelen på sprøytehodet.
Forankre tilbehørsdelen og sprøy-
tehodet med festeringen.
Figur
Sett moppen opp på tilbehørsdelen
og festne den med borrelås.
Fyll sprøyteflasken
Figur
Fyll det medfølgende konsentratet
(1 x 20 ml) i sprøyteflasken og fyll
flasken langsomt opp med klart
vann til merket "MAX" (gir 250 ml
rengjøringsmiddel-løsning).
Lukk flasken.
Lade opp batteri
Forsiktig!
Batteriet må lades komplett før
første bruk.
Figur
Før bruk, sett ladeapparatet inn i en
vanlig stikkontakt.
Stikk støpselet til ladekabelen inn
på baksiden av apparatet.
Merk: Under ladeprosessen linker
lade- / driftsindikatorene. Når batte-
riet er fullt oppladet vil den lyse kon-
stant grønt.
52 NO
– 5
Page 53

Arbeidsstart
Rengjøring med sprayflaske og
tilbehørsdel*
* avhengig av modell
Figur
For å påføre rengjøringsmidlet,
trykk flaskens sprøytehendel og
spray inn flaten jevnt. Løsne derpå
smusset med moppen.
Merk: Pad skylles ved behov av under rennende vann!
Viktig: Før bruk, forsikre deg om at avstrykerene er frie for smuss.
Figur
Kole til apparatet, lade- / driftsindi-
kator lyser konstant grønn.
For å suge opp rengjøringsvæsken,
dra apparatet ovenfra og ned.
Merk: Vanskelig tilgjengelige flater
kan suges på tvers så vel som via
hodet (begrenset mengde).
Merknader:
Ved svakt batteri begynner lade- /
driftsindikator langsomt å blinke, og
apparatet kobles ut etter en viss tid. I
så fall må batteriet lades opp
Apparatet kan slås av når spruteflasken er i bruk. Da vil brukstiden økes
betraktelig for hver opplading av batteriet.
Rengjøring uten sprayflaske
Påfør rengjøringsmidlet på vanlig
måte og løsne smusset, som angitt
av produsenten.
Flere prosedyrer som ved "Rengjø-
ring med spruteflaske og viskepåsats", figur .
Avbryte arbeidet
Figur
Sett apparatet på ståfoten (parke-
ringsposisjon) og slå av.
Tøm beholderen under
arbeidet
Når den maksimale fyllingsgraden
(markering) av bruktvannstanken er
nådd, må tanken tømmes.
Figur
Slå av maskinen.
Figur
Åpne lokket på bruktvannstanken
og tøm tanken.
Lukk lokket på spillvannstanken.
Avslutte arbeidet / rengjøre
apparatet
Slå av maskinen.
Figur
Lås først opp sugedysen og ta den
av avskilleren, lås derettet opp av-
skilleren og ta den av.
Rengjør avskilleren og sugedysen
under rennende vann (ikke egnet
for oppvaskemaskin).
Figur
Merknad: I basisapparatet befinner det seg elektriske komponenter, dette må ikke skylles under rennende vann!
Ta av spillvannstanken og trekk ut
lokket.
Tøm spillvannstanken og skyll med
vann. Lukk tanken igjen.
Ta moppen av sprayflasken og
vask under rennende vann. Mop-
pen kan vaskes ved opp til 60°C i
vaskemaskin (ikke bruk skyllemid-
del).
La rengjort apparat tørkes før de-
lene settes sammen igjen.
Lad opp batteriet.
Oppbevaring av apparatet
Oppbevar apparatet stående i et
tørt tom.
– 6
53NO
Page 54

– 7
Fyll rengjøringsmiddel.
Pumpemekanismen i sprayflasken
er defekt, ta kontakt med forhandleren.
Kontroller lade- / driftsindikatoren:
Intet signal hhv. langsomt blinken-
de signal: Lade opp batteriet.
Ved hurtig blinkende signal: Ta
kontakt med forhandleren.
Skyll avstrykeren.
Snu slitte avstrykerlepper:
Trekk avstrykerleppen av silikon sideveis ut. Silikonleppen fuktes i det
runde området med vann eller rengjøringsmiddel. Silikonleppen føres
omvendt inn i holderen igjen.
Skift avstrykerleppe ved behov:
Dersom begge kanter er slitte etter
snuing av silikonleppen, må du skifte ut med en ny silikonileppe Silikonleppen skiftes som beskrevet
over.
Kontroller doseringen av rengjø-
ringsmidlet.
Tøm bruktvannstanken (maks.
100 ml innhold).
Konsentrat for vinduspussing (4 x
20 ml)
Bestillingsnr.: 6.295-302.0
Mikrofibermopp (2 Ant.)
Bestillingsnr.: 2.633-100.0
Avstryker, bred (2 stykk)
Bestillingsnr.: 2.633-005.0
Avstryker, smal (2 stykk)
Bestillingsnr.: 2.633-104.0
Hofteveske
Bestillingsnr.: 2.633-006.0
Det tas forbehold om tekniske
endringer!
Feilretting
Sprayflasken spruter ikke
Apparatet starter ikke
Striper ved rengjøringen
Vann kommer ut på siden av
tanken
Tilleggsutstyr
Tekniske data
Beskyttelsestype IP X4
Volum bruktvannstank 100 ml
Driftstid ved fullt ladet
batteri
25 min
Nominell spenning batteri
3,7 V
Nominell effekt apparat 10 W
Ladetid ved tomt batteri 140 min
Utgangsspenning lader 5,5 V
Utgangsstrøm lader 600 mA
Lydtrykksnivå (EN
60704-2-1)
50 dB(A)
Vekt 0,6 kg
Batteritype Li-Ion
54 NO
Page 55

Page 56

Page 57

Page 58

http://www.kaercher.com/dealersearch
 Loading...