

Page 1
WT 5
Deutsch. . . . . 5
English . . . . .16
Français . . . .27
Italiano . . . . .39
Nederlands . . .50
Español. . . . .61
Português . . .72
Ελληνικά . . . .83
59663550 (08/14)
Page 2
234
Page 3
Page 4

Page 5
Inhaltsverzeichnis
Allgemeine Hinweise . . . . . . . . . . . . . . . . . . . . . . . . . . . . . . . . . . . . . . . . . . . . 5
Sicherheitshinweise . . . . . . . . . . . . . . . . . . . . . . . . . . . . . . . . . . . . . . . . . . . . . 6
Bedienung . . . . . . . . . . . . . . . . . . . . . . . . . . . . . . . . . . . . . . . . . . . . . . . . . . . . 6
Pflege und Wartung . . . . . . . . . . . . . . . . . . . . . . . . . . . . . . . . . . . . . . . . . . . . . 14
Hilfe bei Störungen. . . . . . . . . . . . . . . . . . . . . . . . . . . . . . . . . . . . . . . . . . . . . . 15
Technische Daten . . . . . . . . . . . . . . . . . . . . . . . . . . . . . . . . . . . . . . . . . . . . . . . 15
Allgemeine Hinweise
Sehr geehrter Kunde,
– Dieses Gerät wurde für den privaten Gebrauch entwickelt und ist nicht für die
– Dieses Gerät ist zum Anschluss an einen Wasserhahn vorgesehen und steuert
Hinweise zu Inhaltsstoffen (REACH)
Aktuelle Informationen zu Inhaltsstoffen finden Sie unter:
www.kaercher.de/REACH
In jedem Land gelten die von unserer zuständigen Vertriebsgesellschaft herausgegebenen Garantiebedingungen. Etwaige Störungen an Ihrem Gerät beseitigen wir
innerhalb der Garantiefrist kostenlos, sofern ein Material- oder Herstellungsfehler
die Ursache sein sollte. Im Garantiefall wenden Sie sich bitte mit Kaufbeleg an Ihren
Händler oder die nächste autorisierte Kundendienststelle.
(Adresse siehe Rückseite)
Lesen Sie vor der ersten Benutzung Ihres Gerätes diese Originalbetriebsanleitung, handeln Sie danach und bewahren Sie diese für späteren Gebrauch oder für Nachbesitzer auf.
Bestimmungsgemäße Verwendung
Beanspruchungen des gewerblichen Einsatzes vorgesehen.
automatisch den Wasserfluss in Bewässerungssystemen.
Umweltschutz
Die Verpackungsmaterialien sind recyclebar. Bitte werfen Sie die Verpackungen nicht in den Hausmüll, sondern führen Sie diese einer Wiederverwertung zu.
Altgeräte enthalten wertvolle recyclingfähige Materialien, die einer Verwertung zugeführt werden sollten. Bitte entsorgen Sie Altgeräte deshalb über
geeignete Sammelsysteme.
Garantie
Symbole in der Betriebsanleitung
몇 VORSICHT
Für eine möglicherweise gefährliche Situation, die zu leichten Verletzungen oder zu
Sachschäden führen kann.
Deutsch 5
Page 6
Sicherheitshinweise
몇 VORSICHT
Bewässerungsautomat nicht in Trinkwassersystemen betreiben.
Bewässerungsautomat nur mit unbehandeltem, klarem Süßwasser mit einer
Temperatur bis maximal 35°C betreiben.
Bewässerungsautomat nur im Außenbereich installieren.
Bewässerungsautomat keinem direkten Wasserstrahl aussetzen und nie in
Wasser tauchen.
Bewässerungsautomat vor jedem Betrieb auf Schäden prüfen, bei sichtbaren
Beschädigungen Betrieb einstellen.
Bewässerungsautomat nur in vertikaler Position anbringen.
Keine Dichtmasse und keine Schmiermittel verwenden, um den Bewässe-
rungsautomat am Wasserhahn anzuschließen.
Nicht am angeschlossenen Schlauch ziehen.
Nur 9V Batterien (Typ 6LR61) verwenden.
Bewässerungsautomat nicht an Orten installieren, an denen sich Kondenswas-
ser bildet, da hierdurch die Batterie beschädigt werden kann.
Bewässerungsautomat nicht in der Nähe von Wärmequellen installieren (maxi-
male Umgebungstemperatur 60°C).
Bewässerungsautomat nicht in der Nähe von unter Spannung stehenden Ge-
räten betreiben.
Bedienung
Prüfen Sie beim Auspacken den Packungsinhalt auf Vollständigkeit und Beschädigungen. Benachrichtigen Sie bei Beanstandungen bitte Ihren Händler.
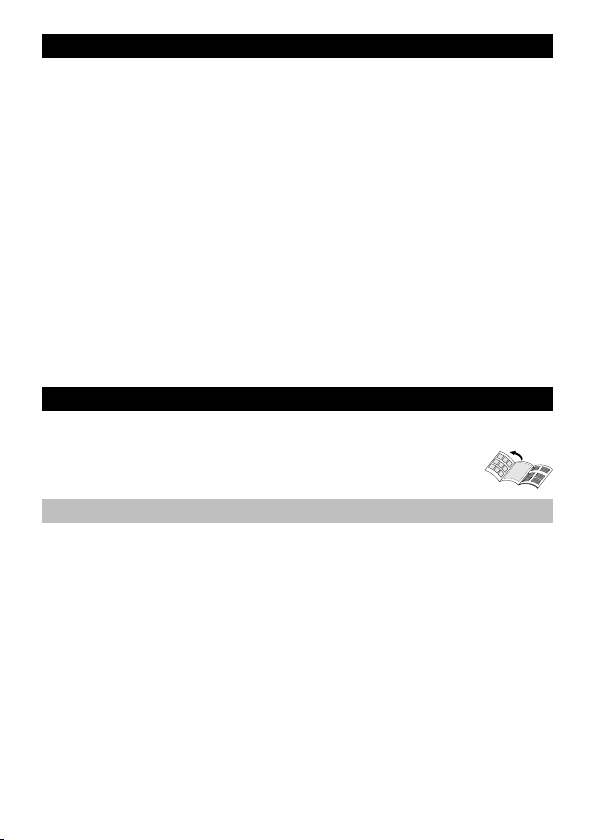
Abbildungen siehe Ausklappseite!
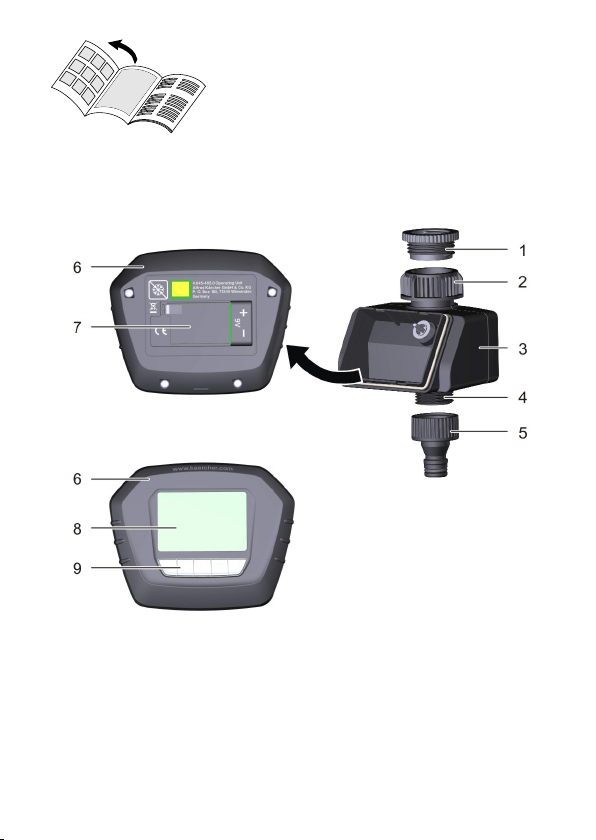
Gerätebeschreibung
Abbildungen siehe Seite 2
3
1 Reduzierstück (G
2 Wasseranschluss (G 1) mit Filterdichtung
3 Ventileinheit
4 Schlauchanschluss
5 Kupplungsteil für Schlauchanschluss
6 Bedieneinheit
7 Batteriefach
8 Display
9 Tastenfeld
/4)
6 Deutsch
Page 7

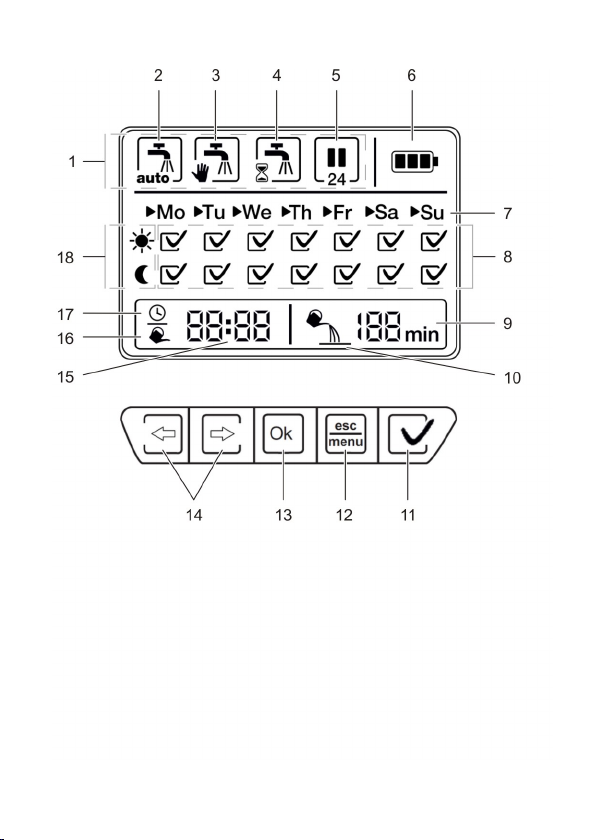
Displaybeschreibung
Abbildungen siehe Seite 3
1 Menüleiste
2 Automatische Bewässerung
3 Manuelle Bewässerung
4 Countdown-Funktion Bewässerung
5 Unterbrechung Bewässerung
6 Batteriestatus Bedieneinheit
7 Anzeige Wochentag
8 Anzeige Bewässerungsprogramm (aktiviert/deaktiviert)
9 Bewässerungsdauer
10 Anzeige Bewässerung ist aktiv
11 Bestätigungstaste Aktivierung/Deaktivierung Bewässerung
12 menu / esc-Taste
13 ok-Taste
14 Pfeiltasten
15 Uhrzeit / Bewässerungszeit
16 Anzeige Bewässerungszeit
17 Anzeige aktuelle Zeit
18 Bewässerungszeitraum (morgens/abends)
Funktion
Dem Gerät stehen 4 Modi zur Verfügung.
Automatische Bewässerung
– Mit dieser Funktion können Bewässerungszeiträume individuell eingestellt wer-
den und die Bewässerung wird automatisch aktiviert und deaktiviert.
Manuelle Bewässerung
– Mit dieser Funktion wird die Bewässerung manuell ein- oder ausgeschaltet.
Countdown-Funktion Bewässerung
– Mit dieser Funktion wird die Bewässerung nach einer gewünschten Zeit (max.
120 Minuten) automatisch abgeschaltet.
Unterbrechung der Bewässerung
– Mit dieser Funktion wird die automatische Bewässerung für 24 Stunden ausge-
setzt.
Vor Inbetriebnahme
Wasserhahn muss geschlossen sein.
Kupplungsteil auf Schlauchanschluss schrauben.
Bei Bedarf Reduzierstück auf Wasseranschluss schrauben.
Ventileinheit am Gehäuse halten und Wasseranschluss auf den Wasserhahn
schrauben.
몇 VORSICHT
Bewässerungsautomat nie ohne mitgelieferte Filterdichtung an den Wasserhahn
anschließen.
Deutsch 7
Page 8

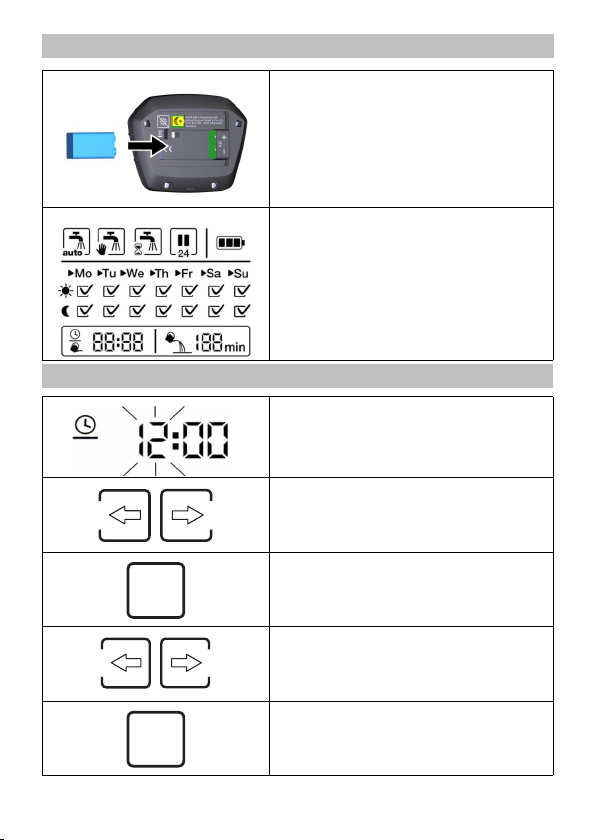
Vorbereitung Bedieneinheit
Ok
Hinweis: Die Batterie ist nicht im Lieferumfang enthalten.
Batterie lagerichtig (+/- Kennzeichnung)
in das Batteriefach einlegen.
Sobald die Batterie eingelegt ist, wech-
selt die Anzeige, nach kurzem Selbsttest,
direkt in den Einstellmodus für die aktuelle Uhrzeit und den Wochentag. Es blinken die Stunden der Anzeige Uhrzeit.
Uhrzeit einstellen bei Erstinbetriebnahme
Hinweis: Sobald die Batterie eingelegt wur-
de, blinkt die Uhrzeit automatisch.
Die Stunden mit den Pfeiltasten einstel-
len.
Mit ok-Taste bestätigen.
Ok
Es blinken die Minuten.
Die Minuten mit den Pfeiltasten einstel-
len.
Mit ok-Taste bestätigen.
Die Uhrzeit ist eingestellt.
8 Deutsch
Page 9
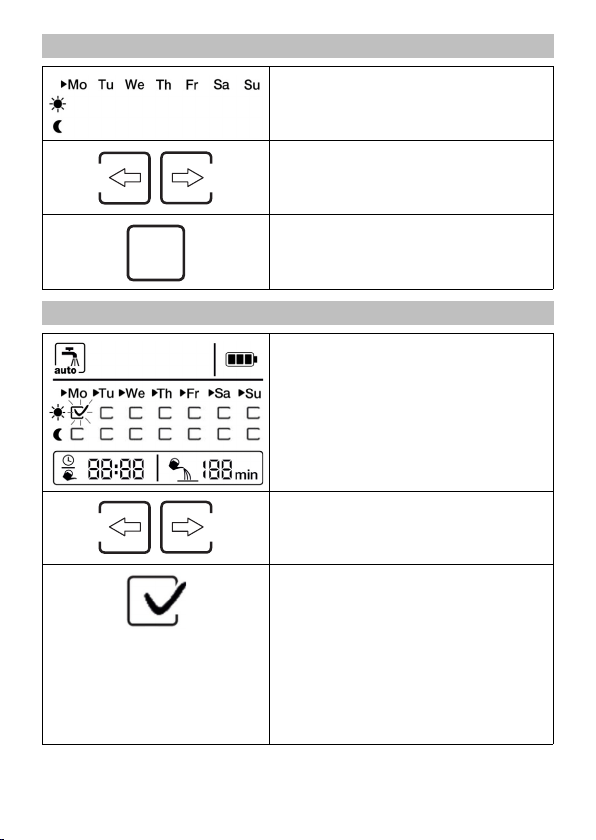
Wochentag einstellen bei Erstinbetriebnahme
Anzeige: Montag bis Sonntag
Den Wochentag mit den Pfeiltasten ein-
stellen.
Mit ok-Taste bestätigen.
Ok
Der Wochentag ist eingestellt.
Einstellung automatische Bewässerung
Es blinkt die Anzeige Bewässerung (aktiviert)
Hinweis
Die Werkseinstellung für die Bewässerungszeit und -dauer sind morgens 6:00, 5 Minuten
und abends 21:00, 5 Minuten.
Mit den Pfeiltasten kann durch das Bewässerungsprogramm navigiert werden.
Mit Bestätigungstaste Aktivierung/Deak-
tivierung Bewässerung markieren.
Wenn voreingestellte Uhrzeit und Dauer in
Ordnung sind, können mit den Pfeiltasten
weitere Bewässerungszeiträume ausgewählt
werden.
Hinweis
Mit esc/menu-Taste kann der Einstellmodus
jederzeit verlassen werden.
Deutsch 9
Page 10
Wenn voreingestellte Uhrzeit und Dauer nicht
Ok
Ok
Ok
Ok
esc
menu
Hinweis
Zur späteren Änderung der Einstellungen mit esc/menu-Taste und den Pfeiltasten
in den Einstellmodus der automatischen Bewässerung wechseln.
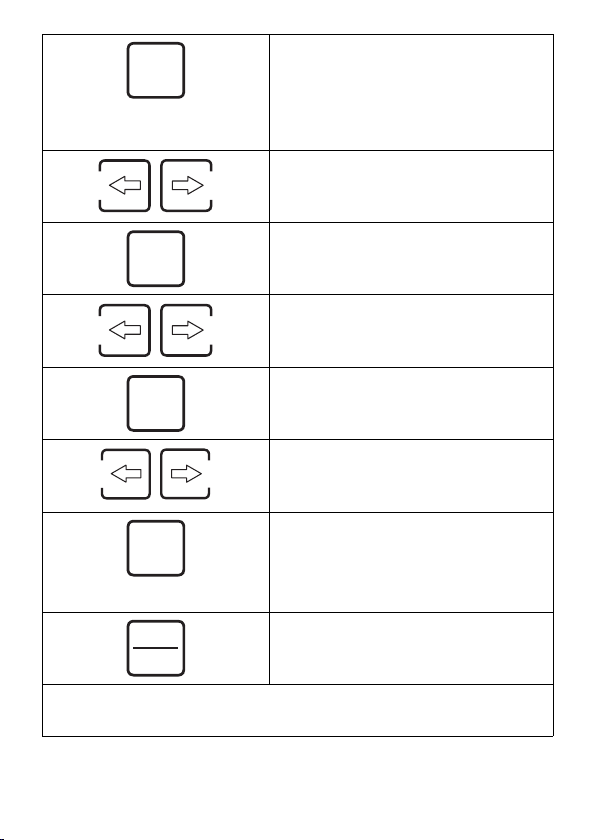
in Ordnung sind:
Mit ok-Taste bestätigen, um die Uhrzeit
und Dauer des aktiven Bewässerungszeitraums zu ändern.
Es blinken die Stunden.
Die Stunden mit den Pfeiltasten einstel-
len.
Mit ok-Taste bestätigen.
Es blinken die Minuten.
Die Minuten mit den Pfeiltasten einstel-
len.
Mit ok-Taste bestätigen.
Es blinkt die Bewässerungsdauer.
Die Minuten mit den Pfeiltasten einstel-
len.
Mit ok-Taste bestätigen.
Die Bewässerungsdauer ist eingestellt.
Es können nun weitere Bewässerungs-
zeiträume mit den Pfeiltasten eingestellt
werden.
Mit esc/menu-Taste den Einstellmodus
verlassen.
Automatische Bewässerung ist aktiviert.
10 Deutsch
Page 11

Einstellung manuelle Bewässerung
Ok
esc
menu
Mit esc/menu-Taste in den Einstellmo-
esc
dus wechseln.
menu
Es blinkt das Symbol für manuelle Bewässerung.
Mit ok-Taste bestätigen.
Ok
Es erscheint das Bewässerungssymbol.
Das Ventil öffnet.
Bewässerung ist aktiv.
Mit esc/menu-Taste schließt das Ventil
und es wird in den Automatikmodus gewechselt.
Mit ok-Taste schließt das Ventil, es wird
in den Einstellmodus gewechselt und es
kann eine neue Funktion ausgewählt
werden.
Deutsch 11
Page 12
Ok
esc
menu
12 Deutsch
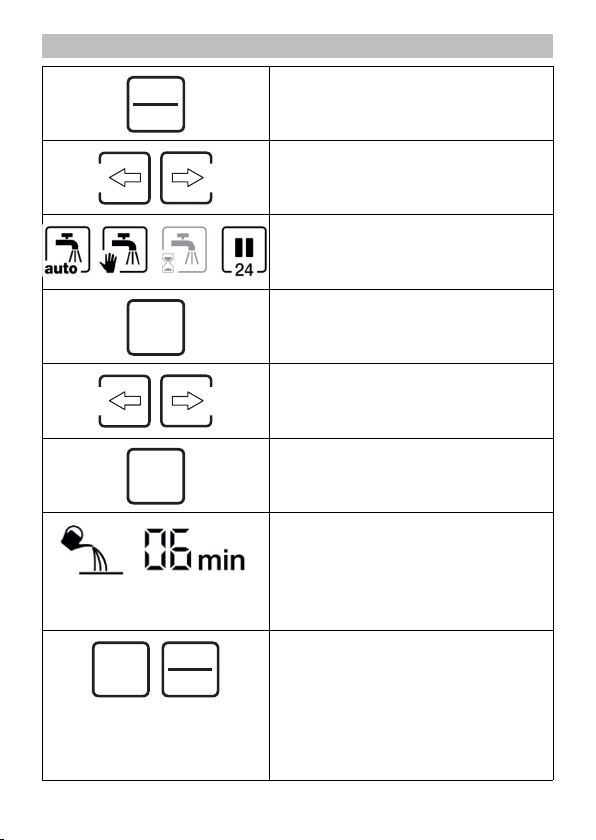
Einstellung Countdown-Funktion Bewässerung
Mit esc/menu-Taste in den Einstellmo-
esc
dus wechseln.
menu
Bewässerungsmodus mit den Pfeiltasten
auswählen.
Es blinkt das Symbol für die CountdownFunktion.
Mit ok-Taste bestätigen.
Ok
Es blinken die Minuten.
Die Minuten mit den Pfeiltasten einstel-
len.
Mit ok-Taste bestätigen.
Ok
Es erscheint das Bewässerungssymbol.
Die Countdown-Funktion ist aktiviert.
Das Ventil öffnet.
Bewässerung ist aktiv.
Nach Ablaufzeit des Countdowns wechselt
die Funktion in den Automatikmodus.
Für vorzeitiges Beenden:
Mit esc/menu-Taste schließt das Ventil
und es wird in den Automatikmodus gewechselt.
Mit ok-Taste schließt das Ventil, es wird
in den Einstellmodus gewechselt und es
kann eine neue Funktion ausgewählt
werden.
Page 13

Unterbrechung Bewässerung
Ok
esc
menu
Mit esc/menu-Taste in den Einstellmo-
esc
dus wechseln.
menu
Bewässerungsmodus mit den Pfeiltasten
auswählen.
Es blinkt das Symbol für die Unterbrechung
der Bewässerung.
Mit ok-Taste bestätigen.
Ok
Bedieneinheit auf Ventileinheit setzen.
Wasserhahn öffnen.
Am Ende der Bewässerungssaison
Wasserhahn schließen.
Bewässerungsautomat von Wasserhahn und Wasserschlauch trennen.
Bedieneinheit muss mit Ventileinheit verbunden bleiben.
Manuelle Bewässerung aktivieren, damit restliches Wasser aus dem Bewässe-
rungsautomaten abfließen kann.
Bedieneinheit von Ventileinheit trennen.
Batterie entfernen.
Bewässerungsautomat an einem trockenen und frostsicheren Ort lagern.
Die Bewässerungseinstellung ist für 24
Stunden deaktiviert.
Für ein Beenden vor Ablauf der 24 Stun-
den kann mit ok-Taste oder esc/menuTaste die Funktion unterbrochen werden
und es wird in den Automatikmodus gewechselt.
Betrieb
Betrieb beenden
Deutsch 13
Page 14
Pflege und Wartung
Filterdichtung reinigen
Filterdichtung im Wasseranschluss regelmäßig entnehmen und unter fließen-
dem Wasser ausspülen.
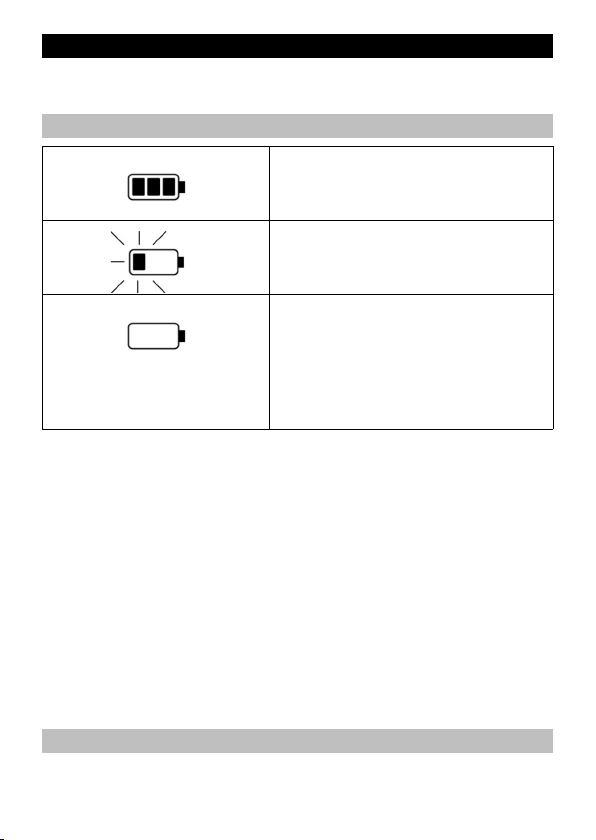
Batterie
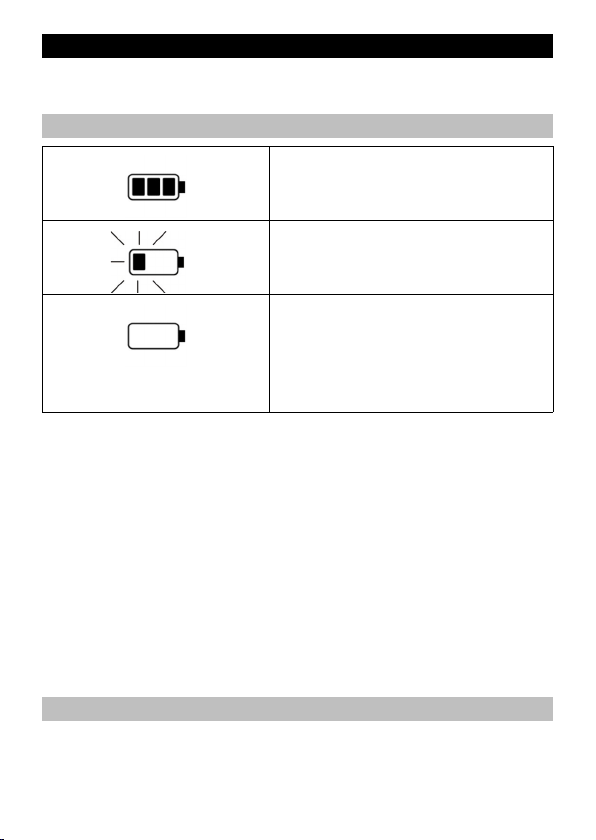
Batteriestatus voll
Batteriestatus fast leer
Batterie erneuern.
Batteriestatus leer
Batterie erneuern.
Hinweis
Im Modus automatische Bewässerung wird
das Ventil zur Sicherheit geschlossen.
Die Bewässerung kann nicht mehr aktiviert
werden.
Batterie wechseln
Bedieneinheit abnehmen.
Neue 9V Batterie (Typ 6LR61) einlegen.
Verbrauchte Batterie gemäß den geltenden Bestimmungen entsorgen.
Bedieneinheit auf Ventileinheit setzen, auf richtigen Sitz achten.
Hinweis
Die alte Batterie kann innerhalb von 3 Minuten durch eine neue Batterie ersetzt werden, ohne dass die Bewässerungseinstellungen und Programmierung verloren gehen.
Verwendbare Batterietypen:
– Alkaline
– Wiederaufladbare Batterie mit geringer Selbstentladung und mit mindestens
250 mAh Kapazität.
Hinweis
Wiederaufladbare Batterien halten unter Umständen keine ganze Saison.
Wartung
Das Gerät ist wartungsfrei.
14 Deutsch
Page 15
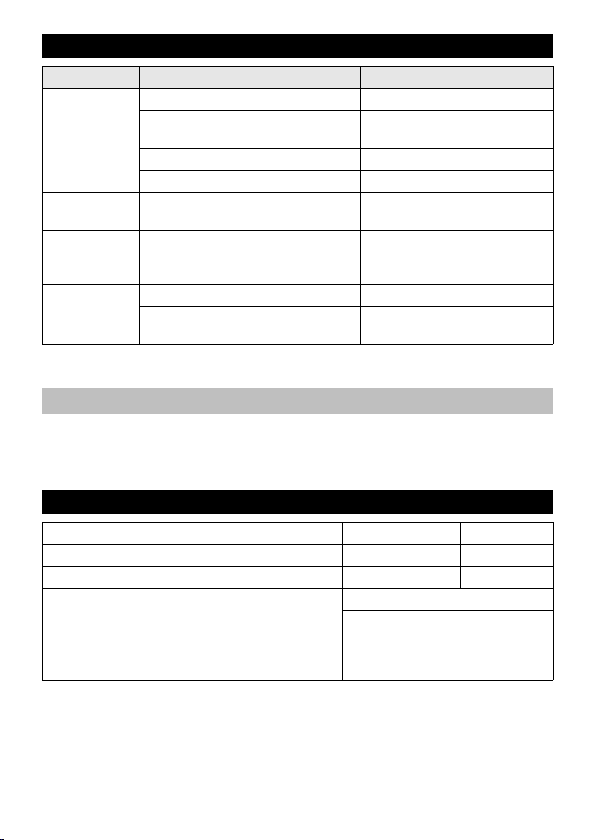
Hilfe bei Störungen
Störung Ursache Behebung
Bewässerung
erfolgt trotz
Programmierung nicht.
Ventil öffnet /
schließt nicht.
Keine DisplayAnzeige
Leckage am
Wasseranschluss.
Bei Fragen oder Störungen hilft Ihnen unsere Kärcher-Niederlassung gerne weiter.
Adresse siehe Rückseite.
Wasserhahn geschlossen. Wasserhahn öffnen.
Batterie leer. Neue 9V Batterie (Typ 6LR61)
Batterieanschlusskontakte oxidiert. Kontakte reinigen.
Filterdichtung verstopft. Filterdichtung reinigen.
Bei abgenommener Bedieneinheit
kann Ventil nicht öffnen /schließen.
Batterie leer oder Kontakte oxidiert. Neue 9V Batterie (Typ 6LR61)
Filterdichtung defekt. Filterdichtung ersetzen.
Wasseranschluss am Wasserhahn
hat sich gelöst.
einlegen.
Bedieneinheit an die Ventileinheit anbringen.
einlegen oder Kontakte reinigen.
Wasseranschluss wieder festschrauben.
Reset durchführen
Batterie aus dem Batteriefach nehmen, bis die Anzeige im Display vollständig
erloschen ist.
oder
Durch 5 Sekunden drücken der ok-Taste werden die Einstellung zurückgesetzt.
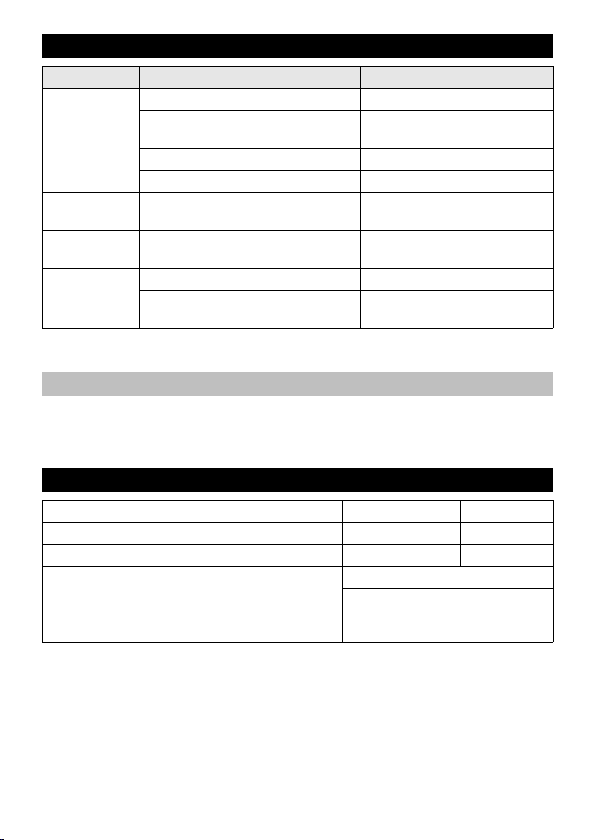
Technische Daten
Betriebsdruck 0,1 - 1,0 (1 - 10) MPa (bar)
Zulauftemperatur (max.) 35 °C
Umgebungstemperatur +1 -> +60 °C
Batterietyp 9V (6LR61 / Alkaline)
9V (Baugröße wie: 6LR61 / Wiederaufladbare Batterie mit geringer Selbstentladung und mindestens 250 mAh)
Technische Änderungen vorbehalten.
Deutsch 15
Page 16
Contents
General information . . . . . . . . . . . . . . . . . . . . . . . . . . . . . . . . . . . . . . . . . . . . . 16
Safety instructions . . . . . . . . . . . . . . . . . . . . . . . . . . . . . . . . . . . . . . . . . . . . . . 17
Operation . . . . . . . . . . . . . . . . . . . . . . . . . . . . . . . . . . . . . . . . . . . . . . . . . . . . . 17
Maintenance and care . . . . . . . . . . . . . . . . . . . . . . . . . . . . . . . . . . . . . . . . . . . 25
Troubleshooting . . . . . . . . . . . . . . . . . . . . . . . . . . . . . . . . . . . . . . . . . . . . . . . . 26
Technical specifications . . . . . . . . . . . . . . . . . . . . . . . . . . . . . . . . . . . . . . . . . . 26
General information
Dear Customer,
– This appliance has been designed for use in private households and is not in-
– This appliance is designed to be connected to a water tap and automatically
Information on ingredients (REACH)
The latest information on ingredients can be found at:
www.kaercher.de/REACH
The warranty terms published by the relevant sales company are applicable in each
country. We will repair potential failures of your appliance within the warranty period
free of charge, provided that such failure is caused by faulty material or defects in
manufacturing. In the event of a warranty claim please contact your dealer or the
nearest authorized Customer Service centre. Please submit the proof of purchase.
(See address on the reverse)
Please read and comply with these original instructions prior to the initial operation of your appliance and store them for later use or subsequent owners.
Proper use
tended for commercial use.
regulates the water flow in irrigation systems.
Environmental protection
The packaging material can be recycled. Please do not place the packaging
into the ordinary refuse for disposal, but arrange for the proper recycling.
Old appliances contain valuable materials that can be recycled. Please arrange for the proper recycling of old appliances. Please dispose your old appliances using appropriate collection systems.
Warranty
Symbols in the operating instructions
몇 CAUTION
For a possibly dangerous situation which can lead to minor injuries or property damage.
16 English
Page 17
Safety instructions
몇 CAUTION
Do not use the irrigation device in drinking water systems.
Only operate the irrigation device with untreated, clear fresh water with a tem-
perature of max. 35°C.
Only install the device outside.
Do not expose the watering device to a direct water jet and never immerse it in
water.
Check the irrigation device for damages prior to each use and stop using it if
there are visual damages.
Only mount irrigation device in a vertical position.
Do not use sealant or lubrication to connect the irrigation device to the water
tap.
Do not pull on the connected hose.
Only use 9V batteries (type 6LR61).
Do not install the irrigation device in areas where condensation water may be
generated, as this may damage the battery.
Do not install the watering device near heat sources (max. ambient temperature
60°C).
Do not install the irrigation device near powered devices.
Operation
Check the contents of the packaging for completeness and damages when unpacking. If you detect any damages please contact your dealer.
Illustrations on fold-out page!
Description of the Appliance
Illustrations on Page 2
3
1 Reduction piece (G
2 Water connection (G 1) with filter gasket
3 Valve unit
4 Hose connection
5 Coupling element for hose connection
6 Control unit
7 Battery compartment
8 Display
9 Keypad
/4)
English 17
Page 18

Description of the display
Illustrations on Page 3
1 Menu bar
2 Automatic irrigation
3 Manual irrigation
4 Countdown function watering
5 Interruption watering
6 Battery status control unit
7 Display day of the week
8 Display watering programme (activated/deactivated)
9 Irrigation duration
10 Display watering is active
11 Confirmation button activation/deactivation watering
12 menu / esc button
13 OK button
14 Arrow keys
15 Time / time of irrigation
16 Display watering time
17 Display current time
18 Watering period (in the morning/evening)
Function
The device has 4 modes at disposal.
Automatic irrigation
– With this function watering periods can be set individually and the watering is
automatically activated and deactivated.
Manual irrigation
– With this function the watering is manually switch on or off.
Countdown function watering
– With this function the watering is automatically switched off after a desired pe-
riod of time (max. 120 minutes).
Interruption of the watering
– With this function the automatic watering is intermitted for 24 hours.
Before Startup
The tap must be closed.
Screw the coupling element onto the hose connection.
If necessary, screw the reduction piece onto the water connection.
Hold the valve unit on the casing and screw the water connection onto the water
tap.
몇 CAUTION
Never connect the watering device to the water tap without using the supplied filter
seal.
18 English
Page 19

Preparation control unit
Note: The battery is not included in the scope
of delivery.
Insert the battery into the battery com-
partment in the correct position (+/- marking).
As soon as the battery is inserted, the
display changes directly into the settings
mode for the current time and day of the
week after a short self-test. The hours of
the time display are flashing.
Setting the time upon initial start-up
Note: As soon as the battery is inserted, the
time flashes automatically.
Set the hours by means of the arrow
keys.
Confirm with the OK button.
Ok
The minutes are flashing.
Ok
Set the minutes by means of the arrow
keys.
Confirm with the OK button.
The time is set.
English 19
Page 20

Setting the day of the week upon initial start-up
display: Monday through Sunday
Set the day of the week using the arrow
keys.
Confirm with the OK button.
Ok
The day of the week is set.
Setting automatic watering
The display watering (activated) is flashing
Note
The factory setting for the watering time and
duration is 5 minutes at 6 a.m. and 5 minutes
at 9 p.m.
You can navigate through the watering programme using the arrow keys.
Mark activation/deactivation watering us-
ing the confirmation button.
If the preset time and duration is OK, further
watering periods can be selected using the arrow keys.
Note
The settings mode can be left with the esc/
menu button at any time.
20 English
Page 21
If the preset time and duration is not OK:
Ok
Confirm using the OK button to change
the time and the duration of the active
watering period.
The hours are flashing.
Set the hours by means of the arrow
keys.
Confirm with the OK button.
Ok
Ok
Ok
esc
menu
Note
Switch into the settings mode of the automatic watering using the esc/menu button
and the arrow keys for later changes of the settings.
The minutes are flashing.
Set the minutes by means of the arrow
keys.
Confirm with the OK button.
The watering duration is flashing.
Set the minutes by means of the arrow
keys.
Confirm with the OK button.
The watering duration is set.
Further watering periods can be set us-
ing the arrow keys.
Leave the settings mode using the esc/
menu button.
Automatic watering is activated.
English 21
Page 22
esc
Ok
esc
menu
menu
Ok
Setting of manual watering
Switch into the settings mode using the
esc/menu button.
The symbol for manual watering is flashing.
Confirm with the OK button.
The watering symbol appears.
The valve opens.
Watering is active.
The valve is closed with the esc/menu
button and is switched into the automatic
mode.
The valve is closed with the OK button,
it is switched into the settings mode and
a new function can be selected.
22 English
Page 23

Setting of the countdown function watering
Ok
esc
menu
Switch into the settings mode using the
esc
esc/menu button.
menu
Select the watering mode with the arrow
keys.
The symbol for the countdown function
flashes.
Confirm with the OK button.
Ok
The minutes are flashing.
Set the minutes by means of the arrow
keys.
Confirm with the OK button.
Ok
The watering symbol appears.
The countdown function is activated.
The valve opens.
Watering is active.
After completion of the countdown the function changes into the automatic mode.
For premature termination:
The valve is closed with the esc/menu
button and is switched into the automatic
mode.
The valve is closed with the OK button,
it is switched into the settings mode and
a new function can be selected.
English 23
Page 24
Interruption watering
Ok
esc
menu
Switch into the settings mode using the
esc
esc/menu button.
menu
Select the watering mode with the arrow
keys.
The symbol for the interruption of the watering
is flashing.
Confirm with the OK button.
Ok
Place control unit onto valve unit.
Open tap.
At the end of the irrigation season
Turn off tap.
Remove the irrigation device from the water tap and the water hose.
The control unit must remain connected to the valve unit.
Activate manual irrigation to drain the remaining water from the irrigation de-
vice.
Disconnect the control unit from the valve unit.
Remove the battery.
Store the irrigation device at a dry and frost-free location.
The irrigation settings are deactivated for
24 hours.
The function can be interrupted by using
the OK button or the esc/menu button before the expiration of the 24 hours and
changes into the automatic mode.
Operation
Finish operation
24 English
Page 25
Maintenance and care
Clean the filter gasket
Regularly remove the filter gasket from the water connection and rinse under
running water.
Battery
Battery status full
Battery status almost empty
Replace battery.
Battery status empty
Replace battery.
Note
In the automatic watering mode the valve is
closed for safety purposes.
Watering can no longer be activated.
Change the battery
Remove control unit.
Insert a new 9V battery (type 6LR61).
Dispose of the used battery according to the local provisions.
Place the control unit onto the valve unit, ensure proper seating.
Note
The old battery can be replaced by a new one within 3 minutes without losing the
watering settings and programming.
Suitable battery types:
– Alkaline
– Rechargeable battery with low self-discharge and a minimum capacity of
250 mAh.
Note
Rechargeable batteries may not last an entire season.
Maintenance
The appliance is maintenance free.
English 25
Page 26
Troubleshooting
Fault Cause Correction
The irrigation
does not take
place in spite
of the programming.
Valve does not
open / close.
No display indication
Leakage at the
water connection.
Our Kärcher branch will be pleased to help you further in the case of questions or
faults. See address on the reverse.
Water tap is closed. Open tap.
Battery depleted. Insert a new 9V battery (type
Battery contacts oxidized. Clean the contacts.
Filter gaskets blocked. Clean the filter gasket.
When the control unit is removed,
the valve cannot open / close.
Battery empty or contacts oxidised. Insert a new 9V battery (type
Filter gasket defective. Replace the filter gasket.
The water connection at the water
tap has become loose.
6LR61).
Attach the control unit to the
valve unit.
6LR61) or clean contacts.
Reconnect the water connection.
Performing a reset
Remove the battery from the battery compartment until the indication on the
display has completely gone out.
or
The settings are reset by pressing the OK button for 5 seconds.
Technical specifications
Operating pressure 0,1 - 1,0 (1 - 10) MPa (bar)
Max. feed temperature 35 °C
Ambient temperature +1 -> +60 °C
Battery type 9V (6LR61 / Alkaline)
9V (size as: 6LR61 / Rechargeable battery with low self-discharge
and at least 250 mAh)
Subject to technical changes.
26 English
Page 27
Table des matières
Consignes générales . . . . . . . . . . . . . . . . . . . . . . . . . . . . . . . . . . . . . . . . . . . . 27
Consignes de sécurité . . . . . . . . . . . . . . . . . . . . . . . . . . . . . . . . . . . . . . . . . . . 28
Utilisation . . . . . . . . . . . . . . . . . . . . . . . . . . . . . . . . . . . . . . . . . . . . . . . . . . . . . 28
Entretien et maintenance . . . . . . . . . . . . . . . . . . . . . . . . . . . . . . . . . . . . . . . . . 36
Assistance en cas de panne. . . . . . . . . . . . . . . . . . . . . . . . . . . . . . . . . . . . . . . 37
Caractéristiques techniques . . . . . . . . . . . . . . . . . . . . . . . . . . . . . . . . . . . . . . . 38
Consignes générales
Cher client,
– Cet appareil ne doit être utilisé que pour un usage domestique.
– Le présent appareil est destiné au raccord à un robinet d'eau et pilote automa-
Instructions relatives aux ingrédients (REACH)
Les informations actuelles relatives aux substances se trouvent à l'adresse :
www.kaercher.de/REACH
Dans chaque pays, les conditions de garantie en vigueur sont celles publiées par
notre société de distribution responsable. Les éventuelles pannes sur l’appareil sont
réparées gratuitement dans le délai de validité de la garantie, dans la mesure où
celles-ci relèvent d'un défaut matériel ou d'un vice de fabrication. En cas de recours
en garantie, adressez-vous à votre revendeur ou au service après-vente agréé le
plus proche munis de votre preuve d'achat.
(Adresse au dos)
Lire cette notice originale avant la première utilisation de votre appareil, se comporter selon ce qu'elle requièrt et la conserver pour une
utilisation ultérieure ou pour le propriétaire futur.
Utilisation conforme
tiquement le flux d'eau dans les systèmes d'arrosage.
Protection de l’environnement
Les matériaux constitutifs de l’emballage sont recyclables. Ne pas jeter les
emballages dans les ordures ménagères, mais les remettre à un système de
recyclage.
Les appareils usés contiennent des matériaux précieux recyclables lesquels
doivent être apportés à un système de recyclage. Pour cette raison, utilisez
des systèmes de collecte adéquats afin d'éliminer les appareils usés.
Garantie
Symboles utilisés dans le mode d'emploi
몇 PRÉCAUTION
Signale la présence d'une situation éventuellement dangereuse pouvant entraîner
des blessures légères ou des dommages matériels.
Français 27
Page 28
Consignes de sécurité
몇 PRÉCAUTION
Ne pas faire fonctionner l'arroseur automatique dans des systèmes d'eau po-
table.
N'exploiter l'appareil d'arrosage qu'avec de l'eau claire non traitée, à une tem-
pérature maximale de 35°C.
Installer l'arroseur automatique uniquement en zone extérieure.
Ne pas soumettre l'arroseur automatique à un jet d'eau direct et ne pas le plon-
ger dans l'eau.
Contrôler avant chaque utilisation que l'arroseur automatique n'est pas
endommagé ; l'arrêter en cas de dommages visibles.
Disposer l'arroseur automatique uniquement en position verticale.
Ne pas utiliser de mastic ni de lubrifiant pour raccorder l'arroseur automatique
au robinet d'eau.
Ne pas tirer sur le tuyau raccordé.
Utiliser uniquement des piles 9V (type 6LR61).
Ne pas installer l'arroseur automatique sur des sites où il se forme de la
condensation d'eau car cela pourrait endommager la pile.
Ne pas installer l'arroseur automatique près de sources de chaleur (tempéra-
ture ambiante max. 60° C).
Ne pas utiliser l'arroseur automatique à proximité d'appareils sous tension élec-
trique.
Utilisation
Lors du déballage, contrôler la présence de l’intégralité du matériel et d'éventuels
dommages. Si des dégâts imputables au transport sont constatés, il faut en informer
le revendeur.
Illustrations, cf. côté escamotable !
Description de l’appareil
Illustrations voir page 2
3
1 Réducteur (G
2 Raccord d'eau (G1) avec joint filtre
3 Bloc de vannes
4 Raccord du tuyau
5 Elément de couplage pour raccord de tuyau
6 Unité de commande
7 Compartiment batterie
8Ecran
9 Pavé de touches
/4)
28 Français
Page 29

Description de l'écran
Illustrations voir page 3
1 Barre de menus
2 Arrosage automatique
3 Arrosage manuel
4 Arrosage avec fonction compte à rebours
5 Interruption de l'arrosage
6 État de charge de la batterie Unité de commande
7 Affichage des jours de semaine
8 Affichage du programme d'arrosage (activé/désactivé)
9 Durée de l'arrosage
10 L'affichage de l'arrosage est actif
11 Touche de confirmation Activation/Désactivation de l'arrosage
12 Touche menu / esc
13 Touche OK
14 Touches de flèches
15 Heure / Heure d'arrosage
16 Affichage de la durée d'arrosage
17 Affichage de la durée actuelle
18 Période d'arrosage (matin/soir)
Fonctionnement
L'appareil dispose de 4 modes.
Arrosage automatique
– Avec cette fonction, des périodes d'arrosage peuvent être réglées individuelle-
ment et l'arrosage est automatiquement activé ou désactivé.
Arrosage manuel
– Avec cette fonction, l'arrosage est activé ou désactivé manuellement.
Arrosage avec fonction compte à rebours
– Avec cette fonction, l'arrosage est automatiquement arrêté après une durée dé-
finie (max. 120 minutes).
Interruption de l'arrosage
– Avec cette fonction, l'arrosage automatique est suspendu pendant 24 heures.
Avant la mise en service
Le robinet d'eau doit être fermé.
Visser l'élément de couplage sur le raccord de tuyau.
Si nécessaire, visser le réducteur sur le raccord d'eau.
Maintenir le bloc de vannes sur le boîtier et visser le raccord d'alimentation en
eau sur le robinet d'eau.
몇 PRÉCAUTION
Ne jamais raccorder l'arroseur automatique au robinet d'eau sans le joint de filtre
fourni.
Français 29
Page 30
Préparation de l'unité de commande
Remarque : La batterie n'est pas comprise
dans l'étendue de livraison.
Positionner correctement la batterie
(marques +/-) dans le compartiment pour
batteries.
Dès que la batterie est installée, l'affi-
chage passe directment, après un bref
auto-contrôle, dans le mode de réglage
pour l'heure actuel et le jour de semaine
actuel. Les heures de l'affichage Heure
clignotent.
Régler l'heure à la première mise en service
Remarque : Dès que la batterie est mise en
place, l'heure clignote automatiquement.
Régler les heures avec les flèches.
Confirmer avec la touche OK.
Ok
Les minutes clignotent.
30 Français
Ok
Régler les minutes avec les flèches.
Confirmer avec la touche OK.
L'heure est réglée.
Page 31

Régler le jour de semaine à la première mise en service
Affichage : lundi au dimanche
Régler le jour de semaine à l'aide des
touches de flèches.
Confirmer avec la touche OK.
Ok
Le jour de semaine est réglé.
Réglage de l'arrosage automatique
L'affichage de l'arrosage clignote (activé)
Remarque
Le réglage d'usine pour l'heure et la durée
d'arrosage sont le matin à 6h00, 5 minutes et
le soir à 21h00, 5 minutes.
Il est possible de naviguer dans le programme
d'arrosage grâce aux touches de flèches.
Marquer avec la touche de confirmation
Activation/Désactivation de l'arrosage
Si l'heure et la durée préréglées sont correctes, d'autres périodes d'arrosage peuvent
être sélectionnées avec les touches de
flèches.
Remarque
Vous pouvez quitter le mode de réglage à tout
moment avec la touche ESC/Menu.
Français 31
Page 32

Si l'heure et la durée préréglées ne sont pas
Ok
Ok
esc
menu
correctes :
confirmer avec la touche OK pour modi-
fier l'heure et la durée de la période d'arrosage active.
Les heures clignotent.
Régler les heures avec les flèches.
Confirmer avec la touche OK.
Ok
Ok
Remarque
Pour modifier ultérieurement les réglages, passer avec la touche ESC/menu et les
touches de flèches en mode de réglage de l'arrosage automatique.
Les minutes clignotent.
Régler les minutes avec les flèches.
Confirmer avec la touche OK.
La durée d'arrosage clignote.
Régler les minutes avec les flèches.
Confirmer avec la touche OK.
La durée d'arrosage est réglée.
Les autres périodes d'arrosage peuvent
être maintenant réglées avec les touches
de flèches.
Quitter le mode de réglage avec la
touche ESC/menu.
L'arrosage automatique est activé.
32 Français
Page 33

Réglage de l'arrosage automatique
Ok
esc
menu
Passer en mode de réglage avec la
esc
touche ESC/menu.
menu
Le symbole d'arrosage manuel clignote.
Confirmer avec la touche OK.
Ok
Le symbole d'arrosage apparaît.
La vanne s'ouvre.
L'arrosage est actif.
La vanne se ferme avec la touche ESC/
menu et une commutation se fait sur le
mode automatique.
La vanne se ferme avec la touche ok,
une commutation se fait sur le mode de
réglage et une nouvelle fonction peut
être sélectionnée.
Français 33
Page 34

Réglage de la fonction compte à rebours de l'arrosage
Passer en mode de réglage avec la
esc
touche ESC/menu.
menu
Sélectionner le mode d'arrosage avec les
touches de flèches.
Le symbole de la fonction compte à rebours
clignote.
Confirmer avec la touche OK.
Ok
Les minutes clignotent.
Régler les minutes avec les flèches.
Confirmer avec la touche OK.
Ok
Le symbole d'arrosage apparaît.
La fonction de compte à rebours est acti-
vée.
La vanne s'ouvre.
L'arrosage est actif.
Après la fin du compte à rebours, la fonction
passe en mode automatique.
34 Français
Page 35

Ok
esc
menu
esc
Ok
esc
menu
menu
Ok
Pour une fin anticipée :
La vanne se ferme avec la touche ESC/
menu et une commutation se fait sur le
mode automatique.
La vanne se ferme avec la touche ok,
une commutation se fait sur le mode de
réglage et une nouvelle fonction peut
être sélectionnée.
Interruption de l'arrosage
Passer en mode de réglage avec la
touche ESC/menu.
Sélectionner le mode d'arrosage avec les
touches de flèches.
Le symbole d'interruption de l'arrosage clignote.
Confirmer avec la touche OK.
Le réglage de l'arrosage est désactivé
pour 24 heures.
Pour une fin avant l'expiration des
24 heures, la fonction peut être interrompue avec la touche OK ou la touche ESC/
menu et une commutation en mode automatique se fait.
Fonctionnement
Mettre l'unité de commande sur le bloc de vannes.
Ouvrir le robinet d'eau.
Français 35
Page 36

Fin de l'utilisation
A la fin de la saison d'arrosage
Fermer le robinet d'eau.
Séparer l'arroseur automatique du robinet d'eau et du tuyau d'eau.
L'unité de commande doit restée liée au bloc de vannes.
Activer l'arrosage manuel afin que l'eau restante puisse s'écouler de l'arroseur
automatique.
Séparer l'unité de commande du bloc de vannes.
Retirer la pile.
Entreposer l'arroseur automatique dans un endroit sec et protégé du gel.
Entretien et maintenance
Nettoyer le joint de filtrage
Retirer régulièrement le joint de filtrage dans le raccord d'eau et le rincer à l'eau
courante.
Batterie
État de charge de la batterie complet
État de charge de la batterie presque vide
Remplacer la batterie.
État de charge de la batterie vide
Remplacer la batterie.
Remarque
En mode arrosage automatique, la vanne est
fermée pour des raisons de sécurité.
L'arrosage ne peut plus être activé.
changer la batterie
Retirer l'unité de commande.
Insérer une pile 9 V (type 6LR61) neuve.
Éliminer la batterie usée en respectant les dispositions en vigueur.
Mettre l'unité de commande sur le bloc de vannes ; veiller au bon emplacement.
Remarque
L'ancienne batterie peut être remplacée par une neuve dans un délai de 3 minutes
sans que les réglages d'arrosage et la programmation soient perdus.
36 Français
Page 37

Types de batterie utilisables :
– alcalines
– Batterie rechargeable à faible autodécharge et d'une capacité minimale de
250 mAh.
Remarque
Des batteries rechargeables ne tiennent pas une saison entière dans certaines circonstances.
Maintenance
L'appareil ne nécessite aucune maintenance.
Assistance en cas de panne
Panne Cause Élimination
L'arrosage n'a
pas lieu en dépit de la programmation.
La soupape ne
s'ouvre / ne se
ferme pas.
Pas d'affichage à
l'écran
Fuite sur le
raccord d'eau.
Notre succursale Kärcher se tient à votre entière disposition pour d'éventuelles
questions ou problèmes. L'adresse figure au dos.
Retirer la batterie du compartiment pour batteries jusqu'à ce que l'affichage soit
entièrement éteint à l'écran.
ou
Par une pression de 5 secondes sur la touche OK, les réglages sont réinitiali-
sés.
Robinet d'eau fermé. Ouvrir le robinet d'eau.
Pile vide. Insérer une pile 9 V (type
Contacts de raccordement de la
pile oxydés.
Joint de filtage bouché. Nettoyer le joint de filtrage.
Lorsque l'unité de commande est
retirée, la soupape ne peut pas
s'ouvrir/se fermer.
Batterie vide ou contacts oxydés. Mettre en place une batterie 9
Joint de filtrage défectueux. Remplacer le joint de filtrage.
Le raccord d'eau s'est désolidarisé
du robinet d'eau.
6LR61) neuve.
Nettopyer les contacts.
Poser l'unité de commande sur
le bloc de vannes.
V (type 6LR61) et nettoyer les
contacts.
Resserrer le raccord d'eau.
Effectuer une réinitialisation
Français 37
Page 38

Caractéristiques techniques
Pression de service 0,1 - 1,0 (1 - 10) MPa (bars)
Température d'alimentation (max.) 35 °C
Température ambiante +1 -> +60 °C
Type de pile 9V (6LR61 / alcaline)
9V (dimension comme : 6LR61 /
Batterie rechargeable à faible autodécharge et d'une capacité minimale de 250 mAh)
Sous réserve de modifications techniques.
38 Français
Page 39

Indice
Avvertenze generali . . . . . . . . . . . . . . . . . . . . . . . . . . . . . . . . . . . . . . . . . . . . . 39
Norme di sicurezza. . . . . . . . . . . . . . . . . . . . . . . . . . . . . . . . . . . . . . . . . . . . . . 40
Uso . . . . . . . . . . . . . . . . . . . . . . . . . . . . . . . . . . . . . . . . . . . . . . . . . . . . . . . . . . 40
Cura e manutenzione . . . . . . . . . . . . . . . . . . . . . . . . . . . . . . . . . . . . . . . . . . . . 48
Guida alla risoluzione dei guasti. . . . . . . . . . . . . . . . . . . . . . . . . . . . . . . . . . . . 49
Dati tecnici . . . . . . . . . . . . . . . . . . . . . . . . . . . . . . . . . . . . . . . . . . . . . . . . . . . . 49
Avvertenze generali
Egregio cliente,
– Questo apparecchio è concepito per il solo uso domestico e non deve essere
– Questo dispositivo è previsto per il collegamento ad un rubinetto e controlla au-
Avvertenze sulle componenti contenute (REACH)
Informazioni aggiornate sulle componenti contenute sono disponibili all'indirizzo:
www.kaercher.de/REACH
Le condizioni di garanzia valgono nel rispettivo paese di pubblicazione da parte della nostra società di vendita competente. Entro il termine di garanzia eliminiamo gratuitamente eventuali guasti all’apparecchio, se causati da difetto di materiale o di
produzione. Nei casi previsti dalla garanzia si prega di rivolgersi al proprio rivenditore, oppure al più vicino centro di assistenza autorizzato, esibendo lo scontrino di
acquisto.
(Indirizzo vedi retro)
Prima di utilizzare l'apparecchio per la prima volta, leggere le presenti
istruzioni originali, seguirle e conservarle per un uso futuro o in caso
di rivendita dell'apparecchio.
Uso conforme a destinazione
adibito ad uso commerciale o industriale.
tomaticamente il flusso di acqua nei sistemi di irrigazione.
Protezione dell’ambiente
Tutti gli imballaggi sono riciclabili. Gli imballaggi non vanno gettati nei rifiuti
domestici, ma consegnati ai relativi centri di raccolta.
Gli apparecchi dimessi contengono materiali riciclabili preziosi e vanno perciò consegnati ai relativi centri di raccolta. Si prega quindi di smaltire gli apparecchi dimessi mediante i sistemi di raccolta differenziata.
Garanzia
Simboli riportati nel manuale d'uso
몇 PRUDENZA
Indica una probabile situazione pericolosa che può determinare danni leggeri a persone o danni alle cose.
Italiano 39
Page 40

Norme di sicurezza
몇 PRUDENZA
Non utilizzare l'automatismo di irrigazione nei sistemi di acqua potabile.
Fare funzionare l'automatismo di irrigazione solo con acqua dolce chiara e non
trattata con temperatura massima fino a 35 °C.
Installare l'automatismo di irrigazione solo in ambienti esterni.
Non esporre l'automatismo di irrigazione direttamente al getto d'acqua e non
immergerlo mai nell'acqua.
Prima di ogni utilizzo accertarsi che l'automatismo di irrigazione non sia dan-
neggiato ed in caso di danni visibili interrompere il funzionamento.
Applicare l'automatismo di irrigazione solo in posizione verticale.
Non utilizzare alcun mastice ed alcun lubrificante per collegare l'automatismo
di irrigazione al rubinetto.
Non tirare dal tubo flessibile collegato.
Utilizzare solo batterie da 9 V (tipo 6LR61).
on installare l'automatismo di irrigazione nei punti in cui si potrebbe formare
della condensa poiché si potrebbe danneggiare la batteria.
Non installare l'automatismo di irrigazione vicino a fonti di calore (temperatura
ambiente massima 60 °C).
on utilizzare l'automatismo di irrigazione vicino a dispositivi sotto tensione.
Uso
Disimballare la confezione e controllare che il contenuto sia al completo e che non
presenti danneggiamenti. Nel caso in cui si riscontrino danni informare immediatamente il proprio rivenditore.
Figure riportate sulla pagina pieghevole!
Descrizione dell’apparecchio
Per le figure vedi pagina 2
3
1 Riduttore (G
2 Raccordo dell'acqua (G 1) con guarnizione del filtro
3 Unità valvole
4 Giunto per tubo flessibile
5 Giunto per collegamento del tubo flessibile
6 Quadro di comando
7 Alloggiamento batterie
8 Display
9 Campo tasti
/4)
40 Italiano
Page 41

Descrizione display
Per le figure vedi pagina 3
1 Barra menù
2 Irrigazione automatica
3 Irrigazione manuale
4 Funzione di countdown dell'irigazione
5 Interruzione dell'irrigazione
6 Stato batterie quadro di comando
7 Indicatore giorno settimanale
8 Indicatore programma d'irrigazione (attivato/disatiivato)
9 Durata di irrigazione
10 Indicatore Irrigazione attivo
11 Tasto di conferma Attivazione/Disattivazione irrigazione
12 Menù Tasto ESC
13 Tasto OK
14 Tasti a freccia
15 Orario / Tempo di irrigazione
16 Indicatore Tempo d'irrigazione
17 Indicatore Tempo attuale
18 Periodo d'irrigazione (mattina/sera)
Funzione
All'apparecchio sono disponibili 4 modalità.
Irrigazione automatica
– Con questa funzione è possibile impostare individualmente i periodi d'irrigazio-
ne e l'irrigazione viene poi attivata e disattivata.
Irrigazione manuale
– Con questa funzione l'irrigazione viene manualmente inserita o disinserita.
Funzione di countdown dell'irigazione
– Con questa funzione l'irrigazione viene automaticamente disinserita dopo un
tempo desiderato (120 minuti al massimo).
Interruzione dell'irrigazione
– Con questa funzione l'irrigazione viene automaticamente interrotta per 24 ore.
Prima della messa in funzione
Il rubinetto deve essere chiuso.
Avvitare il giunto sull'attacco del tubo flessibile.
All'occorrenza avvitare il riduttore sul raccordo dell'acqua.
Tenere ferma l'unità valvole dal corpo e avvitare l'attacco dell'acqua sul rubinet-
to a sfera.
몇 PRUDENZA
Mai collegare l'automatismo di irrigazione al rubinetto d'acqua senza la guarnizione
del filtro in dotazione.
Italiano 41
Page 42

Preparazione unità di comando
Indicazione: La batteria non è in dotazione.
Mettere la batteria in posizione corretta
(marcatura +/-) nel vano batteria.
Non appena la batteria è inserita, la vi-
sualizzazione cambia, dopo un breve autotest, direttamente nella modalità di impostazione per l'orario attuale e il giorno
settimanale. Le ore del display Orario
lampeggiano.
Impostazione dell'orario alla prima messa in funzione
Indicazione: L'ora lampeggia automatica-
mente, non appena è stata inserita la batteria.
Impostare le ore con i tasti a freccia.
Confermare con il tasto OK.
Ok
I minuti lampeggiano.
42 Italiano
Ok
Impostare i minuti con i tasti a freccia.
Confermare con il tasto OK.
L'ora è impostata.
Page 43

Impostazione del giorno settimanale alla prima messa in funzione
Display: Da lunedì a domenica
Impostare il giorno settimanale con i tasti
a freccia.
Confermare con il tasto OK.
Ok
Il giorno settimanale è impostato.
Impostazione dell'irrigazione automatica
Il display irrigazione (attivato) lampeggia
Indicazione
Le impostazioni da stabilimento per il tempo e
la durata d'irrigazione sono di mattina alle ore
6:00 di 5 minuti e la sera alle ore 21:00 di 5 minuti.
Con i tasti a freccia è possibile navigare attraverso il programma d'irrigazione.
Con il tasto di conferma Attivazione/Di-
sattivazione marcare Irrigazione.
Se l'orario e la durata pre-impostati sono a posto, con i tasti a freccia possono essere selezionati altri periodi d'irrigazione.
Indicazione
La modalità d'impostazione può essere abbandonata in qualsiasi momento con il tasto
esc/menù.
Italiano 43
Page 44

Se l'orario e la durata pre-impostati non sono
Ok
Ok
a posto:
Confermare con il tasto OK per modifica-
re l'orario e la durata del periodo d'irrigazione attivo.
Le ore lampeggiano.
Impostare le ore con i tasti a freccia.
Confermare con il tasto OK.
Ok
Ok
esc
menu
Indicazione
Per eseguire successivamente le modifiche delle impostazioni, cambiare nella modalità d'impostazione dell'irrigazione automatica con il tasto esc/menù e i tasti a
freccia.
I minuti lampeggiano.
Impostare i minuti con i tasti a freccia.
Confermare con il tasto OK.
La durata d'irrigazione lampeggia.
Impostare i minuti con i tasti a freccia.
Confermare con il tasto OK.
La durata di irrigazione è impostata.
Quindi con i tasti a freccia è possibile im-
postare altri periodi d'irrigazione.
Abbandonare la modalità di impostazio-
ne con il tasto esc/menù.
L'irrigazione automatica è attivata.
44 Italiano
Page 45

Impostazione dell'irrogazione manuale
Ok
esc
menu
Cambiare nella modalità di impostazione
esc
con il tasto esc/menù.
menu
Il simbolo per l'irrigazione manuale lampeggia.
Confermare con il tasto OK.
Ok
Appare il simbolo di irrigazione.
La valvola si apre.
L'irrigazione è attiva.
Con il tasto esc/menù la valvola si chiude
e si cambia nella modalità automatica.
Con il tasto OK la valvola si chiude, vie-
ne cambiato nella modalità d'impostazione ed è possibile selezionare una nuova
funzione.
Italiano 45
Page 46

Impostazione della funzione di countdown dell'irigazione
Ok
esc
menu
Cambiare nella modalità di impostazione
esc
con il tasto esc/menù.
menu
Selezionare la modalità d'irrigazione con
i tasti a freccia.
Il simbolo per la funzione di countdown lampeggia.
Confermare con il tasto OK.
Ok
I minuti lampeggiano.
Impostare i minuti con i tasti a freccia.
Confermare con il tasto OK.
Ok
Appare il simbolo di irrigazione.
La funzione di countdown è attivata.
La valvola si apre.
L'irrigazione è attiva.
Scaduto il tempo del countdown, la funzione
cambia nella modalità automatica.
Per terminare anticipatamente la funzione:
Con il tasto esc/menù la valvola si chiude
e si cambia nella modalità automatica.
Con il tasto OK la valvola si chiude, vie-
ne cambiato nella modalità d'impostazione ed è possibile selezionare una nuova
funzione.
46 Italiano
Page 47

Interruzione dell'irrigazione
Ok
esc
menu
Cambiare nella modalità di impostazione
esc
con il tasto esc/menù.
menu
Selezionare la modalità d'irrigazione con
i tasti a freccia.
Il simbolo per l'interruzione dell'irrigazione
lampeggia.
Confermare con il tasto OK.
Ok
Mettere l'unità di comando sopra l'unità valvole.
Aprire il rubinetto d'acqua.
Alla fine della stagione dell'irrigazione
Chiudere il rubinetto.
Scollegare l'automatismo di irrigazione dal rubinetto e dal tubo flessibile dell'ac-
qua.
L'unità di comando deve rimanere collegata all'unità valvole.
Attivare l'irrigazione manuale affinché l'acqua residua possa defluire dall'auto-
matismo di irrigazione.
Staccare l'unità di comando dall'unità vavlole.
Rimuovere la batteria.
Riporre l'automatismo di irrigazione in un luogo asciutto e protetto dal gelo.
L'impostazione per l'irrigazione è disatti-
vata per 24 ore.
Per terminare la funzione prima che sca-
dino le 24 ore con il tasto OK o il tasto
esc/menù è possibile interrompere la
funzione e si cambia nella modalità automatica.
Funzionamento
Dopo l’uso
Italiano 47
Page 48

Cura e manutenzione
Pulizia della guarnizione del filtro
Rimuovere regolarmente la guarnizione del filtro nel raccordo dell'acqua e
sciacquare il filtro sotto acqua corrente.
Batteria
Stato batteria piena
Stato batteria quasi scarica
Rinnovare la batteria.
Stato batteria scarica
Rinnovare la batteria.
Indicazione
In modalità utomatica d'irrigazione, la valvola
per sicurezza viene chiusa.
L'irrigazione non può essere più attivata.
Sostituire la batteria.
Togliere l'unità di comando.
Inserire una nuova batteria da 9 V (tipo 6LR61).
Smaltire la batteria scarica in conformità alle disposizioni in vigore.
Mettere l'unità di comando sull'unità valvole, fare attenzione alla sua sede cor-
retta.
Indicazione
La vecchia batteria può essere sotituita da una nuova entro 3 minuti, senza che le
impostazioni dell'irrigazione e la progarmmazione vanno perse.
Tipi di batteria utilizzabili:
– Alcaline
– Batteria ricaricabile con scarica minima possibile e con una capacità minima di
250 mAh.
Indicazione
In alcune circostanze, le batterie ricaricabili non tengono una stagione completa.
Manutenzione
L'apparecchio è senza manutenzione.
48 Italiano
Page 49

Guida alla risoluzione dei guasti
Guasto Causa Rimedio
Nonostante la
programmazione non ha
luogo alcuna
irrigazione.
Valvola non
apre / non
chiude.
Nessuna visualizzazione
a display
Perdita dal
raccordo
dell'acqua.
In caso di domande o anomalie la filiale Kärcher è felice di poterla aiutare. Indirizzo
vedi retro.
Rubinetto chiuso. Aprire il rubinetto.
Batteria scarica. Inserire una nuova batteria da
Contatti di collegamento delle batterie ossidati.
Guarnizione del filtro otturato. Pulire la guarnizione del filtro.
Con elemento di comando la valvo-
la non può aprire / chiudere.
Batteria scarica o contatti ossidati. Inserire una nuova batteria da
Guarnizione del filtro difettosa. Sostituire la guarnizione del fil-
Il raccordo dell'acqua si è staccato
dal rubinetto.
9 V (tipo 6LR61).
Pulire i contatti.
Collocare l'unità di comando
all'unità valvole.
9V (tipo 6LR61) oppure pulire i
contatti.
tro.
Avvitare nuovamente il raccor-
do dell'acqua.
Esecuzione di un reset
Rimuove la batteria dal vano batteria finché la visualizzaione sul display è com-
pletamente sparita.
oppure
Premendo per 5 secondi il tasto OK le impostazioni vengono resettate.
Dati tecnici
Pressione di esercizio 0,1 - 1,0 (1 - 10) MPa (bar)
Temperatura in entrata (max.) 35 °C
Temperatura ambiente +1 -> +60 °C
Tipo batteria 9V (6LR61 / alcaline)
9V (grandezza costruttiva come:
6LR61 /Batteria ricaricabile con
scarica minima possibile e con
una capacità minima di 250 mAh)
Con riserva di modifiche tecniche.
Italiano 49
Page 50

Inhoud
Algemene instructies . . . . . . . . . . . . . . . . . . . . . . . . . . . . . . . . . . . . . . . . . . . . 50
Veiligheidsinstructies . . . . . . . . . . . . . . . . . . . . . . . . . . . . . . . . . . . . . . . . . . . . 51
Bediening . . . . . . . . . . . . . . . . . . . . . . . . . . . . . . . . . . . . . . . . . . . . . . . . . . . . . 51
Onderhoud . . . . . . . . . . . . . . . . . . . . . . . . . . . . . . . . . . . . . . . . . . . . . . . . . . . . 59
Hulp bij storingen . . . . . . . . . . . . . . . . . . . . . . . . . . . . . . . . . . . . . . . . . . . . . . . 60
Technische gegevens . . . . . . . . . . . . . . . . . . . . . . . . . . . . . . . . . . . . . . . . . . . . 60
Algemene instructies
Geachte klant,
– Dit apparaat is voor privé-gebruik ontwikkeld en is niet bedoeld voor industrieel
– Dit apparaat is voorzien voor de aansluiting aan een waterkraan en regelt au-
Informatie over stoffen (REACH)
Actuele informatie over stoffen vindt u onder:
www.kaercher.de/REACH
In ieder land zijn de door ons bevoegde verkoopkantoor uitgegeven garantiebepalingen van toepassing. Eventuele storingen aan het apparaat verhelpen wij zonder
kosten binnen de garantietermijn, mits een materiaal of fabrieksfout de oorzaak van
deze storing is. Neem bij klachten binnen de garantietermijn contact op met uw leverancier of de dichtstbijzijnde klantenservicewerkplaats en neem uw aankoopbewijs mee.
(adres zie achterzijde)
Lees vóór het eerste gebruik van uw apparaat deze originele gebruiksaanwijzing, ga navenant te werk en bewaar deze voor later gebruik of voor een latere eigenaar.
Doelmatig gebruik
gebruik.
tomatisch de waterstroming in besproeiiingssystemen.
Zorg voor het milieu
Het verpakkingsmateriaal is herbruikbaar. Deponeer het verpakkingsmateriaal niet bij het huishoudelijk afval, maar bied het aan voor hergebruik.
Onbruikbaar geworden apparaten bevatten waardevolle materialen die geschikt zijn voor hergebruik. Lever de apparaten daarom in bij een inzamelpunt voor herbruikbare materialen.
Garantie
Symbolen in de gebruiksaanwijzing
몇 VOORZICHTIG
Voor een mogelijke gevaarlijke situatie die tot lichte verwondingen of materiële
schade kan leiden.
50 Nederlands
Page 51

Veiligheidsinstructies
몇 VOORZICHTIG
Besproeiingsautomaat niet in drinkwatersystemen gebruiken.
Besproeiingsautomaat enkel met onbehandeld, zuiver zoet water met een tem-
peratuur tot max. 35°C gebruiken.
Besproeiingsautomaat enkel buiten installeren.
Besproeiingsautomaat niet blootstellen aan een directe waterstraal en nooit in
water dompelen.
Besproeiingsautomaat voor elk gebruik op schade controleren, bij zichtbare be-
schadigingen gebruik stopzetten.
Besproeiingsautomaat enkel verticaal aanbrengen.
Geen pakkingmateriaal en geen smeermiddelen gebruiken om de besproei-
ingsautomaat aan de waterkraan aan te sluiten.
Niet aan de aangesloten slang trekken.
Enkel 9V-batterijen (type 6LR61) gebruiken.
Besproeiingsautomaat niet installeren op plaatsen waar condensatiewater
wordt gevormd, aangezien daardoor de batterij beschadigd kan worden.
Besproeiingsautomaat niet in de buurt van warmtebronnen installeren (maxi-
male omgevingstemperatuur 60°C).
Besproeiingsautomaat niet in de buurt van onder spanning staande apparatuur
gebruiken.
Bediening
Controleer bij het uitpakken de inhoud van de verpakking op volledigheid en beschadigingen. Neem ingeval van opmerkingen contact op met uw dealer.
Afbeeldingen zie uitklapbaar blad!
Beschrijving apparaat
Afbeeldingen zie pagina 2
3
1 Verloopstuk (G
2 Wateraansluiting (G 1) met filterafdichting
3 Klepeenheid
4 Slangaansluiting
5 Koppelgedeelte voor slangaansluiting
6 Bedieningseenheid
7 Batterijvak
8 Display
9 Toetsenveld
/4)
Nederlands 51
Page 52

Displaybeschrijving
Afbeeldingen zie pagina 3
1 Menulijst
2 Automatische besproeiing
3 Manuele bewatering
4 Countdown-functie besproeiing
5 Onderbreking besproeiing
6 Batterijstatus bedieningseenheid
7 Weergave weekdag
8 Weergave besproeiingsprogramma (geactiveerd/gedeactiveerd)
9 Besproeiingsduur
10 Weergave besproeiing is actief
11 Bevestigingstoets activering/deactivering besproeiing
12 menu / esc-toets
13 ok-toets
14 Pijltoetsen
15 Uur / besproeiingstijd
16 Weergave besproeiingstijd
17 Weergave actuele tijd
18 Besproeiingsperiode ('s morgens/'s avonds)
Functie
Op het apparaat staan 4 modi ter beschikking.
Automatische besproeiing
– Met die functie kunnen besproeiingsperiodes individueel ingesteld worden en
de besproeiing wordt automatisch geactiveerd en gedeactiveerd.
Manuele bewatering
– Met die functie wordt de besproeiing manueel in- of uitgeschakeld.
Countdown-functie besproeiing
– Met die functie wordt de besproeiing na een gewenste tijd (max. 120 minuten)
automatisch uitgeschakeld.
Onderbreking van de besproeiing
– Met die functie wordt de automatische besproeiing 24 uren uitgezet.
Voor ingebruikneming
Waterkraan moet gesloten zijn.
Koppelgedeelte op slangaansluiting schroeven.
Indien nodig het verloopstuk op de wateraansluiting draaien.
Klepeenheid aan de behuizing houden en wateraansluiting op de waterkraan
schroeven.
몇 VOORZICHTIG
Besproeiiingsautomaat nooit zonder meegeleverde filterafdichting op de waterkraan aansluiten.
52 Nederlands
Page 53

Voorbereiding bedieningseenheid
Instructie: De batterij wordt niet meegele-
verd.
Batterij in de juiste positie (+/- markering)
in het batterijvak leggen.
Zodra de batterij is ingelegd, springt de
weergave na een korte zelftest direct in
de instelmodus voor het huidige uur en
weekdag. De uren van de weergave Uur
knipperen.
Uur instellen bij de eerste inbedrijfstelling
Instructie: Zodra de batterij werd ingelegd,
knippert het uur automatisch.
Stel de uren in met de pijltoetsen.
Bevestog met de ok-toets.
Ok
De minuten knipperen.
Ok
Stel de minuten in met de pijltoetsen.
Bevestog met de ok-toets.
Het uur is ingesteld.
Nederlands 53
Page 54

Weekdag instellen bij de eerste inbedrijfstelling
Weergave: maandag tot zondag
Stel de weekdag in met de pijltoetsen.
Bevestog met de ok-toets.
Ok
De weekdag is ingesteld.
Instelling automatische besproeiing
De weergave Besproeiing knippert (geactiveerd)
Tip
De fabrieksinstelling voor de besproeiingstijd
en -duur is 's morgens 6:00, 5 minuten en 's
avonds 21:00, 5 minuten.
Met de pijltoetsen kan door het besproeiingsprogramma genavigeerd worden.
Markeer de besproeiing met de bevesti-
gingstoets activering/deactivering.
Als de vooringestelde tijd en duur in orde zijn,
kunnen met de pijltoetsen andere besproeiingsperiodes geselecteerd worden.
Tip
Met de esc/menu-toets kan de instelmodus
altijd verlaten worden.
54 Nederlands
Page 55

Als de vooringestelde tijd en duur niet in orde
Ok
Ok
zijn:
met ok-toets bevestigen om de tijd en
duur van de actieve besproeiingsperiode
te veranderen.
De uren knipperen.
Stel de uren in met de pijltoetsen.
Bevestog met de ok-toets.
Ok
Ok
esc
menu
Tip
Om achteraf de instellingen te veranderen, schakelt u met de esc/menu-toets en de
pijltoetsen over naar de instelmodus voor de automatische besproeiing.
De minuten knipperen.
Stel de minuten in met de pijltoetsen.
Bevestog met de ok-toets.
De besproeiingsduur knippert.
Stel de minuten in met de pijltoetsen.
Bevestog met de ok-toets.
De besproeiingsduur is ingesteld.
Er kunnen nu andere besproeiingsperio-
des met de pijltoetsen ingesteld worden.
Verlaat de instelmodus met de esc/
menu-toets.
Automatische besproeiing is geactiveerd.
Nederlands 55
Page 56

Instelling manuele besproeiing
Ok
esc
menu
Ga met de esc/menu-toets naar de in-
esc
stelmodus.
menu
Het symbool voor de manuele besproeiing
knippert.
Bevestog met de ok-toets.
Ok
Het besproeiingssymbool verschijnt.
Vervolgens gaat de klep open.
De besproeiing is actief.
Met de esc/menu-toets gaat de klep dicht
en wordt overgeschakeld op de automatische modus.
Met de ok-toets gaat de klep dicht, er
wordt naar de instelmodus omgeschakeld en er kan een nieuwe functie geselecteerd worden.
56 Nederlands
Page 57

Ok
esc
menu
Instelling countdown-functie besproeiing
Ga met de esc/menu-toets naar de in-
esc
stelmodus.
menu
Selecteer de besproeiingsmodus met de
pijltoetsen.
Het symbool voor de countdown-functie knippert.
Bevestog met de ok-toets.
Ok
De minuten knipperen.
Stel de minuten in met de pijltoetsen.
Bevestog met de ok-toets.
Ok
Het besproeiingssymbool verschijnt.
De countdown-functie is geactiveerd.
Vervolgens gaat de klep open.
De besproeiing is actief.
Na afloop van de countdown gaat de functie
over op de automatische modus.
Voor vroegtijdige beëindiging:
Met de esc/menu-toets gaat de klep dicht
en wordt overgeschakeld op de automatische modus.
Met de ok-toets gaat de klep dicht, er
wordt naar de instelmodus omgeschakeld en er kan een nieuwe functie geselecteerd worden.
Nederlands 57
Page 58

Onderbreking besproeiing
Ok
esc
menu
Ga met de esc/menu-toets naar de in-
esc
stelmodus.
menu
Selecteer de besproeiingsmodus met de
pijltoetsen.
Het symbool voor de onderbreking van de besproeiing knippert.
Bevestog met de ok-toets.
Ok
Zet de bedieningseenheid op klepeenheid.
Waterkraan opendraaien.
De werkzaamheden beëindigen
Op het einde van het bewateringsseizoen
Waterkraan dichtdraaien.
Bewateringsautomaat van waterkraan en waterslang halen.
De bedieningseenheid moet met de klepeenheid verbonden blijven.
Manuele bewatering activeren, opdat restwater uit de bewateringsautomaat
kan stromen.
Scheid de bedieningseenheid van de klepeenheid.
Batterij verwijderen.
Bewateringsautomaat op een droge en vorstvrije plaats opslaan.
De besproeiingsinstelling is voor 24 uren
gedeactiveerd.
Om voor afloop van de 24 uren te beëin-
digen, kan de functie met de ok-toets of
esc/menu-toets onderbroken worden en
wordt in de automatische modus omgeschakeld.
Gebruik
58 Nederlands
Page 59

Onderhoud
Filterafdichting reinigen
Filterpakking geregeld uit de wateraansluiting nemen en onder stromend water
uitspoelen.
Accu
Batterijstatus vol
Batterijstatus bijna leeg
Vervang de batterij.
Batterijstatus leeg
Vervang de batterij.
Tip
In de modus automatische besproeiing wordt
de klep voor de veiligheid gesloten.
De besproeiing kan niet meer geactiveerd
worden.
Batterij vervangen
Neem de bedieningseenheid weg.
Leg een nieuwe 9V-batterij (type 6LR61) in.
Verbruikte batterij conform de geldende bepaleingen verwijderen.
Zet de bedieningseenheid op klepeenheid, let op een correcte positionering.
Tip
De oude batterij kan binnen 3 minuten door een nieuwe vervangen worden, zonder
dat de besproeiingsinstellingen en programmering verloren gaan.
Bruikbare batterijtypes:
– alkaline
– heroplaadbare batterijenmet een lage zelfontlading en met een capaciteit van
minimum 250 mAh.
Tip
Heroplaadbare batterijen gaan mogelijk niet een volledig seizoen mee.
Onderhoud
Het apparaat is onderhoudsvrij.
Nederlands 59
Page 60

Hulp bij storingen
Storing Oorzaak Oplossing
Bewatering
vindt niet
plaats ondanks programmering.
Klep gaat niet
open/dicht.
Geen displayweergave
Lekkage aan
de wateraansluiting.
Bij vragen of storingen helpt onze Kärcher-vestiging u graag verder. Adres zie achterzijde.
Waterkraan dicht. Waterkraan openen.
Batterij leeg. Leg een nieuwe 9V-batterij (ty-
Batterijaansluitcontacten geoxideerd.
Filterpakking verstopt. Filterpakking reinigen
Bij een afgenomen bedieningseen-
heid kan de klep niet openen/sluiten.
Batterij leeg of contacten geoxideerd.
Filterpakking defect. Filterpakking vervangen.
Wateraansluiting aan de water-
kraan is losgekomen.
pe 6LR61) in.
Contacten reinigen.
Breng de bedieningseenheid
op de klepeenheid aan.
Leg een nieuwe 9V batterij (type 6LR61) in of reinig de contacten.
Wateraansluiting weer vastschroeven.
Reset uitvoeren
Neem de batterij uit de batterijhouder, tot de weergave op het display volledig
gedoofd is.
of
Door de ok-toets 5 seconden in te drukken, wordt de instelling gereset.
Technische gegevens
Bedrijfsdruk 0,1 - 1,0 (1 - 10) MPa (bar)
Toevoertemperatuur (max.) 35 °C
Omgevingstemperatuur +1 -> +60 °C
Batterijtype 9V (6LR61 / alkaline)
9V (bouwgrootte zoals: 6LR61 /
heroplaadbare batterij met een
lage zelfontlading en met een capaciteit van minimum 250 mAh).
Technische wijzigingen voorbehouden.
60 Nederlands
Page 61

Índice de contenidos
Indicaciones generales . . . . . . . . . . . . . . . . . . . . . . . . . . . . . . . . . . . . . . . . . . . 61
Indicaciones de seguridad . . . . . . . . . . . . . . . . . . . . . . . . . . . . . . . . . . . . . . . . 62
Manejo . . . . . . . . . . . . . . . . . . . . . . . . . . . . . . . . . . . . . . . . . . . . . . . . . . . . . . . 62
Cuidados y mantenimiento . . . . . . . . . . . . . . . . . . . . . . . . . . . . . . . . . . . . . . . . 70
Ayuda en caso de avería . . . . . . . . . . . . . . . . . . . . . . . . . . . . . . . . . . . . . . . . . 71
Datos técnicos . . . . . . . . . . . . . . . . . . . . . . . . . . . . . . . . . . . . . . . . . . . . . . . . . 71
Indicaciones generales
Estimado cliente:
– Este aparato ha sido diseñado para el uso particular y no para los esfuerzos
– Este aparato está diseñado para su conexión a un grifo de agua y regula auto-
Aviso sobre sustancias (REACH)
Encontrará información actual sobre las sustancias en:
www.kaercher.de/REACH
En todos los países rigen las condiciones de garantía establecidas por nuestra empresa distribuidora. Las averías del aparato serán subsanadas gratuitamente dentro del periodo de garantía, siempre que se deban a defectos de material o de fabricación. En un caso de garantía, le rogamos que se dirija con el comprobante de
compra al distribuidor donde adquirió el aparato o al servicio al cliente autorizado
más próximo a su domicilio.
(La dirección figura al dorso)
Antes del primer uso de su aparato, lea este manual original, actúe de
acuerdo a sus indicaciones y guárdelo para un uso posterior o para
otro propietario posterior.
Uso previsto
del uso industrial.
máticamente el caudal en los sistemas de riego.
Protección del medio ambiente
Los materiales de embalaje son reciclables. Por favor, no tire el embalaje a
la basura doméstica; en vez de ello, entréguelo en los puntos oficiales de
recogida para su reciclaje o recuperación.
Los aparatos viejos contienen materiales valiosos reciclables que deberían
ser entregados para su aprovechamiento posterior. Por este motivo, entregue los aparatos usados en los puntos de recogida previstos para su reciclaje.
Garantía
Español 61
Page 62

Símbolos del manual de instrucciones
몇 PRECAUCIÓN
Para una situación que puede ser peligrosa, que puede acarrear lesiones leves o
daños materiales.
Indicaciones de seguridad
몇 PRECAUCIÓN
No utilizar los equipos automáticos de riego en sistemas de agua potable.
Utilizar los equipos automáticos de riego solamente con agua dulce, no tratada,
con una temperatura máxima de 35ºC.
Instalar el equipo automático de riego solamente en exterior.
No someter el sistema automático de riego directamente al chorro de agua y
no sumergirlo nunca en agua.
Comprobar antes de cada utilización si el equipo automático de riego está da-
ñado, si hay daños visibles debe dejar de usarlo.
Colocar el equipo automático de riego solamente en posición vertical.
No usar masa para juntas ni lubricante para conectar el equipo automático de
riego al grifo de agua.
No tirar de la manguera conectada.
Usar únicamente pilas de 9V (tipo 6LR61).
No instalar el equipo automático de riego en lugares donde se forma agua de
condensación, pues esta puede dañar la pila.
No instalar el equipo autom?ico de riego cerca de fuentes de calor (temperatu-
ra ambiente máxima 60ºC).
No utilizar el equipo automático de riego cerca de aparatos sometidos a tensión.
Manejo
Verifique durante el desembalaje que no falte ninguna pieza ni haya daños. Si debe
hacer alguna reclamación, informe a su distribuidor.
Ilustraciones, véase la contraportada.
Descripción del aparato
Ilustraciones, véase la página 2
3
1 Pieza reductora (G
2 toma de agua (G 1) con junta del filtro
3 Unidad de la válvula
4 empalme de manguera
5 Pieza de acoplamiento para conexión de manguera
6 Unidad de operación
7 Compartimento de las pilas
8 anuncio
9 Teclado
/4)
62 Español
Page 63

Descripción de pantalla
Ilustraciones, véase la página 3
1 Barra de tareas
2 Riego automático
3 Riego manual
4 Riego con función de cuenta atrás
5 Interrupción del riego
6 Estado de batería de la unidad de mando
7 Visualización del día de la semana
8 Visualización programa de riego (activado/desactivado)
9 Duración de riego
10 Visualización riego activa
11 Tecla de confirmación activación/desactivación riego
12 menú / tecla esc
13 Tecla ok
14 Teclas de flechas
15 Hora / horario de riego
16 Visualización tiempo de riego
17 Visualización tiempo actual
18 Período de riego (mañana/noche)
Función
El equipo dispone de 4 modos de funcionamiento.
Riego automático
– Con esta función se pueden configurar individualmente los períodos de riego y
el riego se activa y desactiva automáticamente.
Riego manual
– Con esta función se puede conectar y desconectar el riego manualmente.
Riego con función de cuenta atrás
– Con esta función se puede desconectar automáticamente el riego tras el perío-
do de tiempo deseado (máx. 120 minutos).
Interrupción del riego
– Con esta función se puede interrumpir durante 24 horas el riego automático.
Antes de la puesta en marcha
El grifo de agua tiene que estar cerrada.
Atornillar le pieza de acoplamiento a la conexión de manguera.
Si es necesario, atornillar la pieza reductora a la toma de agua.
Sujetar la unidad de válvula a la carcasa y atornillar la conexión de agua al gri-
fo.
몇 PRECAUCIÓN
No conectar nunca el equipo automático de riego al grifo de agua sin la junta de filtro
suministrada.
Español 63
Page 64

Preparación unidad de operación
Nota: La batería no viene incluida.
Colocar la batería correctamente (mar-
cas +/-) en el compartimento de baterías.
Tan pronto como la batería está coloca-
da, la pantalla cambia directamente al
modo de configuración para la hora actual y el día de la semana. Las horas de
la indicación de las horas parpadean.
Configurar la hora en la puesta en marcha
Indicación: Tan pronto como se coloca la ba-
tería, la hora parpadea automáticamente.
Configurar las horas con las flechas.
Confirmar con la tecla ok.
Ok
Parpadean los minutos.
64 Español
Ok
Configurar los minutos con las flechas.
Confirmar con la tecla ok.
La hora está ajustada.
Page 65

Configurar el día de la semana en la puesta en marcha
Indicación: Lunes a domingo
Configurar el día de la semana con las
flechas.
Confirmar con la tecla ok.
Ok
El día de la semana está configurado.
Configuración riego automático
Parpadea el piloto del riego (activado)
Nota
La configuración de fábrica para el período y
dirección de riego es 5 minutos a las 6:00 de
la mañana y de 5 minutos a las 21:00 de la
noche.
Con las flechas se puede navegar por el programa de riego.
Marcar la activación/desactivación de
riego con la tecla de confirmación.
Si la hora y la duración preconfiguradas son
correctas, se pueden seleccionar otros períodos de riego.
Nota
Con la tecla esc/menú se puede salir en todo
momento del modo de configuración.
Español 65
Page 66

Si la hora y la duración preconfiguradas no
Ok
Ok
son correctas:
Confirmar con la tecla ok, para modificar
la hora y la duración del período de riego
activo.
Parpadean las horas.
Configurar las horas con las flechas.
Confirmar con la tecla ok.
Ok
Ok
esc
menu
Nota
Para modificar posteriormente las configuraciones, cambiar al modo de configuración del riego automático con la tecla esc/menú y las flechas.
Parpadean los minutos.
Configurar los minutos con las flechas.
Confirmar con la tecla ok.
Parpadea la duración de riego.
Configurar los minutos con las flechas.
Confirmar con la tecla ok.
Se ha configurado la duración de riego.
Ahora se pueden configurar otros perío-
dos de riego con las flechas.
Salir del modo de configuración con la te-
cla esc/menú.
El riego automático está activado.
66 Español
Page 67

esc
Ok
esc
menu
menu
Ok
Configuración riego manual
Cambiar al modo de configuración con la
tecla esc/menú.
El símbolo de riego manual parpadea.
Confirmar con la tecla ok.
Aparece el símbolo de riego.
Se abre la válvula.
El riego está activado.
Con la tecla esc/menú se cierra la válvula
y se cambia automáticamente al modo
automático.
Con la tecla ok se cierra la válvula, se
cambia al modo de configuración y se
puede seleccionar una nueva función.
Español 67
Page 68

Configuración riego con función de cuenta atrás
Ok
esc
menu
Cambiar al modo de configuración con la
esc
tecla esc/menú.
menu
Seleccionar el modo de riego con las fle-
chas.
El símbolo de la función de cuenta atrás parpadea.
Confirmar con la tecla ok.
Ok
Parpadean los minutos.
Configurar los minutos con las flechas.
Confirmar con la tecla ok.
Ok
Aparece el símbolo de riego.
La función de cuenta atrás está activada.
Se abre la válvula.
El riego está activado.
Tras finalizar la cuenta atrás, la función cambia al modo automático.
Para finalizar prematuramente:
Con la tecla esc/menú se cierra la válvula
y se cambia automáticamente al modo
automático.
Con la tecla ok se cierra la válvula, se
cambia al modo de configuración y se
puede seleccionar una nueva función.
68 Español
Page 69

Interrupción del riego
Ok
esc
menu
Cambiar al modo de configuración con la
esc
tecla esc/menú.
menu
Seleccionar el modo de riego con las fle-
chas.
El símbolo de interrupción del riego parpadea.
Confirmar con la tecla ok.
Ok
Colocar la unidad de mando en la unidad de válvula.
Abrir el grifo del agua.
Finalización del funcionamiento
Al final de la temporada de riego
Cerrar el grifo del agua.
Desconectar el equipo automático de riego del grifo del agua y de la manguera
de agua.
La unidad de mando tiene que estar unida a la unidad de válvula.
Activar riego manual, para que salga el agua residual del equipo automático de
riego.
Separar la unidad de mando de la unidad de válvula.
Retirar la pila.
Guardar el equipo automático de riego en un lugar seco y protegido de las he-
ladas.
Se ha desactivado la configuración de
riego durante 24 horas.
Para finalizar antes de que se acaben las
24 horas, se puede pulsar la tecla ok o la
tecla esc/menú para interrumpir la función y se cambia al modo automático.
Funcionamiento
Español 69
Page 70

Cuidados y mantenimiento
Limpiar la junta de filtro
Sacar regularmente la junta de filtro de la conexión de agua y enjuagarla bajo
agua corriente.
Batería
Estado de batería lleno
Estado de la batería casi vacío
Cambiar la batería.
Estado de la batería vacío
Cambiar la batería.
Nota
En modo de riego automático se cierra la válvula por seguridad.
No se puede volver a activar el riego.
Cambiar la batería
Extraer la unidad de mando.
Colocar pila nueva de 9V (tipo 6LR61).
Eliminar la batería usada de acuerdo con las normativas vigentes.
Colocar la unidad de mando en la unidad de válvula, respetar la posición co-
rrecta.
Nota
La batería vieja, se puede sustituir en 3 minutos por una nueva sin que se pierdan
las configuraciones de riego y programación.
Tipos de batería que se pueden utilizar:
– Alcalina
– Batería recargable con autodescarga y con una capacidad de al menos 250
mAh.
Nota
Las baterías recargables no aguantan una temporada completa bajo ningún concepto.
Mantenimiento
El aparato no precisa mantenimiento.
70 Español
Page 71

Ayuda en caso de avería
Avería Causa Solución
A pesar de estar programado, no se ejecuta el riego.
Válvula no
abre/cierra.
Sin indicador
de pantalla
Fuga en la conexión de
agua.
En caso de dudas o alteraciones, la sucursal de Kärcher estará encantada de ayudarle. La dirección figura al dorso.
Grifo de agua cerrado. Abrir el grifo del agua.
Pila agotada. Colocar pila nueva de 9V (tipo
Contactos de conexión de la pila
oxidados.
Junta de filtro obstruída. Limpiar la junta de filtro.
Con la unidad de mando extraída,
la válvula no se puede abrir/cerrar.
Batería vacía o contactos oxida-
dos.
Junta de filtro averiada. Sustituir junta de filtro.
La conexión de agua en el grifo de
agua se ha soltado.
6LR61).
Limpiar los contactos.
Colocar la unidad de mando
en la unidad de válvula.
Colocar una pila nueva de 9V
(tipo 6LR61) o limpiar los contactos.
Volver a enroscar la conexión
de agua.
Resetear
Sacar la batería del compartimento hasta que se apague totalmente el indica-
dor de la pantalla.
o
Si se pulsa la tecla ok durante 5 segundos, se restablece la configuración.
Datos técnicos
Presión de trabajo 0,1 - 1,0 (1 - 10) MPa (bar)
Temperatura de entrada (máx.) 35 °C
Temperatura ambiente +1 -> +60 °C
Tipo de batería 9V (6LR61 / alcalina)
9V (tamaño como: 6LR61 / batería recargable con autodescarga
y con una capacidad de al menos
250 mAh)
Sujeto a modificaciones técnicas.
Español 71
Page 72

Índice
Instruções gerais . . . . . . . . . . . . . . . . . . . . . . . . . . . . . . . . . . . . . . . . . . . . . . . 72
Avisos de segurança . . . . . . . . . . . . . . . . . . . . . . . . . . . . . . . . . . . . . . . . . . . . 73
Manuseamento. . . . . . . . . . . . . . . . . . . . . . . . . . . . . . . . . . . . . . . . . . . . . . . . . 73
Conservação e manutenção. . . . . . . . . . . . . . . . . . . . . . . . . . . . . . . . . . . . . . . 81
Ajuda em caso de avarias . . . . . . . . . . . . . . . . . . . . . . . . . . . . . . . . . . . . . . . . 82
Dados técnicos . . . . . . . . . . . . . . . . . . . . . . . . . . . . . . . . . . . . . . . . . . . . . . . . . 82
Instruções gerais
Estimado cliente,
aparelho.
– Este aparelho foi desenvolvido para o uso privado e não foi concebido para
– Este aparelho foi concebido para conectar a uma torneira de água e regular au-
Avisos sobre os ingredientes (REACH)
Informações actuais sobre os ingredientes podem ser encontradas em:
www.kaercher.de/REACH
Em cada país vigem as respectivas condições de garantia estabelecidas pelas nossas Empresas de Comercialização. Eventuais avarias no aparelho durante o período de garantia serão reparadas, sem encargos para o cliente, desde que se trate
dum defeito de material ou de fabricação. Em caso de garantia, dirija-se, munido do
documento de compra, ao seu revendedor ou ao Serviço Técnico mais próximo.
(Endereços no verso)
Leia o manual de manual original antes de utilizar o seu aparelho.
Proceda conforme as indicações no manual e guarde o manual para
uma consulta posterior ou para terceiros a quem possa vir a vender o
Utilização conforme as disposições
suster as necessidades de uma utilização industrial.
tomaticamente o caudal da água no sistema de irrigação.
Proteção do meio-ambiente
Os materiais de embalagem são recicláveis. Não coloque as embalagens
no lixo doméstico, envie-as para uma unidade de reciclagem.
Os aparelhos velhos contêm materiais preciosos e recicláveis e deverão ser
reutilizados. Por isso, elimine os aparelhos velhos através de sistemas de
recolha de lixo adequados.
Garantia
Símbolos no Manual de Instruções
몇 CUIDADO
Para uma possível situação perigosa que pode conduzir a ferimentos leves ou danos materiais.
72 Português
Page 73

Avisos de segurança
몇 CUIDADO
Não operar o aparelho de irrigação em sistemas de água potável.
Operar o aparelho de irrigação apenas com água limpa, não tratada, com uma
temperatura máx. de 35 ?.
Instalar o aparelho de irrigação apenas no exterior.
Não expor o aparelho de irrigação a jactos de água directos, nem mergulhá-lo
na água.
Controlar o aparelho de irrigação antes de cada utilização quanto a danos e
imobilizar o sistema se forem detectados defeitos.
Fixar o aparelho de irrigação apenas em posição vertical.
Não utilizar massa de vedação nem lubrificantes para conectar o aparelho de
irrigação à torneira.
Não puxar pela mangueira conectada.
Utilizar apenas baterias de 9V (tipo 6LR61).
Não instalar o aparelho de irrigação em locais onde é formada água de con-
densação, visto que esta pode danificar a bateria.
Não instalar o aparelho de irrigação na proximidade de fontes de calor (tempe-
ratura ambiente máxima: 60°C).
Não operar o aparelho de irrigação na proximidade de aparelhos sob tensão.
Manuseamento
Ao desembalar verifique a integridade do conteúdo da embalagem e eventuais danos. No caso de danos ou falta de material, informe o seu revendedor.
Ver figuras na página desdobrável!
Descrição da máquina
Figuras veja página 2
3
1 Peça redutora (G
2 Ligação da água (G 1) com junta de filtro
3 Unidade de válvulas
4 Conexão de mangueira
5 Peça de acoplamento para ligação de mangueira
6 Unidade de comando
7 Compartimento da bateria
8 Display
9 Campo de teclas
/4)
Português 73
Page 74

Descrição do display
Figuras, ver página 3
1 Barra do menu
2 Irrigação automática
3 Irrigação manual
4 Função de contagem decrescente da irrigação
5 Interrupção da irrigação
6 Estado da bateria da unidade de comando
7 Indicação do dia da semana
8 Indicação do programa de irrigação (activada / desactivada)
9 Tempo de irrigação
10 A indicação de irrigação está activada
11 Tecla de confirmação da activação / desactivação da irrigação
12 Menu / tecla Esc
13 Tecla OK
14 Teclas de setas
15 Hora / Tempo de irrigação
16 Indicação do tempo de irrigação
17 Indicação do tempo actual
18 Período de irrigação (manhã / noite)
Funcionamento
O aparelho tem 4 modos.
Irrigação automática
– Com esta função, é possível ajustar os períodos de irrigação individualmente
e a irrigação é activada e desactivada automaticamente.
Irrigação manual
– Com esta função, a irrigação é ligada ou desligada manualmente.
Função de contagem decrescente da irrigação
– Com esta função, a irrigação é desligada automaticamente após o tempo indi-
cado (máx. 120 minutos).
Interrupção da irrigação
– Com esta função, a irrigação automática é interrompida durante 24 horas.
Antes de colocar em funcionamento
A torneira deve estar fechada.
Enroscar a peça de acoplamento na ligação da mangueira.
Se necessário, enroscar a peça redutora na ligação da água.
Segurar a unidade de válvulas na carcaça e enroscar a ligação de água na tor-
neira.
몇 CUIDADO
Nunca ligar o aparelho de irrigação à torneira sem a junta de filtro incluída no volume de fornecimento.
74 Português
Page 75

Preparação da unidade de comando
Aviso: A bateria não está incluída no volume
de fornecimento.
Inserir a bateria correctamente (+/-) no
compartimento da bateria.
Assim que a bateria estiver inserida, a in-
dicação avança automaticamente para o
modo de ajuste da hora actual e do dia
da semana (após um curto autodiagnóstico). As horas piscam.
Na primeira colocação em funcionamento, ajustar a hora
Aviso: assim que a bateria tiver sido inserida,
a hora pisca automaticamente.
Ajustar as horas com as teclas de seta.
Confirmar com a tecla OK.
Ok
Os minutos piscam.
Ok
Ajustar os minutos com as teclas de seta.
Confirmar com a tecla OK.
A hora está ajustada.
Português 75
Page 76

Na primeira colocação em funcionamento, ajustar o dia da semana
Indicação: Segunda-feira a Domingo
Ajustar o dia da semana com as teclas
de seta.
Confirmar com a tecla OK.
Ok
O dia da semana está ajustado.
Ajuste da irrigação automática
A indicação "Irrigação" pisca (activada)
Aviso
O período e a duração da irrigação estão configurados de fábrica do seguinte modo: manhã, 6:00, 5 minutos; noite, 21:00, 5 minutos.
Com as teclas de seta é possível navegar
através do programa de irrigação.
Com a tecla de confirmação, assinalar a
activação / desactivação da irrigação.
Se a hora e duração predefinidas estiverem
correctas, é possível seleccionar outros períodos de irrigação através das teclas de seta.
Aviso
Com a tecla ESC/MENU é possível abandonar o modo de ajuste a qualquer momento.
76 Português
Page 77

Se a hora e duração predefinidas não estive-
Ok
Ok
rem correctas:
confirmar com a tecla OK para alterar a
hora e duração do período de irrigação
activo.
As horas piscam.
Ajustar as horas com as teclas de seta.
Confirmar com a tecla OK.
Ok
Ok
esc
menu
Aviso
Para a alteração posterior dos ajustes, utilizar a tecla ESC/MENU e as teclas de
seta para comutar para o modo de ajuste da irrigação automática.
Os minutos piscam.
Ajustar os minutos com as teclas de seta.
Confirmar com a tecla OK.
A duração da irrigação pisca.
Ajustar os minutos com as teclas de seta.
Confirmar com a tecla OK.
O tempo de irrigação está ajustado.
Agora é possível ajustar outros períodos
de irrigação através das teclas de seta.
Abandonar o modo de ajuste com a tecla
ESC/MENU.
A irrigação automática está activada.
Português 77
Page 78

esc
Ok
esc
menu
menu
Ok
Ajuste da irrigação manual
Mudar para o modo de ajuste com a te-
cla ESC/MENU.
O símbolo para a irrigação manual pisca.
Confirmar com a tecla OK.
É exibido o símbolo da irrigação.
A válvula abre.
A irrigação está activa.
Com a tecla ESC/MENU, a válvula fecha
e é comutado para o modo automático.
Com a tecla OK a válvula fecha, é comu-
tado para o modo de ajuste e não é possível seleccionar uma nova função.
78 Português
Page 79

Ajuste da função de contagem decrescente da irrigação
Ok
esc
menu
Mudar para o modo de ajuste com a te-
esc
cla ESC/MENU.
menu
Seleccionar o modo de irrigação com as
teclas de seta.
O símbolo para a função de contagem decrescente pisca.
Confirmar com a tecla OK.
Ok
Os minutos piscam.
Ajustar os minutos com as teclas de seta.
Confirmar com a tecla OK.
Ok
É exibido o símbolo da irrigação.
A função de contagem decrescente está
activada.
A válvula abre.
A irrigação está activa.
Após a conclusão da contagem decrescente,
a função comuta para o modo automático.
Para uma conclusão prematura:
Com a tecla ESC/MENU, a válvula fecha
e é comutado para o modo automático.
Com a tecla OK a válvula fecha, é comu-
tado para o modo de ajuste e não é possível seleccionar uma nova função.
Português 79
Page 80

Interrupção da irrigação
Ok
esc
menu
Mudar para o modo de ajuste com a te-
esc
cla ESC/MENU.
menu
Seleccionar o modo de irrigação com as
teclas de seta.
O símbolo para a interrupção da irrigação pisca.
Confirmar com a tecla OK.
Ok
Colocar a unidade de comando na unidade de válvulas.
Abrir a torneira.
No final da estação de rega
Fechar a torneira de água.
Separar o aparelho de irrigação da torneira da água e da mangueira da água.
A unidade de comando deve permanecer conectada com a unidade de válvu-
las.
Activar a irrigação manual para permitir a saída da água residual do aparelho
de irrigação.
Separar a unidade de comando da unidade de válvulas.
Retirar a bateria.
Guardar o aparelho de irrigação num local seco e protegido contra geada.
O ajuste de irrigação está desactivado
durante 24 horas.
Para a conclusão antes de terem decor-
rido as 24 horas, é possível interromper
a função através da tecla OK ou ESC/
MENU, sendo comutado para o modo
automático.
Funcionamento
Desligar o aparelho
80 Português
Page 81

Conservação e manutenção
Limpar a junta de filtro
Retirar a junta de filtro regularmente da ligação da água e lavar sob água cor-
rente.
Bateria
Estado da bateria: cheia
Estado da bateria: quase vazia
Substituir a bateria.
Estado da bateria: vazia
Substituir a bateria.
Aviso
Por questões de segurança, no modo "Irrigação automática" a válvula é fechada.
A irrigação já não pode ser activada.
Substituir bateria
Remover a unidade de comando.
Inserir uma nova bateria de 9V (tipo 6LR61).
Eliminar a bateria gasta de acordo com a legislação em vigor.
Colocar a unidade de comando na unidade de válvulas e prestar atenção quan-
to a uma fixação correcta.
Aviso
A bateria antiga pode ser substituída por uma bateria nova, no espaço de 3 minutos,
sem que os ajustes de irrigação e a programação sejam perdidos.
Tipos de bateria utilizáveis:
– Alcalino
– Bateria recarregável com auto-descarga baixa e uma capacidade de, pelo me-
nos, 250 mAh.
Aviso
As baterias recarregáveis não duram uma temporada inteira.
Manutenção
O aparelho está isento de manutenção.
Português 81
Page 82

Ajuda em caso de avarias
Avaria Causa Eliminação da avaria
Irrigação não
funciona apesar da programação.
A válvula não
abre/fecha.
Nenhuma indicação no display
Fuga na ligação da água.
Em caso de dúvidas ou avarias, a nossa filial Kärcher local está à sua disposição.
Endereços no verso.
Torneira da água fechada. Abrir a torneira.
Bateria descarregada. Inserir uma nova bateria de 9V
Contactos da bateria oxidados. Limpar os contactos.
Junta de filtro entupida. Limpar a junta de filtro.
Com a unidade de comando des-
montada não é possível abrir/fechar a válvula.
Bateria descarregada ou contacto
oxidado.
Junta de filtro com defeito. Substituir a junta de filtro.
A ligação da água, na torneira, sol-
tou-se.
(tipo 6LR61).
Colocar a unidade de comando na unidade de válvulas.
Inserir uma nova bateria de 9V
(tipo 6LR61) ou limpar os contactos.
Voltar a apertar a ligação da
água.
Executar um Reset
Retirar a bateria do compartimento da bateria até a indicação no display desa-
parecer totalmente.
ou
Se a tecla OK for premida durante 5 segundos, o ajuste é reposto.
Dados técnicos
Pressão de serviço 0,1 - 1,0 (1 - 10) MPa (bar)
Temperatura de admissão (máx.) 35 °C
Temperatura ambiente +1 -> +60 °C
Tipo de bateria 9V (6LR61 / alcalina)
9V (dimensão construtiva como:
6LR61 / bateria recarregável com
auto-descarga baixa e uma capacidade de, pelo menos, 250 mAh)
O fabricante reserva-se o direito de proceder a quaisquer alterações técnicas.
82 Português
Page 83

Πίνακας περιεχομένων
Γενικές υποδείξεις. . . . . . . . . . . . . . . . . . . . . . . . . . . . . . . . . . . . . . . . . . . . . . . 83
Υποδείξεις ασφαλείας. . . . . . . . . . . . . . . . . . . . . . . . . . . . . . . . . . . . . . . . . . . . 84
Χειρισμός . . . . . . . . . . . . . . . . . . . . . . . . . . . . . . . . . . . . . . . . . . . . . . . . . . . . . 84
Φροντίδα και συντήρηση . . . . . . . . . . . . . . . . . . . . . . . . . . . . . . . . . . . . . . . . . 92
Αντιμετώπιση βλαβών . . . . . . . . . . . . . . . . . . . . . . . . . . . . . . . . . . . . . . . . . . . 93
Τεχνικά χαρακτη ριστικά . . . . . . . . . . . . . . . . . . . . . . . . . . . . . . . . . . . . . . . . . . 93
Γενικές υποδείξεις
Προς την αξιότιμη πελατεία μας
– Η παρούσα συσκευή σχεδιάστηκε ειδικά για ιδιωτική χρήση και δεν είναι σε
– Αυτή η συσκευή προορίζεται για σύνδεση σε βάνα νερού και ρυθμίζει αυτόματα
Υποδείξεις για τα συστατικά (REACH)
Ενημερωμένες πληροφορίες για τα συστατικά μπορείτε να βρείτε στη διεύθυνση:
www.kaercher.de/REACH
Σε κάθε χώρα ισχύουν οι όροι εγγύησης που εκδόθηκαν από την αρμόδια εταιρία
μας προώθησης πωλήσεων. Αναλαμβάνουμε τη δωρεάν αποκατάσταση οποιασδήποτε βλάβης στη συσκευή σας, εφ
στικό σφάλμα, εντός της προθεσμίας που ορίζεται στην εγγύηση. Σε περίπτωση
που επιθυμείτε να κάνετε χρήση της εγγύησης, παρακαλούμε απευθυνθείτε με την
απόδειξη αγοράς στο κατάστημα από το οποίο προμηθευτήκατε τη συσκευή ή στην
πλησιέστερη εξουσιοδοτημένη υπηρεσία τεχνικής εξυπηρέτησης πελατών μας.
(Για τη διε
Πριν χρησιμοποιήσετε τη συσκευή σας για πρώτη φορά, διαβάστε αυτές τις πρωτότυπες οδηγίες χρήσης, ενεργήστε σύμφωνα με αυτές και
κρατήστε τις για μελλοντική χρήση ή για τον επόμενο ιδιοκτήτη.
Αρμόζουσα χρήση
θέση να ανταποκριθεί στις καταπονήσεις που συνεπάγεται μία ενδεχόμενη
επαγγελματική της χρήση.
τη ροή νερού στο σύστημα άρδευσης.
Προστασία περιβάλλοντος
Τα υλικά συσκευασίας είναι ανακυκλώσιμα. Μην πετάτε τη συσκευασία στα
οικιακά απορρίμματα, αλλά παραδώστε την προς ανακύκλωση.
Οι παλιές συσκευές περιέχουν ανακυκλώσιμα υλικά, τα οποία θα πρέπει να
παραδίδονται προς επαναχρησιμοποίηση. Για το λόγο αυ
παλιές συσκευές με κατάλληλες διαδικασίες συγκέντρωσης αποβλήτων.
τό αποσύρετε τις
Εγγύηση
όσον οφείλεται σε αστοχία υλικού ή κατασκευα-
ύθυνση βλ. στην πίσω σελίδα)
Ελληνικά 83
Page 84

Σύμβολα στο εγχειρίδιο οδηγιών
몇 ΠΡΟΣΟΧΗ
Για ενδεχόμενη επικίνδυνη κατάσταση, η οποία μπορεί να οδηγήσει σε ελαφρό τραυματισμό ή υλικές βλάβες.
Υποδείξεις ασφαλείας
몇 ΠΡΟΣΟΧΗ
Μην χρησιμοποιείτε το αυτόματο σύστημα άρδευσης σε συστήματα πόσιμου νερού.
Χρησιμοποιείτε το αυτόματο σύστημα άρδευσης μόνον με μη επεξεργασμένο,
καθαρό γλυκό νερό με θερμοκρασία έως 35?.
Εγκαταστήστε το αυτόματο σύστημα άρδευσης μόνον σε εξωτερικό χώρο.
Μην εκθέτετε το αυτόματο σύστημα άρδευσης απευθείας σε δέσμη νερού και
μην το βυθίζετε ποτέ σε νε
Ελέγχετε το αυτόματο σύστημα άρδευσης για τυχόν βλάβες πριν από κάθε χρή-
ση και διακόψτε τη λειτουργία του, εάν διαπιστώσετε ορατές βλάβες.
Τοποθετήστε το αυτόματο σύστημα άρδευσης μόνον σε όρθια θέση.
Μην χρησιμοποιείτε παχύρρευστες ουσίες και λιπαντικά για τη σύνδεση του αυ-
τόματου συστήματος άρδευσης στη βάνα νερού.
Μην τρ
Χρησιμοποιείτε μόνον μπαταρίες 9V (τύπος 6LR61).
Μην εγκαθιστάτε το αυτόματο σύστημα άρδευσης σε σημεία, όπου υπάρχει
Μην εγκαθιστάτε το αυτόματο σύστημα άρδευσης κοντά σε πηγές θερμότητας
Μην χρησιμοποιείτε το αυτόματο σύστημα άρδ
Κατά την αποσυσκευασία ελέγξτε το περιεχόμενο της συσκευασίας για ελλείψεις και
βλάβες. Σε περίπτωση παραπόνων ενημερώστε το κατάστημα.
Εικόνες, βλ. αναδιπλούμενη σελίδα!
Εικόνες, βλ. σελίδα 2
1 Τεμάχιο μείωσης (G
2 Σύνδεση νερού (G 1) με μόνωση φίλτρου
3 Συγκρότημα βαλβίδας
4 Σύνδεση λάστιχου
5 Σύζευξη για σύνδεση ελαστικού σωλήνα
6 Μονάδα χειρισμού
7 Θήκη μπαταριών
8 Ένδειξη οθόνης
9 Πληκτρολόγιο
αβάτε το συνδεδεμένο ελαστικό σωλήνα.
νερό συμπυκνώματος, καθώς ενδέχεται να προκληθούν βλάβες στη μπαταρία.
(μέγιστη θερμοκρασία περιβάλλοντος 60?).
ρό.
ευσης πλάι σε συσκευές υπό τάση.
Χειρισμός
Περιγραφή της συσκευής
3
/4)
84 Ελληνικά
Page 85

Περιγραφή οθόνης
Εικόνες, βλ. σελίδα 3
1 Γραμμή μενού
2 Αυτόματη άρδευση
3 Μη αυτόματη άρδευση
4 Λειτουργία Countdown άρδευσης
5 Διακοπή άρδευσης
6 Κατάσταση μπαταρίας χειριστηρίου
7 Ένδειξη ημέρας
8 Ένδειξη προγράμματος άρδευσης (ενεργοποίηση/απενεργοποίηση)
9 Διάρκεια άρδευσης
10 Ένδειξη ενεργούς άρδευσης
11 Πλήκτρο επιβεβαίωσης ενεργοποίησης/απενεργοποίησης άρδευσης
12 Μενού / πλήκτρο esc
13 Πλήκτρο ok
14 Πλήκτρα με βέλη
15 Ώρα / Ώρα άρδευσης
16 Ένδειξη χρόνου άρδευσης
17 Ένδειξη τρέχουσας ώρας
ονικό διάστημα άρδευσης (πρωί/βράδυ)
18 Χρ
Λειτουργία
Η συσκευή διαθέτει 4 λειτουργίες.
Αυτόματη άρδευση
– Με αυτήν τη λειτουργία μπορείτε να ρυθμίσετε τα μεμονωμένα χρονικά διαστή-
ματα άρδευσης και να ενεργοποιήσετε ή να απενεργοποιήσετε αυτόματα την
άρδευση.
Μη αυτόματη άρδευση
– Με αυτήν τη λειτουργία μπορείτε να ενεργοποιήσετε ή να απενεργοποιήσετε μη
αυτόματα την άρδευση.
Λειτουργία Countdown άρδευσης
– Με αυτήν τη λειτουργία μπορείτε να απενεργοποιήσετε αυτόματα την άρδευση
έπειτα από τον επιθυμητό χρόνο (έως 120 λεπτά).
Διακοπή άρδευσης
– Με αυτήν τη λειτουργία μπορείτε να απενεργοποιήσετε την αυτόματη άρδευση
για 24 ώρες.
Πριν τη θέση σε λειτουργία
Η βάνα νερού πρέπει να είναι κλειστή.
Βιδώστε τη σύζευξη στη σύνδεση ελαστικού σωλήνα.
Βιδώστε το τεμάχιο μείωσης στη σύνδεση νερού.
Κρατήστε τη μονάδα βαλβίδας στο περίβλημα και βιδώστε τη σύνδεση νερού
στη βάνα.
몇 ΠΡΟΣΟΧΗ
Μην συνδέετε ποτέ το αυτόματο σύστημα άρδευσης στη βάνα χωρίς τη συνοδευτική
μόνωση φίλτρου.
Ελληνικά 85
Page 86

Προετοιμασία μονάδας χειρισμού
Υπόδειξη: Η μπαταρία δεν περιλαμβάνεται
στη συσκευασία.
Τοποθετήστε την μπαταρία στη σωστή
θέση (σημάδια +/-) στη θήκη της.
Μόλις τοποθετηθεί η μπαταρία, εκτελεί-
ται ένας σύντομος αυτοέλεγχος και εμφανίζεται αμέσως η ένδειξη της κατάστασης
ρύθμισης της τρέχουσας ώρας και ημέρας. Οι ώρες της ένδειξης ώρας αναβοσβήνουν.
Ρύθμιση ώρας κατά την πρώτη ενεργοποίηση
Υπόδειξη: Μόλις τοποθετηθεί η μπαταρία, θα
αρχίσει να αναβοσβήνει αυτόματα η ώρα.
Ρυθμίστε τις ώρες με τα πλήκτρα βέλους.
Επιβεβαιώστε με το πλήκτρο ΟΚ.
Ok
Τα λεπτά αναβοσβήνουν.
86 Ελληνικά
Ok
Ρυθμίστε τα λεπτά με τα πλήκτρα βέ-
λους.
Επιβεβαιώστε με το πλήκτρο ΟΚ.
Η ώρα έχει ρυθμιστεί.
Page 87

Ρύθμιση ημέρας κατά την πρώτη ενεργοποίηση
Ένδειξη: Δευτέρα έως Κυριακή
Ρυθμίστε την ημέρα με τα πλήκτρα βέ-
λους.
Επιβεβαιώστε με το πλήκτρο ΟΚ.
Ok
Η ημέρα έχει ρυθμιστεί.
Ρύθμιση αυτόματης άρδευσης
Αναβοσβήνει η ένδειξη άρδευσης (ενεργή)
Υπόδειξη
Η εργοστασιακή ρύθμιση για το χρόνο και τη
διάρκεια άρδευσης είναι το πρωί στις 6:00 για
5 λεπτά και το βράδυ στις 21:00 για 5 λεπτά.
Με τα πλήκτρα βέλους μπορείτε να περιηγηθείτε στο πρόγραμμα άρδευσης.
Επισημάνετε με το πλήκτρο επιβεβαίω-
σης την ενεργοποίηση/απενεργοποίηση
της άρδευσης.
ροεπιλεγμένη ώρα και διάρκεια είναι
Εάν η π
σωστή, μπορείτε να επιλέξετε περισσότερα
διαστήματα άρδευσης με τα πλήκτρα βέλους.
Υπόδειξη
Μπορείτε να εξέλθετε από τη λειτουργία ρύθμισης οποιαδήποτε στιγμή με το πλήκτρο esc/
μενού.
Ελληνικά 87
Page 88

Εάν η προεπιλεγμένη ώρα και διάρκεια δεν εί-
Ok
ναι σωστή:
Επιβεβαιώστε με το πλήκτρο ΟK, προ-
κειμένου να αλλάξετε την ώρα και τη διάρκεια του ενεργού διαστήματος άρδευσης.
Οι ώρες αναβοσβήνουν.
Ρυθμίστε τις ώρες με τα πλήκτρα βέλους.
Επιβεβαιώστε με το πλήκτρο ΟΚ.
Ok
Ok
Ok
esc
menu
Υπόδειξη
Για αλλαγή των ρυθμίσεων σε μεταγενέστερο χρόνο, μεταβείτε στη λειτουργία ρύθμισης της αυτόματης άρδευσης με το πλήκτρο esc/μενού και τα πλήκτρα βέλους.
Τα λεπτά αναβοσβήνουν.
θμίστε τα λεπτά με τα πλήκτρα βέ-
Ρυ
λους.
Επιβεβαιώστε με το πλήκτρο ΟΚ.
Η διάρκεια άρδευσης αναβοσβήνει.
Ρυθμίστε τα λεπτά με τα πλήκτρα βέ-
λους.
Επιβεβαιώστε με το πλήκτρο ΟΚ.
Η διάρκεια άρδευσης έχει ρυθμιστεί.
Με τα πλήκτρα βέλους μπορούν να ρυθ-
μιστούν μόνο δύο πρόσθετα χρονικά δια-
ματα άρδευσης.
στή
Εξέλθετε από τη λειτουργία ρύθμισης με
το πλήκτρο esc/μενού.
Η αυτόματη άρδευση είναι ενεργοποιημένη.
88 Ελληνικά
Page 89

Ρύθμιση μη αυτόματης άρδευσης
Ok
esc
menu
Μεταβείτε στη λειτουργία ρύθμισης με το
esc
πλήκτρο esc/μενού.
menu
Αναβοσβήνει το σύμβολο μη αυτόματης άρδευσης.
Επιβεβαιώστε με το πλήκτρο ΟΚ.
Ok
Εμφανίζεται το σύμβολο άρδευσης.
Η βαλβίδα ανοίγει.
Η άρδευση είναι ενεργή.
Η βαλβίδα κλείνει με το πλήκτρο esc/με-
νού και εμφανίζεται η αυτόματη λειτουργία.
Με το πλήκτρο ΟΚ κλ
ανοίγει η λειτουργία ρύθμισης και παρέχεται η δυνατότητα επιλογής μιας νέας
λειτουργίας.
είνει η βαλβίδα,
Ελληνικά 89
Page 90

Ρύθμιση λειτουργίας Countdown άρδευσης
Ok
esc
menu
Μεταβείτε στη λειτουργία ρύθμισης με το
esc
πλήκτρο esc/μενού.
menu
Επιλέξτε τη λειτουργία άρδευσης με τα
πλήκτρα βέλους.
Αναβοσβήνει το σύμβολο της λειτουργίας
Countdown.
Επιβεβαιώστε με το πλήκτρο ΟΚ.
Ok
Τα λεπτά αναβοσβήνουν.
Ρυθμίστε τα λεπτά με τα πλήκτρα βέ-
λους.
Επιβεβαιώστε με το πλήκτρο ΟΚ.
Ok
90 Ελληνικά
Εμφανίζεται το σύμβολο άρδευσης.
Η λειτουργία Coun
Η βαλβίδα ανοίγει.
Η άρδευση είναι ενεργή.
Μετά το πέρας του Countdown ανοίγει η αυτόματη λειτουργία.
Για πρόωρο τερματισμό:
Η βαλβίδα κλείνει με το πλήκτρο esc/με-
νού και εμφανίζεται η αυτόματη λειτουργία.
Με το πλήκτρο ΟΚ κλείνει η βαλβίδα,
ανοίγει η λειτουργία ρύθμισης και παρέχεται η δυ
λειτουργίας.
tdown είναι ενεργή.
νατότητα επιλογής μιας νέας
Page 91

Διακοπή άρδευσης
Ok
esc
menu
Μεταβείτε στη λειτουργία ρύθμισης με το
esc
πλήκτρο esc/μενού.
menu
Επιλέξτε τη λειτουργία άρδευσης με τα
πλήκτρα βέλους.
Αναβοσβήνει το σύμβολο διακοπής της άρδευσης.
Επιβεβαιώστε με το πλήκτρο ΟΚ.
Ok
Τοποθετήστε τη μονάδα χειρισμού πάνω στη μονάδα βαλβίδας.
Ανοίξτε τον κρουνό.
Τερματισμός λειτουργίας
Στο τέλος της σεζόν άρδευσης
Κλείστε τη βάνα νερού.
Αποσυνδέστε το αυτόματο σύστημα άρδευσης από τη βάνα νερού και τον ελα-
στικό σωλήνα νερού.
Η μονάδα χειρισμού πρέπει να παραμείνει συνδεδεμένη με τη μονάδα βαλβί-
δας.
Ενεργοποιήστε τη μη αυτόματη άρ
σύστημα άρδευσης το νερό που έχει απομείνει.
Αποσυνδέστε τη μονάδα χειρισμού από τη μονάδα βαλβίδας.
Αφαιρέστε τη μπαταρία.
Φυλάξτε το αυτόματο σύστημα άρδευσης σε ξηρό χώρο που προστατεύεται
από τον παγετό.
Η ρύθμιση άρδευσης απενεργοποιείται
για 24 ώρες.
Για τον τερματισμό της 24ωρης διαδικα-
σίας μπορείτε να διακόψετε τη λειτουργία
με το πλήκτρο ΟΚ ή το πλ
νού και να μεταβείτε στην αυτόματη λειτουργία.
ήκτρο esc/με-
Λειτουργία
δευση, ώστε να εκρεύσει από το αυτόματο
Ελληνικά 91
Page 92

Φροντίδα και συντήρηση
Καθαρισμός της μόνωσης φίλτρου
Αφαιρείτε τακτικά τη μόνωση φίλτρου της σύνδεσης νερού και ξεπλένετέ την με
τρεχούμενο νερό.
Μπαταρία
Φορτισμένη μπαταρία
Σχεδόν κενή μπαταρία
Αντικαταστήστε την μπαταρία.
Κενή μπαταρία
Αντικαταστήστε την μπαταρία.
Υπόδειξη
Στη λειτουργία αυτόματης άρδευσης, η βαλβίδα
είναι κλειστή για λόγους ασφαλείας.
Η άρδευση δεν μπορεί πλέον να ενεργοποιηθεί.
Αντικαταστήστε τη μπαταρία
Αφαιρέστε τη μονάδα χειρισμού.
Τοποθετήστε μια καινούρια μπαταρία 9V (τύπος 6LR61).
Διαθέστε τις χρησιμοποιημένες μπαταρίες σύμφωνα με τις ισχύουσες διατάξεις.
Τοποθετήστε τη μονάδα χειρισμού στη μονάδα βαλβίδας και φροντίστε για τη
ορθή της έδραση.
Υπόδειξη
Η παλιά μπαταρία μπορεί να αντικατασταθεί εντός 3 λεπτών από μια καινούρια
μπαταρία, χωρίς να χαθούν οι ρυθμίσεις άρδευσης και το προγραμματισμός.
Χρησιμοποιούμενοι τύποι μπαταρίας:
– Αλκαλική
– Επαναφορτιζόμενη μπαταρία με ελάχιστη αυτόματη αποφόρτιση και χωρητικό-
τητα τουλάχιστον 250 mAh.
Υπόδειξη
Οι επαναφορτιζόμενες μπαταρίες δεν διαρκούν υπό ορισμένες συνθήκες για ολόκληρη τη σεζόν.
Συντήρηση
Το μηχάνημα δεν χρειάζεται συντήρηση.
92 Ελληνικά
ν
Page 93

Αντιμετώπιση βλαβών
Βλάβη Αίτιο Αντιμετώπιση
Η άρδευση δεν
πραγματοποιείται παρά τον
προγραμματισμό.
Η βαλβίδα δεν
ανοίγει / δεν
κλείνει.
Δεν υπάρχει
ένδειξη στην
οθόνη
Διαρροή στη
σύνδεση νερού.
Σε περίπτωση αποριών ή βλαβών μπορείτε να απευθύνεστε στο πλησιέστερο υποκατάστημα του Οίκου Kδrcher, το οποίο θα σας βοηθήσει ευχαρίστως. Για τη διεύθυνση βλ. στην πίσω σελίδα.
Κλειστή βάνα νερού. Ανοίξτε τη βάνα νερού.
Άδεια μπαταρία. Τοποθετήστε μια καινούρια
Οξειδωμένες επαφές σύνδεσης
μπαταρίας.
Φρασμένη μόνωση φίλτρου. Καθαρίστε τη μόνωσης φίλ-
Η βαλβίδα δεν μπορεί να ανοίξει /
να κλείσει εά
νάδα χειρισμού.
Η μπαταρία είναι άδεια ή οι επαφές
είναι οξειδωμένες.
Βλάβη στη μόνωση φίλτρου. Αντικαταστήστε τη μόνωση
Αποσυ
νερού στη βάνα.
ν έχει αφαιρεθεί η μο-
νδέθηκε η διάταξη σύνδεσης
μπαταρία 9V (τύπος 6LR61).
Καθαρίστε τις επαφές.
τρου.
Τοποθετήστε τη μονάδα χειρι-
σμού στη μονάδα βαλβίδας.
Τοποθετήστε μια καινούρια
μπαταρία 9V (τύπος 6LR61) ή
καθαρίστε τις επαφές.
φίλτρου.
Σφίξτε ξανά τη σύνδεση νερού.
Εκτέλεση επαναφοράς
Αφαιρέστε την μπαταρία από τη θήκη μπαταριών, ώσπου να σβήσει εντελώς η
ένδειξη στην οθόνη.
ή
Οι ρυθμίσεις μηδενίζονται με παρατεταμένη πίεση του πλήκτρου ΟΚ για 5 δευ-
όλεπτα.
τερ
Τεχνικά χαρακτηριστικά
Πίεση λειτουργίας 0,1 - 1,0 (1 - 10) MPa (bar)
Θερμοκρασία προσαγωγής (μέγ.) 35 °C
Θερμοκρασία περιβάλλοντος +1 -> +60 °C
Τύπος μπαταρίας 9V (6LR61 / αλκαλική)
9V (μέγεθος κατασκευής όπως:
6LR61 / Επαναφορτιζόμενη μπατα-
ρία με ελάχιστη αυτόματη αποφόρτιση και τουλάχιστον 250 mAh)
Με την επιφύλαξη τεχνικών αλλαγών.
Ελληνικά 93
Page 94

Page 95

Page 96

Page 97

Page 98

http://www.kaercher.com/dealersearch
 Loading...