

Page 1
HDS 5/11 U/UX
001
HDS 5/13 U/UX
HDS 5/15 U/UX
Deutsch 6
English 17
Français 28
Italiano 40
Nederlands 52
Español 63
Português 75
Dansk 87
Norsk 98
Svenska 109
Suomi 120
Ελληνικά 131
Türkçe 144
Русский 155
Magyar 168
Čeština 179
Slovenščina 190
Polski 201
Româneşte 213
Slovenčina 225
Hrvatski 236
Srpski 247
Български 259
Eesti 271
Latviešu 282
Lietuviškai 293
Українська 304
59657320 04/16
Page 2

2
Page 3

3
Page 4
9
11
4
1
3
22
5
18
30
27
28
12
10
15
16
14
17
24
25
19
6
7
2
21
13
14
23
2
1
20
8
29
26
32
31
4
Page 5
2
3
1 2
4
+
5
6
7
8
9
5
Page 6
Lesen Sie vor der ersten Benut-
zung Ihres Gerätes diese Originalbetriebsanleitung, handeln Sie danach
und bewahren Sie diese für späteren Gebrauch oder für Nachbesitzer auf.
– Vor erster Inbetriebnahme Sicherheits-
hinweise Nr. 5.951-949.0 unbedingt lesen!
– Bei Transportschaden sofort Händler
informieren.
– Packungsinhalt beim Auspacken prü-
fen. Lieferumfang siehe Abbildung 1.
Inhaltsverzeichnis
Umweltschutz . . . . . . . . . . . . . DE 1
Gefahrenstufen . . . . . . . . . . . . DE 1
Geräteelemente . . . . . . . . . . . DE 2
Symbole auf dem Gerät . . . . . DE 2
Bestimmungsgemäße Verwen-
dung . . . . . . . . . . . . . . . . . . . . DE 2
Sicherheitshinweise . . . . . . . . DE 3
Sicherheitseinrichtungen. . . . . DE 3
Inbetriebnahme. . . . . . . . . . . . DE 3
Bedienung. . . . . . . . . . . . . . . . DE 5
Lagerung. . . . . . . . . . . . . . . . . DE 7
Transport. . . . . . . . . . . . . . . . . DE 8
Pflege und Wartung . . . . . . . . DE 8
Hilfe bei Störungen . . . . . . . . . DE 8
Garantie . . . . . . . . . . . . . . . . . DE 10
Zubehör und Ersatzteile . . . . . DE 10
EU-Konformitätserklärung. . . . DE 10
Technische Daten . . . . . . . . . . DE 11
Umweltschutz
Die Verpackungsmaterialien
sind recyclebar. Bitte werfen Sie
die Verpackungen nicht in den
Hausmüll, sondern führen Sie
diese einer Wiederverwertung
zu.
Altgeräte enthalten wertvolle recyclingfähige Materialien, die einer Verwertung zugeführt werden sollten. Batterien, Öl und
ähnliche Stoffe dürfen nicht in
die Umwelt gelangen. Bitte entsorgen Sie Altgeräte deshalb
über geeignete Sammelsysteme.
Bitte Motorenöl, Heizöl, Diesel und Benzin
nicht in die Umwelt gelangen lassen. Bitte
Boden schützen und Altöl umweltgerecht
entsorgen.
Hinweise zu Inhaltsstoffen (REACH)
Aktuelle Informationen zu Inhaltsstoffen finden Sie unter:
www.kaercher.de/REACH
Gefahrenstufen
GEFAHR
Hinweis auf eine unmittelbar drohende Gefahr, die zu schweren Körperverletzungen
oder zum Tod führt.
몇 WARNUNG
Hinweis auf eine möglicherweise gefährliche Situation, die zu schweren Körperverletzungen oder zum Tod führen kann.
몇 VORSICHT
Hinweis auf eine möglicherweise gefährliche Situation, die zu leichten Verletzungen
führen kann.
ACHTUNG
Hinweis auf eine möglicherweise gefährliche Situation, die zu Sachschäden führen
kann.
6 DE
– 1
Page 7
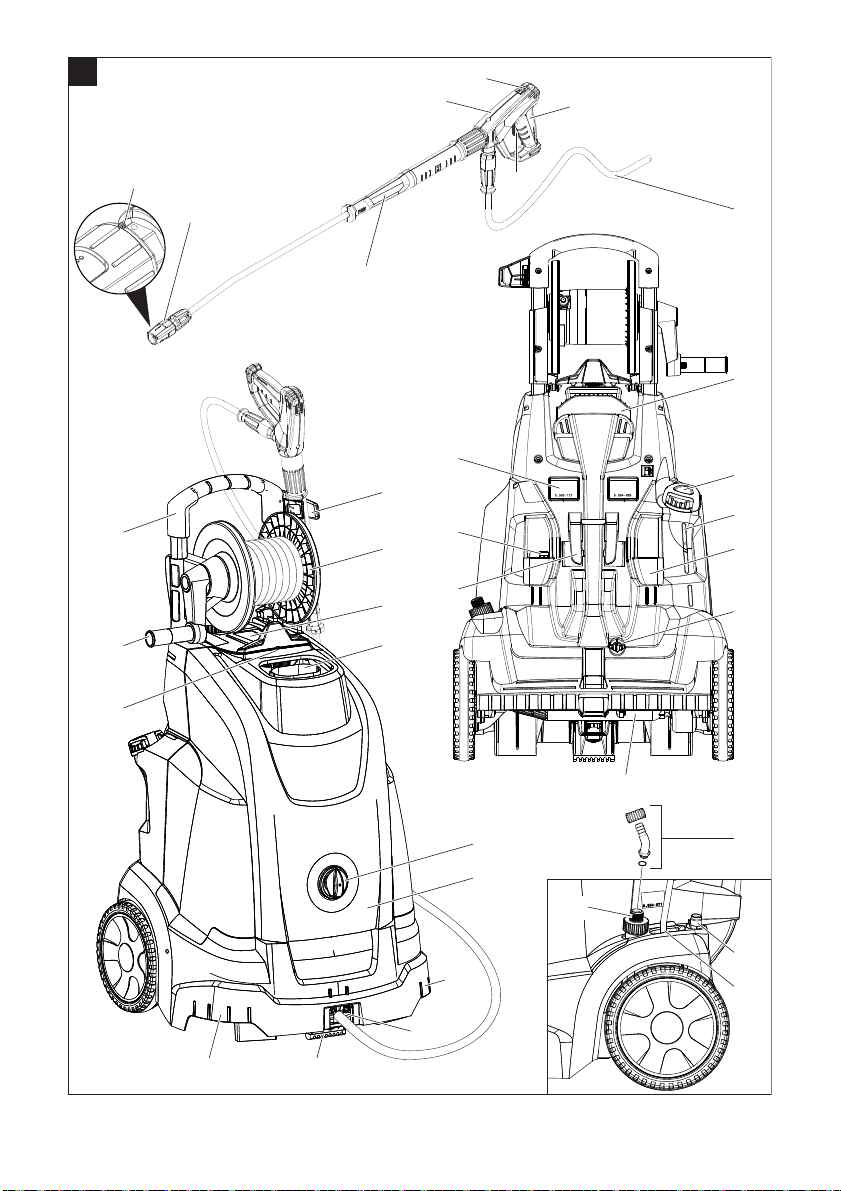
Geräteelemente
Abbildung
1 Hochdruckschlauch EASY!Lock
2 Kabelhalter
3 Einfüllöffnung für Brennstoff
4 Füllstandsanzeige
5 Düsenablage
6 Elektrozuleitung
7 Hochdruckpumpe
8 Wasseranschluss-Set
9 Hochdruckanschluss EASY!Lock (nur
HDS 5/xx U)
10 Strahlrohrablage
11 Wasseranschluss mit Filter
12 Auflager
13 Austrittsöffnung des Hochdruck-
schlauchs (nur HDS 5/xx UX)
14 Tragegriff
15 Gerätehaube
16 Geräteschalter
17 Brenner
18 Schlauchablage (nur HDS 5/xx U)
19 Schlauchtrommel (nur HDS 5/xx UX)
20 Reinigungsmittel-Saugschlauch mit Filter
21 Halterung für Strahlrohr
22 Typenschild
23 Haubenverschluss
24 Handkurbel für Schlauchtrommel (nur
HDS 5/xx UX)
25 Schubbügel
26 Markierung der Düse
27 Dreifachdüse EASY!Lock
28 Strahlrohr EASY!Lock
29 Handspritzpistole EASY!Lock
30 Sicherungsraste der Handspritzpistole
31 Sicherungshebel
32 Abzugshebel
Farbkennzeichnung
– Bedienelemente für den Reinigungs-
prozess sind gelb.
– Bedienelemente für die Wartung und
den Service sind hellgrau.
Symbole auf dem Gerät
Hochdruckstrahlen können bei
unsachgemäßem Gebrauch
gefährlich sein. Der Strahl darf
nicht auf Personen, Tiere, akti-
ve elektrische Ausrüstung
oder auf das Gerät selbst gerichtet werden.
Der Hochdruckreiniger darf nur senkrecht
stehend betrieben werden.
Gerät mit Schlauchtrommel:
Verbrennungsgefahr durch heiße Oberflächen!
Bestimmungsgemäße
Verwendung
– Reinigen von: Maschinen, Fahrzeugen,
Bauwerken, Werkzeugen, Fassaden,
Terrassen, Gartengeräten, etc.
– Der Hochdruckreiniger darf nur senk-
recht stehend betrieben werden.
– Das Gerät niemals unbeaufsichtigt las-
sen, solange es in Betrieb ist.
GEFAHR
Verletzungsgefahr! Beim Einsatz an Tankstellen oder anderen Gefahrenbereichen
entsprechende Sicherheitsvorschriften beachten.
Bitte mineralölhaltiges Abwasser nicht ins
Erdreich, Gewässer oder Kanalisation gelangen lassen. Motorenwäsche und Unterbodenwäsche deshalb bitte nur an geeigneten Plätzen mit Ölabscheider durchführen.
Anforderungen an die Wasserqualität:
ACHTUNG
Als Hochdruckmedium darf nur sauberes
Wasser verwendet werden. Verschmutzungen führen zu vorzeitigem Verschleiß oder
Ablagerungen im Gerät und im Zubehör.
Wird Recyclingwasser verwendet, dürfen
folgende Grenzwerte nicht überschritten
werden.
– 2
7DE
Page 8
pH-Wert 6,5...9,5
elektrische Leitfähigkeit * Leitfähigkeit
Frischwasser
+1200 µS/cm
absetzbare Stoffe ** < 0,5 mg/l
abfiltrierbare Stoffe *** < 50 mg/l
Kohlenwasserstoffe < 20 mg/l
Chlorid < 300 mg/l
Sulfat < 240 mg/l
Kalzium < 200 mg/l
Gesamthärte < 28 °dH
< 50 °TH
< 500 ppm (mg
/l)
CaCO
3
Eisen < 0,5 mg/l
Mangan < 0,05 mg/l
Kupfer < 2 mg/l
Aktivchlor < 0,3 mg/l
frei von üblen Gerüchen
* Maximum insgesamt 2000 µS/cm
** Probevolumen 1 l, Absetzzeit 30 min
*** keine abrasiven Stoffe
Sicherheitshinweise
– Jeweilige nationale Vorschriften des
Gesetzgebers für Flüssigkeitsstrahler
beachten.
– Jeweilige nationale Vorschriften des
Gesetzgebers zur Unfallverhütung beachten. Flüssigkeitsstrahler müssen regelmäßig geprüft und das Ergebnis der
Prüfung schriftlich festgehalten werden.
– Die Heizeinrichtung des Gerätes ist
eine Feuerungsanlage. Feuerungsanlagen müssen regelmäßig nach den jeweiligen nationalen Vorschriften des
Gesetzgebers überprüft werden.
– Am Gerät/Zubehör dürfen keine Verän-
derungen vorgenommen werden.
Sicherheitseinrichtungen
Sicherheitseinrichtungen dienen dem
Schutz des Benutzers und dürfen nicht außer Kraft gesetzt oder in ihrer Funktion umgangen werden.
Druckschalter
Der Druckschalter schaltet das Gerät beim
Schließen der Handspritzpistole ab und
beim Öffnen wieder ein.
Sicherheitsventil
– Das Sicherheitsventil öffnet bei Kessel-
überdruck oder wenn das Überströmventil bzw. der Druckschalter defekt ist.
– Das Sicherheitsventil ist werkseitig ein-
gestellt und plombiert. Einstellung nur
durch den Kundendienst.
Wassermangelsicherung
Die Wassermangelsicherung verhindert,
dass der Brenner bei Wassermangel einschaltet.
Abgastemperaturbegrenzer
Der Abgastemperaturbegrenzer schaltet
das Gerät bei Erreichen einer zu hohen Abgastemperatur ab.
Wicklungsschutzkontakt
Der Wicklungsschutzkontakt in der Motorwicklung des Pumpenantriebs schaltet den
Motor bei thermischer Überbelastung ab.
Sicherungsraste
Die Sicherungsraste an der Handspritzpistole verhindert unbeabsichtigtes Einschalten des Gerätes.
Inbetriebnahme
몇 WARNUNG
Verletzungsgefahr! Gerät, Zubehör, Zuleitungen und Anschlüsse müssen in einwandfreiem Zustand sein. Falls der Zustand nicht einwandfrei ist, darf das Gerät
nicht benutzt werden.
8 DE
– 3
Page 9

Handspritzpistole, Strahlrohr, Düse und Hochdruckschlauch montieren
Hinweis: Das EASY!Lock-System verbin-
det Komponenten durch ein Schnellgewinde mit nur einer Umdrehung schnell und sicher.
Strahlrohr mit Handspritzpistole verbin-
den und handfest anziehen (EASY!Lock).
Düse auf das Strahlrohr montieren
(Markierung auf dem Stellring oben)
und handfest anziehen (EASY!Lock).
Gerät ohne Schlauchtrommel:
Hochdruckschlauch mit Handspritzpistole und Hochdruckanschluss des Gerätes verbinden und handfest anziehen
(EASY!Lock).
Gerät mit Schlauchtrommel:
Hochdruckschlauch mit Handspritzpistole verbinden und handfest anziehen
(EASY!Lock).
Brennstoff auffüllen
GEFAHR
Explosionsgefahr! Nur Dieselkraftstoff oder
leichtes Heizöl einfüllen. Der Betrieb mit
Biodiesel nach EN 14214 (ab 6 °C Außentemperatur) ist möglich. Ungeeignete
Brennstoffe, z. B. Benzin, dürfen nicht verwendet werden.
ACHTUNG
Beschädigungsgefahr! Gerät niemals mit
leerem Brennstofftank betreiben. Die
Brennstoffpumpe wird sonst zerstört. Dies
gilt auch bei Kaltwasserbetrieb.
Tankverschluss öffnen.
Brennstoff auffüllen.
Tankverschluss schließen.
Übergelaufenen Brennstoff abwischen.
Reinigungsmittelbehälter auffüllen/
austauschen
GEFAHR
Verletzungsgefahr!
– Nur Kärcher-Produkte verwenden.
– Keinesfalls Lösungsmittel (Benzin,
Azeton, Verdünner etc.) ansaugen.
– Kontakt mit Augen und Haut vermeiden.
– Sicherheits- und Handhabungshinwei-
se des Reinigungsmittel-Herstellers beachten.
Kärcher bietet ein individuelles Reinigungs- und Pflegemittelprogramm an.
Ihr Händler berät Sie gerne.
Externen Reinigungsmittelbehälter auf-
füllen/austauschen.
Wasseranschluss
몇 WARNUNG
Vorschriften des Wasserversorgungsunternehmens beachten.
Gemäß gültigen Vorschriften darf
das Gerät nie ohne Systemtrenner
am Trinkwassernetz betrieben
werden. Stellen Sie sicher, dass
der Anschluss Ihrer Hauswasseranlage, an
dem der Hochdruckreiniger betrieben wird,
mit einem Systemtrenner gemäß EN 12729
Typ BA ausgestattet ist.
Wasser, das durch einen Systemtrenner
geflossen ist, wird als nicht trinkbar eingestuft.
몇 VORSICHT
Systemtrenner immer an der Wasserversorgung, niemals direkt am Gerät anschließen.
Anschlusswerte siehe Technische Daten.
Zulaufschlauch (Mindestlänge 7,5 m,
Mindestdurchmesser 1/2“) mit
Schlauchschelle am WasseranschlussSet befestigen.
Zulaufschlauch am Wasseranschluss
des Gerätes und am Wasserzulauf (zum
Beispiel Wasserhahn) anschließen.
Hinweis: Der Zulaufschlauch und die
Schlauchschelle sind nicht im Lieferumfang
enthalten.
Wasser aus Behälter ansaugen
Saugschlauch (Durchmesser mindes-
tens 1/2“) mit Filter (Zubehör) am Wasseranschluss anschließen.
– Max. Saughöhe: 0,5 m
– 4
9DE
Page 10

GEFAHR
Verletzungs- und Beschädigungsgefahr!
Saugen Sie niemals Wasser aus einem
Trinkwasserbehälter an. Saugen Sie niemals lösungsmittelhaltige Flüssigkeiten wie
Lackverdünnung, Benzin, Öl oder ungefiltertes Wasser an. Die Dichtungen im Gerät
sind nicht lösungsmittelbeständig. Der
Sprühnebel von Lösungsmitteln ist hochentzündlich, explosiv und giftig.
Stromanschluss
– Anschlusswerte siehe Technische Da-
ten und Typenschild.
– Der elektrische Anschluss muss von ei-
nem Elektroinstallateur ausgeführt werden und IEC 60364-1 entsprechen.
Geräteschalter auf „0/OFF“ stellen.
Netzstecker einstecken.
GEFAHR
Verletzungsgefahr durch elektrischen
Schlag!
– Ungeeignete elektrische Verlänge-
rungsleitungen können gefährlich sein.
Verwenden Sie im Freien nur dafür zugelassene und entsprechend gekennzeichnete elektrische Verlängerungsleitungen mit ausreichendem Leitungsquerschnitt.
– Verlängerungsleitungen immer voll-
ständig abrollen.
– Stecker und Kupplung einer verwende-
ten Verlängerungsleitung müssen wasserdicht sein.
ACHTUNG
Die maximal zulässige Netzimpedanz am
elektrischen Anschlusspunkt (siehe Technische Daten) darf nicht überschritten werden. Bei Unklarheiten bezüglich der an Ihrem Anschlusspunkt vorliegenden Netzimpedanz setzen Sie sich bitte mit Ihrem
Energieversorgungsunternehmen in Verbindung.
Bedienung
GEFAHR
Explosionsgefahr! Keine brennbaren Flüssigkeiten versprühen.
GEFAHR
Verletzungsgefahr! Gerät nie ohne montiertes Strahlrohr verwenden. Strahlrohr vor
jeder Benutzung auf festen Sitz überprüfen. Verschraubung des Strahlrohrs muss
handfest angezogen sein.
GEFAHR
Verletzungsgefahr! Beim Arbeiten
Handspritzpistole und Strahlrohr mit beiden
Händen halten.
GEFAHR
Verletzungsgefahr! Der Abzugshebel und
der Sicherungshebel dürfen bei Betrieb
nicht festgeklemmt werden.
GEFAHR
Verletzungsgefahr! Bei defektem Sicherungshebel Kundendienst aufsuchen.
ACHTUNG
– Beschädigungsgefahr! Gerät niemals
mit leerem Brennstofftank betreiben.
Die Brennstoffpumpe wird sonst zerstört. Dies gilt auch bei Kaltwasserbetrieb.
– Beschädigungsgefahr! Gerät niemals
ohne Filter im Wasseranschluss betreiben.
– Beschädigungsgefahr! Keine Gegen-
stände (Schlauch usw.) in bzw. über
den Kamin legen.
– Gerät mit Schlauchtrommel:
Beschädigungsgefahr! Hochdruckschlauch immer vollständig abrollen.
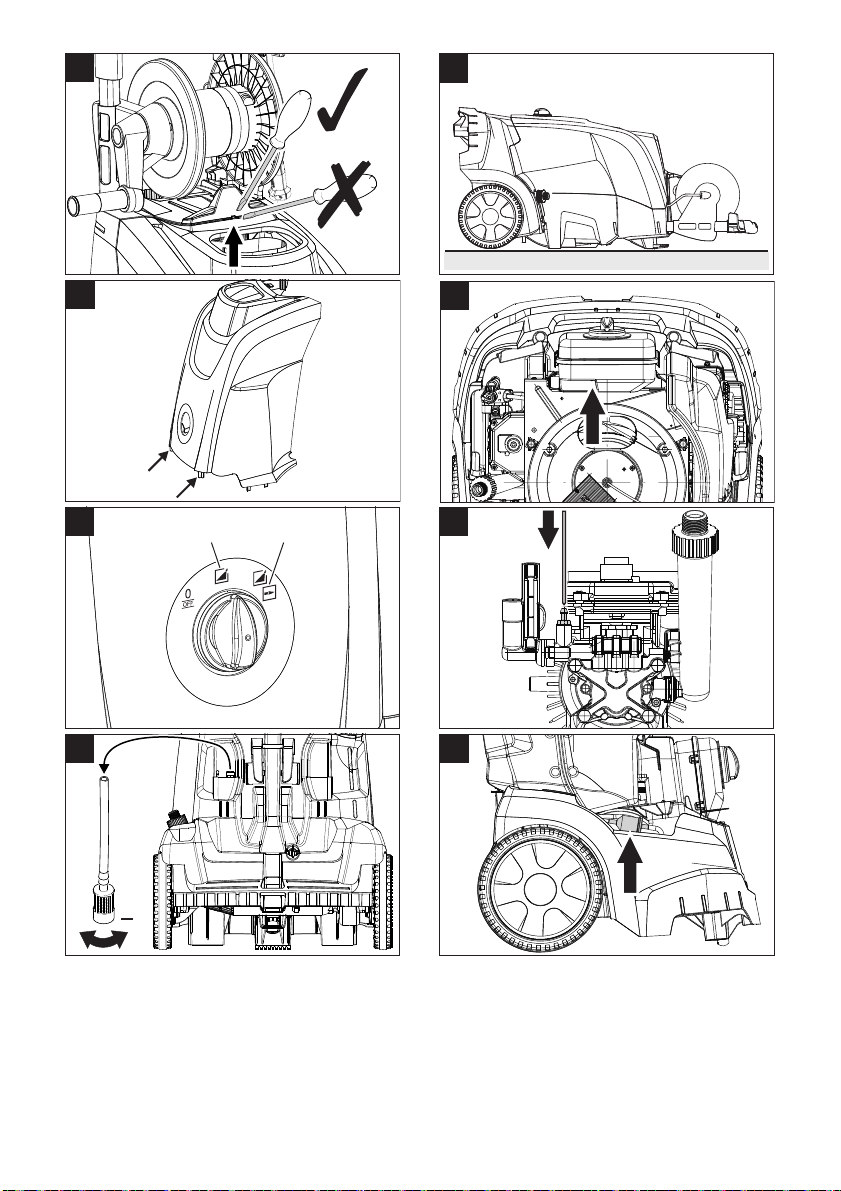
Gerätehaube öffnen/schließen
Abbildung
Haubenverschluss mit Schraubendre-
her entriegeln, Gerätehaube nach vor-
ne klappen und aushängen.
Abbildung
Gerätehaube einhängen (siehe Pfeile),
nach oben klappen und Haubenver-
schluss einrasten.
Handspritzpistole öffnen/schließen
Handspritzpistole öffnen: Sicherungs-
hebel und Abzugshebel betätigen.
Handspritzpistole schließen: Siche-
rungshebel und Abzugshebel loslas-
sen.
10 DE
– 5
Page 11
Düse wechseln
GEFAHR
Verletzungsgefahr! Gerät vor Düsenwechsel ausschalten und Handspritzpistole betätigen, bis Gerät drucklos ist.
Handspritzpistole sichern, dazu Siche-
rungsraste nach vorne schieben.
Düse wechseln.
Betriebsarten
Abbildung
0/OFF = Aus
1 Betrieb mit Kaltwasser
2 Betrieb mit Heißwasser
Gerät einschalten
Geräteschalter auf gewünschte Be-
triebsart stellen.
Das Gerät läuft kurz an und schaltet ab, sobald der Arbeitsdruck erreicht ist.
Handspritzpistole entsichern, dazu Si-
cherungsraste nach hinten schieben.
Bei Betätigung der Handspritzpistole schaltet das Gerät wieder ein.
Hinweis: Tritt kein Wasser aus der Hochdruckdüse, Pumpe entlüften.
Pumpe entlüften:
Bei geöffneter Handspritzpistole Gerät
mit Geräteschalter mehrfach ein- und
ausschalten.
Hinweis: Durch Demontieren des Strahlrohrs von der Handspritzpistole wird der
Entlüftungsvorgang beschleunigt.
Betrieb unterbrechen
Abzugshebel loslassen, das Gerät
schaltet ab.
Handspritzpistole sichern, dazu Siche-
rungsraste nach vorne schieben.
Handspritzpistole entsichern, dazu Si-
cherungsraste nach hinten schieben.
Abzugshebel erneut ziehen, das Gerät
schaltet wieder ein.
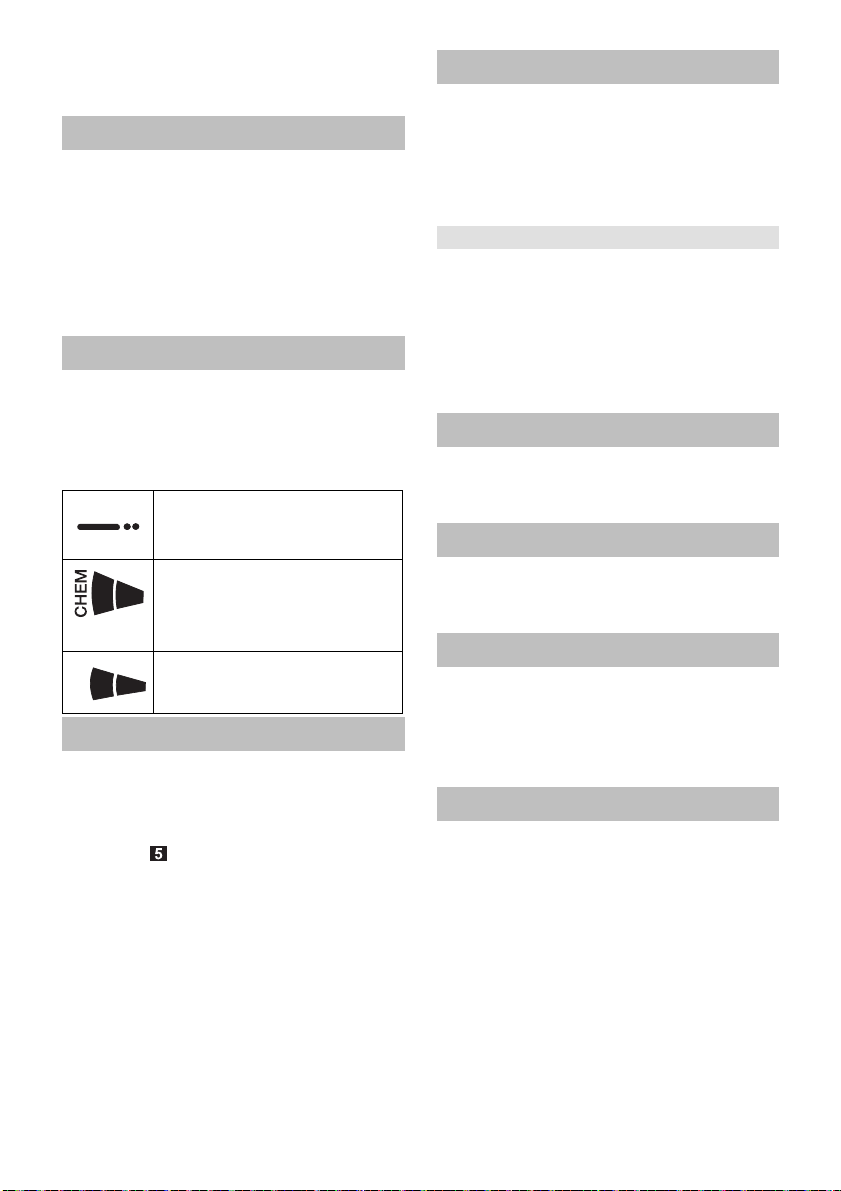
Strahlart wählen
Handspritzpistole schließen.
Handspritzpistole sichern, dazu Siche-
rungsraste nach vorne schieben.
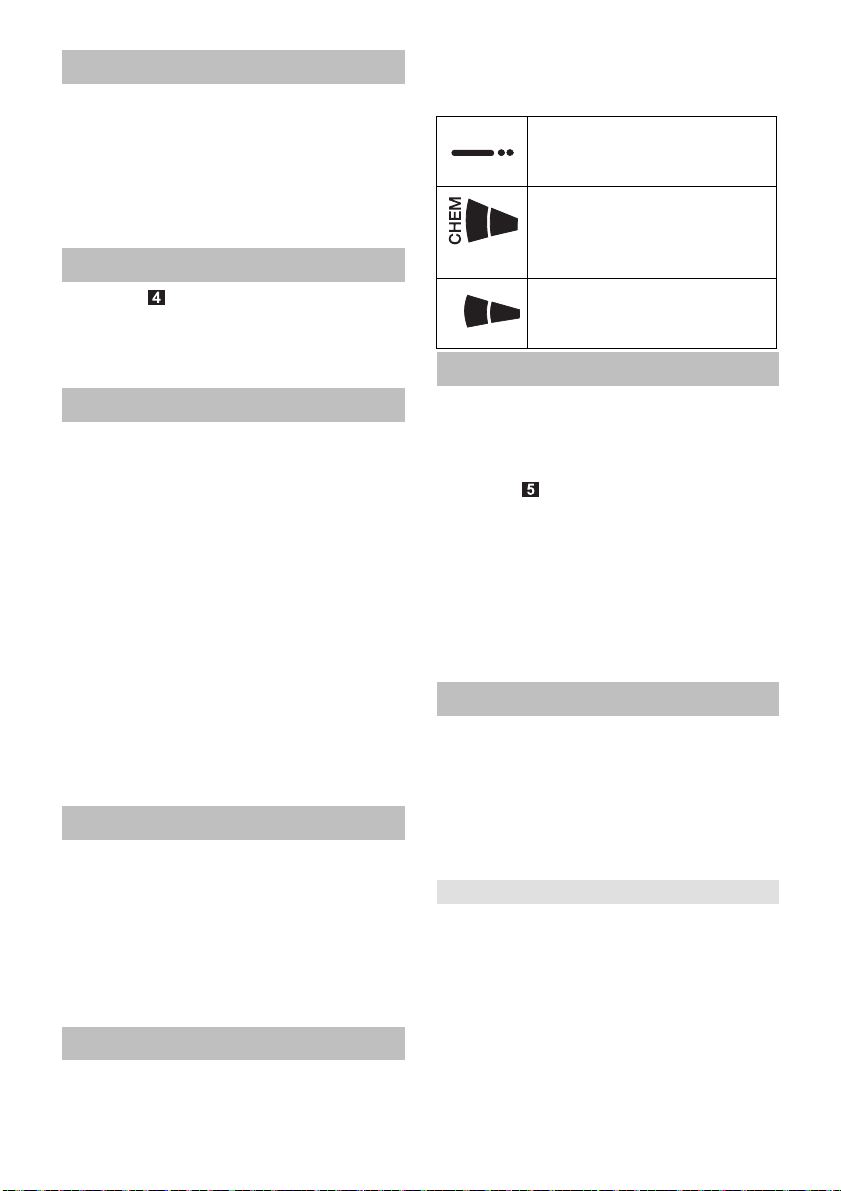
Gehäuse der Düse drehen, bis das ge-
wünschte Symbol mit der Markierung
übereinstimmt:
Hochdruck-Rundstrahl (0°) für
besonders hartnäckige Verschmutzungen
Niederdruck-Flachstrahl
(CHEM) für den Betrieb mit
Reinigungsmittel oder Reinigen mit geringem Druck
Hochdruck-Flachstrahl (25°)
für großflächige Verschmutzungen
Betrieb mit Reinigungsmittel
– Zur Schonung der Umwelt sparsam mit
Reinigungsmitteln umgehen.
– Das Reinigungsmittel muss für die zu
reinigende Oberfläche geeignet sein.
Abbildung
Reinigungsmittel-Saugschlauch her-
ausziehen.
Filter am Reinigungsmittel-Saug-
schlauch drehen, um das Reinigungs-
mittel zu dosieren.
Reinigungsmittel-Saugschlauch in einen
Behälter mit Reinigungsmittel hängen.
Düse auf „CHEM“ stellen.
Reinigen
Reinigungsmittelkonzentration entspre-
chend der zu reinigenden Oberfläche
einstellen.
Hinweis: Hochdruckstrahl immer zuerst
aus größerer Entfernung auf zu reinigendes Objekt richten, um Schäden durch zu
hohen Druck zu vermeiden.
Empfohlene Reinigungsmethode
– Schmutz lösen:
Reinigungsmittel sparsam aufsprühen
und 1...5 Minuten einwirken, aber nicht
eintrocknen lassen.
– Schmutz entfernen:
Gelösten Schmutz mit Hochdruckstrahl
abspülen.
– 6
11DE
Page 12

Betrieb mit Kaltwasser
Entfernen von leichten Verschmutzungen
und Klarspülen, z.B: Gartengeräte, Terrasse, Werkzeuge, etc.
Geräteschalter auf „1“ stellen.
Betrieb mit Heißwasser
GEFAHR
Verbrühungsgefahr!
Geräteschalter auf „2“ stellen.
Nach Betrieb mit Reinigungsmittel
Filter am Reinigungsmittel-Saug-
schlauch ganz zudrehen (-).
Geräteschalter auf „1“ stellen.
Gerät bei geöffneter Handspritzpistole
mindestens 1 Minute klarspülen.
Gerät ausschalten
GEFAHR
Verbrühungsgefahr durch heißes Wasser!
Nach dem Betrieb mit Heißwasser muss
das Gerät zur Abkühlung mindestens zwei
Minuten mit Kaltwasser bei geöffneter Pistole betrieben werden.
Wasserzulauf schließen.
Handspritzpistole öffnen.
Pumpe mit Geräteschalter einschalten
und 5-10 Sekunden laufen lassen.
Handspritzpistole schließen.
Geräteschalter auf „0/OFF“ stellen.
Netzstecker nur mit trockenen Händen
aus Steckdose ziehen.
Wasseranschluss entfernen.
Handspritzpistole betätigen, bis Gerät
drucklos ist.
Handspritzpistole sichern, dazu Siche-
rungsraste nach vorne schieben.
Gerät aufbewahren
Handspritzpistole in den Halter stecken.
Gerät ohne Schlauchtrommel:
Hochdruckschlauch aufwickeln und
über die Schlauchablage hängen.
Gerät mit Schlauchtrommel:
Hochdruckschlauch auf die Schlauchtrommel aufwickeln. Griff der Kurbel
einschieben, um die Schlauchtrommel
zu blockieren.
12 DE
Anschlusskabel um den Kabelhalter wi-
ckeln.
Stecker mit montiertem Clip befestigen.
Frostschutz
ACHTUNG
Beschädigungsgefahr! Frost zerstört das
nicht vollständig von Wasser entleerte Gerät.
Gerät an einem frostfreien Ort abstellen.
Ist das Gerät an einem Kamin angeschlossen, ist folgendes zu beachten:
ACHTUNG
Beschädigungsgefahr durch über den Kamin eindringende Kaltluft.
Gerät bei Außentemperaturen unter
0 °C vom Kamin trennen.
Ist eine frostfreie Lagerung nicht möglich,
Gerät stilllegen.
Stilllegung
Bei längeren Betriebspausen oder wenn
eine frostfreie Lagerung nicht möglich ist:
Wasser ablassen.
Gerät mit Frostschutzmittel durchspü-
len.
Wasser ablassen
Wasserzulaufschlauch und Hochdruck-
schlauch abschrauben.
Abbildung
Gerät auf den Rücken legen.
Gerät max. 1 Minute im Kaltwasserbe-
trieb laufen lassen bis Pumpe und Lei-
tungen leer sind.
Gerät mit Frostschutzmittel durchspülen
Hinweis: Handhabungsvorschriften des
Frostschutzmittelherstellers beachten.
Handelsübliches Frostschutzmittel in
Wasseranschluss einfüllen.
Gerät (ohne Brenner) einschalten, bis
Gerät komplett durchspült ist.
Dadurch wird auch ein gewisser Korrosionsschutz erreicht.
Lagerung
몇 VORSICHT
Verletzungs- und Beschädigungsgefahr! Gewicht des Gerätes bei Lagerung beachten.
– 7
Page 13

Transport
GEFAHR
Verletzungsgefahr! Kippgefahr bei zu großen Steigungen, bei zu großer seitlicher
Neigung und bei instabilem Untergrund.
– Gerät nur auf Steigungen bis maximal
2% bewegen.
– Das Gerät ausschließlich auf befestig-
tem Untergrund bewegen.
ACHTUNG
Abzugshebel während des Transports vor
Beschädigung schützen.
몇 VORSICHT
Verletzungs- und Beschädigungsgefahr!
Gewicht des Gerätes beim Transport beachten.
Gerät vor dem Transport auf den Rü-
cken legen und Restwasser auslaufen
lassen.
Zum Transport über längere Strecken
Gerät am Schubbügel hinter sich herziehen.
Gerät zum Tragen an den Griffen und
am Schubbügel fassen.
Beim Transport in Fahrzeugen Gerät
nach den jeweils gültigen Richtlinien
gegen Rutschen und Kippen sichern.
Pflege und Wartung
GEFAHR
Verletzungsgefahr durch unabsichtlich anlaufendes Gerät und elektrischen Schlag.
Vor allen Arbeiten am Gerät, Gerät ausschalten und Netzstecker ziehen.
Wasserzulauf schließen.
Handspritzpistole öffnen.
Pumpe mit Geräteschalter einschalten
und 5-10 Sekunden laufen lassen.
Handspritzpistole schließen.
Geräteschalter auf „0/OFF“ stellen.
Netzstecker nur mit trockenen Händen
aus Steckdose ziehen.
Wasseranschluss entfernen.
Handspritzpistole betätigen, bis Gerät
drucklos ist.
Handspritzpistole sichern, dazu Siche-
rungsraste nach vorne schieben.
Gerät abkühlen lassen.
Sicherheitsinspektion/
Wartungsvertrag
Mit Ihrem Händler können Sie eine regelmäßige Sicherheitsinspektion vereinbaren
oder einen Wartungsvertrag abschließen.
Bitte lassen Sie sich beraten.
Wartungsintervalle
Wöchentlich
Filter im Wasseranschluss reinigen.
Monatlich
Filter am Reinigungsmittel-Saug-
schlauch reinigen.
Alle 500 Betriebsstunden, mindestens jährlich
Wartung des Gerätes vom Kunden-
dienst durchführen lassen.
Wartungsarbeiten
Hinweis: Ölwechsel an der Hochdruck-
pumpe sind nicht notwendig.
Filter im Wasseranschluss reinigen
Filter entnehmen.
Filter in Wasser reinigen und wieder
einsetzen.
Filter am ReinigungsmittelSaugschlauch reinigen
Filter in Wasser reinigen und wieder
einsetzen.
Hilfe bei Störungen
GEFAHR
Verletzungsgefahr durch unabsichtlich anlaufendes Gerät und elektrischen Schlag.
Vor allen Arbeiten am Gerät, Gerät ausschalten und Netzstecker ziehen.
Gerät läuft nicht
– Keine Netzspannung
Netzanschluss/Zuleitung prüfen.
– Motor überlastet/überhitzt
Geräteschalter auf „0/OFF“ stellen.
Gerät abkühlen lassen.
Gerät einschalten.
Tritt die Störung danach wieder auf,
Gerät durch Kundendienst prüfen las-
sen.
– 8
13DE
Page 14

– Abgastemperaturbegrenzer hat ausge-
löst, Heizschlange verrußt.
Gerät vom Kundendienst entrußen lassen.
– Abgastemperaturbegrenzer hat ausge-
löst, Abgastemperatur zu hoch.
Geräteschalter auf „0/OFF“ stellen.
Gerät abkühlen lassen.
Nur bei Geräten mit manueller Rück-
stellung:
Abbildung
Rückstelltaste des Abgastemperatur-
begrenzers betätigen.
Gerät einschalten.
Tritt die Störung danach wieder auf, Ge-
rät durch Kundendienst prüfen lassen.
Gerät baut keinen Druck auf
– Luft im System
Pumpe entlüften:
Bei geöffneter Handspritzpistole Gerät
mit Geräteschalter mehrfach ein- und
ausschalten.
Hinweis: Durch Demontieren des Strahlrohrs von der Handspritzpistole wird der
Entlüftungsvorgang beschleunigt.
Falls externer Reinigungsmittelbehälter
leer, auffüllen/austauschen.
Anschlüsse und Leitungen prüfen.
– Filter im Wasseranschluss verschmutzt
Filter reinigen.
– Wasserzulaufmenge zu gering
Wasserzulaufmenge prüfen (siehe
Technische Daten).
– Wasserhahn geschlossen.
Wasserhahn öffnen.
Gerät schaltet bei geöffneter
Handspritzpistole laufend aus/ein
– Luft im System
Pumpe entlüften:
Bei geöffneter Handspritzpistole Gerät
mit Geräteschalter mehrfach ein- und
ausschalten.
Hinweis: Durch Demontieren des Strahlrohrs von der Handspritzpistole wird der
Entlüftungsvorgang beschleunigt.
– Hochdruckdüse verstopft
Düse reinigen.
– Heizschlange verkalkt
Gerät vom Kundendienst entkalken lassen.
14 DE
Gerät schaltet bei geschlossener
Handspritzpistole laufend ein und
aus
– Leckage im Hochdrucksystem
Hochdrucksystem und Anschlüsse auf
Dichtigkeit prüfen.
Gerät leckt, Wasser tropft unten aus
Gerät
– Pumpe undicht, Sicherheitsventil un-
dicht.
Hinweis: Zulässig sind 3 Tropfen/Minute.
Bei stärkerer Undichtigkeit Gerät durch
Kundendienst prüfen lassen.
Gerät saugt kein Reinigungsmittel
an
– Düse ist auf „Hochdruck“ eingestellt
Düse auf „CHEM“ stellen.
– Externer Reinigungsmittelbehälter ist
leer.
Externen Reinigungsmittelbehälter auf-
füllen/austauschen.
– Filter am Reinigungsmittel-Saug-
schlauch verschmutzt
Filter reinigen.
Abbildung
– Rückschlagventil verklebt
Reinigungsmittelschlauch abziehen
und Rückschlagventil mit stumpfem
Gegenstand lösen.
Brenner zündet nicht
– Brennstofftank ist leer.
Brennstoff auffüllen.
– Wassermangel
Wasseranschluss prüfen, Zuleitungen
prüfen.
– Wasserzulauftemperatur zu hoch.
Max. 30 °C warmes Wasser einspei-
sen.
Abbildung
– Brennstofffilter verschmutzt
Brennstofffilter wechseln.
– 9
Page 15

Kundendienst
CEO
Head of Approbation
Kann die Störung nicht behoben werden, muss das Gerät vom Kundendienst
überprüft werden.
Garantie
In jedem Land gelten die von unserer zuständigen Vertriebsgesellschaft herausgegebenen Garantiebedingungen. Etwaige
Störungen an Ihrem Gerät beseitigen wir
innerhalb der Garantiefrist kostenlos, sofern ein Material- oder Herstellungsfehler
die Ursache sein sollte. Im Garantiefall
wenden Sie sich bitte mit Kaufbeleg an Ihren Händler oder die nächste autorisierte
Kundendienststelle.
Zubehör und Ersatzteile
Nur Original-Zubehör und Original-Ersatzteile verwenden, sie bieten die Gewähr für
einen sicheren und störungsfreien Betrieb
des Gerätes.
Informationen über Zubehör und Ersatzteile finden Sie unter www.kaercher.com.
EU-Konformitätserklärung
Hiermit erklären wir, dass die nachfolgend
bezeichnete Maschine aufgrund ihrer Konzipierung und Bauart sowie in der von uns
in Verkehr gebrachten Ausführung den einschlägigen grundlegenden Sicherheitsund Gesundheitsanforderungen der EURichtlinien entspricht. Bei einer nicht mit
uns abgestimmten Änderung der Maschine
verliert diese Erklärung ihre Gültigkeit.
Produkt: Hochdruckreiniger
Typ: 1.064-xxx
Einschlägige EU-Richtlinien
2006/42/EG (+2009/127/EG)
2000/14/EG
2014/30/EU
Angewandte harmonisierte Normen
EN 55014–1: 2006+A1: 2009+A2: 2011
EN 55014–2: 2015
EN 60335–1
EN 60335–2–79
EN 61000–3–2: 2014
HDS 5/11, HDS 5/13:
EN 61000–3–3: 2013
HDS 5/15:
EN 61000–3–11: 2000
Angewandtes Konformitätsbewertungsverfahren
2000/14/EG: Anhang V
Schallleistungspegel dB(A)
HDS 5/11 U, HDS 5/15:
Gemessen: 91
Garantiert: 94
HDS 5/11 UX, HDS 5/13:
Gemessen: 91
Garantiert: 93
5.957-976
Die Unterzeichnenden handeln im Auftrag
und mit Vollmacht der Geschäftsführung.
Dokumentationsbevollmächtigter:
S. Reiser
Alfred Kärcher GmbH & Co. KG
Alfred-Kärcher-Str. 28 - 40
71364 Winnenden (Germany)
Tel.: +49 7195 14-0
Fax: +49 7195 14-2212
Winnenden, 2016/01/01
– 10
15DE
Page 16

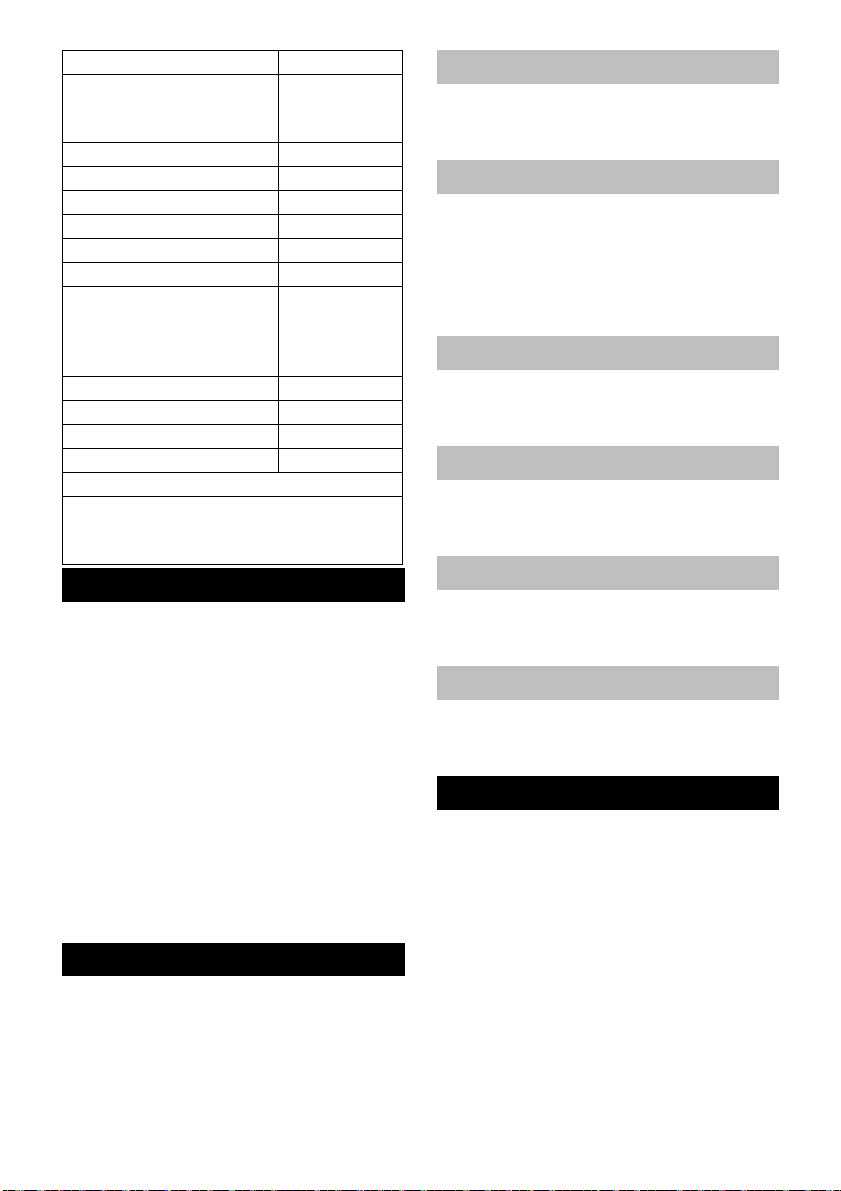
Technische Daten
HDS 5/11 HDS 5/13 HDS 5/15
Netzanschluss
Spannung V 220 230 240 220 230 240 220 230 240
Stromart Hz 1~ 50 1~ 50 1~ 50
Anschlussleistung kW 2,2 2,6 2,7
Absicherung (träge) A 16 16 13 16 16 13 16 16 13
Schutzart -- IPX5 IPX5 IPX5
Schutzklasse -- I I I
Maximal zulässige Netzimpedanz Ohm -- -- (0.380+j0.237)
Wasseranschluss
Zulauftemperatur (max.) °C 30 30 30
Zulaufmenge (min.) l/h (l/min) 500 (8,3) 550 (9,2) 500 (8,3)
Saughöhe aus offenem Behälter (20 °C) m 0,5 0,5 0,5
Zulaufdruck (max.) MPa (bar) 0,6 (6) 0,6 (6) 0,6 (6)
Zulaufschlauch-Durchmesser (min.) Zoll 1/2 1/2 1/2
Zulaufschlauch-Länge (min.) m 7,5 7,5 7,5
Leistungsdaten
Fördermenge Wasser l/h (l/min) 450 (7,5) 500 (8,3) 450 (7,5)
Arbeitsdruck Wasser (mit Standarddüse)
Max. Betriebsüberdruck (Sicherheitsventil)
Max. Arbeitstemperatur Heißwasser °C 80 80 80
Reinigungsmittelansaugung l/h (l/min) 0-33 (0-0,6) 0-33 (0-0,6) 0-33 (0-0,6)
Brennerleistung kW 26 29 26
Maximaler Heizölverbrauch kg/h 2,7 3,1 2,7
Rückstoßkraft der Handspritzpistole
(max.)
Düsengröße der Standarddüse (UX) -- 032 (033) 034 028
Ermittelte Werte gemäß EN 60335-2-79
Geräuschemission
Schalldruckpegel L
Unsicherheit K
Schallleistungspegel L
K
(UX)
WA
pA
pA
+ Unsicherheit
WA
Hand-Arm Vibrationswert
Handspritzpistole m/s
Strahlrohr m/s
Unsicherheit K m/s
Betriebsstoffe
Brennstoff -- Heizöl EL oder
Ölmenge l 0,1 0,1 0,2
Ölsorte Motorenöl
Maße und Gewichte
Länge x Breite x Höhe (UX) mm 618 x 618 x 994
Typisches Betriebsgewicht (UX) kg 70 (72) 74 (76) 76 (78)
Brennstofftank l 6,5 6,5 6,5
MPa (bar) 11,0 (110) 12,5 (125) 15,0 (150)
MPa (bar) 16,5 (165) 18,0 (180) 20,0 (200)
N 18,1 21,4 20,8
dB(A) 76 76 77
dB(A) 3 3 3
dB(A) 94 (93) 93 94
2
2
2
15W40
2,4 1,0 0,9
1,4 1,1 1,1
0,3 0,3 0,3
Heizöl EL
Diesel
Best.-Nr. 6.288-
050.0
oder Diesel
Best.-Nr.
6.288-050.0
618 x 618 x
(1163)
994 (1163)
Heizöl EL oder
Diesel
Best.-Nr. 6.288-
050.0
618 x 618 x 994
(1163)
16 DE
– 11
Page 17
Please read and comply with
these original instructions prior
to the initial operation of your appliance and
store them for later use or subsequent owners.
– Before first start-up it is definitely nec-
essary to read the operating instructions and safety indications Nr. 5.951-
949.0!
– In case of transport damage inform ven-
dor immediately.
– Check the contents of the pack before
unpacking. For scope of delivery see illustration 1.
Contents
Environmental protection . . . . EN 1
Danger or hazard levels . . . . . EN 1
Device elements . . . . . . . . . . . EN 2
Symbols on the machine. . . . . EN 2
Proper use . . . . . . . . . . . . . . . EN 2
Safety instructions. . . . . . . . . . EN 3
Safety Devices . . . . . . . . . . . . EN 3
Start up . . . . . . . . . . . . . . . . . . EN 3
Operation . . . . . . . . . . . . . . . . EN 5
Storage . . . . . . . . . . . . . . . . . . EN 7
Transport. . . . . . . . . . . . . . . . . EN 7
Care and maintenance . . . . . . EN 8
Troubleshooting . . . . . . . . . . . EN 8
Warranty . . . . . . . . . . . . . . . . . EN 9
Accessories and Spare Parts . EN 9
EU Declaration of Conformity . EN 10
Technical specifications . . . . . EN 11
Environmental protection
The packaging material can be
recycled. Please do not throw
the packaging material into
household waste; please send it
for recycling.
Old appliances contain valuable
materials that can be recycled;
these should be sent for recycling. Batteries, oil, and similar
substances must not enter the
environment. Please dispose of
your old appliances using appropriate collection systems.
Please do not release engine oil, fuel oil,
diesel and petrol into the environment Protect the ground and dispose of used oil in
an environmentally-clean manner.
Notes about the ingredients (REACH)
You will find current information about the
ingredients at:
www.kaercher.com/REACH
Danger or hazard levels
DANGER
Pointer to immediate danger, which leads
to severe injuries or death.
몇 WARNING
Pointer to a possibly dangerous situation,
which can lead to severe injuries or death.
몇 CAUTION
Pointer to a possibly dangerous situation,
which can lead to minor injuries.
ATTENTION
Pointer to a possibly dangerous situation,
which can lead to property damage.
– 1
17EN
Page 18
Device elements
Illustration
1 High pressure hose EASY!Lock
2 Cable clamp
3 Pouring vent for fuel
4 Filling level display
5 Storage compartment for nozzles
6 Power supply
7 High-pressure pump
8 Water supply set
9 High pressure connection EASY!Lock
(HDS 5/xx U only)
10 Storage for spray pipe
11 Water connection with filter
12 Support
13 Output opening of the high pressure
hose (HDS 5/xx U only)
14 Carrying handle
15 Cover
16 Power switch
17 Burner
18 Hose storage (HDS 5/xx U only)
19 Hose drum (HDS 5/xx UX only)
20 Detergent suction hose with filter
21 Support for spray lance
22 Nameplate
23 Cover lock
24 Hand crank for hose drum (HDS 5/xx
UX only)
25 Push handle
26 Marking of the nozzle
27 Triple nozzle EASY!Lock
28 Spray lance EASY!Lock
29 Trigger gun EASY!Lock
30 Safety latch of the hand spray gun
31 Safety lever
32 Triggering lever
Colour coding
– The operating elements for the cleaning
process are yellow.
– The controls for the maintenance and
service are light gray.
Symbols on the machine
High-pressure jets can be dangerous if improperly used. The
jet may not be directed at persons, animals, live electrical
equipment or at the appliance
itself. The high pressure cleaner must only
be used while standing.
Device with hose drum:
Risk of burns on account of hot
surfaces!
Proper use
– Cleaning of: Machines, Vehicles, Struc-
tures, Tools, Facades, Terraces, Gardening tools, etc.
– The high pressure cleaner must only be
used while standing.
– Never leave the appliance unattended
as long as it is in operation.
DANGER
Risk of injury! Follow the respective safety
regulations when operating at gas stations
or other dangerous areas.
Please do not let mineral oil contaminated
waste water reach soil, water or the sewage system. Perform engine cleaning and
bottom cleaning therefore only on specified places with an oil trap.
Quality requirements for water:
ATTENTION
Only clean water may be used as high
pressure medium. Impurities will lead to increased wear and tear or formation of deposits in the appliance and accessories.
If recycled water is used, the following limit
values must not be exceeded.
pH value 6,5...9,5
electrical conductivity * Conductivity
fresh water
+1200 µS/cm
settleable solids ** < 0,5 mg/l
total suspended solids *** < 50 mg/l
18 EN
– 2
Page 19

Hydrocarbons < 20 mg/l
Chloride < 300 mg/l
Sulphate < 240 mg/l
Calcium < 200 mg/l
Total hardness < 28 °dH
< 50 °TH
< 500 ppm (mg
/l)
CaCO
3
Iron < 0,5 mg/l
Manganese < 0,05 mg/l
Copper < 2 mg/l
Active chloride < 0,3 mg/l
free of bad odours
* Maximum total 2000 µS/cm
** Test volume 1 l, settling time 30 min
*** no abrasive substances
Safety instructions
– Please follow the national rules and
regulations for fluid spray jets of the respective country.
– Please follow the national rules and
regulations for accident prevention of
the respective country. Fluid spray jets
must be tested regularly and the results
of these tests must be documented in
writing.
– The heating appliance of the machine is
an ignition plant. All national laws and
regulations about heating systems must
also be followed.
– The appliance/accessories must not be
modified.
Safety Devices
Safety devices serve for the protection of
the user and must not be put out of operation or bypassed with respect to their function.
Pressure switch
The pressure switch turns the device off
when the handgun is closed and switch on
when the handgun is opened.
Safety valve
– The safety valve opens in case of ex-
cessive pressure in the boiler or if the
overflow valve or the pressure switch is
broken.
– The safety valve is set by the manufac-
turer and sealed. Setting only by customer service.
Water shortage safeguard
The water shortage safeguard prevents the
burner to be turned on when there is water
shortage.
Temperature stop for exhaust gases
The temperature stop switches off the machine when the waste gases have reached
very high temperatures.
Winding protection contact
The winding protection contact in the motor
winding of the pump drive switches off the
engine when there is a thermal overload.
Safety catch
The safety catch on the trigger gun prevents the appliance from being switched on
unintentionally.
Start up
몇 WARNING
Risk of injury! Appliance, accessories, supply lines and connections must be in faultfree condition. If they are not in a perfect
state then the appliance must not be used.
Install the hand-spray gun, the jet
pipe, the nozzle and the high
pressure hose
Note: The EASY!Lock system joins com-
ponents with a quick-fasten thread solidly
and securely with just one turn.
Join the spray lance with the trigger gun
and tighten until hand-tight
(EASY!Lock).
Mount the nozzle on the spray lance
(marking on the adjustment ring at the
top) and hand-tighten it (EASY!Lock).
– 3
19EN
Page 20

Appliance without hose drum:
Join the high-pressure hose with trigger
gun and high-pressure connection of
the appliance and tighten until handtight (EASY!Lock).
Device with hose drum:
Join the high pressure hose with trigger
gun and tighten until hand-tight
(EASY!Lock).
Refill fuel
DANGER
Danger of explosion! Only refill diesel oil or
light fuel oil. The operation with bio diesel
as per EN 14214 (starting at an outside
temperature of 6 °C) is possible. Inappropriate fuels, e.g. petrol, must not be used.
ATTENTION
Risk of damage! Never operate device with
an empty fuel tank. The fuel pump will otherwise be destroyed. This also applies to
cold water operation.
Open fuel filler cap.
Refill fuel.
Close tank lock.
Wipe off spilled fuel.
Fill/replace detergent container
DANGER
Risk of injury!
– Use Kärcher products only.
– Under no circumstances vacuum sol-
vents (petrol, aceton, diluting agent etc.).
– Avoid eye and skin contact.
– Observe safety and handling instruc-
tions by the detergent manufacturer.
Kärcher offers an individual cleaning
and care appliances program.
Your dealer will consult you gladly.
Fill/replace external detergent container.
Water connection
몇 WARNING
Observe regulations of water supplier.
According to applicable regulations, the appliance must never be
used on the drinking water net
without a system separator. Ensure that the connection of your building
water installation on which the high-pressure cleaner is operated is equipped with a
system separator pursuant to EN 12729
Type BA.
Water that was flowing through a system
separator is considered non-drinkable.
몇 CAUTION
Always connect the system separator to
the water supply, never directly to the appliance!
For connection values refer to technical
specifications
Attach supply hose (minimum length
7.5 m, minimum diameter 1/2“) to the
water supply set by means of a hose
clamp.
Connect the supply hose to the water
connection point of the machine and at
the water supply point (for e.g. a tap).
Note: The supply hose and the hose clamp
are not included in the scope of delivery.
Suck in water from vessel
Connect suction hose (minimum diame-
ter 1/2“) with filter (accessory) to the
water connection point.
– Max. suck height: 0.5 m
DANGER
Risk of personal injury or damage! Never
suck in water from a drinking water container. Never suck in liquids which contain solvents like lacquer thinner, petrol, oil or unfiltered water. The sealings within the device
are not solvent resistant. The spray mist of
solvents is highly inflammable, explosive
and poisonous.
Power connection
– For connection values, see technical
data and type plate.
– The electrical connections must be
done by an electrician according to IEC
60364-1.
Set the appliance switch to "0/OFF“.
Plug in the mains plug.
20 EN
– 4
Page 21

DANGER
Risk of injury on account of electric shock!
– Unsuitable electrical extension cables
can be hazardous. Only use electrical
extension cables outdoors which have
been approved and labelled for this pur-
pose and have an adequate cable
cross-section.
– Always unwind extension lines com-
pletely.
– The plug and coupling of the extension
cable used must be watertight.
ATTENTION
The highest allowed net impedance at the
electrical connection point (refer to technical data) is not to be exceeded. In case of
confusion regarding the power impedance
present on your connection, please contact
your utilities provider.
Operation
DANGER
Danger of explosion! Do not spray flammable liquids.
DANGER
Risk of injury! Never use the appliance
without the spray lance attached. Check
and ensure proper fitting of the spray lance
prior to each use. The screw connection of
the spray lance must be finger-tight.
DANGER
Risk of injury! Hold the hand spray gun and
the spray pipe firmly with both hands.
DANGER
Risk of injury! The trigger and safety lever
may not be locked during the operation.
DANGER
Risk of injury! Contact Customer Service if
the safety lever is damaged.
ATTENTION
– Risk of damage! Never operate device
with an empty fuel tank. The fuel pump
will otherwise be destroyed. This also
applies to cold water operation.
– Risk of damage! Never operate the ap-
pliance without a filter in the water con-
nection.
– Risk of damage! Do not place any objects
(hose, etc.) on or over the chimney.
– Device with hose drum:
Risk of damage. Always unwind highpressure hose completely.
Open/close the hood
Illustration
Unlock the hood lock using a screwdriv-
er, pivot the appliance hood forward
and unhook it.
Illustration
Hook in the appliance hood (see arrows),
pivot it up and lock in the hood lock.
Opening/closing the trigger gun
To open the trigger gun: Actuate the
safety lever and trigger.
To close the hand spray gun: Release
the safety lever and trigger.
Replace the nozzle
DANGER
Risk of injury! Switch the appliance off prior
to replacing nozzle and activate hand spray
gun until device is pressureless.
Secure the trigger gun. To do so, push
the safety catch towards the front.
Replacing the nozzle.
Operating modes
Illustration
0/OFF = Off
1 Operating with cold water
2 Operating with hot water
Turning on the Appliance
Set appliance switch to desired operat-
ing mode.
The device starts briefly and turns off, as
soon as the working pressure is reached.
Release the trigger gun. To do so, push
the safety catch towards the back.
When activating the hand spray gun the device switches back on.
Note: If no water comes out of the high
pressure nozzle, vent pump.
Vent pump:
With open hand spray gun turn device
on and off multiple times with the device
switch.
– 5
21EN
Page 22
Note: By dismantling the spray lance from
the hand spray gun, the venting process is
accelerated.
Interrupting operation
Release the pulling lever; the device will
switch off.
Secure the trigger gun. To do so, push
the safety catch towards the front.
Release the trigger gun. To do so, push
the safety catch towards the back.
Release the pulling lever again; the device will switch on again.
Select spray type
Close the hand spray gun.
Secure the trigger gun. To do so, push
the safety catch towards the front.
Turn the casing of the nozzle till the de-
sired symbol matches the marking.
High pressure circular spray
(0°) for specially stubborn dirt
Flat low pressure spray
(CHEM) for operating using detergents or cleaning at low
pressure.
High pressure flat spray (25°)
for large dirt areas
Operation with detergent
– For considerate treatment of the envi-
ronment use detergent economically.
– The detergent must be suitable for the
surface to be cleaned.
Illustration
Take out detergent suck hose.
Turn filter on the detergent suction hose
in order to dispense the detergent.
Suspend end of suction hose in a con-
tainer filled with detergent.
Set nozzle to "CHEM".
Cleaning
Set the detergent concentration accord-
ing to the surface to be cleaned.
Note: To prevent damage due to too much
pressure, always position high pressure ray
first from a greater distance towards object
to be cleaned.
Recommended cleaning method
– Loosen the dirt:
Spray detergent economically and let it
work for 1...5 minutes but do not let it
dry up.
– Remove the dirt:
Spray off loosened dirt with the high
pressure jet.
Operating with cold water
Removal of light contaminations and clear
rinse, i.e.: Gardening tools, terrace, tools, etc.
Set the appliance switch to "1".
Operating with hot water
DANGER
Scalding danger!
Set the appliance switch to "2".
After operation with detergent
Completely close the filter at the deter-
gent suction hose (-).
Set the appliance switch to "1".
Open the hand spray gun and rinse the
appliance for at least 1 minute.
Turn off the appliance
DANGER
Danger of scalding from hot water! After operation with hot water, the device must be
operated with openend handgun with cold
water for at least two minutes.
Shut off water supply.
Open the hand spray gun.
Switch on the pump with the power
switch and allow to run for about 5-10
seconds.
Close the hand spray gun.
Set the appliance switch to "0/OFF“.
22 EN
– 6
Page 23

Pull main plug out of socket with dry
hands only.
Remove water connection.
Activate hand spray gun until device is
pressure less.
Secure the trigger gun. To do so, push
the safety catch towards the front.
Storing the Appliance
Insert the hand-spray gun in the holder.
Appliance without hose drum:
Wind up the high-pressure hose and
hang it over the hose storage.
Device with hose drum:
Wind up the high-pressure hose on the
hose drum. Push in the handle of the
crank to block the hose drum.
Wind the connection cable around the
cable holder.
Fasten the plug with the mounted clip.
Frost protection
ATTENTION
Risk of damage! Frost will destroy the appliance if the water has not been completely
drained.
Store in a frost free area.
If the device is connected to a chimney, the
following must be observed:
ATTENTION
Threat of damage by penetrating cold air
through the chimney.
Disconnect device from chimney when
outside temperature drops below 0 °C.
If it is not possible to store frost free, shut
down device.
Shutdown
For longer work breaks or if a frost free storage is not possible:
Drain water.
Flush device with anti-freeze agent.
Dump water
Screw off water supply hose and high
pressure hose.
Illustration
Lay the appliance on its rear.
Operate the appliance for a max. of 1
minute with cold water until the pump
and conduits are empty.
Flush device with anti-freeze agent
Note: Observe handling instructions of the
anti-freeze agent manufacturer.
Fill commercial grade anti-freeze into
the water connection.
Switch on appliance (without heater) till
the appliance has been completely
rinsed.
A certain corrosion protection is achieved
with this as well.
Storage
몇 CAUTION
Risk of personal injury or damage! Consider
the weight of the appliance when storing it.
Transport
DANGER
Risk of injury! Risk of tipping with high inclines, if the inclination is too large to the
side and with unstable surfaces.
– The appliance should only be used on
gradients of max. 2%.
– Only use the machine on sound surfaces.
ATTENTION
Protect the trigger from damage during
transport.
몇 CAUTION
Risk of personal injury or damage! Mind the
weight of the appliance during transport.
Lay the appliance on its rear prior to
transporting it and drain the residual
water.
Pull the device behind you at the carry-
ing handle for transporting it over longer
distances
To carry, hold the appliance by the han-
dles and the pushing handle.
When transporting in vehicles, secure
the appliance according to the guide-
lines from slipping and tipping over.
– 7
23EN
Page 24

Care and maintenance
DANGER
Risk of injury by inadvertent start-up of appliance and electric shock. Prior to all work
on the appliance, switch off the appliance
and pull the power plug.
Shut off water supply.
Open the hand spray gun.
Switch on the pump with the power
switch and allow to run for about 5-10
seconds.
Close the hand spray gun.
Set the appliance switch to "0/OFF“.
Pull main plug out of socket with dry
hands only.
Remove water connection.
Activate hand spray gun until device is
pressure less.
Secure the trigger gun. To do so, push
the safety catch towards the front.
Allow device to cool down.
Safety inspection/ maintenance
contract
You can sign with your dealer a contract for
regular safety inspection or even sign a
maintenance contract. Please take advice
on this matter.
Maintenance intervals
Weekly
Clean filter in the water connection.
Monthly
Clean filter at the detergent suck hose.
Every 500 operating hours, at least annually
Have the maintenance of the device
performed by the customer service.
Maintenance Works
Note: It is not necessary to perform an oil
change on the high-pressure pump.
Clean filter in the water connection.
Remove the filter.
Clean filter in water and reinstall.
Clean filter at the detergent suck hose
Clean filter in water and reinstall.
Troubleshooting
DANGER
Risk of injury by inadvertent start-up of appliance and electric shock. Prior to all work
on the appliance, switch off the appliance
and pull the power plug.
Appliance is not running
– No power
Check power connection/conduit.
– Engine overload/overheat
Set the appliance switch to "0/OFF“.
Allow device to cool down.
Turn on the appliance.
If malfunction still occurs, have device
checked by customer service.
– The exhaust temperature limiter has
been triggered, heating coil is sooted.
Have device de-sooted by customer
service.
– The exhaust temperature limiter has
been triggered, exhaust temperature
too high.
Set the appliance switch to "0/OFF“.
Allow device to cool down.
Only in devices with manual reset:
Illustration
Press reset button of the exhaust tem-
perature limiter.
Turn on the appliance.
If malfunction still occurs, have device
checked by customer service.
Device is not building up pressure
– Air within the system
Vent pump:
With open hand spray gun turn device
on and off multiple times with the device
switch.
Note: By dismantling the spray lance from
the hand spray gun, the venting process is
accelerated.
Fill/replace external detergent contain-
er if empty.
Check connections and conduits.
24 EN
– 8
Page 25

– Filter in the water connection is dirty
Clean filter.
– Amount of water supply is too low.
Check water supply level (refer to tech-
nical data).
– Water tap is closed.
Open tap.
Device continuously turns on and
off while hand spray gun is open
– Air within the system
Vent pump:
With open hand spray gun turn device
on and off multiple times with the device
switch.
Note: By dismantling the spray lance from
the hand spray gun, the venting process is
accelerated.
– High-pressure nozzle clogged
Clean the nozzle.
– Heating coil has heavy calcium deposits
Have the device decalcified by custom-
er service.
Device turns on and off while hand
spray gun is closed
– Leak in the high pressure system
Check high pressure system and con-
nections for tightness.
Device leaks, water drips from the
bottom of the device
– Pump leaks, safety valve not tight.
Note: 3 drops/minute are allowed.
With stronger leak, have device
checked by customer service.
Device is not sucking in detergent
– Nozzle is set to "High pressure"
Set nozzle to "CHEM".
– External detergent container is empty.
Fill/replace external detergent container.
– Filter at the detergent suction hose dirty
Clean filter.
Illustration
– Backflow valve stuck
Remove the detergent hose and loosen
the backflow valve using a blunt object.
Burner does not start
– Fuel tank empty.
Refill fuel.
– Water shortage
Check water supply, check connections.
– Water flow temperature too hot.
Fill in water with a max. temperature of
30°C.
Illustration
– Fuel filter dirty
Change fuel filter.
Customer Service
If malfunction can not be fixed, the device must be checked by customer service.
Warranty
The warranty terms published by the relevant sales company are applicable in each
country. We will repair potential failures of
your appliance within the warranty period
free of charge, provided that such failure is
caused by faulty material or defects in manufacturing. In the event of a warranty claim
please contact your dealer or the nearest
authorized Customer Service centre.
Please submit the proof of purchase.
Accessories and Spare Parts
Only use original accessories and spare
parts, they ensure the safe and trouble-free
operation of the device.
For information about accessories and
spare parts, please visit www.kaercher.com.
– 9
25EN
Page 26

EU Declaration of Conformity
CEO
Head of Approbation
We hereby declare that the machine described below complies with the relevant
basic safety and health requirements of the
EU Directives, both in its basic design and
construction as well as in the version put
into circulation by us. This declaration shall
cease to be valid if the machine is modified
without our prior approval.
Product: High pressure cleaner
Type: 1.064-xxx
Relevant EU Directives
2006/42/EC (+2009/127/EC)
2000/14/EC
2014/30/EU
Applied harmonized standards
EN 55014–1: 2006+A1: 2009+A2: 2011
EN 55014–2: 2015
EN 60335–1
EN 60335–2–79
EN 61000–3–2: 2014
HDS 5/11, HDS 5/13:
EN 61000–3–3: 2013
HDS 5/15:
EN 61000–3–11: 2000
Applied conformity evaluation method
2000/14/EC: Appendix V
Sound power level dB(A)
HDS 5/11 U, HDS 5/15:
Measured: 91
Guaranteed: 94
HDS 5/11 UX, HDS 5/13:
Measured: 91
Guaranteed: 93
Alfred Kärcher GmbH Co. KG
Alfred-Kärcher-Str. 28 - 40
71364 Winnenden (Germany)
Phone: +49 7195 14-0
Fax: +49 7195 14-2212
Winnenden, 2016/01/01
5.957-976
The undersigned act on behalf and under
the power of attorney of the company management.
Authorised Documentation Representative
S. Reiser
26 EN
– 10
Page 27

Technical specifications
HDS 5/11 HDS 5/13 HDS 5/15
Main Supply
Voltage V 220 230 240 220 230 240 220 230 240
Current type Hz 1~ 50 1~ 50 1~ 50
Connected load kW 2.2 2.6 2.7
Protection (slow) A 16 16 13 16 16 13 16 16 13
Type of protection -- IPX5 IPX5 IPX5
Protective class -- I I I
Maximum allowed net impedance Ohm -- -- (0.380+j0.237)
Water connection
Max. feed temperature °C 30 30 30
Min. feed volume l/h (l/min) 500 (8.3) 550 (9.2) 500 (8.3)
Suck height from open container (20 °C) m 0.5 0.5 0.5
Max. feed pressure MPa (bar) 0.6 (6) 0.6 (6) 0.6 (6)
Inlet hose diameter (min.) Inch 1/2 1/2 1/2
Inlet hose length (min.) m 7.5 7.5 7.5
Performance data
Water flow rate l/h (l/min) 450 (7.5) 500 (8.3) 450 (7.5)
Operating pressure of water (using
standard nozzle)
Max. excess operating pressure (safety
valve)
Max. operating temperature of hot water °C 80 80 80
Detergent suck in l/h (l/min) 0-33 (0-0.6) 0-33 (0-0.6) 0-33 (0-0.6)
Burner performance kW 26 29 26
Maximum consumption of heating oil kg/h 2.7 3.1 2.7
Max. recoil force of trigger gun N 18.1 21.4 20.8
Size of standard nozzle (UX) -- 032 (033) 034 028
Values determined as per EN 60335-2-79
Noise emission
Sound pressure level L
Uncertainty K
pA
Sound pressure level L
K
(UX)
WA
pA
+ Uncertainty
WA
Hand-arm vibration value
Hand spray gun m/s
Spray lance m/s
Uncertainty K m/s
Fuel
Fuel -- Fuel oil EL or
Amount of oil l 0.1 0.1 0.2
Oil grade Engine oil
Dimensions and weights
Length x width x height (UX) mm 618 x 618 x 994
Typical operating weight (UX) kg 70 (72) 74 (76) 76 (78)
Fuel tank l 6.5 6.5 6.5
MPa (bar) 11.0 (110) 12.5 (125) 15.0 (150)
MPa (bar) 16.5 (165) 18.0 (180) 20.0 (200)
dB(A) 76 76 77
dB(A) 3 3 3
dB(A) 94 (93) 93 94
2
2
2
15W40
2.4 1.0 0.9
1.4 1.1 1.1
0.3 0.3 0.3
Fuel oil EL or
Diesel
Order no.
6.288-050.0
Diesel
Order no.
6.288-050.0
618 x 618 x
(1163)
994 (1163)
Fuel oil EL or
Diesel
Order no.
6.288-050.0
618 x 618 x 994
(1163)
– 11
27EN
Page 28

Lire ce manuel d'utilisation origi-
nal avant la première utilisation
de votre appareil, le respecter et le conserver pour une utilisation ultérieure ou pour le
futur propriétaire.
– Avant la première mise en service, vous
devez impérativement avoir lu les
consignes de sécurité N° 5.951-949.0 !
– Contactez immédiatement le revendeur
en cas d'avarie de transport.
– Vérifier le contenu de l'emballage à l'ou-
verture. Étendue de livraison cf. figure 1.
Table des matières
Protection de l’environnement FR 1
Niveaux de danger . . . . . . . . . FR 1
Éléments de l'appareil. . . . . . . FR 2
Symboles sur l'appareil. . . . . . FR 2
Utilisation conforme . . . . . . . . FR 2
Consignes de sécurité . . . . . . FR 3
Dispositifs de sécurité. . . . . . . FR 3
Mise en service. . . . . . . . . . . . FR 4
Utilisation . . . . . . . . . . . . . . . . FR 5
Entreposage . . . . . . . . . . . . . . FR 8
Transport. . . . . . . . . . . . . . . . . FR 8
Entretien et maintenance . . . . FR 8
Assistance en cas de panne . . FR 9
Garantie . . . . . . . . . . . . . . . . . FR 10
Accessoires et pièces de re-
change . . . . . . . . . . . . . . . . . . FR 10
Déclaration UE de conformité . FR 11
Caractéristiques techniques . . FR 12
Protection de
l’environnement
Les matériaux constitutifs de
l’emballage sont recyclables. Ne
pas jeter les emballages dans
les ordures ménagères, mais les
remettre à un système de recyclage.
Les appareils usés contiennent
des matériaux précieux recyclables lesquels doivent être apportés à un système de recyclage. Il est interdit de jeter les
batteries, l'huile et les substances similaires dans l'environnement. Pour cette raison, utiliser des systèmes de collecte
adéquats afin d'éliminer les appareils hors d'usage.
Ne jetez pas l'huile moteur, le fuel, le diesel
ou l'essence dans la nature. Protéger le sol
et évacuer l'huile usée de façon favorable
à l'environnement.
Instructions relatives aux ingrédients
(REACH)
Les informations actuelles relatives aux ingrédients se trouvent sous :
www.kaercher.com/REACH
Niveaux de danger
DANGER
Signale la présence d'un danger imminent
entraînant de graves blessures corporelles
et pouvant avoir une issue mortelle.
몇 AVERTISSEMENT
Signale la présence d'une situation éventuellement dangereuse pouvant entraîner
de graves blessures corporelles et même
avoir une issue mortelle.
몇 PRÉCAUTION
Remarque relative à une situation potentiellement dangereuse pouvant entraîner
des blessures légères.
ATTENTION
Remarque relative à une situation éventuellement dangereuse pouvant entraîner
des dommages matériels.
28 FR
– 1
Page 29
Éléments de l'appareil
Illustration
1 Flexible haute pression EASY!Lock
2 Attache-câble
3 Orifice de remplissage pour combus-
tible
4 Affichage de l'état de remplissage
5 Récepteur de buse
6 Alimentation électrique
7 Pompe haute pression
8 Kit de raccord d'alimentation en eau
9 Raccord haute pression EASY!Lock
(seulement HDS 5/xx U)
10 Reposoir de tube d'acier
11 Raccordement d'eau avec filtre
12 Support
13 Orifice de sortie du flexible haute pres-
sion (seulement HDS 5/xx UX)
14 Poignée de transport
15 Capot
16 Interrupteur principal
17 Brûleur
18 Support de flexible (seulement HDS 5/xx U)
19 Enrouleur de flexible (seulement HDS 5/xx
UX)
20 Flexible d'aspiration du détergent avec
filtre
21 Dispositif de fixation de la lance
22 Plaque signalétique
23 Fermeture du capot
24 Manivelle pour enrouleur de flexible
(seulement HDS 5/xx UX)
25 Guidon de poussée
26 Marquage de la buse
27 Buse triple EASY!Lock
28 Tube d’acier EASY!Lock
29 Pistolet de pulvérisation à main EA-
SY!Lock
30 Cran de sécurité de la poignée-pistolet
31 Manette de sécurité
32 Levier de départ
Repérage de couleur
– Les éléments de commande pour le
processus de nettoyage sont jaunes.
– Les éléments de commande pour la
maintenance et l'entretien sont en gris
clair.
Symboles sur l'appareil
Une utilisation incorrecte des
jets haute pression peut présenter des dangers. Le jet ne
doit pas être dirigé sur des per-
sonnes, animaux, installations
électriques actives ni sur l'appareil luimême. Le nettoyeur à haute pression ne
doit être exploité que debout, à la verticale.
Appareil doté d'un dévidoir :
Risque de brûlure provoqué par
les pièces chaudes de l'installation!
Utilisation conforme
– Nettoyage de : machines, véhicules,
bâtiments, outils, façades, terrasses,
appareils de jardinage, etc.
– Le nettoyeur à haute pression ne doit
être exploité que debout, à la verticale.
– Ne jamais laisser l’appareil sans sur-
veillance lorsqu’il est en marche.
DANGER
Risque de blessure ! En cas d'utilisation
dans l'enceinte d'une station service ou
dans d'autres zones à risque, respecter les
consignes de sécurité correspondantes.
Ne pas évacuer les eaux usées contenant
de l'huile minérale dans la terre, les dispositifs pour eaux usées ou les canalisations.
Dès lors, effectuer le nettoyage du moteur
ou du bas de caisse uniquement aux
postes de lavage appropriés et équipés
d'un séparateur d'huile.
Exigences à la qualité d'eau :
ATTENTION
Utiliser uniquement de l'eau propre comme
fluide haute pression. Les salissures entraînent l'usure prématurée ou des dépôts
dans l'appareil et les accessoires.
Si de l'eau de recyclage est utilisée, les valeurs limites suivantes ne doivent pas être
dépassées.
– 2
29FR
Page 30
Valeur de pH 6,5...9,5
conductivité électrique * Conductivité
de l'eau du robinet +1200
µS/cm
substances qui se déposent **
substances qui peuvent
être filtrées ***
Hydrocarbures < 20 mg/l
Chlorure < 300 mg/l
Sulfate < 240 mg/l
calcium < 200 mg/l
Dureté globale < 28 °dH
Fer < 0,5 mg/l
Manganèse < 0,05 mg/l
Cuivre < 2 mg/l
Chlore actif < 0,3 mg/l
exempt de mauvaises odeurs
* Total maximal 2000 µS/cm
** Volume d'essai 1 l, temps de dépose 30
min
*** pas de substance abrasive
< 0,5 mg/l
< 50 mg/l
< 50 °TH
< 500 ppm (mg
/l)
CaCO
3
Consignes de sécurité
– Respecter les dispositions légales na-
tionales respectives pour les jets de liquide.
– Respecter les dispositions légales na-
tionales respectives pour la prévention
des accidents. Les jets de liquides
doivent être contrôlés régulièrement et
le résultat du contrôle consigné par
écrit.
– Le dispositif de chauffage de l'appareil
est une installation de combustion. Les
installations d'allumage doivent être
contrôlées régulièrement en concordance avec les dispositions légales nationales respectives.
– Il est interdit d'effectuer des modifica-
tion sur l'appareil/les accessoires.
Dispositifs de sécurité
Les dispositifs de sécurité ont pour but de
protéger l'utilisateur. Par conséquent, ils ne
doivent en aucun cas être désactivés ou
transformés.
Pressostat
Lorsque le pistolet est fermé, le pressostat
désactive l'appareil. Il le réactive lorsque le
pistolet est de nouveau ouvert.
Soupape de sûreté
– La soupape de sûreté s'ouvre en cas de
surpression du caisson ou lorsque le
clapet de décharge ou le pressostat est
défectueux.
– La soupape de sûreté est réglée et
plombée d'usine. Seul le service aprèsvente est autorisé à effectuer le réglage.
Dispositif de sécurité en cas de
manque d'eau
Le dispositif de sécurité en cas de manque
d'eau permet d'éviter que le brûleur se
mette en marche lorsque la quantité d'eau
est insuffisante.
Limiteur de la température de tuyère
Le limiteur de la température de tuyère arrête l'appareil en attendant une température très haute de tuyère.
Disjoncteur de protection moteur
Le contact de protection d'enroulement
dans l'enroulement de moteur de l'actionnement de pompe arrête le moteur en cas
de surcharge thermique.
Cran de sécurité
Le cran de sécurité de la poignée-pistolet
empêche toute mise en marche inopinée
de l'appareil.
30 FR
– 3
Page 31

Mise en service
몇 AVERTISSEMENT
Risque de blessure ! L'appareil, les accessoires, les conduites et les raccords doivent
être dans un parfait état. Ne pas utiliser l'appareil si son état n'est pas irréprochable.
Monter pistolet pulvérisateur à
main, lance, buse et flexible haute
pression
Remarque : Le système EASY!Lock relie
les composants au moyen d’un filetage rapide et fiable avec une seule rotation.
Relier le tube d’acier au pistolet à main
et serrer à la main (EASY!Lock).
Monter la buse sur la lance (marquage
sur la bague de butée en haut) et serrer
à la main (EASY!Lock).
Appareil sans dévidoir :
Relier le flexible haute pression au pistolet à main et au flexible haute pression de l’appareil et serrer à la main
(EASY!Lock).
Appareil doté d'un dévidoir :
Relier le flexible haute pression au pistolet à main et serrer à la main (EASY!Lock).
Remplissage du combustible
DANGER
Risque d'explosion ! N'utiliser que du gazole ou du fuel léger. L'exploitation avec du
gazole vert selon EN 14214 (à partir d'une
température extérieure de 6 °C) est possible. Il est interdit d'utiliser des combustibles non appropriés, tels que l'essence.
ATTENTION
Risque d'endommagement ! Ne jamais utiliser l'appareil lorsque le réservoir à combustible est vide. sous peine d'endommager la pompe à combustible. Ceci est également valable pour l'exploitation avec de
l'eau froide.
Ouvrir le réservoir de carburant.
Remplissage du combustible.
Fermer le couvercle du réservoir.
Essuyer le combustible ayant éventuel-
lement débordé.
Remplir/remplacer le réservoir de
détergent
DANGER
Risque de blessure !
– Utiliser uniquement les produits Kärcher.
– N'aspirer en aucun cas des solvants
(essence, acétone, diluant, etc.).
– Eviter tout contact avec les yeux ou la
peau.
– Respecter les consignes de sécurité et
d'utilisation fournies par le fabricant du
détergent.
Kärcher propose un assortiment individualisé de produits d'entretien et de nettoyage.
Votre revendeur se fera un plaisir de vous
conseiller.
Remplir/remplacer le réservoir de dé-
tergent externe.
Arrivée d'eau
몇 AVERTISSEMENT
Respecter les prescriptions de votre société distributrice en eau.
Conformément à la réglementation en vigueur, l'appareil ne doit
pas être exploité sans système de
séparation sur le réseau d'eau potable. S'assurer que le raccord d'eau auquel le nettoyeur haute pression est relié
pour son exploitation est équipé d'un système de séparation conforme à la norme
EN 12729 type BA.
L'eau qui s'est écoulée à travers un séparateur système est classifiée comme non potable.
몇 PRÉCAUTION
Toujours connecter le séparateur de système à l'alimentation en eau, et jamais directement à l'appareil.
Pour les valeurs de raccordement, se reporter à la section Caractéristiques techniques.
Fixer le flexible d'alimentation (longueur
minimale 7,5 m, diamètre minimal 1/2“)
avec collier de flexible au niveau du kit
de raccord d'alimentation en eau.
– 4
31FR
Page 32

Raccorder la conduite d'alimentation au
raccord pour l'arrivée d'eau de l'appareil
et à l'alimentation en eau (ex. un robinet).
Remarque : Le flexible d'alimentation et le
collier de flexible ne sont pas contenus
dans l'étendue de livraison.
Aspirer l'eau encore présente dans
les réservoirs
Raccorder le tuyau d'aspiration (dia-
mètre min. de 1/2") et le filtre (accessoire) à l'arrivée d'eau.
– Hauteur d'aspiration max. : 0,5 m
DANGER
Risque de blessure et d'endommagement !
Ne jamais aspirer de l'eau depuis un réservoir d'eau potable. Ne jamais aspirer de liquides contenant des solvants, tels que diluant pour peinture, essence, huile, ou eau
non filtrée. Les joints de l'appareil ne sont
pas résistants aux solvants. Le brouillard
de pulvérisation des solvants est extrêmement inflammable, explosif et toxique.
Raccordement électrique
– Pour les données de raccordement, se
référer à la section Caractéristiques
techniques et à la plaque signalétique.
– Le raccordement électrique doit être ef-
fectué par un électricien et doit correspondre à la CEI 60364-1.
Positionner l'interrupteur sur '0/OFF'.
Brancher la fiche secteur.
DANGER
Risque d'électrocution par choque électrique!
– Des rallonges électriques non adaptées
peuvent présenter des risques. Utiliser
à l’air libre uniquement des câbles de
rallonge électriques autorisés et marqués de façon adéquate avec une section suffisante du conducteur.
– Toujours dérouler complètement les
conduites de rallonge.
– Les fiches mâles et les raccords des
câbles de rallonge utilisés doivent être
étanches à l’eau.
ATTENTION
L'impédance de réseau maximale admissible au niveau du point de raccordement ne
doit en aucun cas être dépassée (voir Caractéristiques techniques). En cas de doute
concernant l'impédance de réseau présente
sur votre point de raccordement, veuillez
vous adresser à l'entreprise responsable de
votre alimentation énergétique.
Utilisation
DANGER
Risque d'explosion ! Ne pas pulvériser de
liquides inflammables.
DANGER
Risque de blessure ! Ne jamais utiliser l'appareil si la lance n'est pas montée. Contrôler avant chaque utilisation la bonne fixation de la lance. Le raccord vissé de la
lance doit être serré à la main.
DANGER
Risque de blessure ! Pendant le travail, retenir la poignée pistolet et la lance des deux
mains.
DANGER
Risque de blessure ! Lors du fonctionnement, ne pas coincer le levier de départ et
le levier de sécurité.
DANGER
Risque de blessure ! En cas de levier de
sécurité défectueux, se rendre au service
après-vente.
ATTENTION
– Risque d'endommagement ! Ne jamais
utiliser l'appareil lorsque le réservoir à
combustible est vide. sous peine d'endommager la pompe à combustible.
Ceci est également valable pour l'exploitation avec de l'eau froide.
– Risque d'endommagement ! Ne jamais
exploiter l'appareil sans filtre dans le
raccord d'eau.
– Risque d'endommagement ! Ne poser
aucun objet (flexible, etc.) dans ou sur
la cheminée.
– Appareil doté d'un dévidoir :
Risque d'endommagement ! Dérouler
toujours entièrement le flexible haute
pression.
32 FR
– 5
Page 33

Ouvrir/fermer le capot de l'appareil
Illustration
Déverrouiller la fermeture du capot
avec un tournevis, rabattre le capot de
l'appareil vers l'avant et le décrocher.
Illustration
Accrocher le capot de l'appareil (voir
flèches), le relever et encliqueter la fer-
meture du capot.
Ouvrir/fermer le pistolet de
pulvérisation à main
Ouvrir le pistolet de pulvérisation à
main : Actionner le levier de sécurité et
le levier de départ.
Fermer le pistolet de pulvérisation à
main. Relâcher le levier de sécurité et le
levier de départ.
Remplacer la buse
DANGER
Risque de blessure ! Mettre l'appareil hors
service et actionner la poignée-pistolet jusqu'à ce que l'appareil soit hors pression
avant de procéder au remplacement de la
buse.
Sécuriser le pistolet de pulvérisation à
main en poussant le loquet de sécurité
vers l’avant.
Remplacer la buse.
Modes de fonctionnement
Illustration
0/OFF = Arrêt
1 Utilisation avec de l'eau froide
2 Utilisation avec de l'eau chaude
Mettre l'appareil en marche
Mettre l'interrupteur principal sur le
mode de fonctionnement souhaité.
L'appareil se met en marche pendant une
courte durée puis s'arrête dès que la pression de service est atteinte.
Enlever la sécurité du pistolet de pulvé-
risation à main en poussant le loquet de
sécurité vers l’arrière.
Dès que la poignée-pistolet est actionnée,
l'appareil se remet en marche.
Remarque : S'il ne sort pas d'eau de la
buse haute pression, purger l'air de la
pompe.
Purger la pompe :
En gardant la poignée-pistolet ouverte,
mettre plusieurs fois l'appareil hors et
sous tension.
Remarque : lorsque la lance du pistolet
manuel est démontée, le processus de
purge est accéléré.
Interrompre le fonctionnement
Relâcher la gâchette, l'appareil se met
hors service.
Sécuriser le pistolet de pulvérisation à
main en poussant le loquet de sécurité
vers l’avant.
Enlever la sécurité du pistolet de pulvé-
risation à main en poussant le loquet de
sécurité vers l’arrière.
Tirer de nouveau sur la gâchette, l'appareil se remet en service.
Choisir le type de jet
Fermer la poignée-pistolet.
Sécuriser le pistolet de pulvérisation à
main en poussant le loquet de sécurité
vers l’avant.
Tourner le logement de la buse jusqu'à
ce que le symbole désiré corresponde
avec le marquage :
Jet bâton à haute pression (0°)
pour des salissures très tenaces
Jet plat à basse pression
(CHEM) pour le service avec
détergent ou nettoyer avec une
pression basse
Jet plat à haute pression (25°)
pour des salissures sur des
grandes surfaces
Fonctionnement avec détergent
– Respecter l'environnement en utilisant
le détergent avec parcimonie.
– Le détergent doit être adapté à la sur-
face à nettoyer.
– 6
33FR
Page 34

Illustration
Retirer le tuyau d'aspiration de dé-
tergent.
Tourner le filtre sur le flexible de dé-
tergent pour doser ce dernier.
Plonger le flexible d’aspiration du dé-
tergent dans un récipient contenant du
détergent.
Placer l'injecteur sur la position
"CHEM".
Nettoyage
Adapter la concentration de détergent
en fonction de la surface à nettoyer.
Remarque :Toujours diriger le jet haute
pression sur l'objet tout d'abord à bonne
distance afin d'éviter tout dommage provoqué par une pression trop élevée.
Méthode de nettoyage conseillée
– Dissoudre la saleté :
Pulvériser le détergent avec parcimonie
puis le laisser agir entre 1 et 5 minutes
sans toutefois le laisser sécher.
– Eliminer la saleté :
Retirer les saletés dissoutes au moyen
du jet haute pression.
Utilisation avec de l'eau froide
Elimination de salissures légères et rinçage
à l'eau claire, ex. : appareils de jardinage,
terrasse, outils, etc.
Mettre l'interrupteur de l'appareil sur
«0».
Utilisation avec de l'eau chaude
DANGER
Risque de brûlure !
Mettre l'interrupteur de l'appareil sur
«2».
Après utilisation avec un détergent
Fermer complètement le filtre sur le
flexible d'aspiration du détergent (-).
Mettre l'interrupteur de l'appareil sur
«0».
Rincer l'appareil à l'eau claire pendant 1
minute au minimum en gardant la poi-
gnée-pistolet ouverte.
Mise hors service de l'appareil
DANGER
Risque de brûlure provoquée par l'eau
chaude ! Après l'utilisation de l'appareil avec
de l'eau chaude, ce dernier doit être actionné,
pistolet ouvert, au minimum deux minutes
avec de l'eau froide afin de le faire refroidir.
Couper l'alimentation en eau.
Ouvrir le pistolet manuel.
Activer la pompe à l’aide de l’interrup-
teur principal et laisser tourner 5 à 10
secondes.
Fermer la poignée-pistolet.
Positionner l'interrupteur sur '0/OFF'.
En veillant à avoir les mains bien
sèches, débrancher la fiche secteur.
Déconnecter l'arrivée d'eau.
Actionner la poignée-pistolet jusqu'à ce
que l'appareil soit hors pression.
Sécuriser le pistolet de pulvérisation à
main en poussant le loquet de sécurité
vers l’avant.
Ranger l’appareil
Enficher la poignée-pistolet dans le
support.
Appareil sans dévidoir :
Enrouler le flexible haute pression et
l'accrocher sur la dépose du flexible.
Appareil doté d'un dévidoir :
Enrouler le flexible haute pression sur
le dévidoir. Enfoncer la poignée de la
manivelle pour bloquer l'enrouleur de
flexible (dévidoir).
Enrouler le câble d'alimentation autour
de l'attache-câbles.
Fixer la fiche électrique avec le clip
monté.
Protection antigel
ATTENTION
Risque d'endommagement ! Le gel peut
endommager l'appareil si l'eau n'a pas été
intégralement vidée.
Stocker l'appareil dans un lieu à l'abris
du gel.
Si l'appareil est relié à une cheminée, respecter les instructions suivantes :
34 FR
– 7
Page 35

ATTENTION
Risque d'endommagement provoqué par
une infiltration d'air froid via la cheminée.
Si la température extérieure descend
en dessous de 0 °C, débrancher l'appa-
reil de la cheminée.
S'il n'est pas possible de le conserver dans
un endroit protégé du gel, remiser l'appareil.
Remisage
En cas d'interruption de longue durée ou s'il
n'est pas possible de conserver l'appareil
dans un lieu protégé du gel :
Purger l'eau.
Rincer l'appareil au moyen de produit
antigel.
Purger l'eau
Dévisser le tuyau d'alimentation en eau
et le flexible haute pression.
Illustration
Poser l'appareil sur le dos.
Faire tourner l'appareil 1 minute au
maximum en mode eau froide, jusqu'à
ce que la pompe et les conduites soient
entièrement vides.
Rincer l'appareil au moyen de produit antigel
Remarque : Respecter les consignes d'uti-
lisation du fabricant du produit antigel.
Verser un produit antigel du commerce
dans le raccord d'eau.
Mettre l'appareil sous tension (sans
brûleur) jusqu'à ce que celui-ci soit inté-
gralement rincé.
Cette opération permet en outre de bénéficier d'une certaine protection anticorrosion.
Entreposage
몇 PRÉCAUTION
Risque de blessure et d'endommagement !
Prendre en compte le poids de l'appareil à
l'entreposage.
Transport
DANGER
Risque de blessure ! Risque de basculement en cas d'inclinaison trop prononcée,
d'inclinaison latérale trop importante ou de
sol instable.
– Ne déplacer l'appareil que sur des
pentes d'au maximum 2 %.
– N'utilisez la machine que sur des sols
stabilisés.
ATTENTION
Protéger le levier de départ contre tout endommagement lors de son transport.
몇 PRÉCAUTION
Risque de blessure et d'endommagement !
Respecter le poids de l'appareil lors du
transport.
Avant le transport, mettre l'appareil sur
le dos et laisser l'eau résiduelle s'évacuer.
Pour transporter l’appareil sur de plus
longues distances, le tirer derrière soi
au moyen du guidon de poussée.
Pour porter l’appareil, le saisir au ni-
veau des poignées et du guidon de
poussée.
Sécuriser l'appareil contre les glisse-
ments ou les basculements selon les directives en vigueur lors du transport
dans des véhicules.
Entretien et maintenance
DANGER
Risque de blessure et de choc électrique
par un démarrage inopiné de l'appareil.
Avant d'effectuer des travaux sur l'appareil,
couper l'interrupteur principal et débrancher la fiche secteur.
Couper l'alimentation en eau.
Ouvrir le pistolet manuel.
Activer la pompe à l’aide de l’interrup-
teur principal et laisser tourner 5 à 10
secondes.
Fermer la poignée-pistolet.
Positionner l'interrupteur sur '0/OFF'.
En veillant à avoir les mains bien
sèches, débrancher la fiche secteur.
Déconnecter l'arrivée d'eau.
Actionner la poignée-pistolet jusqu'à ce
que l'appareil soit hors pression.
Sécuriser le pistolet de pulvérisation à
main en poussant le loquet de sécurité
vers l’avant.
Laisser refroidir l'appareil.
– 8
35FR
Page 36

Inspection de sécurité/Contrat
d'entretien
Vous pouvez accorder avec votre commerçant une inspection de sécurité régulière
ou passer un contrat d'entretien. Conseillez-vous.
Fréquence de maintenance
Hebdomadairement
Nettoyer le filtre dans le raccord d'eau.
Mensuellement
Nettoyer le filtre situé sur le tuyau d'as-
piration de détergent.
Toutes les 500 heures de service, au moins une fois par an.
Faire effectuer la maintenance de l'ap-
pareil par le service après-vente.
Travaux de maintenance
Remarque : La vidange d'huile au niveau
de la pompe haute pression n'est pas nécessaire.
Nettoyer le filtre dans le raccord d'eau.
Retirer le filtre.
Nettoyer le filtre dans l'eau puis le re-
mettre en place.
Nettoyer le filtre situé sur le tuyau d'aspiration de détergent
Nettoyer le filtre dans l'eau puis le re-
mettre en place.
Assistance en cas de panne
DANGER
Risque de blessure et de choc électrique
par un démarrage inopiné de l'appareil.
Avant d'effectuer des travaux sur l'appareil,
couper l'interrupteur principal et débrancher la fiche secteur.
L'appareil ne fonctionne pas
– Pas de tension secteur
Contrôler le raccordement au réseau/le
câble électrique.
– Le moteur est excessivement sollicité/
en surchauffe
Positionner l'interrupteur sur '0/OFF'.
Laisser refroidir l'appareil.
Allumer l’appareil.
Si la panne réapparaît, faire vérifier l'ap-
pareil par le service après-vente.
– Le limiteur de température des gaz
d'échappement s'est déclenché, serpentin de chauffage calaminé.
Faire nettoyer l'appareil par le service
après-vente.
– Le limiteur de température des gaz
d'échappement s'est déclenché, température excessive des gaz d'échappement.
Positionner l'interrupteur sur '0/OFF'.
Laisser refroidir l'appareil.
Seulement pour les appareils avec re-
mise à zéro manuelle :
Illustration
Accioner le poussoir d'attention du mimiteur de la température de tuyère.
Allumer l’appareil.
Si la panne réapparaît, faire vérifier l'ap-
pareil par le service après-vente.
L'appareil n'établit aucune pression
– Présence d'air dans le système
Purger la pompe :
En gardant la poignée-pistolet ouverte,
mettre plusieurs fois l'appareil hors et
sous tension.
Remarque : lorsque la lance du pistolet
manuel est démontée, le processus de
purge est accéléré.
Remplir/remplacer le réservoir de dé-
tergent externe, s'il est vide.
Contrôler les raccords et les conduites.
– Colmatage du filtre dans le raccord
d'eau.
Nettoyer le filtre.
– Le débit de l'alimentation en eau est
trop faible
Contrôler le débit de l'alimentation en
eau (voir la section Caractéristiques
techniques).
– Robinet d'eau fermé.
Ouvrir le robinet d'eau.
36 FR
– 9
Page 37

Lorsque la poignée-pistolet est
ouverte, l'appareil ne cesse de se
mettre sous et hors tension
– Présence d'air dans le système
Purger la pompe :
En gardant la poignée-pistolet ouverte,
mettre plusieurs fois l'appareil hors et
sous tension.
Remarque : lorsque la lance du pistolet
manuel est démontée, le processus de
purge est accéléré.
– Buse de haute pression bouchée
Nettoyer la buse.
– Serpentin de chauffage entartré
Faire détartrer l'appareil par le service
après-vente.
Lorsque la poignée-pistolet est
fermée, l'appareil ne cesse de se
mettre sous et hors tension
– Présence d'une fuite dans le système
haute pression
Vérifier l'absence de fuite au niveau du
système haute pression et des raccords.
L'appareil présente un fuit, de l'eau
s'écoule de l'appareil par le bas
– Manque d'étanchéité de la pompe, fuite
de la soupape de sécurité.
Remarque :Une fuite de 3 gouttes/minute
est autorisée.
En cas de fuite plus importante, faire
vérifier l'appareil par le service aprèsvente.
L'appareil n'aspire pas de détergent
– L'injecteur est réglé à "Haute pression"
Placer l'injecteur sur la position
"CHEM".
– Le réservoir de détergent externe est
vide.
Remplir/remplacer le réservoir de dé-
tergent externe.
– Filtre situé sur le flexible d'aspiration de
détergent encrassé
Nettoyer le filtre.
Illustration
– Le clapet anti-retour est collé
Démonter le tuyau de détergent et dé-
visser le clapet anti-retour à l'aide d'un
objet non contondant.
Le brûleur ne s'allume pas
– Le réservoir de combustible est vide.
Remplissage du combustible.
– Manque d'eau
Contrôler le raccord d'eau, contrôler les
conduites d'alimentation
– Température d'arrivée d'eau trop éle-
vée.
Alimenter de l'eau chaude à 30 °C
maxi.
Illustration
– Le filtre à combustible est encrassé
Remplacer le filtre à combustible.
Service après-vente
Si la panne ne peut être réparée, l'appareil doit être contrôlé par le service
après-vente.
Garantie
Dans chaque pays, les conditions de garantie en vigueur sont celles publiées par
notre société de distribution responsable.
Les éventuelles pannes sur l’appareil sont
réparées gratuitement dans le délai de validité de la garantie, dans la mesure où
celles-ci relèvent d'un défaut matériel ou
d'un vice de fabrication. En cas de recours
en garantie, adressez-vous à votre revendeur ou au service après-vente agréé le
plus proche munis de votre preuve d'achat.
Accessoires et pièces de
rechange
N'utiliser que des accessoires et pièces de
rechange d'origine, ils garantissent le bon
fonctionnement de l'appareil.
Vous trouverez des informations relatives
aux accessoires et pièces de rechange sur
www.kaercher.com.
– 10
37FR
Page 38

Déclaration UE de conformité
CEO
Head of Approbation
Nous certifions par la présente que la machine spécifiée ci-après répond de par sa
conception et son type de construction ainsi que de par la version que nous avons
mise sur le marché aux prescriptions fondamentales stipulées en matière de sécurité et d’hygiène par les directives européennes en vigueur. Toute modification apportée à la machine sans notre accord rend
cette déclaration invalide.
Produit: Nettoyeur haute pression
Type: 1.064-xxx
Directives européennes en vigueur :
2006/42/CE (+2009/127/CE)
2000/14/CE
2014/30/UE
Normes harmonisées appliquées :
EN 55014–1: 2006+A1: 2009+A2: 2011
EN 55014–2: 2015
EN 60335–1
EN 60335–2–79
EN 61000–3–2: 2014
HDS 5/11, HDS 5/13:
EN 61000–3–3: 2013
HDS 5/15:
EN 61000–3–11: 2000
Procédures d'évaluation de la conformité
2000/14/CE: Annexe V
Niveau de puissance acoustique dB(A)
HDS 5/11 U, HDS 5/15:
Mesuré: 91
Garanti: 94
HDS 5/11 UX, HDS 5/13:
Mesuré: 91
Garanti: 93
Alfred Kärcher GmbH Co. KG
Alfred-Kärcher-Str. 28 - 40
71364 Winnenden (Germany)
Téléphone : +49 7195 14-0
Télécopieur : +49 7195 14-2212
Winnenden, 2016/01/01
5.957-976
Les soussignés agissent sur ordre et sur
procuration de la Direction commerciale.
Responsable de la documentation:
S. Reiser
38 FR
– 11
Page 39

Caractéristiques techniques
HDS 5/11 HDS 5/13 HDS 5/15
Raccordement au secteur
Tension V 220 230 240 220 230 240 220 230 240
Type de courant Hz 1~ 50 1~ 50 1~ 50
Puissance de raccordement kW 2,2 2,6 2,7
Protection (à action retardée) A 16 16 13 16 16 13 16 16 13
Type de protection -- IPX5 IPX5 IPX5
Classe de protection -- I I I
Impédance du circuit maximale admissible Ohms -- -- (0.380+j0.237)
Arrivée d'eau
Température d'alimentation (max.) °C 30 30 30
Débit d'alimentation (min.) l/h (l/min) 500 (8,3) 550 (9,2) 500 (8,3)
Hauteur d'aspiration à partir du réservoir
ouvert (20 °C)
Pression d'alimentation (max.) MPa (bars) 0,6 (6) 0,6 (6) 0,6 (6)
Diamètre du tuyau d'alimentation (min.) Pouces 1/2 1/2 1/2
Longueur du tuyau d'alimentation (min.) m 7,5 7,5 7,5
Performances
Débit d'eau l/h (l/min) 450 (7,5) 500 (8,3) 450 (7,5)
Pression de service de l'eau (avec buse
standard)
Pression maximale de marche (clapet de
sécurité)
Température de service max de l'eau
chaude
Aspiration de détergent l/h (l/min) 0-33 (0-0,6) 0-33 (0-0,6) 0-33 (0-0,6)
Puissance du brûleur kW 26 29 26
Consommation maximale de fuel: kg/h 2,7 3,1 2,7
Force de réaction max. de la poignée-pistolet
Taille de la buse standard (UX) -- 032 (033) 034 028
Valeurs déterminées selon EN 60335-2-79
Émission sonore
Niveau de pression acoustique L
Incertitude K
pA
pA
Niveau de puissance acoustique LWA + insécurité KWA (UX)
Valeur de vibrations bras-main
Poignée-pistolet m/s
Lance m/s
Incertitude K m/s
Carburants
Combustible -- Fuel EL ou diesel Fuel EL ou die-
Quantité d'huile l 0,1 0,1 0,2
Types d'huile Huile mo-
Dimensions et poids
Longueur x largeur x hauteur (UX) mm 618 x 618 x 994
Poids de fonctionnement typique (UX) kg 70 (72) 74 (76) 76 (78)
Réservoir à combustible l 6,5 6,5 6,5
m 0,5 0,5 0,5
MPa (bars) 11,0 (110) 12,5 (125) 15,0 (150)
MPa (bars) 16,5 (165) 18,0 (180) 20,0 (200)
°C 80 80 80
N 18,1 21,4 20,8
dB(A) 76 76 77
dB(A) 3 3 3
dB(A) 94 (93) 93 94
2
2
2
2,4 1,0 0,9
1,4 1,1 1,1
0,3 0,3 0,3
Fuel EL ou die-
teur 15W40
N° de réf. 6.288-
050.0
(1163)
sel
N° de réf.
6.288-050.0
618 x 618 x
994 (1163)
sel
N° de réf. 6.288-
050.0
618 x 618 x 994
(1163)
– 12
39FR
Page 40

Prima di utilizzare l'apparecchio
per la prima volta, leggere le
presenti istruzioni originali, seguirle e conservarle per un uso futuro o in caso di rivendita dell'apparecchio.
– Prima di procedere alla prima messa in
funzione leggere tassativamente le norma di sicurezza n. 5.951-949.0!
– Eventuali danni da trasporto vanno co-
municati immediatamente al proprio rivenditore.
– Al momento del disimballaggio, control-
lare il contenuto della confezione. Per il
volume di fornitura vedi Figura 1.
Indice
Protezione dell’ambiente. . . . . IT 1
Livelli di pericolo . . . . . . . . . . . IT 1
Parti dell'apparecchio . . . . . . . IT 2
Simboli riportati sull’apparecchioIT 2
Uso conforme a destinazione . IT 2
Norme di sicurezza . . . . . . . . . IT 3
Dispositivi di sicurezza . . . . . . IT 3
Messa in funzione. . . . . . . . . . IT 3
Uso . . . . . . . . . . . . . . . . . . . . . IT 5
Supporto . . . . . . . . . . . . . . . . . IT 8
Trasporto. . . . . . . . . . . . . . . . . IT 8
Cura e manutenzione . . . . . . . IT 8
Guida alla risoluzione dei guastiIT 9
Garanzia . . . . . . . . . . . . . . . . . IT 10
Accessori e ricambi. . . . . . . . . IT 10
Dichiarazione di conformità UE IT 11
Dati tecnici . . . . . . . . . . . . . . . IT 12
Protezione dell’ambiente
Tutti gli imballaggi sono riciclabili. Gli imballaggi non vanno gettati nei rifiuti domestici, ma consegnati ai relativi centri di raccolta.
Gli apparecchi dismessi contengono materiali riciclabili preziosi
e vanno consegnati ai relativi
centri di raccolta. Batterie, olio e
sostanze simili non devono essere dispersi nell’ambiente. Si
prega quindi di smaltire gli apparecchi dismessi mediante i sistemi di raccolta differenziata.
Sostanze quali olio per motori, gasolio,
benzina o carburante diesel non devono
essere dispersi nell'ambiente. Si prega
pertanto di proteggere il suolo e di smaltire
l'olio usato conformemente alle norme ambientali.
Avvertenze sui contenuti (REACH)
Informazioni aggiornate sui contenuti sono
disponibili all'indirizzo:
www.kaercher.com/REACH
Livelli di pericolo
PERICOLO
Indica un pericolo imminente che determina lesioni gravi o la morte.
몇 AVVERTIMENTO
Indica una probabile situazione pericolosa
che potrebbe determinare lesioni gravi o la
morte.
몇 PRUDENZA
Indica una probabile situazione pericolosa
che potrebbe causare lesioni leggere.
ATTENZIONE
Indica una probabile situazione pericolosa
che potrebbe determinare danni alle cose.
40 IT
– 1
Page 41

Parti dell'apparecchio
Figura
1 Tubo flessibile per alta pressione
EASY!Lock
2 Reggicavo
3 Foro di rabbocco per combustibile
4 Indicatore di livello
5 Ripiano ugello
6 Alimentazione elettrica
7 Pompa ad alta pressione
8 Set di raccordi per l'acqua
9 Attacco alta pressione EASY!Lock (solo
HDS 5/xx U)
10 Alloggio della lancia
11 Collegamento dell'acqua con filtro
12 appoggio
13 Apertura di uscita del tubo flessibile di
alta pressione (solo HDS 5/xx UX)
14 Maniglia trasporto
15 Cofano
16 Interruttore dell'apparecchio
17 Bruciatore
18 Ripiano tubo flessibile (solo HDS 5/xx U)
19 Avvolgitubo (solo HDS 5/xx UX)
20 Tubo flessibile di aspirazione detergen-
te con filtro
21 Supporto per lancia
22 Targhetta
23 Chiusura cofano
24 Leva manuale per avvolgitubo (solo
HDS 5/xx UX)
25 Archetto di spinta
26 Marcatura dell'ugello
27 Ugello a tre getti EASY!Lock
28 Lancia EASY!Lock
29 Pistola a spruzzo EASY!Lock
30 Dispositivo di arresto di sicurezza della
pistola a spruzzo
31 Leva di sicurezza
32 Leva a scatto
Contrassegno colore
– Gli elementi di comando per il processo
di pulizia sono gialli.
– Gli elementi di comando per la manu-
tenzione ed il service sono grigio chia-
ro.
Simboli riportati
sull’apparecchio
Getti ad alta pressione possono risultare pericolosi se usati
in modo improprio. Il getto non
va mai puntato su persone,
animali, equipaggiamenti elettrici attivi o sull'apparecchio stesso. L'idropulitrice può essere utilizzata solo diritta in
verticale.
Apparecchio con avvolgitubo:
Pericolo di scottature causate
da superfici calde!
Uso conforme a destinazione
– Pulizia di: macchine, veicoli, edifici, at-
trezzi, facciate, terrazzi, attrezzi da giardinaggio ecc.
– L'idropulitrice può essere utilizzata solo
diritta in verticale.
– Non lasciare mai l’apparecchio incusto-
dito quando è in funzione.
PERICOLO
Rischio di lesioni! Per apparecchi impiegati
presso stazioni di servizio o in altre zone di
pericolo, osservare le disposizioni di sicurezza vigenti.
L'acqua di scarico contenente oli minerali
non deve essere dispersa nel terreno, nelle acque o nelle canalizzazioni. La pulizia
di motori e di sottoscocche va effettuata
esclusivamente in luoghi provvisti di separatori d'olio.
Requisiti per la qualità dell'acqua:
ATTENZIONE
Utilizzare solo acqua pulita come mezzo ad
alta pressione. Eventuali impurità causano
un'usura precoce o incrostazioni nell'apparecchio e negli accessori.
I valori limite seguenti non devono essere
superati se si utilizza acqua riciclata.
– 2
41IT
Page 42

Valore pH 6,5...9,5
Conducibilità elettrica * Conducibilità
elettrica acqua
pulita +1200
µS/cm
Sostanze sedimentabili ** < 0,5 mg/l
Sostanze filtrabili ** < 50 mg/l
Idrocarburi < 20 mg/l
Cloruro < 300 mg/l
Solfato < 240 mg/l
Calcio < 200 mg/l
Durezza complessiva < 28 °dH
< 50 °TH
< 500 ppm (mg
/l)
CaCO
3
Ferro < 0,5 mg/l
Manganese < 0,05 mg/l
Rame < 2 mg/l
Cloro attivo < 0,3 mg/l
privo di odori fastidiosi
* Massimo totale 2000 µS/cm
** Volumi di campionamento 1 litro, tempo
di sedimentazione 30 minuti
*** Nessuna sostanza abrasiva
Norme di sicurezza
– Rispettare le norme nazionali vigenti
per pompe a getto liquido.
– Rispettare le norme nazionali vigenti
per l'antinfortunistica. Le pompe a getto
liquido devono essere controllate ad intervalli regolari ed il risultato del controllo deve essere registrato per iscritto.
– Il dispositivo di riscaldamento dell’appa-
recchio è un impianto di combustione.
Gli impianti di combustione devono essere controllati ad intervalli regolari secondo le disposizioni nazionali vigenti in
materia.
– È vietato apportare modifiche all'appa-
recchio/accessori.
Dispositivi di sicurezza
I dispositivi di sicurezza servono alla protezione dell'utente e non devono essere disattivati o impiegati per scopi diversi da
quelli indicati.
Pressostato
Il pressostato spegne l'apparecchio al momento della chiusura della pistola a spruzzo manuale e lo al momento dell'apertura.
Valvola di sicurezza
– La valvola di sicurezza si apre in caso di
sovrapressione della caldaia o quando
la valvola di troppopieno o il pressostato presentano guasti.
– La valvola di sicurezza è impostata in
fabbrica e sigillata. Interventi di regolazione sono da effettuarsi esclusivamente dal servizio assistenza clienti
Protezione mancanza acqua
La protezione mancanza acqua impedisce
l'attivazione del bruciatore in mancanza
d'acqua.
Limitatore termico gas di scarico
Il limitatore termico gas di scarico spegne
l'apparecchio al raggiungimento di una
temperatura eccessiva del gas di scarico.
Protezione termica
La protezione termica nell'avvolgimento del
motore della pompa spegne il motore in
caso di sovraccarico termico.
Dispositivo di arresto di sicurezza
Il dispositivo di arresto di sicurezza posto
sulla pistola a spruzzo impedisce l'azionamento accidentale dell'apparecchio.
Messa in funzione
몇 AVVERTIMENTO
Pericolo di lesioni! L'apparecchio, gli accessori, le condotte di alimentazione e gli
attacchi devono essere in perfetto stato. In
caso contrario è vietato usare l'apparecchio.
42 IT
– 3
Page 43

Montare la pistola a spruzzo
manuale, la lancia, l'ugello ed il tubo
flessibile di alta pressione
Avvertenza: Il sistema EASY!Lock unisce
componenti tramite filettatura ad alta velocità soltanto con un giro rapido e sicuro.
Collegare la lancia alla pistola a spruz-
zo e stringere a fondo a mano
(EASY!Lock).
Montare l'ugello sulla lancia (marcature
sull'anello di regolazione superiore) e
stringere a fondo a mano (EASY!Lock).
Apparecchio senza avvolgitubo:
Collegare il tubo flessibile per alta pressione alla pistola a spruzzo e all'attacco
alta pressione, stringendo a fondo a
mano (EASY!Lock).
Apparecchio con avvolgitubo:
Collegare il tubo flessibile per alta pressione alla pistola a spruzzo e stringere
a fondo a mano (EASY!Lock).
Aggiungere combustibile
PERICOLO
Rischio di esplosioni! Aggiungere esclusivamente carburante diesel o gasolio leggero. Il funzionamento con Biodiesel secondo
EN 14214 (a partire da una temperatura
esterna di 6 °C) è possibile. Non utilizzare
carburanti non idonei, quali benzina ecc.
ATTENZIONE
Pericolo di danneggiamento! Non azionare
mai l'apparecchio a serbatoio privo di combustibile. Si rischia di danneggiare permanentemente la pompa di alimentazione
combustibile. Ciò vale anche con funzionamento ad acqua fredda.
Aprire il tappo del serbatoio.
Aggiungere combustibile
Chiudere il tappo del serbatoio.
Eliminare il carburante eventualmente
fuoriuscito.
Riempire/sostituire il serbatoio del
detergente
PERICOLO
Pericolo di lesioni!
– Usare esclusivamente prodotti Kärcher.
– Non aspirare solventi (benzina, aceto-
ne, diluente ecc.).
– Evitare il contatto con gli occhi o la pelle.
– Osservare le indicazioni in materia di si-
curezza e le modalità d'uso fornite dal
produttore del detergente.
Kärcher offre una gamma di pulizia e
manutenzione personalizzata.
Il vostro rivenditore è a disposizione per
qualsiasi ulteriore informazione.
Riempire/sostituire il serbatoio del de-
tergente esterno.
Collegamento all'acqua
몇 AVVERTIMENTO
Rispettare le disposizioni fornite dalla società per l'approvvigionamento idrico.
Secondo quanto prescritto dalle
regolamentazioni in vigore, l'apparecchio non deve mai essere usato senza separatore di sistema alla
rete idrica. Assicurarsi che l'attacco del vostro impianto idrico domestico, al quale viene fatto funzionare l'idropulitrice, sia equipaggiato con un separatore del sistema
scondo la norma EN 12729 tipo BA.
L'acqua che scorre attraverso un separatore di sistema non è classificata come acqua
potabile.
몇 PRUDENZA
Collegare il separatore di sistema sempre
alla mandata dell'acqua, mai direttamente
all'apparecchio.
Collegamenti: vedi Dati tecnici.
Fissare il tubo flessibile di alimentazio-
ne (lunghezza minima 7,5 m, diametro
minimo 1/2“) con fascetta per tubi al set
di raccordo dell'acqua.
Collegare il tubo flessibile di alimenta-
zione al collegamento dell'acqua
dell'apparecchio e all'alimentazione di
acqua (p.es. rubinetto).
– 4
43IT
Page 44

Avviso: il tubo flessibile di alimentazione e
la fascetta non rientrano nel volume di fornitura.
Aspirare l'acqua dal contenitore
Collegare il tubo flessibile di aspirazio-
ne (diametro min. 1/2”) con filtro (accessorio) al collegamento dell'acqua.
– Livello max. di aspirazione: 0,5 m
PERICOLO
Pericolo di lesioni e di danneggiamento!
Non aspirare mai acqua da contenitori d’acqua potabile. Non aspirare mai liquidi contenenti solventi come diluenti per vernici,
benzina, olio o acqua non filtrata. Le guarnizioni dell'apparecchio non sono resistenti
ai solventi. La nebbia di polverizzazione dei
solventi è altamente infiammabile, esplosiva e velenosa.
Allacciamento alla rete elettrica
– Valori di collegamento: vedi Dati tecnici
e targhetta.
– Il collegamento elettrico va eseguito da
un'elettricista qualificato e deve essere
conforme alla norma IEC 60364-1.
Portare l'interruttore dell'apparecchio
su "0/OFF".
Inserire la spina di alimentazione.
PERICOLO
Pericolo di scosse elettriche!
– Prolunghe di cavi elettrici non adatte
possono risultare pericolose. All'aperto
utilizzare solo prolunghe di cavi elettrici
omologate e contrassegnate con sezione cavo sufficiente.
– Srotolare sempre completamente le
prolunghe.
– La spina e il giunto di un cavo prolunga
utilizzati devono essere a tenuta d'acqua.
ATTENZIONE
Non superare il valore massimo d'impedenza di rete consentito per il punto d'allacciamento elettrico (vedi Dati tecnici). In caso di
dubbi sull'impedenza di rete presente sul
punto di collegamento si prega di contattare la propria azienda fornitrice di energia
elettrica.
Uso
PERICOLO
Rischio di esplosioni! Non nebulizzare alcun liquido infiammabile.
PERICOLO
Pericolo di lesioni! Mai utilizzare l'apparecchio senza la lancia. Accertarsi prima di
ogni utilizzo che la lancia sia fissata correttamente. L'avvitamento della lancia deve
essere serrato a mano.
PERICOLO
Pericolo di lesioni! Durante le operazioni tenere con entrambe le mani la pistola a
spruzzo e la lancia.
PERICOLO
Pericolo di lesioni! Non bloccare la leva di
azionamento e la leva di sicurezza durante
l'uso.
PERICOLO
Pericolo di lesioni! Nel caso in cui la leva di
sicurezza sia difettosa, contattare il servizio
clienti.
ATTENZIONE
– Pericolo di danneggiamento! Non azio-
nare mai l'apparecchio a serbatoio pri-
vo di combustibile. Si rischia di danneg-
giare permanentemente la pompa di ali-
mentazione combustibile. Ciò vale an-
che con funzionamento ad acqua
fredda.
– Pericolo di danneggiamento! Non utiliz-
zare mai l'apparecchio nel raccordo
idrico senza filtro.
– Pericolo di danneggiamento! Non pog-
giare alcun oggetto (tubo flessibile ecc.)
nel o sopra il camino.
– Apparecchio con avvolgitubo:
Pericolo di danneggiamento! Srotolare
sempre completamente il tubo flessibile
alta pressione.
Apertura/Chiusura cofano
dell'apparecchio
Figura
Sbloccare la chiusura del cofano con un
cacciavite, Ribaltare il cofano in avanti
e sganciare.
44 IT
– 5
Page 45

Figura
Agganciare il cofano (vedi freccia) sol-
levare ed agganciare la chiusura del cofano.
Apertura/Chiusura della pistola a
spruzzo
Aprire la pistola a spruzzo: Azionare la
leva di sicurezza e la leva di azionamento.
Chiudere la pistola a spruzzo: Rilascia-
re la leva di sicurezza e la leva di azionamento.
Sostituire l'ugello
PERICOLO
Pericolo di lesioni! Disattivare l'apparecchio
prima di sostituire l'ugello ed azionare la pistola a spruzzo fino a completa depressurizzazione dell'apparecchio.
Bloccare la pistola a spruzzo, spingen-
do in avanti l'arresto di sicurezza.
Sostituire l'ugello.
Modalità operative
Figura
0/OFF = Spento
1 Funzionamento con acqua fredda
2 Funzionamento con acqua calda
Accendere l’apparecchio
Impostare l'interruttore dell'apparecchio
alla modalità desiderata.
L'apparecchio si accende brevemente e si
spegne al raggiungimento della pressione
di esercizio.
Sbloccare la pistola a spruzzo, spingen-
do in indietro l'arresto di sicurezza.
L'apparecchio si riaccende al momento
dell'attivazione della pistola a spruzzo.
Avviso: Se l'acqua non esce dall'ugello
alta pressione, eliminare l'aria dalla pompa.
Eliminare l'aria dalla pompa:
Accendere e spegnere l'apparecchio
più volte (pistola a spruzzo manuale
aperta) agendo sull'interruttore dell'ap-
parecchio.
Avviso: Togliendo la lancia dalla pistola a
spruzzo manuale si accelera lo spurgo
dell'aria.
Interrompere il funzionamento
Rilasciare la leva di azionamento, l'ap-
parecchio si disattiva.
Bloccare la pistola a spruzzo, spingendo in avanti l'arresto di sicurezza.
Sbloccare la pistola a spruzzo, spingen-
do in indietro l'arresto di sicurezza.
Tirare nuovamente la leva di azionamento, l'apparecchio si riattiva.
Selezionare il tipo di getto
desiderato
Chiudere la pistola a spruzzo.
Bloccare la pistola a spruzzo, spingen-
do in avanti l'arresto di sicurezza.
Ruotare l'alloggiamento dell'ugello fino
a quando il simbolo desiderato coincide
con il contrassegno:
Getto puntiforme ad alta pressione (0°) per la pulizia di sporco particolarmente resistente
Getto piatto a bassa pressione
(CHEM) per il funzionamento
con detergente o la pulizia a
pressione ridotta
Getto piatto ad alta pressione
(25°) per la pulizia di vaste superfici
Funzionamento con detergente
– Per salvaguardare l'ambiente non ec-
cedere nell'uso di prodotti detergenti.
– Il detergente deve essere adatto alla
superficie da pulire.
Figura
Togliere il tubo flessibile di aspirazione
detergente
Ruotare il filtro posto sul tubo flessibile
di aspirazione del detergente per dosa-
re il detergente.
Appendere il tubo flessibile di aspirazio-
ne detergente in un contenitore con so-
luzione detergente.
Impostare l'ugello su "CHEM".
– 6
45IT
Page 46

Pulizia
Adattare il grado di concentrazione del
detergente alla superficie da pulire.
Avviso: Puntare il getto alta pressione da
una distanza piuttosto elevata, per evitare
danni derivanti da eccessiva pressione.
Metodo di pulizia consigliato
– Sciogliere lo sporco:
Spruzzare misuratamente il detergente
e lasciarlo agire per 1-5 minuti. Non lasciare che il prodotto asciughi sulla su-
perficie.
– Togliere lo sporco:
Sciacquare lo sporco scio lto c on i l get to
alta pressione.
Funzionamento con acqua fredda
Pulire lo sporco facile, sciacqui: attrezzi da
giardinaggio, terrazzi, utensili ecc.
Posizionare l'interruttore dell'apparec-
chio su "1".
Funzionamento con acqua calda
PERICOLO
Pericolo di scottatura!
Posizionare l'interruttore dell'apparec-
chio su "2".
Dopo il funzionamento con il
detergente
Chiudere il filtro posto sul tubo flessibile
di aspirazione detergente (-).
Posizionare l'interruttore dell'apparec-
chio su "1".
Sciacquare l’apparecchio per almeno un
minuto con la pistola a spruzzo aperta.
Spegnere l’apparecchio
PERICOLO
Pericolo di scottature causate da acqua
calda! Dopo il funzionamento con acqua
calda aggiungere acqua fredda e mettere
in moto l'apparecchio (pistola aperta) per
almeno due minuti, in modo che si possa
raffreddare.
Chiudere l'alimentazione dell'acqua.
Aprire la pistola a spruzzo.
Azionare la pompa agendo sull'interrut-
tore dell'apparecchio e lasciarla attivata
per circa 5-10 secondi.
Chiudere la pistola a spruzzo.
Portare l'interruttore dell'apparecchio
su "0/OFF".
Non estrarre mai la spina di alimenta-
zione dalla presa con le mani bagnate.
Staccare il collegamento acqua.
Azionare la pistola a spruzzo fino a
completa depressurizzazione dell'apparecchio.
Bloccare la pistola a spruzzo, spingen-
do in avanti l'arresto di sicurezza.
Deposito dell’apparecchio
Introdurre la pistola a spruzzo nel so-
stegno.
Apparecchio senza avvolgitubo:
Avvolgere il tubo flessibile di alta pressione ed agganciarlo sul ripiano del
tubo flessibile.
Apparecchio con avvolgitubo:
Avvolgere il tubo flessibile di alta pressione sull'avvolgitubo. Introdurre la maniglia della manovella per bloccare
l'avvolgitubo.
Avvolgere il cavo di collegamento attor-
no al reggicavo.
Fissare la spina con la clip montata.
Antigelo
ATTENZIONE
Pericolo di danneggiamento! Apparecchi
non completamente svuotati dell'acqua
possono essere danneggiati dal gelo.
Collocare l'apparecchio in un luogo pro-
tetto dal gelo.
Se l'apparecchio è collegato ad un camino,
è importante osservare quanto segue:
ATTENZIONE
Pericolo di danneggiamento causato
dall'aria fredda proveniente dal camino.
Staccare l'apparecchio dal camino in
caso di temperature esterni inferiori a
0°C.
Se non si dispone di luoghi protetti dal gelo,
mettere a riposo l'apparecchio.
46 IT
– 7
Page 47

Fermo dell'impianto
In caso di lunghi periodi di fermo o se non
si dispone di luoghi protetti dal gelo:
Svuotare l'acqua
Sciacquare l'interno dell'apparecchio
con antigelo.
Svuotare l'acqua
Svitare sia il tubo di alimentazione ac-
qua, sia il tubo alta pressione.
Figura
Posizionare l'apparecchio sulla parte
posteriore.
Mettere in moto l'apparecchio (max. 1
minuto) in modalità di acqua fredda fino
a completo svuotamento della pompa e
delle condutture.
Sciacquare l'interno dell'apparecchio con antigelo
Avviso: Osservare le disposizioni fornite
dal produttore dell'antigelo.
Versare un antigelo commerciale nel
raccordo idrico.
Accendere l'apparecchio (senza brucia-
tore), finché non è completamente pulito.
Ciò assicura anche una certa protezione
anticorrosione.
Supporto
몇 PRUDENZA
Pericolo di lesioni e di danneggiamento!
Osservare il peso dell'attrezzo quando lo si
mette a magazzino.
Trasporto
PERICOLO
Pericolo di lesioni! Rischio di ribaltamento
in caso di salite rilevanti, inclinazione laterale eccessiva e suolo instabile.
– Spostare l'apparecchio solo su penden-
ze non superiori al 2%.
– Condurre l'apparecchio solo su suoli
stabili.
ATTENZIONE
Proteggere la leva di azionamento durante
il trasporto per evitare danneggiamenti.
몇 PRUDENZA
Pericolo di lesioni e di danneggiamento!
Per il trasporto osservare il peso dell'apparecchio.
Prima del trasporto posizionare l'appa-
recchio sulla parte posteriore e scaricare l'acqua residua.
Per trasportare l’apparecchio su lunghi
tragitti tirarlo tenendo l’appostito archetto di spinta.
Per alzare l’apparecchio tenere le mani-
glie e l’archetto di spinta.
Per il trasporto in veicoli, assicurare
l'apparecchio secondo le direttive in vigore affinché non possa scivolare e ribaltarsi.
Cura e manutenzione
PERICOLO
Pericolo di lesioni causato dall'azionamento accidentale dell'apparecchio e da scosse
elettriche. Prima di eseguire qualsiasi lavoro, spegnere l'apparecchio e staccare la
spina.
Chiudere l'alimentazione dell'acqua.
Aprire la pistola a spruzzo.
Azionare la pompa agendo sull'interrut-
tore dell'apparecchio e lasciarla attivata
per circa 5-10 secondi.
Chiudere la pistola a spruzzo.
Portare l'interruttore dell'apparecchio
su "0/OFF".
Non estrarre mai la spina di alimenta-
zione dalla presa con le mani bagnate.
Staccare il collegamento acqua.
Azionare la pistola a spruzzo fino a
completa depressurizzazione dell'apparecchio.
Bloccare la pistola a spruzzo, spingen-
do in avanti l'arresto di sicurezza.
Lasciare raffreddare l'apparecchio.
Controlli preventivi/Contratto di
manutenzione
Presso il Vostro rivenditore potrete concordare regolari controlli preventivi o stipulare
un contratto di manutenzione. Chiedete
consiglio ai nostri esperti.
– 8
47IT
Page 48

Intervalli di manutenzione
Ogni settimana
Pulire il filtro nel collegamento idrico.
Una volta al mese
Pulire il filtro posto sul tubo flessibile di
aspirazione detergente.
Ogni 500 ore d'esercizio, almeno annualmente
Fare eseguire la manutenzione dell'ap-
parecchio dal servizio di assistenza.
Lavori di manutenzione
Avviso: Cambi dell'olio alla pompa ad alta
pressione non sono necessari.
Pulire il filtro nel collegamento idrico
Rimuovere il filtro.
Immergere il filtro in acqua, quindi pulir-
lo e riposizionarlo.
Pulire il filtro del tubo flessibile di aspirazione detergente.
Immergere il filtro in acqua, quindi pulir-
lo e riposizionarlo.
Guida alla risoluzione dei
guasti
PERICOLO
Pericolo di lesioni causato dall'azionamento
accidentale dell'apparecchio e da scosse
elettriche. Prima di eseguire qualsiasi lavoro,
spegnere l'apparecchio e staccare la spina.
L'apparecchio non funziona
– Mancanza tensione di rete
Controllare il collegamento e l'alimenta-
zione.
– Il motore è sovraccarico o surriscaldato
Portare l'interruttore dell'apparecchio
su "0/OFF".
Lasciare raffreddare l'apparecchio.
Accendere l’apparecchio.
Se il guasto persiste, rivolgersi al servi-
zio di assistenza clienti per un controllo.
– Scatto del limitatore termico dei gas di
scarico, serpentina di riscaldamento
con fuliggine.
Far rimuovere la fuliggine da un servizio
di assistenza clienti.
– Scatto del limitatore termico dei gas di
scarico, temperatura dei gas di scarico
troppo alta.
Portare l'interruttore dell'apparecchio
su "0/OFF".
Lasciare raffreddare l'apparecchio.
Solo per apparecchi con ripristino ma-
nuale:
Figura
Premere il pulsante di reset del limitatore temperatura gas di scarico.
Accendere l’apparecchio.
Se il guasto persiste, rivolgersi al servi-
zio di assistenza clienti per un controllo.
L'apparecchio non sviluppa
pressione
– Presenza di aria nel sistema
Eliminare l'aria dalla pompa:
Accendere e spegnere l'apparecchio
più volte (pistola a spruzzo manuale
aperta) agendo sull'interruttore dell'apparecchio.
Avviso: Togliendo la lancia dalla pistola a
spruzzo manuale si accelera lo spurgo
dell'aria.
Riempire/sostituire il serbatoio del de-
tergente esterno se è vuoto.
Controllare gli attacchi e le condutture.
– Filtro nel collegamento idrico sporco
Pulire il filtro.
– Quantità di afflusso di acqua insufficiente
Verificate la quantità di afflusso di ac-
qua (vedi Dati tecnici).
– Rubinetto chiuso.
Aprire il rubinetto.
L'apparecchio continua a spegnersi
e ad accendersi (pistola a spruzzo
aperta)
– Presenza di aria nel sistema
Eliminare l'aria dalla pompa:
Accendere e spegnere l'apparecchio
più volte (pistola a spruzzo manuale
aperta) agendo sull'interruttore dell'ap-
parecchio.
48 IT
– 9
Page 49

Avviso: Togliendo la lancia dalla pistola a
spruzzo manuale si accelera lo spurgo
dell'aria.
– Ugello alta pressione intasato
Pulire la bocchetta.
– Formazioni di calcare sulla serpentina
Far rimuovere il calcare da un servizio
di assistenza clienti.
L'apparecchio continua ad
accendersi e spegnersi (pistola a
spruzzo chiusa)
– Perdita del sistema ad alta pressione
Verificare che il sistema ad alta pressio-
ne e gli attacchi siano a tenuta stagna.
L'apparecchio perde acqua, la quale
fuoriesce dal fondo
– Pompa perde, valvola di sicurezza perde.
Avviso: 3 gocce/minuto rappresentano il
valore massimo accettabile.
Quando si verificano perdite di maggio-
re entità, rivolgersi al servizio di assistenza clienti per un controllo.
L'apparecchio non aspira il
detergente
– L'ugello è impostata so modalità "alta
pressione"
Impostare l'ugello su "CHEM".
– Il serbatoio del detergente esterno è
vuoto.
Riempire/sostituire il serbatoio del de-
tergente esterno.
– Filtro del tubo flessibile di aspirazione
detergente sporco.
Pulire il filtro.
Figura
– Valvola di non ritorno incollata
Togliere il tubo flessibile di aspirazione
detergente e staccare la valvola di non
ritorno aiutandosi con un oggetto smus-
sato.
Bruciatore non si accende
– Serbatoio del combustibile vuoto.
Aggiungere combustibile
– Mancanza di acqua
Controllare il collegamento dell'acqua e
le condutture.
– Temperatura di mandata dell'acqua
troppo alta.
Alimentare max. 30 °C di acqua calda.
Figura
– Filtro combustibile sporco
Sostituire il filtro combustibile.
Servizio assistenza
Se il guasto persiste, rivolgersi al servizio di assistenza clienti per un controllo.
Garanzia
Le condizioni di garanzia valgono nel rispettivo paese di pubblicazione da parte
della nostra società di vendita competente.
Entro il termine di garanzia eliminiamo gratuitamente eventuali guasti all’apparecchio,
se causati da difetto di materiale o di produzione. Nei casi previsti dalla garanzia si
prega di rivolgersi al proprio rivenditore, oppure al più vicino centro di assistenza autorizzato, esibendo lo scontrino di acquisto.
Accessori e ricambi
Utilizzando solamente accessori e ricambi
originali, si garantisce un funzionamento sicuro e privo di disturbi dell'apparecchio.
Si possono trovare informazioni riguardo
ad accessori e ricambi su
www.kaercher.com.
– 10
49IT
Page 50

Dichiarazione di conformità
CEO
Head of Approbation
UE
Con la presente si dichiara che la macchina
qui di seguito indicata, in base alla sua concezione, al tipo di costruzione e nella versione da noi introdotta sul mercato, è conforme ai requisiti fondamentali di sicurezza
e di sanità delle direttive UE. In caso di modifiche apportate alla macchina senza il nostro consenso, la presente dichiarazione
perde ogni validità.
Prodotto: Idropulitrice
Modelo: 1.064-xxx
Direttive UE pertinenti
2006/42/CE (+2009/127/CE)
2000/14/CE
2014/30/UE
Norme armonizzate applicate
EN 55014–1: 2006+A1: 2009+A2: 2011
EN 55014–2: 2015
EN 60335–1
EN 60335–2–79
EN 61000–3–2: 2014
HDS 5/11, HDS 5/13:
EN 61000–3–3: 2013
HDS 5/15:
EN 61000–3–11: 2000
Procedura di valutazione della conformità applicata
2000/14/CE: Allegato V
Livello di potenza sonora dB(A)
HDS 5/11 U, HDS 5/15:
Misurato: 91
Garantito: 94
HDS 5/11 UX, HDS 5/13:
Misurato: 91
Garantito: 93
Alfred Kärcher GmbH & Co. KG
Alfred-Kärcher-Str. 28 - 40
71364 Winnenden (Germany)
Tel.: +49 7195 14-0
Fax: +49 7195 14-2212
Winnenden, 2016/01/01
5.957-976
I firmatari agiscono su incarico e con la procura dell’amministrazione.
Responsabile della documentazione:
S. Reiser
50 IT
– 11
Page 51

Dati tecnici
HDS 5/11 HDS 5/13 HDS 5/15
Collegamento alla rete
Tensione V 220 230 240 220 230 240 220 230 240
Tipo di corrente Hz 1~ 50 1~ 50 1~ 50
Potenza allacciata kW 2,2 2,6 2,7
Protezione (ritardo di fusibile) A 16 16 13 16 16 13 16 16 13
Protezione -- IPX5 IPX5 IPX5
Grado di protezione -- I I I
Massima impedenza di rete consentita Ohm -- -- (0.380+j0.237)
Collegamento idrico
Temperatura in entrata (max.) °C 30 30 30
Portata (min.) l/h (l/min) 500 (8,3) 550 (9,2) 500 (8,3)
Livello di aspirazione da contenitori aperti
(20°C)
Pressione in entrata (max.) MPa (bar) 0,6 (6) 0,6 (6) 0,6 (6)
Diametro tubo flessibile di alimentazione (min.) Pollici 1/2 1/2 1/2
Lunghezza del tubo flessibile di alimentazione (min.)
Prestazioni
Portata acqua l/h (l/min) 450 (7,5) 500 (8,3) 450 (7,5)
Pressione di esercizio - acqua (con ugello
standard)
Sovrapressione massima (valvola di sicurezza)
Quantità max. operativa funzionamento ad
acqua calda
Aspirazione detergente l/h (l/min) 0-33 (0-0,6) 0-33 (0-0,6) 0-33 (0-0,6)
Potenza bruciatore kW 26 29 26
Consumo massimo gasolio kg/h 2,7 3,1 2,7
Max. forza repulsiva pistola a spruzzo
(max.)
Grandezza dell'ugello standard (UX) -- 032 (033) 034 028
Valori rilevati secondo EN 60335-2-79
Emissione sonora
Pressione acustica L
Dubbio K
pA
pA
Pressione acustica LWA + Dubbio KWA (UX) dB(A) 94 (93) 93 94
Valore di vibrazione mano-braccio
Pistola a spruzzo m/s
Lancia m/s
Dubbio K m/s
Carburante e sostanze aggiuntive
Combustibile -- Gasolio EL o Die-
Quantità olio l 0,1 0,1 0,2
Tipo di olio: Olio per mo-
Dimensioni e pesi
Lunghezza x Larghezza x Altezza (UX) mm 618 x 618 x 994
Peso d'esercizio tipico (UX) kg 70 (72) 74 (76) 76 (78)
Serbatoio combustibile l 6,5 6,5 6,5
m 0,5 0,5 0,5
m 7,5 7,5 7,5
MPa (bar) 11,0 (110) 12,5 (125) 15,0 (150)
MPa (bar) 16,5 (165) 18,0 (180) 20,0 (200)
°C 80 80 80
N 18,1 21,4 20,8
dB(A) 76 76 77
dB(A) 3 3 3
2
2
2
tori 15W40
2,4 1,0 0,9
1,4 1,1 1,1
0,3 0,3 0,3
Gasolio EL o
sel
Codice n°: 6.288-
050.0
Diesel
Codice n°:
6.288-050.0
618 x 618 x
(1163)
994 (1163)
Gasolio EL o
Diesel
Codice n°:
6.288-050.0
618 x 618 x 994
(1163)
– 12
51IT
Page 52

Lees vóór het eerste gebruik
van uw apparaat deze originele
gebruiksaanwijzing, ga navenant te werk
en bewaar hem voor later gebruik of voor
een latere eigenaar.
– Voor de eerste inbedrijfstelling veilig-
heidsinstructies nr. 5.951-949.0 in elk
geval lezen!
– Bij transportschade onmiddellijk de
handelaar op de hoogte brengen.
– De inhoud van de verpakking controle-
ren bij het uitpakken. Leveringspakket
zie afbeelding 1.
Inhoudsopgave
Zorg voor het milieu . . . . . . . . NL 1
Gevarenniveaus . . . . . . . . . . . NL 1
Apparaat-elementen . . . . . . . . NL 2
Symbolen op het toestel . . . . . NL 2
Reglementair gebruik . . . . . . . NL 2
Veiligheidsinstructies. . . . . . . . NL 3
Veiligheidsinrichtingen . . . . . . NL 3
Inbedrijfstelling . . . . . . . . . . . . NL 3
Bediening . . . . . . . . . . . . . . . . NL 5
Opslag. . . . . . . . . . . . . . . . . . . NL 8
Vervoer . . . . . . . . . . . . . . . . . . NL 8
Onderhoud . . . . . . . . . . . . . . . NL 8
Hulp bij storingen . . . . . . . . . . NL 8
Garantie . . . . . . . . . . . . . . . . . NL 10
Toebehoren en reserveonderde-
len . . . . . . . . . . . . . . . . . . . . . . NL 10
EU-conformiteitsverklaring . . . NL 10
Technische gegevens . . . . . . . NL 11
Zorg voor het milieu
Het verpakkingsmateriaal is herbruikbaar. Deponeer het verpakkingsmateriaal niet bij het huishoudelijk afval, maar bied het
aan voor hergebruik.
Onbruikbaar geworden apparaten bevatten waardevolle materialen die geschikt zijn voor hergebruik. Lever de apparaten
daarom in bij een inzamelpunt
voor herbruikbare materialen.
Batterijen, olie en dergelijke stoffen mogen niet in het milieu belanden. Verwijder overbodig geworden apparatuur daarom via
geschikte inzamelpunten.
Gelieve motorolie, stookolie, diesel en
benzine niet in het milieu te laten terechtkomen. Gelieve de bodem te beschermen
en oude olie op milieuvriendelijke manier
te verwijderen.
Aanwijzingen betreffende de inhoudsstoffen (REACH)
Huidige informatie over de inhoudsstoffen
vindt u onder:
www.kaercher.com/REACH
Gevarenniveaus
GEVAAR
Verwijzing naar een onmiddellijk dreigend
gevaar dat tot ernstige en zelfs dodelijke lichaamsverwondingen leidt.
몇 WAARSCHUWING
Verwijzing naar een mogelijke gevaarlijke
situatie die tot ernstige en zelfs dodelijke lichaamsverwondingen kan leiden.
몇 VOORZICHTIG
Verwijzing naar een mogelijk gevaarlijke situatie die tot lichte verwondingen kan leiden.
LET OP
Verwijzing naar een mogelijke gevaarlijke
situatie die tot materiële schade kan leiden.
52 NL
– 1
Page 53

Apparaat-elementen
Afbeelding
1 Hogedrukslang EASY!Lock
2 Kabelhouder
3 Vulopening voor brandstof
4 Aanduiding vulstand
5 Straalpijpopbergvak
6 Elektrische toevoerleiding
7 Hogedrukpomp
8 Wateraansluitingsset
9 Hogedrukaansluiting EASY!Lock (al-
leen HDS 5/xx U)
10 Spuitstukhouder
11 Wateraansluiting met filter
12 Steun
13 Uitlaatopening van de hogedrukslang
(enkel HDS 5/xx UX)
14 Handgreep
15 Apparaatkap
16 Apparaatschakelaar
17 Brander
18 Slangopbergvak (enkel HDS 5/xx U)
19 Slangtrommel (enkel HDS 5/xx UX)
20 Reinigingsmiddel-zuigslang met filter
21 Houder voor spuitstuk
22 Typeplaatje
23 Kapsluiting
24 Handkruk voor slangtrommel (enkel
HDS 5/xx UX)
25 Duwbeugel
26 Markering van de sproeier
27 Drievoudige sproeier EASY!Lock
28 Straalbuis EASY!Lock
29 Handspuitpistool EASY!Lock
30 Veiligheidspal van het handspuitpistool
31 Veiligheidshendel
32 Hendel
Kleurmarkering
– Bedieningselementen voor het reini-
gingsproces zijn geel.
– Bedieningselementen voor het onder-
houd en de service zijn lichtgrijs.
Symbolen op het toestel
Hogedrukstralen kunnen gevaarlijk zijn wanneer ondeskundigen het apparaat bedienen. De straal mag niet gericht
worden op personen, dieren,
onder stroom staande voorwerpen of het
apparaat zelf. De hogedrukreiniger mag
enkel verticaal en rechtopstaand gebruikt
worden.
Apparaat met slangtrommel:
Verbrandingsgevaar door hete
oppervlakken!
Reglementair gebruik
– Reinigen van: machines, voertuigen,
bouwwerken, werktuigen, gevels, terrassen, tuingereedschap, enz.
– De hogedrukreiniger mag enkel verti-
caal en rechtopstaand gebruikt worden.
– Het apparaat nooit onbeheerd laten
staan, zolang het nog in werking is.
GEVAAR
Verwondingsgevaar! Bij het gebruik aan
tankstations of andere gevaarlijke zones
overeenkomstige veiligheidsvoorschriften
in acht nemen.
Gelieve mineraaloliehoudend afvalwater
niet in de grond, waterlopen of rioleringen
laten terechtkomen. Gelieve de motorreiniging en bodemreiniging daarom alleen op
geschikte plaatsen met olieafscheider uit
te voeren.
Eisen aan de waterkwaliteit:
LET OP
Als hogedrukmedium mag uitsluitend
schoon water worden gebruikt. Verontreinigingen geven aanleiding tot vroegtijdige
slijtage of afzettingen in het apparaat en de
toebehoren.
Als gerecycleerd water wordt gebruikt, mogen de volgende grenswaarden niet overschreden worden.
– 2
53NL
Page 54

pH-waarde 6,5...9,5
elektrische geleidbaarheid *Geleidbaar-
heid vers water
+1200 µS/cm
afzetbare stoffen ** < 0,5 mg/l
uitfilterbare stoffen *** < 50 mg/l
Koolwaterstoffen < 20 mg/l
Chloride < 300 mg/l
Sulfaat < 240 mg/l
Calcium < 200 mg/l
Totale hardheid < 28 °dH
< 50 °TH
< 500 ppm (mg
/l)
CaCO
3
IJzer < 0,5 mg/l
Mangaan < 0,05 mg/l
Koper < 2 mg/l
Actieve chloor < 0,3 mg/l
vrij van kwalijke geurtjes
* Maximum in totaal 2000 µS/cm
** Testvolume 1 l, afzettijd 30 min
*** geen abrasieve stoffen
Veiligheidsinstructies
– Overeenkomstige nationale voorschrif-
ten van de wetgever voor stralers van
vloeistoffen in acht nemen.
– Overeenkomstige nationale voorschrif-
ten van de wetgever inzake ongevallenpreventie in acht nemen. Stralers van
vloeistoffen moeten regelmatig gecontroleerd worden en het resultaat van de
controle moet schriftelijk vastgelegd
worden.
– De verwarmingseenheid van het appa-
raat is een stookinrichting. Stookinrichtingen moeten regelmatig gecontroleerd worden volgens de nationale
voorschriften van de wetgever.
– U mag geen veranderingen aan het ap-
paraat / de toebehoren aanbrengen.
Veiligheidsinrichtingen
Veiligheidsinrichtingen dienen voor de bescherming van de gebruiker en mogen niet
buiten werking gezet of in hun functie omzeild worden.
Drukschakelaar
De drukschakelaar schakelt het apparaat
bij het sluiten van het handspuitpistool uit
en bij het openen ervan opnieuw in.
Veiligheidsklep
– De veiligheidsklep gaat open bij over-
druk in de ketel of wanneer de overstroomklep resp. de drukschakelaar defect is.
– De veiligheidsklep is in de fabriek inge-
steld en verzegeld. Instelling uitsluitend
door de klantendienst.
Watertekortbeveiliging
De watertekortbeveiliging verhindert dat de
brander in geval van watertekort ingeschakeld wordt.
Uitlaatgastemperatuurregelaar
De uitlaatgastemperatuurregelaar schakelt
het apparaat uit indien de uitlaatgassen
een te hoge temperatuur bereikt hebben.
Spoelbeschermcontact
Het spoelbeschermcontact in de motorspoel van de pompaandrijving schakelt de
motor uit bij een thermische overbelasting.
Veiligheidspal
De veiligheidspal aan het handspuitpistool
verhindert onbedoeld inschakelen van het
apparaat.
Inbedrijfstelling
몇 WAARSCHUWING
Gevaar voor letsel! Apparaat, toebehoren,
toevoerleidingen en aansluitingen moeten
in een perfecte toestand zijn. Als dat niet
het geval is, mag het apparaat niet gebruikt
worden.
54 NL
– 3
Page 55

Handspuitpistool, straalbuis,
sproeier en hogedrukslang
monteren
Opmerking: Het EASY!Lock-systeem ver-
bindt componenten door een snelschroefverbinding met slechts één omdraaiing snel
en veilig.
Straalbuis met handspuitpistool verbinden
en handvast aandraaien (EASY!Lock).
Sproeier op de straalbuis monteren
(markeringen op de stelring bovenaan)
en handvast aandraaien (EASY!Lock).
Apparaat zonder slangtrommel:
Hogedrukslang met handspuitpistool
en hogedrukaansluiting van het apparaat verbinden en handvast aandraaien
(EASY!Lock).
Apparaat met slangtrommel:
Hogedrukslang met handspuitpistool
verbinden en handvast aandraaien
(EASY!Lock).
Brandstof navullen
GEVAAR
Gevaar voor explosie! Uitsluitend diesel of
lichte stookolie vullen. Het gebruik met biodiesel conform EN 14214 (vanaf een buitentemperatuur van 6 °C) is mogelijk. Ongeschikte brandstoffen, bv. benzine, mogen niet gebruikt worden.
LET OP
Gevaar voor beschadiging! Apparaat nooit
gebruiken met een leeg brandstofreservoir.
De brandstofpomp wordt anders vernield.
Dat geldt ook bij de werking met koud water.
Tankdop openen.
Brandstof bijvullen.
Tankdop sluiten.
Overgelopen brandstof wegvegen.
Reinigingsmiddelreservoir vullen /
vervangen
GEVAAR
Verwondingsgevaar!
– Uitsluitend Kärcher-producten gebruiken.
– In geen geval oplosmiddelen (benzine,
aceton, verdunningsmiddel, enz.) opzuigen.
– Contact met de ogen en de huid vermij-
den.
– Veiligheids- en gebruiksinstructies van
de reinigingsmiddelfabrikant in acht nemen.
Kärcher biedt een individueel reinigings- en onderhoudsmiddelgamma
aan
Uw handelaar geeft u graag advies.
Extern reinigingsmiddelreservoir vullen
/ vervangen.
Wateraansluiting
몇 WAARSCHUWING
Voorschriften van de watermaatschappij in
acht nemen.
Conform de geldige voorschriften
mag het apparaat nooit zonder systeemscheider aan het drinkwaternet gebruikt worden. Vergewis u
ervan dat de aansluiting van uw huiswaterinstallatie waarop de hogedrukreiniger
werkt, uitgerust is met een systeemscheider conform EN 12729 type BA.
Water dat door een systeemscheider is gestroomd, wordt als niet drinkbaar geclassificeerd.
몇 VOORZICHTIG
Sluit de systeemscheider altijd aan de watertoevoer en nooit direct aan het apparaat
aan.
Aansluitwaarden zie Technische gegevens.
Toevoerslang (minimunlengte 7,5 m,
minimumdiameter 1/2“) met slangklem
op de wateraansluitingsset bevestigen.
Toevoerslang aan de wateraansluiting
van het apparaat en aan de watertoevoer
(bijvoorbeeld waterkraan) aansluiten.
Instructie: De toevoerslang en de slangklem behoren niet tot het leveringspakket.
Water uit reservoir zuigen
Zuigslang (diameter minimum 1/2“) met
filter (toebehoren) aansluiten aan de
wateraansluiting.
– Max. zuighoogte: 0,5 m
– 4
55NL
Page 56

GEVAAR
Verwondings- en beschadigingsgevaar!
Zuig nooit water uit een drinkwaterreservoir. Zuig nooit oplosmiddelhoudende
vloeistoffen zoals verfverdunners, benzine,
olie of ongefilterd water op. De afdichtingen
in het apparaat zijn niet oplosmiddelbestendig. De spuitnevel van oplosmiddelen
is zeer licht ontvlambaar, explosief en giftig.
Stroomaansluiting
– Aansluitwaarden zie Technische gege-
vens en typeplaatje.
– De elektrische aansluiting moet uitge-
voerd worden door een electricien en
moet voldoen aan IEC 60364-1.
Apparaatschakelaar op „0/OFF“ stellen.
Steek de netstekker in de contactdoos.
GEVAAR
Verwondingsgevaar door elektrische schok!
– Niet-geschikte elektrische verlengka-
bels kunnen gevaarlijk zijn. Gebruik in
open lucht enkel daartoe vrijgegeven
en overeenkomstig gekenmerkte elektrische verlengkabels met een voldoende grote diameter:
– Verlengkabels altijd volledig afrollen.
– Stekker en verbinding van een gebruik-
te verlengkabel moeten waterdicht zijn.
LET OP
De maximaal toegelaten netimpedantie
aan het elektrische aansluitpunt (zie Technische gegevens) mag niet overschreden
worden. In geval van onduidelijkheden in
verband met de netimpedantie aan uw aansluitpunt neemt u best contact op met uw
electriciteitsmaatschappij.
Bediening
GEVAAR
Gevaar voor explosie! Geen brandbare
vloeistoffen sproeien.
GEVAAR
Verwondingsgevaar! Gebruik het apparaat
nooit zonder gemonteerde straalpijp. Controleer de straalpijp voor elk gebruik op stevigheid. De schroefverbinding van de
straalpijp moet handvast aangespannen
zijn.
GEVAAR
Gevaar voor letsel! Bij het werken handspuitpistool en straalbuis met beide handen
vasthouden.
GEVAAR
Gevaar voor letsel! De hendel en de veiligheidshendel mogen tijdens de werking niet
vastgeklemd worden.
GEVAAR
Gevaar voor letsel! Bij defecte veiligheidshendel klantenservice consulteren.
LET OP
– Gevaar voor beschadiging! Apparaat
nooit gebruiken met een leeg brandstofreservoir. De brandstofpomp wordt anders vernield. Dat geldt ook bij de werking met koud water.
– Gevaar voor beschadiging! Apparaat
nooit zonder filter in de wateraansluiting
gebruiken.
– Gevaar voor beschadiging! Geen voor-
werpen (slang e.d.) in of boven de
haard leggen.
– Apparaat met slangtrommel:
Gevaar voor beschadiging! Hogedrukslang altijd volledig afrollen.
Apparaatkap openen / sluiten
Afbeelding
Kapsluiting met schroevendraaier ont-
grendelen, apparaatkap naar voren
klappen en eruit halen.
Afbeelding
Apparaatkap erin hangen (zie pijlen),
naar boven klappen en kapsluiting laten
vastklikken.
Handspuitpistool openen/sluiten
Handspuitpistool openen: Veiligheids-
hendel en hendel bedienen.
Handspuitpistool sluiten: Veiligheids-
hendel en hendel loslaten.
56 NL
– 5
Page 57

Sproeier vervangen
GEVAAR
Gevaar voor letsel! Schakel het apparaat
uit voor een vervanging van de sproeiers
en bedien het handspuitpistool tot het apparaat drukloos is.
Handspuitpistool beveiligen, daarvoor
de vergrendelingspal naar voren schuiven.
Sproeier vervangen.
Bedrijfsmodi
Afbeelding
0/OFF = Uit
1 Werken met koud water
2 Werken met heet water
Apparaat inschakelen
Apparaatschakelaar op de gewenste
bedrijfsmodus instellen.
Het apparaat draait kort en schakelt uit zodra de werkdruk bereikt is.
Handspuitpistool ontgrendelen, daar-
voor de vergrendelingspal naar achte-
ren schuiven.
Bij bediening van het handspuitpistool
schakelt het apparaat opnieuw in.
Instructie: Komt er geen water uit de
sproeier, de pomp ontluchten.
Pomp ontluchten:
Bij geopende handspuitpistool het ap-
paraat met de apparaatschakelaar
meermaals in- en uitschakelen.
Instructie: Door het demonteren van de
straalpijp van de hogedrukaansluiting
wordt het ontluchten versneld.
Werking onderbreken
Bedieningshendel loslaten; het appa-
raat wordt uitgeschakeld.
Handspuitpistool beveiligen, daarvoor de
vergrendelingspal naar voren schuiven.
Handspuitpistool ontgrendelen, daar-
voor de vergrendelingspal naar achte-
ren schuiven.
Bedieningshendel opnieuw aantrekken;
het apparaat wordt opnieuw ingescha-
keld.
Straalsoort kiezen
Handspuitpistool sluiten.
Handspuitpistool beveiligen, daarvoor de
vergrendelingspal naar voren schuiven.
Behuizing van de sproeier draaien tot
het gewenste symbool overeenstemt
met de markering:
Ronde hogedrukstraal (0°)
voor bijzonder hardnekkig vuil
Vlakke lagedrukstraal (CHEM)
voor de werking met reinigingsmiddel of reinigen met een lage
druk
Vlakke hogedrukstraal (25°)
voor uitgestrekt vuil
Werken met reinigingsmiddel
– Ter milieubescherming zuinig omsprin-
gen met reinigingsmiddelen.
– Het reinigingsmiddel moet geschikt zijn
voor het te reinigen oppervlak.
Afbeelding
Reinigingsmiddel-zuigslang uittrekken.
Filter aan de reinigingsmiddel-zuig-
slang draaien om het reinigingsmiddel
te doseren.
Reinigingsmiddel-zuigslang in een re-
servoir met reinigingsmiddel hangen.
Sproeier op „CHEM“ stellen.
Reinigen
Reinigingsmiddelconcentratie instellen
overeenkomstig het te reinigen oppervlak.
Instructie: Hogedrukstaal altijd eerst van
grotere afstand op het te reinigen object
richten, om schade door te hoge druk te
vermijden.
Aanbevolen reinigingsmethode
– Vuil losmaken:
reinigingsmiddel zuinig verdelen en
1...5 minuten laten inwerken, maar niet
laten drogen.
– Vuil verwijderen:
losgekomen vuil met hogedrukstraal af-
spoelen.
– 6
57NL
Page 58

Werking met koud water
Verwijderen van lichte verontreinigingen en
schoonspoelen, bijv.: tuingereedschap, terras, werktuigen, enz.
Apparaatschakelaar op „1“ stellen.
Werking met heet water
GEVAAR
Verbrandingsgevaar!
Apparaatschakelaar op „2“ stellen.
Na werking met reinigingsmiddel
Filter aan de reinigingsmiddel-zuig-
slang volledig dichtdraaien (-).
Apparaatschakelaar op „1“ stellen.
Apparaat bij geopend handspuitpistool
minimum 1 minuut schoonspoelen.
Apparaat uitschakelen
GEVAAR
Verbrandingsgevaar door heet water! Na
de werking met heet water moet het apparaat ter afkoeling minstens twee minuten
met koud water en met geopend pistool gebruikt worden.
Watertoevoer sluiten.
Handspuitpistool openen.
Pomp met apparaatschakelaar inscha-
kelen en 5-10 seconden laten draaien.
Handspuitpistool sluiten.
Apparaatschakelaar op „0/OFF“ stellen.
Stekker alleen met droge handen uit het
stopcontact trekken.
Wateraansluiting verwijderen.
Handspuitpistool bedienen tot het ap-
paraat drukvrij is.
Handspuitpistool beveiligen, daarvoor de
vergrendelingspal naar voren schuiven.
Apparaat opslaan
Handspuitpistool in de houder steken.
Apparaat zonder slangtrommel:
Hogedrukslang oprollen en over het
slangopbergvak hangen.
Apparaat met slangtrommel:
Hogedrukslang op de slangtrommel
wikkelen. Greep van de krukhendel inschuiven om de slangtrommel te blokkeren.
58 NL
Aansluitkabel rond de kabelhouder wik-
kelen.
Stekker met gemonteerde clip bevesti-
gen.
Vorstbescherming
LET OP
Gevaar voor beschadiging! Vorst beschadigt het apparaat als niet al het water eruit is.
Apparaat in een vorstvrije ruimte op-
slaan.
Als het apparaat op een haard is aangesloten, dient het volgende in acht genomen te
worden:
LET OP
Beschadigingsgevaar door via de haard
binnendringende koude lucht.
Apparaat bij buitentemperaturen onder
0 °C van de schoorsteen losmaken.
Is vorstvrije opslag niet mogelijk, apparaat
stilleggen.
Stillegging
Bij langere werkonderbrekingen of als
vorstvrije opslag niet mogelijk is:
Water aflaten.
Apparaat met antivriesmiddel spoelen.
Water aflaten
Watertoevoerslang en hogedrukslang
losschroeven.
Afbeelding
Apparaat op de achterkant leggen.
Apparaat max. 1 minuuut in de werking
met koud water laten draaien tot de
pomp en de leidingen leeg zijn.
Apparaat met antivriesmiddel spoelen
Instructie: Behandelingsvoorschriften van
de fabrikant van het antivriesmiddel in acht
nemen.
Courant antivriesmiddel in de water-
aansluiting vullen.
Apparaat (zonder brander) inschakelen
tot het apparaat volledig is doorge-
spoeld.
Daardoor wordt ook een bepaalde corrosiebescherming bereikt.
– 7
Page 59

Opslag
몇 VOORZICHTIG
Gevaar voor lichamelijk letsel en beschadiging! Let op het gewicht van het apparaat
bij opslag.
Vervoer
GEVAAR
Verwondingsgevaar! Kantelgevaar bij te
grote hellingen, bij een te grote zijdelingse
helling en bij een instabiele ondergrond.
– Apparaat enkel bewegen op hellingen
tot max. 2%.
– Het apparaat uitsluitend op bevestigde
ondergrond bewegen.
LET OP
Hendel tijdens het transport beschermen
tegen beschadiging.
몇 VOORZICHTIG
Verwondings- en beschadigingsgevaar!
Neem bij het transport het gewicht van het
apparaat in acht.
Apparaat voor het transport op de ach-
terkant leggen en restwater eruit laten
lopen.
Voor het transporteren over een langer
stuk het apparaat aan de duwbeugel
achter u aan trekken.
Apparaat voor het dragen aan de gre-
pen en niet aan de duwbeugel vastnemen.
Bij het transport in voertuigen moet het
apparaat conform de geldige richtlijnen
beveiligd worden tegen verschuiven en
kantelen.
Onderhoud
GEVAAR
Verwondingsgevaar door onverwacht startend apparaat en elektrische schok. Voor
alle werkzaamheden aan het apparaat
moet het apparaat uitgeschakeld en de netstekker uitgetrokken worden.
Watertoevoer sluiten.
Handspuitpistool openen.
Pomp met apparaatschakelaar inscha-
kelen en 5-10 seconden laten draaien.
Handspuitpistool sluiten.
Apparaatschakelaar op „0/OFF“ stellen.
Stekker alleen met droge handen uit het
stopcontact trekken.
Wateraansluiting verwijderen.
Handspuitpistool bedienen tot het ap-
paraat drukvrij is.
Handspuitpistool beveiligen, daarvoor de
vergrendelingspal naar voren schuiven.
Apparaat laten afkoelen.
Veiligheidsinspectie/
onderhoudscontract
Met uw handelaar kunt u een regelmatige
veiligheidsinspectie afspreken of een onderhoudscontract afsluiten. Gelieve ons
advies te vragen.
Onderhoudsintervallen
Wekelijks
Filter in de wateraansluiting reinigen.
Maandelijks
Filter aan de reinigingsmiddel-zuig-
slang reinigen.
Alle 500 bedrijfsuren, minstens jaarlijks
Laat het onderhoud van het apparaat
uitvoeren door de klantenservice.
Onderhoudswerkzaamheden
Instructie: Olievervanging aan hogedruk-
pomp is niet noodzakelijk.
Filter in de wateraansluiting reinigen.
Filter verwijderen.
Filter in water reinigen en opnieuw
plaatsen.
Filter aan de reinigingsmiddel-zuigslang reinigen
Filter in water reinigen en opnieuw
plaatsen.
Hulp bij storingen
GEVAAR
Verwondingsgevaar door onverwacht startend apparaat en elektrische schok. Voor
alle werkzaamheden aan het apparaat
moet het apparaat uitgeschakeld en de netstekker uitgetrokken worden.
– 8
59NL
Page 60

Apparaat draait niet
– Geen netspanning
Spanningsaansluiting/toevoerleiding
controleren.
– motor overbelast/oververhit
Apparaatschakelaar op „0/OFF“ stellen.
Apparaat laten afkoelen.
Apparaat inschakelen.
Indien de storing daarna opnieuw op-
treedt, apparaat door klantendienst laten controleren.
– Uitlaatgastemperatuurregelaar is in wer-
king getreden, verwarmingsbuis verroet.
Apparaat door de klantendienst laten
ontroeten.
– Uitlaatgastemperatuurregelaar is in
werking getreden, uitlaatgastemperatuur te hoog.
Apparaatschakelaar op „0/OFF“ stellen.
Apparaat laten afkoelen.
Alleen bij toestellen met manuele terug-
stelling:
Afbeelding
Reset-knop van de uitlaatgastemperatuurregelaar bedienen.
Apparaat inschakelen.
Indien de storing daarna opnieuw op-
treedt, apparaat door klantendienst laten controleren.
Apparaat bouwt geen druk meer op
– Lucht in het systeem
Pomp ontluchten:
Bij geopende handspuitpistool het ap-
paraat met de apparaatschakelaar
meermaals in- en uitschakelen.
Instructie: Door het demonteren van de
straalpijp van de hogedrukaansluiting
wordt het ontluchten versneld.
Indien extern reinigingsmiddelreservoir
leeg is, vullen / vervangen.
Aansluitingen en leidingen controleren.
– Filter in de wateraansluiting vervuild.
Filter reinigen.
– Watertoevoerhoeveelheid te laag
Watertoevoerhoeveelheid controleren
(zie Technische gegevens).
– Waterkraan dicht.
Open de waterkraan.
Het apparaat schakelt bij geopend
handspuitpistool voortdurend aan/
uit
– Lucht in het systeem
Pomp ontluchten:
Bij geopende handspuitpistool het ap-
paraat met de apparaatschakelaar
meermaals in- en uitschakelen.
Instructie: Door het demonteren van de
straalpijp van de hogedrukaansluiting
wordt het ontluchten versneld.
– Hogedruksproeier verstopt
Sproeikop reinigen.
– Verwarmingsbuis verkalkt
Apparaat door de klantendienst laten
ontkalken.
Apparaat schakelt constant in en uit
bij een gesloten handspuitpistool
– Lek in het hogedruksysteem
Hogedruksysteem en aansluitingen op
dichtheid controleren.
Apparaat lekt, water drupt onderaan
uit het apparaat
– Pomp ondicht, veiligheidsklep ondicht.
Instructie: Toegelaten zijn 3 druppels/minuut.
Bij sterkere ondichtheid het apparaat
door de klantendienst laten controleren.
Apparaat zuigt geen
reinigingsmiddel aan
– Sproeier is ingesteld op „Hogedruk“
Sproeier op „CHEM“ stellen.
– Extern reinigingsmiddelreservoir is
leeg.
Extern reinigingsmiddelreservoir vullen
/ vervangen.
– Filter aan de reinigingsmiddel-zuig-
slang verontreinigd
Filter reinigen.
Afbeelding
– Terugslagklep vastgekleefd
Reinigingsmiddelslang verwijderen en
terugslagklep met een stomp voorwerp
lossen.
60 NL
– 9
Page 61

Brander ontsteekt
CEO
Head of Approbation
– Brandstoftank is leeg.
Brandstof bijvullen.
– Watertekort
Wateraansluiting controleren, toevoer-
leidingen controleren.
– Watertoevoertemperatuur te hoog.
Water met een temperatuur van max.
30 °C aanvoeren.
Afbeelding
– Brandstoffilter verontreinigd
Brandstoffilter vervangen.
Klantenservice
Indien de storing niet kan worden opgelost, moet het toestel door de klantendienst gecontroleerd worden.
Garantie
In ieder land zijn de door ons bevoegde
verkoopkantoor uitgegeven garantiebepalingen van toepassing. Eventuele storingen
aan het apparaat verhelpen wij zonder kosten binnen de garantietermijn, mits een materiaal of fabrieksfout de oorzaak van deze
storing is. Neem bij klachten binnen de garantietermijn contact op met uw leverancier
of de dichtstbijzijnde klantenservicewerkplaats en neem uw aankoopbewijs mee.
Toebehoren en
reserveonderdelen
Gebruik alleen origineel toebehoren en originele reserveonderdelen. Deze garanderen dat het apparaat veilig en zonder storingen functioneert.
Informatie over het toebehoren en de reserveonderdelen vindt u op
www.kaercher.com.
EU-conformiteitsverklaring
Hierbij verklaren wij dat de hierna vermelde
machine door haar ontwerp en bouwwijze
en in de door ons in de handel gebrachte
uitvoering voldoet aan de betreffende fundamentele veiligheids- en gezondheidseisen, zoals vermeld in de desbetreffende
EU-richtlijnen. Deze verklaring verliest haar
geldigheid wanneer zonder overleg met
ons veranderingen aan de machine worden
aangebracht.
Product: Hogedrukreiniger
Type: 1.064-xxx
Van toepassing zijnde EU-richtlijnen
2006/42/EG (+2009/127/EG)
2000/14/EG
2014/30/EU
Toegepaste geharmoniseerde normen
EN 55014–1: 2006+A1: 2009+A2: 2011
EN 55014–2: 2015
EN 60335–1
EN 60335–2–79
EN 61000–3–2: 2014
HDS 5/11, HDS 5/13:
EN 61000–3–3: 2013
HDS 5/15:
EN 61000–3–11: 2000
Toegepaste conformiteitsbeoordelingsprocedure
2000/14/EG: Bijlage V
Geluidsvermogensniveau dB(A)
HDS 5/11 U, HDS 5/15:
Gemeten: 91
Gegarandeerd:94
HDS 5/11 UX, HDS 5/13:
Gemeten: 91
Gegarandeerd:93
5.957-976
De ondergetekenden handelen in opdracht
en met volmacht van de bedrijfsleiding.
Gevolmachtigde voor de documentatie:
S. Reiser
Alfred Kärcher GmbH & Co. KG
Alfred Kärcher-Str. 28 - 40
71364 Winnenden (Germany)
Tel.: +49 7195 14-0
Fax: +49 7195 14-2212
Winnenden, 2016/01/01
– 10
61NL
Page 62

Technische gegevens
HDS 5/11 HDS 5/13 HDS 5/15
Spanningaansluiting
Spanning V 220 230 240 220 230 240 220 230 240
Stroomsoort Hz 1~ 50 1~ 50 1~ 50
Aansluitvermogen kW 2,2 2,6 2,7
Zekering (trage) A 16 16 13 16 16 13 16 16 13
Beveiligingsklasse -- IPX5 IPX5 IPX5
Beschermingsklasse -- I I I
Maximum toegelaten netimpedantie Ohm -- -- (0.380+j0.237)
Wateraansluiting
Toevoertemperatuur (max.) °C 30 30 30
Toevoerhoeveelheid (min.) l/h (l/min) 500 (8,3) 550 (9,2) 500 (8,3)
Zuighoogte uit open reservoir (20 °C) m 0,5 0,5 0,5
Toevoerdruk (max.) MPa (bar) 0,6 (6) 0,6 (6) 0,6 (6)
Toevoerslang-diameter (min.) duim 1/2 1/2 1/2
Toevoerslang-lengte (min.) m 7,5 7,5 7,5
Capaciteit
Volume water l/h (l/min) 450 (7,5) 500 (8,3) 450 (7,5)
Werkdruk water (met standaardsproeier) MPa (bar) 11,0 (110) 12,5 (125) 15,0 (150)
Max. bedrijfsoverdruk (veiligheidsklep) MPa (bar) 16,5 (165) 18,0 (180) 20,0 (200)
Max. werktemperatuur heet water °C 80 80 80
Aanzuiging reinigingsmiddel l/h (l/min) 0-33 (0-0,6) 0-33 (0-0,6) 0-33 (0-0,6)
Brandervermogen kW 26 29 26
Maximaal verbruik stookolie kg/u 2,7 3,1 2,7
Reactiedruk van het handspuitpistool
(max.)
Sproeiergrootte van de standaardsproeier (UX)
Bepaalde waarden conform EN 60335-2-79
Geluidsemissie
Geluidsdrukniveau L
Onzekerheid K
Geluidsvermogensniveau L
ligheid K
WA
(UX)
pA
pA
+ onvei-
WA
Hand-arm vibratiewaarde
Handspuitpistool m/s
Staalbuis m/s
Onzekerheid K m/s
Bedrijfsstoffen
Brandstof -- Stookolie EL of
Oliehoeveelheid l 0,1 0,1 0,2
Oliesoort Motorolie
Maten en gewichten
Lengte x breedte x hoogte (UX) mm 618 x 618 x 994
Typisch bedrijfsgewicht (UX) kg 70 (72) 74 (76) 76 (78)
Brandstofreservoir l 6,5 6,5 6,5
N 18,1 21,4 20,8
-- 032 (033) 034 028
dB(A) 76 76 77
dB(A) 3 3 3
dB(A) 94 (93) 93 94
2
2
2
15W40
2,4 1,0 0,9
1,4 1,1 1,1
0,3 0,3 0,3
Stookolie EL
diesel
best.-nr. 6.288-
050.0
of diesel
best.-nr.
6.288-050.0
618 x 618 x
(1163)
994 (1163)
Stookolie EL of
diesel
best.-nr. 6.288-
050.0
618 x 618 x 994
(1163)
62 NL
– 11
Page 63

Antes del primer uso de su apa-
rato, lea este manual original,
actúe de acuerdo a sus indicaciones y
guárdelo para un uso posterior o para otro
propietario posterior.
– ¡Antes de la primera puesta en marcha
lea sin falta las instrucciones de uso y
las instrucciones de seguridad n.°
5.951-949.0!
– En caso de daños de transporte infor-
me inmediatamente al fabricante.
– Comprobar el contenido del paquete al
desembalar. Consultar el contenido en
la imagen 1.
Índice de contenidos
Protección del medio ambiente ES 1
Niveles de peligro . . . . . . . . . . ES 1
Elementos del aparato . . . . . . ES 2
Símbolos en el aparato. . . . . . ES 2
Uso previsto . . . . . . . . . . . . . . ES 2
Indicaciones de seguridad . . . ES 3
Dispositivos de seguridad. . . . ES 3
Puesta en marcha. . . . . . . . . . ES 4
Manejo . . . . . . . . . . . . . . . . . . ES 5
Almacenamiento . . . . . . . . . . . ES 8
Transporte. . . . . . . . . . . . . . . . ES 8
Cuidados y mantenimiento . . . ES 8
Ayuda en caso de avería . . . . ES 9
Garantía . . . . . . . . . . . . . . . . . ES 10
Accesorios y piezas de repuestoES 10
Declaración UE de conformidadES 11
Datos técnicos . . . . . . . . . . . . ES 12
Protección del medio
ambiente
Los materiales empleados para
el embalaje son reciclables y recuperables. No tire el embalaje a
la basura doméstica y entréguelo en los puntos oficiales de recogida para su reciclaje o recuperación.
Los aparatos viejos contienen
materiales valiosos reciclables
que deberían ser entregados
para su aprovechamiento posterior. Evite el contacto de baterías, aceites y materias semejantes con el medio ambiente.
Por este motivo, entregue los
aparatos usados en los puntos
de recogida previstos para su reciclaje.
Por favor, no deje que el aceite para motores, el aceite caliente y la gasolina dañen
el medio ambiente. Evite que sustancias
nocivas penetren en el suelo y elimine el
aceite usado de forma que no dañe el medio ambiente.
Indicaciones sobre ingredientes
(REACH)
Encontrará información actual sobre los ingredientes en:
www.kaercher.com/REACH
Niveles de peligro
PELIGRO
Aviso sobre un riesgo de peligro inmediato
que puede provocar lesiones corporales
graves o la muerte.
몇 ADVERTENCIA
Aviso sobre una situación propablemente
peligrosa que puede provocar lesiones corporales graves o la muerte.
몇 PRECAUCIÓN
Indicación sobre una situación que puede
ser peligrosa, que puede acarrear lesiones
leves.
CUIDADO
Aviso sobre una situación probablemente
peligrosa que puede provocar daños materiales.
– 1
63ES
Page 64

Elementos del aparato
Figura
1 Manguera de alta presión EASY!Lock
2 Portacables
3 Abertura de llenado para combustible
4 Indicador de nivel
5 Soporte para boquillas
6 Conexión eléctrica
7 Bomba de alta presión
8 Set de toma de agua
9 Conexión de alta presión EASY!Lock
(sólo HDS 5/xx U)
10 Soporte de la lanza dosificadora
11 Toma de agua con filtro
12 Apoyo
13 Orificio de salida de la manguera de
alta presión (sólo HDS 5/xx UX)
14 Asa de transporte
15 Capó del aparato
16 Interruptor del aparato
17 Quemador
18 Lugar de almacenamiento de la man-
guera (solo la HDS 5/xx U)
19 Enrollador de mangueras (sólo HDS
5/xx UX)
20 Manguera de detergente con filtro
21 Soporte para la lanza dosificadora
22 Placa de características
23 Cierre del capó
24 Manivela para el enrollador de mangue-
ras (sólo HDS 5/xx UX)
25 Estribo de empuje
26 Marca de la boquilla
27 Boquilla triple EASY!Lock
28 Tubo pulverizador EASY!Lock
29 Pistola pulverizadora EASY!Lock
30 Bloque de seguridad de la pistola pul-
verizadora manual
31 Palanca de seguro
32 Palanca de disparo
Identificación por colores
– Los elementos de control para el proce-
so de limpieza son amarillos.
– Los elementos de control para el man-
tenimiento y el servicio son de color gris
claro.
Símbolos en el aparato
Los chorros a alta presión pueden ser peligrosos si se usan
indebidamente. No dirija el
chorro hacia personas, anima-
les o equipamiento eléctrico
activo, ni apunte con él al propio aparato.
La limpiadora de alta presión solo se puede
utilizar en vertical.
Aparato con enrollador de mangueras:
¡Riesgo de quemaduras por superficies calientes!
Uso previsto
– Limpieza de: Máquinas, vehículos, edi-
ficios, herramientas, fachadas, terrazas, herramientas de jardín, etc.
– La limpiadora a alta presión sólo se
puede operar en vertical.
– No deje nunca el aparato sin vigilancia
mientras esté en funcionamiento.
PELIGRO
¡Peligro de lesiones! Cuando se utilice en
gasolineras u otras zonas de peligro deberán tenerse en cuenta las instrucciones de
seguridad.
Las aguas residuales que contengan aceite no deben penetrar en el suelo ni verterse en aguas naturales o en el sistema de
canalización. Por ello, el lavado de motores y el lavado de los bajos sólo debe realizarse en lugares adecuados con un separador de aceite.
Requisitos para la calidad del agua:
CUIDADO
Sólo se puede utilizar agua limpia como
medio de alta presión. La suciedad provoca desgasto prematuro o sedimentos en el
aparato y los accesorios.
Si se utiliza agua reciclada, no se pueden
superar los siguientes limites.
64 ES
– 2
Page 65

Valor pH 6,5...9,5
Conductividad eléctrica * Conductividad
agua fresca
+1200 µS/cm
sustancias que se pueden
depositar **
Sustancias que se pueden
filtrar ***
Hidrocarburos < 20 mg/l
Cloruro < 300 mg/l
Sulfato < 240 mg/l
Calcio < 200 mg/l
Dureza total < 28 °dH
Hierro < 0,5 mg/l
Manganeso < 0,05 mg/l
Cobre < 2 mg/l
Cloro activo < 0,3 mg/l
sin olores desagradables
* Máxito total 2000 µS/cm
** Volumen de prueba 1 l, tiempo de sedimentación 30 min
*** sin sustancias abrasivas
< 0,5 mg/l
< 50 mg/l
< 50 °TH
< 500 ppm (mg
/l)
CaCO
3
Indicaciones de seguridad
– Respetar las normativas vigentes na-
cionales correspondientes para eyectores de líquidos.
– Respetar las normativas vigentes na-
cionales correspondientes de prevención de accidentes. Los eyectores de líquidos deben ser examinados regularmente y tiene que guardarse una copia
escrita de la revisión.
– El dispositivo calefactor del aparato es
una instalación calefactora. Las instalaciones calefactoras deben revisarse regularmente según las normativas nacionales correspondientes.
– No se debe efectuar ningún tipo de mo-
dificación en el aparato/accesorios.
Dispositivos de seguridad
La función de los dispositivos de seguridad
es proteger al usuario y está prohibido ponerlos fuera de servicio y modificar o ignorar su funcionamiento.
Presóstato
El presóstato desconecta el aparato al cerrarse la pistola pulverizadora manual y al
abrirse lo vuelve a conectar.
Válvula de seguridad
– La válvula de seguridad se abre cuando
hay sobrepresión en la caldera o la válvula de rebose o el presóstato están
defectuosos.
– La válvula de seguridad ha sido ajusta-
da y precintada en fábrica. El ajuste lo
debe realizar solamente el servicio postventa.
Dispositivo de seguridad contra el
funcionamiento en seco
El dispositivo de seguridad contra el funcionamiento en seco evita que el quemador se
conecte en caso de falta de agua.
Limitador de la temperatura de gas
de escape
El limitador de la temperatura de gas de escape apaga el aparato al alcanzar una temperatura de gas de escape demasiado alta.
Contacto de protección de
arrollamiento
El contacto de protección de arrollamiento
en el arrollamiento del accionamiento de la
bomba apaga el motor en caso de sobrecarga térmica.
Muesca de seguridad
La muesca de seguridad de la pistola pulverizadora manual impide una conexión involuntaria del aparato.
– 3
65ES
Page 66

Puesta en marcha
몇 ADVERTENCIA
¡Riesgo de lesiones! El aparato, los accesorios, los tubos de alimentación y las conexiones deben estar en perfecto estado.
Si no están en perfecto estado, no deben
utilizarse.
Montar la pistola pulverizadora
manual, lanza dosificadora,
boquilla y manguera de alta presión
Aviso: El sistema EASY!Lock conecta
componentes de forma rápida y segura
mediante una rosca rápida con tan solo
una vuelta.
Conectar el tubo pulverizador con la
pistola pulverizadora y apretar a mano
(EASY!Lock).
Monte la boquilla en el tubo pulveriza-
dor (la marca del aro de apoyo tiene
que estar arriba) y apretar con la mano
(EASY!Lock).
Aparato sin enrollador de mangueras:
Conectar la manguera de alta presión
con la pistola pulverizadora y la conexión de alta presión del aparato y
apretar a mano (EASY!Lock).
Aparato con enrollador de mangueras:
Conectar la manguera de alta presión
con la pistola pulverizadora y apretar a
mano (EASY!Lock).
Llenar de combustible
PELIGRO
Peligro de explosiones Llenar solo con gasóleo o gasóleo ligero. Es posible el funcionamiento con biodiésel conforme a la norma EN 14214 (a partir de una temperatura
exterior de 6 °C). No deben emplearse
combustibles inadecuado como, por ejemplo, gasolina.
CUIDADO
Peligro de daños El equipo no debe ponerse en funcionamiento nunca con el depósito de combustible vacío. De lo contrario, se
estropeará la bomba de combustible. Esto
también se aplica durante el funcionamiento con agua fría.
66 ES
Abra la tapa del depósito.
Llenar de combustible.
Cerrar la tapa del depósito.
Limpiar el combustible que se haya vertido.
Rellenar o cambiar el recipiente de
detergente
PELIGRO
¡Peligro de lesiones!
– Utilizar sólo productos Kärcher.
– No aspirar en ningún caso disolvente
(gasolina, acetona, diluyente, etc.).
– Evite el contacto con los ojos y la piel.
– Tenga en cuenta las instrucciones de
seguridad y uso del fabricante del de-
tergente.
Kärcher ofrece un programa individual
de limpieza y mantenimiento.
Su comercial le asesorará con mucho gusto.
Rellenar o cambiar la botella de deter-
gente externa.
Conexión de agua
몇 ADVERTENCIA
Tenga en cuenta las normas de la empresa
suministradora de agua.
De acuerdo con las normativas vi-
gentes, está prohibido utilizar el
aparato sin un separador de sistema en la red de agua potable. Asegúrese de que la toma de su instalación de
agua doméstica donde se opera la limpiadora a alta presión, esté equipada con un
separador de sistema conforme a EN
12729 tipo BA.
El agua que haya pasado por un separador
del sistema será catalogada como no potable.
몇 PRECAUCIÓN
Conectar el separador de sistema siempre
a la alimentación de agua, nunca directamente al equipo.
Valores de conexión, ver datos técnicos.
Fijar la manguera de alimentación (lar-
go máximo 7,5m, diámetro máximo 1/
2") con brida de manguera al set de la
toma de agua.
Conectar la tubería de abastecimiento
a la conexión de agua del aparato y a la
alimentación de agua (como el grifo).
Indicación: La manguera de alimentación
y la brida para mangueras no vienen incluidas.
– 4
Page 67

Aspirar agua del depósito
Conectar la manguera de aspiración
(diámetro mínimo 1/2") con filtro (accesorios) a la toma de agua.
– Altura máxima de aspiración: 0,5 m
PELIGRO
¡Peligro de lesiones y daños! No aspire
nunca agua de un depósito de agua potable. No aspire nunca líquidos que contengan disolventes como diluyente de laca,
gasolina, aceite o agua sin filtrar. Las juntas en el aparato no son resistentes a los
disolventes. La neblina pulverizada de los
disolventes es altamente inflamable, explosiva y tóxica.
Toma de corriente
– Valores de conexión: véase la placa de
características y datos técnicos.
– La conexión eléctrica debe ser realiza-
da por un electricista y cumplir la norma
CEI 60364-1.
Ponga el interruptor del aparato en "0/
OFF".
Enchufe la clavija de red.
PELIGRO
Peligro de lesiones por descarga eléctrica.
– Los cables eléctricos prolongadores in-
adecuados pueden ser peligrosos.
Para el exterior, utilice solo cables de
prolongación eléctricos autorizados expresamente para ello, adecuadamente
marcados y con una sección de cable
suficiente:
– Recoger siempre del todos los tubos
alargadores.
– El enchufe y el acoplamiento del cable
de prolongación utilizado tienen que ser
impermeables.
CUIDADO
La impedancia de red máxima permitida en
el punto de conexión eléctrica (véanse los
datos técnicos) no debe ser excedida. En
caso de confusión respecto a la impendacia de red existente en su punto de conexión, póngase en contacto con la empresa que le suministra la energía.
Manejo
PELIGRO
¡Peligro de explosiones! No pulverizar líquidos combustibles.
PELIGRO
¡Peligro de lesiones! No utilizar el aparato
nunca sin la lanza dosificadora sin montar.
Comprobar que la lanza dosificadora está
bien colocada antes de cada uso. La rosca
de la lanza dosificadora debe estar bien
apretada con la mano.
PELIGRO
¡Riesgo de lesiones! Durante el trabajo sujete con firmeza con las dos manos la pistola pulverizadora y el tubo pulverizador.
PELIGRO
¡Riesgo de lesiones! Durante el funcionamiento, la palanca de disparo y la palanca
de fijación no deben estar bloqueadas.
PELIGRO
¡Riesgo de lesiones! Si la palanca de fijación está dañada, llamar al servicio técnico.
CUIDADO
– Peligro de daños El equipo no debe po-
nerse en funcionamiento nunca con el
depósito de combustible vacío. De lo
contrario, se estropeará la bomba de
combustible. Esto también se aplica du-
rante el funcionamiento con agua fría.
– Peligro de daños No operar nunca el
equipo sin filtro en la conexión de agua.
– Peligro de daños No colocar objetos
(manguera etc.) en la chimenea o sobre
ella.
– Aparato con enrollador de mangueras:
¡Peligro de daños! Recoger siempre del
todo la manguera de alta presión.
Abrir/cerrar capó del aparato
Figura
Desbloquear el cierre del capó con un
destornillador. Abatir el capó del apara-
to hacia delante y dejarlo colgando.
Figura
Colgar el capó del aparato (véase las
flechas), abatir hacia arriba y encajar el
cierre del capó.
– 5
67ES
Page 68

Abrir/cerrar la pistola pulverizadora
Abrir la pistola pulverizadora: Accionar
la palanca de fijación y la palanca de
disparo.
Cerrar la pistola de pulverización: Sol-
tar la palanca de fijación y la palanca de
disparo.
Cambiar las boquillas
PELIGRO
¡Riesgo de lesiones! Desconectar el aparato antes de cambiar la boquilla y accionar la
pistola pulverizadora hasta que el aparato
se quede sin presión.
Asegurar la pistola pulverizadora em-
pujando la palanca de fijación hacia delante.
Sustituir la boquilla.
Tipos de servicio
Figura
0/OFF = OFF
1 Servicio con agua fría
2 Servicio con agua caliente
Conexión del aparato
Ajustar el interruptor del aparato al
modo de servicio deseado.
El aparato se pone en marcha brevemente
y se desconecta en cuanto se ha alcanzado la presión de trabajo.
Quitar el seguro de la pistola pulveriza-
dora empujando la palanca de fijación
hacia atrás.
Al accionar la pistola pulverizadora manual
se vuelve a encender el aparato.
Nota: Si no sale agua de la boquilla de alta
presión, purgue el aire de la bomba.
Purgar el aire de la bomba:
Cuando la pistola pulverizadora está
abierta conecte y desconecte el apara-
to varias veces con el interruptor princi-
pal.
Nota: Al desmontar la lanza dosificadora
de la pistola pulverizadora manual se acelera el proceso de purga de aire.
Interrupción del funcionamiento
Soltando la palanca de disparo se apa-
ga el equipo.
Asegurar la pistola pulverizadora empujando la palanca de fijación hacia delante.
Quitar el seguro de la pistola pulveriza-
dora empujando la palanca de fijación
hacia atrás.
Tirando de nuevo de la palanca de disparo, el equipo se enciende de nuevo.
Selección del tipo de chorro
Cerrar la pistola de pulverización manual.
Asegurar la pistola pulverizadora em-
pujando la palanca de fijación hacia delante.
Girar la carcasa de la boquilla hasta
que coincida en símbolo deseado con
la marca:
Chorro circular de alta presión
(0°) para suciedad especialmente resistente
Chorro plano de baja presión
(CHEM) para el uso con detergentes o para limpiar a una
tensión baja.
Chorro plano de alta presión
(25°) para áreas sucias muy
amplias.
Funcionamiento con detergente
– Utilice los detergentes con moderación
para no perjudicar el medio ambiente.
– El detergente debe ser apropiado para
la superficie que se ha de limpiar.
Figura
Saque la manguera de aspiración de
detergente.
Gire el filtro en la manguera de aspira-
ción de detergente para dosificar el de-
tergente.
Cuelgue la manguera de detergente en
un depósito que contenga una solución
de detergente.
Coloque la boquilla en la posición
"CHEM".
68 ES
– 6
Page 69

Limpieza
Ajustar la concentración de detergente
en función de la superficie a limpiar.
Nota: Dirigir pimero el chorro a al ta p resi ón
desde una mayor distancia hacia el objeto
a limpiar, con el fin de evitar causar daños
por una presión demasiado alta.
Método de limpieza recomendado
– disolución de la suciedad
Rociar con detergente con moderación
y dejar actuar 1...5 minutos pero sin de-
jar secar.
– eliminación de la suciedad
Aplicar el chorro de agua a alta presión
sobre la suciedad disuelta para elimi-
narla.
Servicio con agua fría
Eliminación de suciedades ligeras y enjuague de, por ejemplo: aparejos de jardín, terrazas, herramientas, etc.
Colocar el interruptor principal en la po-
sición "1".
Servicio con agua caliente
PELIGRO
Existe peligro de escaldamiento
Colocar el interruptor principal en la po-
sición "2".
Después del funcionamiento con
detergente
Girar totalmente el filtro en la manguera
de aspiración de detergente (-).
Colocar el interruptor principal en la po-
sición "1".
Enjuagar el aparato con la pistola pul-
verizadora abierta durante al menos 1
minuto.
Desconexión del aparato
PELIGRO
Peligro de escaldamiento por agua caliente
Después del servicio con agua caliente, se
debe enfriar el equipo con agua fría durante al menos dos minutos con la pistola
abierta.
Cerrar el abastecimiento de agua.
Abrir la pistola pulverizadora manual.
Conectar la bomba con el interruptor de
equipo y dejar en marcha 5-10 segundos.
Cerrar la pistola de pulverización ma-
nual.
Ponga el interruptor del aparato en "0/
OFF".
Sacar el enchufe de la toma de corrien-
te sólo con las manos secas.
Retirar la conexión de agua.
Poner en funcionamiento la pistola pul-
verizadora manual hasta que no quede
presión en el aparato.
Asegurar la pistola pulverizadora em-
pujando la palanca de fijación hacia delante.
Almacenamiento del aparato
Introducir la pistola pulverizadora ma-
nual en el soporte.
Aparato sin enrollador de mangueras:
Enrollar la manguera de alta presión y
colgar sobre el soporte de manguera.
Aparato con enrollador de mangueras:
Enrollar la manguera de alta presión en
el enrollador de mangueras. Deslizar el
asa de la manivela para bloquear el enrollador de mangueras.
Enrollar el cable de conexión alrededor
del soporte de cable.
Fijar el enchufe con el clip montado.
Protección antiheladas
CUIDADO
¡Riesgo de daños! El hielo deteriora el aparato si éste no se ha vaciado por completo
de agua.
Coloque el aparato en un lugar a salvo
de las heladas.
Si el aparato está conectado a una chimenea deberá tenerse en cuenta lo siguiente:
CUIDADO
Peligro de sufrir daños a causa del aire frío
que penetre a través de la chimenea.
Mantener el aparato a salvo de las tem-
peraturas exteriores por debajo de 0º C.
Si no es posible el almacenamiento libre de
heladas, pare el aparato.
– 7
69ES
Page 70

Parada
En largos periodos de inactividad o cuando
no sea posible el almacenamiento a salvo
del hielo:
Dejar salir agua. Enjuagar el aparato con anticongelante.
Dejar salir agua
Desatornillar la manguera de abasteci-
miento de agua y la manguera a alta
presión.
Figura
Colocar el aparato sobre la parte trasera.
Dejar en marcha el aparato durante 1
minuto como máximo en funcionamiento en frío hasta que la bomba y los conductos estén vacíos.
Enjuagar el aparato con anticongelante.
Nota: Tener en cuenta las instrucciones de
uso del fabricante del anticongelante.
Añadir a la toma de agua un anticonge-
lante de los habituales en el mercado.
Encender el aparato (sin quemador),
hasta que está totalmente enjuagado.
De este modo se conseguirá una protección segura contra la corrosión.
Almacenamiento
몇 PRECAUCIÓN
¡Peligro de lesiones y daños! Respetar el
peso del aparato en el almacenamiento.
Transporte
PELIGRO
Riesgo de lesiones Hay riesgo de vuelco
en pendientes muy inclinadas, cuando la
inclinación lateral es muy grande y cuando
el suelo no es estable.
– Mover el equipo solo en pendientes de
hasta 2%.
– Mover el equipo únicamente sobre una
base firme.
CUIDADO
Proteger la palanca de fijación contra daños durante el transporte.
몇 PRECAUCIÓN
¡Peligro de lesiones y daños! Respetar el
peso del aparato para el transporte.
Colocar el aparato sobre la parte trase-
ra y vaciar el agua residual antes del
transporte.
Para transportar el aparato por trayec-
tos largos, tire de él mediante el estribo
de empuje.
Para transportar el aparato, agárrelo
del mango y del estribo de empuje.
Al transportar en vehículos, asegurar el
aparato para evitar que resbale y vuelque conforme a las directrices vigentes.
Cuidados y mantenimiento
PELIGRO
Peligro de lesiones causadas por un aparato que se arranque involuntariamente y
descarga eléctrica. Antes de efectuar cualquier trabajo en el aparato, hay que desconectarlo de la red eléctrica.
Cerrar el abastecimiento de agua.
Abrir la pistola pulverizadora manual.
Conectar la bomba con el interruptor de
equipo y dejar en marcha 5-10 segundos.
Cerrar la pistola de pulverización ma-
nual.
Ponga el interruptor del aparato en "0/
OFF".
Sacar el enchufe de la toma de corrien-
te sólo con las manos secas.
Retirar la conexión de agua.
Poner en funcionamiento la pistola pul-
verizadora manual hasta que no quede
presión en el aparato.
Asegurar la pistola pulverizadora em-
pujando la palanca de fijación hacia delante.
Deje enfriar el aparato.
Inspección de seguridad/contrato
de mantenimiento
Acuerde una inspección regular de seguridad con su distribuidor o cierre un contrato
de mantenimiento. Solicite el asesoramiento oportuno.
70 ES
– 8
Page 71

Intervalos de mantenimiento
Todas las semanas
Limpiar el filtro de la conexión de agua.
mensualmente
Limpie el filtro en la manguera de aspi-
ración de detergente.
Cada 500 horas de servicio, al menos cada año
Solicitar al servicio técnico que efectúe
el mantenimiento del aparato.
Trabajos de mantenimiento
Indicación: No es necesario cambiar el
aceite de la bomba de alta presión.
Limpiar el filtro de la conexión de agua
Quitar el filtro.
Limpie el filtro en agua y vuelva a colo-
carlo.
Limpie el filtro en la manguera de aspiración de detergente.
Limpie el filtro en agua y vuelva a colo-
carlo.
Ayuda en caso de avería
PELIGRO
Peligro de lesiones causadas por un aparato que se arranque involuntariamente y
descarga eléctrica. Antes de efectuar cualquier trabajo en el aparato, hay que desconectarlo de la red eléctrica.
El aparato no funciona
– No hay tensión de red
Verificar conexión de red/cable.
– Motor sobrecargado/sobrecalentado
Ponga el interruptor del aparato en "0/
OFF".
Deje enfriar el aparato.
Conexión del aparato
Si después de esto la avería se vuelve
a producir, haga que revisen el aparato
en el servicio técnico.
– El limitador de temperatura de gas de
escape se ha activado, el serpentín de
recalentamiento está lleno de hollín.
El aparato deberá deshollinarlo el servi-
cio técnico.
– El limitador de temperatura de gas de
escape se ha activado, la temperatura
del gas de escape es demasiado alta.
Ponga el interruptor del aparato en "0/
OFF".
Deje enfriar el aparato.
Sólo para aparatos con restablecimien-
to manual:
Figura
Pulsar el botón de posición a cero del limitador de temperatura de gases de
escape.
Conexión del aparato
Si después de esto la avería se vuelve
a producir, haga que revisen el aparato
en el servicio técnico.
El aparato no genera presión
– Aire en el sistema
Purgar el aire de la bomba:
Cuando la pistola pulverizadora está
abierta conecte y desconecte el aparato
varias veces con el interruptor principal.
Nota: Al desmontar la lanza dosificadora
de la pistola pulverizadora manual se acelera el proceso de purga de aire.
Rellenar o cambiar la botella de deter-
gente externa si está vacía.
Verifique las conexiones y tuberías.
– El filtro de la conexión de agua está sucio.
Limpiar el filtro.
– La cantidad de abastecimiento de agua
es escasa
Verifique la cantidad de abastecimiento
de agua (ver datos técnicos).
– Grifo de agua cerrado.
Abra el grifo del agua.
– 9
71ES
Page 72

El aparato se apaga/enciende
continuamente cuando la pistola
está abierta
– Aire en el sistema
Purgar el aire de la bomba:
Cuando la pistola pulverizadora está
abierta conecte y desconecte el aparato
varias veces con el interruptor principal.
Nota: Al desmontar la lanza dosificadora
de la pistola pulverizadora manual se acelera el proceso de purga de aire.
– Boquilla de alta presión atascada
Limpiar la boquilla.
– Serpentín de recalentamiento calcificado
El aparato deberá descalcificarlo el ser-
vicio técnico.
El aparato se enciende y se apaga
continuamente cuando la pistola
está cerrada
– Fuga en el sistema de alta presión
Verificar la estanqueidad del sistema
de alta presión y las conexiones.
El aparato tiene fugas, el agua gotea
del aparato por abajo
– Bomba no estanca, válvula de seguri-
dad no estanca.
Nota: Lo permitido es 3 gotas por minuto.
En caso de fuga de mayor envergadura
deje que el servicio técnico revise el
aparato.
El aparato no succiona detergente
– La boquilla está colocada en "presión
alta".
Coloque la boquilla en la posición
"CHEM".
– El recipiente de detergente externo
está vacío.
Rellenar o cambiar la botella de deter-
gente externa.
– Filtro en la manguera de aspiración de
detergente sucio
Limpiar el filtro.
Figura
– La válvula de retención se pega
Desmontar la manguera de detergente
y soltar la válvula de retención con un
objeto obtuso.
El quemador no se enciende
– Depósito de combustible vacío.
Llenar de combustible.
– Falta de agua
Comprobar la conexión de agua y las
tuberías.
– Temperatura de alimentación de agua
demasiado alta.
Alimentar con agua caliente a una tem-
peratura máx. de 30 °C.
Figura
– El filtro de combustible está sucio
Cambie el filtro de combustible.
Servicio de atención al cliente
Si la avería no se puede solucionar el
aparato debe ser revisado por el servicio técnico.
Garantía
En todos los países rigen las condiciones
de garantía establecidas por nuestra empresa distribuidora. Las averías del aparato
serán subsanadas gratuitamente dentro
del periodo de garantía, siempre que se deban a defectos de material o de fabricación.
En un caso de garantía, le rogamos que se
dirija con el comprobante de compra al distribuidor donde adquirió el aparato o al servicio al cliente autorizado más próximo a su
domicilio.
Accesorios y piezas de
repuesto
Utilice solamente accesorios y recambios
originales, ya que garantizan un funcionamiento correcto y seguro del equipo.
Puede encontrar información acerca de los
accesorios y recambios en
www.kaercher.com.
72 ES
– 10
Page 73

Declaración UE de
CEO
Head of Approbation
conformidad
Por la presente declaramos que la máquina designada a continuación cumple, tanto
en lo que respecta a su diseño y tipo constructivo como a la versión puesta a la venta
por nosotros, las normas básicas de seguridad y sobre la salud que figuran en las directivas comunitarias correspondientes. La
presente declaración perderá su validez en
caso de que se realicen modificaciones en
la máquina sin nuestro consentimiento explícito.
Producto: Limpiadora a alta presión
Modelo: 1.064-xxx
Directivas comunitarias aplicables
2006/42/CE (+2009/127/CE)
2000/14/CE
2014/30/UE
Normas armonizadas aplicadas
EN 55014–1: 2006+A1: 2009+A2: 2011
EN 55014–2: 2015
EN 60335–1
EN 60335–2–79
EN 61000–3–2: 2014
HDS 5/11, HDS 5/13:
EN 61000–3–3: 2013
HDS 5/15:
EN 61000–3–11: 2000
Procedimiento de evaluación de la conformidad aplicado
2000/14/CE: Anexo V
Nivel de potencia acústica dB(A)
HDS 5/11 U, HDS 5/15:
Medido: 91
Garantizado: 94
HDS 5/11 UX, HDS 5/13:
Medido: 91
Garantizado: 93
Persona autorizada para la documentación:
S. Reiser
Alfred Kärcher GmbH & Co. KG
Alfred-Kärcher-Str. 28 - 40
71364 Winnenden (Germany)
Tele.: +49 7195 14-0
Fax: +49 7195 14-2212
Winnenden, 2016/01/01
5.957-976
Los abajo firmantes actúan con plenos poderes y con la debida autorización de la dirección de la empresa.
– 11
73ES
Page 74

Datos técnicos
Conexión de red
Tensión V 220 230 240 220 230 240 220 230 240
Tipo de corriente Hz 1~ 50 1~ 50 1~ 50
Potencia conectada kW 2,2 2,6 2,7
Fusible de red (inerte) A 16 16 13 16 16 13 16 16 13
Categoria de protección -- IPX5 IPX5 IPX5
Clase de protección -- I I I
Impedancia de red máxima permitida Ohm -- -- (0.380+j0.237)
Conexión de agua
Temperatura de entrada (máx.) °C 30 30 30
Velocidad de alimentación (mín.) l/h (l/min) 500 (8,3) 550 (9,2) 500 (8,3)
Altura de aspiración desde el depósito
m 0,5 0,5 0,5
abierto (20 ºC)
Presión de entrada (máx.) MPa (bar) 0,6 (6) 0,6 (6) 0,6 (6)
Diámetro de la manguera de alimentación
pulgadas 1/2 1/2 1/2
(min)
Largo de la manguera de alimentación (mín.) m 7,5 7,5 7,5
Potencia y rendimiento
Caudal, agua l/h (l/min) 450 (7,5) 500 (8,3) 450 (7,5)
Presión de trabajo agua (con boquilla es-
MPa (bar) 11,0 (110) 12,5 (125) 15,0 (150)
tándar)
Sobrepresión de servicio máxima (válvula
MPa (bar) 16,5 (165) 18,0 (180) 20,0 (200)
de seguridad)
Temperatura de trabajo máx. agua caliente °C 80 80 80
Aspiración de detergente l/h (l/min) 0-33 (0-0,6) 0-33 (0-0,6) 0-33 (0-0,6)
Potencia del quemador kW 26 29 26
Consumo máximo de fuel kg/h 2,7 3,1 2,7
Fuerza de retroceso de la pistola pulveri-
N 18,1 21,4 20,8
zadora manual (máx.)
Tamaño de la boquilla de la boquilla están-
-- 032 (033) 034 028
dar (UX)
Valores calculados conforme a la norma EN 60335-2-79
Emisión sonora
Nivel de presión acústica L
Inseguridad K
Nivel de potencia acústica LWA + inseguri-
pA
pA
dB(A) 76 76 77
dB(A) 3 3 3
dB(A) 94 (93) 93 94
dad KWA (UX)
Valor de vibración mano-brazo
Pistola pulverizadora manual m/s
Lanza dosificadora m/s
Inseguridad K m/s
2
2
2
Combustibles
Material combustible -- Aceite combusti-
Cantidad de aceite l 0,1 0,1 0,2
Tipo de aceite Aceite para
motor
15W40
Medidas y pesos
Longitud x anchura x altura (UX) mm 618 x 618 x 994
Peso de funcionamiento típico (UX) kg 70 (72) 74 (76) 76 (78)
Depósito de carburante l 6,5 6,5 6,5
74 ES
HDS 5/11 HDS 5/13 HDS 5/15
2,4 1,0 0,9
1,4 1,1 1,1
0,3 0,3 0,3
Aceite com-
ble EL o Diesel
bustible EL o
Diesel
N.° de pedido
6.288-050.0
N.° de pedido
6.288-050.0
618 x 618 x
(1163)
994 (1163)
– 12
Aceite combusti-
ble EL o Diesel
N.° de pedido
6.288-050.0
618 x 618 x 994
(1163)
Page 75

Leia o manual de manual origi-
nal antes de utilizar o seu aparelho. Proceda conforme as indicações no
manual e guarde o manual para uma consulta posterior ou para terceiros a quem
possa vir a vender o aparelho.
– Antes de colocar em funcionamento
pela primeira vez é imprescindível ler
atentamente as indicações de segurança n.º 5.951-949.0!
– No caso de danos provocados pelo
transporte, informe imediatamente o revendedor.
– Verificar o conteúdo da embalagem ao
desembalar o aparelho. Volume de fornecimento, ver figura 1.
Índice
Proteção do meio-ambiente . . PT 1
Níveis de perigo . . . . . . . . . . . PT 1
Elementos do aparelho . . . . . . PT 2
Símbolos no aparelho . . . . . . . PT 2
Utilização conforme o fim a que
se destina a máquina . . . . . . . PT 2
Avisos de segurança. . . . . . . . PT 3
Equipamento de segurança . . PT 3
Colocação em funcionamento PT 4
Manuseamento . . . . . . . . . . . . PT 5
Armazenamento . . . . . . . . . . . PT 8
Transporte. . . . . . . . . . . . . . . . PT 8
Conservação e manutenção . . PT 8
Ajuda em caso de avarias. . . . PT 9
Garantia . . . . . . . . . . . . . . . . . PT 10
Acessórios e peças sobressa-
lentes . . . . . . . . . . . . . . . . . . . PT 10
Declaração UE de conformida-
de . . . . . . . . . . . . . . . . . . . . . . PT 11
Dados técnicos . . . . . . . . . . . . PT 12
Proteção do meio-ambiente
Os materiais da embalagem são
recicláveis. Não coloque as embalagens no lixo doméstico, envie-as para uma unidade de reciclagem.
Os aparelhos velhos contêm
materiais preciosos e recicláveis
e deverão ser reutilizados. Baterias, óleo e produtos similares
não podem ser deitados fora ao
meio ambiente. Por isso, elimine
os aparelhos velhos através de
sistemas de recolha de lixo adequados.
Por favor, não deposite o óleo de motor, o
gasóleo ou a gasolina no ambiente. Proteja o solo e elimine óleo velho sem prejudicar o ambiente.
Avisos sobre os ingredientes (REACH)
Informações actuais sobre os ingredientes
podem ser encontradas em:
www.kaercher.com/REACH
Níveis de perigo
PERIGO
Aviso referente a um perigo eminente que
pode conduzir a graves ferimentos ou à
morte.
몇 ATENÇÃO
Aviso referente a uma possível situação
perigosa que pode conduzir a graves ferimentos ou à morte.
몇 CUIDADO
Aviso referente a uma situação potencialmente perigosa que pode causar ferimentos leves.
ADVERTÊNCIA
Aviso referente a uma situação potencialmente perigosa que pode causar danos
materiais.
– 1
75PT
Page 76

Elementos do aparelho
Figura
1 Mangueira de alta pressão EASY!Lock
2 Braçadeira para cabo
3 Orifício para encher o combustível
4 Indicação do nível de enchimento
5 Suporte para injectores
6 Linha adutora eléctrica
7 Bomba de alta pressão
8 Conjunto de ligação da água
9 Ligação de alta pressão EASY!Lock
(apenas HDS 5/xx U)
10 Depósito para lanças
11 Ligação da água com filtro
12 Suporte
13 Abertura de saída da mangueira de alta
pressão (apenas HDS 5/xx UX)
14 Pega para portar
15 Tampa da máquina
16 Interruptor da máquina
17 Queimador
18 Suporte para mangueiras (apenas HDS
5/xx U)
19 Tambor de mangueira (apenas HDS
5/xx UX)
20 Mangueira de aspiração do detergente
com filtro
21 Suporte para a lança
22 Placa de tipo
23 Fecho da tampa
24 Manivela para tambor de mangueira
(apenas HDS 5/xx UX)
25 Alavanca de avanço
26 Marcação do injector
27 Bico triplo EASY!Lock
28 Lança EASY!Lock
29 Pistola pulverizadora manual EASY!Lock
30 Bloqueio de segurança da pistola pul-
verizadora manual
31 Alavanca de segurança
32 Gatilho de disparo
Identificação da cor
– Os elementos de comando para o pro-
cesso de limpeza são amarelos.
– Os elementos de comando para a ma-
nutenção e o serviço são cinza claros.
Símbolos no aparelho
Os jactos de alta pressão podem ser perigosos em caso de
uso incorrecto. O jacto não
deve ser dirigido contra pesso-
as, animais, equipamento
eléctrico activo ou contra o próprio aparelho. A lavadora de alta pressão só pode ser
operada em estado erigido (na vertical).
Máquina com carretel de mangueira:
Perigo de queimaduras devido
a superfícies quentes!
Utilização conforme o fim a
que se destina a máquina
– Para limpar: Máquinas, veículos, edifí-
cios, ferramentas, fachadas, terraços,
utensílios de jardinagem etc.
– A lavadora de alta pressão só pode ser
operada em estado erigido (na vertical).
– Nunca deixar o aparelho sem vigilância
enquanto estiver a funcionar.
PERIGO
Perigo de lesões! Ao utilizar a máquina em
estações de serviço ou noutros locais de
perigo, observe as respectivas disposições
em matéria de segurança.
Evite que efluentes poluídas com óleo mineral entrem no solo, na água ou na canalização. Por isso, faça lavagens de motor e
do chassis inferior somente em locais adequados para este fim e equipados com separador de óleo.
Requisitos colocados à qualidade da
água:
ADVERTÊNCIA
Como meio de alta pressão, só pode ser
utilizada água limpa. A sujidade provoca o
desgaste prematuro ou depósitos no aparelho e nos acessórios.
Se for utilizada água de reciclagem, os seguintes valores-limite não podem ser ultrapassados.
76 PT
– 2
Page 77

Valor ph 6,5...9,5
Condutibilidade eléctrica * Condutibilida-
de de água limpa +1200 µS/
cm
Substâncias depositáveis **< 0,5 mg/l
Substâncias filtráveis *** < 50 mg/l
Hidrocarbonetos < 20 mg/l
Cloreto < 300 mg/l
Sulfato < 240 mg/l
Cálcio < 200 mg/l
Dureza total < 28 °dH
< 50 °TH
< 500 ppm (mg
/l)
CaCO
3
Ferro < 0,5 mg/l
Manganésio < 0,05 mg/l
Cobre < 2 mg/l
Cloro activo < 0,3 mg/l
Livre de odores agressivos
* No total, máximo de 2000 µS/cm
** Volume de ensaio 1 l, tempo de depósito
30 min
*** Sem substâncias abrasivas
Avisos de segurança
– Respeitar as respectivas disposições
nacionais do legislador referentes a
projectores de jactos líquidos.
– Respeitar as respectivas disposições
nacionais do legislador referentes à
prevenção de acidentes. Os projectores de jactos líquidos têm que ser controlados regularmente e o resultado do
controlo registado por escrito.
– O equipamento de aquecimento da ins-
talação é uma instalação de combustão. As instalações de combustão têm
que ser controladas regularmente de
acordo com as prescrições nacionais
em vigor.
– Não devem ser feitas quaisquer altera-
ções no aparelho/nos acessórios.
Equipamento de segurança
Os dispositivos de segurança servem para
protecção do utilizador e não podem ser
colocados fora de serviço nem sofrer alterações no seu funcionamento.
Interruptor manométrico
O interruptor manométrico desliga o aparelho ao fechar a pistola pulverizadora manual e volta a ligá-lo assim que a pistola for
novamente aberta.
Válvula de segurança
– A válvula de segurança abre em caso
de sobrepressão da caldeira ou quando
a válvula de segurança ou o interruptor
manométrico estiverem com defeito.
– A válvula de segurança vem regulada e
selada da fábrica. A regulação só pode
ser efectuada pelo serviço de assistência técnica.
Dispositivo de protecção contra a
falta de água
O dispositivo de protecção contra a falta de
água impede que o queimador seja liguado
enquando faltar água.
Regulador da temperatura do gás de
escape
O regulador da temperatura do gás de escape desliga o aparelho assim que este
atingir uma temperatura demasiado elevada do gás de escape.
Contacto de protecção de
enrolamento
O contacto de protecção contra enrolamento no motor, do accionamento da bomba, desliga o motor em caso de uma sobrecarga térmica.
Bloqueio de segurança
O bloqueio de segurança na pistola pulverizadora manual impede uma ligação acidental da máquina.
– 3
77PT
Page 78

Colocação em funcionamento
몇 ATENÇÃO
Perigo de ferimentos! O aparelho, os acessórios, os tubos e as conexões têm de se
encontrar num bom estado. Em caso de
dúvidas quanto ao bom estado do aparelho, não o utilizar.
Montar a pistola pulverizadora
manual, lança, bocal e mangueira de
alta pressão
Aviso: Apenas com uma rotação, o siste-
ma EASY!Lock une, de forma rápida e segura, os componentes através de uma rosca de aperto rápido.
Conectar a lança à pistola pulverizado-
ra manual e apertar manualmente
(EASY!Lock).
Montar o bocal no tubo de jacto (ver a
marcação na parte de cima do anel de
ajuste) e apertar manualmente
(EASY!Lock).
Aparelho sem carretel de mangueira:
Conectar a mangueira de alta pressão
à pistola pulverizadora manual e à ligação de alta pressão do aparelho e apertar manualmente (EASY!Lock).
Máquina com carretel de mangueira:
Conectar a mangueira de alta pressão
à pistola pulverizadora manual e apertar manualmente (EASY!Lock).
Encher combustível
PERIGO
Perigo de explosão! Encher somente gasóleo ou outro óleo combustível leve. É possível o funcionamento com Biodiesel, segundo EN 14214 (a partir de uma temperatura
de 6 °C). Combustíveis inadequados, tais
como gasolina, não podem ser utilizados.
ADVERTÊNCIA
Perigo de danos! Nunca ponha o aparelho
a funcionar com o depósito de combustível
vazio. Caso contrário, destrói-se a bomba
de combustível. Isto aplica-se igualmente
ao funcionamento com água fria.
Abrir a tampa do depósito.
Encher combustível.
Fechar a tampa do tanque.
Limpar o combustível derramado.
Encher/substituir o recipiente do
detergente
PERIGO
Perigo de lesões!
– Utilizar exclusivamente produtos da
Kärcher.
– Nunca aspirar solventes (benzina, ace-
tona, diluente, etc.).
– Evite o contacto com os olhos e com a
pele.
– Observe as instruções de segurança e
de manipulação dos fabricantes de detergentes.
Kärcher oferece um programa individual de produtos de limpeza e de manutenção
O seu revendedor estará sempre à disposição para fornecer-lhe mais informações.
Encher/substituir o recipiente do deter-
gente externo.
Ligação de água
몇 ATENÇÃO
Respeite as normas da companhia de
abastecimento de água.
De acordo com as prescrições em
vigor, o aparelho nunca pode ser
ligado à rede de água potável sem
separador de sistema. Assegurar
que a conexão da instalação de água doméstica seja operada na lavadora de alta
pressão com um separador de sistema, segundo EN 12729, tipo BA.
A água que tenha entrado no separador de
sistema é considerada imprópria para consumo.
몇 CUIDADO
Ligar o separador de sistema sempre à alimentação de água e nunca diretamente ao
aparelho.
Valores de conexão, vide dados técnicos.
Fixar a mangueira de admissão (com-
primento mín. 7,5 m, diâmetro mín. 1/
2“) com uma braçadeira no conjunto de
conexão da água.
78 PT
– 4
Page 79

Ligar a mangueira de admissão da
água na ligação da água do aparelho
no ponto de admissão da água (p. ex,
torneira de água).
Aviso: A mangueira de admissão e a braçadeira não estão incluídas no volume de
fornecimento.
Aspirar água a partir do reservatório
Ligar a mangueira de aspiração (diâ-
metro mínimo de 1/2“) com o filtro
(acessório) na ligação da água.
– Altura máx. de aspiração: 0,5 m
PERIGO
Perigo de ferimentos e de danos! Nunca
aspirar água a partir de um tanque de água
potável. Nunca aspirar líquidos que contenham solventes, tais como diluente de verniz, gasolina, óleo ou água não filtrada. As
vedações no aparelho não são resistentes
a solventes. A névoa de pulverização de
solventes é altamente inflamável, explosiva e tóxica.
Conexão de energia eléctrica
– Valores de conexão: vide dados técni-
cos e placa sinalética.
– A ligação eléctrica tem que ser feita por
um electricista credenciado e tem que
corresponder a IEC 60364-1.
Colocar o interruptor do aparelho na
posição "0/OFF".
Ligar a ficha de rede.
PERIGO
Perigo de ferimentos por choque eléctrico!
– Os cabos de extensão eléctricos ina-
propriados podem ser perigosos. Utilize
ao ar livre unicamente cabos de extensão eléctricos com uma secção transversal suficiente e devidamente homologados e marcados.
– Os cabos de extensão devem ser sem-
pre completamente desenrolados.
– A ficha e o acoplamento do cabo de ex-
tensão utilizado têm que ser impermeáveis.
ADVERTÊNCIA
A impedância de rede máx. permitida, no
ponto de conexão eléctrico (ver dados técnicos), não pode ser excedida. Em caso de
dúvidas sobre a impedância de rede existente no seu ponto de conexão, deve entrar
em contacto com a empresa de fornecimento de energia.
Manuseamento
PERIGO
Perigo de explosão! Não pulverizar líquidos inflamáveis.
PERIGO
Perigo de lesões! Nunca utilizar o aparelho
sem a lança montada. Verificar sempre a fixação correcta da lança, antes de utilizar o
aparelho. As uniões roscadas da lança têm
que ser fixadas manualmente.
PERIGO
Perigo de ferimentos! Durante os trabalhos, segurar a pistola pulverizadora manual e a lança com as duas mãos.
PERIGO
Perigo de ferimentos! O gatilho de disparo
e a alavanca de segurança não devem ser
prendidos enquanto o aparelho estiver em
funcionamento.
PERIGO
Perigo de ferimentos! Contactar os Serviços Técnicos no caso de a alavanca de segurança estar danificada.
ADVERTÊNCIA
– Perigo de danos! Nunca ponha o apa-
relho a funcionar com o depósito de
combustível vazio. Caso contrário, destrói-se a bomba de combustível. Isto
aplica-se igualmente ao funcionamento
com água fria.
– Perigo de danos! Nunca operar o apa-
relho sem filtro na ligação da água.
– Perigo de danos! Não posicionar objec-
tos (mangueira, etc.) na ou por cima da
chaminé.
– Máquina com carretel de mangueira:
Perigo de danos! A mangueira de alta
pressão deve sempre ser completamente desenrolada.
– 5
79PT
Page 80

Abrir/fechar a tampa do aparelho
Figura
Bloquear o fecho da cobertura com
uma chave de parafusos, rebater a cobertura do aparelho para a frente e de-
sengatar.
Figura
Engatar a cobertura do aparelho (ver
setas), rebater para cima e encaixar o
fecho da cobertura.
Abrir/Fechar a pistola pulverizadora
manual
Abrir a pistola pulverizadora manual:
accionar a alavanca de segurança e o
gatilho de disparo.
Fechar a pistola pulverizadora manual:
soltar a alavanca de segurança e o ga-
tilho de disparo.
Substituir o bocal
PERIGO
Perigo de ferimentos! Desligar o aparelho
antes de substituir o bocal e accionar a pistola pulverizadora manual até o aparelho ficar isento de pressão.
Bloquear a pistola pulverizadora manu-
al; para o efeito, deslocar o bloqueio de
segurança para a frente.
Substituir o bocal.
Modos operativos
Figura
0/OFF = Desligado
1 Funcionamento com água fria
2 Operação com água quente
Ligar a máquina
Coloque o selector no modo operativo
pretendido.
A máquina funciona por pouco tempo e
desliga-se logo que atingir a pressão de
serviço.
Desbloquear a pistola pulverizadora
manual; para o efeito, deslocar o blo-
queio de segurança para trás.
Ao activar a pistola manual, a máquina volta a ligar-se.
80 PT
Aviso: Se não sair água do bico de alta
pressão, eliminar-se o ar da bomba.
Eliminar o ar da bomba:
Com a pistola manual pulverizadora
aberta, ligar e desligar várias vezes a
máquina através do selector.
Aviso: Se desmontar a lança da pistola
pulverizadora manual, o processo de purga
do ar é acelerado.
Interromper o funcionamento
Libertando o gatilho de disparo, o apa-
relho desliga.
Bloquear a pistola pulverizadora manual; para o efeito, deslocar o bloqueio de
segurança para a frente.
Desbloquear a pistola pulverizadora
manual; para o efeito, deslocar o bloqueio de segurança para trás.
Voltando accionar o gatilho de disparo,
o aparelho volta a funcionar.
Selecção do tipo de jacto
Fechar a pistola pulverizadora manual.
Bloquear a pistola pulverizadora manu-
al; para o efeito, deslocar o bloqueio de
segurança para a frente.
Rodar a estrutura do injector até que o
símbolo desejado coincida com a marcação:
Jacto circular de alta pressão
(0º) para sujidade de remoção
particularmente difícil
Jacto plano de baixa pressão
(CHEM) para funcionamento
com detergentes ou para limpeza com uma pressão reduzida.
Jacto plano de alta pressão
(25º) para sujidade de grande
superfície
Funcionamento com detergente
– Não utilize mais detergente do que ne-
cessário para não prejudicar inutilmente o ambiente.
– Utilize um detergente adequado para a
superfície que pretende limpar.
– 6
Page 81

Figura
Retirar a mangueira de aspiração de
detergente.
Rodar o filtro na mangueira de aspira-
ção do detergente, para dosear o deter-
gente.
Pendurar a mangueira de aspiração do
detergente num recipiente com o pro-
duto.
Regular o bocal em "CHEM".
Limpar
Regular a concentração do detergente
conforme a superfície a ser limpa.
Aviso: Para começar, aumente a distância
do jacto de alta pressão ao objecto a ser
limpo, para evitar possíveis danos causados pela pressão alta.
Métodos de limpeza recomendados
– Soltar a sujidade:
Borrifar um pouco de detergente e dei-
xar actuar 1..5 minutos evitando, po-
rém, que seque.
– Remover a sujidade:
Remover a sujidade solta com o jacto
de alta pressão.
Funcionamento com água fria
Remover sujidade leve e enxaguar com
água limpa, p. ex.: utensílios de jardinagem, terraços, ferramentas, etc.
Colocar o selector na posição "1".
Operação com água quente
PERIGO
Perigo de queimaduras!
Colocar o selector na posição "2".
Depois de trabalhar com detergente
Fechar totalmente o filtro na mangueira
de aspiração do detergente (-).
Colocar o selector na posição "1".
Lavar o aparelho pelo menos durante
um minuto com a pistola pulverizadora
aberta.
Desligar o aparelho
PERIGO
Perigo de queimaduras devido a água
quente! Após o funcionamento com água
quente deixe ligado a máquina, no mínimo,
por mais dois minutos com a pistola aberta
e com água fria para arrefecê-la.
Fechar a alimentação de água.
Abrir a pistola pulverizadora manual.
Ligar a bomba no interruptor do apare-
lho e deixar o mesmo a trabalhar durante 5 a 10 minutos.
Fechar a pistola pulverizadora manual.
Colocar o interruptor do aparelho na
posição "0/OFF".
Antes de retirar a ficha de rede da to-
mada certifique-se que suas mãos estejam secas.
Retirar a conexão de água.
Accionar a pistola manual até a máqui-
na ficar sem pressão.
Bloquear a pistola pulverizadora manu-
al; para o efeito, deslocar o bloqueio de
segurança para a frente.
Guardar a máquina
Encaixar a pistola de injecção manual
no suporte.
Aparelho sem carretel de mangueira:
Enrolar a mangueira de alta pressão e
pendurá-la sobre o depósito das mangueiras.
Máquina com carretel de mangueira:
Enrolar a mangueira de alta pressão no
tambor de mangueira. Empurrar o punho da manivela para bloquear o tambor de mangueira.
Enrolar o cabo de ligação à volta da
braçadeira do cabo.
Fixar a ficha com o clipe montado.
Protecção contra o congelamento
ADVERTÊNCIA
Perigo de danos! O gelo danificará o aparelho se a água não for completamente retirada.
Deposite a máquina num local ao abri-
go do gelo.
Se a máquina estiver conectado em uma
chaminé, deve observar-se o seguinte:
– 7
81PT
Page 82

ADVERTÊNCIA
Perigo de danos através de ar frio que possa penetrar pela chaminé.
Separar a máquina da chaminé, quan-
do a temperatura externa for abaixo de
0 °C.
Se não for possível depositar a máquina
em locais protegidos do gelo, a máquina
deverá ser desactivado.
Desactivação da máquina
Desactiva-se a máquina quando não for
utilizada por muito tempo ou quando não
for possível depositá-la ao abrigo do gelo:
Esvaziar a água.
Enxaguar a máquina com anti-conge-
lante.
Escoar a água
Desmontar a mangueira de alimenta-
ção de água e a mangueira de alta
pressão.
Figura
Deitar o aparelho de costas.
Deixar funcionar a máquina durante, no
máx., 1 minuto com água fria até que
toda a água tenha saído da bomba e
das mangueiras.
Enxaguar a máquina com anticongelante
Aviso: Respeitar as instruções de utiliza-
ção do fabricante do anticongelante.
Encher um anti-congelante na ligação
da água.
Ligar o aparelho (sem queimador) até
que o mesmo esteja totalmente enxa-
guado.
Desse modo, obtém-se assim uma protecção contra corrosão.
Armazenamento
몇 CUIDADO
Perigo de lesões e de danos! Ter atenção
ao peso do aparelho durante o armazenamento.
Transporte
PERIGO
Perigo de ferimentos! Perigo de tombamento no caso de declives acentuados, no
caso de inclinações laterais excessivas e
em caso de pavimentos instáveis.
– Deslocar o aparelho apenas sobre incli-
nações até máx. 2%.
– Conduzir o aparelho apenas sobre piso
firme.
ADVERTÊNCIA
Durante o transporte, proteger o gatilho de
disparo contra danos.
몇 CUIDADO
Perigo de lesões e de danos! Ter atenção
ao peso do aparelho durante o transporte.
Pousar o aparelho de costas e escoar a
água residual antes de o transportar.
Para transportar o aparelho para lon-
gas distâncias, puxe-o pela alavanca
de avanço.
Agarrar no aparelho pelos punhos e pelo
arco de impulsão para o transportar.
Durante o transporte em veículos, pro-
teger o aparelho contra deslizes e tombamentos, de acordo com as directivas
em vigor.
Conservação e manutenção
PERIGO
Perigo de ferimentos devido a choque eléctrico ou activação inadvertida do aparelho.
Desligar o aparelho e retirar a ficha de rede
antes de efectuar quaisquer trabalhos no
aparelho.
Fechar a alimentação de água.
Abrir a pistola pulverizadora manual.
Ligar a bomba no interruptor do apare-
lho e deixar o mesmo a trabalhar durante 5 a 10 minutos.
Fechar a pistola pulverizadora manual.
Colocar o interruptor do aparelho na
posição "0/OFF".
Antes de retirar a ficha de rede da to-
mada certifique-se que suas mãos estejam secas.
Retirar a conexão de água.
82 PT
– 8
Page 83

Accionar a pistola manual até a máqui-
na ficar sem pressão.
Bloquear a pistola pulverizadora manu-
al; para o efeito, deslocar o bloqueio de
segurança para a frente.
Deixar a máquina arrefecer.
Inspecção de Segurança /Contrato
de Manutenção
Pode acordar com o seu Agente vendedor,
uma inspecção regular de segurança ou
assinar um contrato de manutenção. Por
favor, peça informações sobre este tema.
Intervalos de manutenção
Semanalmente
Limpar o filtro na ligação de água.
Mensalmente
Limpar o filtro na mangueira de aspira-
ção do detergente.
Todas as 500 horas de serviço, pelo menos uma vez por ano
Deixar que a manutenção do aparelho
seja efectuada pelos Serviços Técnicos.
Trabalhos de manutenção
Aviso: Não é necessário mudar o óleo na
bomba de alta pressão.
Limpar o filtro na ligação de água
Retirar o filtro.
Limpar o filtro com água e remontá-lo.
Limpar o filtro na mangueira de aspiração de detergente
Limpar o filtro com água e remontá-lo.
Ajuda em caso de avarias
PERIGO
Perigo de ferimentos devido a choque eléctrico ou activação inadvertida do aparelho.
Desligar o aparelho e retirar a ficha de rede
antes de efectuar quaisquer trabalhos no
aparelho.
A máquina não funciona
– Não há tensão de rede
Verificar conexão de rede eléctrica/li-
nha de alimentação.
– Motor sobrecarregado/sobreaquecido
Colocar o interruptor do aparelho na
posição "0/OFF".
Deixar a máquina arrefecer.
Ligar o aparelho.
Se voltar a ocorrer a avaria, mande o
serviço de assistência técnica verificar
a máquina.
– Disparo do limitador da temperatura do
gás de escape; serpentina de aqueci-
mento com fuligem.
Mande o serviço de assistência técnica
eliminar a fuligem.
– Disparo do limitador da temperatura do
gás de escape; temperatura do gás de
escape excessiva.
Colocar o interruptor do aparelho na
posição "0/OFF".
Deixar a máquina arrefecer.
Apenas nos aparelhos com reposição
manual:
Figura
Accionar a tecla de reposição do regu-
lador da temperatura de escape.
Ligar o aparelho.
Se voltar a ocorrer a avaria, mande o
serviço de assistência técnica verificar
a máquina.
A máquina não gera pressão
–Ar no sistema
Eliminar o ar da bomba:
Com a pistola manual pulverizadora
aberta, ligar e desligar várias vezes a
máquina através do selector.
Aviso: Se desmontar a lança da pistola
pulverizadora manual, o processo de purga
do ar é acelerado.
Encher/substituir o recipiente do deter-
gente externo, se este estiver vazio.
Verificar as conexões e as tubagens.
– Filtro na ligação de água com sujidade
Limpar o filtro.
– 9
83PT
Page 84

– Quantidade de abastecimento de água
demasiado baixa
Controlar quantidade de água de ali-
mentação (veja Dados Técnicos).
– Torneira da água fechada.
Abrir a torneira.
O aparelho liga e desliga
continuamente quando a pistola
manual está aberta
–Ar no sistema
Eliminar o ar da bomba:
Com a pistola manual pulverizadora
aberta, ligar e desligar várias vezes a
máquina através do selector.
Aviso: Se desmontar a lança da pistola
pulverizadora manual, o processo de purga
do ar é acelerado.
– Bocal de alta pressão entupido
Limpar bocal.
– Serpentina de aquecimento com calcário
Mande o serviço de assistência técnica
eliminar o calcário.
A máquina liga-se e desliga-se
continuamente quando a pistola
manual está fechada
– Fuga no sistema de alta pressão.
Verificar se o sistema de alta pressão e
as conexões não apresentem fugas.
A máquina apresenta fugas,
vertendo gotas de água
– Bomba com fugas, válvula de seguran-
ça com fugas.
Aviso: São permitidas 3 gotas/minuto.
Se a fuga for maior, mande o serviço de
assistência técnica verificar a máquina.
A máquina não aspira detergente
– O bocal está ajustado em "alta pressão"
Regular o bocal em "CHEM".
– O recipiente de detergente externo está
vazio.
Encher/substituir o recipiente do deter-
gente externo.
– Filtro na mangueira de aspiração de de-
tergente com sujidade
Limpar o filtro.
Figura
– A válvula de retenção está colada.
Retirar a mangueira do produto de lim-
peza (detergente) e soltar a de retenção com um objecto obtuso.
O queimador não acende
– Depósito do combustível vazio.
Encher combustível.
– Falta de água
Controlar a ligação da água, controlar a
linha adutora.
– Temperatura da água de admissão de-
masiado alta.
Alimentar água com máx. 30 °C.
Figura
– O filtro de combustível está sujo
Substituir o filtro de combustível.
Serviço de assistência técnica
Quando o defeito não puder ser consertado, a máquina deverá ser verificada
pelo serviço de assistência técnica.
Garantia
Em cada país vigem as respectivas condições de garantia estabelecidas pelas nossas Empresas de Comercialização. Eventuais avarias no aparelho durante o período de garantia serão reparadas, sem encargos para o cliente, desde que se trate
dum defeito de material ou de fabricação.
Em caso de garantia, dirija-se, munido do
documento de compra, ao seu revendedor
ou ao Serviço Técnico mais próximo.
Acessórios e peças
sobressalentes
Utilizar apenas acessórios e peças sobressalentes originais. Só assim poderá garantir uma operação do aparelho segura e sem
avarias.
Para mais informações sobre acessórios e
peças sobressalentes, consulte
www.kaercher.com.
84 PT
– 10
Page 85

Declaração UE de
CEO
Head of Approbation
conformidade
Declaramos que a máquina a seguir designada corresponde às exigências de segurança e de saúde básicas estabelecidas
nas Directivas UE por quanto concerne à
sua concepção e ao tipo de construção assim como na versão lançada no mercado.
Se houver qualquer modificação na máquina sem o nosso consentimento prévio, a
presente declaração perderá a validade.
Produto: Lavadora de alta pressão
Tipo: 1.064-xxx
Respectivas Directrizes da UE
2006/42/CE (+2009/127/CE)
2000/14/CE
2014/30/UE
Normas harmonizadas aplicadas
EN 55014–1: 2006+A1: 2009+A2: 2011
EN 55014–2: 2015
EN 60335–1
EN 60335–2–79
EN 61000–3–2: 2014
HDS 5/11, HDS 5/13:
EN 61000–3–3: 2013
HDS 5/15:
EN 61000–3–11: 2000
Processo aplicado de avaliação de conformidade
2000/14/CE: Anexo V
Nível de potência acústica dB(A)
HDS 5/11 U, HDS 5/15:
Medido: 91
Garantido: 94
HDS 5/11 UX, HDS 5/13:
Medido: 91
Garantido: 93
Alfred Kärcher GmbH & Co. KG
Alfred-Kärcher-Str. 28 - 40
71364 Winnenden (Germany)
Tel.: +49 7195 14-0
Fax: +49 7195 14-2212
Winnenden, 2016/01/01
5.957-976
Os abaixo assinados têm procuração para
agirem e representarem a gerência.
Responsável pela documentação:
S. Reiser
– 11
85PT
Page 86

Dados técnicos
Ligação à rede
Tensão V 220 230 240 220 230 240 220 230 240
Tipo de corrente Hz 1~ 50 1~ 50 1~ 50
Potência da ligação kW 2,2 2,6 2,7
Protecção de rede (fusível de acção lenta) A 16 16 13 16 16 13 16 16 13
Tipo de protecção -- IPX5 IPX5 IPX5
Classe de protecção -- I I I
Impedância da rede máx. permitida Ohm -- -- (0.380+j0.237)
Ligação de água
Temperatura de admissão (máx.) °C 30 30 30
Quantidade de admissão (mín.) l/h (l/min) 500 (8,3) 550 (9,2) 500 (8,3)
Altura de aspiração dum recipiente aberto
m 0,5 0,5 0,5
(20 ºC).
Pressão de admissão (máx.) MPa (bar) 0,6 (6) 0,6 (6) 0,6 (6)
Diâmetro da mangueira de admissão da
Polegada 1/2 1/2 1/2
água (mín.)
Comprimento da mangueira de admissão
m 7,5 7,5 7,5
(mín.)
Dados relativos à potência
Vazão, água l/h (l/min) 450 (7,5) 500 (8,3) 450 (7,5)
Pressão de serviço da água (com bocal pa-
MPa (bar) 11,0 (110) 12,5 (125) 15,0 (150)
drão)
Máx. pressão de serviço admissível (válvula
MPa (bar) 16,5 (165) 18,0 (180) 20,0 (200)
de segurança)
Temperatura máx. de serviço da água quen-te°C 80 80 80
Aspiração de detergente l/h (l/min) 0-33 (0-0,6) 0-33 (0-0,6) 0-33 (0-0,6)
Potência do queimador kW 26 29 26
Consumo máximo do óleo combustível kg/h 2,7 3,1 2,7
Força de recuo (máx.) da pistola manual N 18,1 21,4 20,8
Calibre do bico do bocal padrão (UX) -- 032 (033) 034 028
Valores obtidos segundo EN 60335-2-79
Emissão de ruído
Nível de pressão acústica L
Insegurança K
pA
pA
Nível de potência acústica LWA + Inseguran-
(UX)
ça K
WA
Valor de vibração mão/braço
Pistola pulverizadora manual m/s
Lança m/s
Insegurança K m/s
dB(A) 76 76 77
dB(A) 3 3 3
dB(A) 94 (93) 93 94
2
2
2
Produtos de consumo
Combustível -- Óleo combustível
Quantidade de óleo l 0,1 0,1 0,2
Tipo de óleo Óleo do mo-
tor 15W40
Medidas e pesos
Comprimento x Largura x Altura (UX) mm 618 x 618 x 994
Peso de operação típico (UX) kg 70 (72) 74 (76) 76 (78)
Tanque de combustível l 6,5 6,5 6,5
HDS 5/11 HDS 5/13 HDS 5/15
2,4 1,0 0,9
1,4 1,1 1,1
0,3 0,3 0,3
extra leve ou ga-
sóleo
N.º de encomen-
da: 6.288-050.0
Óleo combustí-
vel extra leve
ou gasóleo
N.º de enco-
menda: 6.288-
Óleo combustível
extra leve ou ga-
N.º de encomen-
da: 6.288-050.0
050.0
(1163)
618 x 618 x 994
(1163)
618 x 618 x 994
sóleo
(1163)
86 PT
– 12
Page 87

Læs original brugsanvisning in-
den første brug, følg anvisningerne og opbevar vejledningen til senere
efterlæsning eller til den næste ejer.
– Inden første ibrugtagelse skal betje-
ningsvejledningen og sikkerhedshenvisningerne nr. 5.951-949.0 læses!
– Ved transportskader skal forhandleren
informeres omgående.
– Kontroller emballagens indhold. Leve-
ringsomfang se figur 1.
Indholdsfortegnelse
Miljøbeskyttelse . . . . . . . . . . . DA 1
Faregrader . . . . . . . . . . . . . . . DA 1
Maskinelementer. . . . . . . . . . . DA 2
Symboler på maskinen . . . . . . DA 2
Bestemmelsesmæssig anven-
delse . . . . . . . . . . . . . . . . . . . . DA 2
Sikkerhedsanvisninger . . . . . . DA 3
Sikkerhedsanordninger . . . . . . DA 3
Ibrugtagning . . . . . . . . . . . . . . DA 3
Betjening. . . . . . . . . . . . . . . . . DA 5
Opbevaring . . . . . . . . . . . . . . . DA 7
Transport. . . . . . . . . . . . . . . . . DA 7
Pleje og vedligeholdelse . . . . . DA 8
Hjælp ved fejl . . . . . . . . . . . . . DA 8
Garanti . . . . . . . . . . . . . . . . . . DA 9
Tilbehør og reservedele . . . . . DA 9
EU-overensstemmelseserklæ-
ring . . . . . . . . . . . . . . . . . . . . . DA 10
Tekniske data . . . . . . . . . . . . . DA 11
Miljøbeskyttelse
Emballagen kan genbruges.
Smid ikke emballagen ud sammen med det almindelige husholdningsaffald, men aflever den
til genbrug.
Udtjente apparater indeholder
værdifulde materialer, der kan
og bør afleveres til genbrug. Batterier, olie og lignende stoffer er
ødelæggende for miljøet. Aflever derfor udtjente apparater på
en genbrugsstation eller lignende.
Motorolie, fyringsolie, diesel og benzin må
ikke nå ind i miljøet. Beskyt jorden og sørg
for en miljørigtigt bortskaffe af affaldsolie.
Henvisninger til indholdsstoffer
(REACH)
Aktuelle oplysninger til indholdsstoffer finder du på:
www.kaercher.com/REACH
Faregrader
FARE
Henviser til en umiddelbar fare, der fører til
alvorlige kvæstelser eller til døden
몇 ADVARSEL
Henviser til en mulig farlig situation, der kan
føre til alvorlige kvæstelser eller til døden.
몇 FORSIGTIG
Henviser til en mulig farlig situation, der kan
føre til lette personskader.
BEMÆRK
Henviser til en mulig farlig situation, der kan
føre til materiel skade.
– 1
87DA
Page 88

Maskinelementer
Figur
1 Højtryksslange EASY!Lock
2 Kabelholder
3 Påfyldningsåbning til brændstof
4 Påfyldningsindikator
5 Dyseopbevaring
6 EL-ledning
7 Højtrykspumpe
8 Vandtilslutningssæt
9 Højtrykstilslutning EASY!Lock (kun
HDS 5/xx U)
10 Strålerør-opbevaring
11 Vandtilslutning med filter
12 Støtteleje
13 Højtryksslangens udløbsåbning (kun
HDS 5/xx UX)
14 Bæregreb
15 Skærm
16 Afbryder
17 Brænder
18 Slangeholder (kun HDS 5/xx U)
19 Slangetromle (kun HDS 5/xx U)
20 RM-sugeslange med filter
21 Holder til strålerøret
22 Typeskilt
23 Skærmlås
24 Håndsving til slangetromle (kun HDS
5/xx UX)
25 Bøjle
26 Dysens markering
27 Tredobbelt dyse EASY!Lock
28 Strålerør EASY!Lock
29 Håndspøjtepistol EASY!Lock
30 Sikringslås til håndsprøjtepistolen
31 Sikringshåndtag
32 Aftrækker
Farvekodning
– Betjeningselementer til rengøringspro-
cessen er bul.
– Betjeningselementer til vedligeholdelse
og service er lysegrå.
Symboler på maskinen
Højtryksstråler kan være farlige, hvis de ikke anvendes korrekt. Strålen må ikke rettes
mod personer, dyr, tændt elek-
trisk udstyr eller mod selve
maskinen. Højtryksrenseren må kun bruges i lodret stående tilstand.
Maskine med slangerulle:
Skoldningsfare på grund af varme anlægskomponenter!
Bestemmelsesmæssig
anvendelse
– Rensning af: Maskiner, køretøjer, byg-
ninger, værktøj, facader, terrasser, haveredskaber, etc.
– Højtryksrenseren må kun bruges i lod-
ret stående tilstand.
– Lad aldrig damprenseren være uden
opsyn, mens den er i drift.
FARE
Fysisk Risiko! Ved brug på tankstationer eller andre risikoområder skal der tages hensyn til de tilsvarende sikkerhedsregler.
Sørg venligst for at olieholdigt spildevand
ikke når ind i jorden, vandet eller kanalisationen. Motorvask og undervognsvask bør
derfor kun gennemføres på velegnede steder som har en olieudskiller.
Krav til vandets kvalitet:
BEMÆRK
Der må kun bruges rent vand som højtryksmedium. Tilsmudsninger fører til for tidligt
slid eller aflejringer på maskinen og tilbehøret.
Hvis der anvendes recyclingvand, må følgende grænseværdier ikke overskrides.
ph-værdi 6,5...9,5
elektrisk ledningsevne* Ledningsevne
ferskvand
+1200 µS/cm
afskedelige stoffer ** < 0,5 mg/l
88 DA
– 2
Page 89

stoffer som kan filtres ud
***
Kulbrinter < 20 mg/l
Klorid < 300 mg/l
Sulfat < 240 mg/l
Calcium < 200 mg/l
Total hårdhed < 28 °dH
Jern < 0,5 mg/l
Mangan < 0,05 mg/l
Kobber < 2 mg/l
Aktivklor < 0,3 mg/l
fri for dårlige lugter
* Maks. ialt 2000 µS/cm
** Prøvevolumen 1 l, aflejringstid 30 min
*** ingen slibende stoffer
< 50 mg/l
< 50 °TH
< 500 ppm (mg
/l)
CaCO
3
Sikkerhedsanvisninger
– De pågældende nationale love til væ-
skestrålere skal overholdes.
– De pågældende nationale love til fore-
byggelse imod ulykkestilfælde skal
overholdes. Væskestrålere skal kontrolleres regelmæssigt og resultaterne
fra kontrollen skal skiftligt dokumenteres.
– Maskinens opvarmningsindretning er et
fyringsanlæg. Fyringsanlæg skal kontrolleres regelmæssigt iht. de pågældende nationale love.
– Der må ikke foretages ændringer på
maskinen/tilbehøret.
Sikkerhedsanordninger
Sikkerhedsanordningerne tjener brugerens
beskyttelse og må ikke sættes ud af drift eller ignoreres i deres funktion.
Trykkontakt
Trykkontakten slukker rensemaskinen hvis
pistolen låses og tænder maskinen hvis pistolen åbnes.
Sikkerhedsventil
– Sikkerhedsventilen åbnes ved overtryk i
kedlen eller hvis overstrømningsventilen respektive trykkontakten er defekt.
– Af fabrik er sikkerhedsventilen indstillet
og plomberet. Indstilling foretages udelukkende fra kundeservice.
Tørkøringssikringen
Tørkøringssikringen forhindrer at brænderen tændes ved mangel af vand.
Differenstermostat til
udstødningsgas
Differenstermostaten afbryder apparatet
hvis udstødningsgassens temperatur bliver
for høj.
Viklings-beskyttelseskontakt
Viklings-beskyttelseskontakten i pumpedrevets motorvikling afbryder motoren i fald
af en termisk oberbelastning.
Låsetap
Låsetappen på pistolgrebet forhindrer utilsigtet tilkobling af højtryksrenseren.
Ibrugtagning
몇 ADVARSEL
Risiko for tilskadekomst! Maskinen, tilbehør, tilførselsledninger og tilslutninger skal
være i fejlfri tilstand. Hvis apparatet ikke er
i en fejlfri tilstand, må det ikke benyttes.
Montere håndsprøjtepistolen,
strålerøret, dysen og
højtryksslangen
Bemærk: EASY!Lock-systemet forbinder
hurtigt og sikkert komponenterne med kun
en omdrejning takket være hurtiggevindet.
Forbind strålerøret med håndsprøjtepi-
stolen og spænd det fast med hånden
(EASY!Lock).
Monter dysen på strålerøret (markering
på positioneringsringen oppe), og
spænd den fast med hånden.
– 3
89DA
Page 90

Maskine uden slangerulle:
Forbind højtryksslangen med maskinens håndsprøjtepistol og spænd den
fast med hånden (EASY!Lock).
Maskine med slangerulle:
Forbind højtryksslangen med håndsprøjtepistolen og spænd den fast med
hånden (EASY!Lock).
Påfylde brændstof
FARE
Eksplosionsrisiko! Der må kun påfyldes
diesel eller let fyringsolie. Det er muligt at
bruge maskinen med biodiesel iht. EN
14214 (fra 6 °C udendørstemperatur). Der
må ikke anvendes uegnede brændstoffer
som f.eks. benzin.
BEMÆRK
Risiko for beskadigelse! Maskinen må aldrig bruges med en tom brændstoftank. Ellers ødelægges brændstofpumpen. Det
gælder også ved drift med koldt vand.
Åbn tankdækslet.
Påfylde brændstof.
tanklåg skal lukkes.
Spildt brændstof skal fjernes.
Påfyldning/udskiftning af
rensemiddelbeholdere
FARE
Fysisk Risiko!
– Brug kun Kärcher-produkter.
– Der må aldrig opsuges løsningsmiddel
(benzin, acetone, fortyndingsvæske
etc.).
– Undgå kontakt med øjne og huden.
– Læg mærke til rensemiddelfabrikan-
tens sikkerheds- og brugshenvisning.
Kärcher tilbyder et individuelt program
af rense- og plejemidler.
Du er velkommen til at spørge din forhandler om råd.
Påfylde/udskifte eksterne rensemiddel-
beholdere.
Vandtilslutning
몇 ADVARSEL
Læg mærke til vandforsyningsselskabets
reglementer.
Ifølge de gældende love, må maskinen aldrig anvendes på drikkevandsnettet uden en systemseparator. Sørg for, at tilslutningen på
husets vandanlæg, som højtryksrenseren
sættes til, er udstyret med en systemseparator iht. EN 12729 type BA.
Vand, som strømmer igennem en systemseparator, kan ikke drikkes.
몇 FORSIGTIG
Tilslut aldrig en systemadskiller direkte til
maskinen, men til drikkevandsforsyningen.
Tilslutningsværdier, se venligst tekniske data.
Fastgør tilløbsslangen (min. længde 7,5
m, min. diameter 1/2“) med slangebøjlen på vandtilslutningsættet.
Tilslut tilløbsslangen på maskinens
vandtilslutning og på vandtilløbet (f.eks.
vandhanen).
Bemærk: Tilløbsslangen og slangebøjlen
kommer ikke med leverancen.
Indsug vand fra beholderen
Tilslut sugeslangen (mindst 1/2“) dia-
meter) med filter (tilbehør) til vandtilslutningen.
– Max. sugehøjde: 0,5 m
FARE
Fare for person- og materialeskader! Du
må aldrig indsuge vand fra en drikkevandsbeholder. Du må aldrig indsuge væsker,
der indeholder løsningsmiddler som lakfortynder, benzin, olie eller vand, der ikke er
filtret. Maskinens tætninger er ikke opløsningsmiddelbestandig. Sprøjtetågen er
yderst brandfarlig, eksplosiv og giftig.
Strømtilslutning
– Se typeskilt/tekniske data for tilslut-
ningsværdier
– El-tilslutningen skal gennemføres af en
el-installatør og svare til IEC 60364-1.
Sæt startknappen på "0/OFF“.
Sæt netstikket i.
90 DA
– 4
Page 91

FARE
Fare på grund af elektrisk stød!
– Uegnede el-forlængerledninger kan
være farlige. Benyt udelukkende hertil
godkendte og mærkede el-forlænger-
ledninger med et tilstrækkeligt stort led-
ningstværsnit ved udendørs brug:
– Forlængerledninger skal altid rulles helt ud.
– Den anvendte forlængerlednings stik
og tilkobling skal være vandtæt.
BEMÆRK
Den maksimal tilladelige netimpedans ved
el-tilslutningspunktet (se tekniske data) må
ikke overskrides. Hvis der er tvivl om netimpedansen af tilslutningspunktet, kontakt
venligst energiforsyningsvirksomheden.
Betjening
FARE
Eksplosionsrisiko! Brændbare væsker må
ikke sprøjtes.
FARE
Fysisk risiko! Maskinen må aldrig bruges
uden monteret strålerør. Kontroller, om
strålerøret sidder fast før hver brug. Strålerørets forskruning skal være håndspændt.
FARE
Risiko for tilskadekomst! Under arbejdet
skal håndsprøjtepistolen og strålerøret holdes fast med begge hænder.
FARE
Risiko for tilskadekomst! Aftrækkeren og
sikingshåndtaget må ikke komme i klemme
under driften.
FARE
Risiko for tilskadekomst! Kontakt kundeservice, hvis sikringshåndtaget er defekt.
BEMÆRK
– Risiko for beskadigelse! Maskinen må
aldrig bruges med en tom brændstof-
tank. Ellers ødelægges brændstofpum-
pen. Det gælder også ved drift med
koldt vand.
– Risiko for beskadigelse! Maskinen må
aldrig bruges uden filter i vandtilslutnin-
gen.
– Risiko for beskadigelse! Genstande
(slange osv.) må aldrig lægges i eller
over kaminen.
– Maskine med slangerulle:
Risiko for beskadigelse! Højtryksslangen skal altid rulles helt ud.
Åbne/lukke maskinhætten
Figur
Åbn hættelåset med en skruetrækker,
klap maskinhætten frem og hæng den
ud.
Figur
Hæng maskinhætten ind (se pilen), klap
den opad og lad hættelåset gå i hak.
Åbning/lukning af
håndsprøjtepistolen
Åbn håndsprøjtepistolen: Betjen sik-
ringshåndtaget og aftrækkeren.
Luk håndsprøjtepistolen: Slip sikrings-
håndtaget og aftrækkeren.
Udskifte dysen
FARE
Risiko for tilskadekomst! Sluk maskinen og
tryk håndsprøjtepistolen indtil maskinen er
fri for tryk inden dysen skiftes.
Sikr håndsprøjtepistolen ved at skubbe
låsetappen fremad.
Udskiftning af dysen.
Funktionsmåder
Figur
0/OFF = Slukket
1 Betjening med koldt vand
2 Betjening med varmt vand
Tænd for maskinen
Omstilleren indstilles til den ønskede
temperatur.
Maskinen starter kort og slukker så snart
arbejdstrykket blev opnået.
Afsikr håndsprøjtepistolen ved at skub-
be låsetappen tilbage.
Maskinen tændes igen hvis sprøjtepistolen
betjenes.
Bemærk: Hvis der ikke kommer vand ud af
højtryksdysen skal pumpen afluftes.
Pumpen skal afluftes:
Brug hovedafbryderen og tænd og sluk
maskinen flere gange med åbnet pistol.
– 5
91DA
Page 92

Bemærk: Udluftningen kan fremskyndes
ved at afmontere strålerøret fra håndsprøjtepistolen.
Afbrydelse af driften
Slip betjeningshåndtaget, maskinen af-
brydes.
Sikr håndsprøjtepistolen ved at skubbe
låsetappen fremad.
Afsikr håndsprøjtepistolen ved at skub-
be låsetappen tilbage.
Trækbetjeningshåndtaget, maskinen
tændes.
Vælge strålemåde
Luk håndsprøjtepistolen.
Sikr håndsprøjtepistolen ved at skubbe
låsetappen fremad.
Drej dysens hus indtil det ønskede sym-
bol stemmer overens med markeringen:
Højtryks-rundstråle (0°) til særlig hårdnakkede tilsmudsninger
Lavtryk-fladstråle (CHEM) til
drift med rensemiddel eller
rensning med lav tryk
Højtryks-fladstråle (25°) til store tilsmudsede arealer
Drift med rengøringsmiddel
– For at beskytte miljøet bør du være
sparsommeligt med rensemidlet.
– Rensemidlet skal være velegnet til den
overflade som skal renses.
Figur
Sugeslangen til rensemidlet tages ud.
Drej filteret på rensemiddel-sugeslan-
gen for at dosere rensemidlet.
Før RM-sugeslangen ned i en beholder
med rendemiddel.
Stil dysen på "CHEM".
Rensning
Rensemiddelkoncentrationen indstilles
tilsvarende til den overflade du ønsker
at rense.
Bemærk: For at forhindre skader på grund
af en for høj tryk, bør højtryksstrålen altid
først rettes imod genstanden fra en langt
afstand.
Anbefalet rensemetode
– Løsne smuds:
Rensemiddel sprøjtes sparsommeligt
på og indvirker 1...5 minutter, men må
ikke tørre.
– Fjern snavs:
Vask det løsnede snavs af med høj-
tryksstrålen.
Betjening med koldt vand
Fjernelse af lette tilsmudsninger og skylning. f.eks.: Haveredskaber, terrasse,
værktøj, etc.
Hovedafbryderen sættes på "1".
Betjening med varmt vand
FARE
Skoldningsrisiko!
Hovedafbryderen sættes på "2".
Efter brug med rensemiddel
Luk filteret på rensemiddelsugeslangen
helt (-).
Hovedafbryderen sættes på "1".
Spol maskinen med åbnet håndsprøjte-
pistol for mindst et minut.
Sluk for maskinen
FARE
Skoldningsrisiko på grund af varmt vand!
Efter brug med varmt vand skal maskinen
køles af i mindst to minutter med koldt vand
og åbnet pistol.
Luk vandtilførslen.
Åbn håndsprøjtepistolen.
Tænd pumpen på kontakten og lad den
køre i 5-10 sekunder.
Luk håndsprøjtepistolen.
Sæt startknappen på "0/OFF“.
Netstikken bør kun trækkes ud af stik-
dåsen med tørre hænder.
Fjern vandtilslutningen.
Betjen sprøjtepistolen indtil maskinen
er fri for tryk.
Sikr håndsprøjtepistolen ved at skubbe
låsetappen fremad.
92 DA
– 6
Page 93

Opbevaring af damprenseren
Sæt håndsprøjtepistolen ind i holderen.
Maskine uden slangerulle:
Højtryksslangen vikles op og hænges
over slangeopbevaringen.
Maskine med slangerulle:
Højtryksslangen vikles op på slangetromlen. Skub svingehåndtagets arm
ind for at blokere slangetromlen.
Tilslutningskablet vikles omkring kabel-
holderen.
Fastgør stikket med den monterede
klip.
Frostbeskyttelse
BEMÆRK
Risiko for beskadigelse! Frost ødelægger
maskinen hvis den ikke fuldstændig tømmes for vand.
Maskinen opbevares et frostfrit sted.
Hvis maskinen er tilsluttet til en kamin skal
der tages hensyn til følgende:
BEMÆRK
Risiko for beskadigelse i forbindelse med
kold luft som trænger ind i kaminen oppefra.
Ved udendørstemperaturer under 0 °C
skal maskinen fjernes fra kaminen.
Hvis en frostfri oplagring ikke er mulig skal
maskinen afbrydes.
Afbrydning/nedlæggelse
Hvis maskinen ikke bruges i en lang tidsperiode eller hvis en frostfri oplagring ikke er
muligt:
Vand afledes.
Maskinen skyldes grundigt med frost-
væske.
Vand afledes.
Vandtilførselsslangen og højtryksslan-
gen skrues fra.
Figur
Læg maskinen med bagsiden nedad.
Maskinen skal køre max. 1 minut i kold-
vandsdrift indtil pumpen og ledningerne
er tom.
Maskinen skyldes grundigt med frostvæske
Bemærk: Tag hensyn til frostvæskeprodu-
centens instruktioner.
Almindelig frostvæske som kan købes i
handlen fyldes ind i vandtilslutningen.
Tænd maskinen (uden brænder), indtil
maskinen er spolet komplet.
Herved opnår man også en vis beskyttelse
imod rust.
Opbevaring
몇 FORSIGTIG
Fare for person- og materialeskader! Hold
øje med maskinens vægt ved opbevaring.
Transport
FARE
Risiko for tilskadekomst! Fare for at vælte
ved for store stigninger, ved for stor hældning til siden og ved ustabil undergrund.
– Maskinen må kun bevæges på stignin-
ger op til maksimalt 2 %.
– Kør kun med maskinen på et fast un-
derlag.
BEMÆRK
Beskyt aftrækkeren mod beskadigelser under transport.
몇 FORSIGTIG
Fare for person- og materialeskader! Hold
øje med maskinens vægt ved transporten.
Før transporten lægges maskinen med
bagsiden nedad og tømmes for reste-
rende vand.
Træk højtryksrenseren i bøjlen, når den
skal transporteres over længere stræk-
ninger.
Tag fat i håndtaget og på skubbebøjlen
når maskinen skal bæres.
Ved transport i biler skal renseren fast-
spændes i.h.t. gældende love.
– 7
93DA
Page 94

Pleje og vedligeholdelse
FARE
Fare for tilskadekomst på grund af utilsigtet
startende maskine og elektrisk stød. Træk
netstikket og afbryd maskinen inden der arbejdes på maskinen.
Luk vandtilførslen.
Åbn håndsprøjtepistolen.
Tænd pumpen på kontakten og lad den
køre i 5-10 sekunder.
Luk håndsprøjtepistolen.
Sæt startknappen på "0/OFF“.
Netstikken bør kun trækkes ud af stik-
dåsen med tørre hænder.
Fjern vandtilslutningen.
Betjen sprøjtepistolen indtil maskinen
er fri for tryk.
Sikr håndsprøjtepistolen ved at skubbe
låsetappen fremad.
Motoren skal køles ned.
Sikkerhedsinspektion/
servicekontrakt
De kan aftale en regelmæssig sikkerhedsinspektion med deres forhandler eller aftale
en vedligeholdelseskontrakt. Søg rådgivning.
Vedligeholdelsesintervaller
En gang om ugen
Rens vandtilslutningens filter.
En gang om måneden
Rens filteret på rensemiddelsugeslan-
gen.
Hver 500. driftstime, mindst en gang om året
Lad kundeservice gennemføre vedlige-
holdelsen.
Vedligeholdelsesarbejder
Bemærk: Olieskift på højtrykspumpen er
ikke nødvendige.
Rens vandtilslutningens filter.
Fjern filteret.
Filteret renses med vand og genindsæt-
tes.
Rens filteret på rensemiddelsugeslangen
Filteret renses med vand og genindsæt-
tes.
Hjælp ved fejl
FARE
Fare for tilskadekomst på grund af utilsigtet
startende maskine og elektrisk stød. Træk
netstikket og afbryd maskinen inden der arbejdes på maskinen.
Maskinen kører ikke
– Ingen netspænding
Kontroller nettilslutning/tilslutningsled-
ningen.
– Motor overbelastet/overhedet
Sæt startknappen på "0/OFF“.
Damprenseren skal være afkølet.
Tænd for maskinen.
Hvis denne fejl forekommer igen skal
maskinen kontrolleres fra kundeser-
vice.
– Differenstermostat til røggas blev aktiveret,
varmeslangen tilsodet.
Lad kundeservice fjerne sod fra maskinen.
– Differenstermostat til røggas blev akti-
veret, røggastemperaturen for høj.
Sæt startknappen på "0/OFF“.
Damprenseren skal være afkølet.
Kun ved maskiner med manuel tilbage-
stilling:
Figur
Tryk røggastemperaturens tilbagestil-
lingstast.
Tænd for maskinen.
Hvis denne fejl forekommer igen skal
maskinen kontrolleres fra kundeser-
vice.
Maskinen opbygger ingen tryk
– Luft i systemet
Pumpen skal afluftes:
Brug hovedafbryderen og tænd og sluk
maskinen flere gange med åbnet pistol.
Bemærk: Udluftningen kan fremskyndes
ved at afmontere strålerøret fra håndsprøjtepistolen.
94 DA
– 8
Page 95

Påfyld/udskift, hvis eksterne rensemid-
delbeholdere er tom.
Kontroller tilslutninger og ledninger.
– Filteret i vandtilslutningen tilsmudset
Rens filteret.
– Tilførselsmængden af vand er for lav.
Kontroller tilførselsmængden (se tekni-
ske data).
– Vandhanen lukket.
Åbn for vandhanen.
Sprøjtepistol er åbnet og maskinen
tænder og slukker konstant
– Luft i systemet
Pumpen skal afluftes:
Brug hovedafbryderen og tænd og sluk
maskinen flere gange med åbnet pistol.
Bemærk: Udluftningen kan fremskyndes
ved at afmontere strålerøret fra håndsprøjtepistolen.
– Højtryksdyse tilstoppet
Rens dyserne.
– Varmeslangen forkalket
Lad kundeservice fjerne kalk fra maski-
nen.
Sprøjtepistol er låst og maskinen
tænder og slukker konstant
– Lækage i højtrykssystemet
Højtrykssystemet og tilslutninger skal
kontrolleres med hensyn til tæthed.
Maskinen lækker, vand drypper ud
af bunden
– Pumpe utæt, sikkerhedsventil utæt.
Bemærk: Tilladeligt er 3 drypper/minut.
Ved stærkere lækage skal maskinen
kontrolleres af kunde-service.
Maskinen indsuger ingen
rensemiddel
– Dysen er indstillet til "Højtryk".
Stil dysen på "CHEM".
– Ekstern rensemiddelbeholder tom.
Påfylde/udskifte eksterne rensemiddel-
beholdere.
– Filteret på rensemiddel-sugeslangen til-
smudset
Rens filteret.
Figur
– Kontraventilen klæbet sammen
Fjern rengøringsmiddelslangen og løsn
kontraventilen med en stump genstand.
Brænderen tænder ikke
– Brændstoftank tom.
Påfylde brændstof.
– Vandmangel
Kontroller vandtilslutningen, kontroller
ledningerne.
– Vandtilførselstemperaturen er for høj.
Max. 30 °C varmt vand må indledes.
Figur
– Brændstoffilteret tilsmudset
Udskift brændstoffilteret
Kundeservice
Hvis fejlen ikke kan fjernes skal maskinen kontrolleres fra kundeservice.
Garanti
I de enkelte lande gælder de af vore forhandlere fastlagte garantibetingelser.
Eventuelle fejl på apparatet afhjælpes gratis inden for garantien, såfremt fejlen kan tilskrives en materiale- eller produktionsfejl.
Hvis De ønsker at gøre garantien gældende, bedes De henvende Dem til Deres forhandler eller nærmeste kundeservice medbringende kvittering for købet.
Tilbehør og reservedele
Anvend kun originaltilbehør og -reservedele. De er en garanti for en sikker og fejlfri
drift af maskinen.
Informationer om tilbehør og reservedele
findes www.kaercher.com
– 9
95DA
Page 96

EU-
CEO
Head of Approbation
overensstemmelseserklæring
Hermed erklærer vi, at den nedenfor nævnte maskine i design og konstruktion og i den
af os i handlen bragte udgave overholder
de gældende grundlæggende sikkerhedsog sundhedskrav i EU-direktiverne. Ved
ændringer af maskinen, der foretages uden
forudgående aftale med os, mister denne
erklæring sin gyldighed.
Produkt: Højtryksrenser
Type: 1.064-xxx
Gældende EU-direktiver
2006/42/EF (+2009/127/EF)
2000/14/EF
2014/30/EU
Anvendte harmoniserede standarder
EN 55014–1: 2006+A1: 2009+A2: 2011
EN 55014–2: 2015
EN 60335–1
EN 60335–2–79
EN 61000–3–2: 2014
HDS 5/11, HDS 5/13:
EN 61000–3–3: 2013
HDS 5/15:
EN 61000–3–11: 2000
Anvendte overensstemmelsesvurderingsprocedurer
2000/14/EF: Bilag V
Lydeffektniveau dB(A)
HDS 5/11 U, HDS 5/15:
Målt: 91
Garanteret: 94
HDS 5/11 UX, HDS 5/13:
Målt: 91
Garanteret: 93
Alfred Kärcher GmbH & Co. KG
Alfred-Kärcher-Str. 28 - 40
71364 Winnenden (Germany)
Tlf.: +49 7195 14-0
Fax: +49 7195 14-2212
Winnenden, 2016/01/01
5.957-976
Undertegnede agerer på vegne af og med
fuldmagt fra ledelsen.
Dokumentationsbefuldmægtiget:
S. Reiser
96 DA
– 10
Page 97

Tekniske data
HDS 5/11 HDS 5/13 HDS 5/15
Nettilslutning
Spænding V 220 230 240 220 230 240 220 230 240
Strømtype Hz 1~ 50 1~ 50 1~ 50
Tilslutningseffekt kW 2,2 2,6 2,7
Sikring (forsinket) A 16 16 13 16 16 13 16 16 13
Kapslingsklasse -- IPX5 IPX5 IPX5
Beskyttelsesklasse -- I I I
Maksimalt tilladelig netimpedans Ohm -- -- (0.380+j0.237)
Vandtilslutning
Forsyningstemperatur, maks. °C 30 30 30
Forsyningsmængde, min. l/h (l/min) 500 (8,3) 550 (9,2) 500 (8,3)
Sugehøjde ud fra åbn beholder (20 °C) m 0.5 0.5 0.5
Tilførselstryk, maks. MPa (bar) 0,6 (6) 0,6 (6) 0,6 (6)
Diameter tilførselsslange (min.) Tommer 1/2 1/2 1/2
Længde tilførselsslange (min.) m 7.5 7.5 7.5
Ydelsesdata
Kapacitet, vand l/h (l/min) 450 (7,5) 500 (8,3) 450 (7,5)
Arbejdstryk vand (med standarddyse) MPa (bar) 11,0 (110) 12,5 (125) 15,0 (150)
Maks. driftsovertryk (sikkerhedsventil) MPa (bar) 16,5 (165) 18,0 (180) 20,0 (200)
Max. arbejdstryk varmt vand °C 80 80 80
Indsugning rensemiddel l/h (l/min) 0-33 (0-0,6) 0-33 (0-0,6) 0-33 (0-0,6)
Brænderkapacitet kW 26 29 26
Makismalt fyringsolieforbrug kg/h 2,7 3,1 2,7
Sprøjtepistolens tilbagestødskraft max. N 18,1 21,4 20,8
Standarddysens dysestørrelse (UX) -- 032 (033) 034 028
Oplyste værdier ifølge EN 60335-2-79
Støjemission
Lydtryksniveau L
Usikkerhed K
Lydeffektniveau L
pA
pA
+ usikkerhed KWA
WA
(UX)
Hånd-arm vibrationsværdi
Håndsprøjtepistol m/s
Strålerør m/s
Usikkerhed K m/s
Driftsstoffer
Brændstof -- Fyringsolie EL
Oliemængde l 0,1 0,1 0,2
Olietype: Motorolie
Mål og vægt
Længde x bredde x højde (UX) mm 618 x 618 x 994
Typisk driftsvægt (UX) kg 70 (72) 74 (76) 76 (78)
Brændstoftank l 6,5 6,5 6,5
dB(A) 76 76 77
dB(A) 3 3 3
dB(A) 94 (93) 93 94
2
2
2
15W40
2,4 1,0 0,9
1,4 1,1 1,1
0,3 0,3 0,3
Fyringsolie EL
eller diesel
Bestillingsnr.
6.288-050.0
eller diesel
Bestillingsnr.
6.288-050.0
618 x 618 x
(1163)
994 (1163)
Fyringsolie EL
eller diesel
Bestillingsnr.
6.288-050.0
618 x 618 x 994
(1163)
– 11
97DA
Page 98

Før første gangs bruk av appa-
ratet, les denne originale bruksanvisningen, følg den og oppbevar den for
senere bruk eller for overlevering til neste
eier.
– Det er tvingende nødvendig å lese sik-
kerhetsinstruksene nr. 5.951-949.0 før
maskinen settes i drift!
– Informer straks forhandleren ved trans-
portskader.
– Kontroller ved utpakking at ingen ting
mangler. Leveringsomfang, se figur 1.
Innholdsfortegnelse
Miljøvern . . . . . . . . . . . . . . . . . NO 1
Risikotrinn . . . . . . . . . . . . . . . . NO 1
Maskinorganer . . . . . . . . . . . . NO 2
Symboler på maskinen . . . . . . NO 2
Forskriftsmessig bruk . . . . . . . NO 2
Sikkerhetsanvisninger. . . . . . . NO 3
Sikkerhetsinnretninger . . . . . . NO 3
Ta i bruk . . . . . . . . . . . . . . . . . NO 3
Betjening. . . . . . . . . . . . . . . . . NO 5
Lagring . . . . . . . . . . . . . . . . . . NO 7
Transport. . . . . . . . . . . . . . . . . NO 7
Pleie og vedlikehold . . . . . . . . NO 7
Feilretting . . . . . . . . . . . . . . . . NO 8
Garanti . . . . . . . . . . . . . . . . . . NO 9
Tilbehør og reservedeler. . . . . NO 9
EU-samsvarserklæring . . . . . . NO 10
Tekniske data . . . . . . . . . . . . . NO 11
Miljøvern
Materialet i emballasjen kan resirkuleres. Ikke kast emballasjen
i husholdningsavfallet, men lever den inn til resirkulering.
Gamle apparater inneholder verdifulle materialer som kan resirkuleres. Disse bør leveres inn til
gjenvinning. Batterier, olje og lignende stoffer må ikke komme ut
i miljøet. Gamle maskiner skal
derfor avhendes i egnede innsamlingssystemer.
Vennligst ikke slipp ut motorolje, fyringsolje, diesel eller bensin i naturen. Beskytt
jordsmonnet og deponer brukt olje på en
miljøvennlig måte.
Anvisninger om innhold (REACH)
Aktuell informasjon om stoffene i innholdet
finner du under:
www.kaercher.com/REACH
Risikotrinn
FARE
Anvisning om en umiddelbar truende fare
som kan føre til store personskader eller til
død.
몇 ADVARSEL
Anvisning om en mulig farlig situasjon som
kan føre til store personskader eller til død.
몇 FORSIKTIG
Anvisning om en mulig farlig situasjon som
kan føre til mindre personskader.
OBS
Anvisning om en mulig farlig situasjon som
kan føre til materielle skader.
98 NO
– 1
Page 99

Maskinorganer
Figur
1 Høyttrykksslange EASY!Lock
2 Kabelholder
3 Påfyllingsåpning for drivstoff
4 Fyllingsindikator
5 Dyseholder
6 Elektroforsyningsledning
7 Høytrykkspumpe
8 Vanntilkoblingssett
9 Høytrykkstilkobling EASY!Lock (kun
HDS 5/xx U)
10 Strålerørholder
11 Vanntilkobling med filter
12 Opplagring
13 Utløpsåpning på høytrykkslange (kun
HDS 5/xx UX)
14 Bærehåndtak
15 Maskinhette
16 Apparatbryter
17 Brenner
18 Slangeholder (kun HDS 5/xx U)
19 Slangetrommel (kun HDS 5/xx UX)
20 Rengjøringsmiddel-sugeslange med fil-
ter
21 Holder for strålerør
22 Typeskilt
23 Hettelås
24 Håndsveiv for slangetrommel (kun HDS
5/xx UX)
25 Skyvebøyle
26 Merking av dyse
27 Treveisdyse EASY!Lock
28 Strålerør EASY!Lock
29 Håndsrpøytepistol EASY!Lock
30 Sikringstast høytrykkspistol
31 Sikringshendel
32 Avtrekkerhendel
Fargemerking
– Betjeningselementer for rengjørings-
prosessen er gule.
– Betjeningselementer for vedlikehold og
service er lysegråe.
Symboler på maskinen
Høytrykkstråler kan være farlige ved feil bruk. Strålen må
ikke rettes mot personer, dyr,
elektrisk utstyr som er på, eller
maskinen selv. Høytrykksvas-
keren skal kun brukes vertikalt stående.
Apparat med slangetrommel:
Forbrenningsfare fra varme
overflater!
Forskriftsmessig bruk
– Rengjøring av: Maskiner, kjøretøyer,
bygninger, verktøy, fasader, terasser,
hageutstyr, etc.
– Høytrykksvaskeren skal kun brukes
vertikalt stående.
– La aldri apparatet være ubevoktet når
det er i gang.
FARE
Fare for skader! Ved bruk på bensinstasjoner og andre farlige steder skal relevante
sikkerhetsforskrifter følges.
Ikke la avløpsvann med oljeinnhold komme ned i jordsmonnet, vann eller avløpssystem. Motorvask og understellsvask skal
derfor bare utføres på egnede steder med
oljeavskiller.
Krav til vannkvalitet:
OBS
Som høytrykksmedium skal det bare brukes rent vann. Smuss fører til slitasje før tiden eller avleiringer på apparatet og på tilbehøret.
Hvis det brukes resirkulert vann, må følgende grenseverdier ikke overskrides.
pH-verdi 6,5...9,5
elektrisk ledningsevne * Ledningsevne
ferskvann
+1200 µS/cm
utfellingsbare stoffer ** < 0,5 mg/l
avfiltrerbare stoffer *** < 50 mg/l
Hydrokarbonater < 20 mg/l
– 2
99NO
Page 100

Klorid < 300 mg/l
Sulfat < 240 mg/l
Kalsium < 200 mg/l
Total hardhet < 28 °dH
< 50 °TH
< 500 ppm (mg
/l)
CaCO
3
Jern < 0,5 mg/l
Mangan < 0,05 mg/l
Kopper < 2 mg/l
Aktivt klor < 0,3 mg/l
uten ubehagelig lukt
* Maksimalt totalt 2000 µS/cm
** Prøvevolum 1 l, utfellingstid 30 min
*** ingen slipende stoffer
Sikkerhetsanvisninger
– Følg gjeldende lovpålagte nasjonale
forskrifter for væskestrålemaskiner.
– Følg gjeldende lovpålagte nasjonale
forskrifter om ulykkesforhindring. Væskestrålemaskinen må kontrolleres regelmessig og resultatene av kontrollen
skal protokollføres.
– Varmeinnretningen på maskinen er et
fyringsanlegg. Fyringsanlegg må kontrolleres regelmessig i ehnhold til de
gjeldende nasjonale forskriftene.
– Det må ikke gjøres endringer på appa-
ratet/tilbehøret.
Sikkerhetsinnretninger
Sikkerhetsinnretninger er beregnet for å
beskytte brukeren og må ikke settes ut av
drift eller omgås.
Trykkbryter
Trykkbryteren kobler av apparatet når høytrykkpistolen lukkes, og kobler det på igejn
når den åpnes.
Sikkerhetsventil
– Sikkerhetsventilen åpner ved tankover-
trykk eller dersom ovestrømsventil eller
trykkbryter er defekt.
– Overstrømsventilen er innstilt og plom-
bert fra fabrikken . Justering må kun
foretas av kundeservice.
Lavvannssikring
Lavvannssikringen forhindrer at brenneren
kobles inn ved vannmangel.
Avgasstemperaturbegrenser
Avgasstemperaturbegrenseren kobler ut
maskinen når det blir for høy temperatur på
avgassen.
Viklingsbeskyttelseskontakt
Viklingskontakten i motorviklingen for pumpen kobler ut motoren ved termisk overbelastning.
Sikringslås
Sikringslåsen på håndsprøytepistolen forhindrer utilsiktet aktivering av høytrykksvaskeren.
Ta i bruk
몇 ADVARSEL
Fare for personskade! Apparat, tilbehør, tilførselsledninger og tilkoblinger må være i
plettfri tilstand. Maskinen skal ikke brukes
dersom det ikke er i feilfri stand.
Monter høytrykkspistol, dyse og
høytrykkslange
Henvisning: EASY!Lock-Systemet forbin-
der komponenter raskt og sikkert med en
hurtigvinsj på kun en omdreining.
Kolbe strålerøret til håndsprøytepisto-
len og stram den håndfast (EASY!Lock).
Monter dysen på strålerøret (markerin-
gen på den ytre ringen skal vende oppover) og trekk den til for hånd (EASY!Lock).
Apparat uten slangetrommel:
Koble høyttrykkslangen med
håndsprøytepistolen og høyttrykkstilkoblingen på apparatet og stram (EASY!Lock).
Apparat med slangetrommel:
Kolbe høyttrykkslangen til håndsprøytepistolen og stram (EASY!Lock).
100 NO
– 3
 Loading...