

Page 1
Watering System Duo Smart Kit
001
Register
your product
www.kaercher.com/welcome
Deutsch 2
English 11
Français 19
Italiano 27
Nederlands 36
Español 45
Português 54
Dansk 63
Norsk 71
Svenska 79
Suomi 87
Ελληνικά 95
Türkçe 105
Русский 113
Magyar 123
Čeština 132
Slovenščina 140
Polski 148
Româneşte 157
Slovenčina 166
Hrvatski 174
Srpski 182
Български 191
Eesti 201
Latviešu 209
Lietuviškai 217
Українська 225
中文
ﺔﻴﺑﺮﻌﻟﺍ
234
241
59683730
(02/19)
Page 2
Inhalt
Sicherheitshinweise ............................ 2
Bestimmungsgemäße Verwendung.... 4
Anschluss an das Trinkwassernetz..... 4
Umweltschutz...................................... 4
Zubehör und Ersatzteile...................... 4
Lieferumfang....................................... 4
Gerätebeschreibung ........................... 4
Symbole in der Kurzanleitung............. 6
Inbetriebnahme................................... 7
Bewässerungsfunktionen.................... 8
Sprachsteuerung................................. 8
Kontrollleuchten .................................. 8
Lagerung............................................. 9
Pflege und Wartung ............................ 9
Hilfe bei Störungen ............................. 9
Garantie .............................................. 9
Technische Daten ............................... 10
Sicherheitshinweise
Lesen Sie vor der ersten Benutzung des Geräts diese Ori-
ginalbetriebsanleitung und die
Sicherheitshinweise. Handeln Sie danach.
Beachten Sie vor der Inbetriebnahme
die grafische Betriebsanleitung Ihres
Geräts und diese Sicherheitshinweise.
Neben den Hinweisen in der Betriebsan-
leitung müssen Sie die allgemeinen Sicherheits- und
Unfallverhütungsvorschriften des Gesetzgebers berücksichtigen.
Allgemeine Sicherheitshinweise
GEFAHR
Erstickungsgefahr. Halten Sie Verpackungsfolien von Kindern fern.
몇 WARNUNG
Personen mit verringerten physischen,
sensorischen oder geistigen Fähigkeiten
oder Mangel an Erfahrung und Wissen dürfen das Gerät nur benutzen, wenn sie korrekt beaufsichtigt werden oder wenn sie
durch eine für ihre Sicherheit zuständige
Person bezüglich der sicheren Anwendung
des Geräts unterwiesen wurden und wenn
sie die daraus resultierenden Gefahren
verstanden haben.
Beaufsichtigen Sie Kinder, um sicherzustellen, dass sie nicht mit dem Gerät spielen.
Kinder ab mindestens 8 Jahren dürfen das
Gerät betreiben, wenn sie durch eine für ihre Sicherheit zuständige Person in der Anwendung unterwiesen wurden oder wenn
sie korrekt beaufsichtigt werden und wenn
sie die daraus resultierenden Gefahren
verstanden haben.
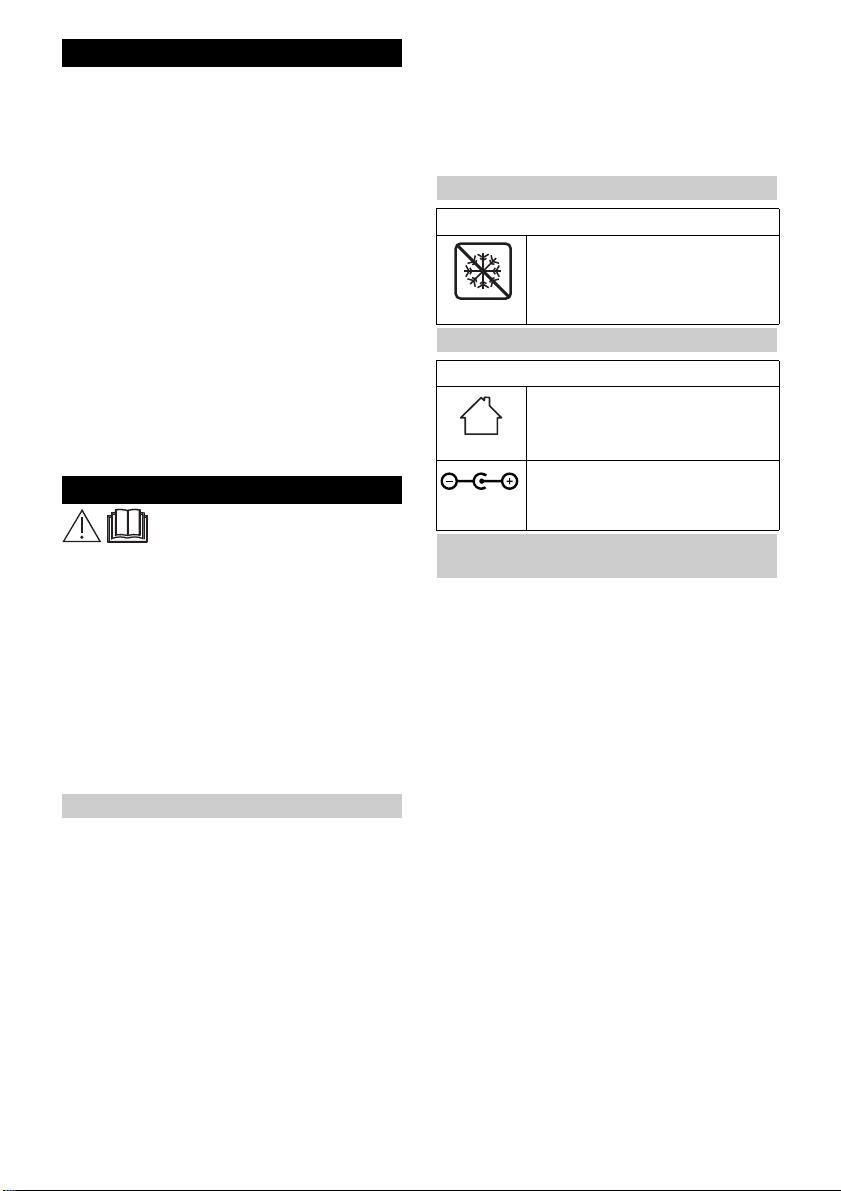
Symbole auf dem Gerät
Bewässerungsventil
Gerät vor Frost schützen
Symbole auf dem Gerät
Gateway
Benutzen Sie das Gerät nur in
Innenräumen
Verwenden Sie nur das zugelassene Netzteil 6.745-110.0
Eingang: 5 V / 1 A
Sicherheitshinweise
Bewässerungsventil
Betreiben Sie das Bewässerungsventil
nur mit unbehandeltem, klarem Süßwasser. Das Gerät darf keinesfalls in
Verbindung mit explosiven, korrosiven
oder entzündlichen Stoffen betrieben
werden.
Die Wassertemperatur darf nicht über
35 °C liegen.
Der Wasserzulaufdruck darf 10 bar
(1 MPa) am Geräteeingang nicht überschreiten.
Tauchen Sie das Bewässerungsventil
niemals vollständig in Flüssigkeiten.
Betreiben Sie das Bewässerungsventil
nur im Außenbereich.
Prüfen Sie das Bewässerungsventil re-
gelmäßig auf Beschädigungen. Bei
sichtbaren Beschädigungen Gerät nicht
mehr in Betrieb nehmen.
Nehmen Sie das Bewässerungsventil
nur in vertikaler Position in Betrieb.
2 Deutsch
Page 3

Benutzen Sie keine Dichtmasse oder
Schmiermittel, um das Bewässerungsventil am Wasserhahn anzuschließen.
Betreiben Sie das Gerät nicht ohne den
integrierten Filter am Wassereingang.
Prüfen Sie den Filter am Wassereingang
regelmäßig auf Beschädigungen. Partikel im Wasser, die durch einen beschädigten Filter in das Gerät eindringen,
verhindern das ordnungsgemäße Öffnen und Schließen des Ventils.
Ersetzen Sie beschädigte Wasserfilter
umgehend.
Prüfen Sie nach längerer Außerbetrieb-
nahme, mindestens jedoch monatlich,
das Gerät auf Dichtheit und vergewissern Sie sich, dass die Ventile zuverlässig öffnen und schließen.
Ziehen Sie nicht an den angeschlosse-
nen Schläuchen.
Beachten Sie vor der Wandmontage die
Anforderungen an die Wand und Oberfläche.
Prüfen Sie bei Wandmontage die Wand
auf Tragfähigkeit. Montieren Sie das Gerät sicher an die Wand.
Das Gerät muss jederzeit zugänglich
sein. Montieren Sie das Gerät nicht an
unzugänglichen Stellen oder höher als
2 Meter.
Installieren Sie das Bewässerungsventil
nicht in der Nähe von Wärmequellen
und schützen Sie es vor Frost (erlaubte
Umgebungstemperatur 5 °C bis 40 °C).
Verwenden Sie nur Batterien, die für Ihr
Bewässerungsventil zugelassen sind.
Sie finden Informationen über die benötigten Batterietypen in der Betriebsanleitung des Geräts.
Verwenden Sie keine wiederaufladba-
ren Batterien.
Installieren Sie das Bewässerungsventil
nicht an Orten, an denen sich Kondenswasser bildet.
Betreiben Sie das Bewässerungsventil
nicht in der Nähe von Geräten, die unter
Spannung stehen.
Nehmen Sie ein nicht ordnungsgemäß
funktionierendes Gerät nicht in Betrieb.
Sicherheitshinweise Gateway
Öffnen Sie niemals das Gerät oder das
Steckernetzteil.
Verlegen Sie das Anschlusskabel so,
dass niemand darauf treten oder darüber stolpern kann.
Betreiben Sie das Gerät nur mit dem
mitgelieferten Steckernetzteil oder einem entsprechenden Ersatz (Bestellnummer 6.745-102.0).
Schließen Sie das Steckernetzteil immer
an eine jederzeit zugängliche Netzsteckdose an, die den auf dem Typenschild angegebenen Werten entspricht.
Tauchen Sie das Gerät niemals in Flüs-
sigkeiten.
Fassen Sie das Steckernetzteil nicht mit
nassen Händen an.
Betreiben Sie das Gerät nur in trocke-
nen Innenräumen.
Stellen Sie das Gerät auf eine stabile
und rutschfeste Unterlage.
Stellen Sie das Gerät entfernt von Wär-
mequellen und direkter Sonneneinstrahlung auf.
Stellen Sie das Gerät nicht auf wär-
meempfindliche Oberflächen.
Beachten Sie vor der Wandmontage die
Anforderungen an die Wand und Oberfläche.
Prüfen Sie bei Wandmontage die Wand
auf Tragfähigkeit. Montieren Sie das Gerät sicher an die Wand.
Das Gerät muss jederzeit zugänglich
sein. Montieren Sie das Gerät nicht an
unzugänglichen Stellen wie hinter Verkleidungen, in Möbeln oder höher als 2
Meter.
Betreiben Sie das Gerät nicht in der Nä-
he anderer elektrischer Geräte. Insbesondere nicht in der Nähe von anderen
Funkanlagen.
Reinigen Sie das Gerät nur trocken, zum
Beispiel mit einem Staubtuch.
Ziehen Sie nicht am Kabel.
Deutsch 3
Page 4
Funkstandards
Die Geräte verwenden die folgenden
Funkstandards:
ZigBee (IEEE 802.15.4)
WLAN (IEEE 802.11)
Gerät Bauart Frequenz
MHz
Gateway SRD 2400 -
2483,5
Water
Controller
Duo Smart
Hiermit erklärt Alfred Kärcher SE & Co. KG,
dass der Funkanlagentyp Gateway / Bewässerungsventil (Water Controller Duo
Smart) der Richtlinie 2014/53/EU entspricht. Der vollständige Text der EU-Konformitätserklärung ist unter der folgenden
Internetadresse verfügbar:
www.kaercher.com
SRD 2412 -
2472
Leistung
max. ERP
110 mW
10 mW
Bestimmungsgemäße
Verwendung
Dieses Gerät wurde für den privaten Gebrauch entwickelt und ist nicht für die Beanspruchungen des gewerblichen Einsatzes
vorgesehen.
Dieses Gerät ist zum Anschluss an einen
Wasserhahn vorgesehen und steuert automatisch den Wasserfluss in Bewässerungssystemen.
Der Hersteller haftet nicht für eventuelle
Schäden, die durch nicht bestimmungsgemäßen Gebrauch oder falsche Bedienung
verursacht werden.
Anschluss an das
Trinkwassernetz
Bitte beachten Sie beim Anschluss dieses
Produkts an das Trinkwassernetz die Anforderungen der EN 1717 und wenden Sie
Sich bei eventuellen Rückfragen an Ihren
Sanitärfachbetrieb.
Umweltschutz
Die Verpackungsmaterialien sind
recyclebar. Bitte Verpackungen um-
weltgerecht entsorgen.
Elektrische und elektronische Geräte
enthalten wertvolle recyclebare Mate-
rialien und oft Bestandteile wie Batterien, Akkus oder Öl, die bei falschem
Umgang oder falscher Entsorgung eine potentielle Gefahr für die menschliche Gesundheit und die Umwelt darstellen
können. Für den ordnungsgemäßen Betrieb des Geräts sind diese Bestandteile jedoch notwendig. Mit diesem Symbol
gekennzeichnete Geräte dürfen nicht mit
dem Hausmüll entsorgt werden.
Hinweise zu Inhaltsstoffen (REACH)
Aktuelle Informationen zu Inhaltsstoffen finden Sie unter: www.kaercher.de/REACH
Zubehör und Ersatzteile
Nur Original-Zubehör und Original-Ersatzteile verwenden, sie bieten die Gewähr für
einen sicheren und störungsfreien Betrieb
des Geräts.
Informationen über Zubehör und Ersatzteile finden Sie unter www.kaercher.com.
Lieferumfang
Der Lieferumfang des Geräts ist auf der
Verpackung abgebildet. Prüfen Sie beim
Auspacken den Inhalt auf Vollständigkeit.
Bei fehlendem Zubehör oder bei Transportschäden benachrichtigen Sie bitte Ihren
Händler.
Gerätebeschreibung
Funktion
Dieses Gerät steuert die Bewässerung entweder durch die Smartphone-App oder
durch direkte Bedienung an der Bedieneinheit.
Um die Bedienung durch die App zu ermöglichen, muss das Gerät mittels des mitgelieferten Gateways im WLAN Netzwerk
eingebunden werden.
Dies erfolgt mithilfe der Kärcher Home &
Garden App, welche kostenlos im Apple
App Store oder Google Play Store erhältlich
ist.
4 Deutsch
Page 5
An der Bedieneinheit kann folgende Funk-
121
3
4
5
6
2
1
7
3
4
5
1
2
1
2
tion eingestellt werden:
Die Wasserausgänge ein- und aus-
schalten.
Durch die App können folgende Funktionen
eingestellt werden:
Die Wasserausgänge ein- und aus-
schalten.
Ein Zeitprogramm festlegen oder lö-
schen.
Die Wetterbasierte-Bewässerung akti-
vieren oder deaktivieren.
Das Zeitprogramm pausieren.
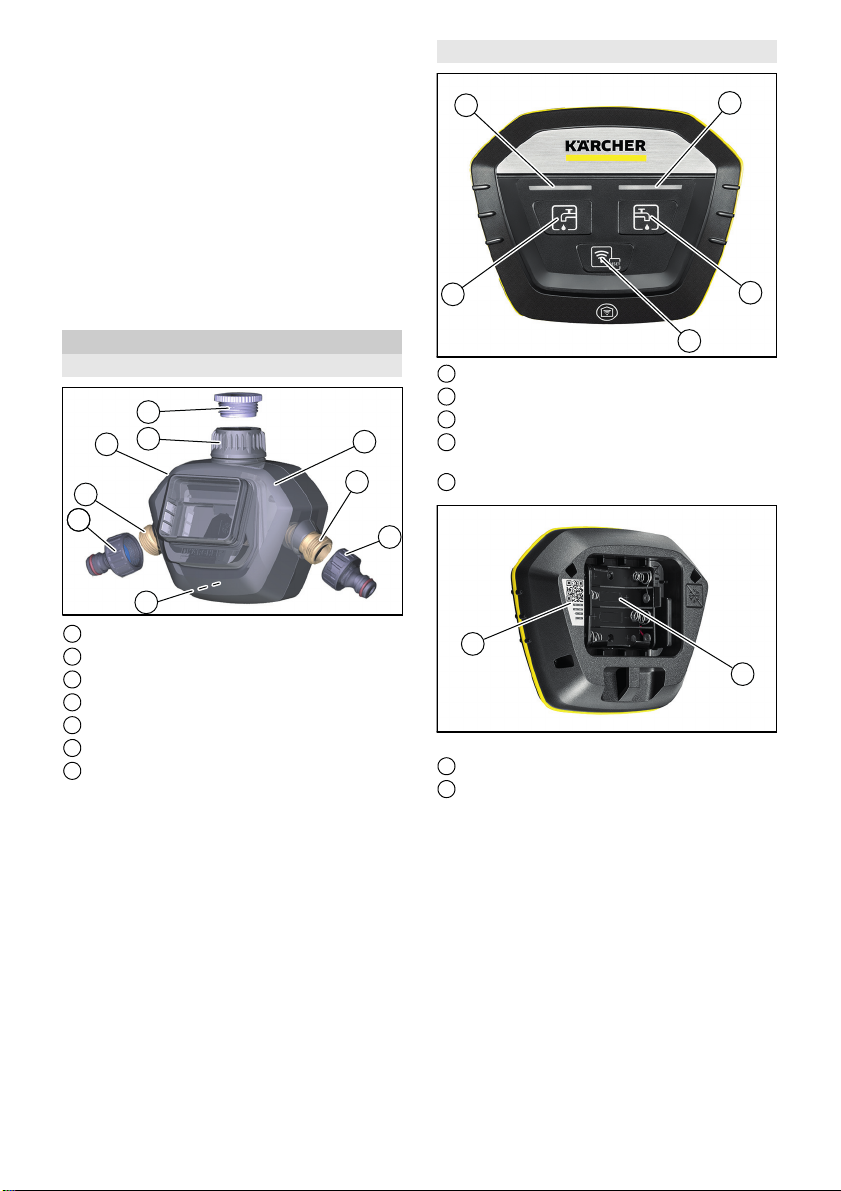
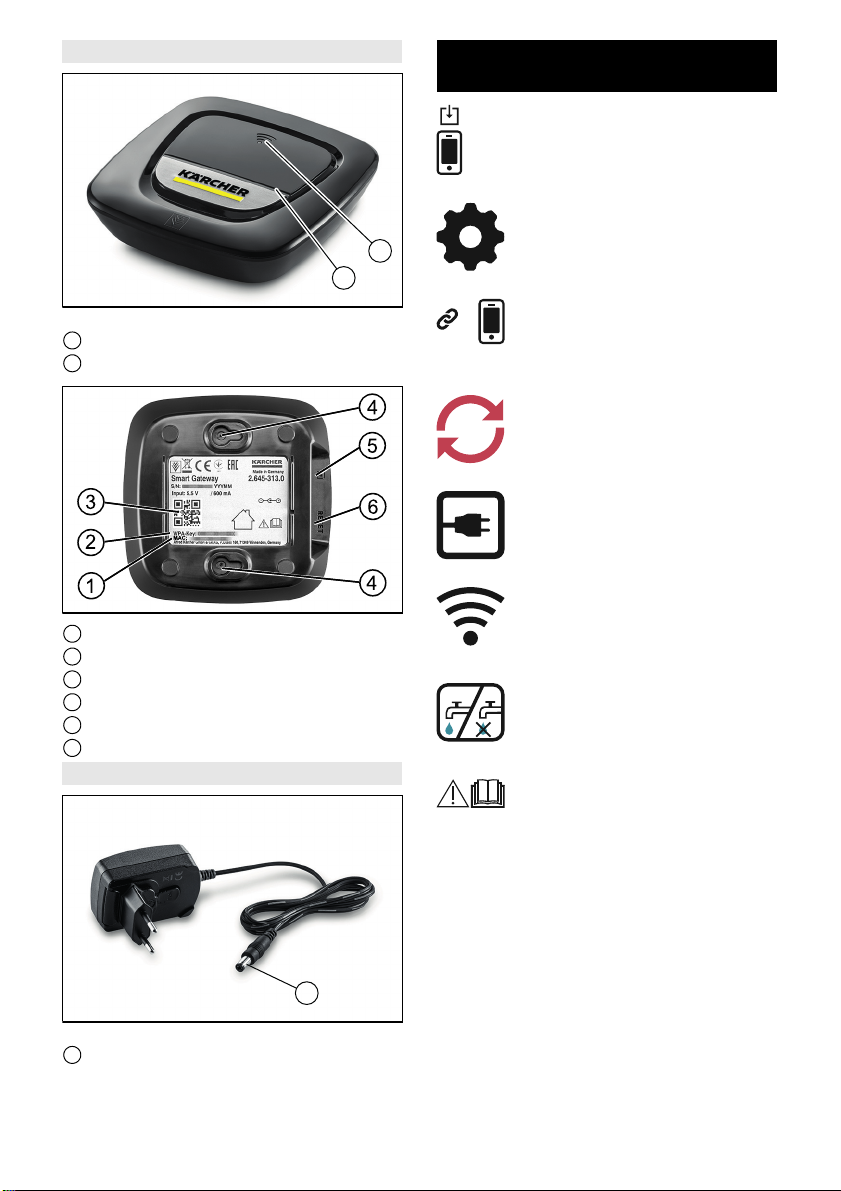
Bedienelemente
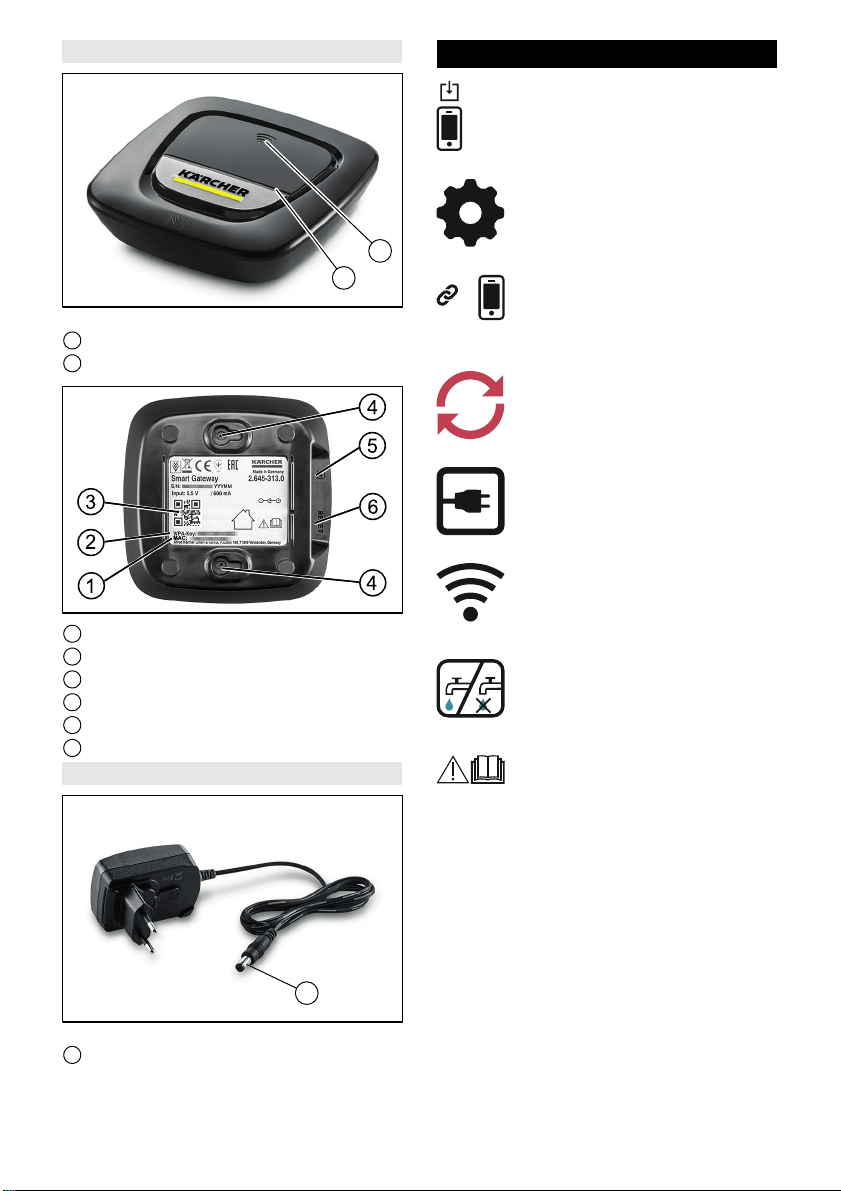
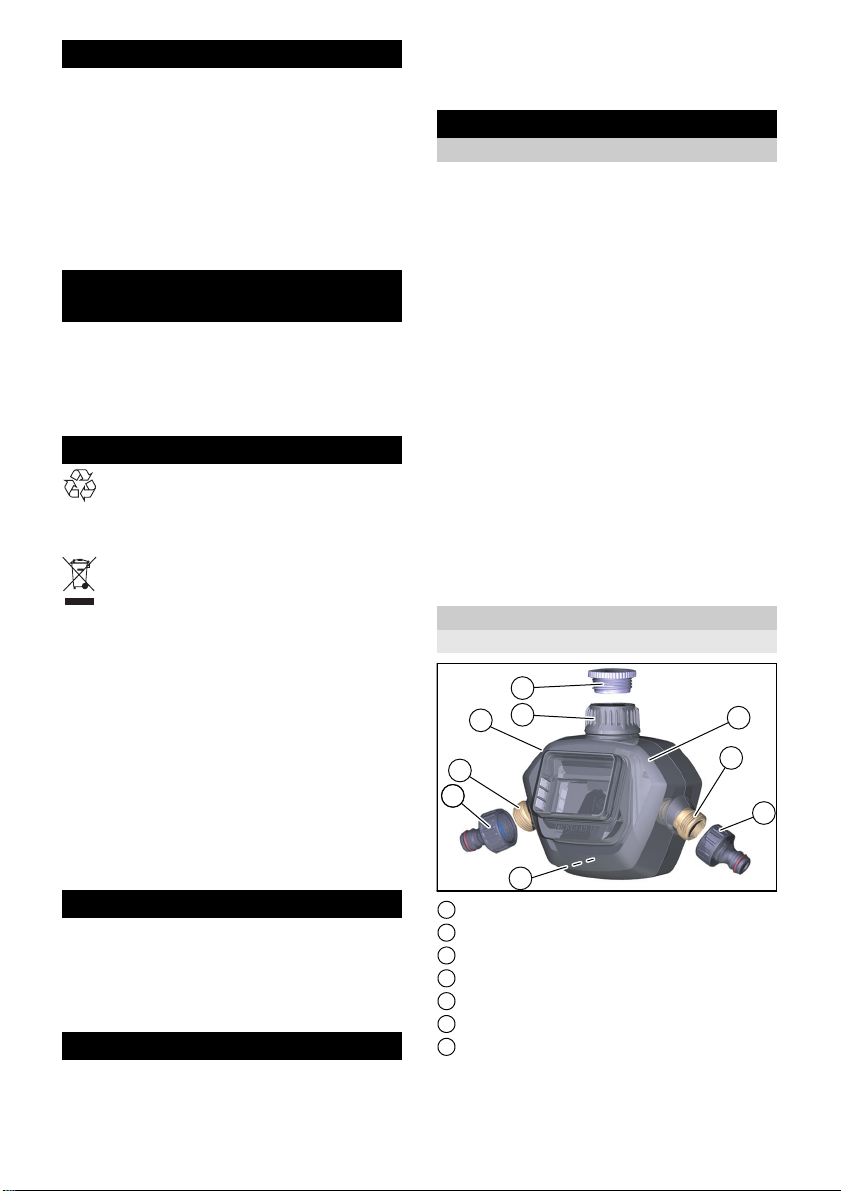
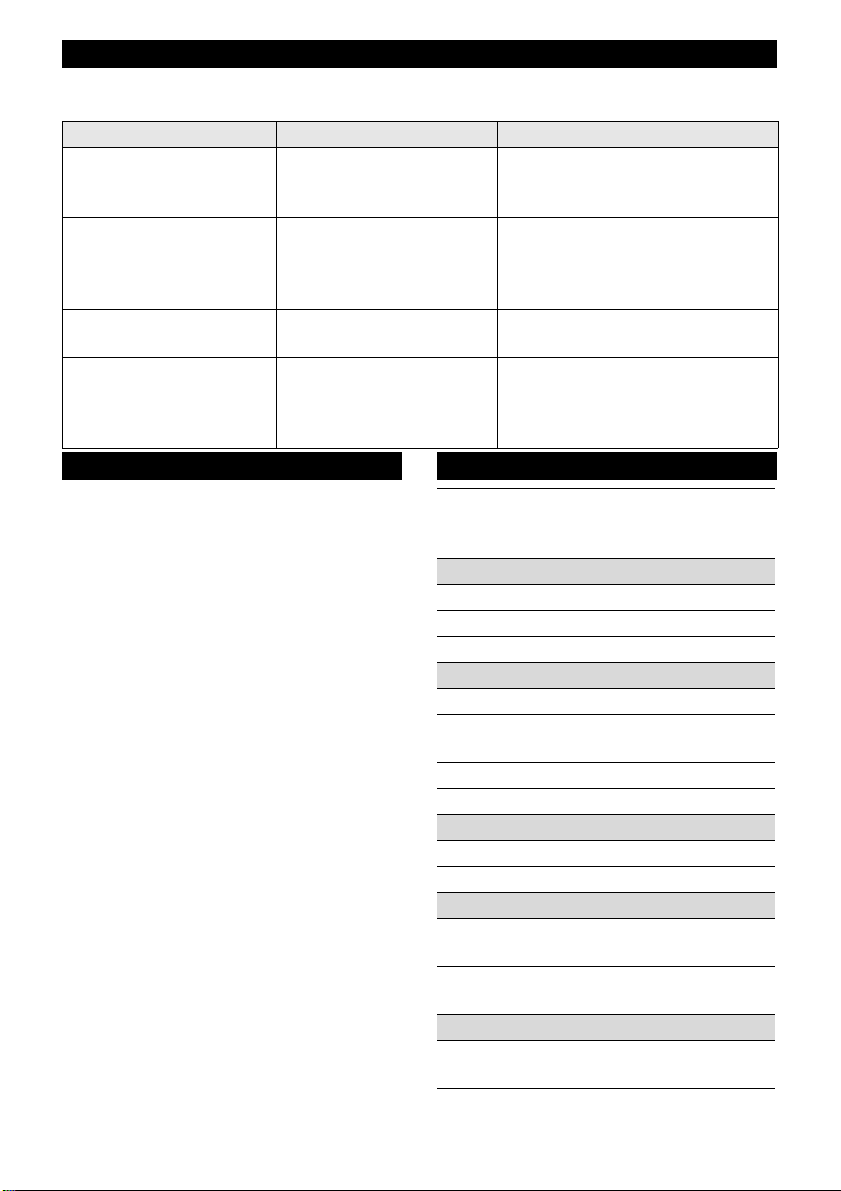
Ventil
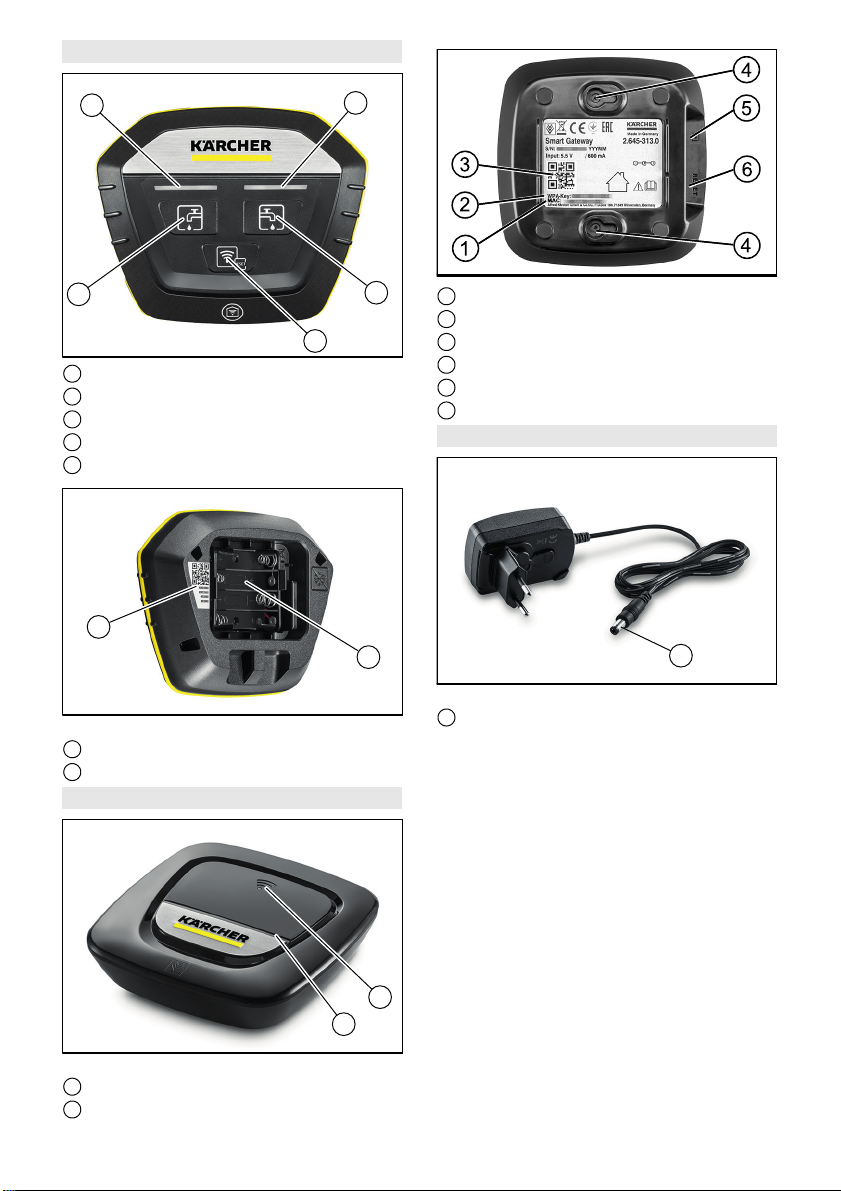
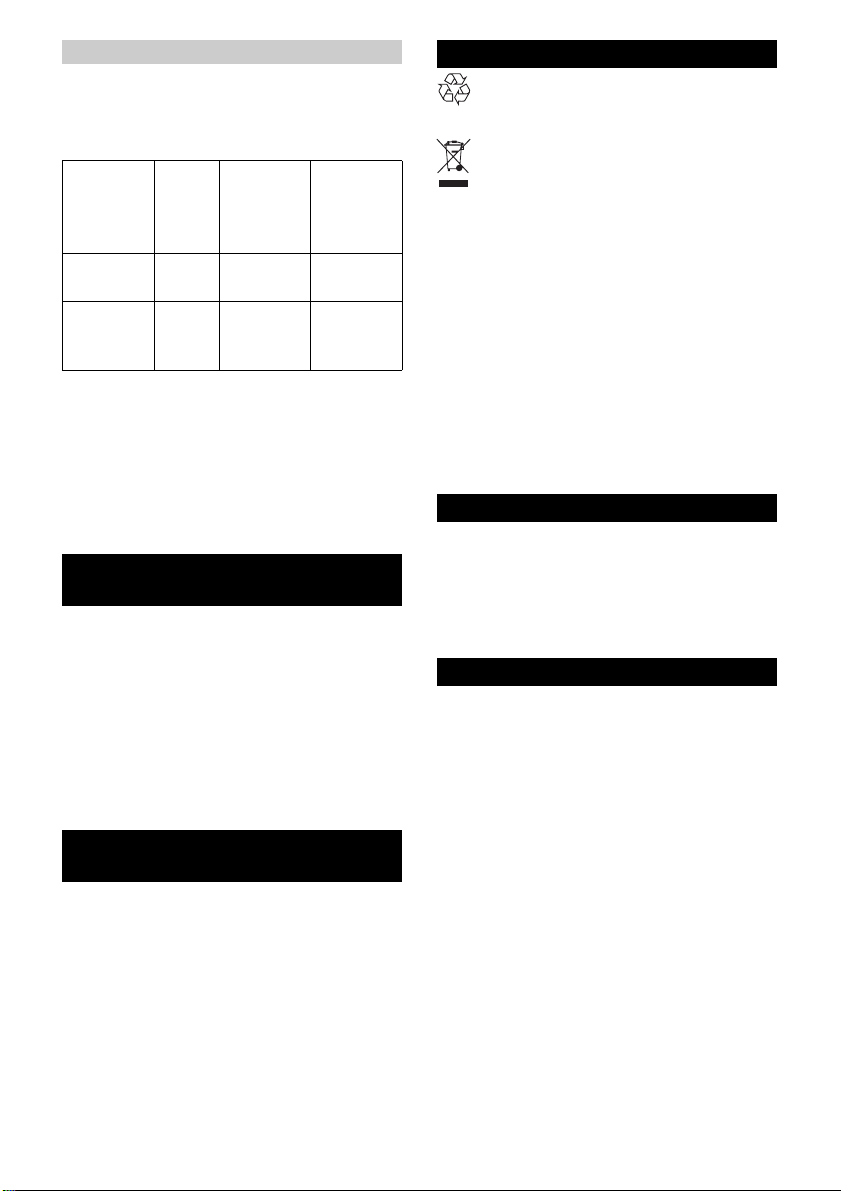
Bedieneinheit
1 Steuerungstaste Wasserausgang Links
2 LED Links
3 LED Rechts
4 Steuerungstaste Wasserausgang
Rechts
5 Pairing/Reset-Taste
1 Hahnanschlussadapter
2 G 3/4” Schlauchanschluss
3 Öse für Diebstahlsicherung
4 G 1” Wasseranschluss mit Vorfilter
5 G 3/4” Reduzierstück
6 Gehäuseoberteil für Zweikanalgerät
7 Aussparungen für Wandmontage
1 QR-Code Pairing
2 Batteriefach
Deutsch 5
Page 6
1 LED WLAN
1
2
1
2 LED Reihe
Gateway
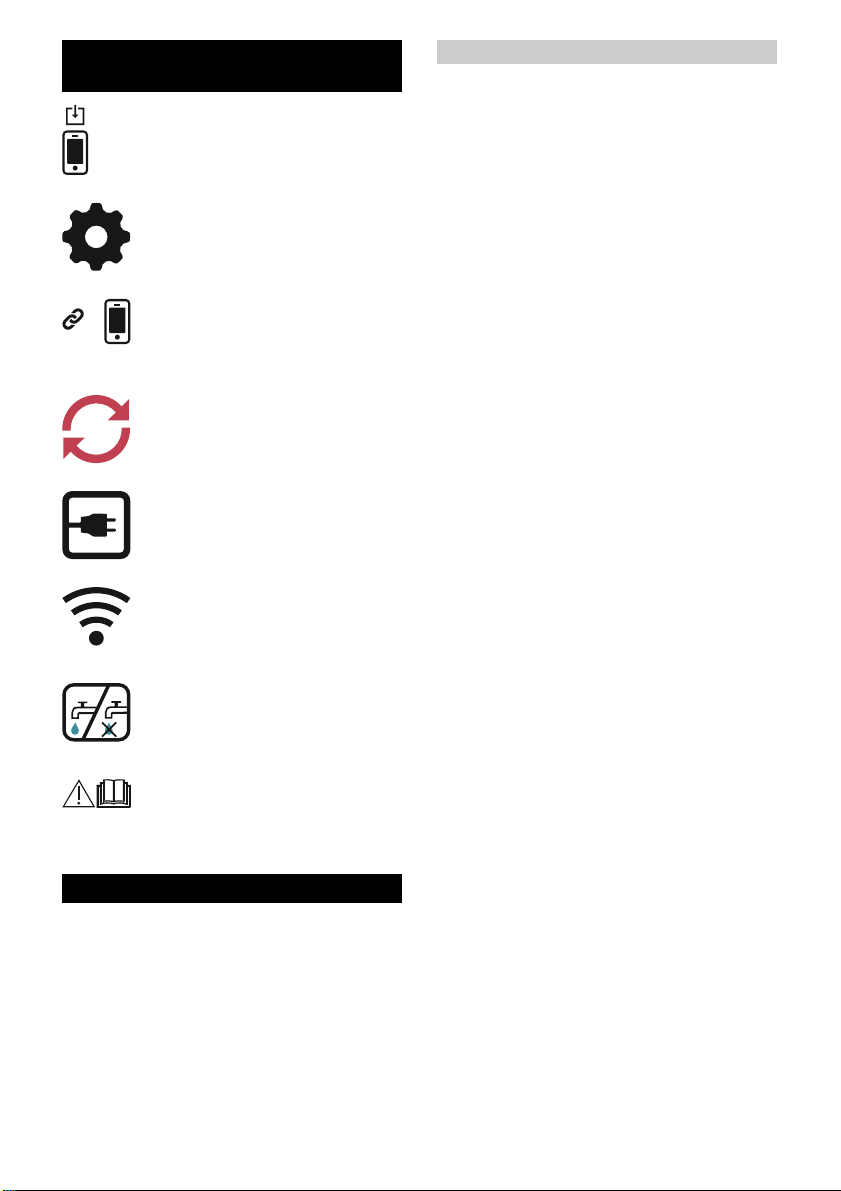
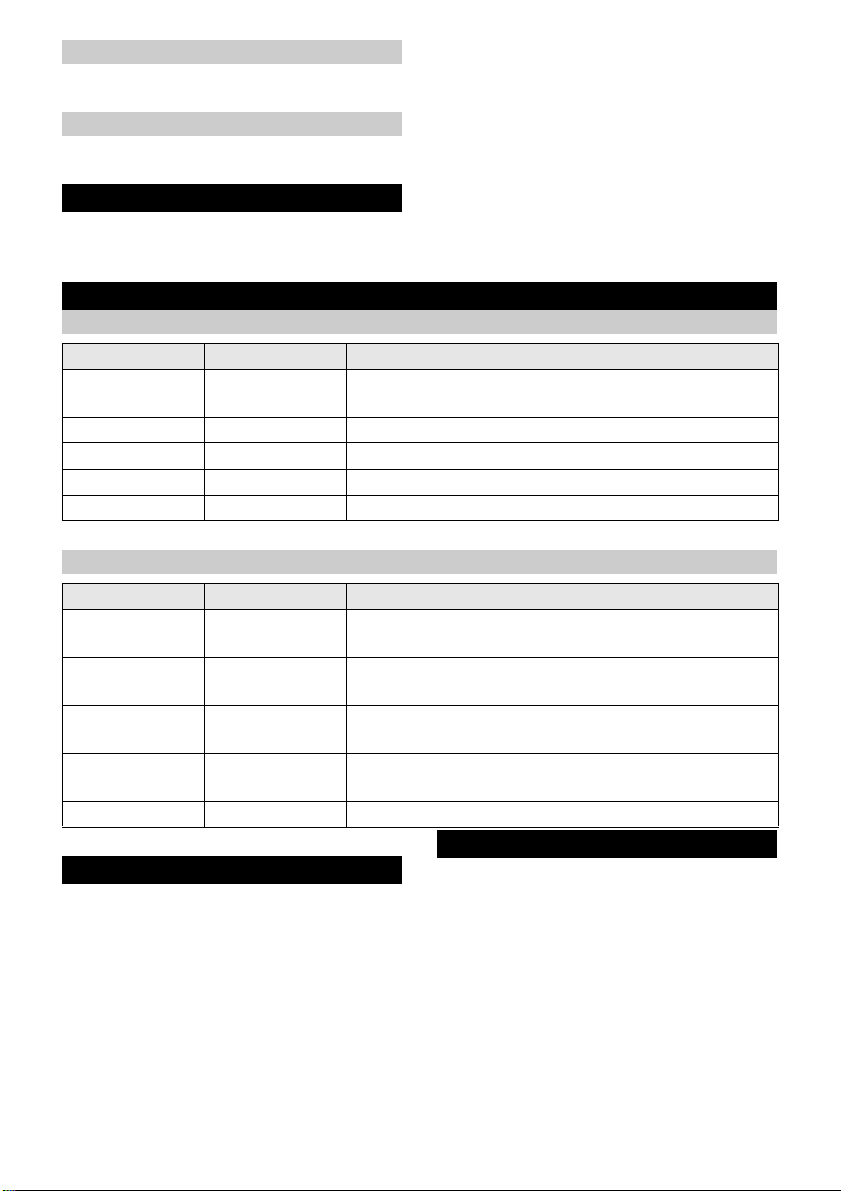
Symbole in der Kurzanleitung
KÄRCHER Home&Garden-App
herunterladen
Bootvorgang des Gateways
Inbetriebnahme durch die App
Reset
Stromanschluss
Netzwerkverbindung
1 MAC-Adresse
2 WPA-Key
3 QR-Code Paring
4 Aussparung für Wandmontage
5 Netzteilbuchse
6 Reset-Taste
Netzteil
1 Hohlstecker
6 Deutsch
Wasserausgang ein-/ausschalten
Beiliegende Sicherheitshinweise
unbedingt beachten.
Page 7

Inbetriebnahme
Hinweis: Die Inbetriebnahme erfolgt durch
die KÄRCHER Home&Garden-App. Bitte
folgen Sie der dort beschriebenen Vorgehensweise, um auf dem aktuellen Stand zu
sein.
Hinweis: Das Bewässerungsventil benötigt 4 x 1,5 V AAA Batterien. Diese sind
nicht im Lieferumfang enthalten. Zusätzliche Informationen über die Batterien finden
Sie im Kapitel “Technische Daten”.
Gateway in Betrieb nehmen
1. Die KÄRCHER Home&Garden App vom
Apple App Store oder vom Google Play
Store herunterladen.
2. Die KÄRCHER Home&Garden App öff-
nen.
3. Auf “Produkt hinzufügen” wechseln.
4. Ein Konto erstellen (falls Sie noch nicht
registriert sind).
5. Den Hohlstecker des Netzteils in die
Buchse des Gateways stecken.
6. Das Netzteil in eine Steckdose stecken.
Der Bootvorgang startet und kann einige
Minuten dauern.
7. Den QR-Code des Gateways scannen.
8. “Kärcher-Gateway” als Accesspoint in
der WLAN-Suche des Smartphones
wählen.
9. Als WLAN-Passwort des Gateways den
vorher gescannten QR-Code einfügen
oder den WPA-Key auf dem Typenschild
des Gateways manuell eintragen.
10.Bei Rückkehr in die KÄRCHER Ho-
me&Garden App wird die Verbindung
geprüft.
11.Das Heimnetzwerk wählen und das
Passwort eingeben.
Ist die Prüfung der Verbindung erfolg-
reich, wird die korrekte Installation be-
stätigt.
Hinweis: Platzieren Sie das Gateway in
der Wohnung auf der selben Hausebene,
möglichst nah am Bewässerungsventil.
Optimal ist ein Platz am Fenster.
Wichtig: Sind auf dem WLAN-Router ein
MAC-Filter oder zusätzliche Firewalls eingerichtet, muss dort die MAC-Adresse des
Gateways freigegeben werden. Die MACAdresse ist auf dem Typenschild des Gateways angegeben.
Ventil in Betrieb nehmen
1. “Produkt hinzufügen” wählen.
2. Den QR-Code des Ventils scannen.
3. Die Batterien in die Bedieneinheit einlegen.
4. Die Pairing-Taste auf der Bedieneinheit
drücken.
Ist die Verbindung erfolgreich, erscheint
eine Bestätigung der korrekten Installation.
5. Das Ventil mit dem Wasserhahn verbinden.
6. Die Schlauchanschlüsse mit den
Schläuchen verbinden.
7. Die Bedieneinheit in das Ventil einlegen.
8. Den Wasserhahn öffnen.
Wandmontage
Bei Bedarf können die Geräte an einer
Wand befestigt werden. Die verwendeten
Schrauben dürfen folgende Abmessungen
nicht überschreiten.
Gateway
Durchmesser Schraubenkopf: 9 mm
Höhe Schraubenkopf: 2,7 mm
Durchmesser Gewinde: 4,2 mm
Ventil
Durchmesser Schraubenkopf: 11 mm
Höhe Schraubenkopf: 5,5 mm
Durchmesser Gewinde: 6 mm
Deutsch 7
Page 8

Bewässerungsfunktionen
Die Einstellung der Berwässerungsfunktionen ist in der App erklärt.
Manuelle Bewässerung
Die Bewässerung manuell an der Bedieneinheit ein- und ausschalten.
Die Bewässerungsdauer ist in der App frei
einstellbar (maximal 90 Minuten).
Zeitgesteuerte Bewässerung
Eine unbegrenzte Anzahl von Bewässerungsterminen für jeden Wasserausgang
anlegen (maximale Dauer 90 Minuten pro
Termin).
Wetterbasierte Bewässerung
Bewässerungstermin aufgrund von Wetterdaten pausieren.
Bewässerung pausieren
Bewässerungstermine in einem Zeitraum
von 1 bis 24 Stunden aussetzen.
Sprachsteuerung
Die Sprachsteuerung durch einen digitalen
Sprachassistenten erfolgt durch die Verbindung zwischen Ihrem Kärcher Home &
Garden Account und einem externen digitalen Sprachassistenten. Die Anleitung für
die Verbindung ist beim Anbieter des digitalen Sprachassistenten erhältlich. Die Liste
der aktuellen Anbieter finden Sie unter
www.kaercher.com.
Die Verfügbarkeit der verschiedenen
Sprachassistenten ist in jedem Land unterschiedlich. Eine Liste der verfügbaren
Sprachen ist auf der Webseite des jeweiligen Anbieters zu finden.
Kontrollleuchten
Gateway
LED-Reihe LED WLAN Bedeutung
Blinkt Aus Booten, Startphase nach Verbindung mit dem Strom-
netz.
An Blinkt Konfiguration WLAN gestartet.
An Blinkt Keine Verbindung zur Cloud.
An An Korrekte Verbindung besteht.
Blinkt Blinkt Werkseinstellungen werden wieder hergestellt.
Ventil
LED Links LED Rechts Bedeutung
Blinkt mehrmals Blinkt mehrmals Pairing Phase (nach dem Drücken der Taste Pairing/
Reset.
Blinkt schnell
3 mal
Blinkt abwech-
selnd
Blinkt 1 Sekunde Blinkt 1 Sekunde Wasserausgang auf der blinkenden Seite ein/aus.
An An Softwareaktualisierung (Dauer 10...20 Minuten).
8 Deutsch
Blinkt schnell
3 mal
Blinkt abwechselnd
Unpairing.
Recovery Modus, die Werkseinstellungen werden wie-
der hergestellt.
Page 9
Lagerung
ACHTUNG
Beschädigungsgefahr
Wasserrückstände können das Ventil beschädigen.
Entleeren Sie das Ventil vor der Lagerung.
1. Das Ventil vollständig entleeren.
2. Die Batterien aus der Bedieneinheit entfernen.
3. Das Ventil und die Bedieneinheit an einem trockenen, frostgeschützten Ort lagern.
Pflege und Wartung
Wir empfehlen, die Batterien in der Bedieneinheit jährlich zu wechseln.
Der Zustand der Batterien wird in der
KÄRCHER Home&Garden App angezeigt.
Hilfe bei Störungen
Hinweis: Eine ausführliche Störungshilfe ist in der KÄRCHER Home&Garden App unter
FAQ verfügbar.
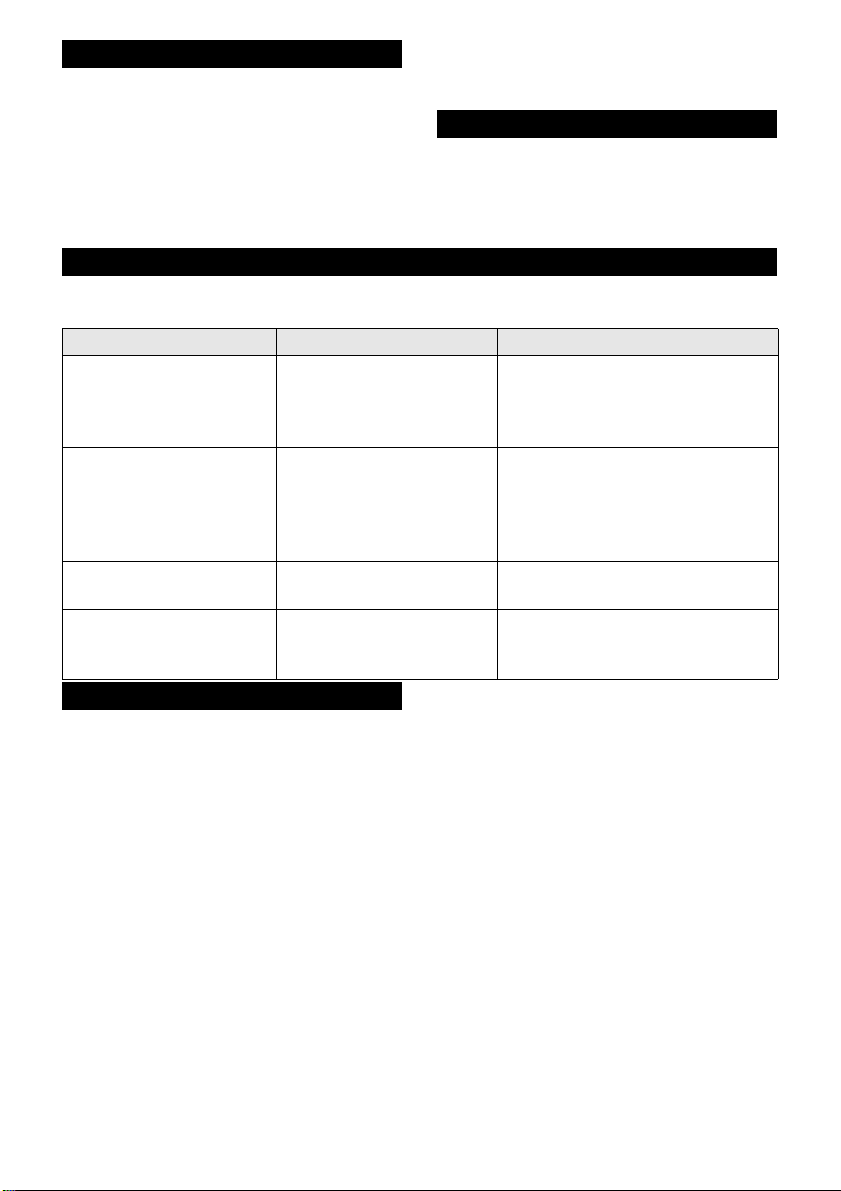
Störung Ursache Behebung
Das Gateway verbindet
sich nicht mit dem WLAN
Netzwerk.
Die Ventile lassen sich
nicht mit dem Gateway
verbinden.
Das Ventil öffnet oder
schließt nicht.
Die Ventile öffnen sich
nicht bei Tastendruck. Die
LEDs leuchten nicht.
Der WLAN Router wird mit
einem MAC Filter oder einer anderen Firewall betrieben.
Hindernisse schwächen
das Funksignal zwischen
dem Gateway und den
Ventilen.
Die Bedieneinheit ist nicht
am Ventil angebracht.
Die Batterien sind leer. Die Batterien in der Bedieneinheit
Die MAC Adresse des Gateways
am WLAN Router freigeben.
Das Gateway an einem anderen
Platz in der Wohnung platzieren.
Möglichst in der Nähe eines Fensters in der Richtung des Bewässerungsventils
Die Bedieneinheit in das Ventil einlegen.
ersetzen.
Garantie
In jedem Land gelten die von unserer zuständigen Vertriebsgesellschaft herausgegebenen Garantiebedingungen. Etwaige
Störungen an Ihrem Gerät beseitigen wir
innerhalb der Garantiefrist kostenlos, sofern ein Material- oder Herstellungsfehler
die Ursache sein sollte. Im Garantiefall
wenden Sie sich bitte mit Kaufbeleg an Ihren Händler oder die nächste autorisierte
Kundendienststelle.
Die Garantie bezieht sich nicht auf Schäden an Pflanzen.
Deutsch 9
Page 10
Technische Daten
Watering
System Duo
Smart Kit
Netzteil
Netzspannung V 100-240
Phase ~ 1
Frequenz Hz 47-63
Batterien
Anzahl 4
Batteriespannung V 1,5
Kapazität, min. Ah 800
Batterietyp AAA
ZigBee
Frequenz MHz 2412-2472
Reichweite
Funkeinheit
Wasseranschluss
Betriebsdruck MPa
Zulauftemperatur
(max.)
Umgebung
Umgebungstemperatur
Technische Änderungen vorbehalten.
m 100
0,1-1,0 (1-10)
(bar)
°C 35
°C +5...+40
10 Deutsch
Page 11
Contents
Safety instructions............................... 11
Intended use ....................................... 13
Connection to the drinking water net-
work .................................................... 13
Environmental protection .................... 13
Accessories and spare parts............... 13
Scope of delivery ................................ 13
Device description............................... 13
Symbols used in the brief instructions 15
Commissioning ................................... 15
Watering functions .............................. 16
Voice control ....................................... 16
Indicator lamps.................................... 16
Storage ............................................... 17
Care and service................................. 17
Troubleshooting guide......................... 17
Warranty.............................................. 17
Technical data ..................................... 18
Safety instructions
Read these original operating
instructions and the safety in-
structions before using the device for the first time. Proceed accordingly.
Prior to initial startup, please observe
the graphical operating instructions for
your device and these safety instructions.
In addition to the notes in the operating
instructions, you also need to take into
consideration the general safety regulations and accident prevention guidelines
applicable by law.
General safety instructions
DANGER
Risk of asphyxiation. Keep packaging film
out of the reach of children.
몇 WARNING
Persons with reduced physical, sensory or
mental capabilities and persons lacking experience and knowledge may only use the
appliance if they are properly supervised,
have been instructed on use of the appliance safely by a person responsible for
their safety, and understand the resultant
hazards involved.
Children must be supervised to prevent
them from playing with the appliance.
Children from the minimum age of 8 may
use the appliance if they are properly supervised or have been instructed in its use
by a person responsible for their safety, and
if they have understood the resultant hazards involved.
Symbols on the device
Watering valve
Protecting the device against
frost
Symbols on the device
Gateway
Only use the device indoors
Only use the approved power
supply 6.745-110.0
input: 5 V / 1 A
Safety instructions for watering
valve
Only operate the watering valve with un-
treated, clean fresh water. The device
must not under any circumstances be
operated with explosive, corrosive or inflammable substances.
The water temperature must not exceed
35 °C.
Do not exceed the water supply pres-
sure of 10 bar (1 MPa) at the device inlet.
Never fully immerse the watering valve
in liquids.
Only operate the watering valve out-
doors.
Regularly check the watering valve for
damage. Do not operate the device if
you discover visible damage.
Only operate the watering valve in a ver-
tical position.
Do not use sealing compound or lubri-
cant to connect the watering valve to the
tap.
Do not operate the device without the in-
tegrated filter at the water inlet.
English 11
Page 12

Regularly check the filter at the water in-
let for damage. Particles in the water
which enter the device through a damaged filter will prevent the valve from
opening and closing properly.
Replace the damaged water filter imme-
diately.
Check the device for leaks and ensure
that the valves open and close reliably if
the device has been shut down for a
long period of time, and always at least
once a month.
Do not pull on connected hoses.
Observe wall and surface requirements
before wall mounting.
When mounting on the wall, check the
load capacity of the wall. Mount the device securely on the wall.
The device must be accessible at all
times. Do not mount the device in inaccessible places or higher than 2 meters.
Do not install the watering valve near
heat sources and protect it against frost
(permitted ambient temperature 5 °C to
40 °C).
Only use batteries approved for your wa-
tering valve. You can find information
about the required battery type in the operating instructions for your device.
Do not use rechargeable batteries.
Do not install the watering valve in loca-
tions where condensation can form.
Do not operate the watering valve near
devices that are connected to power.
Do not start up a device that is not func-
tioning correctly.
Gateway safety instructions
Never open the device or the plug-in
power supply.
Route the connecting cable such that
no-one can tread on it or trip over it.
Only operate the device with the plug-in
power supply provided or with an appropriate replacement (order number
6.745-102.0).
Always connect the plug-in power sup-
ply to a mains socket that is accessible
at all times and corresponds to the values indicated on the type plate.
Never immerse the device in liquids.
Never touch the plug-in power supply
with wet hands.
Only operate the device in dry indoor
rooms.
Place the device on a stable and non-
slip surface.
Set up the device away from heat sourc-
es and direct sunlight.
Do not place the device on heat-sensi-
tive surfaces.
Observe wall and surface requirements
before wall mounting.
When mounting on the wall, check the
load capacity of the wall. Mount the device securely on the wall.
The device must be accessible at all
times. Do not mount the device in inaccessible places such as behind panels,
inside furniture or higher than 2 meters.
Do not operate the device near other
electrical devices. Especially not in the
vicinity of other radio equipment.
Only dry-clean the device, with a duster,
for example.
Do not pull on the cable.
Wireless standards
The devices use the following wireless
standards:
ZigBee (IEEE 802.15.4)
WLAN (IEEE 802.11)
Device Type Frequen-
cy, MHz
Gateway SRD 2400 -
2483,5
Water
Controller
Duo Smart
Alfred Kärcher GmbH & Co. KG hereby declares that the radio system type Gateway /
watering valve (Water Controller Duo
Smart) complies with the Guideline 2014/
53/EC. The complete text of the EC Declaration of Conformity is available at the following Internet address:
www.kaercher.com
SRD 2412 -
2472
Power,
max. ERP
110 mW
10 mW
12 English
Page 13
Intended use
121
3
4
5
6
2
1
7
This device has been developed for private
use and is not intended for the loads imposed by commercial use.
This device is intended for connection to a
water tap and automatically controls the
water flow in a watering system.
The manufacturer accepts no liability for
possible damage caused by improper use
or incorrect operation.
Connection to the drinking
water network
Please observe the requirements of EN
1717 when connecting this product to the
drinking water network and contact your
sanitation specialists if you have any queries.
Environmental protection
The packing materials can be recy-
cled. Please dispose of packaging in
accordance with the environmental regulations.
Electrical and electronic appliances
contain valuable, recyclable materials
and often components such as batteries, rechargeable batteries or oil, which - if
handled or disposed of incorrectly - can
pose a potential threat to human health and
the environment. However, these components are required for the correct operation
of the appliance. Appliances marked by this
symbol are not allowed to be disposed of
together with the household rubbish.
Notes on the content materials (REACH)
Current information on content materials
can be found at: www.kaercher.com/
REACH
Accessories and spare parts
Only use original accessories and original
spare parts. They ensure that the appliance
will run fault-free and safely.
Information on accessories and spare parts
can be found at www.kaercher.com.
Scope of delivery
The scope of delivery for the appliance is
shown on the packaging. Check the contents for completeness when unpacking. If
any accessories are missing or in the event
of any shipping damage, please notify your
dealer.
Device description
Function
This device controls the watering either via
the smartphone app or via direct control at
the control unit.
The device must be integrated into the
WLAN network via the gateway supplied in
order to be operated via the app.
This is done using the Kärcher Home &
Garden app, which is available free of
charge from the Apple App Store or Google
Play Store.
The following functions can be executed at
the control unit:
Switching the water outlets on and off.
This app allows execution of the following
functions:
Switching the water outlets on and off.
Definition or deletion of a time program.
Activation or deactivation of weather-
based watering.
Pausing of the time program.
Control elements
Valve
1 Tap connection adapter
2 G 3/4" hose connection
3 Anti-theft eyelet
4 G 1" water connection with pre-filter
5 G 3/4" reduction piece
6 Housing top for two-channel device
7 Recesses for wall mounting
English 13
Page 14
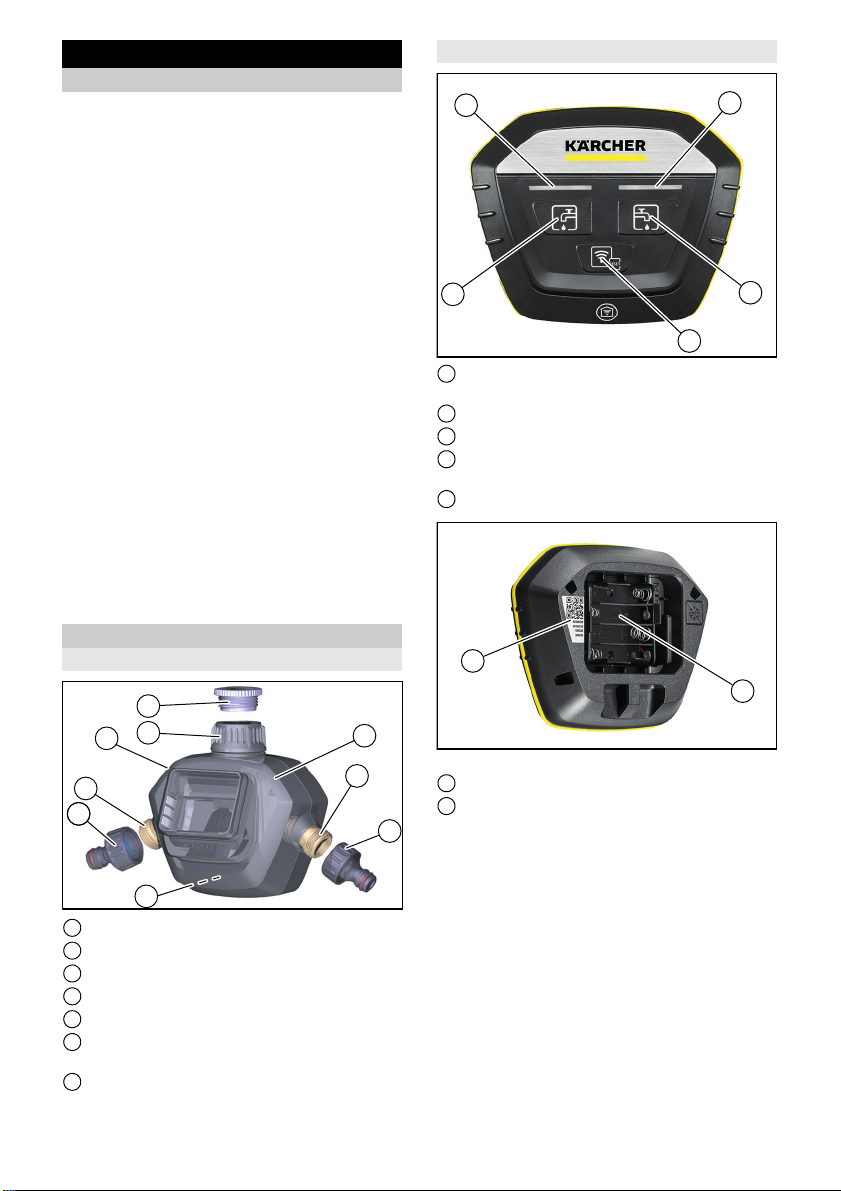
Control unit
3
4
5
1
2
1
2
1
2
1
1 Left water outlet control button
2 Left LED
3 Right LED
4 Right water outlet control button
5 Pairing/Reset button
1 MAC address
2 WPA key
3 QR-code pairing
4 Recess for wall mounting
5 Power supply socket
6 Reset button
Power supply
1 QR-code pairing
2 Battery compartment
Gateway
1 WLAN LED
2 LED strip
14 English
1 Hollow plug
Page 15
Symbols used in the brief
instructions
Download the KÄRCHER
Home&Garden app
Gateway boot process
Commissioning via the app
Reset
Power connection
Network connection
Switch the water outlet on/off
Take care to observe the safety
instructions provided.
Commissioning
Note: Commissioning is performed via the
KÄRCHER Home&Garden app. Please be
sure to follow the instructions provided in
this app to be sure that you are up to date.
Note: The watering valve requires 4 x 1.5 V
AAA batteries. These are not included in
the scope of delivery. Additional information
on the batteries is provided in the "Technical data" chapter.
Starting up the gateway
1. Load the KÄRCHER Home&Garden
app from the Apple App Store or from
the Google Play Store.
2. Open the KÄRCHER Home&Garden
app.
3. Switch to "Add product".
4. Create an account (if you are not already
registered).
5. Insert the hollow plug of the power supply into the gateway socket.
6. Plug the power supply into a power
socket.
The boot process starts and can take
several minutes.
7. Scan the QR code of the gateway.
8. Select "Kärcher-Gateway" as the access
point in the WLAN search on your smartphone.
9. Enter the previously scanned QR code
of the gateway as the WLAN password
or manually enter the WPA key on the
type plate of the gateway.
10.The connection is checked when you return to the KÄRCHER Home&Garden
app.
11.Select the home network and enter the
password.
Correct installation is confirmed if the
connection test is successful.
Note: Position the gateway in the same
floor of your home and as close as possible
to the watering valve. The optimum position
is at a window.
Important: If a MAC filter or additional firewall is set up in your WLAN router then you
must enable the MAC address of the gateway in your router. The MAC address is
specified on the type plate of the gateway.
English 15
Page 16
Starting up the valve
1. Select "Add product".
2. Scan the QR code of the valve.
3. Insert the batteries into the control unit.
4. Press the Pairing button on the control
unit.
Correct installation is confirmed if the
connection is successful.
5. Connect the valve to the water tap.
6. Connect the hose connection to the hoses.
7. Insert the control unit into the valve.
8. Open the water tap.
Wall mounting
If necessary, the units can be attached to a
wall. The screws used must not exceed the
following dimensions.
Gateway
Screw head diameter: 9 mm
Screw head height: 2.7 mm
Thread diameter: 4.2 mm
Valve
Screw head diameter: 11 mm
Screw head height: 5.5 mm
Thread diameter: 6 mm
Watering functions
Setting of the watering functions is explained in the app.
Manually switch the watering on and off at
the control unit.
The watering duration is freely adjustable in
the app (90 minutes maximum).
You can create an unlimited number of watering timedates for each water outlet (maximum duration of 90 minutes per timedate).
Pausing a watering timedate due to weather data.
Disable a watering timedate for a period of
1 to 24 hours.
Voice control using a digital voice assistant
occurs via a connection between your
Kärcher Home & Garden account and an
external digital voice assistant. The instructions for establishing this connection are
available from the respective supplier of
your digital voice assistant. A list of current
suppliers is available at www.kaercher.com.
The availability of the various different digital voice assistants varies from country to
country. A list of the available languages is
provided on the website of the respective
supplier of your digital voice assistant.
Manual watering
Time-controlled watering
Weather-based watering
Pausing watering
Voice control
Indicator lamps
Gateway
LED strip WLAN LED Meaning
Flashes Off Booting, start phase after connection to the mains sup-
ply.
On Flashes WLAN configuration started.
On Flashes No connection to the cloud.
On On Correct connection established.
Flashes Flashes Factory settings being restored.
16 English
Page 17

Valve
Left LED Right LED Meaning
Flashes multiple
times
Flashes 3 times
quickly
Flashes alternately
Flashes for 1
second
On On Software update (duration 10...20 minutes).
ATT ENTION
Risk of damage
Water residues can damage the valve.
Drain the valve before storage.
1. Completely drain the valve.
2. Remove the batteries from the control
unit.
Flashes multiple
times
Flashes 3 times
quickly
Flashes alternately
Flashes for 1
second
Storage
Pairing phase (after pressing the Pairing/Reset button).
Unpairing.
Recovery mode, the factory settings are being restored.
Water outlet on the flashing side on/off.
3. Store the valve and control unit in a dry,
frost-free location.
Care and service
We recommend changing the control unit
batteries annually.
The condition of the batteries is displayed
in the KÄRCHER Home&Garden app.
Troubleshooting guide
Note: Comprehensive troubleshooting help is provided in the FAQ section of the
KÄRCHER Home&Garden app.
Malfunction Cause Rectification
The gateway is not connecting to the WLAN network.
The valves cannot connect to the gateway.
The valve does not open/
close.
The valves do not open
when a button is pressed.
The LEDs do not light up.
Warranty
The warranty conditions issued by our
sales company responsible apply in all
countries. We shall remedy possible malfunctions on your device within the warranty period free of cost, provided that a
material defect or manufacturing defect is
the cause. In a warranty case, please contact your dealer (with the purchase receipt)
The WLAN router uses a
MAC Filter or another firewall.
Obstacles are impairing the
radio signal between the
gateway and the valves.
The control unit is not
placed in the valve.
The batteries are empty. Replace the batteries in the control
or the next authorised customer service
site.
The warranty does not include damage to
plants.
Enable the MAC address of the
gateway in your WLAN router.
Position the gateway in a different
location in your home. Where possible, in the vicinity of a window facing the watering valve
Insert the control unit into the
valve.
unit.
English 17
Page 18

Technical data
Watering
System Duo
Smart Kit
Power supply
Mains voltage V 100-240
Phase ~ 1
Frequency Hz 47-63
Batteries
Quantity 4
Working voltage of
the battery
Min. capacity Ah 800
Battery type AAA
ZigBee
Frequency MHz 2412-2472
Wireless unit
range
Water connection
Operating pressure
Input temperature
(max.)
Environment
Ambient temperature
Subject to technical modifications.
V1,5
m 100
MPa
0,1-1,0 (1-10)
(bar)
°C 35
°C +5...+40
18 English
Page 19
Contenu
Consignes de sécurité ........................ 19
Utilisation conforme ............................ 21
Raccordement au réseau d'eau po-
table .................................................... 21
Protection de l'environnement............. 21
Accessoires et pièces de rechange .... 21
Etendue de livraison ........................... 21
Description de l'appareil...................... 22
Symboles dans le manuel succinct..... 23
Mise en service................................... 24
Fonctions d’arrosage .......................... 24
Commande vocale.............................. 25
Témoins lumineux............................... 25
Stockage............................................. 25
Entretien et maintenance.................... 25
Dépannage en cas de défaut.............. 26
Garantie .............................................. 26
Caractéristiques techniques................ 26
Consignes de sécurité
Veuillez lire le manuel d’instructions original et les
consignes de sécurité avant la
première utilisation de l’appareil. Suivez
ses instructions.
Avant la mise en service, prenez en
compte le manuel d’utilisation graphique
de votre appareil et ces consignes de
sécurité.
Outre les remarques dans ce manuel
d’utilisation, vous devez prendre en
compte les directives générales de sécurité et de la directive pour la prévention des accidents du législateur.
Consignes de sécurité générales
DANGER
Risque d'asphyxie. Ne laissez pas les matériaux d'emballage à la portée des enfants.
몇 AVERTISSEMENT
Les personnes dont les capacités physiques sensorielles ou mentales sont réduites ou qui manquent d'expérience ou de
connaissance peuvent utiliser l'appareil, si
elles sont correctement surveillées ou si
elles ont été instruites sur l'utilisation sûre
de l'appareil et comprennent les dangers
qui en résultent.
Surveillez les enfants pour s’assurer qu’ils
ne jouent pas avec l’appareil.
Les enfants peuvent utiliser l'appareil à partir de l'âge de 8 ans, s'ils ont été instruits
par une personne compétente de son utilisation et des consignes de sécurité ou s'ils
sont surveillés et s'ils ont compris les dangers pouvant en résulter.
Symboles sur l'appareil
Vanne d’arrosage
Protéger l'appareil contre le gel
Symboles sur l’appareil
Passerelle
Utilisez l’appareil uniquement
en intérieur
Utilisez uniquement le bloc secteur autorisé 6.745-110.0
Entrée : 5 V / 1 A
Consignes de sécurité pour la
vanne d’arrosage
Utiliser la vanne d’arrosage exclusive-
ment avec de l’eau douce claire et non
traitée. N’utiliser en aucun cas l’appareil
en lien avec des substances explosives,
corrosives ou inflammables.
La température de l’eau ne doit pas dé-
passer 35 °C.
La pression d’arrivée d’eau ne doit pas
dépasser 10 bars (1 MPa) à l’entrée de
l’appareil.
Ne jamais plonger la vanne d’arrosage
complète dans un liquide.
Utiliser la vanne d’arrosage exclusive-
ment à l’extérieur.
Contrôler régulièrement l’absence de
dommages sur la vanne d’arrosage. En
cas de dommage visible, ne pas mettre
l’appareil en service.
Mettre la vanne d’arrosage en service
uniquement en position verticale.
Ne pas utiliser de mastic, ni de lubrifiant,
pour raccorder la vanne d’arrosage au
robinet d’eau.
Français 19
Page 20

Ne pas utiliser l’appareil sans le filtre in-
tégré à l’entrée d’eau.
Contrôler régulièrement l’absence de
dommages sur le filtre à l’entrée d’eau.
Les particules dans l’eau pénétrant dans
l’appareil en cas de dommage sur le
filtre empêchent l’ouverture et la fermeture correctes de la vanne.
Remplacer immédiatement les filtres à
eau endommagés.
Contrôlez, après toute mise hors service
prolongée, au moins une fois par mois,
l’étanchéité de l’appareil et assurezvous de la fiabilité de l’ouverture et de la
fermeture des vannes.
Ne pas tirer sur les flexibles raccordés.
Avant le montage au mur, observer les
exigences pour le mur et la surface.
En car de montage au mur, vérifier la
portance du mur. Monter l’appareil de
manière sûre au mur.
L’appareil doit être toujours accessible.
Ne pas monter l’appareil à des endroits
inaccessibles ou à plus de 2 mètres de
haut.
Ne pas installer la vanne d’arrosage à
proximité de sources de chaleur et la
protéger contre le gel (température ambiante autorisée 5 °C à 40 °C).
Utiliser exclusivement des batteries au-
torisées pour la vanne d’arrosage. Vous
trouverez des informations sur les types
de batteries requises dans le manuel
d’utilisation de l’appareil.
Ne pas utiliser de batteries rechar-
geables.
Ne pas installer la vanne d’arrosage sur
des emplacements où de l’eau de
condensation peut se former.
Ne pas utiliser la vanne d’arrosage à
proximité d’appareils sous tension.
Ne pas mettre en service un appareil ne
fonctionnant pas correctement.
Consignes de sécurité pour la
passerelle
Ne jamais ouvrir l’appareil, ni le bloc
secteur.
Poser le câble de raccordement de ma-
nière à ce que personne ne puis marcher, ni trébucher dessus.
Utiliser l’appareil uniquement avec le
bloc secteur fourni ou avec une pièce de
remplacement correspondante (Référence 6.745-102.0).
Raccorder le bloc secteur à une prise
secteur accessible à tout moment et correspondant aux valeurs indiquées sur la
plaque signalétique.
Ne jamais plonger l’appareil dans un li-
quide.
Ne pas toucher le bloc secteur avec les
mains mouillées.
Utiliser l’appareil uniquement dans des
espaces intérieurs secs.
Poser l’appareil sur une base stable et
antidérapante.
Poser l’appareil éloigné de sources de
chaleur et du rayonnement direct du soleil.
Ne pas poser l’appareil sur des surfaces
sensibles à la chaleur.
Avant le montage au mur, observer les
exigences pour le mur et la surface.
En car de montage au mur, vérifier la
portance du mur. Monter l’appareil de
manière sûre au mur.
L’appareil doit être toujours accessible.
Ne pas monter l’appareil à des endroits
inaccessibles tels que derrière des habillages, dans des meubles ou à une
hauteur supérieure à 2 mètres.
Ne pas utiliser l’appareil à proximité
d’autres appareils électriques. Surtout
pas à proximité d’autres installations radio.
Nettoyer l’appareil uniquement à sec, à
l’aide d’un chiffon à poussière, par
exemple.
Ne pas tirer sur le câble.
20 Français
Page 21
Standards radio
Les appareils utilisent les standards radio
suivants :
ZigBee (IEEE 802.15.4)
WLAN (IEEE 802.11)
Appareil Type Fré-
quence
MHz
Passerelle SRD 2400 -
2483,5
Water
Controller
Duo Smart
Alfred Kärcher SE & Co. KG déclare par la
présente que le type d’appareil radio Passerelle/vanne d’arrosage (Water Controller
Duo Smart) est conforme à la
directive 2014/53/UE. Le texte complet de
la déclaration de conformité UE est disponible à l’adresse internet suivante :
www.kaercher.com
SRD 2412 -
2472
Puissance
max. ERP
110 mW
10 mW
Utilisation conforme
Cet appareil a été développé pour un
usage privé et n’est pas conçu pour les exigences d’une utilisation professionnelle.
Cet appareil doit être raccordé à un robinet
d’eau et pilote automatiquement le débit
d’eau dans les systèmes d’arrosage.
Le fabricant décline toute responsabilité
pour des dommages éventuels provoqués
par une utilisation non-conforme ou une
mauvaise commande.
Raccordement au réseau
d'eau potable
Lors du raccordement de ce produit au réseau d'eau potable, respecter les exigences de la norme EN 1717 et s'adresser
à un spécialiste sanitaire pour toute éventuelle question.
Protection de
l'environnement
Les matériaux d'emballage sont recyclables. Veuillez éliminer les embal-
lages dans le respect de l’environnement.
Les appareils électriques et électroniques contiennent des matériaux pré-
cieux recyclables et souvent des
composants tels que des piles, batteries ou
de l’huile représentant un danger potentiel
pour la santé humaine et l'environnement,
s'ils ne sont pas manipulés ou éliminés correctement. Ces composants sont cependant nécessaires pour le fonctionnement
correct de l'appareil. Les appareils marqués par ce symbole ne doivent pas être jetés dans les ordures ménagères.
Remarques concernant les matières
composantes (REACH)
Les informations actuelles concernant les
matières composantes sont disponibles
sous : www.kaercher.com/REACH
Accessoires et pièces de
rechange
Utiliser exclusivement des accessoires et
pièces de rechange originaux. Ceux-ci garantissent le fonctionnement sûr et sans
défaut de votre appareil.
Des informations sur les accessoires et
pièces de rechange sont disponibles sur le
site Internet www.kaercher.com.
Etendue de livraison
L’étendue de livraison de l’appareil est illustrée sur l'emballage. Lors du déballage, vérifiez que le contenu de la livraison est
complet. Si un accessoire manque ou en
cas de dommage dû au transport, veuillez
informer votre distributeur.
Français 21
Page 22

Description de l'appareil
121
3
4
5
6
2
1
7
3
4
5
1
2
1
2
Fonctionnement
Cet appareil pilote l’arrosage soit via l’application du smartphone, soit par commande
directe sur l’unité de commande.
Pour permettre la commande avec l’application, l’appareil doit être connecté au réseau WLAN à l’aide de la passerelle
fournie.
Cette opération est réalisée à l’aide de l’application Kärcher Home & Garden, disponible gratuitement dans Apple App Store ou
Google Play Store.
Les fonctions suivantes peuvent être paramétrées sur l’unité de commande :
Mettre les sorties d’eau en marche et à
l’arrêt.
Vous pouvez sélectionner les fonctions suivantes avec l’application :
Mettre les sorties d’eau en marche et à
l’arrêt.
Définir ou effacer un programme ho-
raire.
Activer ou désactiver l’arrosage en fonc-
tion de la météo.
Mettre le programme horaire en pause.
Éléments de commande
Vanne
Unité de commande
1 Touche de commande sortie d’eau de
gauche
2 LED de gauche
3 LED de droite
4 Touche de commande sortie d’eau de
droite
5 Touche appairage/Réinit.
1 Adaptateur de raccord au robinet
2 Raccord de flexible G 3/4”
3 Anneau pour la sécurité antivol
4 Raccord d’eau G 1” avec préfiltre
5 Réducteur G 3/4”
6 Partie supérieur du logement pour ap-
pareil à deux canaux
7 Evidements pour montage au mur
22 Français
1 Appairage par code QR
2 Logement de batteries
Page 23
Passerelle
1
2
1
1 LED WLAN
2 Rangée de LED
Symboles dans le manuel
succinct
Télécharger l’application KÄRCHER Home&Garden
Opération de lancement de la
passerelle
Mise en service avec l’application
Réinit.
Raccordement électrique
Connexion au réseau
1 Adresse MAC
2 Clé WPA
3 Appairage par code QR
4 Evidement pour montage au mur
5 Prise de l’alimentation secteur
6 Touche Réinit.
Alimentation secteur
1 Connecteur creux
Mise en marche/Arrêt de la sortie
d’eau
Observer impérativement les
consignes de sécurité jointes.
Français 23
Page 24

Mise en service
Remarque : La mise en service est réali-
sée à l’aide de l’application KÄRCHER
Home&Garden. Veuillez suivre les instructions décrites pour être à jour.
Remarque : La vanne d’arrosage nécessite des batteries 4 x 1,5 V AAA. Elles ne
sont pas fournies. Vous trouverez plus d’informations sur les batteries au chapitre
« Caractéristiques techniques ».
Mettre la passerelle en service
1. Vous pouvez télécharger l’application
KÄRCHER Home&Garden à partir de
l’App Store Apple ou du Google Play
Store.
2. Ouvrir l’application KÄRCHER
Home&Garden.
3. Aller à « Ajouter produit ».
4. Créer un compte (si vous n’êtes pas en-
core enregistré).
5. Brancher le connecteur creux de l’ali-
mentation secteur dans la prise de la
passerelle.
6. Brancher l’alimentation secteur dans
une prise de courant.
L’opération de lancement démarre et
peut durer plusieurs minutes.
7. Scanner le code QR de la passerelle.
8. Sélectionner « Kärcher-Gateway » en
tant que point d’accès dans la recherche
WLAN du smartphone.
9. Ajouter le code QR scanné au préalable
en tant que mot de passe WLAN de la
passerelle ou saisir manuellement la clé
WPA indiquée sur la plaque signalétique
de la passerelle.
10.Lorsque vous revenez dans l’application
KÄRCHER Home&Garden, la
connexion est contrôlée.
11.Sélectionner le réseau domestique et
saisir le mot de passe.
Une fois le contrôle de connexion abouti,
l’installation correcte est validée.
Remarque : Placer la passerelle au même
étage de l’appartement, le plus près possible de la vanne d’arrosage. Près d’une fenêtre est idéal.
Important : Si un filtre MAC ou des parefeu supplémentaires sont paramétrés dans
le routeur WLAN, l’adresse MAC de la passerelle doit y être autorisée. L’adresse MAC
est indiquée sur la plaque signalétique de
la passerelle.
Mettre la vanne en service
1. Sélectionner « Ajouter produit ».
2. Scanner le code QR de la vanne.
3. Placer les batteries dans l’unité de commande.
4. Appuyer sur la touche d’appairage de
l’unité de commande.
Une fois la connexion établie, l’installation correcte est validée.
5. Relier la vanne au robinet d’eau.
6. Relier les raccords de flexibles aux
flexibles.
7. Insérer l’unité de commande dans la
vanne.
8. Ouvrir le robinet d’eau.
Montage mural
Vous pouvez fixer les appareils au mur si
besoin. Les vis utilisées ne doivent pas dépasser les dimensions suivantes.
Passerelle
Diamètre de la tête de vis : 9 mm
Hauteur de la tête de vis : 2,7 mm
Diamètre du filet : 4,2 mm
Vanne
Diamètre de la tête de vis : 11 mm
Hauteur de la tête de vis : 5,5 mm
Diamètre du filet : 6 mm
Fonctions d’arrosage
Le paramétrage des fonctions d’arrosage
est décrit dans l’application.
Arrosage manuel
Mettre manuellement l’arrosage en marche
/ arrêt sur l’unité de commande.
La durée d’arrosage peut être réglée librement dans l’application (90 minutes maximum).
Arrosage avec programme horaire
Définir un nombre illimité de séquences
d’arrosage pour chaque sortie d’eau (durée
maximale 90 minutes par séquence).
24 Français
Page 25
Arrosage en fonction de la météo
Mettre les séquences d’arrosage en pause
en fonction des données de météo.
Mettre l’arrosage en pause
Suspendre les séquences d’arrosage pour
une période de 1 à 24 heures.
Commande vocale
La commande vocale avec un assistant vocal numérique est réalisée par la liaison
entre votre compte Kärcher Home & Gar-
den et un assistant vocal numérique externe. Le manuel pour la liaison est
disponible auprès du fournisseurs d’assistant vocal numérique. Vous trouverez la
liste des fournisseurs actuels sous
www.kaercher.com.
La disponibilité des différents assistants vocaux diffère d’un pays à l’autre. Vous trouverez la liste des langues disponibles sur le
site web de chaque fournisseur.
Témoins lumineux
Passerelle
Rangée de LED LED WLAN Signification
Clignote Arrêt Lancement, phase de démarrage après la connexion
au réseau électrique.
Allumée Clignote Configuration WALN démarrée.
Allumée Clignote Aucune connexion avec le Cloud.
Allumée Allumée La connexion est correcte.
Clignote Clignote Les réglages d’usine ont été rétablis.
Vanne
LED de gauche LED de droite Signification
Clignote plusieurs fois
Clignote 3 fois rapidement
Clignote en alternance
Clignote 1 seconde
Allumée Allumée Mise à jour logicielle (durée de 10 à 20 minutes).
Clignote plusieurs fois
Clignote 3 fois rapidement
Clignote en alternance
Clignote 1 seconde
Phase d’appairage (après l’appui sur la touche Appai-
rage/Réinit.
Fin de l’appairage.
Mode récupération, les réglages d’usine sont rétablis.
Sortie d’eau côté clignotement marche / arrêt.
Entretien et maintenance
Stockage
ATT ENTION
Risque d’endommagement
Les restes d’eau peuvent endommager la
vanne.
Videz la vanne avant le stockage.
1. Vider complètement la vanne.
2. Retirer les batteries de l’unité de commande.
3. Stocker la vanne et l’unité de commande
dans un endroit sec et protégé contre le
gel.
Nous conseillons de remplacer les batteries de l’unité de commande une fois par
an.
L’état des batteries est affiché dans l’application KÄRCHER Home&Garden.
Français 25
Page 26
Dépannage en cas de défaut
Remarque : Vous trouverez une aide à la
détection des pannes détaillée dans l’appli-
Dysfonctionnement Cause Résolution
La passerelle n’établit pas
la connexion avec le réseau WLAN.
Les vannes ne peuvent
pas être reliées à la passerelle.
La vanne n’ouvre ou ne
ferme pas.
Les vannes n’ouvrent pas
lors de l’appui sur la
touche. Les LED ne s’allument pas.
Le routeur WLAN fonctionne avec un filtre MAC
ou un autre pare-feu.
Des obstacles gênent le signal radio entre la passerelle et les vannes.
L’unité de commande n’est
pas raccordée à la vanne.
Les batteries sont vides. Remplacer les batteries dans l’uni-
Garantie
Les conditions de garantie publiées par
notre société commerciale compétente
s’appliquent dans chaque pays. Nous remédions gratuitement aux défauts possibles sur votre appareil dans la durée de
garantie dans la mesure où la cause du défaut est un vice de matériau ou de fabrication. En cas de garantie, veuillez vous
adresser à votre distributeur ou au point de
service après-vente autorisé le plus proche
avec la facture d’achat.
La garantie ne prend pas en charge les
dommages sur les végétaux.
cation KÄRCHER Home&Garden, sous
FAQ.
Autoriser l’adresse MAC de la passerelle sur le routeur WLAN.
Placer la passerelle à un autre endroit dans l’appartement. Le plus
près possible d’une fenêtre et
orientée vers la vanne d’arrosage
Insérer l’unité de commande dans
la vanne.
té de commande.
Caractéristiques techniques
Watering
Alimentation secteur
Tension du secteur V 100-240
Phase ~ 1
Fréquence Hz 47-63
Batteries
Quantité 4
Tension de la
batterie
Capacité, min. Ah 800
Type de batterie AAA
ZigBee
Fréquence MHz 2412-2472
Portée unité radio m 100
Raccord d'alimentation en eau
Pression de service MPa
Température d'alimentation (max.)
Environnement
Température ambiante
Sous réserve de modifications techniques.
System Duo
Smart Kit
V1,5
0,1-1,0 (1-10)
(bar)
°C 35
°C +5...+40
26 Français
Page 27

Indice
Avvertenze di sicurezza ...................... 27
Impiego conforme alle disposizioni ..... 29
Collegamento alla rete dell'acqua po-
tabile ................................................... 29
Tutela dell’ambiente............................ 29
Accessori e ricambi............................. 29
Volume di fornitura.............................. 29
Descrizione dell’apparecchio .............. 30
Simboli riportati nelle istruzioni brevi... 31
Messa in funzione............................... 32
Funzioni di irrigazione......................... 33
Comando vocale................................. 33
Spie luminose ..................................... 33
Stoccaggio .......................................... 34
Cura e manutenzione.......................... 34
Guida alla risoluzione dei guasti ......... 34
Garanzia ............................................. 34
Dati tecnici .......................................... 35
Avvertenze di sicurezza
Prima di utilizzare l’apparecchio per la prima volta, leggere
le presenti istruzioni per l’uso
originali e le avvertenze di sicurezza. Agire
secondo quanto indicato nelle istruzioni.
Prima della messa in funzione, osserva-
re il manuale d’uso grafico del vostro apparecchio e queste avvertenze di
sicurezza.
Osservare sempre sia le indicazioni ri-
portate nelle istruzioni, sia le norme generali vigenti in materia di sicurezza/
antinfortunistica.
Avvertenze di sicurezza generali
PERICOLO
Pericolo di soffocamento. Tenere le pellicole di imballaggio fuori dalla portata dei bambini.
몇 AVVERTIMENTO
Questo apparecchio può essere usato da
persone con limitate capacità fisiche, sensoriali o mentali e da persone che abbiano
poca esperienza e/o conoscenza dell’apparecchio, solo se queste vengono supervisionate oppure se hanno ricevuto
istruzioni su come usare in sicurezza l’apparecchio e se hanno compreso i pericoli
derivanti dall’uso.
Sorvegliare i bambini per assicurarsi che
non giochino con l'apparecchio.
L’apparecchio può essere utilizzato da
bambini a partire da almeno 8 anni se supervisionati o istruiti correttamente sull’utilizzo da parte di una persona responsabile
per la loro sicurezza e se hanno compreso
i pericoli da esso derivanti.
Simboli riportati sull’apparecchio
Valvola di irrigazione
Proteggere l’apparecchio dal
gelo
Simboli riportati sull’apparecchio
Gateway
Utilizzare l’apparecchio
soltanto in ambienti interni
Utilizzare soltanto l'alimentatore consentito 6.745-110.0
ingresso: 5 V / 1 A
Avvertenze di sicurezza per la
valvola di irrigazione
Utilizzare la valvola di irrigazione solo
con acqua dolce, pulita e non trattata.
Non utilizzare mai l'apparecchio in abbinamento con sostanze esplosive, corrosive o infiammabili.
La temperatura dell'acqua non deve es-
sere maggiore di 35 °C.
La pressione di ingresso dell'acqua non
deve superare i 10 bar (1 MPa) all'ingresso dell'apparecchio.
Non immergere mai completamente la
valvola di irrigazione in un fluido.
Utilizzare la valvola di irrigazione solo
all'aperto.
Verificare regolarmente la presenza di
eventuali danni sulla valvola di irrigazione. Non utilizzare l'apparecchio se presenta danni visibili.
Mettere in funzione la valvola di irriga-
zione esclusivamente in posizione verticale.
Italiano 27
Page 28

Non utilizzare mastice né lubrificanti per
collegare la valvola di irrigazione al rubinetto dell'acqua.
Non utilizzare l’apparecchio senza il fil-
tro integrato all'entrata dell'acqua.
Verificare periodicamente la presenza di
eventuali danni al filtro all'entrata dell'acqua. Le particelle presenti nell'acqua
che confluiscono nell'apparecchio per
via di un filtro danneggiato impediscono
la corretta apertura e chiusura della valvola.
Sostituire il filtro per l'acqua danneggiato
immediatamente.
Dopo un periodo prolungato di messa
fuori servizio verificare, almeno una volta al mese, la tenuta dell'apparecchio e
assicurarsi che la valvola si apra e si
chiuda in maniera affidabile.
Non tirare i tubi flessibili collegati.
Prima del montaggio a parete verificare
i requisiti necessari per la parete e la superficie.
In caso di montaggio a parete, verificare
la capacità di carico della stessa. Montare l'apparecchio alla parete in maniera
sicura.
L'apparecchio deve essere sempre ac-
cessibile. Non montare l’apparecchio in
zone non accessibili o a un'altezza superiore ai 2 metri.
Non installare la valvola di irrigazione vi-
cino a fonti di calore e proteggerla dal
gelo (temperatura ambiente consentita
tra i 5 °C e i 40 °C).
Utilizzare solo batterie consentite per la
specifica valvola di irrigazione. Le informazioni sui tipi di batteria necessari sono riportate nelle istruzioni per l'uso
dell'apparecchio.
Non impiegare batterie ricaricabili.
Non installare la valvola di irrigazione in
punti in cui si produce acqua di condensa.
Non utilizzare la valvola di irrigazione vi-
cino ad apparecchi sotto tensione.
Non mettere in funzione un apparecchio
non correttamente funzionante.
Avvertenze di sicurezza per il
gateway
Non aprire mai l'apparecchio né la spina
alimentatore.
Posizionare il cavo di collegamento in
modo che non possa essere schiacciato
e non vi si possa inciampare.
L’apparecchio può essere caricato solo
con la spina alimentatore in dotazione o
con un ricambio corrispondente (numero d'ordinazione 6.745-102.0).
Collegare sempre la spina alimentatore
a una presa sempre accessibile corrispondente ai valori indicati sulla targhetta.
Non immergere mai l'apparecchio in un
fluido.
Non toccare la spina alimentatore con le
mani bagnate.
Utilizzare l’apparecchio soltanto in vani
interni asciutti.
Posizionare l'apparecchio su una super-
ficie solida e antiscivolo.
Posizionare l'apparecchio a distanza da
fonti di calore e dalla luce solare diretta.
Non posizionare l'apparecchio su super-
fici sensibili al calore.
Prima del montaggio a parete verificare
i requisiti necessari per la parete e la superficie.
In caso di montaggio a parete, verificare
la capacità di carico della stessa. Montare l'apparecchio alla parete in maniera
sicura.
L'apparecchio deve essere sempre ac-
cessibile. Non montare l'apparecchio in
zone non accessibili o dietro rivestimenti, dentro a mobili o ad un'altezza superiore ai 2 metri.
Non utilizzare l'apparecchio vicino ad al-
tri apparecchi elettrici. In particolare non
nei pressi di altri apparecchi radio.
Pulire l'apparecchio solo quando è
asciutto, ad esempio con un panno.
Non tirare il cavo.
28 Italiano
Page 29
Standard radio
Gli apparecchi utilizzano i seguenti standard radio:
ZigBee (IEEE 802.15.4)
WLAN (IEEE 802.11)
Apparecchio
Gateway SRD 2400 -
Water
Controller
Duo Smart
Con la presente Alfred Kärcher GmbH &
Co. KG dichiara che il modello di apparecchiatura radio Gateway / valvola di irrigazione (Water Controller Duo Smart) è
conforme alla direttiva 2014/53/UE. Il testo
completo della dichiarazione di conformità
UE è disponibile al seguente indirizzo web:
www.kaercher.com
Tipo di
costruzione
SRD 2412 -
Frequenza MHz
2483,5
2472
Potenza
max. ERP
110 mW
10 mW
Impiego conforme alle
disposizioni
Questo apparecchio è stato sviluppato per
l’uso privato e non è indicato per le sollecitazioni dell’impiego commerciale.
Questo apparecchio è previsto per l’allacciamento a un rubinetto e regola automaticamente il flusso dell’acqua nei sistemi di
irrigazione.
Il produttore non risponde di eventuali danni causati da un utilizzo non conforme alla
destinazione d’uso o da uso errato.
Collegamento alla rete
dell'acqua potabile
Nel collegamento di questo prodotto alla
rete dell'acqua potabile attenersi ai requisiti
della norma EN 1717 e rivolgersi alla propria impresa sanitaria specializzata per
eventuali domande.
Tutela dell’ambiente
I materiali d'imballaggio sono riciclabili. Smaltire gli imballaggi nel rispetto
dell’ambiente.
Gli apparecchi elettrici ed elettronici
contengono materiali riciclabili prezio-
si e spesso componenti come batterie,
accumulatori oppure olio che, se usati o
smaltiti scorrettamente, possono costituire
un potenziale pericolo per la salute umana
e per l'ambiente. Questi componenti sono
tuttavia necessari per un corretto funzionamento dell'apparecchio. Gli apparecchi
contrassegnati con questo simbolo non devono essere smaltiti con i rifiuti domestici.
Avvertenze sulle componenti contenute
(REACH)
Informazioni aggiornate sulle componenti
contenute sono disponibili all'indirizzo:
www.kaercher.com/REACH
Accessori e ricambi
Utilizzando solamente accessori e ricambi
originali, si garantisce un funzionamento sicuro e privo di disturbi dell'apparecchio.
Si possono trovare informazioni riguardo
ad accessori e ricambi su www.kaer-
cher.com.
Volume di fornitura
Il volume di fornitura dell’apparecchio è riportato sulla confezione. Disimballare la
confezione e controllare che il contenuto
sia completo. In caso di accessori mancanti
o danni dovuti al trasporto si prega di contattare il rivenditore.
Italiano 29
Page 30
Descrizione dell’apparecchio
121
3
4
5
6
2
1
7
3
4
5
1
2
1
2
Funzione
Questo apparecchio comanda l’irrigazione
mediante app su smartphone o intervento
diretto sull’unità di comando.
Per consentire il comando tramite l’app,
l’apparecchio deve essere collegato alla rete WLAN mediante il gateway fornito in dotazione.
A tale scopo si utilizza l’app Kärcher Home
& Garden, disponibile gratuitamente
nell’App Store Apple o nel Play Store Google.
Sull’unità di comando può essere impostata la seguente funzione:
Attivare e disattivare le uscite dell’ac-
qua.
Con l’app si possono impostare le seguenti
funzioni:
Attivare e disattivare le uscite dell’ac-
qua.
Fissare o eliminare un programma ora-
rio.
Attivare o disattivare l’irrigazione basata
sul meteo.
Mettere in pausa il programma orario.
Elementi di comando
Valvola
Unità di comando
1 Tasto di comando uscita dell’acqua a si-
nistra
2 LED sinistro
3 LED destro
4 Tasto di comando uscita dell’acqua a
destra
5 Tasto abbinamento/reset
1 Adattatore attacco rubinetto
2 Raccordo tubo flessibile G 3/4”
3 Occhiello antifurto
4 Collegamento idrico G 1” con prefiltro
5 Tubo di riduzione G 3/4”
6 Copertura involucro per apparecchio a
due canali
7 Tacche per montaggio a parete
30 Italiano
1 Abbinamento codice QR
2 Vano batterie
Page 31

1 LED WLAN
1
2
1
2 LED Serie
Gateway
Simboli riportati nelle
istruzioni brevi
Scaricare l’app KÄRCHER
Home&Garden
Procedura di avvio del gateway
Messa in funzione con l’app
Reset
Alimentazione elettrica
Collegamento alla rete
1 Indirizzo MAC
2 Chiave WPA
3 Abbinamento codice QR
4 Tacca per montaggio a parete
5 Presa alimentatore
6 Tasto reset
Alimentatore
1 Spina coassiale
Attivare/disattivare uscita
dell’acqua
Osservare obbligatoriamente le
avvertenze di sicurezza allegate.
Italiano 31
Page 32

Messa in funzione
Nota: La messa in funzione si effettua con
l’app KÄRCHER Home&Garden. Seguire
la procedura descritta per mantenerla aggiornata.
Nota: La valvola di irrigazione necessita di
4 x 1,5 V AAA batterie, non comprese nella
fornitura. Informazioni aggiuntive sulle batterie sono riportate nel capitolo “Dati tecnici”.
Messa in funzione del gateway
1. Scaricare l’app KÄRCHER Home&Gar-
den dall’App Store di Apple e da Google
Play Store.
2. Aprire l’app KÄRCHER Home&Garden.
3. Andare su “Aggiungi prodotto”.
4. Creare un account (se non si è ancora
registrati).
5. Inserire la spina coassiale dell’alimenta-
tore nella presa del gateway.
6. Inserire l’alimentatore in una presa elet-
trica.
L’operazione di avvio inizia: può durare
alcuni minuti.
7. Leggere il codice QR del gateway.
8. Selezionare “Kärcher-Gateway” come
punto di accesso nella ricerca WLAN
dello smartphone.
9. Come password WLAN del gateway, ag-
giungere il codice QR precedentemente
scansionato o inserire manualmente la
chiave WPA riportata sulla targhetta del
gateway.
10.Quando si torna all’app KÄRCHER Ho-
me&Garden viene verificato il collega-
mento.
11.Selezionare la rete domestica e inserire
la password.
Se la verifica del collegamento dà esito
positivo, viene confermata l’installazione
corretta.
Nota: All’interno dell’abitazione, posizionare il gateway allo stesso livello della costruzione, possibilmente vicino alla valvola di
irrigazione. La posizione ideale è sulla finestra.
Attenzione: Se sul router WLAN sono impostati un filtro MAC o altri firewall, l’indirizzo MAC del gateway deve essere abilitato.
L’indirizzo MAC è riportato sulla targhetta
del gateway.
Messa in funzione della valvola
1. Selezionare “Aggiungi prodotto”.
2. Leggere il codice QR della valvola.
3. Inserire le batterie nell’unità di comando.
4. Premere il tasto di abbinamento sull’unità di comando.
Se il collegamento viene stabilito, viene
visualizzata una conferma della corretta
installazione.
5. Collegare la valvola al rubinetto.
6. Collegare i raccordi dei tubi flessibili ai
tubi.
7. Inserire l’unità di comando nella valvola.
8. Aprire il rubinetto.
Montaggio a parete
Se necessario, gli apparecchi possono essere fissati a parete. Le viti utilizzate non
devono superare le seguenti dimensioni:
Gateway
Diametro testa della vite: 9 mm
Altezza testa della vite: 2,7 mm
Diametro filetto: 4,2 mm
Valvola
Diametro testa della vite: 11 mm
Altezza testa della vite: 5,5 mm
Diametro filetto: 6 mm
32 Italiano
Page 33

Funzioni di irrigazione
L’impostazione delle funzioni di irrigazione
è illustrata nell’app.
Irrigazione manuale
Attivare e disattivare manualmente l’irrigazione sull’unità di comando.
La durata dell’irrigazione è impostabile liberamente nell’app (massimo 90 minuti).
Irrigazione a comando temporale
Programmare un numero illimitato di irrigazioni per ogni uscita dell’acqua (durata
massima di 90 minuti per volta).
Irrigazione basata sul meteo
Mettere in pausa le irrigazioni programmate
in base alle informazioni sul meteo.
Mettere in pausa l’irrigazione
Sospendere le irrigazioni nell’arco di 1-24
ore.
Comando vocale
Il comando vocale tramite un assistente vocale digitale si effettua mediante il collegamento tra l’account Kärcher Home &
Garden e un assistente vocale digitale
esterno. Le istruzioni per il collegamento
sono disponibili presso il fornitore dell’assistente vocale digitale. L’elenco dei fornitori
attuali è disponibile su www.kaercher.com.
La disponibilità dei vari assistenti vocali varia da Paese a Paese. Un elenco delle lingue disponibili è fornito sul sito web del
rispettivo fornitore.
Spie luminose
Gateway
LED Serie LED WLAN Significato
Lampeggiante Off Avviare, fare di avvio dopo il collegamento alla rete
elettrica.
On Lampeggiante Configurazione WLAN avviata.
On Lampeggiante Nessun collegamento al cloud.
On On Collegamento corretto stabilito.
Lampeggiante Lampeggiante Ripristino delle impostazioni di fabbrica.
Valvola
LED sinistro LED destro Significato
Lampeggia ripetutamente
Lampeggia velocemente 3 volte
Lampeggia a intermittenza
Lampeggia
1 secondo
On On Aggiornamento del software (durate 10... 20 minuti).
Lampeggia ripetutamente
Lampeggia velocemente 3 volte
Lampeggia a intermittenza
Lampeggia
1 secondo
Fase di abbinamento (dopo aver premuto il tasto
Abbinamento/reset).
Interruzione dell’abbinamento.
Modalità Recovery, le impostazioni di fabbrica
vengono ripristinate.
Uscita dell’acqua sul lato lampeggiante on/off.
Italiano 33
Page 34

Stoccaggio
ATTENZIONE
Pericolo di danneggiamento
I residui d’acqua possono danneggiare la
valvola.
Prima di conservarla, svuotare la valvola.
1. Svuotare completamente la valvola.
2. Togliere le batterie dall’unità di comando.
3. Conservare la valvola e l’unità di comando in un luogo asciutto, al riparo dal gelo.
Cura e manutenzione
Si consiglia di sostituire le batterie dell’unità
di comando una volta l’anno.
Lo stato delle batterie è visualizzato
nell’app KÄRCHER Home&Garden.
Guida alla risoluzione dei guasti
Nota: Una guida dettagliata alla risoluzione dei guasti è disponibile nell’app
KÄRCHER Home&Garden, nelle FAQ.
Guasto Causa Correzione
Il gateway non si collega
alla rete WLAN.
Le valvole non si collegano al gateway.
La valvola non si apre o
non si chiude.
Le valvole non si aprono
quando si preme il tasto. I
LED non si accendono.
Il router WLAN funziona
con un filtro MAC o con un
altro firewall.
Degli ostacoli indeboliscono il segnale radio tra il gateway e le valvole.
L’unità di comando non è
applicata sulla valvola.
Le batterie sono scariche. Sostituire le batterie nell’unità di
Abilitare l’indirizzo MAC del gateway sul router WLAN.
Posizionare il gateway in un’altra
posizione all’interno dell’abitazione. Possibilmente in prossimità di
una finestra, in direzione della valvola d’irrigazione.
Inserire l’unità di comando nella
valvola.
comando.
Garanzia
In ogni Paese, valgono le condizioni di garanzia rilasciate dalla nostra società di vendita competente. Entro il termine di
garanzia eliminiamo gratuitamente eventuali guasti all’apparecchio, se causati da
difetto del materiale o di produzione. Nei
casi previsti dalla garanzia si prega di rivolgersi al proprio rivenditore, oppure al più vicino centro di assistenza autorizzato,
esibendo lo scontrino di acquisto.
La garanzia non copre i danni alle piante.
34 Italiano
Page 35

Dati tecnici
Watering
System Duo
Smart Kit
Alimentatore
Tensione di rete V 100-240
Fase ~ 1
Frequenza Hz 47-63
Batterie
Numero 4
Tensione batteria V 1,5
Capacità, min. Ah 800
Tipo di batteria AAA
ZigBee
Frequenza MHz 2412-2472
Portata unità radio m 100
Collegamento idrico
Pressione
d’esercizio
Temperatura in
entrata (max.)
Ambiente
Temperatura
ambiente
Con riserva di modifiche tecniche.
MPa
0,1-1,0 (1-10)
(bar)
°C 35
°C +5...+40
Italiano 35
Page 36

Inhoud
Veiligheidsinstructies........................... 36
Reglementair gebruik.......................... 38
Aansluiting op het drinkwaternet......... 38
Milieubescherming.............................. 38
Toebehoren en reserveonderdelen ..... 38
Leveringsomvang................................ 38
Beschrijving apparaat ......................... 39
Symbolen in de korte gebruiksaanwij-
zing ..................................................... 40
Inbedrijfstelling.................................... 41
Besproeiingsfuncties........................... 42
Taalbesturing....................................... 42
Controlelampjes.................................. 42
Opslag................................................. 43
Verzorging en onderhoud.................... 43
Hulp bij storingen ................................ 43
Garantie .............................................. 43
Technische gegevens ......................... 44
Veiligheidsinstructies
Lees voor het eerste gebruik
van het apparaat deze origine-
le gebruiksaanwijzing en de
veiligheidsinstructies. Volg de aanwijzingen
en instructies op.
Neem voor de inbedrijfstelling de grafi-
sche gebruiksaanwijzing van uw apparaat en deze veiligheidsinstructies in
acht.
Naast de instructies in de gebruiksaan-
wijzing moet u ook de algemene wettelijke veiligheidsvoorschriften en de
voorschriften inzake ongevallenpreventie in acht nemen.
Algemene veiligheidsinstructies
GEVAAR
Verstikkingsgevaar. Houd verpakkingsfolie
buiten het bereik van kinderen.
몇 WAARSCHUWING
Personen met verminderde fysieke, sensorische of geestelijke capaciteiten of een gebrek aan ervaring en kennis mogen het
apparaat alleen gebruiken onder correct
toezicht of wanneer ze door een voor hun
veiligheid verantwoordelijke persoon zijn
getraind in het veilige gebruik van het apparaat en wanneer zij de hieruit voortvloeiende gevaren begrepen hebben.
Houd toezicht op kinderen om ervoor te
zorgen dat ze niet met het apparaat spelen.
Kinderen vanaf minstens 8 jaar mogen het
apparaat gebruiken wanneer ze in het gebruik zijn getraind of op een correcte manier toezicht op hen wordt gehouden door
iemand die verantwoordelijk is voor hun
veiligheid en wanneer ze de hieruit voortvloeiende gevaren hebben begrepen.
Symbolen op het apparaat
Besproeiingsventiel
Apparaat tegen vorst beschermen
Symbolen op het apparaat
Gateway
Gebruik het apparaat alleen
binnen
Gebruik uitsluitend de goedgekeurde voedingseenheid
6.745-110.0 ingang: 5 V / 1 A
Veiligheidsinstructies
besproeiingsventiel
Gebruik het besproeiingsventiel alleen
met onbehandeld, helder zoet water.
Het apparaat mag in geen geval in combinatie met explosieve, corrosieve of
brandbare stoffen worden gebruikt.
De watertemperatuur mag niet meer dan
35 °C bedragen.
De watertoevoerdruk mag 10 bar
(1 MPa) aan de apparaatingang niet
overschrijden.
Dompel het besproeiingsventiel nooit
volledig in vloeistof.
Gebruik het besproeiingsventiel alleen
buiten.
Controleer het besproeiingsventiel re-
gelmatig op schade. Bij zichtbare schade het apparaat niet meer in werking
nemen.
Gebruik het besproeiingventiel alleen in
verticale positie.
36 Nederlands
Page 37

Gebruik geen afdichtingsmateriaal of
smeermiddel om het besproeiingsventiel op de waterkraan aan te sluiten.
Gebruik het apparaat niet zonder het ge-
ïntegreerde filter aan de wateringang.
Controleer het filter aan de wateringang
regelmatig op beschadiging. Deeltjes in
het water die door een beschadigd filter
in het apparaat dringen, verhinderen
correct openen en sluiten van het ventiel.
Vervang beschadigde waterfilters on-
middellijk.
Controleer het apparaat na langdurig uit
bedrijf stellen, maar minstens maandelijks, op dichtheid en controleer of de
ventielen betrouwbaar openen en sluiten.
Trek niet aan de aangesloten slangen.
Let voor de wandmontage op de vereis-
ten voor de wand en het oppervlak.
Controleer de wand bij wandmontage op
draagvermogen. Monteer het apparaat
veilig aan de wand.
Het apparaat moet altijd toegankelijk
zijn. Monteer het apparaat niet op ontoegankelijk punten of hoger dan 2 meter.
Installeer het besproeiingsventiel niet in
de buurt van warmtebronnen en beveilig
het tegen vorst (maximale omgevingstemperatuur 5 °C tot 40 °C).
Gebruik alleen batterijen die voor het be-
sproeiingsventiel zijn toegelaten. Informatie over de nodige batterijtypes vindt
u in de gebruiksaanwijzing van het apparaat.
Gebruik geen oplaadbare batterijen.
Installeer het besproeiingsventiel niet op
plaatsen waar condenswater wordt gevormd.
Gebruik het besproeiingsventiel niet in
de buurt van apparaten die onder spanning staan.
Neem een niet-correct werkend appa-
raat niet in gebruik.
Veiligheidsinstructies gateway
Open nooit het apparaat of de stekker-
voeding.
Plaats de aansluitkabel zodanig dat nie-
mand erop kan stappen of erover kan
struikelen.
Gebruik het apparaat alleen met het bij-
geleverde stekkeradapter of een desbetreffende vervanging (bestelnummer
6.745-102.0).
Sluit de stekkervoeding steeds aan op
een stopcontact dat steeds toegankelijk
is en dat voldoet aan de waarden op het
typeplaatje.
Dompel het apparaat nooit volledig in
vloeistof.
Raak de stekkervoeding niet met vochti-
ge handen aan.
Gebruik het apparaat alleen in droge
binnenruimtes.
Plaats het apparaat op een stabiele en
slipvaste ondergrond.
Plaats het apparaat uit de buurt van
warmtebronnen en direct zonlicht.
Plaats het apparaat niet op warmtege-
voelige oppervlakken.
Let voor de wandmontage op de vereis-
ten voor de wand en het oppervlak.
Controleer de wand bij wandmontage op
draagvermogen. Monteer het apparaat
veilig aan de wand.
Het apparaat moet altijd toegankelijk
zijn. Monteer het apparaat niet op ontoegankelijke plaatsen zoals achter bekledingen, in meubels of hoger dan 2
meter.
Gebruik het apparaat niet in de buurt
van andere elektrische apparaten. In het
bijzonder niet in de buurt van andere radioapparatuur.
Reinig het apparaat alleen droog, bijv.
met een stofdoek.
Trek niet aan de kabel.
Nederlands 37
Page 38

Radiostandaards
De apparaten hanteren de volgende radiostandaards:
ZigBee (IEEE 802.15.4)
WLAN (IEEE 802.11)
Apparaat Type Frequen-
tie MHz
Gateway SRD 2400 -
2483,5
Water
Controller
Duo Smart
Hiermee verklaart Alfred Kärcher SE & Co.
KG dat het draadloze installatietype Gateway/besproeiingsventiel (Water Controller
Duo Smart) voldoet aan de richtlijn 2014/
53/EU. De volledige tekst van de EU-conformiteitsverklaring is beschikbaar via de
volgende website:
www.kaercher.com
SRD 2412 -
2472
Vermogen max.
ERP
110 mW
10 mW
Reglementair gebruik
Dit apparaat werd voor privégebruik ontwikkeld en is niet voor de eisen van commercieel gebruik bedoeld.
Dit apparaat is voor de aansluiting op een
waterkraan bedoeld en bestuurt automatisch de waterstroom in besproeiingssystemen.
De fabrikant is niet aansprakelijk voor
eventuele schade als gevolg van ondeskundig gebruik of verkeerde bediening.
Aansluiting op het
drinkwaternet
Neem tijdens de aansluiting van dit product
op het drinkwaternet de vereisten van EN
1717 in acht en neem wanneer u vragen
heeft contact op met uw sanitairspecialist.
Milieubescherming
Het verpakkingsmateriaal is recyclebaar. Gooi verpakkingen met het ge-
scheiden afval weg.
Elektrische en elektronische apparaten bevatten waardevolle recyclebare
materialen en vaak onderdelen zoals
batterijen, accu's of olie, die bij onjuiste omgang of verkeerd weggooien een mogelijk
gevaar voor de gezondheid en het milieu
kunnen vormen. Voor een correct gebruik
van het apparaat zijn deze onderdelen echter noodzakelijk. Apparaten met dit symbool mogen niet met het huisvuil worden
weggegooid.
Instructies voor inhoudsstoffen (REACH)
Actuele informatie over inhoudsstoffen
vindt u onder: www.kaercher.nl/REACH
Toebehoren en
reserveonderdelen
Gebruik alleen origineel toebehoren en originele reserveonderdelen. Deze garanderen een veilige en storingsvrije werking van
het apparaat.
Informatie over toebehoren en reserveonderdelen vindt u onder www.kaercher.nl.
Leveringsomvang
De leveringsomvang van het apparaat is op
de verpakking afgebeeld. Controleer de inhoud bij het uitpakken op volledigheid. Bij
ontbrekend toebehoren of bij transportschade neemt u contact op met uw distributeur.
38 Nederlands
Page 39
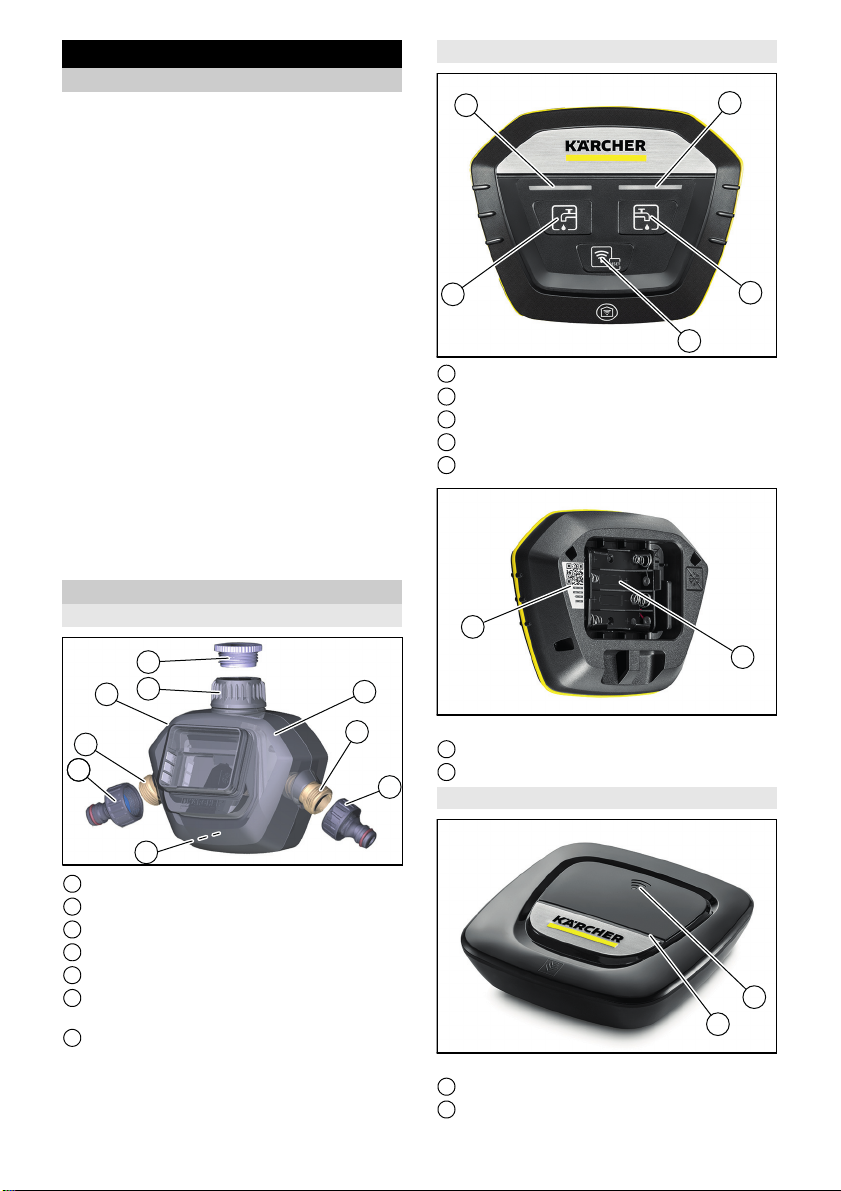
Beschrijving apparaat
121
3
4
5
6
2
1
7
3
4
5
1
2
1
2
1
2
Functie
Dit apparaat bestuurt de besproeiing ofwel
met de smartphone-app of door directe bediening met de bedieningseenheid.
Om de bediening met de app mogelijk te
maken, moet het apparaat met de bijgeleverde gateway in het WLAN-netwerk worden geïntegreerd.
Dit wordt uitgevoerd met de Kärcher Home
& Garden app die kosteloos in de Apple
App Store of Google Play Store verkrijgbaar is.
Op de bedieningseenheid kunnen volgende functies worden ingesteld:
De wateruitgangen in- en uitschakelen.
Met de app kunnen volgende functies worden ingesteld:
De wateruitgangen in- en uitschakelen.
Een tijdprogramma vastleggen of wis-
sen.
De weergebaseerde besproeiingsbasis
activeren of deactiveren.
Het tijdprogramma pauzeren.
Bedieningselementen
Ventiel
Bedieningseenheid
1 Besturingstoets wateruitgang links
2 Led links
3 Led rechts
4 Besturingstoets wateruitgang rechts
5 Pairing/reset-toets
1 Kraanaansluitadapter
2 G 3/4” slangaansluiting
3 Oog voor diefstalbeveiliging
4 G 1” wateraansluiting met voorfilter
5 G 3/4” reductiestuk
6 Behuizingsbovendeel voor tweekanaals
apparaat
7 Uitsparingen voor wandmontage
1 QR-Code Pairing
2 Batterijvak
Gateway
1 Led WLAN
Nederlands 39
2 Led rij
Page 40

Symbolen in de korte
1
gebruiksaanwijzing
KÄRCHER Home&Garden-app
downloaden
Bootprocedure van de gateway
1 MAC-adres
2 WPA-Key
3 QR-Code Paring
4 Uitsparing voor wandmontage
5 Voedingseenheid-bus
6 Reset-toets
Voedingseenheid
1 Holle stekker
Inbedrijfstelling door de app
Reset
Stroomaansluiting
Netwerkverbinding
Wateruitgang in-/uitschakelen
Bijgeleverde veiligheidsaanwijzingen steeds in acht nemen.
40 Nederlands
Page 41

Inbedrijfstelling
Opmerking: De inbedrijfstelling wordt uit-
gevoerd met de KÄRCHER Home&Garden-app. Volg de daar beschreven
procedures op, om steeds up-to-date te
zijn.
Opmerking: Het besproeiingsventiel heeft
4 x 1,5 V AAA batterijen nodig. Deze maken geen deel uit van de levering. Aanvullende informatie over de batterijen staat in
het hoofdstuk “Technische gegevens”.
Gateway in bedrijf nemen
1. De KÄRCHER Home&Garden app in de
Apple App Store of de Google Play Store
downloaden.
2. De KÄRCHER Home&Garden app openen.
3. Naar “Product toevoegen” wisselen.
4. Een account aanmaken (als u nog niet
bent geregistreerd).
5. De holle stekker van de voedingseenheid in de bus van de gateway steken.
6. De voedingseenheid in een contactdoos
steken.
De bootprocedure start en kan enkele
minuten duren.
7. De QR-Code van de gateway scannen.
8. “Kärcher-Gateway” als accesspoint in
de WLAN-lijst van de smartphone selecteren.
9. Als WLAN-wachtwoord van de gateway
de eerder gescande QR-code invoegen
of de WPA-Key op het typeplaatje van
de gateway handmatig invoeren.
10.Bij terugkeer naar de KÄRCHER Home&Garden app wordt de verbinding
gecontroleerd.
11.Het thuisnetwerk selecteren en het
wachtwoord invoeren.
Als de controle van de verbinding succesvol is, wordt de correcte installatie
bevestigd.
Opmerking: Plaats de gateway in de woning op de dezelfde etage, zo dicht mogelijk bij het besproeiingsventiel. Optimaal is
een plaats bij het venster.
Belangrijk: Als op de WLAN-Router een
MAC-filter of aanvullende firewalls zijn ingericht, moet daar het MAC-adres van de
gateway worden vrijgegeven. Het MACadres staat op het typeplaatje van de gateway.
Ventiel in bedrijf nemen
1. “Product toevoegen” selecteren.
2. De QR-code van het ventiel scannen.
3. De batterijen in de bedieningseenheid
plaatsen.
4. De Pairing-toets op de bedieningseenheid indrukken.
Als de verbinding succesvol is, verschijnt een bevestiging van de correcte
installatie.
5. Het ventiel met de waterkraan verbinden.
6. De slangaansluitingen met de slangen
verbinden.
7. De bedieningseenheid in het ventiel
plaatsen.
8. De waterkraan openen.
Wandmontage
Indien nodig kunnen de apparaten op een
wand worden bevestigd. De gebruikte
schroeven mogen de volgende maten niet
overschrijden.
Gateway
Diameter schroefkop: 9 mm
Hoogte schroefkop: 2,7 mm
Diameter schroefdraad: 4,2 mm
Ventiel
Diameter schroefkop: 11 mm
Hoogte schroefkop: 5,5 mm
Diameter schroefdraad: 6 mm
Nederlands 41
Page 42
Besproeiingsfuncties
De instelling van de besproeiingsfuncties
wordt in de app toegelicht.
Handmatige besproeiing
De besproeiing handmatig met de bedieningseenheid in- en uitschakelen.
De besproeiingsduur kan in de app vrij worden ingesteld (maximaal 90 minuten).
Tijdgestuurde besproeiing
Een onbegrensd aantal besproeiingstermijnen voor elke wateruitgang aanleggen
(maximale duur 90 minuten per termijn).
Weergebaseerde besproeiing
Besproeiingstermijn op basis van weergegeven pauzeren.
Besproeiingstermijnen in een periode van 1
tot 24 uur onderbreken.
De taalbesturing door een digitale assistent
wordt uitgevoerd met de verbinding tussen
uw Kärcher Home & Garden account en
een externe, digitale taalassistent. De
handleiding voor de verbinding is verkrijgbaar bij de aanbieder van de digitale taalassistent. De lijst met actuele aanbieders
vindt u op www.kaercher.com.
De beschikbaarheid van de verschillende
taalassistenten is in elk land verschillend.
Een lijst met beschikbare talen staat op de
website van de desbetreffende aanbieder.
Besproeiing pauzeren
Taalbesturing
Controlelampjes
Gateway
Led-rij Led WLAN Betekenis
Knippert Uit Booten, startfase na verbinding met stroomnet.
In Knippert Configuratie WLAN gestart.
In Knippert Geen verbinding met cloud.
In In Correcte verbinding bestaat.
Knippert Knippert Fabrieksinstellingen worden hersteld.
Ventiel
Led links Led rechts Betekenis
Knippert meerdere keren
Knippert snel
3 keer
Knippert afwisselend
Knippert
1 seconde
In In Stoftware-update (duur 10...20 minuten).
42 Nederlands
Knippert meerdere keren
Knippert snel
3 keer
Knippert afwisselend
Knippert
1 seconde
Pairing Phase (na indrukken van de toets
Pairing/Reset.
Unpairing.
Recovery Modus, de fabrieksinstelling worden
hersteld.
Wateruitgang aan de knipperende zijde aan/uit.
Page 43

Opslag
LET OP
Beschadigingsgevaar
Waterresten kunnen het ventiel beschadigen.
Leeg het ventiel voor opslag.
1. Het ventiel volledig legen.
2. De batterijen uit de bedieningseenheid
verwijderen.
3. Het ventiel en de bedieningseenheid op
een droge, tegen vorst beschermde
plaats opslaan.
Verzorging en onderhoud
Wij adviseren om de batterijen in de bedieningseenheid jaarlijks te vervangen.
De toestand van de batterijen wordt in de
KÄRCHER Home&Garden app weergegeven.
Hulp bij storingen
Opmerking: Een uitvoerige storingshulp is verkrijgbaar in de KÄRCHER Home&Garden
app onder FAQ.
Storing Oorzaak Remedie
De gateway wordt verbonden met het WLAN-netwerk.
De ventielen kunnen niet
met de gateway worden
verbonden.
Het ventiel opent of sluit
niet.
De ventielen gaan door
drukken op de toets niet
open. De leds branden
niet.
De WLAN-router wordt met
een MAC-filter of een andere firewall gebruikt.
Hindernissen verzwakken
het signaal tussen de gateway en de ventielen.
De bedieningseenheid is
niet op het ventiel aangebracht.
De batterijen zijn leeg. De batterijen in de bedieningseen-
Het MAC-adres van de gateway op
de WLAN-router vrijgeven.
De gateway op een andere plaats
in de woning aanbrengen. Zo dicht
mogelijk bij een venster in de richting van het besproeiingsventiel
De bedieningseenheid in het ventiel plaatsen.
heid vervangen.
Garantie
In elk land gelden de garantievoorwaarden
die door onze verantwoordelijke verkoopmaatschappij zijn uitgegeven. Mogelijke
storingen aan uw apparaat verhelpen we
binnen de garantieperiode gratis, voor zover een materiaal- of fabricagefout de oorzaak is. Als u gebruik wilt maken van de
garantie, neemt u met uw aankoopbon contact op met uw distributeur of de dichtstbijzijnde geautoriseerde klantenservice.
De garantie geldt voor beschadiging van
planten.
Nederlands 43
Page 44

Technische gegevens
Watering
System Duo
Smart Kit
Voedingseenheid
Netspanning V 100-240
Fase ~ 1
Frequentie Hz 47-63
Batterijen
Aantal 4
Accuspanning V 1,5
Capaciteit, min. Ah 800
Accutype AAA
ZigBee
Frequentie MHz 2412-2472
Reikwijdte
radioeenheid
Wateraansluiting
Bedrijfsdruk MPa
Toevoertemperatuur (max.)
Omgeving
Omgevingstemperatuur
Technische wijzigingen voorbehouden.
m100
0,1-1,0 (1-10)
(bar)
°C 35
°C +5...+40
44 Nederlands
Page 45
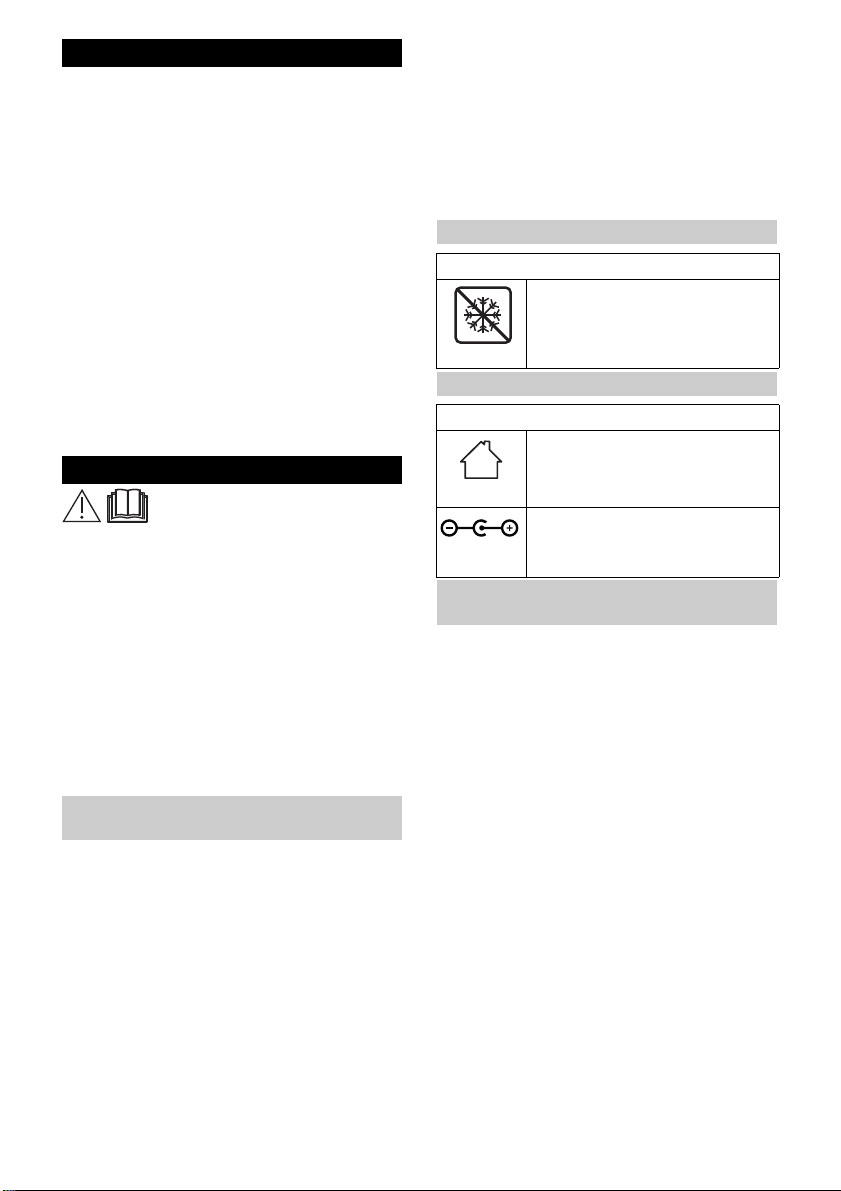
Índice de contenidos
Instrucciones de seguridad................. 45
Uso previsto........................................ 47
Conexión a la red de agua potable ..... 47
Protección del medioambiente............ 47
Accesorios y recambios...................... 47
Volumen de suministro........................ 47
Descripción del equipo........................ 48
Símbolos del manual breve ................ 49
Puesta en funcionamiento .................. 50
Funciones de riego ............................. 51
Control de voz..................................... 51
Pilotos de control ................................ 51
Almacenamiento ................................. 52
Conservación y mantenimiento........... 52
Ayuda en caso de fallos...................... 52
Garantía.............................................. 52
Datos técnicos .................................... 53
Instrucciones de seguridad
Antes de poner en marcha por
primera vez el equipo, lea este
manual de instrucciones y las
instrucciones de seguridad. Actúe conforme a estos documentos.
Antes de la puesta en funcionamiento,
tenga en cuenta el manual de instrucciones gráfico de su equipo y las instrucciones de seguridad.
Además de los avisos incluidos en el
manual de instrucciones, debe respetar
las normativas de seguridad y para la
prevención de accidentes del legislador
correspondiente.
Instrucciones generales de
seguridad
PELIGRO
Riesgo de asfixia. Mantenga los embalajes
fuera del alcance de los niños.
몇 ADVERTENCIA
Las personas con capacidades físicas,
sensoriales o psíquicas limitadas o que carezcan de experiencia y conocimientos sobre el equipo solo pueden utilizar el equipo
bajo supervisión correcta o si han recibido
formación sobre el uso seguro del equipo
por parte de una persona responsable de
su seguridad y han comprendido los peligros existentes.
Se debe supervisar a los niños para asegurarse de que no jueguen con el aparato.
Los niños mayores de 8 años pueden utilizar el equipo si han recibido formación sobre su uso por parte de una persona
responsable de su seguridad o si están bajo supervisión de un adulto y comprenden
los peligros existentes correctamente.
Símbolos en el equipo
Válvula de riego
Proteger el equipo de las heladas
Símbolos en el equipo
Puerta de enlace
Utilice el equipo solo en
interiores
Utilice únicamente la entrada
de la fuente de alimentación
autorizada 6.745-110.0: 5 V/1 A
Instrucciones de seguridad de la
válvula de riego
Utilice la válvula de riego únicamente
con agua dulce limpia no tratada. No utilice el equipo en ningún caso en combinación con sustancias explosivas,
corrosivas o inflamables.
La temperatura del agua no debe ser su-
perior a 35 °C.
La presión de entrada de agua no debe
ser superior a 10 bar (1 MPa) en la entrada del equipo.
Nunca sumerja completamente la válvu-
la de riego en líquidos.
Únicamente utilice la válvula de riego en
el exterior.
Compruebe regularmente si la válvula
de riego presenta algún daño. Si existen
daños visibles, no vuelva a poner en
funcionamiento el equipo.
Únicamente ponga en funcionamiento la
válvula de riego en posición vertical.
No utilice masa de sellado o lubricante
para conectar la válvula de riego al grifo
de agua.
Español 45
Page 46

No utilice el equipo sin el filtro integrado
en la entrada de agua.
Compruebe regularmente si el filtro de la
entrada de agua presenta algún daño.
Las partículas del agua que acceden al
equipo a través de un filtro dañado, impiden que la válvula se abra y se cierre
correctamente.
Sustituya inmediatamente el filtro de
agua dañado.
Tras una puesta fuera de servicio pro-
longada, compruebe, al menos una vez
al mes, la estanqueidad del equipo y
asegúrese de que las válvulas se abren
y se cierran correctamente.
Manténgase alejado de las mangueras
conectadas.
Antes del montaje en la pared, tenga en
cuenta los requisitos sobre la pared y las
superficies.
Para el montaje en la pared es preciso
comprobar la capacidad de carga de la
pared. Monte el equipo en la pared de
forma segura.
El equipo debe estar accesible en todo
momento. No monte el equipo en zonas
inaccesibles o a una altura superior a
2metros.
No instale la válvula de riego cerca de
fuentes de calor y protéjala de las heladas (temperatura ambiente admisible de
5 °C a 40 °C).
Únicamente utilice pilas que estén auto-
rizadas para su válvula de riego. Encontrará información sobre los tipos de pilas
necesarios en el manual de instrucciones del equipo.
No utilice pilas recargables.
No instale la válvula de riego en lugares
en los que se forma agua de condensación.
No utilice la válvula de riego cerca de
equipos que se encuentren bajo tensión.
No ponga en funcionamiento un equipo
que no funciona correctamente.
Instrucciones de seguridad de la
puerta de enlace
Nunca abra el equipo o la fuente de ali-
mentación de red.
Coloque el cable de conexión de forma
que nadie pueda pisarlo o tropezarse
con el mismo.
Utilice el equipo únicamente con la fuen-
te de alimentación de red suministrada o
con el recambio correspondiente (referencia de pedido 6.745-102.0).
Conecte siempre la fuente de alimenta-
ción de red a una toma de corriente que
sea accesible en todo momento y que
cumpla los valores indicados en la placa
de características.
Nunca sumerja el equipo en líquidos.
Nunca toque la fuente de alimentación
de red con las manos mojadas.
Utilice el equipo únicamente en interio-
res secos.
Coloque el equipo sobre una base esta-
ble y antideslizante.
Coloque el equipo lejos de fuentes de
calor y de la radiación solar directa.
No coloque el equipo sobre superficies
sensibles al calor.
Antes del montaje en la pared, tenga en
cuenta los requisitos sobre la pared y las
superficies.
Para el montaje en la pared es preciso
comprobar la capacidad de carga de la
pared. Monte el equipo en la pared de
forma segura.
El equipo debe ser accesible en todo
momento. No monte el equipo en zonas
inaccesibles, como detrás de revestimientos, en muebles o a una altura superior a 2 metros.
No utilice el equipo cerca de otros equi-
pos eléctricos. Sobre todo, no lo utilice
cerca de otras instalaciones radioeléctricas.
Limpie el equipo únicamente en seco,
por ejemplo con un paño de microfibra.
No tire de los cables.
46 Español
Page 47

Estándares de radiofrecuencia
Los equipos usan los siguientes estándares de radiofrecuencia:
ZigBee (IEEE 802.15.4)
WLAN (IEEE 802.11)
Equipo Tipo Frecuen-
cia MHz
Puerta de
enlace
Water
Controller
Duo Smart
Por la presente Alfred Kärcher SE & Co.
KG declara que el tipo de instalación radioeléctrica puerta de enlace/válvula de
riego (Water Controller Duo Smart) cumple
lo dispuesto en la Directiva 2014/53/UE. El
texto completo de la Declaración de conformidad UE está disponible en la siguiente
dirección de Internet:
www.kaercher.com
SRD 2400 -
2483,5
SRD 2412 -
2472
Potencia
máx. ERP
110 mW
10 mW
Uso previsto
Este equipo se ha desarrollado para el uso
doméstico y no es adecuado para las exigencias del uso industrial.
Este equipo has sido concebido para la conexión a un grifo de agua y para controlar
el flujo de agua de un sistema de riego de
forma automática.
El fabricante no se hace responsable de
posibles daños ocasionados por un uso no
previsto o un manejo erróneo.
Conexión a la red de agua
potable
Respete los requisitos de EN 1717 al conectar este producto a la red de agua potable y, en caso de tener alguna duda,
póngase en contacto con su empresa especializada en instalaciones sanitarias.
Protección del
medioambiente
Los materiales del embalaje son reciclables. Elimine los embalajes de for-
ma respetuosa con el medioambiente.
Los equipos eléctricos y electrónicos
contienen materiales reciclables y, a
menudo, componentes, como baterías, acumuladores o aceite, que suponen
un riesgo potencial para la salud de las personas o el medioambiente en caso de manipularse o eliminarse de forma
inadecuada. Sin embargo, dichos componentes son necesarios para un servicio
adecuado del equipo. Los equipos identificados con este símbolo no pueden eliminarse con la basura doméstica.
Avisos sobre sustancias contenidas
(REACH)
Encontrará información actual sobre las
sustancias contenidas en: www.kaer-
cher.com/REACH
Accesorios y recambios
Utilice únicamente accesorios y recambios
originales, estos garantizan un servicio seguro y fiable del equipo.
Encontrará información sobre los accesorios y recambios en www.kaercher.com.
Volumen de suministro
El volumen de suministro del equipo de
muestra en el embalaje. Compruebe la integridad del volumen de suministro durante
el desembalaje. Póngase en contacto con
su distribuidor si faltan accesorios o en caso de daños de transporte.
Español 47
Page 48

Descripción del equipo
121
3
4
5
6
2
1
7
3
4
5
1
2
1
2
Funcionamiento
Este equipo controla el sistema de riego a
través de una aplicación para smartphone
o el manejo directo en la unidad de manejo.
Para permitir el manejo a través de la aplicación, hay que conectar el equipo a la red
WLAN mediante la puerta de enlace suministrada.
Este proceso se lleva a cabo con la aplicación Kärcher Home & Garden, disponible
de forma gratuita en la Apple App Store o
Google Play Store.
En la unidad de manejo se pueden ajustar
las siguientes funciones:
Conectar y desconectar las salidas de
agua.
Mediante la aplicación se pueden ajustar
las siguientes funciones:
Conectar y desconectar las salidas de
agua.
Fijar o borrar una programación.
Desactivar o activar el sistema de riego
en función del clima.
Poner la programación en pausa.
Elementos de control
Válvula
Unidad de manejo
1 Tecla de control de salida de agua iz-
quierda
2 Led izquierda
3 Led derecha
4 Tecla de control de salida de agua dere-
cha
5 Tecla Pairing/Reset
1 Adaptador de conexión de grifos
2 Conexión de mangueras G 3/4"
3 Ojal para protección antirrobo
4 Conexión de agua G 1" con filtro previo
5 Elemento reductor G 3/4"
6 Parte superior de la carcasa para equi-
po de dos canales
7 Ranuras para el montaje en pared
48 Español
1 Código QR
2 Compartimiento de baterías
Page 49

Puerta de enlace
1
2
1
1 Led WLAN
2 Barra de ledes
Símbolos del manual breve
Descarga de la aplicación KÄRCHER Home&Garden
Proceso de carga de la puerta de
enlace
Puesta en funcionamiento a través de la aplicación
Reset
Conexión de corriente
Conexión de red
1 Dirección MAC
2 Clave WPA
3 Paring de código QR
4 Ranura para el montaje en pared
5 Clavija de fuente de alimentación
6 Tecla Reset
Fuente de alimentación
1 Conector hueco
Conexión/Desconexión de salida
de agua
Tenga en cuenta las instrucciones de seguridad.
Español 49
Page 50

Puesta en funcionamiento
Aviso: La puesta en funcionamiento se
realiza mediante la aplicación KÄRCHER
Home&Garden. Siga el procedimiento allí
indicado para estar siempre al día.
Aviso: La válvula de riego requiere 4 pilas
1,5 V AAA. Las pilas no se incluyen en el
alcance del suministro. Puede consultar
más información sobre las pilas en el capítulo «Datos técnicos».
Puesta en funcionamiento de la
puerta de enlace
1. Descargue la aplicación KÄRCHER Ho-
me&Garden de la Apple App Store o la
Google Play Store.
2. Abra la aplicación KÄRCHER Ho-
me&Garden.
3. Conmute a «Añadir producto».
4. Cree una cuenta (si aún no se ha regis-
trado).
5. Introduzca el conector hueco de la fuen-
te de alimentación en la clavija de la
puerta de enlace.
6. Enchufe la fuente de alimentación en
una caja de enchufe.
Se inicia el proceso de carga, que puede
demorarse unos minutos.
7. Escanee el código QR de la puerta de
enlace.
8. Seleccione «Puerta de enlace Kärcher»
como punto de acceso en la búsqueda
WLAN del smartphone.
9. Como contraseña WLAN de la puerta de
enlace debe pegar el código QR previa-
mente escaneado o introducir manual-
mente la clave WPA de la placa de
características de la puerta de enlace.
10.Al volver a la aplicación KÄRCHER Ho-
me&Garden se comprueba la conexión.
11.Seleccione la red doméstica e introduz-
ca la contraseña.
Si la comprobación de la conexión trans-
curre de forma satisfactoria, se confirma
la instalación correcta.
Aviso: Coloque la puerta de enlace en la
vivienda en la misma planta y lo más cerca
posible de la válvula de riego. Una ubicación en la ventana sería óptima.
Importante: Si el rúter WLAN tiene ajustado un filtro MAC o sistemas de cortafuegos
adicionales, hay que habilitar la dirección
MAC de la puerta de enlace en estos sistemas. La dirección MAC se indica en la placa de características de la puerta de
enlace.
Puesta en funcionamiento de la
válvula
1. Seleccione «Añadir producto».
2. Escanee el código QR de la válvula.
3. Inserte las pilas en la unidad de manejo.
4. Accione la tecla Pairing en la unidad de
manejo.
Si la conexión se establece de forma satisfactoria, aparece la confirmación de la
instalación correcta.
5. Conecte la válvula con el grifo de agua.
6. Conecte las conexiones de mangueras
con las mangueras.
7. Inserte la unidad de manejo en la válvula.
8. Abra el grifo de agua.
Montaje en la pared
Si lo desea, puede fijar los equipos en una
pared. Los tornillos empleados no deben
superar las siguientes dimensiones.
Puerta de enlace
Diámetro de la cabeza del tornillo: 9 mm
Altura de la cabeza del tornillo: 2,7 mm
Diámetro de la rosca: 4,2 mm
Válvula
Diámetro de la cabeza del tornillo:
11 mm
Altura de la cabeza del tornillo: 5,5 mm
Diámetro de la rosca: 6 mm
50 Español
Page 51
Funciones de riego
El ajuste de las funciones de riego se describe en la aplicación.
Riego manual
Conecte y desconecte el sistema de riego
de forma manual en la unidad de manejo.
La duración de riego se puede ajustar libremente en la aplicación (máx. 90 minutos).
Programación de riego
Puede crear un número ilimitado de horarios de riego para cada salida de agua (duración máxima de 90 minutos por horario).
Riego en función del clima
Puede pausar los horarios de riego en función de la información meteorológica.
Detenga horarios de riego en un período de
1 a 24 horas.
El control de voz mediante un asistente digital de control de voz se realiza a través de
la conexión de su cuenta de Kärcher Home
& Garden y un asistente digital externo de
control de voz. Las instrucciones para la
conexión están disponibles en el proveedor
del asistente digital de control de voz. Puede consultar una lista actualizada de proveedores en www.kaercher.com.
La disponibilidad de los distintos asistentes
de control de voz varía según el país. Puede consultar una lista de los idiomas disponibles en la página web del proveedor
correspondiente.
Pausa de riego
Control de voz
Pilotos de control
Puerta de enlace
Barra de ledes Led WLAN Significado
Parpadea Apagado Carga, fase de inicio tras la conexión a la red eléctrica.
Encendido Parpadea Configuración WLAN iniciada.
Encendido Parpadea No hay conexión con la nube.
Encendido Encendido Se ha establecido una conexión correcta.
Parpadea Parpadea Se restablecen los ajustes de fábrica.
Válvula
Led izquierda Led derecha Significado
Parpadea en repetidas ocasiones
Parpadea rápido
3 veces
Parpadea de forma alternante
Parpadea durante 1 segundo
Encendido Encendido Actualización de software (duración de 10 a 20 minu-
Parpadea en repetidas ocasiones
Parpadea rápido
3 veces
Parpadea de forma alternante
Parpadea durante 1 segundo
Pairing Phase (tras pulsar la tecla Pairing/Reset)
Unpairing.
Modo Recovery, se restablecen los ajustes de fábrica.
Salida de agua en el lado del parpadeo On/Off.
tos).
Español 51
Page 52

Almacenamiento
CUIDADO
Peligro de daños
Restos de agua pueden dañar la válvula.
Vacíe la válvula antes del almacenamiento.
1. Vacíe totalmente la válvula.
2. Retire las pilas de la unidad de manejo.
3. Almacene la válvula y la unidad de manejo en un lugar seco y protegido frente
a las heladas.
Conservación y
mantenimiento
Recomendamos sustituir las pilas de la unidad de manejo cada año.
El estado de las pilas se indica en la aplicación KÄRCHER Home&Garden.
Ayuda en caso de fallos
Aviso: Puede consultar una Ayuda en caso
de fallos en la aplicación KÄRCHER
Fallo Causa Solución
La puerta de enlace se conecta con la red WLAN.
Las válvulas no se pueden
conectar con la puerta de
enlace.
La válvula no se abre o no
se cierra.
Las válvulas no se abren
al accionar la tecla. Los ledes no se iluminan.
El rúter WLAN se usa con
un filtro MAC u otro software cortafuegos.
Los obstáculos debilitan la
señal de radiofrecuencia
entre la puerta de enlace y
las válvulas.
La unidad de manejo no está colocada en la válvula.
Las pilas están descargadas.
Home&Garden en la sección de FAQ
(preguntas frecuentes).
Habilite la dirección MAC de la
puerta de enlace en el rúter WLAN.
Coloque la puerta de enlace en un
lugar distinto de la vivienda. A poder ser, cerca de una ventana en
dirección a la válvula de riego.
Inserte la unidad de manejo en la
válvula.
Sustituya las pilas en la unidad de
manejo.
Garantía
En cada país se aplican las condiciones de
garantía indicadas por nuestra compañía
distribuidora autorizada. Subsanamos
cualquier fallo en su equipo de forma gratuita dentro del plazo de garantía siempre
que la causa se deba a un fallo de fabricación o material. En caso de garantía, póngase en contacto con su distribuidor o con
el servicio de posventa autorizado más
próximo presentando la factura de compra.
La garantía no incluye daños en plantas.
52 Español
Page 53

Datos técnicos
Watering System Duo Smart Kit
Fuente de alimentación
Tensión de red V 100-240
Fase ~ 1
Frecuencia Hz 47-63
Pilas
Número 4
Tensión de funcionamiento de la batería V 1,5
Capacidad, mín. Ah 800
Tipo de batería AAA
ZigBee
Frecuencia MHz 2412-2472
Alcance de la unidad de radiofrecuencia m 100
Conexión de agua
Presión de servicio MPa (bar) 0,1-1,0 (1-10)
Temperatura de entrada (máx.) °C 35
Entorno
Temperatura ambiente °C +5...+40
Reservado el derecho de realizar modificaciones técnicas.
Español 53
Page 54

Índice
Avisos de segurança........................... 54
Utilização adequada ........................... 56
Ligação à rede de água potável.......... 56
Protecção do meio ambiente .............. 56
Acessórios e peças sobressalentes.... 56
Volume do fornecimento..................... 56
Descrição do aparelho........................ 57
Símbolos nas Instruções resumidas ... 58
Arranque ............................................. 59
Funções de irrigação .......................... 60
Controlo de voz................................... 60
Luzes de controlo................................ 60
Armazenamento.................................. 61
Conservação e manutenção ............... 61
Ajuda em caso de avarias................... 61
Garantia .............................................. 61
Dados técnicos ................................... 62
Avisos de segurança
Antes da primeira utilização do
aparelho leia o manual de ins-
truções original e os avisos de
segurança. Proceda em conformidade.
Antes do arranque, tenha em considera-
ção o manual de instruções gráfico do
seu aparelho e estes avisos de segurança.
Além dos avisos que constam do ma-
nual de instruções, é necessário observar as prescrições gerais de segurança
e as prescrições para a prevenção de
acidentes do legislador.
Avisos gerais de segurança
PERIGO
Perigo de asfixia. Mantenha a película da
embalagem afastada das crianças.
몇 ATE NÇÃO
Pessoas com capacidade física, sensorial
ou intelectual reduzida ou com experiência
e conhecimentos insuficientes devem apenas utilizar o aparelho sob supervisão adequada, depois de instruídas por alguém
responsável pela sua segurança acerca da
utilização segura do aparelho e dos perigos
daí resultantes.
Supervisione as crianças para garantir que
não brincam com o aparelho.
As crianças com, pelo menos, 8 anos de
idade devem apenas operar o aparelho se
forem aconselhadas pela pessoa responsável pela sua segurança, se forem devidamente supervisionadas e se
compreenderem os perigos daí resultantes.
Símbolos no aparelho
Válvula de irrigação
Proteger o aparelho da geada
Símbolos no aparelho
Gateway
Utilize o aparelho apenas em
espaços interiores
Utilize apenas a fonte de alimentação aprovada
6.745-110.0 entrada: 5 V/1 A
Avisos de segurança relativos à
válvula de irrigação
Opere a válvula de irrigação apenas
com água doce fresca, não tratada. O
aparelho nunca deve ser operado em
conjunto com substâncias explosivas,
corrosivas ou inflamáveis.
A temperatura da água não deve ultra-
passar os 35 °C.
A pressão de admissão de água não de-
ve ultrapassar os 10 bar (1 MPa) na entrada do aparelho.
Nunca mergulhe a válvula de irrigação
completamente em líquidos.
Opere a válvula de irrigação apenas no
exterior.
Verifique com regularidade a existência
de danos na válvula de irrigação. Em caso de danos visíveis, não volte a colocar
o aparelho em operação.
Apenas opere a válvula de irrigação na
posição vertical.
Não utilize qualquer massa de vedação
ou lubrificante para ligar a válvula de irrigação à torneira de água.
54 Português
Page 55

Não opere o aparelho sem o filtro inte-
grado na entrada de água.
Verifique com regularidade a existência
de danos no filtro na entrada de água.
As partículas na água, que se infiltram
no aparelho devido à existência de danos no filtro, impedem a abertura e fecho adequados da válvula.
Substitua imediatamente o filtro de água
danificado.
Após períodos prolongados fora de ser-
viço, verifique, pelo menos mensalmente, a estanqueidade do aparelho e
assegure-se de que as válvulas abrem e
fecham de um modo fiável.
Não puxe as mangueiras ligadas.
Antes da montagem na parede, observe
os requisitos relativos à parede e à superfície.
Em caso de montagem na parede, veri-
ficar a capacidade de carga da mesma.
Monte o aparelho na parede de forma
segura.
O aparelho deve estar sempre acessí-
vel. Não monte o aparelho em locais
inacessíveis ou acima dos 2 metros.
Não instale a válvula de irrigação próxi-
mo de fontes de calor e proteja-a da
geada (temperatura ambiente permitida
de 5 °C a 40 °C).
Utilize apenas baterias adequadas para
a sua válvula de irrigação. Encontra informações acerca dos tipos de bateria
necessários no manual de instruções do
aparelho.
Não utilize baterias recarregáveis.
Não instale a válvula de irrigação em lo-
cais onde se acumule água de condensação.
Não opere a válvula de irrigação próxi-
mo de aparelhos sob tensão.
Não opere um aparelho que não funcio-
ne adequadamente.
Avisos de segurança relativos ao
gateway
Nunca abra o aparelho ou a fonte de ali-
mentação de ficha.
Coloque o cabo de ligação de modo que
ninguém passe por cima ou tropece nele.
Opere o aparelho apenas com a fonte
de alimentação de ficha fornecida ou
com um substituto correspondente (refª
6.745-102.0).
Ligue sempre a fonte de alimentação de
ficha a uma tomada de rede acessível
que corresponda aos valores indicados
na placa de características.
Nunca mergulhe o aparelho em líquidos.
Nunca manuseie a fonte de alimentação
de ficha com as mãos húmidas.
Opere o aparelho apenas em espaços
interiores secos.
Coloque o aparelho numa base estável
e anti-derrapante.
Coloque o aparelho afastado de fontes
de calor e da luz directa do sol.
Não coloque o aparelho em superfícies
termossensíveis.
Antes da montagem na parede, observe
os requisitos relativos à parede e à superfície.
Em caso de montagem na parede, veri-
ficar a capacidade de carga da mesma.
Monte o aparelho na parede de forma
segura.
O aparelho deve estar sempre acessí-
vel. Não monte o aparelho em locais
inacessíveis, como por exemplo, atrás
de revestimentos, em móveis ou em locais acima dos 2 metros.
Não operar o aparelho próximo de ou-
tros aparelhos eléctricos. Sobretudo,
junto de outros equipamentos radioeléctricos.
Limpe o aparelho apenas a seco, por
exemplo com um pano de pó.
Não puxe pelo cabo.
Português 55
Page 56

Padrões de equipamentos de rádio
Os aparelhos utilizam os seguintes padrões de equipamentos de rádio:
ZigBee (IEEE 802.15.4)
WLAN (IEEE 802.11)
Aparelho Tipo Frequên-
cia MHz
Gateway SRD 2400 -
2483,5
Water
Controller
Duo Smart
Pelo presente, a Alfred Kärcher SE & Co.
KG, declara que o tipo de instalação de rádio Gateway / válvula de irrigação (Water
Controller Duo Smart) está em conformidade com a Directiva 2014/53/UE. O texto
completo da declaração de conformidade
UE está disponível no seguinte endereço
da Internet:
www.kaercher.com
SRD 2412 -
2472
Potência
máx. ERP
110 mW
10 mW
Utilização adequada
Este aparelho foi desenvolvido para a utilização privada e não está previsto para o
esforço da utilização industrial.
Este aparelho está previsto para a ligação
a uma torneira de água e controla automaticamente o fluxo de água em sistemas de
irrigação.
O fabricante não se responsabiliza por
eventuais danos resultantes da utilização
para fins não previstos ou da operação incorrecta do aparelho.
Ligação à rede de água
potável
Ao ligar este produto à rede de água potável tenha em atenção os requisitos da norma EN 1717 e em caso de dúvidas
contacte o seu especialista em instalações
sanitárias.
Protecção do meio ambiente
Os materiais de empacotamento são
recicláveis. Elimine as embalagens de
acordo com os regulamentos ambientais.
Os aparelhos eléctricos e electrónicos
contêm materiais recicláveis de valor
e, com frequência, componentes como baterias, acumuladores ou óleo que,
em caso de manipulação ou recolha errada, podem representar um potencial perigo
para a saúde humana e para o ambiente.
Estes componentes são necessários para
o bom funcionamento do aparelho. Os aparelhos que apresentem este símbolo não
devem ser recolhidos no lixo doméstico.
Avisos relativos a ingredientes (REACH)
Pode encontrar informações actualizadas
acerca de ingredientes em: www.kaer-
cher.com/REACH
Acessórios e peças
sobressalentes
Ao utilizar apenas acessórios originais e
peças sobressalentes originais, garante
uma utilização segura e o bom funcionamento do aparelho.
Informações acerca de acessórios e peças
sobressalentes disponíveis em www.kaer-
cher.com.
Volume do fornecimento
O volume do fornecimento do aparelho está indicado na embalagem. Ao abrir a embalagem, confirme a integralidade do
conteúdo. Caso faltem acessórios ou em
caso de danos de transporte informe o seu
fornecedor.
56 Português
Page 57

Descrição do aparelho
121
3
4
5
6
2
1
7
3
4
5
1
2
1
2
Função
Este aparelho controla a irrigação através
da aplicação para smartphone ou através
da operação directa na unidade de controlo.
Para que a operação possa ser efectuada
através da aplicação, é necessário integrar
o aparelho na rede WLAN com o gateway
fornecido,
utilizando a aplicação Kärcher Home &
Garden, que se encontra disponível na
Apple App Store ou na Google Play Store.
Na unidade de controlo, pode ser ajustada
a seguinte função:
Ligar e desligar a saída de água.
Com a aplicação, podem ser ajustadas as
seguintes funções:
Ligar e desligar a saída de água.
Estabelecer ou apagar um programa de
tempo.
Activar ou desactivar a irrigação em fun-
ção das condições meteorológicas.
Suspender o programa de tempo.
Elementos de comando
Válvula
Unidade de controlo
1 Tecla de comando da saída de água do
lado esquerdo
2 LED esquerdo
3 LED direito
4 Tecla de comando da saída de água do
lado direito
5 Tecla de emparelhamento/reposição
1 Adaptador da ligação de torneira
2 Ligação de mangueira G 3/4”
3 Ilhó para sistema anti-roubo
4 Ligação de água G 1” com pré-filtro
5 Peça de redução G 3/4”
6 Parte superior da carcaça para apare-
lho de dois canais
7 Entalhes para montagem na parede
1 Emparelhamento com código QR
2 Compartimento da bateria
Português 57
Page 58

Gateway
1
2
1
1 LED de WLAN
2 Conjunto de LED
Símbolos nas Instruções
resumidas
Descarregar a aplicação KÄRCHER Home&Garden
Processo de inicialização do gateway
Arranque através da aplicação
Repor
Ligação eléctrica
Ligação de rede
1 Endereço MAC
2 Chave WPA
3 Emparelhamento com código QR
4 Entalhe para montagem na parede
5 Conector da fonte de alimentação
6 Tecla de reposição
Fonte de alimentação
1 Conector coaxial
58 Português
Ligar/desligar saída de água
Observar impreterivelmente os
avisos de segurança em anexo.
Page 59

Arranque
Aviso: O arranque é efectuado através da
aplicação KÄRCHER Home&Garden. Realize o procedimento descrito na aplicação
para actualizar.
Aviso: A válvula de irrigação necessita de
4 baterias AAA de 1,5 V. Estas não estão
incluídas no volume do fornecimento. Consulte informações adicionais sobre as baterias no capítulo “Dados técnicos”.
Colocar o gateway em
funcionamento
1. Descarregar a aplicação KÄRCHER Home&Garden a partir da Apple App Store
ou da Google Play Store.
2. Abrir a aplicação KÄRCHER Home&Garden.
3. Alternar para “Adicionar produto”.
4. Criar uma conta (caso ainda não esteja
registado).
5. Encaixar o conector coaxial da fonte de
alimentação no conector do gateway.
6. Ligar a fonte de alimentação a uma tomada.
O processo de inicialização começa e
pode demorar alguns minutos.
7. Digitalizar o código QR do gateway.
8. Seleccionar “Gateway Kärcher” como
ponto de acesso na procura de WLAN
do smartphone.
9. Introduzir manualmente o código QR
previamente digitalizado ou a chave
WPA na placa de características do gateway como palavra-passe WLAN.
10.Ao regressar à aplicação KÄRCHER
Home&Garden, a ligação é verificada.
11.Seleccionar a rede doméstica e introduzir a palavra-passe.
Se a verificação for bem-sucedida, a
instalação correcta é confirmada.
Aviso: Posicione o gateway no mesmo andar da habitação, se possível, próximo da
válvula de irrigação. O ideal é colocar à janela.
Importante: Caso tenha sido estabelecido
um filtro MAC ou outras firewalls no router
WLAN, é necessário desbloquear o endereço MAC do gateway no router. O endereço MAC está indicado na placa de
características do gateway.
Colocar a válvula em
funcionamento
1. Seleccionar “Adicionar produto”.
2. Digitalizar o código QR da válvula.
3. Colocar ambas as baterias na unidade
de controlo.
4. Premir a tecla de emparelhamento na
unidade de controlo.
Se a ligação for bem-sucedida, é apresentada uma confirmação da instalação
correcta.
5. Ligar a válvula à torneira de água.
6. Ligar as ligações de mangueira às mangueiras.
7. Colocar a unidade de controlo na válvula.
8. Abrir a torneira de água.
Montagem na parede
Se necessário, os aparelhos podem ser fixados à parede. Os parafusos utilizados
não podem ultrapassar as seguintes dimensões.
Gateway
Diâmetro da cabeça dos parafusos:
9mm
Altura da cabeça dos parafusos: 2,7 mm
Diâmetro da rosca: 4,2 mm
Válvula
Diâmetro da cabeça dos parafusos:
11 mm
Altura da cabeça dos parafusos: 5,5 mm
Diâmetro da rosca: 6 mm
Português 59
Page 60
Funções de irrigação
O ajuste das funções de irrigação é explicado na aplicação.
Irrigação manual
Ligar e desligar a irrigação manual na unidade de controlo.
A duração da irrigação pode ser ajustada livremente na aplicação (no máximo, 90 minutos).
Irrigação temporizada
Aplicar uma selecção ilimitada de datas de
irrigação para cada saída de água (duração máxima de 90 minutos por data).
Irrigação em função das condições
meteorológicas
Suspender a data de irrigação devido a dados meteorológicos.
Suspender as datas de irrigação num período entre 1 a 24 horas.
O controlo de voz é executado com recurso
a um assistente de voz digital, através da ligação entre a sua conta Kärcher Home &
Garden e um assistente de voz digital externo. As instruções para a ligação estão
disponíveis no fornecedor do assistente de
voz digital. A lista dos fornecedores actuais
pode ser consultada em www.kaercher.com.
A disponibilidade dos diferentes assistentes de voz varia de país para país. Poderá
consultar uma lista dos idiomas disponíveis
na página Web do respectivo fornecedor.
Suspender a irrigação
Controlo de voz
Luzes de controlo
Gateway
Conjunto de
LED
Pisca Deslig. Inicialização, fase inicial após a ligação à rede eléctri-
Lig. Pisca Configuração de WLAN iniciada.
Lig. Pisca Sem ligação à Cloud.
Lig. Lig. Existe uma ligação correcta.
Pisca Pisca Os ajustes de fábrica foram repostos.
LED de WLAN Significado
ca.
Válvula
LED esquerdo LED direito Significado
Pisca várias
vezes
Pisca 3 vezes
rapidamente
Pisca alternadamente
Pisca durante
1 segundo
Lig. Lig. Actualização de software (duração de
60 Português
Pisca várias
vezes
Pisca 3 vezes
rapidamente
Pisca alternadamente
Pisca durante
1 segundo
Fase de emparelhamento (após premir a tecla de
emparelhamento/reposição).
Desemparelhamento.
Modo de recuperação: os ajustes de fábrica são
repostos.
Saída de água no lado que pisca lig./desl.
10...20 minutos).
Page 61
Armazenamento
ADVERTÊNCIA
Perigo de danos
As águas residuais podem danificar a válvula.
Esvazie a válvula antes do armazenamento.
1. Esvaziar a válvula por completo.
2. Remover ambas as baterias da unidade
de controlo.
3. Armazenar a válvula e a unidade de
controlo num local seco e sem risco de
congelamento.
Conservação e manutenção
Recomendamos que as baterias na unidade de controlo sejam mudadas anualmente.
O estado das baterias é apresentado na
aplicação KÄRCHER Home&Garden.
Ajuda em caso de avarias
Aviso: Está disponível uma resolução de avarias detalhada na aplicação
KÄRCHER Home&Garden, na secção FAQ.
Avaria Causa Reparação
O gateway não se liga à
rede WLAN.
Não é possível ligar as válvulas ao gateway.
A válvula não abre ou não
fecha.
As válvulas não se abre
premindo a tecla. Os LED
não acendem.
O router WLAN é operado
com um filtro MAC ou outra
firewall.
Os obstáculos enfraquecem o sinal de rádio entre o
gateway e as válvulas.
A unidade de controlo não
está instalada na válvula.
As baterias estão descarregadas.
Desbloquear o endereço MAC do
gateway no router WLAN.
Posicionar o gateway noutro local
da habitação. Se possível, colocálo próximo de uma janela, na direcção da válvula de irrigação
Colocar a unidade de controlo na
válvula.
Substituir ambas as baterias da
unidade de controlo.
Garantia
Em cada país são válidas as condições de
garantia transmitidas pela nossa sociedade distribuidora responsável. Trataremos
de possíveis avarias no seu aparelho no
âmbito do prazo da garantia, sem custos,
desde que estas tenham origem num erro
de material ou de fabrico. Em caso de garantia, contacte o seu revendedor ou a assistência técnica autorizada mais próxima,
apresentando o talão de compra.
A garantia não se aplica a danos em plantas.
Português 61
Page 62

Dados técnicos
Watering
System Duo
Smart Kit
Fonte de alimentação
Tensão da rede V 100-240
Fase ~ 1
Frequência Hz 47-63
Baterias
Quantidade 4
Tensão da bateria V 1,5
Capacidade, mín. Ah 800
Tipo de bateria AAA
ZigBee
Frequência MHz 2412-2472
Alcance da unidade
de rádio
Ligação de água
Pressão de trabalho MPa
Temperatura de
admissão (máx.)
Ambiente
Temperatura
ambiente
Reservados os direitos a alterações técnicas.
m100
0,1-1,0 (1-10)
(bar)
°C 35
°C +5...+40
62 Português
Page 63

Indhold
Sikkerhedshenvisninger...................... 63
Korrekt anvendelse............................. 65
Tilslutning til drikkevandsnettet ........... 65
Miljøbeskyttelse .................................. 65
Tilbehør og reservedele...................... 65
Leveringsomfang ................................ 65
Beskrivelse af apparatet ..................... 66
Symboler i den korte vejledning.......... 67
Ibrugtagning........................................ 68
Vandingsfunktioner ............................. 68
Stemmestyring.................................... 69
Kontrollamper...................................... 69
Opbevaring ......................................... 69
Pleje og vedligeholdelse ..................... 69
Hjælp ved fejl ...................................... 70
Garanti ................................................ 70
Tekniske data ...................................... 70
Børn fra og med min. 8 år må anvende maskinen, hvis de er blevet oplært i brugen af
maskinens af en person med ansvar for deres sikkerhed, eller hvis de er korrekt under
opsyn, og de har forstået de deraf resulterende farer.
Symboler på maskinen
Vandingsventil
Beskyt maskinen mod frost
Symboler på apparatet
Gateway
Anvend kun apparatet indendørs
Sikkerhedshenvisninger
Læs den originale driftsvejledning og sikkerhedshenvisnin-
gerne inden apparatet tages i
brug første gang. Betjen apparatet i overensstemmelse hermed.
Læs den grafiske brugsanvisning til ap-
paratet og disse sikkerhedshenvisninger, inden apparatet tages i brug.
Ud over henvisningerne i driftsvejlednin-
gen skal lovens generelle sikkerhedsforskrifter og ulykkesforebyggende
forskrifter overholdes.
Generelle sikkerhedsforskrifter
FARE
Kvælningsfare. Emballagefolie skal holdes
uden for børns rækkevidde.
몇 ADVARSEL
Maskinen må kun anvendes af personer,
hvis fysiske, sensoriske eller åndelige evner er indskrænket eller af personer med
manglende erfaring og/eller kendskab, hvis
de er under korrekt opsyn, eller hvis de er
blevet oplært af en person, som er ansvarlig for deres sikkerhed i forbindelse med anvendelse af maskinen, og hvis de har
forstået de deraf resulterende farer.
Børn skal være under opsyn for at sikre, at
de ikke leger med maskinen.
Anvend kun den tilladte netdel
6.745-110.0 indgang: 5 V / 1 A
Sikkerhedshenvisninger
vandingsventil
Anvend kun vandingsventilen med ube-
handlet, klart ferskvand. Apparatet må
under ingen omstændigheder anvendes
i forbindelse med eksplosive, ætsende
eller antændelige stoffer.
Vandtemperaturen må ikke være over
35 °C.
Vandtilløbstrykket må ikke overstige
10 bar (1 MPa) ved apparatets indgang.
Dyp aldrig vandingsventilen helt ned i
væsker.
Anvend kun vandingsventilen i udeom-
rådet.
Kontrollér regelmæssigt vandingsventi-
len for beskadigelser. Tag ikke apparatet
i brug, hvis det udviser synlige beskadigelser.
Tag kun vandingsventilen i brug i vertikal
position.
Anvend ikke tætningsmasse eller smø-
remiddel for at tilslutte vandingsventilen
på vandhanen.
Betjen ikke apparatet uden det integre-
rede filter ved vandindgangen.
Dansk 63
Page 64

Kontrollér regelmæssigt filteret ved
vandindgangen for beskadigelser. Partikler i vandet, der trænger ind i apparatet pga. et beskadiget filter, forhindrer
korrekt åbning og lukning af ventilen.
Udskift omgående det beskadigede
vandfilter.
Hvis apparatet er ude af drift i længere
tid, skal det kontrolleres mindst en gang
om måneden for tæthed og det skal sikres, at ventilerne kan åbnes og lukkes
forsvarligt.
Træk ikke i de tilsluttede slanger.
Vær før vægmonteringen opmærksom
på kravene til væggen og overfladen.
Kontrollér væggens bæreevne før væg-
montering. Monter apparatet sikkert på
væggen.
Der skal til enhver tid være adgang til
apparatet. Monter ikke apparatet på utilgængelige steder eller højere end 2 meter.
Installer ikke vandingsventilen i nærhe-
den af varmekilder og beskyt den mod
frost (tilladte omgivende temperatur
5 °C til 40 °C).
Anvend kun batterier, der er godkendt til
din vandingsventil. Informationer om de
påkrævede batterityper findes i apparatets driftsvejledning.
Anvend ikke genopladelige batterier.
Installer ikke vandingsventilen på steder,
hvor der dannes kondensvand.
Anvend ikke vandingsventilen i nærhe-
den af apparater, som er tændte.
Tag ikke et apparat i drift, der ikke funge-
rer korrekt.
Sikkerhedshenvisninger gateway
Åbn aldrig apparatet eller netdelen med
stik.
Læg tilslutningskablet således, at ingen
kan træde på det eller snuble over det.
Betjen kun apparatet med den medføl-
gende netdel med stik eller med en tilsvarende reservedel (bestillingsnummer
6.745-102.0).
Slut altid netdelen med stikket til en net-
stikdåse, der altid er tilgængelig, og som
svarer til de angivne værdier på typeskiltet.
Dyp aldrig apparatet i væsker.
Rør ikke ved netdelen med stik med fug-
tige hænder.
Opbevar apparatet på et tørt sted inden-
dørs.
Stil apparatet på et stabilt og skridsikkert
underlag.
Stil apparatet væk fra varmekilder og di-
rekte sollys.
Stil ikke apparatet på varmefølsomme
overflader.
Vær før vægmonteringen opmærksom
på kravene til væggen og overfladen.
Kontrollér væggens bæreevne før væg-
montering. Monter apparatet sikkert på
væggen.
Der skal til enhver tid være adgang til
apparatet. Monter ikke apparatet på utilgængelige steder, som bag beklædninger, i møbler eller højere end 2 meter.
Anvend ikke apparatet i nærheden af
andre elektriske apparater. Særligt ikke i
nærheden af andre radiosystemer.
Rengør kun apparatet med tørre rengø-
ringsartikler, f.eks. en støvklud.
Træk ikke i kablet.
64 Dansk
Page 65

Radiostandarder
Apparaterne anvender de følgende radiostandarder:
ZigBee (IEEE 802.15.4)
WLAN (IEEE 802.11)
Apparat Kon-
struktion
Gateway SRD 2400 -
Water
Controller
Duo Smart
Hermed erklærer Alfred Kärcher SE & Co.
KG, at radioudstyrstypen gateway / vandingsventil (Water Controller Duo Smart) er
i overensstemmelse med direktiv 2014/53/
EU. EU-overensstemmelseserklæringen er
tilgængelig i dens helhed på følgende
hjemmeside:
www.kaercher.com
SRD 2412 -
Frekvens
MHz
2483,5
2472
Effekt
maks.
ERP
110 mW
10 mW
Korrekt anvendelse
Dette apparat er udviklet til privat brug og
ikke beregnet til de belastninger, der opstår
inden for erhvervsmæssig brug.
Dette apparat er beregnet til tilslutning ved
en vandhane og styrer automatisk vandflowet i vandingssystemer.
Producenten hæfter ikke for eventuelle
skader, der forårsages af ikke korrekt brug
eller forkert betjening.
Tilslutning til
drikkevandsnettet
Vær venligst opmærksom på kravene i EN
1717 i forbindelse med tilslutning af dette
produkt til drikkevandsnettet, og henvend
dig til din sanitærfaglige virksomhed i tilfælde af forespørgsler.
Miljøbeskyttelse
Emballagen kan genbruges. Sørg for
at bortskaffe emballagen miljømæs-
sigt korrekt.
Elektriske og elektroniske maskiner indeholder værdifulde materialer, der
kan genbruges, og ofte dele, såsom
batterier, akku-pakker eller olie, der ved forkert håndtering eller forkert bortskaffelse
kan udgøre en fare for menneskers sundhed og for miljøet. For en korrekt drif t af maskinen er disse dele imidlertid nødvendige.
Maskiner, der er kendetegnet med dette
symbol, må ikke bortskaffes sammen med
husholdningsaffaldet.
Henvisninger til indholdsstoffer
(REACH)
Aktuelle oplysninger om indholdsstoffer findes på: www.kaercher.com/REACH
Tilbehør og reservedele
Anvend kun originaltilbehør og -reservedele. De er en garanti for en sikker og fejlfri
drift af maskinen.
Informationer om tilbehør og reservedele
findes på www.kaercher.com.
Leveringsomfang
Maskinens leveringsomfang er vist på emballagen. Kontroller ved udpakningen, om
indholdet er komplet. Kontakt venligst forhandleren, hvis der mangler tilbehør eller
ved transportskader.
Dansk 65
Page 66

Beskrivelse af apparatet
121
3
4
5
6
2
1
7
3
4
5
1
2
1
2
1
2
Funktion
Dette apparat styrer vandingen enten vha.
smartphone-appen eller ved direkte betjening på betjeningsenheden.
Hvis betjening via app skal være mulig, skal
apparatet integreres i WLAN netværket
med den medleverede gateway.
Dette sker ved hjælp af appen Kärcher Home & Garden, som fås gratis i Apple App
Store eller Google Play Store.
Følgende funktioner kan indstilles på betjeningsenheden:
Til- og frakobling af vandudgangene.
Følgende funktioner kan indstilles via appen:
Til- og frakobling af vandudgangene.
Bestemmelse eller sletning af et tidspro-
gram.
Aktivering og deaktivering af den vejrba-
serede vanding.
Pausering af tidsprogrammet.
Betjeningselementer
Ventil
Betjeningsenhed
1 Styringsknap vandudgang til venstre
2 LED til venstre
3 LED til højre
4 Styringsknap vandudgang til højre
5 Pairing/reset-tast
1 Hanetilslutningsadapter
2 G 3/4" slangetilslutning
3 Øsken til tyverisikring
4 G 1" vandtilslutning med forfilter
5 G 3/4" reduktionsstykke
6 Husoverdel til apparat med to kanaler
7 Udsparinger til vægmontering
66 Dansk
1 QR-kode pairing
2 Batterirum
Gateway
1 LED WLAN
2 LED række
Page 67
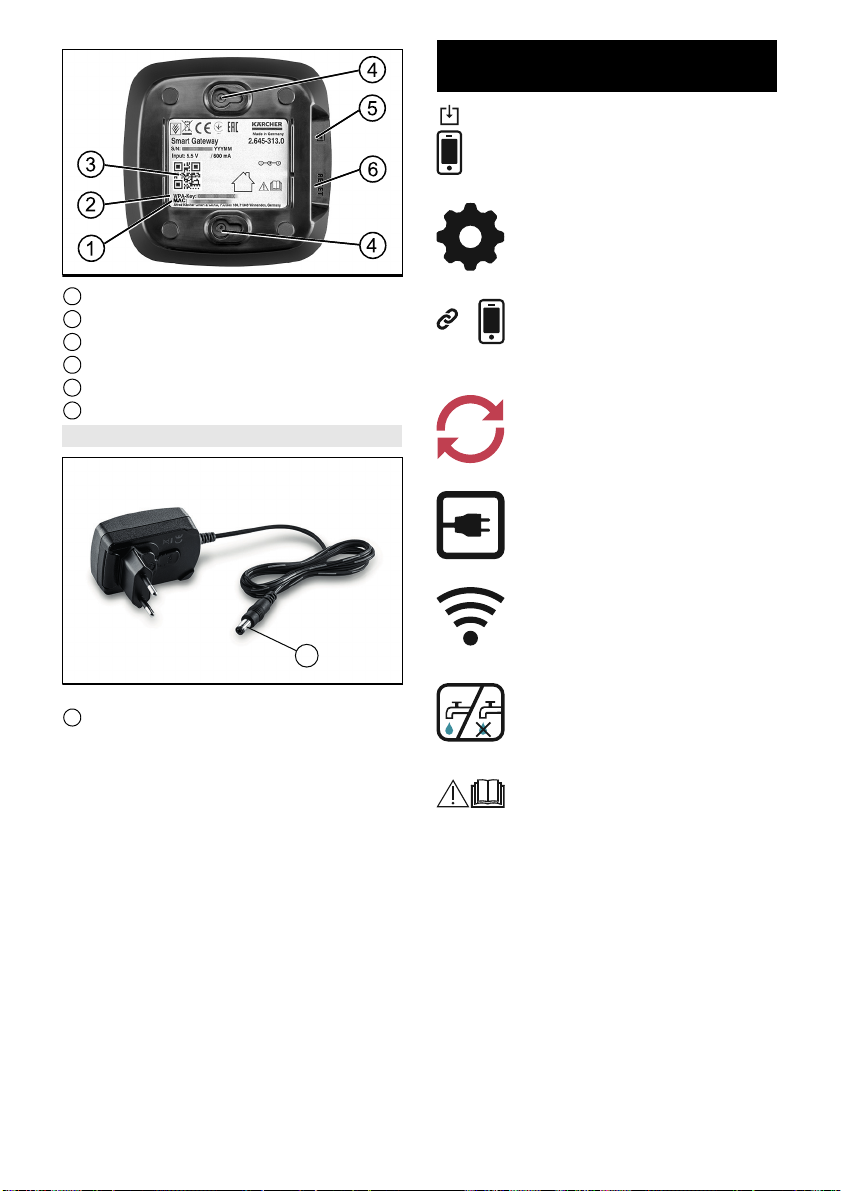
Symboler i den korte
1
vejledning
Download appen KÄRCHER Home&Garden
Systemstart af gateway
1 MAC-adresse
2 WPA-nøgle
3 QR-kode pairing
4 Udsparing til vægmontering
5 Netdelsbøsning
6 Reset-tast
Netdel
1 Hulstik
Ibrugtagning via appen
Reset
Strømtilslutning
Netværksforbindelse
Til-/frakobling af vandudgangen
Overhold altid de vedlagte sikkerhedshenvisninger.
Dansk 67
Page 68

Ibrugtagning
Bemærk: Ibrugtagningen sker via appen
KÄRCHER Home&Garden. Følg den beskrevne fremgangsmåde for at være opdateret.
Bemærk: Vandingsventilen skal bruge 4 x
1,5 V AAA batterier. Disse er ikke omfattet
af leverancen. Du kan finde yderligere informationer om batterierne i kapitlet "Tekniske data".
Ibrugtagning af gateway
1. Download appen KÄRCHER Home&Garden fra Apple App Store eller
Google Play Store.
2. Åbn appen KÄRCHER Home&Garden.
3. Skift til "Tilføj produkt".
4. Opret en konto (hvis du ikke allerede er
registreret).
5. Sæt netdelens hulstik i gatewayens bøsning.
6. Sæt netdelen i stikkontakten.
Systemstarten begynder og kan vare flere minutter.
7. Scan gatewayens QR-kode.
8. Vælg "Kärcher-gateway" som accesspoint i smartphonens WLAN-søgning.
9. Som WLAN-adgangskode for gatewayen tilføjes den tidligere scannede QRkode, eller WPA-nøglen på gatewayens
typeskilt indtastes manuelt.
10.Når du vender tilbage til appen KÄRCHER Home&Garden kontrolleres forbindelsen.
11.Vælg hjemmenetværket og indtast adgangskoden.
Hvis kontrollen af forbindelsen er vellykket , bekræftes den korrekt installation.
Bemærk: Placer gatewayen på samme
etage i boligen, så tæt på vandingsventilen
som muligt. Det er optimalt med en plads
ved vinduet.
Vigtigt: Hvis der på WLAN-routeren er installeret et MAC-filter eller ekstra firewalls,
skal gatewayens MAC-adresse frigives der.
MAC-adressen er angivet på gatewayens
typeskilt.
Ibrugtagning af ventil
1. Vælg "Tilføj produkt".
2. Scan ventilens QR-kode.
3. Ilæg batterierne i betjeningsenheden.
4. Tryk på Pairing-tasten på betjeningsenheden.
Hvis forbindelsen lykkedes, vises en bekræftelse på korrekt installation.
5. Forbind ventilen med vandhanen.
6. Forbind slangetilslutningerne med slangerne.
7. Ilæg betjeningsenheden i ventilen.
8. Åbn vandhanen.
Montering på væg
Ved behov kan apparaterne fastgøres på
væggen. De anvendte skruer må ikke overskride de følgende mål.
Gateway
Diameter skruehoved: 9 mm
Højde skruehoved: 2,7 mm
Diameter gevind: 4,2 mm
Ventil
Diameter skruehoved: 11 mm
Højde skruehoved: 5,5 mm
Diameter gevind: 6 mm
Vandingsfunktioner
Indstillingen af vandingsfunktionerne er forklaret i appen.
Manuel vanding
Vandingen kan til- og frakobles manuelt på
betjeningsenheden.
Vandingsvarigheden kan indstilles frit i appen (maksimalt 90 minutter).
Tidsstyret vanding
Opret et ubegrænset antal vandingsterminer for hver vandudgang (maksimal varighed 90 minutter pr. termin).
Vejrbaseret vanding
Hold pause i vandingsterminen på grund af
vejrdata.
Pausering af vanding
Udsæt vandingsterminer i et tidsrum fra 1 til
24 timer.
68 Dansk
Page 69

Stemmestyring
Stemmestyringen vha. en digital stemmeassistent sker via forbindelsen mellem din
Kärcher Home & Garden konto og en ekstern digital stemmeassistent. Vejledningen
til forbindelsen fås hos udbyderen af den digitale stemmeassistent. Listen over de ak-
tuelle udbydere findes på
www.kaercher.com.
Det er forskelligt fra land til land, hvilke forskellige stemmeassistenter, der er til rådighed. Du kan finde en liste over de
forskellige sprog på hjemmesiden for den
pågældende udbyder.
Kontrollamper
Gateway
LED-række LED WLAN Betydning
Blinker Fra Opstart, startfase efter forbindelse med strømnettet.
Til Blinker Konfiguration WLAN startet.
Til Blinker Ingen forbindelse til Cloud.
Til Til Korrekt forbindelse eksisterer.
Blinker Blinker Fabriksindstillinger genetableres.
Ventil
LED til venstre LED til højre Betydning
Blinker flere gan-geBlinker flere gan-gePairing-fase (efter tryk på tasten Pairing/reset).
Blinker hurtigt
3 gange
Blinker skiftevis Blinker skiftevis Recovery-modus, fabriksindstillingerne genetableres.
Blinker 1 sekund Blinker 1 sekund Vandudgang på den blinkende side til/fra.
Til Til Softwareopdatering (varighed 10...20 minutter).
Blinker hurtigt
3 gange
Unpairing.
Opbevaring
BEMÆRK
Risiko for beskadigelse
Vandrester kan beskadige ventilen.
Tøm ventilen inden opbevaring.
1. Tøm ventilen helt.
2. Fjern batterierne fra betjeningsenheden.
3. Opbevar ventilen og betjeningsenheden
et tørt sted, der er beskyttet mod frost.
Pleje og vedligeholdelse
Vi anbefaler at udskifte batterierne i betjeningsenheden hvert år.
Batteriernes tilstand vises i appen KÄRCHER Home&Garden.
Dansk 69
Page 70

Hjælp ved fejl
Bemærk: Der er en udførlig fejlafhjælpning til rådighed i appen KÄRCHER Home&Garden
under FAQ.
Fejl Årsag Afhjælpning
Gatewayen forbinder sig
ikke med WLAN-netværket.
Ventilerne kan ikke forbindes med gatewayen.
Ventilen åbner og lukker
ikke.
Ventilerne åbner ikke ved
tryk på tasten. LED'erne
lyser ikke.
Garanti
I det enkelte lande gælder de garantibetingelser, der er fastsat af vore salgsselskab.
Eventuelle fejl ved apparatet udbedres gratis inden for garantien, såfremt fejlen kan tilskrives en materiale- eller produktionsfejl.
Hvis du ønsker at gøre garantien gældende, bedes du henvende dig til din forhandler eller nærmeste kundeservicecenter
medbringende kvittering for købet.
Garantien omfatter ikke skader på planter.
WLAN-routeren anvendes
med et MAC-filter eller en
anden firewall.
Forhindringer svækker radiosignalet mellem gateway og ventiler.
Betjeningsenheden er ikke
placeret på ventilen.
Batterierne er tomme. Udskift batterierne i betjeningsen-
Frigiv gatewayens MAC-adresse
ved WLAN-routeren.
Placér gatewayen et andet sted i
boligen. Helst i nærheden af et vindue i vandingsventilens retning
Ilæg betjeningsenheden i ventilen.
heden.
Tekniske data
Watering
System Duo
Smart Kit
Netdel
Netspænding V 100-240
Fase ~ 1
Frekvens Hz 47-63
Batterier
Antal 4
Batterispænding V 1,5
Kapacitet, min. Ah 800
Batteritype AAA
ZigBee
Frekvens MHz 2412-2472
Rækkevidde tråd-
løs enhed
Vandtilslutning
Driftstryk MPa
Tilløbstemperatur
(maks.)
Omgivelse
Omgivelsestemperatur
Der tages forbehold for tekniske ændringer.
m100
0,1-1,0 (1-10)
(bar)
°C 35
°C +5...+40
70 Dansk
Page 71

Indhold
Sikkerhetshenvisninger....................... 71
Forskriftsmessig bruk.......................... 73
Tilkobling til drikkevannsnettet ............ 73
Miljøvern ............................................. 73
Tilbehør og reservedeler..................... 73
Leveringsomfang ................................ 73
Beskrivelse av apparatet..................... 73
Symboler i hurtigveiledningen............. 75
Igangsetting ........................................ 75
Vanningsfunksjoner............................. 76
Talestyring........................................... 76
Kontrollamper...................................... 76
Lagring................................................ 77
Stell og vedlikehold ............................. 77
Bistand ved feil.................................... 77
Garanti ................................................ 77
Tekniske spesifikasjoner ..................... 78
Sikkerhetshenvisninger
Les denne oversettelsen av
den originale driftsveilednin-
gen og sikkerhetshenvisningene før apparatet tas i bruk første gang. Følg
anvisningene.
Legg merke til den grafiske bruksanvis-
ningen og disse sikkerhetsinstruksene
før apparatet tas i bruk.
I tillegg til instruksene i denne bruksan-
visningen må du ta hensyn til de generelle forskrifter vedrørende sikkerhet og
forebygging av ulykker.
Generelle sikkerhetsinstrukser
FARE
Fare for kvelning. Hold innpakningsfolien
vekke fra barn.
몇 ADVARSEL
Personer med reduserte fysiske, sensoriske eller mentale evner, eller med mangel på
erfaring og kunnskap, kan bare bruke apparatet under korrekt tilsyn av eller med instruksjon fra en sikkerhetsansvarlig person
og dermed forstår farene ved apparatet.
Barn skal holdes under tilsyn for å sikre at
de ikke leker med apparatet.
Barn over 8 år kan bruke apparatet dersom
de har fått opplæring i dette av en person
som er ansvarlig for sikkerheten eller der-
som de er under tilsyn og har forstått farene
ved apparatet.
Symboler på apparatet
Vanningsventil
Beskytt apparatet mot frost
Symboler på apparatet
Gateway
Apparatet skal kun brukes innendørs
Bruk kun den tilllatte strømforsyningen 6.745-110.0
inngang: 5 V / 1 A
Sikkerhetsinstrukser
vanningsventil
Bruk vannventilen kun med ubehandlet,
rent ferskvann. Apparatet må aldri brukes i forbindelse med eksplosive, korroderende eller antennelige stoffer.
Vanntemperaturen må ikke ligge over
35 °C.
Vanntilførselstrykket må ikke overstige
10 bar (1 MPa) på apparatinngangen.
Dypp aldri vanningsventilen helt ned i
væsker.
Bruk vanningsventilen kun i områder
utendørs.
Kontroller vanningsventilen regelmessig
for skader. Ved synlige skader må ikke
apparatet tas i bruk lenger.
Ta vanningsventilen kun i bruk i loddrett
posisjon.
Ikke bruk noen tetningsmasse eller smø-
remidler for å koble vanningsventilen til
vannkranen.
Ikke bruk apparatet uten det integrerte
filteret på vanninngangen.
Kontroller filteret på vanninngangen
regelmessig for skader. Partikler i vannet, som kan trenge inn i apparatet dersom filteret er skadet, forhindrer at
ventilen kan åpnes og lukkes som den
skal.
Norsk 71
Page 72

Et skadet vannfilter må byttes ut omgå-
ende.
Etter at apparatet har vært ute av drift
over lengre tid, eller minst hver måned,
må du kontrollere at det er tett og at ventilene kan åpnes og lukkes som de skal.
Ikke trekk i de tilkoblede slangene.
Før montering på vegg må kravene til
vegg og overflate tas hensyn til.
Kontroller at veggen er sterk nok til å
bære apparatet. Fest apparatet sikkert
på veggen.
Apparatet må alltid være tilgjengelig.
Ikke monter apparatet på utilgjengelige
steder eller høyere enn 2 meter.
Ikke installer vanningsventilen i nærhe-
ten av varmekilder og beskytt den mot
frost (tillatt omgivelsestemperatur 5 °C
til 40 °C).
Bruk kun batterier som er godkjent for
din vanningsventil. Du finner informasjon om de nødvendige batteritypene i
apparatets bruksanvisning.
Ikke bruk oppladbare batterier.
Ikke installer vanningsventilen på steder
der det dannes kondens.
Ikke bruk vanningsventilen i nærheten
av apparater som står under spenning.
Ikke ta i bruk et apparat som ikke funge-
rer som det skal.
Sikkerhetsinstrukser Gateway
Apparatet eller strømstøpselet må aldri
åpnes.
Legg tilkoblingsledningen slik at ingen
kan tråkke på eller snuble i den.
Lad apparatet kun med det vedlagte
strømstøpselet eller et annet alternativ
(bestillingsnummer 6.745-102.0).
Koble alltid støpselet til en tilgjengelig
stikkontakt som tilsvarer de angitte verdiene på typeskiltet.
Dypp aldri vanningsventilen ned i væs-
ker.
Ikke ta på strømstøpselet med våte hen-
der.
Apparatet skal bare brukes i tørre rom
innendørs.
Plasser apparatet på et stabilt og sklisik-
kert underlag.
Plasser apparatet unna varmekilder og
direkte sollys.
Ikke plasser apparatet på varmeømfintli-
ge overflater.
Før montering på vegg må kravene til
vegg og overflate tas hensyn til.
Kontroller at veggen er sterk nok til å
bære apparatet. Fest apparatet sikkert
på veggen.
Apparatet må alltid være tilgjengelig.
Ikke monter apparatet på utilgjengelige
steder, som bak kledninger, i møbler eller høyere enn 2 meter.
Ikke bruk apparatet i nærheten av andre
elektriske apparater, særlig ikke i nærheten av andre fjernstyrte anlegg.
Apparatet må kun tørr-rengjøres, for ek-
sempel med en støvklut.
Ikke trekk i ledningen.
Radiostandard
Apparatet anvender følgende standarder
for trådløst nett:
ZigBee (IEEE 802.15.4)
WLAN (IEEE 802.11)
Apparat Konst-
ruksjonsty
pe
Gateway SRD 2400–
Water
Controller
Duo Smart
Herved erklærer Alfred Kärcher SE & Co.
KG at den trådløse gatewayen / vanningsventilen (Water Controller Duo Smart) er i
samsvar med retningslinjen 2014/53/EU.
Du finner den fullstendige teksten til EUsamsvarserklæringen på det følgende nettstedet:
www.kaercher.com
SRD 2412–
Frekvens
MHz
2483,5
2472
Effekt
maks.
ERP
110 mW
10 mW
72 Norsk
Page 73
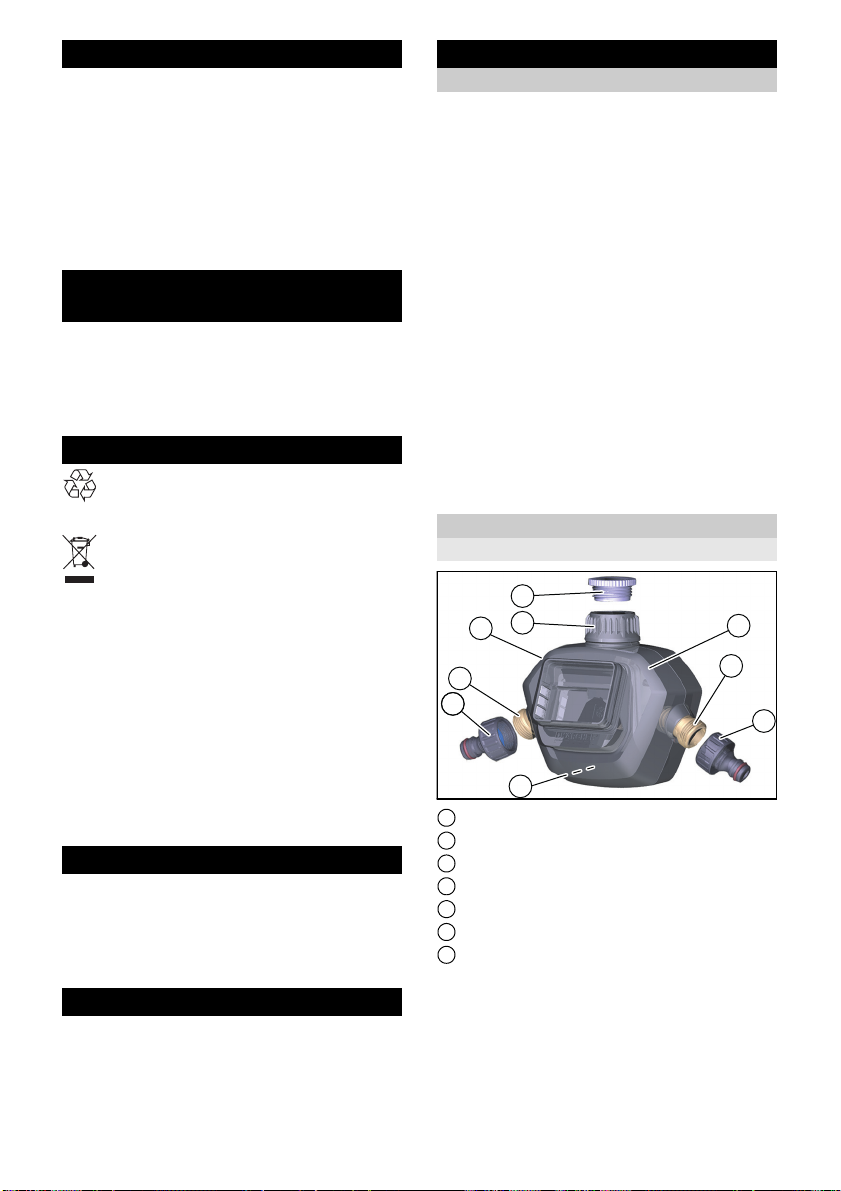
Forskriftsmessig bruk
121
3
4
5
6
2
1
7
Apparatet er utviklet for privat bruk og imøtekommer ikke krav som stilles i industriell
sektor.
Apparatet kobles til en vannkran og kontrollerer automatisk vannflyten i et vanningssystem.
Produsenten er ikke ansvarlig for eventuelle skader forårsaket av ikke-forskriftsmessig eller feil bruk.
Tilkobling til
drikkevannsnettet
Når dette produktet skal kobles til drikkevannsnettet bør du være oppmerksom på
kravene i EN 1717. Henvend deg til en
VVS-entreprenør hvis det er noe du lurer
på.
Miljøvern
Materialet i emballasjen kan resirkuleres. Kvitt deg med emballasjen på mil-
jøvennlig måte.
Elektriske og elektroniske apparater
inneholder verdifulle resirkulerbare
materialer og ofte deler batterier, batteripakker eller olje. Disse kan utgjøre en
potensiell fare for helse og miljø ved feil
bruk eller feil avfallsbehandling. Disse
delene er imidlertid nødvendige for korrekt
drift av apparatet. Apparater merket med
dette symbolet skal ikke kastes i husholdningsavfallet.
Anvisninger om innhold (REACH)
Aktuell informasjon om stoffene i innholdet
finner du under: www.kaercher.com/RE-
ACH
Tilbehør og reservedeler
Bruk bare originalt tilbehør og originale reservedeler; de garanterer for en sikker og
problemfri drift av apparatet.
Informasjon om tilbehør og reservedeler
finner du på www.kaercher.com.
Leveringsomfang
Apparatets leveringsomfang er vist på emballasjen. Kontroller at innholdet i pakken
er komplett når du pakker ut. Manglende tilbehør eller transportskader skal meldes til
forhandleren.
Beskrivelse av apparatet
Funksjon
Apparatet kontrollerer vanningen enten via
smarttelefon-appen eller via direkte betjening på betjeningsenheten.
Apparatet må være tilkoblet WLAN-nettverket ved hjelp av den medleverte gatewayen
for å muliggjøre betjening via appen.
Dette foregår ved hjelp av appen “Kärcher
Home & Garden”, som kan lastes ned gratis på Apple App Store eller Google Play.
Følgende funksjon kan stilles inn på betjeningsenheten:
Slå vannutgangene på og av.
Følgende funksjoner kan stilles inn via appen:
Slå vannutgangene på og av.
Fastsette eller slette et tidsprogram.
Aktivere eller deaktivere værbasert van-
ning.
Sette tidsprogrammet på pause.
Betjeningselementer
Ventil
1 Adapter for vannkran
2 G 3/4” slangetilkobling
3 Ring for tyverisikring
4 G 1” vanntilkobling med forfilter
5 G 3/4” reduksjonsstykke
6 Overdel på hus for tokanals apparat
7 Utsparinger for veggmontasje
Norsk 73
Page 74

Betjeningsenhet
3
4
5
1
2
1
2
1
2
1
1 Kontrollknapp vannutgang venstre side
2 LED venstre side
3 LED høyre side
4 Kontrollknapp vannutgang høyre side
5 Parings- og tilbakestillingsknapp
1 MAC-adresse
2 WPA-nøkkel
3 QR-kode paring
4 Utsparing for veggmontasje
5 Strømkontakt
6 Tilbakestillingsknapp
Strømforsyning
1 QR-kode paring
2 Batterirom
Gateway
1 LED WLAN
2 LED-rekke
74 Norsk
1 Koaksialplugg
Page 75

Symboler i
hurtigveiledningen
Laste ned appen KÄRCHER Home&Garden
Starte opp gateway
Sette i gang via app
Tilbakestille
Strømtilkobling
Nettverkstilkobling
Slå vannutgang på og av
Les alltid de vedlagte sikkerhetshenvisningene.
Igangsetting
Merk: Igangsetting foretas via appen KÄR-
CHER Home&Garden. Følg framgangsmåten som beskrives der for å holde deg
oppdatert.
Merk: Vanningsventilen krever 4 x 1,5 V
AAA-batterier. Disse er ikke inkludert i leveransen. Du finner mer informasjon om batterier i kapitlet “Tekniske data”.
Ta gatewayen i bruk
1. Last ned appen KÄRCHER Home&Garden på Apple App Store eller Google
Play Store.
2. Åpne KÄRCHER Home&Garden.
3. Gå til “Legge til produkt”.
4. Opprett en konto (dersom du ikke er registrert).
5. Sett strømforsyningens koaksialplugg i
kontakten på gatewayen.
6. Sett strømforsyningen i en stikkontakt.
Oppstarten begynner og kan ta noen minutter.
7. Skann gatewayens QR-kode.
8. Velg “Kärcher-Gateway” som tilgangspunkt i WLAN-søket på smarttelefonen.
9. Legg inn QR-koden du allerede har
skannet eller skriv inn WPA-nøkkelen
som du finner på gatewayens typeskilt
som gatewayens WLAN-passord.
10.Tilkoblingen kontrolleres når du går tilbake til KÄRCHER Home&Garden.
11.Velg hjemmenettverk og skriv inn passordet.
Når kontrollen er fullført, bekreftes riktig
installasjon.
Merk: Plasser gatewayen på den samme
etasjen og nærmest mulig vanningsventilen. Alternativt kan den plasseres i vinduet.
Viktig: Dersom WLAN-ruteren er utstyrt
med et MAC-filter eller ekstra brannmurer,
må gatewayens MAC-adresse frigis. Du
finner MAC-adressen på gatewayens typeskilt.
Ta ventilen i bruk
1. Velg “Legg til produkt”.
2. Skann ventilens QR-kode.
3. Sett batteriene i betjeningsenheten.
4. Trykk på paringsknappen på betjeningsenheten.
Når tilkoblingen er fullført, vises en bekreftelse på riktig installasjon.
5. Koble ventilen til vannkranen.
6. Koble slangetilkoblingene til slangene.
7. Legg betjeningsenheten i ventilen.
8. Åpne vannkranen.
Norsk 75
Page 76
Veggmontering
Apparatet kan festes på en vegg om nødvendig. Skruene som brukes må ikke overskride følgende mål.
Gateway
Diameter skruehode: 9 mm
Høyde skruehode: 2,7 mm
Diameter gjenge: 4,2 mm
Ventil
Diameter skruehode: 11 mm
Høyde skruehode: 5,5 mm
Diameter gjenge: 6 mm
Vanningsfunksjoner
Innstillingen for vanningsfunksjonene forklares i appen.
Manuell vanning
Slå vanningen manuelt på og av på betjeningsenheten.
Vanningstiden kan stilles inn fritt i appen
(maksimalt 90 minutter).
Legg inn et ubegrenset antall vanninger for
hver vannutgang (maksimalt 90 minutter
for hver vanning).
Sett vanningen på pause på bakgrunn av
værdata.
Sett vanning på pause fra 1 til 24 timer.
Talestyring via en digital taleassistent foregår via forbindelsen mellom kontoen din i
appen Kärcher Home & Garden og en ekstern, digital taleassistent. Anvisninger for
forbindelsen er tilgjengelig hos tilbyderen
av den digitale taleassistenten. Listen over
aktuelle tilbydere finner du på www.kaercher.com.
Tilgjengeligheten av de forskjellige taleassistentene varierer fra land til land. Du finner en liste over tilgjengelige språk på
nettstedene til de ulike tilbyderne.
Tidsstyrt vanning
Værbasert vanning
Sette vanning på pause
Talestyring
Kontrollamper
Gateway
LED-rekke LED WLAN Betydning
Blinker Av Oppstart, startfase etter tilkobling til strømnettet
På Blinker Konfigurasjon av WLAN har startet.
På Blinker Ingen forbindelse med nettskyen.
På På Forbindelsen er korrekt
Blinker Blinker Tilbakestilling til fabrikkinnstillinger.
Ventil
LED venstre si-deLED høyre side Betydning
Blinker flere ganger
Blinker raskt
3 ganger
Blinker avvekslende
Blinker 1 sekund Blinker 1 sekund Vannutgang på side som blinker på/av.
På På Programvareoppdatering (varighet 10–20 minutter).
76 Norsk
Blinker flere ganger
Blinker raskt
3 ganger
Blinker avvekslende
Paringsfase (etter trykk på knappen paring/tilbakestilling).
Paring brytes.
Gjenoppretting, tilbakestilling til fabrikkinnstillinger.
Page 77

Lagring
OBS
Fare for materielle skader
Vannrester kan skade ventilen.
Tøm ventilen før lagring.
1. Tøm ventilen fullstendig.
2. Ta batteriene ut av betjeningsenheten.
3. Lagre ventilen og betjeningsenheten på
et tørt og frostsikkert sted.
Stell og vedlikehold
Vi anbefaler å skifte batterier i betjeningsenheten en gang i året.
Du kan se battertilstanden i appen KÄRCHER Home&Garden.
Bistand ved feil
Merk: Du finner detaljert informasjon vedrørende bistand ved feil under FAQ i appen
KÄRCHER Home&Garden.
Feil Årsak Utbedring
Gateway kan ikke kobles
til WLAN-nettverket.
Ventilene kan ikke kobles
til gatewayen.
Ventilen åpnes eller lukkes
ikke.
Ventilen åpnes ikke ved
trykk på knappen. LEDlampene lyser ikke.
WLAN-ruteren drives med
et MAC-filter eller en annen
brannmur.
Hindringer svekker sendingen mellom gatewayen og
ventilene.
Betjeningsenheten er ikke
lagt i ventilen.
Batteriene er tomme. Skift batterier i betjeningsenheten.
Frigi gatewayens MAC-adresse på
WLAN-ruteren.
Plasser gatewayet et annet sted i
bygningen. Nærmest mulig et vindu i retning av vanningsventilen.
Legg betjeningsenheten i ventilen.
Garanti
Vår ansvarlige salgsorganisasjon for det
enkelte land har utgitt garantibetingelsene
som gjelder i det aktuelle landet. Eventuelle
feil på apparatet repareres gratis i garantitiden dersom disse kan føres tilbake til material- eller produksjonsfeil. Ved behov for
garantireparasjoner, vennligst henvend
deg med kjøpskvitteringen til din forhandler
eller nærmeste autoriserte kundeservice.
Garantien omfatter ikke skader som oppstår på planter.
Norsk 77
Page 78

Tekniske spesifikasjoner
Watering
System Duo
Smart Kit
Strømforsyning
Nettspenning V 100-240
Fase ~ 1
Frekvens Hz 47-63
Batterier
Antall 4
Batterispenning V 1,5
Kapasitet, min. Ah 800
Batteritype AAA
ZigBee
Frekvens MHz 2412-2472
Rekkevidde trådløs
enhet
Vanntilkobling
Driftstrykk MPa
Tilførselstemperatur (maks.)
Omgivelser
Omgivelsestemperatur
Med forbehold om tekniske endringer.
m100
0,1-1,0 (1-10)
(bar)
°C 35
°C +5...+40
78 Norsk
Page 79

Innehåll
Säkerhetsinformation.......................... 79
Avsedd användning ............................ 81
Anslutning till dricksvattennätet........... 81
Miljöskydd ........................................... 81
Tillbehör och reservdelar..................... 81
Leveransens omfattning...................... 81
Maskinbeskrivning .............................. 81
Symboler i snabbguiden ..................... 83
Idrifttagning ......................................... 83
Bevattningsfunktioner ......................... 84
Röststyrning........................................ 84
Kontrollampor...................................... 85
Förvaring............................................. 85
Skötsel och underhåll.......................... 85
Hjälp vid störningar ............................. 86
Garanti ................................................ 86
Tekniska data ...................................... 86
Barn över minst 8 år får använda maskinen
om en person som ansvarar för deras säkerhet håller dem under ordentlig uppsikt,
instruerar dem i hur maskinen används och
förklarar vilka risker som är förknippade
med användningen av maskinen.
Symboler på apparaten
Bevattningsventil
Skydda apparaten mot frost
Symboler på enheten
Gateway
Använd enheten endast inomhus
Säkerhetsinformation
Läs igenom den här bruksanvisningen och medföljande sä-
kerhetsinformation innan du
använder enheten för första gången. Följ
det som står i den.
Läs bruksanvisningen och säkerhetsin-
formationen till enheten innan du använder den.
Förutom anvisningarna i bruksanvis-
ningen ska lagstiftarens allmänna säkerhets- och skyddsföreskrifter följas.
Allmän säkerhetsinformation
FARA
Kvävningsrisk. Håll förpackningsfolier utom
räckhåll för barn.
몇 VARNING
Personer med nedsatta fysiska, sensoriska
eller mentala förmågor eller med bristande
erfarenhet och kunskap får endast använda maskinen om de befinner sig under
kompetent uppsikt, eller har instruerats av
en person som ansvarar för deras säkerhet
om hur maskinen används på ett säkert
sätt, och om de har förstått de risker som är
förknippade med användningen av maskinen.
Håll uppsikt över barn för att vara säker på
att de inte leker med maskinen.
Använd endast den godkända
nätdelen 6.745-110.0
Ingång: 5 V/1 A
Säkerhetsinformation om
bevattningsventilen
Använd endast obehandlat, rent sötvat-
ten tillsammans med bevattningsventilen. Enheten får absolut inte användas
tillsammans med explosiva, frätande eller brandfarliga ämnen.
Vattentemperaturen får inte överstiga
35 °C.
Vattentillflödestrycket får inte överskrida
10 bar (1 MPa) på enhetsingången.
Lägg aldrig ner bevattningsventilen helt i
vätska.
Använd endast bevattningsventilen ut-
omhus.
Kontrollera regelbundet att bevattnings-
ventilen inte har några skador. Använd
inte enheten om den har synliga skador.
Använd endast bevattningsventilen i lo-
drätt läge.
Använd inte tätningsmassa eller smörj-
medel för att ansluta bevattningsventilen
till vattenkranen.
Använd inte enheten utan det integrera-
de filtret på vatteningången.
Svenska 79
Page 80

Kontrollera filtret på vattengången regel-
bundet med avseende på skador. Partiklar i vattnet som tränger in i enheten på
grund av ett skadat filter gör det svårare
för ventilen att öppna och stänga.
Byt genast ut skadade vattenfilter.
Efter en längre tids urdrifttagning, minst
en gång i månaden, måste man kontrollera att enheten är tät och att ventilerna
öppnas och stängs korrekt.
Dra inte i de anslutna slangarna.
Beakta kraven på väggen och ytan före
väggmonteringen.
Kontrollera väggens bärförmåga vid
väggmontering. Montera enheten på
väggen på korrekt sätt.
Enheten måste vara åtkomlig hela tiden.
Montera inte enheten på otillgängliga
ställen eller högre än 2 meter.
Bevattningsventilen får inte installeras i
närheten av värmekällor och skydda den
mot frost (maximal omgivningstemperatur 5 °C till 40 °C).
Använd endast batterier som får använ-
das för din bevattningsventil. Du hittar
information om de batterityper som
krävs i enhetens bruksanvisning.
Använd inte uppladdningsbara batterier.
Installera inte bevattningsventilen på
platser där det bildas kondens.
Använd inte bevattningsventilen i närhe-
ten av strömförande enheter.
Enheter som inte fungerar korrekt får in-
te tas i drift.
Säkerhetsinformation om gateway
Öppna aldrig enheten eller strömkontak-
ten.
Dra anslutningskabeln så att ingen ris-
kerar att trampa eller snubbla på den.
Använd enheten endast med den med-
följande strömkontakten eller en motsvarande reservkontakt
(beställningsnummer 6.745-102.0).
Anslut alltid strömkontakten till ett uttag
som alltid finns tillgängligt och som motsvarar de värden som anges på typskylten.
Sänk aldrig ner enheten i vätska.
Ta inte i strömkontakten med fuktiga
händer.
Enheten får endast användas i torra ut-
rymmen inomhus.
Ställ enheten på en stabil och halkfri yta.
Ställ enheten på en plats som är skyd-
dad från värmekällor och direkt solljus.
Ställ inte enheten på värmekänsliga ytor.
Beakta kraven på väggen och ytan före
väggmonteringen.
Kontrollera väggens bärförmåga vid
väggmontering. Montera enheten på
väggen på korrekt sätt.
Enheten måste vara åtkomlig hela tiden.
Montera inte enheten på otillgängliga
ställen, till exempel bakom skydd, i möbler eller högre än 2 meter.
Använd inte enheten i närheten av en
annan elektrisk utrustning. Särskilt inte i
närheten av annan radioutrustning.
Enheten får endast torrengöras, till ex-
empel med en dammtrasa.
Dra inte i kabeln.
Överföringsstandarder
Enheterna använder följande överföringsstandarder:
ZigBee (IEEE 802.15.4)
WLAN (IEEE 802.11)
Enhet Kon-
struktionsty
p
Gateway SRD 2400–
Water
Controller
Duo Smart
Härmed intygar Alfred Kärcher SE & Co.
KG att den trådlösa systemtypen gateway/
bevattningsventilen (Water Controller Duo
Smart) överensstämmer med direktiv 2014/
53/EU. Den fullständiga versionen av EUförsäkran om överensstämmelse finns på
följande webbplats:
www.kaercher.com
SRD 2412–
Frekvens
MHz
2483,5
2472
Effekt
max. ERP
110 mW
10 mW
80 Svenska
Page 81

Avsedd användning
121
3
4
5
6
2
1
7
Den här enheten är utvecklad för privat användning och är inte avsedd för belastningarna som uppstår vid professionell
användning.
Enheten ska anslutas till en vattenkran och
styr automatiskt vattenflödet i bevattningssystem.
Tillverkaren ansvarar inte för skador som
orsakas av annan användning än den avsedda eller genom felaktig manövrering.
Anslutning till
dricksvattennätet
När du ansluter denna produkt till dricksvattennätet måste du följa kraven i EN 1717.
Kontakta en VVS-firma om du har ytterligare frågor.
Miljöskydd
Förpackningsmaterialen kan återvinnas. Avfallshantera förpackningar på
ett miljövänligt sätt.
Elektriska och elektroniska maskiner
innehåller ofta värdefulla återvinnings-
bara material och komponenter såsom
engångsbatterier, uppladdningsbara batterier och olja, som vid felaktig användning
eller felaktig avfallshantering kan utgöra en
potentiell risk för människors hälsa och för
miljön. Dessa komponenter är dock nödvändiga för att maskinen ska kunna arbeta
korrekt. Maskiner som märkts med denna
symbol får inte kastas i hushållssoporna.
Information om ämnen (REACH)
Aktuell information om ämnen finns på:
www.kaercher.com/REACH
Tillbehör och reservdelar
Använd endast originaltillbehör och originalreservdelar, så att en säker och störningsfri drift av maskinen är garanterad.
Information om tillbehör och reservdelar
finns på www.kaercher.com.
Leveransens omfattning
Maskinens leveransomfattning är avbildad
på förpackningen. Kontrollera att innehållet
i leveransen är fullständigt. Kontakta din
försäljare om något tillbehör saknas eller
om det finns transportskador.
Maskinbeskrivning
Funktion
Den här enheten styr bevattningen antingen med en smartphone-app eller direkt
med manöverenheten.
För att den ska kunna styras med appen
måste enheten integreras i WLAN-nätverket med medföljande gateways.
Det görs med hjälp av appen Kärcher Home & Garden som kan laddas ner gratis
från Apple App Store eller Google Play Store.
Följande funktioner kan ställas in på manöverenheten:
Aktivera och avaktivera vattenutgångar-
na.
Följande funktioner kan ställas in med appen:
Aktivera och avaktivera vattenutgångar-
na.
Ställa in eller ta bort ett tidsprogram.
Aktivera eller avaktivera väderbaserad
bevattning.
Pausa tidsprogrammet.
Manövreringsreglage
Ventil
1 Ventilanslutningsadapter
2 G 3/4”-slanganslutning
3 Ögla för stöldskydd
4 G 1”-vattenanslutning med förfilter
5 G 3/4”-reduceringsstycke
6 Överdel för enhet med två kanaler
7 Öppningar för väggmontering
Svenska 81
Page 82

Manöverenhet
3
4
5
1
2
1
2
1
2
1
1 Styrknapp vattenutgång vänster
2 LED vänster
3 LED höger
4 Styrknapp vattenutgång höger
5 Sammankopplings-/återställningsknapp
1 MAC-adress
2 WPA-kod
3 QR-kod för sammankoppling
4 Öppning för väggmontering
5 Uttag för nätdel
6 Återställningsknapp
Nätdel
1 QR-kod för sammankoppling
2 Batterifack
Gateway
1 LED WLAN
2 LED-rad
82 Svenska
1 Honkontakt
Page 83
Symboler i snabbguiden Idrifttagning
Ladda ner appen KÄRCHER Home&Garden
Starta gateway
Idrifttagning med appen
Återställning
Strömanslutning
Nätverksanslutning
Vattenutgång på/av
Läs den medföljande säkerhetsinformationen.
Information: Idrifttagningen görs med appen KÄRCHER Home&Garden. Följ anvisningarna i den eftersom de är mest
aktuella.
Information: Bevattningsventilen kräver 4
x 1,5 V AAA-batterier. De ingår inte i leveransen. Mer information om batterier finns i
”Tekniska data”.
Ta gateway i drift
1. Ladda ner appen KÄRCHER Ho-
me&Garden från Apple App Store eller
Google Play Store.
2. Öppna appen KÄRCHER Home&Gar-
den.
3. Gå till ”Lägg till produkt”.
4. Skapa ett konto (om du inte redan har
registrerat dig).
5. Anslut nätdelens honkontakt till uttaget
på gatewayen.
6. Anslut nätdelen till ett eluttag.
Gateway startar och detta kan ta några
minuter.
7. Läs av gatewayens QR-kod.
8. Välj ”Kärcher-Gateway” som alternativ i
telefonens WLAN-sökning.
9. Infoga den avlästa QR-koden som
WLAN-lösenord för gateway eller mata
in WPA-koden på gatewayens typskylt
manuellt.
10.Anslutningen kontrolleras när man går
tillbaka till appen KÄRCHER Ho-
me&Garden.
11.Välj hemmanätverket och mata in lösen-
ordet.
Om anslutningen är ok visas ett medde-
lande om att installationen är klar.
Information: Placera gatewayen på samma nivå i huset så nära bevattningsventilen
som möjligt. Placera den helst vid ett fönster.
Viktigt! Om det finns ett MAC-filter eller ytterligare brandväggar i WLAN-routern måste gatewayens MAC-adress aktiveras.
MAC-adressen anges på gatewayens
typskylt.
Svenska 83
Page 84

Ta ventilen i drift
1. Välj ”Lägg till produkt”.
2. Läs av ventilens QR-kod.
3. Sätt in batterierna i manöverenheten.
4. Tryck på sammankopplingsknappen på
manöverenheten.
Om anslutningen är ok visas ett meddelande om att installationen är klar.
5. Anslut ventilen till vattenkranen.
6. Anslut slanganslutningarna till slangarna.
7. Sätt in manöverenheten i ventilen.
8. Öppna vattenkranen.
Väggmontering
Vid behov kan enheterna fästas på väggen.
Skruvarna får inte överskrida följande mått.
Gateway
Skruvhuvudets diameter: 9 mm
Skruvhuvudets höjd: 2,7 mm
Gängans diameter: 4,2 mm
Ventil
Skruvhuvudets diameter: 11 mm
Skruvhuvudets höjd: 5,5 mm
Gängans diameter: 6 mm
Bevattningsfunktioner
Hur bevattningsfunktionerna ställs in förklaras i appen.
Manuell bevattning
Sätt på och stäng av bevattningen manuellt
på manöverenheten.
Bevattningstiden kan ställas in på valfri
längd i appen (max. 90 minuter).
Tidsstyrd bevattning
Skapa ett obegränsat antal bevattningstider för varje vattenutgång (max. 90 minuter
per gång).
Väderstyrd bevattning
Pausa bevattningen med anledning av väderinformationen.
Pausa bevattningen
Hoppa över bevattningar i 1 till 24 timmar.
Röststyrning
Röststyrning med en digital röststyrningsassistent sker via anslutningen mellan ditt Kärcher Home & Garden-konto och
en extern digital röststyrningsassistent. Hur
du ansluter dessa beskrivs i bruksanvisningen till röststyrningsassistenten. En lista
med aktuella leverantörer finns på www.kaercher.com.
Vilka röststyrningsassistenter som finns beror på det aktuella landet. En lista med tillgängliga språk finns på leverantörens
webbplats.
84 Svenska
Page 85

Kontrollampor
Gateway
LED-rad LED WLAN Betydelse
Blinkar Släckt Startar efter anslutning till elnätet.
Lyser Blinkar Konfigurationen av WLAN har startat.
Lyser Blinkar Ingen anslutning till molnet.
Lyser Lyser Korrekt anslutning finns.
Blinkar Blinkar Fabriksinställningarna återställs.
Ventil
LED vänster LED höger Betydelse
Blinkar flera
gånger
Blinkar snabbt 3
gånger
Blinkar växelvis Blinkar växelvis Återställningsläge, fabriksinställningarna återställs.
Blinkar i 1 se-
kund
Lyser Lyser Programvaran uppdateras (tar 10–20 minuter).
Blinkar flera
gånger
Blinkar snabbt 3
gånger
Blinkar i 1 sekund
Sammankopplingsfas (när man tryckt på knappen för
sammankoppling/återställning).
Upphäver sammankopplingen.
Vattenutgången på/av på den blinkande sidan.
Förvaring
OBSERVERA
Risk för skador!
Vattenrester kan skada ventilen.
Töm ventilen innan den förvaras.
1. Töm ventilen helt.
2. Ta ut batterierna ur manöverenheten.
3. Förvara ventilen och manöverenheten
på en torr, frostskyddad plats.
Skötsel och underhåll
Vi rekommenderar att batterierna i manöverenheten byts en gång om året.
Batteristatusen visas i appen KÄRCHER
Home&Garden.
Svenska 85
Page 86

Hjälp vid störningar
Information: En utförlig felavhjälpningsguide finns i appen KÄRCHER Home&Garden un-
der vanliga frågor (FAQ).
Störning Orsak Åtgärd
Gateway ansluter inte till
WLAN-nätverket.
Ventilerna ansluter inte till
gateway.
Ventilen öppnas eller
stängs inte.
Ventilerna öppnas inte när
man trycker på knappen.
LED:erna lyser inte.
Garanti
I respektive land gäller de garantivillkor
som publicerats av våra auktoriserade distributörer. Eventuella fel på enheten repareras utan kostnad inom garantitiden, under
förutsättning att de orsakats av ett materialeller tillverkningsfel. Vid frågor som gäller
garantin ska du vända dig med kvitto till inköpsstället eller närmaste, auktoriserad
kundtjänst.
Garantin täcker inte skador på växter.
WLAN-routern används
med ett MAC-filter eller annan brandvägg.
Hinder försvagar den trådlösa signalen mellan gateway och ventilerna.
Manöverenheten är inte insatt i ventilen.
Batterierna är slut. Byt batterierna i manöverenheten.
Aktivera gatewayens MAC-adress i
WLAN-routern.
Placera gateway någon annan
stans i bostaden. Placera den helst
nära ett fönster i närheten av bevattningsventilen.
Sätt in manöverenheten i ventilen.
Tekniska data
Watering
System Duo
Smart Kit
Nätdel
Nätspänning V 100-240
Fas ~ 1
Frekvens Hz 47-63
Batterier
Antal 4
Batterispänning V 1,5
Min. kapacitet Ah 800
Batterityp AAA
ZigBee
Frekvens MHz 2412-2472
Räckvidd radioen-
het
Vattenanslutning
Drifttryck MPa
Tilloppstemperatur
(max.)
Omgivning
Omgivande
temperatur
Med förbehåll för tekniska ändringar.
m100
0,1-1,0 (1-10)
(bar)
°C 35
°C +5...+40
86 Svenska
Page 87

Sisältö
Turvaohjeet ......................................... 87
Määräystenmukainen käyttö ............... 89
Liitäntä käyttövesiverkkoon................. 89
Ympäristönsuojelu .............................. 89
Lisävarusteet ja varaosat.................... 89
Toimituksen sisältö.............................. 89
Laitekuvaus......................................... 89
Symbolit pikaohjeessa ........................ 91
Käyttöön ottaminen............................. 91
Kastelutoiminnot ................................. 92
Puheohjaus......................................... 92
Merkkivalot.......................................... 93
Varastointi ........................................... 93
Hoito ja huolto..................................... 93
Ohjeet häiriötilanteissa........................ 94
Takuu .................................................. 94
Tekniset tiedot ..................................... 94
Vähintään 8-vuotiaat lapset saavat käyttää
laitetta, jos heidän turvallisuudestaan vastaava henkilö on antanut heille opastuksen
laitteen käyttämiseen, tai jos he ovat oikein
valvonnan alaisia ja ovat ymmärtäneet käytöstä aiheutuvat vaarat.
Laitteessa olevat merkinnät
Kasteluventtiili
Suojaa laite jäätymiseltä
Laitteessa olevat symbolit
Yhdyskäytävä
Käytä laitetta vain sisätiloissa
Turvaohjeet
Lue ennen laitteen ensimmäistä käyttöä tämä alkuperäinen
käyttöohje ja turvallisuusohjeet. Menettele niiden mukaisesti.
Lue ennen käyttöönottoa oman laitteesi
graafinen käyttöohje ja nämä turvallisuusohjeet.
Käyttöohjeen ohjeiden lisäksi sinun on
noudatettava lakimääräisiä yleisiä turvallisuus- ja tapaturmantorjuntamääräyksiä.
Yleiset turvallisuusohjeet
VAARA
Tukehtumisvaara. Pidä pakkauskalvot pois
lasten ulottuvilta.
몇 VAROITUS
Henkilöt, joilla on vajavaiset ruumiilliset,
aistilliset tai henkiset ominaisuudet tai puutteita kokemuksessa ja tietämyksessä, saavat käyttää tätä laitetta vain siinä
tapauksessa, että he ovat oikein valvonnan
alaisia tai ovat saaneet opastuksen heidän
turvallisuudestaan vastaavan henkilön toimesta laitteen turvalliseen käyttämiseen ja
ovat ymmärtäneet sen käyttöön liittyvät
vaarat.
Valvo lapsia sen varmistamiseksi, että he
eivät leiki laitteella.
Käytä vain hyväksyttyä tehonlähdettä 6.745-110.0
tulo: 5 V / 1 A
Kasteluventtiilin turvaohjeet
Käytä kasteluventtiiliä vain käsittelemät-
tömällä, puhtaalla, suolattomalla vedellä. Laitetta ei missään tapauksessa saa
käyttää yhdessä räjähtävien, syövyttävien tai tulenarkojen aineiden kanssa.
Veden lämpötila ei saa olla yli 35 °C.
Veden tulopaine ei saa olla yli 10 bar
(1 MPa) laitteen sisäänmenossa.
Älä koskaan upota kasteluventtiiliä ko-
konaan nesteeseen.
Käytä kasteluventtiiliä vain ulkotiloissa.
Tarkasta kasteluventtiili säännöllisesti
vaurioiden varalta. Jos laitteessa on näkyviä vaurioita, älä enää käytä sitä.
Käytä kasteluventtiiliä vain pystyasen-
nossa.
Älä käytä tiivistysmassaa tai voiteluai-
netta kasteluventtiilin vesihanaan kiinnittämistä varten.
Älä käytä laitetta ilman vedensyötön in-
tegroitua suodatinta.
Tarkasta vedensyötön suodatin sään-
nöllisesti vaurioiden varalta. Vedessä
olevat hiukkaset, jotka pääsevät laitteeseen vaurioituneen suodattimen läpi,
Suomi 87
Page 88
estävät venttiilin asianmukaisen avautumisen ja sulkeutumisen.
Vaihda vaurioitunut vedensuodatin välit-
tömästi.
Tarkasta pidemmän käytöstäpoiston jäl-
keen vähintään kerran kuussa laitteen
tiiviys ja varmista, että venttiilit avautuvat
ja sulkeutuvat oikein.
Älä vedä liitetyistä letkuista.
Ota ennen seinäasennusta huomioon
seinää ja pintaa koskevat vaatimukset.
Tarkasta seinän kantavuus ennen seinä-
asennusta. Asenna laite tukevasti seinään.
Laitteeseen on oltava pääsy milloin ta-
hansa. Älä asenna laitetta paikkaan, jossa siihen ei pääse käsiksi, äläkä yli
2 metrin korkeuteen.
Älä asenna kasteluventtiiliä lämmönläh-
teiden lähelle, ja suojaa se jäätymiseltä
(ympäristön sallittu lämpötila 5 °C 40 °C).
Käytä vain paristoja, jotka on sallittu kas-
teluventtiiliäsi varten. Tietoa tarvittavista
paristotyypeistä on laitteen käyttöohjeessa.
Älä käytä ladattavia paristoja.
Älä asenna kasteluventtiiliä paikkoihin,
joihin muodostuu kondenssivettä.
Älä käytä kasteluventtiiliä jännitteisten
laitteiden lähellä.
Älä ota laitetta käyttöön, jos se ei toimi
asianmukaisesti.
Yhdyskäytävää koskevat
turvallisuusohjeet
Älä koskaan avaa laitetta tai verkkopis-
toketta.
Sijoita liitäntäkaapeli niin, ettei kukaan
voi astua sen päälle tai kompastua siihen.
Käytä laitetta vain mukana toimitetulla
verkkopistokkeella tai vastaavalla varaosalla (tilausnumero 6.745-102.0).
Liitä verkkopistoke aina pistorasiaan, jo-
ka on jatkuvasti saavutettavissa ja joka
vastaa tyyppikilvessä ilmoitettuja arvoja.
Älä koskaan upota laitetta nesteeseen.
Älä koske verkkopistokkeeseen märillä
käsillä.
Käytä laitetta vain kuivissa sisätiloissa.
Aseta laite vakaalle ja liukumattomalle
alustalle.
Aseta laite etäälle lämmönlähteistä ja
suorasta auringonvalosta.
Älä aseta laitetta lämpöherkille pinnoille.
Ota ennen seinäasennusta huomioon
seinää ja pintaa koskevat vaatimukset.
Tarkasta seinän kantavuus ennen seinä-
asennusta. Asenna laite tukevasti seinään.
Laitteeseen on oltava pääsy milloin ta-
hansa. Älä asenna laitetta paikkaan, jossa siihen ei pääse käsiksi kuten
verhouksen taakse, huonekaluihin, äläkä yli 2 metrin korkeuteen.
Älä käytä laitetta muiden sähkölaitteiden
lähellä. Erityisesti laite on pidettävä
etäällä muista radiolaitteista.
Laitteen saa puhdistaa vain kuivalla väli-
neellä, kuten pölyliinalla.
Älä vedä johdosta.
Radiostandardit
Laitetta koskevat seuraavat radiostandardit:
ZigBee (IEEE 802.15.4)
WLAN (IEEE 802.11)
Laite Tyyppi Taajuus
MHz
Yhdyskäytävä
Water
Controller
Duo Smart
Alfred Kärcher GmbH & Co. KG -yhtiö ilmoittaa täten, radiolaitetyyppi yhdyskäytävä/kasteluventtiili (Water Controller Duo
Smart) täyttää direktiivin 2014/53/EU vaatimukset. EU-vaatimustenmukaisuusvakuutuksen täydellinen teksti löytyy seuraavasta
internet-osoitteesta:
www.kaercher.com
SRD 2400 -
2483,5
SRD 2412 -
2472
Teh o
enint.
ERP
110 mW
10 mW
88 Suomi
Page 89
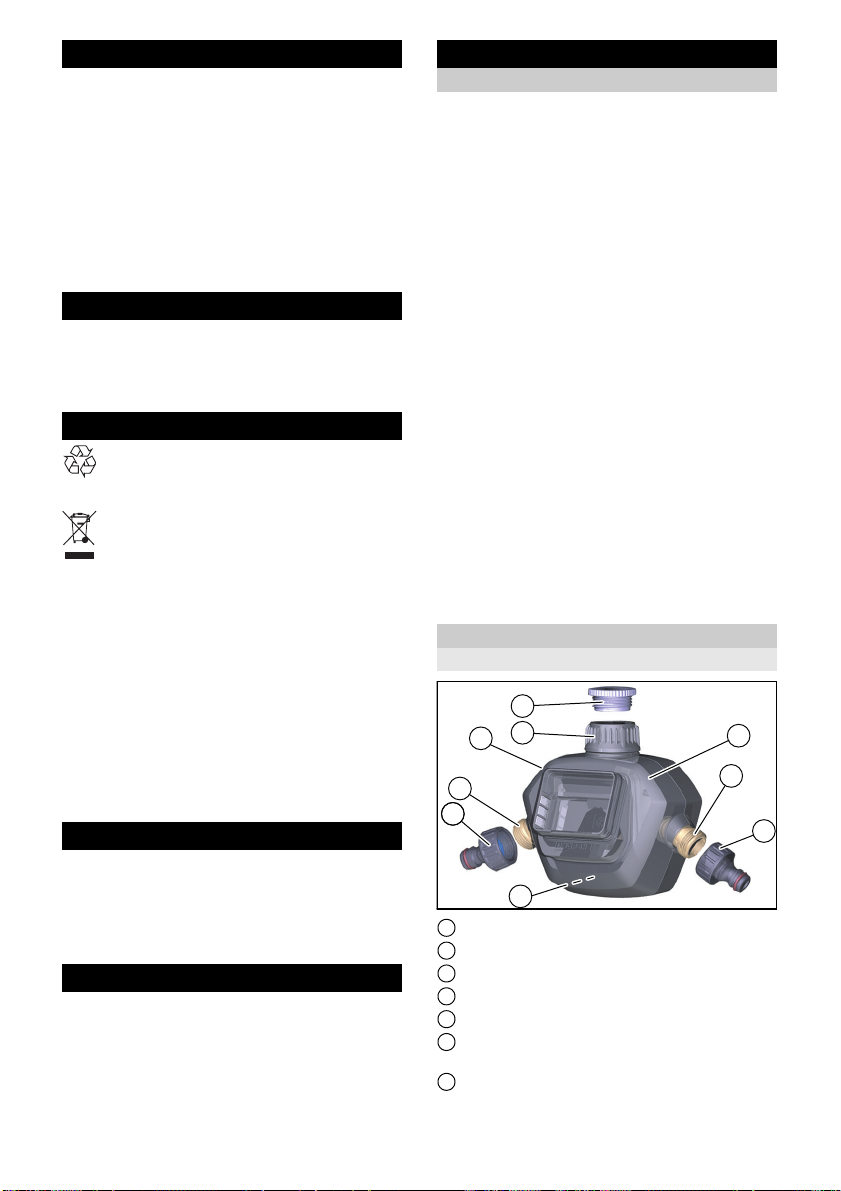
Määräystenmukainen käyttö
121
3
4
5
6
2
1
7
Tämä laite on kehitetty yksityiseen käyttöön eikä sitä ole tarkoitettu ammattikäytön
vaatimuksiin.
Laite on tarkoitettu liitettäväksi vesihanaan
ja se ohjaa vesivirran kastelujärjestelmiin
automaattisesti.
Valmistaja ei vastaa mahdollisista vaurioista, jotka aiheutuvat ei-tarkoituksenmukaisen käytön tai virheellisen käytön
seurauksena.
Liitäntä käyttövesiverkkoon
Ota huomioon tätä tuotetta käyttövesiverkkoon liittäessäsi normin EN 1717 vaatimukset ja jos sinulla on kysymyksiä, käänny
paikallisen LVI-liikkeen puoleen.
Ympäristönsuojelu
Pakkausmateriaalit ovat kierrätettäviä.
Hävitä pakkaukset ympäristöystävälli-
sesti.
Sähkö- ja elektroniikkalaitteet sisältävät arvokkaita kierrätettäviä materiaa-
leja tai rakenneosia kuten paristoja,
akkuja tai öljyjä, jotka väärin käsiteltyinä tai
väärin hävitettyinä voivat aiheuttaa mahdollisia vaaroja ihmisten terveydelle ja ympäristölle. Nämä rakenneosat ovat
kuitenkin välttämättömiä laitteen asianmukaista käyttöä varten. Tällä symbolilla merkittyjä laitteita ei saa hävittää tavallisena
talousjätteenä.
Sisältöaineita koskevia ohjeita (REACH)
Päivitettyjä tietoja sisältöaineista löytyy
osoitteesta: www.kaercher.com/REACH
Lisävarusteet ja varaosat
Käytä vain alkuperäisiä lisävarusteita ja alkuperäisiä varaosia, sillä ne varmistavat
laitteen turvallisen ja häiriöttömän käytön.
Tietoja lisävarusteista ja varaosista löytyy
osoitteesta www.kaercher.com.
Toimituksen sisältö
Laitteen toimituksen sisältö on kuvattu pakkauksessa. Tarkasta laitetta pakkauksesta
purkaessasi pakkauksen sisällön täydellisyys. Jos lisävarusteita puuttuu tai havaitset kuljetusvahinkoja, ilmoita tästä
jälleenmyyjälle.
Laitekuvaus
Toiminta
Laite ohjaa kastelua joko älypuhelinsovelluksella tai suoralla käytöllä käyttöyksiköstä.
Jotta käyttö on mahdollista sovelluksella,
laitteen täytyy olla yhdistettynä WLANverkkoon mukana toimitetulla yhdyskäytävällä.
Tämä tapahtuu Kärcher Home & Garden
App -sovelluksen avulla, joka on saatavissa maksutta Apple App Store- tai Google
Play Store -sovelluskaupasta.
Käyttöyksikössä voi säätää seuraavat toiminnot:
Vedentulojen kytkeminen päälle ja pois
päältä.
Sovelluksella voi säätää seuraavia toimintoja:
Vedentulojen kytkeminen päälle ja pois
päältä.
Ajastetun ohjelman määrittäminen tai
poistaminen.
Säähän perustuvan kastelun aktivointi
tai deaktivointi.
Ajastetun ohjelman keskeyttäminen.
Käyttöelementit
Venttiili
1 Hanaliitännän adapteri
2 G 3/4” letkuliitäntä
3 Varkauslukituksen silmukka
4 G 1” vesiliitäntä ja esisuodatin
5 G 3/4” vähennysosa
6 Kotelon yläosa kaksikanavaiselle lait-
teelle
7 Reiät seinäkiinnitystä varten
Suomi 89
Page 90

Käyttöyksikkö
3
4
5
1
2
1
2
1
2
1
1 Ohjauspainike, vedentulo vasemmalla
2 LED, vasen
3 LED, oikea
4 Ohjauspainike, vedentulo oikealla
5 Pairing/Reset-painike
1 MAC-osoite
2 WPA-Key-tunnus
3 QR-koodi
4 Reikä seinäkiinnitystä varten
5 Tehonlähteen liitäntä
6 Reset-painike
Tehonlähde
1 QR-koodi
2 Paristokotelo
Yhdyskäytävä
1 LED WLAN
2 LED rivi
90 Suomi
1 Onttopistoke
Page 91

Symbolit pikaohjeessa Käyttöön ottaminen
KÄRCHER Home & Garden App
-sovelluksen lataaminen
Yhdyskäytävän käynnistys
Käyttöönotto sovelluksella
Nollaus (Reset)
Sähköliitäntä
Verkkoyhteys
Vedentulon kytkeminen päälle /
pois päältä
Noudata ehdottomasti mukana
toimitettavia turvallisuusohjeita.
Ohje: Käyttöönotto tapahtuu KÄRCHER
Home & Garden App -sovelluksella. Noudata siinä kuvattuja päivitettyjä toimintatapoja.
Ohje: Kasteluventtiiliin tarvitaan 4 x 1,5 V
AAA -paristot. Ne eivät kuulu toimitussisältöön. Paristoja koskevia lisätietoja on luvussa ”Tekniset tiedot”.
Yhdyskäytävän ottaminen käyttöön
1. Lataa KÄRCHER Home & Garden App -
sovellus Apple App Store- tai Google
Play Store -sovelluskaupasta.
2. Avaa KÄRCHER Home & Garden App -
sovellus.
3. Siirry kohtaan ”Lisää tuote” (Add pro-
duct).
4. Luo käyttäjätili (jos et ole vielä rekisteröi-
tynyt).
5. Liitä tehonlähteen onttopistoke yhdys-
käytävän liitäntään.
6. Yhdistä tehonlähteen pistoke pisto-
rasiaan.
Käynnistys voi kestää muutamia minuut-
teja.
7. Lue yhdyskäytävän QR-koodi.
8. Valitse älypuhelimen WLAN-haussa lii-
täntäpisteeksi ”Kärcher yhdyskäytävä”
(Kärcher Gateway).
9. Liitä yhdyskäytävän WLAN-salasanaksi
aiemmin luettu QR-koodi tai syötä yh-
dyskäytävän tyyppikilvessä oleva WPA
Key -tunnus manuaalisesti.
10.Yhteys tarkastetaan KÄRCHER Home
& Garden App -sovellukseen paluun yh-
teydessä.
11.Valitse oma verkko ja syötä salasana.
Jos yhteyden tarkastus onnistui, oikea
asennus vahvistetaan.
Ohje: Sijoita yhdyskäytävä asuntoon samaan tasoon, mahdollisimman lähelle kasteluventtiiliä. Paras paikka on ikkunan
vieressä.
Tärkeää: Jos WLAN-reitittimeen on asennettu MAC-suodatin tai ylimääräisiä palomuureja, yhdyskäytävän MAC-osoite on
vapautettava siinä. MAC-osoite löytyy yhdyskäytävän tyyppikilvestä.
Suomi 91
Page 92

Venttiilin ottaminen käyttöön
1. Valitse ”Lisää tuote” (Add product).
2. Lue venttiilin QR-koodi.
3. Aseta paristot käyttöyksikköön.
4. Paina käyttöyksikön Pairing-painiketta.
Jos yhteyden luominen onnistuu, näyttöön ilmestyy oikean asennuksen vahvistus.
5. Yhdistä venttiili vesihanaan.
6. Yhdistä letkuliitännät letkuihin.
7. Aseta käyttöyksikkö venttiiliin.
8. Avaa vesihana.
Seinäasennus
Laitteet voi tarvittaessa kiinnittää seinään.
Käytettävät ruuvit eivät saa ylittää seuraavia mittoja.
Yhdyskäytävä
Ruuvinkannan halkaisija: 9 mm
Ruuvinkannan korkeus: 2,7 mm
Kierteen halkaisija: 4,2 mm
Venttiili
Ruuvinkannan halkaisija: 11 mm
Ruuvinkannan korkeus: 5,5 mm
Kierteen halkaisija: 6 mm
Kastelutoiminnot
Kastelutoimintojen säätö on selitetty sovelluksessa.
Manuaalinen kastelu
Kastelu kytketään päälle ja pois päältä
käyttöyksiköstä manuaalisesti.
Kasteluaikaa voi säätää sovelluksessa vapaasti (enintään 90 minuuttia).
Ajastettu kastelu
Kullekin vedentulolle voi määrittää rajoittamattoman määrän kastelujaksoja (enimmäiskesto 90 minuuttia kerralla).
Säähän perustuva kastelu
Kastelujakso keskeytyy säätietojen perusteella.
Kastelun keskeyttäminen
Kastelujaksot voi keskeyttää 1–24 tunnin
ajaksi.
Puheohjaus
Digitaalisen puheavustimen avulla tapahtuva puheohjaus saadaan käyttöön yhdistämällä oma Kärcher Home & Garden käyttäjätili ulkoiseen digitaaliseen puheavustimeen. Yhdistämisohjeet ovat saatavissa digitaalisen puheavustimen
toimittajalta. Päivitetty luettelo toimittajista
löytyy osoitteesta www.kaercher.com.
Eri puheavustimien saatavuus vaihtelee
maakohtaisesti. Luettelo saatavissa olevista kielistä löytyy kunki n toimittajan verkkosivulta.
92 Suomi
Page 93

Merkkivalot
Yhdyskäytävä
LED rivi LED WLAN Merkitys
Vilkkuu Pois päältä Käynnistys, käynnistysvaihe sähköverkkoon liittämi-
sen jälkeen
Palaa Vilkkuu WLAN-konfigurointi käynnistynyt
Palaa Vilkkuu Ei yhteyttä pilveen
Palaa Palaa Oikea yhteys luotu
Vilkkuu Vilkkuu Palautetaan tehdasasetuksiin
Venttiili
LED, vasen LED, oikea Merkitys
Vilkkuu useita
kertoja
Vilkkuu nopeasti
3kertaa
Vilkkuu vuorotellen
Vilkkuu
1 sekunnin ajan
Palaa Palaa Ohjelmistopäivitys (kesto 10 - 20 minuuttia)
Vilkkuu useita
kertoja
Vilkkuu nopeasti
3kertaa
Vilkkuu vuorotellen
Vilkkuu
1 sekunnin ajan
Pairing-vaihe (kun Pairing/Reset-painiketta on painet-
tu)
Yhdistämisen poistaminen (unpairing)
Recovery-tila, palautetaan tehdasasetuksiin
Vedentulo vilkkuvalla puolella päälle/pois
Varastointi
HUOMIO
Vaurioitumisvaara
Vesijäämät voivat vaurioittaa venttiiliä.
Tyhjennä venttiili ennen varastointia.
1. Tyhjennä venttiili täysin.
2. Poista paristot käyttöyksiköstä.
3. Säilytä venttiiliä ja käyttöyksikköä kuivassa, jäätymiseltä suojatussa paikassa.
Hoito ja huolto
Suosittelemme, että käyttöyksikön paristot
vaihdetaan vuosittain.
Paristojen tila näytetään KÄRCHER Home
& Garden App -sovelluksessa.
Suomi 93
Page 94

Ohjeet häiriötilanteissa
Ohje: Yksityiskohtaiset häiriöohjeet ovat
saatavissa KÄRCHER Home & Garden
Häiriö Syy Korjaus
Yhdyskäytävä ei yhdisty
WLAN-verkkoon.
Venttiilien yhdistäminen
yhdyskäytävään ei onnistu.
Venttiili ei avaudu tai sulkeudu.
Venttiilit eivät avaudu painiketta painettaessa. LEDit eivät pala.
WLAN-reititintä käytetään
MAC-suodattimen tai muun
palomuurin kanssa.
Esteet heikentävät signaalia yhdyskäytävän ja venttiilien välillä.
Käyttöyksikköä ei ole liitetty
venttiiliin.
Paristot ovat tyhjät. Vaihda käyttöyksikön paristot.
Takuu
Jokaisessa maassa ovat voimassa vastaavan myyntiyhtiön julkaisemat takuuehdot.
Korjaamme laitteessa mahdollisesti ilmenevät häiriöt takuuajan kuluessa maksutta,
jos häiriöiden syynä ovat olleet materiaalitai valmistusvirheet. Takuutapauksessa
pyydämme ottamaan yhteyttä ostotositteen
kanssa jälleenmyyjään tai lähimpään valtuutettuun asiakaspalveluun.
Takuu ei koske kasveille aiheutuneita vaurioita.
App -sovelluksen kohdassa Usein kysytyt
kysymykset (FAQ).
Vapauta yhdyskäytävän MACosoite WLAN-reitittimessä.
Sijoita yhdyskäytävä toiseen paikkaan asunnossa. Jos mahdollista,
ikkunan lähelle kasteluventtiiliä
kohti
Aseta käyttöyksikkö venttiiliin.
Tekniset tiedot
Watering
Tehonlähde
Verkkojännite V 100-240
Vai he ~ 1
Taajuus Hz 47-63
Paristot
Lukumäärä 4
Akun jännite V 1,5
Kapasiteetti, väh. Ah 800
Akkutyyppi AAA
ZigBee
Taajuus MHz 2412-2472
Radioyksikön toimin-
tasäde
Vesiliitäntä
Käyttöpaine MPa
Tulolämpötila (enint.) °C 35
Ympäristö
Ympäristön lämpötila °C +5...+40
Oikeus teknisiin muutoksiin pidätetään.
System Duo
Smart Kit
m100
0,1-1,0 (1-10)
(bar)
94 Suomi
Page 95

Περιεχόμενα
Υποδείξεις ασφαλείας ......................... 95
Προβλεπόμενη χρήση......................... 97
Σύνδεση στο δίκτυο πόσιμου νερού.... 97
Προστασία του περιβάλλοντος............ 97
Παρελκόμενα και ανταλλακτικά ........... 97
Παραδοτέος εξοπλισμός ..................... 98
Περιγραφή συσκευής .......................... 98
Σύμβολα στο συνοπτικό εγχειρίδιο...... 100
Έναρξη χρήσης................................... 100
Λειτουργίες άρδευσης ......................... 101
Φωνητικές εντολές .............................. 101
Ενδεικτικές λυχνίες.............................. 102
Αποθήκευση........................................ 102
Φροντίδα και συντήρηση..................... 102
Αντιμετώπιση βλαβών......................... 103
Εγγύηση.............................................. 103
Τεχνικά χαρακτηριστικά....................... 104
Υποδείξεις ασφαλείας
Πριν από την πρώτη χρήση
της συσκευής, διαβάστε αυτές
τις γνήσιες οδηγίες χρήσης
καθώς και τις υποδείξεις ασφαλείας.
Εφαρμόζετε αυτές τις οδηγίες.
Πριν από την έναρξη χρήσης, λάβετε
υπόψη τις εικονογραφημένες οδηγίες
χρήσης της συσκευής σας και τις
παρούσες υποδείξεις ασφαλείας.
Εκτός από τις υποδείξεις στο εγχειρίδιο
χρήσης πρέπει να τηρείτε και τους
ισχύοντες γενικούς κανονισμούς
ασφαλείας και πρόληψης ατυχημάτων.
Γενικές υποδείξεις ασφαλείας
ΚΙΝΔΥΝΟΣ
Κίνδυνος ασφυξίας. Φυλάσσετε τις
μεμβράνες συσκευασίας μακριά από
παιδιά.
몇 ΠΡΟΕΙΔΟΠΟΙΗΣΗ
Άτομα με περιορισμένες σωματικές,
αισθητηριακές ή νοητικές ικανότητες ή
χωρίς επαρκή πείρα και γνώσεις
επιτρέπεται να χρησιμοποιούν τη συσκευή
μόνο με επίβλεψη ή αν τους έχει εξηγηθεί
από άτομο υπεύθυνο για την ασφάλειά τους
η ασφαλής χρήση της συσκευής και
κατανοούν τους κινδύνους που μπορούν να
προκύψουν από αυτήν.
αν
Επιβλέπετε τα παιδιά, ώστε να είστε βέβαιοι
ότι δεν παίζουν με τη συσκευή.
Παιδιά από την ηλικία των 8 ετών
επιτρέπεται να λειτουργούν τη συσκευή
μόνο εάν καθοδηγούνται κατά τη χρήση της
από άτομο υπεύθυνο για την ασφάλειά τους
ή επιβλέπονται και υπό τον όρο ότι
κατανοούν τους κινδύνους που μπορούν να
προκύψουν από αυτήν.
Σύμβολα επάνω στη συσκευή
Βαλβίδα άρδευσης
Προστατέψτε τη συσκευής από
τον παγετό.
Σύμβολα επάνω στη συσκευή
Gateway
Χρησιμοποιείτε τη συσκευή
μόνο σε εσωτερικούς χώρους.
Χρησιμοποιείτε μόνο το
εγκεκριμένο τροφοδοτικό
6.745-110.0 Είσοδος: 5 V / 1 A
Υποδείξεις ασφαλείας βαλβίδας
άρδευσης
Η βαλβίδα άρδευσης επιτρέπεται να
λειτουργεί μόνο με ακατέργαστο,
καθαρό γλυκό νερό. Η συσκευή δεν
επιτρέπεται σε καμία περίπτωση να
λειτουργήσει σε συνδυασμό με
εκρηκτικά, διαβρωτικά ή εύφλεκτα υλικά.
Η θερμοκρασία του νερού δεν
επιτρέπεται να είναι πάνω από 35 °C.
Η πίεση προσαγωγής νερού στην
είσοδος της συσκευής δεν επιτρέπεται
να υπερβεί τα 10 bar (1 MPa).
Ποτέ μη βυθίζετε τη βαλβίδα άρδευσης
εντελώς μέσα σε υγρά.
Η βαλβίδα άρδευσης πρέπει να
λειτουργεί μόνο σε εξωτερικούς χώρους.
Εξετάζετε τη βαλβίδα άρδευσης τακτικά
για τυχόν ζημιές ή φθορές. Αν υπάρχουν
εμφανείς ζημιές μην χρησιμοποιείτε
άλλο τη συσκευή.
Η βαλβίδα άρδευσης πρέπει να τίθεται
σε λειτουργία μόνο σε κάθετη θέση.
Ελληνικά 95
Page 96

Μην χρησιμοποιείτε στεγανοποιητικό ή
λιπαντικό για να συνδέσετε τη βαλβίδα
άρδευσης στη βρύση.
Μην λειτουργείτε τη συσκευή χωρίς το
ενσωματωμένο φίλτρο στην είσοδο
νερού.
Εξετάζετε το φίλτρο στην είσοδο νερού
τακτικά για τυχόν ζημιές ή φθορές.
Σωματίδια στο νερό που μπορούν να
διεισδύσουν στη συσκευή μέσα από ένα
χαλασμένο φίλτρο, εμποδίζουν το
κανονικό άνοιγμα και κλείσιμο της
βαλβίδας.
Τα χαλασμένα φίλτρα νερού πρέπει να
αντικαθίστανται αμέσως.
Σε περίπτωση χρήσης μετά από
παρατεταμένη παραμονή εκτός
λειτουργίας εξετάζετε τη συσκευή
τουλάχιστον μια φορά το μήνα για
στεγανότητα και να βεβαιώνεστε πως η
βαλβίδα ανοίγει και κλείνει αξιόπιστα.
Μην τραβάτε τους συνδεδεμένους
ελαστικούς σωλήνες.
Πριν από την τοποθέτηση στον τοίχο
μελετήστε τις απαιτήσεις ως προς τον
τοίχο και την επιφάνεια.
Σε περίπτωση επιτοίχιας τοποθέτησης
εξετάστε την αντοχή του τοίχου.
Τοποθετήστε τη συσκευή στέρεα στον
τοίχο.
Η συσκευή πρέπει να είναι πάντα
προσιτή. Μην τοποθετείτε τη συσκευή
σε απρόσιτα σημεία ούτε σε ύψος πάνω
από 2 μέτρα.
Μην εγκαθιστάτε τη βαλβίδα άρδευσης
κοντά σε πηγές θερμότητας και
προστατέψτε την από τον παγετό
(επιτρεπτές θερμοκρασίες
περιβάλλοντος 5 °C έως 40 °C).
Στη βαλβίδα άρδευσης χρησιμοποιείτε
μόνο τις ειδικά εγκεκριμένες μπαταρίες.
Πληροφορίες σχετικά με τους
κατάλληλους τύπος μπαταριών θα
βρείτε στο εγχειρίδιο λειτουργίας της
συσκευής.
Μην χρησιμοποιείτε επαναφορτιζόμενες
μπαταρίες.
Μην τοποθετείτε τη βαλβίδα άρδευσης
σε μέρη όπου σχηματίζεται νερό
συμπύκνωσης.
Μην λειτουργείτε τη βαλβίδα άρδευσης
κοντά σε συσκευές που βρίσκονται υπό
ηλεκτρική τάση.
Μην θέτετε σε λειτουργία μια συσκευή
που δεν λειτουργεί σωστά.
Υποδείξεις ασφαλείας πύλης
gateway
Ποτέ μην ανοίξετε τη συσκευή ούτε το
τροφοδοτικό.
Τοποθετήστε το ηλεκτρικό καλώδιο έτσι
ώστε να μην μπορεί κανείς να το
πατήσει ή να σκοντάψει σε αυτό.
Λειτουργείτε τη συσκευή μόνο με το
παρεχόμενο τροφοδοτικό ή με
κατάλληλο ανταλλακτικό (κωδικός
παραγγελίας 6.745-102.0).
Συνδέετε πάντα το τροφοδοτικό σε μια
μόνιμα προσιτή ηλεκτρική πρίζα, που
ανταποκρίνεται στις τιμές της πινακίδας
τύπου.
Ποτέ μη βυθίζετε τη συσκευή εντελώς
μέσα σε υγρά.
Ποτέ μην πιάνετε το τροφοδοτικό με
υγρά χέρια.
Λειτουργείτε τη συσκευή μόνο σε
εσωτερικούς χώρους χωρίς υγρασία.
Τοποθετήστε τη συσκευή πάνω σε μια
σταθερή και αντιολισθητική επιφάνεια.
Τοποθετείτε τη συσκευή μακριά από
πηγές θερμότητας και από άμεση ηλιακή
ακτινοβολία.
Μην τοποθετείτε τη συσκευή πάνω σε
επιφάνειες που είναι ευαίσθητες στη
θερμότητα.
Πριν από την τοποθέτηση στον τοίχο
μελετήστε τις απαιτήσεις ως προς τον
τοίχο και την επιφάνεια.
Σε περίπτωση επιτοίχιας τοποθέτησης
εξετάστε την αντοχή του τοίχου.
Τοποθετήστε τη συσκευή στέρεα στον
τοίχο.
Η συσκευή πρέπει να είναι πάντα
προσιτή. Μην τοποθετείτε τη συσκευή
σε απρόσιτα σημεία όπως πίσω από
επενδύσεις ή έπιπλα ούτε σε ύψος
πάνω από 2 μέτρα.
96 Ελληνικά
Page 97

Μην λειτουργείτε τη συσκευή κοντά σε
άλλες ηλεκτρικές συσκευές. Ιδιαίτερα όχι
κοντά σε άλλες ασύρματες συσκευές.
Καθαρίζετε τη συσκευή μόνο στεγνά,
όπως για παράδειγμα με ένα
ξεσκονόπανο.
Μην τραβάτε το καλώδιο.
Πρότυπα ασύρματης επικοινωνίας
Οι συσκευές χρησιμοποιούν τα παρακάτω
πρότυπα ασύρματης επικοινωνίας:
ZigBee (IEEE 802.15.4)
WLAN (IEEE 802.11)
Συσκευή Τύπος
κατασ
κευής
Gateway SRD
(συσκε
υή
μικρής
εμβέλει
ας)
Water
Controller
Duo Smart
Η εταιρεία Alfred Kärcher SE & Co. KG
δηλώνει ότι ο τύπος ασύρματου
συστήματος Gateway / βαλβίδας άρδευσης
(Water Controller Duo Smart) πληροί την
οδηγία 2014/53/ΕΕ. Το πλήρες κείμενο της
δήλωσης συμμόρφωσης ΕΕ είναι
διαθέσιμο στην παρακάτω ηλεκτρονική
διεύθυνση:
www.kaercher.com
SRD
(συσκε
υή
μικρής
εμβέλει
ας)
Συχνότητ
α MHz
2400 2483,5
2412 2472
Μέγιστη
ισχύς ERP
110 mW
10 mW
Προβλεπόμενη χρήση
Η παρούσα συσκευή σχεδιάστηκε για
ιδιωτική χρήση και δεν είναι σε θέση να
ανταποκριθεί στις καταπονήσεις τυχόν
επαγγελματικής χρήσης.
Αυτή η συσκευή προορίζεται για σύνδεση
σε βρύση νερού και ρυθμίζει αυτόματα τη
ροή νερού στο σύστημα άρδευσης.
Ο κατασκευαστής δεν ευθύνεται για
ενδεχόμενες ζημιές, που οφείλονται σε μη
ενδεδειγμένη χρήση ή σε λάθος χειρισμό.
Σύνδεση στο δίκτυο πόσιμου
νερού
Κατά τη σύνδεση αυτού του προϊόντος στο
δίκτυο πόσιμου νερού τηρείτε τις
απαιτήσεις του EN 1717 και σε περίπτωση
ερωτήσεων απευθυνθείτε στα ειδικά
καταστήματα ειδών υγιεινής.
Προστασία του
περιβάλλοντος
Τα υλικά συσκευασίας είναι
ανακυκλώσιμα. Απορρίπτετε τις
συσκευασίες με περιβαλλοντικά ορθό
τρόπο.
Οι ηλεκτρικές και ηλεκτρονικές
συσκευές περιέχουν πολύτιμα
ανακυκλώσιμα υλικά και, συχνά,
εξαρτήματα όπως μπαταρίες απλές,
επαναφορτιζόμενες ή λάδια, τα οποία σε
περίπτωση λανθασμένης χρήσης ή
απόρριψης μπορούν να θέσουν σε κίνδυνο
την ανθρώπινη υγεία και το περιβάλλον.
Ωστόσο, αυτά τα συστατικά είναι
απαραίτητα για τη σωστή λειτουργία της
συσκευής. Οι συσκευές που φέρουν αυτό
το σύμβολο δεν επιτρέπεται να
απορρίπτονται μαζί με τα οικιακά
απορρίμματα.
Υποδείξεις σχετικά με συστατικά
(REACH)
Ενημερωμένες πληροφορίες σχετικά με τα
συστατικά είναι διαθέσιμες στη διεύθυνση:
www.kaercher.com/REACH
Παρελκόμενα και
ανταλλακτικά
Χρησιμοποιείτε μόνο γνήσια παρελκόμενα
και γνήσια ανταλλακτικά, καθώς αυτά
εγγυώνται την ασφαλή και απρόσκοπτη
λειτουργία της συσκευής.
Πληροφορίες σχετικά με τα παρελκόμενα
και τα ανταλλακτικά θα βρείτε στη
διεύθυνση www.kaercher.com.
Ελληνικά 97
Page 98

Παραδοτέος εξοπλισμός
121
3
4
5
6
2
1
7
3
4
5
1
2
Ο παραδοτέος εξοπλισμός της συσκευής
απεικονίζεται επάνω στη συσκευασία. Κατά
την αφαίρεση από τη συσκευασία ελέγξτε
την πληρότητα των περιεχομένων. Σε
περίπτωση που λείπουν παρελκόμενα ή
έχουν προκληθεί ζημιές κατά τη μεταφορά,
ενημερώστε τον προμηθευτή σας.
Περιγραφή συσκευής
Λειτουργία
Αυτή η συσκευή ρυθμίζει την άρδευση είτε
μέσω μιας εφαρμογής ενός Smartphone ή
μέσω άμεσου χειρισμού από τη μονάδα
χειρισμού.
Για να είναι εφικτός ο χειρισμός μέσω της
εφαρμογής, η συσκευή θα πρέπει μέσω
του gateway να συνδεθεί στο δίκτυο
WLAN.
Αυτό γίνεται με τη βοήθεια της εφαρμογής
Kärcher Home & Garden App, που
διατίθεται δωρεάν στα Apple App Store και
Google Play Store.
Στη μονάδα χειρισμού μπορεί να ρυθμιστεί
η παρακάτω λειτουργία:
Ενεργοποίηση και απενεργοποίηση των
εξόδων νερού.
Μέσω της εφαρμογής μπορούν να
ρυθμιστούν οι παρακάτω λειτουργίες:
Ενεργοποίηση και απενεργοποίηση των
εξόδων νερού.
Δημιουργία ή διαγραφή ενός
χρονοπρογράμματος.
Ενεργοποίηση και απενεργοποίηση
άρδευσης ανάλογα τον καιρό.
Διακοπή του χρονοπρογράμματος.
Στοιχεία χειρισμού
Βαλβίδα
1 Προσαρμογέας σύνδεσης σε βρύση
2 Υποδοχή ελαστικού σωλήνα G 3/4”
3 Κρίκος για προστασία από κλοπή
4 Υποδοχή νερού με φίλτρο G 1”
5 Συστολή G 3/4”
6 Άνω τμήμα περιβλήματος για συσκευή
δύο καναλιών
7 Εσοχές για τοποθέτηση στον τοίχο
Μονάδα χειρισμού
1 Πλήκτρο ελέγχου εξόδου νερού
αριστερά
2 LED αριστερά
3 LED δεξιά
4 Πλήκτρο ελέγχου εξόδου νερού δεξιά
5 Πλήκτρο ζεύξης/επαναφοράς
98 Ελληνικά
Page 99

1 Ζεύξη κωδικού QR
1
2
1
2
1
2 Θήκη μπαταριών
Gateway
Τροφοδοτικό
1 Κοίλο βύσμα
1 LED WLAN
2 Σειρά LED
1 Διεύθυνση MAC
2 WPA-Key
3 Ζεύξη κωδικού QR
4 Εσοχή για τοποθέτηση στον τοίχο
5 Υποδοχή τροφοδοτικού
6 Πλήκτρο επαναφοράς
Ελληνικά 99
Page 100

Σύμβολα στο συνοπτικό
εγχειρίδιο
Ηλεκτρονική λήψη εφαρμογής
KÄRCHER Home&Garden App
Αρχική ενεργοποίηση του
gateway
Έναρξη χρήσης μέσω της
εφαρμογής
Επαναφορά
Υποδοχή ρεύματος
Σύνδεση δικτύου
Ε ν ερ γ ο πο ί η σ η / α π ε ν ερ γ ο πο ί η σ η
εξόδου νερού
Τηρείτε οπωσδήποτε τις
συνημμένες υποδείξεις
ασφαλείας.
Έναρξη χρήσης
Υπόδειξη: Η έναρξη χρήσης γίνεται από
την εφαρμογή KÄRCHER Home&Garden.
Για να έχετε την πλέον ενημερωμένη
έκδοση ακολουθήστε τη διαδικασία που
περιγράφεται εκεί.
Υπόδειξη: Η βαλβίδα άρδευσης χρειάζεται
4 μπαταρίες 1,5 V AAA. Αυτές δεν
περιλαμβάνονται στον εξοπλισμό
παράδοσης. Περισσότερες πληροφορίες
για τις μπαταρίες θα βρείτε στο κεφάλαιο
«Τεχνικά στοιχεία».
Έναρξη χρήσης της πύλης
1. Κατεβάστε την εφαρμογή KÄRCHER
Home&Garden ηλεκτρονικά από το
Apple App Store ή το Google Play Store.
2. Ανοίξτε την εφαρμογή KÄRCHER
Home&Garden App.
3. Πηγαίνετε στην «Προσθήκη προϊόντος».
4. Ανοίξτε έναν λογαριασμό (αν δεν έχετε
κάνει ακόμη εγγραφή).
5. Συνδέστε το κοίλο βύσμα του
τροφοδοτικού στην υποδοχή του
gateway.
6. Συνδέστε το τροφοδοτικό στην πρίζα.
Η διαδικασία ενεργοποίησης ξεκινά και
μπορεί να διαρκέσει μερικά λεπτά.
7. Σκανάρετε τον κωδικό QR του gateway.
8. Ως σημείο πρόσβασης στην αναζήτηση
WLAN του Smartphone επιλέξτε
«Kärcher-gateway».
9. Ως κωδικό πρόσβασης WLAN του
gateway προσθέστε τον
προα να φερ θέν τα κωδι κό QR ή δώ στ ε με
το χέρι τον κωδικό WPA από την
πινακίδα τύπου του gateway.
10.Κατά την επιστροφή στην εφαρμογή
KÄRCHER Home&Garden γίνεται
έλεγχος της σύνδεσης.
11.Επιλέξτε το οικιακό δίκτυο και δώστε τον
κωδικό πρόσβασης.
Αν ο έλεγχος της σύνδεσης είναι
επιτυχής γίνεται επιβεβαίωση της
σωστής εγκατάστασης.
Υπόδειξη: Τοποθετήστε το gateway στο
σπίτι στο ίδιο επίπεδο όσο γίνεται κοντά
στη βαλβίδα άρδευσης. Προτιμότερη είναι
μια θέση στο παράθυρο.
100 Ελληνικά
 Loading...