


BD 100 W Classic Bp
Table of contents
 Loading...
Kärcher BD 100 W Classic Bp, BD 80W Classic Bp Manual
BD 80/100 W Classic Bp
Register
your product
www.kaercher.com/welcome
English 3
Français 15
Español 28
59688290 (04/19)

Contents
IMPORTANT SAFETY INSTRUCTIONS .......................... 3
OPERATING SAFETY RULES AND PRACTICES........... 3
MAINTENANCE AND REBUILD PRACTICES ................. 4
FIRE SAFETY STANDARD .............................................. 4
General notes ................................................................... 4
Function ............................................................................ 4
Intended use ..................................................................... 4
Environmental protection .................................................. 5
Accessories and spare parts............................................. 5
Scope of delivery .............................................................. 5
Safety instructions ............................................................ 5
Description of the unit ....................................................... 6
Installation......................................................................... 7
Initial startup ..................................................................... 9
Operation .......................................................................... 9
Transport........................................................................... 11
Storage ............................................................................. 11
Care and service............................................................... 11
Troubleshooting guide ...................................................... 13
Warranty ........................................................................... 14
Accessories ...................................................................... 14
Technical data ................................................................... 14
IMPORTANT SAFETY INSTRUCTIONS
READ ALL INSTRUCTIONS BEFORE USING THIS APPLIANCE
몇 WARNING
To reduce the risk of fire, electric shock, or injury:
DO NOT LEAVE appliance unattended when plugged in.
Unplugfrom outlet when not in use and before servicing.
몇 WARNING
TO REDUCE THE RISK OF ELECTRIC SHOCK-USE INDOORS ONLY
Do not allow to be used as a toy. Close attention is nec-
essary when used by or near children.
Use only as described in this manual. Use only manu-
facturer’s recommended attachments.
Do not use with damaged cord or plug. If the unit is not
working as it should, has been dropped, damaged, left
outdoors, or dropped into water, return it to a service
center.
Do not pull or carry by the cord, do not use cord as a
handle, do not close a door on the cord, or pull cord
around sharp edges or corners. Do not run appliance
over cord. Keep cord away from heated surfaces.
DO NOT UNPLUG BY PULLING CORD. To unplug,
grasp plug, not cord.
Do not handle plug or appliance with wet hands.
Do not put any objects into openings. Do not use if
openings are blocked; keep free of dust, lint, hair, and
anything that may reduce air flow.
KEEP HAIR, CLOTHING, LOOSE JEWELRY, FIN-
GERS and all parts of the body away from openings and
moving parts.
Turn off all controls before unplugging.
Use extra care when cleaning on stairs.
Do not use to pick up flammable or combustible liquids,
such as gasoline, or use in areas where they may be
present.
Connect to a properly grounded outlet only. See
Grounding Instructions.
Always disconnect cord from electrical outlet before ser-
vicing appliance.
Never sweep off explosive liquids, combustible gases or
undiluted acids and solvents. This includes petrol, paint
thinner or heating oil which can generate explosive
fumes or mixtures upon contact with the air. Acetone,
undiluted acids and solvents must also be avoided as
they can harm the materials on the machine.
Do not vacuum up burning or smouldering objects!
GROUNDING INSTRUCTIONS
This device must be grounded. If it should malfunction or
break down, grounding provides a path of least resistance
for electric current to reduce the risk of electric shock.
This device is equipped with a cord having an equipment
grounding conductor and ground plug.
The plug must be plugged into an appropriate outlet that is
properly installed and grounded in accordance with all local codes and ordinances.
DANGER
Improper connection of the equipmentgrounding conductor can result in a risk of electrocution.
Check with a qualified electrician or service personnel if
you are in doubt as to whether the outlet is properly
grounded.
Do not modify the plug provided with the product - if it will
not fit the outlet, have a proper outlet installed by a qualified electrician.
Do not use any type of adapter with this product.
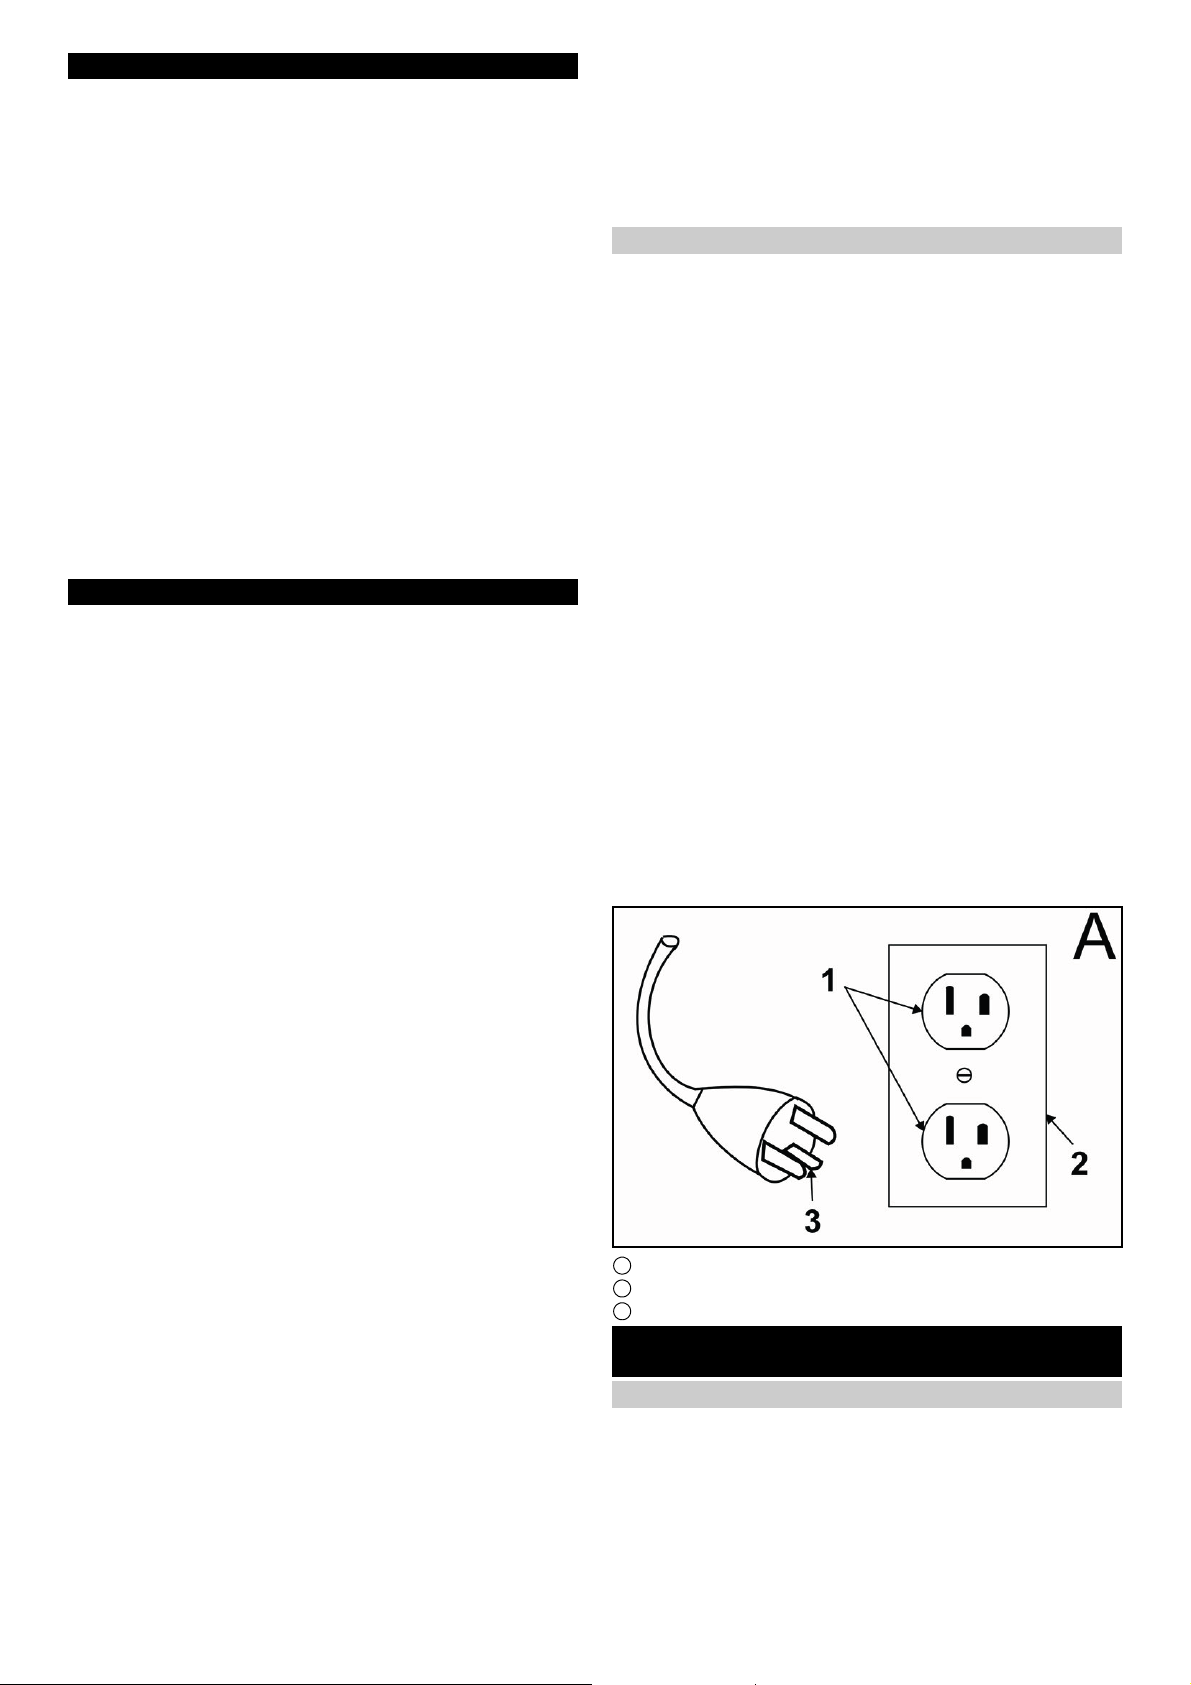
This appliance is for use on a nominal 120-volt circuit and
has a grounding attachment plug that looks like the plug illustrated in sketchpicture A.
Make sure that the appliance is connected to an outlet having the same configuration as the plug.
No adaptor should be used with this appliance.
CONNECT TO A PROPERLY GROUNDED OUTLET ONLY
1 Grounded outlet
2 Grounded outlet box
3 Grounded pin
OPERATING SAFETY RULES AND
PRACTICES
Owner/User Responsibility
The owner and/or user must have an understanding of the
manufacturer’s operating instructions and warnings before
using this device.
Warning information should be emphasized and understood.
If the operator is not fluent in English, the manufacturer’s
instructions and warnings shall be read to and discussed
English 3

with the operator in the operator’s native language by the
purchaser/ owner, making sure that the operator comprehends its contents.
Owner and/or user must study and maintain for future reference the manufacturers’ instructions.
General
Before starting operation, the device must be in the operating position.
Do not start or operate the device, any of its functions or
attachments, from any place other than from the designated operator's position.
Before leaving the operator’s position:
1 bring the device to a complete stop;
2 if the device must be on an incline, block the wheels.
Maintain a safe distance from the edge of ramps, platforms, and other similar working surfaces.
Do not add to, or modify the device.
Do not block access to fire aisles, stairways or fire equipment.
Traveling
Yield the right of way to pedestrians and emergency vehicles such as ambulances and fire trucks.
Cross railroad tracks at an angle wherever possible. Do
not park closer than 6 ft (1800 mm) to the nearest rail of a
railroad track.
Keep a clear view of the path of travel and observe for other traffic, personnel, and safe clearances.
Under all travel conditions, operate the device at a speed
that will permit it to be brought to a stop in a safe manner.
Do not indulge in stunt driving or horseplay.
Slow down for wet and slippery floors. Before driving over
a dockboard or bridge plate, be sure that it is properly secured. Drive carefully and slowly across the dockboard or
bridge plate, and never exceed its rated capacity.
When negotiating turns, reduce speed to a safe level consistent with the operating environment. Make the turns
smoothly.
Operator care of the device
If the device is found to be in need of repair or in any way
unsafe, or contributes to an unsafe condition, the matter
shall be reported immediately to the user’s designated authority, and the device shall not be operated until it has
been restored to safe operating condition.
If during operation the device becomes unsafe in any way,
the matter shall be reported immediately to the user’s designated authority, and the device shall not be operated until
it has been restored to safe operating condition.
Do not make repairs or adjustments unless specifically authorized to do so.
MAINTENANCE AND REBUILD PRACTICES
Operation of the device may be hazardous if maintenance
is neglected or repairs, rebuilds, or adjustments are not
performed in accordance with the manufacturer’s design
criteria. Therefore, maintenance facilities (on or off premises), trained personnel, and detailed procedures shall be
provided.
Maintenance and inspection of the device shall be performed in conformance with the following practices:
1 a scheduled planned maintenance, lubrication, and in-
spection system shall be followed; consult the manufacturer’s recommendations.
2 Only trained and authorized persons shall be permitted
to operate a powered floor scrubber. Operators of powered floor scrubbers shall be qualified as to visual, auditory, physical, and mental ability to operate the
equipment safely.
Avoid fire hazards and have fire protection equipment
present in the work area. Do not use open pans of fuel or
flammable cleaning fluids for cleaning parts.
FIRE SAFETY STANDARD
Any device not in safe operating condition shall be removed from service.
Repairs shall not be made in Class I, Class II, and Class III
locations.
Fire Prevention.The device shall be kept in a clean condition and reasonably free of lint, excess oil, and grease.
Noncombustible agents are preferred for cleaning the device. Flammable liquids [those having flash points at or
above 100°F (37,8°C)] are not allowed. Precautions regarding toxicity, ventilation, and fire hazard shall be appropriate for the agent or solvent used.
Nameplate Visibility. The device type designations as
shown on the nameplate and the type markers shall not be
covered over with paint so that their identification information is obscured.
General notes
Read these original operating instructions and
the enclosed safety instructions before using
the device for the first time. Proceed accordingly.
Keep both books for future reference or for future owners.
Function
This scouring and vacuum machine is used for wet cleaning of level floors.
The device can be adjusted to suit the respective cleaning
task by setting the water volume and detergent volume appropriately. The detergent dosing unit is adjusted via the
amount added to the tank.
The working width and the capacity of the fresh water and
waste water tanks (see chapter Technical data) allow effective cleaning over long working times.
The device has a drive. The device is supplied from 4 batteries.
Note
The device can be equipped with various accessories to
suit the respective cleaning order. Request a copy of our
catalog or visit our Internet website at www.kaercher.com.
Intended use
This device is suitable for commercial and industrial use,
e.g. in hotels, schools, hospitals, factories, shops, offices,
and rental companies. Use the device only in accordance
with the information in these operating instructions.
The device may only be used for cleaning smooth sur-
faces that are insensitive to water and polishing.
The device is not suitable for cleaning frozen floors (e.g.
in cold stores).
The device is not suitable for use in potentially explosive
environments.
The device is approved for operation on surfaces with a
maximum slope (see chapter Technical data).
4 English
Environmental protection
The packing materials can be recycled. Please dispose of packaging in accordance with the environ-
mental regulations.
Electrical and electronic appliances contain valuable,
recyclable materials and often components such as
batteries, rechargeable batteries or oil, which - if handled or disposed of incorrectly - can pose a potential threat
to human health and the environment. However, these
components are required for the correct operation of the
appliance. Appliances marked by this symbol are not allowed to be disposed of together with the household rubbish.
Notes on the content materials (REACH)
Current information on content materials can be found at:
www.kaercher.de/REACH
Accessories and spare parts
Only use original accessories and original spare parts. They
ensure that the appliance will run fault-free and safely.
Information on accessories and spare parts can be found
at www.kaercher.com.
Scope of delivery
During unpacking, check the contents for completeness. If
any accessories are missing or in the event of any shipping
damage, please notify your dealer.
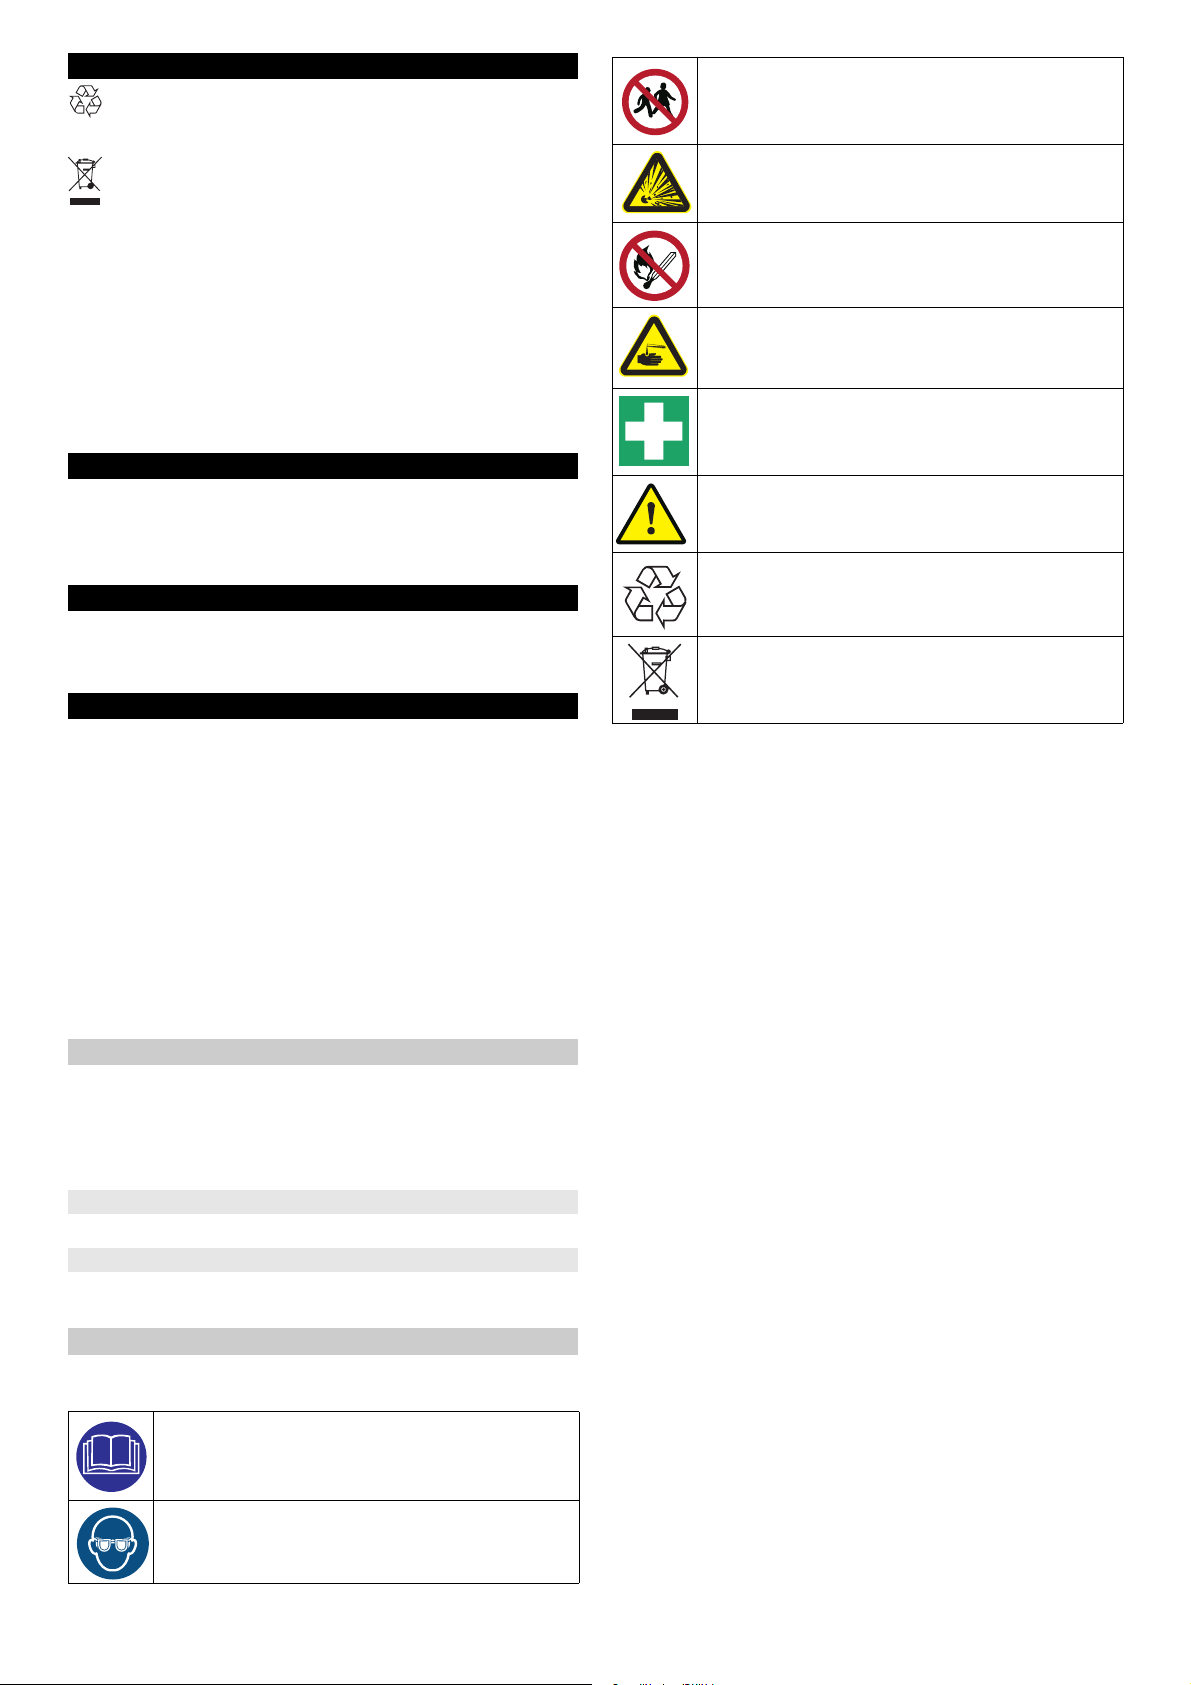
Keep acids and batteries away from children.
Risk of explosion
Fire, sparks, open flames and smoking are prohibited.
Risk of acid burns
First aid.
Warning note
Disposal
Do not throw batteries in the bin.
Safety instructions
Before using the device for the first time, read and observe
these operating instructions and the accompanying brochure: Safety instructions for brush cleaning units spray retraction devices, No. 5.956-251.0.
The device is approved for operation on surfaces with a
specified limited slope (see Chapter Technical data).
몇 WARNING
Device tipping over
Danger of injury
Do not operate the device on sloping surfaces.
The device may only be operated when the hood and all
covers are closed.
Safety devices
몇 CAUTION
Missing or modified safety devices
Safety devices are provided for your own protection.
Never modify or bypass safety devices.
Safety button
The device switches off when the safety button is released.
Key-operated switch
Pulling the key out of the key-operated switch secures the
device against unauthorized use.
Warning symbols
Observe the following warnings when handling the batteries:
Observe notes in the instructions of the battery,
on the battery and in these operating instructions.
Wear eye protection.
English 5

18
19
20
21
22
23
22
24
20
25
26
27
28
29
30
31
32
33
9
4
5
17
1
3
6
7
8
9
10
11
13
5
1415
16
2
12
Description of the unit
Overview of the device
1 Coarse dirt sieve
2 Fluff filter
3 Float
4 Cleaning head
5 Brush replacement pedal
6 Push handle
7 Safety button
8 Waste water tank cap
9 Homebase retaining rail
10 Waste water tank
11 ** Battery
12 Fresh water filter
13 Fresh water tank lock
14 Disc brush
15 Fresh water tank
16 Type plate
17 Hose switch
18 Fresh water tank filling hole
6 English
19 Suction bar
20 Suction bar height adjustment
21 Suction bar inclination adjustment
22 Wing nuts for fastening the suction bar
23 Suction hose
24 Fresh water filling level display
Fresh water drain hose
25 Cleaning head lever
26 Water volume regulation knob
27 Suction bar lever
28 Battery plug connector
29 Key-operated switch
30 Display
31 Working speed rotary knob
32 Travel direction switch
33 Waste water tank drain hose with dosing unit
** Not in scope of delivery
Color coding
Control elements for the cleaning process are yellow.
Control elements for maintenance and servicing are
light gray.
Symbols on the device
Fresh water tank drain opening
Waste water tank drain opening
Increased cleaning head contact pressure
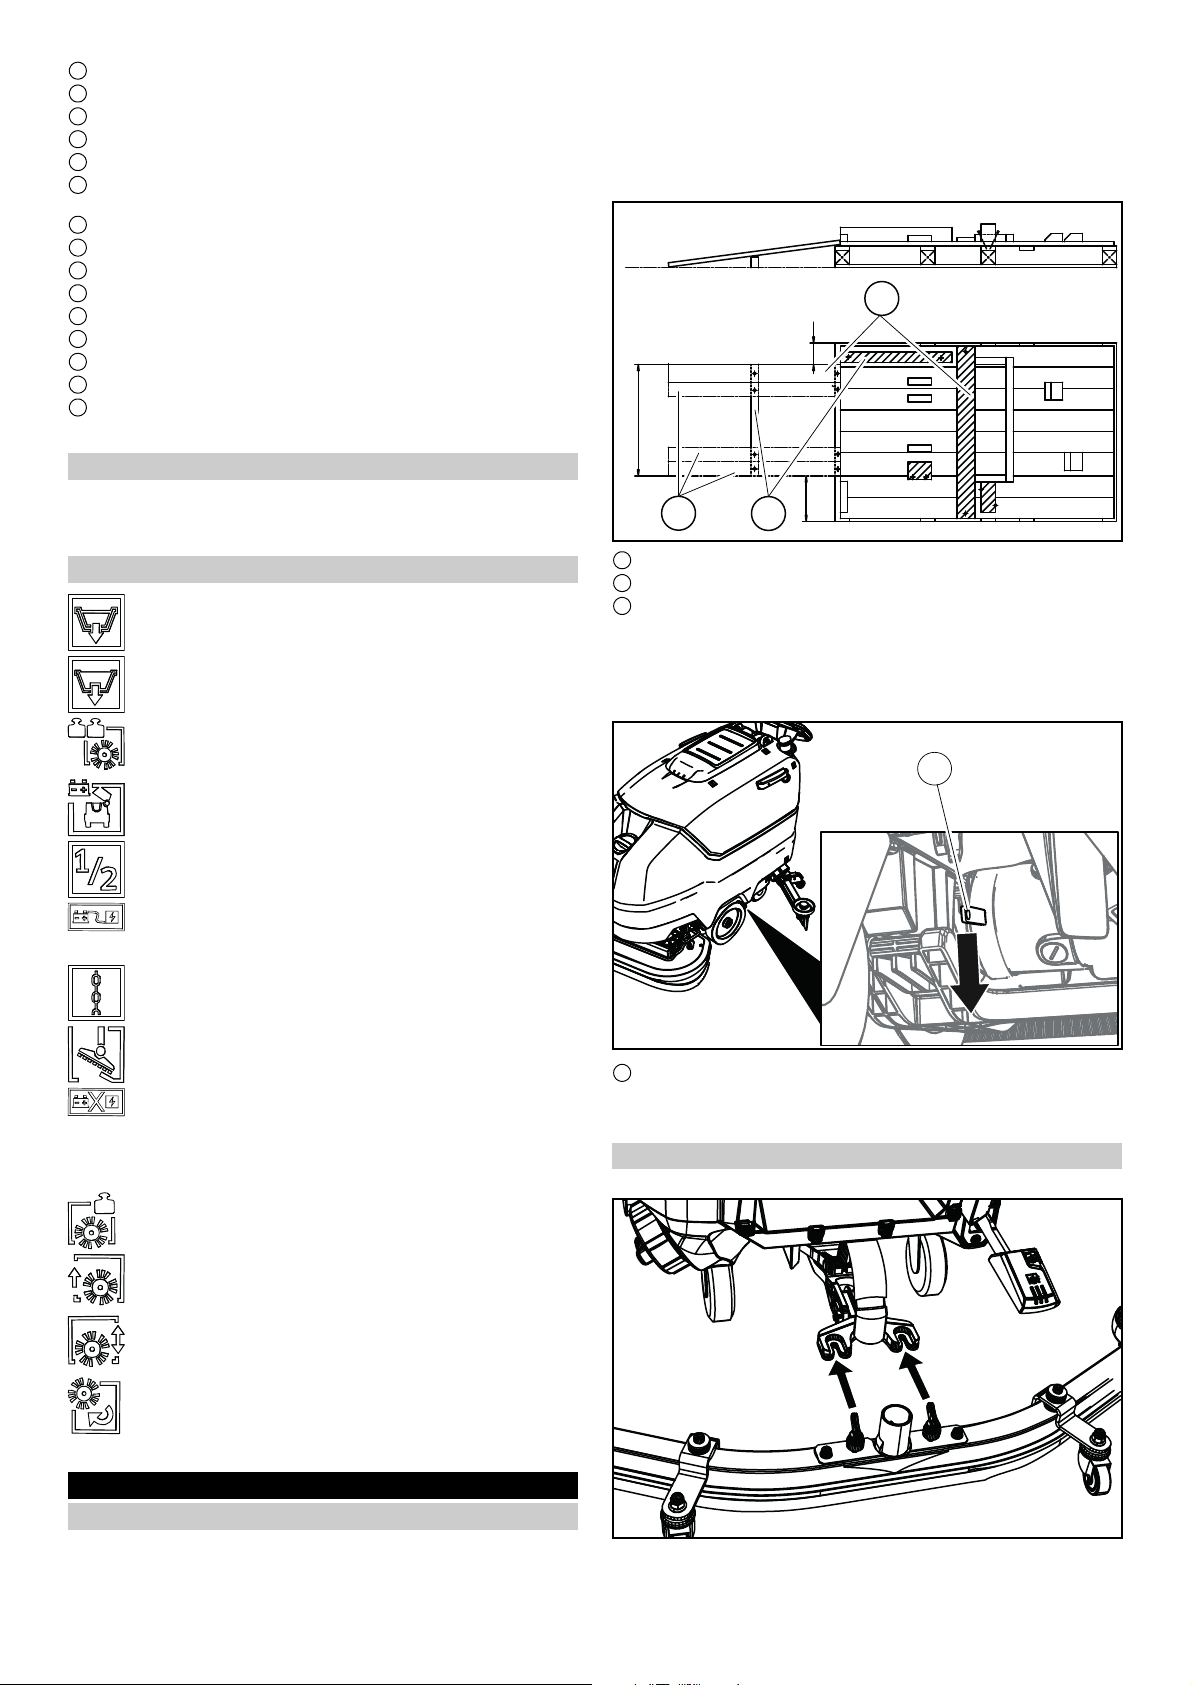
3. Remove the wooden blocks fastened to the pallet by
screws.
4. Using the 3 upper reinforcing boards of the carton packaging (80x24x970 mm) and the board screwed laterally
on the pallet (100x24x970 mm), place a ramp in front of
the pallet and secure it using board pallet screws.
3
120
625
2
1 Beam 80x60x625 mm
2 Board 80x24x970 mm
3 Board 100x24x970 mm
5. Push the beam which has been unscrewed from the pallet (80x60x625 mm) under the ramp for support and
screw into place.
6. Press the brake lever down.
225
1
Battery access
Fresh water tank filling level (50%)
Insert the charger plug here
Eyelet point
* Mop holder
ATTENTION
Incorrect socket
Risk of damage
DO NOT insert the charger plug here
Normal cleaning head contact pressure
Raise the cleaning head
Pedal for raising/lowering the cleaning head
1
1 Brake lever
7. Push the device forwards from the pallet.
8. Press the brake lever up.
Installing the suction bar
1. Insert the suction bar in the suction bar mount.
Brush replacement pedal
* optional
1. Remove the carton.
2. Remove the straps.
Installation
Unloading
2. Tighten the wing nuts.
3. Fit the suction hose.
English 7
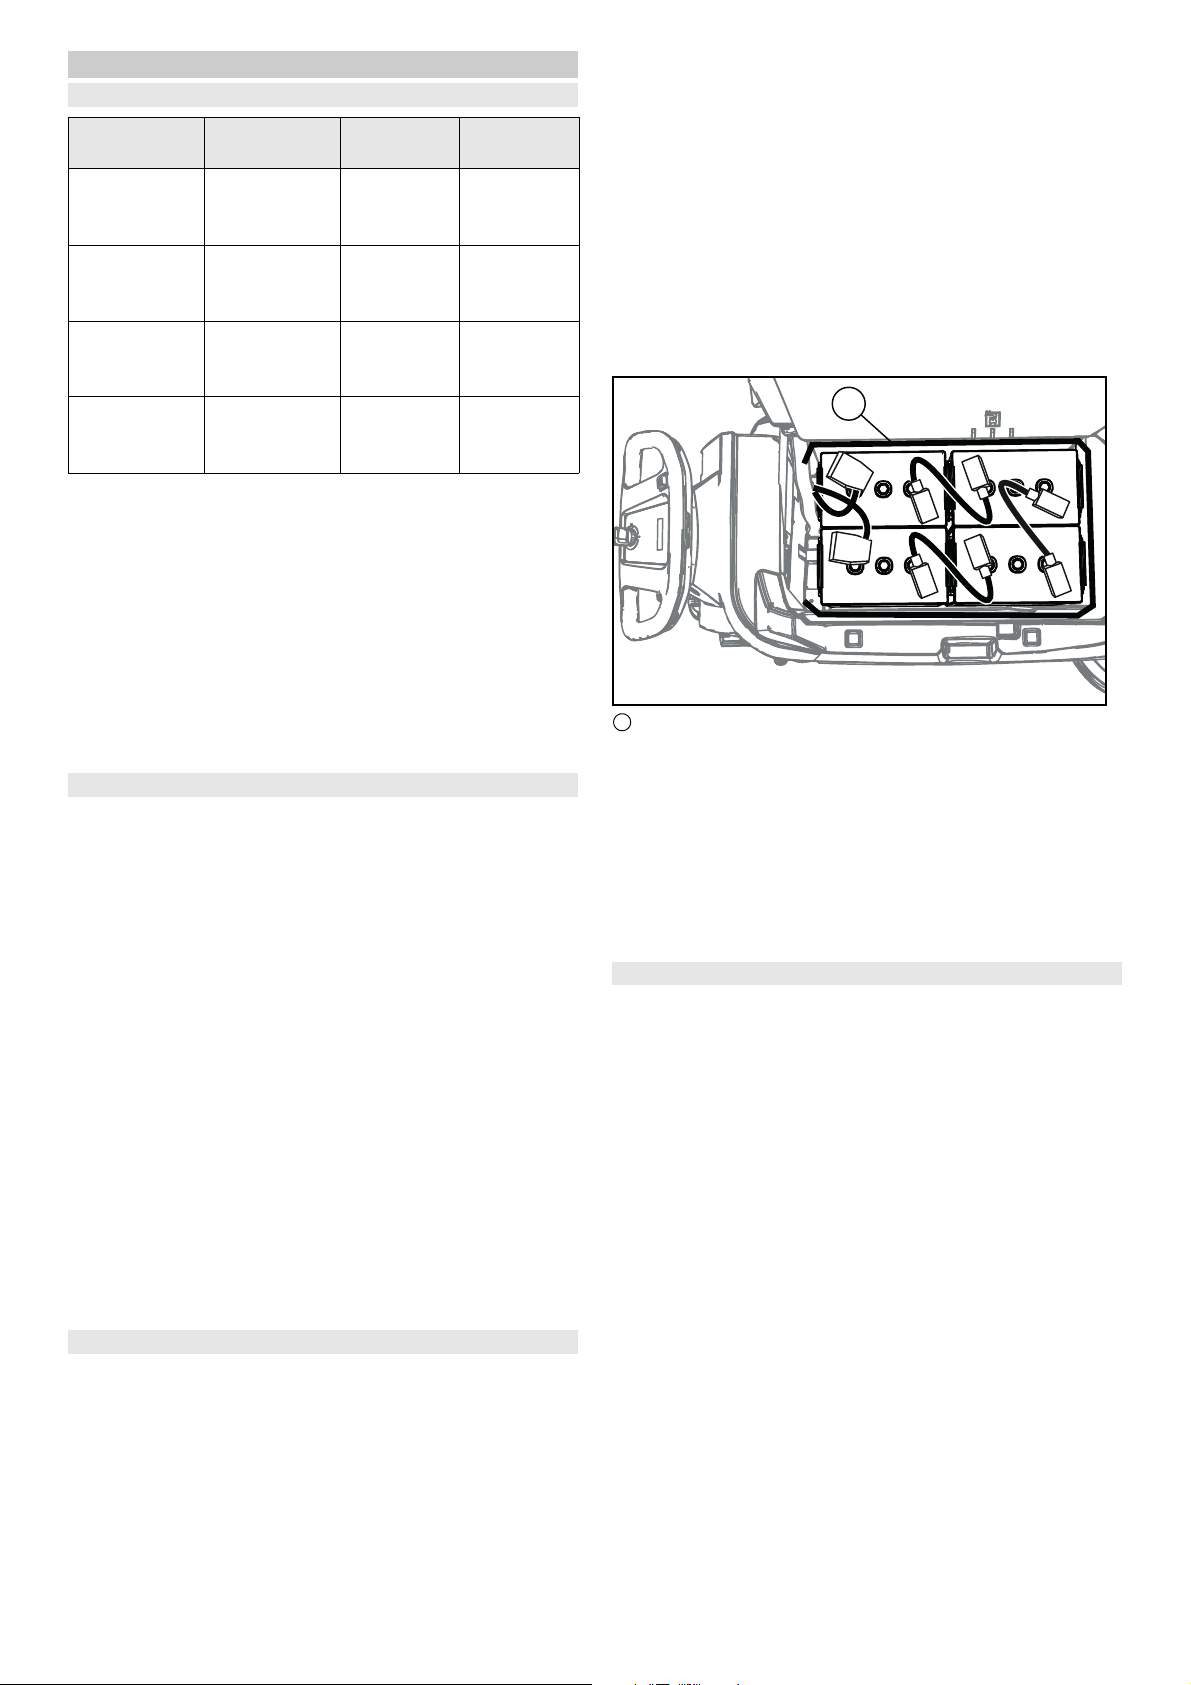
Batteries
+
+
+
+
-
-
-
-
1
Recommemded batteries
Description Order No. Volume
185 Ah - maintenance-free
(C20)
180 Ah - maintenance-free
(C5)
240 Ah - maintenance-free
(C5)
330 Ah - maintenance-free
(C20)
* Minimum volume of the battery charging room
** Minimum air flow between the battery charging room
and the surroundings
The device requires 4 batteries.
1 Complete set (24 V / 185 Ah) incl. connectingcable, or-
der no. 4.035-388.0
2 Complete set (24 V / 180 Ah) incl. connectingcable, or-
der no. 4.035-387.0
3 Complete set (24 V / 240 Ah) incl. connectingcable, or-
der no. 4.035-393.0
4 Complete set (24 V / 330 Ah) incl. connectingcable, or-
der no. 4.035-572.0
Low-maintenance batteries (wet batteries)
6.654-242.0
6.654-124.0
6.654-119.0
8.629-184.0
3
(m
)*
1)
--
2)
--
3)
--
4)
11,88 4,752
Air flow (m3/
h)**
DANGER
Refilling discharged batteries with water
Danger of acid burns from escaping acid, destruction of
clothes
Wear safety goggles when handling the batteries.
Observe the applicable regulations.
Immediately rinse off any splashed acid from the skin or
clothes using copious amounts of water.
ATTENTION
Using water with additives
Defective batteries, loss of warranty claim
Top up the batteries using only distilled or desalinated water (EN 50272-T3).
Do not use any foreign additives, so-called enhancing
agents, because this will invalidate the warranty.
1. Add distilled water one hour before the charging process comes to an end. Observe the correct acid level
according to the battery label.
All cells must produce gas at the end of the charging
process.
Installing and connecting batteries
몇CAUTION
Removing and installing the batteries
Unstable machine position
Ensure that the machine is positioned stably when removing and installing the batteries.
ATTENTION
Incorrect connection polarity
Destruction of the control electronics
Take care to ensure the correct polarity when connecting
the batteries.
ATTENTION
Deep discharge
Risk of damage
Charge the batteries before starting the device.
1. Drain the waste water.
2. Pivot the waste water tank upwards.
3. Place the battery in the device.
1 Strap
4. Fit the strap around the battery.
5. Clamp the batteries towards the rear using the strap.
6. Connect the battery terminals using the connecting cables provided.
7. Clamp the connecting cable to the (+) and (-) battery terminals that are still free.
8. Connect the device-side battery connector to the battery-side battery connector.
9. Pivot the waste water tank downwards.
Removing the battery
몇 CAUTION
Removing and installing the batteries
Unstable machine position
Ensure that the machine is positioned stably when removing and installing the batteries.
1. Turn the key-operated switch to "0" and remove the key.
2. Pull out the battery plug.
3. Drain the waste water.
4. Pivot the waste water tank upwards.
5. Disconnect the cable from the minus terminal at the battery.
6. Disconnect the remaining cables from the battery.
7. Release the strap.
8. Remove the battery.
9. Dispose of the used batteries in accordance with statutory provisions.
8 English
Initial startup
1
1
2
Charging the battery
DANGER
Inappropriate use of the charger
Electric shock
Adhere to the mains voltage and fuse values specified on
the device type plate.
Only use the charger in dry rooms with sufficient ventilation.
ATTENTION
Accumulation of dangerous gases under the tank
during the charging process
Risk of explosion
Pivot the waste water tank upwards before charging lowmaintenance batteries.
ATTENTION
Using an unsuitable charger
Risk of damage
Do not connect the charger to the device-side battery connector.
Use only a charger suitable for the type of battery installed.
Read the operating instructions of the charger manufacturer and observe the safety instructions in particular.
Battery type Charger
6.654-242.0 6.654-434.0
6.654-124.0 6.654-434.0
6.654-119.0 6.654-435.0
8.629-184.0 6.654-419.0
The average charging time is approx. 10-15 hours.
The device cannot be used during the charging process.
Note
The device has deep discharge protection, i.e. the brush
motor and turbine are switched off automatically when the
permitted minimum capacity level is reached.
1. Drive the device directly to the charger and do not drive
on slopes.
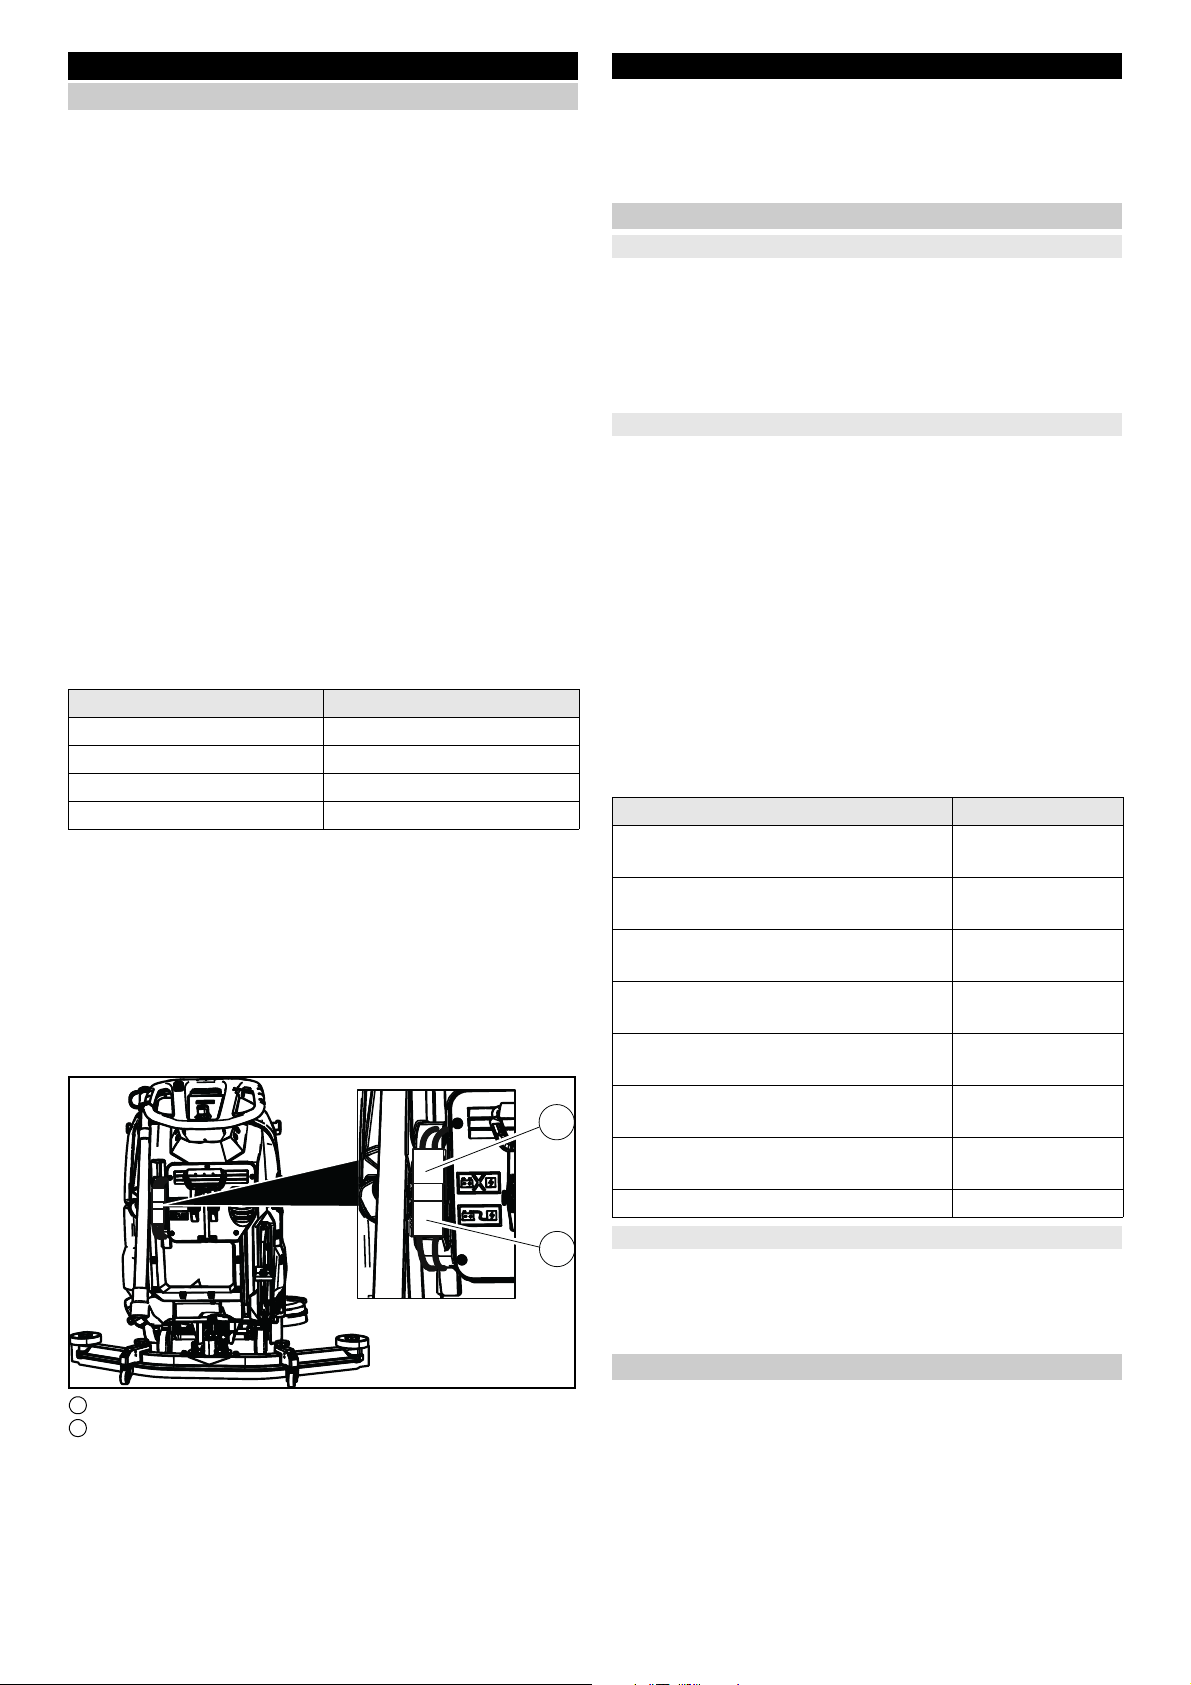
2. Pull out the device-side battery connector.
1 Battery plug, device side
2 Battery plug, battery side
3. Connect the battery-side battery connector to the charger.
4. Plug the mains plug of the charger into the socket.
5. Carry out the charging process in accordance with the
6. Connect the device-side battery connector to the bat-
operating instructions for the charger.
tery-side battery connector.
Operation
ATTENTION
Risks during operation
Danger of injury
Release the safety button in the case of danger.
Filling with operating materials
Filling with fresh water
1. Open the fresh water tank lock.
2. Fill fresh water (max. 60 °C) to the lower edge of the filling nozzle.
Note: The fresh water hose can be clamped in the hose
switch during filling.
3. Close the fresh water tank lock.
Notes on detergents
몇 WARNING
Unsuitable detergents
Health risk, damage to the device
Use only recommended detergents. The operator carries
all increased risks relating to operational safety and increased risk of accidents if using other detergents.
Use only detergents free of solvents, salt and hydrofluoric
acid.
Adhere to the safety instructions stated on the detergent
packaging.
Note
Do not use heavily foaming detergent.
Recommended detergents
Usage Detergent
Maintenance cleaning of all water-resistant floors
Maintenance cleaning of polished
hard surfaces (e.g. granite)
Maintenance cleaning and basic
cleaning of industrial floors
Maintenance cleaning and basic
cleaning of fine stone tiles
Maintenance cleaning of tiles in sanitary areas
Cleaning and disinfection in sanitary
areas
Coating removal on all alkaline-resistant floors (e.g. PVC)
Coating removal on linoleum floors RM 754
Detergent
1. Fill the detergent into the fresh water tank.
Note: The cap of the fresh water tank filling hole can be
used for measuring the detergent. It is fitted with a scale
on the inside.
RM 746
RM 780
RM 755 es
RM 69 ASF
RM 753
RM 751
RM 732
RM 752
Adjusting the water volume
1. Adjust the water volume via the regulating knob to suit
the degree of contamination of the floor covering.
Note
Perform initial cleaning tests with a low water volume.
Increase the water volume step by step until achieving
the desired cleaning result.
English 9
Note
1
10 mm
1
2 3
The cleaning head continues operating without a liquid
supply if the fresh water tank is empty.
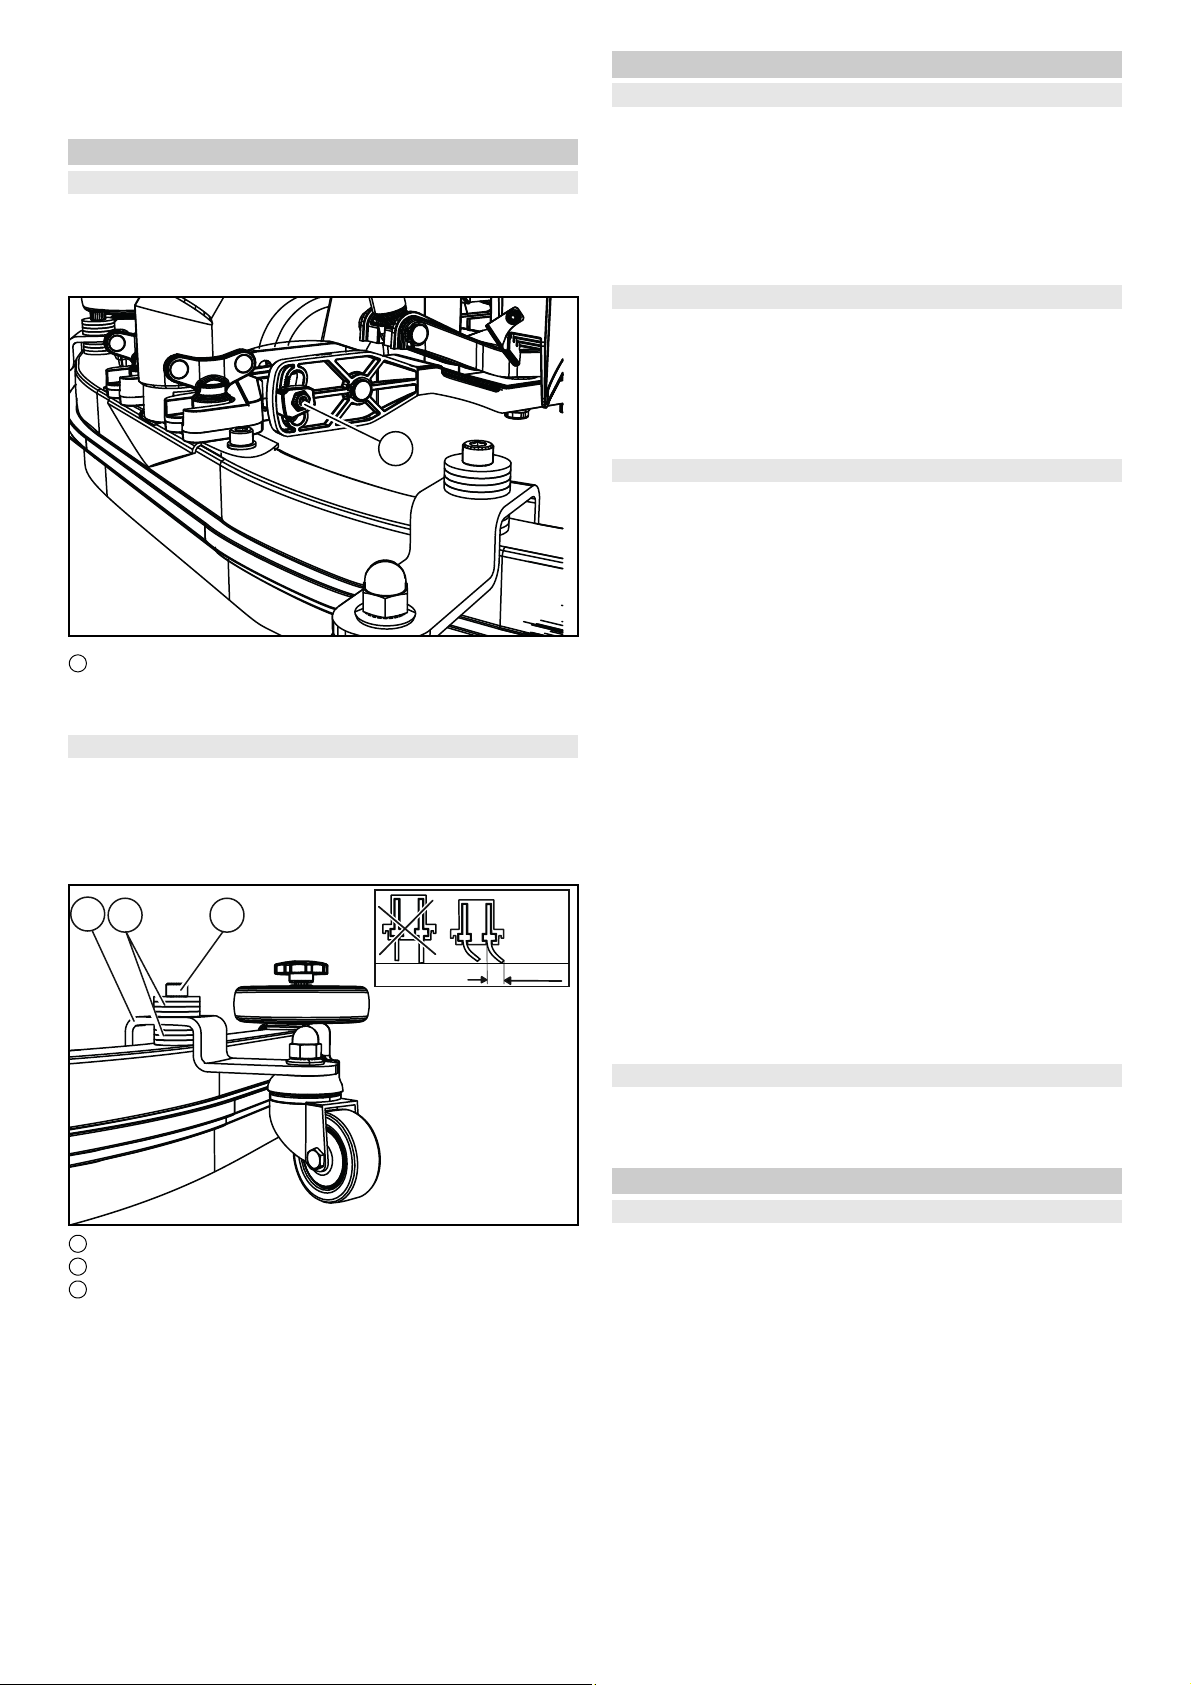
Adjusting the suction bar
Adjusting the inclination
The inclination must be adjusted so that the suction lips of
the suction bar make even contact with the floor over the
entire length of the suction bar.
1. Loosen the screw.
1 Screw
2. Adjust the inclination of the suction bar.
3. Tighten the screw.
Adjusting the height
The height adjustment affects the bending of the suction
lips on contact with the floor.
1. Push the device a small distance forwards.
2. Compare the bending of the suction lips with the illustration below.
´
1 Spacer roller with holder
2 Washer
3 Screw
3. Unscrew the screw.
4. Position a sufficient number of washers between the
suction bar and spacer roller so that the suction lips
have the correct bend.
5. Fit the remaining washers above the spacer roller.
6. Screw in and tighten the screw.
7. Repeat the entire procedure at the other spacer roller.
8. Push the device a small distance forwards.
9. Check the bending of the suction lips over the entire
length.
10.If necessary, repeat the entire adjustment process.
Cleaning
Switching the device on
1. Turn the key-operated switch to "1".
The display shows the following one after the other:
Period of time until the next after-sales Customer Ser-
vice
Software version, control panel
Charging state of the battery and number of operating
hours
Driving
Note
The travel direction can be changed during the cleaning
operation. This way, a certain position can be intensively
cleaned by driving back and forth several times.
1. Set the travel direction switch to "forward".
Cleaning
Note
The inclination and height of the suction bar can be adjusted to improve the vacuuming results (see chapter Adjusting the suction bar).
Note
When the waste water tank is full, the float switch closes
the suction opening and the suction turbine runs at a higher speed. In this case, raise the suction bar and drive to the
location for emptying the waste water tank.
1. Turn the working speed rotary knob to the desired value.
The speed is shown on the display during the adjustment. The display is shown in percentage of the maximum speed.
2. Set the water volume at the regulating valve.
3. Press the suction bar lever downwards.
The suction bar lowers.
Suctioning begins.
4. Press the cleaning head lever downwards, unlatch it
and allow it to move upwards.
5. Pull the safety button towards the push handle.
The cleaning head starts up and the device moves at
the set speed.
Increasing the brush contact pressure
1. Let go of the safety button.
2. Lift the cleaning head lever up with your hand and engage it towards the right.
Finishing operation
Finishing cleaning
1. Let go of the safety button.
2. Press the cleaning head lever downwards and engage
it towards the right.
3. Continue moving a short distance.
The residual water is vacuumed up.
4. Lift the suction bar.
The suctioning continues to run for 10 seconds afterwards.
5. Turn the key-operated switch to "0".
6. Charge the batteries if necessary.
10 English
Draining the waste water
몇 WARNING
Improper disposal of waste water
Environmental pollution
Observe the local waste water treatment regulations.
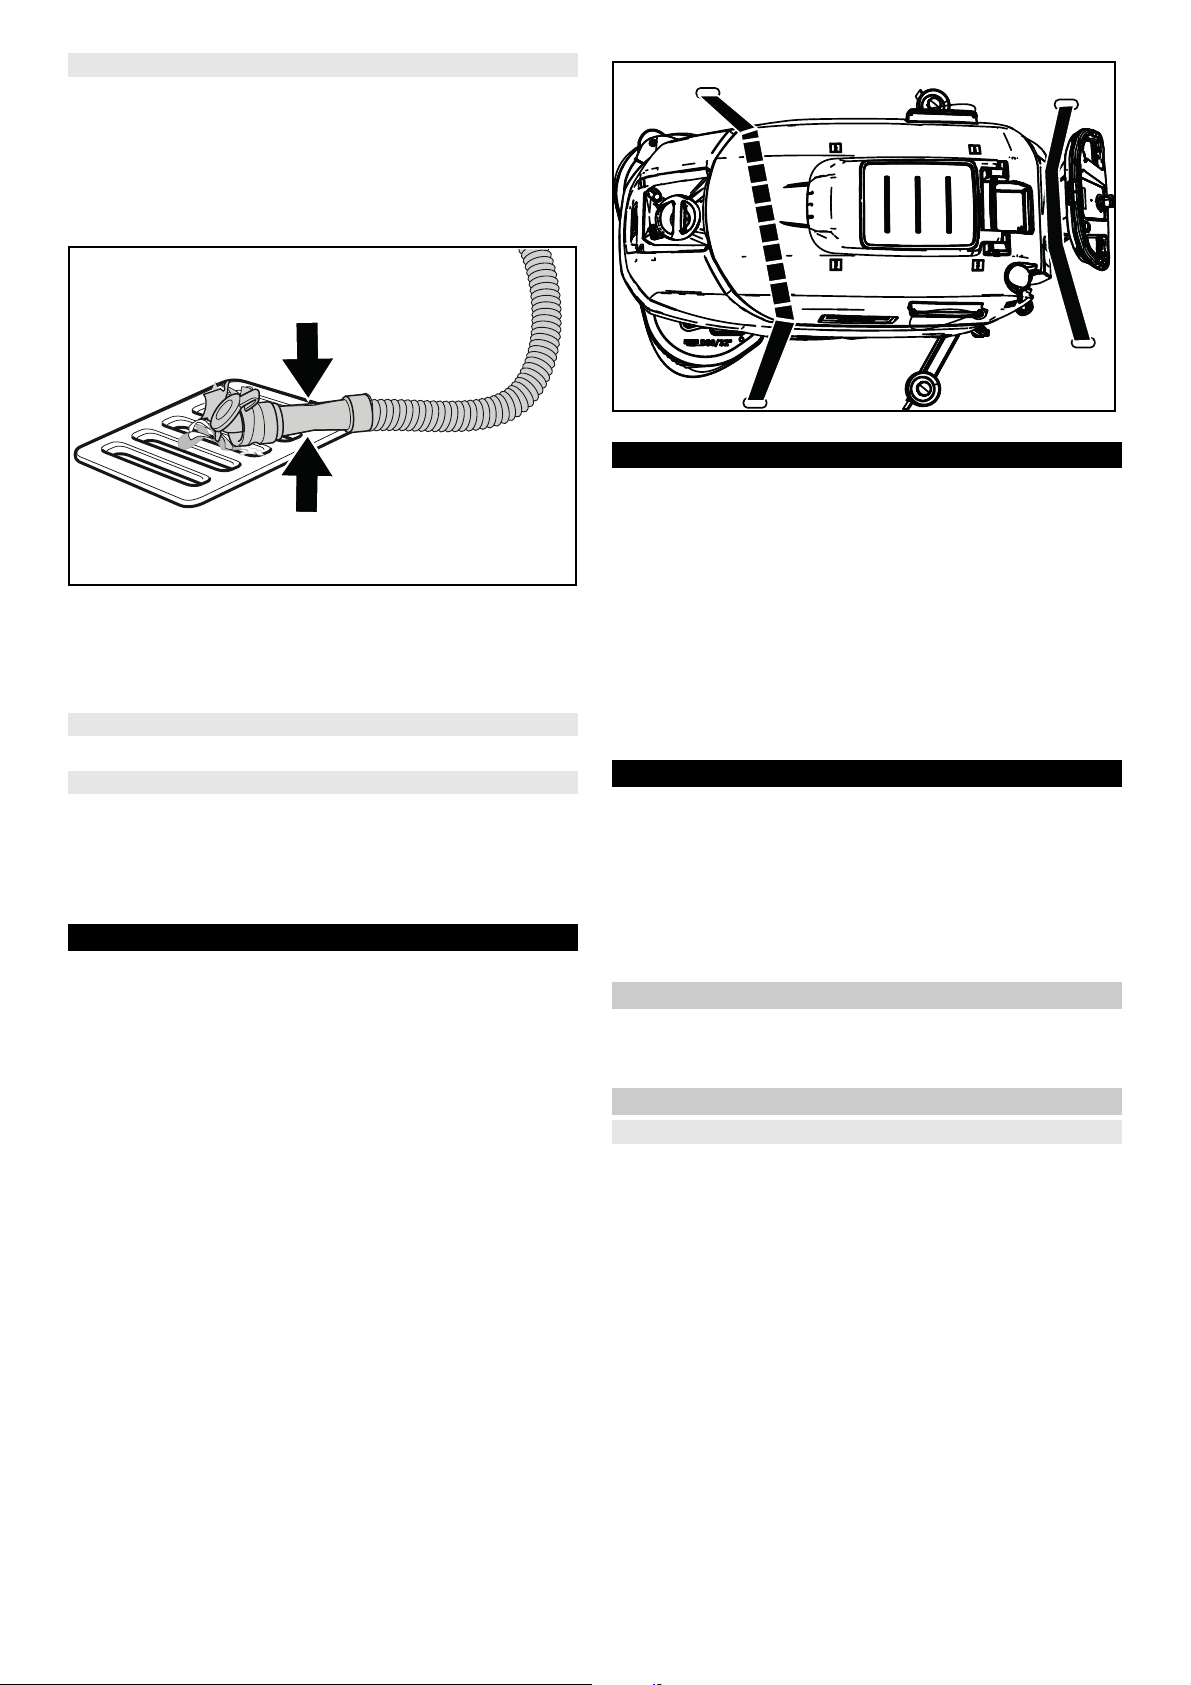
1. Remove the drain hose from the support and lower it
over a suitable collecting device.
2. Press the dosing device together or kink the hose.
3. Open the dosing device cover.
4. Drain the waste water. Regulate the water volume by
pressing or kinking.
5. Rinse the waste water tank with clear water.
Draining fresh water
1. Pull off the filling level display hose and swivel it down.
Draining fresh water quickly
1. Unscrew the fresh water tank lock.
2. Allow the fresh water to drain away.
3. Fit the fresh water tank lock and screw into place.
Note: Ensure that the hose connection in the fresh water tank lock lies at the lowest point after screwing tight.
Transport
DANGER
Driving on slopes
Danger of injury
Observe the maximum permissible inclination when driving the device on slopes for loading and unloading purposes (see chapter Technical data).
Drive slowly.
1.
2.
7. First fit the strap under the waste water tank.
Storage
몇 CAUTION
Failure to observe the weight
Risk of injury and damage
Be aware of the weight of the device during storage.
ATTENTION
Frost
Destruction of the device through freezing water
Drain all water from the device.
Store the device in a frost-free location.
This device may only be stored indoors.
Care and service
DANGER
Inadvertently starting up device
Risk of injury, electric shock
Turn the key-operated switch to "0" and remove the key
before performing any work on the device.
Pull out the charger mains plug.
Drain and dispose of the waste water and fresh water.
Safety inspection/maintenance contract
You can agree on regular safety inspections or close a
maintenance contract with your dealer. Please seek advice
on this.
Maintenance intervals
Each time after use
몇 CAUTION
Failure to observe the weight
Risk of injury and damage
Be aware of the weight of the device during transportation.
1. Press the cleaning head lever downwards and engage
it towards the right.
2. Raise the suction bar.
3. Turn the key-operated switch to "1".
4. Select the travel direction at the travel direction switch.
5. Pull the safety button towards the push handle.
6. When transporting in vehicles, secure the device
against slipping and tipping over according to the applicable guidelines.
English 11
ATTENTION
Incorrect cleaning
Risk of damage.
Do not spray the device with water.
Do not use aggressive detergents.
A detailed description of the individual maintenance work
is provided in Chapter Maintenance work.
Drain the waste water.
Rinse the waste water tank with clear water.
Clean the exterior of the device using a damp cloth, wet-
ted with a mild washing lye.
Check the fluff filter and clean if required.
Clean the coarse dirt sieve.
Clean the suction lips, check for wear and tear and re-
adjust or replace if necessary.
Check the disc brushes for wear and tear and replace if
necessary.
Charge the battery.
CHANGE LIP
2
1
1.
1.
2.
3.
1
12
If the charging state of the battery is below 50%,
charge the battery fully and without interruption.
If the charging state of the battery is above 50%, only
recharge the battery if the entire operating duration
will be required when next used.
Weekly
When used regularly, charge the battery fully and with-
out interruption at least once a week.
Monthly
A detailed description of the individual maintenance work
is provided in Chapter Maintenance work.
1. Drain the fresh water tank and flush out deposits.
2. Clean the fresh water filter.
3. Clean the float and fluff filter.
4. Check battery poles for oxidation, brush off if necessary.
Make sure the connection cables are firmly in place.
5. Clean the seals between the waste water tank and the
cover, check for leaks and replace if necessary.
6. Check the acid density of the cells if the batteries are not
maintenance-free.
7. For a longer downtime, shut down the device when the
battery is fully charged. Fully charge the battery at least
once a month.
Annually
Have the prescribed inspection performed by Customer
Service.
Maintenance work
Turn over or replace the worn suction lips
The suction lips must be turned over or replace when they
have worn down to the wear mark.
3. Pull off the plastic parts.
4. Pull off the suction lips.
5. Push in the turned over or new suction lips.
6. Push on the plastic parts.
7. Screw in and tighten the star handles.
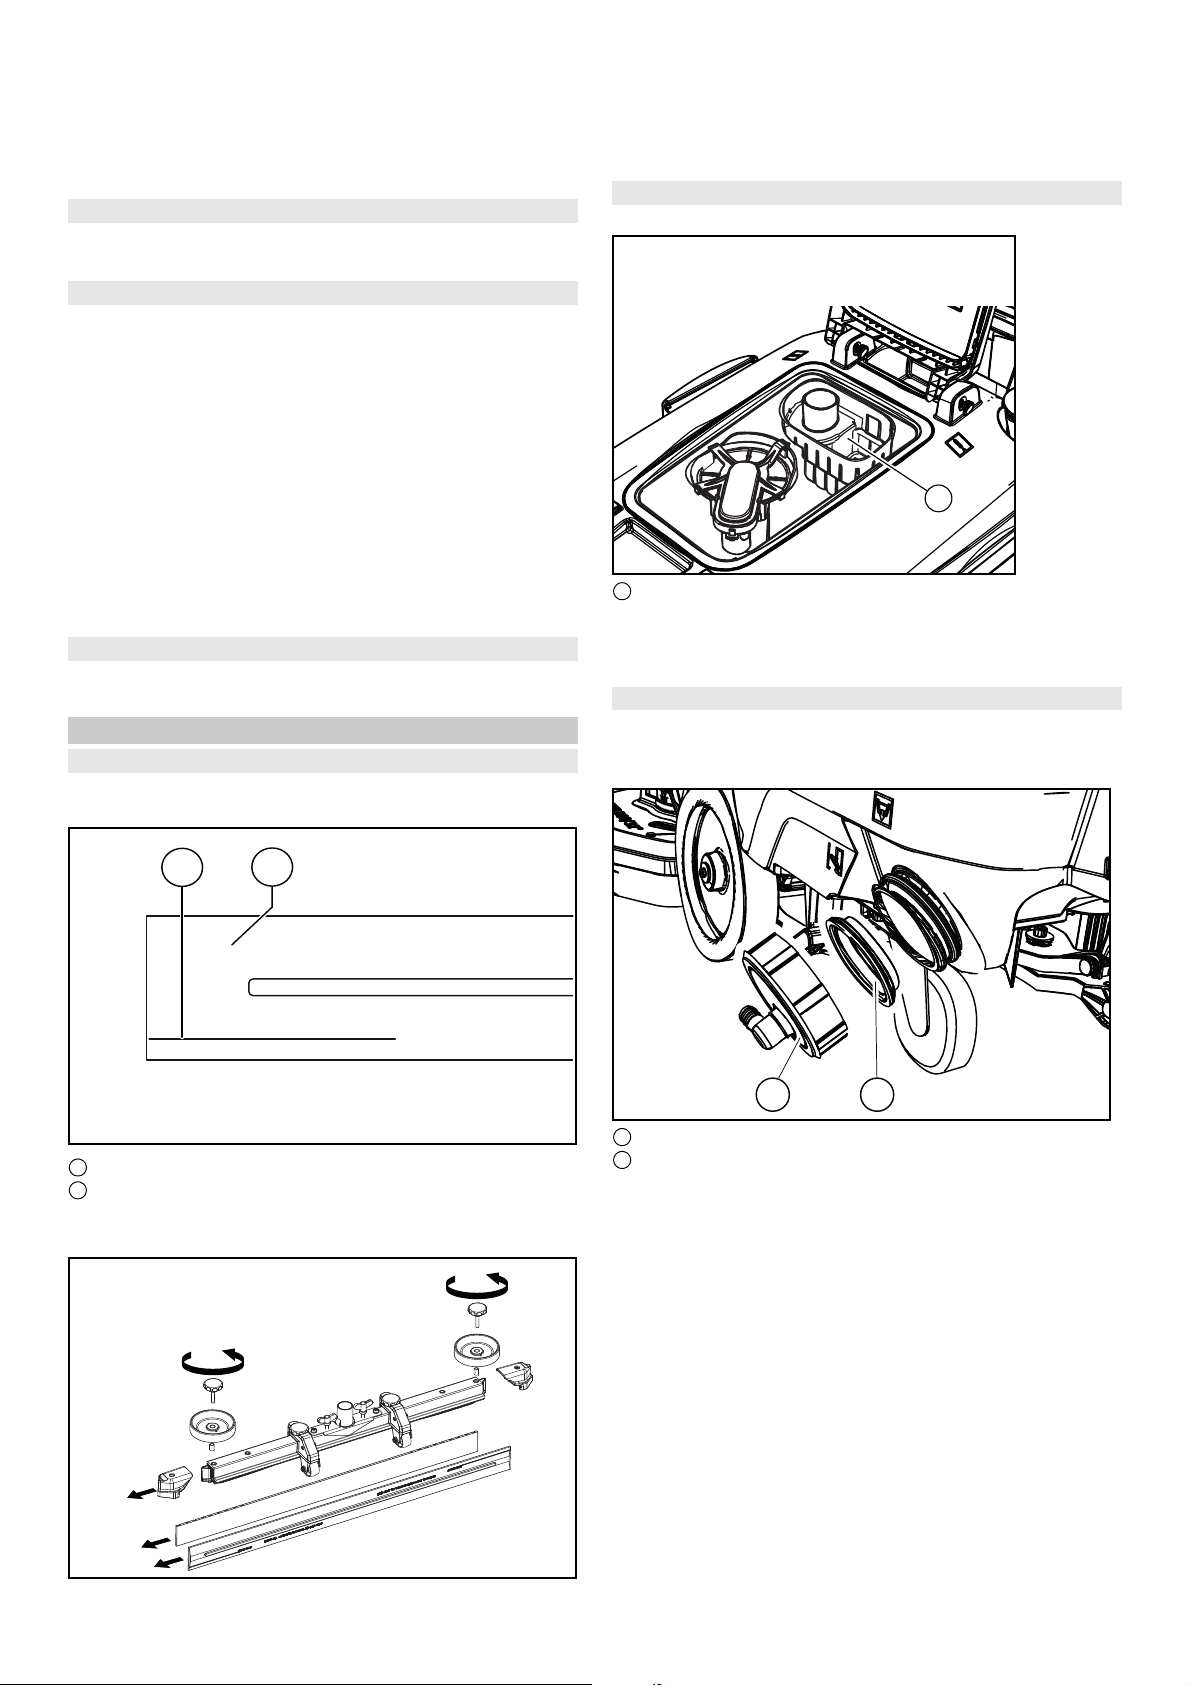
Cleaning the coarse dirt sieve
1. Open the waste water tank cover.
1 Coarse dirt sieve
2. Pull the coarse dirt sieve upwards and off.
3. Rinse off the coarse dirt sieve under running water.
4. Reinsert the coarse dirt sieve into the waste water tank.
Cleaning the fresh water filter
1. Drain the fresh water (see Chapter Draining fresh water).
2. Unscrew the fresh water tank lock.
1 Wear mark
2 Suction lip
1. Remove the suction bar.
2. Unscrew the star handles.
12 English
1 Fresh water tank lock
2 Fresh water filter
3. Pull out the fresh water filter and rinse with clean water.
4. Insert the fresh water filter.
5. Fit the fresh water tank lock.
Note: Ensure that the hose connection in the fresh water tank lock lies at the lowest point after screwing tight.
Loading...