

Page 1

SAFETY PRECAUTIONS
FCC INFORMATION
Warning: Modifying, tampering and/or adjusting this unit or replacement of
any transmitter component (crystal, semiconductor, etc.) in this unit could
result in a violation of the rules.
FCC NOTICE
This wireless microphone system complies with Part 90 of FCC Rules. There
are two frequencies available for the system. You must get a license for each
frequency you plan to use before you use the system (one license can
include both frequencies). Visit http://wireless.fcc.gov/uls/ to access the
license online or phone the nearest FCC offices and contact them to get the
necessary application. Licensing depends on how you will use the system.
RF EXPOSURE
This wireless microphone contains a low power transmitter. When the power
is on, it sends out radio frequency (RF) signals. ln August 1996, the Federal
Communications Commissions (FCC) adopted RF exposure guidelines with
safety levels for wireless devices.
IMPORTANT NOTE: To adhere to the FCC RF exposure compliance
requirements, no change to the antenna or the unit is permitted. Any change
to the antenna or the unit could result in the system exceeding the RF
exposure requirements.
IMPORTANT
To maintain compliance with the FCC's RF exposure guidelines hold the
transmitter and antenna at least 1 inch (2.5 centimeters) from your face and
speak in a normal voice, with the antenna pointed up and away from your
face. Ensure that the antenna is at least 1 inch (2.5 centimeters) from your
body when using your wireless microphone.
Use only the supplied antenna. Unauthorized antennas, modifications or
attachments could damage the transmitter and may violate FCC regulations.
1
Page 2

SAFETY PRECAUTIONS (CONTINUED)
Warning: Changes or modifications to this unit not expressly approved by the
party responsible for compliance could void the user's authority to operate the
equipment.
NOTE: This equipment has been tested and found to comply with the limits
for a Class B digital device, pursuant to Part 15 of the FCC Rules. These
limits are designed to provide reasonable protection against harmful
interference in a residential installation. This equipment generates, uses and
can radiate radio frequency energy and, if not installed and used in
accordance with the instructions, may cause harmful interference to radio
communications. However, there is no guarantee that interference will not
occur in a particular installation. If this equipment does cause harmful
interference to radio or television reception, which can be determined by
turning the equipment off and on, the user is encouraged to try to correct the
interference by one or more of the following measures:
• Reorient or relocate the receiving antenna.
• Increase the separation between the equipment and receiver.
• Connect the equipment into an outlet on a circuit different from that to which
the receiver is connected.
• Consult the dealer or an experienced radio/TV technician for help.
PLEASE KEEP ALL PACKAGING MATERIAL FOR AT LEAST 90 DAYS IN
CASE YOU NEED TO RETURN THIS PRODUCT TO YOUR PLACE OF
PURCHASE OR MEMOREX.
2
Page 3
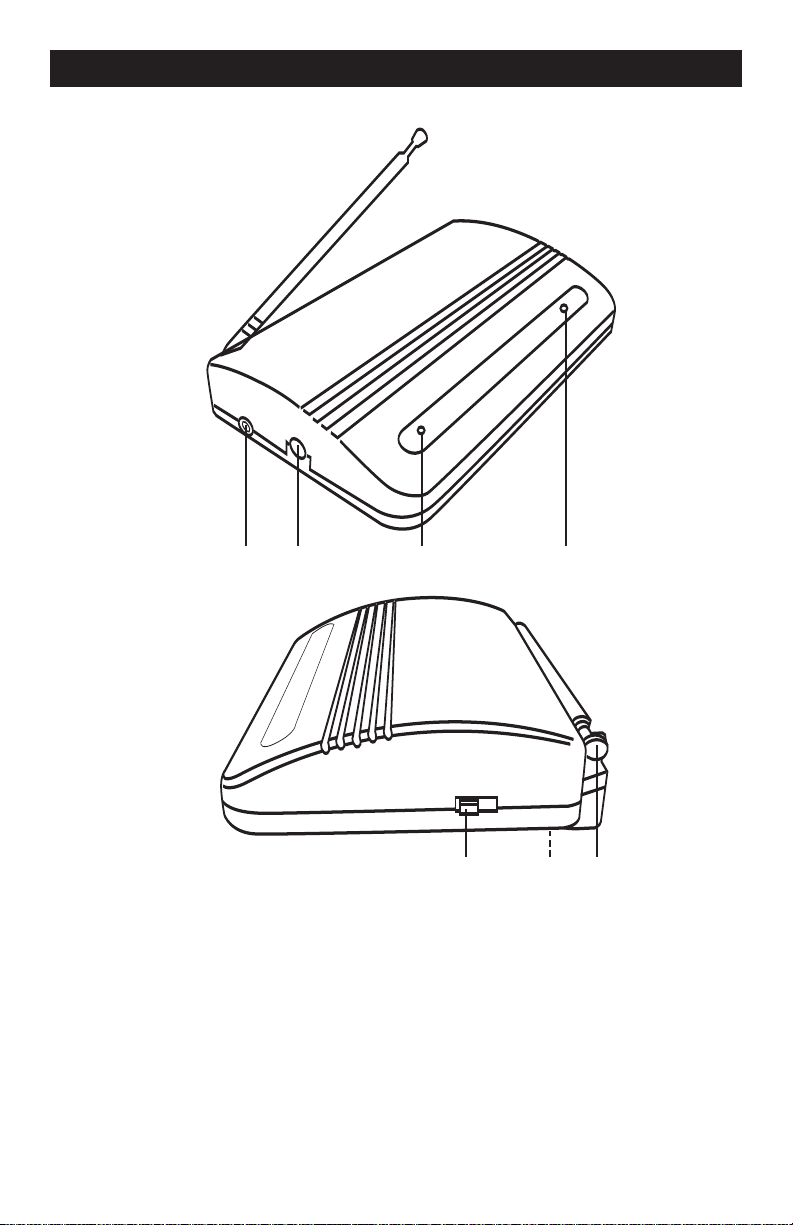
1 2 3
5 76
4
RECEIVER
FRONT
RECEIVER
SIDE
LOCATION OF CONTROLS
1. Line OUT Jack
2. DC 9V Jack z
3. POWER ON Indicator
Microphone ON Indicator
4.
POWER ON/OFF Switch
5.
6. Battery Compartment
(Bottom of Receiver)
7. Antenna
3
Page 4
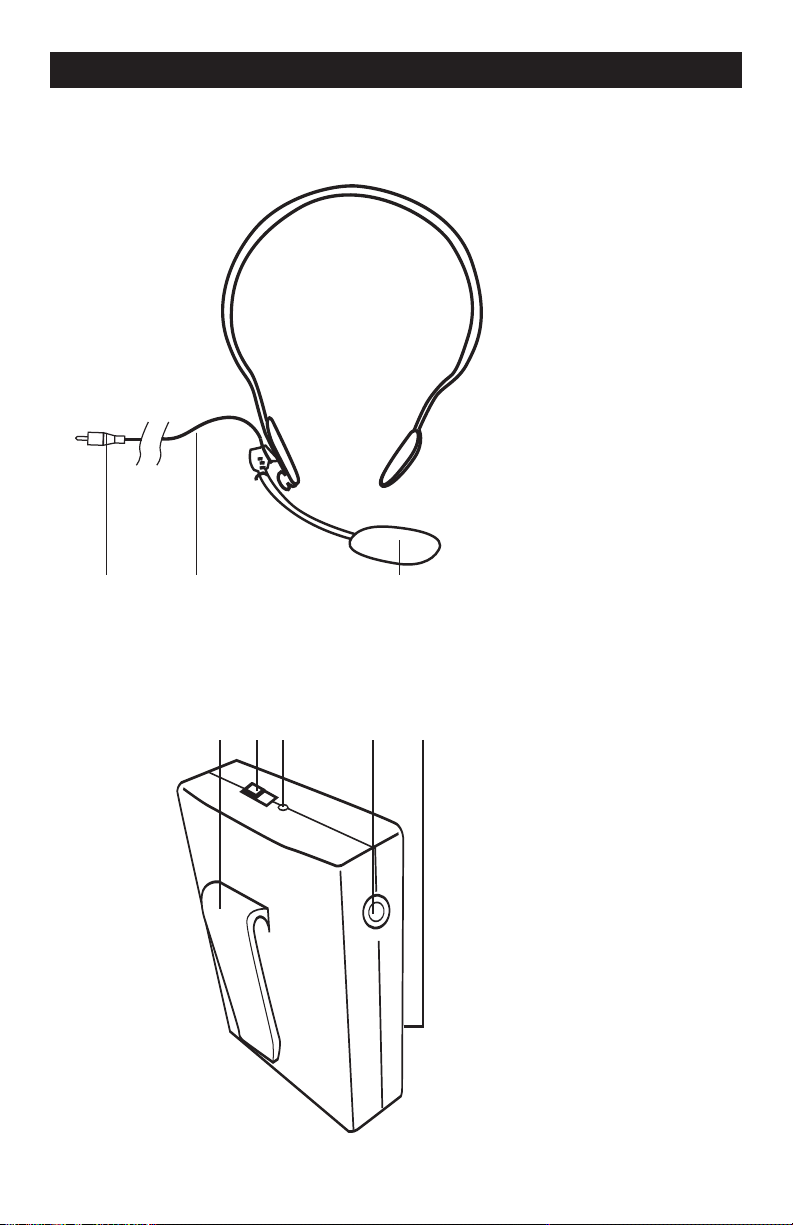
LOCATION OF CONTROLS (CONTINUED)
2
3
1
31 4 52
MICROPHONE
HEADSET
TRANSMITTERREAR VIEW
1. Headset Plug
2. Headset Cord
3. Microphone
1. Belt Clip
2. OFF/
STANDBY/ON
Switch
3. POWER Indicator
4. Headset Jack
5. Battery
Compartment
4
Page 5
INSTALLATION
+
-
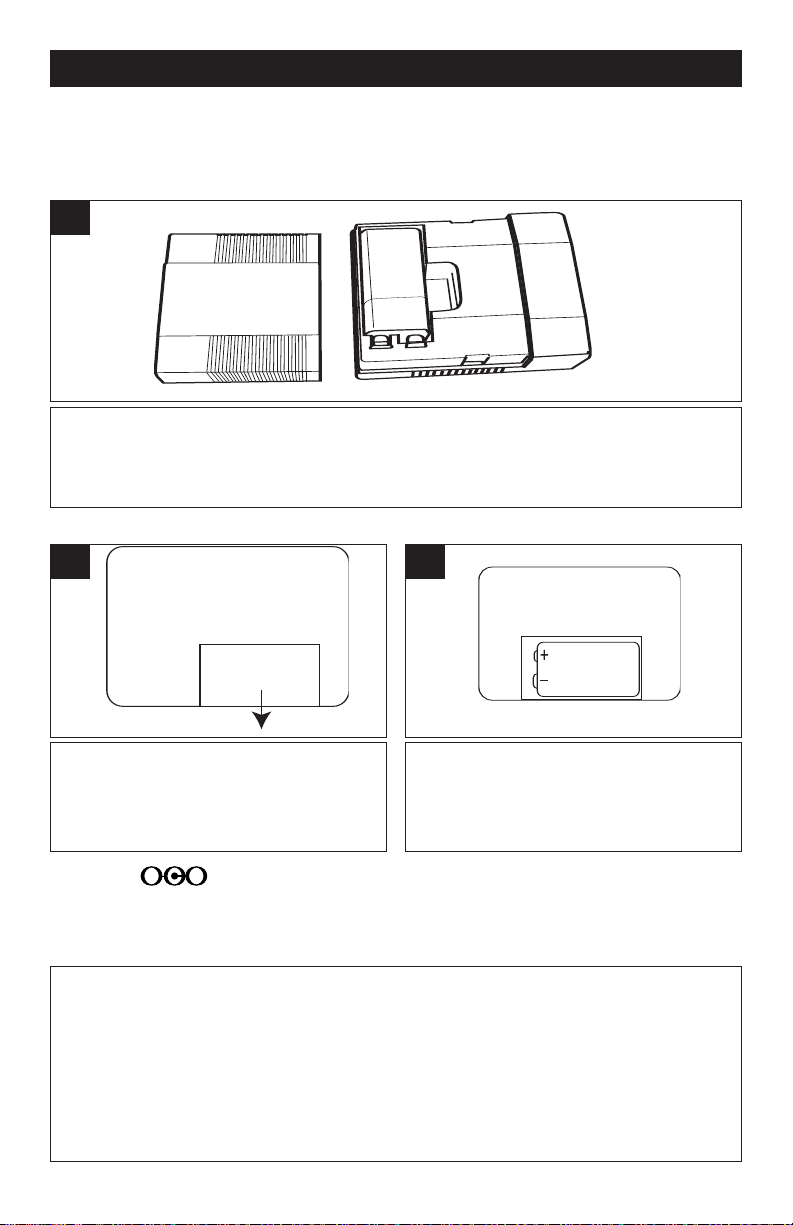
REPLACING THE BATTERIES
If the sound quality starts to become poor or the receiving distance has shortened,
replace the batteries in the transmitter and the receiver as follows:
INSTALLING THE BATTERY INTO THE TRANSMITTER
1
Remove the battery cover at the bottom of the transmitter by sliding it
downward and slightly remove the battery cover. Insert one 9V battery,
making sure to observe the correct polarity (+/–). Replace battery cover.
INSTALLING THE BATTERIES INTO THE RECEIVER
1 2
Remove the battery cover by sliding
it off. To prevent the possibility of
losing the cover, it cannot be
removed.
DC JACK
to an AC outlet having AC 120V, 60Hz only. Plug the small end into the DC 9V jack
on the side of the unit and connect the other end into the AC outlet.
The batteries will be disconnected when the AC adapter is connected.
Follow these precautions when using batteries in this device:
1. Use only the size and type of batteries specified.
2. Be sure to follow the correct polarity when installing the batteries as indicated in the battery
compartment(s). Reversed batteries may cause damage to the device.
3. If the device is not to be used for a long period of time, remove the batteries to prevent damage
or injury from possible battery leakage.
4. Do not try to recharge batteries not intended to be recharged; they can overheat and rupture.
(Follow battery manufacturer’s directions.)
To use the receiver with AC power, connect the AC adapter (included)
BATTERY PRECAUTIONS
Insert a 9V size battery (not
included) to the connector inside the
battery compartment. Slide the
battery cover back into place.
5
Page 6
OPERATION
1
2
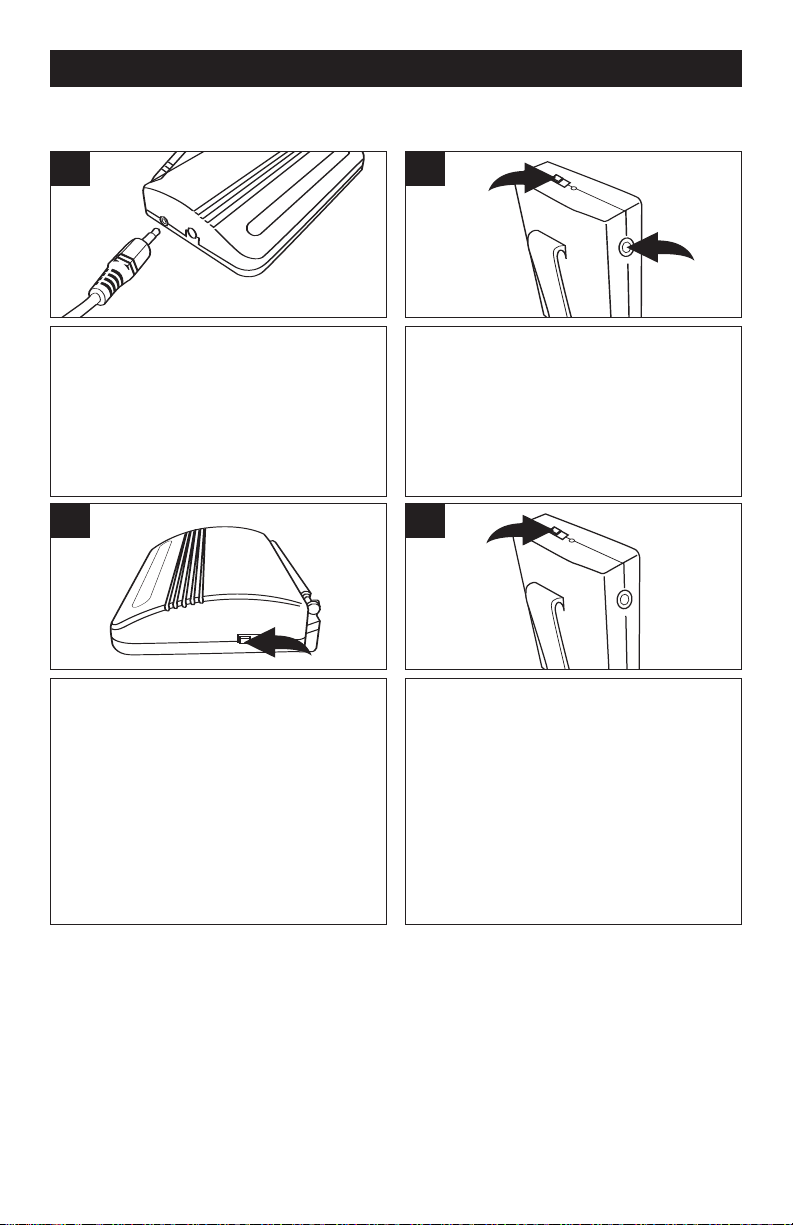
USING YOUR MICROPHONE (TRANSMITTING)
To use your microphone, please see the following:
1
Insert the large end of the cord into the
Microphone jack on the unit you are
connecting this wireless microphone to
and the small end into the Line OUT
jack on the receiver.
3
Slide the Receiver’s POWER switch
to the ON position; the red POWER
indicator on the receiver will light. If
the microphone headset is on, the
green Microphone ON indicator on
the receiver will also light. Raise the
antenna for best reception and speak
or sing into the microphone headset
as desired.
2
Connect the headset plug into the
Headset jack
the headset on your head and adjust the
microphone so it is in front of your mouth.
Slide the OFF/STANDBY/ON switch
the ON position; the POWER indicator
on the transmitter will light.
1 on the transmitter. Place
2 to
4
Slide the transmitter OFF/STANDBY/
ON switch to the STANDBY position to
put the microphone in Standby mode (it
will be on, but will not transmit).
Slide the transmitter OFF/
STANDBY/ON switch to the OFF
position to turn the microphone off; the
POWER indicator on the transmitter
and the green MIC indicator on the
receiver will go out.
NOTES:
• When done using the receiver, slide the POWER switch to the OFF
position; the red POWER indicator will go out.
If your microphone headset is not to be used for a long period of time,
•
remove the batteries in the transmitter and the receiver
If the microphone headset is out of range (microphone too far away from
•
the receiver) the green Microphone ON indicator on the receiver will turn
f and the microphone will be muted.
of
.
6
Page 7

SPECIFICATIONS
Power Requirement
Receiver ..............................................................DC 9V Battery
Transmitter ..........................................................DC 9V Battery
Frequency ..............................................................169.445MHz
Receive Distance...................................................................7m
Specifications subject to change without notice.
FOR ADDITIONAL SET-UP OR OPERATING ASSISTANCE, PLEASE VISIT OUR
WEB SITE AT
WWW.MEMOREXELECTRONICS.COM
OR CONTACT CUSTOMER SERVICE AT (954) 660-7100.
PLEASE KEEP ALL PACKAGING MATERIAL FOR AT LEAST 90 DAYS IN CASE
YOU NEED TO RETURN THIS PRODUCT TO YOUR PLACE OF PURCHASE OR
TO MEMOREX.
FOR PARTS AND ACCESSORIES, CONTACT FOX INTERNATIONAL AT
1-800-321-6993.
7
Page 8

Memcorp, Inc.
Weston, FL
Printed in Hong Kong
Visit our web site at www.memorexelectronics.com
Page 9
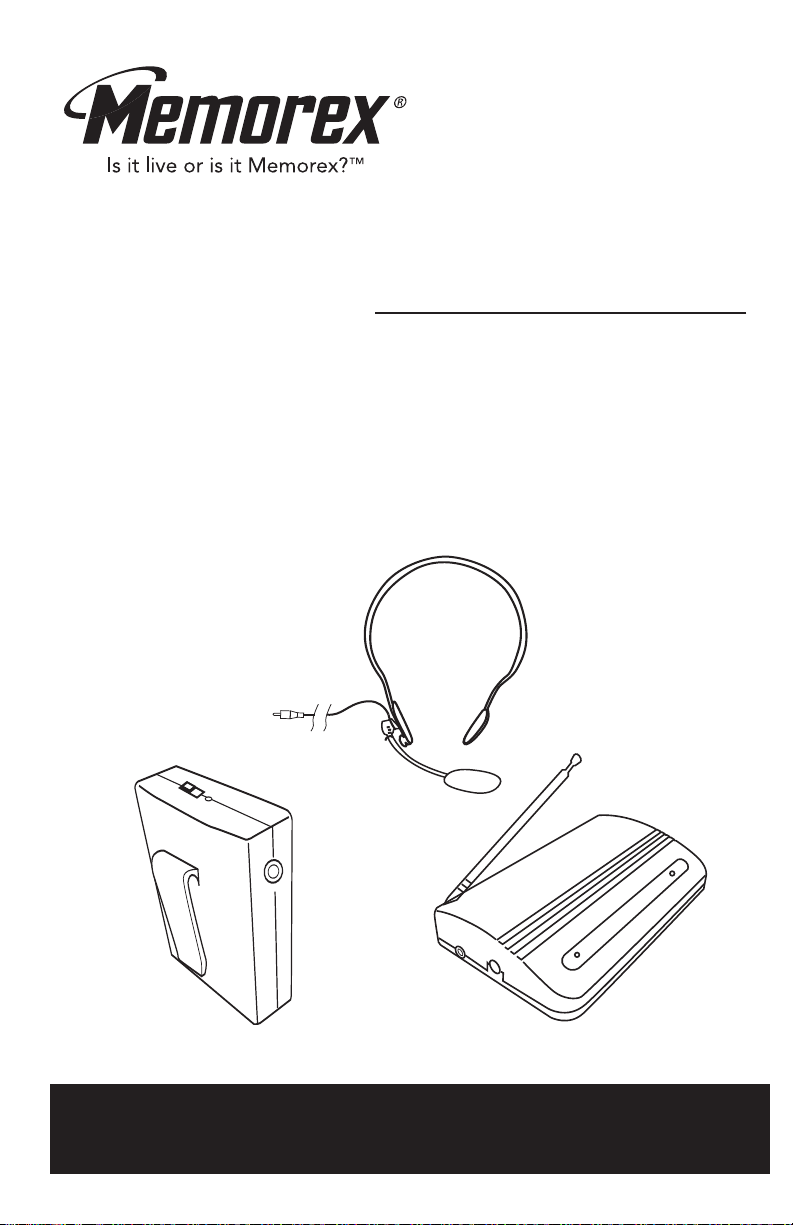
MKA382
User’s Guide
Wireless Microphone
Before operating this product,
please read these instructions completely.
 Loading...