

Page 1
R
STEREO HI-FI SYSTEM
with 4 CD CHANGER / MP3
and AM/FM PLL SYNTHESIZED TUNER
MODEL JX-CD8700
OWNER'S MANUAL
Visit our Web Site: http://www.jwin.com
JXCD8700V10M12EN05062005
Page 2
PRECAUTIONS
WARNING:
TO PREVENT FIRE OR SHOCK HAZARD, DO NOT USE THIS PLUG WITH AN EXTENSION CORD,
RECEPTACLE OR OTHER OUTLET UNLESS THE BLADES CAN BE FULLY INSERTED TO PRESENT
BLADE EXPOSURE. TO PREVENT FIRE OR SHOCK HAZARD. DO NOT EXPOSE THIS APPLIANCE TO
RAIN OR MOISTURE.
CAUTION
RISK OF ELECTRIC SHOCK
DO NOT OPEN
This lightning flash with
arrowhead symbol, within an
equilateral triangle, is intended
to alert the user to the
presence of uninsulated
“dangerous voltage” within the
product’s enclosure that may
be of sufficient magnitude to
constitute a risk of electric
shock persons.
1.
Read these instructions.
2.
Keep these instructions.
3.
Heed all warnings.
4.
Follow all instructions.
5.
Do not use this apparatus near water.
6.
Clean only with dry cloth.
7.
Do not block any ventilation openings. Install in accordance with the manufacturer’s
Warning: to reduce the risk
of electric shock, do not
remove cover (or back) no
user-serviceable parts
inside. Refer servicing to
qualified service personnel.
instructions.
8.
Do not install near any heat sources such as radiators, heat registers, stoves, or ot he r
apparatus (including amplifiers) that produce heat.
9.
Do not defeat the safety purpose of the polarized or grounding type plug. A polarized plug
has two blades with one wider than the other. A grounding type plug ha s two blades and a
third grounding prong. The wide blade or the third prong are prov ided for your safety. If the
provided plug does not fit into your outlet, consult an electrician for replacement of the
obsolete outlet.
10.
Protect the power cord from being walked on or pinched pa rti cul a r ly at the plugs,
convenience receptacles, and at the point where they exit from the apparatus.
11.
Only use attachments/accessories specified by the manufacturer.
12.
Unplug the apparatus during lightning storms or when unused for long periods of time.
13.
Refer all servicing to qualified personnel. Servicing is required when the app aratus has
been damaged in any way, such as power supply cord or plug is damaged, liquid has
been spilled or objects have fallen into the apparatus, the appara tu s has be en expo se d to
rain or moisture, does not operate normally, or has been dropped.
14.
This appliance shall not be exposed to dripping or splashing water and ob jects filled with
liquids such as vases must not be placed on apparatus.
The exclamation point within
an equilateral triangle is
intended to alert the user to
the presence of important
operating and maintenance
(servicing) instructions in the
literature accompanying the
appliance.
CAUTION:
To avoid electric shock, this unit must not be exposed to dripping or splashing water
Minimum distances around the apparatus for sufficient ventilation;
The ventilation should not be impeded by covering the ventilation openings with items, such as
newspapers, table-cloths curtains, etc.
No naked flame sources, such as lighted candles, should be placed on the apparatus;
Before scrapping the appliance, remove the batteries and place them in the appropriate battery
collection container.
CAUTION
CLASS 1 LASER PRODUCT
Use of Controls or adjustments or performance
of procedures other than those specified herein
may result in hazardous radiation exposure.
CLASS 1 LASER PRODUCT
LUOKAN 1 LASERLAITE
KLASS 1 LASERAPPARAT
CAUTION
CLEANING:
Always disconnect unit from power supply before attempting to clean it.
Use soft cloth moistened with soapy water, wipe gently.
Do not use solvents or abrasive materials.
LASER SAFETY
This unit employs a laser. Only qualified service
personnel should attempt repair.
DANGER: INVISIBLE LASER
RADIATION WHEN OPEN AND
INTERLOCK FAILED OR
DEFEATED. AVOID DIRECT
EXPOSURE TO BEAM.
CAUTION: HAZARDOUS LASER
RADIATION WHEN OPEN AND
INTERLOCK DEFEATED.
CAUTION: TO PREVENT ELECTRICAL SHOCK, MATCH WIDE BLADE PLUG TO WIDE SLOT AND
FULLY INSERT.
1
2
Page 3
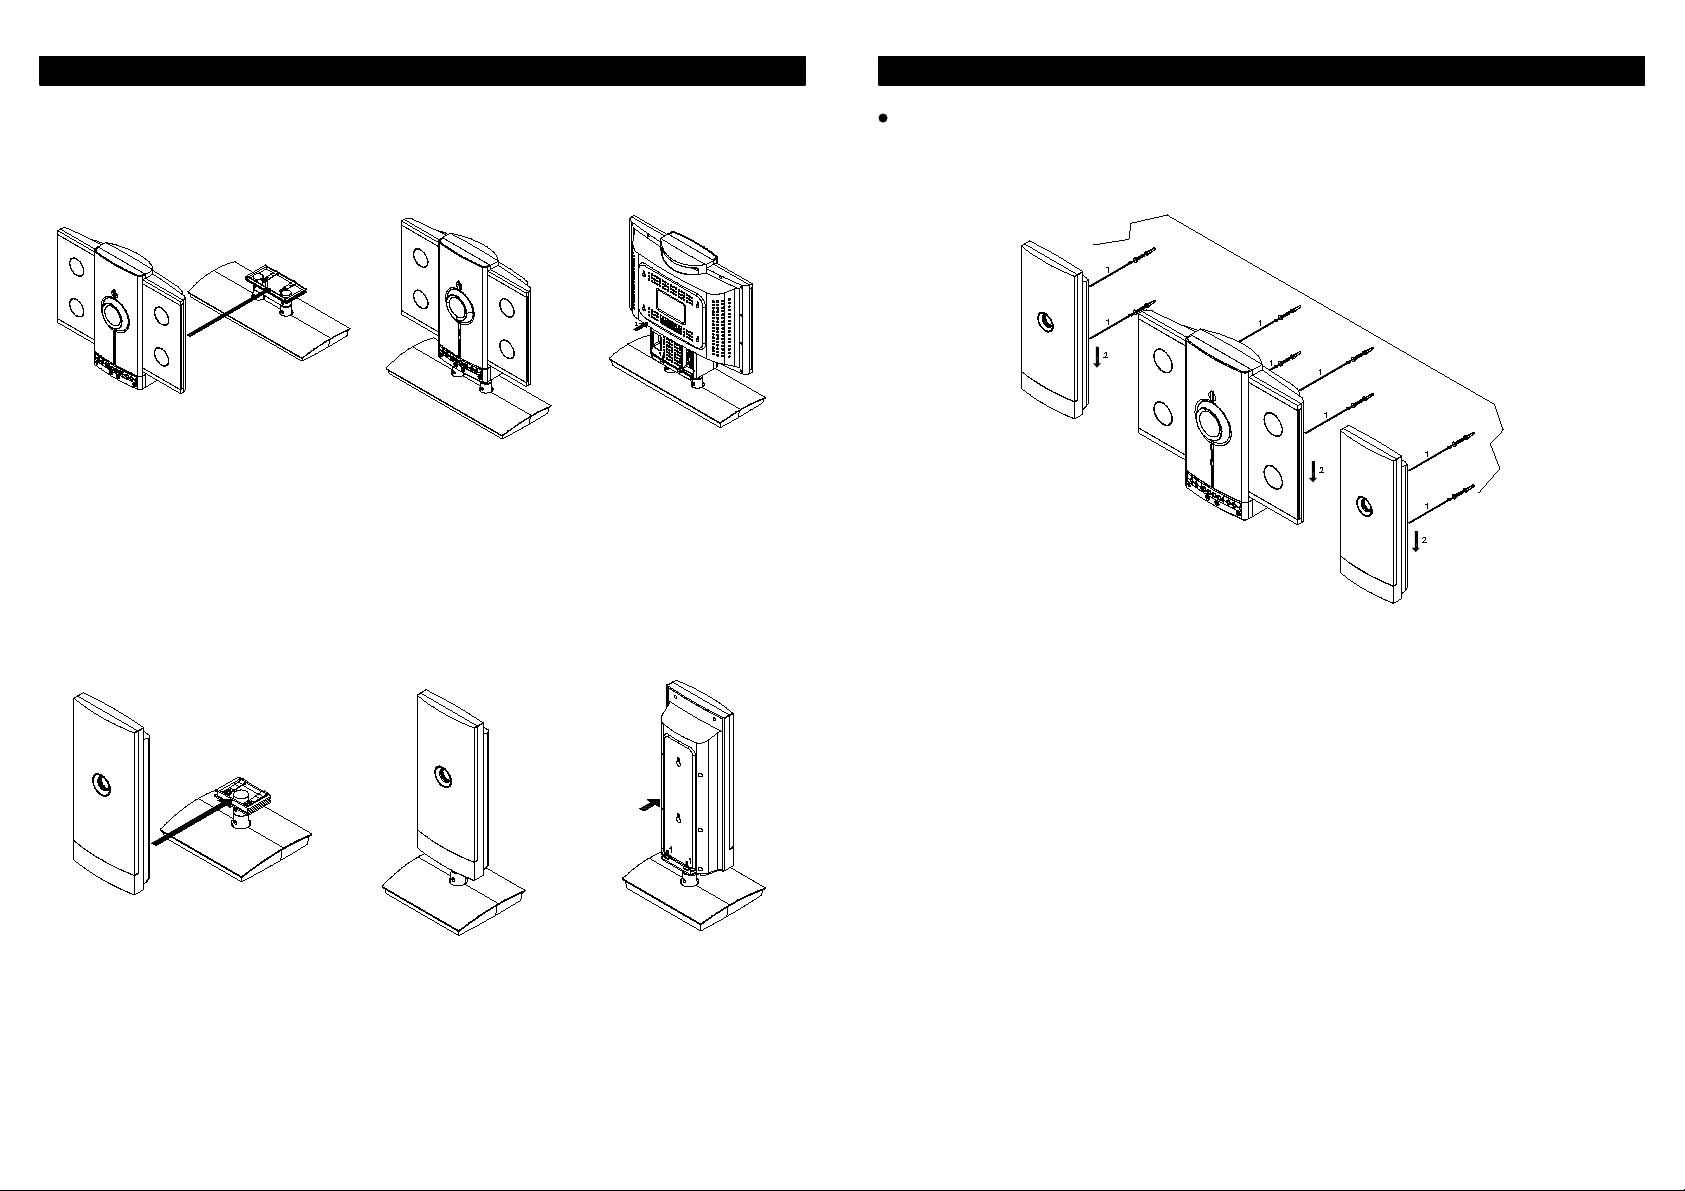
INSTALLATION
INSTALLATION (Wall Mounting)
MAIN UNIT ASSEMBLY AND DISASSEMBLY
CAUTION - This product may be use only with JWIN model JX-CD8500 stand. Use with other stands
may result in instability causing possible injury.
STEP 1 STEP 2 STEP 3
SPEAKER ASSEMBLY AND DISASSEMBLY
Secure the center unit and speakers on the wall (as show below) using 8 dowels and 8
screws (supplied).
STEP 1 STEP 2 STEP 3
3
4
Page 4

26
25
24
23
22
21
20
19
18
Front view
1.
POWER Button
Used to turn the system on and off
RIGHT CD DOOR
2.
3.
DISPLAY
VOLUME UP/DOWN Button
4.
Used to select the desired volume
5.
CD SELECTION 1-4 Button
Selects a CD to play from one of the 4 players
6.
EQ Button
Selects among “FLAT, POP, ROCK, JAZZ and
DISCO” as the tonal qualities desired for any
selection
7.
TUNER/BAND Button
Activates the TUNER and selects the AM, FM,
or FM/Stereo reception bands
8.
MUTE Button
Temporarily switches off the audio if desired
9.
MEM./CLK ADJ. Button
Supplies memory functions for tuner station
presets, clock setting, and CD programming
10.
HEADPHONES Jack
Stereo headphone socket: accepts 3.5mm plug
CONTROLS
14151617
11.
STOP/FM ST. Button
Interrupts the CD playback / clearing the CD
programme, provides stereo-mono switching for
FM stations
REPEAT/PRESET Button
12.
Repeat function for CD mode / retrieve preset
radio stations
PLAY/PAUSE Button
13.
Initiates CD operation and starts CD playback /
pauses CD playback
14.
MP3 MODE Button
Selects TITLE or ALBUM(folder) in MP3 mode
15.
OPEN/CLOSE R Button
Opens and closes the right CD changer door
16.
OPEN/CLOSE L Button
Opens and closes the left CD changer door
DISPLAY MODE Button
17.
Switching to time display (TIMER ON / OFF)
TUNING + SKIP/SEARCH Button
18.
CD forward title selection / CD forward search
operation / Manual tuning of stations, station
search operation
11
13
19.
FOLDER DOWN Button
Activates the MP3 folders (in descending order)
TUNING - SKIP/SEARCH Button
20.
CD backward title selection / CD backward
search operation / Manual tuning of stations,
1
2
3
station search operation
21.
REMOTE SENSOR
Receives infrared signals from the remote
control
TIMER Button
22.
Activates the timer
23.
SNOOZE Button
Turns off the unit for 9 minutes, after which the
unit will then resume its previous function
24.
FOLDER UP Button
Activates the MP3 folder (in ascending order)
25.
SLEEP Button
Set the automatic switch-off time
LEFT CD DOOR
26.
CONNECTIONS
4
5
6
7
8
9
10
12
28
29
27
Rear view
27.
AC
Plug the AC power cord into this socket before
plugging it into the wall outlet
Note:
When the system is connected to AC power,
parts of the unit may be in operation due to its
stand-by function. In order to switch the system
off completely, remove the AC power cord from
the AC outlet.
28.
FM ANT.
FM antenna “pigtail” wire
Note: Do not connect to an external antenna
29.
SPEAKERS R
Terminals for the right channel speaker
SPEAKERS L
30.
Terminals for the left channel speaker
SUBWOOFER Output Jack
31.
Optionally, connect an external subwoofer
speaker (not included)
30
31
5 6
Page 5

Antenna connection
You can achieve acceptable reception if you use
the supplied FM “pigtail” antenna. If so, the antenna
should be elongated and not coiled or bunched up.
If it hangs freely, it can be quite effective.
Speaker connection
Insert LEFT spkr’s striped wire into LEFT channel’s
SPKR block (30) by pressing the RED lever and
inserting the striped wire into the open hole. Do the
same with the LEFT speaker’s non-striped wire and
the BLACK lever. Repeat for the RIGHT channel
SPKR block (29) and the RIGHT speaker’s wire.
REMOTE CONTROL
55
54
53
52
51
50
49
AC power connection
Connect the power cable (included in the
accessories) first to the power socket (27) at the
unit and then insert the power plug into the wall
outlet. When you disconnect the plug from a socket,
do not pull the cable, always pull the plug.
Note: As soon as the unit has been connected to
AC power, parts of the unit are in operation, due to
the standby function. To switch off the unit
completely, remove the plug from the AC outlet.
Once the unit is plugged in, its time display (3)
starts flashing, refer to "Setting the digital clock"
on P.11.
32
33
34
35
32.
POWER Button
Used to turn the system on and off
33.
0 - 9, +10 NUMERIC Button
Recalls TUNER preset stations / Recalls CD
tracks
34.
INTRO Button
Plays the first 10 seconds of each CD track
35.
RANDOM Button
Randomizes the playback of CD tracks
36.
PRESET Button
Retrieves preset AM and FM radio stations
37.
SNOOZE Button
Turns off the unit for 9 minutes, after which the
unit will then resume its previous function
38.
PLAY/PAUSE Button
Initiates CD operation and starts CD playback /
pauses CD playback
39.
EQ Button
Selects among “FLAT, POP, ROCK, JAZZ and
DISCO” as the tonal qualities desired for any
selection
VOLUME + Button
40.
Adjusts to the desired volume (louder)
TUNING + SKIP/SEARCH Button
41.
CD forward title selection / CD forward search
operation / Manual tuning of stations, station
search operation
VOLUME - Button
42.
Adjusts to the desired volume (download)
REMOTE CONTROL
Battery Installation
1.
Remove the battery tray by pressing point (1a)
inside, then sliding point (1b) area at the same
time.
TUNING - SKIP/SEARCH Button
43.
CD backward title selection / CD backward
search operation / Manual tuning of stations,
station search operation
FOLDER DOWN Button
44.
Activates the MP3 folders (in descending order)
45.
STOP Button
Stops CD playback / Clears the CD program
memory
46.
FOLDER UP/STEREO/MONO Button
Activates the MP3 folder (in ascending order) /
Stereo/mono switching for FM stations
REPEAT Button
47.
Selects among CD playback repeat functions
48.
DISPLAY MODE Button
Switching to time display (TIMER ON / OFF)
DISC 1 - 4 Button
49.
Selects a CD to play from one of the 4 players
50.
MEMORY/CLK ADJ. Button
Supplies memory functions for tuner station
presets, clock setting, and CD programming
MP3 MODE Button
51.
Selects TITLE or ALBUM(folder) in MP3 mode
52.
SLEEP Button
Set the automatic switch-off time
53.
TUNER/BAND Button
Activates the TUNER and selects the AM, FM,
or FM/Stereo reception bands
TIMER Button
54.
Activates the timer
55.
MUTE Button
Temporarily silences the audio
48
46
44
47
45
43
36
37
38
39
40
41
42
2.
3.
4.
Pull out the battery tray.
Install or replace the button-type battery
“CR2032” (supplied).
Close the battery tray.
Note: Pull out insulation tag from the
button battery tray before operating the
remote control.
3
1b
1a
Warning: Danger of
explosion if battery is
incorrectly replaced.
Replace only with the
same or equivalent type.
7
8
2
4
Page 6

AMPLIFIER AND RADIO FACILITY
Switching the unit ON
Press the "POWER" button (1)/(32) to turn on the
system.
Operating mode selection
The different operating modes can be directly
selected using the buttons “PLAY / PAUSE ”
(13)/(38) for CD operation and “TUNER / BAND”
(7)/(53) for radio reception (3).
PLAY / PAUSE : playback from the built-in
compact disc player
TUNER / BAND: radio, selection of the frequency
bands
Adjusting the volume
To adjust the volume, press the “VOLUME UP/
DOWN” button (4)/(40)/(42).
To switch off the sound, press "MUTE" button (8)/
(55). This function is indicated by the word, MUTE
in the display (3).
By pressing this button or “VOLUME UP/DOWN”
button (4)/(40)/(42) again, the sound is switched
back on.
Caution! Too high a volume, especially with headphones, may damage your hearing.
Headphones socket
The headphones "PHONES" jack (10) is for
headphones with a 30 to 600 ohm impedance, and
equipped with a 3.5mm jack. Use an adapter (sold
in electronic outlets) if your headphone has a
different plug. The speakers are automatically
switched off when the headphones are being used.
CAUTION:
Listening at high power for a long periods could
damage users' ears.
About the tuner’s preset station memories
AM/FM radio operation
Switch the unit on by pressing the "POWER" button
(1)/(32). Switch to the Tuner operating mode by
pressing the button "TUNER / BAND" (7)/(53).
Manual station selection
Press button "TUNER / BAND" (7)/(53) repeatedly
until the desired frequency band appears. Press the
buttons "TUNING - or TUNING +" (20)/(43) or (18)/
(41) to tune to the desired radio stations and have
them indicated in display (3).
Briefly tapping the button "TUNING - or TUNING +"
step by step alters the reception frequency upward
or downward.
Station search operation
Holding down one of the two buttons "TUNING - or
TUNING +" (20)/(43) or (18)/(41) for approx. 1
second starts the search operation and determines
the direction of the search. The search operation
simply finds stations with strong signals. Stations
with weak reception can only be tuned in manually.
Hold the "TUNING - or TUNING +" button to start
the station search again. During the search
operation, the tuner is muted.
Stereo / Mono
Repeatedly pressing the button "STEREO /
MONO" (46) switches between stereo and mono
reception. The stereo reception of a station in the
FM band is indicated on the display (3)
In the case of stereo stations with a bad (noisy)
reception, we recommend switching tuner to mono
reception. Press the "STEREO / MONO" pushbutton. In the display (3), the message STEREO
disappears in mono mode.
Each time the "MEM./CLK ADJ." button (9)/(50) is
pressed, the memory positions are called up one
after another in ascending number order.
The memory positions are selected directly using
the numerical keys "1 - 0 / +10" (33) on the remote
control.
Program sites 1 - 9; press the corresponding key
"1- 9".
Program sites 10 - 19; Press button "+10" and
then the appropriate button " 0 - 9".
Program site 20; Press button "+10" twice and
then the button "0".
Programming AM and FM Stations in Memory
The program memory allows you store 30 stations
in FM and AM range. Program place selection is
described in the previous operating section.
In TUNER mode, select to FM or AM reception.
1.
Seek out the station required by "Manual station
2.
selection" or "Station search operation".
Press the “MEM./CLK ADJ.” (9)/(50) and then
3.
press the “REPEAT/PRESET” (12, front panel) or
“PRESET” (36, remote) until the desired memory
preset appears.
Press the “MEM./CLK ADJ.” button again to
4.
store the station along with its preset. Repeat
as required.
9 10
Note: You can also directly select the desired
program preset by pressing numeric buttons “1-0 /
+10” (33) on the remote control. Store any
remaining stations by repeating the process.
Changing a program position
If a memory position needs to be replaced by a
station other than the current one, the new station
can be programmed as described above, and will
replace the original station.
Page 7

DIGITAL CLOCK AND TIMER
Setting the digital clock
When you first plug in the unit, the display shows:
To set the clock to the current time proceed as
follows:
1. Press MEM./CLK ADJ. The hour flashes.
2. Enter the hour by pressing the buttons
TUNING + SKIP/SEARCH or
TUNING - SKIP/SEARCH.
3. Confirm the entry by pressing MEM./CLK
ADJ. The minutes will flash.
4. Enter the minutes by pressing the buttons
TUNING + SKIP/SEARCH or
TUNING - SKIP/SEARCH and confirm with
MEM./CLK ADJ.
3. To set the minutes, press the MEM./CLK ADJ.
again and use TUNING + SKIP/SEARCH
and TUNING - SKIP/SEARCH to adjust.
Confirm by pressing MEM./CLK ADJ.
4. Press DISPLAY MODE to proceed to setting
the switch-off time.
5. Set the switch-off time using the same
procedure as switch-on time setting.
6. Press DISPLAY MODE, as required to check
the current time, Timer On, and Timer Off.
7. Press TIMER (22)/(54) to activate the timer.
COMPACT DISC CHANGER
Safety notes for operation of the CD changer
Press one of the "OPEN / CLOSE" buttons (15) or
(16) to open the right or left CD cover (2) or (26).
The right and left CD cover do not opened or closed
at the same time. Make sure the cover is not
obstructed by any objects. This must also be
ensured when closing the CD cover. The disc
loader may only be opened or closed by pressing
either the button "OPEN / CLOSE". Take care that
no foreign objects can fall into the unit when the
disc compartment is open.
Under no circumstance should the laser pick up
lens be touched. Never look directly at the
beam.
CD changer operation
Switch the unit on by pressing the “POWER”
button (1)/(32). To turn on the CD mode, press the
button “ PLAY / PAUSE” (13)/(38) or any
one of the DISC 1-4 buttons (5) or (49). If one or
more CD(s) have already been inserted in the
chosen location(s), playback is started.
Then close the disc compartment by pressing the
“OPEN / CLOSE” button (15) or (16).
After having closed the disc cover, the CD system
immediately begins to scan the content of the
compact disc. Subsequently, the number of tracks
and the play-back time of the compact disc
occupying position 1 appear in the display unit (3).
Playing the entire CD
Select the desired CD with the button “CD
SELECTION 1 - 4” (5) or “DISC 1 - 4” (49) on the
remote. Playback begins automatically.
To switch to the clock display while in tuner and CD
modes, press DISPLAY MODE. The time is
displayed for approximately 10 seconds. The time is
also displayed when the unit is turned off.
Setting the timer
You can set automatic switch-on and switch-off
times with the built-in timer. Before you do this, be
sure the clock is set correctly.
1.
With the unit on, press DISPLAY MODE (17)/
(48), as required, until TIMER ON appears in
the display.
2.
Press MEM./CLK ADJ. (50). The hour flashes.
Use the TUNING + SKIP/SEARCH or
TUNING - SKIP/SEARCH to set the hour of the
desired switch-on time.
When the unit is on standby it will automatically
switch on for the programmed length of time.
The unit automatically selects the operating mode
(CD or TUNER) it was in when last switched off.
Make sure the tuner is tuned to a radio station, or for
CD operation, a CD must be inserted.
Snooze function: When the unit is switched on by
means of the timer, you can press the SNOOZE
button (23)/(37) to switch the unit off for
approximately 9 minutes. After this time, the unit
switches on again. You can press SNOOZE again,
or switch the unit off by pressing POWER.
Setting the sleep timer:
When the unit is in operation it can be set to
automatically switch-off 10 to 120 minutes later.
Press SLEEP (25)/(52), as required, until the
desired delay time appears on the display. The
SLEEP timer can be set for: 120, 90, 60, 50, 40, 30,
20, and 10 minute intervals. The unit automatically
turns off after the entered time has elapsed.
11
(TOC means Table of Contents) If there is no CD
inside, the following will appear after a few seconds:
Inserting and ejecting the CD
The CD compartment (2)/(26) is opened for
inserting or removing compact discs by pressing the
"OPEN / CLOSE" (15) or (16) button.
Insert the disc with the unlabelled side facing the
unit. Press the centre of the CD onto the black
holder that is fitted with 3 retaining bearings.
To remove the CD, hold it by the edges and lightly
press on the holder to remove it.
If the playback of one CD has finished, the playback
of the next inserted CD begins, and so on.
Note: If the CD player is in stop position, you can
start the currently indicated CD by pressing the
button “ PLAY / PAUSE” (13)/(38).
If you select a different CD by pressing the buttons
“CD SELECTION 1 - 4” (5) or “DISC 1 - 4” (49),
playback will start automatically.
Pause / stop
To briefly interrupt playback, press “ PLAY /
PAUSE” button (13)/(38). The display indicates:
Press “ PLAY / PAUSE” button again to
restart play.
To end the playback, press the “STOP” button
(11)/(45).
12
Page 8

Random play
Press RANDOM on the remote control before or
during CD play. The tracks in the CD will be played
in random sequence.
To cancel random play, press STOP, or press
the RANDOM button again.
Repeat play
Press REPEAT once and the track being played
will replay continuously.
Press REPEAT twice to have the entire CD played
continuously.
The selected number appears on the display. If the
CD player is in stop mode, play starts automatically
when a track is selected using the numerical
buttons.
Search operation
While the CD is in play mode you can scan tracks
by holding down TUNING + SKIP/SEARCH
and TUNING - SKIP/SEARCH. The CD will
continue to play until you find the track you want.
When you release the button the unit will resume
normal play mode.
Track intro-scan
Press INTRO while in stop mode to play the first 10
seconds of each track on all inserted CDs.
Press INTRO again and the selected track plays.
Preset EQ function
Press the EQ button (6) or (39) repeatedly to cycle
through the preset EQ shown on the LCD display FLAT, POP, ROCK, JAZZ and DISCO.
Program memory
The built-in program memory lets you play up to 40
tracks (from up to 4 CDs) in the order of your
choice. A track can be stored more than once within
the program.
1. Load the CDs.
2. Press MEM./CLK ADJ. (9)/(50) in the stop
mode to switch to programming mode.
5.
Press MEM./CLK ADJ. to save the track in the
first program location. For example, if you
selected CD 1, track number 14, it will appear in
Program position 1 as shown.
6. For the next program position, reselect this
or another CD and select a track.
7. Confirm the selection using the MEM./CLK
ADJ. button.
8. To program other tracks in the memory,
repeat steps 3 - 7.
PLAYING MP3 DISCS
Inserting and ejecting an MP3 disc
The CD compartment (2)/(26) are opened for
inserting or removing compact discs by pressing the
"OPEN / CLOSE" (15)/(16) buttons.
To play the program, press PLAY/PAUSE.
The program can be played back again as long as
MEMORY appears on the display.
To clear the programming and resume normal
playback
The programming is erased by pressing STOP
until the MEMORY display disappears, or by
opening the CD changer door. If the unit is
switched off, the program is not erased.
Note: REPEAT will not function in programmed
play.
NOTE: This unit counts all the folders on an MP3
disc, even if a folder doesn’t contain any MP3 file(s).
If you select a folder which doesn’t contain any MP3
file(s), the unit will automatically skip to the next
folder until it finds one containing an MP3 file(s).
Playing the entire MP3 CD
1. Select the desired CD with the button “CD
SELECTION 1 - 4” (5) or “DISC 1 - 4” (49) on
the remote. Playback begins automatically.
2. To stop the disc playing, press the “STOP”
button (11)/(45)
Press REPEAT three times to have all the inserted
CDs (up to 4) played continuously.
Track selection
Press TUNING + SKIP/SEARCH and
TUNING - SKIP/SEARCH to select the desired
tracks. The tracks can be selected directly by
pressing the corresponding numerical buttons 1 - 0
/ +10.
Insert the MP3 disc with the unlabelled side facing
the unit. Press the center of the CD onto the black
holder fitted with 3 retaining bearings.
To remove the CD, hold it by the edges and remove
it by gently pressing on the black holder.
Select a CD by pressing the corresponding
3.
DISC 1 - 4 button.
Select the desired track using the numerical
4.
buttons 0 - 9 / +10 on the remote control or by
repeatedly pressing TUNING + SKIP/
SEARCH and TUNING + SKIP/
SEARCH.
Then close the disc compartment by pressing the
“OPEN / CLOSE” button (15) or (16).
After having closed the disc cover, the CD system
begins immediately to scan the content of compact
disc inserted. Afterwards, the number of tracks and
the play-back time of the compact disc occupying
position 1 appear in the display unit (3).
13 14
3. Press the “FOLDER” or button (24)/
(19) or (46)/(44) to select desired MP3 album.
Page 9

4. Press the “ TUNING + or TUNING -”
button (18) or (20) to select desired track.
5. Press the “PLAY/PAUSE” button to play MP3.
Pause / stop
To briefly pause playback, press the “ PLAY
/ PAUSE” button (13)/(38). Display indicates:
Press “ PLAY / PAUSE” button again to
restart play.
To end the playback, press the “STOP” button
(11)/(45).
Playback in random sequence
Press the “RANDOM” button (35) on the remote
control in stop condition to start random play.
By pressing button “STOP” (11)/(45), the
random playback is cancelled. This function can be
switched off by pressing “RANDOM” button again.
Press the “REPEAT” button again to have the
entire MP3 disc played continuously.
Press the “REPEAT” button again to have all the
inserted MP3 discs played continuously.
Title introduction
Press the “INTRO” button (34) during stop mode to
playback the first 10 seconds of each title.
Press the “INTRO” push-button again and the CD
player plays the current selected track.
Program memory
The built-in program memory enables up to 40 titles
to be played from up to 4 CDs in the order of your
choice. Any title can be stored more than once
within one program.
Insert a CD in its compartment.
1.
By pressing the button “MEM./CLK ADJ.” (9)/
2.
(50) in the stop mode you can switch to
programming mode.
3.
Select the desired title using the numeric
buttons “0 - 9 / +10” (33) on the remote control
device or by repeatedly pressing “
TUNING + or TUNING - ”.
Press the “MEM./CLK ADJ.” (9)/(50) to save
4.
the title on the first program location. In display
unit (3) appears:
Confirm selection using the “MEM./CLK ADJ.”
5.
button (9)/(50).
To store the remaining titles in the memory,
6.
repeat steps 3 - 5.
To play back the program, press the “PLAY
/ PAUSE” button (13)/(38). When “PLAY /
PAUSE” is pressed, the program can be played
back again as long as MEMORY appears on the
display unit (3).
To clear the programming (Resume Normal
Playback):
The programming is erased by pressing the “
STOP” button (11)/(45) in the programming mode
(until the MEMORY display disappears), or by
opening the disc compartment.
Note:
REPEAT button (12)/(47) is not used for
programming.
ID3 TAG (Artist/Title)
When an MP3 disc is playing, press the “MP3
MODE” button repeatedly. The track no., title and
artist information will be shown in the display if disc
information is available.
To resume normal play display, press the “MP3
MODE” button repeatedly until playing time
reappears.
CARE AND MAINTENANCE
Treat the disc carefully. Handle the disc only by its edges. Never allow your fingers to contact with the
shiny, unprinted side of the disc.
Do not attach adhesive tape, stickers etc., to the disc label.
Clean the disc periodically with soft, lint-free, dry cloth. Never use detergents or adhesive cleaners to
clean the disc. If necessary, use a CD cleaning kit.
If disc skips or gets stuck on a section of the disc, it is probably dirty or damaged (scratched).
When cleaning the disc, wipe in straight lines from the centre of the disc to the edge of the disc. Never
wipe in circular motions.
To remove a disc from its storage case, press down on the centre of the case and lift the disc outs,
holding it carefully by the edges.
Fingerprints and dust should be carefully wiped off the disc's recorded surface with a soft cloth. Unlike
conventional records. compact disc have no groove to collect dust and microscopic de bris, so gently
wiping with a soft cloth should remove most particles.
Repeat
Press the “REPEAT” button (12)/(47) during MP3
playback to have the title currently being played at
repeated continuously.
15
16
Page 10

SPECIFICATIONS
GENERAL
Power requirement AC 120V ~ 60Hz
Power consumption AC 35 Watts
DC Battery size “CR2032” for
Remote Handset
Dimension Unit 440 (W) x 171.5 (D) x 1075 (H)mm
RECEIVER SECTION
Receiving bands AM/FM
Tuning range AM 530 - 1710KHz
CD PLAYER SECTION
Playback system 4 CD front loading changer
Frequency response 60 - 18,000 Hz
AUDIO SECTION
Power output 12 Watts per channel
Speaker impedance 3 ohms
Headphone impedance 8 - 32 ohms
ACCESSORIES
Power AC cord 1 pc
Instruction Manual 1 set
Remote Control handset 1 pc
Speakers 207.7 (W) x 171.5 (D) x 1065 (H)mm
FM 87.5 - 108MHz
17
 Loading...