

Page 1
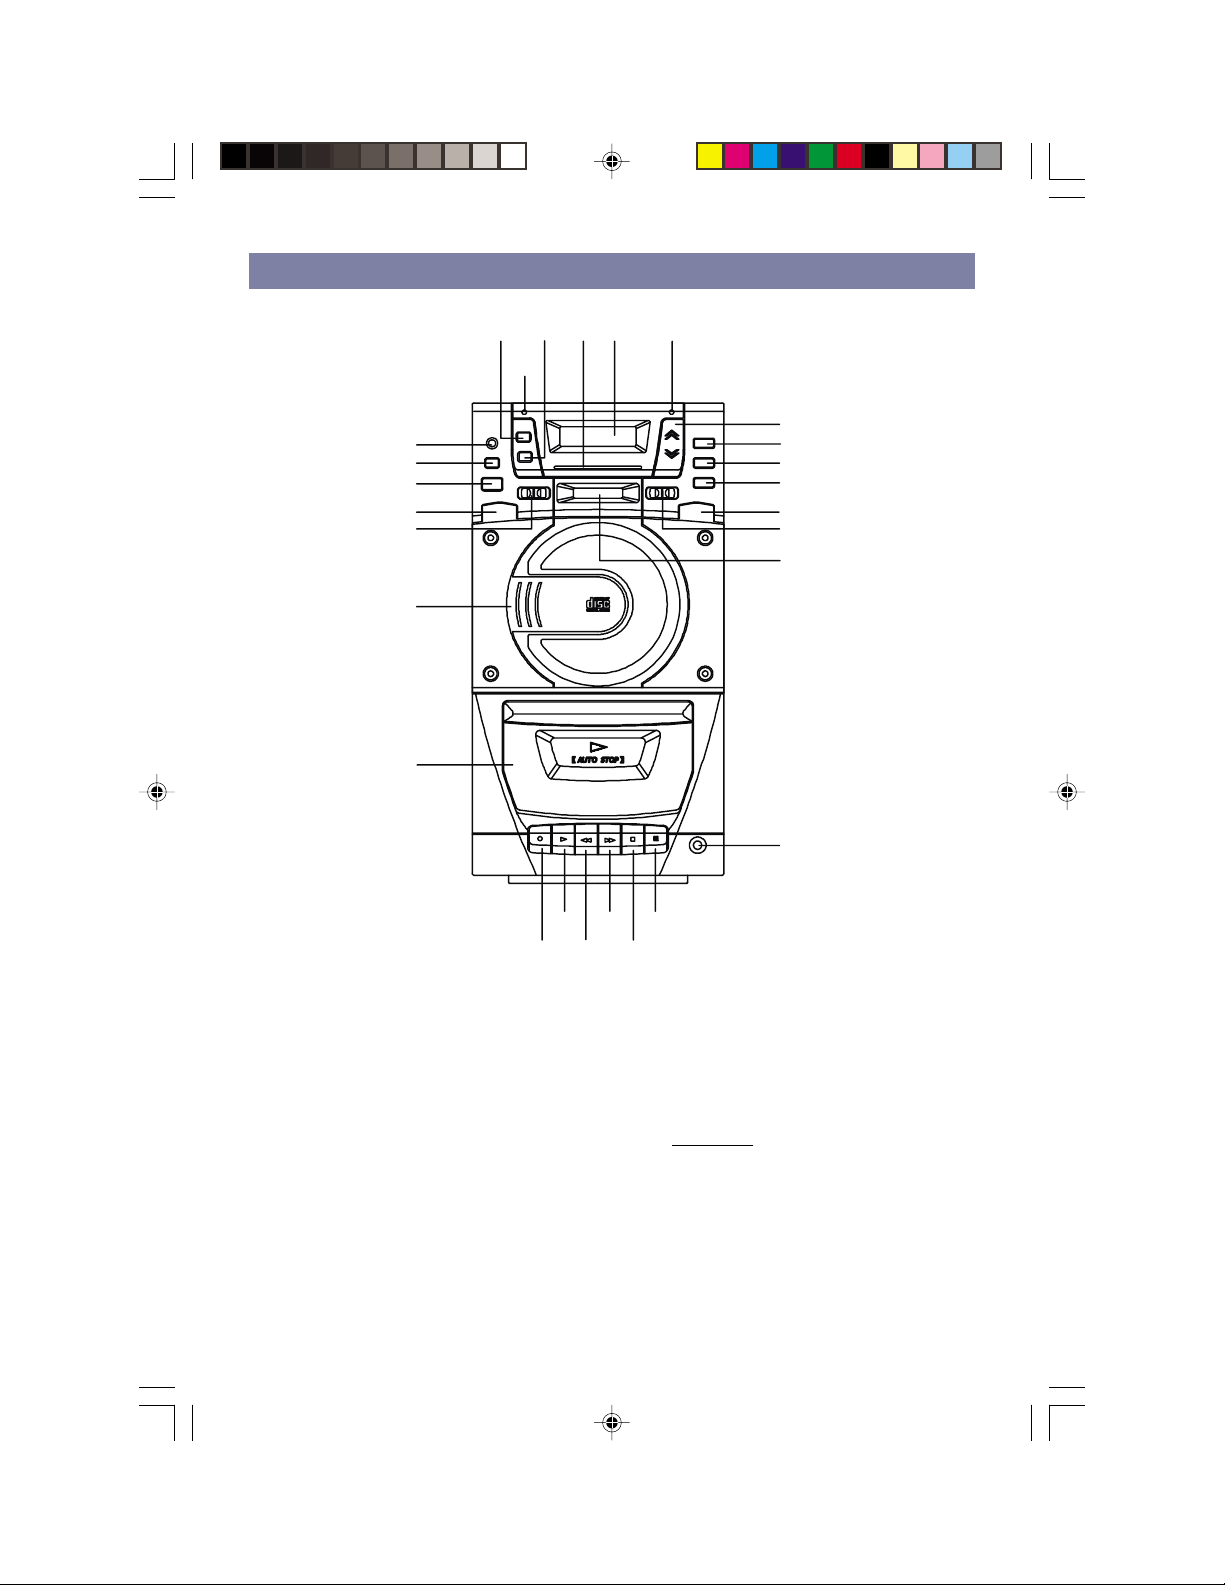
LOCATION OF CONTROLS
25 22 9 18 3
2
19
5
23
1
10
20
6
7
26
27
24
21
11
8
4
1. Power / Stand-by Button
2. Stand-by / Mute Indicator
3. FM Stereo Indicator
4. Stereo Headphone Jack
5. Bass Boost (BBS) Button
6. Cassette Door
7. Volume Up / Down Button
8. Tuning Knob
9. Dial Pointer and Dial Scale
10. Function Selector - CD, Tape, Tuner
11. Radio Wave Band Selector
12. Record Button
13. Play Button
14. Rewind Button
004AV1R.p65 2004/2/10, PM 04:071
13
12 14
15 17
16
15. Fast Forward Button
16. Stop / Eject Button
17. Pause Button
18. L.C.D. Display
19. Remote Sensor
20. CD Compartment
CD Buttons
21. CD Push Open Button
22 Repeat Button
23. Stop Button
24. Play / Pause Button
25. Program Button
26. Skip/Search Forward Button
27. Skip/Search Backward Button
1
Page 2

PREPARATION FOR USE
Remove the stereo carefully from the box, retaining the packaging for future use.
Read these instructions carefully before use.
CONNECTIONS
Connect the speakers to the speaker jack (RCA) on the back of the unit.
Connect the right speaker to the right jack (red) and the left speaker to the left jack (white).
Connect the AC Power cord to an AC outlet.
Unwind the FM antenna.
AC POWER OPERATION
Make sure the voltage setting is correct. Switch on the mains supply.
Press the Power / Stand-by button to switch the unit on or off. The Stand-by Indicator will go
out when in the power is on.
Disconnect the power cord from the mains if the unit is not going to be used for long time.
RADIO OPERATION
1 Attach the plug to the wall socket.
2 Press the Power/ Stand-by button so that it stays depressed.
3 Place the FUNCTION selector switch in the position marked TUNER.
4 Place the RADIO WAVE BAND selector switch in the appropriate position depending
5 Tune in the broadcast station you desire by using the TUNING knob to move the DIAL
6 Adjust the sound level as you wish by using the VOLUME control and to adjust the
on which waveband you wish to hear.
POINTER along the DIAL SCALE.
tone of sound by pressing Bass Boost button.
FM STEREO / MONO BUTTON
When the RADIO WAVE BAND selector is placed in the "FM ST" position, if the FM broadcast
station you are listening to is broadcasting in stereo, the FM STEREO RECEPTION indicator
will light up. You wish then be listening to FM STEREO. In certain case, the signal strength
of the broadcast station may be weak or varying and this may cause excessive background
noise. In these cases adjust the FM EXTERNAL antenna and/or places the RADIO WAVE
BAND selector in the "FM" position.
ANTENNA
l For FM reception there is a Wire Antenna at the rear of the unit. Extend the antenna
l For AM/MW reception the signals are picked up through the built-in ferrite antenna.
004AV1R.p65 2004/2/10, PM 04:072
and move it around to obtain the best reception.
You may have to move or rotate the unit to obtain the best reception.
2
Page 3
What Discs?
Only Discs displaying this symbol can be played on this unit.
PLAYING COMPACT DISCS
Loading and Unloading Compact Discs
l Press the Power / Stand-by button to turn the unit on.
l Place the FUNCTION selector switch in the position marked "CD".
l Press the CD Open button to open the CD compartment.
l When the disc compartment has opened, remove a disc from its case and place the
l Close the CD compartment.
l When the compartment is fully closed, it will start to spin the disc and display the
or it is wrongly placed, the display will show " no disc".
l The disc compartment may be opened at any time by pressing the Open button.
Remove the CD only after the CD has stopped spinning and the compartment has fully
CD vertically in the compartment with the label side facing towards you.
total number of tracks on the CD and the total playing time. If there is no disc,
opened.
CAUTION
l Do not put anything except a compact disc into the compartment. Foreign objects can
l Do not force the compartment by hand during the opening operation.
l Keep the disc compartment closed when not in use to prevent dirt and dust from
l Never place two or more discs into the compartment at any time.
damage the mechanism.
entering the mechanism.
004AV1R.p65 2004/2/10, PM 04:073
3
Page 4

NORMAL DISC PLAY
l Load a CD into the disc compartment, and close the compartment, the display will
l Press the CD Play/Pause button.
A track can be selected by using the CD Skip / Search buttons. If this is done before
once the Play/ Pause button is pressed.
l At the end of the disc, the unit will switch to stop mode
Notes: If the disc is deeply scratched, or too dirty, disc play may not start.
show the total playing time and the total number of tracks on the CD.
pressing the Play/Pause button, disc play will start with the selected track
If an improperly centred disc is played, noise can be heard in the
mechanism. The use of such discs should be avoided.
IMPORTANT INFORMATION
This compact disc player has built-in error compensation circuits to correct for minor
defects in a disc. There are limits, however, to the amount of correction available.
In some cases, the CD player may skip some tracks on a disc during disc play. This
problem may be caused by defects (such as scratches) in the disc being played,
which are too large for the error compensation circuits to handle.
TO STOP A CD AT MID. WAY
l Press the Stop button. Disc play will stop.
l To temporarily stop disc play (pause mode), press the Play/Pause button. Disc play
l To resume disc play, press the Play button again.
will stop at the current play position. The elapsed time will begin to flash.
TRACK SKIP
STARTING DISC PLAY FROM THE BEGINNING OF A PARTICULAR TRACK
l Press the Forward ( ) or Reverse ( ) Search/Skip button to select the desired
Press the Play button to start play.
TO SKIP TO THE NEXT TRACK
l For example, to skip forward to the beginning of track 5 while track 4 is playing.
l Press the Forward Search/Skip button ( ) once. Disc play will start at the
The CD player will skip forward to the next track each time the Forward Search/Skip
button ( ) is pressed. Repeatedly pressing the Forward Search/Skip button makes
the CD player skip forward through the disc track by track. Once the beginning of the
last track is reached the CD player will go to track 1.
TO SKIP BACK TO THE PREVIOUS TRACK
l For example to skip back to the beginning of track 3 while track 4 is playing.
l Press the Reverse Search/Skip button ( ) twice. Disc play will start at the
004AV1R.p65 2004/2/10, PM 04:074
track. The number of the selected track will be shown on the CD display.
beginning of track 5.
beginning of track 3.
4
Page 5

The CD player will skip back one track each time the Reverse Search/Skip button ( )
is pressed. If this button is pressed in the middle of a track, the CD player will skip
back to the beginning of that track. To make it skip back to the previous track press the
Reverse Search/Skip button twice.
Once the beginning of the first track is reached, the CD player will go back to the last
track.
Notes: The Forward and Reverse Search/Skip buttons can be used to select a
desired track to play from before disc play starts. In this case the number
of the selected track will be displayed until the Play/Pause button is
pressed.
SEARCH
During playback, press and hold the Forward Search/Skip or Reverse Search/Skip button
will cause the player to scan through the current track. At the end of a track the player will
skip to the next track and continue scanning.
When the player reaches the end of the final track during Forward Search, or the beginning
of the first track during Reverse Search, it will stop scanning.
REPEAT DISC PLAY
Use the Repeat button to listen to an entire disc, one track, or a programmed sequence
repetitively.
FOR REPEAT PLAY OF ONE TRACK
Press the Repeat button once. The Repeat (REP 1) indicator will be displayed in the CD
display.
Select the desired track by repeatedly pressing the Forward or Reverse Skip Track button .
The selected track will be shown in the CD display.
Press the Play/Pause button.
The selected track will then begin playing through to its end. At which point it will
automatically return to the beginning of that track. This will continue until the Stop button is
pressed.
If the Repeat button is pressed 2 more times during play, the repeat indicator will go off,
repeat play will end, and normal disc play will resume from that point.
FOR REPEAT PLAY OF ALL THE TRACKS ON THE CD
Press the Repeat button twice. The Repeat (ALL) indicator will be shown on the display.
Press the Play/Pause button.
The disc will then begin playing through to the end of the last track. At which point it will
automatically return to the beginning of the first track. This will continue until the Stop button
is pressed.
If the Repeat button is pressed once more, the repeat indicator will go off, repeat play will
end, and normal disc play will resume from that point.
When the last track has finished playing, the CD player will be set to the Stop mode.
5
004AV1R.p65 2004/2/10, PM 04:075
Page 6

FOR REPEAT PLAY OF A PROGRAMMED SEQUENCE
Enter a program track as described in the Programmed Dics Play.
Press the Repeat button. The Repeat indicator will be displayed.
Press the Play/Pause button .
The CD will then begin playing through the sequence in the order in which they were
programmed, to the end of the last programmed track. At which point it will automatically
return to the beginning of the first programmed track. This will continue until the Stop button
is pressed.
If the Repeat button is pressed again, the repeat indicator will go off, repeat play will end.
Disc coutinues to play, until the last programmed track has finished playing, the CD player
will stop.
PROGRAMMED DISC PLAY
It is not possible to enter programs during disc play. Press the Stop button first, then follow
the instructions below.
ENTERING A PROGRAM
Press the Program / Mem button. The following will be displayed on the CD display. Track
memory will flash in the corner of the display
00 P-01
Select the desired track using the Forward or Reverse Skip Track button. The selected track
number will be shown on the CD display
04 P-01
Press the Program / Mem button. The first program selection is now stored in the program
memory.
00 P-02
For the next track, select the desired track number, then press the Program button.
07 P-02
Continue entering tracks in this way until all the desired tracks are stored (up to a limit of 21).
Notes: If the Play/Pause button is pressed before pressing the CD program button
playing from the first selected track.
Any track can be programmed to play more than once.
004AV1R.p65 2004/2/10, PM 04:076
the track will not be stored in memory, and the disc will start
6
Page 7

LISTENING TO PROGRAMMED TRACKS
Enter a program as described above
Press the Play/ Pause button. The track number and playing time will be displayed.
Disc play will start at the beginning of the first programmed track.
When all of the programmed tracks have finished playing, the CD player will enter the stop
mode.
TO CLEAR THE PROGRAM MEMORY
If the disc is playing, press the Stop button to clear the memory
Note: The program memory will also be cleared if the disc compartment is
opened, or if the power is switched off.
CASSETTE TAPE PLAYBACK
l Press the Power / Stand-by button to turn the unit on.
l Place the FUNCTION selector switch in the position marked TAPE.
l Press the Stop/Eject key to open the Cassette Door.
l Insert your cassette tape with the exposed section at the bottom and the playback
l Close the Cassette Door securely.
l Press the Play key to activate playback.
l Use the Pause key whenever you want to suspend playback.
l Press the Stop/Eject key when finished.
side facing you.
RECORDING
RECORDING FROM THE RADIO
l Select the TUNER function by pressing the TUNER Button.
l Tune in your station and put in your cassette tape.
l Press the Record Key and the Play Key at the same time to start recording.
l Press the Stop/Eject key when finished.
RECORDING FROM CD
l Select the CD function by pressing the CD Button.
l Press the Record Key and the Play Key at the same time.
l Press the CD Play/Pause button.
l To stop recording, press the Stop button of the CD player. Then press the Stop/Eject
004AV1R.p65 2004/2/10, PM 04:077
key of the cassette deck.
7
Page 8

HEADPHONES
Headphones should have a 3.5mm diameter stereo plug and an impedance of 8-32
ohms. When headphones are connected, the speakers are automatically
disconnected.
SOUND CONTROLS
The Bass Boost (BBS) button is used to enhance bass boost sound.
REMOTE CONTROL TRANSMITTER
1. Power On/Off Button
2. Stop Button
3. Play / Pause Button
4. Skip Search Forward /
Backward Button
5. Program Buttom
6. Repeat Button
7. Mute Button
8. Volume Up / Down Button
4
5
6
7
3
2
1
8
BATTERY INSTALLATION
Insert 2 "AAA" size or equivalent batteries into the battery compartment of the remote
control and close the cover.
BATTERY REPLACEMENT
When the batteries become too weak, the operating distance of the remote control is greatly
reduced and you will need to replace the batteries.
Notes: To maintain the accuracy and long life of the transmitter, do not press two
004AV1R.p65 2004/2/10, PM 04:078
or more Buttons simultaneously.
If the remote control is not to be used for a long time, remove the batteries
to prevent possible damage through leaking batteries.
Do not mix different types of batteries, or old batteries with new ones.
8
Page 9

USING THE REMOTE CONTROL CORRECTLY
Point the remote controller at the Remote Sensor.
The functions of the Buttons on the remote control are the same as the corresponding
controls on the main unit.
When there is a strong ambient light source, the performance of the infrared Remote Sensor
may be degraded, causing unreliable operation.
The maximum effective distance for remote control operation is about 5 metres (16.5 feet).
AUTOMATIC LEVEL CONTROL (ALC)
This has an automatic recording level control built into the cassette circuitry that is
electronically adjusted to control signal level from any source. therefore, recording is not
affected by the setting of the VOLUME or BASS BOOST button.
CASSETTE TAPE RECOMMENDATIONS
Standard tape lengths have 15 (C-30) and 30 (C-60) minutes of recording time on
each side. Longer length of 45 (C-90) and 60 (C-120) are available, but because longer
tapes in the same size packing need thinner materials, the chance for malfunction is much
greater. Longer Lenger tapes are not recommended. Use only high quality tapes. If
problem happens, try to use a new tape. If there is any slack in the cassette tape, insert a
pencil in the cassette hubs and rotate toward the outside of the cassette until the slack is
taken up.
SAFEGUARD AGAINST ACCIDENTAL ERASURE
To safeguard valuable recordings from being erased accidentally, there is an erasure
prevention tab on each side of the cassette. To prevent accidental erasing, break out the
tab with a screwdirver.
To record on a cassette with the tab broken, place a piece of adhesive tape over that hole.
NOTE: When a tab is broken out, the RECORD button cannot be depressed
004AV1R.p65 2004/2/10, PM 04:079
9
Page 10

CARE AND MAINTENANCE
Care For Compact Discs
l Treat the disc carefully. Handle the disc only by its edge. Never allow your fingers to
touch the shiny, imprinted side of the disc.
l Do not attach adhesive tape, stickers, etc. to the disc label.
l Clean the disc periodically with a soft, lint-free, dry cloth. Never use detergents or
abrasive cleaners to clean the disc. If necessary, use a CD cleaning kit.
l If a disc skips or gets stuck on a section of the disc, it is probably dirty or damaged
(scratched).
l When cleaning the disc, wipe in straight lines from the center of the disc to the outer
edge. Never wipe in circular motions.
Cleaning The Tape Heads
To ensure the continued high performance of your unit, periodically clean the head and
pinch roller to prevent a accumulation of dust or tape oxide deposits. This can be done
simply using a special tape hean cleaning cassette.
NOTE: Never put any metal objects on or near the tape headss.
Erase head
004AV1R.p65 2004/2/10, PM 04:0710
Record/Play
Head
Capstan
10
Pinch
Roller
 Loading...