

Page 1
Document nember:DN-S40008-10
RELEASE DATE:2009/ 6 /10
MODIFY DATE:
JW Electronics Co.,Ld.
SEEDIQ-External
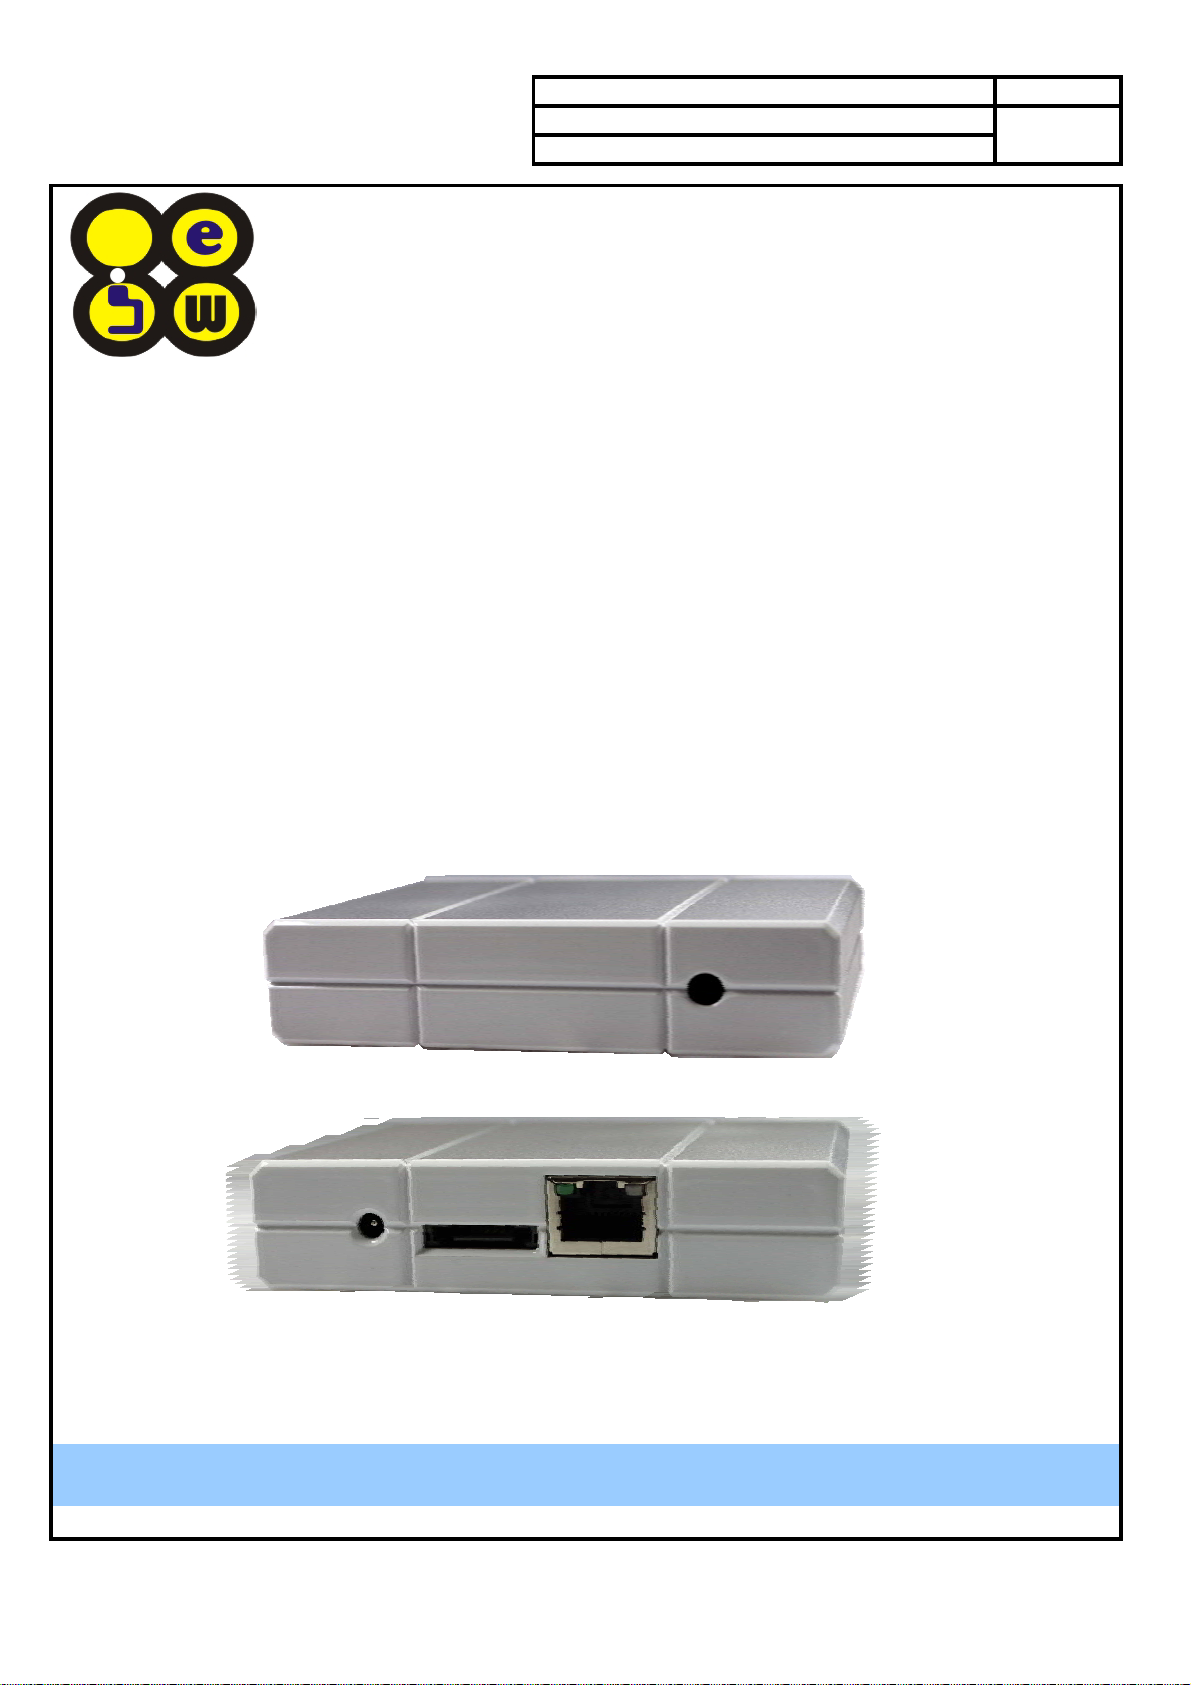
SATA over Ethernet with
-1 10/100/1000 Mbps LAN Port
REV
1.0
-1 e-SATA Port(SATA 1.5Gbps /SATA II )
第 1 頁,共 16 頁
User Menu
Page 2

1.CONTENTS
PAGE
1.Contents
2.Product Specification
3.Package Contents
4.Product Introduction
5. SEEDIQ-External Install Basic Step
5.1 Minimum System Request
5.2 SEEDIQ-External Basic Install Flow Chart
5.3 Hardware Configuration
5.4 Install "miniSAN " in Windows XP & Vista
5.5 miniSAN Easy Application Guide
2
3
3
4
5 ~ 16
5
6
7
7
8 ~ 11
5.6 miniSAN Disk Administration Function
5.7 miniSAN Disk Tool Option Function
5.8 miniSAN Disk Tool About function
5.9 Uninstall miniSAN
5.10 miniSAN Other Needing Attention Iten
12 ~ 13
14 ~ 15
15
16
16
第 2 頁,共 16 頁
Page 3
2.PRODUCT SPECIFICATION
Product Name:SEEDIQ-External
◎
Work system:Windows Vista/XP
◎
Transmission Interface:10/100/1000Mbps LAN Port.
◎
e-SATA Port (SATA 1.5 Gbps & SATA II Support)
Suitable in 2.5", 3.5", SATA HDD
◎
Weight: 115g
◎
Dimension:76mm(L)X93mm(W)X23.3mm(H)
◎
Operating temperature:0°~40°C (32°~104°F)
◎
Website:
◎
E-MAIL:
◎
http://www.jwe.com.tw
[email protected]
3.PACKAGE CONTENTS
Goods Name
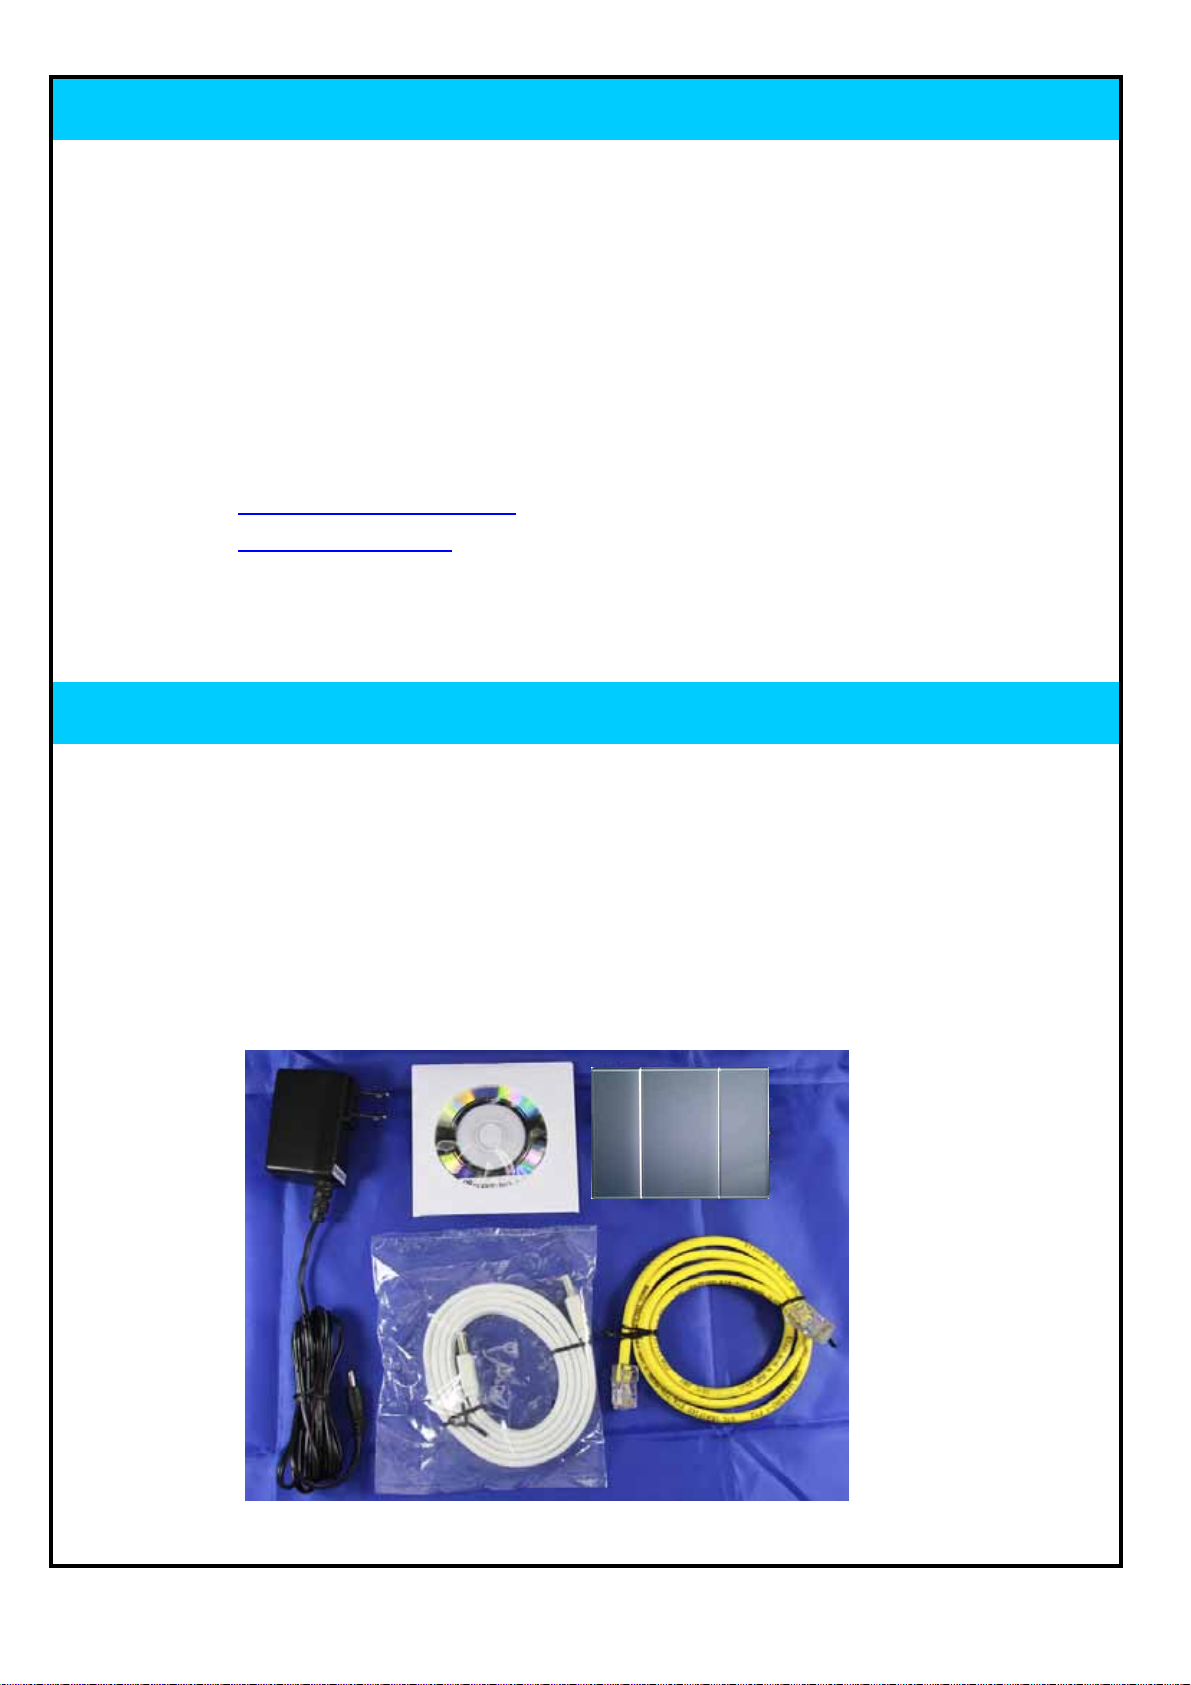
AOE SEEDIQ-External V1.1
e-SATA cable 100CM
RJ45 CAT 5e UTP cable 100CM
CD(The with Driver and User Menu)
DC Adapter (5V/1.2A)
Quantity
1
1
1
1
1
第 3 頁,共 16 頁
Page 4
A
4.PRODUCT INTRODUCTION
4.1 SEEDIQ-External Product Introduction
1
2
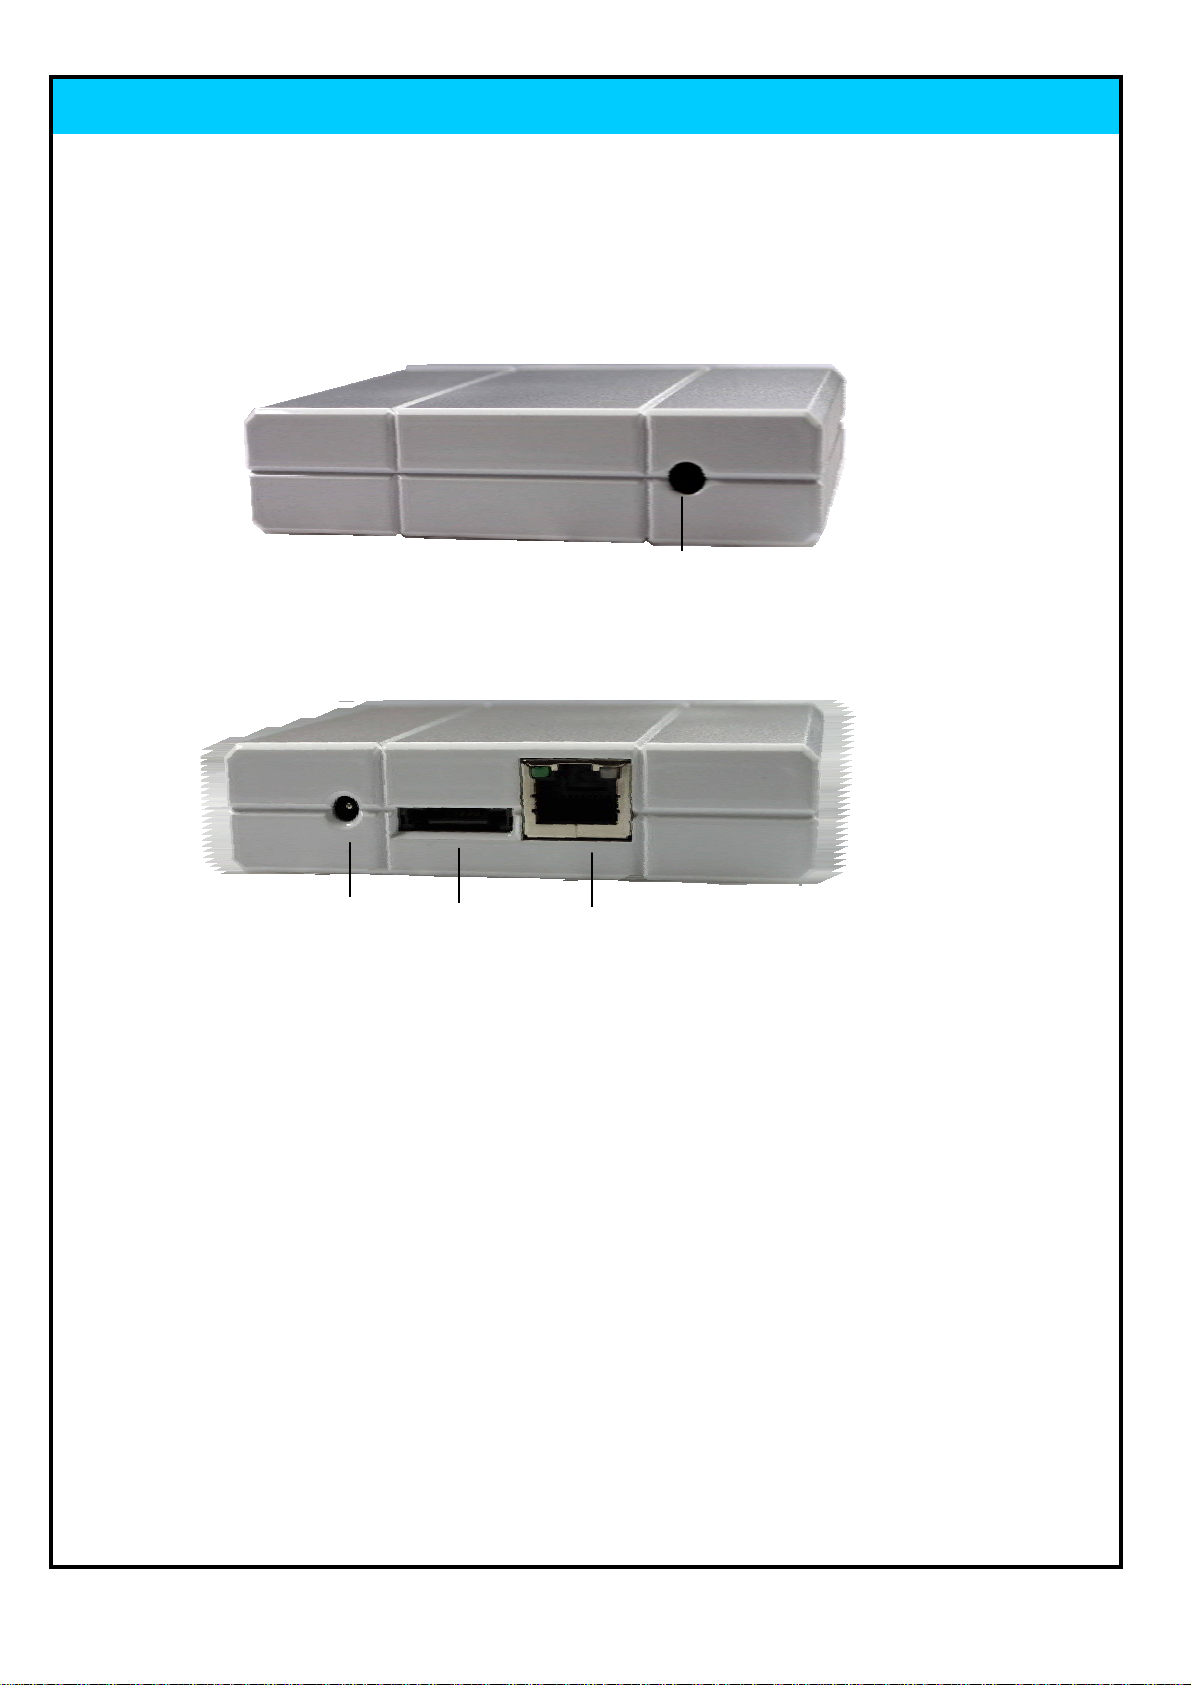
POWER / STATUS LED
1.
DAPTOR DC-JACK
2.
e-SATA Port (LINK e-SATA H.D.D)
3.
10/100/1000Mbps RJ45 LAN Port
4.
3
4
第 4 頁,共 16 頁
Page 5

4.2 SEEDIQ-External LED Introduction
4.2.1 Power / SATA Status LED:Red /Blue
" Power ON " Light "Red color";If e-SATA H.D.D Link Ready ,the LED tureed into Light Blue.
The e-SATA H.D.D read or write,LED is blink.
4.2.2 1000Mbps Link LED(RJ45 Left Side LED)
1000Mbps Link OK,the LED Light "Green"color;if Link is 100Mbps or 10Mbps,the LED Off.
4.2.3 Lan Active LED(RJ45 Right Side LED)
If Lan Active(Read or Write) ,the LED is Green Blink.
5.SEEDIQ-External INSTALL BASIC STEP
★ Quickly Install
5.1 Minimum System Request
Windows® XP / Vista .
400 MHz Pentium® III or higher
128 MB RAM (256 MB recommended)
10/100/1000Base-T Full Duplex Ethernet Card or Switch Hub.
第 5 頁,共 16 頁
Page 6
5.2 SEEDIQ-External Basic Install Flow Chart
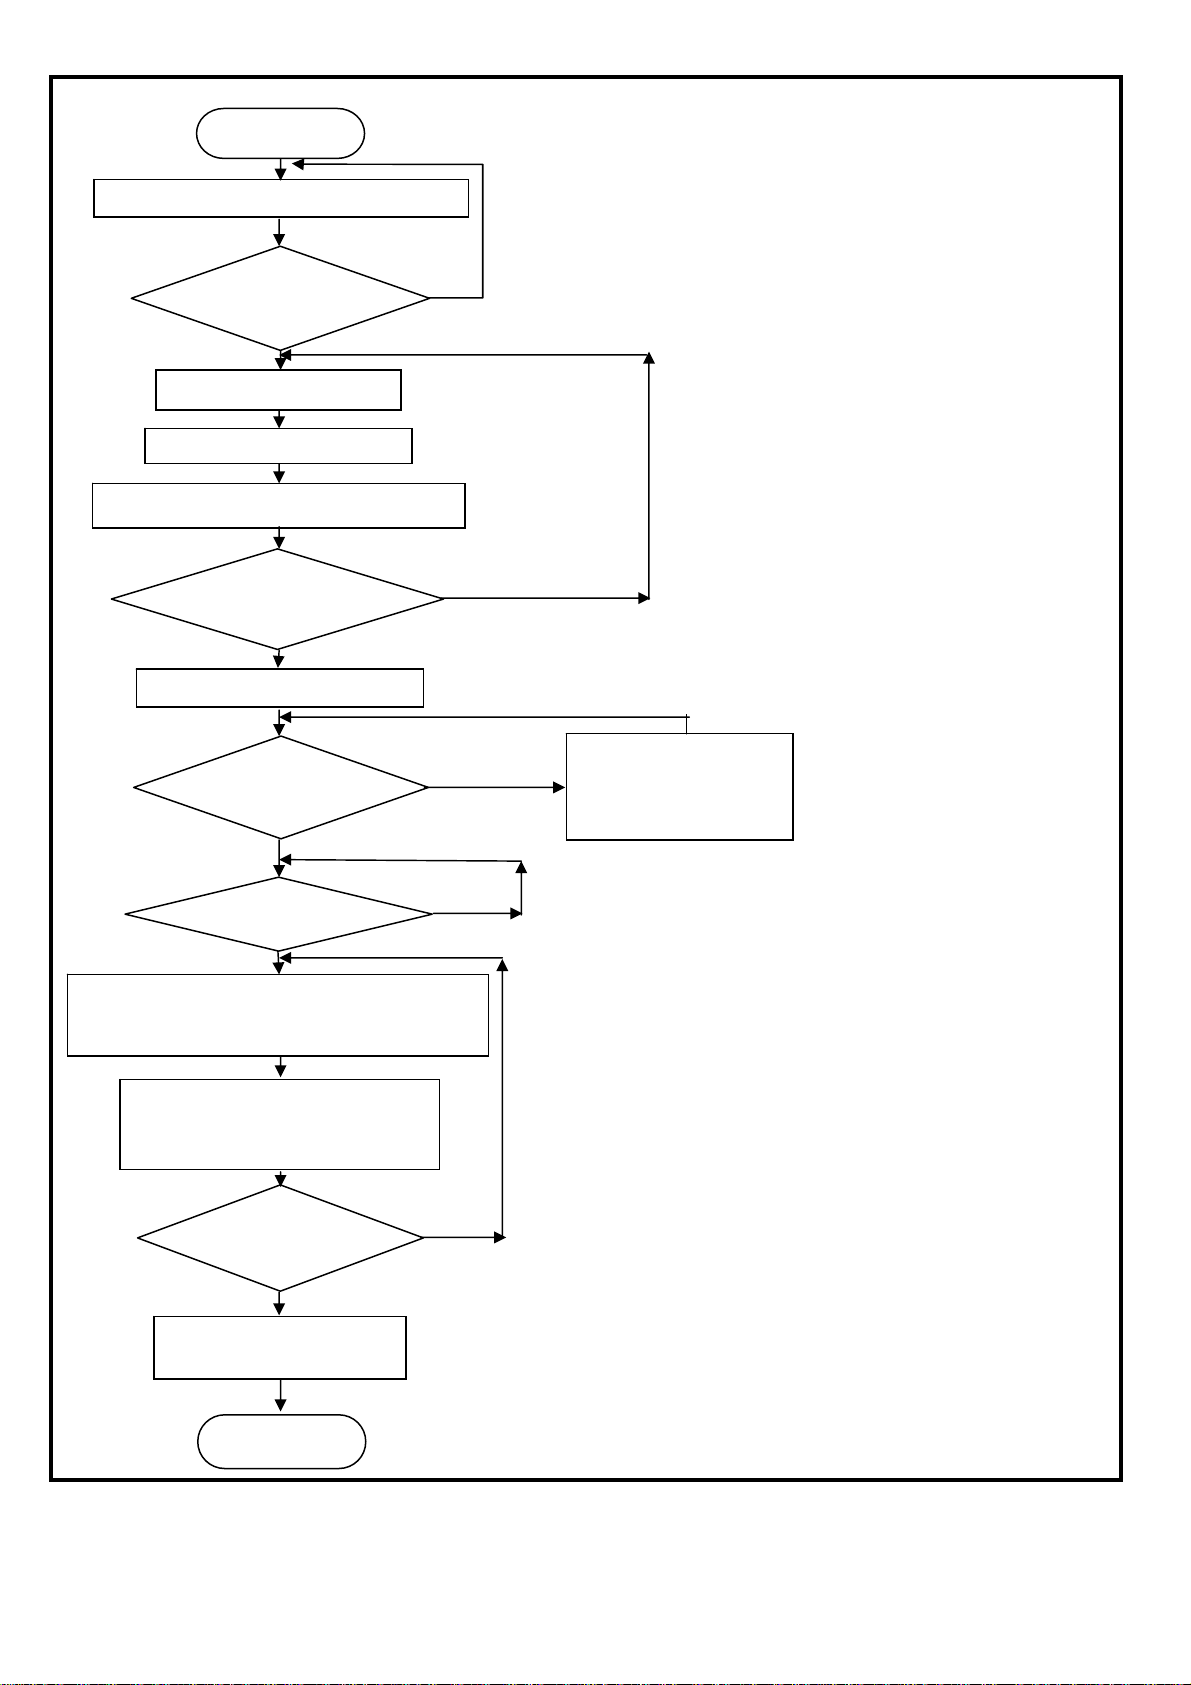
Install "mini SAN" in Windows and Vista
"mini SAN" install
ok?
Link Gigabit LAN Port
Link e-SATA port & H.D.D
DC-JACK Connection Power Adapter
LED have light Blue
from Red color?
YES
Open "mini SAN" program
Use"mini SAN"
discover Disk?
YES
NO
NO
Check & reconnect
Gigabit Lan Port & e-
SATA Port & e-SATA
Disk Mount ok?
YES
1.Selection "My Computer" on windows。
2.Push Right Key on mouse, selection
"
"
1.Selection "Disk Manage"。
2.AOE Disk add "Disk division"。
3.AOE Disk Format。
Create New
"Disk Name" ok?
YES
Create "AOE Disk" ok.
The Device is Ready。
END
NO
※If you must use "mini SAN" disk management further function,Please see…
5.6 mini SAN Disk Management Further Function。
5.7 mini SAN Disk Tools Software Selection Setting。
第 6 頁,共 16 頁
Page 7
5.3 Hardware Configuration
-SEEDIQ-External plug in CAT 5e or CAT6 cable to Gigabit LAN Port and link up PC or 10/100/1000Mbps
Switch Hub.
- SEEDIQ-External e-SATA Port Link up e-SATA Cable & e-SATA Disk.
- SEEDIQ-External DC-JACK connection to Power Adapter.
- Check 10/100/1000Mbps,if 1000Mbps Link ok, the RJ45 Left Side LED light Green LED.
- "Power ON" ,the Power/SATA Status LED is light Red color;if SATA Disk Ready,the LED turn to
Blue color at 11 seconds later .
5.4 Install "miniSAN" in Windows XP & Vista
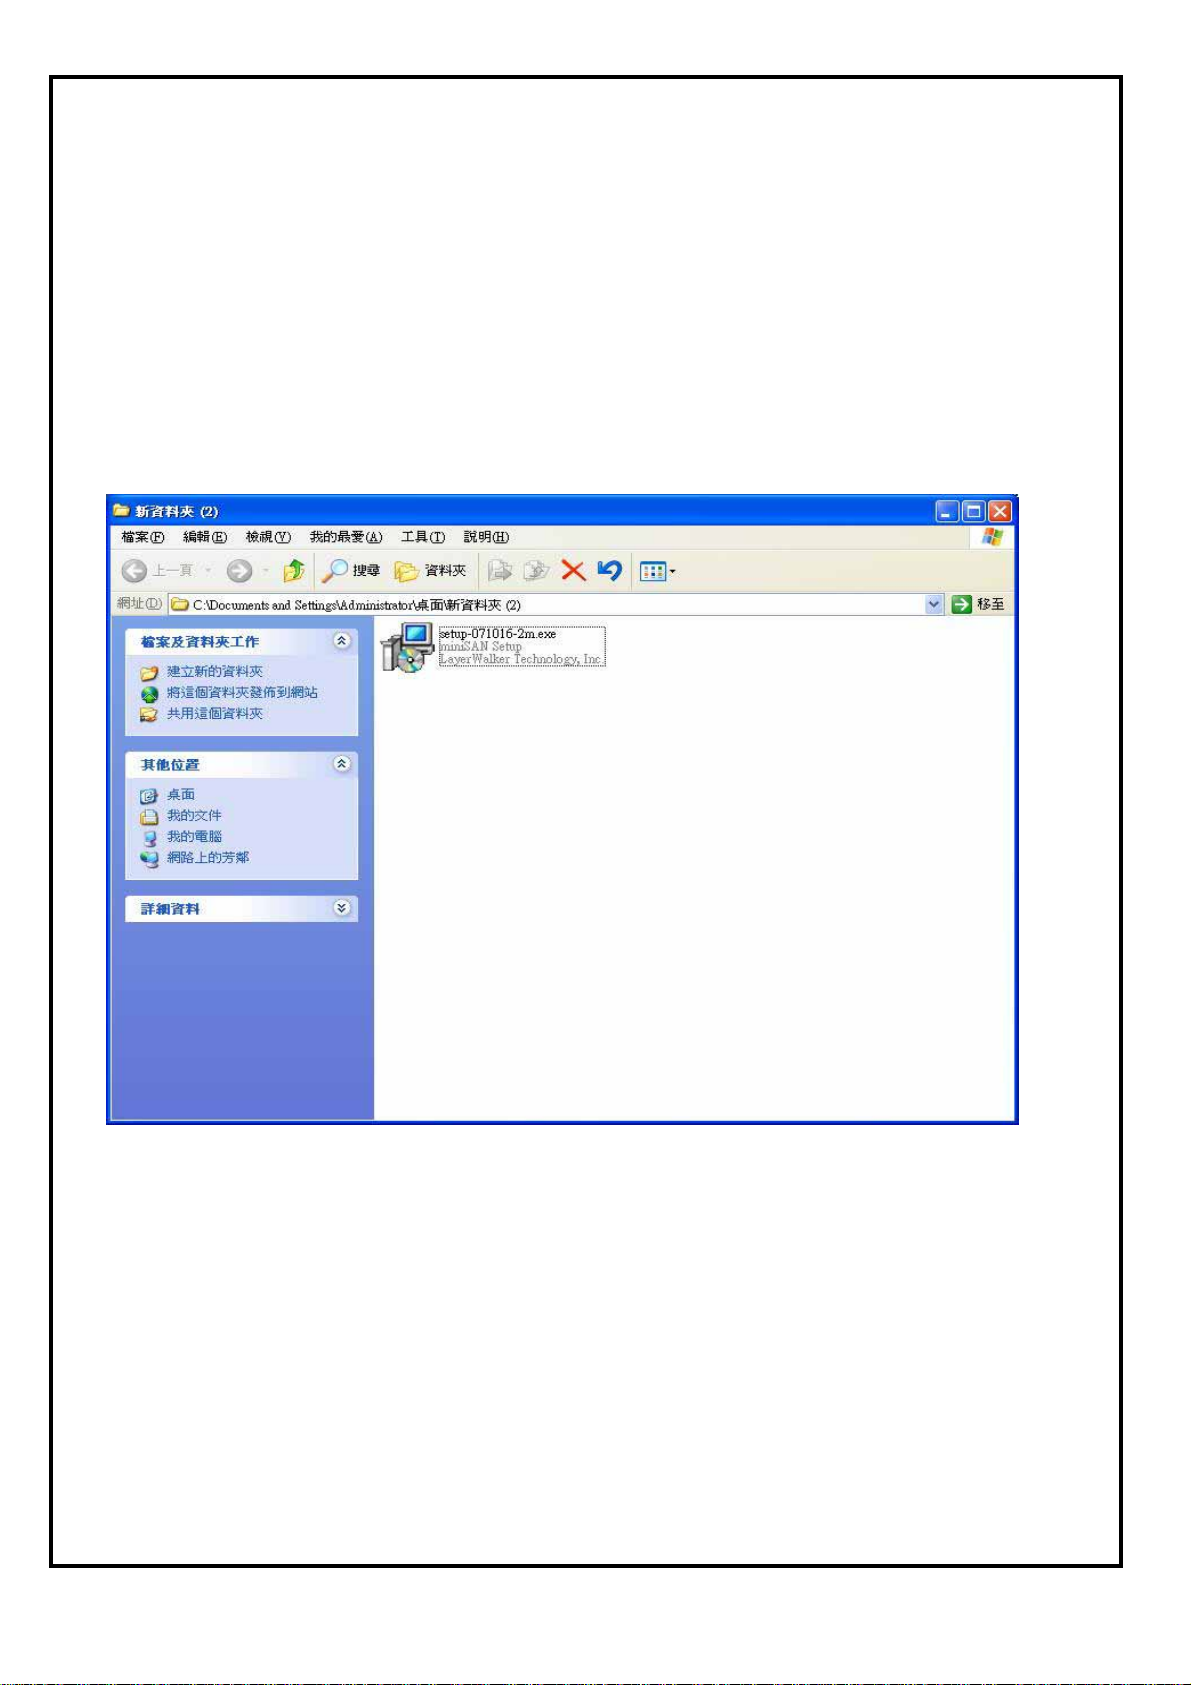
- Find miniSAN Install driver in the driver CD, double click .
- Install Shield Wizard will appear. Click the Next button to continue to next step 。(Don't Double install)
- Accept License Agreement and the click Next to continue installation.
- Click the Install button to install drivers .
-Click Continue Anyway to continue installation .
-Click the Finish button to complete .
-Click on the Yes button to restart your computer now, or No to restart later .(Propose reboot)
第 7 頁,共 16 頁
Page 8
5.5 miniSAN Easy Application Guide
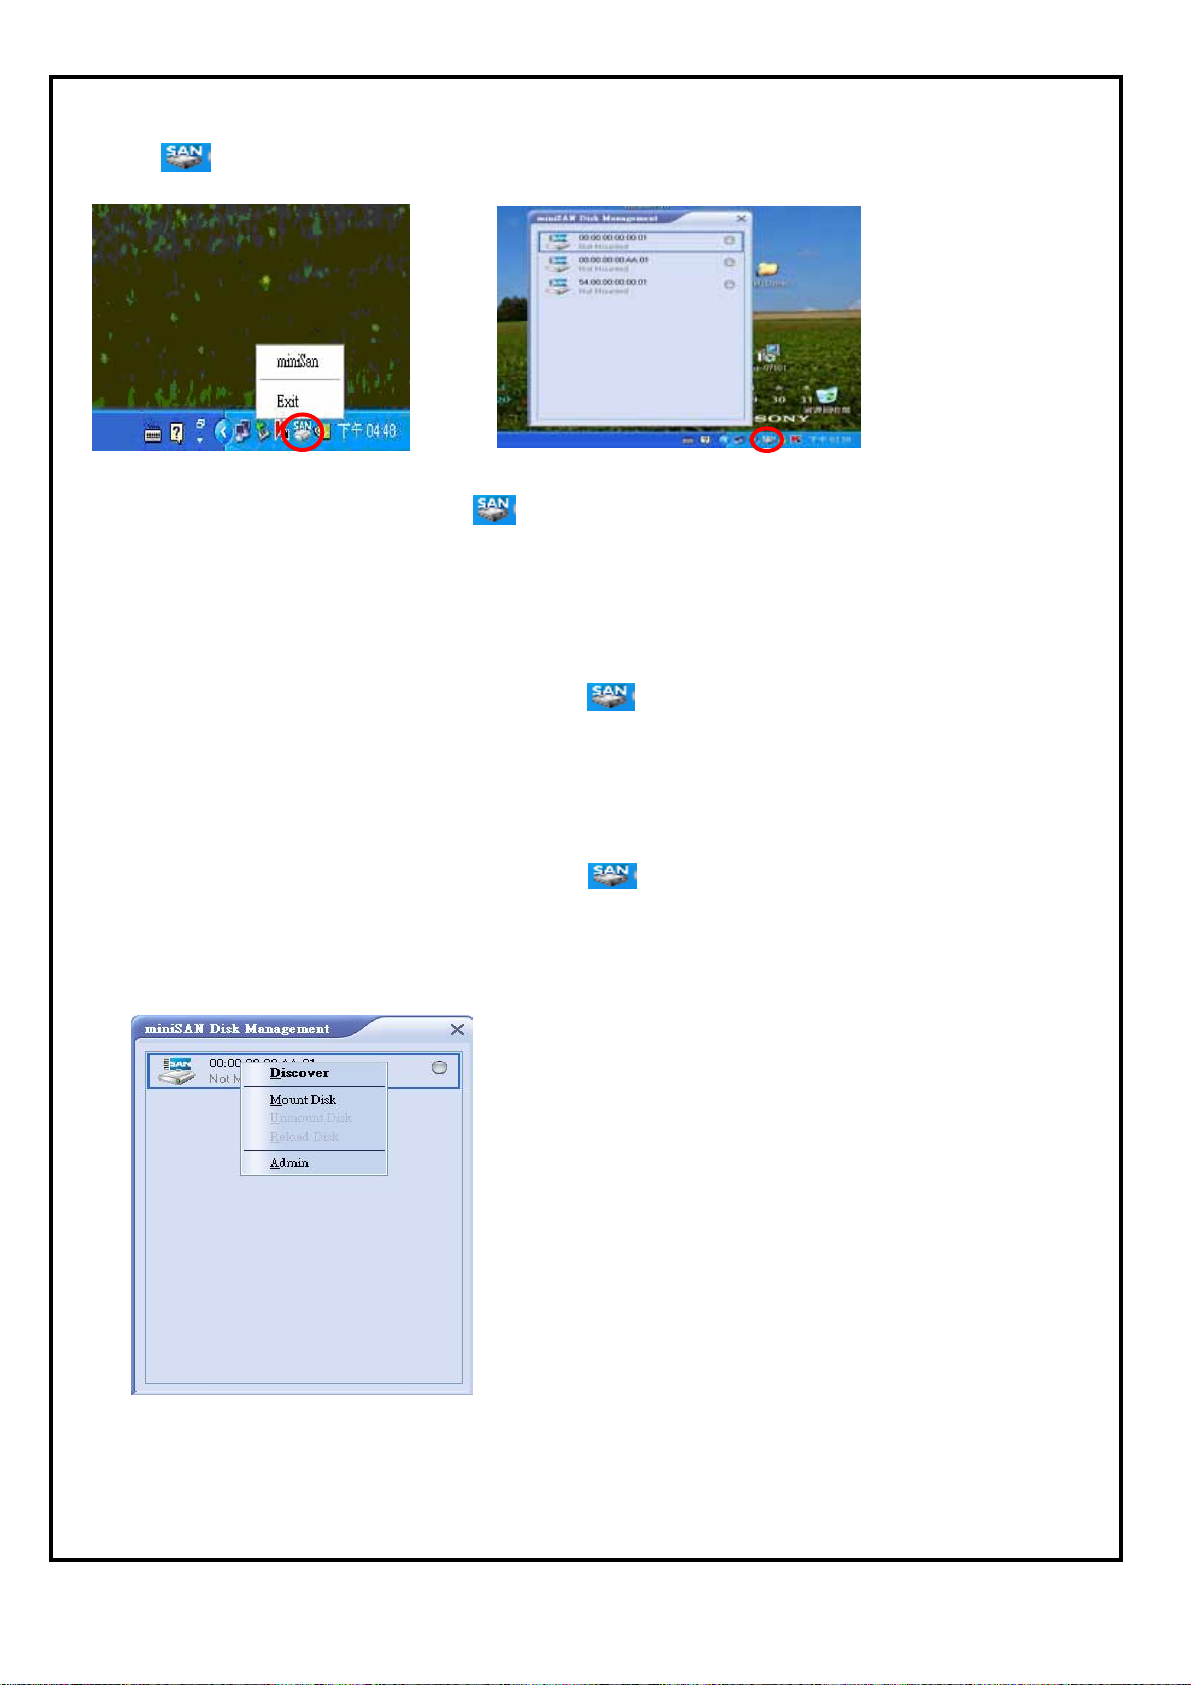
-When software installation is completed, Reboot the PC,you will find a miniSAN Disk Administrator
Tool icon on the system tray.
-Mouse Right Click on the miniSAN controller Icon located on the system tray , and select the
miniSAN item .(The miniSAN Device Management can be running)
-miniSAN Application Tool performs the following functions:(See 5.5.1 ~ 5.5.8)
5.5.1 Discover miniSAN Disk
1. Mouse Left Click on the miniSAN Device Management Icon located on the system tray.
2. The miniSAN Application tool will pop on the desktop and auto discover all miniSAN Disk Mac Address
in the network.
3. Press discover button can research the miniSAN Disk on the network.
5.5.2 Mount miniSAN Disk
1. Mouse Left Click on the miniSAN Device Management Icon located on the system tray .
2. The miniSAN Application tool will pop on the desktop and list all miniSAN Disk Mac Address in the
network.
第 8 頁,共 16 頁
Page 9
3. Select your target disk to access:
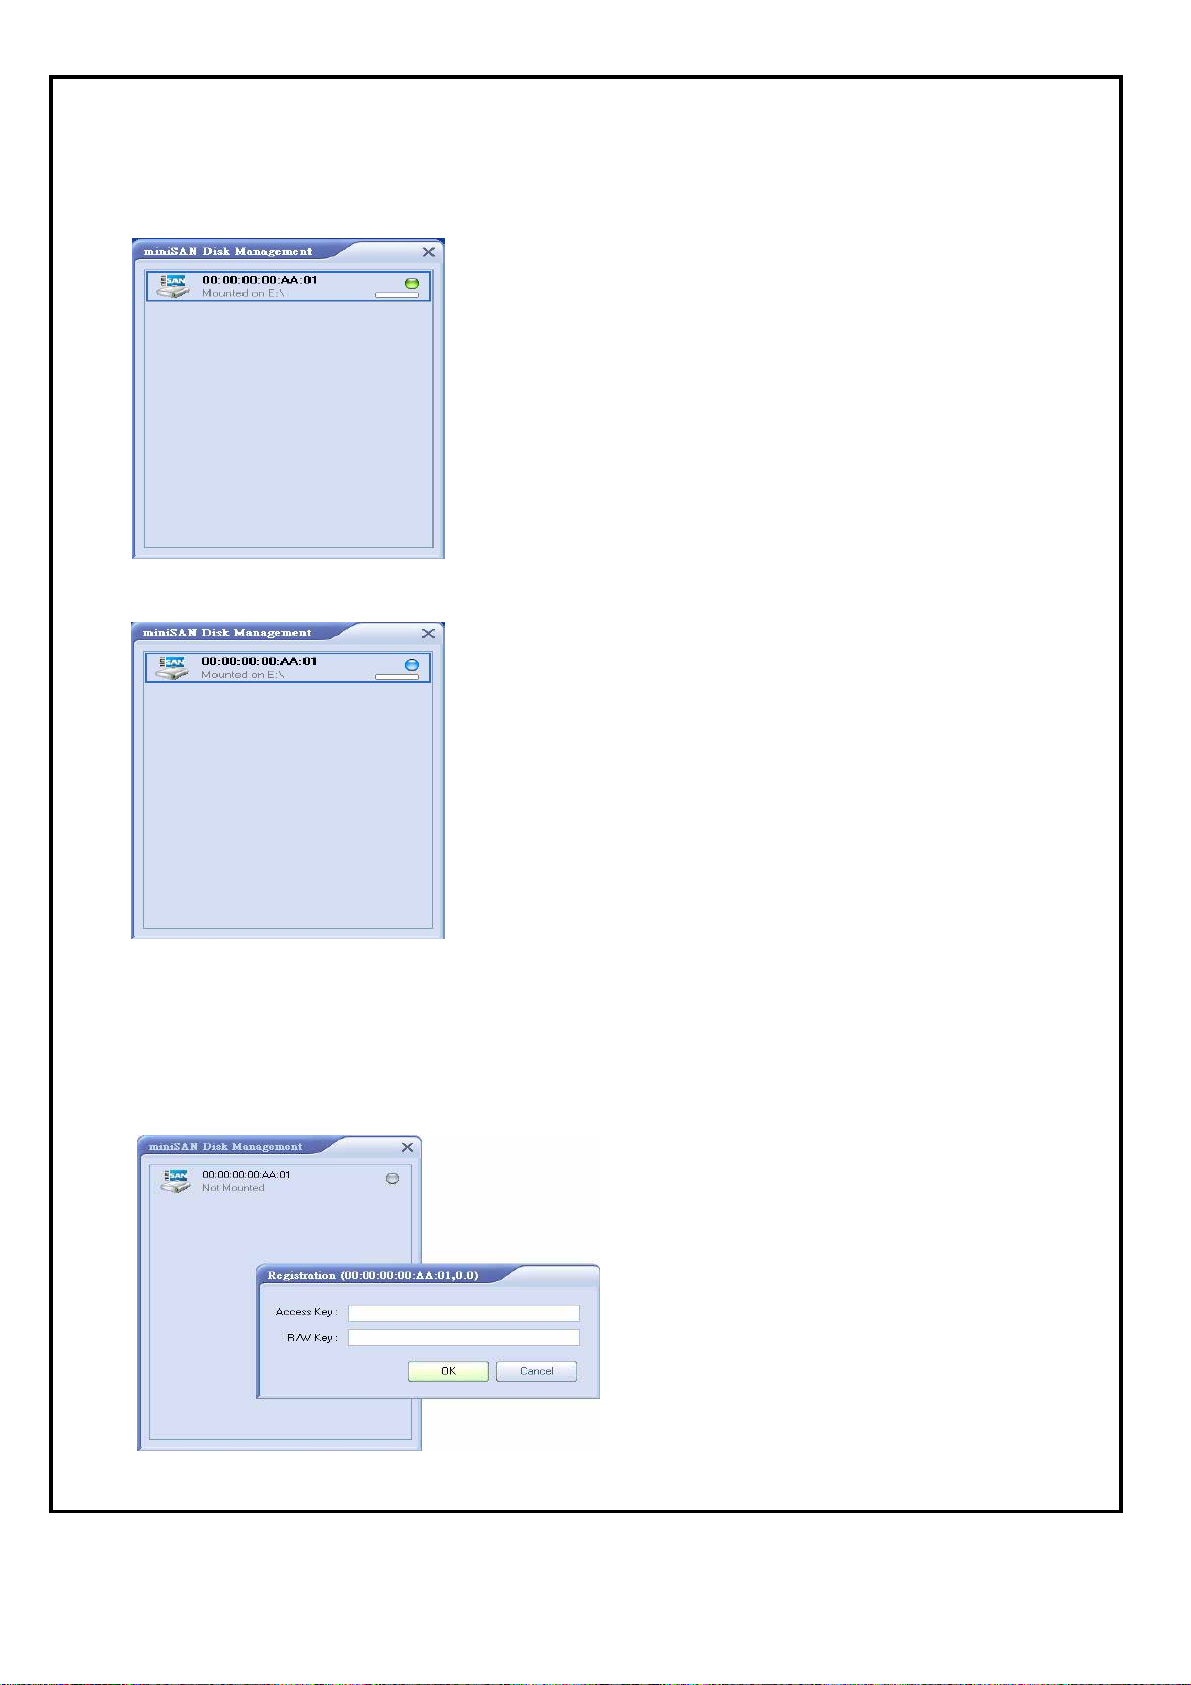
- Select the target disk and click mouse right to show the target disk function window.
- Select Mount Disk for disk access .
- If user mount the target disk to Read/Write mode, the miniSAN Disk is registered as Read / Write
Mode and show the green icon.(mini SAN will create one management as use Read /write Function
at one time)
- If others user mount the target disk to Read/Write mode, the miniSAN Disk is registered as Read Only
Mode and show the blue icon.
- If the miniSAN Disk manager set the Authentication Key, the tool will pop a register window for
key registration .
- If user didn’t have access key, the target disk will not be mounted .
- If user entered the right access key and didn’t have the R/W key, the target disk just can mount
to Read Only mode .
- If user entered the right access key and R/W key, the target disk could mount Read/Write mode .
Note: miniSAN Authentication Access Kay and Write Key is set on "miniSAN Disk Administration
Function " step 5.6.2 .
第 9 頁,共 16 頁
Page 10
5.5.3 Display miniSAN Disk used capacity status
miniSAN Disk manager will show the disk used capacity and used percentage icon when disk mounted.
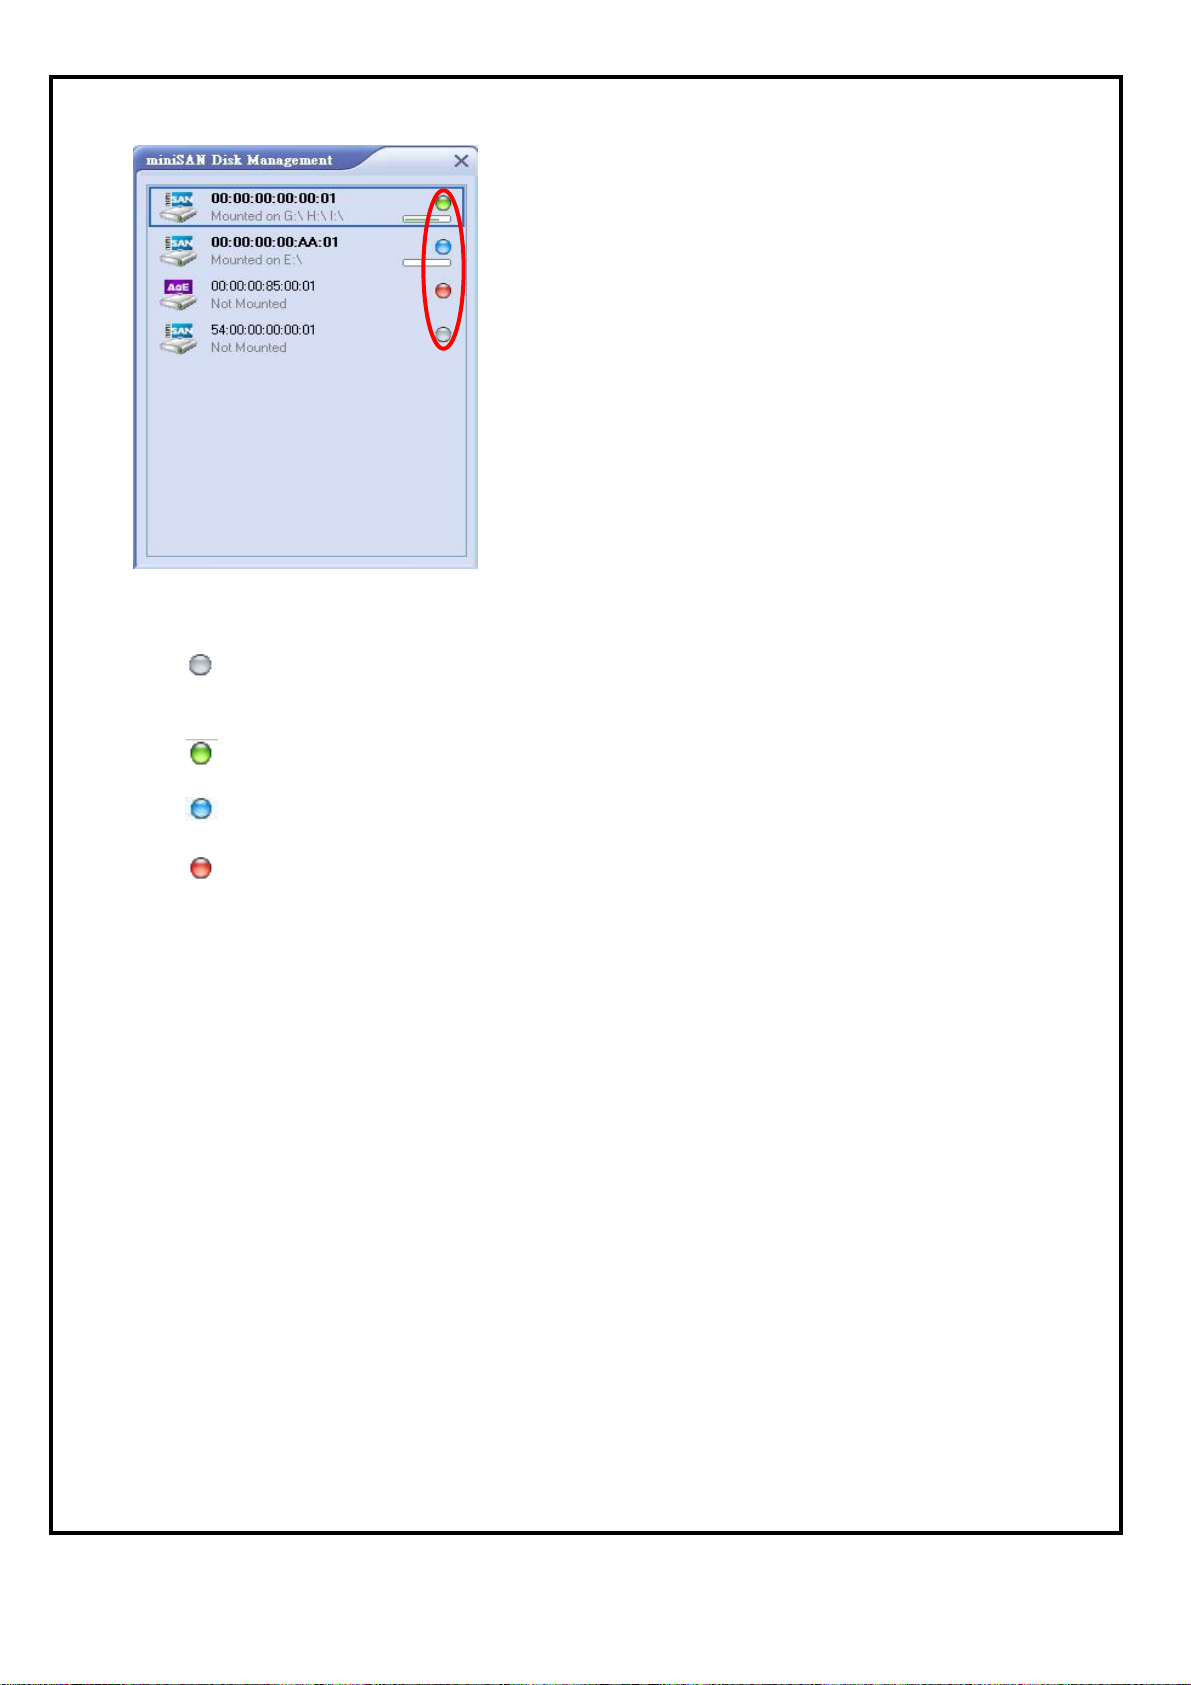
Below is describing each of the miniSAN Disk Device Modes and the icons that correspond with each mode:
Gray
Green
Blue
Red
: Disable mode
- miniSAN Disk is disabled from your computer .
- miniSAN Disk can be enable to access mode if disk mount .
: Access mode
- User can access the miniSAN Disk using Read/Write mode .
: Read Only mode
- User can access the miniSAN Disk using Read Only mode.
: Unrecognized Mode
- miniSAN Disk lost connecting .
- miniSAN Disk have some error and can’t access.
- HDD broken or HDD interface have some problems .
5.5.4 Reload Disk function
- Select the target disk to press reload button.
- Read Only mode disk can reload the disk to Read/Write mode by reload function.
- Mounted R/W mode user didn’t have reload function.
- User can’t reload to R/W mode when the R/W mode user is accessing the target disk.
- User can’t reload to R/W mode when user don’t have R/W key registration.
- Read Only mode disk will refresh disk data for data synchronize.
5.5.5 Unmount miniSAN Disk
- Select the target remove disk to press unmount button.
- miniSAN Disk would be removed from the PC.
第 10 頁,共 16 頁
Page 11
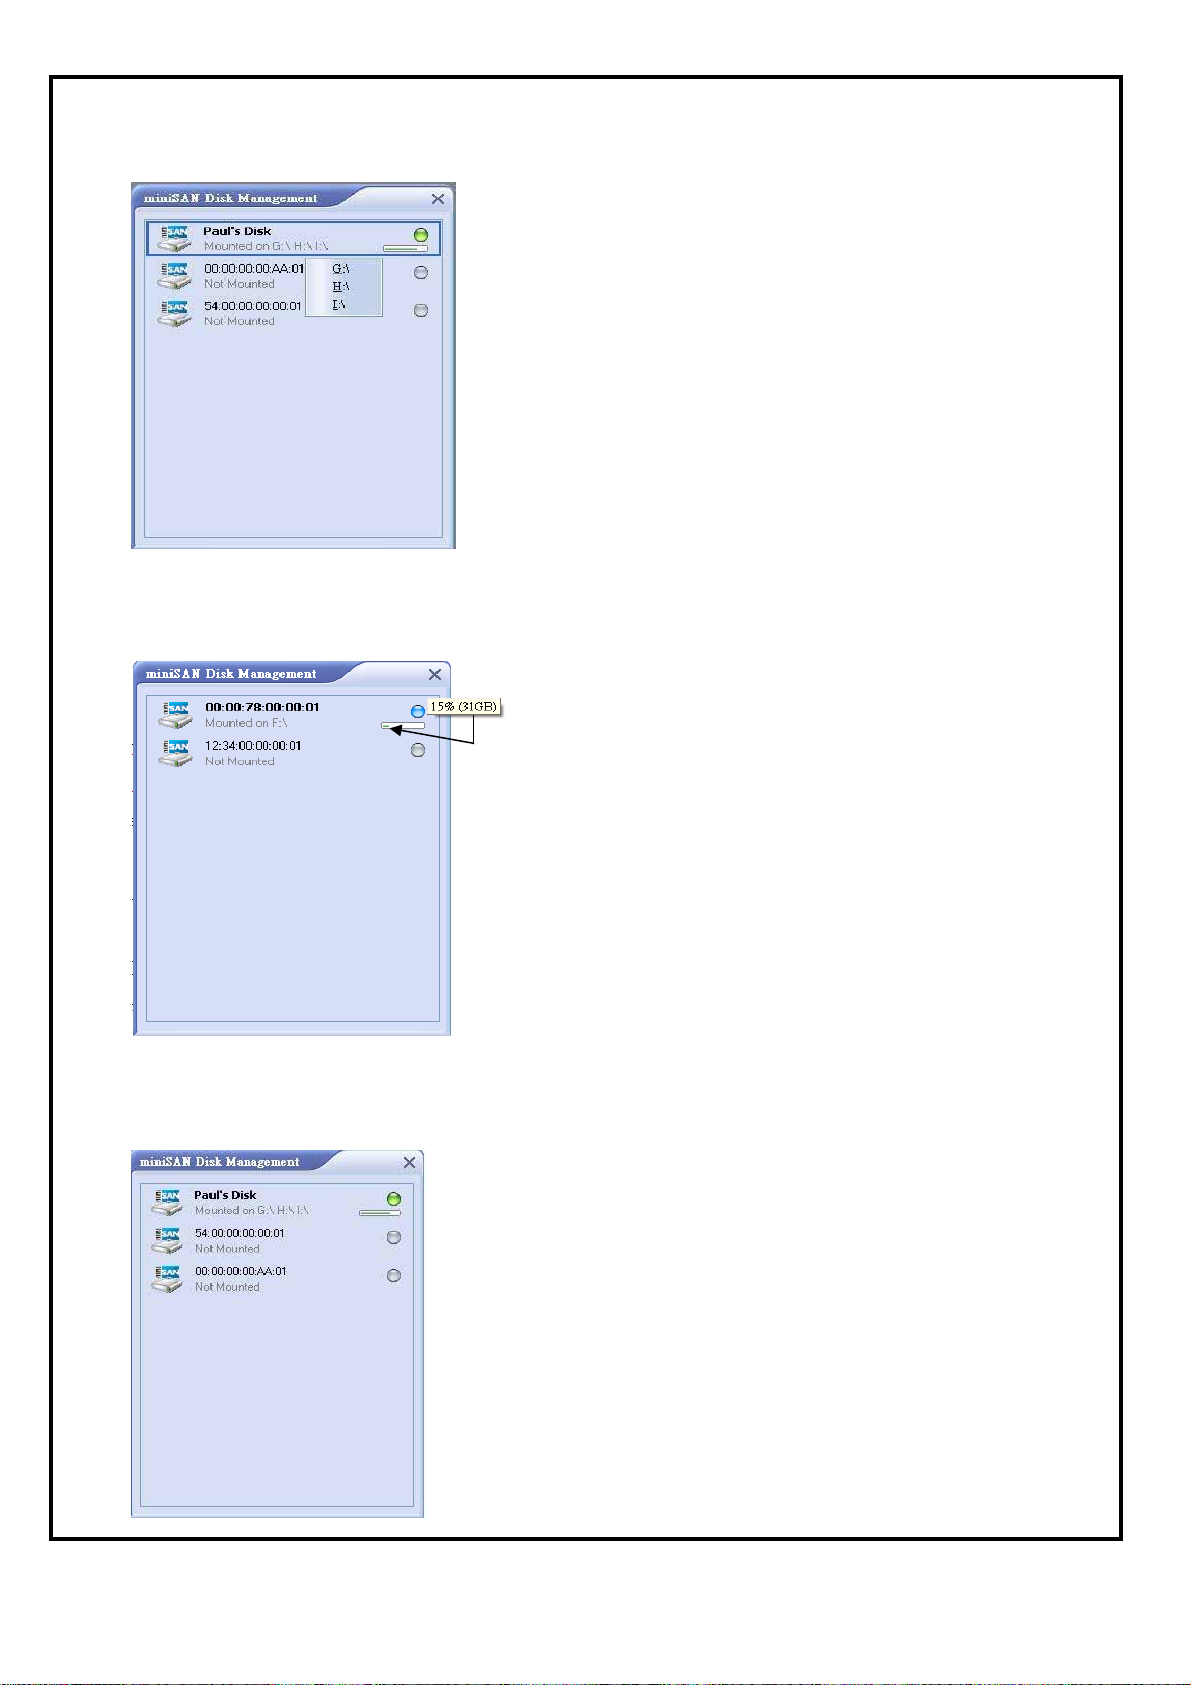
5.5.6 Simple disk volume information
- The disk management tool will show the disk volume information when disk mounted.
- Mouse Left Click on the disk volume will link to the disk file manager.
5.5.7 Display miniSAN Disk used capacity status
- miniSAN Disk manager will show the disk used capacity and used percentage icon when disk mounted.
5.5.8 Disk Description information
- Double click the target MAC address to type your disk description on the disk management tool.
- The description information is only saved on the current PC.
第 11 頁,共 16 頁
Page 12
5.6 miniSAN Disk Administration Function
The miniSAN Disk support some functions for administrator manage. There are four pages of functions list are:
- Disk information page
- Access key lock functions page
- miniSAN Disk transmission traffic Bandwidth check
- Advanced function for target disk
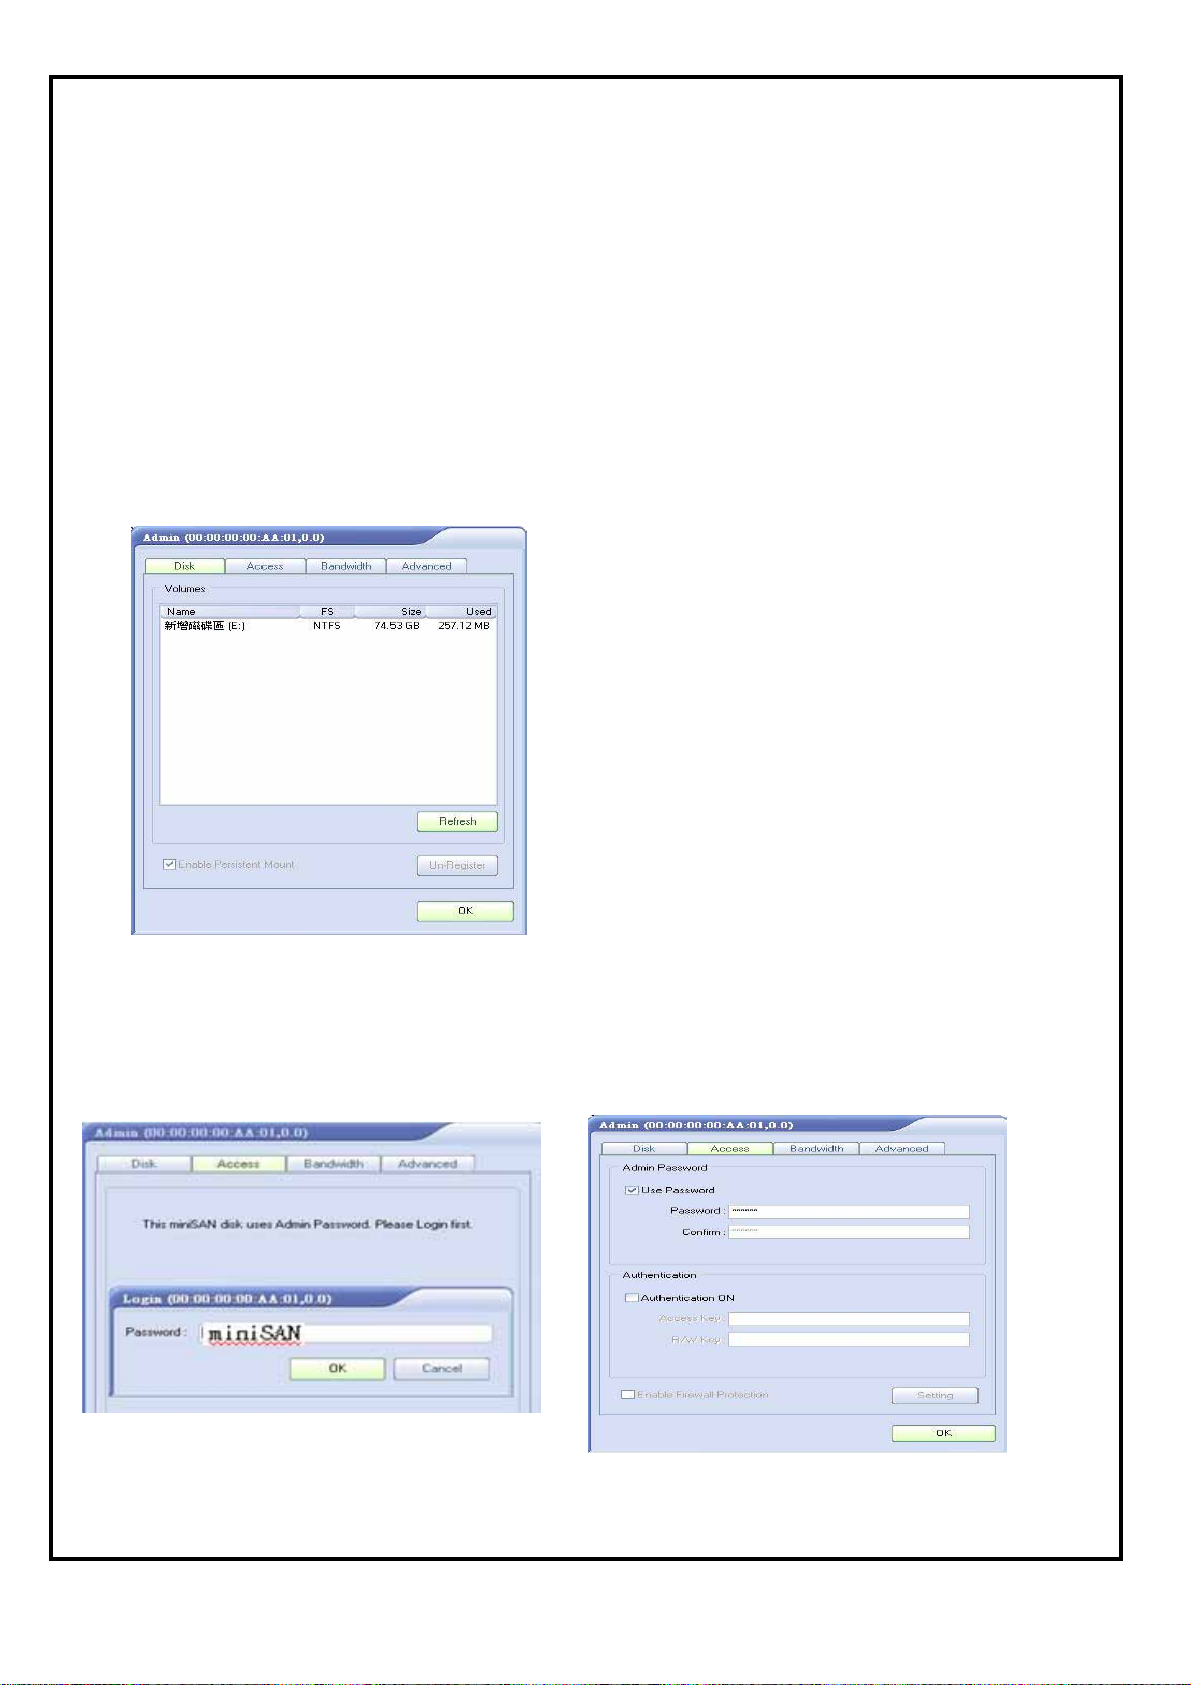
5.6.1 Disk information page
1.Select the target disk and press the Admin button, the Admin pages will show on.
2.The Disk page show the target disk volumes information include Volume Name / File System /Disk size
/Disk Used size.
3.Press the Refresh Button on the page will refresh all volumes information.
4.Press the Un-Register Button will log out the target miniSAN Disk access key registration(Step 5.6.2)
5.Press on the “Enable Persistent Mount” icon will auto mount the target disk when disk valid(Step 5.7.1)
6. Press OK to exit and save.
5.6.2 Disk Access Key Lock page
1. Select the target disk and press the Admin button, the Admin pages will show on.
2. Press the Access page for access manager。
3. It will auto pop out a password login window for disk manager.
4. Press the default login value “miniSAN”, and it will show the page to setup Admin Password and
Authentication Key.
4-1. Press the right password if the password is set..
5.Press Use Password icon to Enable/Disable the target disk access page login function.
6.User can change the target disk password by modifying password and confirm when enable “Use
Password” function.
第 12 頁,共 16 頁
Page 13
7.Press Authentication ON icon to Enable/Disable the target disk mount disk registration functions.
(Step5.5.2)
8.User can setup the Access Key and R/W Key for mount disk registration login password .(Step5.5.2)
9. Press OK to exit and save.
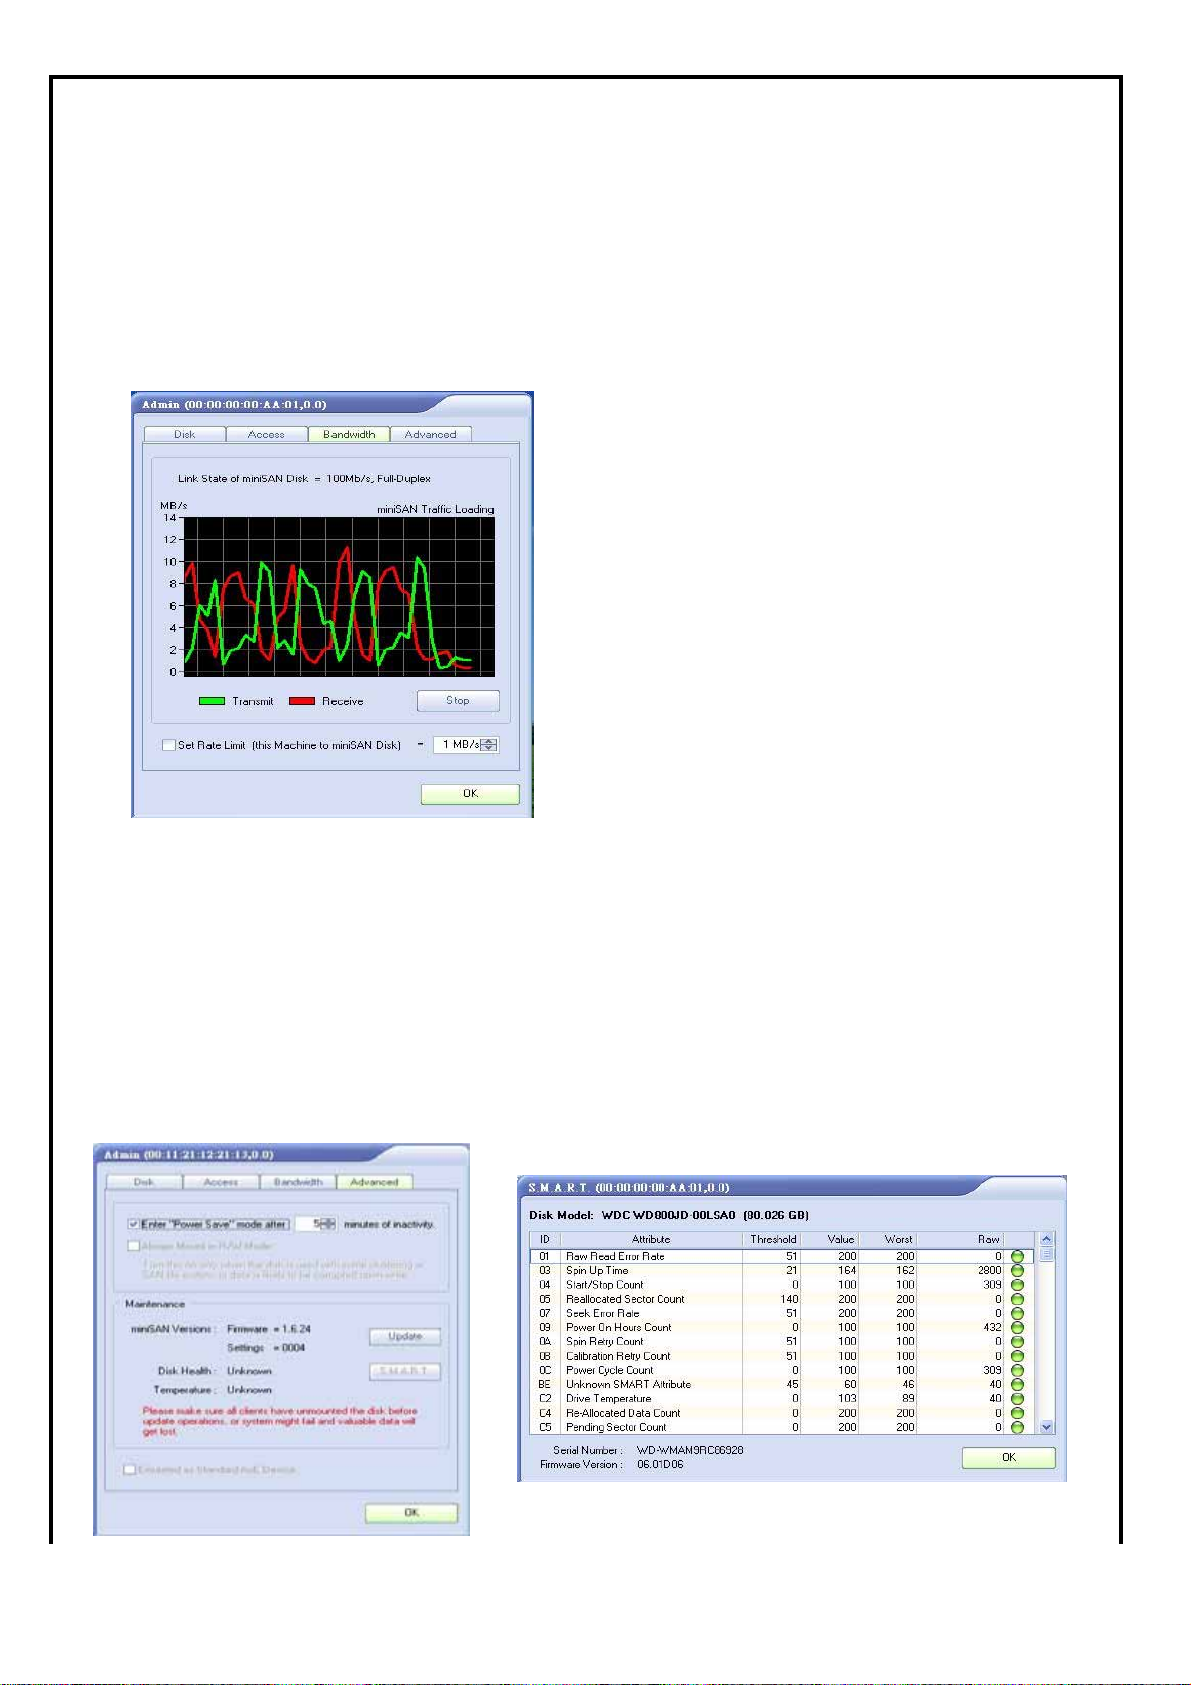
5.6.3 Disk transmission traffic Bandwidth checking
1.Display the target miniSAN disk Link State and current traffic loading chart; the red line show the
write data traffic band width, the green one for read traffic.
2.Press Run/Stop to run/stop the traffic loading chart.
3. Reserve Set Rate Limit function to limit data maximum transfer rate for next driver.
4. Press OK to exit and save .
5.6.4 Advanced function for target disk
1. Enable/Disable Power Save function and set Power Save enable time.
2. Reserve Always Mount in R/W mode function for advance user which have vender file system driver
for concurrent data R/W.
3. Mark sure all clients have unmount the disk press password to login will show Maintenance function to
update and restore miniSAN disk firmware function.
4. Mount the Disk and press password to login will show reserved Disk Health and Power State function
for disk manage.
5. Press password to login will show reserved Emulated as Standard AoE Device for standard AoE
venders and users.
6. Press OK to exit.
第 13 頁,共 16 頁
Page 14
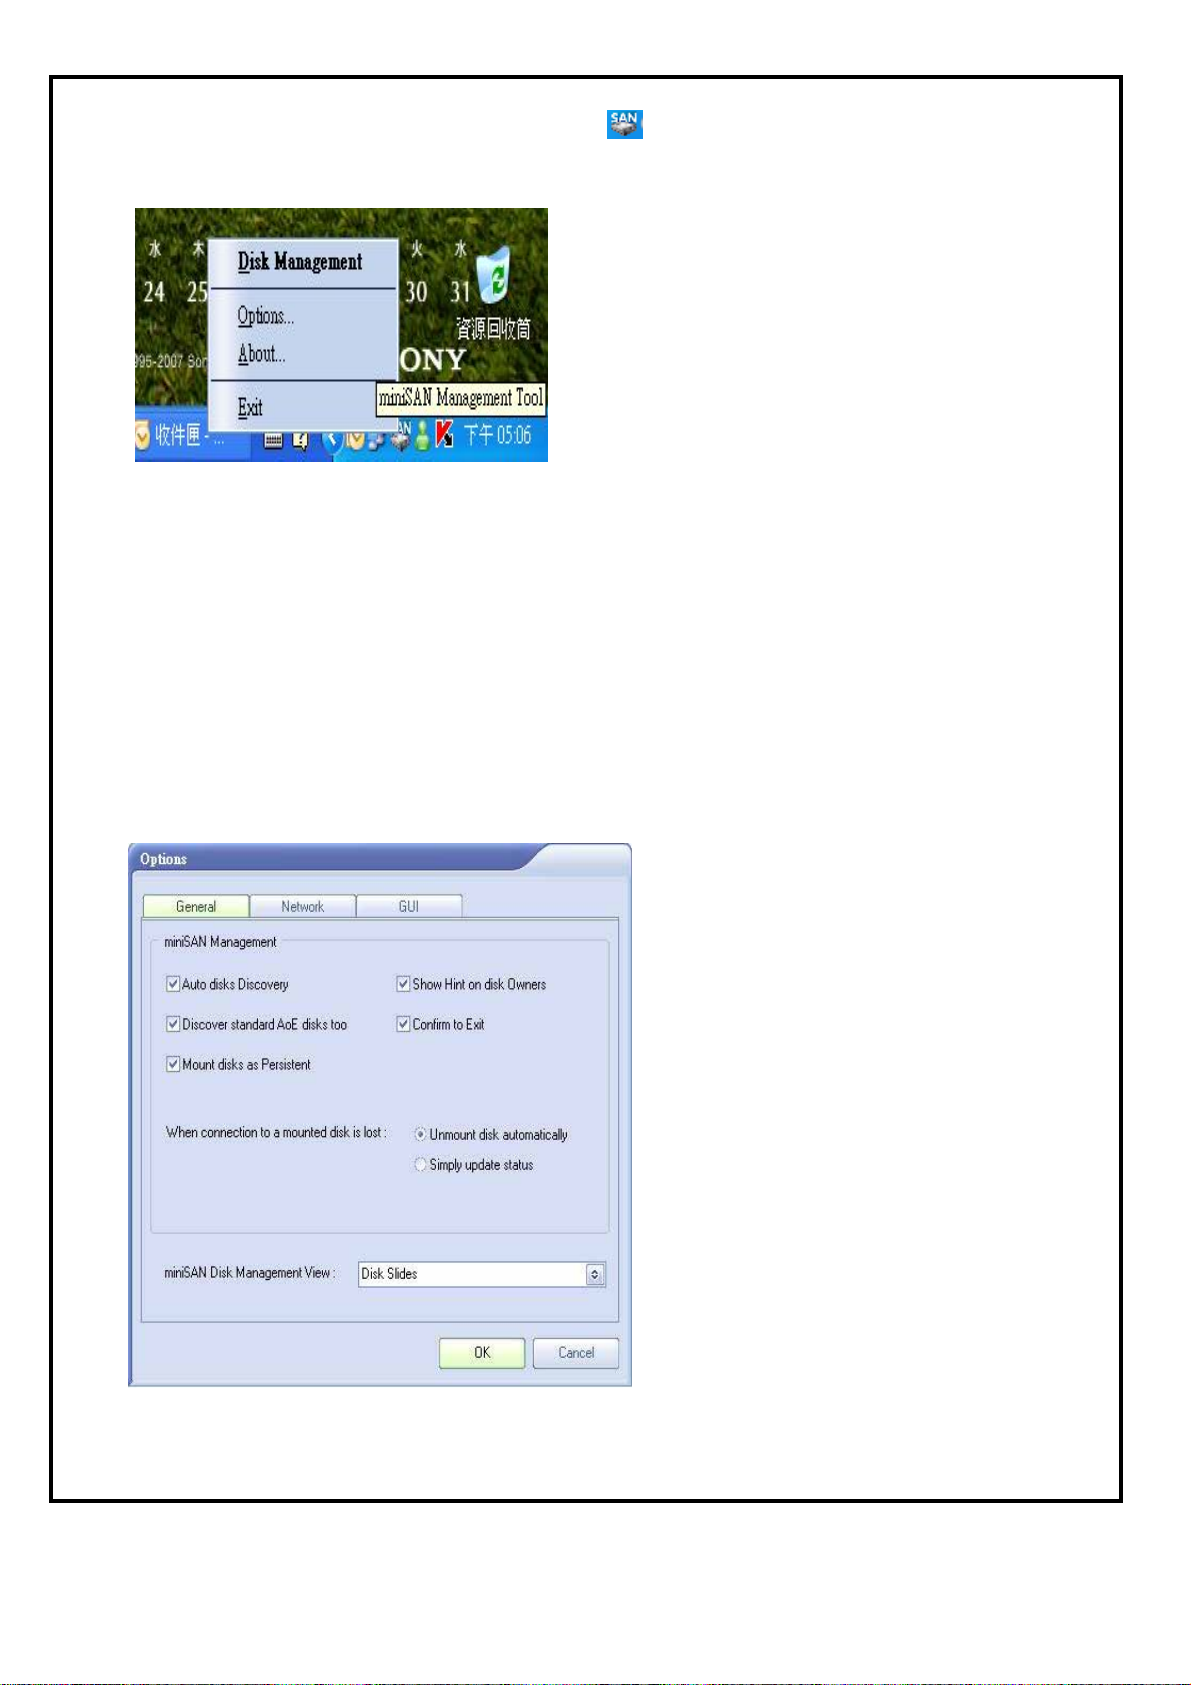
5.7 miniSAN Disk Tool Option Function
1. Mouse Right Click on the miniSAN Device Management Icon located on the system tray .
2. Select the Options function to pop the Options window .
5.7.1 General function description
1. Press Auto disk Discovery icon to Enable/Disable periodical auto discovery disk function.
2. Press Discover standard AoE disk icon to Enable/Disable driver to support standard AoE device.
3. Press Mount disk as Persistent icon to Enable/Disable auto mount the target disk function when disk
valid, please check.
4. Press Show Hint on disk Owners icon to enable/disable Hint massage when disk mounted R/W by
other user.
5. Press Confirm to Exit icon to enable/disable the confirm massage window when exit the miniSAN
management tool.
6. If user want to auto unmount disk when disk lost, press the Unmount disk automatically icon.
7. If user want to keep status when disk lost, Press the Simply update status icon.
8. miniSAN Disk Management Controller Window Style: Disk Slides/Detailed List.
第 14 頁,共 16 頁
Page 15
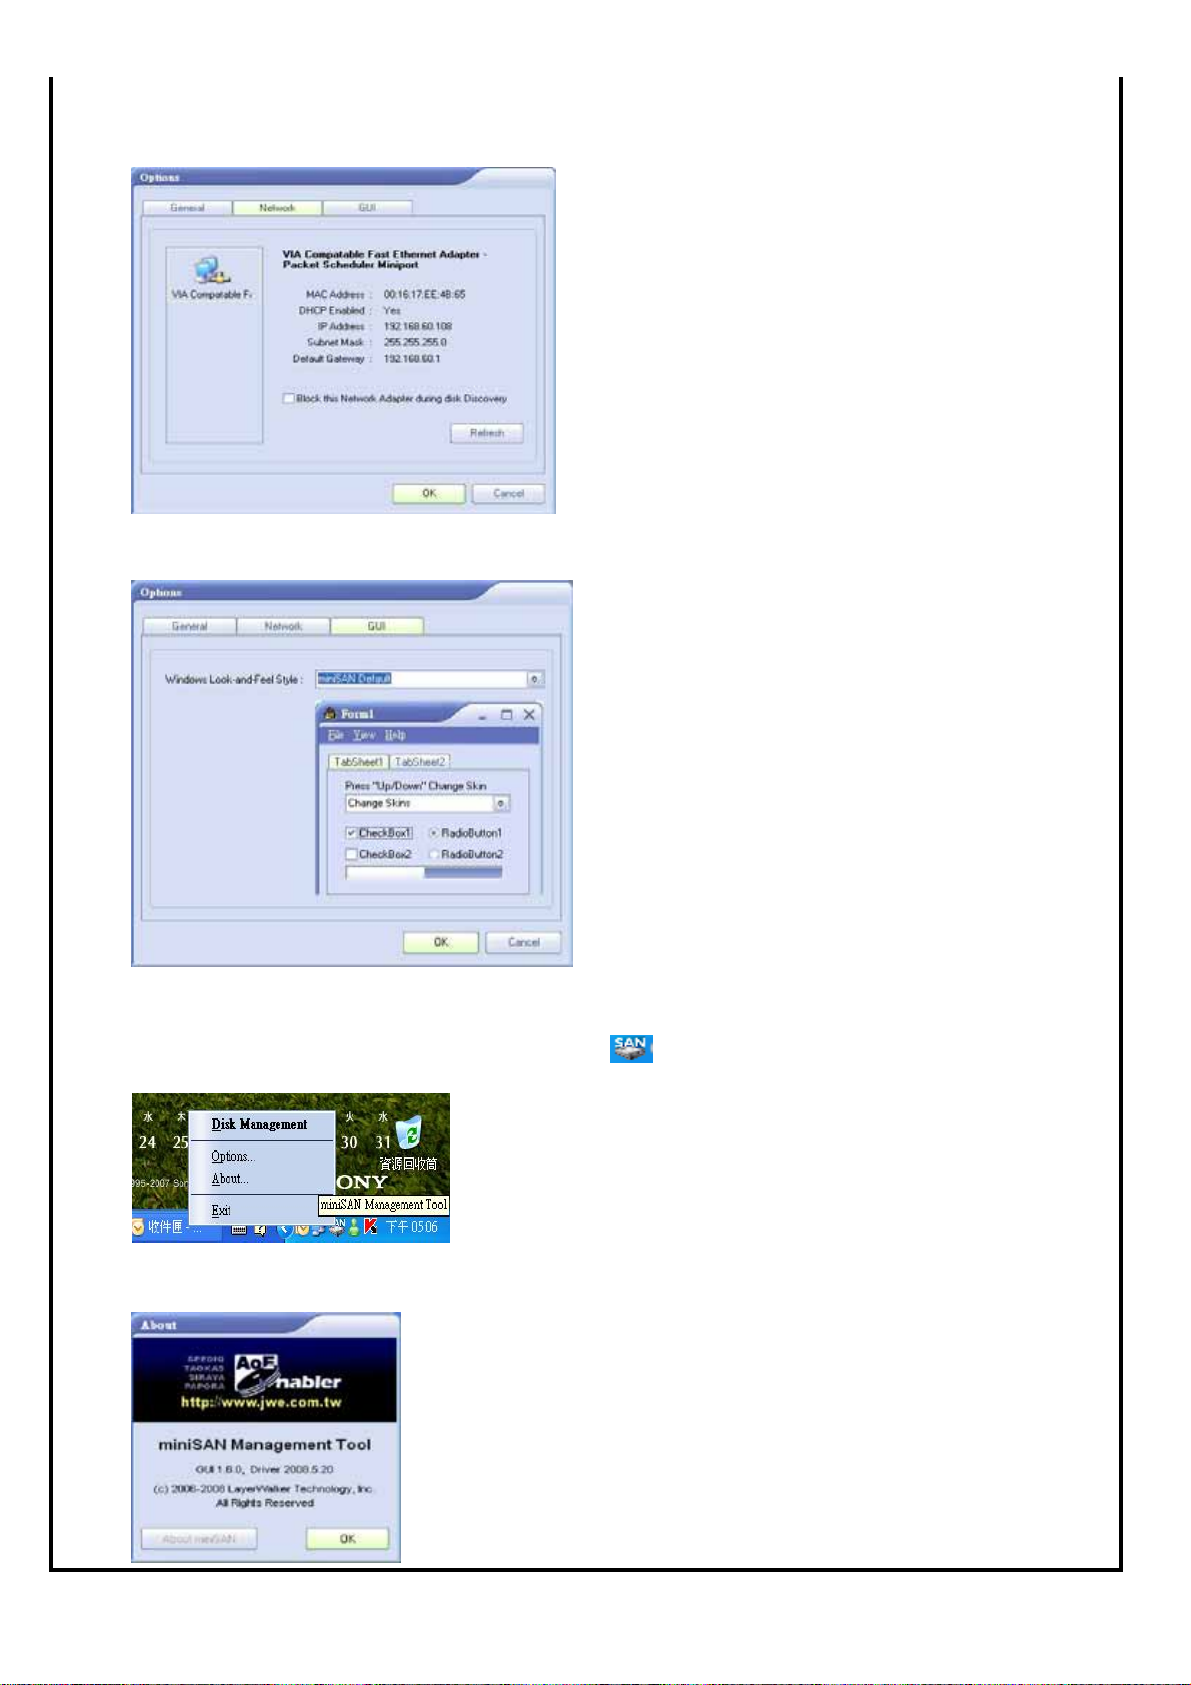
5.7.2 Network function description
1. Enable/Disable Block Network Adapter during disk Discovery.
5.7.3 GUI function description
1. Selection various skin by your like .
5.8 miniSAN Disk Tool About function
1. Mouse Right Click on the miniSAN Device Management Icon located on the system tray.
2. Select the Options function to pop the About window .
3. The About window show the GUI version and Driver version .
4. Press OK for exit 。
第 15 頁,共 16 頁
Page 16

5.9 Uninstall miniSAN
Before you uninstall the miniSAN Driver, you must close all applications using the miniSAN Device and
unmount all disk and then close miniSAN Disk Management .
1. Close miniSAN Disk Management by selecting Exit.
2. Uninstall miniSAN Driver .
- Go to Start > Programs > miniSAN Software > Uninstall miniSAN Software .
- Windows Installer will appear. Click Yes if you want to continue . Other wise click No.
3. Restart the PC once to finish uninstalled.
5.10 miniSAN Other Needing Attention Item
1. The miniSAN program have get a WHQL approval from Microsoft ;User can use in Windows XP & Vista O.S .
2.If SEEDIQ-Internal is Working ,Please don"t move Power and LAN Cable and SATA H.D.D .
第 16 頁,共 16 頁
 Loading...