

Page 1
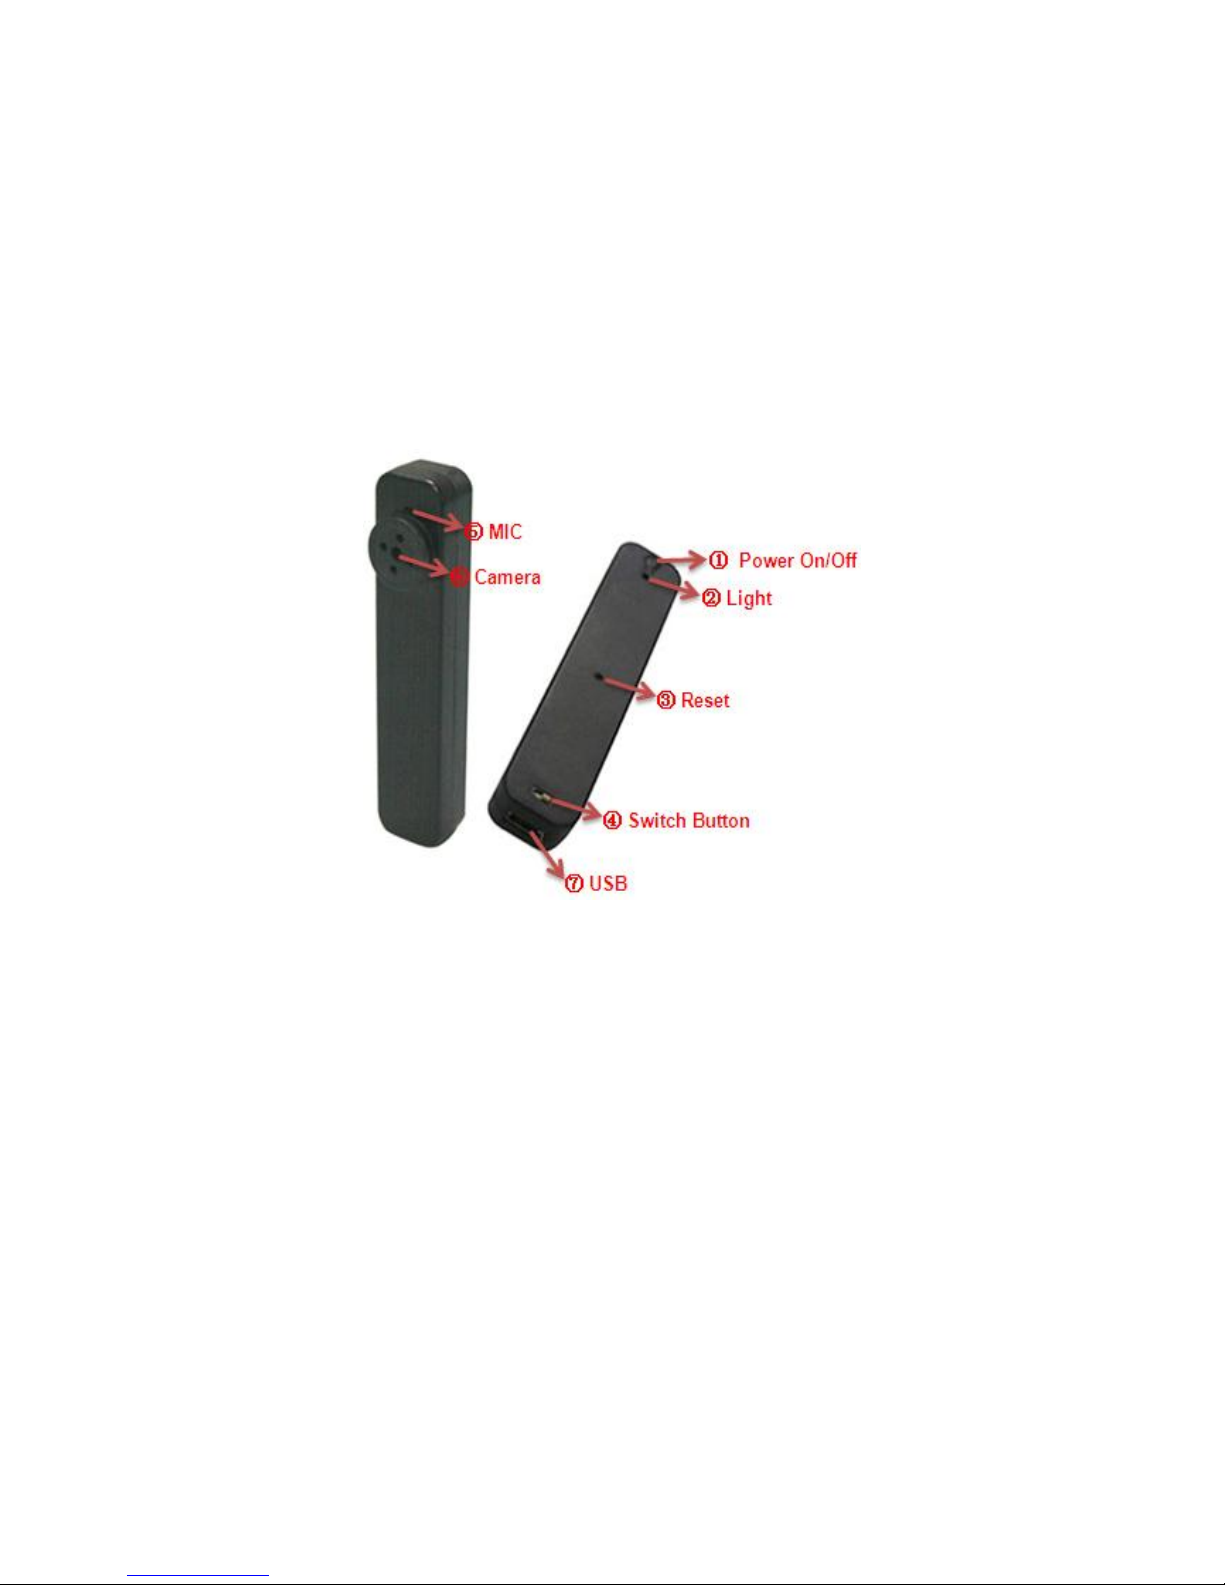
User Manual of Button Camera
● Product Accessories
● Button camera ● Ring ● USB cable
● User manual CD ● Four buttons ● A clip
● Picture & Buttons
1. Power on/off 2. Light 3.Reset 4. switch button (left side taking photo,
right side taking video) 5.Micphone 6.Camera 7. USB port
Technical Data
1) Functions: taking photo, video and audio
2) Color: black (if you need we can design other colors)
3) Video: AVI, 640*480 resolution
4) Photo: JPEG, 1280*960 resolution
5) Internal memory: 1GB-8GB
6) USB: 2.0(Hs)
7) Charging time: 2-3 hours
8) Battery use time: built-in Li battery, 1-2 hours
9) Operation systems: No need for driver installation if the operating system is
Windows ME/ 2000/ XP/ VISTA or above (Windows98 is excepted)
Page 2

Operation
Remark: Switch button: turn left to take photo, turn right to take video and audio
Switch on
Push the switch button to record side (right side)
Recording video and audio
1) Long press on/off button or use the magnetic ring to touch the camera for some
seconds, yellow light turns on, seconds later, blue light keeps on, it start to record
video and audio., the camera starts to record video and audio at the same time.
2) Press on/off button or use the magnetic ring to touch the camera once, yellow
light keeps on, indicating recording is finished and the data is saved automatically.
Taking photo
1) Push the switch button to photo side (left side), yellow light keeps on. Then short
press on/off button, blue light keeps on. The device enters photo mode.
2) Press on/off button or use the magnetic ring to touch the camera once, yellow
light flash once, indicating a photo is taken and saved automatically.
Attention: switch video mode to photo mode, the video file will be saved automatically.
Switch off
Under the standby mode or recording mode, keeping press the on/off button for
several seconds, the device power off, also you can press the reset button with the
clip to turn it off.
Attention: switch off while recording, the file can be saved automatically first.
Reset
You need to reset the device when it doesn’t work because of wrong operation. Just
press the reset button with the clip once, the device will be as good as original.
Charging
Under power off or standby mode, connect the camera to computer via USB cable
and charge it. The yellow light keeps twinkling while being charged. When the yellow
light stops twinkling and keeps on, it shows the camera is fully charged.
Page 3

Setting recording time
There is a function which show the video recorder time (year-month-day hour: minute:
second) will be recorded in the recorded files, and will be shown when playback.
Please set the time correctly as follows:
Insert the user manual CD into the computer
Copy the file “time.txt” to the root of the disk of the camera.
Open the TXT file then write down the computer time as the format in the file and
save it .
Immediately , you must open the device and record a file to activate the time . The
time will be simultaneous to the time file.
Attention
1) The system will turn off automatically when no operation is made within one
minute under standby mode.
2) The system will save the video file firstly then turn off if low of power when taking
video.
3) When taking video continually, the system will automatically generate a new video
file after each operation.
4) The file being saved need some time, please do not operate during the blue light
changing the yellow such as press any buttons or connect it to computer, or the file
would not be saved completely even lost.
5) The time of PC recognizing the device is different according to its different system
and configuration, so please not operate during recognizing. If the device can’t be
recognized, please check your computer’s operation system, device drivers, USB
port and the USB cable is normal, and then connect the hardware again.
 Loading...