


GPS NAVIGATION SYSTEM
DNX7140
DNX7000EX
MONITOR WITH DVD RECEIVER
DDX714
DDX7034BT
INSTRUCTION MANUAL
Take the time to read through this instruction manual.
Familiarity with installation and operation procedures will help you obtain the best
performance from your new GPS Navigation System/DVD Receiver.
For your records
Record the serial number, found on the back of the unit, in the spaces designated on the
warranty card, and in the space provided below. Refer to the model and serial numbers
whenever you call upon your Kenwood dealer for information or service on the product.
Model DNX7140/DNX7000EX/DDX714/DDX7034BT Serial number
US Residence Only
Register Online
Register your Kenwood product at
www.Kenwoodusa.com
© B64-4361-00/00 (KW/K2W/RW)
Contents
How to read this manual 4
Before Use 6
Notes 7
Functions of the buttons on the front
panel 10
Getting Started 12
How to Display the Navigation Screen 12
How to Select the Source 12
How to Set a Medium / a Device 13
Basic Operation 14
How to Display the Source Control Screen 14
How to Display Top Menu Screen 15
Operation on the Playback Screen of Visual
Sources 16
How to Display the Easy Control Screen 17
Watching DVD/Video CD 18
Playback Screen 18
Easy Control Screen 18
Source Control Screen 18
DVD-VIDEO Disc Menu 20
DVD-VR Menu Control 21
Video CD Zoom Control 21
Music Disc/ Audio File Listening &
Video File/ Picture File Watching 22
Source Control Screen 22
List Select 23
USB device select 24
Link search (Audio File in USB) 25
Playback Screen (Video file, Picture file) 25
Easy Control Screen (Video file, Picture file) 26
Picture Control 26
Movie Menu Control 26
iPod Control 27
Playback Screen 27
Easy Control Screen 27
Source Control Screen 28
iPod List 28
Link search (Music file) 29
Radio Listening 30
Source Control Screen 30
Preset Select 31
Auto Memory 31
Manual Memory 32
Radio Text 32
Set Station Name 33
Traffic Information 33
Search by Program Type 34
TV Watching 35
Function During TV Screen 35
Easy Control Screen 35
Source Control Screen 36
Auto Memory 37
Manual Memory 37
Preset Select 38
Set Station Name 38
SIRIUS/XM Control 39
Source Control Screen 39
Channel Search 40
Channel Memory 40
Direct Channel Search 41
HD Radio Control 42
Source Control Screen 42
Auto Memory 43
Manual Memory 43
Receive mode 44
Channel Search 44
Direct Search 45
iTunes Tagging (HD Radio Tagging) 45
Bluetooth Audio Control 46
Before Use 46
Source Control Screen 46
Other Functions 47
How To Use the Character Entry Screen 47
External Device Power Supply Control 47
Muting Audio Volume upon Reception of
Phone Call 48
Screen Control 49
Screen Control 49
Hands Free Unit Control 50
Before Use 50
Downloading the Phonebook 50
Receiving a Call 50
During a Call 50
Call Waiting 51
Making a Call 51
Calling by Phonebook 52
Calling by Entering a Phone Number 52
Making a Call Using Call Records 53
Calling by Voice Recognition 53
Controlling Tone-based Services 54
Setting Up the Hands-Free Phone 54
Voice Registration 55
Key Word Voice Registration 56
Phone Number Preset 57
SMS (Short Message Service) 57
Audio Control 59
Audio Control Menu 59
Audio Control 59
Equalizer Control 60
Graphic Equalizer Setup 60
Zone Control 61
Space Enhancer 61
Position 62
Remote Controller 87
Battery installation 87
Remote Controller mode switch 87
Common operations (AUD mode) 88
DVD/VCD (DVD mode) 89
Music Disc/Audio file/Video file/ Picture file
(AUD mode) 90
Radio (AUD mode) 91
NAVI (NAVI mode) 91
TV (TV mode) 92
Initial Setup 93
Status bar Indicator items 94
DVD Language Codes 95
Help? Troubleshooting 96
Help? Error 98
Specifications 100
Setup Menu 63
How to Display SETUP Menu Screen 63
[Information]
Mileage Tracker (DNX models) 64
Vehicle Maintenance (DNX models) 64
Gas Mileage Analysis (DNX models) 65
Vehicle Setup (DNX models) 65
Software Information 66
[System]
User Interface 66
Language Setting 66
Touch Panel Adjustment 67
Clock Setup 67
Security Setup 68
Monitor Angle Control 69
EXT SW Setup 69
Setup Memory 70
[Display]
Entering Background 71
Panel Color Coordinate 72
Screen Control 73
[Bluetooth SETUP]
Registering Bluetooth Unit 73
Registering Bluetooth Unit PIN Code 75
Bluetooth Unit Connection 75
[AV-IN SETUP]
AV Input Setup 76
[AV Interface]
AV Interface Setup 76
[Navigation]
Navigation Setup 77
[Audio SETUP]
DSP Bypass Control 78
Speaker Setup 78
Car Type (DTA) Setup 79
[DVD SETUP]
DVD Setup 80
DVD Language Setup 81
DVD Parental Level Setup 81
Disc Setup 82
[USB SETUP]
USB Setup 83
[iPod SETUP]
iPod Setup 83
[SIRIUS SETUP]
SIRIUS Parental Code Setup 84
SIRIUS Parental Lock Setup 85
SIRIUS Parental Lock Channel Select 85
[TV SETUP]
TV Setup 86
2 DNX7140/DNX7000EX/DDX714/DDX7034BT English 3
M
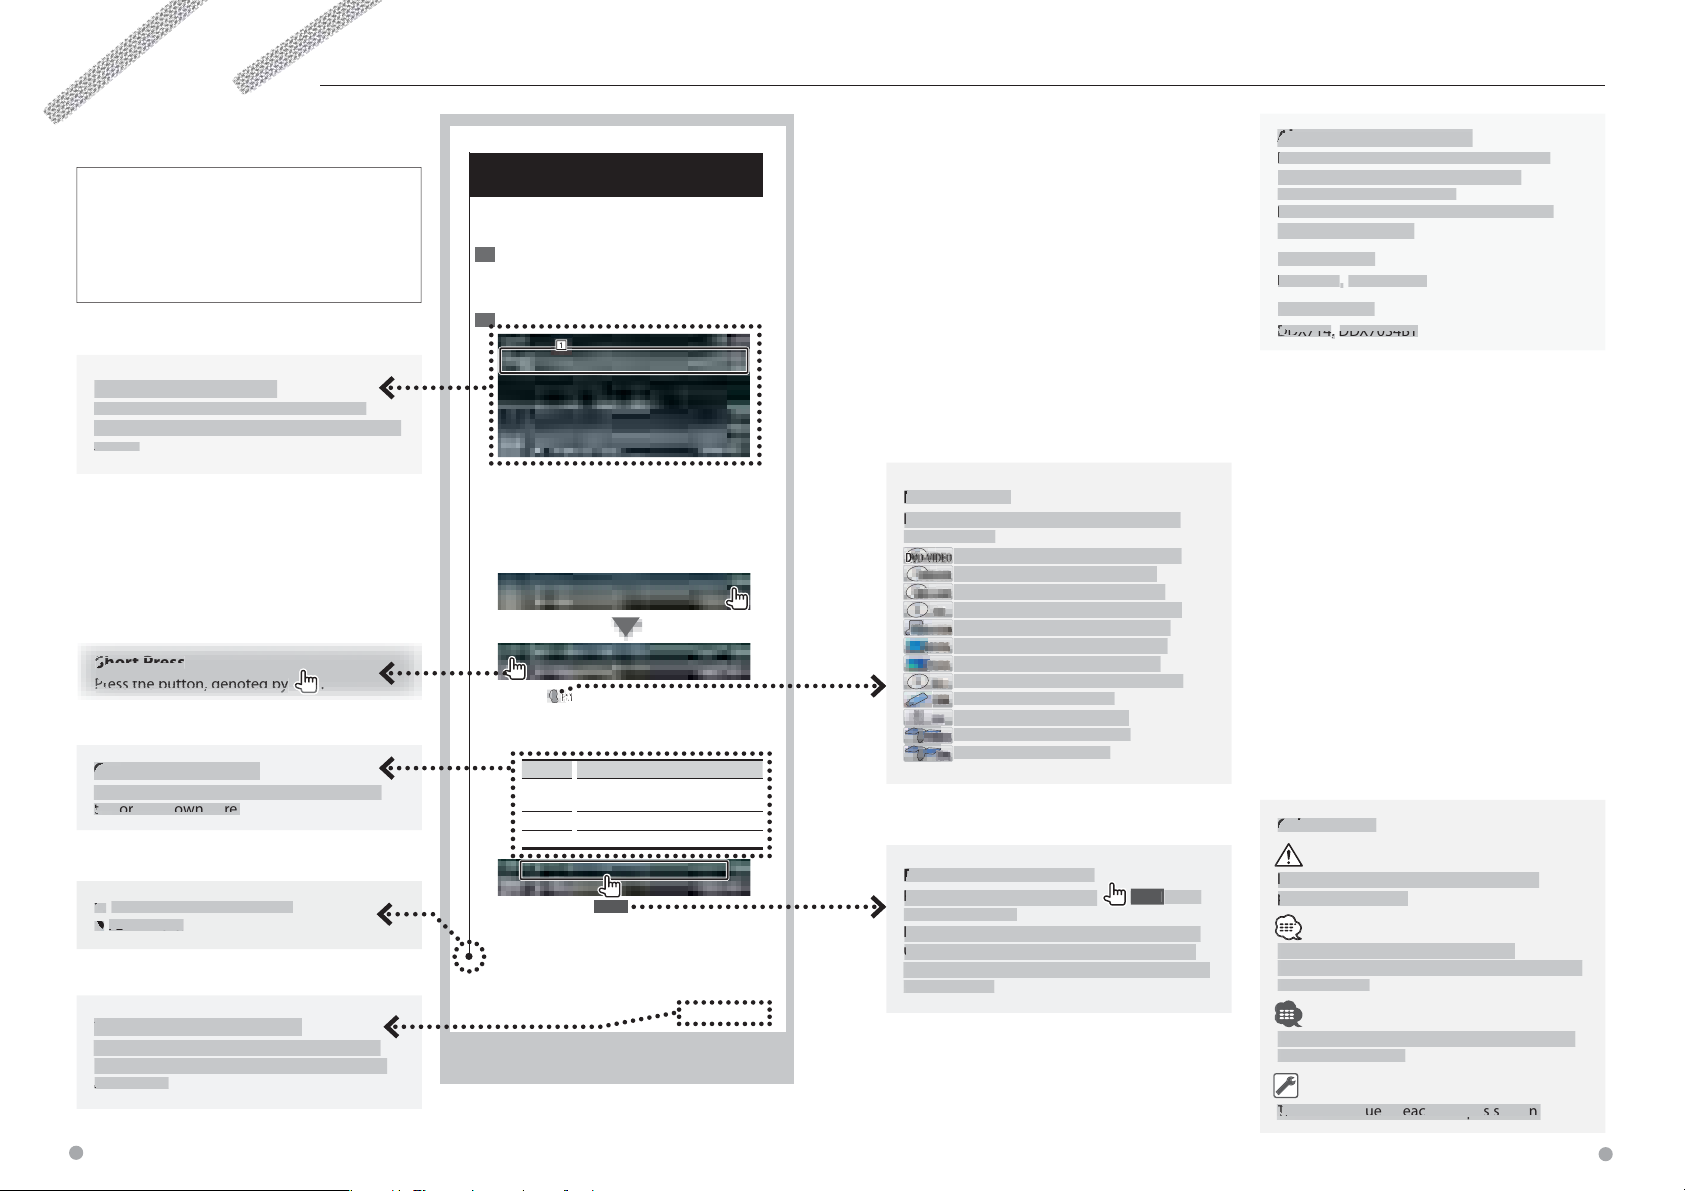
How to read this manual
Short Press
ss
the bu
tto
n,
,
,
den
ote
d b
y
y
y
y
y
ess
seconds o
e
y
2
onds o
e
.
T
fo
f
seconds.
W
h
the
thetht or
der sh
own he
s
y
the item.
TheTTT in
iti val
ue of h s i
s s
how
n
e
T
truction.
een
.
About th
d
used
cribed as sho
odels
uded
eac
ode
ls
0
,
odels
,
,
4BT
.
E
nds
nds
he
e
e.
e.
VD-VID
.
.
.
.
.
ce
.
source.
source.
This manual uses illustrations to explain its
operations.
The displays and panels shown in this manual
are examples used to provide clear explanations
of the operations.
For this reason, they may be different from the
actual displays or panels used, or some display
patterns may be different.
lecting a screen item
elect an coose an item on t
elect the item by touching the button on the
ange
in
the screen
each operation, the screen changes in
.
e screen.
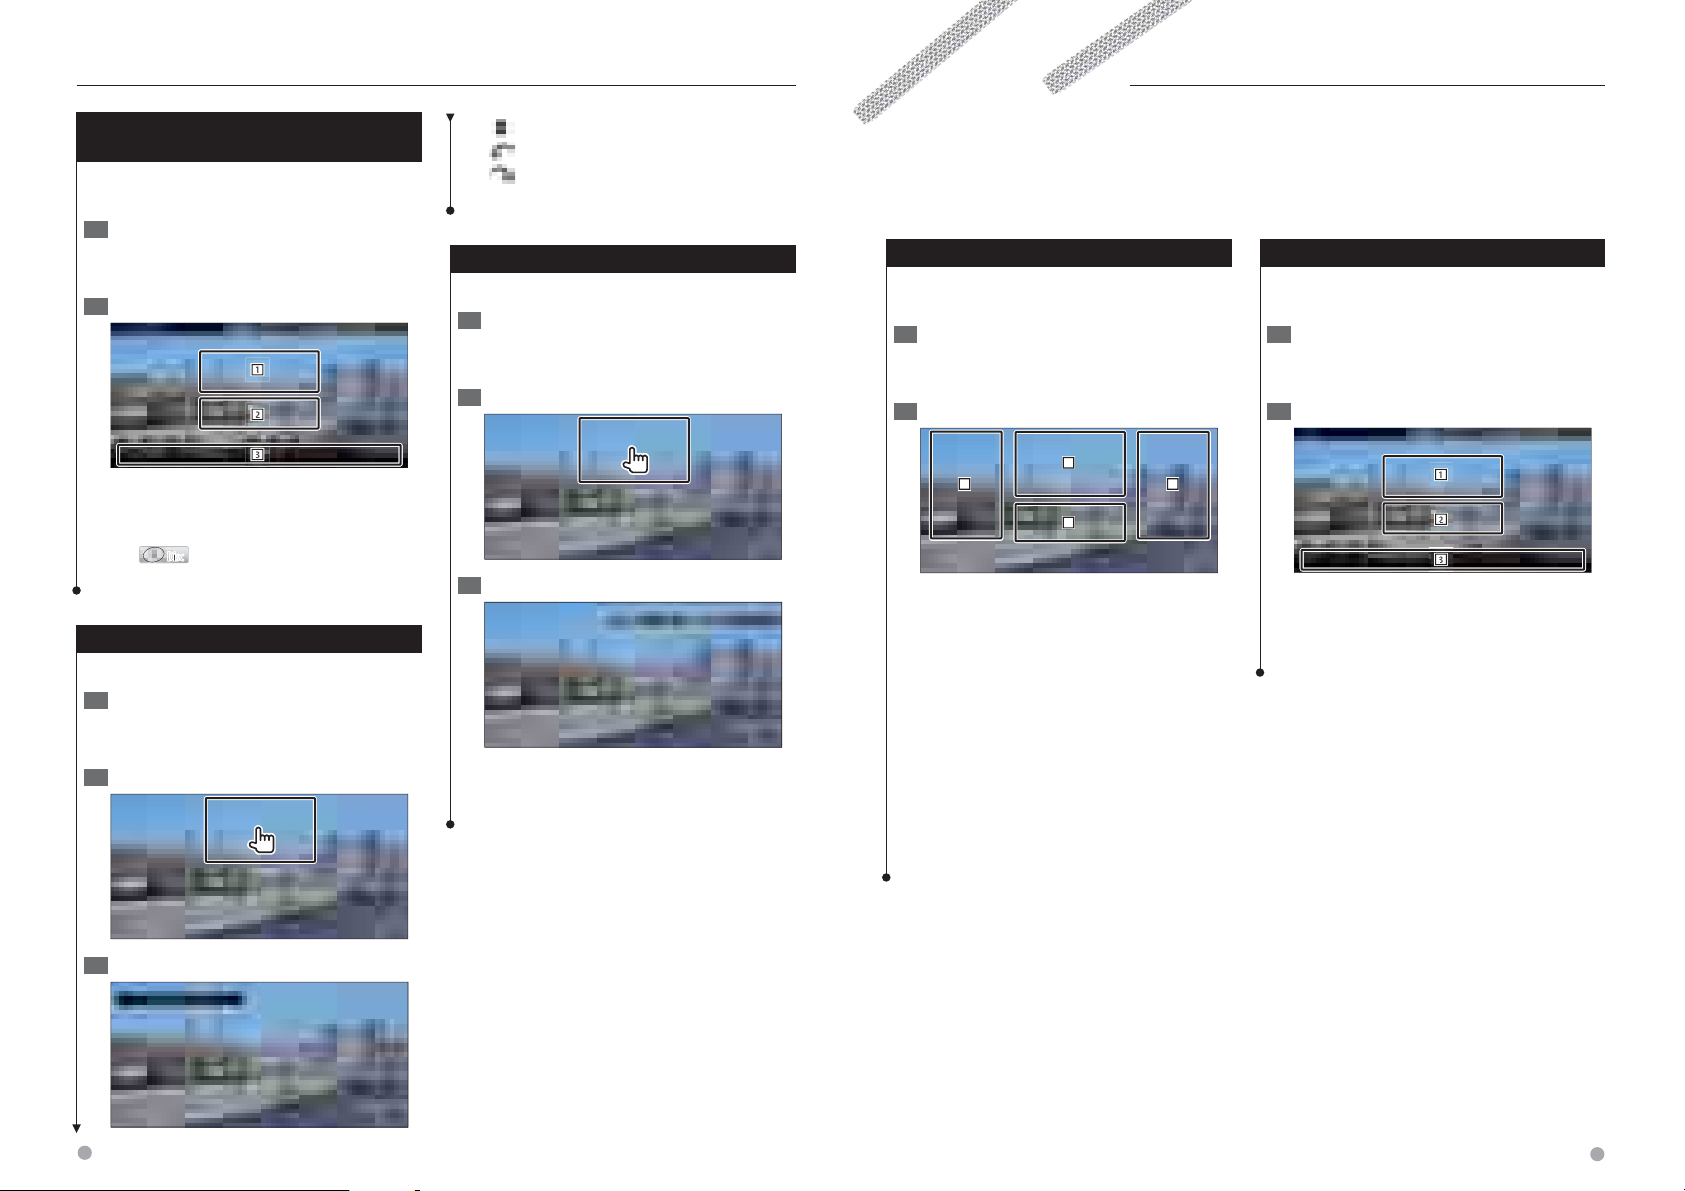
Functions While Displaying the Control
Screen
Switches to the source control screen to use
various functions.
Display the Source 1 Control Screen
See <How to Display the Source Control
Screen>.
Operation on the 2 Source Control screen
1
[FM] Switches to the FM1/2/3 band.
[AM] Switches to the AM band.
[], [D] Tunes in a station.
Use the [SEEK] to change the frequency
switching.
Multi Function
[CRSC]
[SEEK] Switches the Seek mode.
Turns the CRSC function On or Off.
FMF
The mode is switched in the following order
each time you touch the button.
Display Setting
"AUTO1" Tunes in a station with good reception
automatically.
"AUTO2" Tunes in stations in memory one after another.
"MANU" Switches to the next frequency manually.
nction Icon
cons representing available functions are
hown below.
Function of DVD-VIDEO playback
Function of DVD-VR playback
Function of Video CD playback.
Function of CD (CD-DA) playback
Function of Audio File playback
Function of MPEG file playback.
Function of JPEG file playback.
Function of Disc (DVD, CD) media
Function of USB devi
Function of FM reception.
Function of SIRIUS
Function of XM
e model groups
ifferent functions are
odel groups, the model groups are
wn below.
mes of m
incl
roup are as follows:
in different
in
NX mode
NX714
NX7000EX
X m
r mark
h m
l
: Continues to the next line
r
ntinue to the next pag
he instruction continues to the next page.
ake sure to flip the page for the rest of the
2 sec.
Continue to touch until the memory number
appears.
Next page
The above operation example with the mark
differs from the actual operation.
2
ress the button, denoted b
r mor
ndicates to press and hold down the button
ntil operation starts or the screen changes.
he left example indicates to press the button
2
r mor
sec. , for 2
mportant precautions are described to
revent injuries etc.
pecial instructions, supplementar
xplanations, limitations, and reference pages
re described.
eneral precautions and reference pages are
wn on
4 DNX7140/DNX7000EX/DDX714/DDX7034BT English 5
.
NotesBefore Use
2WARNING
To prevent injury or fire, take the following
precautions:
• To prevent a short circuit, never put or leave any
metallic objects (such as coins or metal tools) inside
the unit.
• Do not watch or fix your eyes on the unit’s display
when you are driving for any extended period.
How to reset your unit
• If the unit or the connected unit fails to operate
properly, press the Reset button. The unit returns to
factory settings when the Reset button is pressed.
• Remove the USB device before pressing the Reset
button. Pressing the Reset button with the USB
device installed can damage the data contained in
the USB device. For how to remove the USB device,
see <How to Set a Medium / a Device> (page 13).
• When the unit is turned on after pressing the Reset
button, the Initial SETUP screen is displayed. (page
93)
Reset button
Cleaning the Unit
If the faceplate of this unit is stained, wipe it with a
dry soft cloth such as a silicon cloth.
If the faceplate is stained badly, wipe the stain off
with a cloth moistened with neutral cleaner, then
wipe it again with a clean soft dry cloth.
¤
• Applying spray cleaner directly to the unit may affect its
mechanical parts. Wiping the faceplate with a hard cloth
or using a volatile liquid such as thinner or alcohol may
scratch the surface or erases characters.
Lens Fogging
When you turn on the car heater in cold weather,
dew or condensation may form on the lens in the
disc player of the unit. Called lens fogging, this
condensation on the lens may not allow discs to play.
In such a situation, remove the disc and wait for the
condensation to evaporate. If the unit still does not
operate normally after a while, consult your Kenwood
dealer.
6 DNX7140/DNX7000EX/DDX714/DDX7034BT English 7
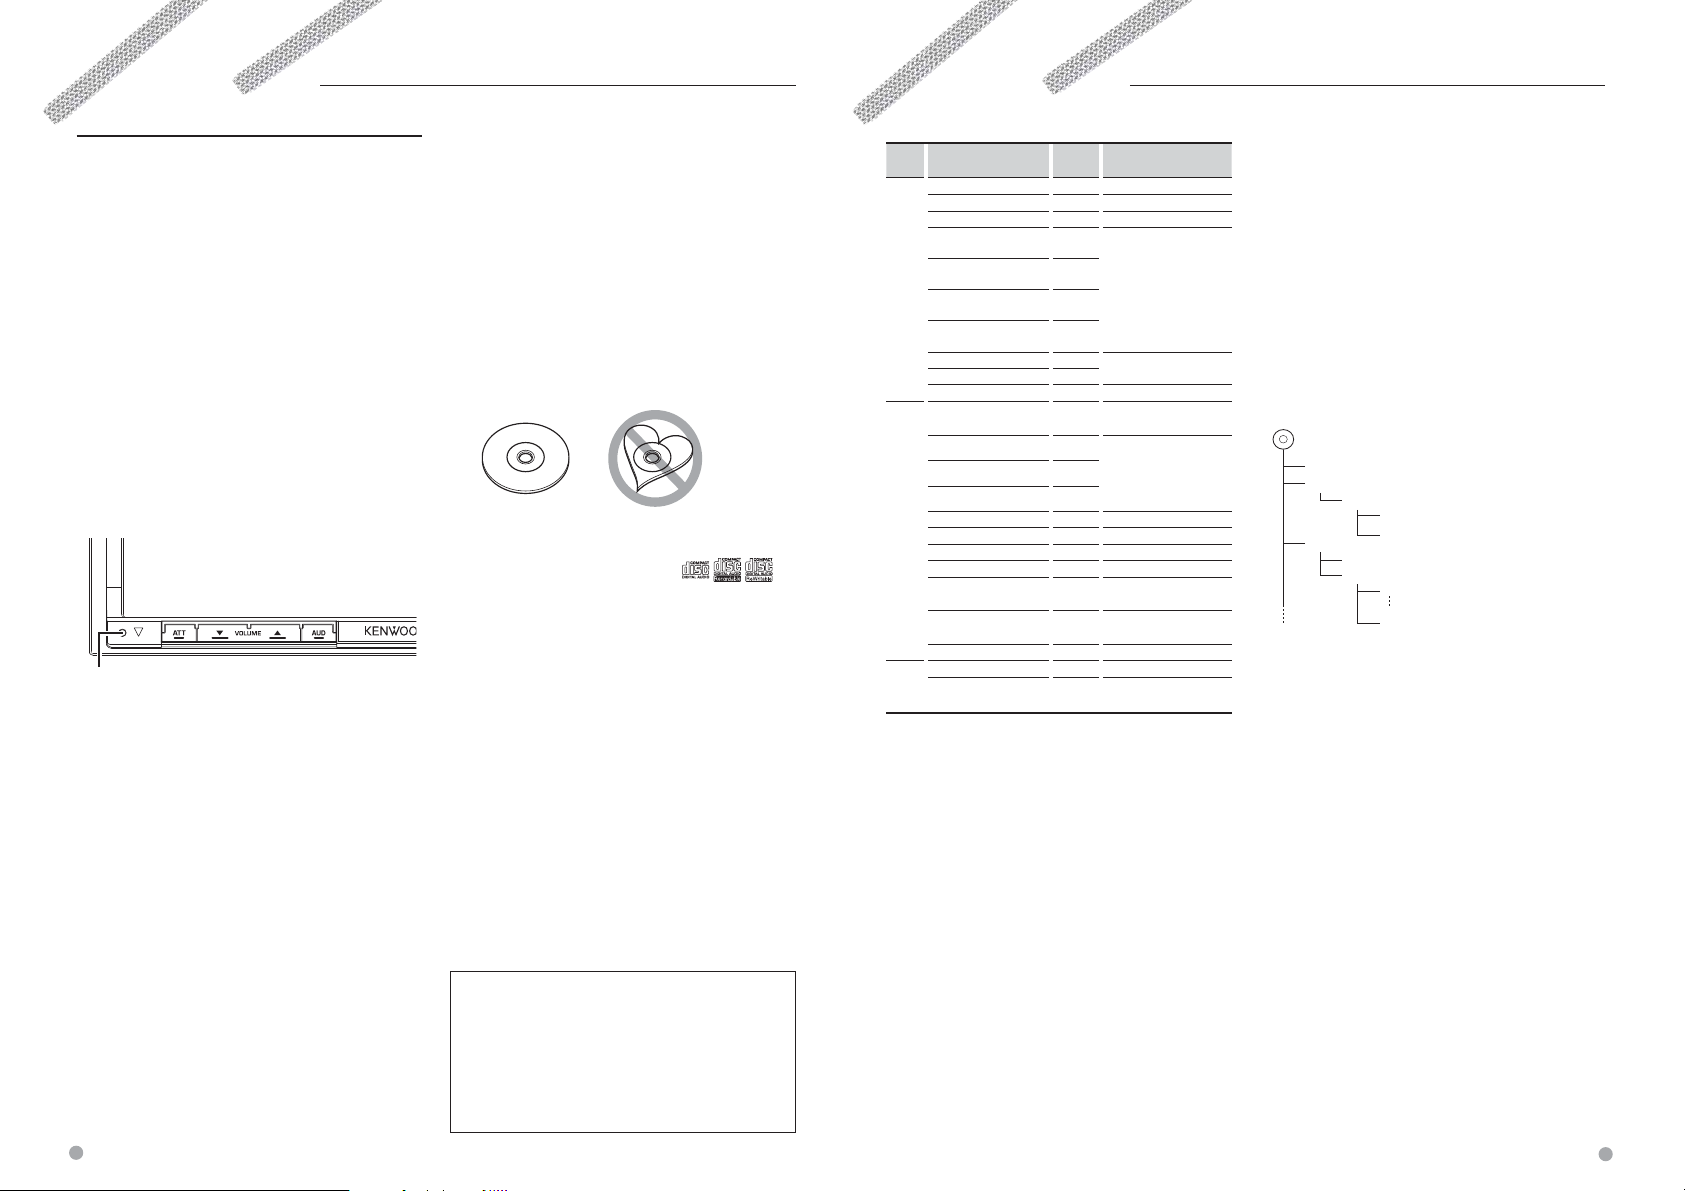
Handling discs
• Do not touch the recording surface of the disc.
• Do not stick tape etc. on the disc, or use a disc with
tape stuck on it.
• Do not use disc type accessories.
• Clean from the center of the disc and move
outward.
• When removing discs from this unit, pull them out
horizontally.
• If the disc center hole or outside rim has burrs,
use the disc only after removing the burrs with a
ballpoint pen etc.
Discs that cannot be used
• Discs that are not round cannot be used.
• Discs with coloring on the recording surface or
discs that are dirty cannot be used.
• This unit can only play the CDs with
This unit may not correctly play discs which do not
have the mark.
• You cannot play a disc that has not been finalized.
(For the finalization process refer to your writing
software, and your recorder instruction manual.)
• If you try to load a 3-inch-disc with its adapter into
the unit, the adapter might separate from the disc
and damage the unit.
.
Other notes
• If you experience problems during installation,
consult your Kenwood dealer.
• When you purchase optional accessories, check
with your Kenwood dealer to make sure that they
work with your model and in your area.
• Characters that conform to ISO 8859-1 can be
displayed.
• The RDS or RBDS feature won’t work where the
service is not supported by any broadcasting
station.
This product includes a non-replaceable
lamp that contains trace amounts of
mercury. Please recycle in accordance
with your local state regulations. Do
not dispose of in trash. For disposal or
recycling information, please contact
your local authorities.
List of playable discs
Disc
types
DVD DVD Video
CD Music CD
Others Dualdisc ×
Standard Support Remark
DVD Audio ×
DVD-VR
DVD-R
DVD-RW
DVD+R
DVD+RW
DVD-R DL (Dual layer)
DVD+R DL (Double layer)
DVD-RAM ×
CD-ROM
CD-R
CD-RW
DTS-CD
Video CD (VCD)
Super video CD ×
Photo CD ×
CD-EXTRA
HDCD
CCCD ×
Super audio CD
‡ : Playback is possible.
% : Playback is partly possible.
× : Playback is impossible.
‡
‡
Not compatible with CPRM.
‡
MP3/WMA/AAC/WAV/
JPEG/MPEG Playback
‡
Multi-border/Multisession/
(Playback depends on
‡
authoring conditions)
Compatible with 8-cm (3
‡
inch) discs
‡
Only video format
‡
‡
CD-TEXT/8-cm (3 inch)
discs supported.
‡
MP3/WMA/AAC/WAV/
JPEG playback
‡
Multisession supported
‡
Packet write not supported.
‡
‡
%
Only music CD session can
be played.
%
Sound quality of normal
CD music
%
Only CD layer can be
played.
Use of "DualDisc"
When playing a "DualDisc" on this unit, the surface
of the disc that is not played may be scratched
while the disc is inserted or ejected. Since the music
CD surface does not conform to the CD standard,
playback may be impossible.
(A "DualDisc" is a disc with one surface containing
DVD standard signals and the other surface
containing music CD signals.)
About Audio files
• Playable Audio file
AAC-LC (.m4a), MP3 (.mp3), WMA (.wma), Linear
PCM (WAV) (.wav)
⁄
• If music of normal CD and other playback systems are
recorded in the same disc, only the playback system
recorded at the first setout is played.
• Acceptable media
CD-R/RW/ROM, DVD±R/RW, mass-storage-class
USB device, iPod with KCA-iP301V
• Playable disc file format
ISO 9660 Level 1/2, Joliet, Romeo, Long file name.
• Playable USB device or SD card file system
• Playable USB device file system
FAT16, FAT32
Although the audio files are complied with the standards
listed above, the play maybe impossible depending on
the types or conditions of media or device.
• Playing order of the Audio file
In the example of folder/file tree shown below, the
files are played in the order from ① to ⑩.
Folder
<
v
v
v
v
v
: Folder
: Audio
Audio file
CD
()
v
v.
An online manual about audio files is put on the
site, www.kenwood.com/audiofile/. On this online
manual, detailed information and notes which are
not written in this manual are provided. Make sure
to read through the online manual as well.
About Video files
• Acceptable video files
MPEG1, MPEG2
• Extensions
mpg, mpeg, m1v, m2v
• Acceptable media
CD-R/RW/ROM, DVD±R/RW, mass-storage-class
USB device, iPod with KCA-iP301V
Acceptable discs, disc formats, USB device file system,
file and folder names and playing order are the same
as those for audio files. See <About Audio files>.
About Picture files
• Acceptable picture files
JPEG
• Extensions
jpg, jpeg
Next page 3
Notes
• Acceptable media
CD-R/RW/ROM, DVD±R/RW, mass-storage-class
USB device
Acceptable discs, disc formats, USB device file system,
file and folder names and playing order are the same
as those for audio files. See <About Audio files>.
iPod/iPhone that can be connected to this
unit
Made for
• iPod nano (1st generation) • iPod nano (2nd generation)
• iPod nano (3rd generation) • iPod nano (4th generation)
• iPod with video • iPod classic
• iPod touch (1st generation) • iPod touch (2nd generation)
Works with
• iPhone • iPhone 3G
• You cannot connect a USB device via a USB hub
and Multi Card Reader.
• Take backups of the audio files used with this unit.
The files can be erased depending on the operating
conditions of the USB device.
We shall have no compensation for any damage
arising out of erasure of the stored data.
• No USB device comes with this unit. You need to
purchase a commercially available USB device.
• When connecting the USB device, usage of the
CA-U1EX (option) is recommended.
Normal playback is not guaranteed when a cable
other than the USB compatible cable is used.
Connecting a cable whose total length is longer
than 5 m can result in abnormal playback.
Navigation units that can be connected to
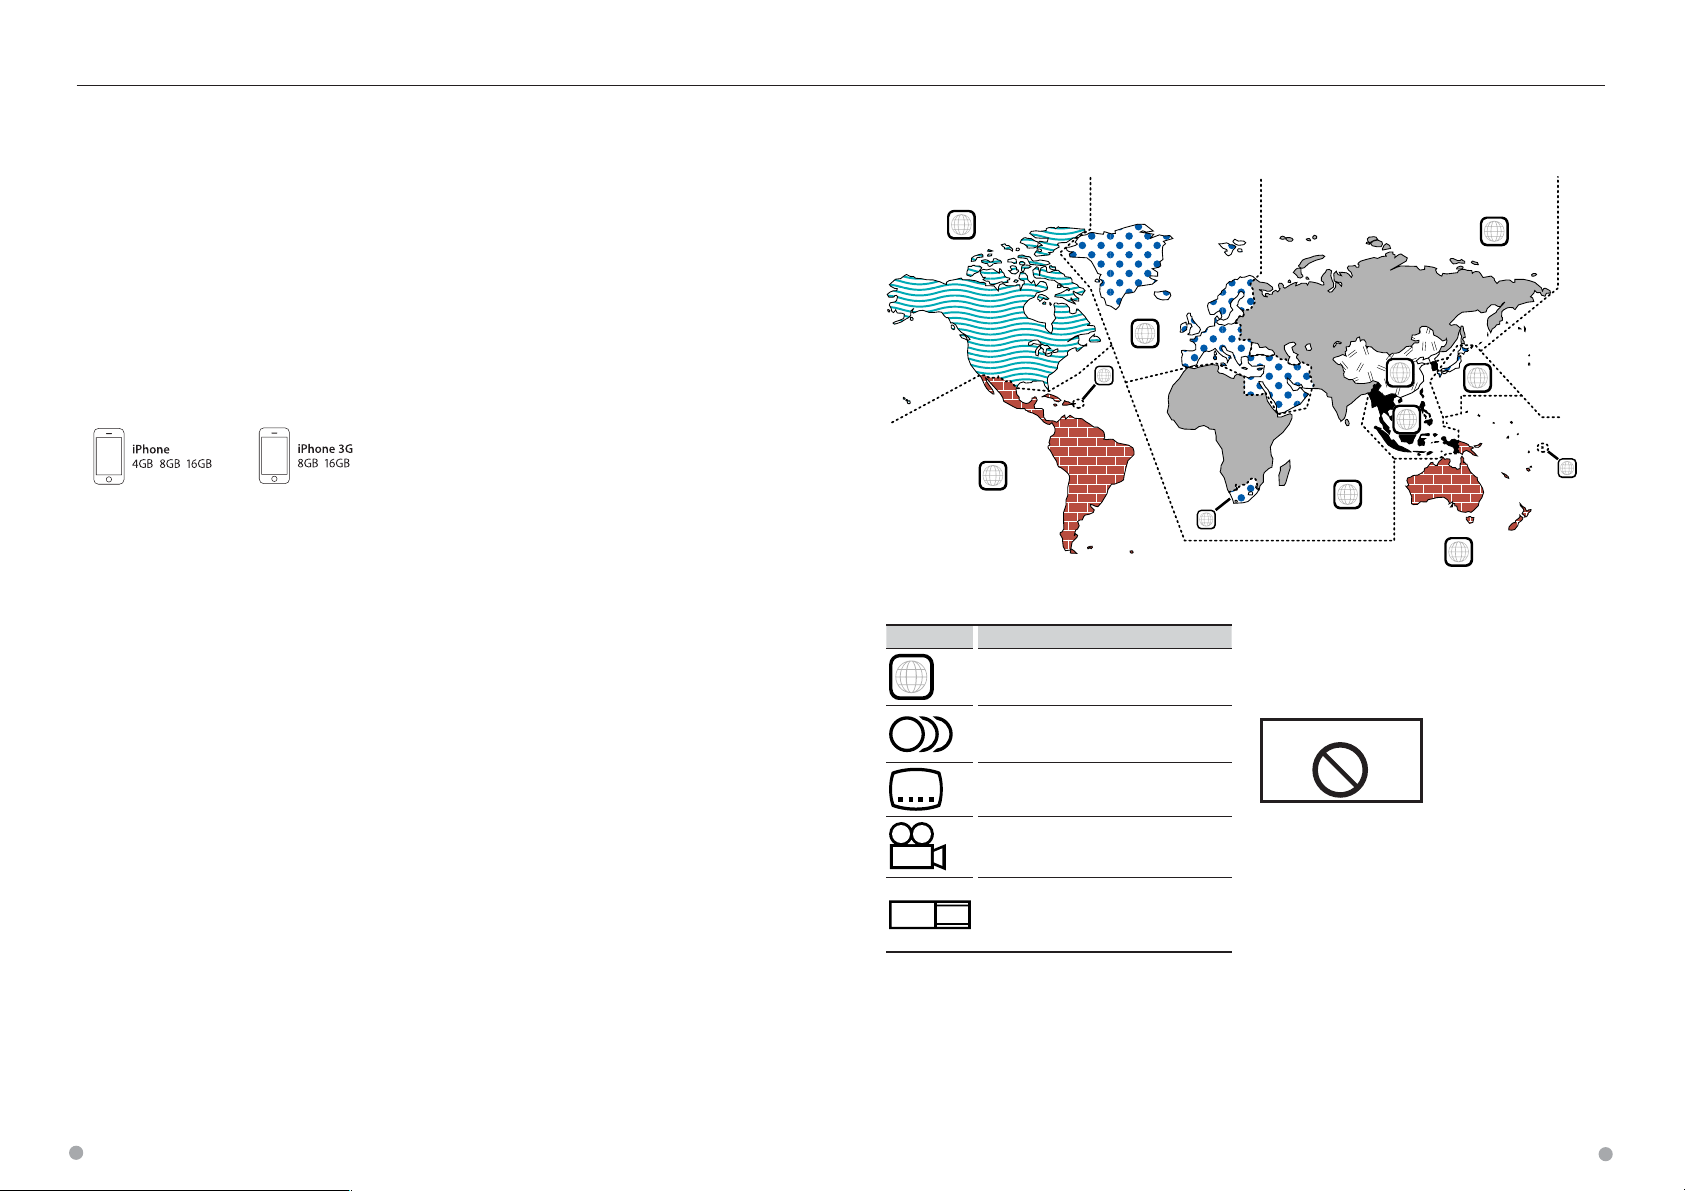
Region codes in the world
The DVD players are given a region code according to the country or area it is marketed, as shown in the
following map.
1
2
1
6
3
5
2
this unit (DDX models only)
1
• Update iPod/iPhone software to the latest version.
• You can control an iPod/iPhone from this unit by
connecting an iPod/iPhone (commercial product)
with Dock connector using an optional accessory
iPod connection cable (KCA-iP301V). The word
"iPod" appearing in this manual indicates the iPod/
iPhone connected with the KCA-iP301V (optional
accessory).
• By connecting your iPod/iPhone to this unit with
an optional accessory iPod connection cable (KCAiP301V), you can supply power to your iPod/iPhone
as well as charge it while playing music. However,
the power of this unit must be on.
⁄
• If you start playback after connecting the iPod, the
music that has been played by the iPod is played
first.
In this case, "RESUMING" is displayed without
displaying a folder name, etc. Changing the browse
item will display a correct title, etc.
• When the iPod is connected to this unit,
"KENWOOD" or "✓" is displayed on the iPod to
indicate that you cannot operate the iPod.
• KNA-G510*/ G431* • KNA-DV4100
• KNA-DV3100 • KNA-DV2100
* Update the navigation software to the latest
version. For how to update the software, refer to the
instruction manual of the navigation unit.
About Satellite Radio tuner
This unit supports Satellite Radio tuners which are
released by SIRIUS and XM.
Optional accessories below are necessary for
connection.
SIRIUS tuner : Conversion cable CA-SR20V
XM tuner : XM interface Box KCA-XM100V
Refer to the instruction manual of Satellite radio
tuner.
HD Radio that can be connected to this
unit
• KTC-HR300 • KTC-HR200
When you connect an HD Radio, Tuner features of
the unit are disabled and changed to HD Radio tuner
features.
TV tuner that can be connected to this unit
• KTC-V300N
4
DVD disc marks
Symbol Description
ALL
8
32
9
16:9 LB
Indicates a region number. The discs with this mark can
be played with any DVD player.
Indicates the number of audio languages recorded. Up
to 8 languages can be recorded in a movie. You can
select a favorite language.
Indicates the number of subtitled languages recorded.
Up to 32 languages can be recorded.
If a DVD disc has scenes shot from multiple angles, you
can select a favorite angle.
Indicates the type of screen for the image. The left mark
indicates that a wide image picture (16:9) is displayed
on a standard TV set screen (4:3) with a black band at
both the top and bottom of the screen (letter box).
5
2
4
Operation regulatory marks
With this DVD, some functions of this unit such as the
play function may be restricted depending on the
location where the DVD is playing. In this case, the
following marks will appear on the screen. For more
information, refer to the disc manual.
Prohibition Mark
Discs with limited period of use
Do not leave discs with a limited period of use in this
unit. If you load an already expired disc, you may not
be able to remove it from this unit.
About USB device
• In this manual, the word "USB device" is used for
flash memories and digital audio players which
have USB terminals.
• When the USB device is connected to this unit,
it can be charged up provided that this unit is
powered.
• Install the USB device in the place where it will not
prevent you from driving your vehicle properly.
8 DNX7140/DNX7000EX/DDX714/DDX7034BT English 9
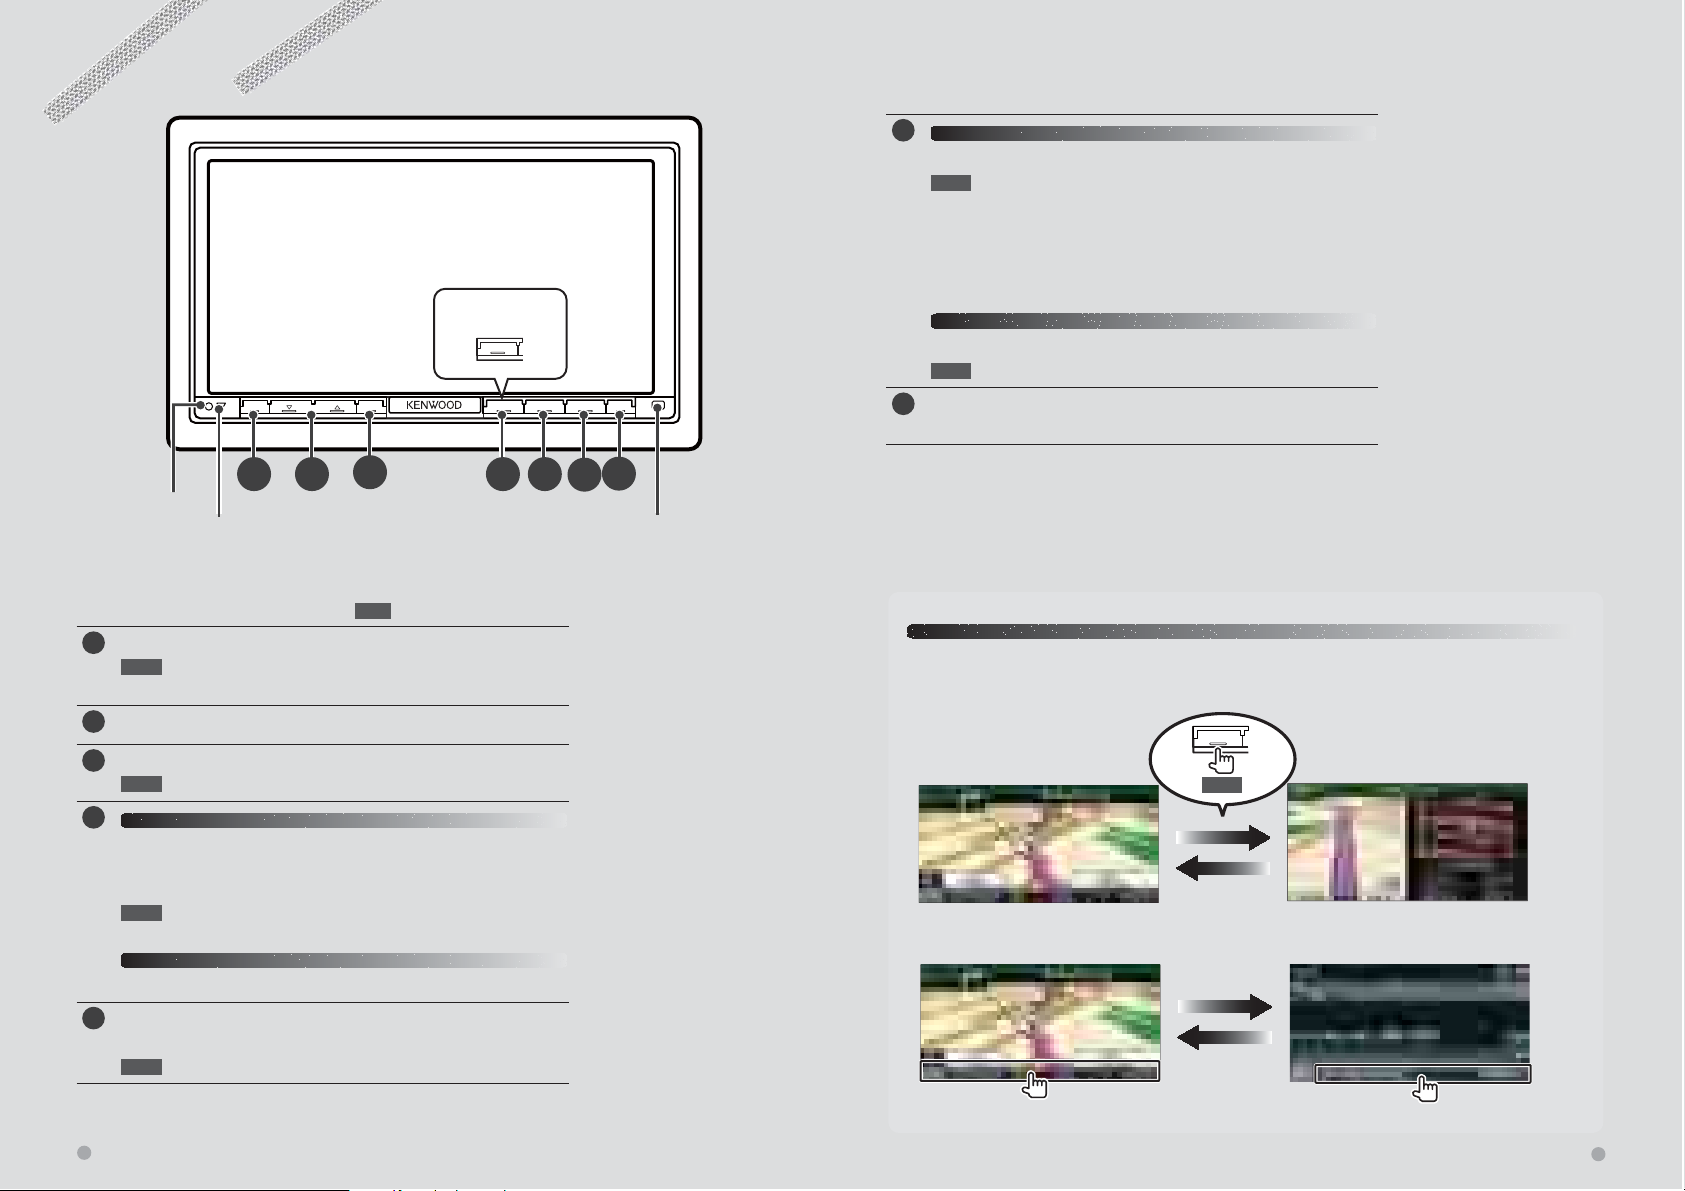
Functions of the buttons on the front panel
DNX models
DDX models
DNX models
DDX models
DNX models
For DDX models
TOP
ATT NAV SRC TEL
VOLUME AUD
Functions of the buttons on the front panel
F
DNX models
Hands Free control On/Off.
1 sec. 7 While watching the navigation screen or playback
screen of a visual source
Displays the Easy Control screen.
7 While watching the screen other than the above
Screen Switching function On/Off.*
DDX models
&
4
!
⁄
*4 When the Picture in Picture function
(page 11) is activated, this function is
disabled.
Hands Free control On/Off.
1 sec. Displays the Easy Control buttons.
Opens the panel and ejects the disc.
G
&
Closes the panel.
A EB
Reset button
(page 6)
Attenuation of the volume On/Off.
A
SI indicator (page 68)
C
1 sec. : Press for more than 1 second
1 sec. Keep the tag data of the currently listening music of
HD Radio.
Volume adjustment.
B
Displays Graphic Equalizer screen.*1 P
C
1 sec. Rear view display On/Off.*
D
DNX models
t
2
Displays the navigation screen.
When the navigation screen has already been displayed, it switches
to the currently selected source screen.
1 sec. Picture in Picture function On/Off.*3 !
DDX models
Displays the Top Menu screen. %
Turns the power On.
E
Displays the Source Select screen.
@
1 sec. Turns the power Off.
D
G
F
Remote control
sensor
⁄
*1 The display may not switch to
Audio Control Menu screen in some
conditions.
2
The function of the [AUD] button
*
can be changed to the display off
function. See <User Interface> (page
66).
3
When the Screen Switching function
*
(page 11) is activated, this function is
disabled.
DNX models
Picture in Picture function
Two screens, the navigation screen and source screen, are displayed. When Picture in Picture
function is on, touching the source screen switches between the R-CAM image and source image.
NAV
1 sec.
Screen Switching function
Switching between the navigation screen and the source control screen with one touch operation.
10 DNX7140/DNX7000EX/DDX714/DDX7034BT English 11
Getting Started
DNX models
DDX models
Getting Started
How to Display the Navigation Screen
DNX models
NAV
The navigation screen appears.
DDX models
TOP
The navigation screen appears.
• For how to set up and use the navigation function,
see the Navigation Instruction Manual.
⁄
• For DDX models, an optional navigation system needs
to be connected. See <Navigation unit that can be
connected to this unit> (page 8) for connectable
navigation units.
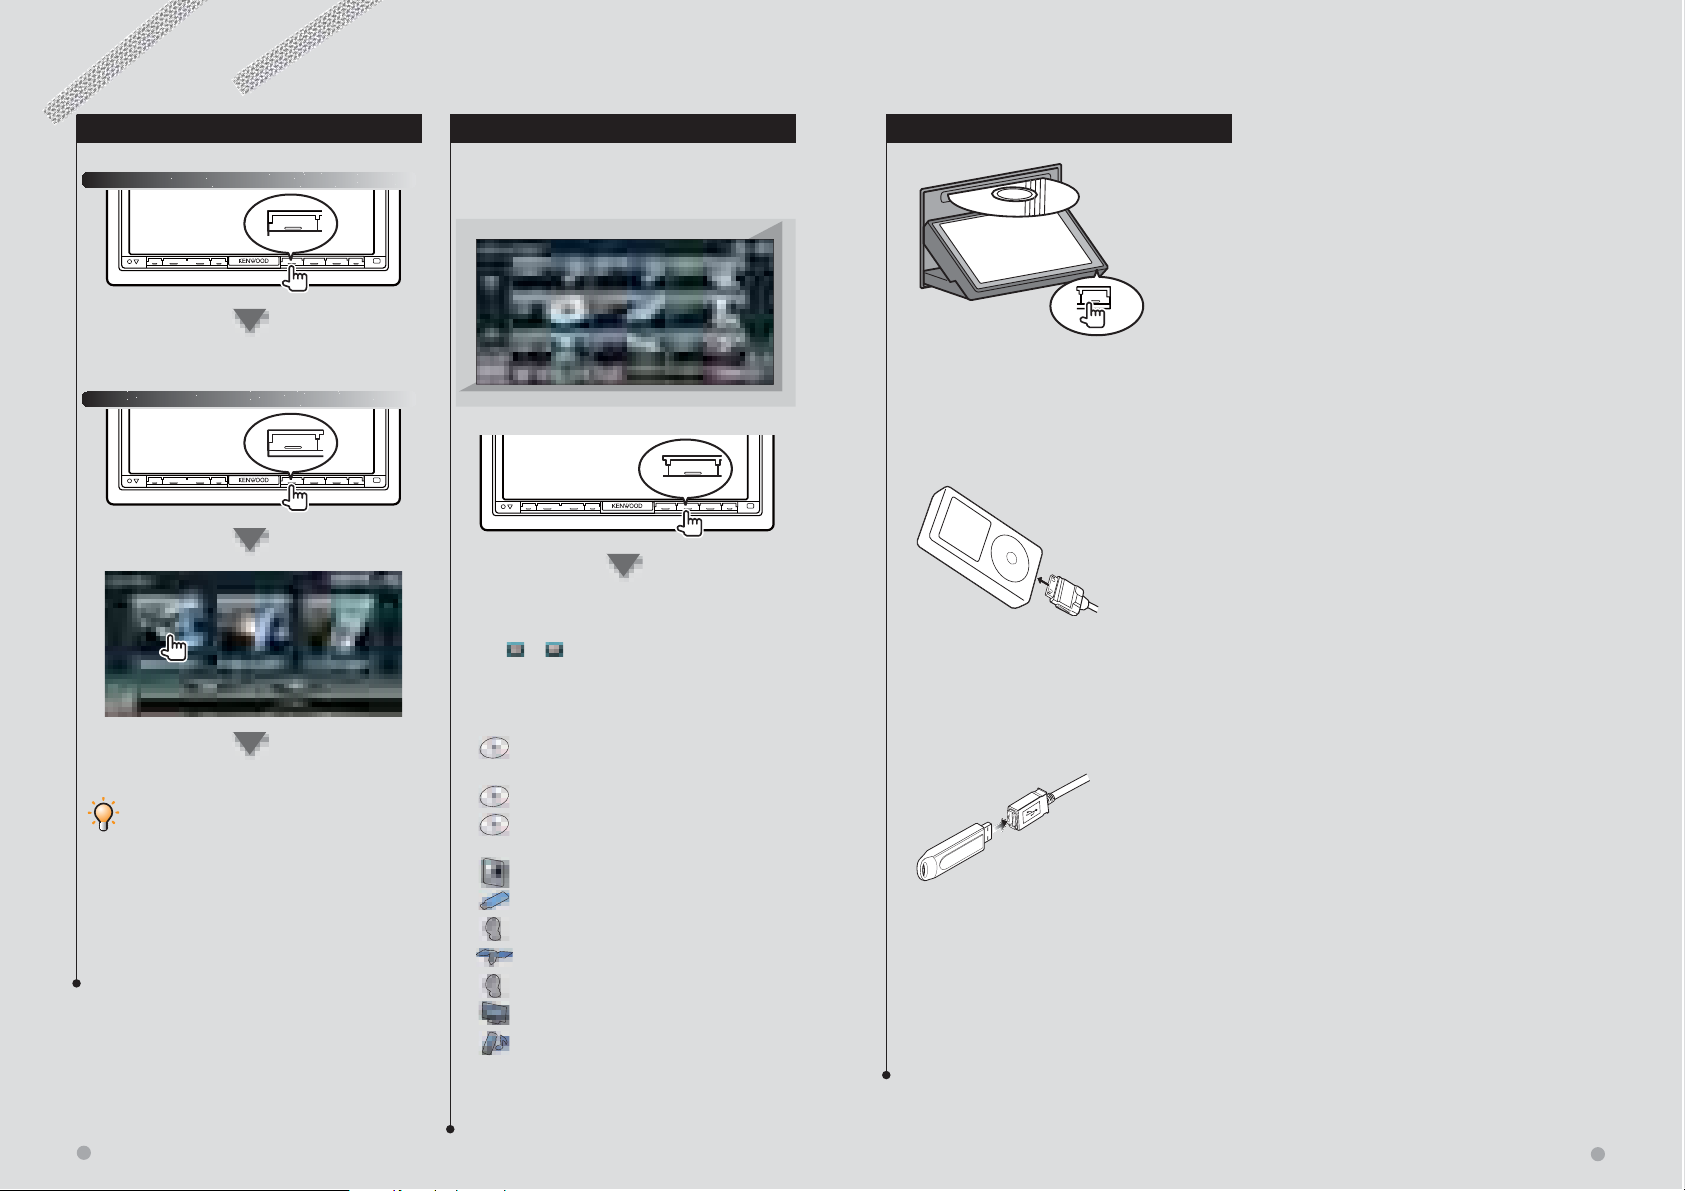
How to Select the Source
Sources can be selected from the Source Select
screen.
Source Select screen
SRC
The Source Select screen appears.
Touch the icon of the source.
Use
or to turn the page.
For how to operate each source, see the
following pages.
DVD-VIDEO/ DVD-VR/
Video CD disc \ Page 18
CD \ Page 22
Audio file/ Video file/
Picture file disc \ Page 22
iPod \ Page 27
USB \ Page 22
TUNER \ Page 30
SIRIUS/ XM \ Page 39
HD RADIO \ Page 42
TV \ Page 35
Bluetooth \ Page 46
⁄
• For Disc media, iPod, and USB, the input is switched to
the source as the media or the device is set.
How to Set a Medium / a Device
7 Disc media
Press the [0] button to open/close the front
panel.
If a disc is already inserted, it is ejected by
pressing the [0] button.
7 iPod
To disconnect the iPod, stop the playback
by touching the [38] button on the source
control screen, and then disconnect the iPod.
See <Source Control Screen> (page 28).
7 USB device
To disconnect the USB device, touch the [0]
button on the source control screen, and
then disconnect the USB device. See <Source
Control Screen> (page 22).
⁄
• The playback starts automatically after setting the media
or the device.
12 DNX7140/DNX7000EX/DDX714/DDX7034BT English 13
Basic Operation
DNX models
DDX models
DNX/DDX models
Basic Operation
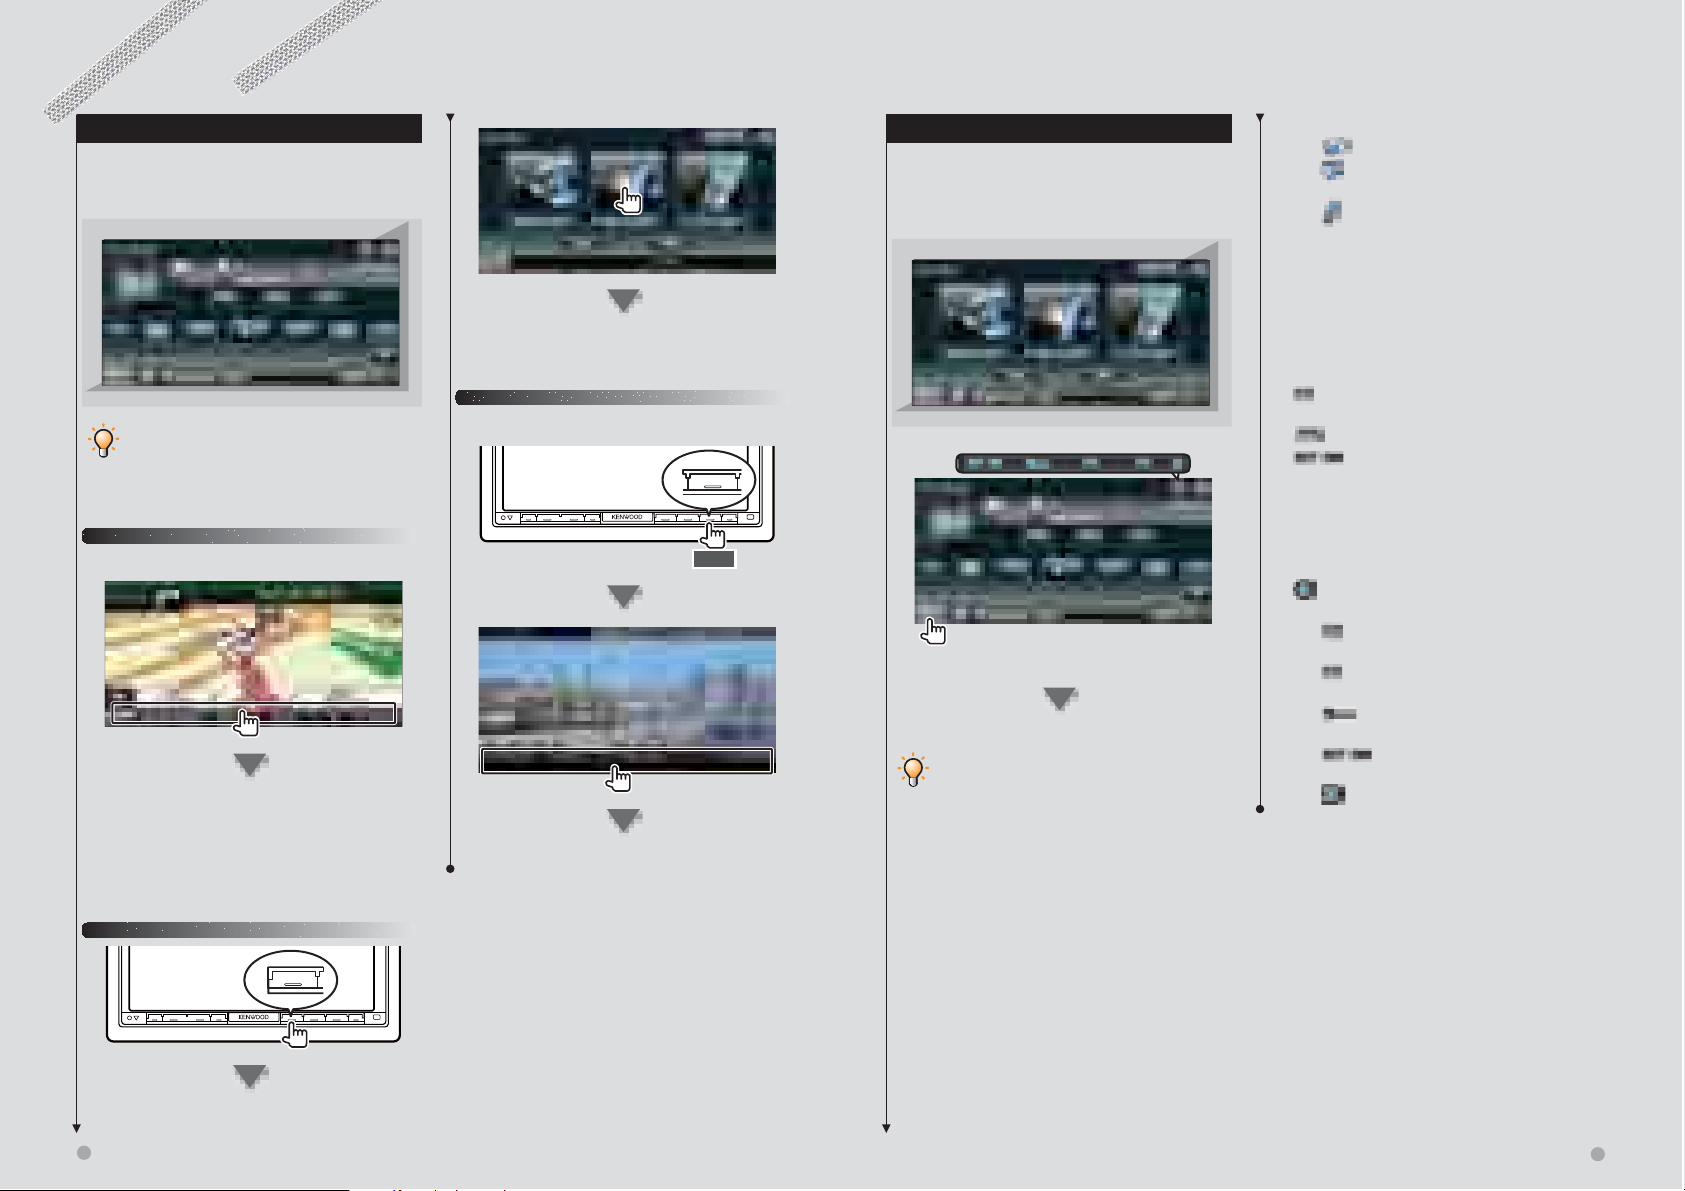
How to Display the Source Control Screen
On the Source Control screen you can find all the
control buttons for the selected source.
Source Control Screen
• For how to use each button, see the operation pages
of each source.
DNX models
While watching the navigation screen
The Source Control Screen appears.
⁄
• The screen will return to the navigation screen by
touching the same part of the Source Control screen.
The Source Control Screen appears.
DNX/DDX models
While watching the Easy Control Screen
TEL
1 sec.
The Source Control Screen appears.
How to Display Top Menu Screen
Top Menu Screen is the entrance to all the
functions. You can enter source operation screen
as well as various setup menu from this screen.
Top Menu screen
Touch the [MENU] button on any screen.
The Top Menu Screen appears.
• For DDX models
Pressing the [TOP] button on the front panel also
displays the Top Menu Screen.
Buttons on the Top Menu screen
[NAV
[SRC
[TEL
[NAV SETUP] Displays Navigation SETUP screen.
[SRC SETUP] Displays SETUP Menu screen. (page
[TEL SETUP] Displays Bluetooth SETUP screen.
[
[
[
The buttons listed below are common for
many screens.
[MENU] Displays Top Menu screen.
[
] Switches to the navigation screen.
] Switches to the source control screen
of the selected source.
] Switches to the Hands Free Main
screen.
(Instruction manual of the Navigation part)
(DNX models only)
63)
(page 73)
] Displays Audio Control Menu screen. (page
59)
] Displays Source Select screen.
] Displays the EXT SW (External Switch)
Control screen. (page 47)
] Opens the function bar. The buttons shown
below appear.
[
] Displays the currently selected source
screen.
[
] Displays Audio Control Menu screen.
(page 59)
[
] Displays SETUP Menu screen. (page
63)
[
] Displays the EXT SW (External
Switch) Control screen. (page 47)
[
] Closes the function bar.
DDX models
TOP
14 DNX7140/DNX7000EX/DDX714/DDX7034BT English 15
Basic Operation
DNX models
DNX/DDX models
Basic Operation
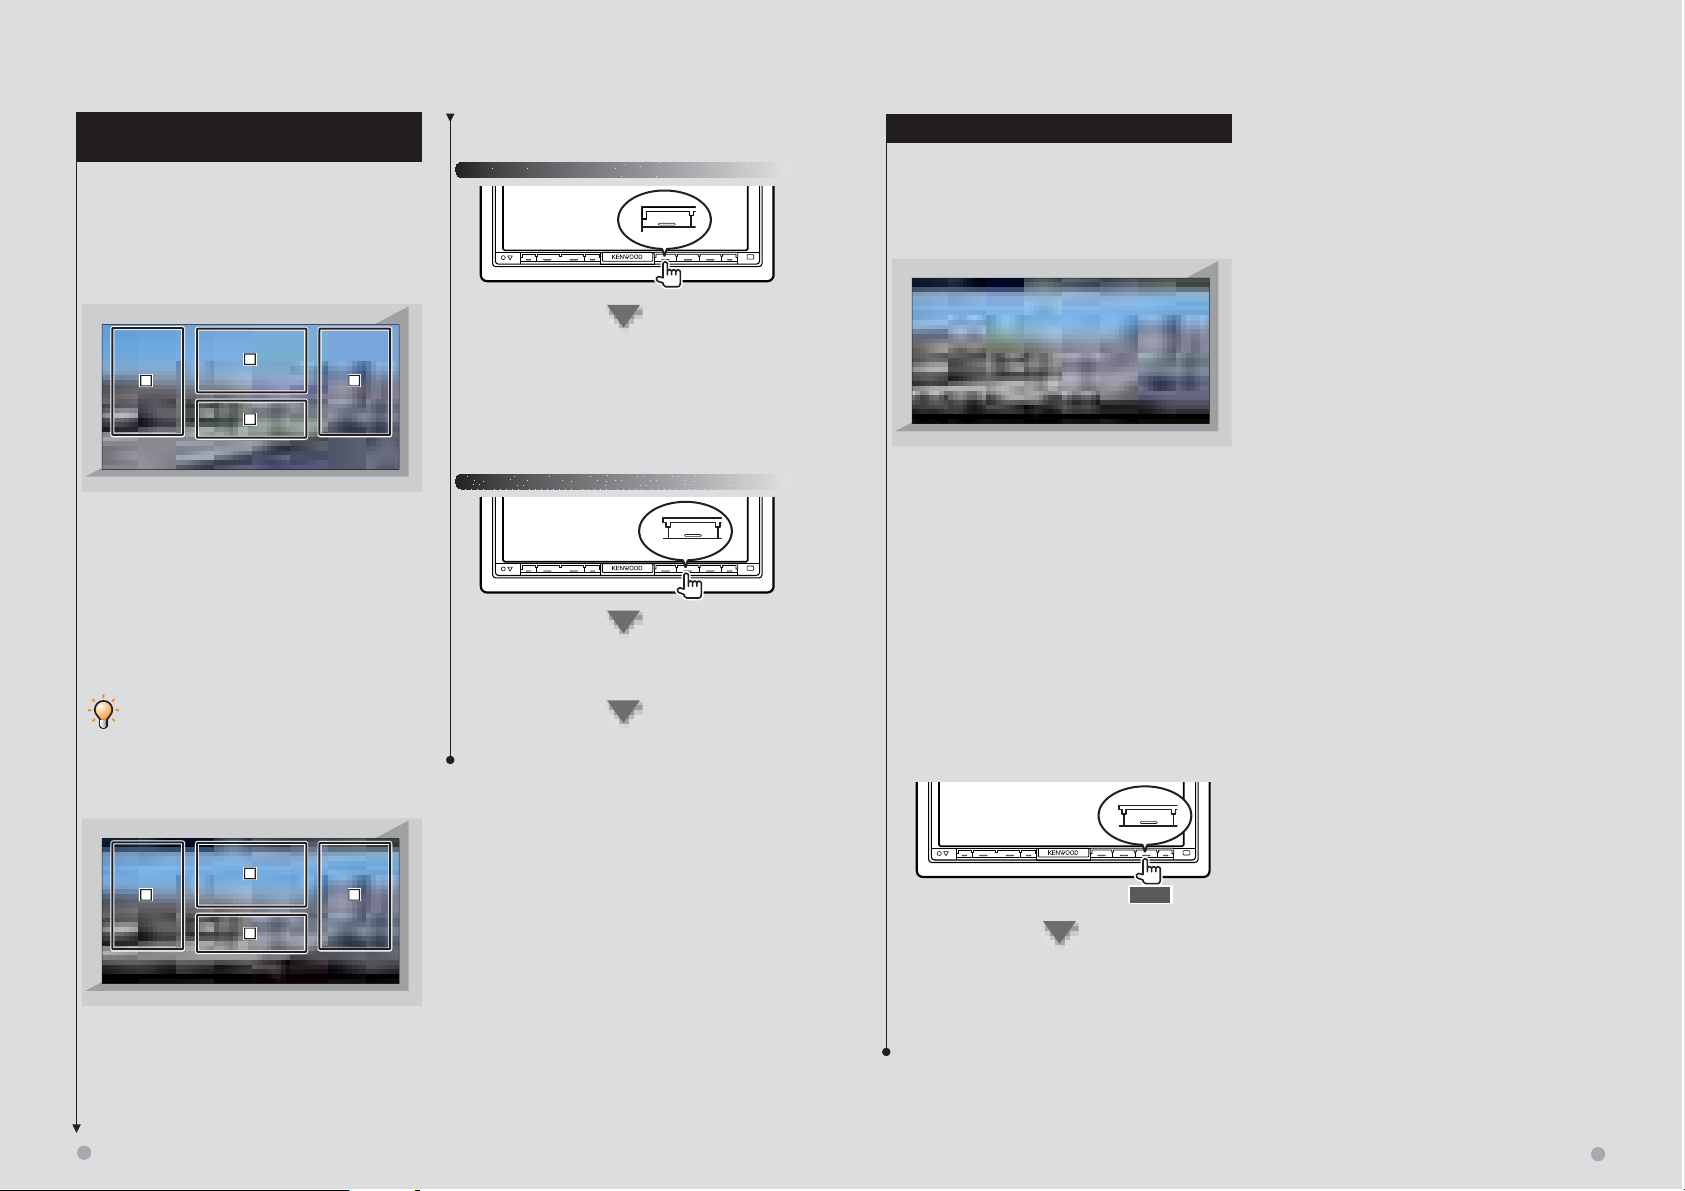
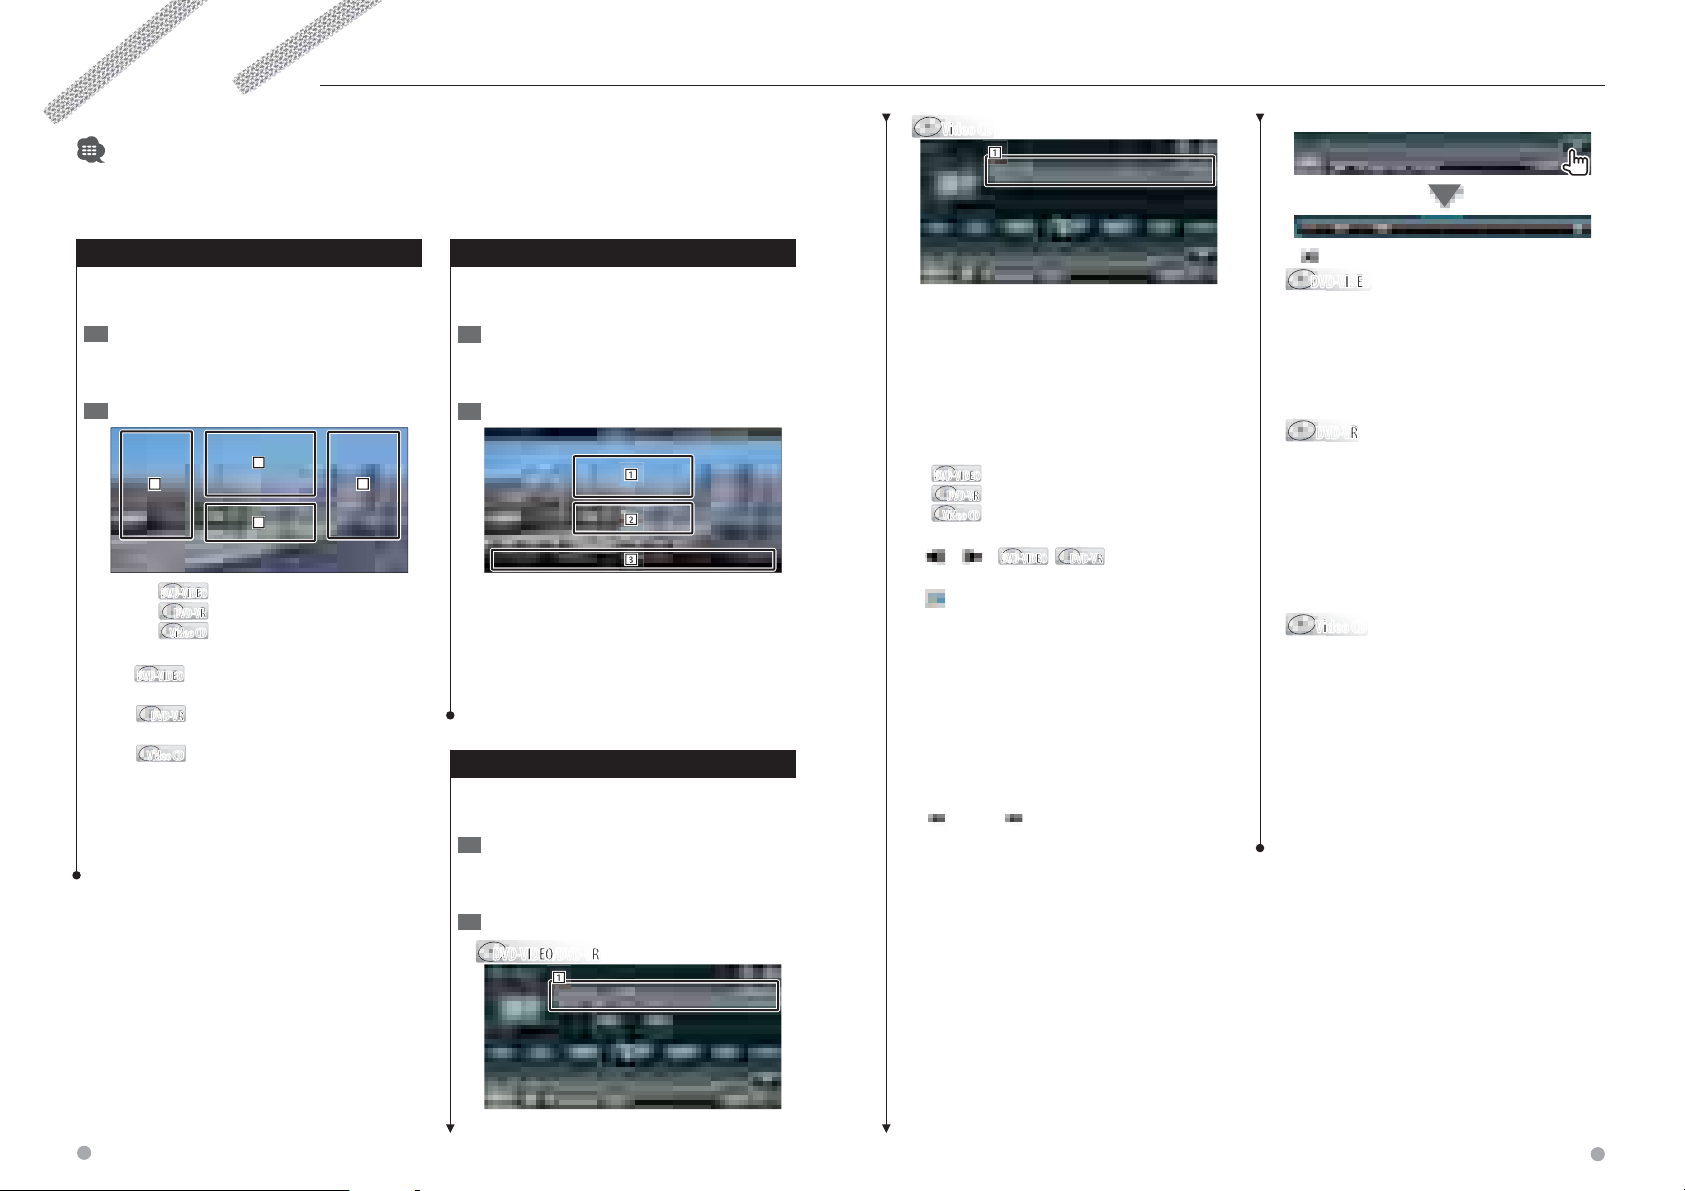
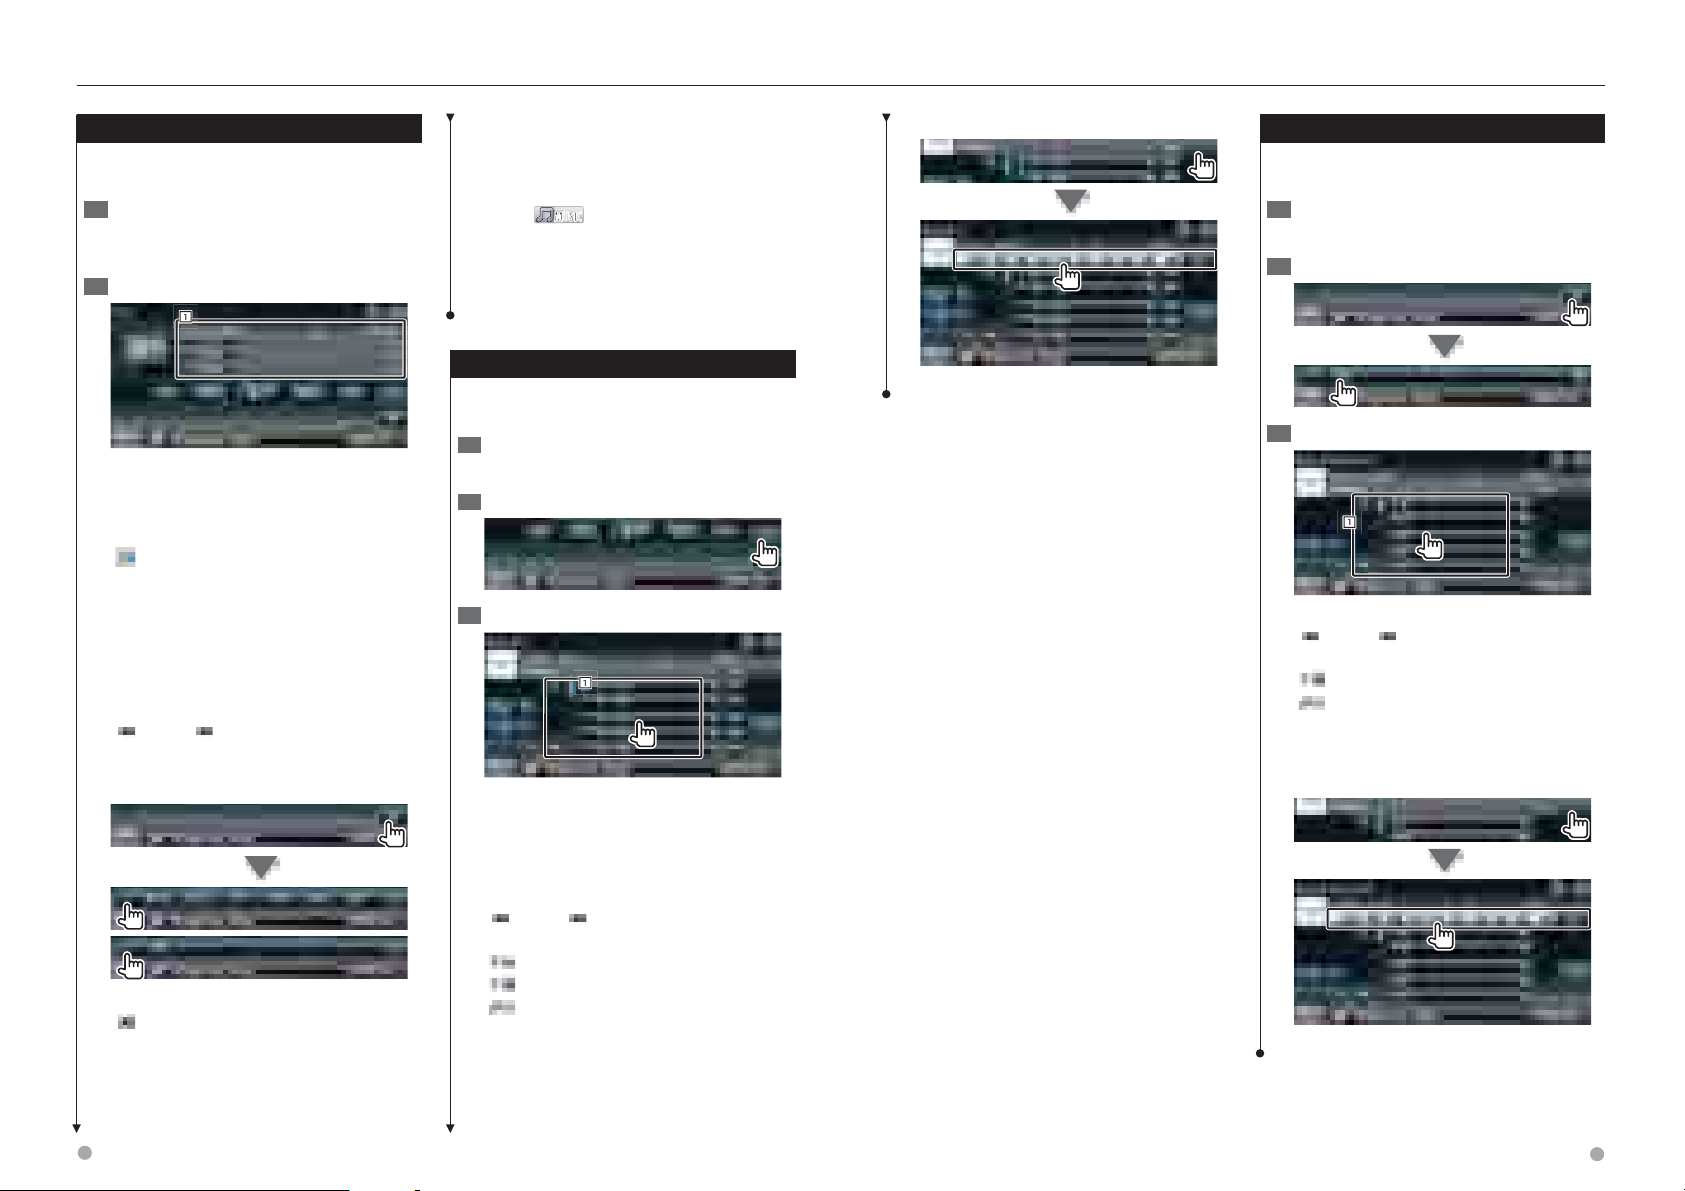
Operation on the Playback Screen of
Visual Sources
While watching visual sources, basic operation is
possible by touching the screen.
The screen has 4 function areas. The function of
each area is different depending on the sources.
(Some areas are unavailable for some sources.)
Playback screen of a visual source
2
31
4
Basic operation of each area
1 Reverse search.
2 Displays Menu control screen (DVD-VIDEO,
DVD-VR source), Picture control buttons
(sources with picture files), or Zoom control
buttons (Video CD).
Switches TV band.
3 Forward search.
4 Displays source information screen.*
• For the function of each touching area, see the pages
of each source.
How to display the playback screen
DNX models
NAV
The Playback screen of a visual source appears.
⁄
• If the display is other than navigation, press the [NAV]
button twice.
DNX/DDX models
SRC
The Source Select screen appears.
Touch the icon of the source.
The Playback screen of a visual source appears.
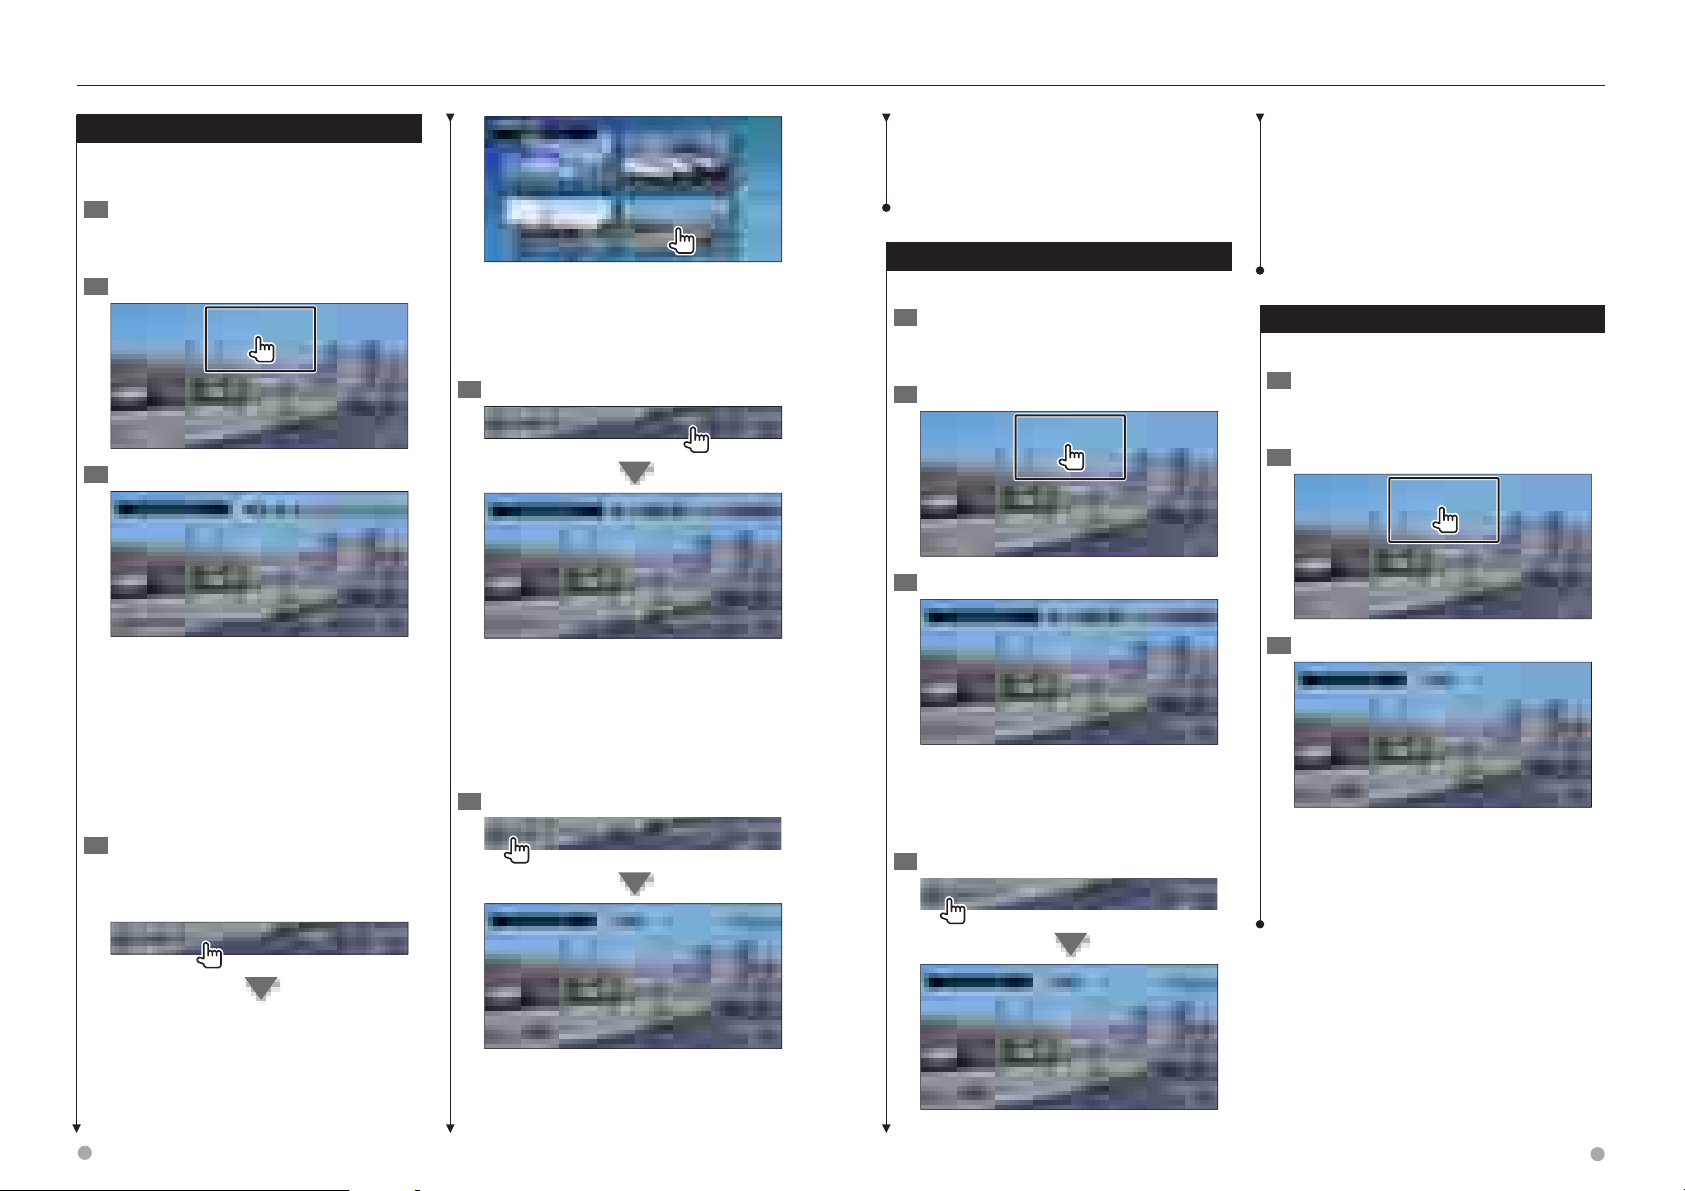
How to Display the Easy Control Screen
Basic operation buttons of the selected source
can be displayed on the playback screen of
visual sources so that you can control the source
without switching the screen.
Easy Control Screen
Buttons on the Easy Control Screen
[∞] Changes the function as follows by touching
the [∞] button.
[SCRN] Displays Screen Control screen (page
49).
[TEL] Switches to the Hands Free Main
screen (page 51).
[EXT SW] Switches to the EXT SW Control
screen (page 47).
[4], [¢], [7], [£8]
Buttons for source control. The buttons are
different depending on the source. See the
operation pages of each source.
While watching the visual source
* Source information screen
2
31
4
The Easy control screen appears.
TEL
1 sec.
⁄
⁄
• The information display is cleared automatically after
approximately 5 seconds.
16 DNX7140/DNX7000EX/DDX714/DDX7034BT English 17
• Easy Control screen is hidden when you touch the central
part of the monitor.
Watching DVD/Video CD
You can play DVD/Video CD using various functions.
• Set the remote controller mode switch to "DVD" mode before starting operation, see <Remote Controller mode switch>
(page 87).
Playback Screen
Basic functions are available even when the
playback screen is displayed.
Display the Playback Screen1
See <Operation on the Playback Screen of Visual
Sources> (page 16).
Operation on the Playback Screen2
2
31
4
1, 3
2
DVD-VIDEODVD-VIDEO
Searches for a chapter.
DVD-VIDEODVD-VIDEO
Searches for a chapter.
DVD-VRDVD-VR
Selects a scene (when PBC is
Video CDVideo CD
On) or a track (when PBC is Off ).
Displays the Menu Control 1 Screen
(page 20).
Displays the Menu Control Screen
DVD-VRDVD-VR
Easy Control Screen
Displays the basic operation buttons on the
screen.
Display the Easy Control Screen1
See <How to Display the Easy Control buttons>
(page 17).
Operation on the Easy Control Screen2
1
2
3
1, 2 Switches to the Playback Screen.
3 Displays the Source Control Screen.
[4], [¢] Searches for a chapter/ scene/
track.
[7] Stops playing.
[38] Plays or pauses.
(page 21).
Displays the Zoom Control Screen
Video CDVideo CD
(page 21).
4 Displays Source Information Screen.
⁄
The information display is cleared automatically after •
approximately 5 seconds.
Source Control Screen
Switches to the source control screen to use
various playback functions.
Display the Source 1 Control Screen
See <How to Display the Source Control
Screen> (page 14).
Operation on the Source Control Screen2
DVD-VIDEO/DVD-VRDVD-VIDEO/DVD-VR
1
Video CDVideo CD
1
[38] Plays or pauses.
[7] Stops playing.
When touched twice, the disc is played from
its beginning when you play it in the next
time.
[0] Ejects a disc.
[1], [¡] Fast Forwards or Fast Backwards.
[4], [¢]
[
[
1 Information display
[
Searches for a chapter.
DVD-VIDEODVD-VIDEO
Searches for a chapter.
DVD-VRDVD-VR
Selects a scene (when PBC is On) or a
Video CDVideo CD
track (when PBC is Off ).
], [ ]
Backwards.
DVD-VIDEODVD-VIDEO
DVD-VRDVD-VR
,
Slow Forwards or
] Switches to the playback screen.
Volume Label.
"Title" Title Number Display
"Chap" Chapter Number Display
"Scene" Scene/Track Number Display
"3" Play Mode Display
"T"/ "C"/ "R"/ "P" Play Time Display
Use the [TIME] to change play time
display.
] When is appeared, the text display is
scrolled by touching it.
Multi Function
[ ] Closes the multi function bar.
DVD-VIDEODVD-VIDEO
[REP] Switches the Repeat Play operations in
the following sequence.
Title Repeat, Chapter Repeat, Repeat Off
[TIME] Switches the play time display in the
following sequence.
Chapter ("C"), Title ("T"), remaining titles ("R")
DVD-VRDVD-VR
[REP] Switches the Repeat Play operations in
the following sequence.
Title Repeat, Repeat Off
[TIME] Switches the play time display in the
following sequence.
Title ("T"), remaining titles ("R")
[PLST] Switches between the original mode
and Play list mode.
Video CDVideo CD
[REP] Switches the Repeat Play operations in
the following sequence.
Track Repeat, Repeat Off (Available when the
PBC is off )
[TIME] Switches the play time display in the
following sequence.
Track ("P"), remaining discs ("R") (Effective only
when the PBC function is off )
[PBC] Turns the PBC On or Off. (only when VCD
Ver 2.0 is in use)
18 DNX7140/DNX7000EX/DDX714/DDX7034BT English 19
Watching DVD/VCD
DVD-VIDEO Disc Menu
Selects an option from the DVD-VIDEO Disc
Menu.
Display the Playback Screen1
See <Operation on the Playback Screen of Visual
Sources> (page 16).
Display the Menu Control 1 screen2
Operation on the Menu Control 1 screen3
[Menu] Calls the Menu.
[Next] Displays the Menu Control 2 screen.
[2], [3], [5], [∞] Selects a menu option.
[Enter] Enters your menu selection.
[Return] Returns to the previous menu screen.
[Top] Displays the Top Menu.
[Highlight] Highlight Control.
[Exit] Exits the Menu Control 1 screen.
Operation on the Highlight Control4
Highlight control lets you control DVD Menu
by touching the menu button directly on the
screen.
⁄
• To cancel Highlight Control, press the [TEL] button for
more than 1 second.
• The Highlight Control is cleared automatically after
approximately 10 seconds.
Operation on the Menu Control 2 screen5
[Previous] Displays the Menu Control 1 screen.
[Angle] Switches the picture angle.
[SUB] Switches the subtitle language.
[Audio] Switches the voice language.
[Zoom] Displays the Zoom Control screen.
[Exit] Exits the Menu Control 2 screen.
Operation on the Zoom Control screen6
[2], [3], [5], [∞] Scrolls the screen in the
direction you touch.
[Return] Returns to the previous screen.
[Exit] Exits the Zoom Control screen.
DVD-VR Menu Control
Selects an option from the DVD-VR Disc Menu.
Display the playback screen1
See <Operation on the Playback Screen of Visual
Sources> (page 16).
Display the Menu Control screen2
Operation on the Menu Control screen3
[Zoom] Displays the Zoom Control screen.
[SUB] Switches the subtitle language.
[Audio] Switches the voice language.
[Exit] Exits the Menu Control screen.
Operation on the Zoom Control screen4
[Zoom] Changes the zoom ratio at 4 levels (2
times, 3 times, 4 times, or off) each time you
touch.
[2], [3], [5], [∞] Scrolls the screen in the
direction you touch.
[Return] Returns to the previous screen.
[Exit] Exits the Zoom Control screen.
Video CD Zoom Control
Displays an enlarged VCD screen.
Display the playback screen1
See <Operation on the Playback Screen of Visual
Sources> (page 16).
Display the Zoom Control buttons2
Operation on the Zoom Control screen3
[Zoom] Changes the zoom ratio at 2 levels (2
times or off ) each time you touch.
[2], [3], [5], [∞] Scrolls the screen in the
direction you touch.
[Exit] Exits the Zoom Control screen.
[Zoom] Changes the zoom ratio at 4 levels (2
times, 3 times, 4 times, or off) each time you
touch.
20 DNX7140/DNX7000EX/DDX714/DDX7034BT English 21
Music Disc/ Audio File Listening &
AuAuAu
AuAuAu
AuAuAu
Video File/ Picture File Watching
You can recall various control screens during playback of CD, audio file, video file and picture file.
• See <List of playable discs> (page 7) for playable discs.
• See <About Audio file> (page 7), <About Video files> (page 7) or <About Picture files> (page 7) for playable files.
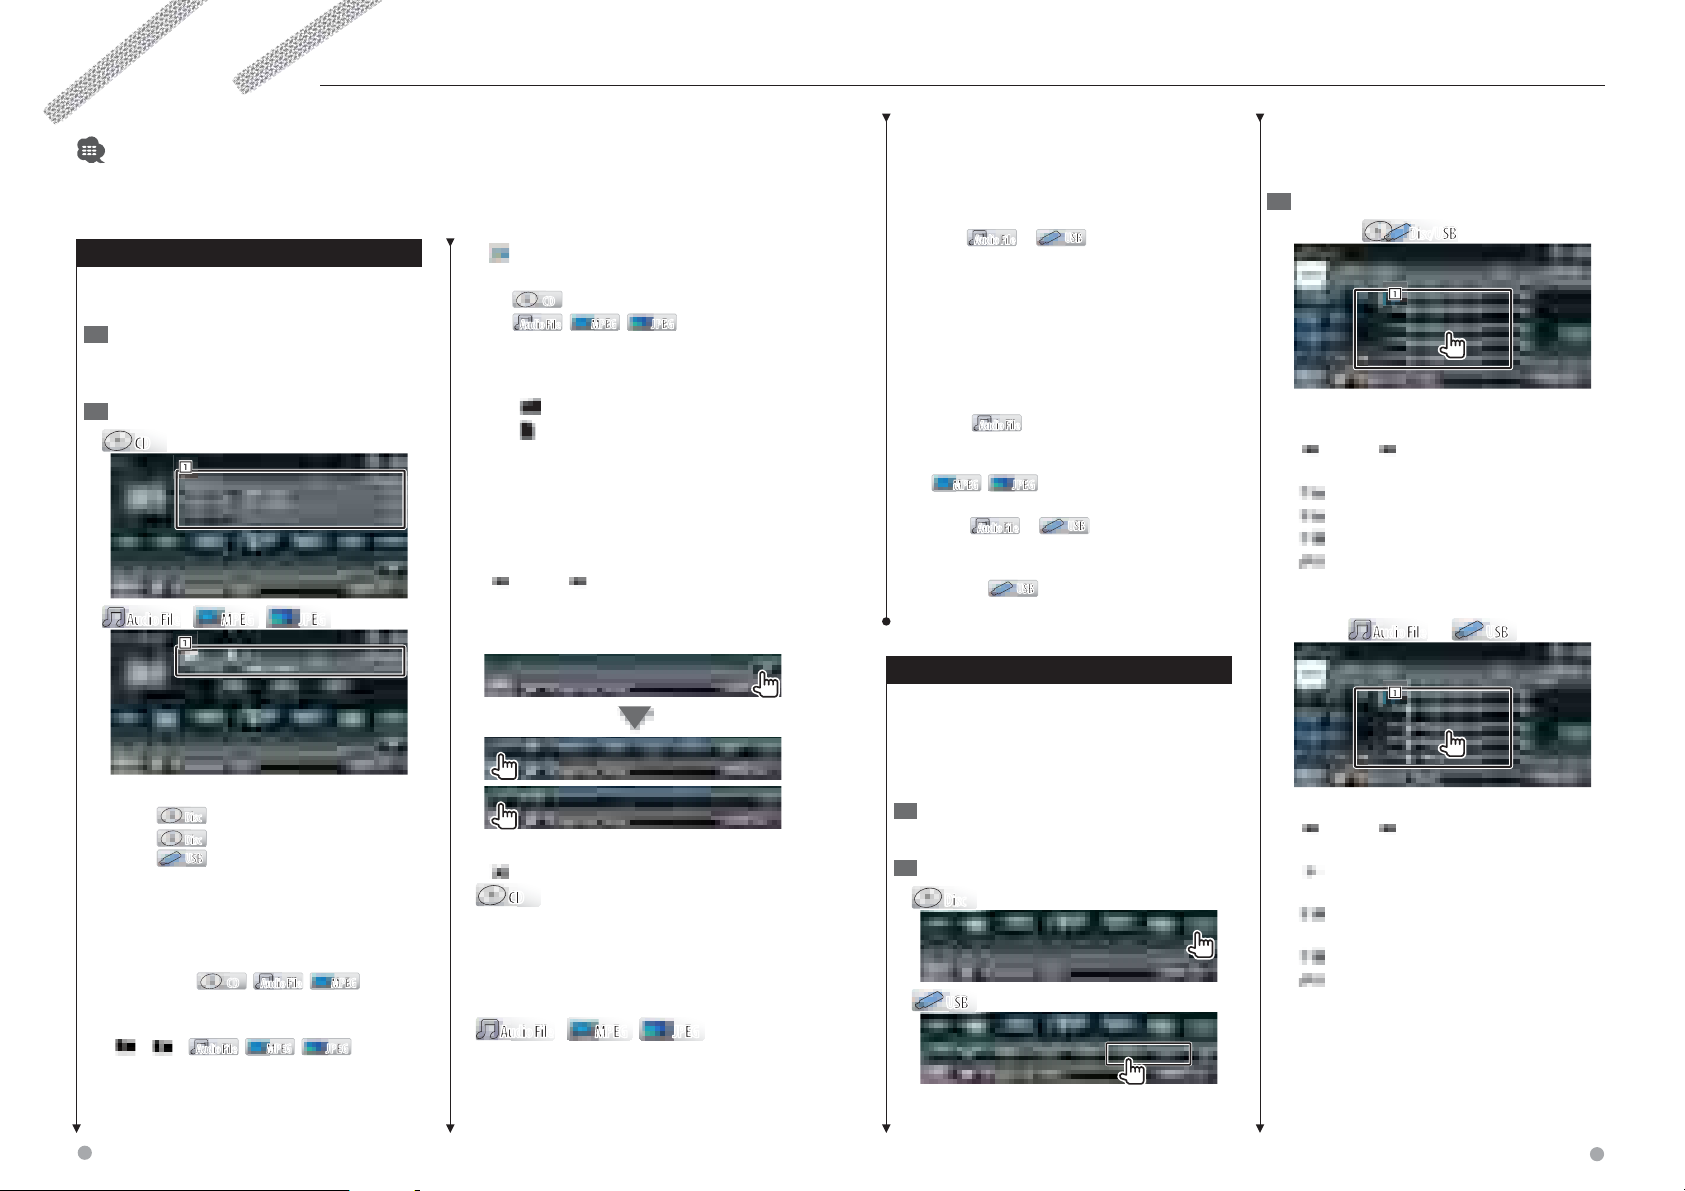
[
Source Control Screen
Switches to the source control screen to use
various playback functions.
Display the Source 1 Control Screen
See <How to Display the Source Control
Screen> (page 14).
Operation on the Source Control screen2
CDCD
1
] Switches to the playback screen.
1 Information display
Selects the Disc Text or Track Text.
CDCD
Audio FileAudio File
,
MPEGMPEG, JPEGJPEG
Selects Folder Name, File Name, Title,
Artist Name, or Album Name.
"Track" Track Number Display
"
" Folder Number Display
"
" File Number Display
"#### / ####" Total number of file in the
folder and the file number display
"3" Play Mode Display
"P"/ "R" Play Time Display
Use the [TIME] to change play time
display.
[
] When is appeared, the text display is
scrolled by touching it.
Audio FileAudio File
MPEGMPEG JPEGJPEG
1
Multi Function
[RDM] Starts or stops Random Play (to play
files of the present folder in random order).
[4Line]/ [2Line] Switches the number of lines
displayed in the Information Display.
[FOLD]/ [Flist] Displays the folder list.
[Plist]
Audio FileAudio File
in
USBUSB
Displays the play list.
[SLIDE] Displays images in the folder currently
being played one after another.
If there is no image in the folder currently
being played, initial background is displayed.
For information on setting the image display
time, see <Disc Setup> (page 82) or <USB
Setup> (page 83).
[INFO]
Displays music information
Audio FileAudio File
(such as Tag and content property) of Audio
file being played.
MPEGMPEG, JPEGJPEG
Displays information of file
being played.
[LINK]
Audio FileAudio File
in
Searches for another
USBUSB
song of the currently selected artist. See <Link
Search> (page 25).
[DEVICE]
Selects the connected USB
USBUSB
device (or a partition). (page 24)
⁄
Touching [List] displays the previously used Folder •
list or Play list.
Select a song3
Folder list
1 Folder opens when touched, and the Audio
file is played.
[
] When is appeared, the text display is
scrolled by touching it.
[
ROOT] Moves to the top hierarchy level.
[
UP] Moves up a hierarchy level.
[
TOP] Moves to the top folder.
[
CUR] Displays the currently playing folder.
[CTRL] Returns to the Source Control screen.
Play list
Disc/USBDisc/USB
1
Audio FileAudio File
in
USBUSB
List Select
Folder list: Searches folders and Audio/ Video/
Picture files stored in media and devices
according to hierarchy.
Play list: Lists and searches music contained in the
[38] Plays or pauses.
[7]
[0]
Stops playing.
DiscDisc
Ejects the disc.
DiscDisc
Removes the USB device.
USBUSB
When "No Device" is shown, the USB
device can be removed safely.
If you wish to play it again while the
USB device is connected, touch it
again.
[1], [¡]
,
Audio FileAudio File
,
MPEGMPEG
CDCD
Fast Forwards or Fast Backwards.
[4], [¢] Selects a track/ file.
[
], [ ]
Audio FileAudio File
,
MPEGMPEG, JPEGJPEG
Selects a folder.
[List] Displays the folder list or play list. (page
23)
[1/2] Switches the multi function display.
[
] Closes the multi function bar.
CDCD
[REP] Repeats the present track.
[RDM] Starts or stops Random Play (to play
music in random order).
[TIME] Switches the play time display between
Track ("P"), and Disc Remaining Time ("R").
Audio FileAudio File
[REP] Repeats the present file or data.
[FREP] Repeats the music or data of the
present folder.
MPEGMPEG JPEGJPEG
USB device.
Display the Source 1 Control Screen
See <Source Control Screen> (page 22).
Start List Select2
DiscDisc
USBUSB
1 Switches to the lower level of the category.
[
] When is appeared, the text display is
scrolled by touching it.
[
ALL] Lists all the music in the selected
category.
[
UP] Moves to the upper level of the
category.
[
TOP] Moves to the top category.
[
CUR] Displays the currently playing
category.
[CTRL] Returns to the Source Control screen.
22 DNX7140/DNX7000EX/DDX714/DDX7034BT English 23
1
Next page 3
Music Disc/ Audio File Listening & Video File/ Picture File Watching
Scrolls to the position of the specified initial
Scrolls to the selected initial.
USB device select
Selects the connected USB device (or a partition).
Display the Source 1 Control Screen
See <Source Control Screen> (page 22).
Display the USB Mount Device Select 2
Screen
Select a USB device3
1
1 Selects a device or partition.
[
UP] Returns to the Device Selection screen.
[
] When is appeared, the text display is
scrolled by touching it.
[CTRL] Returns to the Source Control screen.
Link search (Audio File in USB)
Searches for another song of the currently
selected artist.
Display the Source 1 Control Screen
See <Source Control Screen> (page 22).
Start Link search2
Select a song3
1
1 Plays the touched song.
[
] When is appeared, the text display is
scrolled by touching it.
[
TOP] Moves to the top folder.
[
CUR] Displays the currently playing folder.
[CTRL] Returns to the Source Control screen.
Playback Screen (Video file, Picture file)
Basic functions are available even when the
playback screen is displayed.
Display the Playback Screen1
See <Operation on the Playback Screen of Visual
Sources> (page 16).
Operation on the Playback Screen2
2
31
4
1, 3 Searches for a file.
2
Displays the Picture Control Screen
JPEGJPEG
(page 26).
Displays the Menu Control Screen
MPEGMPEG
(page 26).
4 Displays Source Information Screen.
⁄
The information display is cleared automatically after •
approximately 5 seconds. Also, the information can be
displayed automatically when it is updated.
Scrolls to the position of the specified initial
Scrolls to the selected initial.
24 DNX7140/DNX7000EX/DDX714/DDX7034BT English 25
Music Disc/ Audio File Listening & Video File/ Picture File Watching
iPod Control
Easy Control Screen (Video file, Picture
file)
Displays the basic operation buttons on the
screen.
Display the Easy Control Screen1
See <How to Display the Easy Control Screen>
(page 17).
Operation on the Easy Control Screen2
1
2
3
1, 2 Switches to the Playback Screen.
3 Displays the Source Control Screen.
[4], [¢] Searches for a file.
[7]
Stops playing.
DiscDisc
[38] Plays or pauses.
Picture Control
Adjusting the video display.
Display the Playback Screen1
See <Operation on the Playback Screen of Visual
Sources> (page 16).
Display the Picture Control Screen2
[ ] Reverses the picture horizontally.
[
] Rotates counter clockwise.
[
] Rotates clockwise.
[Exit] Ends Picture Control.
Movie Menu Control
Selects an option from the Movie Menu.
Display the playback screen1
See <Operation on the Playback Screen of Visual
Sources> (page 16).
Display the Menu Control screen2
Operation on the Menu Control screen3
[SUB] Switches the subtitle language.
[Audio] Switches the voice language.
[Exit] Exits the Menu Control screen.
You can control and listen to songs in your iPod by connecting an iPod to this unit with KCA-iP301V
(optional accessory). You can also display video contents on this unit when connecting an iPod with video.
Playback Screen
Basic functions are available even when the
playback screen is displayed.
Display the Playback Screen1
See <Operation on the Playback Screen of Visual
Sources> (page 16).
Operation on the Playback Screen2
2
31
4
1, 3 Selects the music/video.
2 Not effective
4 Displays Source Information Screen.
⁄
The information display is cleared automatically after •
approximately 5 seconds. Also, the information can be
displayed automatically when it is updated.
Remove all accessories such as headphone before •
connecting an iPod. You may not be able to control the
iPod if you connect it with accessories attached.
When you connect an iPod to this unit, playback starts •
from the song you were playing on the iPod itself
(Resume Function).
If the played song is not a video content, "No Video •
Signal" is displayed on the video screen.
Easy Control Screen
Displays the basic operation buttons on the
screen.
Display the Easy Control Screen1
See <How to Display the Easy Control Screen>
(page 17).
Operation on the Easy Control Screen2
1
2
3
1, 2 Switches to the Playback Screen.
3 Displays the Source Control Screen.
[4], [¢] Music/Video Search.
[38] Plays or pauses.
Adjust the video display3
26 DNX7140/DNX7000EX/DDX714/DDX7034BT English 27
iPod Control
Source Control Screen
Switches to the source control screen to use
various playback functions.
Display the Source 1 Control Screen
See <How to Display the Source Control
Screen> (page 14).
Operation on the Source Control Screen2
1
[38] Plays or pauses.
[1], [¡] Fast Forwards or Fast Backwards.
[4], [¢] Selects Music/Video.
[List] Displays the iPod list. (page 28)
[
] Switches to the playback screen.
1 Information display
Selects the Title, Artist Name, Album Name
or iPod Name.
"##### / #####" Total number of music in
the iPod and the music number display
"3" Play Mode Display
"P" Play Time Display
[
] When is appeared, the text display is
scrolled by touching it.
[ARDM] Starts or stops Album Random Play
(plays randomly from current album).*
[INFO] Displays information screen of music/
video being played.
[LINK]
Searches for another song of
MUSICMUSIC
the currently selected artist. See <Link Search>
(page 29).*
⁄
* Disabled when VIDEO is being played.
iPod List
Lists and searches music/video contained in the
iPod.
Display the Source 1 Control Screen
See <Source Control Screen> (page 28).
Display the iPod List2
Select music/video3
1
Scrolls to the position of the specified initial
Scrolls to the selected initial.
Link search (Music file)
Searches for another song of the currently
selected artist.
Display the Source 1 Control Screen
See <Source Control Screen> (page 28).
Start Link search2
Select a song3
1
1 Plays the touched song.
[
] When is appeared, the text display is
scrolled by touching it.
[
TOP] Moves to the top category.
[
CUR] Displays the currently playing
category.
[CTRL] Returns to the Source Control screen.
Multi Function
1 Categories and music are listed.
Scrolls to the position of the specified initial
Touch a category name to move its lower
level. If music title is displayed, the music is
played by touching it.
When [38] is appeared, all the music in its
category is played by touching the button.
[
] When is appeared, the text display is
scrolled by touching it.
[
UP] Returns to previous category.
[
[1/2] Switches the multi function display.
[
] Closes the multi function bar.
[MUSIC] Displays the list of music category.
TOP] Moves to the top category.
[
CUR] Displays the currently playing
category.
[CTRL] Returns to the Source Control screen.
Scrolls to the selected initial.
[VIDEO] Displays the list of video category.
[REP] Repeats the present file or data.
[RDM] Starts or stops Random play.*
28 DNX7140/DNX7000EX/DDX714/DDX7034BT English 29
Radio Listening
Various control screens appear in the Tuner Source mode.
• Set the remote controller mode switch to "AUD" mode before starting operation, see <Remote Controller mode switch>
(page 87).
Source Control Screen
Switches to the source control screen to use
various functions.
Display the Source 1 Control Screen
See <How to Display the Source Control
Screen> (page 14).
Operation on the Source Control screen2
1
[FM] Switches to the FM1/2/3 band.
[AM] Switches to the AM band.
[TI] Turns the Traffic Information function On
or Off.
See <Traffic Information>, (page 33).
[4], [¢] Tunes in a station.
Use the [SEEK] to change the frequency
switching.
[List] Display the Tuner Preset List Screen.
(page 31).
1 Information display
Selects the Program Service Name, Title &
Artist name, Category Name 1/2, or Radio
Tex t.
"FM"/ "AM" Band display
"Preset" Preset number
"MHz"/ "kHz" Frequency display
[
] When is appeared, the text display is
scrolled by touching it.
Multi Function
[1/3] Switches the multi function display.
[
] Closes the multi function bar.
[SEEK] Switches the Seek mode.
The mode is switched in the following order
each time you touch the button.
Display Setting
"AUTO1" Tunes in a station with good reception automatically.
"AUTO2" Tunes in stations in memory one after another.
"MANU" Switches to the next frequency manually.
[AME] Selects the Auto Memory mode.
See <Auto Memory> (page 31).
[PRE] Lists and selects memorized station.
[4Line]/ [2Line] Switches the number of lines
displayed in the Information Display.
[PTY]
type. See <Search for Program Type> (page
34).
[CRSC]
or Off.
[P1] – [P6] When [P1] to [P6] buttons appear,
you can recall the stations on memory.
For memory of broadcasting stations, see
<Auto Memory> (page 31) or <Manual
Memory> (page 32).
[NAME] Sets a name to the station. See <Set
Station Name> (page 33).
[TEXT]
<Radio Text> (page 32).
Searches station by program
FMFM
Turns the CRSC function On
FMFM
Displays Radio Text screen. See
FMFM
Preset Select
Lists and selects memorized station.
Display the Source 1 Control Screen
See <Source Control Screen> (page 30).
Display the Tuner Preset List Screen2
Select a station3
1
1 Memorized stations are displayed. Touch to
tune in.
[DISP] Switches the list display name to Station
name or Program Service Name.
[CTRL] Returns to the Source Control screen.
Auto Memory
Stores stations with good reception in memory
automatically.
Display the Source 1 Control Screen
See <Source Control Screen> (page 30).
Select a band you wish to store in memory2
Select the Auto Memory mode3
Start Auto Memory4
Auto Memory terminates when 6 stations are
stored or when all stations are tuned in.
⁄
• The operation ends automatically if you do not operate
within 10 seconds.
30 DNX7140/DNX7000EX/DDX714/DDX7034BT English 31

Radio Listening
Manual Memory
Stores the current receiving station in memory.
Display the Source 1 Control Screen
See <Source Control Screen> (page 30).
Select a station you wish to store in 2
memory
Store in memory3
2 sec.
Continue to touch until the memory number
appears.
Radio Text
You can display the radio text. (Only when
receiving the FM broadcast)
Select a station1
See <Source Control Screen> (page 30).
Display the radio text2
1
1 Selects the Program Service Name, Title &
Artist name, Station Name, Radio Text Plus, or
Radio Text for text display.
[
] When is appeared, the text display is
scrolled by touching it.
[5], [∞] Scrolls the text display.
Set Station Name
Assigns a name to a station.
Tune in to the station to name1
See <Source Control Screen> (page 30).
Start Name set2
Enter the name3
See <Character Entry> (page 47) for information
on how to enter a name.
End Name set4
Traffic Information
When a traffic bulletin starts, any source is
switched to the traffic information and it is
displayed automatically.
Display the Source 1 Control Screen
See <Source Control Screen> (page 30).
Set the Traffic information mode2
When the traffic bulletin starts...
The Traffic Information screen appears
automatically.
Traffic Information screen
⁄
• It is necessary to have Traffic Information function set to
On in order to have the Traffic Information screen appear
automatically.
• During reception of traffic information the adjusted
volume is automatically remembered, and the next time
it switches to traffic information it's automatically the
remembered volume.
32 DNX7140/DNX7000EX/DDX714/DDX7034BT English 33

Radio Listening
TV Watching
Search by Program Type
A program is tuned when you set its program
type. (Only when receiving the FM broadcast)
Display the Source 1 Control Screen
See <Source Control Screen> (page 30).
Enter Program Type Search mode2
Select a Program Type3
1
1 Program Type is displayed. Touch to select a
Program Type.
[Search] Searches for the program type.
It is displayed when the Program type is
selected.
[User] Continue to touch more than 2 seconds.
The currently receiving station is registered to
the selected program type.
Search a station of the selected Program 4
Typ e
Various control screens appear in the TV source mode. You can only operate TV with the optional accessory
TV Tuner connected.
Function During TV Screen
Basic functions are available even when the TV
screen is displayed.
Display the TV screen1
See <Operation on the Playback Screen of Visual
Sources> (page 16).
Operation on the TV screen2
2
31
4
1, 3 Selects a channel.
2 Switches to TV1 or TV2.
4 Displays Source Information Screen.
⁄
• The information display is cleared automatically after
approximately 5 seconds. Also, the information can be
displayed automatically when it is updated.
Easy Control Screen
Displays the basic operation buttons on the
screen.
Display the Easy Control Screen1
See <How to Display the Easy Control Screen>
(page 17).
Operation on the Easy Control Screen2
1
2
3
1, 2 Switches to the TV screen.
3 Displays the Source Control Screen.
[BAND] Switches to TV1 or TV2.
[4], [¢] Selects a channel.
Use the [SEEK] to change the channel tuning
sequence.
[SEEK] Switches the Seek mode. (page 36)
34 DNX7140/DNX7000EX/DDX714/DDX7034BT English 35

TV Watching
Source Control Screen
Switches to source control screen to use various
functions.
Display the Source 1 Control Screen
See <How to Display the Source Control
Screen> (page 14).
Operation on the Source Control Screen2
1
[BAND] Switches to TV1 or TV2.
[4], [¢] Select a channel.
Use the [SEEK] to change the channel tuning
sequence.
[List] Display the TV Preset List Screen. (page
38).
[
] Switches to the TV screen.
1 Information display
Channel information display
"TV" Band display
"Preset" Memory Number Display
"ch" Channel display
[
] When is appeared, the text display is
scrolled by touching it.
Multi Function
[1/2] Switches the multi function display.
[
] Closes the multi function bar.
[AME] Selects the Auto Memory mode.
See <Auto Memory> (page 37).
[SEEK] Switches the Seek mode.
The mode is switched in the following order
each time you touch the button.
Display Setting
"AUTO1" Tunes in a station with good reception automatically.
"AUTO2" Tunes in stations in memory one after another.
"MANU" Switches to the next frequency manually.
[PRE] Lists and selects memorized station.
[NAME] Sets a name to the station. See <Set
Station Name> (page 38).
[P1] – [P6] When [P1] to [P6] buttons appear,
you can recall channels on memory.
For memory of broadcasting stations, see
<Auto Memory> (page 37) or <Manual
Memory> (page 37).
Auto Memory
Stores stations with good reception in memory
automatically.
Display the Source 1 Control Screen
See <Source Control Screen> (page 36).
Select a band you wish to store in memory2
Select the Auto Memory mode3
Start Auto Memory4
Auto Memory terminates when 6 stations are
stored or when all stations are tuned in.
⁄
• The operation ends automatically if you do not operate
within 10 seconds.
Manual Memory
Stores the current receiving channel in memory.
Display the Source 1 Control Screen
See <Source Control Screen> (page 36).
Select a station you wish to store in 2
memory
Store in memory3
2 sec.
Continue to touch until the memory number
appears.
36 DNX7140/DNX7000EX/DDX714/DDX7034BT English 37

TV Watching
SIRIUS/XM Control (North American sales area only)
Preset Select
Lists and selects memorized station.
Display the Source 1 Control Screen
See <Source Control Screen> (page 36).
Start Preset Select2
Select a station3
1
1 Memorized stations are displayed. Touch to
tune in.
[
] Switches to the TV screen.
[CTRL] Returns to the Source Control screen.
Set Station Name
Assigns a name to a station.
Tune in to the station to name1
See <Source Control Screen> (page 36).
Start Name set2
Enter the name3
See <Character Entry> (page 47) for information
on how to enter a name.
End Name set4
Various control screens appear in the Satellite radio source mode. (with the optional accessory Satellite
radio connected only. To connect the SIRIUS tuner, a conversion cable CA-SR20V (optional accessory) is
necessary and to connect the XM tuner, an XM interface Box KCA-XM100V (optional accessory) is necessary.)
• This document uses the SIRIUS display as an example.
Source Control Screen
Multi Function
Switches to control screen to use various
functions.
Display the Source 1 Control Screen
See <How to Display the Source Control
Screen> (page 14).
Operation on the Source Control screen2
1
[1/2] Switches the multi function display.
[
] Closes the multi function bar.
[SEEK] Switches the Seek mode.
The mode is switched in the following order
each time you touch the button.
Display Setting
[BAND] Switches the band.
[4], [¢] Tunes in a station.
Use the [SEEK] to change the frequency
switching.
[List] Display the Category List Screen. (page
40).
1 Information display
Displays information concerning music
being played.
Changes the display from
SIRIUSSIRIUS
Channel Name, Song Title Name, Artist
Name, Composer Name, to Category
Name.
Changes the display from
XMXM
Channel Name, Artist Name, Song Title
"SEEK1" Tunes channels one after the other.
"SEEK2" Selects channels in memory one after the other.
[DIR] You can tune in by entering the desired
channel number. See <Direct Channel Search>
(page 41).
[CAT] You can tune in by specifying the desired
category. See <Channel Search> (page 40).
[SCN]
Starts or stops Channel Scan
XMXM
(that tunes channels one after the other).
[INFO] Displays the program information
screen.
[P1] – [P6] When [P1] to [P6] buttons appear,
you can recall the channel on memory. For
memory of channel stations, see <Channel
Memory> (page 40).
Name, to Category Name.
Displays the ID number when Channel 0 is
selected.
Displays the SIRIUS ID.
SIRIUSSIRIUS
Displays the RADIO ID.
XMXM
"SR"/ "XM" Band display
"Preset" Preset number
"CH" Channel display
[
] When is appeared, the text display is
scrolled by touching it.
38 DNX7140/DNX7000EX/DDX714/DDX7034BT English 39

SIRIUS/XM Control (North American sales area only)
Channel Search
Specifying the desired category and selecting a
channel.
Display the Source 1 Control Screen
See <Source Control Screen> (page 39).
Display the Category List Screen2
Select a category3
1
1 Selects a category.
Displays all the channels in the selected
category.
[
] When is appeared, the text display is
scrolled by touching it.
[All Channel] Displays all the channels.
[CTRL] Returns to the Source Control screen.
Select a channel4
Channel Memory
Stores the current receiving channel in memory.
Display the Source 1 Control Screen
See <Source Control Screen> (page 39).
Select a channel you wish to store in 2
memory
Store in memory3
2 sec.
Continue to touch until the memory number
appears.
Direct Channel Search
Tuning in by entering the desired channel
number.
Display the Source 1 Control Screen
See <Source Control Screen> (page 39).
Start Direct Channel Search2
Enter the channel number3
1
1 Enters the channel number.
[Cancel] Cancels the direct channel search.
[Clear] Clears the channel number.
Tune in the channel4
1
1 Selects a channel.
Tunes in the selected channel.
[Info Change]
Switches the sequence
SIRIUSSIRIUS
of the list.
Changes the display from Channel Name,
Category Name, Song Title, Artist Name, to
Composer Name.
[
UP] Display the category list.
40 DNX7140/DNX7000EX/DDX714/DDX7034BT English 41

HD Radio Control (North American sales area only)
Various control screens appear in the HD Radio Source mode. (with the optional accessory HD Radio tuner
connected only)
Source Control Screen
Switches to the source control screen to use
various functions.
Display the Source 1 Control Screen
See <How to Display the Source Control
Screen> (page 14).
Operation on the Source Control screen2
1
[HD FM] Switches to the HD FM1/2/3 band.
[HD AM] Switches to the HD AM band.
[4], [¢] Tunes in a station.
Use the [SEEK] to change the frequency
switching.
[CH ∞], [CH 5] Selects a channel (program).
[Tag] Registers the tag of the song you are
listening to now.* (page 45)
[List] Display the Channel List Screen. (page
44).
1 Information display
Selects the Call Letter (8), Title (32), Artist
(32), Album (32), Genre (8), or Station Name
(32).
The number in the ( ) indicates the
maximum number of displayed characters.
"FM"/ "AM" Band display
"Preset" Preset number
"Main"/ "Sub" Indicates whether the Main
or Sub channel is selected now.
"MHz"/ "kHz" Frequency display
"Tag" When song information can be
registered.* (page 45)
[
] When is appeared, the text display is
scrolled by touching it.
Multi Function
[1/2] Switches the multi function display.
[
] Closes the multi function bar.
[AME] Selects the Auto Memory mode.
See <Auto Memory> (page 43).
[SEEK] Switches the Seek mode.
The mode is switched in the following order
each time you touch the button.
Display Setting
"AUTO1" Tunes in a station with good reception automatically.
"AUTO2" Tunes in stations in memory one after another.
"MANU" Switches to the next frequency manually.
[4Line]/ [2Line] Switches the number of lines
displayed in the Information Display.
[DIR] You can tune in by entering the desired
frequency or channel number. See <Direct
Search> (page 45).*
[RCV] The Receive mode switches in the
following order. (page 44)
[TTL] Displays the tuned in program
information.
[P1] – [P6] When [P1] to [P6] buttons appear,
you can recall the stations on memory.
For memory of broadcasting stations, see
<Auto Memory> (page 43) or <Manual
Memory> (page 43).
⁄
* KTC-HR300 (optional accessory) connected only.•
Auto Memory
Stores stations with good reception in memory
automatically.
Display the Source 1 Control Screen
See <Source Control Screen> (page 42).
Select a band you wish to store in memory2
Select the Auto Memory mode3
Start Auto Memory4
Auto Memory terminates when 6 stations are
stored or when all stations are tuned in.
⁄
• The operation ends automatically if you do not operate
within 10 seconds.
Manual Memory
Stores the current receiving station in memory.
Display the Source 1 Control Screen
See <Source Control Screen> (page 42).
Select a station you wish to store in 2
memory
Store in memory3
2 sec.
Continue to touch until the memory number
appears.
42 DNX7140/DNX7000EX/DDX714/DDX7034BT English 43

HD Radio Control (North American sales area only)
Receive mode
Sets the radio broadcasts receive mode.
Display the Source 1 Control Screen
See <Source Control Screen> (page 42).
Display the Receive mode screen2
Select the receive mode3
[Receive Mode] The Receive mode switches in
the following order.
"Auto": Automatically tunes to analog
broadcast when there is no digital
broadcast.
"Digital": Digital broadcasts only.
"Analog": Analog broadcasts only.
Channel Search
Displays the list of channels within the station you
tune in currently.
KTC-HR300 (optional accessory) connected only.
Display the Source 1 Control Screen
See <Source Control Screen> (page 42).
Display the Channel List Screen2
Select a channel3
1
1 Selects a channel.
Tunes in the selected channel.
[Info Change] Displays the category subject to
list display.
[CTRL] Returns to the Source Control screen.
Direct Search
Tuning in by entering the desired frequency or
channel number.
KTC-HR300 (optional accessory) connected only.
Display the Source 1 Control Screen
See <Source Control Screen> (page 42).
Start Direct Search2
Enter the frequency or channel number3
1
1 Enters the frequency or channel number.
[Mode] Switches the search mode to
Frequency or Channel.
[Cancel] Cancels the direct search.
[Clear] Clears the frequency or channel
number.
Tune in the frequency or channel4
iTunes Tagging (HD Radio Tagging)
Using an iTunes Tagging enabled HD Radio you
can tag your music. When you hear a song you
enjoy on your local HD Radio station, you only
have to press the [ATT] button for at least 1
second. The song’s information will then be saved
on this unit. The saved songs will then show up
in a playlist called “Purchased” in iTunes the very
next time you sync your iPod to your computer.
So then you just need to click and then easily buy
and download the song you were tagging directly
from the Apple iTunes Music Store.
KTC-HR300 (optional accessory) connected only.
Registers a tag
ATT
1 sec.
The memory usage can be checked
Display the Source 1 Control Screen
See <Source Control Screen> (page 42).
Display the Information Screen2
The memory usage can be checked3
Select the "Tagging Information" display.
⁄
Up to 50 TAGs (song’s information) can be registered to •
this unit. When iPod is connected, the TAG information
registered to this unit is transferred to the connected
iPod.
44 DNX7140/DNX7000EX/DDX714/DDX7034BT English 45

You can listen to audio files stored in Bluetooth audio player and cell-phone.
Other Functions Bluetooth Audio Control
Before Use
• You need to register your audio player and cell-phone
before using it with this unit. For more details, see
<Registering Bluetooth Unit> (page 73).
• If you have registered two or more audio players or cellphones, you need to select one of them. For more details,
see <Bluetooth Unit Connection> (page 75).
Source Control Screen
Switches to control screen to use various
functions.
Display the Source 1 Control Screen
See <How to Display the Source Control
Screen> (page 14).
Operation on the Source Control screen2
[3] Plays.
[7] Stops playing.
[8] Pauses.
[4], [¢] Selects a file.
⁄
• If the Bluetooth Audio player does not support AVRCP
profile, buttons are not displayed. Operate from the
Audio player.
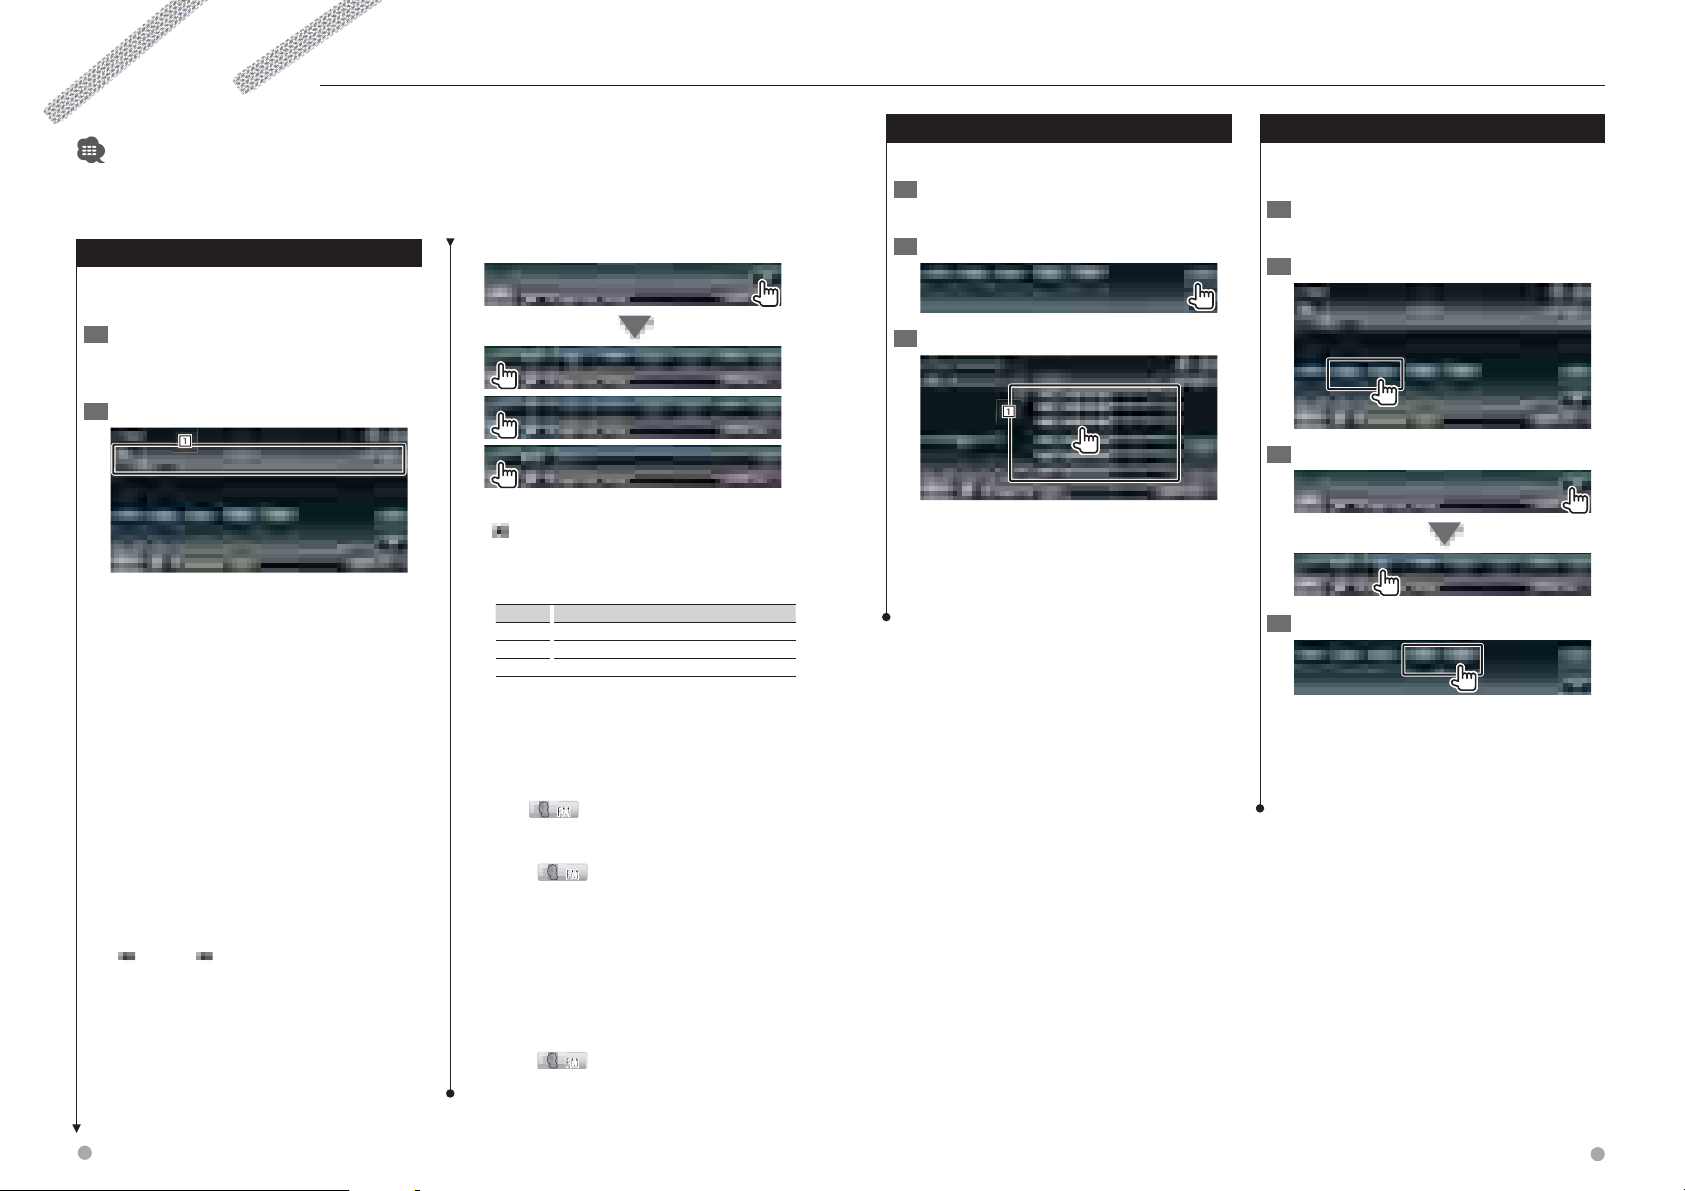
How To Use the Character Entry Screen
Character Entry screen
1
1 Enters characters.
[2], [3] Shifts the cursor.
[5], [∞] Scrolls up or down the character
button display.
[qwe]/ [abc] Sets the key layout of the
character buttons.
abc : Alphabetical key layout.
qwe : Qwerty key layout.
[Clear] Clears the character.
[Space] Enters a space.
If you erase a character, locate the cursor on it
and touch this button.
⁄
• You can enter characters only after you have applied the
parking brake.
External Device Power Supply Control
Controlling the external device power supply.
Display the Source Select Screen1
See <How to Select the Source> (page 12).
Display the EXT SW Control screen2
Control the external device power supply3
You can turn on or off the external device power
supply.
⁄
• You must connect a commercially available relay unit in
order to use this function.
Connect the external device to be controlled to that
relay unit.
• Refer to <EXT SW Setup> (page 69) for information on
setting the power on or off specification.
46 DNX7140/DNX7000EX/DDX714/DDX7034BT English 47

Other Functions
Screen Control
Muting Audio Volume upon Reception of
Phone Call
When the telephone is called...
The Phone Call ("CALL") screen appears, and
system is paused.
Phone Call ("CALL") screen
When the call ends...
Hang up the phone.
The system resumes playing automatically.
⁄
• To use the TEL Mute feature, you need to hook up
the MUTE wire to your telephone using a commercial
telephone accessory. Refer to <INSTALLATION MANUAL>.
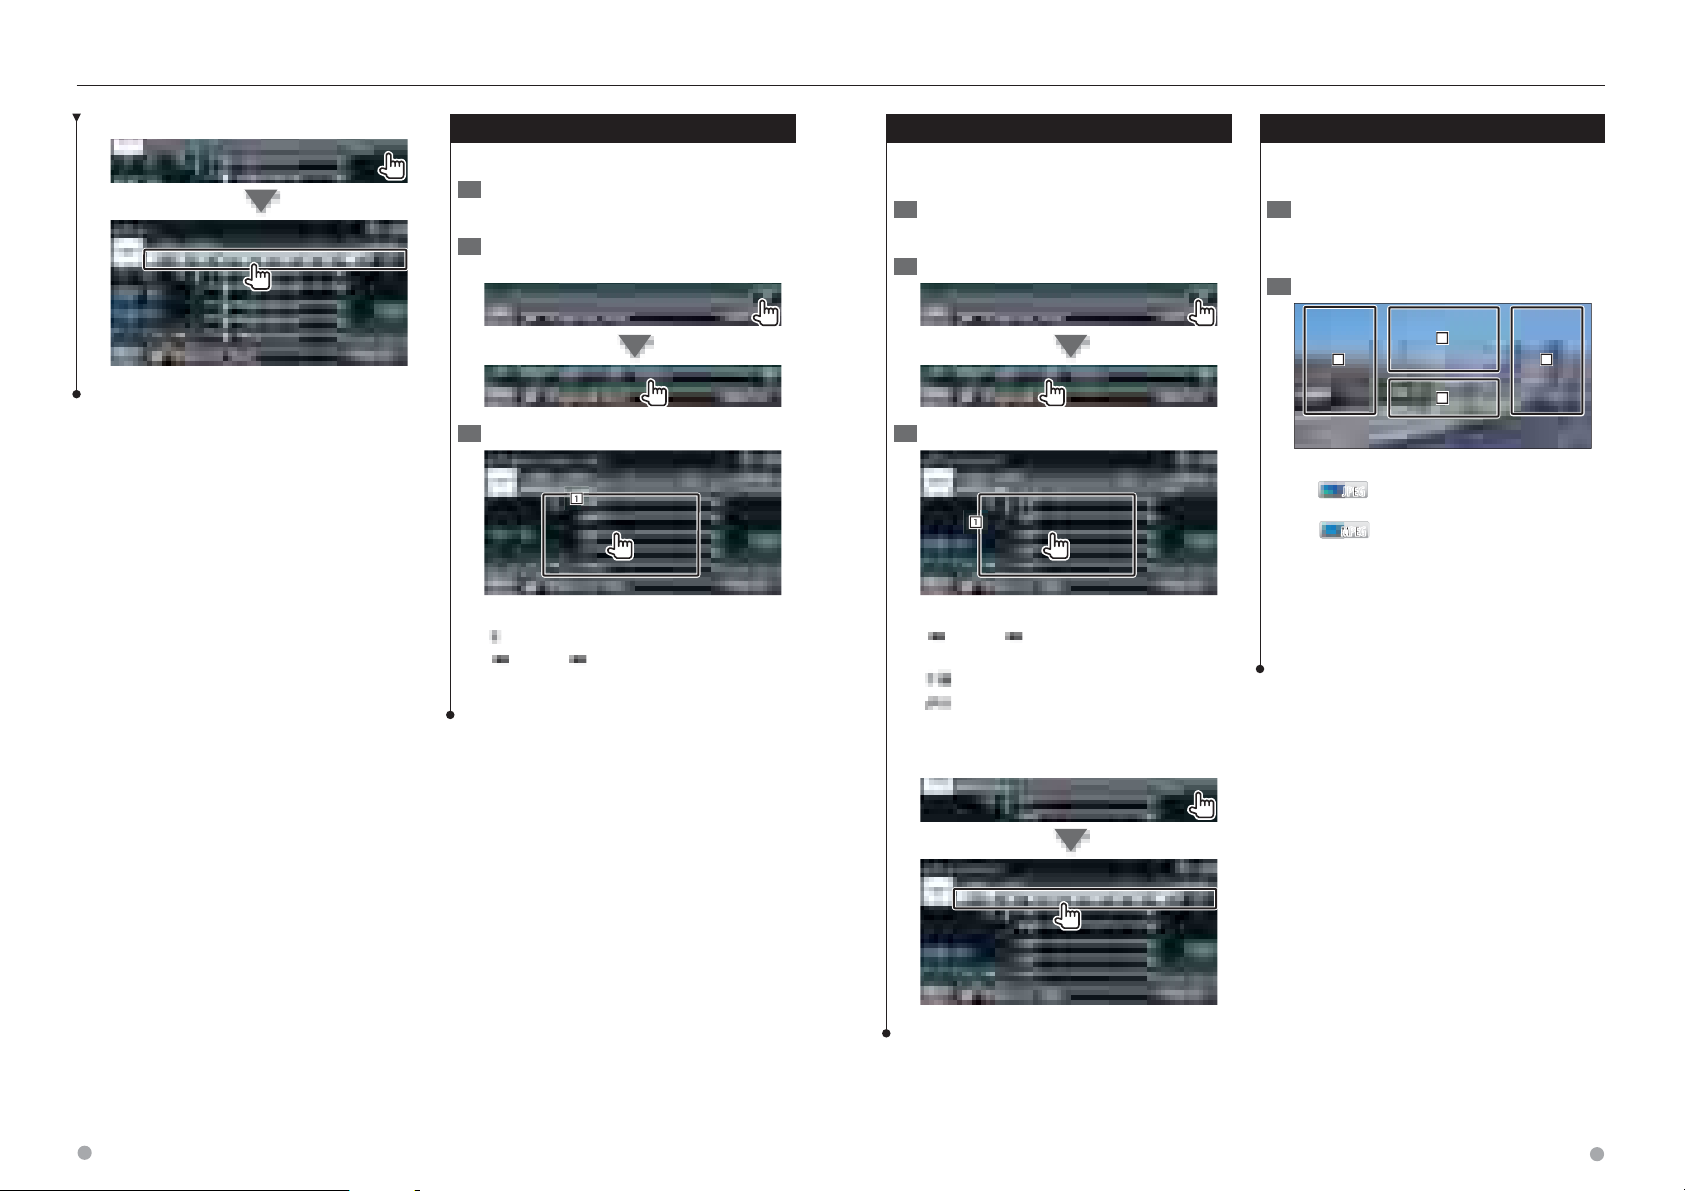
Setting the monitor screen.
Screen Control
Display the Easy Control Screen1
See <How to Display the Easy Control Screen>
(page 17).
Display the Screen Control screen2
Adjust the picture quality3
On or Off according to the
Navigation Day/Night display
setting. (DNX models only)
[Mode] Selects a screen mode.
You can select any of the following screen
mode.
"Full", "Just", "Zoom", "Normal"
⁄
• The Screen Control screen is displayed only when you
have applied the parking brake.
• The picture quality can be set for each source.
• You can set image quality of screens such as menu from
<Screen Control> (page 73).
Full picture mode ("Full")
Justify picture mode ("Just")
[Bright] Brightness Control
[Tint] Tint Control
Displayed for an NTSC system image on Video,
iPod or Rear View Camera.
[Color] Color Control
Displayed on Video, iPod, TV or Rear View
Camera screen only.
[Contrast] Contrast Control
[Black] Black Level Adjustment
[Sharpness] Sharpness control
Displayed on Video, iPod, USB or Rear View
Camera screen only.
[Dimmer] Dimmer Mode Setup
"ON": The display dims.
"OFF": The display doesn’t dim.
"SYNC": Turning the Dimmer function On or
Off when the vehicle light control
switch is turned On or Off.
"NAV-SYNC": Turning the Dimmer function
48 DNX7140/DNX7000EX/DDX714/DDX7034BT English 49
Zoom picture mode ("Zoom")
Normal picture mode ("Normal")

Hands Free Unit Control
Various functions can be used in the Hands Free control mode.
Before Use
You need to register your cell-phone before using it with •
this unit. For more details, see <Registering Bluetooth
device> (page 73).
If you have registered two or more cell-phones, you need •
to select one of them. For more details, see <Bluetooth
Unit Connection> (page 75).
To use the Phone Book, it must be downloaded to this •
unit in advance. For details, see <Downloading the
Phonebook> (page 50).
• To cancel downloading of the phonebook data, operate
the cell-phone.
Receiving a Call
Downloading the Phonebook
Downloads the phonebook data from the
cell-phone to this unit so that you can use the
Phonebook of this unit.
By operating the cell-phone, send the 1
phonebook data to this unit
During a Call
By operating the cell-phone, start the 2
hands-free connection
⁄
• For the cell-phones which support auto-download of
phonebook:
If the phonebook is not downloaded automatically for
some reasons, follow the procedure above to download
manually.
• For how to operate the cell-phone, refer to the
Instruction Manual that comes with your cell-phone.
• Up to 1000 phone numbers can be registered for each
registered cell-phone.
• Up to 32 digits can be registered for each phone number
along with up to 50* characters representing a name.
(* 50: Number of alphabetic alphabetical characters.
Fewer characters can be input depending on the type of
characters.)
• Depending on the type of your cell-phone, the following
restrictions are placed:
- The phonebook data cannot be downloaded normally.
- Characters in the Phonebook are garbled.
- The phonebook data cannot be downloaded normally
if it contains images. It may take several hours to a full
day to download the phone book depending on the
total image size.
Adjusting the Voice Volume during a Call
[ ] Answering a Phone Call
[
] Rejecting an Incoming Call
[ ] Switches the voice output between
phone and speaker.
[DTMF] Outputs dial tone. See <Controlling
Tone-based Services> (page 54).
[
] Disconnecting a call
Call Waiting
[ ] • Answering another incoming call with
the current call suspended
• Switching between the current call and
waiting call
Each touch of this button switches the
calling party.
[
] • Answering another incoming call after
terminating the current call
• Answering the waiting call after
terminating the current call
Making a Call
Displaying the control screen and using various
functions.
Display the Hands-Free Control screen1
TEL
Select a dialing method2
1
1 Calls the displayed phone number. If you
have registered a phone number in the
Phonebook, the destination person name is
displayed.
[
] Calls the displayed phone number.
[Redial] Displays the previously called phone
number.
[Preset1-3] Calls the preset phone number.
For information on how to preset a phone
number, see <Phone Number Preset> (page
57).
[
Phonebook] Displays the Search
for Phonebook screen. See <Calling by
Phonebook> (page 52).
[
Outgoing Calls] Displays the Outgoing
Calls screen. See <Making a Call Using Call
Records> (page 53).
[
Incoming Calls] Displays the Incoming
Calls screen. See <Making a Call Using Call
Records> (page 53).
[
Missed Calls] Displays the Missed
Calls screen. See <Making a Call Using Call
Records> (page 53).
[Direct Number] Displays the Dialing Display
screen. See <Calling by Entering a Phone
Number> (page 52).
[Voice] Starts voice recognition.
See <Calling by Voice Recognition> (page 53).
[BT SETUP] Displays the Bluetooth SETUP
screen. (page 73)
[SETUP] Displays the Hands Free Setup screen.
(page 54)
⁄
While your car is moving, some functions are disabled for •
safety’s sake. The buttons associated with the disabled
functions become ineffective if pressed.
When the Hands-Free Control screen appears, the name •
of the connected cell-phone is displayed for 5 seconds.
* Since the number of steps of the control unit is different •
from that of the cell-phone, the statuses displayed on
the control unit may discord from those displayed on
the cell-phone. No status is displayed if information
about it cannot be obtained.
Setting the cell-phone in the private mode can disable •
the hands-free function.
50 DNX7140/DNX7000EX/DDX714/DDX7034BT English 51

Hands Free Unit Control
Calling by Phonebook
You can call a person using his/her phone
number that you have registered in the
Phonebook.
Display the Hands-Free Control screen1
See <Making a call> (page 51).
Display the Phonebook screen2
Select the name to call 3
2
1
1 Phonebook data list.
2 Displays the Phonebook beginning with the
name whose first character you have touched.
[
] When is appeared, the text display is
scrolled by touching it.
Select the phone number to call 4
Calling by Entering a Phone Number
Makes a call by entering a phone number.
Display the Hands-Free Control screen1
See <Making a call> (page 51).
Display the number input screen2
Enter a phone number3
1
1 Calls the entered phone number.
[Clear] Clears the number.
Make a call4
You can start talking when the destination
responds.
⁄
You can input up to 32 digits.•
Making a Call Using Call Records
Calls by selecting a phone number from the
outgoing, incoming, or missed calls list.
Display the Hands-Free Control screen1
See <Making a call> (page 51).
Display the Outgoing Calls, Incoming Calls, 2
or Missed Calls screen
Select from calls list 3
Example : Outgoing Calls screen
Calls the selected phone number.
Make a call4
⁄
The Outgoing Calls list screen, Incoming Calls list, •
or Missed Calls list screen shows the list of the calls
originated from or received at this unit. They are not the
ones stored in the cell-phone memory.
Display the Voice Recognition screen2
Utter the voice registered in the 3
Phonebook
When a beep is heard, utter the name within 2
seconds.
When a beep is heard, utter the category within
2 seconds.
If there are more than one phone numbers
registered under the same name, go to step 4.
Select a Phone number category4
Make a call5
Calling by Voice Recognition
Calls by recognizing the registered voice.
Selects the Phone number category.
Make a call5
⁄
⁄
To use the Phonebook, it must have been downloaded •
from the cell-phone. For more details, see the instruction
manual of your Bluetooth Unit and your cell-phone.
Initials including no corresponding name will not be •
displayed.
During search, a non-accent character such as "u" is •
searched for instead of an accent character such as "ü".
52 DNX7140/DNX7000EX/DDX714/DDX7034BT English 53
In order to perform voice recognition, voice must •
be registered in the Phonebook data. See <Voice
Registration> (page 55). Or, to perform voice recognition
by Phone number category (Home, Office, Mobile etc.)
of Phonebook data, a key word voice must be registered.
See <Key Word Voice Registration> (page 56).
Display the Hands-Free Control screen1
See <Making a call> (page 51).
⁄
A message is displayed if the voice is not recognized. •
Read the message for the further operation.

Hands Free Unit Control
Controlling Tone-based Services
Uses tone base service using DTMF (Dual Tone
Multi Frequency).
Display the Talking screen1
See <Calling by Entering a Phone Number>
(page 52).
Display the DTMF input screen2
You can send tones during a call3
Setting Up the Hands-Free Phone
The Hands-Free system can be set as follows.
Display the Hands-Free Control screen1
See <Making a call> (page 51).
Display the Hands Free Setup screen2
Set the each item3
[Auto Response] Sets an automatic response
time after call termination. (
"Off": This function can not use.
"0-99": Sets to calling ring time (second).
[Phone Voice] Sets a ringing tone output
position. (
"Front All")
"Front L": Outputs the tone from the front left-
hand side speaker.
"Front R": Outputs the tone from the front
right-hand side speaker.
"Front All": Outputs the tone from the both
front speakers.
"OFF")
[Call Beep] Sets the beep of the incoming call.
"ON")
(
"ON": Beep is heard.
"OFF": Beep is canceled.
[SMS Receive Beep] Sets the beep of the
incoming SMS. (
"ON")
"ON": Beep is heard.
"OFF": Beep is canceled.
[Phone Information Use] Sets whether to
use cell-phone phonebook, outgoing calls list,
incoming calls list and missed calls list.
(
"ON")
"ON": Yes.
"OFF": No.
[SMS Use] Sets the SMS function. (
"ON")
"ON": Use SMS function.
"OFF": SMS not available.
[Key Word] Registers the voice to select phone
number category with voice recognition.
See <Key Word Voice Registration> (page 56).
[Use Phone Voice Recognition] Sets whether
to dial using the phone voice recognition
function. (
"ON")
[Echo Cancel] Sets whether to cancel echo.
(
"ON")
[Microphone Level] Adjusts the sensitivity of
the built-in microphone for a telephone call.
(
"6")
[Noise Reduction] Reduces the noises
generated by the surrounding environment
without changing the microphone volume.
(
"ON")
[Restore] Restores the [Echo Cancel],
[Microphone Level], or [Noise Reduction] value
to the initial value.
⁄
Either the time interval for automatic answer set on this •
unit or the time interval set on the cell-phone, whichever
is shorter, takes effect.
Select the speaker which is further from the microphone •
in order to prevent howling or echoes.
Voice Registration
Registers voice for voice recognition in
Phonebook. Up to 35 voices can be recorded in
one cell-phone.
Display the Phonebook Detail screen1
Go through the procedure of <Calling by
Phonebook> (page 52).
Select the name to register2
1
1 Selects a name.
[Record] Registers the voice for voice
recognition to the selected Phonebook. If
there are already 35 voice tag registered
in the same cell-phone, [Record] button is
deactivated.
[Play] Plays the voice registered in the selected
Phonebook data.
[Delete] Deletes the voice registered in the
selected Phonebook data.
Touch to display the confirmation screen.
Touch [Yes] to delete or [No] to cancel.
Display the voice registration screen 3
Utter the voice to register (1st try) 4
Utter within 2 seconds after the Beep.
Next page 3
54 DNX7140/DNX7000EX/DDX714/DDX7034BT English 55

Hands Free Unit Control
Utter the voice to register (2nd try)5
Utter within 2 seconds after the Beep.
End voice registration6
⁄
A message is displayed if the voice is not recognized. •
Read the message for the further operation.
Repeat from 1st try if the voice is different from the 1st •
try.
Key Word Voice Registration
Registers the voice to select the Phone number
category by Voice Recognition.
Display the Hands Free Setup screen1
See <Setting Up the Hands-Free Phone> (page
54).
Display the Key Word List screen2
[Record] Registers voice for the selected
Phone number category.
[Play] Plays voice registered for the selected
Phone number category.
[Delete] Deletes voice registered for the
selected Phone number category. Touch to
display the confirmation screen. Touch [Yes] to
delete or [No] to cancel.
Display voice registration screen4
Utter the voice to register (1st try) 5
Utter within 2 seconds after the Beep.
Utter the voice to register (2nd try) 6
Utter within 2 seconds after the Beep.
End voice registration 7
Phone Number Preset
Registers frequently used phone number to
Hands Free control screen preset button.
Display the Hands-Free Control screen1
See <Making a call> (page 51).
Select the Preset number to register2
1 sec.
⁄
If no Preset number is registered, pressing this button •
momentarily moves to the step 3.
Select the search destination of the number 3
to register
Register phone number 5
SMS (Short Message Service)
Uses SMS function.
Display the Hands-Free Control screen1
See <Making a call> (page 51).
Display the SMS Select screen2
Select a function3
[ ] Registers from Phonebook.
[
] Registers from outgoing calls list.
[
] Registers from incoming calls list.
[
] Registers from missed calls list.
Select the Phone number category to 3
register
1
1 Selects the Phone number category.
"REC" turns on for data with voice for voice
recognition already registered.
⁄
A message is displayed if the voice is not recognized. •
Read the message for the further operation.
Repeat from 1st try if the voice is different from the 1st •
try.
[Direct Number] Registers by entering phone
numbers.
[Voice] Registers voice for voice recognition to
preset number.
[Memory] Registers the currently displayed
phone number.
[Delete] Deletes the currently displayed phone
number. Touch to display the confirmation
screen. Touch [Yes] to delete or [No] to cancel.
Search phone number to register with each 4
function
[ ] Displays the SMS create menu screen.
[
] Displays received message list.
[
] Displays sent message list.
[
] Displays the Message screen. The button
will be active when any message has been
created after power-on.
[Download] Retrieves SMS messages from the
cell-phone.
Next page 3
56 DNX7140/DNX7000EX/DDX714/DDX7034BT English 57

Hands Free Unit Control
Audio Control
Select a message to display 4
1
1 Calls the number in the selected message.
[DISP] Displays the selected message.
SMS Message screen
Creates a new message for the selected
message.
Create a message
Input the destination1
[ ] Select a destination from the
phonebook.
[Direct Number] Enter the phone number.
[SET] Display the Create SMS Message screen.
[Send] Sends the message.
[Delete] Deletes the Draft message.
Touching the screen displays a confirmation
message. Touch [Yes]. To cancel clearing, touch
[No].
Display the Create SMS Message screen2
Create a message3
1
1 Enters characters.
[2], [3] Moves the cursor.
[5], [∞] Scrolls up or down the character
button display.
[qwe]/ [abc] Sets the key layout of the
character buttons.
abc : Alphabetical key layout.
qwe : Qwerty key layout.
[Clear] Erases the entered character.
If touched more than 1 second, all the input
characters are erased.
[Space] Enters a space.
[SET] Determines the message and returns to
the SMS Create Menu screen.
Send the message.4
Audio Control Menu
Displays the Audio Control menu to set the sound
effect function of this unit.
Display the Source Select Screen1
SRC
Display the Audio Control menu2
In this manual, the above selection is indicated
as:
Touch [
Select the Audio Control item3
Item Page
[Audio Control] 59
[Equalizer] 60
[Zone Control] 61
[Space Enhancer] 61
[Position] 62
] > [ ].
[EQ] 60
Audio Control
You can adjust the front/rear and right/left audio
balance.
Display the Audio Control screen1
Touch [
] > [ ] > [Audio Control]. (page 59)
Set the each item2
1
1 Adjusts the front/back and left/right volume
around the touched area.
[2], [3] Adjusts the right and left volume
balance.
[5], [∞] Adjusts the front and rear volume
balance.
[VOL.Offset] Finely adjust the volume of the
current source to minimize the difference in
volume between different sources.
⁄
If you have increased the volume first, then reduced •
the volume using the "VOL. Offset", the sound
generated if you suddenly switch to another source
may be extremely loud.
[Subwoofer Level] Adjusts the subwoofer
volume.
[Bass Boost] Sets the amount of bass boost.
"OFF"/ "Step1"/ "Step2"
[Stream Information] Displays the present
source information.
The stream (Dolby Digital, dts, Linear PCM,
MPEG, MP3, WMA or AAC) is displayed.
58 DNX7140/DNX7000EX/DDX714/DDX7034BT English 59

Audio Control
Equalizer Control
You can set up the equalizer.
Display the Equalizer screen1
Touch [
] > [ ] > [Equalizer]. (page 59)
Set the each item2
[SystemQ] Selects an equalizer curve type.
You can select any of the following equalizer
curves.
"Natural"/ "Rock"/ "Pops"/ "Easy"/ "Top40"/
"Jazz"/ "Game"/ "iPod"/ "User"
⁄
"User" can be selected after graphic equalizer •
adjustment is carried out. See <Graphic Equalizer
Setup> (page 60).
"iPod" uses the its equalizer function. Only iPod •
sources can be selected.
[EQ] Displays the Graphic Equalizer setup
screen. (page 60)
Graphic Equalizer Setup
You can Manually set the equalizer curve.
Display the Equalizer screen1
Touch [
Display the Graphic Equalizer screen2
Set the Graphic Equalizer3
1 Gain level can be adjusted by touching the
[EQ Init] Returns to the previous level which
[Flat] Tone curve becomes flat.
[Bass EXT] Bass Extend settings.
[SW LEVEL] Adjusts the subwoofer volume.
] > [ ] > [Equalizer]. (page 59)
1
each frequency bar.
[2], [3] Sets a frequency.
[5], [∞] Sets a gain level.
the gain level is adjusted.
If turned "ON", it extends the 62.5 Hz to the
low register by approximately 20%.
Zone Control
You can set the front and rear audio source.
Display the Zone Control screen1
Touch [
] > [ ] > [Zone Control]. (page 59)
Set the Zone Control2
[Single Zone] Turns off the dual zone.
[Front Source] Sets the front audio source.
[Rear Source] Sets the rear audio source.
⁄
When the rear speaker sound is switched, the audio •
source that is output at the AV OUTPUT terminal is
also switched to the same source.
[Rear VOL.] Adjusts the volume of the rear
channel.
⁄
There are following limitations when zone function is set •
to "On".
- There is no output from the subwoofer.
- <Equalizer Control> (page 60), <Space Enhancer> (page
61), <Position> (page 62), <DSP Bypass Control> (page
78), <Speaker Setup> (page 78), and <Car Type (DTA)
Setup> (page 79) are not available.
Space Enhancer
You can enhance the soundscape.
Display the Space Enhancer screen1
Touch [
] > [ ] > [Space Enhancer]. (page
59)
Set the Space Enhancer2
1
1 Sets the soundscape level.
⁄
You cannot set Space Enhancer in tuner source.•
60 DNX7140/DNX7000EX/DDX714/DDX7034BT English 61

Audio Control
4
Setup Menu
Position
You can adjust the sound effects according to
your listening position.
Display the Position screen1
Touch [
] > [ ] > [Position]. (page 59)
Set the Position Control2
[P1] - [P3] Stores the present adjustment setup
in memory, or calls it from memory.
To store your adjustment in memory:
Continue to touch [P1] to [P3] more than 2
seconds.
To call your adjustment from memory:
Touch [P1] to [P3] of your adjustment you
wish to call from memory.
[2], [3] Sets a listening position.
You can select any of "Front R" (Right front),
"Front L" (Left front), "Front All" (All front), and
"All" (All) positions.
[DTA] Displays the Position DTA (Digital Time
Alignment) screen.
Exit Position Control3
⁄
The final distance is adjusted to the total of Car Type Set •
Up value (page 79) and Position Setup (both Position and
Position Fine Control) value.
If you change the Car Type Set Up value • (page 79), the
position is set to "All".
Only the adjusted distance of position setup (Position •
and Position Fine Control values) is stored in memory.
Therefore, the final adjustment distance changes if you
change the Car Type Set Up value (page 79).
Position DTA Control
You can fine-adjust your listening position.
Display the Position DTA screen1
Select a speaker you wish to adjust2
1
3
5
1
Left front speaker
2
Right front speaker
3
Left rear speaker
4
Right rear speaker
5
Subwoofer
2
4
[2], [3] Finely adjusts the value set with the
Position function.
[Total DTA] Indicates setup distance. The
adjusted distance (Position and Position Fine
Control values), and the total of the distance
adjusted by Car Type Set Up (page 79) and
the adjustment distance for position setup are
indicated.
Finely adjust the distance3
Finely adjust the value set with the Position
function.
You can set up various receiver parameters.
How to Display SETUP Menu Screen
Displays the Setup menu to set various functions.
Display the Source Select Screen1
SRC
Display the Setup Menu Screen2
In this manual, the above selection is indicated
as:
Touch [
] > [ ].
Select the setup item3
[5], [∞] Scrolls the setup menu.
⁄
[AV-IN SETUP], [Navigation] and [Audio SETUP] options •
can be locked. The key mark (
video for the locked option. See <Setup Memory> (page
70).
) is displayed in reverse
Item Page
[Information]
[Vehicle]
[Mileage Tracker] 64
[Vehicle Maintenance] 64
[Gas Mileage Analysis] 65
[Vehicle SETUP] 65
[Software] 66
[System]
[User Interface] 66
[Touch] 67
[Clock] 67
[Security] 68
[Angle] 69
[EXT SW] 69
[SETUP Memory] 70
[Display]
[Background] 71
[Color] 72
[Screen Control] 73
[Bluetooth SETUP] 75
[SIRIUS SETUP] 84
[DVD SETUP] 80
[iPod SETUP] 83
[USB SETUP] 83
[TV SETUP] 86
[AV-IN SETUP] 76
[Navigation] 77
[Audio SETUP] 78
[Speaker Select] 78
[Car Type] 79
[AV Interface] 76
62 DNX7140/DNX7000EX/DDX714/DDX7034BT English 63

Setup Menu
Mileage Tracker (DNX models)
Measures the travel distance.
Display the Mileage Tracker screen1
Touch [
[Vehicle]
] > [ ] > [Information] >
> [Mileage Tracker]. (page 63)
Measure the travel distance2
1
1 Displays up to three measurement results.
The "3" mark tuns red during measurement.
[Start] Starts measurement of the travel
distance.
[Stop] Ends measurement of the travel
distance.
Vehicle Maintenance (DNX models)
Displays the maintenance information about the
oil change timing and so forth.
Display the Maintenance screen1
Touch [
[Vehicle]
Select the item to set2
] > [ ] > [Information] >
> [Maintenance]. (page 63)
[Input] Sets a distance.
Set a distance3
1
1 Input a distance.
[Clear] Erases the entered digit.
If touched more than 1 second, all the input
digits are erased.
[Enter] Registers the distance.
[Cancel] Cancels the input distance.
Notification screen
When the set distance is getting close, the
maintenance notification is displayed when the
unit is turns on. Touch the check box, and then
touch the [Close] button to close the display.
Gas Mileage Analysis (DNX models)
Measures the gas mileage.
Display the Gas Mileage screen1
Touch [
[Vehicle]
Display the information about the gas 2
mileage
[Reset] Rests the trip meter.
[Input] Input the information about the
gasoline filled. (Step 3)
[History] Displays the history of mileage. (Step
5)
Input the information about gasoline
Display the Input Gas Information screen3
Inputs the information about gasoline4
] > [ ] > [Information] >
> [Gas Mileage Analysis]. (page 63)
1
Displays the history of gas mileage
Display the Gas Mileage History screen5
Display the history of gas mileage6
1
1 Displays up to three gas mileages.
[Delete] Deletes the history.
Vehicle Setup (DNX models)
Sets the unit of distance and the unit of amount
of gasoline.
Display the Vehicle SETUP screen1
Touch [
[Vehicle]
Set the units2
] > [ ] > [Information] >
> [Vehicle SETUP]. (page 63)
[Mile]/ [km] Set the unit of distance.
[Gallon]/ [Liter] Set the unit of amount of
gasoline.
[Tire Rotation] Sets the tire rotation timing.
Notification is made when the vehicle has run
the set distance.
[Oil Change] Sets the oil change timing.
Notification is made when the vehicle has run
the set distance.
[Notification Cycle] Sets the distance the
vehicle runs before notification is made.
[Reset] Resets the distance the vehicle has run.
[Cost per Liter], [Cost per Gallon] Selects the
mode to input the cost per liter/gallon.
[Gallons Filled] Selects the mode to input the
amount of gasoline filled.
1 Input information.
[Clear] Erases the entered digit.
If touched more than 1 second, all the input
digits are erased.
[CALC] Determines the input information and
returns to the previous screen.
[Cancel] Cancels the input information.
64 DNX7140/DNX7000EX/DDX714/DDX7034BT English 65

Setup Menu
Software Information
Checks the software version of this unit.
Display the Software Information screen1
Touch [
[Software]. (page 63)
Displays the software version.
] > [ ] > [Information] >
⁄
For how to update the software, refer to the relevant •
update procedure manual.
User Interface
You can setup user interface parameters.
Display the User Interface screen1
Touch [
Interface]. (page 63)
Set the each item2
] > [ ] > [System] > [User
[Language] Select the language used for the
control screen and setting items. (page 66)
[Scroll] Allows scrolling of text display on the
Source Control screen. (
"Auto": Scrolls the screen automatically.
"Manual": Allows you to scroll the screen
manually.
[Marker] Sets whether to display the target
when touching the panel.
[Drawer Close] Sets whether to close the
function bar automatically. (
[AUD Key Longer than 1 Second] Sets the
function of the [AUD] button. (page 10)
"V.OFF" : Press the [AUD] button for more than
1 second to turn the display off.
"R-CAM" : Press the [AUD] button for more
than 1 second to switch to rear view.
"Manual")
"Auto")
Language Setting
You can select the display language for the
control screen and audio file tags.
Display the User Interface screen1
Touch [
Interface]. (page 63)
Display the Language Setting screen2
Select a language3
] > [ ] > [System] > [User
Advanced mode (DNX models only)
[GUI Language Select] Selects the display
language used for the control screen and so
forth. (
[Navigation Language Select] Selects the
language used for navigation.
(
"American English")
"American English")
Touch Panel Adjustment
You can adjust the touch panel operations.
Display the Touch panel Adjustment screen1
Touch [
(page 63)
Adjust the Touch panel2
Follow the instruction on the screen and touch
the center of
[Cancel] Cancels the adjustment and returns
to the Touch Panel Adjust screen.
[Reset] Resets to the initial status.
] > [ ] > [System] > [Touch].
.
Clock Setup
You can adjust the clock time.
Display the Clock Setup screen1
Touch [
(page 63)
Setup the Clock2
1 Adjusts hours.
2 Adjusts minutes.
[Reset] Sets "00" minute.
[Synchronize] Sets the clock time in
Adjust the clock time3
] > [ ] > [System] > [Clock].
1
Setup examples: 3:00 – 3:29 \ 3:00
synchronization with the time data sent from
the navigation system or the RDS station. (
DNX models: "Navigation", DDX models: "RDS")
"Off"/ "RDS"/ "Navigation"
When the synchronized mode is set, the clock
cannot be adjusted manually.
2
3:30 – 3:59 \ 4:00
[Select Mode] Selects the mode to select a
language. (
[Beep] Turns the key touch tone On or Off.
(
"On")
[Remote Sensor] Selects a remote control
signal. (
When turned "Off", the remote control of TV
reception is rejected.
66 DNX7140/DNX7000EX/DDX714/DDX7034BT English 67
"On")
Touching [Advanced] allows you to select
languages for respective items.
[Language Select] Selects a language.
(
"American English")
[Enter] Determines the selected language.
[Cancel] Cancels the selected language.
"Easy") (DNX models only)

Setup Menu
Security Setup
You can set a security code to protect your
receiver system against theft.
⁄
• When the Security Code function is activated, the code
cannot be changed and the function cannot be released.
Note the Security Code can be set as the 4 digit number
of your choice.
Display the Security screen1
Touch [
(page 63)
Setup the SI (Security Indicator)2
[Security Code Set] Displays the Security code
[SI] Turns the SI function on or off.
Start Security Code setup3
] > [ ] > [System] > [Security].
input screen.
If turned "On", the SI indicator on the front
panel flashes when the vehicle ignition is off.
(
"On")
Reenter the security code6
Reenter the same security code as that you have
entered in Step 4 for confirmation.
⁄
If you enter a different security code, the screen •
returns to Step 4 (for the first code entry).
Register the security code again7
Now, your security code is registered.
If you have pressed the Reset button or if you
have disconnected the Receiver from battery...
Enter the correct security code1
You must enter the same security code as that
you have entered in Step 4.
Register your security code2
Now, you can use your Receiver.
Monitor Angle Control
You can adjust the position of the monitor.
Display the Angle Setup screen1
Touch [
(page 63)
Set the Monitor Angle2
1
1 Sets the Monitor angle.
[Memory] Stores the current monitor angle as
the angle during power off.
] > [ ] > [System] > [Angle].
EXT SW Setup
Setting up power specification of the external
device for which the power is controlled from this
unit.
Display the Angle Setup screen1
Touch [
(page 63)
Perform EXT SW Setup2
[SW Name] Sets the name of the external
[Output Pattern] Sets the power signal output
] > [ ] > [System] > [EXT SW].
device. See <Character Entry> (page 47) for
information on how to enter the name.
mode.
(
EXT SW1: Pulse, EXT SW2: Level)
"Pulse": Generates a single power signal pulse.
"Level": Continues output of high power signal.
⁄
If you have already completed the code registration, •
[CLR] is displayed.
Enter a security Code4
Input four-digit number.
Register your security code5
68 DNX7140/DNX7000EX/DDX714/DDX7034BT English 69
Sets to turn output on/off each time
the button on the EXT SW Control
screen is touched.
[Pulse Set] Sets the Pulse signal output time.
Outputs 500ms when "1" is set. Increases by
200ms with each step. Up to 100 steps can
be set.

Setup Menu
Setup Memory
Audio Control, AV-IN SETUP, AV Interface,
Navigation, and Audio SETUP settings can be
memorized. The memorized settings can be
recalled at any time. For example, even when the
settings are cleared due to replacement of the
battery, the settings can be restored.
Display the SETUP Memory screen1
Touch [
Memory]. (page 63)
Start Setup Memory2
[Lock] Locks the AV-IN SETUP, Navigation,
[No] Memorizes or recalls the settings. To
Select a desired function3
] > [ ] > [System] > [SETUP
and Audio SETUP settings. When [Lock] is
selected, you cannot change the AV-IN SETUP,
Navigation, and Audio SETUP settings.
cancel the function, touch [No]. To cancel
memorization, touch [No].
The SETUP Menu screen appears again.
Memorize or recall the settings4
When memorizing the Audio Setup and AV
Interface settings:
If settings have already been memorized, a
confirmation message appears. Touch [Yes]. To
cancel memorization, touch [No].
When recalling the memorized settings:
Touching the screen displays a confirmation
message. Touch [Yes]. To cancel recalling, touch
[No].
When clearing the currently memorized
settings:
Touching the screen displays a confirmation
message. Touch [Yes]. To cancel clearing, touch
[No].
Quit memorization/recalling of settings5
Entering Background
Loads a image for background.
Connect the device which has the image 1
to load
Display the Background screen2
Touch [ ] > [ ] > [Display] >
[Background]. (page 63)
Display the Background Memory screen3
[Change] Selects a image for background.
[Delete] Deletes the background image.
Touching the screen displays a confirmation
message. Touch [Yes]. To cancel clearing, touch
[No].
Select a medium4
Load the image6
1
1 Rotates the image.
⁄
See • <About Picture files> (page 7) for readable image
specifications.
This operation is not possible when USB is selected as •
the source.
Background Change
Selects a image for background.
Select Background Change screen1
Select a image for background2
1
Select the image to load5
1
1 Returns to the initial background.
Set the image as the background3
[Recall] Recalls the memorized settings.
[Memory] Memorizes the current Audio Setup
and AV Interface settings.
[Clear] Clears the currently memorized
settings.
1 Lists the files.
[
] When is appeared, the text display is
scrolled by touching it.
[
ROOT] Moves to the top hierarchy level.
[
UP] Moves up a hierarchy level.
70 DNX7140/DNX7000EX/DDX714/DDX7034BT English 71

Setup Menu
Panel Color Coordinate
Sets the screen and button illumination color.
Display the Color screen1
Touch [
(page 63)
Display the Panel Color Coordinate screen2
[Panel Color Scan] When set to "ON", the
Select a color3
1 Sets to the touched color.
[SET] Sets and registers favorite color to the
To register your original color
Start the RGB coordinate1
Adjust the each color value2
] > [ ] > [Display] > [Color].
illumination color of the screen and buttons
changes one after another.
1
preset buttons ([P1] – [P3]).
[Blue Value] Adjusts the Blue.
Select a Preset number to register3
2 sec.
Adjusted color is registered to the selected
Preset button.
Complete the color coordination4
Screen Control
You can adjust the screen mode of the monitor.
Display the Screen Control screen1
Touch [
] > [ ] > [Display] > [Screen
Control]. (page 63)
Set the each item2
[Bright] Brightness Control
[Contrast] Contrast Control
[Black] Black Level Adjustment
[Dimmer] Dimmer Mode Setup
"ON": The display dims.
"OFF": The display doesn’t dim.
"SYNC": Turning the Dimmer function On or
Off when the vehicle light control
switch is turned On or Off.
"NAV-SYNC": Turning the Dimmer function
On or Off according to the
Navigation Day/Night display
setting. (DNX models only)
⁄
• In this Screen Control screen, you can perform setups for
the menu screen. Setups for videos such as DVD can be
performed on the <Screen Control> (page 49).
Registering Bluetooth Unit
Registers the Bluetooth unit to be connected.
Display the Bluetooth Setup screen1
Touch [
] > [ ] > [Bluetooth SETUP].
(page 63)
Display the Connect Device List screen2
Search for a Bluetooth unit3
1
1 Displays the registered Bluetooth units.
The busy service becomes active. The available
service becomes inactive.
[
] When is appeared, the text display is
scrolled by touching it.
[Search] Searches for a Bluetooth unit.
[SP DEV] Registers a Bluetooth unit that
cannot be registered by normal register
(paring) operation.
⁄
A new device cannot be registered if there are 5 •
registered Bluetooth units. Delete unnecessary
registration. See <Bluetooth Unit Connection> (page
75).
1
1 Selects a preset number to register.
[Red Value] Adjusts the Red value.
[Green Value] Adjusts the Green value.
Next page 3
72 DNX7140/DNX7000EX/DDX714/DDX7034BT English 73

Setup Menu
Select the Bluetooth unit to register4
1
1 Displays the searched Bluetooth unit.
[Search] Searches for a Bluetooth unit.
[Cancel] Cancels searching of Bluetooth unit.
Enter PIN code 5
1
1 Enters a code number.
[Enter] Enter the PIN code specified for the
Bluetooth unit to register.
This button will not be active until at least four
PIN code digits have been entered.
[Cancel] Cancels registration of PIN code.
[Clear] Clears the code number.
⁄
You can also register from the Bluetooth unit side. For •
the PIN code necessary for registration, see <Registering
Bluetooth Unit PIN Code> (page 75).
If the error message appears even though the PIN code is •
correct, try <Registering Special Bluetooth Unit>.
Registering Special Bluetooth Unit
Registers Special Bluetooth unit that results in
error by normal operation by selecting from
model name.
Display the Special Device List screen1
Select a model name2
Displays the Bluetooth unit name that can be
registered.
Confirm whether to register3
⁄
Only models in Bluetooth unit name list can be •
registered.
Go through the procedure of <Registering 4
Bluetooth Unit> and complete the
registration (pairing).
Registering Bluetooth Unit PIN Code
Sets the PIN code of the Bluetooth unit to enter
when registering (pairing) from the cell-phone or
audio player side.
Display the Bluetooth Setup screen1
Touch [ ] > [ ] > [Bluetooth SETUP].
(page 63)
Display the Receiver PIN Code screen2
Enter PIN code3
1
1 Enters a code number.
[Cancel] Cancels registration of PIN code.
[Enter] Enters PIN code.
[Clear] Clears the code number.
Bluetooth Unit Connection
Selects the Bluetooth unit to connect.
Display the Bluetooth Setup screen1
Touch [
(page 63)
Display the Connect Device List screen2
Select a registered Bluetooth unit3
Select the service to use4
[TEL (HFP)] Connects/disconnects cell-phone
[Audio (A2DP)] Connects/disconnects Audio
[Remove] Deletes registration (pairing).
] > [ ] > [Bluetooth SETUP].
to use for Hands Free.
player to use for Bluetooth Audio.
Touching the screen displays a confirmation
message. Touch [Yes]. To cancel clearing, touch
[No].
74 DNX7140/DNX7000EX/DDX714/DDX7034BT English 75

Setup Menu
AV Input Setup
You can set AV input parameters.
Display the AV-IN Setup screen1
Touch [
63)
Set the each item2
1 Sets a name to be displayed when you
[AV-IN Interruption] Sets an image display of
[On Screen AV-IN] Sets an on-screen display
[iPod AV Interface Use] Sets the terminal
76 DNX7140/DNX7000EX/DDX714/DDX7034BT English 77
] > [ ] > [AV-IN SETUP]. (page
1
select a system that is connected via the AV
INPUT port. (
the system that is connected via the AV INPUT
port. (
"OFF": When the image source is switched, an
"ON": When an image signal is entered via the
AV INPUT port, this image is displayed.
of the AV-IN playback screen. (
"Auto": Information is displayed for 5 seconds
"Manual": Information is displayed when you
which iPod is connected. (
"VIDEO")
"OFF")
image entered via the AV INPUT port is
displayed.
"Auto")
when updated.
touch on the screen.
"iPod")
AV Interface Setup
You can set audio and visual (AV) interface
parameters.
Display the AV Interface screen1
Touch [
Set the each item2
[AV-OUT] Selects an AV source to be output at
[R-CAM Interrupt] Sets a method to switch to
[R-CAM Mirror] You can flip the left and right
] > [ ] > [AV Interface]. (page 63)
the AV OUTPUT port. (
the rear view camera video display.
(
"Off")
"On": Switches to the rear view camera video
display when engaging the shift knob of
car to "Reverse".
"Off": Switches to the rear view camera video
display when engaging the shift knob of
car to "Reverse" and then pressing the
[AUD] button for more than 1 second.
The function of the [AUD] button needs
to be set to "R-CAM" beforehand. See
<User Interface> (page 66).
of the rear view camera video display. Set to
"On" and the rear view will be displayed left
and right in mirror image on the screen.
(
"Off")
"AV-IN")
Navigation Setup
You can set Navigation parameters.
Display the Navigation Setup screen1
Touch [
Set the each item2
[NAV Interrupt Speaker] Selects speakers
used for voice guidance of the navigation
system.
(
"Front L": Uses the front left side speaker for
"Front R": Uses the front right side speaker for
"Front All": Uses both front speakers for voice
[NAV Voice Volume] Adjusts the volume for
voice guidance of the navigation system.
(
[Line Mute] Mutes the volume during voice
guidance of the navigation system.
(
When turned "On", the volume level drops for
voice guidance.
[Navigation Input] Selects a navigation
system connection. (
only)
"RGB": Allows the Kenwood’s Navigation
"AV-IN": Allows a third-party navigation system
"Off": Must be used if no navigation system
] > [ ] > [Navigation]. (page 63)
"Front All")
voice guidance.
voice guidance.
guidance.
DNX models: "25", DDX models: "21")
"On")
"RGB") (DDX models
System to connect via its interface
cable.
to connect via the AV INPUT1 port.
is connected. (The navigation display
is cancelled when the AV source is
switched.)
[On Screen Navigation] Sets an on-screen
display of the navigation screen. (
(DDX models only)
"Auto": Information is displayed for 5 seconds
when updated.
"Off": Information is not displayed.
"Off")

Setup Menu
DSP Bypass Control
Temporarily bypassing DSP (Digital Signal
Processor) System.
Display the Audio SETUP screen1
Touch [
63)
Set the DSP Select2
] > [ ] > [Audio SETUP]. (page
front speakers, set the tweeter to "On". In the
"On" position, the Equalizer is adjusted to its
best position.
[X'over] Displays the Speaker Crossover Setup
screen.
You can adjust the crossover setup that was
set automatically when you selected the
speaker type.
Select a speaker type3
Set the crossover3
[Phase] Sets the phase of subwoofer output.
[Adjust] Displays the Car Type Adjust screen.
You can adjust the digital time alignment that
was set automatically when you selected the
car type.
Speaker Location setup
Display the Speaker Location Setup screen1
The phase is reversed 180 degrees when set
to "Reverse".
Sets the sub woofer phase. (Only when
Set the speaker locations2
"Subwoofer" is set to "ON" in Audio Setup)
[HPF FREQ] High Pass Filter adjustment.
(When front speaker or rear speaker is selected
on Speaker Select screen)
[Bypass] There is no effect by DSP.
[Through] There is an effect by DSP.
⁄
When the mode is set to [Bypass], DSP System cannot •
be adjusted.
Speaker Setup
You can select a speaker type and its size to get
the best sound effects.
Display the Speaker Select screen1
Touch [
[Speaker Select]. (page 63)
Select a speaker you wish to adjust2
When the speaker type and size are set, the
speaker crossover network and equalizer curve
are set automatically.
1
2
3
[Tweeter] You can set the tweeter when you
] > [ ] > [Audio SETUP] >
1
2
3
Front speaker
Rear speaker
Subwoofer
are selecting front speakers.
If you are using a tweeter together with the
You can select any of the following speaker
types.
"Front" OEM, 4 inch, 5 inch, 6-1/2 inch, 6-3/4
inch, 7 inch, 4x6, 5x7, 6x8, 6x9, 7x10
"Rear" NONE, OEM, 4 inch, 5 inch, 6-1/2 inch,
6-3/4 inch, 7 inch, 4x6, 5x7, 6x8, 6x9, 7x10
"Subwoofer" NONE, 6 1/2 inch, 8 inch, 10 inch,
12 inch, 15 inch over
⁄
Select "NONE" if you have no speakers.•
Crossover Network Setup
You can set a crossover frequency of speakers.
Select the speaker to set the crossover1
1
2
3
1 Sets the High Pass Filter of the front speaker.
2 Sets the High Pass Filter of the rear speaker.
3 Sets the Low Pass Filter of the sub woofer.
Display the Crossover setup screen2
[LPF FREQ] Low Pass Filter adjustment. (When
Subwoofer is selected on Speaker Select
screen)
[Slope] Sets a crossover slope.
Car Type (DTA) Setup
You can setup the car type and speaker network,
etc.
Display the Car Type Setup screen1
Touch [
Type]. (page 63)
Setup the Car Type2
If your car type is selected, the Digital Time
Alignment and Equalizer is set automatically (for
timing adjustment of sound output for each
channel) to have the highest surround effects.
1 Sets up the car type you use together with
this unit.
You can choose according to type of your car.
"OFF", "Compact", "Full Size Car", "Wagon",
"Minivan", "SUV", "Minivan (Long)"
[Location] Sets the locations of the speakers.
] > [ ] > [Audio SETUP] > [Car
1
[Front Speaker] Sets the location of the front
speaker.
"Door", "On Dash", "Under Dash"
[Rear Speaker] Sets the location of the rear
speaker.
"Door", "Rear Deck"
"2nd Row", "3rd Row" (Minivan, Minivan (Long))
Car Type Adjust
You can manually set the sound output timing of
each channel.
Display the Car Type Adjust screen1
Select a speaker you wish to adjust2
1
2
3
1
Front speaker
2
Rear speaker
3
Subwoofer
Next page 3
78 DNX7140/DNX7000EX/DDX714/DDX7034BT English 79

Setup Menu
Set a delay time3
DVD Setup
You can set up the DVD play.
Display the DVD Setup screen1
Touch [
] > [ ] > [DVD SETUP]. (page 63)
Set the each item2
[Screen Ratio] Selects the screen display
1
( "16:9")
mode.*
"16:9": Displays wide pictures.
"4:3 LB": Displays wide pictures in the Letter
Box format (having black stripes at the
top and bottom of screen).
"4:3 PS": Displays wide pictures in the Pan &
[Original] Sets the DVD's original language
(only when setting an audio language).
[Clear] Clears the language code.
Set the language you use4
Scan format (showing pictures cut at
the right and left ends).
Make fine adjustment of the delay time of the
speaker output specified at <Setup the Car
Type> to have a more suitable environment for
your vehicle.
The settings of the delay time are automatically
identified and compensated by specifying the
distances of each speaker from the center of the
vehicle interior.
1 Set the front and rear positions and the height
[Parental Level] Displays the Parental Lock
screen.*
1
( "Off")
(See <DVD Parental Level Setup>, page 81)
[Disc SETUP] Makes the settings related to the
disc media. (See <Disc Setup>, page 82)
[Output] Keep "Auto" to use.*
1
⁄
*• Disabled when a DVD is being played.
DVD Parental Level Setup
Sets a parental level.
Display the DVD Setup screen1
Touch [
Display the Parental Level code number 2
screen
] > [ ] > [DVD SETUP]. (page 63)
of the reference point to the position of the
ears of the person sitting in the front seat, and
set the right and left positions to the center of
the vehicle interior.
2 Measure the distances from the reference
point to the speakers.
3 Calculate the distance difference in
accordance with the farthest speaker.
+3.4feet
1.6feet
[Menu Language] Selects a disc menu
language.*
1
(See <DVD Language Setup>, page 81)
[Subtitle Language] Selects a subtitle
language.*
1
DVD Language Setup
Selects a language you use for the speech and
menus.
Display the DVD Setup screen1
Touch [
Select the language item to set2
] > [ ] > [DVD SETUP]. (page 63)
Enter the code number3
1
(See <DVD Language Setup>, page 81)
5feet
+0feet
2.5feet
+2.5feet
[Audio Language] Selects an audio
language.*
1
(See <DVD Language Setup>, page 81)
[Dynamic Range Control] Sets the dynamic
1
range.*
( "Dialog")
The dynamic range is reduced by changing
from "Wide" to "Normal" and from "Normal"
to "Dialog". "Dialog" makes the total sound
volume becomes larger as compared with
"Wide" and "Normal", allowing you to listen to
the movie's dialog more clearly.
This is effective only when you are using a
Dolby Digital software.
The operation is available during the play stop
mode.
[Angle Mark] Sets an angle mark display.
(
"On")
Enter a language code3
See <DVD Language Codes> (page 95) and
select the desired language.
1
1 Enters a language code.
[Cancel] Cancels the language setup and
returns to the "DVD SETUP" screen.
[Enter] Sets the language and returns to the
"DVD SETUP" screen. (It appears after you have
entered a language code.)
1 Enters a code number.
[Cancel] Cancels the current setup and returns
to the "DVD SETUP" screen.
[Level] Indicates the present parental lock
level.
[Enter] Determines the code number and
displays the Parental Level setup screen.
[Clear] Clears the code number.
⁄
The number you enter first is set as your code •
number.
Next page 3
80 DNX7140/DNX7000EX/DDX714/DDX7034BT English 81

Setup Menu
Display the Parental Level SETUP screen4
Select a parental level and complete the 5
setup
Selects a parental level.
⁄
• If a disc has higher parental lock level, you need to enter
the code number.
• The parental lock level varies depending on a loaded
disc.
• If a disc has no parental lock, anybody can play it back
even when you have set the parental lock.
Disc Setup
Performs setup when using disc media.
Display the DVD Setup screen1
Touch [
Display the Disc Setup screen2
] > [ ] > [DVD SETUP]. (page 63)
[Picture Display Time] Selects a picture
display time. *
1
( "Long")
The Display of a JPEG picture is changed.
("Short", "Middle", "Long")
[CD Read] Sets a music CD playback. *
2
( "1")
"1": Automatically recognizes and plays back
an Audio file disc, a DVD or a music CD.
"2": Forcibly plays back a disc as a music CD.
Select "2" if you wish to play a music CD
having a special format or if you cannot
play a disc in the "1" position.
[On Screen DVD] Sets an on-screen display of
the DVD Playback screen. (
"Manual")
"Auto": Information is displayed for 5 seconds
when updated.
"Manual": Information is displayed when you
touch on the screen.
⁄
*• 1 Disabled when a DVD is being played.
2
You cannot play an Audio file/VCD disc in the "2"
*•
position. Also, you may not play some music CDs
in the "2" position.
USB Setup
Performs setup when using USB.
Display the USB Setup screen1
Touch [
Set the each item2
[Picture Display Time] Selects a picture
display time. (
The Display of a JPEG picture is changed.
("Short", "Middle", "Long")
[On Screen USB] Sets an on-screen display of
the USB Playback screen. (
"Auto": Information is displayed for 5 seconds
"Manual": Information is displayed when you
] > [ ] > [USB SETUP]. (page 63)
"Long")
"Auto")
when updated.
touch on the screen.
iPod Setup
Performs setup when using iPod.
Display the iPod Setup screen1
Touch [
] > [ ] > [iPod SETUP]. (page 63)
Set the each item2
[AudioBook Speed] Sets the Audio book
playback speed. (
"Normal")
[Wide Screen] Sets Wide Screen on or off.
(
"OFF")
[On Screen iPod] Sets an on-screen display of
the iPod Playback screen. (
"Auto")
"Auto": Information is displayed for 5 seconds
when updated.
"Manual": Information is displayed when you
touch on the screen.
⁄
• "Wide Screen" cannot be set while the iPod is connected.
Set the each item3
82 DNX7140/DNX7000EX/DDX714/DDX7034BT English 83

Setup Menu
SIRIUS Parental Code Setup
Sets a SIRIUS Parental code.
Display the SIRIUS Setup screen1
Touch [
] > [ ] > [SIRIUS SETUP]. (page
63)
Display the Parental Code screen2
⁄
If you have already completed the code registration, •
[Change] is displayed.
If you want to clear the code which has already •
registered, touch [Clear].
Pressing [Clear] for 5 seconds or longer deletes the •
code.
Enter the current code number3
1
1 Enters a code number.
[Cancel] Cancels the current setup and returns
to the SIRIUS Setup screen.
[Enter] Determines the code number and
displays the Parental Code 1st screen.
[Clear] Clears the code number.
⁄
If you are to register the parental code for the first •
time, this screen will not appear. Go to Step 4.
Enter the new code number4
Confirm the code number5
Enter the same code number as you input in
step 4.
SIRIUS Parental code is now set, and the display
returns to SIRIUS Setup screen.
SIRIUS Parental Lock Setup
Sets a SIRIUS Parental Lock function on or off.
Display the SIRIUS Setup screen1
Touch [
] > [ ] > [SIRIUS SETUP]. (page
63)
Display the Parental Code screen2
⁄
You need to complete <SIRIUS Parental Code Setup> •
beforehand.
Enter the code number3
Enter the same code number as you input in
<SIRIUS Parental Code Setup> (page 84).
Parental Lock function is now set to on or off,
and the display returns to "SIRIUS SETUP" screen.
⁄
• If you have not registered the parental code, the code
number you input in this step will be the number to
register as SIRIUS Parental Code. In this case, you are
requested to input the code once more.
SIRIUS Parental Lock Channel Select
Selects the channel to enable SIRIUS Parental lock
function.
Display the SIRIUS Setup screen1
Touch [
63)
Display the Parental Code screen2
Enter the code number3
Enter the same code number as you input in
<SIRIUS Parental Code Setup>.
Select a category4
1 Category list
[All Channel] Displays all the channels.
] > [ ] > [SIRIUS SETUP]. (page
1
If touched a category, it Displays all the
channels in the selected category.
84 DNX7140/DNX7000EX/DDX714/DDX7034BT English 85

Setup Menu
Remote Controller
Set the parental lock for each channel5
1
3
2
1 Channel list
2 Sets the Parental lock function on or off for
each channel.
You need to input the Parental code to switch
the Parental lock function on or off.
3 Displays the sort sequence
[Info Change] Switch the sort sequence of
the channel list. ("Channel", "Song title", "Artist",
"Composer" and "Category")
[
UP] Moves to SIRIUS Category Select Setup
screen.
TV Setup
The TV signal receiving areas can be set. (with the
optional accessory TV Tuner connected only)
Displaying TV SETUP screen1
Touch [
Set the each item2
[On Screen TV] Sets an on-screen display of
] > [ ] > [TV SETUP]. (page 63)
the TV screen.
"Auto") (with the optional accessory TV
(
tuner connected only)
"Auto": Information is displayed for 5 seconds
when updated.
"Manual": Information is displayed when you
touch on the screen.
For DNX7140/ DNX7000EX/ DDX7034BT : This unit can be operated using the Remote Controller supplied
with this unit.
For DDX714 : Optional Remote Controller KNA-RCDV330 is designed for controlling this unit.
¤
• Put the Remote Controller in a place where it will not move during braking or other operations. A dangerous situation could
result, if the Remote Controller falls down and gets wedged under the pedals while driving.
• Do not place the battery near an open flame or heat source. This may cause the battery to explode.
• Do not recharge, short, break up or heat the battery or place it in an open fire. Such actions may cause the battery to leak
fluid. If spilled fluid comes in contact with your eyes or on clothing, immediately rinse with water and consult a physician.
• Place the battery out of reach of children. In the unlikely event that a child swallows the battery, immediately consult a
physician.
2CAUTION
• Do not leave the battery near fire or under direct sunlight. A fire, explosion or excessive heat generation may result.
Battery installation
Use two "AAA"/"R03"-size batteries.
Insert the batteries with the + and – poles aligned
properly, following the illustration inside the case.
Remote Controller mode switch
The functions operated from the remote
controller differ depending on the position of the
mode switch.
DISP
V.SEL
SRC
ZOOM
OUT
MENU
ENTER
O
FNC/MENU/PBCMODE/TOP MENU
ROUTEM
VOICE
AV OUT
OPEN
VIEW
MAP DIR
O
+
FM
D
O
O
O
−
AM
Y
1
ABC3DEF
2
1
4
GHI
5
JKL
7
PQRS
8
TUV
CLEAR DIRECT
1
0
IN
O
O
AUDIO
SUBTITLE
ANGLE
ZOOM
6
MNO
9
WXYZ
BS
#+
AUD
POSITION
AUD
DVD
O
TV
NAVI
RETURN
CANCEL
O
VOL
O
2ZONE
R.VOL
ATT
U
DVD
U
U
U
U
U
TV
U
U
NAVI
⁄
• If the Remote Controller operates only over shorter
distances or does not operate at all, it is possible that
the batteries are depleted. In such instances, replace the
both batteries with new ones.
AUD mode
Switch to this mode when controlling a selected
source or tuner source, etc.
DVD mode
Switch to this mode when playing DVDs or CDs etc.
with the player integrated in this unit.
TV mode
This is switched when controlling TV.
NAVI mode
This is switched when controlling Navigation unit.
⁄
• The position of the remote control mode switch is
indicated in the title of each mode, e.g., "(AUD mode)".
• When controlling a player that is not integrated in the
unit, select "AUD" mode.
86 DNX7140/DNX7000EX/DDX714/DDX7034BT English 87

R.VOL
D
2ZONE
Y
O
ZOOM
DVD
O
O
•
TV
O
O
•
Remote Controller
R.VOL
2ZONE
Y
ENTER
O
O
O
O
O
O
•
NAVI
O
Common operations (AUD mode)
Source switching
Switches to the source to be played.
DISP
SRC
MENU
Volume control
Adjusts the volume.
VIEW
O
1
Volume attenuator
Press the key once to lower the volume. Press again
to restore the previous volume.
7
PQRS
CLEAR DIRECT
1
Dual Zone
Switches the Dual Zone function ON and OFF.
O
1
1
4
GHI5JKL6MNO
Rear volume control
Adjusts volume at rear when the Dual Zone
function is ON.
1
1
4
GHI
7
PQRS
CLEAR DIRECT
1
V.SEL
Switches to the navigation screen.
SRC
MENU
V.SEL
ZOOM
OUT
IN
POSITION
O
AUD
•
DVD
•
ENTER
MAP DIR
O
ANGLE
O
+
FM
D
VOL
O
ZOOM
O
−
O
AM
Y
2ZONE
ABC3DEF
2
9
8
TUV
WXYZ
BS
#+
ATT
0
VOL
O
ZOOM
O
−
O
AM
Y
2ZONE
ABC3DEF
2
R.VOL
ABC3DEF
2
5
JKL
6
MNO
R.VOL
9
8
TUV
WXYZ
BS
#+
ATT
0
DISP
V.SEL
ZOOM
OUT
IN
POSITION
O
AUD
•
DVD
•
ENTER
Display angle
Switches the display angle each time it is pressed.
ROUTEM
AV OUT OPEN
VIEW
NAVI
O
AUDIO
RETURN
FNC/MENU/PBCMODE/TOP MENU
CANCEL
VOICE
SUBTITLE
O
MAP DIR
O
ANGLE
+
FM
D
Cursor key
Moves the cursor when displaying menu.
ZOOM
OUT
MENU
IN
POSITION
O
AUD
•
DVD
•
ENTER
O
O
•
TV
•
NAVI
O
AUDIO RETURN
FNC/MENU/PBCMODE/TOP MENU
ENTER
Enters options.
OUT
MENU
IN
POSITION
O
AUD
•
DVD
•
ENTER
O
O
•
TV
•
NAVI
O
AUDIO RETURN
FNC/MENU/PBCMODE/TOP MENU
Hands-free communication
When a call comes in, it answers the call.
ROUTEM
AV OUT OPEN
VIEW
O
FNC/MENU/PBCMODE/TOP MENU
VOICE
MAP DIR
O
AUDIO
RETURN
CANCEL
SUBTITLE
O
ANGLE
+
FM
D
VOL
O
ZOOM
Function
Switches the function screen
ROUTEM
AV OUT OPEN
VIEW
FNC/MENU/PBCMODE/TOP MENU
VOICE
MAP DIR
ENTER
O
•
TV
•
NAVI
O
AUDIO
RETURN
CANCEL
SUBTITLE
ANGLE
MODE
Switches the screen mode.
Screen mode changes each time you press this key.
FNC/MENU/PBCMODE/TOP MENU
ROUTEM
VOICE
AV OUT OPEN
VIEW
MAP DIR
O
FM
•
NAVI
O
AUDIO
RETURN
CANCEL
SUBTITLE
O
ANGLE
+
DVD/VCD (DVD mode)
Track search and file search
Selects the track or file to be played.
VIEW
MAP DIR
O
ANGLE
O
+
FM
D
O
1
Play/Pause
Pauses the track.
Press again to resume playing.
SRC
MENU
Stop
Memorizes the last point where the disc stopped.
When pressed again, the last point is deleted.
SRC
MENU
Direct search
7
PQRS
CLEAR DIRECT
1
Pressing this key switches the features that can be
searched directly.
DVD-VIDEO
Title number
Chapter number
Play time
Item number*
Cancel
* You may not be able to use this function with some discs
or scenes.
DVD-VR
Title number
Play time
Cancel
O
O
O
−
AM
Y
ABC3DEF
2
OUT
ENTER
OUT
ENTER
8
TUV
0
VOL
O
ZOOM
O
2ZONE
DISP
V.SEL
ZOOM
IN
POSITION
O
AUD
•
DVD
•
DISP
V.SEL
ZOOM
IN
POSITION
O
AUD
•
DVD
•
9
WXYZ
BS
#+
ATT
VCD 2.X (PBC ON)
Scene number
Number
Cancel
Once you have switched to the direct search
feature, specify the search number from the
numeric keypad, and then press
ENTER
[ENTER] key.
Numeric keypad
1
ABC3DEF
2
1
4
GHI
7
PQRS
CLEAR DIRECT
1
5
JKL
6
MNO
R.VOL
9
8
TUV
WXYZ
BS
#+
ATT
0
• Specify the number to search in direct search.
1
2
• Press
ABC
to fast forward/backward.
Switches the fast forward/backward speed each
time you press this key.
• Press
4
to slow forward/backward.
GHI
5
JKL
Switches the slow playback speed each time you
press this key.
DVD Top Menu
Returns to the DVD top menu.
FNC/MENU/PBCMODE/TOP MENU
ROUTEM
VOICE
AV OUT OPEN
VIEW
MAP DIR
FM
•
TV
•
NAVI
O
AUDIO
RETURN
CANCEL
SUBTITLE
O
ANGLE
+
DVD Menu
Displays the DVD menu.
Turns the playback control on or off while playing
VCD.
ROUTEM
AV OUT OPEN
VIEW
FNC/MENU/PBCMODE/TOP MENU
VOICE
MAP DIR
ENTER
•
TV
•
NAVI
O
AUDIO
RETURN
CANCEL
SUBTITLE
ANGLE
SUBTITLE
Switches the subtitle language.
ROUTEM
AV OUT OPEN
VIEW
FNC/MENU/PBCMODE/TOP MENU
VOICE
MAP DIR
O
O
AUDIO
RETURN
CANCEL
SUBTITLE
O
ANGLE
+
FM
D
VCD 1.X, VCD 2.X (PBC OFF)
Track number
Cancel
Next page 3
88 DNX7140/DNX7000EX/DDX714/DDX7034BT English 89

Remote Controller
R.VOL
2ZONE
Y
R.VOL
2ZONE
Y
ZOOM
O
O
O
•
ZOOM
Switches the zoom ratio each time you press this
key.
VIEW
MAP DIR
O
ANGLE
O
+
FM
D
O
1
VOL
O
ZOOM
O
−
O
AM
Y
2ZONE
ABC3DEF
2
Picture Angle
Switches the picture angle each time you press this
key.
ROUTEM
AV OUT OPEN
VIEW
O
CANCEL
VOICE
SUBTITLE
MAP DIR
O
ANGLE
O
+
FM
D
VOL
O
ZOOM
O
−
O
AM
AUDIO
Switch Voice Language
Switches the voice language each time you press
this key.
O
ROUTEM
AV OUT OPEN
VIEW
FNC/MENU/PBCMODE/TOP MENU
VOICE
MAP DIR
DVD
•
ENTER
O
•
TV
•
NAVI
O
AUDIO
RETURN
CANCEL
SUBTITLE
Music Disc/Audio file/Video file/ Picture
file (AUD mode)
Folder search
Selects the folder to be played.
O
ANGLE
O
+
FM
D
O
1
1
Track search and file search
Selects the track or file to be played.
VIEW
O
1
O
O
AM
Y
ABC3DEF
2
MAP DIR
O
FM
D
AM
Y
ABC3DEF
2
VOL
O
ZOOM
−
O
2ZONE
O
ANGLE
+
VOL
O
ZOOM
−
O
2ZONE
Memorizes the last point where the disc stopped.
When pressed again, the last point is deleted.
(Disc media only)
DISP
SRC
MENU
V.SEL
ZOOM
OUT
IN
POSITION
O
AUD
•
DVD
•
ENTER
O
Direct search
1
ATT
0
9
7
PQRS
8
TUV
WXYZ
CLEAR DIRECT
BS
#+
Pressing this key switches the features that can be
searched directly.
Music Disc
Track number
Play time
Cancel
Audio files in DVD/CD disc
Folder number
File number
Cancel
Once you have switched to the direct search
feature, specify the search number from the
ENTER
numeric keypad, and then press
[ENTER] key.
Numeric keypad
1
ABC3DEF
2
1
4
GHI
7
PQRS
CLEAR DIRECT
1
5
JKL
6
MNO
R.VOL
9
8
TUV
WXYZ
BS
#+
ATT
0
• Specify the number to search in direct search.
Radio (AUD mode)
Band switching
Switches to bands received by the unit.
O
ANGLE
O
+
FM
D
O
1
1
Station selection
Switches to broadcast stations received by the unit.
VIEW
O
1
Direct tuning
After pressing this key, use the keypad to specify
the broadcast station you wish to receive.
7
PQRS
CLEAR DIRECT
1
Example: 92.1MHz (FM)
Example: 810kHz (AM)
Numeric keypad
1
1
4
GHI
7
PQRS
CLEAR DIRECT
1
• To use preset tuning, press the number of a
programmed broadcast station. (
• Press the direct tuning key first, then specify the
frequency of the station to receive.
O
O
−
AM
Y
ABC3DEF
2
MAP DIR
O
+
FM
D
−
AM
Y
ABC3DEF
2
8
TUV
0
0
0
ABC3DEF
2
5
JKL
8
TUV
0
VOL
O
ZOOM
O
2ZONE
O
ANGLE
VOL
O
ZOOM
O
2ZONE
9
WXYZ
BS
#+
ATT
1
2
ABC
9
WXYZ
8
TUV
R.VOL
ATT
1
0
1
–
)
6
MNO
6
MNO
9
WXYZ
BS
#+
NAVI (NAVI mode)
Joystick
Scrolls the map, or moves the cursor.
ENTER
Performs the selected function.
ZOOM
Zooms in or out the navigation map.
MENU
Displays Main menu.
CANCEL
Displays previous screen.
POSITION
Displays the current position.
MENU
O
MENU
O
SRC
MENU
SRC
MENU
ROUTEM
AV OUT OPEN
VIEW
SRC
MENU
FNC/MENU/PBCMODE/TOP MENU
FNC/MENU/PBCMODE/TOP MENU
FNC/MENU/PBCMODE/TOP MENU
VOICE
MAP DIR
ZOOM
OUT
IN
POSITION
O
AUD
•
DVD
•
ENTER
O
•
TV
•
NAVI
O
AUDIO RETURN
OUT
IN
POSITION
O
AUD
•
DVD
•
ENTER
O
•
TV
•
NAVI
O
AUDIO RETURN
DISP
V.SEL
ZOOM
OUT
IN
POSITION
O
AUD
•
DVD
•
ENTER
DISP
V.SEL
ZOOM
OUT
IN
POSITION
O
AUD
•
DVD
•
ENTER
ENTER
•
TV
•
NAVI
O
AUDIO
RETURN
CANCEL
SUBTITLE
ANGLE
DISP
V.SEL
ZOOM
OUT
IN
POSITION
O
AUD
•
DVD
•
ENTER
Play/Pause
Pauses the track.
Press again to resume playing.
DISP
SRC
MENU
Stop
V.SEL
ZOOM
OUT
IN
POSITION
O
AUD
•
DVD
•
ENTER
O
Next page 3
90 DNX7140/DNX7000EX/DDX714/DDX7034BT English 91

Remote Controller
O
O
O
•
NAVI
O
O
O
•
NAVI
R.VOL
2ZONE
Y
Initial Setup
ROUTEM
Displays Route Option menu.
ROUTEM
AV OUT OPEN
VIEW
FNC/MENU/PBCMODE/TOP MENU
VOICE
MAP DIR
ENTER
•
TV
•
NAVI
O
AUDIO
RETURN
CANCEL
SUBTITLE
ANGLE
VIEW
Switches between 2D and 3D map displays.
ROUTEM
AV OUT OPEN
VIEW
O
FNC/MENU/PBCMODE/TOP MENU
O
VOICE
MAP DIR
O
AUDIO
RETURN
CANCEL
SUBTITLE
O
ANGLE
+
FM
D
VOL
O
ZOOM
VOICE
Plays Voice guidance.
ROUTEM
AV OUT OPEN
VIEW
FNC/MENU/PBCMODE/TOP MENU
VOICE
MAP DIR
ENTER
•
TV
•
NAVI
O
AUDIO
RETURN
CANCEL
SUBTITLE
ANGLE
MAP DIR
Switches between the heading up navigation and
north up navigation map displays.
ROUTEM
AV OUT OPEN
VIEW
O
FNC/MENU/PBCMODE/TOP MENU
O
VOICE
MAP DIR
O
AUDIO
RETURN
CANCEL
SUBTITLE
O
ANGLE
+
FM
D
VOL
O
ZOOM
TV (TV mode)
Switching Band/Video
It switches between the station of the TV band to
receive and video input.
ROUTEM
AV OUT OPEN
VIEW
O
Channel Selection
The TV channel to receive is selected.
VIEW
O
1
Direct tuning
(NTSC TV type only)
7
PQRS
CLEAR DIRECT
1
Press this key first, and then specify the station to
receive with the numeric keypad.
Example: In case of Channel 6 (2-digit)
Numeric keypad
1
1
4
GHI
7
PQRS
CLEAR DIRECT
1
• The number of the memorized station is
selected. (
• Press the direct tuning key first, then specify the
channel of the station to receive.
O
O
VOICE
MAP DIR
O
FM
D
AM
MAP DIR
O
FM
D
AM
Y
ABC3DEF
2
8
TUV
0
0
ABC3DEF
2
5
JKL
8
TUV
0
CANCEL
SUBTITLE
O
ANGLE
+
VOL
O
ZOOM
−
O
O
ANGLE
+
VOL
O
ZOOM
−
O
2ZONE
9
WXYZ
BS
#+
ATT
6
MNO
6
MNO
R.VOL
9
WXYZ
BS
#+
ATT
1
–
)
6
MNO
When pressing the Reset button or turning on the unit for the first time, the Initial SETUP screen is
displayed.
Initial Setup
Turns the power On1
Set the each item2
[Language] Select the language used for the
control screen and setting items. (page 66)
[Angle] You can adjust the position of the
monitor. (page 69)
[iPod AV Interface Use] Sets the terminal
which iPod is connected. (
[R-CAM Mirror] You can flip the left and right
of the rear view camera video display. Set to
"On" and the rear view will be displayed left
and right in mirror image on the screen.
(
"Off")
[Color] Sets the screen and button illumination
color. (page 72)
[EXT SW] Setting up power specification of
the external device for which the power is
controlled from this unit. (page 69)
End initial setup3
"iPod")
⁄
The settings above can be changed in • <Setup Menu>
(page 63).
92 DNX7140/DNX7000EX/DDX714/DDX7034BT English 93

Status bar Indicator items DVD Language Codes
Shown below is a list of indicators displayed on
the Status bar.
Source Display Overview
General "ATT" Indicates that the attenuator is active.
"DUAL" Turns on the Dual zone function.
"TEL" Indicates the connection state of the Bluetooth hands-free
unit. (Orange: Connected. White: Not connected.)
DVD/CD "FO-REP" Indicates that the Folder repeat function is ON.
"IN" Indicates that a disc is inserted.
"MOVIE" Identifies the video file.
"MUSIC" Identifies the music file.
"PICTURE" Identifies the image file.
"RDM" Indicates that the Random function is ON.
"REP" Indicates that the Repeat function is ON.
"SLIDE" Indicates that the slide show function is ON.
DVD-Vide "C-REP" Indicates that the Chapter repeat function is ON.
"T-REP" Indicates that the Title repeat function is ON.
DVD-VR "1 M/S" Identifies the primar y/secondary audio output of stream 1.
"1 MAIN" Identifies the primary audio output of stream 1.
"1 SUB" Identifies the secondary audio output of stream 1.
"PLST" Identifies the Play list mode.
"T-REP" Indicates that the Title repeat function is ON.
VCD "1chLL" Identifies the left audio output of channel 1.
"1chLR" Identifies the monaural audio output of channel 1.
"1chRR" Identifies the right audio output of channel 1.
"1chST" Identifies the stereo audio output of channel 1.
"LL" Identifies the left audio output.
"LR" Identifies the monaural audio output.
"RR" Identifies the right audio output.
"ST" Identifies the stereo audio output.
"PBC" Indicates that the PBC function is ON.
"SVCD" Identifies the Super Video CD.
"VER1" Indicates that the Video CD version is 1.
"VER2" Indicates that the Video CD version is 2.
"REP" Indicates that the Repeat function is ON.
Source Display Overview
USB/ SD "FO-REP" Indicates that the Folder repeat function is ON.
"MOVIE" Identifies the video file.
"MUSIC" Identifies the music file.
"PICTURE" Identifies the image file.
"RDM" Indicates that the Random function is ON.
"REP" Identifies that the Repeat function is ON.
"PLST" Indicates that the Play list mode is selected now.
"SLIDE" Indicates that the slide show function is ON.
iPod "MUSIC" Identifies the music file.
"VIDEO" Identifies the video file.
"RDM" Indicates that the Random function is ON.
"A-RDM" Indicates that the Album random function is ON.
"REP" Indicates that the Repeat function is ON.
Tuner "AUTO1" Indicates that Seek mode is set to Auto1.
"AUTO2" Indicates that Seek mode is set to Auto2.
"CRSC" Indicates that the CRSC function is OFF.
"MANU" Indicates that Seek mode is set to Manual.
"PS" Indicates that the list display format is PS.
"SNPS" Indicates that the list display format is SNPS.
"ST" Indicates that stereo broadcast is being received.
"TI" Indicates the reception state of traffic information.
(Orange: TP is being received. White: TP is not being
received.)
HD Radio "AUTO1" Indicates that Seek mode is set to Auto1.
"AUTO2" Indicates that Seek mode is set to Auto2.
"MANU" Indicates that Seek mode is set to Manual.
"M/S" Indicates whether the reception channel is main or sub.
"ANALOG" Indicates that analog broadcast is being received.
"DIGITAL" Indicates that digital broadcast is being received.
"ST" Indicates that stereo broadcast is being received.
SIRIUS/ XM"SCN" Indicates that the channel scan function is ON.
"SEEK1" Indicates that Seek mode is set to 1.
"SEEK2" Indicates that Seek mode is set to 2.
TV "AUTO1" Indicates that Seek mode is set to Auto1.
"AUTO2" Indicates that Seek mode is set to Auto2.
"MANU" Indicates that Seek mode is set to Manual.
Code Language
aa Afar
ab Abkhazian
af Afrikaans
am Amharic
ar Arabic
as Assamese
ay Aymara
az Azerbaijani
ba Bashkir
be Byelorussian
bg Bulgarian
bh Bihari
bi Bislama
bn Bengali, Bangla
bo Tibetan
br Breton
ca Catalan
co Corsican
cs Czech
cy Welsh
da Danish
de German
dz Bhutani
el Greek
en English
eo Esperanto
es Spanish
et Estonian
eu Basque
fa Persian
fi Finnish
fj Fiji
fo Faroese
fr French
fy Frisian
ga Irish
gd Scots Gaelic
gli Galician
gn Guarani
gu Gujarati
ha Hausa
he Hebrew
hi Hindi
hr Croatian
hu Hungarian
hy Armenian
ia Interlingua
ie Interlingue
ik Inupiak
id Indonesian
Code Language
is Icelandic
it Italian
ja Japanese
jv Javanese
ka Georgian
kk Kazakh
kl Greenlandic
km Cambodian
kn Kannada
ko Korean
ks Kashmiri
ku Kurdish
ky Kirghiz
la Latin
lb Luxembourgish
ln Lingala
lo Laotian
lt Lithuanian
lv Latvian, Lettish
mg Malagasy
mi Maori
mk Macedonian
ml Malayalam
mn Mongolian
mo Moldavian
mr Marathi
ms Malay
mt Maltese
my Burmese
na Nauru
ne Nepali
nl Dutch
no Norwegian
oc Occitan
om (Afan) Oromo
or Oriya
pa Punjabi
pl Polish
ps Pashto, Pushto
pt Portuguese
qu Quechua
rm Rhaeto-Romance
rn Kirundi
ro Romanian
ru Russian
rw Kinyarwanda
sa Sanskrit
sd Sindhi
sg Sangho
sh Serbo-Croatian
Code Language
si Singhalese
sk Slovak
sl Slovenian
sm Samoan
sn Shona
so Somali
sq Albanian
sr Serbian
ss Siswati
st Sesotho
su Sundanese
sv Swedish
sw Swahili
ta Tamil
te Telugu
tg Tajik
th Thai
ti Tigrinya
tk Turkmen
tl Tagalog
tn Setswana
to Tongan
tr Turkish
ts Tsonga
tt Tatar
tw Twi
uk Ukrainian
ur Urdu
uz Uzbek
vi Vietnamese
vo Volapuk
wo Wolof
xh Xhosa
yo Yoruba
zh Chinese
zu Zulu
94 DNX7140/DNX7000EX/DDX714/DDX7034BT English 95

Help? Troubleshooting
Some functions of this unit may be disabled by
some settings made on this unit.
! • Cannot set up the subwoofer.
• Cannot set up subwoofer phase.
• No output from the subwoofer.
• Cannot set up the low pass filter.
• Cannot set up the high pass filter.
▲
Subwoofer is not set to On. ☞ <Speaker Setup>
(page 78)
▲
The Dual zone function is enabled. ☞ <Zone
Control> (page 61)
! • Cannot select the output destination of the
subsource in the Dual zone.
• Cannot adjust the volume of the rear
speakers.
▲
The Dual zone function is disabled. ☞ <Zone
Control> (page 61)
! Cannot play audio files.
▲
"CD Read" of <Disc Setup> (page 82) is set to
"2".
! Cannot Folder select.
▲
The Random play function is enabled.
! Cannot perform Repeat play.
▲
The PBC function is enabled.
! • Cannot set up the equalizer.
• Cannot set up the crossover network.
▲
The Dual zone function is enabled. ☞ <Zone
Control> (page 61)
▲
The DSP Select is Bypass. ☞ <DSP Bypass
Control> (page 78)
What might seem to be a malfunction in your unit
may just be the result of slight misoperation or
miswiring. Before calling service, first check the
following table for possible problems.
General
? The Touch Sensor Tone doesn’t sound.
✔ The preout jack is being used.
☞ The Touch Sensor Tone can’t be output from
the preout jack.
Tuner source
? Radio reception is poor.
✔ The car antenna is not extended.
☞ Pull the antenna out all the way.
✔ The antenna control wire is not connected.
☞ Connect the wire correctly, referring to the
section on <INSTALLATION MANUAL>.
Disc source
? The specified disc does not play, but another
one plays instead.
✔ The specified CD is quite dirty.
☞ Clean the CD.
✔ The disc is loaded in a different slot from that
specified.
☞ Eject the disc magazine and check the
number for the specified disc.
✔ The disc is severely scratched.
☞ Try another disc instead.
Audio file source
? The sound skips when an Audio file is being
played.
✔ The media is scratched or dirty.
☞ Clean the media, referring to the CD
cleaning of the section on <Handling discs>
(page 6).
✔ The recording condition is bad.
☞ Record the media again or use another
media.
96 DNX7140/DNX7000EX/DDX714/DDX7034BT English 97

Help? Error
When the unit fails to operate correctly, the
cause of the failure appears on the display.
"Protect" :
Protective circuit has been activated because a speaker
cord has shorted or it has come in contact with the car
chassis.
➡ Wire or insulate the speaker cord as appropriate
and then push the Reset button.
"Hot Error" :
When the internal temperature of this unit rises to 60°C
or more, the protection circuit is activated and you
may not be able to operate the unit. At such times this
message will appear.
➡ Use the unit again after reducing the
temperature inside the vehicle.
"Hold Error" :
Activation of the protective circuit when the
temperature inside the disc changer is higher than 60
degrees Celsius stops the disc changer from operating.
At such times this message will appear.
➡ Use when the temperature at the site where the
disc changer has been fitted has dropped.
"Mecha Error" :
The disc player is malfunctioning.
➡ Eject the disc and try inserting it again. Contact
the Kenwood dealer if this indicator continues
blinking or the disc cannot be ejected.
"Disc Error" :
An unplayable disc is inserted.
"Read Error" :
Disc is quite dirty.
➡ Clean the disc, referring tot he section on
<Handling discs> (page 6).
Disc is upside down.
➡ Load the disc with the labeled side up.
"Region code Error" :
The disc you wanted to play has a region code that
cannot be played with this unit.
"Parental level Error" :
The disc you wanted to play has a higher level than the
parental level you set.
"Error 07–67" :
The unit is not operating correctly due to some reason
or other.
➡ Push the unit's Reset button. If the "Error 07−67"
message does not disappear, see your nearest
Kenwood dealer.
"No Device" (USB device):
The USB device is selected as a source although no USB
device is connected.
➡ Change the source to any source other than
USB/iPod. Connect an USB device, and change
the source to USB again.
"Disconnected" (iPod, Bluetooth audio player):
The iPod/Bluetooth audio player is selected as a source
although no iPod/Bluetooth audio player is connected.
➡ Change the source to any source other than
iPod/Bluetooth. Connect an iPod/Bluetooth
audio player, and change the source to iPod/
Bluetooth again.
"No Music" :
The connected USB device contains no playable audio
file.
Media was played that doesn’t have data recorded that
the unit can play.
"USB Device Error!!" :
The connected USB device is rated a current capacity
higher than the allowable limit.
➡ Check the USB device.
Some trouble may have occurred to the connected
USB device.
➡ Change the source to any source other than USB.
Remove the USB device.
"Authorization Error" :
Connection to the iPod has failed.
➡ Remove the iPod and then reconnect it.
The unit does not support the iPod.
➡ Refer to <iPod/iPhone that can be connected to
this unit> (page 8).
"Update your iPod" :
The iPod's software is an older version which the unit
can not support.
➡ Confirm that the software for the iPod is the
latest version. Refer to <iPod/iPhone that can be
connected to this unit> (page 8).
"Update your USB database" :
The USB device is different from the previous one or
the contained audio files are replaced.
➡ Update your database. Refer to <Source Control
Screen> of USB Device Control (page 22).
"Check SIRIUS" :
The unit cannot recognize the connected SIRIUS Tuner
Box.
➡ Check the connection of the SIRIUS Tuner Box.
"Antenna Error" :
Something is wrong with the anntena.
➡ Check the connection of the antenna.
"Acquring Signal" :
The unit cannot receive any signal.
➡ Move the vehicle to the area where the unit can
receive signal.
"Updating Firmware" :
Updating the firmware of SIRIUS tuner.
➡ Operation is invalid until the update is
completed.
"Updating Channels **% Completed" :
Updating the SIRIUS Channel Map.
➡ Operation is invalid until the update is
completed.
"Subscription Updated" :
Updating the suscription information.
➡ Operation is invalid until the update is
completed.
"Invalid Channel" :
The selected channel is invalid.
➡ Select a different channel.
"Call 888-539-SIRIUS to Subscribe" :
The selected channel is not subscribed.
➡ Call the displayed number for subscription.
"CHECK XM TUNER" :
The unit cannot recognize the connected XM Tuner.
➡ Check the connection of the XM Tuner.
"NO SIGNAL" :
The unit cannot receive any signal.
➡ Check the connection of the antenna.
"CHECK ANTENNA" :
Something is wrong with the antenna.
➡ Check the connection of the antenna.
"CH UNAVAILABLE" :
The selected channel is invalid.
➡ Select a different channel.
"CH UNAUTHORIZED" :
The selected channel is not subscribed.
"OFF AIR" :
The broadcast of the selected channel has finished.
98 DNX7140/DNX7000EX/DDX714/DDX7034BT English 99

Specifications
Monitor section
Picture Size
: 6.95 inches (diagonal) wide
: 156.2 mm (W ) x 82.4 mm (H)
Display System
: Transparent TN LCD panel
Drive System
: TFT active matrix system
Number of Pixels
: 336,960 (480H x 234V x RGB)
Effective Pixels
: 99.99 %
Pixel Arrangement
: RGB striped arrangement
Back Lighting
: Cold Cathode Fluorescent Tube
DVD player section
D/A Converter
: 24 bit
Audio Decoder
: Linear PCM/ Dolby Digital/ dts/ MP3/ WMA/
AAC/ WAV
Video Decoder
: MPEG1/ MPEG2
Wow & Flutter
: Below Measurable Limit
Frequency Response
Sampling frequency; 96 kHz : 20 – 44,000 Hz
Sampling frequency; 48 kHz : 20 – 22,000 Hz
Sampling frequency; 44.1 kHz : 20 – 20,000 Hz
Total Harmonic Distortion
: 0.008 % (1 kHz)
S/N Ratio (dB)
: 98 dB (DVD-Video 96 kHz)
Dynamic Range
: 98 dB (DVD-Video 96 kHz)
Disc Format
: DVD-Video/ VIDEO-CD/ CD-DA
Sampling Frequency
: 44.1/ 48/ 96 kHz
Quantifying Bit Number
: 16/ 20/ 24 bit
USB interface section
USB Standard
: USB 1.1/ 2.0 High speed
File System
: FAT 16/ 32
Maximum Power Supply Current
: 500 mA
D/A Converter
: 24 Bit
Video Decoder
: MPEG1/ MPEG2
Audio Decoder
: MP3/ WMA/ AAC/ WAV (Linear PCM)
Bluetooth section
Technology
: Bluetooth Ver.1.2 Certified
Frequency
: 2.402 – 2.480 GHz
Output Power
: +4dBm (MAX), 0dBm (AVE), Power Class2
Maximum Communication range
: Line of sight approx. 10m (32.8 ft)
Profile
HFP (Hands Free Profile), SPP (Serial Port Profile),
HSP (Headset Profile), A2DP (Advanced Audio
Distribution Profile), AVRCP (Audio/Video
Remote Control Profile), OPP (Object Push
Profile), PBAP (Phonebook Access Profile), SYNC
(Synchronization Profile)
FM tuner section
Frequency Range
200 kHz : 87.9 MHz – 107.9 MHz
(DNX7140/DNX7000EX/DDX714)
50 kHz : 87.5 MHz – 108.0 MHz (DDX7034BT)
Usable Sensitivity (S/N : 30 dB)
: 9.3 dBf (0.8 μV/ 75 Ω)
Quieting Sensitivity (S/N : 50 dB)
: 15.2 dBf (1.6 μV/ 75 Ω)
Frequency Response (± 3.0 dB)
: 30 Hz – 15 kHz
S/N Ratio (dB)
: 70 dB (MONO)
Selectivity (± 400 kHz)
: ≥ 80 dB
Stereo Separation
: 35 dB (1 kHz)
AM tuner section
Frequency Range (10 kHz)
: 530 kHz – 1700 kHz
Usable Sensitivity
: 28 dBμ
Video section
Color System of External Video Input
: NTSC
External Video Input Level (mini jack)
: 1 Vp-p/ 75 Ω
External Audio Max Input Level (mini jack)
: 2 V/ 25 kΩ
Video Output Level (RCA jacks)
: 1 Vp-p/ 75 Ω
Audio Output Level (RCA jacks)
: 1.2 V/ 10 kΩ
Analog RGB input (DDX714/DDX7034BT only)
: 0.7 Vp-p/ 75 Ω
Audio section
Maximum Power (Front & Rear)
: 50 W x 4
Full Bandwidth Power (Front & Rear)
(4 Ω, 14.4 V, 1 % THD)
: 22 W x 4
Preout Level (V)
: 2 V/ 10 kΩ
Preout Impedance
: ≤ 600 Ω
Speaker Impedance
: 4 – 8 Ω
DSP Section
Graphics equalizer
Band: 5 Band
Frequency (BAND1 – 5): 62.5/ 250/ 1k/ 4k/ 16k Hz
Gain
: -9/ -8/ -7/ -6/ -5/ -4/ -3/ -2/ -1/ 0/ 1/ 2/ 3/ 4/ 5/
6/ 7/ 8/ 9 dB
X'over
High pass filter
Frequency: Through, 30/ 40/ 50/ 60/ 70/ 80/ 90/
100/ 120/ 150/ 180/ 220/ 250 Hz
Slope: -6/ -12/ -18/ -24 dB/Oct.
Low pass filter
Frequency: 30/ 40/ 50/ 60/ 70/ 80/ 90/ 100/ 120/
150/ 180/ 220/ 250 Hz, Through
Slope: -6/ -12/ -18/ -24 dB/Oct.
Time alignment
: 0 – 17 ft (0.07 ft Step)
Position
: 0 – 5.67 ft (0.07 ft Step)
100 DNX7140/DNX7000EX/DDX714/DDX7034BT English 101

Specifications
Navigation section
(DNX7140/DNX7000EX only)
Receiver
: High-sensitivity GPS receiver
Reception Frequency
: 1575.42 MHz (C/A code)
Acquisition Times
Cold : < 38 seconds
Factory Reset : < 45 seconds
(On average for a stationary receiver with a clear
view of the sky)
Accuracy
Position : < 10 meters typical
Velocity : 0.05 m/sec. RMS
Position Method
: GPS
Antenna
: External GPS antenna
External SW
Maximum Power Supply Current
: 500 mA
General
Operating voltage
: 14.4 V (10.5 – 16 V allowable)
Maximum Current Consumption
: 15 A
DImensions (W × H × D)
: 182 × 112 × 163 mm
7-3/16 x 4-7/16 x 6-7/16 inch
Operational Temperature Range
: -10 °C – +60 °C
Storage Temperature Range
: -20 °C – +85 °C
Weight
DNX7140/DNX7000EX: 2.5 kg (5.5 lbs)
DDX714/DDX7034BT: 2.47 kg (5.4 lbs)
2CAUTION
Use of controls or adjustments or performance of procedures other than those specified herein may result in hazardous radiation
exposure.
In compliance with Federal Regulations, following are reproductions of labels on, or inside the product relating to laser product
safety.
Kenwood Corporation
2967-3, ISHIKAWA-MACHI,
HACHIOJI-SHI
TOKYO, JAPAN
KENWOOD CORP. CERTIFIES THIS EQUIPMENT
CONFORMS TO DHHS REGULATIONS N0.21 CFR
1040. 10, CHAPTER 1, SUBCHAPTER J.
Location : Bottom Panel
FCC WARNING
This equipment may generate or use radio frequency energy. Changes or modifications to this equipment may cause harmful
interference unless the modifications are expressly approved in the instruction manual. The user could lose the authority to
operate this equipment if an unauthorized change or modification is made.
NOTE
This equipment has been tested and found to comply with the limits for a Class B digital device, pursuant to Part 15 of the
FCC Rules. These limits are designed to provide reasonable protection against harmful interference in a residential installation.
This equipment may cause harmful interference to radio communications, if it is not installed and used in accordance with the
instructions. However, there is no guarantee that interference will not occur in a particular installation. If this equipment does
cause harmful interference to radio or television reception, which can be determined by turning the equipment off and on, the
user is encouraged to try to correct the interference by one or more of the following measures:
• Reorient or relocate the receiving antenna.
• Increase the separation between the equipment and receiver.
• Connect the equipment into an outlet on a circuit different from that to which the receiver is connected.
• Consult the dealer or an experienced radio/TV technician for help.
102 DNX7140/DNX7000EX/DDX714/DDX7034BT
Specifications subject to change without notice.
Although the effective pixels for the liquid crystal panel is
given as 99.99% or more, 0.01% of pixels may not light or
may light incorrectly.
IC (Industry Canada) Notice
Operation is subject to the following two conditions:
(1) This device may not cause interference, and
(2) this device must accept any interference, including interference that may cause undesired operation of the
device.
The term "IC: " before the certification/registration number only signifies that the Industry Canada technical
specification were met.

The Bluetooth word mark and logos are owned by the Bluetooth SIG, Inc. and any use of such marks by Kenwood Corporation
is under license. Other trademarks and trade names are those of their respective owners.
The "AAC" logo is a trademark of Dolby Laboratories.
Font for this product is designed by Ricoh.
iPod is a trademark of Apple Inc., registered in the U.S. and other countries.
iPhone is a trademark of Apple Inc.
iTunes is a trademark of Apple Inc.
“Made for iPod” means that an electronic accessory has been designed to connect specifically to iPod and has been certified
by the developer to meet Apple performance standards.
“Works with iPhone” means that an electronic accessory has been designed to connect specifically to iPhone and has been
certified by the developer to meet Apple performance standards.
Apple is not responsible for the operation of this device or its compliance with safety and regulatory standards.
is a trademark of DVD Format/Logo Licensing Corporation registered in the U.S., Japan and other countries.
This product incorporates copyright protection technology that is protected by U.S. patents and other intellectual property
rights. Use of this copyright protection technology must be authorized by Macrovision, and is intended for home and other
limited viewing uses only unless otherwise authorized by Macrovision. Reverse engineering or disassembly is prohibited.
Manufactured under license from Dolby Laboratories.
Dolby and the double-D symbol are trademarks of Dolby Laboratories.
Manufactured under license under U.S. Patent #’s: 5,451,942; 5,956,674; 5,974,380; 5,978,762; 6,487,535 & other U.S. and
worldwide patents issued & pending. DTS and DTS 2.0 + Digital Out are registered trademarks and the DTS logos and Symbol
are trademarks of DTS, Inc. © 1996-2008 DTS, Inc. All Rights Reserved.
 Loading...