

JVC XV-M567GD, XV-M565BK Owner’s Manual
DVD VIDEO PLAYER
XV-M565BK/XV-M567GD
INSTRUCTIONS
For Customer Use:
Enter below the Model No. and Serial No.
which are located on the rear, bottom or
side of the cabinet. Retain this informa-
tion for future reference.
Model No.
Serial No.
LVT0521-01 ,_
[UB, US, 3U, 4U, U
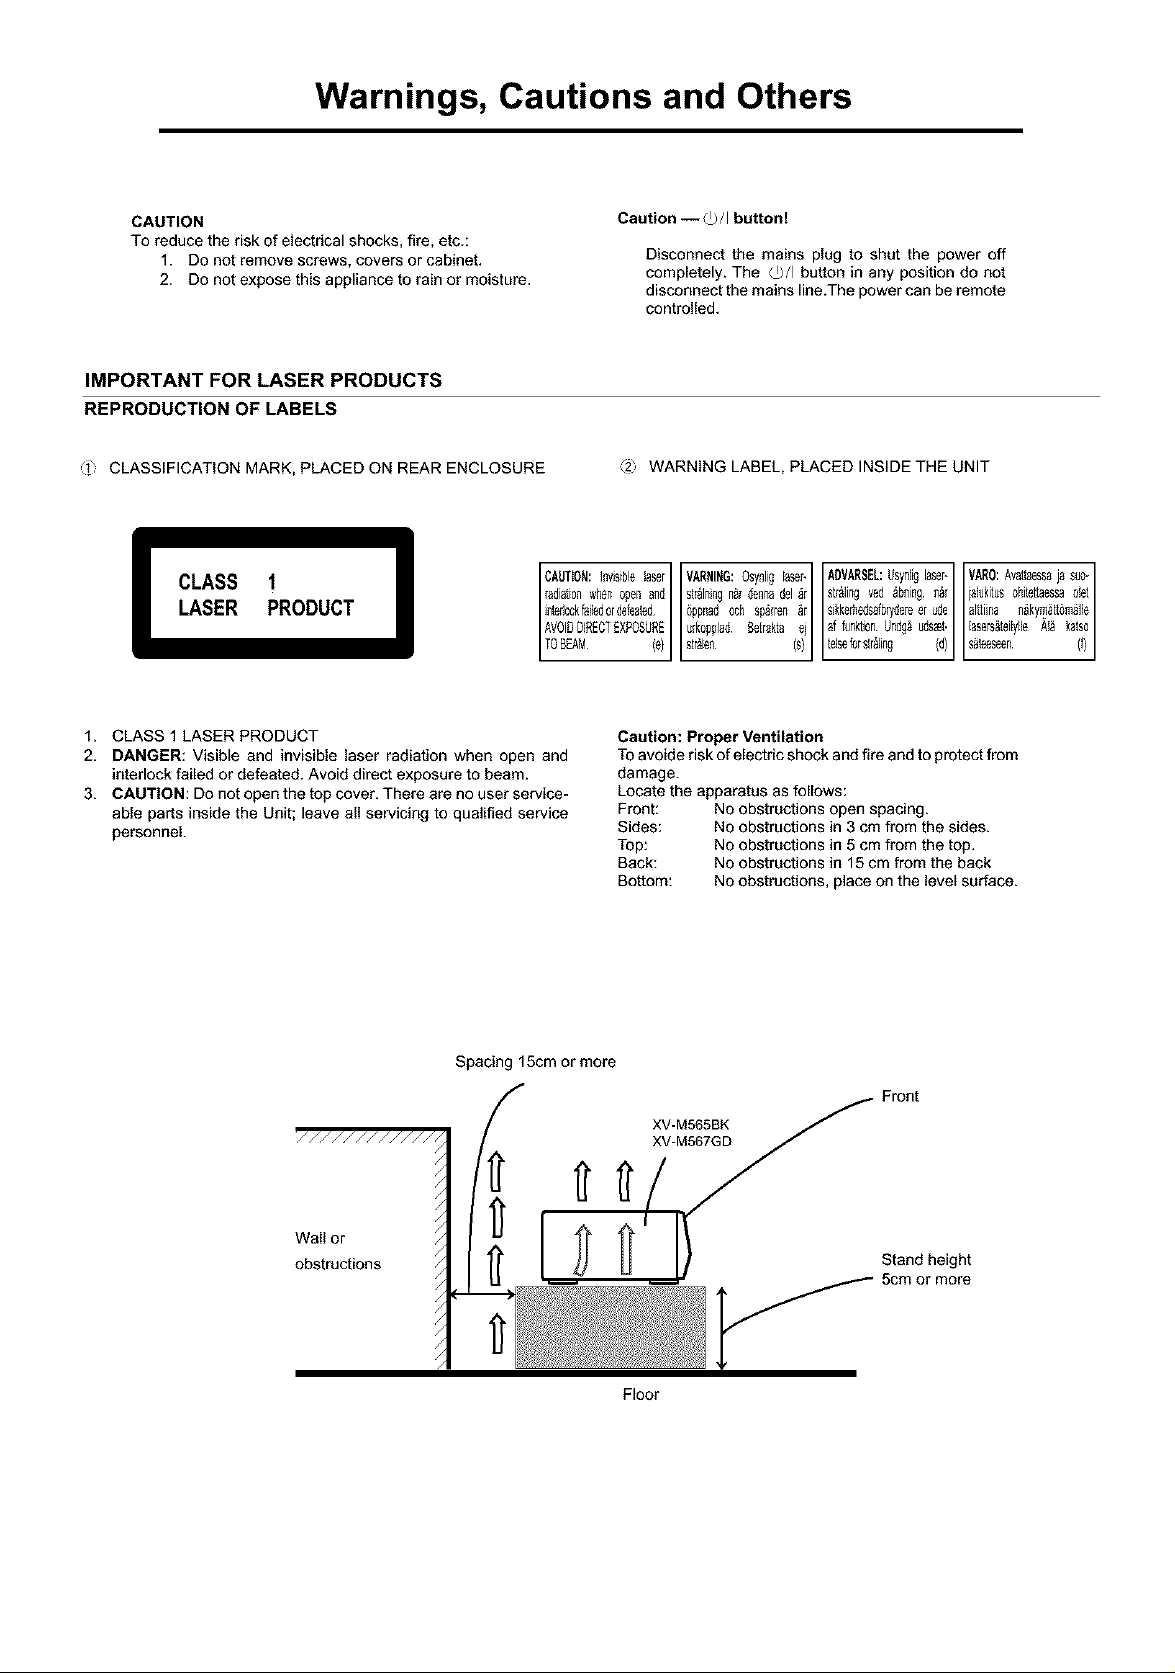
Warnings, Cautions and Others
CAUTION
To reduce the risk of electrical shocks, fire, etc.:
1. Do not remove screws, covers or cabinet.
2. Do not expose this appliance to rain or moisture.
IMPORTANT FOR LASER PRODUCTS
REPRODUCTION OF LABELS
_1; CLASSIFICATION MARK, PLACED ON REAR ENCLOSURE
ICAUT_N:InvsiblelaserI VARNING:OsynligEaser-IAOVARSEL:Usyr_Ligl_er-IIVARO:Avat[aessajasuo
LASER PRODUCT
CLASS 1
1. CLASS 1 LASER PRODUCT
2, DANGER: Visible and invisible laser radiation when open and
interlock failed or defeated. Avoid direct exposure to beam.
3. CAUTION: Do not open the top cover. There are no user service-
able parts inside the Unit; leave all servicing to qualified service
personnel.
Caution--_/I button!
Disconnect the mains plug to shut the power off
completely. The C)/I button in any position do not
disconnect the mains line.The power can be remote
controlled.
_2' WARNING LABEL, PLACED INSIDE THE UNIT
_adiationwher_openand 6ppnadoch sp_rrer__r sikker_edsafbr4eTeerWe alt_irtaialukit_ohitettaessan_kym_tt6m_]leOlet
interbckfaledordefeatedurkoppladBe[r_ktaei affur_ktior_Ur_dg_uds_et, lasers_teilylleAI_ katso
AVOIDDIRECTEXPOSUREstr&len (s) [elseforsir&ling (d)
,o, ,0
Caution: Proper Ventilation
To avoide risk of electric shock and fire and to protect from
damage.
Locate the apparatus as follows:
Front: No obstructions open spacing.
Sides: No obstructions in 3 cm from the sides.
Top: No obstructions in 5 cm from the top.
Back: No obstructions in 15 cm from the back
Bottom: No obstructions, place on the level surface.
Spacing 15cm or more
Front
Stand height
5cm or more

Table of contents
Introduction
Page 1
Features ............................................................................. 1
Supplied accessories ........................................................ 1
About this instruction manual ........................................ 2
Notes on handling ............................................................ 3
Page 4
Names of parts and controls
Front panel .............................................................................. 4
Remote control unit ............................................................... 5
Display window ...................................................................... 7
Rear panel ............................................................................... 7
Operational Principles
On=screen displays ................................................................. 8
To prevent the monitor from burning out
[SCREEN SAVER] ............................................................... 10
On-screen guide icons ......................................................... 10
How to use numeric buttons ............................................... 10
About discs
Playable disc types ............................................................... 11
Disc structure ........................................................................ 11
Page 12
Connections
Before making any connections ......................................... 12
To connect to a TV ................................................................ 12
To connect to a TV with the component video
input jacks ........................................................................... 13
To connect to an audio amplifier or receiver .................... 13
To connect to audio equipment with a digital input ........ 14
To connect the power cord .................................................. 14
Using the remote control unit
To install batteries in the remote control unit ................... 15
To use the remote control unit for TV operation .............. 16
To control the volume of a JVC's amplifier or receiver .., 16
Page 17
Turning on/off the unit .................................................. 17
Inserting and removing discs ........................................ 17
Basic playback
To start playback .................................................................. 18
To stop playback completely ............................................... 18
To stop playback temporarily ............................................. 18
To advance or reverse playback rapidly
while monitoring ................................................................ 19
To locate the beginning of the scene or song ................... 19
Resuming playback
To memorize the interrupted position ............................... 20
To resume playback ............................................................. 20
Page 21
Playing from a specific position on a disc
To locate a desired scene from the DVD menu ................. 21
To locate a desired scene from the menu of
the Video CD/SVCD with PBC ........................................... 21
To locate a desired selection using the numeric buttons .. 22
To locate a desired selection using _ or _ ................. 22
To locate a desired scene by specifying the chapter
number [CHAR SEARCH] .................................................. 23
To locate a desired position in the current title or track
[TIME SEARCH] .................................................................. 23
To locate a desired scene from the digest display
[DIGEST] .............................................................................. 24
Special picture playback
To advance a still picture frame-by-frame ......................... 25
To display still pictures [STROBE] ...................................... 25
To playback in slow-motion [SLOW] .................................. 26
To zoom a scene [ZOOM] .................................................... 26
Changing the playback order
TOplayback in the desired order ]PROGRAM] .................. 27
To playback in random order ]RANDOM] .......................... 28
Repeat playback
TOrepeat the current selection or all disc contents
[REPEAT] ............................................................................. 28
To repeat a desired part [A-B REPEAT] .............................. 29
Selecting a scene angle of DVD VIDEO
TOselect a scene angle from the normal screen
[ANGLE] ............................................................................... 30
To select a scene angle from the angle list display
[ANGLE] .............................................................................. 31
Changing the language and sound
TOselect the subtitle language [SUBTITLE] ...................... 31
To change the audio language or sound [AUDIO] ........... 32
Selecting the picture character
TOselect the picture character [THEATER POSITION] ..... 33
Enjoying virtual surround sound
To simulate surround sound [3D PHONIC[ ........................ 33
Checking the status
To check the disc/time information .................................... 34
TOcheck the DVD function status ....................................... 35
Page 36
Preparation
Turning on the KARAOKE function .................................... 36
Connecting microphones .................................................... 36
Reserving songs
To playback songs reserved ................................................ 37
Selecting audio
Selecting audio track(s) [AUDIO] ........................................ 38
Selecting Karaoke sound [KARAOKE SOUND] ................. 38
Masking the vocal recorded on a disc [VOCAL MASK] ... 39
Playing back the guide vocal only when you stop
singing [VOCAL REPLACE] ................................................ 40
Adding an effect to your voice
Adding an echo effect [ECHO] ............................................ 41
Adding various effects to the vocal [VOCAL EFFECT] ..... 41
Shifting the musical key
Operating the front panel .................................................... 42
Operating the front remote control unit ............................ 42
Page 43
Selecting preferences
How to set preferences ........................................................ 43
LANGUAGE page ................................................................. 43
AUDIO page .......................................................................... 44
DISPLAY page ....................................................................... 45
SYSTEM page ....................................................................... 46
Limiting playback by children
To set Parental Lock for the first time [PARENTAL LOCK]. 47
To change the settings [PARENTAL LOCK] ........................ 48
To temporarily release the Parental lock
[PARENTAL LOCK] ............................................................. 48
Page 49
AV COMPU LINK remote control system
Connection and setup .......................................................... 49
Operation .............................................................................. 50
Care and handling of discs ............................................. 51
Troubleshooting ............................................................... 52
Specifications ................................................................... 53
Table of languages and their abbreviations .. Appendix A
Country code list for parental lock .................. Appendix B
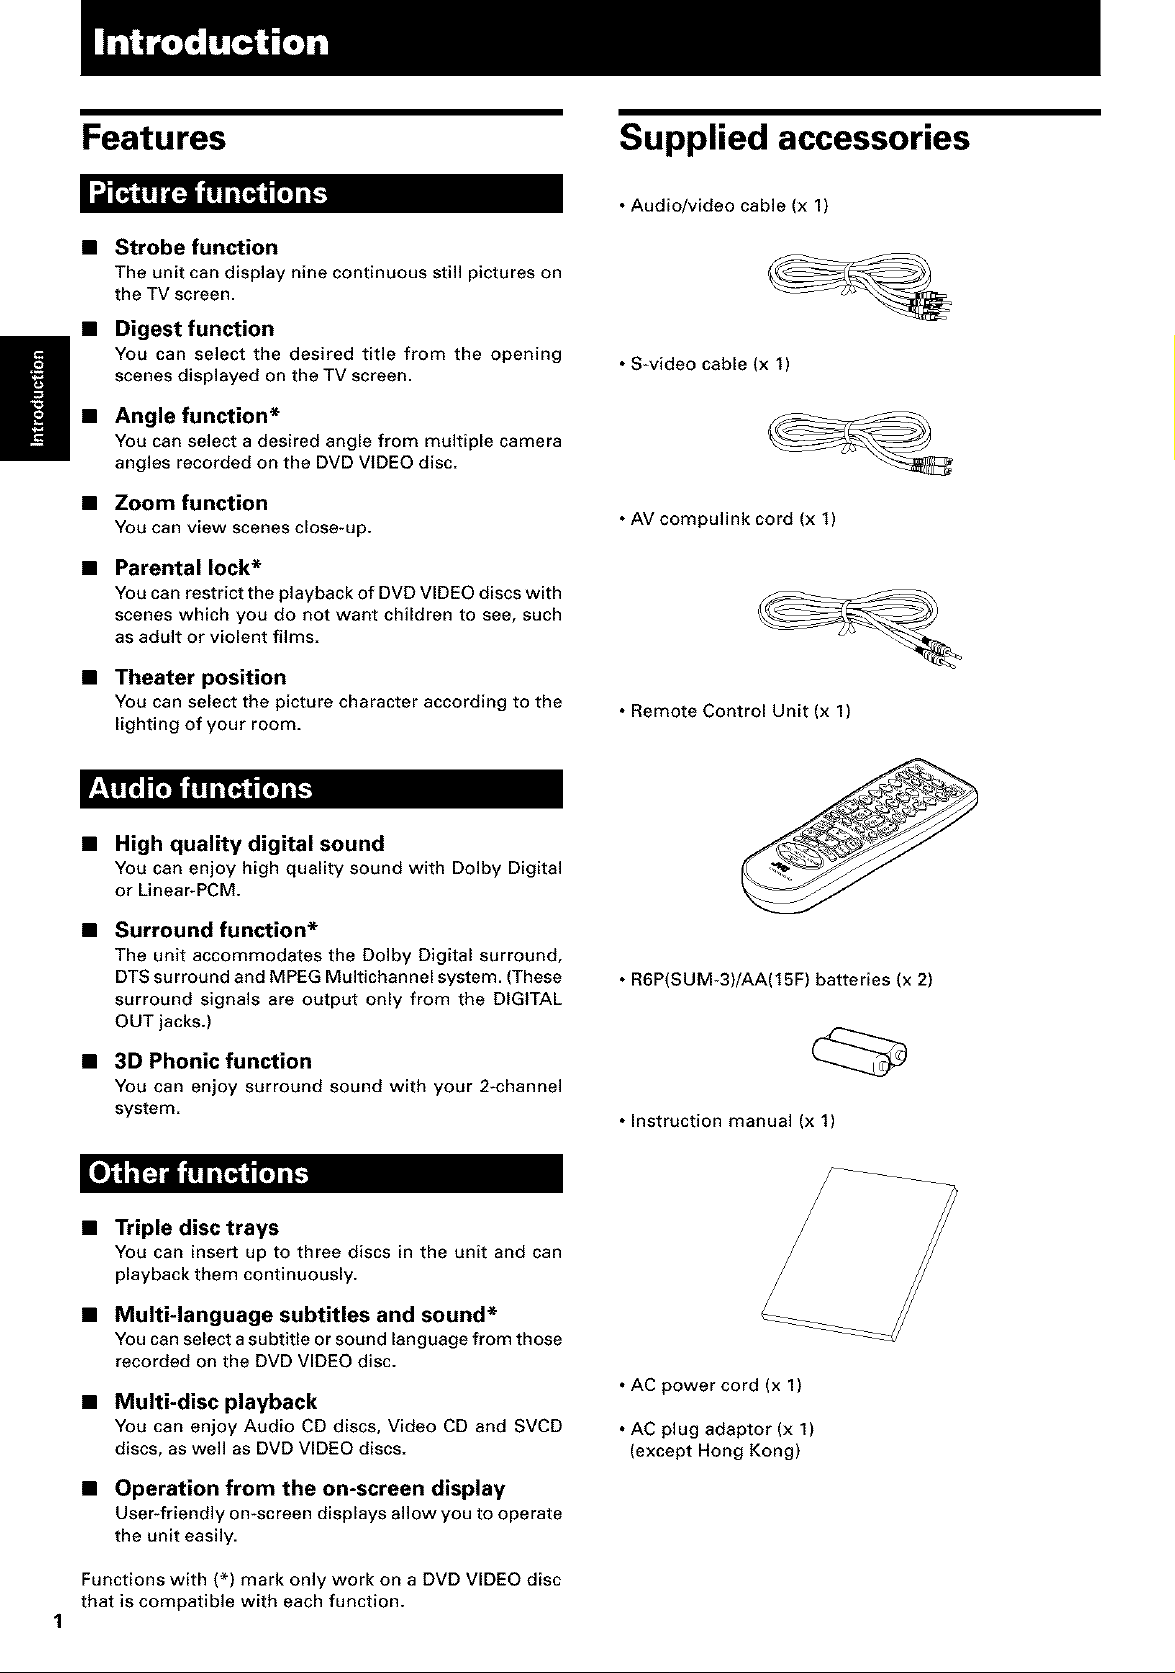
Features Supplied accessories
• Audio/video cable (x 1)
Strobe function
The unit can display nine continuous still pictures on
the TV screen.
Digest function
You can select the desired title from the opening
scenes displayed on the TV screen.
Angle function*
You can select a desired angle from multiple camera
angles recorded on the DVD VIDEO disc.
•S_video cable (x 1)
• Zoom function
You can view scenes close-up.
Parental lock*
You can restrict the playback of DVD VIDEOdiscs with
scenes which you do not want children to see, such
as adult or violent films.
• Theater position
You canselect the picture character accordingto the
lighting of your room.
High quality digital sound
You can enjoy high quality sound with Dolby Digital
or Linear-PCM.
Surround function*
The unit accommodates the Dolby Digital surround,
DTS surround and MPEG Multichannel system. (These
surround signals are output only from the DIGITAL
OUT jacks.)
3D Phonic function
You can enjoy surround sound with your 2_channel
system.
• AV compulink cord (x 1)
• Remote Control Unit (x 1)
• R6P(SUM-3)/AA(15F) batteries (x 2)
• Instruction manual (x 1)
• Triple disc trays
You can insert up to three discs in the unit and can
playback them continuously.
• Multi-language subtitles and sound*
Youcanselecta subtitleorsound languagefrom those
recorded on the DVD VIDEOdisc.
• Multi-disc playback
You can enjoy Audio CD discs, Video CD and SVCD
discs, aswell as DVD VIDEO discs.
• Operation from the on-screen display
User-friendly omscreen displays allow you to operate
the unit easily.
Functions with (*) mark only work on a DVD VIDEO disc
that is compatible with each function.
1
• AC power cord (x 1)
• AC plug adaptor (x 1)
(except Hong Kong)
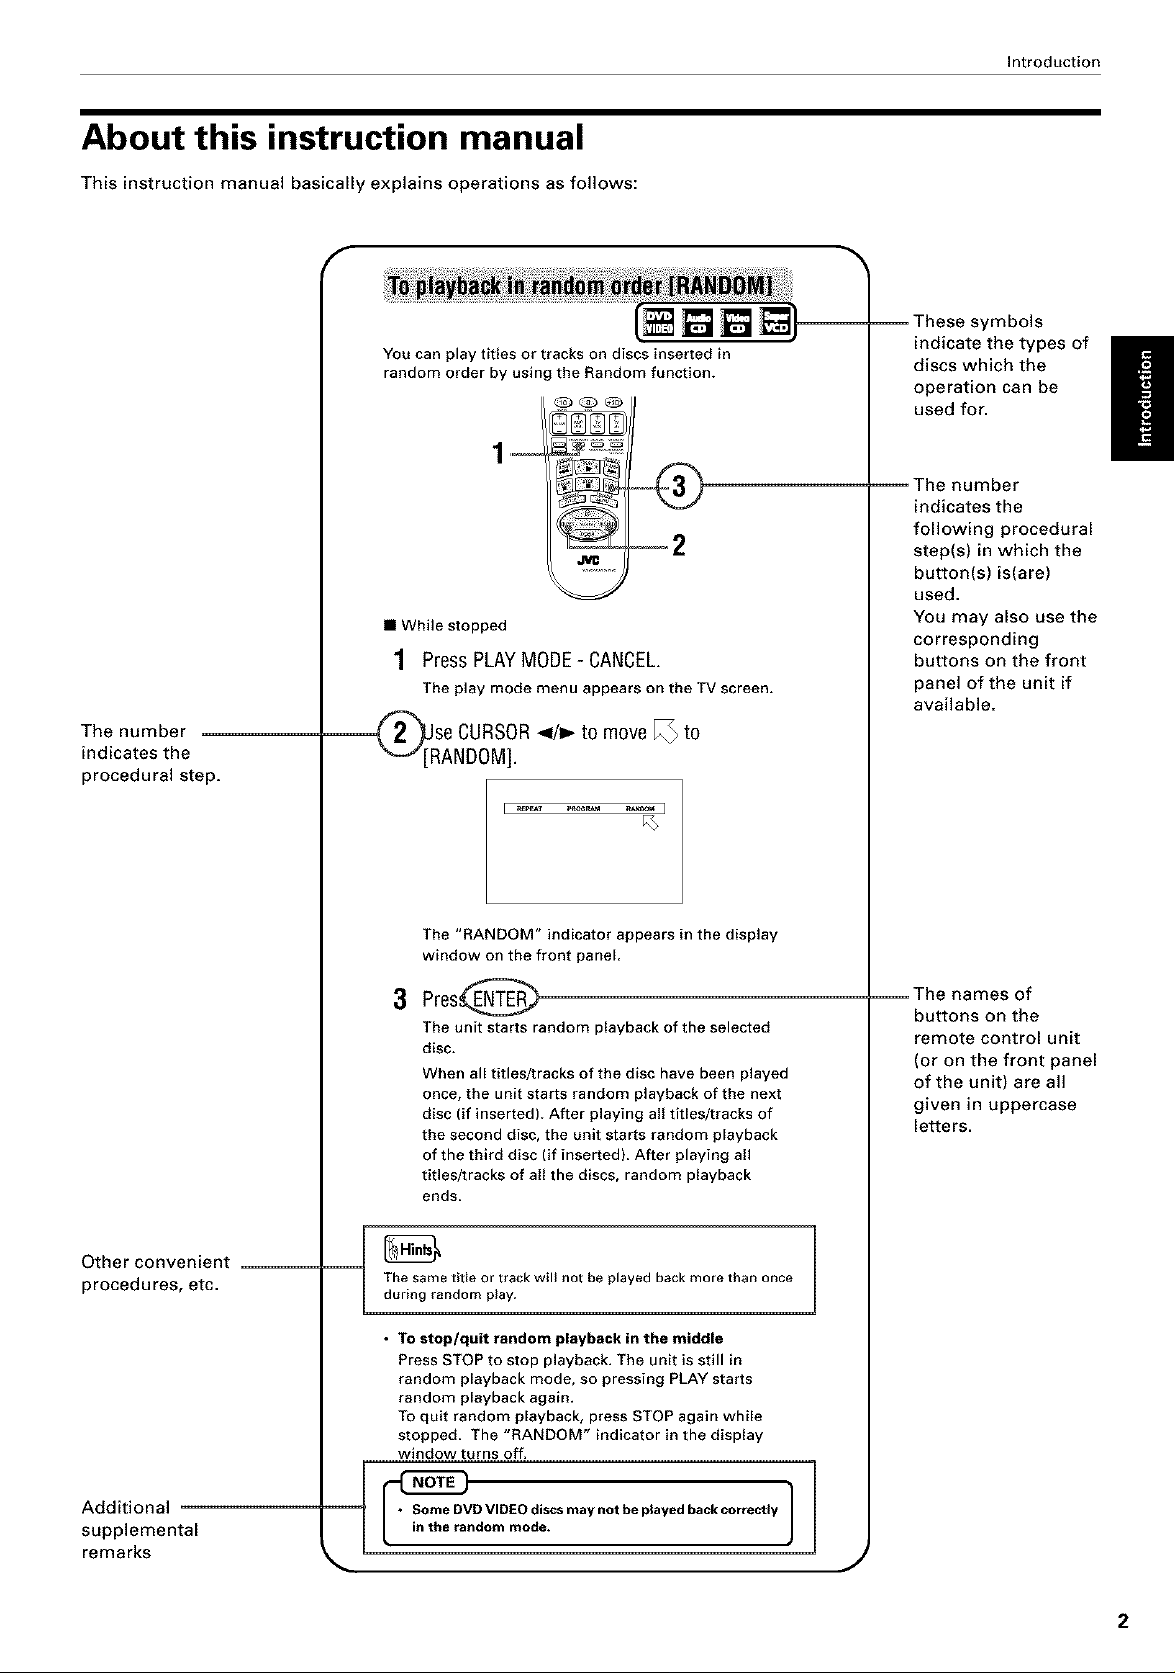
About this instruction manual
This instruction manual basically explains operations as follows:
F
You can play titles or tracks on discs inserted in
random order by using the Random function.
• While stopped
1 Press PLAYMODE- CANCEL.
The play mode menu appears on the TV screen.
The number
indicates the
procedural step.
(_[J[RSe CURSOR</_ to move I_ to
ANDOM].
i _T _aceP_ _ i
Introduction
-- These symbols
indicate the types of
discs which the
operation can be
used for.
I!
The number
indicates the
following procedural
step(s) in which the
button(s) is(are)
used.
You may also use the
corresponding
buttons on the front
panel of the unit if
available.
Other convenient
proced ures, etc.
Additional
supplemental
remarks
The "RANDOM" indicator appears in the display
window on the front panel.
3
Pres@
The unit starts random playback of the selected
disc.
When all titles/tracks of the disc have been played
once, the unit starts random playback of the next
disc (if inserted). After playing all titles/tracks of
the second disc, the unit starts random playback
of the third disc (if inserted). After playing all
titles/tracks of all the discs, random playback
ends.
The same title or track will not be played back more than once
during random play.
• To stop/quit random playback in the middle
Press STOP to stop playback. The unit is still in
random playback mode, so pressing PLAY starts
random playback again.
To quit random playback, press STOP again while
stopped. The "RANDOM" indicator in the display
window turns off.
• inS°meDVDVIDEO discsmay notbe playedbackcorreceYtherandommode. 1
The names of
buttons on the
remote control unit
(or on the front panel
of the unit) are all
given in uppercase
letters.
J
Introduction
Notes on handling
Important cautions
Installation of the unit
• Select a place which is level, dry and neither too hot
nor too cold (between 5°C and 35°C, 41°F and 95°F).
• Leave sufficient distance between the unit and the TV.
• Do not use the player in a place subject to vibrations.
Power cord
• Do not handle the power cord with wet hands[
• A small amount of power (2.7 W) is always
consumed while the power cord is connected to the
wall outlet.
• When unplugging the player from the wall outlet,
always pull the plug, not the power cord.
To prevent malfunction of the unit
• There are no user-serviceable parts inside, if
anything goes wrong, unplug the power cord and
consult your dealer.
• Do not insert any metallic object into the unit.
• Do not use any non-standard shape disc available on
the market, because it may damage the unit.
• Do not use a disc with tape, seals, or paste on it,
because damage to the unit may result.
Note about copyright laws
• Please check the copyright laws in your country
before recording from DVD VIDEO, Audio CD, Video
CD and SVCD discs. Recording of copyrighted
material may infringe copyright laws.
Note about the copyguard system
• The DVD VIDEO disc is protected by the copyguard
system. When you connect the unit to your VCR
directly, the copyguard system activates and the
picture may not be played back correctly.
Safety precautions
Avoid moisture, water and dust
Do not place the unit in moist or dusty places.
Avoid high temperatures
Do not expose the unit to direct sunlight or place it
near a heating device.
When you're away
When away on travel or otherwise for an extended
period of time, remove the plug from the wall outlet.
Do not insert foreign objects into the unit
Do not insert wires, hairpins, coins, etc. into the unit.
Do not block the vents
Blocking the vents may damage the unit.
Care of the cabinet
When cleaning the unit, use a soft cloth and follow the
relevant instructions on the use of chemically-coated
cloths. Do not use benzene, thinner or other organic
solvents and disinfectants. These may cause
deformation or discoloring.
If water gets inside the unit
Turn off the power switch and remove the plug from
the wall outlet, then call the store where you made
your purchase. Using the unit in this state may cause a
fire or electrical shock.
This product incorporates copyright protection technology that is protected by method claims of certain U.S.
patents and other intellectual property rights owned by Macrovision Corporation and other rights owners. Use of
this copyright protection technology must be authorized by Macrovision Corporation, and is intended for home
and other limited viewing uses only unless otherwise authorized by Macrovision Corporation. Reverse engineering
or disassembly is prohibited.
Manufactured under license from Dolby Laboratories. "Dolby" and double-D symbol are trademarks of Dolby
Laboratories.
Confidential Unpublished Works.
© 1992-1997 Dolby Laboratories, Inc. All rights reserved.
Manufactured under license from Digital Theater Systems, Inc. US Pat. No. 5,451,942 and otherworld-wide patents
issued and pending. "DTS", "DTS Digital Surround", are trademarks of Digital Theater Systems, Inc.
© 1996 Digital Theater Systems, Inc. All rights reserved.
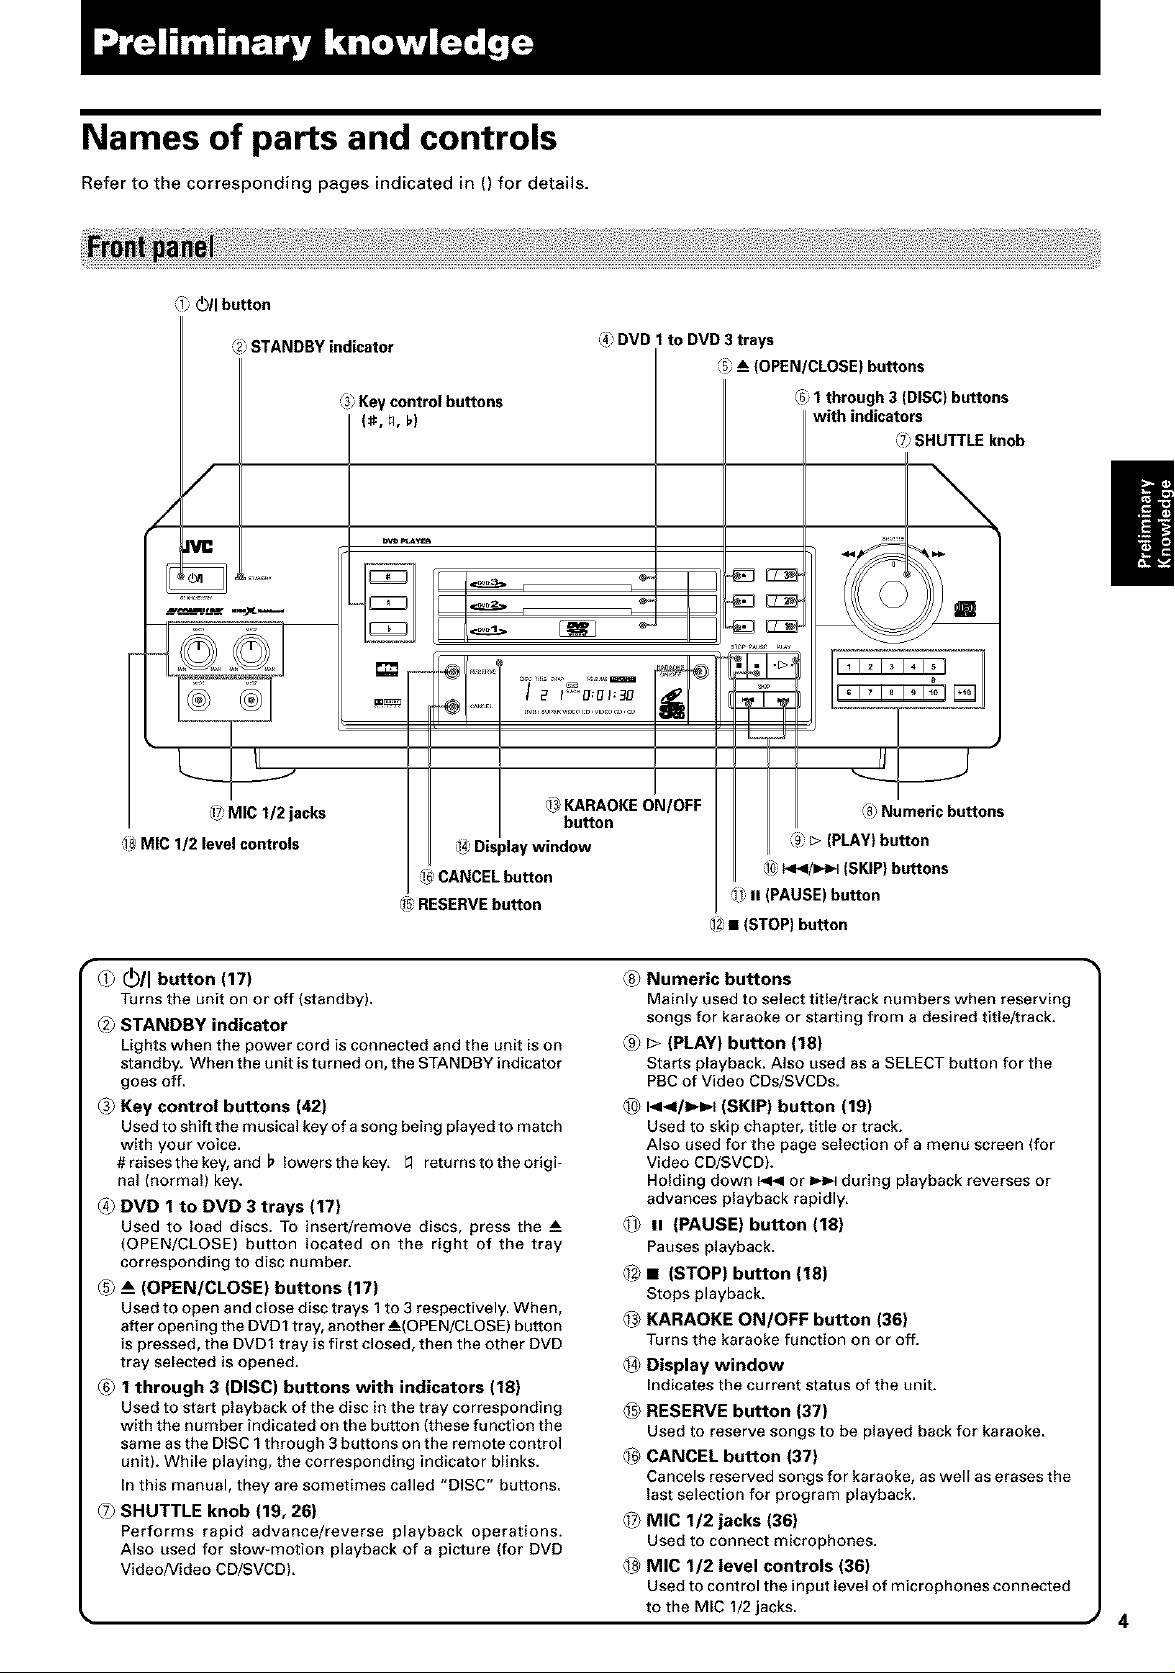
Names of parts and controls
Refer to the corresponding pages indicated in () for details.
_1__11 button
STANDBY indicator
/
/
_ MIC 1/2 jacks
=_ MIC 1/2 level controls
=_3Keycontrolbuttons
(_, _, _)
pn_
@ _'"l ........= ...... I_ _
m
,14_D sp ay w ndow
_ CANCEL button
_ RESERVE button
4_ DVD 1 to DVD 3 trays
_ KARAOKE ON/OFF
button
(5__ (OPEN/CLOSE) buttons
_G_1 through 3 (DISC) buttons
with indicators
_>SHUTTLE knob
\
:_ Numeric buttons
_ _>(PLAY) button
_0)_/l_=,-I (SKIP) buttons
_ n (PAUSE) button
(1_,• (STOP) button
_ _11button (17)
Turns the unit on or off (standby).
_2_STANDBY indicator
Lights when the power cord is connected and the unit is on
standby. When the unit is turned on, the STANDBY indicator
goes off.
_3_Key control buttons (42)
Used to shift the musical key of a song being played to match
with your voice.
#raisesthekey, and _ Iowersthekey. Lq returnstotheorigi=
nal (normal) key.
_4) DVD 1 to DVD 3 trays (17)
Used to load discs. To insert/remove discs, press the
(OPEN/CLOSE) button located on the right of the tray
corresponding to disc number.
_5___ (OPEN/CLOSE) buttons (17)
Used to open and close disc trays 1to 3 respectively. When,
after opening the DVD1 tray, another--_(OPEN/CLOSE) button
is pressed, the DVD1 tray is first closed, then the other DVD
tray selected is opened.
_6_1 through 3 (DISC) buttons with indicators (18)
Used to start playback of the disc in the tray corresponding
with the number indicated on the button (these function the
same as the DISC 1 through 3 buttons on the remote control
unit). While playing, the corresponding indicator blinks.
In this manual, they are sometimes called "DISC" buttons.
(7_ SHUTTLE knob (19, 26)
Performs rapid advance/reverse playback operations.
Also used for slow-motion playback of a picture (for DVD
Video/Video CD/SVCD).
• 4
_8_Numeric buttons
Mainly used to select title/track numbers when reserving
songs for karaoke or starting from a desired title/track.
_ L> (PLAY) button (18)
Starts playback. Also used as a SELECT button for the
PBC of Video CDs/SVCDs.
_0__</_=,4 (SKIP) button (19)
Used to skip chapter, tige or track.
Also used for the page selection of a menu screen (for
Video CD/SVCD).
Holding down _ or _ during playback reverses or
advances playback rapidly.
_1_ II (PAUSE) button (18)
Pauses playback.
_2_• (STOP) button (18)
Stops playback.
_ KARAOKE ON/OFF button (36)
Turns the karaoke function on or off.
_ Display window
Indicates the current status of the unit.
_ RESERVE button (37)
Used to reserve songs to be played back for karaoke.
_ CANCEL button (37)
Cancels reserved songs for karaoke, as well as erases the
last selection for program playback.
_ MIC 1/2 jacks (36)
Used to connect microphones.
@ MIC 1/2 level controls (36)
Used to control the input level of microphones connected
to the MIC 1/2 jacks.
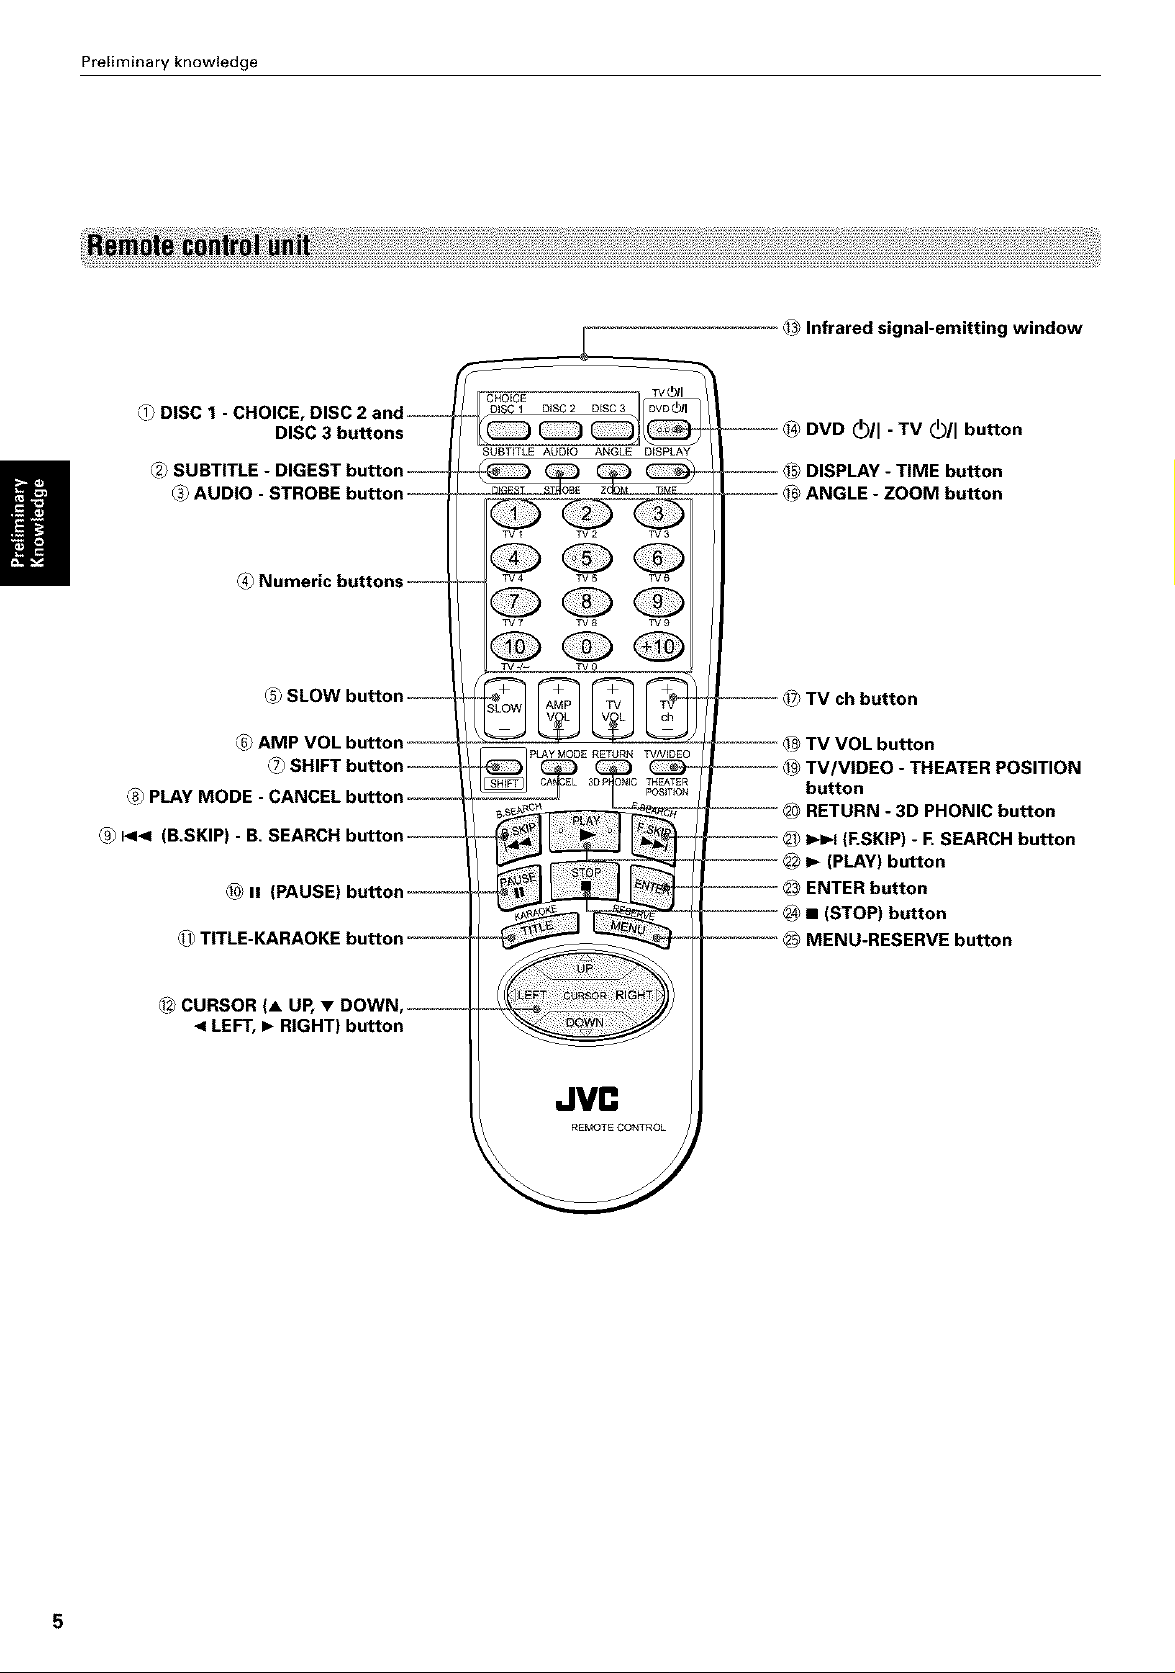
Preliminary knowledge
_1_DISC 1 - CHOICE, DISC
_2_SUBTITLE - DI(
_3_AUDIO - STROBE
DISC 3 buttons
CHOICE
DiSC 2 DISC 3
SUBTITLE AUDIO ANGLE DISPLAY
TV1 TV2 TV3
_ Infrared signal-emitting window
®
_ P<_ (B.SKIP) - B. SEARCH
_@ii (PAUSE)
_1_TITLE-KARAOKE
_ CURSOR (A UP, •
< LEFT, I_ RIGHT) button
TV4 TV5 TV6
TV7 TV8 TV9
TV ./-- TV 0
TV ch button
pLAy MODE RETURN TV/VIDEO
REMOTECONTROL
Preliminary knowledge
_ DISC 1 - CHOICE, DISC 2 and DISC 3 buttons (18)
Used to start playback of a disc in the corresponding tray
(DVD1 through DVD3), as same as the 1 through 3 buttons
on the front panel.
In addition, pressing the DISC 1 button while holding the
SHIFT button brings up the Preference on=screen display
on the TV screen.
_2_SUBTITLE - DIGEST button (24, 31)
Used to display the subtitle selection display on the TV
screen, as well as used to turn the subtitle on or off (for
DVD VIDEO).
Pressing this button while holding down the SHIFT button
displays beginning scenes of each title, chapter or track on
the TV screen (for DVD VIDEO/Video CD/SVCD).
_3_AUDIO - STROBE button (25, 32)
Selects the audio (for DVD VIDEO/Video CD/SVCD).
Pressing this button while holding down the SHIFT button
displays nine continuous still pictures (for DVD VIDEO/
Video CD/SVCD).
_4) Numeric buttons (10, 16)
Used to select a title or track number, as well as used to
enter a time for the Time search and a chapter number for
the Chapter search.
Also used to select a TV channel in conjunction with the
SHIFT button.
_ SLOW button (26)
Used for slow-motion playback of a picture (for DVD VIDEO/
Video CD/SVCD).
_6_AMP VOL button (16)
Used to control the volume of a JVC audio amplifier/
receiver.
(7_ SHIFT button
Used together with other buttons for activating their
secondary functions.
_8_PLAY MODE - CANCEL button (27~30)
Displays an on=screen display for controlling the advanced
playback functions.
Pressing this button while holding down the SHIFT button
cancels reserved songs for karaoke, as well as erases the
last selection for program playback.
C9_I_1< (B.SKIP) - B. SEARCH button (19, 22)
Skips back a chapter, title or track. Also used for the page
selection of a menu screen (for DVD VIDEO/Video CD/
SVCD).
Holding down this button during playback reverses
playback rapidly.
Pressing the button while holding down the SHIFT button
also reverses playback rapidly. If you press the button while
holding down the SHIFT button during rapid reverse
playback, the speed increases.
_ II (PAUSE) button (18)
Pauses playback.
_ TITLE-KARAOKE button (21, 36)
Displays the title menu of a DVD VIDEO disc on the TV
screen.
Pressing this button while holding down the SHIFT button
turns the karaoke function of or off.
_ CURSOR (A UP, • DOWN, < LEFT, I_ RIGHT) buttons
Used to select an item form a menu or on-screen display,
or to change the setting of an item in the on=screen display.
@ Infrared signal-emitting window
Point this window toward the remote sensor on the fronl
panel when pressing buttons.
_4_DVD (b/I - TV (b/I button (16, 17)
Turns the unit on or off (standby). Pressing this button while
holding down the SHIFT button turns the TV on or off.
_ DISPLAY - TIME button (34, 35)
Displays the status information (only for DVD disc) or the
time information (for any disc types). When the time
information appears, pressing this button while holding
the SHIFT button changes the time mode.
When the karaoke function is active, pressing this button
brings up the karaoke menu.
_ ANGLE - ZOOM button (26, 31)
Changes camera angles during playback of a DVD VIDEO
disc containing multiple camera angles. Pressing this
button while holding down the SHIFT button zooms in the
picture (for DVD VIDEO/Video CD/SVCD).
_?_TV ch button (16)
Changes the TV channels.
@ TV VOL button (16)
Adjusts the TV volume.
_9_TV/VlDEO - THEATER POSITION button (16, 33)
Switches the TV input mode.
By pressing the button while holding down the SHIFT
button, you can select the Theater position mode for
matching the picture character to your taste.
_# RETURN - 3D PHONIC button (21, 33)
Returns to the previous menu (for DVD VIDEO/VIdeo CD/
SVCD).
By pressing the button while holding down the SHIFT
button, you can select the 3D Phonic mode for simulating
the surround effect.
_1__ (ESKIP) - E SEARCH button (19, 22)
Skips forward a chapter, title or track. Also used for the
page selection of a menu screen (for DVD VIDEO/Video CD/
SVCD).
Holding down this button during playback advances
playback rapidly.
Pressing the button while holding down the SHIFT button
during playback also advances playback rapidly. If you
press the button while holding down the SHIFT button
during rapid advance playback, the speed increases.
@ 1,_(PLAY) button (18)
Starts playback. Also used as a SELECT button for PBC of
Video CD/SVCDs.
_ ENTER button
Executes the selected item in a menu or on=screen display.
@ • (STOP) button (18)
Stops playback.
Also used to erase all the programmed tracks for the
program play.
___MENU-RESERVE button (21, 37)
Displays a DVD menu on the TV screen.
Pressing this button while holding down the SHIFT button
displays the karaoke reservation table on the TV screen.
Preliminaryknowledge
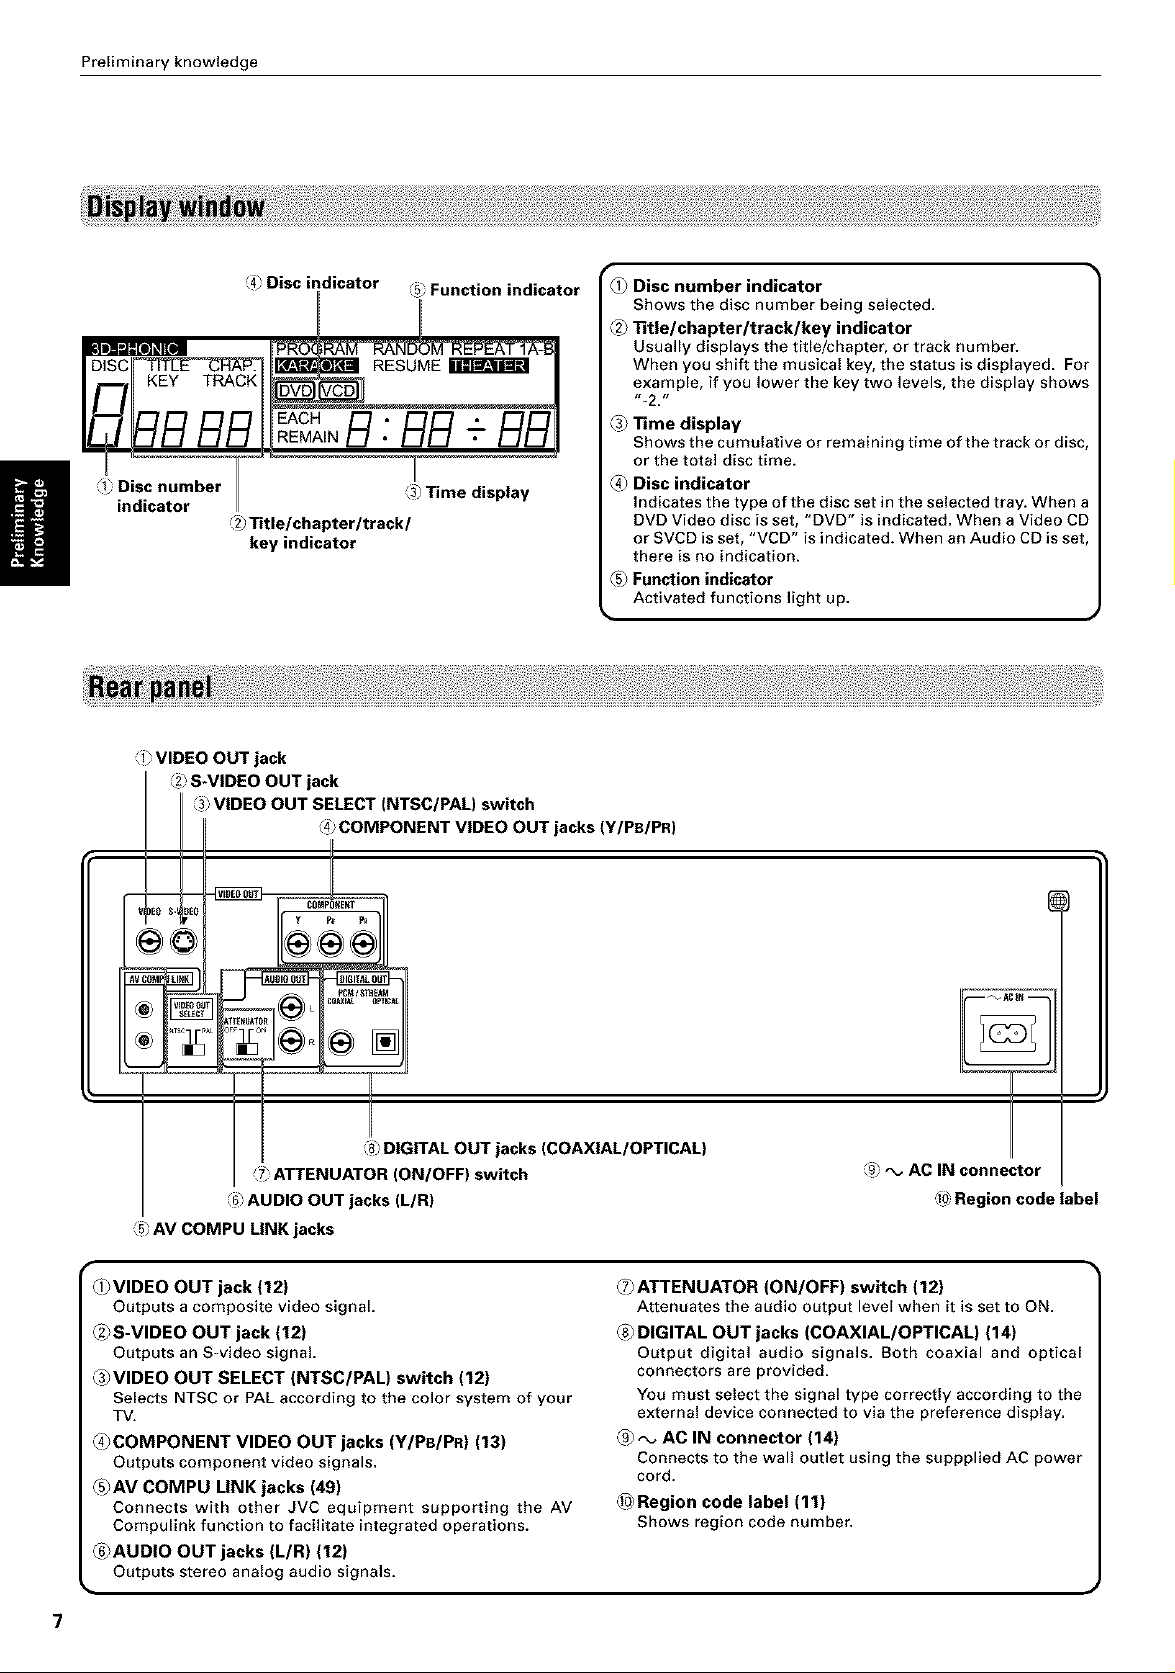
_ Disc indicator (57Function indicator
Disc number 35 Time display
indicator
_ VIDEO OUT jack
2_ S-VIDEO OUT jack
2_Title/chapter/track/
key indicator
3_,VIDEO OUT SELECT (NTSC/PAL) switch
4_ COMPONENT VIDEO OUT jacks (Y/PB/PR)
i[
_1_Disc number indicator
Shows the disc number being selected.
_2_Title/chapter/track/key indicator
Usually displays the title/chapter, or track number.
When you shift the musical key, the status is displayed. For
example, if you lower the key two levels, the display shows
-_2, _r
_3_Time display
Shows the cumulative or remaining time of the track or disc,
or the total disc time.
_ Disc indicator
Indicates the type of the disc set in the selected tray. When a
DVD Video disc is set, "DVD" is indicated. When a Video CD
or SVCD is set, "VCD" is indicated. When an Audio CD is set,
there is no indication.
_5_Function indicator
Activated functions light up.
DIGITAL OUT jacks (COAXIAL/OPTICAL)
Z_ ATTENUATOR (ON/OFF) switch
6_ AUD O OUT jacks (L/R)
AM COMPU LINK jacks
_VIDEO OUT jack (12)
Outputs a composite video signal.
_2_S-VIDEO OUT jack (12)
Outputs an S-video signal.
_3_VIDEO OUT SELECT (NTSC/PAL) switch (12)
Selects NTSC or PAL according to the color system of your
TV.
_COMPONENT VIDEO OUT jacks (Y/PB/PR) (13)
Outputs component video signals.
_5_AV COMPU LINK jacks (49)
Connects with other JVC equipment supporting the AV
Compulink function to facilitate integrated operations.
_6_AUDIO OUT jacks (L/R) (12)
Outputs stereo analog audio signals.
9_ ,_ AC IN connector
d_ Region code label
_ATTENUATOR (ON/OFF) switch (12)
Attenuates the audio output level when it is set to ON.
_8_DIGITAL OUT jacks (COAXIAL/OPTICAL) (14)
Output digital audio signals. Both coaxial and optical
connectors are provided.
You must select the signal type correctly according to the
external device connected to via the preference display.
_ _, AC IN connector (14)
Connects to the wall outlet using the suppplied AC power
cord.
@_Region code label (11)
Shows region code number.

Operational Principles
The unit provides several on-screen displays.
With some displays, you can set or select preferences
or functions, while the others are display-only.
Opening displays
The Opening display appears automatically in some
conditions.
At the bottom, the following information are indicated
depending on the unit's status.
NOW READING: The unit is now reading the disc
information (TOC).
REGION CODE ERROR!: The DVD VIDEO disc loaded
cannot be played because the region code of the
disc does not match the unit.
CHANGE-_ DISC 1: The unit is now changing the
disc tray to DISC 1.
OPEN: The disc tray is now opening.
CLOSE: The disc tray is now closing.
Preliminaryknowledge
Opening display
_ VC_II CO/CDI_JL¥1B
NOW READING
Preference displays
While the unit is stopped except when an Audio CD is
loaded in the selected tray, pressing the DISC 1
CHOICE button while holding the SHIFT button brings
up the preference display for setting the preferences.
There are four pages: LANGUAGE, AUDIO, DISPLAY
and SYSTEM as shown in the right.
See page 43 for detailed information.
PARENTAL LOCK displays
When no disc is inserted or a DVD VIDEO disc is
stopped, pressing the ENTER button while holding
down the SHIFT button brings up the PARENTAL LOCK
display in which you can set the level for limiting
playback.
See page 47 for detailed information.
LANGUAGE
AUtO sm_y s_
sumt_k_ _
[P_Es-_ •• _Y ]
DISPLAY
c_ SC_ENGUmE_ _1
PARENTALLOCK
c=_y code
S_L_
pASSV,X_
AUDIO
C_G_TALAUO_ _
OOWNU[X
CO_RSS_
SYSTEM
RES__TOST_CSY
AV C_P_JLINK _0 '[3_

Preliminary knowledge
Play mode displays
Pressing the PLAY MODE button brings up the play
mode display in which you can control playback
functions.
Different displays appear depending on the disc type
and the unit's status.
While stopped During DVDVIDEOplayback
E,_T _._ ,_o_ ] i._._ _,_._ T,_o. c._o. I
Status displays
Pressing the DISPLAY-TIME button during playback
brings up the status display.
For a DVD VIDEO disc, pressing the DISPLAY-TIME
button toggles between the DVD VIDEO function status
display, and the disc/time display and off.
For a SVCD/Video CD or Audio CD disc, pressing the
DISPLAY_TIME button switches the disc/time display on
and off.
DuringAudioCDplayback
E.........
DVDVIDEOfunction status Disc/time (DVDVIDEO)
DuringSVCD/VideoCDplayback
I................. I
Disc/time(AudioCD/SVCD/ Disc/time
VideoCDwithoutPBC) (SVCD/VideoCDwithPBC)
Karaoke setting displays
When karaoke mode is on, pressing the DISPLAY-TIME
button brings up the karaoke menu display in which
you can set several karaoke functions.
Pressing MENU-RESERVE button while holding down
the SHIFT button brings up the karaoke reservation
display in which you can reserve songs to be played.
Karaoke menu Karaoke reservation
& _ _ 2 3 4 s s D
I[_71 [5iB _ E55 [5_V V V V V
A television monitor screen may be burned out if a
static picture is displayed for a long time. To prevent
this, the unit automatically activates the screen saver
function if a static picture, such as an on-screen display
or menu, is displayed for over 5 minutes.
Pressing any button on the unit orthe remote
control unit will release the screen saver function
and return to the previous display.
• You can select one of several screen saver modes
available (see page 45).
• The screen saver function is not activated during
Audio CD playback or after stopping Audio CD
playback.
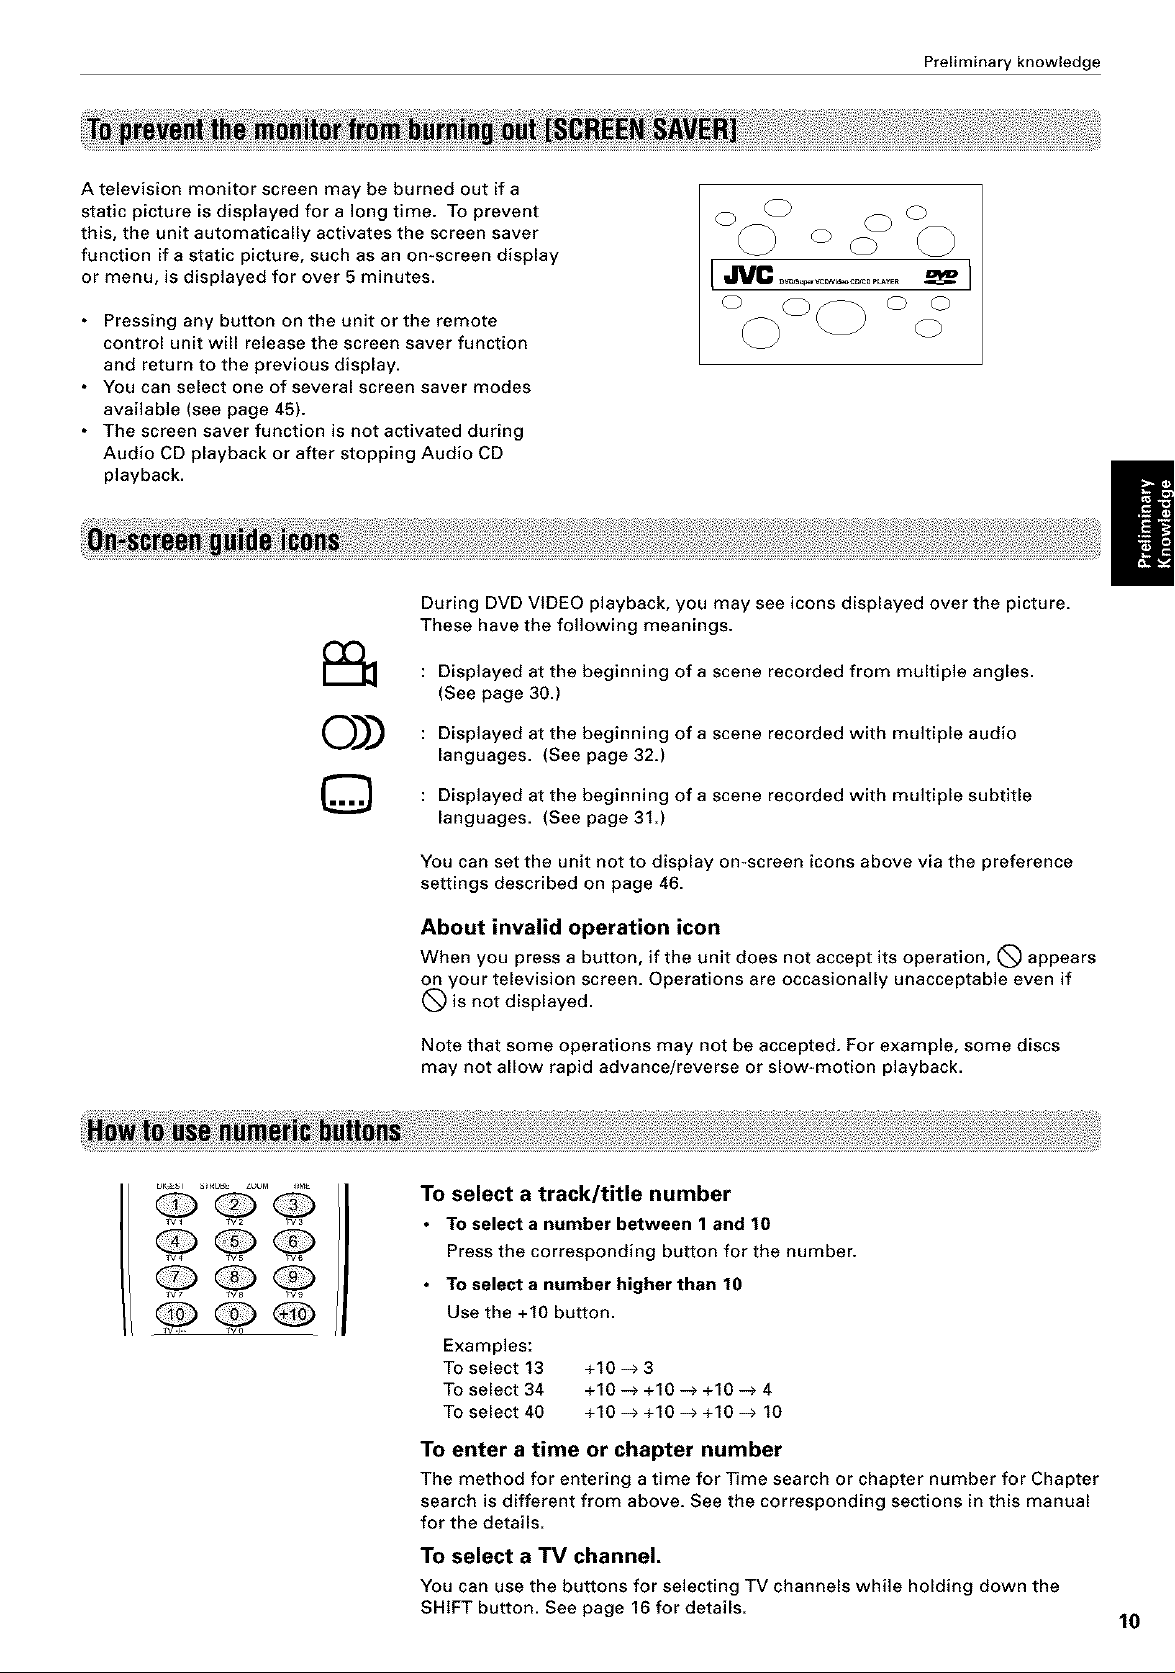
During DVD VIDEO playback, you may see icons displayed over the picture.
These have the following meanings.
Preliminary knowledge
@@@
@ OoQ
0))
©
: Displayed at the beginning of a scene recorded from multiple angles.
(See page 30.)
: Displayed at the beginning of a scene recorded with multiple audio
languages. (See page 32.)
: Displayed at the beginning of a scene recorded with multiple subtitle
languages. (See page 31.)
You can set the unit not to display on-screen icons above via the preference
settings described on page 46.
About invalid operation icon
When you press a button, if the unit does not accept its operation, (_ appears
on your television screen. Operations are occasionally unacceptable even if
(_ is not displayed.
Note that some operations may not be accepted. For example, some discs
may not allow rapid advance/reverse or slow-motion playback.
To select a track/title number
• To select a number between 1 and 10
Press the corresponding button for the number.
• To select a number higher than 10
Use the +10 button.
Examples:
To select 13 +10 -> 3
To select 34 +10 -> +10 -> +10 -> 4
To select 40 +10 -> +10 -> +10 -> 10
To enter a time or chapter number
The method for entering a time for Time search or chapter number for Chapter
search is different from above. See the corresponding sections in this manual
for the details.
To select a TV channel.
You can use the buttons for selecting TV channels while holding down the
SHIFT button. See page 16for details.
I0
Preliminary knowledge
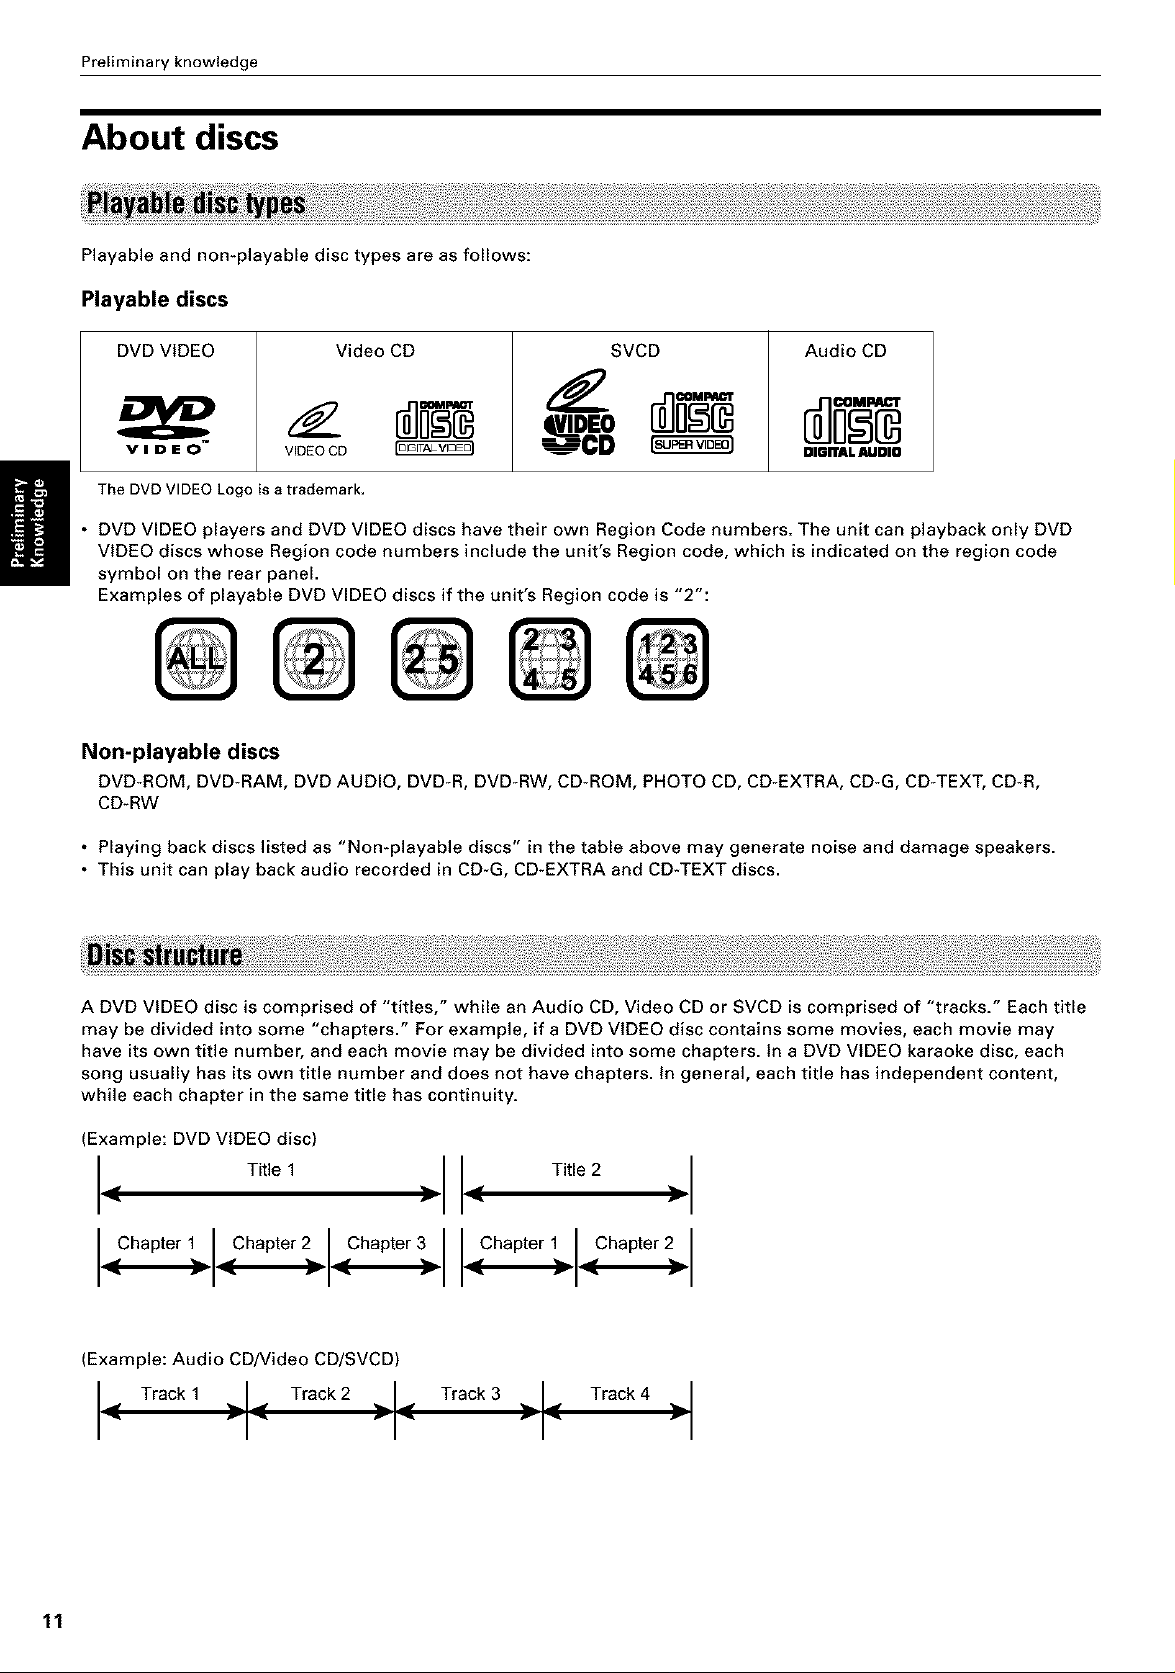
About discs
Playable and non*playable disc types are as follows:
Playable discs
DVD VIDEO
VIDEO
The DVD VIDEO Logo is a trademark,
• DVD VIDEO players and DVD VIDEO discs have their own Region Code numbers. The unit can playback only DVD
VIDEO discs whose Region code numbers include the unit's Region code, which is indicated on the region code
symbol on the rear panel.
Examples of playable DVD VIDEO discs if the unit's Region code is "2":
VIDEO CD
Video CD
SVCD Audio CD
OIGITAL AUOIO
Non-playable discs
DVD_ROM, DVD*RAM, DVD AUDIO, DVD*R, DVD*RW, CD*ROM, PHOTO CD, CD*EXTRA, CD_G, CD*TEXT, CD*R,
CD*RW
• Playing back discs listed as "Non*playable discs" in the table above may generate noise and damage speakers.
• This unit can play back audio recorded in CD-G, CD-EXTRA and CD-TEXT discs.
A DVD VIDEO disc is comprised of "titles," while an Audio CD, Video CD or SVCD is comprised of "tracks." Each title
may be divided into some "chapters." For example, if a DVD VIDEO disc contains some movies, each movie may
have its own title number, and each movie may be divided into some chapters. In a DVD VIDEO karaoke disc, each
song usually has its own title number and does not have chapters. In general, each title has independent content,
while each chapter in the same title has continuity.
(Example: DVD VIDEO disc)
• Title 1 )
Chapterll Chapter21.Chapter3
(Example: Audio CD/Video CD/SVCD)
Track 1 -I-'1_ Track 2 "1-"I_ Track 3 I_ Track 4
I_, Title 2
I"
_Chapter 1 _Chapter 2
11

Connections
*In the following description, "TV" may be substituted with "monitor" or "projector."
*Before using the unit, you have to connect the unit to a TV and/or amplifier.
• Do not connect the AC power cord until all other connections have been made.
• Since different components often have different terminal names, carefully read the instructions supplied with the
component you are going to connect.
You can enjoy using the unit by simply connecting it to a TV. To improve audio sound quality, connect the audio
outputs to your separate audio equipment. (See the following pages.)
*If the TV has an AV COMPU LINK terminal,
you can use the AV COMPU LINK function.
See "AV COMPU LINK remote control system"
The unit
_.-. S-video cable
on page 49 for details.
(supplied)
TV
Yellow
Redwhite
Audio/video cable
(supplied)
Connect the unit to a TV equipped with stereo audio input and video input jacks using the supplied audio/video
cables.
• if your TV has a monaural audio input instead of stereo, you need to use an optional audio cable which converts
stereo audio output to monaural.
• If you r TV has an S-video input, you should connect it with the S-VIDEO output of the unit using the supplied S-
video cable in addition to the (standard) video connection to get better picture quality.
Set the ATTENUATOR switch to OFF normally. If you hear audio sound distorted because the sensitivity of the audio
input of your TV is too high, set the switch to ON.
The unit is compatible with the PAL and NTSC color systems. Set the VIDEO OUT SELECT switch on the rear panel to
match the color system of your TV. Make su re that the color system of the DVD/Video CD/SVCD disc labeled on the
package matches your TV.
If you use a multi*system TV, you can play discs recorded on both PAL and NTSC systems.
Y_Iow r_]]zzE]> _ VIDEO
I_ _ S-VIDEO
i_ RIGHTAUDIO
1_ LEFf
iN
_DEO OUT of the unit directly to the video input of your TV. Connecting VIDEO OUT of the unit to a TV via a VCR may
itor problem when playing back a copy-protected disc. 1
12

Getting started
You can enjoy high picture quality by connecting the unit's COMPONENT VIDEO OUT jacks to the COMPONENT
VIDEO iN jacks of your TV with the video cables.
f Gree___u e Component video
_Red cable (not supplied)
Red
.-_-S-video cable
(supplied)
White
Green _ I Bed
TV
IH
VIDEO IN
LEFT
Blue
t"
'°
_udio cable
(not supplied)
• Connect "Y" to "Y," "PB" to "PB," "PR" to "PR" correctly.
_omponent video input jacks of the TV is of the BNC type, use an adapter to convert a pin jack to a BNC jack ]
[ • If_iu°dal)not connectthe unit with the S.video cable, some functions ofyour TV may not work J
You can enjoy high-quality audio by connecting the unit's audio output to your amplifier or receiver.
The unit
Red
White
[._ White
Amplifier or receiver
'°
Audio cable
(not supplied)
• Connect the unit's AUDIO OUT to any line-level inputs (such as AUX, DVD, CD, etc.) of an audio amplifier or
receiver.
13
Getting started
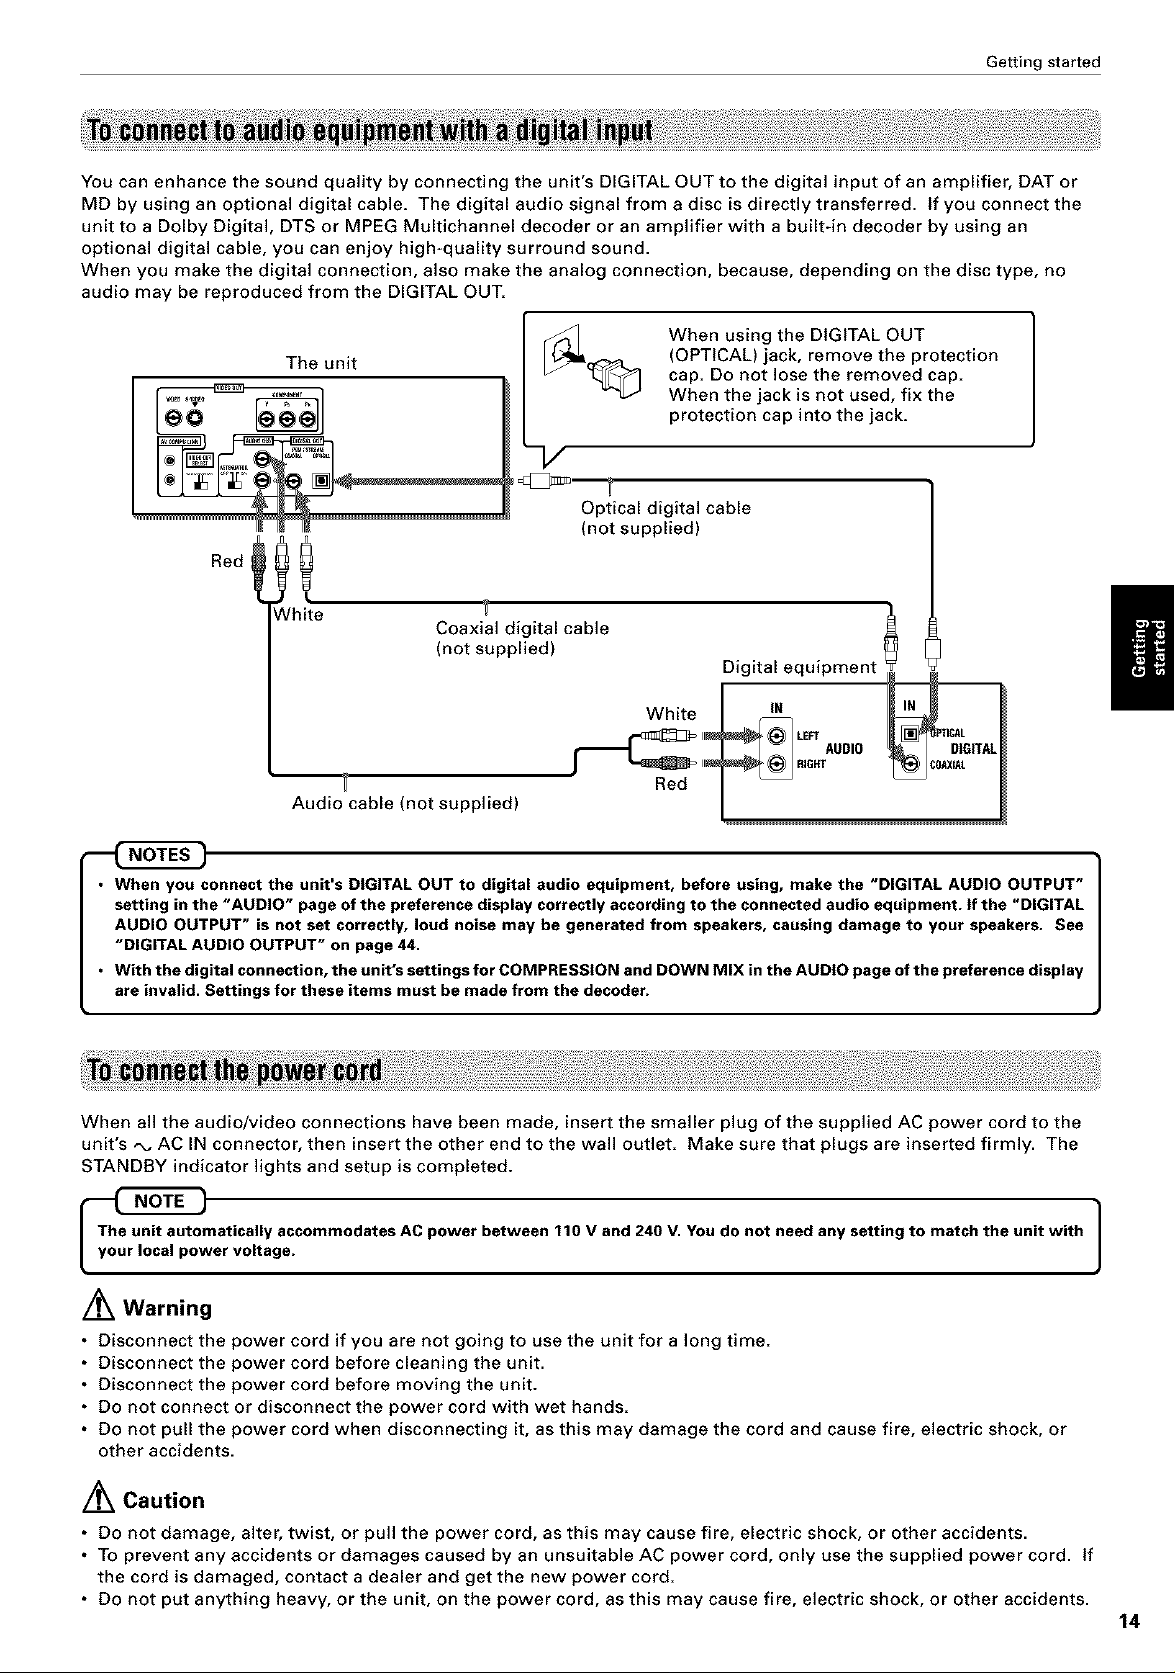
You can enhance the sound quality by connecting the unit's DIGITAL OUT to the digital input of an amplifier, DAT or
MD by using an optional digital cable. The digital audio signal from a disc is directly transferred. If you connect the
unit to a Dolby Digital, DTS or MPEG Multichannel decoder or an amplifier with a builtqn decoder by using an
optional digital cable, you can enjoy high-quality surround sound.
When you make the digital connection, also make the analog connection, because, depending on the disc type, no
audio may be reproduced from the DIGITAL OUT.
When using the DIGITAL OUT
The unit
Optical digital cable
(not supplied)
!! . ig_a)l ca ble
(OPTICAL) jack, remove the protection
cap. Do not lose the removed cap.
When the jack is not used, fix the
protection cap into the jack.
, iilolcable (not in°ilsll Pl _ : DigitalleqL_PAint ___ TI_GITAL
• When you connect the unit's DIGITAL OUT to digital audio equipment, before using, make the "DIGITAL AUDIO OUTPUT"
setting in the "AUDIO" page of the preference displaycorrectly according to the connected audio equipment. If the "DIGITAL
AUDIO OUTPUT" is not set correctly, loud noise may be generated from speakers, causing damage to your speakers. See
"DIGITAL AUDIO OUTPUT" on page 44.
• w_ththedigita_c_nnecti_n_theunit_ssettingsf_r__MPREss__NandD_wNM_X_ntheAUD__page_fthepreferencedisp_ay
are invalid. Settings for these items must be made from the decoder.
When all the audio/video connections have been made, insert the smaller plug of the supplied AC power cord to the
unit's ,x, AC IN connector, then insert the other end to the wall outlet. Make sure that plugs are inserted firmly. The
STANDBY indicator lights and setup is completed.
matieally accommodates ACpower between 110 V and 240 V. You do not need any setting to match the unit with
er voltage.
/_ Warning
• Disconnect the power cord if you are not going to use the unit for a long time.
• Disconnect the power cord before cleaning the unit.
• Disconnect the power cord before moving the unit.
• Do not connect or disconnect the power cord with wet hands.
• Do not pull the power cord when disconnecting it, as this may damage the cord and cause fire, electric shock, or
other accidents.
]
/_ Caution
• Do not damage, alter, twist, or pull the power cord, as this may cause fire, electric shock, or other accidents.
• To prevent any accidents or damages caused by an unsuitable AC power cord, only use the supplied power cord. If
the cord is damaged, contact a dealer and get the new power cord.
• Do not put anything heavy, or the unit, on the power cord, as this may cause fire, electric shock, or other accidents.
14

Getting started
Using the remote control unit
Using the remote control, you can operate not only all the functions of the unit but also basic functions of your TV
and the volume control of a JVC amplifier/receiver.
The battery compartment is located on the back of the remote control unit.
1 Press down the point shown by the arrow at the top of the compartment cover, and
pull it up to open the cover.
2 Placethe two accessoryR6P(SUM-3)/AA(15F)batteriesin the remote control
according to the polarity markings ('%" and "-') inside the compartment and on the
batteries.
3 Place the cover over the compartment, and press down lightly.
• The batteries will last about six months with normal use. If the functions of the remote control become erratic,
replace the batteries. See below for more information.
Precautions for the safe use of batteries
Observe the following precautions for the safe use of batteries. If they are used improperly their life will be shortened,
they may burst or their contents may leak.
• Remove the batteries from the remote control if it is not going to be usedfor a long period of time.
• Remove dead batteries and dispose of them properly.
• Never leave dead batteries lying around, take them apart, mix them with other refuse, or throw them into an incinerator.
• Never touch liquid that has leaked out of e battery.
• Do not mix new and old batteries, or batteries of different types, when replacing them.
15
 Loading...