

Page 1
D VD AUDIO/VIDEO PLAYER
XV-D9000
OPEN
/
DISPLAY
OFF
CLOSE
EX K2
STANDBY/ON
(
-
)
(+)
SLOW
SLOW
(
-
)
(+)
GROUP
SELECT GROUP
TOP MENU
MENU
ENTER
PLAY MODE
SET UP
REPEAT
AUDIOSUBTITLEANGLE
THEATER
TIME
fs/RATE
REPEAT
-
B
POSITION
DISPLAY
DISPLAY
A
4321
9
CHAP./
INDEX
RM - SXVD9000A REMOTE CONTROL
DVD
8765
RETURN
+
1010/0
CANCELRESUMEGROUP
PAGE
CLEAR
DVD AUDIO
EXTENDED K2
PROCESSING
STANDBY
VIDEO
/
DISP.
/
OFF
ON
DISPLAY
OFF
DVD AUDIO
XV - D9000
/
VIDEO PLAYER
DOLBY
D I G I T A L
INSTRUCTIONS
For Customer Use:
Enter below the Model No. and Serial
No. which are located either on the rear,
bottom or side of the cabinet. Retain this
information for future reference.
Model No.
Serial No.
LVT0454-003A
[E]
Page 2

Warnings, Cautions and Others
Warnung, Achtung und sostige Hinweise
Mises en garde, précautions et indications diverses
Waarschuwingen, voorzorgen en andere mededelingen
Caution –– switch!
Disconnect the mains plug to shut the power off completely.
The switch in any position does not disconnect the mains
line. The power can be remote controlled.
Achtung — -Schalter!
Den Netzstecker aus der Steckdose ziehen, um die Stromversorgung
vollkommen zu unterbrechen. Der Schalter unterbrichet in keiner
Stellung die Stromversorgung vollkommen. Die Stromversorgung kann
mit der Fernbedienung ein- und ausgeschaltet werden.
Attention — Commutateur !
Déconnecter la fiche de secteur pour couper complètement le
courant. Le commutateur ne coupe jamais complètement la
ligne de secteur, quelle que soit sa position. Le courant peut être
télécommandé.
Voorzichtig — schakelaar!
Om de stroomtoevoer geheel uit te schakelen, trekt u de stekker uit
het stopkontakt. Anders zal er altijd een geringe hoeveelheid stroom
naar het apparaat lopen, ongeacht de stand van de schakelaar.
U kunt het apparaat ook met de afstandsbediening aan- en
uitschakelen.
CAUTION
To reduce the risk of electrical shocks, fire, etc.:
1. Do not remove screws, covers or cabinet.
2. Do not expose this appliance to rain or moisture.
ACHTUNG
Zur Verhinderung von elektrischen Schlägen, Brandgefahr, usw:
1. Keine Schrauben lösen oder Abdeckungen enternen und
nicht das Gehäuse öffnen.
2. Dieses Gerät weder Regen noch Feuchtigkeit aussetzen.
ATTENTION
Afin d’éviter tout risque d’électrocution, d’incendie, etc.:
1. Ne pas enlever les vis ni les panneaux et ne pas ouvrir le
coffret de l’appareil.
2. Ne pas exposer l’appareil à la pluie ni à l’humidité.
VOORZICHTIG
Ter vermindering van gevaar voor brand, elektrische schokken, enz.:
1. Verwijder geen schroeven, panelen of de behuizing.
2. Stel dit toestel niet bloot aan regen of vocht.
CAUTION:
• Do not block the ventilation openings or holes.
(If the ventilation openings or holes are blocked by a newspaper
or cloth, etc., the heat may not be able to get out.)
• Do not place any naked flame sources, such as lighted candles,
on the apparatus.
• When discarding batteries, environmental problems must be
considered and local rules or laws governing the disposal of these
batteries must be followed strictly.
• Do not use this apparatus in a bathroom or places with water.
Also do not place any containers filled with water or liquids (such
as cosmetics or medicines, flower vases, potted plants, cups, etc.)
on top of this apparatus.
ACHTUNG
• Blockieren Sie keine Belüftungsschlitze oder -bohrungen.
(Wenn die Belüftungsöffnungen oder -löcher durch eine Zeitung
oder ein Tuch etc. blockiert werden, kann die entstehende Hitze
nicht abgeführt werden.)
• Stellen Sie keine offenen Flammen, beispielsweise angezündete
Kerzen, auf das Gerät.
• Wenn Sie Batterien entsorgen, denken Sie an den Umweltschutz.
Batterien müssen entsprechend den geltenden örtlichen
Vorschriften oder Gesetzen entsorgt werden.
• Setzen Sie die Anlage nicht in einem Badezimmer oder an Orten
ein, an denen Wasser verwendet wird. Stellen Sie auch keine
Behälter, die mit Wasser oder anderen Flüssigkeiten gefüllt sind
(beispielsweise Kosmetik- oder Medikamentenbehälter, Blumenvasen, Topfpflanzen, Tassen etc) auf diese Anlage.
ATTENTION
• Ne bloquez pas les orifices ou les trous de ventilation.
(Si les orifices ou les trous de ventilation sont bloqués par un
journal un tissu, etc., la chaleur peut ne pas être évacuée
correctement de l’appareil.)
• Ne placez aucune source de flamme nue, telle qu’une bougie,
sur l’appareil.
• Lors de la mise au rebut des piles, veuillez prendre en
considération les problèmes de l’environnement et suivre
strictement les règles et les lois locales sur la mise au rebut
des piles.
• N’utilisez pas cet appareil dans une salle de bain ou un autre
endroit avec de l’eau.
Ne placez aucun récipient contenant de l’eau (tel que des
cosmétiques ou des médicaments, un vase de fleurs, un pot
de fleurs, une tasse, etc.) sur cet appareil.
VOORZICHTIG
• Zorg dat u de ventilatieopeningen en -gaten niet afsluit.
(Als de ventilatieopeningen en -gaten worden afgesloten door
bijvoorbeeld papier of een doek, kan er hitte in het apparaat
worden opgebouwd.)
• Zet geen bronnen met open vuur, zoals brandende kaarsen, op
het apparaat.
• Wees milieubewust en gooi lege batterijen niet bij het huishoudelijk afval. Lege batterijen dient u in te leveren met het KCA of bij
een innamepunt voor batterijen.
• Gebruik dit apparaat niet in een badkamer of in andere natte
ruimten.
Zet ook geen voorwerpen op het apparaat die zijn gevuld met
water of andere vloeistoffen (zoals cosmetica, medicijnen,
bloemenvazen, bloempotten, kopjes enz.).
2
Page 3
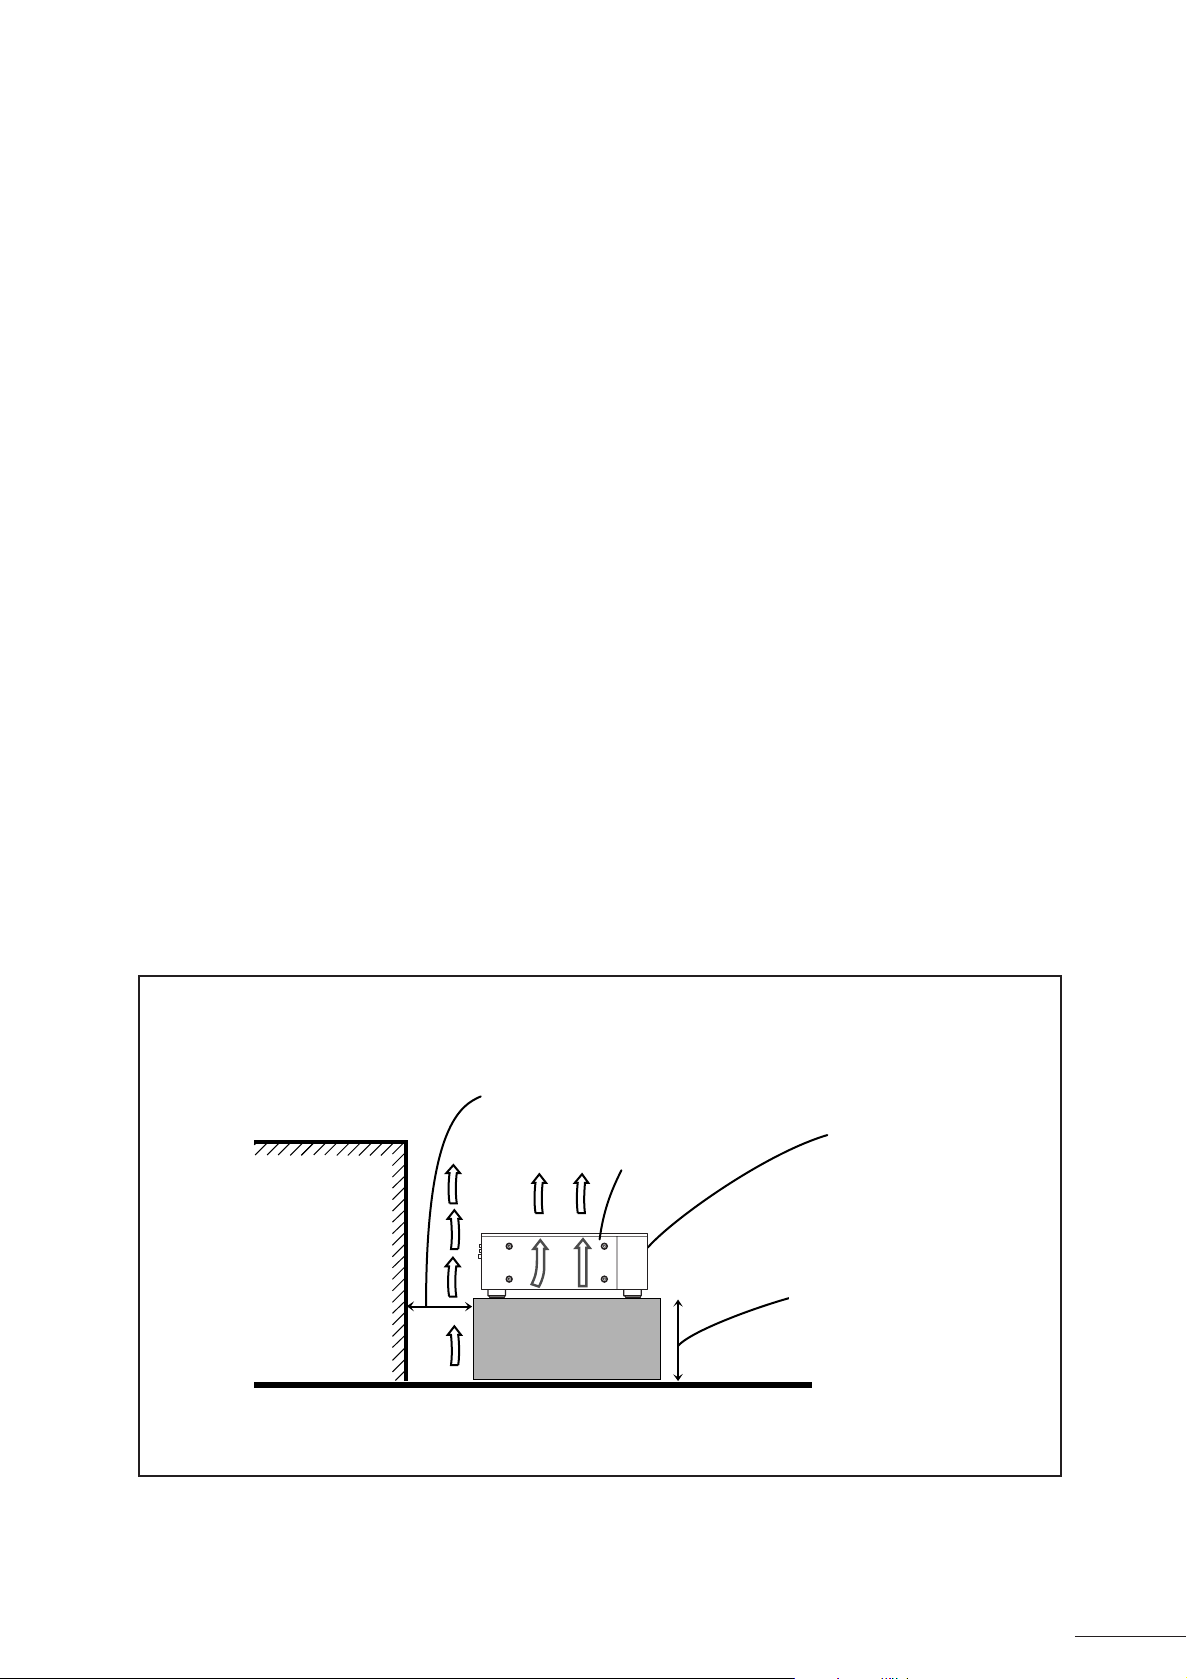
Caution: Proper Ventilation
To avoid risk of electric shock and fire and to protect from damage.
Locate the apparatus as follows:
Front: No obstructions open spacing.
Sides: No obstructions in 3 cm from the sides.
Top: No obstructions in 5 cm from the top.
Back: No obstructions in 15 cm from the back
Bottom: No obstructions, place on the level surface.
Achtung: Angemessene Ventilation
Stellen Sie das Gerät zur Verhütung von elektrischem Schlag und
Feuer und zum Schutz gegen Beschädigung wie folgt auf:
Vorderseite: Offener Platz ohne Hindernisse.
Seiten: Keine Hindernisse innerhalb 3 cm von den Seiten.
Oberseite: Keine Hindernisse innerhalb 5 cm von der Oberseite.
Rückseite: Keine Hindernisse innerhalb 15 cm von der Rückseite.
Unterseite: Keine Hindernisse. Auf eine ebene Oberfläche stellen.
Attention: V entilation Correcte
Pour éviter les chocs électriques, l’incendie et tout autre dégât.
Disposer l’appareil en tenant compte des impératifs suivants
Avant: Rien ne doit gêner le dégagement
Flancs: Laisser 3 cm de dégagement latéral
Dessus: Laisser 5 cm de dégagement supérieur
Arrière: Laisser 15 cm de dégagement arrière
Dessous: Rien ne doit obstruer par dessous; poser l’appareil sur
une surface plate.
Voorzichtig: Zorg Voor Goede Ventilatie
Om gevaar voor brand of een elektrische schok te voorkomen, dient
u bij opstelling van het apparaat op de volgende punten te letten:
Voorkant: Voldoende ruimte vrij houden.
Zijkanten: Minstens 3 cm aan weerszijden vrij houden.
Bovenkant: Niets bovenop plaatsen; 5 cm speling geven.
Achterkant: Minstens 15 cm ruimte achteraan vrij houden.
Onderkant: Opstellen op een egaal horizontaal oppervlak.
Wall or obstructions
Wand oder Hindernisse
Mur, ou obstruction
Wand of meubilair
Spacing 15 cm or more
Abstand von 15 cm oder mehr
Dégagement de 15 cm ou plus
Minstens 15 cm tussenruimte
XV-D9000
Floor
Boden
Plancher
Vloer
Front
Vorderseite
Avant
Voorkant
Stand height 5 cm or more
Standhöhe 5 cm oder mehr
Hauteur du socle: 5 cm ou plus
Standard op minstens 5 cm van de vloer
3
Page 4
IMPORTANT FOR LASER PRODUCTS
WICHTIGER HINWEIS FÜR LASER-PRODUKTE / IMPORTANT POUR LES PRODUITS LASER / BELANGRIJKE INFORMATIE VOOR
LASERPRODUKTEN
REPRODUCTION OF LABELS
ANBRINGUNGSORTE FÜR LASER-PRODUKTE / REPRODUCTION DES ETIQUETTES / VERLARING VAN DE LABELS
1 CLASSIFICATION LABEL, PLACED ON REAR ENCLOSURE
1 KLASSIFIKATIONSETIKETTE AN DER RÜCKSEITE
1 ETIQUETTE DE CLASSIFICATION, PLACÉE A L'ARRIÈRE
DU COFFRET
1 KLASSIFIKATIELABEL, OP DE ACHTERZIJDE VAN HET
APPARAAT
CLASS 1
LASER PRODUCT
1. CLASS 1 LASER PRODUCT
2. DANGER: Invisible laser radiation when open and interlock
failed or defeated. Avoid direct exposure to beam.
3. CAUTION: Do not open the top cover. There are no user
serviceable parts inside the Unit; leave all servicing to qualified
service personnel.
1. LASER-PRODUKT DER KLASSE 1
2. GEFAHR: Sichtbare Laserstrahlung bei Öffnung und
fehlerhafter oder beschädigter Spre. Direkten Kontakt mit dem
Strahl vermeiden!
3. ACHTUNG: Das Gehäuse nicht öffnen. Das Gerät enthält
keinerlei Teile, die vom Benutzer gewartet werden können.
Überlassen Sie Wartungsarbeiten bitte qualifizierten
Kundendienst-Fachleuten.
2 WARNING LABEL, PLACED INSIDE THE UNIT
2 WARNETIKETTE IM GERÄTEINNEREN
2 ETIQUETTE D’AVERTISSEMENT PLACÉE À L’INTERIEUR
DE L’APPAREIL
2 WAARSCHUWINGSLABEL, IN HET APPARAAT
CAUTION: Invisible laser
radiation when open and
interlock failed or defeated.
AVOID DIRECT EXPOSURE
TO BEAM. (e)
VARNING: Osynlig laserstrålning när denna del är
öppnad och spärren är
urkopplad. Betrakta ej
strålen. (s)
ADVARSEL: Usynlig laserstråling ved åbning, når
sikkerhedsafbrydere er ude
af funktion. Undgå udsættelse for stråling (d)
VARO: Avattaessa ja suojalukitus ohitettaessa olet
alttiina näkymättömälle
lasersäteilylle. Älä katso
säteeseen. (f)
1. PRODUIT LASER CLASSE 1
2. ATTENTION: Radiation laser visible quand l’appareil est ouvert
ou que le verrouillage est en panne ou désactivé. Eviter une
exposition directe au rayon.
3. ATTENTION: Ne pas ouvrir le couvercle du dessus. Il n’y a
aucune pièce utilisable à l’intérieur. Laisser à un personnel
qualifié le soin de réparer votre appareil.
1. KLAS 1 LASERPRODUKT
2. GEVAARLIJK: Zichtbaar laserstraling wanneer open en de
beveiliging faalt of uitgeschakeld is. Voorkom het direkt
blootstaan aan de straal.
3. VOORZICHTIG: De bovenkap niet openen. Binnenin het
toestel bevinden zich geen door de gebruiker te repareren
onderdelen: laat onderhoud over aan bekwaam vakpersoneel.
4
Page 5

Contents
Warnings, Cautions and Others ...................................................2
Features ......................................................................................... 6
Usage Precautions........................................................................7
Connections ..................................................................................8
Precautions to Observe When Setting Up the Connections ............... 8
Connecting to a TV with a DVD Component Video
Input T erminal.......................................................................... 9
Connecting to a TV....................................................................10
Connecting to an Amplifier or Receiver..................................... 11
Connecting to an Amplifier with a 5.1 Channel Input Terminal ..12
Connecting to a Device with a Digital Input Terminal ................ 13
Connecting to the Power Supply ...............................................14
Preparing the Remote Control ...................................................15
Parts and Their Functions ..........................................................16
Front Panel................................................................................ 16
Display Section..........................................................................17
Rear Panel ................................................................................ 18
Remote Control ......................................................................... 19
Before Y ou Start .......................................................................... 21
Opening Screen ........................................................................21
Preventing Screen Burn-in [Screen Saver]................................ 21
On-screen guide icons ..............................................................21
Types of Disc Supported by this Player..................................... 22
Disc Composition ......................................................................23
Switching the Power On .............................................................24
Initial Settings ............................................................................. 25
Setting Up the Initial Settings .................................................... 25
PREFERENCE 1 Settings......................................................... 26
PREFERENCE 2 Settings......................................................... 28
SPK. SETTING Screen Settings ...............................................30
Basic Operations ........................................................................ 33
Loading a Disc .......................................................................... 33
Playing a Disc............................................................................34
Step-by-Step Procedure for Playing a Disc...........................34
Stopping a Disc ..................................................................... 34
Pausing a Disc.......................................................................34
Skipping Through a Disc ....................................................... 34
Fast Forward/Backward Through a Disc................................ 35
Resume Playback [RESUME] ...................................................35
Storing the resume position................................................... 35
Resuming Playback............................................................... 35
Viewing One Frame at a Time ................................................... 36
Slow Motion Playback ............................................................... 36
Playing Time Display [TIME DISPLAY]......................................37
Using time display during playback ....................................... 37
Using time display while a disc is stopped
(using [TIME DISPLAY]) .................................................... 37
Using time display while a disc is stopped ............................ 38
Turning the Display Off to Get Better Sound Quality
[DISPLAY OFF] .....................................................................39
Adjusting the Image Brightness [THEATER POSITION] ........... 40
fs/RATE Display [fs/RATE] .........................................................40
Enjoying DVD Audio ................................................................... 42
Using the menu to select an item to play .................................. 42
Selecting a Track ....................................................................... 43
Selecting an Index Item............................................................. 44
Still image display operations.................................................... 44
Advancing/replaying still images [PAGE +/–]......................... 44
Jumping to specified still images on a disc [RETURN] ......... 44
Program Playback .....................................................................45
Random Playback ..................................................................... 46
Repeat Playback ....................................................................... 46
A-B Repeat Playback ................................................................ 47
Changing the Angle [ANGLE] ................................................... 47
Changing the Subtitles [SUBTITLE] ..........................................48
Changing the Audio Setting [AUDIO] ........................................ 49
Playing a Bonus Group ............................................................. 49
Playing DVD Video Discs ............................................................51
Selecting the Section You Want to Watch.................................. 51
Using the menu to select an item to play...............................51
Specifying the title number to begin playback ....................... 52
Specifying the chapter number to begin playback
(Chapter search)................................................................ 52
Repeat Playback ....................................................................... 52
A-B Repeat Playback ................................................................ 53
Changing the Angle [ANGLE] ................................................... 53
Changing the Subtitles [SUBTITLE] ..........................................54
Changing the Audio Language [AUDIO].................................... 54
Parental Lock Setting ................................................................ 55
Setting Parental Lock ............................................................ 55
Changing Parental Lock ........................................................ 56
Temporarily Cancelling Parental Lock ...................................57
Playing Audio CD and Video CD Discs ..................................... 58
Selecting a Song from a Menu ..................................................59
Selecting a Track ....................................................................... 59
Selecting an Index Item............................................................. 59
Program Playback .....................................................................60
Random Playback ..................................................................... 61
Repeat Playback ....................................................................... 61
A-B Repeat Playback ................................................................ 62
Changing the Audio Channel [AUDIO] ......................................62
Extended K2 Processing Version 2.0 Function ........................ 63
Handling Discs ............................................................................ 64
Troubleshooting .......................................................................... 65
Specifications.............................................................................. 66
Dimensions.................................................................................. 67
Table of Languages and Their Abbreviations ........................... 68
Country Code List for Parental Lock.........................................70
Glossary....................................................................................... 71
5
Page 6

Features
High-end DVD player for playback of Audio DVDs and Video DVDs. The machine
makes full use of the latest advances in DVD technology.
Extended K2 Processing Version 2.0
Extended K2 processing takes the music signal before any band limitation is presumed and the digital signal is
expanded for the high bit and high sampling. Version 2.0 strengthens this frequency by as much as four times and is
carried by the front two channels. 44.1 kHz and 48 kHz are expanded and reformed as 24 bit 176.4 kHz and 192 kHz
signals respectively. The means that the pla yback quality of the digital source is one le v el closer to the original master.
PEM • DD Converter with 192 kHz/24 bit Support
This model includes our recently developed PEM • DD conver ter that suppor ts the 192 kHz/24 bit signal that is top
specification for Audio DVD voice format. The front two channels use separate D AC configur ations for the left and right
channels. With a dynamic range of 112 dB, it achieves a high frequency distortion factor of less than 0.001 %.
In addition, all channels use the same D/A converter which provides a jitter-free fine clock generator and the use of
dedicated audio R core power transformer and other features deliver excellent sound quality.
Interference-free, Vibration-free, Resonance-free Construction
Each circuit is isolated to exclude mutual interference between the circuits, with each five block structure being
independent. Analog related circuits are completely isolated from the sub-chassis with the digital elements such as
the dedicated audio power transformer . Furthermore, the occurrence of unnecessary oscillation and outside influences
are excluded by the 3.2 mm steel base plate and the solid aluminum casing. The air tightness of the unit has been
dramatically improved with the use of an airtight disc tray to shut out exter nal vibration and option of completely
turning off the video circuitry to achieve the maximum sound quality possible.
6
Page 7

Usage Precautions
Installing the player
Install the player in a location where the temper ature is between 5 °C to 35 °C (41 °F to 95 °F). If the pla yer is e xposed
to a higher temperature, it may cause it to malfunction, or cause damage . In particular, avoid installing it in the f ollowing
locations.
• Locations where it is exposed to direct sunlight
• Locations that become hot, such as on top of a receiver
If TV or radio reception deteriorates...
• Keep distance between the TV or radio and this player. If this player is installed near equipment that receives
electromagnetic waves, it may effect reception.
Moving the Player
• If you move the pla yer from a cold location to a warm location, do not use the pla yer immediately after moving it. This
is because condensation can form inside the player. If you allow the player to stand with the power on for a few
hours, you can then use it normally.
• Always remove discs from the player before moving it. If you move the player while a disc is inside, the disc can
become lodged inside the player and will be difficult to remove, and can also cause damage.
Do not insert warped or irregular shaped discs
• Do not insert cracked or warped discs into the player, or discs that have been repaired with adhesive, or heartshaped discs, octagonal discs, or other irregular shaped discs. These can cause damage.
Cleaning the exterior of the player
• To clean the cover and other exterior parts of the player, wipe them with soft, dry cloth. For persistent stains or dirt,
wipe them with a cloth moistened with a mild detergent. Never use thinner, benzine, or other inflammable agents.
This can cause cloudiness or discoloring of the exterior.
Trademark and Copyright Information
• This player is based on technology licensed from Dolb y Labor atories Inc. Dolby , Pro Logic , MLP Lossless , and the
Dolby D logo are trademarks of Dolby Laboratories Inc. (Confidential copyright.) © 1992-1998 Dolb y Laboratories
Inc. All rights reserved.
• This player is based on technology licensed from Digital Theater Systems Inc. DTS and DTS Digital Surround are
trademarks of Digital Theater Systems Inc.
©1996 Digital Theater Systems, Inc. All Right Reserved.
• This player uses cop y protection technology. This cop y protection technology is licensed by Macro vision Inc. for use
in the United States and other countries. T o use this technology a license is required from Macro vision Inc. Without
a license form Macrovision Inc., you may not use this technology outside the limited range of home use. The
disassembly or reverse engineering of this technology is also prohibited.
• The unauthorized copying, broadcast, presentation, and rental of D VD discs, without the permission of the copyright
owner is prohibited.
• The DVD logo is a registered trademark.
7
Page 8
Connections
● The sound quality can be subtly effected depending on the material and construction of the connection cables and cords. Connection cables or cords are not
supplied with this player. These must be purchased separately. We recommend
that you compare several types and choose cables/cords best suited to your
needs.
In order to use this model, it must be connected to a TV or monitor.
* T o av oid repetition of the various procedures, the follo wing descriptions explain the procedures assuming a connection
to a TV. However, you can also connect the player to a monitor or projector instead of a TV.
Precautions to Observe When Setting Up the Connections
• Before connecting any cables, make sure that power to player itself and the other devices is switched off.
• Depending on the device used, the labels for the terminals may differ . Ref er to the manual provided with y our device
when making connections.
• Make sure you insert all plugs firmly. A loose connection can cause noise or the loss of sound.
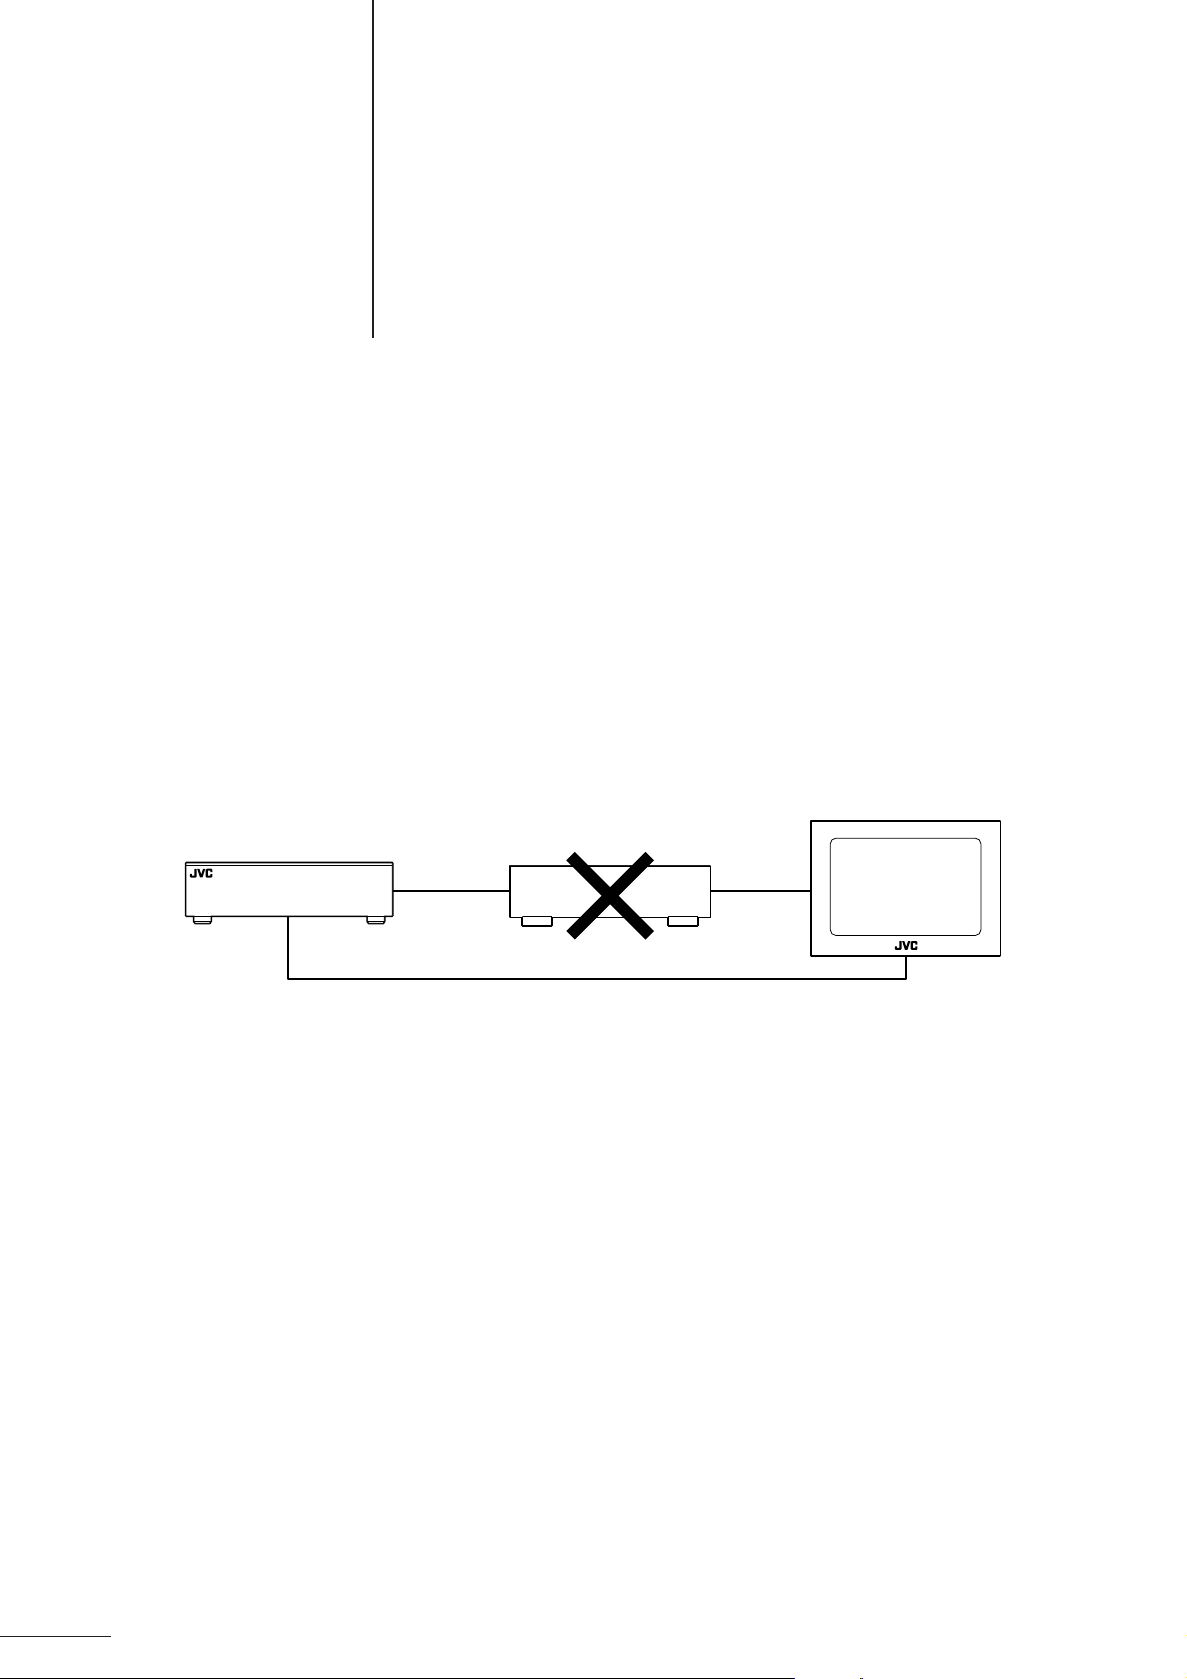
• Connect the video output from the player directly to a TV (or monitor). If the video output is connected via a video
player, the picture quality during playback will deteriorate.
Main unit
Direct connection
Video player
TV
8
Page 9
Connections
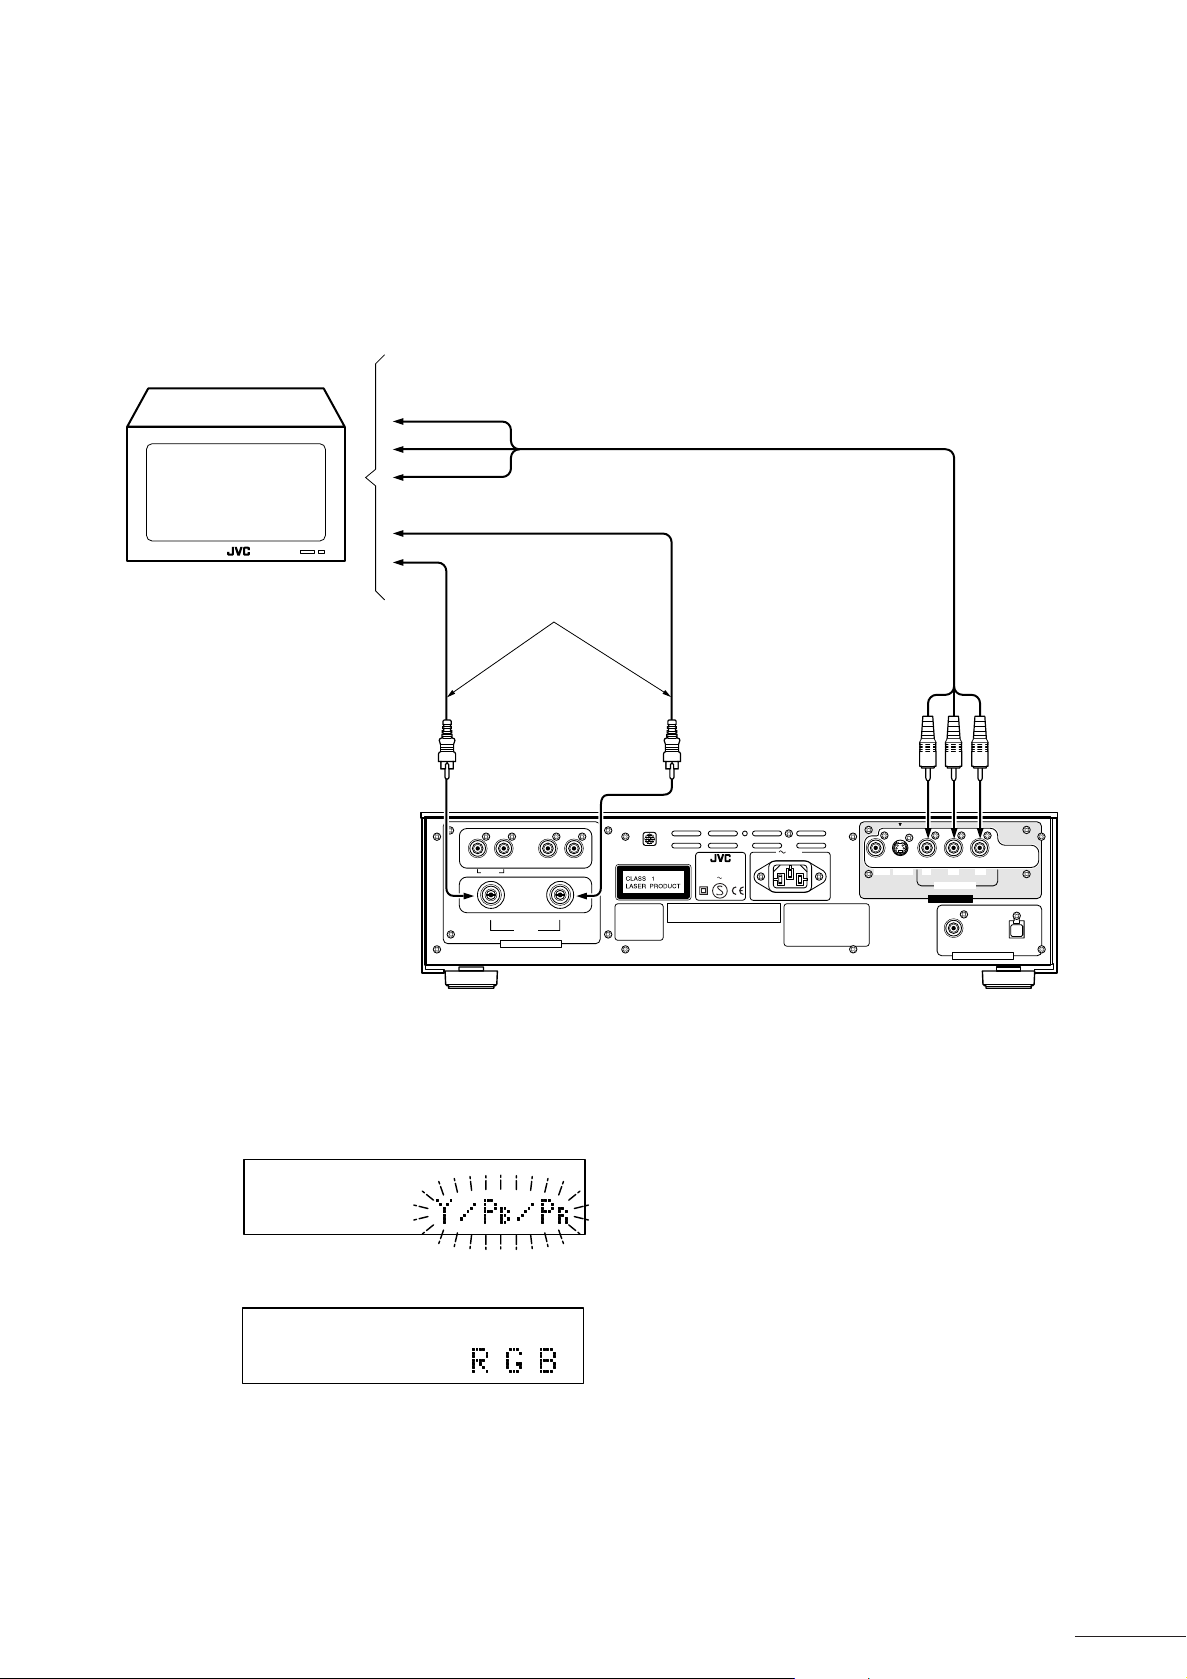
Connecting to a TV with a DVD Component or RGB Video Input Terminal
By using the component/RGB video output terminal to connect the player to the TV you can enjoy high-quality video
performance.
To DVD component or RGB video input terminal
PR / R
PB / G
Y / B
TV
To AUDIO LEFT input terminal
To AUDIO RIGHT input terminal
Sound is output from
the TV speakers.
Audio cable
Component or RGB cable
RIGHT LEFT
AC IN
Manufactured under license from Dolby
Laboratories."Dolby", "MLP Lossless",
and the double-D symbol are
trademarks of Dolby Laboratories.
Confidential Unpublished Works.
Copyrights 1992-1998 Dolby
Laboratories. All rights reserved.
VICTOR COMPANY OF JAPAN,LIMITED MADE IN JAPAN
VIDEO
S-VIDEO
P
B
/B
Y/G
COMPONENT/RGB
VIDEO OUTPUT
COAXIAL OPTICAL
PCM / STREAM
AUDIO DIGITAL OUTPUT
P
R
/R
REAR CENTER SUBWOOFER
RIGHT
WARNING: SHOCK HAZARD - DO NOT OPEN
AVIS: RISQUE DE CHOC ELECTRIQUE - NE PAS OUVRIR
LEFT
FRONT
AUDIO ANALOG OUTPUT
Apparatus Claims of
U.S. Patent Nos.
4,631,603, 4,577,216,
4,819,098, and
4,907,093 licensed
for limited viewing
uses only.
DVD PLAYER
MODEL NO. XV-D9000
AC 230V 50Hz 35W
Manufactured under license from Digital Theeter Systemes, Inc. US Pat.
No.5,451,942 and other world-wide paterts lssued and pending. "DTS"
and "DTS Digital Surround" are trademarks of Digital Theater Systems,
Inc. Copyrlght 1996 Digital Theater Systems,Inc.All rights reeerved.
• The output of the COMPONENT/RGB terminal can be changed between “COMPONENT” and “RGB”. If the 7
(STOP) key of the main unit is kept pressed for 3 seconds or longer, the current setting is displayed flashing.
If it is kept pressed for another 2 seconds or longer, the output setting is changed.
Main unit
9
Page 10
Connections
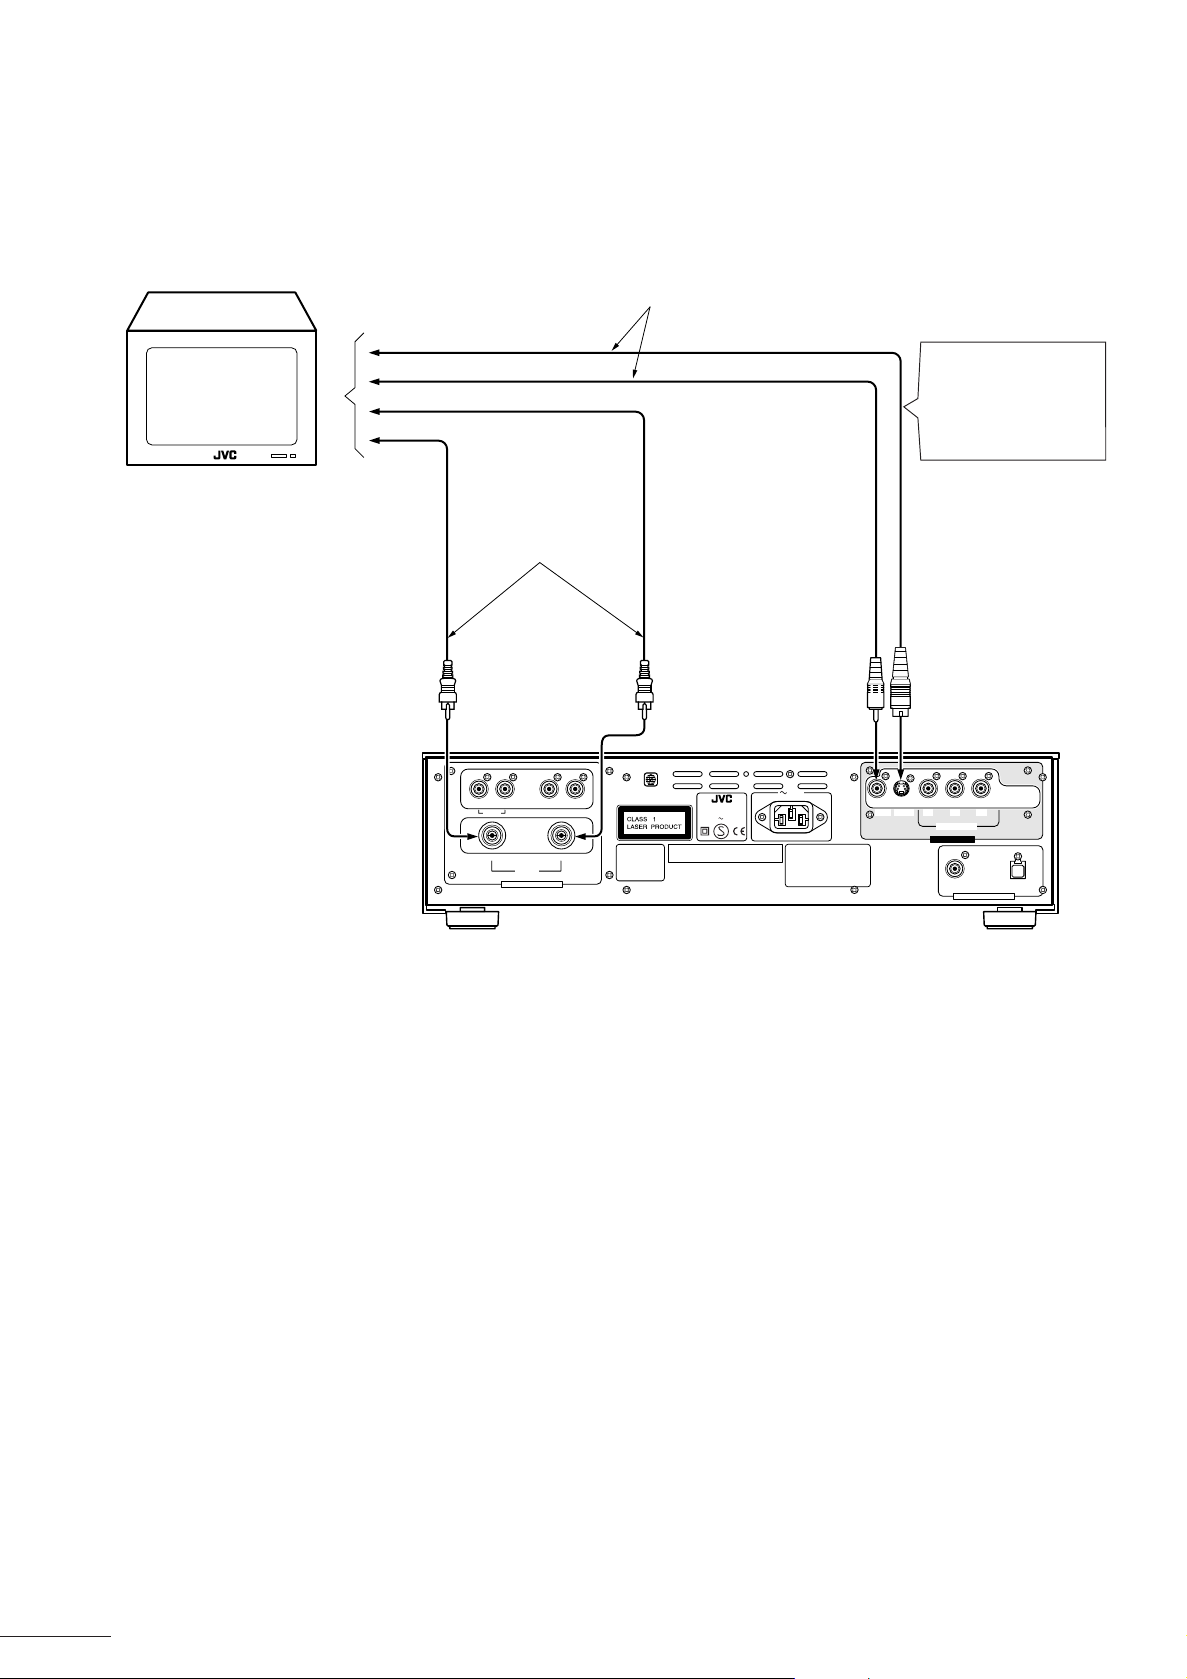
Connecting to a TV
You can also use the player b y simply connecting it to a normal TV . To enjoy the advanced sound quality, connect the
audio output to specialist audio equipment. See pages 11, 12 and 13.
Connect one of these
TV
Sound is output from
the TV speakers.
To S-Video input terminals S Video cable
To video input terminals video cable
To AUDIO LEFT input terminal
To AUDIO RIGHT input terminal
Audio cable
Main unit
RIGHT LEFT
DVD PLAYER
REAR CENTER SUBWOOFER
RIGHT
WARNING: SHOCK HAZARD - DO NOT OPEN
AVIS: RISQUE DE CHOC ELECTRIQUE - NE PAS OUVRIR
LEFT
FRONT
AUDIO ANALOG OUTPUT
Apparatus Claims of
U.S. Patent Nos.
4,631,603, 4,577,216,
4,819,098, and
4,907,093 licensed
for limited viewing
uses only.
MODEL NO. XV-D9000
AC 230V 50Hz 35W
Manufactured under license from Digital Theeter Systemes, Inc. US Pat.
No.5,451,942 and other world-wide paterts lssued and pending. "DTS"
and "DTS Digital Surround" are trademarks of Digital Theater Systems,
Inc. Copyrlght 1996 Digital Theater Systems,Inc.All rights reeerved.
AC IN
Manufactured under license frufactured under license from Dolby
Laboratories."Dolby", "MLP Lossless",
and the double-D symbol are
trademarks of Dolby Laboratories.
Confidential Unpublished Works.
Copyrights 1992-1998 Dolby
Laboratories. All rights reserved.
VICTOR COMPANY OF JAPAN,LIMITED MADE IN JAPAN
VIDEO
Connect this if your TV
has a S-Video input
terminal. You will get
better picture quality.
S-VIDEO
P
B
/B
Y/G
COMPONENT/RGB
VIDEO OUTPUT
COAXIAL OPTICAL
PCM / STREAM
AUDIO DIGITAL OUTPUT
P
R
/R
S-Video Signal
S-Video separates the luminance signal (Y) and color signal (C) of previous video signals . It achieves vivid images in
which color blur is rare.
<CAUTION>
When using S-Video Signal, set the OUTPUT FORMAT to [Y/PB/PR]. Refer to page 9.
10
Page 11
Connections
s
d
g
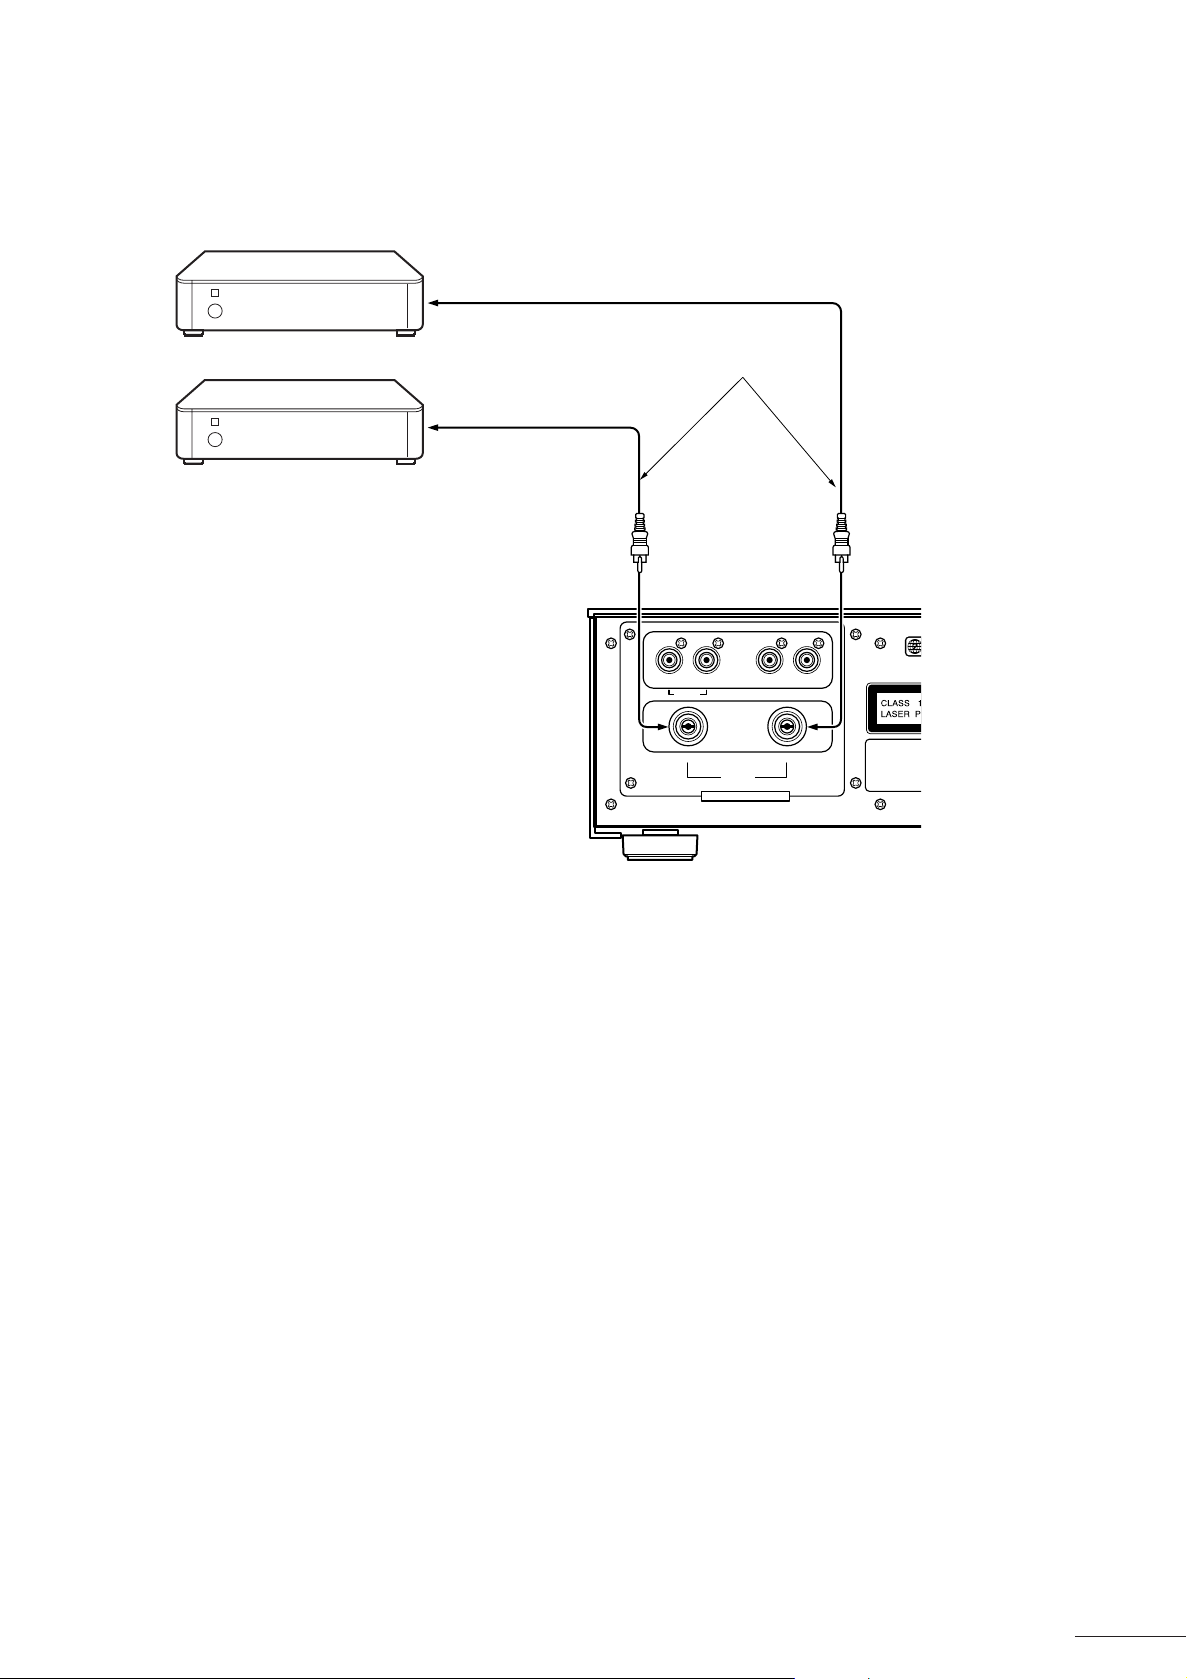
Connecting to an Amplifier or Receiver
By connecting the output from the player to speakers via a receiver or receiver you can enjoy realistic sound.
To LEFT input terminal
Connect the player output to
Amplifier or Receiver
Audio cable
To RIGHT input terminal
Main unit
RIGHT LEFT
the amplifier line input terminal
(AUX, DVD, CD, etc.) See
pages 9 and 10 for details for
the video signal connection.
REAR CENTER SUBWOOFER
Apparatus Claim
U.S. Patent Nos.
RIGHT
WARNING: SHOCK HAZARD - DO NOT OPEN
AVIS: RISQUE DE CHOC ELECTRIQUE - NE PAS OUVRIR
AUDIO ANALOG OUTPUT
LEFT
FRONT
4,631,603, 4,577,2
4,819,098, and
4,907,093 license
for limited viewin
uses only.
After you have setup the connection...
● Downmix Settings
When playing D VD Audio , Dolby Digital, and DTS multi-channel discs the do wnmix settings are used. These settings
mean that even when multi-channel discs are played back in two stereo channels, they use not only the front left
and right channels, but also use the other channel information. Set [DOWNMIX] in Initial Settings 2 of the Initial
Settings screen to [Lt/Rt] or [Lo/Ro]. See page 29.
• If [DOWNMIX] is set to [OFF], you can hear only front left and right channel sound.
• Some multi-channel DVD Audio discs prohibit downmixing. In these cases sound will only be output of the front
left and right channels.
11
Page 12
Connections
s
d
g
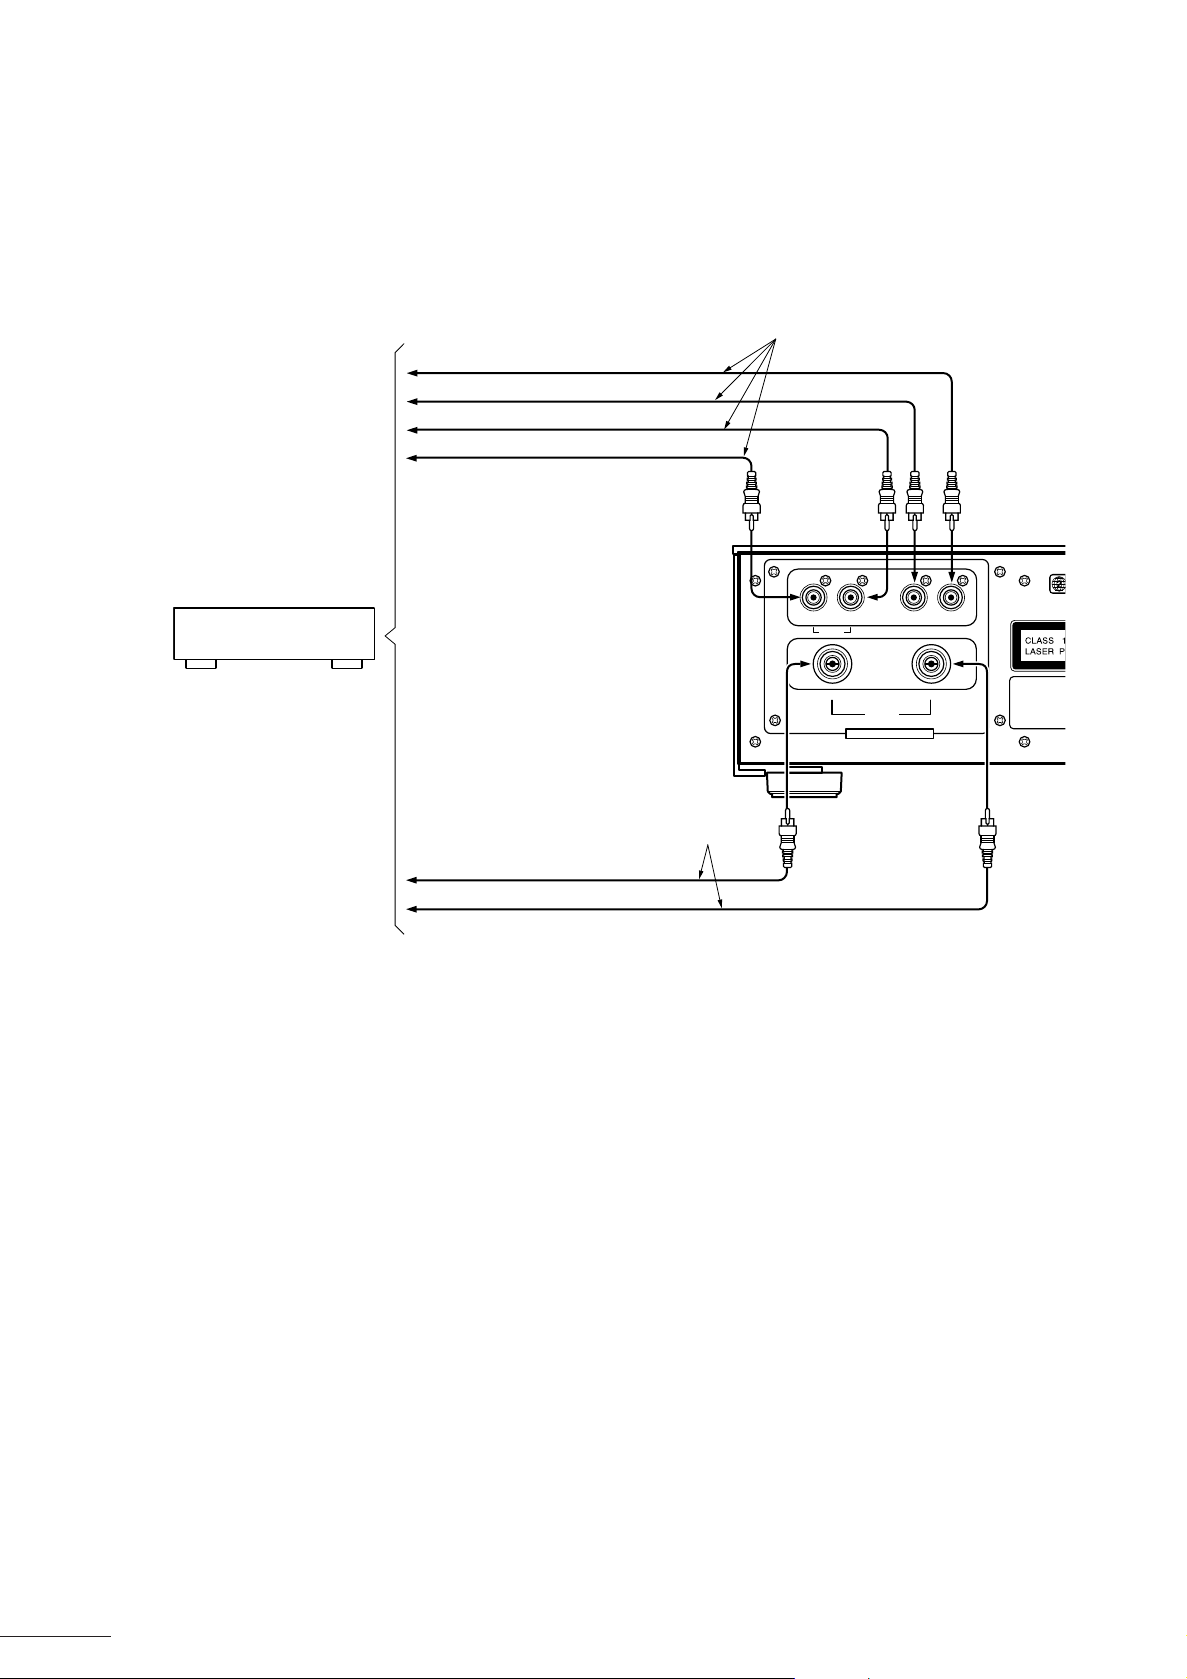
Connecting to a Receiver with a 5.1 Channel Input Terminal
The player has a built-in DVD Audio decoder, Dolby Digital decoder and DTS decoder, which means that external
decoders are unnecessary. By connecting the 5.1 ch output terminal of the player to the 5.1 ch input terminal of the
receiver, you can enjoy realistic multiochannel playback.
See pages 9 and 10 for details for the video signal connection.
Audio cable
To SUBWOOFER input terminal
To CENTER input terminal
To REAR LEFT input terminal
To REAR RIGHT input terminal
Main unit
Amplifier or receiver
(with 5.1 channel input terminal)
RIGHT LEFT
REAR CENTER SUBWOOFER
RIGHT
FRONT
WARNING: SHOCK HAZARD - DO NOT OPEN
AVIS: RISQUE DE CHOC ELECTRIQUE - NE PAS OUVRIR
AUDIO ANALOG OUTPUT
Audio cable
To FRONT RIGHT input terminal
To FRONT LEFT input terminal
After you have setup the connection...
● Speaker Settings
Set Speaker Settings of the Initial Settings screen to [5.1 CHANNEL] or [EXPERT]. See page 30.
● Downmix Settings
Set [DOWNMIX] in Initial Settings 2 of the Initial Settings screen to [OFF]. See page 29.
LEFT
Apparatus Claim
U.S. Patent Nos.
4,631,603, 4,577,2
4,819,098, and
4,907,093 license
for limited viewin
uses only.
12
Page 13

Connections
Connecting to a Device with a Digital Input Terminal
By connecting the digital output from this player to the digital input terminal of a receiver etc., y ou can send the digital
audio signal from discs to external devices without changing the signal. Also, by connecting to Dolby Digital or DTS
decoders (or amplifiers with built-in decoders), you can enjoy high-quality surround audio.
See pages 9 and 10 for details for the video signal
connection to a TV.
Remove the protective cap
before connecting
the digital optical
cable.
Main unit
VIDEO
S-VIDEO
nder license fr
nder license from Dolby
olb
olby", "MLP Lossless",
-D symbol are -D symbol are
olb
olby Laboratories.
pub
published Works.
2-1998 Dolb
2-1998 Dolby
ll rights reser
ll rights reserved.
COMPANY OF JAPAN,LIMITED MADE IN JAPAN
Y/G
VIDEO OUTPUT
P
R
/R
P
B
/B
COMPONENT/RGB
COAXIAL OPTICAL
PCM / STREAM
AUDIO DIGITAL OUTPUT
Connect one of these
Digital device
To DIGITAL COAXIAL input terminal Coaxial cable
To DIGITAL OPTICAL input terminal Digital optical cable
After you have setup the connection...
● Digital OUT Settings
Set [DIGITAL] OUT in Initial Settings 2 of the Initial Settings screen to match the connection to the external device.
See page 28.
Note:
●
When connecting to devices with Dolby Digital or DTS decoder functions
The [COMPRESSION] and [DOWNMIX] settings in Initial Settings 2 of the Initial Settings screen will not be applied
to the digital output from the player. Make any adjustments for these settings with the external decoder.
●
DVD Audio digital output
When recording the DVD Audio multi-channel digital output, the digital output is downmixed to two channels.
What is DTS (Digital Theater System)?
DTS is a new surround format that has better data compression to Dolby Digital that deliv ers superior quality surround
playback of audio. It uses the same 5.1 channel that Dolby Digital uses, but due to lower audio compression during
recording it produces audio with more depth and high S/N playback. It's wide dynamic range allows it to produce
magnificent sound with excellent audio separation.
13
Page 14
Connections
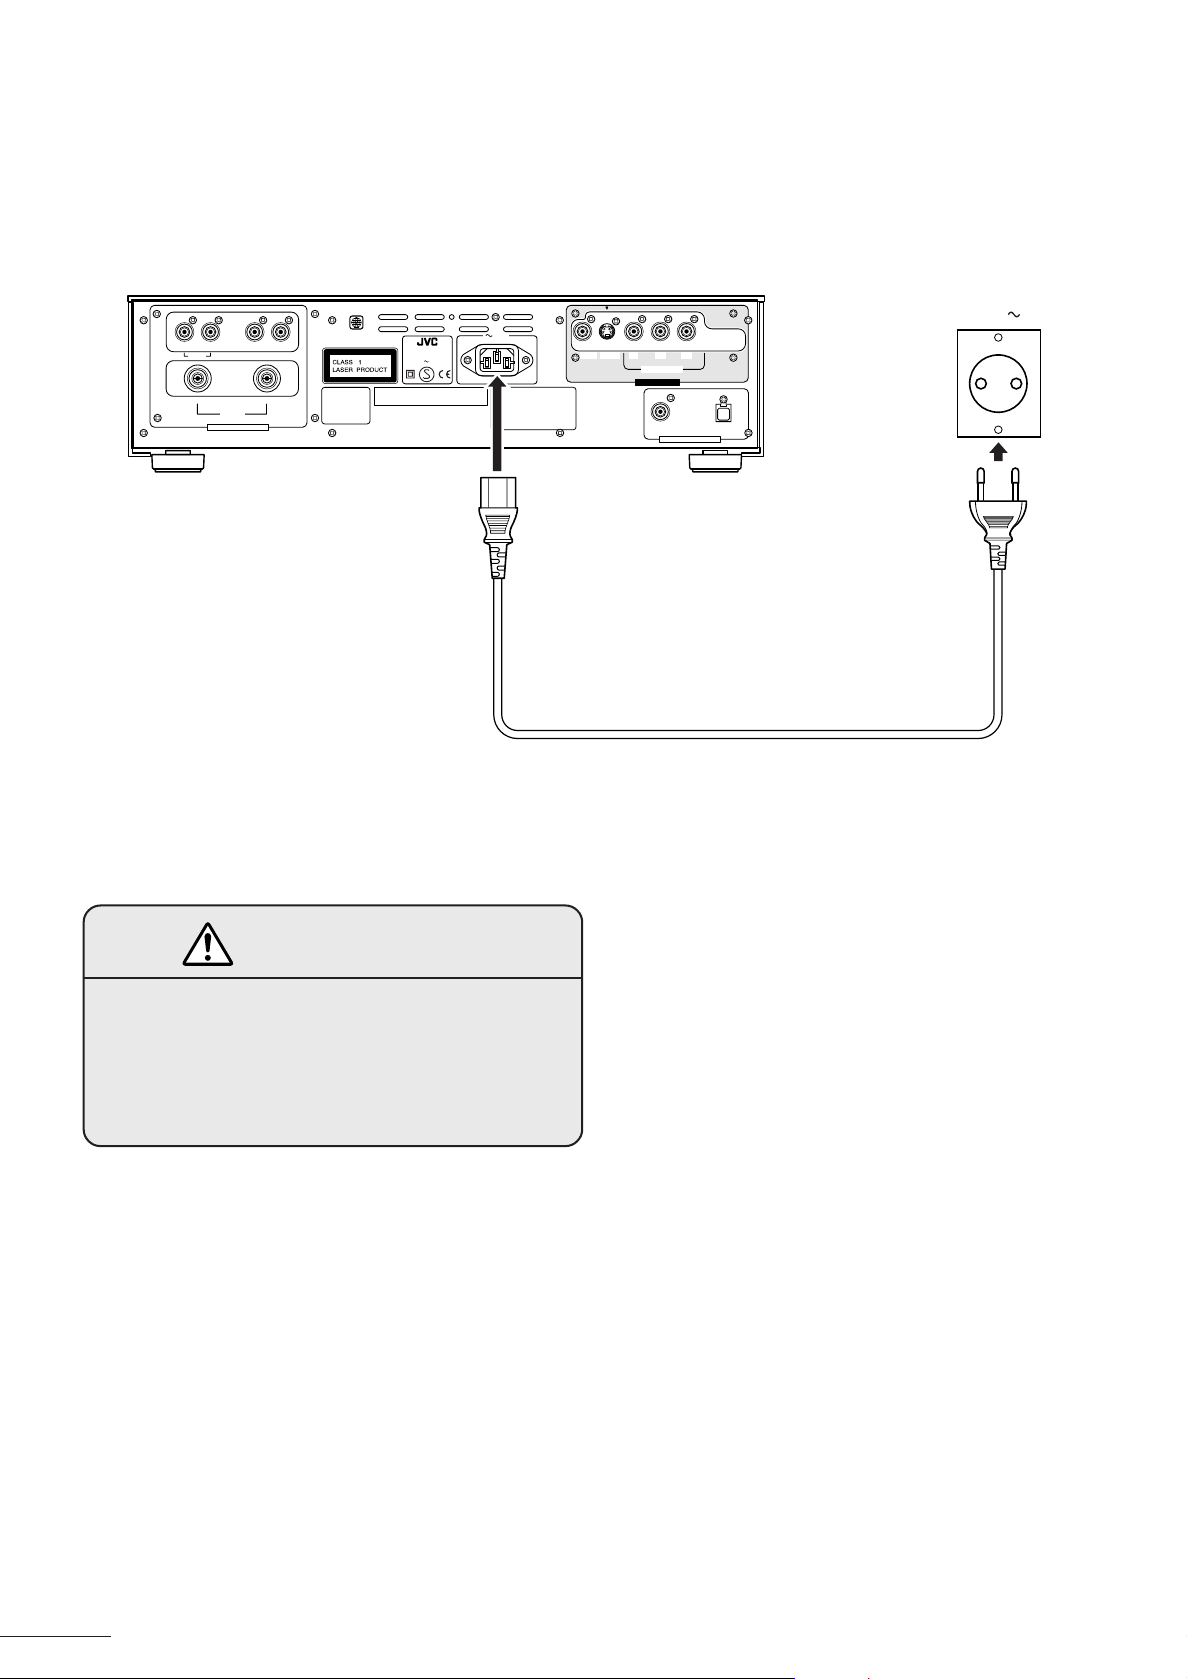
Connecting to the Power Supply
Use the power cord provided to connect the player to the power supply.
Insert the connector of the power cord into the power connector slot on the rear panel before inserting the power plug
into the power outlet.
Main unit
RIGHT LEFT
REAR CENTER SUBWOOFER
RIGHT
WARNING: SHOCK HAZARD - DO NOT OPEN
AVIS: RISQUE DE CHOC ELECTRIQUE - NE PAS OUVRIR
LEFT
FRONT
AUDIO ANALOG OUTPUT
Apparatus Claims of
U.S. Patent Nos.
4,631,603, 4,577,216,
4,819,098, and
4,907,093 licensed
for limited viewing
uses only.
DVD PLAYER
MODEL NO. XV-D9000
AC 230V 50Hz 35W
Manufactured under license from Digital Theeter Systemes, Inc. US Pat.
No.5,451,942 and other world-wide paterts lssued and pending. "DTS"
and "DTS Digital Surround" are trademarks of Digital Theater Systems,
Inc. Copyrlght 1996 Digital Theater Systems,Inc.All rights reeerved.
AC IN
Manufactured under license frufactured under license from Dolby
Laboratories."Dolby", "MLP Lossless",
and the double-D symbol are
trademarks of Dolbtrademarks of Dolby Laboratories.
Confidential Unpublished Works.
Copyrights 1992-1998 Dolbyrights 1992-1998 Dolby
Laboratories. All rights reserved.
VICTOR COMPANY OF JAPAN,LIMITED MADE IN JAPAN
VIDEO
S-VIDEO
P
B
/B
Y/G
COMPONENT/RGB
VIDEO OUTPUT
COAXIAL OPTICAL
PCM / STREAM
AUDIO DIGITAL OUTPUT
P
R
/R
AC230V 50Hz
• The AC power cord of this unit has certain one-way direction connections to prevent electric shock.
• Always connect the player directly to a wall power outlet.
CAUTION
Only use the power cord provided with the
player.
If you use a different cable, it may cause a
malfunction or a fire hazard.
14
Page 15
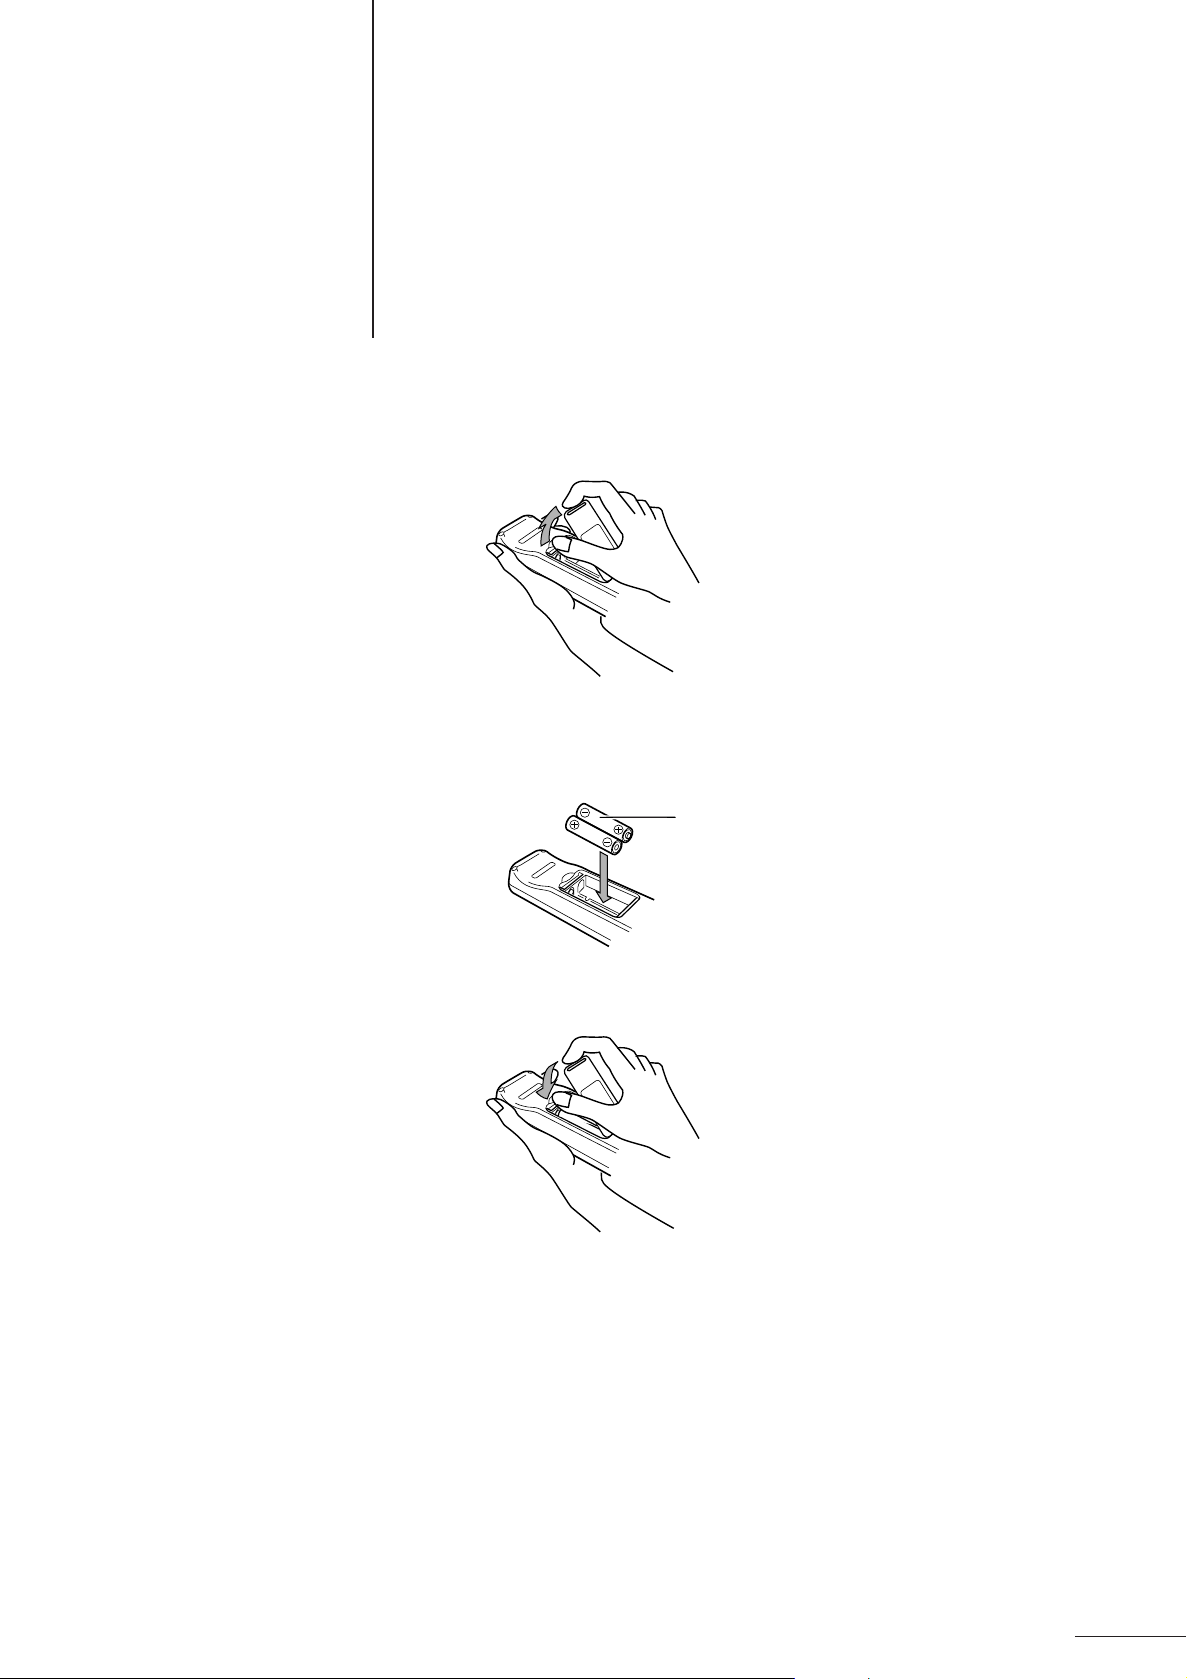
Preparing the Remote Control
● You can use the remote control to control the player.
The rear of the remote control includes a compartment for batteries.
1 While pressing the upper section of the battery compartment cover, lift off the cover.
2 Insert AAA dry-cell batteries.
Make sure that the + and - poles of the batteries are the same as indicated inside the battery compartment.
AAA dry-cell batteries
3 Close the battery compartment cover.
Note:
●
When the operation range of the remote control is reduced, or if you can only use it when v ery close to the main unit,
it is time to replace the batteries. Replace both batteries with new AAA batter ies. Although the battery life will vary
depending on amount of use and operating conditions, the batteries should last for six months , or so.
●
If you will not be using the play er for an extended period, remove the batteries from the remote control.
15
Page 16
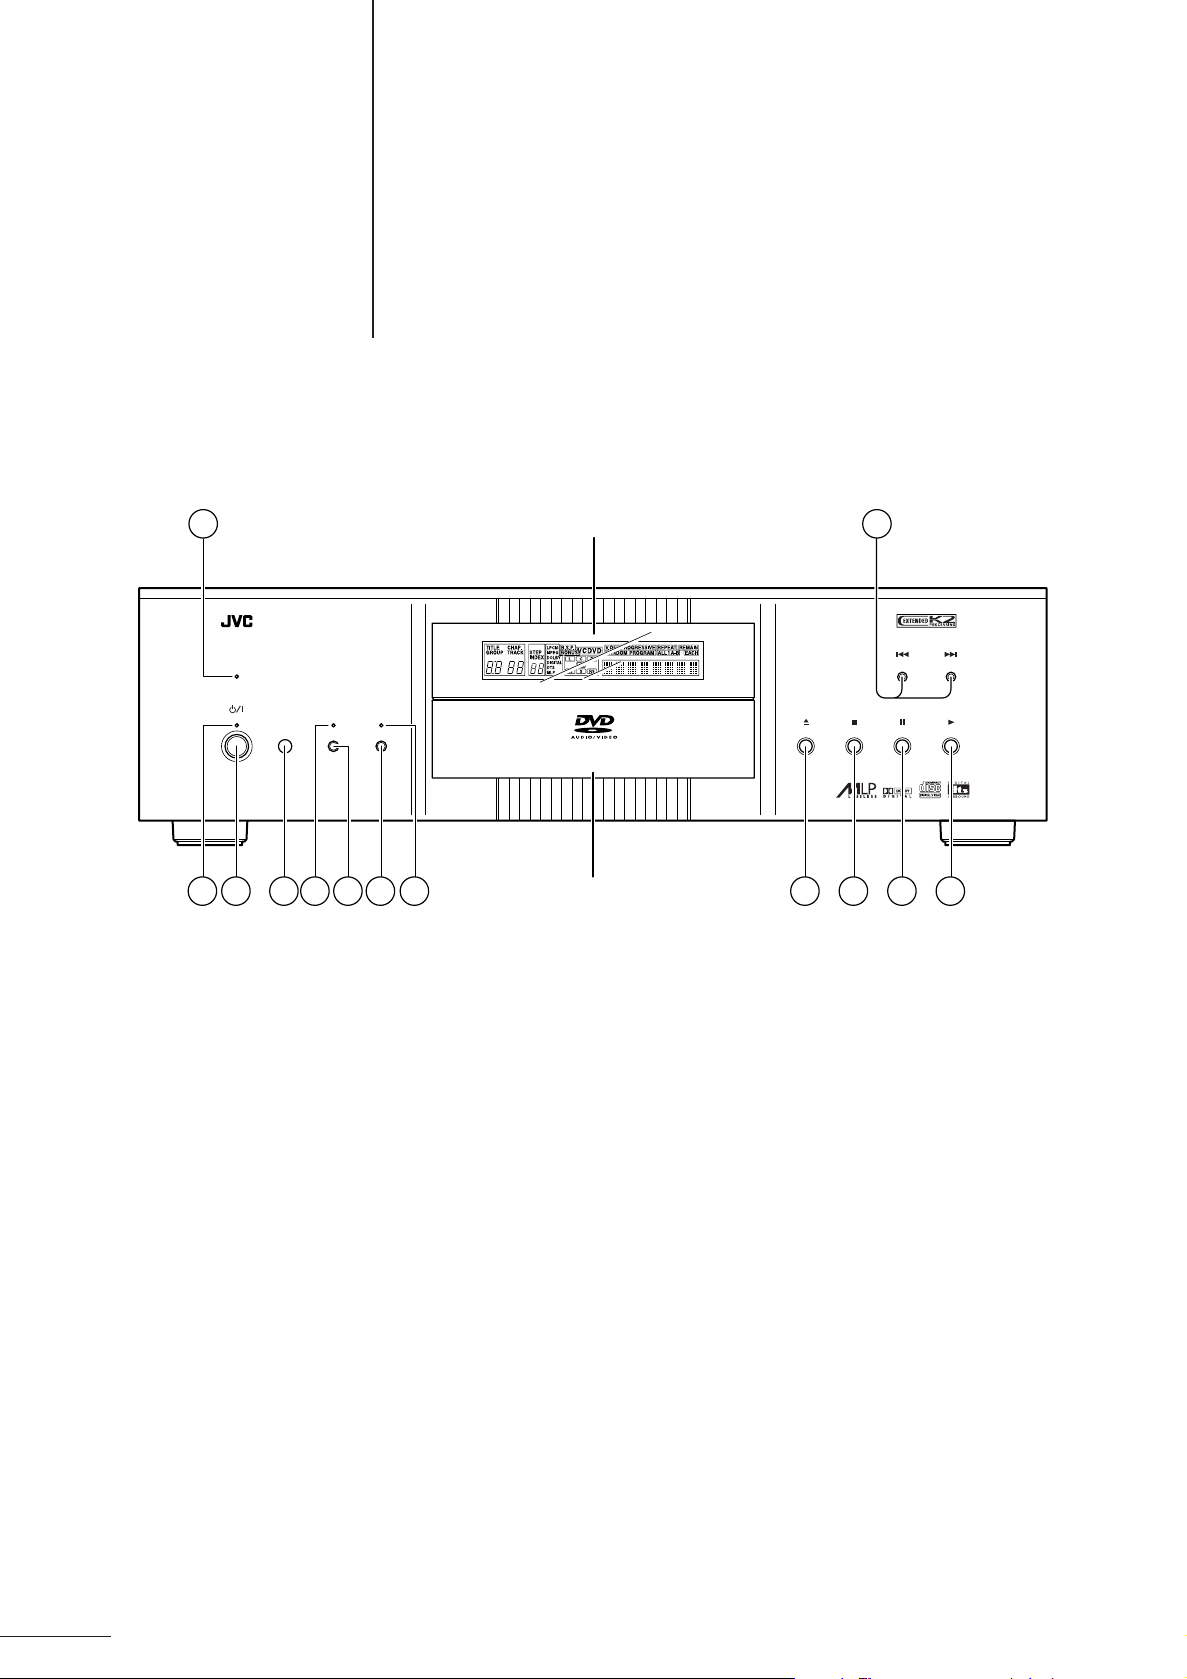
Parts and Their Functions
Front Panel
This allows you to perform basic operations for the player. The buttons on the front panel are all available on the
remote control and the functions of both buttons are the same.
1 13
DVD AUDIO
/
VIDEO
ON
DISPLAY
DISP.
/
OFF
OFF
STANDBY
EXTENDED K2
PROCESSING
1 DVD AUDIO Indicator (blue)
This lights when you insert a DVD Audio disc.
2 POWER STANDBY Indicator (red)
This lights when the player is s witched off. When the player
is switched on, this indicator goes out.
Display
DVD AUDIO
Disc tray
XV - D9000
/
VIDEO PLAYER
8 DISPLAY OFF Indicator (orange)
This lights when the display mode is off.
9 0 (Open/Close) Button
This opens or closes the disc tray. It can also be used to
turn the power on.
12111098652 743
3
POWER/STANDBY Switch
Switches the power on and off.
4 Remote Control Optical Sensor
Receives the control signals from the remote control.
EXTENDED K2 PROCESSING Indicator (orange)
5
This lights when Extended K2 Processing function is on.
6 EXTENDED K2 PROCESSING Button
Switches the Extended K2 Processing function on and off.
See page 63.
7 VIDEO/DISP.ON/OFF Button
Each press of this button switches the video output from
the main unit on or off, and switches the displa y mode. See
page 39.
16
0 7 (Stop) Button
This stops playback of a disc that is playing.
- 8 (Pause) Button
This pauses playback of a disc that is playing.
= 3 (Play) Button
This starts playback of a disc in the disc tray. It can also be
used to turn the power on.
~ 4/¢ (Skip) Buttons
Use these to jump to the next/previous scene, or to jump to
the next/previous track.
By pressing this button continuously during playback, you
can fast forward/backward through the disc. Playback
returns to normal mode when you release the button.
Page 17
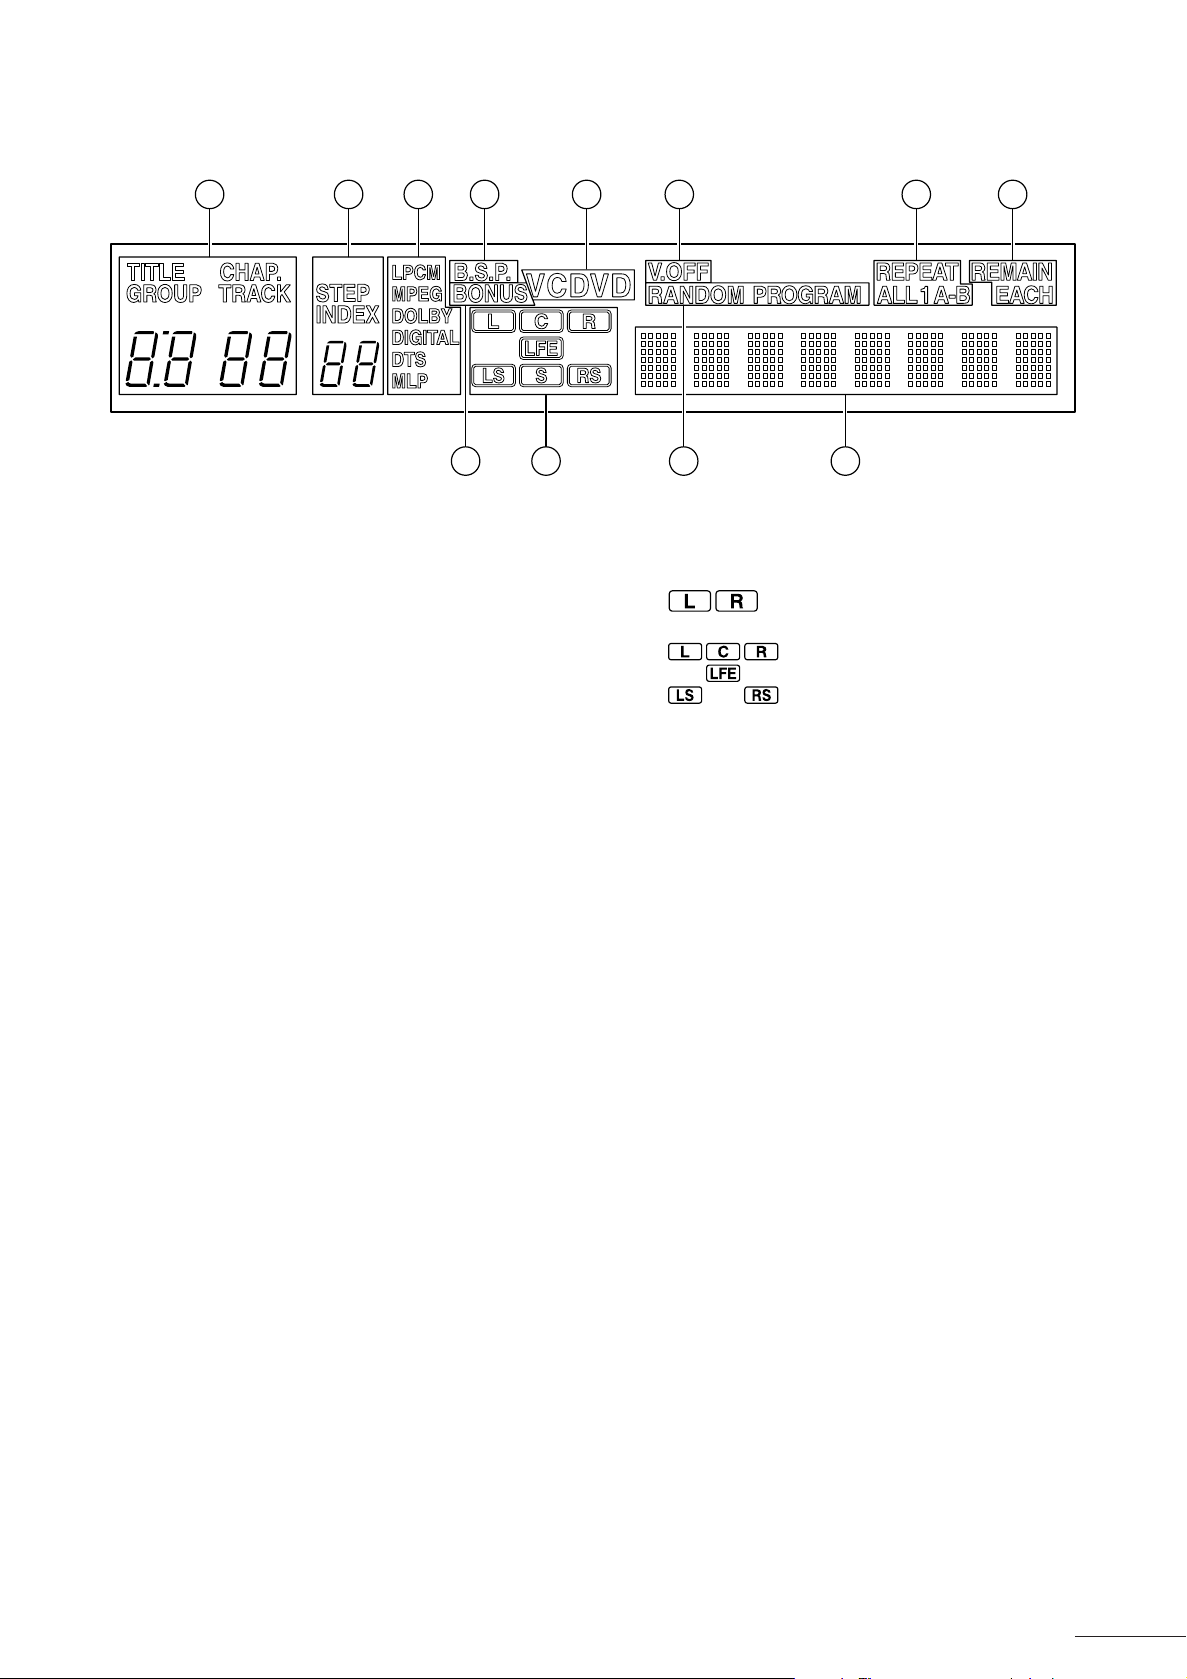
Display Section
1 2 3 4 6 8 10 11
Parts and Their Functions
5 7 129
1 TITLE/CHAP./GROUP/TRACK Display
For DVD Audio, this displays the Group number and Track
(song) number.
For D VD Video, this displays the Title n umber and Chapter
(song) number.
For Audio CD or Video CD, this displays the Tr ac k number.
2 STEP/INDEX Display
STEP : Displays the program step number for
programmed tracks.
INDEX : Displa ys the index number recorded on the disc.
• Displayed for DVD Audio and Audio CD discs.
Signal Format Display
3
When you play a disc, this displa ys the audio signal f ormat
used by the disc.
LPCM : Linear PCM format
MPEG : MPEG format
DOLBY DIGITAL : Dolby Digital format
DTS : Digital Theater System format
MLP : Meridian Lossless Packing format (lossless
compression for DVD Audio)
4 B.S.P. (Browsable Still Pictures) Display (red)
This indicates if you can freely select the still images stored
on a DVD A udio disc. When this is lit y ou press the PAGE +/
- buttons on the remote control to select a still image.
5 BONUS Display
This lights when there is a bonus group in a DVD Audio
disc.
• Not all discs include bonus groups.
6 Disc Type Display
Displays DVD, CD, or VCD (Video CD) as appropriate for
the disc.
7 Audio Channel Display
Displays the audio channel information stored on a disc.
• For stereo two channel audio
lights.
• For 5.1 multi-channel format audio
lights.
L,R : Front left/r ight
C : Center
LS,RS : Rear left/right
LFE : Subwoofer low frequency signal
8 V.OFF Display (red)
When V.OFF is lit, you can switch off the video output when
playing DVD Audio or Audio CD discs. By pressing the
DISPLAY OFF button on the remote control or the VIDEO/
DISP.OFF on the player, you can turn the V.OFF display
on.
See page 39.
9 Play Mode Display
Displays the function being used.
0 Repeat Display
Displays the function being used.
- Time Display Mode
Displays the selected time display mode.
= Message/Time Display
Displays any messages from the player or playback time of
the disc.
17
Page 18

Parts and Their Functions
Rear Panel
RIGHT LEFT
REAR CENTER SUBWOOFER
RIGHT
WARNING: SHOCK HAZARD - DO NOT OPEN
AVIS: RISQUE DE CHOC ELECTRIQUE - NE PAS OUVRIR
AUDIO ANALOG OUTPUT
LEFT
FRONT
Apparatus Claims of
U.S. Patent Nos.
4,631,603, 4,577,216,
4,819,098, and
4,907,093 licensed
for limited viewing
uses only.
Manufactured under license from Digital Theeter Systemes, Inc. US Pat.
No.5,451,942 and other world-wide paterts lssued and pending. "DTS"
and "DTS Digital Surround" are trademarks of Digital Theater Systems,
Inc. Copyrlght 1996 Digital Theater Systems,Inc.All rights reeerved.
● Analog Audio Output Terminals
Use these terminals to connect the analog output from the
player to a TV or analog amplifier.
1 FRONT T erminals
These terminals are for connecting the analog audio output
for the front left/right channels.
2 REAR/CENTER/SUBWOOFER T erminals
These terminals are for connecting the analog audio output
for the rear left/right, center, and subwoofer channels.
They are used for multi-channel format configurations.
● Video Output Terminals
Use these terminals to connect the video output from the
player to a TV etc.
DVD PLAYER
MODEL NO. XV-D9000
AC 230V 50Hz 35W
AC IN
VIDEO
Manufactured under license from Dolby
Laboratories."Dolby", "MLP Lossless",
and the double-D symbol are
trademarks of Dolby Laboratories.
Confidential Unpublished Works.
Copyrights 1992-1998 Dolby
Laboratories. All rights reserved.
VICTOR COMPANY OF JAPAN,LIMITED MADE IN JAPAN
8 61
43
S-VIDEO
52
P
P
B
/B
Y/G
COMPONENT/RGB
VIDEO OUTPUT
COAXIAL OPTICAL
PCM / STREAM
AUDIO DIGITAL OUTPUT
R
/R
7
● Digital Audio Output Terminals
Use these terminals to connect the digital audio output from
the player to a device with digital input terminals.
6 COAXIAL T erminal
Outputs the digital audio signal.
7 OPTICAL Terminals
Outputs the digital audio signal.
● Power Connector
8 Power Connector
Connects to the power cord provided with the player.
VIDEO Terminal
3
Outputs the video signal (composite signal.)
4 S-VIDEO Terminal
Outputs the S-video signal.
5 COMPONENT/RGB Terminal
Outputs the component or RGB video signals.
• The output of these terminals can be changed between
“COMPONENT” and “RGB”. See page 9.
18
Page 19
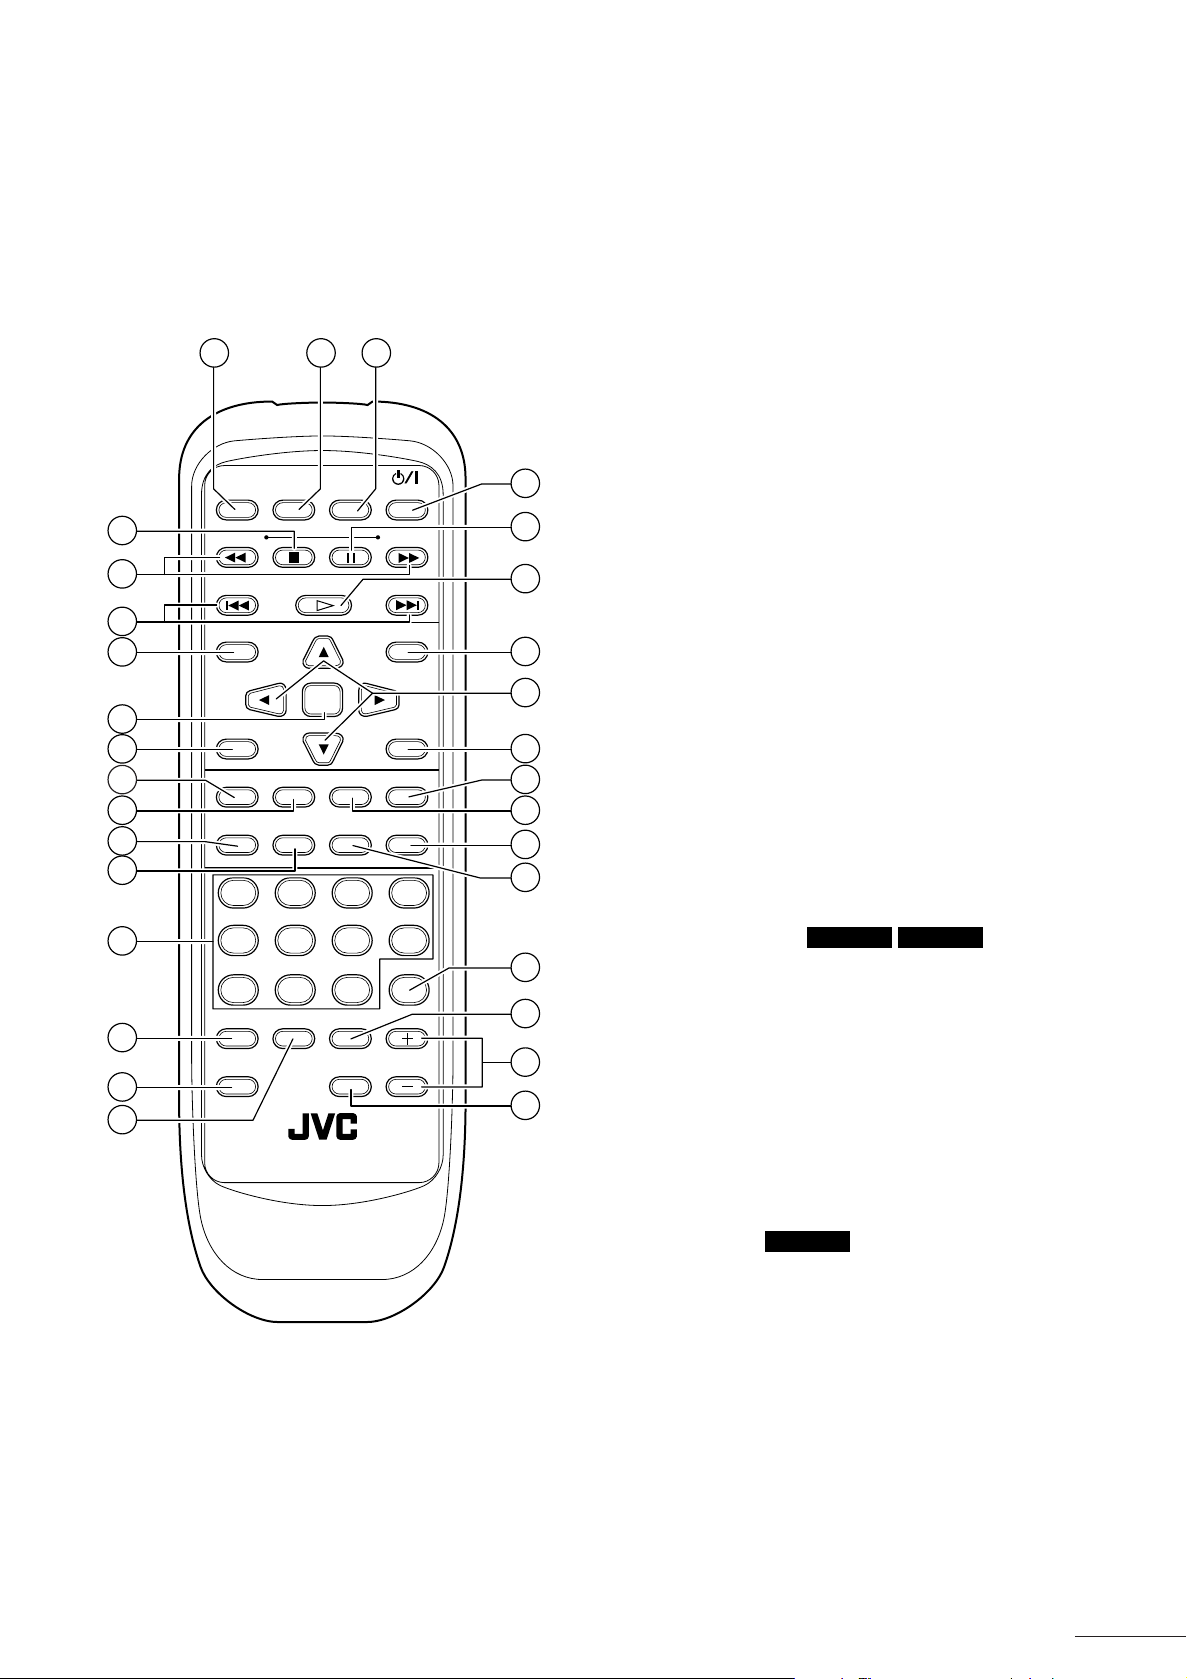
Parts and Their Functions
Remote Control
The buttons on the front panel are all available on the
remote control.
The functions of the buttons are the same.
234
5
6
7
10
11
12
16
17
18
19
/
OPEN
CLOSE
-
)
(
SLOW
-
(
GROUP
TOP MENU
SET UP
fs/RATE
DISPLAY
)
DISPLAY
EX K2
DISPLAY
OFF
SELECT GROUP
ENTER
AUDIOSUBTITLEANGLE
THEATER
TIME
POSITION
STANDBY/ON
(+)
SLOW
(+)
MENU
PLAY MODE
REPEAT
REPEAT
A
-
B
4321
1
8
9
13
14
15
20
21
22
23
1 STANDBY/ON Switch
Switches the power on and off.
2 DISPLAY OFF Button
Each press of this button toggles the video output from the
main unit on or off, and switches the display mode. See
page 39.
3 EX K2 Button
Switches the Extended K2 Processing function on and off.
See page 63.
4 OPEN/CLOSE Button
This opens or closes the disc tray. It can also be used to
turn the power on.
5 7 (Stop) Button
This stops playback of a disc that is playing.
6 1/¡ (Fast Forward/Backward) Buttons
These can be used to play the disc faster than normal.
They can also be used to play in slow motion.
7 4/¢ (Skip) Buttons
Use these to jump to the next/previous scene, or to jump to
the next/previous trac k. With pressing [GROUP] or [CHAP/
INDEX] you can skip the group or index titles.
8 8 (Pause) Button
This pauses playback of a disc that is playing.
9 # (Play) Button
This starts playback of a disc in the disc tray. It can also be
used to turn the power on.
24
25
26
27
RETURN
+
9
CHAP./
INDEX
RM - SXVD9000A REMOTE CONTROL
1010/0
CANCELRESUMEGROUP
CLEAR
PAGE
DVD
8765
28
0 TOP MENU Button
Press this to display the top menu of DVD Audio discs or
DVD A UDIO
DVD VIDEO
the title menu of D VD Video discs on the screen. See pages
29
30
42 and 51.
- ENTER Button
Press this to confirm a menu selection made from the on
31
screen menus of DVD Audio or DVD Video discs.
= SET UP Button
Press this to display the Initial Settings screen. See page
25.
~ MENU Button
DVD VIDEO
Press this to display the menu screen for DVD Video discs.
See page 51.
! 5/∞/3/2 (Cursor) Buttons
Press these to select items in the menu screens or onscreen displays for DVD Audio and DVD Video discs.
19
Page 20

Parts and Their Functions
@ PLAY MODE Button
DVD A UDIO AUDIO CD VIDEO CD
Use this button to select the Play mode (Random play,
Program play.)
• You can use this button while a DVD Audio, Audio CD,
or Video CD is stopped.
# ANGLE Button
DVD A UDIO
DVD VIDEO
Use this button to change the angle when playing DVD
Audio/Video discs that include multi-angle information. See
page 47 and 53.
$ SUBTITLE Button
DVD A UDIO
DVD VIDEO
Use this button to switch of subtitles, when playing DVD
Audio/Video discs that include subtitle information. Y ou can
also use it to hide subtitles. See pages 48 and 54.
% fs/RATE DISPLAY Button
Use this button to display the fs (sampling frequency) or
transmission bit rate of each channel for a disc that is pla ying.
See page 39.
^ TIME DISPLA Y Button
DVD A UDIO AUDIO CD VIDEO CD
Use this button to display the pla ying time of a track or disc.
See page 37.
& REPEAT Button
Use this button to repeat a title, chapter, or repeat all the
tracks or a single track on a disc. See pages 46, 47, and
52.
* AUDIO Button
DVD A UDIO DVD VIDEO VIDEO CD
Use this button to change the audio output when playing
DVD Audio discs with audio selection information, or DVD
Video and Video CD discs that include multi-audio
information. See page 54.
( REPEAT A-B Button
Use this button to repeat a specified section of a disc. See
pages 47, 53, and 62.
+ GROUP Button
DVD A UDIO
Use this button to select groups on DVD Audio discs.
Enter the group number with the number keys while pressing
this button.
See pages 38, 43, and 49.
¡ CHAP/INDEX Button
DVD A UDIO DVD VIDEO AUDIO CD
Use this button to select chapters in DVD Video discs, or
index items on DVD Audio and Audio CD discs. Enter the
number with the number keys while pressing this button.
See pages 44, 52, and 59.
™ RESUME Button
Use this button to resume play from a paused or stopped
position.
You can resume play from a position where the 7 (Stop)
button was pressed or the position when the power was
switched off. See page 34.
£ RETURN Button
DVD A UDIO VIDEO CD
Use this button to return to the previous menu screen.
If B.S.P. is lit while playing a DVD Audio disc, this returns to
the specified still image on the disc.
Note:
●
Even when B.S.P. is lit, some discs do not include a
specified still image.
¢ CANCEL Button
Use this button to cancel a track in a program.
∞ PAGE +/- Buttons
If B.S.P. is displayed when playing a DVD Audio disc, use
these buttons to browse forw ard/backw ard through the still
images. See page 44.
§ CLEAR Button
Use this button to clear all the contents of a program.
DVD A UDIO
) THEATER POSITION Button
DVD A UDIO DVD VIDEO VIDEO CD
Use this button to change the brightness of the video image.
See page 40.
_ Number Buttons
Use these buttons to select a group, trac k, inde x item, title ,
chapter or items in the on-screen menus.
• Using the number buttons
To specify numbers 1 to 10, simply press the
corresponding button.
To specify numbers for 11 up, use the [+10] and [10/0]
buttons.
Example: To specify number 24, press [+10] twice,
then press [4].
To specify number 30, press [+10] twice,
then press [10/0].
20
Page 21
Before Y ou Start
This section describes some basic information you should know before you start
using your player. It also describes the various types of discs that can be played
with the player.
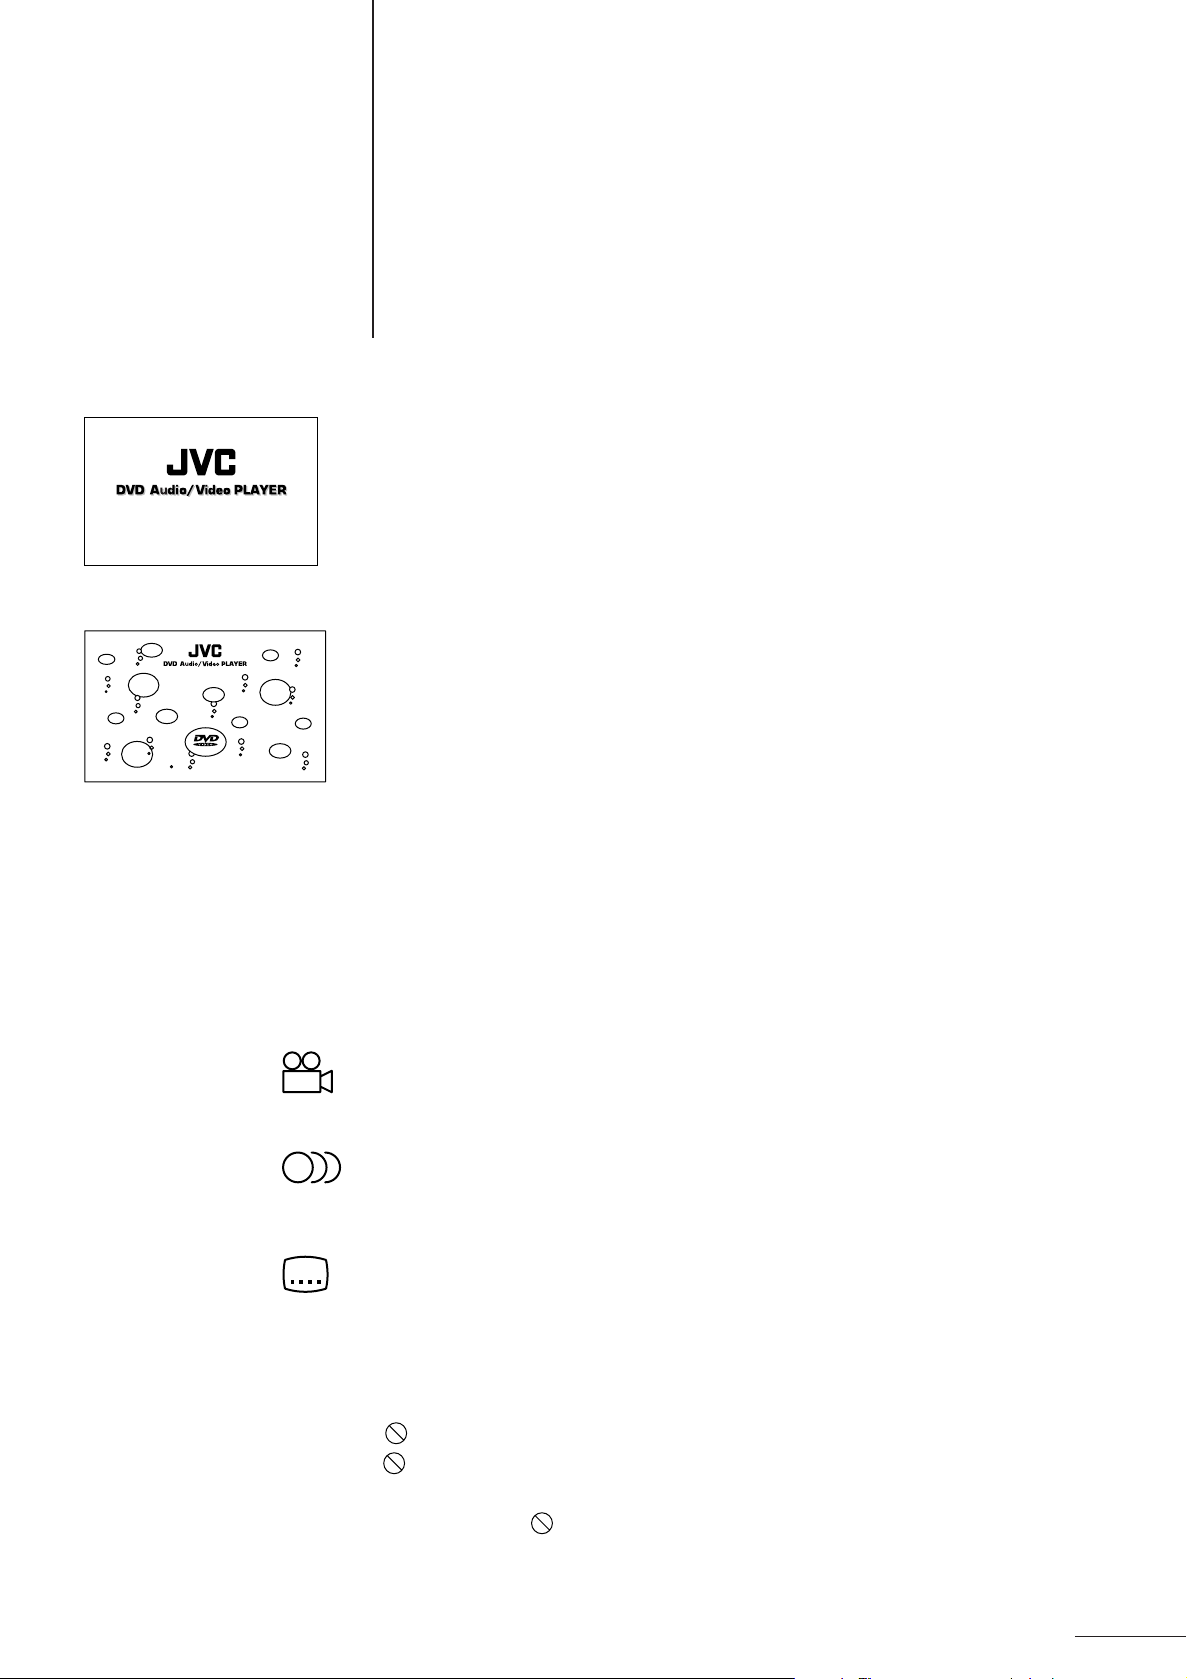
Opening Screen
This screen is displayed automatically when the power for the player is tur ned on.
During playback of a disc, it changes to the disc screen.
• Since Audio CD discs do not include screen information, the opening screen is
usually displayed for these types of discs.
Preventing Screen Burnin [Screen Saver]
If a still image is displayed for a long time, a residual shadow of the image can be
burntinto the TV screen. To prevent this from happening, the player has a screen
saver function. If the Initial Settings screen, a paused image, menu or other still image
is displayed for more than five minutes without any operations being performed, the
screen is darkened and a moving image is displayed.
• The moving image is set in [SCREEN SAVER] of Initial Settings 2 in the Initial
Settings screen.
• The screen saver function is cancelled when any of the operation buttons are pressed
and the player returns to the original screen.
See page 29.
On-screen guide icons
When playing DVD Video/Audio discs, y ou ma y see icons displayed over the picture.
These icons have the following meanings:
This icon is displayed at the beginning of the multi-angle information included on
some discs. If this icon appears while you are playing a disc, you can change the
angle used. See pages 47 and 53.
This icon is displayed at the beginning of the multilingual information included on
some discs. If this icon appears while you are playing a disc, you can change the
audio language used. See page 49.
This icon is displayed at the beginning of the m ultiple subtitle information included on
some discs. If this icon appears while you are playing a disc, you can change the
subtitle language used. See pages 48 and 54.
You can also setup the player so that these icons are not displayed. Set from the
GUIDE setting in Initial Settings 1 of the Initial Settings screen. See page 27.
If appears during operation...
If appears when you try to perform an operation, it means that you cannot use that
function. Depending on the type of disc, you may not be able to perform some
operations even if is not displayed on the screen.
Depending on the type of disc, you may not be able to use the fast forward/backward,
pause, slow motion playback and other functions. In these cases the operations will
be invalid.
21
Page 22
Before You Start
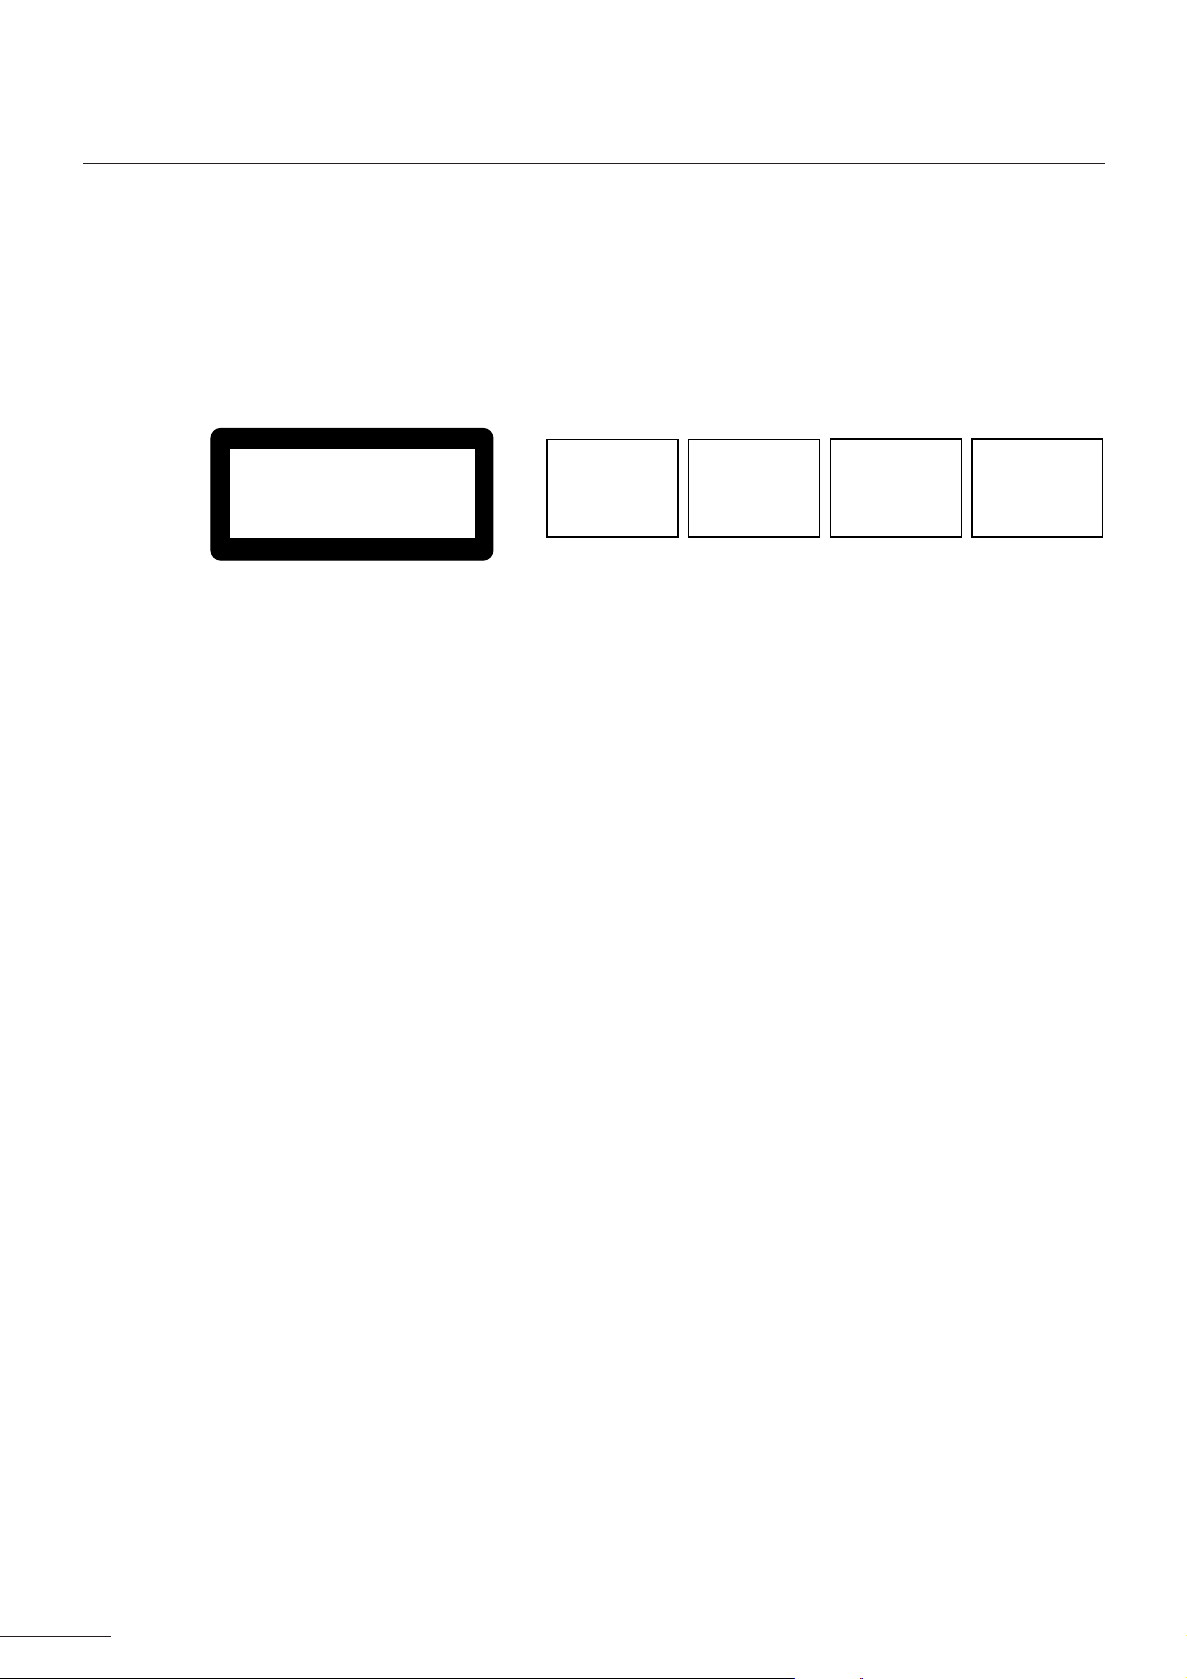
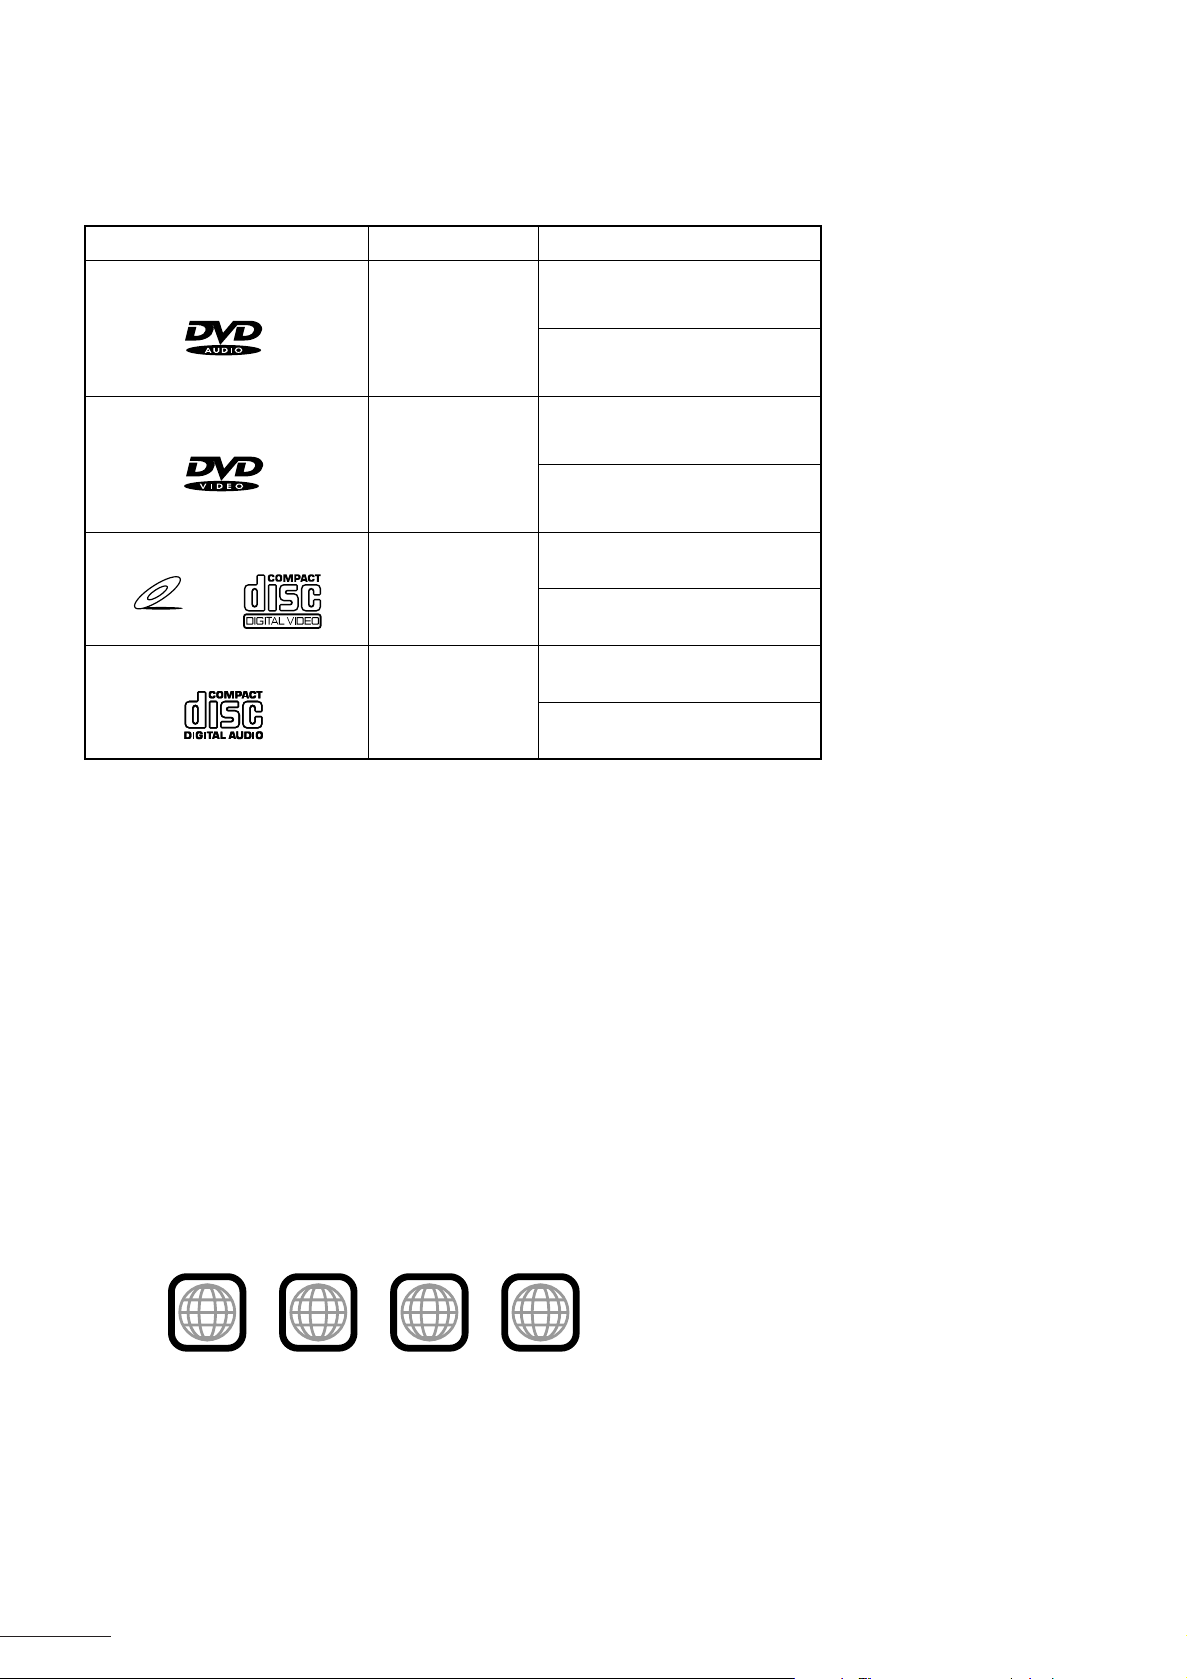
Types of Disc Supported by this Player
The types of disc that can be played by this player are as shown below.
Discs that can be played Content type Disc size
DVD Audio
Audio
+
Video
12 cm
8 cm
D VD Video
Video CD
VIDEO CD
Audio CD
Audio
+
Video
Audio
+
Video
Audio
12 cm
8 cm
12 cm
8 cm
12 cm
8 cm
Discs that cannot be played
• DVD-ROM • DVD-RAM • DVD-R • DVD-RW • CD-EXTRA
• CD-G • CD-R • CD-RW • CD-ROM • Photo CD
• CD TEXT
You cannot playback these types of disc. If you try to playback these kinds of discs, you ma y only get noise playback.
This noise may damage your speakers.
For CD-G, CD EXTRA, and CD TEXT discs you can playback the audio only.
Regional code (local code)
The regional codes in DVD Video disc restrict the geographical region in which a disc can be played. If the regional
code in the D VD Video disc does not match the codes of the DVD pla y er, you cannot play the disc. The regional code
for this player is 2, so you can playback DVD Video discs that have the number 2 on them.
• Examples of DVD Video discs that can be played by this player.
2
ALL
This unit accommodates discs for the PAL system.
Note:
●
The playback requirements for DVD Audio, DVD Video and Video CD discs are determined by the software
manufacturer . This pla yer depends on the contents produced by the software man ufacturer , therefore, some functions
may not work as intended.
22
221
1
3
4
Page 23

Before You Start
Disc Composition
DVD Audio discs
Generally, DVD Audio discs consist of up to nine groups, called Groups. Each Group can contain up to 99 tracks
(songs).
In addition, each Group can also contain up to 99 index items.
Example of DVD Audio disc composition
Group 1 Group 2
Track 1 Track 2 Track 3 Track 1 Track 2
1st song
Index 1
2nd song 3rd song 1st song 2nd song
Index 1 Index 2
* Some discs also include bonus groups that hav e not been publiciz ed. When you insert one of these discs, BONUS
appears on the display.
DVD Video discs
Generally, DVD Video discs consist of a number of large sections, called Titles. Each Title has its own number (Title
number) so that you can quickly access the title y ou want to w atch. Titles can also be made up of a number of smaller
sections called Chapters. Each Chapter also has its own n umber(chapter number) so that y ou can quickly access the
chapter you want to watch. However, not all discs are divided into Titles or Chapters.
Example of DVD Video disc composition
Title 1 Title 2
Chapter 1 Chapter 3Chapter 2 Chapter 1 Chapter 2
Audio CD and Video CD discs
Generally, Audio CD discs are divided into a number of individual songs, called Tracks. Each Track has its own
number(Track number). F or example , the second song becomes Track 2. Karaok e Video CD discs, etc., are the same .
However, some discs are not divided into Tracks.
Audio CD discs can also contain up to 99 index items.
Example of Audio CD disc composition
Track 1 Track 3 Track 4
1st song
Index 1
Track 2
2nd song 4th song
Index 1 Index 2
3rd song
23
Page 24

Switching the Power On
● When the power is switched off, the STANDBY indicator comes on.
■ When the STANDBY indicator is on
1 Press the button on the remote control or the player itself.
The power is switched on and the STANDBY indicator goes out.
• The opening screen is displayed on the TV screen.
If you press the button on the remote control or the pla y er again, the power is s witched off and the STANDBY
indicator lights.
• The opening screen disappears from the TV screen.
One-Touch Operation
● 3 (Play) Button
Pressing # on the remote control or 3 on the player switches the power on.
If a disc is in the disc tray, playback of the disc starts.
● OPEN/CLOSE Button
Pressing [OPEN/CLOSE] on the remote control or 0 on the player switches the power on and the disc tray is
ejected.
Note:
●
The player is designed so that it uses a very small amount of electricity even when it is switched off. If you will not
be using the player for an extended period of time, unplug the power cord from the power outlet.
24
Page 25

Initial Settings
● Before using the player , set up the Initial Settings to match y our system configuration.
● You can set up the Initial Settings while a disc is stopped or there is no disc
loaded in the player.
● You can perform these operations from the remote control.
The Initial Settings screen consists of the following three screens.
• Initial Settings 1, Initial Settings 2
These settings are used to set up the settings for playing DVD Audio and DVD Video discs.
• Speaker Settings
These settings are used to adjust the settings to match the speakers connected to the player.
Setting Up the Initial Settings
1 Remove the disc from the disc tray.
• Or stop the disc.
2 Press [SET UP].
The Initial Settings screen is displayed.
To switch between the various Initial Settings screens, press 2/3 to align the arrow ( ) with the tab.
Initial Settings 1 Initial Settings 2 Speaker Settings
PREFERENCE1 PREFERENCE2 SPK.SETTING
MENU
AUDIO
SUBTITLE
ON SCREEN
GUIDE
MONITOR TYPE
PRESS KEY
ENGLISH
ENGLISH
ENGLISH
ENGLISH
ON
4:3LB
jj
PREFERENCE1
DIGITAL OUT
DOWN MIX
COMPRESSION
SCREEN SAVER
AUTO STANDBY
PRESS KEY
PREFERENCE2 SPK.SETTING
PCM ONLY
OFF
OFF
MODE 1
OFF
3 Press 5/∞ to align the arrow ( ) with the item you want to select.
PREFERENCE1 PREFERENCE2 SPK.SETTING
MENU
AUDIO
SUBTITLE
ON SCREEN
GUIDE
MONITOR TYPE
PRESS KEY
ENGLISH
ENGLISH
ENGLISH
ENGLISH
ON
4:3LB
4 Press 2/3 to select the setting.
Each time you press 2/3 the display changes and the displayed setting is selected.
PREFERENCE1
PRESS KEY
PREFERENCE2 SPK.SETTING
5.1 CHANNEL
LEVEL
DELAY
F.SP
Large
C.SP
Small
R.SP
Small
BASS
S woofer
TEST TONE
5 Repeat steps 3 and 4 for each setting.
• After you have finished making the settings, press 5/∞ continuously until the arrow appears in the tab again.
Then press 2/3 to select the next screen.
6 When you have finished making all the settings, press [SET UP].
The display returns to the normal display.
P
25
Page 26

Initial Settings
PREFERENCE 1 Settings
MENU
Some DVD Video discs include menus in several languages. When playing
these discs you can specify which language should be used when displaying
the menus when they first appear.
Each time you press 3, the language changes in the order shown below. By
pressing 2, you can go through the languages in reverse order.
ENGLISH➝SPANISH➝FRENCH ➝CHINESE ➝GERMAN➝ITALIAN➝JAPANESE ➝additional language codes
from AA to ZU.
See page 68.
* If the specified menu language is not included on a disc, the menu is displayed in the language included on the disc.
AUDIO
Some D VD Video discs include audio in se veral languages. When playing these
discs you can specify which language should be used for the audio when the
disc is first played.
Each time you press 3, the language changes in the order shown below. By
pressing 2, you can go through the languages in reverse order.
PREFERENCE1 PREFERENCE2 SPK.SETTING
MENU
AUDIO
SUBTITLE
ON SCREEN
GUIDE
MONITOR TYPE
PRESS KEY
PREFERENCE1 PREFERENCE2 SPK.SETTING
MENU
AUDIO
SUBTITLE
ON SCREEN
GUIDE
MONITOR TYPE
PRESS KEY
ENGLISH
ENGLISH
ENGLISH
ENGLISH
ON
4:3LB
ENGLISH
ENGLISH
ENGLISH
ENGLISH
ON
4:3LB
ENGLISH➝SPANISH➝FRENCH ➝CHINESE ➝GERMAN➝ITALIAN➝JAPANESE ➝additional language codes
from AA to ZU.
See page 68.
* If the specified audio language is not included on a disc, the audio is played using the language included on the
disc.
SUBTITLES
Some DVD Video/Audio discs of foreign language films include subtitles in
several languages. When playing these discs you can specify which language
should be used when displaying the subtitles for the first time.
Each time you press 3, the language changes in the order shown below. By
pressing 2, you can go through the languages in reverse order.
ENGLISH➝SPANISH➝FRENCH ➝CHINESE ➝GERMAN➝ITALIAN➝JAPANESE ➝additional language codes
from AA to ZU.
See page 68.
* If the specified subtitle language is not included on a disc, the subtitles are displayed in the language included on
the disc.
PREFERENCE1 PREFERENCE2 SPK.SETTING
MENU
AUDIO
SUBTITLE
ON SCREEN
GUIDE
MONITOR TYPE
PRESS KEY
ENGLISH
ENGLISH
ENGLISH
ENGLISH
ON
4:3LB
26
Page 27

ON SCREEN
You can change the on screen language.
Each time you press 2/3 the language switches between English, German
and French.
ENGLISH
↓
GERMAN
↓
FRENCH
Initial Settings
PREFERENCE1 PREFERENCE2 SPK.SETTING
MENU
AUDIO
SUBTITLE
ON SCREEN
GUIDE
MONITOR TYPE
PRESS KEY
ENGLISH
ENGLISH
ENGLISH
ENGLISH
ON
4:3LB
English
ON SCREEN ENGLISH
BILDSCHIRMMENUE DEUTSCHGermam
D'ECRAN FRANCAISFrench
GUIDE
The player includes a function that allows it to display on-screen guide icons
while a disc is playing. These icons can help you understand what is stored on
the discs and how to use the play er itself. You can also set up the player so that
these are not displayed.
• ON: The on-screen guide are displayed.
• OFF: The on-screen guide are not displayed.
Example: , etc.
See page 21.
PREFERENCE1 PREFERENCE2 SPK.SETTING
MENU
AUDIO
SUBTITLE
ON SCREEN
GUIDE
MONITOR TYPE
PRESS KEY
ENGLISH
ENGLISH
ENGLISH
ENGLISH
ON
4:3LB
MONITOR TYPE
If you have connected the pla y er to a wide-screen TV (horizontal /vertical ratio of 16:9), select 16:9 WIDE. If the pla yer
is connected to a standard TV (horizontal /vertical ratio of 4:3), select either 4:3PS or 4:3LB according to your
taste. Many DVD Video film titles are intended for playback on wide-screen TVs. When playing these titles on a
standard TV they include converters for either the Pan Scan or Letterbox format. If the disc includes conver ters for
both formats, you can choose which format to use.
• 4:3PS
This format uses the same height as the original but clips the right and left edges of
the picture.
Note:
●
If the disc does not support the Pan Scan format, Letterbox is used.
• 4:3LB
This format reduces the overall picture size and imposes a black mask at the top
and bottom of the picture. It does not clip the right and left edges of the picture.
• 16:9 WIDE
Select this format when connected to a wide-screen TV (horizontal /vertical
ratio of 16:9). This displays the whole picture for 16:9 film titles.
27
Page 28

Initial Settings
PREFERENCE 2 Settings
Digital Output
Depending on the device to which the Digital Audio Output terminal is connected,
you have to change these settings to match the device.
• If there is nothing connected to the Digital Audio Output terminal, you do not
need to adjust these settings.
• STREAM/PCM
Use this setting if the player is connected to a receiver with DTS, Dolby Digital,
and MPEG decoders or with separate decoders.
• DOLBY DIGITAL/PCM
Use this setting if the player is connected to a receiver with a PCM or Dolby
Digital, decoder.
• PCM ONLY
Use this setting if the player is connected to a receiver with digital terminal that
supports linear PCM output, or a DAT tape deck.
[Relation between disc types and output signals]
Disc type
44.1/88.2/176.4kHz, 16/20/24 bit
linear PCM DVD Audio
48/96/192kHz, 16/20/24 bit
linear PCM DVD Audio
44.1/88.2/176.4kHz, 16/20/24 bit
MLP DVD Audio
48/96/192kHz, 16/20/24 bit
linear MLP DVD Audio
48kHz, 16/20/24 bit linear PCM DVD Video
STREAM/PCM DOLBY DIGITAL/PCM
44.1kHz, 16 bit linear PCM
48kHz, 16 bit linear PCM
44.1kHz, 16 bit linear PCM
48kHz, 16 bit linear PCM
48kHz, 16 bit linear PCM
Output
PREFERENCE1
DIGITAL OUT
DOWN MIX
COMPRESSION
SCREEN SAVER
AUTO STANDBY
PRESS KEY
PREFERENCE2 SPK.SETTING
PCM ONLY
OFF
OFF
MODE 1
OFF
PCM ONLY
96kHz, 16/20/24 bit linear PCM DVD Video
DTS DVD Video
Dolby Digital DVD Video
MPEG DVD Video
Audio CD
DTS Audio CD
Video CD
28
48kHz, 16 bit linear PCM
DTS bit stream
48kHz, 16 bit linear PCM
Dolby Digital bit stream 48kHz, 16 bit linear PCM
MPEG bit stream 48kHz, 16 bit linear PCM
44.1kHz, 16 bit linear PCM
DTS bit stream 44.1kHz, 16 bit linear PCM
44.1kHz, 16 bit linear PCM
Page 29

DOWNMIX
This setting adjusts the signal output to the Audio Output terminal to match the
connected device.
• Lt/Rt: Use this setting if the Audio Output terminal of the player is
connected to a receiver with a built-in Dolby Pro Logic decoder.
• Lo/Ro: Use this setting if the Audio Output terminal of the player is
connected to a TV or a receiver with a built-in Dolby Pro Logic
decoder.
• OFF: Use this setting if the 5.1 ch Audio Output terminal of the player is
connected to a receiver with a 5.1ch input terminal.
COMPRESSION
You can adjust the downmix range according to your needs.
• ON: This plays discs while suppressing the dynamic range. Use this
for quiet films etc. and other discs where is difficult to hear the
audio.
• OFF: This plays discs using the original dynamic range.
PREFERENCE1
DIGITAL OUT
DOWN MIX
COMPRESSION
SCREEN SAVER
AUTO STANDBY
PRESS KEY
PREFERENCE1
DIGITAL OUT
DOWN MIX
COMPRESSION
SCREEN SAVER
AUTO STANDBY
Initial Settings
PREFERENCE2 SPK.SETTING
PCM ONLY
OFF
OFF
MODE 1
OFF
PREFERENCE2 SPK.SETTING
PCM ONLY
OFF
OFF
MODE 1
OFF
SCREEN SAVER
PRESS KEY
If a still image is displayed for a long time, a residual shadow of the image can
be burnt-into the TV screen. To prevent this from happening, the player has a
screen saver function. If more than five minutes elapses without any operations
being performed, the screen saver starts. You can choose the following settings.
PREFERENCE1
DIGITAL OUT
DOWN MIX
COMPRESSION
SCREEN SAVER
AUTO STANDBY
PREFERENCE2 SPK.SETTING
PCM ONLY
OFF
OFF
MODE 1
OFF
• MODE 1: This mode uses a moving background.
• MODE 2: This mode uses a stationary background.
PRESS KEY
• DIMMER: This mode dims the screen.
• OFF: The screen saver function is switched off.
Note:
●
If the Screen Saver function is set to OFF, be careful to ensure that image burn-in does not occur.
●
If the Screen Saver function is set to MODE 1 and flickering occurs, change to a different setting.
AUTO STANDBY
When the unit is stopped for more than 30 minutes or 60 minutes, the unit enters standby mode automatically.
• 60: Time is set to 60 minutes.
• 30: Time is set to 30 minutes.
• OFF: The auto standby function is off.
PREFERENCE1
DIGITAL OUT
DOWN MIX
COMPRESSION
SCREEN SAVER
AUTO STANDBY
PREFERENCE2 SPK.SETTING
PCM ONLY
OFF
OFF
MODE 1
OFF
OFF 30 60
PRESS KEY
29
Page 30

Initial Settings
SPK. SETTING Screen Settings
Use these settings to match the capabilities of the speakers connected to the play er . In most cases, you should select
either 2 Channel or 5.1 Channel. You can also select Expert which allows you to adjust the output balance or delay
time.
Speaker Channel Settings
Adjust this setting to match the speaker system connected to the player.
• 2 CHANNEL: Use this setting when the player is connected to a 2 channel
amplifier or two speakers. The setting is completed simply by
selecting [2 CHANNEL].
• 5.1CHANNEL:Use this setting when the player is connected to a 5.1 channel
amplifier and you are using front, rear , center, and subw oofer
speakers. The settings are completed simply by selecting [5.1
CHANNEL].
PREFERENCE1
PRESS KEY
PREFERENCE2 SPK.SETTING
5.1 CHANNEL
LEVEL
DELAY
F.SP
Large
C.SP
Small
R.SP
Small
BASS
S woofer
TEST TONE
• EXPERT: This setting allows you to make detailed adjustments to the output to match your speakers. It is
intended for experienced audio experts.
Note:
●
These settings are only effective for analog audio output. If you are using digital audio output, adjust the speakers
settings on the external decoder.
Expert Settings
● Speaker Size Settings
Select the speaker size for the speakers you are using.
1 Press 5/∞ to select the type of speaker.
• F.SP (Front speakers)
• C.SP (Center speaker)
• R.SP (Rear speakers)
2 Press 2/3 to select the settings.
• Large: Large speakers capable of playing bass tones.
• Small: Small speakers that do not reproduce bass tones well.
• None: There is no speaker connected to that channel.
If you select [SMALL] for the front speakers, you cannot select [LARGE] for any of the other speakers.
PREFERENCE1
LFE
BASS
BASS
PRESS KEY
PREFERENCE2 SPK.SETTING
EXPERT
LEVEL
DELAY
F.SP
Large
C.SP
Small
R.SP
Small
BASS
S woofer
TEST TONE
30
Page 31

● Bass Redirect Settings
If you are using small speakers that cannot reproduce low tones w ell, y ou can
redirect the bass audio to the subwoofer or front speakers.
Initial Settings
1 Press 5/∞ to select [BASS].
2 Press 2/3to select the settings.
• S-woofer: Redirects the bass audio output to the subwoofer.
• L/R: Redirects the bass audio output to the front speakers.
If the front speakers are set to [SMALL], the bass audio is automatically
redirected to the subwoofer.
● Speaker LEVEL Settings
You can select the output level for each speaker, within a range of +6 dB to -6dB.
1 Press 5/∞ to select [Level], then press [ENTER].
The Level Settings screen appears.
2 Press 5/∞ to select the type of speaker.
• F.SP (Front speakers) is fixed at 0dB and cannot be adjusted.
3 Press 2/3 to select the desired output level.
• You can use the test tone to check the output level. See page 30.
PREFERENCE1
LFE
BASS
BASS
PRESS KEY
PREFERENCE1
LFE
BASS
BASS
PRESS KEY
PREFERENCE2
PREFERENCE2
SPK.SETTING
EXPERT
LEVEL
DELAY
F.SP
C.SP
R.SP
BASS
TEST TONE
SPK.SETTING
EXPERT
LEVEL
DELAY
F .SP
C.SP
R.SP
S woofer
TEST TONE
Large
Small
Small
S woofer
0dB
0dB
0dB
0dB
4 Press 5/∞ to select [LEVEL], then press [ENTER].
The Level Settings screen closes.
● Delay Time Settings
You can adjust the delay time for each speaker.
1 Press 5/∞ to select [DELAY], then press [ENTER].
The Delay Time Settings screen appears.
2 Press 5/∞ to select the type of speaker.
• F.SP (Front speakers) and S.WOOFER (Subwoofer) are at 0ms and
cannot be adjusted.
3 Press 2/3 to set the desired delay time.
• You can adjust C.SP (Center speaker): within a range of 0ms to –5ms.
• You can adjust R.SP (Rear speakers): within a range of 0ms to –15ms.
• You can use the test tone to check the effect of the settings. See page 32.
4 Press 5/∞ to select Delay, then press [ENTER].
The Delay Time Settings screen closes.
PREFERENCE1
LFE
BASS
BASS
PRESS KEY
PREFERENCE2
SPK.SETTING
EXPERT
LEVEL
DELAY
F .SP
C.SP
R.SP
S WOOFER
TEST TONE
0ms
0ms
0ms
0ms
31
Page 32

Initial Settings
● Using the Test Tone
You can play a test tone when adjusting the speaker level or delay time.
1 While adjusting the speaker level or delay time, press 5/∞ to select Test Tone, then press [ENTER].
You can play a test tone from all speakers except the subwoofer.
• To play the test tone from a specific speaker, press 5/∞ to select the speaker.
2 Press 2/3 to adjust the Level or Delay setting.
3 Press 5/∞ to select Test Tone, then press [ENTER] to stop the test tone.
32
Page 33

Basic Operations
This section describes the basic procedures of how to insert a disc into the disc tray
and how to play the disc.
● Y ou can perform all operations with the remote control and basic operations from
the player itself.
● The
can be performed with the indicated types of disc.
Example:
Loading a Disc
1 Press [OPEN/CLOSE] on the remote control. (On the player itself, press 0.)
The disc tray is ejected.
2 Place the disc on the disc tray.
Place the disc so it is aligned with the center of the disc tray. If the disc is not aligned correctly, it may be damaged
when the disc tray closes or it may become jammed in the disc tray.
DVD
AUDIO
DVD
VIDEO
AUDIO
VIDEO
symbols after titles in this section mean that these operations
CD
CD
DVD
AUDIO
VIDEO
VIDEO
Means that the operation can be performed on all discs.
CD
CD
DVD
AUDIO
Place the disc with the label facing upwards
• Place 8 cm discs in the
groove in the disc tray.
DISP.
/
OFF
VIDEO
/
OM
DISPLAY
OFF
EXTENDED K2
DVD AUDIO
PROCESSING
POWER
STANDBY
AUDIO/VIDEO
D9000
-
XV
VIDEO PLAYER
/
DVD AUDIO
Disc tray
3 Press [OPEN/CLOSE] on the remote control. (On the player itself, press 0.)
The disc tray closes.
Note:
●
Be careful not to trap your fingers in the disc tray.
33
Page 34

Basic Operations
DVD
AUDIO
Playing a Disc
DVD
AUDIO
VIDEO
VIDEO
CD
CD
This section describes the procedure for basic operations. Play, stop, pause and skip.
Step-by-Step Procedure for Playing a Disc
1 Press # (Play) (On the player itself, press 3.)
The disc is played starting at the beginning.
●
DVD Video: Pressing # displays the menu on the TV screen. In this case, you can select an item from the
menu to playback. See page 51.
●
Video CD : For Video CD discs that include PBC (Playback Control) information, pressing # displays the
menu on the TV screen. In this case, you can select an item from the menu to playback. See
page 59.
Stopping a Disc
■ While a disc is playing
1 Press 7 (Stop). (On the player itself, press 7.)
Playback stops.
Pausing a Disc
■ While a disc is playing
1 Press 8 (Pause). (On the player itself, press 8.)
Playback is paused.
Cancelling Pause
Press # (Play). (On the player itself, press 3.)
Skipping Through a Disc
■ While a disc is playing
1 Press ¢ or 4. (On the player itself, also press ¢ or 4.)
¢ : Skips ahead to tracks in the forward direction.
4 : Skips back to tracks in the reverse direction.
• DVD Audio: For this type of disc you can skip across track numbers.
While pressing [GROUP], press ¢ or 4 to skip groups.
• You can also use this procedure while a disc is stopped.
• DVD Video: Although it will depend on the contents of the disc, for most disc you skip across titles or
chapters.
• Audio CD: For this type of disc you can skip across track numbers.
• You can also use this procedure while a disc is stopped.
• Video CD: For this type of disc you can skip across track numbers.
When playing Video CD discs using PBC, you may not be able to skip tracks for some
discs. For more information about PBC playback (using the menu function for normal
playback), see page 58.
• You can also use this procedure while a disc is stopped.
34
Page 35

Basic Operations
Fast Forward/Backward Through a Disc
You can perform these operations by pressing the f ast f orwards/bac kwards b uttons on the remote control or the pla y er itself .
Using the ¡/1 buttons on the remote control to fast forward/backward through a disc.
■ While a disc is playing
1 Press ¡ or 1.
¡: Fast forward through a disc.
1: Moves fast backward through a disc.
• The playback speed increases with each press of the button.
To resume normal playback
Press # (Play).
Using the ¢/4 buttons on the player itself to fast forward/backward through a disc.
■ While a disc is playing
1 Press and hold down ¢ or 4 .
¢ : Fast forward through a disc.
4 : Fast backward through a disc.
• When you release the ¢/4 button, normal playback resumes.
DVD
AUDIO
Resume Playback [RESUME]
DVD
AUDIO
VIDEO
VIDEO
CD
CD
If you press the 7 (Stop) button while a disc is playing, that point is stored as the resume point. If you turn the power
off, while a disc is playing, that point is stored as the resume point. If you continue playbac k from the resume point, you
can continue from your previous session.
Storing the resume position
■ While a disc is playing
1 Press 7 (Stop).
The point at which the disc was stopped is stored as the resume point.
• If you turn the power off the point at which the power was switched off is stored as the resume point. (The
resume point is remembered even if the power is switched off.)
• If you store a new resume point, the previous resume point is replaced by the new resume point.
Resuming Playback
■ While a disc is stopped or the power is OFF
1 Press [RESUME].
Playback starts from the stored resume point.
• When playing Video CD discs that use PBC, playback may resume from slightly before or after the stored
resume point.
• If you use resume after stopping program or random playback, playback will start from the resume point using
normal playback, not program or random playback. (For DVD Audio, Audio CD, and Video CD)
Clearing a resume point
If you open the disc tray, the stored resume point is cleared.
Example of basic resume playback
To continue playback from a pre vious session, press [RESUME] instead of [PLAY]. Playback resumes point where you
stopped the previous session.
35
Page 36

Basic Operations
Viewing One Frame at a Time
DVD
AUDIO
DVD
VIDEO
VIDEO
CD
CD
AUDIO
You can view pictures one frame at a time.
• For D VD Audio discs, y ou can only view pictures one frame at a time if the disc includes video images. F or discs that
only include still pictures, or do not include any pictures, is displayed.
■ While a disc is playing
1 Press 8 to pause playback.
2 Press 8.
Each time you press the button, the paused image is advanced by one frame.
• Pressing # (Play), resumes normal playback.
Slow Motion Playback
DVD
AUDIO
VIDEO
DVD
VIDEO
CD
CD
AUDIO
You can perform slow motion playback by pressing the buttons on the remote control or the player itself.
• For D VD Audio discs, you can only use slow motion playback if the disc includes video images . For discs that only
include still pictures, or do not include any pictures, is displayed.
Using the ¡/1 buttons on the remote control for slow motion playback.
■ While a disc is playing
1 Press 8 to pause playback.
2 Press ¡ or 1.
¡ : Uses slow motion playback in the forward direction.
1 : Uses slow motion pla yback in the reverse direction. (Only for DVD Audio and DVD Video discs.)
The slow motion playback speed increases with each press of the button.
• Pressing # (Play), resumes normal playback.
Pausing slow motion playback
Press 8 (Pause).
Using the ¢/4 buttons on the player itself for slow motion playback.
■ While a disc is playing
1 Press 8 to pause playback.
2 Press and hold down ¢ or 4.
¢ : Uses slow motion playback in the forward direction.
4 : Uses slow motion playback in the reverse direction. (Only for DVD Audio and DVD Video discs.)
• When you release the ¢/4 button, the player returns to the paused state.
Note:
●
The audio signal is not output during slow motion playback.
●
You cannot use slow motion playback in the reverse direction for Video CD discs.
36
Page 37

Basic Operations
DVD
AUDIO
Playing Time Display [TIME DISPLAY]
DVD
AUDIO
VIDEO
VIDEO
CD
CD
While a disc is playing you can display the elapsed/remaining playing time for a track, the elapsed/remaining playing
time for the disc. You can also display the playing time while a disc is stopped.
• You can perform these operations from the remote control.
Using time display during playback
■ While a disc is playing
1 Press [TIME DISPLAY].
Each time you press the button, the time display changes as shown below.
• When playing DVD Audio/Audio CD discs
EACH (Elapsed playing time of the current track)
↓
EACH REMAIN (Remaining playing time of the current track)
↓
No display
↓
REMAIN
• When playing Video CD discs (with PBC Off)
DVD Audio: Elapsed playing time of current group
Audio CD : Elapsed playing time from start of disc
DVD Audio: Remaining playing time of current group
Audio CD : Remaining playing time of disc
EACH (Elapsed playing time of the current track)
↓
EACH REMAIN (Remaining playing time of the current track)
Note:
●
You can only use time display for Video CD discs when PBC is set to Off. If PBC is set to On, the times are not
displayed.
Using time display while a disc is stopped (using [TIME DISPLAY])
■ While a disc is paused
1 Press [TIME DISPLAY].
Each time you press the button, the time display changes as shown below.
• When Audio CD or Video CD discs are stopped (with PBC Off)
EACH (Elapsed playing time for track 1 0:00)
↓
EACH REMAIN(Elapsed playing time for track 1)
↓
No display (Elapsed playing time from start of disc 0:00)
↓
REMAIN (Total playing time of disc)
37
Page 38

Basic Operations
• When Video CD discs are stopped (with PBC On)
PBC display
↓
REMAIN (Total playing time of disc)
Note:
●
For DVD Audio discs, you cannot display the playing time by pressing [TIME DISPLAY] while the disc is stopped.
Using time display while a disc is stopped
When you insert a disc or if you stop playback, the playing time display changes as shown below.
• For DVD Audio discs
(Total playing time of disc)
↓ Approximately five seconds later
REMAIN (Total playing time for the first group)
↓ Approximately five seconds later
(Display when stopped)
You can view the playing time for each group by pressing [GROUP], then pressing ¢ ([GROUP(+)]) or 4
([GROUP(-)]) to select each group.
• For Audio CD/Video CD discs
(Total playing time of disc)
↓ Approximately five seconds later
EACH REMAIN (Playing time for the first track)
You can view the playing time for each track by pressing ¢ or 4 to select each track.
38
Page 39

Basic Operations
Turning the Display Off to Get Better Sound Quality [DISPLAY OFF]
AUDIO
DVD
VIDEO
VIDEO
CD
CD
AUDIO
DVD
If you do not need the picture display, you can switch off the video output. (For DVD Audio and Audio CD only)
By switching off the video output display while a disc is playing, you can eliminate noise generated by the video
circuitry or the display. This allows you to achieve even greater sound quality from the player.
■ While a disc is playing or paused
1 Press [DISPLAY OFF]. (On the player itself, press [VIDEO/DISP.ON/OFF].)
Each time you press the button, the video output and display changes as shown below.
V.OFF is lit The picture on the TV goes off.
↓ (For DVD Audio and Audio CD only)
• V.OFF is lit and the display The picture on the TV goes off.
darkens. (For DVD Audio and Audio CD only)
• For DVD Audio discs, the DVD
AUDIO indicator on the player
itself goes off.
↓
• V.OFF is lit The picture on the TV goes off.
• The DISPLAY OFF (For DVD Audio and Audio CD only)
indicator on the player itself is lit During playback, the whole display goes off.
• For DVD Audio the DVD AUDIO
indicator on the player itself goes off.
↓
No display Return to the normal state.
Note:
●
For some DVD Audio discs, you may not be able to switch off the picture display.
●
You can still access the Initial Settings screen even when the picture display has been switched off.
●
If the power is switched off, the settings return to the normal state.
39
Page 40

Basic Operations
Adjusting the Image Brightness [THEATER POSITION]
DVD
AUDIO
VIDEO
DVD
VIDEO
CD
CD
AUDIO
You can adjust the image brightness so it best suits the lighting in the room where the video is being played.
• You can perform these operations from the remote control.
• For DVD A udio discs, y ou can only adjust the image brightness if the disc includes video images. F or discs that only
include still pictures, or do not include any pictures, is displayed.
■ While a disc is playing
1 Press [THEATER POSITION] to select the image brightness.
The THEATER POSITION display appears.
THEATER
1
Each press of the button changes the THEATER POSITION as shown below.
Theater position
1
↓
2 The image becomes darker.
↓
3
↓
OFF (Normal position)
2 Press [ENTER].
The on screen display goes out.
• If you do not perform any operations for five seconds or more, the display automatically goes out.
DVD
AUDIO
fs/RATE Display [fs/RATE]
DVD
AUDIO
VIDEO
VIDEO
CD
CD
You can display fs (sampling frequency) and bit rate information while a disc is playing.
• You can perform these operations from the remote control.
■ While a disc is playing
1 Press [fs/RATE].
The fs (sampling frequency) and bit rate information for each audio channel stored on the disc and the n umber of
quantized bits is displayed. Five seconds later the display returns to normal.
40
Audio channel data (Blinks)
Quantized bits
Example: 24 bit
Sampling frequency (kHz)
Example: 96kHz
Page 41

Basic Operations
• For DVD Audio discs, a maximum of two audio channels are recorded on the discs. In this case, the data for each
channel is displayed as shown below.
Display example: Channel group 1
Example: Front L/R
96kHz/24 bit
↓ Five seconds later
Channel group 2
Example: Center, Rear L/R, Subwoofer
48kHz/20 bit
↓ Five seconds later
To original screen
• For DVD Audio/DVD Video discs that use a compressed format, only the fs information is displayed for the audio
channels.
2 Press [fs/RATE] again while the fs information is displayed.
The bit rate/second is displayed. The display is refreshed every 1/2 second.
Example: 9.2Mbps
The bit rate for DVD Audio and D VD Video is variab le, so the av erage bit rate will change depending on the scene .
Generally, scenes with a lot of movement will have a higher bit rate.
• Press [fs/RATE] again to return to the original screen.
41
Page 42

Enjoying DVD Audio
This section describes how to use the player to select the song you want to listen
to, create a program of songs, repeat a certain song, and various other functions. It
also describes the display operations for still images.
DVD
AUDIO
DVD
VIDEO
CD
VIDEO
CD
AUDIO
● About DVD Audio
DVD Audio discs include tracks that have been divided into groups and can also include still images. The basic
structure of DVD Audio discs is shown below.
● You can perform these operations from the remote control.
● For more information on using the number buttons, see page 20.
DVD Audio
Group 1
Group 2
Group 3
Group 9 (Max.)
Track 1
Track 2
Track 99 (Max.)
TrackGroup
Still picture 1
Still picture 2
Still picture 3
Still picture (Last)
Still picture
• Up to 9 groups
Some discs also include bonus groups (special groups not listed in the contents.)
BONUS appears on the display.
• One group can contain up to 99 tracks
Some tracks also include index items.
• Multiple still images
Some discs include still images that appear while the disc is playing. These still images can be controlled using the
[Automatic Slide Show method] or [Button Operated Bro w sab le method]. Some discs also include especial effects
for the transition between images.
* The stereo playback of some multi-channel tracks may be prohibited. For these tracks, only the front L/R channel
will be output from the digital out. The analog output will be in accordance with the [SPEAKER SETTINGS].
Using the menu to select an item to play
Some DVD Audio discs include a menu screen.
■ Insert a DVD Audio disc
1 Press [TOP MENU].
The menu screen appears.
2 Press 5/∞/3/2 to select an item.
Depending on the menu, you may also be able to use the number keys to select an item.
3 Press [ENTER] or # (Play).
Playback of the selected item begins.
42
Page 43

Enjoying Audio DVD
Selecting a Track
● Use the ¢ 4 buttons to select a track.
■ While an Audio DVD disc is playing
1 While pressing [GROUP], press ¢ ([GROUP(+)]) or 4 ([GROUP(–)]) to select the group.
¢ (GROUP (+)): Each time you press the button the group number increases by one.
4 (GROUP (–)): Each time you press the button the group number decreases by one.
2 Press ¢ or 4 to select the track.
¢ : Each time you press the button the track number within the group increases by one.
4 : If you press the button once, playback of the track begins. If you press the key again, the track number is
reduced by one.
• Playback starts from the selected track.
● Using the number buttons to select a track
■ While an Audio DVD disc is playing
1 While pressing [GROUP], use the number buttons (1-9) to specify the group number.
• Playback begins from the first track of the selected group.
2 Press the number buttons to specify the track number.
Example: To specify track 15
Press +10 ➝ 5
* : You cannot use the number buttons to specify a
• Playback of the selected track begins.
track when the menu is displayed.
Selecting a track from a stopped group
Use the same procedure as described above to select a track.
43
Page 44

Enjoying Audio DVD
Selecting an Index Item
If an index has been included with a track, y ou can specify the index n umber to begin playbac k from that index number
position.
● Selecting an index item using [CHAP./INDEX] (Index search)
■ While an Audio DVD disc is playing
1 While pressing [CHAP./INDEX], use the number buttons to specify the index number.
• Playback starts from the selected index number.
● Using the ¢ 4 buttons to select an index item (Index skip)
■ While an Audio DVD disc is playing
1 While pressing [CHAP./INDEX], press ¢ or 4 to select the index number.
¢ : Each time you press the button the index number increases by one.
4 : Each time you press the button the index number decreases by one.
Still image display operations
Some DVD Audio discs include still images that appear while the disc is playing. You can perform the following still
image display operations while B.S.P is on.
Advancing/replaying still images [PAGE +/–]
■ While an Audio DVD disc is playing
1 Press [PAGE+] or [PAGE –]
PAGE +: Displays the next still image.
PAGE –: Displays the previous still image.
* B.S.P. appears in red only when the disc includes still images that can be browsed.
Jumping to specified still images on a disc [RETURN]
■ While an Audio DVD disc is playing (Only when B.S.P. is on)
1 Press [RETURN].
Jumps to the specified still images on the disc.
• Some discs do not include still images that can be browsed by pressing [RETURN]. In this case, is displayed.
44
Page 45

Program Playback
You can arrange songs on a disc in the order you want to play them.
• You can include up to 33 songs in a program.
■ While a DVD Audio is stopped
1 Press [PLAY MODE] until PROGRAM is displayed.
Each press of the button changes the display mode as shown below.
PROGRAM RANDOM No display (Normal playback)
2 Specify the group and track numbers.
1) While pressing [GROUP], press the number keys to specify the group number.
2) Press the number buttons to select the track number.
Enjoying Audio DVD
3 Specify the next group and track number.
• If you want to specify another track in the same group, you can skip the step specifying the group.
• You can repeat the same track several times.
• If you make a mistake entering a number, press [CANCEL]. The last track in the program is deleted.
4 When you have finished the programs, press # (Play).
Playback begins using the track order in the program.
• After all tracks in the program have been played, playback stops.
Since the player is still in Program mode, you can continue Program playback.
• Even if you press [PLAY MODE] and select either [NORMAL PLAYBACK] or [RANDOM PLAYBACK], you can
still use Program playback after they have finished.
• You can use fast forward/backward or skip through the track, as you would with [NORMAL PLAYBACK].
Checking and editing the contents of a program
Press the ¢ button while the disc is stopped. Each press of the button displa ys the tracks in the prog ram in the order
they are programmed. Press 4 to display them in reverse order. The program number currently selected blinks.
• Deleting a program step:
Press [CANCEL]. The selected (blinking) program step is deleted.
• Adding a step to a program:
Repeat the procedure in step 2 and specify the new group and trac k number . The new program step will be inserted
at the currently selected (blinking) program number.
• When you have finished checking the program:
If you press [ENTER], the program step number stops blinking and you return to the last step in the program.
45
Page 46

Enjoying Audio DVD
Clearing the contents of a program
• While the disc is stopped, press [CLEAR].
• Open the disc tray or switch the power off.
Random Playback
You can play the songs on a disc in random order. All tracks in all groups on the disc will be pla y ed in a r andom order.
■ While a DVD Audio disc is stopped
1 Press [PLAY MODE] until RANDOM is displayed.
Each press of the button changes the display mode as shown below.
PROGRAM RANDOM No display (Normal playback)
2 Press # (Play).
Random playback begins. All tracks in all groups are play ed once is a r andom order, then the playback stops and
RANDOM goes out.
Cancelling Random Playback
• During playback, press 7 (Stop). Random playback stops and RANDOM goes out.
• While a disc is stopped, press [PLAY MODE]. RANDOM goes out.
Repeat Playback
You can repeat a specified tracks, all tracks in a group, or all tracks in all groups.
■ While an Audio DVD disc is playing or paused
1 Press [REPEAT] to select the repeat mode you want to use.
Each press of the button changes the repeat mode as shown below.
REPEAT ALL
↓
REPEAT
↓
REPEAT 1
↓
No display(OFF)
Repeats all tracks in all groups.
Repeats all tracks in the selected group.
Repeats the selected track.
Repeat playback is not performed.
• Repeat playback begins.
• To select repeat playback while a disc is stopped, press # (Play). Repeat playback begins.
Using repeat playback during program playback
REPEAT ALL
↓
REPEAT 1
↓
No display (OFF)
46
Repeats all tracks in the program.
Repeats the selected track.
Repeat playback is not performed.
Page 47

Using repeat playback during random playback
Enjoying Audio DVD
REPEAT ALL
↓
REPEAT 1
↓
No display (OFF)
Cancelling Repeat Playback
• Press [REPEAT] to select No display (OFF).
• Repeat playback is also cancelled if you used [PLAY MODE] to change the playback mode.
• It is also cancelled if you open the disc tray or switch the power off.
Repeats all tracks in all groups in a random order.
Repeats the selected track.
Repeat playback is not performed.
A-B Repeat Playback
You can repeat a specified section within a single track.
■ While an Audio DVD disc is playing (You cannot select this during program or random playback.)
1 Press [REPEAT A-B] at the starting point of the section you want to repeat.
REPEAT A- appears in red, and the A-B Repeat start point (point A) is stored.
2 Press [REPEAT A-B] again at the finish point of the section you want to repeat.
REPEAT A-B appears in red, and the A-B Repeat finish point (point B) is stored.
• Repeat playback of the section between A and B begins.
• You can also use ¡ (Fast forward) to search for point B.
Cancelling A-B Repeat Playback
• You can cancel A-B repeat playback by pressing [REPEAT A-B].
• If you perform an operation that goes beyond point B (skipping ahead to the next track, etc.), A-B repeat playback
is cancelled. Or you can press 7 (Stop) to cancel it.
It is also cancelled if you open the disc tray or switch the power off.
Changing the Angle [ANGLE]
Some discs, such as those of live concerts, include video footage tak en from sev eral angles (multi-angle) on the same
disc. For discs that use this function, you can select the viewing angle you wish to use.
■ While playing a DVD Audio that uses multi-angle
1 Press [ANGLE].
2 Press [ANGLE], or press 2/3 to select the camera angle you wish to use.
• Each press of the button changes the angle.
Example:
1/3
↓
2/3
↓
3/3
3 Press [ENTER].
The Angle on screen display disappears from the TV screen.
• If you do not perform any operations for 10 seconds or more, the display automatically goes out.
47
Page 48

Enjoying Audio DVD
If is displayed when you press a button
The scene being played does not include any multi-angle information.
Changing the Subtitles [SUBTITLE]
When playing a disc that includes subtitles, you can select the type of subtitles, or choose not to display subtitles.
■ While playing a DVD Audio disc that includes subtitles
1 Press [SUBTITLE].
2 Press 2/3 to select the subtitles.
• Each press of the button changes the subtitles display.
Example:
• English, Spanish, French, Chinese, German, Italian, Japanese, and the language codes f or any other languages
are displayed. See page 68.
(English)
1/2
↓
(French)
2/2
↓
(No subtitles displayed)
–
/2
3 Press [ENTER].
The Subtitles on screen display disappears from the TV screen.
• If you do not perform any operations for 10 seconds or more, the display automatically goes out.
• You can press [SUBTITLE] to turn the subtitles display on or off.
If is displayed when you press a button
The disc does not include any subtitles, or prohibits changes being made.
48
Page 49

Enjoying Audio DVD
Changing the Audio Setting [AUDIO]
Some DVD Audio discs include multiple audio. For discs that do this, you can select the audio you wish to hear.
■ While playing a DVD Audio that allows multiple audio selection
1 Press [AUDIO].
2 Press [AUDIO], or 2/3 to select the audio track you wish to hear.
• Each press of the button changes the audio.
Example:
3 Press [ENTER].
The Audio on screen display disappears from the TV screen.
• If you do not perform any operations for 10 seconds or more, the display automatically goes out.
1/2
↓
2/2
If is displayed when you press a button
The disc does not include multiple audio selection, or prohibits changes being made.
* For DVD Audio only, in addition to the on screen display for audio selection on the TV screen, AUDIO * (*: number)
is displayed on the display of the player itself. This means that you can change the audio selection even with the
video display switched off.
Playing a Bonus Group
If you insert a disc that includes bonus groups, BONUS appears on the display. You can use the following procedure to
play a bonus group.
• In order to playback a bonus group, you need to enter a key number.
Bonus group selection Key number entry (Normal operation)
BONUS appears on display BONUS blinks
KEY_ _ _ _ displayed
• Selecting a bonus group
If BONUS appears on the display, you can select the bonus group using one of the methods below. When try to select
a bonus group, the KEY_ _ _ _ message asking for the key number is displayed.
• The bonus group number will not be displayed until the key number has been entered.
BONUS goes out
■ While a DVD Audio disc is stopped
• While pressing [GROUP], press the number buttons to select a bonus group.
• Select a bonus group when creating a program.
■ While an Audio DVD disc is playing
• While pressing [GROUP], press ¢ (GROUP (+)) to select a bonus group.
• While pressing [GROUP], press the number buttons to select a bonus group.
49
Page 50

Enjoying Audio DVD
● Entering the key number
If you select a bonus group using the methods described previously, the following message will appear on the display
asking you to enter the key number.
KEY_ _ _ _ (The first digit for the key number blinks)
* About the key number
The key number you enter here is the key number for accessing bonus groups. Please refer to the documentation
provided with the disc for details.
■ While an Audio DVD disc is playing or paused
1 Press the number buttons (0-9) to enter the (4 digit) key number.
• To correct a mistake, press 2/3 to move to the digit and reenter the number.
• While you are entering the key number BONUS blinks on the display.
2 After entering the (4 digit) key number, press [ENTER] or # (Play).
If the key number is correct, BONUS goes out from the display and the bonus group number is displayed.
You can now perform standard operations with the bonus group.
• If the key number is not correct, the first digit for the key number blinks and the player waits for you to reenter
the key number.
Cancelling Key Number Entry Mode
You can exit key number entry mode using one of the following operations.
• Press [CLEAR].
• Switch the power off.
• Not entering the key number within 10 seconds.
• Make a song selection (selecting a group, etc.)
• Press [STOP].
Clearing the key number
• Open the disc tray.
50
Page 51

Playing DVD Video Discs
This section describes how to use the player to select titles or chapters, change the
camera angle, select the audio or subtitle language, and various other functions.
● You can perform these operations from the remote control.
DVD
AUDIO
DVD
VIDEO
CD
VIDEO
CD
AUDIO
Selecting the Section You Want to Watch
You can specify a title or chapter to start playback from the section you want to watch.
● Using the menu to select an item to play
Most DVD Video discs, include a menu screen. This menu can include var ious information, such as the film title or
song titles, it can also include information about the artist. You can select the section you want to watch from this
menu.
■ Insert a DVD Video disc
1 Press [MENU] or [TOP MENU].
The menu screen appears.
Example:
● For more information on using the number buttons, see page 20.
2 Press 2/3/5/∞ to select an item.
• Depending on the menu screen, you can also use the number buttons to make a selection.
3 Press [ENTER] or # (Play).
Playback of the selected item begins.
Using the MENU button and TOP MENU button
If a disc includes several titles, it often includes a menu screen that displays a list of the titles. This type of menu is
accessed by pressing the TOP MENU button. On the other hand, even discs that do not include more than one title
usually include a menu screen. In this case, the menu is accessed by pressing the MENU button.
For details about the menus for each disc, refer to the documentation provided with the disc.
If is displayed when you press a button
●
If is displayed when you press the TOP MENU button:
The disc does not include a menu that lists the titles on the disc.
●
If is displayed when you press the MENU button:
The disc does not include any menu screen.
51
Page 52

Playing DVD Video Discs
● Specifying the title number to begin playback
Use the number buttons to specify the title number. Playback starts from that number.
■ While a DVD Video disc is stopped
1 Press the number buttons to specify the title number.
The specified title number appears on the display
and playback starts from that title number.
• You can also specify this procedure while a disc is playing.
Title number
If is displayed when you press a button
The disc does not include the specified title number.
● Specifying the chapter number to begin playback (Chapter search)
For DVD Video discs that include films, the titles are often divided into scenes, or chapters. By specifying these
chapter numbers, you can start playback from that scene.
■ While a DVD Video disc is playing
1 While pressing [CHAP./INDEX], press the
number keys to specify the chapter number.
Playback begins from the specified chapter.
If is displayed when you press a button
The disc does not include a chapter with the specified number , or the disc will not allo w y ou to use this function.
Repeat Playback
You can repeat a title or chapter that is playing.
■ While a DVD Video disc is playing
1 Press [REPEAT] to select the repeat mode you want to use.
Each press of the button changes the repeat mode as shown below.
• Repeat playback begins.
REPEAT
↓
REPEAT 1
↓
No display (OFF)
Repeats the title that is playing.
Repeats the chapter that is playing.
Repeat playback is not performed.
Cancelling Repeat Playback
• Press [REPEAT] to select No display (OFF).
• It is also cancelled if you open the disc tray or switch the power off.
52
Page 53

Playing DVD Video Discs
A-B Repeat Playback
You can repeat a specified section you want to watch.
■ While a DVD Video disc is playing
1 Press [REPEAT A-B] at the starting point of the section you want to repeat.
REPEAT A- appears in red, and the A-B Repeat start point is stored.
2 Press [REPEAT A-B] again at the finish point of the section you want to repeat.
REPEAT A-B appears in red, and the A-B Repeat finish point is stored.
• Repeat playback of the section between A and B begins.
• You can also use ¡ (Fast forward) to search for point B.
Cancelling A-B Repeat Playback
• You can cancel A-B repeat playback by pressing [REPEAT A-B].
• If you perform an operation that goes beyond point B (skipping ahead to the ne xt chapter, etc.), A-B repeat pla yback
is cancelled. Or you can press 7 (Stop) to cancel it.
It is also cancelled if you open the disc tray or switch the power off.
Changing the Angle [ANGLE]
Some discs, such as those of live concerts, include video footage tak en from sev eral angles (multi-angle) on the same
disc. For discs that use this function, you can select the viewing angle you wish to use.
■ While playing a DVD Video that uses multi-angle
1 Press [ANGLE].
2 Press [ANGLE], or press 2/3 to select the camera angle you wish to use.
• Each press of the button changes the angle.
Example:
3 Press [ENTER].
The Angle on screen display disappears from the TV screen.
• If you do not perform any operations for 10 seconds or more, the display automatically goes out.
1/3
↓
2/3
↓
3/3
If is displayed when you press a button
The scene being played does not include any multi-angle information.
53
Page 54

Playing DVD Video Discs
Changing the Subtitles [SUBTITLE]
When playing a disc that includes subtitles, such as foreign language films, you can select the type of subtitles, or
choose not to display subtitles.
■ While playing a DVD Video disc that includes subtitles
1 Press [SUBTITLE].
2 Press 2/3 to select the subtitles.
• Each press of the button changes the subtitles display.
Example:
• English, Spanish, French, Chinese, German, Italian, Japanese, and the language codes f or any other languages
are displayed. See page 68.
(ENGLISH)
1/2
↓
(FRENCH)
2/2
↓
(No subtitles displayed)
–
/2
3 Press [ENTER].
The Subtitles on screen display disappears from the TV screen.
• If you do not perform any operations for 10 seconds or more, the display automatically goes out.
• You can press [SUBTITLE] to turn the subtitles display on or off.
If is displayed when you press a button
The disc does not include any subtitles, or prohibits changes being made.
Changing the Audio Language [AUDIO]
Some discs, such as foreign language films, include audio in more than one language . When playing this type of disc,
you can select which audio language to use.
■ While playing a DVD Video that allows multiple audio selection
1 Press [AUDIO].
2 Press [AUDIO], or 2/3 to select the audio language you wish to hear.
• Each press of the button changes the audio language.
Example:
1/2
↓
2/2
(ENGLISH)
(FRENCH)
• English, Spanish, French, Chinese, German, Italian, Japanese, and the language codes f or any other languages
are displayed. See page 68.
3 Press [ENTER].
The Audio on screen display disappears from the TV screen.
• If you do not perform any operations for 10 seconds or more, the display automatically goes out.
If is displayed when you press a button
The disc does not include multiple audio languages, or prohibits changes being made.
54
Page 55

Playing DVD Video Discs
Parental Loc k Setting
Parental lock is a function that allo ws playbac k le vels f or audio or video material to be set depending on the audience.
For example , you can use parental lock to cut gr aphic scenes from films, or replace them with other scenes that you do
not want children to watch.
Setting Parental Lock [7+ENTER]
■ While a DVD Video disc is stopped, or no disc is loaded
1 While pressing 7 (Stop), press [ENTER].
The parental lock screen display appears on the TV screen.
2 Press 5/∞ to align the arrow ( ) with [Country Code], then press 2/3 to select a code.
PARENTAL LOCK
Country Code
Set Level
PASSWORD
PRESS KEY ENTER
DE
–
– – – –
EXIT
3 Press 5/∞ to align the arrow ( ) with [Set Level], then press 2/3 to select the restriction level.
Each press of the button changes the level from 1 (Most restriction) to 8, and “–” (No restriction).
• For example, if “–” is selected the disc can be played with no restrictions.
PARENTAL LOCK
Country Code
Set Level
PASSWORD
PRESS KEY ENTER
DE
3
– – – –
EXIT
4 Press [ENTER].
The arrow ( ) moves to [PASSWORD].
5 Press the number buttons to enter the password, then press [ENTER].
The parental lock setting and password are set, and the arrow ( ) moves EXIT.
• The password is four digits comprising of the numbers 0-9.
• If you want to reenter the four digit password, enter a new four digit password before pressing [ENTER].
PARENTAL LOCK
Country Code
Set Level
PASSWORD
NEW PASSWORD? PRESS 0~9 KEY
DE
3
– – – –
EXIT
6 Press [ENTER] again.
The display returns to the opening screen.
55
Page 56

Playing DVD Video Discs
Changing Parental Lock
The procedure for changing the parental lock settings is similar to the previous procedure, except that you need to
enter the existing password before you can make any changes.
■ While a DVD Video disc is stopped or no disc is loaded
1 While pressing 7 (Stop), press [ENTER].
The parental lock screen appears.
• The arrow ( ) moves to [PASSWORD].
PARENTAL LOCK
Country Code
Set Level
PASSWORD
CURRENT PASSWORD? PRESS 0~9 KEY
2 Press the number buttons to enter the existing password (four digits), then press [ENTER].
• If the password is not correct, a message asking you to reenter the password will appear. Enter the correct
password.
DE
3
– – – –
EXIT
3 Press 5/∞ to align the arrow ( ) with [Set Level], then press 2/3 to select the new restriction level.
• Setting Level 1 : Most restriction
• Setting Level – : No restriction
PARENTAL LOCK
Country Code
Set Level
PASSWORD
PRESS KEY ENTER
DE
3
– – – –
EXIT
4 Press [ENTER].
The arrow ( ) moves to [PASSWORD].
5 Press the number buttons to enter the new password, then press [ENTER].
The new parental lock setting and password are set, and the arrow ( ) moves EXIT.
6 Press [ENTER] again.
The display returns to the opening screen.
Note:
●
If you cannot remember the password for step 2, enter 8888.
●
If you enter an incorrect password three times at step 2, the arrow ( ) moves to EXIT and you cannot use the
5/∞ buttons to move it.
56
Page 57

Playing DVD Video Discs
Temporarily Cancelling Parental Lock
If you have set very strict restrictions for the parental lock settings, you may find that you cannot watch discs you want
to watch when you try to play them. If this occurs, a screen appears asking if you want to temporarily cancel the
parental lock restriction.
■ While the Parental Lock Temporary Cancellation screen is displayed
1 Press 5/∞ to align the arrow ( ) with [YES] or [NO], then press [ENTER].
PARENTAL LOCK
This DISC can't play now!
Temporary
Level Chane?
PASSWORD
PRESS ENTER EXECUTE
If you select [YES], the arrow ( ) moves to [PASSWORD]. Proceed to step 2.
If you select [NO], press [OPEN/CLOSE] to eject the disc.
YES
NO
– – – –
2 Press the number buttons to enter the password (four digits), then press [ENTER].
Parental lock is temporarily cancelled and playback begins.
• If the password is not correct, a message asking you to reenter the password will appear. Enter the correct
password.
Note:
●
If you enter an incorrect password three times , the arrow ( ) moves to [NO] and y ou cannot use the 5/∞ b uttons
to move it. Press [OPEN/CLOSE] to eject the disc.
57
Page 58

Playing Audio CD and Video CD Discs
In addition to DVD discs, this player can play Audio CD and Video CD discs. For
Video CD discs that include PBC (Playback Control), y ou can use a menu screen to
select items, the operations for both types of CD is similar. This section descr ibes
the operation for both types of CD.
DVD
DVD
AUDIO
VIDEO
AUDIO
CD
VIDEO
CD
● About Video CDs with PBC (Playback Control)
• Most Video CD discs include the PBC function. When y ou insert these Video CD discs , PBC appears in the displa y
on the player and a menu appears on the TV screen. You can select songs to playback from this menu.
• Y ou can also pla y Video CD discs without using the PBC function. While the disc is stopped, if you press the n umber
buttons to start playback, PBC is not displayed and the songs are played in the same way as Audio CD discs.
• Video CD discs that do not include the PBC function are played in the same way as Audio CD discs.
These points are summarized in the table below.
Video CD PBC Functions
PBC Function Basic operations PBC display
With PBC
function
Playback with
PBC On
(Menu playback)
● You can perform these operations from the remote control.
● For more information on using the number buttons, see page 20.
Select songs from the menu screen using the number
buttons, while PBC is displayed.
• While a disc is playing, basic operation are the same
as those for Audio CD discs.
PBC changes as follows.
• Use ¢/4 to change operations while a disc is
stopped
¢ : PBC ➝1 ➝2 ➝•••
4 : •••➝2 ➝1 ➝PBC
• PBC playback only while PBC is displayed.
For example, if you display and play track 3, playback
will begin from track 3 with PBC off.
Playback with
PBC Off
(Playback without
using menu)
While a Video CD is stopped, specify the trac k (song)
to play using the number buttons. (To start playback
from the beginning of the disc, press 1.)
• While a disc is playing, basic operation are the same
as those for Audio CD discs.
Without PBC function • Same operations as for Audio CD discs
Note:
●
When using the PBC menu, you cannot use the cursor or ENTER buttons.
58
—
—
Page 59

Playing Audio CD and Video CD Discs
VIDEO
Selecting a Song from a Menu
CD
When you play a Video CD disc that includes PBC , PBC appears on the displa y of the play er and the contents of the menu
included on the disc are displayed on the TV screen. You can use this menu to jump directly to the item you want to watch.
■ While the PBC menu is displayed on the screen
1 Press the number buttons to select a song.
Example:
Playback of the selected song begins.
To return to the menu screen, press [RETURN].
If [Next] or [Previous] are displayed on the menu screen.
• Press the ¢ button to advance to the next page of the menu.
• Press the 4 button to return to the previous page of the menu.
* The operation procedure can vary depending on the disc.
AUDIO
VIDEO
CD
Selecting a Track
CD
■ While an Audio CD or Video CD is stopped or playing
1 Press the number buttons to specify the track number.
• Playback begins from the specified track number.
When using Video CD discs
• If you specify a track number while a disc is stopped, playbac k begins with PBC off (playback without using the men u.)
• Even when playing a disc with PBC on, some discs will not allow you to specify a trac k number while the disc is pla ying.
AUDIO
Selecting an Index Item
CD
If an Audio CD disc includes an index with a tr ack, you can specify the inde x number to begin pla ybac k from that index
number position.
● Selecting an index item using [CHAP./INDEX] (Index search)
■ While an Audio CD disc is playing
1 While pressing [CHAP./INDEX], use the number buttons to specify the index number.
• Playback starts from the selected index number.
59
Page 60

Playing Audio CD and Video CD Discs
● Using the ¢/4 buttons to select an index item (Index skip)
■ While an Audio CD disc is playing
1 While pressing [CHAP./INDEX], press ¢ or 4 to select the index number.
¢ : Each time you press the button the index number increases by 1.
4 : Each time you press the button the index number decreases by 1.
AUDIO
VIDEO
CD
Program Playback
You can arrange songs on a disc in the order you want to play them.
●
You can include up to 32 songs in a program.
■ While an Audio CD or Video CD disc is stopped
1 Press [PLAY MODE] until PROGRAM is displayed.
PROGRAM RANDOM No display (Normal playback)
Each press of the button changes the display mode as shown below.
CD
Elapsed playing time
(minutes : seconds)
2 Press the number buttons to select the track number.
3 Specify the next track number.
• You can repeat the same track several times.
• If you make a mistake entering a number, press [CANCEL]. The last track in the program is deleted.
4 When you have finished the programs, press # (Play).
Playback begins using the track order in the program.
• After all the tracks in the program have been played, playback stops.
Since the player is still in Program mode, you can continue Program playback.
• Even if you press [PLAY MODE] and select either [NORMAL PLAYBACK] or [RANDOM PLAYBACK], you can
still use Program playback after they have finished.
• You can use fast forward/backward or skip through the track, as you would with [NORMAL PLAYBACK].
Checking and editing the contents of a program
Press the ¢ button while the disc is stopped. Each press of the button displa ys the tracks in the prog ram in the order
they are programmed. Press 4 to display them in reverse order.
The program number currently selected blinks.
• Deleting a program step:
Press [CANCEL]. The selected (blinking) program step is deleted.
• Adding a step to a program:
Repeat the procedure in step 2 and specify the new track number. The new program step will be inserted at the
currently selected (blinking) program number.
60
Page 61

Playing Audio CD and Video CD Discs
• When you have finished checking the progr am:
If you press [ENTER], the program step number stops blinking you return to the last step in the program.
Clearing the contents of a program
• While the disc is stopped, press [CLEAR].
• Open the disc tray or switch the power off.
AUDIO
VIDEO
CD
Random Playback
CD
You can play the songs on a disc in random order. All tracks on the disc will be played in a random order.
■ While an Audio CD or Video CD disc is stopped
1 Press [PLAY MODE] until RANDOM is displayed.
Each press of the button changes the display mode as shown below.
PROGRAM RANDOM No display (Normal playback)
2 Press # (Play).
Random playback begins . All tracks are played once is a r andom order, then playback stops and RANDOM goes
out.
Cancelling Random Playback
• During playback, press 7 (Stop). Random playback stops and RANDOM goes out.
• While a disc is stopped, press [PLAY MODE]. RANDOM goes out.
AUDIO
VIDEO
CD
Repeat Playback
CD
You can repeat a specified track or all tracks on a disc.
You cannot use repeat playback while playing a Video CD disc using PBC.
■ While an Audio CD or Video CD is playing or stopped
1 Press [REPEAT] to select the repeat mode you want to use.
REPEAT
Repeats all tracks on the disc.
↓
REPEAT 1
Repeats the selected track.
↓
No display (OFF)
Repeat playback is not performed.
Each press of the button changes the repeat mode as shown below.
• Repeat playback begins.
• To select repeat playback while a disc is stopped, press # (Play). Repeat playback begins.
Using repeat playback during program playback
REPEAT : Repeats all the tracks in the program.
REPEAT 1 : Repeats the selected track.
No display (OFF) : Repeat playback is not performed.
61
Page 62

Playing Audio CD and Video CD Discs
Using repeat playback during random playback
REPEAT : Repeats all tracks in a random order.
REPEAT 1 : Repeats the selected track.
No display (OFF) : Repeat playback is not performed.
Cancelling Repeat Playback
• Press [REPEAT] to select No display (OFF).
• Repeat playback is also cancelled if you used [PLAY MODE] to change the playback mode.
• It is also cancelled if you open the disc tray or switch the power off.
AUDIO
VIDEO
CD
A-B Repeat Playback
CD
You can repeat a specified section within a single track.
■ While an Audio CD or Video CD is playing (You cannot select this during program or random playback.)
1 Press [REPEAT A-B] at the starting point of the section you want to repeat.
REPEAT A- appears in red, and the A-B Repeat start point is stored.
2 Press [REPEAT A-B] again at the finish point of the section you want to repeat.
REPEAT A-B appears in red, and the A-B Repeat finish point is stored.
• Repeat playback of the section between A and B begins.
• You can also use ¡ (Fast forward) to search for point B.
Cancelling A-B Repeat Playback
• You can cancel A-B repeat playback by pressing [REPEAT A-B].
• If you perform an operation that goes beyond point B (skipping ahead to the next track, etc.), A-B repeat playback
is cancelled. Or you can press 7 (Stop) to cancel it.
It is also cancelled if you open the disc tray or switch the power off.
• If you exit the track, the A point is cancelled. (You only perform A-B Repeat within a single track.)
Changing the Audio Channel [AUDIO]
VIDEO
CD
Some Video CD discs , such as Karaoke discs, include se ver al audio channels: one channel with a v ocal trac k and one
channel without a vocal track. When playing these types of discs, you can select the channel with vocals or without
vocals.
■ While a Video CD disc is playing
1 Press [AUDIO].
The audio channels (L/R, L, or R) are displayed on the TV screen.
2 Press 2/3 to switch between the channels.
You can choose between the following three settings.
• L/R : Normal stereo playback.
• L : Outputs the L (Left) channel to the left and right speakers.
• R : Outputs the R (Right) channel to the left and right speakers.
62
Page 63

DVD
AUDIO
Basic Outline
DVD
VIDEO
AUDIO
CD
VIDEO
CD
Extended K2 Processing Version 2.0 Function
This section describes the Extended K2 Processing Version 2.0 function and how
to use it.
Input
Bit
extension
Input Output
44.1kHz, 16/20/24 bit 176.4kHz, 24 bit
48kHz, 16/20/24 bit 192kHz, 24 bit
88.2kHz, 16/20/24 bit 176.4kHz, 24 bit
96kHz, 16/20/24 bit 192kHz, 24 bit
Frequency
conversion
Band
extension
Output
Bit Extension and Frequency/Band Expansion
The Extended K2 Processing V ersion 2.0 technology is a ne w process that performs bit extension and band e xpansion
for the digital signal from CD and D VD discs to provide a sound quality that is closer to original sound. The process can
be divided into three parts, Bit expansion, Frequency conversion, and Band expansion, with each enhancement
applying supposition of the analog signal before conversion to a digital signal, and then quantization as a new high bit,
high sampling digital signal. This allows it to conver t the audio from normal CD format or various DVD formats to a
maximum output of 24 bits and the frequency band by a maximum of four times for a high quality, high bit, high
sampling format.
How to Use the Extended K2 Processing Version 2.0, Function
■ To use the Extended K2 Processing version 2.0, press [EX K2] on the remote control or [EXTENDED K2
PROCESSING] on the player itself.
• The EXTENDED K2 PROCESSING indicator on the player comes on and the Extended K2 Processing Version
2.0, function is enabled.
The Extended K2 Processing Version 2.0, function effects the front L/R channels for the following discs.
• Audio CD, Video CD
• DVD Audio, DVD Video
(The function does not work for disc with a sampling frequencies of 176.4kHz, or 192kHz.)
Notice
• You cannot out put the signal that has been processed by the Extended K2 Processing to the digital output
(AUDIO DIGITAL OUTPUT) ter minals.
63
Page 64

Handling Discs
Handling precautions
When handling discs, be sure to observe the following precautions . If you do not handle discs properly , it can become
difficult to read the signal from them, noise may be generated by the disc, or cause other malfunctions.
• When removing the disc from its case, lift the disc out while holding the pressing the center of the case.
• Be careful not to damage the disc.
• Keep the signal surface (rear surf ace) of the disc clean, do not stick labels or stic ky tape on the label surf ace of the
disc.
• Do not bend or warp the disc.
Storing discs
Always store discs in their cases to pre vent dust, scratches or warping, and av oid storing them in the following locations.
• Locations exposed to direct sunlight
• Locations with high levels of humidity or dust
• Locations exposed to high temperatures, such as near heaters or in a car
Cleaning discs
• If dust or fingerpr ints appear on the signal surface of the discs, wipe them gently with a soft, dry cloth from the
center of the disc to the edge. Do not wipe the disc along the circumference.
• Never use record cleaner, record spray, thinner, benzine, or other solvents to clean the discs.
64
Page 65

Problem Cause Solution
The remote control does
not work.
There is no video.
There is no sound.
There is no sound.
NO AUDIO is displayed.
Troubleshooting
If you experience problems with your player, please check the table below before
calling for service.
The power cord is not plugged into the socket.The power does not come on.
The player is too far away.
The remote control is not pointing
towards the player.
The batteries have died. Replace the batteries.
The polarity (+/-) of the batteries is incorrect. Insert the batteries correctly.
Sunlight is shining on the remote control
optical sensor.
The video cable is not connected correctly.
The input selection on the TV is incorrect. Make sure the selection is correct.
The Video Off function is on. (V.OFF displayed)
The cables are not connected correctly.
The input selection on the amplifier is incorrect.
The disc has been illegally copied. Consult with disc vendor.
Insert the power plug firmly.
Try to make sure that there are no
obstructions within 5 m of the remote control
optical sensor.
Cut off the sunlight.
Connect the cables correctly. See page 9 and 10.
Cancel Video Off. See page 39.
Connect the cables correctly. See pages 9 to 13.
Make sure connections/operations are correct.
MULTI CH is displayed.
L/R ONLY is displayed.
You cannot play a disc.
The picture is jittery.
The picture is stretched
vertically or horizontally.
The player does not operate
correctly.
The track is prohibited STEREO PLAYBACK. Listen in MULTI CHANNEL SETTING or
listen another STEREO track.
The regional code (locale lock) of the player
and the disc do not match.
The disc is a type the player cannot
play, such as CD-R, etc.
The disc is dirty.
A video recorder is connected
between the player and the TV.
Progressive mode is On, for a TV that
does not support progressive output.
The initial settings are incorrect.
The TV settings are incorrect. Correct the TV settings.
Lightning or electrical noise has
damaged the circuitry.
Condensation has formed inside the player
because a heater has just been turned on
or the player has been moved from a cold
to a warm location.
Replace the disc.
Clean the disc.
Connect the player directly to the TV.
Turn off Progressive mode. See page 29.
Set the initial settings to match the
TV type. See page 27.
Turn off the power, then reconnect
the power cord.
Turn off the power, then turn the
power back on a few hours later.
If these items do not apply, the problem may not be with the player. Check any other equipment connected to the
player . If you still cannot solve the problem after chec king the items abov e, ref er to the W arranty , on page 73, and call
for service.
65
Page 66

● General
● Video output
Specifications
Supported disc types : DVD Audio, DVD Video, Video CD, Audio CD
Video standard : PAL color TV format
Power supply : AC230V 50Hz
Power consumption : At power on 35 W
During standby (STANDBY) 2 W
Weight : 13.1 kg (29.5 lbs)
External dimensions : (W) 436 mm x (H) 125 mm x (D) 391 mm
17-3/16 x 4-15/16 x 15-7/16 inches
Accessories : Power cord x1
Remote control x1
Video : 1.0 Vp- p/75 Ω
S-Video : Y output : 1.0 Vp- p/75 Ω
C output : 0.286 Vp- p/75 Ω
Video (Component) : Y output : 1.0 Vp- p/75 Ω
PB/PR output : 0.7 Vp- p/75 Ω
Video (RGB) : R output : 1.0 Vp- p/75 Ω
G output : 1.0 Vp- p/75 Ω
B output : 1.0 Vp- p/75 Ω
Horizontal resolution : Over 500 lines
S/N ratio : Over 73 dB
● Audio output
Analog audio output : 2.5 Vrms/10 k Ω
Digital audio output : Optical : –21 dBm to –15 dBm (Peak)
: Coaxial : 0.5 Vp- p/75 Ω
● Audio characteristics
Frequency characteristics : CD (fs =44.1 kHz) : 2 Hz to 20 kHz
DVD Audio/Video (fs =48 kHz): 2 Hz to 22 kHz
DVD Audio/Video(fs =96 kHz) : 2 Hz to 44 kHz
DVD Audio(fs =192 kHz) : 2 Hz to 88 kHz
* fs : Sampling frequency
Dynamic range : 16 bit : Over 100 dB
20 bit/24 bit : Over 112 dB
Overall high wave modulation ratio : 16 bit : Less than 0.0015 %
20 bit/24 bit : Less than 0.0010 %
Wow/Flutter : Less than measurement limit (± 0.001 % W.PEAK)
• The specifications and appearance of this model are subject to change without notice.
66
Page 67

Dimensions
391
436
DVD AUDIO
EXTENDED K2
VIDEO
/
PROCESSING
DISP.
ON
/
OFF
DISPLAY
OFF
DVD AUDIO
XV - D9000
/
VIDEO PLAYER
125
STANDBY
133
435 522
(Units: mm)
67
Page 68

Table of Languages and Their Abbreviations
When you select the subtitle language or sound, the languages shown below are
displayed as ab bre viations . To select the desired language, select the abbreviation
corresponding the language you want to.
AA Afar
AB Abkhazian
AF Afrikaans
AM Ameharic
AR Arabic
AS Assamese
AY Aymara
AZ Azerbaijani
BA Bashkir
BE Byelorussian
BG Bulgarian
BH Bihari
BI Bislama
BN Bengali, Bangla
BO Tibetan
BR Breton
CA Catalan
CO Corsican
CS Czech
CY Welsh
DA Danish
DZ Bhutani
EL Greek
EO Esperanto
ET Estonian
EU Basque
FA Persian
FI Finnish
FJ Fiji
FO Faroese
FY Frisian
GA Irish
GD Scots Gaelic
GL Galician
GN Guarani
GU Gujarati
HA Hausa
HI Hindi
HR Croatian
HU Hungarian
HY Armenian
IA Interlingua
IE Interlingue
IK Inupiak
IN Indonesian
IS Icelandic
IW Hebrew
JI Yiddish
JW Javanese
KA Georgian
KK Kazakh
KL Greenlandic
KM Cambodian
KN Kannada
KO Korean (KOR)
KS Kashmiri
KU Kurdish
KY Kirghiz
LA Latin
LN Lingala
LO Laothian
LT Lithuanian
LV Latvian, Lettish
MG Malagasy
MI Maori
MK Macedonian
ML Malayalam
MN Mongolian
MO Moldavian
MR Marathi
MS Malay (MAY)
MT Maltese
MY Burmese
NA Nauru
NE Nepali
NL Dutch
NO Norwegian
OC Occitan
OM (Afan) Oromo
OR Oriya
PA Panjabi
PL Polish
PS Pashto, Pushto
PT Portuguese
QU Quechua
RM Rhaeto-Romance
RN Kirundi
RO Rumanian
RU Russian
RW Kinyarwanda
SA Sanskrit
SD Sindhi
SG Sangho
SH Serbo-Croatian
SI Singhalese
SK Slovak
SL Slovenian
SM Samoan
SN Shona
SO Somali
SQ Albanian
SR Serbian
SS Siswati
ST Sesotho
SU Sundanese
SV Swedish
SW Swahili
TA Tami l
TE Telugu
TG Tajik
TH Thai
TI Tigrinya
TK Turkmen
TL Tagalog
TN Setswana
TO Tonga
TR Turkish
TS Tsonga
TT Tatar
TW Twi
UK Ukrainian
UR Urdu
UZ Uzbek
VI Vietnamese
VO Volapuk
WO Wolof
XH Xhosa
YO Yoruba
ZU Zulu
68
Page 69

Country Code List for Parental Lock
This list is used for the Parental Lock operation. For details, see page 55.
AD Andorra
AE United Arab Emirates
AF Afghanistan
AG Antigua and Barbuda
AI Anguilla
AL Albania
AM Armenia
AN Netherlands Antilles
AO Angola
AQ Antarctica
AR Argentina
AS American Samoa
AT Austria
AU Australia
AW Aruba
AZ Azerbaijan
BA Bosnia and Herzegovina
BB Barbados
BD Bangladesh
BE Belgium
BF Burkina Faso
BG Bulgaria
BH Bahrain
BI Burundi
BJ Benin
BM Bermuda
BN Brunei Darussalam
BO Bolivia
BR Brazil
BS Bahamas
BT Bhutan
BV Bouvet Island
BW Botswana
BY Belarus
BZ Belize
CA Canada
CC Cocos (Keeling) Islands
CF Central African Republic
CG Congo
CH Switzerland
CI Cote d’Ivoire
CK Cook Islands
CL Chile
CM Cameroon
CN China
CO Colombia
CR Costa Rica
CU Cuba
CV Cape Verde
CX Christmas Island
CY Cyprus
CZ Czech Republic
DE Germany
DJ Djibouti
DK Denmark
DM Dominica
DO Dominican Republic
DZ Algeria
EC Ecuador
EE Estonia
EG Egypt
EH Western Sahara
ER Eritrea
ES Spain
ET Ethiopia
FI Finland
FJ Fiji
FK Falkland Islands(Malvinas)
FM Micronesia
(Federated States of)
FO Faroe Islands
FR France
FX France, Metropolitan
GA Gabon
GB United Kingdom
GD Grenada
GE Georgia
GF French Guiana
GH Ghana
GI Gibraltar
GL Greenland
GM Gambia
GN Guinea
GP Guadeloupe
GQ Equatorial Guinea
GR Greece
GS South Georgia and the
South Sandwich Islands
GT Guatemala
GU Guam
GW Guinea-Bissau
GY Guyana
HK Hong Kong
HM Heard Island and
McDonald Islands
HN Honduras
HR Croatia
HT Haiti
HU Hungary
ID Indonesia
IE Ireland
IL Israel
IN India
IO British Indian Ocean
Territory
IQ Iraq
IR Iran (Islamic Republic of)
IS Iceland
IT Italy
JM Jamaica
JO Jordan
JP Japan
KE Kenya
KG Kyrgyzstan
KH Cambodia
KI Kiribati
KM Comoros
KN Saint Kitts and Nevis
KP Korea, Democratic
People’s Republic of
KR Korea, Republic of
KW Kuwait
KY Cayman Islands
KZ Kazakhstan
LA Lao People’s Democratic
Republic
LB Lebanon
LC Saint Lucia
LI Liechtenstein
LK Sri Lanka
LR Liberia
LS Lesotho
LT Lithuania
LU Luxembourg
LV Latvia
LY Libyan Arab Jamahiriya
MA Morocco
MC Monaco
MD Moldova, Republic of
MG Madagascar
MH Marshall Islands
ML Mali
MM Myanmar
MN Mongolia
MO Macau
MP Northern Mariana
Islands
MQ Martinique
MR Mauritania
MS Montserrat
MT Malta
MU Mauritius
MV Maldives
MW Malawi
MX Mexico
MY Malaysia
MZ Mozambique
NA Namibia
NC New Caledonia
NE Niger
NF Norfolk Island
NG Nigeria
NI Nicaragua
NL Netherlands
NO Norway
NP Nepal
NR Nauru
NU Niue
NZ New Zealand
OM Oman
PA Panama
PE Peru
PF French Polynesia
PG Papua New Guinea
PH Philippines
PK Pakistan
PL Poland
PM Saint Pierre and
Miquelon
PN Pitcairn
PR Puerto Rico
PT Portugal
PW Palau
PY Paraguay
QA Qatar
RE Reunion
RO Romania
RU Russian Federation
RW Rwanda
SA Saudi Arabia
SB Solomon Islands
SC Seychelles
SD Sudan
SE Sweden
SG Singapore
SH Saint Helena
SI Slovenia
SJ Svalbard and Jan Mayen
SK Slovakia
SL Sierra Leone
SM San Marino
SN Senegal
SO Somalia
SR Suriname
ST Sao Tome and Principe
SV El Salvador
SY Syrian Arab Republic
SZ Swaziland
TC Turks and Caicos Islands
TD Chad
TF French Southern
Territories
TG T ogo
TH Thailand
TJ Tajikistan
TK Tokelau
TM Turkmenistan
TN Tunisia
TO T onga
TP East Timor
TR T urkey
TT Trinidad and Tobago
TV Tuvalu
TW Taiwan, Province of
China
TZ Tanzania, United
Republic of
UA Ukraine
UG Uganda
UM United States Minor
Outlying Islands
US United States
UY Uruguay
UZ Uzbekistan
VA Vatican City State
(Holy See)
VC Saint Vincent and the
Grenadines
VE Venezuela
VG Virgin Islands (British)
VI Virgin Islands (U.S.)
VN Vietnam
VU Vanuatu
WF Wallis and Futuna Islands
WS Samoa
YE Yemen
YT Mayotte
YU Yugosla via
ZA South Africa
ZM Zambia
ZR Zaire
ZW Zimbabwe
69
Page 70

Glossary
A
A
Aspect ratio
The horizontal to vertical ratio of the displayed image.
For standard TV's the horizontal/v ertical ratio is 4:3, f or
wide-screen TV's the horizontal/vertical ratio is 16:9.
Authoring
The process of encoding the source material, or the
process of adding control information to the encoded
data, or converting the data to DVD format.
B
B
Bit rate
The transfer rate.
Bit stream
The digital data generated by the various encoding
processes.
C
C
Chapter
Each chapter within a title.
Color variation signal
A signal that removes the brightnes signal from the G/
B/R signals and represents the hue and density.
Component
A video format that takes three separate video inputs
with information for the three primary colors of light to
create the video signal. There are G/B/R, Y/PB/PR and
other formats.
Composite
A synchronous composite video signal that combines a
signal combining the brightness and color frequency
signals and a standard color burst signal.
Cursor
Generally, the point where you enter numbers.
D
D
Decode
The process of decoding a signal that has been encoded
in a format standard, so that it restores to the original
signal.
Dolby Digital
The Dolby Digital (AC-3) for mat developed to produce
theater-like surround sound for household systems.
Consists of a maximum of 5.1 channels, three front
channels, two rear channels, and a 0.1 subwoofer
channel.
70
Downmix
This function converts multichannel (three channels or
more) sound formats for audio tracks to two stereo
channels. This is usually perf ormed when the number of
program channels is larger than the number of speakers .
DTS (Digital Theater System)
A new surround format that holds more data than Dolby
Digital to provide even better surround playback.
The number of channels is the same 5.1 channel of
Dolby Digital but the use of a better audio compression
ratio during digital recording means that it has higher S/
N playback. It also has a wider dynamic range for delicate
sound separation.
E
E
Encode
The process of encoding a signal to meet a standard.
Extended K2 Processing
20 bit K2 processing extends 16 bit signals to 20 bit to
improve signal resolution, and also e xpands the sampling
frequency by two to improv e the frequency band during
playback. This allows better sound reproduction of the
subtle nuances of the original for more realistic sound
playback.
Version 2.0 fur ther expands this capability to 24 bit
176.4kHz/192kHz.
G
G
Geographical region playback control (Regional
code)
A system that only allows playback of a disc in
predetermined geographical regions. There are eight
regions in the world, and each region has a number
(Region No.) If the region number on the disc matches
the region number assigned to the player, you can play
the disc.
L
L
Letterbox
A technique for displaying wide screen video on a 4:3
TV without clipping the image by projecting a black, or
other color, mask across the top and bottom parts of the
screen. It is called by this name, since the appearance
is similar to a letterbox.
Linear PCM audio
A lossless compression format for conv erting an analog
audio signal to a digital signal.
Page 71

Glossary
M
M
Menu
A screen included on DVD Video discs that allows you
to select the titles of video or audio on the disc, or to
select the subtitles or camera angle, etc.
Multi-angle
A function that includes mutiple camera angles for the
same scene in a title and allows the user to select which
angle to use.
Multichannel
For DVD Audio discs, a single audio track can only
consist of one sound scene. However, the y can include
three or more channels for the audio track.
Multilingual
A function that allows a single title to support several
languages.
Multi-story
A function that includes mutiple story variations for the
same title. Usually this allows you to select the story
you wish to follow when pla ying the disc, and to continue
making selections via a menu at each story junction
within the title.
O
O
One-sided disc
DVD discs that include signals that can only be read
from one surface. There are single layer and dual layer
one-sided discs.
S
S
Sampling frequency
The sampling frequency used when converting the
analog signal to a digital signal. Expressed as a rate of
times/second, it samples the analog signal and
determines the digital signal value.
Squeezed video
A method of storing 16:9 video data that is uniformly
shrunk (squeezed) to 4:3 video size.
When this is displayed on a TV or monitor the left and
right are stretched so that is return to the original ratio.
Surround
An audio encoding system that produces realistic,
theater-like sound to speakers placed around the listener .
S-Video format
A video signal that separates the brightness signal (Y)
and color signal (C) of a traditional video signal. It
produces an image with very little color blur .
T
T
Transfer rate
The amount of digital data transferred in one second,
using a transfer rate capable of MPEG-2 compression.
Two-sided discs
DVD discs that include signals that can be read from
both surfaces. The disc needs to be turned over.
P
P
Parental control function
A function that can automatically detect whether the
video or audio content of a disc is appropriate for the
audience (for example, educationally undesirable
scenes) by comparing the parental level stored on the
disc with the parental level set on the pla yer . If the le vels
match, or the level on the player is higher, you can pla y
the disc.
Playback control (PBC)
A signal included on (version 2.0) Video CD discs that
can control playback. Video CD discs that support this
function include a menu on the disc which allows you to
interact with the software, perfor m searches and other
functions.
71
Page 72

VICTOR COMPANY OF JAPAN, LIMITED
EN
0301TTMCREJSC
 Loading...