

Page 1
LVT0924-005A [E]
Page 2

Page 3
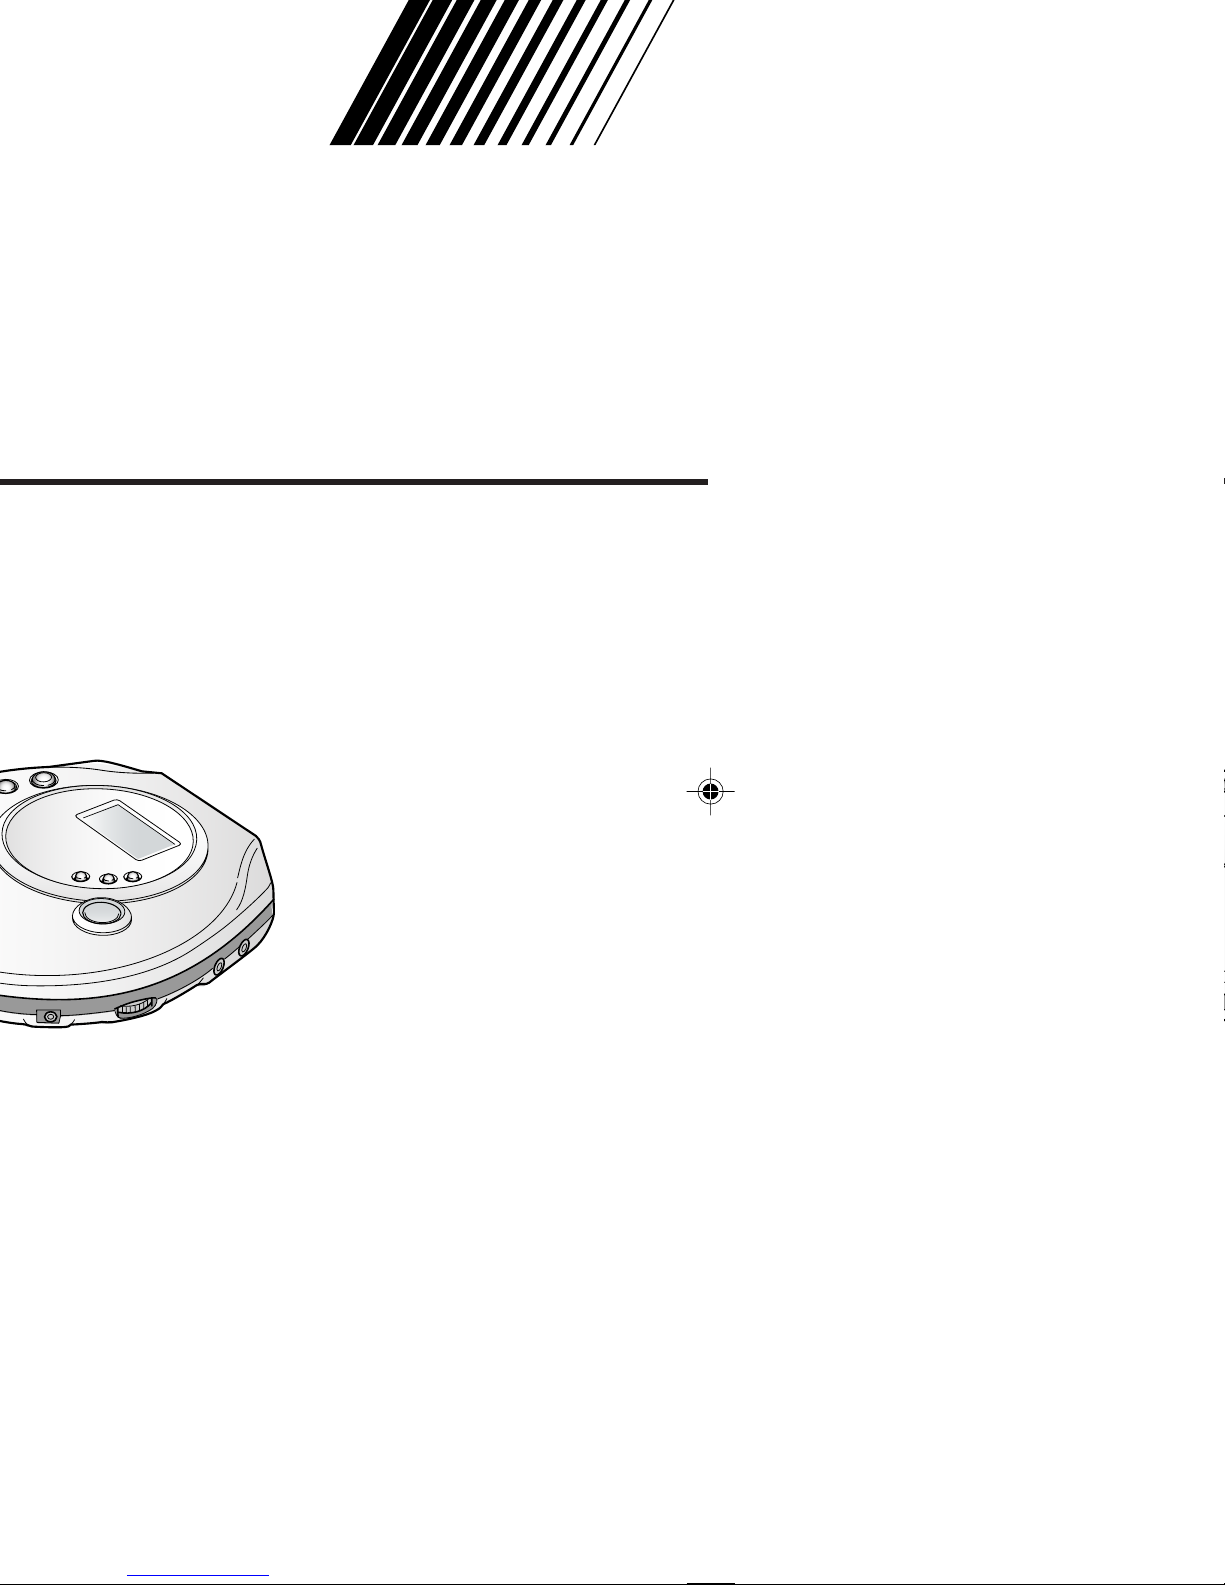
Geachte klant
Dank u voor de aanschaf van dit JVC toestel. Lees alvorens het toestel te gebruiken deze gebruiksaanwijzing
goed door teneinde de beste resultaten te verkrijgen en
een lange levensduur van het toestel te waarborgen.
Inhoud
Bedieningsfuncties . . . . . . . . . . . . . . . . . . . . . . 5
Voorbereidingen voor stroomvoorziening . . . 7
Voorkomen van toevallige bediening (HOLD
vergrendelfunctie) . . . . . . . . . . . . . . . . . . . . 11
Afspelen in de normale volgorde
(Basis-afspeelfunctie) . . . . . . . . . . . . . . . . . 13
Andere afspeelfuncties . . . . . . . . . . . . . . . . . . 17
Anti-schok beveiliging (A.S.P.) . . . . . . . . . . . . 25
Gebruik van het apparaat met los verkrijgbare
accessoires . . . . . . . . . . . . . . . . . . . . . . . . . . 27
Informatie over compact discs . . . . . . . . . . . . 29
Voorzorgsmaatregelen . . . . . . . . . . . . . . . . . . . 32
Verhelpen van storingen . . . . . . . . . . . . . . . . . 35
Onderhoud . . . . . . . . . . . . . . . . . . . . . . . . . . . . 35
Technische gegevens . . . . . . . . . . . . . . . . . . . 37
WAARSCHUWING!
IN DIT APPARAAT WORDT EEN LASER GEBRUIKT. HET GEBRUIK VAN REGELAARS EN
HET MAKEN VAN AFSTELLINGEN OF BEDIENINGEN DIE NIET IN DEZE GEBRUIKSAANWIJZING
STAAN BESCHREVEN, KAN LEIDEN TOT BLOOTSTELLING AAN GEVAARLIJKE STRALING.
MAAK HET APPARAAT NIET OPEN EN GA NIET
ZELF REPAREREN. LAAT HET ONDERHOUD
AAN ERKENDE VAKMENSEN OVER.
WAARSCHUWING:
TENEINDE HET GEVAAR VOOR BRAND OF
ELEKTRISCHE SCHOKKEN TE VERKLEINEN,
MAG DIT APPARAAT NIET WORDEN BLOOTGESTELD AAN REGEN OF VOCHT.
Het kenteken bevindt zich op de onderzijde van
het apparaat.
Bijgeleverde accessoires
Controleer tijdens het uitpakken van het
apparaat of alle accessoires aanwezig zijn.
Netspanningsadapter (AA-R4514) . . . . . . . . . . . . . . . 1 st.
Stereo oortelefoons . . . . . . . . . . . . . . . . . . . . . . . . . . 1 st.
Gebruik de nummers tussen haakjes wanneer u
naar onderdelen vraagt.
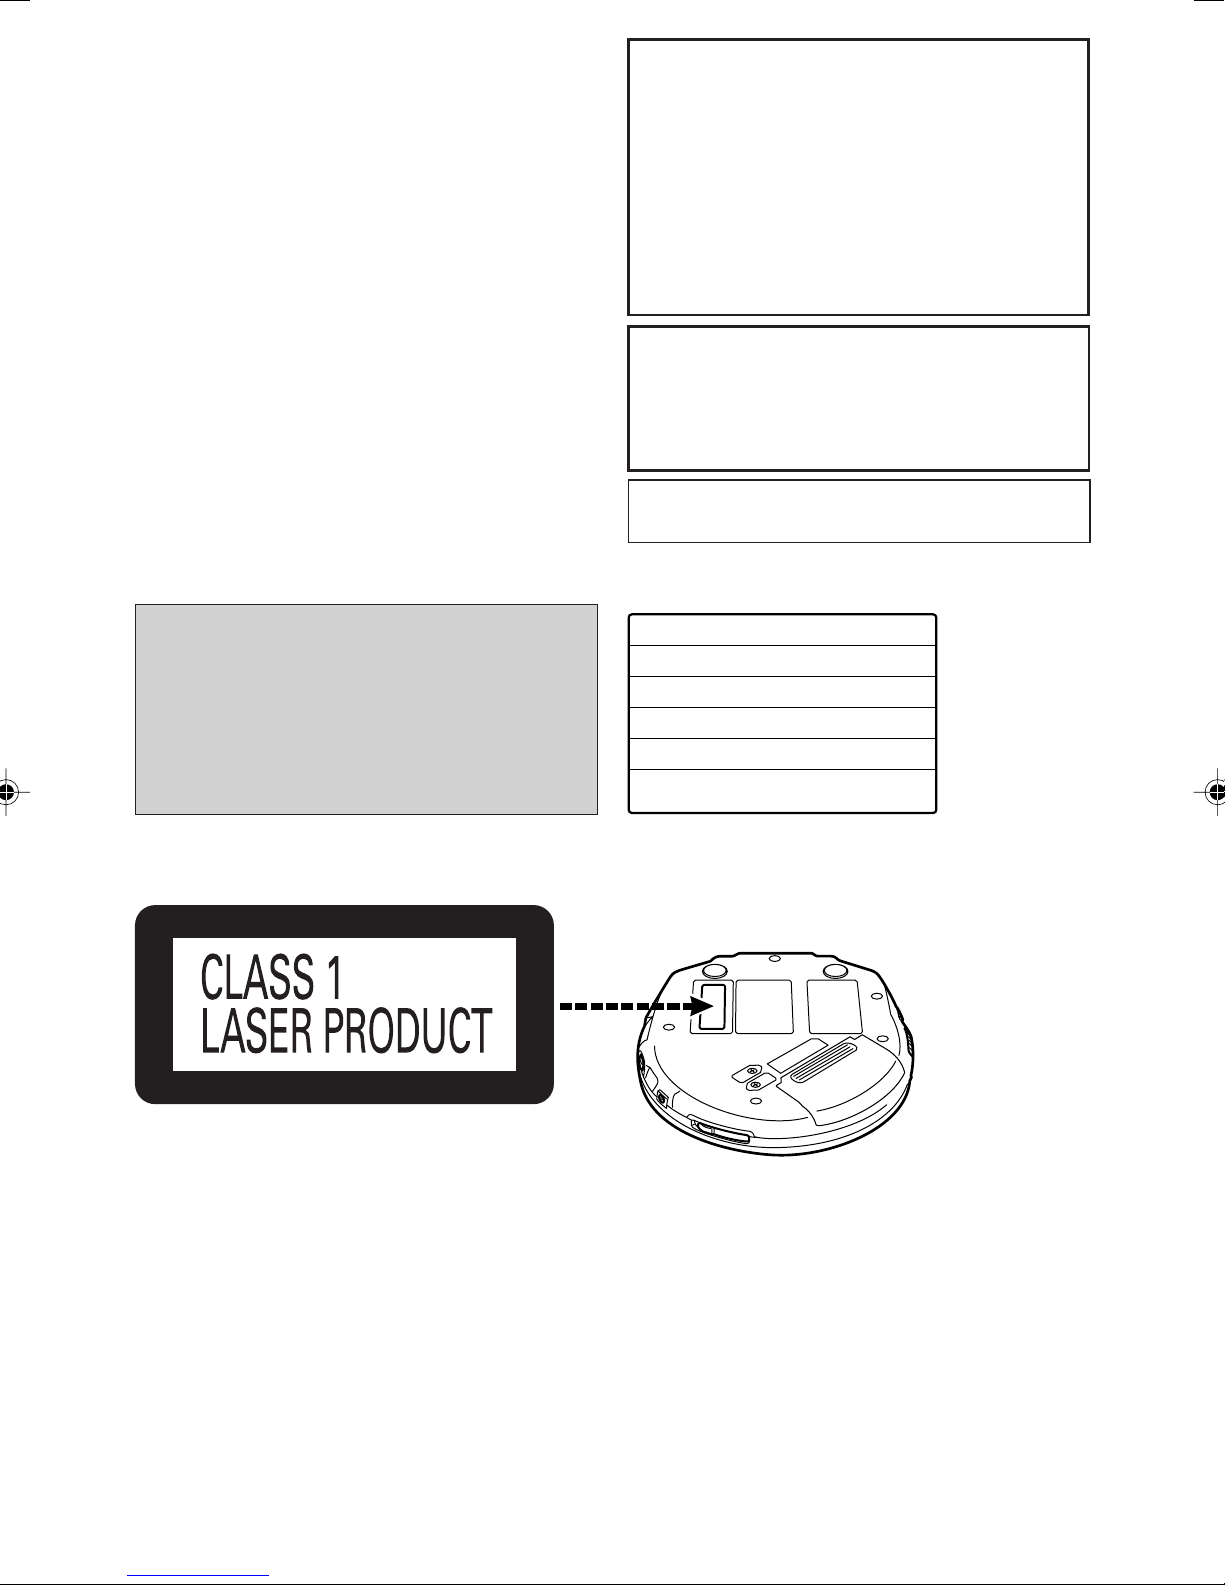
1. CLASS 1 LASER PRODUCT
2. DENGER: Invisible laser
radiation when open and
interlock failed or defeated.
Avoid direct exposure to
beam.
3. CAUTION: Do not open the
top cover. There are no user
serviceable parts inside the
Unit; leave all servicing to
qualified service personnel.
1. PRODUCTO LASER CLASE 1
2. PELIGRO: En el interior hay
radiación láser invisible. Evite
el contacto directo con el haz.
3. PRECAUCIÓN: No abra la
tapa superior. En el interior de
la unidad no existen piezas
reparables por el usuario; deje
todo servicio técnico en manos
de personal calificado.
DANGER
ADVARSEL
VARO!
VARNING
ADVARSEL
VORSICHT
Bottom of the unit
Parte inferior del aparato
Apparatens undersida
Onderzijed van het apparaat
INVISIBLE LASER RADIATION WHEN OPEN AND INTERLOCK DEFEATED.
AVOID DIRECT EXPOSURE TO BEAM.
USYNLIG LASERSTRÅLING VED ÅBNING, NÅR SIKKERHEDSAFBRYDERE
ER UDE AF FUNKTION. UNDGÅ UDSÆTTELSE FOR STRÅLING.
AVATTAESSA JA SUOJALUKITUS OHITETTAESSA OLET ALTTIINA
NÄKYMÄTÖNTÄ LASERSÄTEILYLLE. ÄLÄ KATSO SÄTEESEEN.
OSYNLIG LASERSTRÅLNING NÄR DENNA DEL ÄR ÖPPNAD OCH
SPÄRREN ÄR URKOPPLAD. BETRAKTA EJ STRÅLEN.
USYNLIG LASERSTRÅLING NÅR DEKSEL ÅPNES OG SIKKERHEDSLÅS
BRYTES. UNNGÅ EKSPONERING FOR STRÅLEN.
UNSICHTBARE LASERSTRAHLUNG, WENN ABDECKUNG GEÖFFNET
UND SICHERHEITSVERRIEGELUNG ÜBERBRÜCKT.
NICHT DEM STRAHL AUSSETZEN.
1. KLAS 1 LASERPRODUKT
2. GEVAARLIJK: Onzichtbare
laserstraling wanneer open en de
beveiliging faalt of uitgeschakeld is.
Voorkom het direkt blootstaan aan de
straal.
3. VOORZICHTIG: De bovenkap niet
openen. Binnenin het toestel bevinden
zich geen door de gebruiker te
repareren onderdelen: laat onderhoud
over aan bekwaam vakpersoneel.
(Bottom of product)
(P sat under apparatet)
(Tuotteen pohjassa)
(Apparatens undersida)
(Produktets underside)
(Unterseite des Ger tes)
3
Page 4
CAUTION:
• Do not block the ventilation opening or holes. (If the ventilation
openings of holes are blocked by a newspaper or cloth, etc., the
heat may not be able to get out.)
• Do not place any naked flame sources, such as lighted candles,
on the apparatus.
• When discarding batteries, environmental problems must be considered and local rules or laws governing the disposal of these
batteries must be followed strictly.
• Do not expose this apparatus to rain, moisture, dripping or
splashing and that no objects filled with liquids, such as vases,
shall be placed on the aparatus.
PRECAUCIÓN:
• No obstruya las rendijas o los orificios de ventilación.
(Si las rendijas o los orificios de ventilación quedan tapados con
un periódico, un trozo de tela, etc., no se podrá disipar el calor).
• No ponga sobre el aparato ninguna llama al descubierto, como
velas encendidas.
• Cuando tenga que descartar las pilas, tenga en cuenta los
problemas ambientales y observe estrictamente los reglamentos o
las leyes locales sobre disposición de las pilas.
• No exponga este aparato a la lluvia, humedad, goteos o
salpicaduras. Tampoco ponga recipientes conteniendo líquidos,
como floreros, encima del aparato.
VOORZICHTIG:
• Zorg dat u de ventilatieopeningen en -gaten niet afsluit.
(Als de ventilatieopeningen en -gaten worden afgesloten door
bijvoorbeeld papier of een doek, kan er hitte in het apparaat
worden opgebouwd.)
• Zet geen bronnen met open vuur, zoals brandende kaarsen, op
het apparaat.
• Wees milieubewust en gooi lege batterijen niet bij het
huishoudelijk afval. Lege batterijen dient u in te leveren met het
KCA of bij een innamepunt voor batterijen.
• Stel dit apparaat niet bloot aan regen, vocht, drupwater of spatwater en plaats geen enkel voorwerp waarin zich een vloeistof
bevindt, zoals een vaas, op het apparaat.
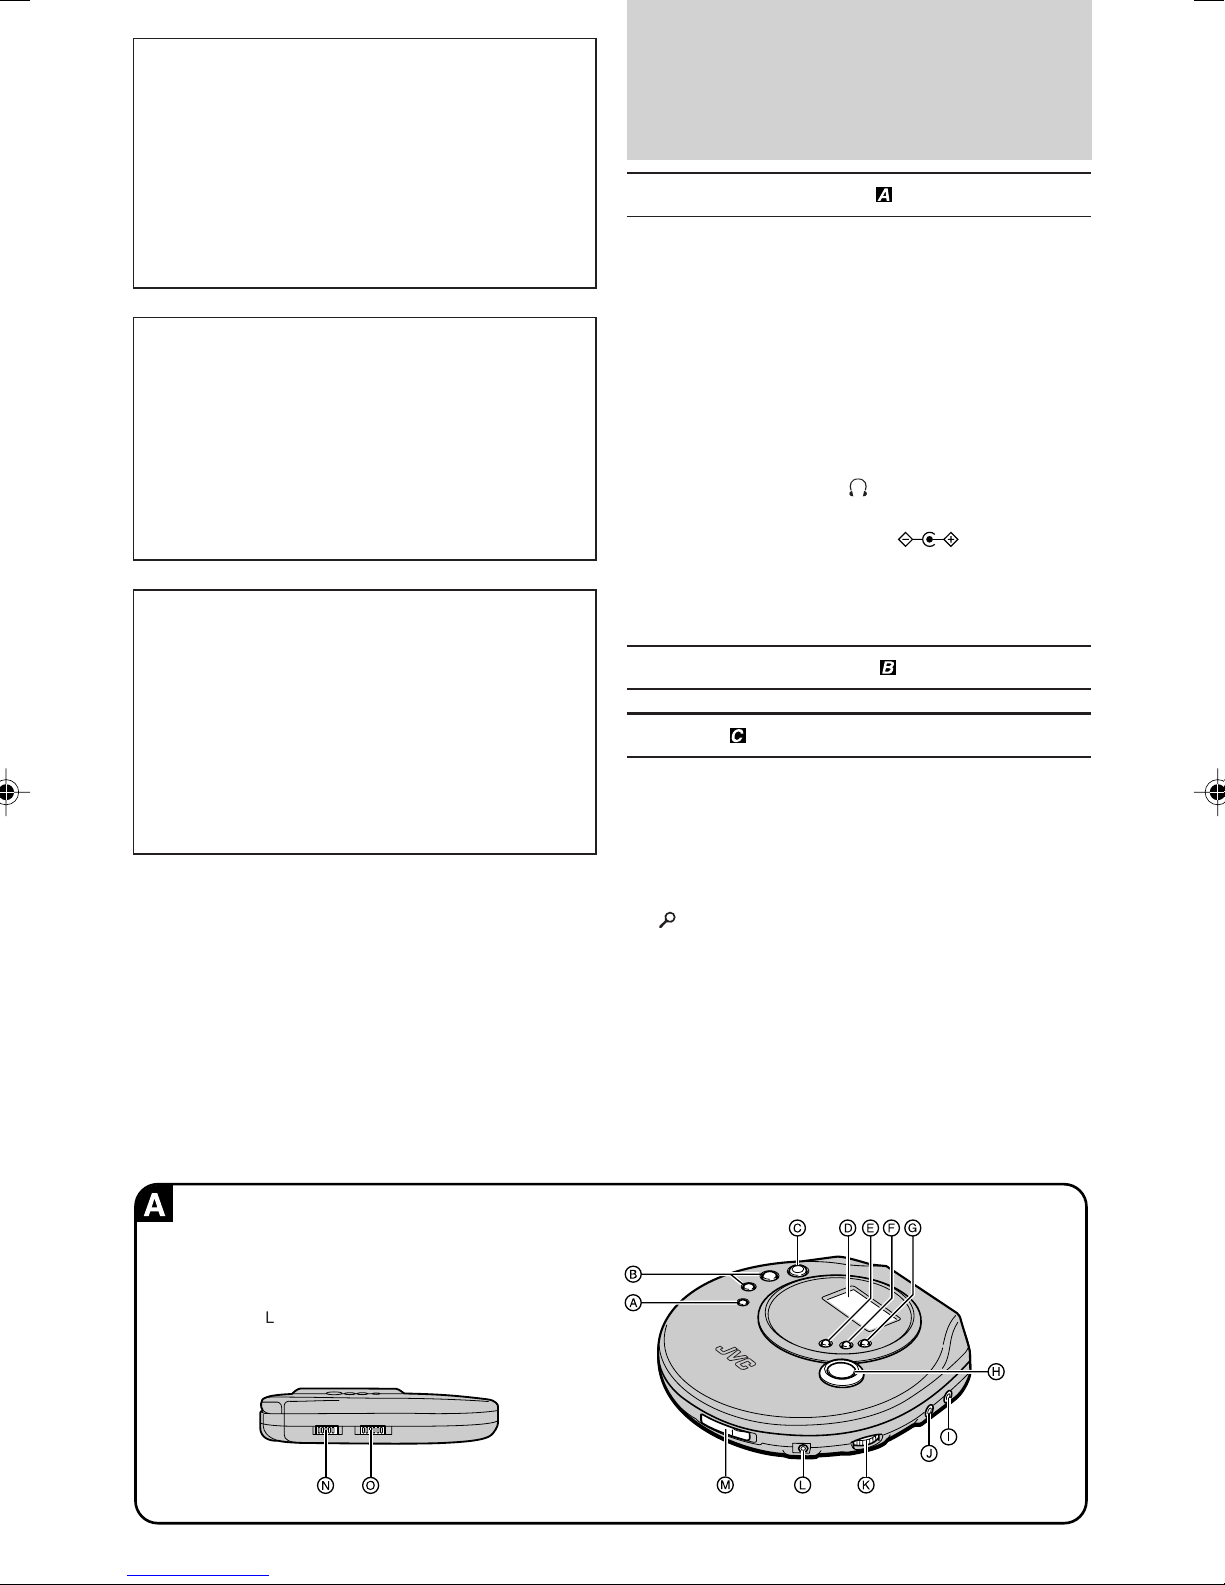
Location of
Controls
Portable CD player
A Stop / power off button (7)
B Skip / search buttons (4, ¢)
C Play / pause button (3/8)
D Display
E MODE button
F A.S.P. (Anti-shock protection)/
T.SERACH (Title Search) button
G PROGRAM button
H GROUP button
I LINE OUT jack
J Headphones jack ( )
K Headphones volume control (VOLUME)
L DC in jack (DC IN 4.5 V )
M Lid open switch (OPEN 3)
N HOLD switch
O Hyper-bass sound switch (HBS)
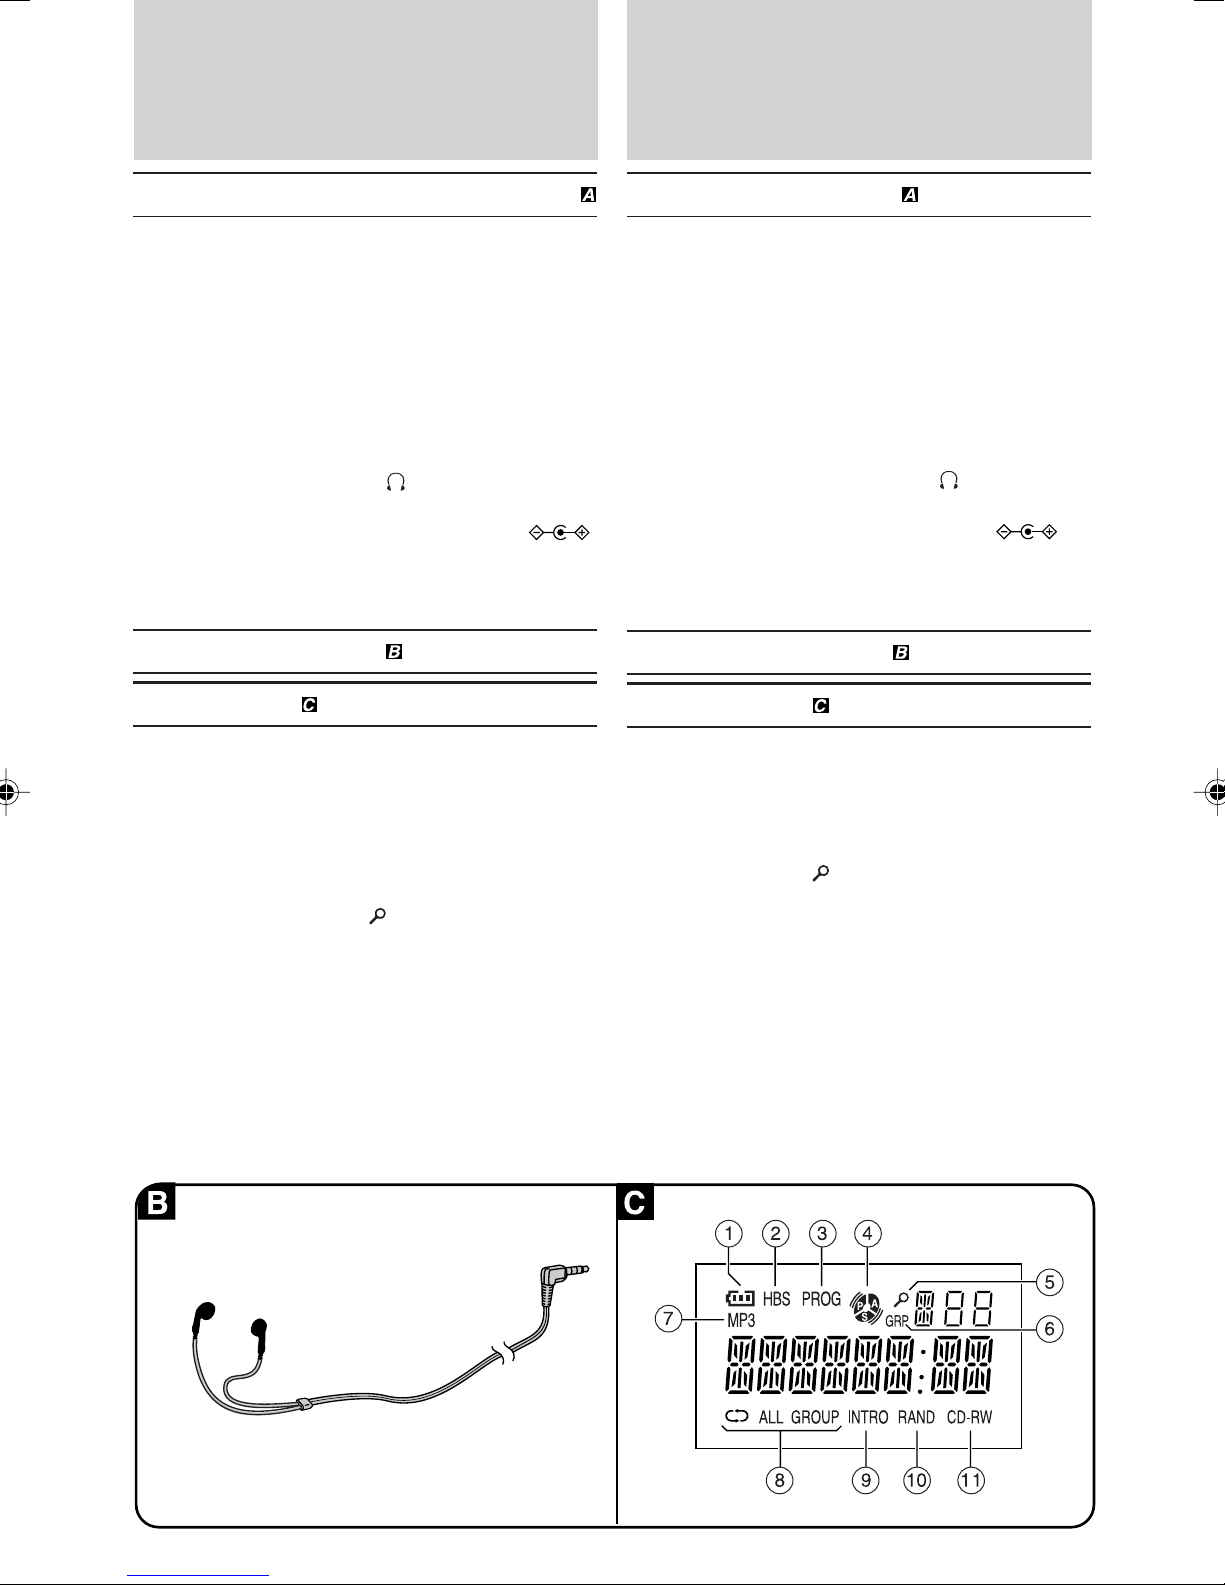
Stereo headphones
Display
1 Battery indicator (See page 8.)
2 HBS (Hyper-Bass Sound) indicator (See
page 22.)
3 PROG (Program) indicator (See page 18.)
4 A.S.P. (Anti-Shock Protection) indicator
(See page 24.)
5 (Search) indicator (See page 22.)
6 GRP (Group) indicator (See page 22.)
7 MP3 indicator
Lights when an MP3 disc is used.
8 Repeat indicator (See page 20.)
9 INTRO indicator (See page 20.)
0 RAND (Random) indicator (See page 16.)
- CD-RW indicator
Lights when a CD-RW is used.
A
Left side panel of the unit
Panel lateral del aparato
Linker zijkant van het apparaat
4
Page 5
Ubicación de los
Bedienings-
controles
Tocadiscos portátil de discos compactos
A Botón de parada/desconexión (7)
B Botones de salto/búsqueda (4, ¢)
C Botón de reproducción/pausa (3/8)
D Pantalla
E Botón de modo (MODE)
F Botón de protección antichoques (A.S.P.)/
Búsqueda de título (T.SEARCH)
G Botón de programación (PROGRAM)
H Botón de grupo (GROUP)
I Toma de salida de línea (LINE OUT)
J Toma de auriculares ( )
K Control de volumen de auriculares (VOLUME)
L Toma de entrada de CC (DC IN 4,5 V )
M
Interruptor de apertura de la tapa (OPEN 3)
N Interruptor de retención (HOLD)
O Interruptor de sonidos hiper-graves (HBS)
Auriculares estéreo
functies
Draagbare CD-speler
A Stop/uitschakeltoets (7)
B Spring/zoektoetsen (4, ¢)
C Weergave/pauzetoets (3/8)
D Uitleesvenster
E Afspeelfunctie-keuzetoets (MODE)
F Anti-schok beveiligingstoets (A.S.P.)/
titelzoektoets (T.SEARCH)
G Programmeertoets (PROGRAM)
H Groeptoets (GROUP)
I Uitgangsaansluiting (LINE OUT)
J Hoofdtelefoon-aansluiting ( )
K Hoofdtelefoon-volumeregelaar (VOLUME)
L Gelijkstroomingang (DC IN 4.5 V )
M Deksel-openknop (OPEN 3)
N Toetsblokkeerknop (HOLD)
O Basversterkingsknop (HBS)
Stereohoofdtelefoon
Visualizador
1 Indicador de batería (Consulte la página 8.)
2 Indicador de sonidos hiper-graves (HBS)
(Consulte la página 22.)
3 Indicador de programa (PROG) (Consulte
la página 18.)
4 Indicador de protección antichoques
(A.S.P.) (Consulte la página 24.)
5
Indicador de búsqueda ( ) (Consulte la página 22.)
6
Indicador de grupo (GRP) (Consulte la página 22.)
7 Indicador MP3
Se enciende cuando se utiliza un disco MP3.
8
Indicador de repetición (Consulte la página 20.)
9 Indicador de introducciones (INTRO) (Con-
sulte la página 20.)
0 Indicador de reproducción aleatoria
(RAND) (Consulte la página 16.)
- Indicador de CD-RW
Se enciende cuando se utiliza un CD-RW.
B C
Uitleesvenster
1 Batterij-indicator (zie blz. 8)
2 Basversterkingsindicator (HBS) (zie blz. 22)
3 Programma-indicator (PROG) (zie blz. 18)
4 Anti-schok beveiligingsindicator (A.S.P.)
(zie blz. 24)
5 Zoekindicator
6 Groepindicator (GRP) (zie blz. 22)
7 MP3 indicator
Licht op wanneer een MP3 disc wordt gebruikt.
8 Herhaalindicator (zie blz. 20)
9 Intro-indicator (INTRO) (zie blz. 20)
0 Willekeurige weergave-indicator (RAND)
(zie blz. 16)
- CD-RW indicator
Licht op wanneer een CD-RW wordt gebruikt.
( )
(zie blz. 22)
5
Page 6
A
B
C
D
Power Supply
Preparations
Refer to the specifications (page 36) for information on
operating times when using rechargeable batteries or
dry-cell batteries.
When using rechargeable batteries
Be sure to recharge the rechargeable batteries BN-R1211
(not included) before using them.
For information about these, see “When purchasing rechargeable batteries” on page 30.
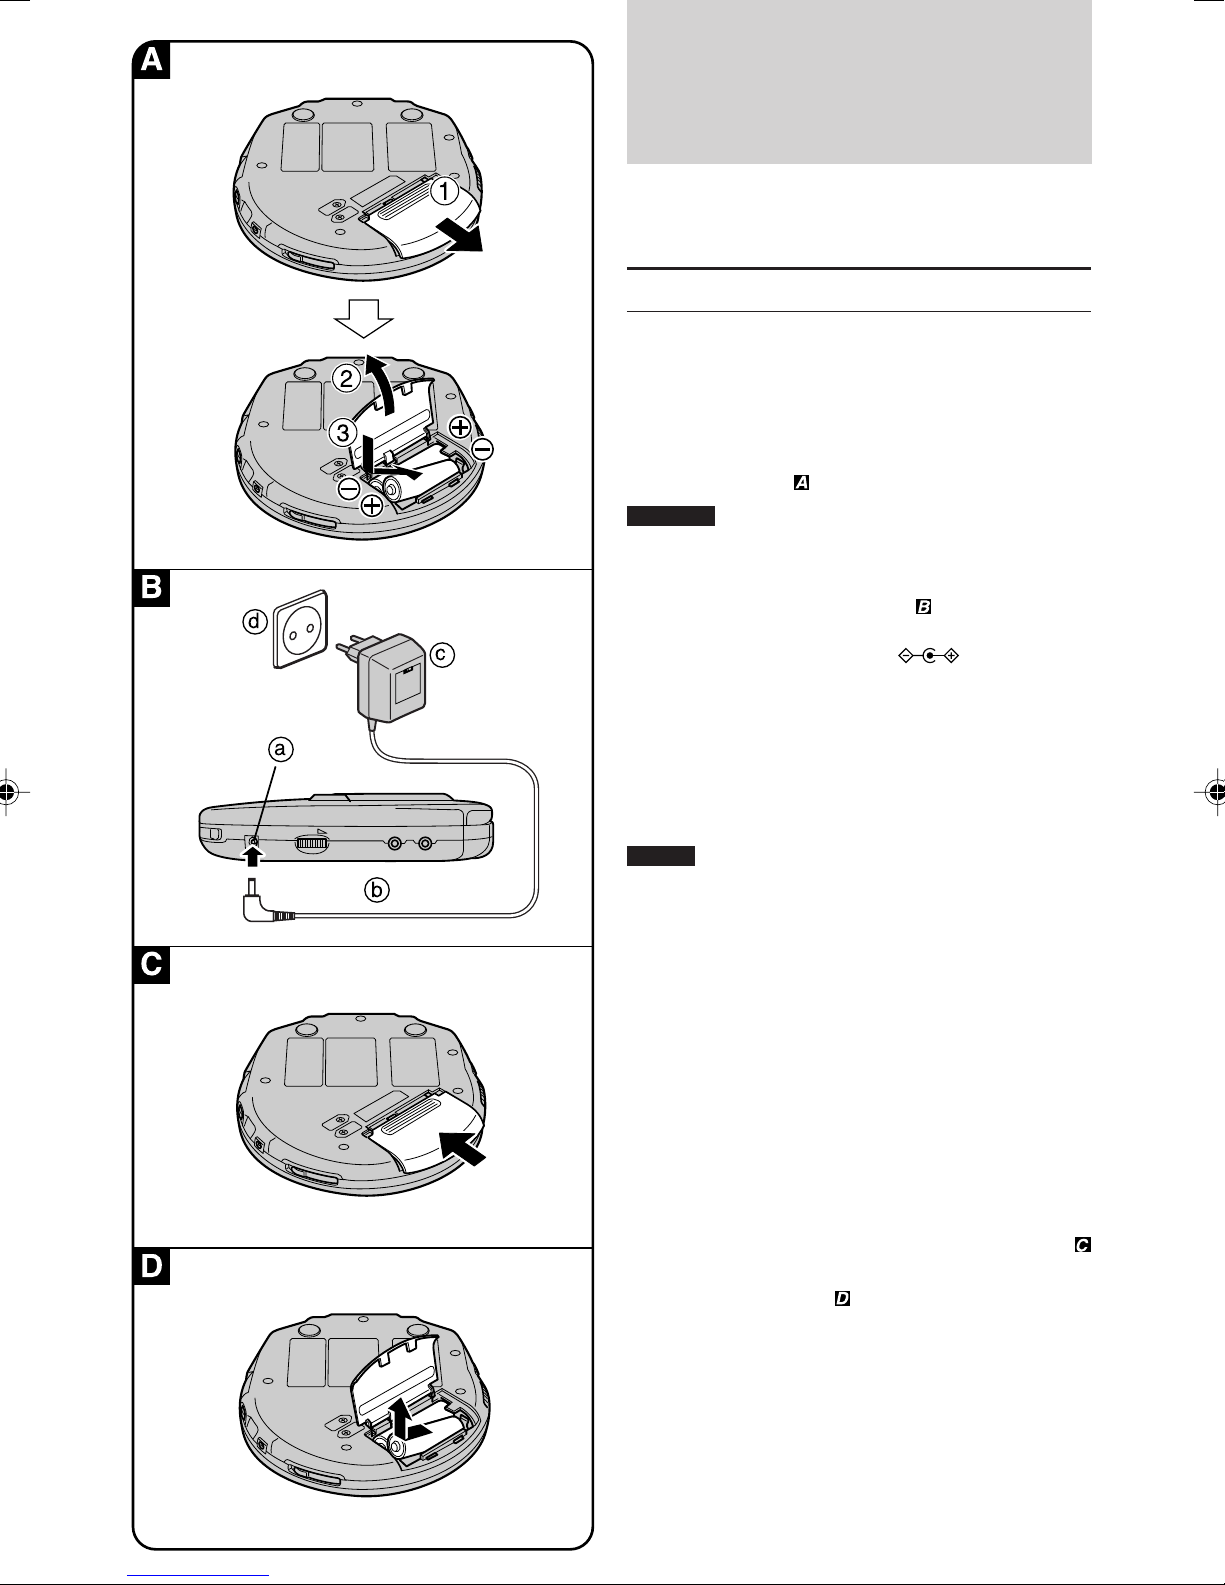
Recharging procedure
1 Insert the special rechargeable batteries
into the unit.
Caution:
Do not open the battery lid too wide. It can break if you
forcibly open it beyond approximately 90°.
d
c
a
b
2 Connect the AC adaptor.
* Recharging will be completed after 10 hours.
a DC IN jack (DC IN 4.5 V
b Right side panel of the unit
c AC adaptor
d AC power outlet
)
3 When recharging is complete, unplug the
AC adaptor from the power outlet and the
DC IN jack.
Notes:
• To operate the unit on batteries, the AC adaptor must
be disconnected from the DC IN jack.
• It takes approximately 10 hours to recharge the re-
chargeable batteries.
• Rechargeable batteries have a service life of approxi-
mately 300 charge-discharge cycles. If the operating time
on one full charge becomes noticeably shorter than it used
to be, the batteries have reached the end of their service
life and should be replaced.
• Recharging takes place only when the unit is powered
off. (It is not possible to recharge the batteries while
playing a CD.)
• The AC adaptor and rechargeable batteries may be-
come warm while recharging is in progress. This is
normal and is not a malfunction.
If the battery lid compartment comes loose
Slide the lid back into place horizontally.
Removing batteries
Push up on the battery in the direction indicated by the
arrow. Then lift it out.
6
Page 7
Preparativos
Voorbereidingen
para el suministro
de alimentación
Consulte las especificaciones (página 36) para tener
información de los tiempos de reproducción cuando se
utilicen baterías recargables o pilas secas.
Cuando utilice baterías recargables
Asegúrese de cargar las baterías recargables BNR1211 (no incluidas) antes de utilizarlas.
Para información sobre éstos, consulte “Cuando comprar baterías recargables” de la página 31.
Procedimiento de carga
1 Inserte las baterías recargables especiales
en el aparato.
Precaución:
No abra demasiado la tapa del compartimiento de las
pilas. Se romperá si lo abre a la fuerza en más de 90º.
2 Conecte el adaptador de CA.
* La recharge quedará completada después de 10
horas.
a Toma de entrada de CC ( DC IN 4.5 V
b Panel del lado derecho aparato.
c Adaptador de CA
d Toma de CA
)
voor stroom-
voorziening
Zie de technische gegevens (blz. 37) voor de beschikbare speelduur wanneer oplaadbare of droge batterijen
worden gebruikt.
Gebruik van oplaadbare batterijen
De oplaadbare batterijen BN-R1211 (niet bijgeleverd)
moeten voor gebruik worden opgeladen. Zie voor nadere bijzonderheden de paragraaf “Wanneer u oplaadbare batterijen koopt” op pagina 32.
Opladen van de batterijen
1 Plaats de speciale oplaadbare batterijen in
het apparaat.
Waarschuwing:
Klap het batterijdeksel niet te ver open. Als u het verder
dan 90° doordrukt, kan het breken.
2 Sluit de netspanningsadapter aan.
* Na 10 uur zijn de batterijen opgeladen.
a Gelijkstroomingang
(DC IN 4,5 V
b Rechter zijkant van het apparaat
c Netspanningsadapter
d Stopcontact
)
3 Cuando termine la carga, desenchufe el
adaptador de CA de la toma de corriente y
de la toma DC IN.
Notas:
• Para hace funcionar la unidad con baterías, deberá
desconectar el adaptador de CA de la toma DC IN.
• Las pilas recargables tardan aproximadamente 10 horas en recargarse.
• Las baterías recargables tienen una duración aproximada de 300 ciclos de carga y descarga. Si el tiempo
de funcionamiento con una carga completa se reduce considerablemente en comparación con lo que era antes, la
batería ha llegado al final de su duración de servicio y deberá ser reemplazada.
• Las baterías sólo pueden recargarse con la unidad
apagada. (No es posible recargarlas durante la reproducción de un CD.)
• El adaptador de CA y las baterías recargables pueden
calentarse durante la carga. Esto no es ningún fallo.
Si se afloja la tapa del compartimiento de las
baterías
Vuelva a poner la tapa deslizándola horizontalmente.
Extracción de las baterías
Empuje las baterías hacia arriba en el sentido indicado
por la flecha. Levántelas luego y sáquelas.
3 Nadat de batterijen zijn opgeladen, haalt u
de stekkers van de netspanningsadapter uit
het stopcontact en uit de gelijkstroomingang.
Omerkingen:
• Als u het apparaat op stroom van de batterijen wilt gebruiken, moet u de stekker van de netspanningsadapter
uit de DC IN aansluiting trekken.
• Het opladen van de oplaadbare batterijen duurt ongeveer 10 uur.
• De oplaadbare batterijen hebben een levensduur die overeenkomt met ongeveer 300 keren opladen/ontladen. Als
de gebruiksduur na volledig opladen merkbaar korter
wordt dan voorheen, zijn de batterijen waarschijnlijk versleten en moeten ze door nieuwe worden vervangen.
• Opladen kan alleen terwijl het apparaat staat uitgeschakeld. (Het is niet mogelijk de batterijen op te laden tijdens
het afspelen van een CD.)
• De netspanningsadapter en de oplaadbare batterijen kunnen tijdens het opladen nogal warm worden. Dit is normaal, geen storing en dus niet gevaarlijk.
Indien het deksel van het batterijvak loskomt
Schuif het deksel horizontaal terug op zijn plaats.
Verwijderen van de batterijen
Duw de batterijen omhoog in de richting van de pijl en
neem deze eruit.
7
Page 8
A
Power Supply
Preparations
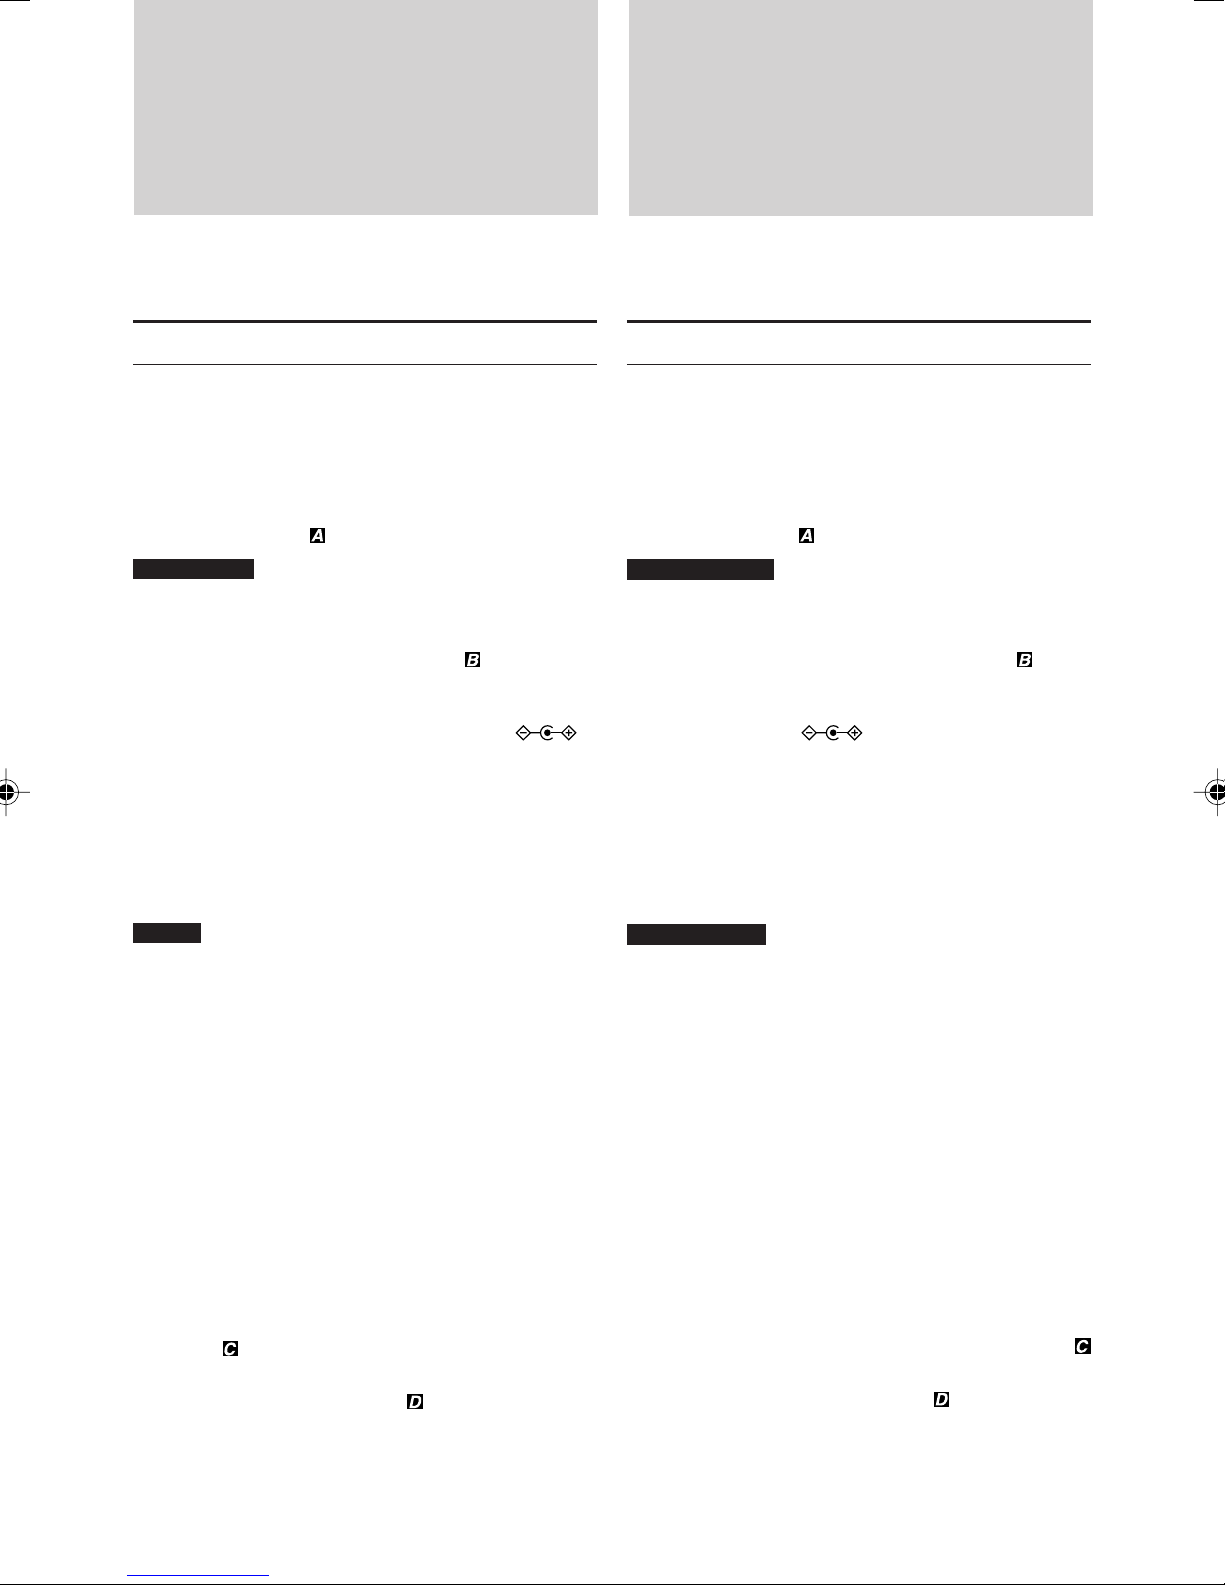
Using the AC adaptor
Connect the AC adaptor supplied.
d
c
a
b
a DC IN jack (DC IN 4.5 V )
b Right side panel of the unit
c AC adaptor
d AC power outlet
Note:
The unit is in the standby condition when the AC adaptor
is connected. The primary circuit is always “live” as long
as the AC adaptor is connected to an AC power outlet.
Using dry-cell batteries
(not included)
After disconnecting the AC adaptor, insert two “R6” (LR-
6) alkaline batteries.
The procedure for inserting and removing dry-cell batteries is identical to that for rechargeable batteries.
B
Battery indicator
e Battery indicator
The battery indicator changes as shows on the left according to the remaining capacity of the battery.
f Fully charged
g Low battery
h Empty
i After a while the unit will turn off
Rechargeable batteries: Recharge batteries.
Dry-cell batteries: Replace batteries with new ones.
Notes:
• The length of time the unit can continue further operation after the battery indicator changes to “
depending on the type of batteries used.
• The battery indicator may not be correctly displayed if
rechargeable batteries, other than those designated by
e
f
g
h
i
JVC, are used.
• When power is supplied from the AC adaptor, “
dicator always lights up.
Tip:
Turning off the Anti-Shock Protection (see page 24) will
save the battery power more or less.
If the unit malfunctions or freezes during use,
disconnect the power source (the AC adaptor
and batteries) once. Then, connect the power
source and operate the unit again.
” differs
” in-
8
Page 9
Preparativos para el
Voorbereidingen voor
suministro de
alimentación
Utilización del adaptador de CA
Conecte el adaptador de CA suministrado.
a Toma de entrada de CC (DC IN 4.5 V )
b Panel del lado derecho del aparato.
c Adaptador de CA
d Toma de CA
Nota:
El aparato estará en la condición de espera cuando el adaptador
de CA esté conectado. El circuito primario siempre tendrá corriente cuando el adaptador de CA esté conectado a un tomacorriente.
Utilización de pilas secas
(no suministrada)
Después de desconectar el adaptador de CA, inserte dos pilas
alcalinas “R6” (LR6).
El procedimiento de inserción y extracción de las
pilas secas es idéntico al de las baterías recargables.
Indicador de baterías recargables/
pilas secas
e Indicador de baterías
El indicador de batería cambiará como se muestra a la
izquierda de acuerdo con la capacidad restante de la
batería.
f Completamente cargada
g Poca carga
h Vac ía
i Después de un rato la unidad se apagará.
Baterías recargables: Cargue las baterías.
Pilas secas: Reemplace las pilas por otras nuevas.
Notas:
• El tiempo que el aparato continuará funcionando desde que el indicador de baterías cambie a “
derá del tipo de baterías/pilas utilizadas.
• El indicador de baterías podrá no mostrarse
carrectamente si se utilizan pilas recargables diferentes a las designadas por JVC.
• Cuando la alimentación sea suministrada desde el
adaptador de CA, se mantendrá encendido el indicador “
Sugerencia:
Si se desactiva la protección antichoques (consulte la página 25),
se ahorrará energía de la batería en cierto modo.
”.
” depen-
stroomvoorziening
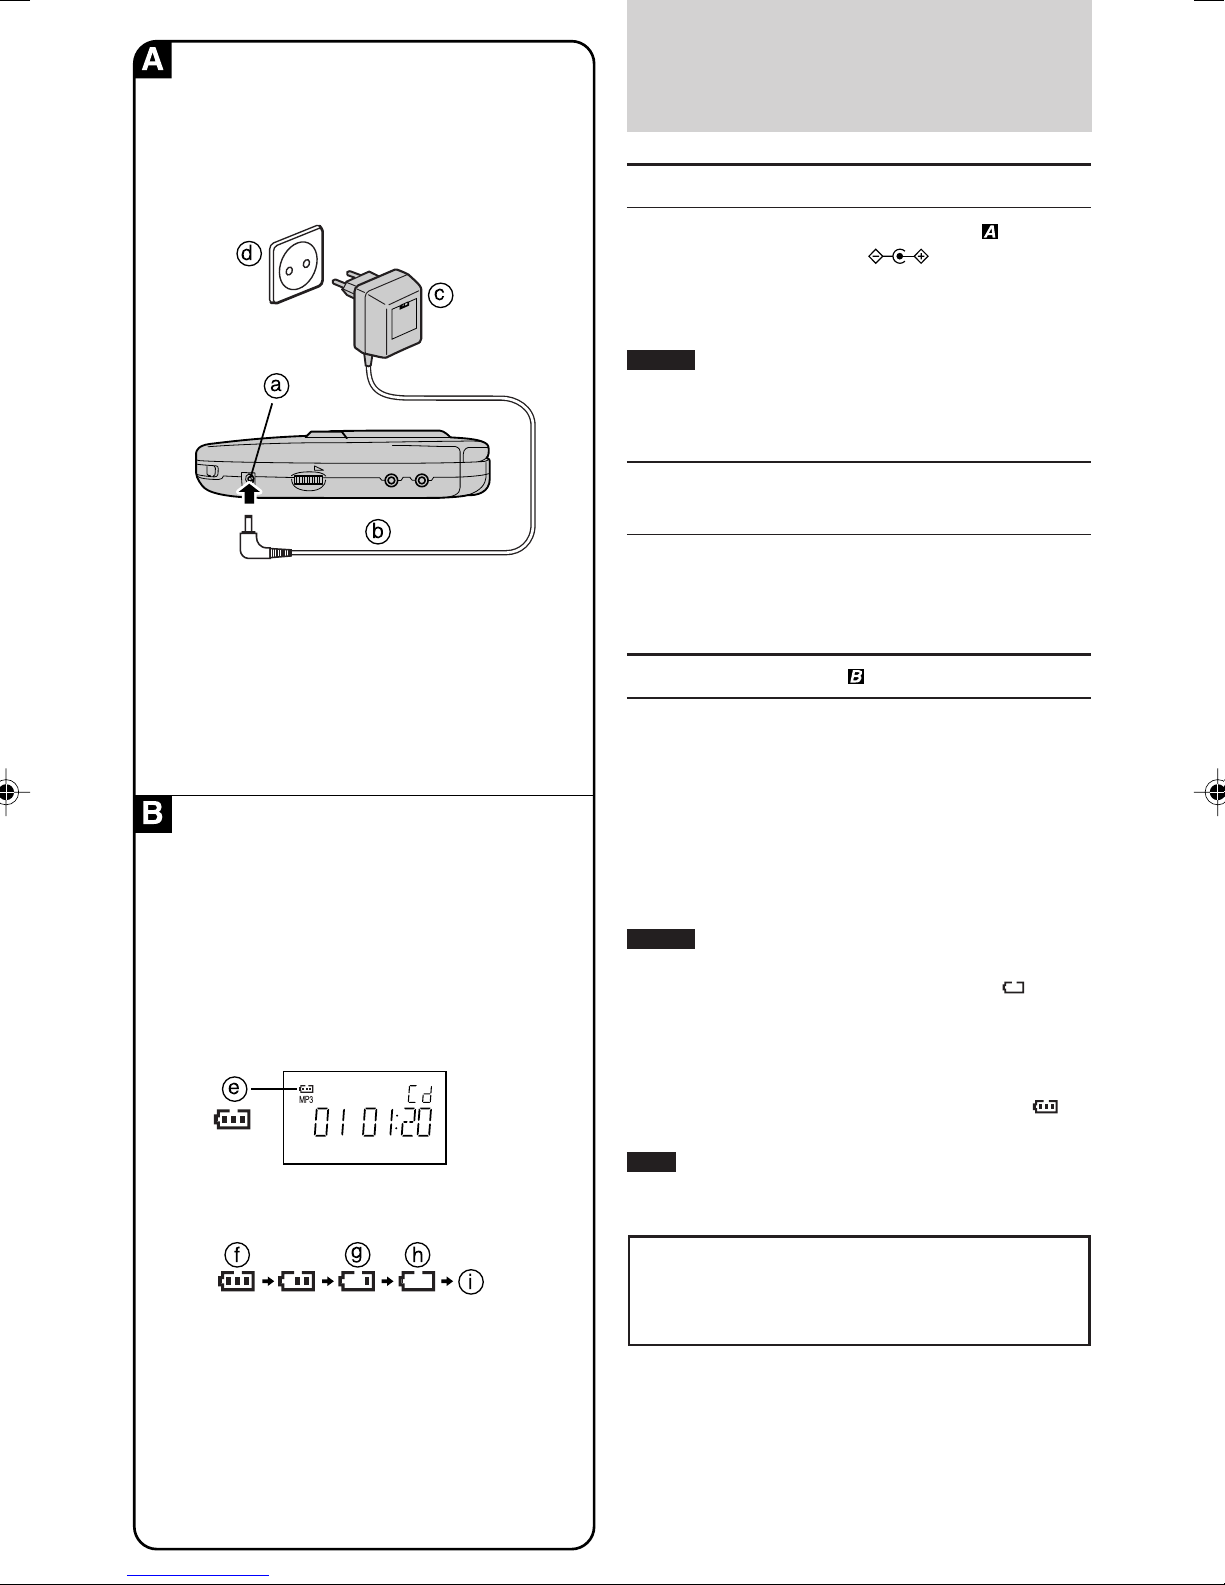
Gebruik van de netspanningsadapter
Sluit de bijgeleverde netspanningsadapter aan.
a Gelijkstroomingang
(DC IN 4,5 V
b Rechter zijkant van het apparaat
c Netspanningsadapter
d Stopcontact
Omerkingen:
Het apparaat staat in “standby” wanneer de netspanningsadapter is aangesloten. De primaire stroomkring
staat altijd onder spanning zolang als de netspanningsadapter op een stopcontact is aangesloten.
Gebruik van droge batterijen
(niet bijgeleverd)
Verwijder de stekker van de netspanningsadapter uit het
stopcontact en plaats twee “R6” (LR6) alkaline-batterijen in het batterijvak.
De droge batterijen worden op dezelfde wijze geplaatst en verwijderd als de oplaadbare batterijen.
Batterij-indicator
e Beatterij-indicator
De batterij-indicator verandert zoals links hiernaast is
aangegeven overeenkomstig de resterende hoeveelheid
batterij-energie.
f Volledig opgeladen
g Lage batterijspanning
h Leeg
i Na een poosje schakelt het apparaat uit.
Oplaadbare batterijen: Laad de batterijen opnieuw op.
Droge batterijen: Vervang de batterijen door nieuwe.
Omerkingen:
• Hoe lang u het apparaat nog op stroom van de batterijen kunt blijven gebruiken nadat de batterij-indicator
verandert naar “
• Het kan zijn dat de batterij-indicator niet knippert wanneer er andere oplaadbare batterijen worden gebruikt
dan voorgeschreven door JVC.
• Wanneer de bijgeleverde netspanningsadapter wordt
gebruikt, zal de “
Tip:
Door uitschakelen van de anti-schok beveiliging (zie blz. 25) kunt
u zorgen dat de batterijen langer meegaan.
)
”, hangt af van het soort batterijen.
” indicator voortdurend oplichten.
Si el aparato funciona mal o se congela durante
el uso, desconecte una vez la fuente de
alimentación (adaptador de CA y baterías/pilas).
Después, vuelva conectar la fuente de
alimentación y continúe con la operación.
Als het apparaat tijdens gebruik plotseling stopt
of niet goed meer werkt, maak dan de stroombron
(netspanningsadapter en batterijen) even los. Na
opnieuw aansluiten van de stroombron zult u het
apparaat weer normaal kunnen gebruiken.
9
Page 10
HOLD
OFF ON
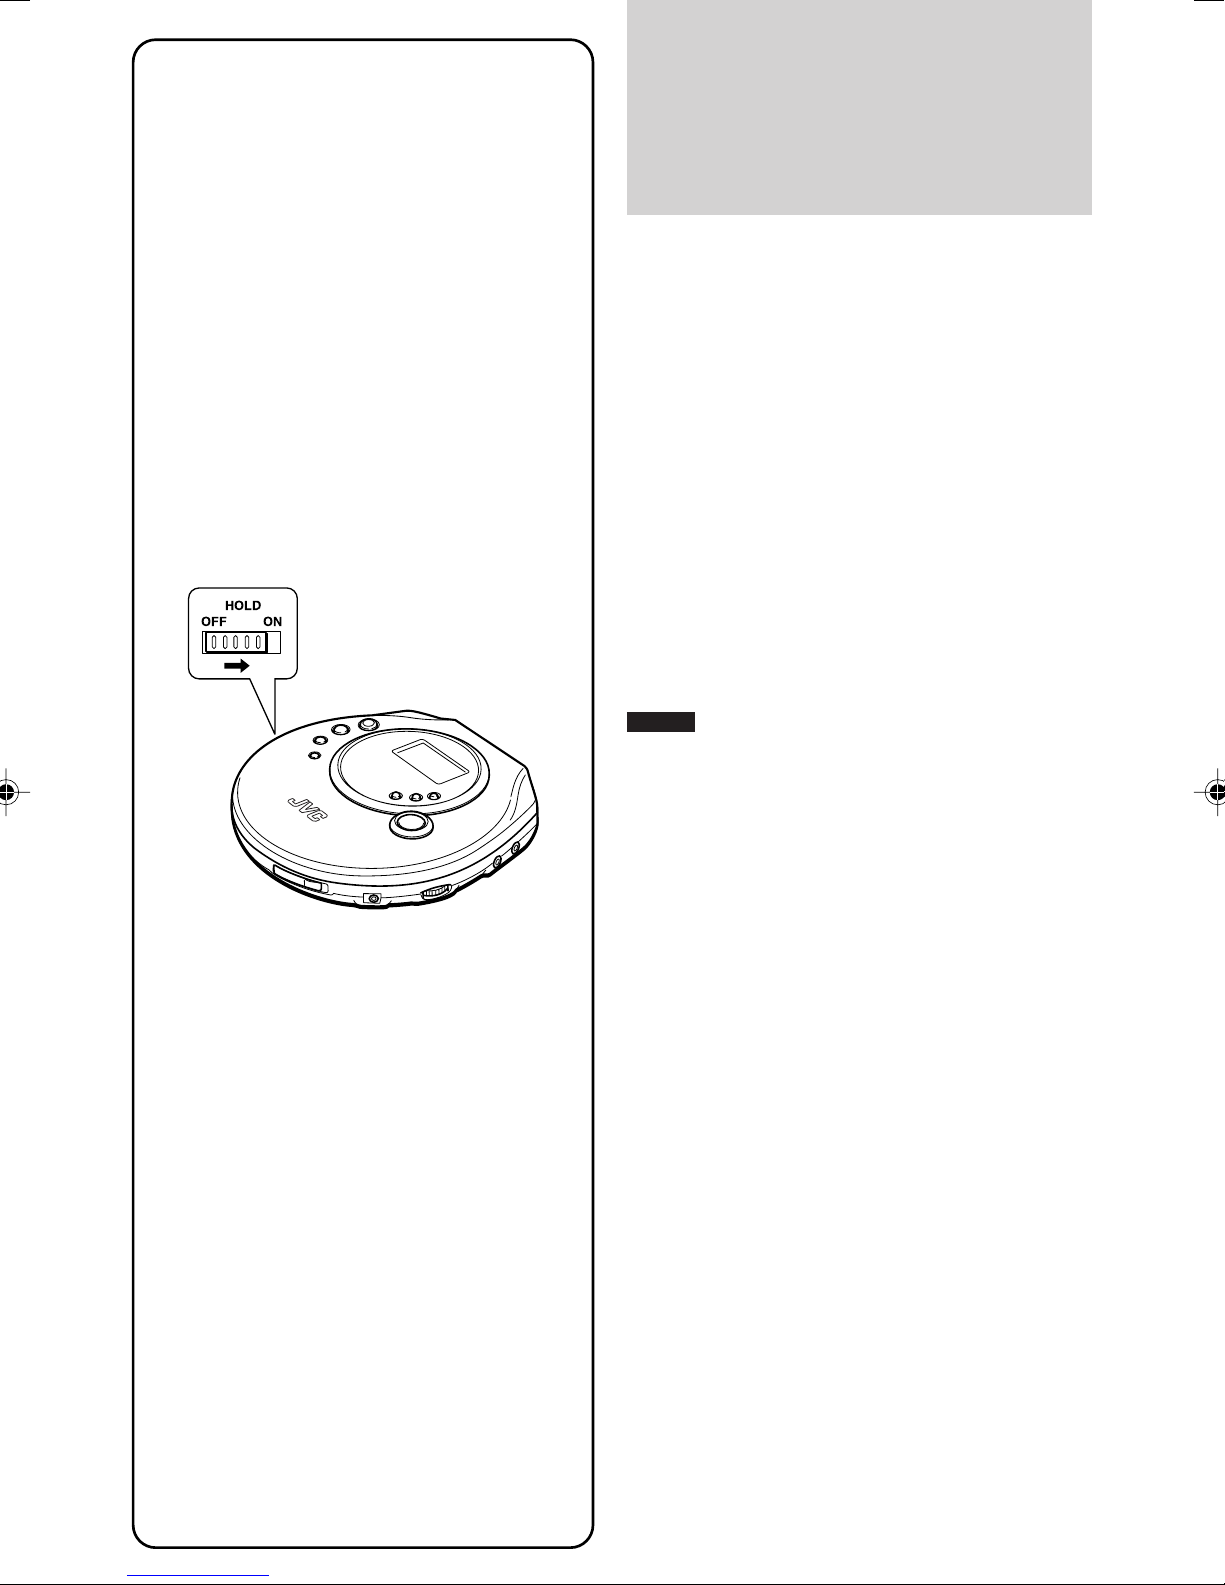
Preventing Accidental Operation
(Hold)
The HOLD switch is prepared to prevent an accidental
operation by an unexpected button press.
Setting the HOLD switch ON prevents the following:
• Powering on the unit accidentally (which can cause the
batteries to go dead).
• Play being cut off unexpectedly.
To set the unit in hold mode
Set the HOLD switch to the ON position.
“HOLD ” indication
When the unit is in hold mode, “HOLD” will be displayed
if a button is pressed.
To release the function
Set the HOLD switch to OFF position.
Note:
Before turning on the unit, be sure that HOLD is OFF.
Otherwise, you cannot turn on the unit.
10
Page 11

Prevención de fun-
Voorkomen van
cionamiento accidental (Bloqueo)
El interruptor HOLD tiene la función de evitar una operación accidental debida a la pulsación accidental de un
botón.
Al poner el interruptor HOLD en la posición
ON se evita lo siguiente:
• Encendido accidental de la unidad (lo cual puede hacer que se agoten las baterías/pilas).
• Interrupción inesperada de la reproducción.
Para poner la unidad en el modo de bloqueo
Ponga el interruptor HOLD en la posición ON.
Indicador “HOLD”
Cuando la unidad esté en el modo bloqueado, se
visualizará “HOLD” si se pulsa un botón.
Para quitar el bloqueo
Ponga el interruptor HOLD en la posición OFF.
Nota:
Antes de encender la unidad, asegúrese de que el interruptor HOLD esté puesto en la posición OFF. De lo
contrario, no podrá encenderla.
toevallige bediening (HOLD vergrendelfunctie)
Met de HOLD toetsblokkeerknop kunt u voorkomen dat
het apparaat gaat werken wanneer een van de toetsen
per ongeluk wordt ingedrukt.
Als de HOLD toetsblokkeerknop op ON staat,
voorkomt u dat het volgende gebeurt:
• Per toeval inschakelen van het apparaat (waardoor de
batterijen uitgeput raken).
• Plotseling onderbreken van het afspelen midden in een
muziekstuk.
Inschakelen van de vergrendelfunctie
Zet de HOLD toetsblokkeerknop in de ON stand.
“HOLD” aanduiding
Wanneer de vergrendelfunctie is ingeschakeld, licht de
aanduiding “HOLD” in het uitleesvenster op als een toets
wordt ingedrukt.
Uitschakelen van de vergrendelfunctie
Zet de HOLD toetsblokkeerknop in de OFF stand.
Opmerking:
Controleer of de HOLD toetsblokkeerknop op OFF staat
voordat u het apparaat uitschakelt. Anders kunt u het
apparaat niet inschakelen.
11
Page 12
1
2
OPEN
3
4
5
2
3
a
5
HOLD
OFF ON
VOLUME
e
1
4,6
RL
b
f
g
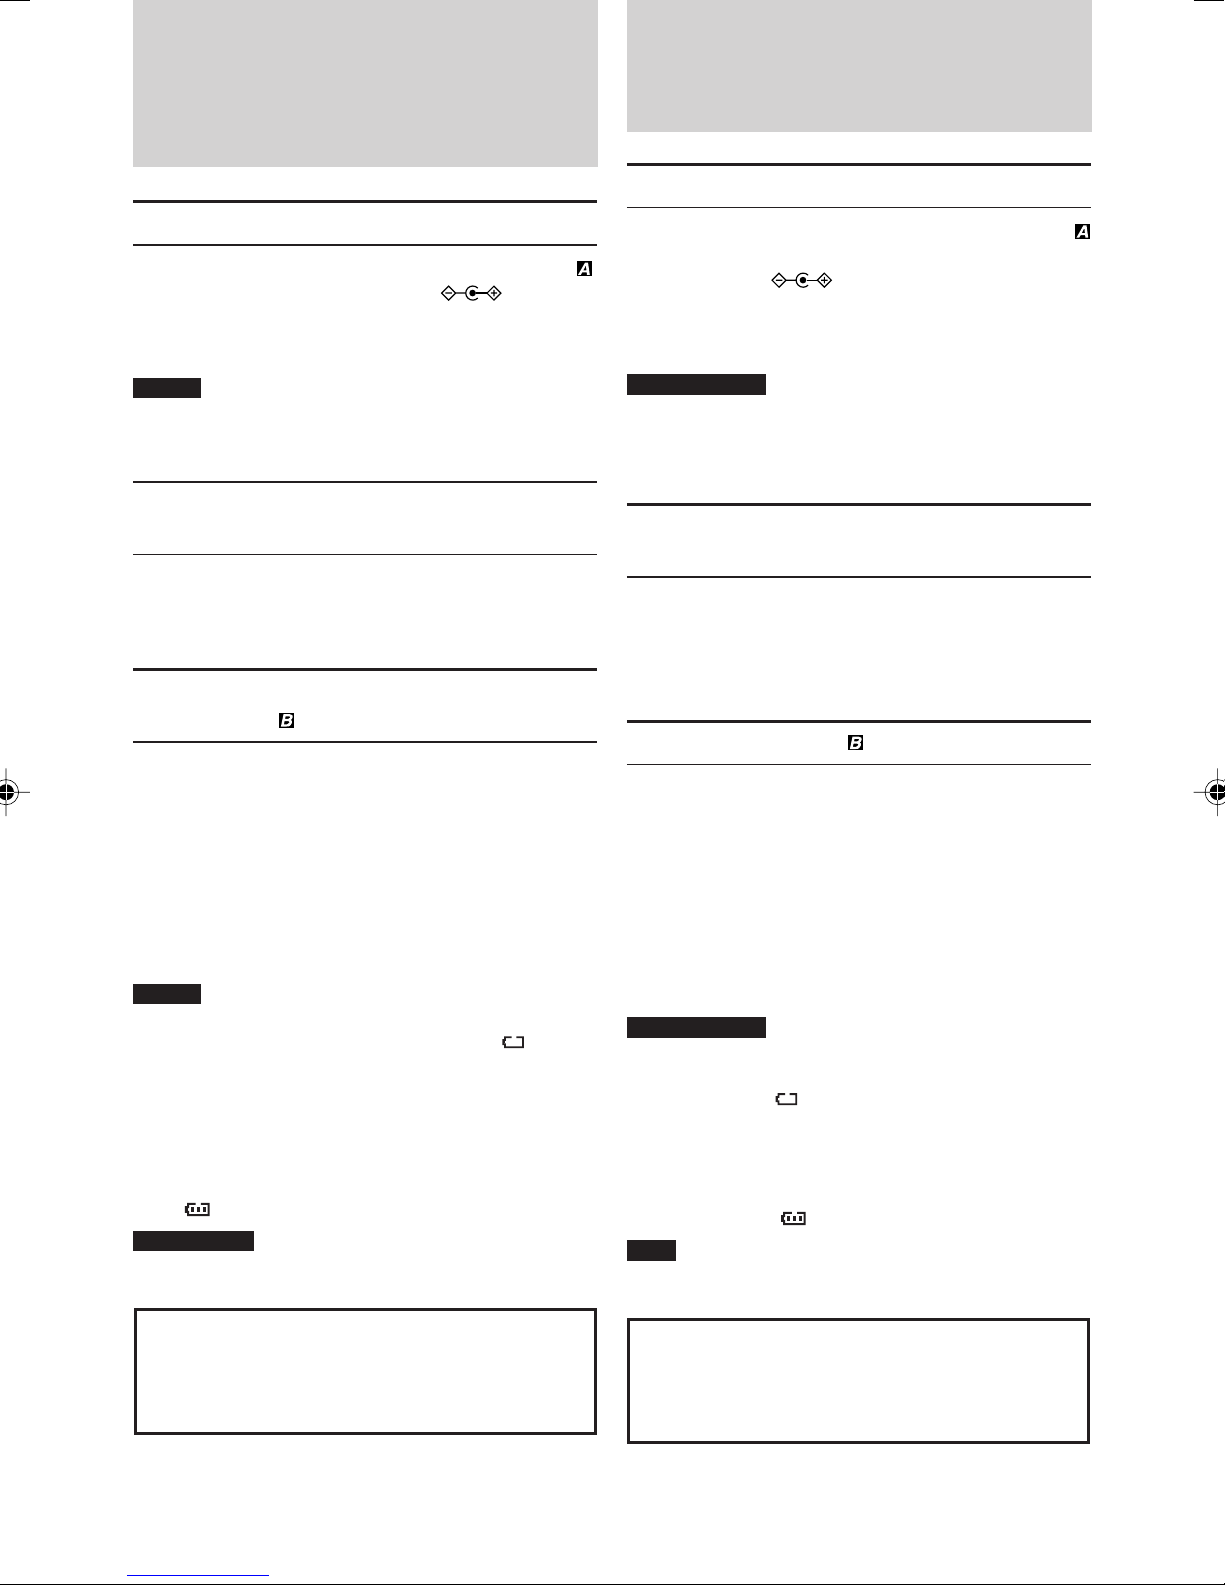
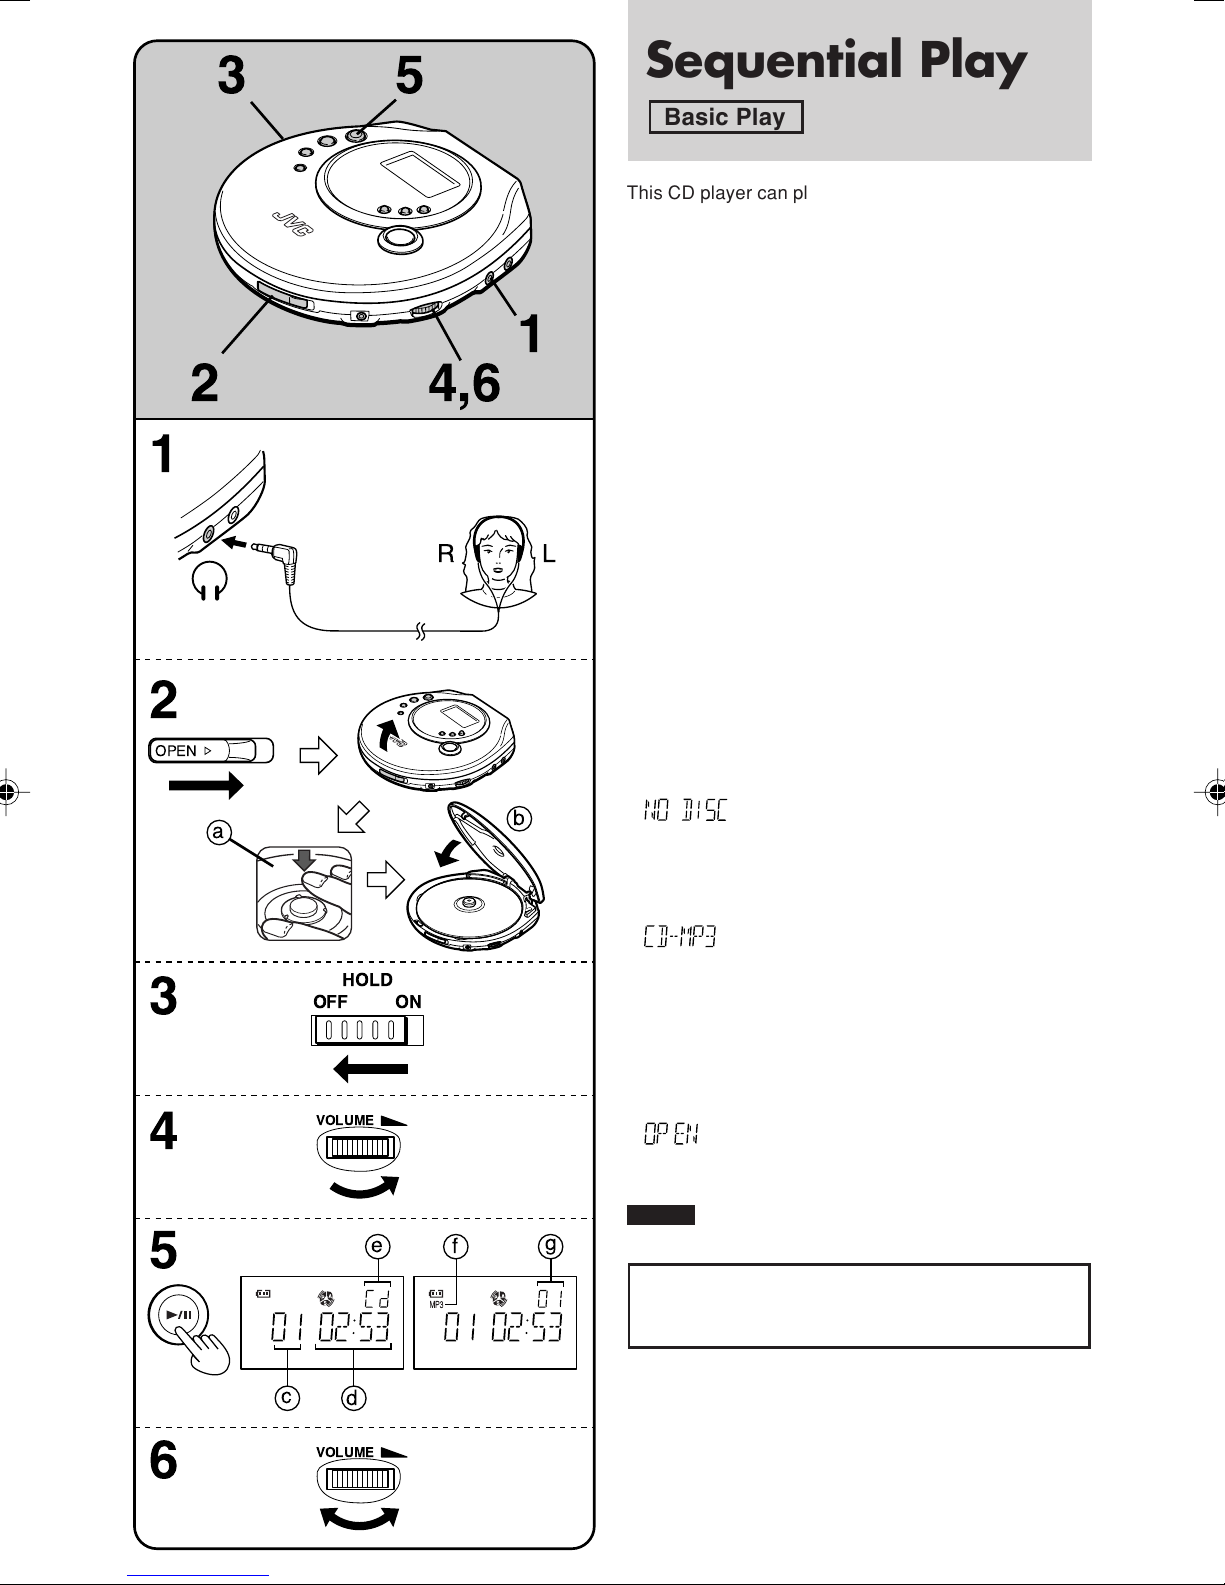
Sequential Play
Basic Play
This CD player can play back both Audio CDs and MP3
files (tracks).
1 Firmly connect the plug into the jack.
2 Slide OPEN 3 to open the lid, and insert
the disc.
a Label must face upward.
Press the area near the center hole of the disc
until it clicks into position.
b Close the lid.
3 Release the hold mode.
4 Turn down the volume.
5 Press 3/8.
Play now starts.
c Track number in play
d Elapsed playing time of each track
e Shows “Audio-CD”
f Shows “MP 3”
g Group number in play
Play stops automatically when all the tracks have
been played.
6 Adjust the volume level.
For your reference:
“ ”
This indication appears for about 30 seconds if the 3/8
button is pressed when no disc is loaded in the unit or if
the disc is not properly seated. Then, the unit is automatically shut off.
“ ”
This indication appears to let you know the status of the
unit.
• Preparation period before playing the track
“MP3” flashes for several seconds after you have press
the 3/8 button to play the disc.
(Flashes until the rotational speed of disc becomes
constant or until the contents of disc is read.)
“ ”
•Opened lid
Stays lit for 30 seconds when the lid is opened.
Note:
Never insert foreign objects into the body.
Auto power off function
If the unit is left in stop mode for 30 seconds, the
unit powers itself off automatically to save power.
c
d
VOLUME
6
12
Page 13
Reproducción
Afspelen in de
secuencial
Reproducción básica
Este reproductor de CD puede reproducir CDs de audio
y archivos (melodías) MP3.
1 Conecte firmemente el enchufe en la toma.
2 Deslice OPEN 3 para abrir la tapa e inser-
tar el disco.
a Lado de la etiqueta hacia arriba.
Presione la parte próxima al agujero central del
disco hasta que éste quede colocado haciendo
un ruido seco.
b Cierre la tapa.
3 Desactive el modo de retención.
4 Baje el volumen.
5 Pulse 3/8.
La reproducción comienza ahora.
c Número de la melodía que está siendo reproducida
Tiempo de reproducción transcurrido de cada melodía
d
e Muestra “CD de audio”
f Muestra “MP3”
g Número de grupo reproduciéndose
La reproducción se parará automáticamente después
de haberse reproducido todas las melodías.
6 Ajuste el nivel del volumen.
normale volgorde
Basis-afspeelfunctie
Deze CD-speler kan zowel audio-CD’s als MP3 bestanden (muziekstukken) afspelen.
1 Het stekkertje stevig in de aansluiting steken.
2 Verschuif OPEN 3 om het deksel te ope-
nen en plaats de CD erin.
a De kant met het label erop moet bovenaan liggen.
Druk zachtjes op de binnenrand van de CD totdat deze goed op zijn plaats zit.
b Sluit het deksel.
3 Zet HOLD in de vrije stand.
4 Verlaag het volume.
5 Druk op 3/8.
Het afspelen begint nu.
c Nummer van nu afspelend muziekstuk
d Verstreken afspeeltijd van ieder muziekstuk
e Geeft “Audio-CD” aan
f Geeft “MP3” aan
g Nummer van nu afspelende groep
Het afspelen stopt automatisch nadat alle muziekstukken op de CD zijn afgespeeld.
6 Stel het volumeniveau in.
Para su referencia:
“ ”
Esta indicación aparecerá durante aprox. 30 segundos
minuto si el botón 3/8 se pulsa sin haber un disco en el
aparato o si el disco no está completamente asentado.
“ ”
Esta indicación aparecerá para avisarle del estado del
aparato.
• Período de preparación antes de reproducir la melodía.
“MP3” parpadeará durante varios segundos después
de pulsar el botón 3/8 para reproducir el disco.
(Parpadea hasta que la velocidad de rotación del disco
es constante o hasta que se lea el contenido del disco.)
“ ”
• Tapa abierta
Permanece encendida durante 30 segundos cuando
se abre la tapa.
Notas:
Nunca inserte objetos extraños en el aparato.
Función de desconexión automática de la
alimentación
Si el aparato es dejado en el modo de parada por
más de 30 segundos, la alimentación se desconectará automáticamente para ahorrar energia.
Vor uw informatie:
“ ”
Deze aanduiding verschijnt ongeveer 30 seconden lang als u
op de 3/8 weergavetoets drukt terwijl er geen disc in het ap-
paraat aanwezig is of de disc niet goed ligt. Daarna slaat het
apparaat automatisch af.
“ ”
Deze aanduiding geeft de toestand van het apparaat aan.
• Voorbereiding voor afspelen van het muziekstuk.
“MP3” knippert enkele seconden lang na indrukken van
de 6 weergavetoets om met afspelen van de disc te
beginnen.
(Knippert totdat de draaisnelheid van de disc geheel constant is of totdat de inhoud van de disc is gelezen.)
“ ”
• Geopend deksel
Blijft 30 seconds lang branden wanneer het deksel open staat.
Opmerkingen:
Steek nooit voorwerpen die er niet horen in het apparaat.
Automatische afslag
Wanneer het apparaat 30 seconden in de stopstand staat, schakelt het apparaat vanzelf uit, om
onnodig verbruik van de batterijen te voorkomen.
13
Page 14
Sequential Play Basic Play
MODE
A
B
C
D
E
F
G
g
MODE
GROUP
GROUP
GROUP
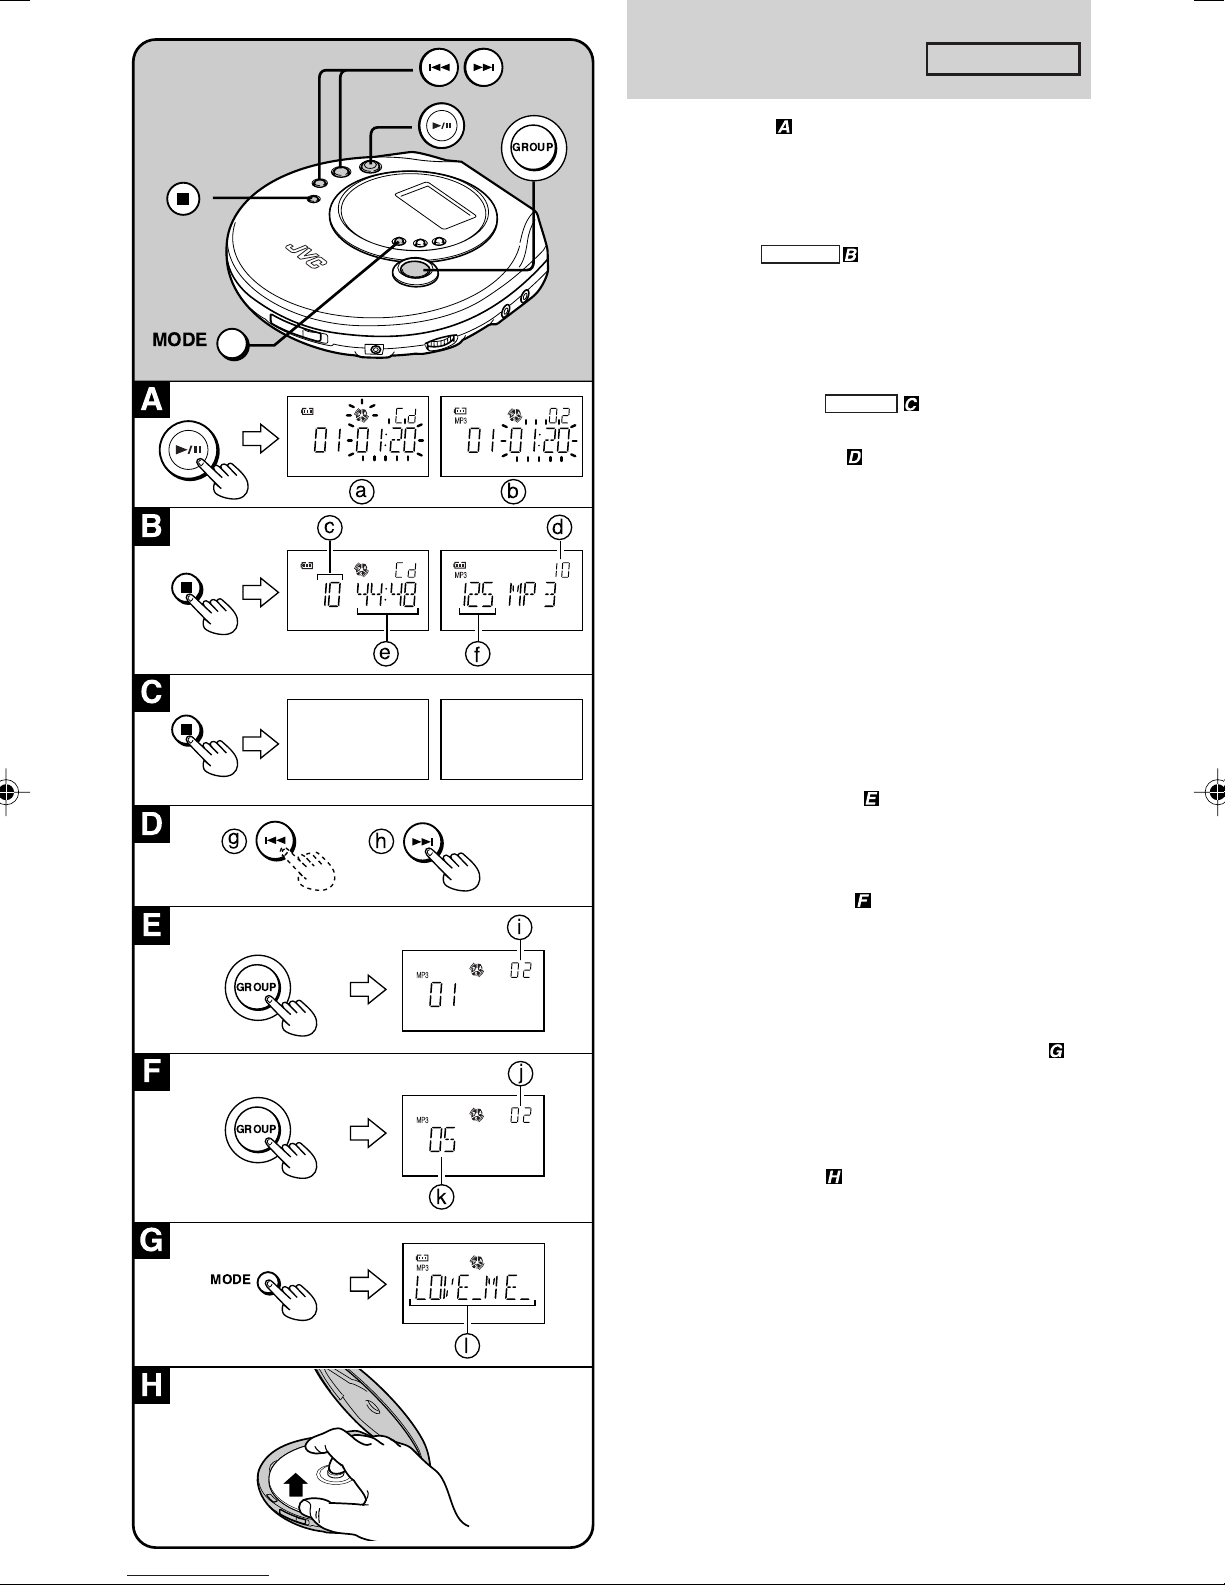
During play, press.
Press again to resume play.
a For Audio CD
b For MP3
To stop play Stop mode
To pause play
During play, press.
c Total number of tracks (For Audio-CD)
d Total playing time (For Audio-CD)
e Total number of group (For MP3)
f Total number of track (For MP3)
To turn off the unit Off mode
In stop mode, press.
Fast forward/reverse
a
c
e
b
d
f
Skip function
During play, press.
Search function
Keep depressed during play.
g Reverse direction
h Forward direction
• To skip back to the previous track, quickly press the
4 button twice.
• During program play, the button is used to fast forward
or back through the programmed sequence of tracks.
• During random play, the skip button cannot be used to
skip back to tracks that were played previously in the
random sequence.
Group skip (MP3 only)
h
During play or in stop mode, press.
Each time the button is pressed, group skips forward.
i Group number
Track skip (MP3 only)
i
During play or in stop mode, keep depressing.
Track number quickly changes in forward over the
groups.
j Group number
k Track number
Showing the group/track title (MP3 only)
j
During play, keep depressing.
Group title and track title scroll. To cancel the title display, keep MODE depressing again.
l Example of group/track title
Removing the disc
k
Turn off the unit and, after the disc has stopped rotating,
remove the disc.
H
14
l
Page 15

Reproducción secuencial
Afspelen in de normale
Reproducción básica
Para hacer una pausa en la reproducción
Púlselo durante la reproducción.
Vuelva a pulsarlo para reanudar la reproducción.
a Para CD de audio
b Para MP3
Para detener la reproducción Modo de parada
Púlselo durante la reproducción.
c Número total de melodías (Para CD de audio)
d Tiempo de reproducción total (Para CD de audio)
e Número total de grupos (Para MP3)
f Numero total de melodías (Para MP3)
Para apagar el aparato Modo de apagado
Púlselo durante el modo de parada.
Salto hacia adelante/hacia atrás
Función de salto
Púlselo durante la reproducción.
Función de búsqueda
Manténgalo pulsado durante la reproducción.
g Dirección de retroceso
h Dirección de avance
• Para volver a la melodía anterior, pulse rápidamente,
dos veces, el botón 4.
• Si se está reproduciendo un programa, el botón permiten avanzar o retroceder por la secuencia programada.
• Durante la reproducción aleatoria, el botón de salto no
podrán ser utilizados para saltar a melodías que hayan sido reproducidas previamente en el orden aleatorio.
Salto de grupo (MP3 solamente)
Durante la reproducción o en el modo de parada, pulse.
Cada vez que se pulse el botón, se saltará un grupo
hacia delante.
i Número de grupo
Salto de melodía (MP3 solamente)
Durante la reproducción o en el modo de parada, mantenga pulsado.
El número de melodía cambiará rápidamente hacia delante sobre los grupos.
j Número de grupo
k Número de melodía
Para mostrar el título de grupo/melodía (MP3
solamente)
Durante la reproducción, mantenga pulsado.
El título de grupo y título de melodía se desplazará. Para
cancelar la visualización de título, mantenga pulsado
MODE otra vez.
l Ejemplo de título de grupo/melodía
Extracción de discos
Desconecte el aparato y, después de que el disco haya
dejado de girar, extraiga el disco.
volgorde
Basis-afspeelfunctie
Om het afspelen te pauzeren
Tijdens afspelen indrukken.
Druk nogmaals om het afspelen te hervatten.
a Voor audio-CD
b Voor MP3
Om het afspelen te laten stoppen Stopstand
Tijdens afspelen indrukken.
c Totaal aantal muziekstukken (Voor audio-CD)
d Totale afspeeltijd (Voor audio-CD)
e Totaal aantal groepen (Voor MP3)
f Totaal aantal muziekstukken (Voor MP3)
Om het apparaat uit te schakelen
Uitgeschakelde stand
In de stopstand indrukken.
Snel vooruit/achteruit
SKIP functie
Tijdens afspelen indrukken.
SEARCH functie
Indrukken en ingedrukt houden tijdens het afspelen.
g Achter-waartse richting
h Voor-waartse richting
• Om terug te gaan naar het begin van het voorgaande muziekstuk drukt u tweemaal kort achtereen op de 4 toets.
• Deze toets wordt gebruikt om tijdens het geprogrammeerd
afspelen snel voorwaarts of achterwaarts te gaan door
de geprogrammeerde volgorde van de muziekstukken.
• Tijdens het afspelen in willekeurige volgorde kan de
overslaantoets niet worden gebruikt om terug te gaan
naar muziekstukken die tot dan toe werden afgespeeld
in de willekeurige volgorde.
Overslaan van groepen (Alleen voor MP3)
Tijdens afspelen of in de stopstand indrukken.
Telkens als op de toets wordt gedrukt, wordt een groep
verder vooruitgegaan.
i Groepnummer
Overslaan van muziekstukken (Alleen voor
MP3)
Tijdens afspelen of in de stopstand indrukken en ingedrukt houden.
Het muziekstuknummer in de groep verandert snel in
voorwaartse richting.
j Groepnummer
k Muziekstuknummer
Aangeven van de groep/muziektitel (Alleen
voor MP3)
Tijdens afspelen indrukken en ingedrukt houden.
De groeptitel en muziektitel schuiven door het uitleesvenster. Om de aanduiding te laten verdwijnen, houdt u
de MODE toets nog een keer ingedrukt.
l Voorbeeld van groep/muziektitel
Verwijderen van de disc
Schakel het apparaat uit, wacht tot de disc tot stilstand
komt en neem deze uit het apparaat.
15
Page 16

A
Other Play
Methods
Descriptions are common to Audio CDs and MP3 files
a
3
4
6
7
1
2
5
8
9
10
b
c
unless otherwise noted.
MP3 File Compatibility
• This player can read MP3 files that are recorded in the
format that is compliant with ISO 9660.
• The player can read or play an MP3 file with the extension code —“.mp3”.
• Group/track title can be displayed.
Note:
• ID3* tags cannot be shown on the display.
* An MP3 file can contain file information called “ID3 Tag”
where its album name, performer, track title, etc. are
recorded.
How are MP3 files recorded and played back?
The illustration shows the normal playing order of the MP3
files. You will see that the MP3 files are played back in the
order from the higher hierarchy to the lower one.
a Hierarchy
b Group
c MP3 file
B
1
Random play
You can play all tracks in a random order. After playing
all tracks, the unit stops.
1 Play the disc.
2 Press MODE until “RAND” flashes.
Cancelling
Press MODE until “RAND” goes out, or press the 7 button to stop the disc.
For your reference:
• You can also select random play in stop mode.
• During program play (“PROG” appears on the display),
random play is not selectable.
MODE
2
16
Page 17

Otros métodos
Andere
de reproducción
Las descripciones son las comunes de CD de audio y
archivos MP3 a menos que se indique de otra forma.
Compatibilidad con archivos MP3
• Este reproductor puede leer archivos MP3 que estén
grabados en un formato que esté en conformidad con
ISO 9660.
• El reproductor puede leer o reproducir archivos MP3
con el código de extensión –“.mp3”.
• Se puede visualizar el título de grupo/melodía.
Notas:
• Las etiquetas ID3* no pueden mostrarse en el
visualizador.
* Un archivo MP3 puede contener información de archi-
vo denominada “ID3 Tag” donde están grabados el nombre del álbum, el del autor, el título de melodía, etc.
¿Cómo se graban y reproducen los archivos
MP3?
La ilustración muestra el orden de reproducción normal
de los archivos MP3. Podrá observar que los archivos
MP3 se reproducen en el orden de jerarquía más alta a
más baja.
a Jerarquía
b Grupo
c Archivo MP3
afspeelfuncties
De beschrijvingen gelden zowel voor audio-CD’s als MP3
bestanden, mits anders vermeld.
Geschikte MP3 bestanden
• Deze muziekspeler kan MP3 bestanden lezen die zijn
opgenomen in een formaat dat voldoet aan ISO 9660.
• De muziekspeler kan MP3 bestanden lezen of afspelen met de bestandsextensie “.mp3”.
• Groep/muziektitels kunnen ook worden aangegeven.
Opmerkingen:
• ID3* tags kunnen niet in het uitleesvenster worden aangegeven.
* Een MP3 bestand kan bestandsinformatie bevatten die
“ID3 Tag” wordt genoemd. Deze informatie is bijvoor-
beeld de titel van het album, naam van de artiest, titel
van het muziekstuk enz.
Hoe zijn MP3 bestanden opgenomen en hoe
worden deze weergegeven?
De afbeelding toont de normale afspeelvolgorde van de
MP3 bestanden. MP3 bestanden worden afgespeeld
vanaf de hogere niveaus in de hiërarchie naar de lagere
niveaus.
a Hiërarchie
b Groep
c MP3 bestand
Reproducción aleatoria
Se pueden reproducir todas las piezas en orden aleatorio. De pués de reproducir todas las melodías, el aparato entra en el modo de parada.
1 Reproduzca el disco.
2 Pulse MODE hasta que parpadee “RAND”.
Cancelación
Pulse MODE hasta que se apague “RAND” o pulse el
botón 7 para parar el disco.
Para su referencia:
• También puede seleccionar la reproducción aleatoria
en el modo de parada.
• Durante la reproducción programada (aparece “PROG”
en la pantalla), no puede seleccionar al mismo tiempo
la reproducción aleatoria.
Afspelen in willekeurige volgorde
U kunt alle muziekstukken in willekeurige volgorde laten afspelen. Nadat alle muziekstukken eenmaal zijn
weergegeven, stopt het apparaat.
1 Start de weergave van de disc.
2 Druk op de MODE afspeelfunctie-keuze-
toets totdat er “RAND” gaat knipperen.
Uitschakelen
Druk op de MODE afspeelfunctie-keuzetoets totdat de
aanduiding “RAND” dooft, of druk op de 7 toets om de
disc te stoppen.
Nuttige tips:
• U kunt de willekeurige weergave ook vanuit de stopstand inschakelen.
• Tijdens programma-weergave (wanneer het uitleesvenster “PROG” aangeeft) kunt u geen willekeurige
weergave kiezen.Andere afspeelfuncties
17
Page 18

2
Other Play Methods
Program play
4
7
a b
PROGRAM
1
c
PROGRAM
3
d
PROGRAM
5
6
(For Audio CD)
Repeat steps 4 and 5 to program all the de-
sired tracks.
(Para CD de audio)
Repita los pasos 4 y 5 para programar todas
las melodías deseadas.
(Voor audio-CD)
Herhaal stappen 4 en 5 om alle gewenste muziekstukken te programmeren.
You can program up to 64 tracks in any desired order
including the same tracks.
For Audio CD, go to step 3. Though the display differs a
little, operation is the same.
1 (MP3 only) During playback or in stop mode,
press PROGRAM.
a “PROG” lights up
b Group number
c Program sequence number
2 (MP3 only) Select the desired group num-
ber. (e.g. 02)
3 Press PROGRAM.
d Track number
4 Select the desired track. (e.g. 03)
5 Press PROGRAM
6 For MP3, repeat steps 2-5 to select other
tracks.
For Audio-CD, repeat steps 4 and 5.
7 Press the 6 button.
7 To confirm the programmed tracks
In stop mode, press PROGRAM repeatedly. The programmed track number will successively appear together
with the program sequence number. At this time, you
can change the program, if required.
If the programmed tracks are less than 64, track number
“00” appears for the youngest programmable sequence
number, enabling further programming.
7 To delete the entire programmed sequence
In stop mode, press the 7 button during programming
process. Turning off the unit will also delete the program.
(For MP3)
Repeat steps 2-5 to program all the desired
tracks.
(Para MP3)
Repita los pasos 2-5 para programar todas
las melodías deseadas.
(Voor MP3)
Herhaal stappen 2-5 om alle gewenste muziekstukken te programmeren.
18
Page 19

Otros métodos de
reproducción
Andere afspeelfuncties
Programma-weergave
Reproducción programada
Se pueden programar hasta 64 melodías en el orden
deseado, incluyendo las mismas melodías.
Para CD de audio, vaya al paso 3. Aunque la visualización varía un poco, la operación es igual.
1 (MP3 solamente) Durante la reproducción
o en el modo de parada, pulse PROGRAM.
a Se enciende “PROG”
b Número de grupo
c Número de secuencia del programa
2 (MP3 solamente) Seleccione el número de
grupo deseado. (ej.,02)
3 Pulse PROGRAM
d Número de melodía
4 Seleccione la melodía deseada. (ej., 03)
5 Pulse PROGRAM
6 Para MP3, repita los pasos 2-5 para selec-
cionar otras melodías.
Para CD de audio, repita los pasos 4 y 5.
7 Pulse el botón 6.
7 Para confirmar las melodías programadas
En el modo de parada, pulse PROGRAM repetidamente. Los números de las melodías programadas aparecerán sucesivamente junto con el número de secuencia
programado. En este momento, puede cambiar el programa si fuera necesario.
Si las melodías programadas son de menos de 64, el
número de melodía “00” aparece para el número de secuencia programado más bajo, para que pueda seguir
programando.
7 Para borrar toda la secuencia programada
En el modo de parada, pulse el botón 7 durante el proceso de programación. El programa también se borrará
al apagar la unidad.
U kunt tot 64 muziekstukken in elke gewenste volgorde
kiezen en daarbij ook hetzelfde muziekstuk meermalen
programmeren.
Voor audio-CD’s begint u bij stap 3. Hoewel de aanduidingen iets anders zijn, is de bediening hetzelfde.
1 (Alleen voor MP3) Druk tijdens afspelen of
in de stopstand op de PROGRAM toets.
a “PROG” licht op
b Groepnummer
c Programma-volgnummer
2 (Alleen voor MP3) Kies het gewenste groep-
nummer. (bijv. 02)
3 Druk op de PROGRAM.
d Muziekstuknummer
4 Kies het gewenste muziekstuk. (bijv. 03)
5 Druk op de PROGRAM.
6 Voor MP3 herhaalt u de stappen 2-5 om de
andere muziekstukken te kiezen.
Voor een audio-CD herhaalt u de stappen 4
en 5.
7 Druk op de 6 toets.
7 Controleren van de geprogrammeerde
nummers
Druk in de stopstand meermalen op de PROGRAM toets.
Dan verschijnen achtereenvolgens alle geprogrammeerde nummers, samen met hun programma-volgnummer. Op dat moment kunt u het programma nog
aanpassen als u wilt.
Als er nog geen 64 nummers zijn geprogrammeerd, verschijnt het muziekstuknummer “00” na het laatst geprogrammeerde nummer, om aan te geven dat u desgewenst nog meer nummers kunt programmeren.
7 Wissen van alle geprogrammeerde nummers
Druk in de stopstand, druk tijdens het programmeren op
de 7 toets. Wanneer het apparaat wordt uitgeschakeld,
zal het programma ook gewist worden.
19
Page 20

A
Other Play Methods
Repeat play
You can repeatedly play one track or one group (for
MP3), or all tracks or all groups (for MP3).
MODEMODE
B
2
1
a b c
2
1 During playback or in stop mode, press
MODE until the repeat indicator lights up.
a 1 track repeat
b 1 group repeat (MP3 only)
c All tracks repeat/All groups repeat (MP3 only)
2 Press the 6 button.
Cancelling
Press MODE until the repeat indicator goes out and the
unit returns to normal play mode.
For your reference:
Repeat function is also effective for program play (except 1 group repeat).
Intro play
You can successively play the first 10 seconds of every
track from the first track.
Intro play stops after playing the last track.
1 In stop mode, press MODE until “INTRO”
flashes.
2 Press the 6 button.
Intro play will start from the first track.
Cancelling
Press MODE until “INTRO” goes out and the unit returns to normal play mode.
1
MODE
MODE
20
For your reference:
• You can also use intro play during playback. In this case,
intro play after the current track has been played back.
• You can also use intro play for program play.
Page 21

Otros métodos de
reproducción
Andere afspeelfuncties
Herhaalde weergave
Reproducción repetida
Podrá reproducir repetidamente una melodía o un grupo (para MP3), o todas las melodías o todos los grupos
(para MP3).
1 Durante la reproducción o en el modo de
parada, pulse MODE hasta que se encienda el indicador de repetición.
a Repetición de 1 melodía
b Repetición de 1 grupo (MP3 solamente)
c Repetición de todas las melodías/repetición de
todos los grupos (MP3 solamente)
2 Pulse el botón 3/8 .
Cancelación
Pulse MODE hasta que se apague el indicador de repetición y el aparato vuelva al modo de reproducción normal.
Para su referencia:
La función repetida también puede utilizarse junto con la
reproducción programada (exsepro repetición de 1 melodía).
Reproducción de las introducciones
Se pueden reproducir sucesivamente los primeros 10
segundos de todas las melodías desde la primera canción.
La reproducción de introducciones se para después de
reproducir la última melodía.
1 En el modo de parada, pulse MODE hasta
que parpadee “INTRO”
2 Pulse el botón 3/8 .
La reproducción de “INTRO” empezará desde la primera canción.
U kunt een enkel muziekstuk of een enkele groep (voor
MP3) of alle muziekstukken of alle groepen (voor MP3)
herhaaldelijk laten weergeven.
1 Druk tijdens afspelen of in de stopstand op
de MODE afspeelfunctie-keuzetoets totdat
de herhaal-aanduiding boven de cijfers
oplicht.
a Herhalen van 1 muziekstuk
b Herhalen van 1 groep (alleen voor MP3)
c Herhalen van alle muziekstukken/herhalen van
alle groepen (alleen voor MP3)
2 Druk op de 3/8 weergavetoets.
Uitschakelen
Druk op de MODE toets totdat de herhaal-aanduiding
dooft, dan komt het apparaat weer in de normale
weergavestand.
Nuttige tip:
U kunt de herhaalfuncties ook gebruiken tijdens programma-weergave (uitzonderen herhalen van 1 groep).
Intro-weergave
U kunt de eerste 10 seconden van alle muziekstukken
achtereen laten weergeven.
De intro-weergave stopt vanzelf na het laatste muziekstuk.
1 Druk in de stopstand op de MODE afspeel-
functie-keuzetoets totdat “INTRO” gaat
knipperen.
2 Druk op de 3/8 weergavetoets.
De “INTRO” weergave begint dan vanaf het eerste
muziekstuk.
Cancelación
Pulse MODE hasta que se apague “INTRO” y el aparato vuelva al modo de reproducción normal.
Para su referencia:
• También podrá utilizar la reproducción de introduccio-
nes durante la reproducción. En este caso, reproduzca las introducciones después de haberse reproducido la melodía actual.
• También puede utilizar la reproducción de introduccio-
nes en la reproducción programada.
Uitschakelen
Druk op de MODE toets totdat de “INTRO” aanduiding
dooft, dan komt het apparaat weer in de normale
weergavestand.
Nuttige tips:
• U kunt de intro-weergave ook tijdens afspelen inschakelen. In dit geval begint de intro-weergave nadat het
huidige muziekstuk is afgelopen.
• U kunt met de intro-weergave ook alleen het begin van
alle geprogrammeerde muziekstukken beluisteren.
21
Page 22

A
Other Play Methods
a
b
1
A.S.P./T.SEARCH
2
3
B
1
A.S.P./T.SEARCH
2
3
C
HBS
OFF ON
Title search (MP3 only)
Alphabet search
During playback or in stop mode, you can search a track
c
that begins with A-Z, 0-9.
1 Press A.S.P./T.SEARCH. “A” appears.
“ ” blinks.
a “ ”
b A-Z, 0-9
c Example: Track title that begins with A
d
e
2 Search a track by specifying the first letter
(A-Z) or number (0-9). If nothing is found,
“NOTHING” appears.
d Example: When the letter L is specified
3 Press the 6 button.
e “ ” stays lit
All the tracks with the specified letter will be played.
After that, the “
disc stops.
To cancel the alphabetic play, press the 7 button
f
i
g
h
once. Then, the “
unit returns to normal play.
Group Search
During playback or in stop mode, you can search a group
you want to play.
” indicator will disappear and the
” indicator disappears and the
1 Press A.S.P./T.SEARCH until “GRP” ap-
pears. “ ” indicator lights up.
f “ ”
g GRP
h Group number
i Group title (Example)
2 Select a desired group. Each time you press
the ¢ or 4 button, the group title changes.
3 Press the 6 button.
Playback starts from the first track of the selected group.
When the 6 button is pressed, group search mode
automatically released.
Hyper-Bass Sound (HBS)
22
You can enjoy powerful bass sound.
To get the hyper-bass sound effect
Set HBS switch to ON. The “HBS” indicator lights up.
To cancel the effect
Set HBS switch to OFF.
Page 23

Otros métodos de
reproducción
Andere afspeelfuncties
Zoeken van een titel (Alleen voor MP3)
Búsqueda de melodía (MP3 solamente)
Búsqueda alfabética
Durante la reproducción o en el modo de parada, podrá
buscar una melodía cuya inicial comience por A-Z, 0-9.
1 Pulse A.S.P./T.SEARCH. Aparecerá “A”.
Parpadeará “ ”.
a “ ”
b A-Z, 0-9
c Ejemplo: Título de melodía que comienza por A
2 Busque una melodía especificando la pri-
mera letra (A-Z) o número (0-9). Si no se
encuentra nada, aparecerá “NOTHING”.
d Ejemplo: Cuando la letra especificada sea L.
3 Pulse el botón 6.
e “ ” se mantendrá encendido.
Se reproducirán todas las melodías cuya primera letra sea la especificada. Después, el indicador “
Para cancelar la reproducción alfabética, pulse
el botón 7 una vez. Después, el indicador “
desaparecerá y la unidad volverá al modo de
reproducción normal.
”desaparecerá y el disco se parará.
”
Alfabetisch zoeken
Tijdens afspelen of in de stopstand kunt u een muziektitel zoeken die begint met A-Z of 0-9.
1 Druk op de A.S.P./T.SEARCH toets. De let-
ter “A” verschijnt. “ ” knippert.
a “ ”
b A-Z, 0-9
c Voorbeeld: Muziektitel die begint met een A
2 Zoek het gewenste muziekstuk door de
eerste letter (A-Z) of cijfer (0-9) van de titel
in te voeren. Als niets wordt gevonden, verschijnt de aanduiding “NOTHING”.
d Voorbeeld: Wanneer de letter L wordt ingevoerd
3 Druk op de 6 toets.
e “ ” blijft branden
Alle muziekstukken waarvan de titel begint met de ingevoerde letter worden afgespeeld. Daarna zal de “
” indicator doven en stopt de disc.
Om de alfabetische weergave voortijdig te annuleren,
drukt u één maal op de 7 toets. De “
dan verdwijnen en het apparaat schakelt over op normale weergave.
” indicator zal
Búsqueda de grupo
Durante la reproducción o en el modo de parada, podrá
buscar un grupo que quiera reproducir.
1 Pulse A.S.P./T.SEARCH hasta que aparez-
ca “GRP”. Se encenderá el indicador “ ”.
f “ ”
g GRP
h Número de grupo
i Título del grupo (Ejemplo)
2 Seleccione el grupo deseado. Cada vez que
pulse el botón ¢ o 4, el título de grupo
cambiará.
3 Pulse el botón 6.
Comenzará la reproducción desde la primera
melodía del grupo seleccionado. Cuando se pulse el botón 6, el modo de búsqueda de grupo
se cancelará automáticamente.
Efecto de Sonido Hiper-Graves (HBS)
Se puede disfrutar de sonidos graves poderosos.
Para obtener el efecto de hiper-graves
Ponga el interruptor HBS en la posición ON. Se encenderá el indicador “HBS”.
Para cancelar el efecto
Mueva el interruptor HBS a OFF.
Zoeken van een groep
Tijdens afspelen of in de stopstand kunt u ook een gewenste groep zoeken.
1 Druk op de A.S.P./T.SEARCH toets totdat
“GRP” verschijnt. De “ ” indicator licht.
f “ ”
g GRP
h Groepnummer
i Groeptitel (voorbeeld)
2 Kies een gewenste groep. Telkens wanneer
u op de ¢ of 4 toets drukt, verandert
de groeptitel.
3 Druk op de 6 toets.
Het afspelen begint bij het eerste muziekstuk van
de gekozen groep. Wanneer de 6 toets wordt
ingedrukt, komt de groepzoekfunctie automatisch
te vervallen.
Hyper-Bass Sound basversterking
(HBS)
U kunt de lage tonen extra krachtig laten weergeven.
Voor extra-krachtige lage tonen
Zet de HBS versterkingsknop op ON. De “HBS” indicator
zal oplichten.
Uitschakelen van de basversterking
Zet de HBS basversterkingsknop op OFF.
23
Page 24

A
Anti-Shock
Protection
B
C
A.S.P. indicator
Indcador A.S.P.
A.S.P. aanduiding
This function minimizes sound interruption caused by
vibrations, by utilizing audio data that has been stored
in the memory ahead of the following time:
For Audio CD: Up to 45 seconds worth (Anti-Shock Pro-
tection on/off selectable)
For MP3: Up to 120 seconds worth at 128 kbps
(Anti-Shock Protection is fixed to on.)
Normally, the “A.S.P.” indicator lights up on the display
and the Anti-Shock Protection is in effect.
When the disc is played, as the audio data gradually
stored in the memory, the “A.S.P.” indicator changes from
a
blinking to lighting.
a Fully stored
To cancel the Anti-Shock Protection
(Audio CD only)
Press the A.S.P./T.SEARCH button in stop mode or during playback.
The “A.S.P.” indicator goes out on the display.
To activate the Anti-Shock Protection again
(Audio CD only)
To activate the Anti-Shock Protection again, press the
A.S.P./T.SEARCH button once more.
A.S.P./T.SEARCH
Notes:
• The Anti-Shock Protection can be enabled or disabled
during play, and this may cause a slight interruption in
the sound because the disc’s rotational speed changes.
• Turning off the Anti-Shock Protection will save battery
life more or less.
24
Page 25

Protección
Anti-schok be-
antichoques
Esta función minimiza la interrupción de sonido ocasionada por vibraciones, utilizando los datos de audio que
han sido almacenados en la memoria por adelantado:
Para CD de audio: Hasta 45 segundos (La protección
antichoques se puede activar/
desactivar)
Para MP3: Hasta 120 segundos a 128 kbps (La
protección antichoques está siempre
activada.)
Normalmente se enciende el indicador “A.S.P.” en la
pantalla y esto significa que la Protección antichoques
está activada.
Cuando se reproduce un disco, a medida que los datos de
audio se almacenan gradualmente en la memoria, el indicador “A.S.P.” cambia de parpadeando a encendido.
a Memoria completa
Para cancelar la Protección antichoques
(CD de audio solamente)
Pulse el botón A.S.P./T.SEARCH en el modo de parada
o durante la reproducción.
Se apaga el indicador “A.S.P.” en la pantalla.
Para activar la función de protección
antichoques otra vez (CD de audio solamente)
Para activar la protección antichoques otra vez, pulse
el botón A.S.P./T.SEARCH otra vez.
Notas:
• La protección antichoques puede activarse o
desactivarse durante la reproducción, y esto podrá
ocasionar una ligera interrupción en el sonido porque
cambia la velocidad de rotación del disco.
• Con la protección antichoques desactivada se ahorra-
rá energía de la batería en cierto modo.
veiliging
Deze beveiliging voorkomt het wegvallen van geluid door
schudden of stoten tegen het apparaat, door weergave
van de meest recente geluidsgegevens die steeds in het
buffergeheugen worden bewaard. De geheugenspeel
duur is:
Voor audio-CD: Tot maximaal 45 seconden (anti-schok
beveiliging kan worden in/uitgeschakeld)
Voor MP3: Tot maximaal 120 seconden bij 128
kbps (anti-schok beveiliging is altijd in-
geschakeld)
Gewoonlijk is de “A.S.P.” geheugenopslag-aanduiding
in het uitleesvenster zichtbaar, om aan te geven dat de
Anti-schok beveiliging is ingeschakeld.
Tijdens het afspelen van een disc worden de audiogegevens
geleidelijk opgeslagen in het buffer geheugen, en verandert
de “A.S.P.” aanduiding van knipperen naar continu oplichten.
a Buffergeheugen vol
Uitschakelen van de Anti-shok beveiliging
(Alleen voor audio-CD)
Druk tijdens afspelen of in de stopstand op de A.S.P./
T.SEARCH toets.
De “A.S.P.” geheugenopslag-aanduiding verdwijnt uit het
uitleesvenster.
Weer inschakelen van de anti-schok beveiliging
(Alleen voor audio-CD)
Druk nogmaals op de A.S.P./T.SEARCH toets om de antischok beveiliging weer in te schakelen.
Omerkingen:
• De anti-schok beveiliging kan ook tijdens afspelen in-
of uitgeschakeld worden, maar dit kan een kleine
geluidsonderbreking veroorzaken omdat de rotatiesnelheid van de disc verandert.
• Schakel de anti-schok beveiliging uit wanneer u batte-
rij-energie wilt besparen.
25
Page 26

Using the unit
with an audio
system
Using a stereo connection cable (not included), you can
listen to CDs through your audio system.
• Connect the cable to the amplifier after turning off its
power.
• Do not connect the cable to the PHONO jacks on the
amplifier.
• Obtain the optional connecting cable if the amplifier
comes with mini-phone jacks.
• Adjust the volume level on the amplifier.
a LINE OUT jack
b Stereo connection cable (not included)
c
Amplifier
d Right side panel of the unit
e (White)
f (Red)
a
d
b
c
e
f
Note:
To obtain original sound, set HBS to OFF.
26
Page 27

Utilización del
Gebruik van het
aparato con un
sistema de audio
Utilizando el cable de conexión estéreo (no suministrado), usted podrá escuchar discos compactos en su sistema de audio.
• Conecte el cable al amplificador después de haber desconectado su alimentación.
• No conecte el cable a las tomas PHONO del amplificador.
• Obtenga el cable de conexión opcional si el amplifica-
dor dispone de miniclavijas tipo fonográfico.
• Ajuste el nivel del volumen en el amplificador.
a Toma LINE OUT
b Cable de conexión estéreo (no suministrado)
c Amplificador
d Panel lateral del aparato
e (Blanco)
f (Rojo)
Nota:
Para obtener el sonido original, mueva HBS a OFF.
apparaat met een
audiosysteem
U kunt CD’s via uw audiosysteem beluisteren door de
stereo-aansluitkabel (niet bijgeleverd) te gebruiken.
• Schakel de versterker uit en sluit dan de kabel aan op
de versterker.
• Sluit de kabel niet aan op de PHONO aansluitingen op
de versterker.
• Gebruik de los verkrijgbare speciale aansluitkabel indien de versterker voorzien is van mini-telefoonstekker
ingangen.
• Stel het volumeniveau in op de versterker.
a LINE OUT aansluting
b Stereo-aansluitkabel (niet bijgeleverd)
c Versterker
d Zijpaneel van het apparaat
e (Wit)
f (Rood)
Omerkingen:
Om de oorspronkelijke klank te horen, zet u de HBS basversterkingsknop op OFF.
27
Page 28

A
B
C
D
E
a
Concerning
Compact Discs
Only compact discs bearing this mark can be used
with this unit.
However, continued use of irregular shape CDs (heartshape, octagonal, etc.) can damage the unit.
CD-R and CD-RW discs recorded with the audio CD
format can be played back, though some may not be
played back because of the disc characteristics or
recording condition.
How to remove a disc from its case
How to store the disc in its case
a Label side up
How to hold a disc
If the disc surface is dirty
b Play surface (shiny surface)
Wipe it with a damp cloth and then wipe dry.
Wipe from the center toward the outer edge.
If moisture has formed on a disc
When moisture has formed because the disc was
brought suddenly into a warm room from a cold
environment, wipe off the moisture using a soft dry
cloth.
When storing discs
Avoid locations which are
• Exposed to direct sunlight.
• Susceptible to high levels of humidity or dust.
• Directly exposed to heat from a heating appliance.
• On top of a car dashboard or near the rear window.
Handling precautions
• On the label side (the side with writing)
Do not write anything using a pencil, ball-point pen,
etc. Do not use adhesive paper or labels.
• On the disc (shiny) side
Handle this side carefully to keep it free from
fingerprints or scratches. Do not use record cleaners,
solvents, etc.
• Do not attach labels or stickers to CDs.
Do not use CDs with exposed adhesive from tape or
left over peeled off stickers.
• Do not use scratch-proof protectors or covers other
than those specified for use with this unit.
F
b
28
Page 29

Acerca de los
Informatie over
discos compactos
Sólo los discos compactos que tengan esta marca podrán utilizarse en este aparato.
Sin embargo, la utilización continua de discos compactos de formas irregulares (forma de corazón,
octagonales, etc.) puede estropear el aparato.
Los discos CD-R y CD-RW grabados con el formato de
CD de audio pueden reproducirse, aunque algunos podrán no hacerlo debido a las características del disco o
a las condiciones de la grabación.
Cómo extraer un disco de su caja
Cómo guardar un disco en su caja
a Lado de la etiqueta hacia arriba
Cómo sujetar un disco
Si la superficie del disco está sucia
b Superficie de reproducción (superficie brillante)
Límpiela con un paño húmedo y luego séquela.
Limpie desde el centro hacia la circunferencia exterior.
Si se ha formado humedad en un disco
Cuando se ha formado humedad debido a que el disco
ha sido llevado repentinamente de un lugar frío a otro
caliente, quite la humedad con un paño suave y seco.
Cuando guarde discos
Evite los lugares
• Expuestos a la luz directa del sol.
• Susceptibles de tener altos niveles de humedad y pol-
vo.
• Expuestos directamente al calor de un aparato de calefacción.
• Sobre el salpicadero de un automóvil o cerca de una
ventana.
Precauciones de manejo
• En el lado de la etiqueta (el lado con escritura)
Tenga cuidado para no manchar este lado con huellas
dactilares ni rayarlo. No utilice limpiadores de discos,
disolventes, etc.
• En el lado del disco (lado brillante)
Tenga cuidado para no manchar este lado con huellas
dactilares ni rayarlo. No utilice limpiadores de discos,
disolventes, etc.
• No ponga etiquetas ni pegatinas en los discos compactos.
No utilice discos compactos que tengan adhesivo de
cinta adhesiva expuesto o restos de pegatinas despegadas.
• No utilice cubiertas ni protectores a prueba de rayado
que no sean aquellos especificados para ser utilizados con este sistema.
compact discs
In dit apparaat kunt u alleen compact discs gebruiken
die voorzien zijn van dit opschrift.
Continu gebruik van CD’s met een onregelmatige vorm
(hartvormig, achthoekig, enz.) kan echter het apparaat
beschadigen.
CD-R en CD-RW discs die zijn opgenomen in het audioCD-formaat kunnen worden afgespeeld. Afhankelijk van
de eigenschappen van de disc en de opnamecondities
is het echter mogelijk dat sommige discs niet afgespeeld
kunnen worden.
Om een CD uit haar doos te verwijderen
Om de CD weer in haar doos op te bergen
a Kant met label erop
Vastpakken van een CD
Als er vuil aan een disc kleeft
b Afspeeloppervlok (glanzend oppervlak)
Veeg de disc schoon met een vochtig doekje en droog
de disc daarna af. Veeg altijd vanuit het midden naar de
rand toe.
Als er vocht op een disc is gecondenseerd
Als een disc vanuit de kou plotseling in een warme omgeving wordt gebracht, kan de disc beslaan; veeg dan
voor het afspelen het condensvocht weg met een zacht
droog doekje.
Wanneer u CD’s opbergt
Vermijd dan plaatsen die
• Aan direct zonlicht zijn blootgesteld.
• Onderhevig zijn aan grote vochtigheid of veel stof.
• Direct blootgesteld zijn aan de hitte van een
verwarmingstoestel.
• Op het dashboard of dicht bij de achterruit in een auto.
Voorzorgsmaatregelen voor het hanteren van
CD’s
• Op de labelkant (de bedrukte kant)
Schrijf niet met een potlood, balpen, etc. op de labelkant van CD’s en plak er nooit etiketten of stickers op.
• Op de afspeelkant (glanzende kant)
Behandel deze kant voorzichtig, zodat er geen vingerafdrukken of krassen op terechtkomen. Gebruik nooit
schoonmaakmiddelen bestemd voor grammofoonplaten, oplosmiddelen, etc.
• Kleef geen etiketten of stickers op CD’s. Gebruik geen
CD’s met blootgestelde kleefstof van plakband of achtergebleven kleefstof van afgepelde stickers.
• Gebruik geen tegen krassen bestande beschermers
of deksels, behalve deze welke voor gebruik met dit
systeem zijn voorgeschreven.
29
Page 30

Cautions
Rechargeable batteries
• Only the BN-R1211 battery can be recharged.
• If the power delivered by the batteries lasts for a very short
time after recharging, it means that the batteries’ service life
is over. Do not use them any more.
• Recharging already charged batteries will shorten their service life.
• When recharging batteries for the first time or when they have
not been used for a long period of time, the play time may be
shorter than usual. In a case like this, repeatedly recharge
and discharge the batteries. This will restore them to their
regular state.
• Do not allow any metal objects to touch the terminals of
rechargeable batteries since this may cause short-circuiting
which is dangerous.
• Do not peel off the plastic covering on the rechargeable
batteries. Short-circuiting may occur which is dangerous.
Dry cell batteries/rechargeable
batteries
To prevent damage to the batteries and electrolyte leakage,
heed the following points.
• Align the , and . polarities properly when inserting the
batteries.
• Do not mix different types or makers of batteries or old and
new batteries.
• Remove the batteries if you do not plan to use the unit for a
long period of time.
• Do not throw batteries into a fire, and do not short-circuit,
disassemble or subject them to excessive heat.
• Do not attempt to recharge dry cell batteries.
Notice about the rechargeable battery
The battery is designated recyclable.
Please follow your local recycling regulations.
AC adaptor
• Handle the AC adaptor carefully. Improper handling is
dangerous.
• Do not touch it with wet hands.
• Do not place heavy objects on top of it.
• Do not forcibly bend it.
• Be sure to connect only the AC adaptor provided with the unit.
• Disconnect the AC adaptor from the power outlet if the unit is
not going to be used for a long time.
Unit
No altering or remodeling
This can cause malfunctioning.
No dropping or strong impacts
This may damage the unit.
Locations to be avoided
Avoid using the unit in the following locations since they can
cause malfunctioning.
1. Bathrooms and other moisture-prone places.
2. Warehouses and other dusty places
3. Very hot places near heating appliances, etc.
Do not leave the unit exposed to direct sunlight for
long periods of time
This may deform or discolor the cabinet and may also cause
malfunctioning.
Carrying dry cell batteries/
rechargeable batteries around
When putting dry cell or rechargeable batteries in a pocket or
bag, ensure that no other metal objects such as a necklace are
placed together with them. Contact with metal may cause
short-circuiting which, in turn, may cause a fire.
When purchasing rechargeable
batteries
As a safety precaution, the portable CD players made by JVC
have a construction designed to make it impossible to recharge
ordinary batteries.
To use rechargeable batteries, be absolutely sure to purchase the
rechargeable Ni-Cd batteries designed especially for this unit.
Special rechargeable Ni-Cd batteries:
BN-R1211 (set of 2)
For details, check with your dealer.
Special rechargeable
batteries
Ordinary dry cell
batteries/
rechargeable
batteries
Listening precautions
• Do not play your headphones at a high volume. Hearing
experts advise against continuous extended play.
• If you experience a ringing in your ears, reduce volume or
discontinue use.
• Even if your headphones or earphones are an open-air type
designed to let you hear outside sounds, don’t turn up the
volume so high that you can’t hear what’s around you.
• You should use extreme caution or temporarily discontinue
use in potentially hazardous situations.
• Even if your headphones is an open-air type designed to let
you hear outside sounds, don’t turn up the volume so high
that you can’t hear what’s around you.
30
Page 31

Precauciones
Baterías recargables
• Sólo las baterías BN-R1211 pueden cargarse.
• Si la alimentación suministrada por las baterías dura muy poco
después de cargarlas, esto significa que la duración de servicio de las baterías ha terminado. No las utilice más.
• La carga de baterías que ya están cargadas reduce su duración de servicio.
• Cuando cargue las baterías por primera vez o después de no
haberlas utilizado durante mucho tiempo, el tiempo de reproducción podrá ser inferior al normal. En un caso como éste,
cargue y descargue repetidamente las baterías. As’ recuperarán su estado normal.
• No permita que ningún objeto metálico entre en contacto con
los terminales de las baterías recargables porque podría producirse un peligroso cortocircuito.
• No pele la cubierta de plástico de las baterías recargables. Podrían producirse cortocircuitos que son peligrosos.
Pilas secas/baterías recargables
Para evitar estropear las pilas/baterías y las fugas de electrólito,
siga los consejos siguientes:
• Alinee correctamente las polaridades , y . cuando inserte
las pilas/baterías.
• No mezcla diferentes tipos o marcas de pilas/baterías, ni tampoco pilas/baterías viejas con nuevas.
• Extraiga las pilas/baterías si no piensa utilizar el aparato durante un largo período de tiempo.
• No tire las pilas/baterías al fuego, y no las cortocircuite, desmonte o someta a un calor excesivo.
• No trate de cargar la pilas secas.
Para llevar pilas secas/baterías
recargables
Cuando ponga las pilas secas/baterías recargables en un bolsillo o bolso, asegúrese de no poner otros objetos metálicos como,
por ejemplo, un collar con ellas. El contacto con metales podría
causar un cortocircuito que a la vez podría causar un incendio.
Asegúrese del llevar las baterías recargables en la caja suministrada con ese propósito.
Cuándo comprar baterías
recargables
Como medida de precaución, los reproduc-tores de discos compactos hechos por nuestra compañía tienen un diseño de construcción que imposibilita la carga de las pilas.
Para utilizar baterías recargables, asegúrese de adquirir las baterías recargables de Ni-Cd diseñadas especialmente para este
aparato.
Baterías recargables de Ni-Cd especiales:
BN-R1211 (juedo de dos)
Para conocer más detalles, póngase en contacto con su concesionario.
Aviso acerca de la batería recargable
La batería ha sido designada como reciclable. Siga los reglamentos de reciclamiento locales.
Adaptador de CA
• Maneje el adaptador de CA cuidadosamente. Un manejo inapropiado podría ser peligroso.
• No lo toque con las manos mojadas.
• No ponga objetos pesados sobre él.
• No lo doble a la fuerza.
• Asegúrese de conectar solamente el adaptador de CA sumi-
nistrado con el aparato.
• Desconecte el adaptador de CA de la toma de corriente si el
aparato no va a ser utilizado durante mucho tiempo.
Aparato
No lo altere ni modifique
Esto podría causar averías.
No lo deje caer ni lo golpee
Esto podría estropear el aparato.
Lugares de deberán evitarse
Evite utilizar el aparato en los lugares siguientes porque podrían
producirse averías.
1. Cuartos de baño u otros lugares propensos a la humedad.
2. Almacenes y otros lugares polvorientos.
3. Lugares muy calurosos cerca de aparatos de calefacción, etc.
No deje el aparato expuesto a los rayos directos del
sol durante mucho tiempo.
Esto podría deformar o descolorar la caja y también podría causar averías.
Precauciones al escuchar
• No haga funcionar sus auriculares a alto volumen. Los entendidos en el oído aconsejan contra una audición prolongada y
continua.
• Si Vd. experimenta un silbido en sus oídos, reduzca el volumen
o descontinúe el uso.
• Aunque sus auriculares o cascos auriculares sean de tipo abierto
para permitirle oír sonidos exteriores, no suba el volumen demasiado de forma que ya no se oiga lo que sucede a su alrededor.
• Tenga extrema precaución o eventualmente interrumpa su uso
en situaciones potencialmente peligrosas.
• Aun cuando sus auriculares sean de un diseño de tipo al aire
libre, para permitirle oír sonidos exteriores, no suba el volumen
tan alto que Vd. no pueda oír lo que pasa a su alrededor.
Baterías recargables
especiales
Pilas secas/
baterías recargables
normales
31
Page 32

Voorzorgsmaatregelen
Oplaadbare batterijen
• Alleen de BN-R1211 batterijen kunnen opnieuw opgeladen worden.
• Als de gebruiksduur van de batterijen na volledig opladen uiterst kort wordt, zijn de batterijen versleten. Gebruik deze batterijen niet meer.
• Als u reeds opgeladen batterijen nogmaals oplaadt, zal hun levensduur korter worden.
• Wanneer u de batterijen voor de eerste keer oplaadt of deze na
een lange periode van niet-gebruik opnieuw oplaadt, kan hun
gebruiksduur korter zijn dan normaal. In zo’n geval dient u de
batterijen herhaaldelijk op te laden en te ontladen. Hierdoor zullen zij hun normale gebruiksduur terugkrijgen.
• Pas op dat metalen voorwerpen niet in aanraking komen met
de polen van de oplaadbare batterijen, daar dit gevaarlijke
kortsluiting kan veroorzaken.
• Ga ook na of gebruikte batterijen met het hercirculeringssymbool
(drie pijlen) kunnen worden teruggegeven bij de winkel waar u
deze heeft aangekocht.
Niet weggooien,
maar inleveren
als KCA.
Droge batterijen/oplaadbare
batterijen
Neem de volgende punten in acht om beschadiging van de batterijen en lekkage van elektrolyt te voorkomen.
• Plaats de batterijen met hun , en . polariteiten in de juiste rich-
ting.
• Gebruik nooit batterijen van verschillend type of verschillend
fabrikaat door elkaar. Gebruik nooit oude en nieuwe batterijen
door elkaar.
• Verwijder de batterijen wanneer u het apparaat voor geruime
tijd niet gaat gebruiken.
• Gooi batterijen nooit in het vuur. Sluit de batterijen niet kort, neem
ze niet uit elkaar en stel ze niet bloot aan hoge temperaturen.
• Probeer niet droge batterijen opnieuw op te laden.
Meenemen van droge batterijen/
oplaadbare batterijen
Wanneer u droge of oplaadbare batterijen in een zak of draagtas
plaatst, plaats deze dan niet samen met een halssnoer of andere
metalen voorwerpen. Contact met metaal kan kortsluiting en eventueel brand veroorzaken.
Wanneer u oplaadbare batterijen meeneemt, plaats deze dan in
ieder geval in de speciaal daarvoor bijgeleverde tas.
Wanneer u oplaadbare batterijen
koopt
Uit veiligheidsoverwegingen zijn de CD-spelers van JVC zo ontworpen dat gewone batterijen er niet mee kunnen worden opgeladen.
Wanneer u oplaadbare batterijen gebruikt, koop dan in ieder geval de oplaadbare Ni-Cd batterijen die speciaal voor dit apparaat
zijn ontworpen.
Speciale oplaadbare Ni-Cd batterijen:
BN-R1211 (set van 2 stuks)
Voor details, raadpleeg uw dealer.
32
Speciale oplaadbare
batterijen
Gewone droge batterijen/
oplaadbare batterijen
Opmerking betreffende de oplaadbare batterij
De batterij is recyclable. Volg a.u.b. de plaatselijke
recycling voorschriften op.
Netspanningsadapter
• Behandel de netspanningsadapter voorzichtig. Onjuiste behandeling is gevaarlijk.
• Niet met natte handen aanraken.
• Geen zware voorwerpen erop plaatsen.
• Niet met geweld buigen.
• Gebruik uitsluitend de netspanningsadapter die bij dit apparaat
is bijgeleverd.
• Verwijder de stekker van de netspanningsadapter uit het stopcontact wanneer u het apparaat voor geruime tijd niet gaat gebruiken.
Hoofdapparaat
Niet wijzigen of omvormen
Dit kan foutieve werking veroorzaken.
Niet laten vallen of aan sterke schokken blootstellen
Hierdoor kan het apparaat beschadigd raken.
Te vermijden plaatsen
Om defecten te voorkomen, gebruik het apparaat niet op de volgende plaatsen.
1. Badkamers of andere vochtige plaatsen.
2. Opslagplaatsen of andere stoffige omgevingen.
3. Zeer hete plaatsen zoals dicht bij verwarmingstoestellen, etc.
Stel het apparaat niet voor lange tijd bloot aan direct zonlicht
Hierdoor kunnen de buitenpanelen verkleuren of vervormd raken
en kan beschadiging worden veroorzaakt.
Voorzorgsmaatregelen bij luisteren
via de hoofdtelefoon
• Zet het volume niet te hoog wanneer u door de hoofdtelefoon
naar muziek luistert. Oorartsen raden het af om lang aan een
stuk door de hoofdtelefoon naar muziek te luisteren.
• Zet het volume lager of stop een tijdje met luisteren, indien u
“bijgeluiden” gaat horen.
• Luister niet via de hoofdtelefoon bij het besturen van een motor-
voertuig. Dit brengt de verkeersveiligheid in gevaar en is bovendien op veel plaatsen verboden.
• Neem de grootst mogelijke voorzichtigheid in acht of schakel
het apparaat uit in potentieel gevaarlijke situaties.
• Zelfs wanneer uw hoofdtelefoon zo is ontworpen dat u nog geluiden van buitenaf kunt horen, moet u het volume niet zo hoog
draaien, dat u niet meer hoort wat er om u heen gebeurt.
Page 33

Troubleshooting
Before requesting service for this unit, check the chart below for a possible cause of the problem you are experiencing. Some simple checks or a minor adjustment on your part may eliminate the problem and restore proper operation.
If you are in doubt about some of the check points, or if the remedies indicated in the chart do not solve the problem,
refer to the directory of Authorized Service Centers (enclosed with this unit) to locate a convenient service center, or
consult your dealer for instructions.
Problem Check this
Does not turn on.
Cannot close cover.
Cannot play discs.
Cannot hear music—too noisy.
TV picture is distorted.
Radio reception is noisy.
• Are the batteries charged?
• Is the AC adaptor securely connected?
• Is the HOLD switch set to OFF position?
Is the disc properly secured in place?
• Is the disc properly secured in place?
• Is there moisture condensation on the lens?
(Wait for about an hour and then try again.)
• Are MP3 files recorded on the disc?
• Do MP3 files have the extension code—.mp3?
• Are MP3 files recorded in the format compliant with ISO 9660?
• Is the headphone correctly connected?
• Is the plug dirty? (Wipe away dirt on the plug.)
• Are you playing a compatible disc? While playing a non-MP3 file,
you will hear a noise. (Note it may not be an MP3 file although it
has the extension code—.mp3.)
Are you using the unit body too near a TV or tuner? (If the TV or
tuner is connected to a simple indoor antenna, connect it to an outdoor antenna.)
Maintenance
Maintaining the unit
Wipe the unit with a soft cloth. Remove stubborn dirt
using a cloth which has been dipped in water or soapy
water and wrung out, and then wipe dry.
• If you intend to use a chemically treated cleaning cloth,
read its directions first.
• Do not use alcohol or paint thinners.
Maintaining the lens
Open the lid and clean the lens as shown in the figure.
Use a cotton swab to gently wipe off any finger-prints.
Recommended product: Lens cleaner kit
lens
Air blower for
camera lens
lens
33
Page 34

Solución de problemas
Antes de llevar a reparar la unidad, compruebe que no aparezca la causa de su problema en la siguiente tabla. Tal
vez consiga solucionar el problema haciendo tan sólo algunas pequeñas comprobaciones o ajustes.
Si tiene alguna duda sobre las explicaciones de la tabla o no consigue solucionar el problema siguiendo los consejos indicados en la tabla, busque un servicio técnico en el directorio de servicios técnicos autorizados (que se
adjunta con la unidad) o póngase en contacto con su distribuidor.
Problema Compruebe esto
No se conecta.
No se puede cerrar la tapa.
No se pueden reproducir discos.
No se puede oír la música, hay demasiado ruido.
La imagen de TV está distorsionada. La
recepción de la radio tiene ruido.
•¿Están cargadas las baterías?
•¿Está firmemente conectado el adaptador de CA?
•¿Está el interruptor HOLD en la posición HOLD?
¿Está el disco bien asegurado en su lugar?
•¿Está el disco bien asegurado en su lugar?
•¿Se ha condensado humedad en la lente?
(Espere una hora aproximadamente e intente de nuevo.)
•¿Hay grabados archivos MP3 en el disco?
•¿Tienen los archivos MP3 el código de extensión—.mp3?
•¿Están los archivos MP3 grabados con un formato en conformi-
dad con ISO 9660?
• ¿Están los auriculares conectados correctamente?
•¿Están sucias las clavijas? (Limpie el conector de cualquier su-
ciedad)
•¿Está reproduciendo un disco compatible? Mientras reproduzca
un archivo que no sea MP3, oirá ruido. (Tenga en cuenta que quizás no esté reproduciendo un archivo MP3 aunque éste tenga el
código de extensión—.mp3.)
¿Está usted utilizando el aparato demasiado cerca de un televisor o
un sintonizador? (Si el televisor o el sintonizador está conectado a
una antena interior sencilla, conéctelo a una antena exterior.)
Mantenimiento
Mantenimiento del aparato
Limpie el aparato con un paño suave. Quite las manchas difíciles con un paño humedecido en agua sola o
en agua con jabón y bien escurrido, y luego pase un
pano seco para secarlo.
• Si intenta utilizar un paño de limpieza químico, lea primera estas instrucciones.
• No utilice alcohol ni diluyentes de pintura.
Mantenimiento de la lente
Abra la tapa y limpie la lente como se muestra en la
figura.
Utilice un palillo con algodón para limpiar
cuidadosamente las huellas dactilares.
Producto recomendado: Juego limpiador de lentes
Lente
Soplador de aire
para objetivos de
cámaras
Lente
34
Page 35

Verhelpen van storingen
oorzaak van het probleem kunt vinden. Misschien kunt u met enkele eenvoudige controles of bijstellingen het
probleem oplossen, zodat het apparaat weer goed werkt.
Als u twijfelt over sommige controles of als de oplossingen die in de tabel worden genoemd het probleem niet
verhelpen, neemt u contact op met het dichtstbijzijnde servicecentrum in de lijst die bij het apparaat is geleverd of
met de verkoper.
Storing Controleer het volgende
Het apparaat werkt niet.
Het deksel opent niet niet.
De CD kan niet afgespeeld worden.
Muziek is moeilijk te horen vanwege te
veel ruis.
Ruis op de radio of storing op TV.
• Zijn de batterijen wel opgeladen?
• Is de netspanningsadapter stevig aangesloten?
• Staat de HOLD toetsblokkeerknop niet in de HOLD stand?
Zit de CD goed vast op zijn plaats?
• Zit de CD goed vast op zijn plaats?
• Is er vocht (condens) op de lens?
(Wacht ongeveer een uur en probeer dan opnieuw.)
• Zijn er MP3 bestanden op de disc opgenomen?
• Zijn de MP3 bestanden voorzien van de bestandsextensie .mp3?
• Zijn de MP3 bestanden opgenomen in een formaat dat voldoet
aan ISO 9660?
• Is de hoofdtelefoon juist aangesloten?
• Zijn de stekkers vuil? (Houd de stekker stofvrij)
• Speelt u een geschikte disc af? Bij het afspelen van een niet-MP3
bestand hoort u stoorgeluiden. (Merk op dat een bestand de
bestandsextensie .mp3 kan hebben, maar dat het toch geen MP3
bestand is.)
Wordt dit apparaat te dicht bij een TV of tuner gebruikt? (Als de
TV of tuner op een eenvoudige binnenantenne is aangesloten,
dient u deze op een buitenantenne aan te sluiten.)
Onderhoud
Onderhoud van het apparaat
Veeg de buitenpanelen schoon met een zachte doek.
Verwijder hardnekkige vlekken met behulp van een doek,
die u in water of in een oplossing van water en zeep
dompelt en dan goed uitwringt. Veeg daarna droog met
een droge doek.
• Als u een chemische schoonmaakdoek gebruikt, lees
dan eerst goed de bijbehorende gebruiksinstructies.
• Gebruik nooit alcohol of verfverdunners.
Onderhoud van de lens
Open het deksel en reinig de lens zoals is afgebeeld.
Gebruik een wattenstokje om vingerafdrukken van de lens te verwijderen.
Aanbevolen produkt: Lens-reinigingsset.
Lens
Luchtblazer voor
camera-lenzen
Lens
35
Page 36

Specifications
Especificaciones
Portable CD Player
Type : Compact disc player
Signal detection system
Pickup system : 3 beam laser
Number of channels: : 2 channels (stereo)
Frequency response : 20 Hz to 20 000 Hz
Wow & flutter : Unmeasurable
Output : Headphone (3.5 mm dia.
Duration of battery : Approx. 3 hours when using
(with Anti-Shock two rechargeable
Protection OFF) batteries (BN-R1211) charged
Power requirements : DC 3 V (“R6” size battery × 2)
Dimensions (W×H×D)
Mass : Approx. 255 g
AC adaptor
Input power source : AC 230 V, 50 Hz
Output voltage : DC 4.5 V, 600 mA
* Design and specifications are subject to change with-
out notice.
: Non-contact optical pickup
(semiconductor laser)
stereo × 1)
9 mW/ch at 10 % THD/16 Ω
matching impedance (16 Ω to 1
kΩ)
LINE OUT (3.5 mm dia. stereo
× 1) 0.6 V/50 kΩ
for 10 hours
Approx. 20 hours when using
two alkaline batteries (LR6Panasonic)
DC 2.4 V (rechargeable battery
× 2)
DC IN 4.5 V
: 138.5 mm × 31 mm × 145 mm
(Excluding buttons and
controls)
(without batteries)
Reproductor CD portátil
Tipo : Reproductor de CD
contpacto
Sistema de detección
de señales : Fonocaptor óptico sin contacto
(semiconductor láser)
Sistema fonocaptor : Rayo láser de 3 haces
Número de canales: : 2 canales (estereofónico)
Respuesta de frecuencia : de 20 Hz a 20 000 Hz
Lioro y tremolación : Inmensurable
Salida : Audífono (3,5 mm. de diám.,
estéreo × 1)
9 mW por canal a 10 %
THD/16 Ω (16 Ω a 1 kΩ)
LINE OUT (3,5 mm. de
diám., estéreo × 1) 0,6 V /
50 kΩ
Duración de la pila : 3 horas aprox. cuando se
(Protección utilizan las baterías
antichoques OFF) recargables (BN-R1211)
cargada durante 10 horas
20 horas aprox. cuando se
utilizan dos pilas alcalinas
(LR6 de Panasonic)
Requisitos de energía : 3 V CC (“R6” × 2)
2,4 V CC (pila recargable ×
2)
DC IN 4,5 V
Dimensiones (A × Alt. × P) :
Peso : 255 g aprox.
Adaptador de CA
Fuente de entrada
de energía : CA 230 V, 50 Hz
Voltaje de salida : 4,5 V CC, 600 mA
138,5 mm × 31 mm × 145 mm
(Excluyendo botones y
controles)
(sin pilas)
36
* El diseño y las especificaciones están sujetos a cam-
bio sin aviso.
Page 37

Technische gegevens
Draagbare CD-speler
Type : Compactdiscspeler
Signaaldetectiesysteem
Pick-upsysteem : 3-stralenlaser
Aantal kanalen : 2 kanalen (stereo)
Frequentierespons : 20 Hz tot 20 000 Hz
Wow & Flutter : Onmeetbaar
Output : Hoofdtelefoon (3,5 mm diameter
Levensduur batterij : Ongeveer 3 uur bij gebruik van
(met Anti-shock twee oplaadbare batterijen
beveiliging op OFF)
Stroomvoorziening : DC 3 V (2 × “R6” batterij)
Afmetingen (B × H × D): 138,5 mm × 31 mm × 145 mm
Massa : Ongeveer 255 g
: Non-contact optische pick-up
(halfgeleider laser)
stereo × 1)
9mW/ch op 10% THD/16 Ω overeenkomende impedantie (16 Ω
tot 1 kΩ)
LINE OUT (3,5 mm diameter stereo × 1) 0,6 V/50 kΩ
(BN-R1211) opgeladen voor 10 uur,
Ongeveer 20 uur bij het gebruik
van twee alkali-batterijen (LR6Panasonic)
DC 2,4 V (2 × oplaadbare batterij)
DC IN 4,5 V
(Exclusief toetsen en regelaars)
(zonder batterijen)
Netspanningsadapter
Input stroomvoorziening : AC 230 V, 50 Hz
Outputvoltage : DC 4,5 V, 600 mA
* Ontwerp en specificaties kunnen zonder berichtgeving
worden veranderd.
37
Page 38

Page 39

Concerning Compact Discs
Only compact discs bearing this mark can be used with this unit.
However, continued use of irregular shape CDs (heart-shape, octagonal, etc.) can damage
the unit.
CD-R and CD-RW discs recorded with the audio
CD format can be played back, though some may
not be played back because of the disc characteristics or recording condition.
How to remove a disc from its case
How to store the disc in its case
Label side up
How to hold a disc
If the disc surface is dirty
Wipe it with a damp cloth and then wipe dry.
Wipe from the center toward the outer edge.
Play surface (shiny surface)
If moisture has formed on a disc
When moisture has formed because the
disc was brought suddenly into a warm
room from a cold environment, wipe off
the moisture using a soft dry cloth.
When storing discs
Avoid locations which are
• Exposed to direct sunlight.
• Susceptible to high levels of humidity or
dust.
• Directly exposed to heat from a heating
appliance.
• On top of a car dashboard or near the
rear window.
Handling precautions
• On the label side (the side with writing)
Do not write anything using a pencil,
ball-point pen, etc. Do not use adhesive
paper or labels.
• On the disc (shiny) side
Handle this side carefully to keep it free
from fingerprints or scratches. Do not
use record cleaners, solvents, etc.
• Do not attach labels or stickers to CDs.
Do not use CDs with exposed adhesive
from tape or left over peeled off stickers.
• Do not use scratch-proof protectors or
covers other than those specified for use
with this unit.
PORTABLE CD PLAYER
XL-PM20SL
For Customer Use:
Enter below the Model No. and Serial
No. which are located either on the rear,
bottom or side of the player. Retain this
information for future reference.
Model No.
Serial No.
INSTRUCTIONS
Supplied Accessories
Check the packing carton for these accessories.
AC adaptor (AA-R4515 for the U.K., AA-R4516 for other area) ............................................ 1 pc.
Stereo headphones (for the U.K.) ................................................................................................. 1 pc.
Over stereo headphones (for other area) .................................................................................... 1 pc.
AC plug adaptor (for multi voltage area) ...................................................................................1 pc.
Thank you for purchasing this JVC product. Please read these instructions carefully before starting
operation to be sure to obtain optimum performance and a longer service life from the unit.
Use numbers in parentheses when asking for replacement parts.
Precautions
CAUTION!
THIS PRODUCT UTILIZES A LASER.
USE OF CONTROLS OR ADJUSTMENTS OR PERFORMANCE OF PROCEDURES OTHER THAN THOSE
SPECIFIED HEREIN MAY RESULT IN
HAZARDOUS RADIATION EXPOSURE.
DO NOT OPEN COVERS AND DO NOT
REPAIR YOURSELF. REFER SERVICING TO QUALIFIED PERSONNEL.
WARNING:
TO REDUCE THE RISK OF FIRE OR
ELECTRIC SHOCK, DO NOT EXPOSE
THIS APPLIANCE TO RAIN OR MOISTURE.
Marking sign is located on bottom of
the unit.
INVISIBLE LASER RADIATION WHEN OPEN AND INTERLOCK DEFEATED.
DANGER
AVOID DIRECT EXPOSURE TO BEAM.
USYNLIG LASERSTRÅLING VED ÅBNING, NÅR SIKKERHEDSAFBRYDERE
ADVARSEL
ER UDE AF FUNKTION. UNDGÅ UDSÆTTELSE FOR STRÅLING.
AVATTAESSA JA SUOJALUKITUS OHITETTAESSA OLET ALTTIINA
VARO!
NÄKYMÄTÖNTÄ LASERSÄTEILYLLE. ÄLÄ KATSO SÄTEESEEN.
OSYNLIG LASERSTRÅLNING NÄR DENNA DEL ÄR ÖPPNAD OCH
VARNING
SPÄRREN ÄR URKOPPLAD. BETRAKTA EJ STRÅLEN.
USYNLIG LASERSTRÅLING NÅR DEKSEL ÅPNES OG SIKKERHEDSLÅS
ADVARSEL
BRYTES. UNNGÅ EKSPONERING FOR STRÅLEN.
UNSICHTBARE LASERSTRAHLUNG, WENN ABDECKUNG GEÖFFNET
VORSICHT
UND SICHERHEITSVERRIEGELUNG ÜBERBRÜCKT.
NICHT DEM STRAHL AUSSETZEN.
1. CLASS 1 LASER PRODUCT
2. DANGER: Invisible laser
radiation when open and
interlock failed or defeated.
Avoid direct exposure to
beam.
3. CAUTION: Do not open the
top cover. There are no user
serviceable parts inside the
Unit; leave all servicing to
qualified service personnel.
(Bottom of product)
(Påsat under apparatet)
(Tuotteen pohjassa)
(Apparatens undersida)
(Produktets underside)
(Unterseite des Gerätes)
Bottom of the unit
IMPORTANT for the U.K.
DO NOT cut off the mains plug from this equipment. If the plug
fitted is not suitable for the power points in your home or the
cable is too short to reach a power point, then obtain an appropriate safety approved extension lead or consult your dealer.
BE SURE to replace the fuse only with an identical approved
type, as originally fitted.
If nontheless the mains plug is cut off ensure to remove the
fuse and dispose of the plug immediately, to avoid a possible
shock hazard by inadvertent connection to the mains supply.
If this product is not supplied fitted with a mains plug then follow
the instructions given below:
IMPORTANT:
DO NOT make any connection to the terminal which is marked
with the letter E or by the safety earth symbol or coloured green
or green-and-yellow.
The wires in the mains lead on this product are coloured in accordance with the following code:
Blue : Neutral
Brown : Live
As these colours may not correspond with the coloured markings identifying the terminals in your plug proceed as follows:
The wire which is coloured blue must be connected to the terminal which is marked with the letter N or coloured black.
The wire which is coloured brown must be connected to the terminal which is marked with the letter L or coloured red.
IF IN DOUBT - CONSULT A COMPETENT ELECTRICIAN.
CAUTION:
• Do not block the ventilation opening or holes. (If the ventilation
openings of holes are blocked by a newspaper or cloth, etc., the
heat may not be able to get out.)
• Do not place any naked flame sources, such as lighted candles, on
the apparatus.
• When discarding batteries, environmental problems must be considered and local rules or laws governing the disposal of these
batteries must be followed strictly.
• Do not expose this apparatus to rain, moisture, dripping or
splashing and that no objects filled with liquids, such as vases,
shall be placed on the apparatus.
Printed in China
EN
1
0502SKMCREORI
LVT0924-004A [B,UJ]
VICTOR COMPANY OF JAPAN, LIMITED
Page 40

Power Supply Preparations
Refer to the specifications (page 6) for information on operating times when using rechargeable batteries or dry-cell batteries.
When using rechargeable batteries
Be sure to recharge the rechargeable batteries BN-R1211 (not included) before using them.
For information about these, see “When purchasing rechargeable
batteries” on page 6.
Recharging procedure
1 Insert the special rechargeable batteries
into the unit.
Caution:
Do not open the battery lid too wide. It can break if you forcibly
open it beyond approximately 90°.
2 Connect the AC adaptor.
AC power outlet
AC adaptor
Right side panel of the unit
DC IN jack (DC IN 4.5 V )
Recharging will be completed after 10 hours.
3
When recharging is complete, unplug the AC
adaptor from the power outlet and the DC IN jack.
Notes:
• To operate the unit on batteries, the AC adaptor must be disconnected from the DC IN jack.
• It takes approximately 10 hours to recharge the rechargeable
batteries.
• Rechargeable batteries have a service life of approximately
300 charge-discharge cycles. If the operating time on one full
charge becomes noticeably shorter than it used to be, the batteries
have reached the end of their service life and should be replaced.
• Recharging takes place only when the unit is powered off. (It is
not possible to recharge the batteries while playing a CD.)
• The AC adaptor and rechargeable batteries may become warm
while recharging is in progress. This is normal and is not a malfunction.
If the battery lid
compartment
comes loose
Slide the lid back into
place horizontally.
Removing batteries
Push up on the battery in
the direction indicated by
the arrow. Then lift it out.
Using dry-cell batteries (not included)
After disconnecting the AC adaptor, insert two “R6” (LR6) alkaline batteries.
The procedure for inserting and removing dry-cell batteries is identical to that for rechargeable batteries.
Battery indicator
Battery indicator
The battery indicator changes as follows according to the remaining capacity of the battery.
Fully charged
Rechargeable batteries: Recharge batteries.
Dry-cell batteries: Replace batteries with new ones.
Low battery Empty
After a while
the unit will
turn off.
Notes:
• The length of time the unit can continue further operation after the
battery indicator changes to “ ” differs depending on the type
of batteries used.
• The battery indicator may not be correctly displayed if rechargeable
batteries, other than those designated by JVC, are used.
• When power is supplied from the AC adaptor, “ ” indicator
always lights up.
Tip:
Turning off the Anti-Shock Protection (see page 5) will save the
battery power more or less.
If the unit malfunctions or freezes during use,
disconnect the power source (the AC adaptor
and batteries). Then, connect the power source
and operate the unit again.
Using the AC adaptor
Connect the AC adaptor supplied.
Refer to “When using rechargeable batteries” for connection instructions.
Note:
The unit is in the standby condition when the AC adaptor is connected. The primary circuit is always “live” as long as the AC
adaptor is connected to an AC power outlet.
AC adaptor (for multi voltage area only)
Before use
Make sure the present voltage of your AC adaptor fits to your local voltage before plugging it into the AC power outlet. If it
doesn’t, shift the AC line-voltage selector with a screwdriver so
that it corresponds to your local voltage.
VOLTAGE
ADJUSTOR
AC 110V
~127V
If the power plug will not fit your socket, use the AC adaptor.
AC 220V
~240V
How to use the AC adaptor
Location of Controls
A
Left side panel of the unit
B
Display
Portable CD player A
A Stop / power off button (7)
B Skip / search buttons (4, ¢)
C Play / pause button (3/8)
D Display
E MODE button
F A.S.P. (Anti-Shock Protection) /
T.SEARCH (Title Search) button
G PROGRAM button
H GROUP button
I LINE OUT jack
J Headphones jack (
K Headphones volume control (VOLUME)
L DC in jack (DC IN 4.5 V
M Lid open switch (OPEN 3)
N HOLD switch
O Hyper-bass sound switch (HBS)
1 Battery indicator (See page 2.)
2 HBS (Hyper-Bass Sound) indicator (See page 4.)
3 PROG (Program) indicator (See page 4.)
4 A.S.P. (Anti-Shock Protection) indicator (See page 5.)
5
(Search) indicator (See page 4.)
6 GRP (Group) indicator (See page 4.)
7 MP3 indicator
Lights when an MP3 disc is used.
8 Repeat indicator (See page 4.)
A
)
)
Stereo headphones
9 INTRO indicator (See page 4.)
0 RAND (Random) indicator (See page 4.)
- CD-RW indicator
Lights when a CD-RW is used.
B
2 3
Page 41

y
Sequential Play
E
M
This CD player can play back both Audio CDs and MP3 files (tracks).
Release hold mode
HOLD
OFF ON
3
Basic Pla
5
MODE
GROUP
Label must the upward
OPEN
2
Open the lid
Follow steps 1–6.
In step 1, firmly connect the plug into the jack.
• Play stops automatically when all the tracks have been played.
Operation
To pause play
To stop play
Stop mode
To turn off the
unit
Off mode
During play, press.
During play, press.
In stop mode, press.
Button
Close the lid
4
6
Display/reference
Audio-CD MP3
Press again to resume play.
Total number of tracks
Total playing time
Total number of group
Total number of track
VOLUME
VOLUME
Track number in play
Shows “Audio-CD”
Shows “MP3”
1
Elapsed playing time of each track
RL
For your reference:
“ ”
This indication appears for about 30 seconds if the 3/8 button is
pressed when no disc is loaded in the unit or if the disc is not
properly seated. Then, the unit is automatically shut off.
“ ”
This indication appears to let you know the status of the unit.
• Preparation period before playing the track
“MP3” flashes for several seconds after you have press the 3/8
button to play the disc.
(Flashes until the rotational speed of disc becomes constant or
until the contents of disc is read.)
“ ”
• Opened lid
Stays lit for 30 seconds when the lid is opened.
Note:
Never insert foreign objects into the unit body.
Removing the disc
Turn off the unit and, after the disc has stopped rotating, remove
the disc as shown below:
Skip function
Fast forward/
reverse
Group skip
(MP3 only)
Track skip
(MP3 only)
Showing the
group/track title
During play, press.
Reverse
Search function
Keep depressing during play.
During play or in stop mode, press.
During play or in stop mode, keep
depressing.
During play, keep depressing.
Forward
GROUP
GROUP
MODE
(MP3 only)
3
• To skip back to the previous track, quickly press the
4 button twice.
• During program play, the button is used to fast forward or back through the programmed sequence of
tracks.
• During random play, the skip button cannot be used to
skip back to tracks that were played previously in the
random sequence.
Each time the button is pressed, group skips forward.
Group number
Track number quickly changes in forward over the groups.
Group title and track title scroll. To cancel the title display,
keep MODE depressing again.
Group number
Track number
Example of group/track title
Auto power off function
If the unit is left in stop mode for 30 seconds, the unit powers
itself off automatically to save power.
4
Page 42

Other Play Methods
The letters such as A in the various illustrations refer to the descriptions in the “Location of Controls” section. (See page 2.)
Descriptions are common to Audio CDs and MP3 files unless otherwise noted.
MP3 File Compatibility
• This player can read MP3 files that are recorded in the format
that is compliant with ISO 9660.
• The player can read or play an MP3 file with the extension
code —“.mp3”.
• Group/track title can be displayed.
Note:
• ID3* tags cannot be shown on the display.
* An MP3 file can contain file information called “ID3 Tag”
where its album name, performer, track title, etc. are recorded.
How are MP3 files recorded and played back?
The illustration below shows the normal playing order of the
MP3 files. You will see that the MP3 files are played back in the
order from the higher hierarchy to the lower one.
Hierarchy
3
4
Group
MP3 file
3 Press PROGRAM.
PROGRAM
G
Track number
4 Select the desired track. (e.g. 03)
B
5 Press PROGRAM
PROGRAM
G
6
For MP3, repeat steps 2-5 to select other tracks.
For Audio-CD, repeat steps 4 and 5.
7 Press the 3/8 button.
Title search (MP3 only)
Alphabet search
During playback or in stop mode, you can search a track that
begins with A-Z, 0-9.
1 Press A.S.P./T.SEARCH. “A” appears.
“
” blinks.
A.S.P./T.SEARCH
F
2
Search a track by specifying the first letter (A-Z) or
number (0-9). If nothing is found, “NOTHING” appears.
B
A-Z, 0-9
“ ”
Example: Track title that begins with A
Example: When the letter L is specified
6
7
1
2
5
8
9
10
Random play
You can play all tracks in a random order. After playing all
tracks, the unit stops.
1 Play the disc.
C
2 Press MODE until “RAND” flashes.
E
Cancelling
Press MODE until “RAND” goes out, or press the 7 button to stop the disc.
For your reference:
• You can also select random play in stop mode.
• During program play (“PROG” appears on the display). random play is not selectable.
Program play
You can program up to 64 tracks in any desired order including
the same tracks.
For Audio CD, go to step 3. Though the display differs a little,
operation is the same.
MODE
1 (MP3 only) During playback or in stop mode,
press PROGRAM.
“PROG” lights up
G
PROGRAM
Group number
Program sequence number
2 (MP3 only) Select the desired group number.
(e.g. 02)
B
4
C
• To confirm the programmed tracks
In stop mode, press PROGRAM repeatedly. The programmed track
number will successively appear together with the program sequence
number. At this time, you can change the program, if required.
If the programmed tracks are less than 64, track number “00” appears for the youngest programmable sequence number, enabling
further programming.
• To delete the entire programmed sequence
In stop mode, press the 7 button during programming process.
Turning off the unit deletes the program.
Repeat play
You can repeatedly play one track or one group (for MP3), or all
tracks or all groups (for MP3).
1 During playback or in stop mode, press MODE
until the repeat indicator lights up.
MODE
E
1 track repeat
1 group repeat (MP3 only)
2
All tracks repeat/All groups repeat
(MP3 only)
C
Cancelling
Press MODE until the repeat indicator goes out and the unit returns to normal play mode.
For your reference:
Repeat function is also effective for program play (except 1
group repeat).
Intro play
You can successively play the first 10 seconds of every track
from the first track.
Intro play stops after playing the last track.
1 In stop mode, press MODE until “INTRO” flashes.
MODE
E
2 Press the 3/8 button.
The “INTRO” play will start from the first track.
C
Cancelling
Press MODE until “INTRO” goes out and the unit returns to
normal play mode.
For your reference:
• You can also use intro play during playback. In this case, intro
play after the current track has been played back.
• You can also use intro play for program play.
3 Press the 3/8 button.
“ ” stays lit
C
All the tracks with the specified letter will be played. After that,
the “ ” indicator will disappear and the disc stops.
To cancel the alphabetic play, press the 7 button once. Then, the
“ ” indicator disappears and the unit returns to normal play.
Group Search
During playback or in stop mode, you can search a group you
want to play.
1 Press A.S.P./T.SEARCH until “GRP” appears.
“
” indicator lights up.
F
A.S.P./T.SEARCH
“ ”
Group number
Group title (Example)
2 Select a desired group.
Each time you press it, the next group title is
displayed.
B
3 Press the 3/8 button.
Playback starts from the first track of the selected group.
When the 6 button is pressed, group search mode automatically released.
Hyper-Bass Sound (HBS)
You can enjoy powerful bass sound.
To get the hyper-bass sound effect
Set HBS switch to “ON”. The HBS indicator lights up.
HBS
OFF ON
O
To cancel the effect
Set HBS switch to “OFF”.
Page 43

Anti-Shock Protection
Using the unit with an
This function minimizes sound interruption caused by vibrations, by utilizing audio data that has been stored in the memory ahead
of the following time:
For Audio CD: Up to 45 seconds worth (Anti-Shock Protection on/off selectable)
For MP3: Up to 120 seconds worth at 128 kbps (Anti-Shock Protection is fixed to on.)
Normally, the “A.S.P.” indicator lights up on the display and the Anti-Shock Protection is in effect.
A.S.P indicator
When the disc is played, as the audio data gradually stored in the memory, the “A.S.P.” indicator changes from blinking to lighting:
[Fully stored]
To cancel the Anti-Shock Protection (Audio CD only)
Press the A.S.P./T.SEARCH button in stop mode or during playback.
The “A.S.P.” indicator goes out on the display.
To activate the Anti-Shock Protection again (Audio CD only)
To activate the Anti-Shock Protection again, press the A.S.P./T.SEARCH button once more.
Notes:
• The Anti-Shock Protection can be enabled or disabled during play, and this may cause a slight interruption in the sound because
the disc’s rotational speed changes.
• Turning off the Anti-Shock Protection will save battery life more or less.
audio system
Using a stereo connection cable (not included), you can listen to
CDs through your audio system.
• Connect the cable to the amplifier after turning off its power.
• Do not connect the cable to the PHONO jacks on the amplifier.
• Obtain the optional connecting cable if the amplifier comes
with mini-phone jacks.
• Adjust the volume level on the amplifier.
Right side panel of the unit
Notes:
• To obtain original sound, set HBS to “OFF”.
LINE OUT jack
Stereo connection cable
(not included)
Amplifier
(White)
L
CD/AUX
R
(Red)
Po
Typ
Sign
Pick
Num
Freq
Wow
Outp
Dur
(wit
Pro
Pow
Dim
Mas
AC
Inpu
Outp
*
Preventing Accidental Operation (Hold)
HOLD
OFF ON
The HOLD switch is prepared to prevent an accidental operation
by an unexpected button press.
Setting the HOLD switch ON prevents the following:
• Powering on the unit accidentally (which can cause the batteries to go dead).
• Play being cut off unexpectedly.
To set the unit in hold mode
• Set the HOLD switch to the ON position.
“HOLD ” indication
When the unit is in hold mode, “HOLD” will be displayed if a
button is pressed.
To release the function
Set the HOLD switch to OFF position.
Note:
Before turning on the unit, be sure that HOLD is OFF.
Otherwise, you cannot turn on the unit.
Maintenance
Maintaining the unit
Wipe the unit with a soft cloth. Remove stubborn dirt using a
cloth which has been dipped in water or soapy water and wrung
out, and then wipe dry.
• If you intend to use a chemically treated cleaning cloth, read
its directions first.
• Do not use alcohol or paint thinners.
Maintaining the lens
Open the lid and clean the lens as shown in the figure.
Use a cotton swab to gently wipe off any finger-prints.
Recommended product: Lens cleaner kit
Lens
Air blower for
camera lens
Lens
Re
•On
• If
•Re
• W
•Do
•Do
Dry
ba
To p
the f
•Al
•Do
•Re
•Do
•Do
65
Page 44

Specifications
R
P
T
O
S
L
S
K
T
Å
S
H
Troubleshooting
Portable CD player
Type : Compact disc player
Signal detection system : Non-contact optical pickup (semiconductor laser)
Pickup system : 3 beam laser
Number of channels: : 2 channels (stereo)
Frequency response : 20 Hz to 20 000 Hz
Wow & flutter : Unmeasurable
Output : Headphones (3.5 mm dia. stereo × 1)
Duration of battery : Approx. 3 hours when using two rechargeable batteries
(with Aunti-Shock (BN-R1211) charged for 10 hours,
Protection OFF) Approx. 20 hours when using two alkaline batteries
Power requirements : DC 3 V (“R6” size battery × 2)
Dimensions (W ×H ×D) : 138.5 mm × 31 mm ×145 mm
Mass : Approx. 255 g
9 mW/ch at 10 % THD/16 Ω matching impedance (16 Ω to 1 kΩ)
LINE OUT (3.5 mm dia. stereo × 1) 0.6 V/50 kΩ
(LR6-Panasonic)
DC 2.4 V (rechargeable battery × 2)
DC IN 4.5 V
(Excluding buttons and controls)
(without batteries)
AC adaptor
Input power source : AC 230 V, 50 Hz (for the U.K.)
Output voltage : DC 4.5 V, 600 mA
Design and specifications are subject to change without notice.
*
AC 220 V - 240 V/110 V - 127 V, 50/60 Hz (for multi voltage area)
Cautions
Before requesting service for this unit, check the chart below for a possible cause of the problem
you are experiencing. Some simple checks or a minor adjustment on your part may eliminate the
problem and restore proper operation.
If you are in doubt about some of the check points, or if the remedies indicated in the chart do not
solve the problem, refer to the directory of Authorized Service Centers (enclosed with this unit) to
locate a convenient service center, or consult your dealer for instructions.
Symptom
Does not turn on.
Cannot close cover.
Cannot play discs.
Cannot hear music
—too noisy.
TV picture is distorted.
Radio reception is noisy.
• Are the batteries charged?
• Is the AC adaptor securely connected?
• Is the HOLD switch set to OFF position?
Is the disc properly secured in place?
• Is the disc properly secured in place?
• Is there moisture condensation on the lens?
(Wait for about an hour and then try again.)
• Are MP3 files recorded on the disc?
• Do MP3 files have the extension code—.mp3?
• Are MP3 files recorded in the format compliant with ISO
9660?
• Is the headphone correctly connected?
• Is the plug dirty? (Wipe away dirt on the plug.)
• Are you playing a compatible disc? While playing a nonMP3 file, you will hear a noise. (Note it may not be an
MP3 file although it has the extension code—.mp3.)
Are you using the unit too near a TV or tuner? (If the TV
or tuner is connected to a simple indoor antenna, connect
it to an outdoor antenna.)
Check this
Only compact discs bea
However, continued u
the unit.
How to remove a d
How to hold a disc
If the disc surface
Wipe it with a damp cl
Wipe from the center t
If moisture has form
When moisture has f
disc was brought sud
room from a cold env
the moisture using a so
When storing discs
Avoid locations which
• Exposed to direct sun
• Susceptible to high le
• Directly exposed to
• On top of a car das
Rechargeable batteries
• Only the BN-R1211 battery can be recharged.
• If the power delivered by the batteries lasts for a very short
time after recharging, it means that the batteries’ service life is
over. Do not use them any more.
• Recharging already charged batteries will shorten their service
life.
• When recharging batteries for the first time or when they have
not been used for a long period of time, the play time may be
shorter than usual. In a case like this, repeatedly recharge and
discharge the batteries. This will restore them to their regular
state.
• Do not allow any metal objects to touch the terminals of rechargeable batteries since this may cause short-circuiting which
is dangerous.
• Do not peel off the plastic covering on the rechargeable batteries. Short-circuiting may occur which is dangerous.
Dry cell batteries / rechargeable
batteries
To prevent damage to the batteries and electrolyte leakage, heed
the following points.
• Align the , and . polarities properly when inserting the batteries.
• Do not mix different types or makes of batteries or old and new
batteries.
• Remove the batteries if you do not plan to use the unit for a
long period of time.
• Do not throw batteries into a fire, and do not short-circuit, disassemble or subject them to excessive heat.
• Do not attempt to recharge dry cell batteries.
Carrying dry cell batteries /
rechargeable batteries around
When putting dry cell or rechargeable batteries in a pocket or
bag, ensure that no other metal objects such as a necklace are
placed together with them. Contact with metal may cause shortcircuiting which, in turn, may cause a fire.
Be absolutely sure to carry the rechargeable batteries in the battery carrying case.
When purchasing rechargeable
batteries
As a safety precaution, the portable CD players made by JVC
have a construction designed to make it impossible to recharge
ordinary batteries.
To use rechargeable batteries, be absolutely sure to purchase the
rechargeable Ni-Cd batteries designed especially for this unit.
Special rechargeable Ni-Cd batteries:
BN-R1211 (set of 2)
For details, check with your dealer.
Special rechargeable
batteries
Ordinary dry cell
batteries/rechargeable
batteries
Notice about the rechargeable battery
The battery is designated recyclable.
Please follow your local recycling regulations.
AC adaptor
• Handle the AC adaptor carefully. Improper handling is dangerous.
• Do not touch it with wet hands.
• Do not place heavy objects on top of it.
• Do not forcibly bend it.
• Be sure to connect only the AC adaptor provided with the unit.
• Disconnect the AC adaptor from the power outlet if the unit is
not going to be used for a long time.
Unit
No altering or remodeling
This can cause malfunctioning.
No dropping or strong impacts
This may damage the unit.
Locations to be avoided
Avoid using the unit in the following locations since they can
cause malfunctioning.
1. Bathrooms and other moisture-prone places.
2. Warehouses and other dusty places
3. Very hot places near heating appliances, etc.
Do not leave the unit exposed to direct sunlight for
long periods of time
This may deform or discolor the cabinet and may also cause malfunctioning.
Listening Precautions
• Do not play your headphones at a high volume. Hearing experts advise against continuous extended play.
• If you experience a ringing in your ears, reduce volume or discontinue use.
• Do not use while operating a motorized vehicle. It may create a
traffic hazard and is illegal in many areas.
• You should use extreme caution or temporarily discontinue use
in potentially hazardous situations.
• Even if your headphones is an open-air type designed to let you
hear outside sounds, don’t turn up the volume so high that you
can’t hear what’s around you.
16
 Loading...