

Page 1
HD500_QG-B02.book Page 1 Thursday, September 29, 2005 6:17 PM
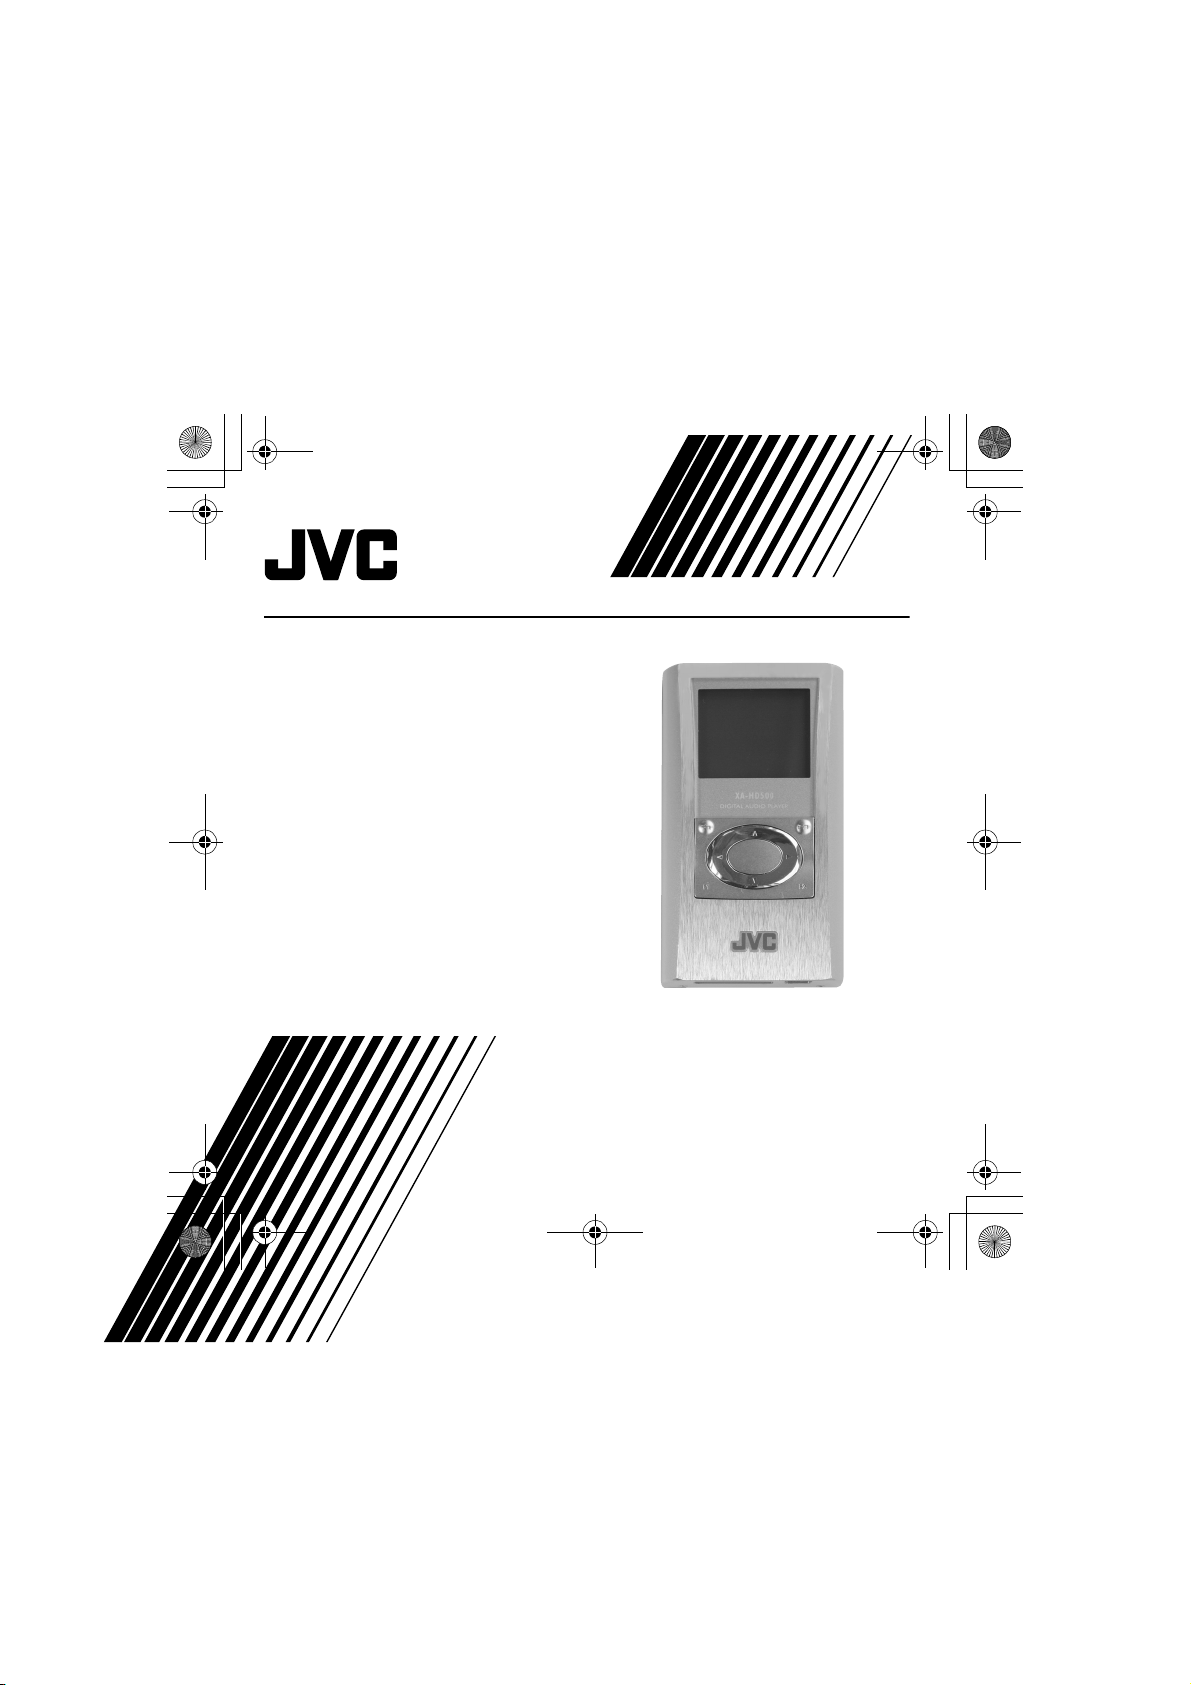
DIGITAL AUDIO PLAYER
XA-HD500S
QUICK GUIDE
LVT1445-004A
[B]
1
Page 2
HD500_QG-B02.book Page 2 Thursday, September 29, 2005 6:17 PM
Thank you for purchasing a JVC product. Before you begin operating this unit,
please read the operating instructions carefully to be sure you get the best
possible performance. If you have any questions, consult your JVC dealer.
Danger, Warning, Cautions and Others
DANGER:
TO REDUCE THE RISK OF FIRE OR
ELECTRICAL SHOCK, CAREFULLY
FOLLOW THESE INSTRUCTIONS.
2
CAUTION:
To reduce the risk of electrical shock,
fire, etc.:
• Do not remove screws, cover or
cabinet.
• Do not expose this appliance to rain
or moisture.
Page 3
HD500_QG-B02.book Page 3 Thursday, September 29, 2005 6:17 PM
DO NOT
the power points in your home or the cable is too short to reach a power point, then obtain
an appropriate safety approved extension lead or consult your dealer.
BE SURE
If nonetheless the mains plug is cut off ensure to remove the fuse and dispose of the plug
immediately, to avoid a possible shock hazard by inadvertent connection to the mains
supply.
If this product is not supplied fitted with a mains plug then follow the instructions given
below:
cut off the mains plug from this equipment. If the plug fitted is not suitable for
to replace the fuse only with an identical approved type, as originally fitted.
IMPORTANT:
DO NOT
safety earth symbol or coloured green or green-and-yellow.
The wires in the mains lead on this product are coloured in accordance with the following
code:
As these colours may not correspond with the coloured markings identifying the terminals
in your plug proceed as follows:
The wire which is coloured blue must be connected to the terminal which is marked with
the letter N or coloured black.
The wire which is coloured brown must be connected to the terminal which is marked with
the letter L or coloured red.
IF IN DOUBT - CONSULT A COMPETENT ELECTRICIAN.
make any connection to the terminal which is marked with the letter E or by the
Blue: Neutral
Brown: Live
3
Page 4
HD500_QG-B02.book Page 4 Thursday, September 29, 2005 6:17 PM
“SOME DOS AND DON’TS ON THE SAFE USE OF EQUIPMENT”
SAFETY INSTRUCTIONS
This equipment has been designed and manufactured to meet international safety
standards but, like any electrical equipment, care must be taken if you are to obtain the
best results and safety is to be assured.
Do read the operating instructions before you attempt to use the equipment.
Do ensure that all electrical connections (including the mains plug, extension leads and
interconnections between pieces of equipment) are properly made and in accordance with
the manufacturer’s instructions. Switch off and withdraw the mains plug when making or
changing connections.
Do consult your dealer if you are ever in doubt about the installation, operation or safety of
your equipment.
Do be careful with glass panels or doors on equipment.
DON’T continue to operate the equipment if you are in any doubt about it working normally,
or if it is damaged in any way—switch off, withdraw the mains plug and consult your dealer.
DON’T remove any fixed cover as this may expose dangerous voltages.
DON’T leave equipment switched on when it is unattended unless it is specifically stated
that it is designed for unattended operation or has a standby mode.
Switch off using the switch on the equipment and make sure that your family know how to do this.
Special arrangements may need to be made for infirm or handicapped people.
DON’T use equipment such as personal stereos or radios so that you are distracted from
the requirements of traffic safety. It is illegal to watch television whilst driving.
DON’T listen to headphones at high volume as such use can permanently damage your hearing.
DON’T obstruct the ventilation of the equipment, for example with curtains or soft furnishings.
Overheating will cause damage and shorten the life of the equipment.
DON’T use makeshift stands and NEVER fix legs with wood screws—to ensure complete
safety always fit the manufacturer’s approved stand or legs with the fixings provided
according to the instructions.
DON’T allow electrical equipment to be exposed to rain or moisture.
ABOVE ALL
–NEVER let anyone, especially children, push anything into holes, slots or any other
opening in the case —this could result in a fatal electrical shock.;
–NEVER guess or take chances with electrical equipment of any kind—it is better to
be safe than sorry!
4
Page 5
HD500_QG-B02.book Page 5 Thursday, September 29, 2005 6:17 PM
For EU
Information for Users on Disposal of Old Equipment
[European Union]
This symbol indicates that the electrical and electronic
equipment should not be disposed as general household waste
at its end-of-life. Instead, the product should be handed over to
the applicable collection point for the recycling of electrical and
electronic equipment for proper treatment, recovery and
recycling in accordance with your national legislation.
Attention:
This symbol is
only valid in the
European
Union.
By disposing of this product correctly, you will help to conserve
natural resources and will help prevent potential negative
effects on the environment and human health which could
otherwise be caused by inappropriate waste handling of this
product. For more information about collection point and
recycling of this product, please contact your local municipal
office, your household waste disposal service or the shop
where you purchased the product.
Penalties may be applicable for incorrect disposal of this waste,
in accordance with national legislation.
(Business users)
If you wish to dispose of this product, please visit our web page
www.jvc-europe.com to obtain information about the take-back
of the product.
[Other Countries outside the European Union]
If you wish to dispose of this product, please do so in
accordance with applicable national legislation or other rules in
your country for the treatment of old electrical and electronic
equipment.
5
Page 6
HD500_QG-B02.book Page 6 Thursday, September 29, 2005 6:17 PM
IMPORTANT NOTICE
1. For your safety
General
• Do not disassemble or modify the XAHD500.
• Do not allow flammables, water or
metallic objects to enter the XAHD500.
Power source
• Do not use any other AC adapter than
the one supplied; otherwise, it may
cause a fire.
• Do not handle the AC adapter with
wet hands.
Traffic safety
• Never operate the XA-HD500 when
driving a car, motorcycle, or bicycle.
This is illegal in many countries and
states; furthermore, it could result in a
traffic accident.
• You should pay extreme attention to
traffic safety in potentially hazardous
situations and stop using the XAHD500.
• Do not block outside sounds by
turning the volume too high.
Hearing comfort and well-being
• Do not listen to music with the
headphones at high volume.
• Listening with the headphones at high
volume over extended periods of time
may damage your hearing.
• If you experience a ringing in your
ears, reduce volume or stop using the
XA-HD500.
2. Avoid using the XA-HD500
- in places subject to excessive
humidity or dust.
- in places subject to extremely high
(over 35
temperatures.
°C) or low (under 5°C)
3. DO NOT leave the XA-HD500
- in direct sunlight.
- near a heater.
4. Avoid the following incidents
and operations
• DO NOT get the XA-HD500 wet. If it
gets wet, do not use the XA-HD500 to
avoid electrical shock and damage.
• DO NOT drop the XA-HD500 or
shake it violently.
• DO NOT connect any USB cable to
the XA-HD500 except the one
supplied.
• DO NOT disconnect the USB cable
while transferring files.
6
Page 7

HD500_QG-B02.book Page 7 Thursday, September 29, 2005 6:17 PM
This Quick Guide only explains the
most fundamental information in order
to use the XA-HD500. For in-depth
information, refer to the Instruction
Manual included in the supplied CDROM.
Contents
• Danger, Warning, Cautions and
Others...............................................2
• IMPORTANT NOTICE ......................6
• System requirements........................7
• Charge the built-in battery ................8
• Insert the battery into the remote......9
• Initial settings..................................10
• Install the supplied CD-ROM ..........12
• About transferring music files to the
XA-HD500.......................................13
• Transfer files by “Drag & Drop”.......14
• Transfer files in Windows Media
Player 10 ........................................16
• Playing the music............................18
• Removing the built-in battery. .........21
• Advanced operations and other
settings ...........................................24
• Specifications..................................25
System requirements
• Operating system:
Microsoft
Edition / Professional)
•CPU
Intel® Pentium® II 233MHz or higher
• RAM
64MB or more
• Hard disk drive space
100MB or more
•Drive
CD-ROM drive
•Port
USB2.0/1.1 port
• Extension code
MP3: <.MP3>, <.mp3>
WMA/WMA-DRM10:
•Browser
Internet Explorer 6.0 or higher
(required to browse the Instruction
Manual installed from the supplied
CD-ROM).
NOTES:
• Some PC's may not work correctly
even if they satisfy the conditions
above.
• The XA-HD500 can neither be used
with a PC assembled by the user nor
with a PC running on 64bit OS.
®
Windows® XP (Home
<.WMA>, <.wma>
7
Page 8
HD500_QG-B02.book Page 8 Thursday, September 29, 2005 6:17 PM
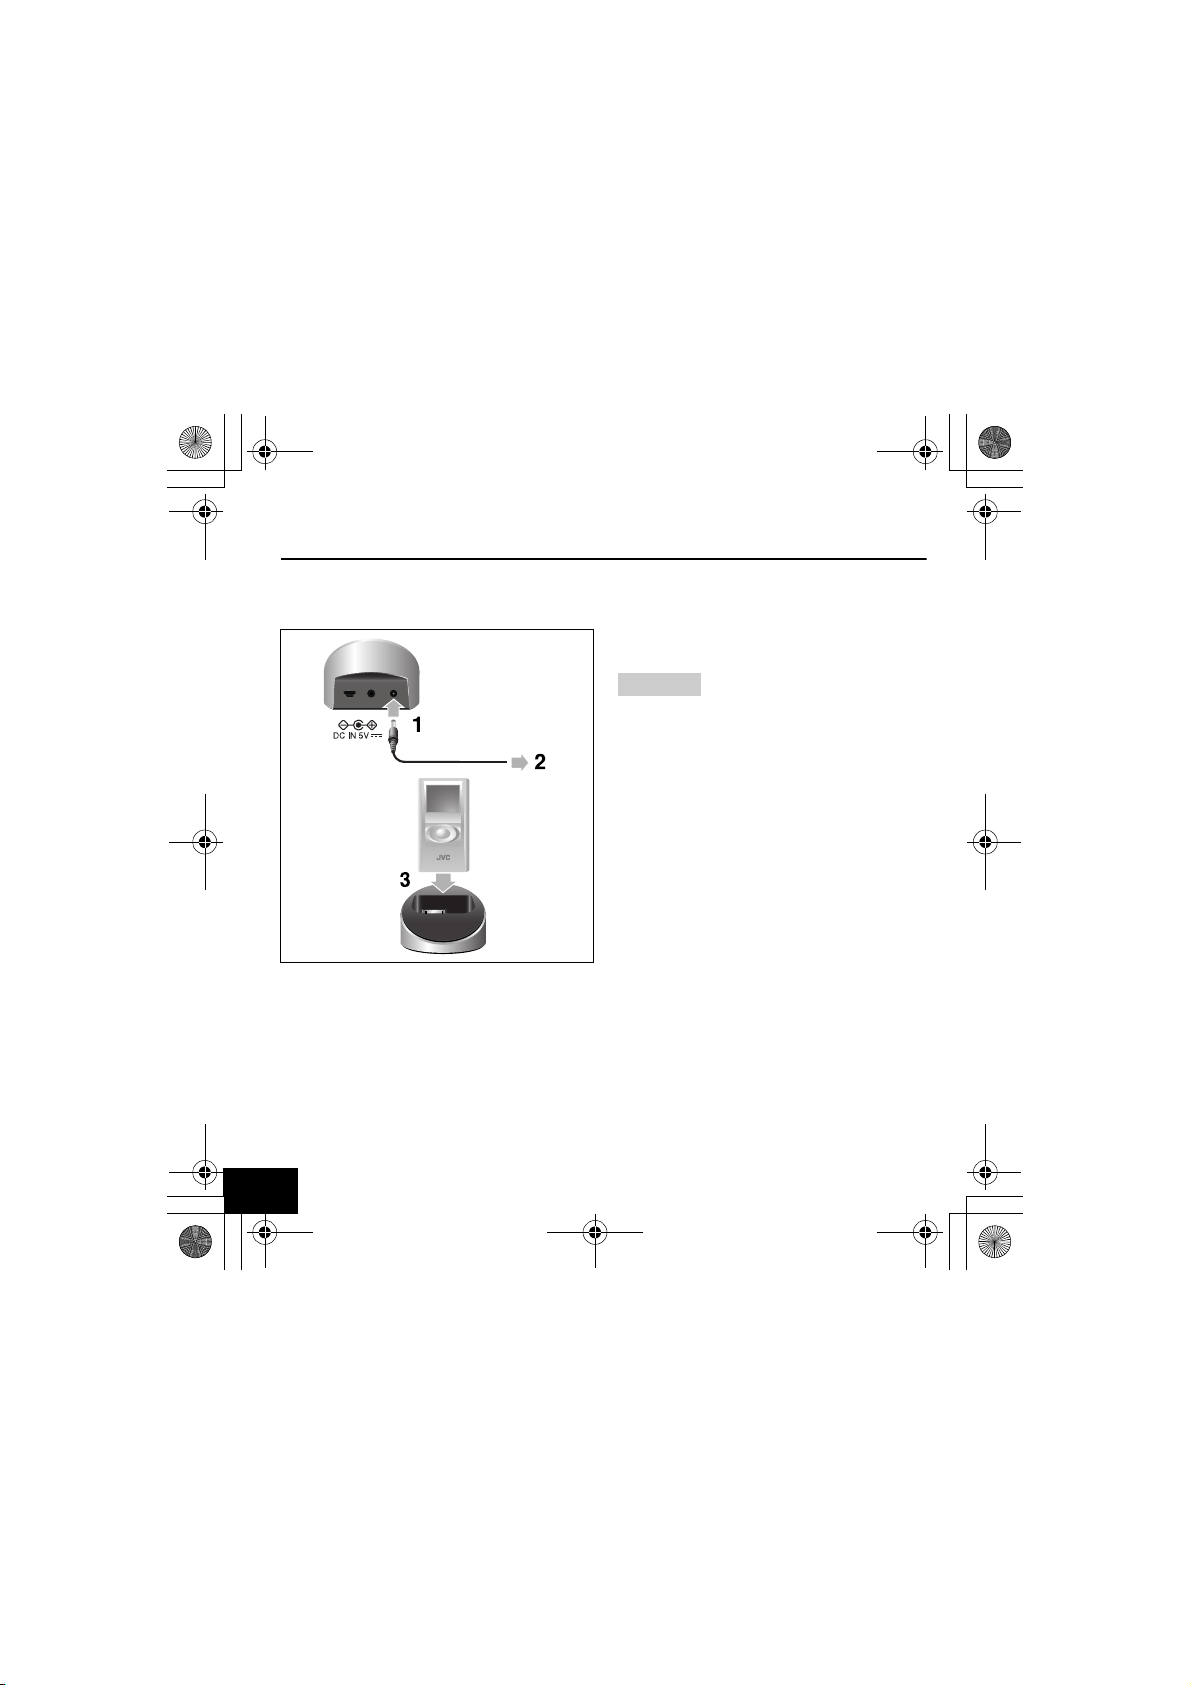
Charge the built-in battery
The battery is undetachable. When it
needs to be repaired, consult your
dealer or JVC Service Center.
To an AC outlet
1 Connect the supplied AC power
adapter to the cradle.
2 Plug it into an AC outlet.
3 Place the XA-HD500 in the cradle.
• Make sure that the connectors are
firmly attached.
• The battery starts charging.
When charging the battery while the
power is off: If the battery is fully
consumed, the battery indicator will not
be displayed at first (for about 1 minute)
after starting charging the battery.
NOTES:
• It takes about 3.5 hours for full charge
when the battery is used up. The time
required for charging varies according
to the remaining battery power and the
current operational status of the XAHD500.
• The built-in battery may eventually
need to be replaced. If the battery
power is consumed too quickly after
fully being charged, it is recommended
to replace the battery. To replace the
battery, consult your dealer or JVC
Service Center.
• If you connect the XA-HD500 to your
PC with the USB cable, you can also
charge the battery (except when the
PC is in the stand-by mode). However,
It is recommended to charge the
battery through the cradle and the AC
adapter.
8
Page 9

HD500_QG-B02.book Page 9 Thursday, September 29, 2005 6:17 PM
Insert the battery into the remote
1
2
3
1 Pull out the battery compartment.
2 Attach the battery in the
compartment, with the + mark
facing upward.
3 Replace the battery compartment.
WARNINGS on the battery
• Store the battery in a place where
children cannot reach. If a child
accidentally swallows the battery,
consult a doctor immediately.
• Do not recharge, short, disassemble,
heat the battery or dispose of it in a
fire. These behaviors may cause the
battery to be overheated, crack or start
a fire.
• Do not leave the battery with other
metallic materials. Doing this may
cause the battery to give off heat,
crack, or start a fire.
• When throwing away or saving the
battery, wrap it in tape and insulate;
otherwise, the battery may be
overheated, crack or start a fire.
• Do not poke the battery with tweezers
or similar tools. Doing this may cause
the battery to be overheated, crack or
start a fire.
When using the remote control unit
• Place the XA-HD500 in the cradle, and
supply the power through the AC plug
adapter; otherwise, the remote control
unit cannot be used.
When using the stereo headphones
Your stereo headphones are supplied
with 3 sizes of earpiece (including the
ones attached). You can select the ones
which fit into your ears best.
When attaching the earpieces, make
sure they are firmly attached.
Confirm that the
earpieces are
attached firmly.
As the supplied earphones are airtight, it
may cause difficulty in listening to sound
played back at a low volume level;
however, increasing the volume may
block external sounds around you. Do
not increase the volume too high,
especially while you are outside.
9
Page 10

HD500_QG-B02.book Page 10 Thursday, September 29, 2005 6:17 PM
Initial settings
Turning the power on
1 Press and hold .
The display window lights up.
Setting the Menu Language and
Date & Time
To display the
Top Menu:
Hold .
To select:
///
To ent e r : ENTER
(center portion)
Selecting the menu language
1 Press the Cursor buttons ( / /
/ ) to select (highlight)
“Settings”, then press ENTER.
• There are 8 items on the Top Menu.
If “Settings” is not shown, press
Cursor button ( ).
2 Press the Cursor buttons
to select (highlight) “Menu
Language”, then press ENTER.
3 Press the Cursor buttons ( / )
to select (highlight) “Menu
Language”, then press ENTER.
• Ex. To select “Français” (French).
The Settings menu is restored
automatically in the menu language
you have selected.
(/ )
10
Page 11

HD500_QG-B02.book Page 11 Thursday, September 29, 2005 6:17 PM
Setting the date and time
1 Press the Cursor buttons ( / )
to select (highlight) “Clock Set”,
then press ENTER.
2 Press the Cursor buttons ( / )
to select (highlight) “Date &
Time”, then press ENTER.
3 Press the Cursor buttons ( / )
to select (highlight) “Set Date &
Time”, then press ENTER.
4 Press the Cursor buttons ( / )
to adjust, and press ( / ) to
move between the displayed
items.
• “AM” and “PM” change
automatically.
• To set the date and time, make
sure to press ENTER after setting
the minute. The internal clock starts
counting the time from “0” second
of the set time.
You can also select either 12-hour /24hour system and date display type
(MM/DD/YY, DD/MM/YY, or YY/MM/
DD). For details, refer to the
Instruction Manual.
11
Page 12

HD500_QG-B02.book Page 12 Thursday, September 29, 2005 6:17 PM
Install the supplied CD-ROM
It is required to install Windows
Media Player 10 in your PC to use
the XA-HD500.
• By using other jukebox applications
and other versions of windows Media
Player, you cannot operate the XAHD500 normally and correctly.
Using the supplied CD-ROM, you can
install the following to your PC.
• Instruction Manual
• Windows Media Player 10
• XA-HD500 Updater: This is a
maintenance tool for the XA-HD500.
Quit all programs before installation.
When you insert the CD-ROM into your
PC, the installation program
automatically starts up.
1 Select the language.
Instruction Manual, Window Media
Player 10, and XA-HD500 Updater
will be installed in the selected
language.
• If the Instruction Manual is not
supplied in the selected language,
the English manual will be installed.
2 Confirm the location to install the
Instruction Manual to.
• If necessary, change the default
location.
12
Page 13

HD500_QG-B02.book Page 13 Thursday, September 29, 2005 6:17 PM
3 Follow the instructions on the
screens to install Windows Media
Player 10 and XA-HD500 Updater.
•If Windows Media Player 10 has
been installed, the warning
message appears on the display.
To install only the Instruction
Manual and XA-HD500 Updater
without installing Windows Media
Player 10, Click <No>.
To read the Instruction Manual
After installation is completed, select
<Start> - <Programs> (or <All
Programs>) - <JVC> - <XA-HD500> <manual>, the click <manual>.
About transferring music
files to the XA-HD500
NOTES:
• For in-depth information on how to use
Windows Media Player, refer to
“Windows Media Player Help”.
• You cannot use any other versions of
Windows Media Player than Windows
Media Player 10.
• It is strongly recommended to assign
an appropriate genre/album/artist
names to each track in Windows
Media Player. After transferring the
files to the XA-HD500, these names
cannot be assigned or edited. Tag
data for Track/Artist/Album/Genre can
be transfer up to its 126th character.
• Use the USB root hub (USB port on
the PC itself) for connecting the
peripheral devices to avoid the
malfunction of XA-HD500.
• Use the supplied USB cable for
connection. When connecting to a PC
with a USB hub or a USB extension
cable, the XA-HD500 may not work
properly.
• While connecting to the PC through
the USB cable, no operation is
possible on the XA-HD500.
• When connecting the XA-HD500 to
the PC, Resume Play is cancelled.
Next time you start playback, playback
starts from the first track of all the
stored tracks.
13
Page 14

HD500_QG-B02.book Page 14 Thursday, September 29, 2005 6:17 PM
Transfer files by “Drag &
Drop”
1 Connect the XA-HD500 to your PC
(either directly or through the
cradle).
(Supplied: 1m)
or
(Supplied:
1m)
XA-HD500 automatically turns on,
and the following screen appears on
the display.
• When the connection is complete,
the arrows on the screen stop
rotating.
• Do not disconnect the USB cable
while the arrows are rotating on the
screen.
The following window appears on
the PC.
2 Select as above, then click <OK>.
3 Click <Start> on the task bar, then
select <My Computer> - <XAHD500> - <Media>, then double
click <Media>.
• If <My Computer> is not in the
Start menu, double click <My
Computer> (on the desktop) <XA-HD500> - <Media>.
14
Page 15

HD500_QG-B02.book Page 15 Thursday, September 29, 2005 6:17 PM
• The following screen appears on
the display of the XA-HD500.
5 Disconnect the USB cable.
4 Drag and drop folders including
the music files (MP3/WMA/WMADRM10).
NOTES:
• Do not drag and drop any files other
than music files into the Media folder.
• If malfunction occurs under the
influence of noise (static electricity,
etc.), please try again.
15
Page 16

HD500_QG-B02.book Page 16 Thursday, September 29, 2005 6:17 PM
Transfer files in Windows
Media Player 10
1 Connect the XA-HD500 to your PC
(either directly or through the
cradle).
XA-HD500 automatically turns on,
and the following screen appears on
the display.
2 Select as above, then click <OK>.
Windows Media Player 10 starts up,
then the following window appears.
• When the connection is complete,
the arrows on the screen stop
rotating.
• Do not disconnect the USB cable
while the arrows are rotating on the
screen.
The following window appears on
the PC.
16
Page 17

HD500_QG-B02.book Page 17 Thursday, September 29, 2005 6:17 PM
•If Windows Media Player 10 starts
up without displaying the above
window, click the <Sync> tab to
display the <Sync> window, then
click < Sync Settings> so that you
can perform the synchronization
settings.
3 Click <Manual>, then click
<Finish>.
4 Select a group from which you
want to transfer files, then select
the files.
5 Click < Start Sync>.
Files selected in step 4 are
transferred.
• When the file transfer ends, the
arrows on the screen stop rotating.
6 Disconnect the USB cable after
making sure that the file transfer
has already completed.
NOTE:
• If malfunction occurs under the
influence of noise (static electricity,
etc.), please try again.
17
Page 18

HD500_QG-B02.book Page 18 Thursday, September 29, 2005 6:17 PM
Playing the music
Turn the power on.
1 Connect the stereo headphones.
2 Turn on the power.
Press and hold .
• When you turn on the power again,
the last displayed screen appears.
• If a long period of time has been
already passed since the last shutoff, the initial screen appears.
Select a track and start playback.
• Ex. Selecting a track from Artist
To display the
Top Menu:
Hold .
To select:
///
To ent e r : ENTER
(center portion)
1 Press the Cursor buttons ( / /
/ ) to select (highlight) “Artist”
on the Top Menu, then press
ENTER.
• There are 8 items on the Top menu.
If “Artist” is not shown, press
Cursor buttons (/).
18
Page 19

HD500_QG-B02.book Page 19 Thursday, September 29, 2005 6:17 PM
2 Press the Cursor buttons ( / )
to select (highlight) an artist you
like, then press ENTER.
3 Press the Cursor buttons ( / )
to select (highlight) an album you
like, then press ENTER.
4 Press the Cursor buttons ( / )
to select (highlight) a track to
start with, then press ENTER.
Playback starts from the selected
track.
To turn the power off
Press and hold until “Shutting
Down....” appears.
Operations during playback
The following operations are only
possible when the playing track
information screen is displayed.
To adjust the volume: Press the
Cursor buttons ( / ).
(Adjustable range: 00 to 30)
To stop: Press .
To play: Press .
To skip tracks: Press the Cursor
buttons ( / ).
To search for a particular portion:
Press and hold the Cursor buttons ( /
).
To change the display information:
press ENTER Repeatedly.
The remaining play time, digital clock,
and analog clock (with the date)
appears in sequence.
19
Page 20

HD500_QG-B02.book Page 20 Thursday, September 29, 2005 6:17 PM
NOTES:
The playback order of the music files
may be different from the order on the
PC.
• Within Genre and Artist, the tracks are
played in the unicode order.
• Within Album, the tracks are played in
the numerical order if the track
numbers are assigned.
• For Playlist, the tracks are played back
in the same order as transferred.
To lock the controls
By using this function, you can avoid an
unintended operation while carrying the
XA-HD500 in your pocket, etc.
1 Slide the HOLD switch to the
“HOLD” position.
HOLD
No operations are possible now. (The
remote control does not work as well.)
The following indicator appears on the
display.
20
Page 21

HD500_QG-B02.book Page 21 Thursday, September 29, 2005 6:17 PM
Removing the built-in battery.
DANGER
• Do not subject the built-in battery
to strong impacts.
Shorting the poles may cause
heating, bursting, or start a fire.
• Do not store the built-in battery
with a metal necklace or hairpin in
a pocket.
Shorting the poles may cause
heating, bursting, or start a fire.
• Do not heat, disassemble, modify
the built-in battery, or throw it into
water or fire.
Bursting, ignition, or heat may cause
a fire or injury.
• Do not leave the built-in battery
near fire or in direct sunlight.
Also, do not leave the built-in battery
near a heater. Bursting, ignition, or
heat may cause a fire or injury.
CAUTIONS
• Do not leave the built-in battery
within the reach of small children.
It may cause injury or accident if
swallowed.
• If the battery liquid leaks and gets
into an eye, rinse the eye with clear
water and consult a doctor
immediately.
Leaving the eye untreated may cause
loss of sight in that eye.
21
Page 22

HD500_QG-B02.book Page 22 Thursday, September 29, 2005 6:17 PM
DO NOT disassemble the XAHD500 except when you dispose
of it.
1 Turn off the power.
• Press and hold .
2 Remove the two screws on the
bottom and one screw on each
side.
3 Remove the top cabinet by lifting
it from the bottom.
4 Remove the connector as in the
illustration below, then remove
the top cabinet.
5 Remove the board from the
bottom cabinet.
• Release the lock, which are
indicated by the arrows and
remove the board by unlocking the
four parts in the illustration below.
22
Page 23

HD500_QG-B02.book Page 23 Thursday, September 29, 2005 6:17 PM
6 Turn over the removed board.
7 Remove the connector from the
built-in battery, then remove the
built-in battery.
8 Stick the connector to the built-in
battery with insulation tape and
keep it in a plastic bag.
• Stick the connector to the built-in
battery with insulation tape wound
around the battery, and keep it in a
plastic bag.
Cautions
• Do not remove the built-in battery
before making sure it has been used
up completely.
• Do not reuse the built-in battery once
it has been removed.
Notice about the rechargeable
battery
The battery is designated recyclable.
Please follow your local recycling
regulations.
23
Page 24

HD500_QG-B02.book Page 24 Thursday, September 29, 2005 6:17 PM
Advanced operations and other settings
The functions of the XA-HD500 are
classified in the table to the right.
• To use these functions, refer to the
Instruction Manual.
* Playlists will be displayed after they
are transferred to the XA-HD500.
Bookmark
New Tracks
*
*
Sound Mode
F Key Preset
Repeat Mode
Play Mode
Menu Language
Font Size
Beep
Clock Set
Auto Standby
Backlight
Reverse Disp.
LCD Contrast
HDD Format
Reset
About
CC Converter
Digital AHB
D. Surround
Manual EQ
Balance
F1 Key Setup
F2 Key Setup
Random Play
Time Play
24
Alarm
Sleep
Date & Time
Firmware Info.
Storage Info.
Page 25

HD500_QG-B02.book Page 25 Thursday, September 29, 2005 6:17 PM
Specifications
• Memory type: 1-inch, 6 Gbyte HDD
• Playable files:
MP3, WMA, WMA-DRM10
(copyright-protected)
• Power supply:
AC 100 V - AC 240 V ,
50 Hz/60 Hz
• Charging time: Approx. 3.5 hours
(AC adapter/USB cable)
• Continuous playback time *:
MP3:
Approx. 30 hours (64 kbps/44.1 kHz)
Approx. 29 hours (128kbps/44.1 kHz)
WMA:
Approx. 28 hours (64 kbps/44.1 kHz)
Approx. 27 hours (128kbps/44.1 kHz)
• Operating Temperature:
5°C to 35°C
• Dimensions (W/H/D):
Main unit:
51.5 mm x 91.6 mm x 17.4 mm
Cradle:
72.3 mm x 46.2 mm x 69.2 mm
Mass:
Main unit: 90 g
(with the built-in battery)
Cradle: 80 g
* With Backlight and all Sound Modes
set to “Off”. The time varies
according to the ambient temperature
and the operating conditions.
• Design and specifications subject to
change without notice.
JVC does not bear any
responsibility for any loss of, or
alteration to the files stored in the
XA-HD500.
25
Page 26

HD500_QG-B02.book Page 26 Thursday, September 29, 2005 6:17 PM
EN
© 2005 Victor Company of Japan, Limited
1005KMMMDWJEM
 Loading...