

Page 1
DIGITAL VIDEO RECORDER
VR-716E
CANCEL
12
34
910
11 1
ALARM
SENSOR
ALARM
SENSOR
ALARM
SENSOR
ALARM
SENSOR
56
78
13 14
15 16
SEQUENCE
REC STOP PLAY STILL
MULTI
SEARCH
TIMER
DISPLAY
[ENGLISH]
The instruction manual in pdf version is stored as ‘VR-716E_en.pdf’
under the ‘VR-716E_Manual’ folder in the provided CD-ROM. For reference method, please see page 3.
[DEUTSCH]
Die Bedienungsanleitung ist unter dem Namen ‘VR-716E_de.pdf’ im
Ordner ‘VR-716E_Manual’ auf der beiliegenden CD-ROM gespeichert. Hinweise zur Benutzung finden Sie auf Seite 3.
MENU
EXECUTE
INSTRUCTIONS
HDD
REV
SKIP
OPERATE
FWD
LOCK
OUT
VIDEO AUDIO
Please read the followings before getting started:
Thank you for purchasing this JVC product.
Before operating this unit, please read the instructions
carefully to ensure the best possible performance.
Set the “TIME ZONE” before operating this unit.
For the setting method, refer to ‘Setting the Date/Time’
on page 16.
[FRANÇAIS]
Le manuel de l’utilisateur est archivé sous le nom de ‘VR-716E_fr.pdf’ dans le dossier intitulé ‘VR-716E_Manual’ du CD-ROM fourni.
Pour de plus amples informations sur la méthode de référence, voir
page 3.
[ESPAÑOL]
El manual de instrucciones está guardado como ‘VR-716E_es.pdf’
en la carpeta ‘VR-716E_Manual’ del CD-ROM proveído. Para método de referencia, por favor, vea la página 3.
[ITALIANO]
Il manuale delle istruzioni è memorizzato come ‘VR-716E_it.pdf’ nella cartella ‘VR-716E_Manual’ contenuta nel CD-ROM allegato. Per il
sistema di riferimento, si prega consultare pagina 3.
LST0151-001A
Page 2
SAFETY PRECAUTIONS
Warning Notice
FOR YOUR SAFETY (Australia)
1.Insert this plug only into effectively earthed threepin power outlet.
2.If any doubt exists regarding the earthing, consult a
qualified electrician.
3.Extension cord, if used, must be three-core
correctly wired.
IMPORTANT (In the United Kingdom)
Mains Supply (AC 230 V)
WARNING – THIS APPARATUS
MUST BE EARTHED
The wires in this mains lead are coloured in
accordance with the following code;
GREEN-and-YELLOW : EARTH
BLUE : NEUTRAL
BROWN : LIVE
As the colours of the wires in the mains lead of this
apparatus may not correspond with the coloured
markings identifying the terminals in your plug,
proceed as follows.
The wire which is coloured GREEN-AND-YELLOW
must be connected to the terminal in the plug which is
marked with the letter E or by the safety earth symbol
or coloured GREEN or GREEN-AND-YELLOW.
The wire which is coloured BLUE must be connected
to the terminal which is marked with the letter N or
which is coloured BLACK. The wire which is coloured
BROWN must be connected to the terminal which is
marked with the letter L or coloured RED.
POWER SYSTEM
Connection to the mains supply
This unit operates on voltage of 220 V to 240 V AC,
50 Hz/60 Hz.
WARNING:
TO REDUCE THE RISK OF FIRE OR ELECTRIC
SHOCK, DO NOT EXPOSE THIS APPLIANCE
TO RAIN OR MOISTURE.
CAUTION
To prevent electric shock, do not open the cabinet.
No user serviceable parts inside. Refer servicing to
qualified service personnel.
Note:
The rating plate and the safety caution are on the rear
of the unit.
The OPERATE button does not completely shut off
mains power from the unit, but switches operating
current on and off.
WARNING
It should be noted that it may be unlawful to re-record
pre-recorded tapes, records, or discs without the
consent of the owner of copyright in the sound or
video recording, broadcast, or cable programme and
in any literary, dramatic, musical or artistic work
embodied therein.
CAUTION
RED colour indications on the operation panel are
provided but they are not safety related, RED colour
indications:
(1) For Recording Button.
Caution for AC Power Cord
FOR YOUR SAFETY PLEASE READ THE FOLLOWING TEXT CAREFULLY.
Appropriate AC Power Cord must be used in each local area.
FOR CONTINENTAL EUROPE, ETC.
Not to be used in the U.K.
FOR U.K. ONLY
If the plug supplied is not suitable for your socket
outlet, it should be cut off and appropriate one fitted.
2
Page 3

SAFETY PRECAUTIONS
WARNING
This is a Class A product. In a domestic environment
this product may cause radio interference in which
case the user may be required to take adequate
measures.
䡵 Place of storage and use
Please avoid storing or using this DVR in the following
places:
• Extremely hot or cold places beyond the allowable temperature for operation (5˚C - 40˚C).
• Humid or dry places beyond the allowable humidity range
for operation (30 % - 80 % RH).
• Dusty or sandy places.
• Places exposed to oil, smoke or steam, such as the
kitchen vicinity.
• Vibrating or unstable places.
• Places prone to condensation.
• Places that generates strong magnetic fields, e.g., transformer or motor.
• Places near devices that generate electric waves, e.g.,
transceiver or mobile phone.
•Places that generate radiation, X-rays or corrosive gases.
䡵 Handling the unit
• Please do not place heavy objects on the DVR, like a
monitor or TV.
• Please do not block the ventilation openings.
•Avoid violent shocks to the unit. Do not drop the unit.
WARNING
For PLUGGABLE EQUIPMENT, the socket outlet
shall be installed near the equipment and shall be
easily accessible.
䡵 Maintaining the unit (Please turn off the power be-
fore performing maintenance work.)
Please wipe the unit with a soft cloth. Do not wipe it with
thinner or benzene lest the surface melts or becomes dull.
For stubborn stains, wipe first with a water-dilluted neutral
detergent and then wipe dry.
䡵 Please use the supplied power cord. Using a differ-
ent type or damaged cord may cause fire or electric
shock.
䡵 Hard-disk
The hard-disk is a consumable item.
Replacement is recommended after 10000 hours of use (if
use in a 25˚C environment).
For information on maintenance planning and costs, consult your nearest JVC dealer.
䡵 To save energy, be sure to turn off the system when
not in use.
How to read the Instruction manual (pdf file)
[ENGLISH]
1. Insert the provided CD-ROM into PC, click [AdobeRdr60_enu.exe]
in the “AdobeReader” folder to install AdobeReader 6.0.
2. Double-click the [VR-716E_en.pdf] in the “VR-716E_Manual”
folder to read the file.
[DEUTSCH]
1. Legen Sie die beiliegende CD-ROM in das CD-ROM-Laufwerk
Ihres Computers. Öffnen Sie den Ordner “AdobeReader” auf der
CD-ROM und doppelklicken Sie auf das Programm
[AdobeRdr60_deu.exe], um den Adobe Acrobat Reader 6.0 zu
installieren.
2. Doppelklicken Sie dann auf die Datei [VR-716E_de.pdf] im Ordner “VR-716E_Manual”, um die Bedienungsanleitung zu öffnen.
[FRANÇAIS]
1. Placez le CD dans le lecteur et cliquez sur [AdobeRdr60_fra.exe]
dans le dossier “AdobeReader” pour installer AdobeReader 6.0.
2. Double-cliquez sur [VR-716E_fr.pdf] dans le dossier “VR716E_Manual” pour lire le fichier.
[ESPAÑOL]
1. Introduzca el CD-ROM proveído en el PC, haga click en
[AdobeRdr60_esp.exe] en la carpeta “AdobeReader” para instalar el AdobeReader 6.0.
2. Haga doble click en [VR-716E_es.pdf] en la carpeta “VR716E_Manual” para leer el fichero.
[ITALIANO]
1.
Inserire il CD-ROM allegato nel PC, fare clic su
[AdobeRdr60_ita.exe] nella cartella “AdobeReader” per installare
6.0.
2. Fare doppio clic su [VR-716E_it.pdf] nella cartella “VR716E_Manual” per leggere il file.
3
Page 4

Table of Content
Getting Started
Table of Content ....................................................................... 4
Main Features ........................................................................... 5
Precautions .............................................................................. 6
Names and Functions .............................................................. 7
Installation and Preparation
System Connection (When Connecting 16 Cameras) ........ 14
Mounting to a Rack ................................................................ 15
Turning On/Off the Power ...................................................... 15
Setting the Date/Time ............................................................ 16
Onscreen Display ................................................................... 19
Menus
Menu Flow Chart .................................................................... 20
Changing Menu Settings ....................................................... 22
Routine Uses
Viewing Live Camera Images
• When connecting the monitor to the [EE OUT] terminal ... 32
• When connecting the monitor to the [VIDEO OUT]
terminal ............................................................................. 33
• Setting Time Interval for Switching Displays in the
Single Picture Mode .......................................................... 34
• Setting Time Interval for Switching Displays in the
Quad Picture Mode ........................................................... 35
Recording Camera Images
• Recording in the Normal Mode ......................................... 36
• Repeat Recording (Repeat Record Feature) .................... 37
Viewing Recorded Images
• Playing Back Recorded Images ........................................ 38
• Viewing Recorded Images in the Split Screen Mode ........ 39
• Searching Image According to Date/Time
(“DATE/TIME SEARCH”) .................................................. 40
• Searching Image According to Alarm/Sensor Data
(“ALARM/SENSOR SEARCH”) ........................................ 41
• Adjusting Playback Speed (Jog/Shuttle Playback) ........... 42
• Viewing Recorded Images in the Skip Mode .................... 43
• Enlarging the Still Image (Still Image Zoom) .................... 44
Record Programming Using the Program Timer
•Weekly Timer (For starting recording on a specific
day and time on a weekly basis) ....................................... 46
•Weekly Timer (For starting recording on a specific
time of the day) ................................................................. 48
•Weekly Timer (For starting recording on a specific
day of the week and time) ................................................. 50
• Date Timer ........................................................................ 52
• Canceling a Record Program............................................ 54
• Changing a Record Program ............................................ 54
Useful Features
• Hard Disk Maintenance .................................................... 55
• Defrag ............................................................................... 57
• Initializing the Hard Disk (“FORMAT”) ............................... 58
• Hard Disk Mirroring ........................................................... 59
•To view the list of Power Outage Recovery Records ........ 60
• Series Recording Using 2 or More VR-716 Recorders ..... 61
• Activation of Recording Via External Signals .................... 61
• External Hard Disk Drives ................................................. 62
• Hard Disk Recovery Feature............................................. 63
• Copying to DVD-RAM ....................................................... 64
• Activation of Recording Via External Alarm/Sensor
Signals .............................................................................. 66
• Using the Motion Detect Feature ...................................... 68
• Motion detect check mode and setting guidance .............. 70
• Continuing with Recording Upon Recovery from
Power Failure .................................................................... 71
• Setting a Title for Each Camera Channel Screen ............. 72
Connecting to a PC
What is a Web Browser?
You can do the followings ..................................................... 73
Cautions for Proper Use of the Web Browser ...................... 74
Setup Flow .............................................................................. 75
Connecting to a Web Browser and Setting Up
Connecting Using a LAN Cable ............................................ 76
Setting Up a Network for VR-716 .......................................... 77
Setting Up a PC Network
• When Using Windows XP ................................................. 78
• When Using Windows 2000 .............................................. 79
Connecting (Login) to the Network ...................................... 81
Routine Uses of the Web Browser
Setting a Title for Each Camera Channel Screen ................ 82
Record Program Using the Program Timer ......................... 83
• Setting Screen .................................................................. 83
• Start recording on a specific time of the week .................. 84
• Start recording at a specific time everyday ....................... 85
• Start recording on a specific day and time ........................ 86
• Start recording at a specific date ...................................... 87
Setting VR-716 to the Program Timer Standby Mode ......... 88
Checking Recording Operation After Release Timer
is Executed ............................................................................. 89
Changing/Deleting Record Programs in the Program
Timer ....................................................................................... 90
Searching Image According to Date/Time (Event Search)
• Searching Alarm/Sensor recording ................................... 91
• Search By Date/Time ........................................................ 92
• Search By Term ................................................................ 93
Useful Browser Features
Restricting Access to VR-716 ............................................... 94
Restricting Access to Recorded Image Files at VR-716 ..... 95
Changing Network Settings of VR-716 from PC .................. 96
Mail Notification Setting During Alarm/Sensor Input ......... 97
Viewing Images of Event Search Results
(Simple Viewer) ....................................................................... 99
Saving VR-716 Settings to a File ......................................... 101
Uploading VR-716 Settings ................................................. 103
Information About Open Source Software ........................ 104
Explanations
Troubleshooting
• Problems Related to Error Code and Onscreen
Display ............................................................................ 105
• Other Problems ............................................................... 106
•Troubleshooting on Use of Browsers .............................. 107
Web Browser Glossary ........................................................ 110
Recording Mechanism
• Normal Recording ........................................................... 111
• Repeat Record ................................................................ 112
• Presensor Recording ...................................................... 113
Skip Jump ............................................................................. 114
Recording Duration.............................................................. 115
RS-232C Connection ........................................................... 115
Notes related to Summer Time ........................................... 116
Others
Specifications ....................................................................... 117
4
Page 5
Getting Started
Thank you for
purchasing this VR-716E
Digital Video Recorder.
In the subsequent sections of this manual, this equipment shall be referred to as VR-716.
Main Features
Built-in hard disk drive with a high
capacity of 160 GB
Simultaneous recording of 400 images /
sec in 16 channels
Recording up to 400 images/second.
Simultaneous Playback mode
Playback, jog/shuttle playback and skip play are
possible during recording.
Monitor with display in quad or 16 split
pictures
16-channel video input can be displayed in quad
or 16 pictures at 25 images per second on the
monitor.
Direct search on the screen
Searches quickly for the date/time and alarm
position to invoke.
Recovery Recording during power outage
Upon recovery from a power outage that occurred during recording, VR-716 will resume recording in the mode prior to the failure.
Timer Recording
Daily/Weekly timer recording up to 8 programs.
Alarm/Sensor Recording
Switches automatically to the Alarm Recording
mode as set in the menu when alarm signals
are received during recording.
Supports 16-channel asynchronous
camera inputs
Simultaneous recording/playback of images in
16 asynchronous cameras.
Network-compatible
Recorded images can be viewed on LAN-connected computers. Titles and timer programs can
also be set using computers.
Motion Detect
Automatically detects image motion within the
specified area and starts alarm recording.
Digital Water Mark
Embeds data in images to protect data integrity
against falsification and unauthorized detection
during data replication.
Transmission of alarm e-mails
E-mails can be sent out to any computers during alarm (sensor) input.
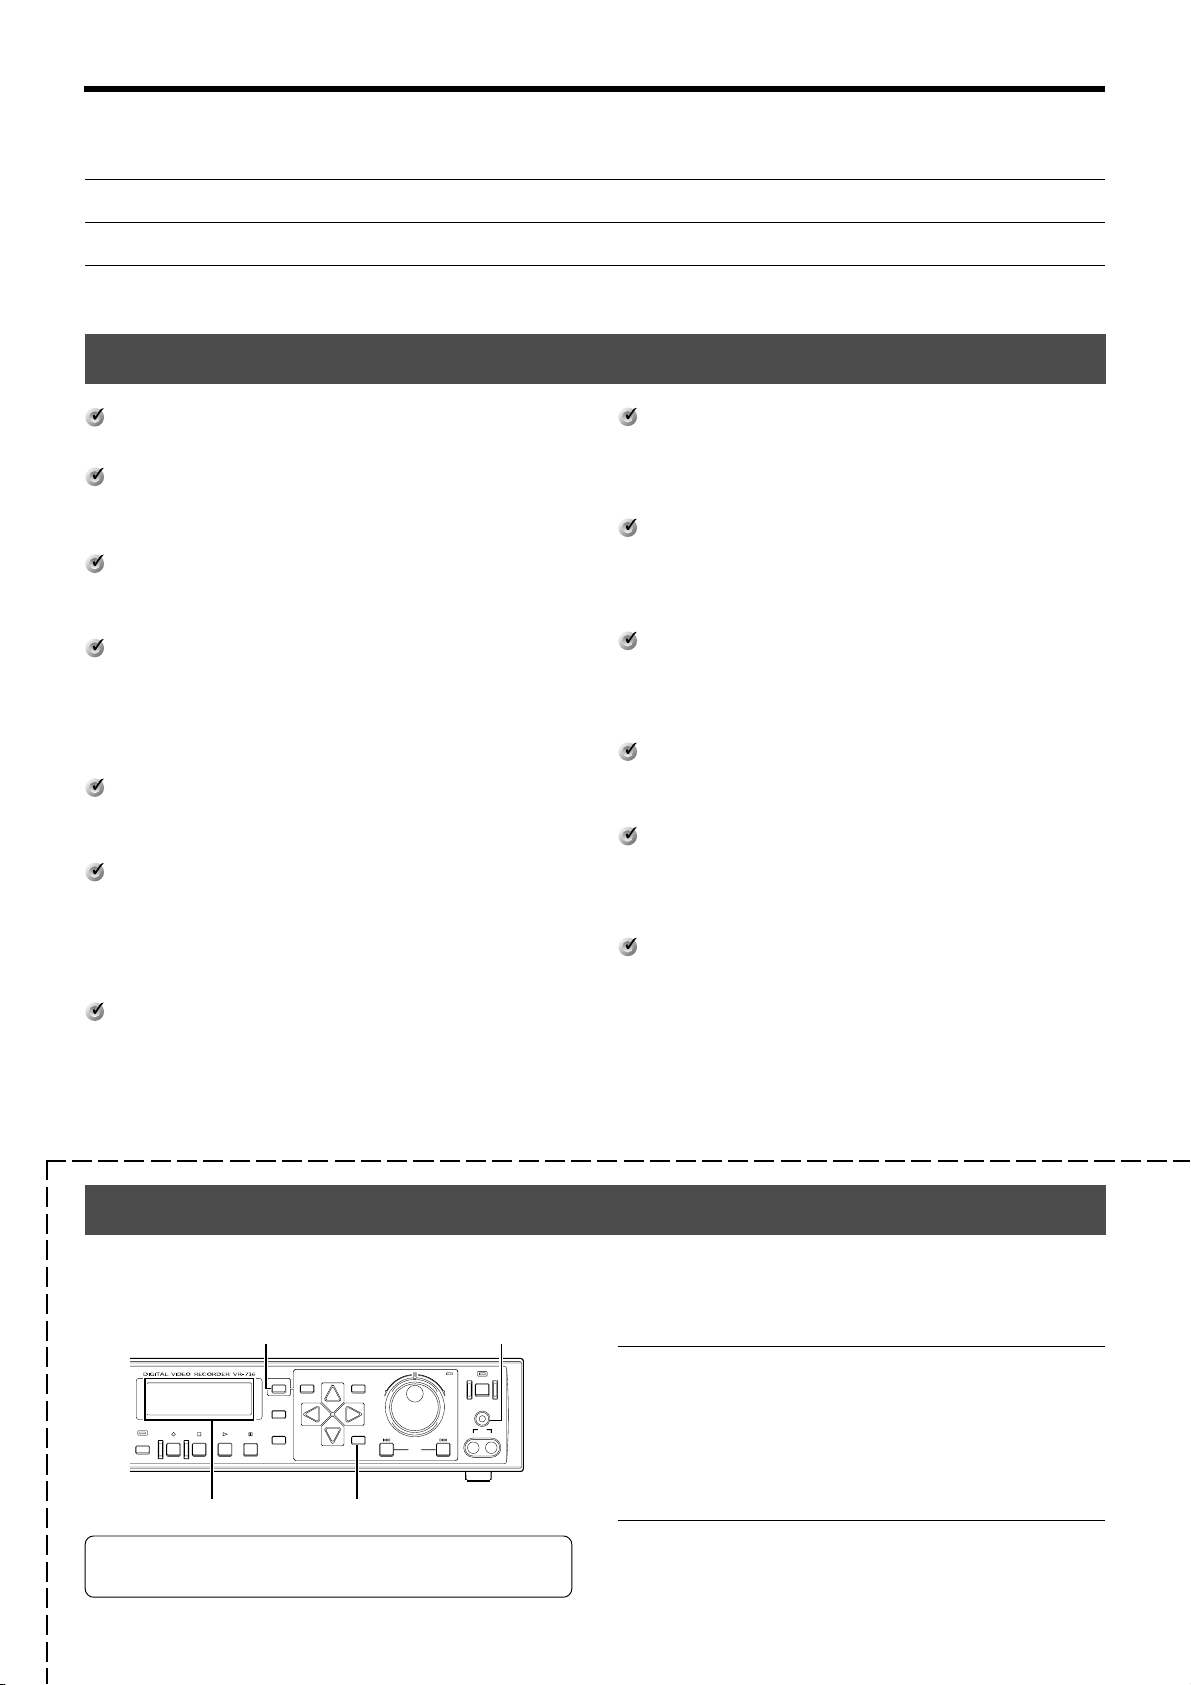
How to Use the Operation Lock
VR-716 employs a secret operation lock system to prevent its power from being turned off by mistake or tampering with the record
functions.When the operation lock is turned ON, the lock operation can be selected as either “ALL” or “STOP REC” from the menu.
☞ Pg 25 ‘OPERATION LOCK’
HDD
FWD
[LOCK]
OPERATE
LOCK
OUT
VIDEO AUDIO
[CANCEL]
CANCEL
SEARCH
MENU
TIMER
SEQUENCE
REC STOP PLAY STILL
MULTI
Front Display [EXECUTE]
For security reasons, it is recommended that you detach
this page and keep it separately.
DISPLAY
REV
EXECUTE
SKIP
䡵 Turning On the Operation Lock
Press the [LOCK] and [EXECUTE] buttons
simultaneously.
• This locks the operation immediately and keys are disabled.
(However, this does not apply to control via Web browsers.)
• [LOCK] is indicated on the front display.
䡵 Turning Off the Operation Lock
Press the [LOCK] and [CANCEL] buttons simultaneously.
• This deactivates the operation lock.
5
Page 6

Getting Started (continued)
Precautions
䡵 Do not stack up the equipment to prevent tempera-
ture within from rising.
䡵 Do not stand this equipment vertically during use.
䡵 Handle this equipment with care. Do not subject it
to physical shock.
䡵 Do not expose the equipment to physical shock
during transport. In particular, do not move the
equipment during recording or playback.
䡵 This product utilizes the open source software.
Refer to the instruction on page 104 to display the
precise information.
䡵 If a power failure occurs during formatting of hard
disk, disconnection, or when configuring or
disabling mirroring, operation of the equipment
may be disabled even if it is connected to the UPS.
䡵 Do not insert foreign object into this unit as this
may cause malfunction or electric shock.
How to Read this Manual
䡵 Symbols used in this manual
Caution
Note
☞
States precautions to be
taken during operation.
States restrictions on the
functions or use of this
equipment. For reference
purposes.
Indicates the page numbers
or items to refer to.
䡵 A longer time may be required to search through
data stored in this equipment if the volume is too
huge. This is not a defect.
䡵 Do not use the power cord supplied with this
equipment on other devices.
䡵 Please note that we will not provide compensation
for any failure during recording or playback due to
defects in this equipment or the hard disk drive.
䡵 TV broadcast or other video (audio) recordings are
for personal use only. Unauthorized use of these
materials is strictly prohibited.
䡵 Please note that recorded images will be erased
when replacing hard disks or upgrading firmware.
䡵 The width of the borders on split screens (dark
portion) may vary according to the type of input
signal. This is a characteristic of this equipment
and is not a defect.
䡵 The names of buttons used during operation are
enclosed in [ ].
Example: MENU button z [MENU]
All product names stated in this manual are trademarks
or registered trademarks of their respective companies.
Marks such as TM, ® and © are omitted in this manual.
6
Page 7
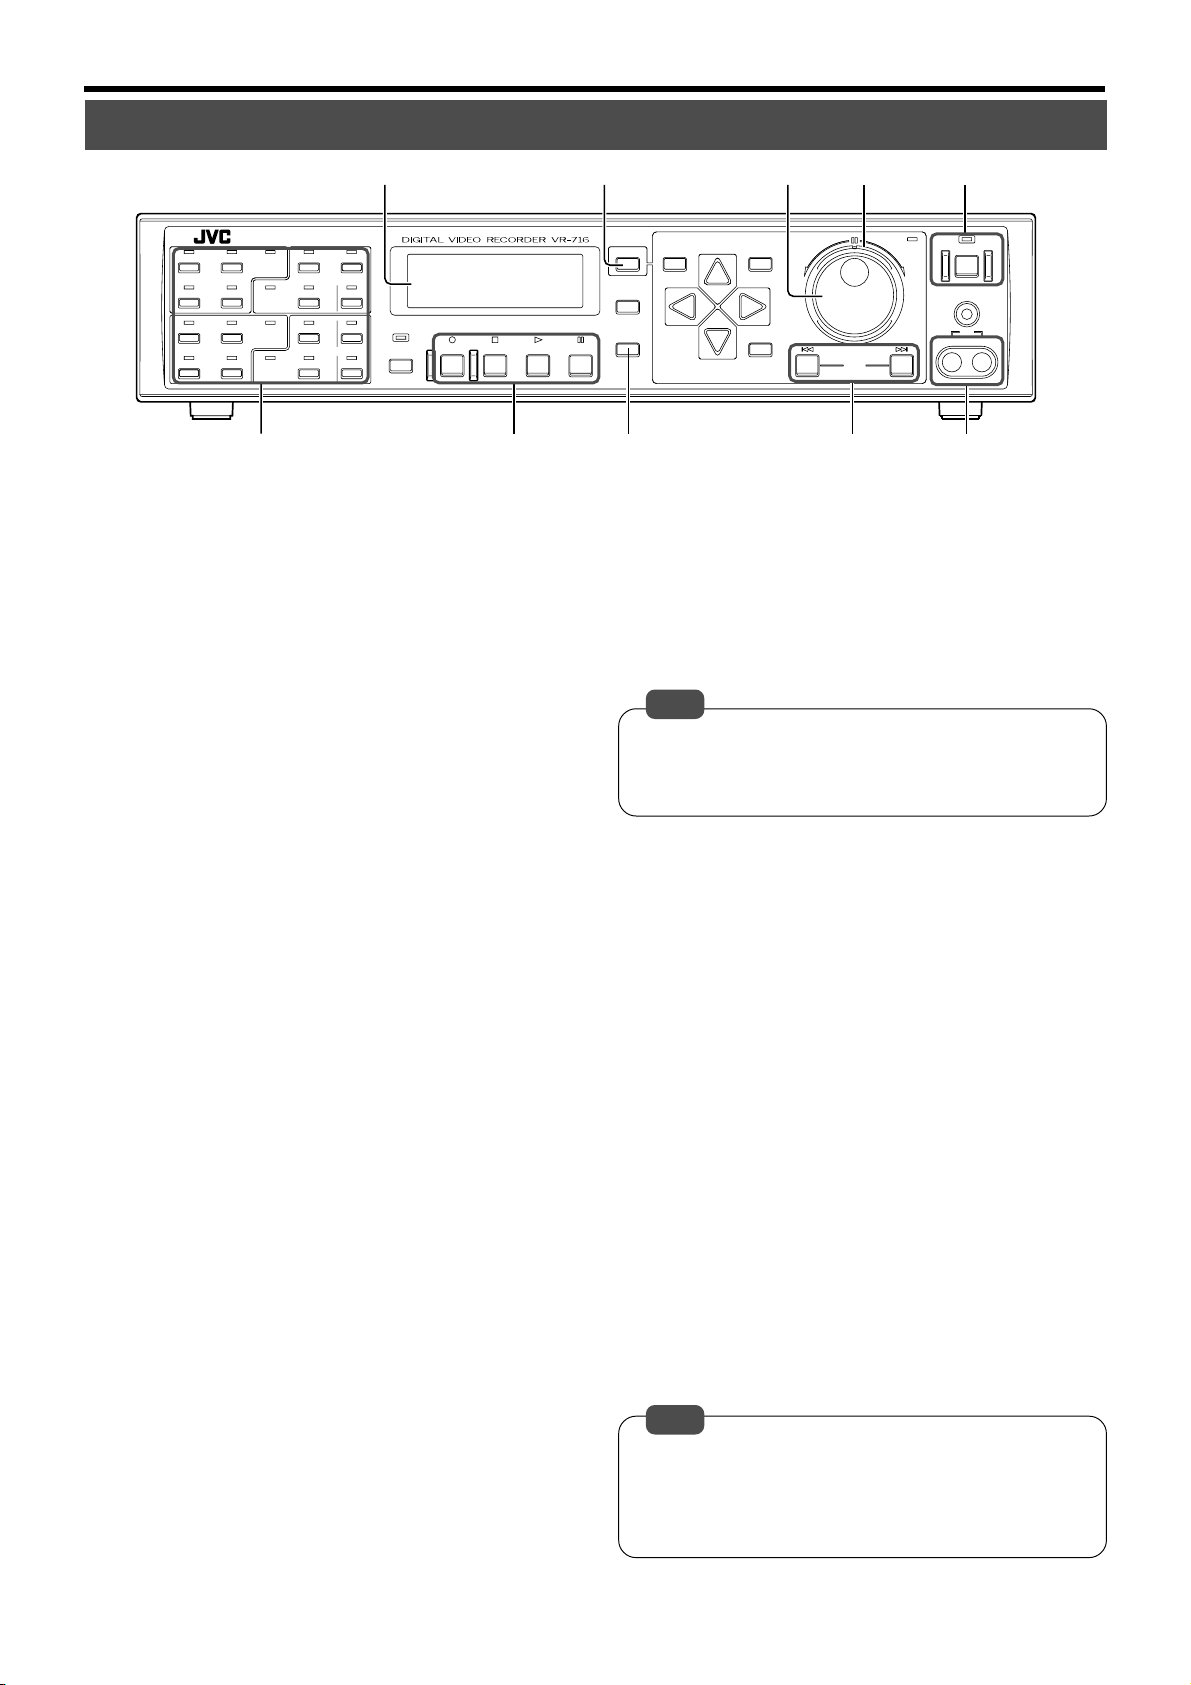
Names and Functions (Front)
5
12
34
910
11 1
ALARM
SENSOR
ALARM
SENSOR
ALARM
SENSOR
ALARM
SENSOR
56
78
13 14
15 16
SEQUENCE
REC STOP PLAY STILL
MULTI
6
1 [OPERATE] Button and Operate LED
To turn off the power, press the button continuously for about
2 seconds.
☞ Page 15 ‘Turning On/Off the Power’
2 Shuttle Dial
When in the Play or Still mode, turn this to adjust the playback speed.
☞ Page 42 ‘Adjusting Playback Speed’
3 Jog Dial
When in the Play or Still mode, turn this to enable single
frame playback. Use this to select the preset values when a
menu screen is displayed.
☞ Page 42 ‘Adjusting Playback Speed’
4 [CANCEL] Button
• Use this to delete Program Timer settings or a record
program.
☞ Page 54 ‘Canceling a Record Program’
• Press this to turn off the alarm/warning LED or the buzzer
when an alarm/warning is activated.
5 Front Display
Displays the operational state and settings of the digital
video recorder.
☞ Page 12 ‘Front Display’
6 Camera Selection Buttons and LEDs
For selecting the camera channel to which output from the
[VIDEO OUT] on the front panel 0 or rear panel °
(☞ Page 9) is sent. The LED of the channel selected will
light up in green. The LED of the channel that received an
alarm input will light up in red. It will light up in orange when
the channel that received an alarm input is selected. The
LED of the channel will blink in green when a camera is not
connected. It will blink in orange when there is an alarm
input and the camera is not connected.
It is also used to switch between display in quad picture
and single picture during playback of recorded video images.
☞ Page 23 “FDP” Menu z ‘INPUT SIGNAL ERROR’
☞ Page 39 ‘Viewing Recorded Images in the Split Screen
Mode’
7 Manual Operation Buttons
• [REC] Button
Press this button when in the Stop or Play mode to start
recording. Recording mode can be specified on the menu
screen.
☞ Page 36 ‘Recording Camera Images’
• [STOP] Button
Press this button to stop playing. Press this button when
in the Simultaneous Record/Play mode to stop playing
and switch to the normal recording mode.
4
CANCEL
TIMER
DISPLAY
SEARCH
3 12
MENU
REV
EXECUTE
HDD
OPERATE
FWD
LOCK
OUT
VIDEO AUDIO
SKIP
7 8 9 0
• [PLAY] Button
Press this button to start playing.
• Pressing this button when in the Stop mode:
Starts playing from the point at which the previous play
back ended.
• Pressing this button when in the Recording mode:
Starts playing back while in the Recording mode. (Simultaneous Record/Play)
☞ Page 38 ‘Viewing Recorded Images’
Note
•Playback immediately after the [OPERATE] button is
turned ON either starts from the point or pauses at the
point where the last recording has ended depending on
the frame rate setting.
• [STILL] Button
Press this button when in the Play mode to switch to the
Still mode.
8 [DISPLAY] Button for Switching Front Panel
Display
Press this button to switch between clock, date, remaining
hard disk space and record setting (record quality, frame
rate, audio) displays.
☞ Page 13 ‘Front Display’
9 [SKIP] Search Buttons
Press this button when in the Stop mode to jump to the
beginning of a start or end point of a recording in the hard
disk.
Press this button when in the Play mode to Skip Jump.
There are 3 Skip Jump modes:
• “TIME” Jump : Jumps in fixed time intervals when but-
ton is pressed.
• “EVENT” Jump : Jumps to the starting point of events
when button is pressed.
• “ALARM” Jump : Jumps to the starting point of alarm re-
cording when button is pressed.
☞ Page 114 ‘Skip Jump’
0 [VIDEO OUT] / [AUDIO OUT] Terminals (RCA)
Outputs recorded video and audio when in the Play mode.
Outputs inputted video and audio when in the Recording or
Stop mode.
Note
•Audio signals will not be output during playback if the frame
rate of video images is set as “1/6 IPS” (1 image per 6
seconds) or “1/12 IPS” (1 image per 12 seconds) in the
“FRAME RATE” item (☞ Page 24) of the “REC MODE”
Menu.
7
Page 8

Getting Started (continued)
Names and Functions (Front)
12
34
910
11 1
^
ALARM
SENSOR
ALARM
SENSOR
ALARM
SENSOR
ALARM
SENSOR
56
78
13 14
15 16
SEQUENCE
REC STOP PLAY STILL
MULTI
& * (
! [HDD] LED
Lights up when the built-in hard disk drive is in operation.
@ [MENU] Button
Press this button to display the menu screen or to return
from the menu to the main screen.
☞ Page 22 ‘Changing Menu Settings’
# Cursor Control Buttons
When the menu or search screens are displayed, use these
buttons to move the cursor. Otherwise, these are used to
change the onscreen display positions of the date or title.
☞ Page 19 ‘Onscreen Display’
$ [SEARCH] Button
Button for displaying the “SEARCH MENU”. Press this button to perform alarm search or date/time search.
Press again to return to the main screen.
☞ Page 40 ‘Searching Image According to Date/Time’
% [TIMER] Button
Press this button to switch to the Standby mode after setting in the “PROGRAM TIMER” is completed. Press again
to disable the Standby mode.
When this button is pressed before setting the Program
Timer, the buzzer will be activated and the [TIMER] indicator on the front display will start to blink.
The ON/OFF of BUZZER depends on the “WARNING” setting in the “BUZZER” Menu.
☞ Page 24 ‘BUZZER Menu’
☞ Page 46 ‘Record Programming Using the Program Timer’
^ [ALARM SENSOR] LED
Blocks (every 4 entries) that are in the Alarm Recording
Standby or Sensor Recording Standby modes will light up
in green.
%
CANCEL
TIMER
DISPLAY
$
SEARCH
MENU
EXECUTE
@
REV
!#
HDD
OPERATE
FWD
LOCK
OUT
VIDEO AUDIO
SKIP
& [SEQUENCE MULTI] / Split Screen Display Switch-
ing Button and LED
Press this button to change the display in the following ways:
16 Split z Single Picture Automatic Switching z Quad Picture Automatic Switching
When quad picture or 16 split are displayed, the LED lights
up in orange. This is indicated in green when in the single
picture automatic switching or quad picture automatic
switching. Does not function when in the Play mode.
☞ Page 33 ‘When Connecting the Monitor to the [VIDEO
OUT] terminal’
* [EXECUTE] Button
Use this button to perform alarm search or date/time search
as well as to execute hard disk scanning or formatting or to
perform other operations.
☞ Page 40 ‘Searching Image According to Date/Time’
☞ Page 58 ‘Initializing the Hard Disk (“FORMAT”)’
( [LOCK] Button
Press and hold this button followed by pressing the [STOP]
button to adjust the seconds of the clock.
• When the value is 29 seconds or less, this will be reset to
00 seconds with the minute value unchanged.
• When the value is 30 seconds and above, this will be
reset to 00 seconds with the minute rounded to the next
higher value.
8
Page 9

Names and Functions (Rear)
AUDIO IN
1234 5678 910111213141516
VIDEO IN
THRU OUT
SCSI
RS-232C UPS
AUDIO OUT VIDEO OUT
LAN
21
21
AVIS:RISQUE DE CHOC
ELECTRIQ
‹ fi fl ‡› ° ‚· ¡
CAUTION
RISK OF ELECTRIC SHOCK
DO NOT OPEN
ALARM
)¤ ⁄
5
81 4/ 16
EXT REC
INCOMRST
IN
15131197531
CLK
SER
OUT
161412108642
RST
REC
WAR
COM
OUT
OUT
OUT
EE OUT
13 169 12
(220V–240V )
SIGNAL GND
AC IN
) [AC IN (220 V - 240 V )] Power Inlet
Connect using the power cord supplied to an AC 220 V 240 V outlet. The main unit will turn on automatically when
connected.
☞ Page 15 ‘Turning On/Off the Power’
⁄ [VIDEO IN] Camera Image Signal Input (BNC)
Connect this to the video output of the video camera (sold
separately).
¤ [AUDIO IN] Terminal (RCA)
Connect this to the audio output of the device for which
audio recording is to be performed.
‹ [RS-232C] Remote Terminal (D-sub 9 Pin)
VR-716 can be controlled externally by connecting it to a
computer.
› [SCSI] Terminal (68-pin Ultra Wide SCSI)
For connection to external hard disk drive (sold separately)
and DVD-RAM drive (sold separately).
fi [UPS] Uninterruptible Power Supply Control
Terminal (D-sub 9 Pin)
For connection to the communication control connector of
the UPS unit. For more details, please consult the outlet
from which this equipment is purchased.
fl [LAN] Connection Interface (100 Base-T)
For connection to the Intranet and other networks using a
LAN cable.
☞ Page 76 ‘Connecting Using a LAN Cable’
‡ [AUDIO OUT 1, 2] Terminals 1 and 2 (RCA)
Outputs the audio input when in the Recording or Stop
mode.
Outputs recorded audio when in the Play mode.
However, there will be no audio output in the following
circumstances:
• When playing back recorded images for which the frame
rate is set as “1/6 IPS” (1 image per 6 seconds) or “1/12
IPS” (1 image per 12 seconds) in the “FRAME RATE”
menu switch.
• When performing search other than x 1 mode or during
Still or single frame playback.
• When playing back images with the “AUDIO REC” item
in the “REC MODE” menu selected as “OFF” during recording.
•When the “MAIN MENU/OPERATION MENU” or
“SEARCH MENU” is displayed in the Play mode.
° [VIDEO OUT 1, 2] Terminals 1 and 2 (BNC)
Outputs images selected using the Camera Selection Buttons 6 on the front panel.
· [THRU OUT] Camera Image Output Terminal (BNC)
Outputs camera image signals that correspond to each
[VIDEO IN] terminal ⁄. For connection to TV monitors.
(Automatic termination)
‚ Signal Input/Output Terminal
For operating VR-716 using external alarm/sensor signals
or signals received from external devices, or for operating
external devices by outputting signals.
☞ Page 10 ‘Names and Functions (Signal In/Out Terminal)’
¡ [EE OUT] (BNC)
Outputs the live images on cameras connected to the
[VIDEO IN] terminals ⁄ in quad picture.
The [1-4 / -16] connector can also be used to output images in 16 split pictures.
☞ Page 32 ‘When Connecting the Monitor to the [EE OUT]
terminal’
9
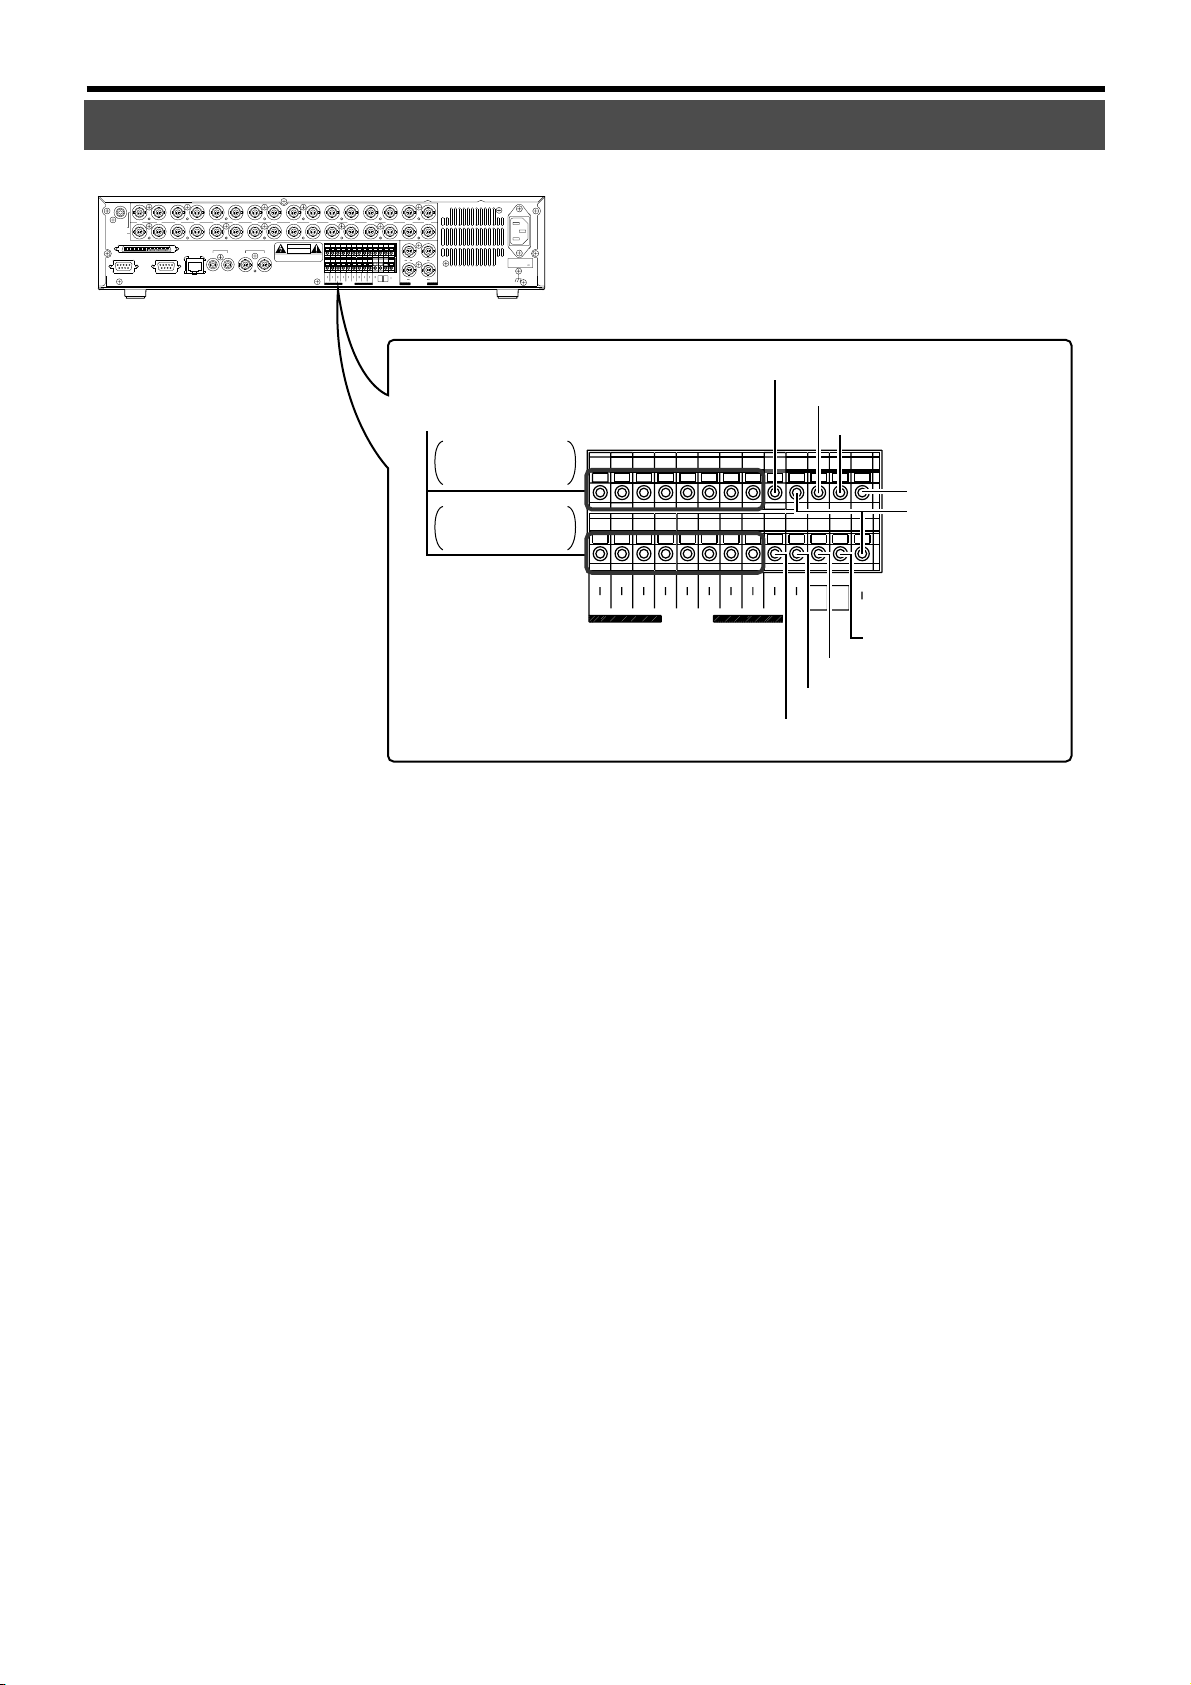
Page 10
Getting Started (continued)
Names and Functions (Signal In/Out Terminal)
(Rear)
AUDIO IN
12345678 910111213141516
VIDEO IN
THRU OUT
SCSI
RS-232C UPS
LAN
AUDIO OUT VIDEO OUT
21
21
CAUTION
RISK OF ELECTRIC SHOCK
DO NOT OPEN
AVIS:RISQUE DE CHOC
ELECTRIQ
5
161412108642
ALARM
13 169 12
RST
REC
WAR
COM
OUT
OUT
OUT
EE OUT
ALARM IN
1
81 4/ 16
EXT REC
IN
INCOMRST
15131197531
CLK
SER
OUT
SIGNAL GND
AC IN
(220V–240V )
CAMERA 1, 3, 5,
7, 9, 11, 13, 15
CAMERA 2, 4, 6,
8, 10, 12, 14, 16
15131197531
161412108642
ALARM
ALARM RESET
2
CLOCK RESET IN
3
SERIES REC IN
4
EXT REC
IN
INCOMRST
SER
CLK
OUT
WAR
OUT
RST
OUT
REC
OUT
COM
7
CLOCK RESET OUT
8
WARNING OUT
9
ALARM REC OUT
0
EXT REC IN
5
COM
6
SERIES REC OUT
1 [ALARM IN] Terminal (Supports Channels 1 - 16)
Te r minal that accepts input signals to start alarm or sensor
recording.
2 [ALARM RESET] Input Terminal
Te r minal that accepts signals to stop recording during alarm
or sensor recording.
3 [CLOCK RESET IN] Terminal
For connection to a master clock or the [CLOCK RESET
OUT] terminal of other devices. This equipment can be set
to a master clock or the clock of other devices upon the
input of clock reset signals.
The clock in VR-716 will be reset as follows upon the input
of clock reset signals:
• When the value is 29 seconds or less, this will be reset to
00 seconds with the minute value unchanged.
• When the value is 30 seconds and above, this will be
reset to 00 seconds with the minute rounded to the next
higher value.
☞ Page 61 ‘Series Recording Using 2 or More VR-716 Re-
corders’
4 [SERIES REC IN] Terminal
Series recording will start upon the input of [SERIES REC
OUT] signals. This is the terminal that accepts the series
recording signals of other VR-716s when multiple sets of
VR-716 are used.
☞ Page 61 ‘Series Recording Using 2 or More VR-716 Re-
corders’
5 [EXT REC IN] Terminal
Starts recording automatically upon receiving external signals when the “EXT REC MODE” is set as “TRIGGER” or
“MANUAL”.
☞ Page 25 ‘OPERATION/EXT REC Menu’
☞ Page 61 ‘Activation of Recording Via External Signals’
6 [COM] Common Ground Terminal
This is a common ground terminal. For connection to the
signal ground terminal of other devices.
7 [SERIES REC OUT] Terminal
Outputs signals when the remaining hard disk space is 1 %
or less.
However, there will be no signal output in the following circumstances:
•When the “SERIES REC” item is set as “OFF” in the menu.
☞ Page 25 ‘OPERATION/EXT REC Menu’
☞ Page 61 ‘Series Recording Using 2 or More VR-716 Re-
corders’
8 [CLOCK RESET OUT] Terminal
Te r minal for output of clock reset signals. Signals are output in the following cases:
When the internal clock of VR-716 turns 00:00 or 12:00.
☞ Page 61 ‘Series Recording Using 2 or More VR-716 Re-
corders’
9 [WARNING OUT] Terminal
Outputs signals during hard disk malfunction or error occurrence. (☞ Page 105)
0 [ALARM REC OUT] Terminal
Outputs signals when VR-716 is in the Alarm Recording or
Sensor Recording mode.
10
Page 11
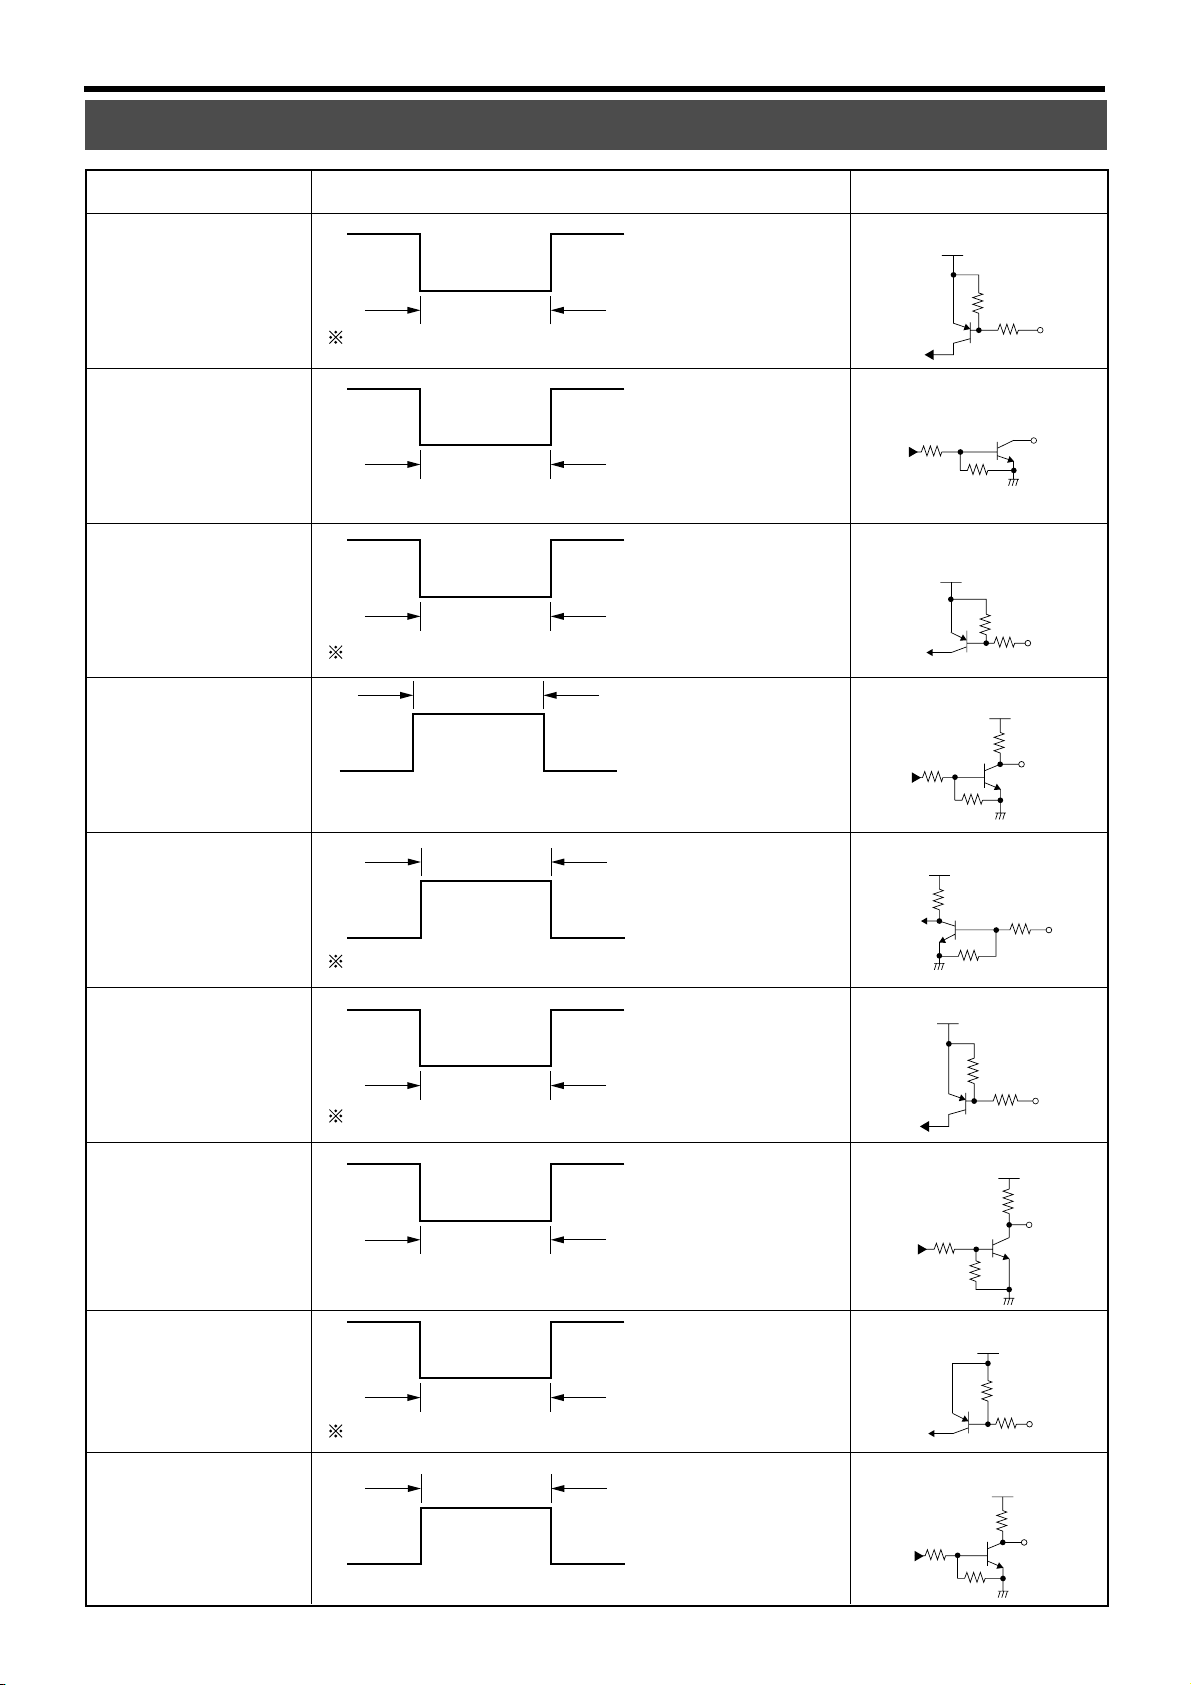
Terminal Signal Level Remarks
High Voltage = 5 V
[CLOCK RESET IN]
Min. 500 ms
Ensure that the impedance at the output is 10 k
Low Voltage = 0 V
¸¸
¸ or less.
¸¸
SET
High Voltage = 5 V
[CLOCK RESET OUT]
1s
Low Voltage = 0 V
SET
High Voltage = 5 V
[ALARM IN]
Min. 400 ms
Ensure that the impedance at the output is 10 k
During Alarm
Recording
Low Voltage = 0 V
¸¸
¸ or less.
¸¸
High Voltage = 12 V
[ALARM REC OUT]
Low Voltage = 0 V
SET
Grounded Input (44 k¸)
5V
22k
22k
Open Collector
22k
22k
Grounded Input (44 k¸)
5V
22k
SET
High Output (4.7 k¸)
22k
22k
12V
4.7k
OUT
IN
OUT
IN
[ALARM RESET]
[EXT REC IN]
[SERIES REC OUT]
[SERIES REC IN]
[WARNING OUT]
Min. 400 ms
High Voltage = 5 V ~ 12 V
Ensure that the impedance at the output is 10 k
High Voltage = 5 V
Min. 400 ms
Ensure that the impedance at the output is 10 k
Low Voltage = 0 V
High Voltage = 5 V
2.5 s ~ 3.0 s
Low Voltage = 0 V
High Voltage = 5 V
Low Voltage = 0 V
2.5 s and above
Ensure that the impedance at the output is 10 k
Sending Warning
High Voltage =12 V
Low Voltage = 0 V
¸¸
¸ or less.
¸¸
¸¸
¸ or less.
¸¸
¸¸
¸ or less.
¸¸
22k
High Input (44 k¸)
3.3V
10k
SET
22k
Grounded Input (44 k¸)
5V
22k
SET
LOW Output (1 k¸)
SET
Grounded Input (44 k¸)
SET
High Output (4.7 k¸)
22k
SET
22k
22k
22k
5V
12V
5V
22k
22k
22k
1k
4.7k
IN
IN
OUT
IN
OUT
22k
11
Page 12
Getting Started (continued)
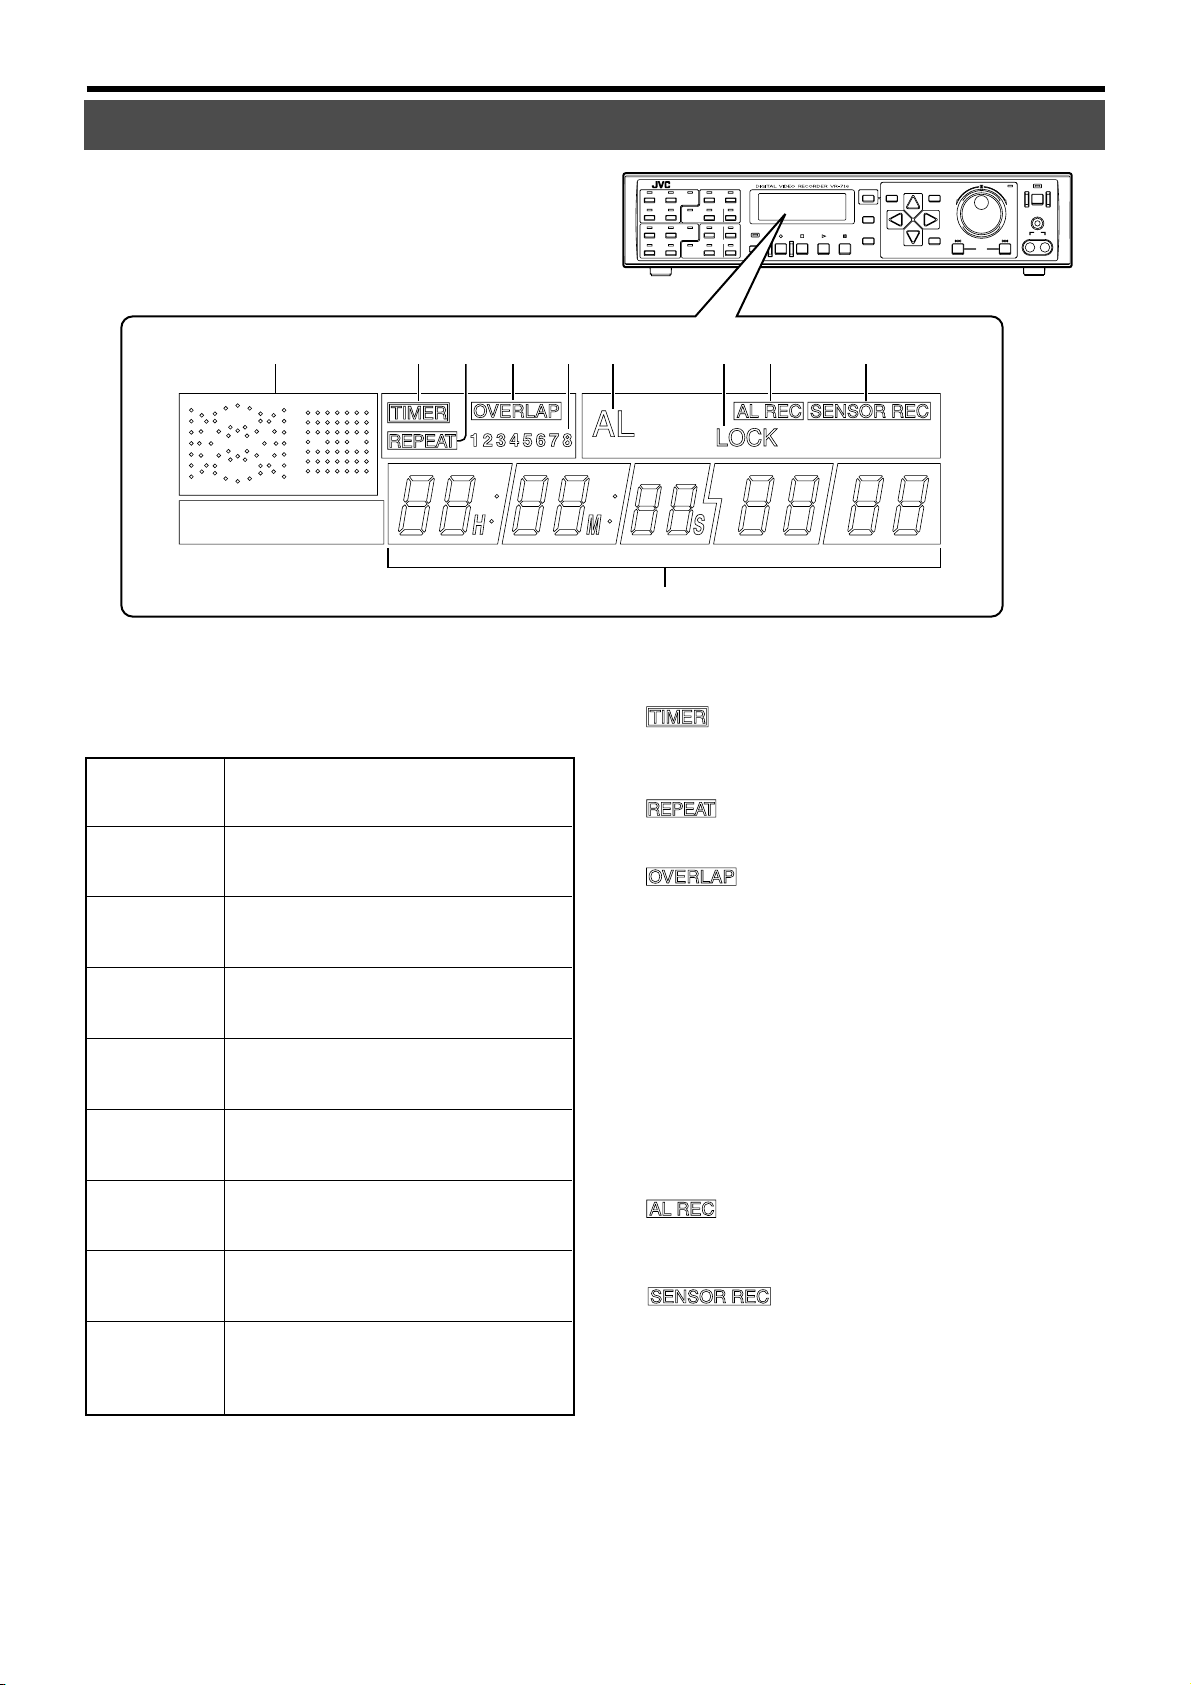
Names and Functions (Front Display)
4 5 7 821 3 6 9
12
34
910
11 1
0
ALARM
SENSOR
ALARM
SENSOR
ALARM
SENSOR
ALARM
SENSOR
56
78
13 14
15 16
SEQUENCE
MULTI
REC STOP PLAY STILL
HDD
CANCEL
SEARCH
MENU
TIMER
DISPLAY
REV
EXECUTE
OPERATE
FWD
LOCK
OUT
VIDEO AUDIO
SKIP
1 Operation Mode Indicator
Displays the operation mode of VR-716.
Recording
_
<
I
<
=
<<
==
Lights up in red.
Play
Still
Fast Forward / Slow Play
Rewind / Slow Play
Single Frame Playback
< I
< blinks.
Single Frame Reverse Playback
= I
= blinks.
Simultaneous Playback
<
_
< and _ blink alternately.
Still Mode During Simultaneous
_ I
Playback
I and _ blink alternately.
2 (Timer) Indicator
Lights up when in the Timer Recording Standby or Timer
Recording mode.
☞ Page 46 ‘Record Programming Using the Program Timer’
3 (Repeat Record) Indicator
Lights up when VR-716 is set in the Repeat Record mode.
☞ Page 37 ‘Repeat Recording’
4 (Overlap) Indicator
Lights up when there is overlap in the timer recording programs of the Weekly Timer.
5 Weekly Timer Program No.
When the Weekly Timer Recording is activated, the LED of
the Program No. for which recording is currently executed
will start blinking. When in the Timer Standby mode, the
Timer Program No. which has been set will light up.
The light goes off upon completion of the timer recording.
6 [AL] (Alarm) Indicator
Lights up during the Alarm/Sensor Recording mode.
Light will start to blink upon completion of alarm/sensor recording.
7 [LOCK] (Lock) Indicator
Lights up when the operation lock is enabled.
8 (Alarm Recording) Indicator
Lights up when in the Alarm Recording Standby mode.
☞ Page 66 ‘Activation of Recording Via External Alarm/Sen-
sor Signals’
9 (Sensor Recording) Indicator
Lights up when in the Sensor Recording Standby mode.
☞ Page 66 ‘Activation of Recording Via External Alarm/Sen-
sor Signals’
12
Page 13
Names and Functions (Front Display)
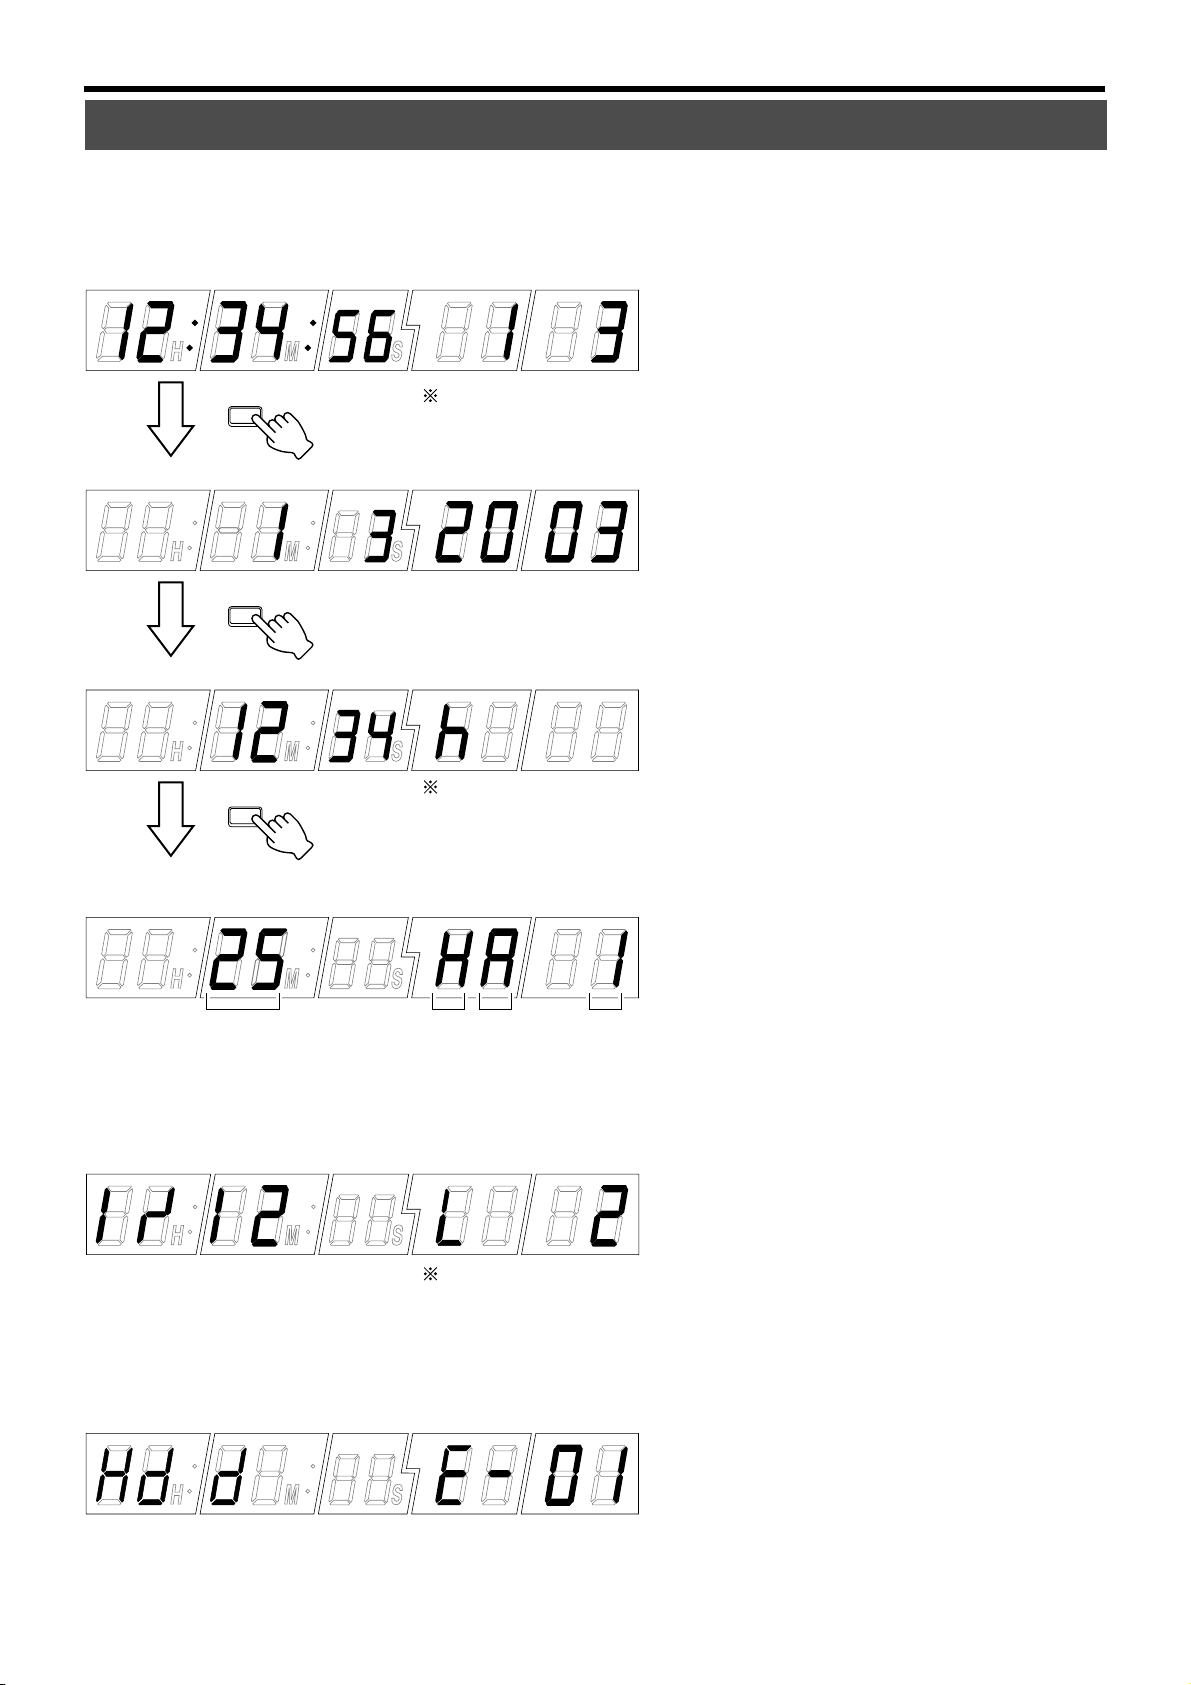
0 Counter/Setting Display
Press the [DISPLAY] button 8 on the front panel to switch
between the clock display, date display, remaining space
display and record setting display.
䡵 Clock Display: Example > 12:34:56, 1 March
DISPLAY
When in the Play mode, display of recording time on the playback screen is not
possible.
䡵 Date Display: Example > 1 March 2003 (When “DATE DISPLAY” setting in menu screen is “D/M/Y”)
DISPLAY
䡵 Remaining Hard Disk Space Display: Example > 1234 hours left
DISPLAY
Displays the remaining time of continuous recording when in the normal re-
cording mode. Display is not shown during Repeat Recording.
䡵 “REC MODE” Settings: Example > “BLOCK”: “1”, “AUDIO REC”: “ON”, “REC QUALITY”: “H”, “FRAME RATE”: “25”
“FRAME RATE” is displayed as below corresponding to
each setting value in the “REC MODE” Menu (☞ Page 24)
25 IPS ➞ “25” 1.7 IPS ➞ “25/15”
“FRAME RATE”
“REC QUALITY” “AUDIO REC”
“BLOCK NO.”
12.5 IPS ➞ “25/2” 1 IPS ➞ “1”
8.3 IPS ➞ “25/3” 1/2 IPS ➞ “1/2”
4.2 IPS ➞ “25/6” 1/6 IPS ➞ “1/6”
2.5 IPS ➞ “25/10” 1/12 IPS ➞ “1/12”
䡵 “REC MODE” Settings: Example > “BLOCK”: “2”, “AUDIO REC”: “OFF”, “REC QUALITY”: “L”, “FRAME RATE”: “1/12”
Displays the recording conditions of each BLOCK when in the normal record-
ing, Timer Recording or Alarm Recording mode. When in the Stop or Timer
Standby mode, however, conditions for each BLOCK during normal recording
are displayed. In addition, recording conditions of the images currently being
played will be shown with priority when in the Play mode.
䡵 Error Code Display: Example > Error01
☞ Page 105 ‘Problems Related to Error Code and Onscreen Display’
13
Page 14
Installation and Preparation
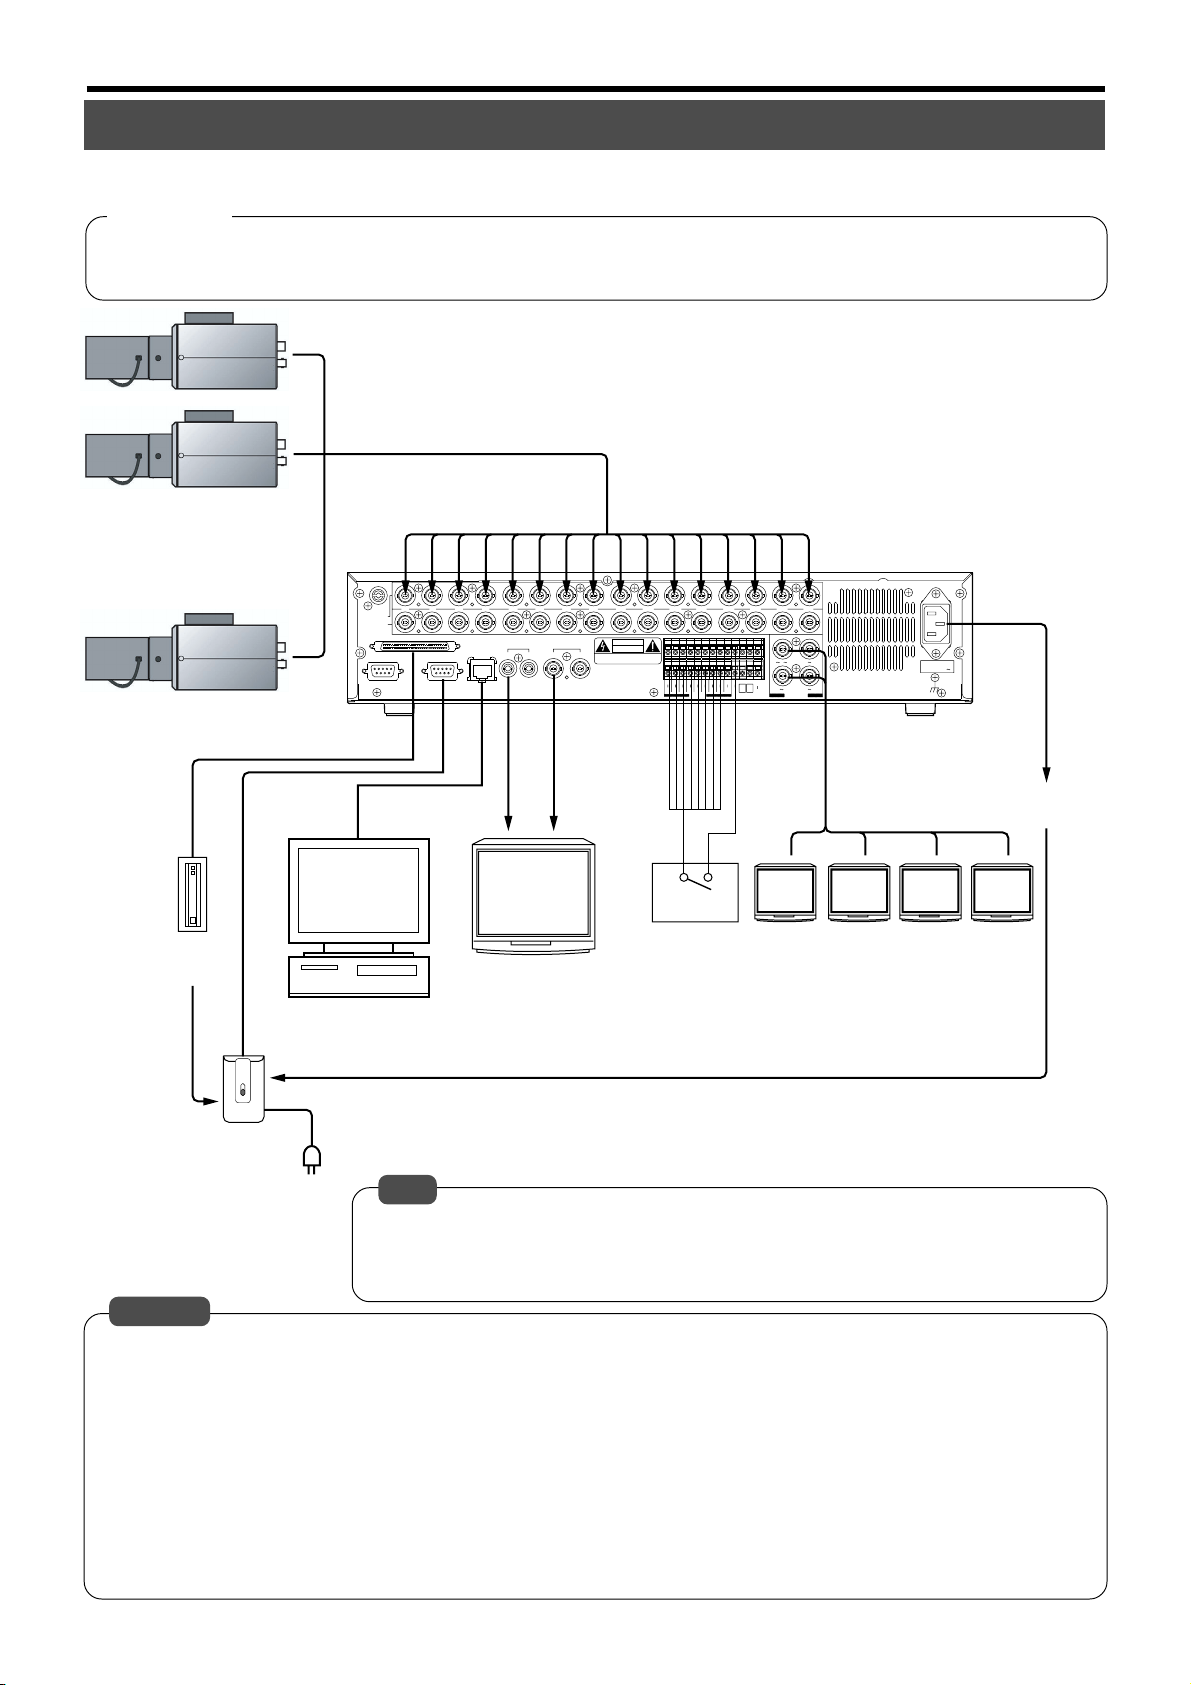
System Connection (When Connecting 16 Cameras)
Connection with up to 16 cameras is possible with VR-716’s switcher.
<Example>
•Perform recording/playback by connecting to 16 cameras.
• Checking recorded images at Monitor 1 and live camera images on Monitors 2 ~ 5 at the same time.
•Execution of alarm recording upon receiving signals from the alarm sensor.
Camera 1
Camera 2
Camera 16
External Hard Disk
Drive
•••••••
AUDIO IN
VIDEO IN
THRU OUT
Computer
Control (Communication) Terminal
12345678 910111213141516
SCSI
RS-232C UPS
AUDIO OUT VIDEO OUT
LAN
21
21
CAUTION
RISK OF ELECTRIC SHOCK
DO NOT OPEN
AVIS:RISQUE DE CHOC
ELECTRIQ
ALARM
EXT REC
IN
INCOMRST
15131197531
SER
CLK
OUT
161412108642
REC
RST
WAR
COM
OUT
OUT
OUT
[ALARM IN] [COM]
[AUDIO IN]
[VIDEO IN]
Alarm Sensor
Monitor 2 Monitor 3
Monitor 1
5
EE OUT
81 4/ 16
13 169 12
SIGNAL GND
(220V–240V )
Power Cord
(Supplied with this equipment)
[VIDEO IN]
Monitor 4
AC IN
AC 220 V - 240 V
50 Hz/60 Hz
Monitor 5
AC 220 V - 240 V Output
AC 220 V - 240 V
Output
UPS
AC 220 V - 240 V
Notes
• Please consult the sales outlet from which this equipment is purchased on the type of UPS
units that are compatible with this equipment.
• Consult the outlet from which this equipment is purchased on the types of usable external
HDDs.
Caution
• Do not connect CCU’s [CAMERA INPUT] to VR-716’s [VIDEO IN]. Doing so may damage the input circuit of VR-716.
• When this equipment is connected to CCU, “NO VIDEO IN ** INPUT (E-03)” will be displayed on the screen if error occurs
during signal input. (** indicates the Camera No.) Recording cannot be properly performed in such a state at both the camera
for which error has occurred as well as at other properly functioning cameras. In this case, set the REC MODE of the camera
channel for which error has occurred to “OFF” on the menu, and eliminate the cause of the error immediately.
☞ Page 24 ‘REC MODE Menu’
•Turn OFF the power of all devices before connecting or disconnecting.
•For channels that are not connected to cameras, set them to “OFF” on the “REC MODE” Menu. ☞ Page 24 ‘REC MODE Menu’
• When [THRU OUT] is connected with the [BNC] connector, the built-in 75 ¸ terminal will be left OPEN. In this case, connect
a 75 ¸ terminal to the last device.
•For connection of devices other than VR-716, please refer to the respective instruction manuals for details.
• Please refer to Page 73 ‘Connecting to a PC’ for connection with computers.
14
Page 15
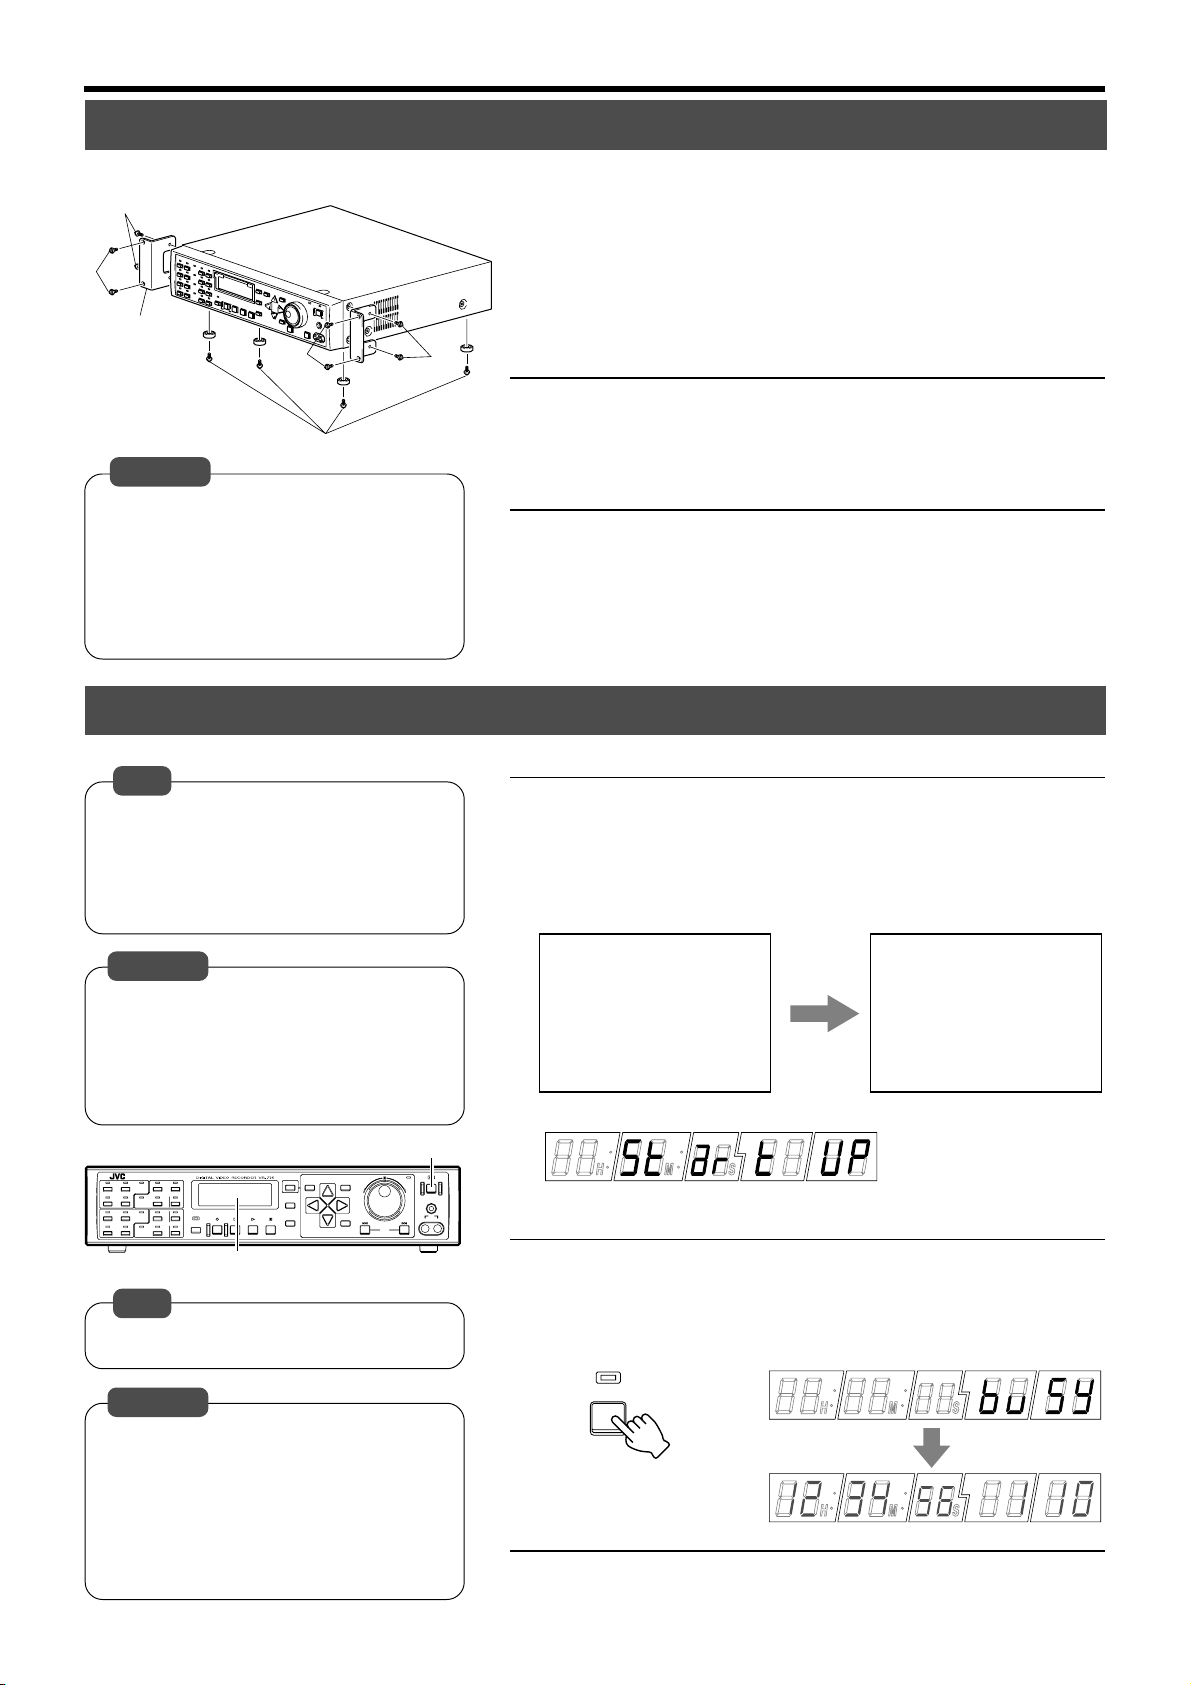
Mounting to a Rack
SYSTEM CHECKING... PLEASE WAIT...
Make use of the rack-mounting bracket provided when mounting VR-716 to the EIA rack.
1
1.
3
Rack-mounting
Bracket
3
2 (4 corners)
Caution
• Do not place any object on VR-716 that has
been mounted onto the rack. This may
cause the rack to give way and lead to injuries or equipment damages.
• When mounting 2 or more VR-716 record-
ers on racks, ensure that they are mounted
at least 1 unit away from one another.
1
Mount the rack-mounting bracket to VR-716 using Screw 1
•Fasten the two sides of VR-716 using the 4 screws provided (M4 x 10
mm).
2.
Remove Screw 2 (4 corners) on the foot stand at
the bottom surface of the equipment
• Remove the foot stand.
3.
Mount VR-716 to the rack using Screw 3
•Fasten the equipment to the rack using the 4 screws provided (M5 x 10
mm).
Turning On/Off the Power
Notes
• Refer to page 62 ‘External Hard Disk Drives’
when adding external HDDs.
• Operation of power is disabled during system checks.
Do so after the “SYSTEM CHECKING...
PLEASE WAIT…” display disappears.
Caution
•Turn ON the power of this equipment only
after connections with all peripheral devices
are completed.
• Do not unplug the power cord when starting up this equipment. This may cause the
equipment to malfunction.
[OPERATE]
HDD
CANCEL
SEARCH
56
ALARM
SENSOR
341278
ALARM
SENSOR
910
13 14
ALARM
SENSOR
11 1
15 16
ALARM
SENSOR
SEQUENCE
REC STOP PLAY STILL
MULTI
Front Display
MENU
TIMER
DISPLAY
REV
EXECUTE
Note
• Press the [OPERATE] button once when in
the OFF state to turn ON the power.
OPERATE
FWD
LOCK
OUT
VIDEO AUDIO
SKIP
䡵 Turning ON the Power
1.
Connect the power cord
• Use the power cord supplied to connect to an AC 220 V - 240 V, 50 Hz/
60 Hz outlet.
• This turns ON the power and starts the system check.
<Monitor>
<Front Display>
䡵 Turning OFF the Power
1.
Press the [OPERATE] button for about 2 seconds
• The front display shows [BUSY] and switches to a dim clock display.
(OFF State)
<Front Display>
Caution
• Unplug the power cord only when the power
of the equipment is OFF. If the power cord
is unplugged when the equipment is in ON
state, it will take time to perform a hard disk
check when it is turned on again. It may take
a long time when the data is fragmented or
when there is a large amount of recorded
data.
OPERATE
2.
Unplug the power cord
15
Page 16
Installation and Preparation (continued)
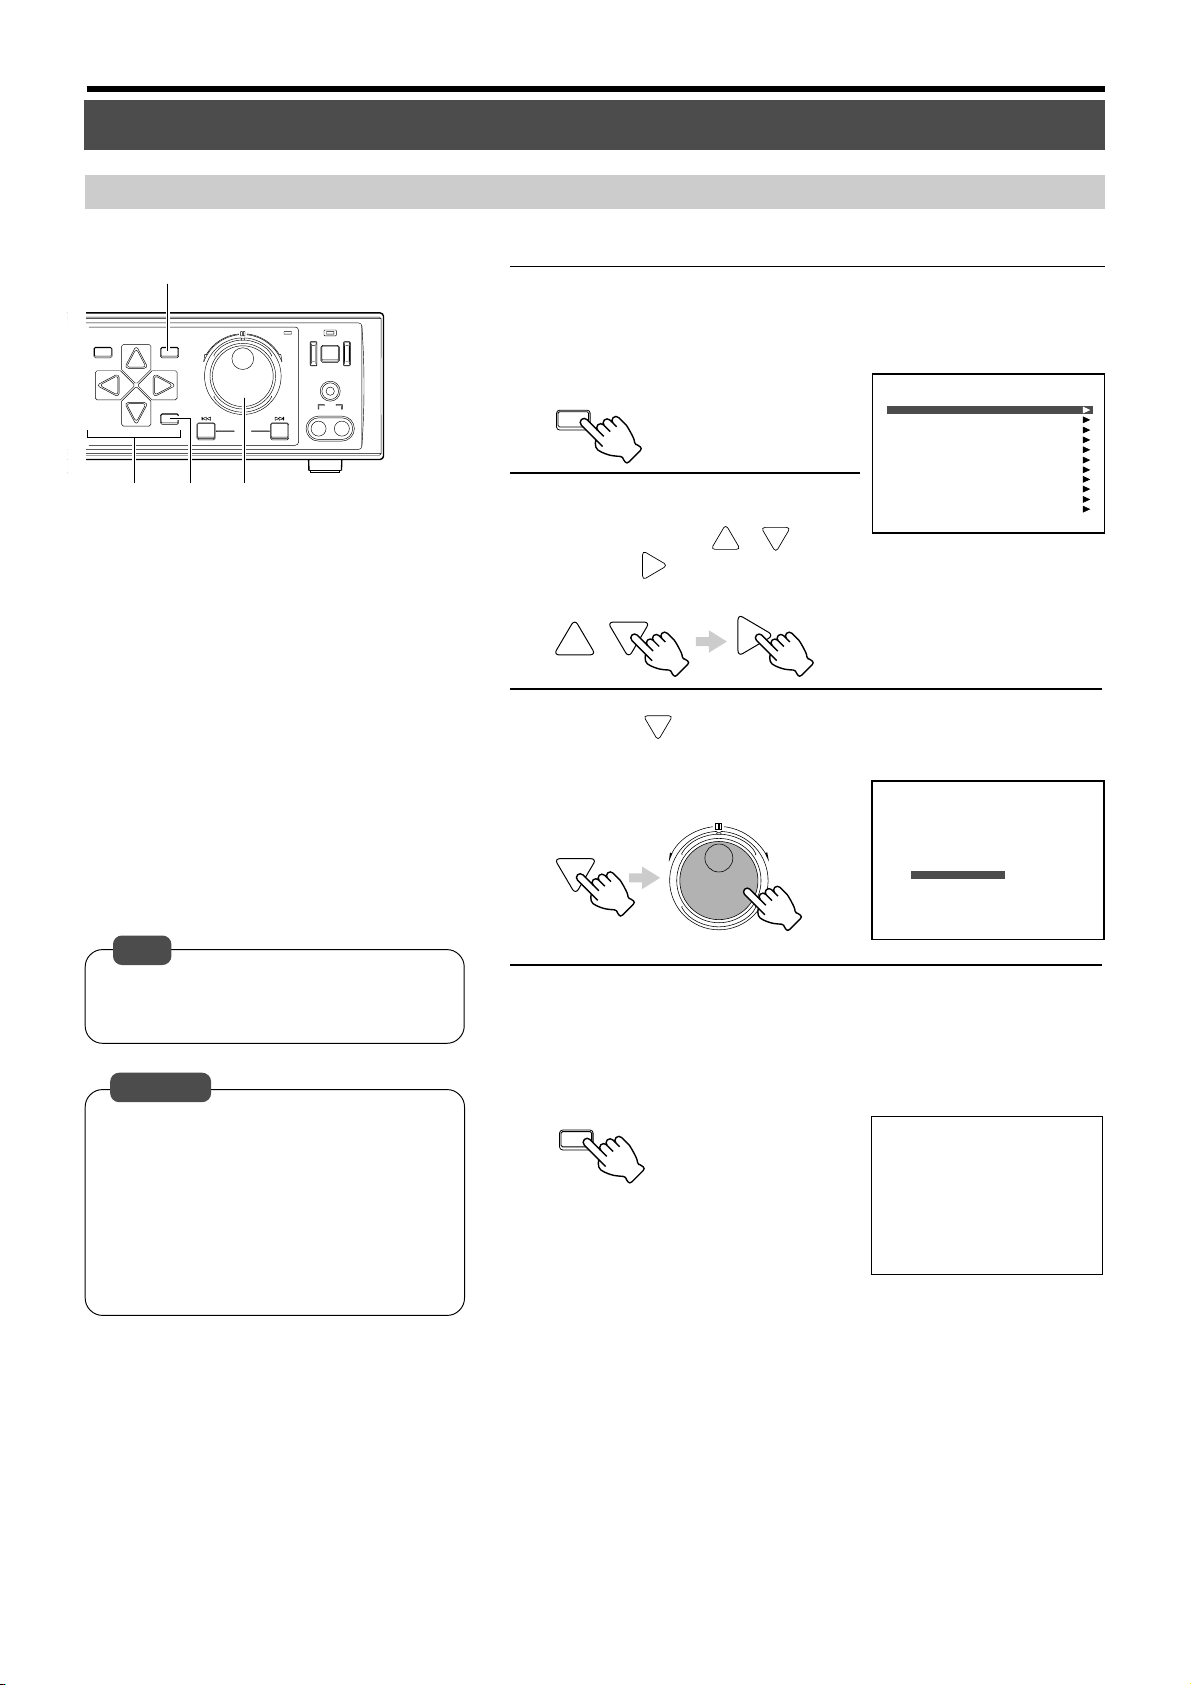
Setting the Date/Time
Onscreen Setting Using the Monitor Screen
Set the date and time on the monitor screen.
䡵 TIME ZONE Setting
1.
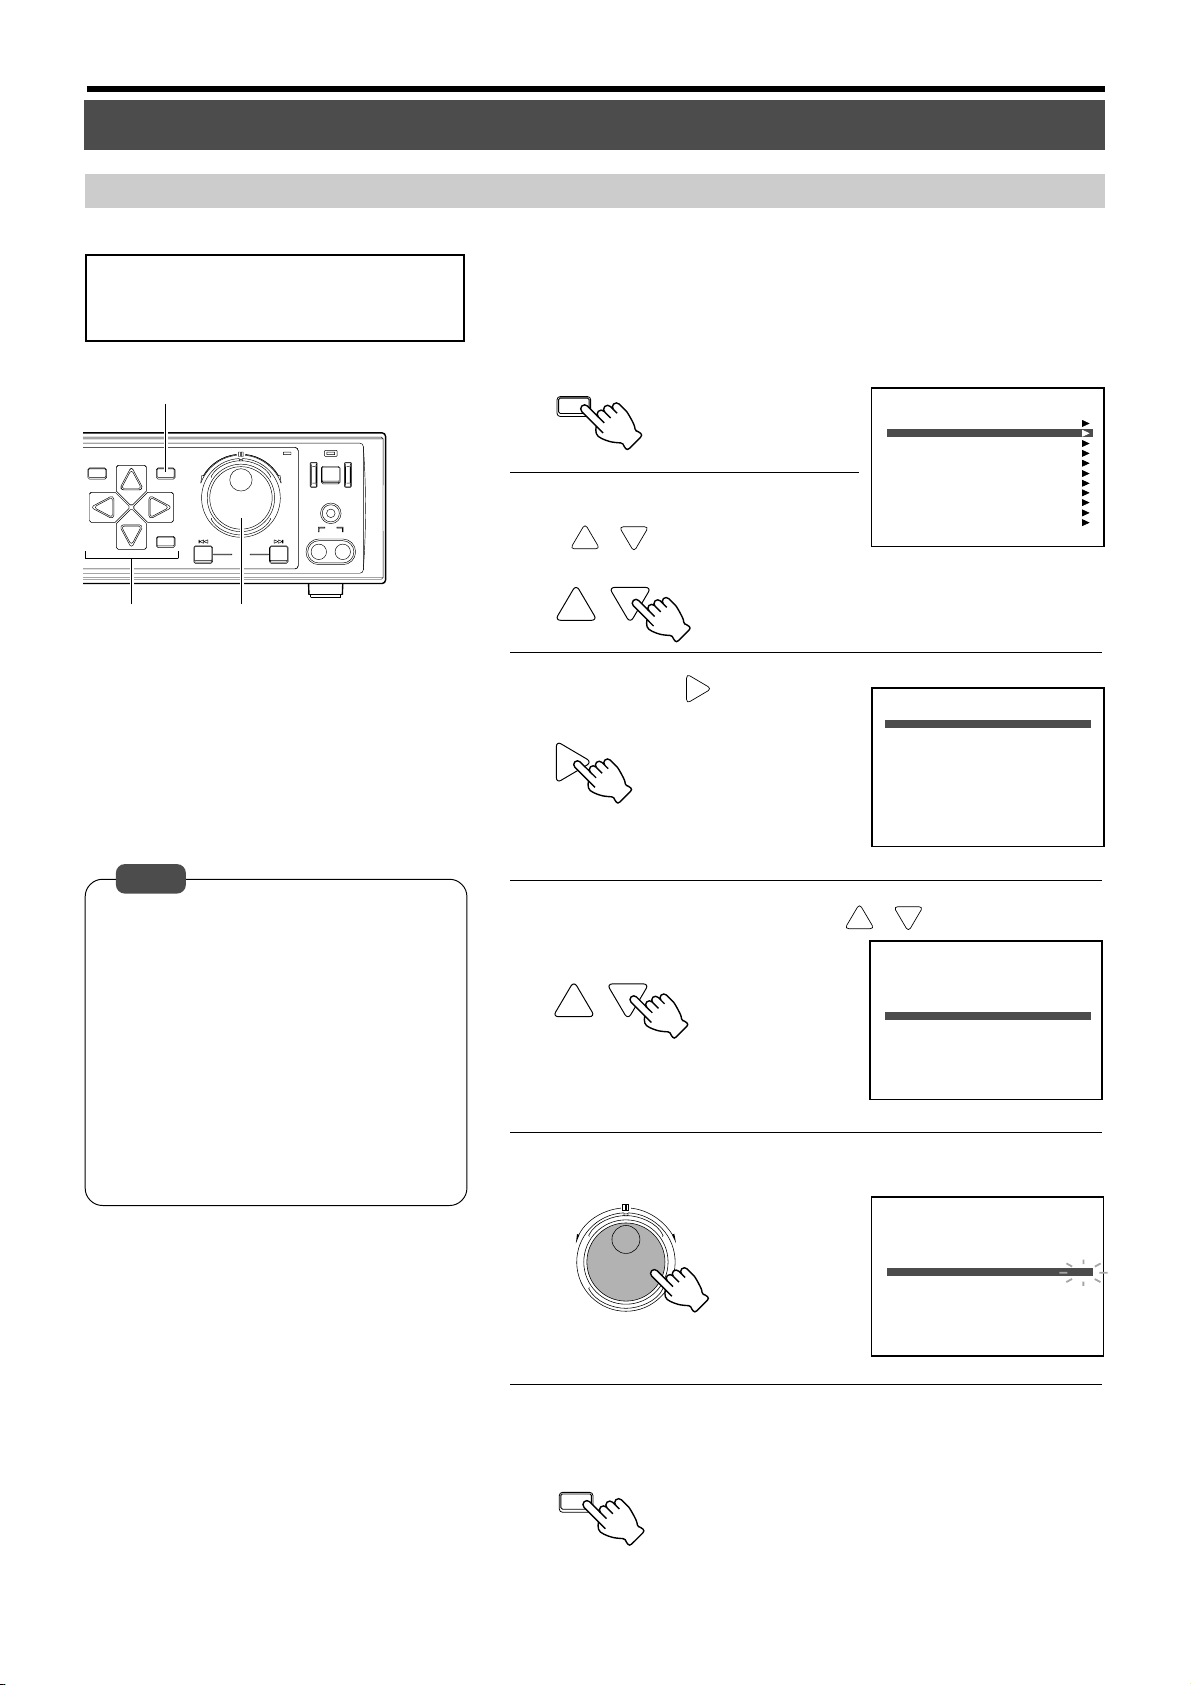
1.
Press the [MENU] button
HDD
SEARCH
MENU
EXECUTE
REV
SKIP
OPERATE
FWD
LOCK
OUT
VIDEO AUDIO
3.4.2.3.
• This displays the “MAIN MENU/OPERATION MENU” screen on the monitor.
MENU
2.
Select the “CLOCK SET”
item using [ / ] and
press [ ]
•Move the cursor to select.
Menu Screen
MAIN MENU/OPERATION MENU
CLOCK SET
ONSCREEN MODE
FDP/BUZZER
REC MODE
CAMERA TITLE
OPERATION/EXT REC
MONITOR DISPLAY
ALARM SENSOR MODE
PROGRAM TIMER
NETWORK
DISK UTILITY/MAINTENANCE
Note
• The order of D/M/Y will change in accordance with the “DATE DISPLAY” setting in
the “ONSCREEN MODE” menu.
Caution
•Pay attention when changing dates if the
hard disk contains recorded data.
Playback, Skip Jump or Direct Jump by
Date/Time may not properly function if there
is overlap in the recording dates.
• Date/Time setting is disabled when in the
Recording mode.
• Refer to the notes related to Summer Time.
(☞ Page 116)
3.
Press [ ] to move the cursor to “TIME ZONE”
and select using the jog dial
•Turn the jog dial to select the region that
you reside in.
REV FWD
4.
Press [EXECUTE] to display the confirmation
CLOCK SET
DMYHM
15 07 2003 12 28
TIME ZONE
US/Michigan
US/Mountain
US/Pacific
US/Samoa
UTC
**************
**************
**************
**************
<= : RETURN
[EXEC]:REGISTER
screen
• It will restart automatically and “TIME ZONE” will be set when pressing
[EXECUTE] again.
EXECUTE
Confirmation screen
TIME ZONE SETTING
UTC
RESTART, AFTER TIME ZONE SETTING.
[CANCEL]:CANCEL [EXEC]:START
START?
16
Page 17
U
SEARCH
5. 10.
MENU
EXECUTE
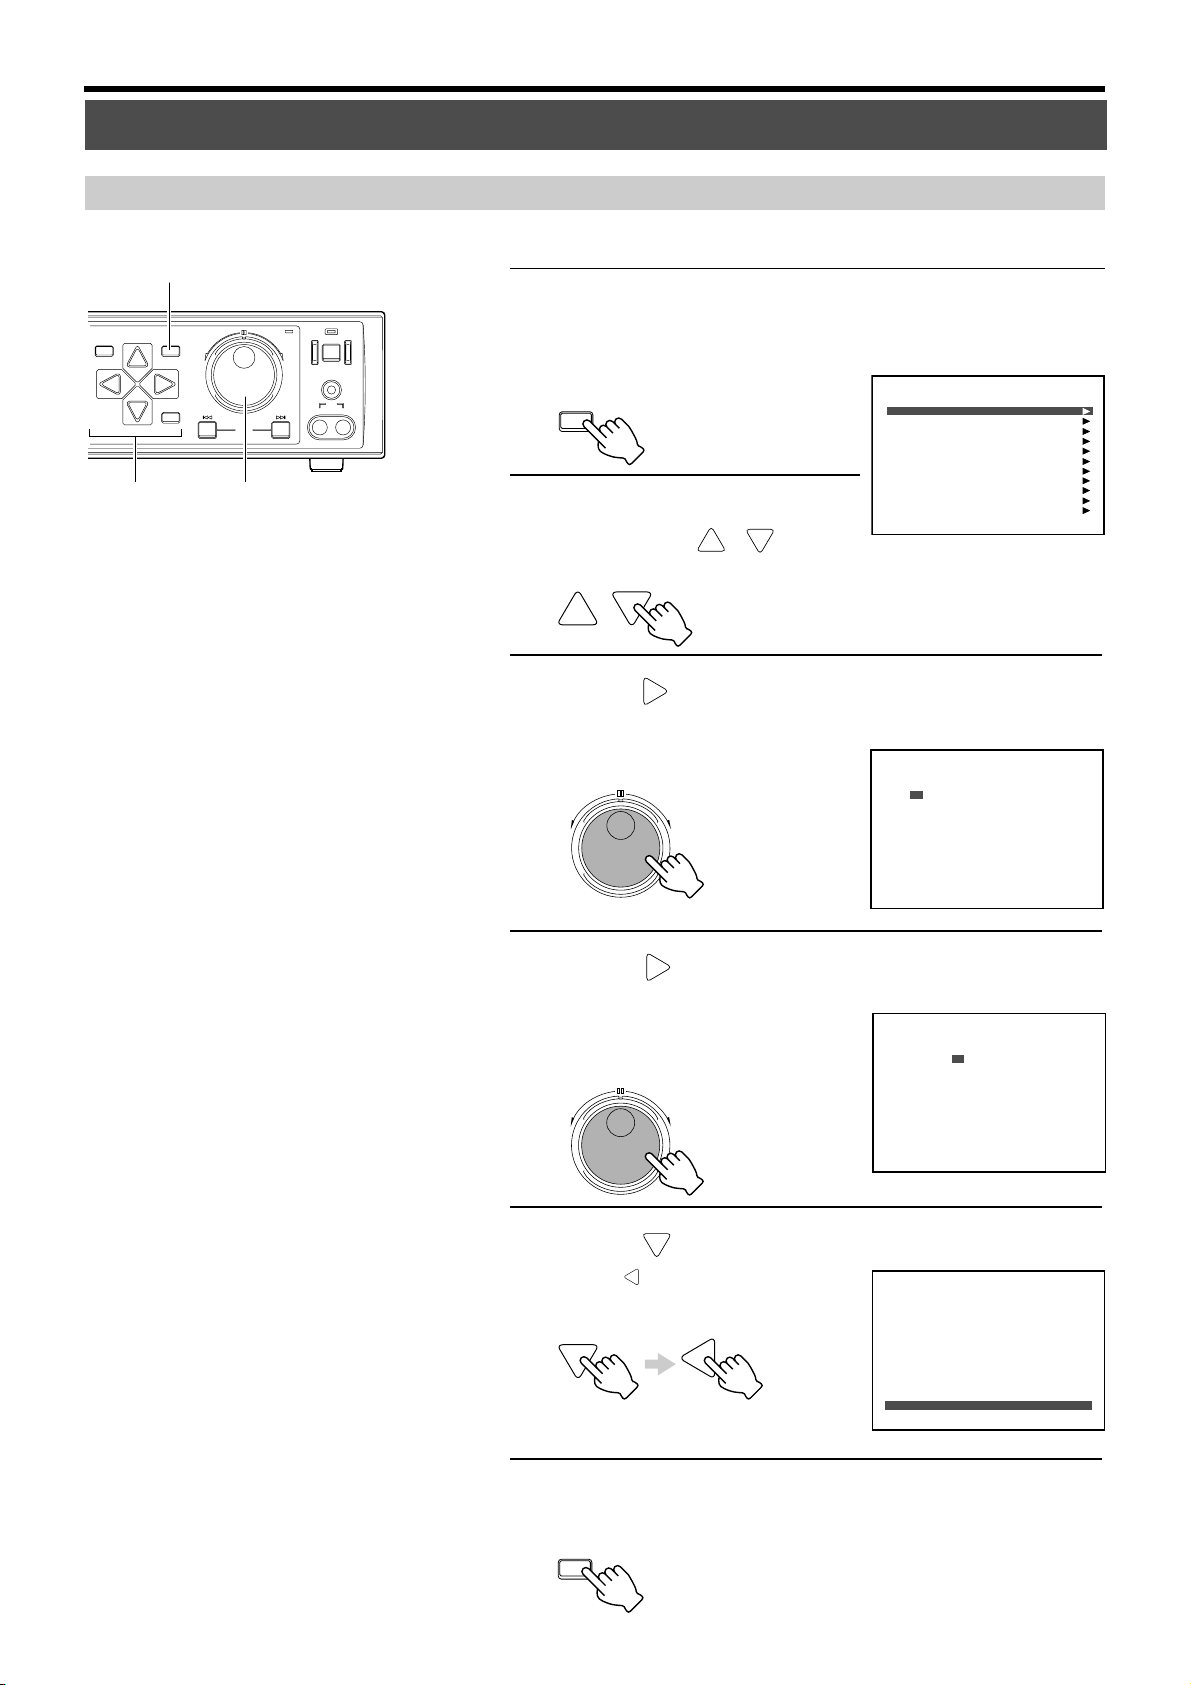
䡵 Clock Setting
5.
Press the [MENU] button
HDD
REV
SKIP
OPERATE
FWD
LOCK
OUT
VIDEO AUDIO
7.8.6.7.8.9.
• This displays the “MAIN MENU/OPERATION MENU” screen on the monitor.
MENU
6.
Select the “CLOCK SET”
Menu Screen
MAIN MENU/OPERATION MENU
CLOCK SET
ONSCREEN MODE
FDP/BUZZER
REC MODE
CAMERA TITLE
OPERATION/EXT REC
MONITOR DISPLAY
ALARM SENSOR MODE
PROGRAM TIMER
NETWORK
DISK UTILITY/MAINTENANCE
item using [ / ]
•Move the cursor to select.
7.
Press [ ] to move the cursor to “CLOCK SET”
and turn the jog dial to adjust “D” (Day)
•Turn the jog dial to increase/decrease
the value.
REV FWD
CLOCK SET
D
15 2003
TIME ZONE: UTC
MHM
Y
07 12 28
<= : RETURN
8.
Press [ ] and turn the jog dial to adjust “M”
(Month)
• Repeat Step 8 to adjust the “Y” (Year),
“H” (Hour) and “M” (Minute) values accordingly.
REV FWD
9.
Press [ ] to move the cursor to “RETURN”
• Press [ ] to return to the “MAIN
MENU/OPERATION MENU” screen.
CLOCK SET
D
15 2003
TIME ZONE: UTC
<= : RETURN
CLOCK SET
D
15 2003
TIME ZONE: UTC
<= : RETURN
MHM
Y
07 12 28
MHM
Y
07 12 28
10.
Press [MENU] to end setting
• The display returns to the normal screen.
MENU
17
Page 18
T
U
Installation and Preparation (continued)
Setting the Date/Time
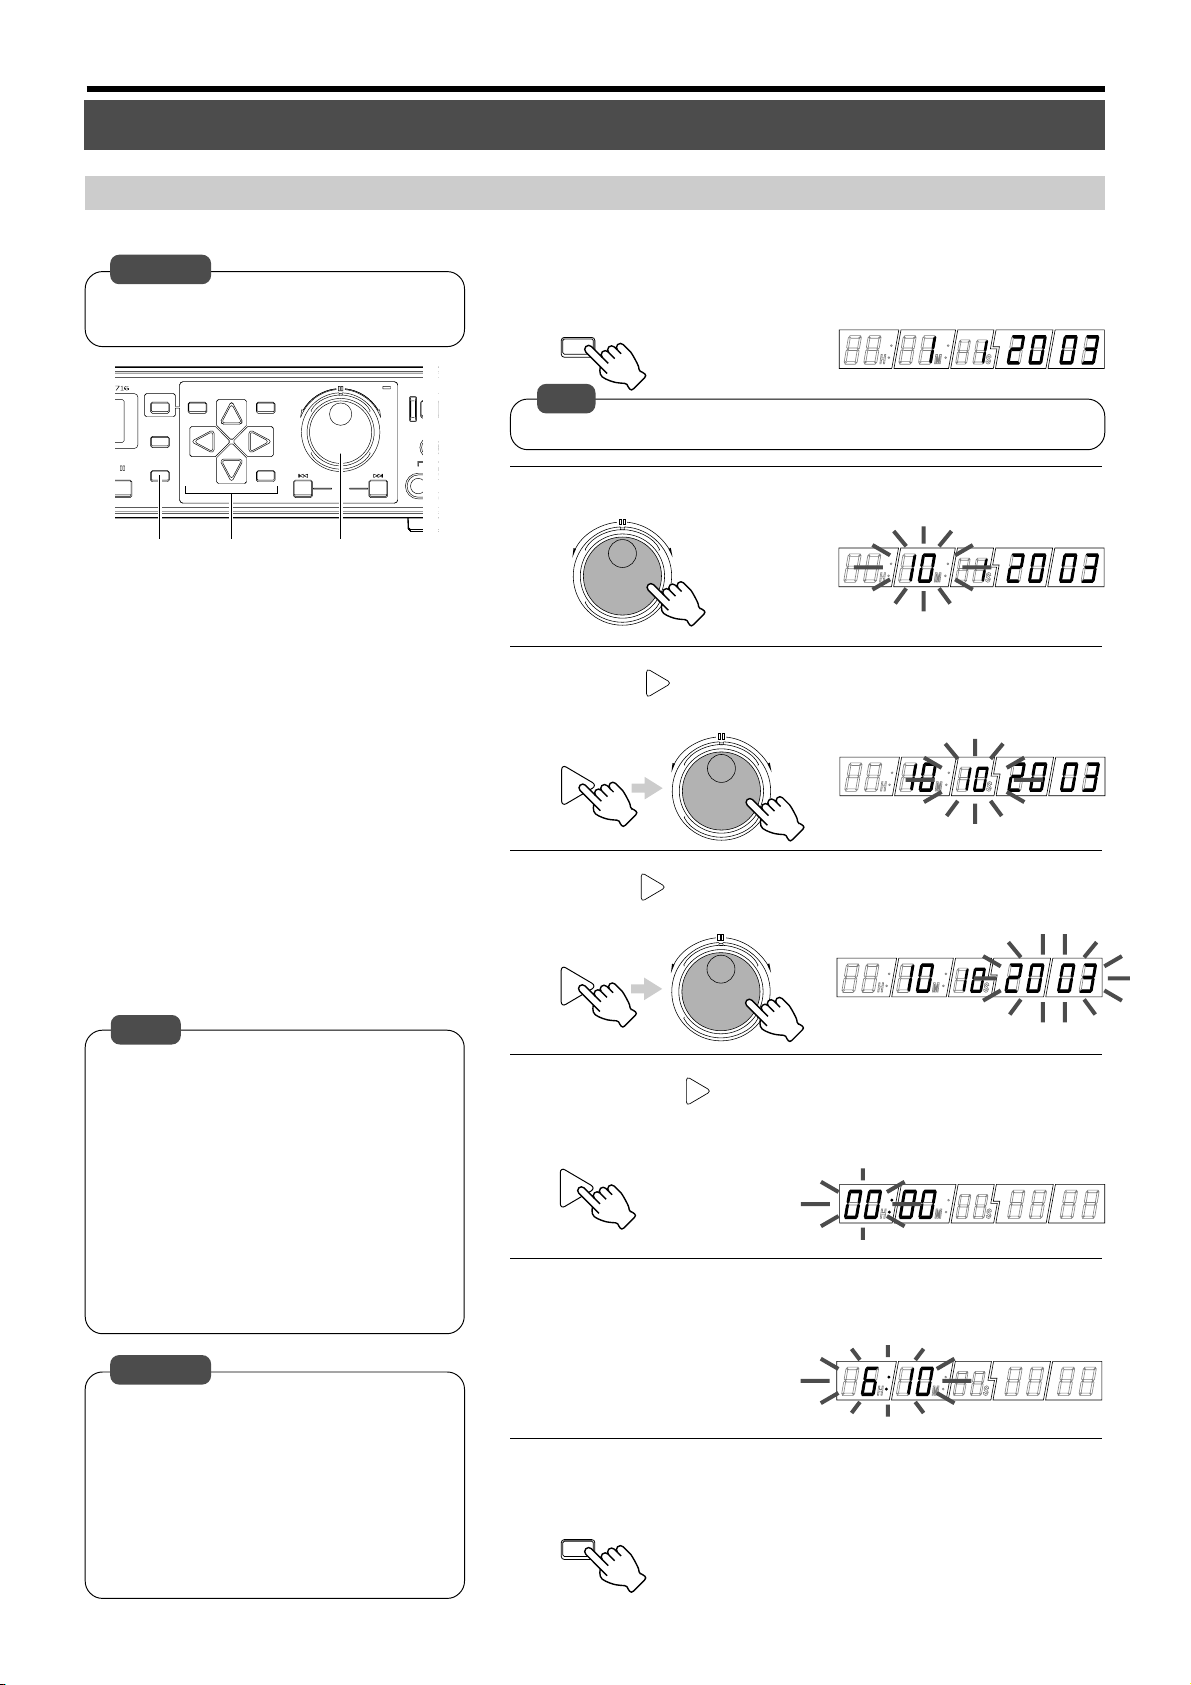
Setting Using the Front Display
Set the date/time on the front display of VR-716.
1.
Caution
• Ensure to set the TIME ZONE before setting the Date/ Time.
HDD
SEARCH
CANCEL
TIMER
DISPLAY
STILL
MENU
EXECUTE
REV
SKIP
OPERA
FWD
LOCK
OUT
VIDEO A
Press the [DISPLAY] button for 2 seconds or
longer
• The “D” (Day) item on the front display will start to blink.
DISPLAY
Note
• Date/Time setting is disabled when VR-716 is in the Recording mode.
2.
Turn the jog dial to adjust “D” (Day)
2.3.4.6.1.7. 3.4.5.6.
Notes
When adjusting the
• Press and hold the [LOCK] button followed
by pressing the [STOP] button to adjust the
seconds
• When the value is 29 seconds or less, this
will be reset to 00 seconds with the minute
value unchanged.
• When the value is 30 seconds and above,
this will be reset to 00 seconds with the
minute rounded to the next higher value.
• The order of D/M/Y will change in accor-
dance with the “DATE DISPLAY” setting in
the “ONSCREEN MODE” menu.
of the clock.
seconds
:
REV FWD
3.
Press [ ] to move the blinking cursor to “M”
and turn the jog dial to adjust the month
REV FWD
4.
Press [ ] to move the blinking cursor to “Y” and
turn the jog dial to adjust the year
REV FWD
5.
Press the [ ] button
• The hour and minute values will be displayed on the front display but
only the hour value blinks.
6.
Adjust “H” (Hour) and “M” (Minute)
• Repeat Steps 3 ~ 4 to adjust the hour and minute values.
Caution
•Pay attention when changing dates if the
hard disk contains recorded data.
Playback, Skip Jump or Direct Jump by
Date/Time may not properly function if there
is overlap in the recording dates.
• The “TIME ZONE” item cannot be altered
on the front display.
• Refer to the notes related to Summer Time.
(☞ Page 116)
18
7.
Press the [DISPLAY] button
• This sets and starts the clock.
DISPLAY
Page 19
Onscreen Display
VR-716 allows the onscreen display of Date/Time, Alarm (Sensor) No. and the operational state on the monitor.
Changing Position of Onscreen Display
<Onscreen Display>
Day-Month-Year
Day of the Week
01-03-2003 SA 12:34:56
60%
AL*3
Remaining Hard Disk Space (Blinks when reached 0%)
AL
SLOW
Time
(24-hour Display)
Alarm (Sensor)
Detection (Blinks)
Playback Direction
(Operational State)
Alarm (Sensor) No.
Camera Title
• Alarm (Sensor) No. display includes the fol-
lowing:
[AL] : The largest alarm (sensor) no.
registered
[AL *] : Alarm (Sensor) No. of playback
image
[AL * P] : Presensor No. of playback image
Onscreen display settings can be specified on
•
the “ONSCREEN MODE” Menu. (☞ Page 23)
Notes
• When in the Onscreen Display Position
Adjustment mode, background of the ‘Date/
Time Display’ and ‘Title Display’ will appear
in blue alternately every time the [EXECUTE] button is pressed.
Alteration of display position is possible
when the background is shown in blue.
•Priority will be given to the ‘Date Time Display’ if it overlaps with the ‘Title Display’.
<Adjustment of Onscreen Display
Position When in Quad Picture>
DATE/TIME
1
2
4
TITLE 1 TITLE 2
TITLE 3
TITLE 4
3
Warning
Display
Area
5
• Press and hold the [EXECUTE] button for
a while when in Quad Picture to switch to
the Onscreen Display Adjustment Screen
as shown in the above diagram.
• Adjust display position in the same way as
described in Steps 1 ~ 5.
• Background of the respective displays will
turn blue in the following order every time
when the [EXECUTE] button is pressed:
1 “DATE/TIME”
2 “TITLE 1”
3 “TITLE 2”
4 “TITLE 3”
5 “TITLE 4”
• The ‘Date/Time Display’ and ‘Title Display’
cannot be moved to the Warning Display
Area.
• Camera titles are not shown during display
in 16 split pictures.
1.
Press and hold the [EXECUTE] button for a while
• The monitor screen switches
to the Onscreen Display Position Adjustment mode.
‘Date/Time
Display’
DATE/TIME
• Background color of the
‘Date/Time Display’ turns
blue.
EXECUTE
Press and hold
2.
Move using the [ / / / ] buttons
‘Title
Display’
TITLE
• The position can be moved diagonally by pressing buttons simultaneously.
•Move the ‘Date/Time Display’ to any position.
•However, it cannot be shifted to the ‘Warning Display Area’.
‘Date/Time
Display’
3.
Press the [EXECUTE] button
DATE/TIME
• The ‘Title Display’ turns blue and is now in
the Onscreen Display Position Adjustment
mode.
EXECUTE
‘Title
Display’
4.
Move using the [ / / / ] buttons
DATE/TIME
TITLE
• The position can be moved diagonally by pressing buttons simultaneously.
•Move the ‘Title Display’ to any position.
•However, it cannot be shifted to the ‘Warning Display Area’.
• The displayed characters will shift to the
left, right or center automatically.
DATE/TIME
5.
Press the [CANCEL] button
‘Title
Display’
TITLE
• This confirms the onscreen display position
and returns the display to the normal screen.
CANCEL
AL*3
60%
SLOW
01-03-2003 SA 12:34:56
TITLE
AL
‘Warning
Display
Area’
‘Warning
Display
Area’
19
Page 20
Menus
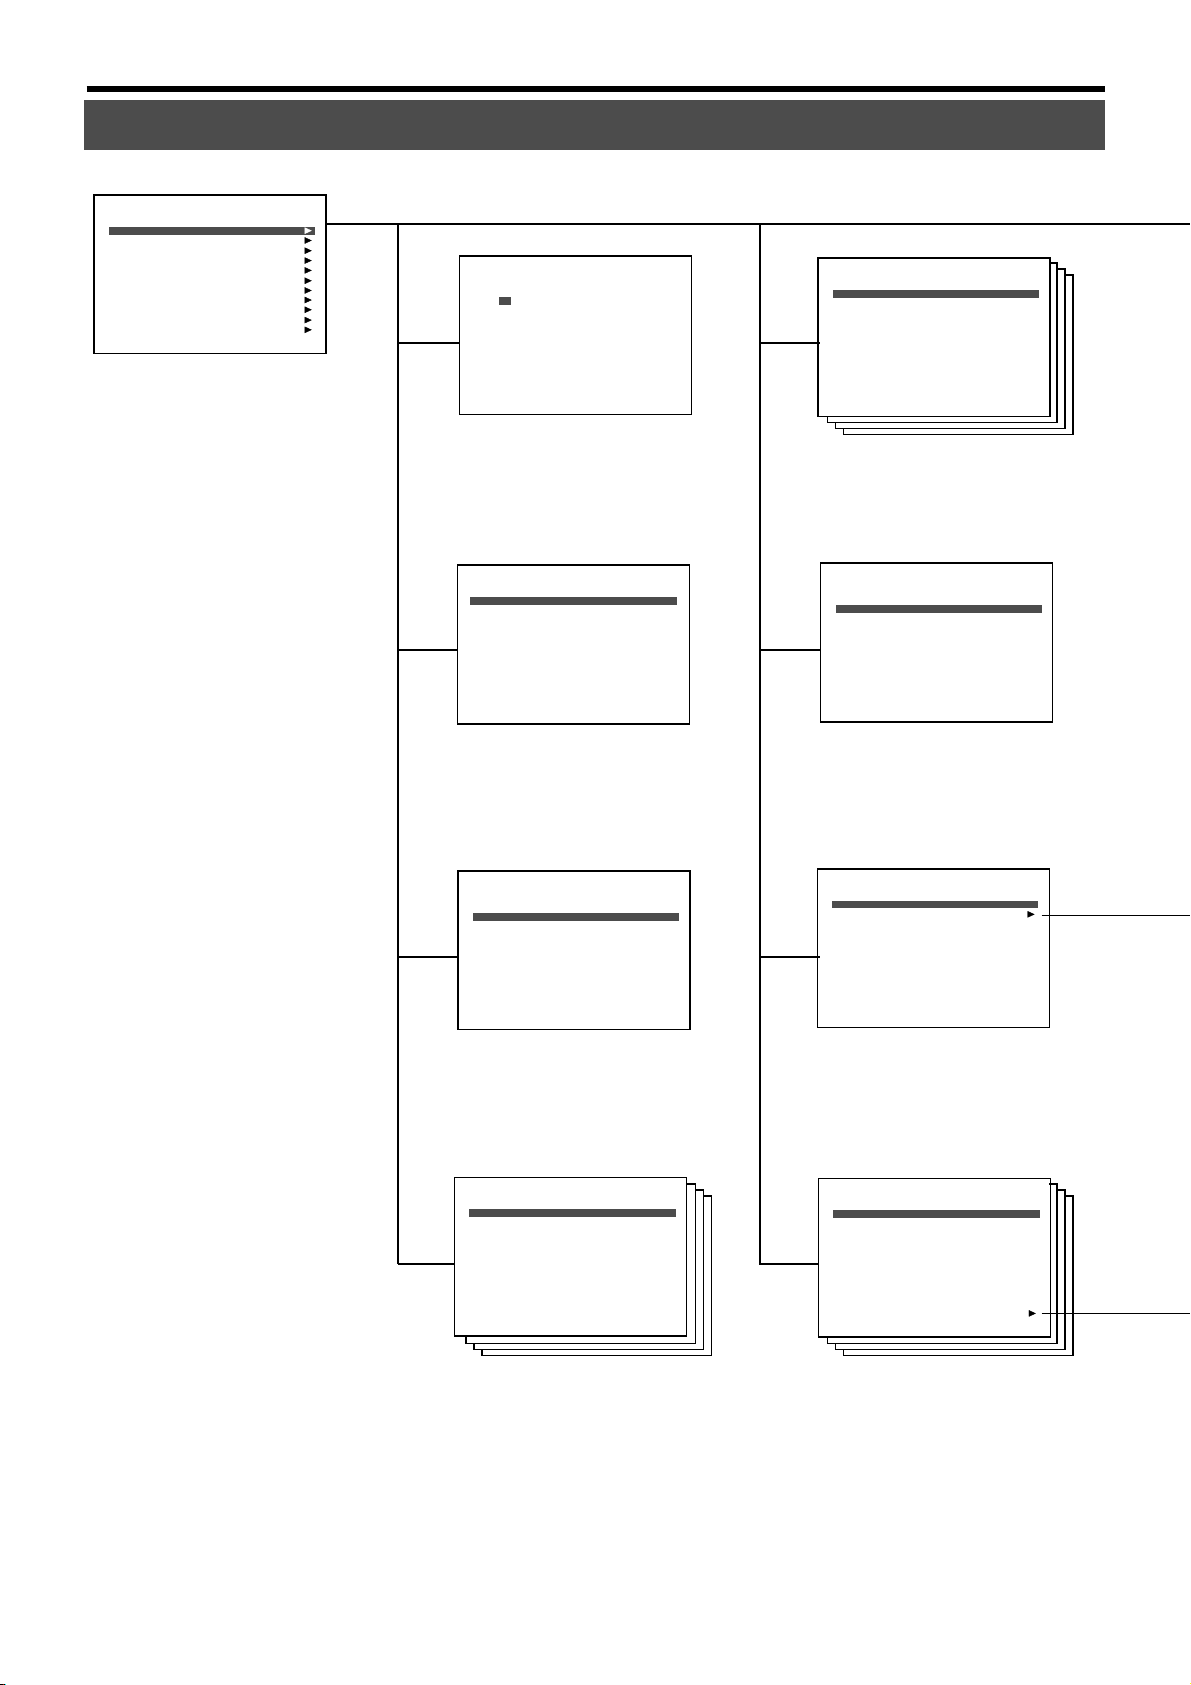
Menu Flow Chart
Menu Screen
MAIN MENU/OPERATION MENU
CLOCK SET
ONSCREEN MODE
FDP/BUZZER
REC MODE
CAMERA TITLE
OPERATION/EXT REC
MONITOR DISPLAY
ALARM SENSOR MODE
PROGRAM TIMER
NETWORK
DISK UTILITY/MAINTENANCE
“CLOCK SET” Menu
CLOCK SET
D
MHM
15 2003
07 12 28
TIME ZONE: UTC
“CAMERA TITLE” Menu
Y
CAMERA TITLE
1.BLOCK
2.CAMERA 1 TITLE (NONE)
3.CAMERA 2 TITLE (NONE)
4.CAMERA 3 TITLE (NONE)
5.CAMERA 4 TITLE (NONE)
1
<= : RETURN
(☞ Page 16)
“ONSCREEN MODE” Menu
ONSCREEN MODE
1.DATE/TIME
2.PLAYBACK MODE
3.TITLE
4.ALARM/SENSOR COUNT
5.DISK CAPACITY
6.ALARM/SENSOR DETECT
7.WARNING
8.BACKGROUND COLOR
9.DATE DISPLAY
BLACK
D/M/Y
(☞ Page 23)
“FDP/BUZZER” Menu
FDP/BUZZER
[ FDP ]
1.ALARM/SENSOR MODE ON
2.ALARM/SENSOR BLINK
3.SEQUENCIAL MONITOR
4.INPUT SIGNAL ERROR
5.WARNING
[BUZZER]
1.HDD FULL
2.ALARM/SENSOR
3.WARNING
OFF
OFF
OFF
<= : RETURN
(☞ Page 25)
“OPERATION/EXT REC” Menu
OPERATION/EXT REC
ON
ON
ON
ON
ON
ON
ON
[ OPERATION ]
1.RECOVERY REC PRIOR STATE
2.REPEAT REC
3.LANGUAGE SELECTION
4.WATER MARK
5.OPERATION LOCK
[EXT REC]
1.EXT REC MODE
2.SERIES REC
ENGLISH
OFF
OFF
ALL
OFF
OFF
(☞ Pages 25)
“MONITOR DISPLAY” Menu
MONITOR DISPLAY
1.EE OUT 1-4/-16
2.SINGLE PICTURE MODE
ON
ON
ON
ON
3.QUAD PICTURE MODE
BLOCK 1
BLOCK 2
BLOCK 3
BLOCK 4
4.ALARM/SENSOR SWITCH
5.SPLIT SCREEN BORDER COLOR
1SEC
1SEC
1SEC
1SEC
OFF
BORDER 3
1-4
“REC MODE” Menu
REC MODE
1.BLOCK
2.CAMERA 1
3.CAMERA 2
4.CAMERA 3
5.CAMERA 4
6.FRAME RATE
7.REC QUALITY
8.AUDIO REC
RECORDABLE HOUR
(☞ Pages 23, 24)
1
ON
OFF
OFF
OFF
25 IPS
H
ON
APPROX. 38H
(☞ Page 24)
(☞ Page 26)
“ALARM/SENSOR MODE” Menu
ALARM/SENSOR MODE
1.BLOCK 1
2.REC MODE ALARM
3.FRAME RATE
4.QUALITY
5.DURATION
6.AUDIO REC
7.PRESENSOR REC
8.PRESENSOR REC DURATION
9.EXT INPUT OPERATING MODE
10.MOTION DETECT
11.MOTION DETECT SETTING
25 IPS
180SEC
OFF
10SEC
OFF
OFF
ON
(☞ Pages 27, 28)
H
20
Page 21
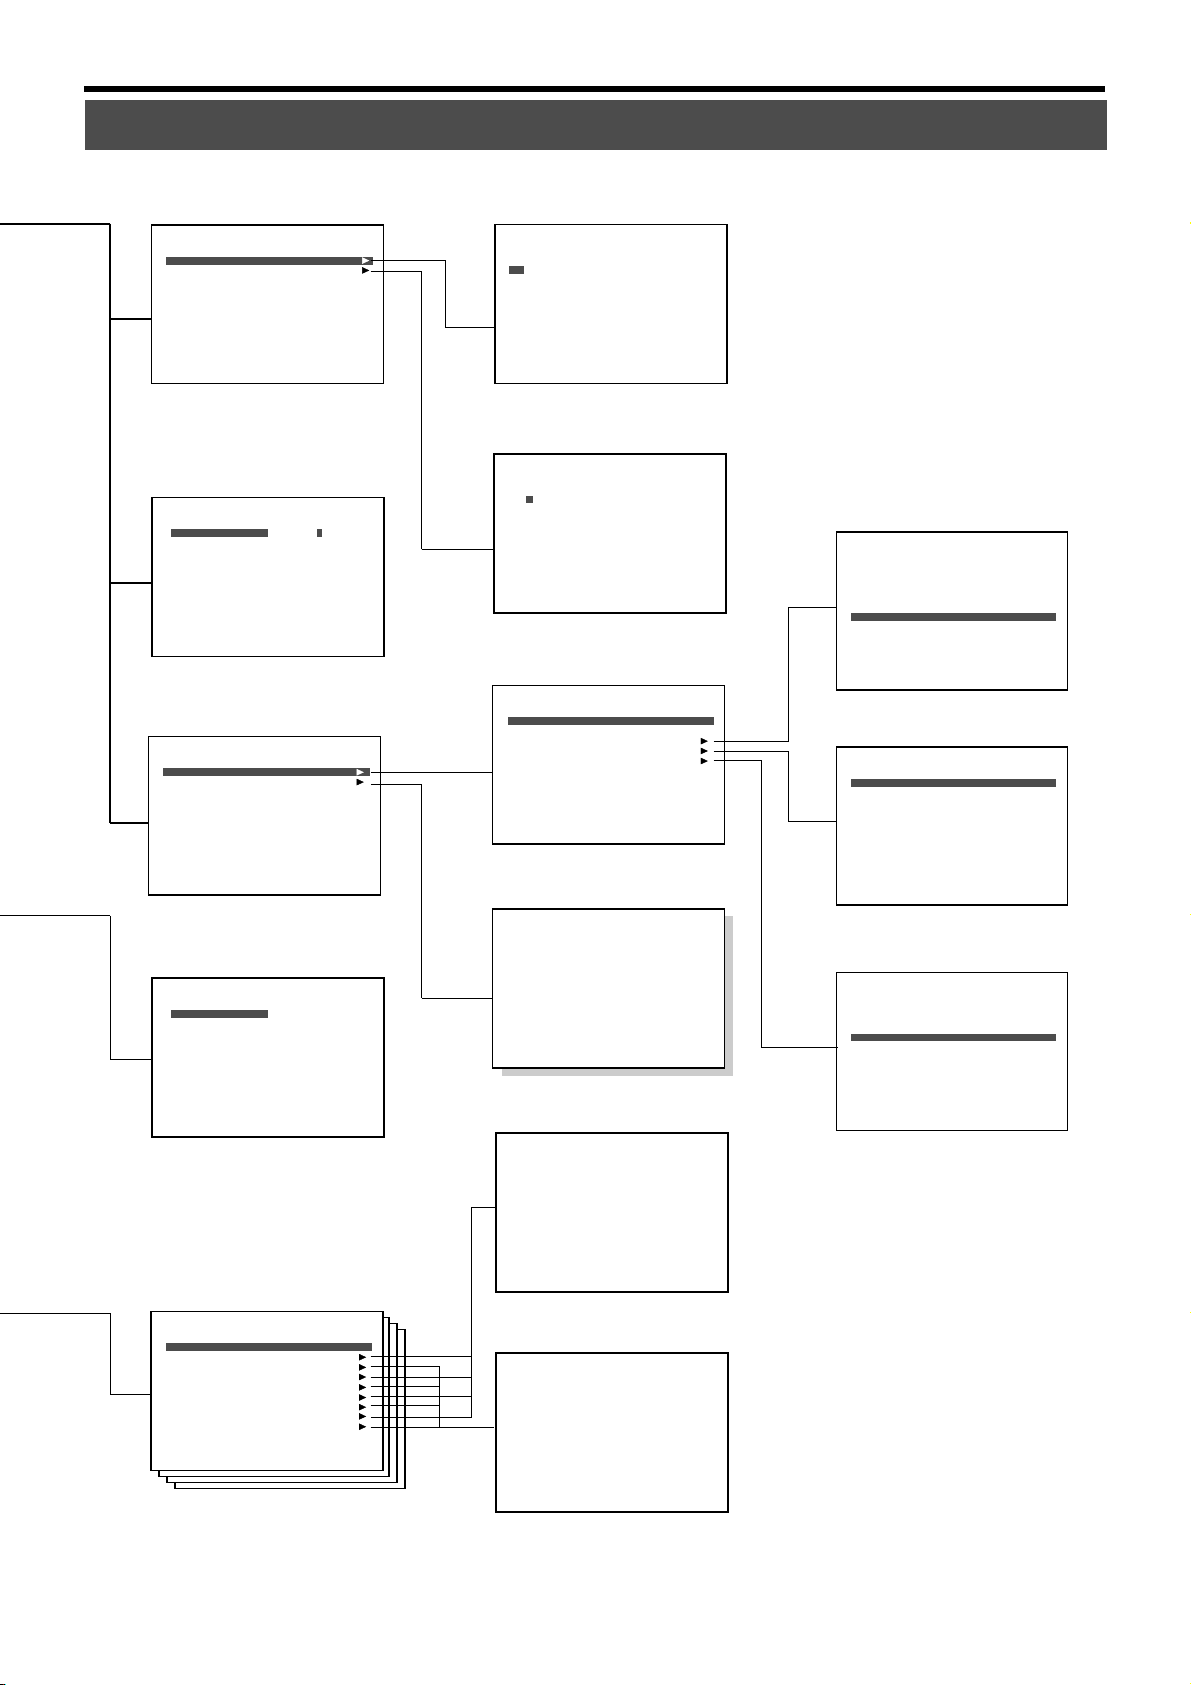
“PROGRAM TIMER” Menu
“WEEKLY TIMER” Menu
PROGRAM TIMER
1.WEEKLY TIMER
2.DATE TIMER
3.AFTER RELEASE
CONTINUE
(☞ Pages 29, 30)
“NETWORK” Menu
NETWORK
1.HOST NAME
2.METHOD
3.IP ADDRESS
4.NET MASK
5.DEFAULT GATEWAY
6.NAME SERVER
MAC ADDRESS
<= : RETURN
[CANCEL]:DELETE
vr716
STATIC
192.168. 0. 10
255.255.255. 0
192.168. 0.254
0. 0. 0. 0
00:80:88:40:b0:00
(☞ Page 31)
“DISK UTILITY/MAINTENANCE” Menu
DISK UTILITY/MAINTENANCE
1.DISK UTILITY
2.MAINTENANCE
(☞ Page 31)
“SINGLE PICTURE MODE” Menu
SINGLE PICTURE MODE
1.CAMERA 1 1SEC
2.CAMERA 2 1SEC
3.CAMERA 3 1SEC
4.CAMERA 4 1SEC
5.CAMERA 5 1SEC
6.CAMERA 6 1SEC
7.CAMERA 7 1SEC
8.CAMERA 8 1SEC
<= : RETURN
9.CAMERA 9 1SEC
10.CAMERA 10 1SEC
11.CAMERA 11 1SEC
12.CAMERA 12 1SEC
13.CAMERA 13 1SEC
14.CAMERA 14 1SEC
15.CAMERA 15 1SEC
16.CAMERA 16 1SEC
(☞ Page 26)
WEEKLY TIMER
SUN
MON
TUE
WED
THU
FRI
SAT
DAY
<= : RETURN
[CANCEL]:CANCEL
CAM1-4 CAM5-8 CAM9-12 CAM13-16 EXEC
START END
** ** ** ** ** ** ***** ***** ***** *****
** ** ** ** ** ** ***** ***** ***** *****
** ** ** ** ** ** ***** ***** ***** *****
** ** ** ** ** ** ***** ***** ***** *****
** ** ** ** ** ** ***** ***** ***** *****
** ** ** ** ** ** ***** ***** ***** *****
** ** ** ** ** ** ***** ***** ***** *****
** ** ** ** ** ** ***** ***** ***** *****
SUN
MON
TUE WED THU FRI SAT
(☞ Page 29)
“DATE TIMER” Menu
DATE TIMER
<= : RETURN
[CANCEL]:CANCEL
CAM1-4 CAM5-8 CAM9-12 CAM13-16 EXEC
START END
** ** ** ** ** ***** *** ** ***** ** ***
1. **
-
**
2. **
**
-
3. **
**
4. **
-
**
5. **
**
6. **
-
**
-
7. **
**
-
8. **
**
9. **
10. **
11. **
12. **
13. **
14. **
15. **
16. **
-
**
-
**
**
**
**
-
**
**
**
(☞ Page 30)
“DISK UTILITY” Menu
DISK UTILITY
1.AUTO SCAN DISK
2.MANUAL SCAN DISK OFF
3.DEFRAG DATABASE
4.FORMAT
5.MIRRORING
(☞ Pages 31, 55)
“MAINTENANCE” Menu
MAINTENANCE
1.TOTAL TIME
2.POWER OUTAGE TIME LIST
PL-1
PL-
**********
PL-
**********
PL-
**********
[CANCEL]:LIST CLEAR
10/07/2003 TH 10:47
** / ** / **** ** **:**
** / ** / **** ** **:**
** / ** / **** ** **:**
(☞ Pages 31, 60)
“DETAIL SETTING” Menu
DETAIL SETTING
1.DETECTING SENSITIVITY
2.TERMINATION SENSITIVITY +3
3.OBJECT SIZE LEVEL
OFF
22H
“DEFRAG DATABASE” Menu
DEFRAG DATABASE
DEFRAG AUTO MODE
DEFRAG
SET [YES] FOR DEFRAG
<= : RETURN
[EXEC]:DEFRAG
SETTIMEDATE
OFF0001
YES
(☞ Page 57)
“FORMAT” Menu
FORMAT
BUILT-IN HDD 1 : 76GB OK
BUILT-IN HDD 2 : 76GB OK
EXTERNAL HDD 1 :
EXTERNAL HDD 2 :
EXTERNAL HDD 3 :
EXTERNAL HDD 4 :
START FORMAT
ALL RECORDED HDD DATA IS DELETED!!
1.SET FORMATTING HDD TO [YES]
2.SET START FORMAT TO [YES]
YES
YES
NO
(☞ Page 58)
“MIRRORING” Menu
MIRRORING
BUILT-IN HDD 1 : 76GB OK
BUILT-IN HDD 2 : 76GB OK
MIRRORING SETTING
ALL HDD DATA WILL BE DELETED!!
NO MIRRORING SETTING
SET [YES] FOR MIRRORING SETTING
[EXEC]:START MIRROR
NO
(☞ Pages 59, 60)
7
2
“MOTION DETECT SETTING” Menu
MOTION DETECT SETTING
1.BLOCK
2.CAMERA 1 SCENE
AREA SETTING
3.CAMERA 2 SCENE
AREA SETTING
4.CAMERA 3 SCENE
AREA SETTING
5.CAMERA 4 SCENE
AREA SETTING
MANUAL
MANUAL
MANUAL
MANUAL
1
(☞ Page 28)
(☞ Pages 28)
“CAMERA AREA SETTING” Menu
CAMERA2 AREA SETTING
[CANCEL] :CANCEL AREA [EXEC] :SET AREA
[CANCEL]HOLD:DELETE ALL
[EXEC]HOLD:SET ALL
[SEARCH]HOLD:CHECK MODE
[SEARCH]:CHECK MODE CLEAR
(☞ Pages 68, 69)
21
Page 22
Menus (continued)
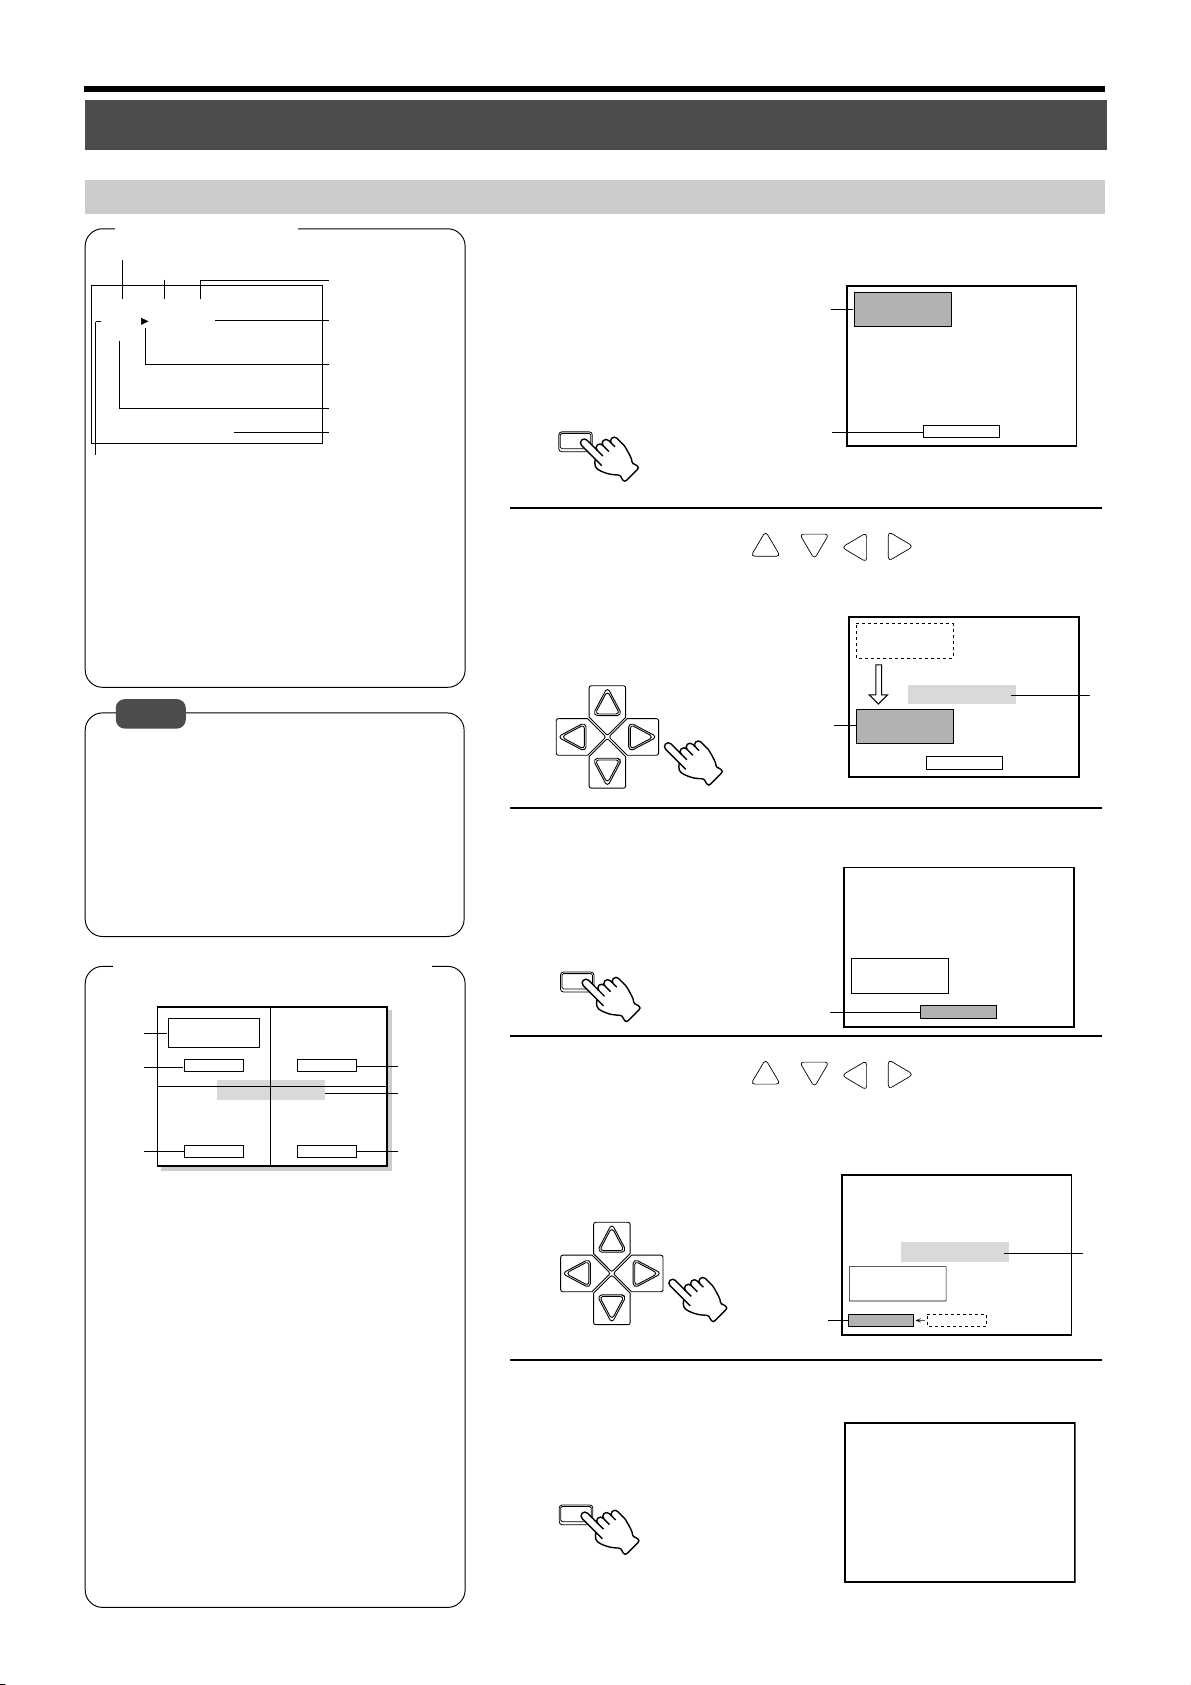
Changing Menu Settings
Changing Initial Settings
Change the VR-716 preset values (Factory settings) during purchase according to its use.
Connect the monitor for which the menu
screen is to be displayed to the [VIDEO OUT]
terminal. (☞ Page 33)
1.6.
HDD
L
SEARCH
Y
MENU
EXECUTE
REV
SKIP
OPERATE
FWD
LOCK
OUT
VIDEO AUDIO
5.2.3.4.
1.
Press the [MENU] button
• This displays the “MAIN MENU/OPERATION MENU” screen on the
monitor.
MENU
2.
Select menu item using
[ / ]
•Move the cursor to select.
MAIN MENU/OPERATION MENU
CLOCK SET
ONSCREEN MODE
FDP/BUZZER
REC MODE
CAMERA TITLE
OPERATION/EXT REC
MONITOR DISPLAY
ALARM SENSOR MODE
PROGRAM TIMER
NETWORK
DISK UTILITY/MAINTENANCE
Notes
• Changes can be made to items in the following menus when in the Recording mode:
• “ONSCREEN MODE” (excluding DATE
DISPLAY) (☞ Page 23)
• “FDP” (☞ Page 23)
•“BUZZER” (☞ Page 24)
• “MONITOR DISPLAY” (☞ Page 26)
• “SEARCH MENU”
• Menu operation is disabled when in the Timer
mode.
•Values that have been altered will be written
into the memory when exiting the menu screen.
Do not continue using with the altered menu
screens left open.
3.
Press the [ ] button
• The settings are displayed.
4.
Select menu item using [ / ]
•Move the cursor to select.
5.
Turn the jog dial to select a value
REV FWD
ONSCREEN MODE
1.DATE/TIME
2.PLAYBACK MODE
3.TITLE
4.ALARM/SENSOR COUNT
5.DISK CAPACITY
6.ALARM/SENSOR DETECT
7.WARNING
8.BACKGROUND COLOR
9.DATE DISPLAY
ONSCREEN MODE
1.DATE/TIME
2.PLAYBACK MODE
3.TITLE
4.ALARM/SENSOR COUNT
5.DISK CAPACITY
6.ALARM/SENSOR DETECT
7.WARNING
8.BACKGROUND COLOR
9.DATE DISPLAY
ONSCREEN MODE
1.DATE/TIME
2.PLAYBACK MODE
3.TITLE
4.ALARM/SENSOR COUNT
5.DISK CAPACITY
6.ALARM/SENSOR DETECT
7.WARNING
8.BACKGROUND COLOR
9.DATE DISPLAY
BLACK
D/M/Y
BLACK
D/M/Y
BLACK
D/M/Y
OFF
ON
ON
ON
ON
ON
ON
ON
ON
ON
ON
ON
ON
ON
ON
ON
ON
ON
ON
ON
ON
22
6.
Press [MENU] to end setting
• The display returns to the normal screen.
MENU
Page 23

“ONSCREEN MODE” Menu
[ ● ] are factory settings.
Item Settings Description
“DATE/TIME”
● “ON”
“OFF”
For setting the Day/Month/Year and clock’s onscreen display.
“ON” : Date/time displayed.
“OFF” : Date/time not displayed.
“PLAYBACK MODE”
“TITLE”
“ALARM/SENSOR
COUNT”
“DISK CAPACITY”
“ALARM/SENSOR
DETECT”
“WARNING”
“BACKGROUND
COLOR”
“DATE DISPLAY”
● “ON”
“OFF”
● “ON”
“OFF”
● “ON”
“OFF”
● “ON”
“OFF”
● “ON”
“OFF”
● “ON”
“OFF”
● “BLACK”
“CLEAR”
● “D/M/Y”
“Y/M/D”
“M/D/Y”
For setting the onscreen display of the Playback mode.
“ON” : Playback mode displayed.
“OFF” : Playback mode not displayed.
For setting the onscreen display of camera channel titles.
“ON” : Title displayed.
“OFF” : Title not displayed.
For setting the onscreen display of Alarm/Sensor Nos.
“ON” : Alarm/Sensor No. displayed.
“OFF” : Alarm/Sensor No. not displayed.
For setting the onscreen display of the remaining hard disk space.
“ON” : Remaining disk space displayed. (Display is not shown when in the
Repeat Record mode.)
“OFF” : Remaining disk space not displayed.
For setting whether to display the [AL] mark onscreen during alarm/sensor recording.
“ON” : [AL] mark displayed.
“OFF” : [AL] mark not displayed.
For setting whether to display warning onscreen during error.
“ON” : Warning displayed.
“OFF” : Warning not displayed.
For setting the background of the settings menu screen.
“BLACK” : Displays background in black.
“CLEAR” : Displays live camera images or playback images.
For changing the order of date display.
“FDP” Menu
[ ● ] are factory settings.
Item Settings Description
“ALARM/SENSOR
MODE”
“ALARM/SENSOR
BLINK”
“SEQUENTIAL
MONITOR”
“INPUT SIGNAL
ERROR”
● “ON”
“OFF”
● “ON”
“OFF”
● “ON”
“OFF”
● “ON”
“OFF”
For setting whether to light up the [AL] (alarm) Indicator 6 (☞ Page 12) on the front
display during alarm/sensor recording.
“ON” : Indicator lights up.
“OFF” : Indicator does not light up.
☞ Page 12 ‘Names and Functions (Front Display)’
For setting whether to blink the [AL] (alarm) Indicator 6 (☞ Page 12) on the front
display upon completion of alarm/sensor recording.
“ON” : Indicator blinks.
“OFF” : Indicator does not blink.
☞ Page 12 ‘Names and Functions (Front Display)’
For setting whether to turn on the LED for the camera selection button 6 (☞ Page 7)
on the front panel.
“ON” : LED of the camera selection button that corresponds to the Cam-
era No. on the monitor screen turns on.
“OFF” : LED of the camera selection button that corresponds to the Cam-
era No. on the monitor screen does not turn on. However, LED lights
up when displaying in 16 split pictures.
For setting the mode of illumination of the camera selection button LED 6 (☞ Page 7)
on the front panel when signal error occurs at the camera.
“ON” : Blinks when “ON” is selected for the camera in the “REC MODE”
Menu but there are no camera signals, or when SINGLE PICTURE
is selected using the camera selection button and “OFF” is selected
for the specified camera in the “REC MODE” Menu.
“OFF” : LED does not blink.
The setting of “INPUT SIGNAL ERROR” on the front display is different from what
is displayed onscreen.
“WARNING”
● “ON”
“OFF”
For setting whether to display warning on the front display during error.
“ON” : Warning displayed.
“OFF” : Warning not displayed.
☞ Page 105 ‘Problems Related to Error Code and Onscreen Display’
23
Page 24
Menus (continued)
“BUZZER” Menu
[ ● ] are factory settings.
Item Settings Description
“HDD FULL”
“ON”
● “OFF”
For setting whether to sound the buzzer when the hard disk has no more space
during recording.
“ON” : The buzzer sounds.
“OFF” : The buzzer does not sound.
“ALARM/SENSOR”
“WARNING”
“ON”
● “OFF”
“ON”
● “OFF”
For setting whether to sound buzzer during alarm/sensor recording.
“ON” : The buzzer sounds.
“OFF” : The buzzer does not sound.
For setting whether to sound buzzer when error occurs.
“ON” : The buzzer sounds.
“OFF” : The buzzer does not sound.
☞ Page 105 ‘Problems Related to Error Code and Onscreen Display’
“REC MODE” Menu
[ ● ] are factory settings. (Setting is disabled when in the Recording mode.)
Item Settings Description
“BLOCK”
“CAMERA 1” ~
“CAMERA 4”
(When “BLOCK 1” is
selected)
● 1
2
3
4
● “ON”
“OFF”
For selecting the camera channel block for which “REC MODE” setting is to be performed.
1 : Sets to Camera Channels 1 - 4.
2 : Sets to Camera Channels 5 - 8.
3 : Sets to Camera Channels 9 - 12.
4 : Sets to Camera Channels 13 - 16.
For selecting the camera to perform recording.
“ON” : Recording enabled.
“OFF” : Recording disabled.
Note
• Menu items vary according to the block selected. “BLOCK 2”: “CAMERA 5” ~
“CAMERA 8”, “BLOCK 3”: “CAMERA 9” ~ “CAMERA 12”, “BLOCK 4”: “CAMERA 13” ~ “CAMERA 16”.
“FRAME RATE”
“REC QUALITY”
“AUDIO REC”
“RECORDABLE
HOUR”
● “25 IPS”
“12.5 IPS”
“8.3 IPS”
“4.2 IPS”
“2.5 IPS”
“1.7 IPS”
“1 IPS”
“1/2 IPS”
“1/6 IPS”
“1/12 IPS”
“H”
● “N”
“B”
“L”
● “ON”
“OFF”
- - - - -
For setting the no. of frames to be recorded.
Note
•“AUDIO REC” switches automatically to “OFF” when “1/6 IPS” (1 image per 6
seconds) or “1/12 IPS” (1 image per 12 seconds) is selected for “FRAME RATE”.
For setting the picture quality of the image to be recorded.
“H” : HIGH (High picture quality)
“N” : NORMAL (Normal picture quality)
“B” : BASIC (Basic picture quality)
“L” : LONG (Long-play quality)
For setting whether to record audio signals.
“ON” : Audio signals recorded.
“OFF” : Audio signals not recorded.
Note
• Switches automatically to “OFF” when “1/6 IPS” (1 image per 6 seconds) or “1/
12 IPS” (1 image per 12 seconds) is selected for “FRAME RATE” in the menu.
Displays the remaining amount of time for which recording is possible at the hard
disk.
Note
• Length of recordable time varies with the settings of the “FRAME RATE”, “REC
QUALITY” and “AUDIO REC” items. ☞ Page 115 ‘Recording Duration’
24
Page 25
“CAMERA TITLE” Menu
[ ● ] are factory settings. (Setting is disabled when in the Recording mode.)
Item Settings Description
“CAMERA 1” ~
“CAMERA 16”
**********
Camera Channels 1 - 16 can be named separately.
☞ Page 72 ‘Setting a Title for Each Camera Channel Screen’
“OPERATION” Menu
[ ● ] are factory settings. (Setting is disabled when in the Recording mode.)
Item Settings Description
“RECOVERY REC”
“REPEAT REC”
“LANGUAGE SELECTION”
● “OFF”
“PRIOR STATE”
“NORMAL REC”
● “OFF”
“ALARM STOP”
“ALARM LOCK”
“ALL”
● “ENGLISH”
“GERMAN”
“FRENCH”
“ITALIAN”
“SPANISH”
For setting whether to perform Recovery Recording.
“OFF” : Switches to the Stop mode upon restoration from power failure. (Switches
to the Timer mode upon restoration if the Program Timer is set.)
“PRIOR STATE” : Re-starts recording upon restoration from power failure, only when
power failure occurs during recording.
“NORMAL REC” : Re-starts recording upon restoration from power failure.
☞ Page 71 ‘Continuing with Recording Upon Recovery from Power Failure’
For setting whether to perform Repeat Recording.
“OFF” : Repeat recording disabled.
“ALARM STOP” : Repeat Recording mode is disabled if alarm recording has been executed.
“ALARM LOCK” : Alarm recording is basically protected from overwriting during re-
peat recording, but images other than alarm recording may remain
if the hard disk space is filled up mostly by Alarm recording.
“ALL” : When there is insufficient hard disk space, previous recordings are
overwritten, starting from the oldest recording.
☞ Page 112 ‘Repeat Record’
For selecting a language displayed in the menu.
“WATER MARK”
“ON”
● “OFF”
For setting whether to embed water mark in the recorded images.
“ON” : Records images with embedded water mark.
“OFF” : Records images without embedded water mark.
Notes
• When in the 1 input per block mode, water mark will not be recorded depending
on the setting.
Refer to the following table. ( : recordable, : not recordable)
25 12.5 8.3 4.2 2.5 1.7 1 1/2 1/121/6
H
N
B
L
“OPERATION LOCK”
● “ALL”
“STOP REC”
REC
QUALITY
•For details on water mark detection, please refer to the application software
[VR-716 Player] Manual (CD-ROM) provided.
For setting the lock operation when the operation lock is ON.
“ALL” : Disables all operations.
“STOP REC” : Disables operation to start or stop recording.
“EXT REC” Menu
[ ● ] are factory settings. (Setting is disabled when in the Recording mode.)
Item Settings Description
“EXT REC MODE”
● “OFF”
“TRIGGER”
“MANUAL”
For setting whether to start automatic recording when external signals are received
at the [EXT REC IN] of the signal input/output terminal.
“OFF” : Automatic recording not executed.
“TRIGGER” : Starts recording upon receiving external signals.
“MANUAL” : Continues recording when external signals are input.
☞ Page 61 ‘Activation of Recording Via External Signals’
FRAME RATE (IPS)
“SERIES REC”
“ON”
● “OFF”
For setting whether to execute SERIES recording based on signals received at the
[SERIES REC IN/OUT] terminal.
“ON” : Executes SERIES recording based on [SERIES REC IN/OUT] signals.
“OFF” : Does not execute SERIES recording based on [SERIES REC IN/OUT] signals.
☞ Page 61 ‘Series Recording Using 2 or More VR-716 Recorders’
25
Page 26

Menus (continued)
“MONITOR DISPLAY” Menu
[ ● ] are factory settings.
Item Settings Description
“EE OUT1 - 4/ -16”
“SINGLE PICTURE
MODE”
“SINGLE PICTURE
MODE”
“CAMERA1”
~ “CAMERA16”
● “1-4”
“1-16”
“OFF”
● “1 SEC”
“2 SEC”
“3 SEC”
“4 SEC”
“5 SEC”
“10 SEC”
For setting the screen during output of camera images in VR-716 to the [EE OUT
1-4/-16] terminal.
“1-4” : Images displayed in quad picture.
“1-16” : Images displayed in 16 split pictures.
☞ Page 32 ‘When Connecting the Monitor to the [EE OUT] terminal’
For setting the time interval at which display at VR-716 is switched from the live
image of one camera to another.
“OFF” : Automatic switching of camera channels turned off.
“1 SEC” : Switches camera channel at an interval of 1 second.
“2 SEC” : Switches camera channel at an interval of 2 seconds.
“3 SEC” : Switches camera channel at an interval of 3 seconds.
“4 SEC” : Switches camera channel at an interval of 4 seconds.
“5 SEC” : Switches camera channel at an interval of 5 seconds.
“10 SEC” : Switches camera channel at an interval of 10 seconds.
☞ Page 34 ‘Setting Time Interval for Switching Displays in the Single Picture Mode’
“QUAD PICTURE
MODE”
“BLOCK 1”
~ “BLOCK 4”
“ALARM/SENSOR
SWITCH”
“SPLIT SCREEN
BORDER COLOR”
“OFF”
● “1 SEC”
“2 SEC”
“3 SEC”
“4 SEC”
“5 SEC”
“10 SEC”
● “OFF”
“SEQUENTIAL”
“FIX”
“OFF”
“BORDER 1”
“BORDER 2”
● “BORDER 3”
For setting the time interval at which display is switched from one camera channel
block to another when in quad picture.
“OFF” : Automatic switching of camera channels turned off.
“1 SEC” : Switches camera channel at an interval of 1 second.
“2 SEC” : Switches camera channel at an interval of 2 seconds.
“3 SEC” : Switches camera channel at an interval of 3 seconds.
“4 SEC” : Switches camera channel at an interval of 4 seconds.
“5 SEC” : Switches camera channel at an interval of 5 seconds.
“10 SEC” : Switches camera channel at an interval of 10 seconds.
☞ Page 35 ‘Setting Time Interval for Switching Displays in the Quad Picture Mode’
For setting the switching mode of the monitor screen when alarm/sensor signals are
received.
“OFF” : Sends output to monitor according to the Camera Selection button
settings.
“SEQUENTIAL” : Sends only output of cameras for which alarm has been triggered
to the monitor in sequence. (Switching of display is fixed at an interval of 1 second.)
“FIX” : Sends only output of the camera for which its alarm has last been
triggered to the monitor.
Notes
• Screen display of monitor can be switched using the Camera Selection buttons even when “SEQUENTIAL” or “FIX” are selected.
• When multiple alarms are simultaneously detected, image of cameras for which
alarm has been triggered will be output to the monitor alternately even when
“FIX” is selected.
For setting the brightness of the border line of split screen.
“BORDER 1” : Dark grey
“BORDER 2” : Grey
“BORDER 3” : Bright grey
26
Page 27

“ALARM/SENSOR MODE” Menu
This menu is used for specifying settings related to alarm or sensor recording.
Alarm/sensor inputs are either received via the [ALARM IN] terminal at the rear panel of VR-716 or via Motion Detect.
[ ● ] are factory settings. (Setting is disabled when in the Recording mode.)
Item Settings Description
“BLOCK”
● 1
2
3
4
For selecting the camera channel block for which alarm or sensor recording settings
are to be specified.
1 : Sets to Camera Channels 1 - 4.
2 : Sets to Camera Channels 5 - 8.
3 : Sets to Camera Channels 9 - 12.
4 : Sets to Camera Channels 13 - 16.
“REC MODE”
“FRAME RATE”
“QUALITY”
“DURATION”
“AUDIO REC”
“PRESENSOR REC”
● “ALARM”
“SENSOR”
“ALARM/SENSOR”
● “25 IPS”
“12.5 IPS”
“8.3 IPS”
“4.2 IPS”
● “H”
“N”
“B”
“L”
“10 SEC”
“15 SEC”
“30 SEC”
“60 SEC”
“120 SEC”
● “180 SEC”
“MANUAL”
● “ON”
“OFF”
“ON”
● “OFF”
For specifying settings related to alarm and sensor recording.
“ALARM” : Starts alarm recording only when VR-716 is in the normal
recording mode.
“SENSOR” : Starts sensor recording only when VR-716 is in the Stop
mode.
“ALARM/SENSOR” : Starts alarm recording when in the normal recording mode
and sensor recording when in the Stop mode.
☞ Page 66 ‘Activation of Recording Via External Alarm/Sensor Signals’
For setting the frame rate during alarm recording. Value is set according to the no. of
images to record in 1 second.
For setting the picture quality during alarm recording.
“H” : HIGH (High picture quality)
“N” : NORMAL (Normal picture quality)
“B” : BASIC (Basic picture quality)
“L” : LONG (Long-play quality)
For setting the duration of alarm or sensor recording.
“10 SEC” ~ “180 SEC” : Duration of alarm/sensor recording.
“MANUAL” : Continues alarm/sensor recording when alarm signals are
input. (Maximum: 20 minutes)
In the case of alarm or sensor recording via Motion Detect,
recording lasts for a duration of 10 seconds upon the last
sensor detection.
For setting whether to record audio signals.
“ON” : Audio signals recorded.
“OFF” : Audio signals not recorded.
For setting whether to activate presensor recording.
Select “ON” to activate presensor recording.
☞ Page 113 ‘Presensor Recording’
“PRESENSOR REC
DURATION”
● “10 SEC”
“20 SEC”
“30 SEC”
For setting the duration of presensor recording.
“10 SEC” : Activates presensor recording over an interval of 10 ~ 20 seconds.
“20 SEC” : Activates presensor recording over an interval of 20 ~ 30 seconds.
“30 SEC” : Activates presensor recording over an interval of 30 ~ 60 seconds.
☞ Page 113 ‘Presensor Recording’
27
Page 28

Menus (continued)
“ALARM/SENSOR MODE” Menu (continued)
[ ● ] are factory settings. (Setting is disabled when in the Recording mode.)
Item Settings Description
“EXT INPUT OPERATING MODE”
● “OFF”
“ON”
“NORMAL”
“TIMER”
For setting alarm or sensor recording actions for the signal input/output terminal
[ALARM IN] of VR-716.
“OFF” : Alarm/sensor recording not activated.
“ON” : Alarm/sensor recording activated.
“NORMAL” : Alarm/sensor recording activated except when in the Timer
Recording or Timer Standby mode.
“TIMER” : Alarm/sensor recording activated when in the Timer Re-
cording or Timer Standby mode.
☞ Page 66 ‘Activation of Recording Via External Alarm/Sensor Signals’
“MOTION DETECT”
“MOTION DETECT
SETTING”
“SCENE”
● “OFF”
“ON”
“NORMAL”
“TIMER”
● “STANDARD”
“MANUAL”
“DOORWAY H”
“DOORWAY L”
“PASSAGE H”
“PASSAGE L”
“REGISTER H”
“REGISTER L”
“ATM H”
“ATM L”
“LOBBY H”
“LOBBY L”
“GATE H”
“GATE L”
“PARKING LOT H”
“PARKING LOT L”
“LOW LUX H”
“LOW LUX L”
“ELEVATOR”
“COUNTER”
For setting alarm or sensor recording using Motion Detect.
“OFF” : Motion Detect not activated.
“ON” : Motion Detect activated.
“NORMAL” : Motion Detect activated except when the Program Timer is
“TIMER” : Motion Detect activated when the Program Timer is in the
☞ Page 68 ‘Using the Motion Detect Feature’
For setting the sensitivity of the Motion Detect feature.
Sensitivity is set upon selecting an item in “SCENE”.
“DOORWAY” : To detect the opening and closing of the door of building
“PASSAGE” : To detect the movement of people on the passageway in
“REGISTER” : To detect the movement of people operating the cash reg-
“ATM” : To detect the change in users at the entrance of ATM termi-
“LOBBY” : To detect the movement of people in the wide lobby.
“GATE” : To detect the opening and closing of the door at a dim en-
“PARKING LOT” : To detect the cars going in and out of the entrance of car
“LOW LUX” : To detect the movement of people outside a dark house.
“ELEVATOR” : To detect the opening and closing of an elevator door, or
“COUNTER” : To detect the visitors going in and out at the reception of
“SCENE” setting is a reference. Please try other settings if the sensitivity does
not suit your requirement.
The following details can be specified when “MANUAL” is selected:
“DETAIL SETTING” for each camera
“DETECTING SENSITIVITY” ..................... 1 ~ 15 (Factory setting: 7)
“TERMINATION SENSITIVITY” ................. + 0 ~ 14 (Factory setting: +3)
“OBJECT SIZE LEVEL” ............................. 1 ~ 10 (Factory setting: 2)
“DETECTING SENSITIVITY”
“TERMINATION SENSITIVITY”:An offset level for detection sensitivity. The higher the value,
Valid when the sum of “DETECTING SENSITIVITY” and “TERMINATION SEN-
SITIVITY” is 15 or less. If the value is set to more than 15, it will be automatically
adjusted to the maximum value when exiting setting.
“OBJECT SIZE LEVEL”
☞ Page 68 ‘Using the Motion Detect Feature’
in the Standby mode.
Standby mode.
and shop, or people going in and out.
the school, corporation or shop.
ister in the shop/change machine in amusement center, or
the change in the waiting queue.
nals of bank or post office.
trance or employee use entrance, or people going in and
out.
parks outside a house.
people going in and out.
hotel, corporation or shop.
:Level for detection. The higher the value, the higher the sen-
sitivity.
the lesser the interruption to the alarm detection.
:Level for the size of the object to be detected. The higher
the value the lower the sensitivity to detect the motion of
small objects.
“AREA SETTING”
28
For setting the area from which motion is to be detected using the Motion Detect
feature.
☞ Page 68 ‘Using the Motion Detect Feature’
Page 29
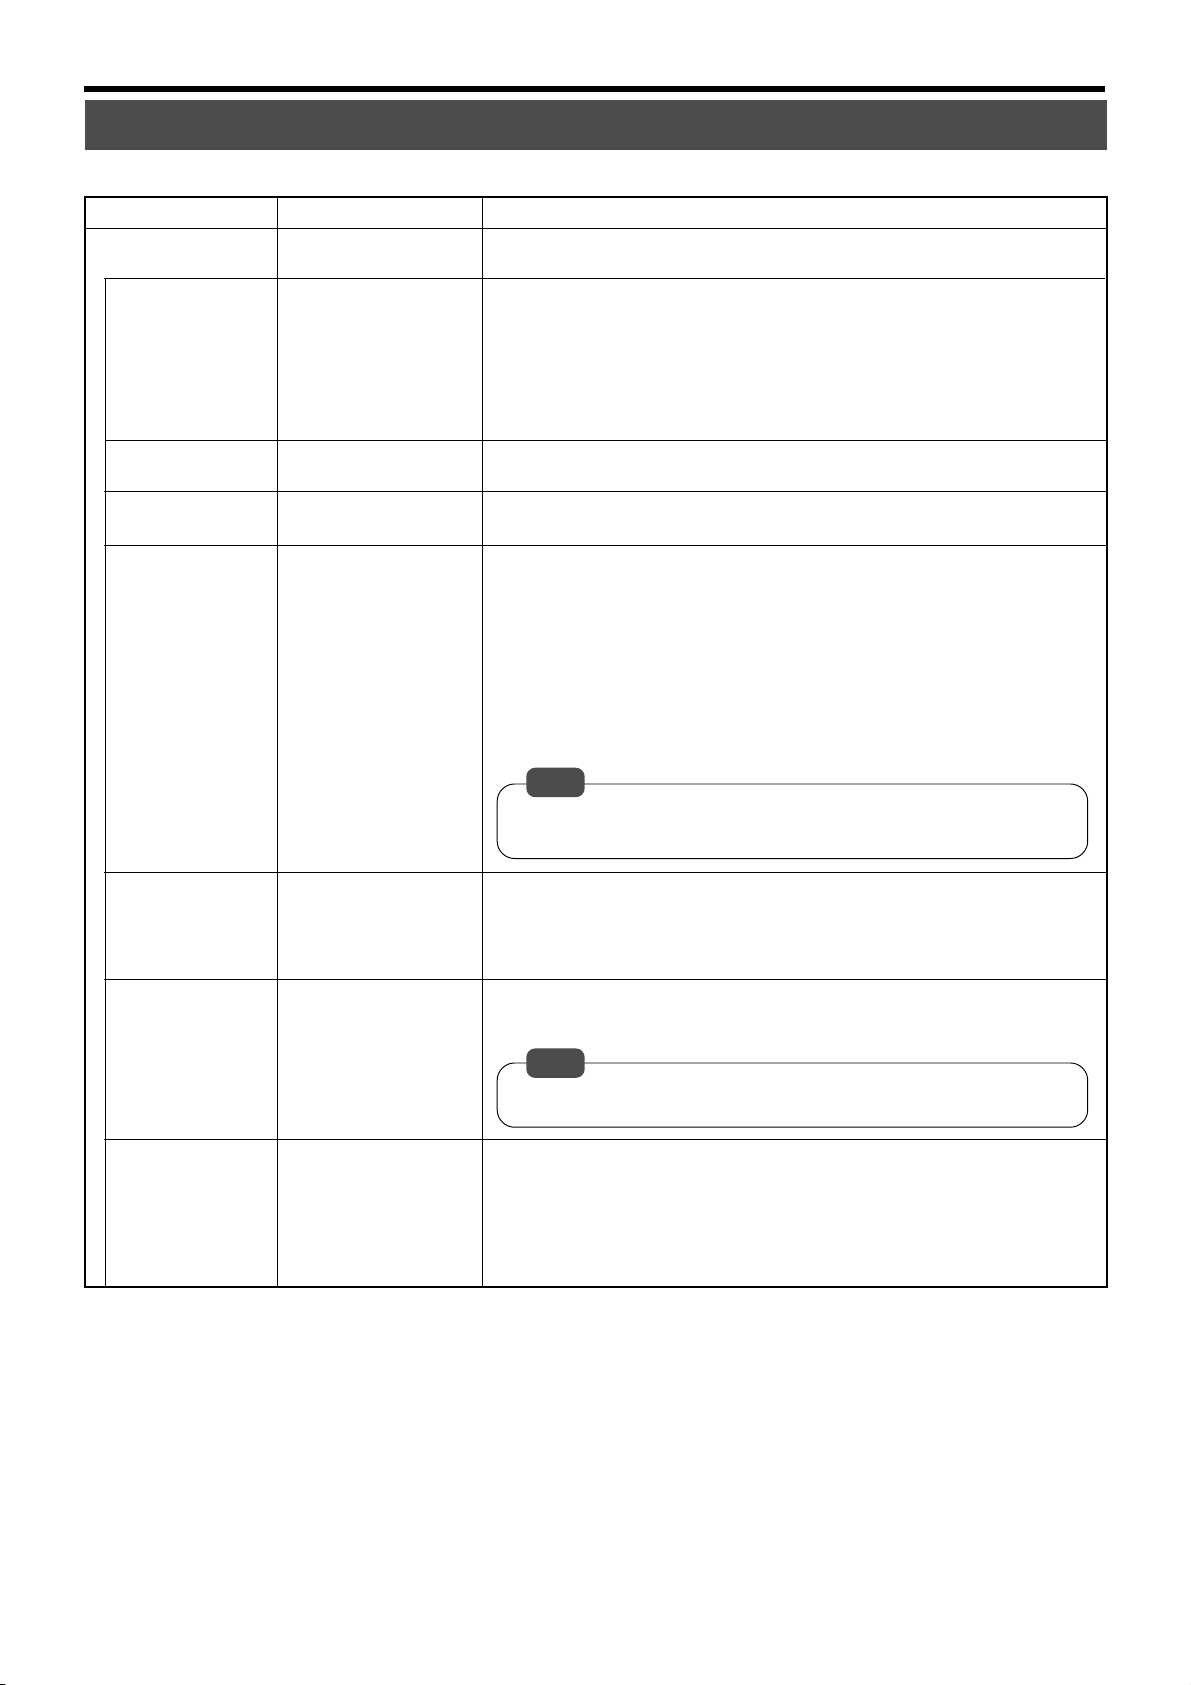
“PROGRAM TIMER” Menu
Setting is disabled when in the Recording mode.
Item Settings Description
“WEEKLY TIMER”
Opens the “WEEKLY TIMER” screen in the “PROGRAM TIMER” for setting.
☞ Page 50 ‘Record Programming Using the Program Timer (Weekly Timer)’
“START”/ “END”
DAY
“START”/ “END”
TIME (HOUR)
“START”/ “END”
TIME (MINUTE)
“FRAME RATE”
“SUN”, “MON”, “TUE”,
“WED”, “THU”, “FRI”,
“SAT”, “DAY”
00 ~ 23
00 ~ 59
25
12.5
8.3
4.2
2.5
1.7
1
1/2
1/6
1/12
Starts/Ends recording at a specific time every week/day.
For setting the day of the week for which recording starts/ends (or to start/end recording on a daily basis). Starting/Ending time can be set using the “START”/ “END”
TIME (HOUR) and “START”/ “END” TIME (MINUTE) items described below.
“SUN” ~ “SAT” : For setting the day of the week for which recording starts/ends.
“DAY” : Starts recording at a specific time everyday. In this case, days of
the week for which recording is to be activated can also be specified.
For setting the starting/ending time (in units of hours) of the timer.
For setting the starting/ending time (in units of minutes) of the timer.
For setting the no. of frames to be recorded.
25 : “25 IPS”
12.5 : “12.5 IPS”
8.3 : “8.3 IPS”
4.2 : “4.2 IPS”
2.5 : “2.5 IPS”
1.7 : “1.7 IPS”
1:“1 IPS”
1/2 : “1/2 IPS”
1/6 : “1/6 IPS”
1/12 : “1/12 IPS”
Note
•“AUDIO REC” switches automatically to “–” when “1/6 IPS” (1 image per 6
seconds) or “1/12 IPS” (1 image per 12 seconds) is selected for “FRAME
RATE”.
“REC QUALITY”
“AUDIO REC”
“EXEC”
“H”
“N”
“B”
“L”
“A”
–
“OFF”
“ON”
“WLY”
For setting the picture quality of the image to be recorded.
“H” : HIGH (High picture quality)
“N” : NORMAL (Normal picture quality)
“B” : BASIC (Basic picture quality)
“L” : LONG (Long-play quality)
For setting whether to record audio signals.
“A” : Audio signals recorded.
–:Audio signals not recorded.
Note
• Switches automatically to “–” when “1/6 IPS” (1 image per 6 seconds) or “1/12
IPS” (1 image per 12 seconds) is selected for “FRAME RATE” in the menu.
For turning on/off the timer.
“OFF” : Timer not activated.
“ON” : Turns “OFF” after recording has been executed once on a specific
day/time. (Remains in the “ON” mode if “DAY” has been selected as
the starting day.)
“WLY” : Timer activates during the time range set on a weekly basis. Dis-
abled when “START”/ “END” DAY is set as “DAY”.
29
Page 30
Menus (continued)
“PROGRAM TIMER” Menu (continued)
[ ● ] are factory settings.
Item Settings Description
“DATE TIMER”
For executing the recording of a program on a specific date.
Opens the “DATE TIMER” screen in the “PROGRAM TIMER” Menu for setting.
☞ Page 52 ‘Record Programming Using the Program Timer (Date Timer)’
“START”/ “END”
TIME (HOUR)
“START”/ “END”
TIME (MINUTE)
“FRAME RATE”
“REC QUALITY”
“AUDIO REC”
00 ~ 23
00 ~ 59
25
12.5
8.3
4.2
2.5
1.7
1
1/2
1/6
1/12
“H”
“N”
“B”
“L”
“A”
–
For setting the starting/ending time (in units of hours) of the timer.
For setting the starting/ending time (in units of minutes) of the timer.
For setting the no. of frames to be recorded.
25 : “25 IPS” 1.7 : “1.7 IPS”
12.5 : “12.5 IPS” 1 : “1 IPS”
8.3 : “8.3 IPS” 1/2 : “1/2 IPS”
4.2 : “4.2 IPS” 1/6 : “1/6 IPS”
2.5 : “2.5 IPS” 1/12 : “1/12 IPS”
Note
•“AUDIO REC” switches automatically to “–” when “1/6 IPS” (1 image per 6
seconds) or “1/12 IPS” (1 image per 12 seconds) is selected for “FRAME
RATE”.
For setting the picture quality of the image to be recorded.
“H” : HIGH (High picture quality)
“N” : NORMAL (Normal picture quality)
“B” : BASIC (Basic picture quality)
“L” : LONG (Long-play quality)
For setting whether to record audio signals.
“A” : Audio signals recorded.
–:Audio signals not recorded.
Note
• Switches automatically to “–” when “1/6 IPS” (1 image per 6 seconds) or “1/12
IPS” (1 image per 12 seconds) is selected for “FRAME RATE” item in the
menu.
“EXEC”
START DATE “M”
(MONTH)
START DATE “D”
(DAY)
“AFTER RELEASE”
● “ON”
“OFF”
1 ~ 12
1 ~ 31
For turning on/off the programmed timer.
“ON” : Starts recording on the specified date every year.
“OFF” : Timer not activated.
For setting the date (in the Month unit) at which timer recording is executed.
For setting the date (in the Day unit) at which timer recording is executed.
Note
• When execution date is set as February 28 and ending date as the following
day, the ending date of the program will be February 29 on leaps years and
March 1 otherwise.
“CONTINUE”
“NORMAL REC”
● “STOP”
Action when timer is released according to the respective settings of “AFTER RELEASE”
CONTINUE
NORMAL REC
STOP STOP STOP
Settings
For setting the action when the timer is released upon pressing the [TIMER] button
during timer recording or timer standby, or when all the timer recordings have ended
and timers are released.
“CONTINUE” : When the timer is released during timer recording, it con-
tinues in the recording mode until the [STOP] button is
pressed.
When the timer is released during timer standby or when
all the timer recordings have ended, it remains in the stop
mode.
“NORMAL REC” : Stops recording using the Program Timer and switches to
recording in the mode as set in the “REC MODE” Menu
(☞ Page 24).
“STOP” : Stops recording using the Program Timer instantly.
Status when timer is released
Timer Recording Timer Standby All programs ended
Continues in the timer recording mode
Starts normal recording Starts normal recording Starts normal recording
STOP
STOPSTOP
30
Page 31

“NETWORK” Menu
[ ● ] are factory settings. (Setting is disabled when in the Recording mode.)
vr716
Settings
For setting the display name of VR-716 when it is connected to the network.
☞ Page 96 ‘Changing Network Settings of VR-716 from PC’
Item Description
“HOST NAME”
“METHOD”
“IP ADDRESS”
“NET MASK”
“DEFAULT GATEWAY”
● “STATIC”
“DHCP”
“OFF”
192.168.0.10
255.255.255.0
192.168.0.254
For selecting the method of setting the IP address.
“STATIC” : Select this when connecting to the network without using the DHCP
server. When “STATIC” is selected, the “IP ADDRESS”, “NET MASK”
and “DEFAULT GATEWAY” items will need to be specified as well.
“DHCP” : Select this when connecting to the network using the DHCP server.
“IP ADDRESS”, “NET MASK” and “DEFAULT GATEWAY” will be
automatically assigned by the DHCP server.
When “DHCP” is selected, the IP address will be masked. It will
appear when displaying the “NETWORK” menu again after exiting
it.
“OFF” : Not connected to the network.
☞ Page 96 ‘Changing Network Settings of VR-716 from PC’
For setting the “IP ADDRESS”, “NET MASK”, “DEFAULT GATEWAY” and “NAME
SERVER”.
Setting of these items will be required when “STATIC” is selected in the “METHOD”
item of the “NETWORK” Menu. Ensure that there are no duplicate IP addresses in
the network.
☞ Page 96 ‘Changing Network Settings of VR-716 from PC’
Note
• Setting will be disabled when “DHCP” address is selected in the “METHOD”
“NAME SERVER”
“MAC ADDRESS”
***.***.***.***
item of the “NETWORK” Menu. (In this case, only the name server can be
altered.)
Unique physical address of the product. This address cannot be altered.
A “IP ADDRESS SETTING IN PROGRESS...” message will be displayed on the monitor screen upon changing the network
settings. All operations are disabled when this is shown.
“DISK UTILITY/MAINTENANCE” Menu
[ ● ] are factory settings. (Setting is disabled when in the Recording mode.)
Item Description
“DISK UTILITY”
“AUTO SCAN DISK”
“MANUAL SCAN
DISK”
“DEFRAG AUTO
MODE”
“DEFRAG DATABASE”
“FORMAT”
“MIRRORING”
“MAINTENANCE”
Settings
“ON”
● “OFF”
“ON”
● “OFF”
“DATE” “TIME” “SET”
01 00 “ON”
● “OFF”
“YES”
● “NO”
“YES”
● “NO”
“YES”
● “NO”
For setting whether to scan disk upon turning “ON” the power of VR-716.
“ON” : Starts to scan disk when the power is ON.
“OFF” : Does not scan disk.
☞ Page 55 ‘Scanning Hard Disk Data (“AUTO SCAN DISK”)’
Scan Disk starts upon setting to “ON” and performing procedures according to the
onscreen message.
☞ Page 56 ‘Scanning Hard Disk Data (“MANUAL SCAN DISK”)’
For performing defrag.
Do so by following procedures according to the onscreen message.
☞ Page 57 ‘Defrag’
For formatting the hard disk.
Do so by following procedures according to the onscreen message.
☞ Page 58 ‘Initializing the Hard Disk (“FORMAT”)’
Specifies the mirroring settings.
Do so by following procedures according to the onscreen message.
☞ Page 59 ‘Hard Disk Mirroring’
“TOTAL TIME”
“POWER OUTAGE
TIME LIST”
Displays the total operating time.
Displays the time at which power failure is detected. Use the [CANCEL] button to
clear the list.
31
Page 32

Routine Uses
Viewing Live Camera Images
When connecting the monitor to the [EE OUT] terminal
Only live images currently displayed can be viewed on the monitor that is connected to the [EE OUT] terminal. Playback of recorded
images and display of menu screens are not possible.
䡵
The following screen will be displayed on the moni-
12 13 14 15 16
EXT REC
IN
INCOMRST
1513119
SER
CLK
OUT
16141210
REC
RST
WAR
COM
OUT
OUT
OUT
LARM
EE OUT
[EE OUT] Terminal
5~81~4/~16
13~169~12
(220V–240V )
SIGNAL GND
AC IN
tor when it is connected to the [EE OUT] terminal:
CAMERA 1 CAMERA 2 CAMERA 5 CAMERA 6
CAMERA 2
CAMERA 4
CAMERA 3 CAMERA 4 CAMERA 7 CAMERA 8
CAMERA 9 CAMERA 10 CAMERA 13 CAMERA 14
CAMERA 11 CAMERA 12 CAMERA 15 CAMERA 16
1~4/~16
CAMERA 1
CAMERA 3
1.4.
HDD
SEARCH
MENU
EXECUTE
REV
SKIP
OPERATE
FWD
LOCK
OUT
VIDEO AUDIO
3.2.
Notes
• When the monitor is connected to the [EE
OUT] terminal and only one camera is set to
“ON” among the “CAMERA 1” ~ “CAMERA 4”
items for each “BLOCK” (1-4) in the “REC
MODE” Menu (☞ page 24), only a single
screen will be displayed on the monitor even
when “1-4” has been selected in the “MONITOR DISPLAY” Menu (☞ page 26). Screens
will be displayed in the quad picture when
“1-16” is selected.
• When all the items in “CAMERA 1” ~ “CAMERA 4” (when Block 1 is selected) is set to
“OFF” in the “REC MODE” Menu (☞ page 24),
the display turns black and recording is not
executed.
CAMERA 6
CAMERA 8
CAMERA 12
CAMERA 16
5~8
9~12
13~16
CAMERA 5
CAMERA 7
CAMERA 9 CAMERA 10
CAMERA 11
CAMERA 13 CAMERA 14
CAMERA 15
䡵 Displaying in the 16 Split Screen Mode
1.
Press the [MENU] button
•Follow procedures in ‘Changing Menu
Settings’ on page 22 to display the
“MONITOR DISPLAY” Menu.
MENU
2.
Press [ ] to move the cursor to “EE OUT 1-4/-
MONITOR DISPLAY
1.EE OUT 1-4/-16
2.SINGLE PICTURE MODE
3.QUAD PICTURE MODE
BLOCK 1
BLOCK 2
BLOCK 3
BLOCK 4
4.ALARM/SENSOR SWITCH
5.SPLIT SCREEN BORDER COLOR
16”
1SEC
1SEC
1SEC
1SEC
OFF
BORDER 3
1-4
32
3.
Turn the jog dial to select
“1-16”
REV FWD
4.
Press [MENU] to end setting
MENU
MONITOR DISPLAY
1.EE OUT 1-4/-16
2.SINGLE PICTURE MODE
3.QUAD PICTURE MODE
BLOCK 1
BLOCK 2
BLOCK 3
BLOCK 4
4.ALARM/SENSOR SWITCH
5.SPLIT SCREEN BORDER COLOR
1-16
1SEC
1SEC
1SEC
1SEC
OFF
BORDER 3
Page 33

When connecting the monitor to the [VIDEO OUT] terminal
Q
E
Display of live images, playback of recorded images and display of menu screens on the monitor are possible when it is connected
to the [VIDEO OUT] terminal.
䡵 The following screen will be displayed on the
AUDIO IN
12345678
VIDEO IN
THRU OUT
SCSI
RS-232C UPS
AUDIO OUT VIDEO OUT
LAN
21
[VIDEO OUT] Terminal
21
AVIS:RIS
EL
monitor upon pressing the ‘Camera Selection’ buttons:
Lights up
3
: Screen switches in the following order each time the
button is pressed.
CAMERA 1 CAMERA 2
12
34
910
11 1
‘Camera Selection’
56
ALARM
SENSOR
78
ALARM
SENSOR
13 14
ALARM
SENSOR
15 16
ALARM
SENSOR
[SEQUENCE MULTI]
SEQUENCE
MULTI
REC STOP
Notes
• Camera Selection buttons can be used to select cameras only when multiple cameras are
set to “ON” among the “CAMERA 1” ~ “CAMERA 4” items for each “BLOCK” (1-4) in the
“REC MODE” Menu (☞ page 24). When cam-
eras that are set to “OFF” are selected, the
monitor will output a black image. If only 1
camera is set to “ON” in each block, the monitor will only display image of cameras in the
“ON” mode.
•When switching the screen using the [SEQUENCE MULTI] button, the display image
prior to switching will freeze for an instant.
CAMERA 3
Single Picture
CAMERA 3 CAMERA 4
Quad Picture
䡵 The following screen will be displayed on the
monitor upon pressing the [SEQUENCE MULTI]
button:
SEQUENCE
MULTI
Single Picture Mode (LED lights up in green)
Quad Picture Mode (LED lights up in green)
CAMERA 1 CAMERA 2
CAMERA 3 CAMERA 4
: Screen switches in the following order each time the
button is pressed.
CAMERA 1 CAMERA 2 CAMERA 3
16 Split Screen Display (LED lights up in orange)
CAMERA 1 CAMERA 2 CAMERA 5 CAMERA 6
CAMERA 3 CAMERA 4
CAMERA 9 CAMERA 10 CAMERA 13 CAMERA 14
CAMERA 11 CAMERA 12 CAMERA 15 CAMERA 16
CAMERA 5 CAMERA 6
CAMERA 7 CAMERA 8
CAMERA 9 CAMERA 10
CAMERA 11 CAMERA 12
CAMERA 7 CAMERA 8
䡵 Refer to page 34 on setting the time interval for switching dis-
plays when in the Single Picture mode.
䡵 Refer to page 35 on setting the time interval for switching dis-
plays when in the Quad Picture mode.
33
Page 34

Routine Uses (continued)
Viewing Live Camera Images
Setting Time Interval for Switching Displays in the Single Picture Mode
This enables the monitor to display images from Camera 1 ~ Camera 16 by switching from one camera to another according to the
preset time interval.
Connect the monitor to the [VIDEO OUT] terminal.
1.5.
HDD
CANCEL
TIMER
DISPLAY
SEARCH
MENU
EXECUTE
REV
SKIP
OPERATE
FWD
LOCK
OUT
VIDEO AUDIO
3.2.4.
12
34
910
11 1
ALARM
SENSOR
ALARM
SENSOR
ALARM
SENSOR
ALARM
SENSOR
56
78
13 14
15 16
SEQUENCE
MULTI
REC STOP
1.
Press the [MENU] button
•Follow procedures in ‘Changing Menu
Settings’ on page 22 to display the
“MONITOR DISPLAY” Menu and the
“SINGLE PICTURE MODE” screens.
2.
Press [ ] to select a camera no.
SINGLE PICTURE MODE
1.CAMERA 1 1SEC
2.CAMERA 2 1SEC
3.CAMERA 3 1SEC
4.CAMERA 4 1SEC
5.CAMERA 5 1SEC
6.CAMERA 6 1SEC
7.CAMERA 7 1SEC
8.CAMERA 8 1SEC
<= : RETURN
9.CAMERA 9 1SEC
10.CAMERA 10 1SEC
11.CAMERA 11 1SEC
12.CAMERA 12 1SEC
13.CAMERA 13 1SEC
14.CAMERA 14 1SEC
15.CAMERA 15 1SEC
16.CAMERA 16 1SEC
•Move the cursor to the camera no. for which monitor display time is to
be altered.
3.
Turn the jog dial to select
the monitor display time
REV FWD
SINGLE PICTURE MODE
1.CAMERA 1 1SEC
2.CAMERA 2 1SEC
3.CAMERA 3 1SEC
4.CAMERA 4 1SEC
5.CAMERA 5 1SEC
6.CAMERA 6 1SEC
7.CAMERA 7 1SEC
8.CAMERA 8 1SEC
<= : RETURN
• Clockwise direction: Increases the time
9.CAMERA 9 1SEC
10.CAMERA 10 1SEC
11.CAMERA 11 1SEC
12.CAMERA 12 1SEC
13.CAMERA 13 1SEC
14.CAMERA 14 1SEC
15.CAMERA 15 1SEC
16.CAMERA 16 1SEC
value.
• Anti-clockwise direction: Decreases the time
value.
6.
Note
• Display in the Single Picture mode is possible
only when the “CAMERA 1” ~ “CAMERA 4”
items are set to “ON” for each block in the “REC
MODE” Menu (☞ page 24) and the “SINGLE
PICTURE MODE” item in the “MONITOR DISPLAY” Menu (☞ page 26) is not set to “OFF”.
4.
Move the cursor to “<=: RETURN” using [ ]
and press [ ]
• This returns the screen display to the
“MONITOR DISPLAY” Menu.
5.
Press [MENU] to end setting
• The display returns to the normal screen.
MENU
6.
Press [SEQUENCE MULTI] to select the Single
SINGLE PICTURE MODE
1.CAMERA 1 1SEC
2.CAMERA 2 1SEC
3.CAMERA 3 1SEC
4.CAMERA 4 1SEC
5.CAMERA 5 1SEC
6.CAMERA 6 1SEC
7.CAMERA 7 1SEC
8.CAMERA 8 1SEC
<= : RETURN
Picture mode
• Monitor starts to switch its display automatically.
• LED lights up in green.
SEQUENCE
MULTI
“SINGLE PICTURE MODE”
9.CAMERA 9 1SEC
10.CAMERA 10 1SEC
11.CAMERA 11 1SEC
12.CAMERA 12 1SEC
13.CAMERA 13 1SEC
14.CAMERA 14 1SEC
15.CAMERA 15 1SEC
16.CAMERA 16 1SEC
34
CAMERA 1 CAMERA 2 CAMERA 3
Page 35

Setting Time Interval for Switching Displays in the Quad Picture Mode
P
Monitor will display images of each block (“BLOCK 1”: “CAMERA 1” ~ “CAMERA 4”, “BLOCK 2”: “CAMERA 5” ~ “CAMERA 8”,
“BLOCK 3”: “CAMERA 9” ~ “CAMERA 12”, “BLOCK 4”: “CAMERA 13” ~ “CAMERA 16”) in quad picture by switching from one block
to another.
1.
Connect the monitor to the [VIDEO OUT] terminal.
1.4.
HDD
CANCEL
TIMER
DISPLAY
SEARCH
MENU
EXECUTE
REV
SKIP
OPERATE
FWD
LOCK
OUT
VIDEO AUDIO
3.2.
12
34
910
11 1
ALARM
SENSOR
ALARM
SENSOR
ALARM
SENSOR
ALARM
SENSOR
56
78
13 14
15 16
SEQUENCE
MULTI
REC STOP
Press the [MENU] button
•Follow procedures in ‘Changing Menu
Settings’ on page 22 to display the
“MONITOR DISPLAY” Menu.
MENU
2.
Press [ ] to select a block under the “QUAD
MONITOR DISPLAY
1.EE OUT 1-4/-16
2.SINGLE PICTURE MODE
3.QUAD PICTURE MODE
BLOCK 1
BLOCK 2
BLOCK 3
BLOCK 4
4.ALARM/SENSOR SWITCH
5.SPLIT SCREEN BORDER COLOR
PICTURE MODE” item
•Move the cursor to the camera block no. for which monitor display time
is to be altered.
MONITOR DISPLAY
1.EE OUT 1-4/-16
2.SINGLE PICTURE MODE
3.QUAD PICTURE MODE
BLOCK 1
BLOCK 2
BLOCK 3
3.
Turn the jog dial to select
BLOCK 4
4.ALARM/SENSOR SWITCH
5.SPLIT SCREEN BORDER COLOR
the monitor display time
REV FWD
1SEC
1SEC
1SEC
1SEC
BORDER 3
1SEC
1SEC
3SEC
1SEC
BORDER 3
1-4
OFF
1-4
OFF
5.
Notes
• Display in the Quad Picture mode is possible
only when multiple cameras are set to “ON” in
the corresponding block of the “REC MODE”
Menu (☞ page 24) and the “QUAD PICTURE
MODE” item in the “MONITOR DISPLAY”
Menu (☞ page 26) is not set to “OFF”. Monitor will display in the single picture if only one
camera is set to “ON” in the block.
• Camera images for each block are displayed
in the layout as follows:
“BLOCK 1”:
“BLOCK 2”:
“BLOCK 3”:
CAMERA 1 CAMERA 2
CAMERA 3 CAMERA 4
CAMERA 5 CAMERA 6
CAMERA 7 CAMERA 8
CAMERA 9 CAMERA 10
CAMERA 11 CAMERA 12
4.
Press [MENU] to end setting
• The display returns to the normal screen.
MENU
5.
Press [SEQUENCE MULTI] to select the Quad
Picture mode
• Monitor starts to switch its display automatically in quad picture.
• LED lights up in green.
SEQUENCE
MULTI
CAMERA 1 CAMERA 2
CAMERA 3 CAMERA 4
“QUAD PICTURE MODE”
CAMERA 5 CAMERA 6
CAMERA 7 CAMERA 8
CAMERA 9 CAMERA 10
CAMERA 11 CAMERA 12
“BLOCK 4”:
CAMERA 13 CAMERA 14
CAMERA 15 CAMERA 16
35
Page 36

Routine Uses (continued)
L
Recording Camera Images
Recording in the Normal Mode
1.2.
HDD
SEARCH
Y
MENU
EXECUTE
REV
SKIP
OPERATE
FWD
LOCK
OUT
VIDEO AUDIO
1.
Press the [MENU] button
• Display the “REC MODE” Menu by following the procedures in ‘Changing Menu Settings’ on page 22 and specify settings for menu items
required for recording.
MENU
● Main menu items related to recording:
Select the camera channel block for which
recording mode is to be set.
• “BLOCK 1”: “CAMERA 1” ~ “CAMERA 4”
• “BLOCK 2”: “CAMERA 5” ~ “CAMERA 8”
• “BLOCK 3”: “CAMERA 9” ~ “CAMERA 12”
REC MODE
1.BLOCK
2.CAMERA 1
SEARCH
6
8
14
SEQUENCE
REC STOP PLAY STILL
MULTI
16
[STOP]
3.
CANCEL
TIMER
DISPLAY
3.CAMERA 2
4.CAMERA 3
5.CAMERA 4
6.FRAME RATE
7.REC QUALITY
8.AUDIO REC
RECORDABLE HOUR
OFF
OFF
OFF
25 IPS
APPROX. 25H
1
ON
H
ON
• “BLOCK 4”: “CAMERA 13” ~ “CAMERA 16”
Specify for each camera whether to execute
recording.
Select the frame rate during recording.
Select the picture quality of the recording
image.
Select whether to execute audio recording.
Displays an estimate of remaining recording
time.
Notes
• Recording will not be executed if all cameras
within a block are set to “OFF” in Step 1.
•Audio recording will be disabled if “1/6 IPS” or
“1/12 IPS” is selected for “FRAME RATE”.
Specify settings for each block.
2.
Press [MENU] to end setting
• This exits the menu to return to the normal screen.
MENU
3.
Press the [REC] button
• The recording mark [_] on the front display lights up and recording
starts.
Front Display
REC
䡵 To stop recording
Press the [STOP] button
STOP
36
Page 37

Repeat Recording (Repeat Record Feature)
VR-716 comes equipped with a Repeat Record feature that returns to the start point and overwrites old data when there is
insufficient hard disk space.
☞ Page 112 ‘Repeat Record’
1.
Press the [MENU] button
1.4.
•Follow procedures in ‘Changing Menu Settings’ on page 22 to display
the “OPERATION/EXT REC” Menu.
HDD
L
SEARCH
Y
MENU
EXECUTE
REV
SKIP
OPERATE
FWD
LOCK
OUT
VIDEO AUDIO
MENU
2.
Press [ ] to select the
OPERATION/EXT REC
[ OPERATION ]
1.RECOVERY REC PRIOR STATE
2.REPEAT REC
3.LANGUAGE SELECTION
4.WATER MARK
5.OPERATION LOCK
[EXT REC]
1.EXT REC MODE
2.SERIES REC
OFF
ENGLISH
OFF
OFF
OFF
ALL
“REPEAT REC” item
3.2.
CANCEL
6
8
14
SEQUENCE
REC STOP PLAY STILL
MULTI
16
SEARCH
TIMER
DISPLAY
5.
•Move the cursor to select.
3.
Turn the jog dial to select the mode of repeat
recording
☞ Page 112 ‘Repeat Record’
REV FWD
4.
Press [MENU] to end setting
• This exits the menu to return to the normal screen.
OPERATION/EXT REC
[ OPERATION ]
1.RECOVERY REC PRIOR STATE
2.REPEAT REC
3.LANGUAGE SELECTION
4.WATER MARK
5.OPERATION LOCK
[EXT REC]
1.EXT REC MODE
2.SERIES REC
OFF
ENGLISH
OFF
OFF
OFF
ALL
MENU
5.
Press the [REC] button
• The recording mark [_] as well as the [REPEAT] indicator on the front
display light up and recording starts.
Front Display
REC
37
Page 38

Routine Uses (continued)
Viewing Recorded Images
Playing Back Recorded Images
Play back the recorded images. To do so, search according to the date of the image to be played back using “DATE/TIME SEARCH”
(☞ page 40) or according to the time when alarm/sensor signals are received using the “ALARM/SENSOR SEARCH” feature (☞
page 41).
1.
Search for the image to view
Connect the monitor for viewing the playback
image to the [VIDEO OUT] terminal.
SEARCH
6
8
14
SEQUENCE
REC STOP PLAY STILL
MULTI
16
CANCEL
TIMER
DISPLAY
• Search according to the date of the image. (☞ page 40)
• Search according to alarm data. (☞ page 41)
2.
Press the [PLAY] button
• The playback mark [<] on the front display lights up and playback starts.
PLAY
Front Display
2.
12
34
910
11 1
Notes
• Playback is possible regardless of the order
in Steps 1 and 2.
• When in the Simultaneous Playback mode that
enables playback and recording at the same
time, press the [STOP] button once to stop
playback, and press the [STOP] button again
to stop recording.
• If no matching image is found in the selected
camera no. during the specified date/time in
Step 2, the “SPECIFIED IMAGE IS NOT RECORDED” and “JUMP WITH SKIP BUTTON”
messages will be displayed on the screen.
• When in the Simultaneous Playback mode and
playback is executed immediately after recording starts, the “NO PLAYBACK POSSIBLE
IMAGES” message will appear on the screen.
In this case, press the [PLAY] button again
after recording has continued for about 1
minute.
Caution
• Refer to the notes related to Summer Time.
(☞ Page 116)
56
ALARM
SENSOR
78
ALARM
SENSOR
13 14
ALARM
SENSOR
15 16
ALARM
SENSOR
3.
‘Camera Selection’
SEQUENCE
MULTI
REC STOP
3.
Press the ‘Camera Selection’ button
• Select the camera no. for which its
image is to be displayed on the monitor.
3
CAMERA 3
To stop playback temporarily
STILL
• Stops playback temporarily.
To restart playback, press the
[PLAY] button.
• Stops playback.
To stop playback
STOP
Upon stopping, the display
switches to the live camera image. Image may be distorted for
an instant upon switching.
Playing Back During Recording (Simultaneous
Playback Mode)
Viewing of recorded images is possible when in the Recording mode.
This will not affect the images recorded.
• The playback mark [<] and the recording mark [_] on the front display
will blink alternately.
Front Display
䡵 The following modes of playback are possible
when in the Simultaneous Playback mode:
• Normal playback
• Direct Jump Playback ☞ Page 40 ‘Searching Image Accord-
ing to Date/Time’
• Jog/Shuttle Playback ☞ Page 42 ‘Adjusting Playback Speed’
• Skip Playback ☞ Page 43 ‘Viewing Recorded Images
in the Skip Mode’
38
Page 39

Viewing Recorded Images in the Split Screen Mode
D
C
1.
Press the [PLAY] button
Connect the monitor for viewing the playback
image to the [VIDEO OUT] terminal.
• The playback mark [<] on the front display lights up and playback starts.
PLAY
Front Display
12
34
910
11 1
ALARM
SENSOR
ALARM
SENSOR
ALARM
SENSOR
ALARM
SENSOR
56
78
13 14
15 16
SEQUENCE
REC STOP PLAY STILL
MULTI
2.3. 1.
‘Camera Selection’
Notes
• If there is no image in the selected camera
no., the “SPECIFIED IMAGE IS NOT RECORDED” message will be displayed. In this
case, jump using the [SKIP] button.
• Display in the Split Screen mode is possible
only when multiple cameras are set to “ON”
for the selected camera block in the “REC
MODE” Menu (☞ Page 24).
• When selecting cameras from different blocks,
images may distort or error may occur in the
time display if the “REC MODE” Menu settings
(☞ Page 24) vary across the blocks.
•Recorded images cannot be viewed in 16 Split
pictures.
2.
Press the ‘Camera Selection’ button
• Select the camera no. for which its image is to be displayed on the monitor.
3
3.
Press the ‘Camera Selection’ button again
• Monitor will display in quad picture.
3
CAMERA 1
CAMERA 3
CAMERA 3
CAMERA 2
CAMERA 4
To exit quad picture
To view image of other cameras in the
Split Screen
3
• Press the ‘Camera Selection’
button.
Image of the selected camera no. will be played back on
5 5
• Select the camera no. to be
displayed on the monitor by pressing the ‘Camera Selection’ button
twice.
the monitor.
CAMERA 5 CAMERA 6
CAMERA 3
CAMERA 5
CAMERA 7 CAMERA 8
39
Page 40

Routine Uses (continued)
Viewing Recorded Images
Searching Image According to Date/Time (“DATE/TIME SEARCH”)
1.
Connect the monitor for viewing the playback
image to the [VIDEO OUT] terminal.
1.
HDD
SEARCH
MENU
EXECUTE
REV
SKIP
OPERATE
FWD
LOCK
OUT
VIDEO AUDIO
3.4.2.4. 5.
Press the [SEARCH] button
• This displays the “SEARCH MENU” screen.
SEARCH
2.
Move the cursor to
“DATE/TIME SEARCH”
using [ ] and press
[ ]
• This displays the “DATE/TIME
SEARCH” screen.
SEARCH MENU
1.SEARCH SETTING
2.DATE/TIME SEARCH
3.ALARM/SENSOR SEARCH
4.SKIP MODE
5.TIME JUMP SETTING
DATE/TIME SEARCH
<= : RETURN
MHM
D
07 12 28
15 2003
[EXEC]:SEARCH
LATEST
ALARM
1HOUR
Y
SEARCH
6
8
14
SEQUENCE
REC STOP PLAY STILL
MULTI
16
CANCEL
TIMER
DISPLAY
6.
Notes
• Date/Time Search can be performed when in
the Recording mode.
• If no image is found on the specified date/time,
the recorded image of the next closest date
will be displayed in the Still mode.
• When “LATEST” is selected during specification of Date/Time Search, the current time will
be displayed as the date/time in the “DATE/
TIME SEARCH” screen. When “PREVIOUS”
is selected, the date/time of the previous
search will be displayed. Memory will be
cleared upon turning off the power and time
display switches to the current time.
(This is also applicable during “ALARM/SENSOR SEARCH” as described in page 41.)
• The order of D/M/Y will change in accordance
with the “DATE DISPLAY” setting in the
“ONSCREEN MODE” menu.
Caution
• Refer to the notes related to Summer Time.
(☞ Page 116)
3.
Turn the jog dial to select a “D” (Day) value
REV FWD
DATE/TIME SEARCH
<= : RETURN<= : RETURN
M
D
MHM
Y
07
15 2003
07 12 28
[EXEC]:SEARCH
• Clockwise direction: Increases the value.
• Anti-clockwise direction: Decreases the value.
4.
Press [ ] and turn the jog dial to select a “M”
(Month) value
•Next, use [ ] and the jog dial to select the “Y” (Year), “H” (Hour) and “M”
(Minute) values accordingly.
REV FWD
5.
Press the [EXECUTE] button
• This starts the Date/Time Search.
Upon completion of search, image of the selected date/time will be
displayed in the Still mode.
EXECUTE
6.
Press the [PLAY] button
• This starts the playback of the image that is retrieved according to the
date/time.
PLAY
DATE/TIME SEARCH
D
M
15 2003
07
<= : RETURN
[EXEC]:SEARCH
Y
HM
12 28
40
Page 41

Searching Image According to Alarm/Sensor Data (“ALARM/SENSOR SEARCH”)
Connect the monitor for viewing the playback
image to the [VIDEO OUT] terminal.
1.
HDD
SEARCH
MENU
EXECUTE
REV
SKIP
OPERATE
FWD
LOCK
OUT
VIDEO AUDIO
3.5.2.3. 4.5.
CANCEL
6
8
14
SEQUENCE
REC STOP PLAY STILL
MULTI
16
SEARCH
TIMER
DISPLAY
6.
<How to clear the Alarm Record List>
• Press the [CANCEL] button when in the
“ALARM/SENSOR SEARCH” screen.
z A screen to confirm deletion of the alarm
records will be displayed. Press the [EXECUTE] button.
z This deletes the entire Alarm Record List
within the hard disk. (To cancel the delete
operation, press the [CANCEL] button.)
• Alarm data will be cleared upon deleting the
Alarm Record List, and Alarm Search will be
disabled. In this case, images recorded during alarm recording are not deleted but are
converted into images in the normal recording mode.
• Deletion of the Alarm Record List is not possible when in the Recording mode. (The
“[CANCEL]: LIST CLEAR” display will disappear.)
1.
Press the [SEARCH] button
• This displays the “SEARCH MENU”
screen.
SEARCH
2.
Move the cursor to the
“ALARM/SENSOR
SEARCH” item using
[ ] and press [ ]
• This displays the “ALARM/SENSOR
SEARCH” screen.
3.
Turn the jog dial to select a “D” (Day) value
SEARCH MENU
1.SEARCH SETTING
2.DATE/TIME SEARCH
3.ALARM/SENSOR SEARCH
4.SKIP MODE
5.TIME JUMP SETTING
ALARM/SENSOR SEARCH
D
15 2003
No.
CAMERA D M Y H M S
****** ** **-**-****
** ** ** **
******
******
** ** ** **
******
** ** ** **
** ** ** **
******
** ** ** **
******
******
** ** ** **
******
** ** ** **
******
** ** ** **
<= : RETURN
[CANCEL]:LIST CLEAR [EXEC]:SEARCH
•Next, use [ ] and the jog dial to select the “M” (Month), “Y” (Year), “H”
(Hour) and “M” (Minute) values accordingly.
4.
Press the [EXECUTE] button
REV FWD
• This starts the Alarm Search. Upon
completion of search, the Alarm List
on or about the specified date/time will
be displayed in order starting from the
most current record.
EXECUTE
ALARM/SENSOR SEARCH
D
15 2003
No.
CAMERA D M Y H M S
****** ** **-**-****
** ** ** **
******
******
** ** ** **
******
** ** ** **
** ** ** **
******
** ** ** **
******
******
** ** ** **
******
** ** ** **
******
** ** ** **
<= : RETURN
[CANCEL]:LIST CLEAR [EXEC]:SEARCH
ALARM/SENSOR SEARCH
D
15 2003
No.
CAMERA D M Y H M S
****** ** **-**-****
******
** ** ** **
******
** ** ** **
000002 5
1234
000001
** ** ** **
******
******
** ** ** **
******
** ** ** **
******
** ** ** **
<= : RETURN
[CANCEL]:LIST CLEAR [EXEC]:SEARCH
LATEST
ALARM
1HOUR
MHM
Y
07 12 28
** ** **
MHM
07 12 28
** ** **
MHM
07 12 28
** ** **
678
**-**-****
**-**-****
**-**-****
**-**-****
**-**-****
**-**-****
**-**-****
**-**-****
Y
**-**-****
**-**-****
**-**-****
**-**-****
**-**-****
**-**-****
**-**-****
**-**-****
Y
**-**-****
**-**-****
16-07- 2003
15-07- 2003
**-**-****
**-**-****
**-**-****
**-**-****
**:**:**
**:**:**
**:**:**
**:**:**
**:**:**
**:**:**
**:**:**
**:**:**
**:**:**
**:**:**
**:**:**
**:**:**
**:**:**
**:**:**
**:**:**
**:**:**
**:**:**
**:**:**
**:**:**
**:**:**
**:**:**
10:10: 10
:10: 10
10
**:**:**
**:**:**
**:**:**
**:**:**
Notes
•A maximum of 4 camera Nos. may be recorded
in each Alarm List when multiple alarms are
simultaneously triggered. Playback in this case
will start from the image of the smallest camera No.. To view image of other cameras, select accordingly using the Camera Selection
buttons.
• If there is no alarm record on the specified date/
time, the next closest alarm record will be selected.
• When the Alarm List is displayed, the [SKIP]
button can be used to jump scroll the list in
units of 100 records.
• When the Alarm No. in the alarm search list
exceeds 7 digits, only the lower 6 digits will be
displayed.
• As searching will take time when there is an
increase in the number of alarms, frequent usage to receive alarms is not recommended.
5.
Turn the jog dial and press [EXECUTE] to select
the alarm to view
• Image of the selected alarm will be
displayed in the Still mode.
REV FWD
6.
Press the [PLAY] button
EXECUTE
• This starts the playback of the selected alarm image.
PLAY
ALARM/SENSOR SEARCH
D
MHM
15 2003
No.
****** ** **-**-****
******
** ** ** **
******
** ** ** **
000002 5
1234
000001
** ** ** **
******
******
** ** ** **
******
** ** ** **
******
** ** ** **
<= : RETURN
[CANCEL]:LIST CLEAR [EXEC]:SEARCH
Y
07 12 28
CAMERA D M Y H M S
** ** **
**-**-****
**-**-****
678
16-07-2003
15-07-2003
**-**-****
**-**-****
**-**-****
**-**-****
**:**:**
**:**:**
**:**:**
10:10:10
10
:10:
**:**:**
**:**:**
**:**:**
**:**:**
10
41
Page 42

Routine Uses (continued)
Viewing Recorded Images
Adjusting Playback Speed (Jog/Shuttle Playback)
Playback speed can be adjusted by turning the jog/shuttle dial. This feature is very useful when searching for a specific screen for
viewing.
䡵 Turn the shuttle dial
SEARCH
Shuttle dial
MENU
EXECUTE
REV
Jog dial
HDD
OPERATE
FWD
LOCK
OUT
SKIP
VIDEO AUDIO
Note
•Frame rate when turning the jog dial at a
faster speed may be lower as compared
with when turning it at a slower speed.
When in the Playback mode
Still
Slow ForwardSlow Reverse
x–1
REV FWD
x–3
x–5
x–15
x–60
x–360
This starts the Slow Motion Playback as well as the Fast Forward and Fast
Reverse Playback modes.
x1
x3
x5
x15
x60
x360
䡵 Turn the jog dial
When in the Playback mode
REV FWD
HDD
REV FWD
HDD
Starts frame-by-frame playback in the forward direction.
SEARCH
6
8
14
SEQUENCE
REC STOP PLAY STILL
MULTI
16
[STOP]
CANCEL
TIMER
DISPLAY
[PLAY]
• When the jog dial is turned, frame-to-frame playback is performed. Playback switches to the Still mode upon releasing the dial.
● Press the [STOP] or [PLAY] button to stop Jog Play-
back/Shuttle Playback
STOP
• Monitor display switches to the
live camera image.
Starts frame-by-frame playback in the reverse direction.
PLAY
• Monitor display switches to the
normal playback screen.
42
Page 43

Viewing Recorded Images in the Skip Mode
Connect the monitor for viewing the playback
image to the [VIDEO OUT] terminal.
4.1.
HDD
SEARCH
MENU
EXECUTE
REV
SKIP
OPERATE
FWD
LOCK
OUT
VIDEO AUDIO
3. 5.2.
Note
• The “TIME JUMP SETTING” can be specified by selecting one of the following:
“1MIN”, “5MIN”, “10MIN”, “30MIN”,
“1HOUR”, “4HOURS”, “1DAY”, “1WEEK”
(“1HOUR” is selected in the factory settings.)
1.
Press the [SEARCH] button
• This displays the “SEARCH MENU”
screen.
SEARCH
2.
Press [ ] to select the
SEARCH MENU
1.SEARCH SETTING
2.DATE/TIME SEARCH
3.ALARM/SENSOR SEARCH
4.SKIP MODE
5.TIME JUMP SETTING
“SKIP MODE” item
•Move the cursor to select.
3.
Turn the jog dial to select a Skip mode
SEARCH MENU
1.SEARCH SETTING
2.DATE/TIME SEARCH
3.ALARM/SENSOR SEARCH
4.SKIP MODE
5.TIME JUMP SETTING
4.
Press [MENU] to end setting
• This exits the menu to return to the normal screen.
LATEST
ALARM
1HOUR
“TIME” : Time Jump Setting
“ALARM” : Alarm Jump Setting
“EVENT” : Event Jump Setting
LATEST
ALARM
1HOUR
Caution
• When in the Stop mode, pressing the [SKIP]
button (o) jumps to the oldest event while
pressing the [SKIP] button (i) jumps to
the most current event.
• Time Jump cannot be executed if the date/
time is not set.
Set the date/time in advance.
☞ Page 18 ‘Setting the Date/Time’
MENU
5.
Press the [SKIP] button when in the Playback
mode
• Pressing the button skips the playback image.
SKIP
o :Jumps from the current play-
back image to an old image and
displays it in the Still mode.
i :Jumps from the current play-
back image to a new image and
displays it in the Still mode.
䡵 To select the Time Jump interval
SEARCH MENU
1.SEARCH SETTING
2.DATE/TIME SEARCH
3.ALARM/SENSOR SEARCH
4.SKIP MODE
5.TIME JUMP SETTING
Select using the “TIME JUMP SETTING” item in the “SEARCH MENU”
LATEST
screen.
ALARM
☞ Page 114 ‘Skip Jump’
1HOUR
43
Page 44

Routine Uses (continued)
Viewing Recorded Images
Enlarging the Still Image (Still Image Zoom)
Still images can be viewed in an enlarged mode.
Connect the monitor for viewing the playback
image to the [VIDEO OUT] terminal.
C STOP PLAY STILL
CANCEL
TIMER
DISPLAY
SEARCH
MENU
EXECUTE
REV
2.3. 4.
1.
Playback the image
•Perform Steps 1 ~ 3 of ‘Playing Back Recorded Images’ on page 38.
2.
Press the [STILL] button
• Press the button at the point for which
display is to be enlarged.
STILL
3.
Press and hold the [STILL] button for a while
•A Guide Box for specifying the zoom area will be displayed on the
screen.
STILL
Notes
• Still image cannot be enlarged when playback screen is in quad.
• Pressing the [CANCEL] button during setting exits the Still Image Zoom mode.
4.
Move using the [ / / / ] buttons
•Move the Guide Box to the position on the image that is to be enlarged.
• The position can be moved diagonally by pressing buttons simultaneously.
44
Page 45

C STOP PLAY STILL
5. 6.7.8.
CANCEL
TIMER
DISPLAY
SEARCH
MENU
EXECUTE
5.
Press the [STILL] button
REV
• Each time the [STILL] button is
pressed, x2 Zoom or x4 Zoom in both
vertical and horizontal directions can
be selected.
STILL
6.
Press the [EXECUTE] button
• The portion within the Guide Box will
be displayed in full screen.
EXECUTE
(x2 Zoom)
(x4 Zoom)
Notes
• Still image cannot be enlarged when playback screen is in quad.
• Pressing the [CANCEL] button during setting exits the Still Image Zoom mode.
7.
Scroll using the [ / / / ] buttons
• The zoom screen can be scrolled by pressing the buttons in the direction to be viewed.
• It can be moved diagonally by pressing buttons simultaneously.
8.
Press the [CANCEL] button
• This exits the Zoom mode.
• Press [PLAY] to return to the normal playback mode.
45
Page 46

Routine Uses (continued)
Record Programming Using the Program Timer
Weekly Timer (For starting recording on a specific day and time on a weekly basis)
<Example>
Execute recording from 8:00 a.m. every
Friday ~ 5:00 p.m. every Saturday.
䡵 Recording Mode
• Cameras 1 - 4
“FRAME RATE” : “12.5 IPS”
“REC QUALITY” : “H”
“AUDIO REC” : “A” (ON)
• Cameras 5 - 8
“FRAME RATE” : “25 IPS”
“REC QUALITY” : “N”
“AUDIO REC” : “A” (ON)
• Cameras 9 - 12
“FRAME RATE” : “2.5 IPS”
“REC QUALITY” : “N”
“AUDIO REC” : – (OFF)
• Cameras 13 - 16
“FRAME RATE” : “1/2 IPS”
“REC QUALITY” : “B”
“AUDIO REC” : – (OFF)
1.
HDD
SEARCH
MENU
EXECUTE
REV
SKIP
OPERATE
FWD
LOCK
OUT
VIDEO AUDIO
1.
Press the [MENU] button
•Follow procedures in ‘Changing Menu Settings’ on page 22 to display
the “PROGRAM TIMER” Menu and the “WEEKLY TIMER” Menu
screens.
MENU
2.
Press [ ] to select the line
for which program is to be
WEEKLY TIMER
SUN
MON
TUE
WED
THU
FRI
SAT
DAY
<= : RETURN
[CANCEL]:CANCEL
CAM1-4 CAM5-8 CAM9-12 CAM13-16 EXEC
START END
** ** ** ** ** ** ***** ***** ***** *****
** ** ** ** ** ** ***** ***** ***** *****
** ** ** ** ** ** ***** ***** ***** *****
** ** ** ** ** ** ***** ***** ***** *****
** ** ** ** ** ** ***** ***** ***** *****
** ** ** ** ** ** ***** ***** ***** *****
** ** ** ** ** ** ***** ***** ***** *****
** ** ** ** ** ** ***** ***** ***** *****
SUN MON
TUE WED THU FRI SAT
set
•For example, move the cursor to the third line. (Program can be set for
any line.)
3.
Turn the jog dial to adjust the starting day to “FRI”
(Friday)
REV FWD
WEEKLY TIMER
SUN
MON
FRI
WED
THU
FRI
SAT
DAY
<= : RETURN
[CANCEL]:CANCEL
CAM1-4 CAM5-8 CAM9-12 CAM13-16 EXEC
START END
** ** ** ** ** ** ***** ***** ***** *****
** ** ** ** ** ** ***** ***** ***** *****
** ** ** ** ** ** ***** ***** ***** *****
** ** ** ** ** ** ***** ***** ***** *****
** ** ** ** ** ** ***** ***** ***** *****
** ** ** ** ** ** ***** ***** ***** *****
** ** ** ** ** ** ***** ***** ***** *****
** ** ** ** ** ** ***** ***** ***** *****
SUN MON
TUE WED THU FRI SAT
3.4.5.2.4.5.
Notes
• Only 1 line on the “WEEKLY TIMER” Menu is
executed at any one time and there will be no
simultaneous execution of multiple lines.
• Upon pressing the [TIMER] button when there
is an overlap in the program, the [OVERLAP]
wording on the front display will light up, blink
for about 10 seconds and continue to remain
lit. When an overlap occurs between programs
in the Weekly Timer and Date Timer, the
[OVERLAP] wording will not light up. In this
case, priority is given to the Date Timer settings. When “DAY” is set in the “WEEKLY
TIMER” Menu, [OVERLAP] will not be displayed even when it overlaps with other timer
programs. In this case, priority will be given to
the program with an earlier starting time.
• It may take about 20 seconds before [OVERLAP] is displayed.
Caution
• Refer to the notes related to Summer Time.
(☞ Page 116)
4.
Press [ ] to move cursor to the
Hour
under the “START” column, and turn the jog dial
to select “08”
•To set the minute value of the starting
time, press [
Minute
position and adjust by turning
] to move cursor to the
the jog dial.
REV FWD
5.
Press [ ] to move cursor to the
WEEKLY TIMER
SUN
MON
FRI
WED
THU
FRI
SAT
DAY
<= : RETURN
[CANCEL]:CANCEL
CAM1-4 CAM5-8 CAM9-12 CAM13-16 EXEC
START END
** ** ** ** ** ** ***** ***** ***** *****
** ** ** ** ** ** ***** ***** ***** *****
08 00
** ** ** ** ***** ***** ***** *****
** ** ** ** ** ** ***** ***** ***** *****
** ** ** ** ** ** ***** ***** ***** *****
** ** ** ** ** ** ***** ***** ***** *****
** ** ** ** ** ** ***** ***** ***** *****
** ** ** ** ** ** ***** ***** ***** *****
SUN MON
TUE WED THU FRI SAT
Day of the Week
position under the “END” column, and turn the
jog dial to select “SAT” (SATURDAY)
REV FWD
WEEKLY TIMER
SUN
MON
FRI
WED
THU
FRI
SAT
DAY
<= : RETURN
[CANCEL]:CANCEL
CAM1-4 CAM5-8 CAM9-12 CAM13-16 EXEC
START END
** ** ** ** ** ** ***** ***** ***** *****
** ** ** ** ** ** ***** ***** ***** *****
08 00 SAT
** ** ** ***** ***** ***** *****
** ** ** ** ** ** ***** ***** ***** *****
** ** ** ** ** ** ***** ***** ***** *****
** ** ** ** ** ** ***** ***** ***** *****
** ** ** ** ** ** ***** ***** ***** *****
** ** ** ** ** ** ***** ***** ***** *****
SUN MON
TUE WED THU FRI SAT
position
46
Page 47

A
K
T
10.10.
SEARCH
CANCEL
TIMER
DISPLAY
STILL
MENU
EXECUTE
REV
HDD
FWD
SKIP
6.7.8.6.7.8.9.
Notes
• The “FRAME RATE”, “REC QUALITY” and
“AUDIO REC” settings of Block 1 (Cameras 1
- 4) will be automatically copied to the remaining blocks. To make alterations, do so by turning the jog dial.
• In the case of camera blocks for which recording is not to be executed, press the [CANCEL]
button to clear the settings.
• Maximum duration of nonstop recording is less
than 1 week.
• “FRAME RATE”, “REC QUALITY” and “AUDIO
REC” settings can be specified for each Block
(Cameras 1 - 4, Cameras 5 - 8, Cameras 9 12, Cameras 13 - 16).
• Timer mode will not be activated if the “AUDIO REC” setting remains as “*”. Make sure
that this is changed to “A” or “–”.
WEEKLY TIMER
SUN
MON
TUE
WED
THU
FRI
SAT
DAY
<= : RETURN
[CANCEL]:CANCEL
CAM1-4 CAM5-8 CAM9-12 CAM13-16 EXEC
START END
** ** ** ** ** ** ***** ***** ***** *****
** ** ** ** ** ** ***** ***** ***** *****
08 00 SAT
17 00
12.5
MON
25HA 2.5 N-NA 1/2B-
TUE
WED
THU FRI SAT
** ** ** ** ** ** ***** ***** ***** *****
** ** ** ** ** ** ***** ***** ***** *****
** ** ** ** ** ** ***** ***** ***** *****
** ** ** ** ** ** ***** ***** ***** *****
** ** ** ** ** ** ***** ***** ***** *****
SUN
12.5 H A
**
VIDEO
6.
OPER
LOC
OU
Press [ ] to move cursor to the
under the “END” column, and turn the jog dial to
select “17”
•To set the minute value of the ending
time, press [
Minute
position and adjust by turning
] to move cursor to the
the jog dial.
REV FWD
7.
Press [ ] and turn the jog dial to set “FRAME
Hour
position
WEEKLY TIMER
SUN
MON
FRI
WED
THU
FRI
SAT
DAY
<= : RETURN
[CANCEL]:CANCEL
CAM1-4 CAM5-8 CAM9-12 CAM13-16 EXEC
START END
** ** ** ** ** ** ***** ***** ***** *****
** ** ** ** ** ** ***** ***** ***** *****
08 00
SAT
17 00
** ***** ***** ** ****** **
** ** ** ** ** ** ***** ***** ***** *****
** ** ** ** ** ** ***** ***** ***** *****
** ** ** ** ** ** ***** ***** ***** *****
** ** ** ** ** ** ***** ***** ***** *****
** ** ** ** ** ** ***** ***** ***** *****
SUN
MON
TUE WED THU FRI SAT
RATE”, “REC QUALITY” and “AUDIO REC”
WEEKLY TIMER
REV FWD
8.
Press [ ] to move cursor to the “EXEC” column,
SUN
MON
FRI
WED
THU
FRI
SAT
DAY
<= : RETURN
[CANCEL]:CANCEL
CAM1-4 CAM5-8 CAM9-12 CAM13-16 EXEC
START END
** ** ** ** ** ** ***** ***** ***** *****
** ** ** ** ** ** ***** ***** ***** *****
08 00
SAT
17 00 HA NA 1/2B-
12.5
MON
TUE
25HA 2.5 N-
THU FRI SAT
WED
** ** ** ** ** ** ***** ***** ***** *****
** ** ** ** ** ** ***** ***** ***** *****
** ** ** ** ** ** ***** ***** ***** *****
** ** ** ** ** ** ***** ***** ***** *****
** ** ** ** ** ** ***** ***** ***** *****
SUN
**
and turn the jog dial to select “WLY”(WEEKLY)
REV FWD
WEEKLY TIMER
SUN
MON
FRI
WED
THU
FRI
SAT
DAY
<= : RETURN
[CANCEL]:CANCEL
CAM1-4 CAM5-8 CAM9-12 CAM13-16 EXEC
START END
** ** ** ** ** ** ***** ***** ***** *****
** ** ** ** ** ** ***** ***** ***** *****
08 00 SAT
17 00 HA NA 1/2B- WLYC
12.5
** ** ** ** ** ** ***** ***** ***** *****
** ** ** ** ** ** ***** ***** ***** *****
** ** ** ** ** ** ***** ***** ***** *****
** ** ** ** ** ** ***** ***** ***** *****
** ** ** ** ** ** ***** ***** ***** *****
SUN
25 2.5 N-
MON
TUE WED THU FRI SAT
WLY
“FRAME RATE”
“AUDIO REC”: ON
“REC QUALITY”
• When in the Timer Standby mode, turning OFF
of the [OPERATE] button as well as recording
operations will be disabled.
• When an invalid timer has been set, this invalid setting will be automatically deleted upon
exiting the Timer screen. In this case, the “DELETE INVALID TIMER SETTING” message
will be displayed on the screen. To clear this
message, press the [CANCEL] button.
Caution
• When all the settings for cameras in a block
(CAMERA 1 ~ CAMERA 4 / CAMERA 5 ~
CAMERA 8 / CAMERA 9 ~ CAMERA 12 /
CAMERA 13 ~ CAMERA 16) under the “REC
MODE” Menu (☞ Page 24) are set to “OFF”,
Program Timer Recording will not be activated
for that block.
9.
Move the cursor to “<=: RETURN” using [ ] and
press [ ]
• This displays the “PROGRAM TIMER”
Menu screen.
10.
Press [MENU] to return to the normal screen, and
WEEKLY TIMER
SUN
MON
FRI
WED
THU
FRI
SAT
DAY
<= : RETURN
[CANCEL]:CANCEL
CAM1-4 CAM5-8 CAM9-12 CAM13-16 E XEC
START END
** ** ** ** ** ** ***** ***** ***** *****
** ** ** ** ** ** ***** ***** ***** *****
08 00 SAT
17 00 HA NA 1/2B- WLY
12.5
** ** ** ** ** ** ***** ***** ***** *****
** ** ** ** ** ** ***** ***** ***** *****
** ** ** ** ** ** ***** ***** ***** *****
** ** ** ** ** ** ***** ***** ***** *****
** ** ** ** ** ** ***** ***** ***** *****
SUN MON
25 2.5 N-
TUE WED THU FRI SAT
press [TIMER]
• The Timer indicator on the front display lights up and switches to the
Timer Standby mode.
• The Weekly Timer Program No. on the front display lights up.
(The number of the line for which timer recording has been set will light
up)
MENU
TIMER
47
Page 48

Routine Uses (continued)
Record Programming Using the Program Timer
Weekly Timer (For starting recording on a specific time of the day)
<Example>
Execute recording from 8:00 a.m. ~ 5:00
p.m. everyday.
䡵 Recording Mode
• Cameras 1 - 4
“FRAME RATE” : “12.5 IPS”
“REC QUALITY” : “H”
“AUDIO REC” : “A” (ON)
• Cameras 5 - 8
“FRAME RATE” : “25 IPS”
“REC QUALITY” : “N”
“AUDIO REC” : “A” (ON)
• Cameras 9 - 12
“FRAME RATE” : “2.5 IPS”
“REC QUALITY” : “N”
“AUDIO REC” : – (OFF)
• Cameras 13 - 16
“FRAME RATE” : “1/2 IPS”
“REC QUALITY” : “B”
“AUDIO REC” : – (OFF)
1.
HDD
SEARCH
MENU
EXECUTE
REV
SKIP
OPERATE
FWD
LOCK
OUT
VIDEO AUDIO
1.
Press the [MENU] button
•Follow procedures in ‘Changing Menu Settings’ on page 22 to display
the “PROGRAM TIMER” Menu and the “WEEKLY TIMER” Menu
screens.
MENU
2.
Press [ ] to select the
line for which program is to
WEEKLY TIMER
SUN
MON
TUE
WED
THU
FRI
SAT
DAY
<= : RETURN
[CANCEL]:CANCEL
CAM1-4 CAM5-8 CAM9-12 CAM13-16 EXEC
START END
** ** ** ** ** ** ***** ***** ***** *****
** ** ** ** ** ** ***** ***** ***** *****
** ** ** ** ** ** ***** ***** ***** *****
** ** ** ** ** ** ***** ***** ***** *****
** ** ** ** ** ** ***** ***** ***** *****
** ** ** ** ** ** ***** ***** ***** *****
** ** ** ** ** ** ***** ***** ***** *****
** ** ** ** ** ** ***** ***** ***** *****
SUN MON
TUE WED THU FRI SAT
be set
•For example, move the cursor to the third line. (Program can be set for
any line.)
3.
Turn the jog dial to select “DAY”
REV FWD
WEEKLY TIMER
SUN
MON
DAY
WED
THU
FRI
SAT
DAY
<= : RETURN
[CANCEL]:CANCEL
CAM1-4 CAM5-8 CAM9-12 CAM13-16 EXEC
START END
** ** ** ** ** ** ***** ***** ***** *****
** ** ** ** ** ** ***** ***** ***** *****
** ** ** ** ** ** ***** ***** ***** *****
** ** ** ** ** ** ***** ***** ***** *****
** ** ** ** ** ** ***** ***** ***** *****
** ** ** ** ** ** ***** ***** ***** *****
** ** ** ** ** ** ***** ***** ***** *****
** ** ** ** ** ** ***** ***** ***** *****
SUN MON
TUE WED THU FRI SAT
3.4.5.2.4.5.
Note
• When “DAY” is selected for the starting day
of the week, specification of ending day will
not be necessary.
Caution
• Refer to the notes related to Summer Time.
(☞ Page 116)
4.
Press [ ] to move cursor to the
Hour
under the “START” column, and turn the jog dial
to select “08”
•To set the minute value of the starting
time, press [
Minute
position and adjust by turning
] to move cursor to the
the jog dial.
REV FWD
5.
Press [ ] to move cursor to the
WEEKLY TIMER
SUN
MON
DAY
WED
THU
FRI
SAT
DAY
<= : RETURN
[CANCEL]:CANCEL
CAM1-4 CAM5-8 CAM9-12 CAM13-16 EXEC
START END
** ** ** ** ** ** ***** ***** ***** *****
** ** ** ** ** ** ***** ***** ***** *****
08 00
** ** ** ** ***** ***** ***** *****
** ** ** ** ** ** ***** ***** ***** *****
** ** ** ** ** ** ***** ***** ***** *****
** ** ** ** ** ** ***** ***** ***** *****
** ** ** ** ** ** ***** ***** ***** *****
** ** ** ** ** ** ***** ***** ***** *****
SUN MON
TUE WED THU FRI SAT
Hour
under the “END” column, and turn the jog dial to
select “17”
•To set the minute value of the ending
time, press [
Minute
position and adjust by turning
] to move cursor to the
the jog dial.
REV FWD
WEEKLY TIMER
SUN
MON
DAY
WED
THU
FRI
SAT
DAY
<= : RETURN
[CANCEL]:CANCEL
CAM1-4 CAM5-8 CAM9-12 CAM13-16 EXEC
START END
** ** ** ** ** ** ***** ***** ***** *****
** ** ** ** ** ** ***** ***** ***** *****
08 00 **17 00
** ***** ***** ** ****** **
** ** ** ** ** ** ***** ***** ***** *****
** ** ** ** ** ** ***** ***** ***** *****
** ** ** ** ** ** ***** ***** ***** *****
** ** ** ** ** ** ***** ***** ***** *****
** ** ** ** ** ** ***** ***** ***** *****
SUN MON
TUE WED THU FRI SAT
position
position
48
Page 49

A
K
T
10.10.
SEARCH
CANCEL
TIMER
DISPLAY
STILL
MENU
EXECUTE
REV
HDD
FWD
SKIP
6.7.8.6.7.8.9.
Notes
• The “FRAME RATE”, “REC QUALITY” and
“AUDIO REC” settings of Block 1 (Cameras
1 - 4) will be automatically copied to the
remaining blocks. To make alterations, do
so by turning the jog dial.
• In the case of camera blocks for which recording is not to be executed, press the
[CANCEL] button to clear the settings.
• “FRAME RATE”, “REC QUALITY” and “AUDIO REC” settings can be specified for each
Block (Cameras 1 - 4, Cameras 5 - 8, Cameras 9 - 12, Cameras 13 - 16).
WEEKLY TIMER
SUN
MON
TUE
WED
THU
FRI
SAT
DAY
<= : RETURN
[CANCEL]:CANCEL
“FRAME RATE”
• During “DAY” setting, ending time switches
automatically to the following day if the ending time set is earlier than the starting time.
• When an invalid timer has been set, this
invalid setting will be automatically deleted
upon exiting the Timer screen. In this case,
the “DELETE INVALID TIMER SETTING”
message will be displayed on the screen.
To clear this message, press the [CANCEL]
button.
Caution
•Pay attention when changing the day of the
week at the final line in Step 8.
Other record program settings for which
“DAY” has been selected will also be altered.
• Maximum duration of nonstop recording is
less than 24 hours.
• When all the settings for cameras in a block
(CAMERA 1 ~ CAMERA 4 / CAMERA 5 ~
CAMERA 8 / CAMERA 9 ~ CAMERA12 /
CAMERA 13 ~ CAMERA16) under the
“REC MODE” Menu (☞ Page 24) are set to
“OFF”, Program Timer Recording will not
be activated for that block.
CAM1-4 CAM5-8 CAM9-12 CAM13-16 EXEC
START END
** ** ** ** ** ** ***** ***** ***** *****
** ** ** ** ** ** ***** ***** ***** *****
08 00 SAT
17 00
12.5
MON
25HA 2.5 N-NA 1/2B-
TUE
WED
THU FRI SAT
** ** ** ** ** ** ***** ***** ***** *****
** ** ** ** ** ** ***** ***** ***** *****
** ** ** ** ** ** ***** ***** ***** *****
** ** ** ** ** ** ***** ***** ***** *****
** ** ** ** ** ** ***** ***** ***** *****
SUN
12.5 H A
“AUDIO REC”: ON
“REC QUALITY”
**
VIDEO
OPER
6.
LOC
OU
Press [ ] and turn the jog dial to set “FRAME
RATE”, “REC QUALITY” and “AUDIO REC”
WEEKLY TIMER
REV FWD
7.
Press [ ] to move cursor to the “EXEC” column,
SUN
MON
DAY
WED
THU
FRI
SAT
DAY
<= : RETURN
[CANCEL]:CANCEL
CAM1-4 CAM5-8 CAM9-12 CAM13-16 EXEC
START END
** ** ** ** ** ** ***** ***** ***** *****
** ** ** ** ** ** ***** ***** ***** *****
08 00
17 00 HA NA 1/2B-
12.5
**
** ** ** ** ** ** ***** ***** ***** *****
** ** ** ** ** ** ***** ***** ***** *****
** ** ** ** ** ** ***** ***** ***** *****
** ** ** ** ** ** ***** ***** ***** *****
** ** ** ** ** ** ***** ***** ***** *****
SUN MON
25 2.5 N-
TUE WED THU FRI SAT
**
and turn the jog dial to select “ON”
WEEKLY TIMER
REV FWD
8.
Press [ ] to move the cursor to the final line
• Check that “SUN” ~ “SAT” has been selected. When “– –” is displayed, select
the day of the week to execute recording using [
9.
Move the cursor to “<=: RETURN” using [ ] and
] and the jog dial.
REV FWD
SUN
MON
DAY
WED
THU
FRI
SAT
DAY
<= : RETURN
[CANCEL]:CANCEL
WEEKLY TIMER
SUN
MON
DAY
WED
THU
FRI
SAT
DAY
<= : RETURN
[CANCEL]:CANCEL
CAM1-4 CAM5-8 CAM9-12 CAM13-16 EXEC
START END
** ** ** ** ** ** ***** ***** ***** *****
** ** ** ** ** ** ***** ***** ***** *****
08 00
17 00 HA NA 1/2B- ON
12.5
**
** ** ** ** ** ** ***** ***** ***** *****
** ** ** ** ** ** ***** ***** ***** *****
** ** ** ** ** ** ***** ***** ***** *****
** ** ** ** ** ** ***** ***** ***** *****
** ** ** ** ** ** ***** ***** ***** *****
SUN
START END
** ** ** ** ** ** ***** ***** ***** *****
** ** ** ** ** ** ***** ***** ***** *****
08 00
**
** ** ** ** ** ** ***** ***** ***** *****
** ** ** ** ** ** ***** ***** ***** *****
** ** ** ** ** ** ***** ***** ***** *****
** ** ** ** ** ** ***** ***** ***** *****
** ** ** ** ** ** ***** ***** ***** *****
SUN
25 2.5 N-
MON
TUE
THU FRI SAT
WED
CAM1-4 CAM5-8 CAM9-12 CAM13-16 E XEC
17 00 HA NA 1/2B- ON
12.5
25 2.5 N-
MON
TUE
THU FRI SAT
WED
press [ ]
• This displays the “PROGRAM TIMER”
Menu screen.
10.
Press [MENU] to return to the normal screen, and
WEEKLY TIMER
SUN
MON
DAY
WED
THU
FRI
SAT
DAY
<= : RETURN
[CANCEL]:CANCEL
CAM1-4 CAM5-8 CAM9-12 CAM13-16 EXEC
START END
** ** ** ** ** ** ***** ***** ***** *****
** ** ** ** ** ** ***** ***** ***** *****
08 00
17 00 HA NA 1/2B- ON
12.5
MON
TUE
25 2.5 N-
THU FRI SAT
WED
**
** ** ** ** ** ** ***** ***** ***** *****
** ** ** ** ** ** ***** ***** ***** *****
** ** ** ** ** ** ***** ***** ***** *****
** ** ** ** ** ** ***** ***** ***** *****
** ** ** ** ** ** ***** ***** ***** *****
SUN
press [TIMER]
• The Timer indicator on the front display lights up and switches to the
Timer Standby mode.
• The Weekly Timer Program No. on the front display lights up.
(The number of the line for which timer recording has been set will light
up)
MENU
TIMER
49
Page 50

Routine Uses (continued)
Record Programming Using the Program Timer
Weekly Timer (For starting recording on a specific day of the week and time)
<Example>
Execute recording from 9:30 a.m. ~ 10:30
p.m. on every Monday, Wednesday and
Friday.
䡵 Recording Mode
• Cameras 1 - 4
“FRAME RATE” : “12.5 IPS”
“REC QUALITY” : “H”
“AUDIO REC” : “A” (ON)
• Cameras 5 - 8
“FRAME RATE” : “25 IPS”
“REC QUALITY” : “N”
“AUDIO REC” : “A” (ON)
• Cameras 9 - 12
“FRAME RATE” : “2.5 IPS”
“REC QUALITY” : “N”
“AUDIO REC” : – (OFF)
• Cameras 13 - 16
“FRAME RATE” : “1/2 IPS”
“REC QUALITY” : “B”
“AUDIO REC” : – (OFF)
1.
HDD
SEARCH
MENU
EXECUTE
REV
SKIP
OPERATE
FWD
LOCK
OUT
VIDEO AUDIO
1.
Press the [MENU] button
•Follow procedures in ‘Changing Menu Settings’ on page 22 to display
the “PROGRAM TIMER” Menu and the “WEEKLY TIMER” Menu
screens.
MENU
2.
Press [ ] to select the
line for which program is to
WEEKLY TIMER
SUN
MON
TUE
WED
THU
FRI
SAT
DAY
<= : RETURN
[CANCEL]:CANCEL
CAM1-4 CAM5-8 CAM9-12 CAM13-16 EXEC
START END
** ** ** ** ** ** ***** ***** ***** *****
** ** ** ** ** ** ***** ***** ***** *****
** ** ** ** ** ** ***** ***** ***** *****
** ** ** ** ** ** ***** ***** ***** *****
** ** ** ** ** ** ***** ***** ***** *****
** ** ** ** ** ** ***** ***** ***** *****
** ** ** ** ** ** ***** ***** ***** *****
** ** ** ** ** ** ***** ***** ***** *****
SUN
MON
TUE
THU FRI SAT
WED
be set
•For example, move the cursor to select the first line.
(Program can be set for any line.)
3.
Turn the jog dial to select “DAY”
REV FWD
WEEKLY TIMER
DAY
MON
TUE
WED
THU
FRI
SAT
DAY
<= : RETURN
[CANCEL]:CANCEL
CAM1-4 CAM5-8 CAM9-12 CAM13-16 E XEC
START END
** ** ** ** ** ** ***** ***** ***** *****
** ** ** ** ** ** ***** ***** ***** *****
** ** ** ** ** ** ***** ***** ***** *****
** ** ** ** ** ** ***** ***** ***** *****
** ** ** ** ** ** ***** ***** ***** *****
** ** ** ** ** ** ***** ***** ***** *****
** ** ** ** ** ** ***** ***** ***** *****
** ** ** ** ** ** ***** ***** ***** *****
SUN MON
TUE WED THU FRI SAT
3.4.5.2.4.5.
Note
• When “DAY” is selected for the starting day
of the week, specification of ending day will
not be necessary.
Caution
• Refer to the notes related to Summer Time.
(☞ Page 116)
4.
Press [ ] to move cursor to the
Hour
under the “START” column, and turn the jog dial
to select “09”
•To set the minute value of the starting
time, press [
Minute
position and adjust by turning
] to move cursor to the
the jog dial.
REV FWD
5.
Press [ ] to move cursor to the
WEEKLY TIMER
DAY
MON
TUE
WED
THU
FRI
SAT
DAY
<= : RETURN
[CANCEL]:CANCEL
CAM1-4 CAM5-8 CAM9-12 CAM13-16 EXEC
START END
09 30
** ** ** ** ***** ***** ***** *****
** ** ** ** ** ** ***** ***** ***** *****
** ** ** ** ** ** ***** ***** ***** *****
** ** ** ** ** ** ***** ***** ***** *****
** ** ** ** ** ** ***** ***** ***** *****
** ** ** ** ** ** ***** ***** ***** *****
** ** ** ** ** ** ***** ***** ***** *****
** ** ** ** ** ** ***** ***** ***** *****
SUN MON
TUE WED THU FRI SAT
Hour
under the “END” column, and turn the jog dial to
select “22”
•To set the minute value of the ending
time, press [
Minute
position and adjust by turning
] to move cursor to the
the jog dial.
REV FWD
WEEKLY TIMER
DAY
MON
TUE
WED
THU
FRI
SAT
DAY
<= : RETURN
[CANCEL]:CANCEL
CAM1-4 CAM5-8 CAM9-12 CAM13-16 EXEC
START END
09 30
22
30
** ***** ***** ***** *****
**
** ** ** ** ** ** ***** ***** ***** *****
** ** ** ** ** ** ***** ***** ***** *****
** ** ** ** ** ** ***** ***** ***** *****
** ** ** ** ** ** ***** ***** ***** *****
** ** ** ** ** ** ***** ***** ***** *****
** ** ** ** ** ** ***** ***** ***** *****
** ** ** ** ** ** ***** ***** ***** *****
SUN MON
TUE WED THU FRI SAT
position
position
50
Page 51

A
K
T
10.10.
SEARCH
CANCEL
TIMER
DISPLAY
STILL
MENU
EXECUTE
REV
HDD
FWD
SKIP
6.7.8.6.7.8.9.
Notes
• The “FRAME RATE”, “REC QUALITY” and
“AUDIO REC” settings of Block 1 (Cameras
1 - 4) will be automatically copied to the
remaining blocks. To make alterations, do
so by turning the jog dial.
• In the case of camera blocks for which recording is not to be executed, press the
[CANCEL] button to clear the settings.
• “FRAME RATE”, “REC QUALITY” and “AUDIO REC” settings can be specified for each
Block (Cameras 1 - 4, Cameras 5 - 8, Cameras 9 - 12, Cameras 13 - 16).
WEEKLY TIMER
SUN
MON
TUE
WED
THU
FRI
SAT
DAY
<= : RETURN
[CANCEL]:CANCEL
“FRAME RATE”
• During “DAY” setting, ending time switches
automatically to the following day if the ending time set is earlier than the starting time.
• When an invalid timer has been set, this
invalid setting will be automatically deleted
upon exiting the Timer screen. In this case,
the “DELETE INVALID TIMER SETTING”
message will be displayed on the screen.
To clear this message, press the [CANCEL]
button.
Caution
•Pay attention when changing the day of the
week at the final line in Step
Other record program settings for which
“DAY” has been selected will also be altered.
• When all the settings for cameras in a block
(CAMERA 1 ~ CAMERA 4 / CAMERA 5 ~
CAMERA 8 / CAMERA 9 ~ CAMERA 12 /
CAMERA 13 ~ CAMERA 16) under the
“REC MODE” Menu (☞ Page 24) are set to
“OFF”, Program Timer Recording will not
be activated for that block.
CAM1-4 CAM5-8 CAM9-12 CAM13-16 EXEC
START END
** ** ** ** ** ** ***** ***** ***** *****
** ** ** ** ** ** ***** ***** ***** *****
08 00 SAT
17 00
12.5
MON
25HA 2.5 N-NA 1/2B-
TUE
WED
THU FRI SAT
** ** ** ** ** ** ***** ***** ***** *****
** ** ** ** ** ** ***** ***** ***** *****
** ** ** ** ** ** ***** ***** ***** *****
** ** ** ** ** ** ***** ***** ***** *****
** ** ** ** ** ** ***** ***** ***** *****
SUN
12.5 H A
“AUDIO REC”: ON
“REC QUALITY”
8
**
.
VIDEO
OPER
6.
LOC
OU
Press [ ] and turn the jog dial to set “FRAME
RATE”, “REC QUALITY” and “AUDIO REC”
REV FWD
7.
Press [ ] to move cursor to the “EXEC” column,
WEEKLY TIMER
DAY
MON
TUE
WED
THU
FRI
SAT
DAY
<= : RETURN
[CANCEL]:CANCEL
CAM1-4 CAM5-8 CAM9-12 CAM13-16 E XEC
START END
09 30
22
30 15 15HA 15HA 15HA WLYHA
**
** ** ** ** ** ** ***** ***** ***** *****
** ** ** ** ** ** ***** ***** ***** *****
** ** ** ** ** ** ***** ***** ***** *****
** ** ** ** ** ** ***** ***** ***** *****
** ** ** ** ** ** ***** ***** ***** *****
** ** ** ** ** ** ***** ***** ***** *****
** ** ** ** ** ** ***** ***** ***** *****
SUN MON
TUE WED THU FRI SAT
and turn the jog dial to select “ON”
WEEKLY TIMER
REV FWD
8.
Press [ ] to move the cursor to the final line
DAY
MON
TUE
WED
THU
FRI
SAT
DAY
<= : RETURN
[CANCEL]:CANCEL
• Use [ ] and the jog dial to select the
day of the week to execute recording.
Select “– –” for days of the week for
which recording is not to be executed.
REV FWD
9.
Move the cursor to “<=: RETURN” using [ ] and
WEEKLY TIMER
DAY
MON
TUE
WED
THU
FRI
SAT
DAY
<= : RETURN
[CANCEL]:CANCEL
CAM1-4 CAM5-8 CAM9-12 CAM13-16 EXEC
START END
09 30
22
30 HA NA 1/2B- ON
12.5
**
** ** ** ** ** ** ***** ***** ***** *****
** ** ** ** ** ** ***** ***** ***** *****
** ** ** ** ** ** ***** ***** ***** *****
** ** ** ** ** ** ***** ***** ***** *****
** ** ** ** ** ** ***** ***** ***** *****
** ** ** ** ** ** ***** ***** ***** *****
** ** ** ** ** ** ***** ***** ***** *****
SUN
START END
09 30
**
** ** ** ** ** ** ***** ***** ***** *****
** ** ** ** ** ** ***** ***** ***** *****
** ** ** ** ** ** ***** ***** ***** *****
** ** ** ** ** ** ***** ***** ***** *****
** ** ** ** ** ** ***** ***** ***** *****
** ** ** ** ** ** ***** ***** ***** *****
** ** ** ** ** ** ***** ***** ***** *****
--
25 2.5 N-
MON
TUE
THU FRI SAT
WED
CAM1-4 CAM5-8 CAM9-12 CAM13-16 EXEC
22
30 HA NA 1/2B- ON
12.5
25 2.5 N-
MON
--
-- FRI --
WED
press [ ]
• This displays the “PROGRAM TIMER”
Menu screen.
10.
Press [MENU] to return to the normal screen, and
WEEKLY TIMER
DAY
MON
TUE
WED
THU
FRI
SAT
DAY
<= : RETURN
[CANCEL]:CANCEL
CAM1-4 CAM5-8 CAM9-12 CAM13-16 E XEC
START END
09 30
22
30 HA NA 1/2B- ON
12.5
MON
--
25 2.5 N-
-- FRI --
WED
**
** ** ** ** ** ** ***** ***** ***** *****
** ** ** ** ** ** ***** ***** ***** *****
** ** ** ** ** ** ***** ***** ***** *****
** ** ** ** ** ** ***** ***** ***** *****
** ** ** ** ** ** ***** ***** ***** *****
** ** ** ** ** ** ***** ***** ***** *****
** ** ** ** ** ** ***** ***** ***** *****
--
press [TIMER]
• The Timer indicator on the front display lights up.
• The Weekly Timer Program No. on the front display lights up.
(The number of the line for which timer recording has been set will light
up)
MENU
TIMER
51
Page 52

Routine Uses (continued)
Record Programming Using the Program Timer
Date Timer
For executing the recording of a program on different dates.
1.
<Example>
Execute recording from 8:00 a.m. ~ 11:00
p.m. on 1 October and 10 October.
䡵 Recording Mode
• Cameras 1 - 4
“FRAME RATE” : “8.3 IPS”
“REC QUALITY” : “H”
“AUDIO REC” : “A” (ON)
• Cameras 5 - 8
Do not record
• Cameras 9 - 12
“FRAME RATE” : “4.2 IPS”
“REC QUALITY” : “B”
“AUDIO REC” : – (OFF)
• Cameras 13 - 16
Do not record
1.
HDD
SEARCH
MENU
EXECUTE
REV
SKIP
OPERATE
FWD
LOCK
OUT
VIDEO AUDIO
Press the [MENU] button
•Follow procedures in ‘Changing Menu Settings’ on page 22 to display
the “PROGRAM TIMER” Menu and the “DATE TIMER” Menu screens.
MENU
2.
Press [ ] to select the line
for which program is to be
set
•For example, move the cursor to select the first line.
(Program can be set for any line.)
3.
Turn the jog dial to set the
starting
Day
column to
“1”
REV FWD
DATE TIMER
<= : RETURN
[CANCEL]:CANCEL
DATE TIMER
<= : RETURN
[CANCEL]:CANCEL
CAM1-4 CAM5-8 CAM9-12 CAM13-16 EXEC
START END
** ** ** ** ** ***** *** ** ***** ** ***
1.
** - **
2.
** - **
3.
** - **
4.
** - **
5.
** - **
6.
** - **
7.
** - **
8.
** - **
CAM1-4 CAM5-8 CAM9-12 CAM13-16 EXEC
START END
** ** ** ** ** ***** *** ** ***** ** ***
1.
01
- **
2.
** - **
3.
** - **
4.
** - **
5.
** - **
6.
** - **
7.
** - **
8.
** - **
10.
11.
12.
13.
14.
15.
16.
9.
10.
11.
12.
13.
14.
15.
16.
9.
** - **
** - **
** - **
** - **
** - **
** - **
** - **
** - **
** - **
** - **
** - **
** - **
** - **
** - **
** - **
** - **
3.4.5.6.2.4.5.6.
Caution
• Refer to the notes related to Summer Time.
(☞ Page 116)
4.
Press [ ] to move cursor to the starting
Month
position, and turn the jog
dial to select “10”
REV FWD
5.
Perform setting for other
Day
and
Month
items
accordingly
• Repeat Steps 2 ~ 4 to set the
Month
.
6.
Press [ ] to move cursor to the
Day
and
DATE TIMER
<= : RETURN
[CANCEL]:CANCEL
DATE TIMER
<= : RETURN
[CANCEL]:CANCEL
CAM1-4 CAM5-8 CAM9-12 CAM13-16 EXEC
START END
** ** ** ** ******* *** ** ***** ** ***
1.
01
10
-
2.
** - **
3.
** - **
4.
** - **
5.
** - **
6.
** - **
7.
** - **
8.
** - **
CAM1-4 CAM5-8 CAM9-12 CAM13-16 EXEC
START END
** ** ** ** ** ***** *** ** ***** ** ***
1.
01
10
-
2.
10
10
-
3.
** - **
4.
** - **
5.
** - **
6.
** - **
7.
** - **
8.
** - **
Hour
under the “START” column, and turn the jog dial
to select “08”
•To set the minute value of the starting
time, press [
Minute
position and adjust by turning
] to move cursor to the
the jog dial.
REV FWD
DATE TIMER
<= : RETURN
[CANCEL]:CANCEL
CAM1-4 CAM5-8 CAM9-12 CAM13-16 EXEC
START END
08 00
** ** ** ***** *** ** ***** ** ***
1.
01
10
-
2.
10
10
-
3.
** - **
4.
** - **
5.
** - **
6.
** - **
7.
** - **
8.
** - **
9.
** - **
10.
** - **
11.
** - **
12.
** - **
13.
** - **
14.
** - **
15.
** - **
16.
** - **
9.
** - **
10.
** - **
11.
** - **
12.
** - **
13.
** - **
14.
** - **
15.
** - **
16.
** - **
position
9.
** - **
10.
** - **
11.
** - **
12.
** - **
13.
** - **
14.
** - **
15.
** - **
16.
** - **
52
Page 53

R
C
U
11.11.
HDD
SEARCH
CANCEL
TIMER
DISPLAY
L
MENU
EXECUTE
REV
SKIP
OPE
FWD
VIDEO
7.8.9.7.8.9.10.
Notes
• The “FRAME RATE”, “REC QUALITY” and
“AUDIO REC” settings of Block 1 (Cameras
1 - 4) will be automatically copied to the
remaining blocks. To make alterations, do
so by turning the jog dial.
• In the case of camera blocks for which recording is not to be executed, press the
[CANCEL] button to clear the settings.
• Maximum duration of nonstop recording will
last for less than 24 hours.
• “FRAME RATE”, “REC QUALITY” and “AUDIO REC”settings can be specified for each
Block (Cameras 1 - 4, Cameras 5 - 8, Cameras 9 - 12, Cameras 13 - 16).
7.
Press [ ] to move cursor to the
LO
O
under the “END” column, and turn the jog dial to
select “23”
•To set the minute value of the ending
time, press [
Minute
position and adjust by turning
] to move cursor to the
the jog dial.
REV FWD
8.
Press [ ] and turn the jog dial to set “FRAME
DATE TIMER
<= : RETURN
[CANCEL]:CANCEL
Hour
CAM1-4 CAM5-8 CAM9-12 CAM13-16 EXEC
START END
08 00 23 00
** ***** *** ** ***** ** ***
1.
01
10
-
2.
10
10
-
3.
** - **
4.
** - **
5.
** - **
6.
** - **
7.
** - **
8.
** - **
position
9.
** - **
10.
** - **
11.
** - **
12.
** - **
13.
** - **
14.
** - **
15.
** - **
16.
** - **
RATE”, “REC QUALITY” and “AUDIO REC”
REV FWD
DATE TIMER
<= : RETURN
[CANCEL]:CANCEL
CAM1-4 CAM5-8 CAM9-12 CAM13-16 EXEC
START END
08 00 23 00 8.3HA
1.
01
10
-
2.
10
10
-
3.
** - **
4.
** - **
5.
** - **
6.
** - **
7.
** - **
8.
** - **
** ***
9.
10.
11.
12.
13.
14.
15.
16.
4.2B
** - **
** - **
** - **
** - **
** - **
** - **
** - **
** - **
**** ***
DATE TIMER
<= : RETURN
[CANCEL]:CANCEL
CAM1-4 CAM5-8 CAM9-12 CAM13-16 EXEC
START END
08 00 23 00 8.3HA
1.
01
10
-
2.
10
10
-
3.
** - **
4.
** - **
5.
** - **
6.
** - **
7.
** - **
8.
** - **
** ***
9.
10.
11.
12.
13.
14.
15.
16.
4.2B ON
** ***
** - **
** - **
** - **
** - **
** - **
** - **
** - **
** - **
8.3 H A
“FRAME RATE”
“AUDIO REC”: ON
“REC QUALITY”
• Ending time switches automatically to the
following day if the ending time set is earlier than the starting time.
• When an invalid timer has been set, this
invalid setting will be automatically deleted
upon exiting the Timer screen. In this case,
the “DELETE INVALID TIMER SETTING”
message will be displayed on the screen.
To clear this message, press the [CANCEL]
button.
Caution
• When all the settings for cameras in a block
(CAMERA 1 ~ CAMERA 4 / CAMERA 5 ~
CAMERA 8 / CAMERA 9 ~ CAMERA12 /
CAMERA 13 ~ CAMERA16) under the
“REC MODE” Menu (☞ Page 24) are set to
“OFF”, Program Timer Recording will not
be activated for that block.
9.
Press [ ] and turn the jog dial to select “ON”
under the “EXEC” column
DATE TIMER
REV FWD
<= : RETURN
[CANCEL]:CANCEL
10.
Move the cursor to “<=: RETURN” using [ ] and
CAM1-4 CAM5-8 CAM9-12 CAM13-16 EXEC
START END
08 00 23 00 8.3HA
1.
01
10
-
2.
10
10
-
3.
** - **
4.
** - **
5.
** - **
6.
** - **
7.
** - **
8.
** - **
** ***ON** ***
press [ ]
DATE TIMER
<= : RETURN
[CANCEL]:CANCEL
11.
Press [MENU] to return to the normal screen, and
CAM1-4 CAM5-8 CAM9-12 CAM13-16 EXEC
START END
08 00 23 00 8.3HA
1.
01
10
-
2.
10
10
-
3.
** - **
4.
** - **
5.
** - **
6.
** - **
7.
** - **
8.
** - **
** ***ON** ***
press [TIMER]
• The Timer indicator on the front display lights up.
MENU
TIMER
9.
10.
11.
12.
13.
14.
15.
16.
9.
10.
11.
12.
13.
14.
15.
16.
4.2B
4.2B
** - **
** - **
** - **
** - **
** - **
** - **
** - **
** - **
** - **
** - **
** - **
** - **
** - **
** - **
** - **
** - **
53
Page 54

Routine Uses (continued)
L
R
O
U
L
R
C
U
Record Programming Using the Program Timer
Canceling a Record Program
1.
Press the [MENU] button
L
Notes
CANCEL
TIMER
DISPLAY
SEARCH
2.
1.3.
MENU
EXECUTE
HDD
REV
SKIP
OPE
FWD
L
O
VIDEO
•Follow procedures in ‘Changing Menu Settings’ on page 22 to display
the “PROGRAM TIMER” Menu and the “WEEKLY TIMER” Menu
screens.
MENU
2.
Press [ ] to select the
record program to delete
•For example, delete the fourth line of the record program.
WEEKLY TIMER
SUN
MON
TUE
FRI
THU
FRI
SAT
DAY
<= : RETURN
[CANCEL]:CANCEL
CAM1-4 CAM5-8 CAM9-12 CAM13-16 E XEC
START END
** ** ** ** ** ** ***** ***** ***** *****
** ** ** ** ** ** ***** ***** ***** *****
** ** ** ** ** ** ***** ***** ***** *****
** ** ** ** ** ** ***** ***** ***** *****
** ** ** ** ** ** ***** ***** ***** *****
** ** ** ** ** ** ***** ***** ***** *****
** ** ** ** ** ** ***** ***** ***** *****
** ** ** ** ** ** ***** ***** ***** *****
SUN MON
TUE WED THU FRI SAT
•Move the cursor away from the “CAM” 1-4 /
5-8 / 9-12 / 13-16 items and press the [CANCEL] button to clear all settings for a particular day.
• If the [CANCEL] button is pressed with the
cursor inside any of the “CAM” 1-4 / 5-8 /
9-12 / 13-16 columns, only that camera
block will be cleared.
Changing a Record Program
1.
CANCEL
TIMER
DISPLAY
SEARCH
MENU
EXECUTE
REV
HDD
FWD
SKIP
3.2.3.
VIDEO
3.
Press the [CANCEL] button
• The selected record program will be deleted.
CANCEL
1.
Press the [MENU] button
•Follow procedures in ‘Changing Menu Settings’ on page 22 to display
the “PROGRAM TIMER” Menu and the “WEEKLY TIMER” Menu
screens.
OPE
LO
O
MENU
2.
Press [ ] to select the
record program to alter
WEEKLY TIMER
DAY
MON
TUE
FRI
THU
FRI
SAT
DAY
<= : RETURN
[CANCEL]:CANCEL
CAM1-4 CAM5-8 CAM9-12 CAM13-16 EXEC
START END
** ** ** ** ** ** ***** ***** ***** *****
** ** ** ** ** ** ***** ***** ***** *****
** ** ** ** ** ** ***** ***** ***** *****
09 00 **23 00 8.3HA 8.3NA 4.2B- 12.5B ON
** ** ** ** ** ** ***** ***** ***** *****
** ** ** ** ** ** ***** ***** ***** *****
** ** ** ** ** ** ***** ***** ***** *****
** ** ** ** ** ** ***** ***** ***** *****
SUN MON
TUE WED THU FRI SAT
•For example, alter the fourth line of the record program.
3.
Press [ ] to select the
item and alter by turning
the jog dial
REV FWD
WEEKLY TIMER
DAY
MON
TUE
FRI
THU
FRI
SAT
DAY
<= : RETURN
[CANCEL]:CANCEL
CAM1-4 CAM5-8 CAM9-12 CAM13-16 E XEC
START END
** ** ** ** ** ** ***** ***** ***** *****
** ** ** ** ** ** ***** ***** ***** *****
** ** ** ** ** ** ***** ***** ***** *****
09 00
SAT
23 00 ON
8.3HA 8.3NA 4.2B- 12.5B
** ** ** ** ** ** ***** ***** ***** *****
** ** ** ** ** ** ***** ***** ***** *****
** ** ** ** ** ** ***** ***** ***** *****
** ** ** ** ** ** ***** ***** ***** *****
SUN MON
TUE WED THU FRI SAT
54
Page 55

Useful Features
Hard Disk Maintenance
When power failure occurs while in the Recording mode or Sensor Record Standby mode, or when failure occurs in the recorded
data of the hard disk, recording/playback may not function properly. To repair the hard disk, two types of scan disk functions are
available on VR-716:
•Auto Scan Disk
Scans the hard disk automatically upon turning on the power.
• Manual Scan Disk
Performs manual scanning of the hard disk. Perform Manual Scan Disk regularly when the “AUTO SCAN DISK” item in the menu
is set to “OFF” or when the power of the equipment remains on for extensive periods of time.
Scanning Hard Disk Data (“AUTO SCAN DISK”)
1.
Press the [MENU] button
•Follow procedures in ‘Changing Menu Settings’ on page 22 to display
the “DISK UTILITY/MAINTENANCE” Menu and the “DISK UTILITY”
screen.
MENU
DISK UTILITY
1.AUTO SCAN DISK
2.MANUAL SCAN DISK OFF
3.DEFRAG DATABASE
4.FORMAT
5.MIRRORING
OFF
SEARCH
1.4.
MENU
EXECUTE
HDD
REV
SKIP
OPERATE
FWD
LOCK
OUT
VIDEO AUDIO
3.2.
Notes
•To cancel the Auto Scan Disk operation,
press the [CANCEL] button.
• Scan the hard disk once a month if recording is continuously executed.
2.
Press [ ] to select the
“AUTO SCAN DISK” item
•Move the cursor to select.
3.
Turn the jog dial to select “ON”
REV FWD
4.
Press [MENU] to end setting
• The display returns to the normal screen.
• Scanning will be executed when the power is turned on.
MENU
DISK UTILITY
1.AUTO SCAN DISK
2.MANUAL SCAN DISK OFF
3.DEFRAG DATABASE
4.FORMAT
5.MIRRORING
ON
Caution
• Scanning may take a longer time if the data
volume of recorded events are heavy or if
there is a large number of events. (Approx.
a few hours)
• Recording, playback and search are not
possible when Auto Scan Disk is executed.
55
Page 56

Useful Features (continued)
Hard Disk Maintenance
Scanning Hard Disk Data (“MANUAL SCAN DISK”)
1.
Press the [MENU] button
SEARCH
1.
MENU
EXECUTE
HDD
REV
SKIP
OPERATE
FWD
LOCK
OUT
VIDEO AUDIO
3.4.2.
•Follow procedures in ‘Changing Menu Settings’ on page 22 to display
the “DISK UTILITY/MAINTENANCE” Menu and the “DISK UTILITY”
screen.
MENU
2.
Press [ ] to select the
“MANUAL SCAN DISK”
item
•Move the cursor to select.
DISK UTILITY
1.AUTO SCAN DISK
2.MANUAL SCAN DISK OFF
3.DEFRAG DATABASE
4.FORMAT
5.MIRRORING
OFF
Notes
•To cancel the Manual Scan Disk operation,
press the [CANCEL] button.
• Scan the hard disk once a month if recording is continuously executed.
3.
Turn the jog dial to select “ON”
REV FWD
4.
Press the [EXECUTE] button
• This starts the scanning.
EXECUTE
DISK UTILITY
1.AUTO SCAN DISK
2.MANUAL SCAN DISK ON
3.DEFRAG DATABASE
4.FORMAT
5.MIRRORING
Screen Display when in the Disk
Scanning Mode
28-07-2003 MO 11:35:23
100%
AL-0
SCANDISK
---CANCEL WITH [CANCEL]---
***
%
OFF
Caution
• Scanning may take a longer time if the data
volume of recorded events are heavy or if
there is a large number of events. (Approx.
a few hours)
• Recording, playback and search are not
possible when Manual Scan Disk is executed.
56
Page 57

C
T
Defrag
When alarm or sensor recording is performed repeatedly with Repeat Recording set to “ON”, data in the hard disk may become
fragmented. Continued use of such data may cause files to split up and recorded into free space, thereby giving rise to fragmentation or decay of data and subsequently slows down the speed extremely during hard disk search. This is where the “DEFRAG
DATABASE” feature comes into play in the maintenance of the hard disk.
It is also recommended to “FORMAT” (Initialize) the hard disk on a regular basis to avoid data fragmentation. When there is
insufficient hard disk space, create a backup data and format the disk to create space for the recorded data.
1.
Press the [MENU] button
1.
HDD
SEARCH
CANCEL
TIMER
DISPLAY
L
MENU
EXECUTE
REV
SKIP
OPER
FWD
LO
OU
VIDEO
3.2.3 4.5
•Follow procedures in ‘Changing Menu Settings’ on page 22 to display
the “DISK UTILITY/MAINTENANCE” Menu and the “DISK UTILITY”
screen.
MENU
2.
Select the “DEFRAG DA-
DISK UTILITY
1.AUTO SCAN DISK
2.MANUAL SCAN DISK OFF
3.DEFRAG DATABASE
4.FORMAT
5.MIRRORING
TABASE” item using [ ]
and press [ ]
• This displays the “DEFRAG DATABASE” Menu.
OFF
Notes
•Perform defrag if search operation takes
more than 30 seconds.
• Disabled when in the Recording mode. (Not
including automatic execution.)
•To enable automatic execution, select the
“DEFRAG AUTO MODE” item, specify the
date and time and set to “ON”. Defrag will
run automatically on the specified date/time.
Caution
• It will interrupt the recording and perform
defrag if the time of the automatic execution is reached during recording.
Recording will be resumed automatically after defrag has been completed.
3.
Select “DEFRAG” using [ ], press [ ] and turn
the jog dial to select “YES”.
REV FWD
4.
Press the [EXECUTE] button
• This displays the “DEFRAG CONFIRMATION” Screen.
EXECUTE
5.
Press the [EXECUTE]
button again
• Defrag starts. Upon completion, a
“COMPLETED” message will be displayed on the screen.
EXECUTE
DEFRAG DATABASE
DEFRAG AUTO MODE
DEFRAG
SET [YES] FOR DEFRAG
DEFRAG CONFIRMATION
START DEFRAG!!
[CANCEL]:CANCEL [EXEC]:START
START?
DEFRAG DATABASE...WAIT
COMPLETED
SETTIMEDATE
OFF0001
YES
57
Page 58

C
T
Useful Features (continued)
Initializing the Hard Disk (“FORMAT”)
Recording may fail if there is insufficient space on the hard disk. In this case, format the hard disk to create space.
1.
1.
Press the [MENU] button
•Follow procedures in ‘Changing Menu Settings’ on page 22 to display
HDD
CANCEL
SEARCH
TIMER
DISPLAY
L
MENU
EXECUTE
REV
SKIP
3.2.3 4.5
OPER
FWD
LO
OU
VIDEO
the “DISK UTILITY/MAINTENANCE” Menu and the “DISK UTILITY”
screen.
MENU
DISK UTILITY
1.AUTO SCAN DISK
2.MANUAL SCAN DISK OFF
3.DEFRAG DATABASE
4.FORMAT
5.MIRRORING
2.
Select the “FORMAT” item
OFF
using [ ] and press [ ]
• This displays the “FORMAT” screen.
3.
Use [ / ] to select the hard disk to format,
and turn the jog dial to select “YES”
Note
REV FWD
FORMAT
BUILT-IN HDD 1 : 76GB OK
BUILT-IN HDD 2 : 76GB OK
EXTERNAL HDD 1 :
EXTERNAL HDD 2 :
EXTERNAL HDD 3 :
EXTERNAL HDD 4 :
START FORMAT
ALL RECORDED HDD DATA IS DELETED!!
1.SET FORMATTING HDD TO [YES]
2.SET [START FORMAT] TO [YES]
YES
YES
NO
• The hard disk capacity displayed on the
screen is calculated based on 1 GB = (1024)
Bytes. Therefore it is displayed as lower than
the actual capacity.
Caution
• All recorded events will be deleted upon formatting. Ensure to create a backup for important event records.
• At the screen upon completion of “FORMAT”, never unplug the power cord.
3
4.
Select “START FORMAT”, turn the jog dial to select “YES” and press the [EXECUTE] button.
• This displays the “FORMAT CONFIRMATION” Screen.
EXECUTE
5.
Press the [EXECUTE]
button again
•Formatting starts. Upon completion,
the “FORMAT SUCCEEDED” screen
will be displayed.
• Press [OPERATE] button to start.
EXECUTE
FORMAT CONFIRMATION
ALL RECORDED HDD DATA IS DELETED!!
[CANCEL]:CANCEL [EXEC]:START
BUILD-IN HDD 1 : FORMAT SUCCEEDED
BUILD-IN HDD 2 : FORMAT SUCCEEDED
MIRRORING SETING
PRESS [OPERATE] FOR OPERATION
START?
HDD UPDATE IS COMPLETED
58
Page 59

Hard Disk Mirroring
Mirroring refers to recording the same data in the 2 built-in hard disks. In this way, recorded data can be secured even if data in one
of the hard disks is damaged.
䡵 Mirroring Setting
1.
1.
Press the [MENU] button
CANCEL
TIMER
DISPLAY
SEARCH
MENU
EXECUTE
HDD
REV
SKIP
OPERATE
FWD
LOCK
OUT
VIDEO AUDIO
3.2. 3.4.
•Follow procedures in ‘Changing Menu Settings’ on page 22 to display
the “DISK UTILITY/MAINTENANCE” Menu and the “DISK UTILITY”
screen.
MENU
2.
Select the “MIRRORING”
item using [
press [
• This displays the “MIRRORING” Menu
screen.
]
] and
DISK UTILITY
1.AUTO SCAN DISK
2.MANUAL SCAN DISK OFF
3.DEFRAG DATABASE
4.FORMAT
5.MIRRORING
MIRRORING
BUILT-IN HDD 1 : 76GB OK
BUILT-IN HDD 2 : 76GB OK
MIRRORING SETTING
ALL HDD DATA WILL BE DELETED!!
NO MIRRORING SETTING
SET [YES] FOR MIRRORING SETTING
[EXEC]:START MIRROR
OFF
YES
Notes
• Mirroring settings can be undone in the Mirroring mode. (☞ Page 60)
• Recording and playback are not possible
when performing mirroring setting.
• The hard disk capacity displayed on the
screen is calculated based on 1 GB = (1024)
Bytes. Therefore it is displayed as lower than
the actual capacity.
Caution
• When mirroring is set, recordable space in
the hard disk will reduce by half.
Pay attention when setting the recording duration.
• Mirroring can only be set for built-in hard
disks. Mirroring at external hard disk drives
are not possible.
• There is no guarantee that data will not be
damaged when mirroring is set.
•When mirroring settings are activated,
events recorded in the built-in as well as
external hard disks will be deleted. Ensure
to create a backup for important event
records.
•When mirroring settings are activated, playback speed may slow down or image and
sound may be out of sync, depending on
the record settings and operational state.
This does not affect the recording operation.
3.
Turn the jog dial to select “YES” and press
[EXECUTE] button
• This displays the “MIRRORING CONFIRMATION” screen.
REV FWD
3
4.
Press the [EXECUTE] button again
EXECUTE
• Setting takes approximately 1 hour,
upon which mirroring setting will be
completed.
• Upon completion, the “MIRRORING
SETTING SUCCEEDED” screen will be
displayed.
• Press [OPERATE] button to start.
EXECUTE
MIRRORING CONFIRMATION
ALL HDD DATA IS DELETED!!
IT TAKES APPROX. 1HOUR
START?
[CANCEL]:CANCEL [EXEC]:START
BUILD-IN HDD 1 : NOW MIRRORING SETTING...
BUILD-IN HDD 2 : NOW MIRRORING SETTING...
MIRRORING SETING
MIRRORING SETTING TAKES APPROX. 1 HOUR
------ NOW SETTING [97.2%] ------
BUILD-IN HDD 1 : MIRRORING SETTING SUCCEEDED
BUILD-IN HDD 2 : MIRRORING SETTING SUCCEEDED
MIRRORING SETING
HDD UPDATE IS COMPLETED
PRESS [OPERATE] FOR OPERATION
59
Page 60

Useful Features (continued)
Hard Disk Mirroring (continued)
HDD
SEARCH
MENU
EXECUTE
REV
SKIP
OPERATE
FWD
LOCK
OUT
VIDEO AUDIO
1.2.3.
Notes
• Recording and playback are not possible
when undoing mirroring.
• The hard disk capacity displayed on the
screen is calculated based on 1 GB = (1024)
Bytes. Therefore it is displayed as lower than
the actual capacity.
Caution
• When mirroring is undone, events recorded
in the built-in as well as external hard disks
will be deleted. Ensure to create a backup
for important event records.
䡵 Undo Mirroring
1.
Turn the jog dial to select “NO” during
mirroring setting.
REV FWD
2.
Press the [EXECUTE] button
• This displays the “MIRRORING CONFIRMATION” screen.
EXECUTE
3
3.
Press the [EXECUTE]
button again
• Cancels the mirroring setting operation and exits the Mirroring mode.
• Upon completion, the “MIRRORING
CANCELLATION SUCCEEDED”
screen will be displayed.
• Press [OPERATE] button to start.
EXECUTE
MIRRORING
BUILT-IN HDD 1 : 76GB OK
BUILT-IN HDD 2 : 76GB OK
MIRRORING SETTING
ALL HDD DATA WILL BE DELETED!!
NOW MIRRORING
SET [NO] TO CANCEL MIRRORING
[EXEC]:CANCEL MIRROR
MIRRORING CONFIRMATION
ALL HDD DATA IS DELETED!!
START?
[CANCEL]:CANCEL [EXEC]:START
BUILD-IN HDD 1 : NOW CANCELING MIRRORING
BUILD-IN HDD 2 : NOW CANCELING MIRRORING
MIRRORING SETING
BUILD-IN HDD 1 : MIRRORING CANCELLATION SUCCEEDED
BUILD-IN HDD 2 : MIRRORING CANCELLATION SUCCEEDED
MIRRORING SETING
NO
To view the list of Power Outage Recovery Records
Viewing of the list of date and time at which power failure is restored is possible.
1.
1.
Press the [MENU] button
•Follow procedures in ‘Changing Menu
Settings’ on page 22 to display the
“DISK UTILITY/MAINTENANCE” Menu
and the “MAINTENANCE” screen.
• This displays the “POWER OUTAGE
TIME LIST”.
60
SEARCH
MENU
EXECUTE
HDD
REV
SKIP
OPERATE
FWD
LOCK
OUT
VIDEO AUDIO
HDD UPDATE IS COMPLETED
PRESS [OPERATE] FOR OPERATION
MAINTENANCE
1.TOTAL TIME
2.POWER OUTAGE TIME LIST
PL-1
PL-
**********
PL-
**********
PL-
**********
[CANCEL]:LIST CLEAR
22H
10/07/2003 TH 10:47
** / ** / **** ** **:**
** / ** / **** ** **:**
** / ** / **** ** **:**
Page 61

Series Recording Using 2 or More VR-716 Recorders
Recording using 2 or more VR-716 recorders is possible. Once the first VR-716 is full, recording automatically starts at the second
VR-716.
Camera 1
Camera 16
•••••
<VR-716 1>
AUDIO IN
12345678910111213141516
VIDEO IN
THRU OUT
SCSI
RS-232C UPS
AUDIO IN
12345678910111213141516
VIDEO IN
THRU OUT
SCSI
RS-232C UPS
LAN
LAN
AUDIO OUT VIDEO OUT
21
AUDIO OUT VIDEO OUT
21
CAUTION
RISK OF ELECTRIC SHOCK
DO NOT OPEN
21
AVIS:RISQUE DE CHOC
ELECTRIQ
CAUTION
RISK OF ELECTRIC SHOCK
DO NOT OPEN
21
AVIS:RISQUE DE CHOC
ELECTRIQ
<VR-716 2>
Connection
5
81 4/ 16
AC IN
(220V–240V )
EXT REC
IN
INCOMRST
15131197531
SER
CLK
OUT
161412108642
REC
RST
WAR
COM
OUT
OUT
OUT
ALARM
EXT REC
INCOMRST
IN
15131197531
SER
CLK
OUT
161412108642
REC
RST
WAR
COM
OUT
OUT
OUT
ALARM
SIGNAL GND
13 169 12
EE OUT
5
81 4/ 16
AC IN
(220V–240V )
SIGNAL GND
13 169 12
EE OUT
<Connection of the Signal Input/Output Terminals>
• Connect the [SERIES REC OUT] terminal at the rear panel of the first VR716 to the [SERIES REC IN] terminal of the second.
•Connect the [CLOCK RESET OUT] terminal of the first VR-716 to the
[CLOCK RESET IN] terminal of the second.
• Connect the [COM] terminal of the first VR-716 to the same terminal at the
second.
<Connection between the 2 VR-716 Recorders>
•Connect the [THRU OUT] terminals 1 - 16 of the first VR-716 to the [VIDEO
IN] terminals 1 - 16 of the second VR-716 accordingly.
<Signal Input/Output Terminals>
IN
INCOMRST
15131197531
161412108642
ALARM
[CLOCK RESET OUT] [SERIES REC OUT]
15131197531
161412108642
ALARM
OUT
OUT
WAR
OUT
WAR
OUT
CLK
RST
OUT
CLK
RST
OUT
SER
REC
OUT
[SERIES REC IN][CLOCK RESET IN]
IN
INCOMRST
SER
REC
OUT
EXT REC
COM
EXT REC
COM
[COM]
[COM]
Setting
• Specify the same settings for both recorders in the “REC MODE” Menu
(☞ Page 24).
• In the “OPERATION” Menu, specify a value other than “NORMAL REC” for
the “RECOVERY REC” item.
• In the “OPERATION” Menu (☞ Page 25) of the first VR-716, set “REPEAT
REC” to “OFF”.
• Set the “SERIES REC” item in the “EXT REC” Menu (☞ Page 25) to “ON”
for both recorders.
Notes
• When the [CLOCK RESET OUT/IN] terminals are connected, the clock
in the 2 or more VR-716 recorders will be synchronized twice a day at
12:00 am and 12:00pm.
•Turn off the power of the equipment before connecting.
• Recording at the second VR-716 can only be stopped by using the
[STOP] button on it.
• Recording will not start upon input of signals when the [OPERATE]
button is in the OFF mode.
• Recording will not start when in the Program Timer Standby mode.
• When the power of the first VR-716 is cut off, the second VR-716 starts
recording automatically.
Activation of Recording Via External Signals
While in the Stop mode, recording starts when the [EXT REC IN] terminal at the rear panel receives input signals from external
devices.
[EXT REC IN]
Setting
1.
Set the “EXT REC MODE” item in the “EXT REC”
Menu to “TRIGGER” or “MANUAL”.
Notes
• When this is set to “MANUAL”, recording is executed only while input
signals are received.
• When this is set to “TRIGGER”, recording will continue between the
interval when input signals are received until after execution of the Stop
operation. Recording can only be stopped by using the [STOP] button
on VR-716. Recording cannot be stopped using an external device.
• Recording will not start upon input of signals when the [OPERATE]
button is in the OFF mode.
• Recording will not start when in the Program Timer Standby mode.
61
ALARM
EXT REC
IN
OUT
WAR
OUT
INCOMRST
CLK
RST
OUT
SER
REC
OUT
COM
15131197531
161412108642
Page 62

Useful Features (continued)
External Hard Disk Drives
VR-716 allows connection of up to 4 external hard disk drives in addition to the 2 built-in hard disks. Follow the procedure below to
alter the connection setup of the hard disk. There are 3 ways of altering connection setup, namely “NEW”, “CHANGE” and “DISCONNECT”.
<Rear Panel of VR-716>
AUDIO IN
12345678 910111213141516
VIDEO IN
THRU OUT
SCSI
RS-232C UPS
AUDIO OUT VIDEO OUT
LAN
21
21
CAUTION
RISK OF ELECTRIC SHOCK
DO NOT OPEN
AVIS:RISQUE DE CHOC
ELECTRIQ
ALARM
5
81 4/ 16
EXT REC
IN
INCOMRST
15131197531
SER
CLK
OUT
161412108642
WAR
OUT
13 169 12
REC
RST
COM
OUT
OUT
EE OUT
(220V–240V )
SIGNAL GND
AC IN
<SCSI Standards on Expansion >
Interface Ultra Wide SCSI
Connector Half Pitch D-sub
68 Pin
When connecting to 4 external
hard disk drives (connection up
to 4 hard disk drives is possible)
Terminator
When connecting to multiple hard disk drives
• Set a separate SCSI ID No. for each hard disk and ensure that there
are no duplicate values.
• Connect the last hard disk drive in the series to the terminator.
(Refer to the instruction manual of the hard disk drive to be connected
for procedure on setting the SCSI ID No. as well as termination.)
<
Alteration of Connection Setup
• “NEW” : Connect to a new hard disk
drive.
• “CHANGE” : Replace the hard disk drive
currently connected with
another hard disk.
• “DISCONNECT” : Disconnect the hard disk
drive currently connected.
Once a hard disk drive is
disconnected, images recorded on the hard disk
cannot be viewed even
when it is reconnected.
>
1.
Turn OFF the power
•Turn off the power by following the procedure on ‘Turning OFF the Power’
in ‘Turning ON/OFF the Power’ on page 15.
• External hard disk drive cannot be detected even if it is connected with
the power turned off. Connect only after unplugging the power cord.
2.
Connect the external hard disk drive and turn ON
the power
•Turn on the power of the external disk drive before doing so for
VR-716.
Maximum Transfer Rate 20 MB/s
SCSI ID Use values between
0 ~ 3 (4 and above
cannot be used)
Notes
• Maximum transfer rate is not guaranteed.
• Consult the outlet from which this equipment
is purchased on the types of HDD and cable
that can be connected.
Notes
•For the external hard disk and cable that
can be connected, consult your nearest JVC
dealer.
• The external hard disk drive will not function properly if its power is turned on after
turning on VR-716.
•Turn off the power of VR-716 before turning off the power of external hard disk.
• When turning off the power of the external
hard disk in the OPERATE OFF status of
this unit, disconnect this unit from the wall
outlet together.
Caution
• Recording will not be performed properly
and this unit will restart automatically if the
power supply of external hard disk is turned
off during recording.
Do not turn off the power supply of external
hard disk during operation.
62
3.
Turn ON the power of VR-716
•Turn on the power by following the
procedure on ‘Turning ON the Power’ in
‘Turning ON/OFF the Power’ on page
15.
• The “HDD RECONFIGURING” screen
will be displayed.
HDD RECONFIGURING
EXTERNAL HDD 4: 115GB NEW
HDD CONFIGURATION CHANGED
PUSH [EXEC] FOR ABOVE HDD APPLY
PUSH [CANCEL] TO QUIT
(ALL RECONFIGURING DATA IS DELETED!)
Page 63

6.
HDD
SEARCH
MENU
EXECUTE
REV
SKIP
OPERATE
FWD
LOCK
OUT
VIDEO AUDIO
4.5.
Notes
• If the “HDD RECONFIGURING” screen is
not displayed upon turning on the power
again, this means the connection is faulty.
Tu rn off the power of VR-716 and the external hard disk drives and check if the cables,
terminator and power supply are properly
connected.
• Press the [CANCEL] button when the HDD
Reconfiguration screen is displayed to terminate the process. Upon terminating, turn
off the power of VR-716.
• Disconnection instead of formatting will be
executed when “DISCONNECT” is selected
for the alteration of connection setup. The
“NOW DISCONNECTING...” z “DISCON-
NECTING SUCCEEDED” messages will be
displayed on the screen.
•Formatting time required for each external
hard disk drive (120 GB) is about 30 seconds.
• Recording and playback are not possible
when altering connection setup.
• The hard disk capacity displayed on the
screen is calculated based on
1 GB = (1024)3 Bytes. Therefore it is displayed as lower than the actual capacity.
Caution
• At the screen upon completion of “FORMAT”, never unplug the power cord.
4.
Press the [EXECUTE] button
• This displays the “CONFIRM HDD
RECONFIGURING” Screen.
EXECUTE
5.
Press the [EXECUTE] button again
CONFIRM HDD RECONFIGURING
ALL RECONFIGURED HDD DATA IS DELETED!
[CANCEL]:CANCEL [EXEC]:START
START?
• This starts the formatting of the external hard disk drive.
• Upon completion, the “FORMAT SUCCEEDED” screen will be displayed.
EXECUTE
6.
Press the [OPERATE] button
EXTERNAL HDD4 : NOW FORMATTING...
EXTERNAL HDD 4 : FORMAT SUCCEEDED
MIRRORING SETING
HDD UPDATE IS COMPLETED
HDD UPDATE IS COMPLETED
PRESS [OPERATE] FOR OPERATION
PRESS [OPERATE] FOR OPERATION
• The hard disk drives are now usable.
OPERATE
Hard Disk Recovery Feature
Note
• The following operations are not possible
when error [E-01] is displayed:
• “TIME ZONE SETTING”
• “DEFRAG DATABASE”
• “FORMAT”
• “MIRRORING”
•“DVD-RAM COPY”
This unit is incorporated with automatic recovery feature. When there is failure on the hard disk, it will restart and recover automatically. Upon restart,
recording will continue with the remaining hard disk after the hard disk which
failure occurred had been automatically disconnected. Recording is disabled
during restart. Error code [E-01] will be displayed on the front display after
automatic restart.
To return to the normal display from error code display, turn [OPERATE] to
off once and then turn [OPERATE] to on again.
Automatic recovery is not possible in the case of severe failure where it cannot be rebooted.
63
Page 64

Useful Features (continued)
Copying to DVD-RAM
Copy of data stored in VR-716 to DVD-RAM is possible when a DVD-RAM drive is connected to it.
<VR-716>
AUDIO IN
12345678910111213141516
VIDEO IN
THRU OUT
SCSI
RS-232C UPS
LAN
AUDIO OUT VIDEO OUT
CAUTION
RISK OF ELECTRIC SHOCK
DO NOT OPEN
21
21
AVIS:RISQUE DE CHOC
ELECTRIQ
ALARM
DVD-RAM
1.
81 4/ 16
5
EXT REC
IN
INCOMRST
15131197531
SER
CLK
OUT
161412108642
13 169 12
REC
RST
WAR
COM
OUT
OUT
OUT
EE OUT
SIGNAL GND
AC IN
(220V–240V )
Connection
Connect the DVD-RAM drive to the [SCSI] terminal on the rear panel of VR-
716.
DVD-RAM FORMAT
• Before copying to the DVD-RAM, execute “6.DVD-RAM FORMAT” under
“DISK UTILITY” in “DISK UTILITY/MAINTENANCE”.
•Execute DVD-RAM FORMAT using VR-716.
•DVD-RAM will be formatted by FAT32.
• It will return to “DISK UTILITY/MAINTENANCE” menu automatically af-
ter the “DVD-RAM FORMAT” is completed.
HDD
CANCEL
TIMER
DISPLAY
SEARCH
MENU
EXECUTE
REV
SKIP
OPERATE
FWD
LOCK
OUT
VIDEO AUDIO
3.2.3.
Notes
• When a DVD-RAM drive is not connected,
the following items will not be displayed on
the “DISK UTILITY” Menu:
Item “6. DVD-RAM FORMAT”
Item “7. DVD-RAM COPY”
•2 or more DVD-RAM drives cannot be connected.
•Consult the outlet from which this equipment
is purchased on the types of DVD-RAM
drive and cable that can be connected.
• The number of devices including external
hard disk to be connected to SCSI terminal
should be 4 or less.
• When connecting external hard disk simultaneously, connect the DVD-RAM drive to
the nearest terminator.
• Set the SCSI ID of the DVD-RAM drive to
4.
• The order of D/M/Y will change in accordance with the “DATE DISPLAY” setting in
the “ONSCREEN MODE” menu.
• Recording and playback on this unit are not
possible during “DVD-RAM COPY”.
• Network connection is not possible during
“DVD-RAM COPY”.
Caution
• All the data in DVD-RAM will be deleted if “DVD-RAM FORMAT” is
executed.
Copying to DVD-RAM
1.
Press the [MENU] button
•Follow procedures in ‘Changing Menu Settings’ on page 22 to display
the “DISK UTILITY/MAINTENANCE” Menu and the “DISK UTILITY”
screen.
• Stop the recording if it is in operation.
MENU
DISK UTILITY
1.AUTO SCAN DISK
2.MANUAL SCAN DISK OFF
3.DEFRAG DATABASE
4.FORMAT
5.MIRRORING
6.DVD-RAM FORMAT
7.DVD-RAM COPY
2.
Select the “DVD-RAM
COPY” item using [ ]
and press [ ]
• The “DVD-RAM COPY” screen will be
displayed.
3.
Turn the jog dial to select a
DVD- RAM COPY
D
MHM
Y
28 2003
07 10 09
**:**:**
**:**:**
**:**:**
**:**:**
**:**:**
**:**:**
**:**:**
**:**:**
**:**:**
D/M/Y H:M:S(END)
**-**-**
**:**:**
**:**:**
**-**-**
**-**-**
**:**:**
**-**-**
**:**:**
**-**-**
**:**:**
**:**:**
**-**-**
**:**:**
**-**-**
**:**:**
**-**-**
**-**-**
**:**:**
[EXEC]:SAVE/CANCEL
COPY D/M/Y H:M:S(START)
**-**-**
**-**-**
**-**-**
**-**-**
**-**-**
**-**-**
**-**-**
**-**-**
**-**-**
COPY START CAPA[ 4473 MB] RESV[ 0 MB]
<= : RETURN
“D” (Day) value
• Use [ ] and the jog dial to set the starting day, month, year, hour,
minute and second values of the data to copy.
•To display only alarm/sensor data, set “AL FIX” to “ON”.
AL FIX
OFF
CAMERA
** ****
**
** **** **
** **** **
** **** **
** **** **
** **** **
** **** **
** **** **
** **** **
ON
Caution
• Always leaves the power supply of DVDRAM drive on. Malfunction will occur if
power is turned off and when DVD-RAM is
not inserted.
64
REV FWD
Page 65

CANCEL
TIMER
DISPLAY
SEARCH
MENU
EXECUTE
7.8.
9.
4.
HDD
REV
SKIP
OPERATE
FWD
LOCK
OUT
VIDEO AUDIO
5.6.6.8. 4.5.
Press the [EXECUTE] button
•The data list is displayed and cursor
moves to the data closest to the specified starting day, month, year, hour,
minute and second.
• Alarm/sensor data is displayed in yellow.
EXECUTE
DVD-RAM COPY
M
HM
Y
D
0728 10 10
2003
COPY D/M/Y H:M:S(START)
28-07-03
28-07-03
28-07-03
28-07-03
28-07-03
28-07-03
28-07-03
28-07-03
**-**-** **-**-**
COPY START CAPA[ 4473 MB] RESV[ 0 MB]
<= : RETURN
D/M/Y H:M:S(END)
28-07-03
06:30:16
06:30:16
28-07-03
28-07-03
06:30:16
28-07-03
06:30:16
28-07-03
06:30:14
28-07-03
06:30:14
06:30:14
28-07-03
06:30:13
28-07-03
**:**:** **:**:**
[EXEC]:SAVE/CANCEL
06:30:16
06:30:16
06:30:16
06:30:16
06:30:14
06:30:14
06:30:14
06:30:13
AL FIX
OFF
CAMERA
13
14 15 16
1
5
9
13 1415 16
1
5
9
** **** **
16
Notes
• This cannot be executed if the data volume
to be copied exceeds the space available.
• The data copied to the DVD-RAM may shift
2 seconds forward or backward from the
specified location.
• Press the [SEARCH] button upon completion of DVD-RAM Copy. A file list containing
the copied data on the DVD-RAM will be
displayed.
• The image data copied previously is also
displayed in the list.
• If the copied image data is the same as
the previously copied data, it will be
stored and displayed in the list separately with different names on the DVDRAM.
• The items of the list remain even if the
image data is deleted via computer or
others.
• When copying data which has been selected for copy (indicated by the [ _ ] mark)
in Step 5, the [ _ ] mark will disappear and
returns to the screen for setting the starting/ending time. Set the date/time again and
execute.
•For the file name of image data, refer to the
instruction manual of VR-716 PLAYER (Execute backup).
• Do not change the file name. The correct
information may not be displayed during
playback.
Caution
•At the screen upon completion of “DVDRAM COPY” , never unplug the power cord.
• Refer to the notes related to Summer Time.
(☞ Page 116)
•Take note of the following when setting the
starting/ending time of DVD-RAM Copy:
• Set a starting/ending time that is within
the time range of the master data.
• The starting time set shall precede the
ending time.
• Dates that do not correspond to the cal-
endar cannot be specified.
• File with “FRAME RATE” less than 25 cop-
ied to DVD-RAM may not be able to playback with generic software on PC. Playback using the same method as viewing
the backup file on the PC installed with
bundled application [VR-716 Player].
5.
Turn the jog dial to select the data to copy and press [EXECUTE]
• The cursor moves to the
• Press [CANCEL] to return to the screen after Step
Day
under the “START” column of the specified data.
4
is executed.
• When copying as specified by the original “START” / “END” time, perform step
7
after this operation.
REV FWD
6.
Turn the jog dial to select the copy range
EXECUTE
DVD-RAM COPY
MHM
Y
D
28
07 10 10
2003
COPY D/M/Y H:M:S(START)
28-07-03
28-07-03
28-07-03
28-07-03
28-07-03
28-07-03
28-07-03
28-07-03
**-**-** **-**-**
COPY START CAPA[ 4473 MB] RESV[ 0 MB]
<= : RETURN
D/M/Y H:M:S(END)
28-07-03
06:30:16
06:30:16
28-07-03
28-07-03
06:30:16
28-07-03
06:30:16
28-07-03
06:30:14
28-07-03
06:30:14
06:30:14
28-07-03
06:30:13
28-07-03
**:**:** **:**:**
[EXEC]:SAVE/CANCEL
06:30:16
06:30:16
06:30:16
06:30:16
06:30:14
06:30:14
06:30:14
06:30:13
AL FIX
OFF
CAMERA
13
14 15 16
1
5
9
13 1415 16
1
5
9
** **** **
• Use [ ] and the jog dial to set the starting/ending time of DVD-Ram Copy.
• Press [CANCEL] to return to the screen after Step
4
is executed.
• The line will be displayed in green after the original “START” / “END” time has
been changed.
7.
Press the [EXECUTE] button
• This displays the [ _ ] mark and the entire
line is highlighted.
EXECUTE
• Repeat Steps
REV FWD
5 ~ 7
to continue marking data
DVD-RAM COPY
MHM
Y
D
07 10 10
28
2003
COPY D/M/Y H:M:S(START)
28-07-03
28-07-03
28-07-03
28-07-03
28-07-03
28-07-03
28-07-03
28-07-03
**-**-** **-**-**
COPY START CAPA[ 4473 MB] RESV[ 0 MB]
<= : RETURN
D/M/Y H:M:S(END)
28-07-03
06:30:16
06:30:16
28-07-03
28-07-03
06:30:16
28-07-03
06:30:16
28-07-03
06:30:14
28-07-03
06:30:14
06:30:14
28-07-03
06:30:13
28-07-03
**:**:** **:**:**
[EXEC]:SAVE/CANCEL
06:30:16
06:30:16
06:30:16
06:30:16
06:30:14
06:30:14
06:30:14
06:30:13
AL FIX
OFF
CAMERA
13
14 15 16
1
5
9
13 1415 16
1
5
9
** **** **
to be copied with the [ _ ] mark displayed.
8.
Select “COPY START” using
DVD-RAM COPY CONFIRMATION
[ ] and press [EXECUTE]
• The “DVD-RAM COPY CONFIRMATION”
screen will be displayed.
9.
Press the [EXECUTE] button again
EXECUTE
• The unit enters “DVD-RAM COPY” mode,
and starts copying.
• Press [CANCEL] during Copy to cancel the
operation.
• Upon completion, the “COPY HAS BEEN
COMPLETED” message will be displayed.
EXECUTE
START COPY TO DVD-RAM
START?
[CANCEL]:CANCEL [EXEC]:START
DVD-RAM COPY
COPY HAS BEEN COMPLETED
[SEARCH]: SEE LIST ON DVD-RAM
[OPERATE]: REMOVE DVD-RAM TO END
16
16
65
Page 66

Useful Features (continued)
Activation of Recording Via External Alarm/Sensor Signals
When signals from alarm devices are input via the [ALARM IN] terminal on the rear panel, recording will automatically start in the
mode as specified for the “REC MODE” item in the “ALARM/SENSOR MODE” Menu (☞ Page 27). Alarm recording will be executed
if alarm signals are received when VR-716 is in the Recording mode. Sensor recording will be executed when in the Stop mode. In
other words, naming varies according to the mode of VR-716.
<Example>
Set the record mode for Cameras 1 - 4 and
Cameras 9 - 12.
Before doing so, ensure that setting for
Cameras 1 - 4 and Cameras 9 - 12 in the
“REC MODE” Menu is completed.
☞ Page 36 ‘Recording in the Normal Mode’
910111213141516
CAUTION
RISK OF ELECTRIC SHOCK
DO NOT OPEN
S:RISQUE DE CHOC
ELECTRIQ
ALARM
IN
INCOMRST
15131197531
SER
CLK
OUT
161412108642
REC
RST
WAR
OUT
OUT
OUT
5
81 4/ 16
EXT REC
13 169 12
COM
EE OUT
1.
2.
HDD
SEARCH
MENU
EXECUTE
REV
SKIP
OPERATE
FWD
LOCK
OUT
VIDEO AUDIO
4.5.3.5.
<Types of Record Modes>
1.
Connect the alarm device to the ‘Signal Input/
Output terminal’ on the rear panel of the equipment
• Connect the alarm device to the [ALARM IN 1 ~ ALARM IN 4] and
[ALARM IN 9 ~ ALARM IN 12] terminals.
2.
Press the [MENU] button
•Follow procedures in ‘Changing Menu Settings’ on page 22 to display
the “ALARM/SENSOR MODE” Menu.
MENU
ALARM/SENSOR MODE
1.BLOCK 1
2.REC MODE ALARM
3.FRAME RATE
4.QUALITY
5.DURATION
3.
Press [ ] to select the
“BLOCK” item
•Move the cursor to select.
4.
Turn the jog dial to select “1”
• Setting can now be performed for
Camera 1 ~ Camera 4.
REV FWD
6.AUDIO REC
7.PRESENSOR REC
8.PRESENSOR REC DURATION
9.EXT INPUT OPERATING MODE
10.MOTION DETECT
11.MOTION DETECT SETTING
ALARM/SENSOR MODE
1.BLOCK 1
2.REC MODE ALARM
3.FRAME RATE
4.QUALITY
5.DURATION
6.AUDIO REC
7.PRESENSOR REC
8.PRESENSOR REC DURATION
9.EXT INPUT OPERATING MODE
10.MOTION DETECT
11.MOTION DETECT SETTING
25 IPS
180SEC
10SEC
25 IPS
180SEC
10SEC
OFF
OFF
OFF
OFF
OFF
OFF
H
ON
H
ON
• “ALARM” :
Starts alarm recording only when VR-716
is in the Recording mode.
• “SENSOR”:
Starts sensor recording only when VR-716
is in the Stop mode.
• “ALARM/SENSOR” :
Starts alarm recording when VR-716 is in
the Recording mode and sensor recording
when in the Stop mode.
Notes
• Ensure that the “EXT INPUT OPERATING
MODE” (☞ page 28) item is set to “ON”. If
this is set to “OFF”, recording via alarm signals is not possible even when setting is
completed.
• About 1 second or less will be required before sensor recording starts upon the input
of alarm signals. To resolve this, make use
of the ‘Presensor Recording’ feature.
(☞ Page 113)
66
5.
Press [ ] and turn the jog dial to select “REC
MODE” to set a value
REV FWD
For selecting a record mode.
ALARM/SENSOR MODE
1.BLOCK 1
2.REC MODE ALARM
3.FRAME RATE
4.QUALITY
5.DURATION
6.AUDIO REC
7.PRESENSOR REC
8.PRESENSOR REC DURATION
9.EXT INPUT OPERATING MODE
10.MOTION DETECT
11.MOTION DETECT SETTING
25 IPS
180SEC
10SEC
OFF
OFF
OFF
H
ON
For selecting the frame rate during recording.
For selecting the picture quality during
recording.
For selecting the duration of recording.
For selecting whether to execute audio
recording during recording.
For selecting the duration of presensor
recording. ☞ Page 113 ‘Presensor Recording’
For selecting whether to activate presensor
recording.
For setting the operation of the record mode.
☞ Page 28 ‘ALARM/SENSOR MODE Menu’
Page 67

SEARCH
9.
MENU
EXECUTE
6.
Press [ / ] to move the cursor to the
HDD
REV
SKIP
OPERATE
FWD
LOCK
OUT
VIDEO AUDIO
7.8.6.8.
“BLOCK” item
ALARM/SENSOR MODE
1.BLOCK 3
2.REC MODE ALARM
3.FRAME RATE
4.QUALITY
5.DURATION
6.AUDIO REC
7.PRESENSOR REC
8.PRESENSOR REC DURATION
9.EXT INPUT OPERATING MODE
7.
Turn the jog dial to select
“3”
• Setting can now be performed for Camera 9 ~ Camera 12.
REV FWD
8.
Repeat procedure in Step 5 to select the “REC
10.MOTION DETECT
11.MOTION DETECT SETTING
25 IPS
180SEC
OFF
10SEC
OFF
OFF
H
ON
MODE” item and set a value accordingly
Notes
• In the case when “REC MODE” is set to
“ALARM”, press the [REC] button after
menu setting is completed. Alarm recording will be executed in the specified mode
when alarm input is received.
• In the case when “REC MODE” is set to
“SENSOR”, press the [STOP] button after
menu setting is completed. Sensor recording will be executed in the specified mode
when alarm input is received.
• Press the [CANCEL] button to stop the
buzzer sound during alarm or sensor recording. Press the [CANCEL] button again
during alarm recording to return to the normal recording mode or during sensor recording to stop the operation.
• Press the [CANCEL] button once again and
the Alarm/Sensor [AL] indicator on the front
display will stop blinking.
Front Display
56
78
13 14
SEQUENCE
15 16
REC STOP PLAY STILL
MULTI
[CANCEL]
CANCEL
TIMER
DISPLAY
SEARCH
9.
Press [MENU] to end menu setting
• The display returns to the normal screen.
• The [AL REC] or [SENSOR REC] indicator on the front display will
appear.
MENU
Front Display
䡵 Notification During Alarm Recording or Sensor
Recording
FDP/BUZZER
[ FDP ]
1.ALARM/SENSOR MODE ON
2.ALARM/SENSOR BLINK
3.SEQUENTIAL MONITOR
4.INPUT SIGNAL ERROR
5.WARNING
[BUZZER]
1.HDD FULL
2.ALARM/SENSOR
3.WARNING
MONITOR DISPLAY
1.EE OUT 1-4/-16
2.SINGLE PICTURE MODE
3.QUAD PICTURE MODE
BLOCK 1
BLOCK 2
BLOCK 3
BLOCK 4
4.ALARM/SENSOR SWITCH
5.SPLIT SCREEN BORDER COLOR
1-16
1SEC
1SEC
1SEC
1SEC
OFF
BORDER3
OFF
OFF
OFF
ON
ON
ON
ON
[AL] indicator on the front display will
appear during alarm or sensor recording
when this is set to “ON”.
[AL] indicator on the front display will blink
after alarm or sensor recording has ended
when this is set to “ON”.
Buzzer will sound when this is set to “ON”.
For setting the switching mode of the
monitor screen when alarm signals are
received. ☞ Page 26 ‘MONITOR DISPLAY
Menu’
67
Page 68

Useful Features (continued)
Using the Motion Detect Feature
VR-716 comes equipped with a Motion Detect feature, whereby the monitor screen is divided into 150 areas and alarm/sensor
recording is automatically executed upon detection of image motion within these areas.
1.
Press the [MENU] button
•Follow procedures in ‘Changing Menu Settings’ on page 22 to display
the “ALARM/SENSOR MODE” Menu.
MENU
ALARM/SENSOR MODE
1.BLOCK 1
2.REC MODE ALARM
3.FRAME RATE
4.QUALITY
5.DURATION
6.AUDIO REC
2.
Turn the jog dial to select a
block
REV FWD
3.
Press [ ] and turn the jog dial to set a value for
7.PRESENSOR REC
8.PRESENSOR REC DURATION
9.EXT INPUT OPERATING MODE
10.MOTION DETECT
11.MOTION DETECT SETTING
each item
25 IPS
180SEC
OFF
10SEC
OFF
OFF
H
ON
SEARCH
1.
MENU
EXECUTE
HDD
REV
SKIP
OPERATE
FWD
LOCK
OUT
VIDEO AUDIO
2.3.5.3.4.
Caution
• When cameras are connected, flickering
fluorescent lights may give rise to false detection. In this case, set the camera to
flickerless. (☞ Instruction manual of camera used)
• Ensure that an item other than “OFF” is selected for the “MOTION DETECT” item
(☞ page 28).
Motion Detect will not activate yet after setting is completed.
• The Motion Detect feature is not designed
to prevent thefts or fire disasters. We do not
bear responsibility for any loss incurred due
to accidents or damages.
REV FWD
For selecting a record mode.
For selecting the frame rate during
recording.
For selecting the picture quality during
recording.
ALARM/SENSOR MODE
1.BLOCK 1
2.REC MODE ALARM
3.FRAME RATE
4.QUALITY
5.DURATION
6.AUDIO REC
7.PRESENSOR REC
8.PRESENSOR REC DURATION
9.EXT INPUT OPERATING MODE
10.MOTION DETECT
11.MOTION DETECT SETTING
25 IPS
180SEC
10SEC
OFF
OFF
OFF
H
ON
For selecting the duration of recording.
For selecting whether to execute audio
recording during recording.
For selecting whether to activate
presensor recording. ☞ Page 113
‘Presensor Recording’
For selecting the duration of presensor
recording.
For setting the operation of Motion Detect.
☞ Page 28 ‘ALARM/SENSOR MODE
Menu’
4.
Select the “MOTION DETECT SETTING” item using [ ] and press [ ]
MOTION DETECT SETTING
1.BLOCK
2.CAMERA 1 SCENE
AREA SETTING
3.CAMERA 2 SCENE
• This displays the “MOTION DETECT
SETTING” Menu screen.
AREA SETTING
4.CAMERA 3 SCENE
AREA SETTING
5.CAMERA 4 SCENE
AREA SETTING
MANUAL
MANUAL
MANUAL
MANUAL
1
68
5.
Turn the jog dial to select
“BLOCK”
REV FWD
• Set “BLOCK” to “1”:
Sets detection of motion at Camera 1 ~ Camera 4.
• Set “BLOCK” to “2”:
Sets detection of motion at Camera 5 ~ Camera 8.
• Set “BLOCK” to “3”:
Sets detection of motion at Camera 9 ~ Camera 12.
• Set “BLOCK” to “4”:
Sets detection of motion at Camera 13 ~ Camera 16.
Page 69

11.
HDD
SEARCH
MENU
EXECUTE
REV
SKIP
OPERATE
FWD
LOCK
OUT
VIDEO AUDIO
7.6.8.9.10.
<
How to set manually
•To determine the value for “DETECTING
SENSITIVITY”, “TERMINATION SENSITIVITY” and “OBJECT SIZE LEVEL”, when selecting the “SCENE” value other than
“STANDARD”, please refer to the detailed
setting displayed. (☞ Page 70 ‘Setting’)
Notes
•To alter the “REC MODE” Menu settings before setting at the “AREA SETTING” screen,
close the setting screen and open the
“AREA SETTING” screen again after alteration is completed. There are cases where
live images are not displayed at the background of the “AREA SETTING” screen.
• The monitor screen is divided into 150 areas for detecting motion. To set all 150 areas, press and hold [EXECUTE].
•To clear all 150 areas, press and hold [CANCEL].
• Record mode of Motion Detect (picture
quality, frame rate, etc.) is identical to the
Alarm Mode settings.
☞ Page 66 ‘Activation of Recording Via Ex-
ternal Alarm Signals’
• After camera setting is completed, capture
an actual image to double-check if alarm is
properly triggered via Motion Detect as well
as its detection sensitivity.
>
6.
Press [ ] to move the cursor to “SCENE”
•Move the cursor to the camera for which
motion is to be detected.
7.
Turn the jog dial to select a
MOTION DETECT SETTING
1.BLOCK
2.CAMERA 1 SCENE
AREA SETTING
3.CAMERA 2 SCENE
AREA SETTING
4.CAMERA 3 SCENE
AREA SETTING
5.CAMERA 4 SCENE
AREA SETTING
value
• Select a value from the
• When “MANUAL” is selected, “DETECTING SENSITIVITY”, “TERMINATION SENSITIVITY” and “OBJECT SIZE LEVEL” can be further
specified under “DETAIL SETTING”.
REV FWD
8.
Press [ ] to move the
cursor to “AREA SETTING”
9.
Press the [ ] button
• Select the area for which motion is to be detected.
• Press and hold [SEARCH] when the “AREA SETTING” screen is displayed to switch to Motion Detect Test mode. (☞ Page 70 ‘Check mode’)
•To exit the Test mode, press [SEARCH] again.
10.
Select the areas in the leftmost column and press [ ]
Settings
column under “SCENE” on page 28.
MOTION DETECT SETTING
1.BLOCK
2.CAMERA 1 SCENE
AREA SETTING
3.CAMERA 2 SCENE
AREA SETTING
4.CAMERA 3 SCENE
AREA SETTING
5.CAMERA 4 SCENE
AREA SETTING
Use [ / / / ] to select the areas and press
[EXECUTE]. Areas that are selected will be displayed in
a different color on the monitor screen. To undo the
selection, press [CANCEL].
• The position can be moved diagonally by pressing
buttons simultaneously.
• The position can be moved continuously by pressing
and holding the buttons.
to return to the “MOTION DETECT SETTING” Menu screen
Press [ ] to return to the “MOTION DETECT
SETTING” screen when areas selected are in the
leftmost column.
Repeat Steps 3 ~ 10 to specify settings for other cameras.
MANUAL
MANUAL
MANUAL
MANUAL
MANUAL
MANUAL
MANUAL
MANUAL
1
1
11.
Press [MENU] to end setting
• The display returns to the normal screen.
MENU
69
Page 70

Useful Features (continued)
Motion detect check mode and setting guidance
Check mode
䡵 Screen image
Press and hold [SEARCH] button when the “AREA SETTING” screen
is displayed to open the check mode screen.
ALARM mark
(Red: Alarm is ongoing)
䡵 Explanation of the screen content
• ALARM mark:
A red [a] will be displayed on the upper left of the screen when
ALARM detection is ongoing.
• Detection area boundary (Blue):
Boundary of the setting unit area in the “AREA SETTING” screen.
•Frame of the specified area for detection:
The area as specified in the “AREA SETTING” will be displayed as
a white frame.
• Detection point (White):
The point where motion has reached the “DETECTING SENSITIVITY” will be displayed as a white dot. ALARM detection will be activated if the number of white dot hits the number of “OBJECT SIZE
LEVEL”.
• Detection point (Green):
The point where motion has reached between the “DETECTING
SENSITIVITY” and “TERMINATION SENSITIVITY” will be displayed
as a green dot.
•Graph of sum total for detection point (Yellow):
The changes in the display number of white dot will be displayed
with the x-axis as the elapsed time.
Setting
䡵 Setting value for different scene
For setting to other than “STANDARD”, refer to the setting value from
the arrow on the right side of “SCENE”
in the menu.
䡵 How to check setting value and
alarm
Perform “SCENE” and “AREA SETTING”, make sure that the ALARM
mark is displayed when there is a
motion to be detected as in check
mode. Change the scene or widen the
detection area if the ALARM mark is
not displayed.
䡵 Manual setting
When the selected “STANDARD” or
other scenes cannot be detected,
change the 3 parameters in the
manual setting by referring to ‘Table
1: Setting value for different scene’ and
‘Table 2: “OBJECT SIZE LEVEL” and
“Alarm operation Minimum number of
detection point”’.
Ta ble 1: Setting value for different scene
“SCENE”
“STANDARD”
“DOORWAY H”
“DOORWAY L”
“PASSAGE H”
“PASSAGE L”
“REGISTER H”
“REGISTER L”
“ATM H”
“ATM L”
“LOBBY H”
“LOBBY L”
“GATE H”
“GATE L”
“PARKING LOT H”
“PARKING LOT L”
“LOW LUX H”
“LOW LUX L”
“ELEVATOR”
“COUNTER”
*1Number of white dot displayed in check mode
*2The maximum number of point to be detected within one area is 9. Set the number of area
such that the sum total of detection point exceeds the minimum number of detection point.
Detailed setting
“DETECTING
SENSITIVITY”
–
10
7
9
8
10
10
10
8
10
7
14
10
14
10
15
12
8
6
“TERMINATION
SENSITIVITY”
–
+1
+4
+0
+3
+2
+2
+3
+5
+4
+8
+0
+4
+0
+4
+0
+0
+4
+5
“OBJECT
SIZE
LEVEL”
–
2
3
2
3
1
3
1
8
2
3
1
5
1
6
2
4
2
4
Detection area boundary (Blue)
Frame of the specified area for
detection (White)
Detection point (White, Green)
Object
Graph of sum total for detection
point (Yellow)
Alarm operation
Minimum number of detection
point *
2
2
4
2
4
1
4
1
20 *
2
4
1
8
1
10 *
2
6
2
6
1
2
2
70
Ta ble 2: “OBJECT SIZE LEVEL” and “Alarm operation Minimum number of detection point”
“OBJECT SIZE LEVEL”
Alarm operation Minimum
number of detection point
12 3 4 5 6 78910
12 4 6 81015202530
Page 71

Continuing with Recording Upon Recovery from Power Failure
VR-716 is equipped with a Recovery Recording feature that starts recording automatically upon recovery from a power failure. With
this feature, restoration procedure will not be required when a power failure occurs during recording.
SEARCH
Note
1.4.
MENU
EXECUTE
1.
Press the [MENU] button
HDD
REV
SKIP
OPERATE
FWD
LOCK
OUT
VIDEO AUDIO
3.2.
•Follow procedures in ‘Changing Menu Settings’ on page 22 to display
the “OPERATION/EXT REC” Menu.
MENU
OPERATION/EXT REC
[ OPERATION ]
1.RECOVERY REC OFF
2.REPEAT REC
3.LANGUAGE SELECTION
4.WATER MARK
5.OPERATION LOCK
[EXT REC]
1.EXT REC MODE
2.
Press [ ] to select the
2.SERIES REC
OFF
ENGLISH
OFF
ALL
OFF
OFF
“RECOVERY REC” item
•Move the cursor to select.
3.
Turn the jog dial to select an operating mode
• “PRIOR STATE”:
When a power failure occurs during
recording, recording will start again
upon restoration. If power failure occurs
when the equipment is in the Sensor
Record mode (☞ page 66), however,
recording will not start automatically
upon restoration.
• “NORMAL REC”:
Recording resumes upon recovery from a power failure, regardless of
the mode prior to the failure.
OPERATION/EXT REC
[ OPERATION ]
1.RECOVERY REC NORMAL REC
2.REPEAT REC
3.LANGUAGE SELECTION
4.WATER MARK
5.OPERATION LOCK
[EXT REC]
1.EXT REC MODE
2.SERIES REC
ENGLISH
OFF
OFF
ALL
OFF
OFF
• The “POWER OUTAGE LOG IS UPDATED”
message will be displayed on the monitor
only when the “WARNING” item in the
“ONSCREEN MODE” Menu (☞ page 23)
is set to “ON”. Press the [CANCEL] button
to clear the message display.
Caution
• Hard Disk Checking is performed upon recovery from a power failure, which may take
a while before recording starts. It may take
a long time when the data is fragmented or
when there is a large amount of recorded
data.
•A list containing the date and time at which
power failure is restored can be viewed.
(☞ Page 60)
• When the Program Timer is set, recording
will resume in the same mode after restoring from a power failure.
4.
Press [MENU] to end setting
• The display returns to the normal screen.
MENU
䡵 Notification of Power Outage
• The following message will be displayed on the monitor screen when
a power outage occurs, and the [other E-04] message will appear on
the front display.
01-03-2003 SA 12:34:56
100%
AL-0
POWER OUTAGE LOG IS UPDATED
71
Page 72

Useful Features (continued)
Setting a Title for Each Camera Channel Screen
<Example>
Register the title for Camera 1 as [ENTRANCE1].
1.6.
HDD
SEARCH
MENU
EXECUTE
REV
SKIP
OPERATE
FWD
LOCK
OUT
VIDEO AUDIO
3.5.2.4.5.
1.
Press the [MENU] button
•Follow procedures in ‘Changing Menu Settings’ on page 22 to display
the “CAMERA TITLE” Menu.
MENU
CAMERA TITLE
1.BLOCK
2.CAMERA 1 TITLE (NONE)
3.CAMERA 2 TITLE (NONE)
4.CAMERA 3 TITLE (NONE)
5.CAMERA 4 TITLE (NONE)
2.
Press [ ] to select the
“BLOCK” item
<= : RETURN
•Move the cursor to select.
3.
Turn the jog dial to set “BLOCK” to “1”
CAMERA TITLE
1.BLOCK
REV FWD
2.CAMERA 1 TITLE (NONE)
3.CAMERA 2 TITLE (NONE)
4.CAMERA 3 TITLE (NONE)
5.CAMERA 4 TITLE (NONE)
<= : RETURN
1
1
<Characters that can be used in camera titles>
(Excludes the case when title is set using a
computer.)
Up to 15 characters can be used when registering the camera title.
4.
Press [ ] to select the “CAMERA 1 TITLE” item
• Move the cursor to select.
CAMERA TITLE
1.BLOCK
2.CAMERA 1 TITLE (NONE)
3.CAMERA 2 TITLE (NONE)
4.CAMERA 3 TITLE (NONE)
5.CAMERA 4 TITLE (NONE)
= > ? @ A B C D E
5.
Turn the jog dial to select a character
INPUT SELECT([JOG])
<= : RETURN
[CANCEL]:DELETE [SKIP]:CATEGORY
• Upon moving the cursor to [E], press [ ] to move the cursor forward
and continue to select [N], [T], [R], [A], [N], [C], [E] and [1] accordingly.
REV FWD
CAMERA TITLE
1.BLOCK
2.CAMERA 1 TITLE ENTRANCE
3.CAMERA 2 TITLE (NONE)
4.CAMERA 3 TITLE (NONE)
5.CAMERA 4 TITLE (NONE)
INPUT SELECT([JOG])
<= : RETURN
[CANCEL]:DELETE [SKIP]:CATEGORY
A B C D E F G H I
Repeat Steps 2 ~ 5 to register titles for other cameras.
1
1
Note
•To clear a registered character, use [
to select the character and press [CANCEL].
72
/ ]
6.
Press [MENU] to end setting
• The display returns to the normal screen.
MENU
Page 73

Connecting to a PC – What is a Web Browser? –
You can do the followings
By connecting to a PC via a LAN cable, images recorded on VR-716 can be viewed on the PC monitor.
Hub
LAN
[LAN] Terminal
CANCEL
SEARCH
56
ALARM
SENSOR
341278
ALARM
SENSOR
910
13 14
ALARM
SENSOR
11 1
15 16
ALARM
SENSOR
SEQUENCE
REC STOP PLAY STILL
MULTI
Bundled Application
[VR-716 Player]
MENU
TIMER
DISPLAY
EXECUTE
Operate VR-716 using a PC (Installation of the
bundled application [VR-716 Player] required.)
• Search/Playback of recorded image on VR-716
• Backup of recorded image on VR-716 in PCs
• Capturing recorded image on VR-716 as still images
Refer to the [VR-716 Player] User’s Manual in the
bundled CD-ROM for procedure on setup and
operation of the [VR-716 Player] application.
(The VR-716 Player application cannot be used
to execute Record/Stop operations on VR-716.)
100BASE-T
Straight LAN Cable
HDD
REV
OPERATE
FWD
LOCK
OUT
VIDEO AUDIO
SKIP
Use Enhanced Category 5 or Category 6 cables to connect to PCs
or hubs.
Use a crossover cable for direct connection to PC, and a straight
cable when connecting via a hub.
Perform setting of VR-716 with ease using a general-purpose browser
(Internet Explorer)
• Input of camera titles using keyboard
• Record program using the Program Timer
• Event search of alarm/sensor records
• Security settings for files containing images recorded in VR716
• Playback of recorded images using a simple viewer
(Playback with simple viewer is not possible without installing the
bundled application [VR-716 Player])
• Backup of menu settings
Note
• The PC specifications above are merely recommended example for using the application software with ease and is not a
guarantee against its operation.
Even when the PC fulfils the necessary operating conditions, its performance may vary across individual users depending
how the PC is used.
Caution
• Simultaneous playback of images from a single VR-716 on multiple PCs is not possible.
73
Page 74

Connecting to a PC – What is a Web Browser? – (continued)
Cautions for Proper Use of the Web Browser
䡵 Minimum PC Specifications Required
•OS:Windows 2000 Professional SP4 / Windows XP Professional SP1 / Windows XP Home Edition SP1
• CPU : Pentium III 800MHz and above
• Memory : 256 MB and above
• Hard Disk : At least 50 MB of free space is required to install the
bundled application software.
•Monitor : XGA (1024 x 768 pixels) and above required
SXGA (1280 x 1024 pixels) recommended
Supports Internet Explorer Ver. 5.5 (SP2) / Ver. 6.0.
In addition, Internet Explorer 5.0 is not supported.
䡵 Other Cautions
• Assuming that the Web browser is used in an Intranet environment in this
case, disable the proxy server by selecting the “Internet Options” A
“Connection” from the Internet Explorer.
•Priority will be given to operation at the main unit of VR-716 when it is in
the Recording, Timer Standby or Operating modes. Operation using a
Web browser or simple viewer will be restricted in this case.
Note
• The PC specifications are merely recommended example for using the application
software with ease and is not a guarantee
against its operation. Even when the PC
fulfils the necessary operating conditions,
its performance may vary across individual
users depending how the PC is used.
74
Page 75

Setup Flow
Connecting Using a LAN Cable
Setting Up a Network for VR-716
• Set the “IP ADDRESS”.
• Set the “NETMASK”.
• Set the “DEFAULT GATEWAY”.
Setting Up a PC Network
• Set the “IP address”.
• Set the “Subnet mask”.
☞ Page 76
☞ Page 77
☞ Page 78
WindowsXP ☞ Page 78
Windows2000 ☞ Page 79
Notes
◆ What is IP address?
☞ Page 110
◆ What is subnet mask?
☞ Page 110
◆ What is default gateway?
☞ Page 110
Connecting (Login) to the Network
☞ Page 81
◆ What is Login?
☞ Page 110
75
Page 76

Connecting to a PC – Connecting to a Web Browser and Setting Up –
Connecting Using a LAN Cable
䡵 Connecting to a (LAN) Network
Notes
◆ What is LAN?
LAN
☞ Page 110
Hub
100BASE-T
Straight LAN Cable
AUDIO IN
[LAN] Terminal
12345678910111213141516
VIDEO IN
THRU OUT
SCSI
RS-232C UPS
LAN
AUDIO OUT VIDEO OUT
CAUTION
RISK OF ELECTRIC SHOCK
DO NOT OPEN
21
21
AVIS:RISQUE DE CHOC
ELECTRIQ
VR-716 (Rear Panel)
15131197531
OUT
161412108642
WAR
OUT
ALARM
◆ Use Enhanced Category 5 or Category 6
cables to connect to PCs or hubs. Use a
crossover cable for direct connection to
PC, and a straight cable when connecting
via a hub.
◆ Consult the network administrator when
connecting to an existing LAN line.
Caution
• Simultaneous playback of images from 1
VR-716 on multiple PCs is not possible.
81 4/ 16
5
EXT REC
IN
INCOMRST
SER
CLK
13 169 12
REC
RST
COM
OUT
OUT
EE OUT
SIGNAL GND
AC IN
(220V–240V )
䡵 Connecting to a Peer-to-peer Network
100BASE-T Cross LAN Cable
AUDIO IN
VIDEO IN
THRU OUT
RS-232C UPS
[LAN] Terminal
123456789101112 13 14 15 16
SCSI
AUDIO OUT VIDEO OUT
LAN
CAUTION
RISK OF ELECTRIC SHOCK
DO NOT OPEN
21
21
AVIS:RISQUE DE CHOC
ELECTRIQ
VR-716 (Rear Panel)
5
81 4/ 16
EXT REC
IN
INCOMRST
15131197531
SER
CLK
OUT
161412108642
13 169 12
REC
RST
WAR
COM
OUT
OUT
OUT
ALARM
EE OUT
SIGNAL GND
AC IN
(220V–240V )
Note
◆ What is peer-to-peer?
☞ Page 110
Caution
• Unplug the power cord of VR-716 before
connecting the LAN cable.
76
Page 77

Setting Up a Network for VR-716
Perform the initial setup at the main unit of
VR-716 by referring to the monitor screen
connected to VR-716.
1.5.
HDD
SEARCH
1.2.3.4.
MENU
EXECUTE
REV
SKIP
3.
Notes
• If DHCP is selected, DHCP server assigned
by IP address will be displayed when displaying this menu again after exiting it. (Cannot be altered.)
• When “DHCP” is selected, this unit will only
acquire the IP address during startup or
changing of setting. When the network is
valid after startup, to acquire the IP address,
set “METHOD” back to “DHCP” if it has been
set otherwise.
OPERATE
FWD
LOCK
OUT
VIDEO AUDIO
1.
Press the [MENU] button
• Use [ ] to move the cursor to “NET-
WORK”.
MENU
2.
Press the [ ] button
• Displays the “NETWORK” screen.
MAIN MENU/OPERATION MENU
CLOCK SET
ONSCREEN MODE
FDP/BUZZER
REC MODE
CAMERA TITLE
OPERATION/EXT REC
MONITOR DISPLAY
ALARM SENSOR MODE
PROGRAM TIMER
NETWORK
DISK UTILITY/MAINTENANCE
NETWORK
1.HOST NAME
2.METHOD
3.IP ADDRESS
4.NET MASK
5.DEFAULT GATEWAY
6.NAME SERVER
MAC ADDRESS
<= : RETURN
[CANCEL]:DELETE
Factory settings are as follows:
• “METHOD” : “STATIC” (DHCP not used)
• “IP ADDRESS” : 192.168.0.10
• “NET MASK” : 255.255.255.0
• “DEFAULT GATEWAY” : 192.168.0.254
Consult the network administrator if there are prescribed settings in
the LAN environment for which VR-716 is to be connected.
3.
Press [ ] to move the cursor to the item to be
altered and turn the jog dial.
REV FWD
NETWORK
1.HOST NAME
2.METHOD
3.IP ADDRESS
4.NET MASK
5.DEFAULT GATEWAY
6.NAME SERVER
MAC ADDRESS
<= : RETURN
[CANCEL]:DELETE
vr716
STATIC
192.168. 0. 10
255.255.255. 0
192.168. 0.254
0. 0. 0. 0
00:80:88:40:b0:00
vr716
STATIC
192.168. 0. 10
255.255.255. 0
192.168. 0.254
0. 0. 0. 0
00:80:88:40:b0:00
4.
Move the cursor to “<=: RETURN” using [ ] and
press [ ]
NETWORK
1.HOST NAME
2.METHOD
3.IP ADDRESS
4.NET MASK
5.DEFAULT GATEWAY
6.NAME SERVER
MAC ADDRESS
<= : RETURN
[CANCEL]:DELETE
5.
Press [MENU] to end setting
• The display returns to the normal screen. (“IP ADDRESS SETTING IN
PROGRESS...” may be displayed.)
MENU
vr716
STATIC
192.168. 0. 10
255.255.255. 0
192.168. 0.254
0. 0. 0. 0
00:80:88:40:b0:00
77
Page 78

Connecting to a PC – Connecting to a Web Browser and Setting Up – (continued)
The following illustrates how to set up a small LAN using VR-716’s factory settings.
䡵 Example
HDD
56
ALARM
SENSOR
341278
ALARM
SENSOR
910
13 14
ALARM
SENSOR
15 16
11 1
ALARM
SENSOR
SEQUENCE
MULTI
REC STOP PLAY STILL
CANCEL
SEARCH
TIMER
DISPLAY
OPERATE
MENU
REV
FWD
• “METHOD” : [STATIC] (DHCP not used)
LOCK
• “IP ADDRESS” : 192.168.0.10
EXECUTE
OUT
VIDEO AUDIO
SKIP
• “SUBNET MASK” : 255.255.255.0
• “DEFAULT GATEWAY” : 192.168.0.254
PC for Web Browser
Operation
•“Workgroup” : [WORKGROUP]
LAN
Hub
Other Network PC 1
• Method : STATIC
• “IP address” : 192.168.0.12
• “Subnet mask” : 255.255.255.0
• “Default gateway” : 192.168.0.254
•“Workgroup” : [WORKGROUP]
Setting Up a PC Network (Windows XP)
When Using Windows XP
1.
Click the button
• Right-click on “My Network Places” and select “Properties”.
• Method : STATIC
• “IP address” : 192.168.0.11
• “Subnet mask” : 255.255.255.0
• “Default gateway” : 192.168.0.254
•“Workgroup” : [WORKGROUP]
Other Network PC 2
• Method : STATIC
• “IP address” : 192.168.0.13
• “Subnet mask” : 255.255.255.0
• “Default gateway” : 192.168.0.254
•“Workgroup” : [WORKGROUP]
2.
Select the network for which the PC used for Web
browser operation is connected
• Right-click and select “Properties”.
1 Check the ticked items.
• Proceed to page 80 step
3.
Notes
• Install accordingly if [Client for Microsoft
Networks] and [Internet Protocol (TCP/IP)]
are not displayed.
Refer to Windows Help Menu for the installation procedure.
◆ What is TCP/IP?
☞ Page 110
◆ What is DHCP?
☞ Page 110
◆ What is Workgroup?
☞ Page 110
78
Page 79

Setting Up a PC Network (Windows 2000)
When Using Windows 2000
1.
Click the button
• Click “Settings” z “Control Panel”.
• Double-click to open the “Network and Dial-up Connections” screen.
2.
Select “Local Area Connection”
• Right-click “Local Area Connection” and click “Properties”.
Click “Properties”.
1
• Proceed to page 80 step
3.
79
Page 80

Connecting to a PC – Connecting to a Web Browser and Setting Up – (continued)
Setting Up a PC Network (Windows 2000/XP)
3.
Select [Internet Protocol (TCP/IP)] and click
Note
• This is the screen of Windows XP. The
screen will be slightly different in the case
of Windows 2000.
Select [Internet Protocol (TCP/IP)].
1
Click “Properties”.
2
Select “Use the following IP
3
address”.
Set the “IP address” to
4
192.168.0.11.
Set the “Subnet mask” to
5
255.255.255.0.
Set the “Default gateway” to
6
192.168.0.254.
Click “OK”.
7
4.
Click on the “Local Area Connection Properties” screen.
Caution
• Do not use the same “IP address” within a
network environment during setting.
80
Click “OK”.
1
Page 81

Connecting (Login) to the Network
1.
Start the Web browser
2.
Enter the IP address for VR-716 in (factory
setting: 192.168.0.10)
Enter the IP address
1
(factory setting: 192.168.0.10)
2
Click “ Go”.
3.
Enter the login password for VR-716
Enter [admin] (lower case).
1
Enter [vr-716] (lower case).
2
3
Click “OK”.
Top Page
Note
◆ Login password to VR-716 can be altered
via operation at the web browser.
☞ Page 94
Factory setting:
User name : [admin] (lower case)
Password : [vr-716] (lower case)
81
Page 82

Connecting to a PC – Routine Uses of the Web Browser –
Setting a Title for Each Camera Channel Screen
1.
Click z
2.
Set the camera title
Notes
• Up to 15 characters can be used when
1
Click the [Check] box.
Enter characters of
2
the camera title.
Click [SAVE].
3
setting the camera title.
• Clicking [SAVE] with the field left blank will
reset the camera title.
• Click [SAVE] to save the title at VR-716.
• Corrections cannot be made once [SAVE]
is clicked. To make corrections, re-enter
the title.
• Click [RESET] will restore the value on the
main unit.
• When the [Camera **] under [Input No.] is
displayed in orange, it indicates that the
“Camera **” item under the “REC MODE”
menu in the main menu is set to “OFF”.
Caution
• Camera title input is disabled if [Check]
box is not clicked.
• Click [SAVE] only after all camera titles
have been updated.
• Alteration of camera titles is not possible
when VR-716 is in the Recording mode.
82
Page 83

Record Program Using the Program Timer (Setting Screen)
1.
Click z z
䡵 Display Area in Program List for Weekly Timer
• [PROGRAM LIST FOR WEEKLY TIMER] can be
displayed, updated or deleted.
Note
• The [PROGRAM LIST FOR WEEKLY
TIMER] has the following meaning:
SPE: REC SPEED
QUL: REC QUALITY
AUD: AUDIO REC
83
Page 84

Connecting to a PC – Routine Uses of the Web Browser – (continued)
Record Program Using the Program Timer (Start recording on a specific time of the week)
<Example> Execute recording from 8:00 a.m. every Friday ~ 5:00 p.m. every Saturday.
䡵 Recording Mode
• [CAMERA] 1 - 4
[REC SPEED] : 12.5
[REC QUALITY] : [H]
[AUDIO REC] : [ON]
1.
Click z z
• [CAMERA] 5 - 8
[REC SPEED] : 25
[REC QUALITY] : [N]
[AUDIO REC] : [ON]
• [CAMERA] 9 - 12
[REC SPEED] : 2.5
[REC QUALITY] : [N]
[AUDIO REC] : [OFF]
• [CAMERA] 13 - 16
[REC SPEED] : 1/2
[REC QUALITY] : [B]
[AUDIO REC] : [OFF]
Notes
1
Select the Program No..
2
Select the day/time for
recording to start and
end.
3
Select the [REC
SPEED], [REC
QUALITY] and [AUDIO
REC] for each camera
channel.
Select [WEEKLY].
4
Click [SAVE].
5
6
Check program setting
at the display area of
the Program List for
Weekly Timer.
•A maximum of 8 record programs can be
set using the Weekly Timer.
• Only numbers that have not been programmed are displayed in the [PROGRAM] field.
• When [1/12 IPS] (1 image per 12 seconds)
or [1/6 IPS] (1 image per 6 seconds) is selected for [REC SPEED], audio recording
is set automatically to “OFF” and this cannot be altered.
• Click [SAVE] to save settings at VR-716.
•Click [RESET] when settings are incorrectly entered.
• Upon clicking [SAVE], restoration of the
original preset value will not be possible.
Caution
• When all the “CAMERA” settings of a particular “BLOCK” in VR-716’s “REC MODE”
Menu are set to “OFF”, the “FRAME
RATE”, “REC QUALITY” and “AUDIO REC”
settings for that block cannot be altered.
• Refer to the notes related to Summer Time.
(☞ Page 116)
2.
Set to the Program Timer Standby mode
☞ Page 88 ‘Setting VR-716 to the Program Timer Standby Mode’
84
Page 85

Record Program Using the Program Timer (Start recording at a specific time everyday)
<Example> Execute recording from 8:00 a.m. ~ 5:00 p.m. everyday.
䡵 Recording Mode
• [CAMERA] 1 - 4
[REC SPEED] : 12.5
[REC QUALITY] : [H]
[AUDIO REC] : [ON]
1.
Click z z
• [CAMERA] 5 - 8
[REC SPEED] : 25
[REC QUALITY] : [N]
[AUDIO REC] : [ON]
1
2
3
4
5
• [CAMERA] 9 - 12
[REC SPEED] : 2.5
[REC QUALITY] : [N]
[AUDIO REC] : [OFF]
Select the Program
No..
Select the day/time for
recording to start and
end. Set [START] DAY
to [DAY].
Select the [REC
SPEED], [REC
QUALITY] and [AUDIO
REC] for each camera
channel.
Select [ON].
Check that all days of a
week have been
selected.
Click [SAVE].
• [CAMERA] 13 - 16
[REC SPEED] : 1/2
[REC QUALITY] : [B]
[AUDIO REC] : [OFF]
Notes
• [END] DAY cannot be set if [DAY] is selected for [START] DAY.
• Only [ON] or [OFF] can be selected under
[EXEC] if [DAY] is selected for [START]
DAY.
Caution
• Refer to the notes related to Summer Time.
(☞ Page 116)
2.
Set to the Program Timer Standby mode
☞ Page 88 ‘Setting VR-716 to the Program Timer Standby Mode’
Program List for Weekly
Timer
Note
Program List for Weekly Timer
Press [UP] to change and [DEL] to clear
preset values.
85
Page 86

Connecting to a PC – Routine Uses of the Web Browser – (continued)
Record Program Using the Program Timer (Start recording on a specific day and time)
<Example> Execute recording from 9:30 a.m. ~ 10:30 p.m. on every Monday, Wednesday and Friday.
䡵 Recording Mode
• [CAMERA] 1 - 4
[REC SPEED] : 12.5
[REC QUALITY] : [H]
[AUDIO REC] : [ON]
1.
Click z z
• [CAMERA] 5 - 8
[REC SPEED] : 25
[REC QUALITY] : [N]
[AUDIO REC] : [ON]
1
2
3
4
5
7
• [CAMERA] 9 - 12
[REC SPEED] : 2.5
[REC QUALITY] : [N]
[AUDIO REC] : [OFF]
Select the Program No..
Select the day/time for
recording to start and
end. Set [START DAY]
to [DAY].
Select the [REC
SPEED], [REC
QUALITY] and [AUDIO
REC] for each camera
channel.
Select [ON].
Select [***] for setting
other than [MON],
[WED] and [FRI].
Click [SAVE].
• [CAMERA] 13 - 16
[REC SPEED] : 1/2
[REC QUALITY] : [B]
[AUDIO REC] : [OFF]
Notes
• [END] DAY cannot be set if [DAY] is selected for [START] DAY.
• Only [ON] or [OFF] can be selected under
[EXEC] if [DAY] is selected for [START]
DAY.
Caution
• Refer to the notes related to Summer Time.
(☞ Page 116)
6
2.
Set to the Program Timer Standby mode
☞ Page 88 ‘Setting VR-716 to the Program Timer Standby Mode’
Click [UP] to update
setting for the Program
No. selected in 1.
Program List for Weekly
Timer.
Notes
•[DAILY MODE] can be set when [DAY] is
selected at [START] DAY. Select [***] for
days for which recording is not to be executed, followed by clicking [SAVE].
Program List for Weekly Timer
Press [UP] to change and [DEL] to clear
preset values.
Be careful when [DAY] is selected for other
Program Nos. As all record programs with
[DAY] selected will be set at the same time.
• Click [SAVE] to save settings at VR-716.
•Click [RESET] when settings are incorrectly entered. This restores the setting
saved at the recorder.
• Upon clicking [SAVE], restoration of the
original preset value will not be possible.
86
Page 87

Record Program Using the Program Timer (Start recording at a specific date)
<Example> Execute recording from 8:00 a.m. ~ 11:00 p.m. on 1 October.
䡵 Recording Mode
• [CAMERA] 1 - 4
[REC SPEED] : 8.3
[REC QUALITY] : [H]
[AUDIO REC] : [ON]
1.
Click z z
• [CAMERA] 5 - 8
DO NOT RECORD
• [CAMERA] 9 - 12
[REC SPEED] : 4.2
[REC QUALITY] : [B]
[AUDIO REC] : [OFF]
• [CAMERA] 13 - 16
DO NOT RECORD
Select the Program No..
1
Select the date to
2
execute record.
3
Select the time to start/
end record program.
Select the [REC
4
SPEED], [REC
QUALITY], [AUDIO
REC] and [EXEC] for
each camera channel.
Click [SAVE].
5
Program List for Date
Timer.
Notes
•A maximum of 16 timer programs can be
set for a specific recording mode in the
Date Timer Setup.
• Click [RESET] to restore the value previously saved.
• Click [SAVE] to save settings at VR-716.
•Click [RESET] when settings are incorrectly entered.
• Upon clicking [SAVE], restoration of the
original preset value will not be possible.
Caution
• When all the “CAMERA” settings of a particular “BLOCK” in VR-716’s “REC MODE”
Menu are set to “OFF”, the “FRAME
RATE”, “REC QUALITY” and “AUDIO REC”
settings for that block cannot be altered.
• Refer to the notes related to Summer Time.
(☞ Page 116)
2.
Set to the Program Timer Standby mode
☞ Page 88 ‘Setting VR-716 to the Program Timer Standby Mode’
87
Page 88

Connecting to a PC – Routine Uses of the Web Browser – (continued)
Setting VR-716 to the Program Timer Standby Mode
1.
Click z z
Note
• Timer mode cannot be executed if none
of the Timer Program execution mode is
activated and sensor setting is not performed.
2.
Click
1
Click [TIMER MODE].
3.
To undo the Timer Standby mode, click
Click the [ON] button.
1
Click the [OFF] button.
1
Notes
• Operations after setting the [TIMER
MODE] to [OFF] are reflected on the [Release Timer operation] screen.
☞ Page 88
• Alteration of settings and termination of
recording related to [Release Timer operation] is not possible via the Web browser.
☞ Page 54
Caution
• The [OFF] button is displayed when the
[TIMER STANDBY MODE] is activated.
Double-check the [Release Timer operation] before using.
88
Page 89

Checking Recording Operation After Release Timer is Executed
1.
Click z z
Note
• Release the Timer mode at VR-716. Select one of the 3 operations below after
Timer mode is released:
Click [AFTER RELEASE].
1
[CONTINUE]:
Recording will continue when Timer Recording is currently executed.
[STOP]:
Switches to the Stop mode regardless of
whether Timer Recording is currently executed.
[NORMAL REC]:
Switches to the Normal Recording mode
regardless of whether Timer Recording is
currently executed.
9 Operation after Release Timer: [STOP]
Current status of the
2
[Release Timer operation]
is displayed.
(Example)
[AFTER RELEASE]:
[CONTINUE]
9 Operation after Release Timer: [NORMAL
REC]
Caution
• Release Timer operation settings can only
be viewed at the Web browser. Alteration
is not possible.
89
Page 90

Connecting to a PC – Routine Uses of the Web Browser – (continued)
Changing/Deleting Record Programs in the Program Timer
䡵 [WEEKLY TIMER] Programs
1.
Click z z
To alter a record
䡵
program.
Click [UP] to change
settings in the setting
area of [WEEKLY TIMER
SETUP].
䡵 [DATE TIMER] Programs
1.
Click z z
To cancel a record
䡵
program. Click [DEL].
To cancel a record
䡵
program. Click [DEL].
Notes
• Upon clicking the [UP] button, current values will be displayed in the setting area of
[WEEKLY TIMER SETUP].
•To execute/undo the Program Timer, click
[UP] for each program and set [EXEC] in
the setting area to [ON] / [OFF].
• When [DEL] is clicked, program settings
will be discarded (cleared) in both Weekly
and Date Timers and initial settings will be
restored. To restore the values prior to clicking [DEL], perform the Timer Recording
setting again.
90
Page 91

Searching Image According to Date/Time (Event Search)
Searching Alarm/Sensor recording
1.
Click z z
Select alarm/sensor
1
channel to search.
2
Specify a date/time.
Select the display mode
3
of search results.
4
Click [SEARCH].
<Selection items for 1>
•From all the alarm/sensor channels
• ch 1 ~ ch 16 (specify by camera channel)
<Selection items for 3>
•[BEFORE]:
Displays alarm events prior to the specified time in 5 starting from the most current event.
• [AFTER]:
Displays alarm events after the specified
time in 5 starting from the oldest event.
Notes
•A maximum of 15 events can be displayed
during every search.
• When search result exceeds 15, a [Next
15 Events] button will be displayed below
the list of search results. Click the [Next
15 Events] to display the next 15 results.
• Click the [Previous 15 Events] in the same
way to display the previous results.
• Alarm search cannot be executed if alarm
data is deleted at VR-716.
Search results are
5
displayed.
Close the search
6
results screen.
2.
Click the button for the event to be viewed
• This opens up the Viewer window and starts to playback images of the
camera channel for which alarm/sensor recording is executed.
(☞ Page 99)
<Display details in 5>
• [ALARM NO]
• [TYPE]
[A] : Alarm Recording (Orange)
[S] : Sensor Recording (Orange)
(In the case of alarm/sensor recording
by “MOTION DETECT”, [M] is also displayed.)
[P] : Presensor Recording (Pink)
• [CHANNEL]:
Indicating the number of camera for input.
This will be displayed in white for normal
recording, in orange for alarm/sensor recording, in pink for presensor recording
and in red only for the channel which received alarm input among the alarm/sensor recording.
•[START]
• [END]
• [DURATION]
Caution
• Installation of the bundled application software [VR-716 Player] is required in order
to view the playback images.
• Refer to the notes related to Summer Time.
(☞ Page 116)
91
Page 92

Connecting to a PC – Routine Uses of the Web Browser – (continued)
Searching Image According to Date/Time (Event Search)
Search By Date/Time
1.
Click z z
Input date of the image
1
to playback.
<Selection items for 2>
Select a camera
2
channel (optional).
Click [SEARCH].
3
•From all the camera channels
• ch 1 ~ ch 16 (specify by camera channel)
• ch 1 ~ ch 4, ch 5 ~ ch 8, ch 9 ~ ch 12, ch
13 ~ ch 16 (specify by block)
Search results are
4
displayed.
5
Close the search
results screen.
<Display details in 4>
• [TYPE]
[A] : Alarm Recording (Orange)
[S] : Sensor Recording (Orange)
[P] : Presensor Recording (Pink)
[N] : Normal Recording (White)
• [START]
• [END]
• [DURATION]
• [CHANNEL]
Caution
• Installation of the bundled application software [VR-716 Player] is required in order
to view the playback images.
• Refer to the notes related to Summer Time.
(☞ Page 116)
2.
To view a particular event, click the button for
that event
• This opens up the Viewer window and starts playback of images from the
specified date.
(☞ Page 99)
92
Page 93

Searching Image According to Date/Time (Event Search)
Search By Term
1.
Click z z
<Selection items for 2>
Input the Start/End
1
Date.
Select the display
2
mode of search results.
Select a camera
3
channel (optional).
To refine search, select
4
a condition accordingly.
• [ASC]:
Displays results from the oldest event.
•[DESC]:
Displays results from the most current
event.
<Selection items for 3>
•From all the camera channels
• ch 1 ~ ch 16 (specify by camera channel)
• ch 1 ~ ch 4, ch 5 ~ ch 8, ch 9 ~ ch 12, ch
13 ~ ch 16 (specify by block)
Click [SEARCH].
5
Search results are
6
displayed.
2.
Click the button for the event to be viewed
• This opens up the Viewer window and starts playback. (☞ Page 100)
<Selection items for 4>
• [All Event REC] (Displays events of all recording data.)
• [All the alarm/sensor channels] (Displays
only events of alarm/sensor recording.)
• [Only Normal REC] (Displays recording
events except those of alarm/sensor recording.)
<Display details in 6>
• [TYPE]
[A] : Alarm Recording (Orange)
[S] : Sensor Recording (Orange)
[P] : Presensor Recording (Pink)
[N] : Normal Recording (White)
• [START]
• [END]
• [DURATION]
• [CHANNEL]
Notes
•A maximum of 15 search results can be
displayed on the screen at a time.
• When search result exceeds 15, a [Next
15 Events] button will be displayed below
the list of search results. Click the [Next
15 Events] to display the next 15 results.
• Click the [Previous 15 Events] in the same
way to display the previous results.
Caution
• Installation of the bundled application software [VR-716 Player] is required in order
to view the playback images.
• Refer to the notes related to Summer Time.
(☞ Page 116)
93
Page 94

Connecting to a PC – Useful Browser Features –
Restricting Access to VR-716
When there are multiple users sharing a VR-716 in a network environment, authorization of access rights of varying degrees to
individual users will be necessary in order to protect VR-716 settings or data.
At VR-716, the level of sharing can be specified according to the folders in which image files (event files) are stored.
1.
Click z
Enter a user name
1
(arbitrary).
2
Enter user name as
specified on Windows.
3
Enter password. Make
sure not to forget the
password.
4
Enter again to verify the
password.
5
Select one of the Access
Rights.
6
Click [SAVE].
Notes
• Refer to the Windows Help Menu to find
out the user name set on Windows.
• The different levels of access rights are illustrated as follows:
VR-716
Timer
Event
setting
setting
[Administrators] Yes Yes Yes Yes
[Operators] No Yes Yes No
[Users] No No Yes No
setting
Utility
• The 2 user names below are included in
the factory settings:
12
[Login Name]
[Password]
[Access Rights]
[admin] [guest]
[vr-716] [vr-716]
[Administrators] [Operators]
䡵 Viewing the List of Registered Access Users
1.
Click z
The list of registered
1
users is displayed.
◆
Click [DELETE] to clear
data of the registered
user.
◆
Click [UPDATE] to alter
data of the registered
user.
Caution
• When alteration is made to the registered
Access User, ensure to perform account
registration on Windows with the same
user name and password.
Refer to Windows Help Menu for the registration procedure of user accounts.
• If the current Administrators’ rights password is forgotten, restoration by the user
will not be possible. (☞ Page 107)
94
Page 95

Restricting Access to Recorded Image Files at VR-716
When there are multiple users sharing a VR-716 in a network environment, authorization of access rights of varying degrees to
individual users will be necessary in order to protect VR-716 settings or file.
At VR-716, the level of sharing can be specified according to the folders in which image files (event files) are stored.
1.
Click z
Select [Security].
1
Enter the [Workgroup]
2
name registered with LAN.
A list of image data will
3
be displayed when [YES]
is selected.
4
Click [SAVE].
<Selection items for 1>
• [SHARE]:
Verifies only passwords that are registered
in the Access User Setup (☞ Page 94).
•[USER]:
Ver ifies both user name and password.
Note
•Factory settings:
[Security] : [SHARE]
[Workgroup] : [WORKGROUP]
[Browseable] : [YES]
Caution
•When access rights are altered during
playback of image files, reboot of Windows
will be required.
☞ Page 110 ‘Browsing Function’
䡵 The [Security] and [Browseable] settings combine to yield 4 selectable levels of secu-
rity.
Security Level
High
[Security]
[Browseable]
Low
[SHARE]
Ver ifies [Login Name] and
[Password] of registered
users of VR-716. Unregistered users can gain access using [guest] and
password
The list of image files can
also be viewed on other
PCs within the same network.
[YES]
.
[USER]
[NO]
Ver ifies [Login Name] and
[Password] of registered
users of VR-716. Unregistered users can gain access using [guest] and
no
password
The list of image files cannot be viewed on other
PCs.
.
[USER]
[YES]
Ver ifies [Login Name] and
[Password] of registered
users of VR-716.
The list of image files can
no
also be viewed on other
PCs within the same network.
[USER]
[NO]
Ver ifies [Login Name] and
[Password] of registered
users of VR-716.
The list of image files cannot be viewed on other
PCs.
95
Page 96

Connecting to a PC – Useful Browser Features – (continued)
Changing Network Settings of VR-716 from PC
Details in the “NETWORK” Menu of VR-716 can be altered via operation on a Web browser.
1.
Click z
Select the method of IP
1
address setting.
• [Static]:
DHCP server not used.
• [DHCP]:
Uses DHCP server.
• [None]:
Prohibits all network
connections.
2
Enter the name used to
denote your PC in the
network environment.
Enter the domain name.
3
4
Enter the [IP Address],
[Subnet Mask], [Default
Gateway] and [Name
Server].
Caution
• When network settings of VR-716 are
changed, network settings need to be altered accordingly at the PC. Consult the
network administrator when making alterations.
• Upon changing network settings of VR716, change the network settings at the
PC as well, followed by restarting the Web
browser.
Notes
◆ What is [Domain name]?
☞ Page 110
◆ What is [DHCP]?
☞ Page 110
◆ What is [Host name]?
☞ Page 110
5
Click [SAVE].
96
Page 97

Mail Notification Setting During Alarm/Sensor Input
In a network environment where use of a mail server (SMTP) is possible, mail notification setting can be performed at VR-716 to
send out the alarm list during alarm/sensor input in the form of notification messages on a regular basis.
1.
Click z
Select a [Mode].
1
Register the [Mail (SMTP)
2
Server ].
Select an [Interval] for
3
sending out notification
messages (5, 10, 15 or
30 minutes).
Register the mail
4
address of the [To EMAIL].
Register the mail
5
address of the [From
E-MAIL].
Click [SAVE].
6
䡵 Upon setting, the mail notification feature can be
checked to ensure that it is properly functioning.
• Clicking [SAVE] at the [E-MAIL SETUP] screen displays a confirmation
screen.
<Selection items for 1>
• [None]:
Disables the mail notification feature.
• [Alarm/Sensor]:
Sends out mail notification during alarm/
sensor input.
Notes
• When using the mail notification feature,
perform settings described in page 96 ‘Network Settings’ as well.
•To use the mail notification feature, the
following information must be registered.
• Mode
• Mail (SMTP) Server
(Enter the domain name.)
• Sender’s Mail Address
• Minimum Mail Notification Interval
• Receiver’s Mail Address
• Notification mails can be sent out to multiple receivers by inserting [ , ] or a space
between the receivers’ mail addresses.
(Maximum no. of input characters is 254)
•The following is registered as the [Subject:]
in the factory settings:
[Starting Alarm/Sensor REC!!]
(Maximum no. of input characters is 32)
• [Normal] or [Short] can also be selected
from the [List Form] as the mode of message display.
Click [TEST E-MAIL].
1
• Click [TEST E-MAIL] to issue a test mail. Check that this mail is received
at the specified destination.
• When sending of notification fails due to errors in the settings or network,
an error message will be displayed. Check the mail notification as well as
network settings.
Caution
• Mail notification may fail depending on the
authentication method at the mail server.
• Consult your network administrator on the
mail server’s settings.
•A complete alarm/sensor list may not be
received depending on the maximum no.
of characters a mobile can receive.
• Regardless of the interval setting of mail
notification, the mail notification will be sent
within 10 minutes from the first alarm/sensor input. It may take much time before
data can be received depending on the
network environment.
97
Page 98

Connecting to a PC – Useful Browser Features – (continued)
䡵 The notification mail received during alarm/sensor input will look as follows:
Mail Header
From: xxxxx@xxxxx.co.jp
To: xxxxx@xxxxx.co.jp
Subject: Starting Alarm/Sensor REC!!
Message (Normal List Format)
• ALARM/SENSOR NOTIFICATION
• The content in the [Subject] will be reflected.
Host name: VR-716 [3rd factory]
The following alarm/sensor recording has been started:
-----------------------
01/08/2003(FRI) 20:15:15 A 3ch [INF.], 4ch [ENTRANCE]
01/08/2003(FRI) 20:15:17 S 9ch [ ]
01/08/2003(FRI) 20:18:15 A 13ch [N. GATE], 14ch [ ], 16ch [ ]
-----------------------
The End
Message (Short List Format)
RECORD NOTIF.
---------------HOST. vr716
[3rd factory]
---------------LIST DISPLAY
14/10/2003
---------------clock: 19:39:18
Mode: A
CamCh: 3[INF.], 4[ENTRANCE]
---------------clock: 19:39:39
Mode: S
CamCh: 6[ ]
---------------clock: 19:39:45
Mode: A
CamCh: 13[N. GATE], 14[ ], 16[ ]
----------------
• VR-716’s host name will be reflected as the Host Name. The content
registered at [Location Name] is also reflected in [ ].
• Lists data of alarm/sensor that are triggered within the specified
minimum notification interval. The list contains 3 types of information
as shown below:
• Alarm/Sensor Activation Time
• Recording Mode
A: Alarm recording
S: Sensor recording
• Camera Channel [Camera Title]
Note
•Only the language of the mail message changes in
accordance with the “LANGUAGE SELECTION” in the
main menu. (☞ page 25)
Caution
• There will be a few seconds difference between the
alarm notification list and the actual time when recording starts.
• Refer to the notes related to Summer Time.
(☞ Page 116)
98
Page 99

Viewing Images of Event Search Results (Simple Viewer)
Installation of the bundled application software [VR-716 Player] will be required prior to using the Simple
Viewer. Otherwise, it cannot be used to view event images of search results.
1.
Search for an event
☞ Page 91 ‘Searching Image According to Date/Time’
2.
Click the button for the event to be
viewed
Displays the Viewer window.
1
2
3
4
5
6
7
8
9
0
Caution
• Playback using the Simple Viewer may stop or playback
speed may be unstable as priority is given to recording or
other forms of internal processing over outgoing processing to the network.
• Network playback of VR-716 via simultaneous connection
by multiple PCs is not possible.
• There may be cases whereby recorded image file with
audio may not be fully displayed.
• Refer to the notes related to Summer Time. (☞ Page 116)
!
Control Panel
䡵 Names and Functions
1 [START]
Displays the date/time recording started.
2 [END]
Displays the date/time recording ended.
3 [TYPE]
Displays the mode of recording and the camera channels.
This will be displayed in white for normal recording, in orange for alarm/sensor recording, in pink for presensor recording and in red when there is alarm input during alarm/
sensor recording. (☞ See right diagram)
Image Display Area
䡵 Recording Mode
[NORMAL] Recording using the (r) button at VR-
716.
[NORMAL (SPLIT)] Splits up automatically in the Normal
Recording mode during recording over
extensive periods of time.
[PRESENSOR] When “PRESENSOR REC” is set to “ON”
at VR-716 .
[ALARM] When recording mode is set to “ALARM”
at VR-716.
[SENSOR] When recording mode is set to “SEN-
SOR” at VR-716.
䡵 Camera Channel
[ - ]: No input
1 ch ~ 16 ch (Multiple channels are displayed during simultaneous
input)
99
Page 100

Connecting to a PC – Useful Browser Features – (continued)
Example) n1_20030224_091035001.bmp
Denotes YY MM DD (year, month, day).
The example shown indicates that images are recorded in the Normal
Recording mode at Block 1 (Cameras 1-4) on 24/02/2003 at 09:10:35.
Denotes hh mm ss msec (hour, minute,
second, millisecond).
Denotes recording mode and block no..
(a: Alarm Recording s: Sensor/ Presensor
Recording n: Normal Recording)
Viewing Images of Event Search Results (Simple Viewer)
䡵 Functions (continued)
1
2
3
4
5
6
7
8
9
0
!
4 [TITLE]
Displays the registered camera title.
[NO TITLE]
[QUAD DISPLAY]
When title is not registered.
When displaying in quad picture.
8 Displays the operational status of the Web Viewer.
[FILE OPEN]
[ACCESS FAILED]
[TOP OF FILE]
[END OF FILE]
[PLAY]
[PAUSE]
[FWD SKIP]
[BACK SKIP]
[ERROR]
9 [INTERVAL] when using the Skip buttons. [Skip inter-
val] that can be selected varies according to the frame
rate of the image files.
Check the “REC QUALITY” and “FRAME RATE” at VR-
716.
“FRAME RATE”
Preparation for playback on Web Viewer
is completed.
Preparation for playback on Web Viewer
failed.
Top of the file.
End of the file.
Currently in the Playback mode.
Currently in the Still mode.
Currently in the Skip mode.
Currently in the Reverse Skip mode.
When internal error has occurred.
[INTERVAL]
[Registered Camera
Title]
5 Switching between quad picture and single picture
modes.
(The Web Viewer automatically identifies screens in quad/
single picture as well as the camera no..)
: Displays in single picture. (Displays each camera chan-
nel no.)
: Displays in quad picture.
6 Displaying the time of playback images.
7 Control buttons for the recorded image files.
: Skip in the reverse direction according to the skip in-
tervals.
: Stop playback and move to the top of the file.
: Start playback.
: Stop playback image temporarily.
: Skip in the forward direction according to the skip in-
tervals.
Title display according to the
camera no..
[25 IPS] ~ [1 IPS]
[1/2 IPS]
[1/6 IPS]
[1/12 IPS]
0 ON/OFF switches for [REPEAT] and [MUTE]. Tick
the Q to turn [ON] the switch.
The [MUTE] box cannot be ticked for image files without audio sound. (Displayed as OFF all the time)
! Click
specified directory (default directory is C:\). The time
stamp of the recorded image will be used automatically as the file name of the still image as shown below:
[1 sec], [5 sec], [10 sec], [20 sec], [30 sec], [1 min], [5 min],
[10 min], [15 min], [30 min] and [1 hour]
[2 sec], [4 sec], [10 sec], [20 sec], [30 sec], [1 min], [5 min],
[10 min], [15 min], [30 min] and [1 hour]
[5 sec], [10 sec], [20 sec], [30 sec], [1 min], [5 min],
[10 min], [15 min], [30 min] and [1 hour]
[10 sec], [20 sec], [30 sec], [1 min], [5 min], [10 min],
[15 min], [30 min] and [1 hour]
to save the still image in BMP format to the
Note
• If playback is started during continuous alarm recording, it
will start to playback 2 seconds earlier than the starting time.
100
The still image can also be saved to the Desktop by leaving the directory field empty and pressing [Enter] during
playback.
 Loading...