

Page 1

V.NETWOKS MULTI CAMERA BROWSER
VN-S200U/S100U
INSTRUCTIONS
For Customer Use:
Enter below the Serial No. which is
located on the body. Retain this
information for future reference.
Model No. VN-S200U/S100U
Serial No.
This instruction book is made from
100% recycled paper.
SS961541-001
1
Page 2
CUATION
EIt is strictly prohibited to duplicate or copy any part or whole of this document.
EThe information in this document is subject to changes without prior notice.
EBear in mind not to violate the copyright when using either the product or this document.
EWe cannot assume any liability for the consequences of any errors or mistakes occurring
in this document.
TRADEMARKS
Microsoft and Windows are registered trademarks of the Microsoft Corporation operating
both in the United States and in other countries.
This document omits symbols such as , ©, ® with trademarks.
Other corporate names and product names mentioned in this document are trademarks
or registered trademarks of their respective owners.
BEFORE RECORDING OR SAVING IMAGES
ECopyright law prohibits the use without authorization of the copyright owners of images
reproduced from TV broadcasting or video recording and the recording of images of
published materials such as posters, except for the purpose of personal entertainment.
EWhen recording or saving an important image, always be sure to perform test recording
in order to ensure correct recording and reproduction. Also take care of the available
hard disk capacity.
EWe cannot assume any liability for damages which may be incurred in a case where
correct recording or reproduction is not available due to a problem with the present
application or with the computer software.
CONTENTS
INTRODUCTION . . . . . . . . . . . . . . . . . . . . . . 3
INSTALLATION . . . . . . . . . . . . . . . . . . . . . . . 7
VIEWING V.NETWORKS IMAGES . . . . . . . 9
CONTROLLING THE V.NETWORKS . . . . 12
RECORDING V.NETWORKS IMAGES . . . 14
DELETING RECORDING FILES . . . . . . . . 15
TIMER RECORDING . . . . . . . . . . . . . . . . . 16
PLAYING RECORDING IMAGES . . . . . . . 17
SNAPSHOT RECORDING . . . . . . . . . . . . . 18
CHANGING THE VIEW WINDOW SETUP . . .
CHANGING THE V.NETWORKS SETUP . . .
SETTING THE POSITION MEMORY . . . . 25
ARRANGING THE WINDOWS . . . . . . . . . 26
RIGHT-CLICK MENU . . . . . . . . . . . . . . . . . 27
UNINSTALLATION . . . . . . . . . . . . . . . . . . . 28
TROUBLE SHOOTING . . . . . . . . . . . . . . . . 29
19
24
2
Page 3

INTRODUCTION
This application entitled "MULTI CAMERA BROWSER" (VN-S100U, VNS200U) is used to display images from multiple V.NETWORKS units on the
operator terminal equipment.
(The V.NETWORKS series products include the VN-C1U, VN-C2U and VNC3U. Verify that your V.NETWORKS unit is the VN-C1U, VN-C2U or VN-C3U.
Operating Environment
The following environment is required to run this application.
Basic software:
Microsoft Windows 95, 98 or NT (Service Pack 4 or higher)
Computer:
A PC incorporating Pentium U 333 MHz or faster CPU.
(Pentium V 500 MHz or more is recommended.)
Memory
Available memory space of 64 MB or more.
(128 MB or more is recommended.)
Hard disk free capacity (before installation)
10 MB or more (Free space of at least 50 MB is required for recording.)
Disk device
CD-ROM drive is indispensable.
Display, video card
Resolution 640×480 or better. High Color (16-bit) display is
indispensable.
(Resolution of 1024×768 or better and True Color (32-bit) display are
recommended)
Other
The MULTI CAMERA BROWSER is compatible only with JVC camera
models VN-C1U, VN-C2U and VM-C3U.
3
Page 4
Main Functions
1. Multi-browsing
ESimultaneous connections to multiple V.NETWORKS units.
ESimultaneous browsing of up to 16 units (With the VN-S100U, up to 4
cameras can be browsed.)
2. Recording
EThe displayed V.NETWORKS images can be saved as successive still
images.
EVariable saving interval.
ETimer recording. (This function is for exclusive use with the VN-S200U.)
3. PLAY BACK
EPlayback of recording by simply specifying the time and date.
ESimultaneous display of saved time.
4. Pop-up
ECtrl + double clicking on a window showing a V.NETWORKS image, displays
a magnified image in another window.
5. Snapshot
ESaving of still images in desired folders (up to 16 images).
6. Auto dial-up
EWhen a V.NETWORKS unit on WAN is registered, it can be connected by
automatic dial-up.
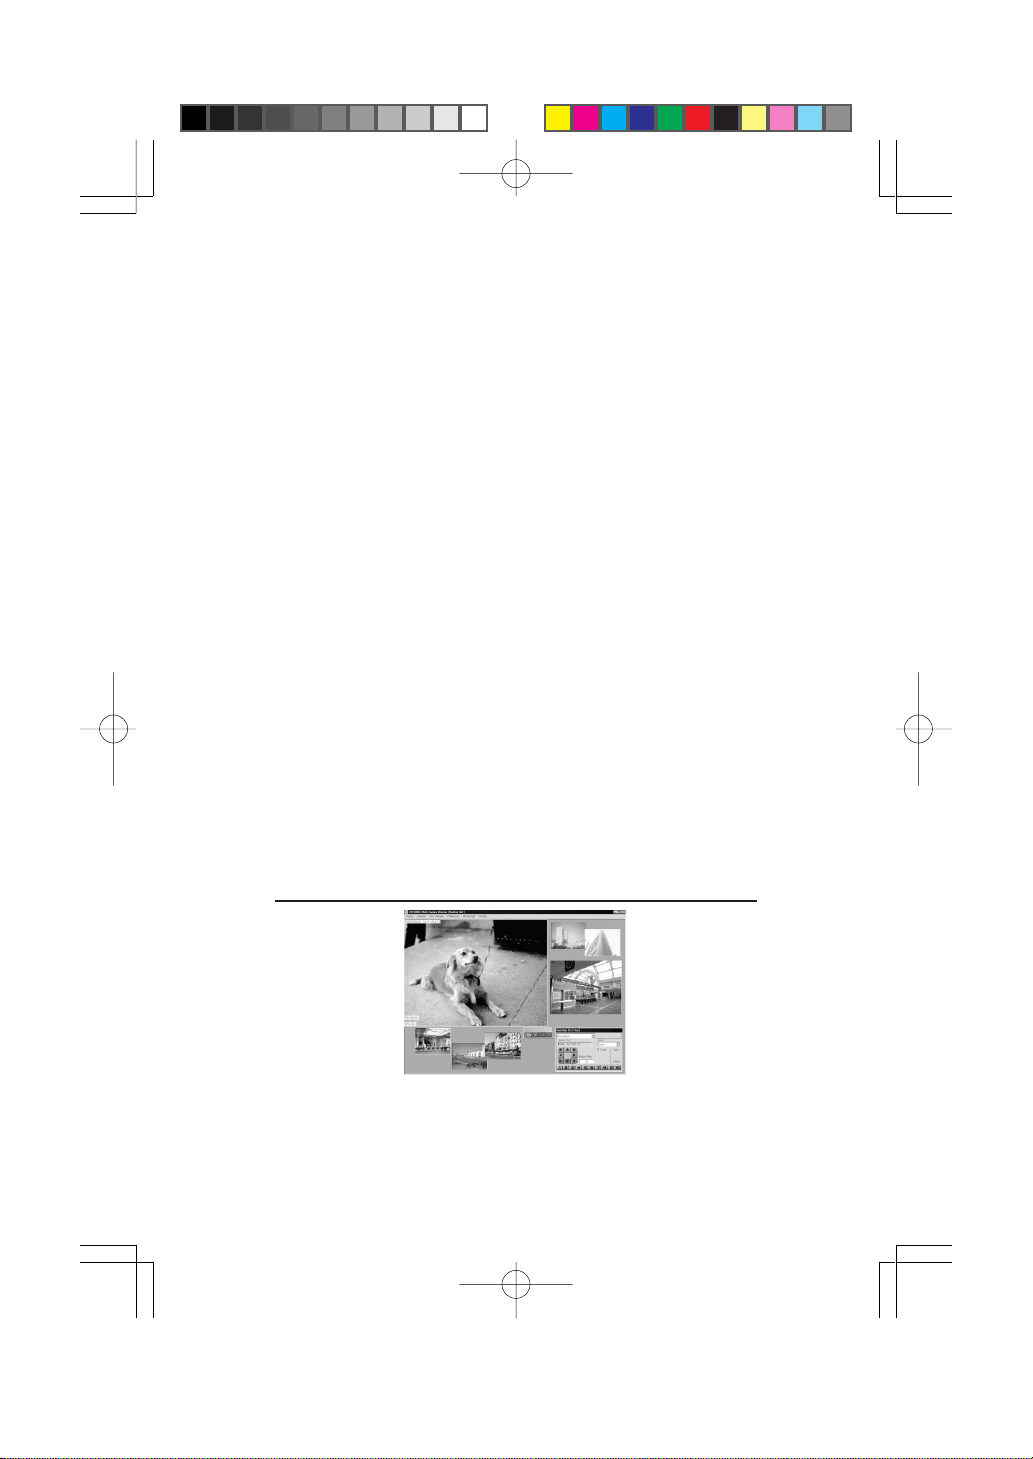
Overall View of MULTI CAMERA BROWSER Screen
Figure 1
NOTE) Fig. 1 shows the overall view with the VN-S200U.
With the VN-S100U, up to four images can be displayed in the View window.
4
Page 5
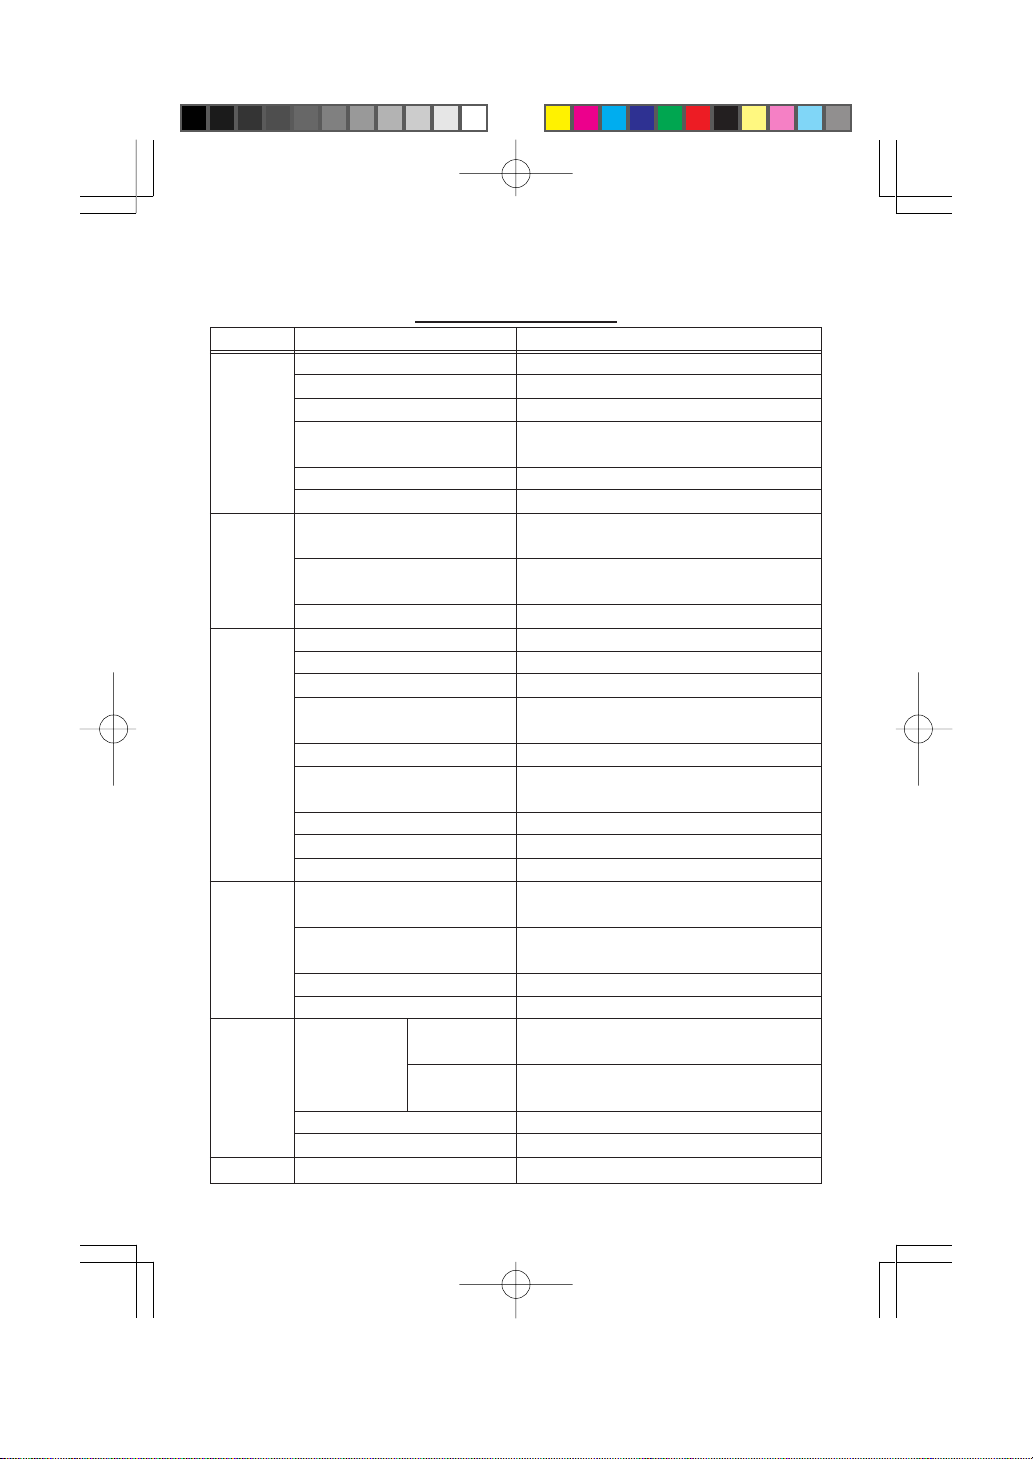
Menu Item
File
View
View
window
V.Networks
Window
Help
Menu Function List
Pull-Down Item Outline
New Work space
Open Work space
Save Work space
Save Work space as
Close Work space
Exit
Controller
REC/Play Controller
Tool Tip
New View Window
Add View Window
Delete View Window
Start Recording
Stop Recording
Timer Recording
Start Playback
Stop Playback
Properties
Register V.Networks
Delete V.Networks
Properties...
Position Memory
Arrange view
Window
Align With Grid
(Window List)
About
by
Registration
by Name
Creates a new work space.
Opens an existing work space.
Saves a work space by overwriting.
Saves a work space by assigning a new
name.
Close the currently open work space.
Exits from the browser.
Toggles the display of the V.NETWORKS
controller on and off.
Toggles the display of the recording,
playback and snapshot controller.
Toggles the display of the tool tip.
Creates a new View window.
Opens an existing View window.
Deletes the registration of a View window.
Saves the images in the View window as
successive images.
Stops recording.
Starts and stops recording automatically at
the set time of day.
Plays the recorded images successively.
Stops Playback.
Sets up the View window.
Registers a V.NETWORKS in the View
window.
Deletes a V.NETWORKS from the View
window.
Sets up a V.NETWORKS.
Sets up the position memory.
Arranges windows in a tile in the order they
were registered.
Arranges windows in a tile in the
alphabetical order of names
Aligns the windows with grid automatically.
Checks the View windows being displayed.
Shows the browser version.
5
Page 6
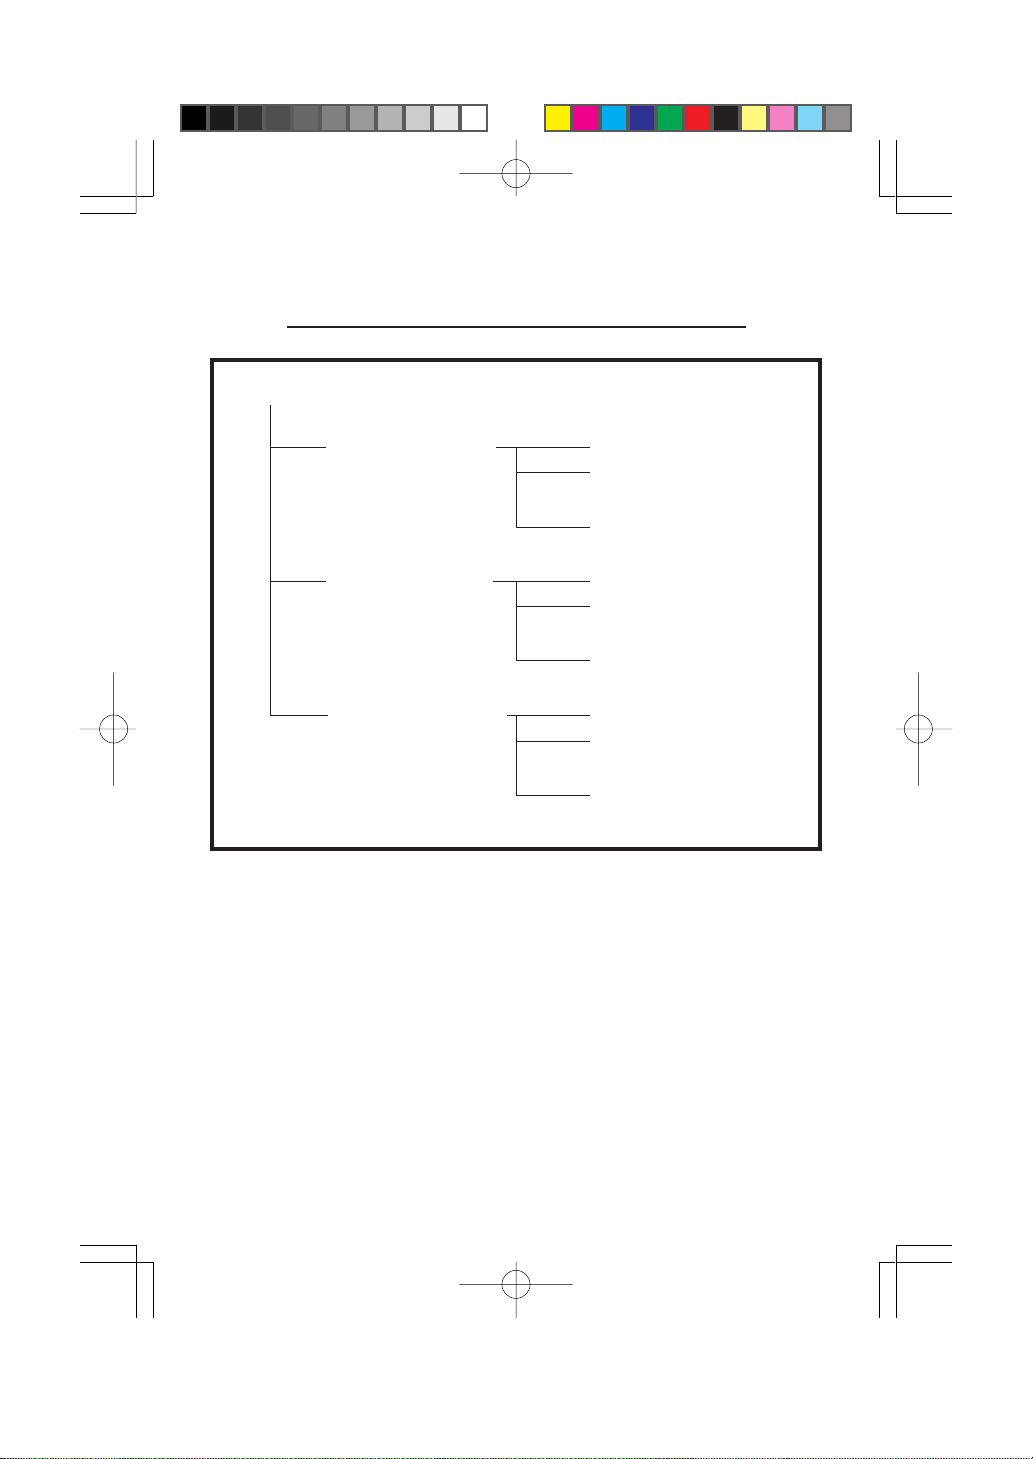
Construction of MULTI CAMERA BROWSER
Work space (*.vnw)
View window No.1
View window No.2
...
View window No.16
*The figure above shows the construction of the VN-S200U.
With the VN-S100U, the following restrictions are applied.
Number of View windows . . . . . . . . . . . . . . 4
Number of cameras per View windows . . . 4
V.NETWORKS No.1
V.NETWORKS No.2
V.NETWORKS No.16
V.NETWORKS No.17
V.NETWORKS No.18
V.NETWORKS No.32
V.NETWORKS No.241
V.NETWORKS No.242
V.NETWORKS No.256
... ...
6
Page 7
INSTALLATION
This section describes the installation procedure of the application.
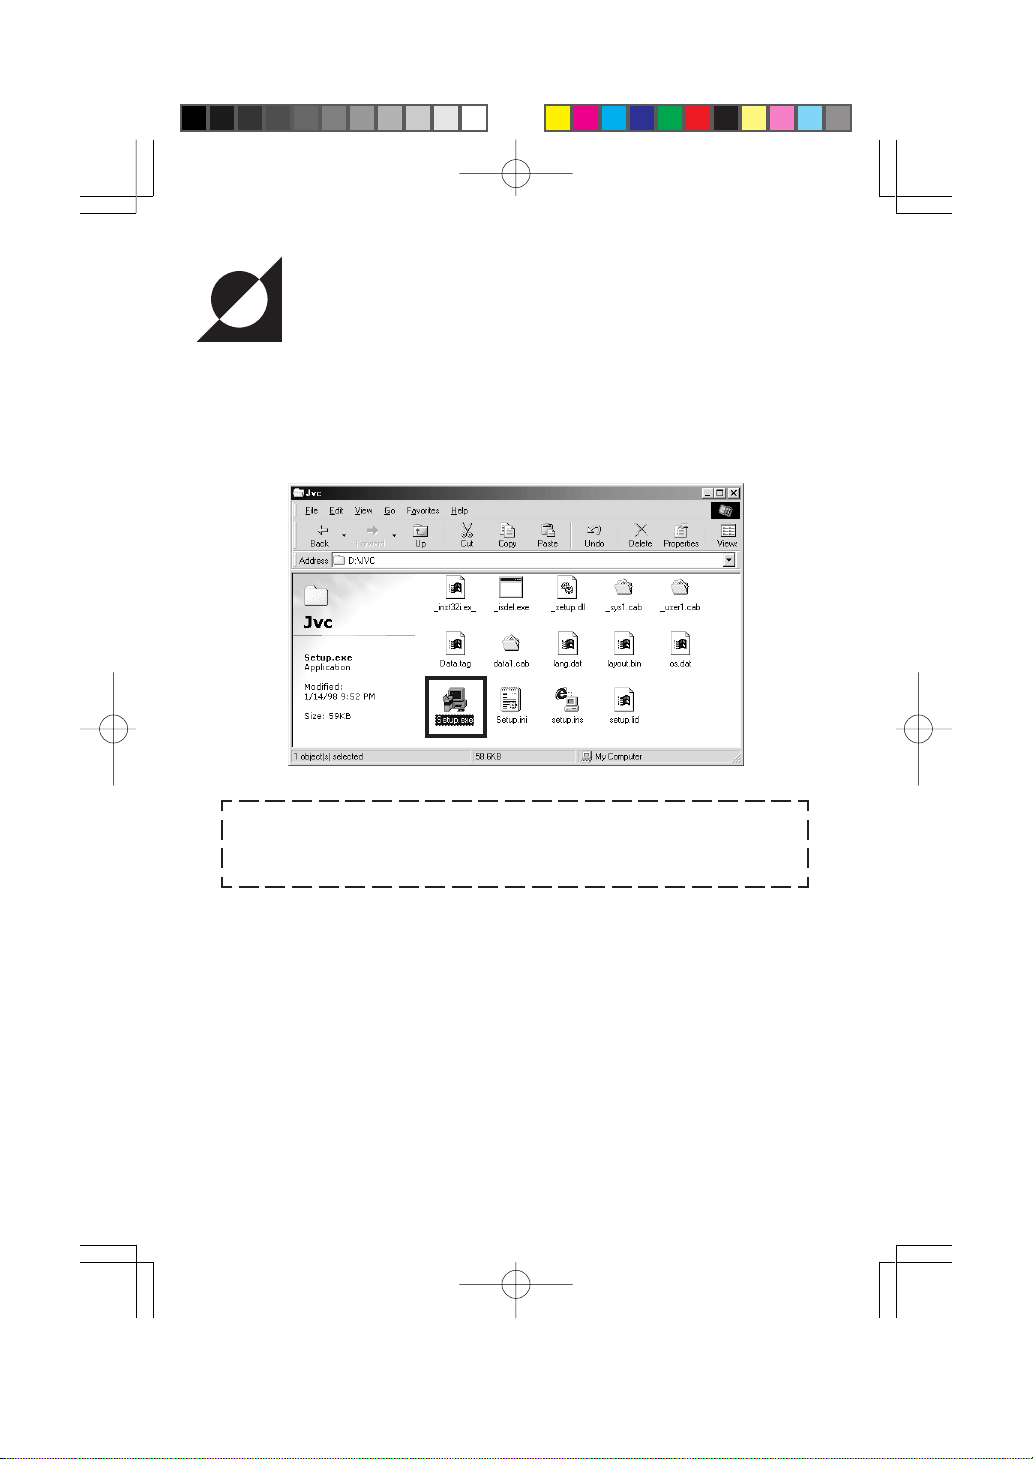
1. Insert the "VN_S200U" CD-ROM in the CD-ROM drive (* with the VN-S200U).
2. Double-click \Jvc\setup.exe of the CD-ROM in order to run it.
In advance, set the IP addresses of the VN-C1U/C2U/C3U cameras to
be used sing the provided setup tool. For the operating procedure of the
setup tool, refer to the cameras' instruction manuals.
7
Page 8
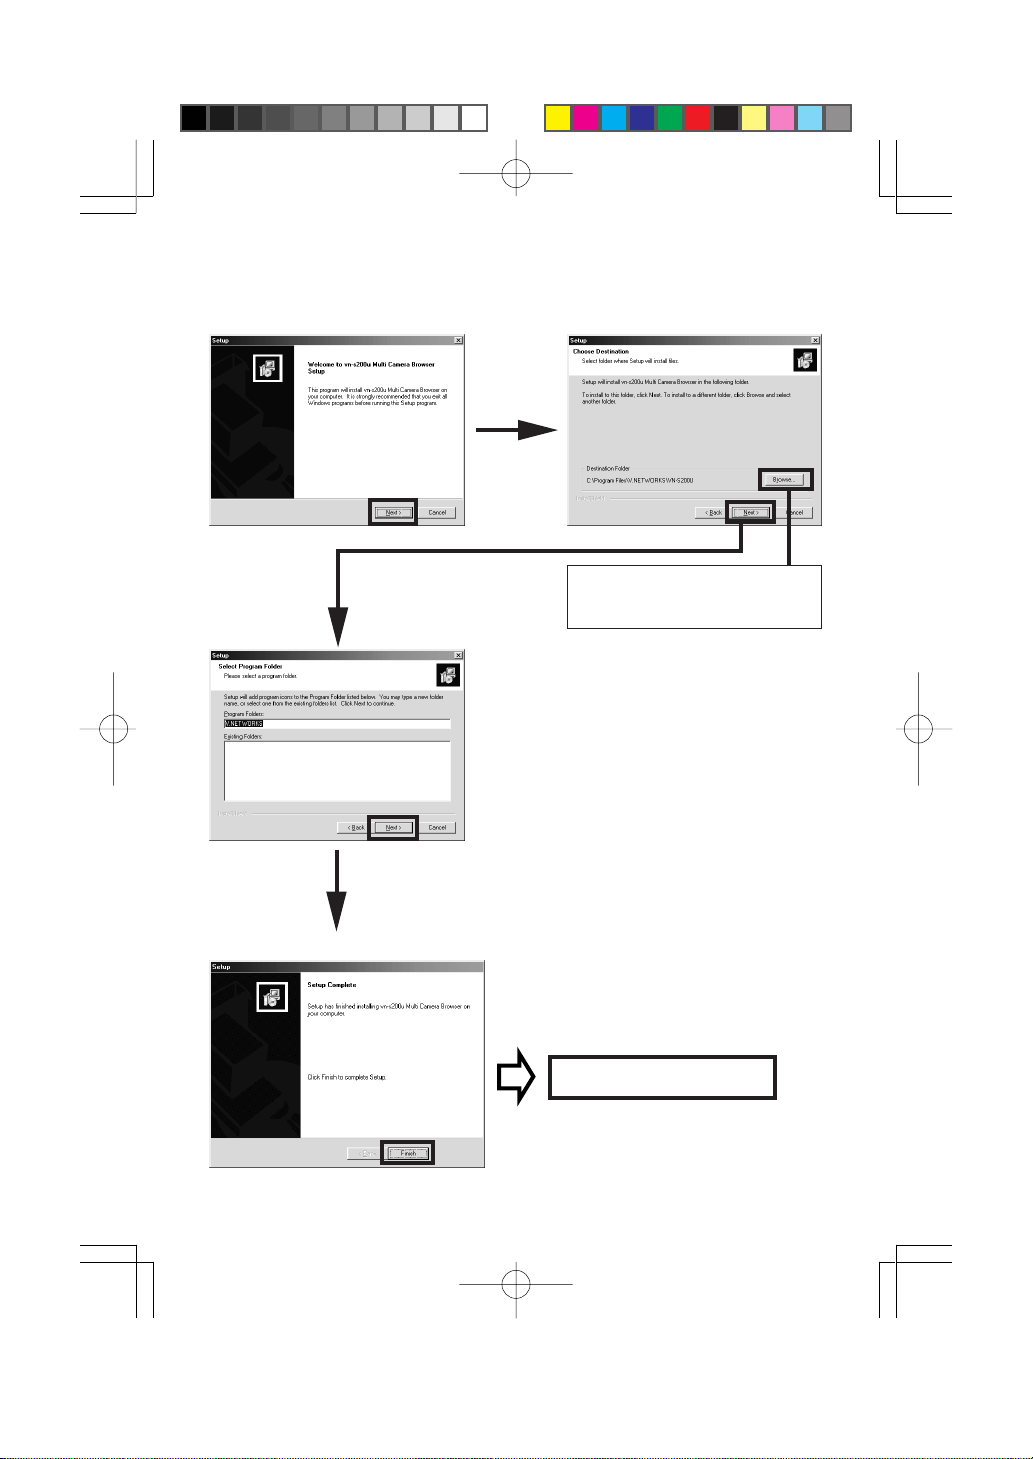
3. Perform operations in accordance with the displayed instructions.
Click here to change the installation
destination.
Installation has completed
8
Page 9
VIEWING V.NETWORKS IMAGES
This section describes the operations procedure for displaying V.NETWORKS
images on your PC.
1. Start the Multi Camera Browser.
1-1. From "Start" on the taskbar, select [Programs] - [V.NETWORKS] - [vn-
s200u Multi Camera Browser] to start it.
2. Create a workspace
2-1. On the menu bar, select [File] - [New Workspace] to create a new
workspace.
3. Register V.NETWORKS in the workspace
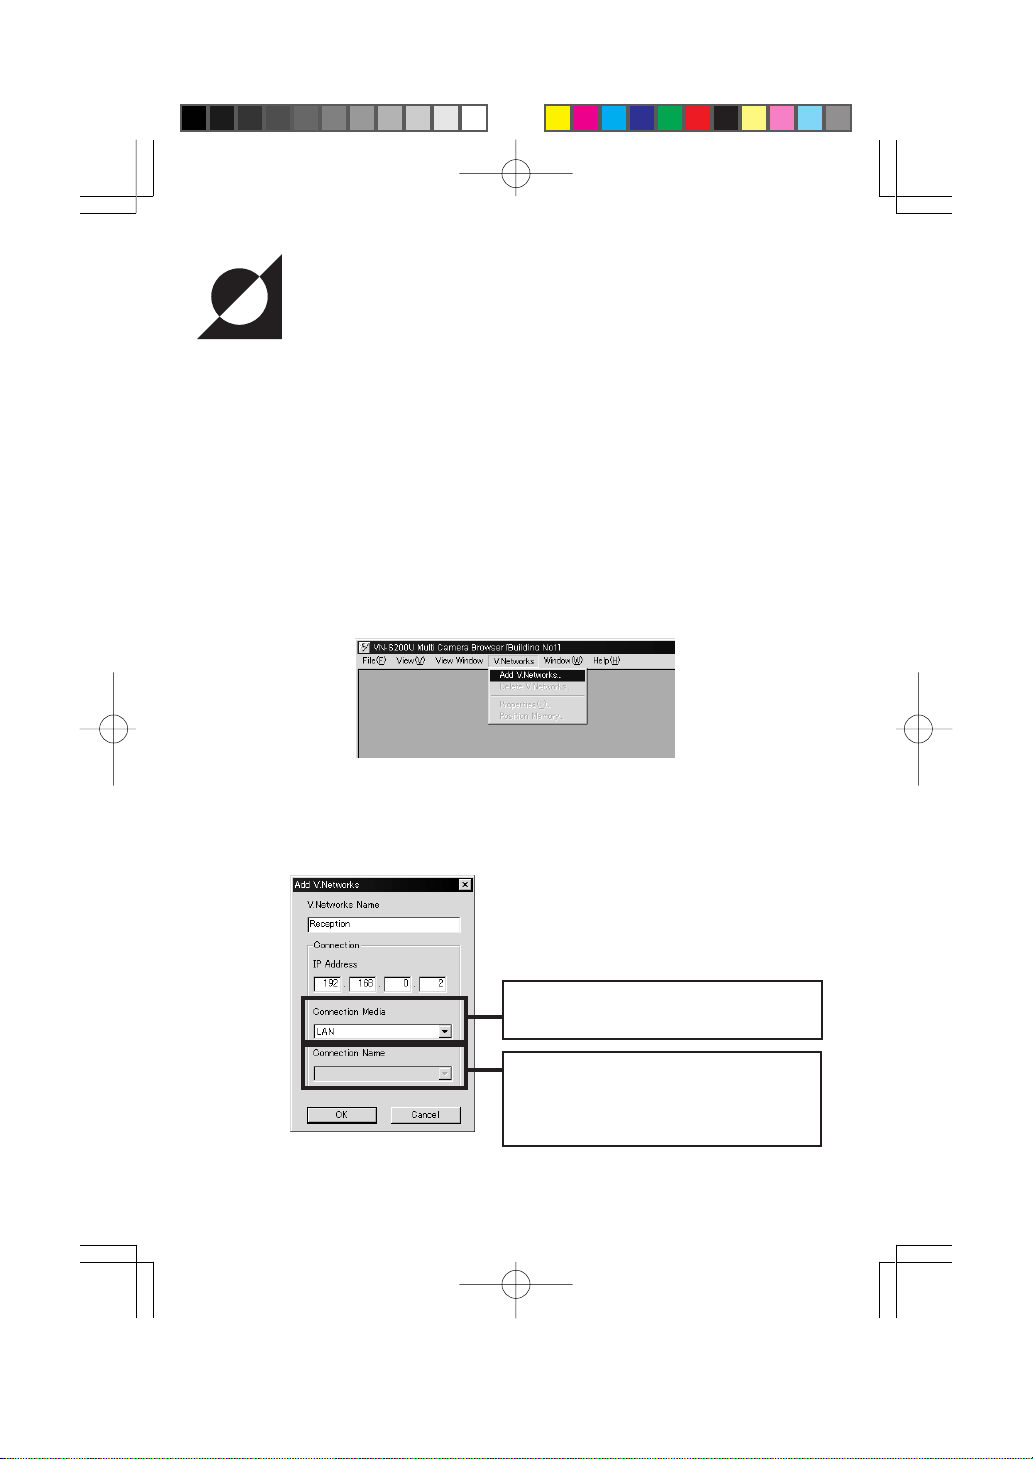
3-1. On the menu bar, select [V.Networks] - [Add V.Networks]
3-2. Enter the V.NETWORKS name, IP address, connection mode and
connection destination (only when 'WAN' is selected as the connection
mode).
LAN : Connected through LAN
WAN : Dial-up connection
When WAN is used, it is necessary to
set the connection destination in
advance. For the procedure, refer to the
Windows manual and other documents.
9
Page 10
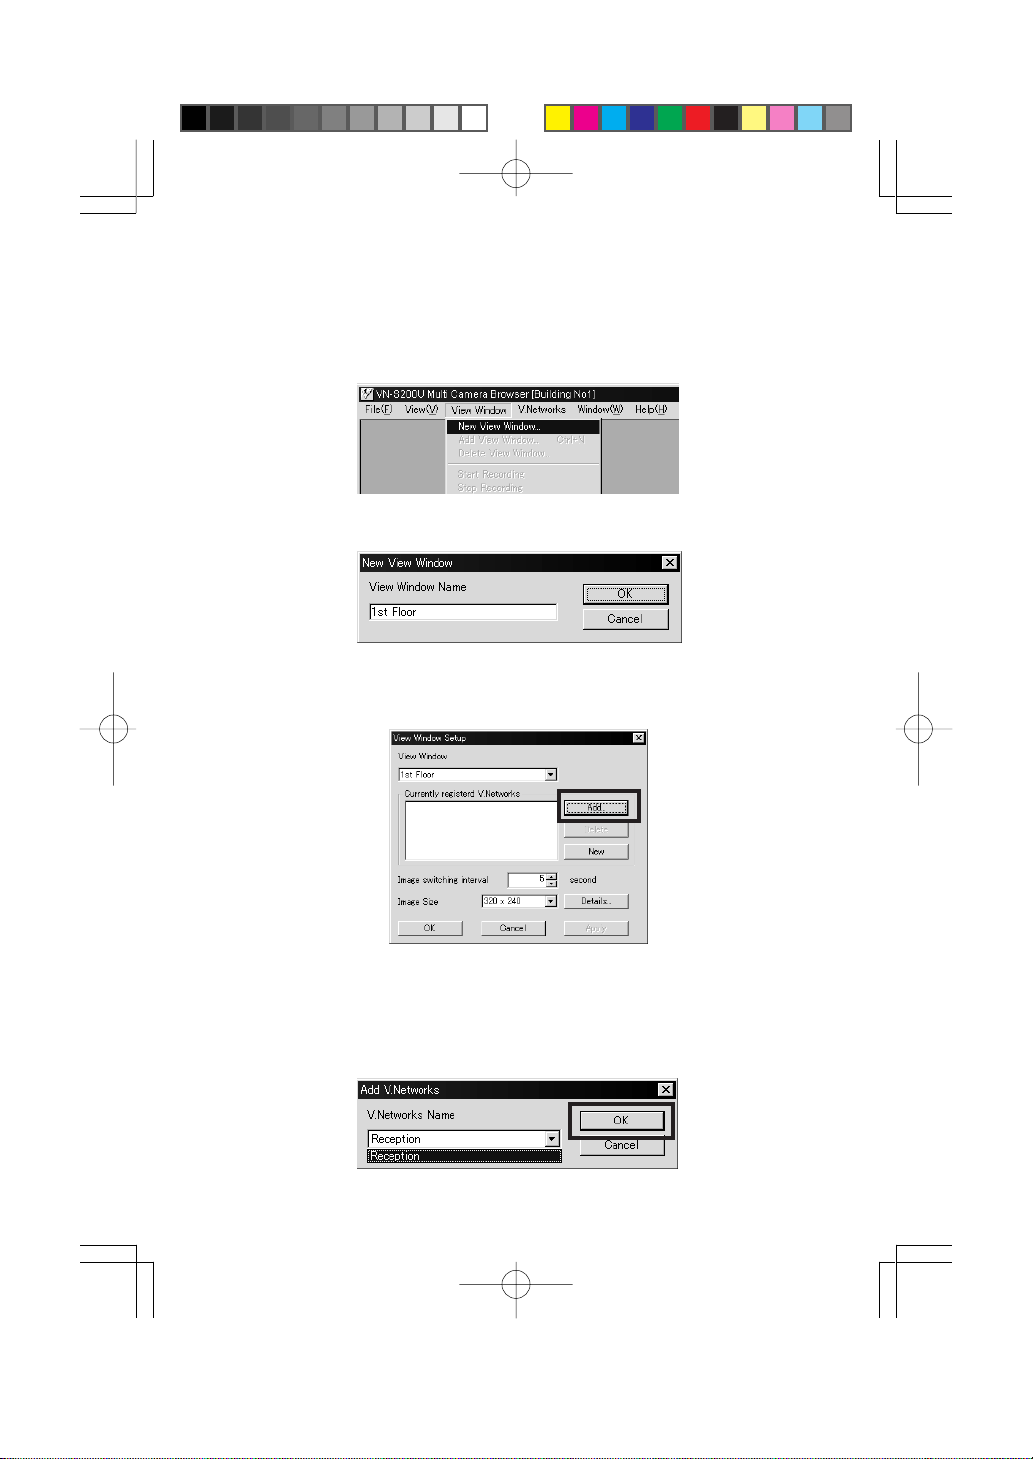
4. Create a View window
4-1. On the menu bar, select [View Window] - [New View Window].
4-2. When a window is displayed, enter the View window name in it.
4-3. On the "View Window Setup" item, select the View window where you
want to add the V.NETWORKS and click the <Add> button.
4-4. When the "Add V.Networks" window is displayed, click the displayed
contents in order to display all the V.NETWORKS units registered for
the workspace. Select the V.NETWORKS to be added to the View
window and click the <OK> button.
10
Page 11

4-5. Set the View window switching interval and image size, then click the
<OK> button.
11
Page 12

CONTROLLING THE V.NETWORKS
This section describes how to pan, tilt or zoom the connected V.NETWORKS
using the controller and set it to the condition in which viewing is required.
Procedure
1. Among the currently displayed View windows, click the one where the
V.NETWORKS to be controlled is registered in order to make it active.
2. If more than one V.NETWORKS has been registered in the View window,
interrupt the image switching by clicking the [Pause Switching] button on
the controller.
3. Click the pull-down menu of the controller to select the V.NETWORKS to
be controlled.
View window name
Name of the controlled View window
V.NETWORKS name
Select the V.NETWORKS
to be controlled
PAN/TILT
Shows the current
pan/tilt position
Pause Switching
Lets the image switching
operation pause temporarily
PAN/TILT buttons
Control the panning and tilting of
the selected V.NETWORKS.
Position memory
Press one of the buttons to point to a preset position.
When the connection destination is the VN-C1U : Pan/tilt/zoom/position memory operations are
not available.
When the connection destination is the VN-C2U : Zooming operation and position memories 7
to 10 are not available.
LENS
Controls the zooming,
focusing and iris of the
lens.
12
Page 13

Operations
Panning/tilting operation
Click one of the eight arrow buttons to pan/tilt the V.NETWORKS in the
indicated direction by the angle set in "Angle Step". (The angle is freely variable
in steps between 0º and 40º.)
Lens operation
In the pull-down menu in the LENS field, select the item to be controlled from
IRIS, ZOOM and FOCUS.
When the Zoom operation is selected, the "Fast" check-box is displayed.
Checking this box enables zooming in and out at high speed.
When the Focus operation is selected, the "Auto" check-box is displayed,
Checking this box enables auto focusing.
When the Iris operation is selected, the "Auto" check-box is
displayed.Checking this box enables auto iris control.
13
Page 14

RECORDING V.NETWORKS IMAGES
The recording function saves images displayed in the currently active window
onto a disk.
Images are recorded on a per-window basis. The recording file is stored in
the folder specified by "Save in" under [View Window] - [Properties] [Details]. The default folder is the folder having the same name as the View
window name under the folder where the application is installed {i.e.
(Application installation folder)\(View window name)}.
When recording has completed, a file named *******.rec is created on a disk.
For detailed recording setup, see "5. Recording setup" in "CHANGING THE
VIEW WINDOW SETUP".
Procedure
1. Among the currently displayed View windows, click the View window to
be recorded to make it active.
2. Ensure that the title bar of the Record/Play Controller shows the name of
the View window to be recorded, then click the Record button. (If the
Record/Play Controller is not displayed, select [View] - [REC/Play
Controller] to display it.)
3. Recording starts at the same time as the characters "REC" are displayed
on the top right of the View window.
14
Page 15

DELETING RECORDING FILES
Recording files are saved with file names "<recording start time>.rec".
To delete recording files, open the Explorer and delete files "*.rec".
CAUTION !!
As a recording file cannot be restored once it has been deleted,
make sure that the file is unnecessary by checking the contents
before deletion. JVC cannot assume liabilities for the loss of recording
files.
15
Page 16

TIMER RECORDING
(*This function is for exclusive use with the VN-S200U.)
The timer recording function starts and stops recording automatically at the
set time of day.
For detailed recording setup, see "5. Recording setup" in "CHANGING THE
VIEW WINDOW SETUP".
Procedure
1. Select [View Window] - [Timer Recording].
2. The [Timer Recording] window appears.
3. In the View window column, select the View window you want to set
timer recording.
4. To set timer recording, check the [Enable Timer Recording] check box
and set the [Recording start time] and [Recording end time].
5. After checking that the set data is correct, click <OK>.
CAUTION !!
To enable timer recording, the MULTI CAMERA BROWSER (this
application) should be running at the timer start time.
16
Page 17

PLAYING RECORDING IMAGES
(*VN-S100U : 1 image play back, VN-S200U : up to 4 images play back
simultaneously.)
This section describes how to play back a recorded file.
Procedure
1. Click the Play button of the Record/Play Controller. When a window as
shown below appears, select the size and number of played windows.
2. When the Select Image window appears, select the View window to be
played and the time.
( When the [Sort by Name] check box is checked, the time is sorted on a
per-camera basis.)
(Click [Browse] allows you to select another folder.)
Select View window
* 2 Screen during playback
3. Click [Complete] to display the Playback window.
Select time
17
Page 18

SNAPSHOT RECORDING
The snapshot function saves the currently displayed View window as a still
image in a file.
Up to 16 images can be acquired at once.
Procedure
1. Click the View window where the images that you want to include as
snapshots are displayed.
2. Click the Snapshot button of the Record/Play Controller. If the Record/
Play Controller is not displayed, select [View] - [REC/Play Controller] to
display it.
*A check mark is displayed to the right of "REC/Play Controller" while the
Record/Play Controller is displayed.
3. Click the Snapshot button to display the still image of the currently active
View window in another window (Snapshot window).
4. In the Snapshot window, select [File] - [Save]. The [Save] dialog box
appears and the still image can be saved in a desired disk.
CAUTION !!
The saved snapshot files cannot be viewed with the MULTI CAMERA
BROWSER appropriate image viewing software.
18
Page 19

CHANGING THE VIEW WINDOW SETUP
1. Adding or deleteing V.NETWORKS to or from a View windows
1-1. When [View Window] - [Properties] in the menu bar is selected, the
following window appears.Use this window to change the setup of the
View window.
1-2. Select the View window you want to change the setting.
1-3. The list of currently registered V.NETWORKS names is shown under
item [Currently Registered V.Networks].
To add V.NETWORKS, go to step 1-4
To delete V.NETWORKS, go to step 1-5
19
Page 20

1-4. Click the [Add] button. When the [Add V.Networks] window appears
showing the list of V.NETWORKS currently registered in the workspaces
select the V.NETWORKS you want to add and click the [Add] button.
The addition is complete when the name of the added V.NETWORKS
is displayed in the [Currently registered V.Networks] field.
*Up to 16 V.NETWORKS units can be registered per View window. It
is not permitted to register more than 16 V.NETWORKS.
1-5. In the [Currently registered V.Networks] field, select and highlight the
V.NETWORKS to be deleted and click the [Delete] button. The deletion
is completed when the name of the specified V.NETWORKS disappears
from the [Currently registered V.Networks] field.
2. Changing the image switching interval
When more than one V.NETWORKS is registered in a single View window,
this function sets the interval of switching the images of different
V.NETWORKS in seconds. If it is not required to switch V.NETWORKS,
click the mouse right button and on the view window use [Pause Switching].
20
Page 21

3. Changing the window size
This function changes the size of the View window.
Select the window size from three options of 160×120, 320×240 and
640×480.
REMARK : If the view window size is increased more than the camera image size,
the image quality becomes coarse due to image magnification.
4. Setting the information display
This function displays information on the currently displayed V.NETWORKS.
1. Display no information.
2. Display the V.NETWORKS name.
3. Display the V.NETWORKS name and V.NETWORKS ID.
4. Display the V.NETWORKS name, V.NETWORKS ID and model name.
Select one of the four options above (also see the figure on the right).
(The information is displayed in the same color as the color set for the
Time Stamp.)
V.NETWORKS name
V.NETWORKS ID
V.NETWORKS model name
Time stamp : Displays the current time of day in the View window.
Status : Displays the name, ID and model name of V.NETWORKS.
The display or non-display as well as the display style can be set.
The settings can be confirmed in the preview.
Color : Sets the color of characters and the backgrounds of information.
21
Page 22

5. Recording setup
This function will change the settings related to recording. The settings made
here are also reflected in timer recording.
[Recording Method]
Sets the recording method for the available capacity in the save
destination disk.
Update : When the available space decreases, old images recorded
at the beginning of the recording are deleted in order to save
the latest images.
Stop : Recording stops when the available space decreases.
[Recording Period]
Specifies the time after the start till the end of recording.
Select from : 5 min., 10 min., 20 min., 30 min., 40 min., 50 min., 1 hr,
2 hr, 3 hr, 6 hr, 12 hr., 1 day, 2 days, 3 days, 4 days, 5
days, 6 days, 1 week, No limit.
22
Page 23

[Recording Interval]
Specifies the interval of recording of each frame in seconds.
Set in the range from 0 to 120 seconds.
[Save in]
Sets the folder where you want to save the recording file.
Can be set for each View window.
[REC mark]
Displays characters "REC" at the top right of the View window during
recording.
23
Page 24

CHANGING THE V.NETWORKS SETUP
Details of V.NETWORKS including the image quality can be set.
[Quality]
Saturation Adjusts the depths of colors
Color Balance Adjust the balance of blue and red.
*These do not
need adjustment
in the Full Auto
operation
*Exposure cannot be controlled when the VN-C3U is connected.
[Upside down]
Displays the V.NETWORKS images upside down.
( Perform settings according to the circumstances of the camera installation.)
[Image size]
Sets the sizes of the images sent from V.NETWORKS.
Select the desired size from 160×120, 320×240 and 640×480.
Gain Adjusts the sensitivity
Exposure Adjusts the iris
Contrast Adjusts the contrast
Brightness Adjusts the brightness
[Frame Rate]
Sets the maximum frame rate of image transmission by V.NETWORKS.
Set a rate in the range from 30 Frame/sec. to 1 Frame/sec.
*In this context, the frame rate refers to the transmission frame rate of the
V.NETWORKS unit. The image display rate shown on the PC is variable
depending on the PC performance and the LAN environment.
24
Page 25

SETTING THE POSITION MEMORY
This function changes the setting of the position memory for panning, tilting(VN-
C2U VN-C3U) and zooming (VN-C3U only).
Procedure
1. In the menu bar, click [V.Networks] - [Position Memory].
2. Select the V.NETWORKS for which you want to change the position
memory.
* The current registration information is displayed in the [PAN/TILT/ZOOM]
field.
3. Operate the panning, tilting and zooming to set the conditions you want
to register.
4. In the position memory bank from 1 to 6 (from 1 to 10 with the VN-C3U),
click the [Memory] button with the memory number you want to use. Now
the position memory setting is complete.
25
Page 26

ARRANGING THE WINDOWS
Arrange Windows
Arranges the View windows.
(Arranging is sometimes not possible depending on the numbers and sizes
of the windows.)
Align with Grid
Arranges the View windows by automatically aligning them with the grid.
Window List
Display all the View windows registered in the workspaces.
A check mark is shown to the left of the currently displayed window.
Placing a check mark causes the corresponding View window to be
displayed,and removing it causes the View window to disappear.
View Window
Time stamp
(The display can be either
set or defeated)
V.NETWORKS Information
(Shows the model name , ID and
name. The display can be either
set or defeated)
26
REC displayed during recording
(The display can be either set or
defeated)
View window name
(Tool tip)
(The display can be either
set or defeated)
Left button
Click Ë Selects a window.
Drag Ë Moves a View window.
Double-click Ë Panning, tilting.
Ctrl + Double-click Ë Pop-up
Right button
Click Ë Right-click menu
Page 27

RIGHT-CLICK MENU
Clicking the right button of the mouse on the View window displays the rightclick menu as shown below. The right-click menu can be used to control the
following functions.
Tele
Zooms into an image.(VN-C3U only)
Wide
Zooms out from an image.(VN-C3U only)
Larger
Magnifies image without changing the
resolution.Image size changes from 160×120 to
320×240 and 640×480. (The size of the images
transmitted by each V.NETWORKS is not affected.)
Smaller
Reduces image size without changing the resolution.
Image size changes from 640×480 to 320×240 and 160×120. (The size
of the images transmitted by each V.NETWORKS is not affected.)
Pause Switching
Lets the image switching of V.NETWORKS pause temporarily.
Show Time Stamp
Displays the current time of day on the View window screen.
Properties
Displays the [View Window setup] window.
(* For details on the View window, see "CHANGING THE VIEW WINDOW
SETUP" on page 19.)
Right-click menu
27
Page 28

UNINSTALLATION
Use the following procedure to uninstall (Delete) the Multi Camera Browser
from your PC.
1. In the taskbar, select [Start] - [Settings] - [Control Panel]
2. In the Control Panel, double-click "Add/Remove programs".
3. When the [Add/Remove programs Property] window appears, select "vns200u Multi Camera Browser" under the [Install/Uninstall] tag and click
the [Add/Remove] button.
(Procedure for Windows98)
The recording files (including the folders having the View window names)
and the Multi Camera Browser workspace setting file (*.vnw) are not deleted
by uninstalling.
28
Page 29

Page 30

Page 31

Page 32

 Loading...