

Page 1

VN-C30U
ADDITIONS TO INSTRUCTIONS
– Control from Web Browser –
INSTRUCTIONS
Thank you for purchasing the JVC VN-C30U.
To gain maximum benefit from this product, read this
instruction manual carefully befor use and retain it for future
reference.
The serial number is very important for maintaining quality of
your product. At the time of purchase, check to see that the
serial number is correctly printed on the top of the unit and
that the serial numbers on the unit and warranty match.
This instruction manual is printed on
recycled paper.
For Customer Use:
Enter below the Serial No. which is
located on the body. Retain this
information for future reference.
Model No. VN-C30U
Serial No.
LWT0031-001D
Page 2

With VN-C30U Version 2, it has become possible to view images and to
perform various controls and settings of operations configurations via the
web browser.
This manual has been compiled in order to describe this new facility, which
is the “Control via Web Browser”. However, note that MPEG1 moving images
cannot be viewed and the image up-down inversion function is unavailable
via the web browser.
OPERATING ENVIRONMENT
The environment described below is necessary for operation of the VN-C30U
through a web browser.
A personal computer running the following web browser:
• The PC needs to satisfy the operational environment (P.10), which is
described in a separate volume of the manual.
•Web browser that has compatibility with Java Script and Frame:
Netscape Ver. 4.x or Internet Explorer Ver. 4.x, 5.x, 6.x is required.
• For the CPU performance and memory capacity requirements, refer to
the values recommended for the web browser in use.
To obtain smooth moving image displays on a large screen, a web
browser capacity above the recommended value is required.
Camera supplied images will not be displayed correctly in the 256color mode.
In order to view a moving image with a Web browser, a JAVA VM is required.
CAUTION:
5If a Microsoft Corporation JAVA VM is not used to view a moving image, please
go to the following Homepage address for further advice.
http://www.jvc-victor.co.jp/english/pro/vnetworks/index-e.html
5A Microsoft VM is not provided with a WindowsXP SP1a.
LAN Environment
• The VN-C30U unit functions as a web server based on HTTP protocol.
Access linkage using a host name is possible if the environment allows
the DNS (Domain Name System) to be used.
• It is possible to connect a VN-C30U unit and a PC in a direct 1:1
connection by using a cross cable. (Certain LAN boards do not allow
the use of a cross cable, though this is a very rare case. Be sure to
check your LAN board.)
2
Page 3
1. Setup
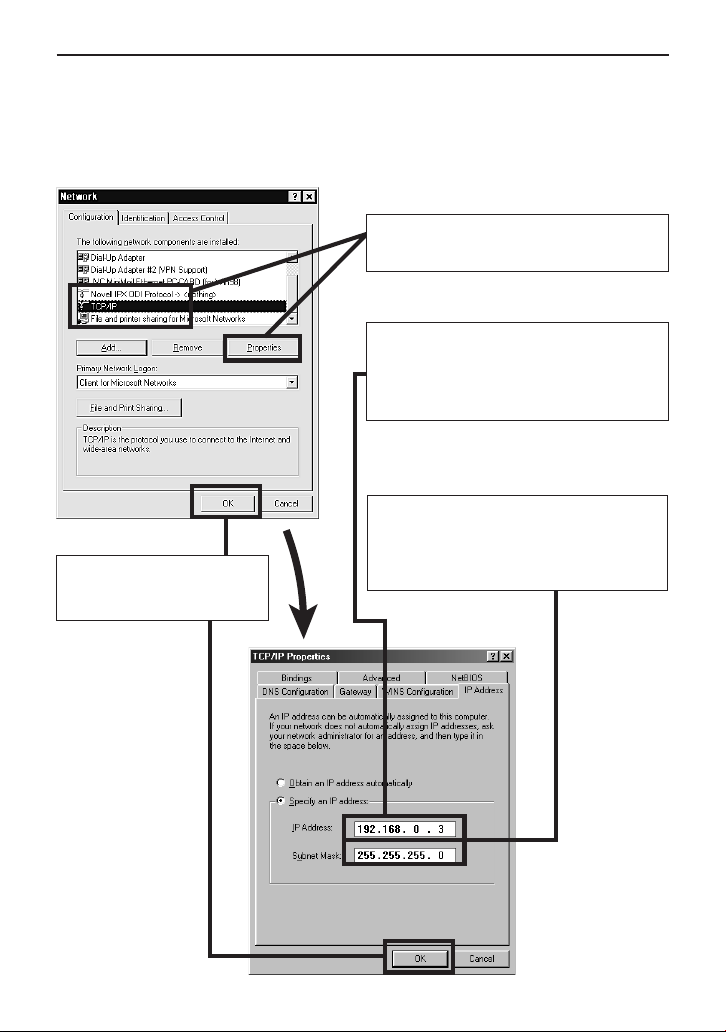
1-1 Changing the IP Address of the PC
Select the [Start] button then select [Settings] – [Control Panel] –
[Network] to display the [Network] settings panel.
3 Click on <OK> and then
restart the PC.
1 Select item “TCP/IP” then click on
<Properties>.
2 Before making a change, always make
a note of the original IP address.
Change the IP address to:
192.168.0.3
Set [Subnet Mask] to a value suitable for
the setting operation. If a suitable value
is unknown, check with the network
administrator.
3
Page 4

Web Page Illustrations Used in This Manual
Hereafter, the figures entitled VN-C30U Page show a display of the web
page data of the VN-C30U (including images captured by the cameras) by
the web page display function of the web browser.
Due to this mechanism, the format and character font of the displayed web
pages may be variable depending on the types and settings of the web
browser in use. Should the operation be hindered due to a lack of any of the
screen display items that should be displayed, adopt measures for displaying
all items by resizing the window, etc.
The figures in this manual are based on Netscape web page displays.
When the browser in use is Netscape
• When a moving image of the VN-C30U is displayed, the web page
display cannot be updated by changing the Netscape window size. In
this case, click on the <Update> button on the Netscape window to
update the web page display.
When the browser in use is Internet Explorer
• After the password has been changed, the password entry confirmation
window may ask for the password twice. In this case, enter the same
password twice.
• When the VN-C30U is connected through a proxy server, the correct
pan/tilt positions may sometimes not be enabled to be displayed. In
this case, click “Pan/Tilt” a few times until the correct display is obtained.
4
Page 5
1-2 Changing the internal settings
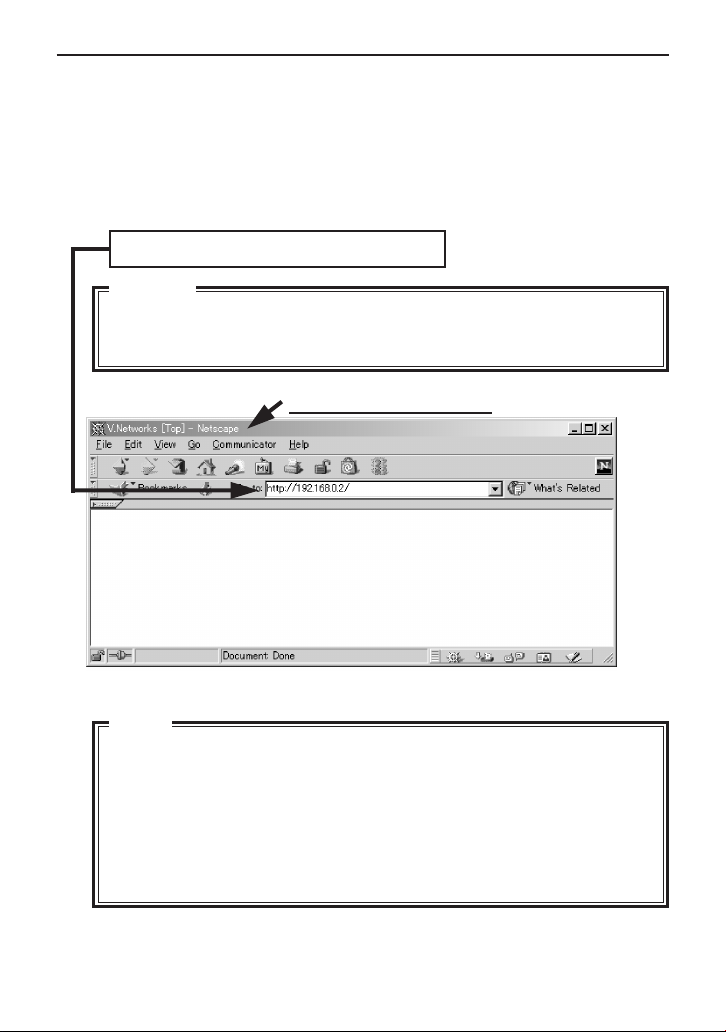
Start the web browser.
In the web browser, specify the factory-set web page address of the
VN-C30U. (Direct specification of the factory-set web page address
enables the web browser to display the VN-C30U Top Page.)
http://192.168.0.2/index-e.html
Caution
If a proxy server is set for accessing the Internet, a direct specification
may not be permitted. In this case, change the proxy setting to permit
direct address specification.
Display with Netscape
Note:
● In this manual, the terms “Top page” and “Home page” are used as
described below:
Top page
Home page
: Indicates “index-e.html”
:•If the default page (See page 8) is set to valid, the
specified html page is indicated.
• If the default page is set to invalid, “index-e.html” is
indicated.
5
Page 6
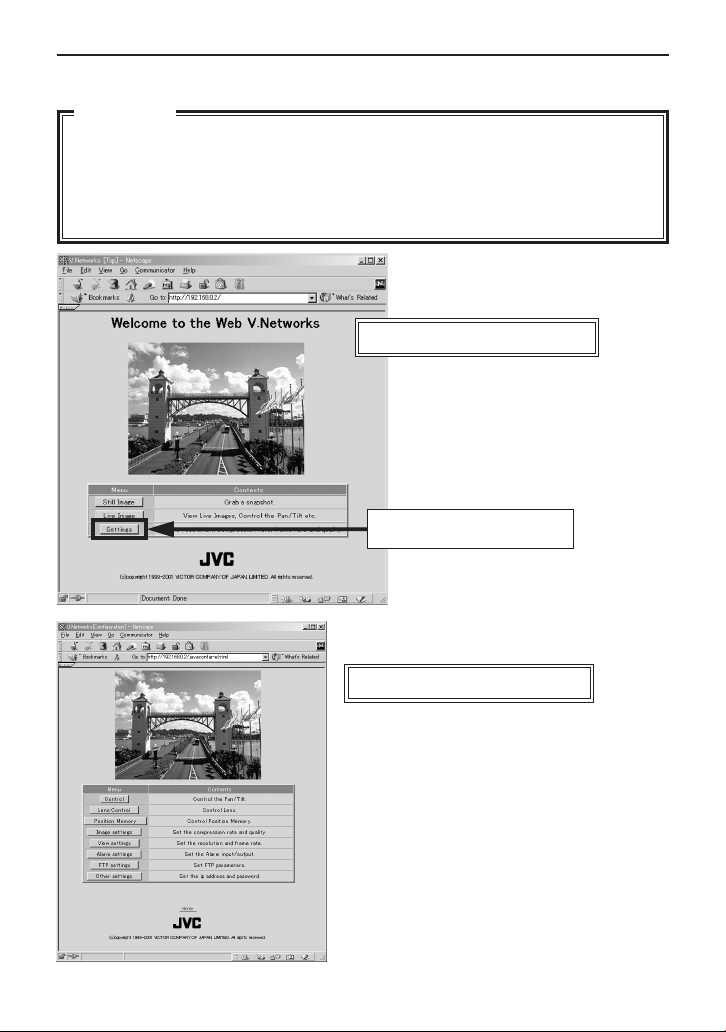
The VN-C30U Top page appears.
CAUTION
• The background changes to blue when the image mode of the VN-C30U
is set to the MPEG mode.
•The Top page will not appear if the “HTTP Viewing” is set to “Disable”
using the Setup Tool.
Instead the message “403 Forbidden” will be displayed.
VN-C30U Top page
Click on <Settings>.
VN-C30U Settings page
6
Page 7
The setup consists of changing the contents of [Other Settings]. (The same
setup is also available using the Setting tool provided with the standard
controller.)
VN-C30U Settings page [Other Settings]
Items in [Other Settings]
[DHCP] Set this to “Enable” when the DHCP is used.
[IP Address] To change to the IP address assigned to or approved for
the network administrator. (This is can be changed only
when DHCP is not used.)
[Subnet Mask] Similarly to the IP address, to set the value assigned to
or approved for the network administrator
[Default Gateway]
[Host Name] To specify the host name using up to 8 alphanumeric
[MAC Address] A physical address proper to each product.
To set the IP address of the default gateway
If this is not used, set “0.0.0.0”.
characters
This should be set when access linkage using a host
name is required in an environment allowing the use of
the DNS (Domain Name System). The host name is
displayed in the title bars of sub-windows including the
control windows.
Do not specify anything when the host name is not used
or unknown.
* This cannot be changed.
7
Page 8

[Program Version] Program version of the firmware in the VN-C30U
unit.
* This cannot be changed.
[Password] To set the password using up to 8 alphanumeric
characters.
The same password should be entered twice at
each level for confirmation.
[Pan/Tilt Position] To select whether the current pan/tilt positions
are to be displayed in the control and
configuration windows. (This is ineffective with
the VN-C30U Ver. 2.)
[Cache Control] With a very small number of proxy servers that
caches cgi, the pan/tilt control may not function
correctly. In this case, inhibit the Cache operation
by checking the cache box.
[FTP Server Function] Set whether FTP Server is valid/invalid.
If this is set to valid, it will be possible to upload
various user HTML pages, GIF and JPEG image
files, etc. to this unit using common FTP client
software.
* Uploaded files will all be placed directly under
the “/user folder” directory.
Access from a web browser can be done by
inputting the URL such as http://192.168.0.2/
user/aaa.html
(When accessing “aaa.html” stored on FTP, the
“192.168.0.2” denotes the IP address of this
machine.)
* The FTP user name is fixed as “Administrator”.
For the FTP password, use the administrator
level password.
* When the “HTTP Viewing” is set to “Disable”
using the Setup Tool, it will not be able to
access the file uploaded with a Web browser.
8
Page 9

CAUTION
• The allotted FTP user area is approximately 90 K bytes, however since
this unit’s file system is generated dynamically, the actual storable
capacity may be less than this in certain cases.
•Folders cannot be created on this FTP server. Only file upload/delete/
rename are possible.
[Default Page Set-up] If “invalid”, it will be set to the regular VN-C30U
Top Page.
If “valid”, the HTML file you set will be used as
the default page.
*Default Page refers to the page that is displayed when only the IP address
is specified.
ATTENTION
Even if the function is “valid”, if the HTML file specified here does not
exist then a message such as “404: Not Found” will be displayed by the
browser when “http://192.168.0.2/” is specified, so make sure that the
setting is made correctly.
[HTTP Port] It is possible to change the port number of the
HTTP Server on this unit to a number other than
the default port 80 to raise the level of security.
(Selectable range: 1-65535 excluding 20 and 21)
If the HTTP Port is changed, access from web
browser will be done as follows:
http://192.168.0.2:12345/ or http://
192.168.0.2:12345/index.html
(Example when Port 12345 is selected)
When you don’t know or forget the HTTP Port
number, use the provided Setup tool to check it.
[Default positioning] This enables setting the HTTP port automatically
in order to resume a specified position number
when the power is turned on or if the software is
reset. (It is necessary to register a position in
advance in the memory to enable this function.
Refer to page 19.)
9
Page 10

Password protection
Access protection using a password is provided with the VN-C30U to
restrict other connecting browsers (users). The access protection function
provides three security levels, each of which is allowed to access the
kinds of pages as shown in the following table.
(For the configuration of the VN-C30U web pages, see page 14.)
Level Access Permission
User Image pages only.
Operator Web pages other than the configuration pages.
Administrator All web pages
CAUTION
•Never forget the current password for it cannot be canceled or changed
unless it matches the password set at the administrator level.
•Even when the user or operator level password is set, the password will
not be asked for unless the administrator level password is set.
10
Page 11

VN-C30U Configuration page
[Other Settings]
Click on <Apply> to update the settings.
Confirm the changed IP address again. Click on <OK>
if the entry is correct.
CAUTION
The confirmation window above is displayed after [IP Address], [Subnet
Mask], [Host Name] and/or [HTTP Port] have been changed.
When <OK> in this window is clicked, the VN-C30U unit is reset internally
to update the IP address, etc. As this renders the IP address before change
(factory-set value) ineffective, the connection to the VN-C30U is
disconnected. The screen indicates that a connection cannot be
established after the web browser has not been used for a while. This is a
result of the change in the IP address. (The same is also true when the
Port Number is changed.)
11
Page 12

1-3 Restoring the IP address of the PC
In the same way as section 1-1, select [Start] – [Settings] – [Control
Panel] – [Network] to display the [Network] settings panel and change
[TCP/IP Properties] to the original IP address that has been noted
previously.
After the change, restart the PC by following the displayed instruction
message.
2. VN-C30U Access Test
This test confirms that the VN-C30U web pages may be browsed and
displayed via the web browser using the set IP address or DNS host
name.
(For the configuration of the VN-C30U web pages, see page 14.)
CAUTION
If a proxy server is set for accessing the Internet, web pages may not be
directly specified. In this case, change the proxy setting to permit direct
address specification.
Also, when the DNS is used, contact the network administrator to update
the information related to the DNS address setting, etc.
Enter: http:// <IP address> or <Host name> /
12
Page 13

The [User Name and Password Entry] request window appears (for access
authorization).
The user name is not used.
For the password, enter the one of the
three passwords that have been set.
Click on <OK>.
It is recommended to register the browsing information connection location
(URL: Uniform Resource Locator).
To speed up the display of VN-C30U web pages from your web browser,
it is recommended to register the URL information during the access test
using the set IP address or DNS host name.
The registration uses “Bookmark” of Netscape or Internet Explorer. While
a VN-C30U web page is displayed, perform the operation using the web
browser’s menu to add the page to the “Bookmark”.
Add Bookmark (Display with Netscape)
13
Page 14

VN-C30U WEB PAGES
– Display Items and Operation Description –
The configuration of URLs inside the VN-C30U is as shown below.
CAUTION
Authorization of access (Security) right is required in the access of any URL.
Security level
Top page (index-e.html)
Still image page (still-e.html)
Moving image page (java-e.html)
Still image URL (still.jpg)
Serverpush moving image
URL (push.jpg)
Java moving image URL
(mjpeg.class)
<User> <Operator> <Administrator>
Pan/tilt controller (pan_tilt-e.html)
Lens controller (lenz-e.html)
Configuration page (javaconfig-e.html)
Configuration menus
Image Quality Configuration
(configimage-e.html)
Alarm Configuration (alarm-e.html)
Other Configurations (config-e.html)
View Configuration (viewconfig-e.html)
Position Memory Configuration
(position-e.html)
FTP Client Configuration (fpt-e.html)
Top page: http://
/index-e.html (
*****
: URL indicating the VN-C30U)
*****
This page is intended to provide links to other VN-C30U web pages.
VN-C30U Top page
VN-C30U still image
The camera image at the
moment browsing starts is
displayed.
Link buttons for web pages. (Operates with single clicks.)
14
Page 15

Still Image Page: http://
/still-e.html (
*****
: URL indicating the VN-C30U)
*****
This page displays only still images. The initial image is the camera image at
the moment browsing starts. To update the image, perform the “Reload” or
“Update” operation on the web browser. To save the image being displayed,
perform the “Save As” operation on the web browser.
VN-C30U Still Image page
Hyperlink to the Home page
Moving Image Page:
http://*****/java-e.html (****: URL indicating the VN-C30U)
This page displays only moving images. The displayed image is the camera
image that is being updated automatically.
CAUTION
Do not attempt to save images in this page for it has not been compiled
assuming the use of the “Save Image As” function of the web browser.
Also do not attempt to save the entire web page for it has neither been
compiled assuming the use of the “Save As” function.
VN-C30U Moving Image page
Buttons for displaying the sub-window
for use in panning, tilting, zooming and
position memory movement controls.
Button for displaying the sub-window for
use in the iris, focus and zoom settings.
Hyperlink to the Home page.
15
Page 16

Control windows
[Pan/Tilt/Zoom] control window
The sub-window shown below can be used for the control of panning, tilting,
zooming and position movement.
The VN-C30U unit incorporates a position memory storing up to 10 pan/tilt
positions used in image capturing. Clicking one of the 10 (No.) buttons enables
the camera to start the pan/tilt operation to the corresponding position stored
in the memory. When the mouse pointer is placed over the Move Position
button, the Pan/Tilt/Zoom location of each position will be displayed in Alt.
The pan/tilt position can be changed using these 8 pan/tilt control buttons.
The amount of movement per press of a pan/tilt button is the “Angle Step”.
The current [Zoom Step] and [Angle
Step] settings for the pan/tilt operation
are displayed.
Either setting can be changed by
entering the desired angle value
(integer) and clicking on the <Apply>
button.
The lens zooming can be changed
using these two buttons. The amount
of lens movement per press of the
button is the “Zoom Step”.
CAUTION
Do not execute the pan/tilt operation until the web browser has completed
loading the images of all the buttons.
16
Page 17

[Lens] control window
[Zoom] This setting controls zooming.
Change the value and click on the <Apply> button to enable the
lens to zoom in or out.
[Focus] This setting controls focusing.
When it is set to [Auto], the focusing is adjusted automatically.
(Autofocusing)
When it is set to [Manual], the focusing position can be specified
as required. (Change the value on the right and click on the
<Apply> button to set the lens to the specified focusing position.)
[Iris] When it is set to [Auto], the iris is adjusted automatically according
to the brightness of the object.
When it is set to [Manual], the iris can be set as required, regardless
of the brightness of the object. (Change the value on the right and
click on the <Apply> button.)
17
Page 18

Configuration Page:
http://
/javaconfig-e.html (
*****
: URL indicating the VN-C30U)
*****
This page is used for settings related to images and connections (setup).
(A camera image updates automatically to be displayed as a moving image.)
Moving image
VN-C30U Settings page
Click on the desired setting button to
display a sub-window for the setting item.
18
Hyperlink to the Home page
Page 19

[Control] and [Lens] control windows
See the descriptions in “Control windows”.
[Position Memory Configuration] window
Positions currently set in the position memory.
[Image Quality Configuration] window
VN-C30U Control page
[Position Memory]
Click on <Apply> to set
the current pan/tilt position
as a position stored in the
position memory.
Click on <Default> to
reset all of the settings in
the image quality-related
menu to the factory-set
values.
Image quality-related setting items.
After setting the desired items, click on <Apply> to make the settings valid. See
the following table for a description of each item.
19
Page 20

Item Effect
Compression Rate
Saturation This adjusts the development of colors.
White Balance
Brightness • When [AGC] is checked, the gain of the internal amplifier is
Shutter Speed Select [1/60] for normal image capturing. To reduce flickering under
The compression rate is inversely proportional to the image quality.
When the compression rate is small, the image quality can be
improved but the data quantity increases.
Increasing this value increases color saturation.
When [AWB] is checked, the auto white balance circuit controls the
white balance automatically.
When [AWB] is not checked, the R Gain and B Gain settings are activated.
adjusted automatically according to the surrounding brightness.
• When [BLC] is checked, the back light compensation function is
activated. One of the five photo-metering areas from the pull-down
menu can be selected. The brightness will be adjusted
automatically based on the selected photo-metering area.
CAUTION : The BLC function does not work effectively unless [AGC] is checked.
fluorescent lighting, etc., select [1/100] if the local power voltage is
50 Hz or [1/60] if it is 60 Hz.
[View Configuration]
window
Item Effect
Resolution
JPEG Frame Rate
Select the image size from “640 x 480”, “320 x 240” and “160 x 120”.
When [Cornpensate aspect ration when 160 x 120 selected.] is checked,
the image size of the “160 x 120” display becomes actually 160 x 112.
Select the maximum number of frames transmitted from the VNC30U per second.
CAUTION
•
The actual number of frames transmitted or displayed per second is dependent on the
performance of the PC, type of web browser and LAN environment. In case communication
faults involving the processing of other users are expected (particularly when the network
environment is usually subjected to a relatively heavy load), it is recommended to set the frame
rate to a lower value.
•
When a large image size (640 x 480) is used, the upper limit of the frame rate is limited at 3 fps
regardless of the setting made in [JPEG Frame Rate].
•
Be sure to adjust [JPEG Frame Rate] in consideration of the number of simultaneous accesses
to the unit. If its processing capability is exceeded, it will be impossible to perform correct operations
including the web page display, movement and button operations.
20
Page 21

[Alarm Configuration] window
This window sets the action to be performed when an alarm signal is input.
Alarm 1 or 2
[On/Off] Check [On] when using the corresponding alarm input (1 or 2)
and check [Off] when not using it.
[Settings] An alarm input enables the camera movement to one of the
positions stored in the position memory and an alarm signal
output.
• [Go to a Preset Position]
Select one of the positions 1 to 10, which have been set in
the VN-C30U [Position Memory Configuration] window. When
an alarm is input, the camera will move to the specified
position.
• [Alarm Out]
When “Yes” is selected, the alarm output outputs the signal
set in [Alarm Out] below in the case of an alarm input.
• [FTP]
When “1” or a larger value is selected, the FTP client function
will be enabled for a certain period according to the current
FTP settings, even if the function is disabled by a setting. (To
make this possible, the FTP settings should be set to enable
FTP in advance.)
21
Page 22

Relay Alarm
When alarm signals are input one after another with an interval of a few seconds,
an interlocked alarm input can be identified and enable another operation.
Alarm Out
[Enable/Disable] Check [Enable] to use the alarm output and [Disable]
to not use it.
[Configuration Items]
* Set the alarm output according to the output destination device.
* After completing alarm configurations, be sure to confirm that the alarm
operations are performed as intended.
These items are used to set the signal output from
the alarm output terminal.
• [Momentum]
Set the time period for which the alarm output is to
be continued.
• [Value]
Select whether the [High] or [Low] level signal is
output as the alarm output.
• [Power on Init]
Select whether or not the alarm signal is output from
the alarm output of VN-C30U at the moment it is
turned ON.
22
Page 23

[FTP Client Configuration] window
● FTP client function
This function uploads the VN-C30U images (still images) periodically to an
existing FTP server.
This makes possible an image distribution service from a server and greatly
increases the number of clients to whom images may be distributed.
[FTP function] • [Available]: ........... Check to enable the FTP function.
• [Not available]: ..... Check to disable the FTP function.
[Username] Enter the user name to be used in authentication with the
FTP server.
23
Page 24

[Password] Enter the password to be used in authentication
with the FTP server. (The entered characters are
displayed as “*”.)
[Host IP Address] Enter the IP address of the upload destination FTP
server.
[FTP Port] Enter the upload destination FTP port number.
[FTP Folder] Enter the upload destination folder name in the
FTP server. If this is not entered, the images will
be uploaded in the default folder.
[Upload Interval] Enter the interval for image uploading to the FTP
server. (It is possible to upload earliest by setting
this item at 0 second.)
● [Disconnect every time]
Check this box to disconnect the connection after
every image uploading.
This makes it necessary to establish a
*
connection before the next time an image is
uploaded.
[Error Recovery] ● [On connect error]
Select the operation to be performed in case of
an error related to the TCP connection or FTP
authentication.
• [Retry forever]: ........... The connection will be
retried until the VNC30U is turned OFF.
[Retry in every * min]
•
: .... The connection will be
retried for the specified
period.
24
● [On transfer error]
Select the operation to be performed in case of
a file transfer error while images are uploading.
• If [Stop Uploading] ........................ is checked:
The FTP function of the VN-C30U is disabled
automatically in case of a transfer error.
*To resume the FTP operation, check [Available]
in [FTP function].
Page 25

[Filename] ● [*.jpg]
Enter the file name to be assigned to the uploaded
image. (The latest image will overwrite this file.)
* As the images are uploaded in the same file names,
the FTP server retains only one image file.
● [Timestamp]
When this is selected, the images will be uploaded
by acquiring the current time from the NTP server (see
below) and by naming the image file according to the
current time data, in the format of “YYYY-MM-DD-HHMM-SS-mmm”.
As the images are uploaded in different file names,
*
the FTP server will retain the same number of image
files as the number of uploaded images.
● [NTP Server IP Address]:
Enter the IP address of the NTP (Network Time
Protocol) server.
● [Camera Timezone GMT]:
Enter the difference of the local time with respect to
the Greenwich Mean Time.
● [Adjust in every * day * hour]: Specify the interval
period for acquiring the correct time data from the
NTP server for use in correcting the time error.
•
If [
Stop Uploading
The FTP function of the VN-C30U is not disabled
in case of a transfer error. In this case, upload
will be retried at every uploading interval.
] ...................... is not checked:
25
Page 26

Note:
• An NTP server is required for the NTP setting.
• With Windows XP Home Edition and Windows XP Professional, NTP
sever functions become enabled when they are installed in the standard
procedure.
• For Windows 2000, follow the procedure below to enable NTP server
functions.
1. Set the value for the following registry to “1.” (The default value is
“0.”)
HKEY_LOCAL_MACHINE\SYSTEM\CurrentControlSet\Services\W32Time\Parameters\LocalNTP
Registry editing is a highly risky operation.
Safety measures should be taken beforehand, e.g. creating
registry backups. JVC shall not be held liable for any loss caused
by registry editing.
2. Restart the Windows Time Service.
This can be done by opening [Administrative Tools] in [Control Panel]
and selecting [Services], [Windows Time] and [Windows Time
Properties].
<Apply> button When the FTP operation is enabled, clicking this button
starts the FTP operation with the settings made in this
window.
When the FTP operation is disabled, clicking this button
does not save the settings made in this window.
26
Page 27

LINK OF VN-C30U IMAGES
–
Pasting VN-C30U output images on separately created web pages
Images (still and moving images) captured using the VN-C30U can be
incorporated and displayed on web pages created by the user.
CAUTION
• Images cannot be displayed when the VN-C30U unit is in the MPEG
mode.
• When the “HTTP Viewing” is set to “Disable” using the Setup Tool, it will
not be possible to display images.
Displaying a Still Image :
Create a web page including the following description to display the still
image in the web page.
<IMG SRC=”http:// ****** /still.jpg”>
(****: URL indicating the VN-C30U)
Displaying a Moving Image :
A moving image can either be a Serverpush image or a Java image.
The image type should be selected according to the compatibility conditions
of the web browser (or by adjusting the web page.)
–
Display by Serverpush image
Create a web page including the following description to display the moving
image in the web page of a Serverpush-compatible web browser (i.e.
Netscape).
<IMG SRC=”http:// ****** /push.jpg”>
(****: URL indicating the VN-C30U)
27
Page 28

Display of a Java applet image
Create a web page including the following description to display a moving
image in the web page of a Java-compatible web browser (i.e. Internet
Explorer, etc.).
<APPLET CODE=”mjpeg.class”WIDTH=640 HEIGHT=480
CodeBase=”http:// ****** /”> </APPLET>
(****: URL indicating the VN-C30U)
CAUTION
• Both the displayed still images and moving images are displayed in the
image sizes and compression rates set in the configuration.
If the web browser is set to disable Java execution, images may not be
displayed correctly.
• If passwords are set, Java moving images cannot be displayed unless it
has previously been authenticated. (Restriction with Internet Explorer)
• The values of “WIDTH” and “HEIGHT” should be identical to those set in
the image size setting of the VN-C30U.
However, both “160 x 112” and “160 x 120” are valid.
CAUTION
• If the browser in use is Netscape Ver. 4.06 or older, it is required to
update the Java Plug-in to Ver. 1.1 or higher in order to browse and
display moving images.
Java Plug-in is available in web sites such as http://java.sun.com/
getjava/, etc.
• Under certain environments, image reloading may be repeated when
the [Pan/Tilt/Zoom] control window is displayed. This is not a
malfunction, however.
• When the [Time Stamp Format] file name is selected in the [FTP Client
Configuration] window, a time stamp name for 1900’s (years) is used
unless the correct time has been acquired from an NTP server.
28
Page 29

Link Methods for Various Java Applets
Since the Java applets listed below are used to run the functions in this unit’s
factory-set web page, it is possible to easily incorporate them into your original
HTML pages (*1).
• Pan/Tilt/Zoom Button (Control.class)
• Position Button (MemoryPositions.class)
• Current Location Display (Location.class)
[Applet Common Coding] (Example when 192.168.0.2 is IP address of this machine)
<APPLET CODE=”XXXXX.class” WIDTH=”XXX” HEIGHT=”XXX”
codebase=”http://192.168.0.2/”>
<PARAM NAME=”AAAAA” VALUE=”LLLLL”>
<PARAM NAME=”BBBBB” VALUE=”MMMMM”>
</APPLET>
Note: Parts like XXXXX.class and AAAAA will change according to the actual
applet being used.
[Parameter Descriptions]
5 Pan/Tilt/Zoom Button (Control.class) — Applet to control Pan/Tilt/Zoom
movement of camera.
Parameter name Description Default setting
bgcolor Sets background color in Gray
16-step 24-bit color
cache Cache Prohibited/Allowed setting 1[Prohibited]
1[Prohibited] or 0 [Allowed]
...
*
1
Requires a basic knowledge of HTML.
29
Page 30

[Parameter Descriptions]
5 Position Button (MemoryPositions.class) — Applet to move camera position
to the preset position.
Parameter name Description Default setting
bgcolor Sets background color in Gray
16-step 24-bit color
timer Memory position sampling cycle 60000 msec
(10-step integer, millisecond
specification)
cache Cache Prohibited/Allowed setting 1[Prohibited]
1[Prohibited] or 0 [Allowed]
5 Current Location Display (Location.class) — Displays the current Pan/
Tilt/Zoom position of the unit.
Parameter name Description Default setting
fgcolor Sets character color in 16-step Green
24-bit color
bgcolor Sets background color in 16-step Black
24-bit color
timer Current position sampling cycle 2 s
(10-step integer, second
specification)
30
Page 31

Regarding HTTP Port Change Function
This version has been equipped with an HTTP Port change function. The
port can be checked/selected using the provided Setup tool, in addition to
via web browser.
If you forget the HTTP Port number and cannot connect using a web browser,
perform the following steps.
[PROCEDURE]
Input the IP address in the Setup tool, and check the “HTTP Port” while
connected to the VN-C30U. Since the current port number is displayed, input
the port number you want to change it to and click the OK button. (When the
port number is changed, the system is automatically rebooted.)
CAUTION
If the connected VN-C30U is below Version 3.0, the HTTP Port cannot
be changed.
31
Page 32

VICTOR COMPANY OF JAPAN, LIMITED
VN-C30U V.NETWORKS
is a registered trademark owned by VICTOR COMPANY OF JAPAN, LTD.
is a registered trademark in Japan, the U.S.A., the U.K. and many other countries.
COPYRIGHT
C
2002 VICTOR COMPANY OF JAPAN, LTD.
Printed in Japan
LWT0031-001D
 Loading...