

Page 1

VN-C2WU
V.NETWORKS
INSTRUCTIONS
SS961534-001
Thank you for purchasing the JVC VN-C2WU.
To gain maximum benefit from this product, read this
instruction manual carefully before use and retain it for future
reference.
The serial number is very important for maintaining quality of
your product. At the time of purchase, check to see that the
serial number is correctly printed on the top of the unit and
that the serial numbers on the unit and warranty match.
This instruction manual is printed on
recycled paper.
For Customer Use:
Enter below the Model No. and Serial
No. which are located on the rear of the
cabinet. Retain this information for future
reference.
Model No.
Serial No.
Page 2
i
Page 3

CONTENTS
Safety Precautions .................................................................................................. i
Package Contents .................................................................................................. 1
Operating Environment .......................................................................................... 1
VN-C2WU Installation and Setup ........................................................................... 3
Before starting installation and setup .................................................................. 3
Names of VN-C2WU parts .................................................................................. 3
Installation and setup .......................................................................................... 4
Installation ........................................................................................................... 4
Connecting to a network ..................................................................................... 5
Setting the VN-C2WU IP address ....................................................................... 6
About the web pages mentioned in this ............................................................. 7
VN-C2WU/Web Pages ......................................................................................... 15
Top page............................................................................................................ 15
Still image page ................................................................................................. 16
Live image page ................................................................................................ 16
Control page ...................................................................................................... 17
Setting page ...................................................................................................... 20
How to link the VN-C2WU images ........................................................................ 24
Displaying still images ....................................................................................... 24
Displaying animated images ............................................................................. 24
Troubleshooting .................................................................................................... 26
Specifications ....................................................................................................... 29
ii
Page 4

1
Package Contents
Operating Environment
This product includes all of the following items. If any item should be missing, please contact your local
dealer.
VN-C2WU main unit
Ferrite core
Instruction manual (this document)
The environment described below is necessary for operation of the VN-C2WU.
A personal computer running the following WWW browser software:
WWW browser software that is compatible with JavaScript or Frame. Netscape 4.0 or higher,
or Internet Explorer 4.0 or higher, is required.
CPU performance and memory capacity should be the recommended values for the WWW
browser software used. To ensure the smooth display of animated images on a large screen,
these values should be even larger than those recommended.
Also, images from the camera will not be correctly displayed in the 256-color mode, etc.
• In the case of Internet Explorer, an environment in which JAVA can be executed correctly is
necessary.
LAN environment
The VN-C2WU operates as a web browser using HTTP protocol.
Access linking by host name is possible with an environment able to use DNS (Domain Name
System).
The VN-C2WU and a personal computer can be connected directly at 1: 1 by using cross
cables. (Although rare, the use of cross cables is not possible with some LAN boards.)
Caution
The standard used for connection to the VN-C2WU is 10BASE-T.
Page 5

2
To ensure correct usage
When installing, avoid the following.
• Locations subject to rain and water.
• Locations where the ambient temperature exceeds the range of 0 to +40 °C.
• Locations with vibration.
• Locations with excessive dust, oil or gas.
When this product is used with AGC on (camera setting: Auto), sensitivity will be increased
automatically in dark places and the screen may flicker in some cases. This is not a
malfunction.
When the color balance of this product is used with the camera setting at Auto, in some
cases the recorded colors may differ slightly from the natural colors due to the principle of
the automatic tracking color balance circuit.
When any bright object such as a lamp, etc., is photographed, white bands may appear
above and below the bright object. This is called smearing, a phenomenon caused by the
characteristics of the individual pixels, and is not a malfunction.
Page 6

3
VN-C2WU Installation and Setup
Before starting installation and setup
It is necessary to set an IP address for each VN-C2WU unit. Use the following procedure for the setup of
individual units. (If the power is not turned on, the installation operation can be performed at one time.)
1. Install the VN-C2WU.
Only in cases of installation in a location where the power cannot easily be turned on, complete
steps 2 to 4 before installing.
2. Connect the VN-C2WU to a network.
(With the VN-C2WU power turned on.)
3. Set the VN-C2WU IP address.
When setting the VN-C2WU IP address, be sure to contact the network manager for assignment
or approval.
4. VN-C2WU access test.
This test is performed after any change to confirm the IP address.
Names of VN-C2WU parts
Front view
Rear view
Top view
10BASE-T port
DC IN jack
Lens cover
Lens block
Page 7

4
Installation and Setup
1. Installation
Use the optional bracket for installation.
Make the power and network connections after completion of the installation.
(3) Mount the VN-C2WU on the fixer.
(1) Attach the fixer to the ceiling, etc.
(2) Mount the cover on the fixer.
Caution
To prevent the unit from falling, mount only on areas with sufficient strength.
VN-C2WU can be installed as shown in the diagram below, or inverted. Do not
install the unit sideways.
Page 8
5
Caution
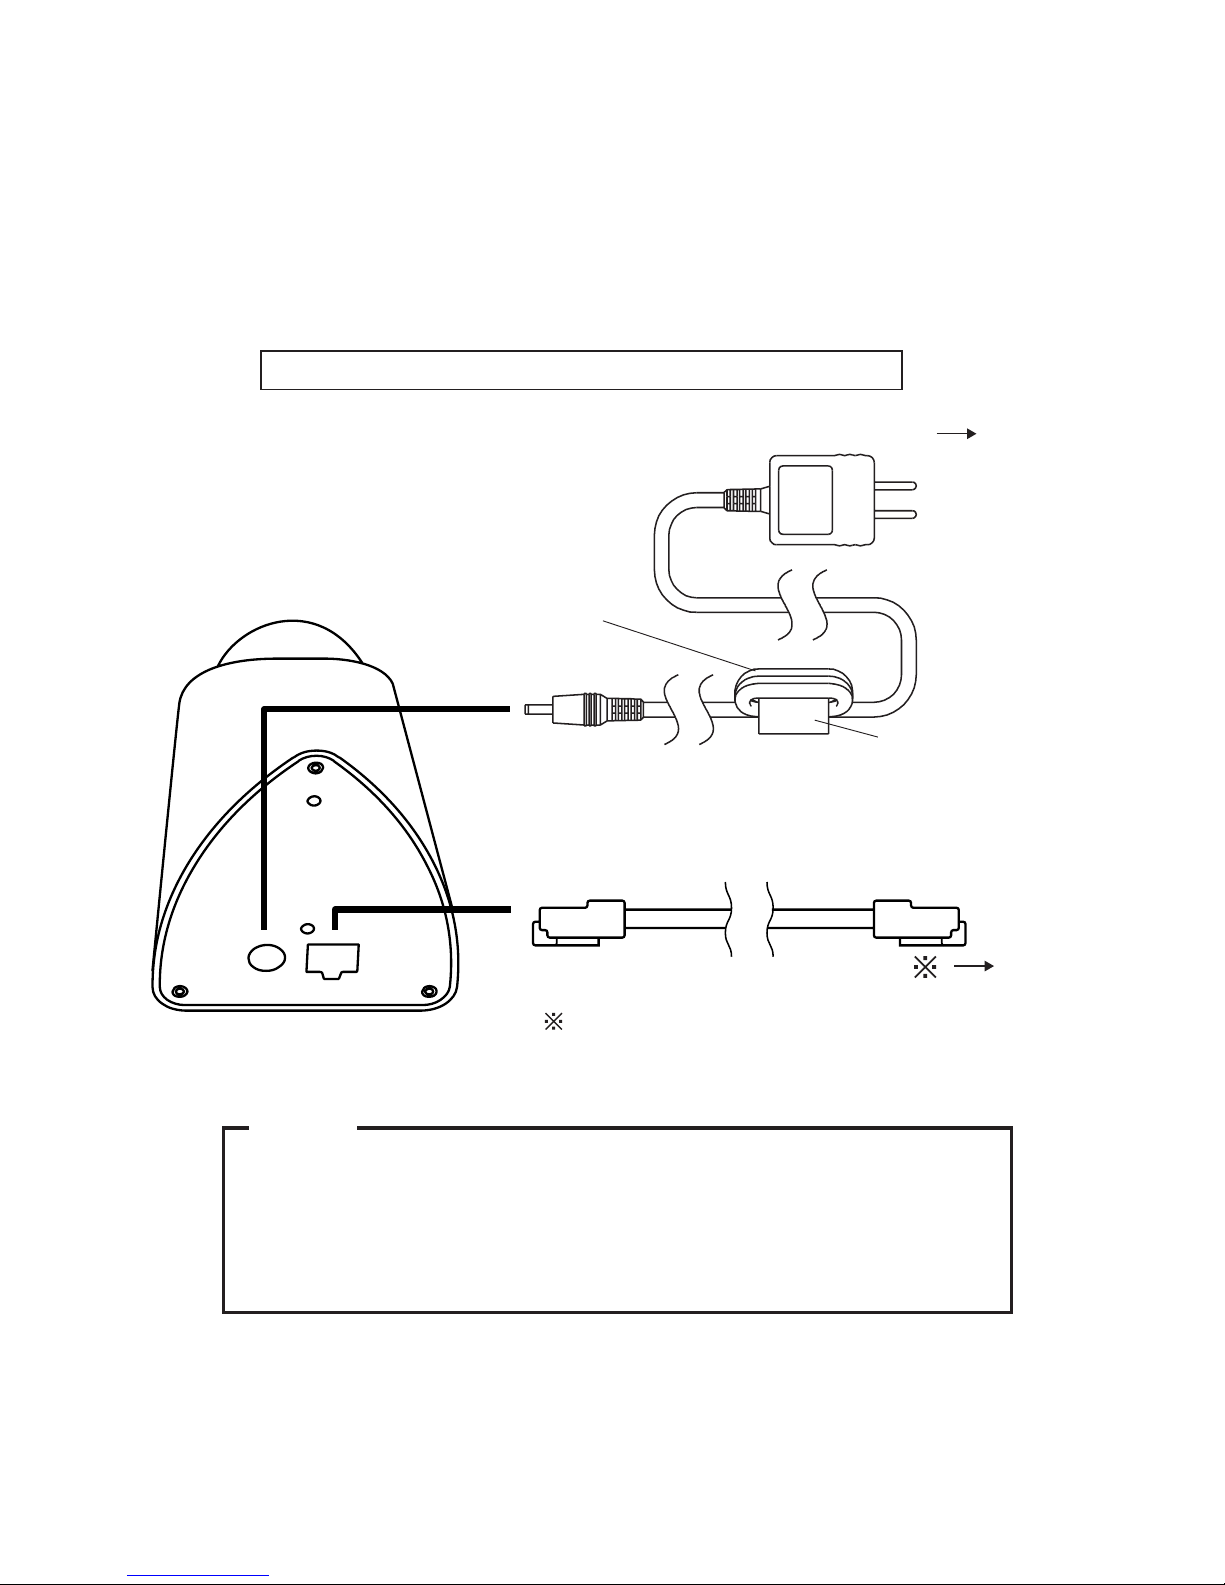
2. Connecting to a network
(Ethernet, Fast Ethernet through Auto negotiation HUB).
Turn on the power of only one VN-C2WU unit.
When network connection is completed and the power is turned on, the VN-C2WU unit will be
connected to the network at the following IP address.
Factory set (Default) IP address : 192.168. 0. 2
All VN-C2WU units are set to the same IP address at the factory; therefore, if
the power of multiple VN-C2WU units is turned on at the same time, correct
access will not be possible. Always turn the power on for only one unit at a
time. If duplication occured, perform the proper processing, wait for 10 min. or
more or turn off the power of all units on the network and then turn the power
on again; otherwise, correct access will not be possible.
When connecting to a HUB, use a straight cable.
When connecting directly to a PC, use a cross cable.
Caution
To power outlet
Optional adapter
Optional shielded
LAN cable (10BASE-T)
Install the ferrite core within 50mm
of VN-C2WU-side connector.
Ferrite core
Round 3x
Page 9

6
3-1 Changing the IP address of the PC
Display the network settings panel by selecting Settings from the Start button, then selecting
Control Panel and Network, in that order.
3. Setting the VN-C2WU IP address
(1) Select the TCP/IP item, then click on
Properties.
(2)
Before making a change, always
make a note of the original IP
address.
After making the note, change the IP
address to 192.168. 0. 3.
Set the subnet mask to a value suitable
for the setting operation. If the value is
unknown, check with the network
administrator.
(3) Click on OK and then reboot the PC.
Page 10

7
About the web pages mentioned in this instruction manual
From the following page, all the screens expressed as VN-C2WU pgae are contained in VN-C2WU
and displayed by the web page browse and display function of the WWW browser software.
Therefore depending on WWW browser software and its settings, the formats and fonts may be different
from the screens of VN-C2WU page, in this manual.
In this manual, all the screens of VN-C2WU are displayed by the web page browse and display function
of Netscape.
Page 11

8
3-2 Changing internal settings
Start the WWW browser software.
Specify the factory-set VN-C2WU web page address in the browse location in the WWW browser
software. (When the factory-set IP address is specified, the WWW browser software will display the
VN-C2WU top page.)
http://192.168.0.2/
WWW browser software (using Netscape as an example)
Caution
In some cases, direct specification is not possible when a proxy server has
been set for Internet access. In such cases, contact the network administrator
and change the setting.
Caution
Page 12

9
Display of the VN-C2WU top page.
The Settings page is displayed.
VN-C2WU top page.
VN-C2WU Settings page.
Click on Settings.
Scroll so that all of "Other
Settings" can be seen.
Page 13

10
Setup is performed by changing the "Other Settings" contents.
Other Settings
[IP address]
Change to an IP address assigned or approved by the network administrator.
[Subnet mask]
Like the IP address, the subnet mask is assigned or approved by the network administrator.
[Default Gateway]
Set the default Gateway IP address. 0.0.0.0 means the gateway is not used.
[Host name]
• Specify using up to 8 letters. Only in the environment to use DNS (Domain Name System) and make
the access link by host name. Except for this environment, do not specify anything.
[MAC address]
This is the unique physical address of the product.
Cannot be changed.
VN-C2WU Settings page "Other settings"
Page 14

11
Other Settings
[Program version]
The version of the VN-C2WU main unit firmware.
Cannot be changed.
[Power Frequency]
This setting reduces the amount of flicker under fluorescent lighting. Set to 50Hz or 60Hz in
accordance with the power frequency at the installation location.
[Password]
Specify using up to 8 letters. Enter (re-enter) the same password two times in each level for
confirmation purposes.
[Auto Refresh]
Specify Pan/Tilt position display in the (Control page) and (Configration page) is automatically
refreshed or not.
Password function
An access protection using a password is provided to regulate connecting PCs (users) connected to
the VN-C2WU. This access protection function has three levels to match the access levels. The pages
that can be accessed at each of these levels are as shown below.
(Refer to page 22 for the VN-C2WU web page configuration.)
Password level
User level
Operator level
Administrator level
Accessible page
Still Image page and Live Image page.
The above pages and (Pan/Tilt) control page.
The above pages and Settings page.
Caution
Never forget the current password because the password setting cannot be
changed unless it matches the Administrator level password.
Caution
Page 15

12
Caution
The confirmation screen shown above will appear when the IP address,
subnet mask, host name and power frequency settings are changed.
When OK is clicked in this confirmation screen, the VN-C2WU main unit
internal preset operation will be performed and the IP address, etc., will be
changed. The Factory set (Default) IP address of 192.168.0.2 will become
invalid, and the connection to the VN-C2WU will be no longer possible. When
the WWW browser software is not operated for a certain time, a message
indicating that connection is not possible will appear as a result of IP address
change.
Caution
VN-C2WU Settings page "Other Settings"
Press Apply button to enable the setting.
Check the new IP address again.
If there is no mistake in the entry, click on OK.
Page 16

13
3-3 Restore to the original PC IP address
Using the same procedure as described in item 3-1, select Settings from the Start button, then
select Control Panel and Network, in that order. Next, restore to the original IP address and
reboot the PC in accordance with the messages.
4. VN-C2WU connection test
This test confirms whether or not each VN-C2WU web page can be displayed with the WWW browser
software using the set IP address or DNS host name.
(Refer to page 20 for the VN-C2WU web page configuration.)
Caution
In some cases, direct specification is not possible when a proxy server has
been set for Internet access. In such cases, contact the network administrator
and change the settings.
Also contact the network administrator and make necessary settings
regarding DNS address for using DNS.
Caution
Enter http:// IP Address or Host name /
Page 17

14
Enter the User Name and Password.
In order to assure quick display of the VN-C2WU web page from the WWW browser being used,
register a browse location (URL : Uniform Resource Locator) is recommended.
Use Bookmarks with Netscape or Favovites with Internet Explorer for this registration.
Enter a password.
It is not necessary to enter a user name.
Click on OK.
Addition to Bookmarks (using Netscape).
Page 18

15
VN-C2WU/Web page
Explanation of display items and operations
The following is a diagram of the configuration of the VNC2WU internal URL (web pages).
Top page:
http://
*****
index_e.html. (
*****
is the URL of the VN-C2WU.)
The purpose of this page is to link to each of the VN-C2WU web pages.
In order to access all the VN-C2WU web pages, the Administrator level password is required.
Settings page
(spushconfig_e.html
or
javaconfig_e.html)
Password level
USER OPERATOR
ADMINISTRATOR
Top page (index_e.html)
Still image page (still_e.html)
Live image page (java_e.html or spush_e.html)
Still iamge (still.jpg)
Server Push live image URL
(push.jpg)
Java live image URL
(mjpeg.class)
Control page
(spushcontrol_e.html
or javacontrol_e.html)
Caution
VN-C2WU top page
Still image
When browsing is started.
Buttons to link each page. (use a singal click)
Page 19

16
Still image page:
http://
*****
still_e.html. (
*****
is the URL of the VN-C2WU)
This page is to display a still image when browsing is started. To update the image, use the Reload or
Refresh function of the WWW browser software. To save the image being displayed, use the Save
as... function of the WWW browser software.
Live image page:
The URL will be changed automatically by the WWW browser software.
Netscape http://
*****
/spush_e.html
Internet Explorer http://
*****
/jave_e.html.
(
*****
is the URL indicated by the VN-C2WU)
This page is to display live images. The camera images are updated automatically and displayed as live
images.
Caution
The Save as... function of the WWW browser software cannot be used with
this page so do not attempt to save. The Save as... function cannot be used
for the entire web page so do not attempt to save.
Caution
Caution
Server push images are cached in the browser; therefore, operation of the
browser may become sluggish after continuous use for an extended time period.
In such cases, set caching by the browser to off.
Caution
VN-C2WU still image page
Hyper link to the top page.
VN-C2WU live image page
Hyper link to the top page.
Page 20

17
Control page:
The URL will be changed automatically by the WWW browser software.
Netscape http://
*****
/spushcontrol_e.html
Internet Explorer http://
*****
/javacontrol_e.html.
(
*****
is the URL of the UN-C2WU)
This page is to control Pan/Tilt operations and to operate the position memory.
The images are updated automatically and displayed as live images.
Caution
Perform the Pan/Tilt operations after all images have been loaded into the
web browser.
Caution
VN-C2WU control page
Hyper link to other pages.
Live image
VN-C2WU data display area
The current Pan/Tilt position is
displayed.
Warning messages for operations
are also displayed.
Operation menu
The buttons related to camera
Pan/Tilt operations are located
here. Refer to the next page for
Page 21

18
Pan/Tilt control
The Pan/Tilt position display is as shown in the illustration.
Tilt range
Pan/Tilt shoot range
Pan direction
Tilt direction
–75° +5°
VN-C2WU control pageVN-C2WU control page
The current Pan/Tilt angle step is displayed here.
Angles (integer value) can be changed by
entering value and clicking on the Apply button.
The Pan/Tilt can be controlled with the 8 Pan/Tilt
operation buttons.
The amount of movement for each operation of
Pan/Tilt is the above Pan/Tilt Angle.
Pan range
0°
–50°+50°
0°
–75°
+5°
Portion of the image
will be missing with
this range.
–30° a
rea
–10° a
rea
30° a
rea
50°
–50°
Page 22

19
Position memory movement
Position memory setting
VN-C2WU control page (position memory setting)VN-C2WU control page (position memory setting)
VN-C2WU control page (position memory control)VN-C2WU control page (position memory control)
The VN-C2WU is equipped with 10 position
memories.
The contents of the currently set position memory
are displayed.
The current Pan/Tilt position can be set to any of
the 10 position memories by clicking on "Apply".
Page 23

20
Settings Page:
The URL will be changed automatically by the WWW browser software.
Netscape http://
*****
/spushconfig_e.html
Internet Explorer http://
*****
/javaconfig_e.html.
(
*****
is the URL of the VN-C2WU)
This page is to make the camera image related settings and connection (setup) related settings.
(The images are updated automatically and displayed as live images.)
VN-C2WU settings page
Hyper link to other pages
Live image.
VN-C2WU data display area
The current Pan/Tilt position is
always displayed. Warning
messages for the various
operations are also displayed.
Settings menu
The buttons used for the image
and connection (setup) related
settings are located here. Refer to
the next page for details.
Page 24

21
Camera Auto/Manual Settings
Image Quality Setting
VN-C2WU settings page
(Auto/manual settings)
“Quality” in “Image Quality Setting” such
as Saturation and Color Balance can be
manually set.
“Quality” in “Image Quality Setting” can be
automatically set.
Select Auto or Manual depending on
operational environment.
Click Apply after selecting Auto or
Manual.
Manual :
Auto :
After making each setting, click
Apply to change the VN-C2WU
internal settings.
Clicking Default returns all of the
settings to the factory set values
(Default values).
Also effective when Auto
is set.
VN-C2WU settings page
(Image Quality setting)
Page 25

22
Image Quality menu
[Resolution]
Three different image sizes are available: 640 x 480, 320 x 240 and 160 x 120.
[Compression Rate]
The compression ratio has an inversely proportional relationship to image quality but increasing the
compression ratio increases the number of frames that can be displayed per second.
[Frame Rate]
Frame rate sets the upper limit for the number of image frames sent from the VN-C2WU per second.
(fps is the abbreviation for frames per second)
Caution
If the frame rate is not set to 1fps or less in the band below 10Mbps, the
pan/tilt operations may not be possible from the control page in some cases.
(ISDN 64k, 128k, analog 56k, etc., are pertinent.)
Caution
Caution
The number of frames actually sent and displayed per second depends on
the performance of the personal computer and WWW browser software, and
on the LAN environment, etc. When communication interference from
processing being performed by other users is anticipated (especially in
environments where the load on the network is relatively heavy), it is
advisable to set a low value for the frame rate.
Caution
Compression ratio Low Medium High
Image quality High Medium Low
No. of frames Low Medium High
Quality
Image Sensor can be used when Camera Auto/Manual Setting is set to Manual. (Excluding the
“Saturation” and the “Color Balance”.)
Images can be adjusted by changing the detail items.
Page 26

23
[Other Settings]
Item
Saturation
Color Balance
Brightness
Effect
Adjustment of the color saturation.
Also effective when Auto is set.
(The larger the setting value, the greater the color
saturation.)
Adjustment of the tone.
Also effective when Auto is set.
(50 is the median value. Decreasing the setting
value emphasizes red and increasing the setting
value emphasizes blue.)
Adjustment of the image brightness.
(The larger the setting value, the greater the
brightness.)
Contrast
Adjustment of the contrast. (The larger the
setting value, the stronger the contrast.)
Gain
Adjustment of the gain of the internal amp.
(Increase the setting value when light is
insufficient.)
Exposure
Adjustment of the exposure time.
(The smaller the setting value, the lighter the
image.)
VN-C2WU settings page
(Other Settings)
Most of the items are set during installation and setup. Refer to page 10 for details.
Page 27

24
How to link the VN-C2WU images
The still or live mages of VN-C2WU can be pasted and displayed in a separate web page you have
created.
Displaying still image:
A still image can be displayed by creating a web page with the contents described below.
<IMG SRC="http://
*****
/still.jpg">
*****
shows the URL indicated by the VN-C2WU.
<IMG SRC="http://
*****
/push.jpg">
*****
indicates the VN-C2WU IP address.
Displaying live images:
Two methods can be used for live images: the Serverpush method and the Java method.
It is necessary to use one of these methods in accordance with the WWW browser software
compatability.
Displaying with Serverpush
Live images can be displayed with Serverpush-compatible WWW browser software (Netscape) by
creating a web page with the contents described below.
Page 28

25
<APPLET CODE="mjpeg.class"WIDTH=640 HEIGHT=480>
CodeBase=http://
*****
/"></APPLET>
*****
indicates the VU-C2WU IP address.
Displaying with Java
Live images can be displayed with Java-compatible WWW browser software (Internet Explorer, etc.) by
creating a web page with the contents described below.
Caution
The resolution, compression rate, etc., of both the still and live images
browsed and displayed (in a separate web page are) in accordance with the
previously set setting values.
Also, correct display may not be possible if Java execution is disabled with
the WWW browser software.
Caution
Caution
When a password has been set, animated images cannot be displayed with
JAVA without prior confirmation.
Caution
Page 29

26
Troubleshooting
Out of focus Use the following procedure to adjust the
focus.
1. Set both the pan and tilt positions to
zero (0) degrees.
2. Remove the lens cover.
3. Loosen the screws fastening the lens
block.
Caution: For safety, turn off the power
before loosening the lens block
screws.
4. Display an VN-C2WU image with the
WWW browser software. (Animated
images can be displayed with the
WWW browser software.)
5. Slowly rotate the lens block until the
focus is correct.
6. Tighten the lens block screws.
7. Firmly attach the lens cover, making
sure the cutouts in the lens cover and
case are aligned.
Mount so that the notches
are aligned
Lens block
Lock screw
Lens cover
Page 30

27
The new VN-C2WU IP address
has been forgotten.
Unknown IP addresses are handled as recoveries or repairs. Contact your local dealer.
The password set with the password protection function has
been forgotten.
Cancellation of the password protection
function is handled as a repair, so contact
your local dealer. For safety, please show
personal identification at that time.
The colors are unsatisfactory.
• Check the color adjustment of the
displaymonitor and video card.
Colors will differ slightly depending on the
video card and display monitor used with
the personal computer. Improvement is
sometimes possible by adjusting the color
setting of the display monitor. Depending
on the video card used, the color can
sometimes be adjusted with Screen
Properties (click the right mouse button
from the Desktop).
• Switching to True Color (24-bit) display
Natural color reproduction is difficult at a
setting of High Color (16-bit) or less. The
use of True Color is recommended.
• Adjusting the color balance
Color balance can be changed using
VN-C2WU Setting Page → Image Quality
Menu → Color Balance.
(Cont'd on the next page)
Page 31

28
The colors are unsatisfactory. • Try changing Camera Auto/Manual Setting
on the VN-C2WU Setting Page from Auto
to Manual and then back to Auto.
When using a different light sources for re-
cording
(For example, when moving back and forth
between outdoors under sunlight and indoors under fluorescent lighting.)
In some cases, time is required for the
auto tracking white balance to start operating.
In this case, the white balance can be star-
ted rapidly by temporarily changing the
setting from Auto to Manual and then
checking.
Image size and position change
spontaneously
Whena single VN-C2WU unit is accessed
by multiple operators and managers, the last
setting made is the one that will be valid.
Page 32

29
Specifications
LAN standard : IEEE 802. 3 standard
Communication protocol : TCP/IP, HTTP
Image sensor : 1/3 inch, 300,000 pixels CMOS image sensor
Minimum focusing distance : 1.0 m
Pan/Tilt angles : Pan : 100°
Tilt : 80°
Output image format : 640 X 480, 320 X 240, 160 X 120 pixels
Power voltage : DC 5 V
Power consumption : 1.4 A (max)
Operating temperature : 0 to 40°C
Mass (weight) : Approx. 260 g
External dimensions (unit: mm)
Page 33

VICTOR COMPANY OF JAPAN, LIMITED
VN-C2WU V.NETWORKS
Printed in Japan
SS961534-001
COPYRIGHT © 2000 VICTOR COMPANY OF JAPAN, LTD.
 Loading...