

Page 1
Home Cinema DD Speaker System
English
Heimkino-DD-Lautsprechersystem
Système d’enceinte Home cinéma DD
DD-luidsprekersysteem voor uw huisbioscoop
Sistema de altavoces DD de cine en casa
Sistema di diffusione DD per Home Cinema
Hembio DD-högtalarsystem
Hjemmebiograf DD-højttalersystem
SX-XD55
Kotiteatterin DD-kaiutinjärjestelmä
Deutsch
Français
Nederlands
Español
ItalianoSvenskaDanskSuomi
SX-XD55F
INSTRUCTIONS
BEDIENUNGSANLEITUNG
MANUEL D’INSTRUCTIONS
GEBRUIKSAANWIJZING
MANUAL DE INSTRUCCIONES
ISTRUZIONI
BRUKSANVISNING
INSTRUKTIONSBOG
SX-XD55F SX-XD55F SX-XD55F
SX-XD55F
SX-XD55C
KÄYTTÖOHJE
LVT1203-002A
[E]
Page 2

Thank you for purchasing a JVC speaker system.
Before you begin using these speakers, please read the
instructions carefully.
Contents
Warnings, Cautions and Others...................................... 2
English
Assembly ........................................................................ 15
Additional Information ..................................................... 20
Specifications ................................................................. 22
Tak fordi du har købt JVC højttalere.
Inden du tager dem i brug, bedes du læse vejledningen
nøje igennem.
Indhold
Advarsler, forsigtighedsregler og andet .......................... 9
Dansk
Samling ........................................................................... 31
Yderligere oplysninger .................................................... 36
Specifikation ................................................................... 38
Herzlichen Glückwunsch zum Kauf von JVC-Lautsprechern.
Bevor Sie die Lautsprecher in Betrieb nehmen, lesen Sie
bitte die Bedienungsanleitung gründlich durch.
Inhalt
Warnungen, Vorsichtshinweise usw. ............................... 3
Zusammenbau ................................................................ 15
Deutsch
Zusätzliche Informationen .............................................. 20
Technische Daten ........................................................... 22
Merci d’avoir acheté ces enceintes JVC.
Avant de les utiliser, veuillez lire attentivement ces
instructions.
Contenus
Avertissements, précautions et autres............................ 4
Montage .......................................................................... 15
Français
Informations complémentaires ....................................... 20
Spécifications ................................................................. 22
Dank u voor de aanschaf van deze JVC luidsprekers.
Lees alvorens gebruik deze gebruiksaanwijzing goed door.
Inhoud
Waarschuwingen en andere aandachtspunten .............. 5
Monteren ........................................................................ 23
Extra informatie .............................................................. 28
Nederlands
Specificaties ................................................................... 30
Kiitos, että valitsit JVC-kaiuttimet.
Ennen kuin ryhdyt käyttämään kaiuttimia, lue nämä
käyttöohjeet huolellisesti.
Sisältö
Varoituksia, huomautuksia ym. ....................................... 10
Suomi
Kokoaminen .................................................................... 31
Lisätietoja ....................................................................... 36
Tekniset tiedot ................................................................. 38
Dzi´kujemy za zakup g∏oÊników JVC.
Przed rozpocz´ciem korzystania z g∏oÊników przeczytaj
uwa˝nie instrukcj´ obs∏ugi.
Spis treÊci
Ostrze˝enia, Êrodki ostro˝noÊci i inne ............................ 11
Polski
Monta˝ ............................................................................ 39
Informacje dodatkowe .................................................... 44
Dane techniczne ............................................................. 46
Köszönjük, hogy megvásárolta ezt a JVC hangszóró
rendszert.
A rendszer használatbavétele elŒtt, kérjük, olvassa el
figyelmesen az útmutatót.
Tartalomjegyzék
Figyelmeztetés, Óvintézkedés és Egyebek .................... 12
Magyar
Összeszerelés ................................................................ 39
További tudnivalók .......................................................... 44
Mıszaki adatok............................................................... 46
Gracias por la compra de los altavoces JVC.
Por favor lea atentamente las instrucciones antes de
empezar a usar los altavoces.
Contenido
Advertencias, precauciones y notas ............................... 6
Montaje ........................................................................... 23
Español
Información adicional ...................................................... 28
Especificaciones ............................................................. 30
La ringraziamo per l’acquisto di diffusori JVC.
Prima di utilizzare i diffusori, leggere attentamente le
istruzioni.
Indice
Avvertenze, Precauzioni e Altro...................................... 7
Italiano
Assemblaggio ................................................................. 23
Ulteriori informazioni ....................................................... 28
Dati caratteristici ............................................................. 30
Tack för att du valde JVC högtalare.
Läs instruktionerna noggrant innan du börjar använda
dem.
Innehåll
Varningar, försiktighetsåtgärder m.m. ............................. 8
Montering ........................................................................ 31
Svenska
Ytterligare information .................................................... 36
Specifikation ................................................................... 38
Dûkujeme vám za zakoupení reproduktorÛ JVC.
Pfied jejich pouÏitím si peãlivû pfieãtûte tyto pokyny.
Obsah
Varování, v˘strahy a dal‰í............................................... 13
MontáÏ ............................................................................ 47
âesky
DoplÀkové informace ...................................................... 52
Technické údaje .............................................................. 54
Благодарим Вас за приобретение акустической
системы JVC.
Прежде чем начать использование данной системы,
внимательно ознакомьтесь с инструкциями.
Содержание
Предостережения, предупреждения и прочее .......... 14
Русский
Монтаж .......................................................................... 47
Дополнительная информация ..................................... 52
Технические характеристики ....................................... 54
1
Page 3
Warnings, Cautions and Others
Leg
Speaker
grille
Speaker
cord
7 Precautions for installation
• Do not install the speakers on an uneven surface or in a place
subject to vibration; otherwise, they may fall over, causing
damage or injury.
– Take the occurrence of earthquakes or other
physical shocks into consideration when selecting
the installation place, and secure the speakers
thoroughly.
• To prevent deformation or discoloration of the
cabinet, do not install the speakers where they are
exposed to direct sunlight or high humidity, and
avoid installation near air conditioning outlets.
• Speaker vibrations may cause howling. Place the
speakers as far away from the player as possible.
• The speakers are magnetically shielded to avoid
color distortions on TVs. However, if not installed properly, it
may cause color distortions. So, pay attention to the following
when installing the speakers.
– When placing the speakers near a TV set, turn off the TV’s
main power switch or unplug it before installing the
speakers.
Then wait at least 30 minutes before turning on the TV’s
main power switch again.
Some TVs may still be affected even though you have followed
the above. If this happens, move the speakers further away
from the TV.
• Tuner reception may become noisy or hissing if a speaker is
installed near the tuner. In this case, leave more distance
between the tuner and the speakers or use an outdoor
antenna for better tuner reception without interference from
the speakers.
• Do not lean against the speakers, as the speakers could fall
down or break, possibly causing an injury. Especially be
careful that children do not lean against them.
7 Precautions for Daily Use
• To maintain the appearance of the speakers
Wipe with a dry, soft cloth if the cabinet or control panel should
become dirty.
If very dirty, apply a small amount of water or neutral detergent
to the cloth and wipe clean, then wipe with a dry cloth.
• To improve the sound field
If the speakers are facing a solid wall or glass door,
etc., it is recommended to furnish the wall with
materials that absorb sounds, for example by
hanging up thick curtains, to prevent reflections and
standing waves.
• To use the speakers without any trouble
– Do not reproduce sounds at so high a volume that they are
distorted; otherwise, the speakers may be damaged by
internal heat buildup.
– When moving the speakers, do not pull the speaker cords;
otherwise, the speakers may fall over, causing damage or
injury.
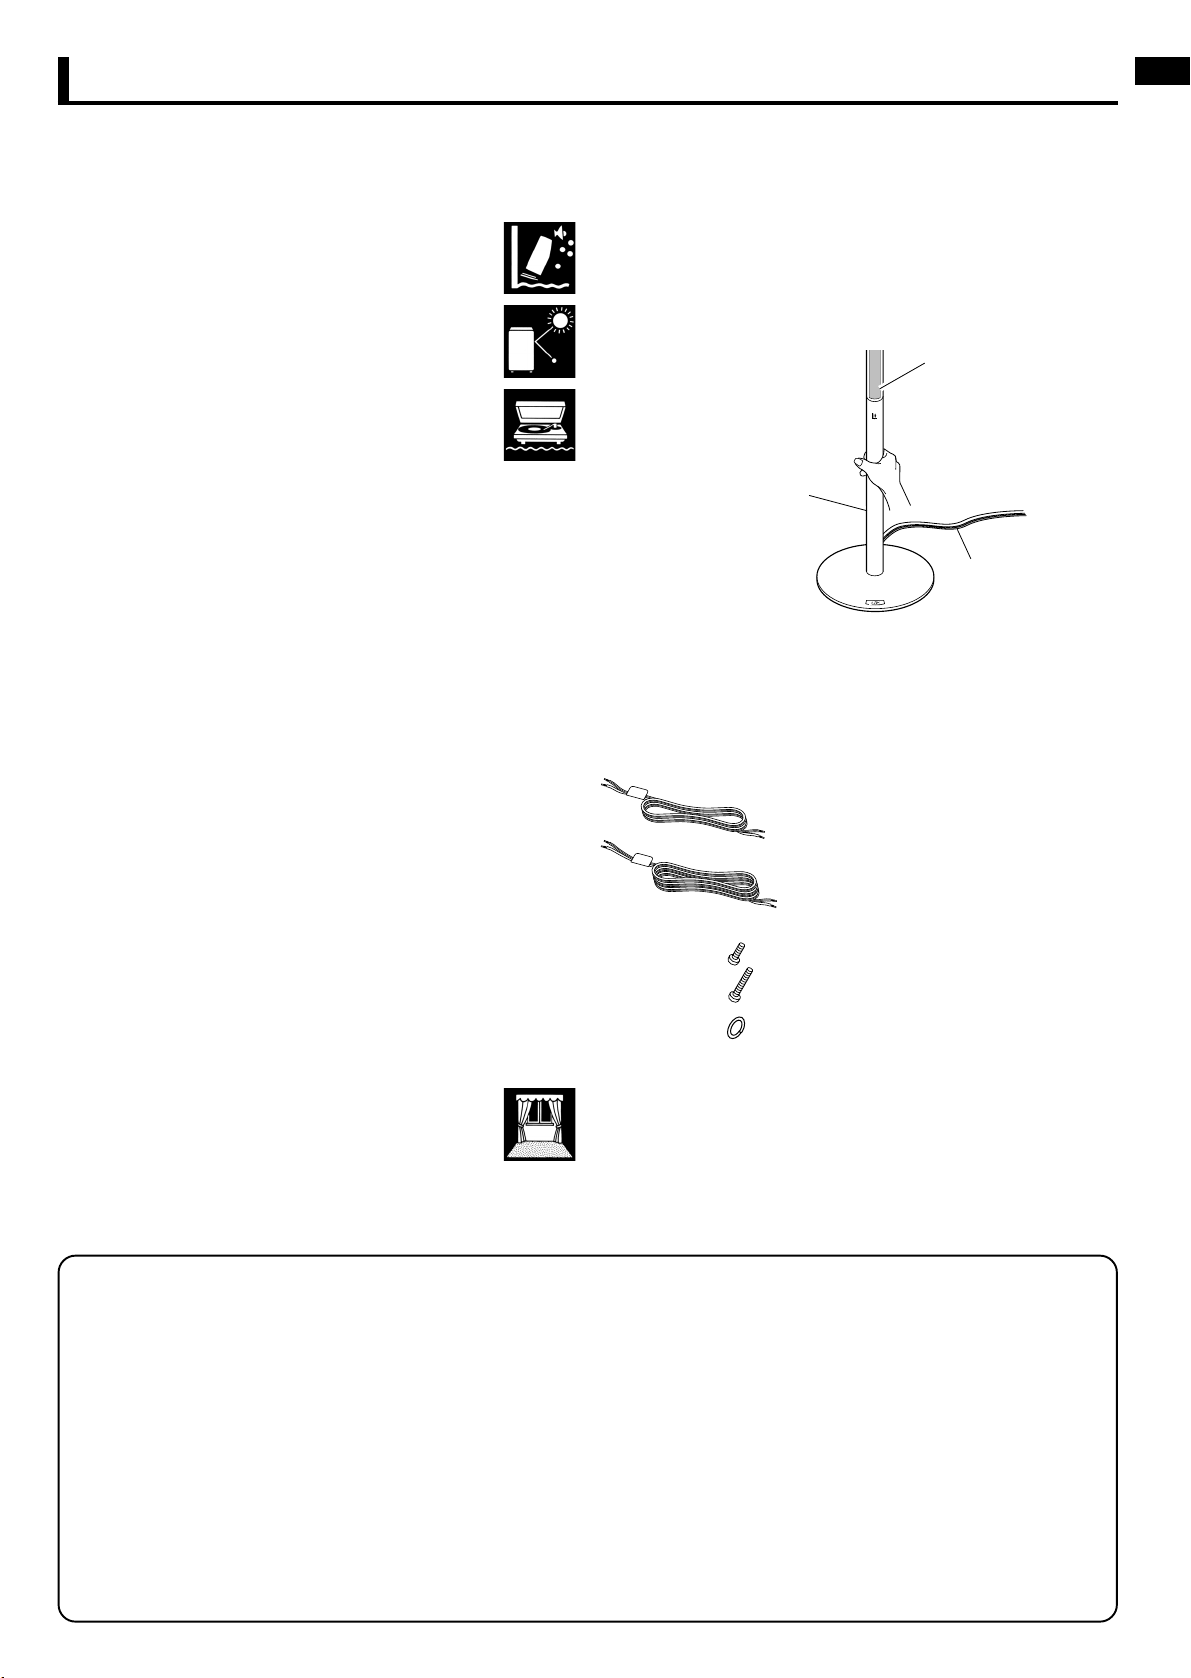
– When holding a satellite speaker, do not grasp the speaker
(upper) portion, but always grasp the leg (lower) portion of
the satellite speaker.
Satellite
speaker
7 Checking the supplied Accessories
Check to be sure you have the following supplied accessories.
The number in parenthesis indicates the quantity of the piece
supplied.
• Speaker cords
6 m (3);
For front left/right and center speakers
15 m (3);
For surround left/right and surround
back speakers
• Screws
• Washers
If any of the items above are missing, contact your dealer
immediately.
(M5 x 12 mm) (5)
(M4 x 25 mm) (15)
(5)
English
Speaker and Speaker cords—to improve the sound quality
About DD (Direct Drive) speaker
DD (Direct Drive) technology improves sound localization and transmits the powerful sounds.
About the OFC cord
The core wires of the supplied speaker cords are made of OFC (Oxygen Free Copper). This OFC cord enables high quality
sound reproduction.
When connecting the speaker cords
Make sure to match the polarity (ª and ·); otherwise, the surround effect will become less effective.
After connecting, check that the exposed cores are fully inserted into the terminal.
When using other speaker cords
Observe the following;
• Buy thick speaker cords rather than thin cords, and make them as short as possible for connection.
• Use speaker cords of the same length for both left and right speakers.
• Do not use long speaker cords; otherwise, the sound quality may deteriorate.
2
Page 4

Assembly / Zusammenbau / Montage
7 Assembling the satellite speakers
EnglishDeutschFrançais
Each speaker (except the center speaker) has been divided into three
parts for shipment. Before using this speaker system, assemble it first by
following the procedure explained from pages 15 to 19.
• Prepare a Phillips screw driver.
7 Satellitenlautsprecher zusammenbauen
Jeder Lautsprecher (mit Ausnahme des Mittenlautsprechers) wird in drei
Teilen geliefert. Vor der Verwendung dieses Lautsprechersystems müssen
Sie die Lautsprecher gemäß den Anweisungen auf den Seiten 15 bis 19
zusammenbauen.
• Legen Sie einen Kreuzschlitz-Schraubendreher bereit.
Speaker section
7 Montage des enceintes satellites
Chaque enceinte (sauf l’enceinte centrale) est divisée en trois parties
pour l’expédition. Avant d’utiliser ce système d’enceintes, assemblez-les
d’abord en suivant la procédure expliquée aux pages 15 à 19.
• Préparez un tournevis cruciforme.
Before assembling—
• Take care not to drop the stand while assembling; otherwise, it may cause damage to the floor or injury.
• Ensure enough space for assembly and installation.
• Place a large, thick cloth on the floor where you assemble the speaker, so you can protect the floor and the speaker itself.
• Use the speaker only after assembly is fully and correctly done.
Lautsprecherteil
Section de l’enceinte
Leg
Fuß
Pied
Stand
Ständer
Socle
Vor dem Zusammenbau:
• Darauf achten, dass der Ständer während des Zusammenbaus nicht herunterfällt, da er sonst den Fußboden beschädigen oder
Verletzungen verursachen könnte.
• Sicherstellen, dass ausreichend Platz für Zusammenbau und Aufstellung vorhanden ist.
• Legen Sie ein großes weiches Stück Stoff unter, um beim Zusammenbau den Boden und den Lautsprecher selbst vor
Beschädigungen zu schützen.
• Nehmen Sie den Lautsprecher erst dann in Gebrauch, wenn der Zusammenbau vollständig und ordnungsgemäß abgeschlossen ist.
Avant le montage—
• Faites attention de ne pas faire tomber le socle pendant le montage; sinon, il pourrait endommager le sol ou causer des blessures.
• Assurez-vous de disposer de suffisamment d’espace pour le montage et l’installation.
• Placez un grand tissu épais sur le sol, à l’endroit où vous souhaitez monter l’enceinte, de façon à protéger le sol et l’enceinte elle-
même.
• Utilisez l’enceinte uniquement une fois que l’enceinte est complètement et correctement montée.
Attaching the leg and the stand / Anbringen von Fuß und Ständer / Fixation du pied et du socle
1
Terminal cover
Anschlussabdeckung
Couvercle des prises
Screw
Schraube
Vis
Remove the terminal cover from the leg.
First remove the screw on the terminal cover, then detach the cover by
pulling it upward.
• You will need to use the removed screw in step 5 on page 18.
Nehmen Sie die Anschlussabdeckung vom Fuß ab.
Entfernen Sie zunächst die Schraube von der Anschlussabdeckung
und nehmen Sie dann die Abdeckung ab, indem Sie sie nach oben
ziehen.
5
• Die entfernte Schraube wird in Schritt
angebracht.
auf Seite 18 wieder
15
Leg
Fuß
Pied
Retirez le couvercle des prises du pied.
Retirez d’abord la vis sur le couvercle des prises, puis détachez le
couvercle en le tirant vers l’extérieur.
• Vous aurez besoin d’utiliser la vis retirée à l’étape 5 de la page 18.
Page 5

2
mark
-Markierung
Marque
Leg
Fuß
Pied
mark
-Markierung
Marque
Stand
Ständer
Socle
Join the leg to the stand.
• Rotate either the leg or stand so that the mark on the leg and the
mark on the stand are facing the same direction.
• Make sure to match the screw holes on the leg with those on the
stand so that they are aligned correctly.
Bringen Sie den Fuß am Ständer an.
• Drehen Sie entweder Fuß oder Ständer so, dass die -Markierung
am Fuß und die
Richtung zeigen.
• Sicherstellen, dass die Schraubenbohrungen am Fuß mit denen am
Ständer übereinstimmen und korrekt ausgerichtet sind.
-Markierung am Ständer in die gleiche
Assemblez le pied sur le socle.
• Tournez soit le pied soit le socle de façon que la marque sur pied
et celle
• Assurez-vous que les trous de vis sur le pied sont alignés
correctement avec les trous sur le socle.
sur socle soient dirigées dans la même direction.
EnglishDeutschFrançais
3
Leg
Fuß
Pied
Cushion
Kissen
Coussin
Stand
Ständer
Socle
Screw
Schraube
Vis
Fix the leg to the stand with three of the supplied
screws (long: M4 x 25 mm).
• Do not tighten each screw completely one by one.
First put all screws in, then tighten them evenly and firmly.
Befestigen Sie den Fuß am Ständer mit Hilfe von drei
der mitgelieferten Schrauben (lange: M4 x 25 mm).
• Die Schrauben zunächst nicht einzeln festziehen.
Bringen Sie erst alle Schrauben an und ziehen Sie sie dann
gleichmäßig und fest an.
Fixex le pied sur le socle avec trois des vis
fournies (long: M4 x 25 mm).
• Ne serrez pas complètement chaque vis une par une.
Mettez d’abord toutes les vis en place, puis serrez-les
progressivement de façon uniforme puis solidement.
It is recommended to place a cushion under the leg.
• You can tighten the screws easily by placing the leg
horizontally.
Es ist empfehlenswert, ein Kissen unter den Fuß zu legen.
• Die Schrauben können leichter angezogen werden, wenn
Sie den Fuß in die waagerechte Position bringen.
Il est recommandé de placer un coussin sous le pied.
• Vous pouvez serrer les vis facilement en plaçant le pied
horizontalement.
To be continued on the next page / Fortsetzung auf der nächsten Seite / Suite à la page suivante
16
Page 6

Assembly / Zusammenbau / Montage
EnglishDeutschFrançais
4
Ta g
Etikett
Étiquette
To the speaker
terminal of the leg
Zum
Lautsprecheranschluss
am Fuß
Aux prises
d’enceinte du pied
1)
The cord with the black stripe is on this side as
illustrated.
Auf dieser Seite befindet sich das Kabel mit dem
schwarzen Streifen, wie in der Abbildung gezeigt.
Le cordon avec la bande blanche doit
être de ce côté comme montré sur
l’illustration.
2)
Leg
Fuß
Pied
Stand
Ständer
Socle
Connect the speaker cord to the speaker terminal
of the leg.
• Use the 6-meter speaker cords for front speakers and
15-meter speaker cord for rear speakers.
• Each speaker cord has its name tag attached to one end. Attach the
without the name tag to the speaker terminal.
end
• Twist and remove the insulation at the end of each speaker cord
before connecting.
1)
Insert the speaker cord inside the stand as illustrated.
• Pull the speaker cord out of the center of the stand by about
50 cm.
2)
Insert the tips of the speaker cord into the leg and pull them
out as illustrated.
3)
Insert the speaker cord into the speaker terminal inside the leg.
Schließen Sie das Lautsprecherkabel an den
Lautsprecheranschluss im Fuß an.
• Verwenden Sie die 6-Meter-Lautsprecherkabel für die FrontLautsprecher und die 15-Meter-Lautsprecherkabel für die hinteren
Lautsprecher.
• Bei jedem Lautsprecherkabel ist ein Namensetikett an einem Ende
angebracht. Schließen Sie das Ende
Lautsprecheranschluss an.
• Schneiden Sie die Isolierung vor dem Anschluss am Ende aller
Lautsprecherkabel ein, verdrillen Sie sie und ziehen Sie die
Isolierung ab.
1)
Führen Sie das Lautsprecherkabel in den Ständer ein (siehe
Abbildung).
• Ziehen Sie das Lautsprecherkabel circa 50 cm weit aus der Mitte
des Ständers heraus.
2)
Führen Sie die Enden des Lautsprecherkabels in den Fuß ein
und ziehen Sie sie wie unten heraus (siehe Abbildung).
3)
Führen Sie das Lautsprecherkabel in den
Lautsprecheranschluss innen im Fuß ein.
ohne Namensetikett am
3)
1
Press
Drücken
Poussez
Black
Schwarz
Noir
Black striped
Schwarz gestreift
Bande noire
2
Insert
Einsetzen
Insérez
3
Release
Freigeben
Relâchez
Red
Rot
Rouge
Leg
Fuß
Pied
Copper
Kupfer
Cuivré
Connectez le cordon d’enceinte à la prise
d’enceinte sur le pied.
• Utilisez les cordons d’enceintes de 6 mètres pour les enceintes
avant et les cordons d’enceinte de 15 mètres pour les enceintes
arrière.
• Chaque cordon d’enceinte a une étiquette portant son nom attaché
à une extrémité. Fixez l’extrémité sans l’étiquette aux prises
d’enceinte.
• Torsadez et retirez l’isolant à l’extrémité de chaque cordon
d’enceinte avant la connexion.
1)
Insérez le cordon d’enceinte à l’intérieur du socle comme
montré sur l’illustration.
• Faites sortir le cordon d’enceinte par le centre du socle d’environ
50 cm.
2)
Insérez les extrémités du cordon d’enceinte dans le pied et
tirez-les comme montré sur l’illustration.
3)
Insérez le cordon d’enceinte dans les prises d’enceinte dans le
pied.
17
Page 7

5
Terminal cover
Anschlussabdeckung
Couvercle des prises
Screw
Schraube
Attach the terminal cover to the leg.
Push cords fully inside the leg. Then fix the terminal cover using the
1
screw removed in step
Vis
Bringen Sie die Anschlussabdeckung am Fuß an.
Schieben Sie die Kabel vollständig in den Fuß hinein. Befestigen Sie
dann die Anschlussabdeckung mit Hilfe der Schraube, die Sie in Schritt
1
entfernt haben.
.
Remettez en place le couvercle des prises sur le pied.
Poussez le cordon complètement dans le pied. Puis fixez le couvercle
des prises en utilisant la vis que vous avez retirée à l’étape
Joining the leg and the speaker unit / Anbringen von Fuß und Lautsprechereinheit /
Réunion du pied et de la section de l’enceinte
EnglishDeutschFrançais
1
.
6
1
Press
Drücken
Poussez
Speaker section
Lautsprecherteil
Section de l’enceinte
2
Insert
Einsetzen
Insérez
Black
Schwarz
Noir
Red
Rot
Rouge
Black striped
Schwarz gestreift
Bande noire
3
Release
Freigeben
Relâchez
Copper
Kupfer
Cuivré
Insert the speaker cord into the speaker terminal
inside the leg.
Führen Sie das Lautsprecherkabel in den
Lautsprecheranschluss innen im Fuß ein.
Insérez le cordon d’enceinte dans les prises
d’enceinte dans le pied.
Leg
Fuß
Pied
Speaker section
Lautsprecherteil
Section de l’enceinte
Leg
Fuß
Pied
Speaker cord
Lautsprecherkabel
Cordon d’enceinte
Cord protector
Leitungsschutz
Protecteur de cordon
Leg
Fuß
Pied
To be continued on the next page / Fortsetzung auf der nächsten Seite / Suite à la page suivante
Do not pull or remove the cord protector, otherwise the
speaker cord may come off from terminal on the leg or the
speaker may be damaged.
Ziehen Sie nicht am Leitungsschutz und entfernen Sie
diesen nicht. Das Lautsprecherkabel kann sich sonst vom
Anschluss am Fuß lösen, oder der Lautsprecher kann
beschädigt werden.
Ne tirez pas sur le protecteur de cordon ni ne le retirez.
Sinon, le cordon d’enceinte peut sortir par la prise sur le
pied ou l’enceinte peut être endommagée.
18
Page 8

Assembly / Zusammenbau / Montage
EnglishDeutschFrançais
7
Speaker section
Lautsprecherteil
Section de l’enceinte
8
Join the speaker section and the leg.
Insert the speaker section to the leg, then fix the speaker section and the leg
Joint here
without gap.
Hier ohne Lücke
verbunden.
Réunissez ici les
deux parties
sans laisser
d’espace.
Leg
Fuß
Pied
Screw
Schraube
Vis
Repeat the procedure from step 1 to assemble the other satellite speakers.
Wiederholen Sie den Vorgang in Schritt
Répétez la procédure à partir de l’étape 1 pour monter les autres enceintes satellites.
Washer
Unterlegscheibe
Rondelle
1
, um die anderen Satellitenlautsprecher zusammenzubauen.
with one of the washers and one of the supplied screws (short: M5 x 12 mm).
• Push cords fully inside the leg before attaching the speaker section.
Verbinden Sie Lautsprecherteil und Fuß.
Stecken Sie das Lautsprecherteil in den Fuß und befestigen Sie dann
Lautsprecherteil und Fuß mit einer Unterlegscheibe und einer der
mitgelieferten Schrauben (kurze: M5 x 12 mm).
• Schieben Sie die Kabel vollständig in den Fuß hinein, bevor Sie das
Lautsprecherteil anbringen.
Réunissez la section de l’enceinte et le pied.
Insérez la section de l’enceinte dans le pied, puis fixez la section de
l’enceinte et le pied avec une des rondelles et un des vis fournis (court:
M5 x 12 mm).
• Poussez le cordon complètement à l’intérieur du pied avant de fixer la
section de l’enceinte.
For disassembly / Zerlegung / Pour démonter les enceintes:
Reverse Assembly procedure:
1) Remove the speaker section from the leg.
2) Remove the leg from the stand.
Gehen Sie in umgekehrter Reihenfolge des Zusammenbaus vor:
1) Nehmen Sie das Lautsprecherteil vom Fuß ab.
2) Nehmen Sie den Fuß vom Ständer ab.
Inversez la procédure de montage:
1) Séparez la section de l’enceinte du pied.
2) Séparez le pied du socle.
7 Connecting the center speaker
•
1
Press
Drücken
Poussez
2
Insert
Einsetzen
Insérez
3
Release
Freigeben
Relâchez
To connect the center speaker, use the same type of speaker cord
(6 m; tagged with “CENTER”) as used for connecting the front speakers.
• Twist and remove the insulation at the end of each speaker cord before
connecting.
Insert the speaker cord into the speaker terminal.
7 Anschließen des Mittenlautsprechers
•
Um den Mittenlautsprecher anzuschließen, verwenden Sie das gleiche Kabel
(6 m, mit „CENTER“ bezeichnet) wie für den Anschluss der Frontlautsprecher.
•
Schneiden Sie die Isolierung vor dem Anschluss am Ende aller
Lautsprecherkabel ein, verdrillen Sie sie und ziehen Sie die Isolierung ab.
Führen Sie das Lautsprecherkabel in den
Lautsprecheranschluss ein.
Black
Schwarz
Noir
Black striped
Schwarz gestreift
Bande noire
19
Copper
Kupfer
Cuivré
Red
Rot
Rouge
7 Connexion de l’enceinte centrale
• Pour connecter l’enceinte centrale, utilisez le même type de cordon
d’enceinte (6 m; étiqueté “CENTER”) que celui utilisé pour la connexion
des enceintes avant.
• Torsadez et retirez l’isolant à l’extrémité de chaque cordon d’enceinte
avant la connexion.
Insérez le cordon d’enceinte dans les prises
d’enceinte.
Page 9

Additional Information / Zusätzliche Informationen / Informations complémentaires
7 Connecting the speaker system to the amplifier
Before connecting—
• Turn off the power to the amplifier before connecting the speaker system; otherwise, the speakers may be damaged.
• The impedance of each speaker is 6 Ω. Before connecting them to your amplifier, check the speaker impedance range of your
amplifier. If the impedance of this speaker is out of the speaker impedance range indicated on the amplifier, you cannot connect
this system to the amplifier.
• The maximum power handling capacity of the SX-XD55 is 100 W. Excessive input will result in abnormal noise and possible
damage.
• Be sure to turn down the volume level to prevent unwanted noise before performing following operations:
– Turning on or off other components,
– Operating the amplifier,
– Tuning FM stations,
– Fast-forwarding a tape,
– Continuously reproducing high frequency oscillation or high pitch electronic sounds.
• When using a microphone, do not aim it at the speakers or use it near the speakers; otherwise, the howling which occurs may
damage the speakers.
• Before replacing the cartridge, always turn off the power to the turntable; otherwise, the clicking noise may damage the speakers.
7 Anschließen des Lautsprechersystems an den Verstärker
Vor dem Anschließen:
• Schalten Sie die Stromversorgung des Verstärkers ab, bevor Sie das Lautsprechersystem anschließen, da die Lautsprecher sonst
beschädigt werden können.
• Jeder Lautsprecher hat eine Impedanz von 6 Ω. Prüfen Sie vor dem Anschließen der Lautsprecher den LautsprecherImpedanzbereich Ihres Verstärkers. Wenn die Impedanz dieses Lautsprechers außerhalb des für Ihren Verstärker angegebenen
Lautsprecher-Impedanzbereichs liegt, kann dieses System nicht an den Verstärker angeschlossen werden.
• Das SX-XD55 verfügt über eine maximale Leistungsaufnahmekapazität von 100 W. Übermäßige Eingangsleistung hat laute
Störgeräusche zur Folge und kann Schäden verursachen.
• Vor dem Ausführen der folgenden Funktionen sicherstellen, dass die Lautstärke verringert wurde, um unerwünschte
Nebengeräusche zu vermeiden:
– Ein- oder Ausschalten anderer Komponenten,
– Betrieb des Verstärkers,
– Einstellen von UKW-Sendern,
– Schnelles Vorspulen einer Cassette,
– Andauernde Wiedergabe von Hochfrequenzschwingungen oder elektronischen Klangsignalen mit hoher Tonhöhe.
• Wenn Sie ein Mikrofon verwenden, richten Sie es nicht auf die Lautsprecher bzw. verwenden Sie es nicht in der Nähe der
Lautsprecher, da die Lautsprecher durch das dadurch entstehende Pfeifgeräusch beschädigt werden können.
• Vor dem Austauschen des Tonabnehmers immer die Stromversorgung zum Plattenspieler abschalten, da die Lautsprecher durch
das klickende Geräusch beschädigt werden können.
EnglishDeutschFrançais
7 Connexion du système d’enceinte à l’amplificateur
Avant la connexion—
• Mettez l’amplificateur hors tension avant de connecter le système d’enceinte; sinon les enceintes risquent d’être endommagées.
• L’impédance de chaque enceinte est de 6 Ω. Avant de les connecter à votre amplificateur, vérifiez que la plage d’impédance
d’enceinte de votre amplificateur autorise cette impédance. Si l’impédance de ces enceintes est en dehors de la plage
d’impédance indiquée sur l’amplificateur, vous ne pouvez pas connecter ce système à l’amplificateur.
• La capacité de puissance soutenue maximale du SX-XD55 est de 100 W. Un niveau d’entrée excessif peut entraîner des bruits
anormaux et d’éventuels dommages.
• Assurez-vous de réduire le niveau de volume pour éviter les bruits indésirables avant de réaliser les opérations suivantes:
– Mise sous ou hors tension des autres appareils
– Utilisation de l’amplificateur
– Accord des stations FM
– Avance rapide d’une bande
– Reproduction continue d’oscillation à haute fréquence ou de sons électroniques très hauts.
• Lors de l’utilisation d’un microphone, ne le dirigez pas vers les enceintes ni ne l’utilisez près des enceintes; sinon, un hurlement
risquerait de se produire et d’endommager les enceintes.
• Avant de remplacer la cellule du tourne-disque, mettez toujours ce dernier hors tension; sinon, un bruit désagréable pourrait
endommager les enceintes.
To be continued on the next page / Fortsetzung auf der nächsten Seite / Suite à la page suivante
20
Page 10

CENTER SURROUND SURROUND
BACK
LEFTRIGHT LEFTRIGHT
FRONT
SPEAKERS
CENTER
FRONT LEFT
FRONT RIGHT
SURROUND RIGHT
SURROUND LEFT
SURROUND BACK
Additional Information / Zusätzliche Informationen / Informations complémentaires
EnglishDeutschFrançais
Surround right
speaker
Rechter SurroundLautsprecher
Enceinte Surround
droite
Front right
speaker
Rechter Frontlautsprecher
Enceinte avant
droite
Speaker terminals on
the amplifier
Lautsprecheranschlüsse
am Verstärker
Prises d’enceinte sur
l’amplificateur
Center speaker
Mittenlautsprecher
Enceinte centrale
Enceinte avant
Surround back speaker
Hinterer Surroundlautsprecher
Enceinte Surround arrière
Front left
speaker
Linker Frontlautsprecher
gauche
Surround left
speaker
Linker Surround-
Lautsprecher
Enceinte
Surround gauche
7 Typical connection method to an amplifier
Connect the speakers to a speaker terminal of the amplifier
with the speaker cords by referring to the diagram on the left.
• Make sure to match the polarity (ª and ·) when
connecting the speaker cords.
7 Typische Anschlussmethode an einen Verstärker
Schließen Sie die Lautsprecher mit Hilfe der Lautsprecherkabel
gemäß des linken Schaubilds an den Lautsprecheranschluss
des Verstärkers an.
• Beim Anschließen der Lautsprecherkabel sicherstellen, dass
die Polung (ª und ·) stimmt.
7 Méthode de connexion typique à un amplificateur
Connectez les enceintes aux prises d’enceinte de
l’amplificateur en vous référant au schéma ci-à gauche.
• Assurez-vous de respecter les polarités (ª et ·) lors de la
connexion des cordons d’enceinte.
Front left speaker
Linker Front-lautsprecher
Enceinte avant gauche
Surround left
speaker
Linker
SurroundLautsprecher
Enceinte
Surround
gauche
Center speaker
Mittenlautsprecher
Enceinte centrale
Listening
position
Hörposition
Position
d’écoute
Surround back
speaker
Hinterer
Surroundlautsprecher
Enceinte Surround
arrière
Front right speaker
Rechter Front-lautsprecher
Enceinte avant droite
Subwoofer*
Subwoofer*
Caisson de grave*
Surround right
speaker
Rechter
SurroundLautsprecher
Enceinte
Surround
droite
7 General layout of speakers
Place all speakers at the same distance from the listening
position if possible.
• Usually place the center speaker close to the TV.
• When you place the center speaker on a TV, make sure the
surface is level and stable.
* For a subwoofer, JVC’s SP-DWF10 is recommended. This
combination gives you the best possible high-quality
surround sounds.
7 Allgemeine Anordnung der Lautsprecher
Stellen Sie möglichst alle Lautsprecher im gleichen Abstand
von der Hörposition auf.
• Den Mittenlautsprecher gewöhnlich in der Nähe des
Fernsehgeräts aufstellen.
• Wenn Sie den Mittenlautsprecher auf einem Fernsehgerät
aufstellen, sicherstellen, dass die Oberfläche eben und
stabil ist.
* Bei Verwendung eines Subwoofer ist der SP-DWF10 von
JVC zu empfehlen. Mit dieser Kombination erzielen Sie das
bestmögliche Surround-Klangbild von höchster Qualität.
7 Disposition générale des enceintes
Placez, si possible, toutes les enceintes à la même distance
de la position d’écoute.
• Normalement, placez l’enceinte centrale près du téléviseur.
• Si vous placez l’enceinte centrale sur un téléviseur, assurez-
vous que la surface est plate et stable.
* Pour le caisson de grave, nous recommandons d’utiliser le
SP-DWF10 de JVC. En combinaison avec ce système
d’enceinte, il offre la meilleure qualité de son Surround
possible.
21
Page 11

Specifications / Technische Daten / Spécifications
SX-XD55F (Satellite speaker)
Type : 1-way 2-speaker bass reflex
type, magnetically shielded type
Speaker unit : Direct drive (9.5 cm × 1 cm) × 2
Frequency range : 130 Hz to 20 000 Hz
Input impedance : 6 Ω
Power handling Capacity : 100 W
Sound pressure level : 80 dB/W•m
Dimensions : 282 mm (width) × 1 108 mm
(height) × 282 mm (depth)
Mass : 3.0 kg each
SX-XD55F (Satellitenlautsprecher)
Typ : 1-Weg Lautsprecher,
2-Bassreflex, magnetisch
abgeschirmt
Lautsprechereinheit : Direct Drive (9,5 cm × 1 cm) × 2
Frequenzbereich : 130 Hz bis 20 000 Hz
Eingangsimpedanz : 6 Ω
Leistungsaufnahmekapazität
Schallleistungspegel : 80 dB/W•m
Abmessungen : 282 mm (breit) × 1 108 mm
Gewicht : je 3,0 kg
: 100 W
(hoch) × 282 mm (tief)
SX-XD55C (Center speaker)
Type : 1-way 2-speaker bass reflex
type, magnetically shielded type
Speaker unit : 5.5 cm cone × 2
Frequency range : 80 Hz to 20 000 Hz
Input impedance : 6 Ω
Power handling Capacity : 100 W
Sound pressure level : 79 dB/W•m
Dimensions : 200 mm (width) × 78 mm
(height) × 120 mm (depth)
Mass : 0.85 kg
SX-XD55C (Mittenlautsprecher)
Typ : 1-Weg Lautsprecher,
2-Bassreflex, magnetisch
abgeschirmt
Lautsprechereinheit : 5,5 cm Konus × 2
Frequenzbereich : 80 Hz bis 20 000 Hz
Eingangsimpedanz : 6 Ω
Leistungsaufnahmekapazität
Schallleistungspegel : 79 dB/W•m
Abmessungen : 200 mm (breit) × 78 mm (hoch)
Gewicht : 0,85 kg
: 100 W
× 120 mm (tief)
EnglishDeutschFrançais
SX-XD55F (Enceinte satellite)
Type : 1 voie, 2 haut-parleurs
type à enceinte acoustique à
évent accordé, blindé
magnétiquement
Haut-parleurs : 2 direct drive de 9,5 cm × 1 cm
Plage de fréquences : 130 Hz à 20 000 Hz
Impédance d’entrée: 6 Ω
Capacité de puissance
soutenue : 100 W
Niveau de pression
acoustique : 80 dB/W•m
Dimensions :
Masse : 3,0 kg chacun
282 mm (largeur) × 1 108 mm
(hauteur) × 282 mm (profondeur)
SX-XD55C (Enceinte centrale)
Type : 1 voie, 2 haut-parleurs
type à enceinte acoustique à
évent accordé, blindé
magnétiquement
Haut-parleur : 2 cône de 5,5 cm
Plage de fréquences : 80 Hz à 20 000 Hz
Impédance d’entrée: 6 Ω
Capacité de puissance
soutenue : 100 W
Niveau de pression
acoustique : 79 dB/W•m
Dimensions :
Masse : 0,85 kg
200 mm (largeur) × 78 mm
(hauteur) × 120 mm (profondeur)
22
Page 12

SX-XD55
Home Cinema DD Speaker System
EN, GE, FR, NL, SP, IT, SW, DA, FI, PO, HU, CZ, RU
0304NSMMDWHCE© 2004 Victor Company of Japan, Limited
Page 13

CAUTIONS / VORSICHTSMASSNAHMEN / ATTENTION / VOORZORGEN /
PRECAUCIONES / ATTENZIONE / VARNINGAR
7 For Unpacking and Assembling
7
Für das Auspacken und den Zusammenbau
7 Pour le démontage et le montage
7 Para el desembalaje y el montaje
7
Apertura della confezione e assemblaggio
7 För uppackning och montering
7 Voor het uitpakken en monteren
To prevent the deformation of the speaker grille, do not hold the speaker grille strongly.
Um eine Verformung der Lautsprecherabdeckung zu vermeiden, die
Lautsprecherabdeckung nicht zu fest halten.
Pour éviter la déformation des grilles d’enceinte, ne tenez pas la grille trop fortement.
Voorkom vervorming van het luidsprekerrooster en houd het luidsprekerrooster voorzichtig vast.
Para evitar la deformación de la rejilla de altavoz, no sujete la rejilla con una fuerza excesiva.
Per evitare la deformazione della griglia del diffusore, maneggiare sempre la
griglia con delicatezza.
För att förhindra deformation av högtalarens skyddsgaller, håll ej hårt i det.
• Be sure to connect the cords to the speaker terminals on the speaker section before
inserting the speaker section into the leg.
• Sicherstellen, dass die Kabel an die Lautsprecheranschlüsse am Lautsprecherteil
angeschlossen sind, bevor Sie das Lautsprecherteil in den Fuß einstecken.
• Assurez-vous de connecter les cordons aux prises d’enceinte de la section de
l’enceinte avant d’insérer la section de l’enceinte sur le pied.
• Verbind de snoeren beslist met de luidsprekeraansluitingen op het
luidsprekergedeelte alvorens het luidsprekergedeelte in de poot te steken.
• Antes de insertar la sección de altavoz en la pata, asegúrese de conectar los
cordones a los terminales de altavoz de la sección de altavoz.
• Prima di inserire l’unità diffusore sullo stelo, collegare i cavi ai terminali dei diffusori
sull’unità diffusore.
• Innan hopsättningen av högtalarenheten och foten, försäkra dig om att koppla
kablarna till högtalarens kabelsko på högtalarenheten.
Leg
Fuß
Pied
Poot
Pata
Stelo
Fot
Speaker grille
Lautsprecherabdeckung
Grille d’enceinte
Luidsprekerrooster
Rejilla del altavoz
Griglia del diffusore
Högtalarens skyddsgaller
Speaker section
Lautsprecherteil
Section de l’enceinte
Luidsprekergedeelte
Sección del altavoz
Unità diffusore
Högtalarenhet
Speaker terminals
Lautsprecheranschlüsse
Prises d’enceinte
Luidsprekeraansluitingen
Terminales de altavoz
Terminali del diffusore
Högtalarkabelskor
Cord / Kabel / Cordon /
Snoer / Cordón / Cavo /
Kabel
7 For Daily Use
7 Für den Gebrauch
7 Pour une utilisation quotidienne
7 Para uso diario
7 Uso quotidiano
7 För daglig användning
7 Voor dagelijks gebruik
When moving the speaker, always hold its leg. If you hold the speaker grille or pull the
speaker cord, the speaker may fall down, causing damage or injury.
Wenn Sie einen Lautsprecher verschieben möchten, halten Sie ihn immer am Fuß fest.
Wenn Sie die Lautsprecherabdeckung festhalten oder am Lautsprecherkabel ziehen, kann
der Lautsprecher umfallen und dadurch Beschädigungen oder Verletzungen verursachen.
Lors du déplacement des enceintes, tenez-les toujours par leur pied. Si vous tenez une
enceinte par la grille ou par le cordon d’enceinte, l’enceinte risque de tomber et d’être
endommagée ou de blesser quelqu’un.
Voor het verplaatsen van de luidsprekers, moet u de luidsprekers altijd bij de poten
vasthouden. Indien u het luidsprekerrooster vasthoudt of aan een snoer trekt, zal de
luidspreker vallen met beschadiging of letsel tot gevolg.
Antes de mover el altavoz, sosténgalo siempre por su pata. Si lo sujeta por la rejilla o
tira del cordón de altavoz, éste se podría caer, produciendo daños o lesiones.
Spostare i diffusori impugnando lo stelo. Non impugnare la griglia del diffusore o tirare
il cavo; il diffusore potrebbe cadere, con conseguenti danni a persone o cose.
Håll alltid i högtalarens fot när du förflyttar högtalaren. Om man håller i högtalarens
skyddsgaller eller drar i kablarna, kan högtalaren falla och materiell eller kroppslig
skada kan uppstå.
Leg
Fuß
Pied
Poot
Pata
Stelo
Fot
Speaker grille
Lautsprecherabdeckung
Grille d’enceinte
Luidsprekerrooster
Rejilla del altavoz
Griglia del diffusore
Högtalarens skyddsgaller
Speaker cord
Lautsprecherkabel
Cordon d’enceinte
Luidsprekersnoer
Cordón de altavoz
Cavo per diffusore
Högtalarkabel
EN, GE, FR, NL, SP, IT, SW
LV43246-002B
[E,UP]
 Loading...