

Page 1

JVC D-ILA® Projector
RS-232C, LAN
and Infrared
Remote Control Guide
FOR MODELS:
DLA-HD350
DLA-HD550
DLA-X3
●
DLA-HD950
●
DLA-X7
●
DLA-HD750
●
DLA-HD990
●
DLA-X9
DLA-RS10
DLA-RS15
DLA-RS40
Introduction..................................................................................................................2
RS-232C Command Types..........................................................................................2
Direct Commands List .................................................................................................3
Remote Control Emulation Commands List.................................................................4
Converting & Testing Codes......................................................................................10
Acknowledgement Response Return Codes - Basic .................................................11
Acknowledgement Response Return Codes - Advanced..........................................12
RS-232C Interface Details.........................................................................................15
Command Format......................................................................................................16
Local Area Network (LAN) Control ............................................................................17
Infrared Control..........................................................................................................19
Multiple Projector Infrared Control.............................................................................20
●
DLA-RS25
●
DLA-RS50
●
DLA-RS20
Version 1.3
Contents
●
DLA-RS35
●
DLA-RS60
Page 2

JVC D-ILA Projector Remote Control Guide
Introduction
This guide provides all of the information required to enable Remote Control of JVC D-ILA
projectors, either by RS-232C connection, Infrared Remote Control, or LAN. This will enable
Custom Installers or users to remotely control almost every function on these projectors.
The RS-232C control codes shown in this guide will control the JVC DLA-HD350, DLAHD750, DLA-HD550, DLA-HD950, DLA-HD990, DLA-X3, DLA-X7, DLA-X9, DLA-RS10,
DLA-RS20, DLA-RS15, DLA-RS25, DLA-RS35, DLA-RS40, DLA-RS50 and DLA-RS60 DILA projectors via an RS-232C connection. The commands in this guide are in raw
hexadecimal format and may require conversion to work with proprietary control systems.
See page 10 for some examples of how to convert them. Please note that some commands
work only with specific projector models and this is indicated where applicable. If required,
full details of the RS-232C interface and command format are shown on pages 15-16.
The Infrared Remote Control Codes shown in this guide will control the JVC DLA-HD350,
DLA-HD750, DLA-HD550, DLA-HD950, DLA-HD990, DLA-X3, DLA-X7, DLA-X9, DLA-RS10,
DLA-RS20, DLA-RS15, DLA-RS25, DLA-RS35, DLA-RS40, DLA-RS50 and DLA-RS60 DILA projectors via Infrared emulation. Some controllers will also generate Infrared commands
from the RS-232C control codes.
The LAN Remote Control Protocol and Codes shown in this guide will control the DLA-X7,
DLA-X9, DLA-RS50 and DLA-RS60 over a LAN via a TCP/IP Network Connection.
RS-232C Command Types
There are two basic types of RS-232C commands. These are:
1. Direct Commands (see page 3)
2. Remote Control Emulation Commands (see pages 4-9).
Direct Commands, as their name suggests, directly control the projector. Remote Control
Emulation Commands achieve the same result, but they do it by emulating the functionality
of the Remote Control Commands. The general rule is to use a Direct Command if one is
available, otherwise use a Remote Control Emulation Command. One other difference
between them is that Direct Commands will generally display fewer on-screen confirmation
messages when the projector responds to them.
Some commands are duplicated as both a Direct Command and a Remote Control
Emulation Command. For these, the Direct Command should be used in preference to the
Remote Control Emulation Command unless any additional on-screen confirmation
messages provided by the Remote Control Emulation Command are required. Most of the
commands in the Remote Control Emulation list do not actually appear on the Remote
Control Handset, but they are all available if you wish to control those functions on the
projector, either by RS-232C connection, or by Infrared Remote Control.
In addition to the commands sent from the PC or controller to the projector, there are two
types of Acknowledgement Response Return Codes returned by the projector to the PC or
controller. When used with appropriate control equipment, these can be used to further
customise the installation. Details of the Acknowledgement Response Return Codes and
how to use them are on pages 11-14.
The following seven pages contain a list of all useful Direct and Remote Control Emulation
Commands. Where a command is specific to an individual model or a range of models, the
applicable model(s) are shown in brackets after the command name. If no model is shown,
then that command works with all models.
Page 2 of 20
Page 3
JVC D-ILA Projector Remote Control Guide
Direct Commands:
POWER
Command Hex Code
Power Off 21 89 01 50 57 30 0A
Power On 21 89 01 50 57 31 0A
INPUT SWITCHING
Command Hex Code
Input – HDMI 1 21 89 01 49 50 36 0A
Input – HDMI 2 21 89 01 49 50 37 0A
Input – Component 21 89 01 49 50 32 0A
Input – S-Video 21 89 01 49 50 30 0A
Input – Video 21 89 01 49 50 31 0A
Input – PC
(HD750/950/990/X7/X9/RS20/25/35/50/60)
21 89 01 49 50 33 0A
Input + (Go to next highest input) 21 89 01 49 50 2B 0A
Input – (Go to next lowest input) 21 89 01 49 50 2D 0A
TEST PATTERNS
Command Hex Code
Test Pattern – Off 21 89 01 54 53 30 0A
Test Pattern – Colour Bars 21 89 01 54 53 31 0A
Test Pattern – Stair step (black and white) 21 89 01 54 53 36 0A
Test Pattern – Stair step (red) 21 89 01 54 53 37 0A
Test Pattern – Stair step (green) 21 89 01 54 53 38 0A
Test Pattern – Stair step (blue) 21 89 01 54 53 39 0A
Test Pattern – Crosshatch (green) 21 89 01 54 53 41 0A
GAMMA TABLE
Command Hex Code
Gamma – Normal 21 89 01 47 54 30 0A
Gamma – A 21 89 01 47 54 31 0A
Gamma – B 21 89 01 47 54 32 0A
Gamma – C 21 89 01 47 54 33 0A
Gamma – D (HD550/950/990/X3/X7/X9/
RS15/25/35/40/50/60)
21 89 01 47 54 37 0A
Gamma – Custom1 21 89 01 47 54 34 0A
Gamma – Custom2 21 89 01 47 54 35 0A
Gamma – Custom3 21 89 01 47 54 36 0A
GAMMA VALUE
Command Hex Code
Gamma Correction Value – 1.8 21 89 01 47 50 30 0A
Gamma Correction Value – 1.9 21 89 01 47 50 31 0A
Gamma Correction Value – 2.0 21 89 01 47 50 32 0A
Gamma Correction Value – 2.1 21 89 01 47 50 33 0A
Gamma Correction Value – 2.2 (Default) 21 89 01 47 50 34 0A
Gamma Correction Value – 2.3 21 89 01 47 50 35 0A
Gamma Correction Value – 2.4 21 89 01 47 50 36 0A
Gamma Correction Value – 2.5 21 89 01 47 50 37 0A
Gamma Correction Value – 2.6 21 89 01 47 50 38 0A
TEST COMMAND
Command Hex Code
Null Command (to check communication) 21 89 01 00 00 0A
Page 3 of 20
Page 4
JVC D-ILA Projector Remote Control Guide
Remote Control Emulation Commands
Command Hex Code ASCII
Advanced – Direct access to Picture Adjust >
Advanced menu (HD550/950/990/X3/X7/X9/
21 89 01 52 43 37 33 37 33 0A 73
RS15/25/35/40/50/60)
Anamorphic – Off (X3/X7/X9/RS40/50/60)
(HD350/750/950/990/RS10/20/25/35 –
21 89 01 52 43 37 33 32 34 0A 24
Vertical Stretch – Off)
Anamorphic – A (X3/X7/X9/RS40/50/60)
(HD350/750/950/990/ RS10/20/25/35 –
21 89 01 52 43 37 33 32 33 0A 23
Vertical Stretch – On)
Anamorphic – B (X3/X7/X9/RS40/50/60) 21 89 01 52 43 37 33 32 42 0A 2B
Anamorphic – Cycles through Off/A/B
(X3/X7/X9/RS40/50/60)
21 89 01 52 43 37 33 43 35 0A C5
Aspect – 16:9 21 89 01 52 43 37 33 32 36 0A 26
Aspect – 4:3 21 89 01 52 43 37 33 32 35 0A 25
Aspect – Zoom 21 89 01 52 43 37 33 32 37 0A 27
Aspect (PC) – Auto (X7/X9/RS50/60) 21 89 01 52 43 37 33 41 45 0A AE
Aspect (PC) – Full (X7/X9/RS50/60) 21 89 01 52 43 37 33 42 30 0A B0
Aspect (PC) – Just (X7/X9/RS50/60) 21 89 01 52 43 37 33 41 46 0A AF
Aspect + (cycles through all available modes) 21 89 01 52 43 37 33 37 37 0A 77
Auto Align (PC input on HD750/950/990/X7/
X9/RS20/25/35/50/60)
Back – Steps backwards through menus and
removes any OSD messages
21 89 01 52 43 37 33 31 33 0A 13
21 89 01 52 43 37 33 30 33 0A 03
BNR (Block Noise Reduction) – Off 21 89 01 52 43 37 33 31 30 0A 10
BNR (Block Noise Reduction) – On 21 89 01 52 43 37 33 30 46 0A 0F
Bright Level – (X7/X9/RS50/60) 21 89 01 52 43 37 33 41 33 0A A3
Bright Level + (X7/X9/RS50/60) 21 89 01 52 43 37 33 41 32 0A A2
Brightness – 21 89 01 52 43 37 33 37 42 0A 7B
Brightness + 21 89 01 52 43 37 33 37 41 0A 7A
Brightness Adj. (Adjustment Bar On/Off
toggle)
21 89 01 52 43 37 33 30 39 0A 09
CEC – Off 21 89 01 52 43 37 33 35 37 0A 57
CEC – On 21 89 01 52 43 37 33 35 36 0A 56
Clear Motion Drive – Off
(X3/X7/X9/RS40/50/60)
Clear Motion Drive – Mode 1
(X3/X7/X9/RS40/50/60)
Clear Motion Drive – Mode 2
(X3/X7/X9/RS40/50/60)
Clear Motion Drive – Mode 3
(X3/X7/X9/RS40/50/60)
Clear Motion Drive – Mode 4
(X3/X7/X9/RS40/50/60)
Clear Motion Drive – Inverse Telecine
(X3/X7/X9/RS40/50/60)
21 89 01 52 43 37 33 34 37 0A 47
21 89 01 52 43 37 33 43 45 0A CE
21 89 01 52 43 37 33 43 46 0A CF
21 89 01 52 43 37 33 34 38 0A 48
21 89 01 52 43 37 33 34 39 0A 49
21 89 01 52 43 37 33 34 41 0A 4A
Clear Motion Drive – Cycles through: Off/
Mode 1/Mode 2/Mode 3/Mode 4/Inverse
21 89 01 52 43 37 33 38 41 0A 8A
Telecine (X3/X7/X9/RS40/50/60)
Colour – 21 89 01 52 43 37 33 37 44 0A 7D
Colour + 21 89 01 52 43 37 33 37 43 0A 7C
Colour Adj. (Adjustment Bar On/Off toggle) 21 89 01 52 43 37 33 31 35 0A 15
Page 4 of 20
Page 5
JVC D-ILA Projector Remote Control Guide
Command Hex Code ASCII
Colour Management – Off
(HD750/950/ 990/X7/X9/RS20/RS/35/50/60)
Colour Management – Custom1
(HD750/950/990/X7/X9/RS20/25/35/50/60)
Colour Management – Custom2
(HD750/950/990/X7/X9/RS20/25/35/50/60)
Colour Management – Custom3
(HD750/950/990/X7/X9/RS20/25/35/50/60)
Colour Management – Cycles through: Off/
Custom1/Custom2/Custom3 (X7/X9/RS50/60)
Colour Profile – Cycles through all Colour
Profiles that are available in the current
Picture Mode (X7/X9/RS50/60)
Colour Space – Cycles through Standard/
Wide1/Wide2 (X3/RS40)
Colour Temp. – 5800K
(HD350/550/750/950/990/RS10/15/20/25/35)
Colour Temp. – 6500K 21 89 01 52 43 37 33 34 46 0A 4F
Colour Temp. – 7500K
(HD350/550/750/950/990/RS10/15/20/25/35)
Colour Temp. – 9300K
(HD350/550/750/950/990/RS10/15/20/25/35)
Colour Temp. – Custom1 21 89 01 52 43 37 33 35 33 0A 53
Colour Temp. – Custom2 21 89 01 52 43 37 33 35 34 0A 54
Colour Temp. – Custom3 21 89 01 52 43 37 33 35 35 0A 55
Colour Temp. – High Bright (HD350/550/750/
950/990/X3/RS10/15/20/25/35/40)
Colour Temp. + (cycles through all options) 21 89 01 52 43 37 33 37 36 0A 76
Colour Temperature Gain Blue –
(X3/X7/X9/RS40/50/60)
Colour Temperature Gain Blue +
(X3/X7/X9/RS40/50/60)
Colour Temperature Gain Green –
(X3/X7/X9/RS40/50/60)
Colour Temperature Gain Green +
(X3/X7/X9/RS40/50/60)
Colour Temperature Gain Red –
(X3/X7/X9/RS40/50/60)
Colour Temperature Gain Red +
(X3/X7/X9/RS40/50/60)
Colour Temperature Offset Blue –
(X3/X7/X9/RS40/50/60)
Colour Temperature Offset Blue +
(X3/X7/X9/RS40/50/60)
Colour Temperature Offset Green –
(X3/X7/X9/RS40/50/60)
Colour Temperature Offset Green +
(X3/X7/X9/RS40/50/60)
Colour Temperature Offset Red –
(X3/X7/X9/RS40/50/60)
Colour Temperature Offset Red +
(X3/X7/X9/RS40/50/60)
Contrast – 21 89 01 52 43 37 33 37 39 0A 79
21 89 01 52 43 37 33 36 30 0A 60
21 89 01 52 43 37 33 36 31 0A 61
21 89 01 52 43 37 33 36 32 0A 62
21 89 01 52 43 37 33 36 33 0A 63
21 89 01 52 43 37 33 38 39 0A 89
21 89 01 52 43 37 33 38 38 0A 88
21 89 01 52 43 37 33 43 44 0A CD
21 89 01 52 43 37 33 34 45 0A 4E
21 89 01 52 43 37 33 35 30 0A 50
21 89 01 52 43 37 33 35 31 0A 51
21 89 01 52 43 37 33 35 32 0A 52
21 89 01 52 43 37 33 39 31 0A 91
21 89 01 52 43 37 33 39 30 0A 90
21 89 01 52 43 37 33 38 46 0A 8F
21 89 01 52 43 37 33 38 45 0A 8E
21 89 01 52 43 37 33 38 44 0A 8D
21 89 01 52 43 37 33 38 43 0A 8C
21 89 01 52 43 37 33 39 37 0A 97
21 89 01 52 43 37 33 39 36 0A 96
21 89 01 52 43 37 33 39 35 0A 95
21 89 01 52 43 37 33 39 34 0A 94
21 89 01 52 43 37 33 39 33 0A 93
21 89 01 52 43 37 33 39 32 0A 92
Page 5 of 20
Page 6
JVC D-ILA Projector Remote Control Guide
Command Hex Code ASCII
Contrast + 21 89 01 52 43 37 33 37 38 0A 78
Contrast Adj. (Adjustment Bar On/Off toggle) 21 89 01 52 43 37 33 30 41 0A 0A
CTI (Colour Transient Improvement) – Off 21 89 01 52 43 37 33 35 43 0A 5C
CTI (Colour Transient Improvement) – Low 21 89 01 52 43 37 33 35 44 0A 5D
CTI (Colour Transient Improvement) – Middle 21 89 01 52 43 37 33 35 45 0A 5E
CTI (Colour Transient improvement) – High 21 89 01 52 43 37 33 35 46 0A 5F
Cursor Up ▲ 21 89 01 52 43 37 33 30 31 0A 01
Cursor Down ▼ 21 89 01 52 43 37 33 30 32 0A 02
Cursor Left ◄ 21 89 01 52 43 37 33 33 36 0A 36
Cursor Right ► 21 89 01 52 43 37 33 33 34 0A 34
Dark Level – (X7/X9/RS50/60) 21 89 01 52 43 37 33 41 35 0A A5
Dark Level + (X7/X9/RS50/60) 21 89 01 52 43 37 33 41 34 0A A4
Detail Enhance – 21 89 01 52 43 37 33 31 32 0A 12
Detail Enhance + 21 89 01 52 43 37 33 31 31 0A 11
Film Tone Blue – (X7/X9/RS50/60) 21 89 01 52 43 37 33 41 31 0A A1
Film Tone Blue + (X7/X9/RS50/60) 21 89 01 52 43 37 33 41 30 0A A0
Film Tone Green – (X7/X9/RS50/60) 21 89 01 52 43 37 33 39 46 0A 9F
Film Tone Green + (X7/X9/RS50/60) 21 89 01 52 43 37 33 39 45 0A 9E
Film Tone Red – (X7/X9/RS50/60) 21 89 01 52 43 37 33 39 44 0A 9D
Film Tone Red + (X7/X9/RS50/60) 21 89 01 52 43 37 33 39 43 0A 9C
Film Tone White – (X7/X9/RS50/60) 21 89 01 52 43 37 33 39 42 0A 9B
Film Tone White + (X7/X9/RS50/60) 21 89 01 52 43 37 33 39 41 0A 9A
Gamma – Normal 21 89 01 52 43 37 33 33 38 0A 38
Gamma – A 21 89 01 52 43 37 33 33 39 0A 39
Gamma – B 21 89 01 52 43 37 33 33 41 0A 3A
Gamma – C 21 89 01 52 43 37 33 33 42 0A 3B
Gamma – D (HD550/950/990/X3/X7/X9/
RS15/25/35/40/50/60)
21 89 01 52 43 37 33 33 46 0A 3F
Gamma – Custom1 21 89 01 52 43 37 33 33 43 0A 3C
Gamma – Custom2 21 89 01 52 43 37 33 33 44 0A 3D
Gamma – Custom3 21 89 01 52 43 37 33 33 45 0A 3E
Gamma + (cycles through all options) 21 89 01 52 43 37 33 37 35 0A 75
Hide (On/Off toggle) 21 89 01 52 43 37 33 31 44 0A 1D
Hide – Off (X3/X7/X9/RS40/50/60) 21 89 01 52 43 37 33 44 31 0A D1
Hide – On (X3/X7/X9/RS40/50/60) 21 89 01 52 43 37 33 44 30 0A D0
Horizontal Position – (X3/X7/X9/RS40/50/60) 21 89 01 52 43 37 33 41 42 0A AB
Horizontal Position + (X3/X7/X9/RS40/50/60) 21 89 01 52 43 37 33 41 41 0A AA
Information (displays Information tab of menu) 21 89 01 52 43 37 33 37 34 0A 74
Input – HDMI-1 21 89 01 52 43 37 33 37 30 0A 70
Input – HDMI-2 21 89 01 52 43 37 33 37 31 0A 71
Input – Component 21 89 01 52 43 37 33 34 44 0A 4D
Input – PC (HD750/950/990/X7/X9/
RS20/25/35/50/60)
21 89 01 52 43 37 33 34 36 0A 46
Input – S-Video (HD350/550/750/950/990) 21 89 01 52 43 37 33 34 43 0A 4C
Input – Video (HD350/550/750/950/990) 21 89 01 52 43 37 33 34 42 0A 4B
Input + (cycles through all inputs) 21 89 01 52 43 37 33 30 38 0A 08
ISF – Day (X7/X9/RS50/60) 21 89 01 52 43 37 33 36 34 0A 64
ISF – Night (X7/X9/RS50/60) 21 89 01 52 43 37 33 36 35 0A 65
ISF – Off (HD950/990/X7/X9/RS25/35/50/60) 21 89 01 52 43 37 33 35 41 0A 5A
ISF – On (HD950/990/X7/X9/RS25/35/50/60) 21 89 01 52 43 37 33 35 42 0A 5B
Keystone Correction Horizontal – 21 89 01 52 43 37 33 34 31 0A 41
Keystone Correction Horizontal + 21 89 01 52 43 37 33 34 30 0A 40
Page 6 of 20
Page 7

JVC D-ILA Projector Remote Control Guide
Command Hex Code ASCII
Keystone Correction Vertical – 21 89 01 52 43 37 33 31 43 0A 1C
Keystone Correction Vertical + 21 89 01 52 43 37 33 31 42 0A 1B
Lens Aperture – 1 (HD350/HD550) 21 89 01 52 43 37 33 32 38 0A 28
Lens Aperture – 2 (HD350/HD550) 21 89 01 52 43 37 33 32 39 0A 29
Lens Aperture – 3 (HD350/HD550) 21 89 01 52 43 37 33 32 41 0A 2A
Lens Aperture – If Lens Aperture Gauge is not
displayed – displays gauge. If Lens Aperture
Gauge is already displayed – Lens Aperture is
21 89 01 52 43 37 33 31 46 0A 1F
decreased (X3/X7/X9/RS40/50/60)
Lens Aperture + If Lens Aperture Gauge is not
displayed – displays gauge. If Lens Aperture
Gauge is already displayed – Lens Aperture is
21 89 01 52 43 37 33 31 45 0A 1E
increased (X3/X7/X9/RS40/50/60)
Lens Aperture Adj. (HD350/750/950/990/
RS10/20/25/35 – Adjustment Bar On/Off
toggle) (X3/ X7/X9/RS40/50/60 – Displays
21 89 01 52 43 37 33 32 30 0A 20
Adjustment Bar)
(HD550/RS15 – Cycles through all options)
Lens Control (cycles through all options) 21 89 01 52 43 37 33 33 30 0A 30
Lens Focus – 21 89 01 52 43 37 33 33 32 0A 32
Lens Focus + 21 89 01 52 43 37 33 33 31 0A 31
Lens Shift – Down 21 89 01 52 43 37 33 32 32 0A 22
Lens Shift – Left 21 89 01 52 43 37 33 34 34 0A 44
Lens Shift – Right 21 89 01 52 43 37 33 34 33 0A 43
Lens Shift – Up 21 89 01 52 43 37 33 32 31 0A 21
Lens Zoom – In 21 89 01 52 43 37 33 33 35 0A 35
Lens Zoom – Out 21 89 01 52 43 37 33 33 37 0A 37
Mask Top – (X3/X7/X9/RS40/50/60) 21 89 01 52 43 37 33 42 36 0A B6
Mask Top + (X3/X7/X9/RS40/50/60) 21 89 01 52 43 37 33 42 35 0A B5
Mask Bottom – (X3/X7/X9/RS40/50/60) 21 89 01 52 43 37 33 42 38 0A B8
Mask Bottom + (X3/X7/X9/RS40/50/60) 21 89 01 52 43 37 33 42 37 0A B7
Mask Left – (X3/X7/X9/RS40/50/60) 21 89 01 52 43 37 33 42 32 0A B2
Mask Left + (X3/X7/X9/RS40/50/60) 21 89 01 52 43 37 33 42 31 0A B1
Mask Right – (X3/X7/X9/RS40/50/60) 21 89 01 52 43 37 33 42 34 0A B4
Mask Right + (X3/X7/X9/RS40/50/60) 21 89 01 52 43 37 33 42 33 0A B3
Menu (On/Off toggle) 21 89 01 52 43 37 33 32 45 0A 2E
Menu Position (HD550/950/990/X3/X7/X9/
RS15/25/35/40/50/60)
21 89 01 52 43 37 33 34 32 0A 42
MNR (Mosquito Noise Reduction) – 21 89 01 52 43 37 33 30 45 0A 0E
MNR (Mosquito Noise Reduction) + 21 89 01 52 43 37 33 30 44 0A 0D
NR (toggles display of RNR/MNR) 21 89 01 52 43 37 33 31 38 0A 18
OK (to accept currently selected option) 21 89 01 52 43 37 33 32 46 0A 2F
Phase (PC Input) – (X7/X9/RS50/60) 21 89 01 52 43 37 33 41 39 0A A9
Phase (PC Input) + (X7/X9/RS50/60) 21 89 01 52 43 37 33 41 38 0A A8
Picture Adjust (HD550/750/990/X3/X7/X9/
RS15/25/35/40/50/60)
21 89 01 52 43 37 33 37 32 0A 72
Picture Mode – 3D (X3/X7/X9/RS40/50/60) 21 89 01 52 43 37 33 38 37 0A 87
Picture Mode – Cinema1
(X3/X7/X9/RS40/50/60 – Film Mode)
Picture Mode – Cinema2
(X3/X7/X9/RS40/50/60 – Cinema Mode)
21 89 01 52 43 37 33 36 39 0A 69
21 89 01 52 43 37 33 36 38 0A 68
Page 7 of 20
Page 8

JVC D-ILA Projector Remote Control Guide
Command Hex Code ASCII
Picture Mode – Cinema3 (HD550/750/990/
RS15/25/35)
(X3/X7/X9/RS40/50/60 – Animation Mode)
Picture Mode – Dynamic
(HD350/550/750/950/990)
Picture Mode – Natural 21 89 01 52 43 37 33 36 41 0A 6A
Picture Mode – Stage 21 89 01 52 43 37 33 36 37 0A 67
Picture Mode – THX
(HD750/950/990/X7/X9/RS20/25/35/50/60)
Picture Mode – User1 21 89 01 52 43 37 33 36 43 0A 6C
Picture Mode – User2 21 89 01 52 43 37 33 36 44 0A 6D
Picture Mode – User3
(HD550/750/950/990/X3/RS20/25/35/40)
Pixel Shift – Horizontal Blue –
(X3/X7/X9/RS40/50/60)
Pixel Shift – Horizontal Blue +
(X3/X7/X9/RS40/50/60)
Pixel Shift – Horizontal Green –
(X3/X7/X9/RS40/50/60)
Pixel Shift – Horizontal Green +
(X3/X7/X9/RS40/50/60)
Pixel Shift – Horizontal Red –
(X3/X7/X9/RS40/50/60)
Pixel Shift – Horizontal Red +
(X3/X7/X9/RS40/50/60)
Pixel Shift – Vertical Blue –
(X3/X7/X9/RS40/50/60)
Pixel Shift – Vertical Blue +
(X3/X7/X9/RS40/50/60)
Pixel Shift – Vertical Green –
(X3/X7/X9/RS40/50/60)
Pixel Shift – Vertical Green +
(X3/X7/X9/RS40/50/60)
Pixel Shift – Vertical Red –
(X3/X7/X9/RS40/50/60)
Pixel Shift – Vertical Red +
(X3/X7/X9/RS40/50/60)
Power – Off (send twice with short delay
between to switch off)
Power – On 21 89 01 52 43 37 33 30 35 0A 05
RNR (Random Noise Reduction) – 21 89 01 52 43 37 33 30 43 0A 0C
RNR (Random Noise Reduction) + 21 89 01 52 43 37 33 30 42 0A 0B
Screen Adjust – Off (X3/RS40) 21 89 01 52 43 37 33 38 30 0A 80
Screen Adjust – A (X3/RS40) 21 89 01 52 43 37 33 38 31 0A 81
Screen Adjust – B (X3/RS40) 21 89 01 52 43 37 33 38 32 0A 82
Screen Adjust – C (X3/RS40) 21 89 01 52 43 37 33 38 33 0A 83
Sharpness – 21 89 01 52 43 37 33 37 46 0A 7F
Sharpness + 21 89 01 52 43 37 33 37 45 0A 7E
Sharpness Adj.
(Adjustment Bar On/Off toggle)
Shutter – Off – Un-synchronises shutter with
“Hide” function (HD550/950/990/X3/X7/X9/
RS15/25/35/40/50/60)
21 89 01 52 43 37 33 36 36 0A 66
21 89 01 52 43 37 33 36 42 0A 6B
21 89 01 52 43 37 33 36 46 0A 6F
21 89 01 52 43 37 33 36 45 0A 6E
21 89 01 52 43 37 33 42 45 0A BE
21 89 01 52 43 37 33 42 44 0A BD
21 89 01 52 43 37 33 42 43 0A BC
21 89 01 52 43 37 33 42 42 0A BB
21 89 01 52 43 37 33 42 41 0A BA
21 89 01 52 43 37 33 42 39 0A B9
21 89 01 52 43 37 33 43 34 0A C4
21 89 01 52 43 37 33 43 33 0A C3
21 89 01 52 43 37 33 43 32 0A C2
21 89 01 52 43 37 33 43 31 0A C1
21 89 01 52 43 37 33 43 30 0A C0
21 89 01 52 43 37 33 42 46 0A BF
21 89 01 52 43 37 33 30 36 0A 06
21 89 01 52 43 37 33 31 34 0A 14
21 89 01 52 43 37 33 32 44 0A 2D
Page 8 of 20
Page 9
JVC D-ILA Projector Remote Control Guide
Command Hex Code ASCII
Shutter – On – Synchronises shutter with
“Hide” function (HD550/950/990/X3/X7/X9/
RS15/25/35/40/50/60)
Shutter – Open (HD550/950/990/X3/X7/X9/
RS15/25/35/40/50/60)
Shutter – Close (HD550/950/990/X3/X7/X9/
RS15/25/35/40/50/60)
Test Pattern (cycles through all patterns) 21 89 01 52 43 37 33 35 39 0A 59
THX – Off (X7/X9/RS50/60) 21 89 01 52 43 37 33 43 37 0A C7
THX – On (X7/X9/RS50/60) 21 89 01 52 43 37 33 43 38 0A C8
THX – Bright (X7/X9/RS50/60) 21 89 01 52 43 37 33 38 35 0A 85
THX – Dark (X7/X9/RS50/60) 21 89 01 52 43 37 33 38 36 0A 86
Tint – (X3/X7/X9/RS40/50/60) 21 89 01 52 43 37 33 39 39 0A 99
Tint + (X3/X7/X9/RS40/50/60) 21 89 01 52 43 37 33 39 38 0A 98
Tint Adj. (Adjustment Bar On/Off toggle) 21 89 01 52 43 37 33 31 36 0A 16
Tracking (PC Input) – (X7/X9/RS50/60) 21 89 01 52 43 37 33 41 37 0A A7
Tracking (PC Input) + (X7/X9/RS50/60) 21 89 01 52 43 37 33 41 36 0A A6
Vertical Position – (X3/X7/X9/RS40/50/60) 21 89 01 52 43 37 33 41 44 0A AD
Vertical Position + (X3/X7/X9/RS40/50/60) 21 89 01 52 43 37 33 41 43 0A AC
Vertical Stretch – Off
(HD350/550/750/950/990/RS10/15/20/25/35)
(X3/X7/X9/RS40/50/60 – Anamorphic Off)
Vertical Stretch – On
(HD350/550/750/950/990/RS10/15/20/25/35)
(X3/X7/X9/RS40/50/60 – Anamorphic A)
21 89 01 52 43 37 33 32 43 0A 2C
21 89 01 52 43 37 33 31 41 0A 1A
21 89 01 52 43 37 33 31 39 0A 19
21 89 01 52 43 37 33 32 34 0A 24
21 89 01 52 43 37 33 32 33 0A 23
Page 9 of 20
Page 10

JVC D-ILA Projector Remote Control Guide
Converting & Testing Codes
The codes shown on pages 3-9 are raw hex codes and must be converted to the appropriate
format in order to work with proprietary controllers such as those from Crestron or AMX. To
help with the conversion, here are two sample strings for those brands:
The Power On Command (from page 3) is: 21 89 01 50 57 31 0A
Crestron controller – Power On Command:
\x21\x89\x01\x50\x57\x31\x0A\r
AMX controller – Power On Command:
SEND_STRING dvProj, "$21, $89, $01, $50, $57, $31, $0A”
You can see from these examples that it is easy to convert any of the RS-232C codes in this
guide into the equivalent Crestron or AMX control strings. This should also be the case for
most other controllers that allow transmission of hex data.
In order to test these commands, it is useful to have a program that can send raw hex codes
directly to the Serial Port on a PC. There are many programs that can do this, but here are a
few that are useful for test purposes:
RS232 Hex Com Tool – 30-Day Evaluation Version available from http://www.rs232pro.com
This is a very simple to use program that lets you send any hex command and see the
response from the projector. The Evaluation Version times out every five minutes, but it can
be instantly restarted and is very simple to use.
Hercules Setup Utility – Free from:
http://www.hw-group.com/products/hercules/index_en.html
This is a slightly more complex program that can do far more than just send hex commands.
Use the “Serial” tab to send commands direct to the serial port. This program is
recommended if you are a more experienced PC user. It is also useful for testing the LAN
Control functions on the DLA-X7, DLA-X9, DLA-RS50 and DLA-RS60.
Docklight – Evaluation version available from: http://www.docklight.de
Another more advanced program. This one is particularly good for checking the
Acknowledgement Response Return Codes.
AccessPort – Free from: http://www.sudt.com/en/ap/index.html
This is an intermediate level program. Not as easy to use as some of the others, but free.
Eltima Software Advanced Serial Port Terminal – 14-Day Evaluation Version available from:
http://www.eltima.com/products/serial-port-terminal/
This is an excellent intermediate level program. It allows the commands to be sent in loops
for repeated testing. It also shows the return codes in both hex and ASCII formats.
If you want to use just one program from those above for general RS-232C and/or LAN
testing, I would recommend the Hercules Setup Utility.
All of these programs will accept the hex codes exactly as shown in this guide. They can
simply be copied and pasted into the programs and then sent to the projector. Most of the
programs require the user to switch to hex mode before sending hex codes.
Please note that you will require a cross-connected serial cable (sometimes called a nullmodem or DTE/DTE cable) if you wish to connect the projector to a PC for testing.
Page 10 of 20
Page 11
JVC D-ILA Projector Remote Control Guide
Acknowledgement Response Return Codes - Basic
In most installations, it will normally be sufficient just to send a command to the projector and
assume that the projector will carry it out requested. In some installations, there may be a
requirement to confirm that the projector has carried out the command before continuing.
This is particularly important when sending multiple commands. It is possible to check if the
projector has carried out a command by monitoring the Acknowledgement Response Return
Code returned by the projector. The projector will return an Acknowledgement Response
Return Code for any valid command that it receives.
The general format of the Acknowledgement Response returned from the projector is:
06 89 01 CC CC 0A - Where CC CC is the first 2 bytes of the command that was originally
sent to the projector (not including the 21 89 01).
Taking the Power On command from page 3 as an example, to switch the projector power
on, send to the projector:
21 89 01 50 57 31 0A
If the Power On Command completes successfully, the projector will return:
06 89 01 50 57 0A
This Acknowledgement Response format is the same for all of the commands listed above.
The Acknowledgement Response Return Codes for all of the commands listed on pages 3-9
(assuming the command is successful) are as follows:
Function Acknowledgement Response
Power On/Off 06 89 01 50 57 0A
Input Changed 06 89 01 49 50 0A
Test Pattern On/Off 06 89 01 54 53 0A
Gamma Table Changed 06 89 01 47 54 0A
Gamma Value Changed 06 89 01 47 50 0A
Remote Control Emulation Command (all commands) 06 89 01 52 43 0A
Test (Null Command – to check communication) 06 89 01 00 00 0A
The list above includes a Test (null) response. This doesn’t actually do anything, but it is
useful to check that the controller is communicating with the projector before sending any
real commands. This should be used with the Test Command shown on page 3.
To use the test command, send to the projector:
21 89 01 00 00 0A
Assuming the projector is connected to the PC or controller correctly, it will respond with:
06 89 01 00 00 0A
It will respond whether it is in Standby or Powered On.
Page 11 of 20
Page 12

JVC D-ILA Projector Remote Control Guide
Acknowledgement Response Return Codes - Advanced
For some functions, it is possible to obtain a more detailed response from the projector. This
is useful where different actions are required depending on the current projector settings or
status. To request the detailed response, taking the above example of the Power Command,
send to the projector:
3F 89 01 50 57 0A
If the projector receives the enquiry command, as a confirmation that it has received the
command, it will first respond with exactly the same information as that returned by the basic
Acknowledgement Return Code shown on page 11:
06 89 01 50 57 0A
Next, the projector will send the detailed response. It will send:
40 89 01 50 57 RR 0A – Where RR is the Detailed Response Return Code.
For clarity, the two returned responses are separated here. In practice, they are returned
from the projector as one continuous string.
For the Power Status Enquiry, the possible values for the Detailed Response Return Code
status (RR) are:
30 – Standby
31 – Power On
32 – Cooling
34 – Emergency
So, as a full worked example, if we send to the projector:
3F 89 01 50 57 0A
If the projector were currently cooling down after being switched to Standby, it would return:
06 89 01 50 57 0A 40 89 01 50 57 32 0A
If the projector were on Standby, it would return:
06 89 01 50 57 0A 40 89 01 50 57 30 0A
A list of all of the useful enquiry codes, together with all possible detailed responses is below:
Power Status (to confirm the current Power Status)
Enquiry Command (to projector) 3F 89 01 50 57 0A
Response (from projector)
06 89 01 50 57 0A 40 89 01 50 57 RR 0A
Response (RR) Meaning
30 Standby
31 Power On
32 Cooling
34 Emergency
Page 12 of 20
Page 13

JVC D-ILA Projector Remote Control Guide
Input Status (to confirm the current Video Input)
Enquiry Command (to projector) 3F 89 01 49 50 0A
Response (from projector)
06 89 01 49 50 0A 40 89 01 49 50 RR 0A
Response (RR) Meaning
30 S-Video
31 Video
32 Component
33 PC (HD750/950/990/X7/X9/RS20/25/35/50/60)
36 HDMI 1
37 HDMI 2
Gamma Table (to confirm the current Gamma Table)
Enquiry Command (to projector) 3F 89 01 47 54 0A
Response (from projector)
06 89 01 47 54 0A 40 89 01 47 54 RR 0A
Response (RR) Meaning
30 Gamma – Normal
31 Gamma – A
32 Gamma – B
33 Gamma – C
34 Gamma – Custom1
35 Gamma – Custom2
36 Gamma – Custom3
Gamma Value (to confirm the current Gamma Value)
Enquiry Command (to projector) 3F 89 01 47 50 0A
Response (from projector)
06 89 01 47 50 0A 40 89 01 47 50 RR 0A
Response (RR) Meaning
30 Gamma Correction Value – 1.8
31 Gamma Correction Value – 1.9
32 Gamma Correction Value – 2.0
33 Gamma Correction Value – 2.1
34 Gamma Correction Value – 2.2
35 Gamma Correction Value – 2.3
36 Gamma Correction Value – 2.4
37 Gamma Correction Value – 2.5
38 Gamma Correction Value – 2.6
Source Status (to confirm the current Video Source Status)
Enquiry Command (to projector) 3F 89 01 53 43 0A
Response (from projector)
06 89 01 53 43 0A 40 89 01 53 43 RR 0A
Response (RR) Meaning
00 JVC Logo displayed
30 No signal or signal out of range
31 Signal input correctly
Page 13 of 20
Page 14

JVC D-ILA Projector Remote Control Guide
There is one enquiry command that has a different response from the projector to those
listed above. This is the Model Status enquiry. When this enquiry sent to the projector, the
projector will respond with a 14-byte string that identifies the model number(s) of the
projector.
Details are as follows:
Model Status (to confirm the current Projector Model)
Enquiry Command (to projector) 3F 89 01 4D 44 0A
Response (from projector)
Response (RR) Meaning
49 4C 41 46 50 4A 20 2D 2D 20 2D 58 48 34
49 4C 41 46 50 4A 20 2D 2D 20 2D 58 48 37
49 4C 41 46 50 4A 20 2D 2D 20 2D 58 48 35
49 4C 41 46 50 4A 20 2D 2D 20 2D 58 48 38
49 4C 41 46 50 4A 20 2D 2D 20 2D 58 48 41
49 4C 41 46 50 4A 20 2D 2D 20 2D 58 48 39
49 4C 41 46 50 4A 20 2D 2D 20 2D 58 48 42
49 4C 41 46 50 4A 20 2D 2D 20 2D 58 48 43
06 89 01 4D 44 0A 40 89 01 4D 44 RR 0A
DLA-HD350
DLA-RS10
DLA-HD750 & DLA-RS20
DLA-HD550
DLA-RS15
DLA-HD950/HD990/DLA-RS25/RS35
DLA-X3 & DLA-RS40
DLA-X7/X9 & DLA-RS50/60
Page 14 of 20
Page 15

JVC D-ILA Projector Remote Control Guide
RS-232C Interface Details
The RS-232C interface on the projector is a standard 9 pin D-Sub male socket. The pin
connections for the projector are as follows:
Pin No. Signal Function Signal Direction
2 Rx Data Receive Data Computer/Controller to Projector
3 Tx Data Transmit Data Projector to Computer/Controller
5 Ground Signal ground –
1, 4 & 6-9 No Connection – –
Connector
Looking at the connector from the side of the projector, the pins are as follows:
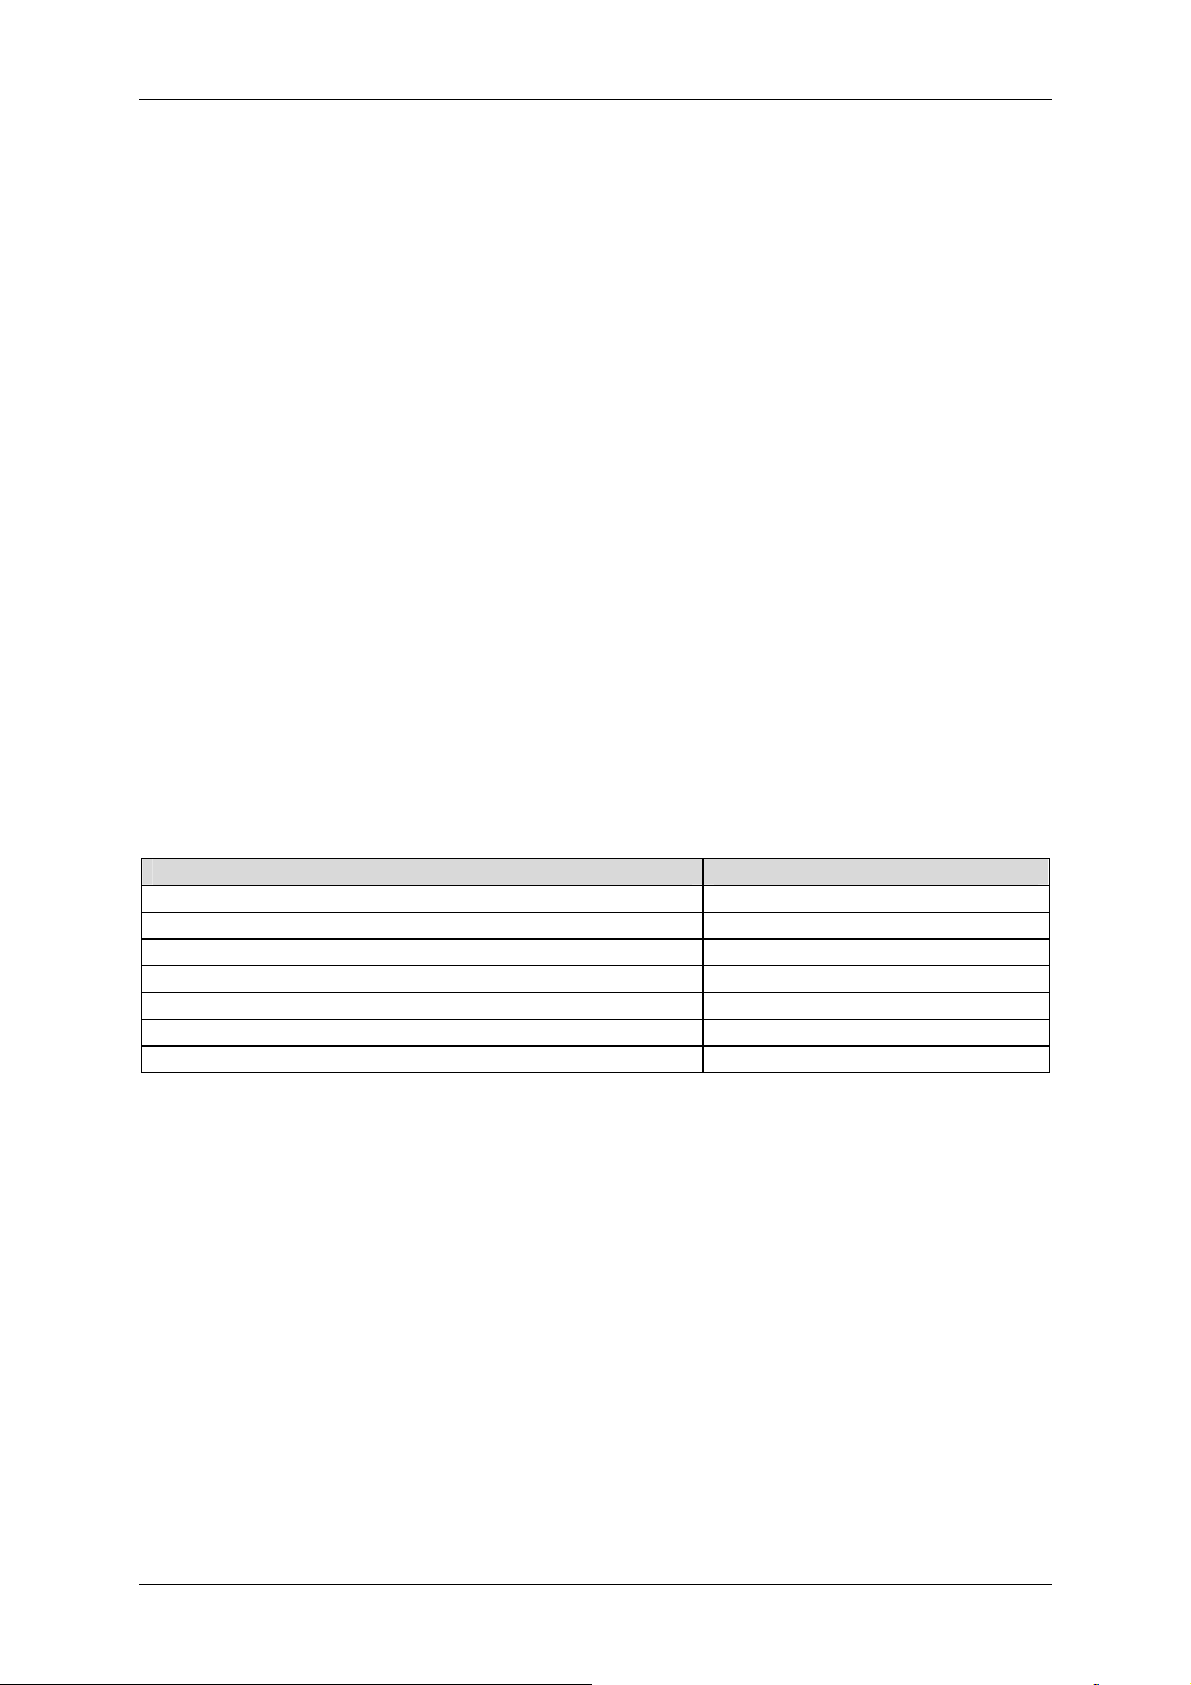
Communication Parameters
The communication parameters for the projector are as follows:
Parameter Value
Interface RS-232C
Mode Asynchronous
Data Rate 19200bps (19.2kbps)
Character Length 8 Bit
Parity None
Start Bit 1
Stop Bit 1
Flow Control None
Data Format Binary
Diagram of Data Format:
D0 D1 D2 D3 D4 D5 D6 D7
Start Bit Stop Bit
Set both send and receive modes to Hex in control software.
Page 15 of 20
Page 16

JVC D-ILA Projector Remote Control Guide
Command Format
The RS-232C commands are bidirectional and consist of a variable number of hexadecimal
numbers. All of the commands sent to the projector shown in this guide are either 7 bytes or
10 bytes long. The Acknowledgement Response Return Codes returned from the projector
can be between 6 and 14 bytes long. The basic format of the commands is as follows:
Section Size Comments
Header 1 byte Can be one of four possible values – see below
Unit ID 2 bytes Fixed – always 89 01
Command 2 bytes See below
Data Variable Length varies depending on command – see below
End 1 byte. Fixed – always 0A
Taking each of these sections in turn:
Header
The header can be one of 4 possible values. These are:
21 – Operating Command (from PC/controller to projector)
3F – Acknowledgement Response return Code Request (from PC/controller to projector)
06 – Acknowledgement Response Return Code – Basic (from projector to PC/controller)
40 – Acknowledgement Response Return Code – Detailed (from projector to PC/controller)
Unit ID
This is fixed at 89 01 for all models.
Command
This is the command sent to/from the projector and varies depending on the command. As
an example, the Power Command is 50 57. The other commands can be worked out from
the tables on pages 3-9.
Data
This is the value to apply to the command. Using the Power example above, the data value
for Off is 30 and the data value for On is 31.
End
This signifies the end of the command and is fixed at 0A for all models.
Putting all this together, a typical command (Power On) to the projector would therefore be:
Header Unit ID Command Data End
21 89 01 50 57 31 0A
Error Handling
The projector will ignore any commands that it cannot recognise, e.g. Unit ID does not
match, parity error, invalid command, etc. It will also ignore any inappropriate commands,
e.g. Power On when in cooling mode.
The projector will discard any commands received if there is a break of 50ms or longer in the
incoming data.
If consecutive commands are used, it is assumed that any external controller will not transmit
a command until it has received an appropriate Acknowledgement Response Return Code to
confirm that the projector is ready to accept the next command (see page 11 for details).
Page 16 of 20
Page 17

JVC D-ILA Projector Remote Control Guide
Local Area Network (LAN) Control (DLA-X7, DLA-X9, DLA-RS50 and DLA-RS60)
In addition to RS-232C and Infrared Remote Control, the DLA-X7, DLA-X9, DLA-RS50 and
DLA-RS60 also support Local Area Network (LAN) Control. Full instructions on how to use
this are below. These instructions assume a basic knowledge of TCP/IP networking.
Hardware
The LAN control enabled projectors are equipped with a standard RJ45 connection. They
can be connected to a LAN, a PC or a controller either directly or via a router, hub or switch
using a standard patch cable in the same way as any other network device.
Projector Setup
In order to use LAN Control, the projector must be switched from RS-232C to LAN Control
mode. Depending on the particular network configuration, some basic network settings may
have to be changed in the projector’s network menu, though this is unlikely.
To set the projector to LAN Control Mode, go to the “Function” menu on the projector, then
scroll down to “Communication Terminal” and change this from “RS-232C” (the default) to
“LAN”. This will set the projector to LAN Control Mode. It will also enable the “Network”
option further down in the same menu. Scroll down to the “Network” option and press “OK”.
This will show the projector’s network settings. These should be familiar to anyone with
knowledge of TCP/IP networks, but a basic explanation of them is as follows:
DHCP Client – (Available Options Off/On). When set to “Off”, the projector’s IP Address,
Subnet Mask and Default Gateway values must be set manually, however the default values
will be suitable for most installations. When set to “On”, these values will be obtained
automatically from a Dynamic Host Configuration Protocol (DHCP) server on the LAN.
Please note that if DHCP is set to “On”, there must be a DHCP server running and reachable
on the LAN, otherwise network communication will not work. The default setting is “Off”
IP Address – Sets the IP (Internet Protocol) address of the projector. As with all IP networks,
each device on the LAN must have a unique IP address. Duplicate IP addresses on a LAN
will cause unpredictable results. The default value is 192.168.0.2.
Subnet Mask – Sets the Subnet Mask of the projector. In most cases the default value will be
suitable. The default value is 255.255.255.0.
Default Gateway – Sets the Default IP Gateway of the projector. This is usually used only on
larger LANs with multiple sites. In virtually all installations, the default value will be suitable.
The default value is 192.168.0.254.
MAC Address – A 6 byte hex number that uniquely identifies the projector on the LAN. The
value is unique to each individual projector.
A detailed explanation of the above settings and general LAN setup is beyond the scope of
this guide, but the following Wikipedia links may be useful if further information is required:
Dynamic Host Configuration Protocol.......... http://en.wikipedia.org/wiki/Dhcp
IP Address.................................................. http://en.wikipedia.org/wiki/Ip_address
Subnet Mask............................................... http://en.wikipedia.org/wiki/Subnet_mask
Default Gateway ......................................... http://en.wikipedia.org/wiki/Default_gateway
MAC Address.............................................. http://en.wikipedia.org/wiki/Mac_address
Page 17 of 20
Page 18

JVC D-ILA Projector Remote Control Guide
Making And Testing The Connection
When the projector is first connected to the LAN, you should test the connection between the
PC or controller and the projector to make sure that communication is OK before attempting
to send any commands. You can use the standard ICMP “Ping” command for this.
Control Software
Most LAN compatible Custom Install Control systems that can send hex data should work
with the LAN-enabled models. For initial testing with a PC, any basic TCP/IP network
communication software that supports Port Selection can be used. The Hercules Setup
Utility, which was suggested on page 10 for RS-232C testing, also supports TCP/IP network
connections and this works well, although due to the 5-second network timeout (see below
for details) you have to be quick with the mouse when controlling the projector. The “TCP
Client” tab of the Hercules Setup Utility also has a Ping facility that can be used to test
communication with the projector, and either this tab or the “Test Mode” tab can be used to
communicate with the projector.
Control Protocol
In order to control the projector, we must first establish a network connection with the
projector and then send the command. The control protocol sequence to do this is as follows:
1. The PC or Controller should first request a TCP/IP connection to the projector on Port
20554. The port number is very important, as this is the only port on which the projector
will communicate.
2. When a network connection request is received, the projector will respond immediately
with “PJ_OK” to confirm that it is available.
3. In order to maintain the network connection, the external controller must then respond
to the projector within 5 seconds with “PJREQ”.
4. The projector will then respond immediately with “PJACK” to acknowledge that it is
ready to accept a command.
5. The command can now be sent. This command can be any of the hex commands
shown on pages 3-9 or any of the Acknowledgement Response Requests on pages 11-
14. The command must be sent within 5 seconds of receiving “PJACK” from the
projector, otherwise the projector will close the network connection.
Looking at this as a timeline, using the same numbered steps as above, the sequence is:
Step 1 Step 2 Step 3 Step 4 Step 5
Controller to
Projector
Projector to
Controller
Request
Connection
PJ_OK
max
>
5 sec
PJREQ
PJACK
max
5 sec
>
Command
Assuming the steps shown above are carried out correctly, the projector will respond to the
command. It will then close the network connection after 5 seconds. If you wish to send more
than one command, each individual command must be preceded by the connection
establishment procedure shown above.
If the controller does not respond to the projector within 5 seconds in steps 3 and 5 above,
the projector will close the network connection.
Page 18 of 20
Page 19

JVC D-ILA Projector Remote Control Guide
Infrared Control
It is also possible to control JVC D-ILA projectors via Infrared Remote Control Signal
Emulation, though is this sometimes slightly more difficult to achieve than RS-232C control
due to the differences in Infrared emulation methods between the various equipment
manufacturers.
To send an Infrared command to the projector, the required format is 73 in hex, followed by
the ASCII value, also in hex, of the command required. The hex ASCII values for all of the
Remote Control Emulation Commands are shown in right hand column of the Remote
Control Emulation Command tables on pages 4-9.
As an example, to send the Power On command, send: 73 05
It is unlikely that these raw commands will work with proprietary Infrared controllers and they
must be converted to the appropriate format before use. For the most common Infrared
control system, the Philips Pronto, the widely available and free “MakeHex” program will
convert the codes in this guide into the “Long hex” format used by Pronto and other similar
systems. Full details of how to carry out the conversion are included with the MakeHex
program, but here is some basic information that may help with the process. This information
assumes a basic knowledge of MakeHex and the DOS commands required to use it.
When using MakeHex, remember that this uses decimal numbers in its .irp input file. The
numbers given in this guide are all in hex. You will therefore have to convert them to decimal
to use with MakeHex. The Calculator program supplied with most versions of Microsoft
Windows can be used to convert from hex to decimal and from decimal to hex.
As a full worked example, using the Menu Command (which toggles the Menu On/Off),
looking at page 7, we can see that the hex ASCII code for this is 2E. This gives a complete
hex command of 73 2E. Converting these two numbers to decimal gives 115 46.
Putting these two numbers into the JVC .irp input file supplied with MakeHex gives the
following first two lines for the .irp input file:
Device=115
Function=46
Running MakeHex with these parameters will generate the following output file:
Device Code: 115 Function: 46
0000 006D 0001 0011 0141 00A0 0014 003C 0014 003C 0014 0014 0014 0014 0014 003C
0014 003C 0014 003C 0014 0014 0014 0014 0014 003C 0014 003C 0014 003C 0014 0014
0014 003C 0014 0014 0014 0014 0014 02E6
This can be used in any Remote Control system that uses Pronto style Long hex commands.
There is however a way to make this process slightly easier and this is to run MakeHex with
the –B command line option. This will generate the hex as well as the decimal numbers for
the required commands. Running MakeHex –B on the .irp file shown above will generate the
following output file:
Device Code: 115 (0x73) Function: 46 (0x2E)
0000 006D 0001 0011 0141 00A0 0014 003C 0014 003C 0014 0014 0014 0014 0014 003C
0014 003C 0014 003C 0014 0014 0014 0014 0014 003C 0014 003C 0014 003C 0014 0014
0014 003C 0014 0014 0014 0014 0014 02E6
Page 19 of 20
Page 20

JVC D-ILA Projector Remote Control Guide
This shows both the decimal (115 and 46) as well as the hex (73 and 2E) command numbers
and makes it easier to confirm that the correct command has been generated.
Using the method above, it is possible to generate any individual Pronto style Long hex
command.
MakeHex can also generate a range of commands. As an example, the following entries in
the .irp file would generate all commands from 22 to 45 (16 to 2D in hex).
Device=115
Function=22..45
If all of this sounds a little involved, we have produced a ready-made Long hex file. This
includes all commands from 0 to 255 with both decimal and hex command numbers. This is
available from:
http://uk.jvc-service.net/public/document.cfm?prog=docu.cfm&Model=DLA-HD350&SGK=0&SGT=0&MLDC_id=6918
Any required commands can be copied from this file.
Some controllers are able to create Infrared Commands from the RS-232C Remote Control
Emulation Codes on pages 4-9. Where this is possible, it is a matter of personal preference
as to which of them should be used.
Multiple Projector Infrared Control
The DLA-X3, DLA-X7, DLA-X9, DLA-RS40, DLA-RS50 and DLA-RS60 can be set to use
either hex code 73 (as shown in all of the above Infrared code examples) or hex code 63 to
control them. This allows two projectors to be controlled independently from one Infrared
source. To set an individual projector to receive hex code 63 commands, go into the Service
Menu, choose “Option”, and then scroll down to “IR Code” and press “OK”. In the “Code
Select” option screen, move the highlighted cursor from “A” to “B” and then press “OK”. The
projector will then respond only to “B” codes (hex code 63). You should then substitute the
default hex code of 73 (115 in decimal) with the new hex code of 63 (99 in decimal) in all
Infrared commands to control that particular projector.
When you change the projector from Code A to Code B, you will not then be able to control
that projector using the normal Remote Control. To change back to Code A, use the buttons
on the rear of the projector to access the Service Menu.
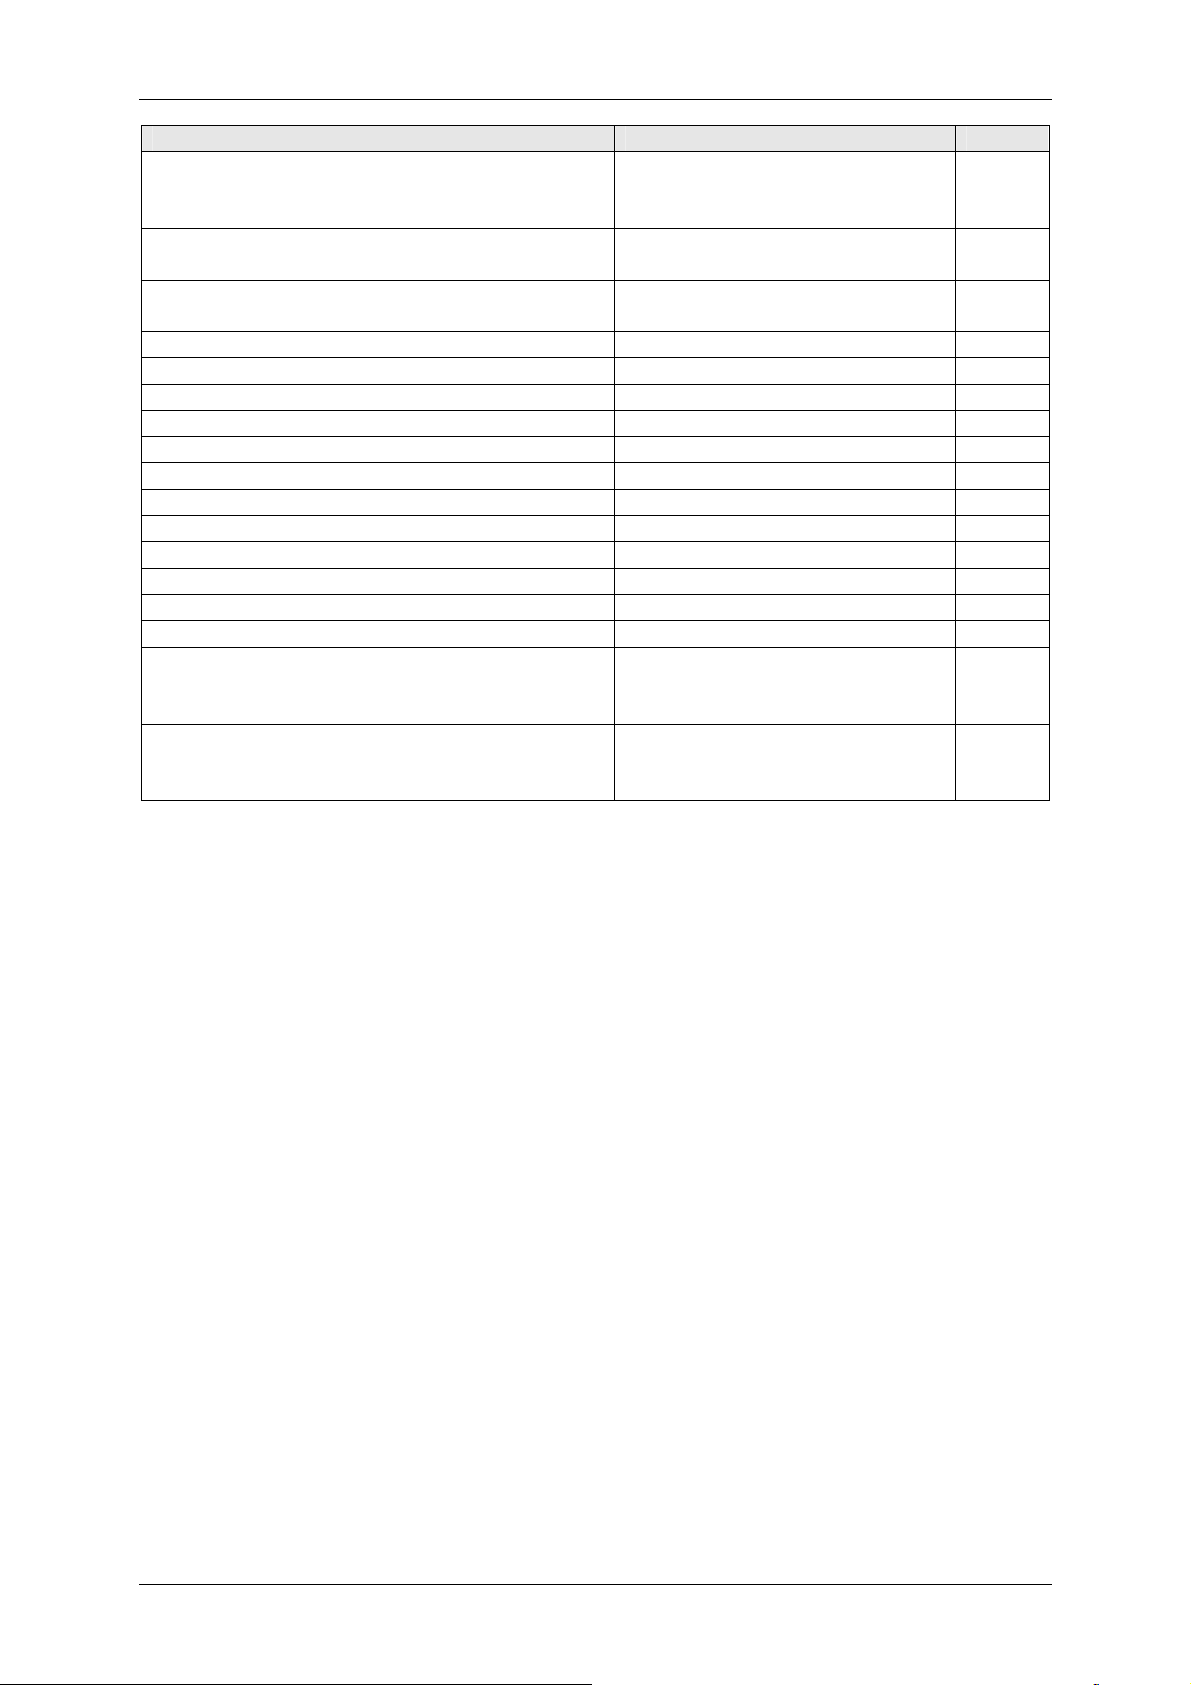
Document Version History:
Version Date Details
1.0 01/06/2009 First Version – for DLA-H350/HD750/RS10/RS20.
1.1 21/09/2009 Added new codes for DLA-HD550/HD950/HD990/RS15/RS25/RS35.
1.2 15/02/2010 Expanded Infrared Control information.
1.3 01/12/2010 Added new codes, LAN control information and multiple projector control
Added RS-232C Interface Details.
Added additional Video Source Status Response.
Other minor corrections and amendments.
Other minor corrections and amendments.
information for DLA-X3/DLA-X7/DLA-X9/DLA-RS40/DLA-RS50/DLA-RS60.
Other minor corrections and amendments.
Produced by Gary Broadbent – JVC(UK)
This document may be distributed freely as long as the author and copyright information remain intact.
Please email any corrections, suggestions or requests for more information for the attention of Gary Broadbent at: info@jvc.co.uk
This document may be updated from time to time. To download the most recent version, go to:
http://uk.jvc-service.net/public/document.cfm?prog=docu.cfm&Model=DLA-HD350&SGK=0&SGT=0&MLDC_id=6776
V1.3 – 01/12/2010 –
© 2010 JVC
E&OE
Page 20 of 20
 Loading...