

Page 1
CD PORTABLE SYSTEM
RC-EZ35S
ENGLISH
MP3
INSTRUCTIONS
For Customer Use:
Enter below the Model No. and Serial No.
which are located either on the rear, bob
torn or side of the cabinet. Retain this
information 1orfuture reference.
Model No.
Serial No.
Thank you for purchasing this JVC product.
Please read these instructions carefully before starting operation to be sure to
obtain optimum performance and a longer service lifefrom the unit.
601 EZ3500 010
LVT1527 0010 [J/q
CAUTION
DONOTEXPOSETORAINORMOISTURE
NEPASEXPOSERALAPLUIENIAL'HUMIDITE
ATTENTION:RISQUEDECHOCELECTRIQUE,NEPAS0UVRIR
The lightning flash with arrowhead symbol, within an equilateral triangle is intended to alert
the user to the presence of uninsulated "dangerous voltage" within the product's enclosure
that may be of sufficient magnitude to constitute a risk of electric shock to persons.
The exclamation point within an equilateral triangle is intended to alert the user to the
presence of important operating and maintenance (servicing) instructions inthe literature
accompanying the
appliance.
For U.S.A.
This equipment has been tested and found to comply with the limits for a Class B digital device,
pursuant to part 15 of the FCC Rules.
These limits are designed to provide reasonable protection against harmful intederence ina residential
installation.
This equipment generates, uses and can radiate radio frequency energy and, if not installed and
used inaccordance with the instructions, may cause harmful interference to radio communications.
However, there is no guarantee that interference will not occur in a particular installation. If this
equipment does cause harmful interference toradio ortelevision reception, which can be determined
by turning the equipment off and on, the user is encouraged to try to correct the interference byone
or more ofthe following measures:
Reorient or relocate the receiving antenna.
Increase the separation between the equipment and receiver.
Connect the equipment into an outlet on a circuit different from that towhich the receiver is connected.
Consult the dealer or an experienced radio/TV technician for help.
CAUTION
Changes or modification not approved by JVC could void the user's authority to operate this equipment.
For Canada:
This Class B digital apparatus complies with Canadian ICES-O03, i
Cet appareil numerique de la classe B est conforme & la norme NMB-O03 du Canada. |
J
Caution -- O/I STANDBY/ON switch!
Disconnect the mains plug to shut the power off completely. The O/I STANDBY/ON switch in any
position does not disconnect the mains line.The power can be remote controlled.
CAUTION
To reduce the risk of electrical shocks, fire, etc.:
1. Do not remove screws, covers or cabinet.
2. Do not expose this appliance to rain or moisture.
3. To disconnect power from the mains, pull out the mains plug.
When installing the product, ensure that the plug is easily accessible.
iMPORTANT FOR LASER PRODUCTS
1. CLASS 1 LASER PRODUCT
2. CAUTION: Invisible laser radiation when open and interlock failed or defeated. Avoid direct exposure to
beam.
3. CAUTION: Do not open the top cover. There are no user serviceable parts inside the Unit; leave all
servicing to qualified service personnel.
JVC
_: EN
© 2005 Victor Company ofJapan, Limited
1105KMMBICMTS
This portable system operates on battery or AC power.
FM telesce 3ic antenna
BEAT CUT
Battery compartment
_,Coutlet
iNSERTiNG BATTERIES
1 Open the battery compartment cover.
Pull the battery compartment cover toward you while pressing the sections marked by the arrows.
2 Insert eight R20(SUM-1)/D (13D)-size batteries. (not supplied)
Be sure to insert the batteries with the (+) and (-) terminals positioned correctly.
R20 (SUM-1)/D (13D)-size batteries
3 Replace the battery compartment cover.
Inserting Batteries into the Remote Control Unit:
Match the polarity (+ and -) of the batteries. R03 (UM-4)/AAA (24F)x2 (not supplied)
°q
Note: The battery power will be switched off when you plug the power cord into the
AC IN "%.jack on the unit.
CAUTION:
To avoid battery leakage or explosion, handle batteries properly.
• If you are not going to use your system for a month or more, remove the batteries from the battery
compartment.
• Dispose of batteries inthe proper manner, according tofederal, state, and local regulations.
• Do not mix with different battery types or with new and old ones, or do not attempt to charge a
battery not intended to be recharged.
, Discard leaky batteries immediately. Leaking batteries can cause skin burns or other personal injury.
SUPPRLYING AC POWER
Plug the power cord into the AC IN%, jack on the back of the unit, and into an AC power outlet.
Note:To switch off the system completely, unplug the power cord.
CAUTIONS:
1. ONLY USE JVC POWER CORD PROVIDED WITH THIS UNIT TO AVOID MALFUNCTION OR
DAMAGE TO THE UNIT. REMOVE BATTERmES WH EN USING THE POWER CORD.
2. BE SURE TO UNPLUG THE POWER CORD FROM THE OUTLET WHEN GOING OUT OR WHEN
THE UNIT IS NOT IN USE FOR AN EXTENDED PERIOD OFTIME.
USING HEADPHONES
Connect commercially available headphones to the PHONES jack on the rear of the main unit. While the
headphones are connected, the speakers do not produce any sound. Before connecting the headphones,
make sure to turn down the sound volume.
ANTENNAS
The AM antenna is built in, so adjusting the position of the unit may help AM reception.The FM telescopic
antenna on the back of the unit can be extended and rotated for better FM reception.
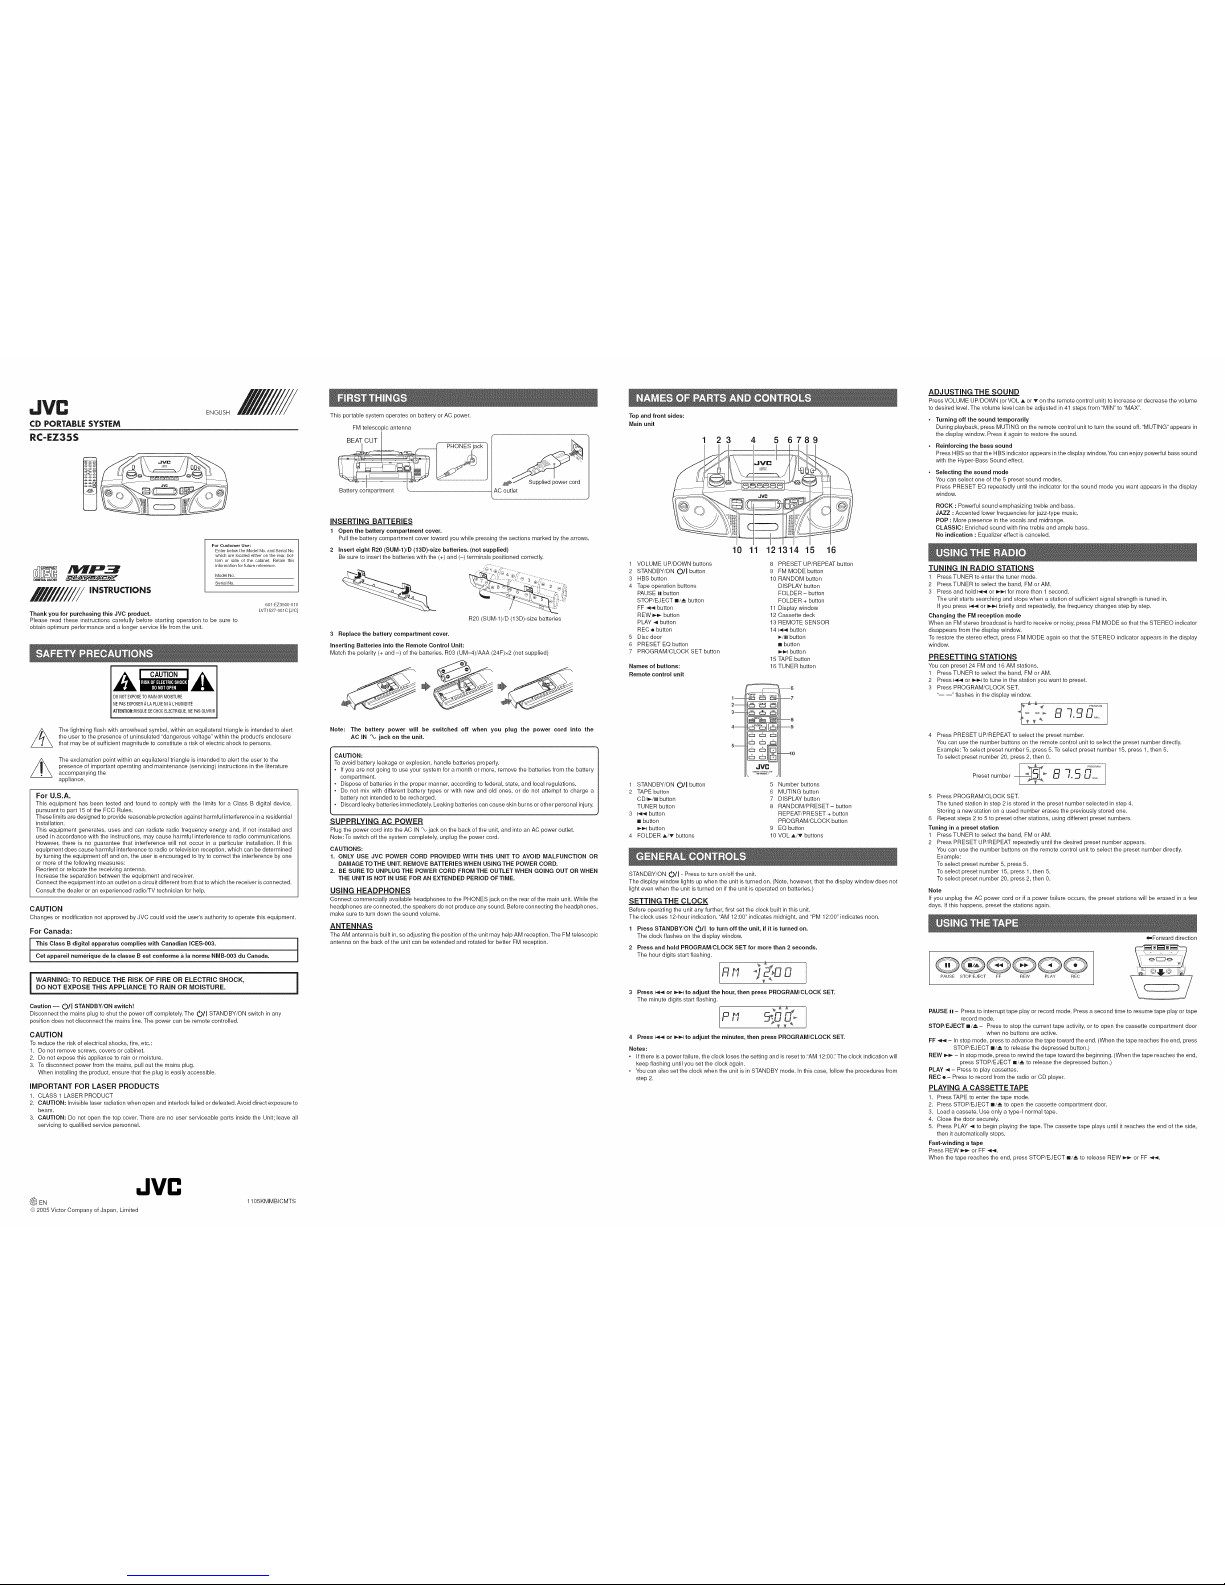
Top and front sides:
Main unit
1 23 5 6789
1 VOLUME UP/DOWN buttons
2 STANDBY/ON Oil button
3 HBS button
4 Tape operation buttons
PAUSE I| button
STOP/EJECT i/,_ button
FF 44 button
REW _ button
PLAY -,I button
REC • button
5 Disc door
6 PRESET EQ button
7 PROGRAM/CLOCK SET button
Names of buttons:
Remote control unit
1 STANDBY/ON O/I button
2 TAPE button
CD/_/II button
TUNER button
3 I_ button
m button
_,-_1button
4 FOLDER A/T buttons
10 11
1m
2m_
3m_
4m []
JVC
121314 15 16
8 PRESET UP/REPEAT button
9 FMMODE button
10 RANDOM button
DISPLAY button
FOLDER - button
FOLDER + button
11 Display window
12 Cassette deck
13 REMOTE SENSOR
14 _ button
_/1| button
m button
P,,_,-Ibutton
15 TAPE button
16 TUNER button
--6
m7
m8
m9
ml0
5 Number buttons
6 MUTING button
7 DISPLAY button
8 RANDOM/PRESET- button
REPEAT/PRESET + button
PROGRAM/CLOCK button
9 EQbutton
10 VOL ,a,/_" buttons
STANDBY/ON O/I - Press to turn on/off the unit.
The display window lights up when the unit is turned on. (Note, however, that the display window does not
light even when the unit is turned on if the unit is operated on batteries.)
SETTING THE CLOCK
Before operating the unit any further, first set the clock built in this unit.
The clock uses 12-hour indication. "AM 12:00" indicates midnight, and "PM 12:00" indicates noon.
1 Press STANDBY/ON (_/I to turn off the unit, if it is turned on.
The clock flashes on the display window.
2 Press and hold PROGRAM/CLOCK SET for more than 2 seconds.
The hour digits start flashing.
"° 1
Rrl 5
3 Press _-,I or _ to adjust the hour, then press PROGRAM/CLOCK SET.
The minute digits start flashing.
P ¢I u I
4 Press _ or =,_,_1to adjust the minutes, then press PROGRAM/CLOCK SET.
Notes:
• Ifthere is a power failure, the clock loses the setting and is reset to "AM 12:00." The clock indication will
keep flashing until you set the clock again.
• Youcan also set the clock when the unit is in STANDBY mode. In this case, follow the procedures from
step 2.
ADJUSTING THE SOUND
PressVOLUME UP/DOWN (or VOL A or T on the remote control unit) to increase or decrease the volume
to desired level. The volume level can be adjusted in 41 steps from "MIN" to "MAX".
• Turning off the sound temporarily
During playback, press MUTING on the remote control unit to turn the sound off. "MUTING" appears in
the display window. Press it again to restore the sound.
• Reinforcing the bass sound
Press HBS so that the HBS indicator appears in the display window. You can enjoy powerful bass sound
with the Hyper-Bass Sound effect.
• Selecting the sound mode
You can select one ofthe 5 preset sound modes.
Press PRESET EQ repeatedly until the indicator for the sound mode you want appears in the display
window.
ROCK : Powerful sound emphasizing treble and bass.
JAZZ : Accented lower frequencies for jazz-type music.
POP :More presence inthe vocals and midrange.
CLASSIC: Enriched sound with fine treble and ample bass.
No indication : Equalizer effect is canceled.
TUNING IN RADIO STATIONS
1 Press TUNER to enter the tuner mode.
2 PressTUNER to select the band, FM crAM.
3 Press and hold I_ or _,_,-Ifor more than 1 second.
The unit starts searching and stops when a station of sufficient signal strength is tuned in.
If you press b94 or _ briefly and repeatedly, the frequency changes step by step.
Changing the FM reception mode
When an FM stereo broadcast is hard to receive or noisy, press FM MODE so that the STEREO indicator
disappears from the display window.
To restore the stereo effect, press FM MODE again so that the STEREO indicator appears in the display
window.
PRESETTING STATIONS
You can preset 24 FM and 16 AM stations.
1 Press TUNER to select the band, FM or AM.
2 Press I_'_,qor _ to tune inthe station you want to preset.
3 Press PROGRAM/CLOCK SET.
----" flashes in the display window.
Press PRESET UP/REPEAT to select the preset number.
You can use the number buttons on the remote control unit to select the preset number directly.
Example: To select preset number 5, press 5. To select preset number 15, press 1, then 5.
To select preset number 20, press 2, then 0.
Preeet number
I
5 Press PROGRAM/CLOCK SET.
The tuned station in step 2 is stored in the preset number selected in step 4.
Storing a new station on a used number erases the previously stored one.
6 Repeat steps 2 to 5 to preset other stations, using different preset numbers.
Tuning in a preset station
1 Press TUNER to select the band, FM or AM.
2 Press PRESET UP/REPEAT repeatedly until the desired preset number appears.
You can use the number buttons on the remote control unit to select the preset number directly.
Example:
To select preset number 5, press 5.
To select preset number 15, press 1, then 5.
To select preset number 20, press 2, then 0.
Note
If you unplug the AC power cord or if a power failure occurs, the preset stations will be erased in a few
days. Ifthis happens, preset the stations again.
Q®GQQQ
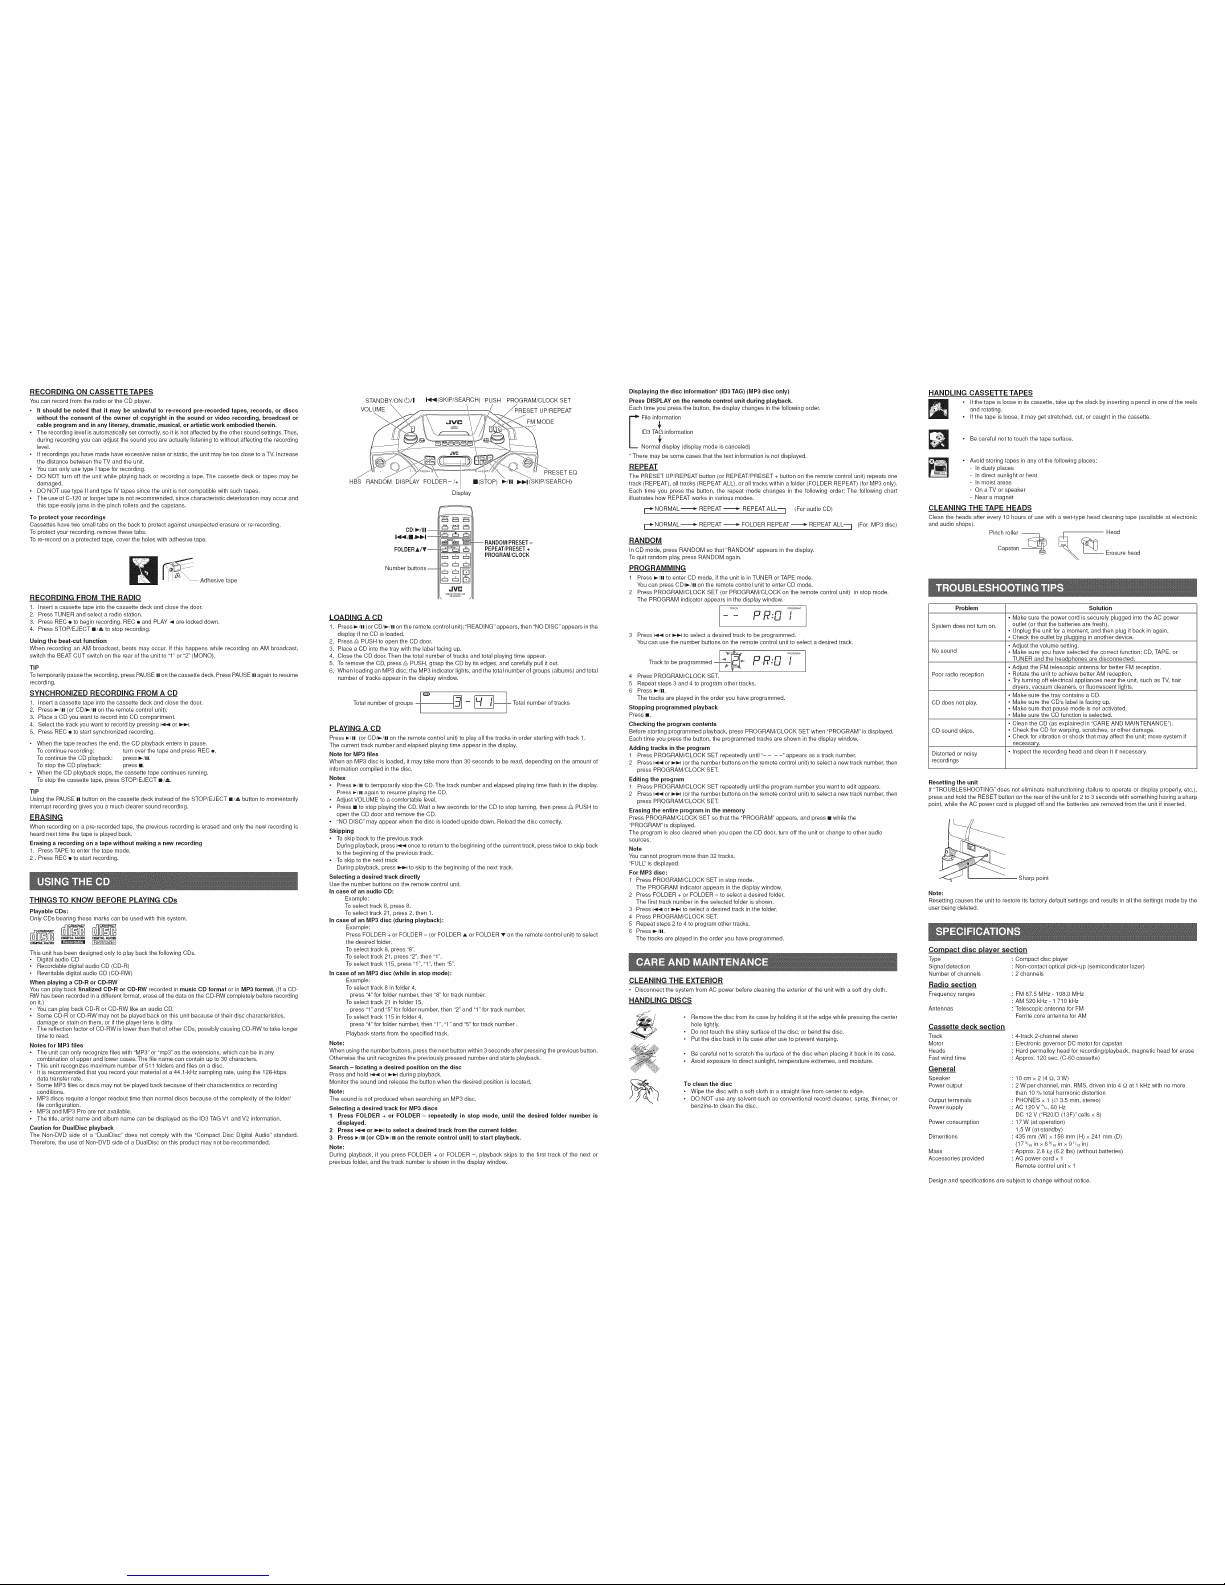
PAUSE STOP/EJECT FF REW PLAY REC
,(,,,,Forward direction
PAUSE n - Press to interrupt tape play or record mode. Press a second time to resume tape play or tape
record mode.
STOP/EJECT a/,_ - Press to stop the current tape activity, or to open the cassette compartment door
when no buttons are active.
FF _ - In stop mode, press to advance the tape toward the end. (When the tape reaches the end, press
STOP/EJECT I/A to release the depressed button.)
REW _ - Instop mode, press to rewind the tape toward the beginning. (When the tape reaches the end,
press STOP/EJECT _/,_ to release the depressed button.)
PLAY _1 - Press to play cassettes.
REC ® - Press to record from the radio or CD player.
PLAYING A CASSETTETAPE
1. Press TAPE to enter the tape mode.
2. Press STOP/EJECT _/,_ to open the cassette compartment door.
3. Load acassete. Use only a type-I normal tape.
4. Close the door securely.
5. Press PLAY _ to begin playing the tape. The cassette tape plays until it reaches the end of the side,
then it automatically stops.
Fast-winding a tape
Press REW _ or FF -_-_.
When the tape reaches the end, press STOP/EJECT _/_ torelease REW _-_ or FF _-_.
Page 2
RECORDING ON CASSETTETAPES
You can record from the radio or the CD player.
• It should be noted that it may be unlawful to re-record pre-recorded tapes, records, or discs
without the consent of the owner of copyright in the sound or video recording, broadcast or
cable program and in any literary, dramatic, musical, or artistic work embodied therein.
• The recording level is automatically set correctly, so it is not affected by the other sound settings. Thus,
during recording you can adjust the sound you are actually listening to without affecting the recording
level.
• Ifrecordings you have made have excessive noise or static, the unit may be too close to a TV. Increase
the distance between the TV and the unit.
• Youcan only use type I tape for recording.
• DO NOT turn off the unit while playing back or recording a tape. The cassette deck or tapes may be
damaged.
• DO NOT use type II and type IV tapes since the unit is not compatible with such tapes.
• The use of C-120 or longer tape is not recommended, since characteristic deterioration may occur and
this tape easily jams in the pinch rollers and the capstans.
To protect your recordings
Cassettes have two small tabs on the back to protect against unexpected erasure orre-recording.
To protect your recording, remove these tabs.
To re-record on a protected tape, cover the holes with adhesive tape.
Adhesive tape
RECORDING FROM THE RADIO
1. Insert a cassette tape into the cassette deck and close the door.
2. Press TUNER andselect a radio station.
3. Press REC • to begin recording. REC • and PLAY 4 are locked down.
4. Press STOP/EJECT a/._,, to stop recording.
Using the beat-cut function
When recording an AM broadcast, beats may occur. If this happens while recording an AM broadcast,
switch the BEAT CUT switch on the rear of the unit to "1" or "2" (MONO).
TIP
To temporarily pause the recording, press PAUSE Illon the cassette deck. Press PAUSE H again to resume
recording.
SYNCHRONIZED RECORDING FROM A CD
1. Insert a cassette tape into the cassette deck and close the door.
2. Press _/H (or CD/_/H on the remote control unit).
3. Place aCD you want to record into CD compartment.
4. Select the track you want to record by pressing _ or _=,,4.
5. Press REC • to start synchronized recording.
• When the tape reaches the end, the CD playback enters in pause.
To continue recording: turn over the tape and press REC o.
To continue the CD playback: press =,-/H.
To stop the CD playback: press m.
• When the CD playback stops, the cassette tape continues running.
To stop the cassette tape, press STOP/EJECT w/,_.
TiP
Using the PAUSE H button on the cassette deck instead of the STOP/EJECT w/,_,,button to momentarily
interrupt recording gives you a much clearer sound recording.
ERASING
When recording on a pre-recorded tape, the previous recording is erased and only the new recording is
heard next time the tape is played back.
Erasing a recording on a tape without making a new recording
1. Press TAPE to enter the tape mode.
2. Press REC • to start recording.
THINGSTO KNOW BEFORE PLAYING CDs
Playable CDs:
Only CDs bearing these marks can be used with this system.
DI_ITAL AUOlO DI_ITAL AUDID
D_O.'ALAUDIO _
This unit has been designed only to play back the following CDs.
• Digital audio CD
• Recordable digital audio CD (CD-R)
• Rewritable digital audio CD (CD-RW)
When playing a CD-R or CD-RW
You can play back finalized CD-R or CD-RW recorded inmusic CD format or in MP3 format. (Ifa CD-
RW has been recorded ina different format, erase all the data on the CD-RW completely before recording
on it.)
• Youcan play back CD-R or CD-BW likean audio CD.
• Some CD-R or CD-RW may not be played back on this unit because oftheir disc characteristics,
damage or stain on them, or ifthe player lens is dirty.
• The reflection factor of CD-RW is lower than that of other CDs, possibly causing CD-RW to take longer
time to read.
Notes for MP3 files
• The unit can only recognize files with "MP3" or "rap3" as the extensions, which can be in any
combination of upper and lower cases. The file name can contain up to 30 characters.
• This unit recognizes maximum number of 511 folders and files on a disc.
• Itis recommended that you record your material at a 44.1-kHz sampling rate, using the 128-kbps
data transfer rate.
• Some MP3 files or discs may not be played back because oftheir characteristics or recording
conditions.
• MP3 discs require a longer readout time than normal discs because of the complexity of the folder/
file configuration.
• MP3i and MP3 Pro are not available.
• The title, artist name and album name can be displayed as the ID3 TAG Vl and V2 information.
Caution for DualDisc playback
The Non-DVD side of a "DualDisc" does not comply with the "Compact Disc Digital Audio" standard.
Therefore, the use of Non-DVD side of a DualDisc on this product may not be recommended.
STANDBY/ON _/| _(SKIP/SEARCH) PUSH PROGRAM/CLOCK SET
vo,u,E\ .
.,vo/
HBS RANDOM DISPLAY FOLDER-/+ re(STOP) F/l! _b,4(SKIP/SEARCH)
Display
CDf!_/n --
I,,_4,11,1l_H --
FOLDERA/T--
Number buttons--
_ _:::3c::31
_ iiJr%qtl
JVC
-- RANDOM/PRESET-
PEPEATfPRESET+
PROGRAM/CLOCK
LOADING A CD
1. Press _/H (or CD/_/H onthe remote control unit); "READING" appears, then "NO DISC' appears in the
display if no CD is loaded.
2. Press _ PUSH to open the CD door.
3. Place a CD into the tray with the label facing up.
4. Close the CD door. Then the total number of tracks and total playing time appear.
5. To remove the CD, press _ PUSH, grasp the CD by itsedges, and carefully pull it out.
8. When loading an MP3 disc, the MP3 indicator lights, and the total number of groups (albums) and total
number of tracks appear inthe display window.
Total number of groups Ic_
I
-= _Total number of tracks
PLAYING A CD
Press _/H (or CD/_/H on the remote control unit) to play all the tracks in order starting with track 1.
The current track number and elapsed playing time appear in the display.
Note for MP3 files
When an MP3 disc is loaded, itmay take more than 30 seconds to be read, depending on the amount of
information compiled inthe disc.
Notes
• Press _/H to temporarily stop the CD. The track number and elapsed playing time flash in the display.
Press I_/lll again to resume playing the CD.
• Adjust VOLUME to a comfortable level.
• Press mto stop playing the CD. Wait a few seconds for the CD to stop turning, then press _ PUSH to
open the CD door and remove the CD.
• "NO DISC" may appear when the disc is loaded upside down. Reload the disc correctly.
Skipping
• To skip back to the previous track
During playback, press 144 once to return to the beginning ofthe current track, press twice to skip back
to the beginning of the previous track.
• To skip to the next track
During playback, press _ to skip to the beginning of the next track.
Selecting a desired track directly
Use the number buttons on the remote control unit.
in case of an audio CD:
Example:
To select track 8, press 8.
To select track 21, press 2, then 1.
in case of an MP3 disc (during playback):
Example:
Press FOLDER + or FOLDER - (or FOLDER ,_ or FOLDER v on the remote control unit) to select
the desired folder.
To select track 8, press "8".
To select track 21, press "2", then "1 ".
To select track 115, press "1", "1", then "5".
in case of an MP3 disc (while in stop mode):
Example:
To select track 8 in folder 4,
press "4"for folder number, then "8" for track number.
To select track 21 in folder 15,
press "1"and "5" for folder number, then "2" and "1" for track number.
To select track 115 in folder 4,
press "4"for folder number, then "1 ","1" and "5" for track number.
Playback starts from the specified track.
Note:
When using the number buttons, press the next button within 3 seconds after pressing the previous button.
Otherwise the unit recognizes the previously pressed number and starts playback.
Search - locating adesired position on the disc
Press and hold _ or _,,-I during playback.
Monitor the sound and release the button when the desired position is located.
Note:
The sound is not produced when searching an MP3 disc.
Selecting a desired track for MP3 discs
1 Press FOLDER + or FOLDER - repeatedly in stop mode, until the desired folder number is
displayed.
2 Press I_,_ or _,.4 to select adesired track from the current folder.
3 Press _/H (or CD/_/H onthe remote control unit) to start playback.
Note:
During playback, if you press FOLDER + or FOLDER -, playback skips to the first track of the next or
previous folder, and the track number is shown in the display window.
Displaying the disc information* (ID3 TAG) (MP3 disc only)
Press DISPLAY on the remote control unit during pNayback.
Each time you press the button, the display changes in the following order.
'_File in_rmation
ID3 TAG,_information
Normal display (display mode is canceled)
* There may be some cases that the text information isnot displayed.
REPEAT
The PRESET UP/REPEAT button (or REPEAT/PRESET + button on the remote control unit) repeats one
track (REPEAT), all tracks (REPEAT ALL), or all tracks within a folder (FOLDER REPEAT) (for MP3 only).
Each time you press the button, the repeat mode changes in the following order: The following chart
illustrates how REPEAT works in various modes.
F=_NORMAL _ REPEAT _ REPEAT ALL-='] (For audio CD)
NORMAL _ REPEAT _ FOLDER REPEAT _ REPEAT ALL--] (For MP3 disc)
RANDOM
In CD mode, press RANDOM so that "RANDOM" appears in the display.
To quit random play, press RANDOM again.
PROGRAMMING
1 Press _,-/H to enter CD mode, if the unit is inTUNER orTAPE mode.
You can press CD/_',-/H on the remote control unit to enter CD mode.
2 Press PROGRAM/CLOCK SET (or PROGRAM/CLOCK on the remote control unit) in stop mode.
The PROGRAM indicator appears in the display window.
3 Press I_ or _ to select a desired track to be programmed.
You can use the number buttons on the remote control unit to select a desired track.
2, ...........
Track to be programmed _ p _t [
4 Press PROGRAM/CLOCK SET.
5 Repeat steps 3 and 4 to program other tracks.
6 Press _/H.
The tracks are played in the order you have programmed.
Stopping programmed playback
Press =.
Checking the program contents
Before starting programmed playback, press PROGRAM/CLOCK SET when "PROGRAM" is displayed.
Each time you press the button, the programmed tracks are shown in the display window.
Adding tracks in the program
1 Press PROGRAM/CLOCK SET repeatedly until"- - - -" appears as a track number.
2 Press I-_.,,_or _,,,-_1(or the number buttons on the remote control unit) to select a new track number, then
press PROGRAM/CLOCK SET.
Editing the program
1 Press PROGRAM/CLOCK SET repeatedly untilthe program number you want to edit appears.
2 Press I-._ or _ (or the number buttons on the remote control unit) to select a new track number, then
press PROGRAM/CLOCK SET.
Erasing the entire program in the memory
Press PROGRAM/CLOCK SET so that the "PROGRAM" appears, and press = while the
"PROGRAM" is displayed.
The program is also cleared when you open the CD door, turn off the unit or change to other audio
sources.
Note
You cannot program more than 32 tracks.
"FULl" is displayed.
For MP3 disc:
1 Press PROGRAM/CLOCK SET in stop mode.
The PROGRAM indicator appears in the display window.
2 Press FOLDER + or FOLDER - to select adesired folder.
The first track number in the selected folder is shown.
3 Press I-,_ or _,-_1to select a desired track in the folder.
4 Press PROGRAM/CLOCK SET.
5 Repeat steps 2 to4 to program other tracks.
6 Press _/H.
The tracks are played in the order you have programmed.
CLEANING THE EXTERIOR
• Disconnect the system from AC power before cleaning the exterior of the unit with a soft dry cloth.
HANDLING DISCS
• Remove the disc from its case by holding it atthe edge while pressing the center
hole lightly.
• Do not touch the shiny surface of the disc, or bend the disc.
• Put the disc back in its case after use to prevent warping.
• Becareful not to scratch the surface of the disc when placing it back in its case.
• Avoid exposure to direct sunlight, temperature extremes, and moisture.
To clean the disc
• Wipe the disc with a soft cloth in a straight line from center to edge.
• DO NOT use any solvent-such as conventional record cleaner, spray, thinner, or
benzine-to clean the disc.
HANDLING CASSETTE TAPES
• Ifthe tape is loose in its cassette, take up the slack by inserting apencil in one of the reels
and rotating.
• Ifthe tape is loose, it may get stretched, cut, or caught in the cassette.
• Becareful notto touch the tape sudace.
• Avoid storing tapes in any of the following places:
- In dusty places
- In direct sunlight or heat
- In moist areas
- On a TV or speaker
- Near a magnet
CLEANING THE TAPE HEADS
Clean the heads after every 10 hours of use with a wet-type head cleaning tape (available atelectronic
and audio shops).
Pinch roller Head
Capstan _ _, (_ Erasure head
Problem Solution
• Make sure the power cord is securely plugged into the AC power
System does not turn on. outlet (or that the batteries are fresh).
• Unplug the unit for a moment, and then plug it back in again.
• Check the outlet by plugging in another device.
• Adjust the volume setting.
No sound • Make sure you have selected the correct function: CD, TAPE, or
TUNER and the headphones are disconnected.
• Adjust the FM telescopic antenna for better FM reception.
Poor radio reception • Rotate the unit to achieve better AM reception.
• Try turning off electrical appliances near the unit, such as TV, hair
dryers, vacuum cleaners, or fluorrescent lights.
• Make sure the tray contains a CD.
CD does net play. • Make sure the CD's label is facing up.
• Make sure that pause mode is not activated.
• Make sure the CD function is selected.
• Clean the CD (as explained in "CARE AND MAINTENANCE").
CD sound skips. • Check the CD for warping, scratches, or other damage.
• Check for vibration or shock that may affect the unit; move system if
necessary.
Distorted or noisy • Inspect the recording head and clean it if necessary.
recordings
Resetting the unit
If "TROUBLESHOOTING" does not eliminate malfunctioning (failure to operate or display properly, etc.),
press and hold the RESET button on the rear of the unit for 2 to 3seconds with something having a sharp
point, while the AC power cord is plugged off and the batteries are removed from the unit if inserted.
Sharp point
Note:
Resetting causes the unit to restore its factory default settings and results in all the settings made by the
user being deleted.
Compact disc pJa3zersection
Type
Signal detection
Number of channels
Radio section
Frequency ranges
Antennas
Cassette deck section
Track
Motor
Heads
Fastwind time
General
Speaker
Poweroutput
Output terminals
Power supply
Power consumption
Dimentions
Mass
Accessories provided
Compact disc player
Non-contact optical pick-up (semicondicator lazer)
2 channels
FM 87.5 MHz - 108.0 MHz
AM 520 kHz- 1 710 kHz
Telescopic antenna for FM
Ferrite core antenna for AM
4-track 2-channel stereo
Electronic governor DC motor for capstan
Hard permalloy head for recording/playback, magnetic head for erase
Approx. 120 sec. (C-80 cassette)
10 cm x 2 (4 _,>,3W)
2 W per channel, min. RMS, driven into 4 d2at 1 kHz with no more
than 10 % total harmonic distortion
PHONES x 1 (¢d3.5 mm, stereo)
AC 120 V %, 60 Hz
DC 12 V ("R20/D (13F)" cells x 8)
17 W (at operation)
1.5 W (at standby)
435 mm (W) x 158 mm (H) x 241 mm (D)
(173/1_in x 6_/1_ inx 91/1_ in)
Approx. 2.8 k_ (6.2 Ibs) (without batteries)
AC power cord x 1
Remote control unit x 1
Design and specifications are subject to change without notice.
Page 3

JVC
CD PORTABLE SYSTEM
RC-EZ32S
ENGLISH
OIGITAL AUDIO
INSTRUCTIONS
ForCustomer Use:
Enter below the Model No. and Serial No.
which are located either onthe rear, bot-
kbm or side of the cabinet. Retain this
intormation forfuture reference.
Model No.
Serial No.
Thank you for purchasing this JVC product.
Please read these instructions carefully before starting operation to be sure to
obtain optimum performance and a longer service life from the unit.
601-EZ3200-010
LVTt525-001B
[JiC]
CAUTION
DONOTEXPOSETO RAINORMOISTURE
NEPASEXPOSERA LAPLUIENI AL'HUMIDITE
ATTENTION:RiSQUEDECHOCELECTRiQUE,NEPASOUVRIR
The lightning flash with arrowhead symbol, within anequilateral triangle is intended to alert the user
to the presence of uninsulated "dangerous voltage" within the product's enclosure that may be of
sufficient magnitude to constitute a risk of electric shock to persons.
The exclamation point within an equilateral triangle is intended to alert the user to the presence of
important operating and maintenance (servicing) instructions in the literature accompanying the
appliance.
For U.S.A.
This equipment has been tested and found to comply with the limits fora Class B digital device, pursuant to
part 15 of the FCC Rules.
These limits are designed to provide reasonable protection against harmful interference in a residential
installation.
This equipment generates, uses and can radiate radio frequency energy and, ifnot installed and used in
accordance with the instructions, may cause harmful interference to radio communications. However, there
is no guarantee that interference will not occur in a particular installation. If this equipment does cause
harmful interference to radio or television reception, which can be determined by turning the equipment off
and on, the user is encouraged to try to correct the interference byone or more of the following measures:
Reorient or relocate the receiving antenna.
increase the separation between the equipment and receiver.
Connect the equipment into an outlet on a circuit different from that to which the receiver is connected.
Consult the dealer or anexperienced radio/TV technician for help.
CAUTION
ChaRges or modification not approved by JVC could void the user's authority to operate this equipment.
For Canada:
This Class B digital apparatus complies with Canadian ICES-003. j
J
Oct appareil num_rique de Ja classe B est conforme & Janorme NMB-003 du Canada.
Caution -- O/I STANDBY/ON switch!
Disconnect the mains plug to shut the power off completely.The t,_)/I STANDBY/ON switch inany position
does not disconnect the mains line.The power can be remote controlled.
CAUTION
To reduce the risk of electrical shocks, fire, etc.:
1. Do not remove screws, covers or cabinet.
2. Do notexpose this appliance to rain or moisture.
3. To disconnect power from the mains, pull out the mains plug.
When installing the product, ensure that the plug is easily accessible.
iMPORTANT FOR LASER PRODUCTS
1. CLASS 1 LASER PRODUCT
2. CAUTION: Invisible laser radiation when open and interlock failed or defeated. Avoid direct exposure to
beam.
3. CAUTION: Do notopen the top cover.There are no userserviceable parts inside the Unit; leave all servicing
toqualified service personnel.
,.IVC
EN
© 2005 Victor Company of Japan, Limited
1105KMMBICMTS
!i!i!i!i!i!i!i!Ti!iiii!li!li!i!!iI!;i!!;
POWER SUPPLY
This CD portable system operates ORbattery or AC power.
BATTERY POWER
Insert eight D-sized alkaline batteries (not supplied) and you
can take your system just about anywhere. Open the battery
compartment cover ORthe back of the unit by pressing down
the two tabs. Insert batteries as marked on the unit.
important battery information
• If you are Rot going to use the unit for a month or more, be
sure to remove batteries because they can leak and cause
damage.
FM telescc )ic antenna
BEAT CUT PHONES
__=_ _ =
Batterycompartment AC IN %
• Dispose of batteries inthe proper manner, according to federal, state, and local regulations.
• Discard leaky batteries immediately. Leaking batteries can cause skin burns or other personal injury.
AC POWER
Plug the AC power cord into the AC IN '% jack ORthe back of the unit, and into an AC power outlet.
For Your Safety
The AC power plug is polarized (one blade is wider than the other) and only fits into AC
power outlets OReway. If the plug will notgo into the outlet completely, turn the plug over and AcJN
try to insert it the other way. If itwill not still fit, contact a qualified electrician to change the t
outlet, or use a different ORe. Donot attempt to bypass this safety feature.
CAUTIONS:
1. ONLY USE JVC POWER CORD PROVIDED WITH THIS UNIT TO AVOID
MALFUNCTION ORDAMAGETOTHE UNIT. REMOVE BATTERIES WHEN USINGTHE
POWER CORD.
2. BE SURETO UNPLUGTHE POWER CORD FROMTHE OUTLETWHEN GOING OUT _,
OR WHEN THE UNIT IS NOT IN USE FOR AN EXTENDED PERIOD OFTIME. ACoutlet
ANTENNAS
The AM antenna is built in, so adjusting the position of the unit may help AM reception. The FM telescopic
antenna on the back of the unit can be extended and rotated for better FM reception.
STANDBY/ON d)/! button - Press STANDBY/ON d)/! to turn on the unit.
Function buttons - Press TUNER, TAPE or_/11 to select the tuner, tape or CD function.
VOLUME buttons - Press UP or DOWM of the volume buttons to increase or decrease the volume.
HBS button - Press HBS to get the hyper bass sound effect.
PRESET EQ button - Press PRESET EQ to select the equalizer FLAT, ROCK, JAZZ, POP or CLASSIC.
MUTING button - Press MUTING to temporarily turn the sound off, to restore, press MUTING again.
Before operating the unit any further, first set the clock.
1. Press STANDBY/ON Lb/!to turn off the unit, if it isturned on.
The clock indication appears OR the display window.
2. Press PROGRAM/CLOCK SET, the hour digits start flashing.
3. Press _ or _-I to set the hour, then press PROGRAM/CLOCK SET. The minute digits start flashing.
4. Press I_ or_s_,4to set the minutes, then press PROGRAM/CLOCK SET.
TUNING TO A RADIO STATION
1. PressTUNER to enter the tuner mode.
2. PressTUNER toselect the band, PM or AM.
3. Tune in a desired station by pressing I_-,_ or _,-_,4.
4. Toturn the radio off, press STANDBY/ON d)/|.
PRESETTING STATIONS
You can preset 20 FM and 12 AM stations.
1. PressTUNER to select the band, PM or AM.
2. Tune ina desired station to preset by pressing I_,S_or _4.
3. Press PROGRAM/CLOCK SET.
"- -" flashes on the display.
4. Press PRESET/REPEAT repeatedly to select apreset number. The selected number flashes.
5. Press PROGRAM/CLOCK SET.
The station with the preset number isstored in the memory.
6. Repeat steps 2 to 5to preset other stations, allocating a different preset number to each.
TUNING iN A PRESET STATION
After selecting the band, FM or AM, press PRESET/REPEAT repeatedly until the desired preset number appears.
Note: Ifthe unit is unplugged or apower failure occurs, the preset stations will be erased from the memory. Ifthis
happens, you need to preset the stations again.
BEAT CUT SWITCH
When recording an AM station, beats may occur. If this happens, switch the BEAT
CUT switch position to "1" or"2".
FM MODE BUTTON
When an FM stereo broadcast is hard to receive or noisy,press FM MODE."MONO"
appears on the display window. Reception improves.
To restore stereo reception, press FM MODE again. "MONO" disappears from the
display window.
1 2
BEAT CUT
PAUSE STOP/EJECT FF REW PLAY REC
REC • - Press to record from the radio or CD player.
PLAY -_ - Press to play a cassette.
REW _ - In stop mode, press to rewind the tape toward the beginning.
FF _ - In stop mode, press to advance the tape toward the end.
STOP/EJECT _/_ - Press to stop current tape activity, orto open the cassette compartment door when no
buttons are active.
PAUSE H - Press to interrupt tape play orrecord mode. Press again to resume tape play or tape record mode.
PLAYING A CASSETTE TAPE
1. PressTAPE toenter the tape mode.
2. Press STOP/EJECT _/,_ to open the cassette compartment door.
3. Insert acassette tape into the compartment with the open edge up and the playback side facing out.
4. Close the door securely.
5. Press REW _ or FF -,_-_to move the tape to the desired starting point.
6. Press PLAY -,_to begin playing the tape. Playback continues until the tape reaches the end of the side, then
automatically stops.
RECORDING ON A CASSETTETAPE
You can record from the radio orthe CD player.
For best recording, use a normal bias tape.
it should be noted that it may be unlawful to re-record pre-recorded tapes, records, or discs without
the consent ofthe owner of copyright in the sound or video recording, broadcast or cable program
and in any literary, dramatic, musical, orartistic work embodied therein.
ERASE PROTECTION
When you record new material, the cassette deck records over
_*_ _, whatever is on the tape. To protect a tape from accidental
_ erasure, break off one or both plastic tabs (one for each tape
side) of the cassette tape. Ifyou decide later to record on the
tape, seal the hole with a piece of cellophane tape.
WARNING
A little bit of slack in your tape can cause scratches on the tape, or worse yet, the tape
could break. If you notice some slack inthe tape, use a pencil to tighten it up before you
insert the tape inthe cassette compartment.
NOTE
Use of tapes longer than 120 minutes is not recommended, since characteristic deterioration may occur and
these tapes easily jam in the pinch roller and the capstan.
RECORDING FROM THE RADIO
1. Insert acassette tape into the cassette deck and close the door.
2. PressTUNER, thenpress I_ or_ to tune a radio station.
3. Press REC _ to begin recording. Both REC _ and PLAY -_ lock down.
4. Press STOP/EJECT _/_ toend recording.
5. To turn off the radio, press STANDBY/ON Eb/[
RADIO RECORDING TiPS
To temporarily pause recording, press PAUSE n. Press PAUSE H again to resume recording.
SYNCHRONIZED RECORDING FROM A CD
1. Insert acassette tape into the cassette deck and close the door.
2. Press _/H.
3. insert the CD you want to record into the CD compartment.
4. Select the track you want to record by pressing _ or _,_-I. Then press REC ®.
TIP
Pressing PAUSE H instead of STOP/EJECT m/,_ to momentarily interrupt recording gives you a much cleaner
sound recording.
#_ ::iiiiii_i iii i ii_i_iii___,7,iii;¢¢¢¢¢¢¢¢¢¢¢¢¢¢¢@2¸¸¸;¸;¸¸¸;"
ilililililililiiii_7_iT_TiT_7_i_i_l_i__!_i__i!_i!_i!_i!_i!_i!_i!_i!_i!_i!_i!_i!_i!_i!_i!_i!_i!_i!_i!_i!_i!_i!_i!_i!_i!_i!_i!_i!_i!_i!_i!_i!_i!_7_!!!i7_!l__i_
STAN DBY/ON _)/|
VOLUME
I,_I_I(SKIP/SEARCH) PUSH PROGRAM/CLOCK SET
PRESET/REPEAT
•JVl= FM MODE
PRESET EQ
HBS MUTING RANDOM Display _(STOP) I_/11 I_I(SKIP/SEARCH)
PLAYING A CD
1. Press _./11."-..... "flashes, and then "no d IS[" appears in thedisplay if nodisc is loaded.
2. Press _ PUSH to open the CD compartment cover.
3. Place aCD with thelabel side facing up.
4. Close the CD compartment cover. The total number of tracks and total playing time of the disc appear in the
display.
5. Press 1_/11.Playback starts from track 1.The current track number and elapsed playing time appears in the
display.
Elapsed playing time
!
Current track number
To pause playback, press li_/ll. The elapsed playing time flashes in the display. Press _/11 again to resume
playback.
To stop playback, press I. Wait a few seconds for the disc to stop turning completely, and then remove the disc.
To remove the disc, open the CD compartment cover, and carefully pull itout.
SKiP
The skip function lets you quickly locate the beginning of anytrack on the CD,including the track currently being
played.
During playback:
• Press b',_-'_once to return to the beginning of the current track.
• Press I-,_ twice inrapid succession to return to the beginning of the previous track.
• Press _-I toskip to the beginning of the next track.
In stop mode:
Press I_-,_ or _l_d repeatedly until the desired track number is displayed, and then press _/11. Playback starts
from the selected track.
SEARCH
• During playback, press and hold _ to move forward through a disc at high speed.
• During playback, press and hold _ to move back through adisc at high speed.
REPEAT PLAY
The PRESET/REPEAT button allows you toplay the current track, all thetracks ORthe CD or theentire program
repeatedly. Each time you press PRESET/REPEAT, check the display to see which choice you have selected.
,, When "REPEAT" flashes inthe display:
The current track isplayed repeatedly.
* When "REPEAT" lights up continuously in the display:
All the tracks on the CD or the entire program are played repeatedly.
RANDOM PLAY
In CD mode, press RANDOM so that "RANDOM" appears in the display. Tracks are played in random order. To
quit random playback, press RANDOM again.
PROGRAM PLAY
1. In stop mode, press PROGRAM/CLOCK SET to enter program create mode. "PROGRAM" and "Pr:01 --"
appear inthe display.
2. Press _ or _,-_-Itoselect a track number.
3. Press PROGRAM/CLOCK SET to store the selected track number in the program.
4. Repeat steps 2 and 3.
You can store up to 18 tracks in the program. If you select more than 18 tracks, programmed tracks are
overwritten from the first track.
5. Press _/H to start program play.
To confirm the order of programmed tracks, press PROGRAM/CLOCK SET in stop mode.
To clear the program, press I, in stop mode. "PROGRAM" disappears from the display.
PLAYING A CD-R OR CD-RW
User-edited CD-Rs (Recordable) and CD-RWs (Rewritable) can be played only ifthey are already "finalized."
• You can playyour original CD-Rs or CD-RWs recorded in music CD format. (However, they may not be played
depending on their characteristics or recording conditions.)
• Before playing CD-Rs or CD-RWs, read their instructions and cautions carefully.
• Some CD-Rs and CD-RWs may not be played on this unit because of their disc characteristics, damage or
stain on them, or if the player's lens isdirty.
• CD-RWs may require a longer readout time. (This is caused by the fact that the reflectance of CD-RWs is
lower than that of regular CDs.)
Caution for DualDisc playback
The Non-DVD side of a"DualDisc" does not comply with the "Compact Disc Digital Audio" standard. Therefore,
the use of Non-DVD side of a DualDisc on this product may not be recommended.
CLEANING THE EXTERIOR
Disconnect the unit from AC power before cleaning the exterior of the unit with a soft dust cloth.
HANDLING CDS
, Do not touch the signal surfaces. Hold bythe edges, or byone edge and the hole.
• Do not affix labels or adhesive tape to the label surfaces. Also, do not scratch or damage the label.
• Discs rotate at high speed inside the player. Do not use damaged (cracked or warped) discs.
CLEANING CDS
• Dirty discs CaRcause sound-skip. Always keep discs clean by wiping them gently with a soft cloth from the
inner edge toward the outer perimeter.
• If adisc becomes dirty, wet asoft cloth in water, wring itout well, wipe the dirt away gently, and then remove
any water drops with a dry cloth.
• Do not use record cleaning sprays orantistatic agents on discs. Also, never clean discs with benzene, thinner,
or other volatile solvents which may cause damage to the disc surface.
TAPE CARE
• Do not expose tapes to sunlight or store them in hot places. High temperatures may warp the shell or damage
the tape itself.
• Keep cassettes in their boxes when not inuse.
• Cassette tapes can be erased by magnetic fields produced by magnets, electric motors, electrical transformers,
and other devices. Keep tapes away from magnets and magnetic fields.
CLEANING THE TAPE HEADS
Iron oxide particles from the magnetic tape build up on the parts that come in contact with the tape. These
deposits can cause incomplete erasure, muffled playback sound, and might prevent automatic stop.
Toclean the cassette deck, open the cassette compartment door, push the PLAY -_button and gently clean the
heads, capstan, and pinch roller with ahead cleaner.
Always unplug the ACpower cord before cleaning, and allow 30 minutes drying time after using aliquid cleaner.
Clean the heads after every 25 hours of use.
• Never use any metal objects on or near the tape heads.
• Do not allow any cleaning material to fallinto the tape assembly.
STANDBY/ON _/I
TAPE
CD I'/11
I_I_I(SKIP/S EARCH)
RANDOM
PRESET/REPEAT
FM MODE
EQ
MUTING
III _(STOP)
(SKIP/SEARCH)
Problem Solution
, Make sure the AC power cord is securely plugged into an AC
The unit doesn't turn on power outlet (or that the batteries are fresh).
, Unplug the unit for a moment, and then plug it back in again.
, Check the outlet by plugging in another device.
, Adjust the volume setting.
No sound , Make sure you have selected the correct function: CD, TAPE, or
TUNER, and headphones are disconnected.
, Adjust the FM telescopic antenna for better FM reception.
Poor radio reception , Rotate the unit to achieve better AM reception.
, Try turning off electrical appliances near the unit, such as TV, hair
dryers, vacuum cleaners, or fluorrescent lights.
, Make sure the tray contains a CD.
, Make sure the CD's label isfacing up.
CD doesn't play , Make sure that pause mode is not activated.
, Make sure the CD function is selected.
, Clean the CD (as explained in "CARE AND MAINTENANCE").
CD sound skips , Check the CD for warping, scratches, or other damage.
, Check for vibration or shock that may affect the unit; move the unit
if necessary.
Distorted or noisy , Inspect the recording head and clean it if necessary.
recordings
HOWTO RESETTHE UNiT
If normal operations are disabled, reset the unit as follows:
1. Turn off the unit.
2. Press the RESET key on the back of the unit with the tip of small screwdriver or similar tool.
Sharp point
3. Turn on the unit.
The clock setting and preset AM/FM stations will be lost when the RESET key is pressed.You need to set the
clock and preset AM/FM stations again.
Compact disc player section
Type Compact disc player
Signal detection Non-contact optical pick-up (semicondicator lazer)
Number of channels 2 channels
Radio section
Frequency ranges
Antennas
Cassette deck section
Track
Motor
Heads
Fast wind time
General
Speaker
Power output
Output terminals
Power supply
Power consumption
Dimentions
Mass
Accessories provided
FM 87.9 MHz - 107.9 MHz
AM 520 kHz- 1 710 kHz
Telescopic antenna for FM
Ferrite core antenna for AM
4-track 2-channel stereo
Electronic governor DC motor for capstan
Hard permalloy head for recording/playback, magnetic head for erase
Approx. 120 sec. (C-60 cassette)
10cm x2 (4 £_,3W)
2W per channel, min. RMS, driven into 4 _)at 1 kHz with no more than 10
% total harmonic distortion
PHONES x 1 (_ 3.5 mm, stereo)
AC 120 V %, 80 Hz
DC 12 V ("R20/D (13F)" cells x8)
17W (at operation)
1.5W (at standby)
435 mm (W) × 156 mm (H) ×241 mm (D)
(173/_ in x 8_/_ in x 9Vm in)
Approx. 2.8 k# (8.2 Ibs) (without batteries)
AC power cord × 1
Remote control unit × 1
Design and specifications are subject to change without notice.
Page 4

JVC
CD PORTABLE SYSTEM
RC-EZ315
ENGLISH
DIGITAL AUDIO
iNSTRUCTiONS
For Customer Use:
Enter below the Model No. and Serial No.
which are located either on the rear, bot =
tom or side of the cabinet. Retain tMs
information for future reference.
Model No.
Serial No.
Thank you for purchasing this dVC product.
Please read these instructions carefully before starting operation to be sure to
obtain optimum performance and a longer service lifefrom the unit.
601-EZ3100-040
LVTt524-004C
[d/C]
CAUTION
DONOT EXPOSETO RAINORMOISTURE
NEPAS EXPOSER,_LA PLUIENI AL'HUMIDITE
ATTENTION:RISQUEDECHOCELECTRIQUE,NEPASOUVRIR
The lightning flash with arrowhead symbol, within an equilateral triangle isintended to alert the user
to the presence of uninsulated "dangerous voltage" within the product's enclosure that may be of
sufficient magnitude to constitute a risk of electric shock to persons.
The exclamation point within an equilateral triangle is intended to alert the user to the presence of
important operating and maintenance (servicing) instructions in the literature accompanying the
appliance.
For U.S.A.
This equipment has been tested and found to comply with the limits for a Class B digital device, pursuant to
part 15of the FCC Rules.
These limits are designed to provide reasonable protection against harmful interference in a residential
installation.
This equipment generates, uses and can radiate radio frequency energy and, if not installed and used in
accordance with the instructions, may cause harmful interference toradio communications. However, there
is no guarantee that interference will not occur in a particular installation. If this equipment does cause
harmful interference to radio or television reception, which can be determined byturning the equipment off
and on, the user is encouraged to try to correct the interference by one or more of the following measures:
Reorient or relocate the receiving antenna.
increase the separation between the equipment and receiver.
Connect the equipment into an outlet on a circuit different from that to which the receiver is connected.
Consult the dealer or an experienced radio/TV technician for help.
CAUTION
Changes or modification not approved by JVC could void the user's authority to operate this equipment.
For Canada:
This Class B digital apparatus complies with Canadian ICES-003,
Cet appareil num_rique de la classe B est conforme _ la norme NMB-003 du Canada.
I WARNING: TO REDUCE THE RISK OF FIRE OR ELECTRIC SHOCK,
DO NOT EXPOSE THIS APPLIANCE TO RAIN OR MOISTURE.
Caution -- (_ OFF switch!
Disconnect the mains plug to shut the power off completely.The switch in any position does not disconnect
the mains line.
CAUTION
To reduce the risk of electrical shocks, fire, etc.:
1. Do not remove screws, covers or cabinet.
2. Do not expose this appliance to rain or moisture.
3. To disconnect power from the mains, pull out the mains plug.
When installing theproduct, ensure that the plug is easily accessible.
iMPORTANT FOR LASER PRODUCTS
1. CLASS 1 LASER PRODUCT
2. CAUTION: Invisible laser radiation when open and interlock failed or defeated. Avoid direct exposure to
beam.
3. CAUTION: Do not open the top cover.There are no user serviceable parts inside the Unit; leave all servicing
to qualified service personnel.
,_ EN
© 2005 Victor Company of Japan, Limited
1105KMMBICMTS
POWER SUPPLY
This CD portable system operates on battery or AC power.
BATTERY POWER
Insert eight D-sized alkaline batteries (not supplied) and you
can take your system just about anywhere. Open the battery
compartment cover on the back of the unit by pressing down
the two tabs. Insert batteries as marked on the unit.
important battery information
• Ifyou are not going to use the unit for a month or more, be
sure to remove batteries because they can leak and cause
damage.
FM telesco )icantenna
BEAT CUT PHONES
I
Batterycompartment AC IN %
• Dispose of batteries inthe proper manner, according to federal, state, and local regulations.
• Discard leaky batteries immediately. Leaking batteries can cause skin burns or other personal injury.
AC POWER
Plug the AC power cord into the AC IN % jack on the back of the unit, and into an AC power outlet.
For Your Safety
The AC power plug is polarized (one blade is wider than the other) and only fits into AC
power outlets one way. If the plug will not go into the outlet completely, turn the plug over and ACJ,
try to insert it the other way. If it will not still fit, contact a qualified electrician to change the t
outlet, or use a different one. Do not attempt to bypass this safety feature.
CAUTIONS:
1, ONLY USE JVC POWER CORD PROVIDED WITH THIS UNIT TO AVOID
MALFUNCTION OR DAMAGETOTHE UNIT, REMOVE BATTERIESWHEN USINGTHE
POWER CORD,
2. BE SURETO UNPLUGTHE POWER CORD FROMTHE OUTLETWHEN GOING OUT _.
OR WHEN THE UNIT IS NOT IN USE FOR AN EXTENDED PERIOD OFTIME. ACoutlet
ANTENNAS
The AM antenna is built in, so adjusting the position of the unit may help AM reception. The FM telescopic
antenna on the back of the unit can be extended and rotated for better FM reception.
FUNCTION Switch - Move the switch to select the TUNER, TAPE or CD function.
Move the FUNCTION switch to TAPE / t_ OFF position with no cassette buttons pressed, to turn the unit off.
VOLUME knob -Turn the volume knob to increase or decrease thevolume.
TUNING TO A RADIO STATION
1. Move tile FUNCTION switch to TUNER to turn the radio on.
2. Set the BAND switch to FM or AM.
3. Tune to a desired station by turning the TUNING wheel knob.
4. To turn off the radio, move the FUNCTION switch to TAPE / q_)OFR
BEAT CUT SWITCH
The BEAT CUT switch is also used for changing the FM reception mode.
• Recording an AM station
When recording an AM broadcast, beats may occur. If this happens, switch the
BEAT CUT switch position to "1"or "2".
• Changing the FM reception mode
When an FM stereo broadcast is hard to receive or noisy, switch to "2" (MONO).
Reception improves.
To restore stereo reception, switch to "1".
FMST_ MONO
1 2
BEAT CUT
Q®QQQQ
PAUSE STOP/EJECT FF REW PLAY REC
REC • - Press to record from the radio or CD player.
PLAY _ - Press to play a cassette.
REW _ - In stop mode, press to rewind the tape toward the beginning.
FF -_-_ - Instop mode, press to advance the tape toward the end.
STOP/EJECT m/,_ - Press to stop current tape activity, or to open the cassette compartment door when no
buttons are active.
PAUSE |l - Press to interrupt tape play or record mode. Press again to resume tape play or tape record mode.
PLAYING A CASSETTETAPE
1. Move the FUNCTION switch toTAPE / t_ OFR
2. Press STOP/EJECT R/,_ toopen the cassette compartment door.
3. insert a cassette tape into the compartment with the open edge up and the playback sidefacing out.
4. Close the door securely.
5. Press REW _ or FF _ to move the tape to the desired starting point.
6. Press PLAY -_ to begin playing the tape. Playback continues until the tape reaches the end of the side, then
automatically stops.
RECORDING ON A CASSETTETAPE
You can record from the radio or the CD player.
For best recording, use a normal bias tape.
it should be noted that it may be unlawful to re-record pre-recorded tapes, records, or discs without
the consent of the owner of copyright in the sound or video recording, broadcast or cable program
and in any literary, dramatic, musical, orartistic work embodied therein.
ERASE PROTECTION
When you record new material, the cassette deck records
_D j_ _ over whatever ison the tape.To protect a tape from accidental
erasure, break off one or both plastic tabs (one for each tape
side) ofthe cassette tape. If you decide later to record on the
tape, seal the hole with a piece of cellophane tape.
A little bit of slack in your tape can cause scratches on the tape, or worse yet, the tape
could break. If you notice some slack in the tape, use a pencil to tighten it up before you
insert the tape inthe cassette compartment.
NOTE
Use of tapes longer than 120 minutes isnot recommended, since characteristic deterioration may occur and
these tapes easily jam in the pinch roller and the capstan.
RECORDING FROM THE RADIO
1. Insert a cassette tape into the cassette deck and close the door.
2. Move the FUNCTION switch to TUNER and tune to a radio station.
3. Press REC o to begin recording. REC ® and PLAY -_ both lock down.
4. Press STOP/EJECT _/A to end recording.
5. To turn off the radio, slide the FUNCTION switch to TAPE / (_ OFR
RADIO RECORDING TiPS
To temporarily pause recording, press PAUSE ||. Press PAUSE || again to resume recording.
SYNCHRONIZED RECORDING FROM A CD
1. Insert a cassette tape into the cassette deck and close the door.
2. Move the FUNCTION switch to CD.
3. insert the CD you want to record into the CD compartment.
4. Select the track you want to record by pressing _ (SKIP/SEARCH) or _ (SKIP/SEARCH). Then press
REC e.
TiP
Pressing PAUSE 11instead of STOP/EJECT w/A to momentarily interrupt recording gives you a much cleaner
sound recording.
FUNCTION I_I<(SKIP/SEARCH) PUSH I_/11
PROGRAM REPEAT Display re(STOP) _ (SKIP/SEARCH)
PLAYING A CD
1. Set tile FUNCTION switch to CD. "- -" flashes, andthen "00" appears in the display if no disc is loaded.
2. Press _ PUSH to open the CD compartment cover.
3. Place a CD with the label side facing up.
4. Close the CD compartment cover.The total number of tracks oil the disc appears in the display.
5. Press _/11. Playback starts from track 1.The current track number appears in the display.
To pause playback, press I-Ill. "_-" flashes in the display. Press _/11 again to resume playback.
To stop playback, press I, (STOP). Wait a few seconds for the disc to stop turning completely, andthen remove
the disc.
To remove the disc, open the CD compartment cover, and carefully pull it out.
SKiP
The skip function lets you quickly locate the beginning of any track on the CD, including the track currently being
played.
During playback:
,, Press I_'_ (SKIP/SEARCH) once to return to the beginning of the current track.
* Press E,_4 (SKIP/SEARCH) twice in rapid succession to return to the beginning of the previous track.
, Press _*_,4(SKIP/SEARCH) to skip to the beginning of the next track.
Instop mode:
Press I_ (SKIP/SEARCH) or I_ (SKIP/SEARCH) repeatedly until the display shows the desired track number,
and then press _/||. Playback starts from the selected track.
SEARCH
* During playback, press and hold _ (SKIP/SEARCH) to move forward through adisc at high speed.
* During playback, press and hold _ (SKIP/SEARCH) to move back through a disc at high speed.
REPEAT PLAY
The REPEAT button allows you to play the current track, all the tracks on the CD or the entire program repeatedly.
Each time you press REPEAT, check the display to see which choice you have selected.
o When "REP" flashes in the display:
The current track is played repeatedly.
o When "REP" lights up continuously in the display:
All the tracks on the CD or the entire program are played repeatedly.
PROGRAM PLAY
1. Instop mode, press PROGRAM to enter program create mode. "_" and "01" start flashing in the display.
2. Press I_ (SKIP/SEARCH) or _,¢_1(SKIP/SEARCH) to select a track number.
3. Press PROGRAM to store the selected track number in the program.
4. Repeat steps 2 and 3.
You can store up to 20 tracks in the program, if you select more than 20 tracks, programmed tracks are
overwritten from the first track.
5. Press _/|| to start program play.
To confirm the order of programmed tracks, press PROGRAM in stop mode.
To clear the program, press m(STOP) in stop mode. "D" disappears from the display.
PLAYING A CD-R OR CD-RW
User-edited CD-Rs (Recordable) and CD-RWs (Rewritable) can be played only if they are already "finalized."
• Youcan play your original CD-Rs or CD-RWs recorded in music CD format. (However, they may not beplayed
depending on their characteristics or recording conditions.)
• Before playing CD-Rs or CD-RWs, read their instructions and cautions carefully.
• Some CD-Rs and CD-RWs may not be played oil this unit because of their disc characteristics, damage or
stain on them, or if the player's lens is dirty.
• CD-RWs may require a longer readout time. (This is caused by the fact that the reflectance of CD-RWs is
lower than that of regular CDs.)
Caution for DualDisc playback
The Non-DVD side of a "DualDisc" does not comply with the "Compact Disc Digital Audio" standard. Therefore,
the use of Non-DVD side of a DualDisc on this product may not be recommended.
CLEANING THE EXTERIOR
Disconnect the unit from AC power before cleaning the exterior of the unit with a soft dust cloth.
HANDUNG CDS
* Do not touch the signal surfaces. Hold by the edges, or by one edge and the hole.
, Do not affix labels or adhesive tape to the label surfaces. Also, do not scratch or damage the label.
, Discs rotate at high speed inside the player. Do not use damaged (cracked or warped) discs.
CLEANING CDS
• Dirty discs can cause sound-skip. Always keep discs clean by wiping them gently with a soft cloth from the
inner edge toward the outer perimeter.
• Ifa disc becomes dirty, wet a soft cloth in water, wring it out well, wipe the dirt away gently, and then remove
any water drops with a dry cloth.
• Donot use record cleaning sprays or antistatic agents on discs. Also, never clean discs with benzene, thinner,
or other volatile solvents which may cause damage to the disc surface.
TAPE CARE
• Donot expose tapes to sunlight or store them in hot places. High temperatures maywarp the shell or damage
the tape itself.
• Keep cassettes in their boxes when not in use.
• Cassettetapescanbeerasedbymagnetic_e_dspr_ducedbymagnets_e_ectricm_t_rs_e_ectrica_transf_rmers_
and other devices. Keep tapes away from magnets and magnetic fields.
CLEANING THE TAPE HEADS
Iron oxide particles from the magnetic tape build up on the parts that come in contact with the tape. These
deposits can cause incomplete erasure, muffled playback sound, and might prevent automatic stop.
To clean the cassette deck, open the cassette compartment door, push the PLAY -_ button and gently clean the
heads, capstan, and pinch roller with a head cleaner.
Always unplug the AC power cord before cleaning, and allow 30 minutes drying time after using a liquid cleaner.
Clean the heads after every 25 hours of use.
* Never use any metal objects on or near the tape heads.
, Do not allow any cleaning material to fall into the tape assembly.
I,-/11
PROGRAM
(SKIP/SEARCH)
SKIP/SEARCH)
Problem Solution
, Make sure the AC power cord is securely plugged into an AC
power outlet (or that the batteries are fresh).
The unit doesn't turn on
, Unplug the unit for a moment, and then plug it back in again.
, Check the outlet by plugging in another device.
, Adjust the volume setting.
No sound , Make sure you have selected the correct function: CD, TAPE, or
TUNER, and headphones are disconnected.
, Adjust the FM telescopic antenna for better FM reception.
Poor radio reception , Rotate the unit to achieve better AM reception.
, Try turning off electrical appliances near the unit, such as TV, hair
dryers, vacuum cleaners, or fluorrescent lights.
, Make sure the tray contains a CD.
, Make sure the CD's label is facing up.
CD doesn't play , Make sure that pause mode is not activated.
, Make sure the CD function is selected.
, Clean the CD (as explained in "CARE AND MAINTENANCE").
CD sound skips , Check the CD for warping, scratches, or other damage.
, Check for vibration or shock that may affect the unit; move the unit
if necessary.
Distorted or noisy , Inspect the recording head and clean it if necessary.
recordings
Compact disc player section
Type Compact disc player
Signal detection Non-contact optical pick-up (semicondicator lazer)
Number of channels 2 channels
Radio section
Frequency ranges
Antennas
FM 88 MHz- 108 MHz
AM 530 kHz - 1 700 kHz
Telescopic antenna for FM
Ferrite core antenna for AM
Cassette deck section
Track
Motor
Heads
Fast wind time
4-track 2-channel stereo
Electronic governor DC motor for capstan
Hard permalloy head for recording/playback, magnetic head for erase
Approx. 120 sec. (C-60 cassette)
General
Speaker
Power output
Output terminals
Power supply
Power consumption
Dimentions
Mass
Accessories provided
10 cm x2 (4 £_,3W)
2 W per channel, Tin. RMS, driven into 4 £_at 1 kHz with no more than 10
% total harmonic distortion
PHONES × 1 (® 3.5 ram, stereo)
AC 120V %, 60 Hz
DC 12 V ("R20/D (13F)" cells × 8)
17 W (at operation)
1.5 W (at standby)
435 mm (W) × 156 mm (H) ×241 mm (D)
(173/_6in × 63/16in × 9 Vmin)
Approx. 2.8 kg (6.2 Ibs) (without batteries)
AC power cord x 1
Remote control unit × 1
Design and specifications are subject to change without notice.
 Loading...