

Page 1
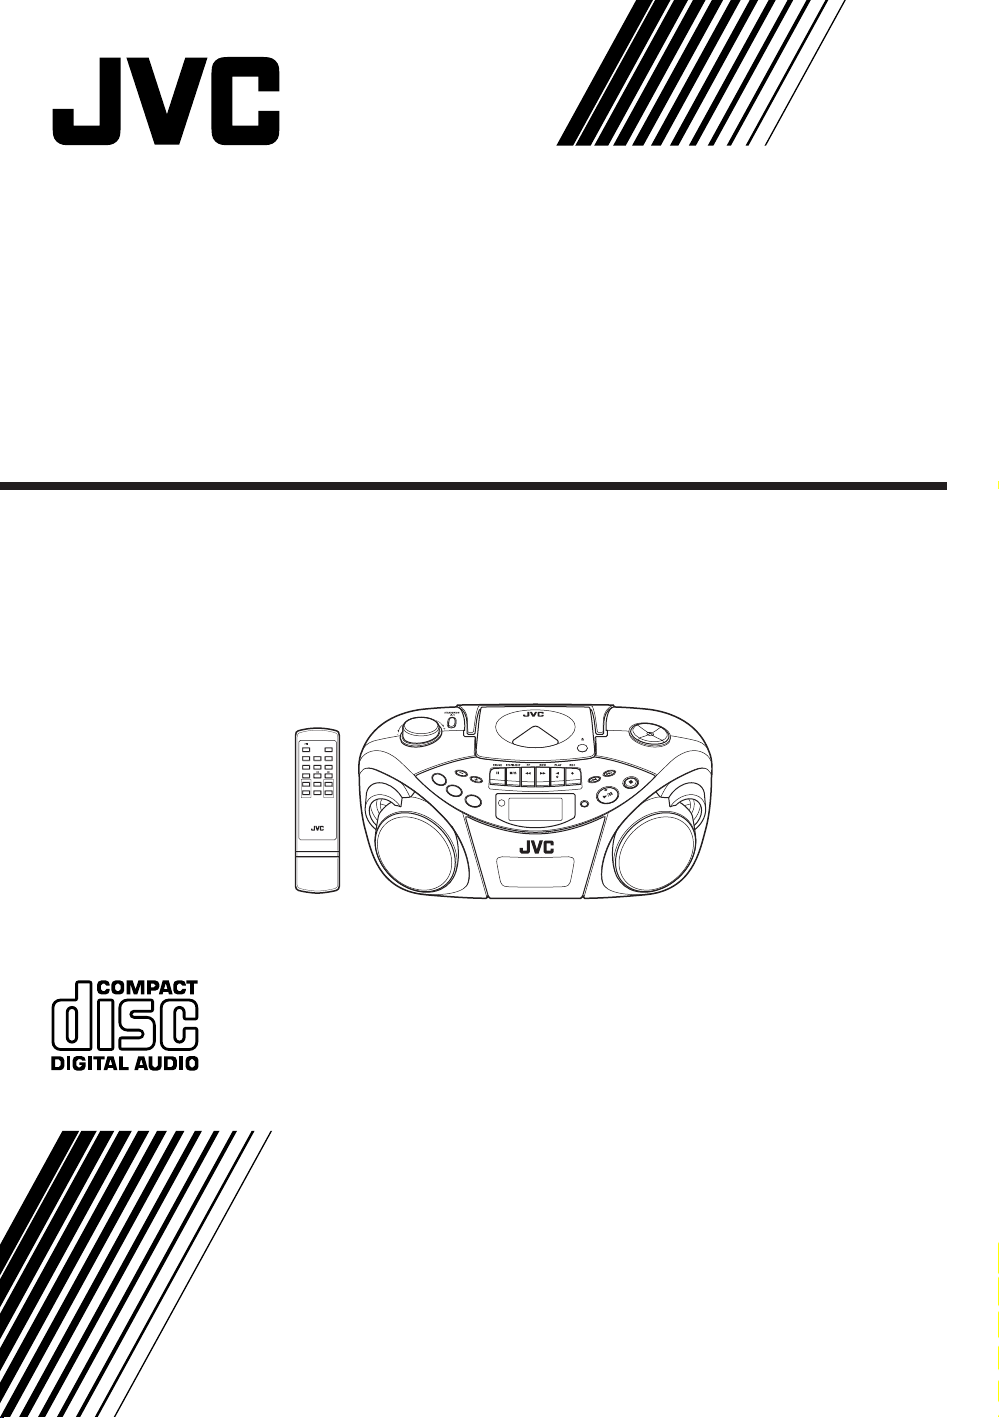
CD PORTABLE SYSTEM
CD-PORTABLE-SYSTEM
CHAINE PORTABLE A CD
DRAAGBAAR CD-SYSTEEM
SISTEMA PORTATIL CON CD
SISTEMA PORTATILE CON LETTORE CD
RC-EX25S
STANDBY/ON DISPLAY
TUNER/
CD/
BAND
TAPE
RANDOM
CD PLAY
/PAUSE
INTRO STOP
FM MODE
HBS/
CD REPEAT/
+
PRESET EQ
MUTING
–
RM-SRCEX25A REMOTE CONTROL
+
VOLUMEPRESET
–
PRESET
TAPE
RANDOM
CD REPEA
T
CD
TUNER
REMOTE
SENSOR
BAND
M
U
TIN
G
F
M
M
O
D
E
P
R
O
G
R
A
M
/
C
L
O
C
K
S
E
T
A
d
d
"
/"
HB
S/
PRE
S
ET E
PUSH
PLAY/PAUSE
DISPLAY
Q
STOP
INSTRUCTIONS
BEDIENUNGSANLEITUNG
MANUEL D’INSTRUCTIONS
GEBRUIKSAANWIJZING
MANUAL DE INSTRUCCIONES
ISTRUZIONI
LVT1212-004B
[E]
Page 2

Warnings, Cautions and Others
Warnung, Achtung und sostige Hinweise
Mises en garde, précautions et indications diverses
Waarschuwingen, voorzorgen en andere mededelingen
Avisos, Precauciones y Varios
Simboli di avvertenza, attenzione e altri
Caution –– STANDBY/ON button!
Disconnect the mains plug to shut the power off
completely. The STANDBY/ON button in any position
does not disconnect the mains line.
Achtung — STANDBY/ON-Schalter!
Den Netzstecker aus der Steckdose ziehen, um die
Stromversorgung vollkommen zu unterbrechen. Der
Schalter STANDBY/ON unterbrichet in keiner Stellung die
Stromversorgung vollkommen.
Attention — Commutateur STANDBY/ON!
Déconnecter la fiche de secteur pour couper
complètement le courant. Le commutateur STANDBY/ON
ne coupe jamais complètement la ligne de secteur, quelle
que soit sa position.
CAUTION
To reduce the risk of electrical shocks, fire, etc.:
1. Do not remove screws, covers or cabinet.
2. Do not expose this appliance to rain or moisture.
ACHTUNG
Zur Verhinderung von elektrischen Schlägen,
Brandgefahr, usw:
1. Keine Schrauben lösen oder Abdeckungen enternen
und nicht das Gehäuse öffnen.
2. Dieses Gerät weder Regen noch Feuchtigkeit
aussetzen.
ATTENTION
Afin d’éviter tout risque d’électrocution, d’incendie, etc.:
1. Ne pas enlever les vis ni les panneaux et ne pas ouvrir
le coffret de l’appareil.
2. Ne pas exposer l’appareil à la pluie ni à l’humidité.
Voorzichtig — STANDBY/ON schakelaar!
Om de stroomtoevoer geheel uit te schakelen, trekt u de
stekker uit het stopkontakt. Anders zal er altijd een
geringe hoeveelheid stroom naar het apparaat lopen,
ongeacht de stand van de STANDBY/ON schakelaar.
Precaución –– Interruptor STANDBY/ON!
Desconectar el cable de alimentación para desactivar la
alimentación totalmente. Cualquiera que sea la posición
de ajuste del interruptor STANDBY/ON, la alimentación
no es cortada completamente.
Attenzione –– L’interruttore STANDBY/ON!
Disinserire la spina del cavo di alimentazione dalla presa
della rete elettrica per staccare completamente
l’alimentazione. L’interruttore STANDBY/ON in nessuna
posizione stacca la linea di alimentazione elettrica
principale.
Per l’Italia:
“Si dichiara che il questo prodotto di marca JVC è
conforme alle prescrizioni del Decreto Ministeriale
n.548 del 28/08/95 pubblicato sulla Gazzetta Ufficiale
della Repubblica Italiana n.301 del 28/12/95.”
VOORZICHTIG
Ter vermindering van gevaar voor brand, elektrische
schokken, enz.:
1. Verwijder geen schroeven, panelen of de behuizing.
2. Stel dit toestel niet bloot aan regen of vocht.
PRECAUCIÓN
Para reducir riesgos de choques eléctricos, incendio, etc.:
1. No extraiga los tornillos, las cubiertas ni la caja.
2. No exponga este aparato a la lluvia o a la humedad.
ATTENZIONE
Per ridurre il rischio di shock elettrici, incendi, ecc...
1. Non togliete viti, coperchi o la scatola.
2. Non esponete l’apparecchio alla piogggia e all’umidità.
– G-1 –
Page 3

CAUTION
• Do not block the ventilation openings or holes.
(If the ventilation openings or holes are blocked by a
newspaper or cloth, etc., the heat may not be able to
get out.)
• Do not place any naked flame sources, such as lighted
candles, on the apparatus.
• When discarding batteries, environmental problems
must be considered and local rules or laws governing
the disposal of these batteries must be followed strictly.
• Do not expose this apparatus to rain, moisture, drippimg
or splashing and that no objects filled with liquids, such
as vases, shall be placed on the apparatus.
ACHTUNG
• Blockieren Sie keine Belüftungsschlitze oder -
bohrungen.
(Wenn die Belüftungsöffnungen oder -löcher durch eine
Zeitung oder ein Tuch etc. blockiert werden, kann die
entstehende Hitze nicht abgeführt werden.)
• Stellen Sie keine offenen Flammen, beispielsweise
angezündete Kerzen, auf das Gerät.
•Wenn Sie Batterien entsorgen, denken Sie an den
Umweltschutz. Batterien müssen entsprechend den
geltenden örtlichen Vorschriften oder Gesetzen entsorgt
werden.
• Setzen Sie dieses Gerät auf keinen Fall Regen,
Feuchtigkeit oder Flüssigkeitsspritzern aus. Es dürfen
auch keine mit Flüssigkeit gefüllen Objekte, z. B. Vasen,
auf das Gerät gestellt werden.
ATTENTION
• Ne bloquez pas les orifices ou les trous de ventilation.
(Si les orifices ou les trous de ventilation sont bloqués
par un journal un tissu, etc., la chaleur peut ne pas être
évacuée correctement de l’appareil.)
• Ne placez aucune source de flamme nue, telle qu’une
bougie, sur l’appareil.
• Lors de la mise au rebut des piles, veuillez prendre en
considération les problèmes de l’environnement et
suivre strictement les règles et les lois locales sur la
mise au rebut des piles.
• N’exposez pas cet appareil à la pluie, à l’humidité, à un
égouttement ou à des éclaboussures et ne placez pas
des objets remplis de liquide, tels qu’un vase, sur
l’appareil.
VOORZICHTIG
• Zorg dat u de ventilatieopeningen en -gaten niet afsluit.
(Als de ventilatieopeningen en -gaten worden
afgesloten door bijvoorbeeld papier of een doek, kan er
hitte in het apparaat worden opgebouwd.)
• Zet geen bronnen met open vuur, zoals brandende
kaarsen, op het apparaat.
•Wees milieubewust en gooi lege batterijen niet bij het
huishoudelijk afval. Lege batterijen dient u in te leveren
met het KCA of bij een innamepunt voor batterijen.
• Stel dit apparaat niet bloot aan regen, vocht, drupwater
of spatwater en plaats geen enkel voorwerp waarin zich
een vlocistof bevindt, zoals een vaas, op het apparaat.
Gebruikte batterijen:
PRECAUCIÓN
• No obstruya las rendijas o los orificios de ventilación.
(Si las rendijas o los orificios de ventilación quedan
tapados con un periódico, un trozo de tela, etc., no se
podrá disipar el calor).
• No ponga sobre el aparato ninguna llama al
descubierto, como velas encendidas.
• Cuando tenga que descartar las pilas, tenga en cuenta
los problemas ambientales y observe estrictamente los
reglamentos o las leyes locales sobre disposición de las
pilas.
• No exponga este aparato a la lluvia, humedad, goteos o
salpicaduras. Tampoco ponga recipientes conteniendo
líquidos, como floreros, encima del aparato.
ATTENZIONE
• Evitare di ostruire le aperture o i fori di ventilazione con
giornali, indumenti etc., in quanto s’impedirebbe al
calore di fuoriuscire.
• Non collocare fiamme libere (es. candele accese)
sull’apparecchio.
• Le batterie devono essere smaltite nel rispetto
dell’ambiente, attenendosi ai regolamenti locali in
materia.
• Non esporre l’apparecchio a pioggia, umidità,
gocciolamenti e spruzzi d’acqua ed evitare di
sovrapporvi oggetti contenenti liquidi (vasi etc.).
– G-2 –
Page 4

IMPORTANT FOR LASER PRODUCTS
1. CLASS 1 LASER PRODUCT
2. CAUTION: Do not open the top cover. There are no
user serviceable parts inside the unit; leave all
servicing to qualified service personnel.
3. CAUTION: Visible and invisible laser radiation when
open and interlock failed or defeated. Avoid direct
exposure to beam.
4. REPRODUCTION OF LABEL: CAUTION LABEL,
PLACED INSIDE THE UNIT.
WICHTIG FÜR LASER-PRODUKTE
1. LASER-PRODUKT DER KLASSE 1
2. ACHTUNG: Die obere Abdeckung nicht öffnen. Das
Gerät enthält keine Teile, die vom Benutzer gewartet
werden können.Wartungen nur von qualifziertem
Fachpersonal durchführen lassen.
3. ACHTUNG: Sichtbare und unsichtbare Laserstrahlung
bei offenem Gerät und Defekt oder Umgehen der
Verriegelung. Setzen Sie sich dem Strahl nicht direkt
aus.
4. ANBRINGEN DES ETIKETTS: WARNHINWEIS-
ETIKETT, INNEN AM GERÄT ANGEBRACHT.
IMPORTANT POUR PRODUITS LASER
1. PRODUIT LASER CLASSE 1
2. ATTENTION: N’ouvrez pas le couvercle supérieur. Il n’y
a aucune pièce réparable par l’utilisateur à l’intérieur de
l’appareil; confiez toute réparation à un personnel
qualifié.
3. ATTENTION: Risque de radiations laser visible and
invisible quand l’appareil est ouvert et que le système
de verrouillage ne fonctionne pas ou a été mis hors
service. Évitez toute exposition directe au rayon.
4. REPRODUCTION DE L’ÉTIQUETTE: ÉTIQUETTE DE
PRÉCAUTION PLACÉE À L’INTÉRIEUR DE
L’APPAREIL.
BELANGRIJK VOOR LASERPRODUKTEN
1. KLASSE 1 LASERPRODUKT
2. VOORZICHTIG: Open de bovenste afdekking niet. Er
zijn geen door de gebruiker te repareren onderdelen in
het toestel; laat onderhoud en reparatie over aan
erkend onderhoudspersoneel.
3. VOORZICHTIG: Zichtbare en onzichtbare laserstraling
indien open en interlock defect of buiten werking
gesteld. Voorkom directe blootstelling aan de straal.
4. REPRODUCTIE VAN LABEL:
WAARSCHUWINGSLABEL IN TOESTEL
AANGEBRACHT.
IMPORTANTE PARA PRODUCTOS LÁSER
1. PRODUCTO LÁSER CLASE 1
2. PRECAUCIÓN: No abra la tapa superior. En el interior
de la unidad no hay piezas que pueda reparar el
usuario; encargue el servicio a personal técnico
cualificado.
3. PRECAUCIÓN: Radiación láser visible e invisible en
caso de apertura o con interbloqueo averiado o
defectuoso. Evite la exposición directa a los haces.
4. REPRODUCCIÓN DE LA ETIQUETA: ETIQUETA DE
PRECAUCIÓN, COLOCADA EN EL INTERIOR DE LA
UNIDAD.
AVVERTENZE IMPORTANTI SUI PRODOTTI
LASER
1. PRODOTTO LASER DI CLASSE 1
2. ATTENZIONE: Non aprire il coperchio superiore.
Nessuna parte interna dell’unità richiede manutenzione
da parte dell’utente; per la manutenzione rivolgersi al
personale qualificato.
3. ATTENZIONE: Quando l’unità è aperta e il dispositivo
di sincronizzazione è guasto o non funzionante, si può
verificare l’emissione di radiazioni laser visibili o non
visibili. Evitare l’esposizione diretta ai raggi laser.
4. RIPRODUZIONE DELL’ETICHETTA: ETICHETTA DI
AVVERTENZA, POSIZIONATA SULLA SUPERFICIE
INTERNA DELL’UNITÀ.
– G-3 –
CAUTION - INVISIBLE LASER RADIATION WHEN OPEN AND INTERLOCKS
VORSICHT ! UNSICHTBARE LASERSTRAHLUNG TRITT AUS, WENN
VARNING - OSYNLIG LASERSTRÅLNING NÄR DENNA DEL ÄR ÖPPNAD
ADVARSEL - USYNLIG LASERSTRÅLING VED ÅBNING NÅR
DEFEATED. AVOID EXPOSURE TO BEAM.
DECKEL GEÖFFNET UND WENN SICHERHEITSVERRIEGELUNG
ÜBERBRÜCKT IST. NICHT DEM STRAHL AUSSETZEN!
OCH SPÄRR ÄR URKOPPLAD STRÅLEN ÄR FARLIG.
SIKKERHEDSAFBRYDERE ER UDE AF FUNKTION. UNDGÅ
UDSÆTTELSE FOR STRÅLING.
Page 5

CONTENTS
English
FEATURES ................................................................. 1
SAFETY PRECAUTIONS ......................................... 1
HANDLING PRECAUTIONS ................................... 2
POWER SUPPLY ....................................................... 3
NAMES OF PARTS AND CONTROLS .................... 4
REMOTE CONTROL UNIT ...................................... 5
TURNING THE UNIT ON/OFF................................. 6
SETTING THE CLOCK ............................................. 7
FEATURES
1 Portable system incorporating CD player
• CD functions can be operated with the remote
control unit as well as on the main unit.
• 8-cm CD playback capability
2 Digital LCD (Liquid Crystal Display) indicates
general playback status.
SAFETY PRECAUTIONS
Prevention of Electric Shocks, Fire Hazards
and Damages
• Even when the STANDBY/ON button is set to
STANDBY, a very small current will flow. When the
unit is turned on, the display window lights in orange.
When the unit is in standby mode, the display window
turns off. (Note, however, that the display window does
not light even when the unit is turned on if the unit is
operated on batteries.) To save power and for safety
when not using the unit for an extended period of time,
disconnect the power cord from the household AC
outlet.
• Do not handle the power cord with wet hands.
• When unplugging from the wall outlet, always grasp
and pull the plug, not the power cord.
• Consult your nearest dealer when damage,
disconnection, or contact failure is found with the cord.
ADJUSTING THE SOUND........................................ 8
PLAYING COMPACT DISCS ................................... 9
RADIO RECEPTION ............................................... 14
CASSETTE PLAYBACK ......................................... 16
RECORDING ............................................................ 18
MAINTENANCE ...................................................... 20
TROUBLESHOOTING ............................................ 21
SPECIFICATIONS ................................................... 22
3 Synchronized recording with CD playback
4 Hyper-Bass Sound effect
• Do not bend the cord sharply, or pull or twist it.
• Rating label is placed on the exterior of the bottom.
• Do not modify the power cord in any manner.
• Do not remove screws to disassemble the unit and do
not touch anything inside the unit to avoid accidents.
• Do not insert any metallic objects into the unit.
• Unplug the power cord when there is a possibility of
lightning.
• If water gets inside the unit, unplug the power cord
from the outlet and consult your dealer.
• Do not block the ventilation holes of the unit so that
heat can escape.
• Do not install the unit in a badly ventilated place.
1
Page 6

HANDLING PRECAUTIONS
Do not use this unit in direct sunlight or leave the unit
in a closed automobile (or yacht, etc.) where it would
be exposed to high temperatures above 40°C.
1 Avoid using the unit in the following places:
• Where the temperature may become excessively
high or low; the recommended temperature range
is 5°C and 35°C.
• Where it could be subject to vibrations.
• Where it is excessively humid, such as in a
bathroom.
• Where it could be magnetized by a magnet or
speaker.
2 Pay attention to dust.
Be sure to close the disc door so that the lens is not
contaminated by dust. Do not touch the lens.
3 Condensation
Condensation may occur in the following cases, in
which the unit may not operate correctly:
• The unit is in a room where a heater has just been
switched on.
• The unit is in a place where there is smoke or high
humidity.
• The unit has just moved from a cold place to a
warm room.
In these cases, set the STANDBY/ON button to ON
and wait one or two hours before use.
4 Volume control
Compact discs produce very little noise compared
with analog records. If you adjust the volume by
listening to the noise as you do with analog records,
the speakers could be damaged by a sudden blast of
sound when playback starts. Therefore, turn down
the volume before starting and adjust it as required
while playing a CD.
5 Safety mechanism
The unit incorporates a safety interlock mechanism
which switches off the laser beam when the disc door
is opened.
6 Do not place magnetic objects such as
cassette tapes near the speakers.
Since the speakers contain magnets inside, do not
place cassette tapes or magnetic cards nearby as
recorded data could be erased.
7 Keep the unit away from the TV.
When the unit is used near a TV, the TV picture could
be distorted. If this happens, move the unit away from
the TV. If this does not correct the situation, avoid
using the unit when the TV is turned on.
8 Cleaning the cabinet
If the cabinet gets dirty, wipe it with a soft, dry cloth.
Never use benzine or thinner as these could damage
the surface finish.
9 When listening with headphones
• Do not listen at high volumes as it could damage
your hearing.
• For safety, do not drive while listening with
headphones.
10 Carrying handle
Do not raise or lower the carrying handle with the
telescopic antenna extended, to avoid damaging the
antenna. Position the carrying handle so that it does
not interfere with operation.
English
2
Page 7

POWER SUPPLY
English
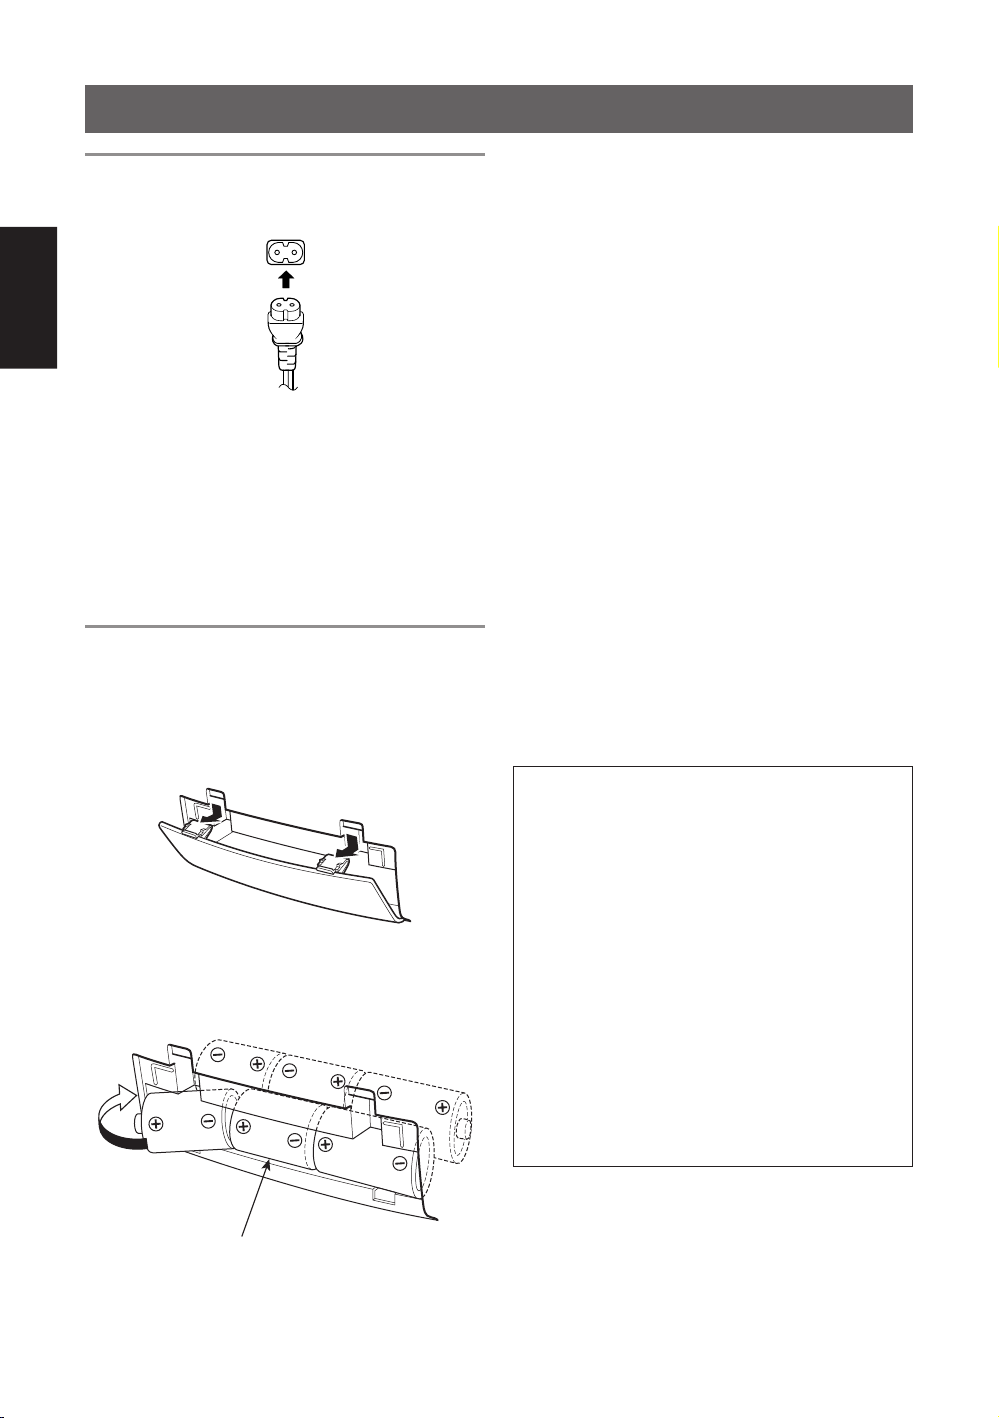
Operation on household AC
Connect the AC power cord.
AC IN
CAUTIONS:
• Use only with the JVC power cord provided with this
unit to avoid malfunction or damage to the unit.
Remove batteries when using the power cord.
• Be sure to unplug the power cord from the outlet when
going out or when the unit is not in use for an extended
period of time.
Operation on batteries
Loading batteries
1
Open the battery cover.
Pull the battery cover toward you while pressing the
sections marked by the arrows.
Checking batteries
When the tape speed or output sound level decreases, or
CD playback becomes intermittent, replace all batteries
with fresh ones.
When making an important recording, use new batteries
(preferably alkaline batteries for a longer service life) to
avoid any possible failure.
For better battery usage
• Continuous operation of the unit causes the battery
power to be consumed more quickly than
noncontinuous operation.
• Operation of the unit in a cold place causes the battery
power to be consumed more quickly than in a warm
place.
CAUTIONS:
• When not using the unit for a long time (more than
two weeks) or when using the household AC, remove
the batteries to avoid a malfunction or damage to the
unit.
• When the JVC power cord provided with this unit is
connected, the power is automatically switched from
the batteries to the household AC even when the
batteries are loaded.
However, remove the batteries when using the power
cord.
2
Insert six R20 (SUM-1)/D (13D)-size batteries.
Be sure to insert the batteries with the ª and ·
terminals positioned correctly.
1
33
2
6
5
4
R20 (SUM-1)/D (13D)-size batteries
3
Replace the cover.
CAUTIONS WHEN USING BATTERIES:
When batteries are used incorrectly, it may result in
the leakage of chemicals from the batteries or they
may explode. The following care should be taken:
• Check that the positive ª and negative ·
terminals of the batteries are positioned correctly
and load them as shown in the figure on the left.
• Do not mix new and old batteries together, or mix
different types of batteries.
• Do not try to recharge non-rechargeable batteries.
• Remove the batteries when the unit is not to be used
for an extended period of time.
If chemicals from the batteries come in contact with
your skin, wash them off immediately with water. If
chemicals leak onto the unit, clean the unit
completely.
3
Page 8
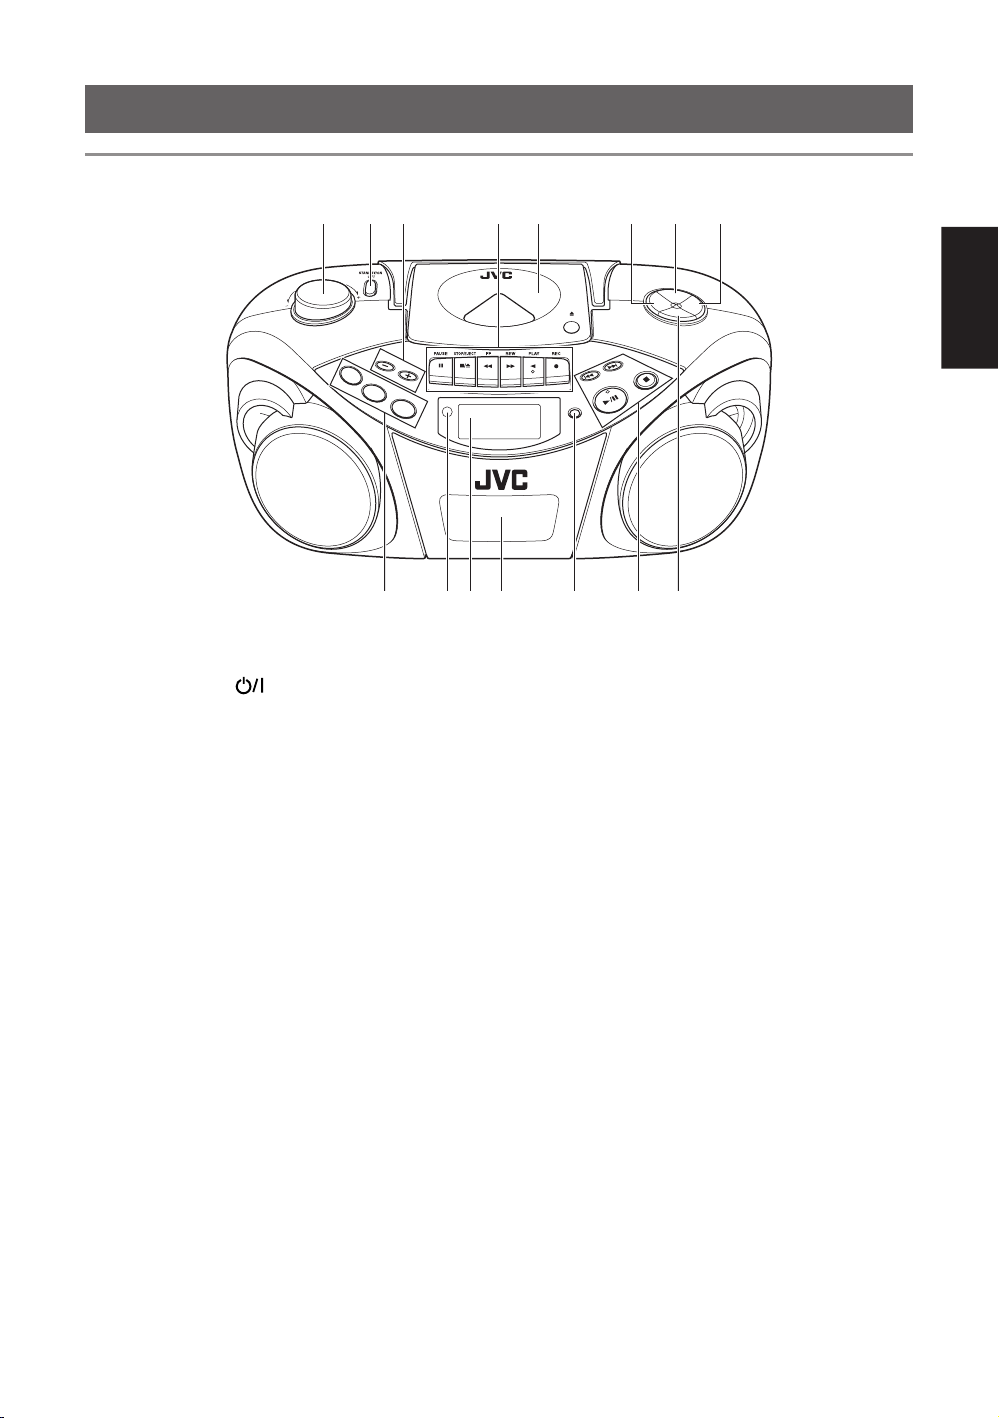
NAMES OF PARTS AND CONTROLS
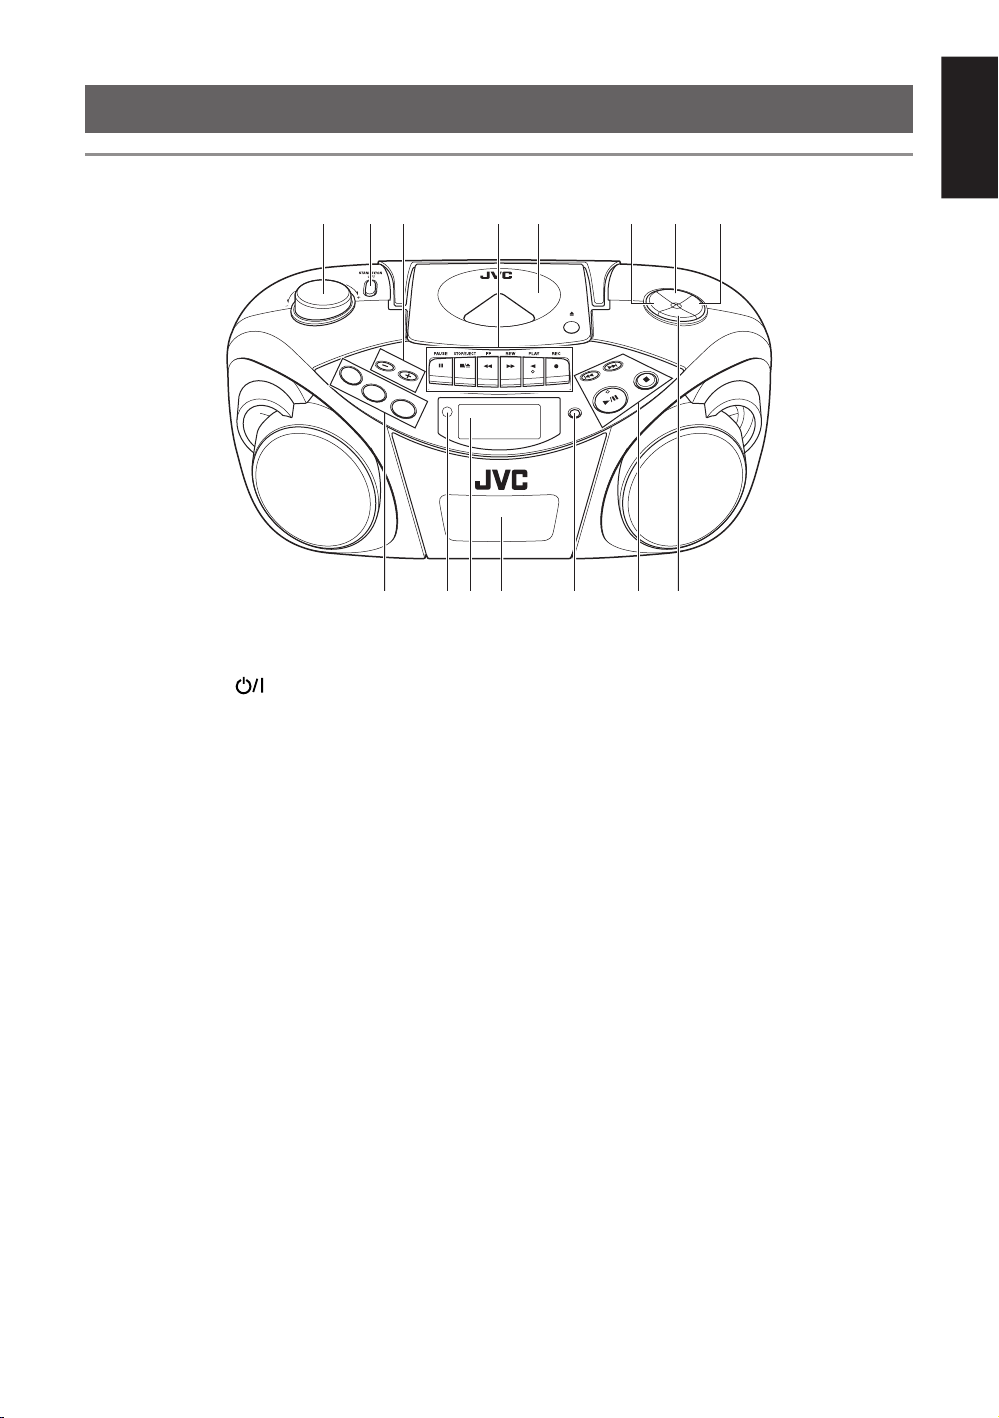
Top and front sides
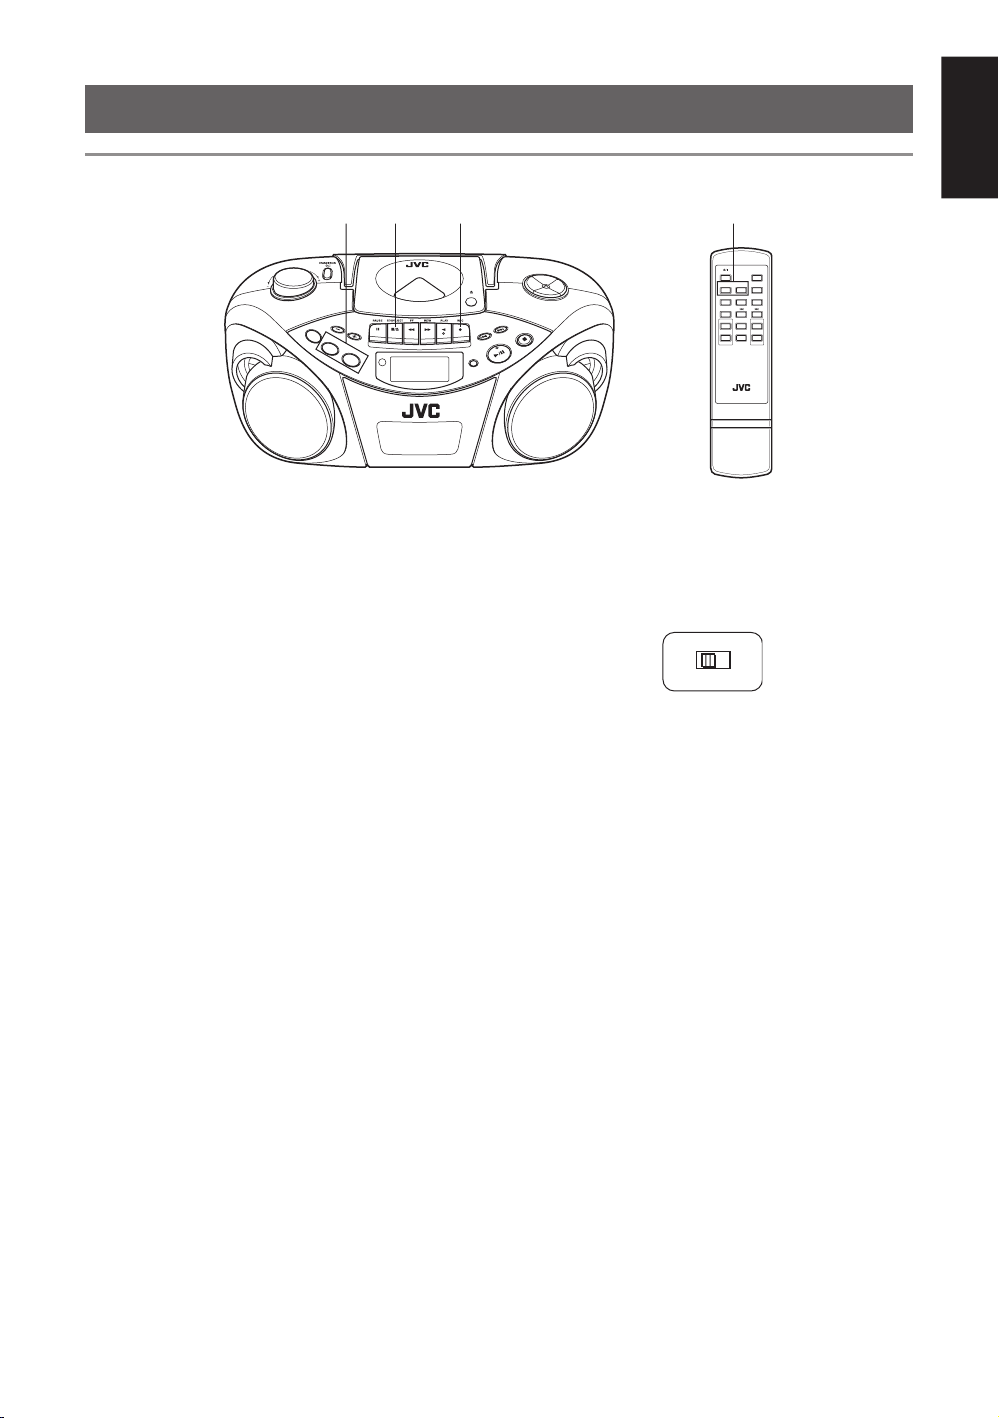
1 VOLUME knob
2 STANDBY/ON
3 PRESET – button
PRESET + / CD REPEAT button
4 Tape operation buttons
PAUSE 8 button
STOP/EJECT § button
FF 1 button
REW ¡ button
PLAY 2 button
REC ¶ button
5 Disc door
6 FM MODE button
7 MUTING button
button
1 2
TAPE
PRESET
CD REPEAT
RANDOM
CD
TUNER
REMOTE
SENSOR
BAND
9 1110 1312
43 6 7 85
MUTING
FM
M
O
DE
P
RO
G
R
A
M
/
CL
O
CK
S
ET
Ad
d
"/"
H
B
S/
PR
ESE
T E
PUSH
DISPLAY
PLAY/PAUSE
Q
STOP
14 15
8 PROGRAM/CLOCK SET button
9 TAPE button
CD/RANDOM button
BAND/TUNER button
10 REMOTE SENSOR
11 Display window
12 Casette deck
13 DISPLAY button
14 4 button
¢ button
PLAY/PAUSE 3/8 button
STOP 7 button
15 HBS/PRESET EQ button
English
4
Page 9
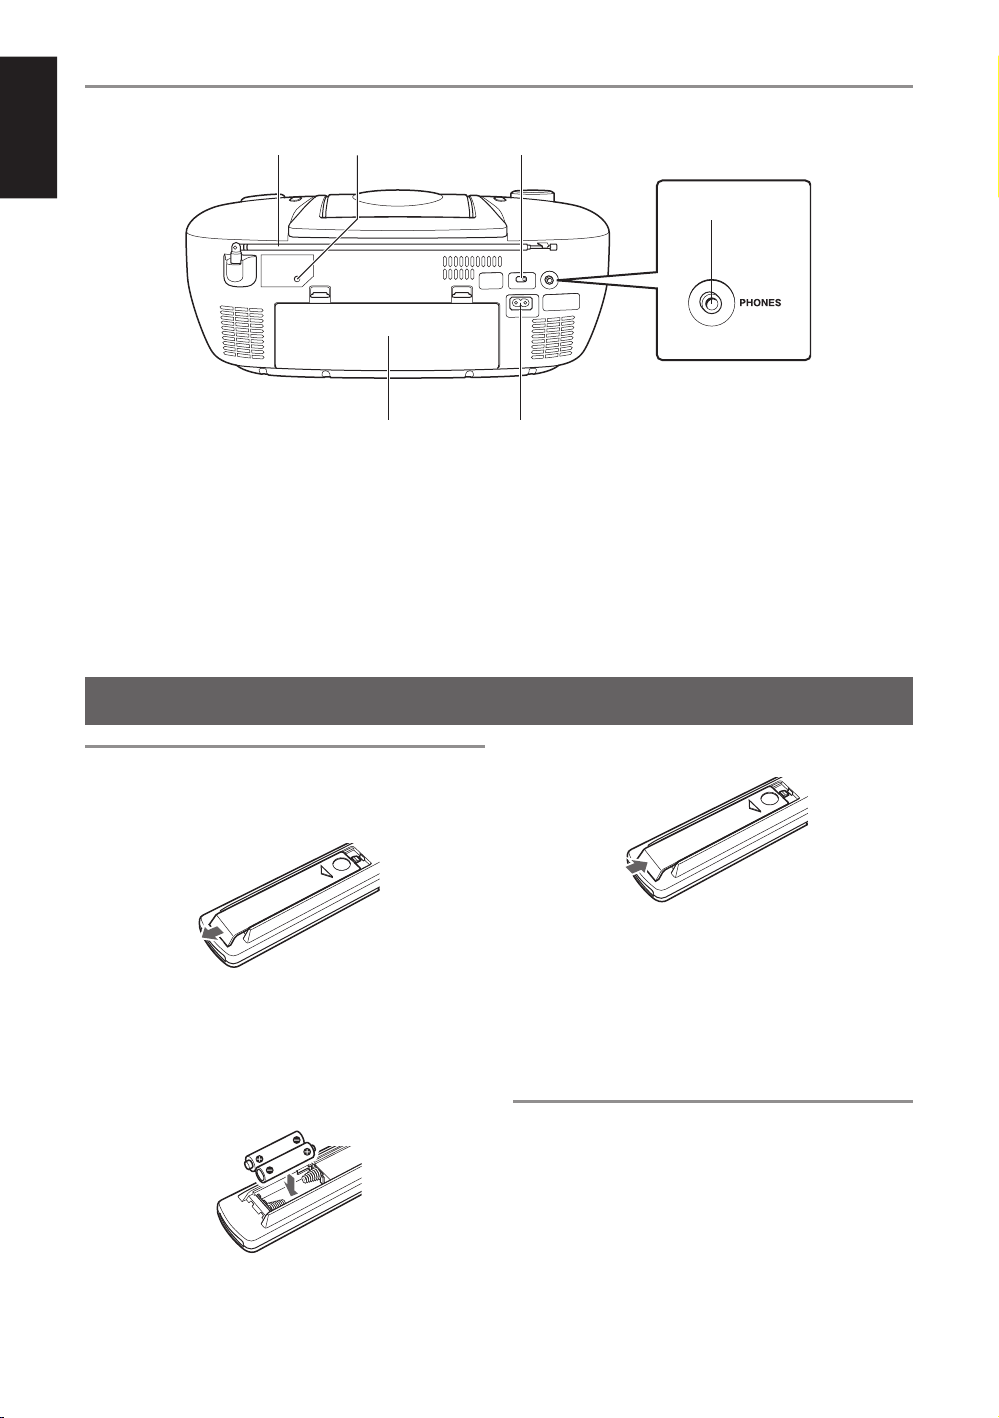
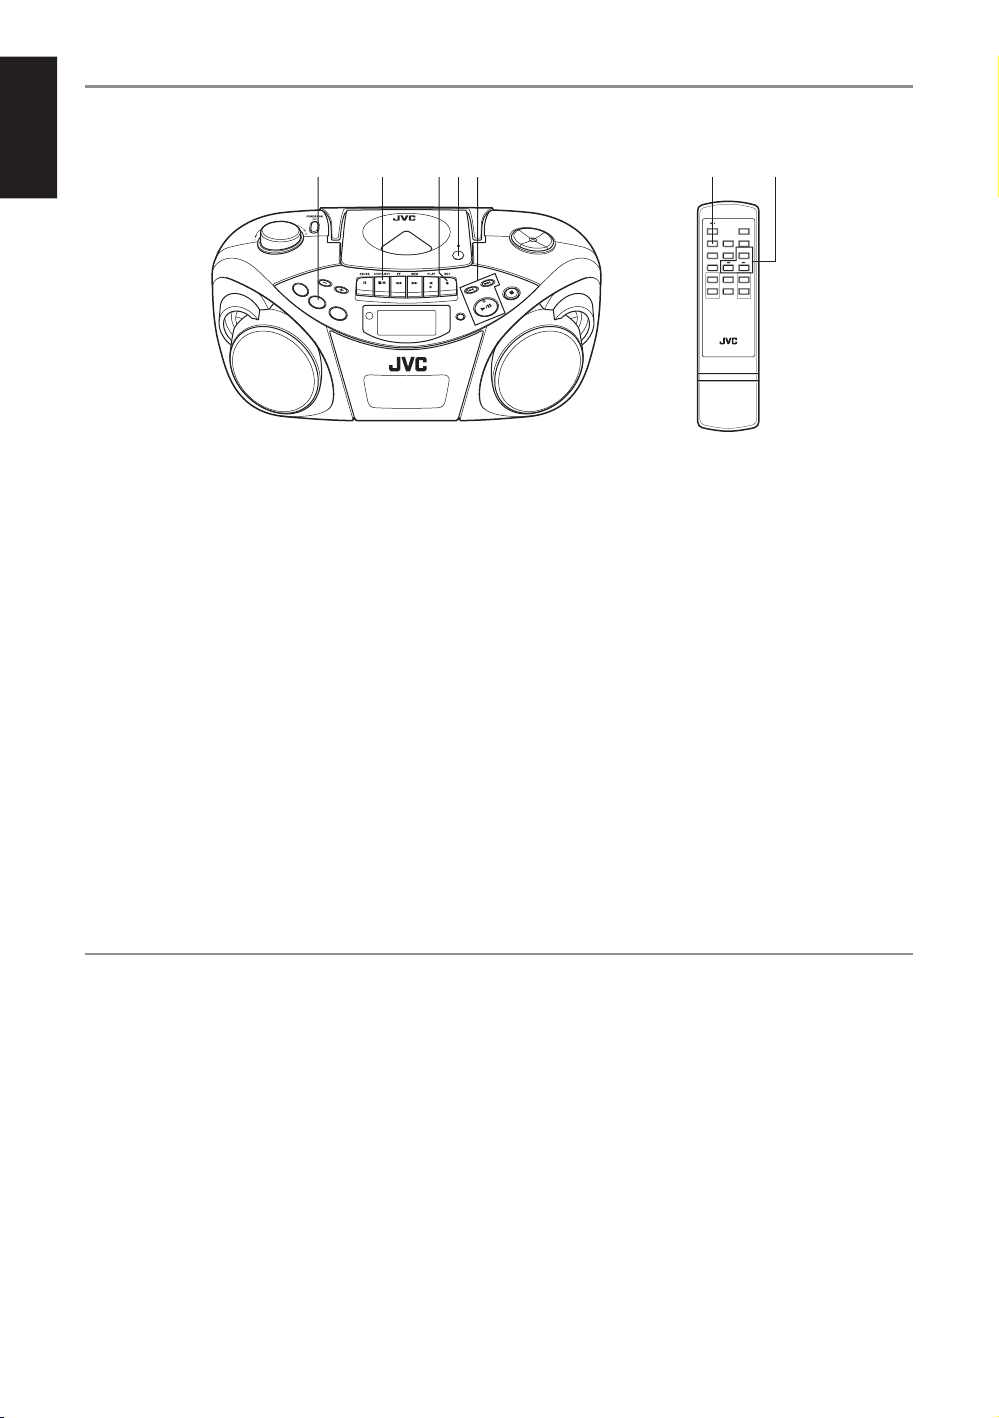
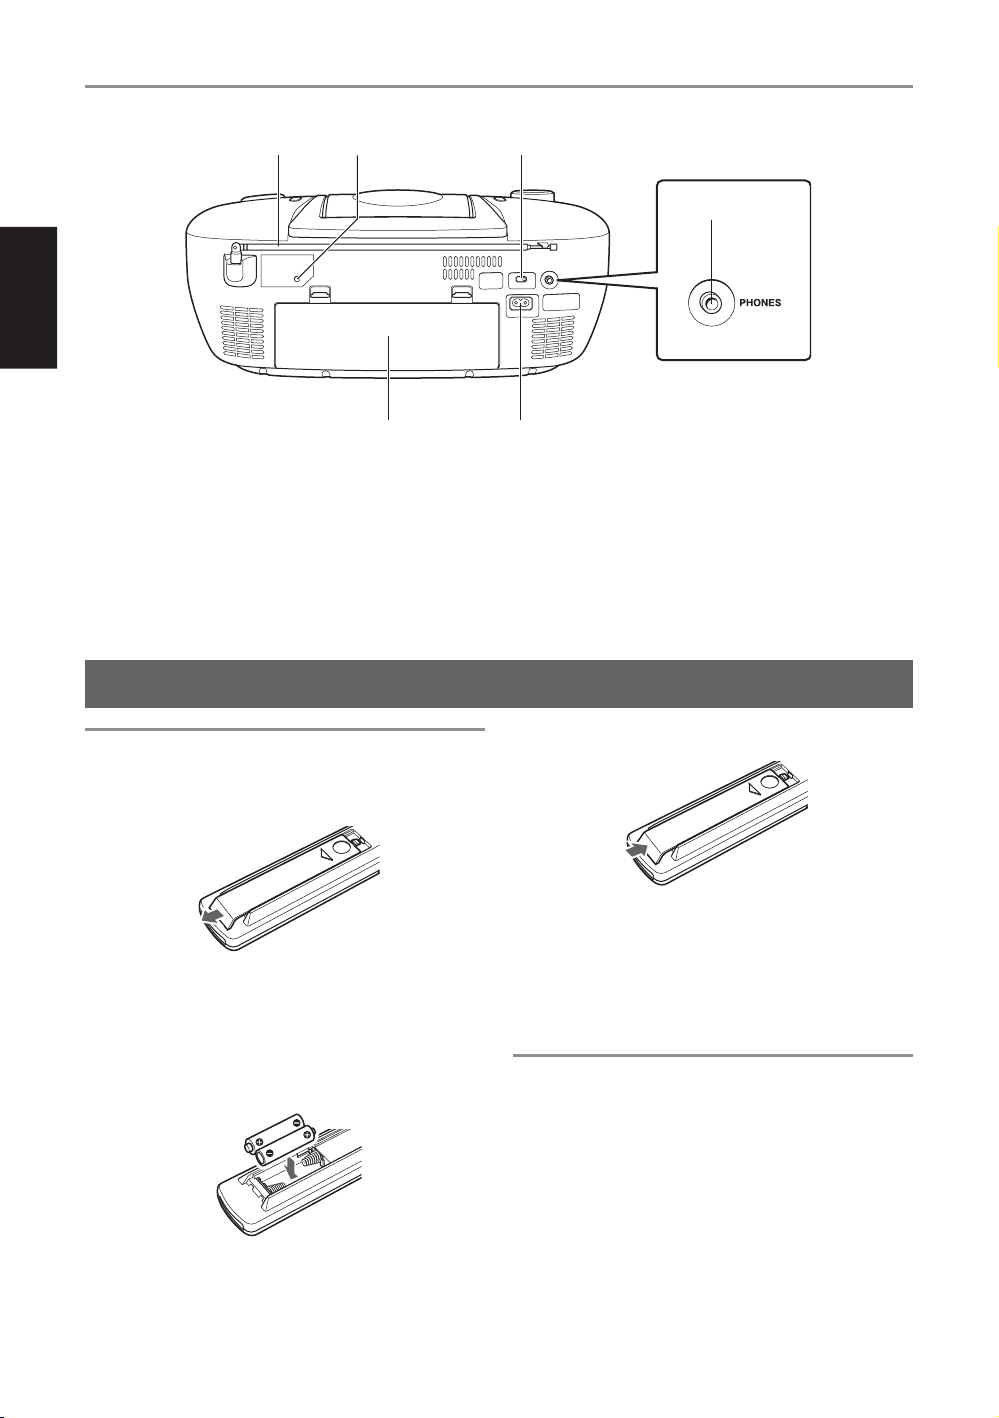
Rear side
English
16 Telescopic antenna
17 RESET button
18 BEAT CUT switch
19 PHONES jack
Connect stereo mini headphones (3.5-mm diameters,
impedance of 16 Ω to 32 Ω) to this jack. The speaker
output is switched off with headphones connected.
REMOTE CONTROL UNIT
16 17 18
20
21
20 Battery compartment cover
21 ÓAC IN (AC input) jack
19
Installing batteries
1
Remove the battery cover from the back of the
remote control unit.
2
Insert two AAA (UM-4)/R03-size batteries
(supplied).
Insert the batteries with the ª and · terminals
matching the indication inside the battery
compartment. Insert the · ends first.
AAA (UM-4)/R03-size batteries
5
3
Replace the battery cover.
Battery replacement
The maximum operating distance between the remote
control unit and the remote sensor section of the unit is
approximately 7 meters. When the operating range
decreases or remote control operation becomes unstable,
replace the batteries with new ones.
Notes on using the remote control
unit
• Point the top of the remote control unit toward the
remote sensor section of the unit as directly as possible.
The operable distance from the main unit decreases if
you point the remote control unit at an angle.
• Press the buttons gently and firmly.
• Do not expose the remote sensor section of the unit to
strong light (direct sunlight or artificial lighting) and
make sure that there are no obstacles between the
remote sensor section and the remote control unit.
Page 10
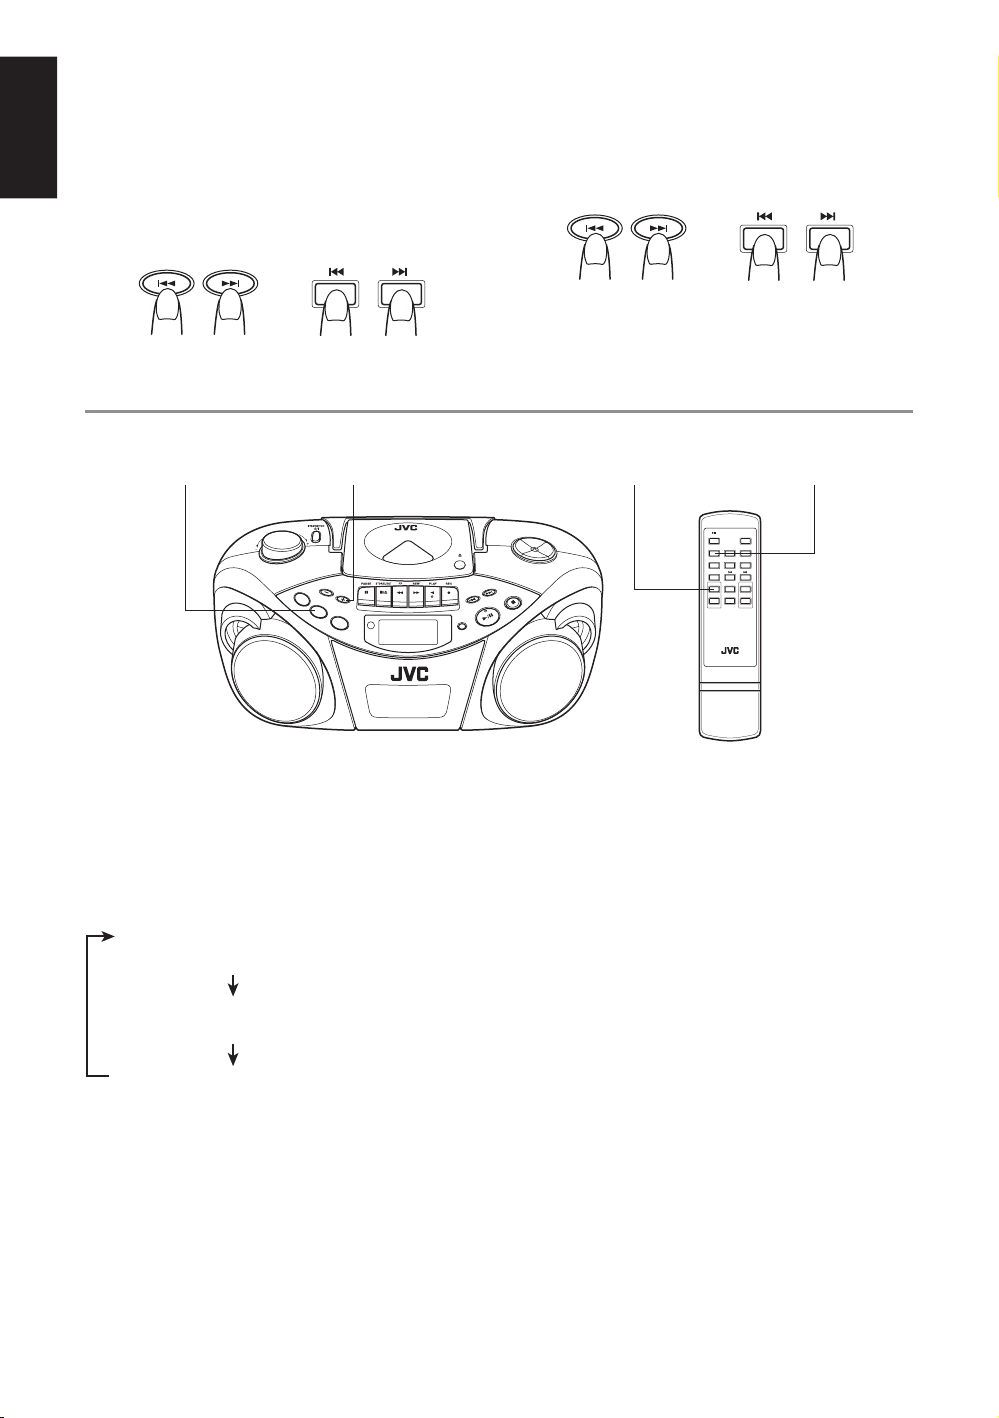
Names of buttons
1
STANDBY/ON DISPLAY
TUNER/
CD/
BAND
2
3
4
RANDOM
INTRO STOP
FM MODE
CD REPEAT/
+
5
TAPE
CD PLAY
/PAUSE
HBS/
+
PRESET EQ
VOLUMEPRESET
MUTING
–
–
6
7
8
9
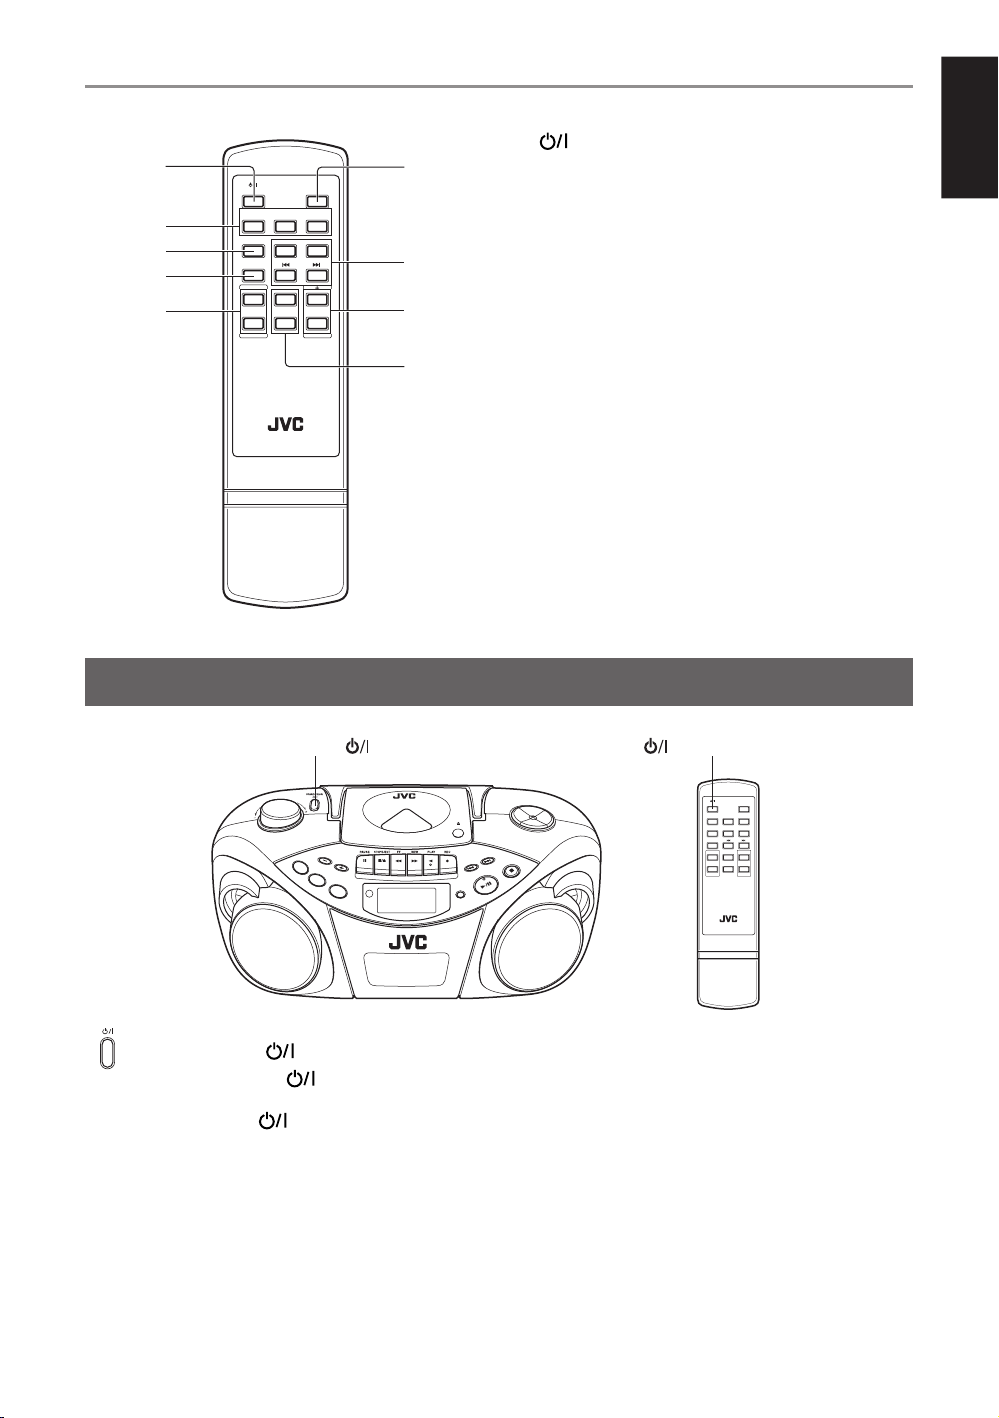
TURNING THE UNIT ON/OFF
1 STANDBY/ON button
2 CD/RANDOM button
TUNER/BAND button
TAPE button
3 INTRO button
4 FM MODE button
5 CD REPEAT / PRESET + button
PRESET – button
6 DISPLAY button
7 STOP button
CD PLAY/PAUSE button
4 button
¢ button
8 VOLUME + button
VOLUME – button
9 HBS/PRESET EQ button
MUTING button
English
PUSH
PRESET
TAPE
CD REPEAT
R
AN
DO
M
CD
TUNER
STANDBY/ON
REMOTE
SENSOR
BAND
DISPLAY
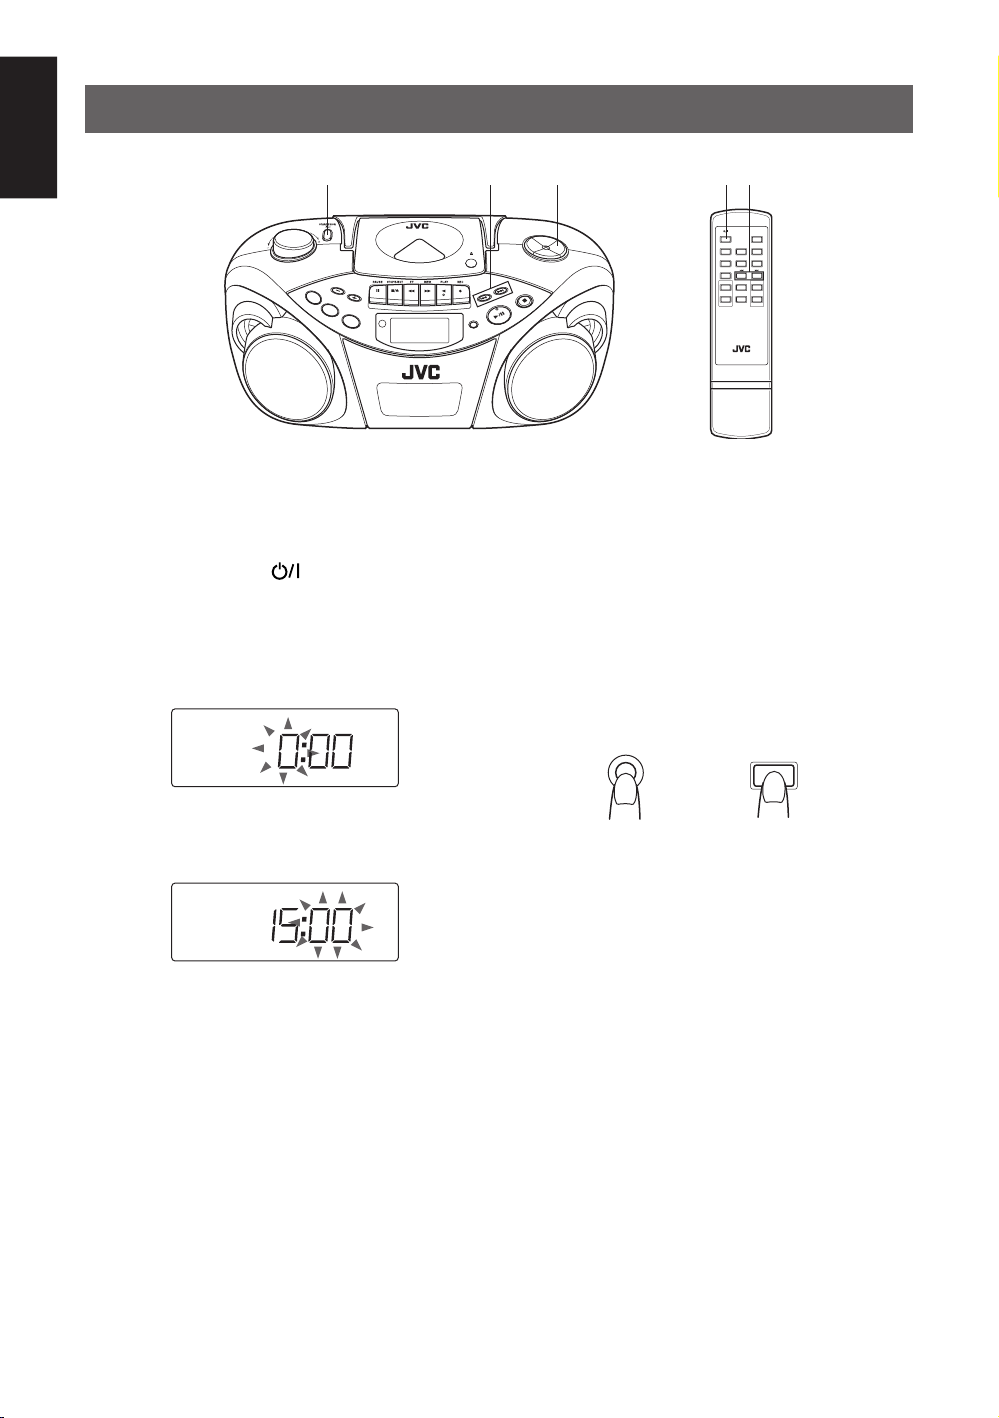
STANDBY/ON button
Press the STANDBY/ON button on the unit to
turn on and off the unit.
You can also press the
STANDBY/ON button on
the remote control unit.
The display window lights up when the unit is turned on.
(Note, however, that the display window does not light
even when the unit is turned on if the unit is operated on
batteries.) The unit comes on ready to play the source
selected when the unit was last turned off.
To switch off the power supply completely
Unplug the AC power cord from the AC outlet. If the
batteries are inserted in the unit, take them out.
STANDBY/ONSTANDBY/ON
STANDBY/ON DISPLAY
TUNER/
CD/
BAND
RANDOM
INTRO STOP
FM MODE
HBS/
CD REPEAT/
PRESET EQ
+
MUTING
–
RM-SRCEX25A REMOTE CONTROL
TAPE
CD PLAY
/PAUSE
+
VOLUMEPRESET
–
PLAY/PAUSE
MUTIN
G
F
M
M
O
D
E
P
R
O
G
R
A
M
/
C
L
O
C
K
S
E
T
A
d
d
"
/"
HBS
/
PRESET EQ
STOP
Notes:
• When you unplug the AC power cord or if a power
failure occurs, the clock is reset to “0:00” right away,
while the tuner preset stations (see page 15) will be
erased in a few days. The clock indication will keep
flashing until you set the clock again.
• Remove the batteries when carrying the unit by hand
or in the trunk of a car. This prevents the power from
being accidentally turned on, thus avoiding wasteful
battery consumption.
6
Page 11
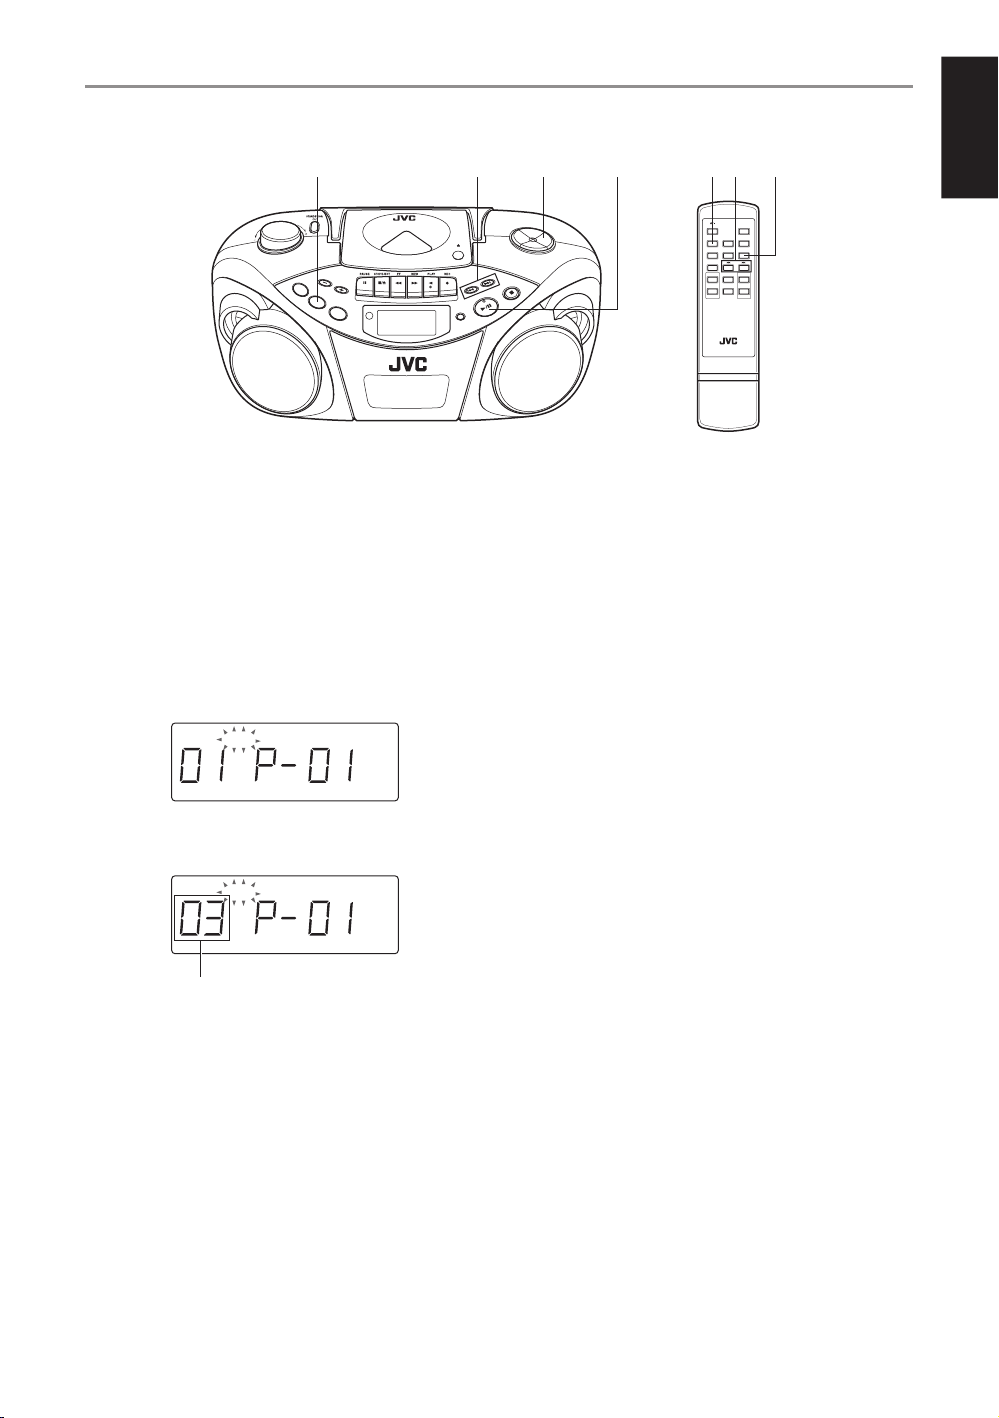
SETTING THE CLOCK
English
PRESET
TAPE
CD
RANDOM
REPEAT
CD
TUNER
REMOTE
SENSOR
BAND
Before operating the unit any further, first set the clock
built in this unit.
The clock uses 24-hour indication.
1
Press STANDBY/ON to turn off the unit, if it
is turned on.
The clock flashes on the display window.
2
Press and hold PROGRAM/CLOCK SET for more
than 2 seconds.
The hour digits start flashing.
2,3,43,4 3,411
MU
TIN
G
F
M
MO
DE
P
R
O
G
R
A
M
/
C
L
O
C
K
S
E
T
A
d
d
"
/"
H
BS
/
P
RE
S
ET
E
PUSH
AY
PL
DISPLAY
Q
P
TO
S
E
US
A
/P
STANDBY/ON DISPLAY
TUNER/
CD/
BAND
RANDOM
INTRO STOP
FM MODE
HBS/
CD REPEAT/
PRESET EQ
+
MUTING
–
RM-SRCEX25A REMOTE CONTROL
TAPE
CD PLAY
/PAUSE
+
VOLUMEPRESET
–
Note:
If there is a power failure, the clock loses the setting and
is reset to “0:00.” The clock indication will keep flashing
until you set the clock again.
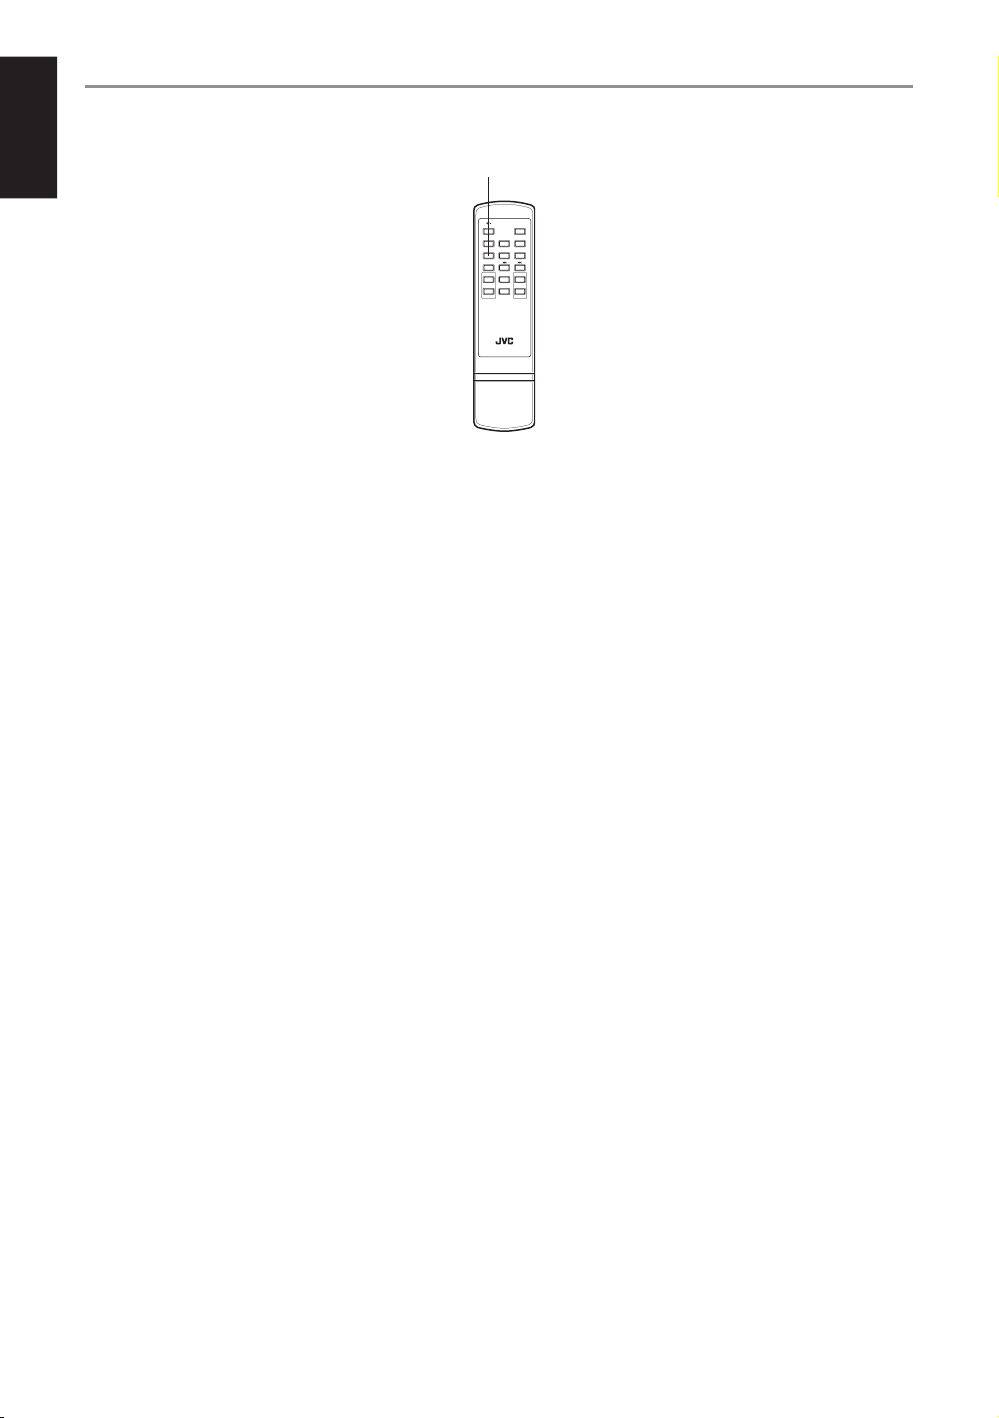
To show the clock when CD or tuner is
selected
Press DISPLAY.
Each time you press the button, the display changes the
clock indication and the normal indication alternately.
(Operating the unit while clock indication is displayed
changes the display to the normal indication.)
DISPLAY
DISPLAY
3
Press 4 or ¢ to adjust the hour, then press
PROGRAM/CLOCK SET.
The minute digits start flashing.
4
Press 4 or ¢ to adjust the minutes, then press
PROGRAM/CLOCK SET.
7
Main unit Remote
Page 12
ADJUSTING THE SOUND
–
PHONES (on the rear)
VOLUME VOLUME +/
PRESET
TAPE
CD REPEAT
RANDOM
CD
TUN
ER
REMOTE
SENSOR
BAND
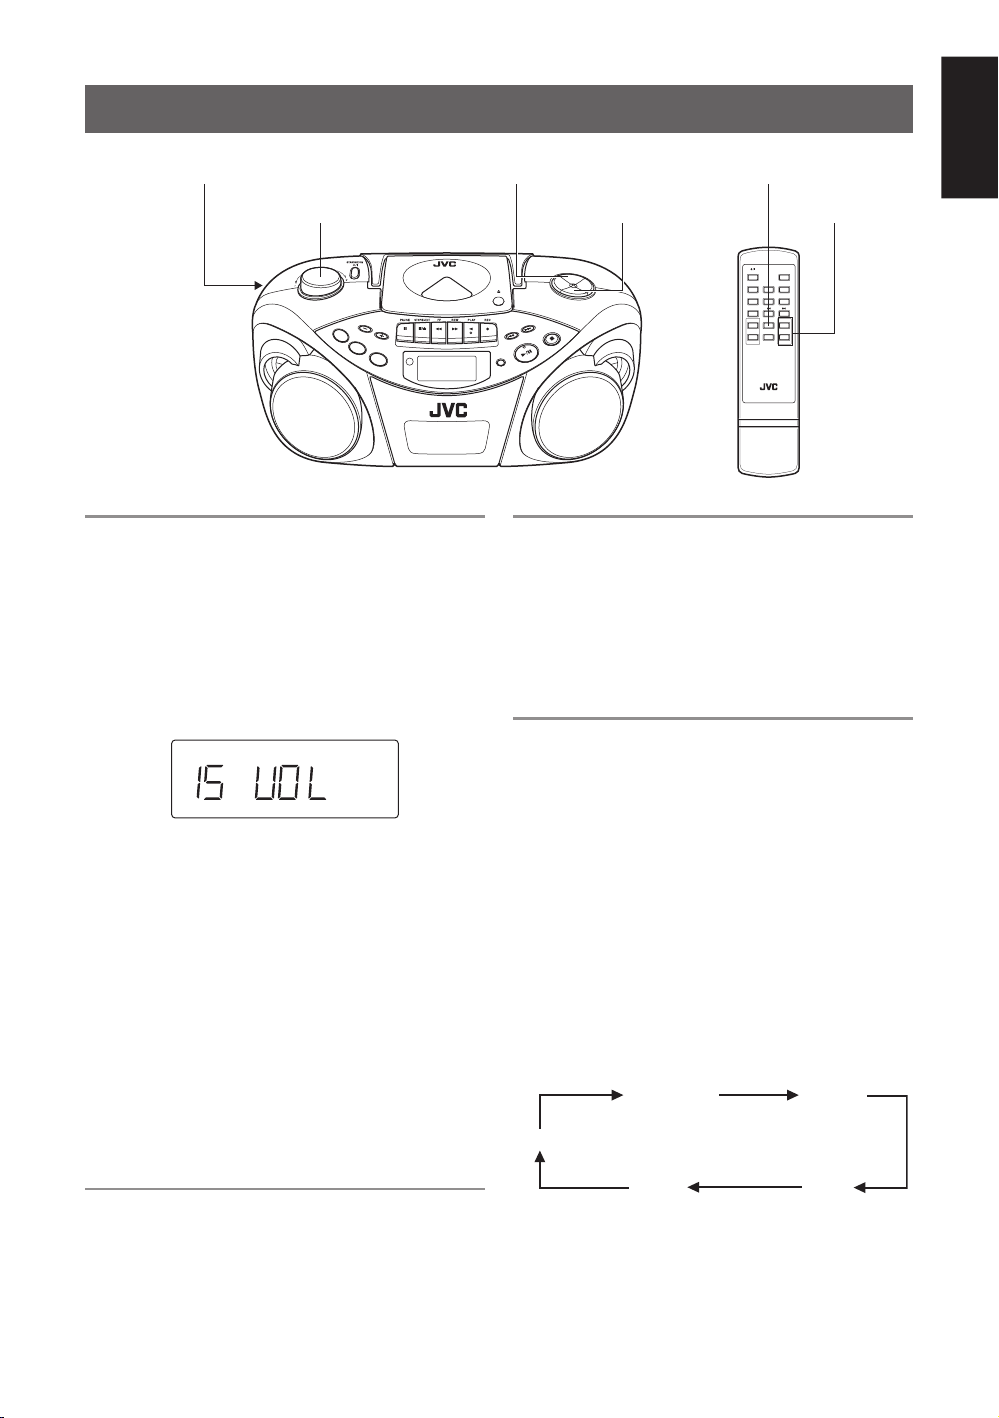
Adjusting the volume
Turn VOLUME clockwise to increase the volume or
counterclockwise to decrease it.
You can press VOLUME + or VOLUME – on the remote
control unit to increase or decrease the volume
respectively.
The volume level can be adjusted in 31 steps (00 VOL to
30 VOL).
MUTING HBS/PRESET EQ
HBS/PRESET EQ
M
UTING
F
M MOD
E
P
R
O
G
R
A
M
/
C
L
O
C
K
S
E
T
A
d
d
"
/"
H
B
S
/
P
R
E
S
E
T
E
PUSH
PLAY/PAUSE
DISPLAY
Q
STOP
STANDBY/ON DISPLAY
TUNER/
CD/
BAND
RANDOM
INTRO STOP
FM MODE
HBS/
CD REPEAT/
PRESET EQ
+
MUTING
–
RM-SRCEX25A REMOTE CONTROL
TAPE
CD PLAY
/PAUSE
+
VOLUMEPRESET
–
Reinforcing the bass sound
You can enjoy powerful bass sound with the Hyper-Bass
Sound effect.
Press and hold HBS/PRESET EQ so that the HBS
indicator lights up in the display window.
To turn off the effect, press and hold the button again so
that the HBS indicator goes off.
Selecting the sound mode
You can select one of the 5 preset sound modes.
English
Caution:
DO NOT turn off the unit with the volume set to an
extremely high level; otherwise a sudden blast of sound
could damage your hearing and/or the speakers and
headphones, when you turn on the unit or start playing
another source next time.
REMEMBER you cannot adjust the volume unless the
unit is turned on.
Turning off the sound temporarily
During playback, press MUTING.
The sound is turned off and the MUTING indicator
appears in the display window.
To restore the sound, press MUTING again.
Listening through headphones
Connect a pair of headphones to the PHONES jack.
No sound comes out of the speakers anymore. Be sure to
turn down the volume before connecting headphones.
CLASSIC: Good for classical music.
ROCK : Boosts low and high frequency. Good for
acoustic music.
POP : Good for vocal music.
JAZZ :Good for jazz music.
FLAT : Normal sound.
To select the sound mode
Press HBS/PRESET EQ repeatedly until the indicator
for the sound mode you want appears in the display
window.
Each time you press the button, the sound mode changes
as follows:
CLASSIC ROCK
FLAT
JAZZ
POP
8
Page 13
PLAYING COMPACT DISCS
English
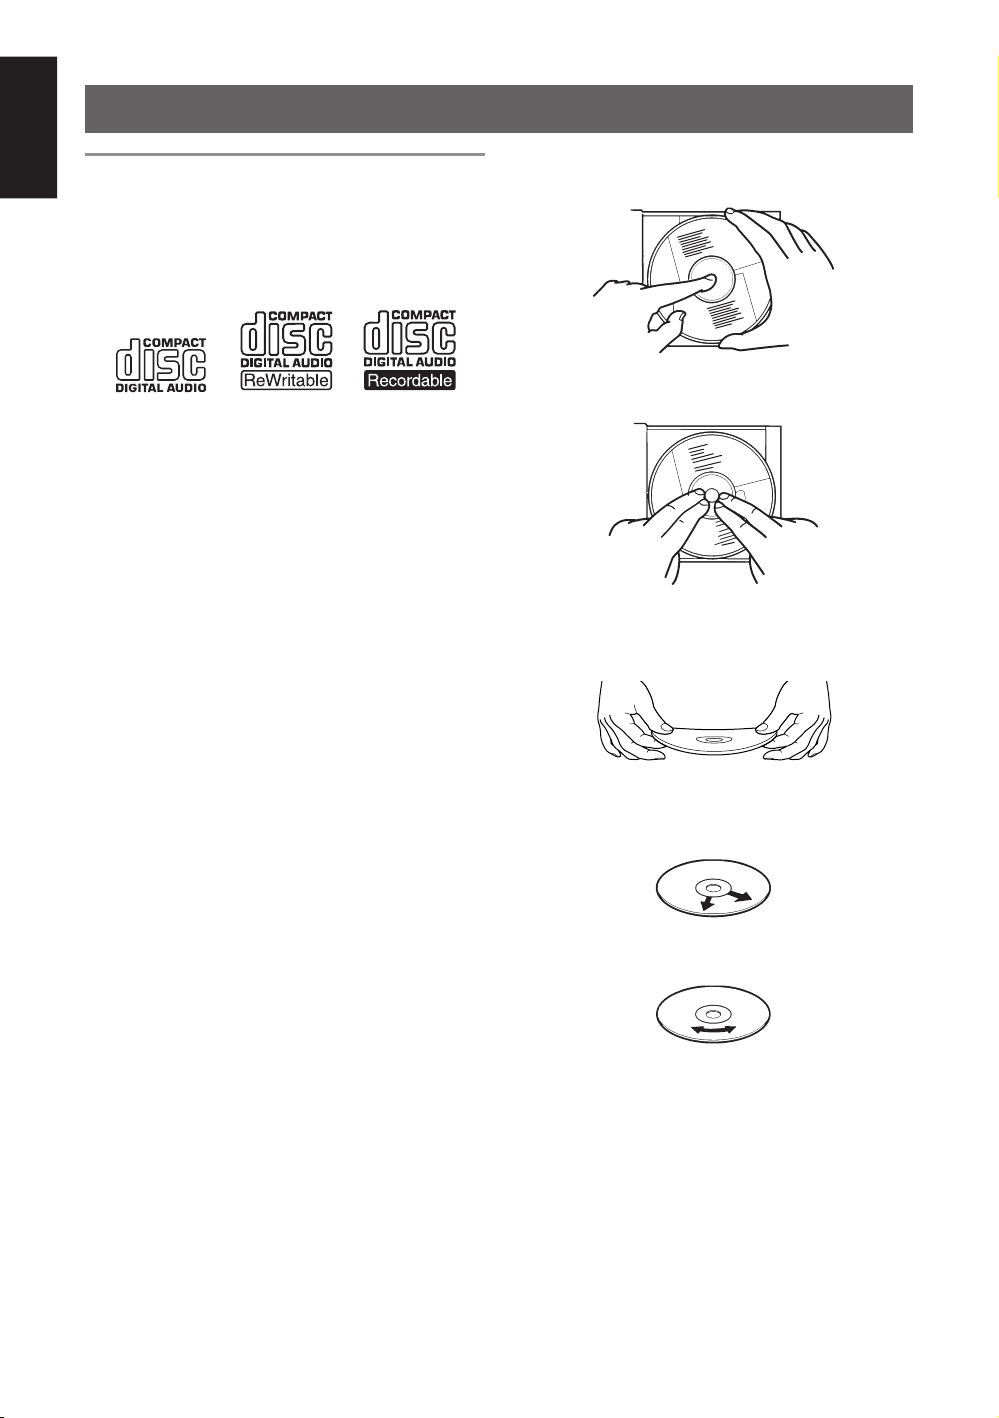
Notes on compact discs
This unit has been designed only to play back the
following CDs.
• Digital audio CD
• Recordable digital audio CD (CD-R)
• Rewritable digital audio CD (CD-RW)
When playing a CD-R or CD-RW
You can play back finalized CD-R or CD-RW recorded
in music CD format. (If a CD-RW has been recorded in
a different format, erase all the data on the CD-RW
completely before recording on it.)
• You can play back CD-R or CD-RW like an audio CD.
• Some CD-R or CD-RW may not be played back on
this unit because of their disc characteristics, damage
or stain on them, or if the player lens is dirty.
• The reflection factor of CD-RW is lower than that of
other CDs, possibly causing CD-RW to take longer
time to read.
• CD-R and CD-RW of MP3 format cannot be played
back.
• Removing the disc from its storage case and
replacing it
Press the center and lift out.
Press to secure the disc.
• Handling
Handling discs
Since dirty, damaged or warped discs could damage the
unit, care should be taken of the following:
• Do not touch the reflective recorded surface.
• Do not stick or write anything on the label side.
• Do not bend discs.
Storage
• After removing a disc from the unit, be sure to put it
back in its case.
• Do not expose discs to direct sunlight, high
temperatures from a heater, etc., high humidity or dust.
Cleaning discs
Before loading a disc, wipe off any dust, dirt or
fingerprints with a soft, dry cloth. Discs should be
cleaned by wiping radially, from the center to edge.
Never use thinner, benzine, record cleaner or antistatic
spray.
Incorrect
• Cleaning
Correct
Incorrect
9
Page 14
Basic operation
PRESET
TAPE
CD REPEAT
RANDOM
CD
TUNER
REMOTE
SENSOR
BAND
1
Press CD/RANDOM to enter CD mode, if the unit
is in TUNER or TAPE mode.
You can press CD/RANDOM on the remote control
unit to enter CD mode.
2
Press ) PUSH to open the disc door.
3
Load a disc with the label side facing up and close
the disc door.
• 8-cm CD can be played on the unit without an
adapter.
4
Press PLAY/PAUSE 3/8 to start playback.
You can start playback by pressing CD PLAY/PAUSE
on the remote control unit.
The current track number and elapsed playing time
are displayed during playback.
CD
23 4 5 4115
M
UTING
FM MO
D
E
PR
O
GRAM/
C
L
O
C
K
S
ET
Add"/"
HBS/
P
RESET
E
PUSH
Y/
PLA
DISPLAY
Q
STOP
E
S
U
A
P
STANDBY/ON DISPLAY
TUNER/
CD/
BAND
RANDOM
INTRO STOP
FM MODE
HBS/
CD REPEAT/
PRESET EQ
+
MUTING
–
RM-SRCEX25A REMOTE CONTROL
TAPE
CD PLAY
/PAUSE
+
VOLUMEPRESET
–
English
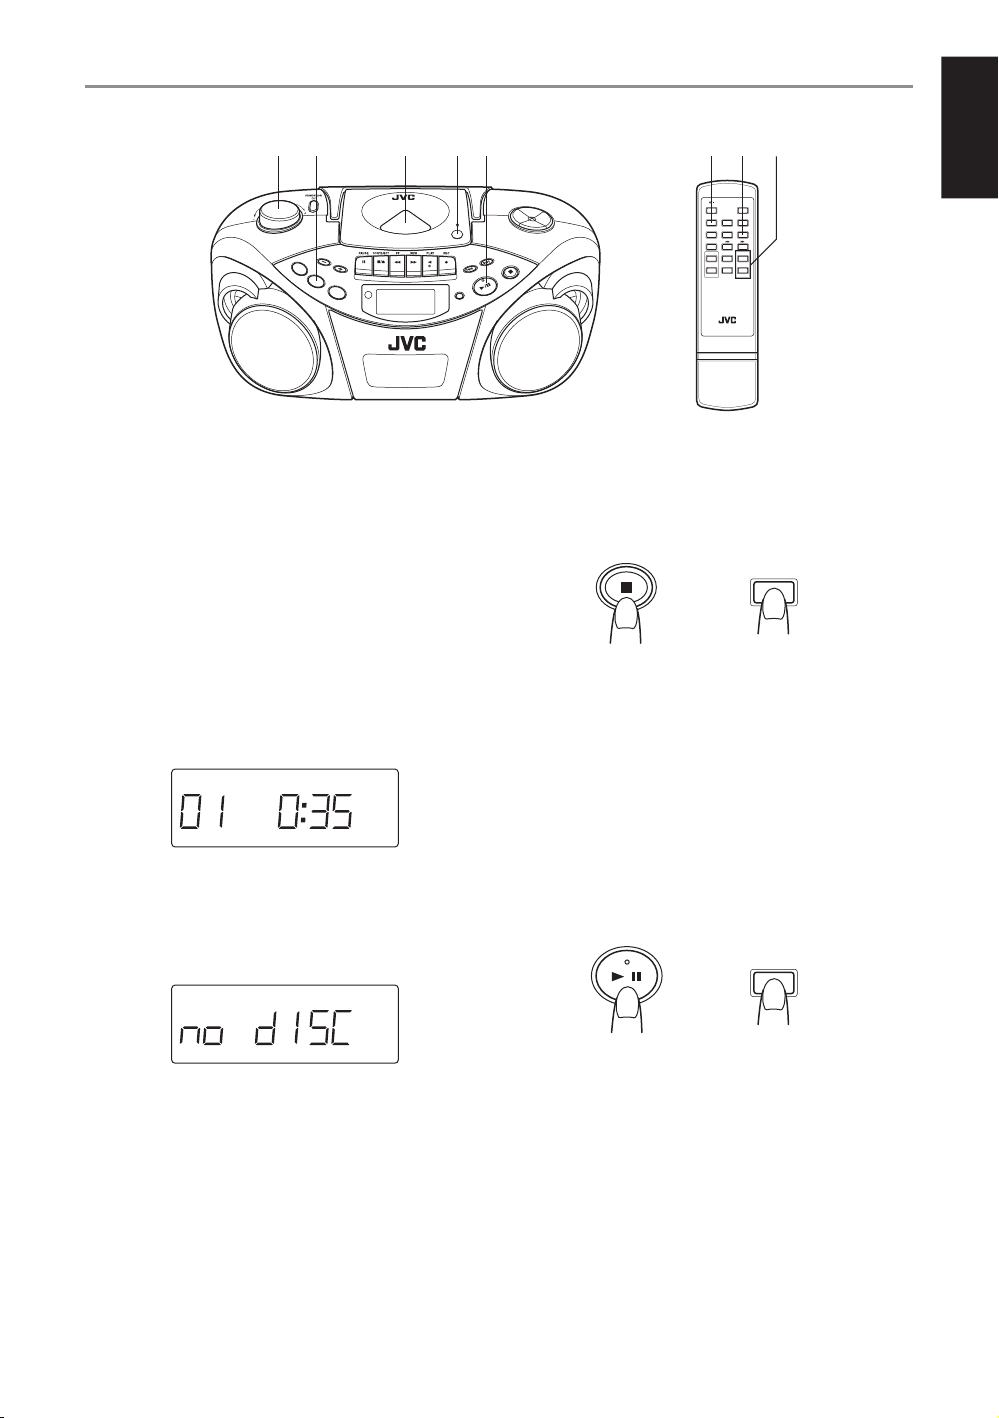
To stop playback
Press STOP 7.
You can press STOP on the remote control unit to stop
playback.
STOP
Main unit Remote
Caution:
Stop playback before opening the disc door. Check that
the disc has completely stopped rotating before
unloading the disc.
STOP
5
Adjust the volume.
Notes:
• The following indication may be displayed when the
disc is loaded upside down. Reload the disc correctly.
CD
• If mistracking occurs during playback, lower the
volume.
• Mistracking may occur if a strong shock is applied to
the unit or if it is used in a place subject to vibrations
(e.g. in a car travelling on a rough road).
• If you press CD/RANDOM while in CD mode, the unit
enters the random playback mode.
To pause playback
Press PLAY/PAUSE 3/8 during playback.
You can press CD PLAY/PAUSE on the remote control
unit to pause playback.
To resume playback, press the button again.
PLAY/PAUSE
CD PLAY
/PAUSE
Main unit Remote
10
Page 15
Skipping
• To skip back to the previous track
During playback, press 4 once to return to the
English
beginning of the current track, press twice to skip back
to the beginning of the previous track.
• To skip to the next track
During playback, press ¢ to skip to the beginning
of the next track.
Main unit Remote
Repeat/Random playback
Search – locating a desired position on the
disc
Press and hold 4 or ¢ during playback.
Monitor the sound and release the button when the
desired position is located.
Main unit Remote
PRESET+/CD REPEAT
PUSH
PRESET
TAPE
CD REPEAT
RANDOM
CD
TUNER
REMOTE
SENSOR
BAN
D
DISPLAY
Repeat playback
Press PRESET + / CD REPEAT during playback.
You can press CD REPEAT / PRESET + on the remote
control unit to select repeat playback.
Each time you press the button, the repeat mode changes
in the following order:
Repeat playback of all tracks on the disc
(“REPEAT ALL” lights up.)
Repeat playback of a single track
(“REPEAT 1” lights up.)
+
STANDBY/ON DISPLAY
TUNER/
CD/
BAND
RANDOM
INTRO STOP
FM MODE
HBS/
CD REPEAT/
PRESET EQ
+
MUTING
–
RM-SRCEX25A REMOTE CONTROL
CD/RANDOMCD/RANDOM
TAPE
CD PLAY
/PAUSE
+
VOLUMEPRESET
–
PLAY/PAUS
CD REPEAT/PRESET
MU
TIN
G
FM MODE
P
R
O
G
R
A
M
/
C
L
O
C
K
S
E
T
A
d
d
"
/"
HB
S/
P
RE
SE
T E
Q
STOP
E
Random playback
Press CD/RANDOM in CD mode so that the
RANDOM indicator lights up in the display window.
You can press CD/RANDOM on the remote control unit
to select random playback.
Tracks are played in random order.
To cancel random playback, press the button again so
that the RANDOM indicator goes off.
Repeat playback is canceled.
11
Page 16
Programmed playback
Up to 20 tracks can be programmed to play in any desired order.
3,5 3 6 11 2,4,5 6
English
PUSH
PRESET
TAPE
CD REPEAT
RANDOM
CD
TUNER
REMOTE
SENSOR
BAND
DISPLAY
Note:
There is a time limit in doing the following steps. If the
setting is canceled before you finish, start from step 2
again.
1
Press CD/RANDOM to enter CD mode.
You can press CD/RANDOM on the remote control
unit to enter CD mode.
2
Press PROGRAM/CLOCK SET in stop mode.
The PROG indicator starts blinking in the display
window.
CD
PROG
3
Press 4 or ¢ to select a desired track to be
programmed.
CD
PROG
Track to be programmed
4
Press PROGRAM/CLOCK SET.
5
Repeat steps 3 and 4 to program other tracks.
6
Press PLAY/PAUSE 3/8 while the PROG
indicator blinks.
The tracks are played in the order you have
programmed.
You can press CD PLAY/PAUSE on the remote
control unit to start programmed playback.
Notes:
• If the PROG indicator goes off before you press PLAY/
PAUSE 3/8 (or CD PLAY/PAUSE on the remote
control unit), press PROGRAM/CLOCK SET, then
start playback.
• If you press CD/RANDOM while in CD mode, the unit
enters the random playback mode.
MUTIN
G
FM
MO
DE
PROGRAM/
CLOC
K
S
ET
Ad
d
"/"
HBS
/
PRESE
T EQ
TOP
S
E
US
A
P
/
Y
LA
P
STANDBY/ON DISPLAY
TUNER/
CD/
BAND
RANDOM
INTRO STOP
FM MODE
HBS/
CD REPEAT/
PRESET EQ
+
MUTING
–
RM-SRCEX25A REMOTE CONTROL
TAPE
CD PLAY
/PAUSE
+
VOLUMEPRESET
–
To stop during playback
Press STOP 7 (or STOP on the remote control unit).
The PROG indicator goes off and the unit exits from
programmed playback.
To check the program contents
Before starting programmed playback, press
PROGRAM/CLOCK SET.
Each time you press the button, the programmed tracks
are shown in the display window.
To add tracks in the program
1
Press PROGRAM/CLOCK SET repeatedly so that
“00” appears as the track number.
2
Press 4 or ¢ to select the track number, then
press PROGRAM/CLOCK SET.
To edit the program
1
Press PROGRAM/CLOCK SET repeatedly so that
the program number you want to edit is shown.
2
Press 4 or ¢ to select a new track number,
then press PROGRAM/CLOCK SET.
To repeat programmed playback
Press PRESET + / CD REPEAT (or CD REPEAT /
PRESET + on the remote control unit) after starting
programmed playback.
To erase the entire program in the memory
Press PROGRAM/CLOCK SET so that the PROG
indicator blinks, and press STOP 7 (or STOP on the
remote control unit) while the PROG indicator blinks.
The stored program is also cleared when the disc door is
opened.
Note:
After you have programmed 20 tracks, the program
number returns to “1.” Programming more tracks
overwrite the tracks already programmed to those
numbers.
12
Page 17
Playing back introductions – Intro playback
Every track or every programmed track of a CD can be played for the beginning 10 seconds.
English
INTRO
STANDBY/ON DISPLAY
TUNER/
CD/
BAND
RANDOM
INTRO STOP
FM MODE
CD REPEAT/
PRESET EQ
+
MUTING
–
RM-SRCEX25A REMOTE CONTROL
TAPE
CD PLAY
/PAUSE
HBS/
+
VOLUMEPRESET
–
Press INTRO.
The INTRO indicator appears in the display window and
intro playback starts.
To use intro playback for programmed and random
playback, press the button after starting playback.
To stop during playback
Press STOP 7 (or STOP on the remote control unit).
The INTRO indicator goes off and the unit exits from
the intro playback.
To cancel intro playback without stopping
Press INTRO during playback.
The INTRO indicator goes off and the unit continues
playback.
Note:
If you press INTRO while playing a track over ten
seconds from the beginning, the introduction of the next
track begins to play.
13
Page 18

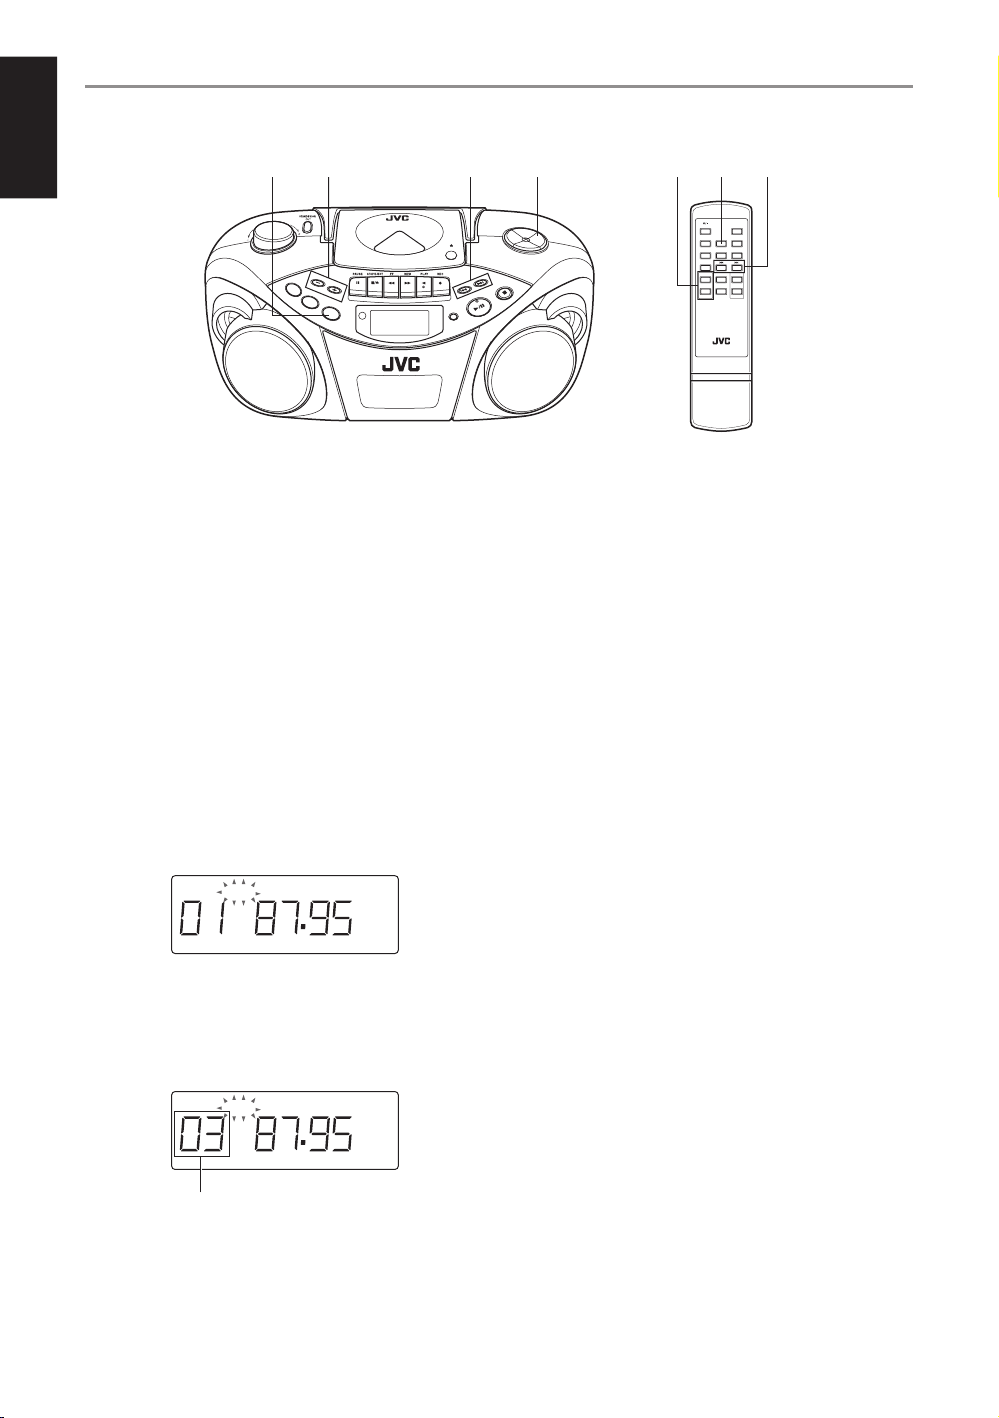
RADIO RECEPTION
Tuning in a station
PRESET
TAPE
CD REPEAT
RANDOM
CD
TUNER
REMOTE
SENSOR
BAND
1
Press BAND/TUNER to enter the tuner mode.
2
Press BAND/TUNER to select the band, FM or
AM.
3
Press and hold 4 or ¢ for more than 1 second.
The unit starts searching and stops when a station of
sufficient signal strength is tuned in.
If you press 4 or ¢ briefly and repeatedly, the
frequency changes step by step.
4
Adjust the volume.
English
3 4 31,21,24
M
U
TING
FM
MODE
PROGRAM/
CLOC
K
SET
Add
"/"
H
B
S
/
PRESE
PUSH
PLAY/P
DISPLAY
T EQ
TOP
S
USE
A
Using the antennas
FM
STANDBY/ON DISPLAY
TUNER/
CD/
BAND
RANDOM
INTRO STOP
FM MODE
HBS/
CD REPEAT/
PRESET EQ
+
MUTING
–
RM-SRCEX25A REMOTE CONTROL
TAPE
CD PLAY
/PAUSE
+
VOLUMEPRESET
–
Changing the FM reception mode
When an FM stereo broadcast is hard to receive or noisy,
reception improves in monaural reception.
Press FM MODE so that the MONO indicator
appears in the display window.
To restore the stereo effect, press FM MODE again so
that the MONO indicator goes off.
FM MODE
FM MODE
Main unit Remote
Note:
The FM reception mode setting will be canceled when
you tune in another station.
AM
MUTING
F
M
M
O
D
E
P
R
O
G
R
A
M
/
C
L
O
C
K
S
E
T
A
d
d
"
/
"
H
B
S
/
P
R
E
S
E
T
E
PUSH
PRESET
TAPE
CD REPEA
RANDOM
T
CD
T
U
N
E
R
REMOTE
SENSOR
BA
N
D
DISPLAY
Q
STOP
AUSE
PLAY/P
Note:
The built-in ferrite core antenna may pick up interference
from television receivers in the neighborhood disturbing
AM reception.
14
Page 19
Presetting stations
You can preset 10 FM and 10 AM stations.
English
2,6 3,5,6 2,6 14,64,61
PUSH
PRESET
TAPE
CD REPEA
RANDOM
T
CD
TUNER
REMOTE
SENSOR
BAND
PLA
DISPLAY
There is a time limit in doing the following steps. If the
setting is canceled before you finish, start from step 3
again.
Note:
In some cases, test frequencies have been already
memorized for the tuner since the factory examined the
tuner preset function before shipment. This is not a
malfunction. You can preset the stations you want into
memory by following the presetting method.
1
Press BAND/TUNER to select the band, FM or
AM.
2
Press 4 or ¢ to tune in the station you want to
preset.
3
Press PROGRAM/CLOCK SET.
The PROG indicator starts blinking in the display
window.
TUNER
PROG
FM
MHz
M
U
TING
F
M
M
O
D
E
P
R
O
G
R
A
M
/
C
L
O
C
K
S
E
T
A
d
d
"
/"
H
B
S
/
P
RES
E
T E
Q
STOP
AUSE
Y/P
5
Press PROGRAM/CLOCK SET.
STANDBY/ON DISPLAY
TUNER/
CD/
BAND
RANDOM
INTRO STOP
FM MODE
HBS/
CD REPEAT/
PRESET EQ
+
MUTING
–
RM-SRCEX25A REMOTE CONTROL
TAPE
CD PLAY
/PAUSE
+
VOLUMEPRESET
–
The tuned station in step 2 is stored in the preset
number selected in step 4.
Storing a new station on a used number erases the
previously stored one.
6
Repeat steps 2 to 5 to preset other stations, using
different preset numbers.
Tuning in a preset station
1
Press BAND/TUNER to select the band, FM or
AM.
2
Press PRESET + / CD REPEAT or PRESET –
repeatedly until the desired preset number
appears.
Note:
If you unplug the AC power cord or if a power failure
occurs, the preset stations will be erased in a few days. If
this happens, preset the stations again.
4
Press PRESET + / CD REPEAT or PRESET – to
select the preset number.
You can press CD REPEAT / PRESET + or PRESET
– on the remote control unit to select the preset
number.
TUNER
PROG
FM
MHz
Preset number
15
Page 20
CASSETTE PLAYBACK
Notes on cassette tapes
• Use only type-I normal tapes. The recording/playback
characteristics of this unit are those for normal tapes,
which have different characteristics from CrO
metal tapes.
• The use of tapes longer than 120 minutes is not
recommended, since characteristic deterioration may
occur and these tapes easily jam in the pinch roller and
the capstan.
• Loose tape may cause trouble. Gently tighten the tape
with a pencil as shown in the figure below.
Turn the pencil to take up
the slack.
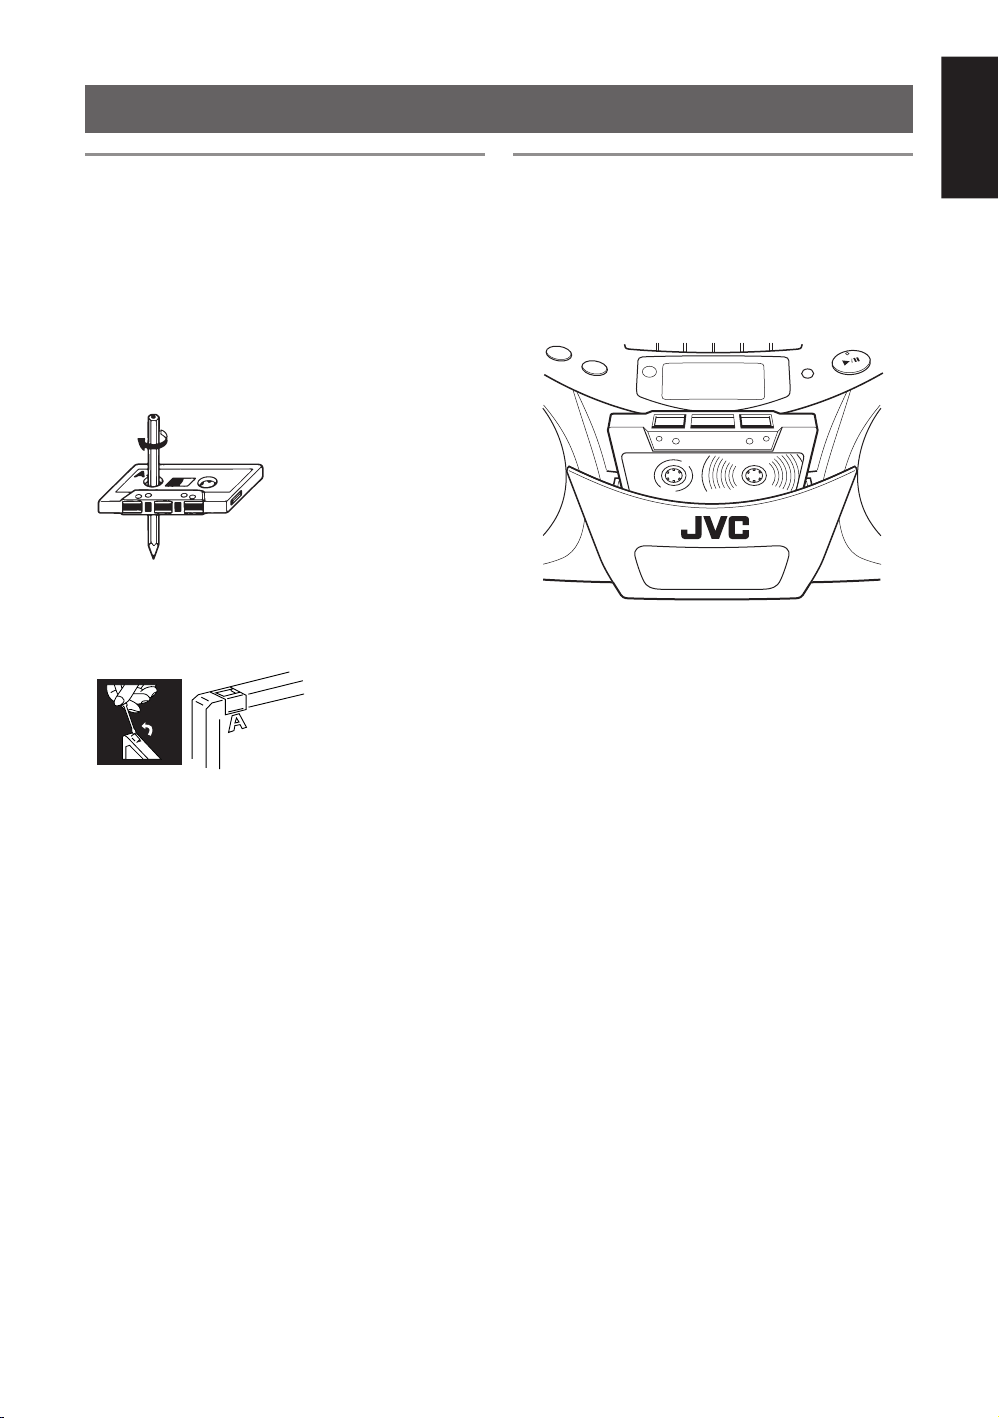
• To prevent recordings from being accidentally erased,
remove the tab(s) with a screwdriver. After the tabs
have been broken off, reseal the slots with adhesive
tape to erase or re-record.
2 and
Loading a cassette
1
Press STOP/EJECT § to open the cassette
holder.
2
Load a cassette with the open side up and the
playback side facing out as shown in the figure
below.
+ Forward direction
CD
TUNER
REMOTE
SENSOR
BAND
3
Close the cassette holder by pressing it gently and
firmly.
The cassette holder clicks back into position.
DISPLAY
PLAY/PAUSE
English
16
Page 21

Basic operation
English
1
Press TAPE to enter the tape mode.
2
Load a cassette.
Use only a type-I normal tape.
3
Press PLAY 2 to start playback.
4
Adjust the volume.
To stop playback
Press STOP/EJECT §.
The tape also stops when it reaches the end.
2 3 4 114
MUTING
FM MODE
PROGRA
M/
CLOC
K
SET
Add
"/"
HBS/
P
R
E
S
PUSH
PRESET
TAPE
CD REPEAT
RANDOM
CD
TUNER
REMOTE
SENSOR
BAND
PLAY/PAU
DISPLAY
ET EQ
TOP
S
E
S
STANDBY/ON DISPLAY
TUNER/
CD/
BAND
RANDOM
INTRO STOP
FM MODE
HBS/
CD REPEAT/
PRESET EQ
+
MUTING
–
RM-SRCEX25A REMOTE CONTROL
TAPE
CD PLAY
/PAUSE
+
VOLUMEPRESET
–
Fast-winding a tape
Press REW ¡ or FF 1.
When the tape reaches the end, press STOP/EJECT §
to release REW ¡ or FF 1.
17
Page 22
RECORDING
Basic operation
32 11
PUSH
PR
E
SET
TAPE
C
RANDOM
D R
EPE
A
T
CD
TUNER
REMOTE
SENSOR
BAND
Standard recording
1
Prepare the recording source.
• When recording from the radio:
Set to the tuner mode and tune in a desired station.
• When recording from a CD:
Set to the CD mode and load a CD.
2
Load a blank or erasable cassette.
Use only a type-I normal tape.
3
Press REC ¶.
PLAY 2 is also depressed, and recording starts.
To stop recording
Press STOP/EJECT §.
The tape also stops when it reaches the end.
Notes:
• It should be noted that it may be unlawful to re-
record pre-recorded tapes, records, or discs without
the consent of the owner of copyright in the sound
or video recording, broadcast or cable program and
in any literary, dramatic, musical, or artistic work
embodied therein.
• The recording level is automatically set correctly, so it
is not affected by VOLUME. Thus, during recording
you can adjust the sound you are actually listening to
without affecting the recording level.
• If a recording you made has excessive noise or static,
the unit may have been too close to a TV which was on
during the recording. Either turn off the TV or increase
the distance between the TV and the unit.
DISPLAY
M
UTIN
G
FM MO
DE
P
R
O
G
R
A
M
/
C
L
O
C
K
S
E
T
A
d
d
"
/"
H
B
S/
P
R
E
S
E
T
E
Q
STOP
USE
A
PLAY/P
STANDBY/ON DISPLAY
TUNER/
CD/
BAND
RANDOM
INTRO STOP
FM MODE
HBS/
CD REPEAT/
PRESET EQ
+
MUTING
–
RM-SRCEX25A REMOTE CONTROL
TAPE
CD PLAY
/PAUSE
+
VOLUMEPRESET
–
Using the beat-cut function
When recording an AM broadcast, beats may occur. If
this happens, change the BEAT CUT switch on the rear
of the unit to either “1” or “2” to reduce the beating
sound.
BEAT CUT
12
To start recording at the exact moment
1
Press PAUSE 8 first, then press REC ¶, thus
entering the record-pause (standby) mode.
2
Press PAUSE 8 to release the tape at the exact
moment you want to start recording.
Note:
Do not leave the unit in pause mode for more than a few
minutes. Instead, press STOP/EJECT § to stop the
tape.
English
18
Page 23
Synchronized recording with CD playback
You can make the CD player to start playback when the tape deck enters the recording mode.
English
2541 3 4 3
PRESET
TAPE
CD REPEAT
RANDOM
CD
TUNER
REMOTE
SENSOR
BAND
1
Load a cassette.
Use only a type-I normal tape.
2
Load a CD.
3
Press CD/RANDOM to enter CD mode.
You can press CD/RANDOM on the remote control
unit to enter CD mode.
4
Specify a track or point on the disc to start
recording.
• To start recording from the desired track, select the
track by pressing 4 or ¢ in stop mode.
• To start recording from the desired point on a disc,
play the disc and pause at the desired point by
pressing PLAY/PAUSE 3/8 (or CD PLAY/PAUSE
on the remote control unit).
5
Press REC ¶.
PLAY 2 is also depressed, and synchronized
recording starts.
M
UT
IN
G
F
M
M
O
D
E
P
R
O
G
R
A
M
/
C
L
O
C
K
S
E
T
A
d
d
"/"
H
B
S
/
P
RES
E
T E
PUSH
PLAY/P
DISPLAY
Q
STOP
AUSE
STANDBY/ON DISPLAY
TUNER/
CD/
BAND
RANDOM
INTRO STOP
FM MODE
HBS/
CD REPEAT/
PRESET EQ
+
MUTING
–
RM-SRCEX25A REMOTE CONTROL
TAPE
CD PLAY
/PAUSE
+
VOLUMEPRESET
–
When the tape reaches the end first, the CD player enters
the pause mode. Press PLAY/PAUSE 3/8 (or CD
PLAY/PAUSE on the remote control unit) to continue
playback, or press STOP 7 (or STOP on the remote
control unit) to stop playback.
When the CD player stops first, the tape continues
running. In this case, press STOP/EJECT § to stop
the tape.
• The CD SYNC indicator appears in the display
window during synchronized recording.
Erasing
When recording on a pre-recorded tape, the previous
recording is erased and only the new recording is heard
next time the tape is played back.
19
To erase a tape without making a new
recording
1
Press TAPE on the unit to enter the tape mode.
2
Press REC ¶.
Page 24
MAINTENANCE
Cleaning the heads, capstan and
pinch roller
Cleaning is important!
When the tape is running, magnetic powder and dust
naturally accumulate on the heads, capstan and pinch
roller. When they become too dirty;
• Sound quality deteriorates.
• The sound output level drops.
• The previous recording is not completely erased.
• Recording is not performed satisfactorily.
To avoid these, clean the heads, capstan and pinch roller
every 10 hours of use.
Head (recording/playback)
Pinch roller Erasure head
Capstan
Open the cassette holder. Clean the heads, capstan
and pinch roller.
For effective cleaning, use a cleaning kit available at an
audio store.
After cleaning, make sure that the cleaning fluid has dried
completely before loading a cassette.
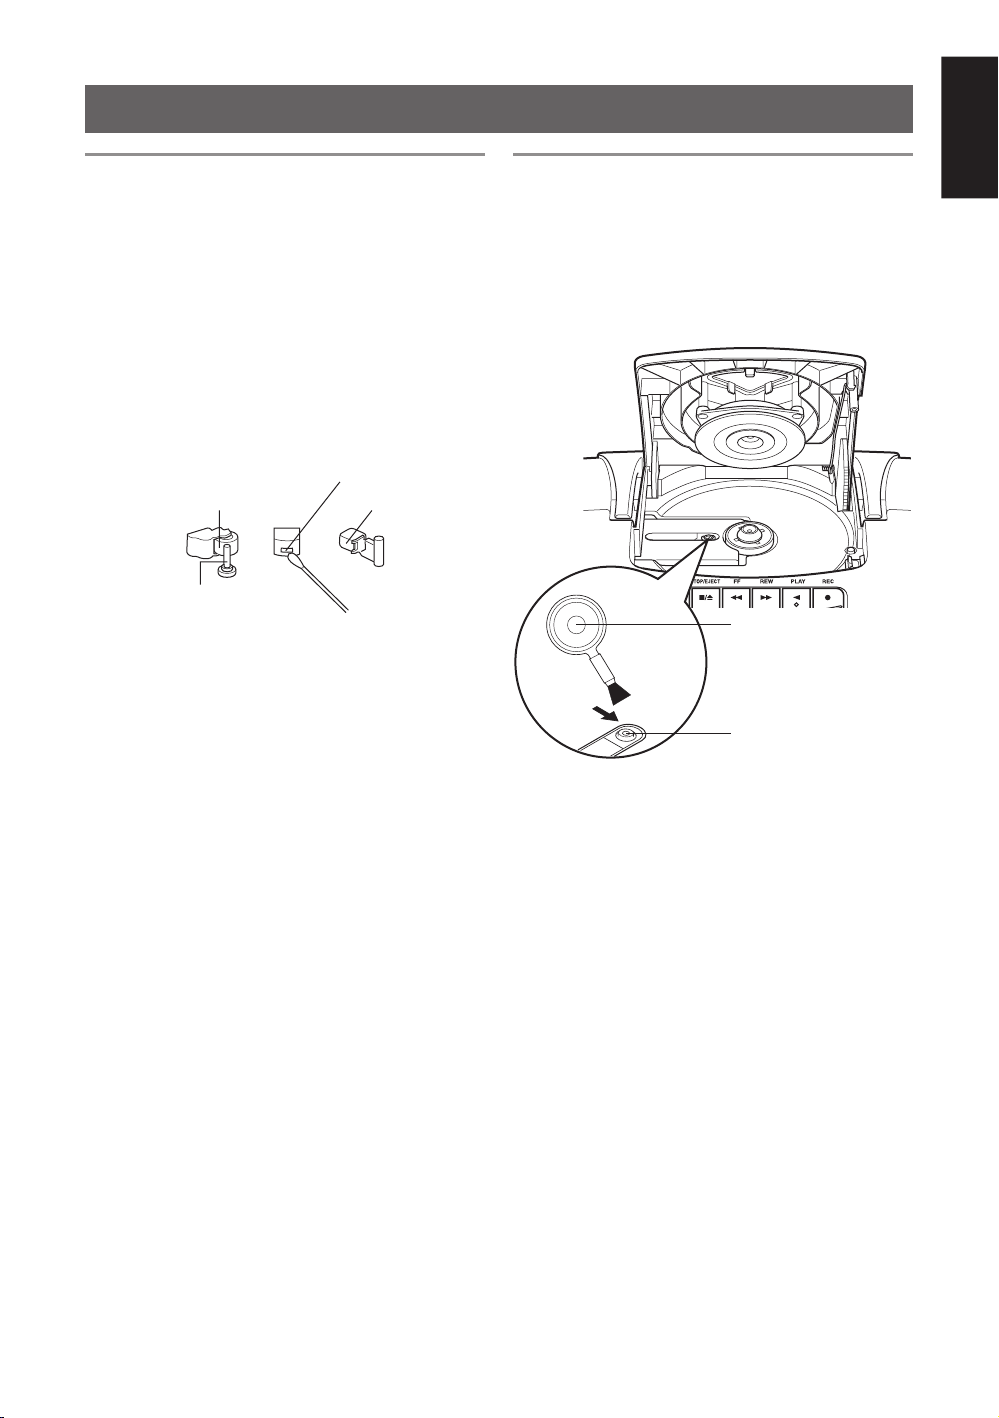
Cleaning the CD pickup lens
English
If the CD pickup lens is dirty, the sound may be
degraded.
Open the disc door and clean the lens.
Use a blower (available at a camera store, etc.) to blow
off dust on the lens.
Blower
Lens
Cautions:
• Keep magnets and metallic objects away from the
head. If the head becomes magnetized, noise will
increase and the sound will deteriorate.
• Demagnetize the recording/playback head every 20 to
30 hours of use with a head demagnetizer available at
an audio store. When demagnetizing the head, the unit
should be turned off.
As the erasure head of the unit is of magnetic type,
do not demagnetize it.
• Do not use anything other than alcohol for cleaning.
Thinner and benzine will damage the rubber pinch
roller.
20
Page 25
TROUBLESHOOTING
English
• If you are having a problem with your unit, check this
list for a possible solution before calling for service.
• If you cannot solve the problem from the hints given
here, or the unit has been physically damaged, call a
qualified person, such as your dealer, for service.
Symptom
Power cannot be turned on.
When PLAY 2 is pressed, tape does not
move.
Playback sound is at a very low level.
REC ¶ does not function.
The disc is loaded but does not play.
No sound from the speakers.
Since the tape speed is irregular, wow
and flutter occur.
Radio reception is poor and there is
much static.
Remote control is impossible.
Possible cause
The power cord is unplugged.
PAUSE 8 is pressed.
• Batteries are run down.
• The head is dirty.
• The safety tabs of the cassette have
been broken off.
• No cassette is loaded.
• The disc is upside down.
• The disc is dirty.
• The disc is damaged or warped.
• The lens is dirty.
• There is moisture condensation.
Headphones are conneced.
• The pinch roller or capstan is dirty.
• Batteries are run down.
The antenna is not properly adjusted.
• Batteries in the remote control unit are
run down.
• The remote sensor section is exposed
to bright light (direct sunlight, etc.)
Action
Connect the power cord.
Press PAUSE 8 again to release it.
• Replace the batteries with new ones.
• Clean the head.
• Reseal the slots with adhesive tape.
• Load a cassette.
• Load the disc with the label side facing
up.
• Clean the disc.
• Replace the disc with a playable one.
• Clean the lens.
• Turn the unit on and wait one or two
hours before use.
Disconnect the headphones.
• Clean the pinch roller and capstan.
• Replace the batteries with new ones.
Adjust the antenna correctly.
• Replace the batteries with new ones.
• Try not to operate the unit under direct
sunlight, etc.
Note:
When the unit is moved from a cold place of around 0˚C
to a warm place, it may not operate normally, because
moisture has formed inside the unit. Normal operation
will be restored after waiting one or two hours.
21
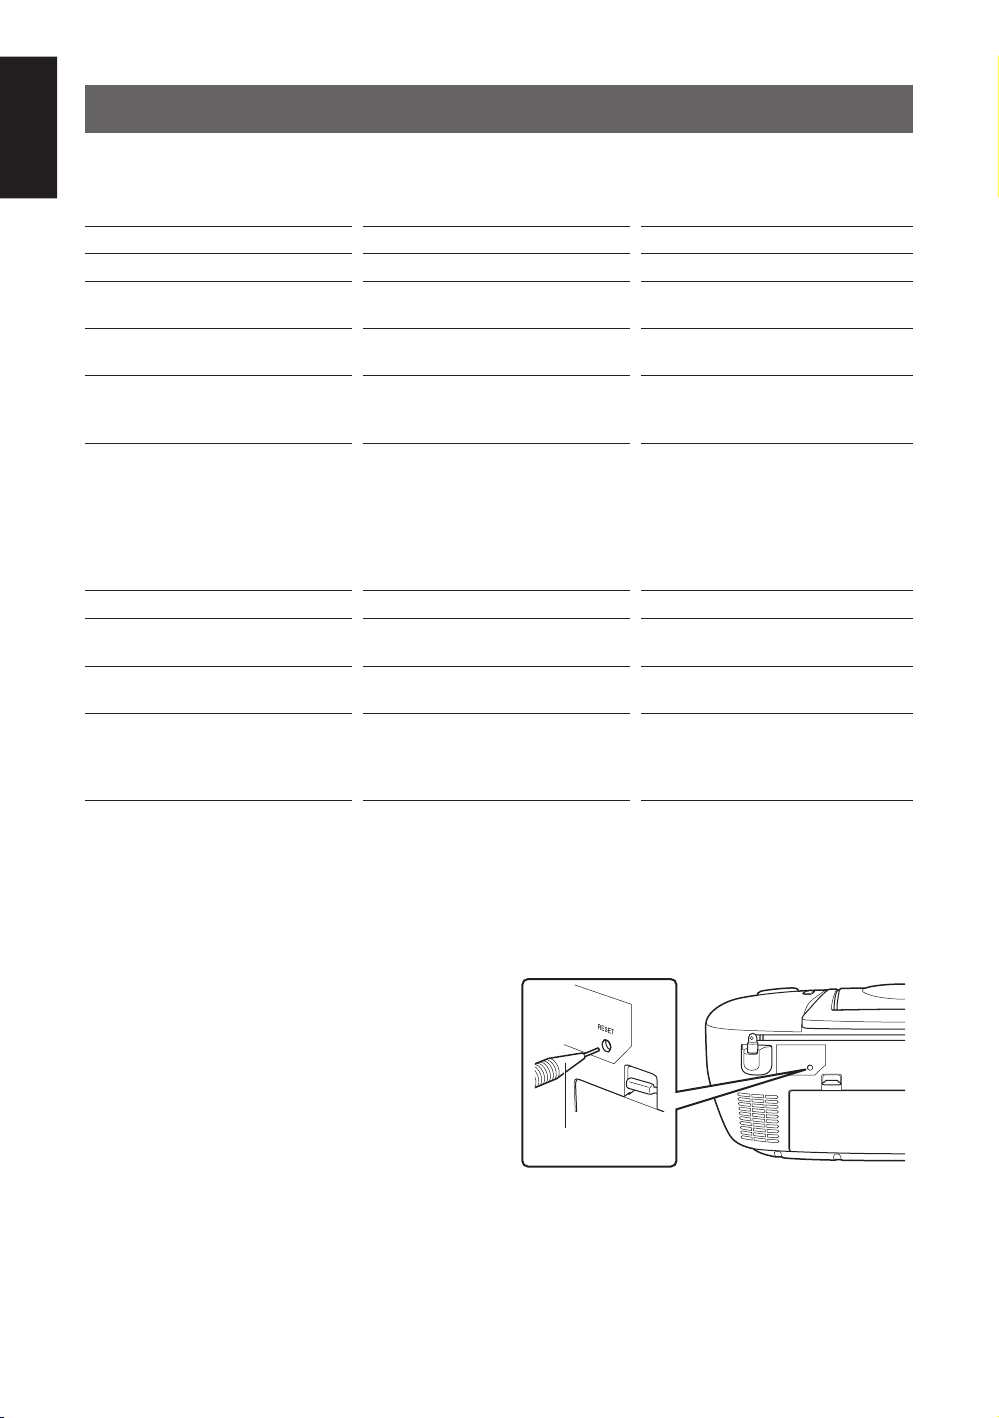
Resetting the unit
If “TROUBLESHOOTING” does not eliminate
malfunctioning (failure to operate or display properly,
etc.), press the RESET button on the rear of the unit with
something having a sharp point, while the unit is turned
on.
Sharp point
Note:
Resetting causes the unit to restore its factory default
settings and results in all the settings made by the user
being deleted.
Page 26

SPECIFICATIONS
CD player
CD capacity : 1 CD
Signal-to-noise ratio : 75 dB
Dynamic range : 60 dB
Tuner
Frequency range : FM 87.5 – 108.0 MHz
AM 522 – 1 629 kHz
Antennas : Telescopic antenna for FM
Ferrite core antenna for AM
Cassette deck
Frequency response : 60 Hz – 10 000 Hz
Wow & flutter : 0.15% (WRMS)
Fast wind time : Approx. 150 sec.
(C-60 cassette)
General
English
Speakers : 9 cm cone × 2
Speaker impedance : 4 Ω
Output power : 4 W (2 W + 2 W) at 4 Ω
(10% THD)
Output terminals : PHONES × 1
Power supply : AC 230 V Ó, 50 Hz
DC 9 V (R20 (SUM-1)/D
(13D)-size batteries × 6)
Power consumption : 13 W (at operation)
3 W (on standby)
Dimensions : 420 mm × 178 mm ×
250 mm (W/H/D)
Mass : Approx. 3.2 kg
(without batteries)
Accessories provided : AC power cord × 1
Remote control unit × 1
Batteries for the remote
control unit (AAA/UM-4/
R03) × 2
Design and specifications are subject to change without
notice.
22
Page 27

INHALT
BESONDERE VORZÜGE ......................................... 1
HINWEISE ZUR SICHERHEIT ................................ 1
HINWEISE ZUR HANDHABUNG ........................... 2
STROMVERSORGUNG ............................................ 3
NAMEN DER TEILE UND BEDIENELEMENTE ... 4
FERNBEDIENUNG ................................................... 5
EIN-/AUSSCHALTEN DES GERÄTS ...................... 6
EINSTELLEN DER UHRZEIT .................................. 7
Deutsch
BESONDERE VORZÜGE
1 Tragbares System mit integriertem CD-
Player
• CD-Funktionen können mit der Fernbedienung
oder direkt am Gerät gesteuert werden.
• Auch 8-cm-CDs können wiedergegeben werden.
2 Digitale LCD-Display (Flüssigkristallanzeige)
zeigt den allgemeinen Wiedergabestatus an
HINWEISE ZUR SICHERHEIT
Zum Schutz gegen Elektroschock, Brand
und Beschädigung
• Auch wenn die STANDBY/ON-Taste auf STANDBY
steht, fließt etwas Strom durch das Kabel. Wenn das
Gerät eingeschaltet wird, leuchtet das Anzeigefenster
orange auf. Wenn sich das Gerät im
Bereitschaftsmodus befindet, ist das Anzeigefenster
ausgeschaltet. (Bedenken Sie allerdings, dass das
Anzeigefenster auch dann nicht aufleuchtet, wenn das
Gerät eingeschaltet ist, aber mit Batterien betrieben
wird). Zur Sicherheit und um Strom zu sparen, sollten
Sie das Netzkabel aus der Wandsteckdose ziehen, falls
das Gerät längere Zeit nicht benutzt werden wird.
• Berühren Sie das Netzkabel nicht mit nassen Händen.
• Das Netzkabel darf grundsätzlich nur durch direktes
Erfassen des Steckers abgezogen werden; ziehen Sie
nicht am Kabel.
• Wenn am Kabel ein Schaden, Riss oder Wackelkontakt
zu erkennen ist, müssen Sie bei Ihrem Fachhändler
sofort ein neues Kabel besorgen.
TONREGULIERUNG ................................................ 8
CDs ABSPIELEN ....................................................... 9
RADIOEMPFANG ................................................... 14
KASSETTEN ABSPIELEN...................................... 16
AUFNEHMEN .......................................................... 18
WARTUNG............................................................... 20
FEHLERSUCHE ....................................................... 21
TECHNISCHE DATEN............................................ 22
3 Mit CD-Wiedergabe synchronisierte
Aufnahme
4 Hyper-Bass-Soundeffekte
• Das Kabel darf nicht geknickt, gezogen oder verdreht
werden.
• Das Typenschild befindet sich außen auf der
Geräteunterseite.
• Das Netzkabel darf in keiner Weise modifiziert
werden.
• Entfernen Sie keinerlei Schrauben, um das Gerät zu
zerlegen, und berühren Sie keine Komponenten im
Geräteinnern; es besteht sonst Unfallgefahr.
• Stecken Sie keinerlei Metallgegenstände in das Gerät.
• Ziehen Sie bei einem Gewitter den Netzstecker ab, falls
die Gefahr eines Blitzeinschlags besteht.
• Falls Wasser ins Gerät eingedringen sollte, müssen Sie
sofort den Netzstecker abziehen und sich dann an einen
Fachhändler wenden.
• Blockieren Sie nicht die Lüftungsöffnungen des
Geräts, damit die Wärme entweichen kann.
• Stellen Sie das Gerät nicht an mangelhaft belüfteten
Orten auf.
1
Page 28

HINWEISE ZUR HANDHABUNG
Verwenden Sie das Gerät nicht unter direkter
Sonneneinstrahlung, und lassen Sie es nicht im
geschlossenen Fahrzeug (oder Boot usw.) liegen, wo
die Innentemperatur 40ºC überschreiten könnte.
1 Benutzen Sie das Gerät nicht an Orten
folgender Art:
• Wo die Temperatur übermäßig hoch oder niedrig
sein kann. Der empfohlene Temperaturbereich ist
zwischen 5ºC und 35ºC.
• Wo starke Vibrationen auftreten könnten
•Wo die Feuchtigkeit sehr hoch ist, z.B. im
Badezimmer
• Wo das Gerät starken Magnetquellen ausgesetzt ist,
wie z.B. Elektromagneten oder Lautsprechern.
2 Schützen Sie das Gerät vor übermäßigem
Staub
Schließen Sie das CD-Fach, damit die CD-Linse
nicht von Staub blockiert wird. Berühren Sie niemals
die CD-Linse.
3 Kondensation
Unter den folgenden Bedingungen kann
Kondensation auftreten und das Gerät nicht mehr
ordnungsgemäß funktionieren:
• Wenn das Gerät in einem Raum steht, wo gerade
eine Heizung eingeschaltet wurde
• Wenn das Gerät in einem Raum mit starkem Rauch
oder hoher Luftfeuchtigkeit steht
• Wenn das Gerät von einem kalten in einen warmen
Raum gebracht wurde
Stellen Sie in solchen Fällen die STANDBY/ONTaste auf ON und warten Sie eine oder zwei Stunden,
bevor Sie das Gerät benutzen.
4 Lautstärkeregelung
Anders als bei Analogschallplatten entsteht bei CDs
extrem wenig Rauschen. Falls Sie versuchen, die
Lautstärke durch Horchen auf den anfänglichen
Rauschpegel einzustellen, wie Sie das vielleicht von
Analogschallplatten gewohnt sind, können die
Lautsprecher durch einen heftigen Schallstoß bei
Beginn der Wiedergabe beschädigt werden. Drehen
Sie deshalb die Lautstärke anfangs herunter, und
regulieren Sie sie erst während der CD-Wiedergabe.
5 Sicherheitsvorrichtung
Das Gerät weist eine Sicherheitsvorrichtung auf, die
den Laserstrahl abschaltet, sobald das CD-Fach
geöffnet wird.
6 Lassen Sie keine magnetischen
Gegenstände in der Nähe der Lautsprecher
Die Lautsprecher enthalten Elektromagneten; wenn
Sie Tonbandkassetten oder Magnetkarten darauf
ablegen, könnten deren Daten eventuell gelöscht
werden.
7 Halten Sie das Gerät fern von
Fernsehgeräten
Wenn das Gerät zu nahe am Fernseher aufgestellt
wird, kann es zu einer Verzerrung des Fernsehbilds
kommen. Stellen Sie das Gerät in solchen Fällen
weiter weg vom Fernseher auf. Falls die
Bildverzerrung dadurch nicht behoben wird, sollten
Sie das Gerät nicht benutzen, solange der Fernseher
eingeschaltet ist.
8 Reinigen des Gehäuses
Falls das Gehäuse schmutzig ist, können Sie es mit
einem weichen, trockenen Tuch abwischen.
Verwenden Sie auf keinen Fall Benzin oder
Farbverdünner, da sonst die Geräteoberfläche
Schaden leiden könnte.
9 Betrieb mit Kopfhörer
• Stellen Sie die Lautstärke nicht zu hoch ein; es
besteht die Gefahr permanenter Gehörschäden.
• Aus Sicherheitsgründen sollten Sie niemals mit
aufgesetztem Kopfhörer ein Fahrzeug fahren.
10 Tragegriff
Klappen Sie den Tragegriff nicht hoch oder herunter,
solange die Antenne ausgefahren ist, da die Antenne
sonst beschädigt werden könnte. Stellen Sie den
Tragegriff so, dass er den Antennenbetrieb nicht
behindert.
Deutsch
2
Page 29
STROMVERSORGUNG
Betrieb mit Netzspannung
Schließen Sie das AC-Netzkabel an.
AC IN
Deutsch
VORSICHT:
• Verwenden Sie das Gerät nur mit dem mitgelieferten
JVC-Netzkabel, um jegliche Fehlfunktion oder
Beschädigung zu vermeiden.
Nehmen Sie die Batterien heraus, falls Sie das Gerät
mit Netzspannung betreiben.
• Ziehen Sie unbedingt das Netzkabel aus der Steckdose,
bevor Sie das Haus verlassen oder wenn Sie vorhaben,
das Gerät längere Zeit nicht zu benutzen.
Betrieb mit Batterien
Batterien einlegen
1
Öffnen Sie den Batteriefachdeckel.
Ziehen Sie den Batteriefachdeckel zu sich her, und
drücken Sie gleichzeitig auf die mit Pfeil
gekennzeichneten Stellen.
2
Legen Sie sechs Batterien des Typs R20
(SUM-1)/D (13D) ein.
Achten Sie darauf, dass die Batteriepole ª und ·
korrekt ausgerichtet sind.
1
6
33
5
4
Batterien prüfen
Wenn die Bandgeschwindigkeit schwächer wird, die
Lautstärke abnimmt oder die CD-Wiedergabe nur noch
mit Unterbrechungen funktioniert, sollten Sie alle
Batterien durch frische ersetzen.
Vor wichtigen Aufnahmen sollten Sie neue Batterien
einlegen (möglichst Alkalizellen mit langer
Betriebslebensdauer), um Ausfälle zu vermeiden.
Bessere Batterienutzung
• Bei fortgesetztem Gerätebetrieb werden die Batterien
schneller leer als bei Betrieb mit Unterbrechungen.
• Bei Gerätebetrieb in kalter Umgebung werden die
Batterien schneller leer als bei Betrieb an warmen
Orten.
VORSICHT:
• Wenn Sie das Gerät längere Zeit nicht benutzen wollen
(mehr als zwei Wochen), oder wenn Sie es mit
Netzspannung betreiben, sollten Sie die Batterien
herausnehmen, um jegliche Störungen oder
Beschädigungen zu vermeiden.
• Wenn Sie das Gerät über das mitgelieferte JVCNetzkabel am Stromnetz anschließen, schaltet die
Stromversorgung auch bei eingelegten Batterien
automatisch auf Netzstrom um.
Bei Betrieb über das Netzkabel sollten Sie aber
trotzdem die Batterien herausnehmen.
VORSICHT BEI BATTERIEBETRIEB:
Wenn Batterien falsch benutzt werden, könnten sie
explodieren oder es könnte Batteriesäure austreten.
Achten Sie besonders auf Folgendes:
• Vergewissern Sie sich, dass die Batteriekontakte ª
und · korrekt ausgerichtet sind; legen Sie die
Batterien gemäß der linken Abbildung ein.
• Legen Sie niemals alte und neue Batterien
zusammen ein, und kombinieren Sie niemals
verschiedene Arten von Batterien.
• Versuchen Sie keinesfalls, nicht-wiederaufladbare
Batterien aufzuladen.
• Nehmen Sie die Batterien heraus, wenn das Gerät
längere Zeit nicht benutzt werden soll.
2
Falls Batteriechemikalien einmal auf die Haut geraten
sind, müssen Sie sie sofort mit viel Wasser abspülen.
Falls diese Chemikalien auf das Gerät geraten sind,
ist das Gerät sofort gründlich zu reinigen.
Batterietyp R20 (SUM-1)/D (13D)
3
Setzen Sie den Batteriefachdeckel wieder auf.
3
Page 30
NAMEN DER TEILE UND BEDIENELEMENTE
Oberseite und Front
1 2
PRESET
TAPE
CD REPEAT
RANDOM
CD
BAND
9 1110 1312
1 VOLUME-Knopf
2 STANDBY/ON
-Taste (Bereitschaft)
3 PRESET – -Taste (Vorwahlsender)
PRESET + /CD REPEAT-Taste
4 Kassettenbetriebstasten
PAUSE 8 -Taste
STOP/EJECT § -Taste (Stopp/Auswurf)
FF 1 -Taste
REW ¡ -Taste
PLAY 2 -Taste
REC ¶ -Taste
5 CD-Fach
6 FM MODE (UKW)-Taste
7 MUTING-Taste (Stummschaltung)
43 6 7 85
MUTING
FM
M
O
DE
P
RO
G
R
A
M
/
CL
O
CK
S
ET
Ad
d
"/"
H
B
S/
PR
ESE
T E
PUSH
Q
Deutsch
STOP
TUNER
REMOTE
SENSOR
8 PROGRAM/CLOCK SET-Taste
9 TAPE-Taste (Kassette)
10 REMOTE SENSOR
11 Anzeigefenster
12 Kassettendeck
13 DISPLAY-Taste (Anzeige)
14 4 Taste
15 HBS/PRESET EQ-Taste
PLAY/PAUSE
DISPLAY
14 15
(Programm/Uhreinstellung)
CD/RANDOM-Taste (CD/Zufallswiedergabe)
BAND/TUNER-Taste (Tuner/Wellenbereich)
¢ Taste
PLAY/PAUSE 3/8 -Taste
STOP 7 -Taste
(Equalizer-Voreinstellung)
4
Page 31
Rückseite
Deutsch
16 17 18
19
20
16 Teleskopantenne
17 RESET-Taste (Werkeinstellungen)
18 BEAT CUT-Schalter (Überlagerungs-
begrenzung)
19 PHONES-Buchse (Kopfhörer)
Schließen Sie einen Stereo-Ministecker-Kopfhörer
(3,5 mm Steckerdurchmesser, Impedanz 16 Ω bis
FERNBEDIENUNG
Batterien einlegen
1
Nehmen Sie den Batteriefachdeckel von der
Rückseite der Fernbedienung ab.
2
Legen Sie zwei Batterien der Größe AAA (UM-4)/
R03 ein (mitgeliefert).
Legen Sie die Batterien so ein, dass ª und · den
Markierungen im Batteriefach entsprechen. Setzen Sie
zuerst jeweils die Minusseite · ein.
Batterietyp AAA (UM-4)/R03
21
32 Ω) an diese Buchse an. Der Lautsprecherausgang
bleibt abgeschaltet, solange der Kopfhörer
angeschlossen ist.
20 Batteriefachdeckel
21 ÓAC IN (AC-Eingangs)-Buchse
3
Setzen Sie den Batteriefachdeckel wieder auf.
Auswechseln der Batterien
Der maximale Steuerabstand zwischen Fernbedienung
und Sensorfenster am Gerät beträgt etwa 7 Meter. Wenn
der Steuerabstand kleiner geworden ist oder die
Fernbedienung nicht mehr einwandfrei funktioniert,
sollten Sie die Batterien durch neue ersetzen.
Hinweise zum Gebrauch der
Fernbedienung
•Richten Sie die Vorderkante der Fernbedienung
möglichst direkt auf das Sensorfenster des Geräts. Der
steuerbare Abstand vom Gerät ist geringer, wenn Sie
die Fernbedienung in einem anderen Winkel auf das
Gerät richten.
• Betätigen Sie die Tasten sachte aber nachdrücklich.
• Achten Sie darauf, dass kein starkes Licht (direkte
Sonneneinstrahlung oder starkes Kunstlicht) direkt auf
das Sensorfenster des Geräts strahlt. Außerdem sollten
sich zwischen Fernbedienung und Sensorfenster des
Geräts keine Hindernisse befinden.
5
Page 32

Namen der Tasten
1
STANDBY/ON DISPLAY
TUNER/
CD/
BAND
2
3
4
RANDOM
INTRO STOP
FM MODE
CD REPEAT/
+
5
TAPE
CD PLAY
/PAUSE
HBS/
+
PRESET EQ
VOLUMEPRESET
MUTING
–
–
6
7
8
9
EIN-/AUSSCHALTEN DES GERÄTS
1 STANDBY/ON-Taste (Bereitschaft)
2 CD/RANDOM-Taste (CD/Zufallswiedergabe)
TUNER/BAND-Taste (Tuner/Wellenbereich)
TAPE-Taste (Kassette)
3 INTRO-Taste (Anspieltaste)
4 FM MODE (UKW)-Taste
5 CD REPEAT / PRESET + -Taste
(Vorwahlsender aufwärts)
PRESET – -Taste (Vorwahlsender abwärts)
6 DISPLAY-Taste (Anzeige)
7 STOP-Taste
CD PLAY/PAUSE-Taste (CD-Abspielen/
Pause)
4 Taste
¢ Taste
8 VOLUME + -Taste (Lautstärke)
VOLUME – -Taste (Lautstärke)
9 HBS/PRESET EQ-Taste
(Equalizer-Voreinstellung)
MUTING-Taste (Stummschaltung)
Deutsch
PUSH
PRESET
TAPE
CD REPEAT
RA
NDO
M
CD
TUNER
STANDBY/ON
REMOTE
SENSOR
BAND
DISPLAY
STANDBY/ON -Taste (Bereitschaft)
Drücken Sie die STANDBY/ON -Taste (Ein/AusTaste) am Gerät, um es ein- bzw. auszuschalten.
Sie können dazu auch die
STANDBY/ON-Taste
der Fernbedienung drücken.
Das Anzeigefenster leuchtet auf, wenn das Gerät
eingeschaltet wird. (Beachten Sie, dass das
Displayfenster auch dann nicht aufleuchtet, wenn das
Gerät eingeschaltet ist, aber mit Batterien betrieben
wird.) Das Gerät ist dann sofort wieder mit der beim
letzten Ausschalten gewählten Tonquelle aktiv.
Um die Stromversorgung komplett
auszuschalten
Ziehen Sie das AC-Netzkabel aus dem AC-Ausgang.
Falls sich Batterien im Gerät befinden, entfernen Sie sie.
STANDBY/ONSTANDBY/ON
STANDBY/ON DISPLAY
TUNER/
CD/
BAND
RANDOM
INTRO STOP
FM MODE
HBS/
CD REPEAT/
PRESET EQ
+
MUTING
–
RM-SRCEX25A REMOTE CONTROL
TAPE
CD PLAY
/PAUSE
+
VOLUMEPRESET
–
PLAY/PAUSE
MUTING
F
M
M
O
D
E
P
R
O
G
R
A
M
/
C
L
O
C
K
S
E
T
A
d
d
"
/"
HBS/
PRESET EQ
STOP
Hinweise:
• Wenn Sie das AC-Netzkabel herausziehen oder ein
Stromausfall eintritt, wird die Uhr auf der Stelle auf
„0:00“ (0:00 Uhr) gestellt, wohingegen die
eingestellten Radiosender (siehe Seite 15) nach ein
paar Tagen gelöscht werden. Die Uhranzeige blinkt
solange, bis Sie die Uhrzeit erneut einstellen.
• Nehmen Sie die Batterien heraus, wenn Sie das Gerät
in der Hand oder im Auto transportieren wollen. Sie
verhindern damit, dass sich das Gerät versehentlich
einschaltet und unnötig Strom verbraucht.
6
Page 33

EINSTELLEN DER UHRZEIT
2,3,43,4 3,411
PRESET
TAPE
CD REPEAT
RANDOM
CD
TUNER
REMOTE
SENSOR
Deutsch
BAND
Bevor Sie das Gerät weiter benutzen, stellen Sie zuerst
die darin eingebaute Uhr ein.
Die Uhr verfügt über eine 24-Stunden-Anzeige.
1
Drücken Sie STANDBY/ON , um das Gerät
auszuschalten, wenn es eingeschaltet ist.
Die Uhr blinkt auf dem Anzeigefenster.
2
Drücken Sie PROGRAM/CLOCK SET
(Programm/Uhreinstellung) und halten Sie sie
länger als 2 Sekunden gedrückt.
Die Stundenziffern beginnen zu blinken.
MU
TIN
G
FM
MODE
P
R
O
G
R
A
M
/
C
L
O
C
K
S
E
T
A
d
d
"
/"
H
B
S/
P
RE
S
ET
E
PUSH
AY
PL
DISPLAY
Q
P
STO
E
US
A
/P
STANDBY/ON DISPLAY
TUNER/
CD/
BAND
RANDOM
INTRO STOP
FM MODE
HBS/
CD REPEAT/
PRESET EQ
+
MUTING
–
RM-SRCEX25A REMOTE CONTROL
TAPE
CD PLAY
/PAUSE
+
VOLUMEPRESET
–
Hinweis:
Wenn ein Stromausfall eintritt, verliert die Uhr ihre
Einstellung und wird auf „0:00“ (0:00 Uhr)
zurückgestellt. Die Uhranzeige blinkt solange, bis Sie
die Uhrzeit erneut einstellen.
Anzeige der Uhrzeit, während CD oder
Radio eingestellt ist
Drücken Sie DISPLAY.
Mit jedem Tastedruck wechselt die Anzeige zwischen
der Uhrzeitanzeige und der normalen Anzeige.
(Ein Steuerbefehl an das Gerät, während die Uhrzeit
angezeigt wird, bewirkt den Wechsel der Anzeige auf
normale Anzeige.)
DISPLAY
DISPLAY
3
Drücken Sie 4 oder ¢ um die Stunden
einzustellen und drücken Sie dann PROGRAM/
CLOCK SET.
Die Minutenziffern beginnen zu blinken.
4
Drücken Sie 4 oder ¢ um die Minuten
einzustellen und drücken Sie dann PROGRAM/
CLOCK SET.
7
Gerät Fernbedienung
Page 34

TONREGULIERUNG
–
PHONES (on the rear)
PHONES (auf der Rückseite)
VOLUME VOLUME +/
PRESET
TAPE
CD REPEAT
RANDOM
CD
TUN
ER
REMOTE
SENSOR
BAND
Einstellen der Lautstärke
Drehen Sie VOLUME im Uhrzeigersinn, um die
Lautstärke lauter zu stellen oder gegen den
Uhrzeigersinn, um sie leiser zu stellen.
Sie können VOLUME + oder VOLUME – auf der
Fernbedienung drücken, um die Lautstärke lauter oder
leiser zu stellen.
Der Lautstärkepegel kann in 31 Stufen eingestellt werden
(00 VOL bis 30 VOL).
MUTING HBS/PRESET EQ
HBS/PRESET EQ
M
UTING
F
M MOD
E
P
R
O
G
R
A
M
/
C
L
O
C
K
S
E
T
A
d
d
"
/"
H
B
S
/
P
R
E
S
E
T
E
PUSH
PLAY/PAUSE
DISPLAY
Q
STOP
STANDBY/ON DISPLAY
TUNER/
CD/
BAND
RANDOM
INTRO STOP
FM MODE
HBS/
CD REPEAT/
PRESET EQ
+
MUTING
–
RM-SRCEX25A REMOTE CONTROL
TAPE
CD PLAY
/PAUSE
+
VOLUMEPRESET
–
Verstärkung der Basstöne
Mit dem Hyper-Bass Sound können Sie aus dem Gerät
auch kräftige Bässe hervorholen.
Drücken Sie die HBS/PRESET EQ-Taste und halten
Sie sie gedrückt, bis die HBS-Anzeige im
Anzeigefenster aufleuchtet.
Zum Abschalten des Basseffekts drücken Sie die Taste
erneut und halten Sie sie gedrückt, bis die HBS-Anzeige
erlischt.
Deutsch
Vorsicht:
Schalten Sie das Gerät NICHT aus, solange die
Lautstärke sehr laut eingestellt ist. Andernfalls könnte
beim nächsten Einschalten oder beim nächsten
Aktivieren einer Tonquelle ein plötzlicher Schallstoß Ihr
Gehör und/oder die Lautsprecher und Kopfhörer
beschädigen.
DENKEN Sie DARAN, dass Sie die Lautstärke nicht
regeln können, solange das Gerät ausgeschaltet ist.
Kurzzeitiges Abschalten des Tons
Drücken Sie während der Wiedergabe MUTING.
Der Ton wird ausgeschaltet und die MUTING-Anzeige
erscheint auf dem Anzeigefenster.
Der Ton wird wieder aktiviert, wenn Sie die MUTINGTaste erneut drücken.
Betrieb mit Kopfhörer
Schließen Sie den Kopfhörer an die PHONES
Buchse an.
Aus den Lautsprechern ertönt nun kein Ton mehr.
Senken Sie unbedingt die Lautstärke, bevor Sie einen
Kopfhörer anschließen.
Wahl des Klangmodus
Sie können unter 5 Voreinstellungen des Klangmodus
wählen.
CLASSIC : Gut für klassische Musik.
ROCK : Verstärkt hohe und tiefe Töne. Gut für
akustische Musik.
POP : Gut für Vokalmusik.
JAZZ : Gut für Jazzmusik.
FLAT : Normaler Klang.
Wahl des Klangmodus
Drücken Sie wiederholt HBS/PRESET EQ, bis die
Anzeige des von Ihnen gewünschten Klangmodus im
Anzeigefenster erscheint.
Mit jedem Tastendruck wechselt der Klangmodus wie
folgt:
CLASSIC ROCK
FLAT
JAZZ
POP
8
Page 35

CDs ABSPIELEN
Hinweise zu Compact-Discs
Dieses Gerät wurde nur zur Wiedergabe folgender CDTypen konzipiert:
• Digitale Audio-CDs
• Aufnehmbare digitale Audio-CDs (CD-R)
• Überschreibbare digitale Audio-CDs (CD-RW)
Deutsch
Zum Abspielen einer CD-R oder CD-RW
Es können finalisierte, in Musik-CD-Format
aufgenommene CD-R oder CD-RW abgespielt
werden. (Wenn eine CD-RW in einem anderen Format
aufgenommen wurde, löschen Sie alle Daten auf der CDRW vollständig, bevor Sie sie überspielen).
• Sie können CD-R oder CD-RW abspielen wie eine
Audio-CD.
• Manche CD-R oder CD-RW können aufgrund ihrer
Merkmale, eventueller Beschädigungen oder Flecken
nicht auf diesem Gerät abgespielt werden oder weil
die Linse des CD-Players verschmutzt ist.
• Der Reflektionsgrad einer CD-RW ist niedriger als der
anderer CDs, daher kann das Lesen einer CD-RW
länger dauern.
• CD-R und CD-RW im MP3-Format können nicht
abgespielt werden.
• Herausnehmen einer Disc aus ihrer Hülle und
Wiedereinsetzen
Drücken Sie auf die Hüllenmitte, um die Disc
herauszunehmen.
Drücken Sie auf den inneren Disc-Rand, bis sie
einrastet.
• Handhabung
Handhabung von Discs
Da verschmutzte, beschädigte oder verformte Discs das
Gerät beschädigen könnten, sollten Sie folgende Punkte
besonders beachten:
• Berühren Sie nicht die reflektierende Aufnahmefläche.
• Die Etikettseite darf nicht beklebt oder beschrieben
werden.
• Discs dürfen nicht verbogen werden.
Aufbewahrung
• Vergessen Sie nicht, aus dem Gerät herausgenommene
Discs wieder in ihre Hülle zurückzustecken.
• Discs sollten keiner direkten Sonneneinstrahlung,
hohen Temperaturen eines Heizkörpers o.ä., hoher
Feuchtigkeit oder Staub ausgesetzt werden.
Reinigen von Discs
Vor dem Einlegen einer Disc sollten Sie Staub, Schmutz
oder Fingerabdrücke mit einem weichen, trockenen Tuch
entfernen. Discs sollten grundsätzlich nur durch eine
gerade Wischbewegung von der Mitte her weg zum
Außenrand gereinigt werden.
Verwenden Sie keinesfalls Farbverdünner, Benzin,
Schallplattenreinigungsmittel oder Antistatik-Spray.
9
Falsch
• Reinigung
Richtig
Falsch
Page 36

Grundfunktionen
23 4 5 4115
PUSH
PRESET
TAPE
CD REPEAT
RANDOM
CD
TUNER
REMOTE
SENSOR
BAND
1
Schalten Sie durch Drücken der CD/RANDOM-
DISPLAY
Taste auf den CD-Modus, falls das Gerät im
TUNER- oder TAPE-Modus ist.
Sie können CD/RANDOM auf der Fernbedienung
drücken, um in den CD-Modus zu gehen.
2 Drücken Sie ) PUSH, um das CD-Fach zu öffnen.
3
Legen Sie eine Disc mit dem Etikett nach oben
weisend ein, und schließen Sie die Klappe.
• 8-cm-CDs können auf diesem Gerät ohne Adapter
abgespielt werden.
4
Drücken Sie PLAY/PAUSE 3/8 um mit der
Wiedergabe zu beginnen.
Sie können mit der Wiedergabe beginnen, indem Sie
CD PLAY/PAUSE auf der Fernbedienung drücken.
Während der Wiedergabe werden die gegenwärtige
Titelnummer und die verstrichene Wiedergabezeit
angezeigt.
CD
5
Stellen Sie die Lautstärke.
Hinweise:
• Folgende Information wird eventuell angezeigt, wenn
die Disc falsch herum eingelegt wurde. Legen Sie die
Disc noch einmal korrekt ein.
CD
M
UTING
FM MO
D
E
PR
O
GRAM/
C
L
O
C
K
S
ET
Add"/"
HBS/
P
RESET
E
Q
STOP
E
S
U
A
P
Y/
PLA
STANDBY/ON DISPLAY
TUNER/
CD/
BAND
RANDOM
INTRO STOP
FM MODE
HBS/
CD REPEAT/
PRESET EQ
+
MUTING
–
RM-SRCEX25A REMOTE CONTROL
TAPE
CD PLAY
/PAUSE
+
VOLUMEPRESET
–
Abbruch der Wiedergabe
Drücken Sie STOP 7.
Sie können STOP auf der Fernbedienung drücken, um
die Wiedergabe abzubrechen.
STOP
STOP
Gerät Fernbedienung
Vorsicht:
Halten Sie die Wiedergabe an, bevor Sie das CD-Fach
öffnen. Warten Sie, bis die Disc sich nicht mehr dreht,
und nehmen Sie sie erst dann heraus.
Pausieren der Wiedergabe
Drücken Sie PLAY/PAUSE 3/8 während der
Wiedergabe.
Sie können auch CD PLAY/PAUSE auf der
Fernbedienung drücken, um die Wiedergabe
abzubrechen.
Drücken Sie zum Fortsetzen der Wiedergabe erneut diese
Taste.
PLAY/PAUSE
CD PLAY
/PAUSE
Deutsch
• Falls während der Wiedergabe Titelfehlzugriffe
auftreten, sollten Sie die Lautstärke senken.
• Titelfehlzugriffe treten auf, wenn das Gerät starken
Erschütterungen ausgesetzt oder an einem Ort mit
starken Vibrationen betrieben wird (z.B. in einem
Fahrzeug auf schlechten Straßen).
• Wenn Sie CD/RANDOM drücken, während das Gerät
im CD-Modus ist, geht dieses auf den
Zufallswiedergabemodus.
Gerät Fernbedienung
10
Page 37
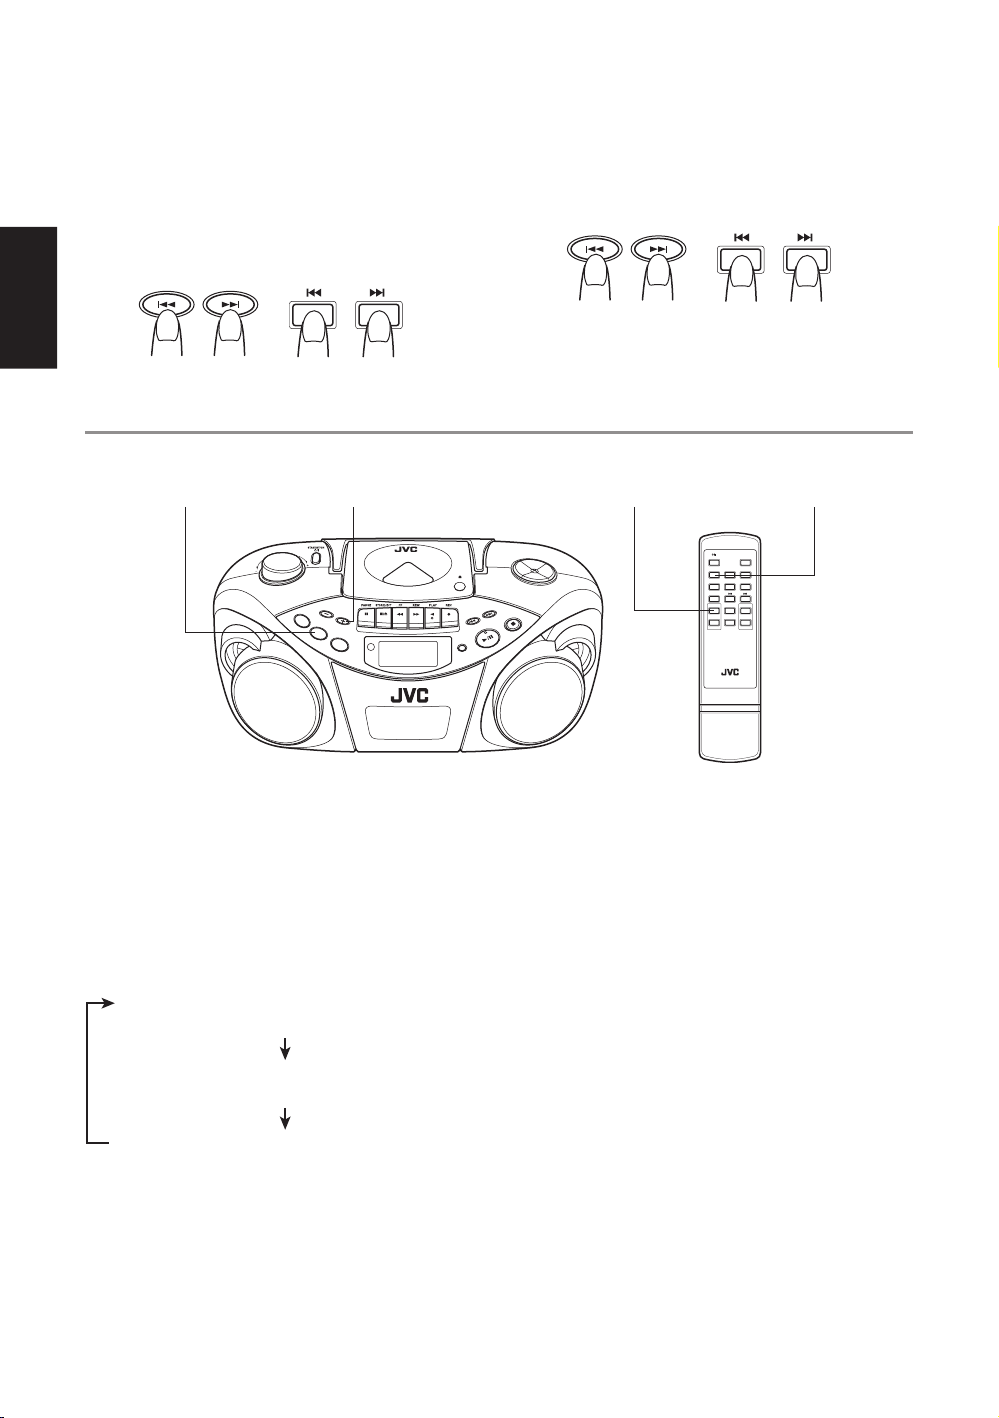
Überspringen einzelner Titel
• Sprung zum vorausgehenden Titel
Betätigen Sie während der Wiedergabe 4 einmal,
um zum Anfang des aktuellen Titels zurückzugehen,
betätigen Sie es zweimal, um zum Anfang des
vorherigen Titels zu gehen.
• Sprung zum nächsten Titel
Drücken Sie während der Wiedergabe die ¢ Taste,
um zum Anfang des nächsten Titels zu springen.
Suchen – Auffinden einer gewünschten
Stelle auf der CD
Drücken Sie 4 oder ¢ und halten Sie es während
der Wiedergabe gedrückt.
Hören Sie hin, und lassen Sie die Taste los, wenn die
betreffende Stelle erreicht wird.
Deutsch
Gerät Fernbedienung
Wiedergabe mit Wiederholung/Zufallswiedergabe
PRESET+/CD REPEAT
PUSH
PRESET
TAPE
CD REPEAT
RANDOM
CD
TUNER
REMOTE
SENSOR
BAN
D
Wiedergabewiederholung
Drücken Sie während der Wiedergabe
PRESET + / CD REPEAT.
Sie können CD REPEAT / PRESET + auf der
Fernbedienung drücken, um die Wiederholung der
Wiedergabe anzuwählen.
Mit jedem Tastendruck wechselt der Wiederholungsmodus wie folgt:
Wiederholte Wiedergabe aller Titel der Disc
(„REPEAT ALL“ leuchtet im Anzeigefenster auf.)
STOP
E
PLAY/PAUS
DISPLAY
Zufallswiedergabe
Drücken Sie die CD/RANDOM-Taste im CD-Modus,
so dass die RANDOM-Anzeige im Anzeigefenster
aufleuchtet.
Sie können CD/RANDOM auf der Fernbedienung
drücken, um die Zufallswiedergabe anzuwählen.
Die Titel werden nun in Zufallsreihenfolge abgespielt.
Um die Zufallswiedergabe abzubrechen, drücken Sie
wieder die CD/RANDOM-Taste; die RANDOMAnzeige erlischt nun.
Gerät Fernbedienung
CD REPEAT/PRESET
MU
TIN
G
FM MODE
P
R
O
G
R
A
M
/
C
L
O
C
K
S
E
T
A
d
d
"
/"
HB
S/
P
R
ESE
T EQ
+
STANDBY/ON DISPLAY
TUNER/
CD/
BAND
RANDOM
INTRO STOP
FM MODE
HBS/
CD REPEAT/
PRESET EQ
+
MUTING
–
RM-SRCEX25A REMOTE CONTROL
CD/RANDOMCD/RANDOM
TAPE
CD PLAY
/PAUSE
+
VOLUMEPRESET
–
Wiederholte Wiedergabe eines einzelnen Titels
(„REPEAT 1“ leuchtet im Anzeigefenster auf.)
Wiederholte Wiedergabe wird abgebrochen.
11
Page 38

Programmierte Wiedergabe
Bis zu 20 Titel können in jeder beliebigen Folge programmiert werden.
3,5 3 6 11 2,4,5 6
PUSH
PRESET
TAPE
CD REPEAT
RANDOM
CD
TUNER
REMOTE
SENSOR
BAND
DISPLAY
Hinweis:
Für die folgenden Schritte steht nur eine beschränkte
Zeitspanne zu Verfügung. Wenn die Einstellung
abgebrochen wird, bevor Sie zu Ende sind, fangen Sie
wieder von Schritt 2 ab an.
1
Drücken Sie CD/RANDOM, um in den CD-Modus
zu gehen.
Sie können CD/RANDOM auf der Fernbedienung
drücken, um in den CD-Modus zu gehen.
2
Drücken Sie PROGRAM/CLOCK SET im
Stoppmodus.
Die PROG-Anzeige blinkt nun im Anzeigefenster.
CD
PROG
3
Drücken Sie 4 oder ¢ um den zu
programmierenden Titel auszuwählen.
CD
PROG
Zu programmierender Titel
4
Drücken Sie PROGRAM/CLOCK SET.
5
Wiederholen Sie die Schritte 3 bis 4, um weitere
Titel zu programmieren.
6
Drücken Sie PLAY/PAUSE 3/8 während die
PROG-Anzeige blinkt.
Die Titel werden in der von Ihnen programmierten
Reihenfolge wiedergegeben.
Sie können CD PLAY/PAUSE auf der Fernbedienung
drücken, um die programmierte Wiedergabe zu
starten.
Hinweise:
• Wenn die PROG-Anzeige erlischt, bevor Sie PLAY/
PAUSE 3/8 drücken (oder CD PLAY/PAUSE auf
der Fernbedienung drücken), drücken Sie PROGRAM/
CLOCK SET, und starten Sie danach die Wiedergabe.
• Wenn Sie CD/RANDOM drücken, während das Gerät
im CD-Modus ist, geht dieses auf den
Zufallswiedergabemodus.
MUTIN
G
FM
MO
DE
PROGRAM/
CLOC
K
S
ET
Ad
d
"/"
HBS
/
PRESE
T EQ
TOP
S
E
US
A
P
/
Y
LA
P
STANDBY/ON DISPLAY
TUNER/
CD/
BAND
RANDOM
INTRO STOP
FM MODE
HBS/
CD REPEAT/
PRESET EQ
+
MUTING
–
RM-SRCEX25A REMOTE CONTROL
TAPE
CD PLAY
/PAUSE
+
VOLUMEPRESET
–
Stoppen der Wiedergabe
Drücken Sie STOP 7 (oder STOP auf der Fernbedienung).
Die PROG-Anzeige erlischt und das Gerät beendet die
programmierte Wiedergabe.
Überprüfung des Programminhalts
Bevor Sie mit der programmierten Wiedergabe starten,
drücken Sie PROGRAM/CLOCK SET.
Mit jedem Tastendruck werden die programmierten Titel
im Anzeigefenster angezeigt.
Aufnahme von Titeln ins Programm
1
Drücken Sie wiederholt PROGRAM/CLOCK
SET, bis als Titelnummer „00“ erscheint.
2
Drücken Sie 4 oder ¢ um die Titelnummer zu
wählen, betätigen Sie dann PROGRAM/CLOCK
SET.
Bearbeitung des Programms
1
Drücken Sie wiederholt PROGRAM/CLOCK SET,
bis die Programmnummer anzeigt wird, die Sie
bearbeiten wollen.
2
Wählen Sie mit 4 oder ¢ eine neue
Titelnummer und betätigen Sie dann PROGRAM/
CLOCK SET.
Wiederholung der programmierten
Wiedergabe
Drücken Sie PRESET + / CD REPEAT (oder CD
REPEAT / PRESET + auf der Fernbedienung), nachdem
Sie die programmierte Wiedergabe gestartet haben.
Löschung des gesamten Programms aus
dem Speicher
Drücken Sie PROGRAM/CLOCK SET, bis die PROGAnzeige blinkt, und drücken Sie STOP 7 (oder STOP
auf der Fernbedienung) während die PROG-Anzeige
blinkt.
Das gespeicherte Programm wird auch gelöscht, sobald
Sie die Disc-Schublade öffnen.
Hinweis:
Nach der Eingabe von 20 Titeln geht die
Programmnummer wieder auf „1“. Mit der Eingabe von
weiteren Titeln überschreiben Sie die bereits
programmierten Titel der entsprechenden Nummern.
Deutsch
12
Page 39

Erste Instruktionen zur Wiedergabe – Anspiel-Wiedergabe
Jeder Titel oder jeder programmierte Titel einer CD kann 10 Sekunden lang angespielt werden.
INTRO
STANDBY/ON DISPLAY
TUNER/
CD/
BAND
TAPE
RANDOM
CD PLAY
/PAUSE
INTRO STOP
FM MODE
HBS/
CD REPEAT/
+
PRESET EQ
+
VOLUMEPRESET
MUTING
–
–
Deutsch
Drücken Sie INTRO.
Die INTRO-Anzeige erscheint im Anzeigefenster und
die Anspiel-Wiedergabe beginnt.
Um die Anspiel-Wiedergabe für programmierte
Wiedergabe und Zufallswiedergabe zu benutzen,
drücken Sie bitte nach Beginn der Wiedergabe die
dementsprechende Taste.
Stoppen der Wiedergabe
Drücken Sie STOP 7 (oder STOP auf der Fernbedienung).
Die INTRO-Anzeige erlischt und das Gerät verlässt die
Anspiel-Wiedergabe.
Herausgehen aus der Anspiel-Wiedergabe
ohne zu stoppen
Drücken Sie während der Wiedergabe INTRO.
Die INTRO-Anzeige erlischt und das Gerät bleibt auf
Wiedergabe.
RM-SRCEX25A REMOTE CONTROL
Hinweis:
Wenn Sie INTRO drücken und der Titel bereits über 10
Sekunden lang läuft, wird der Anfang des folgenden
Titels wiedergegeben.
13
Page 40

RADIOEMPFANG
Sender abstimmen
3 4 31,21,24
PUSH
PRESET
TAPE
CD REPEAT
RANDOM
CD
TUNER
REMOTE
SENSOR
BAND
1
Drücken Sie BAND/TUNER, um auf den Tuner-
DISPLAY
Modus zu gehen.
2
Wählen Sie mit der BAND/TUNER-Taste den
Wellenbereich FM (UKW) oder AM (MW).
3
Drücken Sie 4 oder ¢ und halten Sie es länger
als eine Sekunde gedrückt.
Das Gerät beginnt mit dem Suchlauf und stoppt,
sobald ein Sender mit ausreichend starkem Funksignal
abgestimmt ist.
Wenn Sie die 4 oder ¢ nur kurz und wiederholt
drücken, wechselt die Frequenz schrittweise.
4
Stellen Sie die Lautstärke.
Ändern des FM (UKW)-Empfangsmodus
Wenn eine FM (UKW)-Stereosendung nur schwer zu
hören oder von starkem Rauschen gestört ist, bietet
monophoner Empfang bessere Qualität.
Drücken Sie FM MODE, woraufhin die MONOAnzeige im Anzeigefenster erscheint.
Um wieder auf Stereoeffekt zu gehen, drücken Sie erneut
FM MODE, woraufhin die MONO-Anzeige erlischt.
M
U
TING
FM
MODE
PROGRAM/
CLOC
K
SET
Add
"/"
H
B
S
/
PRESE
T EQ
TOP
S
USE
A
PLAY/P
Gebrauch der Antennen
FM (UKW)
AM (MW)
TAPE
STANDBY/ON DISPLAY
TUNER/
CD/
BAND
TAPE
RANDOM
CD PLAY
/PAUSE
INTRO STOP
FM MODE
HBS/
CD REPEAT/
+
PRESET EQ
+
VOLUMEPRESET
MUTING
–
–
RM-SRCEX25A REMOTE CONTROL
MUTING
F
M
M
O
D
E
P
R
O
G
R
A
M
/
C
L
O
C
K
S
E
T
A
d
d
"
/
"
H
B
S
/
P
R
E
S
E
T
E
PUSH
PRESET
CD REPEA
RANDOM
T
CD
T
U
N
E
R
REMOTE
SENSOR
BA
N
D
DISPLAY
Q
STOP
AUSE
PLAY/P
Deutsch
FM MODE
FM MODE
Gerät Fernbedienung
Hinweis:
Die Einstellung des FM-Empfangsmodus wird gelöscht,
wenn Sie einen anderen Sender abstimmen.
Hinweis:
Die eingebaute Ferritstabantenne kann eventuell
Störungen von Fernsehgeräten in der Nähe aufnehmen
und damit den AM (MW)-Empfang beeinträchtigen.
14
Page 41

Voreinstellung von Sendern
Sie können bis zu 10 FM (UKW)- und 10 AM (MW)-Sender voreinstellen.
2,6 3,5,6 2,6 14,64,61
PRESET
TAPE
CD REPEA
RANDOM
T
CD
TUNER
REMOTE
SENSOR
BAND
Deutsch
Für die folgenden Schritte steht nur eine begrenzte
Zeitspanne zu Verfügung. Sollte aus der Einstellung
gegangen werden, bevor Sie fertig sind, beginnen Sie
wieder von Schritt 3 an.
Hinweis:
In manchen Fällen wurden bereits Testfrequenzen im
Radio gespeichert, weil die Tuner-Voreinstellungsfunktion in der Fabrik vor der Lieferung getestet
wurde. Dies bedeutet keine Störung. Sie können die von
Ihnen gewünschten Sender speichern, indem Sie den
Voreinstellungsanweisungen folgen.
1
Wählen Sie mit der BAND/TUNER-Taste den
Wellenbereich FM (UKW) oder AM (MW).
2
Drücken Sie 4 oder ¢ um den für die
Voreinstellung gewünschten Sender abzustimmen.
3
Drücken Sie PROGRAM/CLOCK SET.
Die PROG-Anzeige blinkt nun im Anzeigefenster.
TUNER
PROG
FM
MHz
M
U
TING
F
M
M
O
D
E
P
R
O
G
R
A
M
/
C
L
O
C
K
S
E
T
A
d
d
"
/"
H
B
S
/
P
RES
E
T E
PUSH
Y/P
PLA
DISPLAY
Q
STOP
AUSE
5
Drücken Sie PROGRAM/CLOCK SET.
STANDBY/ON DISPLAY
TUNER/
CD/
BAND
RANDOM
INTRO STOP
FM MODE
HBS/
CD REPEAT/
PRESET EQ
+
MUTING
–
RM-SRCEX25A REMOTE CONTROL
TAPE
CD PLAY
/PAUSE
+
VOLUMEPRESET
–
Der in Schritt 2 abgestimmte Sender wird auf der in
Schritt 4 gewählten Voreinstellungsnummer
gespeichert.
Die Speicherung eines neuen Senders auf einer bereits
belegten Nummer löscht den vorher gespeicherten
Sender.
6
Wiederholen Sie die Schritte 2 bis 5, um durch
Verwendung anderer Voreinstellungsnummern
weitere Sender voreinzustellen.
Abruf eines voreingestellten Senders
1
Wählen Sie mit der BAND/TUNER-Taste den
Wellenbereich FM (UKW) oder AM (MW).
2
Drücken Sie wiederholt PRESET + / CD REPEAT
oder PRESET – bis die gewünschte Voreinstellungsnummer erscheint.
Hinweis:
Wenn Sie das AC-Netzkabel herausziehen oder ein
Stromausfall eintritt, werden die voreingestellten Sender
nach ein paar Tagen gelöscht. Falls dies geschieht, stellen
Sie die Sender erneut ein.
4
Wählen Sie mit PRESET+/CD REPEAT oder
PRESET – eine Voreinstellungsnummer.
Sie können mit CD REPEAT / PRESET +
oder PRESET – eine Voreinstellungsnummer auf der
Fernbedienung wählen.
TUNER
PROG
FM
MHz
Voreinstellungsnummer
15
Page 42

KASSETTEN ABSPIELEN
Hinweis zu Tonbandkassetten
• Verwenden Sie nur normale Typ-I Kassettenbänder.
Die Aufzeichnungs-/Wiedergabeeigenschaften dieses
Geräts sind auf normale Kassettenbänder abgestimmt,
die andere Eigenschaften aufweisen als die von CrO
und Metallbändern.
• Die Verwendung von Kassettenbändern, die länger als
120 min dauern, ist nicht zu empfehlen, da die
Aufzeichnungsqualität dabei leiden könnte und solche
Bänder leicht zwischen Andruckrolle und Capstan
hängen bleiben.
• Lose Bänder können Störungen verursachen. Straffen
Sie das Kassettenband vorsichtig mit einem Bleistift,
wie nachstehend dargestellt.
Drehen Sie den Bleistift,
• Um zu verhindern, dass Aufnahmen versehentlich
gelöscht werden, sollten Sie die Löschschutzzungen
mit einem Schraubenzieher herausbrechen. Nach dem
Herausbrechen dieser Löschschutzzungen können Sie
die entstandenen Öffnungen mit Klebeband verdecken,
um die Kassette zu löschen oder zu überspielen.
um das Band zu straffen.
Einlegen einer Kassette
1
Drücken Sie STOP/EJECT § um das
Kassettenfach zu öffnen.
2
Legen Sie eine Kassette mit der offenen Seite nach
2
oben und mit der Wiedergabeseite zur
Gerätefront weisend ein, wie dargestellt.
+ Vorwärtslauf
CD
TUNER
REMOTE
SENSOR
BAND
3
Schließen Sie das Kassettenfach durch sanftes
Drücken.
Das Kassettenfach rastet hörbar ein.
DISPLAY
PLAY/PAUSE
Deutsch
16
Page 43

Grundfunktionen
2 3 4 114
PRESET
TAPE
CD REPEAT
RANDOM
CD
TUNER
REMOTE
SENSOR
BAND
Deutsch
1
Drücken Sie TAPE, um auf Kassetten-Modus zu
gehen.
2
Legen Sie eine Kassette ein.
Verwenden Sie nur normale Typ-I Kassettenbänder.
3
Drücken Sie PLAY 2 um mit der Wiedergabe zu
beginnen.
4
Stellen Sie die Lautstärke.
Abbruch der Wiedergabe
Drücken Sie STOP/EJECT §.
Das Kassettenband stoppt außerdem, wenn es ganz
abgelaufen ist.
MUTING
FM MODE
PROGRA
M/
CLOC
K
SET
Add
"/"
HBS/
P
R
E
S
PUSH
PLAY/PAU
DISPLAY
ET EQ
TOP
S
E
S
STANDBY/ON DISPLAY
TUNER/
CD/
BAND
RANDOM
INTRO STOP
FM MODE
HBS/
CD REPEAT/
PRESET EQ
+
MUTING
–
RM-SRCEX25A REMOTE CONTROL
TAPE
CD PLAY
/PAUSE
+
VOLUMEPRESET
–
Schnellspulen des Kassettenbands
Drücken Sie REW ¡ oder FF 1.
Wenn die Kassette am Ende angelangt ist, drücken Sie
STOP/EJECT § um aus REW ¡ oder FF 1 zu
gehen.
17
Page 44
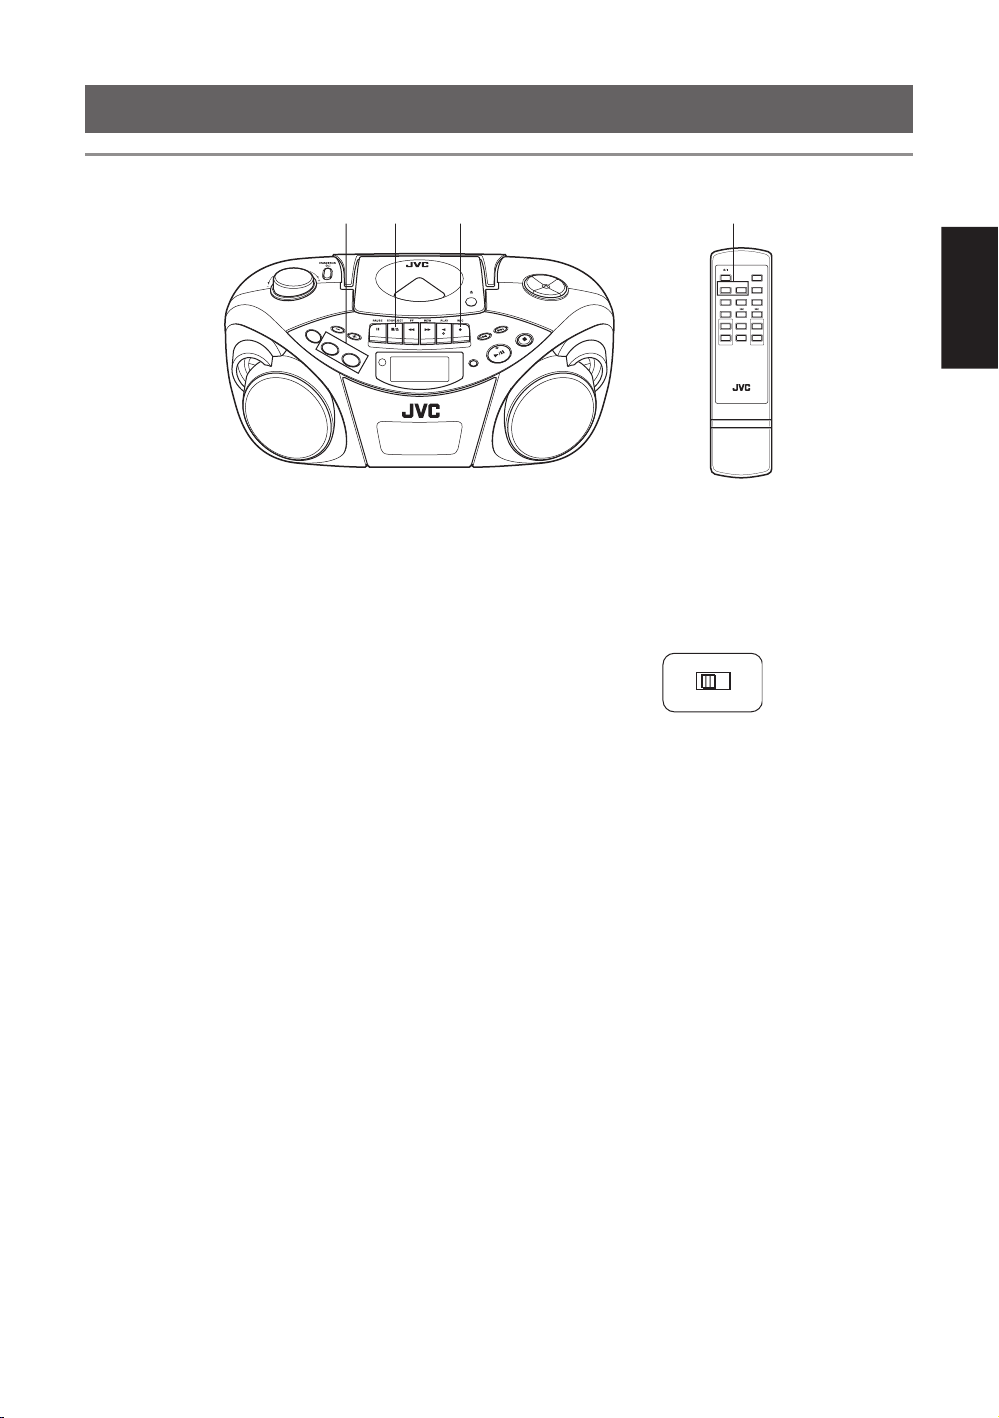
AUFNEHMEN
Grundfunktionen
32 11
PUSH
PR
E
SET
TAPE
C
RANDOM
D R
EPE
A
T
CD
TUNER
REMOTE
SENSOR
BAND
DISPLAY
Standardaufnahme
1
Bereiten Sie die Tonaufzeichnungsquelle vor.
• Bei Aufnahme vom Radio:
Schalten Sie auf den TUNER-Modus, und stimmen
Sie auf den gewünschten Sender ab.
• Bei Aufnahme von CD:
Schalten Sie auf CD-Modus und legen Sie eine CD
ein.
2
Legen Sie eine leere oder löschbare Kassette ein.
Verwenden Sie nur normale Typ-I Kassettenbänder.
3
Drücken Sie REC ¶.
PLAY 2 wird damit auch gedrückt und die Aufnahme
beginnt.
Aufnahmestopp
Drücken Sie STOP/EJECT §.
Das Kassettenband stoppt außerdem, wenn es ganz
abgelaufen ist.
M
UTIN
G
FM MO
DE
P
R
O
G
R
A
M
/
C
L
O
C
K
S
E
T
A
d
d
"
/"
H
B
S/
P
R
E
S
E
T
E
Q
STOP
USE
A
PLAY/P
STANDBY/ON DISPLAY
TUNER/
CD/
BAND
RANDOM
INTRO STOP
FM MODE
HBS/
CD REPEAT/
PRESET EQ
+
MUTING
–
RM-SRCEX25A REMOTE CONTROL
TAPE
CD PLAY
/PAUSE
+
VOLUMEPRESET
–
Verwendung der Beat-Cut-Funktion
Beim Aufnehmen von AM (MW)-Programmen können
Interferenzen auftreten. Sollte dies der Fall sein, stellen
Sie den BEAT CUT-Schalter auf der Geräterückseite auf
entweder „1“ oder „2“, um das Störgeräusch zu
reduzieren.
BEAT CUT
12
Zum exakten Aufnahmebeginn
1
Drücken Sie zuerst PAUSE 8 und drücken Sie
dann REC ¶, und gehen Sie so auf AufnahmePause- (Warte)-Modus.
2
Drücken Sie die PAUSE 8 -Taste, um das
Kassettenband im exakten Augenblick des
gewünschten Aufnahmebeginns freizugeben.
Deutsch
Hinweise:
• Es muss hier darauf hingewiesen werden, dass es
gegen das Gesetz verstoßen kann, bespielte
Kassetten, Platten oder CDs aufzunehmen, ohne die
Genehmigung des Inhabers des Copyrights für den
Ton- oder die Videoaufnahme, der Sendung oder
der Kabelsendung und des darin eingebetteten
literarischen, dramatischen, musikalischen, oder
künstlerischen Werks einzuholen.
• Die Aufnahmeaussteuerung wird automatisch korrekt
geregelt, so dass sie nicht vom VOLUME abhängt.
Daher können Sie während der Aufnahme die
Lautstärke nach Belieben einstellen, ohne dass die
Aufnahme davon beeinträchtigt wird.
• Falls eine Aufnahme übermäßig starke Störungen oder
Statikrauschen aufweist, stand das Gerät
möglicherweise zu nah an einem Fernsehgerät, das
während der Tonaufzeichnung eingeschaltet war.
Schalten Sie das Fernsehgerät daher aus, oder stellen
Sie das Gerät weiter weg vom Fernseher.
Hinweis:
Lassen Sie das Gerät nicht länger als ein paar Minuten
im Pausezustand stehen. Stoppen Sie das Kassettenband
lieber durch Betätigen der STOP/EJECT § -Taste.
18
Page 45

Mit CD-Wiedergabe synchronisierte Aufnahme
Sie können den CD-Player so einstellen, dass die Wiedergabe gleichzeitig mit dem Beginn der Bandaufnahme erfolgt.
2541 3 4 3
Deutsch
1
Legen Sie eine Kassette ein.
Verwenden Sie nur normale Typ-I Kassettenbänder.
2
Legen Sie eine CD ein.
3
Drücken Sie CD/RANDOM, um auf CD-Modus zu
gehen.
Sie können CD/RANDOM auf der Fernbedienung
drücken, um auf CD-Modus zu gehen.
4
Legen Sie einen Titel oder eine Stelle fest, wo die
Aufnahme beginnen soll.
• Um mit der Aufnahme ab einem gewünschten Titel
• Um mit der Aufnahme ab der gewünschten Stelle
5
Drücken Sie REC ¶.
PLAY 2 wird damit auch heruntergedrückt, und die
synchronisierte Aufnahme beginnt.
PUSH
PRESET
TAPE
CD REPEAT
RANDOM
CD
TUNER
REMOTE
SENSOR
BAND
DISPLAY
zu beginnen, wählen Sie den Titel mittels der 4
oder ¢ Taste im Stoppmodus.
auf einer CD zu beginnen, spielen Sie die CD und
stoppen Sie sie an der gewünschten Stelle, indem
Sie auf PLAY/PAUSE 3/8 drücken (oder CD
PLAY/PAUSE auf der Fernbedienung).
M
UT
IN
G
F
M
M
O
D
E
P
R
O
G
R
A
M
/
C
L
O
C
K
S
E
T
A
d
d
"/"
H
B
S
/
P
RES
E
T E
Q
STOP
AUSE
PLAY/P
STANDBY/ON DISPLAY
TUNER/
CD/
BAND
RANDOM
INTRO STOP
FM MODE
HBS/
CD REPEAT/
PRESET EQ
+
MUTING
–
RM-SRCEX25A REMOTE CONTROL
TAPE
CD PLAY
/PAUSE
+
VOLUMEPRESET
–
Wenn zuerst das Band abläuft, spielt der CD-Player
weiter. Drücken Sie PLAY/PAUSE 3 /8 (oder
CD PLAY/PAUSE auf der Fernbedienung), um mit der
Wiedergabe fortzufahren, oder drücken Sie STOP 7
(oder STOP auf der Fernbedienung), um die Wiedergabe
zu beenden.
Wenn der CD-Player zuerst das Disc-Ende erreicht, läuft
das Tonband weiter. In einem solchen Fall können Sie
das Band mit der STOP/EJECT § -Taste anhalten.
• Die CD SYNC Anzeige erscheint während einer
synchronisierten Aufnahme im Anzeigefenster.
Löschen
Beim Aufnehmen auf ein bereits bespieltes Band wird
die frühere Aufnahme gelöscht, und nur die neue
Aufnahme ist bei der nächsten Wiedergabe zu hören.
19
Löschen eines Bands ohne neue
Aufnahme
1
Drücken Sie TAPE auf dem Gerät, um auf
Kassettenmodus zu gehen.
2
Drücken Sie REC ¶.
Page 46

WARTUNG
Tonköpfe, Capstan und Andruckrolle
reinigen
Reinigen ist wichtig!
Wenn das Kassettenband läuft, sammeln sich
magnetisches Pulver und Staub auf Tonköpfen, Capstan
und Andruckrolle an. Wenn diese Teile zu sehr
verschmutzen, folgt:
• Schlechtere Klangqualität
• Sinkender Lautstärke-Ausgangspegel
• Vorige Aufnahme wird nicht ganz gelöscht.
• Aufnahme wird nicht perfekt erstellt.
Um solche Mängel zu vermeiden, sollten Sie Tonköpfe,
Capstan und Andruckrolle alle 10 Betriebsstunden
reinigen.
Tonkopf
(Aufnahme/Wiedergabe)
Andruckrolle
Capstan
Öffnen Sie das Kassettenfach. Reinigen Sie
Tonköpfe, Capstan und Andruckrolle.
Für eine effiziente Reinigung sollten Sie einen im
Audiofachhandel erhältlichen Reinigungssatz
verwenden.
Vergewissern Sie sich nach der Reinigung, dass die
Reinigungsflüssigkeit völlig verdunstet ist, bevor Sie
eine Kassette einlegen.
Löschkopf
Reinigung der CD-Abtastlinse
Wenn die CD-Abtastlinse verschmutzt ist, wird der
Klang beeinträchtigt.
Öffnen Sie die CD-Fachklappe, und reinigen Sie die
Linse.
Blasen Sie Staub mit einem Blasepinsel (im
Kamerafachgeschäft erhältlich) von der Linse.
Blasepinsel
Linse
Deutsch
Vorsicht:
• Halten Sie Magnete und metallische Gegenstände vom
Tonkopf entfernt. Falls sich der Tonkopf magnetisch
auflädt, nimmt der Rauschpegel zu, und der Klang
verschlechtert sich.
• Entmagnetisieren Sie den Aufnahme-/
Wiedergabetonkopf alle 20 bis 30 Stunden Gebrauch
mit einem Kopfreinigungsmittel, das im
Audiofachhandel erhältlich ist. Wenn Sie den Tonkopf
entmagnetisieren, sollte das Gerät ausgeschaltet sein.
Der Löschkopf ist magnetisch, darf also nicht
entmagnetisiert werden.
• Benutzen Sie für die Reinigung ausschließlich
Alkohol. Farbverdünner und Benzin würden die
Andruckrolle beschädigen.
20
Page 47

FEHLERSUCHE
• Falls Sie Probleme mit Ihrem Gerät haben sollten,
checken Sie zuerst diese Liste auf Lösungen durch,
bevor Sie den Kundendienst rufen.
Symptom
Die Stromversorgung kann nicht
eingeschaltet werden.
Deutsch
Wenn man die PLAY2 -Taste drückt,
bewegt sich das Kassettenband nicht.
Der Wiedergabeton ist nur sehr schwach
zu hören.
REC ¶ (Aufnahme) funktioniert nicht.
Die CD ist eingelegt, gibt aber keinen
Ton wieder.
Von den Lautsprechern ist kein Ton zu
hören.
Wegen ungleichmäßiger Bandlaufgeschwindigkeit treten Tonhöhenschwankungen auf.
Der Radioempfang ist schlecht, und es
ist viel Statikrauschen zu hören.
Die Fernbedienung lässt sich nicht
bedienen.
Das Netzkabel ist herausgezogen.
PAUSE 8 ist gedrückt.
• Die Batterien sind schwach.
• Der Tonkopf ist verschmutzt.
• Die Löschschutzzungen der Kassette
wurden herausgebrochen.
• Es ist keine Kassette im Gerät
eingelegt.
• Die Disc ist falsch herum eingelegt.
• Die Disc ist verschmutzt.
• Die Disc ist beschädigt oder verformt.
• Die Linse ist verschmutzt.
• Es ist Feuchtigkeit entstanden.
Der Kopfhörer ist angeschlossen.
• Die Andruckrolle oder der Capstan ist
verschmutzt.
• Die Batterien sind leer.
Die Antenne ist nicht korrekt eingestellt.
• Die Batterien der Fernbedienung sind
schwach.
• Auf das Sensorfenster fällt starkes
Licht (direktes Sonnenlicht, usw.).
• Sollten Sie das Problem nicht mit hier gegebenen Tipps
lösen können, oder sollte das Gerät selbst beschädigt
worden sein, rufen Sie Fachpersonal, wie zum Beispiel
Ihren Fachhändler, für den Kundendienst.
Mögliche Ursache
Behebung
Stecken Sie das Netzkabel ein.
Drücken Sie erneut PAUSE 8, damit
diese entrastet.
• Ersetzen Sie die alten Batterien durch
neue.
• Reinigen Sie den Tonkopf.
• Überkleben Sie die Löschzungen mit
Klebeband.
• Legen Sie eine Kassette ein.
• Legen Sie die Disc mit der Etikettseite
nach oben weisend ein.
• Reinigen Sie die Disc.
• Tauschen Sie die Disc gegen eine
abspielbare CD aus.
• Reinigen Sie die Linse.
• Schalten Sie das Gerät ein und warten
Sie ein oder zwei Stunden, bevor Sie
es benutzen.
Ziehen Sie den Kopfhörer heraus.
• Reinigen Sie die Andruckrolle und den
Capstan.
• Ersetzen Sie die alten Batterien durch
neue.
Richten Sie die Antenne korrekt aus.
• Ersetzen Sie die alten Batterien durch
neue.
• Vermeiden Sie den Betrieb des Geräts
mit direktem Sonnenlichteinfall, usw.
Hinweis:
Wenn das Gerät von einem kalten Ort um 0º C plötzlich
an einen warmen Ort gebracht wird, funktioniert es
eventuell nicht normal, weil im Geräteinnern
Kondensation aufgetreten ist. Nach ein oder zwei
Stunden ist der Betrieb allerdings wieder normal.
Neustart des Geräts
Wenn die „FEHLERSUCHE“ die Störung nicht behebt
(Betriebsfehler oder korrekte Anzeige, etc.), drücken Sie
mit einem spitzen Gegenstand die RESET-Taste auf der
Geräterückseite, dabei muss das Gerät eingeschaltet sein.
21
Spitzer Punkt
Hinweis:
Der Neustart bewirkt, dass das Gerät auf seine von Fabrik
aus eingegebenen Einstellungen geht und hat zur Folge,
dass alle vom Benutzer vorgenommenen Einstellungen
gelöscht werden.
Page 48

TECHNISCHE DATEN
CD-Player
CD-Fassungsvermögen : 1 CD
Signal-Rausch-Abstand : 75 dB
Dynamikumfang : 60 dB
Radio
Frequenzbereich : FM 87,5 – 108,0 MHz
AM 522 – 1 629 kHz
Antennen : Teleskopantenne für FM
(UKW)
Ferritkernantenne für AM
(MW)
Kassettendeck
Frequenzgang : 60 Hz – 10 000 Hz
Tonhöhenschwankungen : 0,15% (effektiv)
Schnellspulzeit : Etwa 150 s (C-60-Kassette)
Allgemeines
Lautsprecher : 9 cm Konus × 2
Lautsprecher-Impedanz : 4 Ω
Ausgangsleistung : 4 W (2 W + 2 W) bei 4 Ω
(10% Klirrfaktor)
Ausgangsbuchsen : PHONES × 1
Stromversorgung : AC 230 V Ó, 50 Hz
DC 9 V (R20 (SUM-1)/D
(13D)-Batteriengröße × 6)
Stromaufnahme : 13 W (bei Betrieb)
3 W (in Bereitschaft)
Abmessungen : 420 mm × 178 mm ×
250 mm (B/H/T)
Gewicht : Etwa 3,2 kg (ohne Batterien)
Mitgelieferter Zubehör : AC-Netzkabel × 1
Fernbedienung × 1
Batterien für die
Fernbedienung (AAA/UM-4/
R03) × 2
Unangekündigte Änderungen des Designs und der
technischen Daten bleiben jederzeit vorbehalten.
Deutsch
22
Page 49

TABLE DES MATIÈRES
CARACTÉRISTIQUES .............................................. 1
CONSIGNES DE SÉCURITÉ .................................... 1
CONSIGNES D’UTILISATION ................................ 2
ALIMENTATION ....................................................... 3
DESCRIPTION ET COMMANDES .......................... 4
TÉLÉCOMMANDE ................................................... 5
ALLUMER ET ÉTEINDRE L’UNITÉ....................... 6
RÉGLAGE DE L’HORLOGE .................................... 7
CARACTÉRISTIQUES
1 Chaîne portable avec lecteur CD
• Les fonctions CD sont accessibles à partir de la
télécommande ou de l’unité principale.
Français
• Capacité de lecture des CD 8-cm
2 L’écran à cristaux liquides (LCD) affiche
l’état de lecture actuel
CONSIGNES DE SÉCURITÉ
Prévention des décharges électriques, des
risques d’incendie et des dommages
• Même quand la touche STANDBY/ON est réglée sur
STANDBY, une faible quantité de courant circule.
Quand l’unité est mise en service, la fenêtre
d’affichage s’éclaire en orange. Quand l’unité est mise
en veille, la fenêtre d’affichage s’éteint. (Veuillez noter
cependant que la fenêtre d’affichage ne s'allume pas,
même quand l'unité est mise en service, si l'appareil
fonctionne sur piles.) Pour économiser l’énergie et par
sécurité lorsque l’unité n’est pas utilisée pendant
longtemps, débranchez le cordon d’alimentation de la
prise de courant secteur.
• Ne manipulez pas le cordon d’alimentation avec les
mains mouillées.
• Pour débrancher l’unité de la prise murale, tirez
toujours sur la fiche, jamais sur le cordon
d’alimentation.
• Consultez votre distributeur le plus proche si le cordon
est endommagé, en cas de déconnexion ou de
défaillance des contacts.
POUR AJUSTER LE SON ......................................... 8
LECTURE DE DISQUES COMPACTS .................... 9
RÉCEPTION RADIO ............................................... 14
LECTURE DE CASSETTES .................................... 16
ENREGISTREMENT ............................................... 18
ENTRETIEN ............................................................. 20
DÉPANNAGE........................................................... 21
SPÉCIFICATIONS ................................................... 22
3 Enregistrement synchronisé avec la lecture
d’un CD
4 Effet sonore Hyper-Bass
• Ne pliez pas brutalement le cordon, ne le tirez pas ou
ne le vrillez pas.
• L’étiquette des caractéristiques nominales se trouve sur
l’extérieur du coffret.
• Ne modifiez pas le cordon d’alimentation en aucune
façon.
• N’enlevez pas les vis pour démonter l’unité et ne
touchez à rien à l’intérieur de l’unité pour éviter les
accidents.
• N’introduisez pas d’objet métallique dans l’unité.
• Débranchez le cordon d’alimentation en cas d’orage.
• Si de l’eau pénètre à l’intérieur de l’unité, débranchez
le cordon d’alimentation de la prise et consultez votre
distributeur.
• N’obstruez pas les trous d’aération de l’unité de
manière à ce que la chaleur puisse s’échapper.
• N’installez pas l’unité dans un endroit mal ventilé.
1
Page 50

CONSIGNES D’UTILISATION
N’exposez pas cette unité aux rayons directs du soleil
ou ne laissez pas cette unité dans une voiture fermée
(ou dans un bateau, etc.) où elle serait exposée à des
températures supérieures à 40°C.
1 Évitez d’utiliser cette unité dans les lieux
suivants:
• Là où la température peut monter ou descendre de
manière excessive, la température recommandée
doit être comprise entre 5°C et 35°C.
• Là où elle peut être sujette à vibrations.
• Là où l’humidité est excessive, comme dans une
salle de bains.
• Là où elle peut être magnétisée par un aimant ou
une enceinte.
2 Faites attention à la poussière
Assurez-vous de fermer le couvercle du logement à
disque afin que la lentille ne soit pas exposée à la
poussière. Ne touchez pas la lentille.
3 Condensation
De la condensation peut se produire dans les cas
suivants, pendant lesquels l’unité peut ne pas
fonctionner correctement:
• L’unité est située dans une pièce où le chauffage
vient d’être allumé.
• L’unité est située dans un endroit où il y a de la
fumée ou beaucoup d’humidité.
• L’unité vient d’être déplacée d’un endroit froid à
un endroit chaud.
Dans ces cas, réglez la touche STANDBY/ON sur
ON et attendez une ou deux heures avant usage.
4 Contrôle de volume
Les disques compacts produisent de très légers
parasites par rapport aux disques analogiques. Si vous
réglez le volume en écoutant les parasites comme
vous le faites avec des disques analogiques, les
enceintes peuvent être endommagées par une
soudaine explosion sonore lors du démarrage de la
lecture. Par conséquent, baissez le volume avant de
démarrer et ajustez-le si besoin pendant la lecture
d’un CD.
5 Mécanisme de sécurité
L’unité intègre un mécanisme de verrouillage de
sécurité qui désactive le rayon laser lorsque le
couvercle du logement à disque est ouvert.
6 Ne placez pas d’objets magnétisés comme
des cassettes audio près des enceintes
Puisque les enceintes contiennent à l’intérieur des
aimants, ne placez pas de cassettes audio ou des
cartes magnétiques à proximité car vous risquez
d’effacer les données enregistrées.
7 Tenez l’unité éloignée du téléviseur
Si l’unité est utilisée près d’un téléviseur, l’image du
téléviseur peut être déformée. Si cela se produit,
éloignez l’unité du téléviseur. Si la situation ne
s’améliore pas, évitez d’utiliser l’unité lorsque le
téléviseur est allumé.
8 Nettoyage du boîtier
Si le boîtier est sale, essuyez-le avec un chiffon doux
et sec. N’utilisez jamais de benzine ou de diluant car
vous risquez d’endommager le revêtement du boîtier.
9 Utilisation des écouteurs
•N’écoutez pas à fort volume car vous risquez
d’endommager votre ouïe.
• Pour votre sécurité, ne conduisez pas en utilisant
les écouteurs.
10 Poignée de transport
Ne levez pas ou ne baissez pas la poignée de transport
avec l’antenne téléscopique déployée, afin d’éviter
d’endommager l’antenne. Placez la poignée de
transport de façon à ne pas interférer avec le
fonctionnement.
Français
2
Page 51

ALIMENTATION
Fonctionnement sur secteur
Raccordement du cordon d’alimentation.
AC IN
PRÉCAUTIONS:
• Utilisez uniquement le cordon d’alimentation JVC
fourni avec l’unité pour éviter des disfonctionnements
ou d’endommager l’unité.
Enlevez les piles pendant l’utilisation du cordon
Français
d’alimentation.
• Assurez-vous de débrancher le cordon d’alimentation
de la prise quand vous sortez ou quand l’unité n’est
pas utilisée pendant longtemps.
Fonctionnement sur piles
Mise en place des piles
1
Ouvrez le couvercle à piles.
Tirez le couvercle à piles vers vous tout en appuyant
sur les onglets indiqués par des flèches.
2
Insérez six piles de taille R20 (SUM-1)/D (13D).
Assurez-vous d’insérer les piles avec les contacts ª
et · correctement positionnés.
1
6
33
5
4
Contrôle des piles
Quand la vitesse de défilement ou le niveau de la sortie
sonore diminue, ou quand la lecture CD devient
intermittente, remplacez toutes les piles par des neuves.
Lors d’un enregistrement important, utilisez des piles
neuves (de préférence des piles alcalines longue durée)
pour éviter toute défaillance possible.
Pour une meilleure utilisation des piles
• Un fonctionnement en continu de l’unité consomme
plus d’énergie des piles qu’un fonctionnement non
continu.
• Le fonctionnement de l’unité dans un lieu froid
consomme plus d’énergie des piles que dans un lieu
chaud.
PRÉCAUTIONS:
• Si vous n’utilisez pas l’unité pendant longtemps (plus
de deux semaines) ou si vous l’utilisez sur le courant
secteur, enlevez les piles pour éviter un
disfonctionnement ou des dommages à l’unité.
• Quand le cordon d’alimentation JVC fourni avec
l’unité est raccordé, l’alimentation passe
automatiquement des piles au secteur, même quand des
piles sont installées.
Cependant, enlevez les piles pendant l’utilisation du
cordon d’alimentation.
CONSIGNES D’UTILISATION DES PILES:
Si les piles sont mal utilisées, une fuite de produits
chimiques peut se produire ou les piles peuvent
exploser. Il faut prendre les mesures suivantes:
• Vérifiez que les contacts positif ª et négatif ·
des piles sont positionnés correctement et insérezles comme indiqué sur la figure à gauche.
• Ne mélangez pas ensembles des piles usagées avec
des neuves ou différents types de pile.
• N’essayez pas de recharger des piles non
rechargeables.
• Enlevez les piles quand l’unité ne va pas être utilisée
pendant longtemps.
2
Si les produits chimiques en provenance des piles
entrent en contact avec votre peau, rincez-la
immédiatemment avec de l’eau. Si des produits
chimiques fuient dans l’unité, nettoyez complètement
l’unité.
Piles de taille R20 (SUM-1)/D (13D)
3
Replacez le couvercle.
3
Page 52

DESCRIPTION ET COMMANDES
Faces supérieure et avant
1 2
TAPE
RANDOM
CD
1 Touche VOLUME
2 Touche STANDBY/ON
3 Touche PRESET –
Touche PRESET + / CD REPEAT
4 Touches de commande cassette
Touche PAUSE 8
Touche STOP/EJECT §
Touche FF 1
Touche REW ¡
Touche PLAY 2
Touche REC ¶
5 Logement du disque
6 Touche FM MODE
7 Touche MUTING
43 6 7 85
PRESET
CD REPEAT
TUNER
REMOTE
SENSOR
BAND
9 1110 1312
MUTING
FM
M
O
DE
P
RO
G
R
A
M
/
CL
O
CK
S
ET
Ad
d
"/"
H
B
S/
PR
ESE
T E
PUSH
DISPLAY
PLAY/PAUSE
Q
STOP
14 15
8 Touche PROGRAM/CLOCK SET
9 Touche TAPE
Touche CD/RANDOM
Touche BAND/TUNER
10 REMOTE SENSOR (capteur de
télécommande)
11 Fenêtre d’affichage
12 Platine à cassette
13 Touche DISPLAY
14 Touche 4
Touche ¢
Touche PLAY/PAUSE 3/8
Touche STOP 7
15 Touche HBS/PRESET EQ
Français
4
Page 53

Face arrière
16 17 18
19
16 Antenne téléscopique
Français
17 Touche RESET
18 Interrupteur BEAT CUT
19 Prise PHONES
Raccordez des mini-écouteurs stéréo (diamètre 3,5mm, impédance entre 16 Ω et 32 Ω) à cette prise. La
sortie des enceintes est désactivée si des écouteurs
sont raccordés.
TÉLÉCOMMANDE
Installation des piles
1
Enlevez le couvercle des piles à l’arrière de la
télécommande.
2
Insérez deux piles de taille AAA (UM-4)/R03
(fournies).
Insérez les piles avec les contacts ª et ·
correspondants aux indications à l’intérieur du
logement à piles. Insérez les extrémités · d’abord.
Piles de taille AAA (UM-4)/R03
5
20
21
20 Couvercle du logement à piles
21 Prise ÓAC IN (entrée secteur)
3
Replacez le couvercle des piles.
Remplacement des piles
La distance maximale de fonctionnement entre le capteur
de l’unité et la télécommande est d’environ 7 mètres. Si
la portée de fonctionnement diminue ou si le
fonctionnement de la télécommande devient instable,
remplacez les piles par des neuves.
Remarques sur l’utilisation de la
télécommande
• Pointer le haut de la télécommande vers le capteur de
l’unité le plus directement possible. La distance
fonctionnelle de l’unité principale diminue si vous
pointez la télécommande avec un angle.
• Appuyez sur les touches doucement et fermement.
•N’exposez pas la télécommande de l’unité à une
lumière forte (soleil direct ou lumière artificielle) et
assurez-vous qu’il n’existe aucun obstacle entre le
capteur et la télécommande.
Page 54

Noms des touches
1
STANDBY/ON DISPLAY
TUNER/
CD/
BAND
2
3
4
RANDOM
INTRO STOP
FM MODE
CD REPEAT/
+
5
TAPE
CD PLAY
/PAUSE
HBS/
+
PRESET EQ
VOLUMEPRESET
MUTING
–
–
6
7
8
9
ALLUMER ET ÉTEINDRE L’UNITÉ
1 Touche STANDBY/ON
2 Touche CD/RANDOM
Touche TUNER/BAND
Touche TAPE
3 Touche INTRO
4 Touche FM MODE
5 Touche CD REPEAT / PRESET +
Touche PRESET –
6 Touche DISPLAY
7 Touche STOP
Touche CD PLAY/PAUSE
Touche 4
Touche ¢
8 Touche VOLUME +
Touche VOLUME –
9 Touche HBS/PRESET EQ
Touche MUTING
Français
PUSH
PRESET
TAPE
CD REPEA
RANDOM
T
C
D
TUNER
STANDBY/ON
REMOTE
SENSOR
BAND
DISPLAY
Touche STANDBY/ON
Appuyez sur la touche STANDBY/ON de l’unité
pour allumer et éteindre l’unité.
Vous pouvez aussi appuyer sur la touche
STANDBY/ON de la télécommande. La fenêtre
d’affichage s’éclaire quand l’unité est allumée. (Veuillez
noter cependant que l’écran ne s’allume pas, même
quand l’unité est mise en service, si l’appareil fonctionne
sur piles.) L’unité est prête à lire la source sélectionnée
quand l’unité a été éteinte la fois précédente.
Pour éteindre complètement l’alimentation
Débranchez le cordon d’alimentation secteur de la prise
murale. Si des piles sont installées dans l’unité, enlevezles.
STANDBY/ONSTANDBY/ON
STANDBY/ON DISPLAY
TUNER/
CD/
BAND
RANDOM
INTRO STOP
FM MODE
HBS/
CD REPEAT/
PRESET EQ
+
MUTING
–
RM-SRCEX25A REMOTE CONTROL
TAPE
CD PLAY
/PAUSE
+
VOLUMEPRESET
–
PLAY/PAUSE
MUTING
FM MODE
P
R
O
G
R
A
M
/
C
L
O
C
K
S
E
T
A
d
d
"
/"
H
B
S
/
P
R
E
S
E
T
E
Q
STOP
Remarques:
• Quand vous débranchez le cordon d’alimentation
secteur ou si une coupure de courant se produit,
l’horloge est aussitôt réinitialisée sur “0:00”, alors que
le préréglage des stations de radio (voir page 15) sera
effacé après quelques jours. L’indication de l’horloge
continuera à clignoter jusqu’à ce que vous régliez à
nouveau l’horloge.
• Enlevez les piles pour transporter l’unité à la main ou
dans le coffre d’une voiture. Ceci empêche la mise sous
tension accidentelle, évitant ainsi un gaspillage de la
consommation des piles.
6
Page 55

RÉGLAGE DE L’HORLOGE
2,3,43,4 3,411
PRESET
TAPE
CD
RANDOM
REPEAT
CD
TUNER
REMOTE
SENSOR
BAND
Avant d’utiliser cette unité plus avant, réglez d’abord
l’horloge intégrée à cette unité.
Français
L’horloge utilise le format 24 heures.
1
Appuyez sur STANDBY/ON pour éteindre
l’unité, si elle était allumée.
L’horloge clignote dans la fenêtre d’affichage.
2
Appuyez et maintenez enfoncé PROGRAM/
CLOCK SET pendant plus de 2 secondes.
Les chiffres des heures commencent à clignoter.
3
Appuyez sur 4 ou ¢ pour ajuster l’heure, puis
appuyez sur PROGRAM/CLOCK SET.
Les chiffres des minutes commencent à clignoter.
MU
TIN
G
F
M
MO
DE
P
R
O
G
R
A
M
/
C
L
O
C
K
S
E
T
A
d
d
"
/"
H
BS
/
P
RE
S
ET
E
PUSH
AY
PL
DISPLAY
Q
P
TO
S
E
US
A
/P
STANDBY/ON DISPLAY
TUNER/
CD/
BAND
RANDOM
INTRO STOP
FM MODE
HBS/
CD REPEAT/
PRESET EQ
+
MUTING
–
RM-SRCEX25A REMOTE CONTROL
TAPE
CD PLAY
/PAUSE
+
VOLUMEPRESET
–
Remarque:
En cas de coupure de courant, l’horloge perd son réglage
et est réinitialisée sur “0:00”. L’indication de l’horloge
continuera à clignoter jusqu’à ce que vous régliez à
nouveau l’horloge.
Pour afficher l’horloge pendant que le CD
ou le tuner est sélectionné
Appuyer sur DISPLAY.
Chaque fois que vous appuyez sur la touche, l’affichage
change alternativement entre l’affichage de l’horloge et
l’affichage normal.
(Le fonctionnement de l’unité pendant l’affichage de
l’horloge change l’affichage pour l’affichage normal.)
DISPLAY
Unité principale Télécommande
DISPLAY
4
Appuyez sur 4 ou ¢ pour ajuster les minutes,
puis appuyez sur PROGRAM/CLOCK SET.
7
Page 56

POUR AJUSTER LE SON
–
PHONES (à l'arrière)
PHONES (on the rear)
VOLUME VOLUME +/
PRESET
TAPE
CD REPEAT
RANDOM
CD
TUN
ER
REMOTE
SENSOR
BAND
Pour ajuster le volume
Tournez la touche VOLUME dans le sens des
aiguilles d’une montre pour monter le volume ou
dans le sens inverse pour le baisser.
Vous pouvez appuyez sur VOLUME + ou VOLUME –
sur la télécommande pour respectivement monter ou
baisser le volume.
Le niveau du volume peut être ajusté sur 31 intervalles
(00 VOL à 30 VOL).
MUTING HBS/PRESET EQ
HBS/PRESET EQ
M
UTING
F
M MOD
E
P
R
O
G
R
A
M
/
C
L
O
C
K
S
E
T
A
d
d
"
/"
H
B
S
/
P
R
E
S
E
T
E
PUSH
PLAY/PAUSE
DISPLAY
Q
STOP
STANDBY/ON DISPLAY
TUNER/
CD/
BAND
RANDOM
INTRO STOP
FM MODE
HBS/
CD REPEAT/
PRESET EQ
+
MUTING
–
RM-SRCEX25A REMOTE CONTROL
TAPE
CD PLAY
/PAUSE
+
VOLUMEPRESET
–
Pour renforcer les sons graves
Vous pouvez profiter d’un son grave puissant avec l’effet
sonore Hyper-Bass.
Appuyez et maintenez enfoncé HBS/PRESET EQ
jusqu’à ce que l’indicateur HBS s’allume à la fenêtre
d’affichage.
Pour couper l’effet, appuyez et maintenez la touche
enfoncée à nouveau jusqu’à ce que l’indicateur HBS
disparaisse.
Français
Précaution:
NE PAS éteindre l’unité avec le volume réglé à un niveau
extrêmement élevé, car une soudaine explosion sonore
pourrait endommager votre ouïe et/ou les enceintes et
les écouteurs, au moment d’allumer l’unité ou de
démarrer la lecture d’une autre source la fois suivante.
RAPPELEZ-VOUS que vous ne pouvez pas ajuster le
volume tant que l’unité n’est pas allumée.
Pour couper le son momentanément
Pendant la lecture, appuyer sur MUTING.
Le son est coupé et l’indicateur MUTING apparaît à la
fenêtre d’affichage.
Pour rétablir le son, appuyez de nouveau sur MUTING.
L’écoute avec des écouteurs
Raccordez une paire d’écouteurs à la prise PHONES.
Acun son ne sort des enceintes désormais. Assurez-vous
de baisser le volume avant de raccorder les écouteurs.
Sélection du mode sonore
Vous pouvez sélectionner l’un des 5 modes sonores
préréglés.
CLASSIC : Bon pour la musique classique.
ROCK : Amplifie les basses et hautes fréquences.
Bon pour la musique accoustique.
POP : Bon pour la musique vocale.
JAZZ : Bon pour la musique de jazz.
FLAT : Son normal.
Pour sélectionner le mode sonore
Appuyez répétitivement sur HBS/PRESET EQ jusqu’à
ce que l’indicateur du mode sonore souhaité apparaisse
à la fenêtre d’affichage.
Chaque fois que vous appuyez sur la touche, le mode
sonore change comme suit:
CLASSIC ROCK
FLAT
JAZZ
POP
8
Page 57
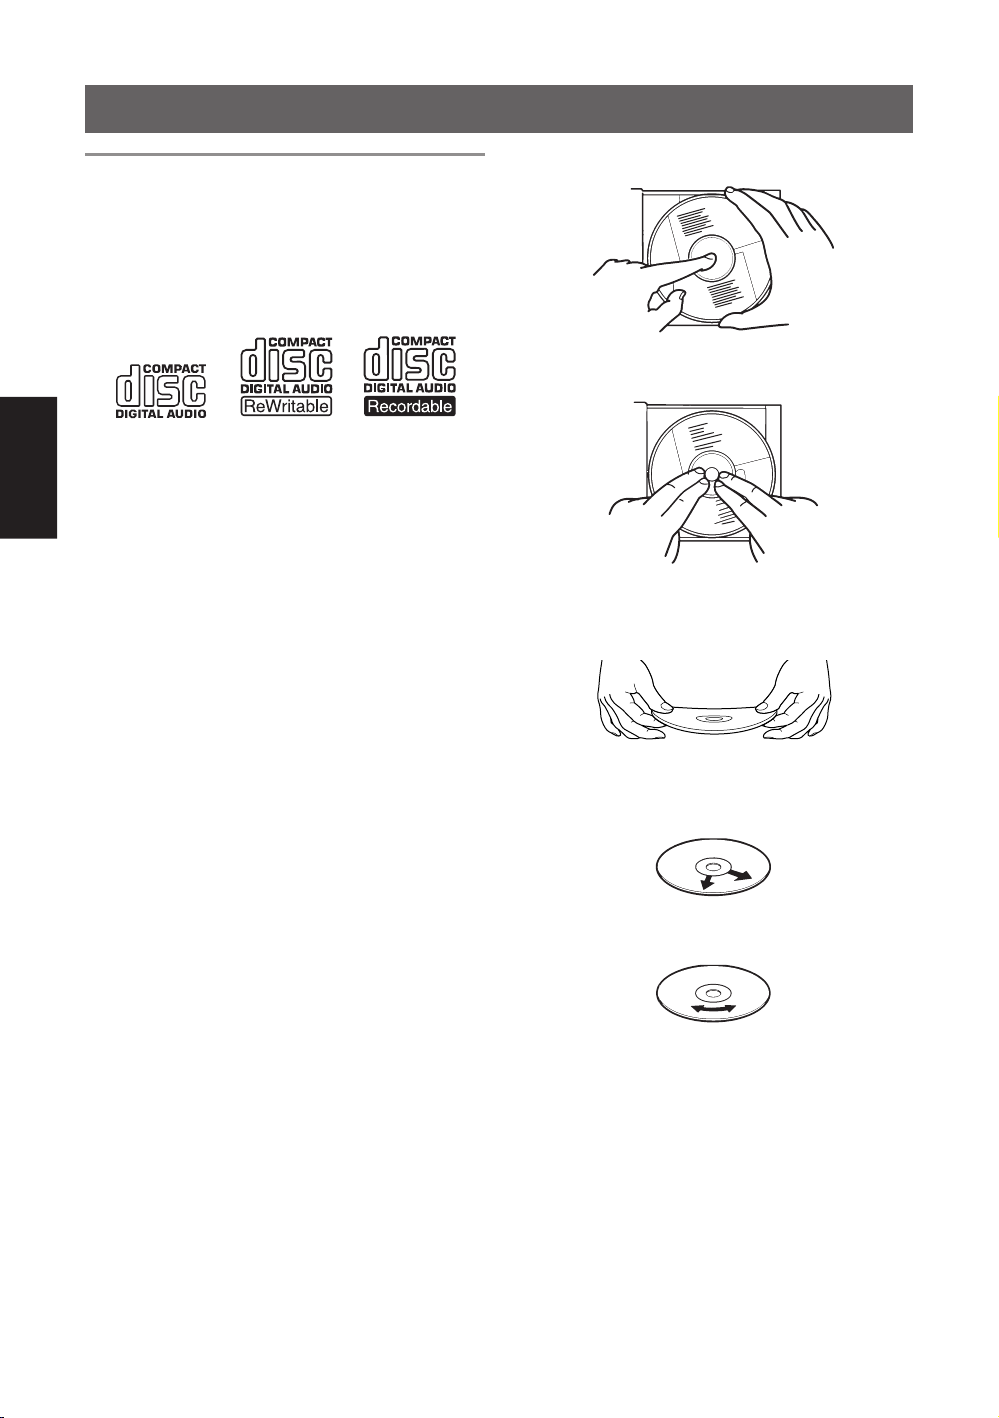
LECTURE DE DISQUES COMPACTS
Remarques sur les disques
compacts
Cette unité a été conçue uniquement pour lire les CD
suivants
• CD audio numérique
• CD audio numérique enregistrable (CD-R)
• CD audio numérique réinscriptible (CD-RW)
Pendant la lecture CD-R ou CD-RW
Vous pouvez lire vos CD-R ou CD-RW clôturés qui
sont enregistrés au format CD musical. (Si un CD-RW
Français
a été enregistré dans un format différent, effacez
complètement toutes les données sur le CD-RW avant
d’enregistrer.)
• Vous pouvez lire un CD-R ou CD-RW comme un CD
audio.
• Certains CD-R ou CD-RW peuvent ne pas être lisibles
sur cette unité en fonction de leurs caractéristiques de
disque, des dégâts ou des tâches ou si la lentille de
lecture est sale.
• Le facteur de réflexion d’un CD-RW est plus faible
que pour les autres CD, ce qui peut entraîner une
lenteur de lecture.
• Les CD-R et CD-RW contenant des pistes au format
MP3 ne peuvent pas être lus.
Manipulation des disques
Puisque des disques sales, abîmés ou voilés peuvent
endommager l’unité, il est important de respecter les
consignes suivantes:
• Ne touchez pas la surface enregistrée réfléchissante.
• Ne collez ni n’écrivez rien sur la face étiquette.
• Ne pliez pas les disques.
• Sortir le disque de son étui et le replacer
Appuyez au centre et retirez-le.
Appuyez pour verrouiller le disque.
• Manipulation
Incorrect
• Nettoyage
Correct
Rangement
• Après avoir sorti le disque de l’unité, assurez-vous de
le ranger dans son étui.
• N’exposez pas les disques à la lumière directe du soleil,
aux hautes températures d’un chauffage, etc., à une
humidité importante ou à la poussière.
Nettoyage des disques
Avant d’insérer un disque, essuyez toute la poussière,
saleté ou traces de doigts avec un chiffon doux et sec.
Les disques doivent être nettoyés en les essuyant de
manière radiale, en partant du centre vers l’extérieur.
N’utilisez jamais de diluant, de benzine, de produit
nettoyant pour disque ou d’aérosol antistatique.
9
Incorrect
Page 58
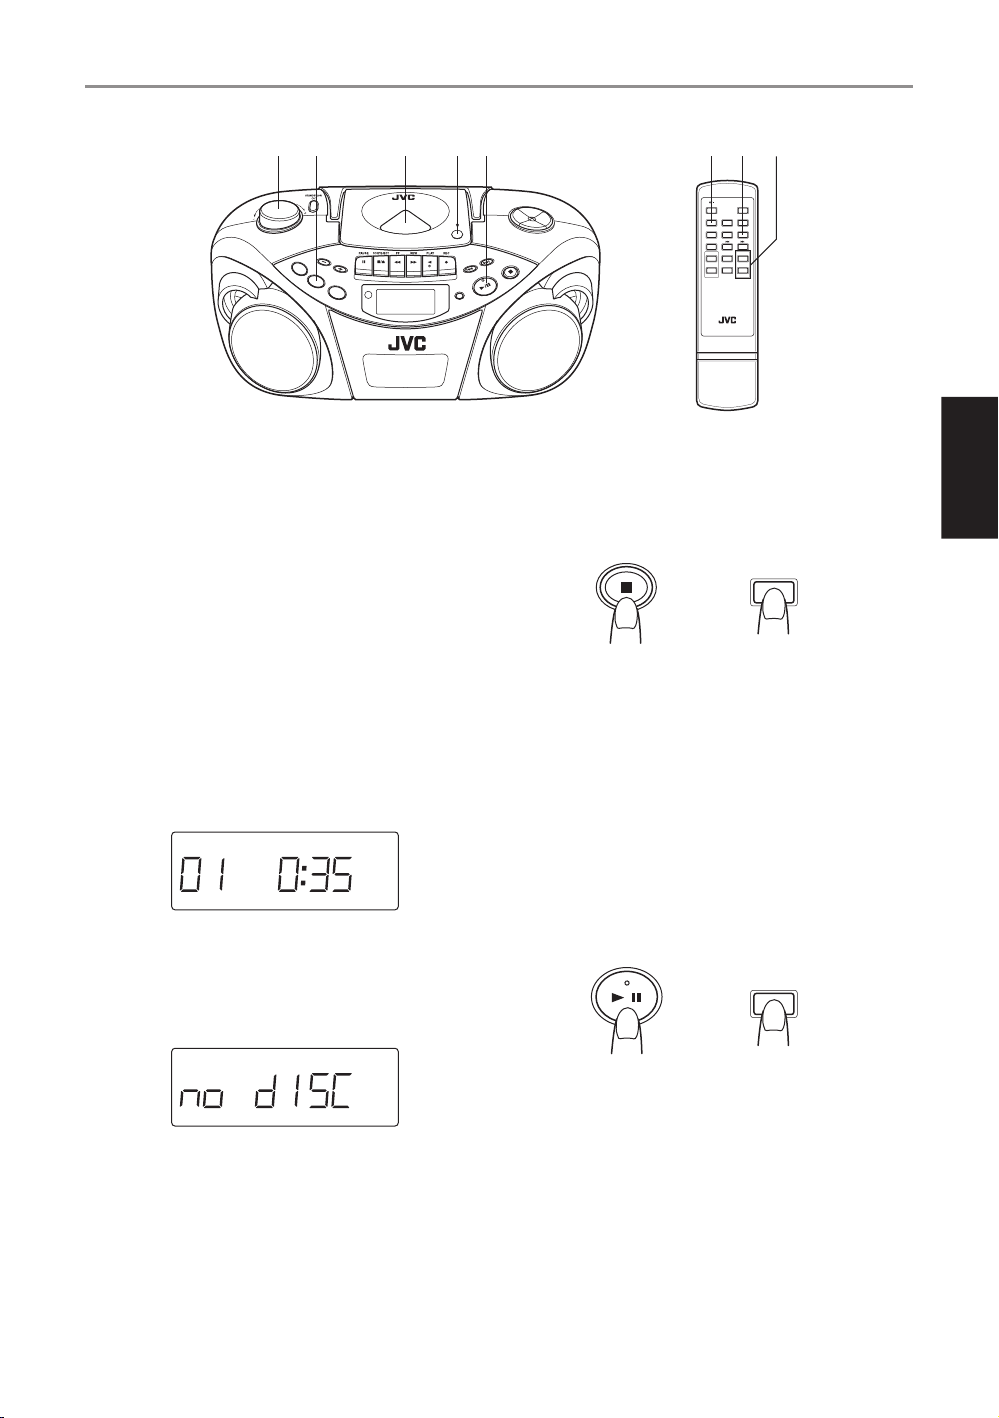
Fonctionnement de base
23 4 5 4115
PUSH
PRESET
TAPE
CD REPEAT
RANDOM
CD
TUNER
REMOTE
SENSOR
BAND
1
Appuyez sur CD/RANDOM pour entrer dans le
DISPLAY
mode CD, si l’unité est dans le mode TUNER ou
TAPE.
Vous pouvez appuyer sur CD/RANDOM sur la
télécommande pour entrer dans le mode CD.
2
Appuyez sur ) PUSH pour ouvrir le logement du
disque.
3
Insérez un disque avec la face étiquetée vers le haut
et fermez le logement du disque.
• Des CD de 8-cm peuvent être lus sur l’unité sans
adaptateur.
4
Appuyez sur PLAY/PAUSE 3/8 pour lancer la
lecture.
Vous pouvez lancer la lecture en appuyant sur CD
PLAY/PAUSE sur la télécommande.
Le numéro de la piste actuelle et le temps de lecture
écoulé s’affichent pendant la lecture.
CD
5
Ajustez le volume.
Remarques:
• L’indication suivante peut s’afficher si le disque est
inséré à l’envers. Réinsérez le disque correctement.
CD
M
UTING
FM MO
D
E
PR
O
GRAM/
C
L
O
C
K
S
ET
Add"/"
HBS/
P
RESET
E
Q
STOP
E
S
U
A
P
Y/
PLA
STANDBY/ON DISPLAY
TUNER/
CD/
BAND
RANDOM
INTRO STOP
FM MODE
HBS/
CD REPEAT/
PRESET EQ
+
MUTING
–
RM-SRCEX25A REMOTE CONTROL
TAPE
CD PLAY
/PAUSE
+
VOLUMEPRESET
–
Pour arrêter la lecture
Appuyez sur STOP 7.
Vous pouvez appuyer sur STOP sur la télécommande
pour arrêter la lecture.
STOP
STOP
Unité principale Télécommande
Précaution:
Arrêtez la lecture avant d’ouvrir le logement du disque.
Vérifiez que le disque a complètement arrêté de tourner
avant de le sortir.
Pour mettre la lecture en pause
Appuyez sur PLAY/PAUSE 3/8 pendant la lecture.
Vous pouvez appuyer sur CD PLAY/PAUSE sur la
télécommande pour arrêter la lecture.
Pour reprendre la lecture, appuyez de nouveau sur la
touche.
PLAY/PAUSE
Unité principale Télécommande
CD PLAY
/PAUSE
Français
• Si des blancs se produisent pendant la lecture, baissez
le volume.
• Des blancs peuvent se produire si l’unité subit un choc
important ou est utilisée dans un endroit sujet aux
vibrations (ex. dans une voiture roulant sur une route
en mauvaise état).
• Si vous appuyez sur CD/RANDOM dans le mode CD,
l’unité entre dans le mode de lecture aléatoire.
10
Page 59

Changement de piste
• Pour revenir à la piste précédente
Pendant la lecture, appuyez sur 4 une fois pour
revenir au début de la piste en cours, appuyez deux
fois pour revenir au début de la piste précédente.
• Pour aller à la piste suivante
Pendant la lecture, appuyez sur ¢ pour aller au début
de la piste suivante.
Unité principale Télécommande
Lecture répétée/aléatoire
Rechercher – localiser une position
particulière sur le disque
Appuyez et maintenez enfoncé 4 ou ¢ pendant
la lecture.
Contrôlez le son et relâchez la touche quand la position
particulière est atteinte.
Unité principale Télécommande
Français
PRESET+/CD REPEAT
PRESET
TAPE
CD REPEAT
RANDOM
CD
TUNER
REMOTE
SENSOR
BAN
D
Lecture répétée
Appuyez sur PRESET + / CD REPEAT pendant la
lecture.
Vous pouvez appuyer sur CD REPEAT / PRESET + sur
la télécommande pour sélectionner la lecture répétée.
À chaque pression de la touche, le mode de répétition
change dans l’ordre suivant:
Lecture répétée de toutes les pistes du disque
(“REPEAT ALL” s’affiche.)
Lecture répétée d'une seule piste
(“REPEAT 1” s’affiche.)
CD REPEAT/PRESET
MU
TING
FM MODE
P
R
O
G
R
A
M
/
C
L
O
C
K
S
E
T
A
d
d
"
/"
H
B
S/
PRE
SE
T E
PUSH
PLAY/PAUS
DISPLAY
Q
STOP
E
+
STANDBY/ON DISPLAY
TUNER/
CD/
BAND
RANDOM
INTRO STOP
FM MODE
HBS/
CD REPEAT/
PRESET EQ
+
MUTING
–
RM-SRCEX25A REMOTE CONTROL
CD/RANDOMCD/RANDOM
TAPE
CD PLAY
/PAUSE
+
VOLUMEPRESET
–
Lecture aléatoire
Appuyez sur CD/RANDOM dans le mode CD jusqu’à
ce que l’indicateur RANDOM s’allume dans la
fenêtre d’affichage.
Vous pouvez appuyer sur CD/RANDOM sur la
télécommande pour sélectionner la lecture aléatoire.
Les pistes sont lues dans un ordre aléatoire.
Pour arrêter la lecture aléatoire, appuyez de nouveau sur
la touche jusqu’à ce que l’indicateur RANDOM
disparaisse.
La lecture répétée est annulée.
11
Page 60

Lecture programmée
Vous pouvez programmer un maximum de 20 pistes à lire dans n’importe quel ordre souhaité.
3,5 3 6 11 2,4,5 6
PUSH
PRESET
TAPE
CD REPEAT
RANDOM
CD
TUNER
REMOTE
SENSOR
BAND
DISPLAY
Remarque:
Il existe une limite de temps pour effectuer les étapes
suivantes. Si le réglage est annulé avant d’avoir fini,
recommencez à partir de l’étape 2.
1
Appuyez sur CD/RANDOM pour entrer dans le
mode CD.
Vous pouvez appuyer sur CD/RANDOM sur la
télécommande pour entrer dans le mode CD.
2
Appuyez sur PROGRAM/CLOCK SET dans le
mode arrêt.
L’indicateur PROG commence à clignoter dans la
fenêtre d’affichage.
CD
PROG
3
Appuyez sur 4 ou ¢ pour sélectionner la piste
souhaitée à programmer.
CD
PROG
Piste à programmer
4
Appuyez sur PROGRAM/CLOCK SET.
5
Répétez les étapes 3 et 4 pour programmer d’autres
pistes.
6
Appuyez sur PLAY/PAUSE 3/8 pendant que
l’indicateur PROG clignote.
Les pistes sont lues dans l’ordre que vous avez
programmé.
Vous pouvez appuyer sur CD PLAY/PAUSE sur la
télécommande pour lancer la lecture programmée.
Remarques:
• Si l’indicateur PROG disparaît avant que vous ayez
appuyé sur PLAY/PAUSE 3/8 (ou CD PLAY/
PAUSE sur la télécommande), appuyez sur
PROGRAM/CLOCK SET, puis lancez la lecture.
• Si vous appuyez sur CD/RANDOM dans le mode CD,
l’unité entre dans le mode de lecture aléatoire.
MUTIN
G
FM
MO
DE
PROGRAM/
CLOC
K
S
ET
Ad
d
"/"
HBS
/
PRESE
T EQ
TOP
S
E
US
A
P
/
Y
LA
P
STANDBY/ON DISPLAY
TUNER/
CD/
BAND
RANDOM
INTRO STOP
FM MODE
HBS/
CD REPEAT/
PRESET EQ
+
MUTING
–
RM-SRCEX25A REMOTE CONTROL
TAPE
CD PLAY
/PAUSE
+
VOLUMEPRESET
–
Pour arrêter pendant la lecture
Appuyez sur STOP 7 (ou STOP sur la télécommande).
L’indicateur PROG disparaît et l’unité sort de la lecture
programmée.
Pour vérifier le contenu d’un programme
Avant de lancer la lecture programmée, appuyez sur
PROGRAM/CLOCK SET.
Chaque fois que vous appuyez sur la touche, la piste
programmée apparaît à la fenêtre d’affichage.
Pour ajouter des pistes au programme
1
Appuyez répétitivement sur PROGRAM/
CLOCK SET jusqu’à ce que “00” apparaisse
comme numéro de piste.
2
Appuyez sur 4 ou ¢ pour sélectionner le
numéro de piste, puis appuyez sur PROGRAM/
CLOCK SET.
Pour modifier le programme
1
Appuyez répétitivement sur PROGRAM/
CLOCK SET jusqu’à ce que le numéro de
programme que vous voulez modifier apparaisse.
2
Appuyez sur 4 ou ¢ pour sélectionner un
nouveau numéro de piste, puis appuyez sur
PROGRAM/CLOCK SET.
Pour répéter une lecture programmée
Appuyez sur PRESET + / CD REPEAT (ou CD
REPEAT / PRESET + sur la télécommande) après avoir
lancé la lecture programmée.
Pour effacer le programme entier de la
mémoire
Appuyez sur PROGRAM/CLOCK SET jusqu’à ce que
l’indicateur PROG clignote et appuyez sur STOP 7 (ou
STOP sur la télécommande) pendant que l’indicateur
PROG clignote.
Le programme mémorisé est aussi effacé à l’ouverture
du logement du disque.
Remarque:
Après avoir programmé 20 pistes, le numéro de
programme revient à “1”. Programmer plus de pistes
écrasera les pistes déja programmées sur ces numéros.
Français
12
Page 61

Lecture des introductions – Lecture intro
Chaque piste ou chaque piste programmée d’un CD peut être lue pendant les dix premières secondes.
INTRO
STANDBY/ON DISPLAY
TUNER/
CD/
BAND
TAPE
RANDOM
CD PLAY
/PAUSE
INTRO STOP
FM MODE
HBS/
CD REPEAT/
+
PRESET EQ
+
VOLUMEPRESET
MUTING
–
–
RM-SRCEX25A REMOTE CONTROL
Appuyez sur INTRO.
L’indicateur INTRO apparaît à la fenêtre d’affichage et
Français
la lecture intro démarre.
Pour utiliser la lecture intro avec la lecture programmée
ou aléatoire, appuyez sur la touche après avoir lancé la
lecture.
Pour arrêter pendant la lecture
Appuyez sur STOP 7 (ou STOP sur la télécommande).
L’indicateur INTRO disparaît et l’unité sort de la lecture
intro.
Pour annuler la lecture intro sans arrêter
Appuyez sur INTRO pendant la lecture.
L’indicateur INTRO disparaît et l’unité continue la
lecture.
Remarque:
Si vous appuyez sur INTRO pendant la lecture d'une
piste au-delà des dix premières secondes, c'est
l'introduction de la piste suivante qui est lue.
13
Page 62
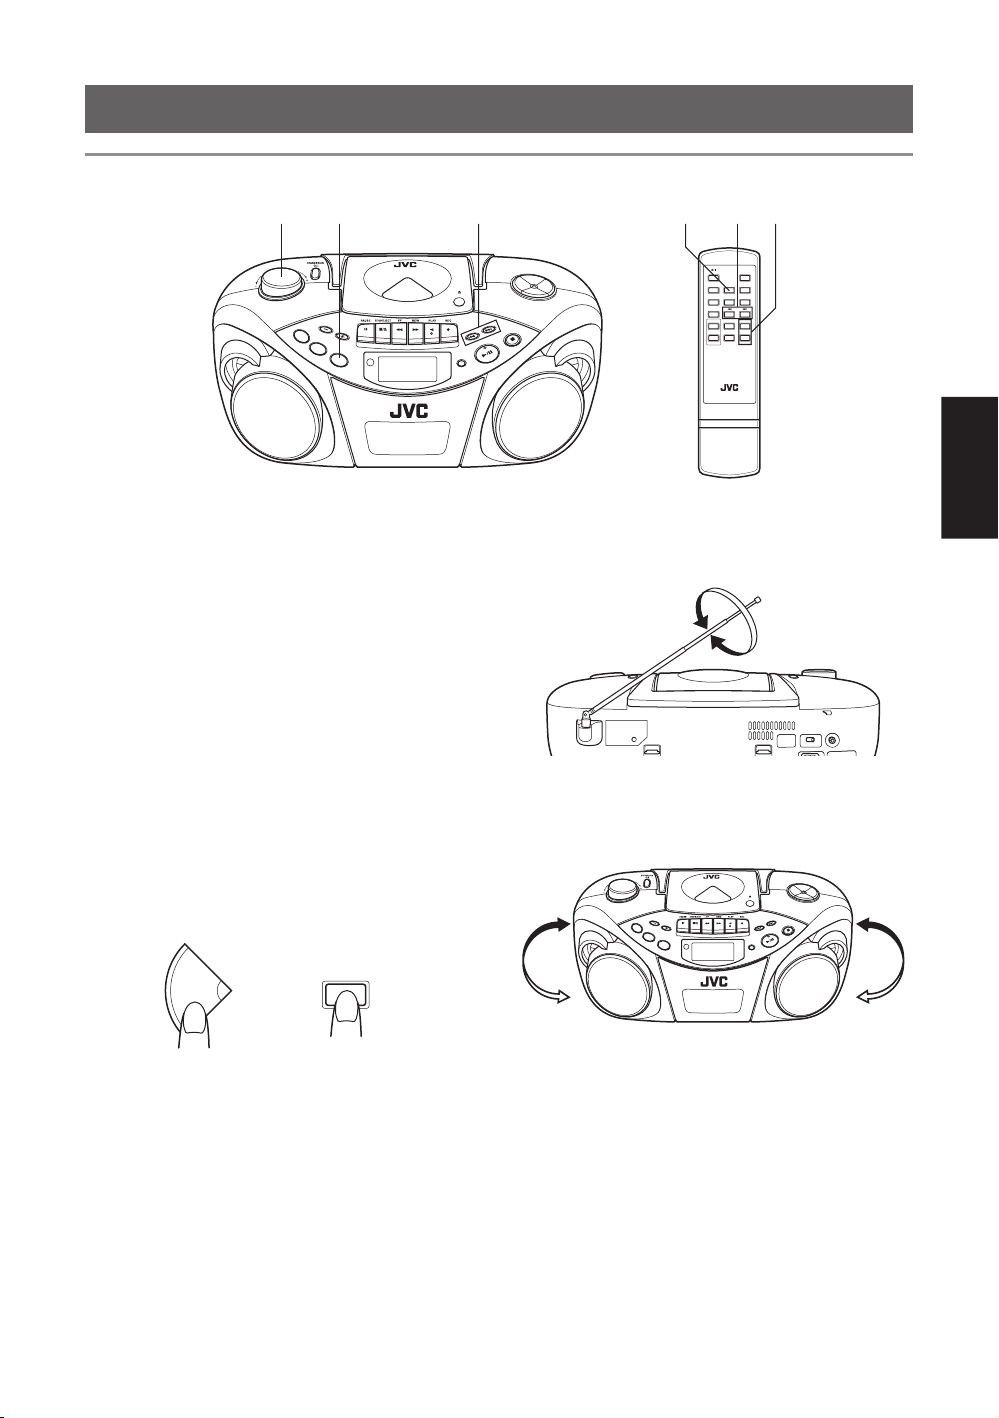
RÉCEPTION RADIO
Réglage d’une station
3 4 31,21,24
PUSH
PRESET
TAPE
CD REPEAT
RANDOM
CD
TUNER
REMOTE
SENSOR
BAND
1
Appuyez sur BAND/TUNER pour entrer dans le
DISPLAY
mode tuner.
2
Appuyez sur BAND/TUNER pour sélectionner la
bande, FM ou AM.
3
Appuyez et maintenez enfoncé 4 ou ¢ pendant
plus de 1 seconde.
L’unité commence à chercher et s’arrête quand une
station avec une force de signal suffisante est trouvée.
Si vous appuyez sur 4 ou ¢ brièvement et
répétitivement, la fréquence change pas à pas.
4
Ajustez le volume.
Pour changer le mode de réception FM
Quand un programme FM stéréo est difficile à recevoir
ou est parasité, la réception sera meilleure en mono.
Appuyez sur FM MODE jusqu’à ce que l’indicateur
MONO apparaisse à la fenêtre d’affichage.
Pour rétablir l’effet stéréo, appuyez sur FM MODE à
nouveau jusqu’à ce que l’indicateur MONO disparaisse.
FM MODE
FM MODE
M
U
TING
FM
MODE
PROGRAM/
CLOC
K
SET
Add
"/"
H
B
S
/
PRESE
T EQ
TOP
S
USE
A
PLAY/P
Utilisation des antennes
FM
AM
TAPE
STANDBY/ON DISPLAY
TUNER/
CD/
BAND
TAPE
RANDOM
CD PLAY
/PAUSE
INTRO STOP
FM MODE
HBS/
CD REPEAT/
+
PRESET EQ
+
VOLUMEPRESET
MUTING
–
–
RM-SRCEX25A REMOTE CONTROL
Français
MUTING
F
M
M
O
D
E
P
R
O
G
R
A
M
/
C
L
O
C
K
S
E
T
A
d
d
"
/
"
H
B
S
/
P
R
E
S
E
T
E
PUSH
PRESET
CD REPEA
RANDOM
T
CD
T
U
N
E
R
REMOTE
SENSOR
BAND
DISPLAY
Q
OP
ST
AUSE
Y/P
PLA
Unité principale Télécommande
Remarque:
Le réglage du mode de réception FM sera annulé quand
vous sélectionnerez une autre station.
Remarque:
L’antenne ferrite intégrée peut capter les interférences
des récepteurs de télévision du voisinage pouvant
troubler la réception AM.
14
Page 63

Préréglage des stations
Vous pouvez prérégler 10 stations FM et 10 stations AM.
2,6 3,5,6 2,6 14,64,61
PRESET
TAPE
CD REPEA
RANDOM
T
CD
TUNER
REMOTE
SENSOR
BAND
Il existe une limite de temps pour effectuer les étapes
suivantes. Si le réglage est annulé avant d’avoir fini,
Français
recommencez à partir de l’étape 3.
Remarque:
Dans certains cas, des fréquences de test ont été déjà
mémorisées dans le tuner car l'usine a contrôlé la fonction
de préréglage du tuner avant expédition. C’est n’est pas
un disfonctionnement. Vous pouvez prérégler les stations
que vous voulez en mémoire en suivant la méthode de
préréglage.
1
Appuyez sur BAND/TUNER pour sélectionner la
bande, FM ou AM.
2
Appuyez sur 4 ou ¢ pour sélectionner la
station que vous voulez prérégler.
3
Appuyez sur PROGRAM/CLOCK SET.
L’indicateur PROG commence à clignoter dans la
fenêtre d’affichage.
TUNER
PROG
FM
MHz
M
U
TING
F
M
M
O
D
E
P
R
O
G
R
A
M
/
C
L
O
C
K
S
E
T
A
d
d
"
/"
H
B
S
/
P
RES
E
T E
PUSH
Y/P
PLA
DISPLAY
Q
STOP
AUSE
5
Appuyez sur PROGRAM/CLOCK SET.
STANDBY/ON DISPLAY
TUNER/
CD/
BAND
RANDOM
INTRO STOP
FM MODE
HBS/
CD REPEAT/
PRESET EQ
+
MUTING
–
RM-SRCEX25A REMOTE CONTROL
TAPE
CD PLAY
/PAUSE
+
VOLUMEPRESET
–
La station réglée à l’étape 2 est enregistrée sur le
numéro de préréglage sélectionné à l’étape 4.
Enregistrer une nouvelle station sur un numéro utilisé
écrase la station précédemment enregistrée.
6
Répétez les étapes 2 à 5 pour prérégler d’autres
stations, en utilisant différents numéros de
préréglage.
Réglage d’une station préréglée
1
Appuyez sur BAND/TUNER pour sélectionner la
bande, FM ou AM.
2
Appuyez répétitivement sur PRESET + /
CD REPEAT ou PRESET – jusqu’à ce que le
numéro de préréglage souhaité apparaisse.
Remarque:
Si vous débranchez le cordon d’alimentation secteur ou
si une coupure de courant se produit, les stations
préréglées seront effacées après quelques jours. Si cela
se produit, préréglez à nouveau les stations.
4
Appuyez sur PRESET + / CD REPEAT ou
PRESET – pour sélectionner le numéro de
préréglage.
Vous pouvez appuyer sur CD REPEAT / PRESET +
ou PRESET – sur la télécommande pour sélectionner
le numéro de préréglage.
TUNER
PROG
FM
MHz
Numéro de préréglage
15
Page 64

LECTURE DE CASSETTES
Remarques sur les bandes cassettes
• Utilisez uniquement des bandes normales de type I.
Les caractéristiques d’enregistrement/lecture de cette
unité sont celles prévues pour les bandes normales, qui
ont des caractéristiques différentes des bandes CrO
métal.
• L’utilisation de bandes plus longues que 120 minutes
n’est pas recommandée, car une détérioration
caractéristique peut se produire et ces bandes sautent
facilement hors des galets d’entraînement et du
cabestan.
• Une bande relâchée peut provoquer des dégats. Tendez
doucement la bande avec un crayon comme indiqué
sur la figure ci-dessous.
Tournez le crayon pour
retendre la bande
• Pour éviter que les enregistrements ne soient effacés
accidentellement, enlevez les languettes avec un
tournevis. Après avoir brisé les languettes, recouvrez
les fentes avec une bande adhésive pour effacer ou
réenregistrer à nouveau.
2 et
Insertion d’une cassette
1
Appuyez sur STOP/EJECT § pour ouvrir le
logement à cassette.
2
Insérez une cassette avec le côté ouvert vers le haut
et la face de lecture comme indiqué sur la figure cidessous.
+ Sens de lecture
CD
TUNER
REMOTE
SENSOR
BAND
3
Refermez le logement à cassette en appuyant dessus
doucement et fermement.
Le logement à cassette clique une fois en position
fermée.
DISPLAY
PLAY/PAUSE
Français
16
Page 65

Fonctionnement de base
2 3 4 114
PRESET
TAPE
CD REPEAT
RANDOM
CD
TUNER
REMOTE
SENSOR
BAND
1
Appuyez sur TAPE pour entrer dans le mode
cassette.
2
Français
Insérez une cassette.
Utilisez uniquement une bande normale de type I.
3
Appuyez sur PLAY 2 pour lancer la lecture.
4
Ajustez le volume.
Pour arrêter la lecture
Appuyez sur STOP/EJECT §.
La bande s’arrête aussi quand elle atteint son extrémité.
MUTING
FM MODE
PROGRA
M/
CLOC
K
SET
Add
"/"
HBS/
P
R
E
S
PUSH
PLAY/PAU
DISPLAY
ET EQ
TOP
S
E
S
STANDBY/ON DISPLAY
TUNER/
CD/
BAND
RANDOM
INTRO STOP
FM MODE
HBS/
CD REPEAT/
PRESET EQ
+
MUTING
–
RM-SRCEX25A REMOTE CONTROL
TAPE
CD PLAY
/PAUSE
+
VOLUMEPRESET
–
Pour rembobiner rapidement une bande
Appuyez sur REW ¡ ou FF 1.
Quand la bande atteint son extrémité, appuyez sur
STOP/EJECT § pour libérer REW ¡ ou FF 1.
17
Page 66

ENREGISTREMENT
Fonctionnement de base
32 11
PUSH
PR
E
SET
TAPE
C
RANDOM
D R
EPE
A
T
CD
TUNER
REMOTE
SENSOR
BAND
DISPLAY
Enregistrement standard
1
Préparation de la source d’enregistrement.
• Si l’enregistrement provient de la radio:
Réglez le mode tuner et sélectionnez la station
souhaitée.
• Si l’enregistrement provient d’un CD:
Réglez le mode CD et insérez le CD.
2
Insérez une cassette vierge ou effaçable.
Utilisez uniquement une bande normale de type I.
3
Appuyez sur REC ¶.
PLAY 2 est aussi enfoncé et l’enregistrement
commence.
Pour arrêter l’enregistrement
Appuyez sur STOP/EJECT §.
La bande s’arrête aussi quand elle atteint son extrémité.
Remarques:
• Il faut remarquer qu'il peut être illégal de
réenregistrer des cassettes déjà enregistrées ou des
disques sans le consentement du propriétaire des
droits d'auteur de l'enregistrement sonore ou vidéo,
d'émissions ou de programmes câblés ainsi que tout
ouvrage littéraire, dramatique, musical ou
artistique qui y serait contenu.
• Le niveau d’enregistrement est réglé automatiquement
de manière correcte et n’est pas affecté par VOLUME.
De plus, pendant l’enregistrement vous pouvez ajuster
le son que vous êtes en train d’écouter sans affecter le
niveau d’enregistrement.
• Si vous avez fait un enregistrement excessivement
parasité ou statique, il se peut que l’unité se soit trouvée
trop près d’un téléviseur allumé pendant
l’enregistrement. Soit vous éteignez le téléviseur, soit
vous augmentez la distance entre le téléviseur et
l’unité.
M
UTIN
G
FM MO
DE
P
R
O
G
R
A
M
/
C
L
O
C
K
S
E
T
A
d
d
"
/"
H
B
S/
P
R
E
S
E
T
E
Q
STOP
USE
A
PLAY/P
STANDBY/ON DISPLAY
TUNER/
CD/
BAND
RANDOM
INTRO STOP
FM MODE
HBS/
CD REPEAT/
PRESET EQ
+
MUTING
–
RM-SRCEX25A REMOTE CONTROL
TAPE
CD PLAY
/PAUSE
+
VOLUMEPRESET
–
Pour utiliser la fonction de coupure de
pulsations (beat-cut)
En enregistrant des programmes AM, des pulsations
peuvent se produire. Si cela se produit, changez
l’interrupteur BEAT CUT à l’arrière de l’unité pour “1”
ou “2” pour réduire le son pulsé.
BEAT CUT
12
Pour commencer l’enregistrement à un
moment précis
1
Appuyez d’abord sur PAUSE 8, puis appuyez sur
REC ¶ pour entrer dans le mode enregistrementpause (standby).
2
Appuyez sur PAUSE 8 pour lancer la cassette au
moment précis où vous souhaitez commencer
l’enregistrement.
Remarque:
Ne laissez pas l’unité en mode pause pendant plusieurs
minutes. Appuyez plutôt sur STOP/EJECT § pour
arrêter la cassette.
Français
18
Page 67

Enregistrement synchronisé avec la lecture d’un CD
Vous pouvez faire en sorte que le lecteur CD lance la lecture lorsque la platine cassette démarre le mode
enregistrement.
2541 3 4 3
1
Insérez une cassette.
Français
Utilisez uniquement une bande normale de type I.
2
Insérez un CD.
3
Appuyez sur RANDOM/CD pour entrer dans le
mode CD.
Vous pouvez appuyer sur CD/RANDOM sur la
télécommande pour entrer dans le mode CD.
4
Spécifiez une piste ou un point du disque comme
point de départ de l’enregistrement.
• Pour lancer l’enregistrement à partir de la piste
• Pour lancer l’enregistrement à partir d’un point
5
Appuyez sur REC ¶.
PLAY 2 est aussi enfoncé et l’enregistrement
synchonisé commence.
PUSH
PRESET
TAPE
CD REPEAT
RANDOM
CD
TUNER
REMOTE
SENSOR
BAND
DISPLAY
souhaitée, sélectionnez la piste en appuyant sur
4 ou ¢ en mode arrêt.
précis sur le disque, lisez le disque et faites une pause
au point souhaité en appuyant sur
PLAY/PAUSE 3/8 (ou CD PLAY/PAUSE sur la
télécommande).
M
UTIN
G
FM
M
O
D
E
P
R
O
G
R
A
M
/
C
L
O
C
K
S
E
T
A
dd
"/
"
H
BS
/
PR
E
SE
T
E
Q
STOP
AUSE
PLAY/P
STANDBY/ON DISPLAY
TUNER/
CD/
BAND
RANDOM
INTRO STOP
FM MODE
HBS/
CD REPEAT/
PRESET EQ
+
MUTING
–
RM-SRCEX25A REMOTE CONTROL
TAPE
CD PLAY
/PAUSE
+
VOLUMEPRESET
–
Quand la cassette atteint la première la fin de la bande,
le lecteur CD passe en mode pause. Appuyez sur PLAY/
PAUSE 3/8 (ou CD PLAY/PAUSE sur la
télécommande) pour continuer la lecture ou appuyez sur
STOP 7 (ou STOP sur la télécommande) pour arrêter la
lecture.
Lorsque le lecteur CD s’arrête le premier, la bande
continue de défiler. Dans ce cas, apuyez sur STOP/
EJECT § pour arrêter la cassette.
• L’indicateur CD SYNC s’affiche à l’écran pendant
un enregistrement synchronisé.
Effacement
Si vous enregistrez sur une cassette précédemment
enregistrée, l’enregistrement précédent est effacé et seul
le nouvel enregistrement sera audible à la prochaine
lecture de la bande.
19
Pour effacer une bande sans faire de
nouvel enregistrement
1
Appuyez sur TAPE sur lunité pour entrer dans le
mode cassette.
2
Appuyez sur REC ¶.
Page 68

ENTRETIEN
Nettoyage des têtes, du cabestan et
du galet d’entraînement
Le nettoyage est important!
Lorsqu’une bande défile, il est naturel que de la poudre
magnétique et de la poussière s’accumulent
naturellement sur les têtes, le cabestan et le galet
d’entraînement. S’ils deviennent trop sales,
• la qualité du son se détériore.
• Le niveau de la sortie sonore baisse.
• L’enregistrement précédent n’est pas complètement
effacé.
• L’enregistrement n’est pas réalisé correctement.
Pour éviter ces inconvénients, nettoyez les têtes, le
cabestan et le galet d’entraînement chaque 10 heures
d’utilisation.
Tête
(enregistrement/lecture)
Galet d’entraînement
Cabestan
Ouvrez le logement à cassette. Nettoyez les têtes, le
cabestan et le galet d’entraînement.
Pour un nettoyage efficace, utilisez un kit de nettoyage
disponible dans votre magasin audio.
Après le nettoyage, vérifiez que le liquide nettoyant a
complètement séché avant d’insérer une cassette.
Tête d’effacement
Nettoyage de la lentille du lecteur CD
Si la lentille du lecteur CD est sale, le son peut être
dégradé.
Ouvrez le logement du disque et nettoyez la lentille.
Utilisez une soufflette (disponible dans un magasin
photo, etc.) pour déloger la poussière sur la lentille.
Français
Soufflette
Lentille
Précautions:
• Tenez éloigné des têtes les objets magnétisés et
métalliques. Si la tête se magnétise, les parasites
augmenteront et le son sera détérioré.
• Démagnétisez la tête d’enregistrement/lecture chaque
20 à 30 heures d’utilisation avec un démagnétiseur de
tête disponible dans votre magasin audio. Pour
démagnétiser la tête, l’unité doit être éteinte.
Comme la tête d’effacement de l’unité est de type
magnétique, ne la démagnétisez pas.
• N’utilisez pas autre chose que de l’alcool pour le
nettoyage. Du diluant et de la benzine endommagera
le caoutchouc du galet d’entraînement.
20
Page 69
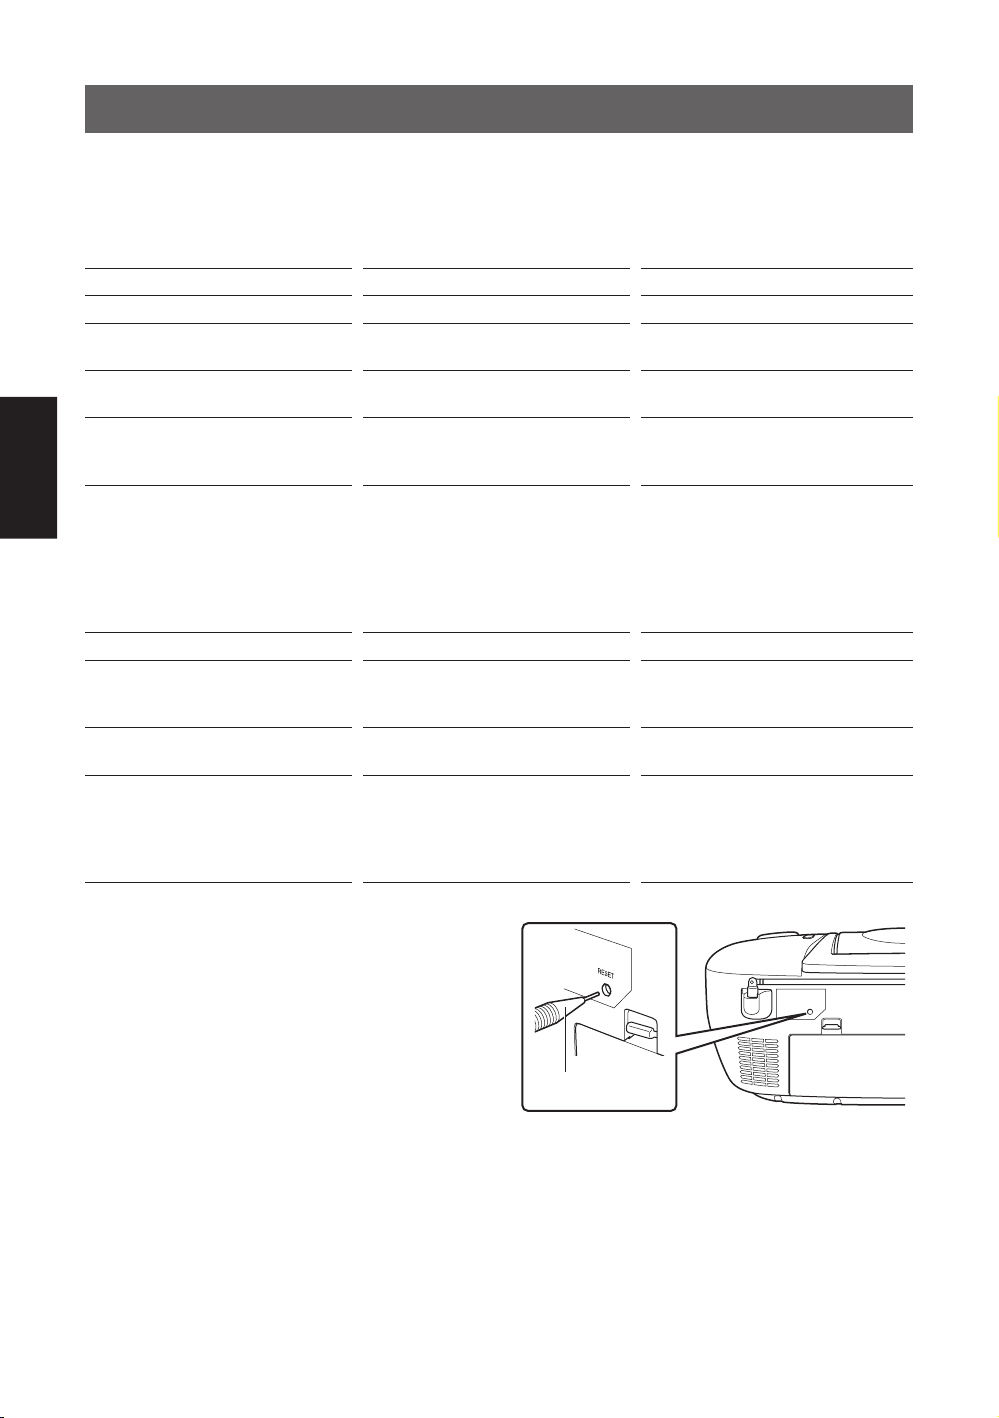
DÉPANNAGE
• Si vous avez un problème avec votre appareil, vérifiez
la présence dans cette liste d’une solution éventuelle
avant d’appeler le service après-vente.
Symptôme
L’unité ne s’allume pas.
Quand PLAY 2 est enfoncé, la cassette
ne défile pas.
Le son en lecture est très bas. low level
REC ¶ ne fonctionne pas.
Le disque est inséré mais la lecture ne
Français
démarre pas.
Aucun son ne sort des enceintes.
A cause d’une vitesse de cassette
irrégulière, du pleurage et du
scintillement se produisent.
La réception radio est pauvre et il y a
beaucoup de parasites.
Les commandes à distance ne
fonctionnent pas.
Le cordon d’alimentation est débranché.
PAUSE 8 est enfoncé.
• Les piles sont déchargées.
• La tête est sale.
• Les languettes de sécurité de la
cassette ont été supprimées.
• Aucune cassette n’est insérée.
• Le disque est à l’envers.
• Le disque est sale.
• Le disque est endommagé ou gondolé.
• La lentille est sale.
• Il existe de la condensation et de
l’humidité.
Les écouteurs sont raccordés.
• Le galet d’entraînement ou le cabestan
est sale.
• Les piles sont déchargées.
L’antenne n’est pas correctement
orientée.
• Les piles de la télécommande sont
déchargées.
• Le capteur de la télécommande est
exposé à une lumière brillante (soleil
direct, etc.)
• Si vous ne pouvez pas résoudre le problème à partir
des conseils qui figurent ici ou si l’unité a été
endommagée physiquement, adressez-vous à une
personne qualifiée, comme votre distributeur, pour la
réparation.
Cause possible
Action
Branchez le cordon d’alimentation.
Appuyez PAUSE 8 de nouveau pour la
désactiver.
• Remplacez les piles par des neuves.
• Nettoyez la tête.
• Obstruez les trous avec du ruban
adhésif.
• Insérez une cassette.
• Insérez le disque avec la face étiquettée
dirigée vers le haut.
• Nettoyez le disque.
• Remplacez par un disque lisible.
• Nettoyez la lentille.
• Allumez l’unité et attendez une ou deux
heures avant utilisation.
Débranchez les écouteurs.
• Nettoyez le galet d’entraînement et le
cabestan.
• Remplacez les piles par des neuves.
Orientez l’antenne correctement.
• Remplacez les piles par des neuves.
• Essayez de ne pas utiliser l’unité sous
la lumière directe du soleil, etc.
Remarque:
Quand l’unité est déplacée d’un lieu froid à environ 0°C
vers un lieu chaud, elle peut ne pas fonctionner
normalement, car de la condensation s’est formée à
l’intérieur du boîtier. Le fonctionnement normal sera
rétabli après avoir attendu une ou deux heures.
Réinitialisation de l’unité
Si “DÉPANNAGE” n’élimine pas le mauvais
fonctionnement (erreur d’opération ou affichage
correct, etc.), appuyez sur le bouton RESET à l’arrière
de l’unité avec un objet pointu pendant que l’unité est
allumée.
21
Objet pointu
Remarque:
La réinitialisation provoque le rétablissement des
réglages de sortie d’usine et tous les réglages effectués
par l’utilisateur seront effacés.
Page 70

SPÉCIFICATIONS
Lecteur CD
Capacité de CD : 1 CD
Rapport signal-bruit : 75 dB
Plage dynamique : 60 dB
Tuner
Gamme de fréquence : FM 87,5 – 108,0 MHz
AM 522 – 1 629 kHz
Antennes : Antenne téléscopique pour
FM
Antenne ferrite pour AM
Platine cassette
Réponse en fréquence : 60 Hz – 10 000 Hz
Pleurage et scintillement : 0,15% (WRMS)
Rembobinage rapide : Environ 150 sec.
(cassette C-60)
Général
Enceintes : Conique 9 cm × 2
Impédance
de l’enceinte : 4 Ω
Alimentation de sortie : 4 W (2 W + 2 W) à 4 Ω
(10% DHT)
Prises de sortie : PHONES × 1
Alimentation : Secteur 230 V Ó, 50 Hz
Piles de taille CC 9 V (R20
(SUM-1)/D (13D) × 6)
Consommation
d’énergie : 13 W (en fonctionnement)
3 W (en veille)
Dimensions : 420 mm × 178 mm ×
250 mm (L/H/P)
Poids : Environ 3,2 kg
(sans les piles)
Accessoires fournis : Cordon d’alimentation × 1
Télécommande × 1
Piles de la télécommande
(AAA/UM-4/R03) × 2
La conception et les spécifications sont sujets à
changement sans préavis.
Français
22
Page 71

INHOUDSOPGAVE
KENMERKEN ............................................................ 1
VEILIGHEIDSVOORSCHRIFTEN ........................... 1
VOORZORGEN BIJ GEBRUIK ................................ 2
STROOMVOORZIENING ......................................... 3
ONDERDELEN EN BEDIENINGSORGANEN ....... 4
AFSTANDSBEDIENING ........................................... 5
HET APPARAAT AAN/UIT ZETTEN...................... 6
DE KLOK INSTELLEN ............................................. 7
KENMERKEN
1 Draagbare stereo-installatie met CD speler
• De CD functies zijn naar keuze te bedienen met de
afstandsbediening of met de toetsen op het apparaat
zelf.
• Ook geschikt voor 8 cm CD singles
2 Het digitale LCD (vloeibare kristallen)
uitleesvenster toont de status van de
weergave
VEILIGHEIDSVOORSCHRIFTEN
Nederlands
Ter voorkoming van elektrische schokken,
brand en schade
• Ook wanneer de STANDBY/ON toets in de
STANDBY stand staat loopt er een kleine stroom.
Wanneer het apparaat aanstaat, licht het displayvenster
oranje op. Wanneer het apparaat op stand-by staat, licht
het displayvenster niet op. (Het displayvenster licht
echter niet op wanneer het apparaat op batterijen werkt,
ook al staat het aan.) Trek de stekker uit het stopcontact
wanneer u het apparaat langere tijd niet zult gebruiken.
• Raak het netsnoer nooit met natte handen aan.
• Trek altijd aan de stekker, en nooit aan het netsnoer.
• Raadpleeg de dichtstbijzijnde audiohandelaar wanneer
het netsnoer beschadigd is of er kortsluiting op is
getreden.
DE GELUIDSWEERGAVE REGELEN .................... 8
AFSPELEN VAN COMPACT DISKS ....................... 9
RADIO ONTVANGST ............................................. 14
CASSETTE WEERGAVE ........................................ 16
OPNEMEN ................................................................ 18
ONDERHOUD .......................................................... 20
STORINGEN VERHELPEN .................................... 21
TECHNISCHE GEGEVENS .................................... 22
3 Synchrone opname van een CD's
4 Hyper-Bass geluidseffect
• Zorg dat het netsnoer niet uitgerekt, geknakt of
gedraaid wordt.
• Er bevindt zich een classificatielabel op de onderzijde
aan de buitenkant.
• Breng geen wijzigingen aan in het netsnoer.
• Verwijder geen schroeven uit het apparaat en raak
nooit enig onderdeel in het inwendige aan, om
ongelukken te vermijden.
• Steek nooit enig metalen voorwerp in het apparaat.
• Trek de stekker uit het stopcontact wanneer er onweer
dreigt.
• Als er water in het apparaat terechtkomt, trek dan
onmiddellijk de stekker uit het stopcontact en
raadpleeg vervolgens een onderhoudsdienst.
• Zorg dat de ventilatie openingen van het apparaat niet
geblokkeerd worden, om oververhitting van het
inwendige te voorkomen.
• Gebruik het apparaat niet in een slecht geventileerde
ruimte.
1
Page 72

VOORZORGEN BIJ GEBRUIK
Gebruik dit apparaat niet in de volle zon en laat het
niet achter in een afgesloten auto (of boot, enz.) waar
het aan temperaturen boven de 40ºC blootgesteld
wordt.
1 Gebruik dit apparaat niet op de volgende
plaatsen:
• Een omgeving waar extreem hoge of lage
temperaturen kunnen optreden; het toegestane
temperatuurbereik voor dit apparaat is van 5ºC tot
35ºC.
• Plaatsen waar het apparaat wordt blootgesteld aan
trillingen.
• Erg vochtige ruimtes zoals een badkamer e.d.
• Plaatsen met krachtige magnetische velden,
afkomstig van magneten of luidsprekers.
2 Pas op voor stof
Sluit de diskhouder altijd zodat er geen stof op de
lens kan komen. Raak de lens niet met uw vingers
aan.
3 Condens
Onder de volgende omstandigheden kan er in het
apparaat vocht condenseren, waarna de werking van
het apparaat gestoord kan worden:
• Het apparaat bevindt zich in een ruimte waar de
verwarming juist is aangeschakeld.
• Het apparaat bevindt zich in een omgeving met
rook of een hoge vochtigheid.
• Het apparaat is zojuist verplaatst van een koude
naar een warme ruimte.
Zet in deze gevallen de STANDBY/ON toets in de
ON stand en wacht één of twee uur alvorens het
apparaat in gebruik te nemen.
4 De volumeregeling
Compact disks bevatten erg weinig ruis in
vergelijking met analoge geluidsbronnen. Als u
gewend bent de geluidssterkte in te stellen aan de
hand van de ruis waarmee de opname start, kan er
een plotselinge geluidspiek volgen die uw
luidsprekers zou kunnen beschadigen. Daarom kunt
u bij het afspelen van een CD het best de
volumeregelaar eerst naar een geringe sterkte
terugdraaien, om de gewenste geluidssterkte te
kiezen wanneer de weergave is begonnen.
5 Beveiligingsmechanisme
Het apparaat is voorzien van een beveiligingsmechanisme dat de laserstraal uitschakelt wanneer
de diskhouder wordt geopend.
6 Leg geen magnetisch gevoelige voorwerpen
zoals cassettes en betaalkaarten vlak bij de
luidsprekers
Aangezien de luidsprekers krachtige magneten
bevatten, moet u cassettes, betaalkaarten e.d. erbij uit
de buurt houden, anders kunnen er gegevens verloren
gaan.
7 Zet het apparaat niet vlak bij een TV
Bij gebruik van dit apparaat in de buurt van een TV
zou het beeld vervormd kunnen worden. Zet het
apparaat in dit geval iets verder van de TV vandaan.
Wanneer dat niet helpt, gebruik het apparaat dan niet
terwijl de televisie aan staat.
8 Reinigen van de behuizing
Als de behuizing van het apparaat vuil is, kunt u het
schoonvegen met een zachte droge doek. Gebruik
geen oplosmiddelen zoals benzine of verdunner, want
deze kunnen de afwerking van het apparaat aantasten.
9 Bij het luisteren met een hoofdtelefoon
• Stel het volume niet te hoog in bij het luisteren met
een hoofdtelefoon, want dat kan uw gehoor
beschadigen.
• Ten behoeve van de veiligheid moet u geen
hoofdtelefoon gebruiken terwijl u een auto
bestuurt.
10 Draagbeugel
Klap de draagbeugel niet omhoog of omlaag terwijl
de telescoopantenne is uitgeschoven, om de antenne
niet te beschadigen. Stel de draagbeugel zo in dat
deze u bij de bediening niet in de weg zit.
Nederlands
2
Page 73

STROOMVOORZIENING
Voeding via het lichtnet
Sluit het netsnoer aan.
AC IN
VOORZORGSMAATREGELEN:
• Gebruik dit apparaat uitsluitend met het bijgeleverde
netsnoer van JVC, om storing of beschadiging van het
apparaat te voorkomen.
Verwijder de batterijen als u het apparaat op het
lichtnet heeft aangesloten.
• Wanneer u op reis gaat of om een andere reden het
apparaat langere tijd niet zult gebruiken, trek de stekker
uit het stopcontact.
Gebruik op batterijen
Batterijen plaatsen
Nederlands
1
Open het batterijdeksel.
Trek het batterijdeksel naar u toe terwijl u de nokken
indrukt die hieronder met pijlen staan aangegeven.
De batterijspanning controleren
Wanneer de cassetteband langzamer gaat lopen, de
geluidssterkte afneemt of het geluid van een CD af en
toe wegvalt, dient u alle batterijen door nieuwe te
vervangen.
We bevelen aan voor het maken van belangrijke
opnamen nieuwe batterijen te plaatsen (bij voorkeur
alkali batterijen, die langer meegaan) om onaangename
verrassingen te voorkomen.
Om de batterijen te sparen
• Als u het apparaat doorlopend gebruikt, zullen de
batterijen eerder leegraken dan bij gebruik met
tussenpozen.
• Bij gebruik in een koude omgeving zullen de batterijen
eerder leegraken dan in een warme ruimte.
VOORZORGSMAATREGELEN:
• Wanneer u het apparaat geruime tijd (langer dan twee
weken) niet gebruikt, of alleen op het lichtnet, kunt u
de batterijen er beter uit verwijderen, om storing in de
werking of schade door eventuele batterijlekkage te
voorkomen.
• Wanneer u het bijgeleverde JVC netsnoer aansluit,
schakelt het apparaat automatisch over van
batterijstroom naar lichtnetvoeding, ook al zijn er
batterijen in het apparaat aanwezig.
Desondanks wordt het aanbevolen de batterijen te
verwijderen wanneer u het apparaat alleen op
netvoeding gebruikt.
2
Plaats zes R20 (SUM-1)/D (13D) formaat
batterijen.
Let bij het plaatsen van de batterijen op de juiste
richting van de ª en · polen.
1
33
2
6
5
4
R20 (SUM-1)/D (13D) formaat batterijen
3
Breng het deksel weer aan.
3
WAARSCHUWINGEN BETREFFENDE DE
BATTERIJEN:
Bij onjuist gebruik van de batterijen kunnen er
chemicaliën uit de batterijen lekken of kunnen ze
ontploffen. Neem altijd de volgende maatregelen in
acht:
• Let op dat de positieve ª en negatieve · polen
van de batterijen in de juiste richting zijn geplaatst,
zoals getoond in de afbeelding links.
• Meng geen oude en nieuwe batterijen, of
verschillende typen batterijen.
• Probeer gewone staafbatterijen niet op te laden.
• Verwijder de batterijen wanneer u het apparaat
langere tijd niet zult gebruiken.
Als er chemicaliën uit de batterijen op uw huid
komen, was ze dan onmiddellijk weg met water. Als
de batterijen vloeistof op het apparaat lekken, maak
het apparaat dan grondig schoon.
Page 74

ONDERDELEN EN BEDIENINGSORGANEN
Bovenkant en voorpaneel
1 VOLUME knop
2 STANDBY/ON
toets
3 PRESET – toets
PRESET + / CD REPEAT toets
4 Cassette toetsen
PAUSE 8 toets
STOP/EJECT § toets
FF 1 toets
REW ¡ toets
PLAY 2 toets
REC ¶ toets
5 Diskklep
6 FM MODE toets
7 MUTING toets
1 2
TAPE
PRESET
CD REPEAT
RANDOM
CD
TUNER
REMOTE
SENSOR
BAND
9 1110 1312
43 6 7 85
MUTING
FM
M
O
DE
P
RO
G
R
A
M
/
CL
O
CK
S
ET
Ad
d
"/"
H
B
S/
PR
ESE
T E
PUSH
DISPLAY
PLAY/PAUSE
Q
STOP
14 15
8 PROGRAM/CLOCK SET toets
9 TAPE toets
CD/RANDOM toets
BAND/TUNER toets
10 REMOTE SENSOR
11 Displayvenster
12 Cassettedeck
13 DISPLAY toets
14 4 toets
¢ toets
PLAY/PAUSE 3/8 toets
STOP 7 toets
15 HBS/PRESET EQ toets
Nederlands
4
Page 75
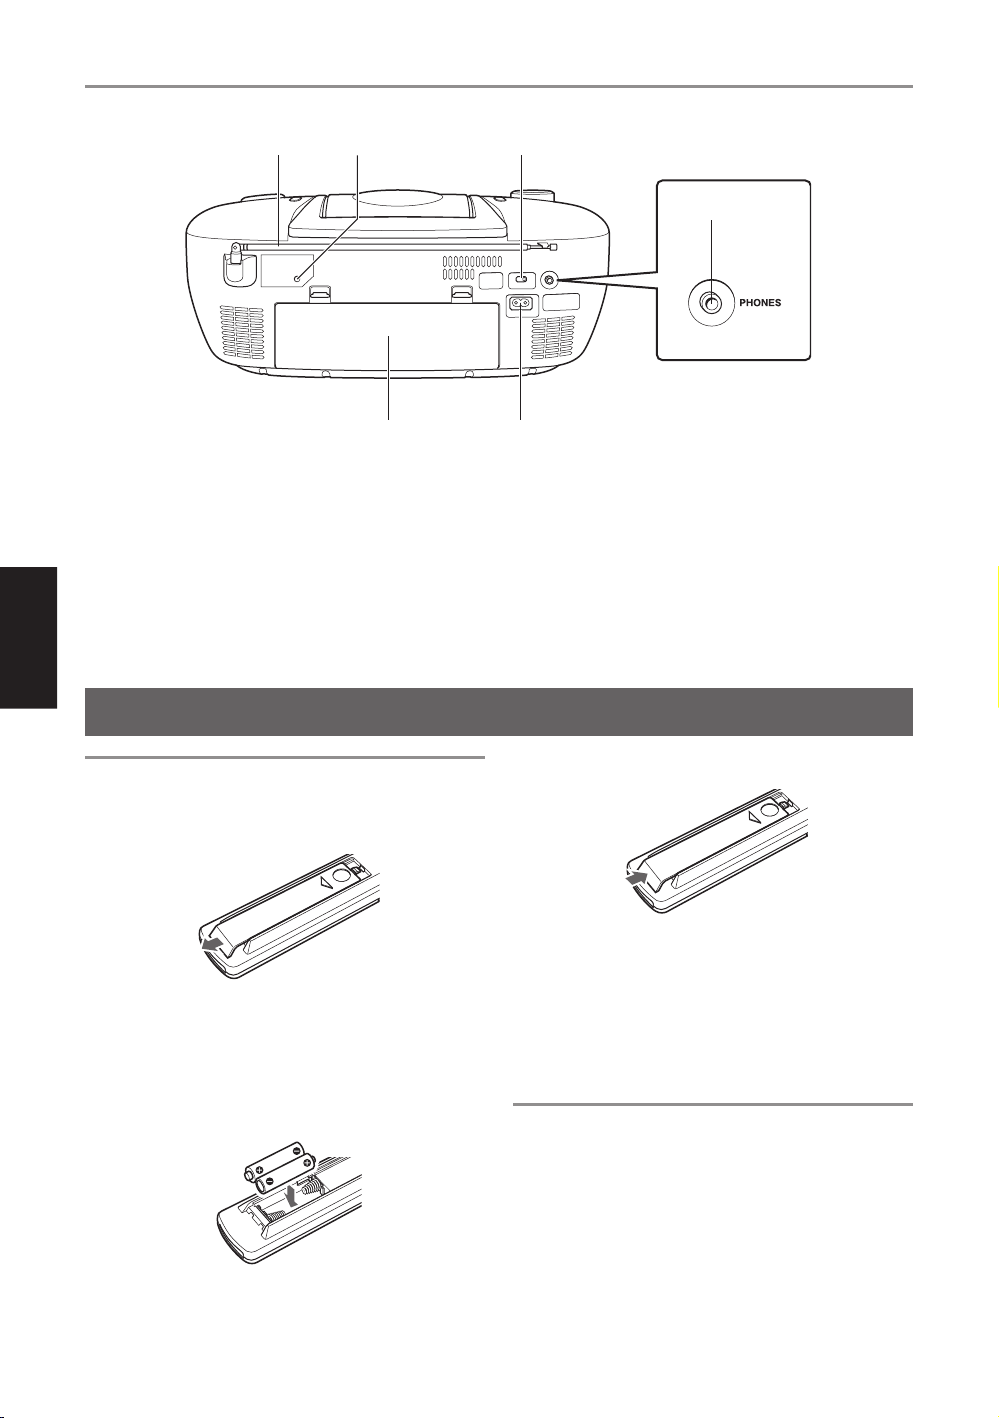
Achterkant
16 17 18
19
16 Telescoopantenne
17 RESET toets
18 BEAT CUT schakelaar
19 PHONES aansluiting
Sluit hier een hoofdtelefoon met een stereo
ministekker (3,5 mm doorsnede, impedantie
16 Ω - 32 Ω) op aan. Zolang er een hoofdtelefoon is
aangesloten klinkt er geen geluid via de luidsprekers.
Nederlands
AFSTANDSBEDIENING
Batterijen plaatsen
1
Verwijder het deksel van het batterijvak op de
achterkant van de afstandsbediening.
2
Plaats twee AAA (UM-4)/R03 formaat batterijen
(bijgeleverd).
Plaats de batterijen met de ª en · polen in de juiste
richting, zoals aangegeven in het batterijvak. Plaats
de · pool van de batterijen eerst.
AAA (UM-4)/R03 formaat batterijen
5
20
21
20 Deksel van het batterijvak
21 ÓAC IN (wisselspanning) ingang
3
Breng het deksel van het batterijvak weer aan.
Batterijen vervangen
De maximale werkzame afstand van de afstandsbediening tot de sensor op het apparaat bedraagt
ongeveer 7 meter. Wanneer deze afstand duidelijk
afneemt of als het apparaat niet meer goed op de
afstandsbediening reageert, vervang de batterijen door
nieuwe.
Opmerkingen over het gebruik van de
afstandsbediening
• Richt de voorzijde van de afstandsbediening zo goed
mogelijk op de sensor van het apparaat. De werkzame
afstand van de afstandsbediening neemt af wanneer u
de afstandsbediening schuin houdt.
• Druk de toetsen voorzichtig maar stevig in.
• Zorg dat er geen fel licht (direct zonlicht of kunstlicht)
op de sensor van het apparaat kan vallen en dat er zich
geen obstakels tussen de sensor en de afstandsbediening bevinden.
Page 76

Benaming van de toetsen
1
STANDBY/ON DISPLAY
TUNER/
CD/
BAND
2
3
4
RANDOM
INTRO STOP
FM MODE
CD REPEAT/
+
5
TAPE
CD PLAY
/PAUSE
HBS/
+
PRESET EQ
VOLUMEPRESET
MUTING
–
–
6
7
8
9
HET APPARAAT AAN/UIT ZETTEN
1 STANDBY/ON toets
2 CD/RANDOM toets
TUNER/BAND toets
TAPE toets
3 INTRO toets
4 FM MODE toets
5 CD REPEAT/PRESET + toets
PRESET – toets
6 DISPLAY toets
7 STOP toets
CD PLAY/PAUSE toets
4 toets
¢ toets
8 VOLUME + toets
VOLUME – toets
9 HBS/PRESET EQ toets
MUTING toets
Nederlands
PUSH
PRESET
TAPE
CD REPEAT
RAND
O
M
CD
TUNER
STANDBY/ON
REMOTE
SENSOR
BAND
DISPLAY
STANDBY/ON toets
Druk op de STANDBY/ON toets op het apparaat
om het aan of uit te zetten.
U kunt ook op de
STANDBY/ON toets van de
afstandsbediening drukken.
Het displayvenster licht op wanneer het apparaat aangaat.
(Merk echter op dat het displayvenster niet oplicht
wanneer het apparaat op batterijen werkt, ook al staat
het aan.) Bij het inschakelen is het apparaat automatisch
gereed om de laatst gebruikte geluidsbron af te spelen.
Om de stroomvoorziening geheel uit te
zetten
Trek de stekker uit het stopcontact. Wanneer er batterijen
in het apparaat geplaatst zijn, verwijder deze.
STANDBY/ONSTANDBY/ON
STANDBY/ON DISPLAY
TUNER/
CD/
BAND
RANDOM
INTRO STOP
FM MODE
HBS/
CD REPEAT/
PRESET EQ
+
MUTING
–
RM-SRCEX25A REMOTE CONTROL
TAPE
CD PLAY
/PAUSE
+
VOLUMEPRESET
–
PLAY/PAUSE
MUTIN
G
F
M
M
O
D
E
P
R
O
G
R
A
M
/
C
L
O
C
K
S
E
T
A
d
d
"
/"
HB
S/
PRESET EQ
STOP
Opmerkingen:
• Wanneer u de stekker uit het stopcontact trekt of er
een stroomstoring optreedt, wordt de klok onmiddellijk
op “0:00” gezet, terwijl de voorkeurzenders van de
radio (zie bladzijde 15) na een paar dagen verloren
zullen gaan. De tijdsweergave blijft knipperen totdat u
de tijd opnieuw instelt.
• Verwijder de batterijen wanneer u het apparaat draagt
of in de kofferruimte van een auto vervoert. Zodoende
kan het apparaat niet per ongeluk aangeschakeld
worden, waardoor de batterijen onnodig leeg zouden
raken.
6
Page 77

DE KLOK INSTELLEN
2,3,43,4 3,411
PRESET
TAPE
CD
RANDOM
REPEAT
CD
TUNER
REMOTE
SENSOR
BAND
Stel de ingebouwde klok van dit apparaat in voordat u
het in gebruik neemt.
De klok werkt op 24-uurs basis.
1
Druk op STANDBY/ON om het apparaat uit
te zetten indien het aanstaat.
De klok knippert in het displayvenster.
2
Houd PROGRAM/CLOCK SET langer dan 2
seconden ingedrukt.
Nederlands
De uren beginnen te knipperen.
3
Druk op 4 of ¢ om de uren in te stellen, en
druk vervolgens op PROGRAM/CLOCK SET.
De minuten beginnen te knipperen.
MU
TIN
G
F
M
MO
DE
P
R
O
G
R
A
M
/
C
L
O
C
K
S
E
T
A
d
d
"
/"
H
BS
/
P
RE
S
ET
E
PUSH
AY
PL
DISPLAY
Q
P
TO
S
E
US
A
/P
STANDBY/ON DISPLAY
TUNER/
CD/
BAND
RANDOM
INTRO STOP
FM MODE
HBS/
CD REPEAT/
PRESET EQ
+
MUTING
–
RM-SRCEX25A REMOTE CONTROL
TAPE
CD PLAY
/PAUSE
+
VOLUMEPRESET
–
Opmerking:
Wanneer er een stroomonderbreking is geweest, gaat de
tijdinstelling verloren en wordt de klok op “0:00”
ingesteld. De tijdsweergave blijft knipperen totdat u de
tijd opnieuw instelt.
Om de tijd weer te geven wanneer CD of
tuner geselecteerd is
Druk op DISPLAY.
Bij elke druk op de toets verandert het display van de
weergave van de klok naar normale weergave en
omgekeerd.
(Bij bediening van het apparaat terwijl de tijd
weergegeven wordt zal het apparaat op normale
weergave overgaan.)
DISPLAY
DISPLAY
4
Druk op 4 of ¢ om de minuten in te stellen, en
druk vervolgens op PROGRAM/CLOCK SET.
7
Het apparaat Afstandsbediening
Page 78
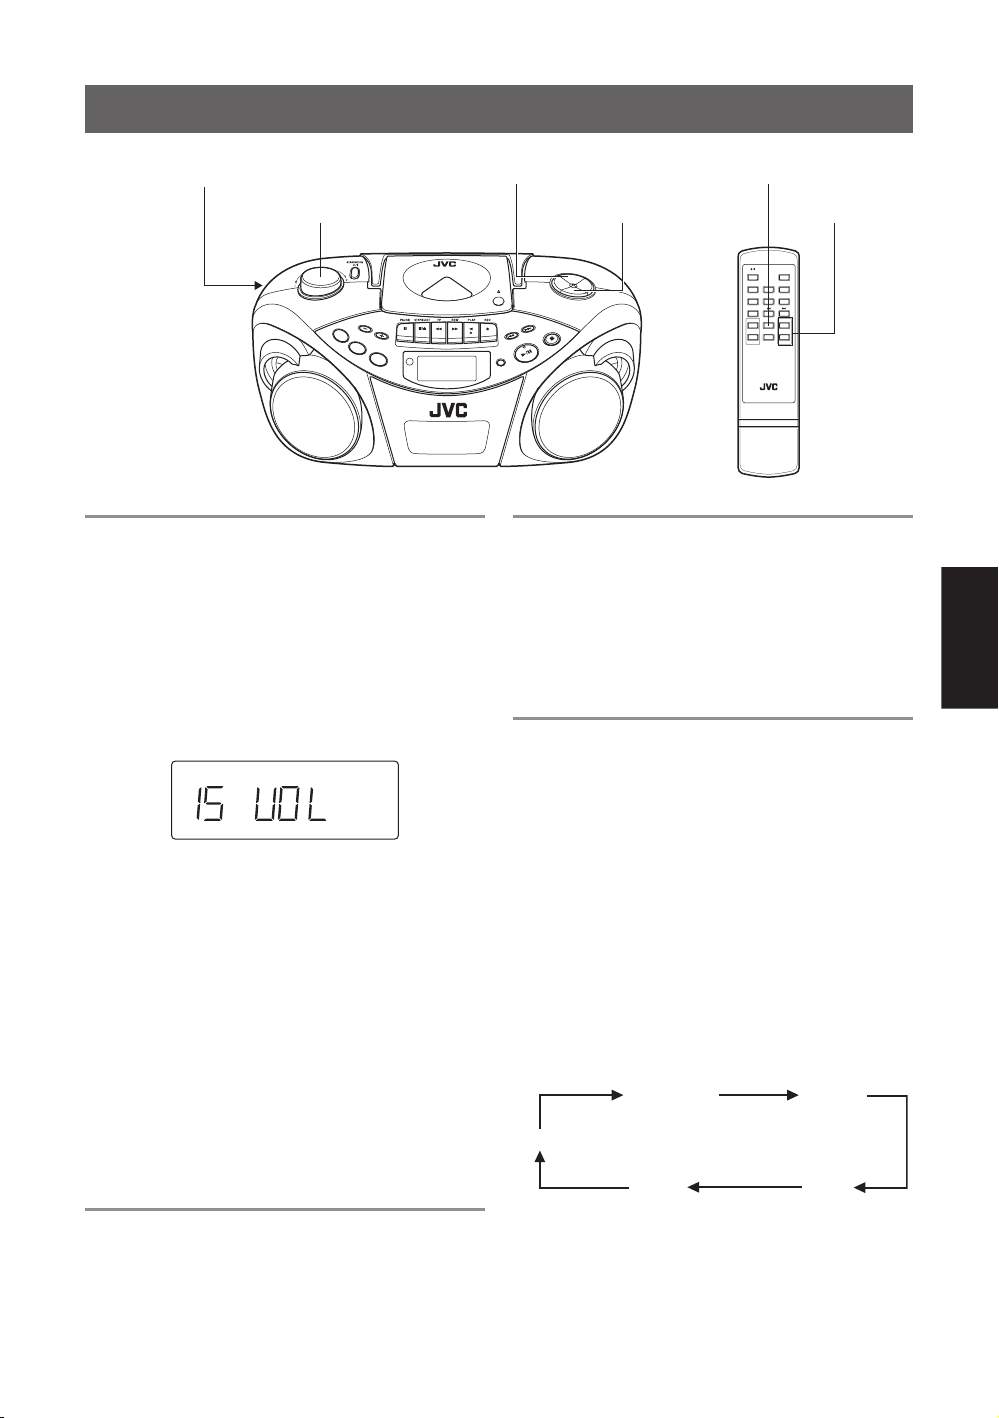
DE GELUIDSWEERGAVE REGELEN
–
PHONES (on the rear)
PHONES (op de achterzijde)
VOLUME VOLUME +/
PRESET
TAPE
CD REPEAT
RANDOM
CD
TUN
ER
REMOTE
SENSOR
BAND
De geluidssterkte regelen
Draai de VOLUME knop in de richting van de
wijzers van de klok om het volume te verhogen en in
tegengesrelde richting om het te verlagen.
U kunt ook op de VOLUME + en VOLUME – toetsen
van de afstandsbediening drukken om het volume te
verhogen of verlagen.
Het volume kan in 31 stappen ingesteld worden
(van 00 VOL t/m 30 VOL).
MUTING HBS/PRESET EQ
HBS/PRESET EQ
M
UTING
F
M MOD
E
P
R
O
G
R
A
M
/
C
L
O
C
K
S
E
T
A
d
d
"
/"
H
B
S
/
P
R
E
S
E
T
E
PUSH
PLAY/PAUSE
DISPLAY
Q
STOP
STANDBY/ON DISPLAY
TUNER/
CD/
BAND
RANDOM
INTRO STOP
FM MODE
HBS/
CD REPEAT/
PRESET EQ
+
MUTING
–
RM-SRCEX25A REMOTE CONTROL
TAPE
CD PLAY
/PAUSE
+
VOLUMEPRESET
–
De lage tonen extra versterken
Met het Hyper-Bass geluidseffect kunt u genieten van
extra krachtige basweergave.
Houd de HBS/PRESET EQ toets ingedrukt totdat de
HBS indicator op het displayvenster oplicht.
Om het effect uit te schakelen, houd de toets opnieuw
ingedrukt, totdat de HBS indicator uitgaat.
Keuze van een klankbeeld
U kunt één van de 5 standaard klankbeelden selecteren.
Nederlands
Waarschuwing:
Zet het apparaat NOOIT uit terwijl het volume erg hoog
staat, want dan kan er de volgende keer dat u het apparaat
inschakelt een geluidsknal klinken, die uw gehoor en/of
de luidsprekers en de hoofdtelefoon beschadigt.
DENK ERAAN dat u het volume niet kunt instellen
wanneer het apparaat uit staat.
Het geluid tijdelijk uitzetten
Druk tijdens de weergave op MUTING.
Het geluid gaat uit en de MUTING indicator verschijnt
op het displayvenster.
Om het geluid weer aan te zetten, druk nogmaals op
MUTING.
Luisteren via een hoofdtelefoon
Sluit een hoofdtelefoon aan op de PHONES uitgang.
Er wordt geen geluid weergegeven via de luidsprekers.
Zet het geluid zachter voordat u de hoofdtelefoon
aansluit.
CLASSIC : Geschikt voor klassieke muziek.
ROCK : Benadrukt lage en hoge tonen. Geschikt
voor akoestische muziek.
POP : Geschikt voor vocalen.
JAZZ : Geschikt voor jazzmuziek.
FLAT : Gewone geluidsweergave.
Keuze van een klankbeeld
Druk herhaald op HBS/PRESET EQ totdat de indicator
van het gewenste klankbeeld in het displayvenster wordt
getoond.
Telkens wanneer u op deze toets drukt, verandert het
klankbeeld als volgt:
CLASSIC ROCK
FLAT
JAZZ
POP
8
Page 79

AFSPELEN VAN COMPACT DISKS
Opmerkingen over compact disks
Dit apparaat is ontworpen voor het afspelen van de
volgende types CD’s.
• Digitale audio CD’s
• Opneembare digitale audio CD’s (CD-R)
• Herschrijfbare digitale audio CD’s (CD-RW)
Bij de weergave van een CD-R of CD-RW
U kunt afgesloten CD-R’s of CD-RW’s afspelen die
zijn opgenomen in muziek CD formaat. (Wanneer een
CD-RW in een ander formaat is opgenomen, wis eerst
alle gegevens van de CD-RW alvorens er een opname
op te maken.)
•U kunt een CD-R of CD-RW op dezelfde wijze
afspelen als een audio CD.
• Sommige CD-R’s of CD-RW’s kunnen niet op dit
apparaat afgespeeld worden vanwege de
eigenschappen van de disks, schade of vlekken op de
disks, of omdat de lens van de speler vuil is.
• De reflectie van CD-RW disks is minder dan die van
Nederlands
andere CD’s, zodat het uitlezen van een CD-RW iets
langer kan duren.
• CD-R en CD-RW disks in het MP3 formaat kunnen
niet afgespeeld worden.
• Disks uit hun doosje halen en weer terugplaatsen
Druk op het midden en verwijder de disk.
Druk om de disk vast te klikken.
• Omgaan met disks
Onjuist
Omgang met disks
Aangezien vuile, beschadigde of verbogen disks het
apparaat kunnen beschadigen, dient u de volgende
punten in aanmerking te nemen:
• Raak de glimmende opnamekant van de disk niet aan.
• Schrijf niet op de etiketzijde van de disk en plak er
niets op.
• Verbuig de disks niet.
Opslag
• Berg elke disk na gebruik weer in zijn doosje op.
• Zorg dat de disks niet worden blootgesteld aan direct
zonlicht, hitte van een kachel e.d., een hoge
vochtigheid of stof.
Disks reinigen
Voordat u een disk in het apparaat plaatst, veeg alle stof,
vuil en vingerafdrukken er van af met een zachte droge
doek. Veeg vanuit het midden naar de rand.
Gebruik nooit benzine, verdunner, platenreinigers of
antistatische spray.
9
• Reinigen
Juist
Onjuist
Page 80

Basisbediening
23 4 5 4115
PUSH
PRESET
TAPE
CD REPEAT
RANDOM
CD
TUNER
REMOTE
SENSOR
BAND
1
Druk op CD/RANDOM om de CD functie te
DISPLAY
selecteren wanneer het apparaat zich in de TUNER
of TAPE stand bevindt.
U kunt ook op CD/RANDOM op de afstandsbediening
drukken om de CD functie te selecteren.
2
Druk op ) PUSH om de CD houder te openen.
3
Plaats een disk met het etiket naar boven en sluit
het deksel.
• Dit apparaat kan ook 8-cm CD singles afspelen
zonder adapter.
4
Druk op PLAY/PAUSE 3/8 om de weergave te
starten.
U kunt de weergave ook starten door op
CD PLAY/PAUSE op de afstandsbediening te
drukken.
Tijdens de weergave worden het nummer en de
verstreken speelduur van de weergegeven track
getoond.
CD
5
Stel het volume in.
Opmerkingen:
• De onderstaande aanduiding kan verschijnen als de
disk ondersteboven is geplaatst. Plaats de disk correct.
CD
M
UTING
FM MO
D
E
PR
O
GRAM/
C
L
O
C
K
S
ET
Add"/"
HBS/
P
RESET
E
Q
STOP
E
S
U
A
P
Y/
PLA
STANDBY/ON DISPLAY
TUNER/
CD/
BAND
RANDOM
INTRO STOP
FM MODE
HBS/
CD REPEAT/
PRESET EQ
+
MUTING
–
RM-SRCEX25A REMOTE CONTROL
TAPE
CD PLAY
/PAUSE
+
VOLUMEPRESET
–
Stoppen met afspelen
Druk op STOP 7.
Druk op STOP op de afstandsbediening om de weergave
te stoppen.
STOP
STOP
Het apparaat Afstandsbediening
Waarschuwing:
Stop de weergave voordat u de diskhouder opent. Wacht
tot de disk geheel tot stilstand is gekomen voordat u hem
verwijdert.
De weergave pauzeren
Druk op PLAY/PAUSE 3/8 tijdens de weergave.
U kunt ook op CD PLAY/PAUSE op de afstandsbediening drukken om de weergave te stoppen.
Druk nogmaals op deze toets om de weergave te
hervatten.
PLAY/PAUSE
Het apparaat Afstandsbediening
CD PLAY
/PAUSE
Nederlands
• Als de weergave overspringt, verminder het volume.
• De weergave kan wel eens haperen of overspringen
als er tegen het apparaat wordt gestoten of als het
blootstaat aan trillingen tijdens de weergave (zoals bij
gebruik in de auto op een slecht wegdek).
• Wanner u op CD/RANDOM drukt terwijl het apparaat
in de CD stand staat, activeert het apparaat de
willekeurige weergave.
10
Page 81

Naar een andere track springen
• Terugkeren naar een eerdere track
Druk tijdens de weergave eenmaal op 4 om terug
te keren naar het begin van de huidige track, en druk
tweemaal op deze toets om terug te springen naar het
begin van de vorige track.
• Naar de volgende track springen
Druk tijdens de weergave op de ¢ toets om direct
naar het begin van de volgende track te springen.
Het apparaat Afstandsbediening
Herhaalde/willekeurige weergave
Zoeken – naar een bepaalde positie op de
disk gaan
Houd 4 of ¢ ingedrukt tijdens de weergave.
Luister naar het versneld weergegeven geluid en laat de
toets los wanneer u de gewenste passage bereikt.
Het apparaat Afstandsbediening
PRESET+/CD REPEAT
PRESET
TAPE
CD REPEAT
RANDOM
CD
TUNER
REMOTE
SENSOR
BAN
D
Nederlands
Herhaalde weergave
Druk op PRESET + / CD REPEAT tijdens de
weergave.
U kunt ook op CD REPEAT / PRESET + op de
afstandsbediening drukken om de herhaalde weergave
te selecteren.
Telkens wanneer u op deze toets drukt, verandert de
herhaalfunctie als volgt:
Herhaalde weergave van alle tracks op de disk
(Hierbij licht de aanduiding “REPEAT ALL” op.)
Herhaalde weergave van een enkele track
(Hierbij licht de aanduiding “REPEAT 1” op.)
CD REPEAT/PRESET
M
UTIN
G
FM MODE
P
R
O
G
R
A
M
/
C
L
O
C
K
S
E
T
A
d
d
"
/"
H
BS/
PR
E
SET
E
PUSH
PLAY/PAUS
DISPLAY
Q
STOP
E
+
STANDBY/ON DISPLAY
TUNER/
CD/
BAND
RANDOM
INTRO STOP
FM MODE
HBS/
CD REPEAT/
PRESET EQ
+
MUTING
–
RM-SRCEX25A REMOTE CONTROL
CD/RANDOMCD/RANDOM
TAPE
CD PLAY
/PAUSE
+
VOLUMEPRESET
–
Willekeurige weergave
Druk in de CD stand op de CD/RANDOM toets zodat
de RANDOM indicator in het displayvenster oplicht.
U kunt ook op CD/RANDOM op de afstandsbediening
drukken om de willekeurige weergave te selecteren.
Hierbij worden alle tracks in willekeurige volgorde
weergegeven.
Om de willekeurige weergave uit te schakelen, druk
nogmaals op deze toets zodat de aanduiding RANDOM
uitgaat.
Geen herhaalde weergave.
11
Page 82

Geprogrammeerde weergave
U kunt maximaal 20 tracks van een disk programmeren voor weergave in een door u gekozen volgorde.
3,5 3 6 11 2,4,5 6
PUSH
PRESET
TAPE
CD REPEAT
RANDOM
CD
TUNER
REMOTE
SENSOR
BAND
DISPLAY
Opmerking:
Er bestaat een tijdslimiet voor het uitvoeren van de
onderstaande handelingen. Wanneer de instelling wordt
geannuleerd voordat u deze voltooid heeft, start opnieuw
vanaf stap 2.
1
Druk op CD/RANDOM om de CD functie te
selecteren.
U kunt ook op CD/RANDOM op de afstandsbediening
drukken om de CD functie te selecteren.
2
Druk op PROGRAM/CLOCK SET in de
stopstand.
In het displayvenster gaat de PROG indicator
knipperen.
CD
PROG
3
Druk op 4 of ¢ om een te programmeren track
te selecteren.
CD
PROG
Te programmeren track
4
Druk op PROGRAM/CLOCK SET.
5
Herhaal stappen 3 en 4 om andere tracks te
programmeren.
6
Druk op PLAY/PAUSE 3/8 terwijl de PROG
indicator knippert.
De tracks worden afgespeeld in de geprogrammeerde
volgorde.
U kunt ook op CD PLAY/PAUSE op de afstandsbediening drukken om de geprogrammeerde weergave
te starten.
Opmerkingen:
• Wanneer de PROG indicator uitgaat voordat u op
PLAY/PAUSE 3/8 drukt (of op CD PLAY/PAUSE
op de afstandsbediening), druk op PROGRAM/
CLOCK SET en start vervolgens de weergave.
• Wanner u op CD/RANDOM drukt terwijl het apparaat
in de CD stand staat, activeert het apparaat de
willekeurige weergave.
MUTIN
G
FM
MO
DE
PROGRAM/
CLOC
K
S
ET
Ad
d
"/"
HBS
/
PRESE
T EQ
TOP
S
E
US
A
P
/
Y
LA
P
STANDBY/ON DISPLAY
TUNER/
CD/
BAND
RANDOM
INTRO STOP
FM MODE
HBS/
CD REPEAT/
PRESET EQ
+
MUTING
–
RM-SRCEX25A REMOTE CONTROL
TAPE
CD PLAY
/PAUSE
+
VOLUMEPRESET
–
Stoppen met de weergave
Druk op STOP 7 (of STOP op de afstandsbediening).
De PROG indicator gaat uit en de geprogrammeerde
weergave stopt.
Controleren van de inhoud van het
programma
Druk op PROGRAM/CLOCK SET alvorens de
geprogrammeerde weergave te starten.
Bij elke druk op de toets worden de geprogrammeerde
tracks in het displayvenster getoond.
Om tracks aan het programma toe te
voegen
1
Druk herhaald op PROGRAM/CLOCK SET
totdat het tracknummer “00” verschijnt.
2
Druk op 4 of ¢ om de gewenste track te
selecteren en druk vervolgens op PROGRAM/
CLOCK SET.
Om het programma te bewerken
1
Druk herhaald op PROGRAM/CLOCK SET
totdat het programmanummer dat u wilt wijzigen
wordt getoond.
2
Druk op 4 of ¢ om een nieuwe track te
selecteren en druk vervolgens op PROGRAM/
CLOCK SET.
Om de geprogrammeerde weergave te
herhalen
Druk op PRESET + / CD REPEAT (of CD REPEAT /
PRESET + op de afstandsbediening) nadat u de
geprogrammeerde weergave gestart heeft.
Om het hele programma te wissen
Druk op PROGRAM/CLOCK SET zodat de PROG
indicator gaat knipperen, en druk vervolgens op
STOP 7 (of STOP op de afstandsbediening) terwijl de
PROG indicator knippert.
Een samengesteld muziekprogramma wordt ook gewist
wanneer u de disc-lade opent.
Opmerking:
Wanneer u 20 tracks geprogrammeerd heeft, start het
programmanummer opnieuw vanaf “1”. Wanneer u meer
tracks programmeert, worden de tracks die al onder deze
nummers geprogrammeerd waren overschreven.
Nederlands
12
Page 83

Weergave van inleidingen – Intro playback
Men kan de eerste tien seconden van elke track of elke geprogrammeerde track van een CD afspelen.
INTRO
STANDBY/ON DISPLAY
TUNER/
CD/
BAND
TAPE
RANDOM
CD PLAY
/PAUSE
INTRO STOP
FM MODE
HBS/
CD REPEAT/
+
PRESET EQ
+
VOLUMEPRESET
MUTING
–
–
RM-SRCEX25A REMOTE CONTROL
Druk op INTRO.
De INTRO indicator verschijnt op het displayvenster en
de weergave van de inleidingen start.
Om deze functie te gebruiken in combinatie met de
geprogrammeerde of willekeurige weergave, druk op
deze toets nadat u de weergave gestart heeft.
Stoppen tijdens de weergave
Druk op STOP 7 (of STOP op de afstandsbediening).
De INTRO indicator gaat uit en de weergave van de
Nederlands
inleidingen wordt afgebroken.
Om de weergave van inleidingen te
stoppen zonder de weergave te stoppen
Druk op INTRO tijdens de weergave.
De INTRO indicator gaat uit en het apparaat gaat verder
met de weergave.
Opmerking:
Wanneer u op INTRO drukt als een track al langer dan
10 seconden speelt, start de weergave van de inleiding
van de volgende track.
13
Page 84

RADIO ONTVANGST
Afstemmen op een zender
3 4 31,21,24
PUSH
PRESET
TAPE
CD REPEAT
RANDOM
CD
TUNER
REMOTE
SENSOR
BAND
1
Druk op BAND/TUNER om de tuner te selecteren.
2
Druk op de BAND/TUNER toets om de gewenste
DISPLAY
frequentieband te kiezen, FM of AM.
3
Houd 4 of ¢ langer dan 1 seconde ingedrukt.
Het apparaat start te zoeken en stopt wanneer er een
voldoende krachtige zender wordt gevonden.
Wanneer u de 4 of ¢ toets herhaaldelijk kort
indrukt, verandert de afstemfrequentie stap voor stap.
4
Stel het volume in.
Verbeteren van de FM ontvangst
Als een FM stereo uitzending onduidelijk is of veel
storing bevat, kunt u de weergave verbeteren door over
te schakelen op mono ontvangst.
Druk op FM MODE zodat de MONO indicator in
het displayvenster oplicht.
Om terug te keren naar stereo ontvangst, druk nogmaals
op FM MODE zodat de MONO indicator uitgaat.
M
U
TING
FM
MODE
PROGRAM/
CLOC
K
SET
Add
"/"
H
B
S
/
PRESE
T EQ
TOP
S
USE
A
PLAY/P
Gebruik van de antennes
FM
AM
TAPE
RANDOM
CD
STANDBY/ON DISPLAY
TUNER/
CD/
BAND
TAPE
RANDOM
CD PLAY
/PAUSE
INTRO STOP
FM MODE
HBS/
CD REPEAT/
+
PRESET EQ
+
VOLUMEPRESET
MUTING
–
–
RM-SRCEX25A REMOTE CONTROL
Nederlands
MUTING
F
M
M
O
D
E
P
R
O
G
R
A
M
/
C
L
O
C
K
S
E
T
A
d
d
"
/
"
H
B
S
/
P
R
E
S
E
T
E
PUSH
PRESET
CD REPEA
T
T
U
N
E
R
REMOTE
SENSOR
BA
N
D
DISPLAY
Q
STOP
AUSE
PLAY/P
FM MODE
FM MODE
Het apparaat Afstandsbediening
Opmerking:
De instelling van de FM ontvangst wordt geannuleerd
wanneer u op een andere zender afstemt.
Opmerking:
De ingebouwde ferriet staafantenne kan storing oppikken
van een dichtbij geplaatste TV, waardoor de AM
ontvangst verstoord kan worden.
14
Page 85

Voorkeurzenders vastleggen
U kunt 10 favoriete FM en 10 AM zenders in het geheugen vastleggen.
2,6 3,5,6 2,6 14,64,61
PRESET
TAPE
CD REPEA
RANDOM
T
CD
TUNER
REMOTE
SENSOR
BAND
Er bestaat een tijdlimiet voor de onderstaande handelingen. Wanneer de instelling wordt geannuleerd voordat u
deze voltooid heeft, start opnieuw vanaf stap 3.
Opmerking:
In sommige gevallen zijn er al bepaalde frequenties
opgeslagen in het geheugen, omdat deze functie getest is
voordat het apparaat de fabriek heeft verlaten. Dit is geen
fout. U kunt de door u gewenste zenders in het geheugen
opslaan door de instelprocedure te doorlopen.
Nederlands
1
Druk op de BAND/TUNER toets om de gewenste
frequentieband te kiezen, FM of AM.
2
Druk op 4 of ¢ om af te stemmen op de zender
die u wilt opslaan.
3
Druk op PROGRAM/CLOCK SET.
In het displayvenster gaat de PROG indicator
knipperen.
TUNER
PROG
FM
MHz
M
U
TING
F
M
M
O
D
E
P
R
O
G
R
A
M
/
C
L
O
C
K
S
E
T
A
d
d
"
/"
H
B
S
/
P
RES
E
T E
PUSH
Y/P
PLA
DISPLAY
Q
STOP
AUSE
5
Druk op PROGRAM/CLOCK SET.
STANDBY/ON DISPLAY
TUNER/
CD/
BAND
RANDOM
INTRO STOP
FM MODE
HBS/
CD REPEAT/
PRESET EQ
+
MUTING
–
RM-SRCEX25A REMOTE CONTROL
TAPE
CD PLAY
/PAUSE
+
VOLUMEPRESET
–
De zender waarop u heeft afgestemd in stap 2 wordt
opgeslagen onder het voorkeurnummer dat u heeft
geselecteerd in stap 4.
Wanneer u een nieuwe zender opslaat onder een
voorkeurnummer dat al in gebruik is, gaat de vorige
zender verloren.
6
Herhaal stappen 2 t/m 5 om meer voorkeurzenders
vast te leggen onder de andere nummers.
Afstemmen op een voorkeurzender
1
Druk op de BAND/TUNER toets om de gewenste
frequentieband te kiezen, FM of AM.
2
Druk herhaald op PRESET + / CD REPEAT of
PRESET – totdat het gewenste voorkeurnummer
wordt weergegeven.
Opmerking:
Wanneer u de stekker uit het stopcontact trekt of er een
stroomonderbreking optreedt, gaan de voorkeurzenders
na een paar dagen verloren. Wanneer dit gebeurt moet u
de voorkeurzender opnieuw instellen.
4
Druk op PRESET + / CD REPEAT of PRESET –
om het voorkeurnummer te selecteren.
U kunt ook op CD REPEAT / PRESET + of
PRESET – op de afstandsbediening drukken om het
voorkeurnummer te selecteren.
TUNER
PROG
FM
MHz
Voorkeurnummer
15
Page 86

CASSETTE WEERGAVE
Opmerkingen over cassettes
• Gebruik alleen type I normale cassettes. De opname/
weergave karakteristieken van dit apparaat zijn
geschikt voor normale cassettes, die een andere
karakteristiek hebben dan CrO
• Gebruik van cassettes met een speelduur van meer dan
120 minuten wordt niet aanbevolen, want de uiterst
dunne band daarvan verliest snel aan kwaliteit en kan
makkelijk verstrikt raken in het bandloopwerk.
• Losse bandlussen kunnen problemen veroorzaken.
Draai voor het plaatsen van een cassette eerst de band
voorzichtig strak met een potlood, zoals getoond in de
onderstaande afbeelding.
• Om te voorkomen dat waardevolle opnamen per
ongeluk gewist worden, breek de wispreventielipje(s)
weg met een schroevendraaier. Om een aldus
beveiligde cassette weer voor wissen of opnemen
geschikt te maken, plak de ontstane opening(en) af met
een stukje plakband.
2 en metaal cassettes.
Draai het potlood om de
band op te winden.
Een cassette plaatsen
1
Druk op STOP/EJECT § om de cassettehouder
te openen.
2
Plaats een cassette in de houder met de open kant
omhoog en de af te spelen zijde naar voren, zoals
getoond in de onderstaande afbeelding.
+ Afspeelrichting
CD
TUNER
REMOTE
SENSOR
BAND
3
Sluit de cassettehouder door het deurtje
voorzichtig maar stevig dicht te drukken.
Het deurtje van de cassettehouder sluit met een klik.
DISPLAY
PLAY/PAUSE
Nederlands
16
Page 87

Basisbediening
2 3 4 114
PRESET
TAPE
CD REPEAT
RANDOM
CD
TUNER
REMOTE
SENSOR
BAND
1
Druk op TAPE om de cassettefunctie te selecteren.
2
Plaats een cassette.
Gebruik alleen type I normale cassettes.
3
Druk op PLAY 2 om de weergave te starten.
4
Stel het volume in.
Stoppen met de weergave
Druk op STOP/EJECT §.
Als het einde van de band bereikt wordt, zal de weergave
vanzelf stoppen.
Nederlands
MUTING
FM MODE
PROGRA
M/
CLOC
K
SET
Add
"/"
HBS/
P
R
E
S
PUSH
PLAY/PAU
DISPLAY
ET EQ
TOP
S
E
S
STANDBY/ON DISPLAY
TUNER/
CD/
BAND
RANDOM
INTRO STOP
FM MODE
HBS/
CD REPEAT/
PRESET EQ
+
MUTING
–
RM-SRCEX25A REMOTE CONTROL
TAPE
CD PLAY
/PAUSE
+
VOLUMEPRESET
–
De band snel afspoelen
Druk op REW ¡ of FF 1.
Wanneer de cassette geheel afgewonden is, druk op
STOP/EJECT § om REW ¡ of FF 1 te
ontgrendelen.
17
Page 88

OPNEMEN
Basisbediening
32 11
PUSH
PR
E
SET
TAPE
C
RANDOM
D R
EPE
A
T
CD
TUNER
REMOTE
SENSOR
BAND
DISPLAY
Standaard opname
1
Zorg dat de geluidsbron gereed is voor de opname.
• Voor het opnemen van een radio uitzending:
Kies de tuner stand voor radio ontvangst en stem af
op de gewenste zender.
• Voor het opnemen van een CD:
Kies de CD stand en plaats een CD.
2
Plaats een lege of voor opnemen geschikte cassette
in de houder.
Gebruik alleen type I normale cassettes.
3
Druk op REC ¶.
PLAY 2 wordt ook ingedrukt en de opname start.
Stoppen met opnemen
Druk op STOP/EJECT §.
Als het einde van de cassette bereikt wordt, zal de
cassette vanzelf stoppen.
Opmerkingen:
• Merk op dat het illegaal kan zijn opnames te maken
van voorbespeelde cassettes, platen of disks zonder
de voorafgaande toestemming van de eigenaar van
de geluids- of video opname, uitzending of het
kabelprogramma en de literaire, dramatische,
muzikale en artistieke werken die daarin verwerkt
zijn.
• Het opnameniveau wordt automatisch ingesteld, en
wordt niet beïnvloed door de stand van de VOLUME
knop. U kunt dus het volume bijregelen tijdens de
opname zonder dat het opnameniveau daardoor
beïnvloed wordt.
• Als uw geluidsopnamen veel ruis bevatten, kan dat te
wijten zijn aan een dichtbij geplaatste TV die tijdens
de opname was ingeschakeld. Zet de TV uit of vergroot
de afstand tussen dit apparaat en de TV.
M
UTIN
G
FM MO
DE
P
R
O
G
R
A
M
/
C
L
O
C
K
S
E
T
A
d
d
"
/"
H
B
S/
P
R
E
S
E
T
E
Q
STOP
USE
A
PLAY/P
STANDBY/ON DISPLAY
TUNER/
CD/
BAND
RANDOM
INTRO STOP
FM MODE
HBS/
CD REPEAT/
PRESET EQ
+
MUTING
–
RM-SRCEX25A REMOTE CONTROL
TAPE
CD PLAY
/PAUSE
+
VOLUMEPRESET
–
Gebruik van de beat-cut functie
Bij opnemen van een AM uitzending kan er door
zweving een storende fluittoon klinken. Wijzig in dit
geval de stand van de BEAT CUT schakelaar op de
achterzijde van het apparaat en selecteer stand “1” of
“2” om dit effect te verminderen.
BEAT CUT
12
Precies op het juiste moment met opnemen
beginnen
1
Druk eerst op PAUSE 8 en daarna op REC ¶,
waardoor het apparaat in de opname pauzestand
terechtkomt (stand-by).
2
Druk nogmaals op de PAUSE 8 toets om de
opname te starten op het exacte moment dat u met
opnemen wilt beginnen.
Opmerking:
Laat het cassettedeck niet langer dan een paar minuten
in de pauzestand staan. Druk op STOP/EJECT § om
de cassette te stoppen.
Nederlands
18
Page 89

Synchrone opname van een CD
U kunt het afspelen van de CD speler precies tegelijk laten beginnen met de start van de opname van het cassettedeck.
2541 3 4 3
1
Plaats een cassette.
Gebruik alleen type I normale cassettes.
2
Plaats een CD.
3
Druk op CD/RANDOM om de CD functie te
selecteren.
U kunt ook op CD/RANDOM op de afstandsbediening
drukken om de CD functie te selecteren.
4
Kies een track of een punt op de disk van waaraf u
de muziek wilt gaan opnemen.
Nederlands
• Om te beginnen met opnemen vanaf een bepaalde
track, selecteer de track in de stopstand met de
4 of ¢ toets.
• Om de opname te starten vanaf een bepaald punt op
de disk, speel de disk af en pauzeer de disk op het
gewenste punt door op PLAY/PAUSE 3/8 (of CD
PLAY/PAUSE op de afstandsbediening) te drukken.
5
Druk op REC ¶.
PLAY 2 wordt ook ingedrukt, en de synchrone
opname start.
M
UT
IN
G
F
M
M
O
D
E
P
R
O
G
R
A
M
/
C
L
O
C
K
S
E
T
A
d
d
"/"
H
B
S
/
P
RES
E
T E
PUSH
PRESET
TAPE
CD REPEAT
RANDOM
CD
TUNER
REMOTE
SENSOR
BAND
PLAY/P
DISPLAY
Q
STOP
AUSE
STANDBY/ON DISPLAY
TUNER/
CD/
BAND
RANDOM
INTRO STOP
FM MODE
HBS/
CD REPEAT/
PRESET EQ
+
MUTING
–
RM-SRCEX25A REMOTE CONTROL
TAPE
CD PLAY
/PAUSE
+
VOLUMEPRESET
–
Als het einde van de cassette het eerst bereikt wordt,
komt de CD speler in de pauzestand terecht. Druk op
PLAY/PAUSE 3/8 (of CD PLAY/PAUSE op de
afstandsbediening) om de weergave voort te zetten, of
op STOP 7 (of STOP op de afstandsbediening) om de
weergave te stoppen.
Als de CD speler het eerst stopt, zal de cassette
doorlopen. Stop de cassette door op de
STOP/EJECT § toets te drukken.
• De CD SYNC indicator licht op in het displayvenster
tijdens de synchrone opname.
Cassettes wissen
Bij het opnemen op een cassette waarop al een opname
stond, wordt de vorige opname gewist, zodat u bij de
volgende keer afspelen alleen de nieuwe opname zult
horen.
19
Een cassette wissen zonder een nieuwe
opname te maken
1
Druk op TAPE op het apparaat om de
cassettefunctie te activeren.
2
Druk op REC ¶.
Page 90

ONDERHOUD
De koppen, de spil en de aandrukrol
reinigen
Regelmatig schoonmaken is belangrijk!
Terwijl de cassette loopt blijft er magnetisch poeder en
stof achter op de koppen, de spil en de aandrukrol.
Wanneer deze onderdelen te vuil worden:
• Neemt de geluidskwaliteit af.
• Neemt de geluidssterkte af.
• Worden eerdere opnamen niet volledig gewist.
• Neemt de kwaliteit van de opnamen af.
Om deze problemen te voorkomen, dient men de koppen,
de spil en de aandrukrol om de 10 gebruiksuren schoon
te maken.
Opname/weergavekop
Aandrukrol
Spil
Open de cassettehouder. Reinig de koppen, de spil en
de aandrukrol.
Voor een afdoende schoonmaakbeurt kunt u het best een
reinigingsset gebruiken, die in de audiohandel
verkrijgbaar is.
Wacht na het schoonmaken tot de reinigingsvloeistof
volledig is opgedroogd voordat u een cassette in de
houder plaatst.
Wiskop
De lens van de CD speler
schoonmaken
Wanneer de lens van de CD speler vuil wordt, zal de
geluidskwaliteit afnemen.
Open het deksel van de diskhouder en maak de lens
schoon.
Gebruik een blaaskwastje (verkrijgbaar in de fotohandel
enz.) om alle stof van de lens te verwijderen.
Blaaskwastje
Nederlands
Lens
Voorzorgsmaatregelen:
• Houd magneten en metalen voorwerpen uit de buurt
van de koppen. Als de koppen gemagnetiseerd raken,
zal er meer ruis klinken en zal de geluidskwaliteit
afnemen.
• Demagnetiseer de opname/weergavekop na elke 20 tot
30 gebruiksuren met een demagnetiseercassette die in
de audiohandel verkrijgbaar is. Het apparaat moet
uitstaan tijdens het demagnetiseren.
Aangezien de wiskop van het apparaat zelf
magnetisch is, moet u de wiskop niet demagnetiseren.
• Gebruik voor het schoonmaken alleen zuivere alcohol.
Oplosmiddelen als verdunner en benzine zullen de
rubber aandrukrol aantasten.
20
Page 91

STORINGEN VERHELPEN
• Wanneer er zich een probleem voordoet met het
apparaat, doorloop eerst de onderstaande punten om te
controleren of er een eenvoudige oplossing bestaat
voordat u een servicecentrum opbelt.
Symptoom
Het apparaat gaat niet aan.
De cassette gaat niet lopen wanneer
PLAY 2 wordt ingedrukt.
Het geluid klinkt zeer zacht.
REC ¶ werkt niet.
De disk is geplaatst maar kan niet
afgespeeld worden.
Er komt geen geluid uit de luidsprekers.
De snelheid van de cassette is
Nederlands
onregelmatig, zodat het geluid zweeft en
loeit.
De radio ontvangst is slecht en er is veel
ruis.
De afstandsbediening werkt niet.
De stekker zit niet in het stopcontact.
PAUSE 8 is in ingedrukt.
• De batterijen zijn leeg.
• De koppen zijn vuil.
• De opname beschermingslipjes van de
cassette zijn weggebroken.
• Er is geen cassette geplaatst.
• De disk is ondersteboven geplaatst.
• De disk is vuil.
• De disk is beschadigd of krom.
• De lens is vuil.
• Er bevindt zich condens in het
apparaat.
De hoofdtelefoon is aangesloten.
• De aandrukrol of de spil is vuil.
• De batterijen zijn leeg.
De antenne is niet optimaal gericht.
• De batterijen van de afstandsbediening zijn leeg.
• Er valt intens licht op de sensor van de
afstandsbediening (direct zonlicht,
enz.)
• Wanneer de onderstaande tips niet voldoen om het
probleem op te lossen of wanneer het apparaat fysiek
beschadigd is, raadpleeg dan gekwalificeerd personeel,
zoals uw dealer.
Mogelijke oorzaak
Maatregel
Sluit het netsnoer aan.
Druk nogmaals op PAUSE 8 om de
pauzestand te verlaten.
• Vervang de batterijen.
• Reinig de koppen.
• Dek de openingen af met plakband.
• Plaats een cassette.
• Plaats de disk met het etiket naar
boven.
• Reinig de disk.
• Vervang de disk.
• Reinig de lens.
• Zet het apparaat aan en laat het een of
twee uur staan voordat u het weer in
gebruik neemt.
Verwijder de hoofdtelefoon.
• Reinig de drukrol en de spil.
• Vervang de batterijen.
Richt de antenne voor optimale
ontvangst.
• Vervang de batterijen.
• Zorg ervoor dat er geen direct zonlicht
of ander licht op het apparaat valt.
Opmerking:
Wanneer u het apparaat van een koude omgeving met
temperaturen rond 0ºC naar een warme ruimte brengt,
kan de werking enige tijd gestoord zijn vanwege het
vocht uit de lucht dat in het inwendige gecondenseerd is.
Na een uur of twee zult u het apparaat weer normaal
kunnen gebruiken.
Het apparaat terugzetten op de
fabrieksinstellingen
Wanneer het niet lukt de storing te verhelpen met behulp
van de aanwijzingen van het onderdeel “STORINGEN
VERHELPEN” (en het apparaat of het display niet
correct functioneren), druk dan op de RESET knop op
de achterzijde van het apparaat met behulp van een
puntig voorwerp terwijl het apparaat aan staat.
21
Scherp voorwerp
Opmerking:
Hierdoor wordt het apparaat teruggezet op de
fabrieksinstellingen en gaan alle instellingen die de
gebruiker gemaakt heeft verloren.
Page 92

TECHNISCHE GEGEVENS
CD speler
CD capaciteit : 1 CD
Signaal/ruisverhouding : 75 dB
Dynamisch bereik : 60 dB
Tuner
Afstembereik : FM 87,5 – 108,0 MHz
AM 522 – 1 629 kHz
Antennes : Telescoopantenne voor FM
Ferriet staafantenne voor
AM
Cassettedeck
Frequentierespons : 60 Hz – 10 000 Hz
Snelheidsfluctuaties : 0,15% (WRMS)
Snelspoeltijd : Ca. 150 seconden (C-60
cassette)
Algemeen
Luidsprekers : 9 cm conus × 2
Luidsprekerimpedantie : 4 Ω
Uitgangsvermogen : 4 W (2 W + 2 W) bij 4 Ω
(10% THD)
Uitgangsaansluitingen : PHONES × 1
Stroomvoorziening : 230 V wisselspanningÓ,
50 Hz
9 V gelijkspanning (R20
(SUM-1)/D (13D) formaat
batterijen × 6)
Stroomverbruik : 13 W (bij gebruik)
3 W (stand-by)
Afmetingen : 420 mm × 178 mm ×
250 mm (B/H/D)
Gewicht : Ongeveer 3,2 kg
(zonder batterijen)
Bijgeleverde
toebehoven : Netsnoer × 1
Afstandsbediening × 1
Batterijen voor de
afstandsbediening (AAA/
UM-4/R03) × 2
Wijzigingen in ontwerp en technische gegevens
voorbehouden, zonder kennisgeving vooraf.
Nederlands
22
Page 93

ÍNDICE
CARACTERÍSTICAS ................................................. 1
PRECAUCIONES DE SEGURIDAD ........................ 1
PRECAUCIONES DE MANEJO ............................... 2
SUMINISTRO ELÉCTRICO...................................... 3
NOMBRE DE LAS PIEZAS Y CONTROLES .......... 4
MANDO A DISTANCIA............................................ 5
CONEXIÓN/DESCONEXIÓN DE LA UNIDAD ..... 6
AJUSTE DEL RELOJ ................................................. 7
CARACTERÍSTICAS
1 Sistema portátil con reproductor de CDs
• Las funciones del CD pueden controlarse tanto con
el mando a distancia como con la unidad principal.
• Capacidad de reproducción de CDs de 8 cm
2 La pantalla de cristal líquido digital (LCD)
indica el estado general de la reproducción
PRECAUCIONES DE SEGURIDAD
Prevención de descargas eléctricas,
incendio y daños
• Incluso cuando el botón STANDBY/ON está ajustado
a STANDBY, circula una cantidad de corriente muy
pequeña.Cuando la unidad está encendida, el
visualizador se ilumina en naranja. Cuando la unidad
está en modo de espera, el visualizador se apaga. (Sin
embargo, tenga en cuenta que si la unidad funciona
Español
con pilas, el visualizador no se ilumina aunque la
unidad esté encendida.) Para ahorrar electricidad y para
su seguridad cuando no vaya a utilizar la unidad
durante un largo período de tiempo, desenchufe el
cable de alimentación de la toma de CA doméstica.
• No toque el cable de alimentación con las manos
húmedas.
• Cuando desenchufe de la pared, siempre sujete y tire
de la clavija y no del cable de alimentación.
•Consulte con su distribuidor más cercano si se produce
un daño, desconexión o mal contacto en el cable.
AJUSTE DEL SONIDO .............................................. 8
REPRODUCCIÓN DE DISCOS CDs ........................ 9
RECEPCIÓN DE LA RADIO .................................. 14
REPRODUCCIÓN DE CASETES ........................... 16
GRABACIÓN ........................................................... 18
MANTENIMIENTO ................................................. 20
SOLUCIÓN DE PROBLEMAS ............................... 21
ESPECIFICACIONES .............................................. 22
3 Grabación sincronizada con la reproducción
del CD
4 Efecto de sonido hipergrave
• No doble con fuerza, tire ni retuerza el cable.
• La etiqueta de potencia nominal está situada en el
exterior de la parte inferior.
• No modifique el cable de alimentación de ninguna
forma.
• No quite los tornillos para desmontar la unidad ni toque
nada en el interior de la unidad, para evitar accidentes.
• No inserte ningún objeto metálico en la unidad.
• Desenchufe el cable de alimentación si existe la
posibilidad de que caiga un rayo.
• Si entra agua dentro de la unidad, desenchufe el cable
de alimentación de la toma y consulte con su
distribuidor.
• No bloquee los orificios de ventilación de la unidad
para que no se acumule el calor en el interior.
• No instale la unidad en un lugar con poca ventilación
de aire.
1
Page 94

PRECAUCIONES DE MANEJO
No utilice esta unidad cuando está expuesta
directamente a los rayos del sol ni deje la unidad en
un automóvil cerrado (o yate, etc.) donde pueda
quedar expuesta a temperaturas superiores a 40ºC.
1 Evite el uso de la unidad en los siguientes
lugares:
• Donde la temperatura pueda subir o bajar mucho;
la gama de temperaturas recomendada es de 5ºC a
35ºC.
• Donde esté expuesta a vibraciones.
• Donde haya mucha humedad, por ejemplo en el
baño.
• Donde pueda quedar magnetizada por un imán o
altavoz.
2 Tenga cuidado con el polvo
Asegúrese de cerrar la bandeja del disco para que la
lente no se ensucie con el polvo. No toque la lente.
3 Condensación
Puede condensarse humedad en los siguientes casos,
en los que la unidad no funcionará correctamente:
• La unidad está en una habitación donde se acaba
de encender la calefacción.
• La unidad está en un lugar donde hay humo o
mucha humedad.
• La unidad se llevó de un lugar frío a una habitación
caliente.
En estos casos, ajuste el botón STANDBY/ON a ON
y espere una o dos horas antes del uso.
4 Control del volumen
Los discos CD producen muy poco ruido en
comparación con los discos analógicos. Si se ajusta
el volumen cuando se escucha un ruido similar al de
los discos analógicos, los altavoces pueden dañarse
por una repentina subida de volumen al empezar la
reproducción. Por lo tanto, baje el volumen antes de
empezar y ajuste según sea necesario cuando
reproduzca un CD.
5 Mecanismo de seguridad
La unidad contiene un mecanismo de seguridad de
interbloqueo que desactiva el rayo láser cuando se
abre la bandeja del disco.
6 No coloque objetos metálicos, como cintas
de casete, cerca de los altavoces.
Como los altavoces contienen imanes en su interior,
no coloque cintas de casete ni tarjetas magnéticas
cerca, ya que pueden borrarse los datos grabados.
7 Mantenga la unidad alejada del TV
Cuando se utiliza la unidad cerca de un TV, la imagen
del TV puede distorsionarse. En este caso, aleje la
unidad del TV. Si esto no corrige la situación, evite
utilizar la unidad cuando esté encendido el TV.
8 Limpieza de la carcasa
Si se ensucia la carcasa, límpiela con un paño suave
y seco. Nunca utilice bencina ni disolventes ya que
pueden dañar el acabado de la superficie.
9 Cuando utilice los auriculares
• No los utilice con un volumen alto ya que puede
dañar sus oídos.
• Para su seguridad, no conduzca mientras utilice los
auriculares.
10 Asa de transporte
No levante ni baje el asa de transporte con la antena
telescópica extendida, para evitar que se dañe la
antena. Coloque el asa de transporte de tal forma que
no interfiera con el funcionamiento.
Español
2
Page 95

SUMINISTRO ELÉCTRICO
Funcionamiento con CA doméstica
Conecte el cable de alimentación de CA.
AC IN
PRECAUCIONES:
• Utilice sólo el cable de alimentación de JVC
suministrado con esta unidad para evitar un mal
funcionamiento o daño en la unidad.
Quite las pilas cuando utilice el cable de alimentación.
• Desenchufe el cable de alimentación de la toma cuando
salga o cuando no vaya a utilizar la unidad durante un
largo período de tiempo.
Funcionamiento con pilas
Colocación de las pilas
1
Abra la tapa de las pilas.
Tire de la tapa de pilas hacia usted mientras presiona
las secciones marcadas por las flechas.
Español
2
Coloque seis pilas R20 (SUM-1)/D (13D).
Asegúrese de colocar las pilas con los terminales ª y
· en la posición correcta.
1
6
33
5
4
Verificación de las pilas
Si disminuye la velocidad de la cinta o el nivel de salida
del sonido, o si la reproducción de CDs es intermitente,
cambie todas las pilas por otras nuevas.
Si hace grabaciones importantes, utilice pilas nuevas
(preferiblemente pilas alcalinas con una vida útil más
larga) para evitar posibles fallos.
Para un mejor uso de las pilas
• Un funcionamiento continuo de la unidad hace que la
carga de las pilas se consuma más rápidamente que
con un funcionamiento no continuo.
• El funcionamiento de la unidad en un lugar frío hace
que la carga de las pilas se consuma más rápidamente
que en un lugar caliente.
PRECAUCIONES:
• Si no utiliza la unidad durante un largo período de
tiempo (más de dos semanas) o si utiliza CA doméstica,
quite las pilas para evitar un mal funcionamiento o
daños en la unidad.
• Cuando se ha conectado el cable de alimentación de
JVC suministrado con esta unidad, la alimentación
cambia automáticamente de las pilas a CA doméstica,
incluso cuando las pilas están colocadas.
Sin embargo, quite las pilas cuando utilice el cable de
alimentación.
PRECAUCIONES AL UTILIZAR LAS PILAS:
Si se utilizan incorrectamente las pilas, pueden
producirse fugas de los productos químicos del
interior de las pilas o pueden explotar. Debe tener en
cuenta lo siguiente:
• Compruebe que ha colocado correctamente los
terminales positivo ª y negativo · de las pilas y
colóquelos tal como se indica en la ilustración de la
izquierda.
• No mezcle pilas nuevas y viejas ni mezcle distintos
tipos de pilas.
• No trate de recargar pilas no recargables.
• Quite las pilas cuando no vaya a utilizar la unidad
2
durante largo período de tiempo.
Si los productos químicos de las pilas entran en
contacto con su piel, lávese inmediatamente con agua.
Si se producen fugas de productos químicos en la
unidad, limpie completamente la unidad.
Pilas R20 (SUM-1)/D (13D)
3
Vuelva a colocar la tapa.
3
Page 96

NOMBRE DE LAS PIEZAS Y CONTROLES
Partes superior y frontal
1 2
PRESET
TAPE
CD REPEAT
RANDOM
CD
TUNER
BAND
9 1110 1312
1 Selector VOLUME
2 Botón STANDBY/ON
3 PRESET – Botón
Botón PRESET + / CD REPEAT
4 Botones de funcionamiento de la cinta
Botón PAUSE 8
Botón STOP/EJECT §
Botón FF 1
Botón REW ¡
Botón PLAY 2
Botón REC ¶
5 Bandeja del disco
6 Botón FM MODE
7 Botón MUTING
43 6 7 85
MUTING
FM
M
O
DE
P
RO
G
R
A
M
/
CL
O
CK
S
ET
Ad
d
"/"
H
B
S/
PR
ESE
T E
PUSH
REMOTE
SENSOR
DISPLAY
PLAY/PAUSE
Q
STOP
14 15
8 Botón PROGRAM/CLOCK SET
9 Botón TAPE
Botón CD/RANDOM
Botón BAND/TUNER
10 REMOTE SENSOR
11 Visualizador
12 Casetera
13 Botón DISPLAY
Español
14 Botón 4
Botón ¢
Botón PLAY/PAUSE 3/8
Botón STOP 7
15 Botón HBS/PRESET EQ
4
Page 97

Parte posterior
16 17 18
19
16 Antena telescópica
17 Botón RESET
18 Interruptor BEAT CUT
19 Toma PHONES
Conecte los minialtavoces estéreo (diámetro 3,5 mm,
impedancia de 16 Ω a 32 Ω) a esta toma. Se desactiva
la salida del altavoz cuando se conectan los altavoces.
MANDO A DISTANCIA
Colocación de las pilas
1
Quite la tapa de las pilas de la parte posterior del
mando a distancia.
Español
2
Coloque dos pilas AAA (UM-4)/R03 (suministradas).
Coloque las pilas con los terminales ª y · de tal
forma que se correspondan con la indicación del
interior del portapilas.
Coloque primero los extremos ·.
Pilas AAA (UM-4)/R03
20
21
20 Tapa del portapilas
21 Toma Ó AC IN (entrada de CA)
3
Vuelva a colocar la tapa de las pilas.
Cambio de pilas
La máxima distancia de funcionamiento entre el mando
a distancia y la sección del sensor remoto de la unidad es
de unos 7 metros. Cuando el rango de funcionamiento
disminuya o el funcionamiento del mando a distancia se
vuelva inestable, cambie las pilas por otras nuevas.
Notas sobre la utilización del mando
a distancia
• Oriente la parte superior del mando a distancia hacia
la sección del sensor remoto de la unidad lo más
directamente posible. La distancia de funcionamiento
desde la unidad principal disminuye cuando orienta el
mando a distancia con un ángulo.
• Pulse los botones suave y firmemente.
• No exponga la sección del sensor remoto de la unidad
a una luz fuerte (rayos solares directos o luz artificial)
y asegúrese de que no haya obstáculos entre la sección
del sensor remoto y el mando a distancia.
5
Page 98

Nombres de los botones
1
STANDBY/ON DISPLAY
TUNER/
CD/
BAND
2
3
4
RANDOM
INTRO STOP
FM MODE
CD REPEAT/
+
5
TAPE
CD PLAY
/PAUSE
HBS/
+
PRESET EQ
VOLUMEPRESET
MUTING
–
–
6
2 Botón CD/RANDOM
Botón TUNER/BAND
Botón TAPE
7
3 Botón INTRO
4 Botón FM MODE
8
5 Botón CD REPEAT / PRESET +
Botón PRESET –
9
6 Botón DISPLAY
7 Botón STOP
Botón CD PLAY/PAUSE
Botón 4
Botón ¢
8 Botón VOLUME +
Botón VOLUME –
9 Botón HBS/PRESET EQ
Botón MUTING
CONEXIÓN/DESCONEXIÓN DE LA UNIDAD
1 Botón STANDBY/ON
PUSH
PRESET
TAPE
CD REPEAT
RA
ND
OM
CD
TUNER
STANDBY/ON
REMOTE
SENSOR
BAND
DISPLAY
Botón STANDBY/ON
Pulse el botón STANDBY/ON de la unidad para
encender y apagar la unidad.
También puede pulsar el botón
STANDBY/ON en
el mando a distancia.
El visualizador se iluminará cuando se encienda la
unidad. (Sin embargo, tenga en cuenta que si la unidad
funciona con pilas, el visualizador no se ilumina aunque
la unidad esté encendida.) La unidad está lista para
reproducir la fuente seleccionada cuando se desconectó
por última vez la unidad.
Para desconectar por completo el
suministro eléctrico
Desenchufe el cable de alimentación de CA de la toma
de CA. Si las pilas están colocadas en la unidad, sáquelas.
STANDBY/ONSTANDBY/ON
STANDBY/ON DISPLAY
TUNER/
CD/
BAND
RANDOM
INTRO STOP
FM MODE
HBS/
CD REPEAT/
PRESET EQ
+
MUTING
–
RM-SRCEX25A REMOTE CONTROL
TAPE
CD PLAY
/PAUSE
+
VOLUMEPRESET
–
PLAY/PAUSE
M
UTING
F
M
M
O
D
E
P
R
O
G
R
A
M
/
C
L
O
C
K
S
E
T
A
dd
"
/"
HBS/
PRESE
T E
Q
STOP
Notas:
• Cuando desenchufe el cable de alimentación de CA o
si se produce un corte de energía, el reloj se reajustará
inmediatamente a “0:00” y las presintonías del
sintonizador (consulte la página 15) se borrarán al cabo
de unos días. La indicación del reloj seguirá
parpadeando hasta que ajuste de nuevo el reloj.
• Quite las pilas cuando transporte la unidad a mano o
en el maletero de un coche. Esto evita que se encienda
accidentalmente la unidad evitando un consumo inútil
de las pilas.
Español
6
Page 99

AJUSTE DEL RELOJ
2,3,43,4 3,411
PUSH
PRESET
TAPE
CD
RANDOM
REPEAT
CD
TUNER
REMOTE
SENSOR
BAND
DISPLAY
Antes de utilizar la unidad, ajuste el reloj incorporado a
esta unidad.
El reloj utiliza la indicación de 24 horas.
1
Pulse STANDBY/ON para apagar la unidad,
si está encendida.
El reloj parpadea en el visualizador.
2
Mantenga pulsado PROGRAM/CLOCK SET
durante más de 2 segundos.
Los dígitos de la hora comienzan a parpadear.
MU
TIN
G
F
M
MO
DE
P
R
O
G
R
A
M
/
C
L
O
C
K
S
E
T
A
d
d
"
/"
H
BS
/
P
RE
S
ET
E
Q
P
TO
S
E
US
A
/P
AY
PL
STANDBY/ON DISPLAY
TUNER/
CD/
BAND
RANDOM
INTRO STOP
FM MODE
HBS/
CD REPEAT/
PRESET EQ
+
MUTING
–
RM-SRCEX25A REMOTE CONTROL
TAPE
CD PLAY
/PAUSE
+
VOLUMEPRESET
–
Nota:
Si se produce un corte de energía, el reloj pierde el ajuste
y se reajusta a “0:00”. La indicación del reloj seguirá
parpadeando hasta que ajuste de nuevo el reloj.
Para ver el reloj cuando se selecciona CD
o sintonizador
Pulse DISPLAY.
Cada vez que pulse el botón, el visualizador alterna la
indicación del reloj y la indicación normal.
(Si utiliza la unidad mientras se visualiza la indicación
del reloj, la pantalla cambia a la indicación normal.)
DISPLAY
DISPLAY
3
Español
4
7
Pulse 4 o ¢ para ajustar la hora y, a
continuación, presione PROGRAM/CLOCK SET.
Los dígitos de los minutos comienzan a parpadear.
Pulse 4 o ¢ para ajustar los minutos y, a
continuación, pulse PROGRAM/CLOCK SET.
Unidad principal Mando a distancia
Page 100

AJUSTE DEL SONIDO
–
PHONES (en la parte posterior)
PHONES (on the rear)
VOLUME VOLUME +/
PRESET
TAPE
CD REPEAT
RANDOM
CD
TUN
ER
REMOTE
SENSOR
BAND
Ajuste del volumen
Gire VOLUME en el sentido de las agujas del reloj
para subir el volumen, o en sentido contrario a las
agujas del reloj para bajarlo.
Puede pulsar VOLUME + o VOLUME – en el mando a
distancia para subir o bajar el volumen respectivamente.
El nivel del volumen puede ajustarse en 31 pasos
(00 VOL a 30 VOL).
MUTING HBS/PRESET EQ
HBS/PRESET EQ
M
UTING
F
M MOD
E
P
R
O
G
R
A
M
/
C
L
O
C
K
S
E
T
A
d
d
"
/"
H
B
S
/
P
R
E
S
E
T
E
PUSH
PLAY/PAUSE
DISPLAY
Q
STOP
STANDBY/ON DISPLAY
TUNER/
CD/
BAND
RANDOM
INTRO STOP
FM MODE
HBS/
CD REPEAT/
PRESET EQ
+
MUTING
–
RM-SRCEX25A REMOTE CONTROL
TAPE
CD PLAY
/PAUSE
+
VOLUMEPRESET
–
Refuerzo del sonido de graves
Se puede disfrutar de potentes sonidos de graves con el
efecto de sonido hipergrave.
Mantenga pulsado el botón HBS/PRESET EQ hasta
que aparezca el indicador HBS en el visualizador.
Para desactivar el efecto, vuelva a mantener pulsado el
botón hasta que desaparezca el indicador HBS.
Selección del modo de sonido
Puede seleccionar uno de los 5 modos de sonido
preajustados.
Precaución:
NO apague la unidad con el volumen ajustado a un nivel
muy alto; de lo contrario, una subida repentina del
volumen podría dañar sus oídos y/o los altavoces y
auriculares la próxima vez que encienda la unidad o
inicie la reproducción de otra fuente.
RECUERDE que no puede ajustar el volumen a menos
que encienda la unidad.
Silenciamiento temporal del sonido
Durante la reproducción, pulse MUTING.
El sonido se silencia y el indicador MUTING aparece en
el visualizador.
Para recuperar el sonido, pulse de nuevo MUTING.
Escucha por los auriculares
Conecte un par de auriculares en la toma PHONES.
No se emite sonido por los altavoces. Asegúrese de bajar
el volumen antes de conectar los auriculares.
CLASSIC : Ideal para música clásica.
ROCK : Realza las bajas y altas frecuencias. Ideal
para música acústica.
POP : Ideal para música vocal.
JAZZ : Ideal para música de jazz.
FLAT : Sonido normal.
Selección del modo de sonido
Pulse repetidamente HBS/PRESET EQ hasta que
aparezca el indicador del modo de sonido deseado en el
visualizador.
Cada vez que pulse el botón, el modo de sonido cambia
de la siguiente forma:
CLASSIC ROCK
FLAT
JAZZ
POP
Español
8
 Loading...