

Page 1
JVE
lnstnuction
lntennet
Fladio
FA-D588
Manual
Bluetooth@
DAB
D,{;
a6itarraiffi
$iluetooth.
Page 2

Page 3
Page 4
Page 5
Safety
Warnings
.
Read
all
the
instructions
carefully
before
using
the
unit
and
keep
them
for.
frtrr"
reference.
.
Retain
the
manual.
lf
you
pass
the
unit
onto
a third
party
make
sure
to
include
this
manual.
.
Check
that
the
voltage
marked
on
the
rating
label
matches
your
mains
voltage.
Damage
.
Please
inspectthe
unitfordamageafter
unpacking.
.
?_:
1",
con,tinue
to
operate
the
unit
if you
are
rn
any
doubt
about
it
working
normally,
or
if
it
is
damaged
in
any
way
_
switch
off,
withdraw
the
mains
plug
and
consult
your
dealer.
Location
of
Unit
.
The-
unit
must
be placed
on
a
flat
stable
surtace
and
should
not
be
subjected
to
vi
brations.
.
Donot
placethe
unitonsloped
orunstable
surfaces
as
the
unit
may
faf
f
off
or.
tip
ovui
.
The
mains
socket
must
be
located
nearthe
unit
and
should
be
easily
accessible.
.
This
unit
is
designed
for
indoor,
domestic
use
only.
Temperature
.
1l:id
extreme
degrees
of
temperature,
etther
hot
or
cold.
place
the
unit
well
away
from
heat
sources
such
as
radiators
or gall
electric
fires.
.
Avoid
exposure
to
direct
sunlight
and
other
sources
of
heat.
Naked
Flames
.
Neverplace
anytype
of
candle
ornaked
ilame
on
the
top
of
or
near
the
unit.
Moisture
.
To
reduce
the
risk
offire,
electric
shock
or
product
damage,
do
not
expose
this
unit
l:
,:if.,
i"':ly,:,
drippins
or
sprashins.
r\o
objects
filled
with
liquids,
such
as
vases,
should
be placed
on
the
unit.
Do
not
operate
the
unit
with
wet
hands,
near
water
or
other
liquid.
.
lf you
spill
any
liquid
into
the
unit,
it
can
cause
serious
damage.
Switch
it
offat
the
marns
tmmediately.
Withdraw
the
mains
prug
and
consult
your
dealer.
Ventilation
.
To prevent
the
risk
of
electric
shock
or
fire
hazard
due
to
overheating,
ensure
that
curtains
and
other
materials
do
not
obstruct
the
ventilation
vents.
.
A
minimum
distance
of
5
cm
around
the
unit
should
be
maintained
to
allow
for
sufficient
ventilation.
.
Do
not
install
or place
thrs
unit
in
a
bootcase,
built_in
cabinet
or
in
another
confined
space.
Ensure
the
unit
is
well
ventilated.
Safety
.
Always.disronnect
the
unit
from
the
mains
supply
before
connecting
/ disconnectino
otner
devices
or
moving
the
unit.
.
Unplug
the
unit
from
the
mains
socket
during
a
lightning
storm.
.
ln
the
interests
ofsafety
and
to
avoid
unnecessary
energy
consumption,
never
leave
the
unit
switched
on
while
:.|:j::ld.d
for
lons
periods
of
time,
e.s.
overnrght,
while
on
holiday
or
while
oui
of
the.
house.
Switch
it
off
and
ai..onne.i
itru
mains
plug
from
the
mains
socket.
Mains
Adapter
Cable
.
Make
sure
the
unit
or
unit
stand
is
not
resting
on
top
ofthe
mains
adapter
cable,
as,the
weight
of
the
unit
may
damage
the
cable
and
create
a
safety
hazard.
Mains
Adapter
.
The
mains
adapter
will
continue
to
oraw
etectricity
from
the
mains
supply
wnen plugged
in
the
mains
sockei.'
ln
the
interests
ofsafety
and
to
avoid
unnecessary
energy
consumption,
never
reave
the
adapter
plugged
in
the
mains
socket
while
unattended
for
long
periods
of
time.
Disconnect
the
adapter
trom
the
power
supply.
Use
only
power
supplies
listed
in
the
user
tnstructions.
The
mains
plug
is
used
as
disconnect
oevrce,
the
disconnect
device
shall
remain
readily
operable.
lnterference
.
Do
not place
the
unit
on
or
near
appliances
wntcn
may
cause
electromagnetic
lnterterence.
lf you
do,
it
may
adversely
afiect
the
operating
performance
ofthe
,rJfi::.
cause
a
distorted
picture
or
A
A
Page 6
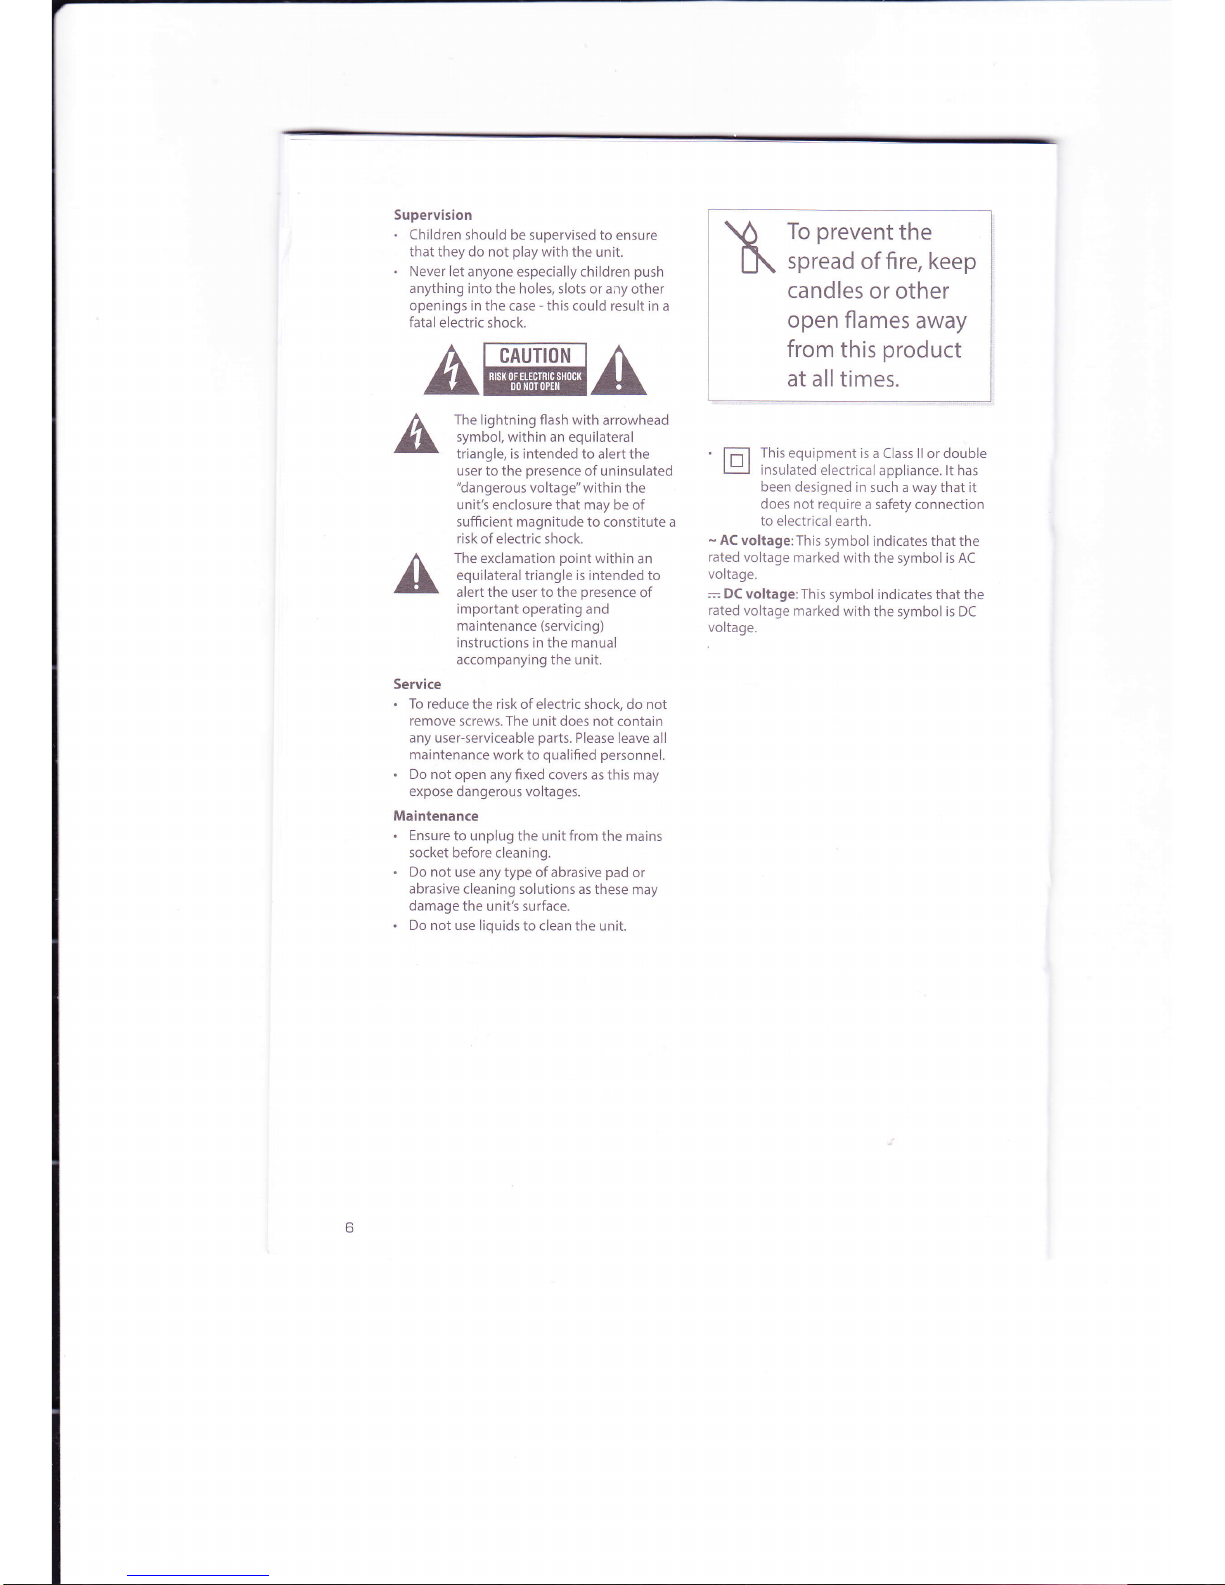
Supervision
.
Children
should be supervised to
ensure
that they do not
play
with
the unit.
.
Never
let anyone especially children
push
anything into
the holes, slots or any
other
openings in
the case
-
this
could result in a
fatal electric shock.
AffiA
The lightning flash with
arrowhead
symbol, within an equilateral
triangle, is intended to alert
the
user to the
presence
of uninsulated
"dangerous
voltage" within
the
unit's enclosure that may be of
sufficient
magnitude to constitute a
risk of electric shock.
The exclamation
point
within
an
equilateral triangle is intended to
alert the user to the
presence
of
important
operating and
maintenance
(servicing)
instructions in the manual
accompanying the
unit.
Service
.
To reducethe
riskof electricshock, do not
remove
screws. The unit does not
contain
any user-serviceable
parts.
Please leave
all
maintenance work to
qualified personnel.
.
Do notopen
anyfixed covers asthis may
expose
dangerous voltages.
Maintenance
.
Ensure
to unplug the unit from
the mains
socket before cleaning.
.
Do not useanytypeof
abrasive
pad
or
abrasive
cleaning solutions as these
may
damage the unit's
surface.
.
Do not use liquids
to clean the unit.
To
prevent
the
spread
of fire, keep
candles
or
other
open flames
away
from
this
product
at
all times.
This equipment
is a Class ll
or
double
insulated
electrical
appliance. lt has
been designed
in such a way
that
it
does not require
a safety connection
to
electrical earth.
-
AC voltage:This
symbol indicates that the
rated
voltage
marked with
the symbol is AC
voltage.
:
DC
voltage: This
symbol indicates that
the
rated
voltage
marked with
the symbol is DC
voltage.
6
Page 7
Thank
}fOU
ior
purchasing your
new
product.
We recommend
that
you
spend
some time
reading this instruction manual
in order that
you
fully understand
all the
operational features.it offers.
You
will also
find some
hints and tips to
help
you
resolve
any
issues.
Read al'l the safety
instructions
carefully
before use and keep this
instruction.manual
for future
reference.
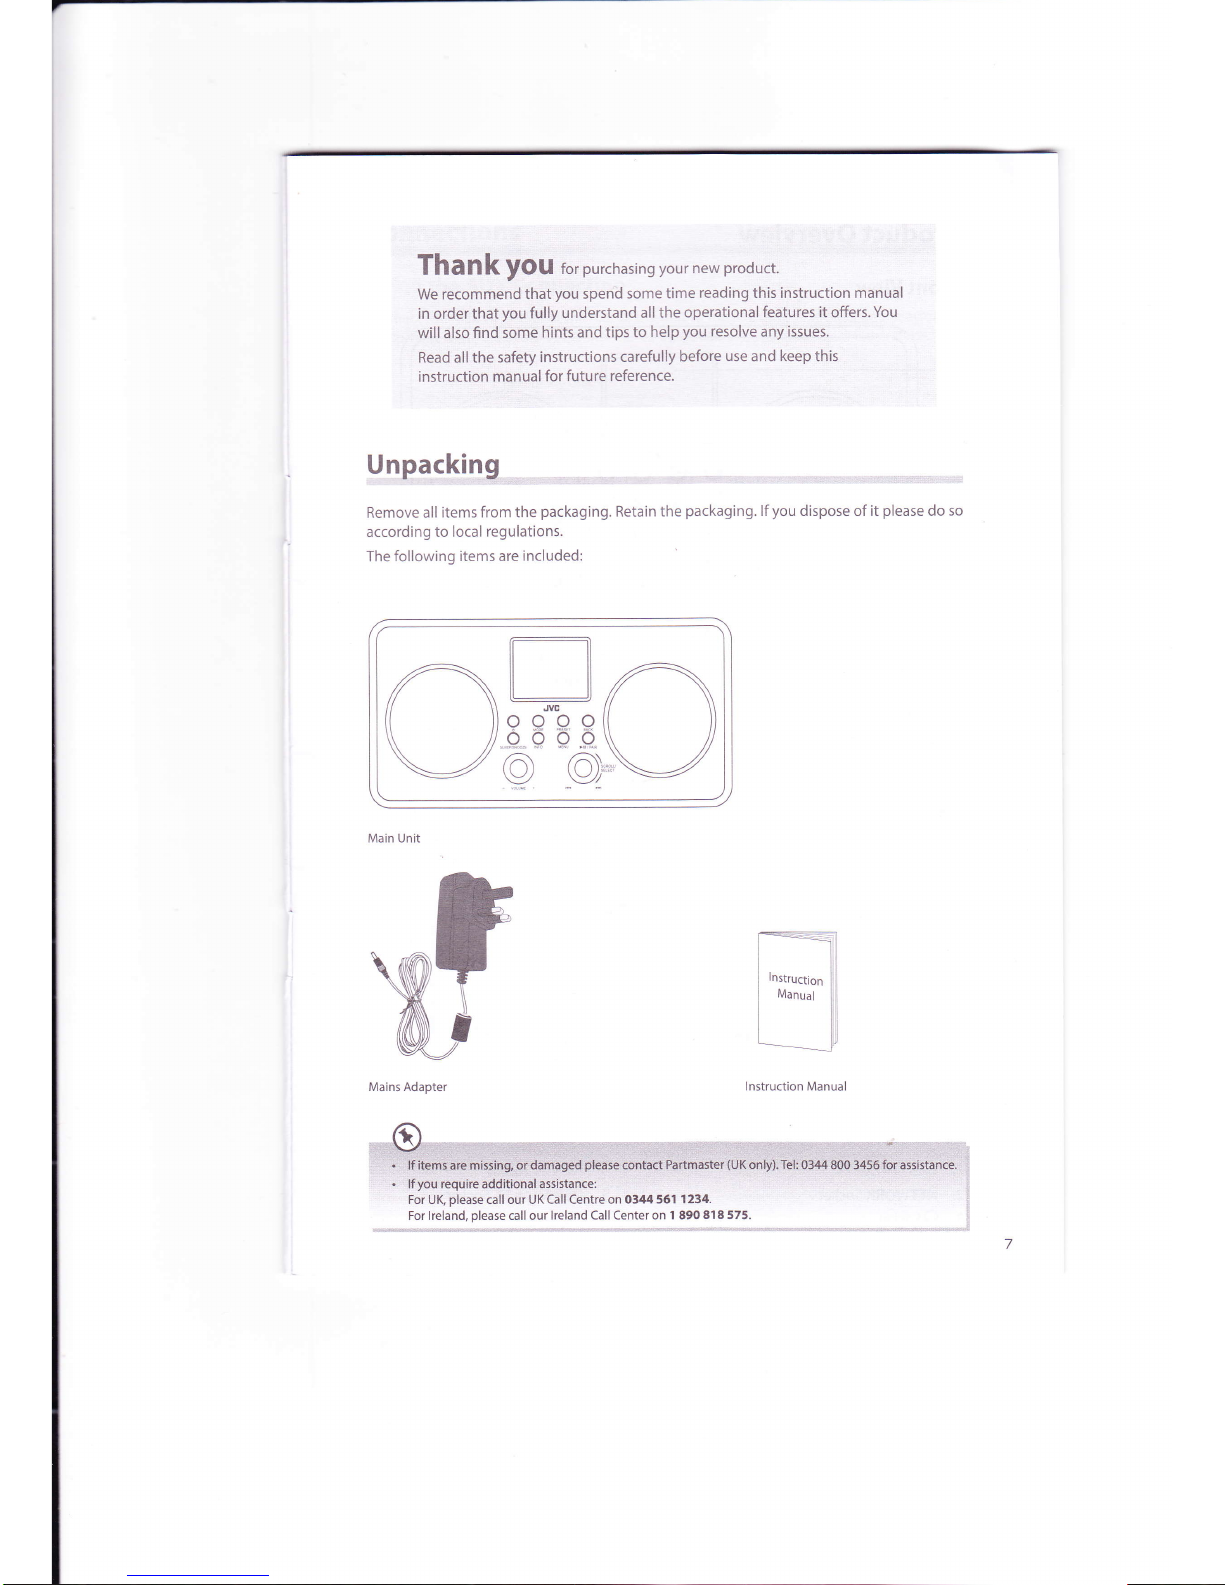
Unpacking
Remove all
items from the
packaging.
Retain
the
packaging.
lf
you
dispose of it
please
do so
according
to local regulations.
The
following items are
included:
Main Unit
Mains Adapter
lnstruction Manual
lf
you
require additional assistance:
For UK
please
call our UK Call Centre on
0344 561 1 234.
For lreland,
please
call our
lreland Call Center on 1 890
8f8 575.
r-l
tLJ,n
ff//\\
o o o o{{ l)
o 6 b 6\ ll
'";-
''"
-'
-:r::
\\
/
o 9)*\:
Page 8
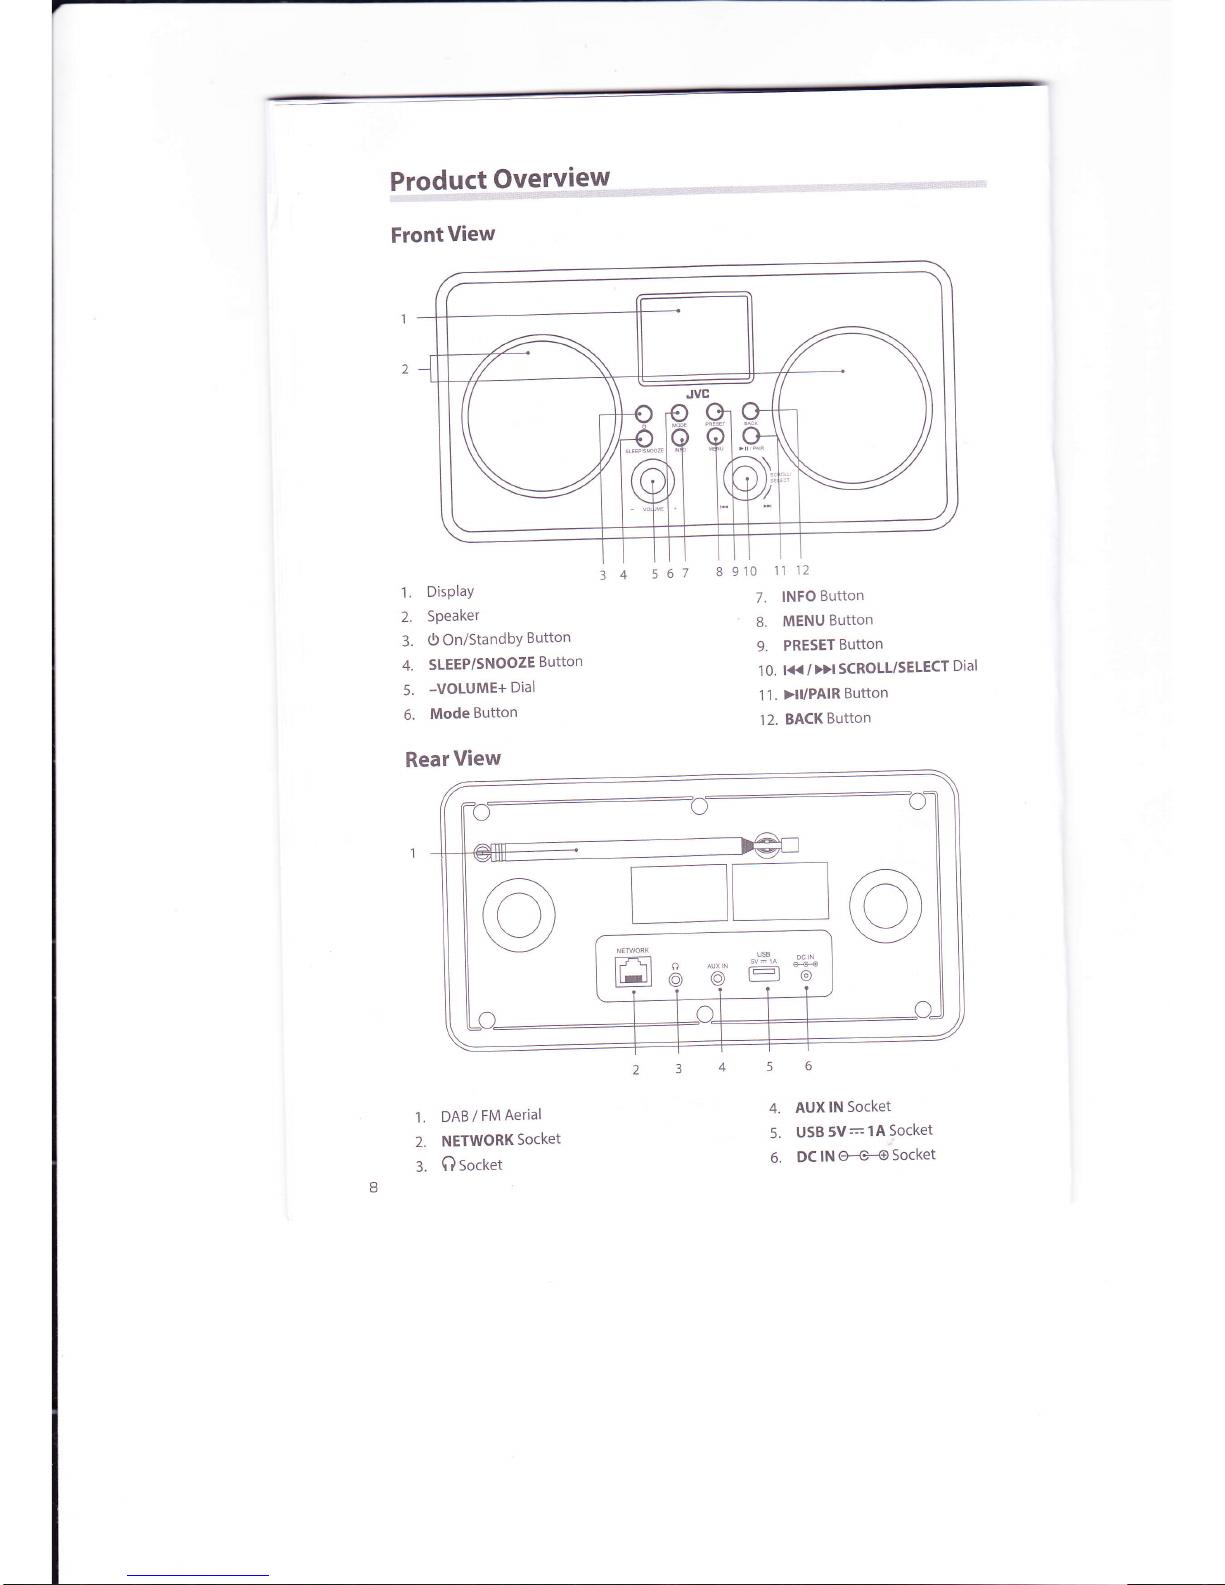
Product
9,y--e-,t-v.i9*ry-,:r,ri:,:.:,ii:rr:i:,;.r,!..:.::ir::r,r.:,,:,,
FrontView
1.
DisPlaY
2.
Speaker
3.
0
On/StandbY
Button
4.
SLEEP/SNOOZE
Button
5.
-VOLUME+
Dial
6.
Mode
Button
RearView
1.
DAB /
FM
Aerial
2.
NETWORK
Socket
3.
Qsocket
8
910
11
12
7.
INFO
Button
8.
MENU
Button
9.
PRESET
Button
1 0.
l{< /Dl
SCROLL/SELECT
Dial
'l
1. )lI/PAIR
Button
12.
BACKButton
4.
AUX
lN
Socket
5.
USB5V:lASocket
6.
DClN@Socket
34
561
Page 9
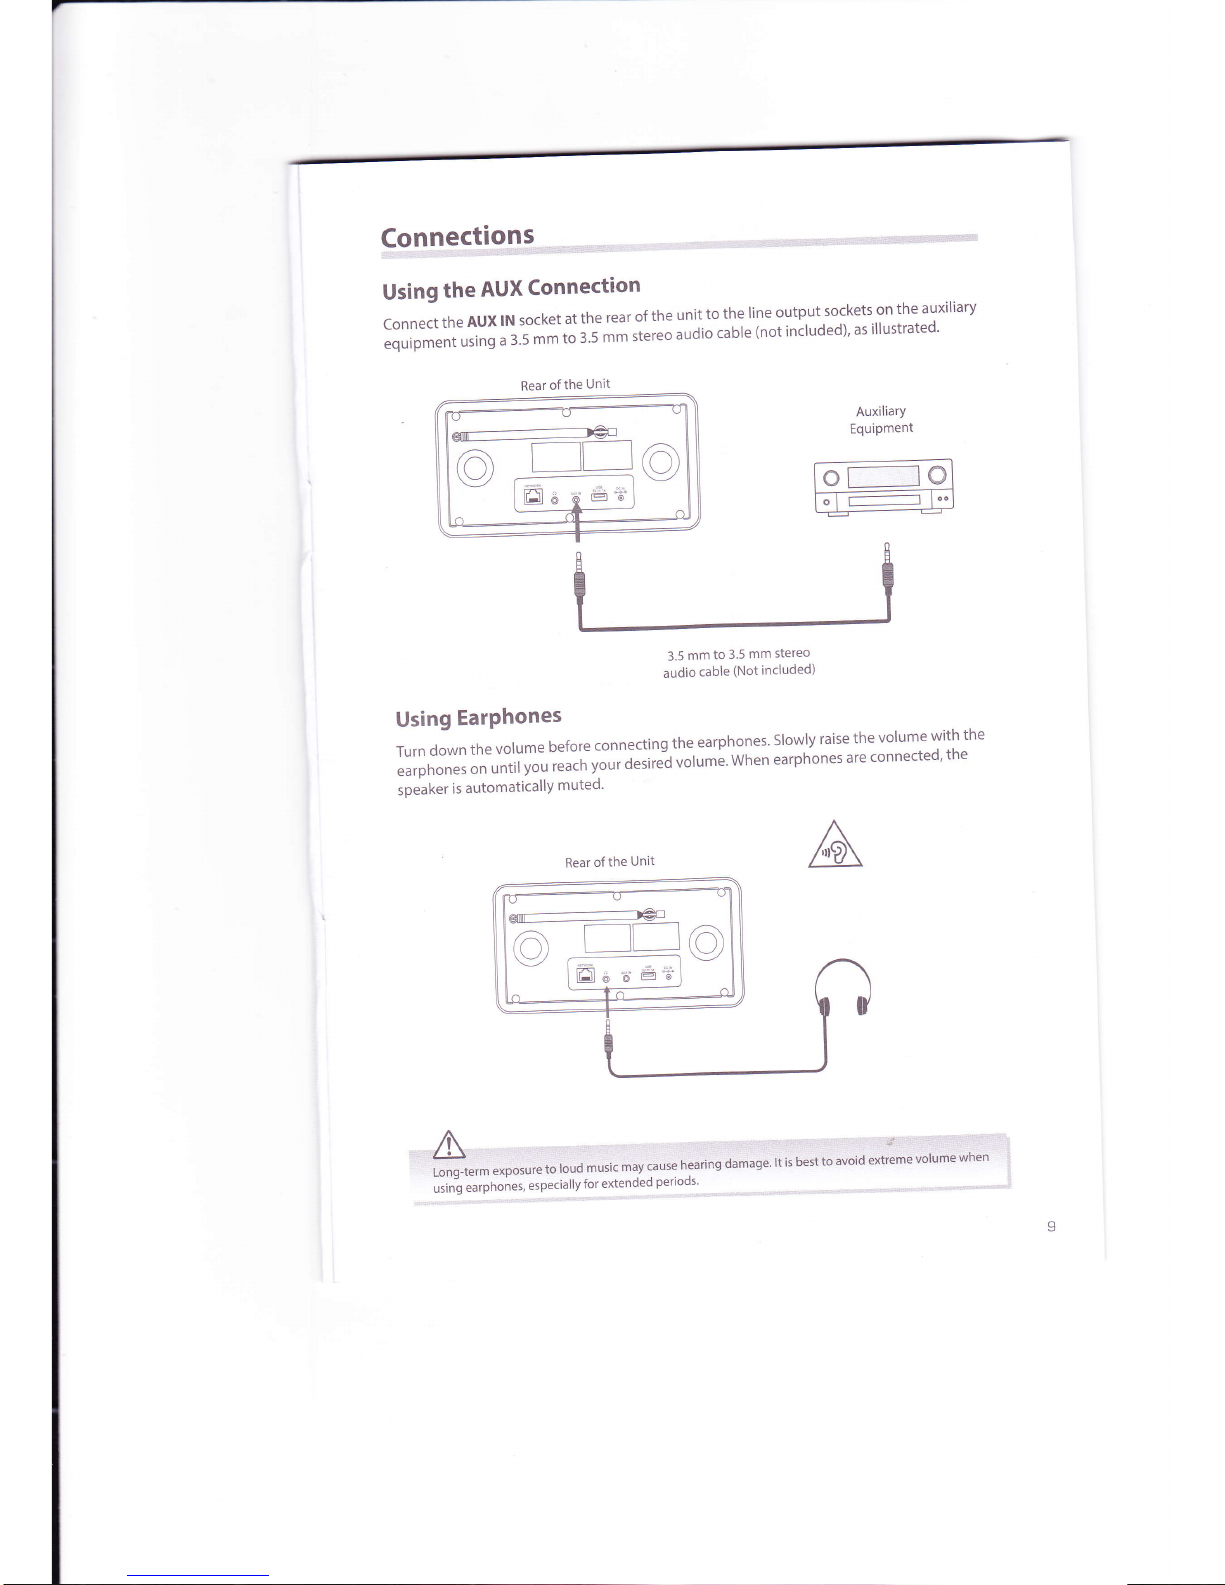
Connections
Using
the
AUX
Connection
ConnecttheAUXlNsocketattherearoftheunittothelineoutputsocketsontheauxiliary
equipment
using
a 3.5
rn*
;;';t;;ereo
audio
cable
(not
included)'
as
illustrated'
AuxiliarY
Equipment
o
t-----_l
@
o
I
r--------------l
l'"
Rear
ofthe
Unit
o
g
Ell
6'd
e6"
.t:'T$i"t'il
ncruded)
Using
EarPhones
Turn
down
the
volume
before
connecting
the
earphones'
Slowly
raise
the
volume
with
the
earphones
on
until
you
t"t;;;;;'iei
uotume'
when
earphones
are
connected'
the
speaker
is automaticallY
muted'
Rear of
the
Unit
:rl;4.:rtL....,t,r,,:r:..iii..::i...:a..r.,:i,
::::ii::tir"..:i'.::::i:r"r::':i'r::r':i..:g'ii:::'i:::':::
''L.tiiq-te.mexbosrratouua*uiiii;"i;'i;n";;naimusaiiri;tesiioivi:ioafttoiir6voluniewlien'
'l
uiin-g
"urpnon"t,
"specially
for
extended
periods'
Page 10
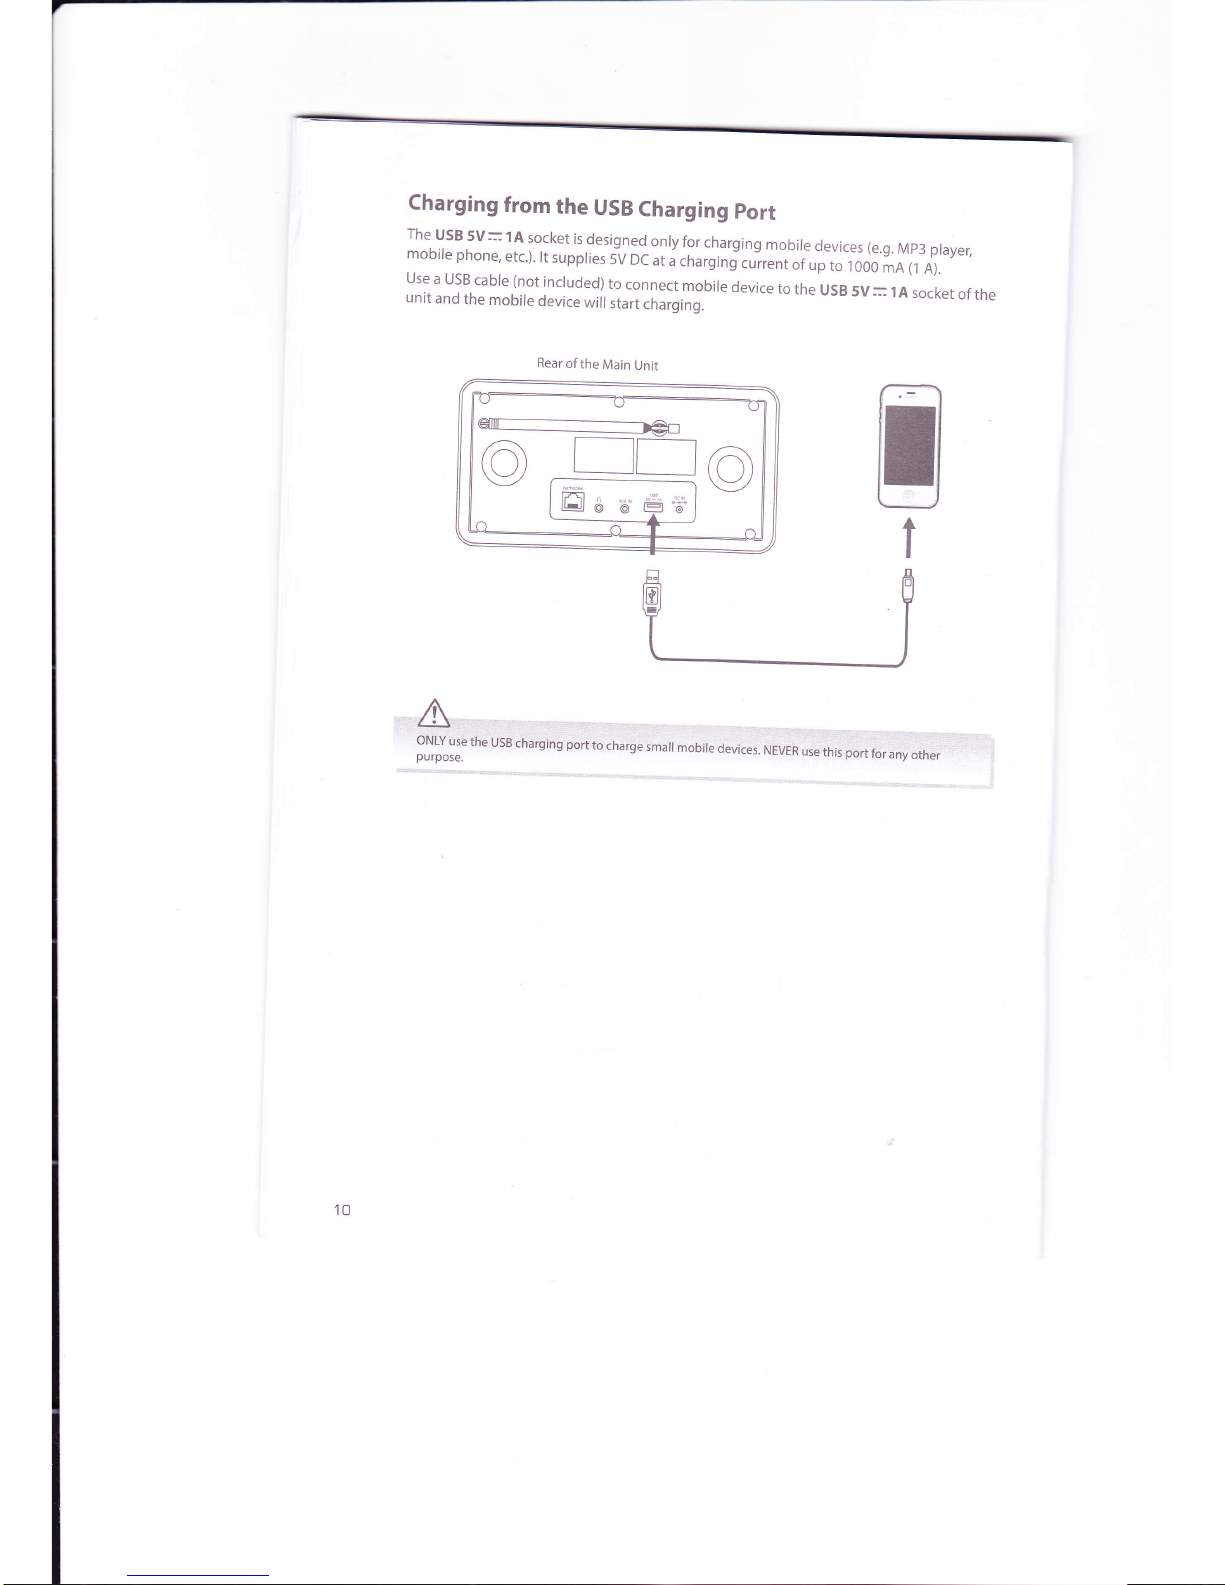
Charging
from
the
USB
Charging
port
The
USB
5V--
1A
socket
is
designed
only
for
charging
mobile
devices (e.g.
Mp3 player,
mobile
phone,
etc.).
rt
suppries
sv
oc
at
a
.r't.rgin
j.u"rrunt
of
up
to
r
000
mA
(1
A).
Use
a
USB
cabre
(not
incruded)
to
connect
mobile
device
to
the
usB
5v=
1A
socket
of
the
unit
and
the
mobile
device
will
start
charging.
Rear
of
the
Main
Unit
@
nEo
ffia
ue#
10
Page 11
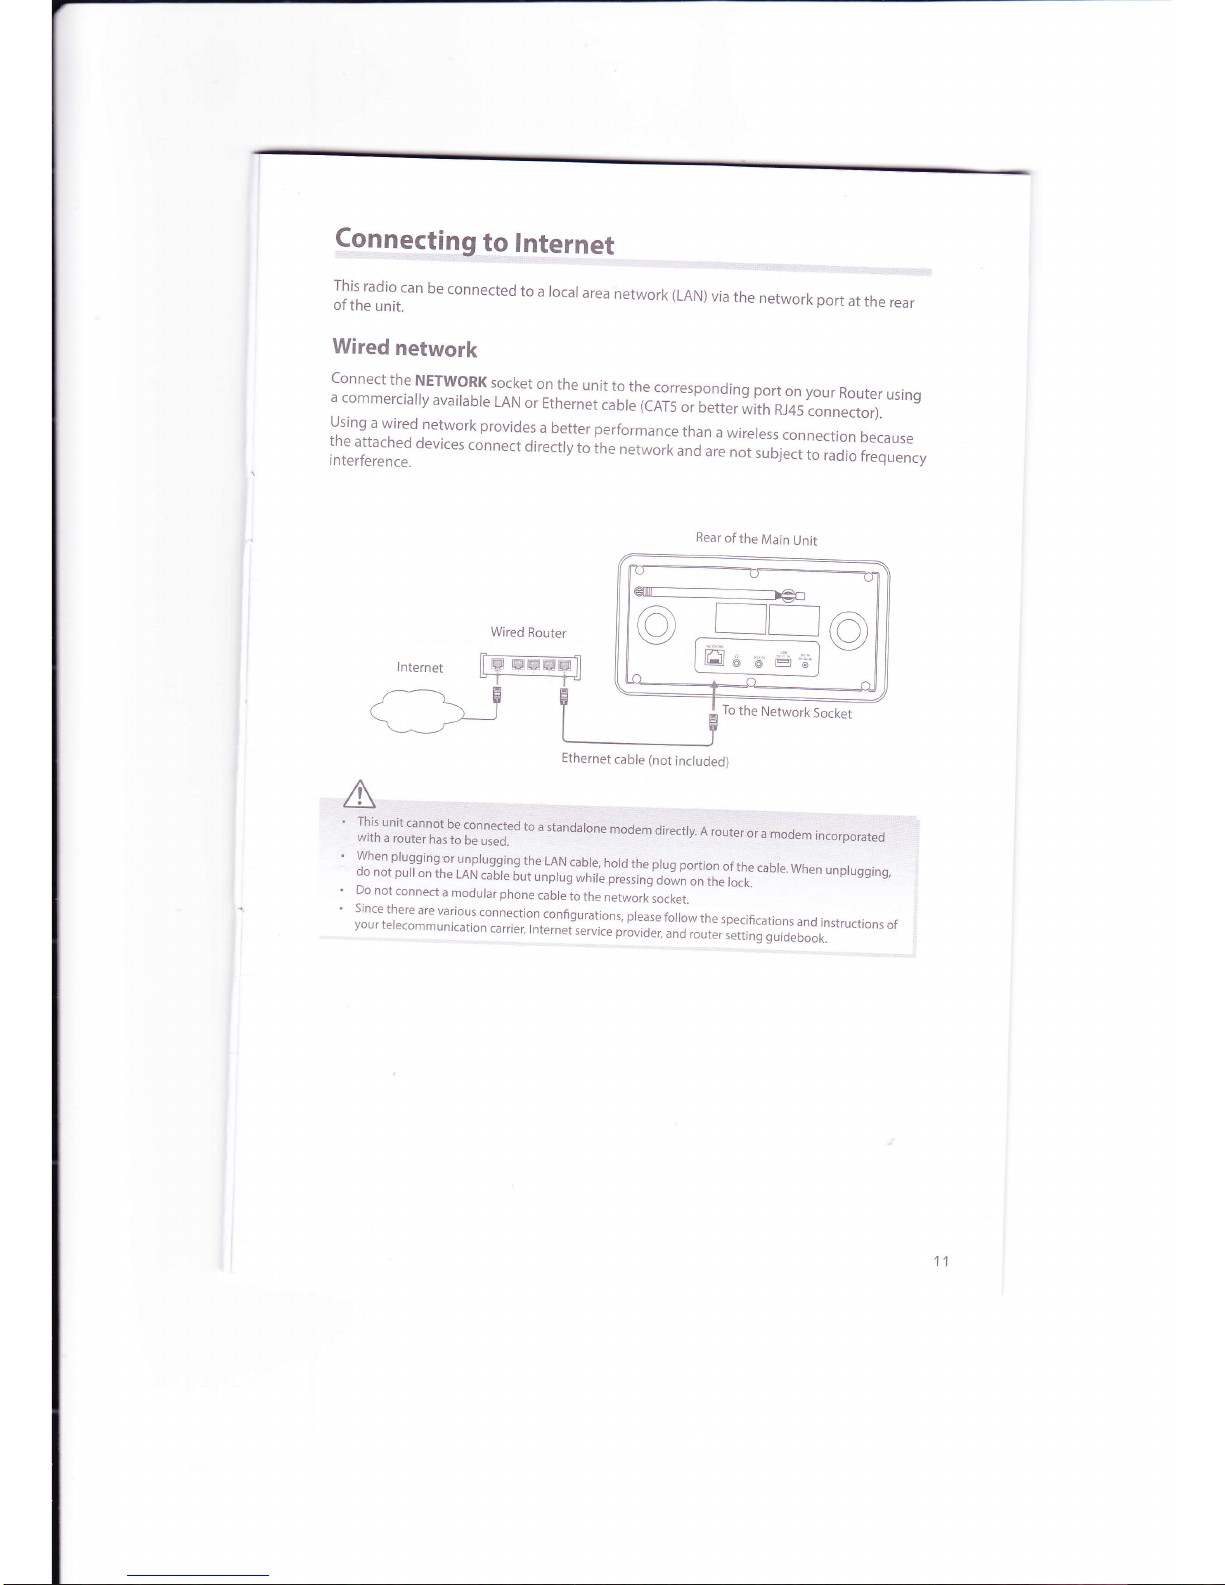
9e.n
n
9*5,!1tg.,,!9.,!
n
l
er
n
e
t
lHrff,:rr
be
connected
to
a locar
area
network (LAN)
via
the
network
port
at
the
rear
Wired
network
connect
the
NETWoRK
socket
on
the
unit
to
the
corresponding
port
on your
Router
using
a
commercially
available
LAN
or
Ethernet
cable
(CAT5
or better
with
RJ45
connector).
using
a
wired
network
provides
a
better performance
than
a
wireress
connection
because
lnl:L.L".1
devices
connect
directty
to
ir,"
n",*ort
una
are
not
sublect,o
,.!"io
ir"qru".y
EI
1 \T
-ta-
-t'-
Rear
of
the
Main
Unit
%:
@
L__illo
t]g
l
v
^
llEll
o
ueai
To
the
Network
Socket
!-l
nii:*ffi11ffi
Jio;.l!*ii;j6n&!&$
u,*.ir,,!qooe*jii6ii:r;*iaar,,.;
when plugging
or
unprugging
the
LAN
cabre,
hord
the prug
portion
01
the
cabre.
when
unprugginq,
do
not putt
on
the
LAN
cabte
but
unprrg
,rhir"
pr;riing-Jl"*l"on
in"
,o.*.
Do
not
connect
a
modular
phone
cable
to
the
network
socket.
;ffi$""J:ffi:[:ii1i"ili':il':ili,":,x,":J;,:5ffi:""i?:"n:;i"T;[1;::il:i:*u.t
on,
of
I
lnternet
Wired
Router
+
it E
EmEm
lt
"T__-_ru
11
Ethernet
cable
(not
included)
Page 12
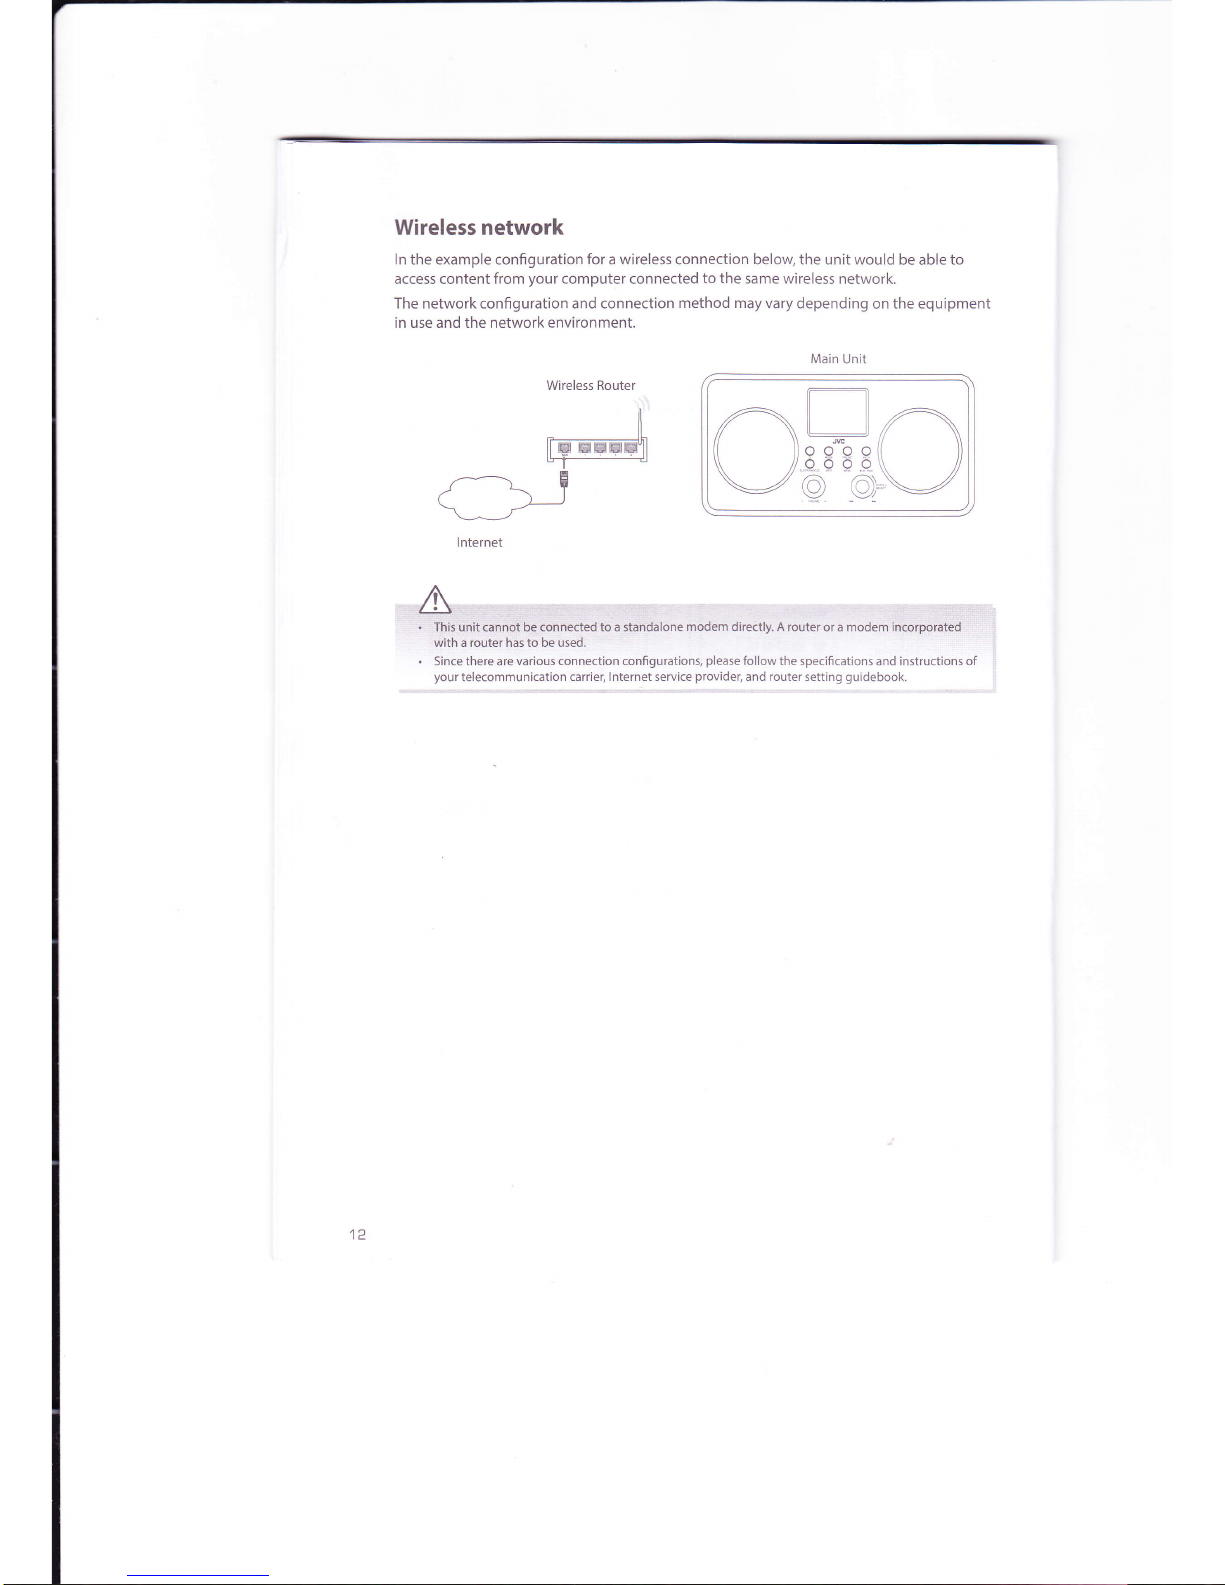
Wireless network
ln the example configuration
for
a wireless connection below the unit would
be able
to
access content from
your
computer
connected
to
the
same wireless
network.
The network configuration and connection
method may vary
depending on the equipment
in use and the network environment.
Main
Unit
Wireless Router
lnternet
A
.:]]],;:].,,.1iii;:ijiiiii;niiibl,hGlcgnrieaedtoaiiindalcinemodemdirectly.Arouteroramodeminidfpii6ted
with a router has to be used.
.
Since there are various
connection configurations,
please
follow the specifications
and instructions
of
l
your
telecommunication
carrier, Internet service
providet
and router setting
guidebook.
_iL
rE-EE-ry1
E
/ \T
\^ )-
tc
Page 13
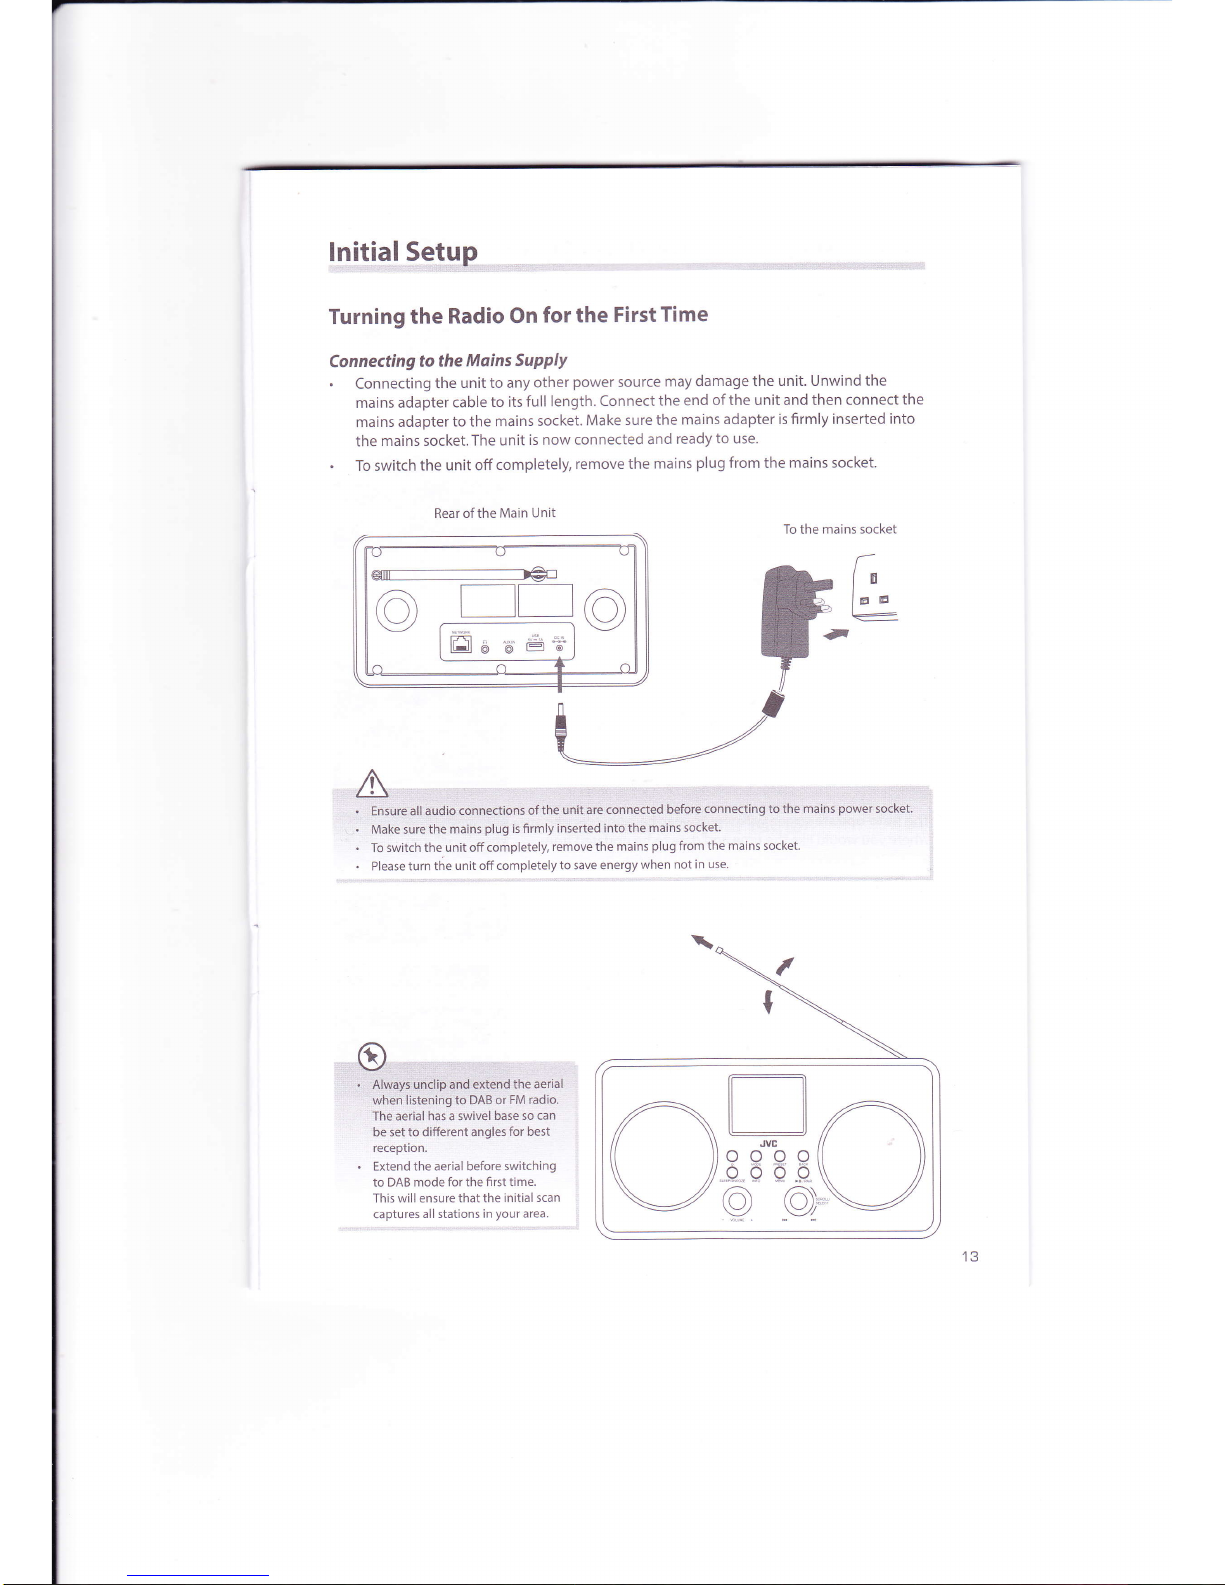
Turning the
Radio On
for the
FirstTime
Connecting
to the
Mains
SUPPIY
.
Connecting
the
unit to any
other
power
source
may
damage the
unit' Unwind the
mains adapter
cable
to its
full length.
Connect
the end
of the unit and then
connect the
mains
adapter
to the mains
socket.
Make sure
the
mains
adapter is firmly inserted
into
the
mains socket.The
unit
is now connected
and
ready
to use.
.
To switch
the unit off
completely,
remove the
mains
plug
from the
mains socket'
Rear of the Main
Unit
lgij!.a!.5s[ttR,.,,**.*,'',,,,,,,,,.
^'''-'-
ttitiinneilid,b'efuietindnnqilinti.tcrlihtt:irlail15lipol,!6i:llti:ket:r:::,:i:
Make'suii'tti,e,m;iirs::iifug
is,firiirty
inieited intctih€'rirairitsiidiet.
To
switih the,unit off completely,
remove the mains
plug
from
the mains
socket-
Please turn the
unit off completely
to save energy
when
not in use.
To the
mains socket
Etr
a
.
Extend the aerial before switching
to DAB
mode for the first
time.
This
will
ensure
that the initial
scan
captures
all stations in
your
area.
ii+
-r.
-"
IHJ 6'd
B?
ba:iet tio
differint angles
for best
r-ll
,AtL___ll ,A
// \
----,vc
// \
{l l)ooooll l)
\ ll66bb\ ll
\/O-O'\/
Page 14
conneS,!!19,!gf'hg.!Rl9ll.ret,ForTheFilqtf
!--g.,..-.,
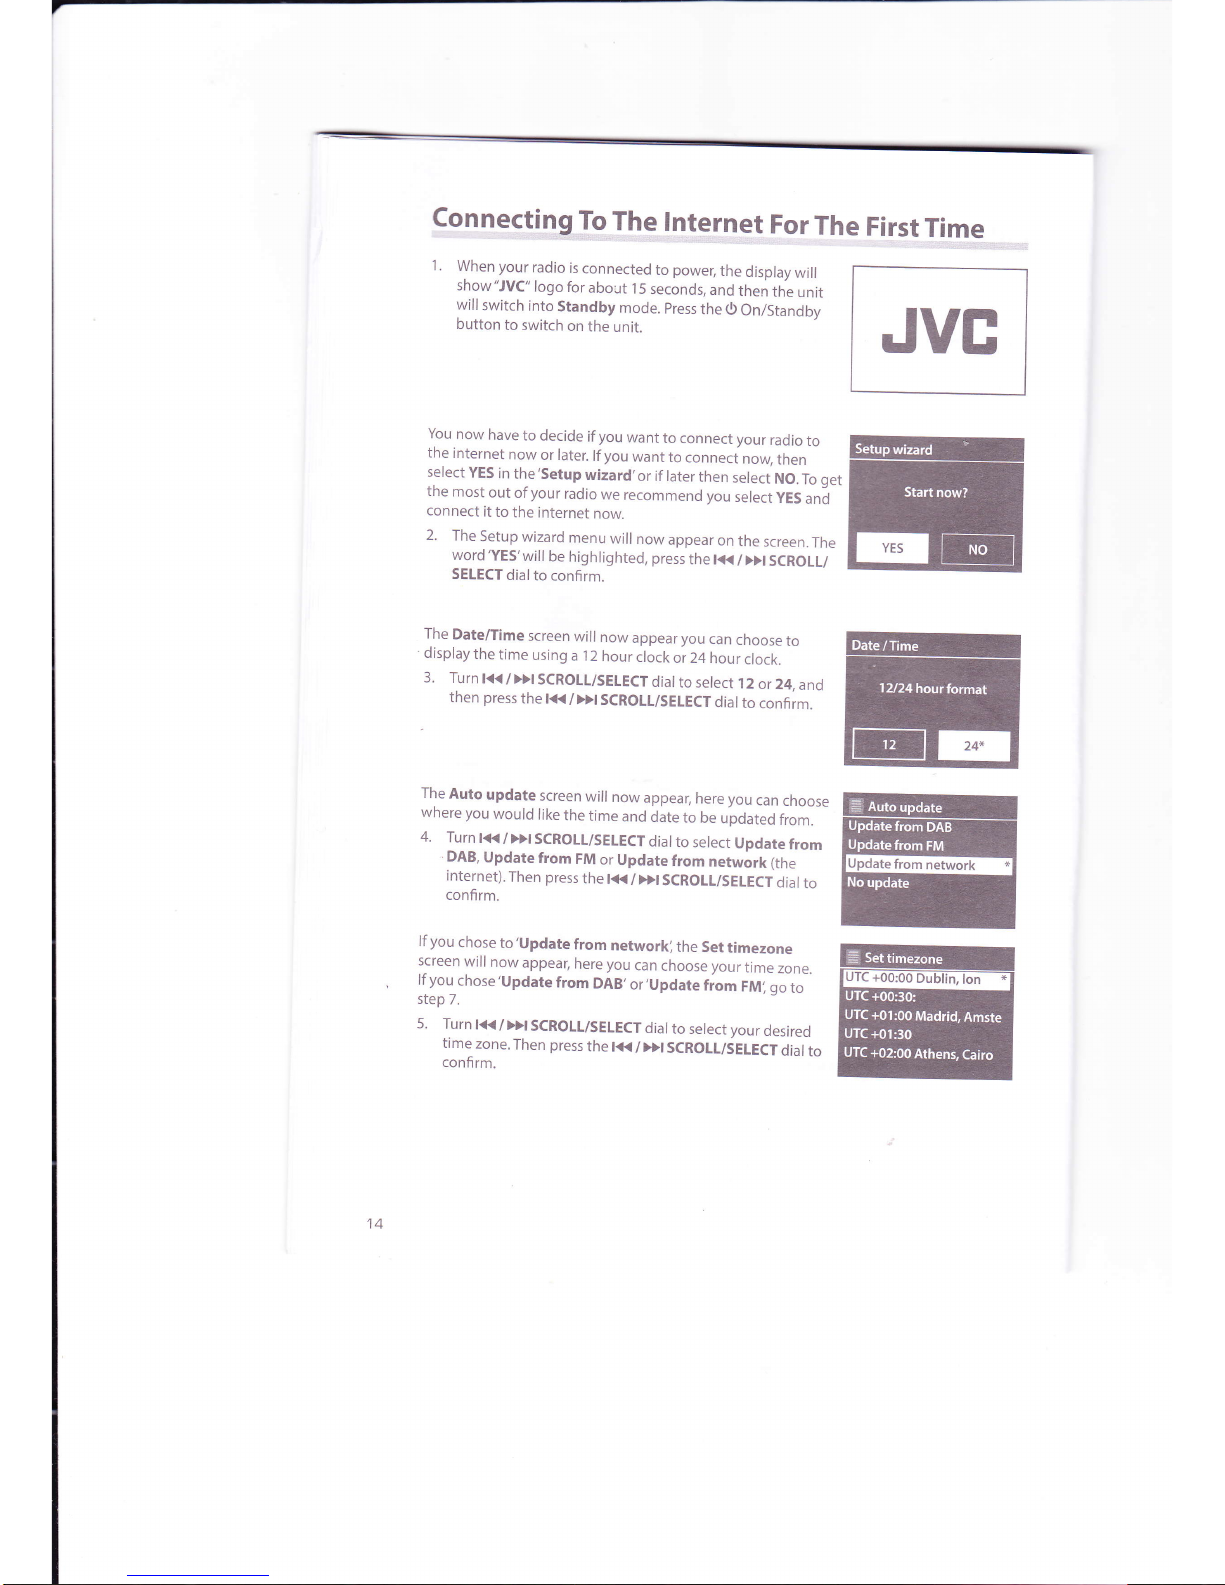
1.
When
your
radio
is
connected
to
power,
the
display
will
show
"JVC"
logo
for
about
l
5 seconds,
and
then
the
unit
will
switch
into
Standby
mode.
press
the
0
On/Standby
button
to switch
on
the
unit.
You
now
have
to decide
if
you
want
to
connect your
radio
to
the
internet
now
or later.
lfyou
want
to
connect
nory
then
select
YES
in
the'Setup
wizard,or
if later
then
select
NO.
To
get
the
most
out
of
your
radio
we recommend
you
select
yES
and
connect
it
to
the internet
now.
2.
The
Setup
wizard
menu
will
now
appear
on
the
screen.
The
word'YES'
wlll
be
highlighted,
press
the t(
/
Dt
SCROLL/
SELECT
dialto
confirm.
The
Date/Time
screen
will
now
appear you
can
choose
to
display
the
time
using
a
l2
hour
clock
or 24
hour
clock.
3.
Turn
l<</>}ISCROLL/SELECTdial
to select
12
or
24,
and
then
press
the l<K
/
Dt
SCROTL/SEIECT
dial
to
confirm.
The
Auto
update
screen
will
now
appear,
here you
can
choose
where
you
would
like
the
time
and
date
to
be
updated
from.
4.
Turn
t<<
/
>>t
SCROLL/SELECT
dial
to
select
Update
from
DAB,
Update
from
FM
or Update
from
network
(the
internet).
Then press
the
lt{
/Dt
SCROLL/SELECTdial
to
confirm.
lf
you
chose
to'Update
from
networkl
the
Set
timezone
screen
will
now
appear,
here you
can
choose your
time
zone.
lf
you
chose'Update
from
DAB,
or,Update
fiom
FMi go
to
step
7.
5.
Turn
t(/DISCROIL/SEIECT
dial
to select your
desired
time
zone.
Then press
the
t<<
/
>>t
SCROLL/SELECT
dial
to
confirm.
JVE
Page 15

The
Daylight
saving
screen
will
now
appear'
here
you
c
.f.r"*"if
,f't"
set
daylight
saving
oN
or
OFF'
6.
Turn
the
l<< /
>|l
SCROLL/SELECT
dial
to
select
ON
or OFF'
Then
press
the
l<< /
DI
SCROLLiSELECT
dial
to
confirm'
7.
Select
YES
and
then
press
the
l( /
)>l
SCROLL/SELECT
dial
to
keeP
network
connected'
The
display
will
show
"Please
select
Wlan
regionl'and
then
the
Wlan
region
menu'
Turn
the
l( /
Dl
SCROLL/
seieiioi.rtoselecttheregion'andthenpressthel{{i
>>l
SCROLL/SELECT
dial
to
confirm'
Your
radio
will
now
scan
for
your
wirelesl
nltwolf:lhr]s
maV
take
a
few
seconds
then
a
list
of
allthe
wireless
networks
will
appear
on
the
screen'
8.
Turn
the
l<< /
>>l
SCROLL/SELECT
dial
to
select-your
wireless
network
Then
press
the
lt{
/
Dl
SCROLL/SELECT
dial
to
confirm'
To
connect
your
radio
to
your router
using
the
WPS
button
follow
the
instructions
below
(con#i''i
iting
tn"
wps
button
on
yout
Router)'
OR
To
connect
your
radio
to
your router
using
yourpassword
follow
the
instructions
on
the
next
pan"
i;;;;;'
itiiiiou'
wiretess
Network
Password)'
Connecting
using
the
WPS
button
on
your
router
ConnectingusingtheWPS(Wi-FiProtectedSetup)buttononyourrouterisaquickandeasy
;.;;;"il.
y-our
radio
without
having
to
type
in
a
password'
lf
your
router
has
a
WPS
button
you
will
notice [WPS]
at
the
front
of
your
network
name'
o
lf vou
don't
see
your
wireless
network
scroll
down
to
rescan
and
try
.#
;;;;;;i;;eed
to
move
vour
radio
closer
to
vour
wireless
router,
the
(
lo(er
the
better'
9.
Turn
thel<</>>ISGROLL/SELECT
dial
to
select'Push
button'then
Press
OK'
You
will
now
see
a
message
on
the
screen
telling
you
to
press
the
WPS
button
on
your
router'
15
Page 16

10.
Press
the
WPS
button
on
your
router.
Check
your
routers
instruction
manual
if
you
are
unsure
which
button
is
the
WPS
button.
Best
connection
speed
as
close
as
possible
Maximum
distance
5
m
Press
the
WPS
button
}A
\_:{;3
Wireless
Router
Connection
using
your
wireless
network
password
1 1.
Press
the
t<<
/Dt SCROLT/SELECT
dial
to
confirm.
your
radio
will
now
connect
to
your
router,
this
may
take
a
few
s.econds.The
message,Setup
wizard
compleied,will
be
displayed
when your
radio
has
connected,
press
the
l+<
/
Dl
SCROTL/SELECT
dial
to
exit
the
menu.
lf
your
router
hasn,t got
a WpS
button
you
will
now
be
asked
to
enter your
wireless
network
password,
or
you
can
select
SKlp
WPS
which
will
also
take you
to
the
password
screen.
'12.
Turn
the
t<<
I
>>l
SCROII/SELECT
dial
to
select
each
letter/
number
of
your
password.
Then press
the
tt(
/
Dl
SCROLL/
SETECT
dial
to
enter
the
selected
letter/number.
I 3.
When you
have
entered
your
password,
the
l<K
/
>>l
SCROII/SELECT
dial
to
select
OK
on
the
right
of
the
screen.Then
press
the
t(
/Dt SCROIL/SEIECT
dial
to
confirm.
The
screen
will
show
the
words,please
wait
connecting'for
a few
seconds.
Then you
will
see
the
message
'Setup
wizard
completedi
press
the
l(
/
>>t
SCROLL/SEtECT
dial
to
exit.
Your
radio
is
now
connected
to
the
internet.
16
Page 17

Basic
on
Switching
ON/OFF
press
0 button
on the
unit
to
switch
the
unit
between
the On and
Standby
mode.
@
i"nlou"
tr," ,ains
plug
from
the mains
socket
if
you want
to
switch the
unit off
completely.
I
Selecting
Modes
Press
MODE
button
on
the
unit,
and
then
turn
the
l{<
/
}}l sCROLL/SELECT
dial to
switch
between
lnternet
radio,
Music
player,
DAB
radio,
FM radio,
Bluetooth
Audio
and
AUX
in mode.
Press
the
lt( /
Dl SCROLL/SELECT
dial
to
confirm'
o
r:',::,r,tii
iiiiafiiieiriadiir;:tiilaraia,plriFr6A6lradio;Bluetooth
Audlo
and AUX
lnrmode;the
unitwill':
automitically
go
to Standby
mode
after
1 5
minutes
if
it has
no audio
playback.
Press standby
button
to
I
resume.
Adjusting
theVolume
Turn
-VOLUME+
dial
to
adjust
the
volume.
Automatically
Setting
the
Clock
The clock
can be
set and
updated
automatically
if
the
unit receives
lnternet /
DAB
/
FM
signals
in
your
location.
ln
order
for the
clock
to
synchronise
to the
current
local
time
you
must
leave
it on
lnternet
/
DAB /
FM station
for a
short
period
of
time.
You can
also
choose
how
you
would
like to
keep
the
clock
up
to date
from
lnternet,
DAB or
FM radio
signals.
Go
to Menu
-
System
Settings
-
Time/Date
-
Auto
Update'
Page 18

System
Settings
Equaliser
The
unit
support
a variety
of
equalizers
and
sound
effects.
1 .
Press
MENU
button,
and
then
turn
the rt{
/
}>r
scRotl/sEtEcr
diar
to serect
system
settings.
Press
the
t{{
/
Dt
SCROLL/SEIECT
dial
to
confirm.
2.
Turnther{</>)r
scRotl/sELEcrdial
toselectEqualiser.pressthel(/)>lscRoLL/
SELECT
to
confirm.
3.
Turn
the
l<<
/
>>l
scRoLL/sELEcr
diar to
serect
a
profire
through
Frat,
crassic,
Rock,
Pop
and
tazz,
and
then
press
the r<K
/
}}r
scRoLL/sEtECT
dia
I to
confi
rm.
Network
Settings
The
Network
settings
menu
has
allthe
setting
for
connecting
your
radio
to
yourwi_Fi.
so
if
you
have
to
re-connect your
radio
at
any time
go
into
the
Network
settings
menu.
SSID
-
select
the
desire
wireless
network.
Rescan
-
Scan
for
available
networks.
Wired
*
select
wired
network.
Manual
config
-
select
wired/wireless
network
with
DHCp
enable/
disable.
Press
the
WPS
button
on
the
modem
device
that you
*irh
to
connect
with.
Press
the t<<
i
Dt
SCROLL/SELECT
dial
to
continue.
Display
the
,utting
on
th" ,nit.
Select
a region
of
your
choice.
Select
wired/wireless
network
with
DHCp
enable/disable.
View
the
connected
network.
To
delete
the
connected
network
memory
in
Network profile.
Page 19

Setting
the
Time
and
Date
l.PressMENUbutton,andthenturnthel(/DlSCRoLL/SELECTdialtoselectSystem
,"i
ingr.
Press
the
l{'i /
}>l
SCROLL/SELECT
dial
to
confirm'
2.Turnthel<</DlscRoLL/sELEcTdialtoselectTime/Date.Pressthel{(/)>lscRoLL/
SELECT
dial
to
confirm'
3.Turnthel<</DISCRoLL/SELECTdialtoselectoptions,andthenpressthel<</>>l
SCROLL/SELECT
dial
to
confirm
the
setting'
lnactive
StandbY
Use
the
Inactive
Standby
to
turn
offthe
unit
after
a certain
time
in
play
mode'
1 .
Press
MENU
button,
and
then
turn
the
l({ /
Dl
SCRoLL/SELECT
dial
to
select
System
'
settings.
Press
the
l( /
Dl
SCROLL/SELECT
to
confirm'
2.Turnthel.(/>>ISCRoLL/SELECTdialtoselectlnactiveStandby.Pressthel<</>>l
SCROLL/SELECT
dial
to
confi
rm'
3.
Turn
the
l<< /
}}l
SCROLL/SELECT
dial
to
select
between
Off'
2
hours'
4 hours'
5
hours
and
6
hours.
Press
the
lt{ /
Dl
SCROLL/SELECT
to confirm'
Language
This
feature
enables
you to
change
menu
language'
l.PressMENUbutton,andthenturnthel(/DlscRoLL/sELE€TdialtoSelectsystem
settings.
Press
the
l{( /
}>l SCROLL/SELECT
dial
to
confirm'
2.Turnthel<K/>>lScRoLL/sELEcTdialtoselectLanguage.Pressthel(/DlscRoLL/
SELECT
dial
to confirm.
3.
Turn
the
l(
/
)>l
sCRoLL/SELECT
to
select
a
language,
and
then
press the
l<<
/
>>l
SCROLL/SELECT
dial
to
confirm'
Here
you can
manually
set
the
time
and
date'
lno*"
ho*
Vou
want
the
time
to
be automatically
up-dated'
Upl"a"
tt.rn
DAB
/
Update
from
FM /
Update
from
Network
/
No
Update
Set
12
Hour
or
24
Hour
disPlaY
s"
- '
--t".t
u
tir'r.'"
-*
(only
available
when
Auto
update
from
Network
is
on.)
Select
daylight
savings.
(Only
available
when
Auto
update
from
Network
is
on.)
19
Page 20

Factory
Reset
lf
you
want
to delete
all
your
stations
and settings,
you
can
return
your
radio
back
to the
default
setting
by running
a Factory
Reset.
I . Press
MENU
button, and
then
turn
the t{{
/
)>l
scRoLL/sELECT
dial
to select
system
settings.
Press
the t{{
/
)>t
SCROTL/SELECT
dial to
confirm.
2.
Turn
the l<<
/
}}r
scRoLL/sELEcr
dial to
select Factory
reset.
press
the r<K
/
)>r
SCROLL/SELECT
dial to
confirm.
3. Turn
the I<<
/
>>!
scRoLL/sELEcr
dial
to select
yes.
press
the t({
/
>>l
scRoLt/sELEcr
dial to
confirm.
4.
The display
will show
the
"JVC"
logo,
and
then the
unit will
swltch
into
standby
mode
after
factory
reset
is done.
e
After
the
system reset,
all
the tuned
stations,
preset
stations will
be
erased.
Software
update
.l
.
Press
MENU
button,
and then
turn
the tt(
/
Dt
scRoLL/sELECT
dial
to select
system
settings.
Press
the t(
/
)>t
SCROTL/SELE€T
dial
to
confirm.
2.
Turn
the l<K
/
>>t
scRoLL/sELEcr
dial
to select
software
update.
press
the t(
/
Dr
SCROLL/SELECT
dial
to confirm.
3. Turn
the t<.(
/
>>t
scRoLL/sELEcr
dial to select
Auto-check
setting
or check
now.
Press
the l(
/
>}l
SCROLL/SELECT
dial to confirm.
Before
downloading
software,
ensure
that
the radio is
plugged
into
a stable
mains power
connection.
lnterrupting
the
mains
supply during
software
download can
lead
to
functional
disiurbances
and/or
damaqe
to
the unit!
Setup
wizard
The
setup
wizard
is available
in
the
system
settings
section; you
can run
through
this
to configure
settings
for
date/time
and
network.
Once
this
has finished, your
radio is
ready
to use.
o
It
is not
necessary
to run through
the
setup
wizard
if a wired
neiwork
is
being
used.
20
Page 21

lnfo
1 . Press
MENU
button, and then
turn the ta<
/
>>l SCROLL/SELECT
dial to select
System
settings.
Press
the l(
/
Dl
SCROLL/SELECT
to confirm.
2. Turn
the l<<
/
Dl
SCROLL/SELECT
dial to select Info.
Press
the t<<
/
D!
SCROLT/
SELECT dial to confirm.
3. The
Software version, Radio
lD and Friendly
name will
show
on the display.
Backlight
1 . Press
MENU
button, and then turn
the tt{
/
D!
SCROLL/SELECT
dial to
select System
settings. Press
the lt(
/
Dl
SCROIL/SEIECT
to
confirm.
2. Turnthel<t</>>tSCROLI/SEIECTdial
toselectBacklight.pressthett{/DISCROIL/
SETECT
dialto confirm.
3. Turn
the l<K
/
)}I
SCROLL/SELECT
dial to select options
and then
press
the t<< / >>t
SCROLT/SELECT
dial to confirm.
On
/
1 O sec
/
20 sec
/
30 sec
/
45
sec
/
60 sec
/ 90 sec
/
12O
sec
/
1
80 sec
High/Medium/Low
Setting a
Sleep Timer
You
can set a sleep
timer
so
if
you
are listening
to
your
radio
and fall
asleep,
it will
automatically
switch
off at the
preset
time. The sleep timer
can
be activated
for up to
a
maximum
of
60 minutes.
To
activate the
sleep function,
press
the
sLEEP/sNoozE
button
repeatedly.
The
time will
change
in
the below
sequence on every
press:
t->
15 minutes
-)30
minutes+45
minutes
-
I
Steep
oFF
{-
60 minutes
,
I
la\Jl9:*qria!a,ti:i,iial:tili::::,::a:!tt:itxt;ca.'l::3:::e:::::i:::3x:iiri::
Ar&-ldl$lii€ilt:llti.lll::irrii:rr:li:r'rlt::r::r::riil.r:ril
rla.i:PiellMEl[U'buttqn;,ird:thd&]ltiiiirtie'K{tr,t[SCR0tiJ5EfFci.dialrotiiia6i6;
r1:"
f(l)}fl(f,SLlIsE{Efiditirtat,i6nfirm:'
r:
r'
:r .:''..
.
,.
.'
2iiTurn
thel<<i >>lscRoLL/sELECTdiilto
seleit sieiii-pres
thCl.({t}iiicnot-i;'Sereciiiiirto
confirm.
3. Turn the
I<<
/
>>l
scRoLL/sEtECT
dial to select
between sleep
oFF,
I 5 minutes,
30
minutes,
45
minutes,
or 60 minutes
and then
press
the l(
/
Dl
SCROLT/SEIECT
dial to
confirm.
4. when
a sleep
timer has
been set the C
symbol and
the
remaining
sleep
time will
be displayed.
Page 22

Alarms
/i\
ffi
an"
,,rn"
.nd
date
is
set
before
you
can
activate
the
alarm
function
Setting
the
Alarm
t""t
t.i'"
has
two
alarms
(Alarm
1 and
Alarm
2)'
1
.
Press
MENU
button'
and
then
turn
the
l'i{
/
Dl
SCROLL/SELECT
dial
to
select
Main
menu'
Press
the
t(
/
)>I
SCROLL/SELECT
dial
to
confirm'
2.Turnthel{</>>lscRoLL/sELEcTdialtoselectAlarms.Press.thel{</)}lScRoLL/
5.
6.
7.
oTtU
ouity
tonce
/
Weekends
/
Weekdays
Bur..r,lnternet
radio'
DAB
or
FM
oiil;;;-";
source
is
rnternet.or
of?.119^tli
''e"'l
iir""nit
't
r"*,th"
bull
ulu't
*-
!9tt'g9t"'dJ
G*
f
i*"*a
or.
saved
preset
station
(not
available
for
Buzz
mode)
--
Save
and
confirm
the
alarm
settlnq
Page 23

lnternet
Radio
Operation
To listen
to
internet
radio your
radio
must
be
connected
to
the
internet.
Try
to
position
your
radio
as
close
as
possible
to
your
router
to
get
the
best
connection
speeds.
Finding
Local
Radio
Stations
1 .
Press
MODE
button,
and
then
turn
the
t<<
/
>>t
SCROLL/
SETECT
dial
to
select
lnternet
Radio.
press
the
t<<
/
>>t
SCROLL/SELECT
dial
to
confi
rm.
2.
Turn
the
t<<
/
}>t
SCROTL/SELECT
dial
to
select
Station
list.
Press
the
t{{
/
Dl
SCROLL/SELE€T
dial
to
confirm.
3.
Turn
the
l<<
/
>>t
SCROLL/SELECT
dial
to
select
Local.
press
the
l<<
/Dt SCROLL/SELECT
dial
to
confirm.
You
can
now
select
Ail
Stations
which
will
display
a list
of
all
the
local
radio
stations
in
your
location
or
select
u
g"nr"
which
will
just
display
a list
of stations
relating
to
your
sel"ected
genre.
4.
Turn
thet<</>)tSCROLt/SELECTdial
to
select
All
Stations
or a genre
in
the
list,
and
then press
the
l{{
/
)>l
SCROLL/
SEIECT
dial
to
confirm.
5.
lt
may
take
a
few
seconds
for
your
radio
to
connect
to
the
station
then you
will
hear
the
station.
ffi
ry
w
ffi
I
Page 24

4.
Finding Radio
Stations From
Around theWorld
f"fil ff
;il
i:iJi:
;ii:: :it:tiil;?:il[
:
llJ
;""11]'("
;
"
"
M
Europe) then select
the country
(e.9.
Portugal).
You
will then be
able to listen to any
radio station from
your
selected country.
1
.
ln lnternet Radio
mode,
turn
the lt{
/
})l SCROLL/SELECT
dial to select
Station
list. Press the l(
/
D! SCROTL/SELECT
dialto confirm.
2.
3.
Turn the l{{
/
Dl SCROLL/SEIECT dial
to select Stations,
and then
press
the
l(( / Dl
SCROLL/SEIECT
dial to confirm.
Press the lt{
/
Dl SCROLT/SELECT
dial to
select
Location
then
press
the l<<
/
Dl
SCROLI/SELECT
dial to confirm.
Turn the
l(
/
)>l SCROLL/SELECT
dial to
select
a area of the
world
e.g.
Europe,
then
press
the l<<
/
Dl SCROLL/SELECT
dial to confirm.
Turn the lt(
/
)>! SCROLL/SELECT
dial to
select
a country
e.g. Portugal, then
press
the !<<
/
>)!
SCROLL/SELE€T
dial to
confirm.
You can now select All station
which will display
a list
of all the
local
radio
stations
in
your
location
or
select a
genre
which will
just
display a list of
stations relating to
your
selected
genre.
6.
Turn thel<</>>ISCROLL/SEIECTdial
to
selectAll
stations
or a
genre
in
the
list, and then
press
7 . furn the l<<
/
>>l SCROLL/SELECT dial
to select
the
radio
station
you
want to listen to then
press
the
l(
/
)>l SCROTL/
SELECT dial to
confirm.
8.
lt
may take a
few seconds for
your
radio
to connect
to the
station then
you
will hear the station.
E@
ffi
Eil
E4
M
Page 25

Searching
for
a
Radio
Station
by
Name
lf
you know
the
name
of
the
radio
station
you can
type
the
station
name
into
the
search
and
find
it
that
way'
ro'
t*u'niLlt
Vou
want
to
listen
to
BBC
RADIO
1 simply
just
type
in
the
station
name.
1 .
ln
lnternet
radio
mode'
turn
the-l<{
/
Dl
SCRO-LL/SELECT
dial
to
select
Station
list'
Press
the
t<< /
Dl
SCROLL/SELECT
dial
to
confirm'
2.
Turn
the
l<<
/
>>l
SCROLL/SELECT
dial
to
select
Stations'
Press
the
l{{
/
}>1
SCROLL/
SELECT
dial
to
confirm'
3.
Turn
the
l<< /
)}l
SCROLL/SELECT
dial
to
select
Search
stations'
Press
the
l(
/
))l
SCROLL/SELECT
dial
to
confirm'
4.
Enter
the
name
of
the
radio
station'
and
then
select
OK'
Your
radio
will
now
display
a
list
of
all
the
stations
wii;
;;;;;*t'
select
your
desired
station
in
the
list'
Searching
for
Popular
Radio
Stations
Your
radio
has
a
list
of
the
most
popular
radio
stations'
these
station
could
be
from
any
country.
1.
ln
lnternet
radio
mode'
turn
the
l<{
/
Dl
SCROLL/SELECT
dial
to
select
Station
Iist'
Press
the
lt{ /
Dl
SCROLL/SELECT
dial
to
confirm'
2.
Turn
the
l<< /
>>l
SCROLL/SELECT
dial
to
selec-t
Stations'
-
pr"r,
if'"
r< /
Dl
SCROLL/SELECT
dial
to
confirm'
3.
Turn
the
lt{ /
>>l
SCROLL/SELECT
dial
to
select
Popular
stations.
Press
the
t<<
/
>>l
SCROLL/SELECT
dial
to
confirm'
ffi
Ery
Searching
for
Newest
Radio
Stations
Yourradiohasalistofthenewestradiostationsthathavebeenadded'thesestationcould
be
from
any
country'
'
il1"Tf":'i*,:,'i-""'lli,?',.'='.',iil,'.""'."j""i','.11"""
ffi
3.
Turnthel<</>>lscRoLL/sELEcrdialtoselectNew
-
stations.
Press
the
l{<
/
>>l
SCROLL/SELECT
dial
to
confirm'
25
Page 26

Saving
Preset
Stations
You can
store
up to
1 0
of
your
favourite
stations
to the memory'
This
will enable
you
to
access
your
favourite
stations
quickly
and
easily.
To store
a
preset, you must
first be
listening
to
the station
that
you
would
like
to save.
1.
Press and
hold
the
PRESET
button
on
your
radio'The Save
to
Preset
screen
will
be disPlaYed.
2.
Turn
the
l{<
/
>>l SCROLT/SELECT
dial
to
select
the
preset
position
you
want
to
store
the station
in.
3.
Press thel{{/DISCROIL/SELECTdial
to
confirm'
Recalling
a
Preset
Station
Once
you
have
saved
a station,
1. Press
the
PRESET
button
to recall
a
preset
station.
2. Turn
the
l<<
/
>>l SCROLL/SELECT
dial
to
select a
preset
station
you
wish
to
listen.
3.
Press
l((
/
Dl SCROLT/SELECT
dial
to
confirm.
When
you
are
listening
to a PRESET
radio
station
you
will
see
a star
and
a number
in the
display.
The
number
is the
preset
station
number.
r:il;::lirOi:i::ir:r.rr:'rr:::.:::.,:.
'
rifyou
choose
a
preset
that
has not been
allocated
a statiori,
the
display
will show"Preset
EmPtY".
riltmill
ffi
26
Page 27

i
Finding
Podcasts
You
can search for
podcasts
from
a
particular
country in
the
world,
by
genre
or
you
can search for
a
particular podcast
it
you
know its title.
1. ln lnternet
radio mode, turn the la{
/
Dl
SCROLL/SELECT
dial to select
Station
list. Press
the l<t<
/
Dl
SCROLL/
SELECT
dialto confirm.
2. Turn
thel<</>>ISCROLL/SELECTdial
to select
Podcasts.
Press
the l{(
/
}>l SCROLL/SELECT
dial to confirm.
3. You can now
search
for
your
Podcast by location,
genre
or if
you
know
the name ofthe Podcast
you
can enter
the
name
and search for it
directly.
Adding
q
stqtion while listening
to it
1.
While listening
to a radio
station
press
and hold
thet<</>>t
SCROLL/SELECT
dial button.
2.
The station
will now be stored
in a folder
called'Stationsl
Any
station
stored in
this way will
be
placed
in
the Stations folder.
@n
E@il
=
*
@
ffi
E@
ffi
Adding
Favourite
Radio
Stations
To make
it easier
to
find
the
radio
stations
that
you
like, you
can add
them to
the'My
favourites'list.
You
can add stations
while listening to them
or if
you
want
to add
multiple
radio
stations
and create folders for
your
favourite stations
then
you
need
to
go
to www.
wifi radio-frontier.com
Page 28

Adding
Stations
via
the
website
f;tore
vou
can
use
this
feature
you
must
register
with
the
website
www.wifiradio_frontier.
You
will
be
asked
to
enter your
email
address
and
the
radios
ACCESS
coDE.
The
access
code
can
be found
in
the
menu.
1
'
ln
lnternet
radio
mode, press
MENU
button.
Turn
the
r<t<
/
)>r
scRoLL/sELECT
diar
to
select
station
rist.
press
the
r<K
/>>r scRoLL/sELEcr
diar
to
confirm.
2'
Turn
the r<K
/
>>r
scRoLL/sELEcr
diar
to
serect
Help.
press
the
l{<
/
Dr
scRolu
SELECT
dial
to
confirm.
3.
Turn
the
t{<
/
Dl
SCROLT/SEIECT
dial
to
select
Get
access
code.
Press
the
l<<
/
>>l
SCROLT/SELECT
dial
to confirm.
4.
The
code
will
change
every
time
you
view
it.
5.
Once you
have
registered
you
can
search
and
view
radio
stations
in
a list
of
your
choice.
To
add
a station
to
the
My
Favourites
list
click
on
the
CD
symbol.
6.
Now
you'll
be
asked
to
choose
where
you
want
to
store
the
station.
You
can
crate
a
group
or select
one
that
F=-tu,fu;---l F'_ @_
--r
youhavealreadycreated.
I
-
ll
;"*'."""*
I
7'Youwillfindtheradiostationandqrouohavel..",'"*'''..ll
nowbeenaddedintotheMyfavrJuritefofO"r.
]..:;;",,.,. ;:_":,1 l' I
e
h-.--,,,,.."=-ll I
The
stations
stored
in
My
favourite
wiil
NoT
be
I
*
@
I I I
dereted
ifyou perform
a
Factory
reset.
I
I
i
j
m=
5
My
Added
Stations
Your
radio
has
a list
of
radio
stations
but if
you
find
a radio
station
that
is
not
on
the
list
you
can
add
it.
you
can
only
add
it
from
the
website
www.wifi
radio-frontier.com
1.
Login
to
the
website
and
click
on
My
added
stations
on
the
left
hand
side
ofthe
screen.Then
click
on
the
blue
arrow
symbol.
2.
Add
the
Station
name,
Station
URL,
Location,
Genre
andType
then
click
on the
blue
arrow
symbol.
This
radio
station
will
now
be
added
into,My
added
stations,on
your
radio.
16
Page 29

DAB
OPeration
ThefirsttimeyouuseDABmakesuretheaerialisfullyextendedbeforeselectingDAB
mode,
because
your radio
*irr
."i"*"'..lly
scan
for
DAB
radio
stations.
lf the
aerial
is not
fully
extended
your radio
will
not
tune
in
properly'
During
the
scan
the
display
will
show
Scanning
"'
together
with
a
slide
bar
that
indicates
the
progress
of
the
scan
and
the
amount
of
staiions
that
have
been
found
so
far'
oncethescanhasfinished,theunitwi|lbroadcastthefirstalphanumericallyfoundstation.
Turnthel.t{/)>lscRoLL/sELECTdialtoselectascannedDABstation,andthenpressthe
l<< /
>>l
SCROLL/SELECT
dial
to
confirm'
DAB
FullScan
TheFullScanwillsearchfortheentireDABBandl|lchannels.Afterthescanhasfinished,
ih;;;.1;;r"umericallyfound
station
will
be
automaticallv
selected'
o:
Full
scan
will
not
replace
the
DAB
stations
in
memory
lf
you want
io remove
all
the
previous
scanned
stations,
Factory
Reset
is required'
l.PressMENUbutton,andthenturnthelS(/}>lscRoLL/sELECTdialtoselectScan.
Press
the
l<< /
Dl SCROLL/SELECT
dial
to
confirm'
2,
The
display
will
show
Scanning
"'
Stations:
##
and
a
progressing
slide
bar'
3.Turnthel{</DISCRoLL/SELECTdialtoselectascannedDABstationinthestation
List,
and
then
press the
l{< /
>>l
SCROLL/SELECT
dial to
confirm'
ManuallyTuning
ln
DAB
Radio
Stations
Aswellastheautoscanfunction,youcanmanuallytunethemin
which
multiplex
the
station
you
are
looking
for
is
in'
1.
Press
MENU
button,
and
then
turn
the
l( /
)>l
SCROLL/
SELECT
dial
to
select
Manual
Tune.
Press
the
l{< /
>>l
SCROTL/
SELECT
dialto
confirm.
2.
Turn
thel{</DISCROLL/
SELECT
dial
to
select
a
multiPlex'
You
will
need
to
know
re
you
will
now
see
the
strengti.t
of
the
signal
for
your
chosen
multiplex.
You
won't
hear
anything
at
the
moment
3.
Now
view
the
Station
List
and
you will
find
any
new
radio
stations
that
have
been
manuallY
tuned
in.
Page 30

Secondary
Services
You
may see a )) symbol
after
the name of the
station,
this indicates
that
there are
secondary
services available
to that
station.These
secondary
services
contain extra
services
that
are
related
to
the
primary
station.
e.g.
a sports
station
may want
to add
extra
commentaries.The
secondary
services
are
inserted
directly
after the
primary
station
in the
station list.
To
select
the secondary station,
turn the t<<
/
Dl
scRoLL/sELEcr
dial
on the unit until
you
find
the secondary service
you
want,
then
press
the t<<
/
Dt
scRoLL/sELECT
dial
on the
unit
to select it.
when
the secondary
service
ends, the unit will
automatically
switch
back
to the
primary
stati on.
Station
List
1. Press
MENU button,
and then turn the l{{
/
)>t
scRoLL/SELECT
dial
to select station
list.
Press the l<<
/
>>l
SCROLLiSELECT
dia I
to confi rm.
.
2. The
display will
show a list
of DAB stations.
DR€
Setting
You can
set the DRC
(Dynamic
Range
compression)
to reduce
the
volume
of loud sounds
and increase
the
volume
of
quiet
sounds.
'l
. Press MENU
button,
and then turn the t{{
/}>t SCROLL/SELECT
dial
to select DRC.
Press
the l({
/
}>l
SCROLL/SELECT
dial to confirm.
2. Turnthel<t</>>t
scRoLL/sELEcrdial
toselectDRChigh/low/off,andthenpressthe
l<<
/
Dl
SCROLL/SELECT
dial to
confirm.
Station
Order
You
may wish
to arrange
the station listing order.
'1.
Press
MENU button,
and then
turn the
t<<
/
>>t
SCROLL/SELECT
dial to select
station
Order.
Press the l<<
/
Dl
SCROLL/SELECT
dial to
confirm.
2. Turn
the l{.(
/
>>l
SCROLL/SELECT
dial to
select Alphanumeric/Ensemble/Valid
order,
and then
press
the l{{
/
}>t
SCROLL/SELECT
dia I to
confi rm
the setii
n
q.
Saving
Preset
Stations
Youcanstoreupto10ofyourfaVourite5tation5tothememory@
This will
enable
you
to access
your
favourite stations quickly
and
easily.
To
store
a
preset,
you
must first
be
listening
to
the station
that
you
would
like to save.
1. Press
and hold
the PRESET
button
on
your
radio.The
Save
to Preset
screen will
be displayed.
2. Turn
the l<<
/
>>l
SCROLL/SELECT
dial to
select
the
preset
position
you
want
to store
the station in.
3. Pressthel{</DISCROLL/SELECTdial
toconfirm.
30
Page 31

Recalling
a
Preset
Station
Once
you
have
saved
a station,
you
can
recall
a
preset
station
by
pressing
the
preset
button.
1 .
Press the
PRESET
button
on the
unit
to
display
the Recall
from
Preset
menu.
2.
Turn
the l<<
/
>>t SCROLL/SELECT
dial
to select
a
preset
station
you wish to
listen'
3.
Pressthelt{/>}ISCROtt/SELECT
dial
to
confirm'
When
you
are listening
to
a PRESET
radio
station
you
will
see a
star
and
a number
in the
display.
The number
is the
preset
station
number.
o
':":'
ii
itiu'choose
a
preset
that
has not been
allocated
a
station,
the display
will
show"Preset
Empty".
#ilffi
ffi
@
@
ruM
--
A
I
31
Page 32

DAB
Display
Modes
Every
time
you
press INFO
on
the
unit,
the
display
will
cycle
through
the
following
display
modes'
DLS
(Dynomic
Label
Segment)
Dynamic
label
segment
is a
scrolling
message
that
the
broadcaster
may
include
with
their
transmissions'
The
message
usually
includes
information,
such
as
program details
etc.
ProgrammeTYPe
This
describes
the
style
of
the
programme
that
is
being
broadcast.
Multiplex
Name
/
Frequency
A
muliiplex
is a
collection
of
radio
stations
that
are
bundled
and
transmitted
on one
frequency'
There
are
national
and
local
multiplexes.
Local
ones
contain
stations
that
are
specific
to that
area.
The
frequency
of the
present station
will
be
displayed.
,,,,,'.'o
DAB
-
unlike
normal
radio,
groups together
several
radio
stations
and
transmits
them
on
one
frequency'
Signal
Error/
Signal
Strength
The
error
is shown
as
a number.
lf the
number
is
0'
it means
the
signal
received
is
error
free
and
the
signal
strength
is
strong.
lf
the error
rate
is
high,
it
isiecommended
to
reposition
the
radio
aerial
or
reposition
the
unit.
The
display
will
show
a slide
bar
to
indicate
the
signal
strength,
the
stronger
the
signal,
the
longer
the
bar
will
be
from
left
to
right.
Bit
Rate /
Codec /
Channels
The
display
will
show
the
digital
audio
bit
rate
being
received
with
additional
information
about
the
audio
codec
and
channel
configuration.
Date
This
displays
the
current
date
provided automatically
by
the
broadcaster.
Programme
TYPe
+
Multiplex
Name
/
Frequency
*
Signal
Error /
Signal
Strength
*
Bit
Rate /
Codec
/
Channels
I
t
Date
3C
DLS
+
Page 33

FM
OPeration
'J:'i"'T$:,i:,1Tll'1:1H'"i'H'[Sffi
if"'-:::LL/sELEcrdiartoserectFM
l{*H*i1k1##il+#*f*a{T,'rsirii1:ii::"fi:":#'T'
Auto
Scan
'
-
'-u
t*rScRoLL/sELEcr
dial
to
perform
auto
whiretstenins,:.:ly;'::f
ffi
::il::llifi'-l'l;i'ol,lio,"u'''ulu
scan'onceastation
haspeet'
-
''-rcrD..l
I /sELEcrdial'
-Or-
r-urn
the
r<<
/
p''::?^'.'J::o','"'l#':H:,i:iTflf::I'"Jilln::1""'i:lT:'"'""
Your
radio
will
search
tot
Manual
Tung
-u^
ruu I >)l scROLL/sELEcr
dial
until
your
desired
To
tune
FM
frequency
manually'
turn
the
l<<
/
>>l
St
frequencY
is
reached'
e _
--..L,.n
oqMHz.
lfreception
isstiil
poocadlustthe
positionof
i
x
T*t':
::l
:Jfi
';TH
:l':l$li
ili';
ill:::
:::"
"
Scan
Setting
;rfi-'U."1','+t"t:xif
*::l'-T:Til{#,:H::il'
,.
tr""
MENU
to
disPlaY
the
FM
menu'
,
.ru,n
*"
'<<
/
D'
s-c-1-o,sY:',liil'iE:1""T5!lil2l
o'''to
setting,
and
then
Pres
'
lffi;**Ul:l;'*',
:il"i!:"'''T#lftH;l::1il
ifi
iti'itiiotl/sElEcr
dial
to
confi
rm'
JO
i
Page 34

Audio
Setting
lf
you
find
that
the
station you
are listening
is
not
clear,
you
can
select
to listen
to
it in
Mono
this
can
often
clear
up
some
of
the
static.
1.
Press
MENU
to
display
the FM
menu.
2.
Turn
the l<K
/>>I
SCROLL/SEIECT
dial
to
select
Audio
setting,
and
then
press
the t<<
/
>>t
SCROLL/SELECT
dial
to
confirm.
3. Turn
the l<t<
/
)>l
SCROLL/SEIECT
dial
to
select
yES,
and
then
press
the
t<<
/
Dt
SCROLI/SEIECT
dial
to
confirm.
Saving
Preset
Stations
l9u
can store
up to
1 0
of
your
favourite
stations
to the
memory.
This
will
enable
you
to
access your
favourite
stations
quickly
and
easily.
To
store
a
preset,
you
must
first
be listening
to
the
station
that
you
would
like
to save.
1.
Press
and
hold
the
pRESET
button
on
your
radio.The
Saveto
Preset
screen
will
be
displayed.
2.
Turn
the
t<K
/
>>t
SCROTL/SELECT
dial
to
select
the
preset
position
you
want
to
store
the
station
in.
3.
Press
the t(
/
Dl
SCROTL/SELECT
dial
to
confirm.
Recalling
a Preset
Station
1.
Press
the
PRESET
button
to
display
the
Recall
from
preset
menu.
2.
Turn
the
t<K
/
Dt
SCROLL/SELECT
dial to
select
a
preset
station you
wish
to
listen.
3.
Press
the
l(
/Dt SCROLL/SELECT
dial
to
confirm.
When you
are listening
to a
pRESET
radio
station
you
will
see
a
star
and
a
number
in
the
display.
The
number
is
the
preset
station
number.
:1
1,,,,,,rQ,,,,,,.,,,,,,,,,",,,
i:r:ii,i::r:.::,,:
i.r,:.:,:,:..
..
lf
you
choose a preset
that
hasn,t
been
allocated
a
station,
"Preset
Empty"
will
be displayed.
.:
#
ry
ffi
ffi
Page 35

FM
Display
Modes
Every
time
you
press
INFO
<
modes,
if
avail[fu*-
....
_
on
the
unit,
the
display
will
cycle
through
the
following
display
Radio
Text
The
broadcaster
can
inclu
inro,m.tionuloil:'il:""rll3'n',.1n;*:.0,'o,ur
Programme
Tvoe
This
describes
t[e,,Styt",,or"Cenre,,of
music
that
is
being
broadcast.
S,tation
Name
/ Frequency
When
an
RDS
station
is
received,
the
name
of
that
station
will
be
displayed,
o,
if
not
if,.
i[;;;;,1,
be
displayed.
Dote
This
displays
the
current
dar
by
the
broadcaster-
te provided
automatically
Page 36

Bluetooth
OPeration
You
can
PraY
musicfrom:.t;:ffi::L,1il':"#:l3l#,T.:dios
speakers
usins
Bruetooth
mode.
First
You
must
Palr
Y(
?:111,lfif
"'#".',".?ilfr
3,i,"*U,Sll{fi
f
,'1,"#',''}'ff
lifr fi i:T'
Bluetooth
Audio
mod
Bluetooth
logo
will
stt;;;;t;
l;lte
oispruv'
rrtis
'r'o*t
ttlut
tnt
radio
is
in
pairins
mode'
-
--r
'^16'r
rhp search
mode'"RA-D58B"will
appear
on
? Activate
yo
ur
Bluetooth'
device
and
select
the
seat
I
::L:llt;T;n:Ti::r
"000-0"
ro
r
the
n'iy:'o
ir
n
ece
ssa
ry
o
nce
serected
the
Bluetooth
logo
on
tntl'J'I""
*u'
'to-f
flashing'vo'l""it"
't
now
paired
with
the
unit'
PIaYing
Music
via
Bluetooth
You
may
need
to
tdi"u
tnJJ"i'me
on
your
ttdl:-t"O
Bluetooth
device'
.
Press
the
>lilPAlR
button
to
play/pause
mustc
.
Turn
the
lt{
/
)>l
SCROLL/SELECT
dial
to
skip
to
the
previous/next
track'
?i:::1"',,'.':1fl
"1.tJ1""'::JI"T:ff
-*''eitherrromtheradioorrromvourBruetooth
:eritwe.ryog-
36
Page 37

M,usi
g
Playel
OPeration
The
built-in
Music
player allows
you to
play
unprotected
audio
files
stored
on
a networked
computer.
To
play
music
from
the
computer,
you
must
setup a shared
file or
media
library
on
the
computei.
press
the
MODE
button,
and
then
turn the
l<<
/
>>l SCROLL/SELECT
dial
to
select
Musi<
Player
mode.
Press
the
t<< /
>)l SCROLL/SELECT
dial
to
confirm.
Media
Sharing
Ensure
that
your
computer
is available
on the
network,
and that
your
computer
is set
up
to
allow
sharing
your media
folders
or
files. Check
how
to setup
a
folder
for sharing
from
your computer's
instruction
manual'
1.
ln Music
player mode,
turn
the
l<<
/
>>l SCROLL/SEIECT
dial
to select
Shared
media
and
press the
l({
/
)>l
SCROLL/
SELECT
dial to
scan
for
all
the available
shared
media
folders
or files.
3.
4.
The
display
will
show
all
found
media
folders
from
the
network.
Turn the
l<< /
>>l SCROLL/SELECT
dial
to select
the
computer
that
you
wish
to
connect
to.
The
unit
will
search
for all
shared
media
from
the
computer'
Turn
the
lt{
/
}>l SCROLL/SELECT
dial
and
select
your
desire
shared
media,
and
then
press
the l( /
Dl SCROLL/SELECT
dial
to confirm.
My
Playlists
You can
add
any of
your songs
that
are stored
on
your
PClMedia
server
into My
playlist.
This
allows
you
to add
your
favourite
tracks
to an
easily accessible
place
so
you
don't
have
to search
though
album
after
album
to
find
you favourite
tracks'
1 . Find
a track
that
you
want
to add
to
My
playlist,
and
then
press
and
hold
the 1<<
/
>>l
SCROLL/SELECT
dial.
A
message
will
pop
up
showing
the track
has been
added
to
my
playlists.
2. PressMENUandthenturnthe
EnffiGn
EC+*?fl
*fffiffiil
have saved
to
MY
PlaYl
Page 38

Clearing
My
Playlist
1. Press
MENU,
and
then
turn
the
l<<
/
DI SCROLL/SEIECT
dial
to
select
Clear
My
PlaYlist.
Press
the
l<< / >>l
SCROLT/SELECT
dial
to
confirm.
2. Turn
thel<</>>ISCROLI/
SELECT
dial
to
select
YES,
and
then
press
the
l<< /
>}l SCROLL/SELECT
dial
to confirm'
3.
Allthe
tracks
will
now
be
removed
from
the
My
playlist'
Repeat
Play
'1.
Press
MENU,
and
then
turn the
l<<
/
>>l SCROLL/SELECT
dial
to select
RePeat
PlaY.
Press
the
l<<
/
Dl SCROLL/SELECT
dial
to
confirm.
2.
The
word'ON'will
aPPear
in the
menu, and
the
repeat
logo will
appear
in the
track
view
Shuffle
Play
'l
. Press
MENU,
and
then
turn
the
l<< / >>l SCROLL/SELECT
dial
to select
Shuffle
PlaY'
Press the
I<K
/
>H SCROLL/5ELECT
dial to
confirm.
2. Theword'ON'will
aPPearin
the
menu, and
shuffle
logo
will appear
in
the
track
view.
Track
lnformation
To see information
about
the
current
track
that
is
playing
repeatedly
press
the lNFo
button.
You
will
see the
following:
Track time
-
Artist
-
Album
-
Bit
rate
/
codec /
sampling
Rate
-
Playback
Buffer
-
Todays Date
ffiffi
ffiffi
Page 39

USB
OPeration
wh
e
n
a
u
5
B
d
ev
i
ce
i
s':
"
"
"'i:l,:",il:
::' htl,::';
llXtt'HJ';
[iTJiy;:,i::i'H'-'3ili''.i'*'ySl::#f,
l',:l:'*'
"#$'f,
:ffi
:n:'-t"t!?::'1i
"
*'
*'
t
cRo
LL/
sELEcr
:'''llil:.ii1,;:r11"j::L'I"jilJfi
f
,',i*il:i'j':'
ri.t rn <plect
USB
Playb
lii
otlitttttr
dialto
confirm'
tt)
:
Y"
unit.un
only
play
MP3
file
format
in
USB
operation
#,;;';'il
dl
::l::i:l
illll,o,,o,
o,,".o,u
The
unit
can
supp''
utu
dl11liil,Li'..'
i,iu
0"""*'
*is
is
not
an
The
unit
may
not
be
compatible
v
',:
indication
of
a
Problem
with
the
unit,
AUX
lN
OPeration
Before
connecti"s."1.1:
T,1ff,jliiiil,ilj,lifii^l1**'ii:::1""""::i:':"$""1il':"j;?]to
l"^"""
.
u""r
external
audio
device
tn:::::
-:;;
;cRoLL/sELEcr
dial
to
select
AUX
,1
Press
the
MoDE
button'
ani:['Jru[i1".i'ilui,l
'ono'n]'
in
mode'
Press
the
l<<
'
2.
Turn -VOLUME+
dial
to
increase/decrease
thevolume'
3.lnAuxinmode'vou,"t;;;:;t;;raudiodevicedirectlvforplavbackfeatures'
O
-::::i*t"l
audio
device'
refe'
.o
*"
";;;t;;;un'io
o"n"
"*"'nal
device;as
well'I
'
When
connecting
the
e)
'
L
iilr
'i.;;.1
-
-L
^,
---
ha ronnected
to
the
unit
are:
Portable
MP3
Players'
.
r".''
o'
"'
"'
"-'":::l
:l#ri""J"li',jl$
;il|,",,'"":
*""'
Cassette
Players'
Mini
ulsc
rrdycr
)
e
' -
r'
'
Maintend!!-C.9-.r,,,,,,...,,,.,,.,r,,r,,,,,,r
""
Cleaning
the
Unit
A
!
'r"
"^nl"gged
from
the
mains
socket
before
cleaning'
Ensure
the
unit
is
fullY
unPtu
.
To
clean
the
unit'
wipe
the
case
with
a
slightly
moist'
lint-free
cloth'
.
Do
not
use
any
O"t"'"n
OtO"ontuinlng
alcohol'
ammonia
or
abrasives'
.
oo
not
spray
aerosol
at
or
near
the
unit'
39
Page 40

Hints
and Tips
lf
a
problem
does
occur,
it may
often
be due to
something
very
minor.
The following
table
contains
various
tips. lf
you
require
additional
assistance
.
For
UK,
please
call
our
UK Call
Centre on 0344
561 1234.
.
For
lreland,
please
call
our lreland
Call
Center
on I
g9O
gl8
575.
Ensure
the mains
plug
is
connected.
Make
sure that
you
select
the
ON
mode.
No
sound from
the
unit.
Please
try either
one
of
the solutions
below:
.
Make
sure that the
unit is
not
muted.Turn
the
-VOLUME+
dial on the
unit to
resume
normal
listening.
.
Press O
on the unit
to switch
the unit
to
standby
mode.
Then
press
the
button
again
to switch
the unit
on.
.
Unplug
the unit from
the
mains
socket,
then
plug
them
again.
Switch on
the
unit.
The
unit does not
respond
when
pressing
any buttons.
The
unit may freeze
up
during
use.
Switch
the
unit off
and
then on
again at
the
mains
socket
to reset
the
unit.
Poor
radio
reception.
.
Make
sure the DAB/FM
aerial
is fully
extended.
.
Electrical
interference
in
your
home
can
cause
poor
reception.
Move
the
unit
away
from
them
(especially
those
with motors
and
transformers).
.
Weak signal.
Search
manually.
.
lf reception
is still
poor,adjustthe
position
oftheaerial.
.
Make
sure
the Wi-Fi
router
is
plugged
in
and
working.
.
Reconnect
the radio
to
your
Wi-Fi.
Check
you
radio
is
within
5m
of
your
router.
Can't
hear
the radio
station
.
Sometimes
the
Wi-Fi
connection
is
temporary
lost
or
connection
is weak,
check
the
Wi-Fi
connection
or move
the
radio
closer
to
your
router.
.
Not all
radio stations
transmit
24
hours
a day,
they might
not
be transmitting.
.
Not
all radio
stations
transmit
at the
same
volume
level you
need
to increase
the
volume.
40
Page 41

;""r*-h.
BG;th
function
is
activated
on
your
Bluetooth
device.
Re-oair
the
unit
with
your
Bluetooth
device'
icannot
find
"RA-D58B"
Can't
hear
the
music
Y*,
t".y
*"d
t"
'tcr*se
the
volume
on
the
radio
and
*r1@
'-:::-@
'
lf
any
functional
abnofm?liy'
again.
Page 42

Product
Fiche
and Specifications
DYS61 2-060200W-3
Dongguan Dongsong
Electronic Co.,
Ltd.
1
00
-
240 V
-
50/60 Hz, 0.4 A
12W
2x2WRMS
5V
-_
1000mA
Main unit: app. 1440
g
Adapter:
app.
1
'15
g
245 mm x 160 mm
x
130 mm
How to
activate wireless
network
port:
.
Connect
the unit
with
power
.
Switch to wireless
mode
(e.9.
lnternet,
Music
player)
How to deactivate
wireless network
port:
.
Go to Main menu
-
System
settings
-
Network
-
Keep network connected.
Select
No and then
press
the.l<< /
>>l
SCROLL/SEIECT
dial
to keep network disconnected
(p.1
a-1 s).
FM
87.50 - 108.00 MHz
DAB 174.928 - 239.200 MHz
2412
-
2472 MHz
Features and specifications
are subject to
change without
prior
notice
Page 43

Useful
lnformation
and
Licences
Team
Knowhow
HelP
with
all
life's
kif
PartmasEen
CO UK
For oeneral
information
about
appliances'
uia"f-runit
hints
and
tips
check
out
Kit
Guides
at
lreland:
1890
818
575
teamknowhow.com
or
call
UK:0344
561
1234
VisitPartmaster.co.uktodayfortheeasiestwaytobuyelectricaI
$;:;ffi:;"-i"i
wiir'
""::l
I'1i::-'::::: :l*:TI:::,:
t-:---l
spares
dllu
dLLs)Jvr
rLJ
"
-
-
'
,+ .t.., t/i<it rnrww.oartmaster.co.uk
or
available
we
can
dellver
direct
to
your
door
the
very
next
day'
Visit
www'partmaster
call
0344
800
:+SO
(Uf
customers
only)'
Calls
charged
at
National
Rate'
',si*,n#[*l
,'J;;:ffi,l:'il:;fi:I-::TJ;:J:'"".1::i;1,io'"'*
'"o
oAB+
which
is a
future
X
-
The
svmbol
on
the
product
or
its
packaging
indicates
that
this
product
;;tiil;";;;o'!Jor
*itr.'
v'ur
othei
household
waste'
lnstead'
it
is
your
responsibility
to
dispose'of
your
waste
equipment
by
handing
it
over
io
a
designated
collection
p"tn'
iot
tft"
recycling
of
waste
electrical
and
electronic
equipment'The
"fu'ut"
collection
and
recy^cling
of
your
waste
equipment
at
the
time
of
diiposal
will
help
conserve
natural
resources
and
ensure
that
it
is
recycled
'n
u"tunn"'
tftut
protects
human
health
and
the
environment.
For
more
information
about
where
you
can
drop
off
your
waste
for
recycling,
please
contact
y*t
ioluliuil'tority'
or
where
you
purchased
your
product.
TheB/uetoofh'wordmarkandlogosareregisteredtrademarksownedbytheBluetoothSlG,
tnc.
and
any
use
of
such
*til
;;;;;
;"#t
litittd
is
under
license'
other
trademarks
and
trud"
nu*"t
are
those
of
their
respective
owner'
Alltrademarksarethepropertyoftheirrespectiveownersandallrightsareacknowledged.
Page 44

Dear Customer,
This
apparatus is in conformance with the valid
European
directives compatibility
and
electrical
safety.
European representative
of the manufacturer
is:
DSG
Retail Ltd.
(co.
no.504877)
1 Portal Way, London, W3 6RS,
UK
The
product
is
distributed and warranted
exclusive
by DSG
Retail Ltd.
"JVC"is
the
trademark of
JVC
KENWOOD
Corporation,
used
by DSG Retail Ltd.
under license.
flB-RA-D58B-1
8061
3V1
)
 Loading...