

Page 1
COMPACT COMPONENT MD SYSTEM
CA-MXS6MDR
STANDBY
/ON
LEVEL
METER
DIMMER
COMPACT COMPONENT MD SYSTEM MX-S6MDR
LINE
RM-SMXS6MDR
REMOTE CONTROL
MENU
SP/LP2/LP4
LONG
REC
MODE
MODE
REC PAUSE
HIGH SPEED
CD MD
DISC LOADING MECHANISM
TITLE/EDIT
PHONES
DISC
ENTER
/DEMO
LINE 2
COMPACT
DIGITAL AUDIO
INSTRUCTIONS
For Customer Use:
Enter below the Model No. and Serial
No. which are located either on the rear,
bottom or side of the cabinet. Retain this
information for future reference.
Model No.
Serial No.
LVT0528-001A
[B]
Page 2

Warnings, Cautions and Others
IMPORTANT for the U.K.
DO NOT cut off the mains plug from this equipment. If the
plug fitted is not suitable for the power points in your
home or the cable is too short to reach a power point,
then obtain an appropriate safety approved extension
lead or consult your dealer.
BE SURE to replace the fuse only with an identical
approved type, as originally fitted.
If nontheless the mains plug is cut off ensure to remove
the fuse and dispose of the plug immediately, to avoid a
possible shock hazard by inadvertent connection to the
mains supply.
If this product is not supplied fitted with a mains plug then
follow the instructions given below:
IMPORTANT:
DO NOT make any connection to the terminal which is
marked with the letter E or by the safety earth symbol or
coloured green or green-and-yellow.
The wires in the mains lead on this product are coloured
in accordance with the following code:
As these colours may not correspond with the coloured
markings identifying the terminals in your plug proceed as
follows:
The wire which is coloured blue must be connected to the
terminal which is marked with the letter N or coloured
black.
The wire which is coloured brown must be connected to
the terminal which is marked with the letter L or coloured
red.
IF IN DOUBT - CONSULT A COMPETENT ELECTRICIAN.
Blue : Neutral
Brown : Live
Caution –– switch!
Disconnect the mains plug to shut the power off completely
(the STANDBY/ON lamp goes off).
The switch in any position does not disconnect the
mains line.
• When the unit is on standby, the STANDBY/ON lamp
lights red.
• When the unit is turned on, the STANDBY/ON lamp lights
green.
The power can be remote controlled.
CAUTION
To reduce the risk of electrical shocks, fire, etc.:
1. Do not remove screws, covers or cabinet.
2. Do not expose this appliance to rain or moisture.
– G-1 –
Page 3

IMPORTANT FOR LASER PRODUCTS
REPRODUCTION OF LABELS
1 CLASSIFICATION LABEL, PLACED ON REAR
ENCLOSURE
CLASS 1
LASER PRODUCT
1. CLASS 1 LASER PRODUCT
2. DANGER: Invisible laser radiation when open and interlock
failed or defeated. Avoid direct exposure to beam.
3. CAUTION: Do not open the top cover. There are no user
serviceable parts inside the Unit; leave all servicing to
qualified service personnel.
2 WARNING LABEL, PLACED INSIDE THE UNIT
DANGER: Invisible laser
radiation when open and
interlock failed or defeated.
AVOID DIRECT EXPOSURE
TO BEAM. (e)
ADVARSEL: Usynlig laserstråling ved åbning, når
sikkerhedsafbrydere er ude
af funktion. Undgå udsættelse for stråling (d)
VARNING: Osynlig laserstrålning när denna del är
öppnad och spärren är
urkopplad. Betrakta ej
strålen. (s)
VARO: Avattaessa ja suojalukitus ohitettaessa olet
alttiina näkymättömälle
lasersäteilylle. Älä katso
säteeseen. (f)
Caution: Proper Ventilation
To avoid risk of electric shock and fire, and to prevent damage,
locate the apparatus as follows:
1 Front:
No obstructions and open spacing.
2 Sides/ Top/ Back:
No obstructions should be placed in the areas shown by
the dimensions below.
3 Bottom:
Place on the level surface. Maintain an adequate air path
for ventilation by placing on a stand with a height of 10 cm
or more.
Front view Side view
16.5 cm
27 cm
15 cm
1 cm1 cm
15 cm
CA-MXS6MDR CA-MXS6MDR
10 cm
15 cm
27 cm
– G-2 –
Page 4

Introduction
We would like to thank you for purchasing one of our JVC products.
Before operating this unit, read this manual carefully and thoroughly to
obtain the best possible performance from your unit, and retain this manual
for future reference.
About This Manual
This manual is organized as follows:
• This manual mainly explains playback operations
using the remote control, and the other operation
such as recording and editing operations using the
buttons and controls on the unit.
You can use the buttons and controls both on the
remote control and on the unit for the same
operations if they have the same or similar names (or
marks), unless mentioned otherwise.
• Basic and common information that is the same for
many functions is grouped in one place, and is not
repeated in each procedure. For instance, we do not
repeat the information about turning on/off the unit,
setting the volume, changing the sound effects, and
others, which are explained in the section “Basic and
Common Operations” on pages 10 – 14.
• The following marks are used in this manual:
Gives you warning and caution to prevent
from damage or risk of fire/electric shock.
Furthermore, gives you information which
is not good for obtaining the best possible
performance from the unit.
Gives you information and hints you had
better know.
Indicates that you have to refer to the
menu operation.
Precautions
Installation
• Install in a place which is level, dry and neither too hot
nor too cold — between 5˚C (41˚F) and 35˚C (95˚F).
• Install the unit in a location with adequate ventilation to
prevent internal heat buildup in the unit.
• Leave sufficient distance between the unit and the TV.
• Keep the speakers away from the TV to avoid
interference with TV.
DO NOT install the unit in a location near heat
sources, or in a place subject to direct sunlight,
excessive dust or vibration.
Power sources
• When unplugging the unit from the wall outlet, always
pull the plug, not the AC power cord.
DO NOT handle the AC power cord with wet
hands.
Moisture condensation
Moisture may condense on the lens inside the unit in the
following cases:
• After starting heating in the room
• In a damp room
• If the unit is brought directly from a cold to a warm place
Should this occur, the unit may malfunction. In this case,
leave the unit turned on for a few hours until the moisture
evaporates, unplug the AC power cord, then plug it in
again.
Others
• Should any metallic object or liquid fall into the unit,
unplug the AC power cord and consult your dealer before
operating any further.
• If you are not going to operate the unit for an extended
period of time, unplug the AC power cord from the wall
outlet.
DO NOT disassemble the unit since there are no
user serviceable parts inside.
If anything goes wrong, unplug the AC power cord and
consult your dealer.
– 1 –
Page 5

Contents
Location of the Buttons and Controls........... 3
Main Unit ............................................................... 4
Remote Control...................................................... 5
Getting Started................................................ 6
Unpacking .............................................................. 6
Connecting Antennas ............................................. 6
Connecting Speakers.............................................. 7
Connecting Other Equipment ................................8
Putting the Batteries into the Remote Control ....... 9
Basic and Common Operations................... 10
Turning On the Power .......................................... 11
Selecting the Sources and Starting Play .............. 11
Adjusting the Volume........................................... 12
Reinforcing the Bass Sound................................. 12
Selecting the Display Brightness ......................... 12
Selecting the Level Meter .................................... 13
Selecting the Sound Modes.................................. 13
Creating Your Own Sound Mode
— MANUAL Mode ...................................... 14
Listening to FM and AM (MW/LW)
Broadcasts ..................................................... 15
Tuning in a Station............................................... 16
Presetting Stations................................................ 16
Tuning in a Preset Station .................................... 17
Receiving FM Stations with RDS........................ 17
Changing the RDS Information ........................... 18
Searching for Programs by PTY Codes
(PTY Search) ................................................. 18
Switching to a Program Type of Your Choice
Temporarily ................................................... 19
• How the EON function actually works...... 20
• Description of the PTY codes .................... 21
Playing Back CDs ......................................... 22
Loading CDs ........................................................ 23
Playing Back the Entire Discs
— Continuous Play........................................ 23
Basic CD Operations ........................................... 24
Programing the Playing Order of the Tracks
— Program Play ............................................24
Playing at Random — Random Play ................... 26
Repeating Tracks or CDs — Repeat Play............ 27
Prohibiting Disc Ejection — Disc Lock .............. 27
Playing Back an MD..................................... 28
Playing Back the Entire MD — Normal Play...... 29
Basic MD Operations........................................... 29
Programing the Playing Order of the Tracks
— Program Play ............................................30
Playing at Random — Random Play ................... 31
Repeating Tracks — Repeat Play ........................ 32
Recording on MDs ........................................ 33
Before You Start Recording ................................. 34
Recording Any Sound Source
— Standard Recording ..................................36
Recording CDs — CD Synchronized Recording... 37
• All CDs Synchronized Recording.............. 37
• One CD Synchronized Recording.............. 38
• First Track Recording ................................ 39
Recording the External Equipment
— Sound Synchronized Recording ...............40
Editing MDs .................................................. 41
Introducing MD Editing Functions ...................... 42
DIVIDE Function ................................................ 43
JOIN Function...................................................... 44
MOVE Function................................................... 44
ERASE Function.................................................. 45
ALL ERASE Function......................................... 46
Making Your Own Titles and Screens......... 47
Assigning Titles to an MD ................................... 48
Creating Your Own Opening and Ending Screens ..... 52
Using the Timers........................................... 53
Setting the Clock.................................................. 54
Using Recording Timer........................................ 54
Using Daily Timer ............................................... 56
Using Sleep Timer ............................................... 59
Timer Priority....................................................... 59
Using the Other Convenient Functions....... 60
Sound Setting ....................................................... 62
FM Reception Mode Setting................................ 62
CD and MD Playback Mode Setting ...................62
Display Setting..................................................... 63
External Source Setting ....................................... 65
Auto Power Off Setting........................................ 66
• To store the display setting in memory ...... 66
Maintenance .................................................. 67
Additional Information ................................ 68
MD Disc Types ....................................................68
ATRAC (Adaptiv e TRansform Acoustic Coding)/
ATRAC3 ( ) ........................................68
UTOC (User Table Of Contents) .........................68
Sound Skip Guard Memory ................................. 68
SCMS (Serial Copy Management System).......... 69
HCMS (High-speed Copy Management System) .. 69
• MD limitations ........................................... 69
MD Messages ................................................ 70
Troubleshooting ............................................ 71
Specifications................................................. 72
– 2 –
Page 6
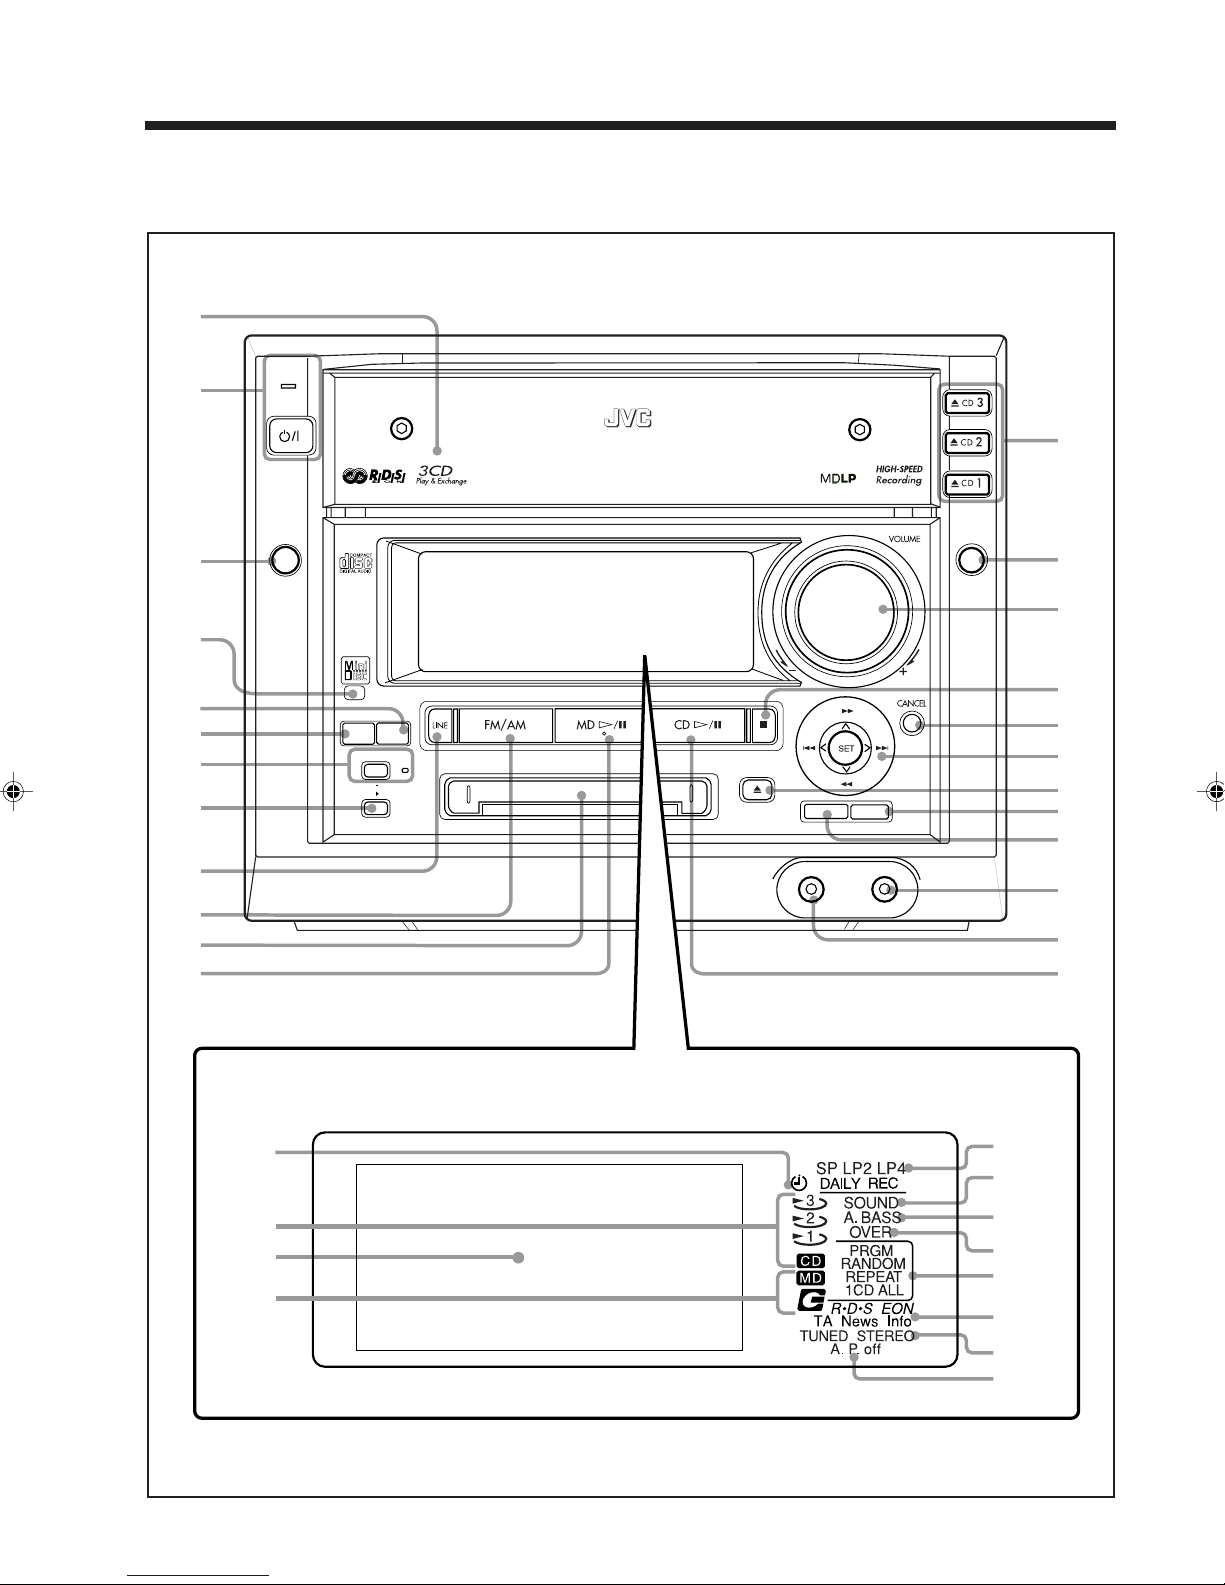
Location of the Buttons and Controls
Become familiar with the buttons and controls on your unit.
Main unit
1
STANDBY
/ON
2
COMPACT COMPONENT MD SYSTEM MX-S6MDR
e
3
4
5
6
7
8
9
p
q
w
Display Window
MENU
SP/LP2/LP4
LONG
MODE
REC PAUSE
HIGH SPEED
CD MD
MODE
DISC
r
t
y
REC
u
i
DISC LOADING MECHANISM
PHONES
TITLE/EDIT
ENTER
/DEMO
LINE 2
o
;
a
s
d
f
g
h
j
k
l
/
z
x
c
v
b
n
– 3 –
Page 7

Continued
See pages in the parentheses for details.
Main Unit
1 Disc trays (23)
2
3 MENU button (14, 54 – 66)
4 Remote sensor
5 REC MODE button (38 – 40)
6 LONG MODE (SP/LP2/LP4) button (35 – 40)
7 REC PAUSE button and lamp (36)
8 HIGH-SPEED CD 3 MD button (37)
9 LINE button (11, 40)
p FM/AM button (11, 16)
q MD loading slot (29)
w MD # / 8 (play/pause) button (11, 29)
e 0 CD1, 0 CD2, 0 CD3 (open/close) buttons (23)
r DISC button (23)
t VOLUME control (12)
y 7 (stop) button (11, 23, 29, 37, 66)
u CANCEL button (25, 31, 43, 49, 54)
i Joy control
o MD 0 (eject) button (29)
; ENTER/DEMO button (9, 49, 50, 52, 66)
a TITLE/EDIT button (43 – 46, 48 – 50)
s LINE 2 jack – stereo mini type (8)
d PHONES jack – stereo mini type (12)
f CD # / 8 (play/pause) button (11, 23)
(Standby/On) button and STANDBY/ON lamp
(11)
• Pressing this button also turns on the unit.
• Pressing this button also turns on the unit.
• Pressing this button also turns on the unit.
• Pressing one of these buttons also turns on the unit.
• 1
/ ¡ / 4 / ¢ , and SET
Pressing SET also turns on the unit.
• Pressing this button also turns on the unit.
• Pressing this button also turns on the unit.
Display window
g Timer mode indicators (54 – 58)
•
, DAILY (Daily Timer) and REC (Recording
Timer)
h CD indicators (23)
• CD source and CD numbers 1 to 3
j Main display
• Shows the source name, track number, and other
information.
k MD indicators (29)
• MD source and MD insertion
l Recording length mode indicators (35)
• SP, LP2, and LP4
/ SOUND indicator (13)
z A. BASS (Active Bass Extension) indicator (12)
x OVER indicator (65)
c Play mode indicators (24 – 27, 30 – 32)
• PRGM (Program), RANDOM, and REPEAT (1/CD/
ALL)
v RDS operation indicators (17, 19)
• RDS, EON, and TA/News/Info
b Tuner mode indicators (16)
• TUNED and STEREO
n A. P. off (Auto Power Off) indicator (66)
STANDBY
/ON
COMPACT COMPONENT MD SYSTEM MX-S6MDR
MENU
SP/LP2/LP4
LONG
REC
MODE
MODE
REC PAUSE
HIGH SPEED
DISC LOADING MECHANISM
CD MD
PHONES
DISC
ENTER
TITLE/EDIT
/DEMO
LINE 2
About the indications in the main display
When using some functions with the remote control, the indications in the main display appear differently at first from those when using
the same functions with the buttons on the unit.
Ex. When starting CD play
using the remote control
This indication does not appear when using the buttons on the unit
except the following:
• When selecting the playback source.
• When calling up the menu, MD editing mode, or title entry mode
When using the remote control, point it at the remote
sensor on the front panel.
– 4 –
Page 8
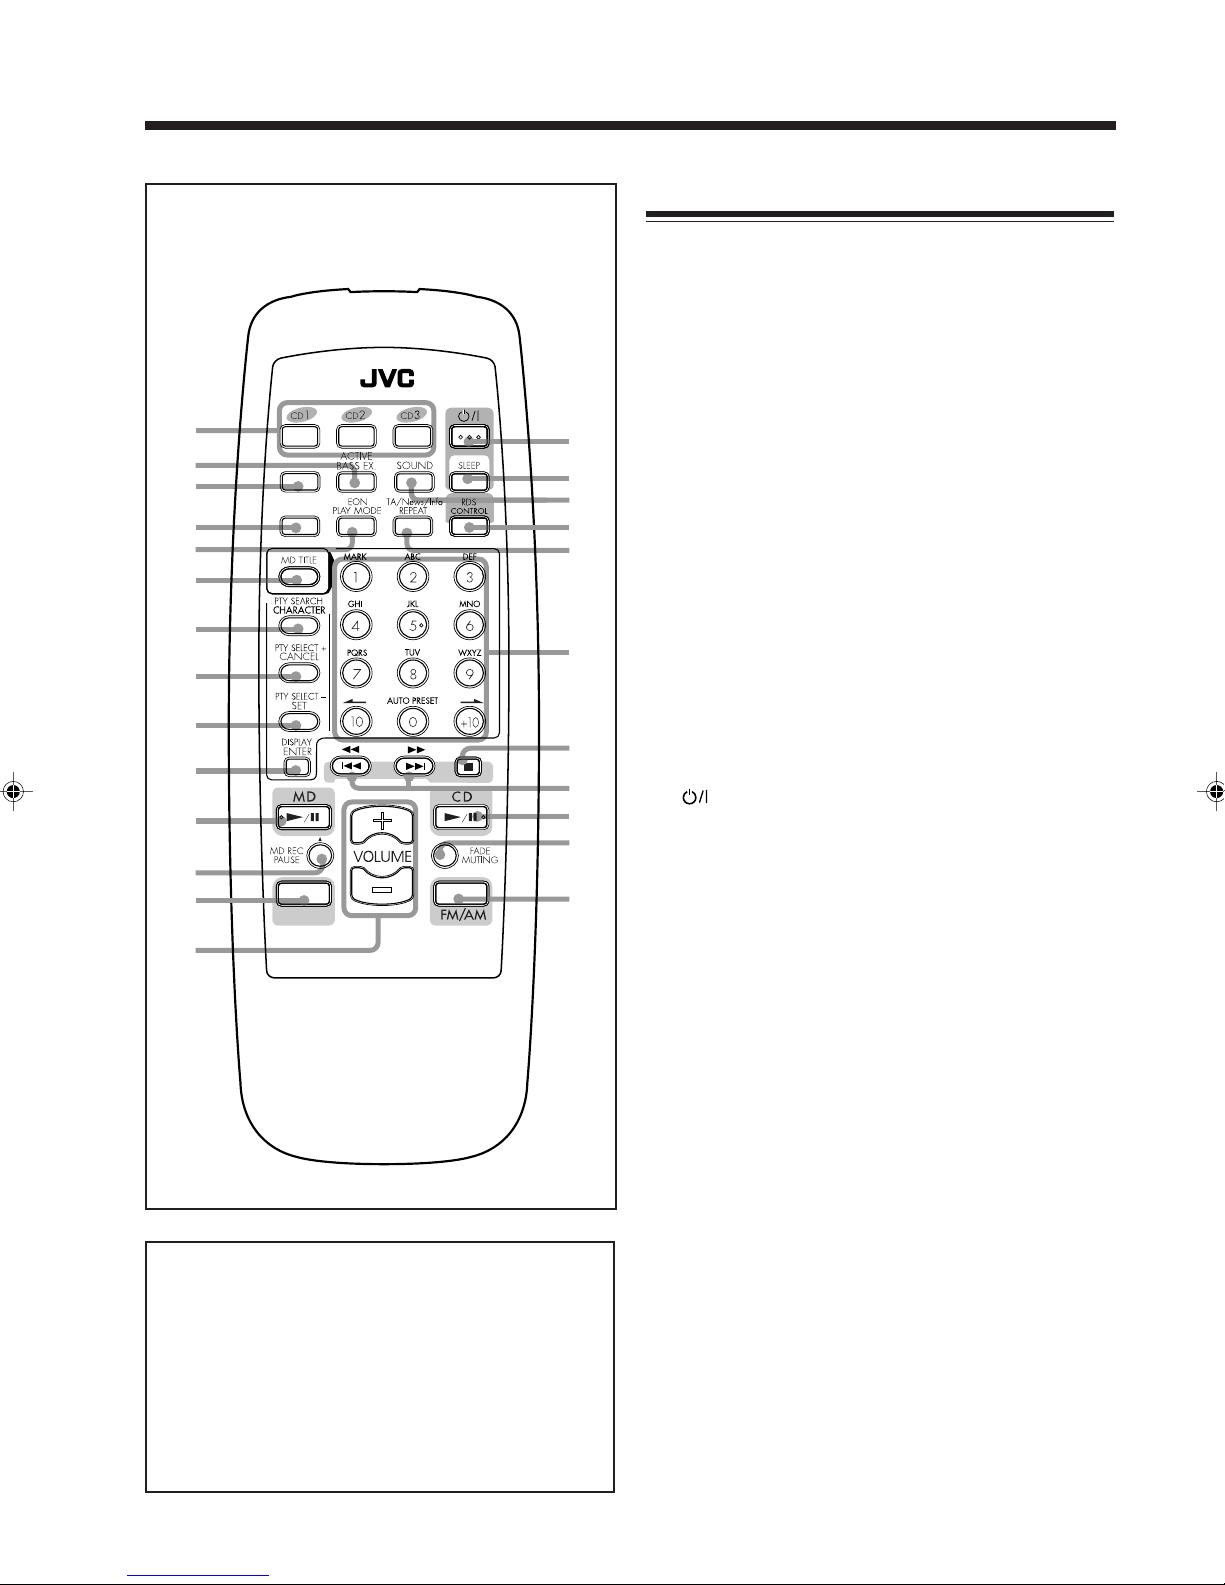
Remote Control
1
LEVEL
2
3
METER
DIMMER
4
5
6
7
8
9
p
q
w
e
r
* When using the remote control:
For RDS operations, press RDS CONTROL on the remote
control before using the buttons (5, 7, 8, 9, p and o).
For entering MD titles, press MD 3 / 8 and MD TITLE
on the remote control before using the buttons (7, 8, 9,
p, and ;).
LINE
RM-SMXS6MDR
REMOTE CONTROL
t
y
u
i
o
;
a
s
d
f
g
Remote Control
1 Disc number buttons (23)
• CD1, CD2, and CD3
Pressing one of these buttons also turns on the unit.
2 ACTIVE BASS EX. (extension) button (12)
3 LEVEL METER button (13)
4 DIMMER button (12)
5*PLAY MODE button (24, 26, 30, 31)
EON button (19)
6 MD TITLE button (50 – 52)
7*CHARACTER button (51)
PTY SEARCH button (18)
8*CANCEL button (25, 31, 51)
PTY SELECT + button (18)
9*SET button (51)
PTY SELECT – button (18)
p*ENTER button (51)
DISPLAY button (18)
q MD 3 / 8 (play/pause) button (11, 29)
• Pressing this button also turns on the unit.
w MD REC PAUSE button (36)
e LINE button (11, 36)
• Pressing this button also turns on the unit.
r VOLUME + / – button (12)
t
y SLEEP button (59)
u SOUND button (13)
i RDS CONTROL button (18)
o*REPEAT button (27, 32)
;*Number buttons
a 7 (stop) button (11, 23, 29, 37)
s 4 / ¢ (reverse search/forward search) button
d CD 3 / 8 (play/pause) button (11, 23, 24)
f FADE MUTING button (12)
g FM/AM button (11, 16)
(Standby/On) button (11)
TA/News/Info button (19)
• 1 – 10, +10 buttons (17, 24, 30)
• Character entry buttons (A – Z, 0 – 9) (51)
• ø / Ø buttons (50, 51)
• AUTO PRESET button (16)
(24, 25, 29 – 31)
1 / ¡ (fast-reverse/fast-forward) button
(16, 24, 29)
• Pressing this button also turns on the unit.
• Pressing this button also turns on the unit.
After using these buttons for RDS operations and entering MD
titles, make sure to change the operation mode of the remote
control to the one you want to use by pressing MD 3 / 8 (q),
CD 3 / 8 (d), or FM/AM (g).
– 5 –
Page 9

Getting Started
Continued
Unpacking
After unpacking, check to be sure that you have all the
following items.
The number in the parenthesis indicates the quantity of the
pieces supplied.
• AM loop antenna (1)
• FM antenna (1)
• Remote control (1)
• Batteries (2)
If any is missing, consult your dealer immediately.
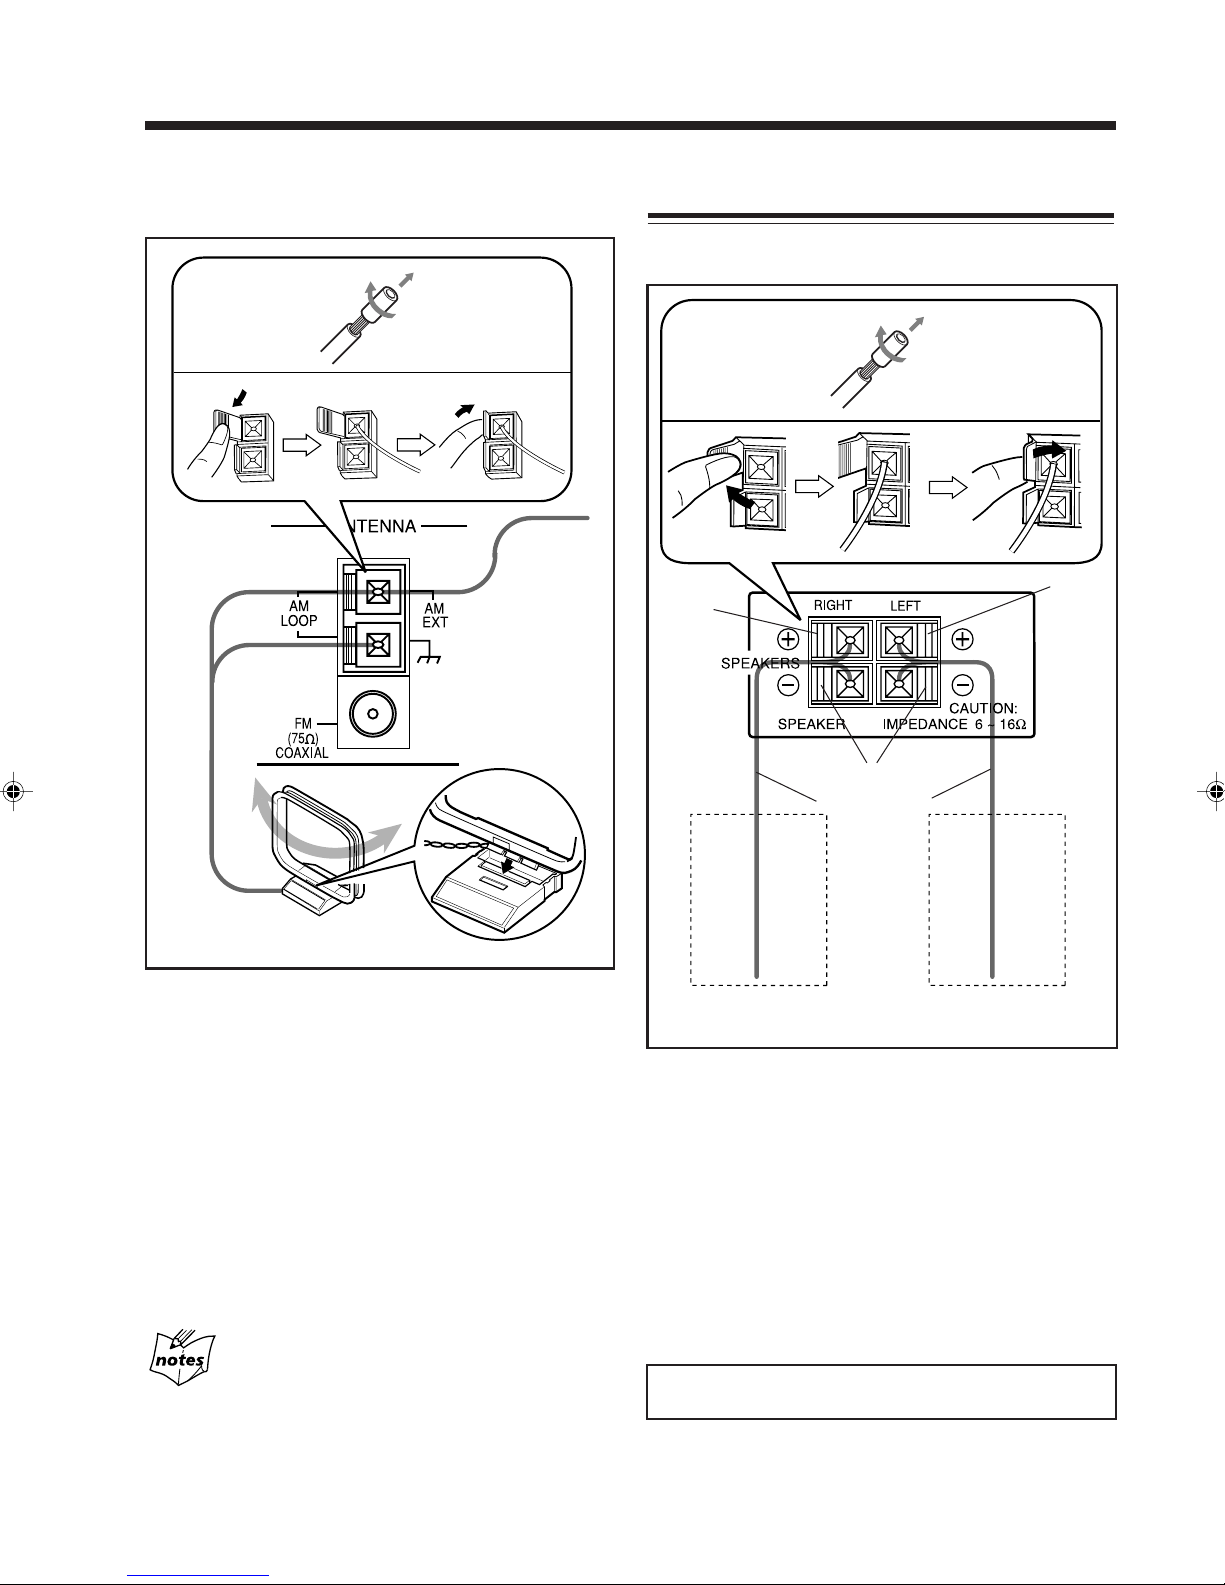
Connecting Antennas
FM antenna
ANTENNA
AM
LOOP
AM
EXT
FM antenna (supplied)
To connect an outdoor FM antenna
Before connecting it, disconnect the supplied FM antenna.
Outdoor FM antenna
(not supplied)
ANTENNA
AM
AM
LOOP
(75 )
COAXIAL
A 75Ω antenna with coaxial type
connector (DIN 45325) should be used.
EXT
FM
FM
(75 )
COAXIAL
1 Attach the FM antenna to the FM (75 Ω) COAXIAL
terminal.
2 Extend the FM antenna.
3 Fasten it up in the position which gives you the best
reception.
About the supplied FM antenna
The FM antenna supplied with this unit can be used as temporary
measure. If reception is poor, you can connect an outdoor FM
antenna.
– 6 –
Page 10
AM antenna
1
2
Connecting Speakers
You can connect the speakers using the speaker cords.
1
Vinyl-covered
wire
(not supplied)
3
AM loop antenna
(supplied)
1 If cords are covered with insulation, twist the core of
the cord at the end of each cord, then remove the
insulation.
2 Connect the AM loop antenna to the AM LOOP
terminals as illustrated.
3 Turn the AM loop antenna until you have the best
reception.
2
Red
Right
speaker
34
Red
Black
Speaker cord
Left
speaker
1 If cords are covered with insulation, twist the core
of the cord at the end of each cord, then remove the
insulation.
2 Open the speaker terminal.
To connect an outdoor AM antenna
When reception is poor, connect a single vinyl-covered
wire to the AM EXT terminal and extend it horizontally.
(The AM loop antenna must remain connected.)
For better reception of both FM and AM (MW/LW)
• Make sure the antenna conductors do not touch any other
terminals and connecting cords.
• Keep the antennas away from metallic parts of the unit,
connecting cords, and the AC power cord.
3 Insert the end of the speaker cord to the terminal.
Match the polarity of the speaker terminals: Red (+) to
red (+) and black (–) to black (–).
4 Close the speaker terminal on the rear of the unit.
Use only speakers with the same speaker impedance as
indicated by the speaker terminals on the rear of the unit.
– 7 –
Page 11

Continued
Connecting Other Equipment
You can connect the following equipment to this unit:
• Cassette deck — used as a playback and recording
device. By using the cassette deck, you can record any
source played back on this unit.
• Portable MD player — used as a playback device.
• Audio equipment with an optical digital output terminal
— used only as a digital playback device.
When you connect and use these equipment, refer also to
the manuals supplied with them.
• DO NOT connect other equipment while the
power is on.
• DO NOT plug in any equipment until all
connections are complete.
To connect another component such as a cassette
deck
Be sure that the plugs of the audio cords and the jacks on
the rear of the unit are color-coded: White plugs and jacks
are for left audio signals, and red ones for right audio
signals.
To connect a portable MD player with a mini output
jack
MENU
SP/LP2/LP4
LONG
REC
MODE
MODE
REC PAUSE
HIGH SPEED
CD MD
MD player
DISC LOADING MECHANISM
TITLE/EDIT
PHONES
To output (mini-jack)
By using a cable with the stereo mini-jack, connect
between the stereo mini-jack on the other equipment and
the LINE 2 jack on the front panel.
DISC
ENTER
/DEMO
LINE 2
To connect audio equipment with an optical digital
output terminal
RIGHT LEFT
SPEAKERS
CAUTION:
SPEAKER
IMPEDENCE 6
16Ω
To input (REC)
Ex. cassette deck
To output (PLAY)
By using audio cords (not supplied), connect:
• Between the audio input jacks on the cassette deck and
the LINE 1 OUT jacks — For recording on the cassette
deck.
• Between the audio output jacks on the cassette deck and
the LINE 1 IN jacks — For playing a tape.
RIGHT LEFT
SPEAKERS
CAUTION:
SPEAKER
IMPEDENCE 6
16Ω
Protective cap
Before connecting the other equipment,
remove the protective cap from the terminal.
Audio equipment with an
optical digital output
To optical digital
output
Connect between the optical digital output terminal on the
other equipment and the DIGITAL IN terminal.
– 8 –
Page 12
NOW, you can plug in the unit and other connected
equipment FINALLY!
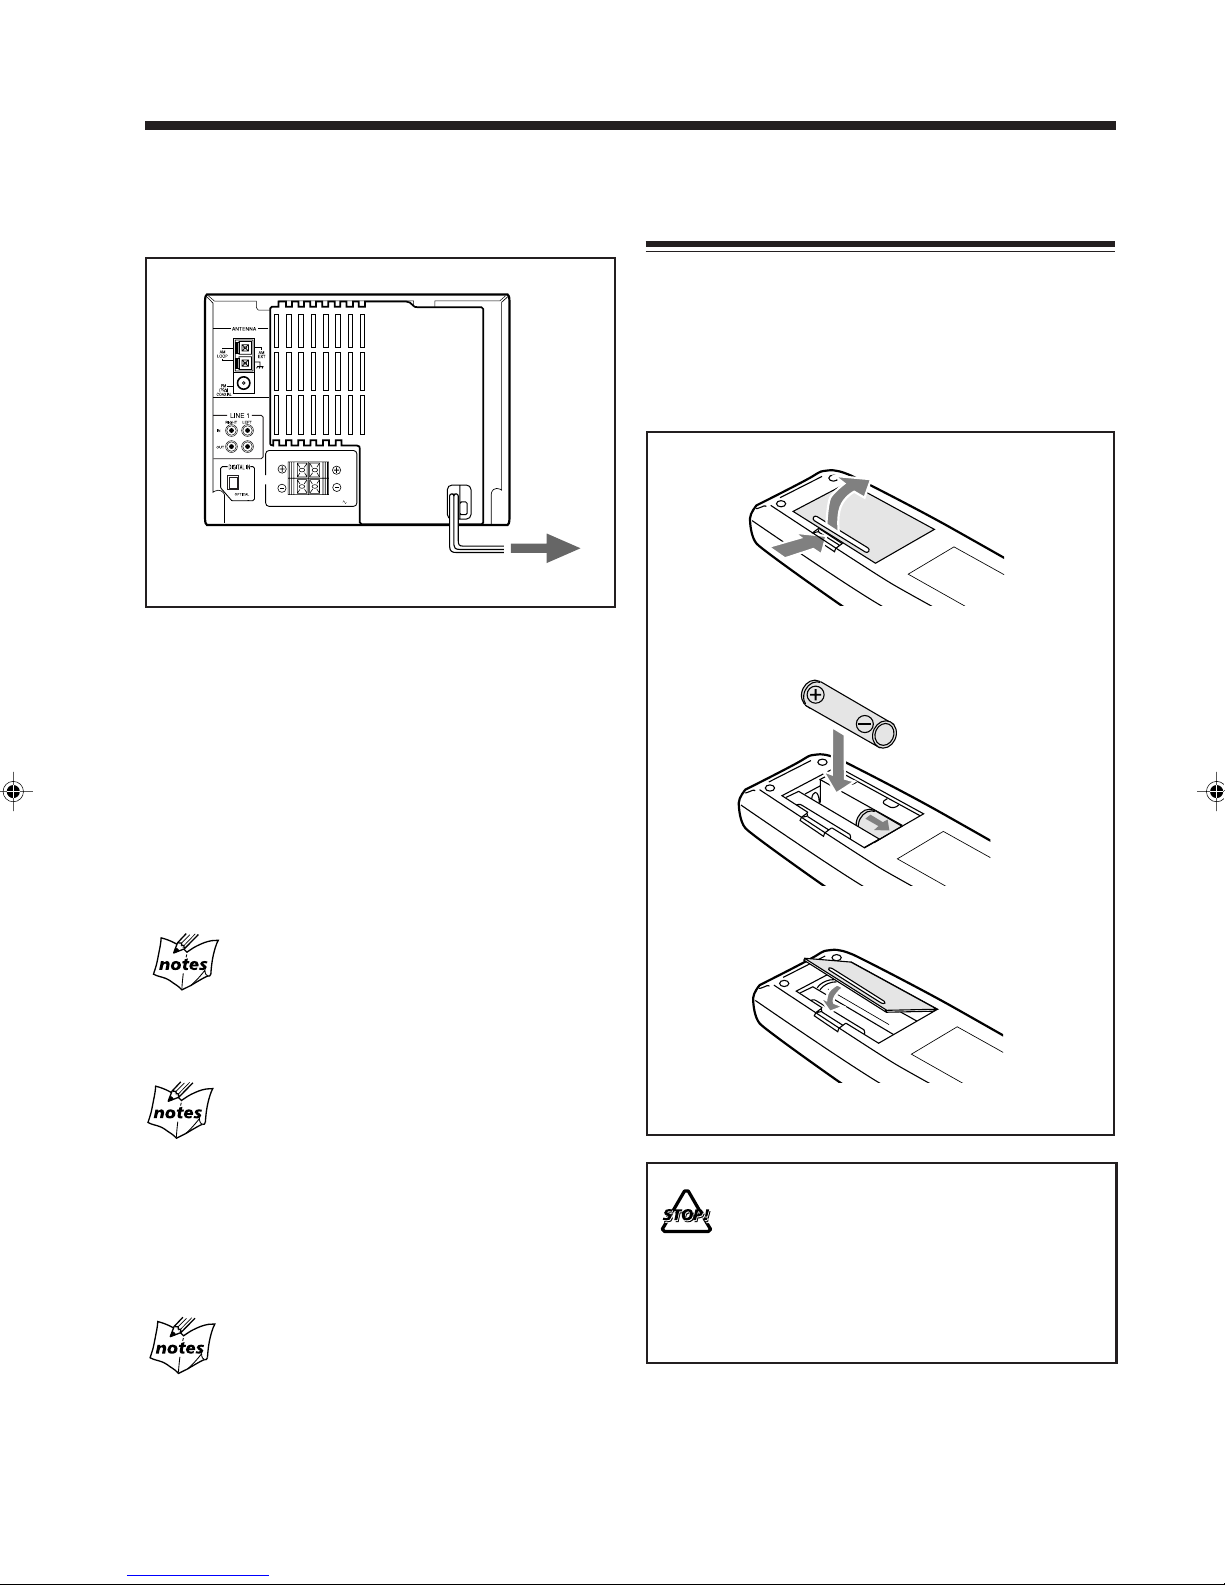
Putting the Batteries into the Remote
Control
Insert the batteries — R6(UM-3)/AA(15F) — into the
remote control, by matching the polarity (+ and –) on the
batteries with the + and – markings on the battery
compartment.
When the remote control can no longer operate the unit,
replace both batteries at the same time.
RIGHT LEFT
SPEAKERS
CAUTION:
SPEAKER
IMPEDENCE 6
16Ω
To a wall outlet
When connecting the AC power cord into a wall outlet, the
unit automatically starts display demonstration.
To stop and cancel the display demonstration, press
ENTER/DEMO during display demonstration. “DEMO
OFF!” appears in the main display, the unit is turned off,
then the display dims.
After canceling the display demonstration, it will start only
when the AC power cord is reconnected or when a power
failure is recovered.
• Pressing some of the buttons on the unit or the remote
control will stop the demonstration temporarily.
If you do not cancel the display demonstration, it
will start automatically in the following cases
• 2 minutes after the unit is turned off.
• When no operation is done for more than 2 minutes after the
unit is turned on.
1
2
R6(UM-3)/AA(15F)
3
If you do not want to start the display demonstration
when the AC power cord is reconnected or when a
power failure is recovered
See “To store the display setting in memory” on page 66.
To start the display demonstration manually
Press ENTER/DEMO.
• Each time you press the button, the display
demonstration turns on and off.
During MD editing and title entry mode
The ENTER/DEMO button cannot function for the display
demonstration.
• DO NOT use an old battery together with a new
one.
• DO NOT use different types of batteries together.
• DO NOT expose batteries to heat or flame.
• DO NOT leave the batteries in the battery
compartment when you are not going to use the
remote control for an extended period of time.
Otherwise, it will be damaged from battery leakage.
– 9 –
Page 13

Basic and Common Operations
The buttons and controls enlarged in the illustration below are used and explained in this section (pages 10 to 14).
Remote control
LEVEL
METER
LEVEL
METER
DIMMER
DIMMER
Main unit
STANDBY
/ON
MENU
LINE
STANDBY
MENU
LINE
RM-SMXS6MDR
REMOTE CONTROL
/ON
COMPACT COMPONENT MD SYSTEM MX-S6MDR
DISC
SP/LP2/LP4
LONG
REC
MODE
MODE
REC PAUSE
HIGH SPEED
CD MD
DISC LOADING MECHANISM
ENTER
TITLE/EDIT
/DEMO
PHONES
LINE 2
– 10 –
Page 14
Turning On the Power
Selecting the Sources and Starting Play
When you press the play button (3 / 8) for a particular
source or the source selecting buttons such as FM/AM and
LINE, the unit automatically turns on (and starts playback
if the source is ready).
• Pressing SET on the unit also turns on the unit.
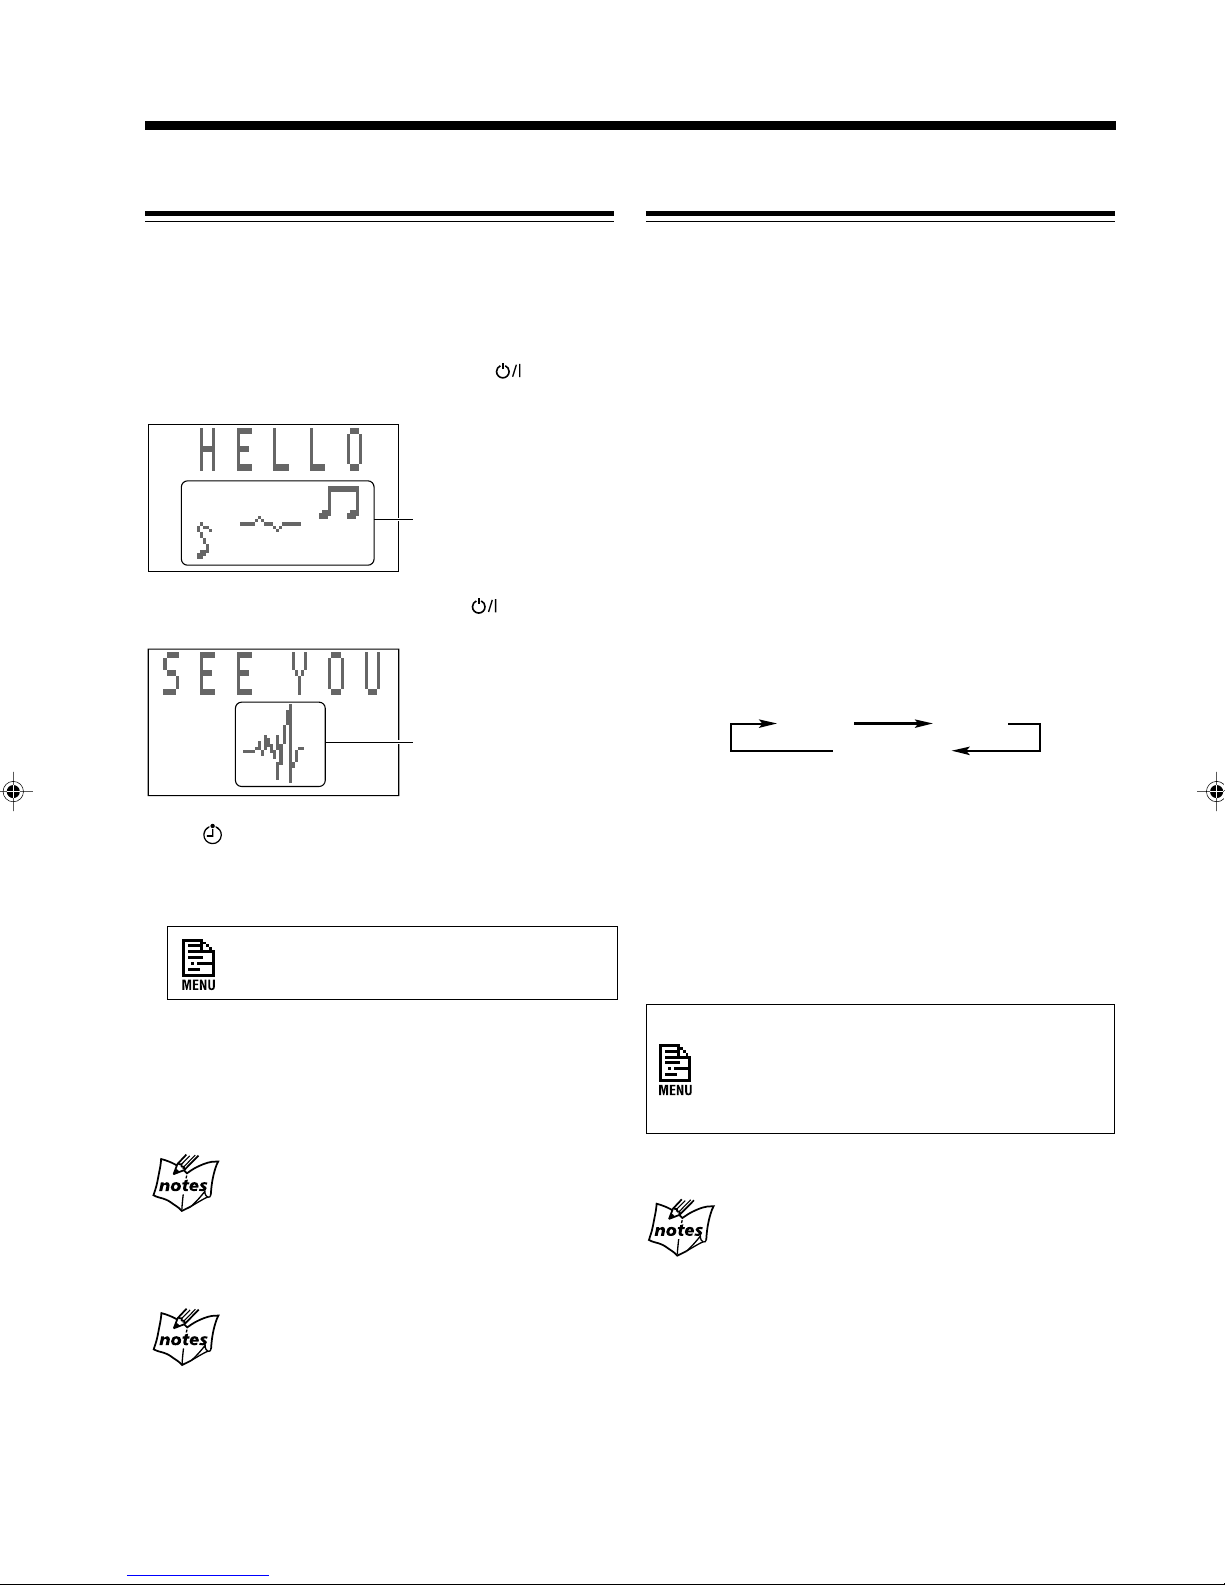
To turn on the unit without playing, press
so that the
STANDBY/ON lamp on the unit lights green.
This indication appears
only when the level
meter is set to “METER
1” (see page 13.)
To turn off the unit (on standby), press
again so that
the STANDBY/ON lamp lights red.
This indication appears
only when the level
meter is set to “METER
1” (see page 13.)
• The indicator will flash on the display until you set
the clock (when the power is off, “0:00” will also flash).
After setting the clock, the clock time will appear on the
display while the power is off.
To select the tuner as the source, press FM/AM.
The unit automatically turns on and the last received station
is tuned in.
• For more detailed operations, see pages 15 to 21.
To select the CD player as the source, press CD 3 / 8.
The unit automatically turns on. (Play starts if a CD is on
one of the CD trays.)
To stop play, press 7.
• For more detailed operations, see pages 22 to 27.
To select the MD player as the source, press MD 3 / 8.
The unit automatically turns on. (Play starts if an MD is in
the MD loading slot.)
To stop play, press 7.
• For more detailed operations, see pages 28 to 32.
To select the external equipment as the source, press
LINE. The unit automatically turns on.
• Each time you press the button, the source changes as
follows:
LINE1 LINE2
DIGITAL IN
LINE1*: To use the equipment connected to the LINE 1
jacks on the rear.
LINE2*: To use the equipment connected to the LINE 2
jack on the front panel.
DIGITAL IN*: To use the digital equipment connected
to the DIGITAL IN terminal on the rear.
To set the clock, use the menu, referring to
“Setting the Clock” on page 54.
• A little power is always consumed even while the unit is
in standby mode.
To switch off the power supply completely, unplug the
AC power cord from the AC outlet.
You can change the opening or ending screen
illustrated above
Instead of showing the above opening or ending screen, you can
make your original screens. To make and store your original
screens, see “Creating Your Own Opening and Ending Screens” on
page 52.
When you unplug the AC power cord or if a power
failure occurs
The clock will be reset to “0:00,” while the tuner preset stations
and other settings will be erased in a few days.
* If you have changed the source name, the changed
name will appear. (See page 65.)
When selecting the equipment connected to the
LINE 1 jacks or the LINE 2 jack, the sound input
level appears for a while. You can adjust the input
level by using the menu. (See page 65 for the sound
input level.)
• For operating the external equipment, see the manuals
supplied with them.
While selecting the digital equipment (“DIGITAL
IN”) as the source
The sampling frequency of the connected digital equipment is
shown in the main display. (If no equipment is connected to the
DIGITAL IN terminal, “UNLOCK” appears.)
– 11 –
Page 15
Continued
Adjusting the Volume
You can adjust the volume level only while the unit is
turned on.
When using the remote control, press VOLUME + to
increase the volume or press VOLUME – to decrease it.
When using the unit, turn VOLUME clockwise to increase
the volume or counterclockwise to decrease it.
For private listening
Connect a pair of headphones to the PHONES jack. No sound
comes out of the speakers. Be sure to turn down the volume before
connecting or putting on the headphones.
If “CANNOT LISTEN!” appears in the main
display
During high-speed recording (see page 36), you cannot listen to
any source, and therefore, cannot adjust the volume level.
DO NOT turn off (on standby) the unit with the
volume set to an extremely high level; otherwise, the
sudden blast of sound can damage your hearing,
speakers and/or headphones when you turn on the
unit or start playing any source.
REMEMBER you cannot adjust the volume level
while the unit is in standby mode.
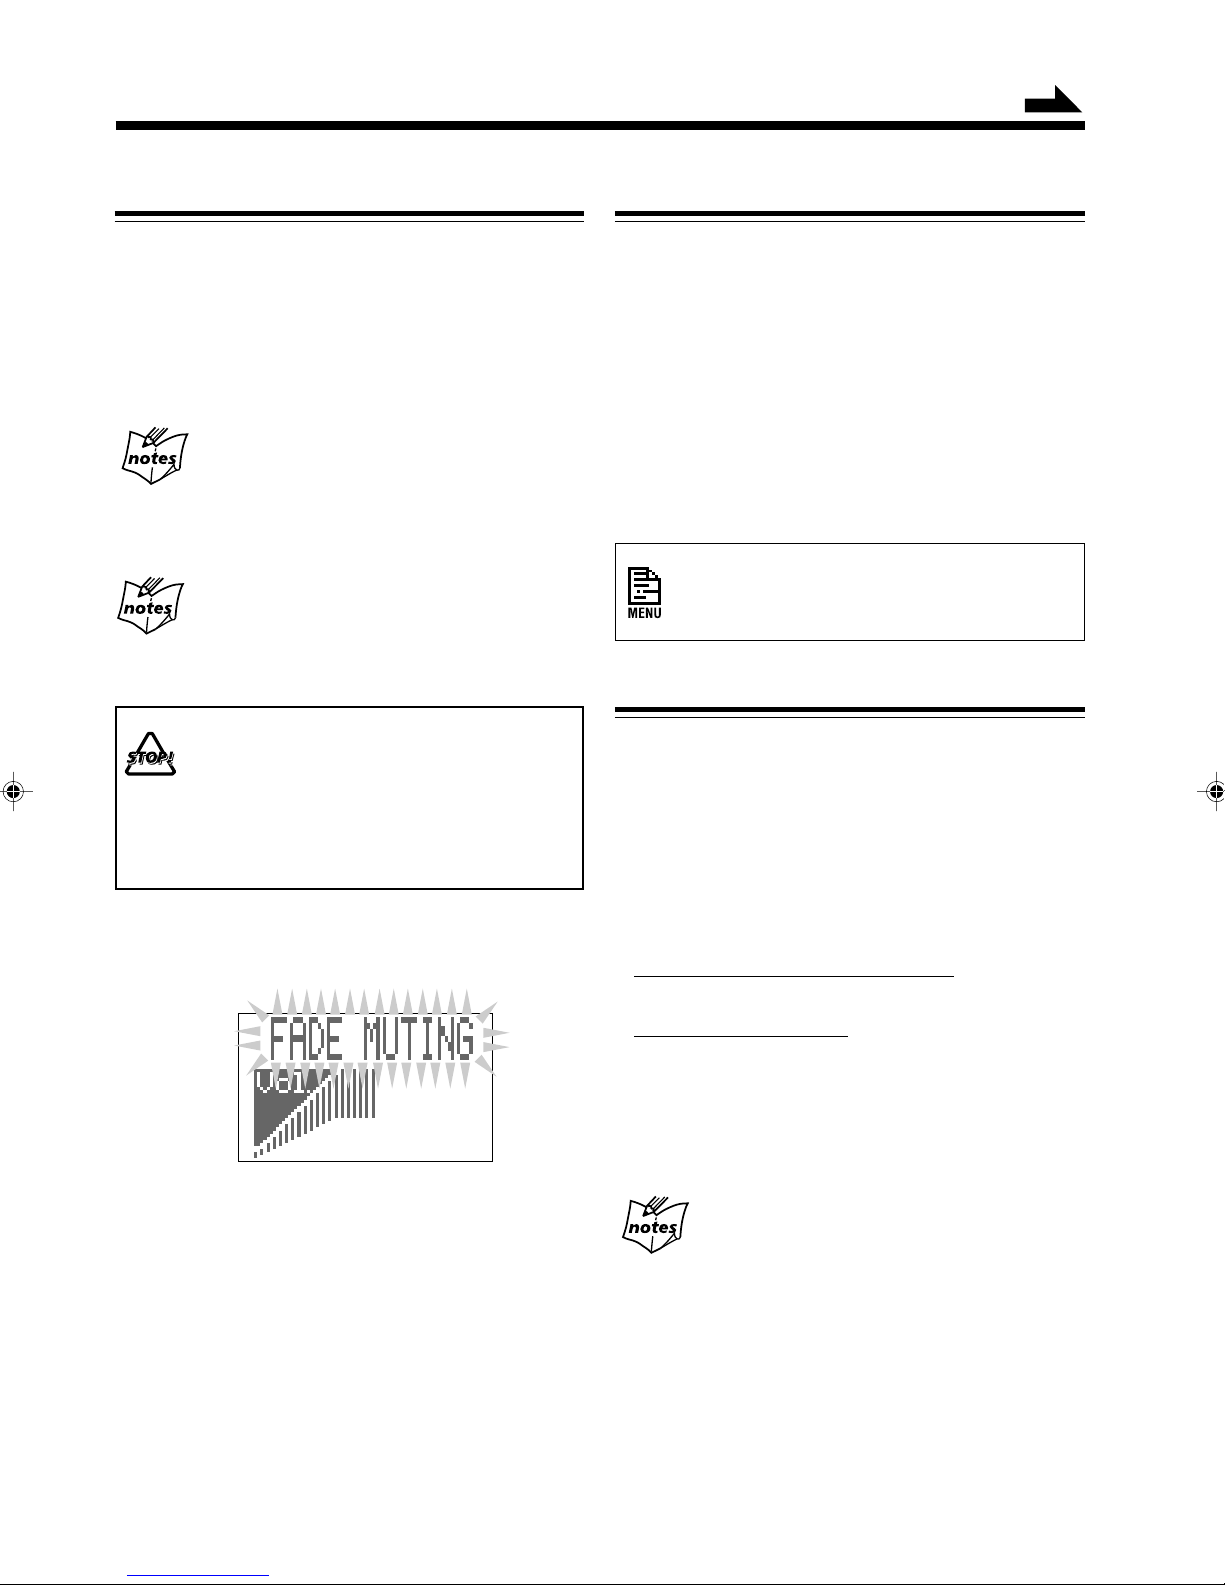
To turn down the volume level temporarily
Press FADE MUTING on the remote control.
Reinforcing the Bass Sound
The richness and fullness of the bass sound is maintained
regardless of how low you set the volume — Active Bass
Extension.
• You can use this effect only for playback.
To get the effect, press ACTIVE BASS EX. (extension) on
the remote control so that “ACTIVE BASS EX. ON”
appears in the main display (the A. BASS indicator also
lights).
To cancel the effect, press the button again so that
“ACTIVE BASS EX. OFF” appears in the main display
(the A. BASS indicator goes off).
When using the unit, you can activate or
deactivate the Active Bass Extension by using
the menu. (See page 62.)
Selecting the Display Brightness
You can change the display brightness whether the unit is
turned on or in standby mode.
You can set and memorize the display brightness setting
each for power-on time and for power-off (standby) time.
To change the display brightness, press DIMMER on the
remote control.
• Each time you press the button, the display brightness
changes as follows:
When the unit is turned off (on standby):
Dark += Dimmer
To restore the sound, press the button again.
When the unit is turned on:
Bright += Dimmer*
* When using some functions, the display window brightens for a
while. For example, when selecting the source either using the
buttons on the unit or on the remote control, or when selecting
the CD or MD track using the buttons on the remote control, etc.
During display demonstration
The display always brightens regardless of the dimmer setting.
– 12 –
Page 16
Selecting the Level Meter
Selecting the Sound Modes
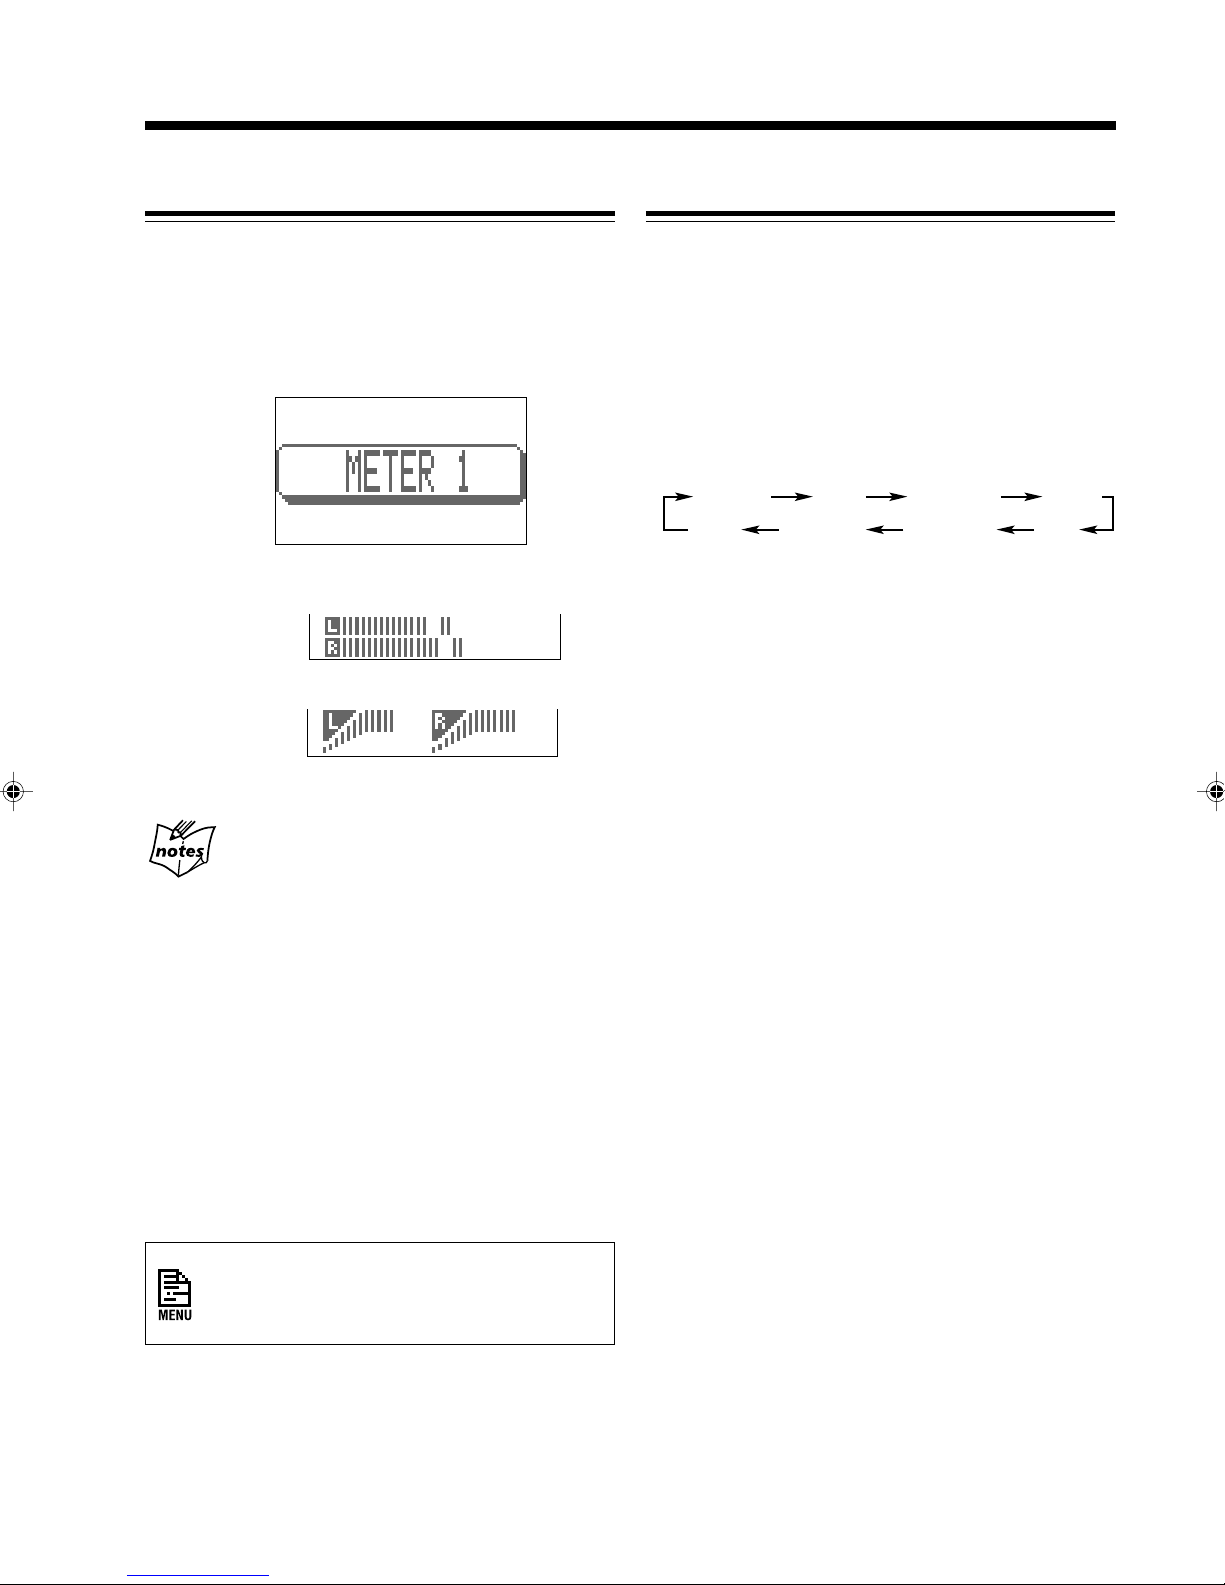
You can select the audio level meter in the main display.
To select the level meter, press LEVEL METER on the
remote control.
• Each time you press the button, the level meter alternates
between “METER 1” and “METER 2.”
Ex. When “METER 1” is selected
METER 1:
METER 2:
Color relationship between the level meter and the
main display
• The color of the main display is preset for each level meter.
When a level meter is selected, the color of the main display and
illumination color of the ring around the VOLUME control are
changed to the color preset for the level meter selected.
• You can change the color of the level meters to any color other
than preset. To change the color of the level meter, first select a
level meter, then change the color of the main display (see
“Selecting the display color” on page 63). The selected color is
also stored in memory as the color for the level meter.
If you select a level meter after selecting the color of the main
display, the color of the main display will also change to the
selected level meter’s color.
• The level meter and main display colors can be backed up
(memorized). For details, refer to “To store the display setting in
memory” (see page 66).
You can select one of the 6 preset sound modes (3 surround
modes and 3 SEA – Sound Effect Amplifier – modes) and 1
manual mode. The sound modes can be applied only to
playback sounds, and cannot be used for recording.
To select the sound modes, press SOUND on the remote
control until the sound mode you want appears on the
display. The SOUND indicator also lights on the display.
• Each time you press the button, the sound modes change
as follows:
D.CLUB
FLAT
(Canceled)
HALL STADIUM ROCK
MANUAL
CLASSIC
POP
Surround modes *:
D. (Dance) CLUB:Increases resonance and bass.
HALL: Adds depth and brilliance to the
sound.
STADIUM: Adds clarity and spreads the sound,
like in an outdoor stadium.
SEA modes:
ROCK: Boosts low and high frequency.
Good for acoustic music.
POP: Good for vocal music.
CLASSIC: Good for classical music.
Manual mode:
MANUAL: Your individual mode stored in
memory. See “Creating Your Own
Sound Mode — MANUAL Mode”
on page 14.
FLAT: Cancels the sound mode.
* Surround elements are added to the sound modes to create a
being-there feeling in your room.
When using the unit, you can select the level
meter by using the menu (see “Selecting the
display color” on page 63).
– 13 –
Page 17

To check the sound mode currently selected, press
SOUND once while the SOUND indicator is lit. The
currently selected sound mode screen will appear in the
main display.
Ex. When “HALL” is currently selected
3
Push the joy control rightward ( ) or leftward ( )
to select “SET UP.”
• Each time you push the joy control, the sound modes
change as follows:
D.CLUB
HALL
STADIUM
ROCK
When using the unit, you can select the sound
modes by using the menu (see page 62).
Creating Your Own Sound Mode —
MANUAL Mode
You can create and store your own sound mode.
• You have to use the menu for the following operations.
For general information on the menu, see pages 60 and
61.
• There is a time limit in doing the following steps. If the
setting is canceled before you finish, start from step
again.
On the unit ONLY:
1
Press MENU.
1
(Canceled)
FLAT
SET UP
4
Press SET.
The equalizer pattern adjustment screen appears.
5
Adjust the equalizer pattern.
1) Push the joy control rightward (
(
) to select the frequency range to adjust
(LOW, MID, HIGH).
2) Push the joy control upward ( ) or downward
(
) to adjust the level (–3 to +3) of the selected
frequency range.
MANUAL
CLASSIC
) or leftward
POP
Ex. When the source is CD, and playing
2
Push the joy control downward ( ) to select
“SOUND” (highlighted).
Current sound mode
3) Repeat steps 1) and 2) to adjust the level of the
other frequency ranges.
6
Press SET again (or wait until the above indication
disappears).
The equalizer pattern you have created is stored in
memory (MANUAL).
To use your own sound mode
Select “MANUAL” when using the sound modes. See
“Selecting the Sound Modes” on page 13.
– 14 –
Page 18
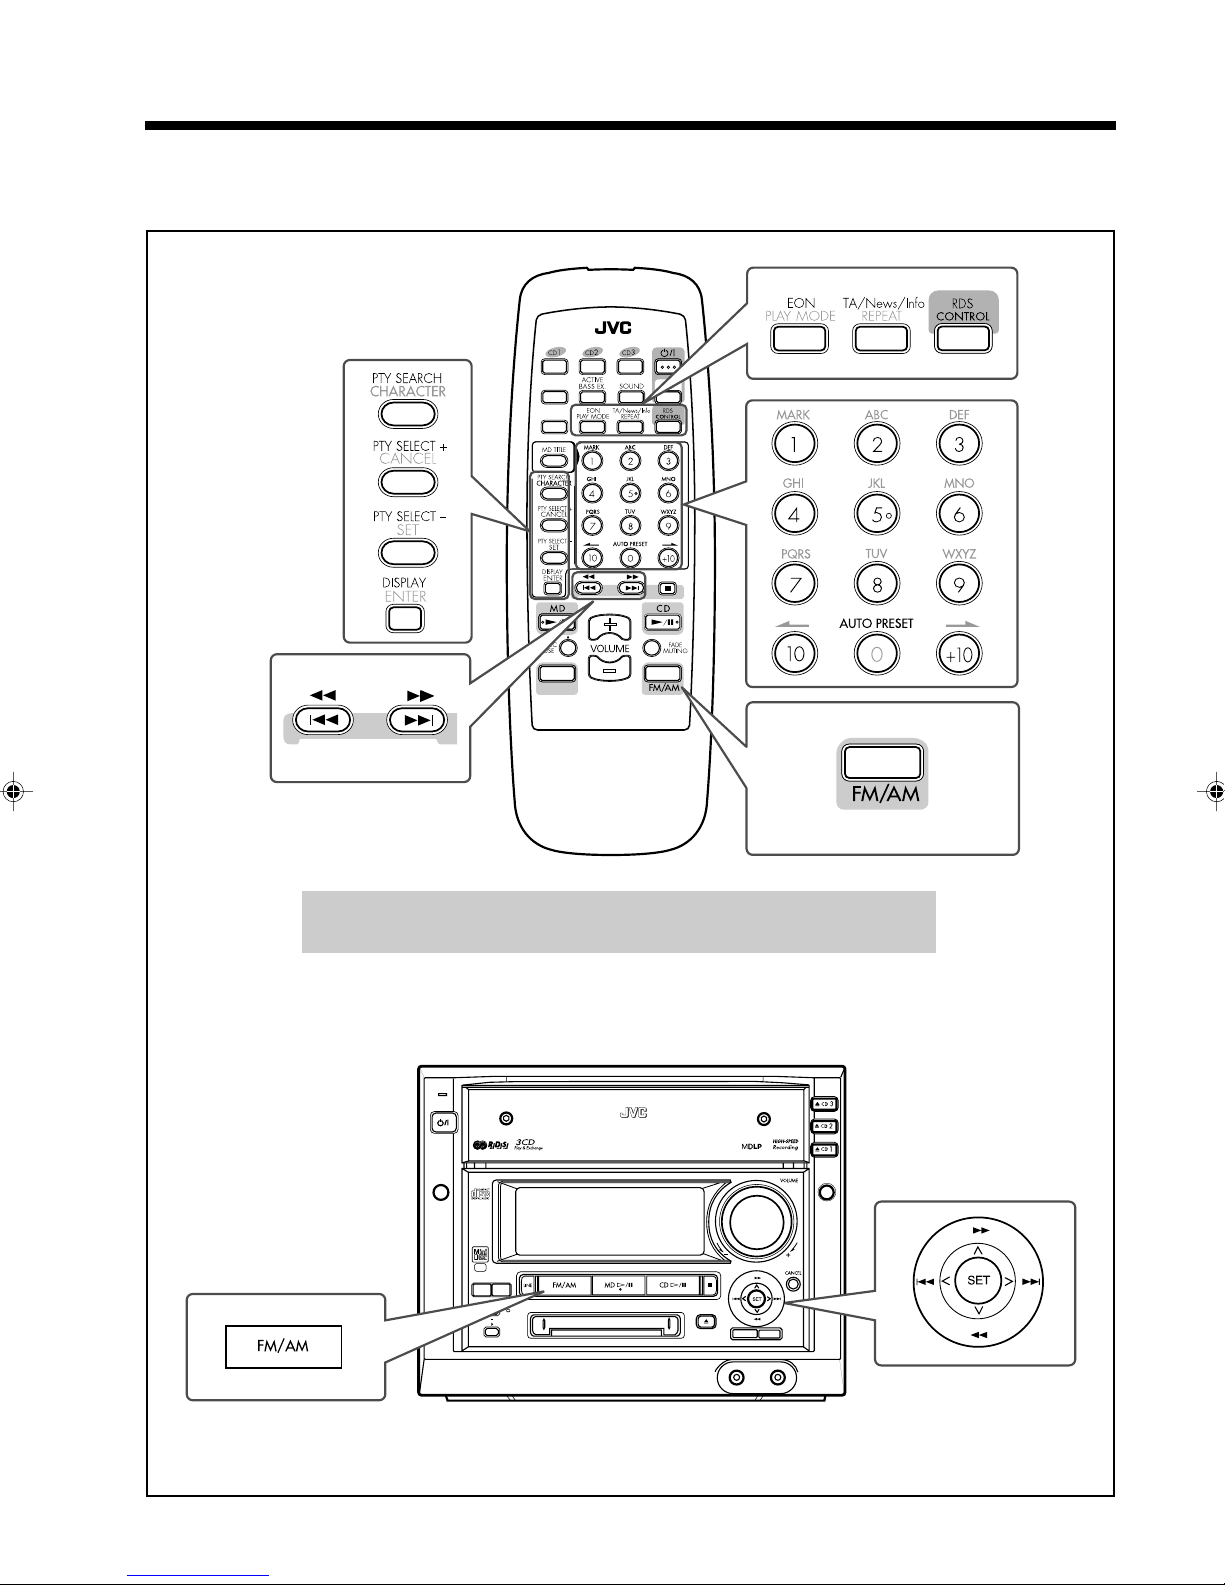
Listening to FM and AM (MW/LW) Broadcasts
The buttons and controls enlarged in the illustration below are used and explained in this section (pages 15 to 21).
Remote control
LEVEL
METER
DIMMER
Main unit
LINE
RM-SMXS6MDR
REMOTE CONTROL
You cannot use the buttons on the front panel to operate the RDS functions.
Use the buttons on the remote control.
STANDBY
/ON
COMPACT COMPONENT MD SYSTEM MX-S6MDR
MENU
DISC
SP/LP2/LP4
LONG
MODE
REC PAUSE
HIGH SPEED
CD MD
REC
MODE
DISC LOADING MECHANISM
ENTER
TITLE/EDIT
/DEMO
PHONES
LINE 2
– 15 –
Page 19
Continued
Tuning in a Station
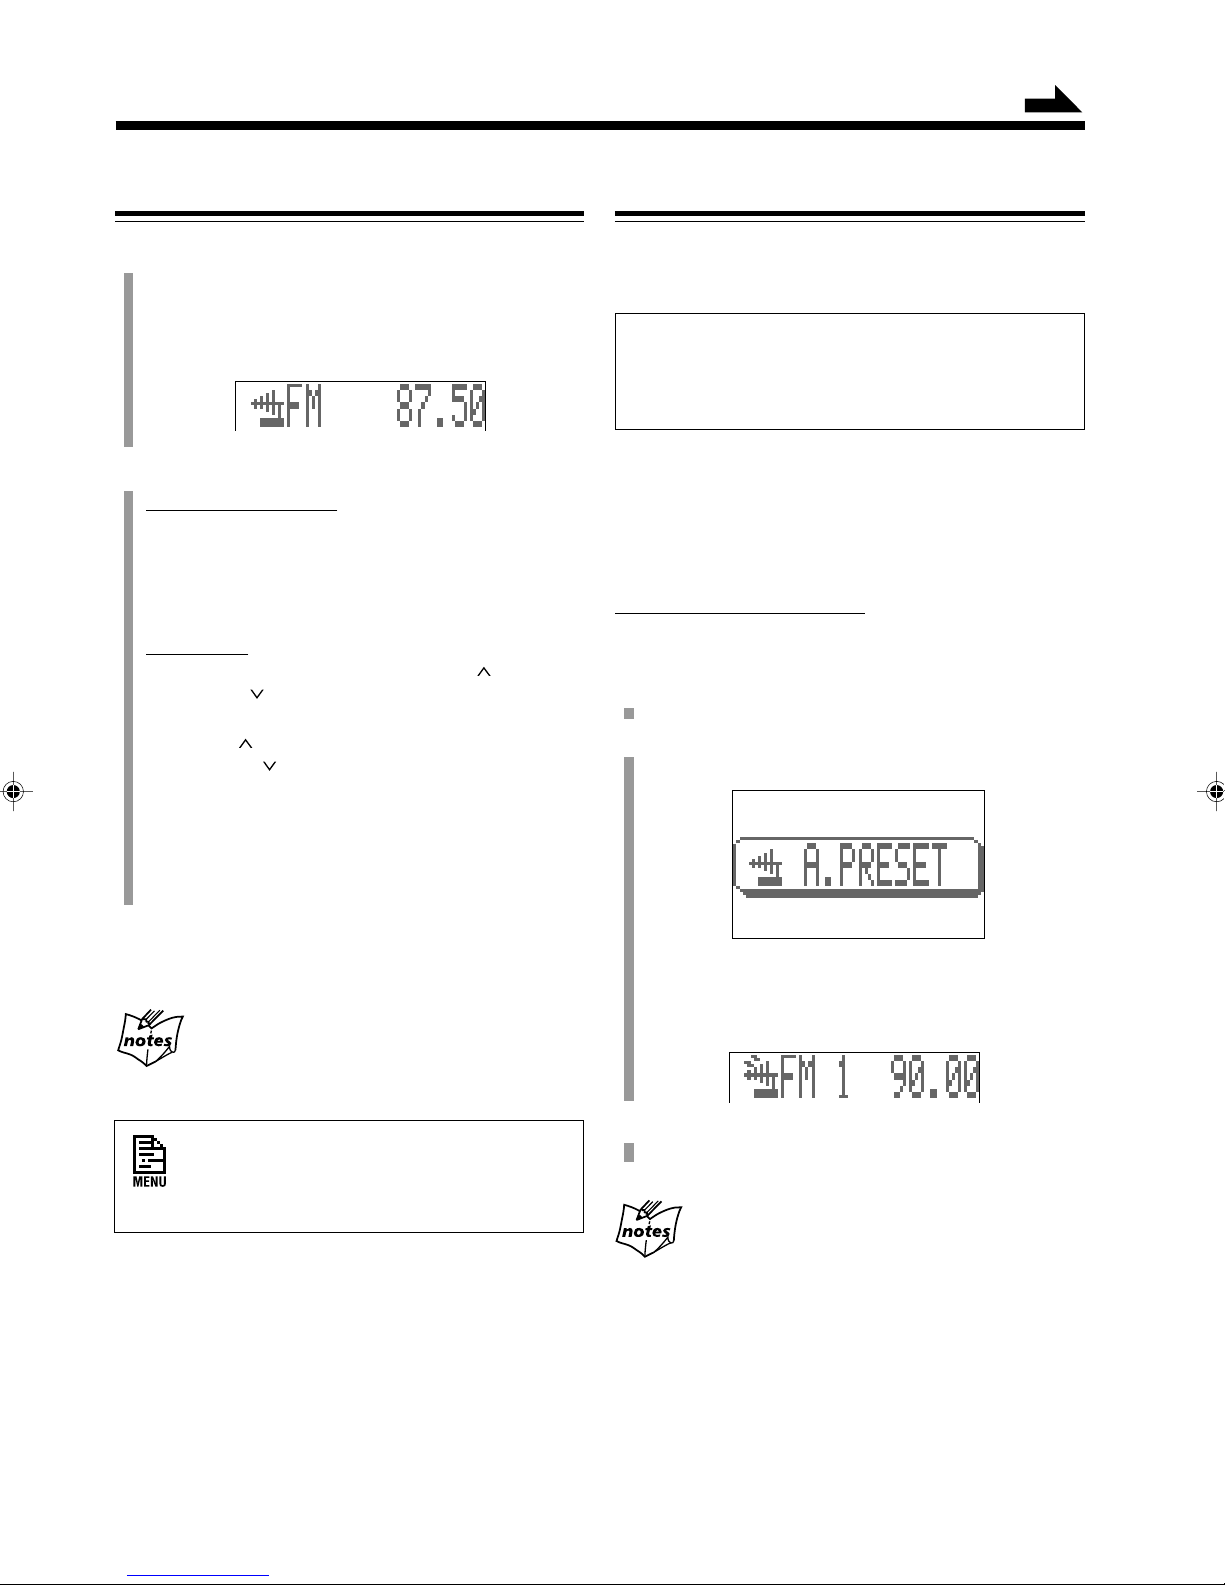
1
Press FM/AM.
The unit automatically turns on and tunes in the
previously tuned station (either FM or AM–MW/LW).
• Each time you press the button, the band alternates
between FM and AM.
2
Tune into a station.
On the remote control:
Press and hold ¡ (¢) or 1 (4) until the
station frequencies start changing in the main
display.
• ¡ (¢) : to increase the frequencies.
• 1 (4) : to decrease the frequencies.
On the unit:
Push and hold the joy control upward (
downward (
changing in the main display.
• Upward (
• Downward (
The unit starts searching stations and stops when a
station of sufficient signal strength is tuned in (the
TUNED indicator lights).
• If an FM program is broadcast in stereo, the STEREO
indicator also lights.
) until the station frequencies start
): to increase the frequencies.
): to decrease the frequencies.
) or
Presetting Stations
You can preset 30 FM and 15 AM (MW/LW) stations —
using either automatic presetting method or manual
presetting method.
In some cases, test frequencies have been already memorized
for the tuner since the factory examined the tuner preset
function before shipment. This is not a malfunction. You can
preset the stations you want into memory by following the
presetting method.
• There is a time limit in doing the following steps. If the
setting is canceled before you finish, start from step
again.
To preset stations automatically — Automatic
Presetting
On the remote control ONLY:
You need to preset stations separately for the FM and AM
bands.
1
Press FM/AM to select the band.
2
Press and hold AUTO PRESET until “A. PRESET”
appears in the main display for about 2 seconds.
1
To stop during searching, press ¡ (¢) or 1 (4)
(or push the joy control again on the unit).
¡¡
When you repeatedly press
(or push the joy control upward or downward on
the unit)
The frequency changes step by step.
When an FM stereo broadcast is hard to
receive or noisy
You can use the menu to improve FM reception.
See “FM Reception Mode Setting” on page 62.
¡ (
¡¡
¢¢
¢) or
¢¢
11
1 (
11
44
4)
44
Local stations with strong signals are searched and
stored in memory automatically.
When automatic preset is over, the station stored in
preset number 1 is received.
3
Repeat steps 1 and 2 to store stations of the other
band.
When you cannot store stations you want
automatically
Stations with weak signals cannot be detected with this automatic
presetting method. To store such a station, use the manual
presetting method on page 17.
– 16 –
Page 20
To preset stations manually — Manual Presetting
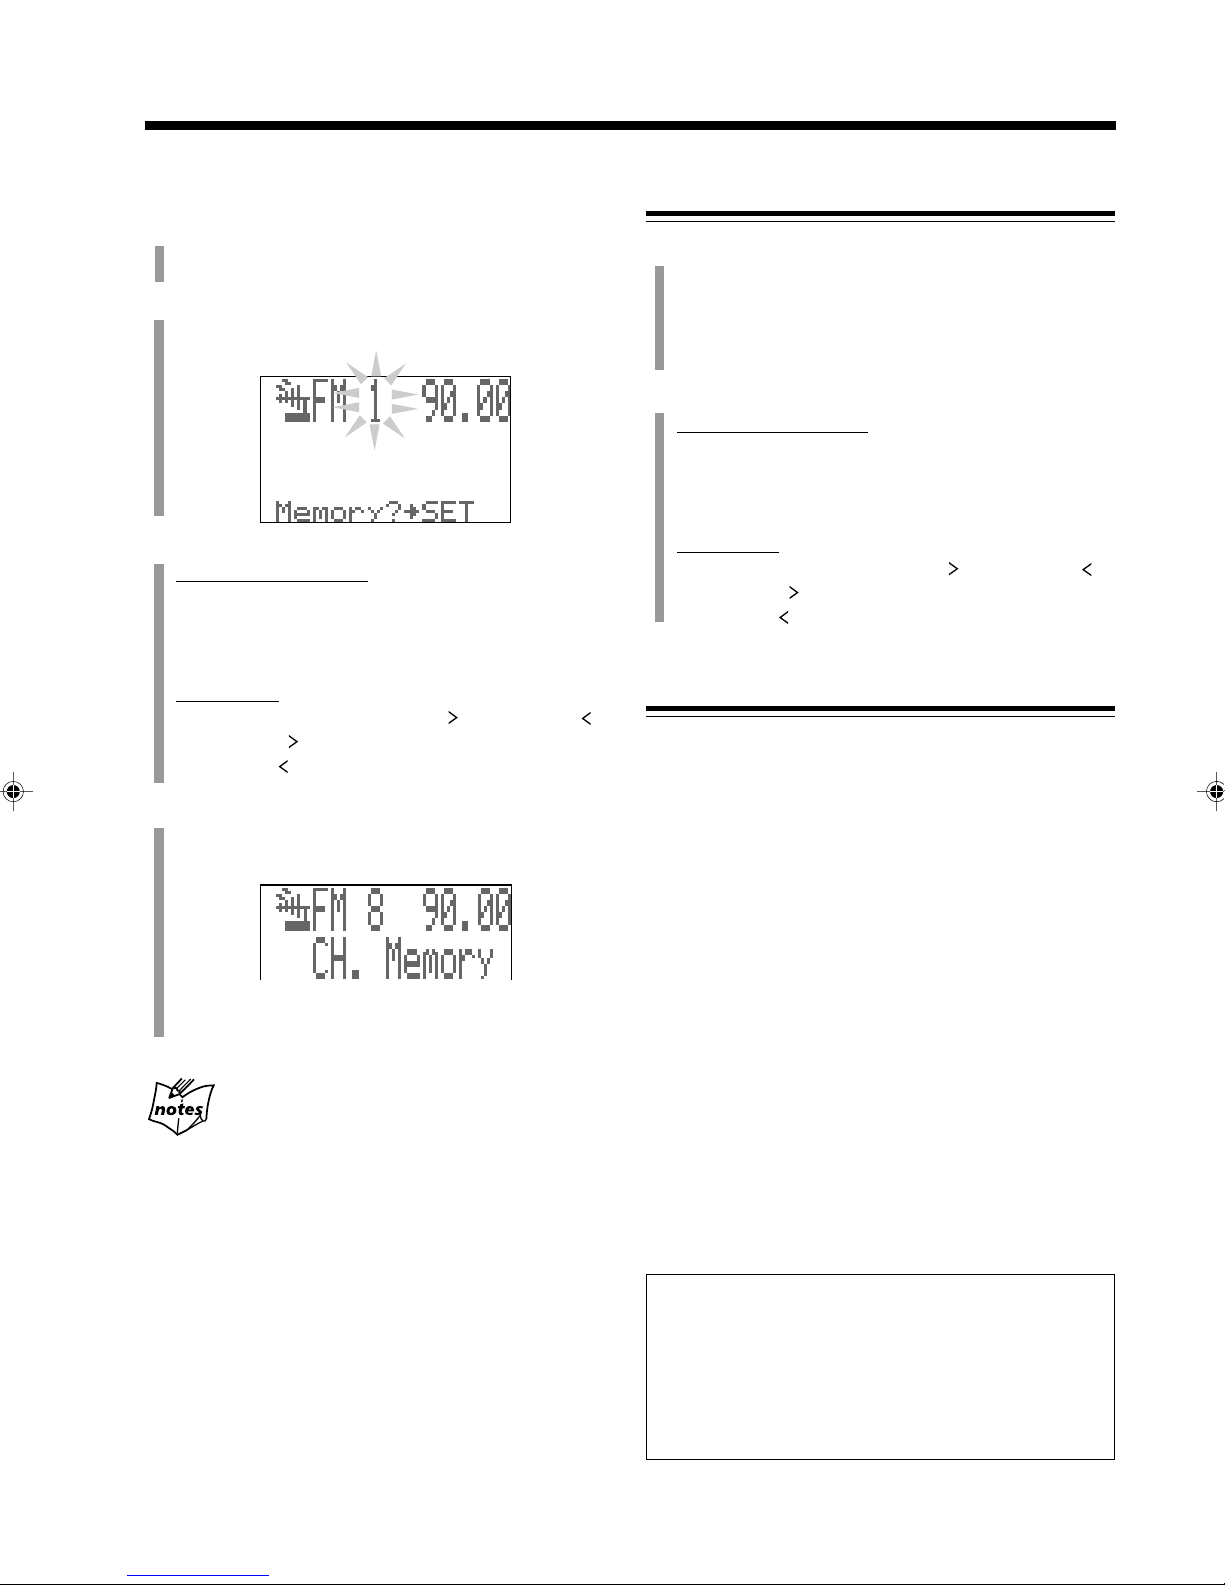
1
Tune in the station you want to preset.
• See “Tuning in a Station” on page 16.
2
Press SET.
The preset number starts flashing.
3
Select a preset number.
On the remote control:
Press the number buttons.
Ex. For preset number 5, press 5.
For preset number 15, press +10, then 5.
For preset number 20, press +10, then 10.
On the unit:
Push the joy control rightward (
• Rightward (
• Leftward (
4
Press SET again.
The tuned station in step
number selected in step
): to increase the preset numbers.
): to decrease the preset numbers.
3
1
is stored in the preset
.
) or leftward ( ).
Tuning in a Preset Station
1
Press FM/AM.
The unit automatically turns on and tunes in the
previously tuned station (either FM or AM–MW/LW).
• Each time you press the button, the band alternates
between FM and AM (MW/LW).
2
Select a preset number.
On the remote control:
Press the number buttons.
Ex. For preset number 5, press 5.
For preset number 15, press +10, then 5.
For preset number 20, press +10, then 10.
On the unit:
Push the joy control rightward (
• Rightward (
• Leftward (
): to increase the preset numbers.
): to decrease the preset numbers.
) or leftward ( ).
Receiving FM Stations with RDS
RDS allows FM stations to send an additional signal along
with their regular program signals. For example, the
stations send their station names, as well as information
about what type of program they broadcast, such as sports
or music, etc.
When tuned to an FM station which provides the RDS
service, the RDS indicator lights on the display.
• Storing a new station on a used number erases the
previously stored one.
When you unplug the AC power cord or if a power
failure occurs
The preset stations will be erased in a few days. If this happens,
preset the stations again.
With the unit, you can receive the following types of RDS
signals.
PS (Program Service):
Shows commonly known station names.
PTY (Program Type):
Shows types of broadcast programs.
RT (Radio Text):
Shows text messages the station sends.
EON (Enhanced Other Networks):
Provides the information about the types of the
programs sent by other RDS stations than the one
being received.
RDS operations are possible only using the remote
control. You can use the buttons printed in orange on
the remote control.
• REMEMBER, after using these buttons for RDS
operations, make sure to change the operation mode
of the remote control to the one you want to use next
by pressing MD 3 / 8, CD 3 / 8, or FM/AM.
– 17 –
Page 21
More about RDS
• Not all FM stations provide RDS signals, nor do all RDS
stations provide the same services. If in doubt, check with local
radio stations for details on RDS in your area.
• RDS may not work correctly if the received station is not
transmitting the signals properly or if the signal strength is
weak.
Continued
Searching for Programs by PTY Codes (PTY
Search)
One of the advantages of RDS is that you can locate a
particular kind of program by specifying the PTY codes.
• The PTY Search is applicable only to the preset stations.
• There is a time limit in doing the following steps. If the
setting is canceled before you finish, start from step
again.
1
Changing the RDS Information
You can see RDS information on the display while
listening to an FM station.
1
Press RDS CONTROL while listening to an FM
station.
2
Press DISPLAY.
• Each time you press the button, the display changes
to show the following information:
PS
(Program Service)
All information (PS/PTY/RT)
If no PS, PTY, or RT signals are sent by a station
“NO PS,” “NO PTY” or “NO RT” appears in the main display.
If the unit takes time to show the RDS information
received from a station
“WAIT PS,” “WAIT PTY,” or “WAIT RT” may appear in the main
display.
PTY
(Program Type)RT(Radio Text)
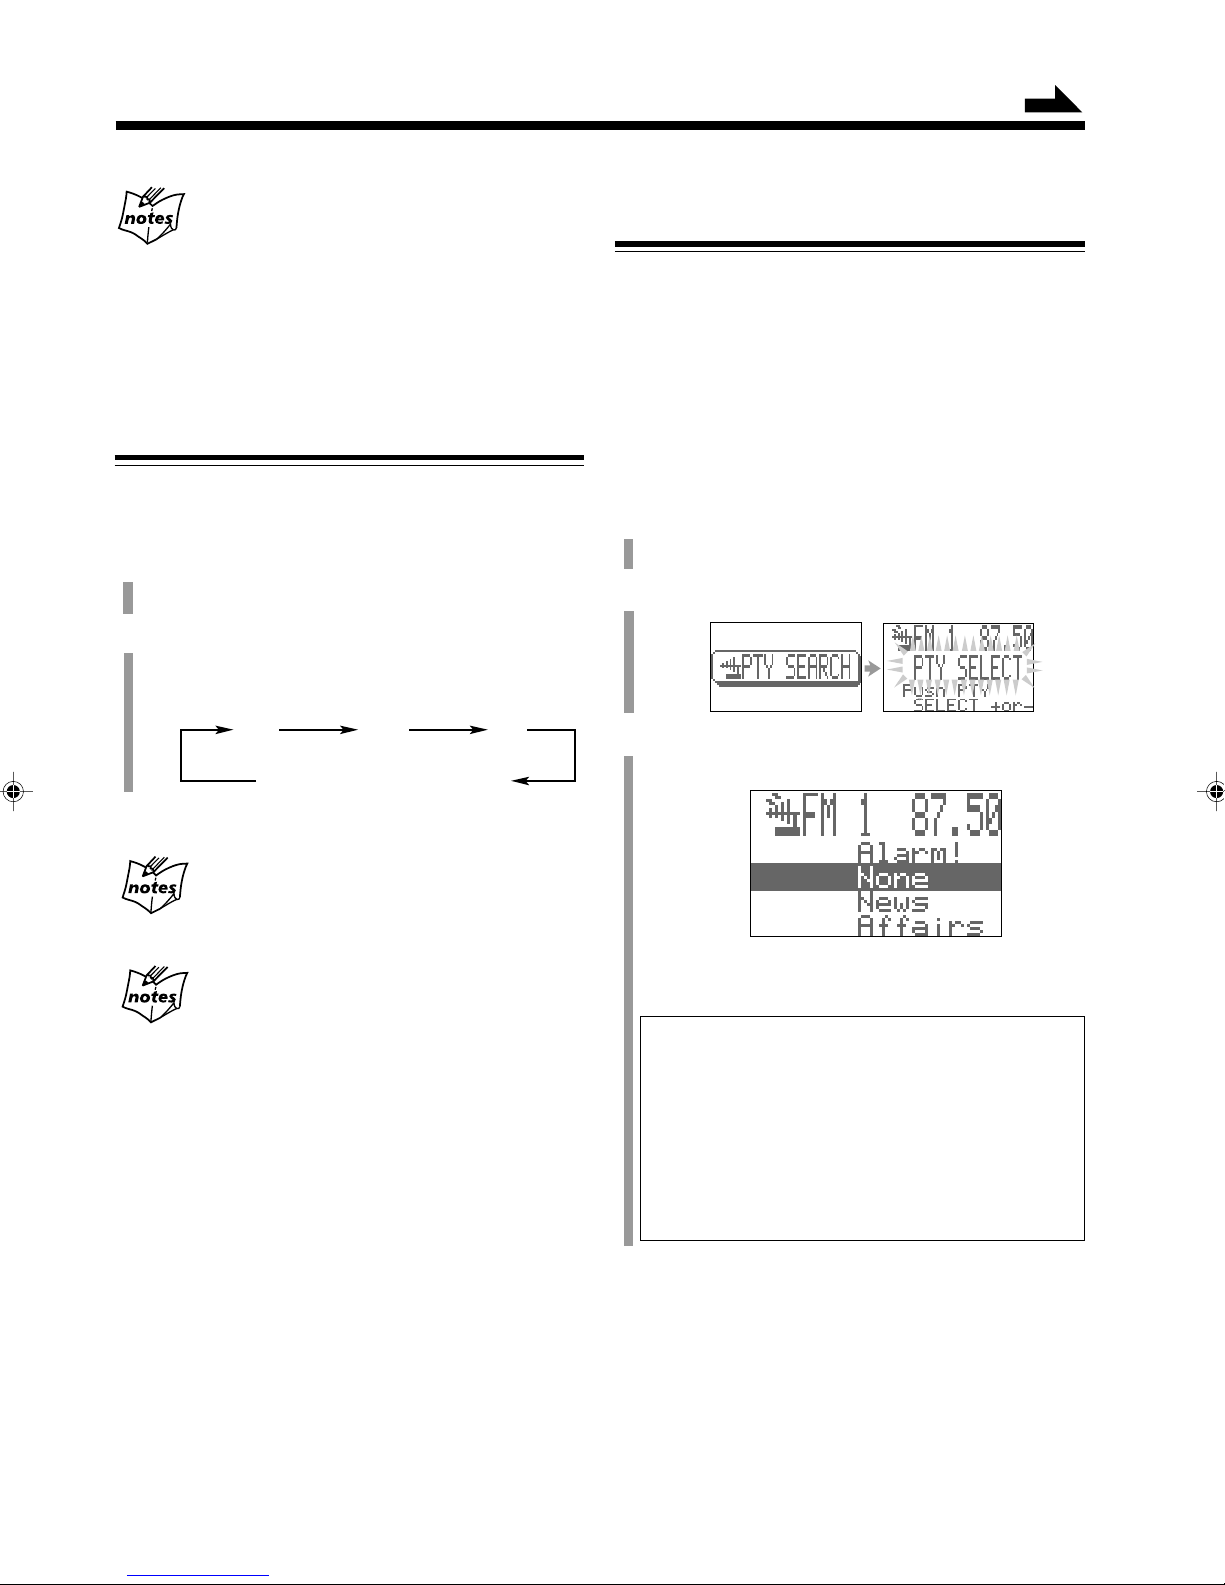
To search for a program using the PTY codes, use the
remote control:
1
Press RDS CONTROL while listening to an FM
station.
2
Press PTY SEARCH.
3
Press PTY SELECT +/– to select a PTY code while
“PTY SELECT” is flashing.
• Each time you press the button, the PTY codes
change as follows (refer also to the list on page 21):
None “News “ Affairs “ Info “
Sport “ Educate “ Drama “ Culture “
Science “ V aried “ Pop M “ Rock M “
Easy M “ Light M “ Classics “
Other M “ Weather “ Finance “ Children “
Social “ Religion “ Phone In “ Travel “
Leisure “ Jazz “ Country “ Nation M “
Oldies “ Folk M “ Document “ TEST “
Alarm! “ (back to the beginning)
– 18 –
Page 22
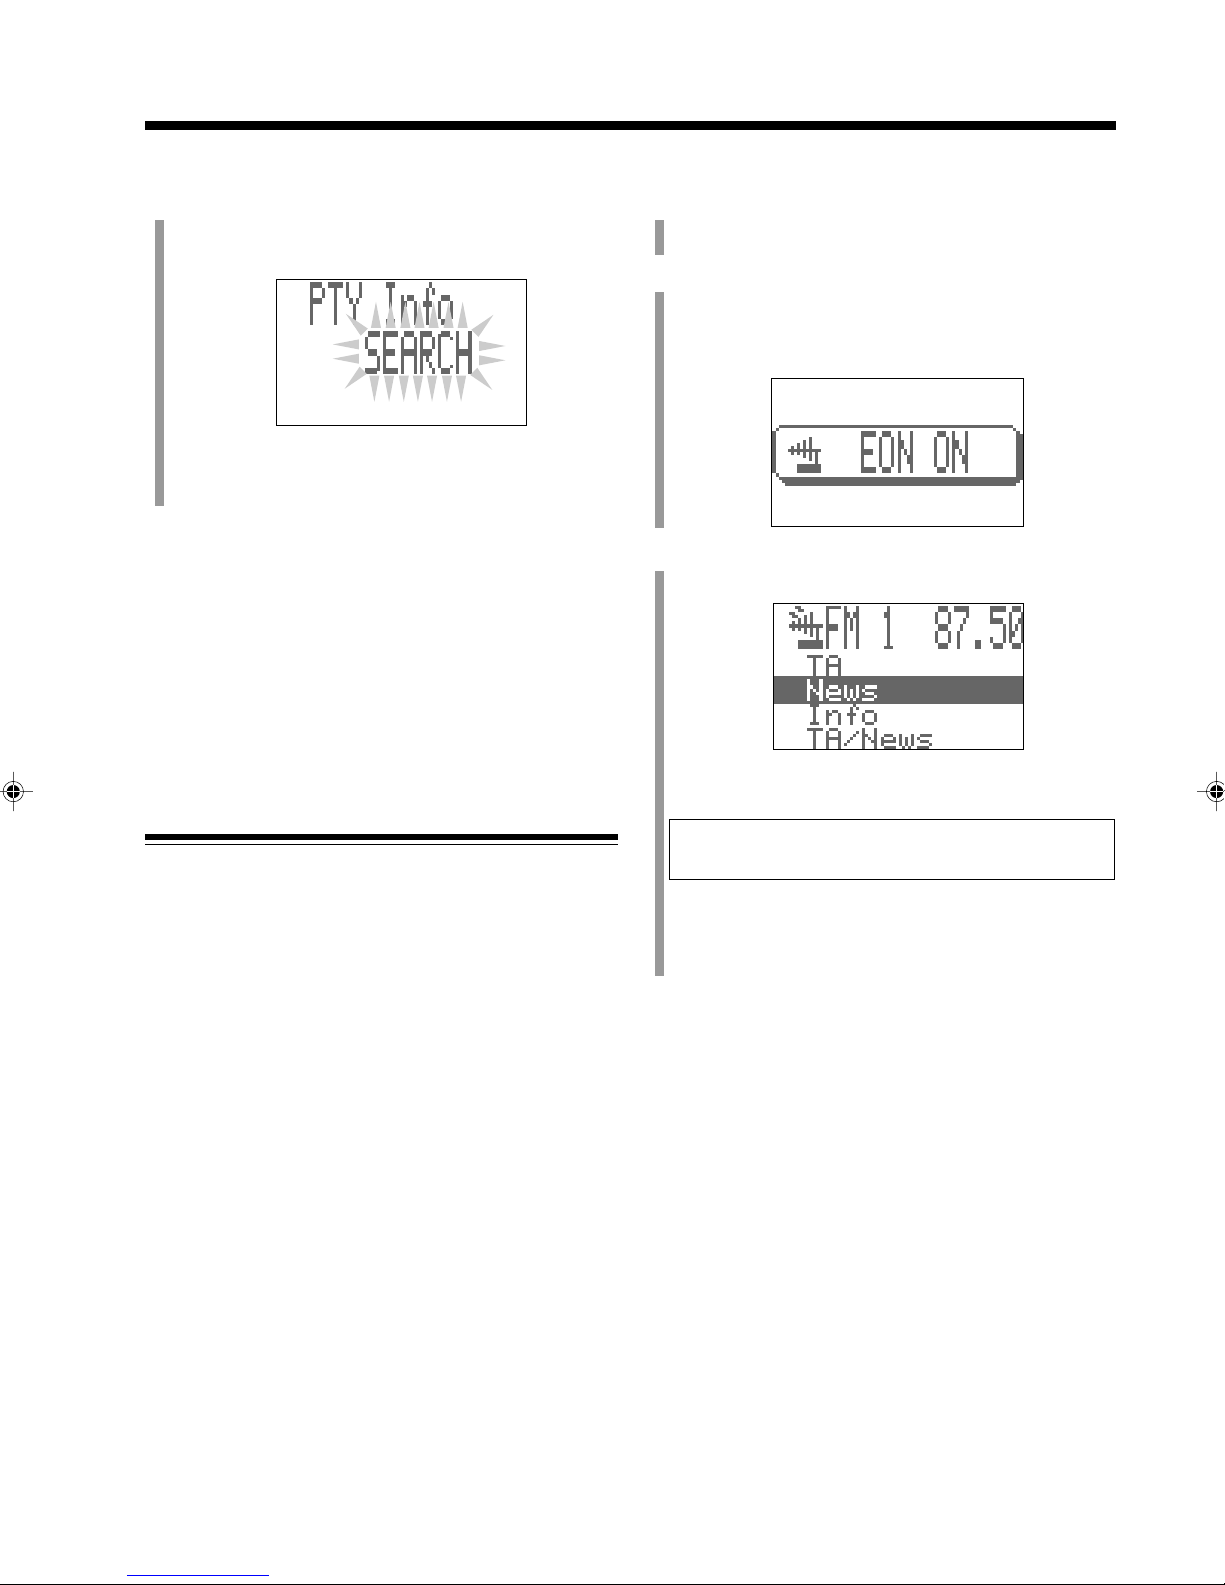
4
Press PTY SEARCH again.
While searching, the selected PTY code appears and
“SEARCH” flashes in the main display.
The unit searches 30 preset FM stations, stops when it
finds the one you have selected, and tunes in that
station.
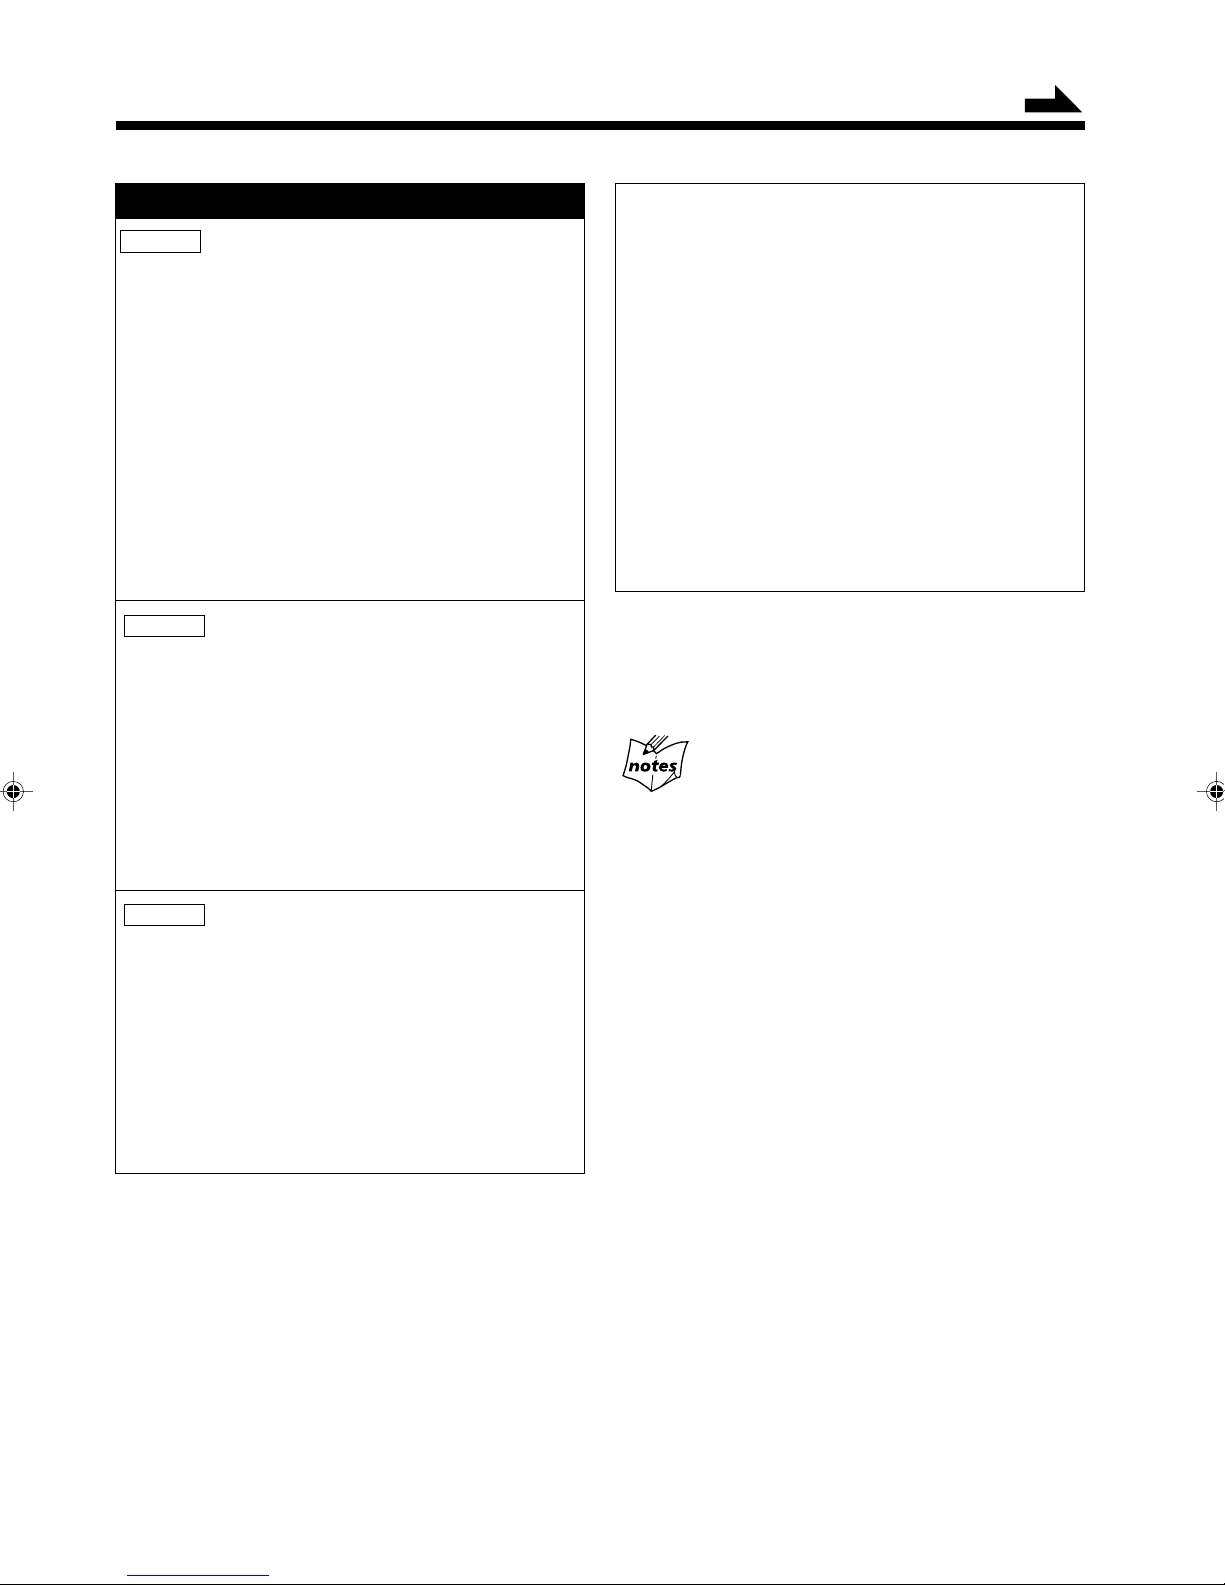
1
Press RDS CONTROL while listening to an FM
station.
2
Press EON.
“EON ON” appears in the main display, and the last
EON data type selected — TA/News/Info — lights on
the display.
To continue searching after the first stop:
Press PTY SEARCH again while the indications in the main
display are flashing.
If no program is found, “NOT FOUND” appears in the main
display and the unit returns to the last received station.
To stop searching any time during the process:
Press PTY SEARCH while searching.
Switching to a Program Type of Your Choice
Temporarily
The EON function allows the unit to switch temporarily to a
broadcast program of your choice (TA, News, and/or Info)
from a different station except when you are listening to a
non-RDS station — some FM stations and AM (MW/LW)
stations.
• The EON indicator lights while receiving a station with
the EON code.
• EON function is applicable only to preset stations.
To activate the EON function, use the remote control:
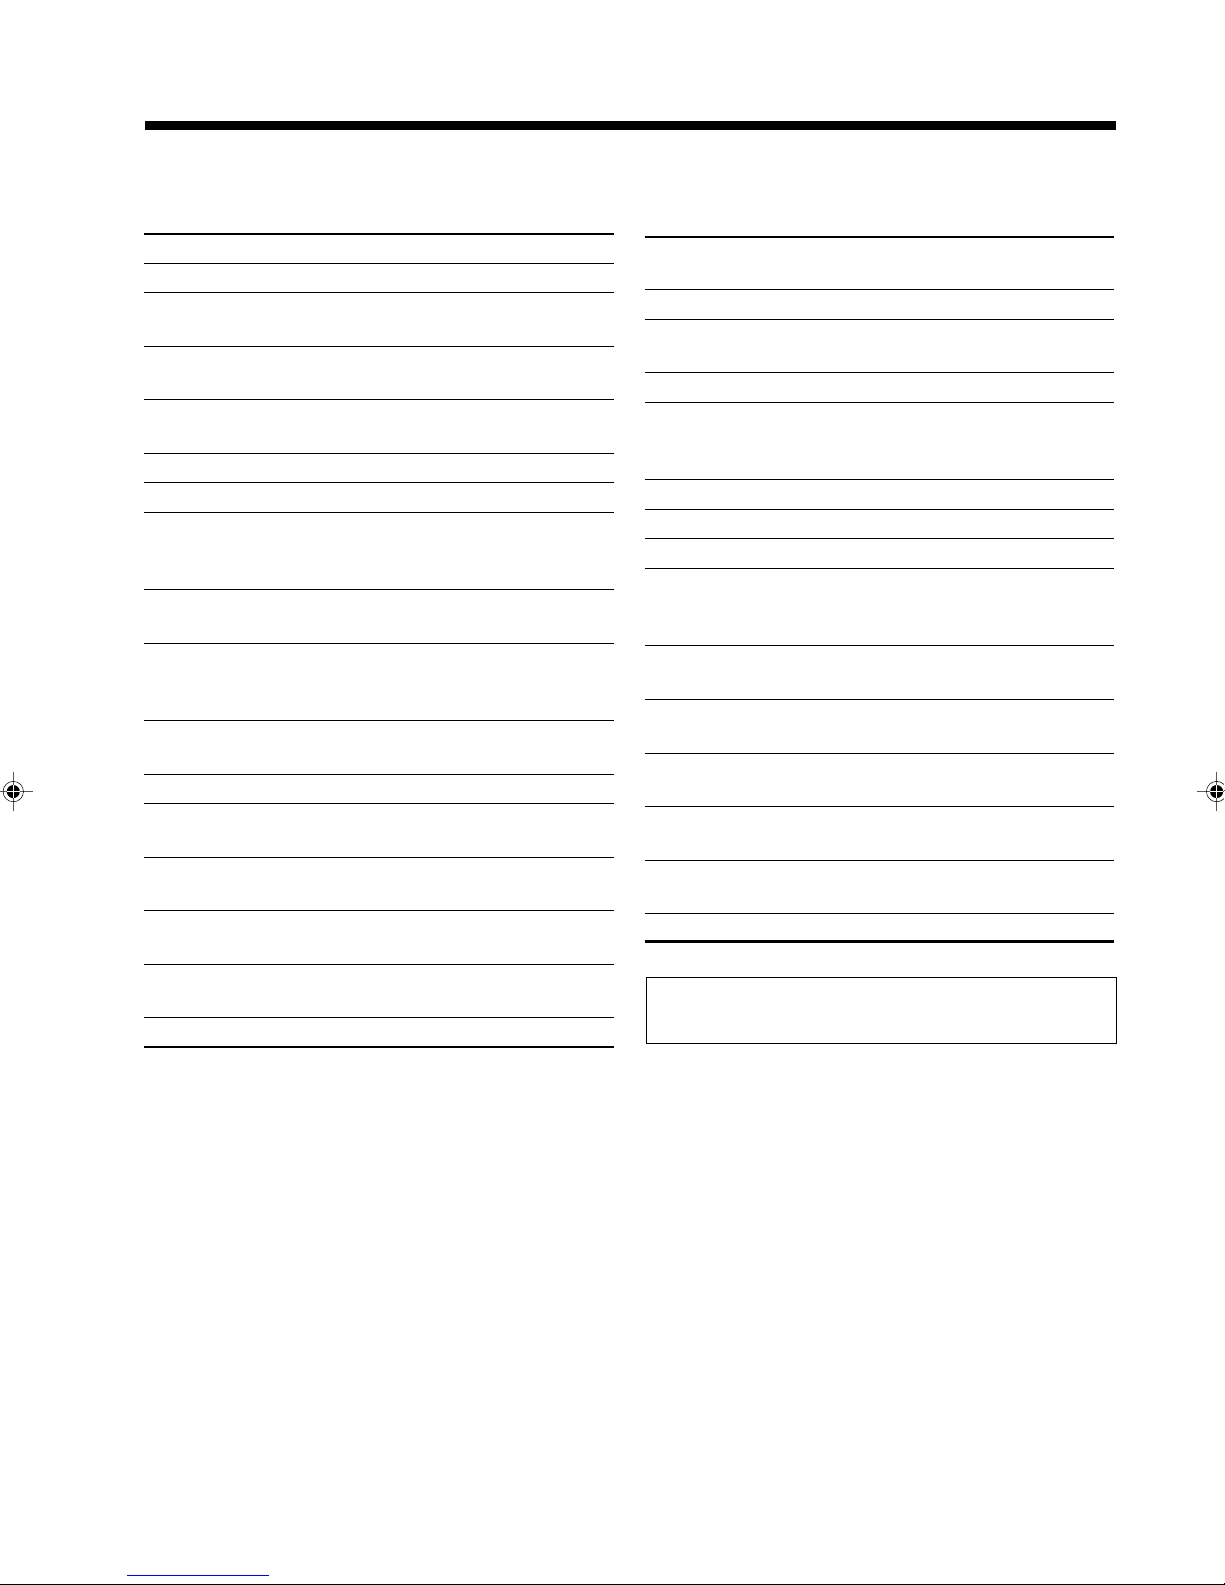
3
Press TA/News/Info repeatedly until the EON data
type you want is selected (highlighted).
• Each time you press the button, the EON data types
change as follows:
TA = News = Info = TA/News = News /Info =
TA/Info = TA/Ne ws/Info = (back to the beginning)
TA: Traffic announcement
News:News
Info: Programs the purpose of which is to impart
advice in the widest sense.
To cancel the EON function, press EON again so that the
TA/News/Info indicator goes off. “EON OFF” also appears
in the main display for a while.
• If you cancel the EON function while receiving a
program selected by the EON function, the unit goes
back to the previously tuned station.
– 19 –
Page 23
Continued
How the EON function actually works:
CASE 1
If there is no station broadcasting the program you
have selected
The unit continues tuning in the current station.
«
When a station starts broadcasting the program you
have selected, the unit automatically switches to the
station. The indicator of received PTY code starts
flashing.
«
When the program is over, “EON END” appears in the
main display, and the unit goes back to the previously
tuned station, but the EON function still remains
activated.
CASE 2
If there is a station broadcasting the program you
have selected
The unit tunes in the program. The indicator of received
PTY code starts flashing.
«
When the program is over, “EON END” appears in the
main display, and the unit goes back to the previously
tuned station, but the EON function still remains
activated.
CASE 3
If the FM station you are listening to is broadcasting
the program you have selected
The unit continues to receive the station but the
indicator of received PTY code starts flashing.
«
When the program is over, “EON END” appears in the
main display, and the indicator of received PTY code
stops flashing and remains lit, but the EON function still
remains activated.
Alarm function
If an “Alarm!” (Emergency) signal is received from a
station while listening to the radio, the unit automatically
switches to the station broadcasting the “Alarm!” signal,
except when you are listening to non-RDS stations (all
AM – MW/LW and some FM stations).
Test function
The TEST signal is used for testing the “Alarm!” signal.
Therefore, it makes the unit work in the same way as the
“Alarm!” signal does.
If a TEST signal is received from a station while
listening to the radio, the unit automatically switches to
the station broadcasting the TEST signal, except when
you are listening to non-RDS stations (all AM – MW/
LW and some FM stations).
More about the EON function
• EON data sent from some stations may not be compatible with
this unit.
• While listening to a program tuned in by the EON function, the
station does not change even if another network station starts
broadcasting a program of the same EON data.
• While listening to a program tuned in by the EON function, you
can only use the EON and DISPLAY buttons as the tuner
operation buttons. If you press any other tuner operation button,
“EON LOCKED!” appears in the main display.
• If the stations alternate intermittently between the station tuned
by the EON function and the currently tuned station
(“WAITING” flashes in the main display), press EON to cancel
the EON function.
If you do not press the button, the currently tuned station is
received finally (“NOT FOUND” appears this time), and the
indication of the EON data type flashing on the display
disappears.
– 20 –
Page 24
Description of the PTY codes:
None: Undefined.
News: News.
Affairs: Topical program expanding or enlarging
upon the news — debate, or analysis.
Info: Programs the purpose of which is to impart
advice in the widest sense.
Sport: Programs concerned with any aspect of
sports.
Educate: Educational programs.
Drama: All radio plays and serials.
Culture: Programs concerning any aspect of national
or regional culture, including language,
theater, etc.
Science: Programs about natural sciences and
technology.
Varied: Used for mainly speech-based programs
such as quizzes, panel games and
personality interviews.
Pop M: Commercial music of current popular
appeal.
Rock M: Rock music.
Easy M: Current contemporary music considered to
be “easy-listening.”
Light M: Instrumental music, and vocal or choral
works.
Classics: Performances of major orchestral works,
symphonies, chamber music, etc.
Other M: Music not fitting into any of the other
categories.
Weather: Weather reports and forecasts.
Finance: Stock Market reports, commerce, trading
etc.
Children: Programs targeted at a young audience.
Social: Programs about sociology, history,
geography, psychology and society.
Religion: Religious programs.
Phone In: Involving members of the public expressing
their views either by phone or at a public
forum.
Travel: Travel information.
Leisure: Programs about recreational activities.
Jazz: Jazz music.
Country: Songs which originate from, or continue the
musical tradition of the American Southern
States.
Nation M: Current popular music of the nation or
region in that country’s language.
Oldies: Music from the so-called “golden age” of
popular music.
Folk M: Music which has its roots in the musical
culture of a particular nation.
Document: Programs concerning factual matters,
presented in an investigative style.
TEST: Broadcasts for testing emergency broadcast
equipment or receiver.
Alarm!: Emergency announcement.
Classification of the PTY codes for some FM
stations may be different from the above list.
– 21 –
Page 25

Playing Back CDs
The buttons and controls enlarged in the illustration below are used and explained in this section (pages 22 to 27).
Remote control
LEVEL
METER
DIMMER
Main unit
DISC
MENU
STANDBY
MENU
LINE
RM-SMXS6MDR
REMOTE CONTROL
/ON
COMPACT COMPONENT MD SYSTEM MX-S6MDR
DISC
SP/LP2/LP4
LONG
REC
MODE
MODE
REC PAUSE
HIGH SPEED
CD MD
DISC LOADING MECHANISM
ENTER
TITLE/EDIT
/DEMO
PHONES
LINE 2
– 22 –
Page 26

Loading CDs
On the unit ONLY:
1
Press one of the open/close buttons (0 CD1, 0 CD2,
or 0 CD3) for the disc tray you want to load a CD
onto.
The unit automatically turns on and the selected disc
tray comes out.
2
Place a CD correctly on the circle of the disc tray,
with its label side up.
Playing Back the Entire Discs — Continuous
Play
You can play CDs continuously.
1
Load CDs.
2
Select a disc number you want to start play with.
On the remote control:
Press one of the disc number buttons (CD1, CD2
and CD3).
On the unit:
Press DISC repeatedly to select the disc number you
want, then press CD # / 8.
CD playback starts from the first track of the selected
disc.
This shows the currently selected disc.
Good
• When using a CD single (8 cm), place it on the
inner circle of the disc tray.
3
Press the same open/close button (0 CD1, 0 CD2,
or 0 CD3) you have pressed in step
The disc tray closes.
4
Repeat steps 1 to 3 to place other CDs.
When loading more than one CD continuously
Press the open/close button (0 CD1, 0 CD2, or 0 CD3) for the
next tray you want to place a CD onto. The first disc tray
automatically closes and the next disc tray comes out.
No good
1
.
Track No.
• Pressing CD 3 / 8 without selecting a disc number
starts playing back the currently selected CD.
To stop during play, press 7.
To remove the disc, press the corresponding open/close
buttons (0 CD1, 0 CD2, or 0 CD3).
CD playback sequence
When 3 CDs are loaded on the disc trays, they are played in one of
the following sequences.
• When CD 1 is the starting disc : CD 1 ] CD 2 ] CD 3 (then
stops)
• When CD 2 is the starting disc : CD 2 ] CD 3 ] CD 1 (then
stops)
• When CD 3 is the starting disc : CD 3 ] CD 1 ] CD 2 (then
stops)
* If no CD is on the disc trays, CD player skips such an empty
tray.
Elapsed playing time
About the CD indicators
Each disc number indicator ( ) corresponds to
the disc tray of the same number.
Lights when a disc on the corresponding disc tray is
currently selected.
Goes off when the unit has recognized that there is
no CD on the corresponding disc tray.
Flashes during play or pause.
Lights when the CD player is selected as the
source.
– 23 –
Page 27

Continued
Basic CD Operations
While playing a CD, you can do the following operations.
To exchange CDs during playback of another
Press the open/close button (0 CD1, 0 CD2, or 0 CD3)
corresponding to a disc number not currently being played
to eject that disc tray and exchange the CD.
If CDs are exchanged during playback, playback will stop
after playing all newly inserted CDs.
To stop playback for a moment
Press CD 3 / 8.
To resume play, press CD 3 / 8 again.
To locate a particular point in a track during play
On the remote control:
Press and hold ¡ (¢) or 1 (4).
• ¡ (¢) : Fast-forwards the tracks.
• 1 (4) : Fast-reverses the tracks.
On the unit:
Push the joy control upward (¡
(1
• Upward (¡
• Downward (1
).
): Fast-forwards the tracks.
) : Fast-reverses the tracks.
To go to another track
On the remote control:
Press ¢ (¡) or 4 (1) repeatedly.
• ¢ (¡) : Skips to the beginning of the next or
succeeding tracks.
• 4 (1) : Goes back to the beginning of the current or
previous tracks.
On the unit:
Push repeatedly (or hold) the joy control rightward
(¢ ) or leftward (4 ).
• Rightward (¢
or succeeding tracks.
• Leftward (4 ): Goes back to the beginning of the
current or previous tracks.
) : Skips to the beginning of the next
) or downward
Programing the Playing Order of the Tracks
— Program Play
You can arrange the order in which the tracks play before
you start playing. You can program up to 32 tracks.
On the remote control:
1
Load CDs.
2
Press CD 3 / 8, then 7.
The source is changed to “CD.”
3
Press PLAY MODE so that “CD PROGRAM”
appears in the main display.
The PRGM indicator also lights.
• Each time you press the button, play mode changes
as follows:
Program play
(CD PROGRAM)
Continuous play
(CD CONT.)
4
Press one of the disc number buttons (CD1, CD2,
and CD3) to select the disc number you want to
play.
Disc No. and Track No.
Ex. Disc No. 1 is selected
Random play
(CD RANDOM)
Step No.
To go to another track directly using the number
buttons (on the remote control ONLY)
Pressing the number button(s) allows you to start playing
the track number you want.
Ex.: For track number 5, press 5.
For track number 15, press +10, then 5.
For track number 20, press +10, then 10.
For track number 32, press +10, +10, +10, then 2.
5
– 24 –
Press the number buttons to select the track from
the disc selected in the above step.
• For how to use the number buttons, see “To go to
another track directly using the number buttons (on
the remote control ONLY)” to the left.
Page 28

6
Program other tracks you want.
• To program tracks from the same disc, repeat step
• To program tracks from a different disc, repeat steps
4
and 5.
7
Press CD 3 / 8.
The tracks are played in the order you have programed.
On the unit:
You have to use the menu for the following operations. For
general information on the menu, see pages 60 and 61.
1
Load CDs.
2
Press CD # / 8, then 7.
The source is changed to “CD.”
3
Select Program play mode using the menu.
(See also page 62.)
1) Press MENU .
“MENU” appears in the main display.
2) Push the joy control downward (
“CD (current play mode setting*).”
* The current play mode — CONTINUE,
RANDOM, or PROGRAM will appear following
“CD” in the main display.
3) Push the joy control rightward (
(
) to select “PROGRAM.”
4) Press SET.
“CD PROGRAM” appears in the main display. The
PRGM indicator also lights.
) to select
) or leftward
5
3) Press SET.
.
Ex. Track No. 4 is selected from
Disc No. 1.
4) Repeat steps to program other tracks.
• To program tracks from the same disc, repeat
steps 2) and 3).
• To program tracks from a different disc, repeat
steps 1) to 3).
5
Press CD # / 8.
The tracks are played in the order you have programed.
To stop during play, press 7.
• Program play also stops when you open a disc tray.
To exit from Program play mode, select another playback
mode (Continuous play or Random play mode) before or
after play either by pressing PLAY MODE on the remote
control or by using the menu on the unit (see page 62).
• Turning off the unit will automatically change the
playback mode to Continuous play.
To check the program contents
Before playing, you can check the program contents by
pressing 4 (1) or ¢ (¡) on the remote control.
• 4 (1) : Shows the programed tracks in the reverse
order.
• ¢ (¡) : Shows them in the programed order.
4
Select the tracks.
1) Push the joy control upward (
) to select the disc number.
(
2) Push the joy control rightward (
(
) to select the track number.
) or downward
) or leftward
To modify the program
Before playing, you can erase the last programed track by
pressing CANCEL. Each time you press the button, the last
programed track is erased from the program.
• When you eject a disc, the tracks selected from that
ejected disc are erased from the program.
To add tracks in the program before you start play,
simply select track numbers you want to add.
To erase the entire program, before or after play, press
and hold CANCEL on the unit until “CD PROGRAM ALL
CLEAR” appears in the main display.
• Turning off the unit also erases the entire program.
– 25 –
Page 29

If you try to program a 33rd step
“CD PROGRAM FULL” will appear in the main display.
If your entry is ignored
You have tried to program a track from an empty tray, or a track
number that does not exist on the CD (for example, selecting track
14 on a CD that only has 12 tracks). Such entries are ignored.
Playing at Random — Random Play
The tracks of all loaded CDs will play at random.
On the remote control:
1
Load CDs.
2
Press CD 3 / 8, then 7.
The source is changed to “CD.”
3
Select Random play mode using the menu.
(See also page 62.)
1) Press MENU.
“MENU” appears in the main display.
2) Push the joy control downward (
“CD (current play mode setting*).”
* The current play mode — CONTINUE,
RANDOM, or PROGRAM will appear
following “CD” in the main display.
3) Push the joy control rightward (
(
) to select “RANDOM.”
4) Press SET.
“CD RANDOM” appears in the main display. The
RANDOM indicator also lights.
Continued
) to select
) or leftward
3
Press PLAY MODE so that “CD RANDOM”
appears in the main display.
The RANDOM indicator also lights.
• Each time you press the button, play mode changes
as follows:
Program play
(CD PROGRAM)
Continuous play
(CD CONT.)
4
Press CD 3 / 8.
The tracks are played at random.
Random play stops when all the tracks are played once.
On the unit:
You have to use the menu for the following operations. For
general information on the menu, see pages 60 and 61.
1
Load CDs.
Random play
(CD RANDOM)
4
Press CD # / 8.
The tracks are played at random.
Random play stops when all the tracks are played once.
To skip the playing track, press ¢ (¡) on the remote
control or push the joy control rightward (¢
• You cannot go back to the previous tracks by pressing
4 (1) on the remote control or pushing the joy
control leftward (4
To stop during play, press 7.
• Random play also stops when you open a disc tray.
To exit from Random play mode, select another playback
mode (Continuous play or Program play mode) before or
after play either by pressing PLAY MODE on the remote
control or by using the menu on the unit (see page 62).
• Pressing one of the disc number buttons (CD1, CD2, and
CD3) starts Continuous play from the first track of the
selected CD.
• Pressing one of the number buttons will start Continuous
play from the selected track of the currently selected CD.
• Turning off the unit will automatically change the
playback mode to Continuous play.
).
).
2
Press CD # / 8, then 7.
The source is changed to “CD.”
– 26 –
Page 30

Repeating Tracks or CDs — Repeat Play
Prohibiting Disc Ejection — Disc Lock
You can have all the CDs, the program or the individual
track currently playing repeat as many times as you like.
To repeat play, press REPEAT on the remote control
during or before playing.
• Make sure that the operation mode of the remote control
is set for operating the CD player. If not, press CD 3 / 8
on the remote control, then 7 before pressing REPEAT.
Ex. When “REPEAT ALL” is
selected
• Each time you press the button, Repeat play mode
changes and appears in the main display as follows:
REPEAT ALL
REPEAT OFF
(Canceled)
REPEAT 1CD
REPEAT 1
REPEA T ALL: Repeats all the tracks on all the CDs
(continuously or at random), or all the
tracks in the program.
REPEAT 1CD*: Repeats all the tracks on one CD.
REPEAT 1: Repeats one track on one CD.
REPEAT OFF: Cancels the repeat play.
You can prohibit CD and MD ejection from the unit and
can lock discs.
• You cannot use this function while the display
demonstration is shown in the main display.
On the unit ONLY:
To prohibit disc ejection
1 Press and hold 7 when the unit is in standby mode.
2 Press 0 CD1.
“LOCKED” appears for a while, and the loaded discs
(both CDs and MD) are locked.
3 Release your finger from 7.
If you try to eject the locked discs
“LOCKED” appears to inform you that the Disc Lock is in use.
To cancel the prohibition and unlock the discs, repeat the
above procedure.
“UNLOCKED” appears for a while in step 2, and the
loaded discs (both CDs and MD) are unlocked.
* REPEAT 1CD is not used for Program play and Random play.
When using the unit, you can activate or
deactivate Repeat play mode by using the menu
(see “Setting the repeat modes” on page 63).
If you turn on the unit after canceling the
prohibition to unlock the discs
The CD tray may come out. This is not a malfunction of the unit.
– 27 –
Page 31

Playing Back an MD
The buttons and controls enlarged in the illustration below are used and explained in this section (pages 28 to 32).
Remote control
LEVEL
METER
DIMMER
Main unit
MENU
STANDBY
MENU
LINE
RM-SMXS6MDR
REMOTE CONTROL
/ON
COMPACT COMPONENT MD SYSTEM MX-S6MDR
DISC
SP/LP2/LP4
LONG
REC
MODE
MODE
REC PAUSE
HIGH SPEED
CD MD
DISC LOADING MECHANISM
ENTER
TITLE/EDIT
/DEMO
PHONES
LINE 2
– 28 –
Page 32

Playing Back the Entire MD — Normal Play
You can play an MD.
Before inserting an MD, turn on the unit; otherwise,
you cannot insert it.
1
Insert an MD into the MD loading slot.
The MD is pulled in automatically.
The MD insertion indicator ( ) lights on the display.
Insert an MD in the same way
as indicated on the MD.
The following indications appear when the current
source is “MD”
If the MD or track has a title
The title will be shown at the center portion of the main display. (If
a title is long and cannot be shown at a time, the unit scrolls the
title to show the entire title.)
* About recording length mode
MDs are played back in the same recording length mode as they
were recorded. When an MD starts playing, the playback mode of
the currently playing track lights on the display.
SP : Indicates the tracks recorded in standard stereo recording
mode on this unit or those recorded on an MD recorder
incompatible with MDLP*.
LP2 : Indicates the tracks recorded in 2 times long-hour stereo
recording mode.
LP4 : Indicates the tracks recorded in 4 times long-hour stereo
recording mode.
* MDLP features a new sound compression method
(ATRAC3) and a 2 times (or 4 times) long-hour stereo
recording and playing function.
The MDLP logo is marked on the MD recorders and players
compatible with MDLP. It is also marked on MDs prerecorded in ATRAC3 (excluding recordable MDs).
T otal Track No.
2
Press MD 3 / 8.
The MD source (
and MD playback starts from the first track.
The recording length mode indicator (SP/LP2/LP4)*
lights on the display.
Track No. Elapsed playing time
To stop during play, press 7.
To remove the disc, press 0 for the MD recorder.
) indicator lights on the display
Total Playing time
Basic MD Operations
While playing an MD, you can do the following operations.
To stop playback for a moment
Press MD 3 / 8.
To resume play, press MD 3 / 8 again.
To locate a particular point in a track during play
On the remote control:
Press and hold ¡ (¢) or 1 (4).
• ¡ (¢) : Fast-forwards the tracks.
• 1 (4) : Fast-reverses the tracks.
On the unit:
Push the joy control upward (¡
(1
• Upward (¡
• Downward (1
).
): Fast-forwards the tracks.
) : Fast-reverses the tracks.
) or downward
– 29 –
Page 33

Continued
To go to another track
On the remote control:
Press ¢ (¡) or 4 (1) repeatedly.
• ¢ (¡) : Skips to the beginning of the next or
succeeding tracks.
• 4 (1) : Goes back to the beginning of the current or
previous tracks.
On the unit:
Push repeatedly (or hold) the joy control rightward
(¢ ) or leftward (4 ).
• Rightward (¢
or succeeding tracks.
• Leftward (4 ): Goes back to the beginning of the
current or previous tracks.
) : Skips to the beginning of the next
To go to another track directly using the number
buttons (on the remote control ONLY)
Pressing the number button(s) allows you to start playing
the track number you want.
Ex.: For track number 5, press 5.
For track number 15, press +10, then 5.
For track number 20, press +10, then 10.
For track number 32, press +10, +10, +10, then 2.
Programing the Playing Order of the Tracks
— Program Play
You can arrange the order in which the tracks play before
you start playing. You can program up to 32 tracks.
On the remote control:
1
Load an MD.
4
Press the number buttons to select the tracks.
• For how to use the number buttons, see “To go to
another track directly using the number buttons (on
the remote control ONLY)” to the left.
Track No.
Ex. When selecting track 5
• If the selected track has a title, it will be shown at the center
portion of the main display. (If the title is long and cannot
be shown at a time, the unit scrolls the title to show the
entire title.)
5
Press MD 3 / 8.
The tracks are played in the order you have programed.
On the unit:
You have to use the menu for the following operations. For
general information on the menu, see pages 60 and 61.
1
Load an MD.
2
Press MD # / 8, then 7.
The source is changed to “MD.”
3
Select Program play mode using the menu.
(See also page 62.)
Total playing time
Step No.
2
Press MD 3 / 8, then 7.
The source is changed to “MD.”
3
Press PLAY MODE so that “MD PROGRAM”
appears in the main display.
The PRGM indicator also lights.
• Each time you press the button, play mode changes
as follows:
Program play
(MD PROGRAM)
Normal play
(MD NORMAL)
(MD RANDOM)
Random play
– 30 –
1) Press MENU.
“MENU” appears in the main display.
2) Push the joy control downward (
“MD (current play mode setting*).”
* The current play mode — NORMAL,
RANDOM, or PROGRAM will appear following
“MD” in the main display.
3) Push the joy control rightward (
) to select “PROGRAM.”
(
) or leftward
) to select
Page 34

4) Press SET.
“MD PROGRAM” appears in the main display.
The PRGM indicator also lights.
4
Select the tracks.
1) Push the joy control rightward (
) to select the track number.
(
2) Press SET.
Ex. When selecting track 5
3) Repeat steps 1) and 2) to program other tracks.
) or leftward
To add tracks in the program before you start play,
simply select track numbers you want to add.
To erase the entire program, before or after play, press
and hold CANCEL on the unit until “MD PROGRAM ALL
CLEAR” appears in the main display.
• When you eject the MD or turn off the unit, the entire
program is also erased.
If you try to program a 33rd step
“MD PROGRAM FULL” will appear in the main display.
If your entry is ignored
You have tried to program a track that does not exist on the MD
(for example, selecting track 14 on an MD that only has 12 tracks).
Such entries are ignored.
If the total playing time exceed 2 hours and 30
minutes
The playing time will not be shown. (“– – : – –” will appear.)
Playing at Random — Random Play
5
Press MD # / 8.
The tracks are played in the order you have programed.
To stop during play, press 7.
To exit from Program play mode, select another playback
mode (Normal play or Random play mode) before or after
play either by pressing PLAY MODE on the remote control
or by using the menu on the unit (see page 62).
• Turning off the unit or ejecting the MD will
automatically change the playback mode to Normal play.
To check the program contents
Before playing, you can check the program contents by
pressing 4 (1) or ¢ (¡) on the remote control.
• 4 (1) : Shows the programed tracks in the reverse
order.
• ¢ (¡) : Shows them in the programed order.
To modify the program
Before playing, you can erase the last programed track by
pressing CANCEL. Each time you press the button, the last
programed track is erased from the program.
The tracks of the loaded MD will play at random.
On the remote control:
1
Load an MD.
2
Press MD 3 / 8, then 7.
The source is changed to “MD.”
3
Press PLAY MODE so that “MD RANDOM”
appears in the main display.
The RANDOM indicator also lights.
• Each time you press the button, play mode changes
as follows:
Program play
(MD PROGRAM)
Normal play
(MD NORMAL)
Random play
(MD RANDOM)
– 31 –
Page 35

4
Press MD 3 / 8.
The tracks are played at random.
Random play ends when all the tracks are played once.
On the unit:
You have to use the menu for the following operations. For
general information on the menu, see pages 60 and 61.
1
Load an MD.
To exit from Random play mode, select another playback
mode (Normal play or Program play mode) before or after
play either by pressing PLAY MODE on the remote control
or by using the menu on the unit (see page 62).
• Turning off the unit or ejecting the MD will
automatically change the playback mode to Normal play.
• Pressing one of the number buttons will start Normal
play from the selected track.
2
Press MD # / 8, then 7.
The source is changed to “MD.”
3
Select Random play mode using the menu.
(See also page 62.)
1) Press MENU .
“MENU” appears in the main display.
2) Push the joy control downward (
“MD (current play mode setting*).”
* The current play mode — NORMAL,
RANDOM, or PROGRAM will appear following
“MD” in the main display.
3) Push the joy control rightward (
(
) to select “RANDOM.”
4) Press SET.
“MD RANDOM” appears in the main display. The
RANDOM indicator also lights.
) to select
) or leftward
Repeating Tracks — Repeat Play
You can have all the tracks, the program or the individual
track currently playing repeat as many times as you like.
To repeat play, press REPEAT on the remote control
during or before playing.
• Make sure that the operation mode of the remote control
is set for operating the MD recorder.
If not, press MD 3 / 8 on the remote control, then 7
before pressing REPEAT.
Ex. When “REPEAT ALL” is selected
• Each time you press the button, Repeat play mode
changes and appears in the main display as follows:
REPEAT ALL
REPEAT OFF
(Canceled)
REPEAT 1
4
Press MD # / 8.
The tracks are played at random.
Random play stops when all the tracks are played once.
To skip the playing track, press ¢ (¡) on the remote
control or push the joy control rightward (¢
• You cannot go back to the previous tracks by pressing
4 (1) on the remote control or pushing the joy
control leftward (4
To stop during play, press 7.
).
REPEA T ALL: Repeats all the tracks in the MD (in
Normal play or Random play mode), or
all the tracks in the program.
REPEAT 1: Repeats one track.
REPEAT OFF: Cancels the repeat play.
).
When using the unit, you can activate or
deactivate Repeat play mode by using the menu
(see “Setting the repeat modes” on page 63).
To prohibit disc ejection — Disc Lock
You can prohibit CD and MD ejection from the unit,
and can lock the discs.
See page 27 for details.
– 32 –
Page 36

Recording on MDs
The buttons and controls enlarged in the illustration below are used and explained in this section (pages 33 to 40).
For recording operations, you mainly use the buttons and controls on the unit.
Main unit
STANDBY
/ON
COMPACT COMPONENT MD SYSTEM MX-S6MDR
MENU
MENU
DISC
DISC
SP/LP2/LP4
LONG
MODE
REC PAUSE
HIGH SPEED
CD MD
Remote control
REC
MODE
SP/LP2/LP4
LONG
MODE
REC PAUSE
HIGH SPEED
CD MD
REC
MODE
DISC LOADING MECHANISM
LEVEL
METER
DIMMER
ENTER
TITLE/EDIT
/DEMO
PHONES
LINE 2
LINE
LINE
RM-SMXS6MDR
– 33 –
REMOTE CONTROL
Page 37

Continued
Before You Start Recording
• It may be unlawful to record or play back copyrighted material without the consent of the
copyright owner.
• The sampling frequency rate converter built in the MD recorder allows you to record a digital source if its sampling
frequency is 32 kHz, 44.1 kHz, or 48 kHz. If no source equipment is connected to the DIGITAL IN terminal or if
the sampling frequency of the connected equipment is not 32 kHz, 44.1 kHz, or 48 kHz, “DIGITAL IN UNLOCK”
appears in the main display (no recording is possible).
• You cannot record the Dolby Digital, DTS Digital Surround, or MPEG Multichannel signals entirely through the
DIGITAL IN terminal.
• When you record onto partially recorded MD, its contents are not erased or overwritten. The recording starts from
the point following the last recorded track of the MD.
If you want to record on such an MD from the beginning, you have to erase its contents first (see “ALL ERASE
Function” on page 46).
• When an MD is fully recorded, recording will stops automatically.
• The recording level is automatically set correctly (except when recording from the equipment connected to the
LINE 1 and LINE 2 jacks), so it is not affected by the VOLUME control. Thus, during recording you can adjust the
sound you are actually listening to without affecting the recording level.
• While recording, you can hear sound mode effect and/or the Active Bass Extension effect through the speakers or
headphones. However, the sound is recorded without these effects (see pages 12 and 13).
About the track marks
When playing an MD, you can move among the tracks.
You can do this because there is a mark recorded at the
beginning of each track enabling you to locate the track.
This mark is called a “track mark” and the portion
between two adjacent track marks is called a “track.”
• When recording from an analog source such as
FM/AM broadcasts, no track mark is recorded on
the MD. This means that, when playing this MD, the
MD recorder will regard the entire recording as one
track (track 1). You will not be able to select directly
a song or navigate through songs.
However, if there is a blank of 3 seconds or more, the
MD recorder will consider it as a blank separating 2
tracks and consequently put a track mark.
To put a track mark manually while recording an
analog source, press SET on the unit at the place you
want to put a track mark.
EX.When pressing SET while recording
an FM broadcast program
To add a track mark after recording is over, you can
use the DIVIDE function (see page 43).
To avoid erasing important recordings
The recordable MD has an erasure prevention tab so
that important recordings are not accidentally erased.
When you finish recording or editing, slide to open the
erasure prevention tab on the cartridge side surface.
New recording or editing is now no longer possible. (If
you try to do, “DISC PROTECTED” appears in the
main display.)
To do re-recording or editing, return the tab to the
closed position.
Erasure prevention tab
Recording/Editing
possible
If “PLAYBACK DISC” appears in the main
display when you try to record on an MD
The MD is only for playback use, not for recording.
Disc protected:
Recording/Editing
not possible
– 34 –
Page 38

Stereo Long-Hour Recording (MDLP)
On conventional MD recorders, 2 times long-hour
recording on MDs has been possible only in monaural
sound, but this unit allows for 2 times or 4 times longhour recording without losing stereo sound.
This feature can be used for any recording method
provided with this unit.
Songs (tracks) can be recorded on a single MD using
different recording length modes (LONG MODE — SP:
Standard Play, LP2: 2 Times Long Play, LP4: 4 Times
Long Play).
To make a recording using this feature, follow the
basic procedure below:
1 Check the recording remaining time of the MD you
want to use for recording. (See the right column,
“To check the remaining recording time.”)
2 Press LONG MODE to set the desired recording
length mode (LONG MODE — SP/LP2/LP4).
• Each time you press the button, the recording
length modes change as follows and the
corresponding indicator lights in the display:
SP
(Standard Play)
LP4
(4 Times Long Play)
LP2
(2 Times Long Play)
REMEMBER to check the remaining recording time
of MDs before starting recording
The remaining recording time of MDs will be calculated
and shown, based on the recording length mode (SP/LP2/
LP4) currently selected.
Before starting recording or using the Recording Timer,
check the recording time remaining on the MD for each
recording length mode (SP/LP2/LP4) and select the
optimum recording length mode.
To check the remaining recording time
1 Insert an MD to record on.
2 Select any source other than “MD.”
3 Press LONG MODE to select the recording length
mode (SP/LP2/LP4).
4 Press REC PAUSE (or MD REC PAUSE on the
remote control).
The unit enters recording pause mode. The track
number to be recorded and the remaining
recording time are shown in the main display.
5 Press 7 to cancel the recording pause mode after
checking the remaining recording time.
Now you can proceed with your recording
operation or Recording Timer operation.
If you want to check the remaining time in other
recording length modes, repeat steps 3 to 5.
SP: Signifies standard-hour stereo recording. The
number of hours usable for recording is the
same as shown on the package of the MD.
LP2:Signifies 2 times long-hour stereo recording.
The number of hours usable for recording is
twice as long as shown on the package of the
MD.
LP4:Signifies 4 times long-hour stereo recording.
The number of hours usable for recording is 4
times as long as shown on the package of the
MD.
3 Press REC MODE to select the recording method if
necessary.
4 Start recording.
• For more detailed explanation, see the following pages
describing the actual recording methods.
Precautions for performing long-hour stereo
recording
After having made long-hour stereo recordings on this
unit, pay attention to the following:
• Songs (tracks) recorded in 2 times or 4 times longhour recording mode can only be played back on the
equipment provided with MDLP, compatible with a
long-hour stereo recording function; otherwise, “LP:”
is displayed before a title and playback proceeds
without sounds.
• When editing songs (tracks) on an MD, you cannot
join (JOIN) songs (tracks) recorded in different
recording length modes (SP/LP2/LP4).
More about MDLP
• You cannot make a long-hour monaural recording using this
unit.
• Sound quality will decrease as the recording length mode
changes to LP2 (little) and LP4 (much). To obtain the best
sound quality, it is recommended to use the SP mode when
recording.
– 35 –
Page 39

Continued
About High-Speed Recording
There are some restrictions to observe for high-speed
recording (exceeding normal speed) to protect
copyrights. (HCMS: see page 69.)
This unit is so designed that a song (track) recorded
from a CD using high-speed recording cannot be rerecorded until 74 minutes elapse after the previous
recording started.
If you try to re-record the same song (track) within the
74 minutes, recording is canceled and the display turns
red with “HCMS CANNOT COPY” shown as a
warning.
The remaining time required until re-recording will then
appear in the main display.
If this happens, press 7 after the remaining time
appears.
CD playback stops.
REMEMBER if you are trying to record a program
including the same song (track) twice using high-speed
recording, recording will stop at the beginning of the
2nd recording of the same song (track). (“HCMS
CANNOT COPY” will appear in the main display.)
During high-speed recording
You cannot listen to any source, and therefore, cannot adjust
the volume level. (“CANNOT LISTEN!” will appear if you try
to do.)
Recording Any Sound Source — Standard
Recording
The following recording method can be applied to any
sound source.
1
Insert a recordable MD in the MD loading slot.
2
Select the source.
When recording CDs:
•
On the unit: Press DISC to select a disc, and press
CD # / 8, then press 7.
On the remote control: Press CD1, CD2, or CD3 to
select a disc you want to record with, then 7.
When recording an FM/AM (MW/LW) broadcast:
•
Press FM/AM, then tune into a station you want.
When recording from external equipment:
•
Press LINE repeatedly until the external equipment
you want is selected.
When the source for recording is the equipment
connected to either the LINE 1 jacks or the LINE 2 jack,
you can select the sound input level. See “Selecting the
sound input level” on page 65.
3
Press LONG MODE on the unit if necessary.
The recording length mode changes as follows:
SP
(Standard Play)
LP4
(4 Times Long Play)
• For the recording length mode, see “Stereo Long-
Hour Recording (MDLP)” on page 35.
4
Press REC PAUSE on the unit (or MD REC PAUSE
on the remote control).
The REC PAUSE lamp on the unit starts flashing.
LP2
(2 Times Long Play)
5
– 36 –
Press MD # / 8.
The REC PAUSE lamp stops flashing and remains lit,
and recording starts.
When recording an FM/AM (MW/LW) broadcast:
•
The station frequency will be recorded as the track
title.
Page 40

6
When recording a CD:
Press CD # / 8.
When recording from external equipment:
Start playback.
• For details, see the manual supplied with your
equipment.
To stop recording for a moment, press REC PAUSE (or
MD REC PAUSE) again.
To resume recording, press MD # / 8 again. (A track mark
is recorded when you resume recording.)
To stop recording, press 7. “WRITING” flashes for a
while.
• When recording from a CD, both the CD player and the
MD recorder stop.
When recording from a CD using Standard
Recording
Two track marks may be recorded at the beginning of the
recording. If this occurs, join these two track marks using the JOIN
function described on page 44.
You can use more useful and easier recording
methods
• For recording from CDs, see “Recording CDs — CD
Synchronized Recording” below.
• For recording from the external equipment, see “Recording the
External Equipment — Sound Synchronized Recording” on
page 40.
Recording CDs — CD Synchronized
Recording
All CDs Synchronized Recording
7Using the HIGH-SPEED CD 3 MD button on the unit
This is the easiest way of CD recording.
1
Insert a recordable MD into the MD loading slot.
2
Prepare CDs.
• After placing CDs, press CD # / 8, then 7 before
going to the next step.
• You can make a program (see page 24) or select
Random play mode (see page 26) if you want. In this
case, you cannot select the starting disc
4
= go to step
3
Press DISC to select the disc you want to start
recording with.
• Make sure that the correct disc number indicator is
selected on the display.
4
Press LONG MODE on the unit if necessary.
The recording length mode changes as follows:
• For the recording length mode, see “Stereo LongHour Recording (MDLP)” on page 35.
5
Press HIGH-SPEED CD 3 MD.
The REC PAUSE lamp on the unit lights, and recording
starts.
.
SP
(Standard Play)
(4 Times Long Play)
Remaining playback time
(2 Times Long Play)
LP4
LP2
You have three methods to record from CDs onto an MD.
Using these synchronized recording methods, you can start
and stop CD play and MD recording at the same time.
• All CDs Synchronized Recording — Records all
loaded CDs continuously (Continuous play mode) or at
random (Random play mode), or the program you have
made (Program play mode).
• One CD Synchronized Recording — Records the
entire CD.
• First T rack Recording — Records the first track of
each CD.
For each recording method, you can select the recording
speed — either high speed or normal speed.
Recording time remaining
on the MD
When all loaded CDs are recorded, recording will stop.
Both the CD player and the MD recorder stop
automatically.
To stop recording, press 7. “WRITING” flashes for a
while.
Both the CD player and the MD recorder stop.
– 37 –
Page 41

Continued
To record a single track during play or pause
Press HIGH-SPEED CD 3 MD while playing back or
pausing a CD track you want to record.
The playback of that CD track is stopped, and the same
track starts playing from the beginning again. This time, the
MD recorder starts recording the CD track.
• When the track is recorded, both the CD player and the
MD recorder stop.
7Using the REC MODE button on the unit
You can select the recording speed — high speed or normal
speed.
1
Insert a recordable MD into the MD loading slot.
2
Prepare CDs.
• After placing CDs, press CD # / 8, then 7 before
going to the next step.
• You can make a program (see page 24) or select
Random play mode (see page 26) if you want. In this
case, you cannot select the starting disc
4
= go to step
3
Press DISC to select the disc you want to start
recording with.
• Make sure that the correct disc number indicator is
selected on the display.
4
Press LONG MODE on the unit if necessary.
The recording length mode changes as follows:
• For the recording length mode, see “Stereo LongHour Recording (MDLP)” on page 35.
5
Select the recording mode.
.
SP
(Standard Play)
(4 Times Long Play)
LP2
(2 Times Long Play)
LP4
2) Push the joy control rightward ( ) or leftward
(
) if you want to change the recording speed
from normal speed to high speed (HIGH).
3) Press SET.
The REC PAUSE lamp on the unit lights, and
recording starts.
When all loaded CDs are recorded, recording will stop.
Both the CD player and the MD recorder stop
automatically.
To stop recording, press 7. “WRITING” flashes for a
while.
Both the CD player and the MD recorder stop.
To record a single track during play or pause
1 Press REC MODE while playing back or pausing a CD
track you want to record.
2 Make sure that “CD=MD” is selected (highlighted).
3 Push the joy control rightward (
want to change the recording speed from normal speed to
high speed (HIGH).
4 Press SET.
The playback of that CD track is stopped, and the same
track starts playing from the beginning again. This time,
the MD recorder starts recording the CD track.
• When the track is recorded, both the CD player and
the MD recorder stop.
During All CDs Synchronized Recording
You can exchange the discs not being played back. (See page 24.)
) or leftward ( ) if you
1) Press REC MODE.
• Make sure that “CD=MD” is selected
(highlighted).
One CD Synchronized Recording
7Using the REC MODE button on the unit ONLY
You can record the entire CD onto an MD.
1
Insert a recordable MD into the MD loading slot.
– 38 –
Page 42

2
Prepare a CD.
• Place a CD on one of the disc tray (CD 1, CD 2, or
CD 3), press CD # / 8, then 7 before going to the
next step.
3
Press DISC to select the disc you want to record.
• Make sure that the correct disc number indicator is
selected on the display.
4
Press LONG MODE on the unit if necessary.
The recording length mode changes as follows:
SP
(Standard Play)
LP2
(2 Times Long Play)
First Track Recording
First Track Recording allows you to record the first track of
each loaded CD. You can, for example, make a directory of
all your best CDs.
7Using the REC MODE button on the unit ONLY
1
Insert a recordable MD into the MD loading slot.
2
Prepare CDs.
• After placing CDs, press CD # / 8, then 7 before
going to the next step.
• Always place a CD on the CD 1 tray. If not, this
function does not work.
LP4
(4 Times Long Play)
• For the recording length mode, see “Stereo LongHour Recording (MDLP)” on page 35.
5
Select the recording mode.
1) Press REC MODE.
2) Push the joy control downward (
“1CD=MD.”
3) Push the joy control rightward (
) if you want to change the recording speed
(
from normal speed to high speed (HIGH).
4) Press SET.
The REC PAUSE lamp on the unit lights, and
recording starts.
EX.When high speed recording is selected
When the entire CD is recorded, recording will stop.
Both the CD player and the MD recorder stop
automatically.
To stop recording, press 7. “WRITING” flashes for a
while.
Both the CD player and the MD recorder stop.
) to select
) or leftward
3
Press LONG MODE on the unit if necessary.
The recording length mode changes as follows:
SP
(Standard Play)
LP4
(4 Times Long Play)
• For the recording length mode, see “Stereo LongHour Recording (MDLP)” on page 35.
4
Select the recording mode.
1) Press REC MODE.
2) Push the joy control downward (
“1st TRK.”
3) Push the joy control rightward (
) if you want to change the recording speed
(
from normal speed to high speed (HIGH).
4) Press SET.
The REC PAUSE lamp on the unit lights, and
recording starts.
When the first track of the CD on the CD 1 tray is
recorded, the first track of the CD on the CD 2 tray
will be recorded. Recording continues until the first
track of each loaded CD is recorded.
LP2
(2 Times Long Play)
) to select
) or leftward
During One CD Synchronized Recording
Repeat play mode will be canceled automatically.
– 39 –
Page 43

5
Press the open/close button (0 CD1, 0 CD2, or
0 CD3) for the CDs already played to replace the
CDs.
• You can change CDs to continue the First Track
Recording using more than 3 CDs.
4
Select Sound Synchronized Recording.
1) Press REC MODE.
When the first track of the last loaded CD is recorded, First
Track Recording stops.
To stop recording, press 7. “WRITING” flashes for a
while.
Both the CD player and the MD recorder stop.
During First Track Recording
Repeat play mode will be canceled automatically.
Recording the External Equipment — Sound
Synchronized Recording
With this recording method, you can start recording
automatically when the source sound comes into this unit
through the LINE 1 jacks, LINE 2 jack, or the DIGITAL IN
terminal. Sound Synchronized Recording will stop
automatically if no sound comes in for more than 30
seconds.
When the sound signal comes in through the DIGITAL IN
terminal, digital recording is performed.
1
Insert a recordable MD into the MD loading slot.
2
Press LINE repeatedly to select the external
equipment you want to record from.
• When selecting the equipment connected either the
LINE 1 jacks or LINE 2 jack, the sound input level
appears for a while. (See page 65 for the sound input
level.)
3
Press LONG MODE on the unit if necessary.
The recording length mode changes as follows:
SP
(Standard Play)
LP2
(2 Times Long Play)
2) Press SET.
The REC PAUSE lamp on the unit starts flashing.
Ex. When “LINE 1” is selected as a
playback source
5
Start playback on the external equipment.
The REC PAUSE lamp stops flashing and remains lit,
and recording starts automatically.
To stop recording, press 7. “WRITING” flashes for a
while.
When the source for recording is the equipment
connected to either the LINE 1 jacks or the LINE 2
jack
You can select the sound input level. See “Selecting the sound
input level” on page 65.
When recording is stopped or finished
Sound Synchronized Recording is canceled automatically.
If Sound Synchronized Recording do not work
correctly
Use the Standard Recording method (see page 36).
Sound Synchronized Recording starts automatically when this unit
detects sound signals coming in. This means that, if sound signal is
too weak for this unit to detect, Sound Synchronized Recording
will not start (or will stop even while the source is being played).
When recording from a DAT deck using Sound
Synchronized Recording
Two track marks may be recorded at the beginning of the
recording. If this occurs, join these two track marks using the JOIN
function described on page 44.
LP4
(4 Times Long Play)
• For the recording length mode, see “Stereo LongHour Recording (MDLP)” on page 35.
– 40 –
Page 44

Editing MDs
The buttons and controls enlarged in the illustration below are used and explained in this section (pages 41 to 46).
Main unit
STANDBY
/ON
COMPACT COMPONENT MD SYSTEM MX-S6MDR
TITLE/EDIT
ENTER
/DEMO
MENU
SP/LP2/LP4
LONG
REC
MODE
MODE
REC PAUSE
HIGH SPEED
CD MD
DISC LOADING MECHANISM
ENTER
TITLE/EDIT
/DEMO
PHONES
LINE 2
You cannot use the remote control to edit MDs.
Use only buttons on the unit.
DISC
– 41 –
Page 45

Continued
Introducing MD Editing Functions
A recorded MD can be edited in many ways. The MD editing functions include dividing, joining, moving, erasing tracks,
erasing the entire disc, and more than one of them can be combined as required.
Dividing a track (DIVIDE) : Page 43
This function divides a track by adding a track marking(s)
in the desired point(s) in the middle or where you want to
search later.
2nd
B CA D
2nd
3rd 4th
B C
3rd 4th
Track No.
5th
D
After dividing
track A
1st
1st
A2
A1
Joining a track (JOIN) : Page 44
This function joins two adjacent tracks into a single track
by deleting a track marking.
2nd
After joining
track B
1st
B
A
1st
BA
3rd 4th 5th
C D E
2nd
3rd 4th
C D E
Track No.
Moving a track (MOVE) : Page 44
This function moves a track by reordering the track
numbers.
2nd
After moving
track B
1st
A
1st
A
B
C D E
3rd 4th 5th
C D E
2nd
3rd 4th 5th
Track No.
B
Erasing all tracks (ALL ERASE) : Page 46
This function erases data in a disc entirely.
2nd
After
All Erase
1st
A
B
3rd 4th 5th
C D E
Track No.
BLANK DISC
Erasing a portion of a track
By combining “DIVIDE,” “ERASE” and “JOIN,” for
example, it is possible to erase only a part of an existing
track.
Dividing track A
into 3 tracks
Erasing track
Joining
tracks and
a c
1st
A
1st
A
a
b
1st
A
a c
1st
A
a c
A
A
A
2nd
b
2nd
Part to be erased
B C
3rd
A
B
c
3rd
C
B
2nd
C
B
2nd
4th
4th
3rd
3rd
Track No.
5th
C
Track No.
Track No.
Erasing a track (ERASE) : Page 45
This function erases selected tracks. After the erasure, the
subsequent tracks are justified and their track numbers are
renumbered automatically. You can erase up to 15 tracks
at a time.
2nd
1st
B
A
After erasing
tracks B and D
1st
C E
A
3rd 4th 5th
C D E
2nd
3rd
Track No.
If “PLAYBACK DISC” or “DISC PROTECTED”
appears when you try to edit an MD
You cannot edit such MDs. See page 70.
You can also assign titles to MDs and/or tracks
(See page 48.)
A title can be assigned to a track or disc. Once a title is assigned,
it is displayed in later playback for confirmation.
Each title can be composed of up to 61 characters, and can be
input using alphabetic characters (uppercase and lowercase),
symbols and numerals.
– 42 –
Page 46

DIVIDE Function
This function allows you to divide one track into two
separate tracks. It is useful, for example, when you want to
add track marks at a certain point within a track or if you
want to separate a recording.
• To stop any time during editing process, press TITLE/
EDIT.
1
Insert an MD you want to edit into the MD loading
slot.
• It takes about 5 seconds for the unit to read the TOC
(Table Of Contents) of the inserted MD. While the
unit is reading it, you cannot go to the next step.
2
Press TITLE/EDIT.
The source is changed to “MD.”
• If “DIVIDE” is not shown, you cannot divide the
track.
5
Press SET when you find the point where you want
to divide the track.
The MD recorder repeats the selected point
— a 3-second period following the dividing point.
• If the dividing point is satisfactory, go to step 7.
• If the dividing point is not satisfactory, go to the next
step.
6
Push and hold the joy control rightward ( ) or
leftward (
• You can shift the dividing point up to ±128. This
range (±128) corresponds to approximately ±8
seconds from the original point (Position 0).
) to precisely adjust the dividing point.
3
Push the joy control downward ( ) to select
“DIVIDE” (highlighted), then press SET.
The first track (or the current track) starts playing.
4
Push the joy control rightward ( ) or leftward ( )
to select the track you want to divide.
The selected track starts playing.
Ex. When you want to divide track 5
If the track has a title, it is shown here.
• If you do not push the joy control rightward (¢
or leftward (4
• You can push and hold the joy control upward (¡
) or downward (1 ) to find the dividing point.
), the same track plays repeatedly.
Ex. When adjusting the point by +20
When you stop holding the joy control, the unit
repeats the newly selected dividing point.
• When you find the right position, go to the next step.
• If you want to cancel the dividing point, press
CANCEL, then select the correct dividing point.
7
Press SET.
8
Press ENTER/DEMO to finish the editing
procedure.
“EDITING” appears for a while, then “WRITING”
flashes while the editing you have made is being
recorded on the MD.
)
To join the divided tracks again, see the JOIN function.
– 43 –
Page 47

Continued
JOIN Function
This function allows you to join two adjacent tracks into
one track.
• To stop any time during editing process, press TITLE/
EDIT.
1
Insert an MD you want to edit into the MD loading
slot.
• It takes about 5 seconds for the unit to read the TOC
(Table Of Contents) of the inserted MD. While the
unit is reading it, you cannot go to the next step.
2
Press TITLE/EDIT .
The source is changed to “MD.”
• If “JOIN” is not shown, you cannot join the tracks.
3
Push the joy control downward ( ) to select
“JOIN” (highlighted), then press SET.
5
Press SET.
• If you have selected wrong tracks, press CANCEL,
then select the correct tracks.
6
Press ENTER/DEMO to finish the editing
procedure.
“EDITING” appears for a while, then “WRITING”
flashes while the editing you have made is being
recorded on the MD.
To divide the joined tracks, see the DIVIDE function.
If “CANNOT JOIN” appears in step
You cannot join the following tracks.
• Tracks recorded using different recording length modes (LONG
MODE — SP/LP2/LP4). (See page 35.)
• Digital-recording tracks and analog-recording tracks.
• Tracks recorded using monaural long recording method (not
possible on this unit) and stereo-recording tracks.
5
4
Push the joy control downward ( ) or upward ( )
to select the two adjacent tracks you want to join.
Ex. When you want to join tracks 2 and 3
MOVE Function
This function allows you to move a track to the position
you prefer. It is useful to change the order of the tracks as
you like.
• To stop any time during editing process, press TITLE/
EDIT.
1
Insert an MD you want to edit into the MD loading
slot.
• It takes about 5 seconds for the unit to read the TOC
(Table Of Contents) of the inserted MD. While the
unit is reading it, you cannot go to the next step.
2
Press TITLE/EDIT.
The source is changed to “MD.”
• If “MOVE” is not shown, you cannot move the track.
– 44 –
Page 48

3
Push the joy control downward ( ) to select
“MOVE” (highlighted), then press SET.
4
Push the joy control downward ( ) or upward ( )
to select the track you want to move.
5
Press SET.
8
Press ENTER/DEMO to finish the editing
procedure.
“EDITING” appears for a while, then “WRITING”
flashes while the editing you have made is being
recorded on the MD.
ERASE Function
This function allows you to erase unwanted tracks.
• To stop any time during editing process, press TITLE/
EDIT.
1
Insert an MD you want to edit into the MD loading
slot.
• It takes about 5 seconds for the unit to read the TOC
(Table Of Contents) of the inserted MD. While the
unit is reading it, you cannot go to the next step.
2
Press TITLE/EDIT.
The source is changed to “MD.”
Ex. When you want to move track 3
• If you have selected a wrong track number, press
CANCEL, then select the correct track number.
6
Push the joy control downward ( ) or upward ( )
to select the position where you want to move the
track to.
Ex. When you want to move to
the track 5 position
7
Press SET.
• If you have selected wrong tracks, press CANCEL,
then select the correct tracks by repeating from step
4
.
3
Push the joy control downward ( ) to select
“ERASE” (highlighted), then press SET.
4
Push the joy control downward ( ) or upward ( )
to select the track you want to erase.
– 45 –
Page 49

5
Press SET.
“
” appears between track number and track title.
” means the track in the same line will be erased
“
when you finish the editing procedure.
Ex. When you want to erase track 3
• If you have selected a wrong track number, press
CANCEL, then select the correct track number.
6
Repeat step 4 and 5 to select all the tracks you want
to erase.
• You can select up to 15 tracks.
7
Press ENTER/DEMO to finish selecting tracks.
ALL ERASE Function
This function allows you to erase all the tracks on an MD.
• To stop any time during editing process, press TITLE/
EDIT.
1
Insert an MD you want to edit into the MD loading
slot.
• It takes about 5 seconds for the unit to read the TOC
(Table Of Contents) of the inserted MD. While the
unit is reading it, you cannot go to the next step.
2
Press TITLE/EDIT.
The source is changed to “MD.”
3
Push the joy control downward ( ) to select “ALL
ERASE” (highlighted), then press SET.
8
Press ENTER/DEMO again to finish the editing
procedure.
“EDITING” appears for a while, then “WRITING”
flashes while the editing you have made is being
recorded on the MD.
4
Press ENTER/DEMO to finish the editing
procedure.
“EDITING” appears for a while, then “WRITING”
flashes while the editing you have made is being
recorded on the MD.
– 46 –
Page 50

Making Your Own Titles and Screens
The buttons and controls enlarged in the illustration below are used and explained in this section (pages 47 to 52).
Main unit
STANDBY
/ON
TITLE/EDIT
Remote control
ENTER
/DEMO
MENU
STANDBY
MENU
/ON
COMPACT COMPONENT MD SYSTEM MX-S6MDR
DISC
SP/LP2/LP4
LONG
REC
MODE
MODE
REC PAUSE
HIGH SPEED
CD MD
DISC LOADING MECHANISM
ENTER
TITLE/EDIT
/DEMO
PHONES
LINE 2
LEVEL
METER
DIMMER
LINE
RM-SMXS6MDR
REMOTE CONTROL
– 47 –
Page 51

Continued
Assigning Titles to an MD
You can assign a name to each MD and to each track using
alphabetic characters (uppercase and lowercase), symbols
and numerals. Once a title is assigned, it is displayed for
your confirmation.
• You cannot edit titles composed of more than 61
characters.
About the number of characters inputted for an MD
The total number of characters that can be input for an MD is
1792, and the maximum number that can be input for each
track is 61. (However, the actual number you can input may be
slightly less than this maximum numbers due to the MD
limitations – see page 69.)
• A space can be counted as one character.
• When the stereo long-hour recording (LP2 or LP4: see page
35) method is used for recording, the maximum number you
can input for a track title automatically reduced since "LP:"
and four spaces are automatically added to the beginning of
the track title. Consequently this reduces the total number of
characters you can input for an MD.
Example: You can input up to 10 characters for each track if
an MD is composed of 120 tracks recorded using the stereo
long-hour recording method.
• Disc title entry screen: appears when you press SET
when the MD recorder stops.
• Track title entry screen: appears when you press
SET
while playing or pausing.
Ex. While playing track 1
4
Push the joy control rightward ( ) or leftward ( )
to change the title entry mode.
• Title entry mode changes as follows:
Disc
title
Last track
title
1st track
title
2nd track
title
3rd track
title
On the unit:
In the following example, the process is explained from the
very first — that is, inserting a disc. If you have already
2
started recording or playing, start from step
• To exit from the title entry screen any time during the
process, press TITLE/EDIT.
1
Insert an MD you want to edit into the MD loading
slot.
• It takes about 5 seconds for the unit to read the TOC
(Table Of Contents) of the inserted MD. While the
unit is reading it, you cannot go to the next step.
2
Press TITLE/EDIT .
The source is changed to “MD.”
• If you press TITLE/EDIT while recording, track title
entry screen of the current recording track appears in
the main display = go to step 4.
3
Press SET.
The MD recorder enters one of the following title entry
screen.
.
5
Press SET to enter the selected title entry mode.
Ex. When entering a disc title
6
Select the character set you want.
1) Push the joy control horizontally (
vertically (
2) Press SET.
• Each time you press the button, the character sets
change as follows:
Alphabets
/ ) to select “ .”
Numerals
& Symbols
: Select this to change the
character set.
/ ) and
– 48 –
Page 52

7
Input a character.
• Ex. When entering “H”
1) Push the joy control horizontally ( / ) and
vertically (
/ ) until “H” is selected.
Character entry position
8
Repeat steps 6 and 7 to enter other characters.
• The main display can only show 7 characters at a
time. If you enter the 8th character, the first character
disappears, and so on.
9
Press ENTER/DEMO to finish the current title
entry.
The unit enters title entry mode again.
• You can assign another title by repeating steps
4
to 9.
10
Press TITLE/EDIT (or ENTER/DEMO again) to
exit from the title entry mode.
2) Press SET.
The selected character is entered, and the character
entry position moves to the next.
Character entry position
Blanks
• To change the character set, select this, and
press SET.
• To move the character entry position while
entering a title, select 3 for moving it
rightward and 2 for moving it leftward,
then press SET.
Each time you press SET, the character
entry position moves.
11
Press 0 for the MD recorder to eject the MD.
“WRITING” flashes while the editing you have made
is being recorded on the MD.
You can assign titles during play or recording
• During play:
Entering a track title
The MD recorder repeats playback of the current track until you
press ENTER/DEMO in step 9 above. When you press ENTER/
DEMO, the next track will be played.
Entering a disc title
The MD recorder repeats playback of all tracks of the MD until
you press ENTER/DEMO in step 9 above. When you press
ENTER/DEMO, the MD recorder enters the track title entry
mode.
• During recording:
Entering a track title
The MD recorder continues recording even after you press
ENTER/DEMO in step 9 above. When you press ENTER/
DEMO, a track title is assigned to the track where you have
started the title entry. If you do not press ENTER/DEMO before
recording ends, the track title assigned will be canceled.
• During CD Synchronized Recording (see page 37):
You can assign the disc title, and 16 track titles one after another
as recording goes on. The track titles you have entered are
automatically assigned to the tracks recorded on the MD in
sequential order. If you enter 17th track title or more, they are
ignored.
If “NO OPERATE!” appears
Operation you have tried to use is not acceptable. For example,
you have tried to use the remote control while entering a title using
the buttons on the unit. Use the buttons on the unit only.
• To enter a blank, select a blank in the main
display, then press SET.
• If you have entered an incorrect character, press
CANCEL to cancel the last entry.
– 49 –
Page 53

Continued
Changing the Title
You can make a correction or change the title.
1
Follow steps 1 to 5 of page 48.
2
Select the character you want to correct, referring to
7
on page 49.
step
• Make sure that the character you want to change is
flashing.
3
Press CANCEL to delete the character you have
selected in the above step.
4
Input the correct character, referring to step 7 on
page 49.
5
Repeat steps 2 to 4 of the current procedure to
correct more characters.
6
Press ENTER/DEMO to finish correcting the title.
• If you want to correct another title, select another title
entry mode by pushing the joy control rightward (
or leftward (
above.
• If you want to finish the correction, go to the next
step.
), press SET, then repeat from step
On the remote control:
In the following example, the process is explained from the
very first — that is, inserting a disc. If you have already
3
started recording or playing, start from step
• To exit from the title entry screen any time during the
process, press MD TITLE.
1
Insert an MD you want to edit into the MD loading
slot.
2
Press MD 3 / 8, then 7.
The source is changed to “MD.”
3
Press MD TITLE.
The MD recorder enters one of the following title entry
screen.
• Disc title entry screen: appears when you press MD
TITLE when the MD recorder stops.
)
2
• Track title entry screen: appears when you press
MD TITLE while playing, pausing, or recording.
.
7
Press TITLE/EDIT (or ENTER/DEMO again) to
exit from the title entry mode.
8
Press 0 for the MD recorder to eject the MD.
“WRITING” flashes while the editing you have made is
being recorded on the MD.
To erase all the characters
Press CANCEL repeatedly in step 3 above to erase all the
characters, then go to step
6
.
4
Press ø (10) or Ø (+10) to change the title entry
mode.
EX. When track 8 is selected
• Title entry mode changes as follows:
Disc
title
Last track
title
1st track
title
2nd track
title
3rd track
title
– 50 –
Page 54

5
Press SET to enter the selected title entry mode.
Character entry position
6
Press CHARACTER to select the character set you
want.
• Each time you press the button, the character sets
change as follows:
Capital letters Small letters
Numerals
7
Input a character.
1) Press the character entry button for a character
you want to input.
Examples:
• To input an “A” or “a,” press ABC once.
To input a “B” or “b,” press ABC twice.
To input a “C” or “c,” press ABC three times.
• To input a symbol, press MARK repeatedly until
the mark you want appears.
• To input a numeral, press 0 – 9.
• To move the character entry position while
entering a title, press ø (10) or Ø (+10).
• To enter a space while entering a title, press Ø
(+10) twice.
• If you have entered an incorrect character, press
CANCEL to cancel the last entry.
2) Press the button for the next character you want
to input.
• If the next character you want to input is assigned
to the same button you have just pressed in step
7
– 1), press Ø (+10) first to move the character
entry position to the right.
10
Press MD TITLE (or ENTER again) to finish the
title entry.
11
Press 0 (on the unit) for the MD recorder to eject
the MD.
“WRITING” flashes while the editing you have
made is being recorded on the MD.
Available Symbols are as follows:
(Blank)
You can assign titles during play or recording
• During play:
Entering a track title
The MD recorder repeats playback of the current track until
you press ENTER in step 9 above. When you press ENTER,
the next track will be played.
Entering a disc title
The MD recorder repeats playback of all tracks of the MD until
you press ENTER in step 9 above. When you press ENTER,
the MD recorder enters the track title entry mode.
• During recording:
Entering a track title
The MD recorder continues recording even after you press
ENTER in step 9 above. When you press ENTER, a track title
is assigned to the track where you have started the title entry. If
you do not press ENTER before recording ends, the track title
assigned will be canceled.
• During CD Synchronized Recording (see page 37):
You can assign the disc title, and 16 track titles one after
another as recording goes on. The track titles you have entered
are automatically assigned to the tracks recorded on the MD in
sequential order. If you enter 17th track title or more, they are
ignored.
8
Repeat steps 6 and 7 to enter other characters.
• The main display can only show 8 characters at a
time. If you enter the 9th character, the first character
disappears, and so on.
9
Press ENTER to finish the current title entry.
The unit enters title entry mode again.
• You can assign another title by repeating steps 4 to 9.
If “NO OPERATE!” appears
Operation you have tried to use is not acceptable. For example,
You have tried to use the buttons on the unit while entering a title
using the remote control. Use the remote control only.
– 51 –
Page 55

Changing the Title
You can make a correction or change the title.
1
Follow steps 1 to 5 of pages 50 and 51.
2
Press ø (10) or Ø (+10) to select the character
you want to correct.
• Make sure that the character you want to change is
flashing.
3
Press CANCEL to delete the character you have
selected in the above step.
4
Input the correct character by pressing one of the
character entry buttons.
5
Repeat steps 2 to 4 of the current procedure to
correct more characters.
6
Press ENTER to finish correcting the title.
On the unit ONLY:
1
Press to turn off the unit if it is on.
The STANDBY/ON lamp lights red.
2
Call up the Startup Display setting mode.
1) Press MENU.
2) Push the joy control downward (
“Startup Disp.” (highlighted), then press SET.
3) Push the joy control downward ( ) or upward
) to select the screen you want to make, then
(
press SET.
) to select
• If you want to correct another title, select another title
entry mode by pressing ø (10) or Ø (+10), press
2
SET, then repeat from step
• If you want to finish the correction, go to the next
step.
7
Press MD TITLE (or ENTER again) to exit from the
title entry mode.
8
Press 0 (on the unit) for the MD recorder to eject
the MD.
“WRITING” flashes while the editing you have made is
being recorded on the MD.
To erase all the characters
Press CANCEL repeatedly in step
characters, then go to step
6
above.
3
above to erase all the
.
Creating Your Own Opening and Ending
Screens
When you turn on or off the unit, you can show your own
screens instead of the HELLO and SEE YOU screens.
To create your own opening and ending screens, follow the
procedure below.
• You can register up to 26 characters for each screen.
• You have to use the menu for the following operations.
For general information on the menu, see pages 60 and
61.
Power on : To make your own opening screen
Power off : To make your own ending screen
Reset : See “To erase your own screen” below
3
Enter the message using the title entry procedure
7
explained in step
4
Press ENTER/DEMO to finish creating the screen.
5
Repeat steps 2 to 4 to create the other screen if you
want.
To erase your own screen
Repeat the above procedure and in step 3, select “Reset.”
“Startup disp. Reset!” appears in the main display, and your
own screens are erased.
When you turn on and off the unit, the HELLO screen and
the SEE YOU screen will appear.
• If you want to erase only one of the screens, erase all
registered characters by inserting blanks.
When you unplug the AC power cord or if a power
failure occurs
The registered screen messages will be erased.
on pages 49.
– 52 –
Page 56

Using the Timers
The buttons and controls enlarged in the illustration below are used and explained in this section (pages 53 to 59).
Main unit
STANDBY
STANDBY
/ON
/ON
COMPACT COMPONENT MD SYSTEM MX-S6MDR
Remote control
MENU
MENU
SP/LP2/LP4
LONG
REC
MODE
MODE
REC PAUSE
HIGH SPEED
CD MD
DISC LOADING MECHANISM
LEVEL
METER
DIMMER
TITLE/EDIT
/DEMO
PHONES
DISC
ENTER
LINE 2
LINE
RM-SMXS6MDR
– 53 –
REMOTE CONTROL
Page 57

Continued
There are three timers available — Recording Timer, Daily
Timer, and Sleep Timer.
Before using these timers, you need to set the clock built
in the unit.
To set the clock, Recording Timer and Daily Timer, you
have to use the menu. (See pages 60 and 61.)
Setting the Clock
You can set the clock whether the unit is turned on or in
standby mode.
On the unit ONLY:
1
Press MENU.
Ex. When the unit is turned on, and the source
is CD (but not playing)
2
Push the joy control downward ( ) to select
“CLOCK SET” (highlighted), then press SET.
4
Push and hold the joy control rightward ( ) or
leftward (
“ADJUST OK!” appears in the main display, and the
built-in clock starts.
The clock loses the setting and is reset to “0:00.” You need to set
the clock again.
) to adjust the minute, then press SET.
If there is a power failure
To adjust the clock again
Once you have adjusted the clock, you cannot go to the
clock setting directly on the menu.
To readjust the clock, follow the procedure below:
1 Press MENU.
2 Push the joy control downward ( ) to select “REC
ON/OFF” (highlighted).
• If “REC ON/OFF” does not appear and “CLOCK
SET” appears, the clock setting has been lost. (In this
case, simply press SET in the following step.)
3 Push the joy control rightward (
select “CLOCK SET,” then press SET.
The hour digit starts flashing, and now you can adjust
the clock again, following steps
Clock” procedure to the left.
) or leftward ( ) to
2
to 4 of “Setting the
The hour digit in the main display
starts flashing.
3
Push and hold the joy control rightward ( ) or
leftward (
• If you want to correct the hour after pressing SET,
press CANCEL. The hour digit starts flashing again.
) to adjust the hour, then press SET.
Using Recording Timer
With Recording Timer, you can make an unattended
recording.
• You can set Recording Timer whether the unit is turned
on or in the standby mode.
• To correct a mis-entry any time during the setting
process, press CANCEL.
• To cancel the setting any time during the process, press
MENU.
How Recording Timer actually works
The unit automatically turns on, turns off the volume, and
starts recording on the MD when the timer-on time comes.
Then, when the timer-off time comes, the unit
automatically turns off (stands by).
Recording Timer works only once, but the timer settings
remain stored in memory until you reset them or unplug the
AC power cord.
– 54 –
Page 58

On the unit ONLY:
1
Press MENU.
Ex. When the unit is turned on, and the source
is CD (but not playing)
2
Push the joy control downward ( ) to select “REC
ON/OFF” (highlighted).
• If you cannot select “REC ON/OFF,” you have not
finished setting the built-in clock. (See page 54.)
3
Call up the Recording Timer Setup screen.
1) Push the joy control rightward ( ) or leftward
) to select “REC SET UP.”
(
5
Push the joy control rightward ( ) or leftward ( )
to set the minute of the timer-on time, then press
SET.
6
Push the joy control rightward ( ) or leftward ( )
to set the hour of the timer-off time, then press SET.
7
Push the joy control rightward ( ) or leftward ( )
to set the minute of the timer-off time, then press
SET.
8
Push the joy control rightward ( ) or leftward ( )
to select the source.
• The source changes as follows:
FM – – AM – –
DIGITAL IN
FM – –: Tunes into an FM station.
= Select a preset station (see below).
AM – –: Tunes into an AM (MW/LW) station.
= Select a preset station (see below).
LINE1*: Selects the external equipment
connected to the LINE 1 jacks.
LINE2*: Selects the external equipment
connected to the LINE 2 jack.
DIGITAL IN*: Selects the external equipment
connected to the DIGITAL IN
terminal.
* To operate these equipment with the Recording
Timer, they also need to have the timer function.
If you have changed the source name, the changed
name will appear.
LINE1
LINE2
• The items on the menu change as follows:
REC ON/OFF REC SET UP
CLOCK SET
DAILY SET UP
2) Press SET.
The timer (
on the display.
4
Push the joy control rightward ( ) or leftward ( )
to set the hour of the timer-on time, then press SET.
) and REC indicators start flashing
DAILY ON/OFF
9
– 55 –
If you have selected “FM – –” or “AM – –” as the
source in the above step, select a preset number.
Push the joy control downward (
select a preset station, then press SET.
• If you press SET without selecting a preset station,
the last received station will be tuned in when the
timer recording starts.
If you have selected one of the external equipment
as the source in the above step, simply press SET.
) or upward ( ) to
Page 59

Continued
10
Push the joy control rightward ( ) or leftward
) to select the recording length mode.
(
• The recording length mode changes as follows:
SP
(Standard Play)
LP4
(4 Times Long Play)
11
Press SET.
The timer (
remain lit.
12
Press to turn off the unit (on standby) if
necessary.
The STANDBY/ON lamp lights red.
Recording Timer will be canceled and the unit will
not turn off automatically in the following.
• When you pause the recording.
• When you change the source after stopping the recording.
• When you enter the timer setting or clock setting mode.
) and REC indicators stop flashing, and
LP2
(2 Times Long Play)
To turn on or off Recording Timer after its setting is
done
Using Daily Timer
With Daily Timer, you can wake up to your favorite music
or radio program.
• You can set Daily Timer whether the unit is turned on or
in standby mode.
• To correct a mis-entry any time during the setting
process, press CANCEL.
• To cancel the setting any time during the process, press
MENU.
How Daily Timer actually works
The unit automatically turns on, and starts playing the
specified source when the timer-on time comes. Then,
when the timer-off time comes, the unit automatically turns
off (stands by).
Daily Timer works every day, and the timer settings remain
stored in memory until you reset them or unplug the AC
power cord.
On the unit ONLY:
1
Press MENU.
1 Press MENU.
2 Push the joy control downward (
ON/OFF” (highlighted), then press SET.
The Recording Timer On/Off screen appears.
3 To turn off the Recording Timer, push the joy control
downward ( ) to select “OFF” (highlighted), then
press SET.
“REC TIMER OFF” appears for a while. The timer
) and REC indicators go off from the display.
(
The Recording Timer is canceled, but the setting for
the Recording Timer remains in memory.
To turn on the Recording Timer, press SET (after
making sure that “ON” is selected (highlighted) in
the main display).
The timer (
display. The settings you have done are shown in the
main display for your confirmation.
) and REC indicators light on the
) to select “REC
Ex. When the unit is turned on, and the source
is CD (but not playing)
2
Push the joy control downward ( ) to select “REC
ON/OFF” (highlighted).
• If you cannot select “REC ON/OFF,” you have not
finished setting the built-in clock. (See page 54.)
– 56 –
Page 60

3
Call up the Daily Timer Setup screen.
1) Push the joy control rightward (
(
) to select “DAILY SET UP.”
• The items on the menu change as follows:
REC ON/OFF REC SET UP
CLOCK SET
DAILY SET UP
2) Press SET.
The timer (
on the display.
4
Push the joy control rightward ( ) or leftward ( )
to set the hour of the timer-on time, then press SET.
5
Push the joy control rightward ( ) or leftward ( )
to set the minute of the timer-on time, then press
SET.
6
Push the joy control rightward ( ) or leftward ( )
to set the hour of the timer-off time, then press SET.
) and DAILY indicators start flashing
) or leftward
DAILY ON/OFF
– – – – – – : Plays the source selected when the unit
has been turned off.
FM – – : Tunes into an FM station.
9
= go to step
station.
AM – – : Tunes into an AM (MW/LW) station.
= go to step
station.
CD – : Plays a CD.
= Prepare a CD, then go to step
select the CD and starting track.
MD – – – : Plays an MD.
= Prepare an MD, then go to step
select the starting track.
LINE1*: Selects the external equipment
connected to the LINE 1 jacks.
LINE2*: Selects the external equipment
connected to the LINE 2 jack.
DIGITAL IN*: Selects the external equipment
connected to the DIGITAL IN
terminal.
* To operate these equipment with the Daily Timer,
they also need to have the timer function.
If you have changed the source name, the changed
name will appear.
9
If you have selected “FM – – ” or “ AM – –” as the
source in the above step, select a preset station.
Push the joy control downward (
select a preset station, then press SET.
• If you press SET without selecting a preset station,
the last received station will be tuned in when the
unit is turned on with the Daily Timer.
to select a preset
9
to select a preset
) or upward ( ) to
9
to
9
to
7
Push the joy control rightward ( ) or leftward ( )
to set the minute of the timer-off time, then press
SET.
8
Push the joy control rightward ( ) or leftward ( )
to select the source.
• The source changes as follows:
FM – –––––––
DIGITAL IN
LINE2 LINE1 MD – – –
AM – –
CD –
– 57 –
If you have selected “CD –” as the source in the
above step, select a disc number and a track
number.
1) Push the joy control downward ( ) or upward ( )
to select the disc number (CD 1 to CD 3), then
press SET.
2) Push the joy control downward (
to select a track number, then press SET.
• If you press SET without selecting a disc number,
the last selected disc will be played back when the
unit is turned on with the Daily Timer.
• If you press SET without selecting a track number,
playback starts from the first track of the selected
disc when the unit is turned on with the Daily
Timer.
) or upward ( )
Page 61

Continued
If you have selected “MD – – –” as the source in the
above step, select a track number.
Push the joy control downward (
select a track number, then press SET.
• If you press SET without selecting a track number,
the first track starts playing when the unit is
turned on with the Daily Timer.
If you have selected one of the external equipment
as the source in the above step, simply press SET.
10
Push the joy control rightward ( ) or leftward
) to adjust the volume level.
(
• You can adjust the volume level within the range
of 0 (silent) to 50 (maximum).
• “– –” can be selected if you set the timer while
the unit is turned on. The volume is set to the
current volume level.
11
Push the joy control downward ( ) or upward
) to select volume fade-in mode — “FADE” or
(
“NoFADE.”
FADE : Volume fades in (gradually becomes
louder and is set to the specified level).
NoFADE : No fade-in effect. Volume is set to the
specified level w hen the timer-on time
comes.
12
Press SET.
The timer (
and remains lit.
) and DAILY indicators stop flashing
) or upward ( ) to
To turn on or off Daily Timer after its setting is done
1 Press MENU.
2 Push the joy control downward (
ON/OFF” (highlighted).
3 Push the joy control rightward (
select “DAILY ON/OFF” (highlighted), then press
SET.
The Daily Timer On/Off screen appears.
4 To turn off the Daily Timer, push the joy control
downward (
press SET.
“DAILY TIMER OFF” appears for a while. The timer
) and DAILY indicators go off from the display.
(
The Daily Timer is canceled, but the setting for the
Daily Timer remains in memory.
To turn on the Daily Timer, press SET (after
making sure that “ON” is selected (highlighted) in
the main display).
The timer ( ) and DAILY indicators light on the
display. The settings you have done are shown in the
main display for your confirmation.
) to select “OFF” (highlighted), then
) to select “REC
) or leftward ( ) to
13
Press to turn off the unit (on standby) if you
have set the timer with the unit turned on.
The STANDBY/ON lamp lights red.
If the unit is kept turned on when the timer-on time
comes
Daily Timer does not work at all.
Daily Timer will be canceled and the unit will not
turn off automatically in the following.
• When you change the source.
• When you try to start recording.
• When you enter the MD editing or title entry mode.
• When you enter the timer setting or clock setting mode.
– 58 –
Page 62

Using Sleep Timer
With Sleep Timer, you can fall asleep to your favorite
music.
You can set Sleep Timer when the unit is turned on.
How Sleep Timer actually works
The unit automatically turns off after the specified time
length passes.
On the remote control ONLY:
1
Press SLEEP.
• Each time you press the button, the time length
changes as follows:
10
OFF
(Canceled)
2
Wait for about 4 seconds after specifying the time
length.
The display window dims.
To check the remaining time until the shut-off time,
press SLEEP once. The remaining time until the shut-off
time appears for about 4 seconds.
To change the shut-off time, press SLEEP repeatedly until
the time length you want appears.
20 30 60
120
90
To sleep with the Sleep Timer and wake up with the
Daily Timer
The unit turns off when the shut-off time comes (set by the
Sleep Timer), and turns on when the timer-on time (set by
the Daily Timer) comes.
1 Set the Daily Timer as explained on pages 56 to 58.
2 Start playing back any source you want to listen to
before sleep.
3 Set the Sleep Timer.
Timer Priority
Since each timer can be set separately, you may wonder
what happens if the setting for these timers overlaps.
Here are the priorities for each timer.
• A timer with the late timer-on time has priority.
If Recording Timer is set to come on while Daily Timer
is operating, Daily Timer is canceled.
6:00
Recording Timer
Daily Timer
canceled.
If Recording Timer is set to come on while Sleep Timer
is operating, Sleep Timer will not shut off the power even
if the shut-off time comes.
6:00
Recording Timer
Sleep Timer
6:30
7:00
7:307:006:30
7:30
To cancel the setting, press SLEEP repeatedly until
“SLEEP OFF” appears in the main display.
Sleep Timer will be also canceled in the following
cases
• When you turn off the unit.
• When you operate other timer settings.
• When you adjust the clock.
You can use the Auto-Power Off function
through the menu to turn off the unit
automatically. See “Auto Power Off Setting” on
page 66.
canceled.
– 59 –
Page 63

Using the Other Convenient Functions
The buttons and controls enlarged in the illustration below are used and explained in this section (pages 60 to 66).
Main unit
STANDBY
/ON
COMPACT COMPONENT MD SYSTEM MX-S6MDR
MENU
MENU
SP/LP2/LP4
LONG
REC
MODE
MODE
REC PAUSE
HIGH SPEED
CD MD
You cannot use the remote control for the menu operations explained in this section.
Use only buttons on the unit.
Most of the other convenient functions are available
through the menus on this unit.
About the menu screen
Arrows indicate the direction (up/down) you
can move on the menu screen. (In this
example, you can only move down.)
Highlighted
when selected
DISC LOADING MECHANISM
DISC
ENTER
TITLE/EDIT
/DEMO
PHONES
LINE 2
Buttons you use to operate the menu
MENU
MENU
Joy control
• Press to show the menu in the main
display when the menu is not shown.
• Press to cancel the menu operation
when the menu is shown.
• Push downward ( ) or upward ( )
to select the functions on the menu.
• Push the joy control rightward (
leftward (
) to select a proper
setting after selecting the function on
the menu, or to move to another
setting mode.
) or
• These triangles indicate that you can select a
mode or move to another setting by pushing
the joy control rightward ( ) or leftward ( ).
• Items with no triangles indicate that you can
move to their setting screens by pressing SET.
(In this example, “LEVEL METER”)
Ex. This menu appears when the source is CD
(with the unit turned on, but not playing)
– 60 –
SET
CANCEL
• Press to finish the setting or to move
to another setting mode.
• Press to cancel the menu operation.
• Press to go back to the previous step
while setting clock or timers.
Page 64

The following functions are selected and operated through
the menu screens.
• Menus you can see on the screen vary according to the
operating condition of the unit.
Ex. This menu appears when the source is CD
(with the unit turned on, but not playing)
• Clock Setting — CLOCK SET (see page 54)
Appears only when the clock has not been set.
Once it has been adjusted, it appears in the timer
setting mode.
• Timer Setting (see pages 54 – 58)
Recording Timer Setup
— REC SET UP (see page 54)
Recording Timer On/Off Setting
— REC ON/OFF (see page 56)
Daily Timer Setup
— DAILY SET UP (see page 56)
Daily Timer On/Off Setting
— DAILY ON/OFF (see page 58)
Clock Readjustment Setting
— CLOCK SET (see page 54)
• Sound Setting
Sound Mode Setting — SOUND
Appears only when the unit is turned on.
Active Bass Extension On/Off — A. BASS
Appears only when the unit is turned on.
• CD and MD Playback Mode Setting
CD playback mode setting — CD
Appears only when the unit is turned on, and the
source is CD, but not playing.
CD repeat mode setting — CD REPEAT
Appears only when the unit is turned on, and the
source is CD.
MD playback mode setting — MD
Appears only when the unit is turned on, and the
source is MD, but not playing.
MD repeat mode setting — MD REPEAT
Appears only when the unit is turned on, and the
source is MD.
• Display Setting
Level Meter Selection — LEVEL METER
Display Color Selection — COLOR
Display Pattern Selection — DISP
Contrast Adjustment — CONTRAST ADJ.
Appears only when the unit is turned on.
Startup Display Setting
— Startup Disp. (see page 52)
Appears only when the unit is turned off.
• External Source Setting
Input Level Adjustment — INPUT Level
Appears only when the unit is turned on, and the
external equipment connected to the LINE 1
jacks or to the LINE 2 jack is selected as the
source.
Source Name Change — NAME CHANGE
Appears only when the unit is turned on, and the
external equipment is selected as the source.
• Auto-Power Off Setting — A. P. off
Appears only when the unit is turned on.
• FM Reception Mode Setting — FM MODE
Appears only when the unit is turned on, and the
source is FM.
– 61 –
Page 65

Continued
Sound Setting
Selecting the sound modes
You can select one of the 6 preset sound modes (3 surround
modes and 3 SEA – Sound Effect Amplifier – modes) and 1
manual mode.
1
Press MENU.
The menu screen appears in the main display.
2
Push the joy control downward ( ) to select
“SOUND” (highlighted).
3
Push the joy control rightward ( ) or leftward ( )
to select a sound mode you want.
• The sound modes change as follows:
D.CLUB
(Canceled)
FLAT
SET UP
• See pages 13 and 14 for details.
4
Press SET to finish the setting.
Reinforcing the Bass Sound
The richness and fullness of the bass sound is maintained
regardless of how low you set the volume — Active Bass
Extension.
HALL
MANUAL
STADIUM
ROCK
POP
CLASSIC
FM Reception Mode Setting
When an FM stereo broadcast is hard to receive or noisy,
you can change the FM reception mode to “MONO” so that
reception improves.
1
Press MENU.
The menu screen appears in the main display.
• If the current source is not “FM,” you cannot go to
the next step.
2
Push the joy control downward ( ) to select
“FM MODE (current play mode setting*).”
* The current play mode — AUTO or MONO will
appear following “FM MODE.”
3
Push the joy control rightward ( ) or leftward ( )
to select the FM reception mode you want.
AUTO : Normally select this.
In this mode, you can hear stereo sound
when a program is broadcast in stereo. In
addition, static noise between stations
will be erased while tuning.
MONO : Select this when an FM stereo broadcast
is hard to receive or noisy. Reception
improves though stereo effect is lost.
4
Press SET to finish the setting.
1
Press MENU.
The menu screen appears in the main display.
2
Push the joy control downward ( ) to select
“A. BASS” (highlighted).
3
Push the joy control rightward ( ) or leftward ( )
to turn “ON” or “OFF” the Active Bass Extension.
• See page 12 for details.
4
Press SET to finish the setting.
CD and MD Playback Mode Setting
Selecting the playback modes
When the source is “CD” or “MD,” and playback has not
been started, you can change its playback modes through
the menu.
1
Press MENU.
The menu screen appears in the main display.
• If the current source is not “CD” or “MD,” or if CD
or MD play has been started, you cannot go to the
next step.
2
Push the joy control downward ( ) to select “CD
(current play mode setting*)” or “MD (current play
mode setting*).”
* The current play mode will appear following “CD” or
“MD.”
– 62 –
Page 66

3
Push the joy control rightward ( ) or leftward ( )
to select the play mode you want.
• The playback modes change as follows:
When the source is “CD”
PROGRAM
CONTINUE
• See pages 25 and 26 for details.
RANDOM
Display Setting
Selecting the level meter
1
Press MENU.
The menu screen appears in the main display.
2
Make sure that “LEVEL METER” is selected
(highlighted), then press SET.
When the source is “MD”
OFF
RANDOM
*
1CD
ALL
ALL
PROGRAM
NORMAL
• See pages 30 and 32 for details.
4
Press SET to finish the setting.
Setting the repeat modes
When the source is “CD” or “MD,” you can change its
repeat modes through the menu.
1
Press MENU.
The menu screen appears in the main display.
• If the current source is not “CD” or “MD,” you
cannot go to the next step.
2
Push the joy control downward ( ) to select
“CD REPEAT (current repeat mode setting*)” or
“MD REPEAT (current repeat mode setting*).”
* The current repeat mode will appear following
“CD REPEAT” or “MD REPEAT.”
3
Push the joy control rightward ( ) or leftward ( )
to select the play mode you want.
• The repeat modes change as follows:
When the source is “CD”
1
OFF
(Canceled)
* “1CD” is not used for Program play and Random play.
• See page 27 for details.
When the source is “MD”
1
(Canceled)
• See page 32 for details.
3
Push the joy control downward ( ) — or upward
) — to select the level meter you want —
(
“METER 1” or “METER 2.”
• See page 13 for details.
4
Press SET to finish the setting.
Selecting the display color
When you change the display color, the illumination color
of the ring around the VOLUME control also changes.
1
Press MENU.
The menu screen appears in the main display.
2
Push the joy control downward ( ) to select
“COLOR (current display color setting*).”
* The current display color setting will appear
following “COLOR.”
3
Push the joy control rightward ( ) or leftward ( )
to select the display color you want.
• The display color changes as follows:
Pre set O Blue O White O Purple O Orange O
L. Blue (Light Blue) O Y ellow O Green O
Pink O Random* O Manual1** O
Manual2** O Set up*** O
(back to the beginning)
* When you select “Random,” the display color
changes according to the playback sound.
** When you select “Manual1” or “Manual2,” the
display color changes to your own color stored in
memory.
*** When you select “Set up,” you can create and store
your own colors into “Manual1” and “Manual2.”
(See “Creating your own display colors” on the
next page.)
4
Press SET to finish the setting.
4
– 63 –
Press SET to finish the setting.
Page 67

More on the display color
• The colors shown in the display cannot be always reproduced
precisely. Due to the circumstances (room temperature, etc.)
where the unit is used, colors may vary slightly.
• When you change the color of the main display, the display may
seem to move back and forth; this is a characteristic of this unit
and is not a malfunction.
• When a strong light strikes the display, the display happens to
become dark, but this is not a malfunction.
Creating your own display colors
You can select one color from among 24 colors and store it
into each of “Manual 1” and “Manual 2.”
1
Press MENU.
The menu screen appears in the main display.
2
Push the joy control downward ( ) to select
“COLOR (current display color setting*).”
* The current display color setting will appear
following “COLOR.”
Continued
5
Press SET.
6
Push the joy control downward ( ) — or upward
) — to select either “Manual 1” or “Manual 2” in
(
which you want to store the setting.
7
Press SET to finish the setting.
Selecting the display pattern
You can change the display pattern either to positive pattern
or to negative pattern.
1
Press MENU.
The menu screen appears in the main display.
3
Push the joy control rightward ( ) or leftward ( )
to select “Set up” as color setting, then press SET.
4
Push the joy control horizontally ( / ) and
vertically (
• You can select one of 24 colors (+ marks in the main
display).
/ ) to select the color setting.
Green
White
Blue
Red
2
Push the joy control downward ( ) to select
“DISP (current display pattern setting*).”
* The current display pattern setting will appear
following “DISP.”
3
Push the joy control rightward ( ) or leftward ( )
to select either “Posi” or “Nega.”
Nega : Letters and level meters are shown in
color. (Initial setting when shipped from
the factory)
Posi : Background other than letters and level
meters is shown in color, and letters and
level meters look like being shown in
black.
4
Press SET to finish the setting.
Adjusting the display contrast
You can change the display contrast only when the unit is
turned on.
• There is a time limit in doing the following steps. If the
setting is canceled before you finish, start from step
again.
1
1
– 64 –
Press MENU.
The menu screen appears in the main display.
Page 68

2
Push the joy control downward ( ) to select
“CONTRAST ADJ.,” then press SET.
• When shipped from the factory, contrast level is set to
+40.
3
Push and hold the joy control upward ( ) or
downward (
• You adjust the contrast within the range of +25 to
+64.
4
Press SET to finish the adjustment.
If you cannot see any indications on the display
The display contrast is too light. If this happens, unplug the AC
power cord and plug it again. The contrast will be reset to the
initial setting when shipped from the factory.
) to adjust the contrast.
External Source Setting
Selecting the sound input level
This is only used for recording from analog sources (ex.
tape, VCR, or portable MD player) connected to the LINE
1 jacks and to the LINE 2 jack.
If the recorded sound from such an analog source is not
loud enough, or if it is distorted, select the appropriate
sound input level before recording.
• When the input level is too loud during recording, the
display turns red, the OVER indicator lights, and “Level
OVER!” appears.
• You cannot adjust the input level while recording.
1
Press MENU.
The menu screen appears in the main display.
• If the current source is not the external equipment
connected to the LINE 1 jacks or to the LINE 2 jack,
you cannot go to the next step.
3
Push the joy control downward ( ) — or upward
(
) — to select the input level.
•
When the source is the equipment connected to the
LINE 1 jacks:
Level 1 : Select when the recorded sound is not loud
enough. This setting increases the input
signal level. (Initial setting when shipped
from the factory)
Level 2: Select when the recorded sound is distorted.
This setting reduces the input signal level.
When the source is the equipment connected to the
•
LINE 2 jack:
Level 1 : Initial setting when shipped from the
factory
Level 2: Select when the recorded sound is distorted
with “Level 1” selected.
Level 3: Select when the recorded sound is still
distorted with “Level 2” selected.
Level 4: Select when the recorded sound is still
distorted with “Level 3” selected.
• If “Level OVER!” still appears even after
setting the input level to “Level 4,” reconnect
the equipment to the LINE 1 jacks, and set the
input level to “Level 2.”
4
Press SET to finish the setting.
Changing the source name
You can change the external source names (LINE1, LINE2,
and DIGITAL IN) to the actual component names.
• You cannot change the external source names while
recording its sound on an MD.
1
Press MENU.
The menu screen appears in the main display.
• If the current source is not the external equipment
connected, you cannot go to the next step.
2
Push the joy control downward ( ) to select
“NAME CHANGE,” then press SET.
2
Push the joy control downward ( ) to select
“INPUT Level,” then press SET.
Ex. When the source is the external equipment
connected to the LINE 1 jacks
Ex. When the source is the external equipment
connected to the LINE 1 jacks
– 65 –
Page 69

3
Push the joy control downward ( ) — or upward
(
) — to select the source name.
•
When the source is the external equipment connected
to the LINE 1 jacks:
You can select from “LINE1” (Initial setting),
“TAPE,” “DBS,” “VCR,” “TV,” and “GAME.”
When the source is the equipment connected to the
•
LINE 2 jack:
You can select from “LINE2” (Initial setting) and
“P-MD” (portable MD player).
When the source is the equipment connected to the
•
DIGITAL IN terminal:
You can select from “DIGITAL IN” (Initial setting)
and “DBS-DIGITAL.”
4
Press SET to finish the setting.
Auto Power Off Setting
To store the display setting in memory
You can store the following display settings in
memory. So, even though the AC power is unplugged
or a power failure occurs, the settings are kept in
memory.
• Display demonstration off setting (see page 9)
• Level meter (see pages 13 and 63)
• Display color (see page 63)
On the unit ONLY:
1
Unplug the AC power cord.
2
Plug the AC power cord again while holding 7
and ENTER/DEMO at the same time.
Auto Power Off function automatically turns off the unit if
no sound comes in for more than 3 minutes.
If any operation is done during this 3-minute period, Auto
Power Off function is canceled temporarily even though no
sound comes in.
1
Press MENU.
The menu screen appears in the main display.
• If the unit is turned off, you cannot go to the next
step.
2
Push the joy control downward ( ) to select
“A.P.off (current setting*).”
* The current setting will appear following “A.P.off.”
3
Push the joy control rightward ( ) or leftward ( )
to select either “SET” or “CANCEL.”
SET : Activates the Auto Power Off function.
CANCEL : Cancels the Auto Power Off function.
4
Press SET to finish the setting.
When Auto Power Off function is activated, the A.P.off
indicator lights on the display.
The A.P.off indicator starts flashing if no sound comes
in.
When the remaining time until the shut-off time
becomes 20 seconds, it will be shown in the main
display.
3
Set the above settings as you like.
• Turn off the display demonstration. (See
page 9.)
If you turn it off and store its setting in backup
memory, display demonstration will not start
even after the AC power cord is reconnected or
when a power failure is recovered.
• Select the level meter. (See page 13 or 63.)
• Select the display color. (See page 63.)
To erase the memory
Repeat steps
Memory is cleared.
• When the AC power plug is reconnected or a power
failure is recovered, display demonstration
automatically starts.
1
and 2 of the above procedure.
– 66 –
Page 70

Maintenance
To get the best performance of the unit, keep your discs and mechanism clean.
General Notes
In general, you will have the best performance by keeping
your CDs, MDs and the mechanism clean.
• Store CDs and MDs in their cases, and keep them in
cabinets or on shelves.
• Keep the CD trays, and the MD loading slot cover
closed when not in use.
Handling CDs
• Remove the CD from its case by
holding it at the edge while
pressing the center hole lightly.
• Do not touch the shiny surface of
the disc, or bend the CD.
• Put the CD back in its case after
use to prevent warping.
• Be careful not to scratch the
surface of the CD when placing it
back in its case.
• Avoid exposure to direct sunlight,
temperature extremes, and
moisture.
Handling MDs
• Do not open the shutter.
- The shutter is locked so that it
will not open. Trying to force it
open will break the MD. If the
shutter opens accidentally, c lose
it again quickly without
touching the MD inside.
• Do not place MDs in the following places:
- High temperature areas such as
in direct sunlight or inside a
car.
- High humidity areas, e.g. in a
bathroom.
- On a beach or sandy area.
• Clean MDs regularly.
- If dust or dirt gets on cartridge, wipe it off with a soft
dry cloth.
To clean the CD
Wipe the CD with a soft cloth in a
straight line from center to edge.
DO NOT use any solvent — such as conventional
record cleaner, spray, thinner, or benzine — to clean
the CD.
– 67 –
Page 71

Additional Information
Continued
MD Disc Types
There are two types of MDs: Premastered (prerecorded) and Recordable (blank).
Premastered MDs
Premastered MDs, which have been recorded at music studio, can be played back like regular CDs. On an MD of this type,
data is recorded as the presence or absence of tiny pits. A laser beam focuses on the pits on the surface of the MD and
reflects the detection back to the lens in the MD recorder. The MD recorder then decodes the signals and plays them back
as music. This type of MD is called an “optical disc.”
Recordable MDs
Recordable MDs, which use magneto-optical technology, can be recorded and played back repeatedly. The laser inside the
MD recorder applies heat to the MD, demagnetizing the magnetic layer of the MD for recording and playback. This type of
MD is called an “magnetic-optical disc.”
ATRAC (Adaptive TRansform Acoustic Coding)/ATRAC3 ( )
The MD provides 80 minute recording and playback time, much more than an audio CD, but in a diameter of only 64 mm.
This ability to store such a large amount of data is the result of ATRAC, an audio compression technique developed for
MD. This technology cuts out faint sounds that would not be heard by the human beings. This technology, based on human
sensitivity to sounds, reduces recorded data volume up to about one-fifth of the original data volume.
Furthermore, this unit takes advantage of the latest ATRAC3 techniques, which can reduce the amount of data to record to
one-10th or one-20th of the original data volume. This allows for 2 times or 4 times long-hour stereo recording on this unit.
UTOC (User Table Of Contents)
Found only on recordable MDs, this area contains sub-data (track number, recording data, etc.) which can be rewritten by
the user.
UTOC enables us to search tracks quickly and edit tracks on the MD.
3:12
4:15
6:05
Sound Skip Guard Memory
The biggest weakness of discs is their susceptibility to vibration. The “Sound Skip Guard Memory” has been developed to
cope with this weakness.
With this function, a few seconds of signals read by the optical read head from the MD are first stored in memory before
being reproduced as audio signals. Thus, even when vibration or shock interrupts signals being read, these stored signals
can continue to reproduce sounds for the few seconds. Thus, the user will enjoy uninterrupted music.
Normally....
When “vibrated”....
– 68 –
Page 72

SCMS (Serial Copy Management System)
The MD recorder integrated to this unit uses the Serial Copy Management System which allows only first-generation
digital copies to be made of premastered software (like CDs or prerecorded MDs).
ABCDEFG
1st Generation 2nd Generation
I
T
G
I
D
A
L
OK
D
I
T
A
G
I
NO
L
HCMS (High-speed Copy Management System)
Now onto recordable MDs (minidiscs), you can record (copy) sound at a recording speed exceeding the normal speed. This
fact requires some restrictions for protecting copyrights.
On this unit, you cannot re-record, at either high speed or normal speed, a song (track) that has been recorded once from a
CD at high speed, until 74 minutes elapse after the first recording of the song started.
For example, after having recorded the first song (track) of a CD at high speed, you cannot record it again, at either high
speed or normal speed, until 74 minutes elapse after the first recording of that song started.
MD limitations
The MD records data in an original format that differs from that of conventional cassette tapes or DATs. Since there are
some limitations with this recording format, the following types of symptoms may occur. These symptoms are not
malfunctions.
Symptoms
“DISC FULL” appears, even though there is still enough
remaining time on an MD.
“DISC FULL” appears, even though the number of tracks
and recording time do not reach the limit.
The JOIN function sometimes does not work.
The remaining time on the MD does not increase even
when tracks are erased.
The sound drops out during fast forward or fast reverse.
The amount of recorded time on the MD added to the
amount of remaining time is shorter than the MD’s total
possible recording time.
Cause
There is a maximum number of tracks which can be
recorded, regardless of recording time. More than 254
tracks cannot be recorded on an MD.
• Repeating erasure and recording on the same MD creates
many blank portions sparsely on the MD. When recording on such an MD, a track is recorded on these blank
portions sparsely. If a track is divided and recorded into
so many portions, “DISC FULL” appears.
• If a divided portion of less than 8 seconds is made while
a track is recorded on the MD, that track cannot be
joined to another track using the JOIN function. Furthermore, if that track is erased, the remaining time of the
MD may not increase exactly by the erased amount.
• If a track has been divided into many portions while
being recorded on the MD, sounds will drop out while
fast forwarding or reversing such an MD.
You cannot record on a blank portion of less than 2 seconds
in the MD. For this reason, the actual recording time of
discs may become shorter.
– 69 –
Page 73

MD Messages
Message
BLANK DISC
CANNOT JOIN
CANNOT
LISTEN!
DISC ERROR
DISC FULL
EMERGENCY
STOP
HCMS CANNOT
COPY
MD LOAD
ERROR
MD NO DISC
NON-AUDIO
CANNOT COPY
PLAYBACK
DISC
DISC
PROTECTED
SCMS CANNOT
COPY
Signification
The disc is blank.
You are trying to join tracks which
cannot be joined.
You are trying to listen to the sound
during high-speed recording.
There is a problem with the MD.
There is no more space on the MD or
there are over 254 tracks.
A malfunction has occurred during
recording.
You are trying to re-record a song that
has been recorded once at high speed,
before 74 minutes have passed after its
first recording.
MD is not loaded correctly.
There is no MD.
You are trying to copy a non-audio disc
like a CD-ROM, Video CD, or DVD.
You are trying to edit or record on a
playback-only MD.
MD is write-protected.
Digital copy of the 2nd generation is
prohibited.
Solution
Change the MD with another if you
want to enjoy playback.
This is not a malfunction. (See “MD
limitations” on pages 44 and 69.)
This is not a malfunction.
You cannot listen to the sound during
high-speed recording.
Change the MD.
Use another recordable MD or erase
some tracks.
Stop playback, and eject the MD and re-
insert it.
An internal timer works to protect
copyrights. Wait for 74 minutes or
more, then start recording.
Eject the MD and re-insert it.
Put an MD.
Stop recording.
Use a recordable MD.
Unprotect the MD or use another. (See
page 34.)
Use the external equipment connected
to either the LINE 1 jacks (as the
recording/playback device) or the LINE
2 jack (as the playback device).
– 70 –
Page 74

Troubleshooting
If you are having a problem with your unit, check this list for a possible solution before calling for service.
If you cannot solve the problem from the hints given here, or the unit has been physically damaged, call a qualified person,
such as your dealer, for service.
Symptom
No sound is heard.
Unable to record on an MD.
Poor radio reception.
Unable to operate the remote control.
Loaded CDs and MD cannot be
ejected.
The CD does not play.
The CD skips.
If “DIGITAL IN UNLOCK” appears in
the main display.
If “NO OPERATE!” appears in the
main display.
If “CAUTION!” appears in the main
display.
The display suddenly becomes dark.
Operations are disabled.
Possible Cause
Connections are incorrect, or loose.
• You are using a prerecorded MD.
• The MD is write-protected.
• The antenna is not connected
correctly.
• The AM loop antenna is too close
to the unit.
• The FM antenna is not properly
extended and positioned.
• The path between the remote
control and the remote sensor on
the unit is blocked.
• The batteries have lost their charge.
• You are using the remote control
far from the main unit.
• The main AC power cord is not
plugged in.
• The Disc Lock function is in use.
The CD is upside down.
The CD is dirty or scratched.
There is no digital device connected to
the DIGITAL IN terminal.
Operation you have done is not
acceptable. For example, you are trying
to use both the remote control, and the
buttons and controls on the unit while
entering disc or track titles.
Something is wrong with your unit.
This happens because a strong light
strikes the display.
The built-in microprocessor has
malfunctioned due to external electrical
interference.
Action
Check all connections and make
corrections. (See pages 6 – 9.)
• Change it with a recordable MD.
• Unprotect the MD. (See page 34.)
• Reconnect the antenna securely.
• Change the position and direction of
the AM loop antenna.
• Extend FM antenna to the best
reception position.
• Remove the obstruction.
• Replace the batteries. (See page 9.)
• Signals cannot reach the remote
sensor. Move close to the main unit.
• Plug in the AC power plug.
• Turn off the Disc Lock function.
(See page 27.)
Put the CD in with the label side up.
Clean or replace the CD. (See page 67.)
Connect a digital device using digital
optical cord. (See page 8.)
Follow the correct procedure explained
in this manual.
Unplug the unit immediately, then
consult your dealer.
Avoid exposing the unit to a strong
light.
Press CANCEL and DISC on the unit at
the same time to reset the
microprocessor, or unplug the unit then
plug it back in.
– 71 –
Page 75

Specifications
Amplifier
Output Power (IEC 268-3/DIN):
19 W per channel, min. RMS, both channels driven into
6 Ω at 1 kHz, with no more than 0.9% total harmonic
distortion
Audio input sensitivity/Impedance (at 1 kHz)
Analog input:
LINE 1: 190 mV/47 kΩ (at “INPUT Level 1”)
500 mV/47 kΩ (at “INPUT Level 2”)
LINE 2: 45 mV/47 kΩ (at “INPUT Level 1”)
55 mV/47 kΩ (at “INPUT Level 2”)
110 mV/47 kΩ (at “INPUT Level 3”)
290 mV/47 kΩ (at “INPUT Level 4”)
Digital input:
DIGITAL IN: Optical
Signal wave length: 660 nm
Input level: –23 dBm to –15 dBm
(With the built-in sampling rate
converter, corresponding to 32 kHz/
44.1 kHz/48 kHz)
Audio output level/Impedance (at 1 kHz)
LINE 1: 150 mV/3.9 kΩ
Speakers/Impedance: 6 Ω – 16 Ω
Tuner
FM tuning range: 87.50 MHz — 108.00 MHz
AM (MW/LW) tuning range:
MW: 522 kHz — 1 629 kHz
LW: 144 kHz — 288 kHz
MD recorder
Audio playing system: MiniDisc digital audio system
Recording system: Magneto-optical overwrite system
Reading system: Non-contact, semiconductor laser
pickup (λ=780 nm)
Error correction system:
Sampling frequency: 44.1 kHz
Audio compression system:
CIRC (Cross Interleave ReedSolomon Code)
(With sampling rate converter for
recording — 32 kHz/44.1 kHz/
48 kHz)
ATRAC (Adaptive TRansform Acoustic
Coding)/ATRAC3 ( )
General
Power requirement: AC 230V , 50 Hz
Power consumption: 75 W (at operation)
1.6 W (on standby: with back light
off)
1.8 W (on standby: with back light
on)
Dimensions (approx.):
215 mm x 170 mm x 349 mm (W/H/D)
1
/2 in. x 63/4 in. x 133/4 in.)
(8
Mass (approx.): 6.2 kg (13.7 lbs)
Supplied accessories
See page 6.
CD player
CD Capacity: 3 CDs
Dynamic range: 92 dB
Signal-to-noise ratio: 100 dB
Wow and flutter: Immeasurable
Design and specifications are subject to change without
notice.
US and foreign patents licensed from Dolby Laboratories
Licensing Corporation.
– 72 –
Page 76

NOTICE/BEMERKUNG/AVIS/
OPMERKING/AVISO/AVVISO
STANDBY
/ON
COMPACT COMPONENT MD SYSTEM MX-S6MDR
MENU
SP/LP2/LP4
LONG
REC
MODE
MODE
REC PAUSE
HIGH SPEED
CD MD
DISC LOADING MECHANISM
English Nederlands
Display Demonstration
Each time you plug the power cord to the AC outlet.
Display demonstration starts automatically in the
main display.
To stop and cancel the display demonstration,
press ENTER/DEMO on the unit so that “DEMO
OFF!” appears in the main display .
• For more detailed information about demonstration,
see page 9.
Deutsch
Telkens wanneer u de netspanningskabel op een
wandcontactdoos aansluit, wordt automatisch de
demonstratie op de display gestart.
Als u de demonstratie op de display wilt
beëindigen en annuleren, drukt u tijdens de
demonstratie op de toets ENTER/DEMO. De tekst
“DEMO OFF!” verschijnt dan in het hoofdvenster van
de display.
• Zie pagina 9 voor meer informatie over de
demonstratie.
Español
DISC
ENTER
/DEMO
ENTER
TITLE/EDIT
/DEMO
PHONES
LINE 2
Demonstratie over de werking van de display
Displaydemonstration
Wenn Sie das Netzkabel an das Netz anschließen,
wird die Displaydemonstration im Hauptdisplay
automatisch gestartet.
Wenn Sie die Displaydemonstration anhalten und
deaktivieren möchten, müssen Sie die Taste
ENTER/DEMO am Gerät drücken, so daß “DEMO
OFF!” im Hauptdisplay angezeigt wird.
• Ausführlichere Informationen über die
Displaydemonstration finden Sie auf Seite 9.
Français
Démonstration des affichages
Chaque fois que vous branchez le cordon d’alimentation
dans une prise secteur, la démonstration des af fichages
démarre automatiquement sur l’affichage principal.
Pour arrêter et annuler la démonstration des
affichages, appuyez sur ENTER/DEMO sur
l’appareil de façon que “DEMO OFF!” apparaisse sur
l’affichage principal.
• Pour plus d’informations à propos de la
démonstration, référez-vous à la page 9.
Demostración en pantalla
Cada vez que usted enchufa el cable de alimentación
de CA en un tomacorriente de CA, se iniciará
automáticamente la demostración en la pantalla principal.
Para detener y cancelar la demostración en
pantalla, pulse ENTER/DEMO en la unidad para que
se visualice “DEMO OFF!” en la pantalla principal.
• Para una información más detallada sobre la
demostración, consulte la página 9.
Italiano
Demo del display
Ogniqualvolta si collega il cavo di alimentazione alla
presa CA, sul display principale inizia
automaticamente la demo del display.
Per arrestare ed annullare la demo, Premere
ENTER/DEMO sull’impianto: sul display principale
appare “DEMO OFF!”.
• Per maggiori informazioni sulla demo, cfr. pagina 9.
LV42044-001A
[ E, B ]
Page 77

SAFETY INSTRUCTIONS
“SOME DOS AND DON’TS ON THE SAFE USE OF EQUIPMENT”
This equipment has been disigned and manufactured to meet international safety standards but, like any electrical
equipment, care must be taken if you are to obtain the best results and safety is to be assured.
✮✮✮✮✮✮✮✮✮✮✮✮✮✮✮✮✮✮✮✮✮✮✮✮✮✮✮✮✮✮✮✮✮✮✮✮✮✮✮✮✮✮✮✮✮✮✮
Do read the operating instructions before you attempt to use the equipment.
Do ensure that all electrical connections (including the mains plug, extension leads and interconnections between
pieces of equipment) are properly made and in accordance with the manufacturer’s instructions. Switch off and
withdraw the mains plug when making or changing connections.
Do consult your dealer if you are ever in doubt about the installation, operation or safety of your equipment.
Do be careful with glass panels or doors on equipment.
✮✮✮✮✮✮✮✮✮✮✮✮✮✮✮✮✮✮✮✮✮✮✮✮✮✮✮✮✮✮✮✮✮✮✮✮✮✮✮✮✮✮✮✮✮✮✮
DON’T continue to operate the equipment if you are in any doubt about it working normally, or if it is damaged in any
way–switch off, withdraw the mains plug and consult your dealer.
DON’T remove any fixed cover as this may expose dangerous voltages.
DON’T leave equipment switched on when it is unattended unless it is specifically stated that it is designed for
unattended operation or has a standby mode.
Switch off using the switch on the equipment and make sure that your family know how to do this.
Special arrangements may need to be made for infirm or handicapped people.
DON’T use equipment such as personal stereos or radios so that you are distracted from the requirements of traffic
safety. It is illegal to watch television whilst driving.
DON’T listen to headphones at high volume as such use can permanently damage your hearing.
DON’T obstruct the ventilation of the equipment, for example with curtains or soft furnishings.
Overheating will cause damage and shorten the life of the equipment.
DON’T use makeshift stands and NEVER fix legs with wood screws — to ensure complete safety always fit the
manufacturer’s approved stand or legs with the fixings provided according to the instructions.
DON’T allow electrical equipment to be exposed to rain or moisture.
ABOVE ALL
— NEVER let anyone, especially children, push anything into holes, slots or an y other opening in the case —
this could result in a fatal electrical shock.;
— NEVER guess or take chances with electrical equipment of any kind — it is better to be safe than sorry!
EN
VICTOR COMPANY OF JAPAN, LIMITED
0800JTMMDWJEM
JVC
 Loading...