

Page 1
COMPACT COMPONENT SYSTEM
SISTEMAS DE COMPONENTES COMPACTOS
SISTEMA DE COMPONENTES COMPACTOS
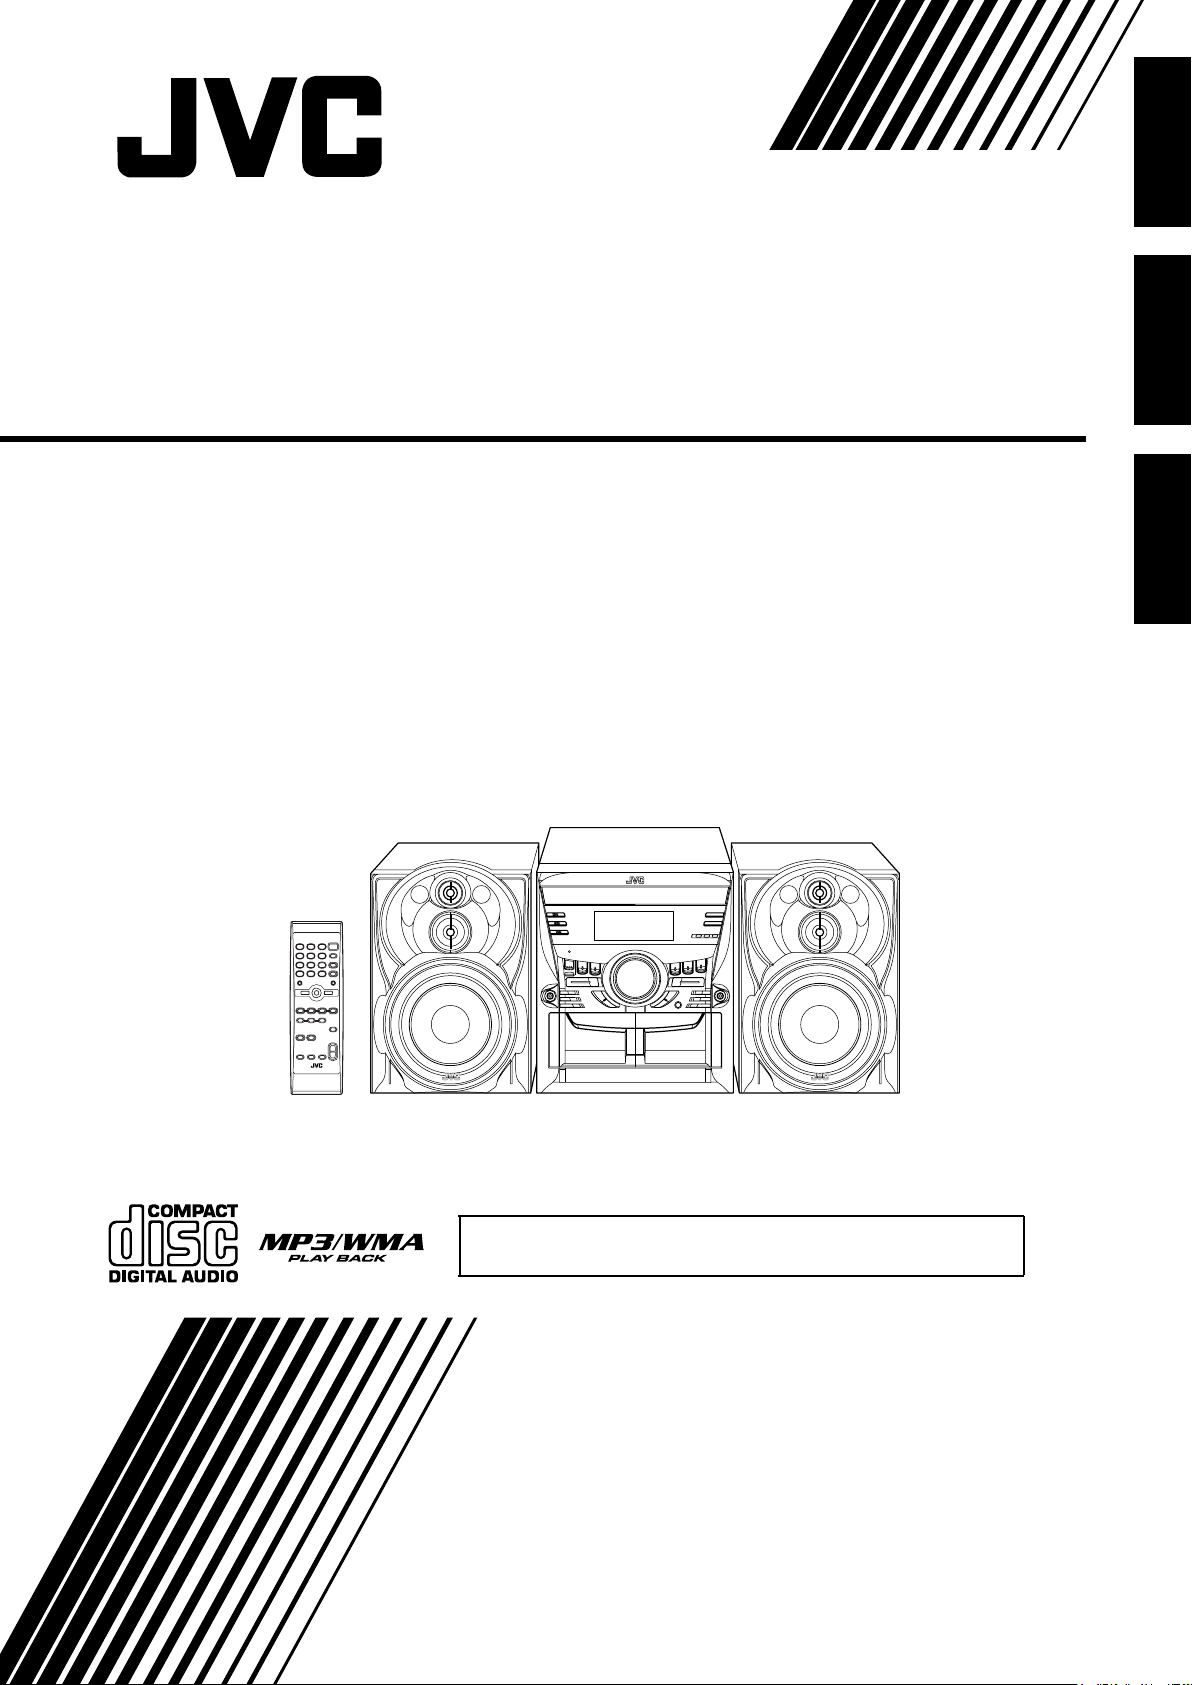
MX-KC45
Consists of CA-MXKC45 and SP-MXKC45
Consiste de CA-MXKC45, y SP-MXKC45
Consiste em CA-MXKC45, e SP-MXKC45
English
Español
Português
SP-MXKC45
Antes de operar su equipo, lea cuidadosamente este instructivo.
MANUAL DE INSTRUCCIONES
INSTRUÇÕES
CA-MXKC45 SP-MXKC45
¡ATENCION!
INSTRUCTIONS
LVT1521-004A
[UW]
Page 2

Warnings, Cautions and Others
Avisos, precauciones y otras notas
Advertências, precauções e outras notas
CAUTION
To reduce the risk of electrical shocks, fire, etc.:
1. Do not remove screws, covers or cabinet.
2. Do not expose this appliance to rain or moisture.
PRECAUCIÓN
Para reducir riesgos de choques eléctricos, incendio, etc.:
1. No extraiga los tornillos, los cubiertas ni la caja.
2. No exponga este aparato a la lluvia o a la humedad.
PRECAUÇÃO
Para reduzir riscos de choques elétricos, incêndio, etc.:
1. Não remova parafusos e tampas ou desmonte a caixa.
2. Não exponha este aparelho à chuva nem à umidade.
CAUTION –– % STANDBY/ON button !
Disconnect the mains plug to shut the power off completely (all lamps
and indications go off). When installing the product, ensure that the
plug is easily accessible. The % STANDBY/ON button in any position
does not disconnect the mains line.
• When the unit is on standby, the STANDBY lamp lights red.
• When the unit is turned on, the STANDBY lamp goes off.
The power can be remote controlled.
PRECAUCIÓN –– Botón % STANDBY/ON !
Desconecte el enchufe tomacorriente para desconectar la alimentación completamente (se apagan todas las lámparas e indicaciones).
Al instalar el aparato, asegúrese de poder acceder fácilmente al
enchufe. Ninguna posición del botón % STANDBY/ON conseguirá
desconectar la red de alimentación eléctrica.
• Cuando la unidad está en espera, la lámpara STANDBY se
enciende en rojo.
• Cuando la unidad está encendida, la lámpara STANDBY se apaga.
La alimentación puede controlarse mediante control remoto.
CUIDADO –– botão % STANDBY/ON !
Desligue a ficha da tomada da parede para desligar completamente a
alimentação (todas as luzes e indicadores apagam-se). Quando instalar o aparelho, certifique-se de que a ficha fique facilmente acessível.
O botão % STANDBY/ON, quer esteja premido ou solto, não desliga
a alimentação principal.
• Quando a unidade estiver em standby, a luz STANDBY fica vermelha.
• Quando a unidade estiver ligada, a luz STANDBY apaga-se.
A alimentação pode ser controlada à distância.
IMPORTANT FOR LASER PRODUCTS / IMPORTANTE PARA PRODUCTOS LÁSER /
IMPOTANTE PARA PRODUTOS LASER
IMPORTANT FOR LASER PRODUCTS
1. CLASS 1 LASER PRODUCT
2. CAUTION: Do not open the top cover. There are no user service-
able parts inside the unit; leave all servicing to qualified service
personnel.
3. CAUTION: Visible and invisible laser radiation when open and
interlock failed or defeated. Avoid direct exposure to beam.
4. REPRODUCTION OF LABEL: CAUTION LABEL, PLACED
INSIDE THE UNIT.
PARA PRODUTOS LASER, IMPORTANTE
1. PRODUTO LASER DE CLASSE 1
2. PRECAUÇÃO: não abrir a cobertura superior. Dentro da unidade
não existem partes cuja manutenção tenha de ser feita pelo
usuário; deixe qualquer manutenção a cargo do pessoal de
serviço qualificado.
3. CUIDADO: QUANDO ABRE O DISPOSITIVO, É EMITIDA RADIAÇÃO LASER DE CLASSE 1M VISÍVEL OU INVISÍVEL. NÃO
OLHE FIXAMENTE PARA O FEIXE LASER NEM OLHE
DIRECTAMENTE PARA O MESMO UTILIZANDO INSTRUMENTOS ÓPTICOS.
4. REPRODUÇÃO DE ETIQUETA: ETIQUETA DE AVISO SITUADA
NO INTERIOR DA UNIDADE.
IMPORTANTE PARA PRODUCTOS LÁSER
1. PRODUCTO LASER CLASE 1
2. PRECAUCIÓN: No abra la tapa superior. En el interior de la
unidad no hay piezas que pueda reparar el usuario; encargue el
servicio a personal técnico cualificado.
3. AVIS O: RADIACIÓN LÁSER DE CLASE 1M VISIBLE Y/O INVIS-
IBLE CUANDO ESTÁ ABIERTO. NO MIRAR FIJAMENTE EL
HAZ NI OBSERVAR DIRECTAMENTE CON INSTRUMENTAL
ÓPTICO.
4. REPRODUCCIÓN DE LA ETIQUETA: ETIQUETA DE PRECAUCIÓN, COLOCADA EN EL INTERIOR DE LA UNIDAD.
G-1
[European Union only]
[La Unión europea solo]
[Apenas União Europeia]
Page 3
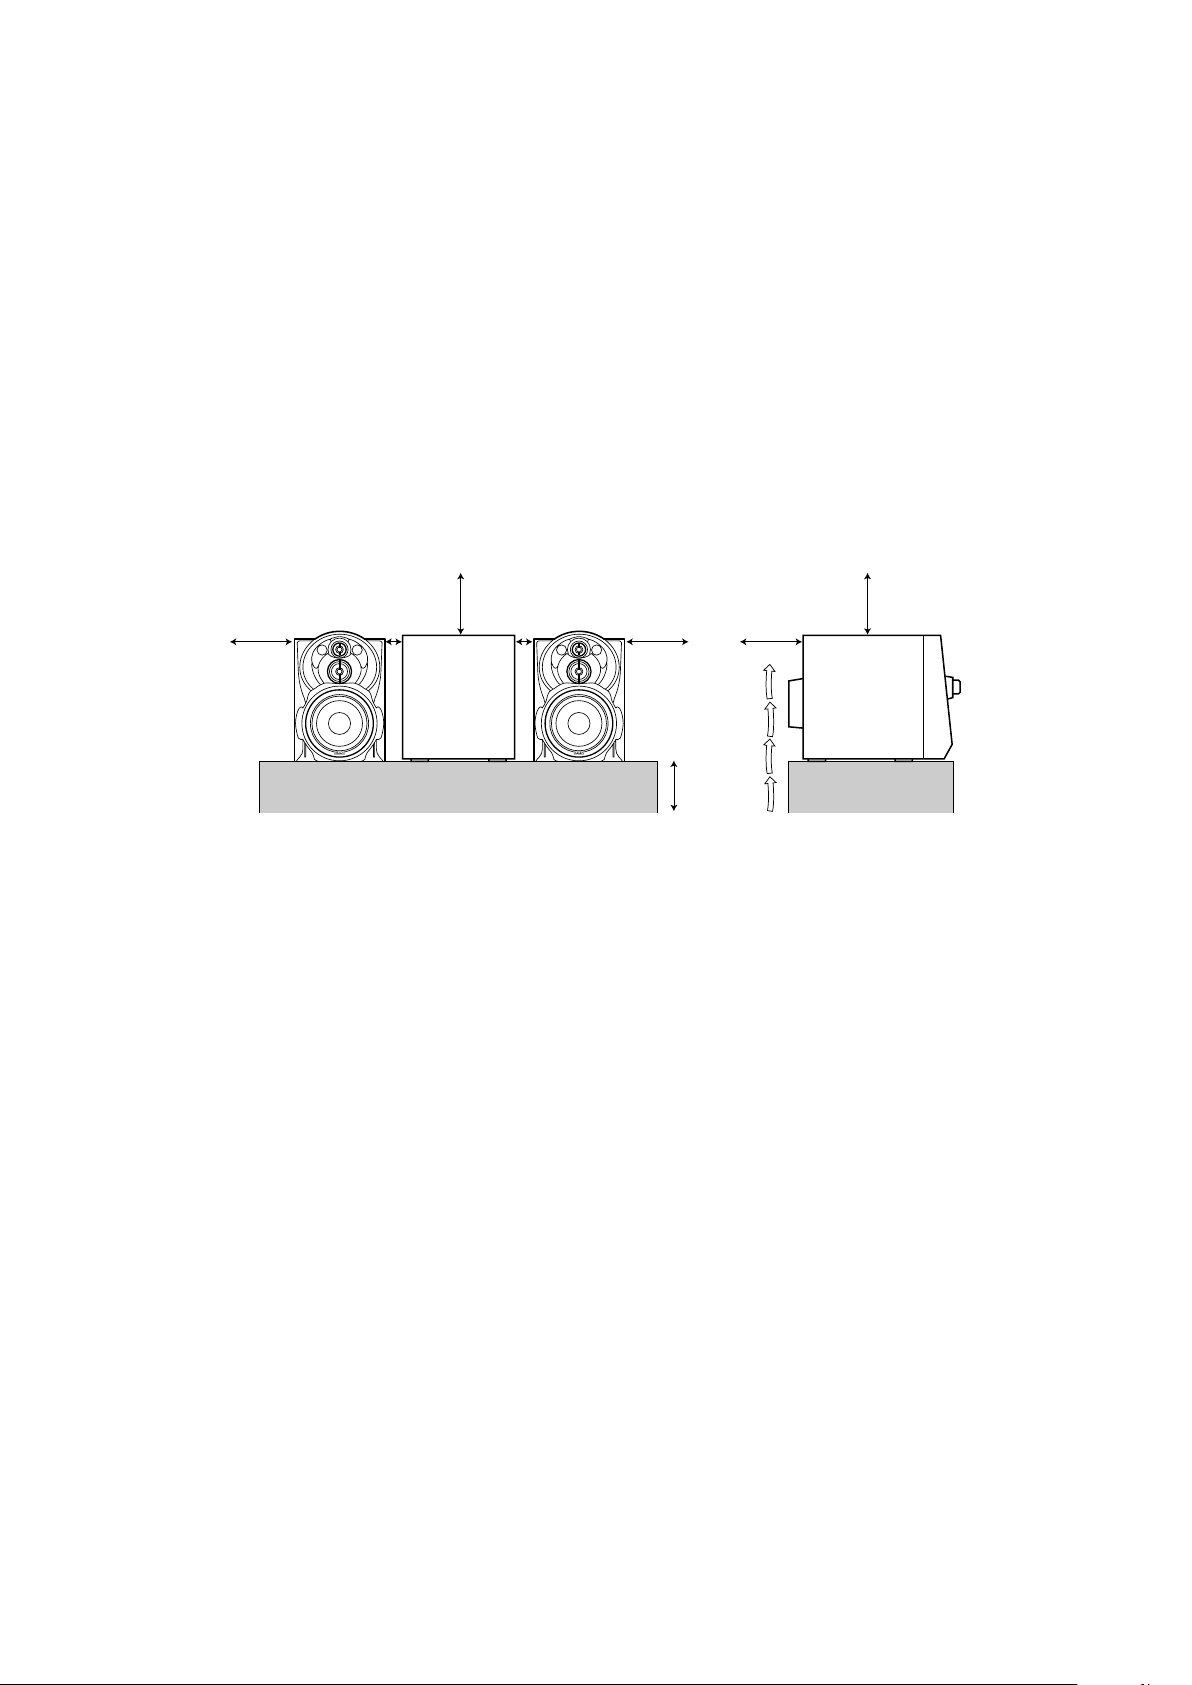
Caution: Proper Ventilation
To avoid risk of electric shock and fire, and to prevent damage, locate the apparatus as follows:
1 Front: No obstructions and open spacing.
2 Sides/ Top/ Back: No obstructions should be placed in the areas shown by the dimensions below.
3 Bottom: Place on the level surface. Maintain an adequate air path for ventilation by placing on a stand with a height of 10 cm or more.
Precaución: el aparato debe estar bien ventilado
Para evitar posibles riesgos de descargas eléctricas e incendios y prevenir cualquier posible daño, coloque el aparato del modo siguiente:
1 Parte delantera: No ponga nada delante, deje el espacio libre.
2 Laterales/ parte superior/ No se debería colocar nada en las áreas y las distancias que se detallan a continuación.
parte trasera:
3 Parte inferior: Coloque el aparato sobre una superficie recta. Debe haber buena circulación de aire; para ello, coloque el
aparato sobre una base a una altura mínima de 10 cm.
Precaução: Ventilação adequada
Para evitar riscos de choques elétricos e incêndios, e prevenir avarias, instale o aparelho como segue:
1 Parte frontal: Sem obstruções e espaços abertos.
2 Partes laterais/ tampa/ posterior: Nenhuma obstrução deverá ser colocada entre as áreas cujas dimensões são indicadasabaixo.
3 Parte inferior: Instale-o sobre uma superfície plana. Deverá ser mantido espaço suficiente para a ventilação se este for
instalado numa posição que tenha uma altura de 10 cm ou mais.
Front view
Vista frontal
Visão frontal
15cm 15cm
15cm 1cm 1cm 15cm
About the cooling fan
A cooling fan is mounted on the rear panel of the unit to prevent abnormal temperature inside the unit, thus assuring normal operation of
the unit. The cooling fan automatically starts rotating to intake external cool air when the volume is increased up to more than a certain level.
Ventilador de enfriamiento
En el panel trasero de la unidad central se provee un ventilador de enfriamiento para evitar el aumento anormal de la temperatura in- terior
de la unidad, asegurando así el normal funcionamiento de la misma. El ventilador de enfriamiento comienza a girar automáticamente para
introducir aire frío exterior cuando se aumenta el volumen por encima de un cierto nivel.
Acerca da ventoinha de arrefecimento
No painel posterior da unidade, está instalada uma ventoinha de arrefecimento para evitar uma temperatura anormal no interior da unidade,
assegurando o seu funcionamento normal. Quando o volume aumentar para um valor superior a um determinado nível, a ventoinha de
arrefecimento começa a rodar para permitir a entrada de ar frio a partir do exterior.
CAUTION
1. Do not block the ventilation openings or holes.
(If the ventilation openings or holes are blocked by a newspaper or
cloth, etc., the heat may not be able to get out.)
2. Do not place any naked flame sources, such as lighted candles,
on the apparatus.
3. When discarding batteries, environmental problems must be considered and local rules or laws governing the disposal of these batteries must be followed strictly.
4. Do not expose this apparatus to rain, moisture, dripping or splashing and that no objects filled with liquids, such as vases, shall be
placed on the apparatus.
PRECAUCION!
1. No obstruya las rendijas o los orificios de ventilación.
(Si las rendijas o los orificios de ventilación quedan tapados con
un periódico, un trozo de tela, etc., no se podrá disipar el calor).
2. No ponga sobre el aparato ninguna llama al descubierto, como
velas encendidas.
3. Cuando tenga que descartar las pilas, tenga en cuenta los problemas ambientales y observe estrictamente los reglamentos o las
leyes locales sobre disposición de las pilas.
4. No exponga este aparato a la lluvia, humedad, goteos o salpicaduras. Tampoco ponga recipientes conteniendo làqquidos, como
floreros, encima del aparato.
Side view
Vista lateral
Visão lateral
15cm
10cm
CUIDADO
1. Não tape as aberturas ou os orifícios de ventilação.
(Se tapar as aberturas ou orifícios de ventilação com um jornal,
um pano, etc., o calor não sai).
2. Não coloque objectos com chama, como velas acesas, em cima
do aparelho.
3. Quando se desfizer das baterias, deve ter em consideração os
problemas ambientais e respeitar integralmente os regulamentos
e leis locais relativos à forma de deitar fora as baterias.
4. N'exposez pas cet appareil àj la pluie, àj l'humiditàm, àj un
àmgouttement ou àj des àmclaboussures et ne placez pas des
objets remplis de liquide, tels qu'un vase, sur l'appareil.
G-2
Page 4

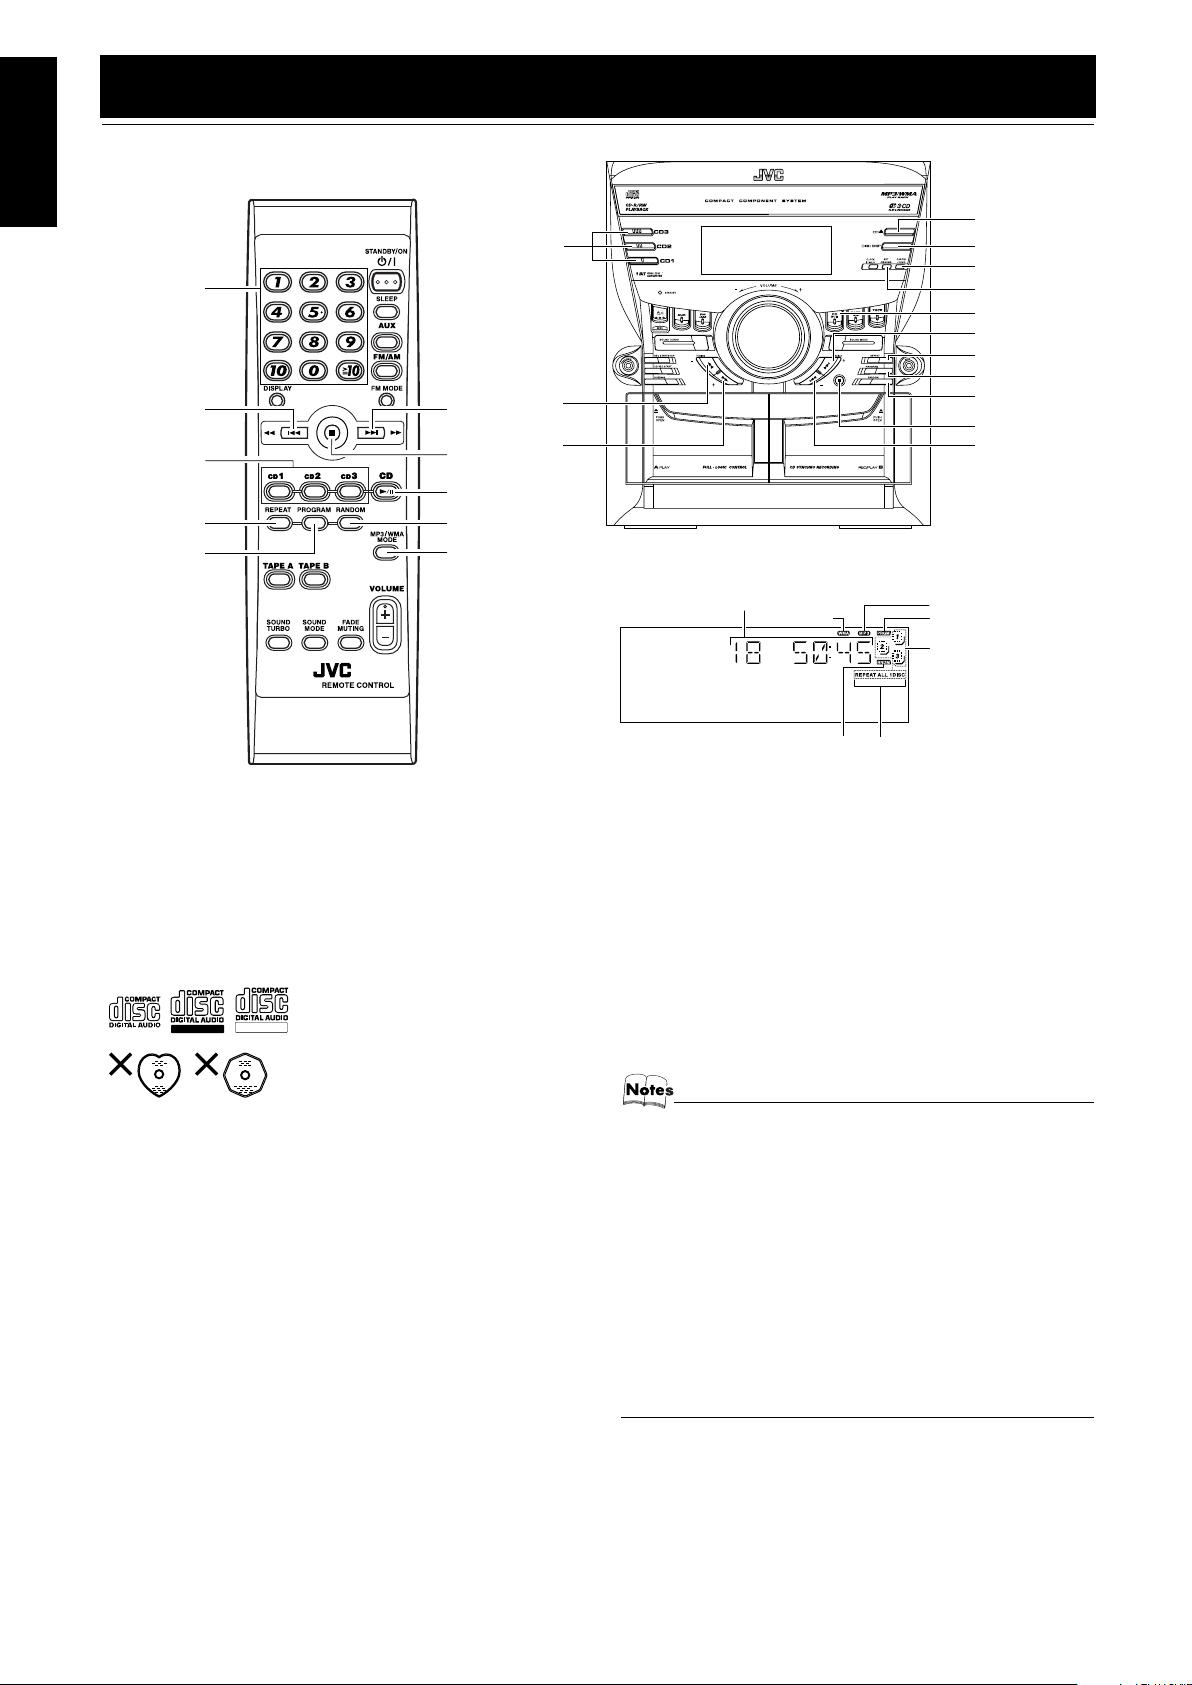
English
Introduction
Thank you for purchasing the JVC Compact Component System.
We hope it will be a valued addition to your home, giving you years of enjoyment.
Be sure to read this instruction manual carefully before operating your new stereo system.
In it you will find all the information you need to set up and use the system.
If you have a query that is not answered by the manual, please contact your dealer.
Features
Here are some of the things that make your System both powerful and simple to use.
❏ The controls and operations have been redesigned to make them very easy to use, freeing you to just enjoy the
music.
• With JVC’s COMPU PLAY you can turn on the System and automatically start the Radio, Cassette Deck, or
CD Player with a single touch.
❏ The great SEA (Sound Effect Amplifier) effects Rock, Pop and Classics are provided.
❏ The Sound Turbo function provides emphasized rich sound.
❏ A 45-station preset capability (30 FM and 15 AM) in addition to auto-seek and manual tuning.
❏ CD changer function can operate 3 discs.
• Discs can be changed during play using the Carrousel tray (rotational tray).
❏ Two Decks enabling tape dubbing.
❏ Timer functions; Daily Timer, REC (Recording) Timer, and Sleep Timer.
❏ You can connect various external units, such as an MD recorder.
❏ The CD Player can play back a CD-R and CD-RW.
How This Manual Is Organized
• Basic information that is the same for many different functions - e.g. setting the volume - is given in the section “Basic Operations”,
and not repeated under each function.
• The names of buttons/controls and display messages are written in all capital letters: e.g. FM/AM, “NO DISC”.
• If the button names on the Unit and the Remote Control are the same, the description on where the button is used will be omitted.
• System functions are written with an initial capital letter only: e.g. Normal Play.
Use the table of contents to look up specific information you require.
We have enjoyed making this manual for you, and hope it serves you in enjoying the many features built into your System.
IMPORTANT CAUTIONS
Installation of the System
1
• Select a place which is level, dry and neither too hot nor too cold. (Between 5°C and 35°C.)
• Leave sufficient distance between the System and a TV.
• Do not use the System in a place subject to vibrations.
Power cord
2
• Do not handle the power cord with wet hands!
• Some power is always consumed as long as the power cord is connected to the wall outlet.
• When unplugging the System from the wall outlet, always pull the plug, not the power cord.
Malfunctions, etc.
3
• There are no user serviceable parts inside. In case of system failure, unplug the power cord and consult your dealer.
• Do not insert any metallic object into the System.
1
Page 5

Table of Contents
Introduction ...................................................................................................................1
Features.................................................................................................................................................... 1
How This Manual Is Organized............................................................................................................... 1
IMPORTANT CAUTIONS..................................................................................................................... 1
Table of Contents ..........................................................................................................2
Getting Started ..............................................................................................................3
Accessories .............................................................................................................................................. 3
Set the VOLTAGE SELECTOR Switch.................................................................................................3
How To Put Batteries In the Remote Control.......................................................................................... 3
Using the Remote Control ....................................................................................................................... 4
Connecting the FM Antenna.................................................................................................................... 4
Connecting the AM Antenna................................................................................................................... 5
Connecting the Speakers ......................................................................................................................... 5
Connecting External Equipment.............................................................................................................. 6
Connecting to the Wall Outlet................................................................................................................. 6
DEMO Mode ........................................................................................................................................... 6
COMPU Play........................................................................................................................................... 6
Basic Operations...........................................................................................................7
Turning the Power On and Off................................................................................................................ 7
ECO Mode (ECO) ................................................................................................................................... 7
Adjusting the Volume.............................................................................................................................. 8
Fade-out Muting (FADE MUTING) ....................................................................................................... 8
Emphasizing the sound
(SOUND TURBO) .................................................................................................................................. 8
Selecting the Sound Mode (SOUND MODE)......................................................................................... 8
Entering the Number with the Remote Control (Numeric Keys) ............................................................ 8
Changing the Display .............................................................................................................................. 8
Using the Tuner .............................................................................................................9
Tuning In a Station .................................................................................................................................. 9
Presetting Stations ................................................................................................................................. 10
To Change the FM Reception Mode ..................................................................................................... 10
Using the CD Player ....................................................................................................11
To Load CDs ......................................................................................................................................... 12
To Unload CDs...................................................................................................................................... 12
Changing the MP3/WMA Playback Mode............................................................................................ 12
Basics of Using the CD Player-Normal Play......................................................................................... 13
Resume Play for Audio CD and MP3/WMA Disc................................................................................ 14
Programming the Playing Order of the Tracks...................................................................................... 14
Random Play.......................................................................................................................................... 15
Repeating Tracks ................................................................................................................................... 15
Tray Lock Function ............................................................................................................................... 15
Using the Cassette Deck (Listening to a Tape) ........................................................16
Playing a Tape ....................................................................................................................................... 16
Using the Cassette Deck (Recording) ......................................................................17
Standard Recording ............................................................................................................................... 18
CD Synchro Recording.......................................................................................................................... 18
Tape to Tape Recording (DUBBING)................................................................................................... 18
Using an External Equipment ....................................................................................19
Listening to the External
Equipment.............................................................................................................................................. 19
Using the Timers .........................................................................................................20
Setting the Clock ................................................................................................................................... 20
Fixing the Clock .................................................................................................................................... 20
Setting the Daily Timer ......................................................................................................................... 21
Setting the REC (Recording)
Timer ..................................................................................................................................................... 22
Setting the SLEEP Timer ...................................................................................................................... 24
Timer Priority ........................................................................................................................................ 24
Care And Maintenance................................................................................................25
Troubleshooting ..........................................................................................................26
Specification ................................................................................................................27
English
2
Page 6
Getting Started
English
Accessories
Make sure that you have all of the following items, which are supplied with the System.
AM Loop Antenna (1)
FM Wire Antenna (1)
Remote Control (1)
Batteries (2)
AC Plug Adaptor (1)
If any of these items are missing, contact your dealer immediately.
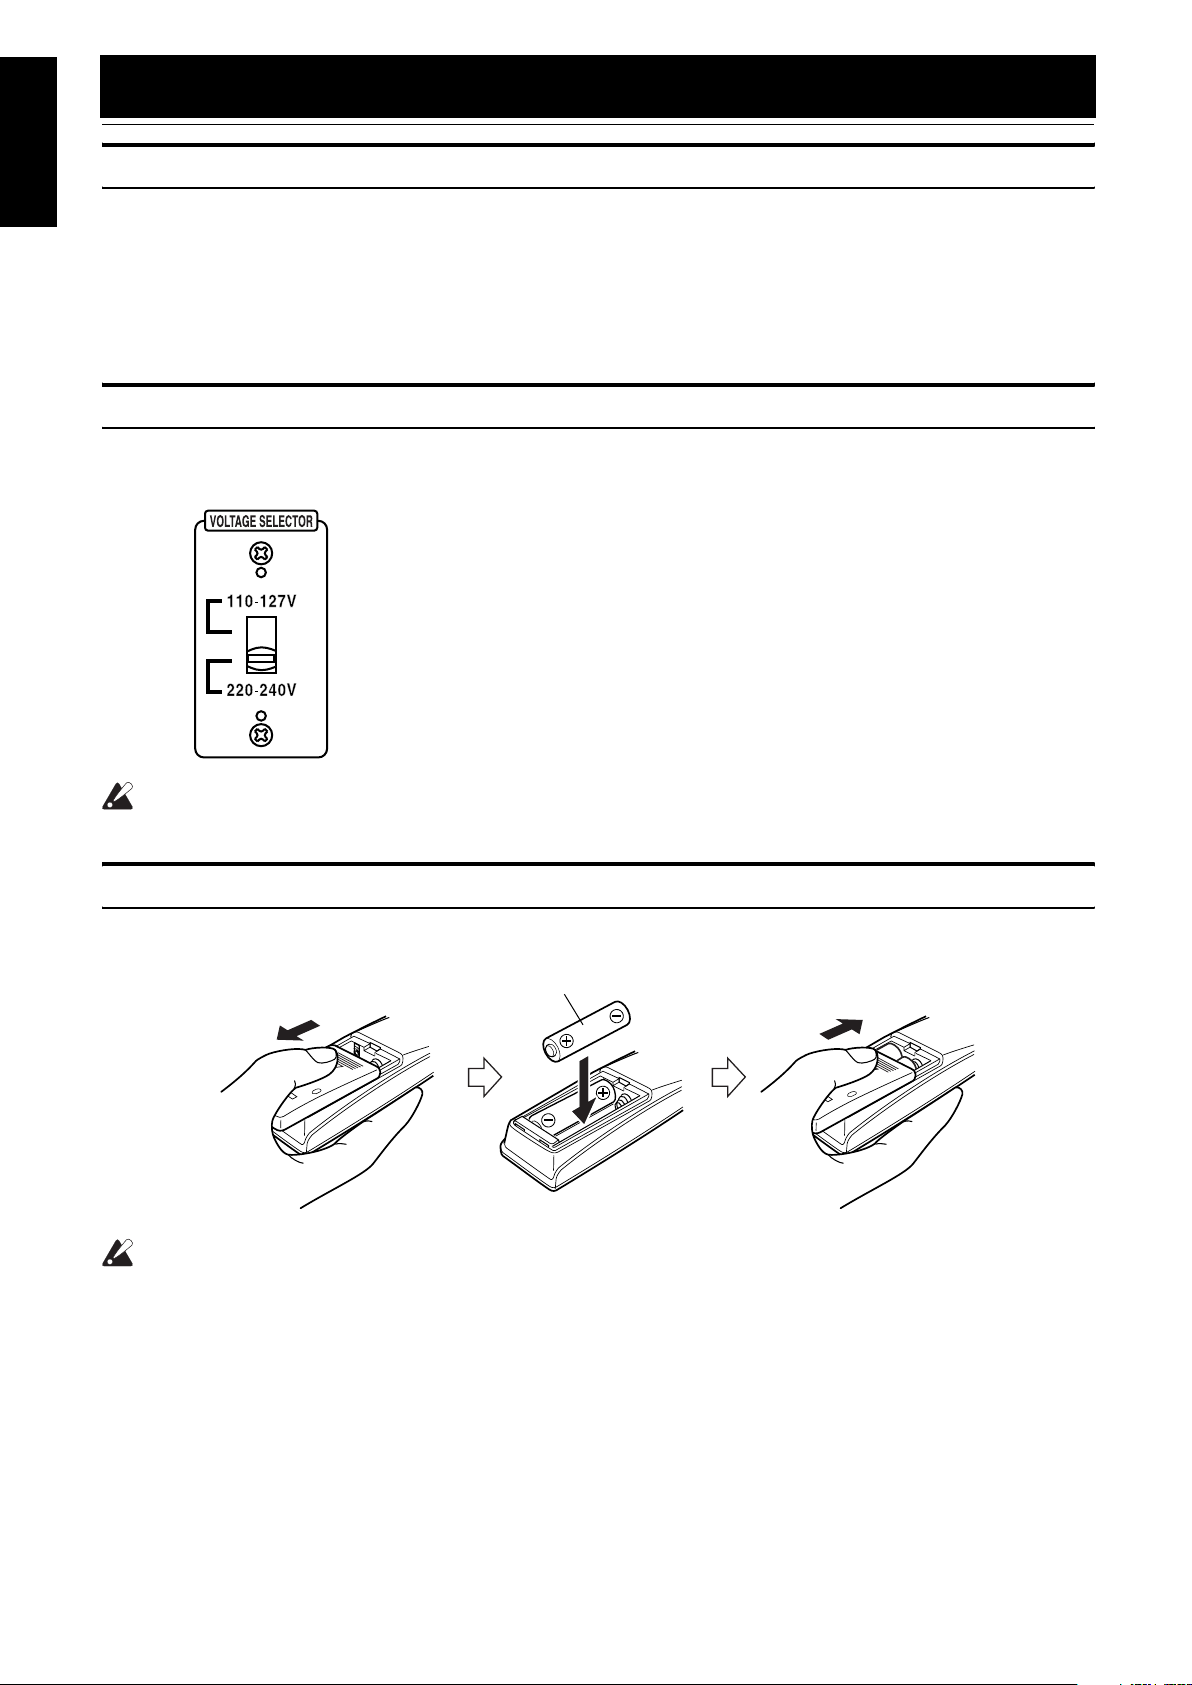
Set the VOLTAGE SELECTOR Switch
To avoid damaging the System, set the voltage before plugging in the System.
Set the correct voltage for you area with the VOLTAGE SELECTOR switch on the back of the Unit. Use a screwdriver to slide the selector up and
down.
CAUTION:
• Make all connections before plugging the System into an AC power outlet.
How To Put Batteries In the Remote Control
Match the polarity (+ and –) on the batteries with the + and – markings in the battery compartment.
R6P(SUM-3)/AA(15F)
CAUTION:
• Handle batteries properly.
❏ To avoid battery leakage or explosion:
• Remove batteries when the Remote Control will not be used for a long time.
• When you need to replace the batteries, replace both batteries at the same time with new ones.
• Do not use an old battery with a new one.
• Do not use different types of batteries together.
3
Page 7

Getting Started
Using the Remote Control
The Remote Control makes it easy to use many of the functions of the System from a distance of up to 7m away.
You need to point the Remote Control at the remote sensor on the System’s front panel.
Remote sensor
CAUTION:
• Make all connections before plugging the System into an AC power outlet.
English
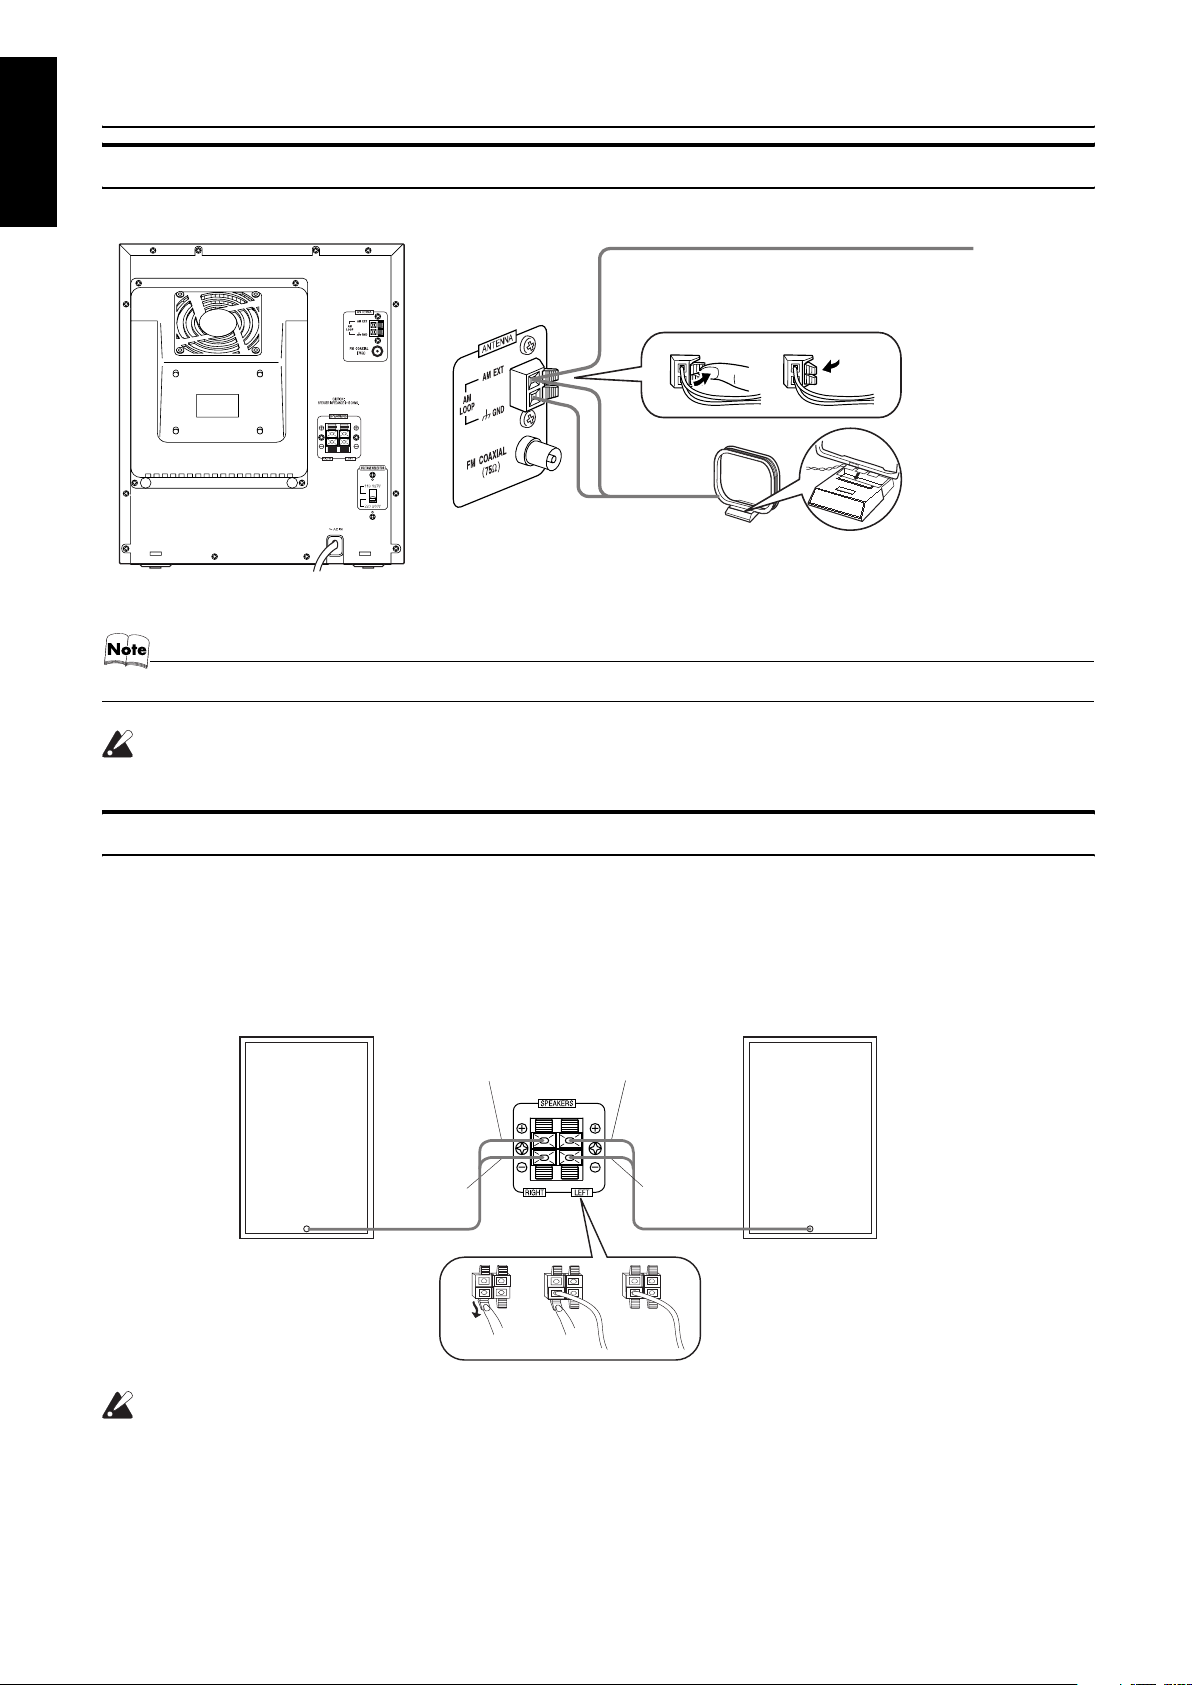
Connecting the FM Antenna
Using the Supplied Wire Antenna
FM wire antenna
Using the Coaxial Type Connector (Not supplied)
A 75Ω antenna with coaxial type connector (IEC or DIN45 325) should be connected to the FM 75Ω COAXIAL terminal.
If reception is poor, connect the outdoor antenna.
FM outdoor antenna
(Not supplied)
Coaxial cable
• Before attaching a 75 ohm coaxial lead (the kind with a round wire going to an outdoor antenna), disconnect the supplied
FM Wire Antenna.
4
Page 8
Getting Started
English
Connecting the AM Antenna
Rear Panel of the Unit
AM antenna wire (not supplied)
If reception is poor, connect the outside antenna.
Turn the loop until you
have the best reception.
AM loop antenna (Supplied)
Attach the AM loop to its base by snapping the
tabs on the loop into the slot in the base.
• Even when connecting an outside AM antenna, keep the indoor AM loop connected.
CAUTION:
• To avoid noise, keep antennas away from the System, the connecting cord and the AC power cord.
Connecting the Speakers
1. Open each of the terminals to connect the speaker wire leads.
2. Connect the speaker cords to the Speaker terminals of the Unit.
Connect the gray (+) and gray with black stripe (–) cords of the right side speaker to the red (+) and black (–) terminals marked RIGHT
on the System.
Connect the gray (+) and gray with black stripe (–) cords of the left side speaker to the red (+) and black (–) terminals marked LEFT on
the System.
3. Close each of the terminals.
Right side (rear view)
Gray with
black stripe
Gray
Gray
Gray with
black stripe
Left side (rear view)
CAUTIONS:
• A TV may display irregular colors if located near the speakers. If this happens, set the speakers away
from the TV.
• Use speakers with the correct impedance only. The correct impedance is indicated on the rear panel.
5
Page 9
Getting Started
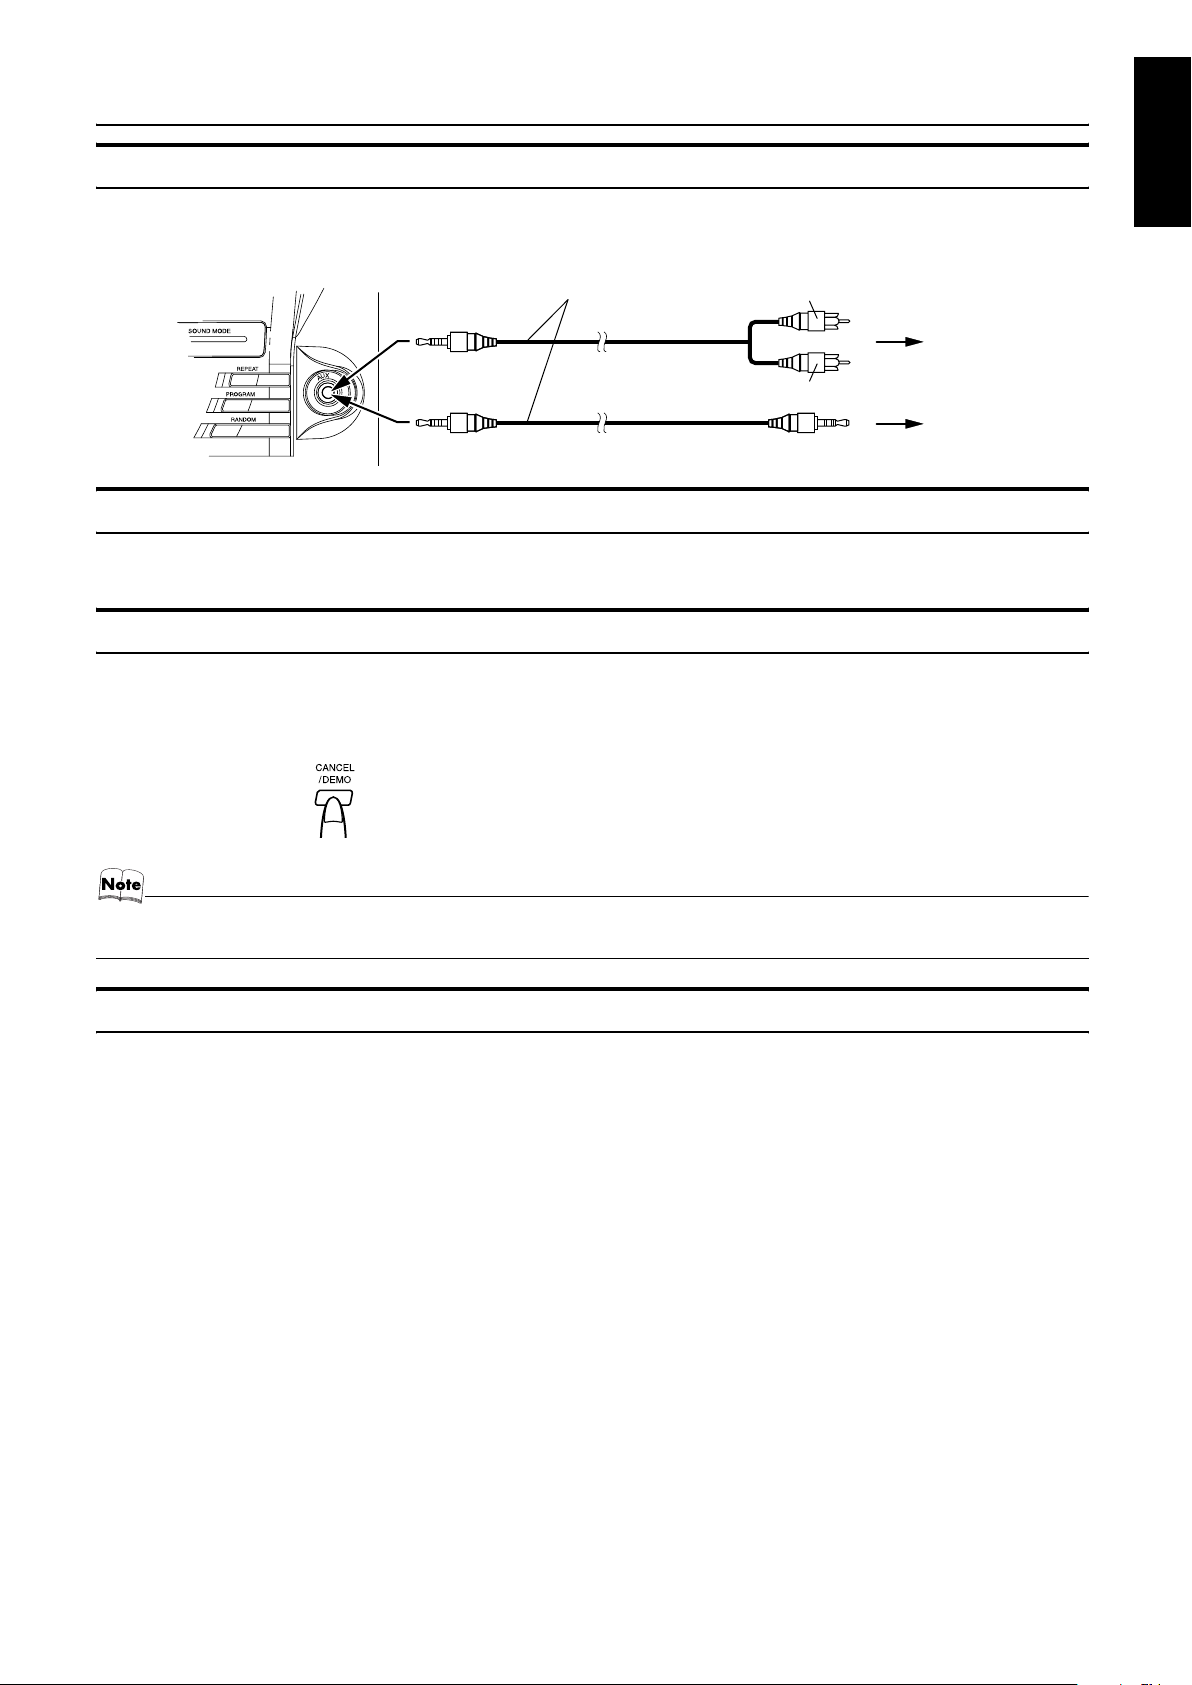
Connecting External Equipment
Connect a signal cord with stereo mini plugs (not supplied) between the System’s AUX jack on the front panel and the audio output jack
or output terminals of the external portable CD, MD player, STB, etc.
You can then listen to the external source through the System.
Signal cord (not supplied)
White
Red
Lch
Rch
To audio output of
external equipment.
Connecting to the Wall Outlet
Plug the AC power cord into the wall outlet.
Now, your System is at your command!
DEMO Mode
When the System is connected to the wall outlet, a DEMO mode displaying some of the system’s features automatically starts.
To turn the DEMO display off, press any of the operation buttons. The DEMO display automatically stops.
To turn the DEMO display on, press the DEMO button on the Unit for more than 2 seconds.
English
(For 2 seconds)
• While the System is turned on, the DEMO display will automatically starts if no operation is made for 2 minutes. To cancel
this auto DEMO display function, press the CANCEL button on the Unit during DEMO display.
COMPU Play
JVC’s COMPU PLAY feature lets you control the most frequently used System functions with a single touch.
With One Touch Operation you can play a CD, a tape, turn on the radio, or listen to an external equipment with a single press of the play
button for that function. One Touch Operation turns the power on for you, then starts the function you have specified. If the System is not
ready (no CD or tape in place), the System still powers on so you can insert a CD or tape.
How One Touch Operation works in each case is explained in the section dealing with that function.
The COMPU PLAY buttons are:
On the Unit
CD 6 button
FM/AM button
TAPE A 3, TAPE B 3 buttons
AUX button
CD1, CD2 and CD 3 buttons
CD Open/Close 0 button
On the Remote Control
CD 6 button
FM/AM button
TAPE A, TAPE B buttons
AUX button
CD1, CD2 and CD 3 buttons
6
Page 10
English
Basic Operations
Numeric
keys
DISPLAY
SOUND
TURBO
SOUND
MODE
STANDBY/ON
STANDBY indicator
(STANDBY/ON)
SOUND TURBO
VOLUME +, –
FADE MUTING
Sound Turbo indicator
* When the System is in use, the display shows other items as well.
For simplicity, we show here only the items described in this section.
ECO
PHONES
Various information
Status bar (Indicates various statuses.)
Display
SOUND MODE
VOLUME
Sound Mode indicator
Level bar
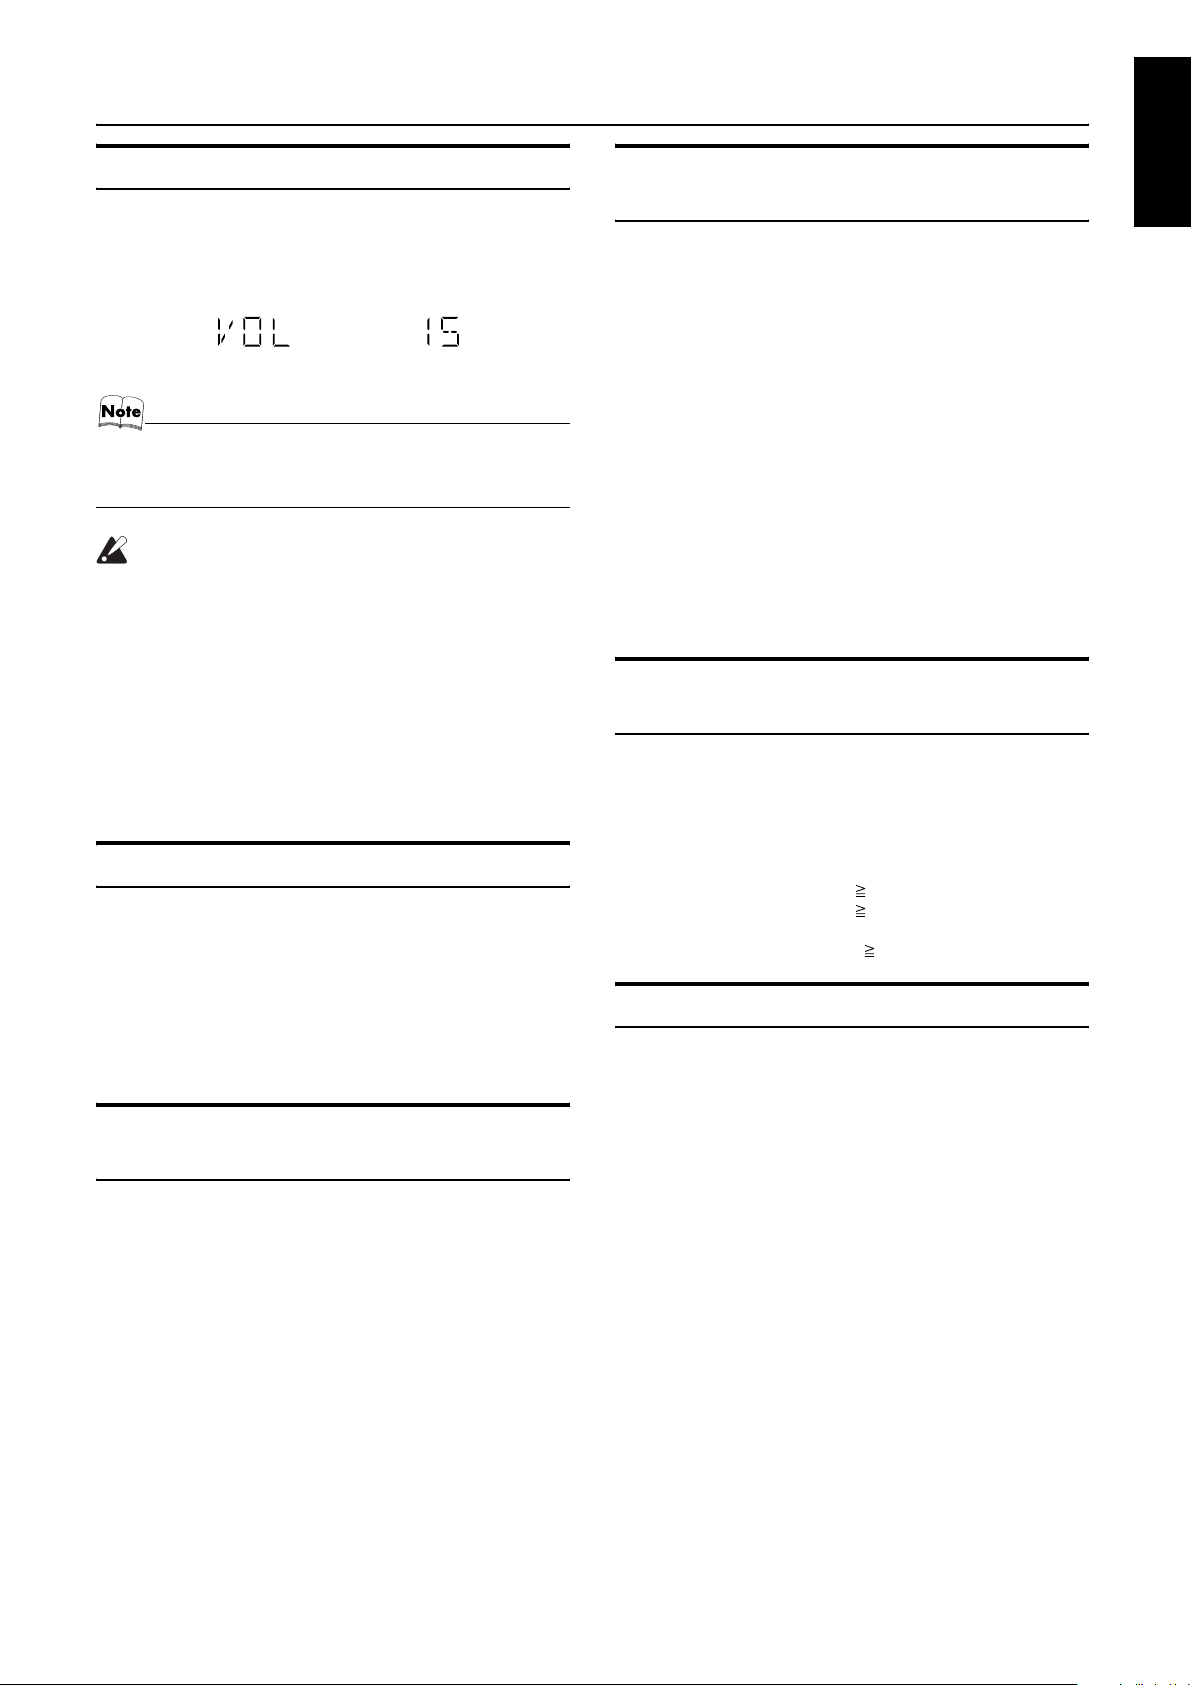
Turning the Power On and Off
Turning the System On
Press the STANDBY/ON button.
1
or
The display comes on and “POWER ON” is displayed once.
The STANDBY indicator goes out.
The System comes on ready to continue in the mode it was in
when the power was last turned off.
Turning the System Off
Press the STANDBY/ON button again.
1
or
“GOOD BYE” is displayed and the display goes out, except
for the clock display. The STANDBY indicator lights up. (The
display is dimmed.)
• Some power is always consumed even though power is
turned off (called Standby mode).
• To switch off the System completely, unplug the AC power
cord from the wall outlet. When you unplug the AC power
cord, the clock will be reset to 0:00 immediately.
ECO Mode (ECO)
The System has three energy modes; power on, power off (Standby) and ECO. In ECO mode, the display goes off and the least
power is consumed.
To enter ECO mode, press the ECO button on the Unit in Standby mode (while the STANDBY indicator lights up). “ECO
MODE” appears on the display, then the display goes off. The
STANDBY indicator remains lit.
To cancel ECO mode and turn on the power, press the
STANDBY/ON button on the Unit.
To cancel ECO mode and enter Standby mode, press the
ECO button again.
7
Page 11
Basic Operations
Adjusting the Volume
Turn the VOLUME control on the Unit clockwise to increase the
volume or turn it counterclockwise to decrease the volume.
Press the VOLUME + button on the Remote Control to increase
the volume or press the VOLUME – button on the Remote Control
to decrease the volume.
You can set the volume level to MIN, 1-30, or MAX.
• When you turn the power off at a volume level of over 19,
the volume level is automatically set to 19 when the power
is turned back on.
CAUTIONS:
• DO NOT turn on the System and/or start playing
any source without first setting the VOLUME
control to minimum, as a sudden blast of sound
could damage your hearing, speakers and/or
headphones.
For private listening
Connect a pair of headphones to the PHONES jack. No sound
comes out of the speakers.
Be sure to turn down the volume before connecting or putting on
headphones.
Fade-out Muting (FADE MUTING)
You can mute the output with one touch operation.
To muting the output, press the FADE MUTING button on the
Remote Control. The output is faded out.
To release muting, press the FADE MUTING button once
again. The output is faded in to the previous level.
• After Fade-out Muting, turning the VOLUME control on the
unit or pressing the VOLUME button on the Remote Control
will increase the volume from the previous level.
Emphasizing the sound (SOUND TURBO)
Selecting the Sound Mode (SOUND MODE)
You can select one of 3 SEA (Sound Effect Amplifier) modes.
You can use this effect only for playback.
To get the effect, press the SOUND MODE button until Sound
Mode you want appears on the display.
The SOUND MODE indicator lights up in the display.
Each time you press the button, the SOUND MODE changes as
follows:
ROCK = POP = CLASSIC = FLAT = (back to the beginning)
To cancel the effect, press the SOUND MODE button until
“FLAT” appears on the display.
The “SOUND MODE” indicator goes off.
ROCK Boosts low and high frequencies. Good for
acoustic music.
POP Good for vocal music.
CLASSIC Set for wide and dynamic sound stereo
systems.
FLAT No sound effect applies.
Entering the Number with the Remote Control (Numeric Keys)
You will use the number keys on the Remote Control to enter numbers for presetting stations, recalling the preset stations, or programming the playing tracks on CDs.
How to enter the number with the number keys is explained here.
Examples:
• To enter number 5, press 5.
• To enter number 15, press 10 = 1 = 5.
• To enter number 20, press 10 = 2 = 0.
(For MP3/WMA disc only)
• To enter number 125, press 10 (2 times) = 1 = 2 = 5.
Changing the Display
On the Remote Control ONLY
Each time you press the DISPLAY button, the display changes as
shown below:
Currently selected source Ô Current time
English
High and low frequencies are highly boosted.
To get the effect, press the SOUND TURBO button.
The SOUND TURBO indicator lights up and “S-TURBO” appears
on the display.
To cancel the effect, press the button again.
The SOUND TURBO indicator goes out and “OFF” appears on
the display.
8
Page 12

English
Using the Tuner
Numeric
keys
FM/AM
FM MODE
1
¡
Band display, Frequency display, Preset channel
FM/AM
1
¡
SET
¢
4
* When the System is in use, the display shows other items as well.
For simplicity, we show here only the items described in this section.
You can listen to FM and AM stations. Stations can be tuned in
manually, automatically, or from preset memory storage.
❏ Before listening to the radio:
• Make sure that both the FM and AM antennas are correctly
connected. (See pages 4 and 5.)
Setting the AM Tuner Interval Spacing
When shipped, the AM tuner interval is set to 10 kHz spacing (100
kHz spacing for FM broadcast). You can change it to 9 kHz spacing.
To select 9 kHz intervals, press the 7 button on the Remote
Control for more than 2 seconds in Standby mode, “AM-10” appears on the display, then press the 9 button on the Remote Control
(at the same time, the 50 kHz spacing is selected for FM broadcast).
To select 10 kHz intervals again, press the 7 button on the
Remote Control for more than 2 seconds in Standby mode, “AM9” appears on the display, then press the 10 button on the Remote
Control.
One Touch Radio
Just press the FM/AM button to turn on the System and start playing the station you were last tuned to.
❏ You can switch from any other sound source to the radio by
pressing the FM/AM button.
FM mode indicators
Tuning In a Station
Press the FM/AM button.
1
The Band and Frequency you were last tuned to appear on the
display.
Each time you press the button, the band alternates between
FM and AM.
or
Select a station using one of the following
2
methods.
• Manual Tuning
Briefly press the 22 or ¡ button to move from frequency
to frequency until you find the station you want.
OR
• Auto Tuning
If you hold down the 22 or ¡ button for 1 second or
more and then release it, the frequency changes down, or up,
automatically until a station is found.
OR
• Preset Tuning (Possible only after presetting stations)
Preset tuning using the Unit:
Select the preset number you want, using the 4 or ¢
button.
9
Page 13
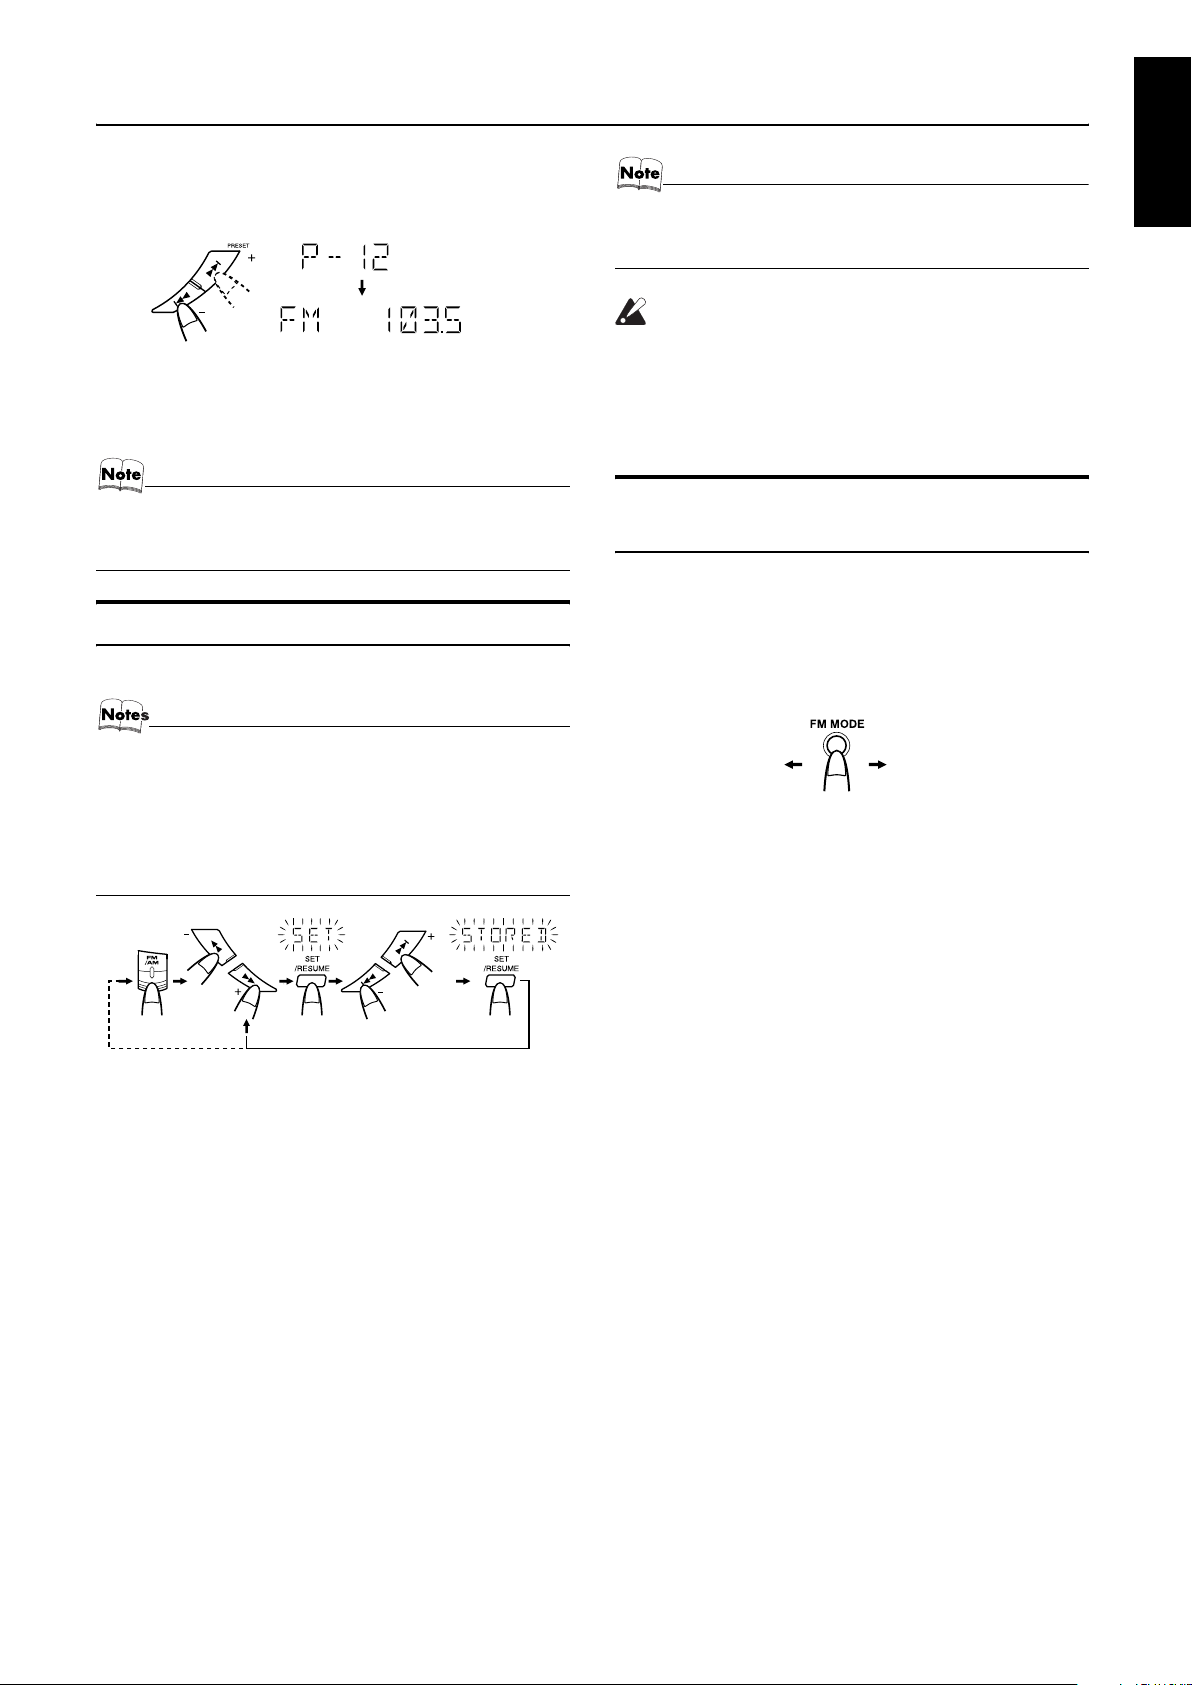
Example:
Press the ¢ button until the preset number “P-12” appears
on the display. Then, the display will show the preset
number’s band and frequency.
Preset tuning using the Remote Control:
Enter the preset number you want to recall using the numeric keys. See “Entering the Number with the Remote Control” on page 8.
Using the Tuner
English
• In step 4, you can select the preset number using the numeric keys on the Remote Control. See “Entering the
Number with the Remote Control” on page 8.
CAUTION:
• Even if the System is unplugged or if the power
failure occurs, the preset stations will be stored
for a few days. However, in case the preset stations are erased, you will need to preset the stations again.
• In AM broadcast, reception sensitivity will be changed by
turning the AM loop antenna. Turn the AM loop antenna
for best reception.
Presetting Stations
You can preset up to 30 FM stations and up to 15 AM stations.
• Preset numbers may have been set to factory test frequencies prior to shipment. This is not a malfunction. You
can preset the stations you want into memory by following
one of the presetting methods below.
• During presetting stations, if no button operation is made
for 5 seconds, the display returns to the band/frequency
display. In this case, repeat steps from the beginning.
TUNING
FM=30, AM=15
When changing the Band
PRESET
oror
To Change the FM Reception Mode
When you are tuned in to an FM stereo broadcast, the “ST (Stereo)” indicator lights up and you can hear stereo effects.
If an FM stereo broadcast is hard to receive or noisy, you can select
Monaural mode. Reception improves, but you lose stereo effect.
Press the FM MODE button on the Remote Control so
that the “MONO” indicator lights up on the display.
ST MONO
To restore the stereo effect, press the FM MODE button on
the Remote Control so that the “MONO” indicator goes off.
Using the CD
Player
Using the CD
Player
On the Unit
Select a band by pressing the FM/AM button.
1
Press the
2
Press the SET button.
3
“SET” will blink for 5 seconds.
While “SET” is blinking, press the
4
button to select the preset number.
: Increases the preset number by 1.
¢
: Decreases the preset number by 1.
4
Press the SET button.
5
“STORED” appears and, after 2 seconds, the display returns to
the band/frequency display.
Repeat above steps 2 to 5 for each station
6
you want to store in memory with a preset
number.
To change the preset stations, repeat the same steps as
above.
22
or
button to tune in a station.
¡
4
or
¢
10
Page 14
English
Using the CD Player
CD1-CD3
Numeric
keys
4
CD1-CD3
REPEAT
PROGRAM
¢
7
CD 6
RANDOM
MP3/WMA
MODE
1
¡
Track number, Playing time,
Program number, etc.
WMA
indicator
CD Open/
Close 0
DISC SKIP
CANCEL
SET/RESUME
CD 6
¢
REPEAT
PROGRAM
RANDOM
7
4
MP3 indicator
Program indicator
Disc indicators
* When the System is in use, the display shows other items as well.
For simplicity, we show here only the items described in this section.
This unit has been designed to playback the following CDs:
• Audio CD
• CD-R (CD-Recordable)
• CD-RW (CD-ReWritable)
• MP3/WMA disc (MP3/WMA files recorded on a CD-R or CDRW)*
Only CDs bearing these marks can
be used with this System. However,
Recordable
ReWritable
continued use of irregular shape
CDs (heart-shape, octagonal, etc.)
can damage the System.
When playing a CD-R or CD-RW
• User-edited CD-Rs (CD-Recordable) and CD-RWs (CD-ReWritable) can be played back when they are already “finalized.”
• Before playing back CD-Rs or CD-RWs, read their instructions
or cautions carefully.
• Some CD-Rs or CD-RWs may not be played back on this unit
because of their disc characteristics, damage or stain on them,
or if the player’s lens is dirty.
• CD-RWs may require a longer readout time since the reflectance of CD-RWs is lower than for regular CDs.
Random
indicator
Repeat
indicator
*For MP3/WMA discs
• This unit manages files and folders on MP3/WMA discs as
“tracks” and “albums.”
• Playback order of the MP3/WMA files (tracks) recorded on a
disc are determined by the writing (or encoding) application;
therefore, playback order may be different from the one you
have intended while recording the files and the folders.
• This unit shows the file (track) names and ID3v2 tags (only
“Title”, “Artist” and “Album”) on the display after starts play;
however, there is a limitation on available characters and some
file names and ID3 tags are not shown correctly.
More about MP3/WMA discs
• MP3/WMA discs (either CD-R or CD-RW) require a longer
readout time. (It varies due to the complexity of the recording configuration.)
• When making an MP3/WMA disc, select ISO 9660 Level 1
or Level 2 as the disc format.
• This unit does not support multisession recording.
• This unit can play MP3/WMA files only with the following
file extensions— “.mp3” and “.wma”.
• Non-MP3/WMA files are ignored. If non-MP3/WMA files
are recorded together with MP3/WMA files, this unit will
take a longer time to scan the disc. It may also cause the
unit to malfunction.
• Some MP3/WMA discs may not be played back because
of their disc characteristics or recorded conditions.
11
Caution for DualDisc playback
The Non-DVD side of a “DualDisc” does not comply with the
“Compact Disc Digital Audio” standard. Therefore, the use of
Non-DVD side of a DualDisc on this product may not be recommended.
Page 15
Using the CD Player
About Disc Indicator:
Disc Rotation
indicator
The Disc indicator consists of the following three kinds of indicators:
Disc Number indicator: Lights all the time.
Selected Disc indicator:Lights for the currently selected
disc number.
Disc Rotation indicator:Runs when the selected CD is
playing or paused. This indicator
goes out if a CD is not loaded for
the selected disc number.
Disc Number
indicator
Selected Disc
indicator
One Touch Play
The power comes on, and operations are done automatically.
❏ By pressing the CD 6 button, the System will come on, and if
a CD is loaded for the disc number that was lastly selected, it
will start playing from the first track.
❏ By pressing the CD1-CD3 button, the System will come on, and
if a CD is already loaded for the selected disc number, it will
start play from the first track.
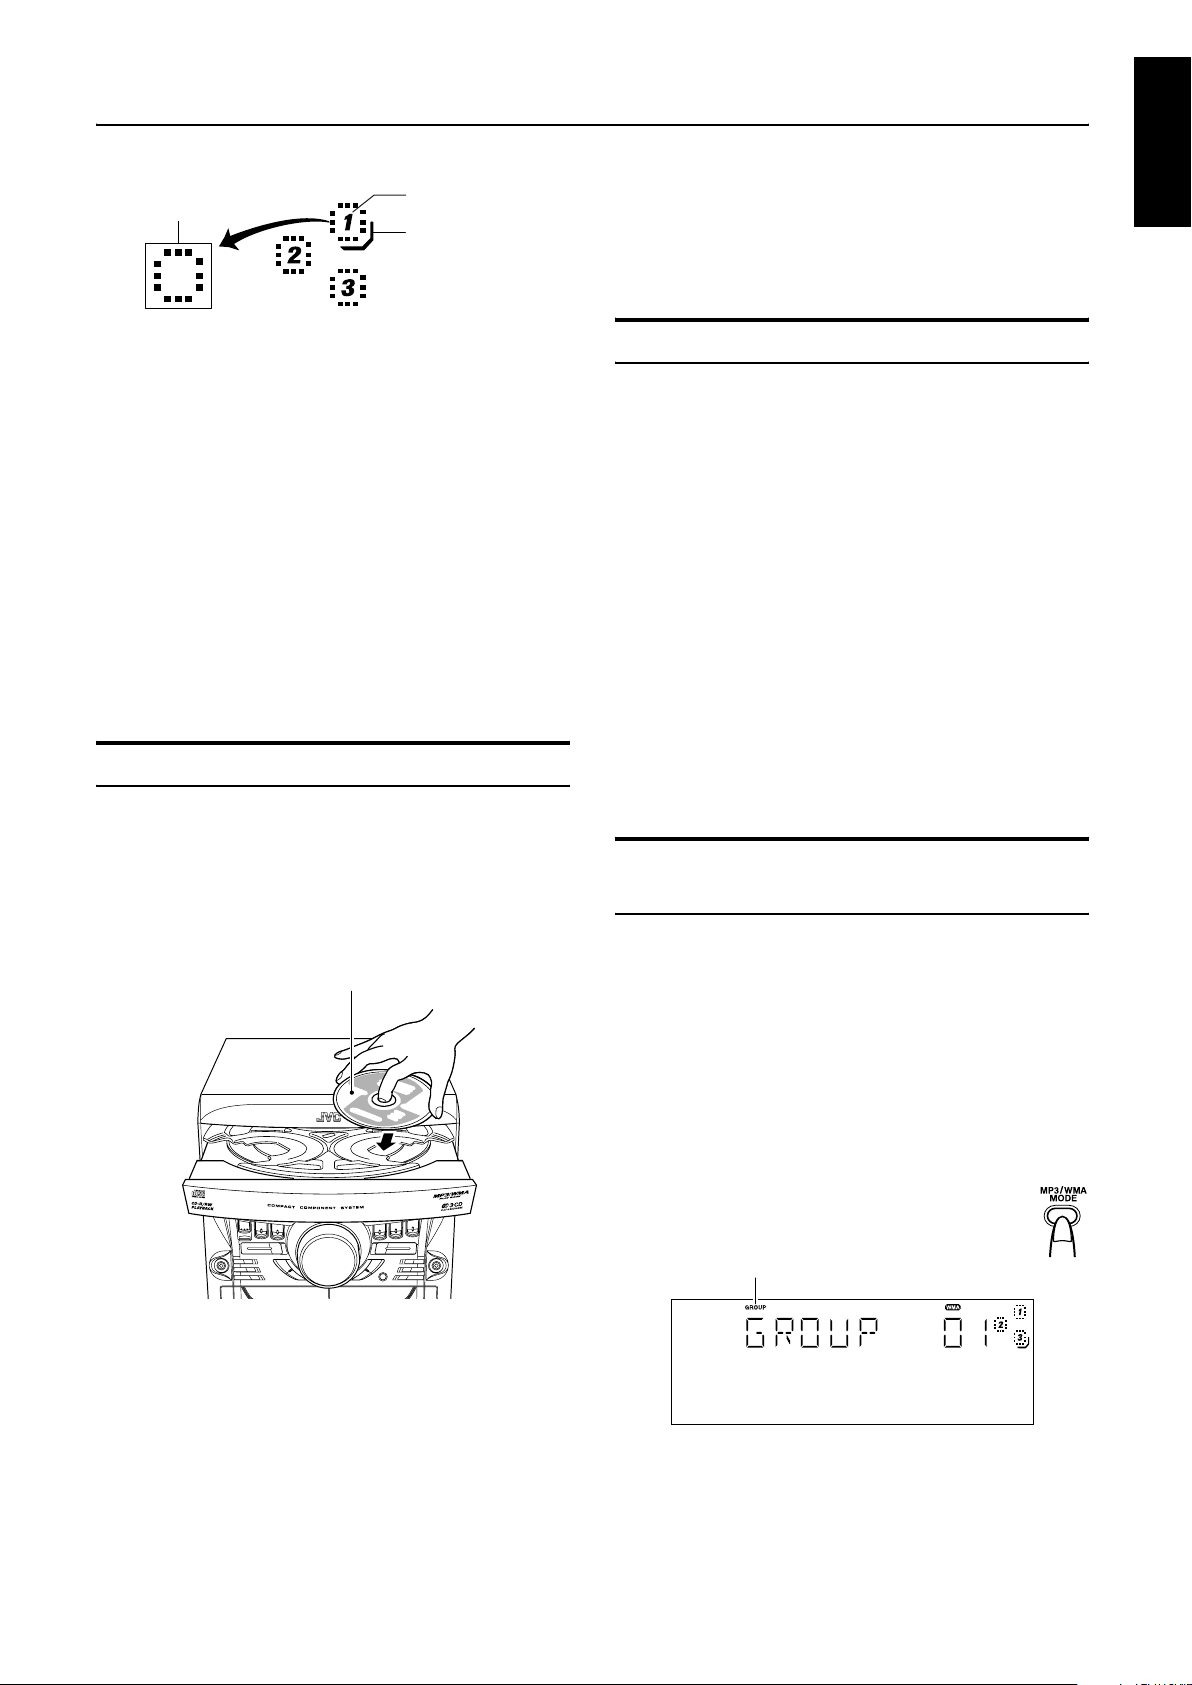
To Load CDs
Press the CD Open/Close 0 button on the
1
Unit to open the tray.
Place one or two CDs, with its label side up,
2
onto the tray.
Be sure that the CD is securely seated inside the recess on the
disc tray.
With the label side up
❏ When you use an 8 cm CD, place it on the inner circle of the tray.
❏ You can load CDs while listening to the other source or while
listening to the CD being played back.
❏ When power is turned off with the tray opened, the tray is auto-
matically closed.
❏ If the CD cannot be read correctly (because it is scratched, for
example), “ NO DISC” appears on the display.
To Unload CDs
Take out the CD as shown below.
While the CD Player is stopped, press the CD
1
0
Open/Close
button on the Unit to open the
tray.
Remove the CD, then press the DISC SKIP
2
button on the Unit.
The tray turns for the next CD.
Repeat step 2 to remove all the CDs.
3
Press the CD Open/Close 0 button on the
4
Unit to close the tray.
❏ You can remove CDs while listening to the other source.
Tips:
• Removing/changing the CDs during playback
While playing back a CD (e.g. CD1), you can remove or change
the other CDs (e.g. CD2 and CD3) by pressing the CD Open/Close
0 button. After removing or changing, press the same button to
close the tray.
Changing the MP3/WMA Playback Mode
When playing an MP3/WMA disc, you can choose the playback
mode of the MP3/WMA disc as follows:
TRACK mode:
The unit recognizes only tracks (files). You can play an MP3/
WMA disc like an Audio CD.
GROUP mode:
The unit recognizes tracks (files) and albums (folders) on an MP3/
WMA disc. You can play an MP3/WMA disc according to the way
how they are grouped.
English
Press the DISC SKIP button on the Unit and
3
place the next CD.
When you press the button, the tray turns for the next CD.
Press the CD Open/Close 0 button on the
4
Unit.
The tray is closed.
On the Remote Control ONLY
Press MP3/WMA MODE before or during playing
an MP3/WMA disc.
GROUP indicator appears when the MP3/WMA
playback mode is the GROUP mode.
• Each time you press the button, the MP3/WMA playback mode
changes between “GROUP” and “TRACK” alternately.
12
Page 16
English
Using the CD Player
GROUP mode
Basics of Using the CD PlayerNormal Play
To Play CDs
Load CDs.
1
Press one of the Disc button (CD1-CD3) you
2
want to play.
The selected disc number (e.g. “CD DISC 1”) appears on the
display.
The first track of the selected CD begins playing. When the
first CD finishes playing, the next and the third CDs are continuously played back.
When the last CD has finished playing, it will return to the first
CD and the CD Player automatically stops.
❏ You can start to play the currently selected disc by simply press-
ing the CD 6 button.
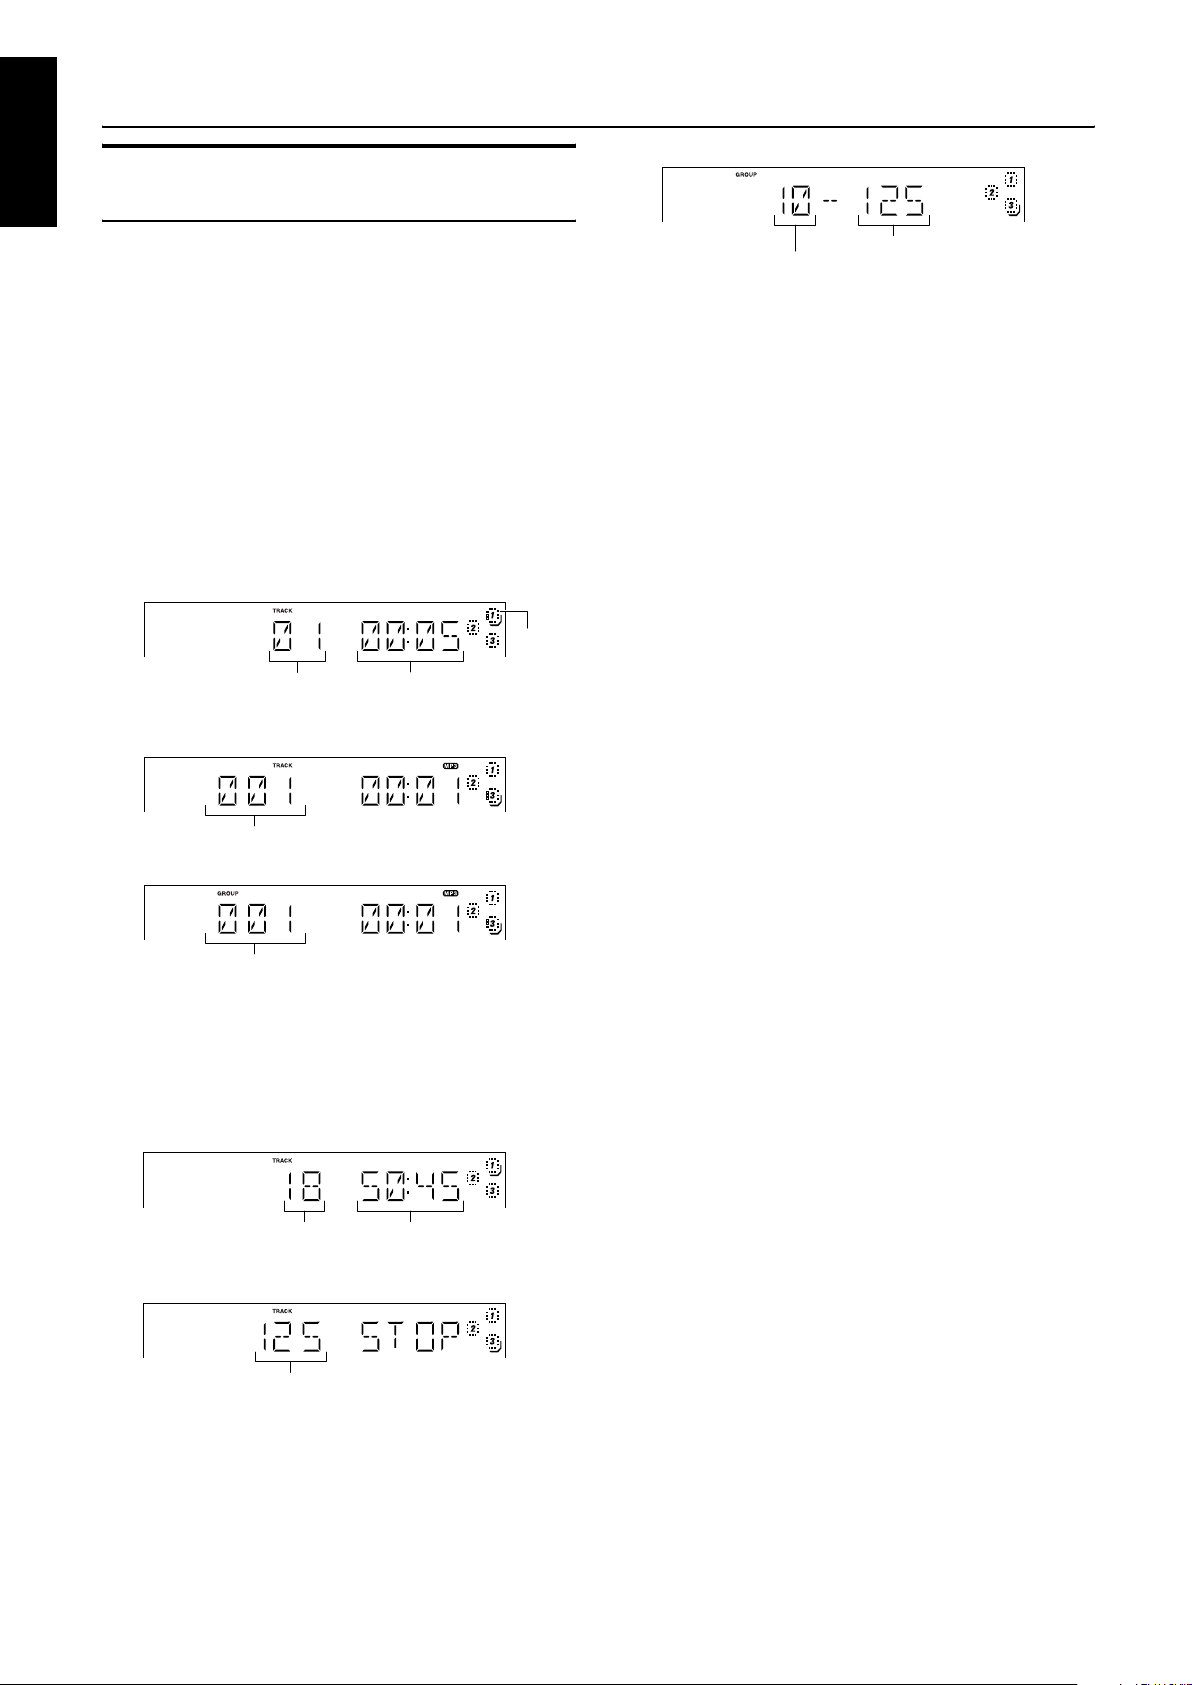
For Audio CD
CD is
playing
Track number
For MP3/WMA disc (The illustrations are for MP3 discs.)
TRACK mode
Track number
GROUP mode
Track number of the current group
• After the display above is shown, if the tracks include ID3
tags, the display will scroll in the order of file name, title, artist, and album, then returns to the original display.
When the Disc button (CD1-CD3) is pressed with the tray opened,
the tray is closed and the selected CD automatically begins playing.
To stop playing the CD, press the 7 button.
For Audio CD
Elapsed playing time
Total group number
To pause, press the CD 6 button. The playing time indication
blinks on the display.
To cancel pause, press the CD 6 button again. Play continues
from the point where it was paused.
Tips:
• Playing back the CD using the DISC SKIP button
You can also play the CDs using the DISC SKIP button. During
playback, each time you press the button, the next CD is automatically played back. If the next disc tray is empty, the disc tray is
automatically skipped.
Total track number
To Select a Track
During playback:
Briefly press the 4 or ¢ button to select the track you want to
play, except for MP3/WMA GROUP mode.
By pressing the button, you can skip to the next track or skip back
to the previous track.
• The selected track starts playing.
• Press the ¢ button once to skip to the beginning of the next
track.
• Press the 4 button to skip to the beginning of the current
track. Press twice quickly to skip to the beginning of the previous track.
In Stop mode:
By briefly pressing the 4 or ¢ button, the CD Player operates
in the same way as during playback, except for MP3/WMA
GROUP mode.
Using the numeric keys on the Remote Control:
Using the numeric keys, you can directly select the track on the
currently selected CD.
• The selected track starts playing.
See “Entering the Number with the Remote Control” on page 8.
In MP3/WMA GROUP mode:
The selected track of the current group starts playing.
Tips:
• For MP3/WMA discs
When the selected track starts playing, information of that track
scrolls on the display, in the order of file name, title, artist, and album.
To Select a Group (For MP3/WMA GROUP mode
only)
Total track number
For MP3/WMA disc
TRACK mode
Total track number
13
Total playing time
During playback:
Briefly press the 4 or ¢ button to select the group you want
to play.
• The first track of the selected group starts playing.
In Stop mode:
Briefly press the 4 or ¢ button to select the group you want
to play. The group number, the group name and the file name scroll
on the display.
Search Play
Holding down the following buttons, during playback, will fast
forward/backwards the CD so you can quickly find a particular
passage in the track you are listening to.
• 22 or ¡ button on the Unit
• 4 or ¢ button on the Remote Control
Page 17
Resume Play for Audio CD and MP3/WMA Disc
You can store the point of the track where you stopped playback.
By pressing CD 6 button, you can start playback again from the
point where you stopped it.
On the Unit ONLY
Press the SET/RESUME button for 2 seconds until both
“RESUME” and “ON” appear on the display.
To turn off the resume play, press the SET/RESUME button
for 2 seconds until both “RESUME” and “OFF” appear on the display.
Using the CD Player
Select the track you want to program.
4
On the Unit
While the display is blinking, press the 4 or ¢ button on the
Unit to select the track, then press the SET button within 5 seconds.
The program order number will be assigned from P-1.
Disc number Track number
English
• To playback from the first track while resume play is activated, press
The following operations will erase the memory of the
track number that you have stopped playback when
• Pressing CD Open/Close 0 button to eject the disc.
• Pressing CD1-CD3 button or DISC SKIP button to change
the disc to play.
7 button twice during playback.
Programming the Playing Order of the Tracks
You can program the playing order of the tracks on all the CDs. Note
that you can only make a program when the CD Player is stopped.
❏ You can program up to 32 tracks in any desired order including
the same tracks.
For MP3/WMA discs
• If you try to select a MP3/WMA disc that has once been
read or played, “MP3 DISC” or “WMA DISC” appears on
the display and it can not be programmed.
• MP3/WMA disc that has not ever been read can be selected in a program mode. But when playback starts,
“MP3 DISC” or “WMA DISC” appears on the display, the
program is deleted and switched to a next program.
Program order number
On the Remote Control
Press the numeric keys to directly enter the track number. Then,
the program order number will be assigned from P-1.
• To delete the current program step, press the CANCEL button
on the Unit.
Repeat steps 3 and 4 to program other tracks
5
on the same CD or the other CD.
To play the program, Press the CD
6
ton.
For details, see “To Play the Program You Have Made” mentioned below.
To confirm the programmed contents, while the CD player
is stopped, select Program mode by pressing the PROGRAM button and press the 4 or ¢ button on the Remote Control.
To delete all the tracks in the program, while the CD Player
is stopped, press the 7 button or open the tray by pressing the CD
Open/Close 0 button.
To Modify the Program, while the CD Player is stopped and the
program mode is selected, press the CANCEL button, the last track
in the program is deleted. To add new tracks to the end of the program, repeat above steps 3 and 4.
6
but-
To Make a Program
Load CDs.
1
In Stop mode, set the CD Player in Program
2
Play mode.
Press the PROGRAM button to light the “PRGM” indicator on the
display.
At the same time, “PROGRAM” appears on the display.
Each time you press the button, the display changes as follows:
PROGRAM = Normal display (Normal Play) = (back to the beginning)
• If a program is already made, the last step of the program will
be displayed.
Press one of the Disc button (CD1-CD3) to
3
select the CD you want to program.
The display will change to the Program Entry display.
or
Disc number Track number
• If you try to program a track number that does not exists
on the CD, your entry will be ignored.
• If you try to program the 33rd track, “FULL” appears on
the display.
To Play the Program You Have Made
Press the CD 6 button.
The System plays the tracks in the order you have programmed
them.
• To use Repeat Play for Program Play, press the REPEAT button to select “REPEAT” before starting playback. For details,
see “Repeating Tracks” on page 15.
❏ You can skip to a particular program track by pressing the 4
or ¢ button during Program Play.
❏ To stop playing, press the 7 button once. If you press the 7 but-
ton, while the CD Player is stopped, the program is deleted.
14
Page 18
Using the CD Player
English
To Exit and Re-enter Program Play
The program you have made is stored in memory. So, you can exit
Program Play temporarily or re-enter Program Play unless you delete the program.
To exit the program mode once, press the 7 button to stop
playing. The “PRGM” indicator goes off and the Program mode
will be canceled. The program is stored in the memory.
To re-enter Program Play mode, press the PROGRAM button until the “PRGM” indicator lights up again.
• Tray will not open during the program playback.
Random Play
The tracks of the selected CD will play in no special order when
you use this mode.
In Stop mode, set the CD Player in Random
1
Play mode.
Press the RANDOM button to light the “RNDM” and “1 DISC”
indicator.
At the same time, “RANDOM” appears on the display.
Each time you press the button, the display changes as follows:
RANDOM = Normal display (Normal Play) = (back to the beginning)
Tray Lock Function
In order to safely keep the CD in the CD Player, the tray can be
electronically locked.
When the electronic lock is on, the tray cannot be opened even if
the CD Open/Close 0 button on the Unit is pressed.
Locking the Tray
Turn on the System and enter CD mode.
1
While pressing down the 7 button, press the
2
0
CD Open/Close
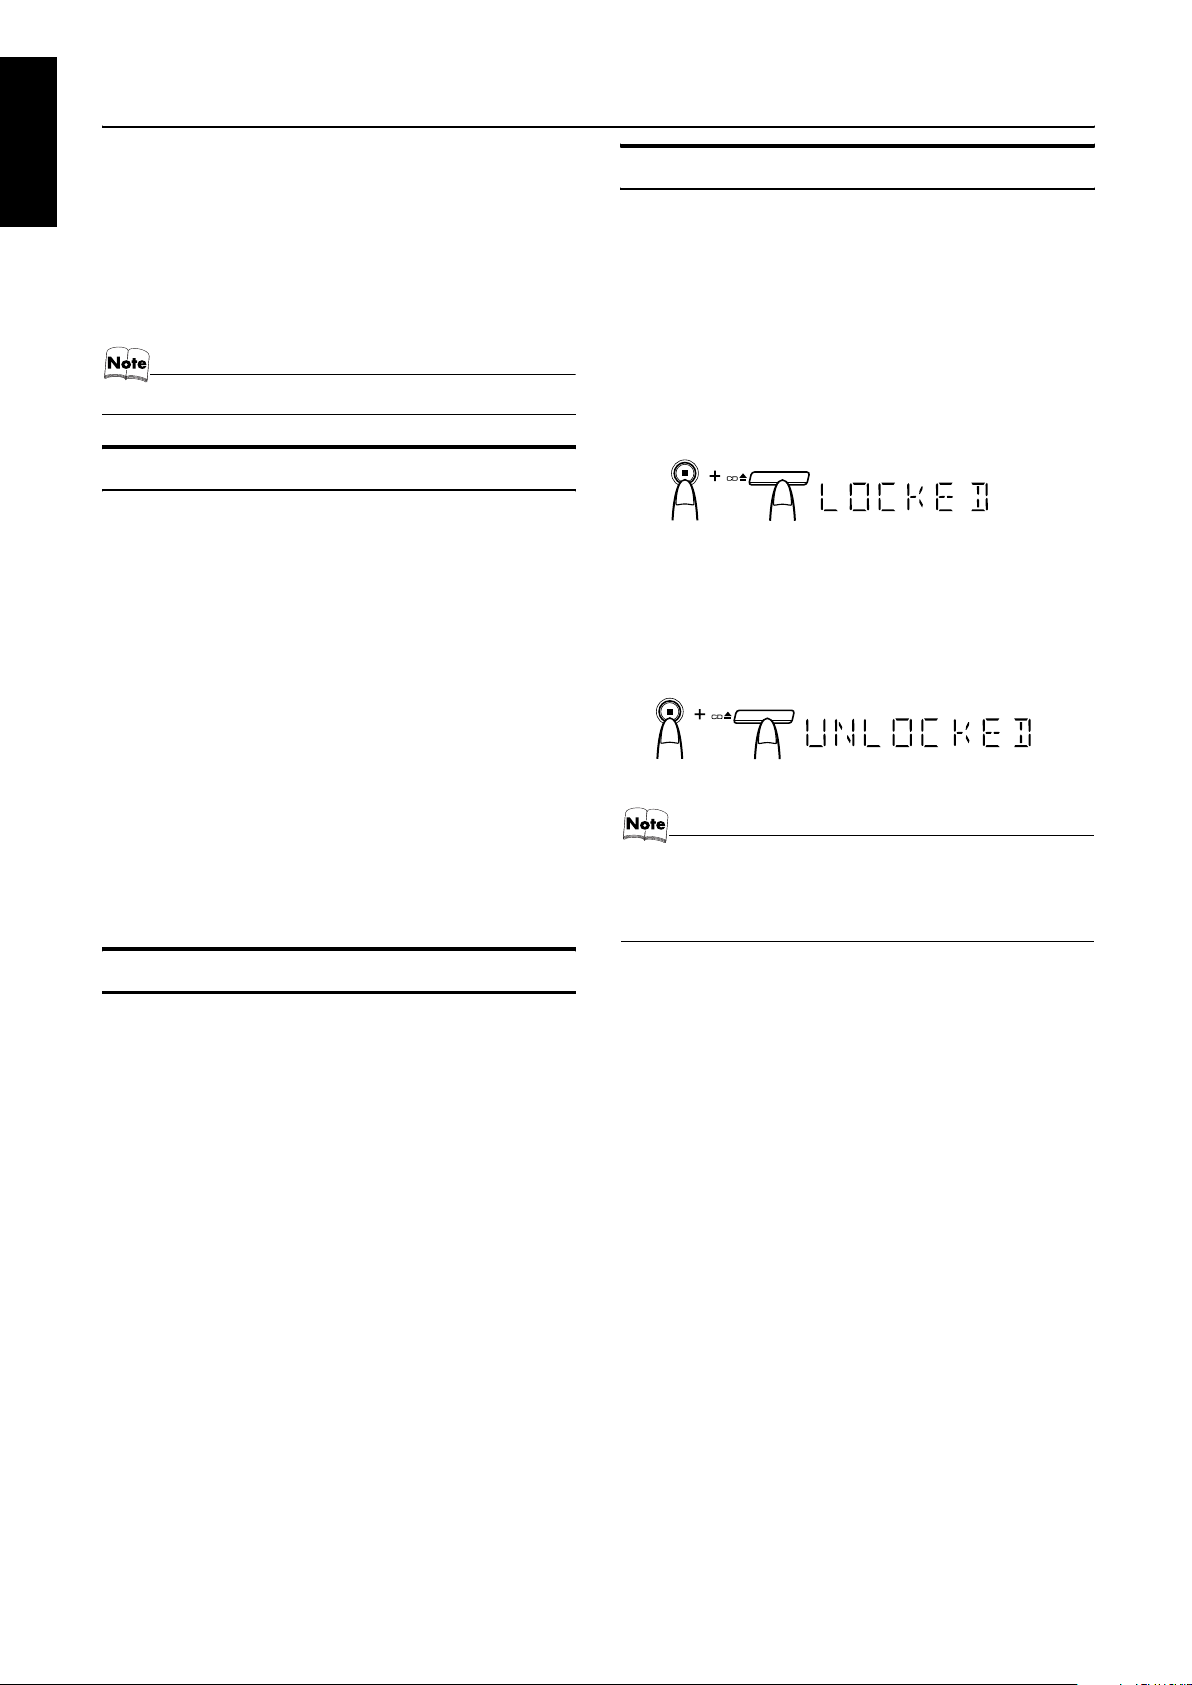
“LOCKED” appears on the display.
• If you try to open the tray by pressing the CD Open/Close 0
button, “LOCKED” appears on the display to let you know that
the tray has been locked.
Unlocking the Tray
Repeat above steps 1 and 2.
“UNLOCKED” appears on the display.
button on the Unit.
Press the CD
2
The tracks on selected CD are played in random order.
To stop playing, press the 7 button. The Random mode is can-
celed and the “RNDM” and “1 DISC” indicator goes off.
To skip a track during playback, press the ¢ button to
jump to the next track in the random sequence.
• To use Repeat Play for Random Play, press the RANDOM button to display “REPEAT” and “1DISC” before starting playback. For details, see “Repeating Tracks” mentioned below.
6
button.
Repeating Tracks
You can repeat all tracks or individual track, as many times as you
like.
Press the REPEAT button.
The Repeat indicator changes with each press of the button, as follows:
REPEAT 1= REPEAT 1DISC= REPEAT ALL = Normal display(Normal Play) = (back to the beginning)
REPEAT 1: Repeats one track.
REPEAT 1DISC
REPEAT ALL: In Normal Play mode, repeats all the tracks on
In Program Play mode, the Repeat indicator changes with each
press of the REPEAT button, as follows:
REPEATÔ Blank display
It repeats all the tracks in the program.
:Repeats all tracks on one CD. (Selectable in
Normal Play and Random Play)
all the CDs.
Now, you can use the tray normally.
• Even after the System is unplugged, the tray lock condition will be retained for a few days. To unlock the tray after
powering up, you need to perform the unlocking operation.
To stop playing, press the 7 button. Changing the source to the
other (e.g. Tuner) will also stop playing. The Repeat mode is canceled and the Repeat indicator goes off.
15
Page 19
Using the Cassette Deck (Listening to a Tape)
English
TAPE B 3
TAPE A 3
7
0 PUSH OPEN
(Deck B)
4
¢
7
0 PUSH OPEN
TAPE B
TAPE A
22
¡
(Deck A)
Deck indicators
* When the System is in use, the display shows other items as well.
For simplicity, we show here only the items described in this section.
The Cassette Deck allows you to play, record, and dub audio tapes.
❏ Listening to type I tape is suitable for this Cassette Deck.
The use of tapes longer than 120minutes (including
120 minute tapes) is not recommended, since characteristic deterioration may occur and these tapes
easily jam in the pinch-rollers and the capstans.
One Touch Play
By pressing the TAPE A 3 or TAPE B 3 button, the System will
come on, and if a tape is in the deck, it will start to play. If no tape
is loaded in either Deck A or Deck B, “NO TAPE” appears on the
display, the System will come on and wait for you to insert a tape,
or select another function.
Playing a Tape
You can use either Deck A or Deck B at a time for playback.
Press the 0 PUSH OPEN part for the deck
1
you want to use.
When the cassette holder opens, put a cas-
2
sette in, with the exposed part of the tape
down, toward the base of the Unit.
The tape will travel from the left to right.
3: Tape indicator
Press 0 PUSH OPEN gently to close the cas-
3
sette holder.
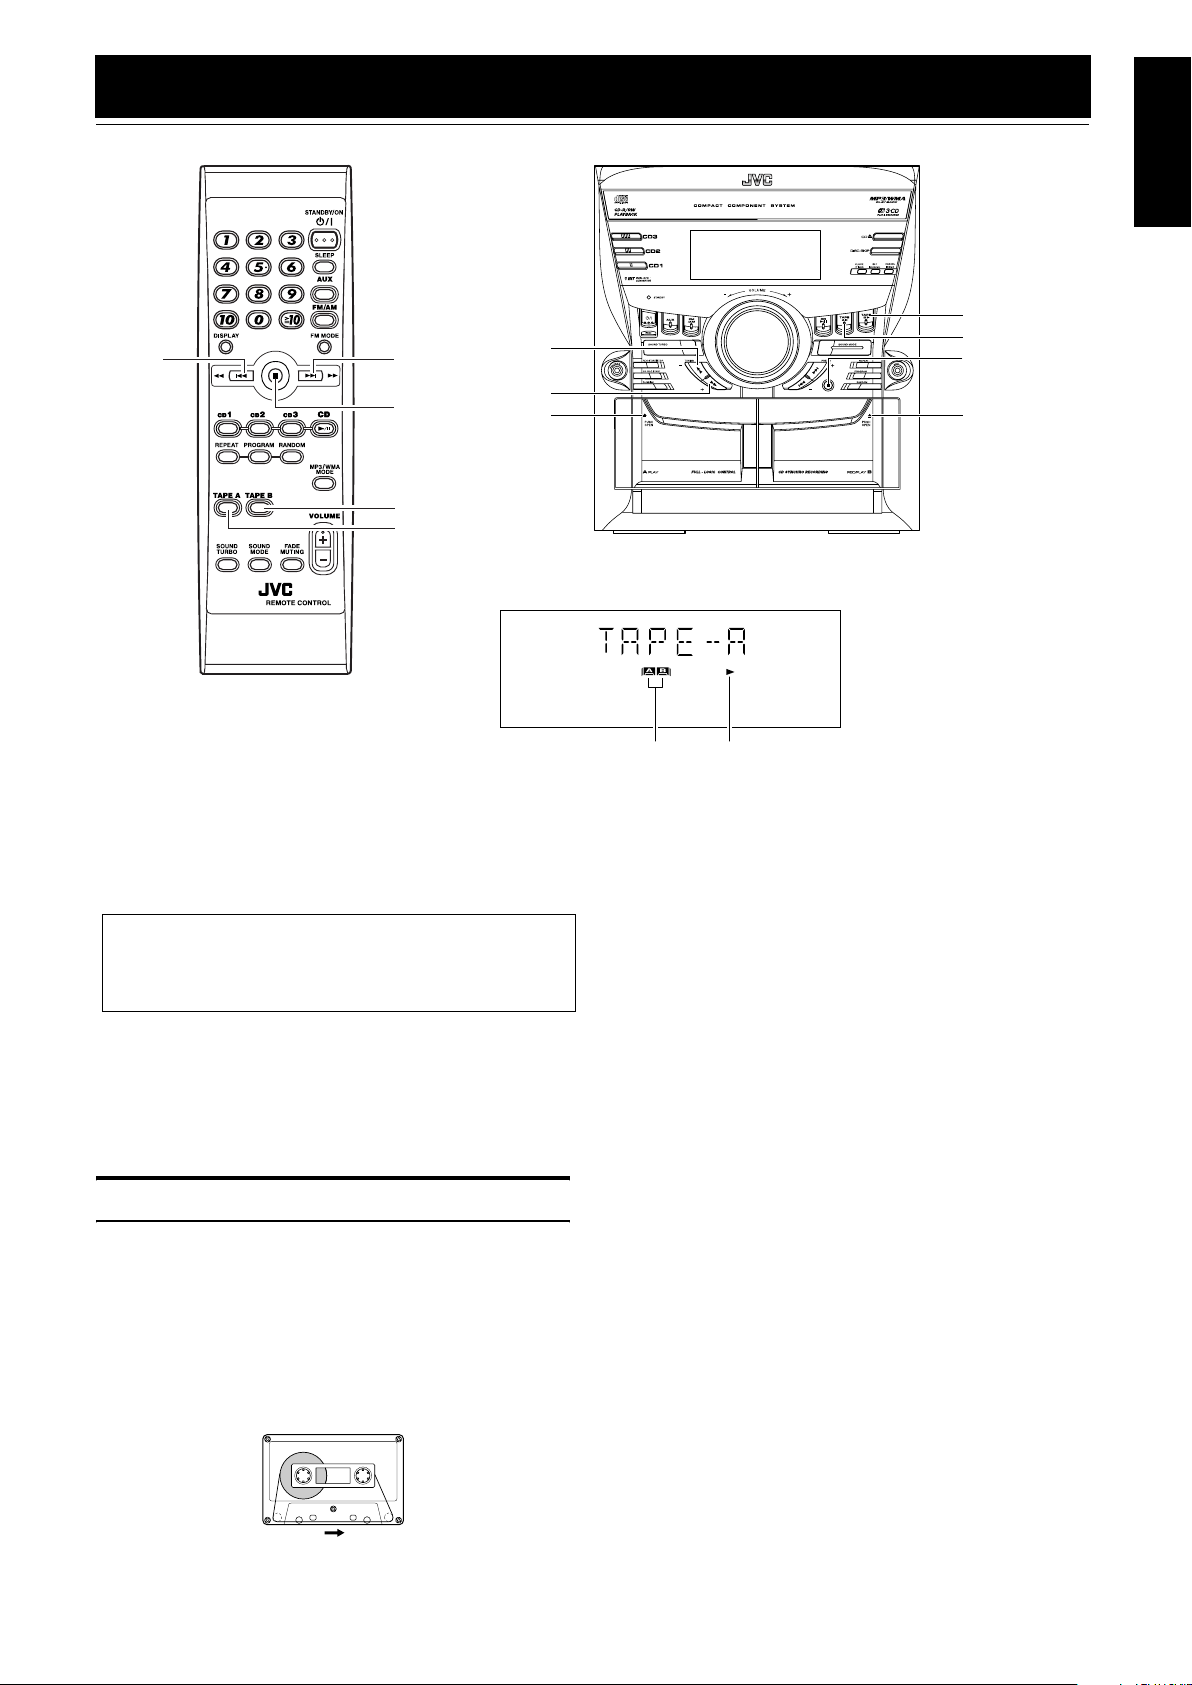
The Deck indicator “A” or “B” lights up on the display.
Press the TAPE A 3 or TAPE B 3 button.
4
The Tape indicator (3) blinks on the display and the tape is
played back.
The Cassette Deck automatically stops when one side of the
tape has finished playing.
To stop playing, press the 7 button.
To remove the tape, stop the tape, and press the 0 PUSH
OPEN part to open the Cassette Holder.
To Fast-Wind a Tape
During playback or in Stop mode, press the ¡ (FF) button on the
Unit to fast-wind the tape onto the right side of the cassette without
playing. (You can also use the ¢ button on the Remote Control.)
During playback or in Stop mode, press the 22 (REW) button on
the Unit to fast-wind the tape onto the left side of the cassette without playing. (You can also use the 4 button on the Remote Control.)
During fast-winding the tape, the Tape indicator (3) goes out.
During fast-winding, the status bar illumination at the bottom of
the display moves counterclockwise.
During rewinding, it moves clockwise.
• The Cassette Deck automatically stops when one side of the
tape has finished playing.
❏ During fast-winding the tape, you can change the tape travelling
direction by pressing the ¡ (FF) or 22 (REW) button.
Tape travelling direction
16
Page 20
English
Using the Cassette Deck (Recording)
TAPE B 3
REC START/STOP
CD REC START
7
0 PUSH OPEN
TAPE B
TAPE A
DUBBING
(Deck A)
TAPE A 3
7
PROGRAM
0 PUSH OPEN
(Deck B)
Deck indicators
* When the System is in use, the display shows other items as well.
For simplicity, we show here only the items described in this section.
Recording onto a cassette from any of the sound sources is simple.
Just place a tape in Deck B, have the source ready, make one or
two settings, and you’re ready to record. For each source, the procedure is a little bit different so we explain each separately. But
first, here are a few things to make your recordings better.
Things To Know Before You Start Recording
❏ It may be unlawful to record or play back copyrighted
material without the consent of the copyright owner.
❏ The recording level, which is the volume at which the new tape
is being made, is automatically set correctly, so it is not affected
by the VOLUME Control on the System. Also, it is not affected
by adjusting the sound effects. Thus, during recording, you can
adjust the sound you are actually listening to without affecting
the recording level.
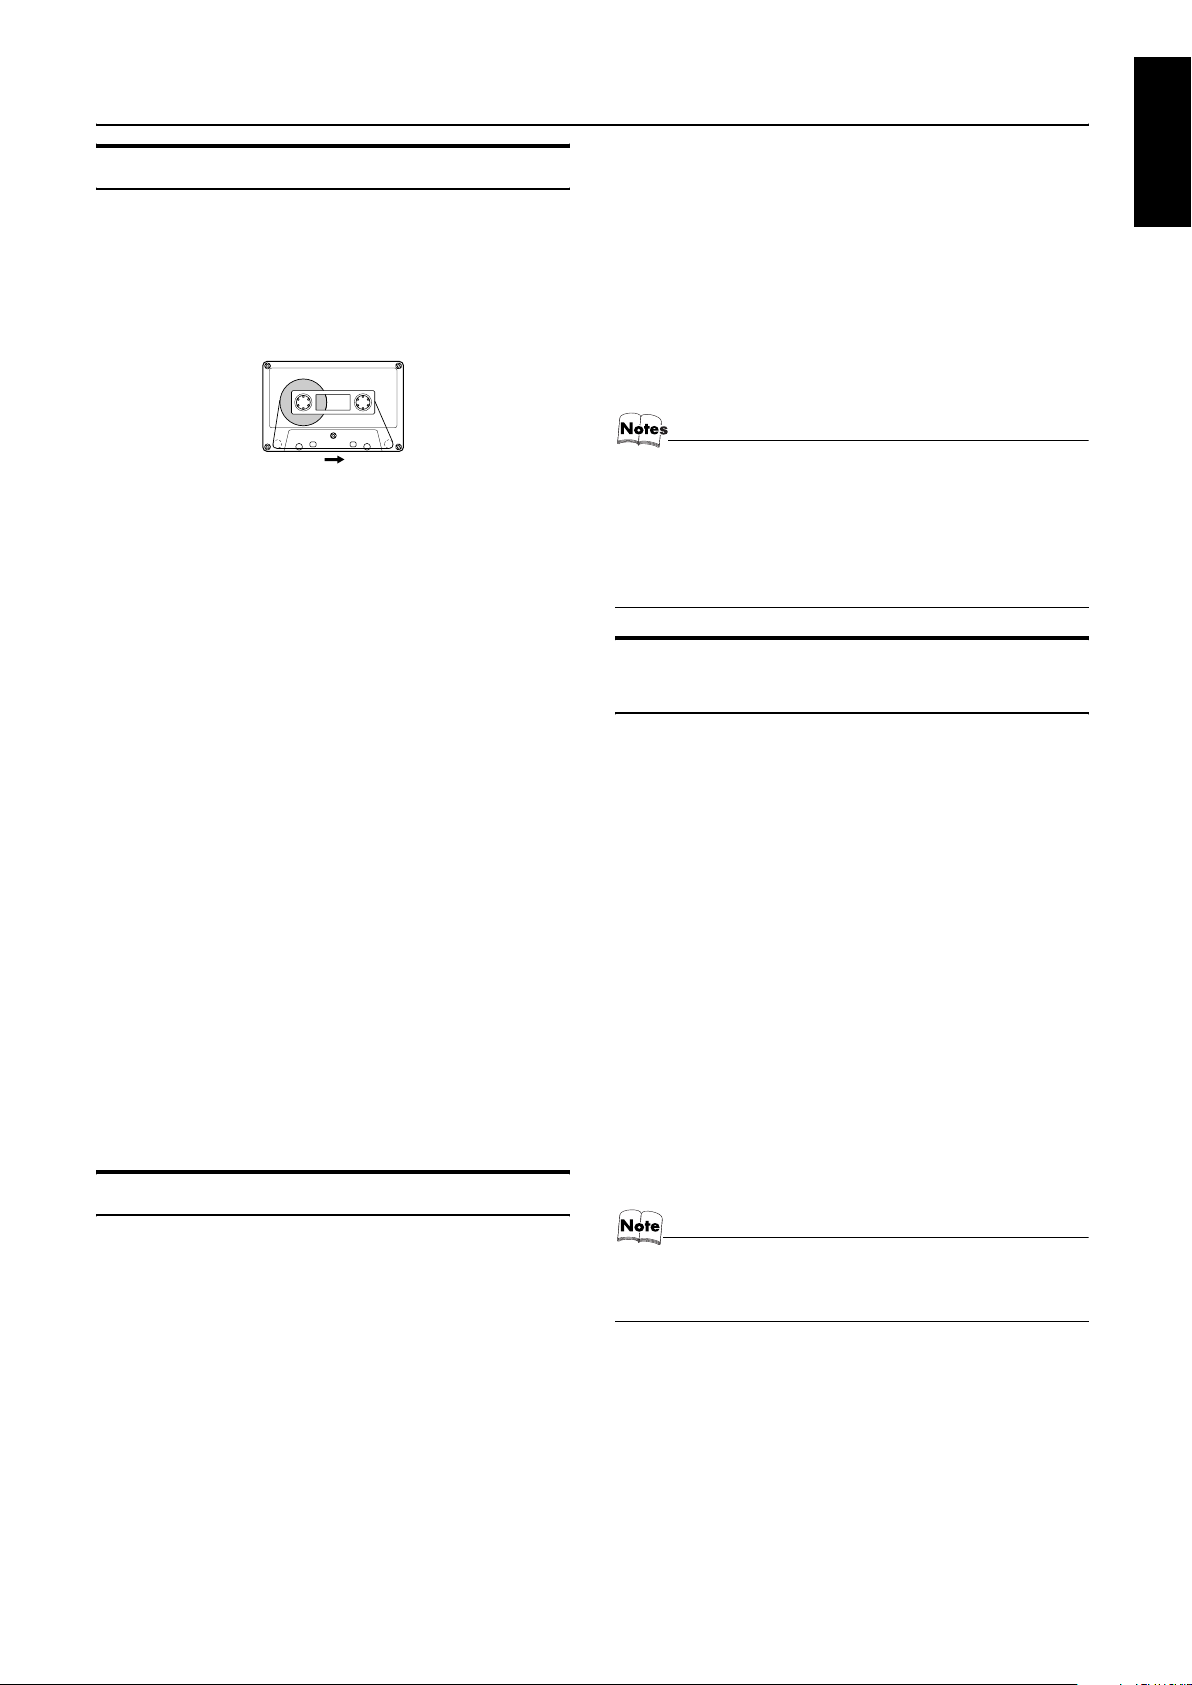
❏ Two small tabs on the back of the cassette tape, one for side A
and one for side B, can be removed to prevent accidental erasure
or recording.
3: Tape indicator
REC indicator
• At the start and end of cassette tapes, there is leader tape
which cannot be recorded onto. Thus, when recording
CDs, radio broadcasts, etc., wind on the leader tape first
to ensure getting the beginning of the recording.
CAUTION:
• If a recording you make has excessive noise or
static, the Unit may have been too close to a TV
which was on during the recording. Either turn
off the TV or increase the distance between the
TV and the Unit.
Adhesive tape
❏ To record on a cassette with the tabs removed, you must cover
the holes with adhesive tape first.
❏ Type I tape can be used for recording.
17
Page 21
Standard Recording
To Record Any Sound Source to Tape
Follow these steps to record from any sound source onto a tape in
Deck B.
Insert a blank or erasable tape into the Deck
1
B and wind past the tape leader.
Using the Cassette Deck (Recording)
Press the CD REC START button on the Unit.
3
“CD REC” appears on the display and the “REC” indicator
lights up. Then, the System begins CD Synchro Recording and
the tracks on the CD are recorded on the tape.
When recording of the tracks of all CDs is finished, the CD
Player and Cassette Deck stop.
• If the tab of the cassette tape on the Deck B is removed to
prevent erasure or recording, “NO REC” will appear on the
display.
• After the CD Player has played the entire CD or all the programmed tracks, the tape automatically stops.
To stop at any time during the recording process, press
the 7 button. The CD Player and Cassette Deck stop.
English
Tape travelling direction
Prepare the source, by, for example, tuning
2
in a radio station, loading CDs, or turning on
connected equipment.
• For CD recording, see “CD Synchro Recording” mentioned
below.
• For dubbing, see “Tape to Tape Recording (DUBBING)”
described below.
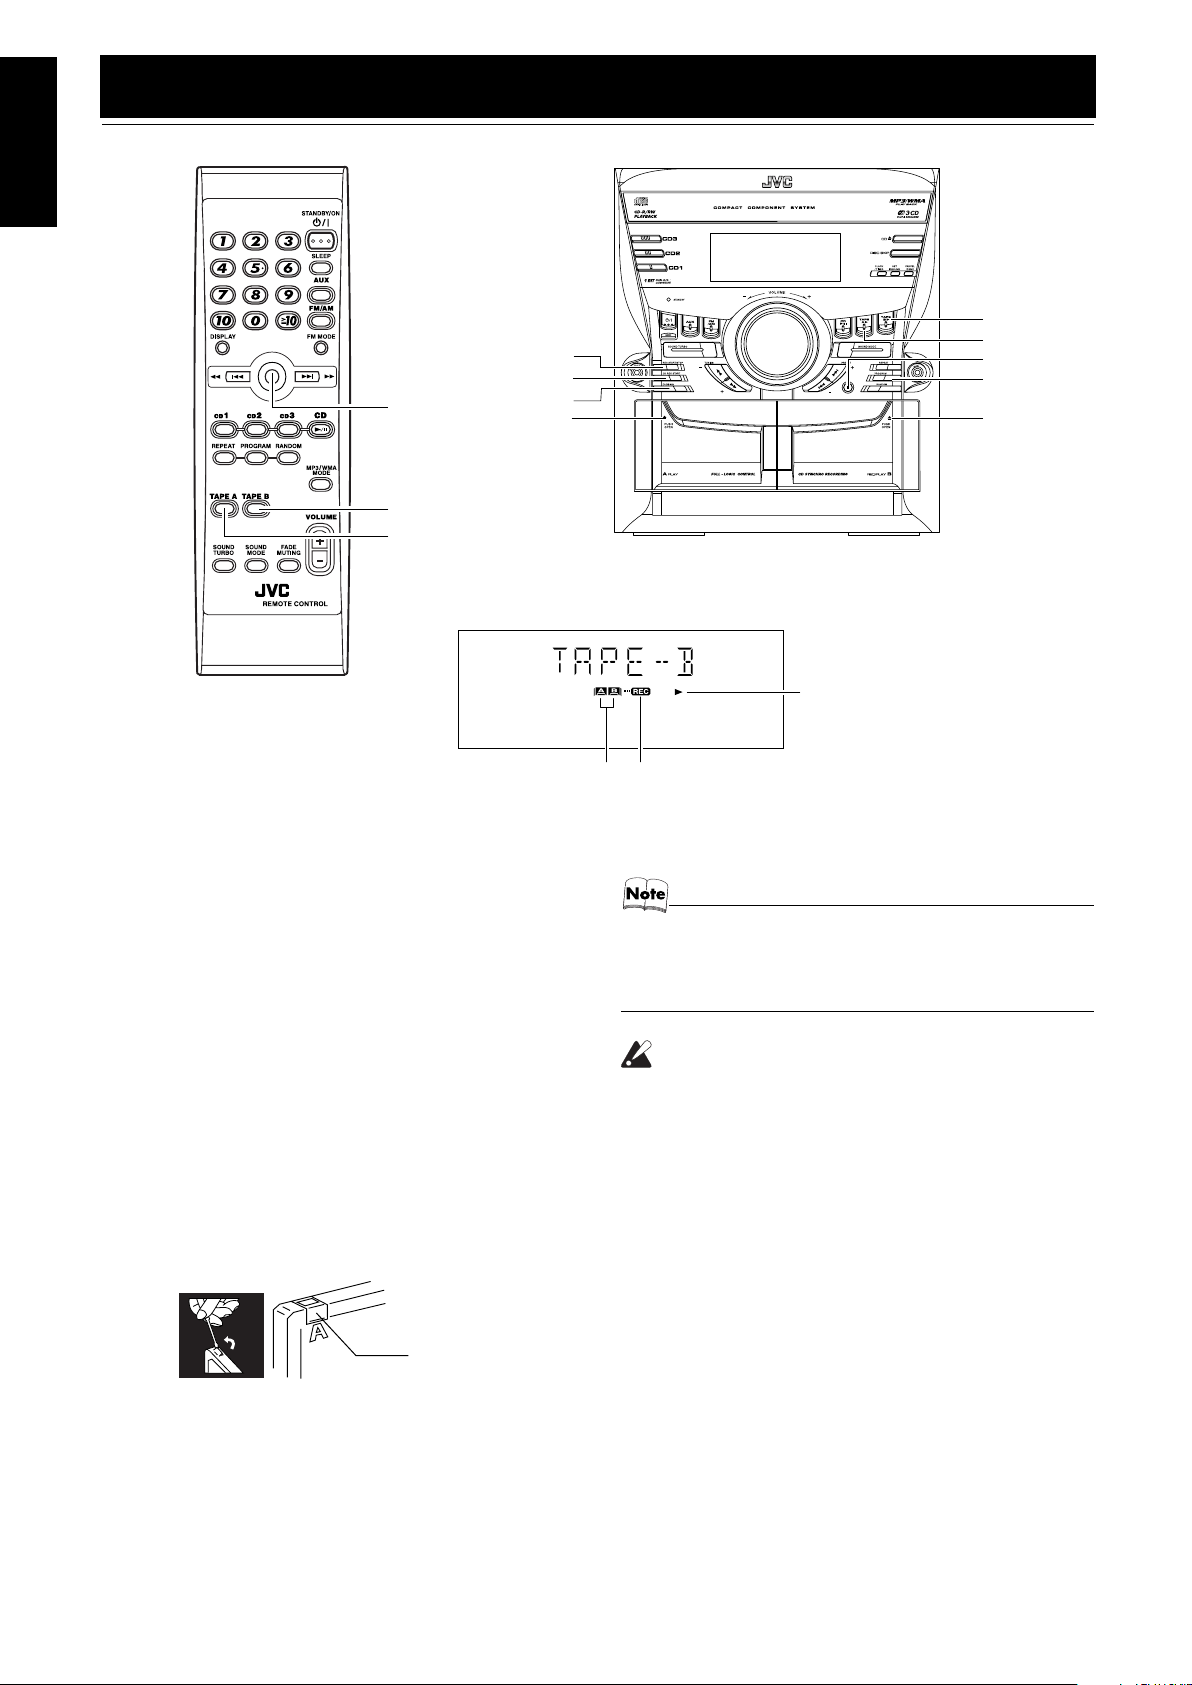
Press the REC START/STOP button on the
3
Unit.
The “REC” indicator lights up and the System begins recording.
The Tape indicator (3) blinks on the display.
• If the tab of the cassette tape on the Deck B is removed to
prevent erasure or recording, “NO REC” will appear on the
display.
To stop during recording, press the REC START/STOP button on the Unit, or press the 7 button.
Recording an AM Station to Tape (Beat Cut)
When recording an AM broadcast, beats may be produced which are
not heard when listening to the broadcast. If this happens, press the
FM MODE button on the Remote Control to eliminate the beats.
Set to AM station and start recording.
1
Press the FM MODE button on the Remote
2
Control to eliminate the beats.
Each time you press the button, the display changes as shown
below:
BEAT 1 Ô BEAT 2
CD Synchro Recording
• If the CD REC START button is pressed when “RESUME”
is displayed (see page 14), CD Synchro Recording will be
started from the beginning of the first track.
• When making SLEEP timer settings while doing CD Synchro recording, set enough time to allow for the CD to finish playing, otherwise the power will go off before
recording is completed.
Tape to Tape Recording (DUBBING)
Recording from one tape to another is called dubbing.
You can dub tapes simply, with just a single button.
Press the TAPE A 3 button, and then press
1
the 7 button.
Insert the source cassette you want to copy
2
from into Deck A for playback.
Insert a blank or erasable cassette you want
3
to copy onto into Deck B for recording.
Press the DUBBING button on the Unit.
4
Deck A and Deck B will start simultaneously and the “REC”
indicator lights up.
During dubbing, the Deck indicators “A” and “B” light up alternately.
• If no tape is inserted into Deck A, “NO TAPE” will appear
on the display.
• If no tape is inserted into Deck B, “NO TAPE” will appear
on the display.
To stop dubbing, press the REC START/STOP button on the
Unit or the 7 button.
Everything on the CD goes onto the tape in the order it is on the
CD, or according to the order you have set in a program.
Prepare CDs. (See page 12.)
1
Press the CD1-3 button (that you want to make recording), and
then press the 7 button.
• If you want to record specific tracks only, you need to program the tracks beforehand. (See page 14.)
• If you want to record one CD only, you need to load one
CD only.
Insert a blank or erasable tape into the Deck
2
B and wind past the tape leader.
• During dubbing, you can hear sound effects through the
speakers or headphones. However, the sound is dubbed
without sound effects.
18
Page 22
English
Using an External Equipment
AUX
AUX
AUX jack
Listening to the External Equipment
You can listen to the external equipment such as portable CD, MD
player, STB, or other auxiliary.
❏ First, make sure that the external equipment is properly connect-
ed to the System. (See page 6.)
Set the volume level to the minimum posi-
1
tion.
Press the AUX button.
2
“AUX IN” appears on the display.
Start playing the external equipment.
3
Adjust the volume level to the level you want
4
listen to.
Apply the following sound effects, if you
5
wish.
• SOUND TURBO (See page 8.)
• SOUND MODE (See page 8.)
• For operation of the external equipment, refer to its Instructions.
19
Page 23

Using the Timers
SLEEP
SLEEP indicator
REC (Recording) Timer indicator
Timer indicator
English
SET
CLOCK/TIMER
¢
4
DAILY Timer indicator
* When the System is in use, the display shows other items as well.
For simplicity, we show here only the items described in this section.
Three types of timers are available:
DAILY Timer
Use this timer to set wake up everyday to music from any
source, instead of an alarm clock.
REC (Recording) Timer
Unattended recording of radio broadcasts. You can set the
starting time and ending time.
SLEEP Timer
Fall asleep and have your System turn off automatically after
a certain length of time.
Setting the Clock
When you plug the AC power cord into the wall outlet, the time indication “0:00” blinks on the display.
You can set the clock whether the System is on or off.
On the Unit
Press the CLOCK/TIMER button.
1
The hour digit of the time indication blinks on the display.
Press the
2
Pressing the ¢ button moves the time forwards and pressing
the 4 button moves it backwards. Holding down the button
moves the hour rapidly.
Press the SET button.
3
The minute digits of the time indication blink on the display.
• To return to the hour setting, press the CANCEL button.
Press the
4
Press the SET button.
5
“CLOCK OK” appears on the display. Then, the selected time
is set and the seconds start counting from 0.
4
4
or
or
¢
button to set the hour.
¢
button to set the minute.
Fixing the Clock
On the Unit
Press the STANDBY/ON button to turn
1
on the System.
Press the CLOCK/TIMER button repeatedly
2
until clock setting display (time indication)
appears on the display.
Each time you press the button, display changes as follows:
DAILY = ON TIME = REC = ON TIME = Clock Setting
display (time indicator)
Press the SET button.
3
The hour digits of the current clock blink on the display.
Follow steps 2 to 5 of “Setting the Clock” men-
4
tioned above.
• The clock must be correctly set for the timers to work.
• Each setting step must be completed within approx. 30
seconds. Otherwise, the setting is cleared and must be
repeated from the beginning.
• The clock may gain or lose one to two minutes per month.
• If there is a power failure, the clock loses its setting
immediately. “0:00” blinks on the display and the
clock must be reset.
=
Canceled = (back to the beginning)
20
Page 24
English
Using the Timers
Setting the Daily Timer
Once you have set the Daily Timer, it is stored in memory. So, the
Daily Timer will be activated at the same time every day until it is
canceled.
The Timer indicator ( ) and “DAILY” indicator on the display
shows that the Daily Timer you have set is in effect.
You can set the Daily Timer whether the System is turned on or
off.
• You can set the Daily Timer whether the System is on or off.
• Perform each setting within approx. 30 seconds. Otherwise, setting will be cleared and the procedure must be
repeated from the beginning.
• If you have made a mistake while setting the timer, press
the CANCEL button on the Unit. However, this does not always cancel the current setting. If the CANCEL button
does not work, press the CLOCK/TIMER button on the
Unit repeatedly until the display returns to the original display, and start from the first step.
On the Unit
Press the CLOCK/TIMER button until “ON
1
TIME” immediately after “DAILY” appears on
the display.
Each time you press the button, the display changes as follows:
DAILY = ON TIME* = REC = ON TIME = Clock setting
display = Canceled = (back to the beginning)
*: This item should be selected for the Daily Timer setting.
2. Press the ¢ or 4 button to set the minute, then press the
SET button.
“OFF TIME” appears and then the System enters OFF-time
setting mode. The current OFF time appears on the display,
and the hour digits blink.
Setting the OFF time (Example: 13:15).
3
1. Press the ¢ or 4 button to set the hour you want the
System to be turned off, then press the SET button.
The minute digits of the OFF time blink on the display.
2. Press the ¢ or 4 button to set the minute, then press the
SET button.
Then, the System enters ON-time setting mode, and the current
ON time appears on the display and the hour digits blink.
Setting the ON time (Example: 10:15).
2
1. Press the ¢ or 4 button to set the hour you want the
System to come on, then press the SET button.
The minute digits of the ON time blink on the display.
Pressing the ¢ button moves the time forwards and pressing the 4 button moves it backwards.
Holding down the button moves the time rapidly.
The System enters Music Source Selecting mode and
“TUNER FM” appears on the display.
Selecting the music source.
4
Press the ¢ or 4 button to select the music source you
want to listen to, then press the SET button.
Each time you press the ¢ or 4 button, the display changes as shown below:
TUNER FM = TUNER AM = CD = TAPE = AUX
IN = (back to the beginning)
According to the music source you have selected, the next operation differs.
When selecting TUNER FM or TUNER AM:
Press the ¢ or 4 button to select the preset station
number, then press the SET button.
When “P---” is selected, the last station you were listening to
will be set.
When selecting CD :
Press the ¢ or 4 button to select the disc number, then
press the SET button.
Each time you press the button the disc number changes as follows:
DISC – = DISC 1 = DISC 2 = DISC 3 = (back to the beginning)
• If no disc number is specified, playback will start from the
first track of the currently selected disc.
21
Page 25

Using the Timers
When selecting TAPE:
Insert a cassette tape you want to play into Deck A.
When selecting AUX:
Prepare the external equipment so that it will turn on at the ON
time set by the System.
To allow this, the equipment should have the timer function.
Setting the volume level.
5
Press the ¢ or 4 button to select the volume level.
MIN, 1-30, or MAX: When the timer is turned on, the Volume
will be automatically set to the selected level.
Press the SET button.
6
The timer setting is completed and the display returns to the
display before you set the Timer.
Press the STANDBY/ON button to turn
7
off the System, if necessary.
The Timer indicator ( ) and “DAILY” indicator are lit on the
display, showing that the Daily Timer is set to on.
To confirm / change the timer setting, repeat the setting procedure from the beginning.
When the timer ON-time comes:
The following operation will be automatically repeated every day.
• When the timer ON-time comes, the System automatically
turns on. The music source you have set is played. The Timer
indicator ( ) blinks and “DAILY” indicator lights during
timer operation.
• When the timer OFF-time comes, the System automatically
turns off. Then, the Timer indicator ( ) and “DAILY” indica-
tor remain lit on the display.
• If the System is already on when the timer ON-time
comes, the Daily Timer does not work.
To cancel the Daily Timer temporarily:
Press the CLOCK/TIMER button on the Unit
1
repeatedly until the “DAILY” appears on the
display.
Press the CANCEL button on the Unit.
2
“OFF” appears and both the Timer indicator ( ) and the
“DAILY” indicator go out.
To activate the cancelled Daily Timer:
Press the CLOCK/TIMER button on the Unit
1
repeatedly until the “DAILY” appears on the
display.
The “DAILY” indicator blinks and the Timer indicator ( )
lights up on the dispaly.
Press the SET button on the Unit.
2
“DAILY SET” appears on the display. The Timer indicator
( ) and the “DAILY” indicator remain lit, and the display returns to the original display.
• If the System is unplugged, or a power failure occurs,
the timer setting will be lost in a few days. You will
need to reset the clock first, then the timer.
Setting the REC (Recording) Timer
With the Recording Timer, you can make a tape of a radio broadcast automatically whether or not you are home.
Once you have set the REC Timer to record a source, the timer setting is stored in memory. So, though the REC Timer turns off once
it is used, you can recall it at any time.
• You can set the REC Timer whether the System is on or
off.
• Perform each setting within approx. 30 seconds. Otherwise, setting will be cleared and the procedure must be
repeated from the beginning.
• If you have made a mistake while setting the timer, press
the CANCEL button on the Unit. However, this does not always cancel the current setting. If the CANCEL button
does not work, press the CLOCK/TIMER button on the
Unit repeatedly until the display returns to the original display, and start from the first step.
English
22
Page 26

Using the Timers
English
On the Unit
You can set the time in the same way as for setting the Daily Timer.
Insert a blank or erasable tape into the Deck
1
B and wind past the tape leader.
Press the CLOCK/TIMER button until “ON
2
TIME” immediately after “REC” appears on
the display.
Each time you press the button, the display changes as follows:
DAILY = ON TIME = REC = ON TIME* = Clock setting
display = Canceled = (back to the beginning)
*: This item should be selected for the REC Timer setting.
Then, the System enters ON-time setting mode. The current
ON time appears on the display and the hour digits blink.
Setting the ON time you want the System to
3
turn on.
1. Press the 4 or ¢ button to set the hour, then press the
SET button.
2. Press the 4 or ¢ button to set the minute, then press the
SET button.
“OFF TIME” appears and then the System enters OFF-time
setting mode. The current OFF time appears on the display,
and the hour digits blink.
Setting the OFF time you want the System to
4
turn off.
1. Press the 4 or ¢ button to set the hour, then press the
SET button.
2. Press the 4 or ¢ button to set the minute, then press the
SET button.
The System enters Preset Station Entering mode.
Press the STANDBY/ON button to turn
8
off the System, if necessary.
The Timer indicator ( ) and “REC” indicator are lit on the
display, showing that the Rec Timer is set to on.
To confirm / change the timer setting, repeat the setting procedure from the beginning.
When the timer ON-time comes:
• When the timer ON-time comes, the System automatically
turns on. The station you have set is played. The Timer indicator ( ) and Tape indicator (3) blink, and the “REC” indicator
lights during timer operation.
To stop timer recording, press the 7 button.
• When the timer OFF-time comes, the System automatically turns
off.
• If the System is already on when the timer ON-time
comes, the REC Timer does not work.
To cancel the REC Timer temporarily:
Press the CLOCK/TIMER button on the Unit
1
repeatedly until “REC” appears on the display.
Press the CANCEL button on the Unit.
2
“OFF” appears and both the Timer indicator ( ) and the
“REC” indicator go out.
To activate the cancelled REC Timer:
Press the CLOCK/TIMER button on the Unit
1
repeatedly until “REC” appears on the display.
The Timer indicator ( ) lights and the “REC” indicator
blinks on the display.
Press the SET button on the Unit.
2
“REC SET” appears on the display. The Timer indicator ( )
and the “REC” indicator remain lit, and the display returns to
the original display.
Select the preset station for recording.
5
1. Press the 4 or ¢ button to set the band (TUNER FM or
TUNER AM), then press the SET button.
2. Press the 4 or ¢ button to set the preset number, then
press the SET button.
When “P---” is selected, the last station you were listening to
will be set.
Setting the volume level.
6
Press the ¢ or 4 button to select the volume level.
MIN, 1-30, or MAX: When the timer is turned on, the Volume
will be automatically set to the selected level.
Press the SET button.
7
The timer setting is completed and the display returns to the
display before you set the Timer.
23
• If the System is unplugged, or a power failure occurs,
the timer setting will be lost in a few days. You will
need to reset the clock first, then the timer.
Page 27

Using the Timers
Setting the SLEEP Timer
Use the Sleep Timer to turn the System off after a certain number
of minutes when it is playing. By setting the Sleep Timer, you can
fall asleep to music and know that your System will turn off by itself rather than play all night.
• You can only set the Sleep Timer when the System is on.
On the Remote Control
During playback a source, press the SLEEP
1
button.
The “SLEEP” indicator starts blinking on the display.
Set the length of time you want the source to
2
play before shutting off.
Each time you press the SLEEP button, the time length changes as follows:
10 = 20 = 30 = 60 = 90 = 120 = OFF = (back to the
beginning)
Wait for 5 seconds.
3
The “SLEEP” indicator stops blinking and remains lit, and the
display returns to the original one before setting the Sleep
Timer.
The System is now set to turn off after the number of minutes
you have set.
Timer Priority
Since REC Timer and DAILY Timer can be set independently, you
may wonder what happens if the settings overlap. Here are the priorities for REC Timer and DAILY Timer:
• Timer with the earlier time setting will have the priority.
Timer will not operate when other Timer is operating.
• If other Timer is set to an exact same time as the REC Timer,
the REC Timer will have the priority.
❏ REC Timer and DAILY Timer will not operate when SLEEP
Timer is operating.
Example
Setting
REC Timer
DAILY Timer
REC Timer
DAILY Timer
ON
ON
21:30 23:0022:3022:00
Operation
ON OFF
OFF
OFF
English
To Confirm the Sleep Time:
When the SLEEP button on the Remote Control is pressed, the remaining sleep time is displayed. Wait until the display returns to
the original display.
To Cancel the SLEEP Timer Setting:
Press the SLEEP button until “OFF” appears on the display.
• Turning off the System also cancels the SLEEP Timer.
• When the REC Timer or the DAILY Timer is operating,
SLEEP Timer can not be set.
21:30 22:30
Operates only in REC Timer mode.
24
Page 28

Care And Maintenance
English
Handle your CDs and tapes carefully, and they will last a long
time.
Compact Discs
• Remove the CD from its case by holding
it at the edges while pressing the case’s
center hole lightly.
• Do not touch the shiny surface of the
CD, or bend the CD.
• Put the CD back in its case after use to
prevent warping.
• Be careful not to scratch the surface of
the CD when placing it back in the case.
• Avoid exposure to direct sunlight, temperature extremes, and moisture.
• A dirty CD may not play correctly. If a
CD does become dirty, wipe it with a
soft cloth in a straight line from center to
edge.
CAUTION:
• Do not use any solvent (for example, conventional record cleaner, spray thinner, benzine,
etc.) to clean a CD.
General Notes
In general, you will have the best performance by keeping your
CDs and the mechanism clean.
• Store CDs in their cases, and keep them in cabinets or on
shelves.
• Keep the System’s Top Cover closed when not in use.
Cassette Tapes
• If the tape is loose in its cassette, take up
the slack by inserting a pencil in one of
the reels and rotating.
• If the tape is loose, it may get stretched,
cut, or caught in the cassette.
• Do not touch the tape surface.
• Do not store the tape:
- In dusty places
- In direct sunlight or heat
- In moist areas
- On a TV or speaker
- Near a magnet
Cassette Deck
• If the heads, capstans, and pinch-rollers of the Cassette Deck
become dirty, the following will occur:
- Loss of sound quality
- Discontinuous sound
-Fading
- Incomplete erasure
- Difficulty recording
• Clean the heads, capstans, and pinch-rollers using a cotton
swab moistened with alcohol.
Capstan
Pinch-roller
Moisture Condensation
Moisture may condense on the lens inside the System in the following cases:
• After turning on heating in the room.
• In a damp room.
• If the System is brought directly from a cold to a warm place.
Should this occur, the System may malfunction. In this case, leave
the System turned on for a few hours until the moisture evaporates,
unplug the AC power cord, and then plug it in again.
Heads
• If the heads become magnetized, the Unit will produce noise or
lose high frequencies.
• To demagnetize the heads, turn off the Unit, and use a head
demagnetizer (available at electronics and record shops).
25
Page 29

Troubleshooting
• If you are having a problem with your System, check this list for a possible solution before calling for service.
• If you cannot solve the problem from the hints given here, or the System has been physically damaged, call a qualified person, such as
your dealer, for service.
Symptom Possible Cause Action
English
No sound is heard. • Connections are incorrect, or loose.
• Headphones are connected.
Poor radio reception • The antenna is disconnected.
• The AM Loop Antenna is too close
to the System.
• The FM Wire Antenna is not properly extended and positioned.
The disc tray does not open.
The CD skips. The CD is dirty or scratched. Clean or replace the CD. (See page 25.)
The CD does not play. The CD is upside down. Put the CD in with the label side up.
/WMA
The MP3
The readout time of the MP3
is too long.
The cassette holder cannot be opened. During tape playing, the power cord
Unable to record. Cassette record protect tabs are re-
Unable to operate the Remote Control. • The path between the Remote Con-
Operations are disabled. The built-in microprocessor has mal-
“PROTECT” appears on the display,
then the power goes off.
disc does not play.
/WMA
• The AC power cord is not plugged in.
• Tray is locked.
• No MP3/WMA files are recorded on
the disc.
•MP3
/WMA
files do not have the file
extension —.wma or .mp3 in thier
file names.
•MP3
/WMA
files are not recorded in
the format compliant with ISO 9660
Level 1 or Level 2.
disc
The readout time varies with the complexity of the recording configuration.
was unplugged.
moved.
trol and the sensor on the Unit is
blocked.
• The batteries have lost their charge.
functioned due to external electrical interference.
The speaker wire leads come in contact
with each other.
• Check all connections and make corrections. (See pages 4 to 6.)
• Disconnect the headphones.
• Reconnect the antenna securely.
• Change the position and direction of
the AM Loop Antenna.
• Extend FM Wire Antenna to the best
reception position.
• Plug the AC power cord.
• Unlock the tray. (See page 15.)
Replace the disc.
Do not use too many hierarchies and
folders when recording. Also, do not
record any other types of audio tracks
together with MP3
page 11.)
Plug in the power cord, and turn on the
System.
Cover holes on back edge of cassette
with tape.
• Remove the obstruction.
• Replace the batteries.
Unplug the System then plug it back in.
Check the connections and make corrections. (See page 5.)
/WMA
files. (See
26
Page 30

Specification
English
Amplifier
Output Power
Input Sensitivity/Impedance (1 kHz) Type 3-way bass-reflex type
AUX IN 400 mV/50 kΩ Speaker Unit Woofer: 16 cm cone × 1
Speaker terminals 6 Ω - 16 Ω Mid: 5cm cone × 1
Phones 32 Ω - 1 kΩ Tweeter; 2cm dome × 1
Cassette Deck Section
Frequency Response Frequency Range 45 Hz - 22 000 Hz
Type I (NORMAL) 63 Hz - 12 500 Hz Sound pressure level 87 dB/W·m
Wow And Flutter 0.15% (WRMS) Dimensions
CD Player Mass Approx. 3.6 kg
CD Capacity 3 CDs Accessories
Dynamic Range 85 dB AM Loop Antenna (1)
Signal-To-Noise Ratio 85 dB Remote Control (1)
Wow And Flutter Unmeasurable Batteries R6P (SUM-3)/AA (15F) (2)
Tuner FM Wire Antenna (1)
FM Tuner AC Plug Adaptor (1)
Tuning Range 87.5 MHz - 108.0 MHz
AM Tuner Power Consumption 165 W (power on mode)
Tuning Range 530 kHz - 1710 kHz (at AM10 kHz 23 W (in Standby mode)
155 W per channel, min. RMS, driven
into 6 Ω at 1kHz, with no more than Mass Approx. 9.3 kg
10% total harmonic distortion Speaker Specifications (each unit)
(IEC 268-3) SP-MXKC45
17 mW/ch output into 32 Ω Power Handling Capacity 160 W
Power Specifications
(at AM10 kHz channel space) Power Requirements
87.50 MHz - 108.00 MHz
(at AM9 kHz channel space)
channel space) 1 W (in ECO mode)
531 kHz - 1710 kHz (at AM9 kHz
channel space) Design and specifications are subject to change without notice.
Unit
Dimensions
Impedance 6 Ω
270 mm × 307 mm × 492 mm (W/H/D)
220 mm × 324 mm × 238 mm (W/H/D)
AC 110 V-127 V/220 V-240 V ,
adjustable with voltage selector,
50 Hz/60 Hz
27
Page 31

Español
Introducción
Gracias por comprar el Sistema de Componentes Compacto de JVC.
Esperamos que cumpla a la perfección sus expectativas y lo disfrute durante muchos años.
Asegúrese de leer detenidamente este manual de instrucciones antes de utilizar el sistema estéreo.
En él encontrará toda la información que precisa para configurar y utilizar el sistema.
Si tiene alguna duda después de haber leído el manual, póngase en contacto con su distribuidor.
Características
Estos son algunos de los aspectos que hacen que su sistema sea tan potente y fácil de utilizar.
❏ Los mandos y las funciones han sido rediseñados para que resulten muy fáciles de utilizar y pueda dedicarse sólo
a disfrutar de la música.
• El sistema COMPU PLAY de JVC permite poner en marcha el equipo y escuchar automáticamente la radio, la
platina de casete o el reproductor de CD pulsando un solo botón.
❏ El sistema SEA (Amplificador de Efectos de Sonido) incorpora efectos de sonido extraordinarios, como rock, pop
y música clásica.
❏ La función Sound Turbo proporciona un sonido rico y realzado.
❏ Posibilidad de memorización de 45 emisoras de radio (30 FM y 15 AM) además de las funciones de autobúsqueda y sintonización manual.
❏ Cargador de CD con capacidad para 3 discos.
• Los discos pueden cambiarse durante la reproducción gracias al mecanismo giratorio de la bandeja.
❏ La doble platina permite copiar cintas.
❏ Funciones de temporizador: Temporizador Diario (DAILY), Temporizador de grabación (REC) y Temporizador de Desconexión Auto-
mática (SLEEP).
❏ Puede conectar varios equipos externos como, por ejemplo, un reproductor de Minidiscs.
❏ El reproductor de CD puede reproducir un CD-R y CD-RW.
Cómo está organizado este manual
• En la sección “Funciones básicas” se ofrece información básica común a numerosas funciones -p. ej. el ajuste del volumen-, que
después no se repetirá en la sección dedicada a cada función.
• El nombre de los botones y mandos y los mensajes de la pantalla aparecen todos en mayúsculas: por ejemplo FM/AM, “NO DISC”.
• Si el nombre del botón del sistema y el del mando a distancia coinciden, no se indicará qué botón se utiliza.
• En las funciones del sistema sólo está en mayúscula la letra inicial de cada palabra (por ejemplo: Reproducción Normal).
Utilice el índice para buscar la información específica que esté buscando.
Hemos disfrutado haciendo este manual para usted y esperamos que le sirva para sacar el máximo provecho de las funciones que posee el
sistema.
PRECAUCIONES IMPORTANTES
Instalación del sistema
1
• Elija un lugar nivelado y seco, ni demasiado frío ni demasiado caluroso. (Entre 5°C y 35°C.)
• Deje espacio suficiente entre el sistema y un televisor.
• No utilice el equipo en un lugar sujeto a vibraciones.
Cable de alimentación
2
• No manipule el cable de alimentación con las manos mojadas.
• Cuando el cable de alimentación está enchufado siempre se consume un poco de electricidad.
• Cuando desconecte el equipo de la toma de corriente, tire siempre del enchufe y no del cable.
Posibles anomalías
3
• No intente reparar ninguna pieza del interior del aparato. En caso de fallo, desenchufe el cable de alimentación y contacte con su distribuidor.
• No inserte ningún objeto metálico en el sistema.
1
Page 32

Índice
Introducción...................................................................................................................1
Características.......................................................................................................................................... 1
Cómo está organizado este manual ......................................................................................................... 1
PRECAUCIONES IMPORTANTES...................................................................................................... 1
Índice ..............................................................................................................................2
Cómo empezar...............................................................................................................3
Accesorios ............................................................................................................................................... 3
Ajuste del interruptor VOLTAGE SELECTOR...................................................................................... 3
Cómo colocar las pilas en el mando a distancia ...................................................................................... 3
Uso del mando a distancia....................................................................................................................... 4
Conexión de la antena FM....................................................................................................................... 4
Conexión de la antena de AM ................................................................................................................. 5
Conexión de los altavoces ....................................................................................................................... 5
Conexión de equipos auxiliares............................................................................................................... 6
Conexión a la toma de corriente.............................................................................................................. 6
Modo de demostración ............................................................................................................................ 6
COMPU Play........................................................................................................................................... 6
Funciones básicas ........................................................................................................7
Encendido y apagado del sistema............................................................................................................ 7
Modo de ahorro (ECO)............................................................................................................................ 7
Ajuste del volumen.................................................................................................................................. 8
Silenciamiento progresivo (FADE MUTING)........................................................................................ 8
Realce del sonido (SOUND TURBO)..................................................................................................... 8
Selección del modo de sonido (SOUND MODE)................................................................................... 8
Introducción de un número con el mando a distancia (teclas numéricas) .............................................. 8
Cambiar la visualización ......................................................................................................................... 8
Uso del sintonizador .....................................................................................................9
Sintonización de una emisora.................................................................................................................. 9
Presintonía de emisoras ......................................................................................................................... 10
Cómo cambiar el modo de recepción FM ............................................................................................. 10
Uso del reproductor de CD.........................................................................................11
Cómo introducir los CD ........................................................................................................................ 12
Cómo sacar los CD................................................................................................................................ 12
Cambio del modo de reproducción de un disco MP3/WMA ................................................................ 12
Instrucciones básicas para utilizar el reproductor de CD: Reproducción Normal ................................ 13
Reanudar la reproducción de un CD de audio y un disco MP3/WMA ................................................. 14
Programación del orden de reproducción de las pistas.......................................................................... 14
Reproducción Aleatoria......................................................................................................................... 15
Repetición de pistas............................................................................................................................... 15
Bloqueo de la bandeja............................................................................................................................ 15
Uso de la platina (escuchar una cinta)......................................................................16
Reproducción de una cinta .................................................................................................................... 16
Uso de la platina (grabación) .....................................................................................17
Grabación Normal ................................................................................................................................. 18
Grabación Sincronizada de CD ............................................................................................................. 18
Grabación de Cinta a Cinta (DUBBING).............................................................................................. 18
Uso de equipos auxiliares..........................................................................................19
Cómo escuchar un equipo auxiliar ........................................................................................................ 19
Uso de los temporizadores ........................................................................................20
Puesta en hora del reloj.......................................................................................................................... 20
Ajuste del reloj....................................................................................................................................... 20
Ajuste del temporizador diario (DAILY)..............................................................................................21
Ajuste del temporizador de grabación (REC)........................................................................................22
Ajuste del temporizador de desconexión automática (SLEEP).............................................................24
Prioridad de los temporizadores ............................................................................................................ 24
Cuidado y mantenimiento ..........................................................................................25
Solución de problemas...............................................................................................26
Características técnicas .............................................................................................27
Español
2
Page 33

Español
Cómo empezar
Accesorios
Asegúrese de que tiene todos los elementos siguientes, suministrados con el sistema.
Antena de cuadro para AM (1)
Antena monofilar de FM (1)
Mando a distancia (1)
Pilas (2)
Adaptador de enchufe CA (1)
Si faltara alguno de estos artículos, contacte de inmediato con su proveedor.
Ajuste del interruptor VOLTAGE SELECTOR
Para evitar que se pueda dañar el sistema, ajuste el voltaje antes de enchufar el sistema.
Ajuste al voltaje correcto correspondiente a su área con el interruptor VOLTAGE SELECTOR en la parte posterior de la unidad. Utilice un destornillador para resbalar el selector hacia arriba y hacia abajo.
PRECAUCION:
• Realice todas las conexiones antes de enchufar el sistema a la toma de corriente.
Cómo colocar las pilas en el mando a distancia
Haga coincidir la polaridad de las pilas (+ y –) con las marcas + y – situadas dentro del compartimento de las pilas.
R6P (SUM-3)/AA (15F)
PRECAUCION:
• Manipule las pilas adecuadamente.
❏ Para evitar que las pilas pierdan líquido o exploten:
• Extraiga las pilas cuando no vaya a utilizar el mando a distancia durante un tiempo prolongado.
• Cuando necesite cambiar las pilas, cambie las dos al mismo tiempo por otras nuevas.
• No utilice una pila vieja con otra nueva.
• No utilice al mismo tiempo pilas de distinto tipo.
3
Page 34

Cómo empezar
Uso del mando a distancia
Con el mando a distancia podrá controlar fácilmente numerosas funciones desde una distancia de hasta 7 m.
Debe apuntar el mando a distancia hacia el sensor remoto del panel frontal del sistema.
Sensor remoto
PRECAUCION:
• Realice todas las conexiones antes de enchufar el sistema a la toma de corriente.
Español
Conexión de la antena FM
Uso de la antena monofilar suministrada
Antena monofilar FM
Uso del conector de tipo coaxial (No incluido)
Se recomienda conectar una antena de 75Ω con conector de tipo coaxial (IEC o DIN45 325) al terminal COAXIAL de FM de 75Ω.
Si la recepción es pobre, utilice la antena exterior.
Antena exterior FM
(no incluida)
Cable coaxial
• Antes de conectar un cable coaxial de 75 ohm (cable redondo que sale hacia una antena exterior), desconecte la antena
monofilar de FM.
4
Page 35

Español
Cómo empezar
Conexión de la antena de AM
Panel posterior del sistema
Antena de AM (no incluida)
Si la recepción es pobre, utilice la antena exterior.
Antena de cuadro para AM
(incluida)
• Cuando conecte una antena AM exterior, mantenga conectada la antena de cuadro AM interior.
Fije la antena de cuadro AM a la base introduciendo las pestañas del cuadro en las ranuras
de la base.
Gire la antena de cuadro
hasta obtener la mejor recepción.
PRECAUCION:
• Para evitar ruidos, mantenga las antenas lejos del cable de conexión, del cable de alimentación CA y del
sistema.
Conexión de los altavoces
1. Abra cada uno de los terminales para conectar los hilos del cable del altavoz.
2. Conecte los cables de los altavoces a los terminales de altavoz de la unidad.
Conecte los cables gris (+) y gris con franja negra (–) del altavoz del lado derecho a los terminales rojo (+) y negro (–) marcados en el
sistema como RIGHT.
Conecte los cables gris (+) y gris con franja negra (–) del altavoz del lado izquierdo a los terminales rojo (+) y negro (–) marcados en el
sistema como LEFT.
3. Cierre todos los terminales.
Lado derecho (vista posterior)
Gris con
franja negra
Gris
Gris
Gris con
franja negra
Lado izquierdo (vista posterior)
CUIDADO:
• El televisor puede presentar colores irregulares si se coloca cerca de los altavoces. Si sucediera esto,
aparte los altavoces del televisor.
• Utilice solamente los altavoces con la impedancia correcta. La impedancia correcta se indica en el panel
posterior.
5
Page 36

Cómo empezar
Conexión de equipos auxiliares
Conecte un cable de señales con miniclavijas estéreo (no suministrado) entre la toma AUX del sistema, en el panel delantero, y la toma de
salida o terminales de salida de audio del reproductor de CD portátil externo, reproductor MD, STB, etc.
De este modo, podrá escuchar la fuente externa a través del sistema.
Cable de señal (no incluido)
Blanco
Canal izquierdo
Rojo
Canal
derecho
A la salida de audio
de un equipo externo.
Conexión a la toma de corriente
Enchufe el cable de alimentación principal a la toma de corriente.
¡El sistema ya está listo para que empiece a utilizarlo!
Modo de demostración
Cuando se enchufa el sistema a la toma de corriente, se activa el modo de demostración, que automáticamente muestra algunas de las funciones disponibles.
Para desactivar el modo de demostración, pulse cualquier botón de funcionamiento. El indicador de modo de demostración se apagará automáticamente.
Para activar el modo de demostración, pulse el botón DEMO del sistema durante al menos 2 segundos.
(durante 2 segundos)
Español
• Mientras el sistema esté encendido, el indicador DEMO volverá a encenderse automáticamente si no pulsa ningún botón
durante 2 minutos. Para cancelar está función de encendido automático en modo de demostración, pulse el botón CANCEL del sistema mientras aparezca en pantalla el indicador DEMO.
COMPU Play
La función COMPU PLAY de JVC le permite controlar las funciones más frecuentes utilizadas en el sistema con un simple botón.
Con el sistema de un solo botón puede reproducir un CD, una cinta, encender la radio o escuchar un equipo auxiliar con sólo pulsar el botón
Play de la función. Al pulsarlo, se enciende el sistema y se pone en marcha la función seleccionada. El sistema se enciende aunque no esté
listo (por ejemplo, no hay CD insertado), para que pueda prepararlo (insertando un CD).
El funcionamiento de un solo botón se explica en cada caso en la sección relacionada con esta función.
Los botones COMPU PLAY son:
En el sistema
Botón CD 6
Botón FM/AM
Botones TAPE A 3, TAPE B 3
Botón AUX
Botones CD1, CD2 y CD3
Botón Abrir/Cerrar CD 0
En el mando a distancia
Botón CD 6
Botón FM/AM
Botones TAPE A, TAPE B
Botón AUX
Botones CD1, CD2 y CD3
6
Page 37

Funciones básicas
Español
Teclas
numéricas
DISPLAY
SOUND
TURBO
SOUND
MODE
STANDBY/ON
Indicador de modo de
espera (STANDBY)
(STANDBY/ON)
SOUND TURBO
VOLUME +, –
FADE MUTING
Indicador de Sound
* Cuando se utiliza el sistema, la pantalla también muestra otros datos.
Para mayor claridad, mostramos tan sólo los indicadores descritos en esta sección.
ECO
PHONES
Información varia
Turbo
Indicador de barra de estado (estados de varias funciones.)
Indicador de modo de
sonido
Indicador de barra
del volumen
Pantalla
SOUND MODE
VOLUME
Encendido y apagado del sistema
Cómo encender el sistema
Pulse el botón STANDBY/ON.
1
o
Se enciende la pantalla y aparece “POWER ON” una vez. El
indicator de modo en espera (STANDBY) se apaga.
El sistema está listo para continuar en la función en que estaba
cuando se apagó por última vez.
Cómo apagar el sistema
Pulse de nuevo el botón STANDBY/ON.
1
o
“GOOD BYE” aparece y la pantalla se apaga, excepto para la
pantalla del reloj. Se enciende el indicador de modo en espera
(STANDBY). (El brillo de la pantalla disminuye.)
• Aunque el sistema esté apagado (en modo de espera), siempre se consume algo de electricidad.
• Para apagar completamente el sistema, desenchufe el cable
de alimentación principal de la toma de corriente. Cuando
desenchufe el cable de alimentación, el reloj se reinicializará inmediatamente a las 0:00 horas.
Modo de ahorro (ECO)
Este sistema tiene tres modos de consumo energético: encendido,
apagado (en espera) y ahorro (ECO). En el modo de ahorro (ECO),
la pantalla se apaga y se consume el mínimo de corriente.
Para activar el modo de ahorro (ECO), pulse el botón ECO
del sistema mientras esté en modo de espera (indicador de modo
en espera (STANDBY) encendido). La pantalla mostrará el indicador “ECO MODE” y luego se apagará. El indicador STANDBY
permanece encendido.
Para desactivar el modo de ahorro (ECO) y volver a encender el sistema, pulse el botón STANDBY/ON eb el sis-
tema.
Para desactivar el modo de ahorro (ECO) y volver a
modo en espera, pulse de nuevo el botón ECO.
7
Page 38

Funciones básicas
Ajuste del volumen
Gire el botón de volumen (VOLUME) del sistema hacia la derecha
para aumentar el volumen o hacia la izquierda para bajarlo.
Pulse el botón VOLUME + del mando a distancia para subir el volumen o el botón VOLUME – del mando a distancia para bajarlo.
Puede seleccionar el volumen mínimo (MIN), un volumen de 1 a
30, o el volumen máximo (MAX).
• Cuando apague el sistema a un nivel de volumen de más
de 19, el nivel del volumen se ajusta automáticamente a
19 cuando el sistema vuelve a encenderse.
CUIDADO:
• NO ENCIENDA el sistema ni comience la reproducción de una fuente de audio sin antes haber
bajado el volumen a mínimo, ya que un inicio repentino a muy alto volumen (VOLUME) puede
dañar los oídos, los altavoces y/o los auriculares.
Para una audición privada
Conecte unos auriculares a la salida PHONES. No se oye nada por
los altavoces.
Asegúrese de bajar el volumen antes de conectar o de ponerse los
auriculares.
Silenciamiento progresivo (FADE MUTING)
Si lo desea, puede hacer que el sonido se detenga progresivamente
pulsando un único botón.
Para activar esta función, pulse el botón FADE MUTING del
mando a distancia. El sonido disminuirá hasta desaparecer.
Para restablecer el sonido, vuelva a pulsar el botón FADE
MUTING. El sonido aumentará hasta llegar al nivel de volumen
anterior.
• Después del silenciamiento progresivo, al girar el control
VOLUME de la unidad o al pulsar el botón VOLUME del
mando a distancia, el volumen aumentará a partir del nivel
anterior.
Realce del sonido (SOUND TURBO)
Selección del modo de sonido (SOUND MODE)
Esta función le permite elegir entre SEA (Sound Effect Amplifier)
tres modos de amplificación de los efectos de sonido.
Este efecto sólo funciona durante la reproducción.
Para obtener el efecto, pulse el botón SOUND MODE hasta
que el modo de sonido que usted desea aparezca en la pantalla.
El indicador de SOUND MODE se illumina en pantalla.
Cada vez que pulse el botón, la pantalla cambia en este orden:
ROCK = POP = CLASSIC = FLAT = (vuelta al principio)
Para cancelar el efecto, pulse el botón SOUND MODE hasta
que en pantalla aparezca el indicador “FLAT”.
El indicador “SOUND MODE” se apaga.
ROCK Potencia los sonidos graves y agudos.
Ideal para música acústica.
POP Ideal para música cantada.
CLASSIC Seleccionable en sistemas estéreo para re-
producir sonidos muy amplios y dinámicos.
FLAT No se aplica ningún efecto de sonido.
Introducción de un número con el mando a distancia (teclas numéricas)
Las teclas numéricas del mando a distancia permiten seleccionar
un número para memorizar una emisora, sintonizar una emisora
presintonizada o programar las pistas que desea reproducir de un
CD.
A continuación se explica cómo introducir los números con las teclas numéricas.
Ejemplos:
• Para introducir un 5, pulse 5.
• Para introducir un 15, pulse 10 = 1 = 5.
• Para introducir un 20, pulse 10 = 2 = 0.
(Sólo para discos MP3/WMA)
• Para introducir un 125, pulse 10 (2 veces) = 1 = 2 = 5.
Cambiar la visualización
En el mando a distancia SOLAMENTE
Cada vez que se pulsa el botón DISPLAY, el contenido de la pantalla cambia del modo siguiente:
Fuente seleccionada actualmente Ô Hora actual
Español
Las frecuencias altas y bajas se potencian en gran medida.
Para conseguir el efecto, pulse el botón SOUND TURBO.
El indicador de SOUND TURBO se ilumina y “S-TURBO” aparece en la pantalla.
Para cancelar la potenciación de graves, pulse de nuevo el
botón.
El indicador de SOUND TURBO se apaga y en pantalla aparece el
mensaje “OFF”.
8
Page 39

Español
Uso del sintonizador
Teclas
numéricas
FM/AM
1
¡
1
FM/AM
FM MODE
¡
Indicador de banda, frecuencia y canal sintonizado
SET
¢
4
* Cuando se utiliza el sistema, la pantalla también muestra otros datos.
Para mayor claridad, mostramos tan sólo los indicadores descritos en esta sección.
Podrá escuchar emisoras de FM y de AM. Las emisoras se pueden
sintonizar manualmente, automáticamente o desde las presintonías
almacenadas en la memoria.
❏ Antes de escuchar la radio:
• Compruebe que las antenas de FM y de AM están conectadas
correctamente. (Véanse las páginas 4 y 5.)
Ajuste del espaciamiento del intervalo de sintonía de AM
El intervalo del sintonizador de AM está ajustado en fábrica con
una separación de 10 kHz (espacio de 100 kHz para la emisión
FM). Usted podrá cambiar la separación a 9 kHz.
Para seleccionar el intervalo de 9 kHz, presione el botón 7
del mando a distancia por más de 2 segundos en el modo de espera
para exhibir “AM-10” en la pantalla y entonces presione el botón
9 del mando a distancia (espacio de 50 kHz para la emisión FM).
Para seleccionar el intervalo de 10 kHz de nuevo, presione el botón 7 del mando a distancia por más de 2 segundos en el
modo de espera para exhibir “AM-9” en la pantalla y entonces presione el botón 10 del mando a distancia.
Encendido de la radio con un solo botón
Pulse sólo el botón FM/AM y el sistema se encenderá en la emisora que tenía seleccionada la última vez que apagó el sistema.
❏ Puede cambiar desde cualquier otra fuente de audio a la radio
con sólo pulsar el botón FM/AM.
Indicadores de modo FM
Sintonización de una emisora
Pulse el botón FM/AM.
1
En la pantalla aparecerán la banda y la frecuencia sintonizadas
en último lugar.
Cada vez que pulse el botón, la banda cambia alternativamente
entre FM y AM.
o
Seleccione una emisora con uno de los
2
métodos siguientes.
• Sintonización manual
Pulse brevemente los botones 22 o ¡ para pasar de una
frecuencia a otra hasta encontrar la emisora deseada.
O
• Sintonización automática
Si mantiene pulsado el botón 22 o ¡ durante al menos 1
segundos y luego lo suelta, el sintonizador retrocederá o
avanzará automáticamente en la secuencia de frecuencias
hasta encontrar una emisora.
O
• Sintonización de emisoras programadas (sólo
cuando se hayan memorizado las emisoras)
Sintonización de emisoras programadas desde el
sistema:
Seleccione el número de presintonía que desee pulsando el
botón 4 o ¢.
9
Page 40

Uso del sintonizador
Ejemplo:
Pulse el botón ¢ hasta que aparezca en la pantalla el número de presintonía “P-12”. Entonces la pantalla mostrará la
banda y la frecuencia de la presintonía.
Sintonización de emisoras programadas desde el
mando a distancia:
Seleccione una presintonía introduciendo el número correspondiente con las teclas numéricas. Véase “Introducción de
un número con el mando a distancia” en la página 8.
• En AM, podrá mejorar la recepción de las emisoras girando la antena de cuadro especial para esta banda. Gírela
hasta que capte bien la señal.
Presintonía de emisoras
Se pueden prefijar hasta 30 emisoras de FM y hasta 15 emisoras de
AM.
Notas
• Antes del empaquetado puede que se haya memorizado
algún número de presintonía en fábrica para realizar
pruebas. No se trata de ninguna anomalía. Puede prefijar
en la memoria las emisoras que desee siguiendo uno de
los métodos siguientes.
• Si mientras esté presintonizando emisoras no pulsa ningún
botón durante 5 segundos, en pantalla volverán a mostrarse
la banda y el número de frecuencia. Si le sucediera esto, deberá repetir la operación desde el principio.
Pulse el botón SET.
5
En la pantalla aparece durante 2 segundos el mensaje “STORED”, tras lo cual vuelven a aparecer indicadas la banda y la
frecuencia de la emisora sintonizada.
Repita los pasos 2 a 5 para cada emisora que
6
desee almacenar en la memoria con un
número presintonizado.
Para cambiar las emisoras presintonizadas, repita los pa-
sos anteriores.
• En el paso 4, puede seleccionar el número de presintonía
utilizando las teclas numéricas del mando a distancia.
Véase “Introducción de un número con el mando a distancia” en la página 8.
PRECAUCION:
• Si desenchufa el equipo o falla la alimentación,
las presintonías se conservarán en la memoria
durante unos días. En el caso de que se pierdan,
deberá volverlas a almacenar manualmente.
Cómo cambiar el modo de recepción FM
Cuando sintonice una emisora FM estéreo se iluminará el indicador “ST (Stereo)” y podrá disfrutar del sonido estereofónico de la
emisora.
Si una emisora de FM estéreo se recibe mal o con ruidos puede seleccionar el modo monoaural. La recepción mejora, aunque se
pierde el efecto estéreo.
Pulse el botón FM MODE del mando a distancia para que
se encienda el indicador “MONO” en la pantalla.
Español
TUNING
FM=30, AM=15
Cuando cambie de banda
PRESET
oo
En el sistema
Seleccione una banda pulsando el botón FM/
1
AM.
Pulse el botón
2
22 o ¡
una emisora.
Pulse el botón SET.
3
El mensaje “SET” parpadeará durante 5 segundos.
Cuando “SET” parpadee, pulse el botón
4
¢
o
para seleccionar el número de presinto-
nía.
: Aumenta en 1 el número de presintonía.
¢
: Reduce en 1 el número de presintonía.
4
para sintonizar
ST MONO
Para restablecer el efecto estéreo, vuelva a pulsar el botón
FM MODE del mando a distancia para que desaparezca el indicador “MONO” de la pantalla.
4
10
Page 41

Español
Uso del reproductor de CD
CD1-CD3
Teclas
numéricas
4
CD1-CD3
REPEAT
PROGRAM
¢
7
CD 6
RANDOM
MP3/WMA
MODE
1
¡
Número de pista, tiempo de repro-
ducción, número de programa, etc.
Indicador de
WMA
Abrir/Cerrar
CD 0
DISC SKIP
CANCEL
SET/RESUME
CD 6
¢
REPEAT
PROGRAM
RANDOM
7
4
Indicador de MP3
Indicador de programa
Indicadores de disco
* Cuando se utiliza el sistema, la pantalla también muestra otros datos.
Para mayor claridad, mostramos tan sólo los indicadores descritos en esta sección.
Esta unidad ha sido diseñada para reproducir los CDs siguientes:
• Audio CD
• CD-R (CD-Recordable)
• CD-RW (CD-ReWritable)
• Disco MP3/WMA (Archivos MP3/WMA grabados en un CDR o CD-RW)*
Sólo se pueden utilizar en este sistema los CD que lleven este distinti-
Recordable
ReWritable
vo. El uso continuado de discos de
perfil irregular (en forma de corazón, octogonales, etc.) puede dañar
el sistema.
Cuando se reproduzca u CD-R o CD-RW
• Los CD-Rs (CD-Recordable) y los CD-RWs (CD-ReWritable)
editados por el usuario se pueden reproducir cuando ya están
“finalizados.”
• Antes de reproducir CD-Rs o CD-RWs, lea sus instrucciones o
avisos cuidadosamente.
• Algunos CD-Rs o CD-RWs tal vez no puedan reproducirse en
esta unidad debido a sus características o a que están dañados o
sucios, o a que la lente del reproductor está sucia.
• Los CD-RWs puede que necesiten más tiempo para ser leídos
porque su reflectancia es inferior a la de los CDs convencionales.
Indicador de
aleatoria
Indicador de función
de repetición
*Para discos MP3/WMA
• Esta unidad administra los archivos y las carpetas de los discos
MP3/WMA como “pistas” y “álbumes.”
• El orden de la reproducción de los archivos MP3/WMA (pistas)
grabados en un disco se determina mediante la aplicación de
escritura (o codificación); por lo tanto, el orden de reproducción puede ser diferente del planeado durante la grabación de
los archivos y las carpetas.
• Esta unidad muestra los nombres de los archivos (pistas) y las
fichas ID3v2 (sólo “Título”, “Artista” y “Álbum”) en la pantalla
después de empezar la reproducción; sin embargo, existe una
limitación en el número de caracteres disponibles, y algunos
nombres de archivos y fichas ID3 no se muestran correctamente.
Notas
Más acerca de los discos MP3/WMA
• Los discos MP3/WMA (CD-R o CD-RW) requieren más
tiempo de lectura. (Este tiempo cambia debido a la complejidad de la configuración de la grabación.)
• Cuando haga un disco MP3/WMA, seleccione ISO 9660
Level 1 o Level 2 como formato del disco.
• Esta unidad no soporta la grabación de múltiples sesiones.
• Esta unidad sólo puede reproducir archivos MP3/WMA
que tengan las extensiones de archivo siguientes: “.mp3”
y “.wma”.
• Los archivos que no son MP3/WMA se ignoran. Si se graban archivos que no son MP3/WMA junto con archivos
MP3/WMA, esta unidad tardará más tiempo en explorar el
disco. Y hasta es posible que la unidad funcione mal.
• Algunos discos MP3/WMA tal vez no se reproduzcan debido a sus características o a las condiciones de la grabación.
11
Precaucion sobre la reproduccion de DualDisc
El lado no DVD de un “DualDisc” no es compatible con la norma
“Compact Disc Digital Audio”. Por consijuiente, no se recomienda
usar el lado no DVD de un DualDisc en este producto.
Page 42

Acerca del indicador de disco:
Indicador de
rotación del disco
Indicador del
número del disco
Indicador del disco
seleccionado
Uso del reproductor de CD
❏
Si utiliza un CD de 8 cm, encájelo en el hueco interior de la bandeja.
❏ Los CDs se pueden cargar mientras escucha otra fuente o el CD
que se está reproduciendo.
❏ Si apaga el sistema con la bandeja abierta, la bandeja se cerrará
automáticamente.
❏ Si no es posible leer correctamente el CD (debido a arañazos,
por ejemplo), en la pantalla se muestra “NO DISC”.
El indicador de disco se divide en tres partes:
Indicador de número
de disco:
Indicador de disco seleccionado:
Indicador de rotación
de disco:
Se mantiene iluminado.
Se enciende el correspondiente al
número de disco seleccionado en
ese momento.
Funciona cuando se reproduce o
se detiene momentáneamente el
CD seleccionado. Se apaga si no
hay ningún CD cargado en la bandeja en el número de CD seleccionado.
Reproducción mediante un solo botón
El sistema se enciende y activa la función pulsada automáticamente.
❏ Si pulsa el botón CD 6, el sistema se encenderá y, si hay algún
CD en el número de disco seleccionado, empezará a reproducirlo desde la primera pista.
❏ Si pulsa el botón CD1-CD3, el sistema se encenderá y, si hay al-
gún CD en el número de disco seleccionado, empezará a reproducirlo desde la primera pista.
Cómo introducir los CD
Pulse el botón Abrir/Cerrar CD 0 situado en
1
el equipo para abrir la bandeja.
Coloque uno o dos CDs, con la cara impresa
2
hacia arriba, en la bandeja.
Asegúrese de que el CD esté firmemente asentado dentro del
hueco de la bandeja del disco.
Con la cara impresa hacia arriba
Cómo sacar los CD
Para sacar un CD, siga estos pasos:
Con el reproductor de CD detenido, pulse el
1
0
botón Abrir/Cerrar CD
situado en el equipo
para abrir la bandeja.
Saque el CD y luego pulse el botón DISC
2
SKIP del equipo.
La bandeja girará para que pueda acceder al siguiente número
de disco.
Repita el paso 2 para sacar cada uno de los
3
CD.
Pulse el botón Abrir/Cerrar CD 0 situado en
4
el equipo para cerrar la bandeja.
❏ Puede sacar los CD mientras se reproduce otra fuente de audio.
Trucos:
• Para sacar/introducir los CD durante la reproducción
Mientras se esté reproduciendo un CD (por ejemplo, CD1), podrá
sacar o cambiar cualquiera de los otros dos (en este caso, CD2 y
CD3). Para ello, pulse el botón Abrir/Cerrar CD 0, saque o cambie
el CD o los CD que desee y pulse de nuevo el mismo botón para
cerrar la bandeja.
Cambio del modo de reproducción de un disco MP3/WMA
Cuando reproduzca un disco MP3/WMA, usted podrá elegir su
modo de reproducción de la forma siguiente:
Modo TRACK:
La unidad sólo reconoce pistas (archivos). Puede reproducir un
disco MP3/WMA como si fuese un CD de audio.
Modo GROUP:
La unidad reconoce las pistas (archivos) y los álbumes (carpetas)
de un disco MP3/WMA. Pueden reproducir un disco MP3/WMA
de acuerdo con la forma en que éstos se encuentran agrupados.
Español
Pulse el botón DISC SKIP del sistema e intro-
3
duzca el CD siguiente.
Cada vez que pulse el botón, la bandeja girará para que pueda
introducir otro CD.
Pulse el botón Abrir/Cerrar CD 0 situado en
4
el equipo.
La bandeja se cerrará.
En el mando a distancia SOLAMENTE
Pulse MP3/WMA MODE antes o durante la reproducción de un disco MP3/WMA.
Cuando el modo de reproducción de MP3/WMA
está en el modo GROUP aparece el indicador
GROUP.
• Cada vez que pulsa el botón, el modo de reproducción MP3/
WMA cambia alternativamente entre “GROUP” y “TRACK”.
12
Page 43

Español
Uso del reproductor de CD
Instrucciones básicas para utilizar el reproductor de CD: Reproducción Normal
Para reproducir los CD
Introduzca los CD.
1
Pulse uno de los botones de disco (CD1-CD3)
2
que quiera reproducir.
El número del disco seleccionado (por ejemplo, “CD DISC 1”)
aparecerá en pantalla.
Se inicia la reproducción de la primera pista del CD. Cuando
acaba de reproducir el primer CD, el sistema pasa sin detenerse
al segundo disco y después al tercero.
Cuando ha terminado de reproducirse el último CD se volverá
al primer CD y el reproductor de CD se detendrá automáticamente.
❏ Puede comenzar la reproducción del disco seleccionado en ese
momento con sólo pulsar el botón CD 6.
Para CD de audio
Se está
reproduciendo
Número de pista Tiempo de reproducción
Para discos MP3/WMA
MP3.)
Modo TRACK
Número de pista
Modo GROUP
Número de pista del grupo actual
• Después de mostrarse la visualización de arriba, si las pistas
incluyen fichas ID3, la visualización se desplazará en el
orden del nombre de archivo, título, artista y álbum, y luego
volverá a la visualización original.
Si pulsa el botón de disco (CD1-CD3) con la bandeja abierta, la
bandeja se cerrará y el CD seleccionado empezará a reproducirse
automáticamente.
Para detener la reproducción del CD, pulse el botón 7.
Para CD de audio
Cantidad total de pistas
Para discos MP3/WMA
Modo TRACK
transcurrido
(Las ilustraciones son para discos
Tiempo total de reproducción
el CD.
Modo GROUP
Cantidad total de grupos
Para hacer una pausa, pulse el botón CD 6. El tiempo de
reproducción parpadea en la pantalla.
Para cancelar la pausa, pulse de nuevo el botón CD 6. La
reproducción se reanuda desde el punto en el que la interrumpió la
pausa.
Trucos:
• Para reproducir un CD con el botón DISC SKIP
También puede reproducir un CD pulsando el botón DISC SKIP.
Cada vez que lo pulse mientras se esté reproduciendo un CD, el sistema pasará automáticamente al siguiente CD. Si el disco no está
cargado, saltará automáticamente al siguiente disco de la bandeja.
Cantidad total de pistas
Para seleccionar una pista
Durante la reproducción:
Pulse brevemente el botón 4 o ¢ para seleccionar la pista que
desee, excepto para el modo del GROUP MP3/WMA.
Al pulsar el botón, podrá saltar a la pista siguiente o volver a la anterior.
• Empieza a oírse la pista seleccionada.
• Pulse una vez el botón ¢ para saltar al inicio de la pista
siguiente.
• Pulse el botón 4 para volver al inicio de la pista que se esté
reproduciendo. Si lo pulsa dos veces rápidamente, retrocederá
hasta el inicio de la pista anterior.
Con el reproductor detenido:
Pulsando brevemente el botón 4 o ¢, el reproductor de CD
funciona igual que durante la reproducción, excepto para el modo
de GROUP MP3/WMA.
Con las teclas numéricas del mando a distancia:
Las teclas numéricas le permiten acceder directamente a la pista
del CD seleccionado que desea escuchar.
• Empieza a oírse la pista seleccionada.
Véase “Introducción de un número con el mando a distancia” en la
página 8.
En el modo GROUP MP3/WMA:
La pista seleccionada del grupo actual empieza a reproducirse.
Trucos:
• Para discos MP3/WMA
Cuando empieza a reproducirse la pista seleccionada, la información de esa pista se desplaza en la pantalla en el orden siguiente:
nombre de archivo, título, artista y álbum.
Para seleccionar un grupo (para el modo GROUP
de MP3/WMA solamente)
Durante la reproducción:
Pulse brevemente el botón 4 o ¢ para seleccionar el grupo
que desea reproducir.
• La primera pista del grupo seleccionado empieza a reproducirse.
Con el reproductor detenido:
Pulse brevemente el botón 4 o ¢ para seleccionar el grupo
que desea reproducir. El número del grupo, el nombre del grupo y
el nombre del archivo pueden verse en la pantalla.
13
Cantidad total de pistas
Reproducción con búsqueda
Mantenga pulsados los botones siguientes durante la reproducción
para que el lector avance o retroceda rápidamente hasta que encuentre el pasaje deseado en la pista del CD que esté escuchando.
• Botones 1 o ¡ del equipo
• Botones 4 o ¢ del mando a distancia
Page 44

Reanudar la reproducción de un CD de audio y un disco MP3/ WMA
Puede guardar el punto de la pista en el que se haya detenido la reproducción. Si pulsa el botón CD 6, podrá iniciar de nuevo la
reproducción desde el punto en el que la detuvo.
En el sistema SOLAMENTE
Pulse el botón SET/RESUME durante 2 segundos hasta que aparezca “RESUME” y “ON” en la pantalla.
Para desactivar la reanudación de la reproducción, pulse
el botón SET/RESUME
“OFF” aparezcan en la pantalla.
Notas
• Para iniciar la reproducción desde la primera pista mientras se activa la reanudación de la reproducción, pulse el
botón 7 2 veces durante la reproducción.
Las operaciones siguientes borrarán la memoria del número de la pista cuya reproducción usted ha detenido:
• Pulsar el botón de Abrir/Cerrar CD 0 para expulsar el disco.
• Pulsar el botón CD1-CD3 o el botón DISC SKIP para cambiar el disco que se va a reproducir.
durante 2 segundos hasta que “RESUME” y
Programación del orden de reproducción de las pistas
Puede programar el orden de reproducción de las pistas de todos los
CD. Sólo podrá preparar un programa con el CD parado.
❏
Puede programar hasta 32 pistas en cualquier orden, incluso repetidas.
Notas
Para discos MP3/WMA
• Si intenta seleccionar un disco MP3 que ha sido leído o
reproducido una vez, “MP3 DISC” o “WMA DISC” aparecerá en la pantalla y éste no podrá ser programado.
• El disco MP3/WMA que nunca haya sido leído podrá ser
seleccionado en un modo de programa. Pero cuando
empieza la reproducción, “MP3 DISC” o “WMA DISC”
aparecerá en la pantalla, el programa se borrará y se pasará al siguiente programa.
Para crear un programa
Introduzca los CD.
1
Con el reproductor detenido, seleccione el
2
modo de Reproducción Programada.
Pulse el botón PROGRAM para que se ilumine el indicador
“PRGM” en la pantalla.
Al mismo tiempo, aparece “PROGRAM” en la pantalla.
Cada vez que pulse el botón, la pantalla cambia en este orden:
PROGRAM = Pantalla normal (Reproducción normal) = (vuelta
al principio)
• Si ya se ha creado un programa, en pantalla se mostrará el
último paso del mismo.
Seleccione el CD que desee programar pul-
3
sando uno de los botones de disco (CD1-CD3).
La pantalla se preparará para recibir los datos del programa
que vaya a crear.
o
Número de disco Número de pista
Uso del reproductor de CD
Seleccione la pista que quiera programar.
4
En el sistema
Seleccione la pista mientras parpadee la pantalla, pulsando los botones 4 o ¢ de la unidad para seleccionar la pista y, a continuación, pulse el botón SET antes de 5 segundos.
A las pistas se les asignará un número según el orden en que hayan
sido programadas, empezando por P-1.
Número de
disco
Número de pista
Número de orden de programación
En el mando a distancia
Seleccione el número de pista directamente utilizando las teclas
numéricas. A las pistas se les asignará un número según el orden
en que hayan sido programadas, empezando por P-1.
• Para eliminar el paso del programa actual, pulse el botón CANCEL de la unidad.
Repita los pasos 3 y 4 para programar otras
5
pistas, ya sea del mismo CD o de otro.
Para empezar a escuchar el programa pulse
6
6
el botón CD
Para más información, véase más abajo el apartado “Para escuchar el programa creado”.
Para confirmar el contenido programado, mientras el reproductor de CD está parado, seleccione el modo de programación
pulsando el botón PROGRAM y pulse el botón 4 o ¢ del
mando a distancia.
Para borrar todas las pistas de un programa, mientras el
reproductor de CD está parado, pulse el botón 7 o abra la bandeja
pulsando el botón Abrir/Cerrar CD 0.
Para modificar el programa, mientras el reproductor de CD
está parado y el modo de programa seleccionado, pulse el botón
CANCEL y la última pista del programa se borrará. Para añadir
más pistas al final del programa, repita los pasos 3 y 4 de arriba.
Notas
• Si intenta añadir al programa un número de pista que no
existe en el CD, el sistema anulará la orden de introducir
esa pista.
• Si intenta programar la pista 33 aparecerá en la pantalla
la palabra “FULL”.
.
Para escuchar el programa creado
Pulse el botón CD 6.
La unidad reproduce las pistas en el mismo orden en que se programaron.
• Para utilizar la Reproducción Repetida en el modo de Reproducción
Programada, pulse el botón REPEAT para seleccionar “REPEAT”
antes de iniciar la reproducción. Para más información, consulte el
apartado “Repetición de pistas” en la página 15.
❏ Puede saltar a una pista programada en particular con el botón
4 o ¢ durante la Reproducción Programada.
❏
Para parar la reproducción, pulse el botón 7 una vez. Si pulsa este
7
con el reproductor detenido, se borrará el programa.
botón
Español
14
Page 45

Uso del reproductor de CD
Español
Para salir del programa y recuperarlo más tarde
El programa creado se graba en la memoria. De este modo, si no
borra el programa, puede salir de él temporalmente y recuperarlo
más tarde.
Para salir del modo de programación, pulse el botón 7 para
detener la reproducción. El indicador “PRGM” se apaga y el modo de
programación se cancelará. El programa se guarda en la memoria.
Para volver al modo de Reproducción Programada, pulse
el botón PROGRAM hasta que el indicador “PRGM” se encienda
de nuevo.
• La bandeja no se abrirá durante la reproducción del programa.
Reproducción Aleatoria
Las pistas del CD seleccionado no se reproducirán en ningún orden
especial cuando utilice este modo.
Con el reproductor detenido, seleccione el
1
modo de Reproducción Aleatoria.
Pulse el botón RANDOM para que se ilumine el indicador de
“RNDM” y “1 DISC”.
Al mismo tiempo, aparece “RANDOM” en la pantalla.
Cada vez que pulse el botón, la pantalla cambia en este orden:
RANDOM = Pantalla normal (Reproducción normal) = (vuelta
al principio)
Bloqueo de la bandeja
Esta función permite bloquear electrónicamente la bandeja para
proteger el CD en el interior del reproductor.
Cuando el bloqueo electrónico esté activado, la bandeja no podrá
abrirse incluso cuando se presione el botón Abrir/Cerrar CD 0 de
la unidad.
Cómo bloquear la bandeja
Encienda el sistema y seleccione el repro-
1
ductor de CD como fuente de audio.
Mientras mantiene pulsado el botón 7, pulse
2
0
el botón Abrir/Cerrar CD
El mensaje “LOCKED” aparecerá en pantalla.
• Cada vez que intente abrir la bandeja pulsando el botón Abrir/
Cerrar CD 0, en pantalla aparecerá el mensaje “LOCKED”
para indicarle que la función de bloqueo está activada.
Cómo desbloquear la bandeja
Repita los pasos 1 y 2 anteriores.
El mensaje “UNLOCKED” aparecerá en pantalla.
del sistema.
Pulse el botón CD
2
Las pistas del CD seleccionado se reproducirán en orden aleatorio.
Para detener la reproducción, pulse el botón 7. El modo de
Reproducción Aleatoria se cancela y el indicador “RNDM” y “1
DISC” se apaga.
Para saltarse una pista durante la reproducción, pulse el
botón ¢; el reproductor saltará a la siguiente pista de la secuencia aleatoria.
• Para utilizar la Reproducción Repetida en el modo de Reproducción
Aleatoria, pulse el botón RANDOM para mostrar “REPEAT” y
“1DISC” antes de iniciar la reproducción. Para conocer detalles,
consulte “Repetición de pistas” mencionado más abajo.
6
.
Repetición de pistas
Puede repetir tantas veces como quiera la misma pista o un determinado grupo de pistas.
Pulse el botón REPEAT.
El indicador Repeat cambiará, cada vez que pulse el botón, en el
orden siguiente:
REPEAT 1= REPEAT 1DISC= REPEAT ALL = pantalla normal (Reproducción Normal) = (vuelta al principio)
REPEAT 1: Repite una pista.
REPEAT 1DISC
REPEAT ALL: En el modo Reproducción normal, se repiten to-
:Repite todas las pistas de un CD. (Se puede se-
leccionar en los modos de reproducción normal
y reproducción aleatoria)
das las pistas de todos los CD.
Ahora, podrá utilizar la bandeja normalmente.
• Incluso después de desenchufar el sistema, la condición
de bandeja bloqueada se mantendrá durante unos pocos días. Tras desbloquear la bandeja tras el encendido,
es necesario que realice la operación de desbloqueo.
En el modo de Reproducción normal, el indicador Repeat cambiará,
cada vez que pulse el botón REPEAT, en el orden siguiente:
REPEATÔ Pantalla en blanco
Repite todas las pistas del programa.
Para detener la reproducción, pulse el botón 7. También
puede detenerla cambiando a otra fuente de audio (por ejemplo, al
sintonizador). El modo de Repetición se cancela y el indicador Repeat se apaga.
15
Page 46

Uso de la platina (escuchar una cinta)
TAPE B 3
TAPE A 3
7
0 PUSH OPEN
(Platina B)
4
¢
7
0 PUSH OPEN
TAPE B
TAPE A
22
¡
(Platina A)
Español
Indicadores de platina
* Cuando se utiliza el sistema, la pantalla también muestra otros datos.
Para mayor claridad, mostramos tan sólo los indicadores descritos en esta sección.
La platina le permite reproducir, grabar y copiar cintas de audio.
❏ En esta platina podrá reproducir cintas de tipo I.
No se recomienda el uso de cintas de duración mayor
a 120 minutos (incluyendo cintas de 120 minutos) ya
que estas cintas se estropean fácilmente ye se suelen
enrollar en el arrastre ye en los rodillos.
Reproducción mediante un solo botón
Pulsando el botón TAPE A 3 o TAPE B 3, el sistema se encenderá,
y si hay una cinta en la platina, esta empezará a ser reproducida. Si
no se ha cargado una cinta en la platina A o la platina B, aparecerá
“NO TAPE” en la pantalla, el sistema se encenderá y esperará a que
usted introduzca una cinta, o seleccione otra función.
Reproducción de una cinta
Para escuchar una cinta puede utilizar indistintamente la platina A
o la platina B.
Presione sobre el indicador 0 PUSH OPEN
1
de la platina que desee utilizar.
Cuando se abra el compartimento de la cinta,
2
introduzca el casete, con la cinta expuesta
hacia abajo, deslizándolo hacia la parte inferior del sistema.
La cinta se reproducirá de izquierda a derecha.
Dirección de reproducción de la cinta
3: Indicador de cinta
Presione 0 PUSH OPEN suavemente para
3
cerrar el compartimento del casete.
El indicador de la platina “A” o “B” se ilumina en la pantalla.
Pulse el botón TAPE A 3 o TAPE B 3.
4
El indicador de cinta (3) parpadea en la pantalla y la cinta se
reproduce.
La platina se para automáticamente una vez reproducida una
cara de la cinta.
Para detener la reproducción, pulse el botón 7.
Para sacar la cinta, pare la reproducción y presione sobre el
punto marcado con 0 PUSH OPEN de la platina correspondiente.
Para rebobinar y avanzar la cinta
Durante la reproducción o con el reproductor detenido, pulse el botón
¡ (FF) del sistema para avanzar rápidamente la cinta hacia la derecha; mientras se avance la cinta, no se reproducirá la grabación. (También puede utilizar el botón ¢ del mando a distancia.)
Durante la reproducción o con el reproductor detenido, pulse el botón 1 (REW) del sistema para rebobinar rápidamente la cinta hacia la izquierda; mientras se retroceda la cinta, no se reproducirá la
grabación. (También puede utilizar el botón 4 del mando a distancia.)
Mientras avanza rápidamente la cinta, el indicador de la cinta (3)
se apaga.
Mientras avanza rápidamente la cinta, la iluminación de la barra de
estado de la parte inferior de la pantalla se mueve en el sentido contrario de las agujas del reloj.
Durante el rebobinado, se mueve en el sentido de las agujas del reloj.
• La platina se para automáticamente una vez reproducida una
cara de la cinta.
❏ Mientras avanza o rebobina rápidamente la cinta, puede invertir
la dirección de la cinta pulsando los botones ¡ (FF) o 22
(REW).
16
Page 47

Español
Uso de la platina (grabación)
REC START/STOP
CD REC START
7
TAPE B
TAPE A
DUBBING
0 PUSH OPEN
(Platina A)
TAPE B 3
TAPE A 3
7
PROGRAM
0 PUSH OPEN
(Platina B)
Indicadores de platina
* Cuando se utiliza el sistema, la pantalla también muestra otros datos.
Para mayor claridad, mostramos tan sólo los indicadores descritos en esta sección.
La grabación en cinta desde cualquiera de las fuentes de audio es
muy simple. Coloque una cinta en la platina B, prepare la fuente
de audio, haga un par de ajustes y todo estará listo para grabar. Para
cada fuente de audio el procedimiento es algo distinto, por lo que
los explicaremos por separado. Sin embargo, antes de empezar
conviene que sepa algunas cosas que mejorarán sus grabaciones.
Cosas que debe saber antes de empezar a grabar
❏ La grabación o reproducción de material con copyrig-
ht puede ser ilegal sin el consentimiento del propietario.
❏ El nivel de grabación, que es el volumen al cual se graba la nue-
va cinta, se ajusta automáticamente, por lo que no se ve afectado
por el control de volumen (VOLUME) del sistema. Tampoco se
ve afectado por el ajuste de efectos sonoros. Por lo tanto, durante
la grabación podrá ajustar el sonido que esté escuchando sin
afectar al nivel de grabación.
❏ En la parte superior del casete hay dos pequeñas pestañas, una
para la cara A y otra para la B, que pueden extraerse para evitar
un borrado o grabado accidental de la cinta.
3: Indicador de cinta
Indicador REC
• Al principio y al final de las cintas hay una cinta guía que
no permite la grabación. Así pues, cuando grabe un CD,
una retransmisión de radio, etc., deje correr primero la
cinta guía para asegurarse de que no pierde el principio
de la grabación.
PRECAUCION:
• Si la grabación tiene mucho ruido o parásitos,
puede que el equipo haya estado demasiado
cerca de un televisor encendido durante la grabación. Apague el televisor o aumente la distancia entre el televisor y el equipo.
Cinta adhesiva
❏ Para grabar en una cinta con las pestañas eliminadas, deberá cu-
brir los orificios con cinta adhesiva.
❏ Se puede grabar en cintas del tipo I.
17
Page 48

Grabación Normal
Para grabar desde cualquier fuente de audio a
cinta
Siga estos pasos para grabar desde cualquier fuente de audio a una
cinta colocada en la platina B.
Inserte una cinta virgen o grabada que no le
1
importe borrar en la platina B y avance hasta
pasar la cinta guía inicial.
Dirección de reproducción de la cinta
Prepare la fuente de audio, por ejemplo, sin-
2
tonizando una emisora de radio, introduciendo un CD o seleccionando el equipo
auxiliar.
• Si va a grabar de un CD, consulte más abajo el apartado
“Grabación Sincronizada de CD”.
• Si va a grabar de cinta a cinta, consulte más abajo el apartado “Grabación de Cinta a Cinta (DUBBING)”.
Pulse el botón REC START/STOP del sistema.
3
El indicador “REC” se ilumina y el sistema comienza a grabar.
El indicador de cinta (3) parpadea en la pantalla.
• Si a la cinta de la platina B se le han quitado las pestañas de
protección para evitar que se borre el contenido, en pantalla
aparecerá el mensaje “NO REC”.
Para detener la grabación, pulse el botón REC START/STOP
del sistema, o bien pulse el botón 7.
Grabación en cinta de una emisora en AM (Beat
Cut)
Cuando se grabe una emisora de AM, puede que se produzcan pitidos no audibles aunque escuche la emisora. Sí esto sucede, pulse el
botón FM MODE en el mando a distancia para eliminar los pitidos.
Sintonice la emisora AM y comience la gra-
1
bación.
Pulse el botón FM MODE en el mando a dis-
2
tancia para eliminar los pitidos.
Cada vez que pulse el botón, la pantalla cambia como se muestra a continuación:
BEAT 1 Ô BEAT 2
Grabación Sincronizada de CD
Todo el contenido del CD se graba en cinta en el orden en que está
en el CD o según el orden que ha fijado en el programa.
Prepare los CD. (Véase la página 12.)
1
Pulse el botón CD1-3 para seleccionar el CD que quiera grabar
y luego pulse el botón 7.
• Si desea grabar sólo unas pistas en particular, prográmelas
de antemano. (Véase la página 14.)
• Si quiere grabar un CD solamente, sólo necesita cargar un CD.
Uso de la platina (grabación)
Pulse el botón CD REC START del sistema.
3
“CD REC” aparece en la pantalla y el indicador “REC” se ilumina. A continuación, el sistema activa la función de Reproducción Sincronizada de CD y empieza a grabar las pistas del
CD en la cinta.
Una vez finalizada la grabación de las pistas de todos los CDs,
el reproductor de CD y la platina de casete se detendrán.
• Si a la cinta de la platina B se le han quitado las pestañas de
protección para evitar que se borre el contenido, en pantalla
aparecerá el mensaje “NO REC”.
• Una vez finalizado el CD o el programa en su totalidad, la
cinta se para automáticamente.
Para detener la grabación en cualquier punto, pulse el botón 7. El reproductor de CD y la platina del casete se detienen.
Notas
• Si se pulsa el botón CD REC START cuando aparece “RESUME” (consulte la página 14), comenzará la Reproducción Sincronizada de CD desde el comienzo de la
primera pista.
• Si ajusta el temporizador de desconexión SLEEP durante
una grabación sincronizada de CD, deje tiempo suficiente
para que el CD pueda sonar hasta el final. De lo contrario,
el equipo se apagará antes de finalizar la grabación.
Grabación de Cinta a Cinta (DUBBING)
La grabación de una cinta a otra recibe el nombre de “dubbing”
(doblaje).
Esta función permite copiar fácilmente una cinta en otra pulsando
un solo botón.
Pulse el botón TAPE A 3 y después el botón
1
7.
Inserte la cinta original que quiera grabar en
2
la platina A para reproducirla.
Inserte una cinta virgen o grabada que no le
3
importe borrar en la platina B y avance hasta
pasar la cinta guía inicial.
Pulse el botón DUBBING del sistema.
4
La platina A y la B se pondrán en marcha simultáneamente y
se encenderá el indicador “REC”.
Mientras se esté copiando la cinta, los indicadores “A” y “B”
se encenderán alternativamente.
• Si no se ha insertado ninguna cinta en la platina A, la pantalla mostrará el mensaje “NO TAPE”.
• Si no se ha insertado ninguna cinta en la platina B, la pantalla mostrará el mensaje “NO TAPE”.
Para detener la grabación de cinta a cinta en cualquier
punto, pulse el botón REC START/STOP del sistema, o bien pul-
se el botón 7.
• Mientras esté copiando una cinta, podrá escuchar la reproducción a través de los altavoces o de los auriculares
con efectos de sonido. Sin embargo, los efectos de sonido no se grabarán en la cinta.
Español
Inserte una cinta virgen o grabada que no le
2
importe borrar en la platina B y avance hasta
pasar la cinta guía inicial.
18
Page 49

Uso de equipos auxiliares
AUX
AUX
Español
Cómo escuchar un equipo auxiliar
Si lo desea, puede escuchar equipos auxiliares como, por ejemplo,
un CD portátil, un reproductor de MD, STB, etc.
❏ Asegúrese primero de que el equipo auxiliar está correctamente
conectado al sistema. (Vea la página 6.)
Baje el volumen al mínimo.
1
Pulse el botón AUX.
2
El mensaje “AUX IN” aparecerá en pantalla.
toma AUX
Comience la reproducción del equipo auxi-
3
liar.
Ajuste el nivel de volumen a su gusto.
4
Aplique algún efecto sonoro, si lo desea.
5
• SOUND TURBO (Véase la página 8.)
• SOUND MODE (Véase la página 8.)
• Para saber cómo funciona el equipo auxiliar, consulte el
manual de instrucciones pertinente.
19
Page 50

Uso de los temporizadores
SLEEP
SET
CLOCK/TIMER
Indicador del temporizador de
desconexíón automática (SLEEP)
Indicador del temporizador de grabación (REC)
Indicador del temporizador
* Cuando se utiliza el sistema, la pantalla también muestra otros datos.
Para mayor claridad, mostramos tan sólo los indicadores descritos en esta sección.
Este sistema incorpora tres tipos de temporizadores:
Temporizador diario (DAILY)
Con este temporizador podrá sustituir la alarma del despertador
por música, ya que le permite despertarse cada día con la música
de la fuente que elija.
Temporizador de grabación (REC)
Este temporizador permite grabar emisiones de radio sin estar
presente. Basta con ajustar la hora de inicio y la duración de la
grabación.
Temporizador de desconexión automática (SLEEP)
Duérmase tranquilo, porque el sistema se apagará automáticamente al cabo del tiempo programado.
Puesta en hora del reloj
Cuando enchufe el cable de alimentación a la red, el indicador
“0:00” parpadeará en la pantalla.
El reloj puede ajustarse tanto si el sistema está en marcha como parado.
Indicador del temporizador diario (DAILY)
Ajuste del reloj
En el sistema
Pulse el botón STANDBY/ON para encen-
1
der el sistema.
Pulse repetidamente el botón CLOCK/TIMER
2
hasta que la visualización de puesta en hora
del reloj (indicación de la hora) aparezca en
la pantalla.
Cada vez que pulse el botón, la visualización cambiará de la
forma siguiente:
DAILY = ON TIME = REC = ON TIME = Visualización
de puesta en hora del reloj (indicador de la hora) = Cancelación
=
(vuelta al principio)
¢
4
Español
En el sistema
Pulse el botón CLOCK/TIMER.
1
El dígito de la indicación de la hora parpadeará en la pantalla.
Pulse los botones
2
4
hora.
Si pulsa el botón ¢ la hora avanzará; si pulsa 4, la hora
disminuirá. Para que la hora aumente o disminuya rápidamente, mantenga pulsado el botón.
Pulse el botón SET.
3
Pasan a parpadear en pantalla los dígitos de los minutos.
• Para volver al paso anterior y ajustar la hora, pulse el botón
CANCEL.
Pulse los botones
4
4
minutos.
Pulse el botón SET.
5
El mensaje “CLOCK OK” aparecerá en pantalla. La hora queda
seleccionada y los segundos comienzan a contar a partir de 0.
o
o
¢
para ajustar la
¢
para ajustar los
Pulse el botón SET.
3
Los dígitos de la hora parpadearán en la pantalla.
Siga los pasos 2 a 5 de “Puesta en hora del
4
reloj” mencionados más arriba.
Notas
• Para que funcionen los temporizadores, el reloj debe estar en hora.
• Cada paso de la configuración deberá completarse antes de aprox. 30 segundos. De no ser así, el ajuste se borrará y deberá repetirse desde el principio.
• Es posible que el reloj se atrase o se adelante un minuto
o un par de minutos al mes.
• Si se produce un fallo de corriente, la información del
reloj se perderá instantáneamente. El mensaje “0:00”
parpadea en la pantalla; deberá poner el reloj de nuevo en hora.
20
Page 51

Español
Uso de los temporizadores
Ajuste del temporizador diario (DAILY)
Una vez que haya ajustado el temporizador diario, quedará almacenado en la memoria. Por ello, el temporizador diario se activará
al mismo tiempo cada día hasta que se cancele.
El indicador de temporizador ( ) y el indicador “DAILY” de la
pantalla muestran que el temporizador diario que ha programado
está activado.
El temporizador diario (DAILY) puede ajustarse tanto si el sistema
está en marcha como si está parado.
Notas
• El temporizador diario puede ajustarse tanto si el sistema
está en marcha como si está parado.
• Realice los ajustes en menos de 30 segundos. En caso
contrario, el ajuste se borrará y deberá repetirse el procedimiento desde el principio.
• Si se equivoca al programar el temporizador, pulse el botón CANCEL desde el sistema para cancelar el ajuste.
Esta orden no siempre funciona. Si el botón CANCEL no
le ha permitido cancelar el ajuste, pulse el botón CLOCK/
TIMER del sistema varias veces hasta que la pantalla
vuelva al principio y repita de nuevo todos los pasos.
En el sistema
Pulse el botón CLOCK/TIMER hasta que, inme-
1
diatamente después del mensaje “DAILY”, en
pantalla aparezca el mensaje “ON TIME”.
Cada vez que pulse el botón, la pantalla cambia en este orden:
DAILY = ON TIME* = REC = ON TIME = pantalla de
puesta en hora del reloj = operación cancelada = (vuelta al
principio)
*: Elija esta opción para ajustar el temporizador diario (DAILY).
2. Pulse los botones 4 o ¢ del sistema para seleccionar
los minutos a los que quiere que se ponga en marcha; a continuación, pulse el botón SET.
El mensaje “OFF TIME” aparece y se muestra la pantalla
que permite ajustar la hora de desconexión con temporizador. La hora de desconexión seleccionada la última vez aparece en pantalla y los dígitos de la hora parpadean.
Cómo ajustar la hora de desconexión (por
3
ejemplo: 13:15).
1. Pulse los botones ¢ o 4 del sistema para ser apagado la
hora a la que quiere que se ponga en marcha; a continuación,
pulse el botón SET.
Los dígitos de los minutos de la hora de apagado parpadearán en la pantalla.
2. Pulse los botones ¢ o 4 para ajustar los minutos y luego pulse el botón SET.
Después, el sistema entrará en el modo de ajuste de la hora de
encendido, la hora de encendido actual aparecerá en la pantalla
y los dígitos de la hora parpadearán.
Cómo ajustar la hora de encendido (por
2
ejemplo: 10:15).
1. Pulse los botones ¢ o 4 del sistema para seleccionar la
hora a la que quiere que se ponga en marcha; a continuación,
pulse el botón SET.
Los dígitos de los minutos de la hora de encendido parpadearán en la pantalla.
Si pulsa el botón ¢ la hora avanzará; si pulsa 4, la hora
disminuirá.
Para que la hora aumente o disminuya rápidamente, mantenga pulsado el botón.
El sistema entra en el modo de selección de la fuente de audio y el indicador “TUNER FM” parpadearán en pantalla.
Para seleccionar la fuente de audio.
4
Pulse los botones ¢ o 4 para seleccionar la fuente de audio que desea escuchar y luego pulse SET.
Cada vez que pulse los botones ¢ o 4, la pantalla cambia
en el orden siguiente:
TUNER FM = TUNER AM = CD = TAPE = AUX IN =
(vuelta al principio)
El paso siguiente dependerá de la fuente de audio que seleccione:
Si ha seleccionado TUNER FM o TUNER AM:
Pulse los botones ¢ o 4 para seleccionar el número de
presintonía y luego pulse SET.
Cuando se seleccione “P---”, se ajustará la última emisora que
estuviera escuchando.
Si ha seleccionado CD:
Pulse los botones ¢ o 4 para seleccionar el número de
disco y luego pulse SET.
Cada vez que pulse el botón, el número de disco cambia en este
orden:
DISC – = DISC 1 = DISC 2 = DISC 3 = (vuelta al principio)
• Si no se especifica un número de disco, la reproducción se
iniciará desde la primera pista del disco seleccionado
actualmente.
21
Page 52

Uso de los temporizadores
Si ha seleccionado TAPE:
Inserte en la platina A la cinta que quiera reproducir.
Si ha seleccionado AUX:
Prepare el equipo auxiliar para que se encienda a la hora de encendido programada.
Para ello, el equipo auxiliar debe contar con un temporizador.
Cómo ajustar el nivel del volumen.
5
Pulse el botón ¢ o 4 para seleccionar el nivel del volumen.
MIN, 1-30 o MAX: Cuando se activa el temporizador, el volumen se pone automáticamente en el nivel de volumen seleccionado.
Pulse el botón SET.
6
La programación del temporizador se completa y la pantalla
vuelve a mostrar la información que tenía antes de que usted
programara el temporizador.
Pulse el botón STANDBY/ON para apa-
7
gar el equipo si es necesario.
El indicador del temporizador ( ) y el indicador “DAILY”
permanecen encendidos para informar de que el temporizador
diario está activado.
Paraconfirme/cambiar los ajustes del temporizador, repita el procedimiento de ajuste desde el principio.
Cuando llegue la hora de encendido del temporizador:
Se producirá cada día lo siguiente.
• A la hora de encendido el sistema se pondrá en marcha automáticamente. La fuente de audio seleccionada empezará. El indi-
cador del temporizador ( ) parpadea y el indicador “DAILY”
se ilumina durante el funcionamiento del temporizador.
• A la hora de desconexión (OFF), de que el sistema se apague
automáticamente. Luego, el indicador del temporizador ( ) y
el indicador “DAILY” permanecerá iluminado.
• Si a la hora de encendido el sistema ya está en marcha,
el temporizador diario (DAILY) no actuará.
Para cancelar provisionalmente el temporizador diario
(DAILY):
Pulse el botón CLOCK/TIMER del sistema
1
varias veces hasta que el indicador “DAILY”
aparezca en pantalla.
Pulse el botón CANCEL del sistema.
2
Aparece “OFF” y tanto el indicador de temporizador ( )
como el indicador “DAILY” se apagan.
Para activar el temporizador diario (DAILY) cancelado:
Pulse el botón CLOCK/TIMER del sistema
1
varias veces hasta que el indicador “DAILY”
aparezca en pantalla.
El indicador “DAILY” parpadea y el indicador del temporizador ( ) se enciende en la pantalla.
Pulse el botón SET del sistema.
2
Aparece “DAILY SET” en la pantalla. El indicador de temporizador
( ) y el indicador “DAILY” siguen iluminados, y la pantalla vuelve a mostrar la visualización original.
• Si el sistema se desenchufa o falla la alimentación, los
datos del temporizador permanecerán en la memoria
unos días y luego se perderán. En ese caso, tendría
que fijar primero la hora y luego el temporizador de
nuevo.
Ajuste del temporizador de grabación (REC)
Con el temporizador de grabación (REC), podrá grabar en una cinta un programa de la radio automáticamente aunque no esté en casa.
Cuando haya ajustado el temporizador de grabación (REC) para
que grabe una fuente, el ajuste del temporizador quedará almacenado en la memoria. Por ello, aunque el temporizador de grabación
(REC) se apague después de utilizarlo, puede activarlo en cualquier momento.
Español
Notas
• El temporizador de grabación (REC) puede ajustarse tanto si el sistema está en marcha como si está parado.
• Realice los ajustes en menos de 30 segundos. En caso
contrario, el ajuste se borrará y deberá repetirse el procedimiento desde el principio.
• Si se equivoca al programar el temporizador, pulse el botón CANCEL desde el sistema para cancelar el ajuste.
Esta orden no siempre funciona. Si el botón CANCEL no
le ha permitido cancelar el ajuste, pulse el botón CLOCK/
TIMER del sistema varias veces hasta que la pantalla
vuelva al principio y repita de nuevo todos los pasos.
22
Page 53

Uso de los temporizadores
Español
En el sistema
Ajuste la hora siguiendo el mismo procedimiento que para el temporizador diario (DAILY).
Inserte una cinta virgen o grabada que no le
1
importe borrar en la platina B y avance hasta
pasar la cinta guía inicial.
Pulse el botón CLOCK/TIMER hasta que,
2
inmediatamente después del mensaje “REC”,
en pantalla aparezca el mensaje “ON TIME”.
Cada vez que pulse el botón, la pantalla cambia en este orden:
DAILY = ON TIME = REC = ON TIME* = pantalla de
puesta en hora del reloj = operación cancelada = (vuelta al
principio)
*: Elija esta. opción para ajustar el temporizador de grabación (REC).
Seguidamente, se accede al modo de ajuste de la hora en que debe
encenderse el sistema. La hora de conexión seleccionada la última
vez aparece en pantalla y los dígitos de la hora parpadean.
Elija la hora a la que quiere que se encienda
3
el sistema.
1. Pulse los botones 4 o ¢ para ajustar la hora y luego
pulse el botón SET.
2. Pulse los botones 4 o ¢ para ajustar los minutos y luego pulse SET.
Aparece “OFF TIME” y entonces la pantalla que permite ajustar la hora de desconexión con temporizador. La hora de desconexión seleccionada la última vez aparece en pantalla y los
dígitos de la hora parpadean.
Elija la hora a la que quiere que se apague el
4
sistema.
1. Pulse los botones 4 o ¢ para ajustar la hora y luego
pulse el botón SET.
2. Pulse los botones 4 o ¢ para ajustar los minutos y luego pulse SET.
A continuación, el sistema le permitirá seleccionar el número
de presintonía que desea grabar.
Seleccione el número de presintonía que
5
desee grabar.
1. Pulse los botones 4 o ¢ para seleccionar la banda del sintonizador (TUNER FM o TUNER AM) y luego pulse SET.
2. Pulse los botones 4 o ¢ para ajustar el número de presintonía y luego pulse SET.
Cuando se seleccione “P---”, se ajustará la última emisora que
estuviera escuchando.
Cómo ajustar el nivel del volumen.
6
Pulse el botón ¢ o 4 para seleccionar el nivel del volumen.
MIN, 1-30 o MAX: Cuando se activa el temporizador, el volumen se pone automáticamente en el nivel de volumen seleccionado.
Pulse el botón STANDBY/ON para apagar
8
el equipo si es necesario.
El indicador del temporizador ( ) y el indicador “REC” permanecen encendidos para informar de que el temporizador de
grabación (REC) está activado.
Para confirme/cambiar los ajustes del temporizador, repita el procedimiento de ajuste desde el principio.
Cuando llegue la hora de encendido del temporizador:
• A la hora de encendido el sistema se pondrá en marcha automáticamente. La emisora de radio seleccionada empezará a reproducirse. El indicador del temporizador ( ) y el indicador de la
cinta (3) parpadean, y el indicador “REC” se ilumina durante
el funcionamiento del temporizador.
Para detener la grabación con temporizador, pulse el botón 7.
• A la hora de desconexión (OFF), de que el sistema se apague
automáticamente.
• Si el sistema ya está encendido cuando llega la hora de
activación del temporizador, el temporizador REC no funciona.
Para cancelar provisionalmente el temporizador de grabación (REC):
Pulse el botón CLOCK/TIMER del sistema
1
varias veces hasta que el indicador “REC”
aparezca en pantalla.
Pulse el botón CANCEL del sistema.
2
Aparece “OFF” y tanto el indicador de temporizador ( )
como el indicador “REC” se apagan.
Para activar el temporizador de grabación (REC) cancelado:
Pulse el botón CLOCK/TIMER del sistema
1
varias veces hasta que el indicador “REC”
aparezca en pantalla.
El indicador del temporizador ( ) se enciende y el indicador
“REC” parpadea en la pantalla.
Pulse el botón SET del sistema.
2
Aparece “REC SET” en la pantalla. El indicador de temporizador ( ) y el indicador “REC” siguen iluminados, y la pantalla vuelve a mostrar la visualizacion original.
• Si el sistema se desenchufa o falla la alimentación, los
datos del temporizador permanecerán en la memoria
unos días y luego se perderán. En ese caso, tendría
que fijar primero la hora y luego el temporizador de
nuevo.
Pulse el botón SET.
7
La programación del temporizador se completa y la pantalla
vuelve a mostrar la información que tenía antes de que usted
programara el temporizador.
23
Page 54

Uso de los temporizadores
Ajuste del temporizador de desconexión automática (SLEEP)
Utilice el temporizador de des conexión automática (SLEEP) para
que el sistema se apague automáticamente cuando hayan transcurrido unos minutos. Al ajustar el temporizador de des conexión automática (SLEEP), puede dormirse escuchando música con la
seguridad de que el equipo se apagará solo y que no funcionará
toda la noche.
• Sólo podrá fijar este temporizador con el sistema encendido.
En el mando a distancia
Pulse el botón SLEEP mientras esté escu-
1
chando una de las fuentes de audio del sistema.
El indicador “SLEEP” empezará a parpadear en pantalla.
Determine el tiempo durante el cual desea
2
que funcione el sistema antes de apagarse.
Cada vez que pulse el botón SLEEP, la pantalla cambia en este
orden:
10 = 20 = 30 = 60 = 90 = 120 = OFF= (vuelta al principio)
Espere 5 segundos.
3
El indicador del temporizador “SLEEP” dejará de parpadear y
permanecerá encendido; luego la pantalla volverá a mostrar la
información que tenía antes de empezar el ajuste del temporizador.
El sistema está ahora listo para apagarse al cabo de los minutos
fijados.
Prioridad de los temporizadores
Como el temporizador REC y el temporizador DAILY pueden ajustarse independientemente, tal vez se pregunte usted qué pasará si sus
ajustes coinciden. En este caso las prioridades son las siguientes:
temporizador REC y temporizador DAILY.
• El temporizador que tenga ajustada la hora más temprana
tendrá prioridad. Un temporizador no podrá funcionar mientras esté funcionando otro temporizador.
• Si otro temporizador tiene ajustada la misma hora que la del
temporizador REC, el temporizador REC tendrá prioridad.
❏ El temporizador REC y el temporizador DAILY no funcionarán
mientras esté funcionando el temporizador SLEEP.
Ejemplo
Programa
Temporizador
REC
Temporizador
DAILY
Temporizador
REC
Temporizador
DAILY
Sólo funciona en el modo del temporizador REC.
Inicio
Inicio
21:30 23:0022:3022:00
Tiempo de funcionamiento
Inicio Final
21:30 22:30
Final
Final
Español
Para confirmar la hora del temporizador de desconexión
automática:
Si pulsa el botón SLEEP del mando a distancia, la pantalla mostrará el tiempo queda para que se desconecte el sistema. Espere a que
el sistema vuelva a la pantalla inicial.
Para cancelar el ajuste del temporizador de desconexión automática:
Pulse el botón SLEEP hasta que “OFF” aparezca en la pantalla.
• Al apagar el equipo se desactiva también el temporizador
SLEEP.
• Cuando el temporizador de grabación (REC) y el temporizador diario (DAILY) están funcionando, el temporizador
de desconexión automática (SLEEP) no puede ajustarse.
24
Page 55

Cuidado y mantenimiento
Español
Si trata sus CD y cintas con cuidado, durarán mucho tiempo.
Discos compactos
• Extraiga los discos de su caja sosteniéndolos por el borde y haciendo un poco
de presión en la sujeción central de la
caja.
• No toque la superficie brillante del CD
ni lo doble.
• Vuelva a colocar el CD en la caja después de utilizarlo para evitar que se
doble.
• Procure no rayar la superficie del CD al
guardarlo en el estuche.
• Evite exponerlo a luz solar directa, altas
temperaturas y humedad.
• Un CD sucio no se reproducirá correctamente. Si un CD se ensucia, límpielo
con un paño suave de dentro afuera.
PRECAUCION:
• No utilice disolventes (por ejemplo, limpiador
convencional de discos, diluyente en atomizador, bencina, etc.) para limpiar el CD.
Notas generales
En general, logrará mejores resultados si mantiene sus CD y mecanismos limpios.
• Guarde los CD en sus estuches y archívelos en cajas o estantes.
• Mantenga la tapa superior del sistema cerrada cuando no lo utilice.
Cintas de casete
• Para tensar la cinta de los casetes, inserte
un lápiz en una de las bobinas y gírelo
en la dirección adecuada.
• Si la cinta está floja puede estirarse, cortarse o engancharse en la platina.
• No toque la superficie de las cintas.
• No guarde las cintas:
- En lugares polvorientos
- Bajo luz solar directa o en lugares de
mucho calor
- En zonas húmedas
- Sobre un televisor o altavoz
- Cerca de un imán
Platina de casete
• Si los cabezales, los arrastres o los rodillos metálicos se ensucian, puede suceder lo siguiente:
- Pérdida de la calidad del sonido
- Sonido entrecortado
- Desvanecimiento del sonido
- Borrado incompleto
- Grabación dificultosa
• Limpie los cabezales, los rodillos de arrastre y los metálicos
con un bastoncillo de algodón humedecido con alcohol.
Rodillo de arrastre
Rodillo metálico
Condensación
Puede condensarse humedad en las lentes dentro del sistema en los
casos siguientes:
• Después de poner en marcha la calefacción.
• En un cuarto húmedo.
• Si la unidad cambia directamente de una zona fría a otra
caliente.
Si ocurre, el sistema puede funcionar mal. En este caso, deje el sistema encendido durante unas horas hasta que la humedad se evapore, desenchufe el cable de alimentación y vuélvalo a enchufar.
Cabezales
• Si los cabezales se magnetizan, se producirá ruido y se perderán
las frecuencias altas.
• Para desmagnetizar los cabezales apague el sistema y utilice un
desmagnetizador de cabezales (que puede adquirirse en tiendas
de material electrónico y de música).
25
Page 56

Solución de problemas
• Si tiene problemas con el equipo, compruebe en esta lista la posible solución antes de acudir al servicio técnico.
• Si no puede solucionar el problema o si el sistema se ha dañado físicamente, póngase en contacto con un técnico cualificado, como por ejemplo
su distribuidor oficial, para que lleve a cabo la reparación.
Síntoma Causa posible Solución
No se oye ningún sonido. • Las conexiones son incorrectas o están flo-
La recepción de radio es pobre. • La antena está desconectada.
No se abre la bandeja de disco. • El cable de alimentación CA está desenchu-
El CD salta. El CD está sucio o rayado. Limpie o sustituya el CD. (Véase la
El CD no funciona. El CD está al revés.
El disco MP3/WMA no se reproduce. • No hay archivos MP3/WMA grabados en el
El tiempo de lectura del disco MP3/WMA es
demasiado largo.
No se abre el compartimento del casete. Durante la reproducción de la cinta se ha des-
No puede grabar. Se han eliminado las pestañas de protección
No se puede utilizar el mando a distancia. • La comunicación entre el mando a distancia
Las funciones están deshabilitadas. El microprocesador incorporado ha fallado de-
Aparece “PROTECT” en pantalla y luego se
apaga.
jas.
• Están conectados los auriculares.
• La antena de cuadro AM está demasiado
cerca del sistema.
• La antena monofilar FM no está adecuadamente extendida o colocada.
fado.
• Está bloqueado el sistema de apertura de la
bandeja.
disco.
• Los archivos MP3/WMA no tienen la extensión de archivo .mp3 o .wma en sus nombres
de archivo.
• Los archivos MP/WMA3 no están grabados
en el formato que cumple con la norma ISO
9660 Level 1 o Level 2.
El tiempo de lectura cambia según la complejidad de la configuración de la grabación.
enchufado el cable de alimentación.
contra grabación del casete.
y el sensor del sistema está bloqueada.
• Las pilas están agotadas.
bido a una interferencia eléctrica externa.
Los cables del altavoz entran en contacto unos
con otros.
• Compruebe todas las conexiones y haga las
correcciones oportunas. (Vea las páginas 4
a6.)
• Desconecte los auriculares.
• Vuelva a conectar bien la antena.
• Cambie la posición y la dirección de la
antena de cuadro AM.
• Alargue la antena monofilar FM hasta que
la recepción sea buena.
• Enchufe el cable de alimentación CA.
• Desbloquee el sistema de apertura de la
bandeja. (Véase la página 15.)
página 25.)
Coloque el CD con la cara impresa hacia arriba.
Cambie el disco.
No utilice demasiadas jerarquías y carpetas
cuando grabe. Además, no grabe ningún otro
tipo de pista de audio junto con archivos MP3/
WMA. (Véase la página 11.)
Enchufe el cable de alimentación y encienda el
sistema.
Tape con cinta los orificios del borde posterior
del casete.
• Elimine la obstrucción.
• Cambie las pilas.
Desenchufe el sistema y vuélvalo a enchufar.
Compruebe las conexiones y haga las correcciones oportunas. (Vea la página 5.)
Español
26
Page 57

Español
Características técnicas
Amplificador Equipo
Potência de Saída
Sensibilidad impedancia/de entrada (1 kHz) Tipo Reflejo de graves de 3 vías
AUX IN 400 mV/50 kΩ Unidad de altavoz Woofer: 16,0 cm tipo cónico × 1
Terminales del altavoz 6 Ω - 16 Ω Medio: 5,0 cm tipo cónico × 1
Auriculares 32 Ω - 1 kΩ De agudos;2,0 cm ipo cúpula × 1
Platina de casete Impedancia 6 Ω
Respuesta en frecuencia
Tipo I (NORMAL) 63 Hz - 12 500 Hz Nivel de presión del sonido 87 dB/W·m
Fluctuación y trémolo 0,15 % (WRMS) Dimensiones
Reproductor de CD
Capacidad del cargador
Margen dinámico 85 dB Antena de cuadro para AM (1)
Relación señal/ruido 85 dB Mando a distancia (1)
Fluctuación y trémolo Inapreciable Pilas R6P (SUM-3)/AA (15F) (2)
Sintonizador Antena monofilar de FM (1)
Sintonizador FM Adaptor de enchufe de CA (1)
Rango de sintonización
Sintonizador de AM Consumo 165 W (sistema encendido)
Alcance de Sintonia 530 kHz - 1710 kHz (con un espacio 23 W (en modo de espera)
155 W por canal, mín. RMS,
a 6 Ω a 1 kHz, conuna distorsión Peso Aprox. 9,3 kg
armónica total máxima del 10 % Especificaciones de los altavoces (cada unidad)
(IEC 268-3) SP-MXKC45
Salida de 17 mW/canal en 32 Ω
3 CDs Accesorios
87,5 MHz - 108,0 MHz (con un espacio de AM 10 kHz entre emission) Requisitos eléctricos
87,50 MHz - 108,00 MHz (con un espacio de AM 9 kHz entre emission)
de 10 kHz entre emission) 1 W (en modo de ECO)
531 kHz - 1710 kHz (con un espacio
de 9 kHz entre emission) Diseño y especificaciones sujetos a cambios sin previo aviso.
Capacidad de manejo de potencia
Especificaciones eléctricas
Dimensions
Gama de frecuencia 45 Hz - 22 000 Hz
270 mm × 307 mm × 492 mm (W/H/D)
160 W
220 mm × 324 mm × 238 mm
Peso Aprox. 3,6 kg
CA 110 V - 127 V/220 V - 240 V
ajustabledesde el selector de tension,
50 Hz/60 Hz
(An/Al/Pr)
,
27
Page 58

Obrigado pela aquisição do Sistema Compacto de Componentes da JVC.
Esperamos que seja uma aquisição valiosa para o seu lar, proporcionando muitos anos de divertimento.
Certifique-se de ler este manual de instruções com atenção antes de operar seu novo sistema estéreo.
Nele, você encontrará todas as informações que precisa para configurar e utilizar o aparelho.
Se ainda tiver alguma dúvida depois de ler este manual, entre em contato com seu revendedor.
Recursos
Veja a seguir as características que fazem do seu sistema um produto poderoso e simples de usar.
❏
❏ Foram incluídos os excelentes efeitos SEA (Amplificador de Efeitos Sonoros): Rock, Pop e Clássico.
❏ A função de Som Turbo enriquece ainda mais o som.
❏ Recurso para programação de 45 estações (30 FM e 15 AM), além da sintonização com busca automática e manual.
❏ O permutador de CDs pode operar até 3 CDs.
❏ O toca-fitas duplo permite duplicar fitas.
Português
❏ Funções de temporização: despertador, gravação temporizada e desligamento automático.
❏ Você pode conectar unidades externas diferentes, como gravadores de MD.
❏ O aparelho de CD reproduz CD-Rs e CD-RWs.
Introdução
Os controles e as operações foram reprojetados para facilitar o uso, deixando você mais livre para apreciar a música.
• Com o COMPU PLAY da JVC, você pode ligar o sistema e iniciar o rádio, o toca-fitas ou o aparelho de CD
com apenas um toque.
• Os discos podem ser substituídos durante a reprodução com o uso da bandeja tipo Carrossel (rotativa).
Como Este Manual Está Organizado
• As informações básicas que são comuns a várias funções – p. ex., o ajuste do volume – são apresentadas na seção “Operações
Básicas” e não são repetidas em cada tópico de função.
• Os nomes dos botões/controles e as mensagens do visor são grafadas em letras maiúsculas: p. ex., FM/AM, “NO DISC” (SEM
DISCO).
• Se os nomes dos botões no sistema e no controle remoto forem os mesmos, a descrição de onde o botão é usado será omitida.
• As funções do sistema são grafadas somente com letra inicial maiúscula: p. ex., Normal Play (Reprodução Normal).
Use o índice para procurar as informações específicas que necessita.
Elaboramos este manual para você com muita satisfação. Esperamos que sirva para ajudá-lo a usufruir dos diversos recursos fornecidos
com o sistema.
PRECAUÇÕES IMPORTANTES
Instalação do Sistema
1
• Escolha um local plano, seco e não exposto a temperaturas excessivas. (Entre 5ºC e 35ºC.)
• Deixe distância suficiente entre o sistema e a TV.
• Não use o sistema em local sujeito a vibrações.
Cabo de alimentação
2
• Não manuseie o cabo de alimentação com as mãos molhadas!
• Se o cabo de alimentação estiver conectado à tomada da parede, sempre haverá consumo de energia .
• Sempre que retirar a tomada macho do sistema da tomada de energia na parede, puxe pela tomada e nunca pelo cabo de alimentação.
Defeitos, etc.
3
• Não existem peças reparáveis no interior do aparelho. Em caso de defeito no sistema, desconecte o cabo de alimentação e consulte
seu revendedor.
• Não introduza nenhum objeto metálico no interior do sistema.
1
Page 59

Conteúdo
Introdução......................................................................................................................1
Recursos................................................................................................................................................... 1
Como Este Manual Está Organizado....................................................................................................... 1
PRECAUÇÕES IMPORTANTES ..........................................................................................................1
Conteúdo........................................................................................................................2
Iniciando.........................................................................................................................3
Acessórios................................................................................................................................................ 3
Ajuste o interruptor VOLTAGE SELECTOR......................................................................................... 3
Como Colocar as Baterias no Controle Remoto...................................................................................... 3
Usando o Controle Remoto .....................................................................................................................4
Conectando a Antena de FM ................................................................................................................... 4
Conectando a antena de AM.................................................................................................................... 5
Conectando as caixas acústicas ............................................................................................................... 5
Conectando Equipamentos Externos....................................................................................................... 6
Conectando com a Tomada na Parede..................................................................................................... 6
Modo DEMO........................................................................................................................................... 6
COMPU Play........................................................................................................................................... 6
Operações Básicas .......................................................................................................7
Ligando e Desligando o Sistema ............................................................................................................. 7
Modo ECO (ECO)................................................................................................................................... 7
Ajustando o Volume................................................................................................................................ 8
Cortando o Volume (FADE MUTING) .................................................................................................. 8
Realçando o som (SOUND TURBO)...................................................................................................... 8
Selecionando o MODO DE SOM (SOUND MODE) ............................................................................. 8
Inserindo o Número com o Controle Remoto (Teclas Numéricas) ......................................................... 8
Alterando o Visor .................................................................................................................................... 8
Usando o Sintonizador .................................................................................................9
Sintonizando uma Estação....................................................................................................................... 9
Programando Estações........................................................................................................................... 10
Para Alterar o Modo de Recepção de FM ............................................................................................. 10
Usando o Aparelho de CD ..........................................................................................11
Para inserir CDs..................................................................................................................................... 12
Para retirar CDs ..................................................................................................................................... 12
Alterando o modo de reprodução de MP3/WMA ................................................................................. 12
Noções Básicas de Como Usar a Reprodução Normal do Aparelho de CD ......................................... 13
Continuar a Reprodução de CDs de Áudio e Discos de MP3/WMA .................................................... 14
Programando a Ordem de Reprodução das Faixas................................................................................ 14
Reprodução Aleatória............................................................................................................................ 15
Repetindo Faixas ................................................................................................................................... 15
Função de Bloqueio da Bandeja ............................................................................................................ 15
Usando o Toca-Fitas (Ouvindo uma Fita) .................................................................16
Reproduzindo uma Fita ......................................................................................................................... 16
Usando o Toca-Fitas (Gravando)...............................................................................17
Gravação Padrão.................................................................................................................................... 18
Gravação Sincronizada de CDs ............................................................................................................. 18
Gravação de Fita para Fita (DUPLICAÇÃO) ....................................................................................... 18
Usando um Equipamento Externo.............................................................................19
Ouvindo o Equipamento Externo .......................................................................................................... 19
Usando os Temporizadores .......................................................................................20
Ajustando o Relógio .............................................................................................................................. 20
Corrigindo o Relógio............................................................................................................................. 20
Ajustando o Despertador ....................................................................................................................... 21
Ajustando o Temporizador de Gravação............................................................................................... 22
Ajustando o Desligamento Automático................................................................................................. 24
Prioridade dos Temporizadores.............................................................................................................24
Cuidados e Manutenção.............................................................................................25
Solução de Problemas................................................................................................26
Especificações ............................................................................................................27
Português
2
Page 60

Acessórios
Verifique se todos os itens abaixo foram fornecidos com o sistema.
Se algum desses itens não estiver presente, entre em contato imediatamente com seu revendedor.
Ajuste o interruptor VOLTAGE SELECTOR
Para evitar possíveis danos ao seu aparelho, escolha a voltagem antes de ligá-lo à corrente elétrica.
Escolha a voltagem correta de sua área residencial, utilizando o interruptor VOLTAGE SELECTOR (seletor de voltagem) localizado na
parte traseira de seu aparelho. Utilize uma chave de fenda para desligar o seletor para cima e para baixo.
Português
Iniciando
Antena de quadro AM (1)
Antena de arame FM (1)
Controle remoto (1)
Baterias (2)
Adaptador de Plugue CA (1)
CUIDADO:
• Faça todas as conexões antes de ligar o aparelho à corrente elétrica (CA).
Como Colocar as Baterias no Controle Remoto
Faça com que a polaridade (+ e –) das baterias corresponda às marcas + e – do compartimento de baterias.
R6P (SUM-3) /AA (15F)
CUIDADO:
• Manuseie as baterias corretamente.
❏ Para evitar vazamentos nas baterias ou explosões:
• Remova as baterias quando o controle remoto não for utilizado por períodos mais longos.
• Sempre substitua ambas as baterias ao mesmo tempo.
• Não misture baterias usadas com novas.
• Não use tipos diferentes de baterias simultaneamente.
3
Page 61

Iniciando
Usando o Controle Remoto
O controle remoto facilita o uso de muitas funções do seu sistema, permitindo operá-lo a uma distância de até 7 metros.
Só é preciso apontar o controle remoto para o sensor localizado no painel frontal do sistema.
Sensor remoto
CUIDADO:
• Faça todas as conexões de áudio antes de conectar o sistema à tomada elétrica CA.
Português
Conectando a Antena de FM
Usando a Antena de Arame Incluída
Antena de arame FM
Usando o Conector Coaxial (não incluído)
Uma antena de 75Ω com conector coaxial (IEC ou DIN45 325) deve ser conectada ao terminal COAXIAL de FM de 75Ω.
Se a recepção for ruim, use uma antena externa.
Antena de FM externa
(não incluída)
Cabo coaxial
• Antes de conectar o cabo coaxial de 75 ohm (com condutor redondo, que leva a uma antena externa), desconecte a
antena de arame FM incluída.
4
Page 62

Iniciando
Conectando a antena de AM
Painel Traseiro da Unidade
Português
• Mesmo se conectar uma antena de AM externa, mantenha a antena de quadro interna conectada.
Antena externa de AM (não incluída)
Se a recepção for deficiente, conecte a antena externa.
Gire o quadro até
conseguir a melhor
recepção.
Antena de quadro AM (incluída)
Prenda o quadro da antena de AM à base
encaixando as lingüetas nos furos da base.
CUIDADO:
• Para evitar ruído, mantenha as antenas afastadas do sistema, do cabo de conexão e do cabo de
alimentação CA.
Conectando as caixas acústicas
1. Abra cada um dos terminais para conectar os fios das caixas acústicas.
2. Conecte os fios das caixas aos terminais das caixas na unidade. Conecte os fios cinza (+) e cinza com listra preta (–) da caixa acústica
direita aos terminais vermelho (+) e preto (–) com a marca RIGHT (direita) no sistema. Conecte os fios cinza (+) e cinza com listra preta
(–) da caixa acústica esquerda aos terminais vermelho (+) e preto (–) com a marca LEFT (esquerda) no sistema.
3. Feche cada um dos terminais.
Lado direito (visto por
Cinza com
listra preta
Cinz
Cinza
Cinza com
listra preta
Lado esquerdo
CUIDADO:
• Um aparelho de TV situado muito próximo das caixas acústicas poderá exibir cores irregulares. Se isso
ocorrer, afaste as caixas do aparelho de TV.
• Use somente caixas acústicas com a impedância correta. A impedância correta é indicada no painel
traseiro.
5
Page 63

Iniciando
Conectando Equipamentos Externos
Conecte o cabo de som com miniplugues estéreo (não fornecido) entre a tomada AUX do sistema no painel frontal e a tomada de saída ou
os terminais de saída de áudio do equipamento externo – aparelho portátil de CD/MD, STB (decodificador de TV a cabo), etc.
Você poderá então ouvir a fonte externa através do seu sistema.
Cabo de som (não incluído)
Branco
Canal esq.
Canal dir.
Vermel
Para a saída de
áudio do
equipamento
externo.
Conectando com a Tomada na Parede
Conecte o cabo de alimentação CA à tomada da parede.
Seu sistema está pronto para ser usado!
Modo DEMO
Quando o sistema é conectado à tomada de energia, o modo DEMO é iniciado automaticamente, mostrando alguns de seus recursos.
Para desativar a exibição do DEMO, pressione qualquer botão de operação. A demonstração é interrompida imediatamente.
Para ativar a exibição do DEMO, pressione o botão DEMO na unidade por mais de 2 segundos.
(Por 2 segundos)
• Se o sistema estiver ligado, a exibição do DEMO será iniciada automaticamente se não for efetuada nenhuma operação
em 2 minutos. Para cancelar essa função automática, pressione o botão CANCEL na unidade durante a demonstração.
Português
COMPU Play
O recurso COMPU PLAY da JVC permite controlar as funções do sistema usadas com maior freqüência com apenas um toque.
Com a Operação em Um Toque, você pode reproduzir um CD ou uma fita, ligar o rádio ou ouvir um equipamento externo pressionando
apenas uma vez o botão de reprodução para a função. A Operação em Um Toque liga o sistema e inicia a função especificada. Se não estiver
pronto (não tiver CD ou fita), o sistema ainda assim será ligado para que você insira o CD ou a fita.
O uso da Operação em Um Toque em cada caso é explicado na seção correspondente.
Os botões do COMPU PLAY são:
Na unidade
Botão CD 6
Botão FM/AM
Botões TAPE A 3, FITA B 3
Botão AUX
Botões CD1, CD2 e CD 3
Botão Abrir/Fechar CD 0
No controle remoto
Botão CD 6
Botão FM/AM
Botões TAPE A, TAPE B
Botão AUX
Botões CD1, CD2 e CD 3
6
Page 64

Operações Básicas
numéricas
DISPLAY
SOUND
TURBO
Português
SOUND
Teclas
MODE
STANDBY/ON
Indicador de
(STANDBY/ON)
Indicador de Som Turbo
* Quando o sistema está em uso, o visor mostra também outros itens. Para
simplificar, mostramos aqui somente os itens descritos nesta seção.
STANDBY
SOUND TURBO
PHONES
VOLUME +, –
FADE MUTING
ECO
Informações
variadas
Indicador do Modo de
Som
Barra de
nível
Barra de status (indica os vários status).
Visor
SOUND MODE
VOLUME
Ligando e Desligando o Sistema
Ligando o Sistema
Pressione o botão STANDBY/ON .
1
ou
O visor é ativado e o aviso “POWER ON” (LIGADO) é
exibido uma vez. O indicador STANDBY (ESPERA) se
apaga.
O sistema fica pronto para ser operado no modo em que estava
quando foi desligado da última vez.
Desligando o Sistema
Pressione o botão STANDBY/ON novamente.
1
ou
O aviso “GOOD BYE” (ADEUS) é exibido e o visor se apaga,
exceto pelo relógio. O indicador STANDBY (ESPERA) se
acende. (A luminosidade do visor é reduzida.)
• Há sempre algum consumo de energia, embora o sistema
esteja desligado (é o chamado "modo de Espera").
• Para desligar totalmente o sistema, desconecte o cabo de
alimentação CA da tomada da parede. Quando a energia
elétrica é cortada, o relógio volta imediatamente para 0:00.
Modo ECO (ECO)
O sistema tem três modos de energia: ligado, desligado (espera) e
ECO. No modo ECO, o visor se apaga e o consumo de energia é
menor.
Para entrar no modo ECO, pressione o botão ECO na unidade
em modo de Espera (quando o indicador de STANDBY estiver
aceso). O aviso “ECO MODE” (MODO ECO) aparece no visor e
se apaga. O indicador STANDBY permanece aceso.
Para cancelar o modo ECO e ligar o sistema, pressione o
botão STANDBY/ON. na unidade.
Para cancelar o modo ECO e entrar no modo de Espera,
pressione novamente o botão ECO.
7
Page 65

Operações Básicas
Ajustando o Volume
Gire o controle de VOLUME da unidade no sentido horário para
aumentar o volume, ou no sentido anti-horário para diminuir.
No controle remoto, pressione o botão VOLUME + para aumentar
o volume ou o botão VOLUME – para diminuir.
Você pode ajustar o nível de volume para MIN, 1-30 ou MAX.
• Quando você desliga o sistema com o volume acima de
19, o nível do volume é automaticamente ajustado para
19 quando a energia é reativada.
CUIDADO:
• NÃO ligue o sistema e/ou comece a reproduzir
qualquer fonte sem antes ajustar o controle de
VOLUME no nível mínimo, pois o impacto de um
som alto repentino pode causar danos à
audição, aos alto-falantes e/ou aos fones de
ouvido.
Para ouvir individualmente
Conecte os fones de ouvido à tomada PHONES (FONES). Os altofalantes são desativados.
Certifique-se de diminuir o volume antes de conectar ou
posicionar na cabeça os fones de ouvido.
Cortando o Volume (FADE MUTING)
Você pode cortar o som com apenas um toque.
Para cortar o som, pressione o botão FADE MUTING (MUDO
GRADUAL) no Controle Remoto. A saída é gradualmente
cortada.
Para liberar o som, pressione novamente o mesmo botão. O
volume voltará gradualmente ao nível anterior.
• Após o corte do volume, se girar o controle de VOLUME na
unidade ou pressionar o botão VOLUME no controle remoto,
você aumentará ou diminuirá o volume a partir do nível
anterior.
Realçando o som (SOUND TURBO)
Selecionando o MODO DE SOM (SOUND MODE)
Você pode selecionar um dos 3 modos SEA (Amplificador de
Efeitos Sonoros).
Esses efeitos só podem ser usados na reprodução.
Para obter o efeito, pressione o botão SOUND MODE (MODO
DE SOM) até que o modo de som desejado apareça no visor. O
indicador SOUND MODE é exibido no visor.
Cada vez que você pressiona o botão, o modo de som se altera do
seguinte modo:
ROCK = POP = CLASSIC = FLAT = (de volta ao início)
Para cancelar o efeito, pressione o botão SOUND MODE até
que “FLAT” apareça no visor.
O indicador “SOUND MODE” se apaga.
ROCK Reforça as freqüências de som baixo e
agudo. Bom para música acústica.
POP Bom para música vocal.
CLASSIC (Clássico) Obtém-se um som amplo e
dinâmico.
FLAT (Normal) Sem efeito de som.
Inserindo o Número com o Controle Remoto (Teclas Numéricas)
Para programar estações, ativar estações programadas ou
programar faixas do CD para reprodução, use as teclas numéricas
do controle remoto.
Veja a seguir como inserir o número com as teclas numéricas.
Exemplos:
• Para inserir o número 5, pressione 5.
• Para inserir o número 15, pressione 10 = 1 = 5.
• Para inserir o número 20, pressione 10 = 2 = 0.
(Somente para discos de MP3/WMA)
• Para inserir o número 125, pressione 10 (2 vezes) = 1 =
2 = 5.
Alterando o Visor
APENAS no controle remoto
Cada vez que você pressiona o botão DISPLAY (VISOR), o visor
muda da seguinte forma:
Fonte selecionada no momento Ô Hora atual
Português
As freqüências altas e baixas são bastante incrementadas.
Para obter o efeito, pressione o botão SOUND TURBO (SOM
TURBO).
A lâmpada indicadora de SOUND TURBO acende e o aviso “STURBO” é exibido no visor.
Para cancelar o efeito, pressione novamente o botão.
O indicador de SOUND TURBO apaga e o aviso “OFF”
(DESLIGADO) é exibido no visor.
8
Page 66

Português
Usando o Sintonizador
Teclas
numéricas
FM/AM
1
¡
1
FM/AM
MODO FM
¡
Indicação da faixa, Indicação da freqüência, Canal programado
SET
¢
4
* Quando o sistema está em uso, o visor também mostra outros itens. Para
simplificar, mostramos aqui somente os itens descritos nesta seção.
Você pode ouvir estações de FM e AM. Elas podem ser
sintonizadas manual ou automaticamente ou através de
programação armazenada na memória.
❏ Antes de ouvir o rádio:
• Verifique se as antenas de FM e AM estão conectadas
corretamente. (Consulte as páginas 4 e 5.)
Ajustando o Intervalo de Espaço do Sintonizador
de AM
Quando o aparelho é embalado, o intervalo do sintonizador é
ajustado para um espaço de 10 kHz (espaço de 100 kHz para
emissão FM). Você pode mudá-lo para um espaço de 9 kHz.
Para selecionar intervalos de 9 kHz, pressione o botão 7 no
controle remoto por mais de 2 segundos na modalidade à espera
para indicar “AM-10” no mostrador e pressione o botão 9 no
controle remoto (espaço de 50 kHz para emissão FM).
Para voltar a selecionar intervalos de 10 kHz outra vez,
pressione o botão 7 no controle remoto por mais de 2 segundos na
modalidade à espera para indicar “AM-9” no mostrador e
pressione o botão 10 no controle remoto.
Rádio em Um Toque
Basta pressionar o botão FM/AM para ligar o sistema e ouvir a
estação sintonizada por último.
❏ Você pode passar de qualquer outra fonte sonora para o rádio
pressionando o botão FM/AM.
Indicadores do modo FM
Sintonizando uma Estação
Pressione o botão FM/AM.
1
A última faixa e freqüência sintonizadas aparecem no visor.
Cada vez que você pressiona o botão, a faixa alterna FM e AM.
ou
Selecione uma estação usando um dos
2
seguintes métodos.
• Sintonia Manual
Pressione rapidamente o botão 22 ou ¡ para mudar a
freqüência até encontrar a emissora desejada.
OU
• Sintonia Automática
Se você mantiver o botão 22 ou ¡ pressionado por um
segundo ou mais e liberá-lo, o valor da freqüência diminuirá
ou aumentará até que uma emissora seja encontrada.
• Sintonia Programada (possível somente depois
de ter programado as estações)
Sintonia programada através da unidade:
Selecione o número programado pretendido usando o botão
4 ou ¢.
OU
9
Page 67

Usando o Sintonizador
Exemplo:
Pressione o botão ¢ até que o número programado “P-12”
apareça no visor. Em seguida, o visor exibirá a faixa e a
freqüência do número programado.
Sintonia programada através do controle remoto:
Insira o número programado pretendido usando as teclas
numéricas. Consulte “Inserindo o Número com o Controle
Remoto” na página 8.
• Em transmissões de AM, a sensibilidade da recepção
será alterada se a antena de quadro for girada. Gire a
antena de quadro AM para obter a melhor recepção.
Programando Estações
Você pode programar até 30 estações de FM e até 15 de AM.
Repita as etapas acima de 2 a 5 para cada
6
estação que quiser armazenar na memória
com um número programado.
Para alterar as estações programadas, repita as mesmas
etapas acima.
• Na etapa 4, você pode selecionar o número programado
usando as teclas numéricas do controle remoto. Consulte
“Inserindo o Número com o Controle Remoto” na página
8.
CUIDADO:
• Mesmo que o sistema seja desligado ou haja
alguma falha no fornecimento de energia
elétrica, as estações programadas continuarão
armazenadas por alguns dias. No entanto, caso
as estações programadas sejam apagadas, será
necessário reprogramá-las.
Para Alterar o Modo de Recepção de FM
Português
• Os números programados podem ter sido ajustados para
testes de freqüência de fábrica antes da expedição do
produto. Isso não é considerado um defeito. Você pode
programar as estações que quiser na memória seguindo
um dos métodos de programação a seguir.
• Durante a programação das estações, se nenhum botão
de operação for acionado em 5 segundos, o visor voltará
a exibir a faixa e a freqüência. Nesse caso, repita as
etapas desde o início.
TUNING
FM=30, AM=15
Ao alterar a faixa
PRESET
ouou
No Sistema
Selecione uma faixa pressionando o botão
1
de FM/AM.
Pressione o botão
2
sintonizar uma estação.
Pressione o botão SET (DEFINIR).
3
O aviso “SET” pisca por 5 segundos.
22
ou
¡
para
Quando uma emissora de FM estéreo é sintonizada, o indicador
“ST (Stereo)” acende e você pode ouvir os efeitos do som estéreo.
Se uma transmissão em FM estéreo apresentar ruídos ou
oscilações, você pode selecionar o modo Monoauricular
(“Mono”). A recepção melhora, mas você perde o som estéreo.
Pressione o botão FM MODE (MODO FM) no controle
remoto para que o indicador “MONO” seja exibido no
visor.
ST MONO
Para restaurar o efeito estéreo, pressione o botão FM MODE
no controle remoto para que o indicador “MONO” seja apagado.
Enquanto “SET” estiver piscando, pressione o
4
botão
4
ou
¢
para selecionar o número
do programa.
: Aumenta o número programado em uma unidade.
¢
: Diminui o número programado em uma unidade.
4
Pressione o botão SET (DEFINIR).
5
É exibido o aviso “STORED” (“ARMAZENADO”) e, após 2
segundos, o visor volta a mostrar a faixa/freqüência.
10
Page 68

Português
Usando o Aparelho de CD
CD1-CD3
Teclas
numéricas
4
CD1-CD3
REPEAT
PROGRAM
¢
7
CD 6
RANDOM
MP3/WMA
MODE
1
¡
Número da faixa, Tempo de
reprodução, Número do
programa, etc.
Indicador
de WMA
Abrir/Fechar
CD 0
DISC SKIP
CANCEL
SET/RESUME
CD 6
¢
REPEAT
PROGRAM
RANDOM
7
4
Indicador de MP3
Indicador de Programa
Indicadores de CD
* Quando o sistema está em uso, o visor também mostra outros itens. Para
simplificar, mostramos aqui somente os itens descritos nesta seção.
Este aparelho foi concebido para reproduzir os seguintes tipos de
CDs:
• CD de áudio
• CD-R (CD gravável)
• CD-RW (CD regravável)
• Disco de MP3/WMA (Arquivos MP3/WMA gravados em um
CD-R ou CD-RW)*
Somente os CDs que apresentam
esta marca podem ser usados neste
Recordable
ReWritable
sistema. O uso contínuo de CDs de
formato irregular (em forma de
coração, octogonais, etc.) pode
danificar o sistema.
Ao reproduzir um CD-R ou CD-RW
• CD-Rs e CD-RWs editados pelo usuário podem ser reproduzidos
se já tiverem sido “finalizados”.
• Antes de reproduzir CD-Rs ou CD-RWs, leia com atenção as
instruções ou precauções pertinentes.
• Alguns CD-Rs ou CD-RWs podem não ser reproduzidos nesta
unidade em virtude de suas características, devido a danos ou
manchas, ou se a lente do leitor de CD estiver suja.
• Os CD-RWs podem precisar de um tempo de leitura mais
longo, pois a refletância desses discos é inferior a dos CDs
comuns.
Indicador de
Aleatório
Indicador de
Repetir
*Para discos de MP3/WMA
• Este sistema gerencia os arquivos e pastas nos discos de MP3/
WMA como “faixas” e “álbuns”.
• A ordem de reprodução dos arquivos MP3/WMA (faixas)
gravados em um disco é determinada pelo aplicativo de
gravação (ou codificação); portanto, a ordem de reprodução
pode ser diferente da ordem pretendida durante a gravação dos
arquivos e pastas.
• Este sistema exibe os nomes dos arquivos (faixas) e as marcas
ID3v1 (somente “Título”, “Artista” e “Álbum”) no visor após o
início da reprodução. No entanto, há um limite de caracteres
disponíveis e alguns nomes de arquivo e marcas ID3 não são
exibidos corretamente.
Mais sobre discos de MP3/WMA
• Os discos de MP3/WMA (CD-R ou CD-RW) exigem um
tempo de leitura mais longo. (Isso varia de acordo com a
complexidade da configuração de gravação.)
• Ao criar um disco de MP3/WMA, selecione ISO 9660
Nível 1 ou Nível 2 para formato do disco.
• Este sistema não suporta a gravação de sessões
múltiplas.
• Esta unidade só pode reproduzir arquivos MP3/WMA
com as seguintes extensões — “.mp3” y “.wma”.
• Os arquivos não-MP3/WMA são ignorados. Se houver
arquivos não-MP3/WMA gravados com arquivos MP3/
WMA, o sistema levará mais tempo para analisar o disco.
Isso também pode gerar erros na unidade.
• Alguns discos de MP3/WMA podem não ser
reproduzidos em virtude de suas características ou
condições de gravação.
11
Cuidados na reprodução de DualDiscs (DVD/CD)
O lado não-DVD de um “DualDisc” não é compatível com o
padrão de áudio digital para CDs. Por isso, não é recomendável a
utilização do lado não-DVD de um DualDisc com este produto.
Page 69

Usando o Aparelho de CD
Sobre o indicador de disco:
Indicador de
rotação do disco
O indicador de CD consiste nos três tipos de indicadores que se
seguem:
Indicador do número do
disco:
Indicador do disco
selecionado:
Indicador de rotação do
disco:
Acende sempre.
Acende para o número do disco
selecionado no momento.
É executado quando o CD
selecionado está sendo
reproduzido ou está parado. Este
indicador apaga se não houver
CD carregado para o número de
disco selecionado.
Indicador do
número do disco
Indicador do disco
selecionado
Reprodução em Um Toque
A energia é ativada e as operações são feitas automaticamente.
❏ Pressione o botão CD 6 para ativar o sistema e reproduzir o
CD a partir da primeira faixa caso haja um CD carregado para o
número de disco selecionado por último.
❏ Pressione o botão CD1-CD3 para ligar o sistema e começar a
reproduzir o CD a partir da primeira faixa caso haja um CD
carregado para o número de disco selecionado.
Para inserir CDs
Pressione o botão Abrir/Fechar CD 0 no
1
sistema para abrir a bandeja.
Coloque um ou dois CDs na bandeja, com o
2
rótulo voltado para cima.
Certifique-se de que o CD esteja devidamente assentado no
interior do rebaixo na bandeja do disco.
Com o rótulo para cima
❏ Ao usar um CD de 8 cm, coloque-o no círculo interno da
bandeja.
❏ Você pode inserir CDs enquanto ouve outra fonte sonora ou
enquanto um CD é reproduzido.
❏ Quando a energia elétrica é desativada com a bandeja aberta,
esta se fecha automaticamente.
❏ Se o CD não puder ser lido corretamente (por estar arranhado,
por exemplo), o aviso “ NO DISC” (SEM DISCO) será exibido
no visor.
Para retirar CDs
Retire o CD conforme a figura abaixo.
Depois que o aparelho de CD parar,
1
0
pressione o botão Abrir/Fechar CD
no
sistema para abrir a bandeja.
Remova o CD e pressione o botão DISC SKIP
2
(PULAR DISCO) no sistema.
A bandeja gira para o próximo CD.
Repita a etapa 2 para remover todos os CDs.
3
Pressione o botão Abrir/Fechar CD 0 no
4
sistema para fechar a bandeja.
❏ Você pode remover CDs enquanto ouve música de outras fontes
sonoras.
Dicas:
• Removendo/trocando CDs durante a reprodução.
Enquanto um CD (por exemplo, o CD1) é reproduzido, você pode
remover ou trocar os outros CDs (por exemplo, o CD2 e CD3)
pressionando Abrir/Fechar CD 0. Depois de remover ou trocar,
pressione o mesmo botão para fechar a bandeja.
Alterando o modo de reprodução de MP3/WMA
Ao reproduzir um disco de MP3/WMA, você pode escolher o
modo de reprodução do disco como se segue:
Modo TRACK (FAIXA):
O sistema reconhece apenas as faixas (arquivos). Você pode
reproduzir um disco de MP3/WMA como um CD de áudio.
Modo GROUP (GRUPO):
O sistema reconhece as faixas (arquivos) e os álbuns (pastas) em
um disco de MP3/WMA. Você pode reproduzir o disco de acordo
com a maneira como as gravações foram agrupadas.
Português
Pressione o botão DISC SKIP (PULAR
3
DISCO) no sistema e coloque o CD seguinte.
Quando você pressiona o botão, a bandeja gira para o CD
seguinte.
Pressione o botão Abrir/Fechar CD 0 no
4
sistema.
A bandeja se fecha.
APENAS no controle remoto
Pressione MP3/WMA MODO (MODO MP3/
WMA) antes ou durante a reprodução de um disco
de MP3/WMA.
O indicador GROUP aparece quando o modo de
reprodução de MP3/WMA é o modo GROUP.
• Todas as vezes que você pressiona o botão, o modo de
reprodução de MP3/WMA é alternado entre “GROUP” e
“TRACK”.
12
Page 70

Usando o Aparelho de CD
Noções Básicas de Como Usar a Reprodução Normal do Aparelho de CD
Para reproduzir CDs
1
2
❏ Você pode começar a reproduzir o disco selecionado no
Português
Para CD de áudio
Para disco de MP3/WMA (As ilustrações são para
discos de MP3.)
Quando o botão do disco (CD1-CD3) é pressionado com a bandeja
aberta, a bandeja é fechada e o CD selecionado começa a ser
reproduzido automaticamente.
Para parar a reprodução do CD, pressione o botão 7.
Para CD de áudio
Insira os CDs
Pressione o botão do disco (CD1-CD3) que
deseja reproduzir.
O número do disco selecionado (por exemplo, “CD DISC 1”)
aparece no visor.
A primeira faixa do CD selecionado começa a ser reproduzida.
Quando o primeiro CD termina sua reprodução, o CD seguinte
e o terceiro são reproduzidos em seqüência.
Quando o último CD termina sua reprodução, o aparelho
retorna ao primeiro CD e pára automaticamente.
momento simplesmente pressionando o botão CD 6.
CD sendo
reproduzido
Número da faixa Tempo de reprodução decorrido
Modo TRACK
Número da faixa
Modo GROUP
Número da faixa no grupo atual
• Após a exibição dos dados acima, se as faixas incluírem
marcas ID3, o visor fará a rolagem do nome do arquivo,
título, artista e álbum e, em seguida, voltará à exibição
original.
Modo GROUP
Número total de grupos
Para fazer uma pausa, pressione o botão CD 6. A indicação
de tempo de reprodução pisca no visor.
Para cancelar a pausa, pressione novamente o botão CD6.
A reprodução continua do ponto em que foi interrompida.
Dicas:
• Reproduzindo o CD usando o botão DISC SKIP
(PULAR DISCO)
Você também pode reproduzir o CD usando o botão DISC SKIP.
Durante a reprodução, sempre que você pressionar o botão, o CD
seguinte é automaticamente reproduzido. Se a bandeja seguinte
estiver vazia, ela será automaticamente ignorada.
Número total de faixas
Para Selecionar uma Faixa
Durante a reprodução:
Pressione rapidamente o botão 4 ou ¢ para selecionar a faixa
que deseja reproduzir, exceto no modo MP3/WMA GROUP
(GRUPO DE MP3/WMA).
Ao pressionar o botão, você pode pular a faixa seguinte ou voltar
à faixa anterior.
• A faixa escolhida começa a ser reproduzida.
• Pressione o botão ¢ uma vez para ir para o início da próxima
faixa.
• Pressione o botão 4 para ir para o início da faixa atual.
Pressione duas vezes rapidamente para ir para o início da faixa
anterior.
No modo parado:
Pressione rapidamente o botão 4 ou ¢ para fazer o aparelho
de CD funcionar como se estivesse em reprodução, exceto para o
modo MP3/WMA GROUP.
Usando as teclas numéricas no Controle Remoto:
Através das teclas numéricas, você pode selecionar diretamente a
faixa do CD atualmente selecionado.
• A faixa escolhida começa a ser reproduzida.
Consulte “Inserindo o Número com o Controle Remoto” na página 8.
No modo MP3/WMA GROUP (GRUPO DE MP3/WMA):
A faixa selecionada do grupo atual começa a ser reproduzida.
Dicas:
• Para discos de MP3/WMA
Quando a faixa selecionada começa a ser reproduzida, as
informações sobre a faixa são apresentadas na seguinte ordem:
nome do arquivo, título, artista e álbum.
Para selecionar um grupo (apenas para o modo
MP3/WMA GROUP)
Número total de faixas
Para disco de MP3
Modo TRACK
Número total de faixas
13
Tempo total de reprodução
Durante a reprodução:
Pressione rapidamente o botão 4 ou ¢ para selecionar o
grupo que deseja reproduzir.
• A primeira faixa do grupo selecionado começa a ser
reproduzida.
No modo parado:
Pressione rapidamente o botão 4 ou ¢ para selecionar o
grupo que deseja reproduzir. O número do grupo, o nome do grupo
e o nome do arquivo são apresentados no visor.
Reprodução Rápida
Mantenha os botões a seguir pressionados durante a reprodução
para avançar e retroceder rapidamente o CD e localizar mas rápido
determinada passagem da faixa que é reproduzida.
• Botão 22 ou ¡ no sistema
• Botão 4 ou ¢ no controle remoto
Page 71

Continuar a Reprodução de CDs de Áudio e Discos de MP3/WMA
Você pode armazenar o ponto da faixa onde foi interrompida a
reprodução. Pressione o botão CD 6 para retomar a reprodução
do ponto em que foi interrompida.
APENAS no sistema
Pressione o botão SET/RESUME (DEFINIR/CONTINUAR) por
2 segundos até que “RESUME” (CONTINUAR) E “ON”
(ATIVO) apareçam no visor.
Para desativar a reprodução continuada, pressione o botão
SET/RESUME
(DESATIVADO) apareçam no visor.
por 2 segundos até que “RESUME” e “OFF”
Usando o Aparelho de CD
Selecione a faixa que pretende programar.
4
No Sistema
Enquanto o visor estiver piscando, pressione o botão 4 ou
no sistema para selecionar a faixa e, em seguida, pressione o botão
SET (DEFINIR) em até 5 segundos.
O número de ordem do programa é atribuído a partir de P-1.
Número do CD Número da faixa
¢
• Para reproduzir a partir da primeira faixa com a
reprodução continuada ativa, pressione o botão 7 duas
vezes durante a reprodução.
As seguintes operações apagarão a memória do
número da faixa cuja reprodução foi interrompida.
• Pressionar o botão Abrir/Fechar CD 0 para ejetar o disco.
• Pressionar o botão CD1-CD3 ou o botão DISC SKIP
(PULAR DISCO) para alterar o disco a ser reproduzido.
Programando a Ordem de Reprodução das Faixas
Você pode programar a ordem de reprodução das faixas em todos os
CDs. Observe que só é possível fazer uma programação quando o
aparelho de CD está parado.
❏ Você pode programar até 32 faixas em qualquer ordem,
inclusive repetindo faixas.
Para discos de MP3/WMA
• Se você tentar selecionar um disco de MP3/WMA que já foi
lido ou reproduzido, o aviso “MP3 DISC” (DISCO DE MP3)
ou “WMA DISC” (DISCO DE WMA) aparecerá no visor e o
mesmo não poderá ser programado.
• Um disco de MP3/WMA que nunca foi lido pode ser
selecionado em um modo de programação. Porém
quando a reprodução se inicia, o aviso “MP3 DISC”
ou
“WMA DISC”
vez a um novo programa.
aparece e o programa é excluído, dando
Número de ordem do programa
No controle remoto
Pressione as teclas numéricas para introduzir diretamente o
número da faixa. Em seguida, o número de ordem do programa
será atribuído a partir de P-1.
• Para excluir a etapa de programação atual, pressione o botão
CANCEL (CANCELAR) no sistema.
Repita as etapas 3 e 4 para programar as
5
outras faixas do mesmo CD ou de outro CD.
Para executar o programa, pressione o botão
6
6
CD
Para obter detalhes, consulte “Para Executar o Programa
Criado por Você” a seguir.
Para confirmar o conteúdo programado, enquanto o
aparelho de CD estiver no modo parado, selecione o modo de
programação pressionando o botão PROGRAM, e pressione o
botão 4 ou ¢ no controle remoto.
Para excluir todas as faixas do programa, enquanto o
aparelho de CD estiver parado, pressione o botão 7 ou abra a
bandeja pressionando o botão Abrir/Fechar CD 0.
Para modificar o programa, enquanto o aparelho de CD
estiver parado e o modo de programação estiver selecionado,
pressione o botão CANCEL (CANCELAR) para excluir a última
faixa do programa. Para adicionar novas faixas ao final do
programa, repita as etapas 3 e 4 acima.
.
Português
Para Criar um Programa
Insira os CDs.
1
Com o aparelho de CD parado, passe para o
2
modo Program Play (Reprodução Programada).
Pressione o botão PROGRAM (PROGRAMAR) para acender o
indicador “PRGM”.
Ao mesmo tempo, o aviso “PROGRAM” aparece no visor.
Cada vez que você pressiona o botão, o visor se altera da seguinte forma:
PROGRAM = Visor normal (Reprodução Normal) = (de volta ao início)
• Se já houver um programa, será exibida a última etapa do programa.
Pressione um dos botões de disco (CD1-CD3)
3
para selecionar o CD que pretende programar.
O visor exibe então a tela de introdução de programa.
ou
Número do CD Número da faixa
• Se você tentar programar um número de faixa que não
existe no CD, sua programação será ignorada.
• Se você tentar programar a 33ª faixa, o visor exibirá o
aviso “FULL” (CHEIO).
Para Executar o Programa Criado por Você
Pressione o botão CD 6.
O sistema reproduz as faixas na ordem programada por você.
• Para repetir a execução da Reprodução Programada, pressione
o botão REPEAT (REPETIR) antes de iniciar a reprodução.
Para obter detalhes, consulte “Repetindo Faixas” na página 15.
❏ Você pode ir diretamente para determinada faixa do programa
pressionando o botão 4 ou ¢ durante a Reprodução
Programada.
❏ Para parar a reprodução, pressione o botão 7 uma vez. Se você
pressionar o botão 7 com o aparelho de CD parado, o programa
será excluído.
14
Page 72

Usando o Aparelho de CD
Para Sair e Volta a Entrar na Reprodução
Programada
O programa que você criou é armazenado na memória. Portanto,
você pode sair da Reprodução Programada temporariamente e
voltar a entrar nesse modo, desde que não exclua o programa.
Para sair do modo de programação, pressione o botão 7
para interromper a reprodução. O indicador “PRGM” se apaga e o
modo de programação é cancelado. O programa é armazenado na
memória.
Para voltar a entrar no modo Reprodução Programada,
pressione o botão PROGRAM até acender novamente o indicador
“PRGM”.
• A bandeja não se abre durante a execução do programa.
Reprodução Aleatória
Português
A faixas do CD selecionado serão reproduzidas sem uma ordem
especial neste modo.
1
Pressione o botão RANDOM (ALEATÓRIO) para acender o
indicador “RNDM” e “1 DISC”.
Ao mesmo tempo, o aviso “RANDOM” aparece no visor.
Cada vez que você pressiona o botão, o visor se altera da seguinte forma:
RANDOM = Visor normal (Reprodução Normal) = (de volta ao início)
No modo parado, ajuste o aparelho de CD
para o modo Reprodução Aleatória.
Função de Bloqueio da Bandeja
Para preservar a segurança do disco dentro do aparelho, a bandeja
pode ser bloqueada eletronicamente.
Quando o bloqueio eletrônico está ativo, a bandeja não pode ser
aberta mesmo que o botão CD Abrir/Fechar 0 da unidade seja
pressionado.
Bloqueando a Bandeja
Ligue o sistema e entre no modo CD.
1
Pressione o botão 7 e, simultaneamente, o
2
0
botão Abrir/Fechar CD
“LOCKED” (BLOQUEADO) aparece no visor.
• Se você tentar abrir a bandeja pressionando o botão Abrir/
Fechar CD 0, o aviso “LOCKED” aparecerá no visor para
indicar que a bandeja foi bloqueada.
Desbloqueando a Bandeja
Repita as etapas 1 e 2 acima.
O aviso “UNLOCKED” (DESBLOQUEADO) aparece no visor.
da unidade.
Pressione o botão CD
2
As faixas no CD selecionado são reproduzidas em ordem
aleatória.
Para parar a reprodução, pressione o botão 7. O modo
Aleatório é cancelado e os indicadores “RNDM” e “1 DISC”
apagam.
Para pular uma faixa durante a reprodução, pressione o
botão ¢ para ir para a próxima faixa da seqüência aleatória.
• Para repetir a execução da Reprodução Aleatória, pressione o
botão RANDOM para exibir “REPEAT” e “1DISC” antes de
iniciar a reprodução. Para obter detalhes, consulte “Repetindo
Faixas”, a seguir.
6
.
Repetindo Faixas
Você pode repetir todas as faixas ou somente uma, quantas vezes
quiser.
Pressione o botão REPEAT (REPETIR).
O indicador REPEAT se altera cada vez que você pressiona o
botão, como se segue:
REPEAT 1= REPEAT 1DISC= REPEAT ALL = Visor normal
(Reprodução Normal) = (de volta ao início)
REPEAT 1: (REPETIR 1) Repete uma faixa.
REPEAT 1DISC
REPEAT ALL: (REPETIR TUDO) No modo Reprodução
:(REPETIR 1 DISCO) Repete todas as faixas em
um CD. (Selecionável na reprodução normal e
aleatória.)
Normal, repete todas as faixas em todos os CDs.
Agora, você pode usar a bandeja normalmente.
• Mesmo se o Sistema for desconectado da energia
elétrica, a condição de bloqueio da bandeja será
mantida por alguns dias. Para desbloquear a bandeja
depois de ligar o sistema, será preciso executar a
operação de desbloqueio.
No modo Reprodução Programada, o indicador Repeat se altera
cada vez que você pressiona o botão REPEAT, como se segue:
REPEATÔ Visor em branco
Repete todas as faixas no programa.
Para parar a reprodução, pressione o botão 7. A alteração da
fonte sonora (p.ex., para sintonizador) também pára a reprodução.
O modo de repetição é cancelado e o indicador Repeat se apaga.
15
Page 73

Usando o Toca-Fitas (Ouvindo uma Fita)
TAPE B 3
TAPE A 3
7
0 PUSH OPEN
(compart. B)
Português
4
¢
7
0 PUSH OPEN
(compart. A)
TAPE B
TAPE A
22
¡
Indicadores de compart.
* Quando o sistema está em uso, o visor também mostra outros itens. Para
simplificar, mostramos aqui somente os itens descritos nesta seção.
O toca-fitas permite reproduzir, gravar e duplicar fitas de áudio.
❏ Este toca-fitas permite a reprodução de fitas do tipo I.
Não se recomenda o uso de fitas com mais de 120
minutos (incluindo fitas de 120 minutos), pois essa
mídia costuma sofrer deteriorações típicas e se
prender nos rolos e eixos do compartimento.
Reprodução em Um Toque
Pressione o botão TAPE A 3 (FITA A) ou TAPE B 3 (FITA B)
para ligar o sistema e começar a reprodução, caso haja uma fita no
compartimento. Se não houver fita no compartimento A ou B, o
aviso “NO TAPE” (SEM FITA) será exibido no visor. O sistema se
ativa e aguarda a inserção de uma fita ou a seleção de outra função.
Reproduzindo uma Fita
Você pode usar o toca-fitas A ou B na reprodução.
Pressione o lado 0 PUSH OPEN (PRESS. P/
1
ABRIR) do compartimento que deseja
utilizar.
Quando o compartimento se abrir, insira
2
uma fita, com a parte exposta voltada para
baixo.
A fita se movimenta da esquerda para a direita.
3: Indicador de fita
Pressione 0 PUSH OPEN suavemente para
3
fechar o compartimento.
O indicador de compartimento “A” ou “B” acende no visor.
Pressione o botão TAPE A 3 ou TAPE B 3.
4
O indicador de fita (3) pisca no visor e a fita é reproduzida.
O toca-fitas pára automaticamente depois de terminar a
reprodução de um lado da fita.
Para parar a reprodução, pressione o botão 7.
Para remover a fita, pare a reprodução e pressione o lado 0
PUSH OPEN para abrir o compartimento.
Para Avançar ou Retroceder Uma Fita
Rapidamente
Durante a reprodução ou no modo parado, pressione o botão ¡
(FF) no sistema para enrolar rapidamente a fita do lado direito do
cassete sem reproduzi-la. (Você também pode usar o botão ¢ do
controle remoto.)
Durante a reprodução ou no modo parado, pressione o botão 22
(REW) no sistema para enrolar rapidamente a fita do lado
esquerdo do cassete sem reproduzi-la. (Você também pode usar o
botão 4 do controle remoto.)
Na movimentação rápida, o indicador de fita (3) se apaga.
No avanço rápido, a iluminação da barra de status na base do visor
se movimenta no sentido anti-horário.
No retrocesso, a barra se movimenta no sentido horário.
• O toca-fitas pára automaticamente depois de terminar a
reprodução de um lado da fita.
❏ Durante a movimentação rápida da fita, você pode alterar a
direção do movimento pressionando o botão ¡ (FF) ou 22
(REW).
Direção de movimento da fita
16
Page 74

Português
N
Usando o Toca-Fitas (Gravando)
REC START/STOP
CD REC START
7
TAPE B
TAPE A
DUBBING
0 PUSH OPEN
(compart. A)
TAPE B 3
TAPE A 3
7
PROGRAM
0 PUSH OPE
(compart. B)
Indicadores de compart.
* Quando o sistema está em uso, o visor também mostra outros itens. Para
simplificar, mostramos aqui somente os itens descritos nesta seção.
A gravação em fita a partir de qualquer fonte sonora é simples.
Coloque a fita no compartimento B, prepare a fonte, faça um ou
dois ajustes e você está pronto para gravar. Conforme a fonte, o
procedimento é um pouco diferente. Por isso, explicaremos cada
um em separado. Mas primeiro, leia as orientações abaixo para
aprimorar suas gravações.
O Que É Preciso Saber Antes de Começar a
Gravar
❏ Pode ser ilegal gravar ou reproduzir material
protegido por direitos autorais sem o consentimento
do detentor dos direitos.
❏ O nível de gravação, que é o volume de gravação da nova fita, é
ajustado automaticamente. Portanto, não é afetado pelo controle
de VOLUME do sistema. Também não é afetado pelos ajustes
dos efeitos sonoros. Sendo assim, durante a gravação, você pode
ajustar o som que está ouvindo sem afetar o nível de gravação.
❏ Duas pequenas abas na parte de trás da fita, uma para lado A e
outra para lado B, podem ser removidas para impedir que a fita
seja apagada ou regravada acidentalmente.
3: Indicador de fita
Indicador de gravação
• No início e no final das fitas, há um trecho de fita que não
serve para gravar. Sendo assim, ao gravar CDs,
transmissões de rádio, etc., avance a fita até o final desse
trecho para que o início da gravação não seja
comprometido.
CUIDADO:
• Se a gravação realizada tiver excesso de ruído
ou energia estática, o sistema pode ter ficado
muito próximo de um aparelho de TV em
funcionamento durante a gravação. Para
corrigir, desligue a TV ou aumente a distância
entre a TV e o sistema.
Fita adesiva
❏ Para gravar na fita depois de retirar as abas, cubra as aberturas
com fita adesiva.
❏ Este toca-fitas permite a gravação de fitas do tipo I.
17
Page 75

Gravação Padrão
Para Gravar Qualquer Fonte Sonora em Fita
Siga as etapas a seguir para gravar de qualquer fonte sonora para
uma fita no compartimento B.
Insira uma fita em branco ou regravável no
1
compartimento B e avance até ultrapassar o
trecho não gravável.
Usando o Toca-Fitas (Gravando)
Pressione o botão CD REC START (INICIAR
3
GRAV. CD) no sistema.
O aviso “CD REC” é exibido no visor e o indicador “REC” se
acende. Em seguida, o sistema começa a gravação
sincronizada do CD e as faixas do CD são gravadas na fita.
Quando termina a gravação de todas as faixas de todos os CDs,
o aparelho de CD e o toca-fitas param.
• Se a aba de proteção da fita no compartimento B tiver sido
removida para evitar novas gravações, o aviso “NO REC”
(SEM GRAV.) aparecerá no visor.
• Depois de o aparelho de CD tocar todo o CD ou todas as
faixas programadas, a fita pára automaticamente.
Para parar a qualquer momento durante o processo de
gravação, pressione o botão 7. O aparelho de CD e o toca-fitas
param.
Direção de movimento da fita
Prepare a fonte, por exemplo, sintonizando a
2
estação de rádio, carregando os CDs ou
ligando o equipamento conectado.
• Para gravar CDs, consulte “Gravação Sincronizada de
CDs” a seguir.
• Para gravar fitas, consulte “Gravação de Fita para Fita
(DUPLICAÇÃO)” a seguir.
Pressione o botão REC START/STOP
3
(INICIAR/PARAR GRAV.) no sistema.
O indicador “REC” se acende e o sistema começa a gravar.
O indicador de Fita (3) pisca no visor.
• Se a aba de proteção da fita no compartimento B tiver sido
removida para evitar novas gravações, o aviso “NO REC”
(SEM GRAV.) aparecerá no visor.
Para parar durante a gravação, pressione o botão REC
START/STOP no sistema ou o botão 7.
Gravando uma estação de AM na Fita
(Eliminação de Batimentos)
Na gravação de estações AM, podem ser produzidos batimentos que
são imperceptíveis durante a transmissão. Se isso ocorrer, pressione
o botão FM MODE (MODO FM) no controle remoto para eliminar
os batimentos.
Sintonize a estação AM e comece a gravar.
1
Pressione o botão FM MODE no controle
2
remoto para eliminar os batimentos.
Cada vez que você pressiona o botão, o visor se altera da
seguinte maneira:
BEAT 1 Ô BEAT 2
Gravação Sincronizada de CDs
Tudo que está no CD segue para a fita na ordem existente no CD
ou de acordo com a ordem definida em um programa.
Prepare os CDs. (Consulte a página 12.)
1
Pressione o botão CD1-3 (que você pretende gravar) e o botão
7.
• Se quiser gravar faixas específicas, será preciso programálas primeiro. (Consulte página 14.)
• Caso queira gravar somente um CD, só será preciso inserir
um CD na bandeja.
• Se o botão CD REC START for pressionado com o aviso
“RESUME” (CONTINUAR) exibido no visor (consulte
página 14), a gravação sincronizada de CD será iniciada
a partir do início da primeira faixa.
• Quando programar o Desligamento Automático (SLEEP)
enquanto estiver fazendo gravações sincronizadas de
CD, programe um tempo que permita o término da
reprodução do CD, caso contrário, a energia será
cortada antes do final da gravação.
Gravação de Fita para Fita (DUPLICAÇÃO)
A gravação de fita para fita também é chamada de duplicação.
Você pode duplicar fitas facilmente, pressionando apenas um
botão.
Pressione o botão TAPE A 3 (FITA A) e, em
1
seguida, o botão 7.
Insira a fita a ser copiada no compartimento
2
A para reprodução.
Insira uma fita em branco ou regravável no
3
compartimento B para gravação.
Pressione o botão DUBBING (DUPLICAÇÃO)
4
no sistema.
Os toca-fitas A e B iniciam simultaneamente a operação e o
indicador “REC” acende.
Durante a duplicação, os indicadores dos toca-fitas “A” e “B”
acendem alternadamente.
• Se não houver fita no compartimento A, o aviso “NO
TAPE” (SEM FITA) será exibido no visor.
• Se não houver fita no compartimento B, o aviso “NO
TAPE” será exibido no visor.
Para parar a duplicação, pressione o botão REC START/
STOP no sistema ou o botão 7.
• Durante a duplicação, você poderá ouvir alguns ruídos
nas caixas ou nos fones de ouvido. No entanto, o som é
duplicado sem esses ruídos.
Português
Insira uma fita em branco ou regravável no
2
compartimento B e avance até ultrapassar o
trecho não gravável.
18
Page 76

Português
Usando um Equipamento Externo
AUX
AUX
Tomada AUX
Ouvindo o Equipamento Externo
Você pode ouvir equipamentos externos, como aparelhos de CD/
MD portátil, STBs (decodificadores de TV a cabo) ou qualquer
outro equipamento auxiliar.
❏ Primeiro, certifique- se de que o equipamento externo está
corretamente conectado ao sistema. (Consulte a página 6.)
Ajuste o nível de volume para a posição
1
mínima.
Pressione o botão AUX.
2
O aviso “AUX IN” (ENTRADA AUX.) aparece no visor.
Inicie a reprodução do equipamento externo.
3
Ajuste o volume para o nível que deseja
4
ouvir.
Aplique os efeitos sonoros a seguir, se
5
desejar.
• SOM TURBO (Consulte a página 8)
• MODO DE SOM (Consulte a página 8)
• Para operar o equipamento externo, consulte as
instruções do próprio aparelho.
19
Page 77

Usando os Temporizadores
SLEEP
SET
CLOCK/TIMER
¢
4
Indic. do SLEEP
Indic. do tempor. de GRAVAÇÃO
Indicador de REC
* Quando o sistema está em uso, o visor também mostra outros itens. Para
simplificar, mostramos aqui somente os itens descritos nesta seção.
Há três tipos de temporizadores:
DAILY (DESPERTADOR) Use este temporizador para ser
acordado todos os dias ao som de músicas de qualquer fonte,
em vez de usar um despertador tradicional.
REC (GRAVAÇÃO) Parar gravar transmissões de rádio
automaticamente. Você pode definir a hora de início e de
término.
SLEEP (DESLIG. AUTO) Adormeça e deixe que o sistema
se desligue automaticamente após certo tempo.
Ajustando o Relógio
Quando você conecta o acabo de alimentação CA à tomada da
parede, o indicador de hora pisca “0:00” no visor.
Você pode ajustar o relógio com o sistema ligado ou desligado.
No Sistema
Pressione o botão CLOCK/TIMER (RELÓGIO/
1
TEMPOR.).
O dígito de indicação de hora começa a piscar no visor.
Pressione o botão
2
4
a hora.
Pressione o botão ¢ para avançar a hora e o botão 4 para
movê-la para trás. Mantenha o botão pressionado para passar a
hora rapidamente.
Pressione o botão SET (DEFINIR).
3
Os dígitos de indicação dos minutos começam a piscar no visor.
• Para voltar ao ajuste da hora, pressione o botão CANCEL
(CANCELAR).
Pressione o botão
4
4
os minutos.
Pressione o botão SET.
5
O aviso “CLOCK OK” (RELÓGIO OK) aparece no visor. Em
seguida, o horário selecionado é definido e a contagem dos
segundos se inicia a partir do 0.
ou
ou
¢
para ajustar
¢
para ajustar
Indic. do DAILY
Corrigindo o Relógio
No Sistema
Pressione o botão STANDBY/ON
1
(ESPERA/LIG.) para ligar o sistema.
Pressione o botão CLOCK/TIMER (RELÓGIO/
2
TEMPOR.) várias vezes até exibir no visor a
indicação de hora.
Cada vez que você pressiona o botão, o visor se altera como se
segue:
DAILY = ON TIME = REC = ON TIME = Ajuste do
Relógio (indicação de hora)
início)
Pressione o botão SET.
3
Os dígitos das horas do relógio começam a piscar no visor.
Siga as etapas de 2 a 5 de “Ajustando o
4
Relógio” apresentadas acima.
• O relógio deve ser ajustado corretamente para o bom
funcionamento dos temporizadores.
• Cada etapa de ajuste deve ser concluída em aprox. 30
segundos. Caso contrário, o ajuste é ignorado e deverá
ser repetido do início.
• O relógio poderá adiantar ou atrasar de um a dois
minutos por mês.
• Se ocorrer falta de energia, o relógio perderá
imediatamente seu ajuste. O horário “0:00” volta a
piscar no visor e o relógio deverá ser reajustado.
=
Cancelado = (de volta ao
Português
20
Page 78

Usando os Temporizadores
Ajustando o Despertador
Depois de ajustado, o despertador é armazenado na memória. Ou
seja, ele será ativado à mesma hora todos os dias até ser cancelado.
O indicador de temporização ( ) e o indicador “DAILY” no
visor mostram que o despertador definido está ativo.
Você pode ajustar o Despertador com o sistema ligado ou
desligado.
• Você pode ajustar o Despertador com o sistema ligado ou
• Efetue cada ajuste em aprox. 30 segundos. Caso
• Se se enganar ao ajustar o temporizador, pressione o
Português
No Sistema
1
desligado.
contrário, o ajuste será apagado e você terá de começar
tudo de novo.
botão CANCEL (CANCELAR) no sistema. No entanto,
isso nem sempre cancela o ajuste atual. Se o botão
CANCEL não funcionar, pressione várias vezes o botão
CLOCK/TIMER no sistema até que o visor volte à exibição
original, e reinicie desde a primeira etapa.
Pressione o botão CLOCK/TIMER até que o
visor exiba “ON TIME” (HORA DE
ATIVAÇÃO) logo depois de “DAILY”
(DESPERTADOR).
Cada vez que você pressiona o botão, o visor se altera da
seguinte forma:
DAILY = ON TIME* = REC = ON TIME = Ajuste do
relógio = Cancelado = (de volta ao início)
*: Este item deve ser selecionado para o ajuste do
Despertador.
2. Pressione o botão ¢ ou 4 para ajustar os minutos e, em
seguida, pressione o botão SET.
O visor exibe “OFF TIME” (HORA DE DESATIVAÇÃO)
e o sistema entra no modo de ajuste da hora de desativação.
A hora de desativação atual aparece no visor com os dígitos
de hora piscando.
Ajustando a hora de desativação (Exemplo: 13:15).
3
1. Pressione o botão ¢ ou 4 para ajustar a hora em que
você deseja que o sistema seja desativado e, em seguida,
pressione o botão SET.
Os dígitos dos minutos da hora de desativação piscam no visor.
2. Pressione o botão ¢ ou 4 para ajustar os minutos e, em
seguida, pressione o botão SET.
Em seguida, o sistema entra no modo de ajuste da hora de
ativação e a hora de ativação atual aparece no visor com os
dígitos de hora piscando.
Ajustando a hora de ativação (Exemplo:
2
10:15).
1. Pressione o botão ¢ ou 4 para ajustar a hora em que
você deseja que o sistema seja ativado e, em seguida,
pressione o botão SET (DEFINIR).
Os dígitos dos minutos da hora de ativação piscam no visor.
Pressione o botão ¢ para avançar a hora e o botão 4
para movê-la para trás.
Mantenha o botão pressionado para passar a hora
rapidamente.
O sistema entra no modo de seleção de fonte de música e o
indicador “TUNER FM” (SINTONIZADOR DE FM)
aparece no visor.
Selecionando a fonte de música.
4
Pressione o botão ¢ ou 4 para selecionar a fonte de música
que você quer ouvir e, em seguida, pressione o botão SET.
Cada vez que você pressiona o botão ¢ ou 4, o visor se
altera da seguinte forma:
TUNER FM = TUNER AM = CD = TAPE = AUX IN =
(de volta ao início)
A operação seguinte varia conforme a fonte de música
selecionada.
Quando selecionar TUNER FM ou TUNER AM:
Pressione o botão ¢ ou 4 para selecionar o número da
estação programada e, em seguida, pressione o botão SET.
Se selecionar “P---”, você definirá a última estação ouvida.
Quando selecionar CD:
Pressione o botão ¢ ou 4 para selecionar o número do
disco e, em seguida, pressione o botão SET.
Cada vez que você pressiona o botão, o número do disco se
altera da seguinte forma:
DISC – = DISC 1 = DISC 2 = DISC 3 = (de volta ao início)
• Se nenhum número de disco for especificado, a reprodução
começará a partir da primeira faixa do disco atualmente
selecionado.
21
Page 79

Usando os Temporizadores
Quando selecionar TAPE (FITA):
Insira a fita que pretende reproduzir no compartimento A.
Quando selecionar AUX (AUXILIAR):
Prepare o equipamento externo para que seja ativado na hora
de ativação definida no sistema.
Para isso, o equipamento deve ter a função de temporização.
Ajustando o nível do volume.
5
Pressione o botão ¢ ou 4 para selecionar o nível do
volume.
MIN, 1-30 ou MAX: Quando o temporizador estiver ativo, o
volume será ajustado automaticamente no nível selecionado.
Pressione o botão SET.
6
O ajuste do temporizador é finalizado e o visor volta à exibição
inicial anterior ao ajuste.
Se necessário, pressione o botão
7
STANDBY/ON (ESPERA/LIG.) para desligar o
sistema.
O indicador de temporização ( ) e o indicador “DAILY”
(DESPERTADOR) acendem no visor, mostrando que o
despertador está ativo.
Para confirmar / alterar o ajuste do temporizador, repita o
procedimento de ajuste desde o início.
Quando a hora de ativação do temporizador é atingida:
A operação a seguir se repete automaticamente todos os dias.
• Quando a hora de ativação é atingida, o sistema se ativa
automaticamente. A fonte de música definida é reproduzida. O
indicador de temporização ( ) pisca e o indicador “DAILY”
(DESPERTADOR) acende durante o funcionamento do
temporizador.
• Quando a hora de desativação é atingida, o sistema se desativa
automaticamente. O indicador de temporização ( ) e o
indicador “DAILY” continuam acesos no visor.
• Se o sistema já estiver ativo quando a hora de ativação
do temporizador for atingida, o despertador não
funcionará.
Para cancelar temporariamente o despertador:
Pressione várias vezes o botão CLOCK/
1
TIMER no sistema até exibir “DAILY” no
visor.
Pressione o botão CANCEL (CANCELAR) no
2
sistema.
O aviso “OFF” (DESLIGADO) aparece e o indicador de
temporização ( ) e o indicador “DAILY” se apagam.
Para ativar o despertador cancelado:
Pressione várias vezes o botão CLOCK/
1
TIMER no sistema até exibir “DAILY” no
visor.
O indicador “DAILY” começa a piscar e o indicador de
temporização ( ) acende no visor.
Pressione o botão SET no sistema.
2
O aviso “DAILY SET” (DESPERTADOR DEFINIDO)
aparece no visor. O indicador de temporização ( ) e o
indicador “DAILY” permanecem acesos, e o visor volta à
exibição original.
• Se o sistema for desconectado da rede de
alimentação ou ocorrer um corte de energia, o ajuste
do temporizador será perdido em alguns dias. Será
preciso ajustar primeiro o relógio e, em seguida, o
temporizador.
Ajustando o Temporizador de Gravação
Com o temporizador de gravação, você pode gravar
automaticamente em fita uma transmissão de rádio, estando ou não
em casa.
Depois de ajustar o temporizador para gravar uma fonte, o ajuste é
armazenado na memória. Portanto, embora o temporizador de
gravação se desligue depois de utilizado, você poderá reativá-lo a
qualquer momento.
Português
• Você pode ajustar o temporizador de gravação com o
sistema ligado ou desligado.
• Efetue cada ajuste em aprox. 30 segundos. Caso
contrário, o ajuste será apagado e você terá de começar
tudo de novo.
• Se se enganar ao ajustar o temporizador, pressione o
botão CANCEL (CANCELAR) no sistema. No entanto,
isso nem sempre cancela o ajuste atual. Se o botão
CANCEL não funcionar, pressione várias vezes o botão
CLOCK/TIMER no sistema até que o visor volte à exibição
original, e reinicie desde a primeira etapa.
22
Page 80

Usando os Temporizadores
No Sistema
Você pode ajustar a hora da mesma maneira que fez para ajustar o
despertador.
1
2
Português
3
4
Insira uma fita em branco ou regravável no
compartimento B e avance até ultrapassar o
início útil da fita.
Pressione o botão CLOCK/TIMER (RELÓGIO/
TEMPOR.) até exibir “ON TIME” (HORA DE
ATIVAÇÃO) logo depois de “REC”
(GRAVAÇÃO) no visor.
Cada vez que você pressiona o botão, o visor se altera da
seguinte forma:
DAILY = ON TIME = REC = ON TIME* = Ajuste do
relógio = Cancelado = (de volta ao início)
*: Este item deve ser selecionado para o ajuste do
temporizador de gravação.
Em seguida, o sistema entra no modo de ajuste da hora de
ativação. A hora de ativação atual aparece no visor com os
dígitos de hora piscando.
Ajustando a hora de ativação para o sistema.
1. Pressione o botão ¢ ou 4 para ajustar a hora e, em
seguida, pressione o botão SET.
2. Pressione o botão ¢ ou 4 para ajustar os minutos e, em
seguida, pressione o botão SET.
O aviso “OFF TIME” (HORA DE DESATIVAÇÃO) aparece e
o sistema entra no modo de ajuste da hora de desativação. A hora
de desativação atual aparece no visor e os dígitos de hora piscam.
Ajustando a hora de desativação para o
sistema.
1. Pressione o botão ¢ ou 4 para ajustar a hora e, em
seguida, pressione o botão SET.
2. Pressione o botão ¢ ou 4 para ajustar os minutos e, em
seguida, pressione o botão SET.
O sistema entra no modo de introdução da estação
programada.
Se necessário, pressione o botão
8
STANDBY/ON (ESPERA/LIG.) para desligar o
sistema.
O indicador de temporização ( ) e o indicador “REC”
permanecem acesos no visor, mostrando que o temporizador
de gravação está ativo.
Para confirmar / alterar o ajuste do temporizador, repita o
procedimento desde o início.
Quando a hora de ativação do temporizador é atingida:
• Quando a hora de ativação for atingida, o sistema será
automaticamente ativado. A estação definida é então
sintonizada. O indicador de temporização ( ) e o indicador de
fita (3) piscam, e o indicador “REC” (GRAVAÇÃO) acende
durante o funcionamento do temporizador.
Para parar a gravação temporizada, pressione o botão 7.
• Quando a hora de desativação é atingida, o sistema se desativa
automaticamente.
• Se o sistema já estiver ativo quando a hora de ativação
for atingida, o temporizador de gravação não funcionará.
Para cancelar temporariamente o temporizador de
gravação:
Pressione várias vezes o botão CLOCK/
1
TIMER no sistema até exibir “REC” no visor.
Pressione o botão CANCEL (CANCELAR) no
2
sistema.
O aviso “OFF” (DESLIGADO) aparece e o indicador de
temporização ( ) e o indicador “REC” se apagam.
Para ativar o temporizador de gravação cancelado:
Pressione várias vezes o botão CLOCK/
1
TIMER no sistema até exibir “REC” no visor.
O indicador de temporização ( ) acende e o indicador
“REC” pisca no visor.
Pressione o botão SET no sistema.
2
O aviso “REC SET” (GRAVAÇÃO DEFINIDA) aparece no
visor. O indicador de temporização ( ) e o indicador “REC”
permanecem acesos, e o visor volta à exibição original.
Selecione a estação programada a ser
5
gravada.
1. Pressione o botão 4 ou ¢ para definir a faixa (TUNER
FM ou TUNER AM) e, em seguida, pressione o botão SET.
2. Pressione o botão 4 ou ¢ para definir o número
programado e, em seguida, pressione o botão SET.
Se selecionar “P---”, você definirá a última estação ouvida.
Ajustando o nível de volume.
6
Pressione o botão ¢ ou 4 para selecionar o nível de volume.
MIN, 1-30 ou MAX: Quando o temporizador estiver ativo, o
volume será ajustado automaticamente no nível selecionado.
Pressione o botão SET.
7
O ajuste do temporizador é finalizado e o visor volta à exibição
inicial anterior ao ajuste.
23
• Se o sistema for desconectado da rede de
alimentação ou ocorrer um corte de energia, o ajuste
do temporizador será perdido em alguns dias. Será
preciso ajustar primeiro o relógio e, em seguida, o
temporizador.
Page 81

Usando os Temporizadores
Ajustando o Desligamento Automático
Use o desligamento automático para desativar o sistema após certo
número de minutos. Com o desligamento automático, você pode
adormecer ouvindo música sabendo que o sistema se desativará
por conta própria, em vez de ficar ativo por toda a noite.
• Você só pode ajustar o desligamento automático quando o
sistema está ativo.
No Controle Remoto
Durante a reprodução de uma fonte sonora,
1
pressione o botão SLEEP (DESLIG. AUTO).
O indicador “SLEEP” começa a piscar no visor.
Defina o período de tempo pelo qual deseja
2
manter ativa a fonte sonora.
Cada vez que você pressiona o botão SLEEP, o período de
tempo se altera da seguinte forma:
10 = 20 = 30 = 60 = 90 = 120 = OFF = (de volta ao
início)
Aguarde 5 segundos.
3
O indicador “SLEEP” pára de piscar e permanece aceso, e o
visor volta à exibição original antes do início do ajuste.
O sistema está agora ajustado para se desativar depois de
transcorridos os minutos definidos por você.
Para Confirmar o Tempo de Desligamento:
Quando o botão SLEEP no controle remoto é pressionado, é
exibido o tempo que ainda falta até o desligamento. Aguarde até
que o visor volte à exibição original.
Para Cancelar o Ajuste do Desligamento Automático:
Pressione o botão SLEEP até exibir “OFF” no visor.
• Se o sistema for desligado, o desligamento automático também
será cancelado.
Prioridade dos Temporizadores
Como o temporizador de gravação e o despertador podem ser
ajustados de forma independente, você talvez se interesse em saber
o que ocorreria se os ajustes se sobrepusessem. Veja a seguir as
prioridades para o temporizador de gravação e o despertador:
• O temporizador com o ajuste de hora que iniciar primeiro
terá prioridade. Um temporizador não funcionará se outro
temporizador estiver em funcionamento.
• Se outro temporizador for ajustado exatamente para a mesma
hora do temporizador de gravação, este (REC) terá primazia.
❏ O temporizador de gravação e o despertador não funcionarão
quando o desligamento automático estiver em funcionamento.
Exemplo
Ajuste
Temp. Grav.
Despertador
Temp. Grav.
Despertador
Funciona somente no modo de temporização de
gravação.
LIG.
LIG.
21:30 23:0022:3022:00
Funcionamento
LIG. DESL.
21:30 22:30
DESL.
DESL.
Português
• Quando o temporizador de gravação ou o despertador
estão ativos, o desligamento automático não pode ser
ajustado.
24
Page 82

Cuidados e Manutenção
Manuseie os CDs e as fitas com cuidado para que durem mais.
CDs
Português
• Não use nenhum tipo de solvente (limpador de
Observações Gerais
Você sempre obterá o melhor desempenho mantendo limpos seus
CDs e o mecanismo.
• Guarde os CDs nas caixas próprias, e mantenha as caixas em
• Quando o sistema não estiver em uso, mantenha a tampa
• Remova o CD da caixa segurando-o
pelas extremidades enquanto pressiona
ligeiramente o furo central.
• Não toque na parte brilhante do CD nem
envergue o disco.
• Coloque o CD de volta na caixa após o
uso para evitar empenos.
• Tenha cuidado para não arranhar a
superfície do CD ao colocá-lo de volta
na caixa.
• Evite expor o disco à luz solar direta, a
temperaturas extremas e à umidade.
• Um CD sujo pode apresentar erros na
reprodução. Se o CD ficar sujo, limpe-o
com um pano macio em linha reta do
centro para a extremidade.
CUIDADO:
discos convencionais, spray de limpeza,
benzina, etc.) para limpar um CD.
armários ou prateleiras.
superior fechada.
Fitas Cassete
• Se a fita estiver muito folgada no
interior do cassete, retire a folga girando
os rolos da fita com o auxílio de um
lápis.
• Caso isso não seja feito, a fita poderá ser
esticada, cortada ou ficar presa no
cassete.
• Não toque na superfície da fita.
• Não armazene a fita em:
- Locais empoeirados
- Locais expostos ao sol ou muito
quentes
- Em áreas úmidas
- Sobre uma TV ou caixa de som
- Perto de um ímã
Compartimento da Fita
• Se as cabeças, eixos e rolos do toca-fitas ficarem sujos, poderá
ocorrer o seguinte:
- Perda de qualidade do som
- Som descontínuo
- Redução gradual do volume
- Eliminação incompleta da gravação anterior
- Dificuldade de gravação
• Limpe as cabeças, eixos e rolos com uma mecha de algodão
embebida em álcool.
Eixo
Rolo
Condensação da Umidade
Poderá haver condensação de umidade sobre as lentes no interior
do sistema nos seguintes casos:
• Se o sistema de aquecimento ambiental estiver ligado.
• Em um cômodo úmido.
• Se a unidade for movida diretamente de um lugar frio para
outro quente.
Se isso ocorrer, o sistema poderá apresentar problemas. Nesse
caso, deixe o aparelho ligado por algumas horas até que a umidade
evapore, desconecte o cabo de alimentação CA e volte a conectálo.
Cabeças
• Se as cabeças ficarem magnetizadas, a unidade produzirá
ruídos ou perderá qualidade em freqüências altas.
• Para desmagnetizar as cabeças, desligue o sistema e use um
desmagnetizador de cabeça (disponível em lojas de eletrônica e
de discos).
25
Page 83

Solução de Problemas
• Se tiver algum problema com seu sistema, verifique esta lista antes de ligar para a assistência técnica.
• Se não puder resolver o problema com as dicas apresentadas aqui ou se o sistema tiver sofrido danos físicos, procure assistência qualificada,
como a prestada por seu revendedor.
Sintoma Causa Possível Ação
Não se ouve som algum. • As conexões estão incorretas ou soltas.
• Os fones de ouvido estão conectados.
Recepção do rádio está ruim. • A antena está desconectada.
A bandeja do CD não abre. • O cabo de alimentação CA não está
O CD está pulando. O CD está sujo ou riscado. Limpe ou substitua o CD. (Consulte
O CD não é reproduzido. O CD está de cabeça para baixo. Coloque o CD na unidade com o rótulo voltado
O disco de MP3/WMA não é reproduzido. • Não há arquivos MP3/WMA gravados no
O tempo de leitura do disco de MP3/WMA é
muito longo.
O compartimento da fita não abre. Durante a reprodução da fita, o cabo de
Impossível gravar. As abas de proteção contra gravação foram
Impossível usar o controle remoto. • O vão entre o controle remoto e o sensor do
Os comandos estão desativados. O microprocessador interno está funcionando
O aviso “PROTECT” (PROTEGER) aparece
no visor e a energia é cortada.
• A antena de quadro AM está muito próxima
do sistema.
• A antena de arame FM não está
corretamente estendida e posicionada.
conectado.
• A bandeja está bloqueada.
disco.
• Os nomes dos arquivos de MP3/WMA não
têm a extensão .mp3 OU .wma.
• Os arquivos de MP3/WMA não foram
gravados em um formato compatível com
ISO 9660 Nível 1 ou Nível 2.
O tempo de leitura varia com a complexidade
da configuração de gravação.
alimentação foi desconectado.
removidas.
sistema está obstruído.
• As baterias perderam a carga.
mal devido a interferências elétricas externas.
Os fios das caixas estão em contato uns com os
outros.
• Confira todas as conexões e corrija o que
for preciso. (Consulte as páginas 4 a 6.)
• Desconecte os fones de ouvido.
• Reconecte a antena com firmeza.
• Altere a posição e direção da antena de
quadro AM.
• Estenda a antena de arame FM até
encontrar a melhor posição de recepção.
• Conecte o cabo de alimentação CA.
• Desbloqueie a bandeja. (Consulte
página 15.)
página 25.)
para cima.
Substitua o disco.
Não utilize muitas hierarquias e pastas ao
gravar. Também não grave outros tipos de
faixas de áudio junto com arquivos MP3/
WMA. (Consulte página 11.)
Reconecte o cabo e ligue o sistema.
Cubra os furos na parte de trás do cassete com
fita adesiva.
• Remova a obstrução.
• Substitua as baterias.
Desconecte o sistema da rede elétrica e volte a
conectá-lo.
Confira todas as conexões e corrija o que for
preciso. (Consulte a página 5.)
Português
26
Page 84

Sensibilidade de entrada/Impedância (1 kHz) Tipo Tipo 3-vias bass-reflex
Português
Especificações
Amplificador Unidade
Potência de Saída 155 W por canal, min. RMS, Dimensões
Entrada AUX 400 mV/50 kΩ Unidade de alto-falante Woofer: 16 cm cone × 1
Terminais dos alto-falantes
Seção Toca-fitas Impedância 6 Ω
Resposta de Freqüência
Type I (NORMAL) 63 Hz - 12 500 Hz
Distorção e Tremulação
CD Player Massa Aprox. 3,6 kg
Capacidade de CDs 3 CDs Accessories
Limite Dinâmico 85 dB AM Loop Antenna (1)
Relação sinal/ruído 85 dB Remote Control (1)
Distorção e Tremulação
Rádio FM Wire Antenna (1)
Sintonizador de FM AC Plug Adaptor (1)
Alcance de Sintonia 87,5 MHz - 108,0 MHz
Sintonizador de AM Consumo de Energia 165 W (no modo ligado)
Alcance de Sintonia 530 kHz - 1710 kHz (em espaço de 23 W (no modo Standby)
Introduzido em 6 Ω a 1 kHz, com Massa Aprox. 9,3 kg
distorção harmônica total inferior a Especificações dos Alto-falantes (cada um)
10 % (IEC 268-3) SP-MXKC45
6 Ω - 16 Ω Mid: 5cm cone × 1
Fones 32 Ω - 1 kΩ Tweeter: 2cm dome × 1
17 mW por canal de saída para 32 Ω
0,15% (WRMS) Dimensões
Incomensurável Batteries R6P (SUM-3)/AA (15F) (2)
(em espaço de canal de AM 10 kHz) Requisitos de Energia
87,50 MHz - 108,00 MHz
(em espaço de canal de AM 9 kHz)
canal de 10 kHz) 1 W (no modo ECO)
531 kHz - 1710 kHz (em espaço de
canal de 9 kHz) O modelo e as especificações estão sujeitos a alterações sem aviso
Capacidade de Potência
Limite de Freqüência 45 Hz - 22 000 Hz
Nível de pressão de som
Especificações de Energia
prévio.
270 mm × 307 mm × 492 mm (W/H/D)
160 W
87 dB/W·m
220 mm × 324 mm × 238 mm (W/H/D)
110 V - 127 V/220 V - 240 Vca
ajustável com o seletor de voltagem,
50 Hz/60 Hz
,
27
Page 85

©
Mains (AC) Line Instruction (not applicable for Europe, U.S.A., Canada, Australia, and
U.K.)
Instrucción sobre la línea de la red (CA) (no aplicable para Europa, EE.UU., Canadá,
Australia, ni el Grã-Bretanha)
Instrução sobre a tensão da rede eléctrica (CA) (não aplicável para a Europa, os E.U.A.,
o Canadá, a Austrália e o Reino Unido)
MX-KC45 COMPACT COMPONENT SYSTEM
IMPORTANT for mains (AC) line
BEFORE PLUGGING IN, do check that your
mains (AC) line voltage corresponds with the
position of the voltage selector switch provided
on the outside of this equipment and, if different, reset the voltage selector switch, to prevent
from a damage or risk of fire/electric shock.
IMPORTANTE para la línea de la red (CA)
ANTES DE ENCHUFAR EL EQUIPO, compruebe si la tensión de la línea de la red (CA)
corresponde con la posición del selector de tensión situado en la parte exterior del equipo, y si
es diferente, reajuste el selector de tensión para
evitar el riesgo de incendios/descargas eléctricas.
IMPORTANTE para a ligação à tensão da
rede (CA)
ANTES DE LIGAR O APARELHO A UMA
TOMADA DA REDE, verifique se a tensão da
rede CA corresponde à posição do seletor de voltagem localizado na parte externa deste equipamento. Caso não corresponda, reajuste o seletor
de voltagem a fim de evitar avarias ou riscos de
incêndio e choque elétrico.
Para el residente de Mexico
IMPORTADOR : JVC DE MEXICO, S.A. DE C.V.
AV. INSURGENTES SUR No.670 8º PISO COL.
DEL VALLE, MEXICO, D.F. C.P.03100
Tel. 55 36 82 52 Fax. 56 69 09 43
EN, SP, PR
2006 Victor Company of Japan, Limited
0406NYMCREBET
 Loading...