

Page 1

VHS • VideoCD COMBO
HR-VCD1
ENGLISH
TV VCD VHS
1
2
3
4
5
6
7
8
9
10
0
+10
PROGRAM REPEAT VIDEO INTRO MPX
TRACKING ON/OFF
CANCEL RANDOM HIGHLIGHT RETURN
KARAOKE SEARCH
PREV SELECT NEXT
REW
PLAY
REC
STOPFFPAUSE/STILL
TV VOL
TV
SP/LP
PROG
MANUAL
SEARCH
TV VOL
TV/VIDEO
KEY CONTROL
DISC 1
DISC 2
DISC 3
OSD
PlayBack
Control
'
COMPACT
'
TV
PROG
/ POWER
STANDBY
KARAOKENORMALPBC OFF
PAL
VIDEO CD
GRAPHICS
COMPACT
DIGITAL VIDEO
DISC
DISC
DISC
VOCAL
REPLACE
NTSC
VOCAL
MASKING
MPX
.
VHS VideoCD COMBO HR-VCD1
3
2
1
NTSC/PAL CONVERTIBILITY
3
TRIPLE TRAY
-
3
2
DISC
1
SELECT
VIDEO
INTRO
STILL
RETURN
NEXTPREV
VCD NUMBER
KEY CONTROL
DOWN NORMAL UP
DIGITAL ECHO
MIX VOL
MIN MAX VCD FRONT AV
OFF ON S.ST
SPATIALIZER
MIC 1
MIN MAX
WIRELESS MIC
MIC 2
MIN MAX
VHS CONTROL
/
SP / LP / EP
LIVE RECORDING
VIDEO (MONO) L AUDIO R
CD REC
GRAPHICS
INSTRUCTIONS
DIGITAL VIDEO
PAL NTSC
LPT0002–0G2A
Page 2

Table of Contents
Thank you for purchasing this JVC VHS • VideoCD COMBO.
To ensure optimum performance of this unit, please read this
instruction manual thoroughly .
Precautions ...........................................................................3
General Information ..............................................................4
Controls, Indicators and Terminals ........................................5
Front panel ..........................................................................5
Wireless remote control ......................................................6
TV Multi-Brand Remote Control ..........................................7
Display panel.......................................................................8
Rear panel...........................................................................8
Connections ..........................................................................9
Basic Playback (Video CD) .................................................10
Various Unique Functions...................................................13
Playback Control Function ..................................................16
The video cassette ..............................................................18
Playback (Video cassette player) ........................................18
Playback Features...............................................................19
Recording............................................................................20
Karaoke Features................................................................21
Editing .................................................................................26
CD Recording......................................................................27
Live Recording ....................................................................28
Troubleshooting...................................................................30
Specifications ......................................................................31
Features
• Triple disc tray
• Program playback
• Video intro search
• Highlight search
• Playback control function
• TV multi-brand remote control
• Digital auto tracking
• Spatializer
• CD Recording
• Live recording
Automatic features
Auto power on
This Player is automatically turned on when the tape is inserted.
Auto rewind
The video tape is automatically rewound when the end of the
tape is reached during the play, recording or shuttle search
forward mode.
Auto playback
If the video cassette’s safety tab has been removed, playback
will begin automatically when the tape is inserted into the
Player.
Power off eject
Even when the Player's power is off, pressing the eject button
will turn the power on and eject the tape. Once ejected, the
power will be turned off again automatically.
PAL NTSC
7 Only cassettes marked “VHS” can be used with this Player.
7 Certain audio features of this product manufactured under a
license from Desper Products, Inc. Spatializer is a trademark owned by Desper Products, Inc.
R
2
Page 3
Precautions
English
Safety precautions
The rating plate and the safety caution are on the rear of the unit.
WARNING: DANGEROUS VOLTAGE IN-
SIDE
WARNING: TO PREVENT FIRE OR SHOCK
HAZARD, DO NOT EXPOSE
THIS UNIT TO RAIN OR MOISTURE.
The POWER /button does not completely shut off
mains power from the unit, but switches operating current
on and off. “
shows ON.
This unit produced to comply with Standard IEC Publ. 65.
CAUTION:
n When you are not using the Player for a long period of
time, it is recommended that you disconnect the power
cord from the AC outlet.
n Dangerous voltage inside. Refer internal servicing to
qualified service personnel. To prevent electric shock or
fire hazard, remove the power cord from the AC outlet
prior to connecting or disconnecting any signal lead or
aerial.
n This unit operates on voltage of AC110 – 240 V~(Rating),
AC90 – 260 V~(operating), 50/60 Hz with automatic
switching.
” shows electrical power standby and “ ”
Importants
• Video tapes recorded with this Player in the LP (Long Play)
or EP (Extended Play) mode cannot be played back on a
single-speed video recorder.
• It may be unlawful to record or playback copyrighted material
without the consent of the copyright owner.
Beware of moisture condensation
Moisture in the air will condense on the recorder when you move
it from a cold place to a warm place, or under extremely humid
conditions — just as water droplets form on the surface of a
glass filled with cold liquid. Moisture condensation on the head
drum will cause damage to the tape. In conditions where
condensation may occur, keep the recorder’s power turned on
for a few hours to let the moisture dry.
Special note on head cleaning
Precautions
Please follow these precautions. Not doing so may result
in damage to the Player, remote control, or video cassette.
• Avoid extreme heat and direct sunlight.
• Avoid extreme cold.
• Avoid extreme humidity.
• Avoid dust.
• Avoid places subject to vibrations.
• Avoid strong magnetic fields.
• Do not block the Player's ventilation openings.
• Do not place anything heavy on the Player or remote
control.
• Do not Place anything which might spill on top of the
Player or remote control.
• Do not place the Player on cushions, pillows, or thick
carpeting.
• Use the Player in a stable, horizontal position only.
• Place cassettes in cassette cases and store vertically.
When transporting
m Be sure to remove cassette and CD from Player before
packing.
m Avoid violent shocks to the Player during packing and
transport.
Accumulation of dirt and other particles on the video heads may
cause the playback picture to become blurred or interrupted.
Although this model is equipped with a built-in head cleaner
which automatically cleans the heads, reducing the likelihood of
dirty heads, if such troubles are encountered please consult the
nearest JVC dealer.
Auto Head Cleaner
A built-in head cleaner automatically cleans the video heads
and head drum whenever a tape is loaded or unloaded to
reduce head clogging.
ATTENTION:
This Player contains microcomputers. External electronic
noise or interference could cause malfunctioning. In such
cases, switch the power off and unplug the power cord.
Then plug it in again and switch on. Take out the cassette.
After checking the cassette, operate the unit as usual.
3
Page 4
General Information
Care and handling of compact discs
How to handle CDs
When handling a compact disc, do not touch the surface of the
disc (reflective silver side –– the side without the label).
Since compact discs are made of plastic, they are easily
damaged. If a disc gets dirty, dusty, scratched or warped, the
sound will not be picked up correctly and, in addition, such a disc
may cause the CD player to malfunction.
Even on label side
Do not damage the label side, stick paper to or use any adhesive
on its surface.
Storage
Make sure that discs are kept in their cases. If discs are piled
one on top of another without their protective cases, they can be
damaged. Do not put discs in a location where they may be
exposed to direct sunlight, or in a place where the humidity or
temperature is high. Avoid leaving discs in your car!
Maintenance of discs
If there are fingerprints or other dirt adhering to a disc, wipe it
with a soft dry cloth, moving from the center outwards.
If a disc is difficult to clean, wipe with a cloth moistened with
water. Never use record cleaners, petrol, alcohol or any antistatic agents.
Which compact discs can be used?
Many types of compact discs are sold for a variety of uses. The
Video CD Player can play the following compact discs:
• Video CD
for audio and video (moving picture) reproduction, including multiplex sound.
• Video CD with Playback Control function
featuring menu-type operation and superfine still pictures for audio and video (moving
picture) reproduction, including multiplex
sound.
• CD Graphics (CD-G)
for audio and video (still picture) reproduction, including multiplex sound.
• Digital Audio CD, including single discs
for audio reproduction.
CDs you can't play back
Do not play back CD-ROMs on this equipment. Doing so may
generate a noise which can damage your speakers.
Using the remote control
The remote control is ready to use when its batteries are
installed properly.
To use it, point its infrared light-emitting window toward the
display window of the player and press a button. The operating
range of the remote control is up to about seven meters in front
of the player and within about 30 degrees to each side –– with
nothing between the remote control and the player interrupting
the beam path.
If pressing a button on the remote control does not produce any
response, check to make sure it is pointed correctly and try
again. If it still does not function, check the batteries.
PlayBack
Control
'
'
CAUTION
Sometimes during play noise or images may be garbled.
This is sometimes due to the disc. (It may not be up to
industry standards.)
These symptom are caused by the discs, not by the malfunction of the Player.
4
Page 5
Controls, Indicators and Terminals
Front panel
4 5 7
321
English
6
DISC
/ POWER
STANDBY
KARAOKENORMAL PBC OFF
PAL
NTSC
VIDEO CD
GRAPHICS
COMPACT
DIGITAL VIDEO
9
8
1
POWER button / STANDBY indicator
2
DISC 1 to DISC 3 trys
3
Open/Close buttons (Disc number 1 to 3) Z p.11
4
DISC 1 through DISC 3 buttons with indicators
3
DISC
2
DISC
1
VOCAL
REPLACE
VOCAL
MASKING
MPX
.
VHS VideoCD COMBO HR-VCD1
NTSC/PAL COMPATIBILITY
3
-
DISC
TRIPLE TRAY
VIDEO
INTRO
RETURN
Z p.10
SELECT
VCD NUMBER
3
2
1
STILL
NEXTPREV
DOWN NORMAL UP
DIGITAL ECHO
MIN MAX VCD
SPATIALIZER
14
$
%
^
&
KEY CONTROL
MIX VOL
FRONT AV
MIN MAX
OFF ON S.ST
16 21
WIRELESS MIC
MIC 1
MIC 2
MIN MAX
18
SP / LP / EP
CD REC
VHS CONTROL
/
LIVE RECORDING
VIDEO (MONO) L AUDIO R
201917121110 13 15
DIGITAL ECHO knob Z p.25
SPATIALIZER switch and indicator Z p.20
MIX VOL knob Z p.29
MIC 1 and MIC2 knobs and MIC input terminals
Z p.25
5
KEY CONTROL buttons Z p.25
6
WIRELESS MIC button with indicator Z p.23
7
Cassette loading slot
8
MODE switch Z p.10
9
Video out select switch Z p.9
0
VOCAL REPLACE button Z p.25
VOCAL MASKING button Z p.25
MPX button
!
Display panel Z p.8
@
VIDEO INTRO button Z p.14
Z p.14
RETURN button Z p.16
#
‰ SELECT button Z p.11
7 Stop button
STILL button Z p.12
8
4 PREV / ¢ NEXT buttons
VCD NUMBER -/+ buttons
Z p.12
Z p.12
Z p.16
*
SP/LP/EP button Z p.20
(
CD REC button with indicator Z p.27,29
)
VIDEO/AUDIO input terminals Z p.26,28
q
VHS CONTROL buttons
4 / ¢ Karaoke search buttons Z p.20
‰ Play button
¶ Record button
§ Stop/Eject button
Z p.18
Z p.20
Z p.18
8 Pause/Still button Z p.20
WARNING of cassette loading slot
n Do not insert fingers or foreign objects into the
cassette loading slot since this could lead to injury
or damage to the mechanism. Be especially careful
with children.
n Do not try to pull out a cassette once automatic
loading has started.
5
Page 6
Controls, Indicators and Terminals (cont’d)
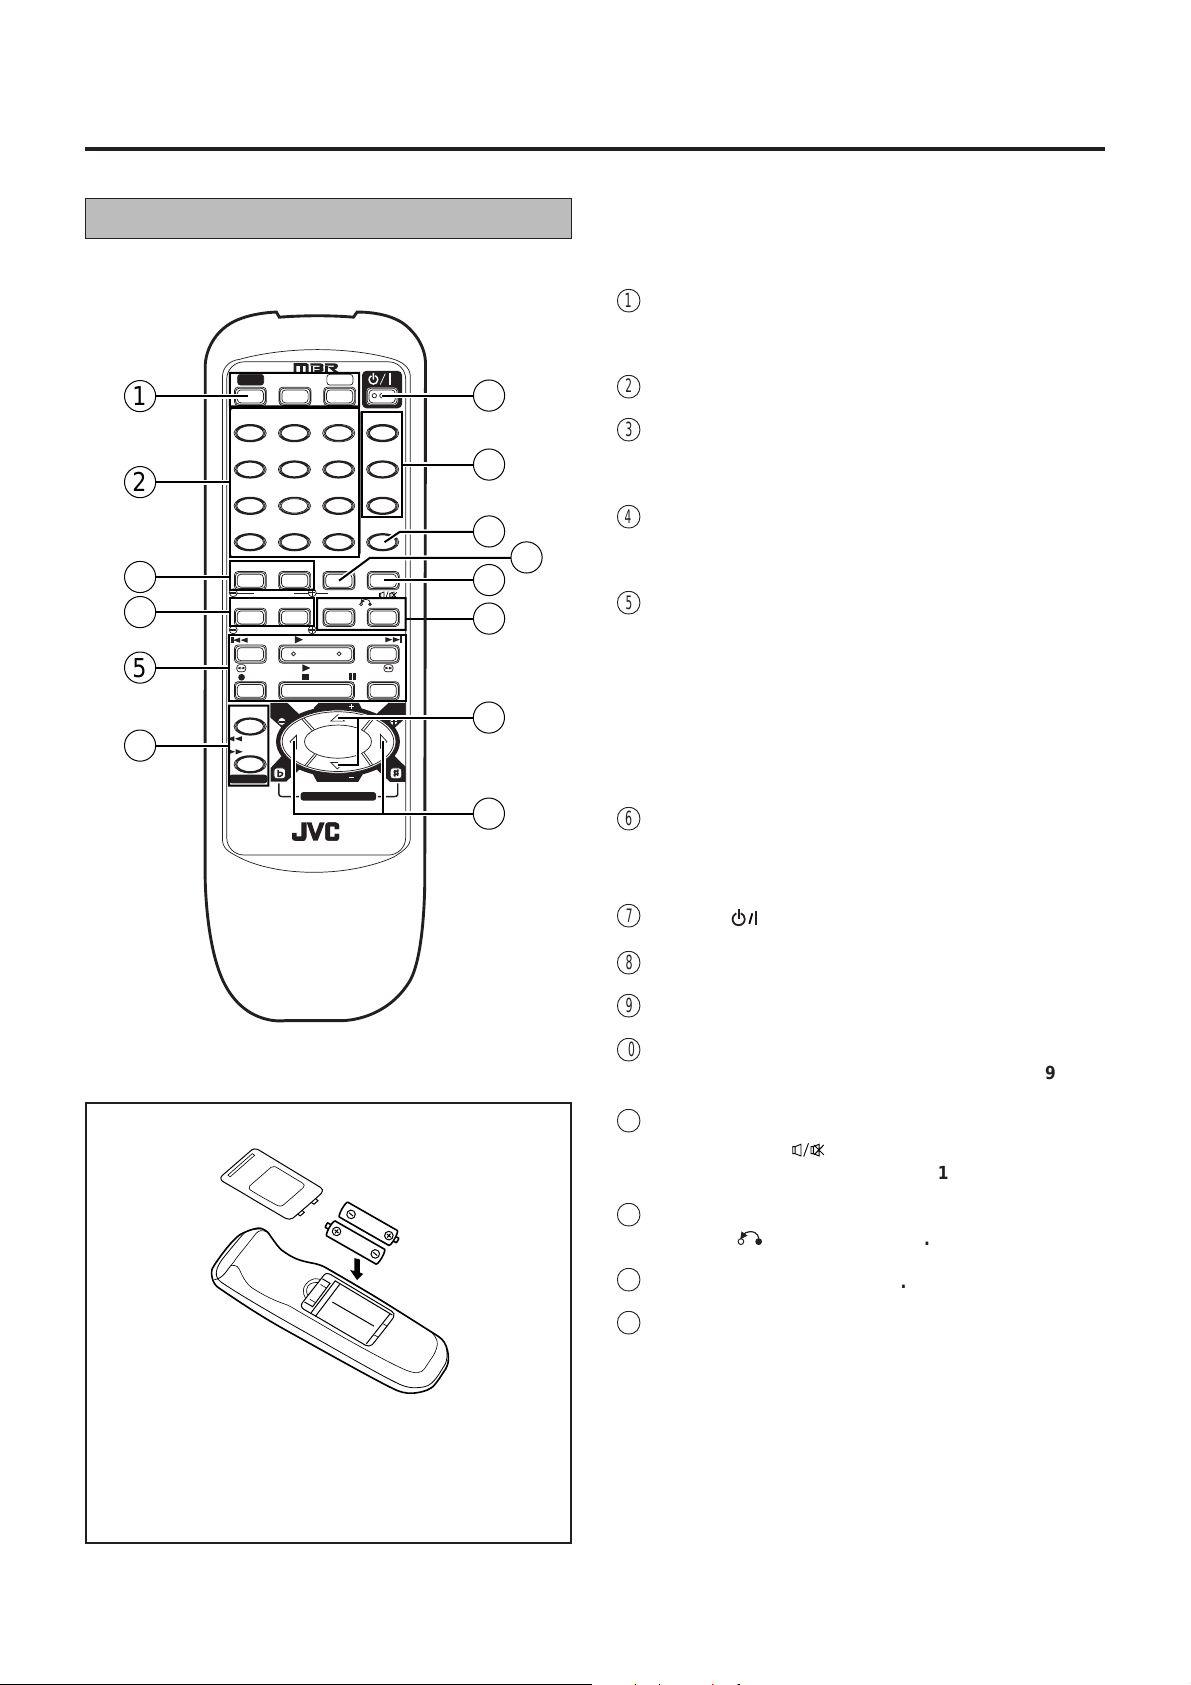
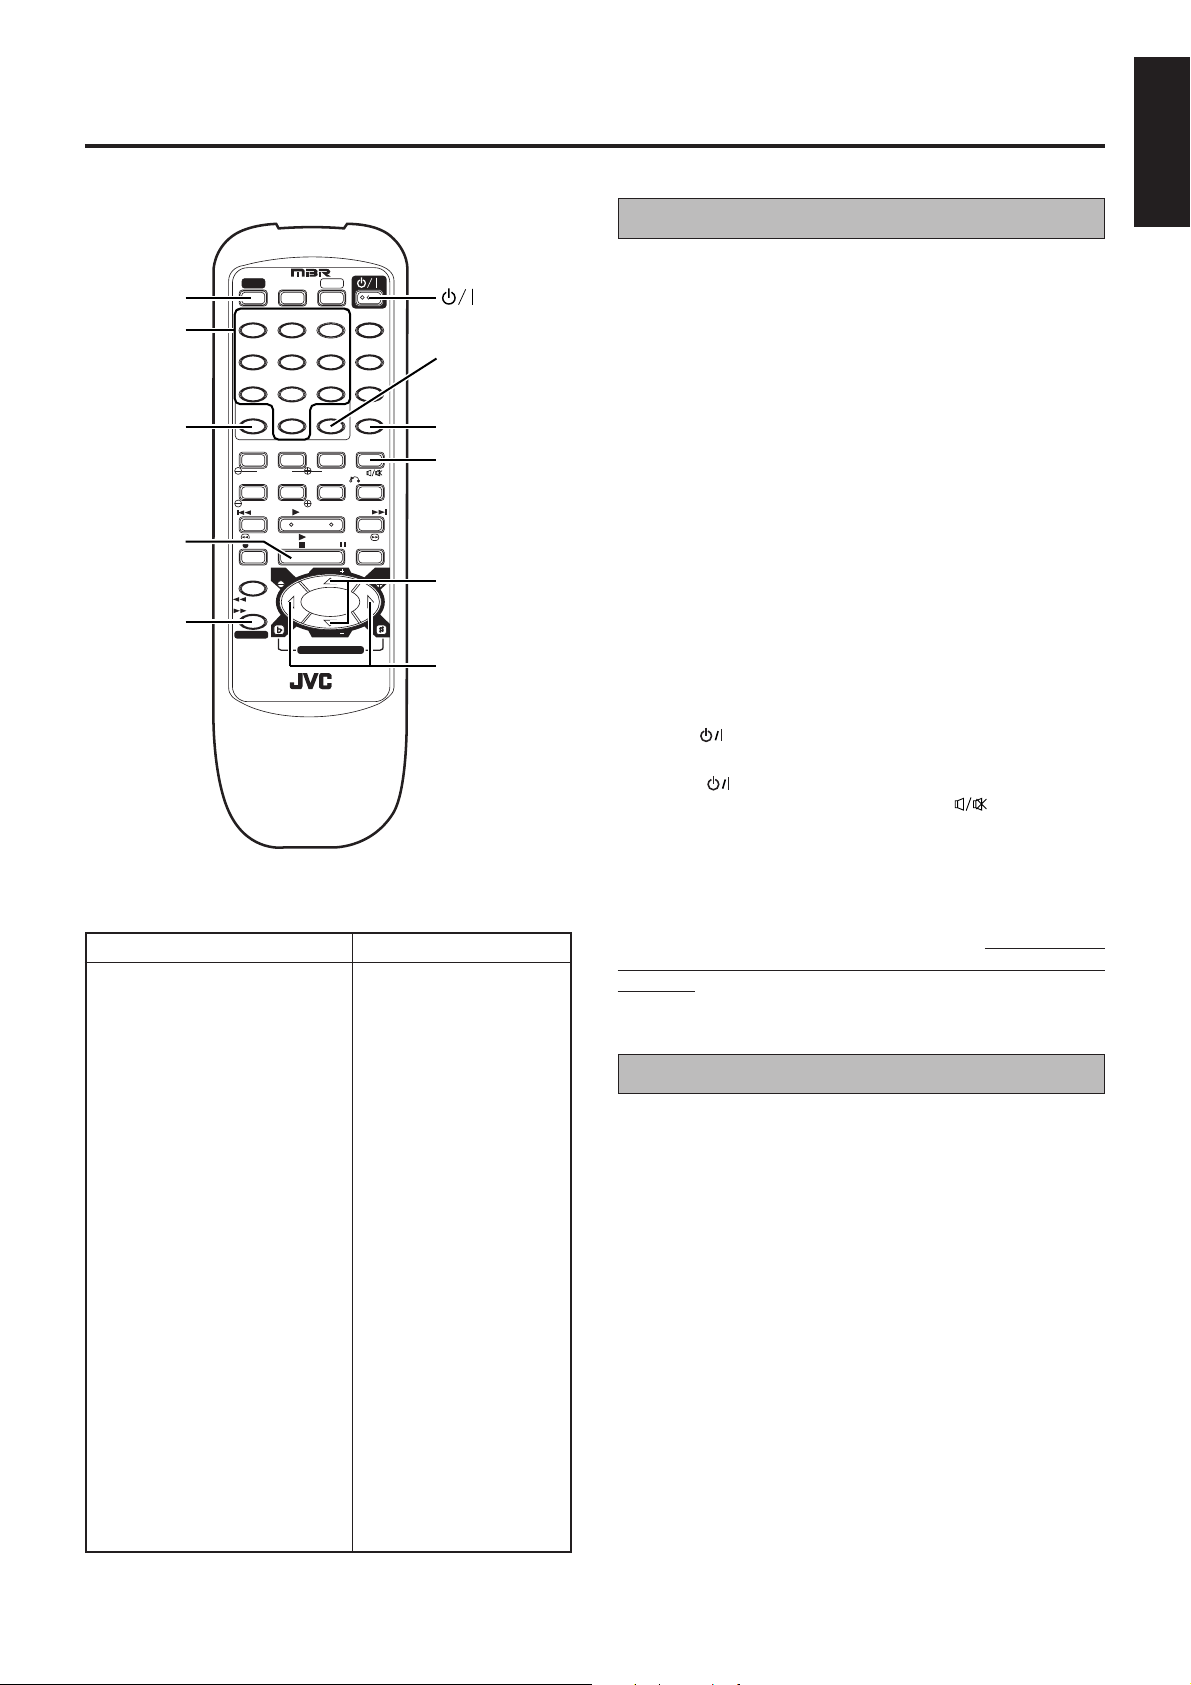
Wireless remote control
1
TV, VCD, VCP control buttons
First press these buttons before beginning to operate
the equipment.
TV VCD VHS
1
1
2
4
5
DISC 1
3
6
DISC 2
7
8
2
3
4
5
6
7
8
10
0
PROGRAM REPEAT VIDEO INTRO MPX
TRACKING ON/OFF
CANCEL RANDOM HIGHLIGHT RETURN
KARAOKE SEARCH
PREV SELECT NEXT
REW
REC
TV
SP/LP
PROG
MANUAL
SEARCH
TV/VIDEO
DISC 3
9
OSD
+10
PLAY
STOPFFPAUSE/STILL
TV VOL
TV VOL
KEY CONTROL
PROG
9
10
11
12
TV
13
14
2
Number keys Z p.11
3
PROGRAM button [VCD] Z p.13
REPEA T button [VCD] Z p.14
TRACKING -/+ buttons [VCP] Z p.19
4
CANCEL button [VCD] Z p.13
RANDOM button [VCD] Z p.14
KARAOKE SEARCH -/+ buttons [VCP] Z p.20
5
[VCD operation buttons]
4 PREV / ¢ NEXT b uttons Z p.12
‰ SELECT button
7
STOP button
8 P A USE/STILL button Z p.12
[VCP operation buttons]
PLA Y / 1 REW / ¡FF / 7
‰
¶ REC / 8 PAUSE/STILL b uttons Z p.20
6
SP/LP button [VCP] Z p.20
TV/VIDEO button [TV] Z p.7
MANUAL SEARCH 1 / ¡ b uttons [VCD]
Z p.11
Z p.12
STOP buttons
Z p.18
Z p.12
Installing Batteries
Open the battery compartment cover.
1
Insert 2 “AA/UM-3” size batteries (provided) in the
2
correct directions.
Replace the cover.
3
7
POWER button
8
DISC 1 through DISC 3 buttons [VCD] Z p.10
9
OSD button [VCD] Z p.13
0
VIDEO INTRO button [VCD] Z p.14
AUT O TRACKING ON/OFF button [VCP]
!
MPX button [VCD] Z p.14
TV sound mute
Audio monitor button [VCP]
@
HIGHLIGHT button [VCD] Z p.15
RETURN button [VCD] Z p.16
#
TV V OL -/+ buttons [TV] Z p.7
$
TV PROG -/+ buttons [TV] Z p.7
KEY CONTROL b/# buttons [VCD] Z p.25
button [TV] Z p.7
Z p.19
Z p.19
6
Page 7
Controls, Indicators and Terminals (cont’d)
TV Multi-Brand Remote Control
English
TV button
NUMBER
keys
NUMBER
10 button
STOP
button
TV/VIDEO
button
TV VCD VHS
1
2
4
5
7
8
10
0
PROGRAM REPEAT VIDEO INTRO MPX
TRACKING ON/OFF
CANCEL RANDOM HIGHLIGHT RETURN
KARAOKE SEARCH
PREV SELECT NEXT
REW
REC
TV
SP/LP
PROG
MANUAL
SEARCH
TV/VIDEO
DISC 1
3
6
DISC 2
DISC 3
9
OSD
+10
PLAY
STOPFFPAUSE/STILL
TV VOL
TV VOL
KEY CONTROL
PROG
Y our remote control can operate the basic functions of your TV
(POWER)
button
NUMBER + 10
button
set. In addition to JVC TVs, other manufacture’s TVs can also
be controlled.
Before you start...
¶ Turn on the TV using its remote control.
¶ Press the TV button on the remote control.
OSD button
MUTE
button
TV
TV VOL
–/+ buttons
TV PROG
NOTE:
• If your TV is a JVC, you don’t have to set the code in step 1.
Go to step 2.
SET TV BRAND CODE
1
Refer to the chart below. While holding down TV , enter your
TV’s brand code using the NUMBER keys, then press STOP.
¶ You don’t have to repeat this step until you replace your
remote control’s batteries.
–/+ buttons
TRY OPERATING TV
2
Press on the remote control to turn the TV off. If it goes
off, try other operations.
¶ The button, TV/VIDEO button, TV PROG -/+ but-
ton, TV VOL -/+ button and MUTE button on the
remote control can all be used to operate the TV.
TV BRAND NAME CODE
JVC 01
AIWA 10
BEIJING 05, 27
CHANGHONG 05, 06, 16, 25
DAEWOO 11
FERGUSON 15
FINLUX 20
FUNAI 09
GOLDSTAR 13
GRUNDIG 17
HITACHI 07
ITT 18
JINXING 23
KONKA 26
MITSUBISHI 06
MIVER 19
NEC 22
NOBLEX 27
NOKIA 21
PANASONIC 02
PEONY 23, 24, 25
PHILIPS 16
SAMSUNG 12
SANYO 08
SHARP 04
SONY 03
TCL 16, 28
THOMSON 14
TOSHIBA 05
IMPORTANT
Although the provided remote control unit is compatible with
JVC televisions, as well as many other models, it may not work
with your TV, or in some instances, may have limited function
capability.
Control Y our TV Using Additional Buttons
The NUMBER keys on the remote control can also be used to
select the TV’s channel by setting the remote control to the TV
mode.
Press the TV button.
1
Use the NUMBER keys, and the DIGIT ENTRY (NUMBER
2
10) button, the NUMBER +10 button or the OSD button to
select the TV’s channel.
¶ DIGIT ENTRY (NUMBER 10) button corresponds to the 1-
digit/2-digit entry switching button (often labelled –/– –) of
your TV’s remote control.
¶ NUMBER +10 button corresponds to the 10 + button, and
the OSD button corresponds to the 20 + button of your TV’s
remote control.
NOTE:
• The way these buttons are used is determined by your TV.
Use these buttons as instructed for your TV’s remote control.
7
Page 8
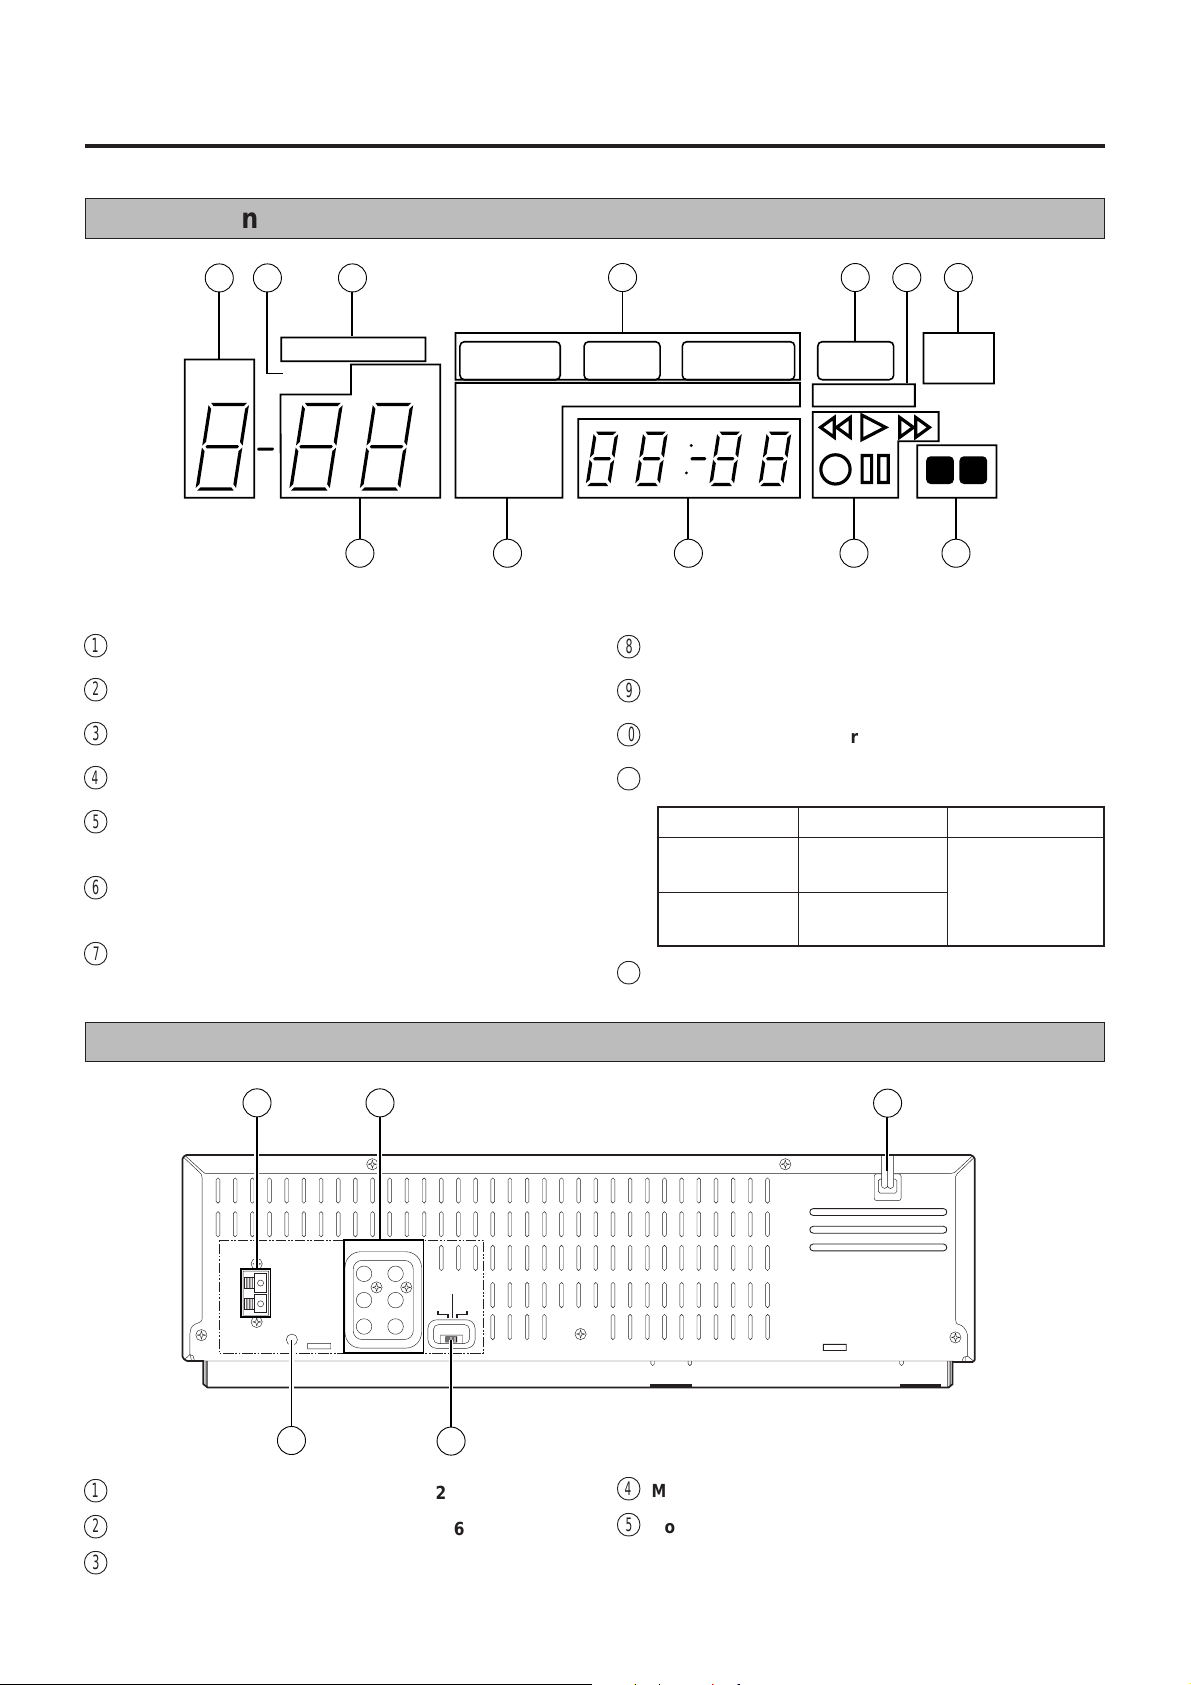
Controls, Indicators and Terminals (cont’d)
Display panel
31 2
984
10
NTSC
TRACK
DISC
PAL
KEY
[VCD display]
1
Disc number indicator
2
Key control indicator
3
Colour system indicator
4
Type of disc indicator
5
Track number indicator
Total number of tracks indicator
6
Each indicator in this area lights when
the corresponding function is activated.
7
Cumulative time of the track indicator
Total time of the disc indicator
VCD CD-GPBC VHS
REPLACE
MASKING
REPEAT1
RANDOM
MPX LR
NEXT
765
[VCP display]
8
VHS mode indicator
9
Tape speed indicator
0
Colour system indicator
!
Symbolic mode indicator
3
1
¡
@
Audio mode indicator
- - - - - - - - - - - - -
Play ¶ Record ¶8 Record pause
Rewind
Fast forward
SP LP EPPROGRAM
1 3
3 ¡
PAL
NTSC
L R
1211
- - - - - - - - - - - - -
Shuttle search
(reverse)
Shuttle search
(forward)
- - - - - - - - - - - - -
3
Still/Slow
8
Rear panel
21
WIRELESS MIC ANT.
FREQ
ADJUST
4
1
Wireless MIC antenna terminals Z p.23
2
VIDEO/AUDIO output terminals Z p.9,26
3
Power cord
OUT1 OUT2
AUDIO R
AUDIO L
VIDEO
NTSC
ON PAL TV
NT8C3.58
5
NTSC4.43
4
MIC Frequency Adjustment screws
5
Colour System Output switch Z p.9
3
Z p.23
8
Page 9
Connections
NTSC3.58
NTSC4.43
NTSC
PLAYBACK
ON PAL TV
NTSC3.58
NTSC4.43
NTSC
PLAYBACK
ON PAL TV
NTSC3.58
NTSC4.43
NTSC
PLAYBACK
ON PAL TV
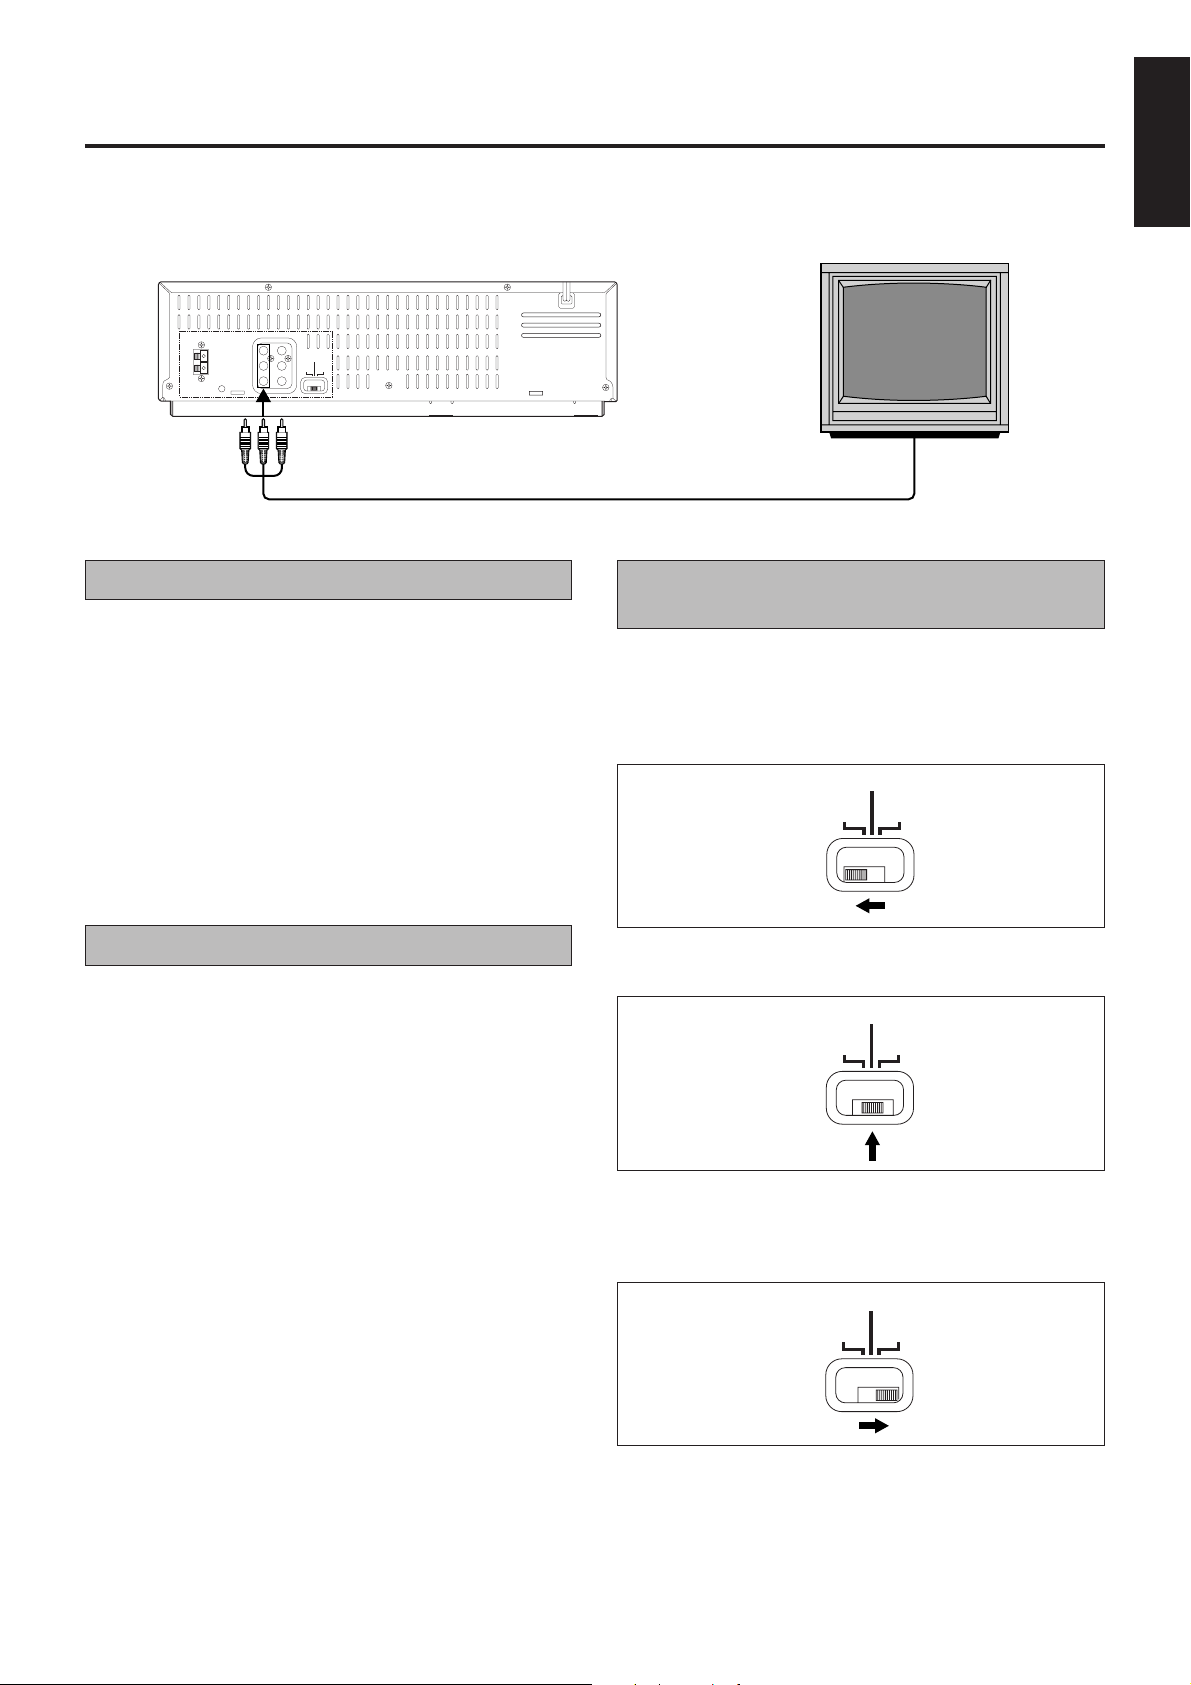
Make sure that the power to the Player and TV is off before
making the following connections.
English
WIRELESS MIC ANT.
OUT1 OUT2
AUDIO R
AUDIO L
FREQ
VIDEO
ADJUST
NT8C3.58
NTSC
ON PAL TV
NTSC4.43
How to connection
Connect the TV’s VIDEO input and AUDIO input termi-
1
nals to the Player's VIDEO output and AUDIO output
terminals.
Connect the power cord to your household AC outlet.
2
Notes:
• Connection not available with television sets without audio/
video input terminals.
• If you put a TV set directly on this Player or install it too close
to a TV set, noise may occur. If this noise occurs, separate
the Player and the TV set.
Colour system output mode selection (VCP)
To watch an NTSC tape, it will be necessary to select one of the
following output modes.
Selecting the NTSC PLAYBACK ON PAL TV mode
Select this mode to watch NTSC tapes on a PAL system TV.
Video out select (VCD)
Set the VIDEO OUT SELECT switch on the front panel to
NTSC or PAL mode according to your television system.
NTSC........ for NTSC exclusive TV
PAL .......... for PAL exclusive TV
Note:
• If the wrong video system mode for the Video CD is selected, it will not playback with the correct screen size.
Selecting the NTSC 3.58 mode
Select this mode to watch NTSC tapes on a NTSC system TV.
Selecting the NTSC 4.43 mode
Select this mode to watch NTSC tapes on a multi-system TV
(that has an NTSC 4.43 setting).
Select NTSC 4.43 to record NTSC 4.43 signal.
Note:
• Adjust the System Output switch to the appropriate position
in order to record NTSC signals.
Select the NTSC PLAYBACK ON PAL TV or NTSC 3.58 to
record NTSC 3.58 signals.
Select NTSC 4.43 to record NTSC 4.43 signals.
9
Page 10
Basic Playback (Video CD)
POWER button
/ POWER
STANDBY
KARAOKENORMAL PBC OFF
PAL
NTSC
VIDEO CD
GRAPHICS
COMPACT
DIGITAL VIDEO
VHS VideoCD COMBO HR-VCD1
MODE switch
TV VCD VHS
1
4
7
10
PROGRAM REPEAT VIDEO INTRO MPX
TRACKING ON/OFF
CANCEL RANDOM HIGHLIGHT RETURN
KARAOKE SEARCH
PREV SELECT NEXT
REW
REC
SP/LP
MANUAL
SEARCH
TV/VIDEO
TV
PROG
VOCAL
REPLACE
VOCAL
MASKING
.
DISC
DISC
DISC
MPX
2
5
8
0
3
2
1
DISC 1
3
6
DISC 2
DISC 3
9
OSD
+10
PLAY
STOPFFPAUSE/STILL
TV VOL
PROG
TV VOL
KEY CONTROL
OPEN/CLOSE
3
-
DISC
TRIPLE TRAY
NTSC/PAL COMPATIBILITY
PREV/NEXT buttons
VCD button
POWER
button
DISC1
through 3
buttons
Number keys
PREV/NEXT
buttons
TV
SELECT
button
buttons
VIDEO
INTRO
RETURN
DISC1 through 3
buttons
3
2
1
SELECT
STILL
NEXTPREV
VCD NUMBER
DOWN NORMAL UP
DIGITAL ECHO
MIN MAX VCD FRONT AV
SPATIALIZER
SELECT button
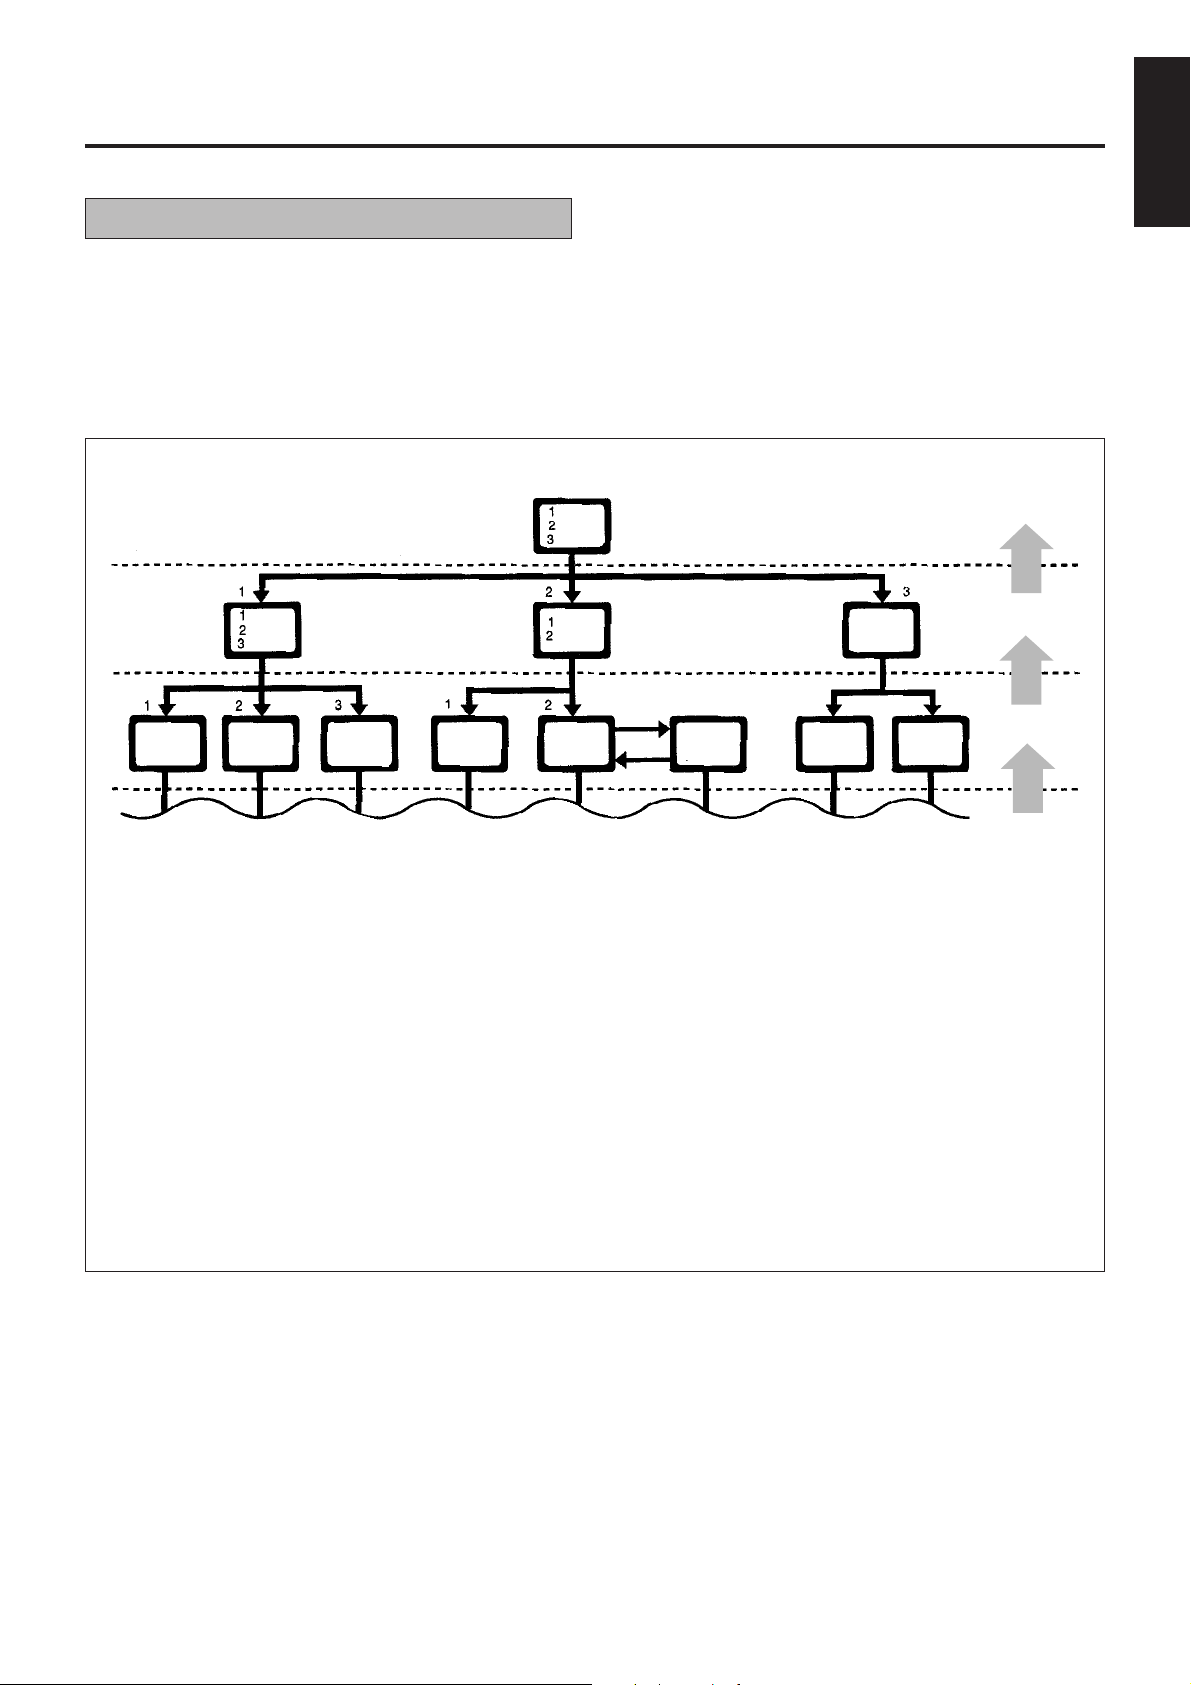
Overview of the three modes
This Player has three (3) modes called KARAOKE, NORMAL,
and PBC OFF mode. These are selected by the MODE switch.
This enables various ways of playing a video CD.
KARAOKE mode : One track playing mode. Whenever one
NORMAL mode : Continuous plural tracks playing mode.
PBC OFF mode : This mode is identical to the NORMAL
To set the mode, switch the MODE switch on the left side of the
front panel.
T riple disc tray usage
Up to three (3) discs can be loaded in the Player. You may insert
a disc into any of the disc trays 1 through 3 whichever you prefer.
If you want to play only a specified disc, press the corresponding disc 1, 2 or 3 button located to the right of the 0 (OPEN/
CLOSE) button.
KEY CONTROL
MIX VOL
OFF ON S.ST
MIC 1
MIN MAX
SP / LP / EP
CD REC
VHS CONTROL
/
VIDEO (MONO) L AUDIO R
LIVE RECORDING
WIRELESS MIC
MIC 2
MIN MAX
NORMAL PBC OFFKARAOKE
track has completed play, the Player stops.
The Player plays tracks continuously in
the order they appear on the disc.
mode, except that the PBC function is
inhibited.
10
When three discs are in inserted, basic order of playing is as
following.
• Pressing DISC 1: DISC 1 → DISC 2 → DISC 3 → STOP
• Pressing DISC 2: DISC 2 → DISC 3 → DISC 1 → STOP
• Pressing DISC 3: DISC 3 → DISC 1 → DISC 2 → STOP
3
2
DISC
3
TRIPLE TRAY
1
Page 11

Basic Playback (Video CD) (cont'd)
In order to operate by remote control, first press the VCD button.
English
Preparation for playing
Turn on the television set, amplifier or receiver to which the
Player is connected, and then select the proper channel
and mode to operate the Player, and set the sound volume
to a reasonable level.
Press the POWER
control.
The display window shows the initial information as shown
below.
Easy start up
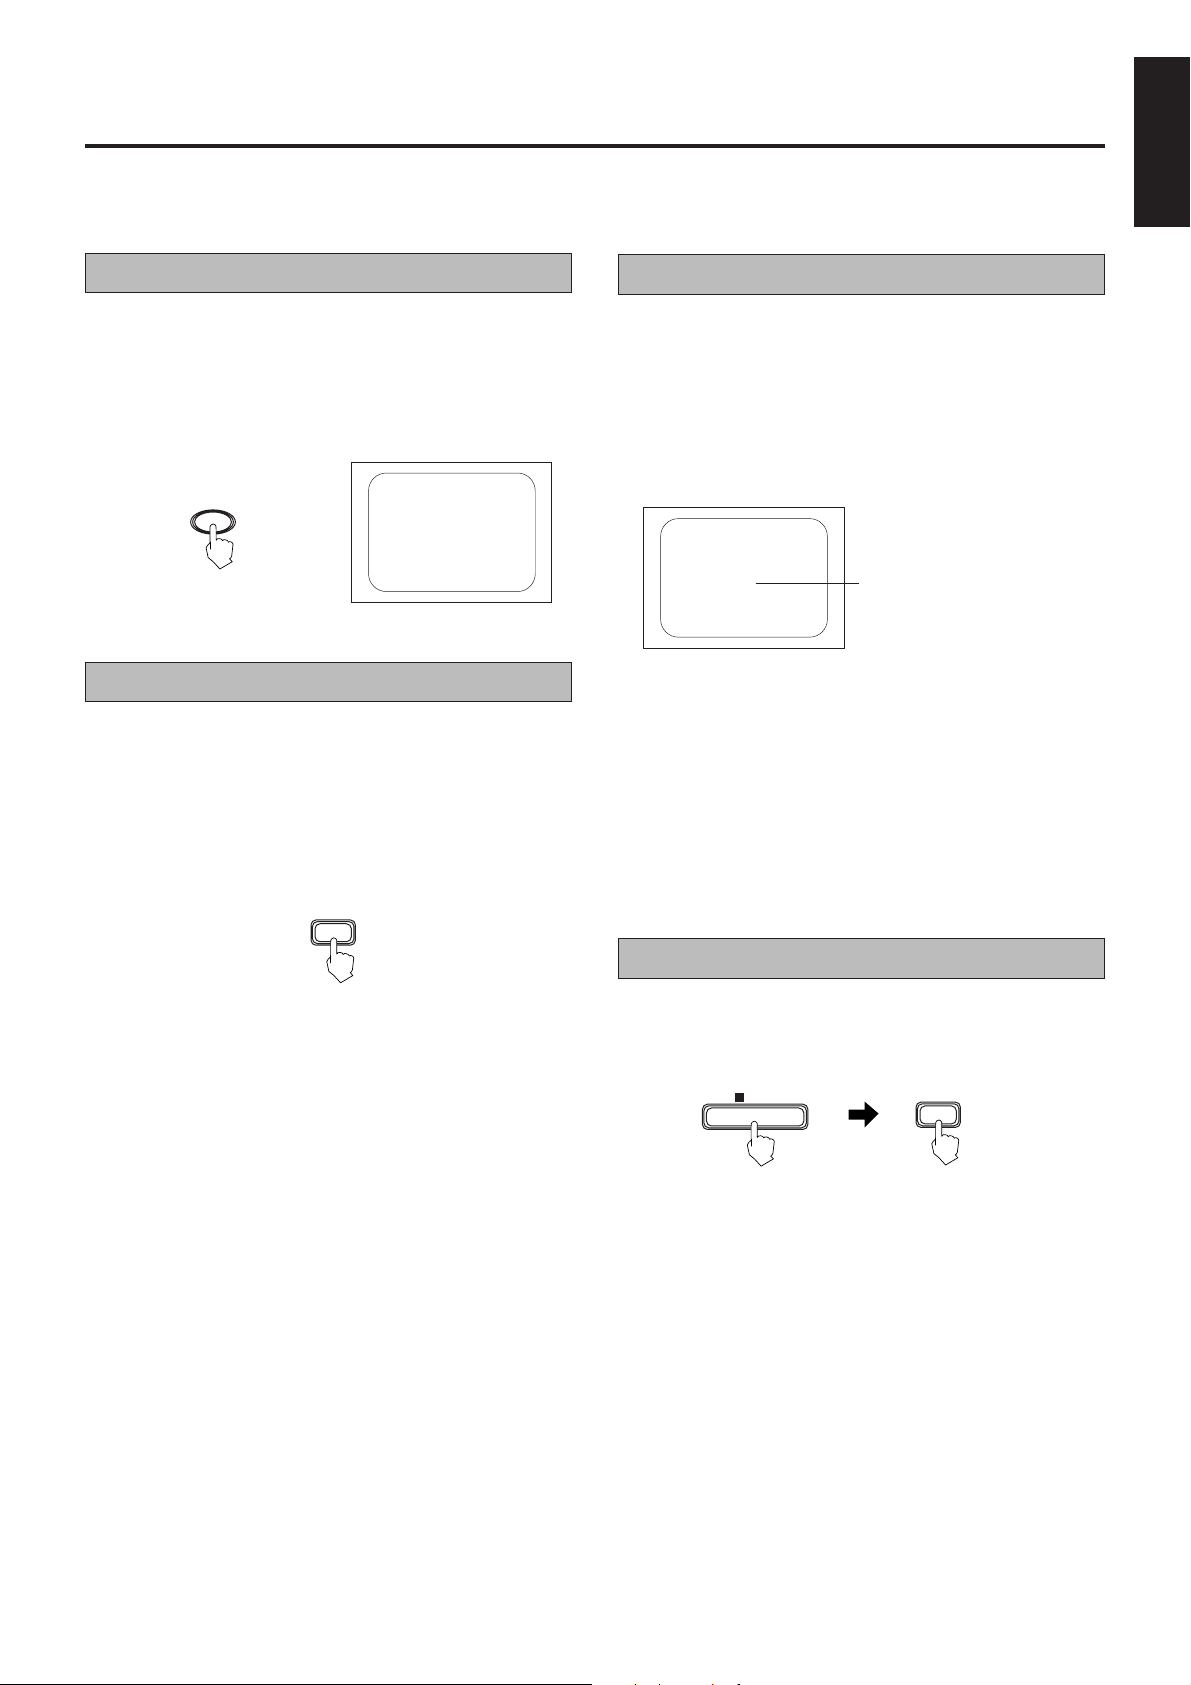
Without pressing the POWER
the Player by pressing 3 SELECT button or disc buttons.
button on the front panel or remote
/ POWER
STANDBY
The STANDBY indicator
goes out.
button you can start up
Starting to play disc(s)
Press the
play from the disc indicated in the Display window.
Press one of the DISC 1 through 3 buttons and the Player
plays the disc you pressed, from the 1st track. For individual track selection, use the number keys on the remote
control.
When you start play, the Display window shows disc number
and the track number being played.
During play, the indicator on the DISC button blinks.
If the PBC function is activated, the display window shows “Pb”
and the television screen shows the initial menu, DISC number,
and “PBC”. See page 16 “Playback Control function”.
33
3 SELECT (PLAY) button. The Player starts to
33
SELECT
or
3
2
1
Inserting/removing the disc(s)
Press the
the disc tray. Then place the disc in the round recess of the
tray with label side up. To close the tray, press the
(OPEN/CLOSE) button again.
If you press the 0 (OPEN/CLOSE) button of the playing disc,
the Player stops and then opens the tray.
If you press the 0 (OPEN/CLOSE) button of a disc that is not
being played, you can change discs without stopping play.
Note :
• When loading a disc in the disc tray, be sure to position the
disc inside the recess. Otherwise, the disc will be damaged
when the disc tray is closed, and the disc cannot be removed
from the unit.
00
0 (OPEN/CLOSE) button (1 through 3) to open
00
3
2
1
CD
Using number keys
Press the number keys on the remote control to select
numbers.
00
0
00
Example: For number 5, press 5. For number 15, press +10,
then 5. For number 20, press +10, then 10. For number 32,
press +10 three times, then 2.
1
2
3
4
5
6
7
8
9
10
0
+10
Note :
• When you press number keys, track will start playing without
pressing 3 SELECT button.
Tray
CORRECT
INCORRECT
11
Page 12

Basic Playback (Video CD) (cont'd)
/ POWER
STANDBY
KARAOKENORMAL PBC OFF
PAL
VIDEO CD
GRAPHICS
COMPACT
DIGITAL VIDEO
PROGRAM
button
CANCEL
button
STOP
button
MANUAL
SEARCH
buttons
DISC
3
DISC
2
DISC
1
VOCAL
REPLACE
NTSC
VOCAL
MASKING
MPX
.
VHS VideoCD COMBO HR-VCD1
TV VCD VHS
1
4
7
10
PROGRAM REPEAT VIDEO INTRO MPX
TRACKING ON/OFF
CANCEL RANDOM HIGHLIGHT RETURN
KARAOKE SEARCH
PREV SELECT NEXT
REW
REC
SP/LP
MANUAL
SEARCH
TV/VIDEO
TV
PROG
2
5
8
0
SELECT button
NTSC/PAL COMPATIBILITY
DISC 1
3
6
DISC 2
DISC 3
9
OSD
+10
PLAY
STOPFFPAUSE/STILL
TV VOL
PROG
TV VOL
KEY CONTROL
STOP
buttons
TV
DISC1 through 3 buttons
3
-
DISC
TRIPLE TRAY
VIDEO
INTRO
RETURN
SELECT
VCD NUMBER
PREV/NEXT
buttons
VCD button
DISC1
through 3
buttons
OSD button
PREV/NEXT
buttons
PAUSE/STILL
button
SELECT
button
3
2
1
STILL
DIGITAL ECHO
NEXTPREV
MIN MAX VCD FRONT AV
KEY CONTROL
DOWN NORMAL UP
MIX VOL
OFF ON S.ST
SPATIALIZER
MIC 1
MIN MAX
WIRELESS MIC
MIC 2
MIN MAX
SP / LP / EP
CD REC
VHS CONTROL
/
VIDEO (MONO) L AUDIO R
LIVE RECORDING
STILL
button
In order to operate by remote control, first
press the VCD button.
Stopping play
Press the
77
7 (STOP) button to stop play at any time.
77
Pausing play
Press the
play.
Notes :
• When the 8 STILL (PAUSE) button is pressed once, “PAUSE”
appears on the television screen, the video motion freezes
and the sound is turned off. The still picture advances frameby-frame each time the 8 STILL (PAUSE) button is pressed.
This frame-by-frame function is effective only for video CDs.
• To release the pause, press the SELECT or blinking DISC 1
through 3 button.
• During “PAUSE” the time counter on the display will blink.
88
8 STILL (PAUSE) button to temporarily suspend
88
Auto search
12
During play, pressing the
44
4 PREV button once causes
44
the Player to replay the current track from the beginning.
Pressing the
play the previous track. Pressing the
44
4 PREV button twice causes the Player to
44
¢¢
¢ NEXT button
¢¢
once causes the Player to skip to the next track.
Manual search
22 22
Holding down the
the remote control or the
the front panel cause the disc to fast forward or reverse.
Continuing to hold down the buttons causes it to search
much faster.
3333
22 /
33 MANUAL SEARCH buttons on
22 22
3333
44
4
44
PREV /
¢¢
¢
NEXT buttons on
¢¢
Page 13
Various Unique Functions
In order to operate by remote control, first press the VCD button.
English
Display of operations status
Press the OSD button on the remote control. By pressing
the OSD button, the following information may be easily
and quickly displayed or vanished on the television screen.
Time, Disc mode, Echo effect, Key control, Program, Repeat,
Random, Multiplexing, Vocal replace, Vocal masking
OSD
(Remote control)
2-1 1:30
(Television screen)
Programming the track sequence you want
Preparation
It is not possible to enter programming mode during play.Verify
whether the Player is playing. If playing, stop the player with the
7 STOP button.
Operation
1. Press the PROGRAM button on the remote control to
enter the programming mode.
PROGRAM
Canceling a programmed track
There are three (3) canceling functions (canceling the last
programmed track, canceling the current track, canceling
the next track to be played).
• To cancel the last programmed track press the CANCEL
button on the remote control and the last programmed
track will be canceled. This can be done while a disc is
playing.
PROGRAMMED SONGS
2-1 3-1
2-2 1-1
2-3 1-2
2-4 1-3
2-5
(Television screen)
• To cancel the current track press
• To cancel the next track, wait until the current track has
finished and press the
track will be canceled and the machine will go to the next
programmed track.
Note :
• To verify the track you programmed, stop the Player and see
ON SCREEN information.
The number located lowest is the
latest track programmed.
77
7 STOP button.
77
¢¢
¢ NEXT button and the next
¢¢
2. Specify the disc by the DISC (1 through 3) button and
then the track by the number keys successively. You
can program up to nine (9) tracks by repeating this
procedure.
3. To play the programmed track press the
button.
33
3 SELECT
33
Notes :
• The track number playing, next track programmed, and
number of programmed tracks are displayed from the left-top
of the television screen. You may use the OSD button to
delete this information.
• Once the programmed track is played, it is deleted from the
program.
• You may continue to program even while the disc is playing.
Clearing a program
To delete all programmed tracks you have entered, press
7 7
the
7 STOP button and then the PROGRAM button. “PROG
7 7
OFF” will be displayed on the television screen.
STOP
Note :
• The Player does not cancel the track program even if the 7
(STOP) button is pressed. Pressing the 3 SELECT (PLAY)
button again causes the Player to resume playing from the
next track.
PROGRAM
13
Page 14

Various Unique Functions (cont'd)
In order to operate by remote control, first press the VCD button.
Repeating tracks
It is possible to repeat all discs or only a single track.
Preparation
This function is controlled by the remote control.
Operation
By pressing the REPEAT button, channel REPEAT modes
are cycled as shown below.
REPEAT
(Remote control) (Display window)
REPEAT ALL
(All discs)
REPEAT1
(1 track)
(Television screen)
→All discs
→1 track
REPEAT OFF
Notes :
• When playing a programmed sequence of tracks,only one
track repeat is available.
• Only REPEAT1 is available in KARAOKE mode.
Randomly playing tracks
Preparations
• This function is controlled by the remote control.
• The RANDOM button is effective only in NORMAL/PBC OFF
mode.
• This function plays tracks randomly from a single disc.
Operation
1. Stop the Player.
2. Press the RANDOM button and random playing will
start.
RANDOM
Playing a multiplex sound CD
This function is used for multiplex sound discs.
Operation
By pressing the MPX button, channel multiplexing modes
are cycled as shown below.
MPX
NORMAL
(left-channel/
right-channel)
L-CH MONO R-CH MONO
(Television screen)
Viewing the VIDEO INTRO of a video CD
Preparation
When you play a video CD with the Playback Control function,
the mode switch is recommended to be in the PBC OFF mode
or KARAOKE mode.
Operation
1. Play the disc you want to see a digest of.
2. Press the VIDEO INTRO button on the Player or the
remote control just after starting disc play. Then the
Player starts to display in sequence the first five (5)
seconds and track numbers of all tracks on the disc.
VIDEO INTRO
3. To select a track during digest display, press the number key corresponding to the item number on the screen.
(Remote control)
3. To cancel random playing, after stopping the Player [
(STOP) button], press the RANDOM button again.
STOP
RANDOM
Note :
• Random is not effective in program or KARAOKE mode.
14
VIDEO INTRO
77
7
77
123
456
789
(Television screen)
Page 15

Various Unique Functions (cont'd)
In order to operate by remote control, first press the VCD button.
English
Programming during VIDEO INTRO
Operation
1. Press the PROGRAM button on the remote control so
that PROGRAM is lit in the display.
2. Press the disc button you want to play, and enter 1 on the
keypad.
3. Press the
started to play, press the VIDEO INTRO button.
4. The Player starts to display in sequence the first five (5)
seconds and track numbers of all tracks on the disc.
Select the number you want to program. You can
program nine (9) tracks.
5. Press the
33
3 SELECT button and then, after the disc has
33
33
3 SELECT button to play.
33
Viewing the highlights of a video CD
This function is used for a movie video CD.
Preparations
• When you play a video CD with the Playback Control
function, the mode switch is recommended to be in the PBC
OFF mode or KARAOKE mode.
• This function is controlled by the remote control unit.
Operation
Start playing the track you want to see the highlights of.
1.
2. After the track begins to play, press the HIGHLIGHT
button on the remote control.
Playing CD Graphics
Basic video CD-playing procedures apply although the pictures
are still. A CD Graphics is identified by “CD-G” shown on the
display.
Notes :
• The following operations may distort the image on the
screen.
Searching for starting point of music
Fast forwarding/reversing
Stop/pause
• If paused, the screen changes to blue in a few minutes. This
is to prevent burn-in of the TV screen.
Playing digital audio CDs
Basic video CD-playing procedures apply to the reproduction of
sound.
Note
:
• No indicator will turn on to show the type of the disc on the
display.
HIGHLIGHT
(Remote control)
3. To select one of the nine (9) segments, press the number key (1 to 9) of the segment which you want to play.
Notes :
• When you choose a highlight it will start from five (5)
seconds before the shown time below each segment.
• The highlights show the proceeding five (5) seconds up to
the displayed time on each highlight.
• The segments are each of nine (9) equal-time period divisions of the track.
• Nine (9) different highlights are displayed for one (1) minute.
• If no highlight is choosen in the one (1) minute period in
normal mode or PBC OFF mode the next nine (9) segment
highlights will begin, in KARAOKE mode highlights will
stop.
• While in VIDEO INTRO or HIGHLIGHT, sometimes image
is garbled partially. This symptom is caused by noise in the
disc itself or incorrect manufacturing, it is not caused by a
malfunction of the Player.
HIGH LIGHT
123
456
789
(Television screen)
15
Page 16

Playback Control Function
Playing Video CDs with Playback
Control function
This Player provides a Playback Control function which utilizes a procedure (menu selection) programmed in a video
CD. The playback operation procedure may differ depending
on the disc you use.
The Playback Control function is described below and in the
figure.
• High-resolution still image display - Super-fine reproduction
of still images with more than 4 times the resolution of video
tape.
• Menu-driven playback - interactive menus for easy selection
of tracks
Preparations
• A video CD with the Playback Control function is required for
this operation.
• Only the NORMAL mode can be used.
• The buttons available for use are the number keys, VCD
NUMBER –/+ buttons, the 4/¢ PREV/NEXT buttons,
3 SELECT button, DISC (1 through 3) buttons, and
RETURN button.
Button functions
Player's VCD NUMBER –/+ buttons
remote control's Number keys
(Including +10 button) .............. Select a specific menu item
from the television screen or
monitor.
4/¢ PREV/NEXT buttons.. Move through menu.
3 SELECT button .................... Starts up a video CD with the
PBC function in DISC tray 1
to 3.
DISC (1 through 3) buttons ...... Start up a video CD with the
PBC function in the specified
DISC tray.
RETURN button................. Returns to the menu.
Operation
1. Verify that the Player is in NORMAL mode.
KARAOKE NORMALPBC OFFKARAOKE NORMALPBC OFF
2. Press the DISC (1 through 3) or
33
3 SELECT button, and
33
then the Player starts up the PBC function. “Pb” is
shown in the Display window. The main menu, “PBC”,
and disc/track number are displayed on the television
screen.
3
2
1
or
3. To move through the menus, press the
SELECT
2-PBC PBC
1
2
3
4
(Television screen)
4 ¢4 ¢
4 ¢ PREV/
4 ¢4 ¢
NEXT buttons.
NEXTPREV
4. When the menu you want appears, select an item in the
menu by using the number keys. The numbers on the
number keys correspond to the menu item numbers.
5. To return to a menu and stop the track being played,
press the
RETURN button.
RETURN
16
Notes :
• Page numbers in the menu show that preceding pages
exist. To move from the current menu, press the 4/¢
PREV/NEXT buttons.
• If you have no desire to use the PBC function when playing
a disc with the PBC function, switch the MODE switch to
“PBC OFF” before playing.
• When you change the mode switch except NORMAL mode
during play Playback Control disc, the play stops, so reset
again from the beginning.
• If you press number keys directly to select the track, you
can’t enter the Player into PBC mode.
Page 17
Playback Control Function (cont'd)
Video CD with Playback Control function
English
What is Playback Control function?
The Playback Control function, ushering a new video CD age,
allows you to enjoy menu-driven operation and high-resolution
still images having a resolution four times greater than moving
pictures.
Example of playback by the Playback Control function
Moving
picyure
A selection menu is displayed when you start playing a
video CD disc with the Playback Control feature. The
selection menu shows a list of numbers for selection. Some
discs may show moving pictures or a divided screen.
1. When a list of numbers is displayed, selecting a number
shows its contents.
2. When a moving picture is displayed, pressing SELECT at
the time when a part of the movie you desire is shown
plays the movie.
Moving
picyure
Moving
picyure
Moving
picyure
picyure
• Menu-driven playback
You can interact with the screen using a menu display to
select and play an entry.
• High-resolution still image display
You can display high-quality images four times clearer than
moving pictures.
Menu screen
Moving
picyure
To next screen
Still
To previous screen
4. After playback, press RETURN to go back to the previous
Still
picture
screen.
After playback, pressing RETURN for 2 seconds or more
causes it to go back to the previous menu selection.
Some discs may return you to the menu screen shown
before playback.
Moving
picyure
Moving
picyure
Note :
When a menu is displayed for a long time, about 10 minutes,
the screen background automatically fades out to prevent
screen burn-in while the setting is suspended.
Press
RETURN
Press
RETURN
Press
RETURN
3. When the selection menu is redisplayed after you have
played your selection, selecting a number again can
replay its contents. (Some discs may show the menu
screen several times.)
When “Next” and “Prev” are shown, pressing “NEXT” or
“PREV” can change the selection menu.
17
Page 18

The video cassette
Playback
(Video cassette player)
Inserting a cassette
TRIPLE TRAY
3
2
3-
DISC
1
STILL
NEXTPREV
VIDEO
INTRO
RETURN
KEY CONTROL
DOWN NORMAL UP
DIGITAL ECHO
MIN MAX VCD FRONT AV
OFF ON S.ST
SPATIALIZER
3
2
1
SELECT
DOWN NORMAL UP
STILL
DIGITAL ECHO
NEXTPREV
MIN MAX VCD FRONT AV
VCD NUMBER
SPATIALIZER
MIC 1
MIX VOL
MIN MAX
MIN MAX
KEY CONTROL
WIRELESS MIC
MIC 1
MIC 2
MIX VOL
MIN MAX
MIN MAX
OFF ON S.ST
SELECT
VIDEO
INTRO
RETURN
VCD NUMBER
3
-
DISC
TRIPLE TRAY
WIRELESS MIC
VHS CONTROL
MIC 2
/
SP / LP / EP
LIVE RECORDING
VIDEO (MONO) L AUDIO R
CD REC
VHS CONTROL
/
SP / LP / EP
LIVE RECORDING
VIDEO (MONO) L AUDIO R
CD REC
DISC
3
/ POWER
DISC
2
STANDBY
DISC
1
KARAOKENORMALPBC OFF
VOCAL
REPLACE
PAL
NTSC
VOCAL
MASKING
MPX
VIDEO CD
GRAPHICS
COMPACT
.
DIGITAL VIDEO
VHS VideoCD COMBO HR-VCD1
DISC
3
/ POWER
DISC
2
STANDBY
DISC
1
KARAOKENORMALPBC OFF
VOCAL
REPLACE
PAL
NTSC
VOCAL
MASKING
MPX
VIDEO CD
GRAPHICS
DIGITAL VIDEO
COMPACT
.
VHS VideoCD COMBO HR-VCD1
NTSC/PAL CONVERTIBILITY
/ POWER
STANDBY
KARAOKENORMALPBC OFF
PAL
NTSC
VIDEO CD
GRAPHICS
COMPACT
DIGITAL VIDEO
VHS VideoCD COMBO HR-VCD1
DISC
3
DISC
2
DISC
1
VOCAL
REPLACE
VOCAL
MASKING
MPX
NTSC/PAL CONVERTIBILITY
.
7 Insert the cassette as shown and push it gently into the
Player
The Player will be turned on automatically and the cassette
will be loaded.
7 Press the Stop/Eject § button to eject a cassette.
During playback or recording, press the § button twice
(once to stop the tape and once more to eject it).
NTSC, PAL and MESECAM video tapes can be played back on
this Player. Refer to the “Colour system output mode selection
( Z P. 9)” section for details.
Before proceeding:
• Turn on the power of the TV and Player.
• Make sure that the TV’s TV/VIDEO switch is set to VIDEO.
• Press the remote control's VHS button.
TV VCD VHS
1
2
3
4
5
6
7
8
9
10
0
+10
PROGRAM REPEAT VIDEO INTRO MPX
TRACKING ON/OFF
CANCEL RANDOM HIGHLIGHT RETURN
KARAOKE SEARCH
PREV SELECT NEXT
REW
PLAY
REC
STOPFFPAUSE/STILL
TV VOL
TV
SP/LP
PROG
MANUAL
SEARCH
TV VOL
TV/VIDEO
KEY CONTROL
NTSC/PAL CONVERTIBILITY
TRIPLE TRAY
1
3
2
3
-
DISC
1
KEY CONTROL
SELECT
VCD NUMBER
STILL
NEXTPREV
DOWN NORMAL UP
DIGITAL ECHO
MIX VOL
MIN MAX VCD FRONT AV
OFF ON S.ST
SPATIALIZER
MIC 1
MIN MAX
VIDEO
INTRO
RETURN
WIRELESS MIC
MIN MAX
2
VHS CONTROL
MIC 2
/
SP / LP / EP
LIVE RECORDING
VIDEO (MONO) L AUDIO R
CD REC
DISC 1
DISC 2
DISC 3
OSD
2
TV
PROG
Notes:
• If the cassette’s safety tab has been removed, playback will
start automatically when the cassette is inserted.
• A cassette can also be ejected when the power is off.
Special note on Video Cassettes
To prevent accidental recording on a recorded cassette, remove its safety tab. To record on it later, cover the hole with
adhesive tape.
Safety tab
To watch a compact VHS tape
Load a pre-recorded cassette.
1
If the safety tab on the cassette is removed, playback will
start automatically.
Press the Play 4 button to start playback.
2
7 Press the Stop/Eject § button or the remote control’s
Stop 7 button to stop playback.
To fast forward or rewind the tape:
7 From the stop mode, press the remote control's Fast
forward ¡ or Rewind 1 button.
NTSC Playback on P AL TV
• The vertical size of the playback picture will shrink and some
picture “noise” may appear on the screen.
• The playback picture may roll. In this case adjust the picture
with the TV’s vertical hold knob (with some TV’s this adjustment may not be possible).
• The colour of the playback picture may differ from the
original.
• In the forward/reverse shuttle search or still modes there
may be no colour depending on the TV and Player combination.
Compact VHS camcorder recordings can be played on your
Player. Place the recorded cassette into a Cassette Adapter
and it can be used like any full-sized VHS cassette.
18
Page 19

Playback Features
In order to operate by remote control, first press the VHS button.
English
Slow motion playback
Slow motion playback is 1/6 of the normal playback speed. The
sound will be cut during slow motion playback.
During playback:
Press the Pause 8 button for 2 seconds.
1
7 Press the Play 3 button to return to the normal playback
speed.
Notes:
• If the picture shakes during the slow mode, use the manual
tracking +/– buttons to correct the picture.
• There will be some picture disturbance and loss of colour
during slow motion playback.
• After approx. 5 minutes, the slow mode will disengage to
protect the video tape.
Still picture and frame advance
Use this feature to freeze the playback picture and to advance
one frame at a time. The sound will be cut during this mode.
During playback:
Press the Pause 8 button.
1
The picture will be frozen.
Press the Pause 8 button repeatedly to advance frames.
2
Each time the button is pressed the still picture will advance
one frame.
Repeat playback
Use this feature to repeat playback of a cassette 20 times.
During playback:
Press the Play 3 button for more than 5 seconds.
1
The Play
cassette will repeat 20 times automatically.
Press the Stop 7 button to stop repeat playback.
2
Tape playback will be stopped and the repeat playback
mode will be cancelled.
3 3
3 indicator will blink slowly and playback of the
3 3
Rewind power off
When the tape has finished rewinding, the Player will turn itself off.
During stop:
Press the remote control's Rewind 1 button.
1
Press the
2
11
“
1” indicator blinks on the display panel.
11
T racking adjustment
Automatic tracking is adjusted each time a cassette is inserted
in the Player, you may wish to adjust tracking manually during
playback.
Manual tracking:
Press the remote control’s ON/OFF button.
button within 2 seconds.
1
Press the remote control’s TRACKING + or – button to
2
adjust tracking.
7 Press the Play 3 button to resume normal playback.
Notes:
• If the picture shakes during the still mode, use the manual
tracking +/– buttons to correct the picture.
• After the picture has been frozen for approx. 5 minutes, the
still mode will disengage to protect the video tape.
Shuttle search playback
Use this feature during playback to visually locate any point on
a recorded cassette. The sound will be cut during shuttle search
operation.
During playback:
Press the remote control's Fast forward ¡ or Rewind
1
1 button to engage shuttle search forward or reverse.
7 Press the Play 3 button to resume normal playback.
Notes:
• When the Player is in the stop mode, press the Play 3 button
to start playback before engaging the shuttle search mode.
• For short searches, keep Fast forward or Rewind button
pressed for more than 2 seconds. When released, normal
playback will continue.
• Disturbances in the shuttle search picture are normal and do
not indicate a problem with the Player.
7
Press the ON/OFF button to return to automatic tracking.
Notes:
• Tracking may need to be adjusted each time a different video
tape is inserted for playback.
• Tracking will be automatically set to the reference position
when the cassette is ejected.
Soundtrack selection
Your Player is capable of recording three soundtracks (HIFI L,
HIFI R and NORM) simultaneously, and playing back the
selected soundtrack.
During Playback:
Press the remote control's Audio mointor button
1
to change the soundtrack.
Track (on display panel)
L + R
=
=
L
=
R
=
No indication (normal)
Note:
• Normally use the “L+R” position. Then Hi-Fi stereo tapes are
played back in stereo, and tapes with normal audio only are
played back automatically in the normal mode.
=
L + R (blink)
for Hi-Fi stereo tapes
for main audio of bilingual tapes
for sub audio of bilingual tapes
for audio-dubbed tapes
mixed normal and L+R audio
Use
19
Page 20

Playback Features
(cont'd)
Recording
Karaoke search
Use this feature to access to the start of the next tune to be
sung.
Press Karaoke search 4 or ¢ button on the front
1
panel.
Playback will start automatically, when the specified song
is found.
Notes:
• Karaoke search does not work with a tape which has no
signal on its normal soundtrack. Also, if the length of blank
parts between tunes is shorter than 3 seconds, if the
tune has a fade-out ending, or if the tape contains excessive noise signals, Karaoke search may not work properly with that tape.
• When you are not using the microphone, disconnect the
microphone from the MIC input terminals. When connecting and disconnecting the microphone, it is recommended
to set the power of Player to OFF.
Spatializer
®
/ POWER
STANDBY
KARAOKENORMALPBC OFF
PAL
VIDEO CD
GRAPHICS
COMPACT
DIGITAL VIDEO
DISC
DISC
DISC
VOCAL
REPLACE
NTSC
VOCAL
MASKING
MPX
.
VHS VideoCD COMBO HR-VCD1
3
2
1
Use the following procedure to record TV programmes on a
blank video tape.
Before proceeding:
• Connect the TV's VIDEO and AUDIO OUT connectors to
the Player's VIDEO and AUDIO IN connectors.
• Turn on the power of the TV and Player.
• Make sure that the video cassette’s safety tab is intact. If it
has been removed, cover the hole with adhesive tape.
• Press ther remote control's VHS button.
TV VCD VHS
1
4
7
10
PROGRAM REPEAT VIDEO INTRO MPX
TRACKING ON/OFF
CANCEL RANDOM HIGHLIGHT RETURN
KARAOKE SEARCH
PREV SELECT NEXT
REW
REC
SP/LP
MANUAL
SEARCH
TV/VIDEO
NTSC/PAL CONVERTIBILITY
TRIPLE TRAY
1
3
2
3
-
DISC
1
KEY CONTROL
SELECT
VCD NUMBER
STILL
NEXTPREV
DOWN NORMAL UP
DIGITAL ECHO
MIX VOL
MIN MAX VCD FRONT AV
OFF ON S.ST
SPATIALIZER
MIC 1
MIN MAX
VIDEO
INTRO
RETURN
WIRELESS MIC
MIC 2
MIN MAX
VHS CONTROL
/
SP / LP / EP
LIVE RECORDING
VIDEO (MONO) L AUDIO R
CD REC
3
2
23
TV
PROG
2
5
8
0
+10
PLAY
STOPFFPAUSE/STILL
TV VOL
TV VOL
KEY CONTROL
DISC 1
3
6
DISC 2
DISC 3
9
OSD
TV
PROG
This function improves the realistic effect of the audio during
playback or recording.
Spatializer® has no effect on recording quality.
TRIPLE TRAY
3
2
3
-
DISC
1
STILL
NEXTPREV
KEY CONTROL
DOWN NORMAL UP
DIGITAL ECHO
MIX VOL
MIN MAX VCD FRONT AV
OFF ON S.ST
SPATIALIZER
MIN MAX
MIC 1
MIN MAX
SELECT
VIDEO
INTRO
RETURN
VCD NUMBER
WIRELESS MIC
VHS CONTROL
MIC 2
/
SP / LP / EP
LIVE RECORDING
VIDEO (MONO) L AUDIO R
CD REC
SPATIALIZER switch
/ POWER
STANDBY
KARAOKENORMALPBC OFF
PAL
VIDEO CD
GRAPHICS
COMPACT
DIGITAL VIDEO
DISC
3
DISC
2
DISC
1
VOCAL
REPLACE
NTSC
VOCAL
MASKING
MPX
NTSC/PAL CONVERTIBILITY
.
VHS VideoCD COMBO HR-VCD1
SPATIALIZER lamp
Select the desired audio with the SPATIALIZER switch.
7 The SPATIALIZER lamp lights up when “ON” or “S.ST”
is selected.
OFF
ON
Set to this position to enjoy the original audio.
Set to this position to enjoy a movie or music pro-
gram in stereo audio with an enhanced quality.
S.ST
Set to this position to enjoy monaural audio tape in
simulated stereo. (S.ST: Simulated Stereo)
Notes:
• Spatializer® is effective only with a stereo TV.
• When this Player is used as the player for editing, the
®
recorded audio will correspond to the Spatializer
setting.
• Set to OFF when using a microphone.
• The picture may be disturbed or the sound volume may be
distorted depending on which unit is connected. This is
because the sound volume will be higher in the ON or S.ST
positions.
Load a blank video tape.
1
Press SP/LP/EP button to select the tape speed.
2
Press the Record
3
remote control unit press the REC
button at the same time.)
7 Press the Stop/Eject
STOP 7 button to stop recording.
To stop recording temporarily:
7 Press the Pause 8 button.
Press the Play 3 button to resume recording.
Notes:
• To engage recording standby, press the Record ¶ button
and then press the Pause 8 button. Press the Play 3 button
again to start recording.
• If the Record ¶ button does not work, check to see if the
cassette safety tab has been removed.
• The player automatically stops when record-standby continues for more than 5 minutes.
• The video tape will be rewound automatically when the end
of the tape is reached.
¶¶
¶ button to start recording. (On the
¶¶
¶¶
¶ and PLAY
¶¶
button or the remote control’s
33
3
33
20
Page 21
Karaoke Features
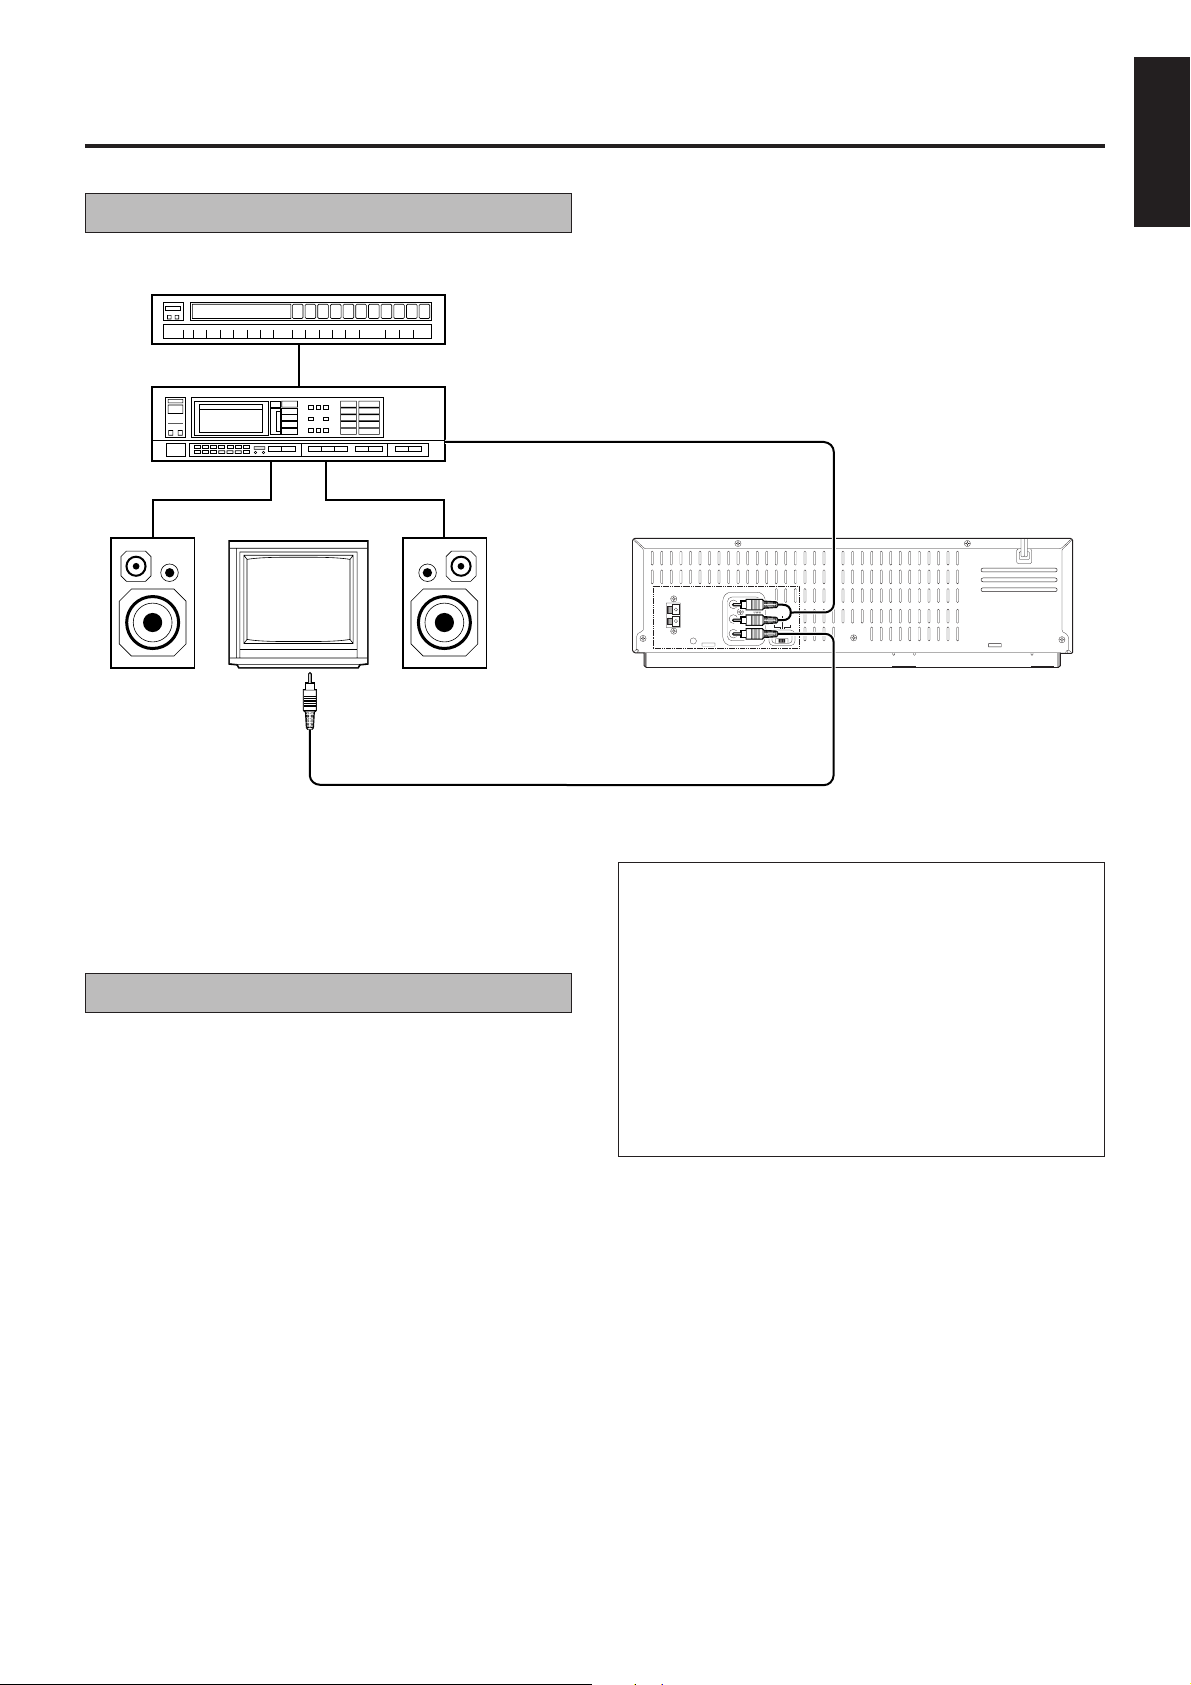
Connecting to Hi-Fi stereo system
FM tuner
Stereo amplifier
AUX IN or TAPE MONITOR
English
Back of Player
Television
Speaker Speaker
VIDEO IN
If you have a Hi-Fi stereo system, you can connect your Player
to it so that the sound can be heard through your Hi-Fi system.
Please make these additional connections:
Hi-Fi audio connection
Connect the AUDIO OUT “L” and “R” connectors of
1
the player to the AUX IN or TAPE MONITOR terminals
of the amplifier.
Notes:
• Make sure “L” and “R” are correct when connecting the
audio input and output connectors of the player to a stereo
amplifier.
• When listening to sound from the connected stereo system,
turn down the sound volume of the TV completely.
WIRELESS MIC ANT.
OUT1 OUT2
AUDIO R
AUDIO L
FREQ
VIDEO
ADJUST
NT8C3.58
NTSC
ON PAL TV
NTSC4.43
CAUTION:
m This player has a dynamic range of more than 90 dB
with regards to its Hi-Fi audio capability. It is
recommended that you check the maximum level if
you are going to listen to the Hi-Fi audio signals
through a stereo amplifier. A sudden surge in speaker
input may cause speaker damage.
m Some speakers and televisions are specialty shielded
to prevent television interference. If both are of the
non-shielded type, do not place the speakers adjacent
to the TV set, otherwise the video playback picture
may be adversely affected.
21
Page 22

Karaoke Features (cont’d)
Microphone
MIC select switch
How To Use
To use as a wired microphone
Insert the connector cable to the end of the Microphone
1
as illustrated and turn it clockwise to fix.
Set the MIC select switch to “WD. (Wired)”.
2
FREQ. screw
To MIC input terminal 1 or 2
on the front panel.
Connector cable or Antenna cable
Battery compartment cap
To use as a wireless microphone
Insert the antenna cable to the end of the microphone
1
as illustrated and turn it clockwise to fix.
Set the MIC select switch to “WL. (Wireless)”.
2
ATTENTION:
When you are not using the microphone, it is recommended to set the MIC select switch to
batteries will discharge even when not in use.
OFF: otherwise the
Installing Batteries
Unscrew and remove the battery
compartment cap.
22
231
(provided) in the correct directions.
Screw the cap back on.Insert 2 “AA/UM-3”-size batteries
Page 23

Karaoke Features (cont’d)
WIRELESS MIC ANT.
OUT1 OUT2
AUDIO R
AUDIO L
FREQ
VIDEO
ADJUST
NT8C3.58
NTSC
ON PAL TV
NTSC4.43
The Karaoke Control Centre on the Player’s front panel
gives you direct access song search, and sound volume/
echo control. The provided microphone can also be used
as a wireless microphone.
Preparation
To use the microphone as a wireless microphone
You need to connect the provided FM feeder cable to the
Player.
While you press the lever, connectors, insert the pro-
1
vided FM feeder cable into the connectors.
English
If there is interference when using the microphone
Follow the steps below to re-adjust the frequency of the microphone and your Player.
Preparation
1. Turn on your TV and Player.
2. Select the TV’s VIDEO channel.
3. Press the WIRELESS MIC button on the Player's front
panel.
m The WIRELESS MIC indicator will light.
4. Set the microphone’s MIC select switch to “WL. (Wireless)”.
5. Turn the MIC knob on the front panel of the player in order
to adjust to the desired sound volume.
6. Set the MIX VOL knob on the player's front panel to the
center or VCD.
Operation
1. Turn tightly the FREQ. screw on the Player's rear panel in
either direction with the provided screwdriver (attached at
the rear of the battery compartment).
2. While speaking into the microphone continuously. Turn the
microphone’s FREQ. screw with the provided screwdriver
in the same direction as in step 1. until your voice can be
clearly heard from the TV’s speaker.
Release the lever.
2
Hang the FM feeder cable on the wall behind the Player
3
so that the cable forms a “T”.
FM feeder antenna
Check
1. First set the microphone’s MIC select switch to “OFF”. And
set the switch to “WL. (Wireless)”.
2. Speak into the microphone and check if your voice can be
heard from the TV’s speaker.
m If your voice cannot be heard. Try again steps 1 and 2 of
“Operation”.
WIRELESS MIC ANT.
23
Page 24

Karaoke Features (cont’d)
Follow steps 1 and 2 of “To use as a wireless micro-
4
phone”. (Z p.22)
Press the Player’s WIRELESS MIC button to make the
5
button light.
WIRELESS MIC button
KEY CONTROL
NORMAL UP
MIX VOL
VCD FRONT AV
OFF ON S.ST
MIC 1
MIN MAX
WIRELESS MIC
MIC 2
MIN MAX
SP / LP / EP
CD REC
VHS CONTROL
/
LIVE RECORDING
VIDEO (MONO) L AUDIO R
To use the microphone as a wired microphone
Follow steps 1 and 2 of “To use as a wired micro-
1
phone”. (Z p.22)
Basic operations
Turn on the TV and select VIDEO channel.
1
Set the microphone’s switch to “WD. (Wired)”.
2
Insert the disc or a pre-recorded Karaoke tape.
3
m If the safety tab on the cassette is removed, playback
will start automaitcally.
Press Play
33
3 button.
33
4
Start singing.
5
Connect the microphone to the Player’s front panel
2
MIC1 or MIC2 terminal.
KEY CONTROL
NORMAL UP
MIX VOL
VCD FRONT AV
OFF ON S.ST
MIC 1
MIN MAX
WIRELESS MIC
MIC 2
MIN MAX
SP / LP / EP
CD REC
VHS CONTROL
/
VIDEO (MONO) L AUDIO R
LIVE RECORDING
Notes:
• When using a wire-less microphone, the player may not
receive the sound volume if it is too far away from the
player.
• You can use up to 3 microphones (2 wired and 1 wireless)
at the same time with this Player.
24
Page 25

Karaoke Features (cont'd)
VOCAL REPLACE button
English
KEY CONTROL buttons
DISC
/ POWER
STANDBY
KARAOKENORMAL PBC OFF
PAL
NTSC
VIDEO CD
GRAPHICS
COMPACT
DIGITAL VIDEO
3
DISC
2
DISC
1
VOCAL
REPLACE
VOCAL
MASKING
MPX
.
VHS VideoCD COMBO HR-VCD1
NTSC/PAL COMPATIBILITY
3
-
DISC
TRIPLE TRAY
VIDEO
INTRO
SELECT
RETURN
VCD NUMBER
DIGITAL ECHO knobVOCAL MASKING button
Vocal replace
Preparation
This function is used for multiplex sound discs and tape.
Operation
1. Press the VOCAL REPLACE button during play or stop.
REPLACE will appear on the display window and
VO.REPLACE will appear on the television screen.
When you start singing, the vocal of the disc is removed and your voice is inserted into the music.
2. To cancel voice replacement, press the VOCAL REPLACE button again.
Vocal masking
Preparation
A digital audio CD and tape with vocals is used for KARAOKE.
Operation
1. Press the VOCAL MASKING button during play or stop.
The Player plays the music with low level vocals recorded on the disc. MASKING will appear on the display window and VO.MASKING will appear on the television screen.
2. To cancel vocal masking, press the VOCAL MASKING
button again.
3
2
1
STILL
DIGITAL ECHO
NEXTPREV
MIN MAX VCD FRONT AV
KEY CONTROL
DOWN NORMAL UP
MIX VOL
OFF ON S.ST
SPATIALIZER
MIC 1
MIN MAX
WIRELESS MIC
MIC 2
MIN MAX
SP / LP / EP
CD REC
VHS CONTROL
/
VIDEO (MONO) L AUDIO R
LIVE RECORDING
MIC1/2 knobs
MIC volume adjustment
Turn the MIC 1 or MIC 2 knobs clockwise (level up) or
counterclockwise (level down) as desired.
When using a wire-less microphone, adjust with the MIC 2
knob.
Adjusting music key
Press the KEY CONTROL buttons ( or #) to change the
key in which the music plays. You can adjust the music on
the remote control unit also.
To return the music to its original key, press the NORMAL
button. Remote control is not available for operation.
Notes :
• The degree the key has been sharpened or flattened is
displayed on the television screen.
• When the song ends the key control will return to NORMAL
mode automatically.
Adjusting echo effect
Turn the DIGITAL ECHO knob clockwise (level up) or
counterclockwise (level down) to adjust the echo effect as
desired.
ATTENTION
Be sure to remove the microphone
Note when connecting the sound output to the input of a TV
or VCR:
If an excessively strong signal is given to a unit through a
microphone, for example when using Karaoke, it may cause
an adverse effect such as distorted sound. Lower the
sound volume using the microphone control.
Karaoke etiquette
Be aware of your neighbors when enjoying karaoke music.
Particularly late at night, the sound you enjoy may reach
your neighbors more than you expect. Common sense and
courtesy are always appreciated.
DIGITAL ECHO
MIN MAX
25
Page 26

Editing
Editing to/from another recorder Editing from a camcorder
Player
WIRELESS MIC ANT.
FREQ
ADJUST
Recorder
DISC 3
/ POWER
DISC 2
STANDBY
DISC 1
KARAOKENORMALPBC OFF
VOCAL
REPLACE
PAL
NTSC
VOCAL
MASKING
MPX
VIDEO CD
GRAPHICS
COMPACT
.
DIGITAL VIDEO
VHS VideoCD COMBO HR-VCD1
AUDIO R
AUDIO L
VIDEO
OUT1 OUT2
NTSC/PAL CONVERTIBILITY
NT8C3.58
NTSC
ON PAL TV
NTSC4.43
Audio/Video signals
3
2
3
-
DISC
1
TRIPLE TRAY
SELECT
VIDEO
INTRO
STILL
RETURN
VCD NUMBER
NEXTPREV
DIGITAL ECHO
MIN MAX VCD FRONT AV
SPATIALIZER
KEY CONTROL
DOWN NORMAL UP
MIX VOL
OFF ON S.ST
MIC 1
MIN MAX
WIRELESS MIC
MIC 2
MIN MAX
Recorder
TRIPLE TRAY
3
2
3
-
DISC
1
STILL
NEXTPREV
KEY CONTROL
DOWN NORMAL UP
DIGITAL ECHO
MIX VOL
MIN MAX VCD FRONT AV
OFF ON S.ST
SPATIALIZER
SELECT
VIDEO
INTRO
RETURN
VCD NUMBER
MIC 1
MIN MAX
WIRELESS MIC
MIN MAX
VHS CONTROL
MIC 2
/
SP / LP / EP
LIVE RECORDING
VIDEO (MONO) L AUDIO R
CD REC
/ POWER
STANDBY
KARAOKENORMALPBC OFF
PAL
VIDEO CD
GRAPHICS
COMPACT
DIGITAL VIDEO
DISC 3
DISC 2
DISC 1
VOCAL
REPLACE
NTSC
VOCAL
MASKING
MPX
.
VHS VideoCD COMBO HR-VCD1
NTSC/PAL CONVERTIBILITY
Audio/Video signals
VIDEO OUT
AUDIO OUT
Player
VHS CONTROL
/
SP / LP / EP
LIVE RECORDING
VIDEO (MONO) L AUDIO R
CD REC
Camcorder
Preparation
Connect the player’s AUDIO and VIDEO OUT connectors to
the recorder’s AUDIO and VIDEO IN connectors.
Select the recorder’s external input mode.
1
m When this unit is beside the recorder, there is no need
for any operations.
Put the player in the Play mode.
2
Put the recorder in the Recorder mode.
3
Notes:
• NTSC tapes being played back in the NTSC PLAYBACK
ON PAL TV mode cannot be dubbed to another recorder.
• When you dub an NTSC tape using this unit as the playback deck, select NTSC 3.58 (or 4.43) with the Colour
System Output switch.
Preparation
Connect the camcorder’s AUDIO and VIDEO OUT connectors
to the recorder’s AUDIO and VIDEO IN connectors.
Put the camcorder in the Play mode.
1
Put the recorder in the Record mode.
2
Important:
m To edit, both the player and the recorder must be of the
same colour system. Set this unit's Colour system
switch to select the appropriate colour system.
26
Page 27

Editing (cont'd)
CD Recording
This function dubs the audio of a CD onto a video tape by
a simple procedure.
English
MODE switch
/ POWER
STANDBY
KARAOKENORMAL PBC OFF
PAL
VIDEO CD
GRAPHICS
COMPACT
DIGITAL VIDEO
DISC
DISC
DISC
VOCAL
REPLACE
NTSC
VOCAL
MASKING
MPX
.
VHS VideoCD COMBO HR-VCD1
3
2
1
NTSC/PAL COMPATIBILITY
DISC1 through 3 buttons
3
-
DISC
TRIPLE TRAY
VIDEO
INTRO
RETURN
SELECT
VCD NUMBER
SELECT button CD REC button
Preparation
• Set the MODE switch of the Player either to “PBC OFF” or
“KARAOKE”.
• Set the MIX VOL knob on the player's front panel to the
center or VCD position.
3
2
1
STILL
DIGITAL ECHO
NEXTPREV
MIN MAX VCD FRONT AV
SPATIALIZER
KEY CONTROL
DOWN NORMAL UP
MIX VOL
MIN MAX
OFF ON S.ST
SP / LP / EP
CD REC
VHS CONTROL
/
VIDEO (MONO) L AUDIO R
LIVE RECORDING
WIRELESS MIC
MIC 1
MIC 2
MIN MAX
Operation
Load a cassette.
1
m Insert the cassette to be recorded on into the Player.
Place the disc to be played on the disc tray of the
2
Player.
Press the CD REC button of the Player.
3
m The lamp in the CD REC button lights up and the VCR
enters the record-pause mode.
m ¶8 appears in the display panel of the Player.
Press the
4
buttons of the CD player.
3 3
3 SELECT button or one of the DISC 1 to 3
3 3
m The CD player starts playback, the Video cassette
player (VCP) starts recording, and the audio of the CD
is recorded onto the video tape.
m The audio of the CD are output at the monitor TV.
m Switching the CD player to stop or pause mode during
dubbing puts the VCR in record-pause mode. To resume dubbing, play the track to be dubbed.
Press the CD REC button to stop CD recording.
5
m The lamp in the CD REC button turns off and both the
CD player and the VCP stop.
27
Page 28

Editing (cont'd)
Live recording
This is a function which records both the singing style
and the Video CD sound simultaneously with the video
tape.
The images from the Video
CD and the mixed sounds
from the Video CD, MIC, and
camcorder are output.
/ POWER
STANDBY
KARAOKENORMALPBC OFF
PAL
NTSC
VIDEO CD
GRAPHICS
COMPACT
DIGITAL VIDEO
DISC
3
DISC
2
DISC
1
VOCAL
REPLACE
VOCAL
MASKING
MPX
.
VHS VideoCD COMBO HR-VCD1
NTSC/PAL COMPATIBILITY
3
-
TRIPLE TRAY
DISC
3
2
INTRO
RETURN
STILL
NEXTPREV
VCD NUMBER
1
SELECT
VIDEO
KEY CONTROL
DOWN NORMAL UP
DIGITAL ECHO
MIX VOL
MIN MAX VCD FRONT AV
OFF ON S.ST
SPATIALIZER
MIC 1
MIN MAX
WIRELESS MIC
MIC 2
MIN MAX
SP / LP / EP
VHS CONTROL
/
LIVE RECORDING
VIDEO (MONO) L AUDIO R
CD REC
Video/Audio
signals
28
Camcorder
SELECT button
/ POWER
STANDBY
KARAOKENORMALPBC OFF
PAL
NTSC
VIDEO CD
GRAPHICS
COMPACT
DIGITAL VIDEO
VHS VideoCD COMBO HR-VCD1
REPLACE
MASKING
VOCAL
VOCAL
MPX
.
DISC
3
DISC
2
DISC
1
NTSC/PAL COMPATIBILITY
DISC 1-3 buttons
3
3
-
TRIPLE TRAY
DISC
VIDEO
INTRO
RETURN
SELECT
VCD NUMBER
2
1
STILL
NEXTPREV
KEY CONTROL
DOWN NORMAL UP
DIGITAL ECHO
MIX VOL
MIN MAX VCD FRONT AV
OFF ON S.ST
SPATIALIZER
MIC 1
MIN MAX
WIRELESS MIC
MIC 2
MIN MAX
SP / LP / EP
CD REC
VHS CONTROL
/
LIVE RECORDING
VIDEO (MONO) L AUDIO R
MODE switch MIX VOL knob CD REC button
Page 29

Editing (cont'd)
Live recording
English
Preparation
Set the MODE switch of the Player either to “PBC OFF” or
“KARAOKE”.
Operation
Connect the equipment as shown in the illustration on
1
the left.
Load a cassette.
2
m Insert the cassette to be recorded in the Player.
Place the disc to be played on the disc tray of the
3
Player.
Shoot the image to be recorded with the camcorder.
4
m For the operating procedure of the camcorder, refer to
the instruction manual.
Adjust the MIX VOL knob of the Player to the desired
5
level.
MIX VOL
Press the CD REC button of the Player.
6
m The lamp in the CD REC button lights up and the VCR
enters the record-pause mode.
m ¶8 appears in the display panel of the Player.
Press the
7
buttons of the Video CD player.
m As the Video CD is played, the Video cassette player
(VCP) begins to record the images from the camcorder
together with the mixed sounds from the Video CD, MIC,
and camcorder.
m The images from the Video CD together with the mixed
sounds are output to the TV.
m Switching the Video CD player to stop or pause mode
during recording puts the VCP in record-pause mode.
To resume recording, play the track to be recorded.
Press the CD REC button to stop live recording.
8
m The lamp in the CD REC button turns off and both the
Video CD player and the VCP stop.
33
3 SELECT button or one of the DISC 1 to 3
33
Mixed sounds
from the Video CD
and MIC
VCD FRONT AV
Sound from the
Camcorder
(External input)
29
Page 30

Troubleshooting
Symptoms Check point
No power is applied to the Player. m Is the power cord disconnected?
– Connect it.
Remote control does not function. m Are the batteries discharged?
– Replace with new ones.
Disc tray does not come out when OPEN/ m Is the power cord disconnected?
CLOSE button is pressed. – Connect it.
Sound is distorted or noise is generated. m Is the disc dirty?
Image is garbled. – Wipe off the disc surface with a soft cloth.
m Is the correctly connected?
Sound is intermittent. m Is the disc dirty?
Image is garbled. – Wipe the disc surface with a soft cloth. (
m Is the disc scratched?
m Is the disc warped?
– Replace the disc with a new one.
No image is displayed on the monitor. m Is the monitor set to the AV mode?
– Set it to the AV mode.
Z p.4)
Noise appears during visual search. m This is normal.
Noise appears during normal or slow-motion m Is the automatic tracking mode engaged?
playback. – Try manual tracking. (
No sound from the microphone is heard. m Is the microphone volume adjusted at the lowest level? (
Recording does not function. m Is a cassette loaded?
m Is the safety tab on the cassette removed?
– Reseal the slot with adhesive tape.
Tape-to-tape editing or camera recording is not m Is the camcorder or another video recorder correctly connected?
possible. m Are all necessary power switch turned ON?
Whistling or howling is heard from TV during m Move camcorder or camera’s microphone away from TV or reduce
camera recording. TV sound volume.
The Player does not function properly . m Microcomputer malfunction. Disconnect the power plug from the
AC outlet and then re-insert it.
The microcomputer will be reset to its initial mode.
Z p.19)
Z p.25)
30
Page 31

Specifications
GENERAL
Power requirements
Rating ........................... AC 110 – 240 V, 50/60 Hz
Operating...................... AC 90 – 260 V, 50/60 Hz
Power consumption............ 25 W
T emperature
Operating...................... 5°C to 40°C
Storage ......................... –20°C to 60°C
Dimensions (W x H x D)..... 460 2 135 2 341 (mm)
Weight ................................ 7.5 kg
VIDEO CD
Playback disc .....................Video CD (with/without Playback
Control function)
CD Graphics
Digital Audio CD
Total harmonic distortion ....Less than 0.015% (1 kHz)
Signal-to-noise ratio ...........More than 90 dB
Frequency response .......... 20 Hz to 20,000 Hz
VIDEO
Format................................ VHS Standard
Recording/Playback
system................................DA-4 (Double Azimuth) head
herical scan system
Recording (line input) .........PAL, SECAM (MESECAM tape)
NTSC 3.58, NTSC 4.43
Playback (line output)......... PAL, SECAM (MESECAM tape)
NTSC 3.58, NTSC 4.43
Simulated P AL (NTSC tape)
Signal-to-noise ratio ...........More than 45 dB
Horizontal resolution .......... More than 250 lines (PAL/
MESECAM)
More than 220 lines (NTSC)
Input ...................................0.5 - 2.0 Vp-p/75 ohms,
unbalanced
Output ................................ 1.0 Vp-p/75 ohms, unbalanced
English
AUDIO
Frequency response .......... 70 Hz to 10,000 Hz (Normal)
20 Hz to 20,000 Hz (Hi-Fi)
Input ...................................–8 dBs/50 k ohms, unbalanced
Output ................................ –6 dBs/1 k ohms, unbalanced
MIC input............................–56 dBs/50 k ohms, unbalanced
ACCESSORIES
Provided accessories
Remote control unit ........................................................... 1
“AA/UM-3” battery ............................................................. 4
Audio/Video cable ............................................................. 1
Microphone ....................................................................... 1
FREQ. adjust screwdriver.............................................. 1
Connector cable ................................................................ 1
Antenna cable ................................................................... 1
FM feeder cable ................................................................ 1
• Design and specifications subject to change without notice.
31
Page 32

HR-VCD1
VICTOR COMPANY OF JAPAN, LIMITED
COPYRIGHT 1997 VICTOR COMPANY OF JAPAN, LTD.
C
Printed In Japan
0897 MNV*SW*YP
 Loading...