

JVC GZ MG155 - Everio Camcorder - 1.07 MP, GZ MG555 - Everio Camcorder - 5.4 MP, MG155 1.07 Operating Manual
Page 1

ENGLISH FRANÇAIS
EN
FR
PC OPERATION GUIDE
GUIDE D'UTILISATION DE L'ORDINATEUR
Dear Customer
Some of the camera illustrations in
this instruction manual may differ
slightly from your camera.
Windows® is either registered
trademark or trademark of Microsoft
Corporation in the United States
and/or other countries.
Macintosh is a registered trademark
of Apple Computer, Inc.
Other product and company names
included in this instruction manual
are trademarks and/or registered
trademarks of their respective
holders.
Cher client
Certaines illustrations de
l'appareil photo, dans ce manuel
d'instructions, peuvent être
légèrement différentes de votre
appareil photo.
Windows® est une marque déposée
ou une marque de commerce de
Microsoft Corporation aux ÉtatsUnis et/ou dans d'autres pays.
Macintosh est une marque déposée
d'Apple Computer, Inc.
D'autres noms de produits et de
sociétés cités dans ce manuel
d'utilisation sont des marques de
commerce et/ou des marques
déposées de leurs détenteurs
respectifs.
Page 2

For All Users
JVC SOFTWARE LICENSE
AGREEMENT
IMPORTANT
TO CUSTOMERS: PLEASE MAKE SURE
TO READ THIS CAREFULLY BEFORE
INSTALLING OR USING THE SOFTWARE
PROGRAM NAMED “DIGITAL PHOTO
NAVIGATOR” (“Program”) ON YOUR PC.
The right to use the Program is granted by Victor
Company of Japan, Limited (“JVC”) to You only
on the condition that You agree to the following.
Should You not agree to the terms hereof, You
may not install or use the Program. HOWEVER,
INSTALLING OR USING THE PROGRAM
INDICATES YOUR ACCEPTANCE OF THESE
TERMS AND CONDITIONS.
1 COPYRIGHT; OWNERSHIP
You acknowledge that all copyrights and other
intellectual property rights in the Program are
owned by JVC and its licensor, and remain
vested in JVC and such licensor. The Program is
protected under the copyright law of Japan and
other countries, and related Conventions.
2 GRANT OF LICENSE
(1) Subject to the conditions of this Agreement,
JVC grants to You a non-exclusive right to
use the Program. You may install and use
the Program on a HDD or other storage
devices incorporated in Your PC.
(2) You may make one (1) copy of the Program
solely for your personal backup or archival
purposes.
3 RESTRICTION ON THE PROGRAM
(1) You may not reverse engineer, decompile,
disassemble, revise or modify the Program,
except to the extent that expressly
permitted by applicable law.
(2) You may not copy or use the Program, in
whole or in part, other than as expressly
specifi ed in this Agreement.
(3) You have no right to grant a license to
use the Program, and may not distribute,
rent, lease or transfer the Program to any
third party or otherwise let them use the
Program.
4 LIMITED WARRANTY
JVC warrants that any media in which the
Program is embodied are free from any
defects in materials and workmanship for a
period of thirty (30) days from the date of Your
purchasing any our products accompanying
the Program. JVC’s entire liability and your
exclusive remedy in connection with the
Program shall be replacement of such defective
media. EXCEPT FOR THE EXPRESS
WARRANTIES STATED HEREIN AND TO
THE EXTENT PERMITTED BY APPLICABLE
LAW, JVC AND ITS LICENSORS DISCLAIM
ANY OTHER WARRANTIES, EITHER
EXPRESS OR IMPLIED, INCLUDING BUT
NOT LIMITED TO IMPLIED WARRANTIES
OF MERCHANTABILITY AND FITNESS FOR
A PARTICULAR PURPOSE IN REGARD TO
THE PROGRAM AND THE ACCOMPANYING
PRINTED MATERIALS. SHOULD THERE BE
ANY PROBLEM ARISING FROM OR CAUSED
BY THE PROGRAM, YOU SHOULD SETTLE
ALL SUCH PROBLEM AT YOUR OWN COST
AND EXPENSE.
5 LIMITED LIABILITY
TO THE EXTENT PERMITTED BY
APPLICABLE LAW, IN NO EVENT SHALL
JVC AND ITS LICENSORS BE LIABLE FOR
ANY INDIRECT, SPECIAL, INCIDENTAL
OR CONSEQUENTIAL DAMAGES
WHATSOEVER, REGARDLESS OF THE
FORM OF ACTION WHETHER IN CONTRACT,
TORT OR OTHERWISE ARISING OUT OF
OR IN CONNECTION WITH THE USE OF
OR INABILITY TO USE THE PROGRAM,
EVEN IF JVC HAS BEEN ADVISED OF THE
POSSIBILITY OF SUCH DAMAGES. YOU
WILL INDEMNIFY AND HOLD HARMLESS
JVC FROM ANY LOSS, LIABILITY OR
COST ARISING OUT OF OR IN ANY WAY
CONNECTED TO CLAIMS FROM ANY THIRD
PARTY RELATING TO THE USE OF THE
PROGRAM.
2
Page 3

6 TERM
This Agreement will become effective on the
date when You install and use the Program on
Your machine, and continue to be in effect until
the termination under the following provision.
Should You breach any provision of this
Agreement, JVC may terminate this Agreement
without giving any notice to You. In this event,
JVC may claim against You for any damages
caused by Your breach. Should this Agreement
be terminated, You must immediately destroy
the Program stored in Your machine (including
the erasing from any memory in Your PC), and
no longer own such Program.
7 EXPORT CONTROL
You agree that You will not ship, transfer or
export the Program or underlying information
and technology to any countries to which Japan
and other relevant countries have initiated an
embargo on such goods.
8 U.S. GOVERNMENT USER
If You are an agency of the United States of
America (the “Government”), You acknowledge
JVC’s representation that the Program is
a “Commercial Item” as defi ned in Federal
Acquisition Regulation (FAR) part 2.101 (g)
consisting unpublished “Commercial Computer
Software” as those items are used at FAR part
12.212 and is only licensed to You with the same
use rights JVC grants all commercial end users
pursuant to the terms of this Agreement.
9 GENERAL
(1) No modifi cation, change, addition, deletion
or other alternation of or to this Agreement
will be valid unless reduced to writing and
signed by an authorized representative of
JVC.
(2) If any part of this Agreement is held
invalid by or in confl ict with any law having
jurisdiction over this Agreement, the
remaining provisions will remain in full force
and effect.
(3) This Agreement shall be governed by
and interpreted under the laws of Japan.
The Tokyo District Court has jurisdiction
over all disputes which may arise with
respect to the execution, interpretation and
performance of this Agreement.
Victor Company of Japan, Limited
NOTE
If You acquired the Program in Germany, the
provisions of Sections 4 (Limited Warranty)
and 5 (Limited Liability) provided above will be
replaced with those of the German version of
this Agreement.
CAUTION:
Operate this equipment according to the
operating procedures described in this
manual.
Use only the provided CD-ROM. Never use
any other CD-ROM to run this software.
Do not attempt to modify this software.
Changes or modifi cations not approved by
JVC could void user’s authority to operate the
equipment.
How to handle a CD-ROM
Take care not to soil or scratch the mirror
surface (opposite to the printed surface). Do
not write anything or put a sticker on either
the front or back surface. If the CD-ROM
gets dirty, gently wipe it with a soft cloth
outward from the center hole.
Do not use conventional disc cleaners or
cleaning spray.
Do not bend the CD-ROM or touch its mirror
surface.
Do not store your CD-ROM in a dusty, hot
or humid environment. Keep it away from
direct sunlight.
You can fi nd the latest information (in
English) on the provided software program
at our world wide web server at http://www.
jvc-victor.co.jp/english/global-e.html
ENGLISH
3
Page 4

Contents
Remember to back up your fi les to your
computer!
Creating room in the Everio’s hard disk clears space for
you to store your next masterpiece.
Windows
®
File Backup on the PC (Windows®) ...................................................5
System Requirements ....................................................................................................6
Software Installation .......................................................................................................6
Connecting the Camera to the PC .................................................................................9
Playing back Files on the PC .......................................................................................10
File Backup on the PC .................................................................................................11
File Backup on the PC without using Software ............................................................13
Other PC Operations (Windows®) ...................................................14
Creating a DVD-Video ..................................................................................................14
Getting More Use from the Software ...........................................................................16
Macintosh
File Backup on the PC (Macintosh) ................................................18
System Requirements ..................................................................................................18
Connecting the Camera to the PC ...............................................................................18
File Backup on the PC .................................................................................................20
Other Devices
File Backup on a NAS Compatibles* ..............................................21
(*No devices can be connected to a camera at the time of camera’s release.)
Connecting the Camera to the External Device ...........................................................21
File Backup on an External Device ..............................................................................22
Folder Structure and Extensions ....................................................23
4
Page 5

Windows
®
File Backup on the PC (Windows®)
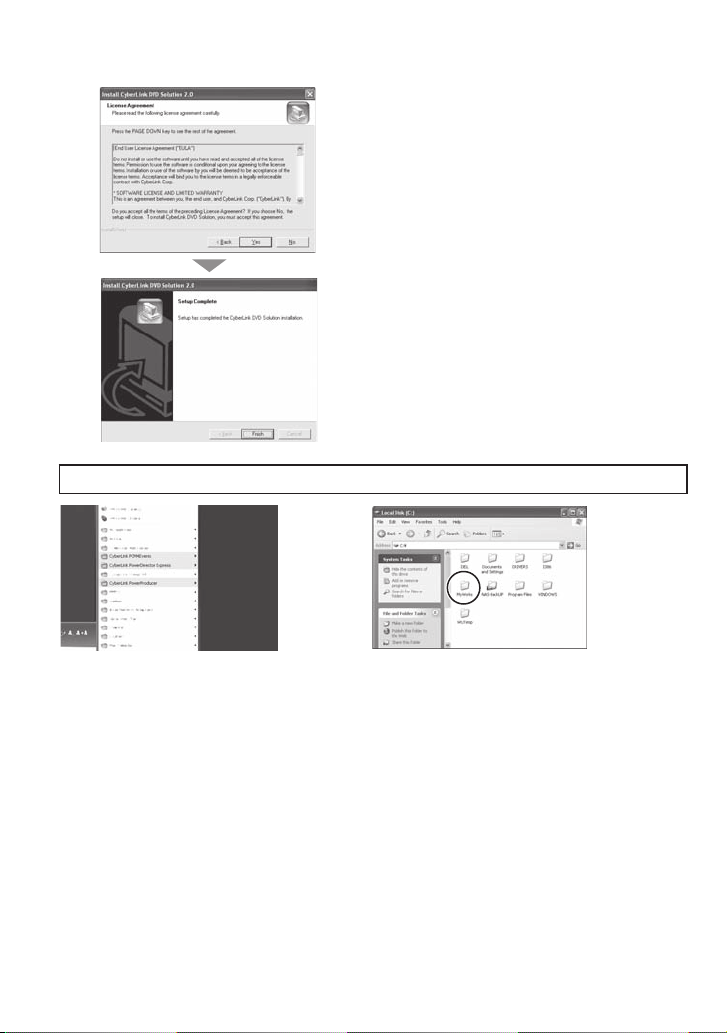
Install the software that came with your Everio.
You can back up your fi les on your computer with a simple
one-touch operation, edit your fi les on your computer, and
also create DVDs.
If you cannot install the software, you can still back up your
fi les on your computer. (墌 pg. 13)
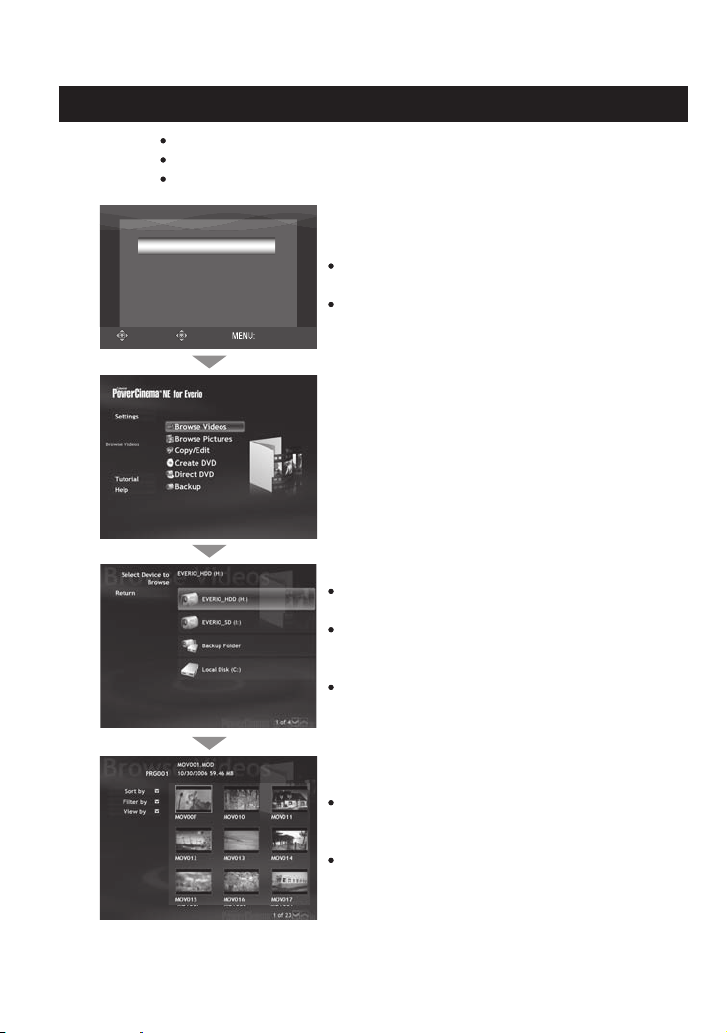
Settings:
You can perform detailed settings for each
item.
Function Explanation:
Select a function on the right, and an
explanation is displayed.
Tutorial:
The operating procedure for each function is
displayed.
ENGLISH
A
B
C
D
E
F
A Plays back video fi les on
the PC (墌 pg. 10)
D Burns fi les that are
backed up on the PC onto
a DVD
B Plays back still image fi les
on the PC (墌 pg. 10)
E Creates a DVD-Video
(墌 pg. 14)
C Edits fi les on the PC
F Backs up camera fi les
onto the PC (墌 pg. 11)
5
Page 6

File Backup on the PC (Windows®) (continued)
System Requirements
OS:
Windows® XP Home Edition [XP] (preinstalled),
or Windows® XP Professional [XP] (preinstalled)
CPU:
®
Intel
Pentium® 4, at least 1.6 GHz
(at least 2.2 GHz recommended)
®
Pentium® M, at least 1.4 GHz
Intel
RAM:
At least 256 MB (at least 512 MB
recommended)
Free hard disk space:
At least 550 MB for installation
For creating DVD Video, at least 10 GB
recommended
For creating VCD, at least 1 GB
recommended
Connector:
USB 2.0 connector
Display:
Must be capable of displaying 1024 x
600 dots (VRAM: 128 MB and more
recommended)
Software Installation
Miscellaneous:
Internet Explorer 5.5 or later
DirectX 9.0 or later
DirectX is automatically installed during
installation.
Supported media:
DVD-Video: DVD-R/-RW, DVD+R/+RW
DVD-VR: DVD-RW, DVD-RAM
DVD+VR: DVD+RW
VideoCD: CD-R/RW
For the compatible DVD burners, refer to
CyberLink web site:
http://www.cyberlink.com/english/products/
powerproducer/3/comp_dvd_drives.jsp
NOTE
The system requirements information is not a
guarantee that the provided software will work
on all personal computers meeting those
requirements.
The following software is included in the CD-ROM that came with your Everio.
CyberLink DVD Solution
Comprehensive application software that consists of the following 3 software.
PowerCinema NE for Everio
The main authoring software. You can perform various operations such as fi le backup,
playback, and editing from the top menu of this software.
PowerProducer 3 NE
Allows you to create DVDs with more specifi ed settings. Automatically starts from an
operation in PowerCinema NE for Everio.
PowerDirector 5 NE Express
Allows you to edit fi les on your PC. Automatically starts from an operation in PowerCinema
NE for Everio.
Digital Photo Navigator 1.5
Allows you to change the format of still image fi les backed up on your computer.
6
Page 7

Preparation: Quit any other software you are using. (Check that there are no other
A
application icons on the status bar.)
Load the provided CD-ROM into the PC.
After a moment, the [SETUP] screen appears. If
the [SETUP] screen does not appear, double-click
the CD-ROM icon in the [My Computer].
ENGLISH
B
C
D
Click [Easy Installation].
If you want to specify the type of software to install
or the installation destination folder etc., select
[Custom Installation].
Follow the instructions on the screen to install the
software.
Click [Yes].
Select the desired language and click [OK].
Continued on next page
7
Page 8
File Backup on the PC (Windows®) (continued)
E
F
When installation is completed
The installed software is displayed in [All
Programs].
Click [Yes].
The software installation starts.
Click [Finish].
The backup destination folder [MyWorks]
for fi les is created on the hard disk drive
that has the most free space.
8
Page 9

Connecting the Camera to the PC
Preparation: Set the camera’s power/mode switch to OFF.
USB Connector
DC Connector
USB Cable
AC Adapter
NOTE
When the USB cable is connected, turning on or off the camera causes malfunctions of
the PC.
Connect the camera directly to the PC, not through the hub.
Do not use an extension USB cable.
Saving the wrong kinds of fi les in a recording medium or deleting fi les or folders from
a recording medium can cause problems with the operation of the camera. When it is
necessary to delete a fi le from a recording medium, delete it through the camera. Also,
do not move or rename folders and fi les in the medium on PC.
Never disconnect the USB cable while the access/charge lamp on the camera lights or
blinks.
When you have fi nished operation
Always follow the procedures below when disconnecting the camera, or turning off the
camera/computer power.
Failing to do so may cause damage to the camera and computer.
A
Confi rm that the access/charge lamp on the camera does not light or blink.
If the access/charge lamp lights or blinks, wait until it is turned off before proceeding.
B
Double-click the [Safely Remove Hardware] or [Unplug or Eject Hardware] icon
in the status bar.
C
Select [USB Mass Storage Device] or [USB Disk], and then click [Stop].
D
Click [OK].
The model name depends on the connected camera.
E
Disconnect the USB cable.
F
Turn off the camera and PC.
AC Outlet
USB Connector
ENGLISH
9
Page 10
File Backup on the PC (Windows®) (continued)
Playing back Files on the PC
Preparation: Install the software from the included CD-ROM. (墌 pg. 6)
A
B
C
Connect the camera to the computer with the USB cable. (墌 pg. 9)
Set the camera’s power/mode switch to ON.
On the camera:
PLAYBACK ON PC
CONNECT TO DEVICE
CREATE DVD
BACK UP
DIRECT PRINT
SELECT
SET
QUIT
Move the set lever to ¡ / ¢ to select
[PLAYBACK ON PC], then press down.
A dialog box is displayed on the PC screen.
However, you do not need to use the dialog box.
PowerCinema starts.
On the PC:
Click [Browse Videos] (for video playback) or
[Browse Pictures] (for still image playback).
Click the media that contains desired fi les.
EVERIO_HDD:
Plays back the fi les stored in the camera’s HDD.
EVERIO_SD:
Plays back the fi les stored in the camera’s SD
card.
Backup Folder:
Plays back the fi les stored in the PC backup
folder (墌 pg. 8).
10
D
Click the desired fi le.
You can use the convenient fi le search function.
Sort by:
The order of fi les is rearranged according to item
that you selected.
Filter by:
Files are fi ltered according to the item that you
selected.
Page 11

File Backup on the PC
This method uses the included software to back up fi les onto your computer.
Video fi les that have never been backed up onto the connected computer are
automatically selected from the back up history and backed up.
If you could not install the software, turn to pg. 13 for details of how to back up your fi les
without using this software.
Preparation:
A
Install the software from the included CD-ROM. (墌 pg. 6)
Connect the camera to the computer with the USB cable. (墌 pg. 9)
Set the camera’s power/mode switch to ON.
On the camera:
Press [DIRECT BACK UP].
A dialog box is displayed on the PC screen.
However, you do not need to use the dialog box.
PowerCinema starts.
ENGLISH
B
C
On the PC:
File copy starts.
Click [Cancel] to cancel the procedure.
When the progress bar disappears, and the
screen on the left is displayed, the process is
complete.
11
Page 12
File Backup on the PC (Windows®) (continued)
File Backup from the specifi ed media
Preparation:
A
Install the software from the included CD-ROM. (墌 pg. 6)
Connect the camera to the computer with the USB cable. (墌 pg. 9)
Set the camera’s power/mode switch to ON.
On the camera:
PLAYBACK ON PC
CONNECT TO DEVICE
CREATE DVD
BACK UP
DIRECT PRINT
SELECT
SET
QUIT
Move the set lever to ¡ / ¢ to select [BACK
UP], then press down.
A dialog box is displayed on the PC screen.
However, you do not need to use the dialog box.
PowerCinema starts.
B
NOTE
When backup is performed, a folder for each of the media (HDD or SD) stored in the
[MyWorks] folder (墌 pg. 8) is created, and the fi les are backed up inside those folders.
(If backup is performed from more than one camera HDD, that number of HDD folders is
created.)
On the PC:
Click [EVERIO_HDD] or [EVERIO_SD].
Turn to pg. 11 and see step B and onwards for
details on this operation.
12
Page 13

File Backup on the PC without using Software
ENGLISH
Preparation: Connect the camera to the computer with the USB cable. (墌 pg. 9)
A
B
C
D
Set the camera’s power/mode switch to ON.
On the PC:
Create a folder to back up fi les into.
On the camera:
PLAYBACK ON PC
CONNECT TO DEVICE
CREATE DVD
BACK UP
DIRECT PRINT
SELECT
SET
QUIT
Move the set lever to ¡ / ¢ to select
[PLAYBACK ON PC], then press down.
On the PC:
Double-click [EVERIO_HDD] or [EVERIO_SD].
Select the folder that you want to back up, and
drag & drop it into the folder you created in
step A.
SD_VIDEO:
Folder that contains video fi les. If you want to
back up fi les individually, open this folder, and
drag & drop folders such as [PRG001] one by
one.
DCIM:
Folder that contains still image fi les. If you want
to back up fi les individually, open this folder, and
drag & drop fi les such as [PIC_0001.JPG] one
by one.
NOTE
For further details on the use of folders, please refer to pg. 23.
13
Page 14

Other PC Operations (Windows®)
Creating a DVD-Video
Using the software included, burn the scenes directly from the camera onto a DVD disc.
Preparation: Install the software from the included CD-ROM. (墌 pg. 6)
Burning only the newly taken scenes
Files that have never been copied to the DVD are automatically selected from the DVD
creation history and copied.
A
Connect the camera to the computer with the USB cable. (墌 pg. 9)
Set the camera’s power/mode switch to ON.
On the camera:
Press [DIRECT DVD].
A dialog box is displayed on the PC screen.
However, you do not need to use the dialog box.
PowerCinema starts.
B
C
NOTE
DVD-RAM discs cannot be used. Regarding DVD-R/DVD+R discs, only unused DVD-R/
DVD+R discs can be used. Regarding DVD-RW/DVD+RW discs, used DVD-RW/
DVD+RW discs can also be used, but they need to be formatted before recording.
Formatting a disc deletes all content recorded on the disc up until that time.
If the number of fi les exceeds 98, or if the total data size exceeds 4300 MB, more than
one DVD will be required.
You may not able to play back the created DVD-Video depending on the performance
of a DVD device. Also the image may stop momentarily at junctions between scenes.
PC must be equipped a DVD drive and DVD player software to playback the created
DVD-Video.
14
On the PC:
Authoring and burning starts.
Click [Stop] to cancel the procedure.
Click [OK].
Page 15

Selecting and burning scenes
ENGLISH
A
B
C
D
PLAYBACK ON PC
CONNECT TO DEVICE
CREATE DVD
BACK UP
DIRECT PRINT
SELECT
SET
QUIT
On the camera:
Move the set lever to ¡ / ¢ to select
[CREATE DVD], then press down.
A dialog box is displayed on the PC screen.
However, you do not need to use the dialog
box.
PowerCinema starts.
On the PC:
Click the check box of the desired fi le.
The
mark appears in the check box.
To select other fi les, repeat this step.
Click [Author and Burn].
Click [Burn to Disc].
Authoring and burning starts.
Click [Stop] to cancel the procedure.
Click [OK].
15
Page 16

Other PC Operations (Windows®) (continued)
Getting More Use from the Software
For more information on detailed operations of the software, see the Tutorials for each
software program or the User’s Guides.
PowerCinema NE for Everio
Select [PowerCinema NE for Everio] from [All Programs].
A
Click [Tutorial].
B
PowerProducer 3 NE
Select [PowerProducer 3 NE] from [All Programs].
A
Click [Readme].
B
PowerDirector 5 NE Express
Select [PowerDirector 5 NE Express] from [All Programs].
A
Click [User’s Guide] or [Readme].
B
Digital Photo Navigator 1.5
The User’s Guide is included on the CD-ROM in PDF format.
Load the provided CD-ROM into the PC.
A
Right-click the CD-ROM icon in [My Computer], then click [Open].
B
Double-click the [DOCS] folder.
C
Open the “Start.pdf” fi le and click the button of the desired language.
D
NOTE
You need to connect to the Internet to be able to see the Tutorial.
Adobe® Acrobat® ReaderTM or Adobe® Reader® must be installed to read PDF fi les.
Adobe® Reader® can be loaded from Adobe’s web site: http://www.adobe.com/
16
Page 17

Contact us for information on the included software
Use of this software is authorized according to the terms of the software license.
JVC
When contacting the nearest JVC offi ce or agency in your country about this software (refer
to the JVC Worldwide Service Network at http://www.jvc-victor.co.jp/english/worldmap/indexe.html), please fi ll out the following and have the appropriate information ready.
Product Name
Model
Problem
Error Message
PC
Manufacturer
Model (Desktop/Laptop)
CPU
OS
Memory (MB)
Available Hard Disk Space (MB)
Please note that it may take some time to respond to your questions, depending on their
subject matter.
JVC cannot answer questions regarding basic operation of your PC, or questions
regarding specifi cations or performance of the OS, other applications or drivers.
CyberLink
Telephone/fax support
Location Language
Germany
Taiwan Mandarin
Japan Japanese
English / German /
French / Spanish /
Italian / Dutch
Paid voice support
Location Language
U.S.A. English
Support web/e-mail
Language URL/e-mail address
English
German / French / Spanish /
Italian
Japanese http://jp.cyberlink.com/support/
Lines are open
(Mon. to Fri.)
1:00 pm to 10:00 pm
Offi ce hours
(Mon. to Fri.)
9:00 am to
5:00 pm
9:00 am to
6:00 pm
10:00 am to
5:00 pm
http://www.cyberlink.com/english/cs/support/
CST
http://www.cyberlink.com/english/cs/support/new_site/support_
goCyberlink@aixtema.de
Phone # Fax #
+49-700-462-
92375
+886-2-8667-1298
ext. 333
+81-3-3516-9555 +81-3-3516-9559
new_site/voice_support.jsp
index.html
+49-241-70525-25
+886-2-8667-1300
URL
ENGLISH
17
Page 18

Macintosh
File Backup on the PC (Macintosh)
You can back up camera fi les onto your computer.
The included software is not compatible with Macintosh
computers.
You can edit video fi les, create DVDs, and perform other such
operations by purchasing the Macintosh supported software.
For further information on this software, please refer to the
PIXELA website.
http://www.pixela.co.jp/oem/jvc/e/index.html
System Requirements
Hardware:
Macintosh must be standard equipped
with USB 2.0 connector
OS:
Mac OS X (v10.3.1 to v10.3.9, v10.4.2 to
v10.4.8)
NOTE
In case of using the PIXELA’s optional
software, please refer to their system
requirements.
Connecting the Camera to the PC
Preparation: Set the camera’s power/mode switch to OFF.
USB Connector
18
DC Connector
AC Adapter
AC Outlet
USB Cable
USB Connector
Page 19

When connection is completed
On the PC’s desktop, [EVERIO_HDD]/[EVERIO_SD]
icon which represents the recording medium in the
camera appears. (墌 pg 23, Folder Structure and
Extensions)
NOTE
When the USB cable is connected, turning on or off the camera causes malfunctions of
the PC.
Connect the camera directly to the PC, not through the hub.
Do not use an extension USB cable.
Saving the wrong kinds of fi les in a recording medium or deleting fi les or folders from
a recording medium can cause problems with the operation of the camera. When it is
necessary to delete a fi le from a recording medium, delete it through the camera. Also,
do not move or rename folders and fi les in the medium on PC.
Never disconnect the USB cable while the access/charge lamp on the camera lights or
blinks.
When you have fi nished operation
Always follow the procedures below when disconnecting the camera, or turning off the
camera/computer power.
Failing to do so may cause damage to the camera and computer.
A
Drag & drop the recording medium icon on the desktop into the [Trash] icon.
If the confi rmation message appears, click [OK].
B
Confi rm that the access/charge lamp on the camera does not light or blink.
If the access/charge lamp lights or blinks, wait until it is turned off before proceeding.
C
Disconnect the USB cable.
D
Turn off the camera and PC.
ENGLISH
19
Page 20

File Backup on the PC (Macintosh) (continued)
File Backup on the PC
Preparation: Connect the camera to the computer with the USB cable. (墌 pg. 18)
A
B
C
Set the camera’s power/mode switch to ON.
Create a folder to back up fi les into.
Double-click [EVERIO_HDD] or [EVERIO_SD].
Select the folder that you want to back up, and
drag & drop it into the folder you created in
step A.
SD_VIDEO:
Folder that contains video fi les. If you want to
back up fi les individually, open this folder, and
drag & drop folders such as [PRG001] one by
one.
DCIM:
Folder that contains still image fi les. If you want
to back up fi les individually, open this folder, and
drag & drop fi les such as [PIC_0001.JPG] one
by one.
NOTE
For further details on the use of folders, please refer to pg. 23.
20
Page 21

Other Devices
File Backup on a NAS Compatibles
No devices can be connected to a camera at the time of
camera’s release.
You can back up the fi les in the camera’s HDD onto an NAS
compatible external device, such as an external HDD.
You cannot back up fi les that are stored on an SD card.
(NAS: Network Attached Storage)
Connecting the Camera to the External Device
Preparation: Set the camera’s power/mode switch to OFF.
USB Connector
DC Connector
USB Cable
ENGLISH
AC Adapter
AC Outlet
USB Connector
21
Page 22

File Backup on a NAS Compatibles (continued)
File Backup on an External Device
Preparation: Connect the camera to the external device with a USB cable. (墌 pg. 21)
A
B
Set the camera’s power/mode switch to ON.
On the camera:
PLAYBACK ON PC
CONNECT TO DEVICE
CREATE DVD
BACK UP
DIRECT PRINT
SELECT
SET
QUIT
Move the set lever to ¡ / ¢ to select
[CONNECT TO DEVICE], then press down.
Operate the external device to back up the
fi les.
22
Page 23

Folder Structure and Extensions
Recording medium
[DCIM]
[XXXJVCSO]
[XXXJVCSO]
[XXXJVCSO]
[SD_VIDEO]
[MGR_INFO]
[PRGXXX]
[PRGXXX]
[PRGXXX]
[EXTMOV]
[PRGXXX.PGI]
[MOVXXX.MOD]
[MOVXXX.MOI]
Contains the still image folders.
Contains the video fi le folders.
Management information* for the media as
a whole
Management information*
Video fi le
Management information* for the video fi le
It may be displayed as the save destination
X = number
folder for the in-store demonstration fi le.
[MISC]
[PRIVATE]
Contains folders with DPOF setting data.
Contains management information fi les of
event information and/or DVD creation for
the fi les taken with the camera.
* Information such as the date and time of recording, recorded with the video fi le.
Extensions
Video fi les : “.mod”
Still image fi les : “.jpg”
The fi le extension may not appear depending on the [FOLDER] option setting of
Windows®.
ENGLISH
23
Page 24

MEMO
Page 25

Page 26

Pour tous les utilisateurs
CONTRAT DE LICENCE LOGICIEL JVC
IMPORTANT
POUR LA CLIENTELE: VEUILLEZ LIRE
CES INSTRUCTIONS SOIGNEUSEMENT
AVANT D’INSTALLER OU D’UTILISER LE
LOGICIEL “DIGITAL PHOTO NAVIGATOR” (le
“Programme”) SUR VOTRE ORDINATEUR.
Le droit d’utiliser ce Programme est accordé
par Victor Company of Japan, Limited (“JVC”)
à vous uniquement, sous réserve de votre
acceptation des termes suivants.
Si vous n’acceptez pas ces termes, vous ne
devez pas installer ou utiliser le Programme.
CEPENDANT, L’INSTALLATION OU
L’UTILISATION DU PROGRAMME SIGNIFIE
QUE VOUS ACCEPTEZ LES TERMES ET
CONDITIONS DU CONTRAT.
1 DROIT D’AUTEUR ET DROIT DE
PROPRIETE
Vous reconnaissez que les droits d’auteur et
autres droits de propriété intellectuelle liés
au Programme sont ceux de JVC et de son
concédant de licence, et restent la propriété de
JVC et d’un tel concédant. Le Programme est
protégé par les lois sur les droits d’auteur en
vigueur au Japon et dans d’autres pays, et par
des conventions y afférent.
2 ACCORD DE LICENCE
(1) Sous réserve des conditions de ce contrat,
JVC vous accorde un droit non exclusif
d’utiliser le Programme. Vous pouvez
installer et utiliser le Programme sur un
disque dur ou autre dispositif de stockage
intégré à votre ordinateur.
(2) Vous pouvez faire une (1) copie de ce
Programme à des fi ns de sauvegarde
personnelle ou d’archive uniquement.
3 RESTRICTIONS SUR LE
PROGRAMME
(1) Vous n’êtes pas autorisé à désosser,
décompiler, désassembler, réviser ou
modifi er le Programme, sauf en cas de
disposition expressément prévue par la loi.
(2) Vous n’êtes pas autorisé à copier ou à
utiliser le Programme, en tout ou en partie,
d’une manière autre que celle spécifi ée
expressément dans le présent contrat.
(3) Vous ne disposez pas du droit d’accorder
une licence d’utilisation du Programme,
ni ne pouvez le distribuer, le louer ou le
transférer à une tierce partie quelle qu’elle
soit, ou encore permettre aux tiers d’utiliser
le Programme.
2
4 GARANTIE LIMITEE
JVC garantit que tout support dans lequel le
Programme est incorporé est exempt de tout
vice de matériau ou de fabrication pour une
période de trente (30) jours à compter de la date
d’achat du produit. La responsabilité de JVC et
l’unique recours dont vous disposez en rapport
avec le Programme se limitent au remplacement
du produit défaillant concerné. SAUF LES
GARANTIES EXPRESSMENT DECLAREES
ICI ET DANS LES LIMITES PERMISES PAR LA
LOI, JVC ET SES CONCEDANTS DE LICENCE
DECLINENT TOUTE AUTRE GARANTIE,
EXPLICITE OU IMPLICITE, Y COMPRIS,
MAIS SANS S’Y LIMITER, LES GARANTIES
IMPLICITES DE QUALITE MARCHANDE ET
D’ADAPTATION A UN BUT PARTICULIER,
EN RAPPORT AVEC LE PROGRAMME ET
SA DOCUMENTATION ECRITE. EN CAS DE
PROBLEMES LIES A, OU CAUSES PAR, CE
PROGRAMME, IL VOUS INCOMBE DE LES
RESOUDRE A VOS PROPRES FRAIS.
5 RESPONSABILITE LIMITEE
DANS LES LIMITES PERMISES PAR LA
LOI, ET QUELLE QUE SOIT LA NATURE
DE L’ACTION INTENTEE, NI JVC NI SES
CONCEDANTS DE LICENCE NE SERONT
RESPONSABLES DE DOMMAGES
INDIRECTS, SPECIAUX OU ACCIDENTELS
LIES A L’UTILISATION OU A L’IMPOSSIBILITE
D’UTILISER LE PROGRAMME, MEME DANS
L’EVENTUALITE OU JVC AURAIT ETE
INFORME DE LA POSSIBILITE DE TELS
DOMMAGES. VOUS VOUS ENGAGEZ A
INDEMNISER JVC POUR TOUTE PERTE,
RESPONSABILITE OU AUTRES FRAIS
EMANANT DE REVENDICATIONS PAR
D’AUTRES PERSONNES EN RAPPORT AVEC
L’UTILISATION DU PROGRAMME.
Page 27

6 TERMES
Ce contrat entre en vigueur à la date
d’installation et d’utilisation du Programme sur
votre machine et reste effectif jusqu’à résiliation
en vertu de la clause suivante.
Si vous violez l’une quelconque des clauses de
ce contrat, JVC se réserve le droit de le résilier
sans avis préalable. Dans ce cas, JVC est en
droit de réclamer réparation pour les dommages
causés par cette violation. En cas de résiliation
de ce contrat, vous devez immédiatement
détruire le Programme stocké sur votre
machine (y compris l’effacer de la mémoire
de votre ordinateur) et ne plus l’avoir en votre
possession.
7 CONTROLE DES EXPORTATIONS
Vous vous engagez à ne pas expédier,
transférer ou exporter le Programme ou les
informations et technologies afférentes vers
tout pays pour lequel le Japon ou d’autres pays
concernés ont déclaré un embargo pour de tels
produits.
8 UTILISATEUR LIE AU
GOUVERNEMENT AMERICAIN
Si vous êtes une agence du gouvernement
des Etats-Unis (le “Gouvernement”), vous
acceptez la déclaration de JVC selon
laquelle le Programme est un “article de
nature commerciale”, comme indiqué dans
la disposition 2.101 (g) du FAR (Federal
Acquisition Regulation), constitué d’un “Logiciel
informatique commercial” inédit tel que les
articles décrits dans la section 12.212 du FAR,
et qu’une licence vous est accordée au même
titre que tout utilisateur fi nal commercial, en
vertu des termes de ce contrat.
9 GENERALITES
(1) Aucun changement, ajout, suppression ou
altération de ce contrat ne sera valide à
moins d’être confi rmé par écrit et signé par
un représentant agréé de JVC.
(2) Si une partie de ce contrat est jugée non
valide ou en confl it avec d’autres lois
ayant juridiction sur ce contrat, les clauses
restantes demeurent pleinement en vigueur.
(3)
Ce contrat est régi et interprété en vertu
des lois du Japon. Le tribunal du district de
Tokyo a juridiction pour toutes les disputes
en rapport avec l’exécution, l’interprétation
et l’accomplissement de ce contrat.
Victor Company of Japan, Limited
REMARQUE
Si vous avez acheté le Programme en
Allemagne, les clauses des sections 4 (Garantie
limitée) et 5 (Responsabilité limitée) indiquées
ci-dessus sont remplacées par celles de la
version allemande de ce contrat.
ATTENTION:
Faire fonctionner ce matériel en suivant les
procédures de fonctionnement décrites dans
ce manuel.
N’utiliser que le CD-ROM fourni. Ne jamais
utiliser tout autre CD-ROM pour exécuter ce
logiciel.
Ne pas tenter de modifi er ce logiciel.
Toute modifi cation ou changement non
approuvé par JVC peut priver l’utilisateur du
droit d’autoriser cet équipement.
Comment manipuler un disque CDROM
Faire attention de ne pas salir ou gratter
la surface miroir (opposée à la surface
imprimée). Ne rien écrire dessus ni coller
d’étiquette sur une face ou l’autre. Si le
CD-ROM devient sale, l’essuyer en douceur
avec un chiffon doux vers l’extérieur en
partant du trou central.
Ne pas utiliser de nettoyants de disque
conventionnels ni des aérosols de
nettoyage.
Ne pas cintrer le CD-ROM ni toucher à sa
surface miroir.
Ne pas ranger votre CD-ROM dans un
endroit sale, chaud ou humide. Ne pas le
mettre en plein soleil.
Vous pouvez trouver les informations les
plus récentes (en anglais) sur le logiciel
fourni sur notre serveur du World Wide Web
à http://www.jvc-victor.co.jp/english/globale.html
FRANÇAIS
3
Page 28

Table des matières
N'oubliez pas de sauvegarder les fi chiers
sur l'ordinateur !
La création d'espace libre sur le disque dur de l'Everio
libère de l'espace pour enregistrer votre prochaine pièce.
Windows
®
Sauvegarde de fi chiers sur l'ordinateur (Windows®) ......................5
Confi guration système requise ......................................................................................6
Installation du logiciel .....................................................................................................6
Raccordement de l'appareil photo à l'ordinateur ............................................................9
Lecture de fi chiers sur l'ordinateur ...............................................................................10
Sauvegarde de fi chiers sur l'ordinateur ........................................................................11
Sauvegarde de fi chiers sur l'ordinateur sans utiliser le logiciel ....................................13
Autres opérations d'ordinateur (Windows®) ..................................14
Créer un DVD-Vidéo ....................................................................................................14
Tirer pleinement profi t des logiciels .............................................................................16
Macintosh
Sauvegarde de fi chiers sur l'ordinateur
Confi guration système requise ....................................................................................18
Raccordement de l'appareil photo à l'ordinateur ..........................................................18
Sauvegarde de fi chiers sur l'ordinateur ........................................................................20
(Macintosh) ...........................18
Autres appareils
Sauvegarde de fi chiers sur un appareil compatible NAS* ............21
(*Aucun appareil ne peut être raccordé à l’appareil photo au moment de sa sortie.)
Raccordement de l'appareil photo à un appareil externe .............................................21
Sauvegarde de fi chiers sur un appareil externe...........................................................22
Structure des dossiers et extensions .............................................23
4
Page 29

Windows
®
Sauvegarde de fi chiers sur l'ordinateur (Windows®)
Installez le logiciel qui accompagne l'Everio.
Il est possible de sauvegarder les fi chiers sur l'ordinateur
à l'aide d'une seule touche, de modifi er les fi chiers sur
l'ordinateur, ainsi que de créer des DVD.
S'il n'est pas possible d'installer le logiciel, vous pouvez quand
même sauvegarder les fi chiers sur l'ordinateur. (墌 p. 13)
Paramètres :
Vous pouvez effectuer des réglages fi ns pour
chacune des options.
Explication de la fonction :
Sélectionnez une fonction sur la droite et une
explication s'affi chera.
Tutoriel :
La procédure d'utilisation s'affi che pour
chaque fonction.
A
B
C
D
E
F
A Lit les fi chiers vidéo sur
l'ordinateur (墌 p. 10)
D Grave sur un DVD les
fi chiers sauvegardés sur
l'ordinateur
B Lit les fi chiers de photos
sur l'ordinateur (墌 p. 10)
E Crée un DVD-Vidéo
(墌 p. 14)
C Édite les fi chiers sur
l'ordinateur
F Sauvegarde les fi chiers
de l'appareil photo sur
l'ordinateur (墌 p. 11)
FRANÇAIS
5
Page 30

Sauvegarde de fi chiers sur l'ordinateur (Windows®) (suite)
Confi guration système requise
Système d'exploitation :
Windows® XP Édition familiale [XP]
(préinstallé),
ou Windows® XP Professionnel [XP]
(préinstallé)
Unité centrale :
®
Intel
Pentium® 4, 1,6 GHz minimum
(2,2 GHz minimum recommandé)
®
Pentium® M, 1,4 GHz minimum
Intel
RAM :
256 Mo minimum (512 Mo minimum
recommandés)
Place disponible sur le disque dur :
550 Mo minimum pour l'installation
Pour la création de DVD vidéo, 10 Go
minimum recommandés
Pour la création de VCD, 1 Go minimum
recommandé
Connecteur :
Connecteur USB 2.0
Écran :
Résolution 1 024 x 600 points
(VRAM : 128 Mo et plus recommandé)
Installation du logiciel
Les logiciels suivants sont compris dans le CD-ROM qui accompagne l'Everio.
CyberLink DVD Solution
Logiciel d'applications complet composé des trois logiciels suivants.
PowerCinema NE for Everio
Le principal logiciel de création. Permet d'effectuer diverses opérations telles que la
sauvegarde, la lecture et la modifi cation des fi chiers depuis le menu supérieur du logiciel.
PowerProducer 3 NE
Permet de créer des DVD en spécifi ant plus de paramètres. Démarre automatiquement lors
d'une opération dans PowerCinema NE for Everio.
PowerDirector 5 NE Express
Permet de modifi er des fi chiers sur l'ordinateur. Démarre automatiquement lors d'une
opération dans PowerCinema NE for Everio.
Digital Photo Navigator 1.5
Permet de changer le format des fi chiers de photo sauvegardés sur l'ordinateur.
Divers :
Internet Explorer 5.5 ou ultérieur
DirectX 9.0 ou ultérieur
DirectX est automatiquement installé pendant
l'installation.
Supports pris en charge :
DVD Vidéo : DVD-R/-RW, DVD+R/+RW
DVD-VR : DVD-RW, DVD-RAM
DVD+VR : DVD+RW
CD vidéo : CD-R/RW
Pour connaître les graveurs de DVD
compatibles, consultez le site web de
CyberLink :
http://www.cyberlink.com/english/products/
powerproducer/3/comp_dvd_drives.jsp
REMARQUE
Les informations relatives à la confi guration
requise ne sont pas une garantie que
le logiciel fourni fonctionnera sur tous
les ordinateurs disposant d'une telle
confi guration.
6
Page 31

Préparation : Fermez toute application ouverte. (Vérifi ez qu'il n'y a plus aucune icône
A
d'application dans la barre d'état.)
Chargez le CD-ROM fourni dans le lecteur de
l'ordinateur.
Au bout de quelques instants, l'écran [SETUP]
s'affi che. Si l'écran [SETUP] ne s'affi che pas,
double-cliquez sur l'icône du CD-ROM dans [Poste
de travail].
B
C
D
Cliquez sur [Easy Installation].
Pour spécifi er le type de logiciel à installer ou
le dossier de destination pour l'installation etc.,
sélectionnez [Custom Installation].
Suivez les instructions à l'écran pour installer le
logiciel.
Cliquez sur [Yes].
Sélectionnez la langue désirée, puis cliquez
sur [OK].
FRANÇAIS
Suite page suivante
7
Page 32

Sauvegarde de fi chiers sur l'ordinateur (Windows®) (suite)
E
F
Une fois l'installation terminée
Les logiciels installés s'affi chent sous
[Tous les programmes].
Cliquez sur [Oui].
L'installation du logiciel commence.
Cliquez sur [Terminer].
Le dossier de destination de sauvegarde
des fi chiers [MyWorks] est créé sur le
disque dur qui possède le plus d'espace
libre.
8
Page 33

Raccordement de l'appareil photo à l'ordinateur
Préparation : Réglez la molette Alimentation/Mode sur OFF.
Connecteur USB
Connecteur CC
Câble USB
Adaptateur CA
REMARQUE
Lorsque le câble USB est branché, la mise sous tension ou hors tension de l'appareil
photo provoque un dysfonctionnement de l'ordinateur.
Raccordez l'appareil photo directement à l'ordinateur, sans passer par le concentrateur.
N'utilisez pas un prolongateur de câble USB.
L'enregistrement d'un type de fi chier incorrect sur un support d'enregistrement, ou la
suppression de fi chiers ou de dossiers d'un support d'enregistrement peut poser des
problèmes lors du fonctionnement de l'appareil photo. S'il est nécessaire de supprimer
un fi chier d'un support d'enregistrement, faites-le à partir de l'appareil photo. Par
ailleurs, veuillez ne pas déplacer ou renommer des dossiers et des fi chiers sur le
support depuis l'ordinateur.
Ne jamais débrancher le câble USB lorsque le voyant d'accès/recharge de l'appareil
photo est allumé ou clignotant.
Une fois l'utilisation terminée
Suivez toujours la procédure ci-dessous pour déconnecter l'appareil photo ou pour
mettre l'appareil photo ou l'ordinateur hors tension.
Autrement vous risquez d'endommager l'appareil photo et l'ordinateur.
A
Vérifi ez que le voyant d'accès/recharge de l'appareil photo n'est ni allumé, ni
clignotant.
Si le voyant d'accès/recharge est allumé ou clignote, attendez qu'il s'éteigne avant
de continuer.
B
Double-cliquez sur l'icône [Supprimer le périphérique en toute sécurité] ou
[Déconnecter ou éjecter le matériel] dans la barre d'état.
C
Sélectionnez [USB Mass Storage Device] ou [USB Disk], puis cliquez sur
[Arrêter].
D
Cliquez sur [OK].
Le nom du modèle dépend de l'appareil photo raccordé.
E
Débranchez le câble USB.
F
Mettez l'appareil photo et l'ordinateur hors tension.
Prise de sortie CA
Connecteur USB
FRANÇAIS
9
Page 34

Sauvegarde de fi chiers sur l'ordinateur (Windows®) (suite)
Lecture de fi chiers sur l'ordinateur
Préparation : Installez le logiciel à partir du CD-ROM fourni. (墌 p. 6)
A
B
C
Raccordez l'appareil photo à l'ordinateur à l'aide du câble USB. (墌 p. 9)
Réglez la molette Alimentation/Mode de l'appareil photo sur ON.
Sur l'appareil photo :
LECTURE SUR PC
CONNECTER L'APPAREIL
CREER DVD
SAUVEGARDER
IMPRESSION DIRECTE
DEFINIR
SELECT.
QUITTER
Déplacez la commande de réglage sur ¡ / ¢
pour sélectionner [LECTURE SUR PC], puis
enfoncez.
Une boîte de dialogue s'affi che sur l'écran de
l'ordinateur. Il n'est toutefois pas nécessaire
d'utiliser la boîte de dialogue.
PowerCinema démarre.
Sur l'ordinateur :
Cliquez sur [Rechercher vidéos] (pour la
lecture de vidéos) ou [Rechercher photos]
(pour la lecture de photos).
Cliquez sur le support qui contient les fi chiers
désirés.
EVERIO_HDD :
Lit les fi chiers enregistrés sur le disque dur de
l'appareil photo.
EVERIO_SD :
Lit les fi chiers enregistrés sur la carte SD de
l'appareil photo.
Dossier de sauvegarde :
Lit les fi chiers enregistrés dans le dossier de
sauvegarde de l'ordinateur (墌 p. 8).
10
D
Cliquez sur le fi chier désiré.
Vous pouvez utiliser la fonction pratique de
recherche des fi chiers.
Trier par :
L'ordre des fi chiers est réorganisé en fonction de
l'option sélectionnée.
Filtrer par :
Les fi chiers sont fi ltrés en fonction de l'option
sélectionnée.
Page 35

Sauvegarde de fi chiers sur l'ordinateur
Cette méthode consiste à utiliser le logiciel fourni pour sauvegarder les fi chiers sur
l'ordinateur.
Les fi chiers vidéo qui n'ont jamais été sauvegardés sur l'ordinateur raccordé
sont automatiquement sélectionnés suivant l'historique de sauvegarde et ils sont
sauvegardés.
Si vous n'avez pas pu installer le logiciel, allez à la page 13 pour plus d'informations sur
la façon de sauvegarder les fi chiers sans utiliser ce logiciel.
Préparation :
A
Installez le logiciel à partir du CD-ROM fourni. (墌 p. 6)
Raccordez l'appareil photo à l'ordinateur à l'aide du câble USB. (墌 p. 9)
Réglez la molette Alimentation/Mode de l'appareil photo sur ON.
Sur l'appareil photo :
Appuyez sur [DIRECT BACK UP].
Une boîte de dialogue s'affi che sur l'écran de
l'ordinateur. Il n'est toutefois pas nécessaire
d'utiliser la boîte de dialogue.
PowerCinema démarre.
B
C
Sur l'ordinateur :
La copie des fi chiers commence.
Cliquez sur [Annuler] pour annuler la procédure.
Lorsque la barre de progression disparaît et
que l'écran de gauche s'affi che, l'opération est
terminée.
FRANÇAIS
11
Page 36

Sauvegarde de fi chiers sur l'ordinateur (Windows®) (suite)
Sauvegarde de fi chiers depuis le support sélectionné
Préparation :
A
Installez le logiciel à partir du CD-ROM fourni. (墌 p. 6)
Raccordez l'appareil photo à l'ordinateur à l'aide du câble USB. (墌 p. 9)
Réglez la molette Alimentation/Mode de l'appareil photo sur ON.
Sur l'appareil photo :
LECTURE SUR PC
CONNECTER L'APPAREIL
CREER DVD
SAUVEGARDER
IMPRESSION DIRECTE
DEFINIR
SELECT.
QUITTER
Déplacez la commande de réglage sur ¡ / ¢
pour sélectionner [SAUVEGARDER], puis
enfoncez.
Une boîte de dialogue s'affi che sur l'écran de
l'ordinateur. Il n'est toutefois pas nécessaire
d'utiliser la boîte de dialogue.
PowerCinema démarre.
B
REMARQUE
Lors de l'exécution de la sauvegarde, un dossier est créé pour chacun des supports
(disque dur ou carte SD) enregistrés dans le dossier [MyWorks] (墌 p. 8), et les fi chiers
sont sauvegardés dans ces dossiers. (Si la sauvegarde est exécutée à partir de plus
d'un disque dur d'appareil photo, le nombre correspondant de dossiers de disque dur
sont créés.)
Sur l'ordinateur :
Cliquez sur [EVERIO_HDD] ou [EVERIO_SD].
Allez à la page 11, étape B et suivantes pour plus
de détails sur cette opération.
12
Page 37

Sauvegarde de fi chiers sur l'ordinateur sans utiliser le logiciel
Préparation : Raccordez l'appareil photo à l'ordinateur à l'aide du câble USB. (墌 p. 9)
A
B
C
D
Réglez la molette Alimentation/Mode de l'appareil photo sur ON.
Sur l'ordinateur :
Créez un dossier pour y sauvegarder les
fi chiers.
Sur l'appareil photo :
LECTURE SUR PC
CONNECTER L'APPAREIL
CREER DVD
SAUVEGARDER
IMPRESSION DIRECTE
DEFINIR
SELECT.
QUITTER
Déplacez la commande de réglage sur ¡ / ¢
pour sélectionner [LECTURE SUR PC], puis
enfoncez.
Sur l'ordinateur :
Double-cliquez sur [EVERIO_HDD] ou
[EVERIO_SD].
Sélectionnez le dossier que vous désirez
sauvegarder et faites un glisser-déposer dans
le dossier créé à l'étape A.
SD_VIDEO :
Dossier contenant des fi chiers vidéo. Pour
sauvegarder les fi chiers individuellement, ouvrez
ce dossier et faites un glisser-déposer des
dossiers tels que [PRG001] un à la fois.
DCIM :
Dossier contenant des fi chiers de photo. Pour
sauvegarder les fi chiers individuellement, ouvrez
ce dossier et faites un glisser-déposer des
fi chiers tels que [PIC_0001.JPG] un à la fois.
FRANÇAIS
REMARQUE
Pour plus de détails sur l'utilisation des dossiers, reportez-vous à la page 23.
13
Page 38

Autres opérations d'ordinateur (Windows®)
Créer un DVD-Vidéo
À l’aide du logiciel fourni, gravez les scènes directement de l’appareil photo à un disque
DVD.
Préparation : Installez le logiciel à partir du CD-ROM fourni. (墌 p. 6)
Graver uniquement les nouvelles scènes enregistrées
Les fi chiers qui n'ont jamais été copiés sur le DVD sont automatiquement sélectionnés
depuis l'historique et copiés.
A
Raccordez l'appareil photo à l'ordinateur à l'aide du câble USB. (墌 p. 9)
Réglez la molette Alimentation/Mode de l'appareil photo sur ON.
Sur l'appareil photo :
Appuyez sur [DIRECT DVD].
Une boîte de dialogue s'affi che sur l'écran de
l'ordinateur. Il n'est toutefois pas nécessaire
d'utiliser la boîte de dialogue.
PowerCinema démarre.
B
C
REMARQUE
Il n’est pas possible d’utiliser les disques DVD-RAM. Pour ce qui est des disques
DVD-R/DVD+R, seuls les disques DVD-R/DVD+R inutilisés sont reconnus. Quant
aux disques DVD-RW/DVD+RW, les disques DVD-RW/DVD+RW déjà utilisés sont
reconnus, mais ils doivent être formatés avant l’enregistrement. Le formatage d’un
disque permet d’effacer tout le contenu enregistré jusqu’à l’exécution de cette
opération.
14
Sur l'ordinateur :
La création et la gravure commencent.
Cliquez sur [Arrêt] pour annuler la procédure.
Cliquez sur [OK].
Page 39

Si le nombre de fi chiers dépasse 98, ou si la taille totale des données dépasse 4300 Mo,
il faudra plus d'un DVD.
Il se peut que le DVD-Vidéo créé ne puisse pas être lu, suivant les caractéristiques de
l’appareil DVD. Il est aussi possible que l’image s’arrête momentanément à la jonction
entre les scènes.
Pour que la lecture du DVD-Vidéo créé soit possible, l’ordinateur doit être équipé d’un
lecteur DVD et d’un logiciel de lecture DVD.
Sélectionner et graver des scènes
A
B
C
D
LECTURE SUR PC
CONNECTER L'APPAREIL
CREER DVD
SAUVEGARDER
IMPRESSION DIRECTE
DEFINIR
SELECT.
QUITTER
Sur l'appareil photo :
Déplacez la commande de réglage sur ¡ /
¢ pour sélectionner [CREER DVD], puis
enfoncez.
Une boîte de dialogue s'affi che sur l'écran de
l'ordinateur. Il n'est toutefois pas nécessaire
d'utiliser la boîte de dialogue.
PowerCinema démarre.
Sur l'ordinateur :
Cliquez sur la case à cocher du fi chier
désiré.
Le symbole apparaît dans la case à cocher.
Pour sélectionner d'autres fi chiers, répétez
cette étape.
Cliquez sur [Créer et graver].
Cliquez sur [Gravure sur disque].
La création et la gravure commencent.
Cliquez sur [Arrêt] pour annuler la procédure.
Cliquez sur [OK].
FRANÇAIS
15
Page 40

Autres opérations d'ordinateur (Windows®)
(suite)
Tirer pleinement profi t des logiciels
Pour plus d'informations sur l'utilisation des logiciels, voir les tutoriels des programmes
logiciels respectifs ou les guides de l'utilisateur.
PowerCinema NE for Everio
Sélectionnez [PowerCinema NE for Everio] dans [Tous les programmes].
A
Cliquez sur [Tutoriel].
B
PowerProducer 3 NE
Sélectionnez [PowerProducer 3 NE] dans [Tous les programmes].
A
Cliquez sur [Fichier Lisez-moi].
B
PowerDirector 5 NE Express
Sélectionnez [PowerDirector 5 NE Express] dans [Tous les programmes].
A
Cliquez sur [Guide de l'utilisateur] ou [Fichier Lisez-moi].
B
Digital Photo Navigator 1.5
Le guide de l'utilisateur est inclus sur le CD-ROM au format PDF.
Chargez le CD-ROM fourni dans le lecteur de l'ordinateur.
A
Cliquez avec le bouton droit de la souris sur l'icône du CD-ROM dans [Poste
B
de travail], puis cliquez sur [Ouvrir].
Double-cliquez sur le dossier [DOCS].
C
Ouvrez le fi chier « Start.pdf » et cliquez sur le bouton de la langue désirée.
D
REMARQUE
Vous devez être connecté à Internet pour pouvoir consulter le Tutoriel.
Adobe® Acrobat® ReaderTM ou Adobe® Reader® doit être installé pour que la lecture des
fi chiers PDF soit possible. Vous pouvez télécharger Adobe® Reader® depuis le site Web
d'Adobe : http://www.adobe.com/
16
Page 41

Contactez-nous pour plus d'informations sur les logiciels fournis.
L’utilisation de ces logiciels est autorisée selon les clauses de la licence du logiciel.
JVC
Si vous devez contacter le bureau ou représentant JVC le plus proche de votre pays à propos
de ces logiciels (consultez le réseau de service mondial JVC à l’adresse http://www.jvcvictor.co.jp/english/worldmap/index-e.html), veuillez remplir le formulaire suivant et réunir les
informations appropriées.
Nom du produit
Modèle
Problème
Message d’erreur
Ordinateur
Fabricant
Modèle (De bureau / Portable)
Unité centrale
Système d’exploitation
Mémoire (Mo)
Place disponible sur le disque dur (Mo)
Veuillez noter que la réponse à vos questions peut prendre un certain temps en fonction de
leur nature.
JVC ne peut pas répondre aux questions concernant le fonctionnement de base de
votre ordinateur ou aux questions concernant les spécifi cations ou les performances du
système d’exploitation, d’autres applications ou pilotes.
CyberLink
Assistance téléphonique/par télécopie
Emplacement Langue
Anglais / Allemand
Allemagne
Taiwan Mandarin De 9:00 à 18:00
Japon Japonais De 10:00 à 17:00 +81-3-3516-9555 +81-3-3516-9559
/ Français /
Espagnol / Italien /
Néerlandais
Assistance vocale payante
Emplacement Langue
États-Unis Anglais De 13:00 à 22:00 CST
Les lignes sont
accessibles
(Du lundi au vendredi)
Assistance par Internet/courrier électronique
Langue Adresse URL/de courrier électronique
Anglais
Allemand / Français / Espagnol
/ Italien
Japonais http://jp.cyberlink.com/support/
http://www.cyberlink.com/english/cs/support/new_site/support_
Heures
d’ouverture (Du
lundi au vendredi)
De 9:00 à 17:00
http://www.cyberlink.com/english/cs/support/
goCyberlink@aixtema.de
N° de téléphone N° de télécopie
+49-700-462-
92375
+886-2-8667-1298
ext. 333
new_site/voice_support.jsp
index.html
+49-241-70525-25
+886-2-8667-1300
URL
FRANÇAIS
17
Page 42

Macintosh
Sauvegarde de fi chiers sur l'ordinateur
Vous pouvez sauvegarder les fi chiers de l'appareil photo sur
l'ordinateur.
Les logiciels fournis ne sont pas compatibles avec les
ordinateurs Macintosh .
Vous pouvez modifi er des fi chiers vidéo, créer des DVD et
effectuer d'autres opérations en achetant les logiciels pris en
charge sous Macintosh.
Pour plus d'informations sur ces logiciels, reportez-vous au
site Web de PIXELA.
http://www.pixela.co.jp/oem/jvc/e/index.html
(Macintosh)
Confi guration système requise
Matériel :
L'ordinateur Macintosh doit être équipé
d'un connecteur USB 2.0
Système d'exploitation :
Mac OS X (v10.3.1 à v10.3.9, v10.4.2 à
v10.4.8)
REMARQUE
Dans le cas de l'utilisation des logiciels en
option de PIXELA, reportez-vous à leurs
instructions de confi guration requise.
Raccordement de l'appareil photo à l'ordinateur
Préparation : Réglez la molette Alimentation/Mode de l'appareil photo sur OFF.
Connecteur USB
18
Connecteur CC
Adaptateur CA
Câble USB
Prise de sortie CA
Connecteur USB
Page 43

Une fois le raccordement terminé
Sur le bureau de l'ordinateur, l'icône [EVERIO_
HDD]/[EVERIO_SD] qui représente le support
d'enregistrement de l'appareil photo s'affi che. (墌 p. 23,
Structure des dossiers et extensions)
REMARQUE
Lorsque le câble USB est branché, la mise sous tension ou hors tension de l'appareil
photo provoque un dysfonctionnement de l'ordinateur.
Raccordez l'appareil photo directement à l'ordinateur, sans passer par le concentrateur.
N'utilisez pas un prolongateur de câble USB.
L'enregistrement d'un type de fi chier incorrect sur un support d'enregistrement, ou la
suppression de fi chiers ou de dossiers d'un support d'enregistrement peut poser des
problèmes lors du fonctionnement de l'appareil photo. S'il est nécessaire de supprimer
un fi chier d'un support d'enregistrement, faites-le à partir de l'appareil photo. Par
ailleurs, veuillez ne pas déplacer ou renommer des dossiers et des fi chiers sur le
support depuis l'ordinateur.
Ne jamais débrancher le câble USB lorsque le voyant d'accès/recharge de l'appareil
photo est allumé ou clignotant.
Une fois l'utilisation terminée
Suivez toujours la procédure ci-dessous pour déconnecter l'appareil photo ou pour
mettre l'appareil photo ou l'ordinateur hors tension.
Autrement vous risquez d'endommager l'appareil photo et l'ordinateur.
A
Glissez-déposez l'icône du support d'enregistrement sur l'icône [Trash] du
bureau.
Si un message de confi rmation s'affi che, cliquez sur [OK].
B
Vérifi ez que le voyant d'accès/recharge de l'appareil photo n'est ni allumé, ni
clignotant.
Si le voyant d'accès/recharge est allumé ou clignote, attendez qu'il s'éteigne avant
de continuer.
C
Débranchez le câble USB.
D
Mettez l'appareil photo et l'ordinateur hors tension.
FRANÇAIS
19
Page 44

Sauvegarde de fi chiers sur l'ordinateur (Macintosh) (suite)
Sauvegarde de fi chiers sur l'ordinateur
Préparation : Raccordez l'appareil photo à l'ordinateur à l'aide du câble USB. (墌 p. 18)
A
B
C
Réglez la molette Alimentation/Mode de l'appareil photo sur ON.
Créez un dossier pour y sauvegarder les
fi chiers.
Double-cliquez sur [EVERIO_HDD] ou
[EVERIO_SD].
Sélectionnez le dossier que vous désirez
sauvegarder et faites un glisser-déposer dans
le dossier créé à l'étape A.
SD_VIDEO :
Dossier contenant des fi chiers vidéo. Pour
sauvegarder les fi chiers individuellement, ouvrez
ce dossier et faites un glisser-déposer des
dossiers tels que [PRG001] un à la fois.
DCIM :
Dossier contenant des fi chiers de photo. Pour
sauvegarder les fi chiers individuellement, ouvrez
ce dossier et faites un glisser-déposer des
fi chiers tels que [PIC_0001.JPG] un à la fois.
REMARQUE
Pour plus de détails sur l'utilisation des dossiers, reportez-vous à la page 23.
20
Page 45

Autres appareils
Sauvegarde de fi chiers sur un appareil compatible NAS
Aucun appareil ne peut être raccordé à l’appareil photo
au moment de sa sortie.
Vous pouvez sauvegarder les fi chiers du disque dur de
l'appareil photo sur un appareil externe compatible NAS,
comme par exemple un disque dur externe.
Il n'est pas possible de sauvegarder les fi chiers enregistrés
sur une carte SD.
(NAS : Network Attached Storage)
Raccordement de l'appareil photo à un appareil externe
Préparation : Réglez la molette Alimentation/Mode de l'appareil photo sur OFF.
Connecteur USB
Connecteur CC
Câble USB
Adaptateur CA
Prise de sortie CA
Connecteur USB
FRANÇAIS
21
Page 46

Sauvegarde de fi chiers sur un appareil compatible NAS (suite)
Sauvegarde de fi chiers sur un appareil externe
Préparation : Raccordez l'appareil photo à l'appareil externe à l'aide d'un câble USB.
A
B
(墌 p. 21)
Réglez la molette Alimentation/Mode de l'appareil photo sur ON.
Sur l'appareil photo :
LECTURE SUR PC
CONNECTER L'APPAREIL
CREER DVD
SAUVEGARDER
IMPRESSION DIRECTE
DEFINIR
SELECT.
QUITTER
Déplacez la commande de réglage sur
¡ / ¢ pour sélectionner [CONNECTER
L’APPAREIL], puis enfoncez.
Utilisez l'appareil externe pour sauvegarder
les fi chiers.
22
Page 47

Structure des dossiers et extensions
Support d'enregistrement
[DCIM]
[XXXJVCSO]
[XXXJVCSO]
[XXXJVCSO]
[SD_VIDEO]
[MGR_INFO]
[PRGXXX]
[PRGXXX.PGI]
[MOVXXX.MOD]
[MOVXXX.MOI]
[PRGXXX]
[PRGXXX]
[EXTMOV]
Contient les dossiers de photos.
Contient les dossiers de fi chiers vidéo.
Informations de gestion* du support
d'enregistrement tout entier
Informations de gestion*
Fichier vidéo
Informations de gestion* du fi chier vidéo
Peut s'affi cher comme dossier de
destination de sauvegarde pour le fi chier de
X = nombre
démonstration du magasin.
[MISC]
Contient des dossiers de données de
confi guration DPOF.
[PRIVATE]
Contient des fi chiers d'information de gestion
des informations d'événement et/ou de
création DVD pour les fi chiers enregistrés
avec l'appareil photo.
* Informations telles que la date et l'heure d'enregistrement, stockées avec le fi chier
vidéo.
Extensions
Fichiers vidéo : « .mod »
Fichiers de photos : « .jpg »
L'extension du fi chier peut ne pas s'affi cher en fonction du réglage de l'option
[FOLDER] sous Windows
®
.
FRANÇAIS
23
Page 48

© 2006 Victor Company of Japan, Limited
Printed in Malaysia
M7
1106FOH-AL-VM
 Loading...