

Page 1
LYT1997-001B-M
INSTRUCTIONS
MANUAL DE INSTRUCCIONES
ENGLISH
EN SP
HD MEMORY CAMERA
VIDEOCÁMARA HD CON MEMORIA
GZ-HM200
U
Dear Customers
Thank you for purchasing this HD
memory camera. Before use, please
read the safety information and
precautions contained on pages 2 and 3
to ensure safe use of this product.
For Future Reference:
Enter the Model No. (located on the
bottom of the HD memory camera) and
Serial No. (located on the battery pack
mount of the HD memory camera) below.
Model No.
Serial No.
Apreciado cliente
Gracias por la compra de esta
videocámara HD con memoria. Antes de
usarla, lea la información de seguridad
y las precauciones contenidas en las
páginas 2 y 3 para garantizar un uso
seguro de este producto.
Para futuras consultas:
Escriba a continuación el número
de modelo (situado en la base de
la videocámara HD con memoria)
y el número de serie (situado en el
Please read the instruction manual prior to
connecting or operating this product.
Por favor, lea el manual de instrucciones antes
de conectar u operar este producto.
compartimiento de la batería de la
videocámara HD con memoria).
Número de modelo.
Número de serie.
For more details on the operations,
refer to the GUIDEBOOK in the
supplied CD-ROM.
Para obtener más información sobre las
operaciones, consulte la GUÍA incluida
en el CD-ROM suministrado.
CASTELLANO
ENGLISH
CASTELLANO
Page 2
2
Safety Precautions
CAUTION
RISK OF ELECTRIC SHOCK
DO NOT OPEN
CAUTION: TO REDUCE THE RISK OF ELECTRIC SHOCK,
DO NOT REMOVE COVER (OR BACK).
NO USER-SERVICEABLE PARTS INSIDE.
REFER SERVICING TO QUALIFIED SERVICE PERSONNEL.
The lightning flash with arrowhead symbol, within an
equilateral triangle, is intended to alert the user to the
presence of uninsulated "dangerous voltage" within the
product's enclosure that may be of sufficient magnitude
to constitute a risk of electric shock to persons.
The exclamation point within an equilateral triangle is
intended to alert the user to the presence of important
operating and maintenance (servicing) instructions in
the literature accompanying the appliance.
WARNING: TO PREVENT FIRE OR SHOCK
HAZARD, DO NOT EXPOSE THIS UNIT TO
RAIN OR MOISTURE.
NOTES:
The rating plate and safety caution are on the
•
bottom and/or the back of the main unit.
The serial number plate is on the battery pack
•
mount.
The rating information and safety caution of the
•
AC adapter are on its upper and lower sides.
Caution on Replaceable lithium battery
The battery used in this device may present a fire
or chemical burn hazard if mistreated.
Do not recharge, disassemble, heat above 100°C
or incinerate.
Replace battery with Panasonic (Matsushita
Electric), Sanyo, Sony or Maxell CR2025.
Danger of explosion or Risk of fire if the battery is
incorrectly replaced.
Dispose of used battery promptly.
•
Keep away from children.
•
Do not disassemble and do not dispose of in
•
fire.
For USA-California Only
This product contains a CR Coin Cell Lithium
Battery which contains Perchlorate Material
– special handling may apply.
See www.dtsc.ca.gov/hazardouswaste/perchlorate
When the equipment is installed in a cabinet or on
a shelf, make sure that it has sufficient space on
all sides to allow for ventilation (10 cm (3-15/16")
or more on both sides, on top and at the rear).
Do not block the ventilation holes.
(If the ventilation holes are blocked by a
newspaper, or cloth etc. the heat may not be able
to get out.)
No naked flame sources, such as lighted candles,
should be placed on the apparatus.
When discarding batteries, environmental
problems must be considered and the local rules
or laws governing the disposal of these batteries
must be followed strictly.
The apparatus shall not be exposed to dripping
or splashing.
Do not use this equipment in a bathroom or
places with water.
Also do not place any containers filled with water
or liquids (such as cosmetics or medicines, flower
vases, potted plants, cups etc.) on top of this unit.
(If water or liquid is allowed to enter this
equipment, fire or electric shock may be caused.)
Do not point the lens directly into the sun. This
can cause eye injuries, as well as lead to the
malfunctioning of internal circuitry. There is also a
risk of fire or electric shock.
CAUTION!
The following notes concern possible physical
damage to the camcorder and to the user.
Carrying or holding the camcorder by the LCD
monitor can result in dropping the unit, or in a
malfunction.
Do not use a tripod on unsteady or unlevel surfaces.
It could tip over, causing serious damage to the
camcorder.
CAUTION!
Connecting cables (Audio/Video, S-Video, etc.)
the camcorder and leaving it on top of the TV is
not recommended, as tripping on the cables will
cause the camcorder to fall, resulting in damage.
CAUTION:
The mains plug shall remain readily operable.
WARNING:
The battery pack, the camcorder with battery
installed, and the remote control with battery
installed should not be exposed to excessive heat
such as direct sunshine, fire or the like.
to
Page 3
3
ENGLISH
IMPORTANT SAFETY INSTRUCTIONS
1. Read these instructions.
2. Keep these instructions.
3. Heed all warnings.
4. Follow all instructions.
5. Do not use this apparatus near water.
6. Clean only with dry cloth.
7. Do not block any ventilation openings. Install
in accordance with the manufacturer’s
instructions.
8. Do not install near any heat sources such
as radiators, heat registers, stoves, or other
apparatus (including amplifiers) that produce
heat.
9. Only use attachments/accessories specified by
the manufacturer.
10. Use only with the cart,
stand, tripod, bracket,
or table specified by
the manufacturer,
or sold with the
apparatus. When a cart
is used, use caution
when moving the cart/
apparatus combination
to avoid injury from
tip-over.
11. Unplug this apparatus during lightning storms
or when unused for long periods of time.
12. Refer all servicing to qualified service
personnel. Servicing is required when the
apparatus has been damaged in any way, such
as power-supply cord or plug is damaged,
liquid has been spilled or objects have fallen
into the apparatus, the apparatus has been
exposed to rain or moisture, does not operate
normally, or has been dropped.
Remember that this camcorder is intended for
private consumer use only.
Any commercial use without proper permission
is prohibited. (Even if you record an event such
as a show, performance or exhibition for personal
enjoyment, it is strongly recommended that you
obtain permission beforehand.)
Trademarks
AVCHD and AVCHD logotype are trademarks of
•
Matsushita Electric Industrial Co., Ltd. and Sony
Corporation.
Manufactured under license from Dolby
•
Laboratories. Dolby and the double-D symbol
are trademarks of Dolby Laboratories.
x.v.Color™ is a trademark of
•
Sony Corporation.
HDMI is a trademark of HDMI
•
Licensing, LLC.
Windows® is either registered trademark or
•
trademark of Microsoft Corporation in the
United States and/or other countries.
Macintosh is a registered trademark of Apple
•
Inc.
YouTubeTM and the YouTube logo are
•
trademarks and/or registered trademarks of
YouTube LLC.
iTunes, iMovie and iPhoto are trademarks of
•
Apple Inc., registered in the U.S. and other
countries.
Other product and company names included
•
in this instruction manual are trademarks
and/or registered trademarks of their respective
holders.
If this symbol is shown, it is only
valid in the European Union.
Page 4
4
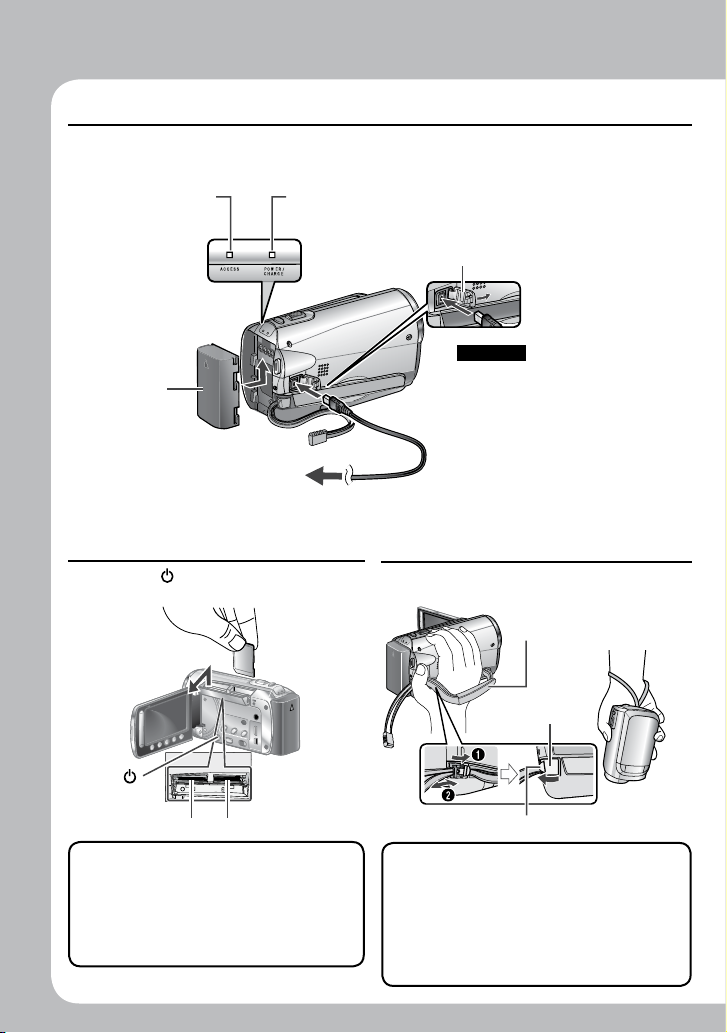
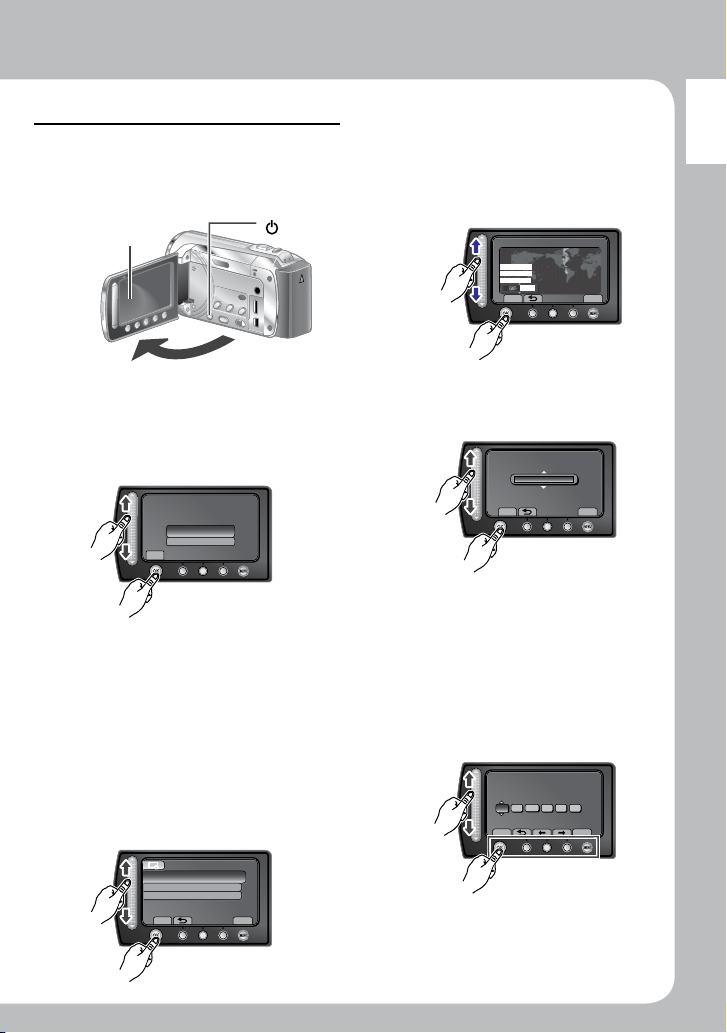
Easy Start Guide
D
C
B
A
( )
Charge the battery before recording
Turn off the camcorder and attach the battery pack.
Access lamp
blinks: Accessing files
Do not remove the
AC adapter, the
battery pack or the
SD card when the
lamp is blinking.
Battery Pack
The battery pack
is not charged
at the time of
purchase.
AC Adapter
To AC Outlet
(110V to 240V)
Power/charge lamp
blinks: Charging
goes out: Charging finished
Insert the SD Card
Press Power ( ) button to turn off the
camcorder.
Open the cover
CAUTION
Charge the battery pack
•
before use. (Z p. 18)
Be sure to use JVC battery
•
packs. If you use any other
battery packs besides JVC
battery packs, safety and
performance can not be
guaranteed.
Grip Adjustment
Adjust the strap and fasten.
Grip Strap
Fasten
Slot B Slot A
Insert and remove an SD card
•
only while the power is turned off.
Otherwise, data on the card may be
corrupted.
Format an SD card when using it for
•
the first time ( Z p. 21)
Tab
Do not pull the strap when you open
•
the fasten. Please pull the tab to open
it.
Fasten the belt when you grip the
•
camcorder.
When carrying the camcorder, please
•
be careful not to drop it.
Page 5
ENGLISH
5
Date/Time Setting
SET
SET DATE/TIME!
YES
NO
SET
QUIT
CLOCK SETTI NG
AREA SETTIN G
SET F OR DAYL IGHT SAV ING TI ME
SET T HE CIT Y, DATE AND TIME
CLOCK ADJUST
SET
QUIT
JAN.10.2009 01:00AM
AREA SETTING
SET
QUIT
SET FOR DAYLIGHT SAVINGTIME
DAYLIGHT SAVINGTIME (DST)
SET DAYLIGHT SAVINGTIME
JAN.10.2009 01:00AM
OFF
CLOCK SETTING
DATE TIME
GMT+9:00
NOV 1
2009 08
54 PM
SAVE
QUIT
Open the LCD monitor to
Q
turn on the camcorder
LCD monitor
Select [YES] within
R
10 seconds
Slide your finger up and down on the
sensor. Then touch OK.
When the message disappears,
•
press the power button for at
least 2 seconds to turn off the
power, and then press it again
for at least 2 seconds.
Touch the sensors with your
•
finger. The sensors do not
function if you touch them with
your finger nail or with gloves on.
Power Button
( )
Select the city closest to
T
the area where you use
the camcorder
Select [ON] or [OFF]
U
Select [ON] if daylight saving time is
effective.
ON: Clock is advanced 1 hour from the
normal time which you set.
OFF: Deactivates the function.
Set the date and time
V
Touch sensor: Sets the date and
time.
: Moves the cursor to the right.
}
OK: Clock starts.
Select [CLOCK SETTING]
S
Page 6
6
Video recording
3 h 59 m
0 : 04 : 01
[
]
REC
0 : 04 : 01
3 h 59 m
[ ]
M
PLAY/REC
DC
CAUTION
This camcorder records video in accordance with the AVCHD format.
•
Try recording with easy [AUTO] mode first.
•
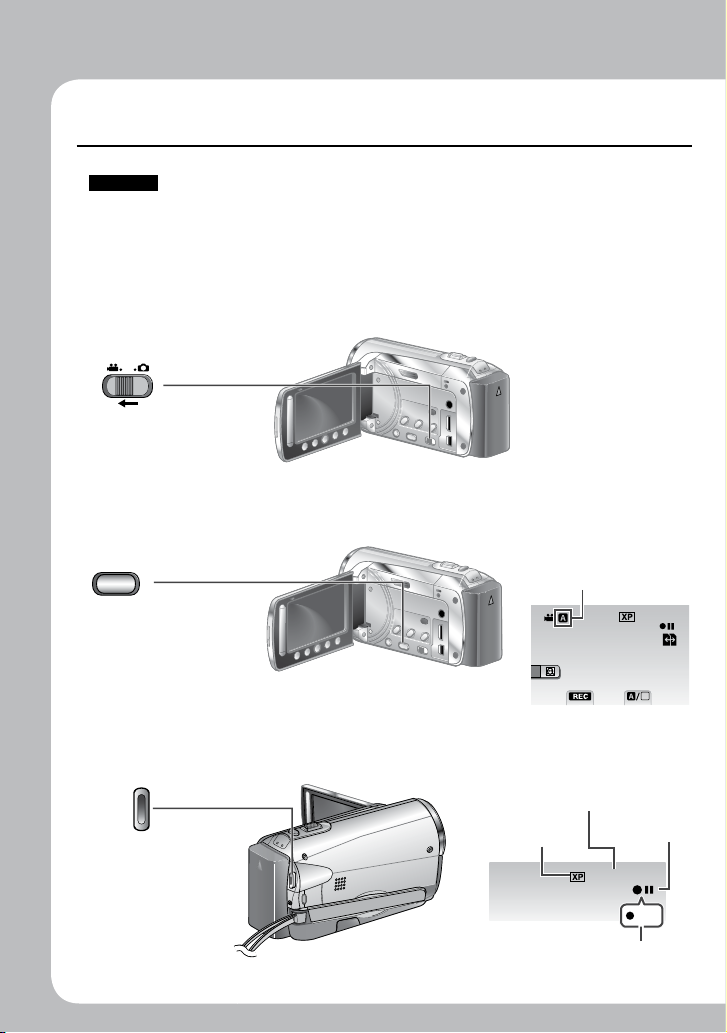
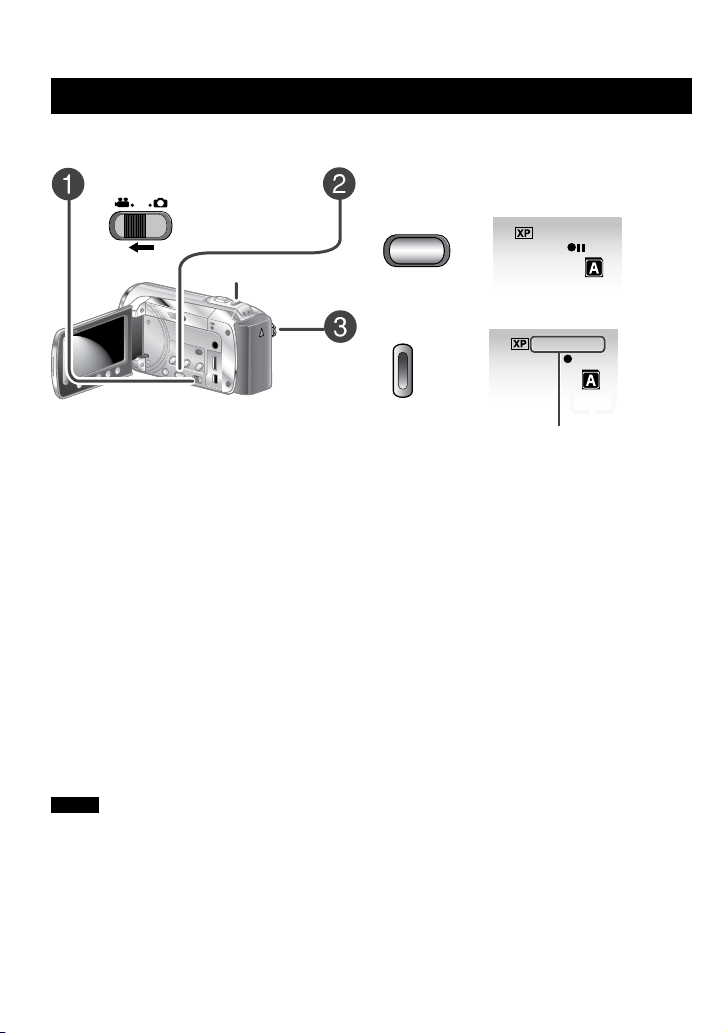
Select ! (video) mode
Q
S elect recording mode
R
The auto recording
indicator appears.
Start recording
S
Remaining space on the SD card.
Recordstandby
Recording
Press the START/
STOP button to start
recording, and press
it again to stop.
Video
Quality
Page 7
ENGLISH
7
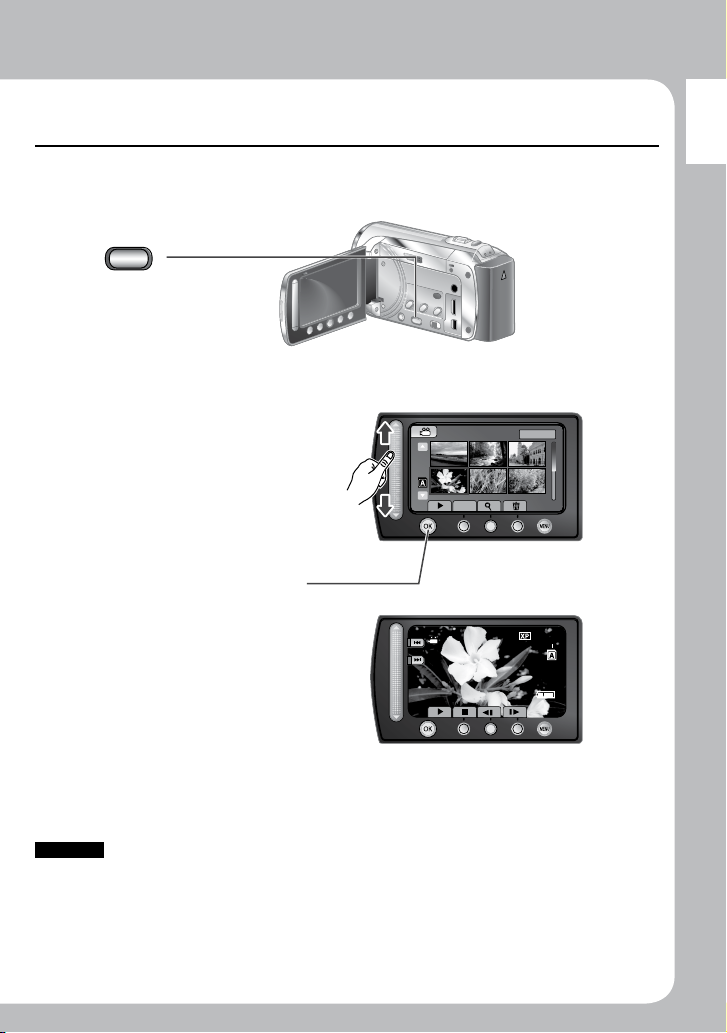
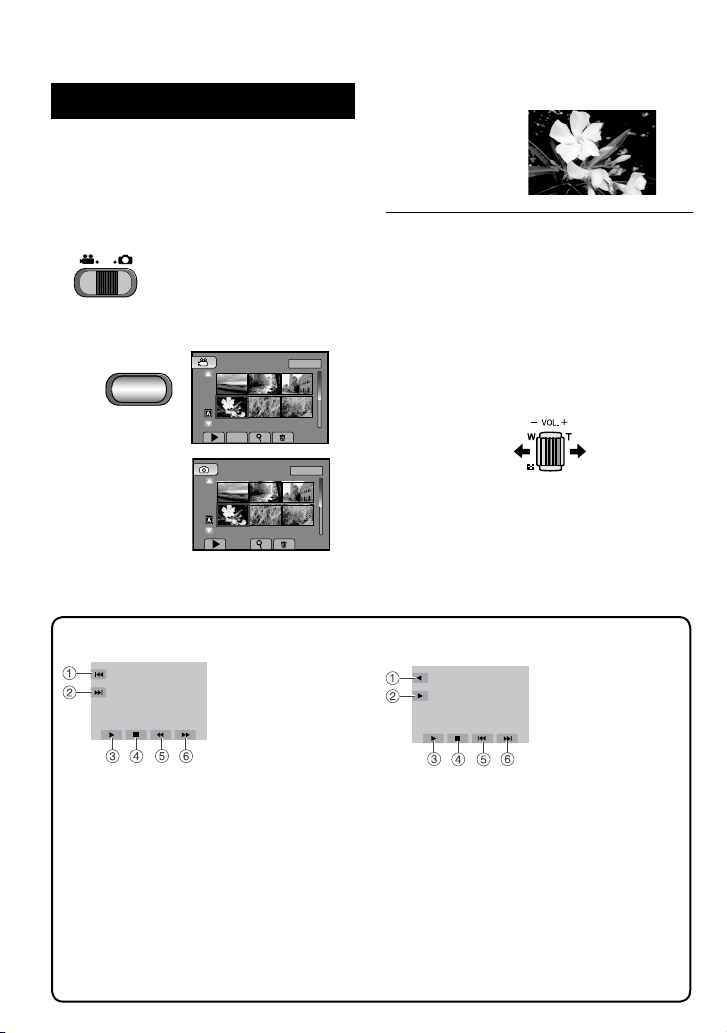
Playing back
PLAY/REC
VIDEO PLAYBACK
DIGEST
1/2
NOV. 01.2009 04:55PM
LASERTOUCH OPERATION
JAN .1. 200 9
04 :55 PM
0. 00 : 00
Select playback mode
Q
The mode changes when
you press the button.
Select the desired file
R
Select F(Touch OK)
S
To perform operations such as forward search or reverse search (Z p. 28)
To view files on TV (Z p. 30)
CAUTION
Don’t forget to make copies after recording!
To copy files onto discs (Z p. 33)
•
To dub files using a VCR/DVD recorder (Z p. 36)
•
To edit files on your computer (Z p. 38)
•
Index screen
Playback screen
Page 8

8
JVC Software Licence Agreement
JVC SOFTWARE LICENCE AGREEMENT
IMPORTANT
TO CUSTOMERS: PLEASE MAKE SURE TO
READ THIS CAREFULLY BEFORE INSTALLING
OR USING THE SOFTWARE PROGRAM
NAMED “DIGITAL PHOTO NAVIGATOR”
(“Program”) ON YOUR PC.
The right to use the Program is granted by Victor
Company of Japan, Limited (“JVC”) to You only
on the condition that You agree to the following.
Should You not agree to the terms hereof, You
may not install or use the Program. HOWEVER,
INSTALLING OR USING THE PROGRAM
INDICATES YOUR ACCEPTANCE OF THESE
TERMS AND CONDITIONS.
1 COPYRIGHT; OWNERSHIP
You acknowledge that all copyrights and other
intellectual property rights in the Program are
owned by JVC and its licensor, and remain
vested in JVC and such licensor. The Program is
protected under the copyright law of Japan and
other countries, and related Conventions.
2 GRANT OF LICENCE
(1) Subject to the conditions of this Agreement,
JVC grants to You a non-exclusive right to
use the Program. You may install and use the
Program on a HDD or other storage devices
incorporated in Your PC.
(2) You may make one (1) copy of the Program
solely for your personal backup or archival
purposes.
3 RESTRICTION ON THE PROGRAM
(1) You may not reverse engineer, decompile,
disassemble, revise or modify the Program,
except to the extent that expressly permitted
by applicable law.
(2) You may not copy or use the Program, in
whole or in part, other than as expressly
specified in this Agreement.
(3) You have no right to grant a licence to use
the Program, and may not distribute, rent,
lease or transfer the Program to any third
party or otherwise let them use the Program.
4 LIMITED WARRANTY
JVC warrants that any media in which the
Program is embodied are free from any defects
in materials and workmanship for a period of
thirty (30) days from the date of Your purchasing
any our products accompanying the Program.
JVC’s entire liability and your exclusive remedy
in connection with the Program shall be
replacement of such defective media. EXCEPT
FOR THE EXPRESS WARRANTIES STATED
HEREIN AND TO THE EXTENT PERMITTED BY
APPLICABLE LAW, JVC AND ITS LICENSORS
DISCLAIM ANY OTHER WARRANTIES, EITHER
EXPRESS OR IMPLIED, INCLUDING BUT
NOT LIMITED TO IMPLIED WARRANTIES
OF MERCHANTABILITY AND FITNESS FOR
A PARTICULAR PURPOSE IN REGARD TO
THE PROGRAM AND THE ACCOMPANYING
PRINTED MATERIALS. SHOULD THERE BE
ANY PROBLEM ARISING FROM OR CAUSED
BY THE PROGRAM, YOU SHOULD SETTLE
ALL SUCH PROBLEM AT YOUR OWN COST
AND EXPENSE.
5 LIMITED LIABILITY
TO THE EXTENT PERMITTED BY APPLICABLE
LAW, IN NO EVENT SHALL JVC AND ITS
LICENSORS BE LIABLE FOR ANY INDIRECT,
SPECIAL, INCIDENTAL OR CONSEQUENTIAL
DAMAGES WHATSOEVER, REGARDLESS
OF THE FORM OF ACTION WHETHER IN
CONTRACT, TORT OR OTHERWISE ARISING
OUT OF OR IN CONNECTION WITH THE USE
OF OR INABILITY TO USE THE PROGRAM,
EVEN IF JVC HAS BEEN ADVISED OF THE
POSSIBILITY OF SUCH DAMAGES. YOU
WILL INDEMNIFY AND HOLD HARMLESS
JVC FROM ANY LOSS, LIABILITY OR
COST ARISING OUT OF OR IN ANY WAY
CONNECTED TO CLAIMS FROM ANY THIRD
PARTY RELATING TO THE USE OF THE
PROGRAM.
Page 9

9
ENGLISH
6 TERM
This Agreement will become effective on the date
when You install and use the Program on Your
machine, and continue to be in effect until the
termination under the following provision.
Should You breach any provision of this
Agreement, JVC may terminate this Agreement
without giving any notice to You. In this event,
JVC may claim against You for any damages
caused by Your breach. Should this Agreement
be terminated, You must immediately destroy the
Program stored in Your machine (including the
erasing from any memory in Your PC), and no
longer own such Program.
7 EXPORT CONTROL
You agree that You will not ship, transfer or
export the Program or underlying information
and technology to any countries to which Japan
and other relevant countries have initiated an
embargo on such goods.
8 U.S. GOVERNMENT USER
If You are an agency of the United States of
America (the “Government”), You acknowledge
JVC’s representation that the Program is
a “Commercial Item” as defined in Federal
Acquisition Regulation (FAR) part 2.101 (g)
consisting unpublished “Commercial Computer
Software” as those items are used at FAR part
12.212 and is only licenced to You with the same
use rights JVC grants all commercial end users
pursuant to the terms of this Agreement.
9 GENERAL
(1) No modification, change, addition, deletion
or other alternation of or to this Agreement
will be valid unless reduced to writing and
signed by an authorized representative of
JVC.
(2) If any part of this Agreement is held
invalid by or in conflict with any law having
jurisdiction over this Agreement, the
remaining provisions will remain in full force
and effect.
(3) This Agreement shall be governed by and
interpreted under the laws of Japan. The
Tokyo District Court has jurisdiction over all
disputes which may arise with respect to the
execution, interpretation and performance of
this Agreement.
Victor Company of Japan, Limited
NOTE
If You acquired the Program in Germany, the
provisions of Sections 4 (Limited Warranty)
and 5 (Limited Liability) provided above will be
replaced with those of the German version of this
Agreement.
CAUTIONS:
Operate this equipment according to the
•
operating procedures described in this manual.
Use only the provided CD-ROM. Never use any
•
other CD-ROM to run this software.
Do not attempt to modify this software.
•
Changes or modifications not approved by
•
JVC could void user’s authority to operate the
equipment.
How to handle a CD-ROM
Take care not to soil or scratch the mirror
•
surface (opposite to the printed surface). Do
not write anything or put a sticker on either
the front or back surface. If the CD-ROM
gets dirty, gently wipe it with a soft cloth
outward from the center hole.
Do not use conventional disc cleaners or
•
cleaning spray.
Do not bend the CD-ROM or touch its mirror
•
surface.
Do not store your CD-ROM in a dusty, hot or
•
humid environment. Keep it away from direct
sunlight.
You can find the latest information (in
English) on the provided software program
at our world wide web server at http://www.
jvc-victor.co.jp/english/global-e.html
Page 10
10
A
B
CAN B E SET T O PREVE NT COPY
VIDEO
DUBBING PLAYBACK
PLAYBACK OTHER FILE
EDIT
SET
QUIT
REC
EDIT PLAYLIS T
B
A
Read This First!
How to use the Touch Sensor
After the menu is displayed on the LCD
monitor:
Q Slide your finger up and down on the
sensor.
R Select [SET]. (Touch OK.)
CAUTION
Touch the sensors with your finger. The
sensors do not function if you touch them
with your fingernail or with gloves on.
To select an on-screen button appearing
on the left side, touch the portion of the
sensor next to the on-screen button.
To select an on-screen button appearing at
the bottom of the screen, touch the buttons
underneath them.
Read these INSTRUCTIONS
to enjoy your CAMCORDER.
For more details on the
operations, refer to the
GUIDEBOOK in the supplied
CD-ROM.
In order to view the GUIDEBOOK, Adobe®
Acrobat® ReaderTM or Adobe® Reader®
must be installed.
Adobe® Reader® can be loaded from
Adobe’s web site:
http://www.adobe.com/
NOTE
Select your desired language with a
single click.
The model name is indicated on the
bottom of your camcorder.
Make a backup of important recorded data
JVC will not be responsible for any lost data.
It is recommended to copy your important
recorded data to a disc or other recording
media for storage. (Z p. 33)
Make a trial recording
Before the actual recording of important
data, make a trial recording and play back
the recorded data to check that the video
and sound have been recorded correctly. We
recommend you to use the same recording
media when performing both the trial recording
and the actual recording.
Reset the camcorder if it does not operate
correctly
This camcorder uses a microcomputer.
Factors such as background noise and
interference can prevent it from operating
correctly. If the camcorder does not operate
correctly, reset the camcorder. (Z p. 46)
Precautions on handling batteries
Be sure to use the JVC BN-VF808U/
•
VF815U/VF823U battery packs. This product
includes patented and other proprietary
technology and is made to be used with the
JVC battery and not with other batteries.
JVC cannot guarantee safety or
performance of this product when it is
operated by other batteries
If the camcorder is subjected to electrostatic
•
discharge, turn off the power before using it
again.
If a malfunction occurs, stop using the
camcorder immediately and contact
www.jvc.com or by phone at 1-800-252-5722
Recorded data may be erased while the
camcorder is being repaired or inspected.
Back up all data before requesting repairs or
inspections.
Because camcorders may be used for
demonstration in a shop, the demonstration
mode is set to [ON] by default
To deactivate the demonstration mode, set
[DEMO MODE] to [OFF].
When Using an SD Card
Operations are confirmed on the following
•
SD cards:
Class 4 or higher compatible SD or SDHC
card. Panasonic, TOSHIBA, SanDisk, ATP
SD card (256 MB to 2 GB) or SDHC card
(4 GB to 32 GB)
For UXP mode, use Class 6 or higher.
If other media are used, they may fail to
•
record data correctly, or they may lose data
that had already been recorded.
MultiMediaCards are not supported.
•
Page 11

ENGLISH
11
GETTING
STARTED
RECORDING/
PLAYBACK
USING WITH
TV EDITING
MENU
SETTINGS
FURTHER
INFORMATIONCOPYING
Contents
GETTING STARTED
Accessories .......................................... 12
Attaching the Core Filter ..............................12
Preparing the Remote Control .....................13
Index ...................................................... 14
Indications on LCD Monitor ................. 16
Necessary Settings before Use ........... 18
Charging the Battery Pack ........................... 18
Date/Time Setting ........................................19
Other Settings ....................................... 20
Language Setting ........................................20
Tripod Mounting ........................................... 20
Using an SD Card ........................................ 21
RECORDING/PLAYBACK
Recording Files ..................................... 22
Video Recording .......................................... 22
Still Image Recording ..................................23
Zooming ....................................................... 24
LED Light .....................................................24
Turning on the Face Detection Mode ........... 25
Checking the Remaining Battery Power ......25
Checking the Remaining Space on the
Recording Media ........................................ 25
Manual Recording ................................ 26
Changing to Manual Recording Mode ......... 26
Manual Setting in Menu ...............................26
Playing Back Files ................................ 28
Video/Still Image Playback ......................... 28
Playback with Special Effects ......................29
USING WITH TV
Viewing Files on TV .............................. 30
Connection with TV......................................30
Playback Operation .....................................30
Operating Together with TV via HDMI
........... 31
EDITING
Managing Files ...................................... 32
Capturing a Still Image from a Video ...........32
Deleting Files ...............................................32
COPYING
Copying Files ........................................ 33
Copying/Moving Files ..................................33
Using a BD/DVD Burner ............................. 34
Dubbing Files to a VCR/DVD Recorder .......36
Creating a Disc using a PC .................. 37
Creating a Disc using a PC .........................37
Using with a Portable Media Player .... 42
Turning on the Export Mode ........................42
Changing the Export Setting .......................42
Transferring the Files to PC .........................42
Uploading Files to Websites ................ 43
Turning on the Upload Mode .......................43
Uploading Files ............................................43
MENU SETTINGS
Changing the Menu Settings ............... 44
FURTHER INFORMATION
Troubleshooting .................................... 44
Warning Indications ............................. 46
Cleaning ................................................ 47
Specifications ....................................... 48
Cautions ................................................ 50
Terms ..................................................... 52
Page 12
12
GETTING STARTED
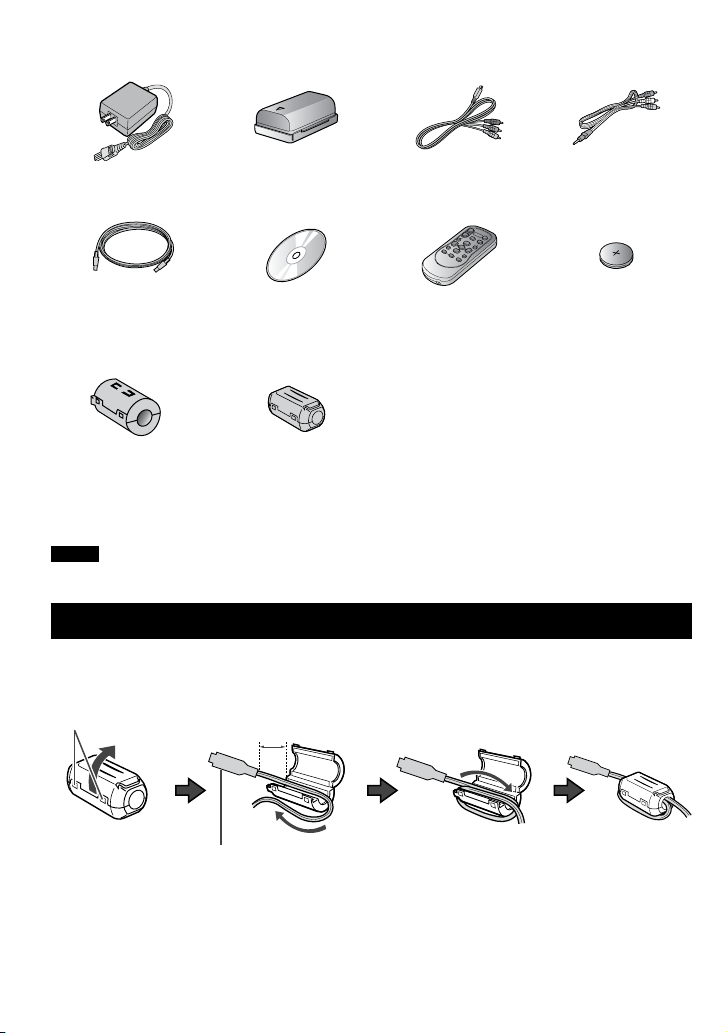
Accessories
AC Adapter
AP-V21U
USB Cable CD-ROM Remote Control
(x 1)
(Component Cable)
Core Filter
NOTE
Make sure to use the provided cables for connections. Do not use any other cables.
Battery Pack
BN-VF808U
(x 2)
(USB Cable and AC
Adapter)
Component Cable Audio/Video Cable
RM-V751U
Lithium Battery
CR2025
Pre-installed in the
remote control unit.
Attaching the Core Filter
The core filter reduces interference caused when connecting to other devices. Connect the end
of the cable with the core filter to the camcorder.
Release the stopper.
3 cm (1-3/16")
To be connected to the
camcorder.
Component cable and
USB cable: Wind once.
AC Adapter: Wind twice.
Page 13
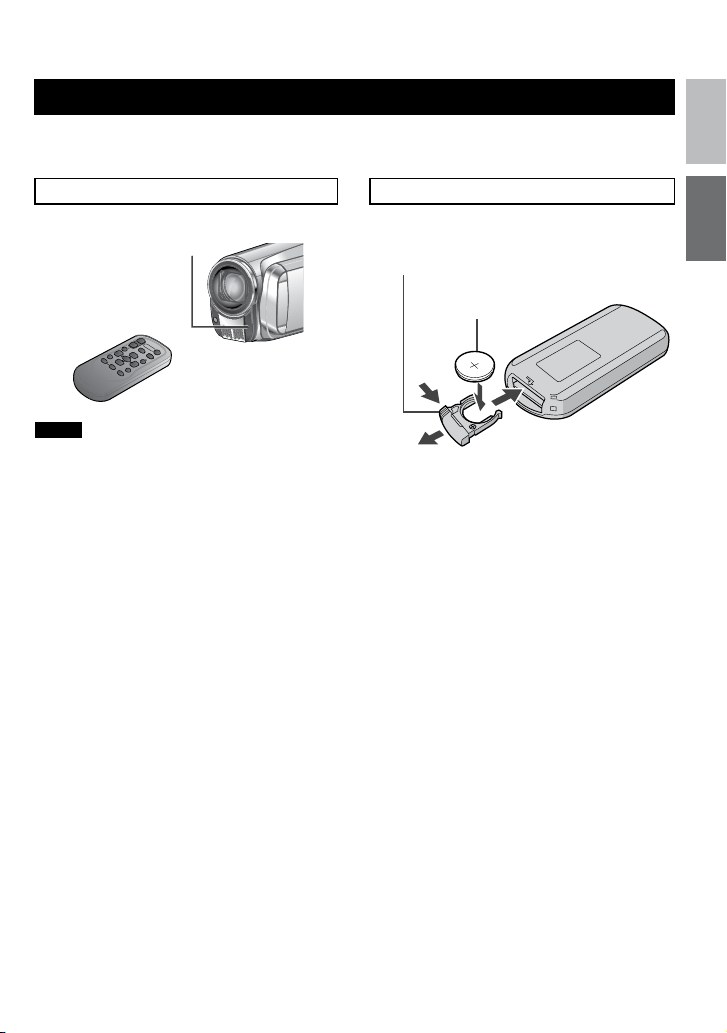
13
ENGLISH
GETTING
STARTED
Preparing the Remote Control
A battery is included inside the remote control at the time of purchase.
Remove the insulation sheet before use.
Beam Effective Area To Reinsert the Battery
Pull out the battery holder by pressing the
Remote Sensor
lock tab.
Lock Tab
Lithium Battery
(CR2025)
Effective distance:
Max. 5 m (16 ft)
NOTE
The transmitted beam may not be effective
or may cause incorrect operation when the
remote sensor is directly exposed to sunlight
or powerful lighting.
Page 14
14
Index
D
C
NOTE
Be careful not to cover 3, 4, 5, 6 and 7
•
during shooting.
The LCD monitor can rotate 270°.
•
Page 15

15
ENGLISH
GETTING
STARTED
Camcorder
! Touch sensor
# LCD Monitor
$ SD Cover
% SD Card Slot B (Z p. 21)
& SD Card Slot A (Z p. 21)
( Audio/Video Connector [AV] (Z p. 30, 36)
) HDMI Mini Connector [HDMI] (Z p. 30)
* Component Connector [COMPONENT]
(Z p. 30)
+ Direct Disc Button [DIRECT DISC]
(Z p. 35)/Information Button [INFO]
(Z p. 25)
, Mode Switch [!, #]
- Export Button [EXPORT] (Z p. 42)
. Playback/Recording Mode Switching
Button [PLAY/REC]
/ Upload Button [UPLOAD] (Z p. 43)
0 Power Switch [ ]
(You can turn off the camcorder by
pressing and holding this button.)
1 Menu Button [MENU] (Z p. 44)
2 OK Button [OK]
3 LED Light (Z p. 24)
4 Lens Cover/Lens
5 Stereo Microphone
6 Remote Sensor
7 Camera Sensor
8 Video Recording Start/Stop Button
[START/STOP] (Z p. 22)
9 Access Lamp [ACCESS] (Blinks when you
access files. Do not turn off the power or
remove the battery pack/AC adapter while
accessing files.)
Power/Charge Lamp [POWER/CHARGE]
(Blinks when you charge the battery.)
: Still Image Shooting Button [SNAPSHOT]
(Z p. 22, 23)
; Zoom Lever [W 7 , T] (Z p. 24)
Speaker Volume Control [–VOL+] (
< Speaker
Z p. 28)
= DC Connector [DC] (Z p. 18)
> USB Connector [ 2 ] (Z p. 34, 38)
? Grip Strap
@ Fasten
A Belt Strap
B Stud Hole
C Tripod Mounting Socket (Z p. 20)
D Battery Release Button [BATT.] (Z p. 18)
Remote Control
Q Infrared Beam Transmitting Window
R ZOOM (T/W) Buttons
(Zoom in/out during playback.)
S Up Button
T Skip Backward Button
U Left Button
V Back Button
W PLAYLIST Button
X START/STOP Button
Y S.SHOT (Snapshot) Button
Z INFO Button
a Skip Forward Button
b PLAY/PAUSE/SET Button
c Right Button
d Next Button
e Down Button
f INDEX Button*
g DISP Button
NOTE
You can move the zooming area with the up/
down/left/right button during zoom in playback
mode.
* Each time you press INDEX, the screen
switches as shown below:
! mode:
Index Screen ↔ Group Index Screen
# mode:
Index Screen ↔ Date Index Screen
Page 16
16
W T
0.0
1/4000
LCD
NOV.10. 2009
4:55PM
RE C
0 : 0 4 : 0 1
[3h 59 m]
PHOT O
LIB.
[99 99 ]
FINE
10
PHOT O
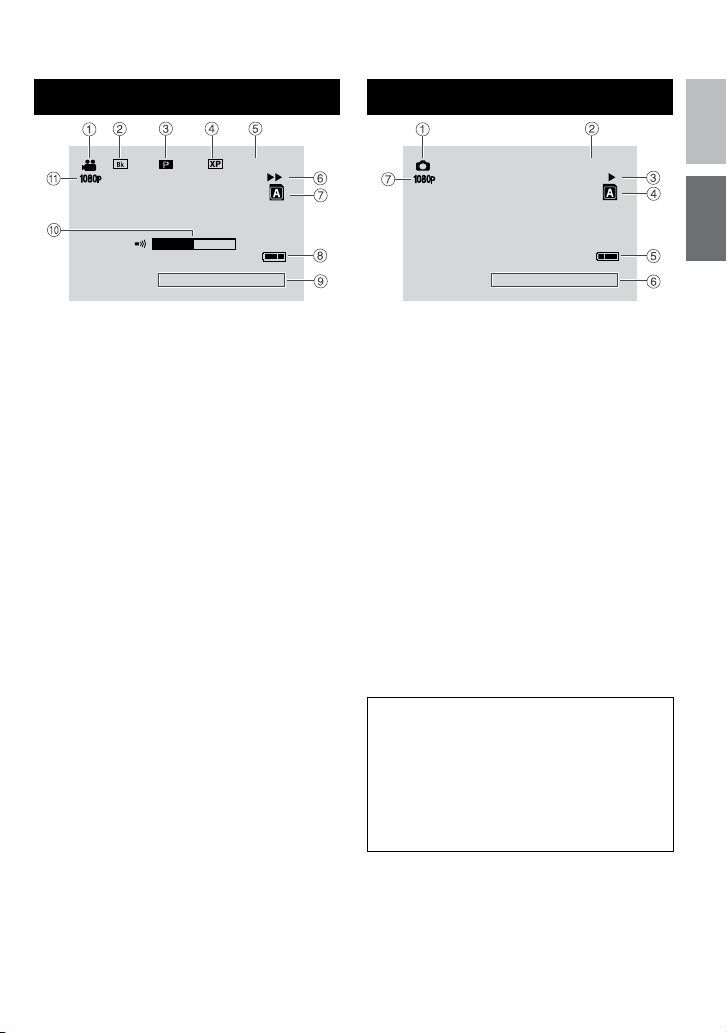
Indications on LCD Monitor
During both Video and Still Image
Recording
! Selected Operation Mode Indicator
(Zp.26)
: Auto Mode
@
3 : Manual Mode
# Effect Mode Indicator
$ Tele Macro Mode Indicator
% LED Light Indicator (Zp. 24)
& Scene Select Mode Indicator
( Quick Review Indicator (Zp.22)
) Zoom Indicator (Zp. 24)
* SD Card Slot Indicator (Zp.21)
: Slot A (Default Setting)
B : Slot B
+ White Balance Indicator
, Monitor Backlight Indicator
- Battery Indicator
. Date/Time (Zp. 19)
/ Manual Focus Adjustment Indicator
0 - : Backlight Compensation Indicator
: Face Detection Mode Indicator
(Zp.25)
1 Brightness Control Indicator
. : Photometry Area Control Indicator
2 Shutter Speed
During Video Recording Only
! Mode Indicator
# Export Mode Indicator (Z p. 42)
$ Counter
% Upload Mode Indicator (Zp. 43)
& Video Quality
( Remaining Time
) MREC: (Appears during recording.)
: (Appears during record-standby
MQ
mode.)
* Digital Image Stabilizer (DIS) Indicator
(Appears when [DIS] is set to [OFF].)
+ Auto Switch Rec Media Indicator
, Wind Cut Indicator
- Shooting Indicator (Z p. 22)
. Event Indicator
/ x.v.Color™ Indicator
During Still Image Recording Only
! Mode Indicator
# Focus Indicator (Z p. 23)
$ Image Size Indicator
% Image Quality Indicator
& Remaining Number of Shots
( Shooting Indicator (Z p. 23)
) Shutter Mode Indicator
* Self-Timer Indicator
Page 17
17
ENGLISH
GETTING
STARTED
During Video Playback
+4
1: 55 : 01
8
NOV.10. 2009
4:55PM
101 - 0098
NOV.10. 2009
4:55PM
During Still Image Playback
! Mode Indicator
# Wipe/Fader Effect Indicator (Zp.29)
$ 6 : Playlist Playback Indicator (Appears
when playing back a playlist.)
DIGEST: Digest Indicator (Zp.28)
% Video Quality
& Counter
( Playback Mode (Zp.28)
:Playback
F
:Pause
Q
:Forward Search
K
:Reverse Search
J
:Forward Slow-Motion
G
:Reverse Slow-Motion
E
(The number on the left shows speed.)
) Card Slot Indicator
* Battery Indicator
+ Date/Time (Zp.19)
, Volume Level Indicator
- Output with 1080p
! Mode Indicator
# Folder/File Number
$ Slide Show Playback Indicator
% Card Slot Indicator
& Battery Indicator
( Date/Time (Zp.19)
) Output with 1080p
To display indication modes on LCD
monitor
In playback mode:
1) Select [ON-SCREEN DISPLAY] from the
MENU.
2) Select the desired setting:
No indications/All indications/Only date
and time/Display date for 5 seconds
Page 18
18
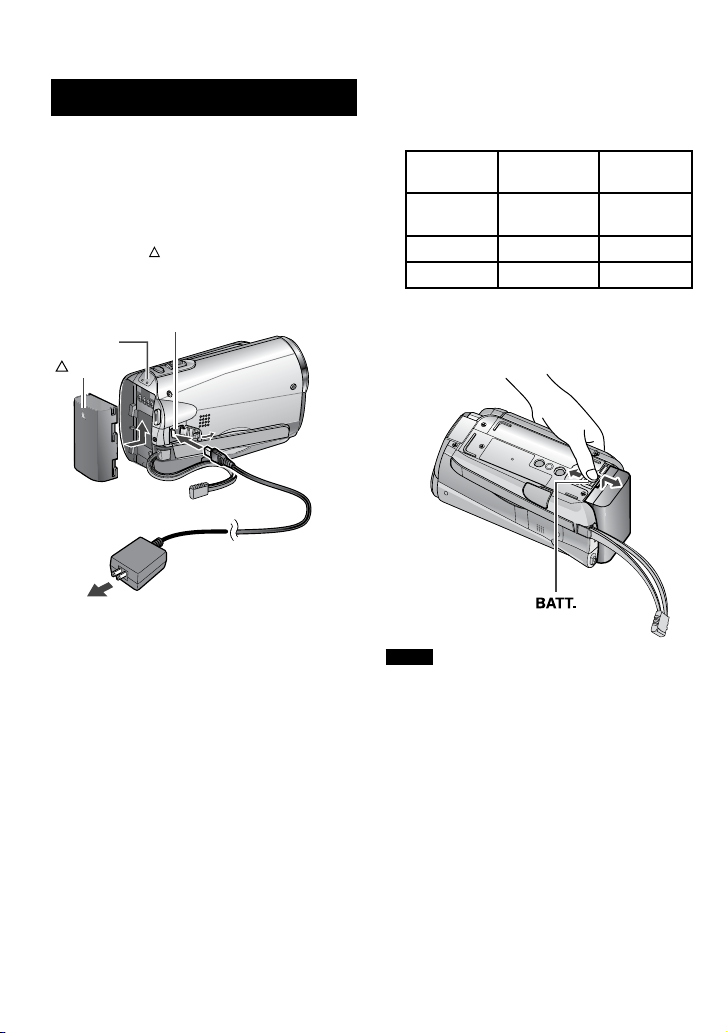
Necessary Settings before Use
Charging the Battery Pack
1
Close the LCD monitor to turn off the
camcorder.
2
Attach the battery pack, then
connect the AC adapter.
With the “ ” (arrow) on the battery pack
•
pointing at the correct direction, slide the
battery pack until it locks in place.
Charge
Lamp
Arrow
DC connector
AC Adapter
To AC Outlet
(110V to 240V)
Required charging/recording time
(approx.)
*When the LED light is off and the monitor
backlight is set to [STANDARD] mode.
Battery pack Charging time Recording
BN-VF808U
(Provided)
BN-VF815U 2 hr. 40 min.
BN-VF823U 3 hr. 40 min.
To detach the battery pack
Slide and hold BATT., then remove the
battery pack.
1 hr. 50 min.
time
1 hr. 25 min.*
3 hr.*
4 hr. 30 min.*
The power/charge lamp blinks to indicate
•
charging has started.
When the lamp goes out, charging is
•
finished.
To check the remaining battery power
See page 25.
NOTE
You can also use the camcorder with just
•
the AC adapter.
The actual recording time may shorten
•
depending on the recording environment,
such as when recording scenes with fast
moving subject.
Please do not pull or bend the AC adapter
•
plug and cable. This may damage the AC
adapter.
Page 19
19
ENGLISH
GETTING
STARTED
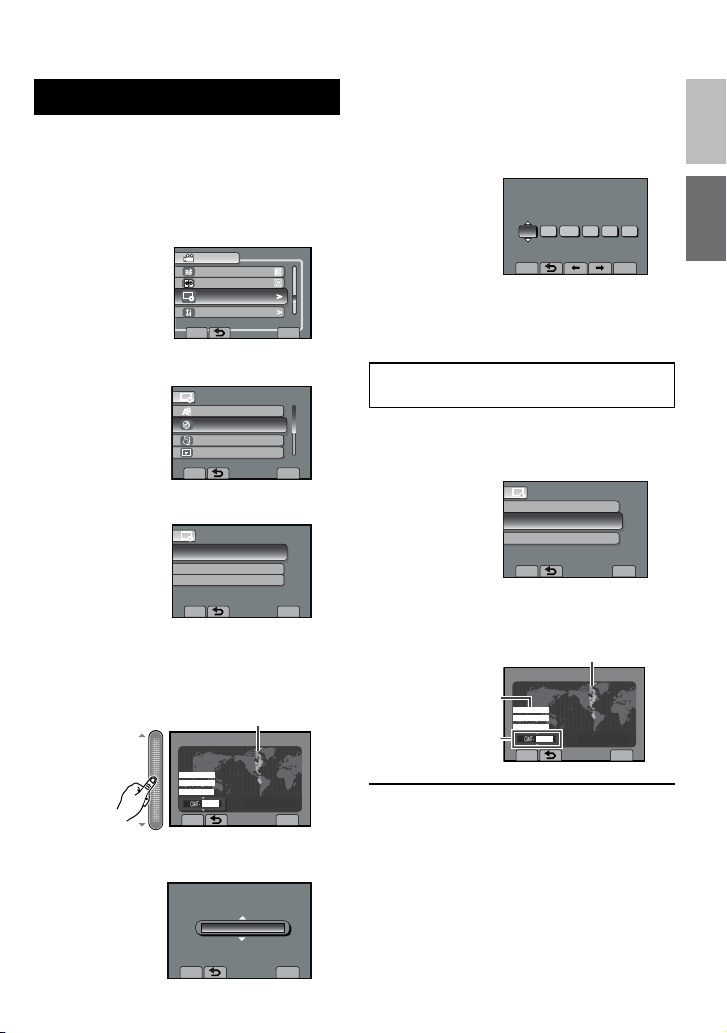
Date/Time Setting
CONFIGURE ON-SCREEN DISPLAY
VIDEO
WIND CUT
AUTO SWITCH REC MEDIA
>
DISPLAY SETTINGS
>
BASIC SETTINGS
SET
QUIT
DISPLAY SETTINGS
SET DATE AND TIME
LANGUAGE
CLOCK ADJUST
DATE DISPLAY STYLE
MONITOR BRIGHT
SET
QUIT
CLOCK ADJUST
SET THE CITY, DATE AND TIME
CLOCK SETTING
AREA SETTING
SET FOR DAYLIGHT SAVING TIME
SET
QUIT
SET
QUIT
AREA SETTING
NOV.10.2009 04:55PM
SET FOR DAYLIGHT SAVING TIME
SET DAYLIGHT SAVING TIME
NOV. 10. 200 9 0 4: 55P M
OFF
DAYLIGHT SAVINGTIME (DST)
SET
QUIT
CLOCK SETTING
DATE TIME
GMT+ 9:00
NOV 1 20090854 PM
SAVE
QUIT
CLOCK ADJUST
SET WHEN IN ANOTHER COUNTRY
CLOCK SETTING
SET FOR DAYLIGHT SAVING TIME
SET
QUIT
AREA SETTING
SET
QUIT
AREA SETTING
NOV.10.2009 04:55PM
1
Open the LCD monitor to turn on the
camcorder.
2
Touch MENU.
3
Select [DISPLAY SETTINGS].
4
Select [CLOCK ADJUST].
5
Select [CLOCK SETTING].
6
Select the city closest to the area
where you use the camcorder.
Select the area by using the touch sensor.
Selected area is highlighted
8
Set the date and time.
Select the item by using the touch sensor
and select [}] to set.
9
Select [SAVE].
To reset the setting, select [QUIT]
Setting the clock to local time when
traveling
After performing steps 1 - 4
5
Select [AREA SETTING].
6
Select the city closest to the area
you are traveling.
Selected area is highlighted
Principal city of
the selected area
Time difference to
GMT
7
Select [ON] if daylight saving time is
effective.
ON: Clock is
advanced 1 hour
from the normal
time which you
set.
OFF: Deactivates
the function.
To return to the previous screen
Select @.
To quit the screen
Touch the MENU button.
Page 20
20
Other Settings
CONFIGURE ON-SCREEN DISPLAY
VIDEO
WIND CUT
AUTO SWITCH REC MEDIA
>
DISPLAY SETTINGS
>
BASIC SETTINGS
SET
QUIT
DISPLAY SETTINGS
LANGUAGE
CLOCK ADJUST
DATE DISPLAY STYLE
SET
QUIT
ON-SCREEN DISPLAY LANGUAGE
MONITOR BRIGHT
Language Setting
The language on the display can be changed.
1
Open the LCD monitor to turn on the
camcorder.
2
Touch MENU.
3
Select [DISPLAY SETTINGS].
4
Select [LANGUAGE].
5
Select the desired language.
To return to the previous screen
Select @.
To quit the screen
Select [QUIT]
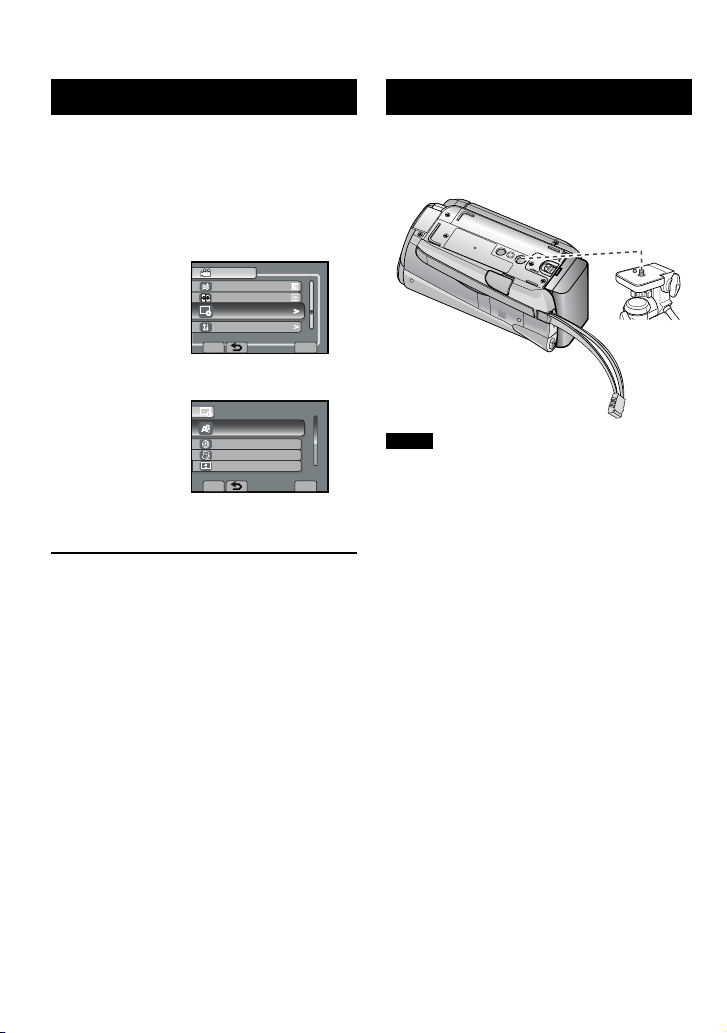
Tripod Mounting
Align the camcorder stud hole with the tripod
stud, and the mounting socket with the screw,
and lock it in place.
Bottom of the
Camcorder
NOTE
Do not use a tripod on unsteady or unlevel
surfaces. It could tip over, causing serious
damage to the camcorder.
Page 21

21
ENGLISH
GETTING
STARTED
Using an SD Card
MEDIA SETTINGS
VIDEO SLOT SELECTION
IMAGE SLOT SELECTION
FORMAT SD CARD
QUIT
SET
SLOT B
SLOT A
ERASE ALL DATA ON
MEDIA SETTINGS
VIDEO SLOT SELECTION
IMAGE SLOT SELECTION
FORMAT SD CARD
QUIT
SET
Operations are confirmed on the following SD
•
cards:
Class 4 or higher compatible SD or SDHC card.
Panasonic, TOSHIBA, SanDisk, ATP SD card
(256 MB to 2 GB) or SDHC card (4 GB to 32
GB)
For UXP mode, use Class 6 or higher.
If other media are used, they may fail to
•
record data correctly, or they may lose data
that had already been recorded.
MultiMediaCards are not supported.
•
Cards used to record video on this
•
camcorder cannot be played back on other
devices.
Some card readers (including internal card
•
readers in PCs) may not be able to support
SDHC format. If you use an SDHC card for
recording and encounter any reading error,
the card reader you are using, might be a
non-SDHC supported device. Please use
the camcorder or other SDHC compatible
devices to access the card.
Video data may not be recorded onto the
•
SD cards on which video data have already
been recorded using the devices from other
manufacturers.
Insert an SD card
Preparation:
Press Power ( ) button to turn off the
camcorder.
1
Open the SD card cover.
Push the cover up gently, to open it.
2
Firmly insert the card with its clipped
edge first.
Clipped
Edge
NOTE
Insert and remove the SD card only while
•
the power is turned off. Otherwise, data on
the card may be corrupted.
Do not touch the terminal on the reverse
•
side of the label.
Change the recording medium
The camcorder is programmed to record in
[SLOT A] when it is shipped from the factory.
You can change the recording medium to
[SLOT B].
From the MENU.
Set [VIDEO SLOT SELECTION] and
[IMAGE SLOT SELECTION] to [SLOT A]
or [SLOT B].
INFORMATION
Recording media switches automatically
•
from Slot A to Slot B and vise versa after the
card in the selected slot is full.
You can conveniently record your video
•
and shoot still image in separate SD cards
by selecting the card slot (A or B) for each
purpose.
Format an SD card when using it for the
first time
From the MENU.
Select [FORMAT SD CARD] to format
the card.
3
Close the SD card cover.
To remove an SD card
Push the SD card once.
After the card comes out a little, pull it out.
Page 22
22
PLAY/REC
[3 h 59 m]
0:00:00
[3 h 59 m]
0:00:01 REC
RECORDING/PLAYBACK
Recording Files
Video Recording
Preparation: • Open the LCD monitor to turn on the camcorder.
Insert an SD card.
•
Select ! (video) mode.
SNAPSHOT
Press PLAY/REC to select the recording
mode.
Press START/STOP to start recording.
You can also start/stop recording by selecting
[REC] on the LCD monitor (On-screen
recording control).
Approximate remaining time
for recording
To stop recording
Press the START/STOP button or select
[REC] again.
To view the video you just recorded
Select A while recording is paused.
Selecting $ during playback deletes that
scene.
To change the video quality
Change the settings in [VIDEO QUALITY]
from the MENU.
NOTE
The video recording mode is automatically selected when you turn the camcorder’s power off and
•
then on again.
If the camcorder is not operated for 5 minutes while the power is on, it turns itself off automatically to
•
conserve power. To turn the camcorder on again when using the battery pack, close the LCD monitor
and open it again. When using the AC adapter, perform any operation such as zooming.
After recording video for 12 consecutive hours, recording stops automatically. To ensure continuous
•
recording, set the [AUTO SWITCH REC MEDIA] to [ON] before you start recording.
A new file will be created for every 4 GB of continuous shooting.
•
To record a still image during video
recording
Press SNAPSHOT.
To record a video clip (approx. 10
minutes)
See page 43.
To turn on the face detection mode
See page 25.
Page 23

ENGLISH
23
RECORDING/
PLAYBACK
PLAY/REC
FINE
FINE [9999]
PHOTO
Still Image Recording
Preparation: • Open the LCD monitor to turn on the camcorder.
Insert an SD card.
•
Select # (still image) mode.
Press PLAY/REC to select the recording
mode.
Press and hold SNAPSHOT halfway.
The ? indicator becomes green when the
captured image is focused.
Press SNAPSHOT fully to take the picture.
To record still images continuously
To view the last recorded image
Select A after shooting.
Selecting $ during playback deletes that
image.
To change the image quality
Change the settings in [IMAGE QUALITY]
from the MENU.
Set to [CONTINUOUS SHOOTING] in
[SHUTTER MODE] from the MENU.
To change the aspect ratio of the image
Change the settings in [IMAGE SIZE] from
the MENU.
To turn on the face detection mode
See page 25.
NOTE
DIS (Digital Image Stabilizer) does not function during still image recording.
•
If the camcorder is not operated for 5 minutes while the power is on, it turns itself off
•
automatically to conserve power. To turn on the camcorder again when using the battery pack,
close the LCD monitor and open it again. When using the AC adapter, perform any operation
such as zooming.
Page 24
24
Recording Files (Continued)
Zooming
Preparation:
Select ! or # mode.
•
Select the recording mode.
•
Zoom out Zoom in
W: Wide angle T: Telephoto
You can also zoom out/zoom in by selecting
[W] or [T] on the LCD monitor. (On-screen
zoom control)
Maximum zoom ratio: 20X/OPTICAL (Factorypreset)
To change the maximum zoom ratio (for
! mode only)
Change the settings in [ZOOM] from the
MENU.
NOTE
Macro shooting is possible as close as
approx. 5 cm (2”) to the subject when the
zoom lever is set all the way to W.
LED Light
Preparation:
Select ! or # mode.
•
Select the recording mode.
•
1
Touch MENU.
2
Select [LIGHT].
3
Select the desired setting.
The LED light remains on
ON
AUTO
OFF
regardless of the surrounding
conditions.
The LED light turns on
automatically when shooting in
insufficient light conditions.
Deactivates this function.
Page 25
ENGLISH
25
RECORDING/
PLAYBACK
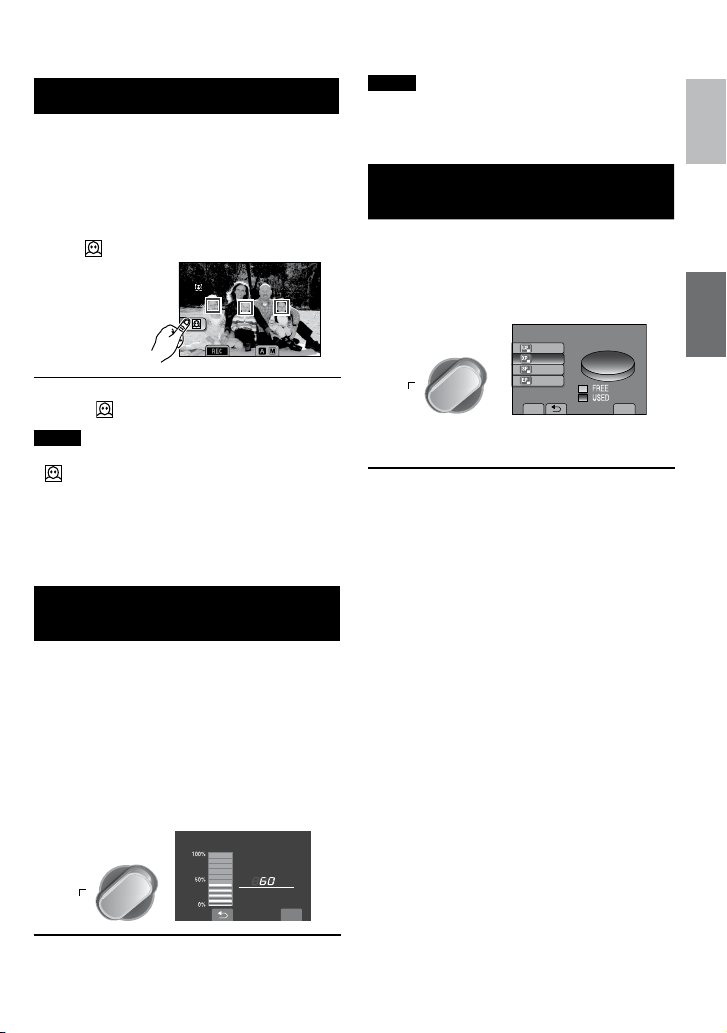
Turning on the Face Detection Mode
W
T
/
DIRECT
DISC
INFO
$#66'4;%10&+6+10
/#:
OKP
6+/'
QUIT
DIRECT
DISC
INFO
MAX RECORDING TIME
SLOT B
0h00m
0h00m
0h00m
0h00m
SET
QUIT
If you set this mode on, the camcorder detects
the faces and adjust brightness and focus so
that the faces are recorded clearly.
Preparation:
• Select ! or # mode.
• Select the recording mode.
Select .
To turn off the face detection mode
Select again.
NOTE
If the LCD monitor is turned upside down,
•
is not displayed. Change the setting when
the LCD monitor is in the normal position.
Depending on the condition, faces may not
•
be detected.
If the face detection does not work correctly,
•
turn off the mode before recording.
Checking the Remaining Battery Power
Preparation:
Disconnect the AC adapter from the
•
camcorder.
Attach the battery pack.
•
Select the recording mode.
•
For ! mode:
Press INFO three times or INFO and then
select ;.
For # mode:
Press the INFO button.
NOTE
The recordable time display should only be
used as a guide. It is displayed in 10-minute
units.
Checking the Remaining Space on the Recording Media
Preparation:
Select ! mode.
•
Select the recording mode.
•
Press the INFO button once (Slot A) or
twice (Slot B).
The maximum recording time is displayed for
each picture quality mode.
To change the video quality
1) Select the video quality.
2) Select [SET].
To change the recording media
1) Press
INFO to select SLOT A or
SLOT B.
2) Select [SET].
To quit the screen
Select [QUIT].
To return to the normal screen
Select [QUIT] or press INFO.
Page 26
26
/
[3 h 59 m]
VIDEO
LIGHT
USE DETAIL SETTINGS BASED
REGISTER EVENT
SET
QUIT
MAN
UAL SETTING
VIDEO QUALITY
VIDEO
TO CORRECT BACKLIT SUBJECT
SET
QUIT
ADJUST BRIGHTNESS
SHUTTER SPEED
WB
BACKLIGHT COMP.
ADJUST BRIGHTNESS
SHUTTER SPEED
WB
BACKLIGHT COMP.
ADJUS
T BRIGHTNE
SS
SHU
TTER SPEED
WB
VIDEO
SET
QUIT
OFF
ON
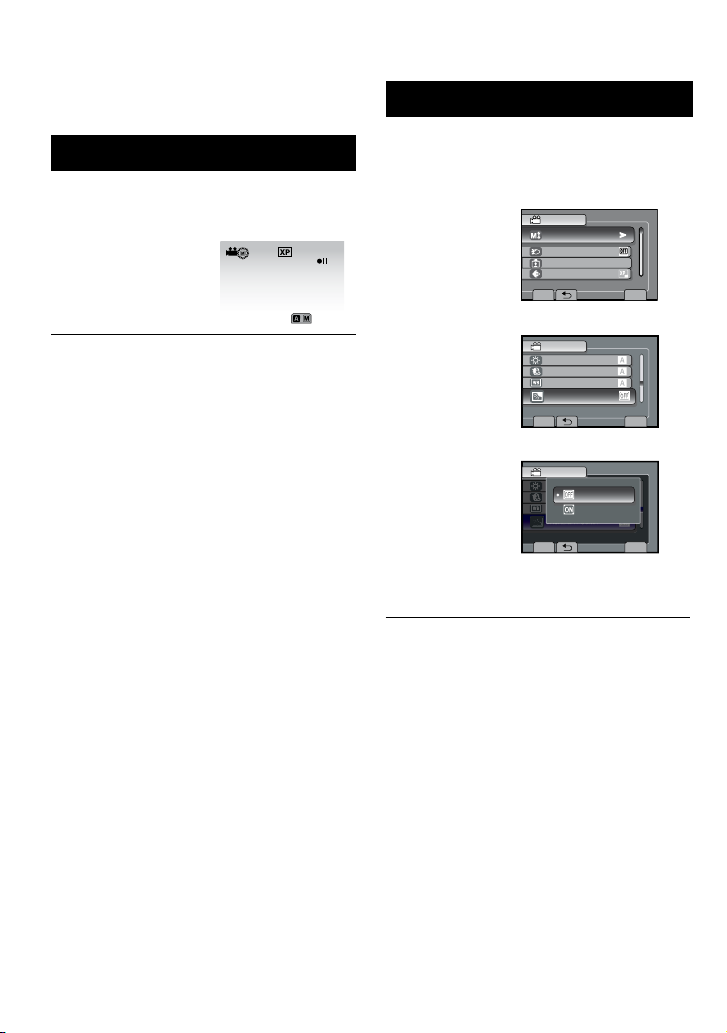
Manual Recording
Manual recording mode enables you to set the
focus and screen brightness, etc. manually.
Changing to Manual Recording Mode
Preparation:
Select ! or # mode.
•
Select the recording mode.
•
Select [A/M] twice.
To return to the auto recording mode
Select [A/M] so that the 4 indicator appears.
Manual Setting in Menu
In the manual recording mode;
1
Touch MENU.
2
Select [MANUAL SETTING].
3
Select the desired menu.
4
Select the desired setting.
Depending on the kind of settings you
select, you can set the value by using the
touch sensor.
To return to the previous screen
Select @.
To quit the screen
Select [QUIT].
Page 27

ENGLISH
27
RECORDING/
PLAYBACK
Scene Select/Effect
Scene Select
You can record videos or still images with
optimum brightness by adjusting the exposure
and shutter speed to suit your surroundings or
the subject.
Effect
You can record videos or still images with
special effects.
After performing steps 1 - 2 on left column.
3
Select [SCENE SELECT] or
[EFFECT].
4
Select the desired setting.
To cancel scene select/effect
Select [OFF].
Items for scene select setting
5 NIGHT:
•
Records with more sensitivity in dim
locations by adjusting the shutter speed
automatically.
3 TWILIGHT:
•
Makes evening scenes look more natural.
6 PORTRAIT:
•
The subject in the foreground is
accentuated by blurring the background.
H SPORTS:
•
Records fast moving subjects clearly.
G SNOW:
•
Compensates for subjects that may
appear too dark when shooting in
extremely bright surroundings, such as
in snow.
/ SPOTLIGHT:
•
Select this when a spotlight makes a
subject appear too bright.
Items for effect setting
J SEPIA:
•
The image is given a brownish tint like an
old photo.
K MONOTONE:
•
This effect skips frames to give images of
an old movie atmosphere.
L CLASSIC FILM*:
•
The image is given an old movie
atmosphere by the effect of skipping
frames.
M STROBE*:
•
The image looks like a series of
consecutive snapshots.
* ! mode only.
Page 28
28
PLAYBACK
PLAY/REC
VIDEO PLAYBACK
DIGEST
1/2
NOV. 01.2009 04:55PM
IMAGE PLAYBACK
1/2
NOV. 01.2009 04:55PM
Playing Back Files
Video/Still Image Playback
Preparation:
Open the LCD monitor to turn on the
•
camcorder.
Insert an SD card.
•
1
Select ! (video) or # (still image)
mode.
2
Press the PLAY/REC button to select
playback mode.
3
Select the desired file.
To move to the previous or next page
Touch [v] or [V] for over a second.
To play back a few seconds from each
select scene of the recorded videos
Touch [DIGEST].
To delete a video/still image
Select $ when playback is stopped.
To change the number of thumbnails
(6 thumbnails / 12 thumbnails)
Move the zoom lever to [T] or [W].
To adjust the sound volume of videos.
Turn down the
volume
The index screen appears.
Operations during Video Playback
Operations during Still Image
: Return to the first scene of the file
!
N
: Go to the first scene of the next file
#
O
: Playback
$
F
: Pause
Q
: Return to the index screen
%
L
: Reverse search (during playback)
&
J
: Frame-by-frame playback in reverse
E
direction (during pause)*
: Forward search (during playback)
(
K
: Frame-by-frame playback in forward
G
direction (during pause)*
* Slow playback starts when you keep
touching the sensor button under E / G
for a while.
Playback
: Change playback order of slide show
!
P
in reverse direction
: Change playback order of slide show
#
F
in forward direction
: Start the slide show
$
F
: End the slide show
Q
: Return to the index screen
%
L
: Display the previous file
&
N
: Display the next file
(
O
Turn up the
volume
Page 29

ENGLISH
29
RECORDING/
PLAYBACK
Playback with Special Effects
SET
QUIT
DUB BING PLAYBA CK
PLAY BAC K O THE R F ILE
EDI T
WAPE /FAD ER
VIDEO
CRE ATE E FFECTS TO THE START
REC
SET
QUIT
DUB BING PLAYBA CK
PLAY BAC K O THE R F ILE
EDI T
WAPE /FAD ER
REC
DUBBI NG PL AYBACK
PLAY BAC K O THE R F IL
E
RE
C
C
VIDEO
OFF
FADER-WHITE
FADER-BLACK
WIPE-SLIDE
Wipe or fader effects
Add effects at the beginning and end of
videos. These effects cannot be set for still
images.
Preparation:
Select ! mode.
•
Select the playback mode.
•
1
Touch MENU.
2
Select [WIPE/FADER].
3
Select a desired effect.
For details on each effect, see the right
column.
4
Select the file you want to play back.
To turn off the effect
Select [OFF] in step 3.
To quit the screen
Select [QUIT].
Items for WIPE/FADER setting
O FADER-WHITE:
•
Fades in or out with a white screen.
P FADER-BLACK:
•
Fades in or out with a black screen.
T WIPE-SLIDE:
•
Wipes in from right to left, or wipes out in
the opposite way.
U WIPE-DOOR:
•
Wipes in as the two halves of a black
screen which open to the left and right
revealing the scene, or wipes out in the
opposite way.
V WIPE-SCROLL:
•
Wipes in from the bottom to the top of a
black screen, or wipes out in the opposite
way.
W WIPE-SHUTTER:
•
Wipes in from the center of a black
screen toward the top and bottom, or
wipes out in the opposite way.
NOTE
No effect will be applied on files with a play
time shorter than 7 seconds.
Page 30
30
USING WITH TV
Viewing Files on TV
This camcorder is designed to be used with
high-definition or NTSC-type color television
signals. It cannot be used with a television of
a different standard.
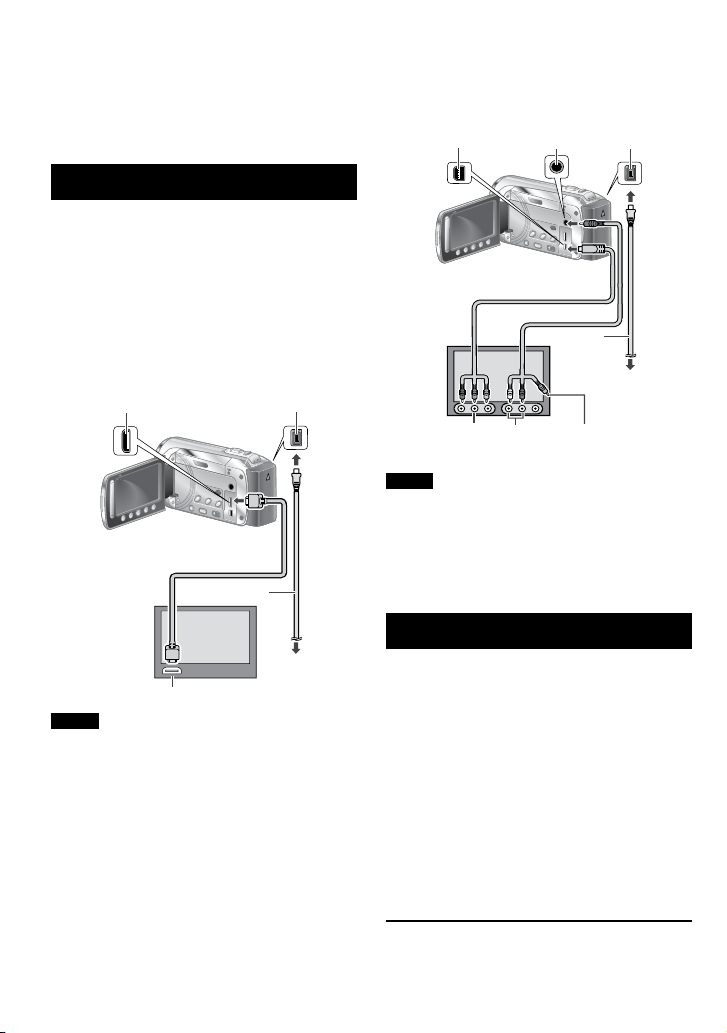
Connection with TV
You can output videos from the HDMI mini
connector, COMPONENT connector, or AV
connector.
We recommend using the Category 2 HDMI
cable (High Speed cable) for viewing in higher
picture quality.
Preparation: Turn off all units.
To connect using the HDMI mini
connector
HDMI Mini Connector
HDMI Cable (optional)
(Mini to full-sized HDMI cable)
AC Adapter
DC Connector
To connect using the COMPONENT/AV
connector
COMPONENT
Connector
COMPONENT
Input Connector
NOTE
• From the MENU, change the settings in
[COMPONENT OUTPUT] according to the
connection.
• From the MENU, change the settings in
[VIDEO OUTPUT] to suit the screen size of
your television.
AV Connector
Component Cable
AV Cable
AC Adapter
Audio L/R Input
Connector
DC Connector
To AC Outlet
Video Connector
is not in use.
HDMI Connector
NOTE
When connecting to the HDMI cable, the
•
image or sound may not appear on the TV
properly depending on the TV connected.
In such cases, perform the following
operations.
1) Disconnect the HDMI cable and connect
it again.
2) Turn off and on the camcorder again.
To AC Outlet
Playback Operation
After the connection with TV is completed
1
Turn on the camcorder and the TV.
2
Set the TV to its VIDEO mode.
3
(Only when connecting the camcorder
to the VCR/DVD recorder)
Turn on the VCR/DVD recorder, and
set the VCR/DVD recorder to its AUX
input mode.
4
Start playback on the camcorder.
(Z p. 28)
To display camcorder’s on-screen
display on TV
Set [DISPLAY ON TV] to [ON] from the
MENU.
Page 31

31
ENGLISH
USING WITH
TV
NOTE
When the video was recorded with x.v.Color™
set to [ON], change the x.v.Color™ setting on
TV. For details, refer to the TV’s instruction
manual.
Playback on TV
Operating Together with TV via HDMI
Connecting the camcorder to an HDMI-CEC*enabled TV using the HDMI cable allows you
to utilize the following convenient functions.
* HDMI-CEC (Consumer Electronics Control)
is an industry standard that enables
interoperability between HDMI-CEC
compliant devices that are connected via
HDMI cables.
NOTE
• Not all HDMI-control devices comply with
the HDMI-CEC standard. The HDMI control
function of the camcorder will not work when
connected to these devices.
• The camcorder is not guaranteed to operate
with all HDMI-CEC-enabled devices.
• HDMI-CEC does not function immediately
after inserting the AC adapter to the AC
outlet. Open the LCD monitor to turn on the
camcorder.
Preparation:
• Connect an HDMI cable between the
camcorder and the TV. (Z p. 30)
• Turn on the TV and set the HDMI-CEC
related setting to on. (For details, refer to the
instruction manual of the TV.)
• Turn on the camcorder and set [HDMI
CONTROL] to [ON] from the MENU.
Select the
playback mode.
Switching off TV and Camcorder
Turn off the TV. The camcorder turns
Switching Display Language
Depending on the TV connected, the display
language of the camcorder will automatically
switch to the language that is used for the TV
when the camcorder is turned on.
(This is applicable only if the camcorder
supports the language selected for the TV.)
To use the camcorder with a language that
differs from the display language of the TV, set
[HDMI CONTROL] to [OFF] from the MENU.
NOTE
The display language of the TV will not
•
switch automatically, even if the display
language of the camcorder is changed.
These functions may not work correctly
•
when devices such as amplifier and selector
are connected. Set [HDMI CONTROL] to
[OFF] from the MENU.
If HDMI-CEC does not work properly, turn
•
off and on the camcorder again.
The TV
automatically
switches to the
HDMI input. (Turn on
the TV beforehand.)
off automatically.
Page 32

SNAPSHOT
SET
QUIT
DELE TE
UPLO AD SET TIN GS
SEAR CH
PLAY BAC K P LAYL IST
VIDEO
DELE TE REC ORD ED V IDEO
SET
QUIT
CURR ENT
FILE SELEC T
DELE TE ALL
VIDEO
DELE TE
DELE TE ONE SC ENE AT A TI ME
DELE TE?
(REM AINING SC ENE S:00 09)
YES
NO
SET
QUIT
EDITING/PRINTING
Managing Files
CAUTION
Do not remove the recording medium (SD
cards) or perform any other operation (such
as turning off the power) while accessing files.
Also, be sure to use the provided AC adapter,
as the data on the recording medium may be
corrupted if the battery becomes exhausted
during operation. If the data on the recording
medium becomes corrupted, format the
recording medium to use the medium again.
Capturing a Still Image from a Video
You can capture the desired scene from a
recorded video, and store it as a still image.
Preparation:
Select ! mode.
•
Select the playback mode.
•
Press SNAPSHOT when playback is
paused.
NOTE
Captured still images are stored at a
•
resolution of 1920 x 1080. The image can
be elongated in the horizontal or vertical
directions depending on the picture quality
of the source video file.
The continuous shooting function cannot be
•
used to capture images.
You cannot capture video during playback.
•
Deleting Files
Protected files cannot be deleted. To delete
•
them, release the protection first.
Once files are deleted, they cannot be
•
restored. Check files before deleting.
Preparation:
Select ! or # mode.
•
Select the playback mode.
•
1
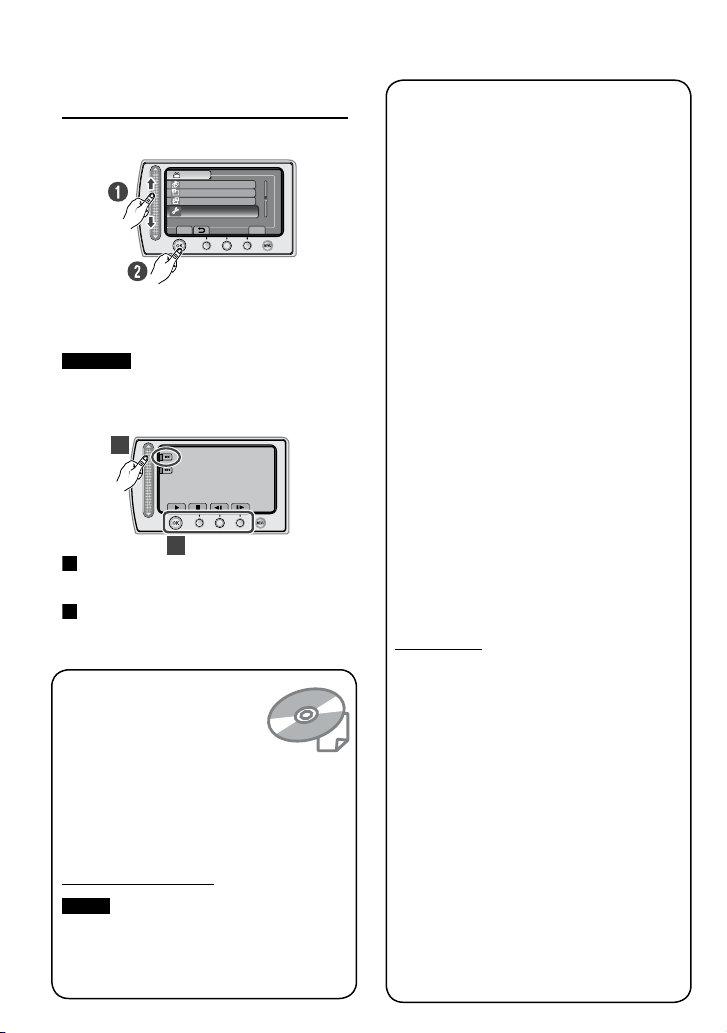
Touch MENU.
2
Select [DELETE]
Deleting the Currently Displayed File
After performing steps 1 - 2
3
Select [CURRENT].
4
Select [YES].
32
You can select the previous or next file by
selecting { or }.
To quit the screen
Select [QUIT].
Page 33

SET
QUIT
EDI T PL AYLIST
DUB BING PLAYBA CK
PLAY BAC K O THE R F ILE
EDI T
VIDEO
CAN BE SET TO PR EVE NT COP Y
REC
REC
PLAY BAC K P LAYL IST
EDI T PL AYLIST
DUBB ING PL AYBA CK
PLAY BAC K M PG F ILE
REC
PLA
YBACK
PLAYLIST
S
DU
BBING
B
C
YBACK MPG F
COP Y FI LES BE TWE EN
VIDEO
SET
QUIT
COPY
MOVE
PRO TECT /CANCE L
DIV IDE
SET
QUIT
COPY VIDEO
SELECT COPY DIRECTION
SLOT A = SLOT B
SLOT B = SLOT A
COPYING
Copying Files
Types of Copying and Connectable Device
The Camcorder
You can copy files between
the SD cards with this
camcorder alone.
DVD Burner
(CU-VD50 /CU-VD3)
You can copy files recorded
on this camcorder onto
discs. (Z p. 35)
BD Burner
LaCie Model No. 301828
You can copy files recorded
on this camcorder onto
discs. (Z p. 34)
USB External Hard Disk
Drive
You can copy files recorded
on this camcorder onto a
usb external hard disk drive.
PC
You can copy files from the
camcorder to a disc using a
PC. (Z p. 40)
VCR/DVD Recorder
You can dub video recorded
on this camcorder onto
VCR/DVD recorder.
NOTE
It is recommended to use the JVC DVD
•
burner (CU-VD50/CU-VD3). When using
(Z p. 36)
CU-VD20 or CU-VD40, the recording time
may take approx. 2 times longer than the
time that is described in the instruction
manual of DVD burner.
Recommended USB external hard disk
•
drive
Seagate FreeAgentTM Desk series
LaCie Design by Neil Poulton series
USB external hard disk drive with the
•
capacity over 2 TB cannot be used.
Copying/Moving Files
Preparation:
Select ! or # mode.
•
Select the playback mode.
•
Make sure that SD card is inserted in the
•
SD Slot.
Make sure that enough free space is left in
•
the copy/move destination medium.
1
Touch MENU.
2
Select [EDIT].
3
Select [COPY] or [MOVE].
[COPY]:
•
Files are copied to the destination
medium while leaving original files in the
source medium.
[MOVE]:
•
Files are moved to the destination
medium while deleting original files
(except read-only files) in the source
medium.
4
Select the direction.
[SLOT A = SLOT B] or
[SLOT B = SLOT A]
ENGLISH
COPYING
33
Page 34

34
SET
QUIT
COPY VIDEO
SELECT AND COPY
SELECT THE OBJECT
TO BE COPIED
COPY ALL
COPY VIDEO
SET
QUIT
NO
COPY QUANTITY:0016
START COPY?
YES
D
C
Copying Files (Continued)
5
Select the desired menu.
• [COPY ALL]/[MOVE ALL]:
Select this to transfer all files in the
recording medium.
When the size of all files in one SD
card is larger than the free space of the
other SD card, only the files that can
be contained in the free space will be
copied.
• [SELECT AND COPY]/[SELECT AND
MOVE]:
Select when you want to transfer the
selected files.
1) Select the desired file, and touch OK.
The s mark appears on the file. To
select other files, repeat this step.
2) Select [EXEC].
6
Select [YES].
File transfer starts. When [COPYING
COMPLETED]/[MOVING COMPLETED]
appears, touch OK.
To quit the screen
Select [QUIT].
To stop the file transfer
1) Select [STOP].
2) When [QUIT?] appears, select [YES].
Using a BD/DVD Burner
The files in the camcorder can be backed up
to a disc using a BD/DVD burner.
Use one of the following methods to view
•
the disc. (If you try to play back the disc with
incompatible player, the disc may not be
ejected.)
- Playback the disc using the camcorder.
- Playback the disc using a BD/DVD burner.*
- Playback on a PC.*
- Playback the disc using a BD/DVD player
that supports BD-MV and AVCHD.*
* The disc must first be finalized on the
camcorder.
Discs other than the created BD/DVD using
•
a BD/DVD burner cannot be played.
When connecting a DVD burner (CU-VD50)
•
to a TV, you can play back the created disc
without using the camcorder. When playing
back, disconnect the USB cable.
Connection with a BD/DVD Burner
Preparation:
Turn on the camcorder first, then turn on the
BD/DVD burner.
DC
Connector
USB
Connector
AC Adapter
USB Connector
NOTE
To AC
Outlet
BD/DVD Burner
USB Cable*
Refer also to the optional BD/DVD burner’s
instruction manual.
*
When connecting to a DVD burner, use the
•
USB cable that came with the DVD burner.
When connecting to a BD burner, use a
•
USB cable with Mini-A(Male) and B(Male)
connectors. JVC’s QAM0852-001 (optional)
is recommended. Refer to page 41 for
details.
Page 35

35
ENGLISH
COPYING
Backup All Files
SET
CREAT E FROM AL L
SELE CT AND CR EATE
PLAY BAC K
VIDEO BACKUP
TO A UTOMATI CALLY SAVE
FINA LIZE
QUIT
ALL SC ENE S
UNS AVED SC ENE S
SAVE AL L V IDE OS
CREATE FROM ALL
SET
SET
QUIT
ALL SCENES
RETURN
QUANTITY REQUIRED
DVD : 1 / DVD(DL) : 1
PREPARE AN EMPTY DISC
EXECUTE
DIRECT
DISC
INFO
EXECUTE
CANCEL
SET
QUIT
UNSAVED SCENES
DVD 1
DVD(DL) 1
Preparation:
Connect the camcorder to the BD/DVD
•
burner.
Select ! or # mode.
•
Make sure that SD card is inserted in the
•
SD Slot.
When using a BD burner, select [CHANGE
•
REC. MEDIA] and select the disc type.
1
Select [CREATE FROM ALL] (!
mode) or [SAVE ALL] (# mode).
2
Select the desired menu.
! mode: [ALL SCENES]
•
# mode: [ALL IMAGES]
All files in the recording medium are
copied.
! mode: [UNSAVED SCENES]
•
# mode: [UNSAVED IMAGES]
Files that have never been copied are
automatically selected and copied.
3
Select [EXECUTE].
4
Select [YES] or [NO].
[YES]: Displays the thumbnails by group.
•
[NO]: Displays the thumbnails by date.
•
5
Select [EXECUTE].
The files are copied on the disc. When
•
[COMPLETED] appears, touch OK.
When [INSERT NEXT DISC PRESS
•
[STOP] TO EXIT CREATE] appears,
change the disc. Remaining files are
copied on the second disc.
To cancel copying, select [STOP].
•
Copying Video Files that Have Never
Been Copied
Files that have never been copied to the discs
are automatically selected and copied.
1
Open the LCD monitor to turn on the
camcorder.
2
Press DIRECT DISC.
3
Select [YES] or [NO].
[YES]: Displays the thumbnails by group.
•
[NO]: Displays the thumbnails by date.
•
4
Select [EXECUTE].
The disc begins to be created.
•
When [COMPLETED] appears, touch
OK.
When [INSERT NEXT DISC PRESS
•
[STOP] TO EXIT CREATE] appears,
change the disc. Remaining files are
copied on the second disc.
To cancel the disc creation, select
•
[STOP].
To quit the screen
1) Select [QUIT].
2) When [QUIT?] appears, select [YES].
Page 36

36
Copying Files (Continued)
Dubbing Files to a VCR/DVD Recorder
Preparation:
Create a playlist.
•
Turn off all units.
•
To connect using the AV connectors
(analog dubbing)
DC Connector
AV Connector
VCR/DVD
Recorder
AV Cable
AV Connector
(input)
To AC
Outlet
Adapter
AC
1
Open the LCD monitor to turn on the
camcorder.
2
Set the VCR/DVD recorder to its AUX
input mode.
Check that the images from the camcorder
are input correctly to the VCR/DVD
recorder.
3
Play back playlists on the camcorder.
1) Touch MENU.
2) Select [DUBBING PLAYBACK].
3) Select the desired playlist.
4) Select [YES]. (A black screen is
displayed for 5 seconds at the first and
the last scene.)
4
At the point you want to start
dubbing, start recording on the VCR/
DVD recorder.
Refer to the VCR/DVD recorder’s
instruction manual.
To stop dubbing
Stop recording on the VCR/DVD recorder.
To hide the date or icons on the screen
Change the settings in [DISPLAY ON TV]
from the MENU.
Page 37

37
ENGLISH
COPYING
Creating a Disc using a PC
Creating a Disc using a PC
You can copy the data from the camcorder
and create a disc using a PC.
Q Installing the software to the PC
System Requirements
Windows Vista
OS: Windows Vista
Home Basic (SP1)
Home Premium (SP1)
(32-bit, pre-installed)
CPU: Intel® CoreTM Duo, 1.66 GHz or
higher
(Intel® CoreTM 2 Duo 2.13 GHz or
higher recommended.)
RAM: At least 2 GB
Windows XP
OS: Windows® XP
Home Edition (SP2/SP3)
Professional (SP2/SP3)
(pre-installed)
CPU: Intel® CoreTM Duo, 1.66 GHz or
higher
(Intel® CoreTM 2 Duo 2.13 GHz or
higher recommended.)
RAM: At least 1 GB
®
NOTE
Make sure your PC has a recordable
•
BD/DVD drive.
If your system does not meet the
•
requirements, it is recommended to copy
files using the BD/DVD burner. (Z p. 35)
Macintosh users may use the software
•
included with their Macintosh (iMovie ’08,
iPhoto) to copy files to their computer.
Preparation:
Load the provided CD-ROM into the PC.
In Windows Vista, the auto play dialog box
appears.
1
Click [Easy Installation].
Follow the on-screen instructions.
2
Click [Yes].
3
Select the desired language and
click [Next].
To check the PC specification
Right-click on [Computer] (or [My
Computer]) in the [Start] menu and select
[Properties].
4
Click [Next].
Page 38

38
Creating a Disc using a PC (Continued)
D
C
SET
QUIT
UPLO AD
BACK UP
EXPO RT TO LIBRAR Y
USB MENU
SAVE RE COR DED VI DEO / STIL L
CREAT E DISC
LIB.
5
Click [Finish].
DC
Connector
Everio Media Browser icon is created on
the desktop.
AC adapter
USB Cable
USB
Connector
INFORMATION
Everio MediaBrowser video editing capability
is available for files copied from the
camcorder to the PC.
To see the Instruction Guide for
Everio MediaBrowser
1) Double-click the icon of Everio
MediaBrowser.
2) Click [Help], and click [MediaBrowser Help].
R Making Backup on the PC
Click
Click
Preparation:
Install the software to the PC.
•
Make sure that enough free space is left in
•
the PC’s harddisk.
Close the LCD monitor to turn off the
•
camcorder.
To AC outlet
1
Open the LCD monitor to turn on the
camcorder.
2
Select [BACK UP].
Everio MediaBrowser starts on the PC.
3
Click [All volume in camcorder] and
click [Next].
Page 39

39
ENGLISH
COPYING
4
Click [Start].
Backup starts.
To disconnect the camcorder from the
PC
1) Right-click the icon (Safely Remove
Hardware) on the task bar and select
[Safely remove USB Mass Storage
Device].
2) Follow the on-screen instructions and
make sure that the device can be safely
removed.
3) Disconnect the USB cable and close the
LCD monitor.
NOTE
It takes time to back up many videos.
S Making User Lists to Arrange the
Files
You can make a user list of a certain subject
(such as Travel, Athletic meet) and put the
files related to the subject into the user list.
Preparation:
Make backup on the PC.
3
Click [+].
4
Input the name of the new user list
and click [OK].
5
Click the recording date.
The files recorded on the day are
displayed.
6
Drag the file and drop into the user
list.
1
Double-click the icon and open the
calendar.
2
Select [Movies only].
To add other files into the user list, repeat
steps 5 and 6.
Page 40

40
Creating a Disc using a PC (Continued)
T Copying Files to a disc
Everio MediaBrowser supports 3 disc formats.
Select the one that suits your purpose.
DVD-Video
disc:
AVCHD disc:
BD:
1
Select the user list and click [Create
Disc].
2
Select the disc type and click [Next].
3
Click [Select files individually] and
click [Next].
To add all the files onto discs, click [Select
all files displayed], then go to step 5.
4
Drag the file, and drop into the part
at the bottom and click [Next].
Suitable if you will give the disc
to your friends and relatives.
Suitable for high quality video.
Suitable for high quality video
with long recording time.
5
Input the disc name, select the top
menu style and click [Next].
6
Click [Start].
NOTE
When copying video recorded in UXP
•
recording mode to create an AVCHD disc,
the video needs to be converted to XP
recording mode before copying. Therefore,
it may take longer time than copying video
recorded in other modes.
Use Everio MediaBrowser Player to
•
playback the disc. Refer to the help of the
provided Everio MediaBrowser software to
operate.
For detail on operating Everio
•
MediaBrowser, click [Help] and refer to
[MediaBrowser Help].
Adobe® Reader® must be installed to read
•
[MediaBrowser Help]. Adobe® Reader® can
be loaded from Adobe’s web site:
http://www.adobe.com
For assistance in operating the provided
•
software, refer to the support information.
(Zp. 41)
Page 41

41
ENGLISH
COPYING
Folder Structure and Extensions
[MOV_XXXX.MTS]
[XXXJVCSO]
[AVCHD]
[DCIM]
[EXTMOV]
[PRIVATE]
[JVC]
[BDMV]
[STREAM]
[XXXXX.MTS]
[BACKUP]
[CLIPINF]
[PLAYLIST]
[INDEX.BDM]
[MOVIEOBJ.BDM]
Recording medium
Contains the still image folders.
Video files with defective management information are also saved.
Contains management information files of event and/or disc
creation information for the files taken with the camcorder.
Video file in AVCHD format
X = number
Customer Support Information
Use of this software is authorized according to the terms of the software licence.
JVC
When contacting the nearest JVC office or agency in your country (refer to the JVC Worldwide Service Network
at http://www.jvc-victor.co.jp/english/worldmap/index-e.html) about this software, please have the following
information ready.
Product Name, Model, Problem, Error Message.
•
PC, (Manufacturer, Model (Desktop/Laptop), CPU, OS, Memory (MB), Available Hard Disk Space (GB)).
•
Please note that it may take some time to respond to your questions, depending on their subject matter.
JVC cannot answer questions regarding basic operation of your PC, or questions regarding specifications or
performance of the OS, other applications or drivers.
Pixela
Region Language Phone #
USA and Canada English +1-800-458-4029 (toll-free)
Europe (UK, Germany, France
and Spain)
Other Countries in Europe
Asia (Philippines) English +63-2-438-0090
China Chinese +86-21-5385-3786
Homepage: http://www.pixela.co.jp/oem/jvc/e/index.html
Please check our website for latest information and downloading.
English/Germany/France/Spanish +1-800-1532-4865 (toll-free)
English/Germany/France/Spanish/
Italian/Dutch
+44-1489-564-764
Page 42

42
EXPORT
ON
EXPORT
SD
LIB.
DONECHECK
EXPORT SETTINGS
1/3
LIB. LIB.
SET
QUIT
UPLO AD
BACK UP
EXPO RT TO L IBRARY
USB MENU
EASY VIDEO REGIST RATIO N
LIB.
CREAT E DISC
COPYING
Using with a Portable Media Player
3
Turning on the Export Mode
You can easily transfer videos recorded in
export mode to iTunes®. All the files with the
export setting turned on are transferred to PC.
For details on transferring, refer to the
operation guide of MediaBrowser in the CDROM.
Preparation:
Select ! mode.
•
Select the recording mode.
•
Press EXPORT twice.
To turn off the export mode
Press EXPORT twice.
Changing the Export Setting
You can set the recorded videos to the export
setting.
Preparation:
Select ! mode.
•
Select the playback mode.
•
Select [DONE].
To cancel the export setting
Select the file and press LIB. again.
To quit the screen
1) Select [DONE].
2) Select [YES].
Transferring the Files to PC
Preparation:
Install iTunes® on a PC.
http://www.apple.com/itunes/
1
Connect the camcorder to the PC
with the USB cable.
2
Select [EXPORT TO LIBRARY].
All the files with the export setting turned
on are transferred to PC.
1
Press EXPORT.
2
Select the file and select [LIB.].
• To check the content of the file, select
[CHECK].
Cannot export the file to iTunes®.
Refer to “Q&A”, “Latest Information”,
“Download Information”, etc. in [Click for
Latest Product Info] in the help of the provided
Everio MediaBrowser software.
Page 43

43
ENGLISH
COPYING
UPLOAD
ON
SET
QUIT
PLAY BA CK ON PC
UPL OAD
EXP ORT TO L IBR ARY
USB MENU
EAS Y U PLO AD TO VID EO
LIB.
CREAT E DISC
Uploading Files to Websites
Turning on the Upload Mode
You can upload the file to video sharing
websites (YouTube™) quickly after recording.
For more information on YouTube™, visit
YouTube™ web site: http://youtube.com/
Preparation:
Select ! mode.
•
Select the recording mode.
•
Press UPLOAD twice.
If you record a file with the upload mode
set on, the recording stops automatically 10
minutes after the recording is started.
The remaining time is displayed on the LCD
monitor.
NOTE
The upload mode turns off each time
recording is finished.
Uploading Files
For details on uploading files, refer to the
operation guide of MediaBrowser in the
CD-ROM.
1
Connect the camcorder to the PC
with the USB cable.
2
Select [UPLOAD].
Cannot upload the file to YouTube
You need your YouTubeTM account to upload
•
files to YouTubeTM. Create your account.
Refer to “Q&A”, “Latest Information”,
•
“Download Information”, etc. in [Click for
TM
Latest Product Info] in the help of the
provided Everio MediaBrowser software.
Page 44

REGI STER EV ENT
VIDE O QUALI TY
ZOOM
DIS
IMAG E BLURR ED NEE D TO
ON
VIDEO
SET
QUIT
REGI STER E VEN T
VIDE O QUAL ITY
ZOOM
DIS
IMAG E BLUR RED NEE D TO
ON
REGISTER EVEN
T
V
IDEO QUALI TY
ZOO
M
DI
S
IMAG
E BL URRED NEE D T
O
O
N
VIDEO
OFF
ON
SET
QUIT
MENU SETTINGS
Changing the Menu Settings
1
Touch MENU.
2
Select the desired menu.
3
Select the desired setting.
To return to the previous screen
Select @.
To quit the screen
FURTHER INFORMATION
Select [QUIT].
Troubleshooting
Before requesting service, consult the
following chart. If the solutions indicated in the
chart do not solve the problem, consult your
nearest JVC dealer or JVC service center for
instructions.
Refer also to the FAQ of new products on
JVC’s website.
The following phenomena are not
malfunctions.
The camcorder heats up when it is used for
•
a long time.
The battery heats up during charging.
•
When playing back a video, the image stops
•
momentarily or the sound is interrupted at
junctions between scenes.
LCD monitor momentarily become red or
•
black when sunlight is recorded.
Black spots, or red, green, or blue spots
•
appear on the LCD monitor.
(The LCD monitor contains 99.99% effective
pixels, but 0.01% of fewer pixels may be
ineffective.)
44
Trouble Action
Card
Cannot insert the SD
card.
Power
No power is supplied.
Recording cannot be
performed.
Recording
Recording stops by
itself.
Vertical lines appear on
recorded images.
Check that the SD card is facing the right direction.
•
Connect the AC adapter correctly.
•
Recharge the battery.
•
SD card is full. Delete unnecessary files or replace the SD card.
•
Insert a commercially available SD card, and set each of the
•
[VIDEO SLOT SELECTION] and [IMAGE SLOT SELECTION] to
[SLOT A] or [SLOT B].
Recording stops automatically after 12 hours of non-stop
•
recording. To ensure continuous recording, set [AUTO SWITCH
REC MEDIA] to [ON] before you start recording.
Such a phenomenon occurs when shooting a subject
•
illuminated by bright light. This is not a malfunction.
Page 45

Trouble Action
The LCD monitor is
Display
difficult to see.
The remaining battery
display is not correct.
Sound or video are
interrupted.
Playback
Cannot find a recorded
video/image.
The camcorder operates
slowly when switching
between video mode
and still image mode,
or when switching the
power on or off.
Other problems
The lamp does not flash
during battery charging.
When connecting to
the HDMI cable, the
image or sound does
not appear on the TV
properly.
HDMI-CEC functions do
not work properly, and
the TV does not work
in conjunction with the
camcorder.
The LCD monitor may be difficult to see if used in bright areas
•
such as under direct sunlight.
Fully charge the battery, run it down, and then recharge it again.
•
If the camcorder is used for long periods of time in high or low
•
temperatures, or if the battery is repeatedly charged, the amount
of remaining battery may not be displayed correctly.
Sometimes playback is interrupted at the connecting section
•
between two scenes.
Select [PLAYBACK OTHER FILE] then search the video on the
•
index screen.
(Video files that have damaged management information can be
played back.)
Cancel group display and date search functions.
•
Change the setting in [VIDEO SLOT SELECTION] or [IMAGE
•
SLOT SELECTION]. (Files on other media are not displayed.)
Slide the mode switch to select the desired mode (! or #).
•
If there are many files (such as video) in the camcorder, it takes
•
time for the camcorder to respond. It is recommended that you
copy all files from the camcorder onto your computer, and erase
the files from the camcorder.
Check the remaining battery charge.
•
(When the battery is fully charged, the lamp does not flash.)
When recharging in either a hot or cold environment, ensure that
•
battery is being charged within the permitted temperature range.
(If the battery is being recharged outside the permitted
temperature range, recharging may stop to protect the battery.)
When connecting to the HDMI cable, the image or sound may
•
not appear on the TV properly depending on the TV connected.
In such cases, perform the following operations.
1) Disconnect the HDMI cable and connect it again.
2) Turn off and on the camcorder again.
TVs may operate differently depending on the specifications,
•
even if they are HDMI-CEC compliant. Therefore, the HDMICEC functions of the camcorder cannot be guaranteed to
operate in combination with all the TVs. In such cases, set
[HDMI CONTROL] to [OFF].
ENGLISH
INFORMATION
FURTHER
45
Page 46

Troubleshooting (Continued)
46
Trouble Action
Other problems
Cannot upload the file
to YouTube™
Cannot export the file
to iTunes
To reset the camcorder when it does not operate normally
! Close the LCD monitor and remove the power supply (battery pack or AC adapter) from the
camcorder, then reattach it.
# Execute [FACTORY PRESET].
®
You need your YouTube™ account to upload files to YouTube™.
•
Create your account.
Refer to “Q&A”, “Latest Information”, “Download Information”,
•
etc. in [Click for Latest Product Info] in the help of the provided
Everio MediaBrowser software.
Refer to “Q&A”, “Latest Information”, “Download Information”,
•
etc. in [Click for Latest Product Info] in the help of the provided
Everio MediaBrowser software.
Warning Indications
Indication Action
Set the clock. If the message still appears after setting the
•
SET DATE/TIME!
clock, the battery for the clock has been depleted. Consult your
nearest JVC dealer.
COMMUNICATING ERROR
CANNOT USE IN
VIDEO MODE
NOT FORMATTED
FORMAT ERROR!
DATA DELETION ERROR
MEMORY CARD ERROR!
CANNOT TAKE MORE STILL
IMAGES AT THE MOMENT
RECORDING CANCELLED
Be sure to use JVC battery packs.
•
Replace the SD card. (Files recorded with other devices that
•
support AVCHD cannot be played back on this camcorder.)
Select [OK] and select [YES] to perform formatting.
•
Check the operating procedure, and perform once again.
•
Turn off the camcorder, and turn it on again.
•
Turn off the camcorder, and turn it on again.
•
Remove and re-insert the SD card. (MultiMediaCard cannot be
•
used.)
Remove any dirt from the SD card terminals.
•
Insert the SD card before switching the power on.
•
If the problem persists, back up all data, and then perform
•
formatting. All data is deleted.
Stop video recording, and then record a still image. (If an SD
•
card is removed or inserted during video recording, a still
image cannot be recorded.)
Insert a new or formatted SD card. Set [VIDEO SLOT
•
SELECTION] to different slot, then record to an SD card in
[SLOT A] or [SLOT B].
Turn off the camcorder and turn it on again.
•
Page 47

Indication Action
47
ENGLISH
FURTHER
INFORMATION
RECORDING FAILURE
PLAYBACK FAILED
USE AC ADAPTOR
POWER IS OFF, OR USB
DEVICE IS UNSUPPORTED
DVD-RW DISC HAS BEEN
ALREADY USED
FINALIZATION FAILED
NO FILES
VIDEO MANAGEMENT FILE
IS DAMAGED, RECOVERY IS
REQUIRED TO RECORD/
PLAYBACK, RECOVER?
NO EVENT REGISTERED
SCENES
CANNOT DETECT FACE
Remove and re-insert the SD card. (MultiMediaCard cannot
•
be used.)
Remove any dirt from the SD card terminals.
•
Insert the SD card before switching the power on.
•
Use the AC Adapter as power supply.
•
Turn on the power of the connected USB device.
•
Connect the AC adapter to the BD/DVD burner.
•
Replace the disc of the BD/DVD burner with another disc.
•
Replace the disc of the BD/DVD burner with another disc.
•
Slide the mode switch to select the desired mode (! or #).
•
Select [OK] to restore.
•
Register events to the files before you start recording.
•
Turn the face detection mode on before you perform recording
•
or snapshot.
Cleaning
Before cleaning, turn off the camcorder and remove the battery pack and AC adapter.
To clean the camcorder
Wipe the camcorder gently with a soft cloth. If the camcorder is particularly dirty, dip the cloth
into diluted mild soap and wring it out well. After wiping with the wet cloth, wipe again with a
dry cloth.
To clean the LCD monitor
Wipe the monitor gently with a soft cloth. Be careful not to damage the monitor.
To clean the lens
Wipe gently with lens cleaning paper.
NOTE
Avoid using strong cleaning agents such as benzine or alcohol.
•
Mold may form if the lens is left dirty.
•
When using a cleaner or chemically treated cloth, refer to the cautions for each product.
•
Page 48

Specifications
48
Camcorder
For general
Power supply
DC 11 V (Using AC adapter)
DC 7.2 V (Using battery pack)
Power consumption
Approx. 3.3 W*
* When the LED light is off and the monitor
backlight is set to [STANDARD] mode.
Rated Current Consumption:
1A
Dimensions (W x H x D)
54.5 mm x 65 mm x 112.5 mm
(2-3/16" x 2-9/16" x 4-7/16")
Weight
Approx. 260 g (0.57 lbs)
Approx. 310 g (0.68 lbs) (incl. battery and grip
belt)
Operating temperature
0°C to 40°C (32°F to 104°F)
Operating humidity
35% to 80%
Storage temperature
–20°C to 50°C (–4°F to 122°F)
Pickup
1/4" (2,800,000 pixels) progressive CMOS
Lens
F 1.9 to 3.2,
f = 2.9 mm to 58.0 mm,
20:1 power zoom lens
Filter diameter
ø30.5 mm
LCD monitor
2.7" diagonally measured,
LCD panel/TFT active matrix system
LED Light
Within 1.5 m (4.9 ft)
(recommended shooting distance)
For video/audio
Recording/Playback format
Signal format
MPEG-4 AVC/H.264
Video:
Audio: Dolby Digital (2ch)
1080i/60
Recording mode (video)
UXP: 1920 x 1080 pixels, average of 24 Mbps
(VBR)
XP: 1920 x 1080 pixels, average of 17 Mbps
(VBR)
SP: 1920 x 1080 pixels, average of 12 Mbps
(VBR)
EP: 1920 x 1080 pixels, average of 5 Mbps
(VBR)
Recording mode (audio)
48 kHz, 256 kbps
For still image
Format
JPEG
Image size
1920 x 1080
1440 x 1080
640 x 480
Picture quality
FINE / STANDARD
For connectors
HDMI
HDMI™ (V.1.3 with x.v.Color™)
Component output
Y, Pb, Pr component output
Y: 1.0 V (p-p), 75
Pb/Pr: 0.7 V (p-p), 75
AV output
Video output: 1.0 V (p-p), 75
Audio output: 300 mV (rms), 1 k
USB
Mini USB type A and type B,
USB 2.0 compliant
W
W
W
W
AC Adapter
Power requirement
AC 110 V to 240 V$, 50 Hz/60 Hz
Output
DC 11 V § , 1 A
Page 49

Remote Control
49
ENGLISH
FURTHER
INFORMATION
Power supply
DC 3 V
Battery life
Approx. 1 year
(depending on the frequency of use)
Operating distance
Within 5 m (16.4 ft)
Operating temperature
0°C to 40°C (32°F to 104°F)
Dimensions (W x H x D)
42 mm x 14.5 mm x 91 mm
(1-11/16" x 5/8" x 3-5/8")
Weight
Approx. 30 g (0.07 lbs)
(incl. battery)
Design and specifications are subject to change
without notice.
Approximate recording time (for video) h: hour/m: minute
Recording medium
Quality
UXP 20 m 40 m 1 h 20 m 2 h 40 m
AVCHD
XP 30 m 1 h 2 h 4 h
SP 44 m 1 h 28 m 2 h 56 m 5 h 52 m
EP 1 h 50 m 3 h 40 m 7 h 20 m 14 h 40 m
4 GB 8 GB 16 GB 32 GB
SD or SDHC Card
Approximate number of storable images (for still image)
Recording medium
Image size/Quality
16:9
1920 x1080 / FINE 510 1030 2100 4140 8330 9999 9999
1920 x 1080 / STANDARD 810 1620 3210 6310 9999 9999 9999
1440 x 1080 / FINE 680 1360 2770 5450 9999 9999 9999
4:3
1440 x 1080 / STANDARD 1070 2140 4360 8570 9999 9999 9999
640 x 480 / FINE 3330 6670 9999 9999 9999 9999 9999
640 x 480 / STANDARD 5990 9999 9999 9999 9999 9999 9999
512 MB 1 GB 2 GB 4 GB 8 GB 16 GB 32 GB
SD or SDHC Card
The recordable time and the number of still images are approximate and may differ depending
on the recording environment, the condition of the SD card, or the remaining battery power.
Page 50

Cautions
50
AC Adapter
When using the AC adapter in areas other
than the USA
The provided AC adapter features automatic voltage
selection in the AC range from 110 V to 240 V.
USING HOUSEHOLD AC PLUG ADAPTER
In case of connecting the unit’s power cord to an AC wall
outlet other than American National Standard C73 series
type use an AC plug adapter, called a “Siemens Plug”,
as shown.
For this AC plug adapter, consult your nearest JVC dealer.
Plug Adapter
Battery Packs
The supplied battery pack is
a lithium-ion battery. Before
using the supplied battery pack
or an optional battery pack,
be sure to read the following
cautions:
To avoid hazards
•
...
do not burn.
...
do not short-circuit the terminals. Keep it away
from metallic objects when not in use. When
transporting, make sure the provided battery
cap is attached to the battery. If the battery
cap is misplaced, carry the battery in a plastic
bag.
...
do not modify or disassemble.
...
do not expose the battery to temperatures
exceeding 60°C (140°F), as this may cause
the battery to overheat, explode or catch fire.
... use only specified chargers.
To prevent damage and prolong service life
•
... do not subject to unnecessary shock.
... charge within the temperature range of 10°C
to 35°C (50°F to 95°F). This is a chemical
reaction type battery — cooler temperatures
impede chemical reaction, while warmer
temperatures can prevent complete charging.
... store in a cool, dry place. Extended exposure
to high temperatures will increase natural
discharge and shorten service life.
... fully charge and then fully discharge the
battery every 6 months when storing the
battery pack over a long period of time.
... remove from charger or powered unit when
not in use, as some machines use current
even when switched off.
Terminals
ATTENTION:
The product you have purchased
is powered by a rechargeable
battery that is recyclable.
Please call 1-800-8-BATTERY for
information on how to recycle this
battery.
Recording Medium (SD Card)
Be sure to follow the guidelines below
•
to prevent corruption or damage to your
recorded data.
Do not bend or drop the recording medium, or
•
subject it to strong pressure, jolts or vibrations.
Do not splash the recording medium with water.
•
Do not use, replace, or store the recording
•
medium in locations that are exposed to strong
static electricity or electrical noise.
Do not turn off the camcorder power or remove
•
the battery or AC adapter during shooting,
playback, or when otherwise accessing the
recording medium.
Do not bring the recording medium near objects
•
that have a strong magnetic field or that emit
strong electromagnetic waves.
Do not store the recording medium in locations
•
with high temperature or high humidity.
Do not touch the metal parts.
•
LCD Monitor
To prevent damage to the LCD monitor, DO
•
NOT
... push it strongly or apply any shocks.
... place the camcorder with LCD monitor on the
bottom.
To prolong service life
•
... avoid rubbing it with coarse cloth.
Page 51

Main Unit
51
ENGLISH
FURTHER
INFORMATION
For safety, DO NOT
•
... open the camcorder’s chassis.
... disassemble or modify the unit.
... allow inflammables, water or metallic objects
to enter the unit.
... remove the battery pack or disconnect the
power supply while the power is on.
... leave the battery pack attached when the
camcorder is not in use.
... place naked flame sources, such as lighted
candles, on the apparatus.
... expose the apparatus to dripping or splashing.
... leave dust or metal objects adhered to the
power plug or an AC wall outlet.
... insert any objects in the camcorder.
Avoid using the unit
•
... in places subject to excessive humidity or dust.
... in places subject to soot or steam such as
near a cooking stove.
... near appliances generating strong magnetic
or electric fields (speakers, broadcasting
antennas, etc.).
... in places subject to extremely high (over 40°C
or 104°F) or extremely low (under 0°C or
32°F) temperatures.
DO NOT leave the unit
•
... in places of over 50°C (122°F).
... in places where humidity is extremely low
(below 35%) or extremely high (above 80%).
... in direct sunlight.
... in a closed car in summer.
... near a heater.
... in high places such as on a TV. Leaving the
unit in high places while a cable is connected
may result in a malfunction if the cable is
caught and the unit falls onto the floor.
To protect the unit, DO NOT
•
... allow it to become wet.
... drop the unit or strike it against hard objects.
... subject it to shock or excessive vibration
during transportation.
... keep the lens directed at extremely bright
objects for long periods.
... expose the lens to direct sunlight.
... swing it excessively when using the hand strap.
... swing the soft camcorder case excessively
when the camcorder is inside it.
... place the camcorder in dusty or sandy areas,
such as on a beach.
To prevent the unit from dropping,
•
Fasten the grip belt securely.
•
When using the camcorder with a tripod, attach
•
the camcorder to the tripod securely.
If the camcorder drops, you may be injured
and the camcorder may be damaged.
When a child uses the unit, there must be
parental guidance.
Declaration of Conformity
Model Number : GZ-HM200U
Trade Name : JVC
Responsible party : JVC AMERICAS CORP.
Address : 1700 Valley Road Wayne, N. J. 07470
Telephone Number : 973-317–5000
This device complies with Part 15 of FCC
Rules. Operation is subject to the following
two conditions: (1) This device may not cause
harmful interference, and (2) this device must
accept any interference received, including
interference that may cause undesired
operation.
Changes or modifications not approved
by JVC could void the user’s authority to
operate the equipment. This equipment has
been tested and found to comply with the
limits for a Class B digital device, pursuant
to Part 15 of the FCC Rules. These limits are
designed to provide reasonable protection
against harmful interference in a residential
installation. This equipment generates, uses,
and can radiate radio frequency energy and, if
not installed and used in accordance with the
instructions, may cause harmful interference
to radio communications. However, there is
no guarantee that interference will not occur
in a particular installation. If this equipment
does cause harmful interference to radio or
television reception, which can be determined
by turning the equipment off and on, the user is
encouraged to try to correct the interference by
one or more of the following measures: Reorient
or relocate the receiving antenna. Increase the
separation between the equipment and receiver.
Connect the equipment into an outlet on a
circuit different from that to which the receiver is
connected.
Consult the dealer or an experienced radio/
TV technician for help.
This Class B digital apparatus complies with
Canadian ICES-003.
Cet appareil numérique de la classe B est
conforme à la norme NMB-003 du Canada.
Page 52

FURTHER INFORMATION
Terms
A AC Adapter ...................................................... 18
AV Connection ...........................................30, 36
B Battery Pack .............................................. 18, 25
BD (Blu ray) ............................................... 33, 34
C Clock Adjust .................................................... 19
Component Connection .................................. 30
Copying Files ................................................... 33
D Date/Time Setting ........................................5, 19
Daylight Saving Time .................................... 5, 19
Deleting Files .................................................. 32
DVD/BD Backup .............................................. 35
E Effect ............................................................... 27
Export to Library Mode .................................... 42
F Face Detection .................................................25
Formatting a Recording Medium ..................... 21
H HDMI Connection ............................................ 30
HDMI-CEC ......................................................31
I iTunes
L Language Setting ............................................20
®
............................................................. 42
LCD Monitor .............................................. 16, 50
LED Light ........................................................ 24
Lens ................................................................ 15
M Manual Recording ........................................... 26
Menu Settings .................................................44
Moving Files .................................................... 33
Q Quick Review.............................................. 22, 23
R Recordable Time/Number of Images ............... 49
Recording Medium .................................... 21, 50
Remote Control ............................................... 13
S Scene Select ................................................... 27
SD Card .............................................. 21, 49, 50
Speaker Volume .............................................. 28
Switching Display Language ............................ 31
T Touch Sensor ................................................. 10
U Uploading Files ................................................43
USB Cable .................................................. 34, 38
V Viewing Files on TV .......................................... 30
W Wipe/Fader ...................................................... 29
X x.v.Color .......................................................... 31
Y YouTube
TM
......................................................... 43
Z Zooming .......................................................... 24
© 2009 Victor Company of Japan, Limited
Printed in Malaysia
US
0109ZAR-MW-MP
Page 53

MEMO
Page 54

2
Precauciones de seguridad
ADVERTENCIA: PARA EVITAR RIESGO
DE INCENDIOS O ELECTROCUCIONES,
NO EXPONGA ESTE APARATO A LA
LLUVIA O HUMEDAD.
NOTAS:
La placa de valores nominales y la precaución
•
de seguridad se encuentran en la parte inferior
y/o en la parte posterior de la unidad principal.
La placa del número de serie se encuentra en
•
el compartimiento de la batería.
La información sobre los valores nominales y
•
las precauciones de seguridad del adaptador
de CA se encuentran en la parte superior e
inferior del mismo.
Precaución relacionada con la batería
de litio recambiable
La batería utilizada en este dispositivo
presenta riesgos de incendio y de
quemaduras químicas si no se usa
correctamente.
No la recargue, ni la desmonte, ni la caliente
por encima de los 100°C, ni la incinere.
Cambie la batería por una Panasonic, Sanyo,
Sony o Maxell CR2025.
Hay peligro de explosión o riesgo de incendio
si la batería se cambia de manera incorrecta.
Deshágase de la batería usada sin demora.
•
Manténgala lejos del alcance de los niños.
•
No la desmonte ni la eche al fuego.
•
Sólo para EE.UU.-California
Este producto contiene una batería de litio CR
de tipo botón que contiene perclorato (puede
requerirse una manipulación especial). Visite
www.dtsc.ca.gov/hazardouswaste/perchlorate
Cuando el equipo se encuentra instalado en
un gabinete o en un estante, asegúrese que
tenga suficiente espacio en todos los lados para
permitir la ventilación (10 cm o más en cada
lado, en la parte superior y en la parte trasera).
No bloquee los orificios de ventilación.
(Si los orificios de ventilación están bloqueados
por un periódico, o paño, etc., el calor no podrá
salir.)
No deberá ser colocada en el aparato ninguna
fuente de llama sin protección, tales como velas
encendidas.
Cuando descarte las pilas, deberá considerar
los problemas ambientales y respetar
estrictamente las normas locales o leyes
vigentes para la eliminación de estas pilas.
La unidad no deberá ser expuesta a goteos ni
salpicaduras.
No use esta unidad en un cuarto de baño o en
lugares con agua.
Tampoco coloque ningún envase lleno de agua
o líquidos (tales como cosméticos o medicinas,
floreros, macetas, vasos, etc.) en la parte
superior de la unidad.
(Si penetra agua o líquidos en la unidad, pueden
producirse electrocuciones o incendios.)
No apunte el objetivo directamente hacia el sol.
Esto puede causarle lesiones en los ojos así
como también fallas en los circuitos internos
de la cámara. Esto también puede producir
riesgo de incendio o de choque eléctrico.
¡PRECAUCIÓN!
Las siguientes notas indican posibles daños a
la cámara o lesiones al usuario.
El transportar o sostener la cámara por el
monitor LCD puede resultar en la caída o en
fallas de la unidad.
No utilice el trípode sobre superficies inestables
o desniveladas ya que la cámara puede caerse,
produciendo graves daños a la misma.
¡PRECAUCIÓN!
Evite conectar los cables (audio/video, S-video,
etc.) a la cámara y dejar la unidad sobre el
TV, ya que el tropezar con uno de los cables
puede derribar la cámara resultando ésta
dañada.
PRECAUCIÓN:
El enchufe de red siempre debe estar
fácilmente disponible.
ADVERTENCIA:
Las baterías, incluidas las baterías de litio
instaladas en la cámara y en el mando a
distancia, no deben dejarse expuestas a un
calor excesivo, como la luz solar directa, el
fuego o una condición similar.
Page 55

3
CASTELLANO
INSTRUCCIONES IMPORTANTES DE
SEGURIDAD
1. Lea estas instrucciones.
2. Conserve estas instrucciones.
3. Preste atención a las advertencias.
4. Siga todas las instrucciones.
5. No utilice este aparato cerca del agua.
6. Limpie sólo con paño seco.
7. No bloquee ninguna abertura de ventilación.
Instale de acuerdo con las instrucciones del
fabricante.
8. No lo instale cerca de ninguna fuente de calor
tales como, radiadores, calefactores, cocinas,
u otros aparatos (incluyendo amplificadores)
que produzcan calor.
9. Sólo utilice dispositivos/accesorios
especificados por el fabricante.
10. Utilice sólo con la
carretilla, estante,
trípode, soporte o
mesa especificado
por el fabricante
o vendido con el
aparato. Cuando
utilice una carretilla,
sea cauteloso al
mover el conjunto de carretilla/aparato para
evitar lesiones provocadas por caídas.
11. Desenchufe este aparato durante estruendos
de relámpagos o cuando esté fuera de uso por
largo tiempo.
12. Refiera toda reparación a personal de servicio
calificado. Se requiere de reparación cuando el
aparato ha sido dañado de alguna manera, por
ejemplo, si el cable o enchufe de alimentación
está dañado, si ocurrió derrame de líquidos
o caída de objetos dentro del aparato, si el
aparato fue expuesto a la lluvia o humedad, si
no funciona normalmente, o sufrió caídas.
Recuerde que esta cámara debe usarse
únicamente para fines privados.
Está prohibido cualquier uso comercial sin la
autorización correspondiente. (Aunque grabe
acontecimientos, tales como espectáculos
o exhibiciones, para su disfrute personal, se
recomienda que obtenga una autorización
previa.)
Marcas comerciales
Los logotipos AVCHD y AVCHD son marcas
•
comerciales de Matsushita Electric Industrial
Co., Ltd. y Sony Corporation.
Fabricado bajo licencia de Dolby Laboratories.
•
Dolby y el símbolo de la doble D son marcas
comerciales de Dolby Laboratories.
x.v.ColorTM es una marca
•
comercial de Sony Corporation.
HDMI es una marca comercial
•
de HDMI Licensing, LLC.
Windows® es una marca
•
registrada o una marca comercial de Microsoft
Corporation en los Estados Unidos y/o en otros
países.
Macintosh es una marca registrada de Apple
•
Inc.
YouTubeTM y el logotipo de YouTube son marcas
•
comerciales y/o marcas comerciales registradas
de YouTube LLC.
iTunes, iMovie y iPhoto son marcas comerciales
•
de Apple Inc., registradas en los EE.UU. y otros
países.
El resto de los nombres de productos y
•
de compañías incluidos en este manual
de instrucciones son marcas comerciales
y/o marcas registradas de sus respectivos
propietarios.
Si este símbolo aparece, sólo es
válido en la Unión Europea.
Page 56

4
D
C
Guía de inicio rápido
B
A
( )
Cargue la batería antes de grabar
Apague la videocámara e inserte la batería.
Luz de acceso
Parpadea: acceso a
los archivos
Cuando esta
luz parpadea,
no extraiga el
adaptador de CA, la
batería ni la tarjeta
SD.
Batería
La videocámara
se suministra
con la batería
descargada.
Adaptador de CA
A la toma de CA
(de 110 V a 240 V)
Luz de alimentación/carga
Parpadea: carga en curso
Se apaga: carga terminada
Inserte la tarjeta SD
Pulse el botón Power ( ) para apagar la
videocámara.
Abrir la cubierta
PRECAUCIÓN
Cargue la batería antes del
•
uso. (Z p. 18)
Asegúrese de utilizar
•
baterías JVC. Si utiliza
alguna otra batería que no
sea de JVC, no se puede
garantizar la seguridad ni el
rendimiento.
Ajuste de la correa de mano
Ajuste la correa y apriétela.
Correa de sujeción
Apretar
Ranura B Ranura A
Inserte y extraiga la tarjeta SD
•
solamente cuando la videocámara
esté apagada. De lo contrario, los
datos que se encuentran en la tarjeta
pueden dañarse.
Formatee la tarjeta SD cuando la
•
utilice por primera vez ( Z p. 21)
No jale la correa cuando abra el
•
ajuste. Jale, por favor, la pestaña para
abrirlo.
Fije la correa mientras sostiene la
•
videocámara.
Cuando lleve la videocámara, procure
•
que no se le caiga.
Pestaña
Page 57

CASTELLANO
5
Ajuste de la fecha/hora
JAN.10.2009 01:00AM
JAN.10.2009 01:00AM
GMT+9:00
NOV 1
2009 08
54 PM
Abra la pantalla LCD para
Q
encender la videocámara
Pantalla LCD
Seleccione [SÍ] (YES) en
R
10 segundos
Deslice el dedo arriba y abajo por el
sensor. A continuación, toque OK.
Cuando desaparezca el
•
mensaje, pulse el botón de
alimentación durante al menos
2 segundos para apagar la
cámara y vuelva a pulsarlo
durante al menos 2 segundos.
Toque los sensores con el dedo.
•
Los sensores no funcionan si los
toca con la uña o con guantes
puestos.
Seleccione [CONF. RELOJ]
S
(CLOCK SETTING)
Botón de
alimentación
( )
Seleccione la ciudad más
T
cercana a la zona donde
vaya a usar la videocámara
Seleccione [ON] o [OFF]
U
Seleccione [ON] si el horario de
verano está activado.
ON: el reloj se adelanta una hora de la
hora normal que ajustó.
OFF: desactiva la función.
Ajuste la fecha y la hora
V
Sensor táctil: Ajusta la fecha y la
hora
: Mueve el cursor hacia la derecha
}
OK: Se pone en marcha el reloj
Page 58

6
Grabación de vídeo
3 h 59 m
0 : 04 : 01
[
]
REC
0 : 04 : 01
3 h 59 m
[ ]
M
PLAY/REC
DC
PRECAUCIÓN
Esta videocámara graba vídeo de acuerdo al formato AVCHD.
•
Intente grabar, primero, en el modo fácil [AUTO].
•
Seleccione el modo ! (video)
Q
Seleccione el modo de grabación
R
Aparece el indicador de
grabación automática.
Inicie la grabación
S
Pulse el botón
START/STOP para
iniciar la grabación
y vuelva a pulsarlo
para detenerla.
Espacio libre en la tarjeta SD.
Calidad
de vídeo
Espera de
grabación
Grabación
Page 59

CASTELLANO
7
Reproducción
PLAY/REC
DIGEST
1/2
NOV. 01.2009 04:55PM
LASERTOUCH OPERATION
JAN .1. 200 9
04 :55 PM
0. 00 : 00
Seleccione el modo de reproducción
Q
El modo cambia al pulsar
el botón.
Seleccione el archivo que desee
R
Seleccione F (Toque OK)
S
Para realizar operaciones como búsqueda hacia adelante o búsqueda hacia
atrás (Z p. 28)
Para visualizar archivos en un televisor (Z p. 30)
PRECAUCIÓN
¡No olvide realizar copias tras la grabación!
Para copiar archivos en discos (Z p. 33)
•
Para copiar archivos en una grabadora de vídeo/DVD (Z p. 36)
•
Para editar archivos en el equipo (Z p. 38)
•
Pantalla de índice
Pantalla de reproducción
Page 60

8
Convenio de licencia del software de JVC
CONVENIO DE LICENCIA DEL SOFTWARE
DE JVC
IMPORTANTE
A NUESTROS CLIENTES: LE ROGAMOS
SE ASEGURE DE LEER ESTE TEXTO
CUIDADOSAMENTE ANTES DE INSTALAR
O DE USAR EL PROGRAMA DE SOFTWARE
DENOMINADO “DIGITAL PHOTO NAVIGATOR”
(“Programa”) EN SU PC.
El derecho a utilizar el Programa le es otorgado
a Usted por Victor Company of Japan, Limited
(“JVC”) a condición de que Usted acepte los
siguientes términos.
En caso de que no acepte los términos del
presente documento, Usted no está autorizado
a instalar o utilizar el Programa. NO OBSTANTE,
LA INSTALACIÓN O EL USO DEL PROGRAMA
IMPLICA QUE USTED ACEPTA ESTOS
TÉRMINOS Y CONDICIONES.
1 COPYRIGHT; PROPIEDAD
Usted reconoce que todos los copyrights y
demás derechos de propiedad intelectual
asociados al Programa pertenecen a JVC y al
proveedor, y permanecen conferidos a JVC y
dicho proveedor. El Programa está protegido por
la ley de copyright de Japón y de otros países,
así como por Convenciones relacionadas.
2 CONCESION DE LICENCIA
(1) En conformidad con las condiciones de este
Acuerdo, JVC le otorga a usted el derecho
no exclusivo a utilizar el programa. Usted
puede instalar y usar el Programa en un
disco duro (HDD) o en otros dispositivos de
almacenamiento incorporados a su PC.
(2) Usted puede realizar una (1) copia del
Programa exclusivamente como copia de
seguridad o para fines de archivo.
3 LIMITACIONES AL USO DEL PROGRAMA
(1) Está prohibido someter el Programa
a ingeniería inversa, descompilarlo,
desensamblarlo, revisarlo o modificarlo,
salvo en la medida en que tal limitación esté
prohibida expresamente por la legislación
aplicable.
(2) Está prohibido copiar o utilizar el Programa,
entero o en parte, de manera distinta a la
estipulada específicamente en este Acuerdo.
(3) Usted no tiene el derecho de otorgar una
licencia para usar el Programa, y no puede
distribuir, alquilar, arrendar, o transferir el
Programa a terceros ni dejarles usar el
Programa de ninguna otra manera.
4 GARANTIA LIMITADA
JVC garantiza que el soporte en el que se
suministra el Programa está exento de defectos
materiales y de fabricación durante un período
de treinta (30) días a partir de la fecha de
adquisición por su parte de cualquiera de los
productos asociados al Programa. La única
responsabilidad de JVC y el recurso exclusivo de
que Usted dispone en relación con el Programa
será la sustitución de los soportes defectuosos
mencionados. SALVO POR LAS GARANTÍAS
EXPRESAS INDICADAS EN ESTE ACUERDO
Y EN LA MEDIDA EN QUE ESTÉ PERMITIDO
POR LA LEGISLACIÓN APLICABLE, JVC
Y SUS PROVEEDORES AUTORIZADOS
RENUNCIAN A TODAS LAS DEMÁS
GARANTÍAS, YA SEAN TÁCITAS O EXPRESAS,
INCLUIDAS A TÍTULO ENUNCIATIVO PERO
NO LIMITATIVO LAS GARANTÍAS TÁCITAS
DE COMERCIABILIDAD E IDONEIDAD PARA
UN FIN DETERMINADO EN RELACIÓN
CON EL PROGRAMA Y LOS MATERIALES
IMPRESOS QUE LO ACOMPAÑAN. EN CASO
DE QUE SURJA CUALQUIER PROBLEMA
RELACIONADO CON EL PROGRAMA O
CAUSADO POR EL MISMO, USTED DEBERÁ
SOLUCIONARLO POR SUS PROPIOS MEDIOS
Y CORRER CON LOS GASTOS INCURRIDOS.
5 RESPONSABILIDAD LIMITADA
EN LA MEDIDA EN QUE ESTÉ PERMITIDO
POR LA LEGISLACIÓN APLICABLE, EN
NINGÚN CASO SERÁN RESPONSABLES
JVC Y SUS PROVEEDORES AUTORIZADOS
POR DAÑOS INDIRECTOS, ESPECIALES,
FORTUITOS O CONSECUENTES DE NINGÚN
TIPO, INDEPENDIENTEMENTE DE SU FORMA,
YA SEA BAJO CONTRATO, ACTO DELICTIVO,
O RELACIONADA CON EL USO O LA
IMPOSIBILIDAD DE UTILIZAR EL PROGRAMA,
AUNQUE SE HAYA NOTIFICADO A JVC LA
POSIBILIDAD DE QUE PUEDAN PRODUCIRSE
TALES DAÑOS. USTED EXONERARÁ A
JVC DE TODA RESPONSABILIDAD QUE
PUDIERA DERIVARSE DE CUALQUIER
PÉRDIDA, RESPONSABILIDAD O COSTE
RELACIONADOS CON CUALQUIER
RECLAMACIÓN DE TERCEROS RESPECTO
AL USO DEL PROGRAMA.
Page 61

9
CASTELLANO
6 RESCISIÓN
Este Acuerdo entrará en vigor en la fecha que
Usted instale y utilice el Programa en su equipo,
y seguirá en vigor hasta su rescisión con arreglo
a la siguiente disposición.
En caso de que Usted infringiera cualquiera
de las disposiciones de este Acuerdo, JVC
puede rescindir dicho Acuerdo sin necesidad
de notificárselo a Usted. En dicho caso, JVC
puede denunciarle por los daños causados por
su infracción. En caso de que este Acuerdo sea
rescindido, Usted debe destruir de inmediato el
Programa guardado en su equipo (incluyendo su
eliminación de cualquier tipo de memoria de su
PC), y no poseer más dicho Programa.
7 CONTROL DE EXPORTACIÓN
Usted acuerda no enviar, transferir, o exportar
el Programa o la información y tecnología
asociados al mismo a ninguno de los países
sometidos a embargo con relación a tales
productos por parte de Japón y de otros países
relevantes.
8 USUARIO DEL GOBIERNO DE EEUU
Si Usted es una agencia de los Estados Unidos
de América (el “Gobierno”), Usted acepta la
categorización que JVC hace del programa como
un “Artículo comercial”, según éste aparece
definido en la Federal Acquisition Regulation
(FAR, Normativa de Adquisición Federal), parte
2.101 (g), que trata del “Software informático
comercial” inédito, según tales artículos se
utilizan en la FAR, parte 12.212, y sólo se le
concede a Usted la licencia del Programa con
los mismos derechos que JVC otorga a todos los
usuarios comerciales finales en conformidad con
los términos de este Acuerdo.
9 GENERAL
(1) Ningún cambio, modificación, adición,
eliminación, o cualquier otra alteración de
este Acuerdo tendrá validez a no ser que
se efectúe por escrito y se firme por un
representante autorizado de JVC.
(2) Si cualquier parte de este Acuerdo quedara
invalidada o entrara en conflicto con cualquier
ley que reglamente este Acuerdo, las
disposiciones restantes permanecerán en
pleno vigor.
(3) Este Acuerdo se regirá y será interpretado
en conformidad con la legislación de Japón.
El Tribunal del Distrito de Tokio tendrá
jurisdicción sobre todas las disputas que
pudieran surgir con respecto a la ejecución,
interpretación y ejercicio de este Acuerdo.
Victor Company of Japan, Limited
NOTA
Si Usted ha adquirido el Programa en Alemania,
las disposiciones de las secciones 4 (Garantía
limitada) y 5 (Responsabilidad limitada)
establecidas arriba serán sustituidas por las
secciones correspondientes que aparecen en la
versión alemana de este Acuerdo.
PRECAUCIÓNES:
Opere este equipo de acuerdo con los
•
procedimientos operativos descritos en este
manual.
Emplee el CD-ROM suministrado
•
exclusivamente. Nunca emplee ningún otro
CD-ROM para ejecutar este software.
No intente modificar este software.
•
Cambios o modificaciones no autorizados por
•
JVC podrían anular la autorización otorgada al
usuario para operar el equipo.
Manipulación del CD-ROM
Tome precauciones para no ensuciar o
•
arañar la superficie reflejante (opuesta a
la superficie impresa). No escriba nada ni
coloque rótulos en ninguna de las caras del
disco. Si el CD-ROM se ensucia, límpielo
suavemente con un paño suave desde el
centro hacia la periferia.
No emplee limpiadores para discos
•
convencionales ni pulverizadores de
limpieza.
No doble el CD-ROM ni toque la superficie
•
reflejante.
No almacene su CD-ROM en un lugar
•
polvoriento, caliente o húmedo. Manténgalo
lejos de la luz solar directa.
Usted puede encontrar la información más
reciente (en inglés) acerca del programa de
software suministrado en nuestro servidor de
Internet http://www.jvc-victor.co.jp/english/
global-e.html
Page 62

10
A
B
SE PU EDE CON F. PARA PR EV COP
VÍDEO
REPROD. COPIA
REPR. OTRO ARCHIVO
EDITAR
REC
EDITA R LISTA REPR.
B
A
¡No olvide leer esta información!
Cómo utilizar el sensor táctil
Una vez que aparezca el menú en la
pantalla LCD:
Q Deslice el dedo arriba y abajo por el
sensor.
R Seleccione [AJUSTE]. (Toque OK.)
PRECAUCIÓN
Toque los sensores con el dedo. Los
sensores no funcionan si los toca con la
uña o con guantes puestos.
Para seleccionar un botón en pantalla que
aparezca en el lado izquierdo, toque la
parte del sensor que se encuentre junto al
botón en pantalla.
Para seleccionar un botón en pantalla que
aparezca en la parte inferior de la pantalla,
toque el botón que se encuentre debajo
de él.
Lea este MANUAL DE
INSTRUCCIONES para disfrutar
de su VIDEOCÁMARA. Para
obtener más información sobre
las operaciones, consulte la
GUÍA incluida en el CD-ROM suministrado.
Para poder ver la GUÍA, tiene que haber
instalado el programa Adobe® Acrobat®
ReaderTM o Adobe® Reader®.
Adobe® Reader® se puede descargar desde
el sitio Web de Adobe:
http://www.adobe.com/
NOTA
Seleccione el idioma deseado con un
solo clic.
El nombre del modelo viene indicado en la
parte inferior de la videocámara.
Realice una copia de seguridad de los datos
importantes que ha grabado
JVC no se responsabilizará de ninguna pérdida
de datos. Se recomienda que guarde los datos
importantes que haya grabado copiándolos en
un disco o cualquier otro soporte de grabación.
(Z p. 33)
Realice una grabación de prueba
Antes de grabar los datos importantes, realice
una grabación de prueba y reproduzca los datos
grabados para comprobar si el vídeo y el sonido
se han grabado correctamente. Le recomendamos
que utilice el mismo soporte de grabación cuando
realice la grabación de prueba y la grabación real.
Reinicie la videocámara si no funciona
correctamente
Esta videocámara usa un micro ordenador. Los
factores como el ruido de fondo y las interferencias
pueden evitar que funcione correctamente. Si la
videocámara no funciona correctamente, reinicie la
videocámara. (Z p. 46).
Precauciones sobre el uso de baterías
Asegúrese de utilizar baterías JVC
•
BN-VF808U/VF815U/VF823U. Este producto
incorpora tecnología patentada y otras
tecnologías de marca, y está hecho para utilizarse
con la batería JVC y ninguna otra.
JVC no puede garantizar la seguridad o el
rendimiento de este producto si se utiliza con
otras baterías.
Si la videocámara sufre una descarga
•
electrostática, apague la videocámara antes de
utilizarla de nuevo.
Si se produce un fallo de funcionamiento, deje
de usar inmediatamente la videocámara y
contacte www.jvc.com o por tel. al
1-800-252-5722
Durante la reparación o la revisión de la videocámara,
es posible que se borren datos grabados. Antes de
realizar una reparación o revisión, haga una copia de
seguridad de todos los datos.
Ya que la videocámara podría utilizarse
para demostración en la tienda, el modo de
demostración se pone en [ON] (activado) por
defecto
Para desactivar el modo de demostración, ajuste
[MODO DEMO] en [OFF].
Uso de una tarjeta SD
Las operaciones se confirman en las siguientes
•
tarjetas SD.
Tarjeta SD o SDHC compatible con Clase 4 o
superior. Tarjeta Panasonic, TOSHIBA, SanDisk,
ATP tarjeta SD (de 256 MB hasta 2 GB) o tarjeta
SDHC (de 4 GB hasta 32 GB).
Para el modo UXP, utilice Clase 6 o superior.
Si se utilizan otros soportes, pueden
•
producirse errores en la grabación de datos o
pueden perderse datos ya grabados.
Las MultiMediaCards no son compatibles.
•
Page 63

CASTELLANO
11
PREPARATIVOS
GRABACIÓN/
REPRODUCCIÓN
USO CON EL
TELEVISOR EDICIÓN
CONFIGURACIONES DE
MENÚS
INFORMACIÓN
ADICIONAL
COPIA
Contenido
PREPARATIVOS
Accesorios ............................................ 12
Fijación del filtro de núcleo .......................... 12
Preparación del mando a distancia .............13
Índice ..................................................... 14
Indicaciones en la pantalla LCD .......... 16
Ajustes preliminares necesarios ........ 18
Carga de la batería ......................................18
Ajuste de la fecha/hora ................................19
Otros ajustes ......................................... 20
Ajuste del idioma .........................................20
Instalación en trípode ..................................20
Uso de una tarjeta SD .................................21
GRABACIÓN/REPRODUCCIÓN
Grabación de archivos ......................... 22
Grabación de vídeo .....................................22
Grabación de imágenes fijas ....................... 23
Zoom ...........................................................24
Luz LED .......................................................24
Activación del modo de detección facial ...... 25
Comprobación de la carga restante de la
batería ........................................................ 25
Comprobación del espacio restante en el
soporte de grabación .................................25
Grabación manual ................................ 26
Cambio al modo de grabación manual ........26
Ajuste manual en el menú ........................... 26
Reproducción de archivos ................... 28
Reproducción de vídeo/imágenes fijas ........ 28
Reproducción con efectos especiales ......... 29
USO CON EL TELEVISOR
Visualización de archivos en un
televisor ............................................... 30
Conexión con el televisor .............................30
Operación de reproducción .........................30
Operación junto con el televisor a través de
HDMI .......................................................... 31
EDICIÓN
Gestión de archivos ............................. 32
Captura de una imagen fija de un vídeo ...... 32
Eliminación de archivos ...............................32
COPIA
Copia de archivos ................................. 33
Copia/traslado de archivos .......................... 33
Uso de una grabadora de BD/DVD..............34
Copia de archivos en una grabadora de
vídeo/DVD ..................................................36
Creación de un disco utilizando un PC .. 37
Creación de un disco utilizando un PC ........ 37
Utilización con un reproductor
multimedia portátil .............................. 42
Activación del modo de exportación ............42
Cambio del ajuste de exportación ...............42
Transferencia de los archivos al PC ............42
Carga de archivos a sitios Web ........... 43
Activación del modo de carga .....................43
Carga de archivos .......................................43
CONFIGURACIONES DE MENÚS
Cambio de las configuraciones de
menús .................................................. 44
INFORMACIÓN ADICIONAL
Solución de problemas ........................ 44
Indicaciones de advertencia ................ 46
Limpieza ................................................ 47
Especificaciones .................................. 48
Precauciones ........................................ 50
Términos ................................................ 52
Page 64

12
PREPARATIVOS
Accesorios
Adaptador de CA
AP-V21U
Cable USB CD-ROM Mando a distancia
(x 1)
(Cable componente)
Filtro de núcleo
NOTA
Asegúrese de utilizar los cables suministrados para las conexiones. No utilice ningún otro cable.
Batería
BN-VF808U
(x 2)
(Cable USB y
Adaptador de CA)
Cable componente Cable de audio/
RM-V751U
vídeo
Pila de litio
CR2025
Preinstalada en el
mando a distancia.
Fijación del filtro de núcleo
El filtro de núcleo reduce las interferencias causadas al conectar los otros dispositivos. Conecte
el extremo del cable con el filtro de núcleo a la videocámara.
Libere el retén.
3 cm
Conectar a la
videocámara
Cable componente y cable USB:
enrolle una vez.
Adaptador de CA: enrolle dos veces.
Page 65

13
CASTELLANO
PREPARATIVOS
Preparación del mando a distancia
El mando a distancia se suministra con una pila instalada.
Antes de su uso, retire el plástico de aislamiento.
Área efectiva del haz de infrarrojos Para volver a insertar la pila
Presione la pestaña de cierre para extraer el
Sensor remoto
soporte de la pila.
Pestaña de cierre
Pila de litio
(CR2025)
Distancia efectiva:
Máx. 5 m
NOTA
El haz transmitido no será efectivo o puede
provocar un funcionamiento incorrecto si el
sensor remoto está expuesto a la luz directa
del sol o a un foco de luz muy potente.
Page 66

14
Índice
D
C
NOTA
Procure no tapar 3, 4, 5, 6 y 7 durante la
•
filmación.
La pantalla LCD puede girar 270°.
•
Page 67

15
CASTELLANO
PREPARATIVOS
Videocámara
! Sensor táctil
# Pantalla LCD
$ Cubierta de la tarjeta SD
% Ranura B para la tarjeta SD (Z p. 21)
& Ranura A para la tarjeta SD (Z p. 21)
( Conector de audio/vídeo [AV] (Z p. 30, 36)
) Miniconector HDMI [HDMI] (Z p. 30)
* Conector componente [COMPONENT]
(Z p. 30)
+ Botón de disco directo [DIRECT DISC]
(Z p. 35)/botón de información [INFO]
(Z p. 25)
, Interruptor de modo [!, #]
- Botón exportar [EXPORT] (Z p. 42)
. Botón de cambio de modo de
reproducción/grabación [PLAY/REC]
/ Botón cargar [UPLOAD] (Z p. 43)
0 Interruptor de alimentación [ ]
(Usted puede apagar la videocámara
resionando y manteniendo presionado este
botón.)
1 Botón de menú [MENU] (Z p. 44)
2 Botón OK [OK]
3 Luz LED (Z p. 24)
4 Cubierta del objetivo/objetivo
5 Micrófono estéreo
6 Sensor remoto
7 Sensor de la cámara
8 Botón de inicio/parada de grabación de
vídeo [START/STOP] (Z p. 22)
9 Luz de acceso [ACCESS] (Parpadea
al acceder a los archivos. No apague
la alimentación ni extraiga la batería o
el adaptador de CA mientras se está
accediendo a los archivos.)
Luz de alimentación/carga [POWER/
CHARGE] (Parpadea al cargar la batería.)
: Botón de disparo de imagen fija
[SNAPSHOT] (Z p. 22, 23)
; Palanca del zoom [W 7 , T] (Z p. 24)
Control de volumen del altavoz [–VOL+]
(Z p. 28)
< Altavoz
= Conector de CC [DC] (Z p. 18)
> Conector USB [ 2 ] (Z p. 34, 38)
? Correa de mano
@ Apretar
A Correa
B Orificio para el perno
C Zócalo de fijación del trípode (Z p. 20)
D Botón de liberación de la batería [BATT.]
(Z p. 18)
Mando a distancia
Q Ventana de transmisión del haz de
infrarrojos
R Botones de ZOOM (T/W)
(Ampliar/reducir durante la reproducción.)
S Botón arriba
T Botón de salto hacia atrás
U Botón izquierda
V Botón atrás
W Botón PLAYLIST
X Botón START/STOP
Y Botón S.SHOT (instantánea)
Z Botón INFO
a Botón de salto hacia adelante
b Botón PLAY/PAUSE/SET
c Botón derecha
d Botón siguiente
e Botón abajo
f Botón INDEX*
g Botón DISP
NOTA
Puede mover el área de zoom con el botón
arriba/abajo/izquierda/derecha al utilizar el
zoom en el modo de reproducción.
* Cada vez que se presiona INDEX, la
pantalla cambia del siguiente modo:
Modo !:
Pantalla de índice ↔ Pantalla de índice de
grupos
Modo #:
Pantalla de índice ↔ Pantalla de índice de
fechas
Page 68

16
W T
0.0
1/4000
LCD
NOV.10. 2009
4:55PM
RE C
0 : 0 4 : 0 1
[3h 59 m]
PHOT O
LIB.
[99 99 ]
FINE
10
PHOT O
Indicaciones en la pantalla LCD
Durante la grabación de vídeo e
imágenes fijas
! Indicador del modo de funcionamiento
seleccionado (Zp.26)
: Modo automático
@
3 : Modo manual
# Indicador de modo de efectos especiales
$ Indicador de modo telemacro
% Indicador de luz LED (Zp. 24)
& Indicador del modo de selección de escena
( Indicador de revisión rápida (Zp.22)
) Indicador de zoom (Zp. 24)
* Indicador de la ranura para tarjeta SD
(Zp.21)
: Ranura A (ajuste predeterminado)
B : Ranura B
+ Indicador de balance de blancos
, Indicador de retroiluminación de la pantalla
- Indicador de batería
. Fecha/hora (Zp. 19)
/ Indicador de ajuste de enfoque manual
0 - : Indicador de compensación de
contraluz
: Indicador del modo de detección facial
(Zp.25)
1 Indicador de control de brillo
. : Indicador de control de área de
fotometría
2 Velocidad de obturación
Sólo durante la grabación de vídeo
! Indicador de modo
# Indicador del modo de exportación
(Z p. 42)
$ Contador
% Indicador de modo de carga (Zp. 43)
& Calidad de vídeo
( Tiempo restante
) MREC: (Aparece durante la grabación.)
: (Aparece durante el modo de espera
MQ
de grabación.)
* Indicador de Estabilizador de imagen
digital (DIS) (Aparece si [DIS] está ajustado
en [OFF].)
+ Indicador de cambio automático de soporte
de grabación
, Indicador de reducción de viento
- Indicador de disparo (Z p. 22)
. Indicador de evento
/ Indicador x.v.Color™
Sólo durante la grabación de
imágenes fijas
! Indicador de modo
# Indicador de enfoque (Z p. 23)
$ Indicador de tamaño de la imagen
% Indicador de calidad de imagen
& Número restante de tomas
( Indicador de disparo (Z p. 23)
) Indicador de modo de obturación
* Indicador de temporizador
Page 69

17
CASTELLANO
PREPARATIVOS
Durante la reproducción de vídeo
+4
1: 55 : 01
8
NOV.10. 2009
4:55PM
101 - 0098
NOV.10. 2009
4:55PM
! Indicador de modo
# Indicador de efectos de cortinilla/fundido
(Zp.29)
$ 6 : Indicador de reproducción de lista de
reproducción (Aparece al reproducir una
lista de reproducción.)
DIGEST: Indicador Digest (
Zp.28)
% Calidad de vídeo
& Contador
( Modo de reproducción (Zp.28)
:Reproducción
F
:Pausa
Q
:Búsqueda hacia adelante
K
:Búsqueda hacia atrás
J
:Cámara lenta hacia adelante
G
:Cámara lenta hacia atrás
E
(El número de la izquierda indica la
velocidad.)
) Indicador de ranura de la tarjeta
* Indicador de batería
+ Fecha/hora (Zp.19)
, Indicador de nivel de volumen
- Salida con 1080p
Durante la reproducción de
imágenes fijas
! Indicador de modo
# Número de carpeta o archivo
$ Indicador de reproducción automática de
las imágenes
% Indicador de ranura de la tarjeta
& Indicador de batería
( Fecha/hora (Zp.19)
) Salida con 1080p
Para visualizar los modos de indicación
en el monitor LCD
En modo de reproducción:
1) Seleccione [DATOS EN PANTALLA] en
el MENU.
2) Seleccione el ajuste deseado:
Sin indicaciones/ Todas las indicaciones/
Sólo fecha y hora/ Indicación de fecha
por 5 segundos.
Page 70

18
Ajustes preliminares necesarios
Tiempo de carga/grabación necesario
Carga de la batería
1
Cierre la pantalla LCD para apagar la
videocámara.
2
Instale la batería y conecte elbatería y conecte el
adaptador de CA.
Con “ ” (flecha) de la batería apuntando
•
en la dirección correcta, deslícela hasta
que se bloquee en su lugar.
(aprox.)
*Cuando la luz LED está apagada y la luz
de fondo de la pantalla está ajustada en
modo de [ESTÁNDAR].
Batería Tiempo de
BN-VF808U
(suministrada)
BN-VF815U 2 h 40 m 3 h*
BN-VF823U 3 h 40 m 4 h 30 m*
carga
1 h 50 m 1 h 25 m*
Tiempo de
grabación
Luz de
carga
Flecha
La luz de alimentación/carga parpadea
•
para indicar que la carga se ha iniciado.
La carga finaliza cuando la luz se apaga.
•
Para comprobar la carga restante de la
batería
Vea la página 25.
Conector de CC
Adaptador de CA
A la toma de CA
(de 110 V a 240 V)
Para extraer la batería
Deslice y sostenga BATT, después,
extraiga la batería.
NOTA
La videocámara también se puede usar con
•
sólo el adaptador de CA.
El tiempo de grabación real se puede
•
acortar dependiendo del entorno de
grabación, como sucede cuando se graban
escenas con un sujeto moviéndo se
rápidamente.
No estire ni doble el enchufe o el cable
•
del adaptador de CA. Se podría dañar el
adaptador de CA.
Page 71

19
CASTELLANO
PREPARATIVOS
Ajuste de la fecha/hora
NOV.10.2009 04:55PM
NOV. 10. 200 9 0 4: 55P M
GMT+ 9:00
NOV 1 20090854 PM
NOV.10.2009 04:55PM
1
Abra la pantalla LCD para encender
la videocámara.
2
Toque MENU.
3
Seleccione [CONFIG. PANTALLA].
4
Seleccione [AJUS.RELOJ].
5
Seleccione [CONF. RELOJ].
6
Seleccione la ciudad más cercana
a la zona donde vaya a usar la
videocámara.
Seleccione el área mediante el sensor
táctil.
El área seleccionada destaca.
8
Ajuste la fecha y la hora.
Cambie el ajuste utilizando el sensor táctil
y seleccione [}] para ajustar.
9
Seleccione [GUARD].
Para reiniciar el ajuste, seleccione
[SALIR].
Ajuste del reloj a la hora local
durante los viajes
Después de realizar los pasos 1 - 4
5
Seleccione [CONF. ÁREA].
6
Seleccione la ciudad más cercana a
la zona del viaje.
El área seleccionada destaca.
Ciudad principal del
área seleccionada
Horas de diferencia
GMT
7
Seleccione [ON] si el horario de
verano está activado.
ON: el reloj se
adelanta una hora
de la hora normal
que ajustó.
OFF: desactiva la
función.
Para volver a la pantalla anterior
Seleccione @.
Para salir de la pantalla
Toque el botón MENU.
Page 72

20
Otros ajustes
Ajuste del idioma
El idioma en el que se muestra la información
de la pantalla puede cambiarse.
1
Abra la pantalla LCD para encender
la videocámara.
2
Toque MENU.
3
Seleccione [CONFIG. PANTALLA].
4
Seleccione [LANGUAGE].
5
Seleccione un idioma.
Para volver a la pantalla anterior
Seleccione @.
Para salir de la pantalla
Seleccione [SALIR].
Instalación en trípode
Alinee el orificio para el perno de la
videocámara con el perno del trípode y
el zócalo de montaje con el tornillo, y, a
continuación, bloquéelo en su lugar.
Parte inferior de la
videocámara
NOTA
No utilice el trípode en superficies inestables
o desniveladas. La videocámara podría caer y
sufrir una avería grave.
Page 73

21
CASTELLANO
PREPARATIVOS
Uso de una tarjeta SD
Las operaciones se confirman en las siguientes
•
tarjetas SD.
Tarjeta SD o SDHC compatible con Clase
4 o superior. Tarjeta Panasonic, TOSHIBA,
SanDisk, ATP tarjeta SD (de 256 MB hasta 2
GB) o tarjeta SDHC (de 4 GB hasta 32 GB).
Para el modo UXP, utilice Clase 6 o superior.
Si se utilizan otros soportes, pueden
•
producirse errores en la grabación de datos
o pueden perderse datos ya grabados.
Las MultiMediaCards no son compatibles.
•
Las tarjetas utilizadas para grabar vídeo en
•
esta videocámara no se pueden reproducir
en otros dispositivos.
Algunos lectores de tarjetas (incluyendo
•
lectores de tarjetas internos de
computadoras) podrían no ser capaces de
brindar apoyo al formato SDHC. Si usted usa
una tarjeta SDHC para grabar y confronta
algún error de lectura, el lector de tarjetas que
está usando, podría ser un dispositivo SDHC
no apoyado. Por favor use la videocámara
u otros dispositivos que sean SDHC
compatibles para tener acceso a la tarjeta.
Los datos de vídeo podrían no grabarse
•
en las tarjetas SD que contienen datos de
vídeo grabados con dispositivos de otros
fabricantes.
Inserte una tarjeta SD
Preparativos:
Pulse el botón Power ( ) para apagar la
videocámara.
1
Abra la tapa de la tarjeta SD.
Abra la cubierta empujándola levemente
hacia arriba.
2
Inserte firmemente la tarjeta por su
lado recortado.
Borde
recortado
NOTA
La tarjeta SD sólo se puede insertar y
•
extraer con la cámara apagada. De lo
contrario, los datos de la tarjeta podrían
dañarse.
No toque el terminal de la parte posterior
•
de la etiqueta.
Cambio del soporte de grabaciónCambio del soporte de grabación
Cuando sale de fábrica, la videocámara está
programada para grabar en la [RANURA A].
Puede cambiar el soporte de grabación a la
[RANURA B].
Desde el MENU.
Ajuste [SEL. RANURA DE VÍDEO] y [SEL.
RANURA IMAGEN] en [RANURA A] o
[RANURA B].
INFORMACIÓN
El soporte de grabación cambia
•
automáticamente de la ranura A a la ranura
B, y viceversa, cuando la tarjeta en la
ranura seleccionada está llena.
Puede grabar cómodamente su vídeo y
•
capturar imágenes fijas en tarjetas video,
seleccionando la ranura de la tarjeta (A o
B) para cada propósito.
Formateo de una tarjeta SD cuando se
utiliza por primera vez
Desde el MENU.
Seleccione [FORMATEAR TARJETA SD]
para formatear la tarjeta.
3
Cierre la tapa de la tarjeta SD.
Para extraer la tarjeta SD
Presione la tarjeta SD una vez.
Cuando la tarjeta se expulse parcialmente,
extráigala.
Page 74

22
PLAY/REC
[3 h 59 m]
0:00:00
[3 h 59 m]
0:00:01 REC
GRABACIÓN/REPRODUCCIÓN
Grabación de archivos
Grabación de vídeo
Preparativos: • Abra la pantalla LCD para encender la videocámara.
Seleccione el modo ! (video)
Inserte una tarjeta SD.
•
SNAPSHOT
Pulse PLAY/REC para seleccionar el
modo de grabación.
Pulse START/STOP para empezar la
grabación.
También puede iniciar/detener la grabación
seleccionando [REC] en la pantalla LCD.
(Control de grabación en pantalla)
Tiempo restante aproximado
para la grabación
Para detener la grabación
Pulse el botón START/STOP o seleccione
nuevamente [REC].
Para ver el vídeo que acaba de grabar
Seleccione A mientras la grabación
está en pausa. Si selecciona $ durante la
reproducción, se elimina la escena.
Para cambiar la calidad de vídeo
Cambie los ajustes en [CALIDAD DE
VÍDEO] en el MENU.
NOTA
El modo de grabación de vídeo se selecciona automáticamente cuando apague la videocámara y la
•
encienda de nuevo.
Si la videocámara no se utiliza durante 5 minutos mientras esté encendida, se apagará
•
automáticamente para ahorrar energía. Para encender de nuevo la videocámara cuando utilice el
paquete de pilas, cierre la pantalla LCD y ábrala de nuevo. Cuando utilice la cámara con el adaptador
de CA, realice cualquier operación, como utilizar el zoom.
La grabación se detiene automáticamente después de 12 horas consecutivas de grabación de vídeo.
•
Para asegurar la grabación continua, antes de comenzar a grabar, ajuste [CAMB AUTO MEDIO
GRAB] a [ON].
Se creará un nuevo archivo por cada 4 GB de filmación continua.
•
Para grabar una imagen fija durante la
grabación de vídeo
Pulse SNAPSHOT.
Para grabar un segmento de vídeo
(aprox. 10 minutos)
Vea la página 43.
Para activar el modo de detección facial
Vea la página 25.
Page 75

CASTELLANO
23
GRABACIÓN/
REPRODUCCIÓN
PLAY/REC
FINE
FINE [9999]
PHOTO
Grabación de imágenes fijas
Preparativos: • Abra la pantalla LCD para encender la videocámara.
Inserte una tarjeta SD.
•
Seleccione el modo #
(imagen fija).
Pulse PLAY/REC para seleccionar el modo
de grabación.
Mantenga pulsado SNAPSHOT hasta la
mitad de su recorrido.
El indicador ? se vuelve verde cuando la
imagen capturada queda enfocada.
Pulse SNAPSHOT hasta el fondo para
tomar la fotografía.
Para ver la última imagen grabada
Seleccione A tras la toma. Si selecciona
$ durante la reproducción, se elimina la
imagen.
Para cambiar la calidad de la imagen
Cambie los ajustes en [CALIDAD DE
IMAGEN] en el MENU.
Para grabar imágenes fijas
continuamente
Ajuste a [TOMA CONTINUA] en [MODO
DE CAPTURA] en el MENU.
Para cambiar la relación de aspecto de
la imagen
Cambie los ajustes en [TAM.IMAGEN] en
el MENU.
Para activar el modo de detección facial
Vea la página 25.
NOTA
El Estabilizador de imagen digital (DIS) no funciona durante la grabación de imágenes fijas.
•
Si no se realiza ninguna operación durante 5 minutos cuando la videocámara está encendida,
•
ésta se apaga automáticamente para ahorrar energía. Para volver a encender la cámara
cuando ésta se utiliza con la batería, cierre la pantalla LCD y vuélvala a abrir. Cuando utilice la
cámara con el adaptador de CA, realice cualquier operación, como utilizar el zoom.
Page 76

24
Grabación de archivos (continuación)
Zoom
Preparativos:
Seleccione el modo ! o #.
•
Seleccione el modo de grabación.
•
Reducción Ampliación
W: Gran angular T: Telefoto
También puede reducir/ampliar seleccionando
[W] o [T] en la pantalla LCD. (Control de zoom
en pantalla)
Máxima relación de zoom: 20X/OPTICO
(Preajustado en fábrica)
Para cambiar el porcentaje de zoom
máximo (sólo modo !)
Cambie los ajustes en [ZOOM] en el
MENU.
NOTA
La filmación en macro (acercándose hasta
unos 5 cm del sujeto) es posible cuando la
palanca del zoom está totalmente ajustada
en W.
Luz LED
Preparativos:
Seleccione el modo ! o #.
•
Seleccione el modo de grabación.
•
1
Toque MENU.
2
Seleccione [ILUMINACIÓN].
3
Seleccione el ajuste que desee.
La luz LED permanece
ON
AUTO
OFF
encendida independientemente
de las condiciones del entorno.
La luz LED se enciende
automáticamente cuando la
luminosidad es insuficiente.
Desactiva esta función.
Page 77

CASTELLANO
25
GRABACIÓN/
REPRODUCCIÓN
Activación del modo de detección
W
T
/
DIRECT
DISC
INFO
SALIR
DIRECT
DISC
INFO
facial
Si activa este modo, la videocámara detecta
las caras y ajusta el brillo y el enfoque de
manera que queden grabadas con nitidez.
Preparativos:
Seleccione el modo ! o #.
•
Seleccione el modo de grabación.
•
Seleccione .
Para desactivar el modo de detección
facial
Seleccione nuevamente .
NOTA
• Si el monitor LCD está boca abajo, no
se visualiza. Cambie el ajuste cuando el
monitor LCD está en la posición normal.
• Dependiendo de las condiciones, puede
suceder que no se pueda detectar las caras.
• Si la detección facial no funciona
correctamente, desactive el modo antes de
la grabación.
Comprobación de la carga restante de la batería
Preparativos:
Desconecte el adaptador de CA de la
•
videocámara.
Instale la batería.
•
Seleccione el modo de grabación.
•
Para el modo !:
Pulse INFO tres veces, o INFO y después
seleccione ;.
Para el modo #:
Pulse el botón INFO.
Para volver a la pantalla normal
Seleccione [SALIR] o pulse INFO.
NOTA
El tiempo de grabación restante sólo debe
utilizarse a modo orientativo. Se muestra en
unidades de 10 minutos.
Comprobación del espacio restante en el soporte de grabación
Preparativos:
Seleccione el modo !.
•
Seleccione el modo de grabación.
•
Pulse el botón INFO una vez (ranura A) o
dos veces (ranura B).
El tiempo máximo de grabación se muestra
para cada modo de calidad de vídeo.
Para cambiar la calidad de vídeo
1) Seleccione la calidad de vídeo.
2) Seleccione [AJUSTE].
Para cambiar el soporte de grabación
INFO para seleccionar RANURA
1) Pulse
A o RANURA B.
2) Seleccione [AJUSTE].
Para salir de la pantalla
Seleccione [SALIR].
Page 78

26
/
[3 h 59 m]
Grabación manual
El modo de grabación manual permite ajustar
manualmente el enfoque, el brillo de la
pantalla, etc.
Cambio al modo de grabación manual
Preparativos:
Seleccione el modo ! o #.
•
Seleccione el modo de grabación.
•
Seleccione [A/M]
dos veces.
Para regresar al modo de grabación
automático
Seleccione [A/M] para que aparezca el
indicador 4.
Ajuste manual en el menú
En el modo de grabación manual:
Toque MENU.
1
2
Seleccione [AJUSTE MANUAL].
3
Seleccione el menú que desee.
4
Seleccione el ajuste que desee.
Según los ajustes que seleccione, podrá
ajustar el valor mediante el sensor táctil.
Para volver a la pantalla anterior
Seleccione @.
Para salir de la pantalla
Seleccione [SALIR].
Page 79

CASTELLANO
27
GRABACIÓN/
REPRODUCCIÓN
Selección de escena/Efectos
Selección de escena
Se pueden grabar vídeos o imágenes
fijas con una claridad óptima ajustando la
exposición y la velocidad de obturación que
se adecuen al entorno o al sujeto.
Efectos
Puede grabar vídeos o imágenes fijas con
efectos especiales.
Después de realizar los pasos 1 - 2 de
la columna izquierda.
3
Seleccione [SELECC. ESCENA] o
[EFECTO].
4
Seleccione el ajuste que desee.
Para cancelar Selección de escena/Efectos
Seleccione [OFF].
Elementos para el ajuste de selección
de escenas
5 NOCHE:
•
Graba con más sensibilidad en
ubicaciones con poca luz ajustando la
velocidad de obturación automáticamente.
3 ATARDECER:
•
Hace que las escenas de atardecer
parezcan más naturales.
6 RETRATO:
•
El sujeto en primer plano se acentúa
dejando borroso el fondo.
H DEPORTE:
•
Graba con claridad sujetos que se
mueven con rapidez.
G NIEVE:
•
Realiza una compensación de los sujetos
que aparecerían demasiado oscuros al
filmar en ambientes extremadamente
claros, como en la nieve.
/ FOCO:
•
Cuando un sujeto aparece demasiado
claro iluminado por la luz de un foco.
Opciones para el ajuste de efectos
J SEPIA:
•
Las imágenes adquieren un tono sepia
como el de las fotografías antiguas.
K MONOCROMO:
•
Las imágenes se convierten en blanco y
negro como las películas antiguas.
L FILM CLÁSICO*:
•
Este efecto se salta fotogramas para
ofrecer una atmósfera de película
antigua.
M ESTROBOSC*:
•
Las imágenes tienen el aspecto de
instantáneas consecutivas.
* Sólo modo !.
Page 80

28
PLAYBACK
PLAY/REC
DIGEST
1/2
NOV. 01.2009 04:55PM
1/2
NOV. 01.2009 04:55PM
Reproducción de archivos
Reproducción de vídeo/imágenes fijas
Preparativos:
Abra la pantalla LCD para encender la
•
videocámara.
Inserte una tarjeta SD.
•
1
Seleccione el modo ! (vídeo) o #
(imagen fija).
2
Pulse PLAY/REC para seleccionar el
modo de reproducción.
3
Seleccione el archivo que desee.
Para pasar a la página anterior o
siguiente
Toque [5] o [∞] durante más de un
segundo.
Para reproducir unos pocos segundos
de cada escena seleccionada de los
vídeos grabados
Toque [DIGEST].
Para eliminar un vídeo/imagen fija
Seleccione $ cuando se detenga la
reproducción.
Para cambiar el número de miniaturas
(6 miniaturas/12 miniaturas)
Mueva la palanca del zoom a [T] o [W].
Para ajustar el volumen de sonido de los
vídeos
Bajar el
Aparece la pantalla de índice.
Operaciones durante la reproducción
Operaciones durante la reproducción
de vídeo, botones en pantalla
:
Volver a la primera escena del archivo
!
N
: Ir a la primera escena del siguiente
#
O
archivo
: Reproducción
$
F
: Pausa
Q
: Volver a la pantalla de índice
%
L
:
Búsqueda hacia atrás (durante la
&
J
reproducción)
: Reproducción hacia atrás fotograma
E
a fotograma (durante la pausa)*
: Búsqueda hacia adelante (durante la
(
K
reproducción)
: Reproducción hacia adelante fotograma
G
a fotograma (durante la pausa)*
* La reproducción en cámara lenta empieza al
tocar continuamente el botón del sensor que
hay debajo de E / G un rato.
volumen
de imágenes fijas
: Cambiar el orden de la reproducción
!
P
automática hacia atrás
: Cambiar el orden de la reproducción
#
F
automática hacia adelante
: Inicie la presentación de diapositivas
$
F
: Finalizar la reproducción automática
Q
: Volver a la pantalla de índice
%
L
: Ver el archivo anterior
&
N
: Ver el archivo siguiente
(
O
Subir el
volumen
Page 81

CASTELLANO
29
GRABACIÓN/
REPRODUCCIÓN
Reproducción con efectos
REP ROD. COPIA
REP R. O TRO AR CHI VO
EDI TAR
COR TINI LLA/FU NDI DO
CRE AR E FECTOS AL CO MIE NZO
REC
VÍDEO
DUB BING PLAYBA CK
PLAY BAC K O THE R F ILE
EDI T
WAPE /FAD ER
REC
DUBBI NG PL AYBACK
PLAY BAC K O THE R F IL
E
RE
C
C
OFF
FUND.BLANCO
FUND.NEGRO
CORT.HORIZ.
VÍDEO
especiales
Efectos de cortinilla o fundido
Agrega efectos especiales al principio y al
final de los vídeos. Estos efectos especiales
no se pueden aplicar a las imágenes fijas.
Preparativos:
Seleccione el modo !.
•
Seleccione el modo de reproducción.
•
1
Toque MENU.
2
Seleccione [CORTINILLA/FUNDIDO].
3
Seleccione el efecto especial que
desee.
Para obtener más información sobre cada
efecto especial, vea la columna derecha.
4
Seleccione el archivo que desee
reproducir.
Opciones de ajuste de CORTINILLA/
FUNDIDO
O FUND.BLANCO:
•
Fundido de entrada o de salida con
pantalla blanca.
P FUND.NEGRO:
•
Fundido de entrada o de salida con
pantalla negra.
T CORT.HORIZ.:
•
Cortinilla de entrada de derecha a
izquierda, o cortinilla de salida a la
inversa.
U CORT.PUERTA:
•
Cortinilla de entrada de modo que las dos
mitades de la pantalla negra se abren
a izquierda y derecha, mostrando la
escena, o cortinilla de salida a la inversa.
V CORT.VERTICAL:
•
Cortinilla de abajo arriba en una pantalla
negra, o desaparición de la cortinilla a la
inversa.
W CORT.PERSIANA:
•
Cortinilla de entrada desde el centro de
una pantalla negra hacia arriba y abajo, o
cortinilla de salida a la inversa.
NOTA
No se aplicará ningún efecto en archivos con
tiempo de reproducción inferior a 7 segundos.
Para desactivar el efecto especial
Seleccione [OFF] en el paso 3.
Para salir de la pantalla
Seleccione [SALIR].
Page 82

30
USO CON EL TELEVISOR
Visualización de archivos en un televisor
Para conectar por medio del conector
Esta videocámara está diseñada para ser
utilizada con señales de televisión en color de
tipo NTSC o de alta definición. No se puede
usar con un televisor de otra norma.
Conexión con el televisor
Puede emitir vídeos por el mini conector
HDMI, el conector COMPONENTES o el
conector AV.
Recomendamos utilizar el cable HDMI de
categoría 2 (cable de alta velocidad) para ver
con una calidad de imagen superior.
Preparativos: Apague todas las unidades.
Para realizar la conexión con el
miniconector HDMI
Miniconector HDMI
Conector de CC
COMPONENTES/AV
Conector
COMPONENT
Cable componente
Conector AV
Cable AV
Adaptador
de CA
Conector de CC
A la toma
de CA
Cable HDMI (opcional)
(Cable HDMI de tamaño mini a
tamaño completo)
Adaptador de CA
Conector HDMI
NOTA
Al realizar la conexión con el cable HDMI,
•
la imagen o el sonido podrían no emitirse
correctamente en el televisor según el
televisor conectado. En tales casos, realice
las siguientes operaciones.
1) Desconecte el cable HDMI y vuelva a
conectarlo.
2) Apague la videocámara y vuelva a
encenderla.
A la toma
de CA
Conector
de entrada
COMPONENT
NOTA
Desde MENU, cambie los ajustes en
•
[SALIDA COMPONENTES] de acuerdo con
la conexión.
Desde MENU, cambie los ajustes en
•
[SALIDA DE VÍDEO] para que corresponda
con el tamaño de pantalla de su televisor.
Conector de
entrada de
audio L/R
El conector de
vídeo no está
en uso.
Operación de reproducción
Una vez realizada la conexión con el
televisor
1
Encienda la videocámara y el
televisor.
2
Ajuste el televisor en el modo de
vídeo.
3
(Sólo cuando se conecta la
videocámara a la grabadora de vídeo/
DVD)
Encienda la grabadora de vídeo/DVD
y ajuste la grabadora de vídeo/DVD
en el modo de entrada AUX.
Page 83

31
CASTELLANO
USO CON EL
TELEVISOR
4
Inicie la reproducción en la
videocámara. (Z p. 28)
Para ver en el televisor la visualización
en pantalla de la videocámara
Ajuste [VER EN TV] a [ON] en el MENU.
NOTA
Si se ha grabado el vídeo con x.v.Color™
ajustado en [ON], cambie el ajuste x.v.Color™
en el televisor. Para obtener más información,
consulte el manual de instrucciones del
televisor.
Operación junto con el televisor a través de HDMI
Si conecta la videocámara a un televisor
habilitado para HDMI-CEC* mediante el
cable HDMI, podrá utilizar las útiles funciones
indicadas a continuación.
* HDMI-CEC (Consumer Electronics Control)
es un estándar industrial que permite
la interoperabilidad entre dispositivos
compatibles con HDMI-CEC que están
conectados mediante cables HDMI.
NOTA
No todos los dispositivos de control HDMI
•
cumplen con el estándar HDMI-CEC. La
función de control HDMI de la videocámara
no funciona si se conecta con estos
dispositivos.
No se garantiza que la videocámara
•
funcione con todos los dispositivos
habilitados para HDMI-CEC.
El HDMI-CEC no funciona inmediatamente
•
después de insertar el adaptador de CA
en el toma de CA. Abra la pantalla de LCD
para encender la videocámara.
Preparativos:
Conecte la videocámara y el televisor
•
mediante un cable HDMI. (Z p. 30)
Encienda el televisor y active el ajuste
•
relativo a HDMI-CEC. (Para obtener
más información, consulte el manual de
instrucciones del televisor.)
Encienda la videocámara y ajuste
•
[CONTROL HDMI] a [ON] en el MENU.
Reproducción en el televisor
Seleccione el modo
de reproducción.
Desconexión del televisor y
videocámara
Apague el
televisor.
Cambio del idioma en pantalla
Dependiendo del televisor conectado,
el idioma en pantalla de la videocámara
cambiará automáticamente al idioma
utilizado para el televisor, cuando encienda
la videocámara. (Esto es sólo aplicable si la
videocámara es compatible con el idioma
seleccionado para el televisor.) Para utilizar la
videocámara con un idioma que sea distinto
del que se muestra en el televisor, ajuste
[CONTROL HDMI] a [OFF] en el MENU.
NOTA
El idioma de visualización en la pantalla del
•
televisor no cambiará automáticamente,
incluso aunque se cambie el idioma de
visualización de la videocámara.
Puede que estas funciones no funcionen
•
correctamente si se conectan dispositivos
como un amplificador y un selector. Ajuste
[CONTROL HDMI] a [OFF] en el MENU.
Si la HDMI-CEC no funciona correctamente,
•
apague la videocámara y vuélvala a
encender.
El TV cambia
automáticamente
a la entrada HDMI.
(Previamente,
encienda el TV.)
La videocámara se
apaga automáticamente.
Page 84

SNAPSHOT
EDICIÓN
Gestión de archivos
CAUTION
No extraiga el soporte de grabación (tarjetas
SD) ni realice ninguna otra operación (por
ejemplo, apagar la alimentación) mientras se
accede a los archivos. Asimismo, asegúrese
de utilizar el adaptador de CA suministrado,
ya que los datos del soporte de grabación se
pueden dañar si la batería se agota durante
la operación. Si los datos del soporte de
grabación se dañan, deberá formatear el
soporte de grabación para volver a usarlo.
Captura de una imagen fija de un
vídeo
Puede capturar la escena deseada de un
vídeo grabado y guardarla como imagen fija.
Preparativos:
Seleccione el modo !.
•
Seleccione el modo de reproducción.
•
Pulse SNAPSHOT cuando la
reproducción esté en pausa.
NOTA
Las imágenes fijas capturadas se guardan
•
con una resolución de 1920 x 1080. La
imagen se puede alargar en sentido
horizontal o vertical dependiendo de la
calidad de imagen del archivo de vídeo de
origen.
La función de toma continua no se puede
•
utilizar para capturar imágenes.
No es posible capturar vídeo durante la
•
reproducción.
Eliminación de archivos
Los archivos protegidos no se pueden
•
eliminar. Para eliminarlos, primero debe
anular la protección.
Una vez eliminados, los archivos no se
•
pueden restaurar. Compruebe los archivos
antes de eliminarlos.
Preparativos:
Seleccione el modo ! o #.
•
Seleccione el modo de reproducción.
•
1
Toque MENU.
2
Seleccione [ELIMINAR].
Eliminación del archivo visualizado
Después de realizar los pasos 1-2
3
Seleccione [ACTUAL].
4
Seleccione [SÍ].
32
Se puede seleccionar el archivo anterior o
siguiente seleccionando { o }.
Para salir de la pantalla
Seleccione [SALIR].
Page 85

REC
C
COPIA
Copia de archivos
Tipos de copia y dispositivos conectables
La cámara
Puede copiar archivos entre
las tarjetas SD, sólo con la
videocámara.
Grabadora de DVD
(CU-VD50 /CU-VD3)
Puede copiar en discos los
archivos grabados en esta
videocámara. (Z p. 35)
Grabadora de BD
LaCie Modelo Nº 301828
Puede copiar a discos los
archivos grabados en esta
videocámara. (Z p. 34)
Unidad de disco duro
externo USB
Puede copiar archivos
grabados en esta
videocámara en una unidad
de disco duro externo USB.
PC
Puede copiar archivos de la
videocámara en un disco,
utilizando un PC. (Z p. 40)
Grabadora de vídeo/DVD
Se pueden copiar en una
grabadora de vídeo/DVD
vídeos grabados en esta
NOTA
• Se recomienda utilizar la grabadora de DVD
JVC (CU-VD50/CU-VD3). Si se utiliza el
modelo CU-VD20 o CU-VD40, el tiempo
de grabación puede tardar aprox. 2 veces
más que el tiempo indicado en el manual de
instrucciones de la grabadora de DVD.
Unidad de disco duro externo USB
•
recomendada
Seagate Serie FreeAgentTM Desk
LaCie Serie Design by Neil Poulton
No se puede usar una unidad de disco duro
•
externo USB con capacidad superior a 2 TB.
videocámara. (Z p. 36)
Copia/traslado de archivos
Preparativos:
Seleccione el modo ! o #.
•
Seleccione el modo de reproducción.
•
Asegúrese de que la tarjeta SD esté
•
insertada en la ranura SD.
Asegúrese de que dispone de suficiente
•
espacio libre en el soporte de destino de la
copia/traslado.
1
Toque MENU.
2
Seleccione [EDITAR].
3
Seleccione [COPIAR] o [MOVER].
[COPIAR]:
•
Los archivos se copian en el soporte
de destino y los archivos originales
permanecen en el soporte de origen.
[MOVER]:
•
Los archivos se mueven al soporte
de destino y los archivos originales
(excepto los archivos de sólo lectura) se
eliminan del soporte de origen.
4
Seleccione la dirección.
[RANURA A = RANURA B] o
[RANURA B = RANURA A]
CASTELLANO
COPIA
33
Page 86

34
D
C
Copia de archivos (continuación)
5
Seleccione el menú que desee.
• [COPIAR TODO]/[MOVER TODO]:
Seleccione esta opción para transferir todos
los archivos del soporte de grabación.
Cuando el tamaño de todos los archivos de
una tarjeta SD sea mayor que el espacio libre
de la otra tarjeta SD, solamente se copiarán
los archivos que quepan en el espacio libre.
• [SELECCIONAR Y COPIAR]/
[SELECCIONAR Y MOVER]:
Seleccione esta opción cuando desee
transferir los archivos seleccionados.
1) Seleccione el archivo deseado y
toque OK. La marca s aparece en
el archivo. Para seleccionar más
archivos, repita este paso.
2) Seleccione [EJEC].
6
Seleccione [SÍ].
La transferencia de los archivos empieza.
Cuando aparezca [COPIA REALIZADA] /
[MOVIMIENTO FINALIZADO], toque OK.
Para salir de la pantalla
Seleccione [SALIR].
Para detener la transferencia de archivos
1) Seleccione [CANCELAR].
2) Cuando aparezca [¿SALIR?], seleccione [SÍ].
Uso de una grabadora de BD/DVD
Puede realizar una copia de seguridad
de los archivos que se encuentran en la
videocámara en un disco, por medio de una
grabadora de BD/DVD.
Utilice uno de los siguientes métodos para
•
ver el disco. (Puede suceder que el disco no
se pueda expulsar si intenta reproducirlo en
un reproductor no compatible.)
- Reproduzca el disco por medio de la
videocámara.
- Reproduzca el disco por medio de la
grabadora de BD/DVD.*
- Reprodúzcalo en un ordenador.*
- Reproduzca el disco con un reproductor
BD/DVD compatible con BD-MV y AVCHD.*
* Primero el disco debe ser finalizado en la
videocámara.
No es posible reproducir un disco distinto
•
del BD/DVD creado con la grabadora de
BD/DVD.
Cuando conecte la grabadora de DVD
•
(CU-VD50) a un TV, puede reproducir el
disco creado sin necesidad de utilizar la
videocámara. Cuando esté reproduciendo,
desconecte el cable USB.
Conexión a una grabadora de BD/DVD
Preparativos:
Encienda, primero, la videocámara, después,
encienda la grabadora de BD/DVD.
Conector de
CC
Conector
USB
A la toma
Adaptador de CA
Conector USB
NOTA
Consulte, también, el manual de instrucciones
de la grabadora de BD/DVD opcional.
*
Cuando conecta a una grabadora de DVD,
•
utilice el cable USB suministrado con la
grabadora de DVD.
Cuando conecta a una grabadora de BD,
•
utilice un USB con conectores Mini-A
(macho) y B (macho). Se recomienda el
cable opcional QAM0852-001 de JVC. Para
los detalles, consulte la página 41.
de CA
Grabadora de BD/DVD
Cable USB*
Page 87

35
CASTELLANO
COPIA
Copia de seguridad de todos los archivos
TODAS LAS ESCENAS
VOLVER
CANTIDAD REQUERIDA
DVD : 1 / DVD(DL) : 1
PREPARAR DISCO VACÍO
EJECUTAR
DIRECT
DISC
INFO
ESCENAS SIN GUARDAR
DVD 1
DVD(DL) 1
CANCELAR
EJECUTAR
Preparativos:
Conecte la videocámara a la grabadora de
•
BD/DVD.
Seleccione el modo ! o #.
•
Asegúrese de que la tarjeta SD esté
•
insertada en la ranura SD.
Cuando utiliza una grabadora de BD,
•
seleccione [CAMBIAR MEDIO GRAB.] y
seleccione el tipo de disco.
1
Seleccione [SELECC. ENTRE TODO]
(modo (!) o [GUARDAR TODO]
(modo (#).
2
Seleccione el menú que desee.
Modo !: [TODAS LAS ESCENAS]
•
Modo
#: [TODAS LAS IMÁGENES]
Se copian todos los archivos del soporte
de grabación.
Modo !: [ESCENAS SIN GUARDAR]
•
Modo #: [IMÁG. NO GUARDADAS]
Se seleccionan y copian
automáticamente todos los archivos que
nunca han sido copiados.
3
Seleccione [EJECUTAR].
4
Seleccione [SÍ] o [NO].
[SÍ]: Muestra las miniaturas por grupo.
•
[NO]: Muestra las miniaturas por fecha.
•
5
Seleccione [EJECUTAR].
Los archivos se copian en el disco.
•
Cuando aparezca [HECHO], toque
Si aparece [INSERTAR SIGUIENTE
•
DISCO PULSAR [CANCELAR] PARA
ABANDONAR LA CREACIÓN], cambie
de disco. Los archivos restantes se
copiarán en el segundo disco.
Para cancelar la copia, seleccione
•
[CANCELAR].
Copia de archivos de vídeo que nunca
se han copiado
Los archivos que nunca se hayan copiado
en los discos se seleccionan y copian
automáticamente.
1
Abra la pantalla LCD para encender
la videocámara.
2
Pulse DIRECT DISC.
3
Seleccione [SÍ] o [NO].
[SÍ]: Muestra las miniaturas por grupo.
•
[NO]: Muestra las miniaturas por fecha.
•
4
Seleccione [EJECUTAR].
Se empieza a crear el disco. Cuando
•
aparezca [HECHO], toque
Si aparece [INSERTAR SIGUIENTE
•
DISCO PULSAR [CANCELAR] PARA
ABANDONAR LA CREACIÓN], cambie
de disco. Los archivos restantes se
copiarán en el segundo disco.
Para cancelar la creación del disco,
•
seleccione [CANCELAR].
Para salir de la pantalla
1) Seleccione [SALIR].
2) Cuando aparezca [¿SALIR?], seleccione
[SÍ].
OK.
OK.
Page 88

36
Copia de archivos (continuación)
Copia de archivos en una grabadora de vídeo/DVD
Preparativos:
Cree una lista de reproducción.
•
Apague todas las unidades.
•
Para realizar la conexión con los
conectores AV (copia analógica)
Conector de CC
Conector AV
Cable AV
Grabadora
de vídeo/
DVD
Conector AV
(Entrada)
A la toma
de CA
Adaptador
de CA
1
Abra la pantalla LCD para encender
la videocámara.
2
Ajuste la grabadora de vídeo/DVD en
el modo de entrada AUX.
Asegúrese de que las imágenes de
la videocámara se hayan introducido
correctamente en la grabadora de vídeo/
DVD.
3
Reproduzca las listas de
reproducción en la videocámara.
1) Toque MENU.
2) Seleccione [REPROD. COPIA].
3) Seleccione la lista de reproducción que
desee.
4) Seleccione [SÍ]. (Aparece una pantalla
negra durante 5 segundos en la primera
y en la última escena.)
4
En el punto donde desee iniciar
la copia, inicie la grabación en la
grabadora de vídeo/DVD.
Consulte el manual de instrucciones de la
grabadora de vídeo/DVD.
Para detener la copia
Detenga la grabación en la grabadora de
vídeo/DVD.
Para ocultar la fecha o los iconos de la
pantalla
Cambie los ajustes en [VER EN TV] en el
MENU.
Page 89

37
CASTELLANO
COPIA
Creación de un disco utilizando un PC
Creación de un disco utilizando un PC
Puede copiar datos desde la videocámara y
crear un disco utilizando un PC.
Q Instalación de software en el PC
Requisitos del sistema
Windows Vista
Sistema
operativo:
CPU: Intel® CoreTM Duo, 1.66 GHz o
RAM: 2 GB como mínimo
Windows XP
Sistema
operativo:
CPU: Intel® CoreTM Duo, 1.66 GHz o
RAM: 1 GB como mínimo
Para comprobar las especificaciones del
PC
Haga clic con el botón secundario del ratón
en [Equipo] (o [Mi PC]) en el menú [Inicio]
y seleccione [Propiedades].
Windows Vista®
Home Basic (SP1)
Home Premium (SP1)
(32 bits, preinstalados)
superior
(Se recomienda Intel® CoreTM 2
Duo 2.13 GHz o superior.)
Windows® XP
Home Edition (SP2/SP3)
Professional (SP2/SP3)
(preinstalado)
superior
(Se recomienda Intel® CoreTM 2
Duo 2.13 GHz o superior.)
NOTA
Asegúrese de que su PC cuenta con una
•
unidad BD/DVD grabable.
Si su sistema no cumple con los
•
requerimientos, se recomienda copiar los
archivos con una grabadora de BD/DVD.
(Z p. 35)
Usuarios de Macintosh pueden utilizar
•
el software incluído con dicho Macintosh
(iMovie ’08, iPhoto) para copiar archivos a la
computadora.
Preparativos:
Inserte el CD-ROM suministrado en el PC.
En Windows Vista aparece el cuadro de
diálogo de reproducción automática.
1
Haga clic en [Easy Installation].
Siga las instrucciones que aparecen en
pantalla.
2
Haga clic en [Yes].
3
Seleccione el idioma deseado y, a
continuación, haga clic en [Next].
4
Haga clic en [Siguiente].
Page 90

38
Creación de un disco utilizando un PC (continuación)
D
C
LIB.
5
Haga clic en [Finalizar].
Conector
CC
Se crea un icono de Everio MediaBrowser
en el escritorio.
INFORMACIÓN
La capacidad de edición de vídeo de Everio
MediaBrowser se encuentra disponible para
los archivos copiados desde la videocámara
al PC.
Para ver la guía de instrucciones de
Everio MediaBrowser
1) Haga doble clic en el ícono de Everio
MediaBrowser.
2) Haga clic en [Ayuda], y clic en [Ayuda de
MediaBrowser].
Clic
Clic
Cable USB
Adaptador de CA
A la toma
de CA
1
Abra la pantalla LCD para encender
la videocámara.
2
Seleccione [HACER COPIA DE
SEGURIDAD].
El programa Everio MediaBrowser se
inicia en el PC.
Conector
USB
R Copia de seguridad en un PC
Preparativos:
Instale el software en el PC.
•
Asegúrese de que quede suficiente espacio
•
libre en el disco duro del PC.
Cierre la pantalla LCD para apagar la
•
videocámara.
3
Haga clic en [Todo el volumen en la
videocamara] y en [Proximo].
Page 91

39
CASTELLANO
COPIA
4
Haga clic en [Comienzo].
2
Seleccione [Solo filmes].
Se inicia la copia de seguridad.
Para desconectar la videocámara del PC
1)
Haga clic con el botón secundario del
ratón en el icono (Quitar hardware
con seguridad) en la barra de tareas
y seleccione [Extracción segura de
Dispositivo de almacenamiento masivo
USB].
2) Siga las instrucciones en pantalla y
asegúrese de que el dispositivo se
pueda quitar de forma segura.
3) Desconecte el cable USB y cierre la
pantalla LCD.
NOTA
Se tardará un tiempo en realizar una copia de
seguridad de muchos vídeos.
S Creación de listas personalizadas
para organizar los archivos
Puede elaborar una lista personalizada
de ciertos temas (por ejemplo, viajes,
certámenes deportivos) e incluir los archivos
relacionados con estos temas en la lista
personalizada.
Preparativos:
Realice una copia de seguridad en el PC.
1
Haga doble clic en el icono y abra el
calendario.
3
Haga clic en [+].
4
Escriba el nombre de la nueva
lista personalizada y haga clic en
[Aceptar].
5
Haga clic en la fecha de grabación.
Se muestran los archivos grabados en
esa fecha.
6
Arrastre y suelte los archivos en la
lista personalizada.
Para agregar más archivos a la lista
personalizada, repita los pasos 5 y 6.
Page 92

40
Creación de un disco utilizando un PC (continuación)
T Copia de los archivos a un disco
Everio MediaBrowser es compatible con
3 formatos de disco. Seleccione el que se
adapte a sus fines.
Disco
DVD-Video:
Disco
AVCHD:
BD:
1
Seleccione la lista personalizada y
haga clic en [Crear disco].
2
Seleccione el tipo de disco y haga
clic en [Proximo].
3
Haga clic en [Selecciona los archivos
individualmente] y clic en [Proximo].
Para añadir todos los archivos de los
discos, haga clic [Seleccionar todos los
archivos visualizados], y luego vaya al
paso 5.
4
Arrastre y suelte el archivo en
la parte inferior y haga clic en
[Proximo].
Apto si va a compartir el disco
con sus amigos y familiares.
Apto para vídeo de alta
calidad.
Apto para vídeo de gran
calidad y tiempo de grabación
prologando.
5
Escriba el nombre del disco,
seleccione el estilo del menú
superior y haga clic en [Proximo].
6
Haga clic en [Comienzo].
NOTA
Cuando copie vídeo grabado en el modo
•
de grabación UXP para crear un disco
AVCHD, deberá convertir el vídeo al modo
de grabación XP, antes de la copia. Por
consiguiente, puede tardar más que cuando
copia vídeo grabado en otros modos.
Utilice Everio MediaBrowser Player para
•
reproducir el disco. Consulte la ayuda del
software Everio MediaBrowser suministrado
para la operación.
Para obtener información detallada sobre
•
el funcionamiento de Everio MediaBrowser,
haga clic en [Ayuda] y consulte “Ayuda de
MediaBrowser”.
Adobe® Reader® debe estar instalado
•
para poder leer “Ayuda de MediaBrowser”.
Adobe® Reader® puede cargarse desde el
sitio web de Adobe: http://www.adobe.com
Para obtener ayuda sobre el funcionamiento
•
del software, consulte la información de
soporte. (Zp. 41)
Page 93

41
CASTELLANO
COPIA
Estructura de carpetas y extensiones
[MOV_XXXX.MTS]
[XXXJVCSO]
[AVCHD]
[DCIM]
[EXTMOV]
[PRIVATE]
[JVC]
[BDMV]
[STREAM]
[XXXXX.MTS]
[BACKUP]
[CLIPINF]
[PLAYLIST]
[INDEX.BDM]
[MOVIEOBJ.BDM]
Soporte de grabación
X = número
Contiene las carpetas de imágenes fijas.
También se guardan los archivos de vídeo con información de
administración defectuosa.
Contiene los archivos de información de gestión relativos a
la información sobre creación de eventos y/o discos para los
archivos grabados con la videocámara.
Archivo de vídeo en formato AVCHD
Información de asistencia al cliente
El uso de este software está autorizado de acuerdo con las condiciones de la licencia de software.
JVC
Cuando se ponga en contacto con la oficina o agencia JVC más cercana de su país (consulte la Red
de servicios internacionales JVC en http://www.jvc-victor.co.jp/english/worldmap/index-e.html) para
hacer consultas sobre este software, tenga a mano la siguiente información.
Nombre del producto, modelo, problema, mensaje de error.
•
PC (fabricante, modelo (sobremesa/portátil), CPU, sistema operativo, memoria (MB), espacio
•
disponible en el disco duro (GB))
Tenga en cuenta que puede tardar un poco responder a sus preguntas según cuál sea el asunto.
JVC no puede responder a preguntas relativas al funcionamiento básico del PC o a las
especificaciones o el rendimiento del sistema operativo, otras aplicaciones o controladores.
Pixela
Región Idioma Nº de teléfono
EE.UU. y Canadá Inglés +1-800-458-4029 (gratuito)
Europa (Reino Unido,
Alemania, Francia y España)
Otros países de Europa
Asia (Filipinas) Inglés +63-2-438-0090
China Chino +86-21-5385-3786
Página web: http://www.pixela.co.jp/oem/jvc/e/index.html
Consulte en nuestro sitio web la información y las descargas más recientes.
Inglés/alemán/francés/español +800-1532-4865 (gratuito)
Inglés/alemán/francés/español/
italiano/holandés
+44-1489-564-764
Page 94

42
EXPORT
ON
EXPORT
SD
1/3
CONF. EXPORT
COPIA
Utilización con un reproductor multimedia portátil
3
Activación del modo de exportación
Los vídeos grabados en el modo de
exportación se pueden transferir fácilmente a
iTunes®. Todos los archivos con el ajuste de
exportación activado se transferirán al PC.
Para obtener más información sobre como
realizar la transferencia, consulte la guía
de funcionamiento de MediaBrowser que
aparece en el CD-ROM.
Preparativos:
Seleccione el modo !.
•
Seleccione el modo de grabación.
•
Pulse EXPORT dos veces.
Para desactivar el modo de exportación
Pulse EXPORT dos veces.
Cambio del ajuste de exportación
Seleccione [SALIR].
Para cancelar el ajuste de exportación
Seleccione el archivo y elija LIB. de nuevo.
Para salir de la pantalla
1) Seleccione [SALIR].
2) Seleccione [SÍ].
Transferencia de los archivos al PC
Preparativos:
Instalar iTunes® en un PC.
http://www.apple.com/itunes/
1
Conecte la videocámara al PC con el
cable USB.
2
Seleccione [INSCR. EN LIBRARY].
Los vídeos grabados se pueden asignar al
ajuste de exportación.
Preparativos:
Seleccione el modo !.
•
Seleccione el modo de reproducción.
•
1
Pulse EXPORT.
2
Seleccione el archivo y elija [LIB.].
• Para comprobar el contenido del archivo,
seleccione [CHECK].
Todos los archivos con el ajuste de
exportación activado se transferirán al PC.
No se puede exportar el archivo a
iTunes®.
Consulte “Q&A”, “Información más reciente”,
“Información de descarga”, etc., en [Clic para
Ultima Info de Producto] en la ayuda del
software Everio MediaBrowser suministrado.
Page 95

43
CASTELLANO
COPIA
UPLOAD
ON
Carga de archivos a sitios Web
Activación del modo de carga
Tras la grabación se puede cargar el archivo
rápidamente a sitios Web (YouTubeTM)
creados para compartir vídeos. Para más
información sobre YouTubeTM, visite el sitio
Web de YouTubeTM: http://www.youtube.com/
Preparativos:
Seleccione el modo !.
•
Seleccione el modo de grabación.
•
Pulse UPLOAD dos veces.
Si graba un archivo con el modo de
carga activado, la grabación se detiene
automáticamente 10 minutos después de su
inicio.
El tiempo restante se muestra en la pantalla
LCD.
NOTA
El modo de carga se desactiva cada vez que
termina la grabación.
Carga de archivos
Para obtener más información sobre
cómo cargar archivos, consulte la guía
de funcionamiento de MediaBrowser que
aparece en el CD-ROM.
1
Conecte la videocámara al PC con el
cable USB.
2
Seleccione [CARGAR].
No se puede cargar el archivo en
YouTube™
Necesita tener una cuenta en YouTube™
•
para cargar archivos en YouTube™. Cree su
cuenta.
Consulte “Q&A”, “Información más
•
reciente”, “Información de descarga”, etc.,
en [Clic para Ultima Info de Producto] en la
ayuda del soft ware Everio MediaBrowser
suministrado.
Page 96

REGIS TER EVENT
VIDEO QU ALITY
ZOOM
DIS
ON
IMAGEN BORROSA. TIENE QUE
R
EGIS TER
REN
T
VID
E
O QU ALI
T
T
ZO
O
S
O
N
IMAGEN BORROSA. TIENE QU
E
AJUSTE
SALIR
VÍDEO
OFF
ON
CONFIGURACIONES DE MENÚS
44
Cambio de las configuraciones de menús
1
Toque MENU.
2
Seleccione el menú que desee.
3
Seleccione el ajuste que desee.
Para volver a la pantalla anterior
Seleccione @.
Para salir de la pantalla
INFORMACIÓN ADICIONAL
Seleccione [SALIR].
Solución de problemas
Antes de solicitar asistencia técnica,
consulte la siguiente tabla. Si las soluciones
indicadas en la tabla no ayudan a solucionar
el problema, póngase en contacto con el
distribuidor JVC o servicio técnico JVC más
cercano para obtener ayuda.
También puede consultar el apartado de
preguntas más frecuentes de productos
nuevos en el sitio web de JVC.
Problema Acción
Tarjeta
No se puede insertar la
tarjeta SD.
Alimentación
No hay alimentación.
La grabación no puede
realizarse.
Grabación
La grabación se detiene.
Los siguientes fenómenos no son fallos
de funcionamiento.
La videocámara se calienta cuando se utiliza
•
de forma prolongada.
La batería se calienta durante la carga.
•
Cuando se reproduce un vídeo, la imagen
•
se detiene momentáneamente o el sonido
se interrumpe en las uniones entre escenas.
La pantalla LCD se muestra roja o negra
•
momentáneamente cuando se graba la luz solar.
Aparecen puntos negros, rojos, verdes o
•
azules en la pantalla LCD.
(La pantalla LCD tiene un porcentaje de
píxeles efectivos del 99,99%, pero puede
que un 0,01% o menos no lo sean.)
Compruebe que la tarjeta SD se esté insertando en la dirección
•
correcta.
Conecte bien el adaptador de CA.
•
Recargue la batería.
•
La tarjeta SD está llena. Elimine los archivos innecesarios o
•
reemplace la tarjeta SD.
Inserte una tarjeta SD disponible en el mercado, y ajuste [SEL.
•
RANURA DE VÍDEO] y [SEL. RANURA IMAGEN] a [RANURA
A] o [RANURA B].
La grabación se detiene automáticamente después de 12 horas
•
consecutivas de grabación de vídeo. Para asegurar la grabación
continua, antes de comenzar a grabar, ajuste [CAMB AUTO
MEDIO GRAB] a [ON].
Page 97

Grabación
45
CASTEL LANO
CONFIGURACIONES DE
MENÚS
Visualización
Reproducción
Otros problemas
Problema Acción
Aparecen líneas
verticales en las
imágenes grabadas.
Es difícil ver la imagen
de la pantalla LCD.
El indicador de batería
restante no es correcto.
El vídeo o el sonido se
interrumpe.
No se puede encontrar
un vídeo/imagen
grabada.
La videocámara funciona
con lentitud al pasar
del modo de vídeo
al modo de imagen
fija y viceversa, o al
encenderla o apagarla.
La luz no parpadea
durante la carga de la
batería.
Al realizar la conexión
con el cable HDMI,
la imagen o el
sonido no se emiten
correctamente en el
televisor.
Las funciones HDMICEC no funcionan
correctamente y el
televisor no funciona
en conjunción con la
videocámara.
Este fenómeno se produce cuando filma un sujeto iluminado por
•
una luz brillante. Esto no es un defecto de funcionamiento.
Puede que sea difícil ver la imagen de la pantalla LCD si la
•
cámara se utiliza en lugares muy iluminados, como, por ejemplo,
bajo la luz solar directa.
Cargue la batería por completo, descárguela totalmente y vuelva
•
a cargarla.
Si la videocámara se utiliza durante un periodo de tiempo
•
prolongado en condiciones de temperatura alta o baja, o si la
batería se carga con mucha frecuencia, puede que no se muestre
correctamente la cantidad de batería restante.
A veces la reproducción se interrumpe en el cambio de una
•
escena a otra.
Seleccione [REPR. OTRO ARCHIVO] y busque el vídeo en la
•
pantalla de índice.
(Los archivos de vídeo con información de gestión dañada se
pueden reproducir.)
Cancele las funciones de visualización por grupo y búsqueda por
•
fecha.
Cambie el ajuste en [SEL. RANURA DE VÍDEO] o [SEL. RANURA
•
IMAGEN]. (No se mostrarán archivos en otros soportes.)
Deslice el interruptor de modo para seleccionar el modo deseado
•
(! o #).
Si la cámara contiene muchos archivos (de vídeo, por ejemplo),
•
tardará bastante tiempo en responder. Es recomendable que
copie todos los archivos de la videocámara al ordenador y que,
una vez completada esta operación, borre los archivos de la
videocámara.
Compruebe la carga restante de la batería.
•
(Si la batería ya está totalmente cargada, la luz no parpadea.)
Si realiza una carga en un entorno con unas condiciones de
•
temperatura elevada o baja, asegúrese de que la batería se esté
cargando dentro del intervalo de temperaturas permitido.
(Si la batería se está cargando fuera del intervalo de temperaturas
permitido, puede que la carga se detenga para protegerla.)
Al realizar la conexión con el cable HDMI, la imagen o el
•
sonido podrían no emitirse correctamente en el televisor según
el televisor conectado. En tales casos, realice las siguientes
operaciones.
1) Desconecte el cable HDMI y vuelva a conectarlo.
2) Apague la videocámara y vuelva a encenderla.
Los televisores pueden funcionar de forma distinta en función
•
de las especificaciones, incluso si son compatibles con HDMICEC. Por lo tanto, no se puede garantizar que las funciones
HDMI-CEC de la videocámara funcionen en combinación con
todos los televisores. En tales casos, ajuste [CONTROL HDMI]
en [OFF].
Page 98

Solución de problemas (continuación)
46
Problema Acción
Otros problemas
No se puede cargar el
archivo en YouTube™
No se puede exportar el
archivo a iTunes®
Para reiniciar la videocámara cuando no funciona correctamente
! Cierre la pantalla LCD y quite la fuente de alimentación (batería o adaptador de CA) de la
videocámara y, a continuación, colóquela de nuevo.
# Ejecute [CONFIG. DE FÁBRICA].
Necesita tener una cuenta en YouTube™ para cargar archivos en
•
YouTube™. Cree su cuenta.
Consulte “Q&A”, “Información más reciente”, “Información de
•
descarga”, etc., en [Clic para Ultima Info de Producto] en la ayuda
del soft ware Everio MediaBrowser suministrado.
Consulte “Q&A”, “Información más reciente”, “Información de
•
descarga”, etc., en [Clic para Ultima Info de Producto] en la ayuda
del soft ware Everio MediaBrowser suministrado.
Indicaciones de advertencia
Indicación Acción
Ajuste el reloj. Si sigue apareciendo el mensaje tras ajustar el
•
¡AJUSTE FECHA/HORA!
ERROR DE COMUNICACIÓN
NO SE PUEDE UTILIZAR EN
MODO DE VÍDEO
NO FORMATEADO
¡ERROR DE FORMATEO!
ERROR ELIMIN. DATOS
¡ERROR EN TARJETA
DE MEMORIA!
NO SE PUEDEN TOMAR MÁS
FOTOS DE MOMENTO
GRABACIÓN CANCELADA
ERROR DE GRABACIÓN
ERROR DE
REPRODUCCIÓN
reloj, significa que se ha agotado la pila del reloj. Consulte con
su distribuidor JVC más próximo.
Asegúrese de utilizar baterías JVC.
•
Reemplace la tarjeta SD. (Archivos grabados con dispositivos
•
no compatibles con AVCHD no se podrán reproducir en esta
videocámara.)
Seleccione [ACEPTAR] y seleccione [SÍ] para realizar el
•
formateo.
Compruebe el procedimiento operativo y vuelva a intentarlo.
•
Apague la videocámara y vuélvala a encender.
•
Apague la videocámara y vuélvala a encender.
•
Extraiga la tarjeta SD y vuelva a insertarla. (No se pueden
•
utilizar tarjetas MultiMediaCard.)
Elimine la suciedad de los terminales de la tarjeta SD.
•
Inserte la tarjeta SD antes de encender la videocámara.
•
Si el problema persiste, realice copias de respaldo de todos
•
los datos, y luego realice en formateo. Todos los datos serán
eliminados.
Detenga la grabación de vídeo y grabe una imagen fija. (Si se
•
retira o inserta una tarjeta SD durante la grabación de vídeo,
no se podrá grabar ninguna imagen fija.)
Inserte una tarjeta SD nueva o formateada. Ajuste [SEL.
•
RANURA DE VÍDEO] a una ranura diferente, a continuación,
grabe en una tarjeta SD en la [RANURA A] o [RANURA B].
Apague la videocámara y vuelva a encenderla.
•
Extraiga y vuelta a insertar la tarjeta SD. (No puede utilizarse
•
MultiMediaCard)
Quite la suciedad de los terminales de la tarjeta SD.
•
Inserte la tarjeta SD antes de encender la videocámara.
•
Page 99

Indicación Acción
47
CASTELLANO
INFORMACIÓN
ADICIONAL
UTILIZAR ADAPTADOR DE
CA
DESCONECTADO O
DISPOSITIVO USB NO
COMPATIBLE
SE HA UTILIZADO DISCO
DVD-RW
FALLO EN INICIALIZACIÓN
NO HAY ARCHIVOS
ARCHIVO GESTIÓN
VÍDEO DAÑADO SE
DEBE RECUPERAR PARA
GRABAR/REPRODUCIR
VÍDEO ¿RECUPERAR?
NO HAY ESCENAS DE
EVENTO REGISTRADAS
NO PUEDE DETECTAR CARA
Utilice el adaptador de CA como fuente de alimentación.
•
Encienda el dispositivo USB conectado.
•
Conecte el adaptador de CA a la grabadora de BD/DVD.
•
Reemplace el disco de la grabadora de BD/DVD por otro disco
•
Reemplace el disco de la grabadora de BD/DVD por otro
•
disco.
Deslice el interruptor de modo para seleccionar el modo
•
deseado (! o #).
Seleccione [ACEPTAR] para restaurarlo.
•
Registre eventos en los archivos antes de iniciar la grabación.
•
Active el modo de detección facial antes de realizar la
•
grabación o la toma de instantánea.
Limpieza
Antes de proceder a la limpieza, apague la videocámara y extraiga la batería y el adaptador de
CA.
Para limpiar la videocámara
Pase con cuidado un trapo suave por la videocámara. Si la videocámara está muy sucia,
humedezca el trapo con un jabón suave diluido y escúrralo bien. Tras limpiar con el trapo
húmedo,vuelva a limpiar con un trapo seco.
Para limpiar la pantalla LCD
Pase con cuidado un trapo suave por la pantalla LCD. Procure no dañar la pantalla LCD.
Para limpiar el objetivo
Limpie suavemente el objetivo con un paño para limpiar objetivos.
NOTA
Evite usar agentes de limpieza fuertes como bencina o alcohol.
•
Si el objetivo no se limpia, se puede formar moho.
•
Cuando se utilice un limpiador o un trapo tratado químicamente, consulte las medidas de
•
precaución de cada producto.
Page 100

Especificaciones
48
Cámara
Aspectos generales
Fuente de alimentación eléctrica
CC 11 V (con adaptador de CA)
CC 7,2 V (con batería)
Consumo eléctrico
Aprox. 3.3 W*
* Cuando la luz LED está apagada y la luz de
fondo de la pantalla está ajustada en modo
[ESTÁNDAR].
Consumo nominal de corriente:
1A
Dimensiones (anchura x altura x fondo)
54,5 mm x 65 mm x 112,5 mm
Peso
Aprox. 260 g
Aprox. 310 g (con batería y correa de mano)
Temperatura de funcionamiento
0°C a 40°C
Humedad de funcionamiento
35% a 80%
Temperatura de almacenamiento
–20°C a 50°C
Fotocaptor
CMOS progresivo de 1/4" (2.800.000 píxeles)
Objetivo
F 1,9 a 3,2,
f = 2,9 mm a 58,0 mm,
objetivo con capacidad de zoom 20:1
Diámetro del filtro
ø30,5 mm
Pantalla LCD
con medida diagonal de 2,7",
panel LCD/sistema de matriz activa TFT
Luz LED
Dentro de 1,5 m
(distancia de filmación recomendada)
Para vídeo/audio
Formato de grabación/reproducción
Vídeo: MPEG-4 AVC/H.264
Audio: Dolby Digital (2 canales)
Formato de señal
1080i/60
Modo de grabación (vídeo)
UXP: 1920 x 1080 píxeles, apromedio de
24 Mbps (VBR)
XP: 1920 x 1080 píxeles, promedio de
17 Mbps (VBR)
SP: 1920 x 1080 píxeles, promedio de
12 Mbps (VBR)
EP: 1920 x 1080 píxeles, promedio de
5 Mbps (VBR)
Modo de grabación (audio)
48 kHz, 256 kbps
Para imágenes fijas
Formato
JPEG
Tamaño de imagen
1920 x 1080
1440 x 1080
640 x 480
Calidad de imagen
FINA / ESTÁNDAR
Para conectores
HDMI
HDMI™ (V.1.3 con x.v.Color™)
Salida componente
Salida componente Y, Pb, Pr
Y: 1.0 V (p-p), 75
Pb/Pr: 0.7 V (p-p), 75
Salida AV
Salida de vídeo: 1,0 V (p-p), 75
Salida de audio: 300 mV (rms), 1 k
USB
Mini USB tipo A y B,
compatible con USB 2.0
W
W
W
Adaptador de CA
Requisito de alimentación eléctrica
AC 110 V a 240 V$, 50 Hz/60 Hz
Salida
CC 11 V § , 1 A
W
 Loading...