

CU-VD50U
DVD Burner
INSTRUCTIONS
Grabador de DVD
MANUAL DE INSTRUCCIONES
ENGLISH
ESPAÑOL
For Customer Use:
Enter the Model No. and Serial
No. (located on the bottom of the
burner) below. Retain this
information for future reference.
Model No.
Serial No.
This burner enables DVDs of videos
recorded with the JVC Hard Disk Camera to
be created without using a PC.
• If you want to edit videos recorded with the camera
and create your original DVDs, use the software
provided with the camera for editing and creating
DVD s.
• A provided data writing software Power2Go 5.5 Lite
can be used for writing data. However, it cannot be
used to edit videos or create DVDs.
• The burner does not include support for Macintosh.
Dear Customer,
Thank you for purchasing this burner. Before use,
please read the safety information and precautions
contained in pages 2 and 3 to ensure safe use of this
product.
Safety Precautions
IMPORTANT:
In the event that any of the following occur, remove the
plug and make a request for repair to the dealer.
• Smoke or abnormal odor is emitted
• Damage from being dropped
• Water or an object enters inside
CAUTION:
A UNIT IS A CLASS 1 LASER PRODUCT.
HOWEVER THIS UNIT USES A VISIBLE LASER
BEAM WHICH COULD CAUSE HAZARDOUS
RADIATION EXPOSURE IF DIRECTED. BE SURE
TO OPERATE THE UNIT CORRECTLY AS
INSTRUCTED.
WHEN THIS UNIT IS PLUGGED INTO THE WALL
OUTLET, DO NOT PLACE YOUR EYES CLOSE TO
THE OPENING OF THE DISC TRAY AND OTHER
OPENINGS TO LOOK INTO THE INSIDE OF THIS
UNIT.
USE OF CONTROLS OR ADJUSTMENTS OR
PERFORMANCE OF PROCEDURES OTHER THAN
THOSE SPECIFIED HEREIN MAY RESULT IN
HAZARDOUS RADIATION EXPOSURE.
DO NOT OPEN COVERS AND DO NOT REPAIR
YOU RSELF. REFER SERVICING TO QUALIFIED
PERSONNEL.
CLASS 1 LASER PRODUCT
REPRODUCTION OF LABELS
WARNING LABEL INSIDE OF THE UNIT
This unit applies to the standard “IEC60825-1:2001”
for laser products.
The socket-outlet shall be installed near the
equipment and shall be easily accessible.
ATTENTION:
This unit contains microcomputers. External electronic
noise or interference could cause malfunctioning. In
such cases, switch the unit off and unplug the mains
power cord. Then plug it in again and turn the unit on.
Take out the disc. After checking the disc, operate the
unit as usual.
CAUTION:
To avoid electric shock or
damage to the unit, first firmly
insert the small end of the
power cord into the AC
Adapter until it is no longer
wobbly, and then plug the
larger end of the power cord into an AC outlet.
The mains plug shall remain readily operable.
• Remove the mains plug immediately if the burner
functions abnormally.
If malfunctioning occurs, stop using the unit
immediately and consult your local JVC dealer.
Caution on Replaceable lithium battery
The battery used in this device may present a fire or
chemical burn hazard if mistreated.
Do not recharge, disassemble, heat above 100 C or
incinerate. Replace battery with Panasonic
(Matsushita Electric), Sanyo, Sony or Maxell CR2025.
Danger of explosion or Risk of fire if the battery is
incorrectly replaced.
• Dispose of used battery promptly.
• Keep away from children.
• Do not disassemble and do not dispose of in fire.
For USA-California Only
This product contains a CR Coin Cell Lithium Battery
which contains Per chlo rate Material – special handling
may apply.
See www.dtsc.ca.gov/hazardouswaste/perchlorate
WARNING:
Batteries shall not be exposed to excessive heat such
as direct sunshine, fire or the like.
Declaration of Conformity (for owners in the U.S.A.)
Model Number : CU-VD50U
Tr ade Name : JVC
Responsible party : JVC AMERICAS CORP.
Address : 1700 Valley Road Wayne,
Telephone Number : 973-317–5000
This device complies with Part 15 of FCC Rules.
Operation is subject to the following two conditions: (1)
This device may not cause harmful interference, and
(2) this device must accept any interference received,
including interference that may cause undesired
operation.
N. J. 07470
2

(For owners in the U.S.A.)
Changes or modifications not approved by JVC could
void the user’s authority to operate the equipment.
This equipment has been tested and found to comply
with the limits for a Class B digital device, pursuant to
Part 15 of the FCC Rules. These limits are designed
to provide reasonable protection against harmful
interference in a residential installation. This
equipment generates, uses, and can radiate radio
frequency energy and, if not installed and used in
accordance with the instructions, may cause harmful
interference to radio communications. However, there
is no guarantee that interference will not occur in a
particular installation. If this equipment does cause
harmful interference to radio or television reception,
which can be determined by turning the equipment off
and on, the user is encouraged to try to correct the
interference by one or more of the following measures:
Reorient or relocate the receiving antenna.
Increase the separation between the equipment and
receiver.
Connect the equipment into an outlet on a circuit
different from that to which the receiver is connected.
Consult the dealer or an experienced radio/ TV
technician for help.
(For owners in Canada)
• FOR USE WITH MODEL NO. AP-V50U
(AC ADAPTER).
• POUR UTILISER AVEC MODELE AP-V50U
(ADAPTATEUR C.A.).
This Class B digital apparatus complies with Canadian
ICES-003.
Cet appareil numérique de la classe B est conforme à
la norme NMB-003 du Canada.
The C/B button does not completely shut off mains
power from the unit, but switches operating current on
and off. ABB shows electrical power standby and ACB
shows ON.
Safety Precautions for the Burner
Be sure to observe the following precautions. Failing to
do so may result in electric shock, fire, injury, or
malfunction.
• Do not disassemble, dismantle, or modify the
equipment. Requests for repair and inspection should
be made to the dealer.
• Do not insert metal or combustible objects or pour
water or other liquids inside the burner.
• Turn off the power when connecting equipment.
• Remove the plug when the burner will not
a prolonged time or prior to cleaning (electricity flows
through the equipment even when the power is off).
• Do not block the ventilation holes of the burner.
• Do not use where there is condensation. Suddenly
carrying the burner from a cold location to a hot
location may result in the formation of drops, which
may cause a malfunction or failure.
• Do not cause the burner to vibrate when discs are in.
be used for
Safety Precautions for Accessories
• When using the AC adapter, the power cord, and the
USB cable, be sure to observe the following
precautions. Failing to do so may result in electric
shock, fire, injury, or malfunction.
• Do not insert or remove the plug when your hands
are wet.
• Fully insert the plug into the outlet.
• Keep dust and metal objects away from the plug.
• Do not damage the cord.
• Place the cord where it will not trip someone up.
• Do not use when thunder can be heard.
• Do not dismantle.
• Do not use for any product other than this one.
• Do not play the provided CD-ROM with an audio
player. Doing so may damage the circuits or speakers.
Safety Precautions for Discs
Do not use the following discs.
• Cracked discs
• Deeply scratched discs
Installation
Do not install in any of the following locations.
• Humid location
• Location of 60 °C or above
• Location subject to direct sunlight
• Location where overheating is likely
• Dusty or smoky locations
• Locations subject to oily smoke or steam such as a
kitchen counter or beside a humidifier
• Unstable location
• Bathroom
• Dusty places
• Slanted location
ATTENTION:
On placing the unit:
Some TVs or other appliances generate strong
magnetic fields. Do not place such appliances on top
of the unit as it may cause picture disturbance.
When moving the product:
Press C/B to turn off the power, and wait at least 30
seconds before unplugging the power cord. Then, wait
at least 2 minutes before moving the product.
EN
ES
3
Basic Guide
Getting Ready to Copy to a DVD!
A Get ready a recommended disc
Use DVD-R, DVD-RW or DVD-R DL disc of the brands listed below.
DVD+R, DVD+RW and DVD-RAM discs cannot be used.
DVD-R DL (Single-
sided double layer)
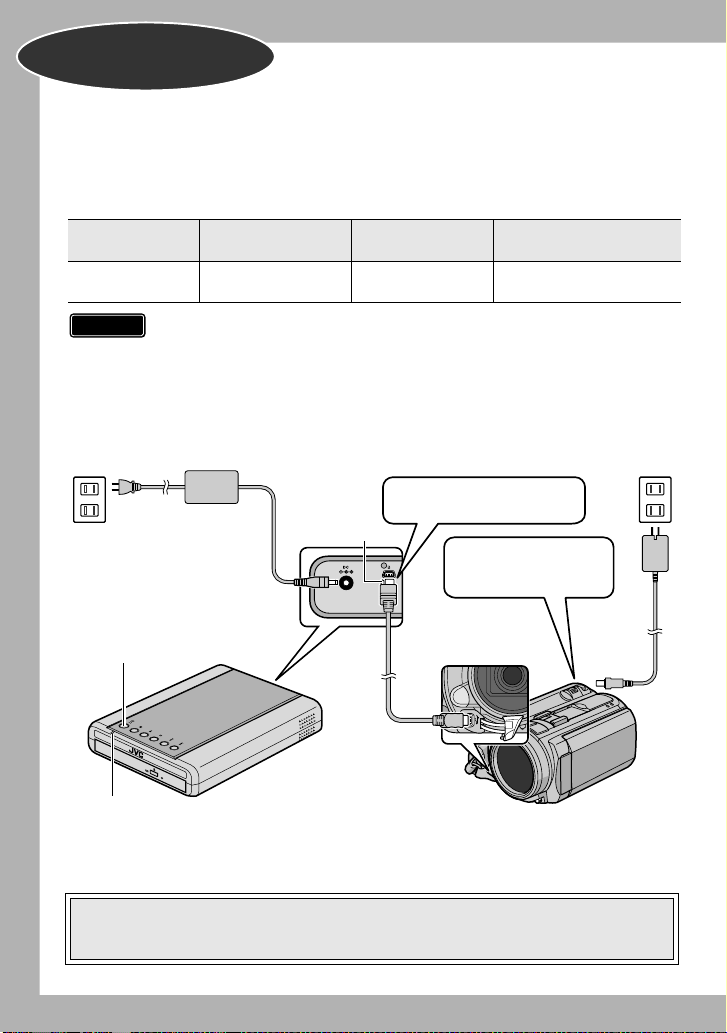
Use the AC adapter to
power on the Everio
camera.
Brand
Caution
•DVD-R DL (single-sided double layer) discs can be used only when the
•Use a commercially available cleaning cloth to wipe the disc gently if
• Do not use discs that are scratched.
B Connect
DVD-R DVD-RW
JVC, TDK,
Verbatim, SONY
burner is connected to a high definition Everio camera.
there are any fingerprints or dirt. Applying too much strength will result in
scratches.
To DC jack
JVC JVC, Verbatim
Insert the connector with the
protrusion to the burner.
Protrusion
Power button
CU-VD50
Power lamp
USB cable
C Press the power button to turn on the burner
• The power lamp changes from blinking orange to steady orange.
• When an AVCHD disc (P. 15) is inserted into a device that is not AVCHDcompatible, you may not be able to eject the disc. To eject the disc, refer to the
instruction manual of your device.
4
To DC jack
Everio
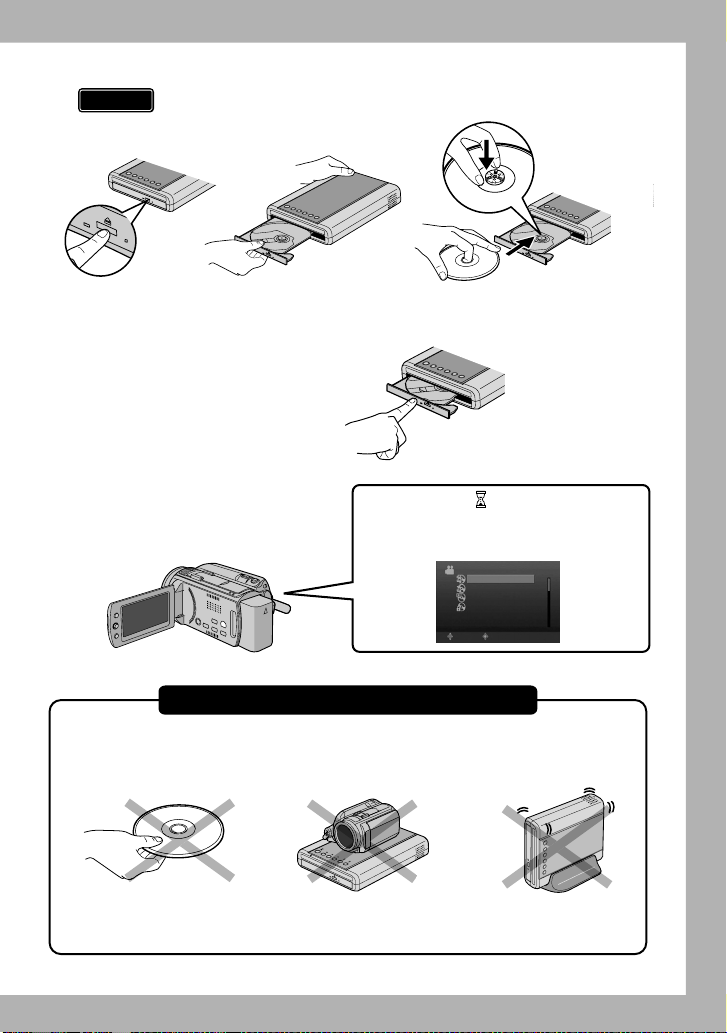
D Open the tray and insert the disc
Caution
• The tray cannot be opened/closed when the burner is off.
A Press the eject
button.
E Close the tray
•Push in until the tray snaps in.
F Open the LCD monitor
• The Everio camera turns on.
• The power lamp on the burner
changes from orange to green light.
Pay attention to the following!
• Do not touch the
recording side
B Pull out
completely.
• Do not place any
objects on top
C Insert firmly into
place.
An hourglass ( ) is displayed when
the burner is recognizing the disc.
When completed, the following screen
appears.
6)$%/
#2%!4%&2/-!,,
3%,%#4!.$#2%!4%
0,!9"!#+
&).!,):%
3%4
3%,%#4
• Do not topple
• Do not subject to
mechanical shock
¹ Recording or playback may not function properly if the disc is scratched
or dirty.
5
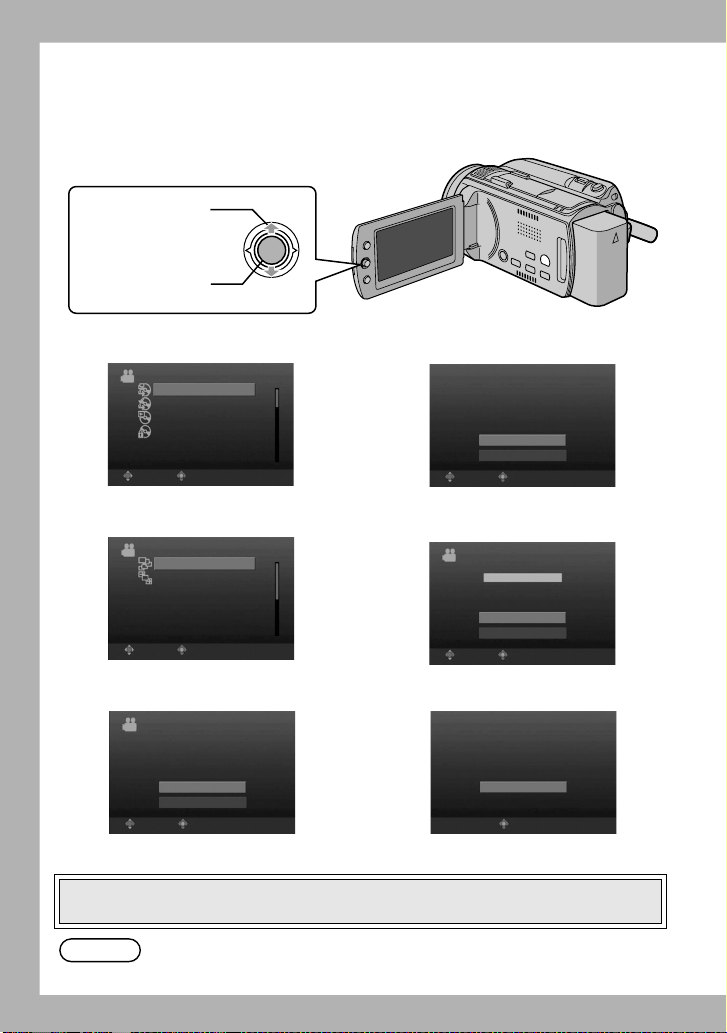
Copying Videos to a DVD
-%.5
$6$
-%.5
Operate on the Everio camera.
¹ Depending on the model connected, the on-screen display may differ from those
shown below.
(move up-down)
Select
Confirm
(push in)
A Select “CREATE FROM ALL”
VIDEO
CREATE FROM ALL
SELECT AND CREATE
PLAYBACK
FINALIZE
SELECT SET
B Select “ALL SCENES”
CREATE FROM ALL
ALL SCENES
UNSAVED SCENES
SELECT SET
-%.5
TOP
C Select “OK”
ALL SCENES
QUANTITY REQUIRED
$6$$6$$,
PREPARE AN EMPTY DISC
OK
RETURN
SELECT SET
-%.5
TOP
D Select “Yes”
ALL SCENES
DO YOU WANT TO MAKE
AN AUTOMATIC HEADLINE ON
THE DISC TOP MENU?
Yes
No
SELECT SET
E Select “EXECUTE”
ALL SCENES
EXECUTE
CANCEL
SELECT SET
F Press “OK”
ALL SCENES
COMPLETED
OK
SET
Copy completed!
TOP
TOP
• Do not turn off the power or remove the USB cable while the the hourglass or the
copy in progress screen is displayed.
Note
6
You can also choose to copy your favorite scenes. For details, refer to the
instruction manual of the Everio camera.
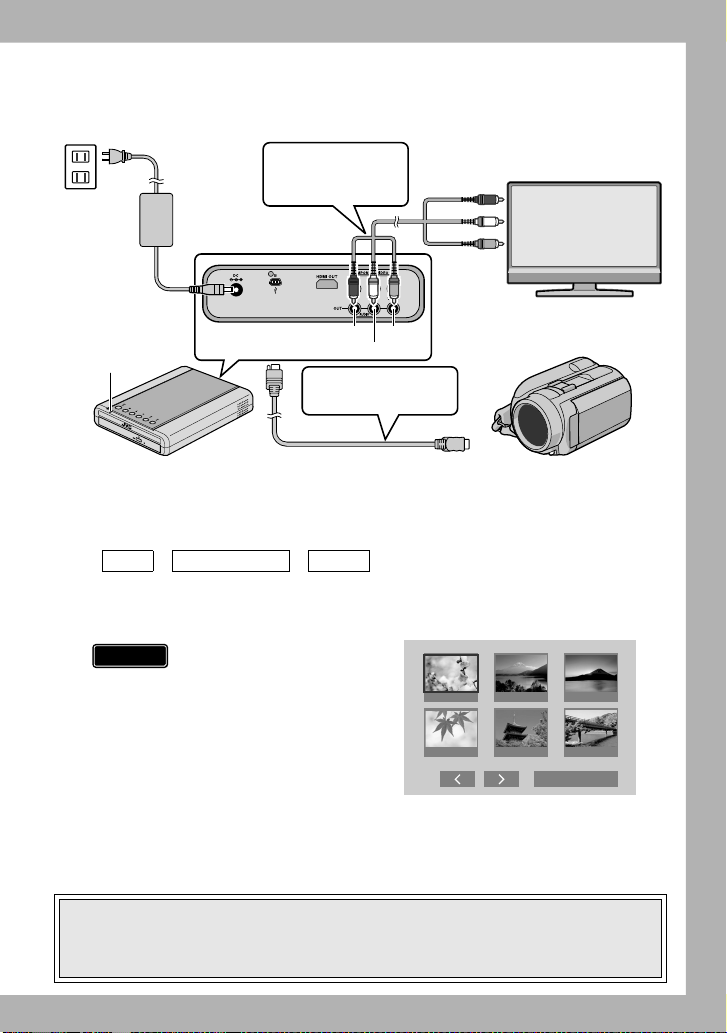
Playing Videos Stored on the DVD
1/2
A Connect this burner to the TV
Power lamp
To DC jack
Connect to the TV
with an Audio/Video
cable.
Red Yellow
White
Remove the USB
cable
Red
White
Yellow
TV
• For details, refer to “Connecting to the TV” (P.12, 13).
B Remove the USB cable
• The power lamp on the burner changes as follows.
Green Blinking orange Orange
• When the USB cable is removed, the playback navigator appears automatically.
(About 40 seconds.)
(Playback navigator screen on the TV)
Caution
•An unfinalized disc
cannot be played back
properly. Refer to the
instruction manual of the
Everio camera and
finalize the disc.
JUN.01.2008 09:51AM JUN.01.2008 11:45AM JUN.01.2008 05:09PM
AUG.01.2008 01:42PM AUG.01.2008 03:15PM AUG.01.2008 05:32PM
DIGEST PLAYBACK
C Use the selection keys on the remote control to select the video to
play back and press the ENTER button.
• When the power lamp blinks slowly in red due to a drop in the burner’s interior
temperature, some functions will not work and there will be no image displayed on
the TV screen. Wait until the power lamp stops blinking in red before operating this
burner.
Playback begins!
7

Contents
z Safety Precautions .................................................................................................. 2
z Getting Started......................................................................................................... 9
Accessories ............................................................................................................... 9
Placing the Burner..................................................................................................... 9
z Names and Functions of Each Part ..................................................................... 10
Front and Top Panel................................................................................................ 10
Rear Panel............................................................................................................... 10
Remote Control ....................................................................................................... 11
z Connecting to the TV ............................................................................................ 12
Connecting to a TV with HDMI Input Terminal ........................................................ 12
Connecting to a TV with Component Video Input Connectors ................................ 13
Connecting to a TV with Audio/Video Input Connectors.......................................... 13
z Copying Everio Video to a DVD ........................................................................... 14
Connecting to an Everio Camera ............................................................................ 14
Creating AVCHD Disc/Data Disc/DVD-Video.......................................................... 15
z Copying from PC to DVD ...................................................................................... 16
Connecting to a PC ................................................................................................. 16
Copying to a DVD.................................................................................................... 16
Computers That Can Be Used ................................................................................ 17
In
stalling CyberLink Power2Go 5.5 Lite .................................................................. 18
CyberLink Power2Go 5.5 Lite Contact Information ................................................. 20
z Folder Configuration ............................................................................................. 21
When Copying from High Definition Everio to Data Disc......................................... 21
When Copying from High Definition Everio to AVCHD Disc.................................... 22
When Creating and Storing Desired Folders and Files on a PC ............................. 22
z Playing Images Stored on the DVD...................................................................... 23
Viewing Images Copied from the High Definition Everio ......................................... 23
Viewing DVD-Video Copied from Everio ................................................................. 27
z Changing the Playback Settings .......................................................................... 29
z Operate in Conjunction with TV via HDMI ........................................................... 31
z Viewing High Quality Images ............................................................................... 33
z Settings Menu ........................................................................................................ 34
Menu Operation Procedures ................................................................................... 34
Settings Menu Items and Descriptions .................................................................... 35
z Screen Display
z Troubleshooting .................................................................................................... 41
z Error Messages...................................................................................................... 45
z Other Information .................................................................................................. 46
z Specifications ........................................................................................................ 48
s..................................................................................................... 39
8
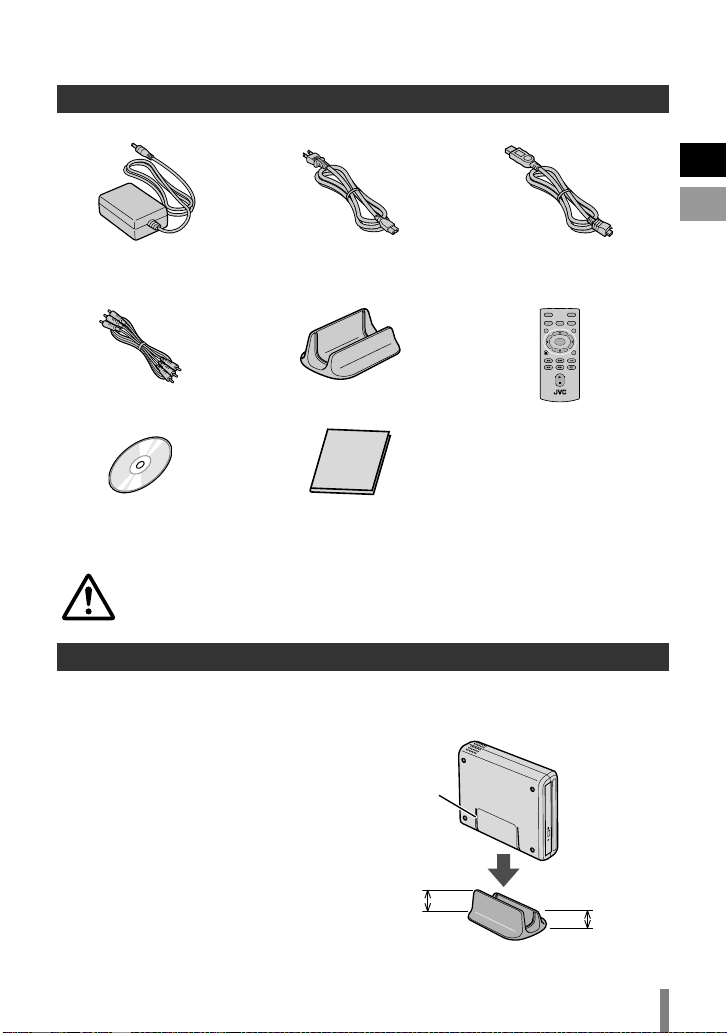
Getting Started
Accessories
If there are any items missing, please consult your authorized dealer.
EN
ES
AC adapter
(AP-V50U)
Audio/Video cable
DVD-R (blank disc) x 1
CD-ROM (data writing
software) x 1
Do not use the provided AC adapter and power cord for other devices. In
addition, do not use AC adapter and power cord other than those provided
with this burner. Doing so may result in electric shock or fire.
Power cord
Stand
Instruction manual
(this manual), other
printed material
USB cable
Mini A – Mini B type
Remote control
(RM-V55U)
Placing the Burner
o Horizontal orientation
Take note of the top and bottom of the burner and place it in the horizontal
orientation.
o Vertical orientation
Align the groove on the bottom of
this burner with the bulge on the
stand and fix the burner securely on
the stand.
Groove
High side
Low side
9
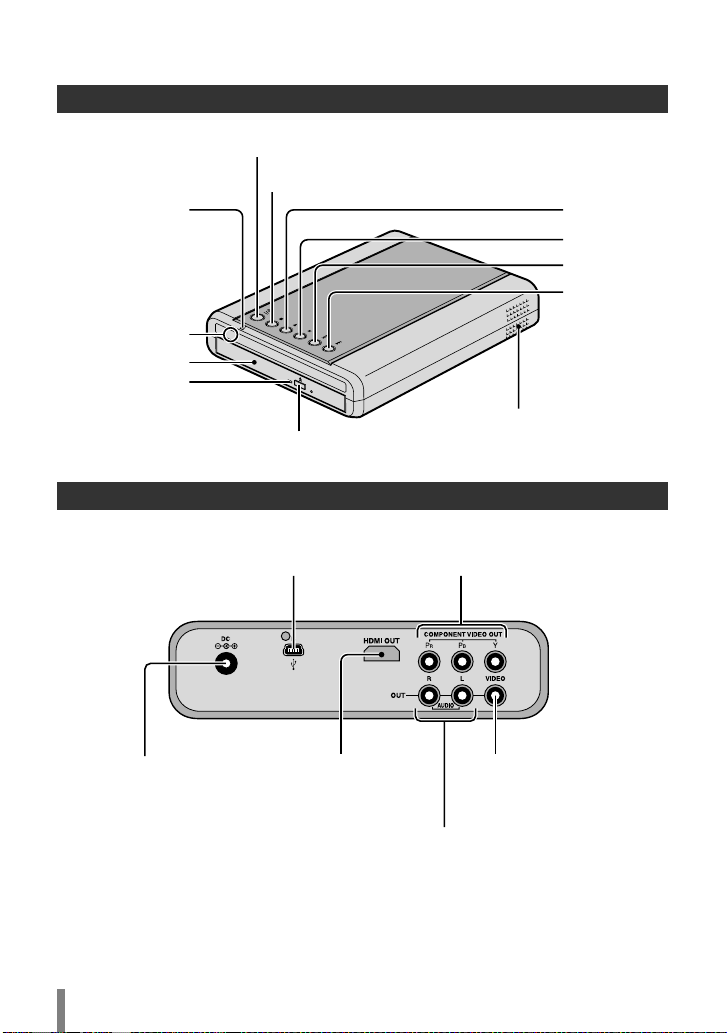
Names and Functions of Each Part
Front and Top Panel
Power (On/Off)
Stop
Power lamp
Power on: orange
USB connected: green
Remote
control sensor
Tray
Access lamp
To eject tray (P. 5)
Rear Panel
Ventilation holes
Do not block these
ventilation holes.
Play
Pause
Reverse skip
Forward skip
Connect to the Everio camera (P. 14)
Connect to the PC (P. 16)
Connect to the
AC adapter
Connect to the TV’s
HDMI input terminal
(P. 12)
10
Connect to the TV’s component
video input connectors (P. 13)
Connect to the TV’s video
input connector (P. 13)
Connect to the TV’s audio input
connectors (P. 13)
Power (On/Off)
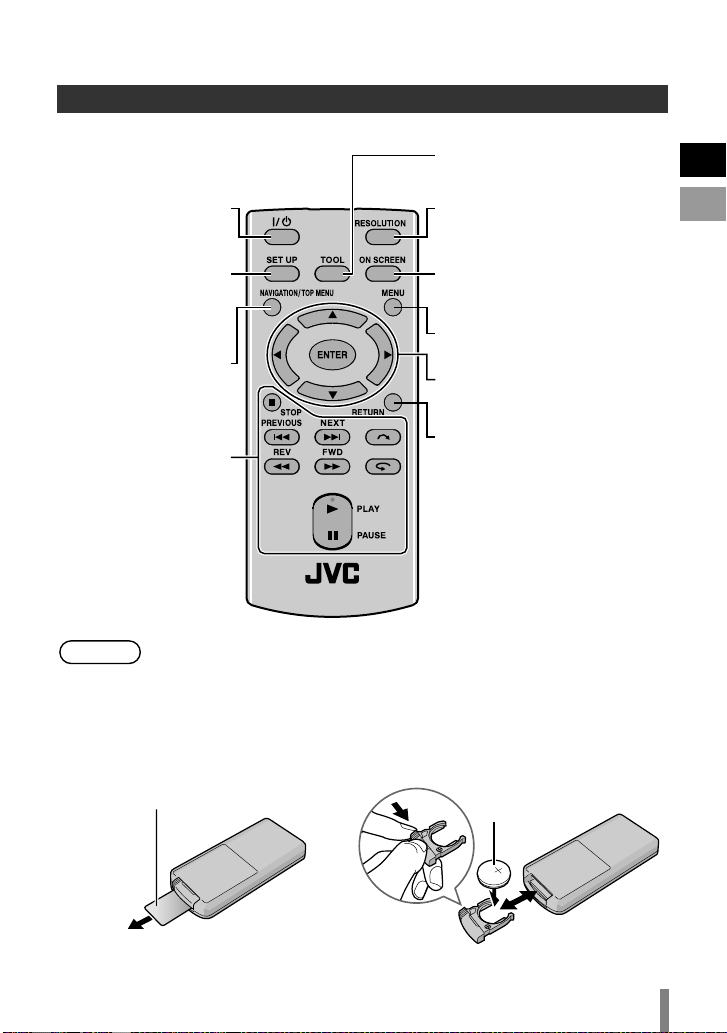
Remote Control
To display the tool menu (P. 25)
To display the playback menu
(P. 29)
To change the output
resolution of the image (P. 33)
EN
ES
To perform basic setup
(P. 34)
To display the playback
navigator (P. 23)
Basic playback
operations
(P. 25, 28)
Note
• If the burner responds poorly to the remote control, the battery of the
remote control is weak. Replace it with a new battery. Insert correctly
according to the e and d directions indicated.
•If problem occurs while using the remote control, remove the battery
and insert it again before operating the remote control.
o When using the remote
control for the first time
Pull out the insulation sheet
To display information on the
screen (P. 39)
To display the playback
navigator (P. 27)
To select/confirm
To return to the previous
creen
s
o When replacing the battery
Lithium battery
11
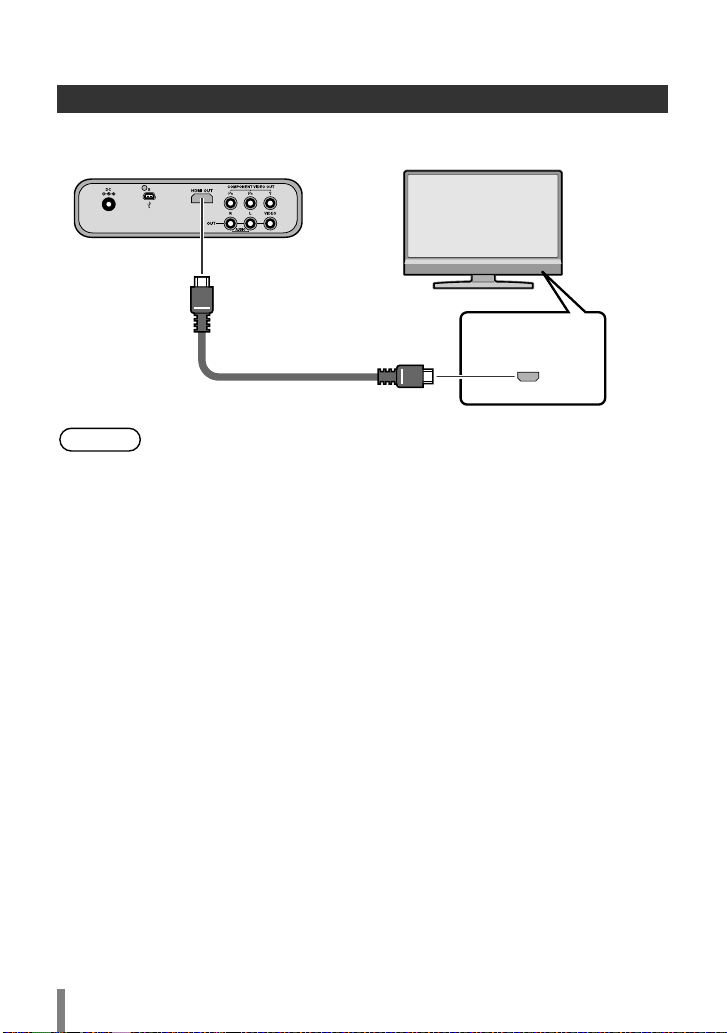
Connecting to the TV
Connecting to a TV with HDMI Input Terminal
This burner
Note
TV
HDMI input
HDMI cable (not provided)
•Images can only be displayed on a High-bandwidth Digital Content
Protection (HDCP) monitor.
• We recommend using the Category 2 HDMI cable (High Speed cable)
for viewing in higher picture quality.
12
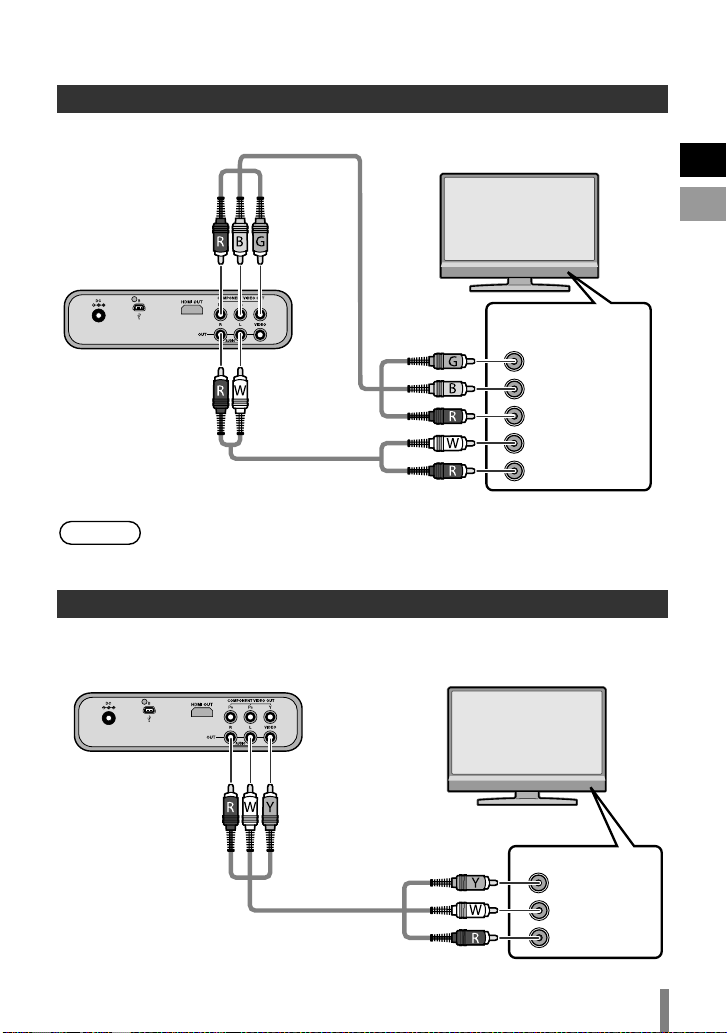
Connecting to a TV with Component Video Input Connectors
Component
video cable
(not provided)
This burner
Note
Audio cable (not provided)
• Connect to a High-bandwidth Digital Content Protection (HDCP)
monitor when using an HDMI-DVI conversion cable.
TV
Component
video input
Y
C
B/PB
CR/PR
Audio in (L)
Audio in (R)
Connecting to a TV with Audio/Video Input Connectors
This burner
TV
EN
ES
Audio/Video cable
(provided)
Video input
Video input
Audio in (L)
Audio in (R)
13
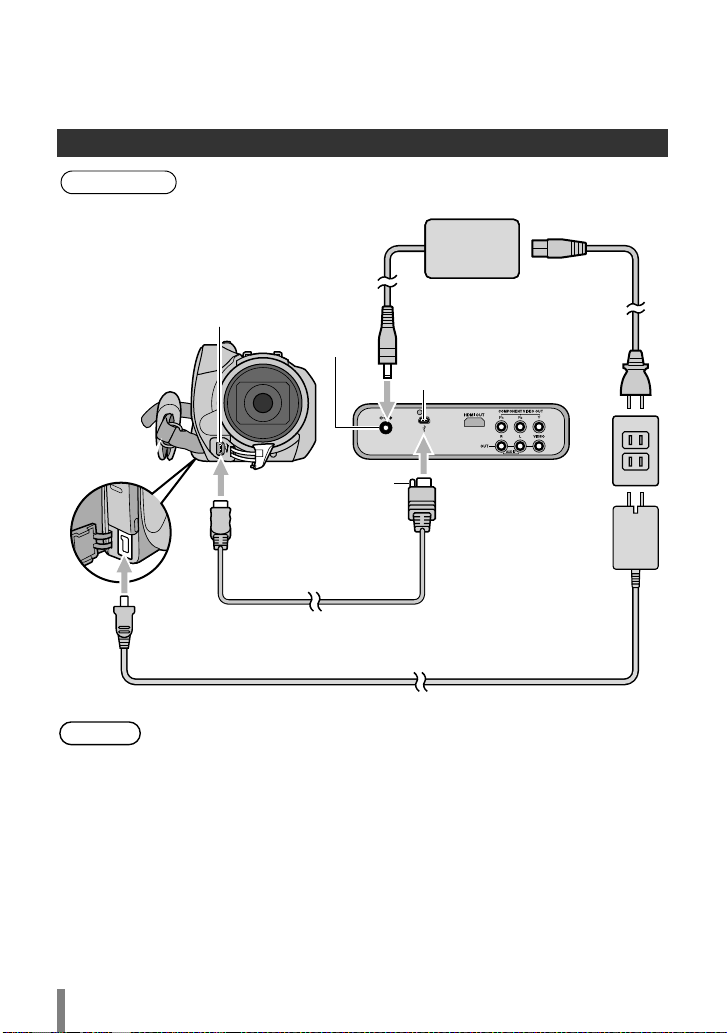
Copying Everio Video to a DVD
By connecting this burner to an Everio camera, you can easily copy recorded images to
a DVD.
Connecting to an Everio Camera
Preparations
To DC jack
Note
•Everio: Off
•This burner: Off
USB connector
DC connector
Protrusion
USB cable (provided
with CU-VD50)
• When the USB cable is connected, all buttons on the remote control of
this burner are not functional except the power button.
AC adapter
USB connector
AC adapter
14
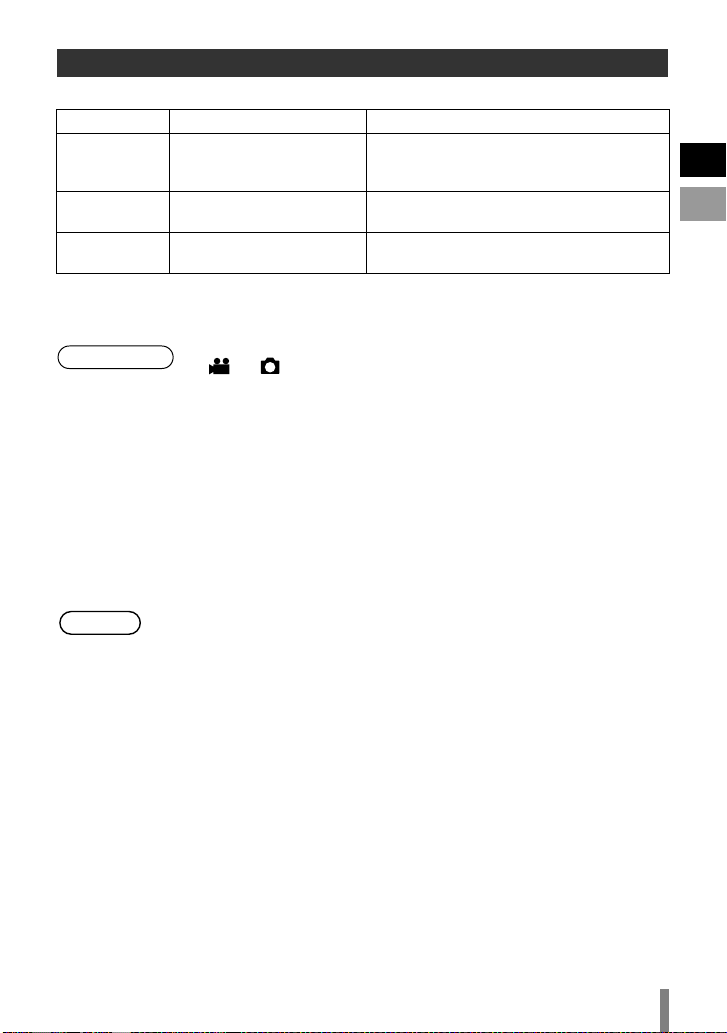
Creating AVCHD Disc/Data Disc/DVD-Video
o Discs that can be created on this burner
Copy Playback
AVCHD Disc
Data Disc
DVD-Video
• High definition Everio GZ-HD30/HD40 supports both AVCHD and MPEG-2 format
recording. Other high definition Everio supports MPEG-2 format recording. (As of
May 2008.)
Preparations
High definition videos in
AVCHD format.
High definition videos in
MPEG-2 format.
Standard definition videos
in MPEG-2 format.
• Mode switch on Everio:
or mode (depending on the item to be copied)
•This burner: On
Can be played back on AVCHDcompatible devices (such as Blu-ray
recorder) or this burner. (P. 23)
Play back on this burner. (P. 23)
Cannot be played back on other devices.
Can be played back on DVD recorder,
DVD player or this
burner. (P. 27)
A Turn on Everio
• The Backup menu will appear on the Everio’s LCD monitor.
B Insert a new disc
• Refer to page 5 on how to insert the disc.
• Refer to page 4 for the recommended discs.
C Create a AVCHD disc, data disc or DVD-Video
• Refer to the instruction manual of your Everio camera on how to crea te a
AVCHD disc, data disc or DVD-Video.
Note
• Depending on the model connected, still images cannot be copied. For
details, refer to the instruction manual of the Everio camera.
• Do not turn off this burner while data is being written to the disc. The
disc cannot be ejected during data writing. Wait until writing finishes.
• The remote control is not operable when this burner is connected to the
Everio.
EN
ES
15
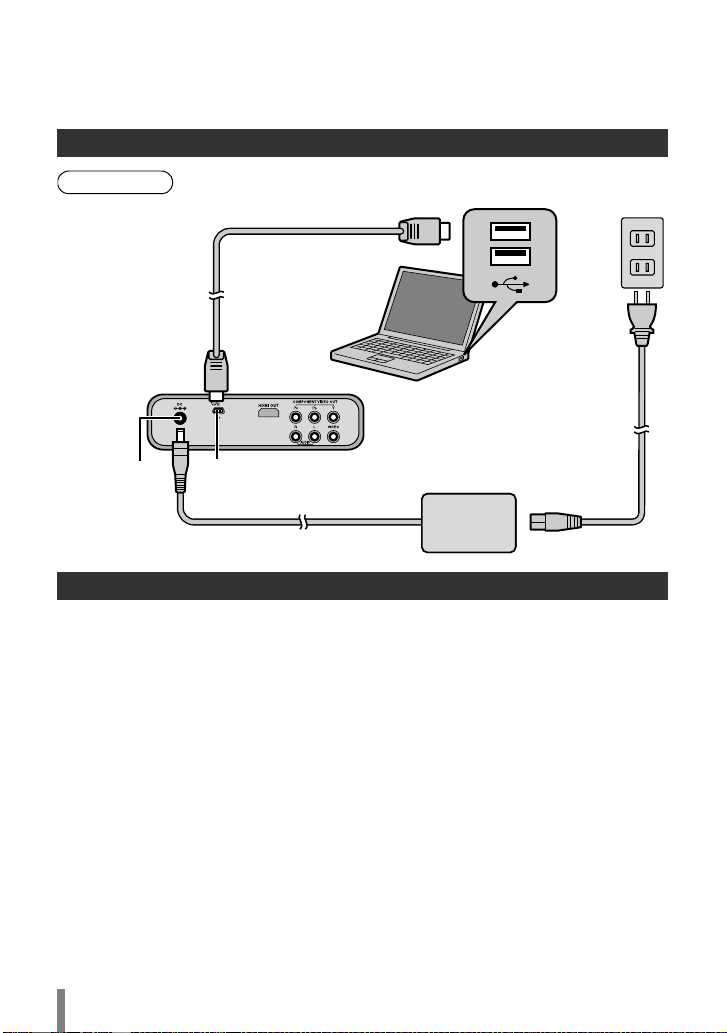
Copying from PC to DVD
This burner can be used as a DVD burner when connected to a PC. And you can use
the provided software to copy to a DVD.
Connecting to a PC
Preparations
DC connector
•Everio: Off
•This burner: Off
USB cable (provided
with Everio)
USB connector
PC
USB connector
AC adapter
Copying to a DVD
A Turn on this burner and the PC
•Install the CyberLink Power2Go 5.5 Lite software if you have not done so.
(P. 18)
B Insert a new disc
• Refer to page 5 on how to insert the disc.
• Refer to page 4 for the recommended discs.
C Use Power2Go to copy to a DVD
A Use Power2Go to create a folder.
•Use alphanumeric characters when entering the folder names or file names.
You can enter up to 40 characters.
B Under the “Burner” tab in the Power2Go “Configuration/Information” menu,
check the box next to “Close disc”. Confirm that the file system under the data
tab is set to “UDF 1.5”. Video playback will not function properly if the disc was
created with the file system
C Copy files such as JTS, TPD and JPG into the folder.
16
set to “ISO9660/Joliet”.

Note
• For details on using Power2Go, refer to the User’s guide, Help and
Readme files installed with the software. You can access the User’s
guide, Help and Rea
• To get customer support and to register the software, you need the
following product key (CD-Key):
PXNVM-NWE4G-XQD9Q-CU9DX-3FQFN-NAKUS
•This burner cannot be used to write files into CD-R or CD-RW discs.
Refer to page 51 for the recommended discs.
•This burner does not response to all the functions of Power2Go 5.5 Lite.
• Power2Go 5.5 Lite does not support conversion of audio files to MP3
format.
• When the “Enter Activation Key” screen appears while using Power2Go
5.5 Lite, close the s
dme files from the Start menu on the PC.
creen without entering the activation key.
o Removing USB cable from PC
A Carry out removing of hardware on the PC.
B Remove the USB cable.
EN
ES
Caution
• To play back disc created on a PC on this burner, follow the following
procedure.
Insert the disc into this burner. After disc recognition, press the
NAVIGATION/TOP MENU button to display the playback navigator.
(P. 23)
•For data disc created on a PC, the date and time displayed will not be
accurate.
Computers That Can Be Used
CyberLink Power2Go 5.5 Lite can be used on computers satisfying the following
conditions.
Operating
system
Connector USB 2.0/1.1 connector (*)
CPU
RAM At least 128 MB (at least 256 MB recommended)
Free hard disk
space
Display Must be capable of displaying 800 x 600 dots
* If you use USB 1.1 cable, it will take approximately 3 hours to write one DVD.
Windows XP Home Edition (pre-installed)
Windows XP Professional (pre-installed)
Windows Vista Home Basic (32-bit edition, pre-installed)
Windows Vista Home Premium (32-bit edition, pre-installed)
Intel Pentium III, at least 800 MHz
(Intel Pentium 4, at least 2 GHz recommended)
At least 50 MB for installation
At least 5 GB recommended for creating DVDs
17

Installing CyberLink Power2Go 5.5 Lite
Caution
• Do not play the provided CD-ROM in an audio player. It is not an audio
CD. Playing this CD-ROM in an audio player will result in a loud high
noise. It may also damage the circuit and speaker.
A Insert the provided CD-ROM in the PC
Windows Vista:
A Click “Run INSTALL.EXE” on the “AutoPlay” screen.
B Click “Continue” on the “User Account Control” screen.
C The “Choose Setup Language” screen appears.
Windows XP:
• After a while, the “Choose Setup Language” screen appears.
B Confirm the language and then click
“OK”
• The following screen appears.
C Click “Next”
• The “License Agreement” screen appears.
D Confirm the contents and then click
“Yes”
• The “Customer Information” screen appears.
18

E Enter the “User Name” and “Company
Name” and then click “Next”
F Follow the on-screen intructions
•Installation starts.
After a while, the “InstallShield Wizard Complete” screen appears.
G Click “Finish”
• The computer will restart and installation is
completed.
• If the screen on the right does not appear,
proceed to step
H.
H Click “Finish”
• The “CyberLink Power2Go 5.5” Readme
screen appears.
EN
ES
I Read the contents of the Readme
19

CyberLink Power2Go 5.5 Lite Contact Information
For information on CyberLink Power2Go 5.5 Lite or other products, use the following
contact information.
Telephone/fax support
Location Language
Germany
English / French /
Spanish
Office hours
(Mon. to Fri.)
9:00 am to 5:00 pm +49-700-462-92375 +49-241-70525-25
Phone # Fax #
Paid voice support
Location Language Office hours (Mon. to Fri.) URL
U.S.A. English 1:00 pm to 10:00 pm CST
http://www.cyberlink.com/english/
cs/support/
Support web/e-mail
Language URL/e-mail address
English http://www.cyberlink.com/english/cs/support/new_site/support_index.html
French /
Spanish
goCyberlink@aixtema.de
20

Folder Configuration
This shows the folder configuration when files are copied from a high definition Everio
camera or a PC to a DVD.
When Copying from High Definition Everio to Data Disc
\
ROOT
*1
[EVERIO_V]
EVERIO VIDEO
(Back-up folders)
[BACKUP]
NORMAL BACK-UP
(Everio: CREATE FROM ALL)
[08060101]
[08060502]
Video files
[MOV001.TOD]
[MOV002.TOD]
EN
ES
*1
[EVERIO_S]
EVERIO IMAGE
[DATE]
DATE BACK-UP
(Everio: CREATE BY DATE)
[EVENT]
EVENT BACK-UP
(Everio: CREATE BY EVENT)
[FILES]
FILE BACK-UP
(Everio: SELECT FROM SCENES)
[PLAYLIST]
PLAYLIST BACK-UP
(Everio: CREATE BY PLAYLIST)
[BACKUP]
NORMAL BACK-UP
[DATE]
DATE BACK-UP
[FILES]
FILE BACK-UP
[08060101]
[08060101]
[08060101]
[08060101]
(Back-up folders)
[08060101]
[08060101]
[08060101]
Still image files
[PIC_0001.JPG]
[PIC_0002.JPG]
*1
Video and still image files recorded on a high definition Everio camera that are
copied to this burner will be stored in the “EVERIO_V” and “EVERIO_S” folders.
21

When Copying from High Definition Everio to AVCHD Disc
Video files
\
ROOT
[BDMV]
[EVERIO_I]
[STREAM]
[BACKUP]
[CLIPINF]
[PLAYLIST]
index.bdmv
MovieObject.bdmv
00000.m2ts
00001.m2ts
When Creating and Storing Desired Folders and Files on a PC
\
ROOT
Video/still image files
*2, 3
[USER_DAT] [USER_DAT2]
[USER_DAT3] [USER1.JTS]
[USER2.TPD]
*2 Create folders with Power2Go and copy the desired video and/or still image files
into the folders. You can use any folder names and file names according to your
preference. (Indicated as “USER_DAT” in the illustration.)
*3 Use Power2Go to copy the “USER_DAT” folders to the DVD. (P. 16)
*4 Files with the extension “.TPD” or “.JTS” are high definition Everio video files edited
on the PC.
• Refer also to “Data format (extension)” (P. 49).
Caution
•You can create folders and files with any names according to your
preference; however do not use “EVERIO_V” or “EVERIO_S” as the
folder name.
•Use alphanumeric characters when entering the folder names or file
names. You can enter up to 40 characters.
•You can create up to 6 levels of folders. Playback is not possible if more
than 6 levels are created.
• The total path length of the file is up to 240 characters.
*4
22

Playing Images Stored on the DVD
You can play back video and still images of Everio stored on a DVD.
Viewing Images Copied from the High Definition Everio
o To start viewing immediately after storing images on a DVD
A Remove the USB cable. (P. 14)
B Connect this burner to the TV.
• For details on connection, refer to “Connecting to the TV” (P. 12, 13).
• Check that the power lamp of this burner lights up in orange.
• After pressing the power button, it will take about 25 seconds to display
the intermediate screen. (P. 34)
A Insert the disc containing the copied images and the playback
navigator will appear
1/2
JUN.01.2008 09:51AM JUN.01.2008 11:45AM JUN.01.2008 05:09PM
AUG.01.2008 01:42PM AUG.01.2008 03:15PM AUG.01.2008 05:32PM
DIGEST PLAYBACK
AVCHD disc
NAVIGATION
IMAGE
VIDEO
FOLDER
001
002 003 004
JUN.01.2008 10:20AM JUN.01.2008 10:35AM JUN.01.2008 11:03AM JUN.01.2008 11:17AM
JUN.01.2008 11:21AM JUN.01.2008 01:34PM JUN.01.2008 03:41PM JUN.01.2008 03:56PM
PREVIOUS NEXT
SELECT
EXIT TOOL MENU
TOP MENU TOOL
Data disc (video images)
08060101
ENTER
RETURN
001/002
PAGE
008007006005
• It will take about 40 seconds to display the playback navigator.
•To alternate between video and still images on a disc that contains video and still
images, switch using the TOOL MENU. (P. 25)
•For data disc (video), the file being selected is played back on its thumbnail.
(Motion thumbnail) It will take several second
s to display all the eight thumbnails.
And a little bit more time to show the motion thumbnail.
• The menu displayed may differ from the menu shown above when an AVCHD
disc created on other devices is inserted.
NAVIGATION
DVD-R
VIDEO
PREVIOUS NEXT
Data disc (still images)
IMAGE
FOLDER
08060101
SELECT
ENTER
EXIT TOOL MENU
TOP MENU TOOL
RETURN
001/002
PAGE
EN
ES
DVD-R
B Select and confirm on the file using the remote control
A Select
Note
B Confirm
•To stop an AVCHD disc during playback, press the STOP button. When
playback stops, the intermediate screen will appear. (P. 34)
To display the playback n
button.
•Playback of the selected file starts.
•You can also press the PLAY button to play
back.
•You can browse the pages using the
PREVIOUS / NEXT ( / ) buttons.
avigator, press the NAVIGATION/TOP MENU
23

o Digest Playback (for AVCHD disc only)
•Use the selection keys to select “DIGEST PLAYBACK” and press the ENTER
button. The videos will be played back for several seconds consecutively.
•Press the NAVIGATION/TOP MENU button during playback to display the sub
menu.
TO NORMAL PLAYBACK : Plays back the video normally.
TO INDEX MENU : Returns to the playback navigator screen.
o To play back images in a different folder [for data disc (video/still
images) only]
A Display the folder list
A Select folder name
NAVIGATION
B Confirm
PREVIOUS NEXT
B Select the folder to play back
• The playback navigator appears when the ENTER button is pressed. Select and
confirm on the file to be played back.
A Select
B Confirm
•You can also select the folder from the “TOOL MENU” (P. 25).
•Files are automatically sorted into the folders created depending on the item selected
in the Backup menu of the high definition Everio.
• To play back images copied from the PC, select the edited video files. (P. 22)
• Select a folder name when you have created a folder on the PC according to your
preference. (P. 22)
Caution
• If images do not appear, check the resolution setting. (P. 33)
•For short video clips (less than 3 seconds), the image will freeze for a few
seconds before playing the next file. (P. 44)
•For data disc (video), the image will freeze for a few seconds before
continuing to the next folder.
PREVIOUS NEXT
Folder Name
IMAGE
VIDEO
FOLDER
001
JUN.01.2008 10:20AM JUN.01.2008 10:35AM JUN.01.2008 11:03AM JUN.01.2008 11:17AM
JUN.01.2008 11:21AM JUN.01.2008 01:34PM JUN.01.2008 03:41PM JUN.01.2008 03:56PM
NAVIGATION
VIDEO
ROOT
001
*5.!- *5.!- *5.!- *5.!-
*5.!- *5.0- *5.0- *5.0-
TOP MENU TOOL
08060101
002 003 004
ENTER
SELECT
EXIT TOOL MENU
RETURN
TOP MENU TOOL
FOLDER
08060101
EVERIO VIDEO
NORMAL BACK-UP
002 003 004
08060101
08060102
08060501
08060701
08061301
08061302
DATE BACK-UP
08060101
08060501
08060701
08061301
ENTER
SELECT
EXIT TOOL MENU
RETURN
DVD-R
PAGE
001/002
008007006005
DVD-R
001/002
008007006005
Note
24
• Depending on the still image standards, some ima
ges are displayed
using a “?” thumbnail, and playback may fail in this case.
• Progressive JPEG files and special files created on the PC cannot be
played back. Videos that are not playable are also displayed as “?”.
•It may take some time to display the images if the size is too large or
when there
are too many files.
•For data disc (still images) created on a PC, files with less than 640 x
480 resolution will not be displayed in full screen.

o Displaying the TOOL MENU [for data disc (video/still images) only]
001/002
001
06.01 11:17
06.01 15:56
DVD-R
08060101
002 003 004
008007006005
*5.!-
*5.0-
TOP MENU TOOL
You can switch between video/still images or display file details from the TOOL
MENU.
Operate when playback navigator is displayed
A Select
B Confirm
NAVIGATION
PREVIOUS NEXT
TOOL MENU
IMAGE
VIDEO
FOLDER
JUN.01.2008 10:20AM JUN.01.2008 10:35AM JUN.01.2008 11:03AM
JUN.01.2008 11:21AM JUN.01.2008 01:34PM JUN.01.2008 03:41PM
ENTER
SELECT
EXIT TOOL MENU
RETURN
TOOL MENU
BACK
FOLDER SELECT
SWITCH TO IMAGE MODE
SHOW DETAIL
TOOL MENU
Select an item with the selection keys and press the ENTER button.
• FOLDER SELECT: Displays the folder list.
• SWITCH TO IMAGE MODE : Switches from video to still image.
(SWITCH TO VIDEO MODE: Switches from still image to video.)
• SHOW DETAIL:Displays the file name, folder name, recorded date, and playback
tion (for video) or image size (for still image). The playback
dura
duration display for video will not be available if the file has not been
played back before.
Note
• When the disc contains both videos and still images, the videos will be
displayed first. To view still images, select “SWITCH TO IMAGE MODE”
from the TOOL MENU.
o Buttons that can be used during playback (AVCHD / data disc)
Remote Control Button
PLAY
Video Image Playback Still Image Playback
Pressing this button when in
the paused or variable speed
playback mode resumes
normal playback.
Description
Starts the slide show.
EN
ES
PAUSEPauses playback. Pauses the slide show.
STOP Stops playback. Stops the slide show.
Fast-forwards playback.
Changes in the order of Search
+1 to Search +3 with each
press.
Press the button when in the
FWD
paused mode to enable forward
playback frame by frame.
Press and hold the button to
slow down the playback speed.
Pressing the button each time
changes the playback speed
between 1/16x, 1/4x, and 1/2x.
b
25

Remote Control Button
REV
NEXT Displays the next video image.
PREVIOUS
Skip
Replay
ENTER b
NAVIGATION
/TOP MENU
TOOL
Description
Video Image Playback Still Image Playback
Rewinds playback. Changes in
the order of Search b1 to
Search b3 with each press.
Press the button when in the
paused mode to enable reverse
playback frame by frame. (Not
available for AVCHD disc.)
Reverse playback at slow
speed is not possible.
Displays the next still
image.
Displays the beginning of the
video image.
Advances the playback position
by about 30 seconds. Pressing
the button continuously
advances the playback position
by the number of times it is
pressed.
Moves the playback position
backward by about 7 seconds.
Pressing the button
continuously moves the
playback position backward by
the number of times it is
pressed.
Displays the playback
navigator.
Displays the playback menu.
(P. 29)
Displays the previous still
image.
Rotates the still image by
90 degrees in the
clockwise direction.
(When in paused mode.)
Rotates the still image by
90 degrees in the anti-
clockwise direction.
(When in paused mode.)
Enlarges the still image.
(2-step)
You can select the
position to enlarge using
the Up/Down/Left/Right
buttons. Press the
RETURN button to restore
the original size.
(When in paused mode.)
Displays the playback
navigator.
Displays the playback
menu. (P. 29)
b
26

Viewing DVD-Video Copied from Everio
o To start viewing immediately after storing images on a DVD
A Remove the USB cable. (P. 14)
B Connect this burner to the TV.
• For details on connection, refer to “Connecting to the TV” (P. 12, 13).
• Check that the power lamp of this burner lights up in orange.
• After pressing the power button, it will take about 25 seconds to display
the intermediate screen. (P. 34)
o To play back the copied files
A Insert the disc containing the copied images
•Playback starts automatically.
o To select and play back a desired file
A Insert the disc containing the copied images
•Playback starts automatically.
B During playback, press the NAVIGATION/TOP MENU button to
display the playback navigator
• Depending on the disc, you can display the playback navigator by pressing the
MENU button.
EN
ES
C Select and confirm on the file to play back
A Select
B Confirm
Note
Caution
•To stop playback, press the STOP button. When playback stops, the
intermediate screen will appear. (P. 34)
To display the playback navigator, press the NAVIGATION/TOP MENU
button.
• If images do not appear, check the resolution setting. (P. 33)
27

o Buttons that can be used during playback (DVD-Video)
Remote Control Button Description
PLAY
PAUSEPauses playback.
STOP Stops playback.
FWD
REV
NEXT Displays the next video.
PREVIOUS Displays the previous video.
Skip
Replay
TOOL Displays the playback menu. (P. 29)
Pressing this button when in the paused or variable speed
playback mode resumes normal playback.
Fast-forwards playback. Changes in the order of Search +1
to Search +3 with each press.
Press the button when in the paused mode to enable
forward playback frame by frame.
Press and hold the button to slow down the playback
speed. Pressing the button each time changes the
playback speed between 1/16x, 1/4x, and 1/2x.
Rewinds playback. Changes in the order of Search b1 to
Search b3 with each press.
Press the button when in the paused mode to enable
reverse playback frame by frame.
Press and hold the button to slow down the reverse
playback speed. Pressing the button each time changes
the reverse playback speed between b1/16x and b1/4x.
Advances the playback position by about 30 seconds.
Pressing the button continuously advances the playback
position by the number of times it is pressed.
Moves the playback position backward by about 7 seconds.
Pressing the button continuously moves the playback
position backward by the number of times it is pressed.
28

Changing the Playback Settings
You can alter the method for playing back video/still images as well as the image
settings.
Operate during playback
indicates the default settings during purchase of this product.
DISC SETTING If the disc contains more than one audio language, subtitle
language or has multi-angle scenes, you can select with this
setting.
AUDIO LANGUAGE Set the audio language to be played back.
SUBTITLE Set the subtitle language to be displayed.
CHANGE ANGLE Switch the angle (camera) to be played back.
PLAYBACK SETTING
REPEAT
For configuring settings on video playback and repeat playback of slide shows.
OFF Do not repeat.
TITLE Repeats playback of the title. (For video images only.)
CHAPTER
FOLDER
Repeats playback between the chapters. (For AVCHD
discs and DVD-Videos only.)
Repeats playback of files within a folder. (For files
stored on the PC only.)
Repeats playback of all files*. (For data disc stored on
high definition Everio only.)
ALL
* The files in the current folder are played back
repeatedly when you play ba
ck from the playback
navigator.
A-B
Repeats playback between two predetermined points A
and B. (For DVD-Videos only.)
CHANGE TITLE (For AVCHD discs and DVD-Videos only)
Jumps to the specified title.
CHANGE CHAPTER (For AVCHD discs and DVD-Videos only)
Jumps to the specified chapter.
SLIDESHOW INTERVAL (For still images only)
5 SEC /
10 SEC /15 SEC For specifying the time for displaying images.
SLIDESHOW EFFECTS (For still images only)
For specifying the fade effect when switching to another image.
OFF Disable fade effect.
ON Enable fade-in or fade-out from black color.
REPEAT
CHANGE TITLE
CHANGE CHAPTER
PLAYBACK SETTING
OFF
EN
ES
29

VIDEO SETTING You can only configure settings for video images.
PICTURE QUALITY
For specifying the video image quality.
NORMAL Set to this value under normal circumstances.
CINEMA Plays back in cinema-like picture quality.
FINE Plays back in clear sharply defined picture quality.
SOFT Plays back in soft textured picture quality.
USER SETTING
DIGITAL NOISE REDUCTION
For specifying whether to enable noise removal from the image.
OFF Disable noise removal.
ON Enable noise removal.
DETAIL SETTING
For specifying the advanced settings when “PICTURE QUALITY” is set to “USER
SETTING”.
CONTRASTFor specifying the image contrast level.
BRIGHTNESS For specifying the image brightness level.
SHARPNESS For specifying the image contour.
COLOR For specifying the color intensity of the image.
GAMMA For specifying the image gray level.
3DNR For specifying the image noise reduction.
PROGRESSIVE OUTPUT
For playing back the source material after converting to an appropriate progressive
video.
AUTO1
AUTO2
VIDEO
Plays back images in the picture quality specified in
“DETAIL SETTING”.
Automatically detects the film material and video material
and converts to the appropriate progressive video.
In addition to “AUTO1”, automatically detects the 30fps
progressive video and converts to the appropriate
progressive video.
Converts the video material to the appropriate progressive
video.
Note
30
•Changing the setting may have no effect on some images.

Operate in Conjunction with TV via HDMI
Connecting this burner to an HDMI-CEC-enabled TV using the HDMI cable allows you
to utilize the following convenient functions.
Preparations
Operation method 1
•Insert a disc.
(Press the PLAY or
NAVIGATION/TOP
MENU button if the
playback navigator does
not appear.)
• Connect an HDMI cable between this
burner and the TV. (P. 12)
•Turn on the TV and set the HDMI-CEC
related setting in its menu to “on”. (For
details, refer to the instruction manual of
the TV.)
•Turn on this burner and set “CONTROL
WITH HDMI” under “CONNECTION
SETTING” in the settings menu to “ON”.
(P. 34, 37)
HDMI cable (not provided)
• The TV automatically
CONNECTION SETTING
SELECT ENTER
EXIT
16:9
480i
RETURN
MONITOR TYPE
COMPONENT OUTPUT
HDMI VIDEO MODE
switches to the HDMI input.
(Turn on the TV
beforehand.)
EN
ES
Operation method 2
•This burner turns off
automatically.
Note
• Some TV will turn on automatically and switch to the HDMI input just by
turning on this burner.
• Depending on the TV connected, the onscreen display language of this
burner will automatically switched to the language that was being
selected for the TV when the burner is turned on.
(This is applicable only if this burner
the TV.)
To use this burner using a language that differs from the onscreen
display language of the TV, set “CONTROL WITH HDMI” to “OFF”.
•Malfunction may occur when devices such as amplifier and selector are
connected. Set “CONTROL WITH HDMI” to “OFF”.
•Turn off the TV.
supports the language selected for
31

Note
Caution
• HDMI-CEC (Consumer Electronics Control) is an industry standard that
enables interoperability between HDMI-CEC compliant devices that are
connected via HDMI cables.
•Not all HDMI-compatible devices comply with the HDMI-CEC standard.
The HDMI control function of this burner will not work when connected
to these devices.
•This burner is not guaranteed to operate with all HDMI-CEC-enabled
devices.
• Depending on the specifications of each HDMI-CEC-enabled device,
some functions may not work with this burner. (For details, refer to the
instruction manual of your TV.)
• Unintended operations may occur with some connected devices. In
these cases, set “CONTROL WITH HDMI” to “OFF”.
• HDMI control does not function when the USB cable is connected.
Remove the USB cable if you want to use the HDMI control function.
• HDMI control does not function immediately after inserting the power
cord to the AC outlet. Press the power button on this burner to turn it on.
• If the HDMI cable connection is
operations to allow this burner and the connected devices to recognize
each other.
A With the TV turned on, turn off and on this burner again.
B Set the “CONTROL WITH HDMI” under “CONNECTION SETTING” in
the settings menu to “OFF”, then set to “ON” again.
changed, perform the following
32

Viewing High Quality Images
You can change the video output resolution when this burner is connected to a high
definition TV using a HDMI or component video cable.
Operate when in the intermediate screen*
* To display the intermediate screen, refer to page 34.
•Press the button each time to change the output resolution.
o Connection using HDMI cable (“HDMI VIDEO MODE” : “ON”)
(Resolutions not supported by the TV are not displayed.)
AUTO 480p 720p 1080i 1080p
o Connection using component video cable
(“HDMI VIDEO MODE” : “OFF”, HDMI cable not connected)
480i 480p 720p 1080i
o Connection using video cable
Setting is not necessary. “480i” is output regardless of the setting.
Caution
• If this burner is connected to a TV that does not support the preset output
resolution using a HDMI cable, the setting switches automatically to
“AUTO”.
• When this burner is connected using a component video cable with the
output resolution set to “1080i” or “720p”, the output resolution will be set
to “480i” or “480p” if a
DVD-Video disc is inserted.
(Intermediate screen)
Current resolution: AUTO
EN
ES
Note
• When the HDMI cable is connected, the resolution of the component
connectors is fixed at “480i”. (“HDMI VIDEO MODE” : “ON”)
• When the resolution is set to “480p” for the HDMI cable connection, the
“4:3 PAN&SCAN” or “4:3 LETTERBOX” display format under
“MONITOR TYPE” in the settings menu will be selected if the image
size is 4:3. (P. 35)
33

Settings Menu
Change the settings of this burner according to the environment of use.
Menu Operation Procedures
Caution
Example: When changing “MONITOR TYPE” under “CONNECTION SETTING” from
A Display the settings menu
B Select “CONNECTION SETTING”
• The SET UP button can only function when the intermediate screen
(screen without image display) is displayed. If the playback navigator is
displayed, press STOP (for AVCHD disc and DVD-Video) or
NAVIGATION/TOP MENU (for data disc) to clear the screen.
“16:9” to “4:3 LETTERBOX”
A Select
MONITOR TYPE
COMPONENT OUTPUT
HDMI VIDEO MODE
CONNECTION SETTING
16:9
480i
B Confirm
C Select “MONITOR TYPE”
A Select
B Confirm
D Select “4:3 LETTERBOX”
A Select
B Confirm
E Close the settings menu
34
EXIT
MONITOR TYPE
COMPONENT OUTPUT
HDMI VIDEO MODE
EXIT
MONITOR TYPE
COMPONENT OUTPUT
HDMI VIDEO MODE
EXIT
SELECT ENTER
CONNECTION SETTING
SELECT ENTER
CONNECTION SETTING
SELECT ENTER
RETURN
16:9
480i
RETURN
16:9
16:9
16:9FULL
480i
4:3 PAN&SCAN
4:3LETT ERBOX
RETURN

Settings Menu Items and Descriptions
indicates the default settings during purchase of this product.
¹ Menu items for which setting cannot be changed will appear grayed out on the
screen.
DISC SETTING If the disc contains more than one audio language, subtitle
AUDIO LANGUAGE Set the audio language to be played back.
SUBTITLE Set the subtitle language to be displayed.
CHANGE ANGLE Switch the angle (camera) to be played back.
VIDEO SETTING
BLACK LEVEL CONTROL
For specifying the black level of the video image.
DARKER Set to this value under normal circumstances.
BRIGHTER Set to this value to brighten the dark areas of the video image.
AUDIO SETTING
DYNAMIC RANGE COMPRESSION
For specifying the dynamic range (ratio between strong and weak signals) of audio
sound. Minute sounds may be heard when the dynamic range is compressed.
ON Outputs audio sound after compressing the dynamic range.
OFF Outputs the recorded audio sound without compressing.
CONNECTION SETTING
MONITOR TYPE
Specify the screen size according to the TV connected. (If the screen size of the TV
is fixed, images displayed on the TV will not change even if you change the settings
of the burner.)
16:9
16:9FULL
4:3 PAN&SCAN
4:3 LETTERBOX
language or has multi-angle scenes, you can select with this
setting.
When connecting to a wide-screen TV (16:9)
(A black band will appear on both left and right sides for 4:3
images.)
When connecting to a wide-screen TV (16:9)
(4:3 images will be stretched sideways.)
When connecting to a 4:3 TV
(The left and right sides of 16:9 images will be missing.)
When connecting to a 4:3 TV
(A black band will appear at the top and bottom for 16:9
images.)
EN
ES
Note
•Changing the
setting may have no effect on some images.
35

CONNECTION SETTING
COMPONENT OUTPUT
For specifying the output resolution setting of the component connectors. You can
also specify the setting using the remote control. (P. 33)
480i During output in D1 (480i)
480p During output in D2 (480p)
720p During output in D3 (1080i)
1080i During output in D4 (720p)
HDMI SETTING
HDMI VIDEO MODE
Specify this setting when you are using the burner with both the HDMI terminal
and component connectors connected.
ON Outputs with priority given to the HDMI terminal.
OFF Outputs with priority given to the component connectors.
HDMI OUTPUT
For specifying the output resolution setting of the HDMI terminal. You can also
specify the setting using the remote control. (P. 33)
AUTO Set to this value under normal circumstances.
480p During output in D2 (480p)
720p During output in D3 (1080i)
1080i During output in D4 (720p)
1080p During output in D5 (1080p) (P. 12)
24p OUTPUT
JVC camcorders do not support 1080/24p recording. (As of May 2008.)
Specify this setting when viewing video images recorded by other devices in
1080/24p on a TV that supports 1080/24p via HDMI connection.
Select this value to output the image
AUTO
OFF Set to this value under normal circumstances.
x.v.Color
Specify this setting when viewing video images recorded in x.v.Color on a TV that
supports x.v.Color. This enhances viewing through reproducing colors closely to
their natural colors.
AUTO Set to this value under normal circumstances.
OFF
supports 1080/24p. Set to “OFF” if the images cannot be
played back properly.
Set to this value when the video images are distorted or when
the colors are not correctly reproduced.
s in 1080/24p to a TV that
36

Deep Color
This function works during playback. Specify this setting when viewing images on
a TV that supports Deep Color. This allows viewing of high definition images of
30-bit and 36-bit color depths that are higher than the full 24-bit color.
AUTO
OFF Set to this value under normal circumstances.
HDMI ENHANCE SETTING
Specify this setting when connected to a TV that comes with the DVI input
terminal using an HDMI-DVI conversion cable.
STANDARD Set to this value under normal circumstances.
ENHANCED
CONTROL WITH HDMI
For specifying whether to use the HDMI-CEC function which allows the TV to
operate in conjunction with this burner. (P. 31)
OFF Do not operate in conjunction with TV.
ON Operate in conjunction with TV.
Select this value to view high definition images on a TV that
supports Deep Color. Set to “OFF” if the images cannot be
played back properly.
Set to this value when the black and white colors of the video
image are not clear.
EN
ES
37

OTHER SETTING
RESUME *
For specifying whether to memorize the stop position.
ON Memorize the stop position.
OFF Do not memorize the stop position.
ON SCREEN GUIDE
For specifying whether to display the playback status information.
AUTO Display for 5 seconds.
OFF Do not display.
ON SCREEN LANGUAGE
For specifying the language to be displayed for the settings menu screen and others.
“ENGLISH” is set as the default language.
( / ENGLISH / FRANÇIAS / DEUTSCH / ITALIANO / NEDERLANDS /
PORTUGUÊS / ESPAÑOL / / / / РУССКИЙ)
SCREEN SAVER
For specifying whether to activate the screensaver.
ON
OFF Do not activate the screensaver.
INITIALIZE SETTING
Restores the settings to the default state at the time of purchase.
DATE DISPLAY STYLE (For data disc only)
Sorts the dates in order. (year.month.day / month.day.year / day.month.year)
TIME DISPLAY CHOICE (For data disc only)
For specifying the time display. (12h / 24h)
*For resume function, the stop position will be reset if the burner is connected to an
Everio or a PC via the USB cable, or when the burner is turned off and the disc is
removed.
Activates the screensaver when this burner is not operated for
an interval of 5 minutes.
38

Screen Displays
You can display information during playback on the screen.
•Press each time to hide/show information.
o During playback of AVCHD disc copied from a high definition Everio
Chapter Number
C1T2
Playback Time
JUN.01.2008 10:20AM
Playback Time
Disc Type
DVD-R
00:00:25
Dolby D 2ch
Disc Type
DVD-R
00:00:25
MPEG 2ch
Audio Format
Playback Mode
Audio Format
Playback Mode
Title Number
Playback Position
o During playback of video data disc copied from a high definition
Everio
File Date/Time
Playback Position
EN
ES
39

o During playback of still image data disc copied from a high definition
Everio
File Date/Time Disc Type
JUN.01.2008 10:20AM
DVD-R
Playback Mode
o During playback of DVD disc copied from Everio
Chapter Number
Title Number
Playback Position
Playback Time
Disc Type
DVD-R
00:00:25
C1T1
Dolby D 2ch
Audio Format
Playback Mode
40

Troubleshooting
Trouble Action
Cannot turn the
power on.
Cannot function
properly.
General
The burner or AC
adapter is hot.
The power lamp
blinks slowly in red
while using the
burner.
The burner is not
recognized by the
Everio camera.
The burner is not
recognized by the PC.
Writing fails.
Copy
z Make sure the AC adapter and power cord are
properly connected. (P. 4)
z Press the power button on this burner for more
than 5 seconds to reset the burner. (The burner
will turn off automatically.)
z The burner and AC adapter will become hot
with prolonged use. This is not a malfunction.
z If the burner is abnormally hot, remove the AC
adapter and consult the dealer from which the
burner is purchased.
z The burner cannot function properly due to a
drop in its interior temperature. Wait until the
power lamp stops blinking.
z There is a rise in the burner’s interior
temperature. Turn off the burner, wait for a
while then turn on again.
z Make sure the USB cable is connected
properly. Insert the connector with the
protrusion to the burner, and the other end to
the Everio camera. (P. 14)
z Make sure the USB cable provided with the
Everio camera is connected properly. (P. 16)
z Use discs recommended for the burner. (P. 48)
z Insert the disc with the label facing up.
z Wipe off any dirt that is found on the tray.
z Use discs for which the writing surface is not
damaged.
z Do not use deformed discs.
EN
ES
Cannot open the disc
tray.
Unable to write/read
data at the maximum
speed (when
connected to a PC)
z If disc writing is currently in progress, the disc
tray cannot be opened. Wait till the writing
process ends.
z If the disc cannot be properly ejected after the
burner is dropped or due to other malfunctions,
insert a thin rod into the force eject hole to eject
the disc. (P. 44)
z Use the recommended discs. (P. 48)
41

Trouble Action
The remote control is
not working.
Unable to operate.
No images on the TV.
Playback
Images are distorted
during fast-forward/
fast-reverse playback.
The images cannot be
displayed in the
normal aspect ratio.
Reading fails.
z The remote control is not operable when the
disc tray is opened. Close the disc tray.
z If the burner does not work at all, remove the
power plug and insert again. (It may not
function properly due to lightning strike or static
electricity.)
z Connect this burner to a TV. (P. 12, 13)
z Switch to the external output that connects the
burner to the TV with a video/audio input
connectors.
z After pressing the power button, it will take
about 25 seconds to display the intermediate
screen. (P. 34)
z If there are too many recorded files or when a
disc that is not recommended is used, it will
take several minutes to display the playback
vigator.
na
z Check the resolution setting again. (P. 33)
z
Images may be distorted for sections where the
playback speed changes. This is not a
malfunction.
z When both the HDMI terminal and Audio/Video
output connectors are connected, set “HDMI
VIDEO MODE” in the settings menu to “OFF” to
output the images with priority given to the
Audio/Video output connectors. (P. 36)
z Insert the disc with the label facing up.
z Wipe off any dirt that is found on the tray.
z Make sure that the writing surface of the disc is
not damaged.
z Do not use deformed discs.
Playback cannot
function properly.
Digest Playback
starts when the
PREVIOUS / NEXT
button is pressed
repeatedly.
42
z Playback of commercial DVD-Video is not
guaranteed.
z AVCHD disc created on a high definition Everio
is equipped with the Digest Playback function. If
the PREVIOUS / NEXT button is pressed
repeatedly during playback, Digest Playback
will start when the normal playback ends.
(P. 24)

Trouble Action
Unable to read the
content of the AVCHD
disc using the PC’s
explorer function.
Unable to play back
images added by a
PC.
Playback
The TV switches input
automatically when
the burner is played.
The TV turns off when
this burner is turned
off.
This burner functions
when the TV’s remote
control is being
operated.
z The PC’s operation system does not support
the AVCHD disc. Install the Power2Go software
provided.
z When playing back a disc (multi-border disc)
containing images added by a PC, the added
images cannot be played back.
z The HDMI-CEC function is enabled. To disable,
set “CONTROL WITH HDMI” in the settings
menu to “OFF”. (P. 37)
EN
ES
43

Problems with seamless playback
During continuous playback of multiple files, the image will freeze for a few seconds
while switching the files in the following cases.
• When the recording dates are different:
The image will freeze for a few seconds when switching between files with different
recording dates.
For files with the same date, playback is seamless.
• When files are deleted:
If files are deleted and added after deleting during continuous recording, the ima
will freeze for a few seconds at the part where deleting is done.
When no files are deleted, playback is seamless.
• When the picture quality (XP/SP/EP) is changed during recording:
The image will freeze for a few seconds when switching between files with different
picture quality.
For files recorded in the same picture quality, playback is seamless.
• When the recorded file is less than 3 seconds:
The image will freeze for a few
3 seconds.
• When more than 99 files with the same date are recorded:
The image will freeze for a few seconds when switching between files at every 99 file
recordings.
For continuous 99 files, playback is seamless.
When a disc cannot be ejected with the eject button, use the following procedure to
eject by force.
A Turn off this burner.
B Insert
C Pull out the tray manually and remove the disc.
a thin rod into the force eject hole located
next to the eject button and the tray will be
ejected.
seconds at the end of a file that is less than
Disc cannot be ejected
ge
44
Force eject hole

Error Messages
Trouble Action
Unplayable disc
Incompatible disc
Unfinalized disc
Use finalized disc
Disc error z The disc may be dirty. Clean the disc and try again.
Region code error
Cannot execute the
operation
Cannot play back
z The disc may be dirty. Clean the disc and try again.
z The disc or data format is not supported. Check the
disc or data format (extension). (P. 49)
z Insert a disc that can be played on this burner.
(P. 49)
z The “Close disc” check box in Power2Go might have
been unchecked to allow further recording. Under
the “Burner” tab in the Power2Go “Configuration/
Information” menu, check the box to close the disc.
(P. 16)
z Disc is not finalized when it is copied from the high
definition Everio. Make sure to finalize the disc after
copying. (For details, refer to the instruction manual
of the Everio camera.)
z Discs with a region code of “1” or “ALL” can be
played back on this burner. Discs with a different
region code from above cannot be played. (P. 46)
z Operate after stopping playback.
z File data may be missing.
z The disc or data format is not supported. Check the
disc or data format (extension). (P. 49)
EN
ES
No video files
stored
No image files
stored
z You have selected a folder that does not contain any
videos.
Select a folder with video files. (P. 25)
z You have selected a folder that does not contain any
still images.
Select a folder with still image files. (P. 25)
45

Other Information
Cleaning Procedure
IMPORTANT:
•Be sure to unplug the burner before beginning cleaning.
• Do not use liquid or aerosol cleaners.
•Ensure that no moisture or liquid comes into contact with the drive during cleaning.
Exterior of the Burner:
Wipe dirt off with a dry cloth.
Disc Tray:
Wipe off dirt with a soft dry cloth.
Do not touch the lens. To clean the lens, use commercially
available lens cleaning blower for cameras. Using a lens cleaning
disc will cause m
Disc:
Use a commercially available cleaning cloth to gently wipe from
the inner edge to the outer edge.
Do not paste any stickers on the label side of the disc. This will cause the center of
rotation to deviate and increase the vibration of the rotating disc thereby affecting
proper playback.
Storage:
Make sure that discs are kept in their cases. If discs are piled on top of one another
without their protective cas
where they may be exposed to direct sunlight, or in a place where the humidity or
temperature is high. Avoid leaving discs in your car!
Region codes are numbers for restricting DVD video playback. The world is separated
into six regions and each region is identified by a number. If the number for
not match the number for the player, the disc cannot be played on the player.
JVC accepts no liability whatsoever for loss of data resulting from inappropriate
connections or handling.
alfunction.
es, they can be damaged. Do not put discs in a location
Region Codes
Disclaimer
Lens
a disc does
Copyrights
Duplicating copyright protected material, for other than personal use, without the
permission of the copyright holder is prohibited by copyright law.
46

Registered Trademarks and Trademarks
•Microsoft, Windows, and Windows Vista are is either registered trademarks or
trademarks of Microsoft Corporation in the United States and/or other countries.
•Macintosh and Mac OS are trademarks of Apple, Inc., registered in the United States
and other countries.
• Pentiu m is a registered trademark of Intel Corporation in the United States
•Manufactured under licence from Dolby Laboratories. “Dolby” and the double-D
symbol are trademarks of Dolby Laboratories.
• HDMI, the HDMI logo and high definition multimedia interface are trademarks or
registered trademarks of HDMI Licensing LCC.
• The x.v.Color and x.v.Color logos are trademarks.
• The AVCHD and AVCHD logos are trademarks of Ma
Ltd. and Sony Corporation.
•Other company and product names mentioned herein are registered trademarks and/
or trademarks of their respective holders.
tsushita Electric Industrial Co.,
.
EN
ES
47

Specifications
General
Rated current 2.3 A
Dimensions (W x H x D) 152 x 42 x 195 mm (6" x 1-7/10" x 7-7/10")
Mass
Operating environment
Laser power
(wavelength, output)
Power supply AC110 V to 240 V, 50 Hz/60 Hz
Input capacity 0.6 A
Output DC 5.3 V, 3.5 A
Operating temperature 0 C to 40 C (32 F to 104 F)
Dimensions (W x H x D)
Mass Approx. 136 g (0.3 lbs)
Type DC 3 V (CR2025 button battery)
Battery life Approx. 1 year (depending on the frequency of use)
Operating distance Approx. 5 m (face up)
Operating temperature 0 C to 40 C (32 F to 104 F)
Dimensions (W x H x D) 42 x 12 x 100 mm (1-7/10" x 1/2" x 4")
Mass Approx. 32 g (0.1 lbs) (including lithium battery)
DVD-R JVC, TDK, Verbatim, SONY
DVD-R DL *1 JVC *2, Verbatim
DVD-RW JVC
•Use of this burner may not be possible or optimal performance may not be achieved
depending on the disc used. We suggest using the recommended discs.
•Use DVDs for videos.
•This burner supports only 12 cm discs.
• The appearance and specifications of this product may be modified without prior
notice.
*1 DVD-R DL discs can be used when the burner is connected to
Everio and PC.
*2 For DVD-R DL manufactured by JVC, use of discs with the “Also recommended for
high definition Everio” message stated is recommended.
Approx. 920 g (2 lbs)
(excluding AC adapter and connection cables)
Operating temperature: 0 C to 35 C (41 F to 95 F)
Storage temperature: -20 C to 60 C (-4 F to 140 F)
For DVD: 656 to 663 nm, 1.04 mW
For CD: 777 to 788 nm, 1.33 mW
AC adapter (AP-V50U)
1
52 x 31 x 120 mm (2" x 1(excluding power cord)
Remote control (RM-V55U)
Recommended discs
/5" x 4-7/10")
a high definition
48

Playback feature
Discs supported DVD-R, DVD-R DL, DVD-RW
Data format
(extension)
Video output 1.0 V 75 K (Pin jack)
Audio output 2.0 Vrms (Pin jack)
Component video
output
HDMI output
terminal
z AVCHD or DVD data disc created by connecting to a high
definition Everio
z DVD video disc created by connecting to Everio
z DVD data disc for which data is recorded using the high
definition Everio, processed using an editing software of
Everio, and written to a specific folder on this burner
• Select the file format for GZ-HD series as the output format
in the PowerDirector output menu.
• Set the file sys
Lite configuration menu to “UDF 1.5”.
•If images created by selecting “SVRT” in the PowerDirector
output menu cannot be played back correctly, deselect
“SVRT” and execute again.
z Extensions recognized by this burner are as follows.
(Extensions that have been changed cannot be played back
properly.)
recorded on Everio (via PC): MTS, TOD, MOD, JPG
•Data
•Data edited on PC: JTS, TPD, JPG
• When playing back a file created on a PC, pressing the
PLAY button after searching may cause the playback
position to deviate.
Y p-p: 1.0 V 75 K (Pin jack)
B/CR, PB/PR p-p: 0.7 V 75 K (Pin jack)
C
19-pin HDCP, x.v.Color, Deep Color compliant
Video: 1080p / 1080i / 720p / 480p / 480i
(We do not provide guarantee for compatibility with DVI-D.)
Audio: 2CH PCM/bit stream
tem under the data tab in the Power2Go 5.5
EN
ES
Caution
•Discs other than those above cannot be played back properly.
49

When connected to an Everio camera
Interface USB 2.0
Interface cable USB cable (Mini A type - Mini B type)
Compatible discs for
writing
(8 cm discs cannot
be used)
Recording format Everio DVD-Video (video only)
Recording time Everio Approx. 30 minutes (including time for
• GZ-MC100, GZ-MC200, GZ-MC500, GZ-MG20, GZ-MG40, GZ-MG50, and
GZ-MG70 cannot be used.
Everio DVD-R, DVD-RW
High definition
Everio
High definition
Everio
High definition
Everio
DVD-R, DVD-R DL, DVD-RW
AVCHD disc (video)
Data disc (video, still image)
finalization)
When recording videos for about 90 minutes
in the Fine mode to a 4.7 GB disc. (This may
vary according to conditions such as the
number of titles.)
AVCHD disc:
Approx. 60 minutes (including time for
finalization)
• When recording videos for about 60 minutes
in the XP mode to a 8.5 GB DVD-R DL disc.
(This may vary according to conditions such
as the numb
Data disc:
Approx. 45 minutes (including time for
finalization)
• When recording videos for about 40 minutes
in the FHD mode to a 8.5 GB DVD-R DL
disc. (This may vary according to conditions
such as the number of files.)
er of files.)
50

When connected to a PC
Interface USB 2.0, USB 1.1 *1
Interface cable USB cable (USB cable provided with Everio can also be used)
Supported operating
system
Data buffer capacity 2 MB
Data transfer rate
(for USB 2.0)
Compatible discs
(8 cm discs cannot
be used)
Supported software PowerProducer 4 NE (provided with Everio)
*1 If you are using a USB 1.1 cable, it will take approximately 3 hours to write one
DVD.
*2 Any CD recorded using the packet-write method is not supported.
Windows XP Home Edition, Windows XP Professional
Windows Vista Home Basic, Windows Vista Home
Premium
(Macintosh is not supported.)
Writing DVD-R: Maximum 8x
DVD-RW: Maximum 6x
DVD-R DL: Maximum 6x
Reading DVD-R: Maximum 8x
DVD-RW: Maximum 8x
DVD-R DL: Maximum 8x
CD-R: Maximum 24x *2
CD-RW: Maximum 24x *2
CD-ROM: Maximum 24x
Writing DVD-R, DVD-RW, DVD-R DL
Reading DVD-R, DVD-RW, DVD-R DL, CD-ROM, CD-R,
CD-RW
CyberLink Power2Go 5.5 Lite (provided with CU-VD50)
EN
ES
51

© 2008 Victor Company of Japan, Limited
Printed in Malaysia
0608MNH-SW-VM
 Loading...