

Page 1
SERVICE MANUAL
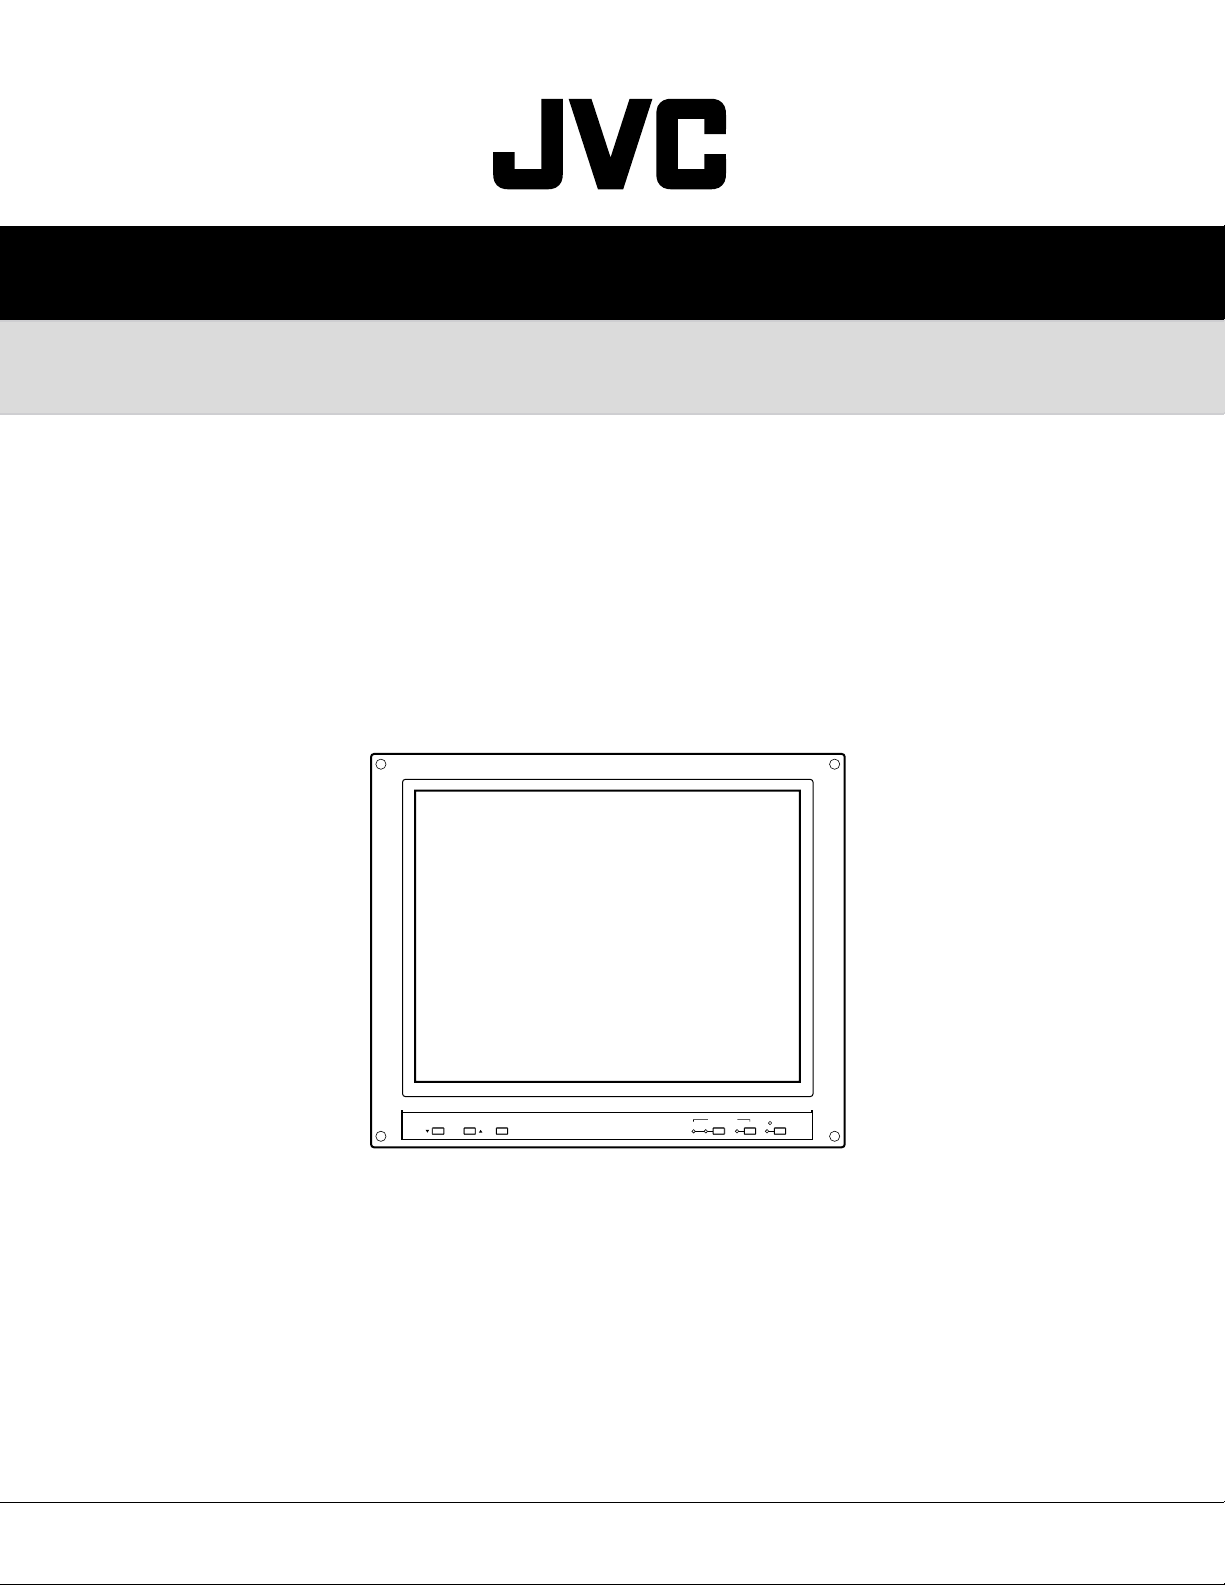
LCD VIDEO MONITOR
LM-17G
LM-17G
LM-17G
MENU/ENTER
/U
/E
/C
INPUT SELECT
POWER
PCVIDEOBA
TABLE OF CONTENTS
1. PRECAUTIONS .......................................................................................................................................... 1-3
2. SPECIFIC SERVICE INSTRUCTIONS ....................................................................................................... 1-6
3. DISASSEMBLY ........................................................................................................................................... 1-7
4. ADJUSTEMNT ...........................................................................................................................................1-11
5. TROUBLE SHOOTING .............................................................................................................................. 1-12
COPYRIGHT © 2003 VICTOR COMPANY OF JAPAN, LTD.
No.52164
2003/11
Page 2
If you need more information on Computer and Electronic Repair, please visit these
in fact
websites to improve yourself.
http://www.fastrepairguide.com
http://www.protech2u.com
http://www.plasma-television-repair.com
http://www.lcd-television-repair.com
Happy Repairing!!
Highly Recommended Repair Ebook:
If you’re a LCD Monitor repairer, then this is the best guide for you.
Why? Because, the author revealed all his LCD Monitor Repairing
secrets for you. I think, with just few Repair tips you learned from
this guide you will get back your investment!
Click Here to read more.
This eBook will show you how to test the electronic component
correctly and accurately. Some of you may say that I don’t
need this eBook because it is too simple! Do you know that,
there is lots of testing electronic components secrets I have learned
from this guide? Do you know how to test a‘TRIAC’ correctly and
accurately? If you answer no then I guess you have to get this
EBook. Click Here to read more.
Are you tired of searching the service manuals to look for the value
of a burnt resistor? If the answer is YES, then this eBook is a ‘must
have’ guide for you. You can save a lot of time and be able to repair
customer’s Electronic equipment with burnt resistors in it.
Click here to read more.
Page 3
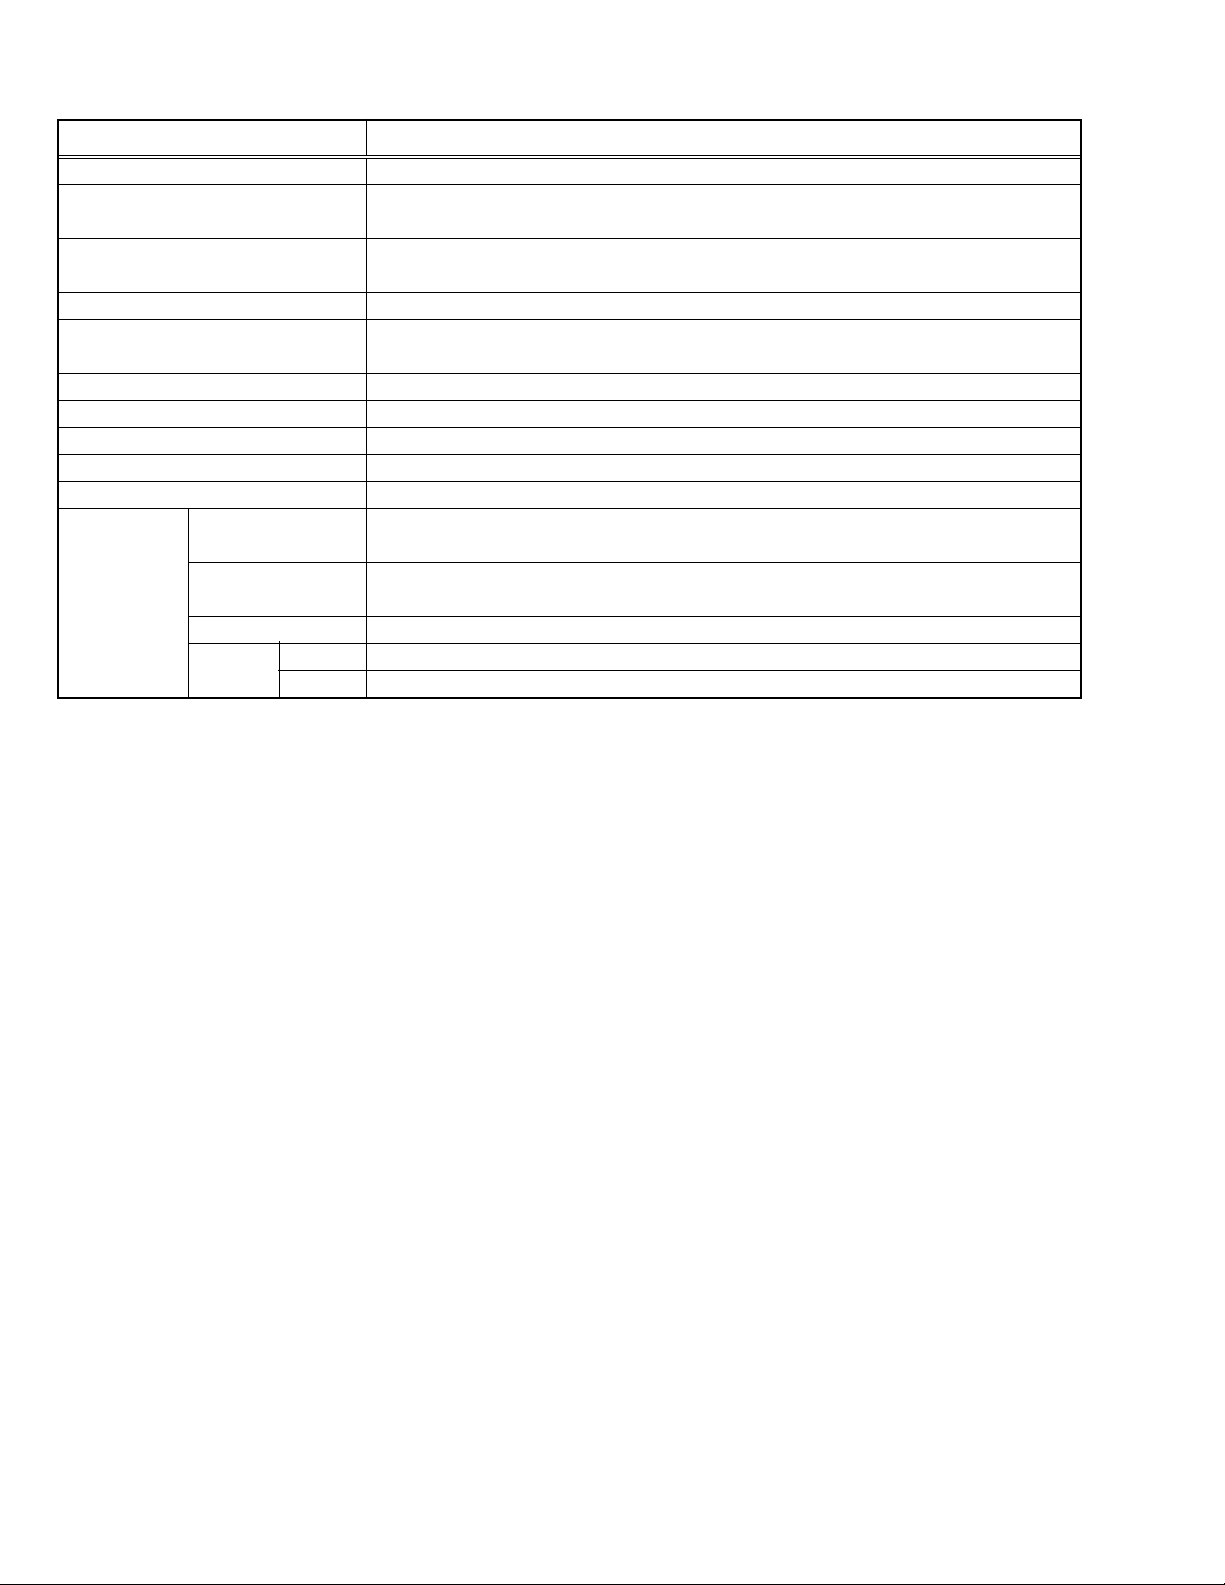
Items Contents
Type
Dimensions (W × H × D)
Mass
Color system
Scanning frequency
Power Input
Power consumption
LCD Panel
Display area
Display Pixels
Input/Output VIDEO A
terminals
VIDEO B
PC input
REMOTE INPUT
ASPECT
SPECIFICATION
LCD Video Monitor
40.2cm × 34.8cm × 6.9cm (Monitor only)
40.2cm × 34.9cm × 16.2cm (With supplied stand)
5kg (Monitor only)
5.8kg (with stand)
PAL / NTSC
H : 31.5kHz ~ 80kHz(PC) / 15.734kHz(NTSC) / 15.625kHz(PAL)
V : 56Hz
AC100V/AC240V, 50Hz/60Hz
45W
17-in, active matrix TFT
Visible size : 43.3cm(Diagonal) / 33.8cm × 27.0cm(H × V)
Horizontal : 1280 pixel × Vertical : 1024 pixel
Composite video, BNC connector ×2, 1V(p-p), 75Ω negative sync
(bridge connection possible, auto termination)
Composite video, BNC connector
(bridge connection possible, auto termination)
Analog RGB : D-sub(15 pin) ×1, positive 0.7 (p-p)
RCA pin ×1
RCA pin ×1
~ 75Hz(PC) / 59.94(NTSC) / 50Hz(PAL)
×
2, 1V(p-p), 75Ω negative sync
NOTE: Design & specifications are subject to change without notice.
1-2 (No. 52164)
Page 4

SECTION 1
PRECAUTION
1. 1 SAFETY PRECAUTIONS
(1) The design of this product contains special hardware,
many circuits and components specially for safety
purposes. For continued protection, no changes should
be made to the original design unless authorized in writing
by the manufacturer. Replacement parts must be identical
to those used in the original circuits. Service should be
performed by qualified personnel only.
(2) Alterations of the design or circuitry of the products should
not be made. Any design alterations or additions will void
the manufacturer's warranty and will further relieve the
manufacturer of responsibility for personal injury or
property damage resulting therefrom.
(3) Many electrical and mechanical parts in the products have
special safety-related characteristics. These
characteristics are often not evident from visual inspection
nor can the protection afforded by them necessarily be
obtained by using replacement components rated for
higher voltage, wattage, etc. Replacement parts which
have these special safety characteristics are identified in
the parts list of Service manual. Electrical components
having such features are identified by shading on the
schematics and by (!) on the parts list in Service
manual. The use of a substitute replacement which does
not have the same safety characteristics as the
recommended replacement part shown in the parts list
of Service manual may cause shock, fire, or other hazards.
(4) Don't short between the LIVE side ground and ISOLATED
(NEUTRAL) side ground or EARTH side ground when
repairing.
Some model's power circuit is partly different in the GND.
The difference of the GND is shown by the LIVE : (
GND, the ISOLATED (NEUTRAL) : (
EARTH : (
) side GND. Don't short between the LIVE
) side GND and
side GND and ISOLATED (NEUTRAL) side GND or EARTH
side GND and never measure the LIVE side GND and
ISOLATED (NEUTRAL) side GND or EARTH side GND at
the same time with a measuring apparatus (oscilloscope
etc.).
If above note will not be kept, a fuse or any parts will be
broken.
(5) If any repair has been made to the chassis, it is
recommended that the B1 setting should be checked or
adjusted (See ADJUSTMENT OF B1 POWER SUPPLY).
(6) The high voltage applied to the picture tube must conform
with that specified in Service manual. Excessive high
voltage can cause an increase in X-Ray emission, arcing
and possible component damage, therefore operation
under excessive high voltage conditions should be kept
to a minimum, or should be prevented. If severe arcing
occurs, remove the AC power immediately and determine
the cause by visual inspection (incorrect installation,
cracked or melted high voltage harness, poor soldering,
etc.). To maintain the proper minimum level of soft X-Ray
emission, components in the high voltage circuitry
including the picture tube must be the exact replacements
or alternatives approved by the manufacturer of the
complete product.
) side
(8) When service is required, observe the original lead dress.
Extra precaution should be given to assure correct lead
dress in the high voltage circuit area. Where a short circuit
has occurred, those components that indicate evidence
of overheating should be replaced. Always use the
manufacturer's replacement components.
(9) Isolation Check
(Safety for Electrical Shock Hazard)
After re-assembling the product, always perform an
isolation check on the exposed metal parts of the cabinet
(antenna terminals, video/audio input and output
terminals, Control knobs, metal cabinet, screw heads,
earphone jack, control shafts, etc.) to be sure the product
is safe to operate without danger of electrical shock.
a) Dielectric Strength Test
The isolation between the AC primary circuit and all metal
parts exposed to the user, particularly any exposed metal
part having a return path to the chassis should withstand
a voltage of 3000V AC (r.m.s.) for a period of one second.
(. . . . Withstand a voltage of 1100V AC (r.m.s.) to an
appliance rated up to 120V, and 3000V AC (r.m.s.) to an
appliance rated 200V or more, for a period of one second.)
This method of test requires a test equipment not generally
found in the service trade.
b) Leakage Current Check
Plug the AC line cord directly into the AC outlet (do not use
a line isolation transformer during this check.). Using a
"Leakage Current Tester", measure the leakage current
from each exposed metal part of the cabinet, particularly
any exposed metal part having a return path to the chassis,
to a known good earth ground (water pipe, etc.). Any
leakage current must not exceed 0.5mA AC (r.m.s.).
However, in tropical area, this must not exceed 0.2mA AC
(r.m.s.).
Alternate Check Method
Plug the AC line cord directly into the AC outlet (do not
use a line isolation transformer during this check.).
Use an AC voltmeter having 1000 ohms per volt or
more sensitivity in the following manner. Connect a
1500Ω 10W resistor paralleled by a 0.15µF AC-type
capacitor between an exposed metal part and a known
good earth ground (water pipe, etc.). Measure the AC
voltage across the resistor with the AC voltmeter. Move
the resistor connection to each exposed metal part,
particularly any exposed metal part having a return path
to the chassis, and measure the AC voltage across
the resistor. Now, reverse the plug in the AC outlet and
repeat each measurement. Any voltage measured
must not exceed 0.75V AC (r.m.s.). This corresponds
to 0.5mA AC (r.m.s.).
However, in tropical area, this must not exceed 0.3V AC
(r.m.s.). This corresponds to 0.2mA AC (r.m.s.).
AC VOLTMETER
(HAVING 1000Ω/V,
OR MORE SENSITIVITY)
0.15µF AC-TYPE
(7) Do not check high voltage by drawing an arc. Use a high
voltage meter or a high voltage probe with a VTVM.
Discharge the picture tube before attempting meter
connection, by connecting a clip lead to the ground frame
and connecting the other end of the lead through a 10kΩ
2W resistor to the anode button.
GOOD EARTH GROUND
1500Ω 10W
PLACE THIS PROBE
ON EACH EXPOSED
ME TAL PA RT
(No. 52164) 1-3
Page 5
1. 2 INSTALLATION
1.2.1 HEAT DISSIPATION
If the heat dissipation vent behind this unit is blocked, cooling
efficiency may deteriorate and temperature inside the unit will
rise.
Therefore, please make sure pay attention not to block the
heat dissipation vent as well as the ventilation outlet behind
the unit and ensure that there is room for ventilation around it.
front side Note
wall
20cm
1.2.2 INSTALLATION REQUIREMENTS
Ensure that the minimal distance is maintained, as specified
below, between the unit with and the surrounding walls, as
well as the floor etc.
Install the unit on stable flooring or stands.
Take precautionary measures to prevent the unit from tipping
in order to protect against accidents and earthquakes.
Use the metal fittings
of the exclusive use
option.
1.Hang
on the
wall
2.Hang
from the
ceiling
3.Put
on the
table
10cm
10cm
10cm
10cm
front
wall
20cm
10cm
10cm
10cm
front wall
10cm
front
wall
10cm
front
wall
Install has to be
done by professional
construction trader
Please confirm the
structure and the
strength of the wall to
install beforehand.
It attempts accident
prevention and safe
securing .
Install on the fixed
floor and the stand.
To prevent from an
accident and for the
safe securing of an
earthquake and so on,
please process for
tumble prevention.
15cm
5cm
15cm
1.2.3 FALL TIP PREVENTION MEASURES
Take precautionary measures to prevent the unit from falling
or tipping to protect against emergencies such as
earthquakes as well as accidents.
Attach the supplied stand to the monitor as shown, and then
fix it with the screws. Please fix the stand with the
supplied screw (A) first, and then fix it with the screws (B).
1-4 (No. 52164)
10cm
BB
A
Page 6

1.3 PRECAUTIONS
(1) Depending on the around temperature, the brightness leaning occurs. Be careful of the environment in the product
installation place and so on sufficiently.
(2) Don't hinder radiation from the back, the heaven and the side. Please refer to the next page that explains about the
condition of the installation.
The inside becomes hot if hindering radiation and there is fear, which the inner circuit damages.
(3) Install in the place with good ventilation. Use in the condition that around temperature is in the 0~35°C range.
(4) Avoid preservation and use at the high temperature or high humidity place. If you behave like this, leaning sometimes
happens in the screen when the set actives.
(5) Depending on the condition and the environment of display, the slight fleck of the light and leaning of the screen and so on
is sometimes conspicuous. This is the characteristic which is peculiar to liquid crystal display. It is not set trouble.
(6) This monitor has cool cathode pipe as the backlight. The time change and the use time sometimes change brightness
and condition of display.
1.4 THE ATTENTION IN TRANSPORTATION
When transporting a set, if the load handling is bad (throwing, falling and so on) however it is using a solid box, pressure inside
liquid crystal display.
In the case there is fear to break the liquid crystal display while transporting. To prevent from the accident or trouble while
transporting, pay attention to choice of the transportation company sufficiently and also arrange for it in the delivery after the
attention of the load handling is explained to the transportation company.
This set is used glass for composing liquid crystal display. When carrying, pay attention not to add over vibration and impact
sufficiently.
Ensure that it is placed upright and not horizontally during transportation and storage as the LCD panel is very vulnerable to
lateral impacts and may break. During transportation, ensure that the unit is loaded along the traveling direction of the vehicle,
and avoid stacking them on one another. For storage, ensure that they are stacked in 2 layers or less even when placed upright.
(No. 52164) 1-5
Page 7

SECTION 2
SPECIFIC SERVICE INSTRUCTIONS
2.1 DESCRIPTION ABOUT LIQUID CRYSTAL PANEL
2.2.1 STRUCTURE OF LIGUID CRYSTAL PANEL
The Liquid Crystal Panel of this model is TFT Panel. The Print circuit board that consist of TFT array and the print circuit board
adopted stripe shaped image element alignment are used. These two boards are mixed. The Liquid crystal is enclosed between
two boards.
2.1.2 LONG RANGE AFTERIMAGE OF LIQUID CRYSTAL
The small amount of ion material has mixed a liquid crystal panel with the liquid crystal material in the manufacturing process.
If ion material is piled up partially among the poles when the voltage is impressed among the poles, the brightness difference
occurs and becomes a long-range afterimage If same picture is reflected for long time, such a long-range afterimage occurs. If
the long-range afterimage occurs, we recommend that you reflect the single color image or moving picture and so on to restore.
2.1.3 THE DISPLAY REPLYING SPEED OF LIQUID CRYSTAL
Because the speed to display of Liquid crystal panel is slower than the speed of the CRT monitor, some of the moving picture
cannot overtake to the speed to display and the image looks flowing is sometimes displayed. This is not trouble, but efficiency
of Liquid Crystal.
2.1.4 THE EYESIGHT CORNER OF LIQUID CRYSTAL
The liquid crystal panel has the wide eyesight corner for which it is difficult to reverse brightness. The tint changes depending on
the direction to see a screen. This is not trouble, but efficiency of Liquid Crystal.
2.1.5 THE PICTURE ELEMENT FAULT OF LIQUID CRYSTAL
The liquid crystal panel is composed of precise technique but all devices don't always work right.
2.2 ATTENTION ITEMS WHEN REPLACING PARTS
2.2.1 ATTENTION TO EXCHANGE THE LIQUID CRYSTAL PANEL
(1) The stillness electricity sometimes makes damage a liquid crystal panel. In liquid crystal panel exchange, do a measure
of the stillness electricity such as the earth band.
(2) A liquid crystal panel and back-light are made from glass. If you gain an impact to these materials, there is fear to damage.
So in case of treatment, be careful sufficiently.
(3) Fix with the screw after confirming that there is not a float to chassis base when exchanging liquid crystal panel.
After that reflect all the black signals and confirm that brightness leaning doesn't occur near the screw fixation part.
When brightness leaning occurs, slacken a screw in the neighborhood until the brightness leaning is running-out.
(4) Fix the torque that installs a screw below 0.294Nm.
If you install at any more torque, the liquid crystal panel is transformed and sometimes damages.
(5) If you pull out or insert each connector when power is ON, it causes the trouble.
So pull out or insert each connector in the condition to have pulled out a power supply plug.
2.2.2 ATTENTION WHEN EXCHANGING THE MAIN PWB
To show the original efficiency of the MAIN PWB, pull out a heat think from the previous MAIN PWB and install it in the new PWB
surely.
2.2.3 ATTENTION WHEN EXCHANGING THE FUSE
When exchanging the fuse, please use specified parts. After fuse exchange, confirm that insulater is set to the shield and
insulate surely.
1-6 (No. 52164)
Page 8

SECTION 3
DISASSEMBLY
3.1 DISASSEMBLY PROCEDURE
CAUTION:
• Even with the power switch off, some parts of the unit
are live. Be sure to disconnect the power plug from the
AC outlet before disassembly and reassembly.
• Remove the power cord.
3.1.1 REMOVING THE BASE
(1) Lie down the unit and let panel downward.
(2) As shown in Fig.1, remove 2 screws [A] and loosen the
two spring screws on BASE.
(3) Slightly remove the BASE.
3.1.2 REMOVING THE FUNCTION COVER
• Remove the BASE.
(1) As shown in Fig.1, remove 5 screws [B].
(2) Shift the FUNCTION COVER toward BASE and raise
upward.
3.1.3 REMOVING THE MAIN PWB
• Remove the FUNCTION COVER.
(1) As shown in Fig.1, remove 4 screws [C].
(2) Slightly remove the MAIN PWB upward.
3.1.4 REMOVING THE POWER PWB
• Remove the FUNCTION COVER.
(1) As shown in Fig.1, remove 1 screw [D].
(2) As shown in Fig.1, remove 4 screws [E], and remove the
earth wire.
(3) Slightly remove the POWER PWB upward.
3.1.9 REMOVING THE CONTROL BRACKET
• Remove the FRONT COVER.
(1) As shown in Fig.1, remove 3 screws [M].
(3) Remove the CONTROL BRACKET upward.
3.1.10 REMOVING THE CONTROL BUTTON
• Remove the CONTROL BRACKET.
(1) As shown in Fig.1, remove 4 screws [N].
(2) Remove two CONTROL BUTTON downward.
3.1.11 REMOVING THE FRONT CONTROL 1 PWB AND THE
FRONT CONTROL 2 PWB
• Remove the CONTROL BRACKET.
(1) As shown in Fig.1, remove 2 screws [P].
(2) Remove the FRONT CONTROL 1 PWB upward.
(3) As shown in Fig.1, remove 2 screws [Q].
(4) Remove the FRONT CONTROL 2 PWB upward.
3.1.12 REMOVING THE BACK COVER AND THE TERMINAL
BRACKET
• Remove the FUNCTION COVER.
• Remove the MAIN PWB
• Remove the POWER PWB
• Remove the INVERTER PWB
• Remove the BNC INPUT PWB
• Remove the FRONT COVER
• Remove the LCD PANEL.
• Remove the CONTROL BRACKET
(1) As shown in Fig.1, remove 4 screws [S].
(2) Remove the BACK COVER and the TERMINAL BRACKET.
3.1.5 REMOVING THE INVERTER PWB
• Remove the FUNCTION COVER.
(1) As shown in Fig.1, remove 3 screws [F].
(2) Slightly remove the INVERTER PWB upward.
3.1.6 REMOVING THE BNC INPUT PWB
• Remove the FUNCTION COVER.
(1) As shown in Fig.1, remove 2 screws [G].
(2) Slightly remove the BNC INPUT PWB upward.
3.1.7 REMOVING THE FRONT COVER
• Remove the BASE.
(1) Lie down the unit and let panel upward.
(2) As shown in Fig.1, remove 4 screws [H].
(3) Slightly remove the FRONT COVER.
3.1.8 REMOVING THE LCD PANEL, THE LCD BRACKET (R)
AND THE LCD BRACKET (L)
• Remove the FRONT COVER.
(1) As shown in Fig.1, remove 4 screws [J].
(2) Raise LCD PANEL upward.
(3) As shown in Fig.1, remove 4 screws [K].
(4) Remove the LCD BRACKET (R) and the LCD BRACKET
(L).
(No. 52164) 1-7
Page 9
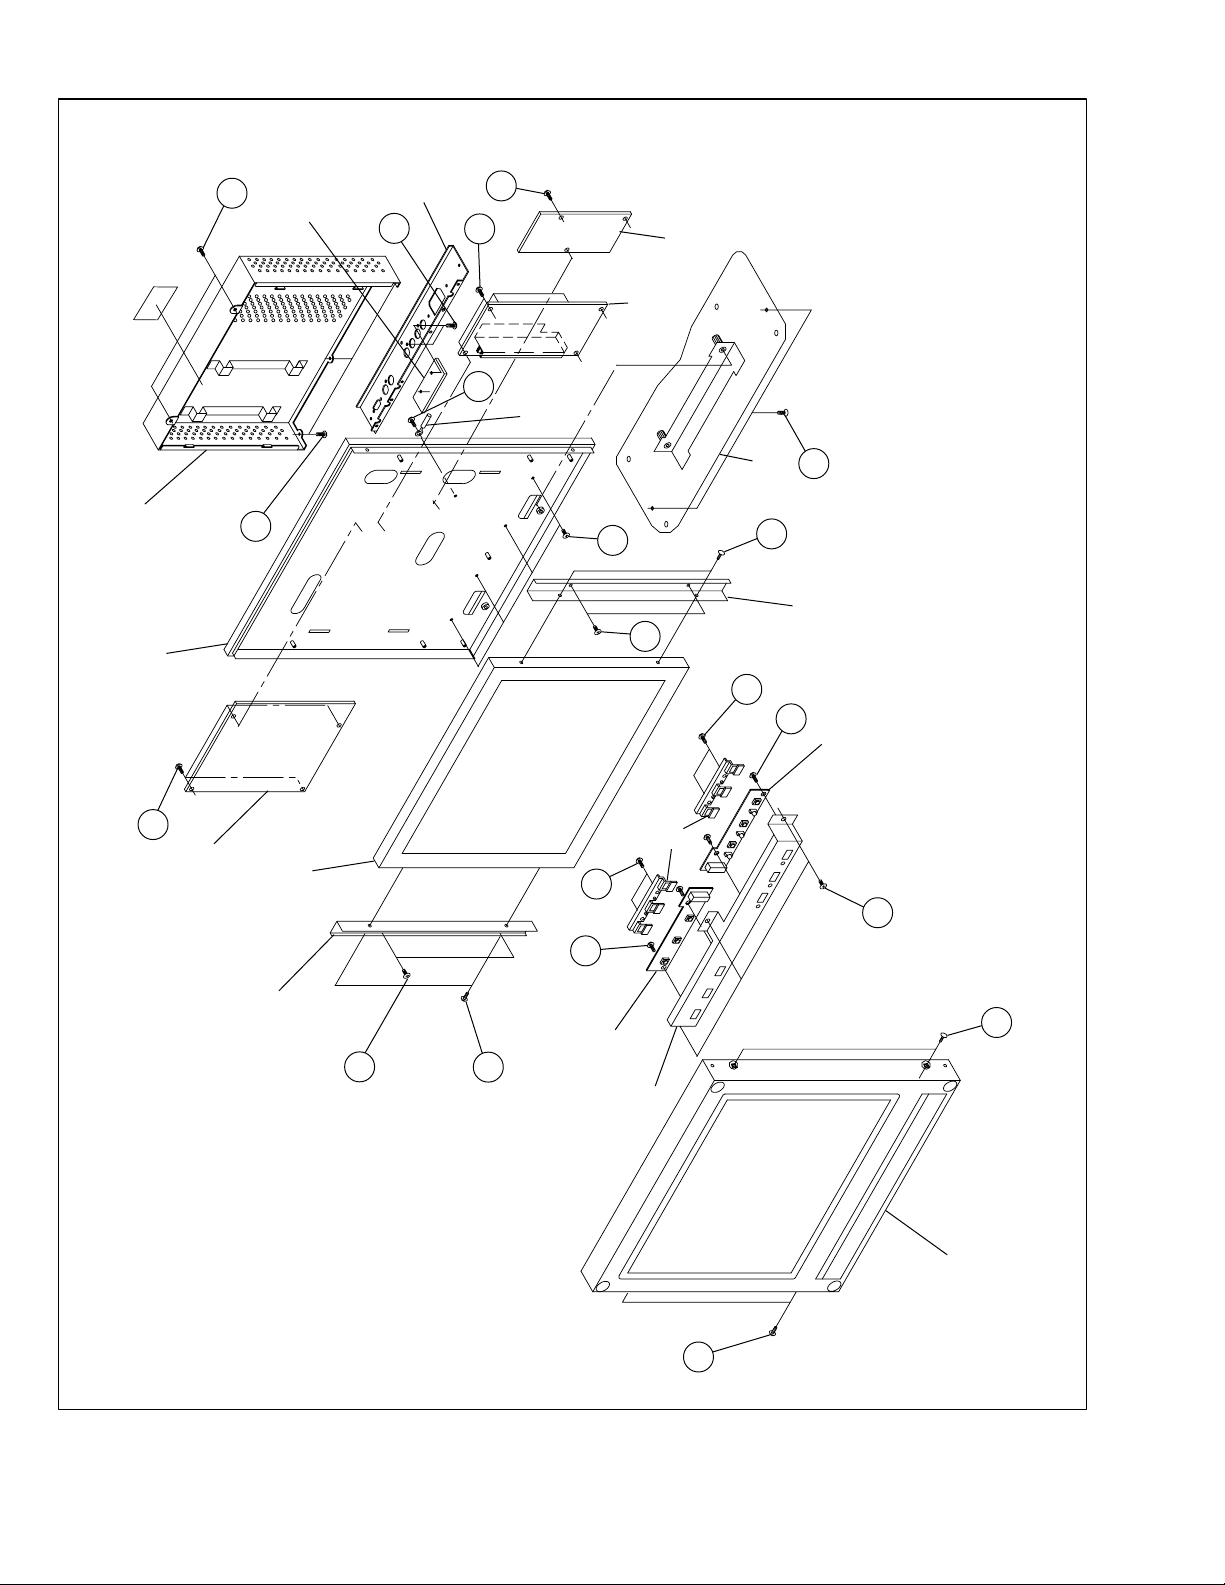
B
PWB
BNC INPUT
BRACKET
TERMINAL
G
F
E
INVERTER PWB
POWER PWB
D
WIRE
EARTH
A
BASE
FUNCTION COVER
BACK COVER
C
MAIN PWB
B
LCD PANEL
LCD BRACKET
S
K
J
LCD BRACKET
N
P
PWB
FRONT CONTROL1
BUTTON
CONTROL
N
M
Q
H
J
K
PWB
1-8 (No. 52164)
FRONT CONTROL2
Fig. 1
BRACKET
CONTROL
FRONT COVER
H
Page 10
3. 2 REPLACEMENT OF MEMORY IC
3.2.1 MEMORY IC
The memory is in the MAIN PWB. The MAIN PWB is only for reference. Avoid replacing individual parts. Replace entire unit only.
When the microcomputer or the memory are out of order, exchange a MAIN PWB.
3. 3 USER SETTING
! PC mode
Setting item Setting range Setting value
BACK LIGHT 0 ~ 100 100
CONTRAST 0 ~ 100 50
H. POSITION 0 ~ 100 50
V. POSITION 0 ~ 100 50
COLOR TEMP.
H. OSD POSITION 0 ~ 100 50
V. OSD POSITION 0 ~ 100 50
REMOTE ON/OFF OFF
! Video mode (VIDEO A,B)
HIGH/NATURAL/LOW/USER
NATURAL
Setting item Setting range Setting value
BACK LIGHT 0 ~ 100 100
PICTURE 0 ~ 100 0
PHASE 0 ~ 45 23
CHROMA 0 ~ 100 80
ASPECT 4 : 3 / 16 : 9 4 : 3
COLOR TEMP.
LOW LIGHT ADJ. 0 ~ 255 20
SIGNAL LEVEL STD/AMP STD
H. OSD POSITION 0 ~ 100 5 0
V. OSD POSITION 0 ~ 100 50
AGC ON/OFF ON
REMOTE ON/OFF OFF
HIGH/NATURAL/LOW/USER
NATURAL
(No. 52164) 1-9
Page 11
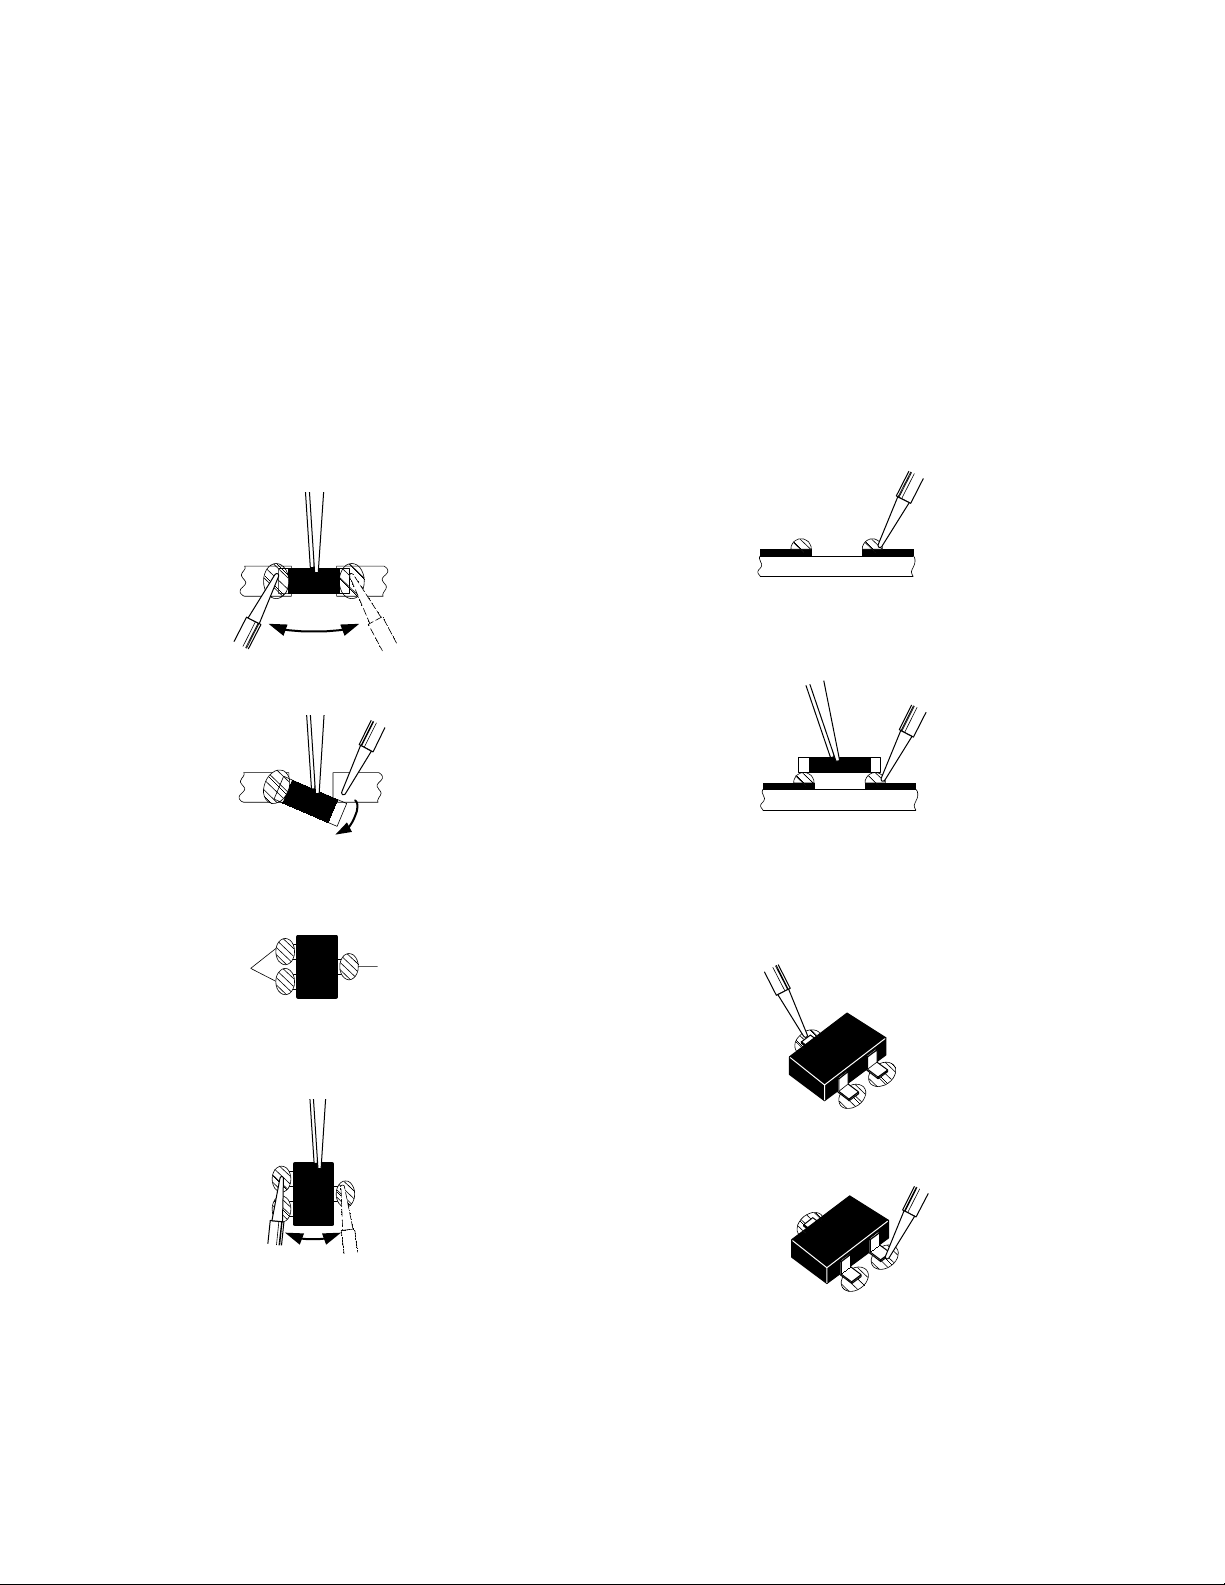
3.4 REPLACEMENT OF CHIP COMPONENT
A
B
C
3.4.1 CAUTIONS
(1) Avoid heating for more than 3 seconds.
(2) Do not rub the electrodes and the resist parts of the pattern.
(3) When removing a chip part, melt the solder adequately.
(4) Do not reuse a chip part after removing it.
3.4.2 SOLDERING IRON
(1) Use a high insulation soldering iron with a thin pointed end of it.
(2) A 30w soldering iron is recommended for easily removing parts.
3.4.3 REPLACEMENT STEPS
1. How to remove Chip parts
[Resistors, capacitors, etc.]
(1) As shown in the figure, push the part with tweezers and
alternately melt the solder at each end.
(2) Shift with tweezers and remove the chip part.
2. How to install Chip parts
[Resistors, capacitors, etc.]
(1) Apply solder to the pattern as indicated in the figure.
(2) Grasp the chip part with tweezers and place it on the
solder. Then heat and melt the solder at both ends of
the chip part.
[Transistors, diodes, variable resistors, etc.]
(1) Apply extra solder to each lead.
SOLDER
SOLDER
(2) As shown in the figure, push the part with tweezers and
alternately melt the solder at each lead. Shift and remove
the chip part.
Note :
After removing the part, remove remaining solder from
the pattern.
[Transistors, diodes, variable resistors, etc.]
(1) Apply solder to the pattern as indicated in the figure.
(2) Grasp the chip part with tweezers and place it on the
solder.
(3) First solder lead A as indicated in the figure.
(4) Then solder leads B and C.
A
B
C
1-10 (No. 52164)
Page 12

SECTION 4
ADJUSTMENT
The service manual does not describe ADJUSTMENT.
(No. 52164) 1-11
Page 13

SECTION 5
TROUBLE SHOOTING
The service manual does not describe TROUBLE SHOOTING.
1-12 (No. 52164)
Page 14

VICTOR COMPANY OF JAPAN, LIMITED
AV & MULTIMEDIA COMPANY VIDEO DISPLAY CATEGORY 12, 3-chome, Moriya-cho, kanagawa-ku, Yokohama, kanagawa-prefecture, 221-8528, Japan
(No. 52164)
Printed in Japan
WPC
Page 15
LM-17G /U,
LM-17G /E,
LM-17G
/C
STANDARD CIRCUIT DIAGRAMS
CONTENTS
USING P.W. BOARD ..................................................................................................................................................................... 2-1
SEMICONDUCTOR ........................................................................................................................................................................ 2-1
BLOCK DIAGRAM ......................................................................................................................................................................... 2-2
CIRCUIT DIAGRAMS ................................................................................................................................................................... 2-3
POWER PWB CIRCUIT DIAGRAM ...................................................................................................................................................... 2-3
MAIN PWB CIRCUIT DIAGRAM ........................................................................................................................................................... 2-5
FRONT CONTROL 1 PWB CIRCUIT DIAGRAM ................................................................................................................................ 2-17
FRONT CONTROL 2 PWB CIRCUIT DIAGRAM ................................................................................................................................ 2-17
BNC INPUT PWB CIRCUIT DIAGRAM ............................................................................................................................................... 2-17
INVERTER PWB CIRCUIT DIAGRAM ................................................................................................................................................ 2-19
PATTERN DIAGRAMS............................................................................................................................................................... 2-21
POWER PWB PATTERN .................................................................................................................................................................... 2-21
USING P.W. BOARD
POWER P.W. BOARD DA-5097613403
MAIN P.W. BOARD DA-5097624700
FRONT CONTROL1 P.W. BOARD DA-5098800661
FRONT CONTROL2 P.W. BOARD DA-5098800647
BNC INPUT P.W. BOARD DA-5098800646
INVERTER P.W. BOARD DA-5097672143
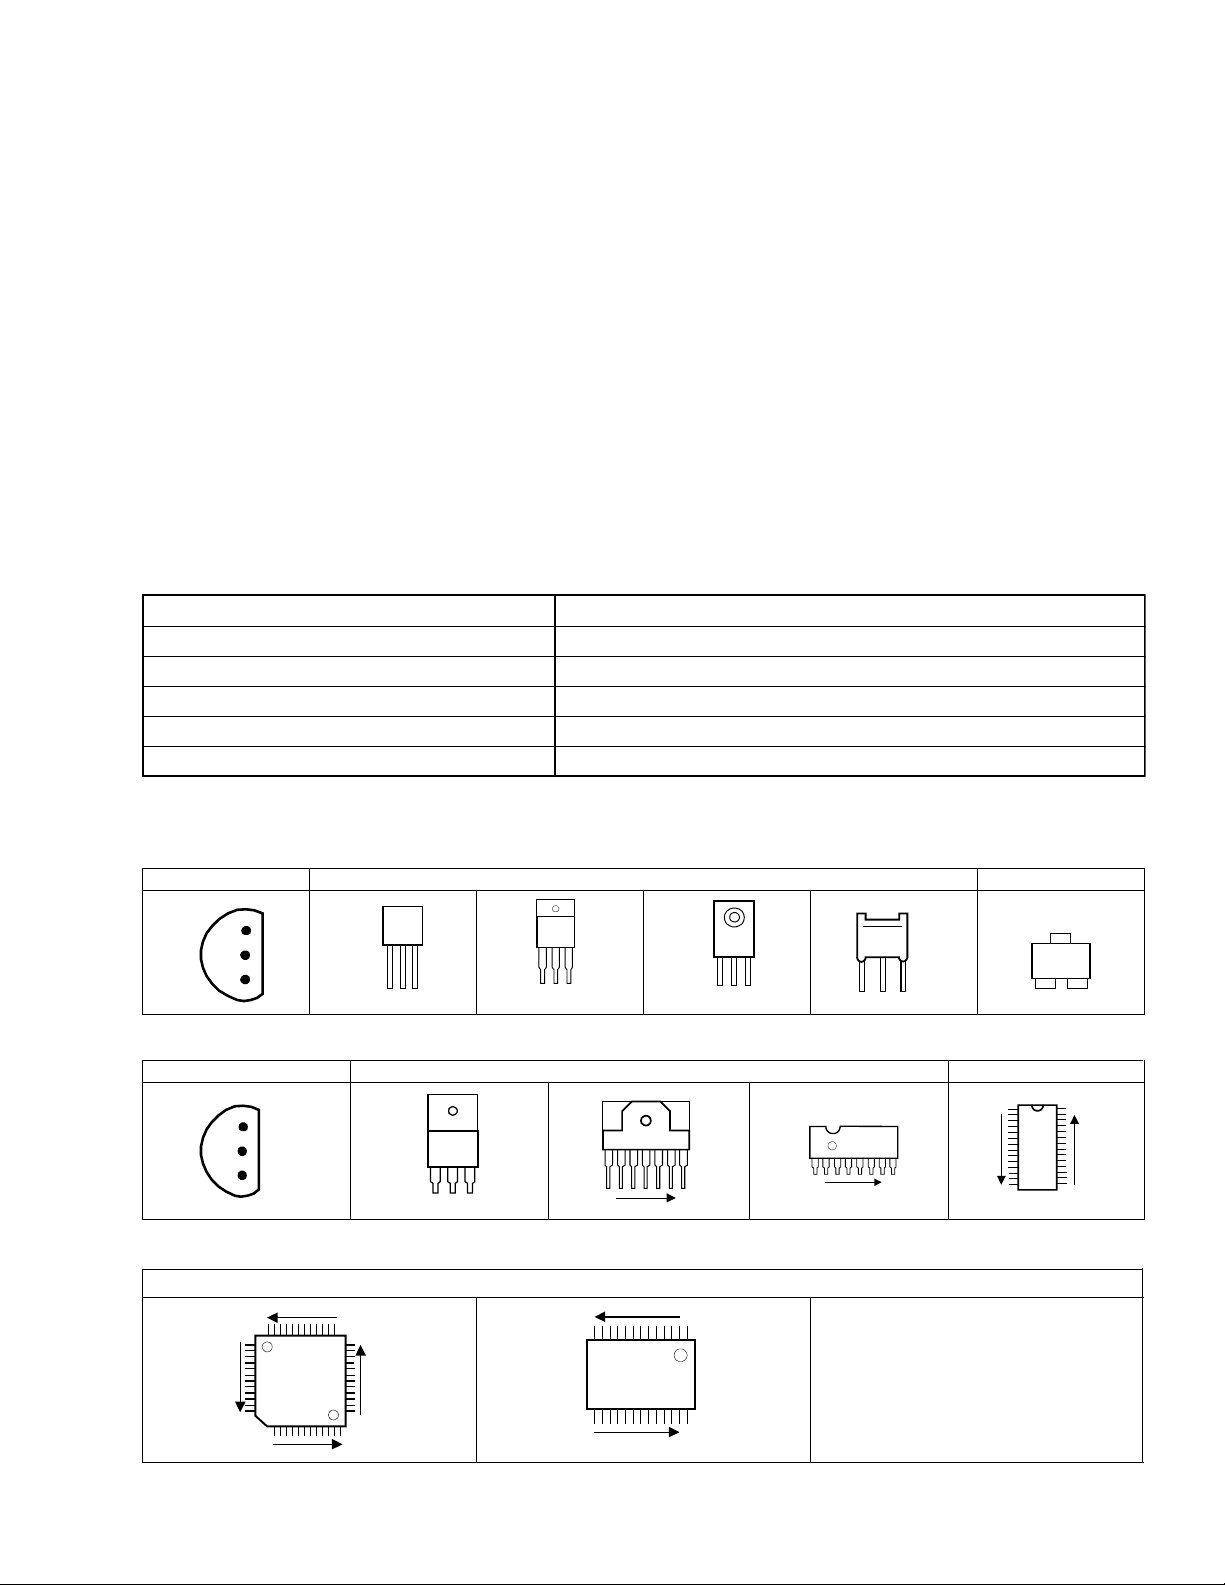
SEMICONDUCTOR SHAPES
TRANSISTOR
BOTTOM VIEW
E
C
B
ECB
(G)(D)(S )
IC
B OT TO M V I EW FR O NT V I EW T OP V I EW
OUT
E
IN
IN OUTE
CHIP IC
N
N
BCE
FRONT VI EW
1 N
TOP VIEW
ECB
1
ECB
1 N
TOP VIEW
CHIP TR
1
C
BE
N
N
1
N
N
(No. 52164) 2-1
Page 16
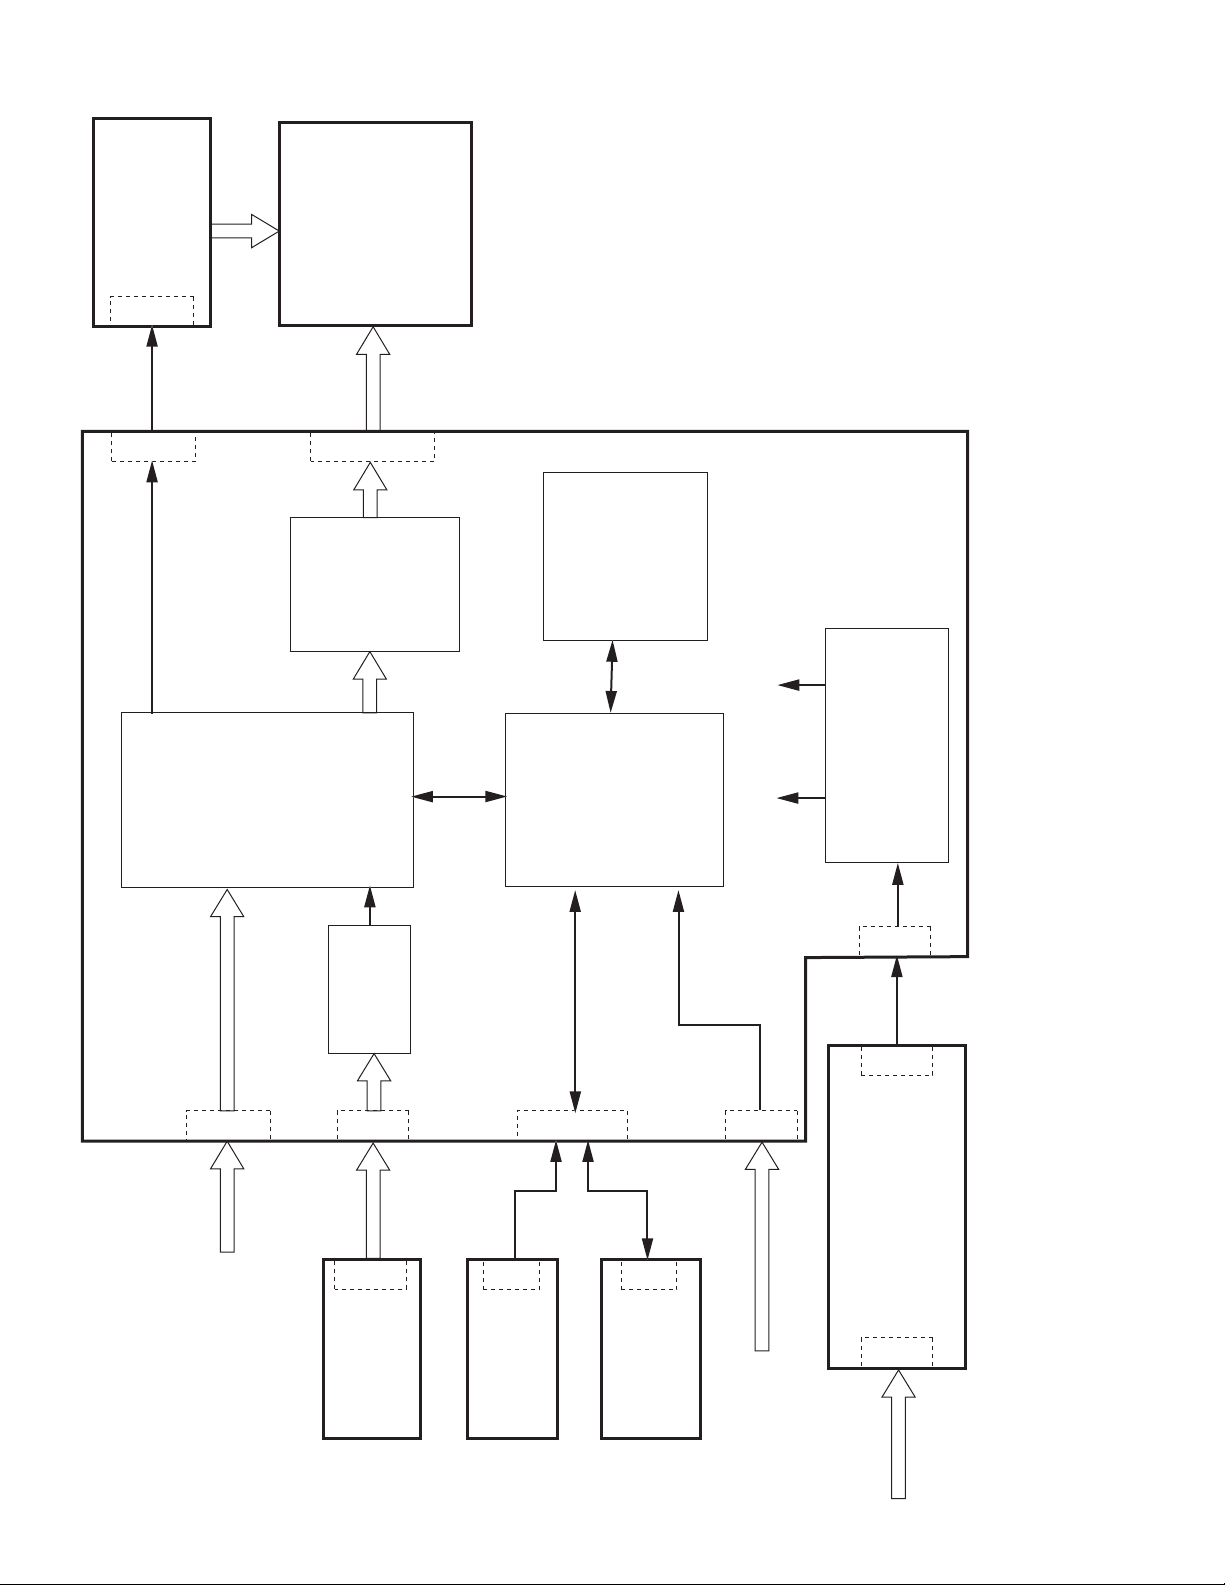
BLOCK DIAGRAM
Inverter
P1
PWB-0528-01
GM5020
Scaler
M170E6
LCD Panel
P010P004
THC63L
LVDS
VDM83A
24LC16B
EEPROM
Micro
W78E65P
Controller
3.3V
5V
Regulator
DC Power
PWB-0636-01
VGA
Video
SAA7118
Video
JP3
BNC
PWB-0584-03-1
P601
Key
PWB-0584-03-2
No. 521642-2
P002 P009P001
P602
Key
/LED
PWB-0584-03-3
12V
P802
P003
Remote input
PWB-0480-05
100~240Vac
P103
S.M.P.S
PWM Controller
P801
Page 17

ISOLATEDLIVE
MAIN PWB
(3/6)
P103
POWER PWB ASS'Y
DA-5097613403
POWER PWB CIRCUIT DIAGRAM
CIRCUIT DIAGRAMS
No. 52164 2-3 2-4
No. 52164
Page 18

PC
INPUT
MAIN PWB ASS'Y (1/6)
DA-5097624700
The schematic diagram is only for reference. Avoid replacing individual parts.
Replace the entire unit only.
MAIN PWB CIRCUIT DIAGRAM (1/6)
No. 52164
2-5 2-6
No. 52164
Page 19

The schematic diagram is only for reference. Avoid replacing individual parts.
Replace the entire unit only.
MAIN PWB ASS'Y (2/6)
DA-5097624700
REMOTE
FRONT
CONTROL2
PWB
P601
FRONT
CONTROL1
PWB
P602
INVERTER PWB
P1
MAIN PWB CIRCUIT DIAGRAM (2/6)
No. 52164 2-7 2-8
No. 52164
Page 20

The schematic diagram is only for reference. Avoid replacing individual parts.
Replace the entire unit only.
POWER PWB
P802
MAIN PWB ASS'Y (3/6)
DA-5097624700
MAIN PWB CIRCUIT DIAGRAM (3/6)
No. 52164
2-9 2-10
No. 52164
Page 21

The schematic diagram is only for reference. Avoid replacing individual parts.
Replace the entire unit only.
LCD
PAN EL
MAIN PWB ASS'Y (4/6)
DA-5097624700
MAIN PWB CIRCUIT DIAGRAM (4/6)
No. 52164
2-11 2-12
No. 52164
Page 22

The schematic diagram is only for reference. Avoid replacing individual parts.
Replace the entire unit only.
MAIN PWB CIRCUIT DIAGRAM (5/6)
MAIN PWB ASS'Y (5/6)
DA-5097624700
No. 52164
2-13 2-14
No. 52164
Page 23

The schematic diagram is only for reference. Avoid replacing individual parts.
Replace the entire unit only.
BNC INPUT
PWB
JP3
MAIN PWB AS'Y (6/6)
DA-5097624700
MAIN PWB CIRCUIT DIAGRAM (6/6)
No. 52164
2-15 2-16
No. 52164
Page 24

The schematic diagram is only for reference. Avoid replacing individual parts.
Replace the entire unit only.
MAIN PWB (2/6)
P002
MAIN PWB (6/6)
P001
MAIN PWB (2/6)
P002
BNC INPUT PWB ASS'Y
DA-5098800646
FRONT CONTROL1 PWB ASS'Y
DA-5098800661
FRONT CONTROL2 PWB ASS'Y
DA-5098800647
FRONT CONTROL1 PWB, FRONT CONTROL2 PWB, BNC INPUT PWB CIRCUIT DIAGRAMS
No. 52164
2-17 2-18
No. 52164
Page 25

TP
TP
TP
TP
The schematic diagram is only for reference. Avoid replacing individual parts.
Replace the entire unit only.
LCD
PANEL
LCD
PANEL
MAIN PWB (2/6)
P004
INVERTER PWB ASS'Y
DA-5097672143
INVERTER PWB CIRCUIT DIAGRAM
No. 52164 2-19 2-20
No. 52164
Page 26

PATTERN DIAGRAM
POWER PWB PATTERN
()
TOP
()
No. 52164
2-21 2-22
No. 52164
Page 27

INSTRUCTIONS
LCD VIDEO MONITOR
LM-17G
LM-15G
Thank you for purchasing this JVC LCD video monitor. Before using it, read
and follow all instructions carefully to take full advantage of the monitor’s
capabilities.
ENGLISH
(* “LCD” stands for Liquid Crystal Display.)
For Customer Use:
Enter below the Serial No. which is located on the rear of the cabinet. Retain this
information for future reference.
Model No. : LM-17G, LM-15G Serial No. :
Page 28

Contents
Safety Precautions .................................................................................................... 3
Installation.................................................................................................................. 5
Unpacking the Monitor................................................................................................. 5
Controls and Features................................................................................................. 5
Using Your Monitor .................................................................................................. 7
Turning the Monitor On and Off ................................................................................. 7
Caring for and Cleaning the Monitor .......................................................................... 7
Using the Menu ........................................................................................................ 8
Summary of Control Buttons........................................................................................ 8
Menu Operations......................................................................................................... 8
Using the Monitor in the PC mode............................................................................... 13
Basic Connection Example ..................................................................................... 16
Troubleshooting ....................................................................................................... 17
Specifications ............................................................................................................ 18
2
Page 29

SAFETY PRECAUTIONS
In order to prevent any fatal accidents caused by disoperation or mishandling the monitor, be fully aware of all the
following precautions.
WARNINGS
To prevent fire or shock hazard, do not expose this monitor to rain or moisture. Dangerous high voltages are present
inside the unit. Do not remove the back cover of the cabinet. When servicing the monitor, consult qualified service
personnel. Never try to service it yourself.
WARNING: THIS APPARATUS MUST BE EARTHED.
This monitor is equipped with a 3-blade grounding-type plug to satisfy FCC rule. If you are unable to insert the
plug into the outlet, contact your electrician.
FCC NOTICE (U.S.A. only)
CAUTION: Changes or modifications not approved by JVC could void the user’s authority to operate the
equipment.
NOTE: This equipment has been tested and found to comply with the limits for a Class A digital device, pursuant to
Part 15 of the FCC Rules. These limits are designed to provide reasonable protection against harmful interference
when the equipment is operated in a commercial environment. This equipment generates, uses, and can radiate
radio frequency energy and, if not installed and used in accordance with the instruction manual, may cause harmful
interference to radio communications. Operation of this equipment in a residential area is likely to cause harmful
interference in which case the user will be required to correct the interference at his own expense.
PRECAUTIONS
● Use only the power source specified on the unit.
● When not using this unit for a long period of time, or when cleaning it, be sure to disconnect the power plug from
the AC outlet.
● Do not allow anything to rest on the power cord. And do not place this unit where people will tread on the cord. Do
ENGLISH
not overload wall outlets or power cords as this can result in a fire or electric shock.
● Avoid using this unit under the following conditions:
– in extremely hot, cold or humid places,
– in dusty places,
– near appliances generating strong magnetic fields,
– in places subject to direct sunlight,
– in badly ventilated places,
– in automobiles with doors closed.
● Do not cover the ventilation slots while in operation as this could obstruct the required ventilation flow.
● When dust accumulates on the screen surface, clean it with a soft cloth.
3
Page 30

● Unplug this unit from the AC outlet and refer servicing to qualified service personnel under the following conditions:
– when the power cord is frayed or the plug is damaged,
– if liquid has been spilled into the unit,
– if the unit has been dropped or the cabinet has been damaged,
– when the unit exhibits a distinct change in performance.
● Do not attempt to service this unit yourself as opening or removing covers may expose you to dangerous voltage or
other hazards. Always refer servicing to qualified service personnel.
● When replacement parts are required, have the service personnel verify in writing that the replacement parts
he/she uses have the same safety characteristics as the original parts. Use of manufacture’s specified
replacement parts can prevent fire, shock, or other hazards.
● Upon completion of any servicing or repair work to this unit, please ask the service personnel to perform the safety
check described in the manufacturer’s service literature.
● When this unit reaches the end of its useful life, improper disposal could result in a picture tube implosion. Ask
qualified service personnel to dispose of this unit.
POWER CONNECTION
The power supply voltage rating of this product is AC 120 V (For U.S.A. and Canada only) and AC 230 V (For
European countries or United Kingdom), the power cord attached conforms to the following power supply voltage
and countries. Use only the power cord designated to ensure Safety and EMC regulations of each countries.
Power cord
Power supply voltage : AC 120 V AC 230 V AC 230 V AC 220V
Countries : U.S.A. and Canada European countries United Kingdom China
Warning:
● Do not use the same Power Cord for AC 120 V as for AC 230 V. Doing so may cause malfunction, electric shock or
fire.
Note for the United Kingdom power cord only
The plug on the United Kingdom power cord has a built-in fuse. When replacing the fuse, be sure to use only a
correctly rated approved type, re-fit the fuse cover. (Consult your dealer or qualified service personnel.)
How to replace the fuse
Open the fuse compartment with the blade screw driver,
And replace the fuse.
(* An example is shown in the illustration.)
Fuse
4
Page 31

Installation
Please follow the instructions in this chapter to install your LCD Monitor.
Note: Before connecting your monitor, first read through the instructions in this chapter and the safety precautions in
the previous chapter.
Unpacking the Monitor
When you are unpacking the monitor, make sure that you have the following items:
Ö The LCD monitor
Ö AC power cord
Ö Stand and screw
Ö This instruction book
Note: Place the monitor on a flat, sturdy surface. Choose an area free from excessive heat, moisture, and sunlight.
<LM-17G> <LM-15G>
ENGLISH
Attach the supplied stand to the monitor as shown, and then fix it with the screws. Please fix the stand with the
supplied screw (A) first, and then fix it with the screws (B).
Controls and Features
5
Page 32

1
Down ( ) button
2
UP ( ) button
3
MENU/ENTER button
4
Video button
5
PC button
6
Power switch [POWER]
7
VIDEO A indicator
8
VIDEO B indicator
9
PC indicator
10
Power indicator
To AC outlet
(120 V AC,
50 Hz/60 Hz)
Use this button for menu operation. (See page 8)
Displays the “AUTO SET UP” menu in the PC mode. (See page 13)
Use this button for menu operation. (See page 8)
Displays the “AUTO SET UP” menu in the PC mode. (See page 13)
Use this button for menu operation. (See page 8)
Selects the VIDEO A or B input.
Selects the PC input.
Press this to turn the power on or off.
Lights when VIDEO A input is selected.
Lights when VIDEO B input is selected.
Lights when PC input is selected.
Lights in green when the power is on.
Unlit when the power is off.
Lights in amber when the monitor is in a reduced power mode, when there is
no signal or when the signal is out of range.
For U.S.A. and Canada
To AC outlet
(230 V AC,
50 Hz/60 Hz)
For Europe
To AC outlet
(220 V AC,
50 Hz/60 Hz)
For the United Kingdom
China
11
AC inlet
12
VIDEO A terminals
13
VIDEO B terminals
14
Remote (external
control) terminals
15
PC input terminal
16
AC power cord
(Provided)
Note: For more details about connections, see the "Basic Connection Example" on page 16.
Connect the provided AC power cord 16 to this inlet. Then connect the AC
power cord 16 to the AC outlet (120V AC/220V AC or 230V AC, 50Hz/60Hz)
Video signal input (IN) and output (OUT) terminals for VIDEO A input.
Video signal input (IN) and output (OUT) terminals for VIDEO B input.
Terminals for controlling the monitor from external unit.
You can select input signals, or change the ASPECT RETIO setting via the
Remote terminals.
You can connect this monitor to your PC.
Before using this terminal, please see the "Video Modes (Analog PC signal)”
and “Unknown Video Modes (Analog PC signal)” on page 20.
CAUTION:
In North America (USA and Canada), this monitor comes with one power cord.
In Europe and the United kingdom, two power cords are provided.
Be sure to use the power cable that is appropriate for the AC outlets used in your
region.
If none of the power cord provided is suitable, please contact your dealer or
qualified service personnel to obtain the correct type of power cord.
6
Page 33

Using Your Monitor
This chapter contains information about using your LCD Monitor.
Turning the Monitor On and Off
Use the power button located at the lower right side of the front panel of the monitor to turn the monitor on and off.
When the monitor is on, the Power indicator near the Power button lights green.
The monitor goes into the reduced power mode when there is no video signal input. And then the Power indicator
changes amber from green.
The Power indicator lights amber when the video signal input is out of range .
Note: Because of the technology used in LCD panels, screen savers will not prolong the life of your monitor . So if
the monitor will not be used for an extended period, be sure to turn it off.
Caring for and Cleaning the Monitor
To maximize screen life and prevent damage to the LCD panel, we recommend that you:
Ö Turn the monitor off when you are not using this monitor for a long period of time.
Ö Don’t press, rub, or poke the monitor with your finger or other object.
Ö Handle your monitor with care.
ENGLISH
Your LCD module is a high-quality optical device that requires special care when cleaning.
Warning
To clean the screen:
1. Turn off and unplug the monitor.
2. Gently dust the screen with a dry, soft, line-free cloth.
Note: If the screen is still dirty, you can dampen the cloth with several drops of distilled water. Make sure the LCD
panel is completely dry before you turn the monitor on.
Don’t use liquid, aerosol, or abrasive cleaning solutions to clean the screen.
Connecting the monitor to the PC
When you connect the monitor to a PC, you might be requested to install the specific driver. In this case do the
following:
-use the driver attached with the video card of the PC you use.
or
-set the monitor as standard monitor in the PC menu.Recommended mode, 1024x768 at 60Hz for LM-15G and
1280x1024 at 60Hz for LM-17G .
7
Page 34

Using the Menu
This chapter contains information about how to changing monitor settings for your LCD Monitor. It is designed with
an menu to help you easily adjust to its optimum performance.
Note: In the PC mode, do the “AUTO SET UP” setting first, before adjusting any settings. For details, see “AUTO
SET UP” on page 13.
Summary of Control Buttons
There are three control buttons located at the lower part of the front panel of your monitor:
MENU/ENTER: Display and select a menu. You can also exit a menu by pressing this button repeatedly.
UP( ): Move upward through the choice in the submenu. If an adjustment bar is displayed, this button increases
the setting value.
Down( ) : Move downward through the choice in the submenu. If an adjustment bar is displayed, this button
decreases the setting value.
Menu Operation
1. Press the ‘MENU/ENTER’ button to display the “BACK LIGHT” menu..
2. Press the ‘MENU/ENTER’ button repeatedly to display the menu you want to use.
100
PICTURE ADJ.
COLOR TEMP.
LOW LIGHT ADJ.
BACK LIGHT
Next page
PICTURE
PHASE
CHROMA
ASPECT
3. Press the ‘UP’ and ‘DOWN’ button to choose the item, and then press the ‘MENU/ENTER’ button to display the
sub-menu.
ASPECT
4 3
16 9
If the item do not have sub-menu, go to the step 4.
4. Press ‘UP’ and ‘DOWN’ button to adjust it, or choose a setting.
5. Press the ‘MENU/ENTER’ button repeatedly to exit the menu.
To return to the menu from the sub-menu, press the ‘MENU/ENTER’ button
The menu will disappear if no operation is performed for approximately 15 seconds.
8
Page 35

In the VIDEO A or B mode (composite video input):
Menu Items
BACK LIGHT You can adjust the light output of the backlight.
PICTURE ADJ. PICTURE, PHASE, CHROMA, ASPECT, COLOR TEMP., LOW LIGHT ADJ. .
SYSTEM SETTING SIGNAL LEVEL, DISPLAY, OSD POSITION, COLOR SYSTEM, AGC, REMOTE,
All reset
In the PC mode (analog RGB input):
Menu Items
BACK LIGHT You can adjust the light output of the backlight.
CONTRAST You can adjust the contrast of the picture.
POSITION ADJ. H.POSITION, V. POSITION
WHITE BALANCE
ADJ.
DISPLAY ADJ. AUTO SET UP, CLOCK, PHASE
SYSTEM SETTING DISPLAY, OSD POSITION, REMOTE, All reset
COLOR TEMP., LOW LIGHT ADJ.
BACK LIGHT menu
You can adjust the light output of the backlight.
BACK LIGHT
100
PICTURE ADJ. menu
PICTURE ADJ.
Next page
PICTURE
PHASE
CHROMA
ASPECT
COLOR TEMP.
LOW LIGHT ADJ.
PICTURE: You can adjust the levels of black and white on the screen, giving you a darker or brighter picture
overall.
.
ENGLISH
PHASE: You can adjust the picture hue. When the COLOR SYSTEM is BW60, BW50 or PAL, you cannot adjust
the PHASE.
CHOROMA: You can adjust the picture color density. When the COLOR SYSTEM is BW60 or BW50, you cannot
adjust the CHOROMA.
ASPECT: You can choose the screen aspect ratio between “4 3 ” and “ 16 9 ”.
COLOR TEMP.: If you select ‘COLOR TEMP.’ and press the ‘MENU/ENTER’ button, the “COLOR TEMP.” menu will
appear. For details, see the following “COLOR TEMP.” menu.
LOW LIGHT ADJ.: At the video mode: You can adjust the brightness of the dark part of picture.
At the PC mode: You can adjust the R.G.B. balance of the dark part of picture. For details of the
adjustments, see “HIGH LIGHT ADJ.” in page10
Next page: If you select ‘Next page’ and press the ‘MENU/ENTER’ button, the next menu will appear.
9
Page 36

COLOR TEMP. menu
1. Press the ‘UP’ and ‘DOWN’ button to choose the “COLOR TEMP.”, and then press the ‘MENU/ENTER’ button
to display the sub-menu.
COLOR TEMP.
HIGH
NATURAL
LOW
USER
2. Press ‘UP’ and ‘DOWN’ button to choose one of four Color temp settings: HIGH, NATURAL, LOW and USER.
“USER” setting:
You can store the adjustments of “HIGH LIGHT ADJ.” to the “USER” setting.
In “HIGH”, “NATURAL” and “LOW”, you cannot use “HIGH LIGHT ADJ.”.
1. Press the ‘UP’ or ‘DOWN’ button to choose the “USER” , and then press the ‘MENU/ENTER’ button to return to
the “HIGH LIGHT ADJ.” menu.
HIGH LIGHT ADJ.
Next page
RED
GREEN
BLUE
2. Press ‘UP’ and ‘DOWN’ button to choose “RED”, and then press ‘MENU/ENTER’ button to display the adjusting
menu.
3. Press ‘UP’ or ‘DOWN’ button to adjust the level, and then press ‘MENU/ENTER’ button to return to the
sub-menu
4. Repeat step 3 and 4 for other colors “GREEN” and “BLUE” to complete the “HIGH LIGHT ADJ.” setting.
RED
50
10
Page 37

SYSTEM SETTING menu
SYSTEM SETTING
Exit
SIGNAL LEVEL
DISPLAY
OSD POSITION
COLOR SYSTEM
AGC
REMOTE
All reset
SIGNAL LEVEL: You can choose the signal level from ”STD.” or “AMP.”.
STD.: Select this for normal operation.
AMP.: Select this to watch dark part of the picture better.
DISPLAY: If you select ‘DISPLAY’ and press the ‘MENU/ENTER’ button, you can confirm the current status;
resolution, Horizontal frequency and Vertical frequency.
COLOR SYSTEM: You can choose the color system from NTSC, PAL, BW60 or BW50. Choose the correct color
system when the color is abnormal or no color appears.
AGC: You can turn the AGC (Auto Gain Control) function on (ON) or off (OFF).If you select off(OFF), you can adjust
contrast bar.
REMOTE: If you select ON, you can only do remote control. If you select OFF, you can control only by using the
monitor’s buttons.
Exit: If you select “Exit” and press the ‘MENU/ENTER’ button, the menu will disappear.
All reset: If you select “All reset” and press the ‘MENU/ENTER’ button, the settings will be return to the factory
settings.
* “COLOR SYSTEM” and the input select will not be return to the factory settings.
OSD POSITION:
You can adjust the position of the menu on the screen as following procedure.
1. Select “OSD POSITION” and press the ‘MENU/ENTER’ button, the sub-menu will appear.
ENGLISH
OSD POSITION
Next page
H. POSITION
V. POSITION
2. Press ‘UP’ and ‘DOWN’ button to choose “H. POSITION” (horizontal position) or “V. POSITION” (vertical
position), and then press ‘MENU/ENTER’ button to display the adjusting menu
3. Press ‘UP’ and ‘DOWN’ button to adjust the position of the menu on the screen.
4. Press ‘MENU/ENTER’ button to return to the “OSD POSITION” menu.
Next page: If you select ‘Next page’ and press the ‘MENU/ENTER’ button, the next menu will appear.
CONTRAST menu
You can adjust the contrast of the image from the PC.
CONTRAST
50
11
Page 38

POSITION ADJ. menu
You can adjust the position of the image from the PC on the screen.
POSITION ADJ.
Next page
H. POSITION
V. POSITION
1. Press ‘UP’ and ‘DOWN’ button to choose “H. POSITION” (horizontal position) or “V. POSITION” (vertical
position), and then press ‘MENU/ENTER’ button to display the adjusting menu
2. Press ‘UP’ and ‘DOWN’ button to adjust the position of the picture on the screen.
3. Press ‘MENU/ENTER’ button to return to the “POSITION ADJ.” menu.
Next page: If you select ‘Next page’ and press the ‘MENU/ENTER’ button, the next menu will appear.
DISPLAY ADJ. menu
You can do the necessary adjustments to display the image from the PC.
DISPLAY ADJ.
Next page
AUTO SET UP
CLOCK
PHASE
AUTO SET UP:
We recommend you to do the AUTO SET UP first. And then adjust the CLOCK or PHASE if necessary.
To use the AUTO SET UP, select this item and press ‘MENU/ENTER’ button. And follow the step 2 of the description
“AUTO SET UP” on page13 .
CLOCK: You can adjust the Clock.
PHASE: You can adjust the Phase.
Next page: If you select ‘Next page’ and press the ‘MENU/ENTER’ button, the next menu will appear.
12
Page 39

Using the Monitor in the PC mode
Since the inherent format of this monitor is 1024 pixels by 768 lines, the monitor will perform best when your PC is
set to a screen resolution of 1024 x 768. If you use a lower resolution (such as 640 x 480), the image is expanded to
fill the screen
Your monitor supports many common video modes, as shown in “Video Modes” on page 20. Check the manuals
supplied with your PC and video adapter card to find out which modes they support. To see what the video mode in
your Microsoft Windows, please check Windows’settings in your PC.
Do the AUTO SET UP first when you use the monitor in the PC mode.
AUTO SET UP
You can setup this monitor to display the analog RGB signal from your PC. Please do the AUTO SET UP whenever
you apply a new video mode or change the refresh rate from the PC.
1. Press ‘UP’ or ‘DOWN’ button while no menu appears on the screen.
The “AUTO SET UP” menu appears on the screen
AUTO SET UP
YES NO
2. Press ‘UP’ or ‘DOWN’ button to choose “YES”, and then press ‘MENU/ENTER’ button to start the AUTO SET
UP.
The monitor will do the necessary settings for new PC input automatically.
AUTO SET UP
Please wait…
When you start the AUTO SET UP, do not display moving images (games, videos, etc) on the screen.
ENGLISH
3. After the AUTO SET UP is complete, you will be asked whether the image is displayed correctly or
not.
AUTO SET UP
Does this image
look correct?
YES NO
4. If the image looks correct, press ‘UP’ or ‘ DOWN’ button to choose “YES”.
The menu disappears.
If the image requires further adjustment, press ‘UP’ or ‘DOWN’ button to choose “NO”. “PHASE” menu will
appear and you can adjust the PHASE by ‘UP’ or ‘DOWN’ button.
When all text appears well focused and there is no instability in the image, press the ‘MENU/ENTER’ button.
The menu disappears.
Note: You can also start the AUTO SET UP with “DISPLAY ADJ.” menu.
13
Page 40

The menu flowchart of the VIDEO mode
*The menu can not be displayed when "No Sync" is displayed.
14
Page 41

The menu flowchart of the PC mode
ENGLISH
*The menu cannot be displayed when "No Sync" is displayed.
15
Page 42

)
Basic Connection Example
Notes:
Before connecting your system, make sure that all devices are turned off.
The illustration shows some examples of different connections. Terminal connections may differ depending on
the devices. Be sure to refer to the manuals provided with the devices.
Each pair of input (IN) and output (OUT) terminals are bridge-connected
If you’re not connecting any equipment to a bridged output (OUT) terminal, be sure not to connect any other
cables to the bridged output (OUT) terminal as this will cause the terminating resistance switch to open (auto
terminate function).
When making a bridge connection, connect the input (IN) and output (OUT) terminals on the monitor to separate
video components.(For example, if both terminals are connected to the same VCR, resonance may occur except
during playback. This is caused by the same video signal “looping” between the VCRs, and is not a malfunction.)
The ASPECT or INPUT A/B settings can be controlled via the ASPECT or INPUT jack in the REMOTE terminal.
When using REMOTE terminal, set REMOTE function ON . See “SYSTEM SETTING menu “ on page 11.
Video Camera
VCR
Video Monitor
VCR
Video Monitor
External control switch
open circuit (open)
RCA pin
closed circuit (short)
External control
functions n circuit
INPUT IN PUT A INPUT B
External control switch
Ope
(open)
Closed circuit
(short)
Video Camera
Video Monitor
VCR
REMOTE
(Remote cable)
Signal Flow
VCR
Video Monitor
REMOTE
(Remote cable)
RCA pin
External control
functions
ASPECT
RATIO
PC
External control switch
open circuit (open)
closed circuit (short
External control switch
Open circuit
(open)
4 – 3 (4 3) 16 – 9 (16 9)
Closed circuit
(short)
16
Page 43

Troubleshooting
Solutions to common problems related to your monitor are described here. If none of the solutions presented here
solove the problem, unplug the monitor and consult a JVC-authorised dealer or service centre for assistance.
A. My monitor doesn’t work.
Check that the power cable is securely plugged into the monitor.
Check that the monitor is turned on.
Turn the monitor off and pull the plug out, then put the plug in again and turn the monitor on.
B. My monitor shows no colors, wrong color, or dark pictures.
Check that the color system is selected correctly. See “SYSTEM SETTING menu” on page 11.
Check the BACK LIGHT and PICTURE ADJ. settings. See “BACK LIGHT menu” and “PICTURE ADJ.
menu” on page 9.
In the PC mode, check the CONTRAST setting. See “CONTRAST menu” on page 11.
C. Dark stripes appear at the top and bottom of the screen, picture vertically squeezed.
Set the ASPECT setting to “4:3”. See “PICTURE ADJ. menu” on page 9.
D. The message “No Sync” appears .
This message appears when there is no video signal. After few seconds, the monitor goes into the reduced
power mode.
Check the connection.
Select the required video signal input.
Connect the video signal cable firmly.
Check that your graphic card outputs the analog RGB signal.
E. The message “Signal Out of Range” appears on my monitor.
This message appears when the input signal is beyond the monitor capability.
Set your PC to a supported video mode; preferably 1024 x 768 at 60 Hz for LM-15G, 1280x1024 at
ENGLISH
60Hz for LM-17G.
F. The image is very unstable in the PC mode.
Set your PC to a supported video mode; preferably 1024 x 768 at 60 Hz for LM-15G, 1280x1024 at
60Hz for LM-17G.
Restore the original factory settings by “All reset”. See “SYSTEM SETTING menu” on page 11.
Do the “AUTO SET UP”. See “AUTO SET UP” on page 13.
G. When connecting to the PC,installation of the device is required. See "Connecting the monitor to the PC" on
page 7
Note: Even if your PC’s setting is out of the range of video modes that are supported by your LCD monitor, it
may still be displayed with reduced quality. This provides you with an opportunity to change your PC’s
setting to a correct one.
The following are not malfunctions:
The monitor emits a strange sound when the room temperature changes suddenly. This is only a problem if an
abnormality appears on the screen as well.
When a still image as been displayed for a long period, a faint residual image may remain on the screen for a short
time after the power has been turned off or when another image is displayed. The image will eventually
disappear.
When you see the monitor from the side, the color or brightness look different.
The LCD panel is made with high-precision technology and has more than 99.99% effective pixels.
Fewer than 0.01% of pixels may be chipped or always lit.
17
Page 44

Specifications
Item
Type LCD Video Monitor
Color system PAL,NTSC, BW60,BW50
LCD panel
Display colors 16700000 colors 16700000 colors
Display area(W x H x D)
Scanning frequency
Viewing Angle
Power Input 100V~240V AC,50Hz/60Hz ,1.2A at 100V ,0.6A at 230V
Input terminals
Video A
Video B
PC input Analog RGB: D-sub (16 pins) x1, positive 0.7V
Model
LM-17G LM -15G
17-in(43.275cm),TFT active matrix
1280 x 1024 dot
337.92mmx270.34mmx432.75mm 304.1mmx228.1mmx380mm
(H) 31.5kHz~80kHz(Analog)
15.734kHz (NTSC)
15.625kHz (PAL)
(V)56Hz~75Hz (Analog)
59.94Hz (NTSC)
50Hz (PAL)
Left/Right 85/85,Up/Down 85/85 Left/Right 60/60,Up/Down 55/45
Composite video:
1line, BNC connector x 2, 1 V(p-p), 75 , bridge-connected (auto termination)
Composite video:
1line, BNC connector x 2, 1 V(p-p), 75 ,bridge-connected (auto termination)
15-in(38.1cm),TFT active matrix
1204 x 768 dot
(H) 31.5kHz~60kHz(Analog)
15.734kHz (NTSC)
15.625kHz (PAL)
(V)56Hz~70Hz (Analog)
59.94Hz (NTSC)
50Hz (PAL)
PP
Recommended mode
REMOTE For INPUT 1 line, RCA pin x 1
REMOTE For ASPECT 1 line, RCA pin x 1
Conditions Temperature 5 ~35 at altitude 0~2000m,5 ~30 at altitude 2000~3000m,
Humidity Altitude 20%~85%RH,non-condensing 3000m Max.
Storage Conditions
Temperature/Humidity/Altitude
Maximum power Consumption 45W 35W
Dimensions
Monitor only(W x H x D)
With supplied stand
(W x H x D)
Net weight
100mm mount based on VESA regulation is equipped.
1280 x 1024 at 60Hz (Analog) 1024 x 768 at 60Hz (Analog)
-20 ~60 / 5%~95% RH/ 10000m Max
402mmx348mmx68.6mm
402mmx349.2mmx162mm
5kg / 5.8kg (with stand)
370mmx309mmx66.1mm
370 mmx310.6 mmx142 mm
3.75kg / 4.2 kg (with stand)
*Pictures may not appear on the some of PC even if frequencies are within this range.
*Design and specifications subject to change without notice
18
Page 45

Dimensions
<LM-17G>
Front View
Side View
ENGLISH
<LM-15G>
Front View
Side View
19
Page 46

Video Modes (Analog RGB Signal)
Your LCD monitor supports the following industry-standard combinations of screen resolution and refresh rates.
For optimum performance, set your PC to the screen resolution of 1024 x 768 at 60 Hz refresh rate.
<LM-17G> <LM-15G>
Supported Resolution
(dots x lines)
VGA
640 x 480
640 x 350
SVGA
XGA
SXGA
US TEXT 720 x 400 70 Hz
Power MAC
800 x 600
800 x 600
1024 x 768
1024 x 768
1280 x 1024 60 Hz
640 x 480 67 Hz
Vertical Frequency
(Refresh Rate)
60 Hz
70 Hz
56 Hz
60 Hz
60 Hz
70 Hz
Supported Resolution
(dots x lines)
VGA
SVGA
XGA
US TEXT
Power MAC
640 x 350
640 x 480
800 x 600
800 x 600
1024 x 768
1024 x 768
720 x 400
640 x 480
Unknown Video Modes (Analog RGB Signal)
Vertical Frequency
(Refresh Rate)
70 Hz
60 Hz
56 Hz
60 Hz
60 Hz
70 Hz
70 Hz
67 Hz
Like all other monitors, the your LCD monitor is designed to work with standard video modes. However, not all
video/graphic cards use only standard display modes.
Your LCD monitor uses state-of-the-art technology, which is designed to synchronize to any display mode. We
recommend choosing one of the supported modes listed above. If you want to use an unknown mode, do the AUTO
SET UP at first. If AUTO SET UP doesn’t make adjustments corrrectly, adjust the CLOCK, PHASE , horizontal
position and vertical position manually.
R
VICTOR COMPANY OF JAPAN, LIMITED
20
Page 47

PARTS LIST
CAUTION
!!
! The parts identified by the symbol are important for the safety . Whenever replacing these parts, be sure to use specified
!!
ones to secure thesafety.
!!
! The parts not indicated in this Parts List and those which are filled with lines
!!
supplied.
!!
! P. W. Board Ass'y will not be supplied, but those which are filled with the Parts No. in the Parts No. columns will be supplied.
!!
ABBREVIATIONS OF RESISTORS, CAPACITORS AND TOLERANCES
!!
! in the Parts No. columns will not be
!!
RESISTORS
CR Carbon Resistor
FR Fusible Resistor
PR Plate Resistor
VR Variable Resistor
HV R High Voltage Resistor
MF R Metal Film Resistor
MG R Metal Glazed Resistor
MP R Metal Plate Resistor
OM R Metal Oxide Film Resistor
CMF R Coating Metal Film Resistor
UNF R Non-Flammable Resistor
CH V R Chip Variable Resistor
CH MG R Chip Metal Glazed Resistor
COMP. R Composition Resistor
LPTC R Linear Positive Temperature Coefficient Resistor
CAPACITORS
C CAP. Ceramic Capacitor
E CAP. Electrolytic Capacitor
M CAP. Mylar Capacitor
CH CAP. Chip Capacitor
HV CAP. High Voltage Capacitor
MF CAP. Metalized Film Capacitor
MM CAP. Metalized Mylar Capacitor
MP CAP. Metalized Polystyrol Capacitor
PP CAP. Polypropylene Capacitor
PS CAP. Polystyrol Capacitor
TF CAP. Thin Film Capacitor
MPP CAP. Metalized Polypropylene Capacitor
TAN. CAP. Tantalum Capacitor
CH C CAP. Chip Ceramic Capacitor
BP E CAP. Bi-Polar Electrolytic Capacitor
CH AL E CAP. Chip Aluminum Electrolytic Capacitor
CH AL BP CAP. Chip Aluminum Bi-Polar Capacitor
CH TAN. E CAP. Chip Tantalum Electrolytic Capacitor
CH AL BP E CAP. Chip Tantalum Bi-Polar Electrolytic Capacitor
RESISTORS
FGJ K MNR HZ P
±1% ±2% ±5% ±10% ±20% ±30%
+30% +50% +80% +100%
-10% -10% -20% -0%
(No. 52164) 3-1
Page 48

CONTENTS
EXPLODED VIEW PARTS LIST .................................................................................................................................................... 3-2
EXPLODED VIEW ......................................................................................................................................................................... 3-3
PRINTED WIRING BOARD PARTS LIST ....................................................................................................................................... 3-4
MAIN PW BOARD ASS’Y ..................................................................................................................................................... 3-4
BNC INPUT PW BOARD ASS’Y .......................................................................................................................................... 3-4
FRONT CONTROL 1 PW BOARD ASS’Y............................................................................................................................ 3-4
FRONT CONTROL 2 PW BOARD ASS’Y............................................................................................................................ 3-4
INVERTER PW BOARD ASS’Y ........................................................................................................................................... 3-4
POWER PW BOARD ASS’Y ................................................................................................................................................ 3-4
PACKING ...................................................................................................................................................................................... 3-6
PACKING PARTS LIST ................................................................................................................................................................. 3-6
EXPLODED VIEW PARTS LIST
! Ref. No. Part No. Part Name Description
1 DA-5642725102 FRONT COVER LM-17G/U, LM-17G/C
1 DA-5642725103 FRONT COVER LM-17G/E
2 DA-5642678400 CLIP (x4)
3 DA-5642724601 CONTROL BRACKET
4 DA-5642848800 CONTROL BUTTON (x2)
5 DA-5642724410 LCD BRACKET (x2)
6 DA-5642724901 BACK COVER
7 DA-5646519201 INSULATOR (x2)
8 DA-5642725200 FUNCTION COVER
9 DA-5642724700 TERMINAL BRACKET
10 DA-5646425700 HEAT SINK(E)
11 DA-5646440601 HEAT SINK(P)
12 DA-5646425701 HEAT SINK(A)
13 DA-5642724401 BASE
14 DA-5642673100 LED HOLDER (x4)
! 15 DA-5051253648 LCD PANEL
16 DA-5030574201 MODEL LABEL LM-17G/U
16 DA-5030574202 MODEL LABEL LM-17G/E
16 DA-5030574204 MODEL LABEL LM-17G/C
S1 DA-7190562313 SCREW PPW M3X6 (x13)
S2 DA-7000311032 SCREW PPW M3X6 (x24)
S3 DA-7134161186 SCREW PZP 3X8 (x3)
S4 DA-7004171116 SCREW PFS M3X8 (x2)
S5 DA-7160250652 SCREW PZS+L 4X6
S6 DA-7190562304 SCREW PPF M3X0.4 (x8)
S7 DA-7006260616 SCREW M4X0.7x06 (x4)
3-2 (No. 52164)
Page 49

EXPLODED VIEW
S1
16
PWB
BNC INPUT
S3
8
S2
9
10
S5
WIRE
EARTH
12
11
INVERTER PWB
POWER PWB
S4
13
7
S1
S2
S6
5
S2
6
S1
S1
PWB
FRONT CONTROL1
14
S2
MAIN PWB
4
15
5
S2
S6
S1
S7
S1
S7
PWB
3
FRONT CONTROL2
2
1
S7
(No. 52164) 3-3
Page 50

PRINTED WIRING BOARD PARTS LIST
MAIN PWB ASS’Y
! Symbol Part No. Part Name Description ! Symbol Part No. Part Name Description
DA-5097624700 MAIN PWB ASS’Y
BNC INPUT PWB ASS’Y
! Symbol Part No. Part Name Description
DA-5098800646 BNC INPUT PWB ASS’Y
FRONT CONTROL1 PWB ASS’Y
! Symbol Part No. Part Name Description
DA-5098800661 FRONT CONTROL1 PWB ASS’Y
R814 DA-5142110295 C RESISTOR 1k 1/6W
R815 DA-5142110295 C RESISTOR 1k 1/6W
R816 DA-5142115395 C RESISTOR 15k 1/6W
R817 DA-5142115395 C RESISTOR 15k 1/6W
R818 DA-5142147395 C RESISTOR 47k 1/6W
R819 DA-5142110495 C RESISTOR 100k 1/6W
R820 DA-5142110495 C RESISTOR 56k 1/4W
R821 DA-5142110495 C RESISTOR 100k 1/6W
R822 DA-5142110395 C RESISTOR 10k 1/6W
R823 DA-5142110595 C RESISTOR 1k 1/6W
R824 DA-5142143295 C RESISTOR 4.3k 1/6W
R825 DA-5134730119 MF RESISTOR 3.01k 1/6W
R826 DA-5142147195 C RESISTOR 470 1/6W
R827 DA-5142182195 C RESISTOR 820 1/6W
R828 DA-5130251090 OM RESISTOR 51 1/2W
R829 DA-5142868995 C RESISTOR 6.8 1/4W
R830 DA-5130333890 OM RESISTOR 0.33 1 W
R831 DA-5130210095 OM RESISTOR 10 1/2W
R832 DA-5142815295 C RESISTOR 1.5k 1/4W
R833 DA-5142815295 C RESISTOR 1.5k 1/4W
R834 DA-5134738329 MF RESISTOR 38.4k 1/6W
R835 DA-5142133495 C RESISTOR 330k 1/6W
R836 DA-5134710028 MF RESISTOR 10k 1/6W
R837 DA-5142147295 C RESISTOR 4.7k 1/6W
R838 DA-5142847295 C RESISTOR 4.7k 1/4W
R839 DA-5142847195 C RESISTOR 470 1/4W
R840 DA-5142110295 C RESISTOR 1k 1/6W
R841 DA-5142833395 C RESISTOR 33k 1/4W
R842 DA-5142147295 C RESISTOR 4.7k 1/6W
FRONT CONTROL2 PWB ASS’Y
! Symbol Part No. Part Name Description
DA-5098800647 FRONT CONTROL2 PWB ASS’Y
INVERTER PWB ASS’Y
! Symbol Part No. Part Name Description
! DA-5097672143 INVERTER PWB ASS’Y
POWER PWB ASS’Y
! Symbol Part No. Part Name Description
RESISTORS
! R801 DA-5101111400 THERMISTOR 5 5A
! R802 DA-5142868490 C RESISTOR 650k 1/4W
! R803 DA-5142868490 C RESISTOR 680k 1/4W
R084 DA-5142833495 C RESISTOR 330k 1/4W
R805 DA-5142833495 C RESISTOR 330k 1/4W
R806 DA-5142833495 C RESISTOR 330k 1/4W
R807 DA-5130251090 OM RESISTOR 51 1/2W
R808 DA-5130310490 OM RESISTOR 100k 1W
R809 DA-5142833395 C RESISTOR 33k 1/4W
R810 DA-5142833395 C RESISTOR 33k 1/4W
R811 DA-5142810595 C RESISTOR 1M 1/4W
R812 DA-5142147295 C RESISTOR 4.7k 1/6W
R813 DA-5142110495 C RESISTOR 100k 1/6W
CAPCITORS
! C801 DA-5270113301 MF CAPACITOR 0.33µF 275V M
! C802 DA-5230108601 C CAPACITOR 4.7µF 250V M
DA-5230108701
DA-5230108101
! C803 DA-5230108601 C CAPACITOR 4.7µF 250V M
DA-5230108701
DA-5230108101
! C804 DA-5213019300 E CAPACITOR 120µF 400V M
C805 DA-5233310291 C CAPACITOR 1µF 1KV K
! C806 DA-5230108301 C CAPACITOR 1µF 250V M
DA-5230108501
DA-5230108401
C807 DA-5216021991 E LOW ESR CAP. 47µF 50V M
C808 DA-5231310391 C CAPACITOR 10µF 50V K
C809 DA-5221110391 POLYESTER CAP. 10µF 50V J
C810 DA-5231347191 C CAPACITOR 470pF 50V K
C811 DA-5216022191 E LOW ESR CAP. 10µF 50V M
C812 DA-5216022091 E LOW ESR CAP. 1µF 50V M
C813 DA-5231322191 C CAPACITOR 220pF 50V K
C814 DA-5222410491 POLYESTER CAP. 100µF 100V J
C815 DA-5232347191 C CAPACITOR 470pF 500V K
C816 DA-5216021891 E LOW ESR CAP. 1000µF 16V M
C817 DA-5216021891 E LOW ESR CAP. 1000µF 16V M
C818 DA-5216021791 E LOW ESR CAP. 470µF 16V M
C819 DA-5231310391 C CAPACITOR 1µF 50V K
C820 DA-5231347291 C CAPACITOR 4.7µF 50V K
C821 DA-5231310391 C CAPACITOR 10µF 50V K
C822 DA-5231310391 C CAPACITOR 10µF 50V K
! C823 DA-5270113701 MF CAPACITOR 470pF 275V M
DA-5270112401
TRANSFORMER
! T801 DA-5061377320 SWITCHING
INDUCTORS
! L801 DA-5061113700 EMI FILTER 14mH
L802 DA-5062142100 CHOKE COIL 1.5µH
! L803 DA-5061113800 EMI FILTER 260µH
! L804 DA-5062119802 CHOKE COIL 22µH
3-4 (No. 52164)
Page 51

! Symbol Part No. Part Name Description ! Symbol Part No. Part Name Description
BEADS
B801 DA-5062122946 FERRITE BEAD
B802 DA-5062122946 FERRITE BEAD
B803 DA-5062133201 FERRITE BEAD
B804 DA-5062133201 FERRITE BEAD
DIODES
D801 DA-6641000704 BRIDGE DIODE
D802 DA-6611007740 SI DIODE
D803 DA-6615023745 SI DIODE
D804 DA-6611007240 SI DIODE
D805 DA-6615007531 Z DIODE
D806 DA-6611020442 SI DIODE
D807 DA-6613003032 SI DIODE
D808 DA-6611010407 SI DIODE
DA-6611007741
DA-6615008441
DA-6611007244
DA-6611007243
DA-6611007245
DA-6615012436
DA-6615007833
DA-6611020443
DA-6613003034
TRANSISTORS
Q801 DA-6626005100 n-MOS FET
Q802 DA-6621032132 NPN TRANSISTOR
Q803 DA-6621025832 NPN TRANSISTOR
Q804 DA-6621025832 NPN TRANSISTOR
Q805 DA-6624000737 PNP TRANSISTOR
Q806 DA-6621025832 NPN TRANSISTOR
Q807 DA-6621025832 NPN TRANSISTOR
DA-6626008902
DA-6621025833
DA-6621025833
DA-6624000734
DA-6621025833
DA-6621025833
IC
I801 DA-6644063004 PWM CONTROLLER
I802 DA-6640007706 VOLTAGE REG.
! I803 DA-6642002904 PHOTO COUPLER
DA-6640007717
DA-6640007705
OTHERS
4E01 DA-5646425700 HEAT SINK(E)
4E02 DA-5646440601 HEAT SINK(P)
4E03 DA-5646425701 HEAT SINK(A)
! F801 DA-5054420084 FUSE 250V/2A
! P801 DA-5056415343 3P CONN. (#2 OFF)
P802 DA-5057404352 4P CONN. (w/WIRE)
(No. 52164) 3-5
Page 52

PACKING
9 10
6
5
8
2
12
7
4
2
13
11
3
13
1
PACKING PARTS LIST
! Ref. No. Part No. Part Name Description
1 DA-9513350156 BLANK CARTON
2 DA-9513355156 ANCHORSHEET (x2)
3 DA-9513355356 ANCHORSHEET-T
4 DA-9533280156 PE BAG for SET
5 DA-9554160800 PE BAG for BASE
6 DA-9533070556 ZIP LOCK PE BAG for MANUAL
7 DA-9530730657 ZIP LOCK PE BAG for SCREW
! 8 DA-5056706095 POWER CORD LM-17G/U
! 8 DA-5056705939 POWER CORD LM-17G/E
! 8 DA-5056706089 POWER CORD LM-17G/C
! 9 DA-5030053011 USER’S MANUAL LM-17G/U
! 9 DA-5030054005 USER’S MANUAL LM-17G/E
! 9 DA-5030053010 USER’S MANUAL LM-17G/C
10 BT-51010-2 WARRANTY CARD LM-17G/E
11 BT-51024-1 SERVICE CENTER LIST LM-17G/E
12 DA-5030409315 IDENTUFICATION LABEL(S) (x2) LM-17G/U
12 DA-5030409311 IDENTUFICATION LABEL(S) (x2) LM-17G/E
12 DA-5030409313 IDENTUFICATION LABEL(S) (x2) LM-17G/C
13 DA-5030409314 IDENTUFICATION LABEL(L) (x2) LM-17G/U
13 DA-5030409310 IDENTUFICATION LABEL(L) (x2) LM-17G/E
13 DA-5030409312 IDENTUFICATION LABEL(L) (x2) LM-17G/C
12
3-6 (No. 52164)
Page 53

If you need more information on Computer and Electronic Repair, please visit these
in fact
websites to improve yourself.
http://www.fastrepairguide.com
http://www.protech2u.com
http://www.plasma-television-repair.com
http://www.lcd-television-repair.com
Happy Repairing!!
Highly Recommended Repair Ebook:
If you’re a LCD Monitor repairer, then this is the best guide for you.
Why? Because, the author revealed all his LCD Monitor Repairing
secrets for you. I think, with just few Repair tips you learned from
this guide you will get back your investment!
Click Here to read more.
This eBook will show you how to test the electronic component
correctly and accurately. Some of you may say that I don’t
need this eBook because it is too simple! Do you know that,
there is lots of testing electronic components secrets I have learned
from this guide? Do you know how to test a‘TRIAC’ correctly and
accurately? If you answer no then I guess you have to get this
EBook. Click Here to read more.
Are you tired of searching the service manuals to look for the value
of a burnt resistor? If the answer is YES, then this eBook is a ‘must
have’ guide for you. You can save a lot of time and be able to repair
customer’s Electronic equipment with burnt resistors in it.
Click here to read more.
 Loading...