

Page 1
;
;
;;;;;;
;
;
;
;
;
;
;
;
;
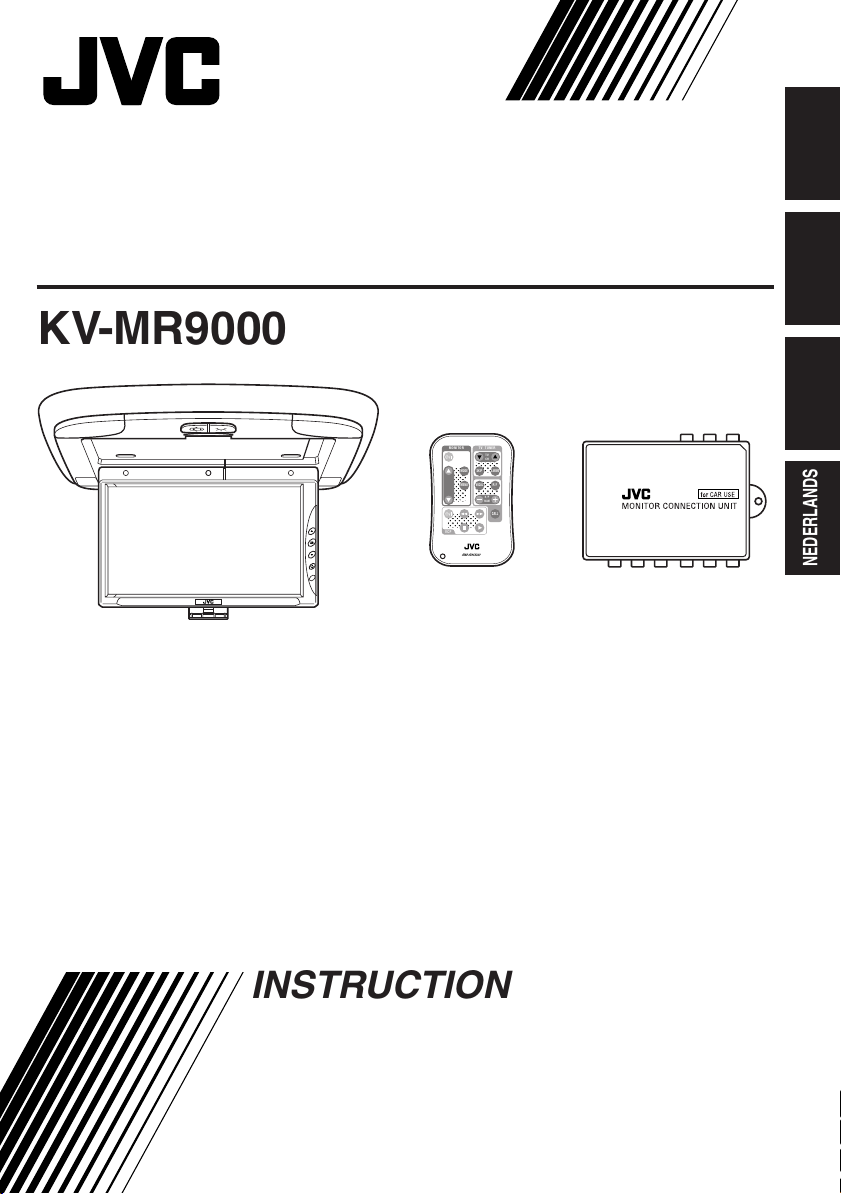
9-INCH WIDE COLOR MONITOR
9"-BREITBILD-FARBMONITOR
MONITEUR COULEUR À ÉCRAN LARGE DE 9 POUCES
9-INCH BREED KLEURENMONITOR
KV-MR9000
ENGLISH
DEUTSCH
For installation and connections, refer to
the separate manual.
Für den Einbau und die Anschlüsse siehe
das eigenständige Handbuch.
Pour l’installation et les raccordements,
référez-vous au manuel séparé.
Bijzonderheden over de installatie en
aansluiting van het apparaat vindt u in de
desbetreffende handleiding.
INSTRUCTIONS
BEDIENUNGSANLEITUNG
MANUEL D’INSTRUCTIONS
GEBRUIKSAANWIJZING
MONITOR
TV TUNER
TV
CH
;;;;
SKIP
MODE
A.MEMO
;;
;;
;;
VOCAL
MENU
R F
;;
;;;;
;;
;;
H/P
VOLUME
CALL
;;;;;;
;;;;;;
VCP
RM-RK500
* This system cannot receive television broadcasts and is primarily
designed for use with a VCR or a DVD player. Use the separately sold
mobile TV tuner unit KV-C10 for optional television broadcast reception.
* Dieses System kann keine Fernsehsignale empfangen und wurde in
erster Linie für die Verwendung mit einem Videorecorder oder einem
DVD-Spieler konzipiert. Verwenden Sie den separat erhältlichen
Fernsehtuner KV-C10, um Fernsehsignale zu empfangen.
* Ce système ne peut pas recevoir les émissions de télévision et il est
essentiellement conçu pour l’utilisation avec un magnétoscope ou un
lecteur de DVD. Utilisez le module de tuner de télévision mobile KV-C10
vendu séparément afin de pouvoir recevoir les émissions de télévision.
* Met dit systeem kunt u geen televisie-uitzendingen ontvangen. Dit
systeem is voornamelijk ontworpen voor het gebruik met een
videorecorder of een DVD-speler. Gebruik de los verkrijgbare draagbare,
KV-C10 TV-tuner voor ontvangst van televisie-uitzendingen.
FRANÇAIS
NEDERLANDS
LVT0987-001A
[E]
Page 2
WARNING:
TO PREVENT FIRE OR SHOCK
HAZARD, DO NOT EXPOSE THIS
UNIT TO RAIN OR MOISTURE.
ENGLISH
CAUTION:
This monitor system should be used with DC 12V only.
To prevent electric shocks and fire hazards, DO NOT
use any other power source.
Installation requires some special
knowledge.
Do not install the monitor system
yourself. Consult a dealer having
special knowledge of this kind for safe
and reliable installation.
WARNINGS
• DO NOT INSTALL THE MONITOR IN A LOCATION WHICH
OBSTRUCTS DRIVING, VISIBILITY OR WHICH IS
PROHIBITED BY APPLICABLE LAWS AND
REGULATIONS.
• THERE MAY BE LEGAL REGULATIONS DEFINING THE
PERMISSIBLE INSTALLATION LOCATIONS FOR THE
DISPLAY UNIT WHICH DIFFER BY COUNTRY OR BY
STATE. BE SURE TO INSTALL THE DISPLAY UNIT IN A
CORRECT LOCATION ACCORDING TO SUCH LAWS.
• DO NOT INSTALL THE MONITOR IN A LOCATION WHICH
OBSTRUCTS THE OPERATION OF AN AIR BAG.
• THE DRIVER MUST NOT OPERATE THE MONITOR
SYSTEM WHILE DRIVING.
OPERATING THE MONITOR WHILE DRIVING MAY LEAD
TO CARELESSNESS AND CAUSE AN ACCIDENT.
* STOP YOUR VEHICLE IN A SAFE LOCATION WHEN
OPERATING THE MONITOR.
• THE DRIVER MUST NOT WATCH THE TELEVISION OR
VIDEOS WHILE DRIVING.
IF THE DRIVER WATCHES THE TELEVISION OR A VIDEO
WHILE DRIVING, IT MAY LEAD TO CARELESSNESS
AND CAUSE AN ACCIDENT.
• WHEN LIGHTNING OCCURS, DO NOT TOUCH THE
ANTENNA WIRE OR THE TELEVISION.
TOUCHING THE ANTENNA WIRE OR THE TELEVISION
UNDER SUCH CONDITIONS MAY CAUSE
ELECTROCUTION.
• KEEP THE MONITOR AT AN APPROPRIATE SOUND
LEVEL WHILE DRIVING.
DRIVING WITH THE SOUND AT A LEVEL THAT
PREVENTS YOU FROM HEARING SOUNDS OUTSIDE
OF AND AROUND THE VEHICLE MAY CAUSE AN
ACCIDENT.
• ASK A TRAINED TECHNICIAN TO INSTALL THE
MONITOR SYSTEM.
INSTALLATION AND WIRING REQUIRE TRAINING AND
EXPERIENCE.
* TO BE SAFE, ASK THE SALES OUTLET WHERE YOU
PURCHASED THE MONITOR SYSTEM TO PERFORM THE
INSTALLATION.
• BE SURE NOT TO LET THE MONITOR FALL OR BE
STRONGLY IMPACTED SINCE THIS MAY CAUSE A
MALFUNCTION OR FIRE.
• DO NOT USE THE MONITOR WITH THE ENGINE OFF.
WATCHING THE MONITOR WITH THE ENGINE OFF WILL
CONSUME BATTERY POWER AND MAY PREVENT THE
ENGINE FROM STARTING.
• DO NOT USE ANY CEILING LIGHT BULBS OTHER THAN
SPECIFIED FOR THIS UNIT (12 V, 3 W).
FAILING TO DO SO MAY POSSIBLY CAUSE FIRE.
• WHEN NOT IN USE, CLOSE THE LIQUID CRYSTAL
PANEL AND STORE IT INTO THE COMPARTMENT.
2
Page 3
Thank you for purchasing a JVC product. Please read all instructions carefully before operation, to
ensure your complete understanding and to obtain the best possible performance from the unit.
CONTENTS
PRECAUTIONS ............................................................ 4
CONTROLS AND FEATURES ......................................... 5
Wide color monitor ......................................................................... 5
Remote controller ........................................................................... 6
Replacing the battery ..................................................................... 7
BASIC OPERATIONS.................................................... 8
Other basic operations ................................................................. 10
Activating the door sensor ......................................................... 10
Turning on or off the ceiling lights .............................................. 10
Selecting the RF signals to the receiver .................................... 10
Using optional cordless headphones ......................................... 10
ADJUSTMENTS ......................................................... 11
Using the Menu ............................................................................. 11
Basic procedure ......................................................................... 11
Adjustable items on the menu ................................................... 12
MAINTENANCE ........................................................ 14
TROUBLESHOOTING ................................................. 14
SPECIFICATIONS ....................................................... 15
ENGLISH
BEFORE USE
* For safety....
• Do not raise the volume level too much, as this
will block outside sounds, making driving
dangerous.
• Stop the car before performing any complicated
operations.
* Temperature inside the car....
If you have parked the car for a long time in hot
or cold weather, wait until the temperature in the
car becomes normal before operating the unit.
3
Page 4
PRECAUTIONS
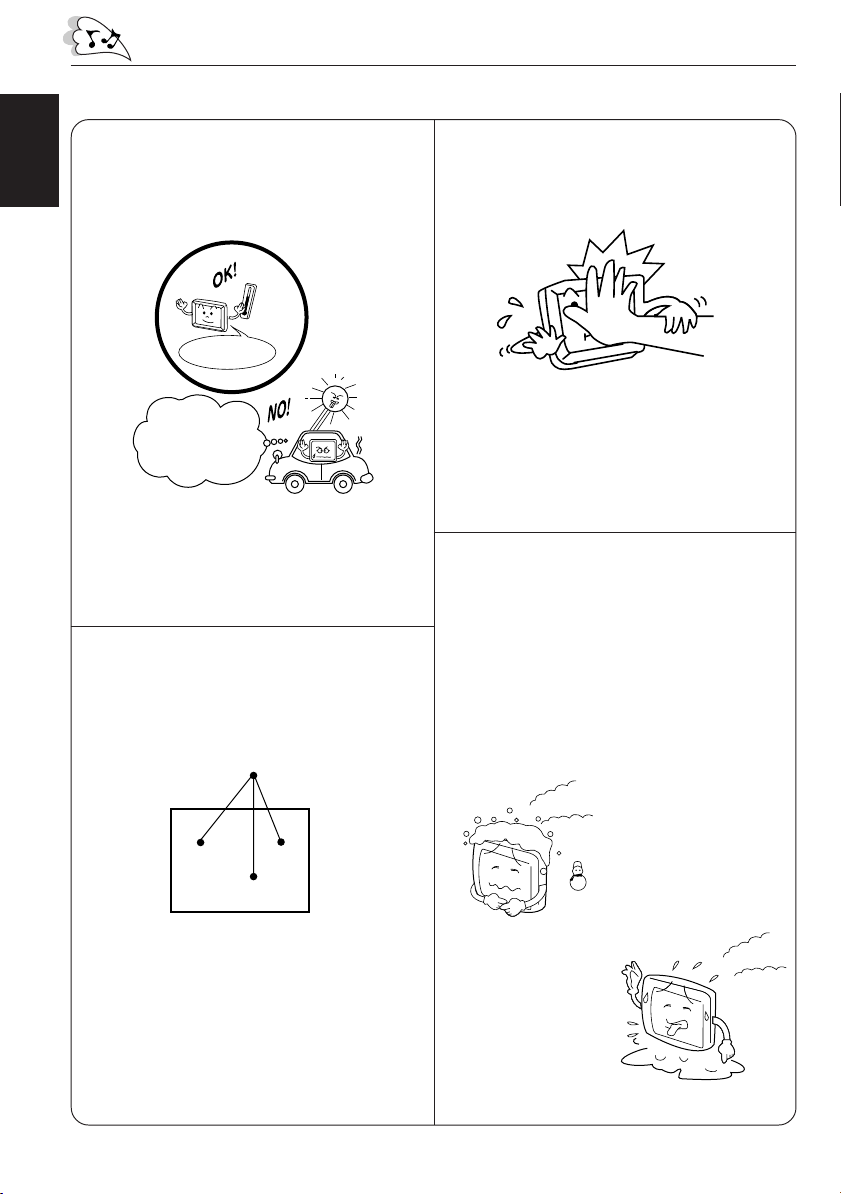
Cautions for handling the liquid crystal panel
Do not expose the liquid crystal display to
direct sunlight.
ENGLISH
• Storage temperature range:
–20 °C to +80 °C
+80°C
–20°C
–20°C to +80°C
During the summer,
temperatures can
reach as high as
100 °C.
When the liquid crystal panel reaches high
temperatures or low temperatures, chemical
changes occur within the liquid crystal panel
which may cause it to malfunction.
The red spots, blue spots and green spots
on the panel surface are a normal
characteristic of liquid crystal panels, and
not a problem.
Do not drop the liquid crystal display or strike
it sharply.
When the temperature is very cold or very
hot, the image may not appear clearly or
may move slowly.
The image may not be synchronized with
the sound or the image quality may decline
in such environments. Note that this is not
a malfunction or problem.
• Usage temperature range: 0 °C to +40 °C
Spots
The liquid crystal panel is built with very high
precision technology and has at least
99.99% effective image pixels. Be aware
that on 0.01% of the panel there may be
missing or constantly lit pixels.
4
0 °C or colder
40 °C or hotter
Page 5
CONTROLS AND FEATURES
Wide color monitor
1
2
3
4
5
6
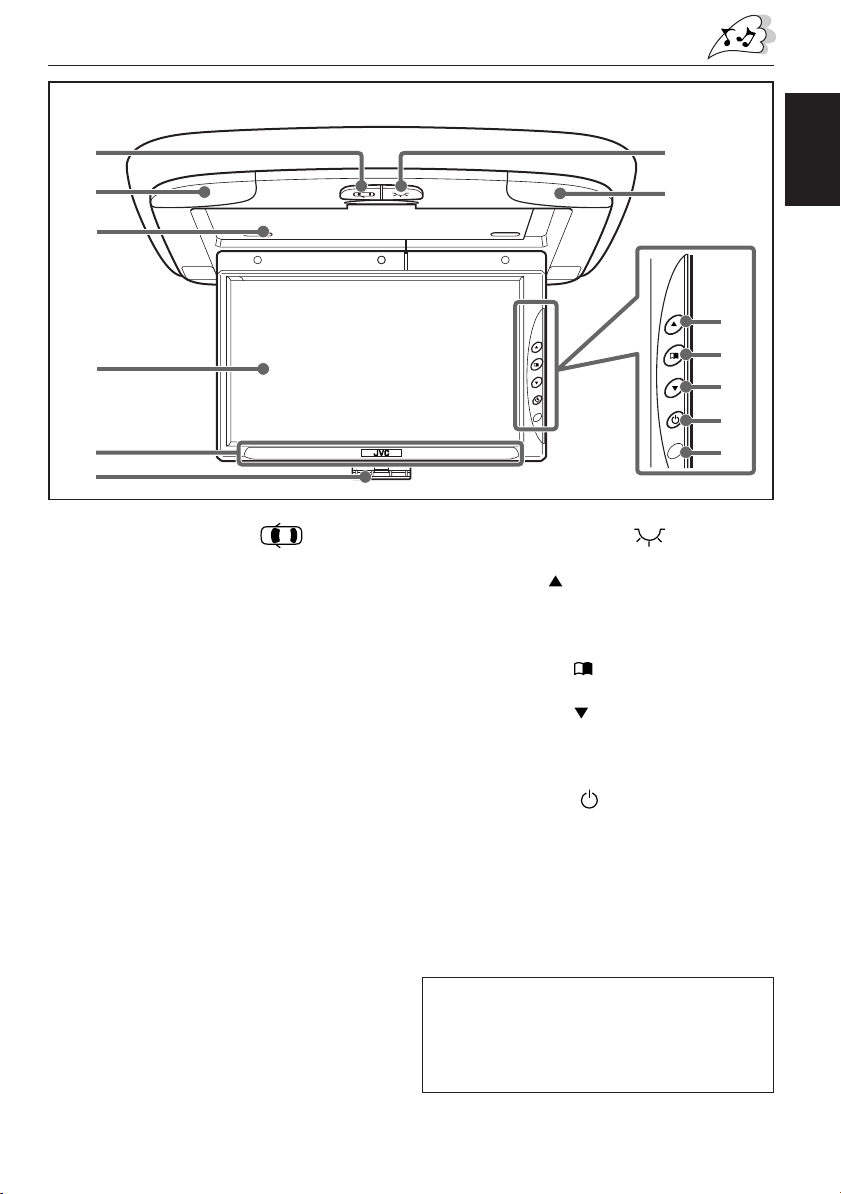
1 Door Sensor button ( )
Activates or deactivates the door sensor
which turns on the ceiling light when a door
is open.
• When the door sensor is turned on, this
button glows red.
2 Ceiling lights
3 Screen compartment
While not in use, close the screen and
store it in this compartment.
4 Screen (Liquid crystal panel)
• When you open the screen, the monitor
automatically turns on.
• When you close it, the monitor
automatically turns off.
5 IR transmitter
• See “Specifications” for cordless
headphones.
It is recommended to use JVC’s
cordless headphones KS-HP1K.
6 Screen hook
• Release from the screen compartment
to use the monitor.
• After using the monitor, close the screen,
and hook to the screen compartment.
7
2
8
9
p
q
w
7 Ceiling Light button (
Turns on or off the ceiling lights.
8 Up button ( )
Increase the adjustment level of (or select
an appropriate setting for) the item
selected by the Menu button.
9 Menu button (
Select an adjustment item.
p Down button ( )
Decrease the adjustment level of (or select
an appropriate setting for) the item
selected by the Menu button.
q Power button (
• Press to turn on the power.
Each time you press the button, the input
mode changes when the power is on.
• Press and hold to turn off the power.
w Remote sensor
Aim at this area when operating the
monitor from the remote controller.
Note:
When you watch the screen at an angle, the
picture might not be clear. This is not a
malfunction. The finest picture can be seen
when you watch the screen straight-on.
)
)
)
ENGLISH
5
Page 6

Remote controller RM-RK500
;
;
;
;
;
;
;
;
;
;
;
;
;
;
;
;
;
;
;
;
;
;
;
;
;
;
;
;
;
;
;
;
;
;
;
;
;
;
;
;
;
;
;
;
;
;
;
;
;
;
;
;
;
;
;
;
;
;
;
;
;
;
;
;
;
;
;
;
;
;
;
;
;
;
;
;
;
;
;
;
;
;
;
;
;
;
;
;
;
;
;
;
;
;
;
;
;
;
;
Monitor section
ENGLISH
1
2
3
MONITOR
;;;;;;
MODE
;;;;;;
;;;;;;
;;;;;;
;;;;;;
;;;;;;
;;;;;;
;;;;;;
;;;;;;
MENU
;;;;;;
;;;;;;
;;;;;;
;;;;;;
;;;;;;
;;;;;;
;;;;;;
;;;;;;
;;;;;;;;;;;;;;;;;
;;;;;;;;;;;;;;;;;
;;;;;;;;;;;;;;;;;
;;;;;;;;;;;;;;;;;
;;;;;;;;;;;;;;;;;
;;;;;;;;;;;;;;;;;
VCP
TV TUNER
TV
CH
;;;;;;;;;;;
;;;;;;;;;;;
;;;;;;;;;;;
;;;;;;;;;;;
;;;;;;;;;;;
SKIP
;;;;;;;;;;;
VOCAL
;;;;;;;;;;;
;;;;;;;;;;;
;;;;;;;;;;;
;;;;;;;;;;;
H/P
VOLUME
A.MEMO
R F
CALL
4
5
Monitor section
1 Power On/Standby button (
Turn on or off the monitor system.
2 Up button (
)
Increase the adjustment level of (or select
an appropriate setting for) the item
selected by the MENU button.
3 Down button ( )
Decrease the adjustment level of (or select
an appropriate setting for) the item
selected by the MENU button.
4 MODE button
Each time you press the button, the input
mode changes.
5 MENU button
Call up or erase the Menu screen.
)
TV tuner section
MONITOR
6
;;;;;;
7
8
Video cassette player section
e
r
6
;;;;;;
;;;;;;
;;;;;;
;;;;;;
;;;;;;
;;;;;;
;;;;;;
;;;;;;
;;;;;;
;;;;;;
;;;;;;
;;;;;;
;;;;;;
;;;;;;
;;;;;;
;;;;;;
;;;;;;;;;;;;;;;;;
;;;;;;;;;;;;;;;;;
;;;;;;;;;;;;;;;;;
;;;;;;;;;;;;;;;;;
;;;;;;;;;;;;;;;;;
;;;;;;;;;;;;;;;;;
VCP
MONITOR
;;;;;;
;;;;;;
;;;;;;
;;;;;;
;;;;;;
;;;;;;
;;;;;;
;;;;;;
;;;;;;
;;;;;;
;;;;;;
;;;;;;
;;;;;;
;;;;;;
;;;;;;
;;;;;;
;;;;;;
;;;;;;;;;;;;;;;;;
;;;;;;;;;;;;;;;;;
;;;;;;;;;;;;;;;;;
;;;;;;;;;;;;;;;;;
;;;;;;;;;;;;;;;;;
;;;;;;;;;;;;;;;;;
VCP
MODE
MENU
MODE
MENU
TV TUNER
TV
CH
;;;;;;;;;;;
;;;;;;;;;;;
;;;;;;;;;;;
;;;;;;;;;;;
;;;;;;;;;;;
SKIP
;;;;;;;;;;;
VOCAL
;;;;;;;;;;;
;;;;;;;;;;;
;;;;;;;;;;;
;;;;;;;;;;;
H/P
VOLUME
TV TUNER
TV
CH
;;;;;;;;;;;
;;;;;;;;;;;
;;;;;;;;;;;
;;;;;;;;;;;
;;;;;;;;;;;
SKIP
;;;;;;;;;;;
VOCAL
;;;;;;;;;;;
;;;;;;;;;;;
;;;;;;;;;;;
;;;;;;;;;;;
H/P
VOLUME
A.MEMO
R F
CALL
A.MEMO
R F
CALL
9
p
q
w
t
y
TV tuner section
The following buttons can be used for operating
JVC’s KV-C10.
• For specific operations, refer to the instructions
for the KV-C10.
6 TV CH buttons ( / )
7 SKIP button
8 VOCAL button
9 A.MEMO (auto memory) button
p RF (radio frequency) button
q H/P (headphones) VOLUME buttons
(+/–)
w CALL button
Video cassette player (VCP) section
The following buttons can be used for operating
JVC’s KV-V8 or KV-V10.
• For specific operations, refer to the instructions
for the KV-V8 or KV-V10
e Power On/Standby button (
)
r 7 (Stop) button
t 1 (Rewind)/¡ (Fast-forward)
buttons
y 3 (Play) button
Page 7

Before using the remote controller:
When you use the remote controller for the
first time, pull out the insulation sheet as
illustrated to the right.
• Aim the remote controller directly at the
remote sensor on the color monitor. Make
sure there is no obstacle in between.
• Do not expose the remote sensor to strong
light (direct sunlight or artificial lighting).
Replacing the battery
When the controllable range or effectiveness
of the remote controller decreases, replace
the battery.
1. Remove the battery holder.
While pushing in the lock using a ball-point
pen or a similar tool (1), pull out the
battery holder in the direction indicated by
the arrow (2).
(back side)
2
1
2. Replace the battery.
Slide a new battery into the holder with
the + side facing upwards so that the
battery is fixed in the holder.
(back side)
ENGLISH
Pull out
Insulation sheet
(The battery has been installed when shipped
from the factory.)
WARNING:
• Store the battery in a place which children
cannot reach.
If a child accidentally swallows the battery,
immediately consult a doctor.
• Do not recharge, short, disassemble or heat
the battery or dispose of in a fire.
Doing any of these things may cause the
battery to give off heat, crack or start a fire.
• Do not leave the battery with other metallic
materials.
Doing this may cause the battery to give off
heat, crack or start a fire.
• When throwing away or saving the battery,
wrap in tape and insulate; otherwise, it may
cause the battery to give off heat, crack or
start a fire.
• Do not poke the battery with tweezers or
similar tools.
Doing this may cause the battery to give off
heat, crack or start a fire.
Lithium coin battery
(product number:
CR2025)
3. Return the battery holder.
Insert the battery holder again pushing it
until you hear a clicking sound.
(back side)
CAUTION:
DO not leave the remote controller in a place
(such as dashboard) exposed to direct sunlight
for a long time. Otherwise, it may be damaged.
7
Page 8
BASIC OPERATIONS
VIDEO 1
;
;
;
;
;
;
;
;
;
;
;
;
;
;
;
;
;
;
;
;
;
;
;
;
;
;
;
;
;
;
Preparation
Before operating the monitor system, make sure that all external components are
correctly connected and installed.
ENGLISH
1
Monitor
2
3
3
2
MONITOR
;;;;;;;
MODE
;;;;;;;
;;;;;;;
;;;;;;;
;;;;;;;
;;;;;;;
;;;;;;;
;;;;;;;
;;;;;;;
MENU
;;;;;;;
;;;;;;;
;;;;;;;
;;;;;;;
;;;;;;;
;;;;;;;
;;;;;;;
;;;;;;;
;;;;;;;;;;;;;;;;
;;;;;;;;;;;;;;;;
;;;;;;;;;;;;;;;;
TV TUNER
TV
CH
;;;;;;;;;;;
;;;;;;;;;;;
;;;;;;;;;;;
;;;;;;;;;;;
;;;;;;;;;;;
SKIP
;;;;;;;;;;;
VOCAL
;;;;;;;;;;;
;;;;;;;;;;;
;;;;;;;;;;;
;;;;;;;;;;;
H/P
VOLUME
A.MEMO
R F
CALL
Remote
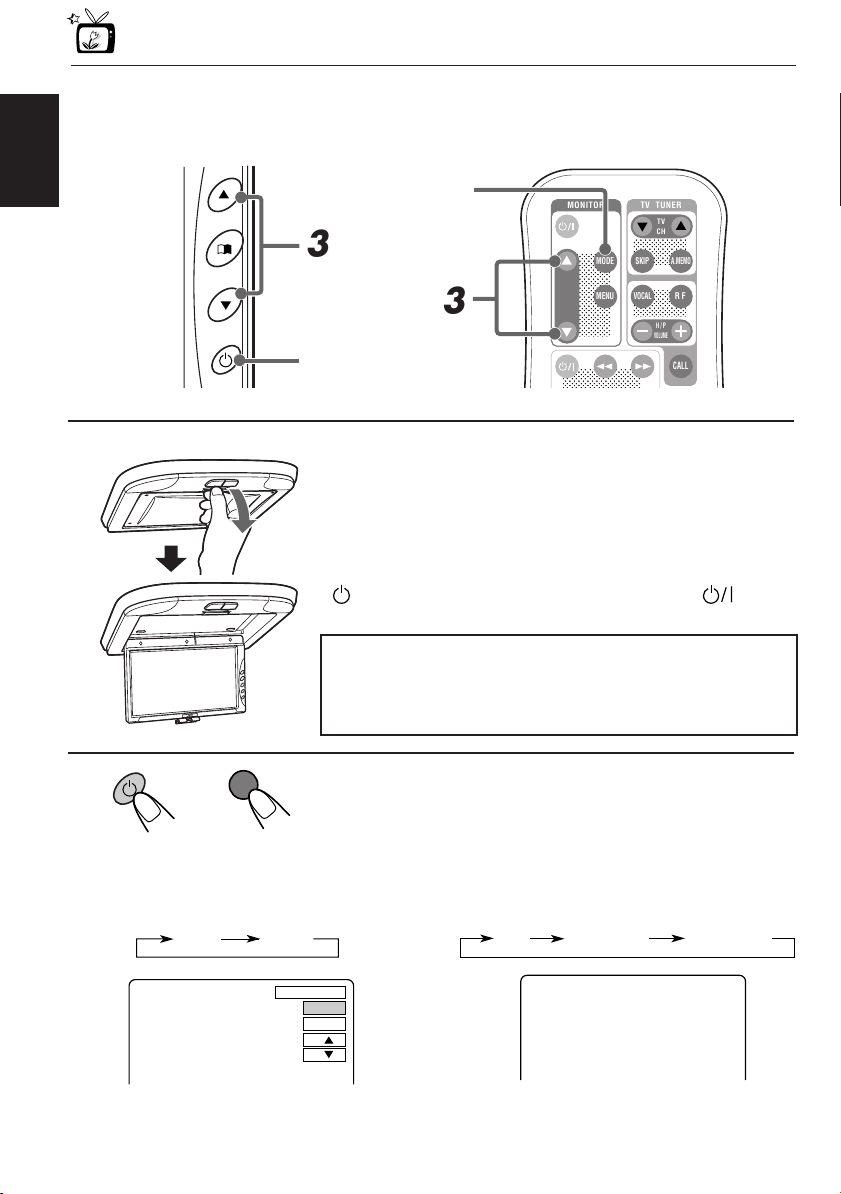
Open the liquid crystal panel.
The monitor turns on.
Note:
If the liquid crystal panel is already open, press the Power button
) on the unit or the Power On/Standby button ( ) on the
(
remote control to turn on the monitor.
CAUTION:
When not in use, close the liquid crystal panel and store it
into the compartment; otherwise it may obstruct the visibility
through the rearview mirror.
2
MODE
Select the input source.
Each time you press the button, the input source changes
Monitor Remote
• When KV-C10 is not connected: • When KV-C10 is connected:
AV 1
8
Ex. When “AV 1” is selected
AV 2
as follows:
AV1: NTSC
MODE
MENU
TV
VIDEO 1
Ex. When “VIDEO 1” is selected
VIDEO 2
Page 9

3
Select the video format—NTSC or PAL, while
the indication of the video format is still on the
screen.
Each time you press the button, the video format
Monitor Remote
alternates between NTSC (initial setting) and PAL. Select
whichever matches to the incoming signals.
Note:
When not using the KV-C10: You can preset the video format
separately for “AV 1” and “AV 2.”
4
Play back the external component.
To operate the external components, refer to the manuals for the connected
components.
5
Select the external component and adjust the volume on the car
receiver.
ENGLISH
To check the current input source
On the monitor: Press the Power button ( ) once.
On the remote: Press the MODE button once.
The on-screen display appears for about 5 seconds.
To turn off the power
Close the liquid crystal panel.
• You can also turn off the power by holding the Power button ( )
on the unit, or by pressing the Power On/Standby button (
on the remote control briefly.
MODE
Monitor Remote
)
Monitor Remote
9
Page 10

Other Basic Operations
Door Sensor button
( )
ENGLISH
Ceiling Light
Ceiling Light button
( )
Ceiling Light
IR transmitter
Activating the door sensor
You can activate or deactivate the door sensor by pressing the Door Sensor button ( ).
When you activate the door sensor, the Door Sensor button glows red if the ignition switch of
the car is turned to “ON” or to “ACC.”
• With the door sensor activated, the ceiling lights go on when a door is open.
Turning on or off the ceiling lights
You can turn on or off the ceiling lights on the monitor by pressing the Ceiling Light button
).
(
Note:
When the Door Sensor button is on, the ceiling lights go off when the door is opened then closed even
if the Ceiling Light button has been turned on.
Selecting the RF signals to the receiver
When you use JVC FM modulator KS-IF200 only:
You can listen to playback sounds from the external component through the receiver even if
it is equipped with no line input.
• Refer also to the instructions of KS-IF200.
When KV-C10 is connected:
Press the RF button on the remote controller.
Each time you press the button, “RF ON” and “RF OFF” alternate and the sounds you hear
through the car speakers change accordingly.
RF ON : Select to listen to the sound of the external component.
RF OFF : Select to listen to the radio (through the receiver).
Using optional cordless headphones
You can use JVC’s optional cordless headphones KS-HP1K to listen to the playback sounds
of the external component.
Playback sounds of the external component are transmitted through this IR transmitter to the
cordless headphones.
10
Page 11
ADJUSTMENTS
;
;
;
;
;
;
;
;
;
;
;
;
;
;
;
;
;
;
;
;
;
;
;
;
;
;
;
;
;
;
;
;
;
;
;
;
;
;
;
;;;;;;;;
;
;
;
;
;
;
;
;
Using the Menu
You can make your own adjustments using the Menu.
• For the adjustable items, see the next page.
Basic procedure
ENGLISH
3
Monitor
1
Monitor Remote
2
Monitor Remote
3
Monitor Remote
MENU
MENU
1, 2,
4
3
MONITOR
;;;;;;;;;;;;;;;;
;;;;;;;;;;;;;;;;
;;;;;;;;;;;;;;;;
;;;;;;
;;;;;;
;;;;;;
;;;;;;
;;;;;;
;;;;;;
;;;;;;
;;;;;;
;;;;;;
;;;;;;
;;;;;;
;;;;;;
;;;;;;
;;;;;;
;;;;;;
;;;;;;
;;;;;;
MODE
MENU
TV TUNER
TV
CH
;;;;;;;;;;;
;;;;;;;;;;;
;;;;;;;;;;;
;;;;;;;;;;;
;;;;;;;;;;;
SKIP
;;;;;;;;;;;
VOCAL
;;;;;;;;;;;
;;;;;;;;;;;
;;;;;;;;;;;
;;;;;;;;;;;
H/P
VOLUME
A.MEMO
R F
CALL
1, 2,
4
Remote
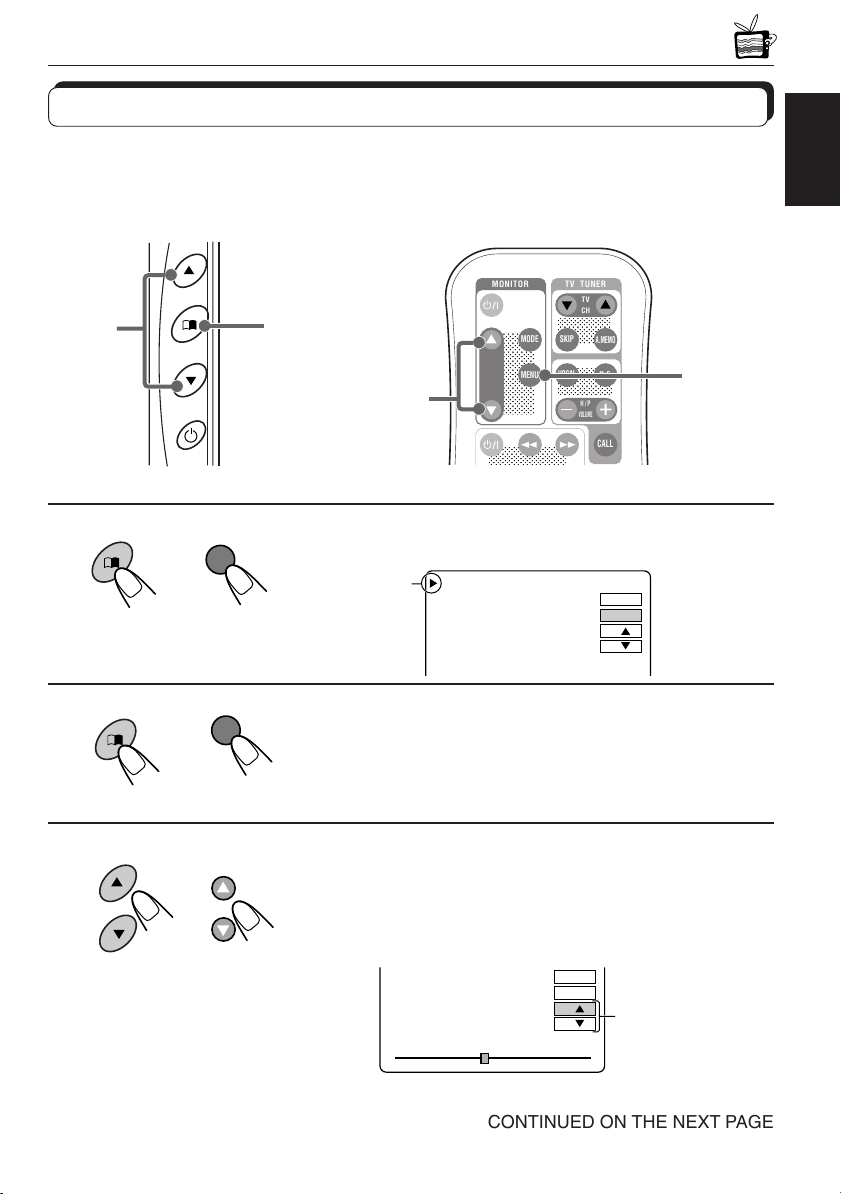
Call up the Menu.
Cursor
COLOR
BRIGHT
TINT
DIMMER
FORMAT
RESET
MODE
MENU
Select an item you want to adjust.
Each time you press the button, the cursor moves to the
next item.
Adjust the level of the selected item (or select
an appropriate setting for the selected item).
• When “RESET” is selected in the above step, the Color,
Brightness, and Tint settings are reset.
MODE
MENU
TINT 32
Activated button is
highlighted.
Ex: When adjusting Tint
CONTINUED ON THE NEXT PAGE
11
Page 12

BRIGHT 32
TINT 32
DIMMER
OFF ON
4
MENU
Exit from the Menu.
• Press the button repeatedly until the Menu is erased.
ENGLISH
Monitor Remote
Adjustable items on the menu
COLOR
Appears only for
NTSC video format
Note:
Menu goes off if no operation is done for about 5 seconds.
BRIGHT
TINT
DIMMER
FORMAT
RESET
MODE
MENU
COLOR : Adjust the color of the picture—lighter or
darker.
• Adjustable range: 0 to 63
• Initial level: 32
BRIGHT : Adjust this if the picture is too bright or too
dark.
• Adjustable range: 0 to 63
• Initial level: 32
TINT : Adjust this if the human skin color is unnatural.
• Adjustable range: 0 to 63
• Initial level: 32
Note:
This can be shown and adjusted when the video
format is NTSC.
DIMMER : Activate the dimmer if the inside of the car is
too bright to view the picture on the screen.
• Selectable settings: ON/OFF
• Initial setting: OFF
12
COLOR 32
Page 13

FORMAT : Select an appropriate display size.
MODE
MENU
COLOR
BRIGHT
TINT
RESET
32
32
32
FORMAT FULL
• Selectable settings: FULL/NORMAL/ZOOM
• Initial setting: FULL
When viewing 16:9 video signals:
FULL: Pictures are fully shown on the screen.
• The black bars will be shown both at the top and the bottom of
the screen.
NORMAL: Pictures are shown at the center of the screen.
ZOOM: Pictures are enlarged on the screen so that no black bars will be
shown on the screen. (The entire picture cannot be shown on
the screen.)
FULL
NORMAL
ZOOM
When viewing 4:3 video signals:
FULL: Pictures are enlarged horizontally and are fully shown on the
screen.
NORMAL: Pictures are shown at the center of the screen.
• The black bars will be shown at the left and right sides of the
screen.
ZOOM: Pictures are enlarged on the screen so that no black bars will be
shown on the screen. (The entire picture cannot be shown on
the screen.)
ENGLISH
FULL
RESET : Reset the Color, Brightness, and Tint levels
to the initial settings.
NORMAL
ZOOM
13
Page 14

MAINTENANCE
To prevent damage to the exterior
• Do not apply pesticides, benzine, thinner or other volatile substances to the unit.
The cabinet surface primarily consists of plastic materials.
• Do not wipe with benzine, thinner or similar substances because this will results in
discoloration or removal of the paint.
ENGLISH
• When a cloth with a cleansing chemical is used, follow the caution points.
– Do not leave the unit in contact with rubber or vinyl products for long periods of time.
– Do not use cleansers which have polishing granules because this could damage the
surface of the unit.
Clean off dirt by wiping lightly with a soft cloth
When the unit is very dirty, wipe with a well-wrung cloth dipped in a kitchen cleanser (neutral)
thinned by water and then go over the same surface with a dry cloth.
(Since there is the possibility of water drops getting inside of the unit, do not directly apply
cleanser to the surface.)
Caution:
If water drops or similar wet substances get inside of the monitor via the liquid crystal panel surface,
it may cause a malfunction.
TROUBLESHOOTING
What appears to be trouble is not always serious. Check the following points before calling a
service center.
Symptoms
• Colored spots (red, blue and
green) appear on the screen.
• No picture appears and sound
is not heard.
• Picture shakes vertically or
colors are abnormal.
• Remote controller does not
work.
• Cordless headphones (not
supplied) do not work.
This is a characteristic of liquid
crystal panels and is not a
malfunction.
Correct input mode is not
selected.
The video format (NTSC/PAL) is
not correct.
The battery has lost its charge.
Remote sensor is exposed to
strong light.
Causes
Remedies
See “Note” on page 15.
Select the correct input mode.
Select the correct video format.
Install a new battery.
Do not expose the remote
sensor to strong light.
14
Page 15

SPECIFICATIONS
WIDE COLOR MONITOR
Display:
9 inch Liquid crystal panel
Number of Pixel:
336,960 pixels (480 vertical × 234
×
horizontal
Drive Method:
TFT (Thin Film Transistor) active matrix
format
Cordless Audio:
Infrared audio transmitter (Support IR
receiver stereo headphones)
L-channel: 2.3 MHz
R-channel: 2.8 MHz
Effective listening angle: 30˚
Effective range: 4 m
Dimensions (W × H × D):
314 mm × 38 mm × 257 mm
including Shroud
Mass: 1.2 kg including Shroud
3)
MONITOR CONNECTION
UNIT
Input
Video: RCA pin × 2 circuits
1 V(p-p), 75 Ω
Audio: RCA pin × 2 circuits
0.5 V(rms)
Tuner: 8-pin DIN connector
(only for JVC’s KV-C10)
Output
Display:
13-pin DIN connector
Video: RCA pin × 1 circuit
1 V(p-p), 75 Ω
Audio: RCA pin × 1 circuit
0.5 V(rms)
Dimensions (W × H × D):
108.5 mm × 28.5 mm × 78 mm
excluding projections
Mass: 160 g
GENERAL
Power Requirement
Operating Voltage:
DC 14.4 V (11 V to 16 V allowance)
Grounding System:
Negative ground
Allowable Operating Temperature:
0°C to +40°C
Allowable Storage Temperature:
–20°C to +80°C
Ceiling light bulb: 12 V / 3 W
ACCESSORIES
Metal plate × 1
Shroud × 1
Extension cord × 1
Power cord × 1
Ceiling light cord × 1
Remote controller (with the battery) × 1
Screw (M4 × 5 mm) × 4
Screw (M4 × 12 mm) × 4
Design and specifications are subject to change
without notice.
Note:
The liquid crystal panel is built with very high
precision technology and has at least 99.99%
effective image pixels. Be aware that on 0.01%
of the panel there may be missing pixels or
constantly lit pixels.
ENGLISH
15
 Loading...