

Page 1
KV-MH6510
6.5-INCH WIDESCREEN MONITOR : INSTRUCTIONS MONITOR DE PANTALLA ANCHA DE 6,5 PULGADAS : MANUAL DE INSTRUCCIONES MONITEUR COULEUR A ECRAN LARGE DE 6,5 POUCES : MANUEL D’INSTRUCTIONS
LVT1327-001A
[J]
© 2005 Victor Company of Japan, Limited
• This system cannot receive television broadcasts and is primarily designed for use with a VCR or a DVD player. Use the separately sold TV tuner unit KV-C1000 for optional television
broadcast reception.
• Este sistema no puede recibir emisiones de televisión y ha sido diseño para utilizarse esencialmente con un VCR o un reproductor DVD. Utilice la unidad de sintonizador de TV móvil
KV-C1000 vendido por separado para una recepción opcional de emisiones de televisión.
• Ce système ne peut pas recevoir les émissions de télévision et il est essentiellement conçu pour l’utilisation avec magnétoscope ou un lecteur de DVD. Utilisez le module de tuner de
télévision mobile KV-C1000 vendu séparément afin de pouvoir recevoir les émissions de télévision.
INFORMATION (For U.S.A.)
This equipment has been tested and found to comply with the limits for a Class B digital device, pursuant to Part 15 of the FCC Rules. These limits are designed
to provide reasonable protection against harmful interference in a residential installation. This equipment generates, uses, and can radiate radio frequency
energy and, if not installed and used in accordance with the instructions, may cause harmful interference to radio communications. However, there is no
guarantee that interference will not occur in a particular installation. If this equipment does cause harmful interference to radio or television reception, which
can be determined by turning the equipment off and on, the user is encouraged to try to correct the interference by one or more of the following measures:
– Reorient or relocate the receiving antenna.
– Increase the separation between the equipment and receiver.
– Connect the equipment into an outlet on a circuit different from that to which the receiver is connected.
– Consult the dealer or an experienced radio/TV technician for help.
ENGLISH
Thank you for purchasing a JVC product. Please read all
instructions carefully before operation, to ensure your complete
understanding and to obtain the best possible performance
from the unit.
• For installation and connections, refer to the separate manual.
ESPAÑOL
Muchas gracias por adquirir un producto JVC. Como primer
paso, por favor lea atentamente estas instrucciones y disfrute
al máximo de todas las prestaciones de esta unidad.
• Para la instalación y las conexiones, refiérase al manual
separado.
FRANÇAIS
Merci pour avoir acheté un produit JVC. Veuillez lire
attentivement toutes les instructions avant d’utiliser l’appareil
afin de bien comprendre son fonctionnement et d’obtenir les
meilleures performances possibles.
• Pour l’installation et les raccordements, référez-vous au
manuel séparé.
For customer Use:
Enter below the Model No. and Serial No.
which are located on the top or bottom of
the cabinet. Retain this information for
future reference.
Model No.
Serial No.
0505MNMMDWJEIN
EN, SP, FR
CAUTION:
This monitor system should be used on DC 12 V only. To
prevent electric shocks and fire hazards, DO NOT use any
other power source.
CAUTION:
This product has a fluorescent lamp that contains
a small amount of mercury. It also contains lead in
some components. Disposal of these materials may
be regulated in your community due to environmental
considerations.
For disposal or recycling information please contact
your local authorities, or the Electronics Industries
Alliance: http://www.eiae.org./
Installation requires some special knowledge.
Do not install the monitor system yourself. Consult a
dealer having special knowledge of this kind for safe
and reliable installation.
WARNING
• DO NOT INSTALL THE MONITOR IN A LOCATION
WHICH OBSTRUCTS DRIVING, VISIBILITY, SAFETY
DEVICE FUNCTION SUCH AS AIR BAGS OR WHICH
IS PROHIBITED BY APPLICABLE LAWS AND
REGULATIONS.
• There may be legal regulations defi ning the permissible
installation locations for the monitor which differ by
country or by state. Be sure to install the monitor in a
correct location according to such laws.
• The driver must not operate the monitor while driving.
* Stop your vehicle in a safe location when operating the
monitor.
• The driver must not watch the television or playback
pictures while driving.
If the driver does it while driving, it may lead to
carelessness and cause an accident.
• Keep the monitor at an appropriate sound level while
driving.
Driving with the sound at a level that prevents you from
hearing sounds outside of and around the vehicle may
cause an accident.
• Be sure not to let the monitor fall or be strongly
impacted since this may cause a malfunction or fi re.
• Do not use the monitor with the engine off.
Doing so with the engine off will consume battery
power and may prevent the engine from starting.
• Do not touch the surface of the liquid crystal panel
directly.
PRECAUCIÓN:
Este sistema del monitor sólo debe utilizarse con 12 V CC.
Para impedir peligros de descargas eléctricas e incendios,
NO utilice ninguna otra fuente de alimentación.
PRECAUCION:
Este producto dispone de una lámpara fluorescente
que contiene una pequeña cantidad de mercurio.
Algunos componentes también contienen plomo.
Para fines de protección ambiental, la disposición de
estos materiales podría estar reglamentada por las
autoridades locales.
Para solicitar información sobre la disposición y
el reciclaje, sírvase ponerse en contacto con sus
autoridades locales, o con Electronics Industries
Alliance: http://www.eiae.org./
La instalación requiere cierto conocimiento especial.
No instale el sistema del monitor por sí mismo. Para
una instalación segura y confiable, consulte con un
concesionario que tenga conocimientos especiales en
esta área.
ADVERTENCIA
• NO INSTALE EL MONITOR EN UN LUGAR QUE IMPIDA
EL MANEJO, LA VISIBILIDAD, EL FUNCIONAMIENTO DE
DISPOSITIVOS DE SEGURIDAD COMO POR EJEMPLO
BOLSAS DE AIRE, O DONDE LO PROHÍBAN LAS LEYES
O REGLAMENTOS LOCALES.
• Como puede haber reglamentos legales, diferentes
según el país o estado, que indiquen las ubicaciones
de instala ción permitidas para el monitor, asegúrese
de instalar el monitor en un lugar que cumpla con tales
reglamentos.
• El conductor no debe operar el sistema del monitor
mientras conduce.
* Para operar el monitor, detenga su vehiculo en un lugar
seguro.
• El conductor no debe ver la televisión ni vídeos
mientras conduce.
Si el conductor ver la televisión o un vídeo mientras
conduce puede descuidarse y causar un accidente.
• Mantenga el monitor a un nivel de sonido apropiado
mientras conduce.
Conducir con el sonido a un nivel que le impida oír el
sonido del exterior o de alrededor de su vehículo puede
causar un accidente.
• Asegúrese de no dejar caer ni golpear con fuerza el
monitor pues podría producir fallos de funcionamiento
o un incendio.
• No mire la televisión estando el motor parado.
Mirar la televisión estando el motor parado consumirá
energía de la batería y podrá impedir que arranque el
motor.
• No toque directamente la superfi cie del panel de cristal
líquido.
ATTENTION:
Ce système de tuner de télévision ne peut être utilisé
seulement que sur du 12 V CC. Pour éviter les risques de
commotions électriques et d’incendie, NE JAMAIS utiliser
d’autre source d’alimentation quelle qu’elle soit.
ATTENTION:
Cet appareil utilise une lampe fluorescente qui contient
une petite quantité de mercure. Il contient aussi du
plomb dans certains composants. La mise au rebut de
ces matériaux peut être réglementée dans votre région
pour des raisons environnementales.
Pour la mise au rebut ou le recyclage, veuillez contacter
les autorités locales ou l’Alliance des industries
électroniques: http://www.eiae.org./
L’installation nécessite certaines connaissances spéciales.
N’installez pas le moniteur vous-même. Consultez un
revendeur possédant les connaissances spéciales
nécessaires pour une installation correcte et sûre.
MISES EN GARDE
• N’INSTALLEZ PAS LE MONITEUR DANS UN ENDROIT
OÙ IL PEUT GÊNER LA VISIBILITÉ DU CONDUCTEUR
OU LE FONCTIONNEMENT D’UN DISPOSITIF DE
SÉCURITÉ TEL QUE LES COUSSINS GONFLABLES,
OU DANS UN ENDROIT INTERDIT PAR LES LOIS ET
RÈGLEMENTS EN PLACE.
• Dès lors que diffèrent suivant les pays les règlements
régissant les emplacements autorisés pour l’installation
du moniteur, se renseigner afi n d’installer le moniteur
sur un emplacement autorisé par lesdites lois et
règlements.
• Le conducteur ne doit jamais faire fonctionner ce
système de moniteur lorsqu’il conduit son véhicule.
* Arrêtez votre véhicule dans un endroit sûr avant d’opérer
votre moniteur.
• Le conducteur ne doit jamais regarder la télévision ou
une vidéo lorsqu’il conduit.
Regarder la télévision ou une vidéo en conduisant
réduit considérablement la vigilance du conducteur et
multiplie les risques d’accident.
• Maintenir le moniteur à un niveau sonore approprié en
conduisant.
Conduire sous un niveau sonore assourdissant qui
empêcherait d’entendre les bruits environnants peut
causer des accidents.
• Veiller à ne jamais laisser tomber ni heurter violemment
le moniteur car cela risque de provoquer des pannes ou
un incendie.
•
Ne pas regarder le moniteur lorsque le moteur est arrêté.
Regarder le moniteur avec le contact moteur coupé
consomme beaucoup de batterie ce qui pourrait
empêcher le moteur de repartir.
• Ne touchez pas directement la surface du panneau à
cristaux liquides.
1
Page 2
Precautions / Precauciones / Précautions
Cautions for handling the liquid crystal panel / Precauciones sobre el manejo del panel de cristal líquido / Précautions à prendre avec l’afficheur à cristaux liquides
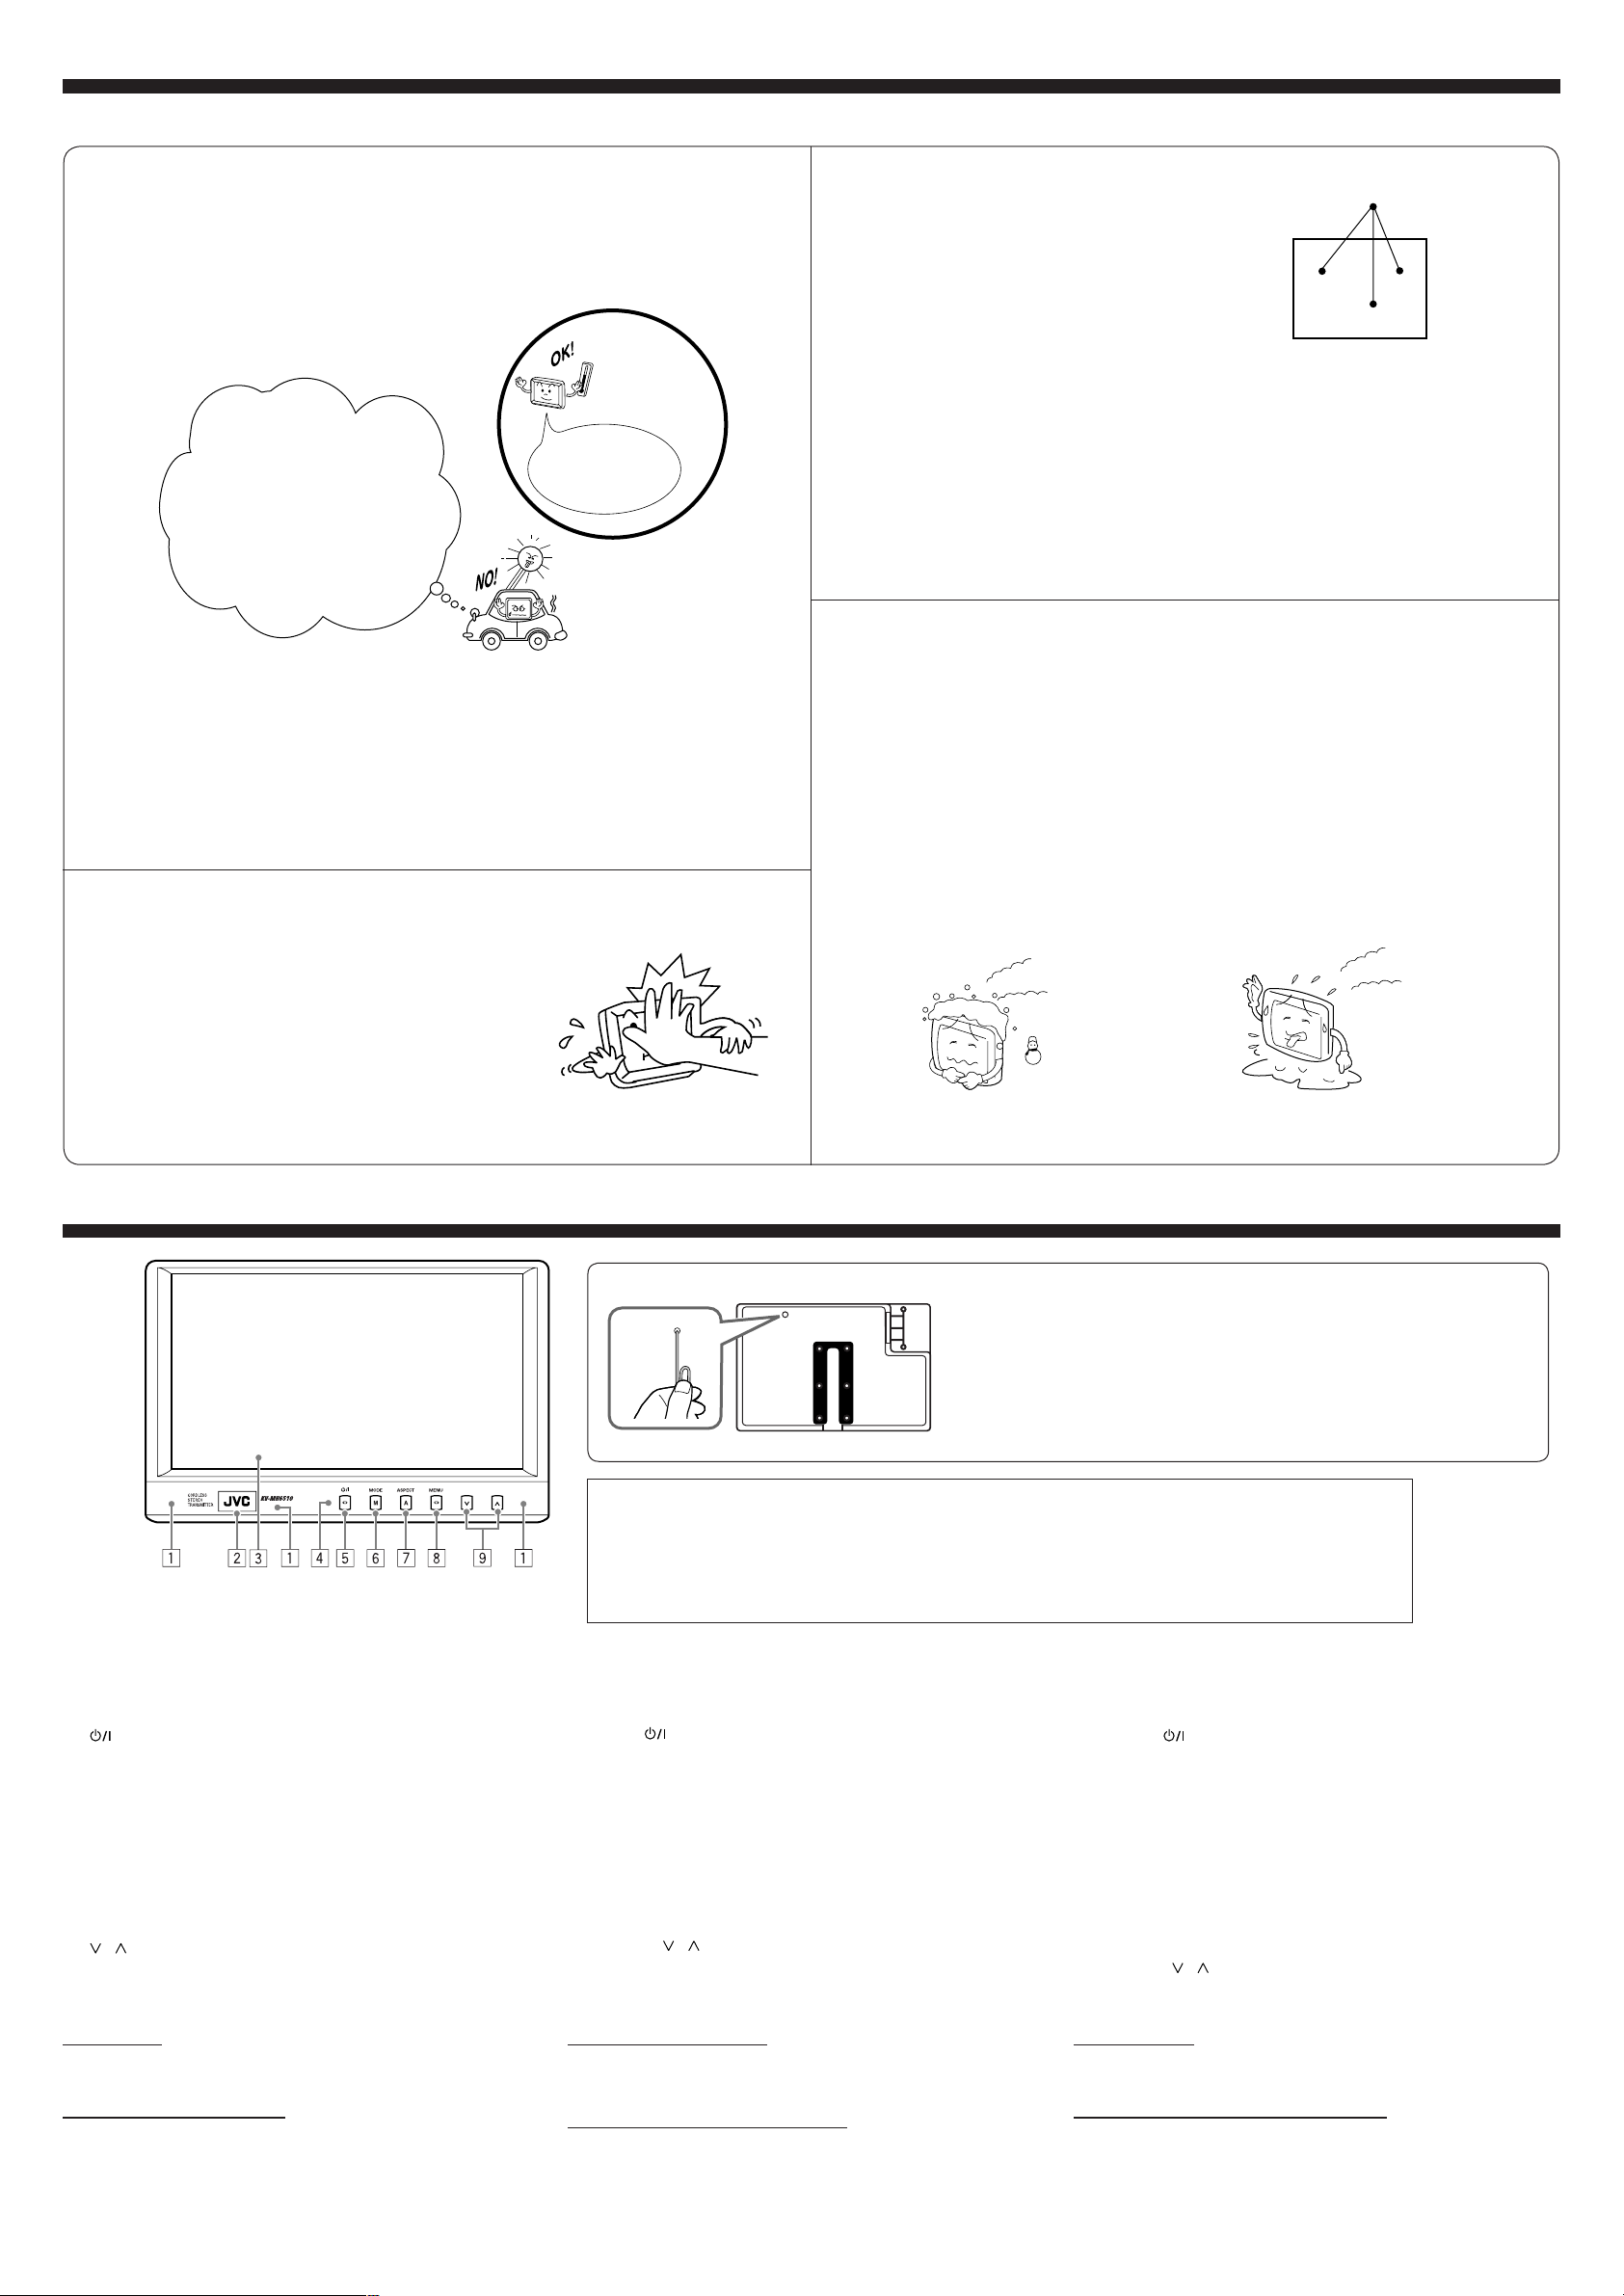
Do not expose the liquid crystal panel to direct sunlight.
• Storage temperature range: –20°C to +80°C (–4°F to 176°F)
No deje la pantalla de cristal líquido expuesta a la luz directa del sol.
• Gama de temperaturas para guardar el panel: –20°C a +80°C (–4°F a 176°F)
N’exposez pas l’afficheur à cristaux liquides directement aux rayons du soleil.
• Plage des températures de rangement: –20°C à +80°C (–4°F à 176°F)
+80°C
–20°C
During the summer, temperatures can
reach as high as 100°C (212°F).
Durante el verano, las temperaturas
pueden alcanzar los 100°C (212°F).
Pendant l’été, la temperature peut
s’élever jusqu’à 100°C (212°F).
–20°C to +80°C
–20°C a +80°C
–20°C à +80°C
When the liquid crystal panel reaches high temperatures or low temperatures, chemical
changes occur within the liquid crystal panel which may cause it to malfunction.
Cuando el panel de cristal líquido alcanza temperaturas altas o bajas, dentro del
panel de cristal líquido se producen cambios químicos que pueden causar fallos en el
funcionamiento.
Lorsque le panneau à cristaux liquides atteint des températures, hautes ou basses,
excessives, les cristaux liquides peuvent devenir le siège de transformations chimiques qui en
altèrent le bon fonctionnement.
The red spots, blue spots and green spots on the panel
surface are a normal characteristic of liquid crystal panels,
and not a problem.
Spots
Puntos
Taches
Los puntos rojos, azules y verdes que se ven sobre la
superficie del panel son una característica normal de los
paneles de cristal líquido y no son signo de anomalía.
Les taches rouges, bleues et vertes à la surface de
l’afficheur à cristaux liquides sont normales et une
caractéristique des afficheurs à cristaux liquides et non un
signe de dysfonctionnement.
Note:
The liquid crystal panel is built with very high precision technology and has at least 99.99% effective
image pixels. Be aware that on 0.01% of the panel there may be missing or constantly lit pixels.
Nota:
El panel de cristal líquido ha sido fabricado con una tecnología de máxima precisión y tiene por
lo menos un 99,99% de pixeles efectivos. Tenga en cuenta que podría haber un 0,01% de pixeles
constantemente apagados o iluminados.
Remarque:
Le panneau à cristaux liquides est fabriqué avec une technologie de très haute précision et possède
au moins 99,99% de pixels d’image effectifs. Notez que sur 0,01% du panneau, il peut avoir des pixels
manquants ou des pixels allumés constamment.
When the temperature is very cold or very hot, the image may not appear clearly or may
move slowly.
The image may not be synchronized with the sound or the image quality may decline in such
environments. Note that this is not a malfunction or problem.
• Usage temperature range: 0°C to +40°C (32°F to 104°F)
Cuando la temperatura esté muy fría o muy caliente, la imagen podrá no aparecer
claramente o podrá moverse lentamente.
En tales entornos, puede suceder que la imagen no esté sincronizada con el sonido o que
la calidad de la imagen disminuya. Tenga en cuenta que esto no es una anomalía ni un fallo
de funcionamiento.
• Gama de temperaturas de utilización: 0°C a +40°C (32°F a 104°F)
Si la température est trop élevée ou trop basse, l’image peut ne pas apparaître tout à fait
nettement ou se mouvoir avec lenteur.
De même, l’image peut sembler désynchronisée avec le son ou encore la qualité d’image
peut se détériorer dans ces environnements extrêmes. Notez simplement qu’il ne s’agit pas
d’un défaut de conception ni d’un mauvais fonctionnement.
• Limites de température d’utilisation: 0°C à +40°C (32°F à 104°F)
Do not drop the liquid crystal panel or strike it sharply.
No deje caer ni aplique un golpe fuerte al panel de cristal
líquido.
Ne faites pas tomber l’afficheur à cristaux
liquides ni ne le heurtez trop fort.
0°C (32°F) or colder
0°C (32°F) o inferior
0°C (32°F) ou plus froidr
Widescreen monitor / Monitor de pantalla ancha / Moniteur à écran large
How to reset your monitor / Cómo reposicionar su unidad / Comment réinitialiser votre appareil
This will reset the microcomputer. Your preset adjustments will also be
erased.
Esto hará que se reposicione el microcomputador. También se borrarán los
ajustes preestablecidos por usted.
Cette procédure réinitialise le micro-ordinateur. Vos ajustements préréglés
sont aussi effacés.
Back / Lado trasero / Arriére
When you watch the screen at an angle, the picture might not be clear. This is not a malfunction.
The finest picture can be seen when you watch the screen straight-on.
Al mirar la pantalla en ángulo, es posible que la imagen no sea clara. Esto no es una anomalía. La
mejor imagen se obtiene al mirar la pantalla en sentido recto.
Si vous regardez l’écran avec un certain angle, l’image peut ne pas être claire. Ce n’est pas un mauvais
fonctionnement. La meilleure image peut être vue quand vous regardez l’écran de face.
40°C (104°F) or hotter
40°C (104°F) o superior
40°C (104°F) ou plus chaud
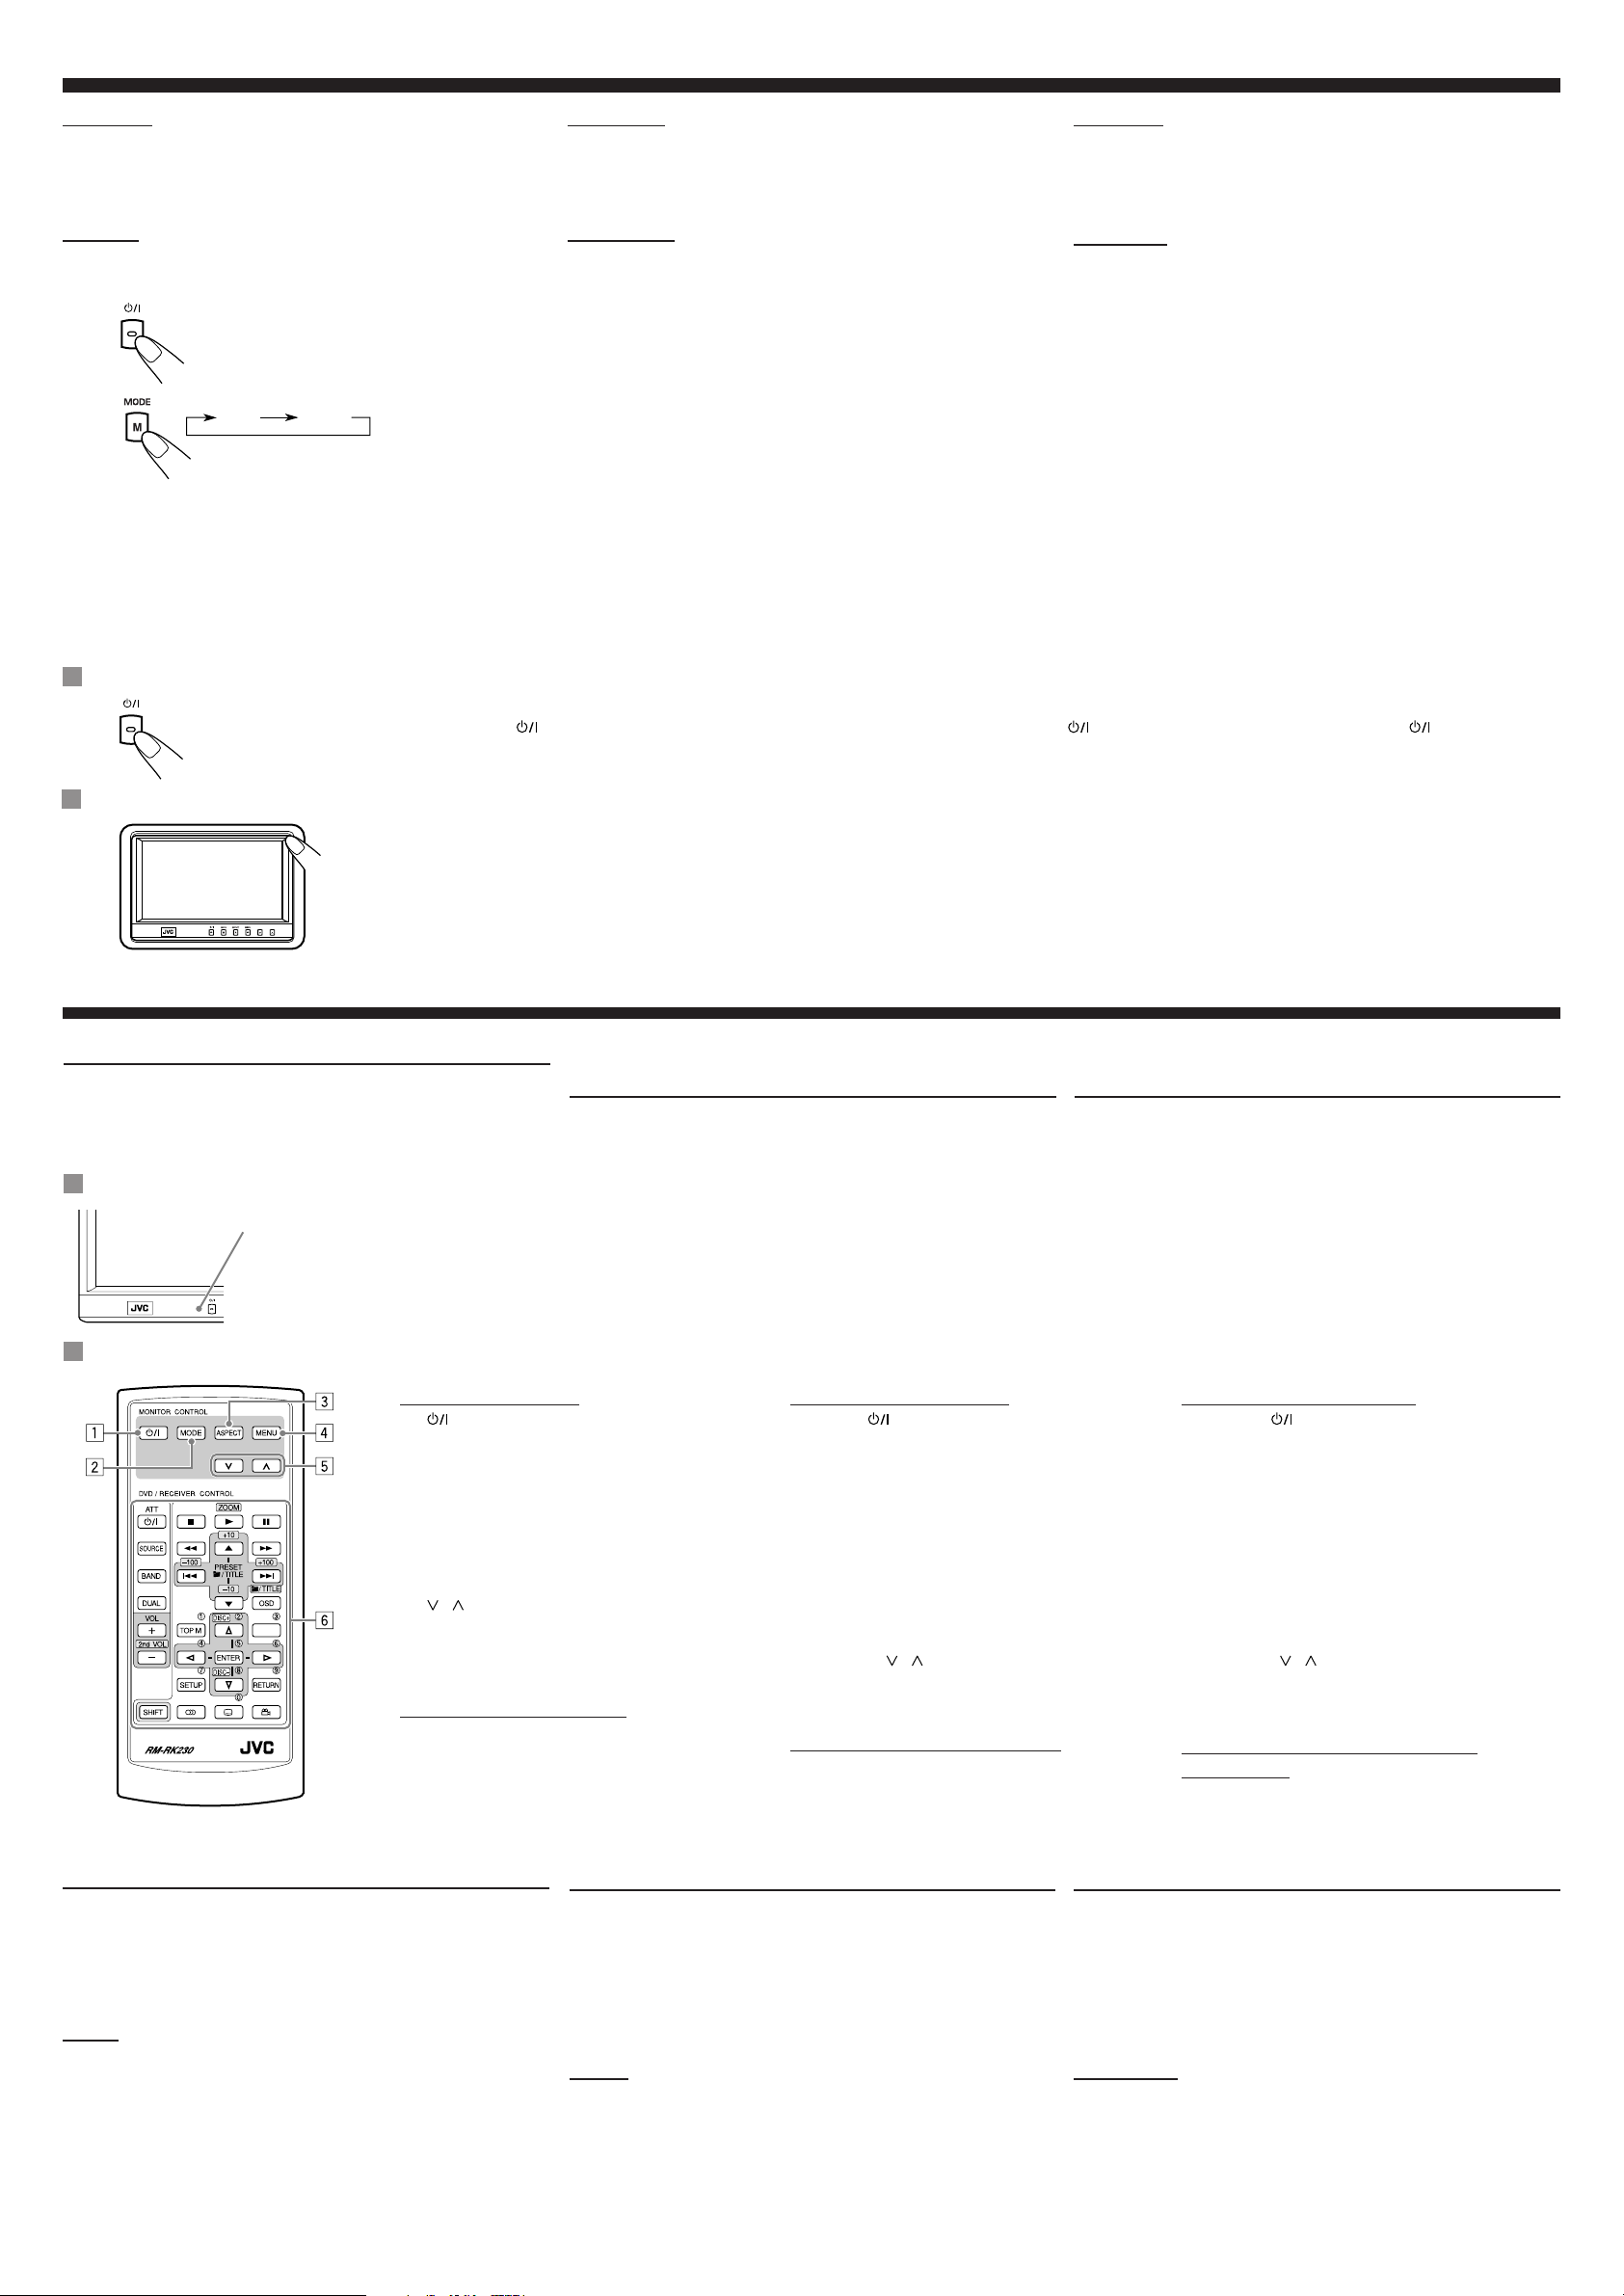
1 IR transmitters
2 White LED
3 Screen (Liquid crystal panel)
4 Remote sensor
5
(standby/on) button
• Turns on the power if pressed.
• Turns off the power if pressed and held.
6 MODE button
• Selects the playback source.
7 ASPECT button
• Changes the aspect ratio of the screen.
8 MENU button
• Calls up the menu, then selects the adjustable menu
items.
9
/ buttons
• Adjust the level of the selected item or select an
appropriate setting for selected item.
For safety....
Stop the car before performing any complicated operations.
Temperature inside the car....
If you have parked the car for a long time in hot or cold
weather, wait until the temperature in the car becomes normal
before operating the unit.
1 Transmisor IR
2 LED blanco
3 Pantalla (Panel de cristal líquido)
4 Sensor remoto
5 Boton
(en espera/encendido)
• Púlselo para conectar la alimentación.
• Púlselo y manténgalo pulsado para desconectar la
alimentación.
6 Botón MODE
• Selecciona la fuente de reproducción.
7 Botón ASPECT
Cambia la relación de aspecto de la pantalla.
•
8 Botón MENU
• Presenta en pantalla el menú, y seguidamente se
seleccionan las opciones de menú ajustables.
9 Botónes
/
• Ajusta el nivel de la opción seleccionada o selecciona un
ajuste apropiado para la opción seleccionada.
Para fines de seguridad....
Detenga el automóvil antes de efectuar cualquier operación
complicada.
Temperatura dentro del automóvil....
Si ha dejado el automóvil estacionado durante largo tiempo
en un sitio cálido o frío, no opere la unidad hasta que se
normalice la temperatura del habitáculo.
1 Émetteur IR
2 DEL blanche
3 Écran (Panneau à cristaux liquides)
4 Capteur de télécommande
5 Touche
(attente/sous tension)
• Appuyez sur cette touche pour mettre l’appareil sous
tension.
• Maintenez cette touche pressée pour mettre l’appareil
hors tension.
6 Touche MODE
• Choisit la source de lecture.
7 Touche ASPECT
• Permet de changer le format d’image de l’écran.
8 Touche MENU
• Appelle un menu sur lequel vous pouvez choisir les
options à régler.
9 Touches
/
• Permet d’ajuster le niveau de l’option choisie ou de
choisir un réglage approprié pour l’option choisie.
Pour sécurité....
Arrêtez la voiture avant de réaliser toute opération compliquée.
Température à l’intérieur de la voiture....
Si votre voiture est restée garée pendant longtemps dans un
climat chaud ou froid, attendez que la température à l’intérieur
de la voiture redevienne normale avant d’utiliser l’appareil.
2
Page 3
AV 1 AV 2
Basic operations / Operaciones basicas / Fonctionnement de base
MENU
Preparation
Before operating the unit, make sure that all external
components are correctly connected and installed.
CAUTION:
• Do not touch the surface of the liquid crystal panel directly.
Preparativos
Antes de operar la unìda, asegúrese de que todos los
componentes externos se encuentren conectados e
instalados de manera correcta.
PRECAUCIÓN:
• No toque directamente la superficie del panel de cristal
líquido.
Préparation
Avant d’utiliser le système, assurez-vous que tous les appareils
extérieurs sont connectés et installés correctement.
ATTENTION:
•
Ne touchez pas directement la surface du panneau à cristaux
liquides.
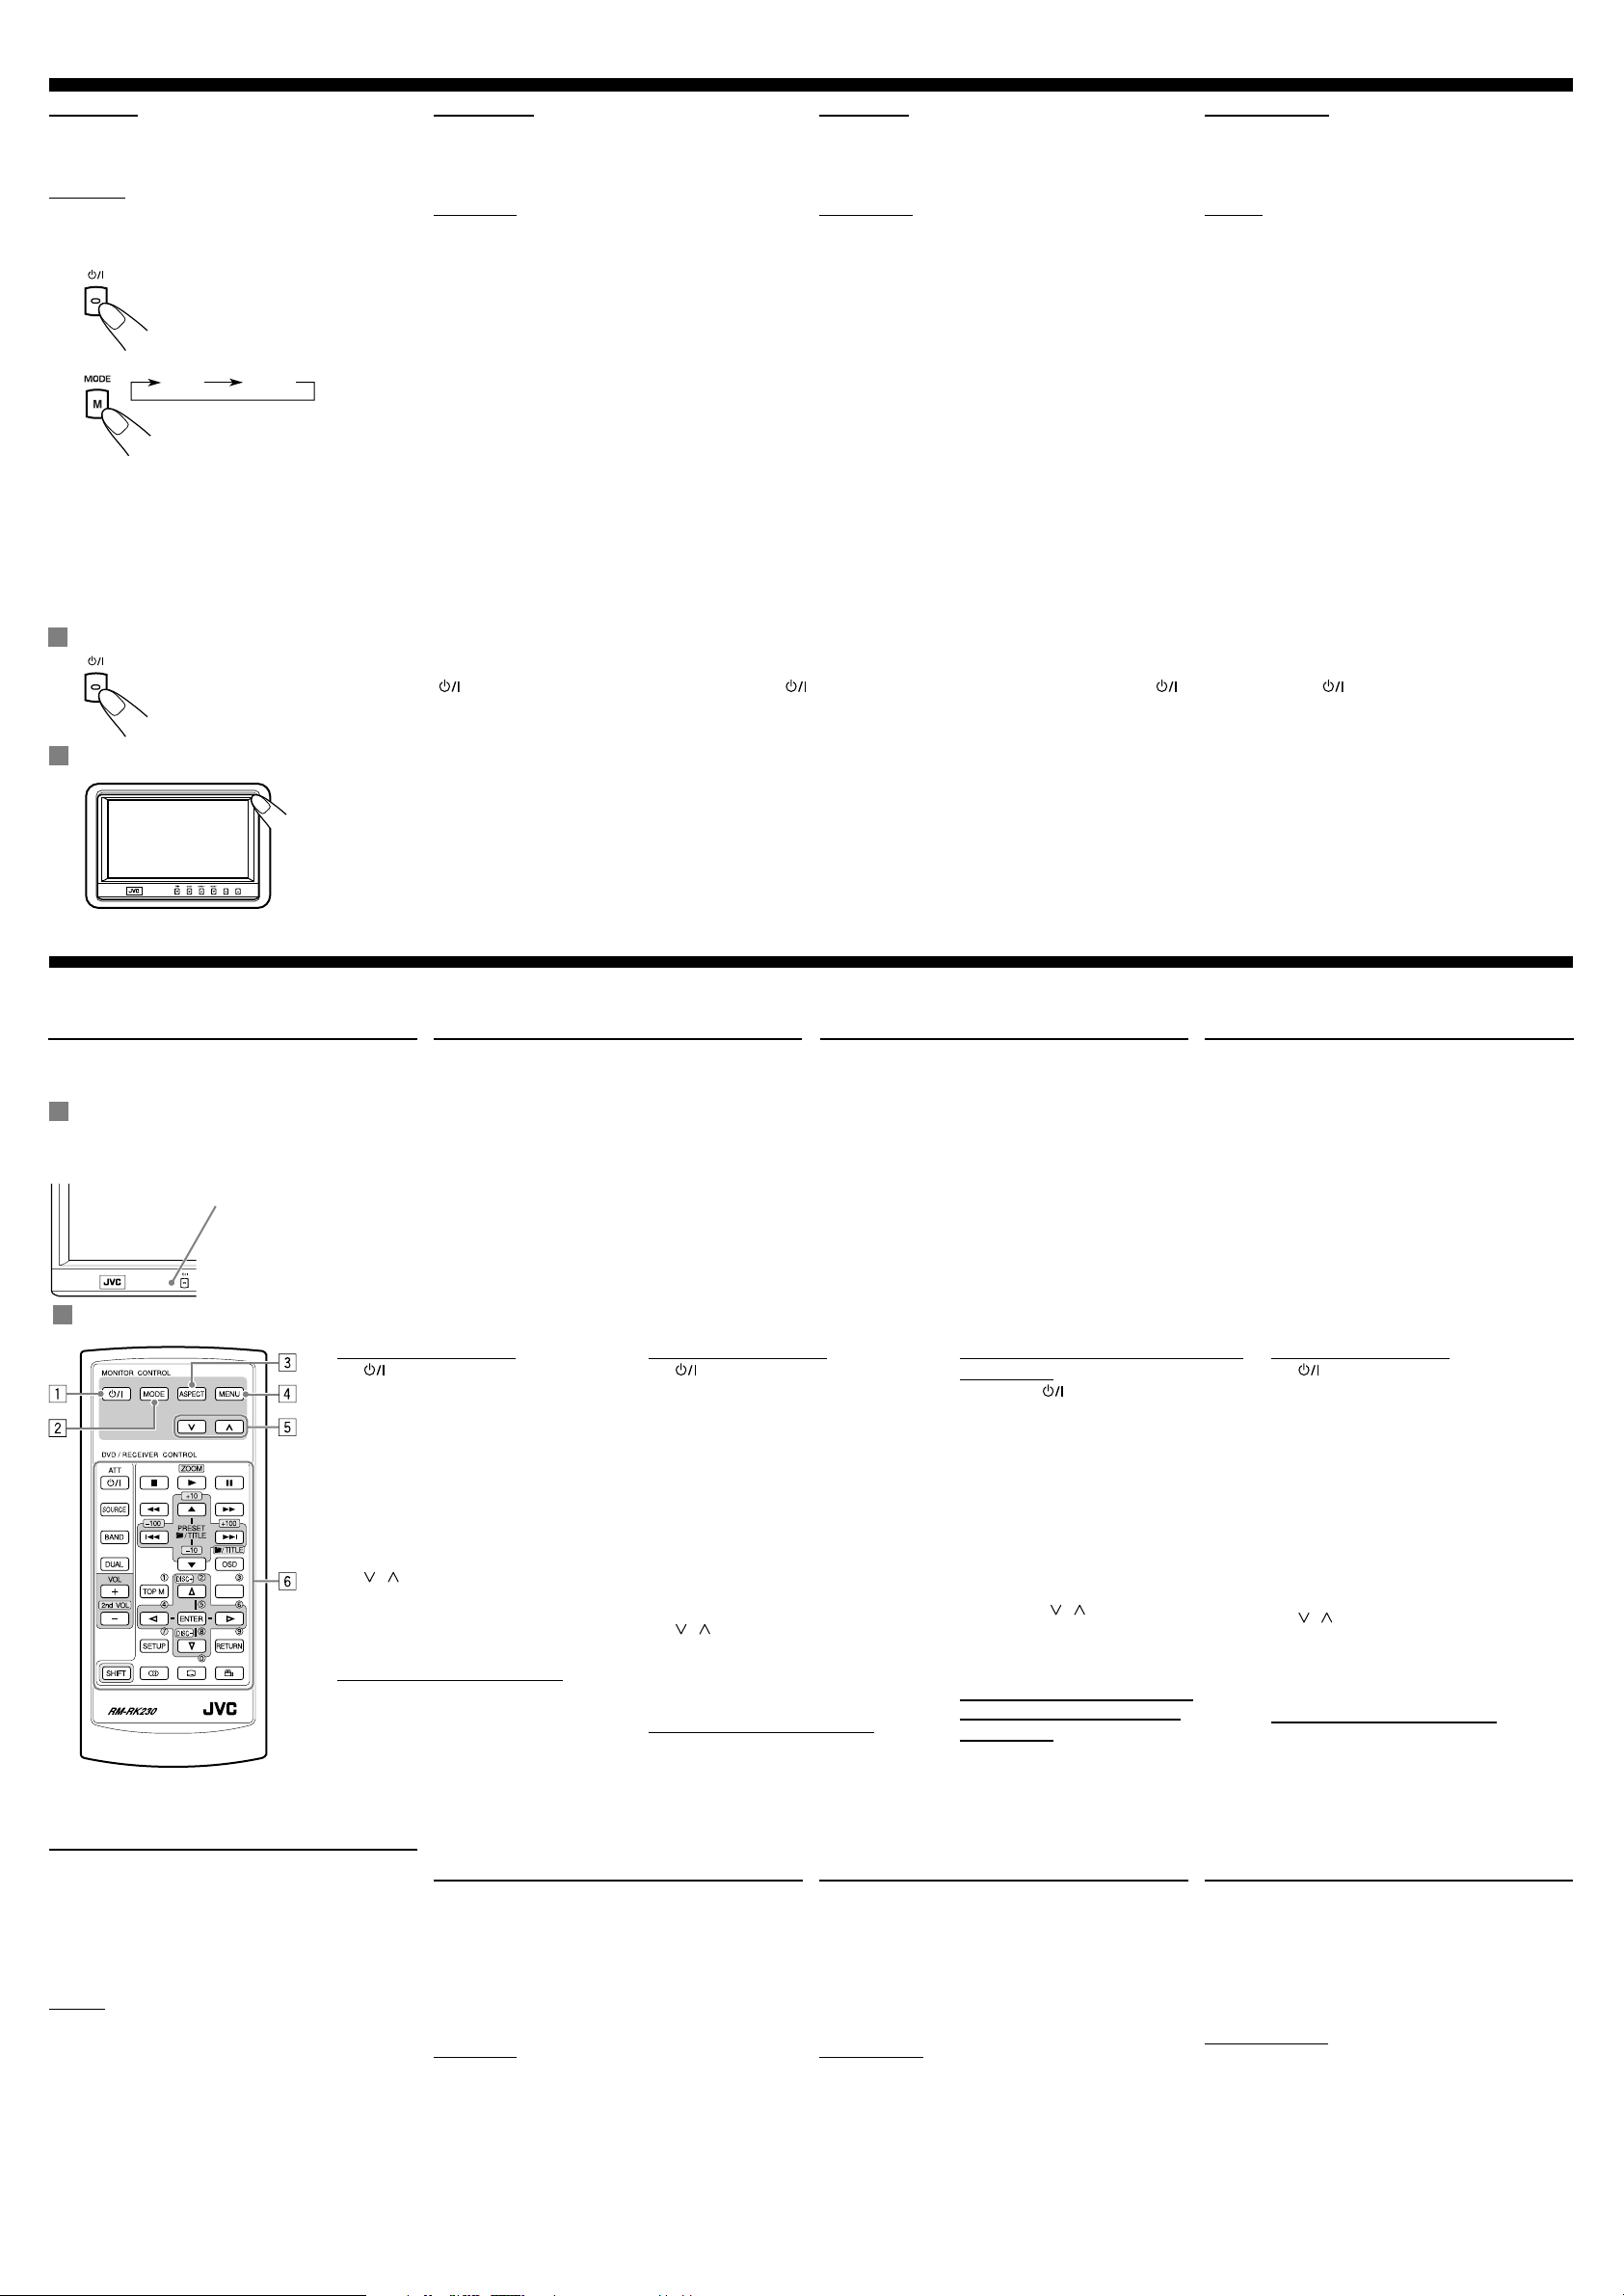
11 Turn on the power. 1 Conecte la alimentación. 1 Mettez l’appareil sous tension.
22 Select the playback source.
Each time you press the button, the
playback source changes.
3 Operate the playback source you
selected.
To operate the external components,
refer to the manuals for the connected
components.
4 Adjust the volume on the car
receiver.
2
Seleccione la fuente de reproducción.
Cada vez que pulsa el botón, la fuente de
reproducción cambia.
3 Opere la fuente de reproducción
que ha seleccionado.
Para operar los componentes externos,
refiérase al manual de los componentes
conectados.
4 Ajuste el volumen del receptor para
automóvil.
2 Choisissez la source de lecture.
Chaque fois que vous appuyez sur la
touche, la source de lecture change.
3 Utilisez la source de lecture que
vous avez choisie.
Pour commander l’appareil extérieur,
référez-vous au mode d’emploi fourni avec
l’appareil connecté.
4 Ajustez le volume sur l’autoradio.
To turn off the power / Para desconectar la alimentación / Pour mettre l’appareil hors tension
Press and hold button.
Pulse y mantenga pulsado el botón .
Maintenez pressée la touche .
To change the monitor angle / Para cambiar el ángulo del monitor / Changement de l’angle du moniteur
Press the top end of the monitor until it
clicks.
The monitor turns upward.
To return the angle, press the bottom end of
the monitor.
Presione la parte superior del monitor hasta
que se oiga un chasquido.
El monitor se girará hacia arriba.
Para recuperar el ángulo anterior, presione el
extremo inferior del monitor.
Appuyer sur la partie supérieure du moniteur
jusqu’au déclic.
Le moniteur s’incline vers le haut.
Pour modifier l’angle, appuyer sur la partie
inférieure du moniteur.
Other basic operations / Otras operaciones básicas / Autres fonctions de base
Using optional remote controller—RM-RK230
You can use JVC’s remote controller RM-RK230, which
supplied with some JVC receivers, to control the monitor.
Before using the optional remote controller / Antes de utilizar el controlador remoto opcional / Avant l’utilisation de la télécommande optionnelle
Remote sensor
Sensor remoto
Capteur de
télécommande
• Aim the remote controller directly at the
remote sensor on the monitor. Make sure
there is no obstacle in between.
• Do not expose the remote sensor to strong
light (direct sunlight or artificial lighting).
Utilización del controlador remoto opcional
—RM-RK230
Para controlar el monitor puede utilizar el controlador remoto
opcional RM-RK230 de JVC, que se incluye con algunos
receptores JVC.
• Apunte el control remoto directamente hacia
el sensor remoto de la unìda. Asegúrese de
que no haya ningún obstáculo en medio.
• No exponga el sensor remoto a una luz
potente (luz solar directa o iluminación
artificial).
Utilisation de la télécommande optionnelle
—RM-RK230
Vous pouvez utiliser la télécommande RM-RK230 JVC, fournie
avec certains récepteurs JVC, pour contrôler le moniteur.
•
Dirigez la télécommande directement sur le
capteur de télécommande du moniteur. Assurezvous qu’il n’y a pas d’obstacle entre les deux.
•
N’exposez pas le capteur de télécommande à
une forte lumière (lumière directe du soleil ou
éclairage artificiel).
Main elements and features / Elementos principales y funciones / Composants principaux et caractéristiques
MONITOR CONTROL
(standby/on) button
1
• Turns on the power if pressed.
• Turns off the power if pressed and held.
2 MODE button
• Selects the playback source.
3 ASPECT button
• Changes the aspect ratio of the screen.
4 MENU button
• Calls up the menu, then selects the
adjustable menu items.
/ buttons
5
• Adjust the level of the selected item or
select an appropriate setting for selected
item.
DVD/RECEIVER CONTROL
6 Receiver control buttons
Controllable only if your car receiver which
is connected to this monitor is one of the
JVC receivers.
Using optional cordless headphones
You can use JVC’s optional cordless headphones KS-HP2 to
listen to the playback sounds of the external component.
Playback sounds are transmitted through IR transmitters to the
cordless headphones.
When using the headphones, set to the monitor menu item “IR”
to “ON.” (For details, see next section.)
NOTES:
• Some noise may occur at some positions on the car
depending on the car type or the window type. In that case,
use the headphones at the position where no noise occurs.
• Some noise may occur at some positions on the car when
using two or more monitors. In that case, set “IR” to “OFF” on
the monitors one by one until the noise occurs no more. (For
details, see next section.)
Uso de los auriculares inalámbricos opcionales
Podrá utilizar los auriculares inalámbricos opcionales
JVC KS-HP2 para escuchar el sonido reproducido por los
componentes externos.
El sonido reproducido se transmite a los auriculares
inalámbricos a través de los transmisores IR.
Cuando utilice los auriculares, ajuste la opción “IR” del menú
del monitor a “ON”. (Para los detalles, consulte la siguiente
sección.)
NOTAS:
• Según el tipo de coche o de ventanilla, en ciertas posiciones
del coche pueden producirse ruidos. En tal caso, utilice los
auriculares en una posición libre de ruidos.
• Cuando se usen dos o más monitores, es posible que oiga
algunos ruidos en función de su situación en el interior del
automóvil. En ese caso, ajuste “IR” a “OFF” en los monitores,
uno por uno, hasta que deje de oírse el ruido. (Para los
detalles, consulte la siguiente sección.)
CONTROL DEL MONITOR
1 Botón
• Púlselo para conectar la alimentación.
• Púlselo y manténgalo pulsado para
desconectar la alimentación.
2 Botón MODE
• Selecciona la fuente de reproducción.
3 Botón ASPECT
Cambia la relación de aspecto de la
•
pantalla.
4 Botón MENU
• Presenta en pantalla el menú, y
seguidamente se seleccionan las
opciones de menú ajustables.
5 Botónes
• Ajusta el nivel de la opción seleccionada
o selecciona un ajuste apropiado para la
opción seleccionada.
CONTROL DEL DVD/RECEPTOR
6 Botones de control del receptor
Controlable solamente si el receptor
autorradio conectado a este monitor es uno
de los receptores de JVC.
3
(en espera/encendido)
/
COMMANDE DU MONITEUR
1 Touche (attente/sous tension)
• Appuyez sur cette touche pour mettre
l’appareil sous tension.
• Maintenez cette touche pressée pour
mettre l’appareil hors tension.
2 Touche MODE
• Choisit la source de lecture.
3 Touche ASPECT
Permet de changer le format d’image de
•
l’écran.
4 Touche MENU
• Appelle un menu sur lequel vous pouvez
choisir les options à régler.
5 Touches
• Permet d’ajuster le niveau de l’option
choisie ou de choisir un réglage approprié
pour l’option choisie.
COMMANDE DU LECTEUR DE DVD
AUTORADIO
6 Touches de commande de l’autoradio
Utilisables uniquement si votre autoradio
connecté à ce moniteur est un autoradio JVC.
/
Utilisation du casque d’écoute sans fil optionnel
Vous pouvez utiliser le casque d’écoute sans fil optionnel
KS-HP2 de JVC pour écouter les sons de lecture de l’appareil
extérieur.
Les sons de lecture sont émis par les émetteurs IR jusqu’au
casque d’écoute sans fil.
Lors de l’utilisation du casque d’écoute, réglez l’option “IR” du
menu du moniteur sur “ON”. (Pour les détails, référez-vous à la
section suivante.)
REMARQUES:
• En fonction du type de véhicule ou du type de fenêtre, vous
pouvez entendre du bruit dans la voiture selon l’endroit où
vous êtes assis. Dans ce cas, utilisez le casque d’écoute.
• En cas d’utilisation de deux moniteurs ou plus, des bruits
peuvent se faire entendre à certains endroits du véhicule.
Auquel cas, mettez un à un les paramètres “IR” des
moniteurs sur “OFF” jusqu’à ce que le bruit disparaisse.
(Pour les détails, référez-vous à la section suivante.)
Page 4
Adjustments / Ajustes / Ajustements
BRIGHT
CONTRAST
TINT
COLOR
IR ON
DIMMER
WHITE LED ON
Using the monitor menu
You can make your own display adjustments using the menu.
• For the adjustable items, see below.
Uso del menú del monitor
Utilizando el menú, podrá realizar sus propios ajustes de
visualización.
• Consulte datos sobre los elementos ajustables en las
indicaciones siguientes.
Utilisation du menu du moniteur
Vous pouvez réaliser vos propres ajustements pour l’affichage
en utilisant le menu.
• Reportez-vous ci-dessous pour consultez la liste des
éléments réglables.
Basic procedure / Procedimiento básico / Procédure de base
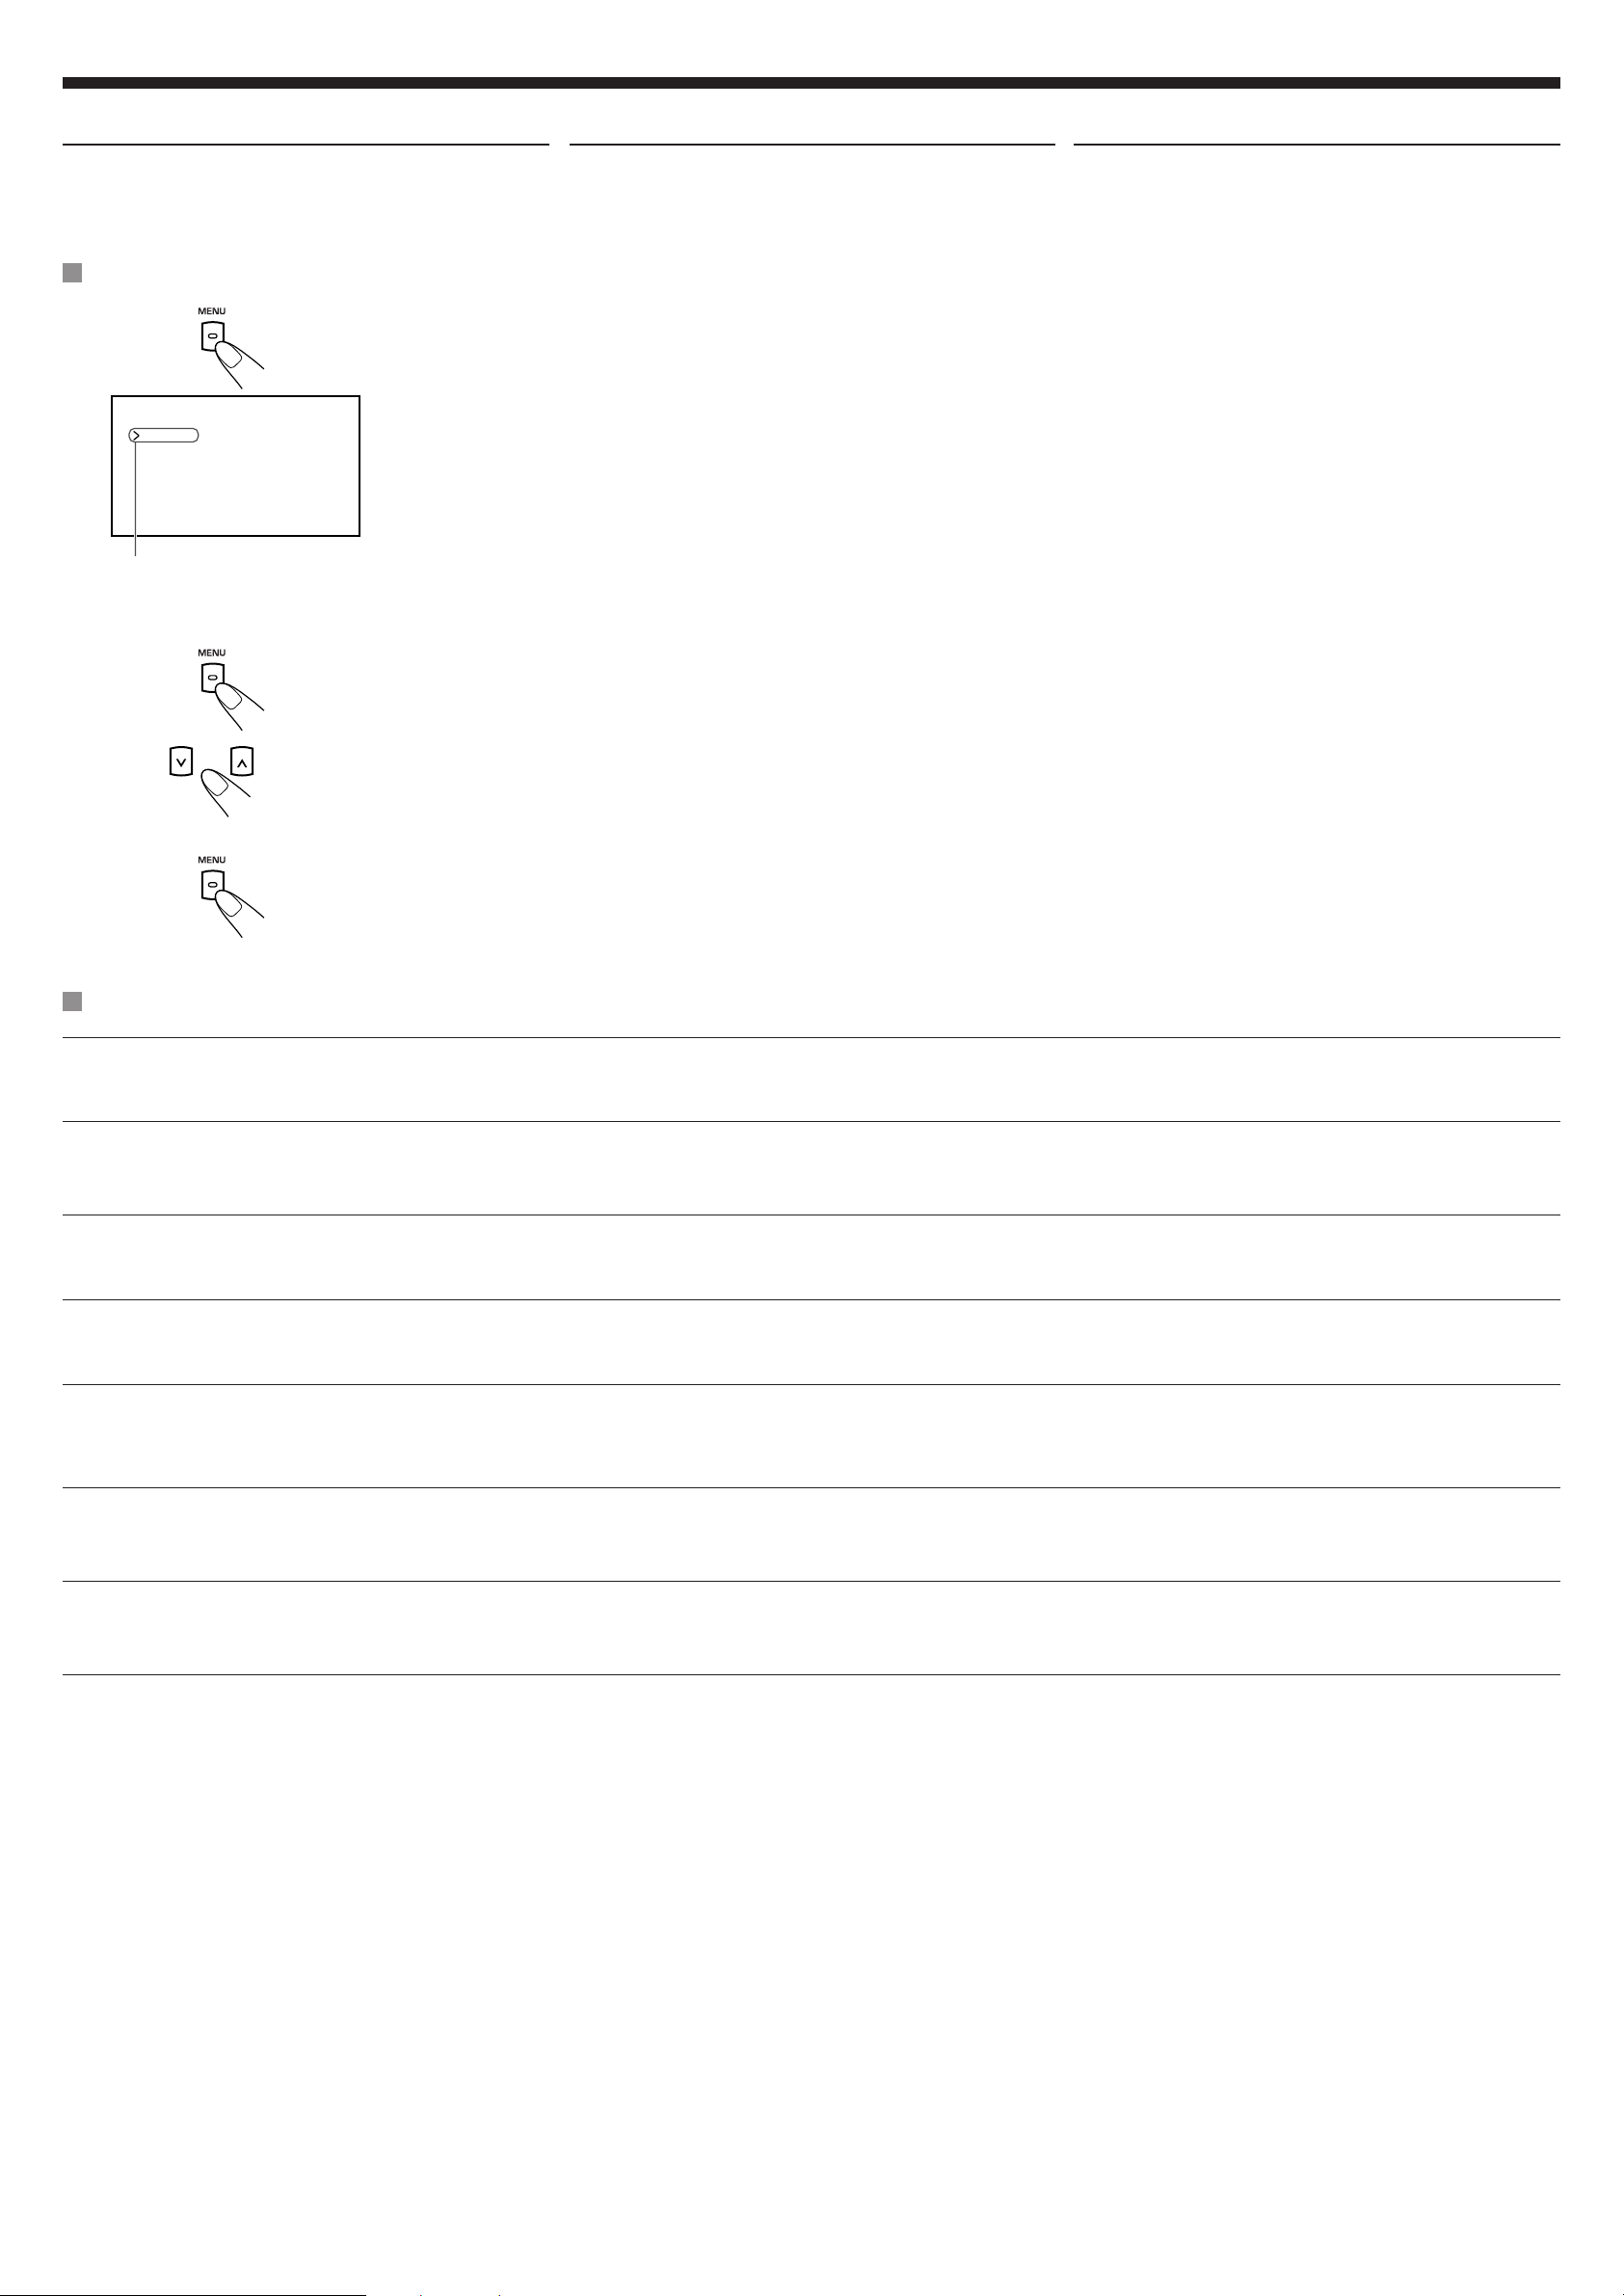
11 Call up the menu.
Menu selection goes off if other operations
are done or no operation is done for about 5
seconds.
Current menu item
Opción de menú actual
Réglage de menu actuel
1 Llame el menú.
La selección del menú se cancela si se
efectúan otras operaciones o no se efectúa
ninguna operación durante aproximadamente
5 segundos.
22 Select an item you want to adjust. 2 Seleccione la opción que desea
ajustar.
1 Appelez le menu.
Le menu disparaît si une autre opération est
réalisée ou si aucune opération n’est réalisée
pendant environ 5 secondes.
2 Choisissez le réglage que vous
souhaitez ajuster.
33 Adjust the level of the selected item
(or select an appropriate setting for
the selected item).
3 Ajuste el nivel de la opción
seleccionada (o seleccione un
ajuste apropiado para la opción
seleccionada).
44 Exit from the menu.
Press the button repeatedly until the menu
disappears.
4 Salga del menú.
Pulse el botón repetidamente hasta que
se borre el menú.
Adjustable items on the monitor menu / Opciones ajustables en el menú del monitor / Réglages ajustables sur le menu du moniteur
BRIGHT:
CONTRAST:
TINT:
COLOR:
IR*:
DIMMER:
WHITE LED:
Adjust this if the picture is too bright or too dark.
• Adjustable range: –10 to +11
• Initial level: 0 (center)
Control the degree of difference between the lightest
and darkest parts of the picture.
• Adjustable range: –10 to +11
• Initial level: 0 (center)
Adjust this if the human skin color is unnatural.
• Adjustable range: –10 to +11
• Initial level: 0 (center)
Adjust the color of the picture—lighter or darker.
• Adjustable range: –10 to +11
• Initial level: 0 (center)
Set to “ON” when you listen to the playback sounds
using JVC’s optional cordless headphones KS-HP2.
• Selectable settings: ON, OFF
• Initial setting: ON
Adjust the light of the screen and the white LED when
you turn on the headlights.
• Adjustable range: –5 to +5
• Initial level: 0 (center)
Light on or off the white LED when you turn on the
monitor.
• Selectable settings: ON, OFF
• Initial setting: ON
Ajústelo si la imagen es demasiado clara u oscura.
• Margen ajustable: –10 a +11
• Nivel inicial: 0 (central)
Controla el grado de diferencia entre las partes más
brillantes y más oscuras de la imagen.
• Margen ajustable: –10 a +11
• Nivel inicial: 0 (central)
Ajústelo si el color de la piel no es natural.
• Margen ajustable: –10 a +11
• Nivel inicial: 0 (central)
Ajusta el color de la imagen—más clara o más oscura.
• Margen ajustable: –10 a +11
• Nivel inicial: 0 (central)
Ajuste a “ON” cuando escuche el sonido reproducido
utilizando los auriculares inalámbricos opcionales JVC
KS-HP2.
• Ajustes seleccionables: ON, OFF
• Ajuste inicial: ON
Ajusta la luminosidad de la pantalla y del LED blanco
cuando se encienden los faros.
• Margen ajustable: –5 a +5
• Nivel inicial: 0 (central)
Enciende o apaga el LED blanco al encender el
monitor.
• Ajustes seleccionables: ON, OFF
• Ajuste inicial: ON
Ajustez ce réglage si l’image est trop lumineuse ou trop
sombre.
• Plage d’ajustement: –10 à +11
• Niveau initial: 0 (centre)
Contrôle le degré de différence entre les parties les plus
lumineuses et les plus sombres de l’image.
• Plage d’ajustement: –10 à +11
• Niveau initial: 0 (centre)
Ajustez ce réglage si la couleur de la peau humaine
n’est pas naturelle.
• Plage d’ajustement: –10 à +11
• Niveau initial: 0 (centre)
Permet d’ajuster la couleur de l’image—plus clair ou
plus sombre.
• Plage d’ajustement: –10 à +11
• Niveau initial: 0 (centre)
Réglez cette option sur “ON” lorsque vous souhaitez
écouter les sons de lecture en utilisant le casque
d’écoute sans fil KS-HP2 de JVC.
• Réglages sélectionnables: ON, OFF
• Réglage initial: ON
Ajuste la luminosité de l’écran et de la DEL blanche
quand vous allumez les feux de la voiture.
• Plage d’ajustement: –5 à +5
• Niveau initial: 0 (centre)
Allume ou éteint la diode (DEL) blanche quand vous
mettez le moniteur sous tension.
• Réglages sélectionnables: ON, OFF
• Réglage initial: ON
3 Ajustez le niveau du réglage
choisi (ou choisissez le réglage
approprié).
4 Quittez le menu.
Appuyez répétitivement sur la touche
jusqu’à ce que le menu disparaisse.
* Turn off the headphones before changing the “IR” setting. * Desactive los auriculares antes de cambiar el ajuste “IR”. * Mettez le casque d’écoute hors service avant de changer le réglage
4
“IR”.
Page 5
Changing the aspect ratio
Cambio de la relación de aspecto
Changement du format d’image
You can select an appropriate aspect ratio for the playback
video signals.
Podrá seleccionar una relación de aspecto apropiada para las
señales de vídeo de reproducción.
Basic procedure / Procedimiento básico / Procédure de base
Each time you press the button, aspect ratio
changes.
La relación de aspecto cambia cada vez que
pulsa el botón.
Changeable aspect ratio / Relaciones de aspecto seleccionables / Formats d’image sélectionnables
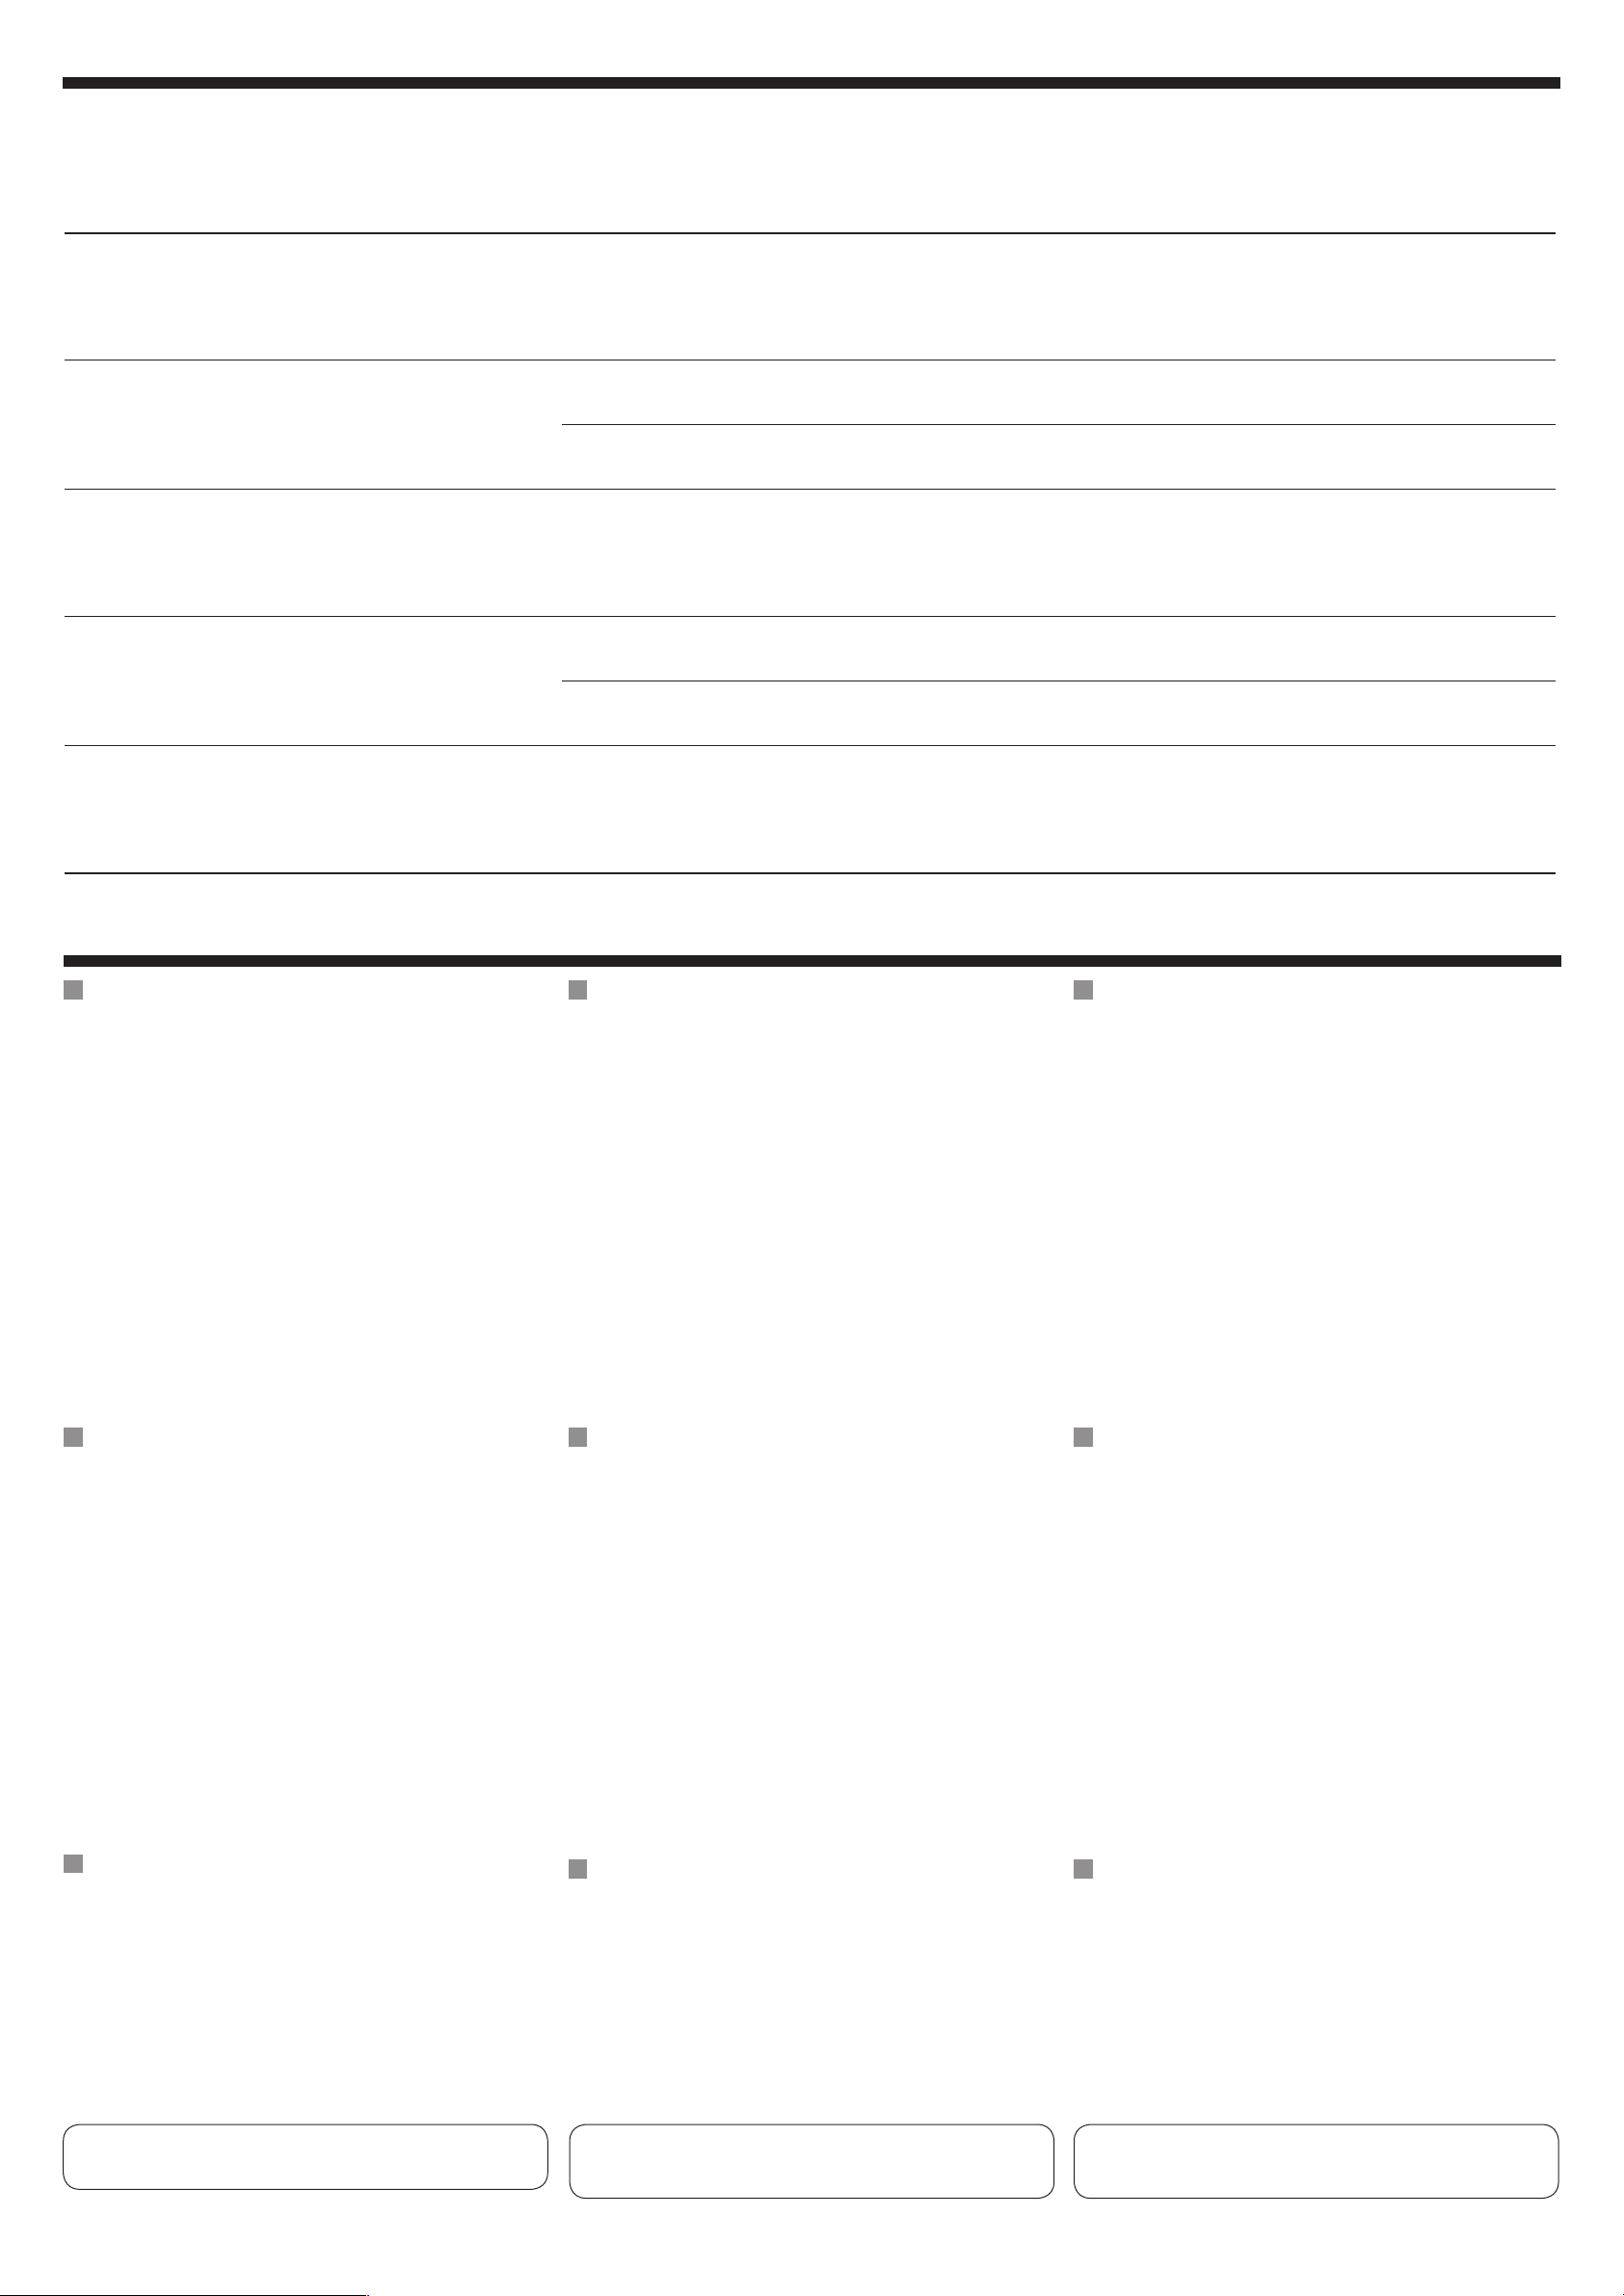
When incoming 16:9 video signal / Cuando la señal de vídeo entrante es de 16:9 / Lors de l’entrée d’un signal vidéo 16:9
FULL:
NORMAL:
Pictures are fully shown on the screen.
• In some cases, the black bars may be shown at
the top and bottom sides of the screen.
Pictures are reduced horizontally.
• The black bars will be shown at the left and right
sides of the screen.
• In some cases, the black bars may be shown
also at the top and bottom sides of the screen.
Las imágenes se muestran por entero en la
pantalla.
• En algunos casos, podrían aparecer barras
negras en las partes superior e inferior de la
pantalla.
Las imágenes se reducen horizontalmente.
• Aparecerán franjas negras en los lados
izquierdo y derecho de la pantalla.
• En algunos casos, también podrían aparecer
barras negras en las partes superior e inferior de
la pantalla.
Vous pouvez choisir le format d’image pour les signaux vidéo
de lecture.
Chaque fois que vous appuyez sur cette touche, le
format d’image change.
Les images apparaissent entièrement sur l’écran.
• Dans certains cas, des barres noires peuvent
apparaître en haut et en bas de l’écran.
Les images sont compressées horizontalement.
• Des barres noires apparaissent à gauche et à
droite de l’écran.
• Dans certains cas, des barres noires peuvent
aussi apparaître en haut et en bas de l’écran.
JUST:
ZOOM:
The middle of pictures are reduced horizontally,
and the left and right sides of the picture enlarged
horizontally.
• In some cases, the black bars may be shown at
the top and bottom sides of the screen.
Pictures are enlarged on the screen so that no
black bars will be shown on the screen. (The entire
picture cannot be shown on the screen.)
El centro de las imágenes se reduce
horizontalmente, y los lados izquierdo y derecho
de la imagen se agranda horizontalmente.
• En algunos casos, podrían aparecer barras
negras en las partes superior e inferior de la
pantalla.
Las imágenes aparecen ampliadas en la pantalla
de manera que no aparezcan las franjas negras
en la misma. (No se muestra la imagen entera en
la pantalla).
When incoming 4:3 video signal / Cuando la señal de vídeo entrante es de 4:3 / Lors de l’entrée d’un signal vidéo 4:3
FULL:
NORMAL:
Pictures are enlarged horizontally and are fully
shown on the screen.
Pictures are shown at the center of the screen.
• The black bars will be shown at the left and right
sides of the screen.
Las imágenes se amplían horizontalmente y se
muestran por entero en la pantalla.
Las imágenes se muestran en el centro de la
pantalla.
• Aparecerán franjas negras en los lados
izquierdo y derecho de la pantalla.
La partie centrale de l’image est compressée
horizontalement et les côtés gauche et droit de
l’image sont agrandis horizontalement.
• Dans certains cas, des barres noires peuvent
apparaître en haut et en bas de l’écran.
Les images sont agrandies sur l’écran de façon
qu’il n’y ait pasde barre noire. (L’image entière
n’apparaît pas sur l’écran.)
Les images sont agrandies horizontalement et
apparaissent entièrement sur l’écran.
Les images apparaissent au centre de l’écran.
• Des barres noires apparaissent à gauche et à
droite de l’écran.
JUST:
ZOOM:
Pictures are enlarged horizontally. The extension
ratio increases toward the both sides of the screen.
Pictures are enlarged on the screen so that no
black bars will be shown on the screen. (The entire
picture cannot be shown on the screen.)
Maintenance / Mantenimiento / Entretien
To prevent damage to the exterior
• Do not apply pesticides, benzine, thinner or other volatile
substances to the monitor.
The cabinet surface primarily consists of plastic materials.
• Do not wipe with benzine, thinner or similar substances
because this will results in discoloration or removal of the
paint.
• When a cloth with a cleansing chemical is used, follow the
caution points.
– Do not leave the unit in contact with rubber or vinyl
products for long periods of time.
– Do not use cleansers which have polishing granules
because this could damage the cabinet.
Para impedir daños en la parte exterior
• No aplique pesticidas, bencina, diluyente u otras sustancias
volátiles a la unidad.
La superficie de la caja está hecha principalmente de
materiales plásticos.
• No la limpie con bencina, diluyente o sustancias similares
porque esto puede causar descoloración o desprendimiento
de la pintura.
• Cuando utilice un paño con un producto químico de
limpieza, siga los puntos de precaución.
– No deje la unidad en contacto con productos de goma o
vinilo durante largos periodos de tiempo.
– No utilice limpiadores que contenga gránulos pulidores,
pues se podrá dañar la carcasa.
Las imágenes se agrandan horizontalmente. La
relación de extensión aumenta hacia ambos lados
de la pantalla.
Las imágenes aparecen ampliadas en la pantalla
de manera que no aparezcan las franjas negras
en la misma. (No se muestra la imagen entera en
la pantalla).
Pour éviter d’endommager l’extérieur
• Ne jamais appliquer de pesticide, benzine, diluant ou autre
substance volatile sur l’unité.
La surface du coffret est essentiellement constituée de
matières plastiques.
• Ne pas frotter l’unité à la benzine, au diluant ou toute autre
substance similaire, car cela entraîne une décoloration et/ou
un écaillage de la peinture.
• Lorsqu’on utilise un chiffon imbibé d’un agent chimique de
nettoyage, prendre les précautions suivantes.
– Ne pas laisser l’unité au contact du caoutchouc ou du
vinyle pendant de longues périodes.
– N’utilisez pas de nettoyant contenant des granules à polir
parce que cela risquerait d’endommager le boîtier.
Les images sont agrandies horizontalement. Le
rapport d’agrandissement augmente pour les deux
côtés de l’écran.
Les images sont agrandies sur l’écran de façon
qu’il n’y ait pas de barre noire. (L’image entière
n’apparaît pas sur l’écran.)
Clean off dirt by wiping lightly with a soft cloth
When the cabinet is very dirty, wipe with a well-wrung cloth
dipped in a kitchen cleanser (neutral) thinned by water and
then go over the same surface with a dry cloth.
(Since there is the possibility of water drops getting inside of
the unit, do not directly apply cleanser to the surface.)
Elimine la suciedad frotando ligeramente con un paño suave
Cuando la unidad esté muy sucia, límpiela con un paño
humedecido en un producto de limpieza de cocina (neutro)
diluido en agua y bien escurrido, y luego pase un paño seco
por la misma superficie.
(Como existe la posibilidad de que entren gotas en el interior
de la unidad, no aplique directamente el producto de limpieza
de cocina diluido en agua a la superficie).
5
Nettoyer les saletés en frottant légèrement au chiffon doux
Quand le boîtier est très sale, frottez-le avec un chiffon bien
essoré imbibé de nettoyant neutre dilué dans de l’eau puis
essuyez la même surface avec un chiffon sec.
(Pour éviter que des gouttes d’eau ne pénètrent dans l’unité,
ne jamais appliquer di rectement de liquide de nettoyage sur la
surface.)
Page 6
Troubleshooting / Localización de averías / Guide de dépannage
What appears to be trouble is not always serious. Check the
following points before calling a service center.
Lo que aparenta ser una avería podría resolverse fácilmente.
Verifique los siguientes puntos antes de llamar al centro de
servicio.
Ce qui apparaît être un problème n’est pas toujours sérieux.
Vérifiez les points suivants avant d’appeler un centre de
service.
Symptoms / Síntomas / Symptôme Causes / Causas / Causes Remedies / Soluciones / Remèdes
• Colored spots (red, blue and green) appear on the screen.
• Puntos de color (rojo, azul y verde) aparecen en la pantalla.
• Des points de couleur (rouges, bleus et verts) apparaissent
sur l’écran.
• No picture appears and sound is not heard.
• No hay imagen ni sonido.
• Aucune image n’apparaît et aucun son n’est entendu.
• The unit does not work at all.
• La unidad no funciona para nada.
• L’appareil ne fonctionne aps du tout.
• Cordless headphones (not supplied) do not work.
Los auriculares inalámbricos (no suministrados) no funcionan.
•
• Le casque d’écoute sans fil (non fourni) ne fonctionne pas.
• Howling occurs from the speakers or the headphones.
• Se escucha silbido de los altavoces o de los auriculares.
• Un hurlement peut se produire dans les enceintes ou le
casque d’écoute.
This is a characteristic of liquid crystal panels and is not a
malfunction.
Esta es una característica de los paneles de cristal líquido y
no es una anomalía.
C’est une caractéristique des panneaux à cristaux liquides et
ce n’est pas un mauvais fonctionnement.
The cord is not connected correctly.
El cable no está correctamente conectado.
Le cordon n’est pas connecté correctement.
Correct input mode is not selected.
No se ha seleccionado el modo de entrada correcto.
Le mode d’entrée correct n’est pas choisi.
The built-in microcomputer may have functioned incorrectly
due to noise, etc.
El microcomptador incorporado podría estar funcionando
incorrectamente debido a ruidos, etc.
Le micro-ordinateur intégré peut fonctionnar incorrectement á
case de parasites, etc.
The battery has lost its charge.
La pila está descargada.
La pile est usée.
The sensor is exposed to strong light.
El sensor remoto se encuentra expuesto a una luz potente.
Le capteur de télécommande estexposé à une lumière trop forte.
It may be caused by a camcorder connected to the monitor.
Podría atribuirse a una videocámara conectada al monitor.
Il peut être causé par un caméscope connecté au moniteur.
See “Note” on page 2.
Véase “Nota” en la página 2.
Consultez la “Remarque” de la page 2.
Connect the cord correctly.
Conecte correctamente el cable.
Connectez le cordon correctement.
Select the correct input mode.
Seleccione el modo de entrada correcto.
Choisissez le mode d’entrée correct.
Reset the unit (see page 2).
Reinicialice la unidad (consulte la página 2).
Réinitialisez L’appareil (voir page 2).
Install a new battery.
Instale una pila nueva.
Installez une nouvelle pile.
Do not expose the sensor to strong light.
No exponga el sensor remoto a una luz potente.
N’exposez pas le capteur de télécommande à une lumière trop forte.
Camcorder is now in recording mode. Deactivate the recording
mode.
La videocámara está actualmente en el modo de grabación.
Desactive el modo de grabación.
Le caméscope est en mode d’enregistrement. Mettez hors
service le mode d’enregistrement.
Specifications / Especificaciones / Spécifications
WIDESCREEN MONITOR
Screen:
6.5 inch liquid crystal panel
Number of pixel:
280 800 pixels (400 vertical × 234 horizontal × 3)
Drive method:
TFT (Thin Film Transistor) active matrix format
Cordless audio:
Infrared audio transmitter (Support IR receiver stereo
headphones)
L-channel: 2.3 MHz
R-channel: 2.8 MHz
Effective range: 1.5 m (5 ft)
Color system: NTSC
Dimensions (W × H × D):
Installation size (approx.):
197 mm × 131 mm × 39 mm (7-13/16" × 5-3/16" × 1-9/16")
(including shroud)
Mass (approx.):
500 g (1.2 lbs) (including shroud)
MONITOR CONNECTION UNIT
Input:
Video: RCA pin × 2 circuits
1 V(p-p), 75 Ω
Audio: RCA pin × 2 circuits
1.5 V(rms)
Output:
Display: 13 pin DIN connector
1 V(p-p), 75 Ω
Video: RCA pin × 1 circuit
1 V(p-p), 75 Ω
Audio: RCA pin × 1 circuit
1.5 V(rms)
Dimensions (W × H × D):
Installation size (approx.):
127 mm × 28 mm × 89 mm (5" × 1-1/8" × 3-9/16")
(excluding projections)
Mass (approx.):
160 g (0.36 lbs)
MONITOR DE PANTALLA ANCHA
Pantalla:
Panel de cristal líquido de 6,5 pulg
Número de pixeles:
280 800 pixeles (400 vertical × 234 horizontal × 3)
Método de mando:
Formato de matriz activa TFT (transistor de película delgada)
Audio inalámbrico:
Transmisor de audio por infrarrojos (Soporta los
auriculares estéreo del receptor IR)
Canal izquierdo: 2,3 MHz
Canal derecho: 2,8 MHz
Alcance efectivo: 1,5 m (5 pies)
Sistema de color: NTSC
Dimensiones (An × Al × Pr):
Tamaño de instalación (aprox.):
197 mm × 131 mm × 39 mm (7-13/16" × 5-3/16" × 1-9/16")
(incluida la cubierta)
Peso (aprox.):
500 g (1,2 lbs) (incluida la cubierta)
UNIDAD DE CONEXIÓN DEL MONITOR
Entrada:
Vídeo: Clavija RCA × 2 circuitos
1 V(p-p), 75 Ω
Audio: Clavija RCA × 2 circuitos
1,5 V(rms)
Salida:
Visualizador: Conector DIN de 13 clavijas
1 V(p-p), 75 Ω
Vídeo: Clavija RCA × 1 circuito
1 V(p-p), 75 Ω
Audio: Clavija RCA × 1 circuito
1,5 V(rms)
Dimensiones (An × Al × Pr):
Tamaño de instalación (aprox.):
127 mm × 28 mm × 89 mm (5" × 1-1/8" × 3-9/16")
(excluidas proyecciones)
Peso (aprox.):
160 g (0,36 lbs)
MONITEUR À ÉCRAN LARGE
Écran:
Panneau à cristaux liquides de 6,5 pouces
Nombre de pixels:
280 800 pixels (400 verticaux × 234 horizontaux × 3)
Méthode d’entraînement:
TFT (Transistor à couches minces) à matrice active
Système audio sans fil:
Émetteur audio infrarouge (Prend en charge les casques
d’écoute à récepteur IR)
Canal gauche: 2,3 MHz
Canal droit: 2,8 MHz
Plage de fonctionnement: 1,5 m (5 pieds)
Standard de couleur: NTSC
Dimensions (L × H × P):
Taille d’installation (approx.):
197 mm × 131 mm × 39 mm (7-13/16" × 5-3/16" × 1-9/16")
(y compris le protecteur de contact)
Masse (approx.):
500 g (1,2 livre) (y compris le protecteur de contact)
UNITÉ DE CONNEXION DU MONITEUR
Entrée:
Vidéo: Prises cinch × 2 circuits
1 V(p-p), 75 Ω
Audio: Prises cinch × 2 circuits
1,5 V(efficace)
Sortie:
Affichage: Connecteur DIN à 13 broches
1 V(p-p), 75 Ω
Vidéo: Prises cinch × 1 circuit
1 V(p-p), 75 Ω
Audio: Prises cinch × 1 circuit
1,5 V(efficace)
Dimensions (L × H × P):
Taille d’installation (approx.):
127 mm × 28 mm × 89 mm (5" × 1-1/8" × 3-9/16")
(hors projections)
Masse (approx.):
160 g (0,36 livre)
GENERAL
Power requirement:
Operating voltage:
DC 14.4 V (11 V to 16 V allowance)
Grounding system: Negative ground
Allowable operating temperature:
0°C to +40°C (32°F to 104°F)
Allowable storage temperature:
–20°C to +80°C (–4°F to 176°F)
Design and specifications are subject to change without notice.
If a kit is necessary for your car, consult your telephone directory
for the nearest car audio speciality shop.
GENERAL
Consumo de energía:
Tensión de funcionamiento:
14,4 V CC (tolerancia de 11 V a 16 V)
Sistema de puesta a tierra: Negativo a masa
Temperatura de funcionamiento permisible:
0°C a +40°C (32°F a 104°F)
Temperatura de almacenamiento permisible:
–20°C a +80°C (–4°F a 176°F)
El diseño y las especificaciones se encuentran sujetos a
cambios sin previo aviso.
Si necesita un kit para su automóvil, consulte su directorio
telefónico para buscar la tienda especializada en car audio más
cercana.
6
GÉNÉRALITÉS
Alimentation:
Tension de fonctionnement:
CC 14,4 V (11 V à 16 V admissibles)
Système de mise à la masse: Masse négative
Températures de fonctionnement admissibles:
0°C à +40°C (32°F à 104°F)
Température de stockage admissible:
–20°C à +80°C (–4°F à 176°F)
La conception et les spécifications sont sujettes à changement
sans notification.
Si un kit est nécessaire pour votre voiture, consultez votre
annuaire téléphonique pour trouver le magasin spécialisé
autoradio le plus proche.
Page 7
KV-MH6510
6,5-INCH WIDESCREEN MONITOR : INSTRUCTIONS
6,5-ZOLL-BREITBILDMONITOR : BEDIENUNGSANLEITUNG
MONITEUR COULEUR À ÉCRAN LARGE DE 6,5 POUCES : MANUEL D’INSTRUCTIONS
LVT1327-002A
[E]
6,5-INCH BREEDBEELD-MONITOR : GEBRUIKSAANWIJZING
© 2005 Victor Company of Japan, Limited
• This system cannot receive television broadcasts and is primarily designed for use with a VCR or a DVD player. Use the separately sold TV tuner unit KV-C1001 for optional television broadcast reception.
• Dieses System kann keine Fernsehsignale empfangen und wurde in erster Linie für die Verwendung mit einem Videorecorder oder einem DVD-Spieler konzipiert. Verwenden Sie den getrennt erhältlichen TV-Tuner
KV-C1001 für optionalen Fernsehempfang.
• Ce système ne peut pas recevoir les émissions de télévision et il est essentiellement conçu pour l’utilisation avec un magnétoscope ou un lecteur de DVD. Utilisez le module de tuner de télévision KV-C1001 vendu
séparément afin de pouvoir recevoir les émissions de télévision.
• Met dit systeem kunt u geen televisie-uitzendingen ontvangen. Dit systeem is voornamelijk ontworpen voor het gebruik met een videorecorder of een DVD-speler. Gebruik de los verkrijgbare KV-C1001 TV-tuner voor ontvangst van televisieuitzendingen.
0505MNMMDWJEIN
EN, GE, FR, NL
ENGLISH
Thank you for purchasing a JVC product. Please read
all instructions carefully before operation, to ensure
your complete understanding and to obtain the best
possible performance from the unit.
• For installation and connections, refer to the
separate manual.
CAUTION:
This monitor system should be used on DC 12 V
only. To prevent electric shocks and fire hazards,
DO NOT use any other power source.
Installation requires some special
knowledge.
Do not install the monitor yourself.
Consult a dealer having special
knowledge of this kind for safe and
reliable installation.
WARNING
• DO NOT INSTALL THE MONITOR IN A
LOCATION WHICH OBSTRUCTS DRIVING,
VISIBILITY, SAFETY DEVICE FUNCTION
SUCH AS AIR BAGS OR WHICH IS
PROHIBITED BY APPLICABLE LAWS AND
REGULATIONS.
• There may be legal regulations defi ning
the permissible installation locations for
the monitor which differ by country or by
state. Be sure to install the monitor in a
correct location according to such laws.
• The driver must not operate the monitor
while driving.
* Stop your vehicle in a safe location when
operating the monitor.
• The driver must not watch the television
or playback pictures while driving.
If the driver does it while driving, it
may lead to carelessness and cause an
accident.
• Keep the monitor at an appropriate sound
level while driving.
Driving with the sound at a level that
prevents you from hearing sounds
outside of and around the vehicle may
cause an accident.
• Be sure not to let the monitor fall or be
strongly impacted since this may cause a
malfunction or fi re.
• Do not use the monitor with the engine
off.
Doing so with the engine off will consume
battery power and may prevent the engine
from starting.
• Do not touch the surface of the liquid
crystal panel directly.
DEUTSCH
Wir danken Ihnen für den Kauf eines JVC Produkts.
Bitte lesen Sie die Anleitung vollständig durch, bevor
Sie das Gerät in Betrieb nehmen, um sicherzustellen,
daß Sie alles vollständig verstehen und die
bestmögliche Leistung des Geräts erhalten.
• Für den Einbau und die Anschlüsse siehe das
eigenständige Handbuch.
ACHTUNG:
Die Betriebsspannung für dieses Monitorsystem
beträgt 12 V Gleichstrom. Betreiben Sie es NICHT
mit anderen Spannungen, um elektrischen Schlag
und Brand zu verhüten.
Die Installation erfordert entsprechende
Fachkenntnisse.
Installieren Sie das Monitorsystem nicht
selbst. Wenden Sie sich für eine sichere
und fachgerechte Installation an einen
Vertragshändler.
WARNUNGEN
•
DEN MONITOR NICHT AN EINEM
ORT ANBRINGEN, WO ER BEIM
FAHREN STÖRT ODER DIE SICHT
BESCHRÄNKT, DIE FUNKTION VON
SICHERHEITSEINRICHTUNGEN WIE
AIRBAGS BEHINDERT ODER WO
ÖRTLICH GELTENDE GESETZE ODER
VORSCHRIFTEN DEN EINBAU VERBIETEN.
•
Es gibt möglicherweise gesetzliche
vorschriften, mit denen zulässige
installationsorte für den monitor geregelt
werden und die von staat zu staat oder
bundesland zu bundesland unterschiedlich
sein können. Vergewissern sie sich aus
diesem grund, dass sie den monitor an
einem ort installieren, der den gesetzlichen
vorschriften entspricht.
• Das monitorsystem darf vom fahrer nicht
während der fahrt betrieben werden.
* Halten sie das fahrzeug an einem sicheren ort an
und bedienen sie dann den monitor.
• Dem fahrer eines fahrzeugs ist das
betrachten von videos während der fahrt
untersagt.
Dies könnte den fahrer ablenken und zu
unfällen führen.
• Stellen sie eine angemessene lautstärke
während der fahrt ein.
Bei zu hoher lautstärke werden geräusche
aus der umgebung übertönt, was zu
unfällen führen kann.
• Stellen sie sicher, dass der monitor
nicht fallengelassen und keine stössen
ausgesetzt wird. Andernfalls kann eine
fehlfunktion oder ein brand entstehen.
• Das monitorsystem nicht bei
abgeschaltetem motor betreiben.
Betreiben des monitors bei
abgeschaltetem motor verbraucht
batterieleistung, so dass der motor später
unter umständen nicht anspringt.
• Berühren Sie nicht die Oberfl äche des
Flüssigkristalldisplays direkt.
FRANÇAIS
Merci pour avoir acheté un produit JVC. Veuillez
lire attentivement toutes les instructions avant
d’utiliser l’appareil afin de bien comprendre
son fonctionnement et d’obtenir les meilleures
performances possibles.
• Pour l’installation et les raccordements, référez-vous
au manuel séparé.
ATTENTION:
Ce système de tuner de télévision ne peut être utilisé
seulement que sur du 12 V CC. Pour éviter les risques
de commotions électriques et d’incendie, NE JAMAIS
utiliser d’autre source d’alimentation quelle qu’elle soit.
L’installation nécessite certaines
connaissances spéciales. N’installez pas
le moniteur vous-même. Consultez un
revendeur possédant les connaissances
spéciales nécessaires pour une installation
correcte et sûre.
MISES EN GARDE
•
N’INSTALLEZ PAS LE MONITEUR DANS UN
ENDROIT OÙ IL PEUT GÊNER LA VISIBILITÉ
DU CONDUCTEUR OU LE FONCTIONNEMENT
D’UN DISPOSITIF DE SÉCURITÉ TEL QUE
LES COUSSINS GONFLABLES, OU DANS
UN ENDROIT INTERDIT PAR LES LOIS ET
RÈGLEMENTS EN PLACE.
• Dès lors que diffèrent suivant les pays les
règlements régissant les emplacements
autorisés pour l’installation du moniteur
d’affi chage, se renseigner afi n d’installer
du moniteur sur un emplacement autorisé
par lesdites lois et règlements.
• Le conducteur ne doit jamais faire
fonctionner ce système de moniteur
lorsqu’il conduit son véhicule.
* Arrêtez votre véhicule dans un endroit sûr avant
d’opérer votre moniteur.
• Le conducteur ne doit jamais regarder la
télévision ou une vidéo lorsqu’il conduit.
Regarder la télévision ou une vidéo en
conduisant réduit considérablement la
vigilance du conducteur et multiplie les
risques d’accident.
• Maintenir le moniteur à un niveau sonore
approprié en conduisant.
Conduire sous un niveau sonore
assourdissant qui empêcherait
d’entendre les bruits environnants peut
causer des accidents.
• Veiller à ne jamais laisser tomber ni
heurter violemment le moniteur car cela
risque de provoquer des pannes ou un
incendie.
• Ne pas regarder le moniteur lorsque le
moteur est arrêté.
Regarder le moniteur avec le contact
moteur coupé consomme beaucoup
de batterie ce qui pourrait empêcher le
moteur de repartir.
• Ne touchez pas directement la surface du
panneau à cristaux liquides.
NEDERLANDS
Hartelijk dank voor de aanschaf van dit JVC-product! Wij
verzoeken u de gebruiksaanwijzing goed door te lezen
voordat u het apparaat gaat gebruiken. Zo krijgt u een
volledig inzicht in de functies van het apparaat en kunt u de
mogelijkheden optimaal benutten.
• Bijzonderheden over de installatie en aansluiting van het
apparaat vindt u in de desbetreffende handleiding.
LET OP:
Dit monitorsysteem is uitsluitend geschikt voor gebruik
met 12 V gelijkstroom. Voorkom een elektrische schok
en brand en gebruik daarom BESLIST NIET een andere
spanningsbron.
Het installeren vereist een specifiekekennis.
Installeer het monitorsysteem
derhalveniet zelf. Raadpleeg de
plaats vanaankoop of een vakman die
dezespeciale kennis heeft voor het veilig
enbetrouwbaar installeren.
WAARSCHUWING
• INSTALLEER DE MONITOR NIET OP EEN
PLAATS DIE HET BESTUREN VAN DE
AUTO, HET ZICHT, DE WERKING VAN
VEILIGHEIDSVOORZIENINGEN ALS
AIRBAGS HINDERT OF OP PLAATSEN
DIE DOOR WETTELIJKE BEPALINGEN OF
REGELS ZIJN VERBODEN.
• Er bestaan mogelijk juridische regels die
bepalen waar de monitor wel en niet mag
worden gemonteerd. Deze regels kunnen
per land of staat verschillen. Zorg er
voor dat u de monitor altijd conform deze
regelgeving monteert.
• De bestuurder mag het monitorsysteem
niet tijdens het autorijden bedienen.
* Parkeer de auto op een veilige plaats alvorens de
monitor te bedienen.
• De bestuurder mag geen video’s bekijken
tijdens het autorijden.
Het bekijken van een video tijdens
het autorijden kan ernstige
verkeersongelukken tot gevolg hebben.
• Houd tijdens het rijden het volume van de
monitor op een passend niveau.
U hoort mogelijk geen andere geluiden
van onder andere verkeer wanneer u een
hoog volume heeft ingesteld. Dit zou
ernstige verkeersongelukken kunnen
veroorzaken.
• Voorkom een onjuiste werking of brand
en wees derhalve voorzichtig zodat de
monitor niet kan vallen of aan zware
schokken onderhevig wordt gesteld.
• Kijk niet naar beelden op de monitor met
de motor uitgeschakeld.
Het bekijken van beelden met de
motor uitgeschakeld zal de auto-accu
uiteindelijk uitputten waardoor de motor
later niet meer kan worden gestart.
• Raak het oppervlak van het vloeibare
kristallendisplay niet direct met uw
vingers aan.
For safety....
Stop the car before performing any complicated
operations.
Temperature inside the car....
If you have parked the car for a long time in hot or
cold weather, wait until the temperature in the car
becomes normal before operating the unit.
Für die Sicherheit....
Das Auto vor dem Durchführen von komplizierten
Bedienschritten anhalten.
Temperatur im Auto....
Wenn Sie das Auto für lange Zeit in heißem oder
kaltem Wetter parken, bitte warten, bis sich die
Temperatur im Auto sich normalisiert hat, bevor Sie
das Gerät einschalten.
Pour sécurité....
Arrêtez la voiture avant de réaliser toute opération
compliquée.
Température à l’intérieur de la voiture....
Si votre voiture est restée garée pendant longtemps
dans un climat chaud ou froid, attendez que la
température à l’intérieur de la voiture redevienne
normale avant d’utiliser l’appareil.
1
Denk aan de veiligheid....
Zet de auto stil voordat u ingewikkelde handelingen met
het apparaat gaat verrichten.
Temperatuur binnen de auto....
Als de auto gedurende lange tijd in de kou of in de warmte
heeft gestaan, mag u het apparaat pas gebruiken nadat de
temperatuur in de auto weer normaal waarden heet bereikt.
Page 8

2
Precautions / Vorsichtsmassnahmen / Précautions / Voorzorgen
Cautions for handling the liquid crystal panel / Warnhinweise für die Handhabung der Flüssigkristallanzeige / Précautions à prendre avec l’afficheur à cristaux liquides / Voorzorgen
voor behandeling van het vloeibare kristallen paneel
Do not expose the liquid crystal panel to direct sunlight.
• Storage temperature range: –20°C to +80°C
Die Flüssigkristallanzeige nicht direktem Sonnenlicht aussetzen.
• Lagertemperaturbereich: –20°C bis +80°C
N’exposez pas l’afficheur à cristaux liquides directement aux rayons du soleil.
• Plage des températures de rangement: –20°C à +80°C
Stel het vloeibare kristallen display niet aanhet directe zonlicht onderhevig.
• Temperatuur voor opslag: –20°C tot +80°C
+80°C
–20 °C
During the summer, temperatures can
reach as high as 100°C.
In Sommer kann die Temperatur im
Wageninneren 100°C erreichen.
Pendant l’été, la temperature peut
s’élever jusqu’à 100°C.
In de zomer kan detemperatuur oplopentot
wel 100°C.
When the liquid crystal panel reaches high temperatures or low temperatures, chemical changes occur
within the liquid crystal panel which may cause it to malfunction.
Bei sehr hohen oder niedrigen Temperaturen treten in der Flüssigkristallanzeige chemische
Veränderungen ein, die zu Störungen führen können.
Lorsque le panneau à cristaux liquides atteint des températures, hautes ou basses, excessives, les cristaux
liquides peuvent devenir le siège de transformations chimiques qui en altèrent le bon fonctionnement.
Wanneer het vloeibare kristallen paneelzeer heet of koud wordt, zal er eenchemische reactie plaatsvinden waardoorhet
vloeibare kristallen paneel mogelijkonjuist functioneert.
Do not drop the liquid crystal panel or strike it sharply.
Die Flüssigkristallanzeige nicht fallenlassen oder starken Stößen aussetzen.
Ne faites pas tomber l’afficheur à cristauxliquides ni ne le heurtez trop fort.
Laat het vloeibare kristallen display nietvallen en druk er niet hard tegen aan.
–20°C to +80°C
–20°C bis +80°C
–20°C à +80°C
–20°C tot +80°C
The red spots, blue spots and green spots on the panel surface are a
normal characteristic of liquid crystal panels, and not a problem.
Rote, blaue und grüne Punkte auf der Anzeige sind ein Merkmal von
Flüssigkristallanzeigen und stellen keine Fehlfunktion dar.
Les taches rouges, bleues et vertes à la surface de l’afficheur à cristaux
liquides sont normales et une caractéristique des afficheurs à cristaux
liquides et non un signe de dysfonctionnement.
De rode, blauwe en groene punten op hetpaneeloppervlak zijn
normaleverschijnsels bij vloeibare kristallenpaneel en veroorzaken geen
problemen.
Note:
The liquid crystal panel is built with very high precision technology and has at least 99.99% effective image pixels. Be
aware that on 0.01% of the panel there may be missing or constantly lit pixels.
Hinweis:
Der Flüssigkristallanzeige wurde mit Präzisionstechnik hergestellt und verfügt über mindestens 99,99% effektive Pixel.
Denken Sie daran, daß auf 0,01% der Bildschirmfläche Pixel fehlen oder konstant leuchten können.
Remarque:
Le panneau à cristaux liquides est fabriqué avec une technologie de très haute précision et possède au moins 99,99%
de pixels d’image effectifs. Notez que sur 0,01% du panneau, il peut avoir des pixels manquants ou des pixels allumés
constamment.
Opmerking:
Het vloeibare kristallen paneel is volgens eenuiterst geavanceerd en nauwkeurigetechnologie vervaardigd en tenminste
99,99%beeldpixels zijn effectief. In de praktijk kan 0,01% van de pixels echter niet werken ofconstant verlicht zijn.
When the temperature is very cold or very hot, the image may not appear clearly or may move slowly.
The image may not be synchronized with the sound or the image quality may decline in such
environments. Note that this is not a malfunction or problem.
• Usage temperature range: 0°C to +40°C
Bei sehr niedrigen oder hohen Temperaturen kann das Bild unklar werden oder sich langsam bewegen.
Das Bild wird möglicherweise nicht synchron mit dem Ton ausgegeben bzw. kann sich die Bildqualität unter
solchen Bedingungen verschlechtern. Dieser Zustand deutet weder auf eine Fehlfunktion noch ein Problem hin.
• Betriebstemperaturbereich: 0°C bis +40°C
Si la température est trop élevée ou trop basse, l’image peut ne pas apparaître tout à fait nettement ou se
mouvoir avec lenteur.
De même, l’image peut sembler désynchronisée avec le son ou encore la qualité d’image peut se
détériorer dans ces environnements extrêmes.
Notez simplement qu’il ne s’agit pas d’un défaut de conception ni d’un mauvais fonctionnement.
• Limites de température d’utilisation: 0°C à +40°C
Bij zeer lage of hoge temperaturen zal hetbeeld mogelijk niet helder worden getoondof langzaam bewegen.
Het beeld is mogelijk niet synchroon aanhet geluid of de beeldkwaliteit verslechtertbij dergelijke omstandigheden.
Dit duidt nietop een onjuiste werking of problemen.
• Temperatuur voor gebruik: 0°C tot +40°C
Spots
Puntjes
Taches
Punten
0°C or colder
0°C oder kälter
0°C ou plus froidr
0°C of lager
40°C or hotter
40°C oder heißer
40°C ou plus chaud
40°C of hoger
Widescreen monitor / Breitbildmonitor / Moniteur à écran large / Breedbeeld-monitor
How to reset your monitor / Zurücksettzen des geräts / Comment réinitialiser votre appareil / Het apparaat terustellen
This will reset the microcomputer. Your preset adjustments will also be erased.
Dadurch wird der Mikrocomputer zurückgesetzt. Ihre vorgegebenen Einstellungen
werden ebenfalls gelöscht.
Cette procédure réinitialise le micro-ordinateur. Vos ajustements préréglés sont aussi
effacés.
De microcomputer wordt hierdoor teruggesteld. De door u gemaakte instellingen worden tevens
gewist.
Back / Rückseite / Arriére / Achter
When you watch the screen at an angle, the picture might not be clear. This is not a malfunction.
The finest picture can be seen when you watch the screen straight-on.
Wenn der Bildschirm von der Seite betrachtet wird, kann das Bild unklar erscheinen. Dies ist keine
Fehlfunktion. Das beste Bild erhalten Sie, wenn Sie den Bildschirm direkt von vorn betrachten.
Si vous regardez l’écran avec un certain angle, l’image peut ne pas être claire. Ce n’est pas un
mauvais fonctionnement. La meilleure image peut être vue quand vous regardez l’écran de face.
Bij het bekijken van het scherm vanuit een hoek, is het beeld mogelijk niet helder. Het beeld is optimaal
wanneer u er recht voor zit.
1 IR transmitters
2 White LED
3 Screen (Liquid crystal panel)
4 Remote sensor
5 (standby/on) button
• Turns on the power if pressed.
• Turns off the power if pressed and held.
6 MODE button
• Selects the playback source.
7 ASPECT button
•
Changes the aspect ratio of the screen.
8 MENU button
• Calls up the menu, then selects the adjustable
menu items.
9 / buttons
• Adjust the level of the selected item or select an
appropriate setting for selected item.
1 Infrarot-Sender
2 Weiße LED
3 Bildschirm (Flüssigkristallanzeige)
4 Fernbedienungssensor
5 (Standby/Ein)-Taste
• Schaltet das Gerät ein, wenn einmal gedrückt.
•
Schaltet das Gerät aus, wenn gedrückt gehalten.
6 MODE (Modus)-Taste
• Wählt die Wiedergabequelle.
7 ASPECT-Taste
• Ändert das Seitenverhältnis des Bildschirms.
8 MENU (Menü)-Taste
• Ruft das Menü auf und dient dann zum Wählen
der einstellbaren Menüpunkte.
9 / -Tasten
• Stellt den Wert des gewählten Punkts ein
oder wählt eine geeignete Einstellung für den
gewählten Punkt.
1 Émetteur IR
2 DEL blanche
3 Écran (Panneau à cristaux liquides)
4 Capteur de télécommande
5 Touche (attente/sous tension)
• Appuyez sur cette touche pour mettre l’appareil
sous tension.
• Maintenez cette touche pressée pour mettre
l’appareil hors tension.
6 Touche MODE
• Choisit la source de lecture.
7 Touche ASPECT
• Permet de changer le format d’image de
l’écran.
8 Touche MENU
• Appelle un menu sur lequel vous pouvez choisir
les options à régler.
9 Touches /
• Permet d’ajuster le niveau de l’option choisie
ou de choisir un réglage approprié pour l’option
choisie.
1 IR-zender
2 Witte LED-indicator
3 Scherm (vloeibaar kristallen paneel)
4 Afstandsbedienings-sensor
5 (standby/aan) toets
• Druk op de toets voor het inschakelen van de
stroom.
• Houd ingedrukt om de stroom uit te schakelen.
6 MODE toets
• Voor het kiezen van de weergavebron.
7 ASPECT toets
• Voor het veranderen van de aspectratio van het
scherm.
8 MENU toets
• Voor het oproepen van het menu en vervolgens voor
het kiezen van instelbare menu-onderdelen.
9 / toetsen
• Voor het instellen van het niveau van het gekozen
onderdeel of voor het kiezen van een geschikte
instelling voor een gekozen onderdeel.
Page 9
MENU
Basic operations / Grundbetrieb / Fonctionnement de base / Basisbediening
AV 1 AV 2
Preparation
Before operating the unit, make sure that all external
components are correctly connected and installed.
Vorbereitung
Vor dem Betrieb des Geräts stellen Sie sicher, dass
alle externen Komponenen richtig angeschlossen
und eingebaut sind.
Préparation
Avant d’utiliser le système, assurez-vous que tous
les appareils extérieurs sont connectéset installés
correctement.
CAUTION:
• Do not touch the surface of the liquid crystal panel
directly.
ACHTUNG:
• Berühren Sie nicht die Oberfläche des
Flüssigkristalldisplays direkt.
ATTENTION:
• Ne touchez pas directement la surface du panneau
à cristaux liquides.
11 Turn on the power. 1 Das Gerät einschalten. 1 Mettez l’appareil sous
tension.
22 Select the playback source.
Each time you press the button, the
playback source changes.
3 Operate the playback
source you selected.
To operate the external components,
refer to the manuals for the
connected components.
4 Adjust the volume on the
car receiver.
2 Wählen Sie die gewünschte
Wiedergabequelle.
Bei jedem Drücken der Taste schaltet
die Wiedergabequelle.
3 Bedienen Sie die gewählte
Wiedergabequelle.
Siehe Anweisungen der
angeschlossenen Komponenten
bzgl. deren Betrieb.
4 Die Lautstärke am Auto-
Receiver einstellen.
2 Choisissez la source de
lecture.
Chaque fois que vous appuyez sur la
touche, la source de lecture change.
3 Utilisez la source de lecture
que vous avez choisie.
Pour commander l’appareil extérieur,
référez-vous au mode d’emploi fourni
avec l’appareil connecté.
4 Ajustez le volume sur
l’autoradio.
To turn off the power / So prüfen Sie die aktuelle Eingangsquelle / Pour mettre l’appareil hors tension / Uitschakelen van de stroom
Voorbereidingen
Controleer dat alle externe componenten juist zijn
aangesloten en geïnstalleerd alvorens dit toestel in gebruik
te nemen.
LET OP:
• Raak het oppervlak van het vloeibare kristallendisplay
niet direct met uw vingers aan.
1 Schakel de stroom in.
2 Kies de weergavebron.
Door iedere druk op de toets, verandert
de weergavebron.
3 Bedien de gekozen
weergavebron.
Zie de bij de betreffende
aangesloten componenten geleverde
gebruiksaanwijzingenvoor bediening.
4 Stel het volume met de
auto-receiver in.
Press and hold button. Halten Sie die Taste . Maintenez pressée la touche . Houd de toets.
To change the monitor angle / Veränderung des Bildschirmwinkels / Changement de l’angle du moniteur / Wijzigen van de monitorhoek
Press the top end of the monitor until it
clicks.
The monitor turns upward.
To return the angle, press the bottom end
of the monitor.
Drücken Sie gegen den oberen Rand des
Monitors bis Sie ein Klicken hören.
Der Monitor neigt sich nach oben.
Um den Monitor wieder in die andere
Richtung zu neigen, drücken Sie gegen
den unteren Rand des Monitors.
Appuyer sur la partie supérieure du
moniteur jusqu’au déclic.
Le moniteur s’incline vers le haut.
Pour modifier l’angle, appuyer sur la partie
inférieure du moniteur.
Druk op het bovenste deel van de
montitor totdat u een klik voelt.
De monitor draait naar boven.
Om de hoek te wijzigen drukt u op het onderste
deel van de monitor.
Other basic operations / Andere Grundfunktionen / Autres fonctions de base / Overige basisbedieningen
Using optional remote controller—
RM-RK230
You can use JVC’s remote controller RM-RK230,
which supplied with some JVC receivers, to control
the monitor.
Before using the optional remote controller / Vor Benutzung der optionalen Fernbedienung / Avant l’utilisation de la télécommande optionnelle / Voordat u de optionele
afstandsbediening gaat gebruiken
Remote sensor
Fernbedienungssensor
Capteur de
télécommande
Afstandsbedieningssensor
• Aim the remote controller directly at the
remote sensor on the monitor. Make sure
there is no obstacle in between.
• Do not expose the remote sensor to
strong light (direct sunlight or artificial
lighting).
Benutzung der optionalen
Fernbedienung—
Sie können die JVC Fernbedienung RM-RK230
verwenden, die mit einigen JVC Empfängern geliefert
wird, um den Monitor zu bedienen.
RM-RK230
• Richten Sie die Fernbedienung direkt
auf den Fernbedienungssensor am
Monitor. Stellen Sie sicher, dass sich kein
Hindernis dazwischen befindet.
• Setzen Sie den Fernbedienungssensor
nicht intensiven Licht (direkte
Sonneneinstrahlung oder künstliches
Licht) aus.
Utilisation de la télécommande
—
optionnelle
Vous pouvez utiliser la télécommande RM-RK230
JVC, fournie avec certains récepteurs JVC, pour
contrôler le moniteur.
RM-RK230
• Dirigez la télécommande directement sur
le capteur de télécommande du moniteur.
Assurez-vous qu’il n’y a pas d’obstacle
entre les deux.
• N’exposez pas le capteur de
télécommande à une forte lumière
(lumière directe du soleil ou éclairage
artificiel).
Gebruik van de optionele
afstandsbediening—RM-RK230
U kunt de RM-RK230 afstandsbediening van JVC, die met
sommige JVC-receivers wordt meegeleverd, gebruiken om
de monitor te bedienen.
• Richt de afstandsbediening direct naar de
afstandsbedieningssensor op de monitor.
Zorg dat er geen voorwerpen het signaalpad
blokkeren.
• Stel de afstandsbedieningssensor niet aan
schel licht onderhevig (direct zonlicht of
lamplicht).
Main elements and features / Hauptelemente und Merkmale / Composants principaux et caractéristiques / Belangrijke onderdelen en functies
MONITOR CONTROL
1
(standby/on) button
• Turns on the power if pressed.
• Turns off the power if pressed and
held.
2 MODE button
• Selects the playback source.
3 ASPECT button
•
Changes the aspect ratio of the screen.
4 MENU button
• Calls up the menu, then selects the
adjustable menu items.
5 / buttons
• Adjust the level of the selected item
or select an appropriate setting for
selected item.
DVD/RECEIVER CONTROL
6
Receiver control buttons
Controllable only if your car receiver
which is connected to this monitor is
one of the JVC receivers.
Using optional cordless headphones
You can use JVC’s optional cordless headphones
KS-HP2 to listen to the playback sounds of the
external component.
Playback sounds are transmitted through IR
transmitters to the cordless headphones.
When using the headphones, set to the monitor menu
item “IR” to “ON.” (For details, see next section.)
NOTES:
• Some noise may occur at some positions on the
car depending on the car type or the window type.
In that case, use the headphones at the position
where no noise occurs.
• Some noise may occur at some positions on the car
when using two or more monitors. In that case, set
“IR” to “OFF” on the monitors one by one until noise
occurs no more. (For details, see next section.)
Verwendung optionaler schnurloser
Kopfhörer
Sie können den optionalen schnurlosen Kopfhörer
KS-HP2 von JVC verwenden, um den Wiedergabeton
der externen Komponente zu hören.
Der Wiedergabeton wird über IR-Sender zum
schnurlosen Kopfhörer übertragen.
Bei Kopfhörerverwendung stellen Sie den MonitorMenüpunkt „IR“ auf „ON“. (Einzelheiten siehe
nächster Abschnitt.)
HINWEISE:
• An manchen Positionen im Auto kann es abhängig
vom Auto- oder Fenstertyp laut sein. Verwenden
Sie in diesem Fall die Kopfhörer dort, wo es nicht
laut ist.
• Es kann an bestimmten Positionen am Auto zu
Nebengeräuschen kommen, wenn zwei oder mehr
Bildschirme verwendet werden. In diesem Fall
„IR“ auf „OFF“ stellen, um die Bildschirme einzeln
zu prüfen, bis die Nebengeräusche nicht mehr
auftreten. (Einzelheiten siehe nächster Abschnitt.)
MONITOR CONTROL
1
(Standby/Ein)-Taste
• Schaltet das Gerät ein, wenn einmal
gedrückt.
• Schaltet das Gerät aus, wenn
gedrückt gehalten.
2 MODE (Modus)-Taste
• Wählt die Wiedergabequelle.
3 ASPECT-Taste
• Ändert das Seitenverhältnis des
Bildschirms.
4 MENU (Menü)-Taste
• Ruft das Menü auf und dient dann
zum Wählen der einstellbaren
Menüpunkte.
5 / -Tasten
• Stellt den Wert des gewählten
Punkts ein oder wählt eine geeignete
Einstellung für den gewählten Punkt.
DVD/RECEIVER CONTROL
6
Receiver-Steuertasten
Nur steuerbar, wenn Ihr an diesen
Monitor angeschlossenene
Autoreceiver ein JVC-Modell ist.
Utilisation du casque d’ésoute sans
fil optionnel
Vous pouvez utiliser le casque d’écoute sans fil
optionnel KS-HP2 de JVC pour écouter les sons de
lecture de l’appareil extérieur.
Les sons de lecture sont émis par les émetteurs IR
jusqu’au casque d’écoute sans fil.
Lors de l’utilisation du casque d’écoute, réglez l’option
“IR” du menu du moniteur sur “ON”. (Pour les détails,
référez-vous à la section suivante.)
REMARQUES:
• En fonction du type de véhicule ou du type de
fenêtre, vous pouvez entendre du bruit dans la
voiture selon l’endroit où vous êtes assis. Dans ce
cas, utilisez le casque d’écoute.
• En cas d’utilisation de deux moniteurs ou plus, des
bruits peuvent se faire entendre à certains endroits
du véhicule. Auquel cas, mettez un à un les
paramètres “IR” des moniteurs sur “OFF” jusqu’à ce
que le bruit disparaisse. (Pour les détails, référezvous à la section suivante.)
3
Commande du moniteur (MONITOR
CONTROL)
1
Touche (attente/sous tension)
• Appuyez sur cette touche pour mettre
l’appareil sous tension.
• Maintenez cette touche pressée pour
mettre l’appareil hors tension.
2 Touche MODE
• Choisit la source de lecture.
3 Touche ASPECT
• Permet de changer le format d’image
de l’écran.
4 Touche MENU
• Appelle un menu sur lequel vous
pouvez choisir les options à régler.
5 Touches /
• Permet d’ajuster le niveau de l’option
choisie ou de choisir un réglage
approprié pour l’option choisie.
Commande du lecteur de DVD/
autoradio (DVD/RECEIVER
CONTROL)
6
Touches de commande de l’autoradio
Utilisables uniquement si votre
autoradio connecté à ce moniteur est
un autoradio JVC.
MONITOR CONTROL
1
(standby/aan) toets
• Druk op de toets voor het inschakelen
van de stroom.
• Houd ingedrukt om de stroom uit te
schakelen.
2 MODE toets
• Voor het kiezen van de weergavebron.
3 ASPECT toets
• Voor het veranderen van de aspectratio
van het scherm.
4 MENU toets
• Voor het oproepen van het menu en
vervolgens voor het kiezen van instelbare
menu-onderdelen.
5 / toetsen
• Voor het instellen van het niveau van het
gekozen onderdeel of voor het kiezen van
een geschikte instelling voor een gekozen
onderdeel.
DVD/RECEIVER CONTROL
6
Bedieningstoetsen voor receiver
Alleen bruikbaar indien de met deze
monitor verbonden auto-receiver een JVC
receiver is.
Gebruik van de los verkrijgbare
draadloze hoofdtelefoon
U kunt de los verkrijgbare JVC KS-HP2 draadloze
hoofdtelefoon voor het beluisteren van de weergave van
een extern component gebruiken.
Het weergavegeluid wordt via IR-zenders naar de
draadloze hoofdtelefoon gestuurd.
Stel het “IR” monitormenu-onderdeel op “ON” indien u de
draadloze hoofdtelefoon wilt gebruiken. (Zie het volgende
gedeelte voor details.)
OPMERKINGEN:
• U kunt op sommige plaatsen in de auto last hebben van
geluidsoverlast, afhankelijk van de soort auto of het soort
raam. Gebruik in dat geval de koptelefoon op de plaats
waar u geluidsoverlast ondervindt.
• Als u gebruik maakt van twee of meer monitors, kunt
u op sommige plaatsen in de auto enige geluidsoverlast
ervaren. Zet in dat geval “IR” op “OFF” op elke
afzonderlijke monitor, totdat u geen geluid meer hoort.
(Zie het volgende gedeelte voor details.)
Page 10
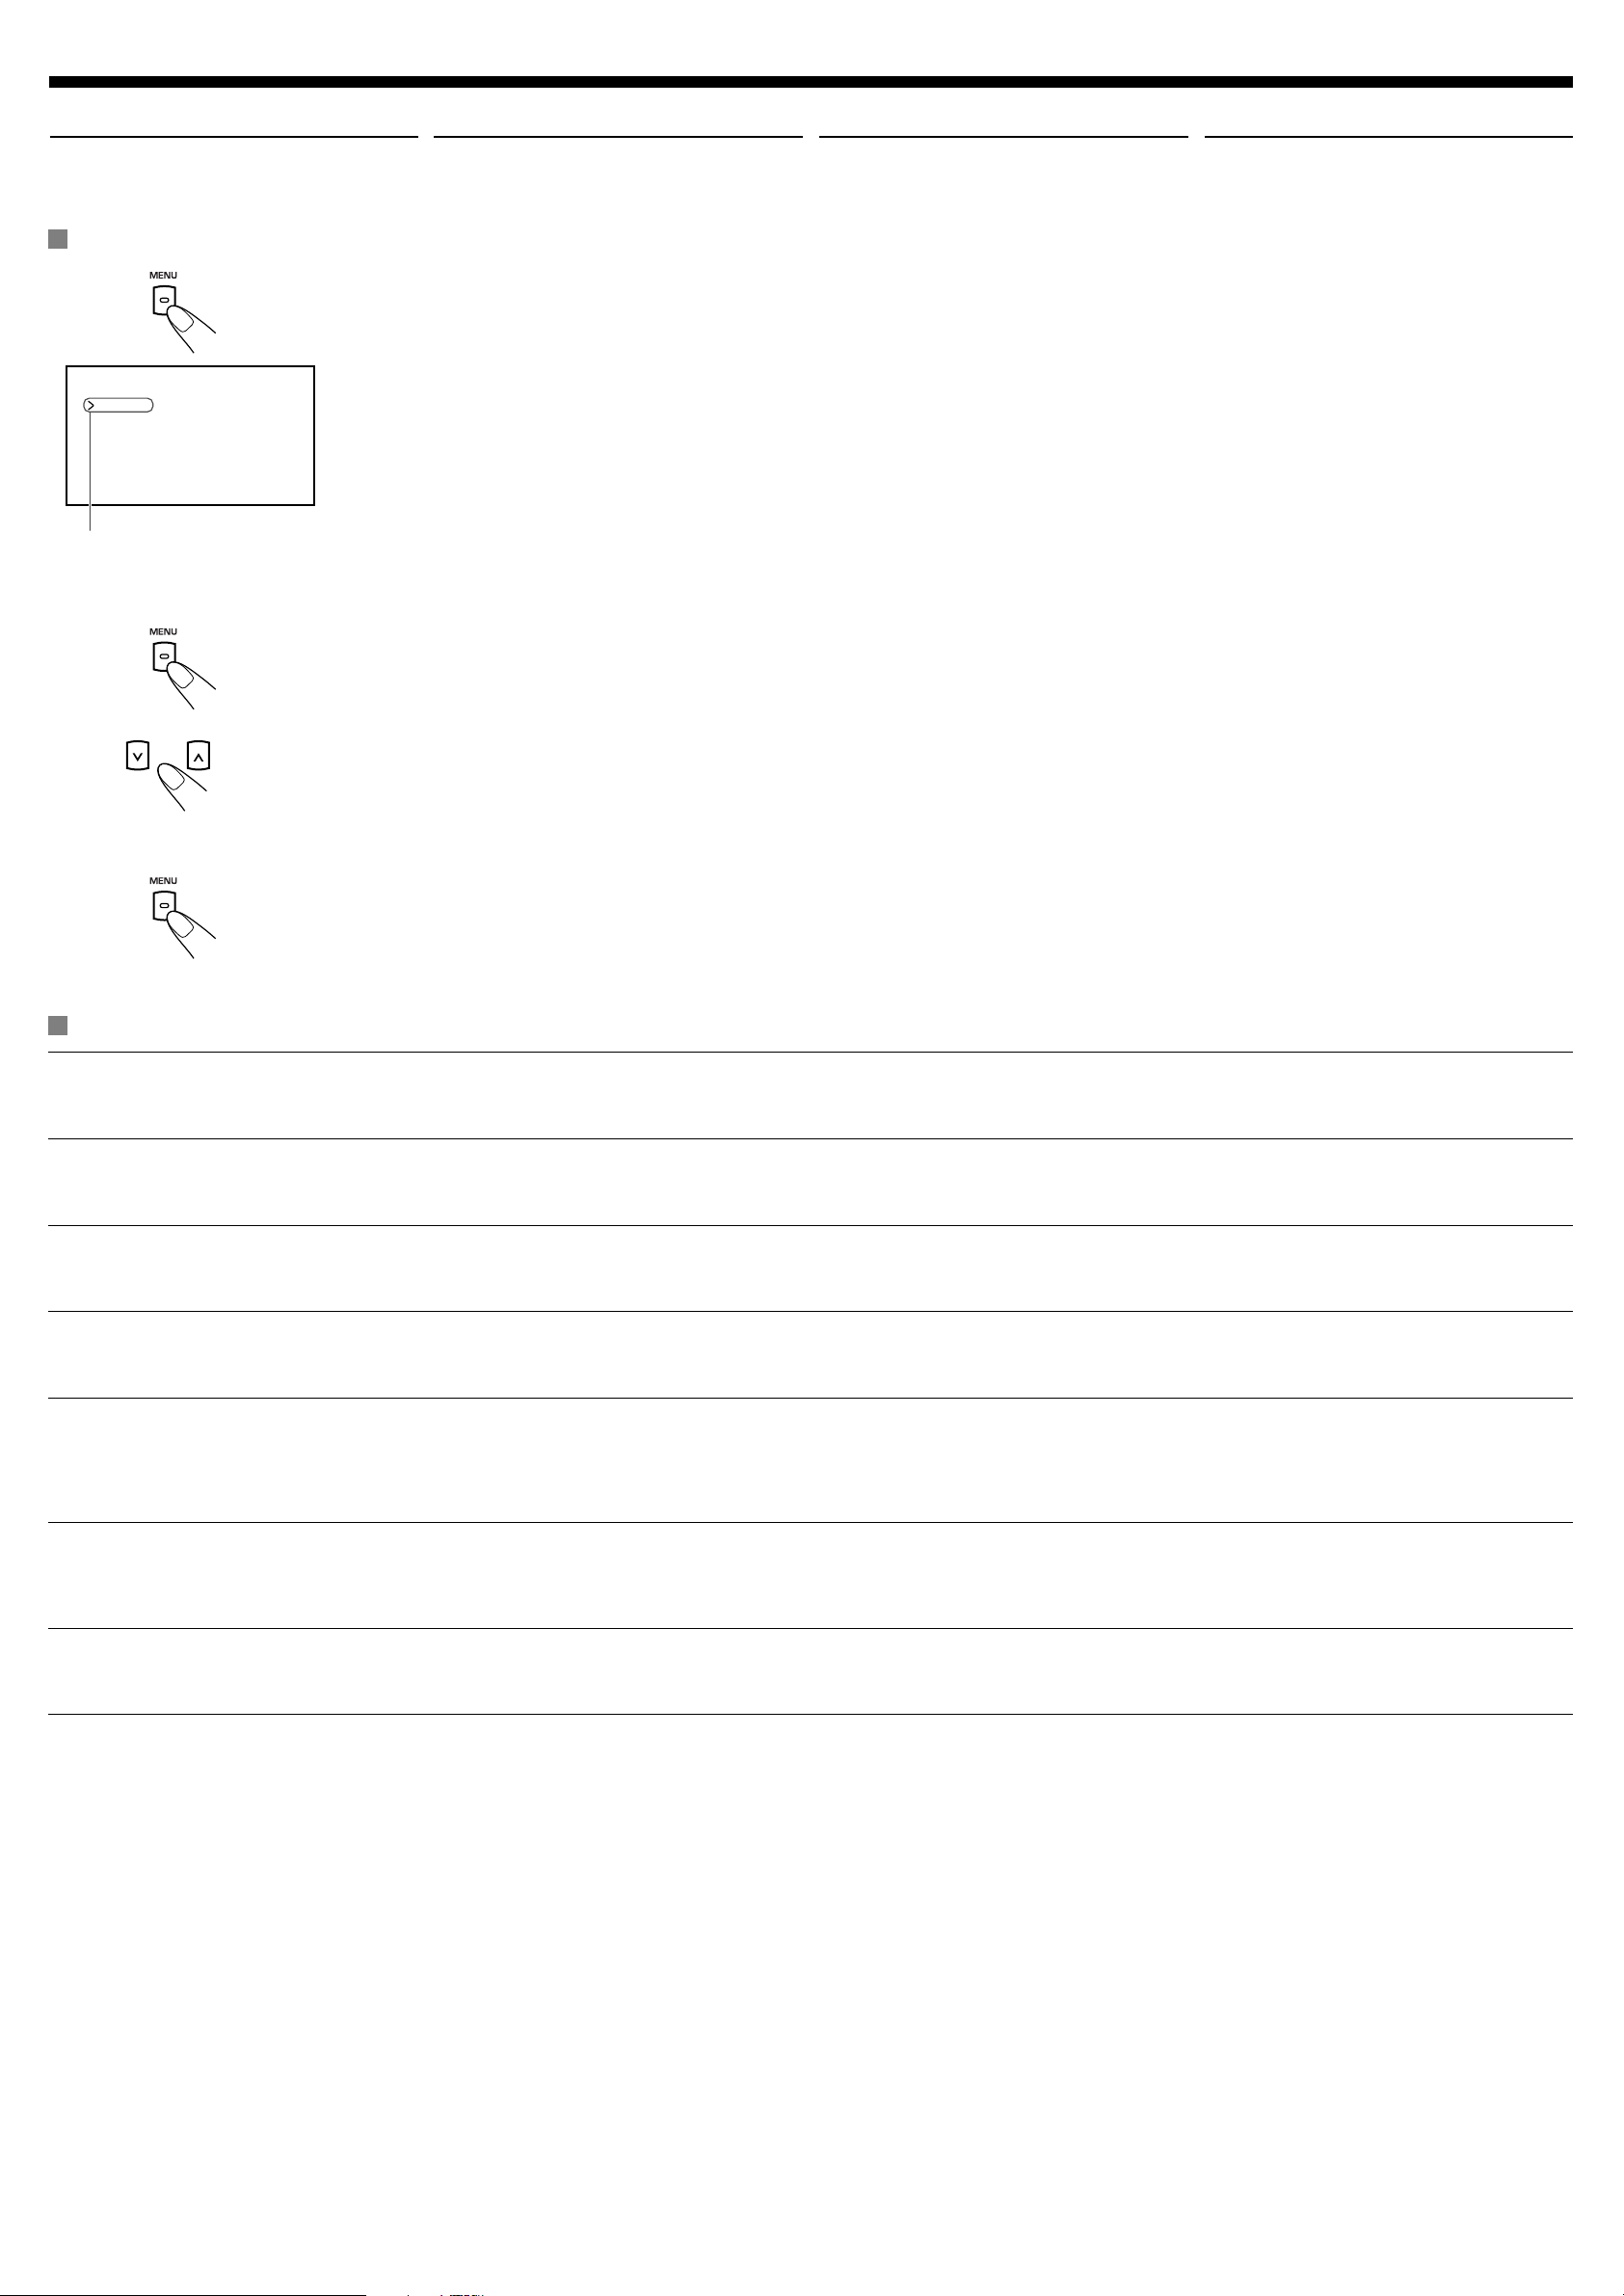
4
Adjustments / Einstellungen / Ajustements / Aanpassingen aanbrengen
BRIGHT
CONTRAST
TINT
COLOR
IR ON
DIMMER
WHITE LED ON
Using the monitor menu
You can make your own display adjustments using
the menu.
• For the adjustable items, see below.
Verwendung des Monitor-Menüs
Sie können Ihr eigenes Displaybild erstellen mit dem
Menü vornehmen.
• Die Einstellungen, die angepasst werden können,
sehen Sie unten.
Basic procedure / Grundverfahren / Procédure de base / Basishandelingen
11
Current menu item
Aktueller Menüpunkt
Réglage de menu actuel
Huidige menu-onderdeel
Call up the menu.
Menu selection goes off if other
operations are done or no operation is
done for about 5 seconds.
22 Select an item you want to
adjust.
1 Rufen Sie das Menü auf.
2 Wählen Sie einen Parameter
Utilisation du menu du moniteur
Vous pouvez réaliser vos propres ajustements pour
l’affichage en utilisant le menu.
• Reportez-vous ci-dessous pour consultez la liste
des éléments réglables.
Die Menüwahl erlischt, wenn andere
Bedienungen ausgeführt werden oder
etwa 5 Sekunden lang keine Bedienung
geschieht.
aus, den Sie einstellen
möchten.
Gebruik van het monitormenu
U kunt uw eigen instellingen voor het display maken met
gebruik van het menu.
• Zie hieronder voor de instelbare onderdelen.
1 Appelez le menu.
Le menu disparaît si une autre opération
est réalisée ou si aucune opération n’est
réalisée pendant environ 5 secondes.
2 Choisissez le réglage que
vous souhaitez ajuster.
1 Roep het menu op.
Het menu dooft indien u een andere
bediening uitvoert of indien u gedurende
ongeveer 5 seconden geen bediening
uitvoert.
2 Kies het in te stellen
onderdeel.
33 Adjust the level of the
selected item (or select an
appropriate setting for the
selected item).
3 Stellen Sie ausgewählten
Parameter entsprechend
ein (oder wählen Sie eine
geeignete Einstellung
für den ausgewählten
3 Ajustez le niveau du réglage
choisi (ou choisissez le
réglage approprié).
3 Stel het niveau van het
gekozen onderdeel in
(of kies de gewenste
instelling voor het gekozen
onderdeel).
Parameter).
44 Exit from the menu.
Press the button repeatedly until the
menu disappears.
4 Verlassen Sie das Menü.
Betätigen Sie wiederholt diese Taste,
bis das Menü ausgeblendet wird.
4 Quittez le menu.
Appuyez répétitivement sur la touche
jusqu’à ce que le menu disparaisse.
4 Verlaat het menu.
Druk herhaaldelijk op de toets totdat het
Menu is gewist.
Adjustable items on the monitor menu / Einstellpunkte im Monitormenü / Réglages ajustables sur le menu du moniteur / Instelbare onderdelen van het monitormenu
BRIGHT:
CONTRAST:
TINT:
COLOR:
IR*:
DIMMER:
WHITE LED:
Adjust this if the picture is too bright or too dark.
• Adjustable range: –10 to +11
• Initial level: 0 (center)
Control the degree of difference between the
lightest and darkest parts of the picture.
• Adjustable range: –10 to +11
• Initial level: 0 (center)
Adjust this if the human skin color is unnatural.
• Adjustable range: –10 to +11
• Initial level: 0 (center)
Adjust the color of the picture—lighter or darker.
• Adjustable range: –10 to +11
• Initial level: 0 (center)
Set to “ON” when you listen to the playback
sounds using JVC’s optional cordless
headphones KS-HP2.
• Selectable settings: ON, OFF
• Initial setting: ON
Adjust the light of the screen and the white LED
when you turn on the headlights.
• Adjustable range: –5 to +5
• Initial level: 0 (center)
Light on or off the white LED when you turn on
the monitor.
• Selectable settings: ON, OFF
• Initial setting: ON
Diesen Parameter einstellen, wenn das Bild zu
hell oder zu dunkel ist.
• Einstellbereich: –10 bis +11
• Anfangspegel: 0 (Mitte)
Regelung des Unterschieds zwischen den
hellsten und dunkelsten Teilen des Bildes.
• Einstellbereich: –10 bis +11
• Anfangspegel: 0 (Mitte)
Diesen Parameter einstellen, wenn die
menschliche Hautfarbe unnatürlich erscheint.
• Einstellbereich: –10 bis +11
• Anfangspegel: 0 (Mitte)
Diesen Parameter einstellen, wenn der Farbton
zu hell oder zu dunkel ist.
• Einstellbereich: –10 bis +11
• Anfangspegel: 0 (Mitte)
Auf „ON“ stellen, wenn Sie den Wiedergabeton
mit dem optionalen schnurlosen Kopfhörer
KS-HP2 von JVC hören.
• Wählbare Einstellungen: ON, OFF
• Anfangseinstellung: ON
Einstellung der Bildschirmhelligkeit und der
weißen LED beim Einschalten der Scheinwerfer.
• Einstellbereich: –5 bis +5
• Anfangspegel: 0 (Mitte)
Aufleuchten oder Erlöschen der weißen LED
beim Einschalten des Monitors.
• Wählbare Einstellungen: ON, OFF
• Anfangseinstellung: ON
Ajustez ce réglage si l’image est trop lumineuse
ou trop sombre.
• Plage d’ajustement: –10 à +11
• Niveau initial: 0 (centre)
Contrôle le degré de différence entre les parties les
plus lumineuses et les plus sombres de l’image.
• Plage d’ajustement: –10 à +11
• Niveau initial: 0 (centre)
Ajustez ce réglage si la couleur de la peau
humaine n’est pas naturelle.
• Plage d’ajustement: –10 à +11
• Niveau initial: 0 (centre)
Permet d’ajuster la couleur de l’image—plus
clair ou plus sombre.
• Plage d’ajustement: –10 à +11
• Niveau initial: 0 (centre)
Réglez cette option sur “ON” lorsque vous
souhaitez écouter les sons de lecture en
utilisant le casque d’écoute sans fil KS-HP2 de
JVC.
• Réglages sélectionnables: ON, OFF
• Réglage initial: ON
Ajuste la luminosité de l’écran et de la DEL
blanche quand vous allumez les feux de la
voiture.
• Plage d’ajustement: –5 à +5
• Niveau initial: 0 (centre)
Allume ou éteint la diode (DEL) blanche quand
vous mettez le moniteur sous tension.
• Réglages sélectionnables: ON, OFF
• Réglage initial: ON
Stel in indien het beeld te helder of te donker is.
• Instelbereik: –10 t/m +11
• Fabrieksniveau: 0 (midden)
Voor het instellen van het verschil tussen de
donkerste en lichtste gedeeltes van het beeld.
• Instelbereik: –10 t/m +11
• Fabrieksniveau: 0 (midden)
Stel in indien de huidskleur van personen
onnatuurlijk is.
• Instelbereik: –10 t/m +11
• Fabrieksniveau: 0 (midden)
Voor het instellen van de beeldkleur—donkerdere of
lichtere.
• Instelbereik: –10 t/m +11
• Fabrieksniveau: 0 (midden)
Stel op “ON” voor weergave van het geluid
via de los verkrijgbare JVC KS-HP2 draadloze
hoofdtelefoon.
• Kiesbare instellingen: ON, OFF
• Basisinstelling: ON
Voor het regelen van de verlichting van het scherm
en de witte LED-indicator bij het aanzetten van de
koplampen.
• Instelbereik: –5 t/m +5
• Fabrieksniveau: 0 (midden)
De witte LED-indicator licht op (ON) of licht niet op
(OFF) wanneer u de monitor inschakelt.
• Kiesbare instellingen: ON, OFF
• Basisinstelling: ON
* Turn off the headphones before changing the “IR”
setting.
* Schalten Sie den Kopfhörer vor dem Ändern der „IR“-
Einstellung aus.
* Mettez le casque d’écoute hors service avant de changer
le réglage “IR”.
* Schakel de hoofdtelefoon uit alvorens de “IR” instelling
te veranderen.
Page 11
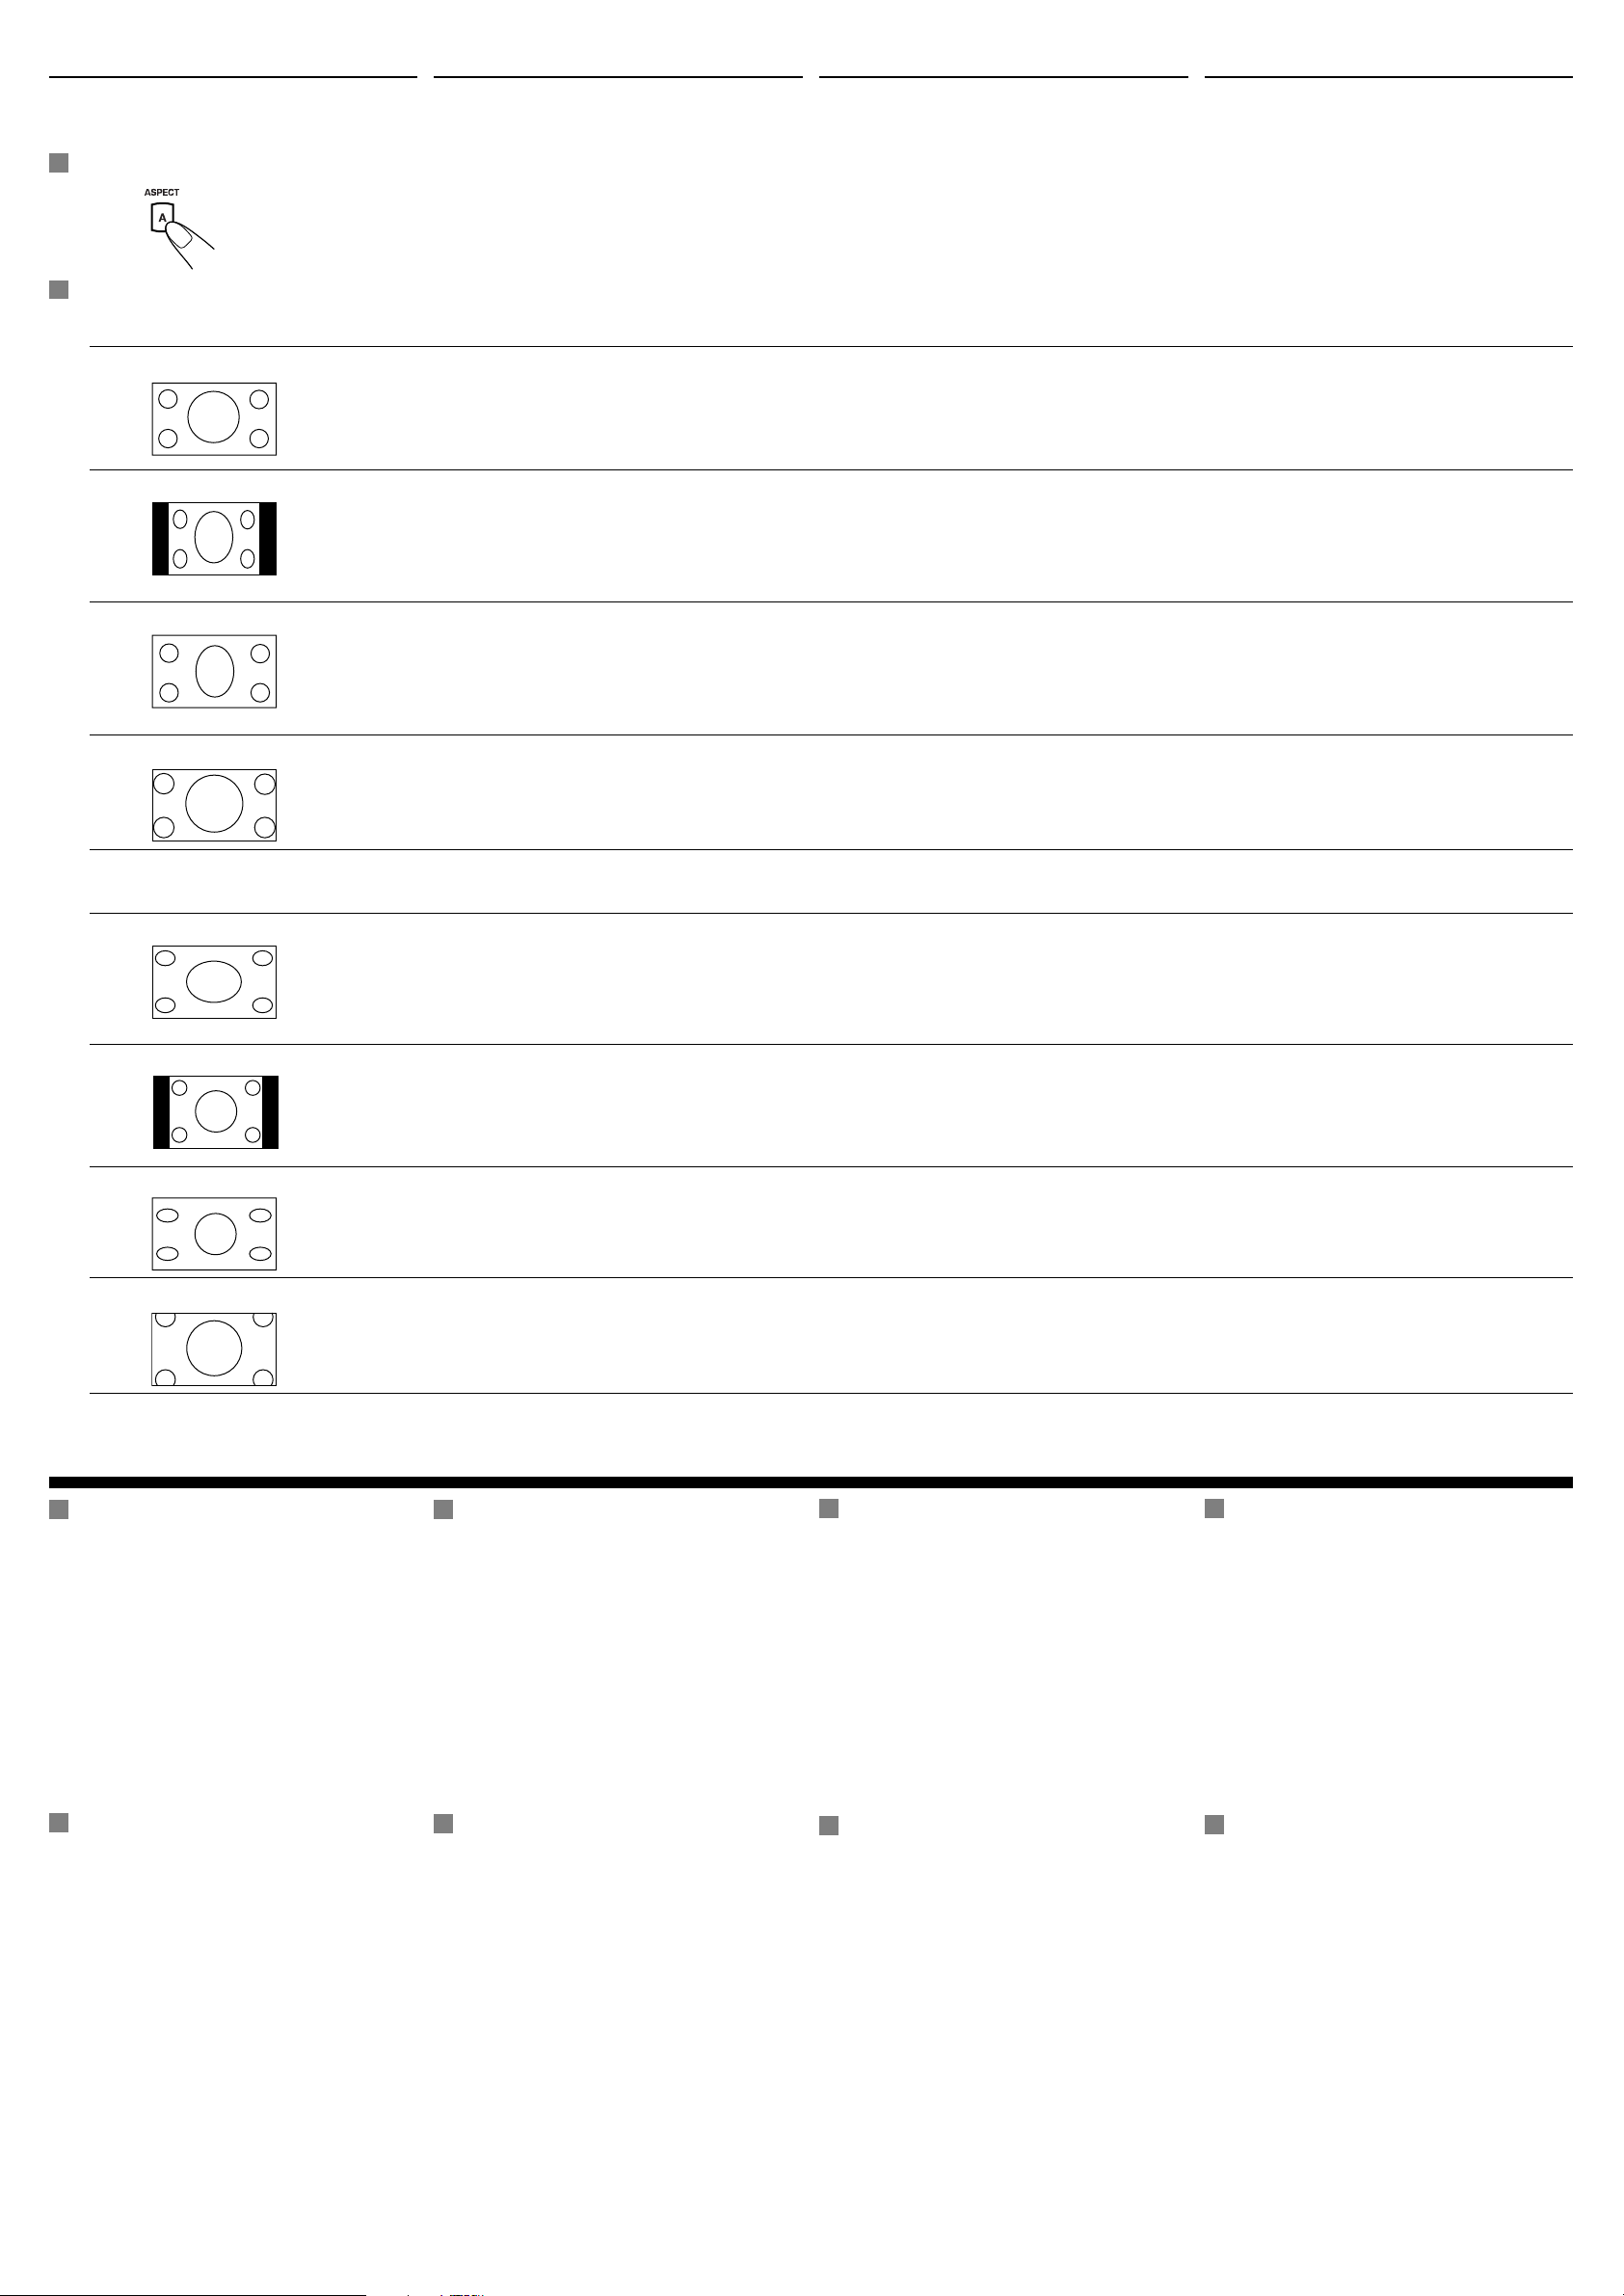
Changing the aspect ratio
Umschalten des Bildseitenverhältnisses
Changement du format d’image
Veranderen van de aspectratio
You can select an appropriate aspect ratio for the
playback video signals.
Sie können ein geeignetes Bildseitenverhältnis für die
Wiedergabe-Videosignale wählen.
Vous pouvez choisir le format d’image pour les
signaux vidéo de lecture.
U kunt de geschikte aspectratio voor weergave van
videosignalen kiezen.
Basic procedure / Grundverfahren / Procédure de base / Basishandelingen
Each time you press the button, aspect ratio
changes.
Bei jedem Drücken der Taste schaltet das
Bildseitenverhältnis um.
Chaque fois que vous appuyez sur cette
touche, le format d’image change.
Changeable aspect ratio / Veränderbares Bildseitenverhältnis / Formats d’image sélectionnables / Instelbare aspectratio’s
When incoming 16:9 video signal / Beim Empfang von 16:9-Videosignalen / Lors de l’entrée d’un signal vidéo 16:9 / Indien 16:9 videosignalen worden ontvangen
FULL:
NORMAL:
JUST:
ZOOM:
Pictures are fully shown on the screen.
• In some cases, the black bars may be
shown at the top and bottom sides of the
screen.
Pictures are reduced horizontally.
• The black bars will be shown at the left
and right sides of the screen.
• In some cases, the black bars may be
shown also at the top and bottom sides of
the screen.
The middle of pictures are reduced
horizontally, and the left and right sides of
the picture enlarged horizontally.
• In some cases, the black bars may be
shown at the top and bottom sides of the
screen.
Pictures are enlarged on the screen so that
no black bars will be shown on the screen.
(The entire picture cannot be shown on the
screen.)
Das Bild wird vollständig auf dem
Bildschirm angezeigt.
• In manchen Fällen können schwarze
Balken oben und unten am
Bildschirmrand erscheinen.
Bilder werden horizontal verkleinert.
• Die schwarzen Balken erscheinen links
und rechts am Bildschirmrand.
• In manchen Fällen können die schwarzen
Balken aber auch oben und unten am
Bildschirmrand erscheinen.
Die Bildmitte wird horizontal verkleinert und
die linke und rechte Seite des Bilds wird
horizontal vergrößert.
• In manchen Fällen können schwarze
Balken oben und unten am
Bildschirmrand erscheinen.
Das Bild wird vergrößert, so daß keine
schwarzen Balken auf dem Bildschirm
angezeigt werden. (Das gesamte Bild
kann nicht auf dem Bildschirm angezeigt
werden.)
Les images apparaissent entièrement sur
l’écran.
• Dans certains cas, des barres noires
peuvent apparaître en haut et en bas de
l’écran.
Les images sont compressées
horizontalement.
• Des barres noires apparaissent à gauche
et à droite de l’écran.
• Dans certains cas, des barres noires
peuvent aussi apparaître en haut et en
bas de l’écran.
La partie centrale de l’image est
compressée horizontalement et les côtés
gauche et droit de l’image sont agrandis
horizontalement.
• Dans certains cas, des barres noires
peuvent apparaître en haut et en bas de
l’écran.
Les images sont agrandies sur l’écran
de façon qu’il n’y ait pasde barre noire.
(L’image entière n’apparaît pas sur l’écran.)
Door iedere druk op de toets verandert de
aspectratio.
De beelden worden volledig op het scherm
getoond.
• In bepaalde gevallen verschijnen zwarte
balken aan de onder- en bovenkant van het
scherm.
De beelden worden in horizontale richting
ingekrimpt.
• Er verschijnen zwarte balken aan de linker- en
rechterkant van het scherm.
• In bepaalde gevallen verschijnen zwarte
balken tevens aan de onder- en bovenkant van
het scherm.
Het midden van het beeld wordt in horizontale
richting ingekrimpt en de linker- en rechterrand
van het beeld worden horizontaal vergroot.
• In bepaalde gevallen verschijnen zwarte
balken aan de onder- en bovenkant van het
scherm.
De beelden worden vergroot op het scherm
zodat er geen zwarte balken op het scherm
verschijnen. (Het volledige beeld kan niet op het
scherm worden getoond.)
When incoming 4:3 video signal / Beim Empfang von 4:3-Videosignalen / Lors de l’entrée d’un signal vidéo 4:3 / Indien 4:3 videosignalen worden ontvangen
FULL:
NORMAL:
JUST:
ZOOM:
Pictures are enlarged horizontally and are
fully shown on the screen.
Pictures are shown at the center of the
screen.
• The black bars will be shown at the left
and right sides of the screen.
Pictures are enlarged horizontally. The
extension ratio increases toward the both
sides of the screen.
Pictures are enlarged on the screen so that
no black bars will be shown on the screen.
(The entire picture cannot be shown on the
screen.)
Das Bild wird horizontal vergrößert und füllt
somit den gesamten Bildschirm aus.
Das Bild wird in der Mitte des Bildschirms
angezeigt.
• Die schwarzen Balken erscheinen links
und rechts am Bildschirmrand.
Bilder werden horizontal vergrößert. Das
Vergrößerungsverhältnis nimmt zu den
Bildschirmrändern hin zu.
Das Bild wird vergrößert, so daß keine
schwarzen Balken auf dem Bildschirm
angezeigt werden. (Das gesamte Bild
kann nicht auf dem Bildschirm angezeigt
werden.)
Les images sont agrandies horizontalement
et apparaissent entièrement sur l’écran.
Les images apparaissent au centre de
l’écran.
• Des barres noires apparaissent à gauche
et à droite de l’écran.
Les images sont agrandies horizontalement.
Le rapport d’agrandissement augmente
pour les deux côtés de l’écran.
Les images sont agrandies sur l’écran
de façon qu’il n’y ait pas de barre noire.
(L’image entière n’apparaît pas sur l’écran.)
De beelden worden horizontaal vergroot en
volledig op het scherm getoond.
De beelden worden in het midden van het
scherm getoond.
• Er verschijnen zwarte balken aan de linker- en
rechterkant van het scherm.
De beelden worden horizontaal vergroot. De
vergrotingsratio wordt hoger bij beide kanten
van het scherm.
De beelden worden vergroot op het scherm
zodat er geen zwarte balken op het scherm
verschijnen. (Het volledige beeld kan niet op het
scherm worden getoond.)
Maintenance / Wartung / Entretien / Onderhoud
To prevent damage to the exterior
• Do not apply pesticides, benzine, thinner or other
volatile substances to the monitor.
The cabinet surface primarily consists of plastic
materials.
• Do not wipe with benzine, thinner or similar
substances because this will results in discoloration
or removal of the paint.
• When a cloth with a cleansing chemical is used,
follow the caution points.
– Do not leave the unit in contact with rubber or
vinyl products for long periods of time.
– Do not use cleansers which have polishing
granules because this could damage the cabinet.
Clean off dirt by wiping lightly with a
soft cloth
When the cabinet is very dirty, wipe with a well-wrung
cloth dipped in a kitchen cleanser (neutral) thinned by
water and then go over the same surface with a dry
cloth.
(Since there is the possibility of water drops getting
inside of the unit, do not directly apply cleanser to the
surface.)
So vermeiden Sie Beschädigungen am Gehäuse
• Bringen Sie das Gerät nicht mit Pestiziden, Benzin,
Lösungsmittel oder anderen flüchtigen Stoffen in
Berührung.
Das Gehäuse besteht vorwiegend aus Kunststoff.
• Wischen Sie es nicht mit Benzin, Lösungsmittel
oder ähnlichen Stoffen ab, da dies zu
Verfärbungen oder zum Entfernen der Farbschicht
führt.
• Bei Reinigung mit einem Tuch und einem
chemischen Reinigungsmittel beachten Sie
folgende Sicherheitsmaßregeln.
– Achten Sie darauf, daß das Gerät nicht längere
Zeit mit Gegenständen aus Gummi oder Vinyl in
Berührung ist.
– Verwenden Sie keine Reinigungsmittel mit
Scheuerpartikeln, da dadurch das Gehäuse
beschädigt werden kann.
Schmutz mit einem weichen Tuch
vorsichtig abwischen
Bei sehr starker Verschmutzung tränken Sie
einen Lappen mit einer wässrigen Lösung von
Küchenspülmittel (neutral), wringen Sie diesen Aus,
wischen das Gehäuse damit ab und wischen danach
mit einem trockenen Lappen trocken.
(Bringen Sie Reinigungsmittel nicht direkt auf die
Oberfläche auf, da dabei Wassertropfen ins Innere
des Geräts gelangen könnten.)
Pour éviter d’endommager l’extérieur
• Ne jamais appliquer de pesticide, benzine, diluant
ou autre substance volatile sur l’unité.
La surface du coffret est essentiellement constituée
de matières plastiques.
• Ne pas frotter l’unité à la benzine, au diluant ou
toute autre substance similaire, car cela entraîne
une décoloration et/ou un écaillage de la peinture.
• Lorsqu’on utilise un chiffon imbibé d’un agent
chimique de nettoyage, prendre les précautions
suivantes.
– Ne pas laisser l’unité au contact du caoutchouc
ou du vinyle pendant de longues périodes.
– N’utilisez pas de nettoyant contenant des
granules à polir parce que cela risquerait
d’endommager le boîtier.
Nettoyer les saletés en frottant
légèrement au chiffon doux
Quand le boîtier est très sale, frottez-le avec un
chiffon bien essoré imbibé de nettoyant neutre dilué
dans de l’eau puis essuyez la même surface avec un
chiffon sec.
(Pour éviter que des gouttes d’eau ne pénètrent dans
l’unité, ne jamais appliquer di rectement de liquide de
nettoyage sur la surface.)
Voorkomen van beschadiging van het
exterieur
• Gebruik geen insecticide, benzine, thinner of andere
vluchtige middelen in de buurt van ofop dit toestel.
De behuizing van het toestel bestaat voornamelijk uit
plastic.
• Voorkom dat de verf en kleur van het toestel wordt
aangetast en veeg het toestel derhalveniet met benzine,
thinner of andere dergelijke middelen schoon.
• Zie de aanwijzingen van het schoonmaakmiddel en
controleer of het middel geschikt voor dit toestel is.
– Vermijd langdurig contact met rubber of vinyl.
– Voorkom beschadiging van de behuizing en gebruik
derhalve geen reinigers met schurende deeltjes.
Verwijder vuil voorzichtig met een
zachte doek
Indien de behuizing zeer vuil is, moet u het met een met
(neutraal) reinigingsmiddel en water bevochtigde, goeduitgewrongen doek schoonmaken. Veeg vervolgens goed
droog met een zacht doekje.
(Wees voorzichtig zodat er geen waterdruppels in het
toestel komen en spuit nooit direct eenschoonmaakmiddel
op het toestel.)
5
Page 12
Troubleshooting / Störungssuche / Guide de dépannage / Oplossen van problemen
What appears to be trouble is not always serious. Check
the following points before calling a service center.
Was wie eine Betriebsstörung erscheint, muss nicht
immer ein ernstes Problem darstellen. Gehen Sie die
folgenden Prüfpunkte durch, bevor Sie sich an den
Kundendienst wenden.
Ce qui apparaît être un problème n’est pas toujours
sérieux. Vérifiez les points suivants avant d’appeler
un centre de service.
Problemen zijn niet altijd van serieuze aard. Controleer
de volgende punten alvorens een onderhoudscentrum te
raadplegen.
Symptoms / Symptome / Symptôme / Symptomen Causes / Ursachen/ Causes/ Oorzaken Remedies / Abhilfen / Remèdes / Oplossingen
• Colored spots (red, blue and green) appear on the screen.
• Auf dem Bildschirm erscheinen (rote, blaue und grüne) Farbpunkte.
• Des points de couleur (rouges, bleus et verts) apparaissent sur
l’écran.
• Er verschijnen gekleurde vlekken op het scherm (rood, blauw en groen).
• No picture appears and sound is not heard.
• Es wird weder ein Bild angezeigt, noch werden Tonsignale
wiedergegeben.
• Aucune image n’apparaît et aucun son n’est entendu.
• Er is wel geluid, maar geen beeld.
• The unit does not work at all.
• Das Gerät funktioniert überhaupt nicht.
• L’appareil ne fonctionne aps du tout.
• Toestel werkt geheel niet.
• Cordless headphones (not supplied) do not work.
• Drahtlose Kopfhörer funktionieren nicht.
• Le casque d’écoute sans fil (non fourni) ne fonctionne pas.
• De draadloze hoofdtelefoon werkt niet.
This is a characteristic of liquid crystal panels and is not a malfunction.
Hierbei handelt es sich um eine Eigenschaft von Flüssigkristallbildschirmen, die keine Fehlfunktion darstellt.
C’est une caractéristique des panneaux à cristaux liquides et ce n’est
pas un mauvais fonctionnement.
Dit is een kenmerk van vloeibare kristallen paneel en is geen storing.
The cord is not connected correctly.
Das Kabel ist nicht richtig angeschlossen.
Le cordon n’est pas connecté correctement.
Het snoer is niet juist aangesloten.
Correct input mode is not selected.
Der falsche Eingangsmodus wurde ausgewählt.
Le mode d’entrée correct n’est pas choisi.
Er is een verkeerdeinvoermodus geselecteerd.
The built-in microcomputer may have functioned incorrectly due to
noise, etc.
Der eingebaute Microcomputer kann aufgrund von Rauschen usw.
falsch funktioniert haben.
Le micro-ordinateur intégré peut fonctionnar incorrectement á case de
parasites, etc.
De ingebouwde microcomputer functioneert mogelijk onjuist vanwege storing,
enz.
The battery has lost its charge.
Die Batterien sind entladen.
La pile est usée.
De batterij is leeg.
See “Note” on page 2.
Siehe „Hinweis“ auf Seite 2.
Consultez la “Remarque” de la page 2.
Zie “Opmerking” op bladzijde 2.
Connect the cord correctly.
Schließen Sie das Kabel richtig an.
Connectez le cordon correctement.
Sluit het snoer juist aan.
Select the correct input mode.
Wählen Sie den richtigen Eingangsmodus.
Choisissez le mode d’entrée correct.
Selecteer de juiste invoermodus.
Reset the unit (see page 2).
Das Gerät zurücksetzen (siehe Seite 2).
Réinitialisez L’appareil (voir page 2).
Stel het toestel terug (zie bladzijde 2).
Install a new battery.
Legen Sie neue Batterie ein.
Installez une nouvelle pile.
Plaats een nieuwe batterij.
• Howling occurs from the speakers or the headphones.
• Heulgeräusche kommen von den Lautsprechern oder vom
Kopfhörer.
• Un hurlement peut se produire dans les enceintes ou le casque
d’écoute.
• U hoort een rondzingend geluid via de luidsprekers of hoofdtelefoon.
The sensor is exposed to strong light.
Der Fernbedienungssensor ist starkem Lichteinfall ausgesetzt.
Le capteur de télécommande estexposé à une lumière trop forte.
De sensor van deafstandsbediening staat blootaan scherp licht.
It may be caused by a camcorder connected to the monitor.
Dies kann durch einen am Monitor angeschlossenen Camcorder
verursacht werden.
Il peut être causé par un caméscope connecté au moniteur.
Dit kan worden veroorzaakt door een camcorder die op de monitor is
aangesloten.
Do not expose the sensor to strong light.
Setzen Sie den Fernbedienungssensor nicht starkem Lichteinfall aus.
N’exposez pas le capteur de télécommande à une lumière trop forte.
Stel de sensor van deafstandsbediening niet blootaan scherp licht.
Camcorder is now in recording mode. Deactivate the recording mode.
Der Camcorder ist nun im Aufnahmemodus. Deaktivieren Sie den
Aufnahmemodus.
Le caméscope est en mode d’enregistrement. Mettez hors service le
mode d’enregistrement.
De camcorder is in de opnamefunctie geschakeld. Annuleer de opnamefunctie.
Specifications / Technische Daten / Spécifications / Technische gegevens
WIDESCREEN MONITOR
Screen:
6.5 inch liquid crystal panel
Number of pixel:
280 800 pixels (400 vertical × 234 horizontal × 3)
Drive method:
TFT (Thin Film Transistor) active matrix format
Cordless audio:
Infrared audio transmitter (Support IR receiver
stereo headphones)
L-channel: 2.3 MHz
R-channel: 2.8 MHz
Effective range: 1.5 m
Color system: NTSC/PAL
Dimensions (W × H × D):
Installation size (approx.):
197 mm × 131 mm × 39 mm
(including shroud)
Mass (approx.):
500 g (including shroud)
MONITOR CONNECTION UNIT
Input:
Video: RCA pin × 2 circuits 1 V(p-p), 75 Ω
Audio: RCA pin × 2 circuits 1.5 V(rms)
Output:
Display: 13 pin DIN connector 1 V(p-p), 75 Ω
Video: RCA pin x 1 circuit 1 V(p-p), 75 Ω
Audio: RCA pin x 1 circuit 1.5 V(rms)
Dimensions (W × H × D):
Installation size (approx.):
127 mm × 28 mm × 89 mm
(excluding projections)
Mass (approx.):
160 g
GENERAL
Power requirement:
Operating voltage:
DC 14.4 V (11 V to 16 V allowance)
Grounding system: Negative ground
Allowable operating temperature:
0°C to +40°C
Allowable storage temperature:
–20°C to +80°C
Design and specifications are subject to change
without notice.
BREITBILD-FARBMONITOR
Bildschirm:
6,5 Flüssigkristallanzeige
Anzahl der pixel:
280 800 pixels (400 vertikal × 234 horizontal × 3)
Ansteuerungsverfahren:
TFT-Aktivmatrixformat
(Thin Film Transistor = Dünnschichttransister)
Drahtloses Audio:
Infrarot-Audio sender (unterstützt IR-Receiver-
Stereokopfhörer)
Linker Kanal: 2,3 MHz
Rechter Kanal: 2,8 MHz
Effektiver Bereich: 1,5 m
Farbsystem: NTSC/PAL
Abmessungen (B × H × T):
Einbaugröße (ca.):
197 mm × 131 mm × 39 mm
(inklusive Halterung)
Gewicht (ca.):
500 g (inklusive Halterung)
MONITOR-ANSCHLUSSEINHEIT
Eingang:
Video: 2 RCA-Büchsen 1 V(p-p), 75 Ω
Audio: 2 RCA-Büchsen 1,5 V(eff.)
Ausgang:
Display: 13-poliger DIN-Anschluss 1 V(p-p), 75 Ω
Video: 1 RCA-Büchse 1 V(p-p), 75 Ω
Audio: 1 RCA-Büchse 1,5 V(eff.)
Abmessungen (B × H × T):
Einbaugröße (ca.):
127 mm × 28 mm × 89 mm
(exklusive Überstände)
Gewicht (ca.):
160 g
ALLGEMEIN
Anschlußwerte:
Betriebsspannung:
DC 14,4 V (11 V bis 16 V Toleranz)
Erdungssystem: Negative erudung
Zulässige Betriebstemqeratur:
0°C bis +40°C
Zulässige Lagertemperatur:
–20°C bis +80°C
Änderungen bei Design und technischen Daten
bleiben vorbehalten.
MONITEUR À ÉCRAN LARGE
Écran:
Panneau à cristaux liquides de 6,5 pouces
Nombre de pixels:
280 800 pixels (400 verticaux × 234 horizontaux × 3)
Méthode d’entraînement:
TFT (Transistor à couches minces) à matrice
active
Système audio sans fil:
Émetteur audio infrarouge (Prend en charge les
casques d’écoute à récepteur IR)
Canal gauche: 2,3 MHz
Canal droit: 2,8 MHz
Plage de fonctionnement: 1,5 m
Standard de couleur: NTSC/PAL
Dimensions (L × H × P):
Taille d’installation (approx.):
197 mm × 131 mm × 39 mm
(y compris le protecteur de contact)
Masse (approx.):
500 g (y compris le protecteur de contact)
UNITÉ DE CONNEXION DU MONITEUR
Entrée:
Vidéo: Prises cinch × 2 circuits
1 V(p-p), 75 Ω
Audio: Prises cinch × 2 circuits
1,5 V(efficace)
Sortie:
Affichage: Connecteur DIN à 13 broches
1 V(p-p), 75 Ω
Vidéo: Prises cinch × 1 circuit
1 V(p-p), 75 Ω
Audio: Prises cinch × 1 circuit
1,5 V(efficace)
Dimensions (L × H × P):
Taille d’installation (approx.):
127 mm × 28 mm × 89 mm
(hors projections)
Masse (approx.):
160 g
GÉNÉRALITÉS
Alimentation:
Tension de fonctionnement:
CC 14,4 V (11 V à 16 V admissibles)
Système de mise à la masse: Masse négative
Températures de fonctionnement admissibles:
0°C à +40°C
Température de stockage admissible:
–20°C à +80°C
BREEDBEELD-MONITOR
Scherm:
6,5 inch vloeibare kristallen paneel
Aantal pixels:
280 800 pixels (400 verticaal × 234 horizontaal × 3)
Aansturingsmethode:
TFT (Thin Film Transistor) actiefmatrixformaat
Draadloos audio:
Infrarood audiozender (geschikt voor IR receiver
stereo-hoofdtelefoon)
L-kanaal: 2,3 MHz
R-kanaal: 2,8 MHz
Effectief bereike: 1,5 m
Kleursysteem: NTSC/PAL
Afmetingen (B × H × D):
Installatie-afmetingen (bij benadering):
197 mm × 131 mm × 39 mm
(inclusief beschermkap)
Gewicht (bij benadering):
500 g (inclusief beschermkap)
MONITOR-AANSLUITGEDEELTE
Ingang:
Video: RCA pin × 2 circuits 1 V(p-p), 75 Ω
Audio: RCA pin × 2 circuits 1,5 V(rms)
Uitgang:
Display: 13-pens DIN-connector 1 V(p-p), 75 Ω
Video: RCA pin × 1 circuit 1 V(p-p), 75 Ω
Audio: RCA pin × 1 circuit 1,5 V(rms)
Afmetingen (B × H × D):
Installatie-afmetingen (bij benadering):
127 mm × 28 mm × 89 mm
(zonder uitstekende delen)
Gewicht (bij benadering):
160 g
ALGEMEEN
Elektriciteit:
Voltage:
14,4 V gelijkstroom (11 V t/m 16 V toelaatbaar)
Aardingssysteem: Negatieve aarding
Toegestane bedrijfstemperatuur:
0°C t/m +40°C
Toegestane opslagtemperatuur:
–20°C t/m +80°C
Ontwerp en technische gegevens zijn zonder voorafgaande
kennisgeving wijzigbaar.
La conception et les spécifications sont sujettes à
changement sans notification.
6
Page 13
KV-MH6510
6.5-INCH WIDESCREEN MONITOR : INSTRUCTIONS
6.5-英吋寬頻顯示器:使用說明書
6.5-인치 와이드 스크린 모니터: 사용 설명서
¡Õ𑇵Õ√å®Õ°«Ñ“ß 6.5 : §”·π–π”
0505MNMMDWJEIN
LVT1327-004A
•
This system cannot receive television broadcasts and is primarily designed for use with a VCR or a DVD player. Use the separately sold TV tuner unit KV-C1000 / KV-C1001 / KV-C1008 for optional television broadcast reception.
• 本系統無法接收電視廣播,是為使用錄像機和 DVD 視盤機而進行的特殊設計,當要接收電視廣播時,請使用另購的 KV-C1000 / KV-C1001 / KV-C1008 型電視機調諧器。
• 본 모니터 시스템은 TV 방송을 수신할 수 없으며 VCR 과 DVD 플레이어용으로 설계된 제품입니다. TV 방송을 수신하려면 별매품인 휴대용 TV 튜너 장치
•
√–∫∫π’ȉ¡Ë“¡“√∂√—∫°“√·æ√Ë¿“æ∂“π’‚∑√∑—»πÏ·≈–‰¥È√—∫°“√ÕÕ°·∫∫‡∫◊ÈÕßµÈπ‡æ◊ËÕ„™È°—∫‡§√◊ËÕ߇≈Ëπ
[U]
VCR
À√◊Õ
DVD
“¡“√∂„™È°—∫µ—«ª√—∫ TV ‡§≈◊ËÕπ∑’Ë∑’Ë®”ÀπË“¬µË“ßÀ“°”À√—∫°“√√—
KV-C1000 / KV-C1001 / KV-C1008
KV-C1000 / KV-C1001 / KV-C1008
© 2005 Victor Company of Japan, Limited
을 사용하십시오.
∫°“√·æ√Ë¿“æ‚∑√∑—»πÏ∑’ˇªÁπÕÿª°√≥χ√‘¡
EN, CT, KO, TH
ENGLISH
Thank you for purchasing a JVC product. Please read
all instructions carefully before operation, to ensure
your complete understanding and to obtain the best
possible performance from the unit.
• For installation and connections, refer to the
separate manual.
CAUTION:
This monitor system should be used on DC 12 V
only. To prevent electric shocks and fire hazards,
DO NOT use any other power source.
Installation requires some special
knowledge.
Do not install the monitor yourself.
Consult a dealer having special
knowledge of this kind for safe and
reliable installation.
WARNING
• DO NOT INSTALL THE MONITOR IN A
LOCATION WHICH OBSTRUCTS DRIVING,
VISIBILITY, SAFETY DEVICE FUNCTION
SUCH AS AIR BAGS OR WHICH IS
PROHIBITED BY APPLICABLE LAWS AND
REGULATIONS.
• There may be legal regulations defining
the permissible installation locations for
the monitor which differ by country or by
state. Be sure to install the monitor in a
correct location according to such laws.
• The driver must not operate the monitor
while driving.
* Stop your vehicle in a safe location when
operating the monitor.
• The driver must not watch the television
or playback pictures while driving.
If the driver does it while driving, it
may lead to carelessness and cause an
accident.
• Keep the monitor at an appropriate sound
level while driving.
Driving with the sound at a level that
prevents you from hearing sounds
outside of and around the vehicle may
cause an accident.
• Be sure not to let the monitor fall or be
strongly impacted since this may cause a
malfunction or fire.
• Do not use the monitor with the engine
off.
Doing so with the engine off will consume
battery power and may prevent the engine
from starting.
• Do not touch the surface of the liquid
crystal panel directly.
中文
多謝您惠購 JVC 的產品。在使用之前,請詳讀全部說
明書,以確保完全理解本機使用方法,並獲得較長的
使用壽命。
• 有關安裝和連接方法,分別參閱操作手冊。
注意:
本顯示器系統僅限使用 12 V 直流電。為防止電擊事
故或火災的發生,請勿使用任何其他種類的電源。
本機的安裝要求特種技能。
切勿自己安裝本顯示器系統。為了保障安裝的
安全性與可靠性,請委託持有特種技能的經銷
商為您安裝。
警告
• 請勿將顯示器安裝在妨礙駕駛,影響視線,妨
礙操作安全設備如安全气袋或違反相關法規之
處。
• 不同的國家或政府可能對顯示屏裝置制定了法
定容許的安裝位置。因此請遵從相關法律將顯
示屏裝置安裝在正確位置。
• 司機在駕駛車輛時禁止操作顯示器系統。
* 在操作顯示器時請將車輛停靠在安全場所。
• 司機在駕駛車輛時禁止收看電視或錄像節目。
如果司機在駕駛時收看電視或錄像節目可能會
導致注意力不集中而引發交通事故。
• 在駕駛時請保持顯示器處於適當的音量等級。
在駕駛車輛時,由於音量過高妨礙您聽清汽車
周圍的聲音可能導致事故發生。
• 勿讓顯示器摔落或受到劇烈的撞擊是因為如此
可能會引起故障或火災。
• 在汽車發動機停火後請勿使用顯示器。
在汽車發動機停火後觀看顯示器可能耗盡蓄電
池以及妨礙發動機起動。
• 切勿直接觸摸液晶顯示面板表面。
한국어
JVC 제품을 구입해 주셔서 감사합니다. 제품을 완전
히 이해하고 최상의 성능을 활용할 수 있도록 사용
전에 모든 지침을 주의깊게 읽어 보십시오.
• 설치 및 연결에 대한 내용은 별도의 설명서를 참조
하십시오.
주의:
이 모니터 시스템은
과 화재의 위험이 있으므로 다른 종류의 전원을사용
하지 마십시오.
설치 작업에는 전문적인 기술이 필요합니다.
모니터 시스템을 직접 설치하지 마십시오.
안전하고 안정적인 설치를 위해, 필요한 지
식이 있는 대리점에 문의해 주십시오.
경고
•
시야를 가리고 에어백 같은 안전 장치 기능과운
전에 방해가 될 수 있는 곳이나 해당 법률에의해
금지되는 곳에는 설치하지 마십시오.
• 국가나 시/도마다 모니터를 설치할 수 있는
위치를 정한 법규가 있습니다. 관련 법규를
따라올바른 위치에 장치를 설치하십시오.
• 운전 중에 모니터를 작동하지 마십시오.
* 모니터를 작동할 때는 안정한 곳에 자동차를 정
차하십시오.
• 운전 중에는 TV 나 비디오를 보지 말아야 합
니다.
운전 중에 TV 나 비디오를 보면 주의가 산만
해져 사고 위험이 있습니다.
• 운전 중에는 볼륨을 적절하게 유지하십시오.
외부와 주행 중 차량의 소리를 듣는 데 지장
을줄 정도로 볼륨이 크면 사고 위험이 있습니
다.
• 모니터를 떨어뜨리거나 강한 충격이 가해지
면고장이나 화재의 위험이 있습니다.
• 엔진이 꺼진 상태에서 모니터를 사용하지 마
십시오.
엔진이 꺼진 상태에서 모니터를 작동하면 배
터리 전원이 소모되어 시동이 걸리지 않을 수
있습니다.
• 액정 패널 표면을 직접 만지지 마십시오.
DC 12 V
전용 제품입니다. 감전
‰∑¬
¢Õ¢Õ∫æ√–§ÿ≥∑’ˇ≈◊Õ°´◊ÈÕº≈‘µ¿—≥±Ï¢Õß JVC °√ÿ≥“ÕË“π§”·π–π”∑—È
ßÀ¡¥‚¥¬≈–‡Õ’¬¥°ËÕπ°“√„™Èß“π ‡æ◊ËÕ„Àȇ¢È“„®™—¥‡®π ·≈–‡æ◊ËÕ„Àȉ¥È√—
∫ª√–‘∑∏‘¿“æŸßÿ¥„π°“√„™Èß“πº≈‘µ¿—≥±Ï
• °√ÿ≥“¥Ÿ§ŸË¡◊Õ∑’Ë·¬°µà“ßÀ“° „π°“√µ‘¥µ—Èß·≈–°“√‡™◊ËÕ¡µàÕ
¢ÈÕ§«√√–«—ß:
√–∫∫®Õ¿“æπ’ȧ«√„™È°—∫‰ø DC 12 V ‡∑Ë“π—Èπ
‡æ◊ËÕªÈÕß°—π°“√À¬ÿ¥∑”ß“π·≈–°“√‡°‘¥‰ø‰À¡È
լ˓ß√ÿπ·√ß ‰¡Ë§«√„™È°—∫·À≈Ëß°”‡π‘¥‰øøÈ“™π‘¥Õ◊Ëπ
°“√µ‘¥µ—ÈßµÈÕß„™È§«“¡™”π“≠‡ªÁπ摇»… ‰¡Ë§«√µ‘¥µ—Èß
®Õ·¥ß¿“æ¥È«¬µ—«‡Õß‚ª√¥ª√÷°…“µ—«·∑π®”ÀπË“¬
§”‡µ◊Õπ
• լ˓µ‘¥µ—È߮աÕ𑇵Õ√Ï „πµ”·ÀπËß∑’Ë°’¥¢«“ß°“√¢—∫¢’Ë
∑—»π«‘—¬ °“√∑”ß“π¢ÕßÕÿª°√≥Ïπ‘√¿—¬ ‡™Ëπ ·Õ√Ï·∫§
À√◊Õ„πµ”·ÀπËß∑’ËÀÈ“¡¡‘„Àȵ‘¥µ—Èß µ“¡°ÆÀ¡“¬ À√◊Õ√–
‡∫’¬∫∑’Ë„™È∫—ߧ—∫
•
„π∫“ߪ√–‡∑»À√◊Õ∫“ß√—∞Õ“®¡’°“√®”°—¥µ”·ÀπËß°“√µ‘¥µ—ÈßÕÿ
ª°√≥Ï°“√·¥ß¿“æµÈÕß·πË„®«Ë“‰¥Èµ‘¥µ—ÈßÕÿª°√≥å
·¥ß¿“æ„πµ”·ÀπËß∑’Ë∂Ÿ°µÈÕßµ“¡°ØÀ¡“¬¢Õß∑ÈÕß∂‘Ëππ—ÈπÊ
• ºŸÈ¢—∫¢’Ë√∂¬πµÏ ‰¡Ë§«√ªØ‘∫—µ‘ß“π√–∫∫®Õ·¥ß¿“æ
„¥Ê∑—Èß‘Èπ ¢≥–¢—∫√∂¬πµÏ°“√ªØ‘∫—µ‘ß“π„¥Ê°—∫®Õ·¥ß¿
“æÕ“®π”‰ª´÷Ëߧ«“¡ª√–¡“∑ ·≈–‡ªÁπ“‡Àµÿ∑”„Àȇ°‘¥Õÿ∫—
µ‘‡Àµÿ
* §«√À¬ÿ¥¬“πæ“Àπ–¢Õߧÿ≥„πµ”·ÀπËß∑’˪≈Õ¥¿—¬
‡¡◊ËÕµÈÕß°“√ªØ‘∫—µ‘ß“π®Õ·¥ß¿“æ
• ºŸÈ¢—∫¢’Ë√∂¬πµÏ ‰¡Ë§«√™¡‚∑√∑—»πÏ À√◊Õ«‘¥’ ‚Õ¢≥–¢—
∫¢’Ëæ“Àπ–∂È“ºŸÈ¢—∫¢’Ë™¡‚∑√∑—»πÏ À√◊Õ«‘¥’‚Õ¢≥–¢—∫¢’ËÕ“®®–
π”¡“´÷Ëß §«“¡ª√–¡“∑ ·≈–°ËÕ„Àȇ°‘¥Õÿ∫—µ‘‡Àµÿ
•
ª√—∫®Õ·¥ß¿“æ„ÀÈ¡’√–¥—∫‡’¬ß∑’ˇÀ¡“–¡°—∫°“√¢—∫¢’Ë√∂¬πµ
¢≥–¢—∫¢’Ë√∂¬πµÏ∑’Ë√–¥—∫‡’¬ß∑’Ë∑”„Àȧÿ≥‰¡Ë“¡“√∂‰¥È¬‘π‡’¬
ß¿“¬πÕ°¬“πæ“Àπ– Õ“®°ËÕ„Àȇ°‘¥Õÿ∫—µ‘‡Àµÿ‰¥
•
µÈÕß¡—Ëπ„®«Ë“®Õ·¥ß¿“æπ’È
‰¡Ë ‰¥È∂Ÿ°°√–·∑°À√◊Õµ°Õ¬Ë“ß·√ß
‡æ√“–Õ“®‡ªÁπ“‡Àµÿ„Àȇ§√◊ËÕ߉¡Ë∑”ß“πÀ√◊Õ‰ø‰À¡È ‰¥ô
• ‰¡Ë§«√„™È®Õ·¥ß¿“æ¢≥–¥—∫‡§√◊ËÕ߬πµÏÕ¬ŸË
°“√™¡®Õ·¥ß¿“æ¢≥–¥—∫‡§√◊ËÕ߬πµÏ®–∑”„ÀÈ
„™Èæ≈—ßß“π®“° ·∫µ‡µÕ√’Ë‘Èπ‡ª≈◊Õß ·≈–Õ“®∑”„Àȇ§√◊ËÕ߬π
µÏµ‘¥‡§√◊ËÕ߉¡Ë‰¥
• լ˓·µ–∫√‘‡«≥æ◊Èπº‘«¢Õß·ºß®Õ§√‘µ—≈‡À≈«µ√ßÊ
È
È
Ï
For safety....
Stop the car before performing any complicated
operations.
Temperature inside the car....
If you have parked the car for a long time in hot or
cold weather, wait until the temperature in the car
becomes normal before operating the unit.
基於安全事項....
在進行任何複雜的操作之前請先將車停下。
關於車內溫度....
若長時間將車停在炎熱或寒冷的氣候裡,在操作主機
前請等待一段時間,直到車內的溫度恢復到正常。
안전 관련 주의 사항....
복잡한 조작을 수행하기 전에는 차량을 정차하십시
오.
차량 내부 온도....
차량이 너무 춥거나 더운 곳에 오랫 동안 주차된 경
우에는 장치를 조작하기 전에 차량 온도가 정상 온
도가될 때까지 기다리십시오.
1
‡æ◊ËÕ§«“¡ª≈Õ¥¿—¬....
§«√À¬ÿ¥√∂°ËÕπ°“√„™Èß“π∑’ˬÿË߬“°´—∫´ÈÕπ
Õÿ≥À¿Ÿ¡‘¿“¬„π√∂....
À“°®Õ¥√∂∑‘È߉«È„π∑’Ë∑’Ë¡’Õ“°“»√ÈÕπÀ√◊ÕÀ𓫇ªÁπ‡«≈“π“π
§«√√Õ®π°«Ë“Õÿ≥À¿Ÿ¡‘¿“¬„π√∂°≈—∫ŸË√–¥—∫ª°µ‘°ËÕπ‡√‘Ë¡„™È
ß“π‡§√◊ËÕß
Page 14

Precautions / 使用前注意事項 / 주의 사항 / ¢ÈÕ§«√√–«—ß
Cautions for handling the liquid crystal panel / 關於液晶面板的注意事項 / 액정 패널 처리 관련 주의 사항 / ¢ÈÕ§«√√–«—ß„π°“√„™âß“π®Õ·∫∫§√‘µ—≈‡À≈«
Do not expose the liquid crystal panel to direct sunlight.
• Storage temperature range: –20°C to +80°C
切勿將液晶面板暴露於陽光直射之處。
• 放置溫度範圍:–20°C 至 +80°C
액정 디스플레이를 직사광선에 노출시키지 마십시오.
• 보관 온도 범위: –20°C ~ +80°C
‰¡Ë§«√π”®Õ·∫∫§√‘µ—≈—¡º—°—∫·ßÕ“∑‘µ¬Ï‚¥¬µ√ß
• ™Ë«ßÕÿ≥À¿Ÿ¡‘∑’ˇÀ¡“–¡°—∫°“√‡°Á∫√—°…“§◊Õ: –20°C ∂÷ß +80°C
+80°C
–20 °C
During the summer, temperatures can
reach as high as 100°C.
夏季裡,溫度可高達 100°C。
여름철에는 온도가 100°C 까지 높아질
수 있습니다.
–20°C to +80°C
–20°C 至 +80°C
–20°C ~ +80°C
–20°C ∂÷ß +80°C
„π™à«ßƒ¥Ÿ√âÕπÕÿ≥À¿Ÿ¡‘ ¿“¬„π√∂Õ“®‡æ‘Ë¡¢÷ôπ
Ÿ
ß∂÷ß 100°C
When the liquid crystal panel reaches high temperatures or low temperatures, chemical changes occur
within the liquid crystal panel which may cause it to malfunction.
液晶面板處於高溫或低溫時,其內部發生化學變化可能因而導致故障。
고온이나 저온 환경에서는 액정 패널 내부에서 화학 변화가 일어나 시스템 장애를 유발할 수도 있습니다.
‡¡◊ËÕ®Õ·∫∫§√‘µ—≈‡À≈«Õ¬ŸË„π¿“æÕÿ≥À¿Ÿ¡‘ŸßÀ√◊յ˔‡°‘π‰ª ®–∑”„Àȇ°‘¥°“√‡ª≈’ˬπ·ª≈ß∑“߇§¡’ ´÷ËßÕ“®∑”„Àȇ°‘¥Õ“°“√º‘¥ª√°µ‘‰¥È
The red spots, blue spots and green spots on the panel surface are a
normal characteristic of liquid crystal panels, and not a problem.
面板表面有紅色,藍色和綠色斑點。此為液晶面板的特性而非故障。
패널 표면의 빨강, 파랑, 녹색 점들은 액정 패널에서 일반적으로 보이
는현상이며, 문제가 있는 것은 아닙니다.
Spots
斑點
점
®ÿ¥
®ÿ¥·¥ß øÈ“ ·≈–‡¢’¬« ∫πÀπÈ“®Õ‡ªÁπ≈—°…≥–‡©æ“–¢Õ߮շ∫∫§√‘µ—≈‡À≈« ´÷Ë߉¡Ë„™ËÕ“°“√º‘¥
ª√°µ‘·µËլ˓߄¥
Note:
The liquid crystal panel is built with very high precision technology and has at least 99.99% effective image pixels. Be
aware that on 0.01% of the panel there may be missing or constantly lit pixels.
注意:
本液晶面板採用高度精密技術製成,有效像素達到
素或斷續閃亮像素。
참고
:
액정 패널은 매우 정밀한 기술로 만들어졌으며
0.01%
는 유실되거나 항시 켜져 있는 화소입니다.
99.99%
以上。但發現在
99.99%
이상의 뛰어난 이미지 화소를 제공합니다. 패널의
0.01%
的面板上仍存在持續不亮像
À¡“¬‡Àµ:
®Õ·∫∫§√‘µ—≈‡À≈«∂Ÿ°√ȓߢ÷Èπ¥È«¬‡∑§‚π‚≈¬’∑’Ë¡’§«“¡·¡àπ¬”Ÿß ·≈–¡’®ÿ¥¿“æ∑’Ë¡’ª√–‘∑∏‘¿“æլ˓ßπÈÕ¬∑’Ëÿ¥ 99.99% ¢Õß®ÿ¥¿“æ∑—ÈßÀ¡¥
‚ª√¥√–«—ß∑’ˇÀ≈◊ÕÕ’° 0.01% ¢Õß®ÿ¥¿“æÕ“®¢“¥À“¬‰ªÀ√◊Õ‡ªÁπ®ÿ¥·ß‚¥¬µ√ß
When the temperature is very cold or very hot, the image may not appear clearly or may move slowly.
The image may not be synchronized with the sound or the image quality may decline in such
environments. Note that this is not a malfunction or problem.
• Usage temperature range: 0°C to +40°C
當溫度過低或過高時,影像可能顯示不清晰或移動緩慢。
在這樣的環境中影像移動與聲音可能不同步,或者影像的質量會降低。請放心此非故障或問題。
• 操作溫度範圍: 0°C 至 +40°C
너무 춥거나 더운 곳에서는 이미지가 선명하게 나타나지 않거나 느리게 움직일 수 있습니다.
그러한 환경에서는 이미지와 사운드가 맞지 않거나 화질이 나빠질 수 있습니다. 이것은 오작동이 아닙니
다.
• 사용 온도 범위: 0°C ~ +40°C
‡¡◊ËÕÕÿ≥À¿Ÿ¡‘‡¬Áπ®—¥À√◊Õ√ÈÕπ®—¥ ¿“æ∑’˪√“°ØÕ“®‰¡Ë™—¥‡®π À√◊ÕÕ“®®–‡§≈◊ËÕπ‰À«™È“
¿“æ∑’˪√“°ØÕ“®‰¡Ëµ√ß°—∫‡’¬ß À√◊Õ§ÿ≥¿“æ¢Õß¿“æÕ“®≈¥≈ß æ÷ߗ߇°µ«Ë“Õ“°“√‡À≈Ë“π’È ‡§√◊ËÕ߉¡Ë‰¥È‡’¬À√◊Õ¡’ª—≠À“
• ™Ë«ßÕÿ≥À¿Ÿ¡‘∑’ˇÀ¡“–¡°—∫°“√„™Èß“π§◊Õ: 0°C ∂÷ß +40°C
Do not drop the liquid crystal panel or strike it sharply.
請勿摔落或強力撞擊液晶面板。
액정 패널을 떨어뜨리거나 충격을 가하지 마십시오.
‰¡Ë§«√«“ßÀ√◊Õ°√–·∑°®Õ·∫∫§√‘µ—≈‡À≈«Õ¬Ë“ß·√ß
0°C or colder
0°C 或更冷時
0°C 이하
0°C À√◊յ˔°«Ë“
Widescreen monitor / 寬屏顯示器 / 와이드 스크린 모니터 / ¡Õ𑇵Õ√Ϯհ«È“ß
How to reset your monitor / 如何重設顯示器 / 모니터를 다시 설정 하는 방법 / «‘∏’°“√µ—È߇§√◊ËÕß„À¡Ë
Back / 後面 / 후면 / ¥È“πÀ≈—ß
When you watch the screen at an angle, the picture might not be clear. This is not a malfunction.
The finest picture can be seen when you watch the screen straight-on.
當您以某個角度觀看螢幕時,圖像可能不清晰。此非故障。正面觀看螢幕時可看到最佳圖像。
화면을 비스듬히 쳐다보면 영상이 깨끗하게 보이지 않을 수도 있습니다. 이것은 오작동이 아닙니
다.화면을 정면에서 보면 선명하게 보입니다.
‡¡◊ËÕ§ÿ≥™¡®Õ¿“æ∑’Ë¡ÿ¡Ê Àπ÷Ëß √Ÿª¿“æ∑’˧ÿ≥‡ÀÁπÕ“®®–‰¡Ë™—¥‡®π π’ˉ¡Ë„™ËÕ“°“√º‘¥ª°µ‘·µËլ˓߄¥ §ÿ≥“¡“√∂™¡¿“æ∑’Ë¥’∑’Ëÿ¥‡¡◊ËÕ§ÿ
≥™¡¿“æ°—∫®Õ¿“æ„π¡ÿ¡µ√ß
40°C or hotter
40°C 或更熱時
40°C 이상
40°C À√◊ÕŸß°«Ë“
This will reset the microcomputer. Your preset adjustments will also be erased.
此操作將會重設微處理器。您所做的預設調整也會被清除。
이것은 마이크로 컴퓨터를 다시 설정할 것입니다.이미 설정된 조정은
지워질 것입니다.
®–‡ªÁπ°“√µ—Èß√–∫∫‰¡‚§√§Õ¡æ‘«‡µÕ√Ï„À¡Ë §Ë“∑’˪√—∫µ—È߉«È°ËÕπ®–∂Ÿ°≈∫∑‘Èß
1 IR transmitters
2 White LED
3 Screen (Liquid crystal panel)
4 Remote sensor
5 (standby/on) button
• Turns on the power if pressed.
• Turns off the power if pressed and held.
6 MODE button
• Selects the playback source.
7 ASPECT button
•
Changes the aspect ratio of the screen.
8 MENU button
• Calls up the menu, then selects the adjustable
menu items.
9 / buttons
• Adjust the level of the selected item or select an
appropriate setting for selected item.
1 紅外線發射器
2 白色 LED
3 螢幕(液晶面板)
4 遙感器
5 (待機/開機)鍵
• 若短暫地按則啟動電源。
• 若按住則關閉電源。
6 MODE 鍵
• 選擇播放源。
7 ASPECT 鍵
• 切換螢幕的縱橫比。
8 MENU 鍵
• 調出菜單,然後選擇可調整菜單項目。
9 / 鍵
• 調整所選項目水平或為所選項目選擇適當的
設定。
1 IR 트랜스미터
2 화이트 LED
3 화면 (액정 패널)
4 원격 센서
5 (대기/켜기) 버튼
• 버튼을 눌러 전원을 켭니다.
• 버튼을 길게 눌러 전원을 끕니다.
6 MODE 버튼
• 재생 소스를 선택합니다.
7 ASPECT 버튼
• 화면의 비율을 변경합니다.
8 MENU 버튼
• 메뉴를 호출한 후 조절 가능한 메뉴항목을 선
택합니다.
9 / 버튼
• 선택한 항목의 레벨을 조정하거나 그에 대한
적절한 설정을 선택합니다.
2
1 µ—«√—∫Ëß—≠≠“≥ IR
2 ‰ø LED ’¢“«
3 ÀπÈ“®Õ (·ºß®Õ§√‘µ—≈‡À≈«)
4 √’‚¡∑‡´Áπ‡´Õ√Ï
5 ªÿË¡ (·µπ¥Ï∫“¬/‡ª‘¥‡§√◊ËÕß)
• ‡ª‘¥‡§√◊ËÕßÀ“°°¥ªÿË¡π’
• ª‘¥‡§√◊ËÕßÀ“°°¥ªÿË¡π’ȧȓ߉«È
6 ªÿË¡ MODE
• ‡≈◊Õ°´Õ√Ï∑’Ë®–‡≈Ëπ
7 ªÿË¡ ASPECT
• ‡ª≈’Ë¬π—¥«π¿“æ∫πÀπÈ“®Õ
8 ªÿË¡ MENU
• ‡√’¬°‡¡πŸ ‡æ◊ËÕ‡≈◊Õ°√“¬°“√∫π‡¡πŸ ∑’Ë“¡“√∂ª√—∫‰¥ÈÈ
9 ªÿË¡ /
•
ª√—∫√–¥—∫√“¬°“√∑’ˇ≈◊Õ° À√◊Õ‡≈◊Õ°°“√µ—Èߧ˓∑’ˇÀ¡“–¡
”À√—∫√“¬°“√∑’ˇ≈◊Õ°
Page 15
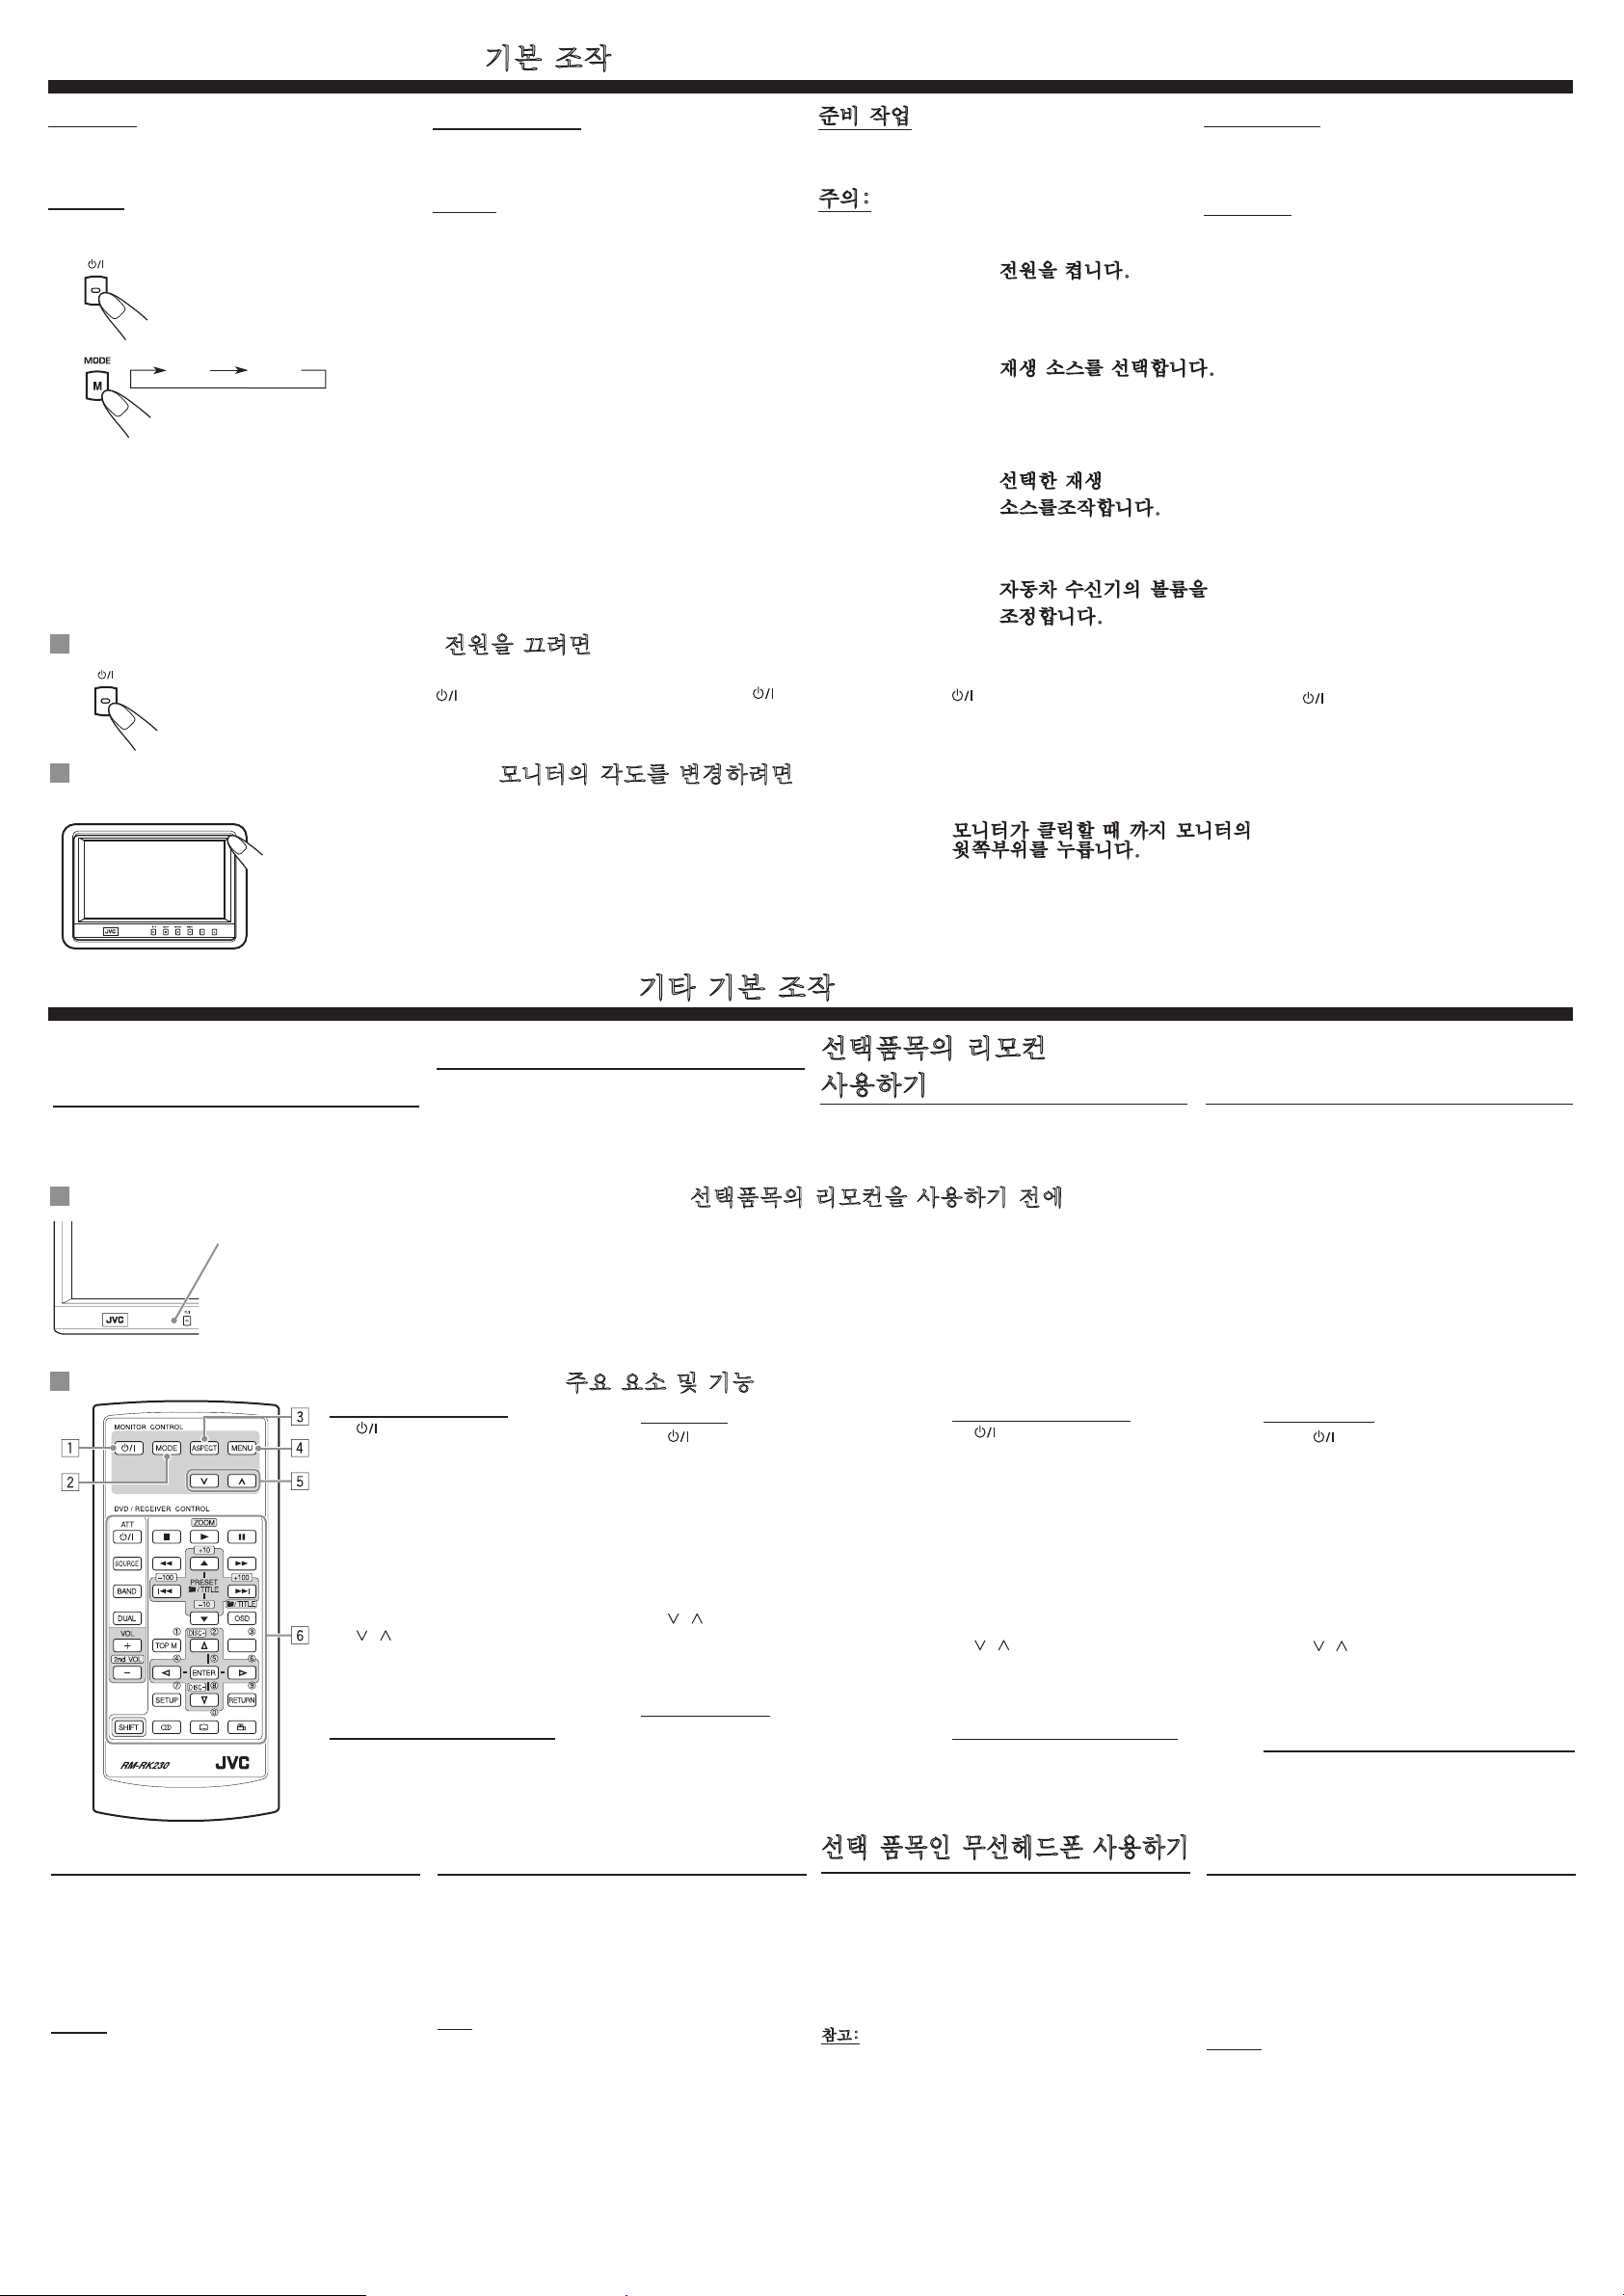
MENU
Basic operations / 基本操作 / 기본 조작 / °“√„™Èß“π‡∫◊ÈÕßµÈπ
AV 1 AV 2
Preparation
Before operating the unit, make sure that all external
components are correctly connected and installed.
CAUTION:
• Do not touch the surface of the liquid crystal panel
directly.
操作前注意事項
在操作顯示器系統之前,確保所有外接設備已正確連
接和安裝完畢。
注意:
• 切勿直接觸摸液晶顯示面板表面。
준비 작업
장치를 조작하기 전에 외부 구성품이 제대로 연결되
어 있는지 확인하십시오.
주의:
• 액정 패널 표면을 직접 만지지 마십시오.
°“√‡µ√’¬¡æ√ÈÕ¡
°ËÕπ„™Èß“π‡§√◊ËÕß ¢Õ„ÀÈ·πË„®«Ë“ ‰¥È‡™◊ËÕ¡µËÕ ·≈–µ‘¥µ—ÈßÕÿª°√≥Ï¿“¬πÕ
°∂Ÿ°µÈÕß·≈È«
¢âÕ§«√√–«—ß:
• լ˓·µ–∫√‘‡«≥æ◊Èπº‘«¢Õß·ºß®Õ§√‘µ—≈‡À≈«µ√ßÊ
1 1 Turn on the power. 1 啟動電源。 1 전원을 켭니다. 1 ‡ª‘¥‡§√◊ËÕß
2 2 Select the playback source.
Each time you press the button, the
playback source changes.
3 Operate the playback
source you selected.
To operate the external components,
refer to the manuals for the
connected components.
4 Adjust the volume on the
car receiver.
2 選擇播放源。
您每次按該鍵,播放源會進行切換。
3 操作所選播放源。
關於外接設備之操作,請參閱所接設
備之使用手冊。
2 재생 소스를 선택합니다.
버튼을 누를 때마다 재생 소스가 바
뀝니다.
3 선택한 재생
소스를조작합니다.
외부 구성품을 조작하려면 연결된 구
성품의 설명서를 참조하십시오.
4 在汽車接收機上調整音量。 4 자동차 수신기의 볼륨을
조정합니다.
2 ‡≈◊Õ°´Õ√Ï∑’Ë®–‡≈Ëπ
·µË≈–§√—Èß∑’Ë°¥ªÿË¡π’È ´Õ√Ï„π°“√‡≈Ëπ®–‡ª≈’ˬπ‰ª
3 „™Èß“π´Õ√Ï„π°“√‡≈Ëπ∑’ˇ≈◊Õ°
„π°“√„™Èß“πÕÿª°√≥Ï¿“¬πÕ° „ÀÈ¥Ÿ§ŸË¡◊Õ¢ÕßÕÿª°√
≥Ï¿“¬πÕ°∑’Ë„™Èπ—Èπ
4 ª√—∫√–¥—∫§«“¡¥—ß∫π‡§√◊ËÕß√—
∫„π√∂¬πµ
To turn off the power / 如何關閉電源 / 전원을 끄려면 / °“√ª‘¥‡§√◊ËÕß
Press and hold button.
按住顯示器上的 鍵。
버튼을 길게 누릅니다.
°¥ªÿË¡ §È“߉«È
To change the monitor angle / 改變螢幕角度 / 모니터의 각도를 변경하려면 / °“√‡ª≈’ˬπ¡ÿ¡¢Õ߮տ“æ
Press the top end of the monitor
until it clicks.
The monitor turns upward.
To return the angle, press the bottom end of
the monitor.
按螢幕頂端直至它接上。
螢幕轉向上。
若要恢復原來角度,按螢幕底端。
모니터가 클릭할 때 까지 모니터의
윗쪽부위를 누릅니다.
모니터가 위로 젖혀집니다.
원상태의 각도로 돌아오려면, 모니 터의
아랫 부위를 누릅니다.
°¥∑’˪√–À≈“¥¥È“π∫π¢Õ߮տ“æ®π‰¥È¬‘π‡’¬ß§≈‘°
®Õ¿“æ®–À¡ÿπ‰ª¥È“π∫π
‡¡◊ËÕµÈÕß°“√°≈—∫ŸË¡ÿ¡‡¥‘¡ °¥∑’˪≈“¬¥È“π≈˓ߢÕ߮տ“æ
Other basic operations / 其它基本操作 / 기타 기본 조작 / °“√„™Èß“π‡∫◊ÈÕßµÈπÕ◊ËπÊ
Using optional
remote controller — RM-RK230
You can use JVC’s remote controller RM-RK230,
which supplied with some JVC receivers, to control
the monitor.
Before using the optional remote controller / 使用選擇性遙控器前 / 선택품목의 리모컨을 사용하기 전에 / °ËÕπ°“√„™È√’‚¡∑§Õπ‚∑√≈´÷Ë߇ªÁπÕÿª°√≥χ√‘¡
Remote sensor
遙感器
원격 센서
√’‚¡∑‡´Áπ‡´Õ√Ï
• Aim the remote controller directly at the
remote sensor on the monitor. Make sure
there is no obstacle in between.
• Do not expose the remote sensor to strong
light (direct sunlight or artificial lighting).
使用選擇性遙控器 — RM-RK230
您可以使用隨一些 JVC 接收器供應的 JVC 遙控器
RM-RK230 控制螢幕。
• 將遙控器直接對准本機上的遙感器。確保兩
者之間沒有障礙物。
• 切勿將遙控器暴露於強光照射處(直射的陽
光或人工光線)。
선택품목의 리모컨
사용하기— RM-RK230
다른 모델의 JVC 수신기에 공급된 JVC RM-RK230 의
리모컨으로 본 모니터를 조절할 수 있습니다.
•리모콘이 모니터의 원격 센서를 향하게하
십시오.리모콘과 모니터 사이에 장애물이
없어야 합니다.
•원격 센서를 직사광선이나 인공 조명 등
의 강한 빛에 노출시키지 마십시오.
°“√„™È√’‚¡∑§Õπ‚∑√≈´÷Ëß
‡ªÁπÕÿª°√≥χ√‘¡ — RM-RK230
§ÿ≥“¡“√∂„™È√’‚¡∑§Õπ‚∑√≈ JVC √ÿËπ RM-RK230
´÷Ëß„ÀÈ¡“æ√ÈÕ¡°—∫Õÿª°√≥Ï√—∫—≠≠“≥ JVC „π°“√§«∫§ÿ¡®Õ¿“扥È
• ‡≈Áß√’‚¡∑§Õπ‚∑√≈‰ª∑’ˇ´Áπ‡´Õ√Ï∫π®Õ¡Õ𑇵Õ√Ï
¥Ÿ„ÀÈ·πË„®«Ë“ ‰¡Ë¡’‘Ëß„¥°’¥¢«“ß∑“ß
• լ˓߄ÀÈ√’‚¡∑‡´Áπ‡´Õ√Ï‚¥π·ß·¥¥®—¥ (·ß·¥¥‚¥¬µ√ß
À√◊Õ·ß®“°À≈Õ¥‰ø)
Main elements and features / 主要組成部分及作用 / 주요 요소 및 기능 / ÕߧϪ√–°Õ∫·≈–§ÿ≥¡∫—µ‘”§—≠
MONITOR CONTROL
1 (standby/on) button
• Turns on the power if pressed.
• Turns off the power if pressed and
held.
2 MODE button
• Selects the playback source.
3 ASPECT button
• Changes the aspect ratio of the screen.
4 MENU button
• Calls up the menu, then selects the
adjustable menu items.
5 / buttons
• Adjust the level of the selected item
or select an appropriate setting for
selected item
DVD/RECEIVER CONTROL
6 Receiver control buttons
Controllable only if your car receiver
which is connected to this monitor is one
of the JVC receivers.
Using optional cordless headphones
You can use JVC’s optional cordless headphones
KS-HP2 to listen to the playback sounds of the
external component.
Playback sounds are transmitted through IR
transmitters to the cordless headphones.
When using the headphones, set to the monitor menu
item “IR” to “ON.” (For details, see next section.)
NOTES:
• Some noise may occur at some positions on the
car depending on the car type or the window type.
In that case, use the headphones at the position
where no noise occurs.
• �Some noise may occur at some positions on the
car when using two or more monitors. In that case,
set “IR” to “OFF” on the monitors one by one until
the noise occurs no more. (For details, see next
section.)
使用選購的無線耳機
您可以選購 JVC 的 KS-HP2 型無線耳機收聽外接組件
播出的聲音。
播出的聲音從紅外線發射器傳送至無線耳機。
使用耳機時,將顯示器菜單項目“IR”設定為
“ON”。(詳情請參閱下一部分。)
備註:
• 視汽車種類或車窗種類而定,其中一些可能會發出
吵雜聲。在這情況下,請 選擇 沒有 吵雜 聲的 位置使
用耳機。
• 若使用一個或多個熒幕,車子的一些位置可能會發出
超噪 音 。在這情 況 下,逐一 將各熒幕 上 的 “IR ” 設
至“OFF”(關閉)直至沒有噪音。(請參閱下章有關
細節。)
顯示器控制
1 (待機/開機)鍵
• 若短暫地按則啟動電源。
• 若按則開關電源。
2 MODE 鍵
• 選擇播放源。
3 ASPECT 鍵
• 切換營幕的縱橫比。
4 MENU 鍵
•
調出菜單,然後選擇可以調整菜單項目。
5 / 鍵
• 調整所選項目水平或為所選項目選擇適
當的設定。
DVD/接收機控制
6 接收機控制鍵
僅在與顯示器相連接的汽車接收機為
JVC接收機時才可如此操作。
선택 품목인 무선헤드폰 사용하기
JVC 무선 헤드폰 (선택 품목) KS-HP2 를 사용하여
외부 구성품의 재생 사운드를 들을 수 있습니다.
재생 사운드는 IR 트랜스미터를 통해 무선 헤드폰
으로 전송됩니다. 헤드폰을 사용할 경우 모니터 메
뉴 항목 “IR” 을 “ON” 으로 설정하십시오. (다음 섹
션 참조.)
참고:
• 자동차나 창문의 유형에 따라 자동차 내의 특정 위
치에서 잡음이 나는 경우도 있습니다. 그럴 경우,
잡음이 나지 는 위치에서 헤드폰을 사용하시기 바
랍니다.
• 두 개 또는 그 이상의 모니터를 사용할 때에는 자
동차 내의 특정 위치에서 잡음이 나는 경우도 있습
니다. 그럴 경우, 잡음이 나지 않을 때 까지 각 모
니터마다 “IR” 을 “OFF” 로 설정하십시오. (다음
섹션 참조.)
3
MONITOR CONTROL
1 (대기/켜기)버튼
• 버튼을 눌러 전원을 켭니다.
• 버튼을 길게 눌러 전원을 끕니다.
2 MODE 버튼
• 재생 소스를 선택합니다.
3 ASPECT 버튼
4 MENU 버튼
5 / 버튼
그에대한 적절한 설정을 선택합니다.
DVD/RECEIVER CONTROL
6 수신기 제어 버튼
이 모니터에 연결된 자
동차 수신기가 JVC 수신기인 경우에만
제어할 수 있습니다.
• 화면의 비율을 변경합니다.
• 메뉴를 호출한 후 조절 가능한 메뉴
항목을 선택합니다.
• 선택한 항목의 레벨을 조정하거나
°“√„™ÈÀŸø—߉√È“¬´÷Ë߇ªÁπÕÿª°√≥χ√‘¡
§ÿ≥“¡“√∂„™ÈÀŸø—߉√È“¬ KS-HP2 ´÷Ë߇ªÁπÕÿª°√≥χ√‘¡¢Õß JVC
‡æ◊ËÕø—߇’¬ß∑’ˇ≈Ëπ®“°Õÿª°√≥Ï¿“¬πÕ°‰¥È
‡’¬ß∑’ˇ≈Ëπ®–∂Ÿ°∂Ë“¬∑Õ¥ºË“πÕÿª°√≥ÏËß—≠≠“≥ IR ¡“¬—ßÀŸø—߉√È“¬
‡¡◊ËÕ„™ÈÀŸø—ß „Àȵ—Èß√“¬°“√‡¡πŸ “IR” ∫π®Õ¿“扪 “ON”
(¥Ÿ√“¬≈–‡Õ’¬¥‰¥È®“°À¡«¥∂—¥‰ª)
À¡“¬‡Àµÿ:
• ‡’¬ß√∫°«πÕ“®‡°‘¥¢÷Èπ∫“ß®ÿ¥„π√∂¬πµÏ µ“¡ª√–‡¿∑¢Õß√∂¬πµÏ
À√◊ÕÀπÈ“µË“ß „π°√≥’‡™Ëππ’È „ÀÈ„™ÈÀŸø—ß„πµ”·ÀπËß∑’ˉ¡Ë‡°‘¥‡’¬ß√∫°«
π¢÷Èπ
• ‡’¬ß√∫°«πÕ“®‡°‘¥¢÷Èπ∫“ß®ÿ¥„π√∂¬πµÏ‡¡◊ËÕ„™È®Õ¿“æµ—Èß·µËÕ
߮բ÷Èπ‰ª „π°√≥’¥—ß°≈Ë“« „Àȵ—Èߧ˓ “IR” ‡ªÁπ “OFF”
∑’ˮտ“æ∑’≈–®Õ®π°«Ë“‡’¬ß√∫°«π®–À“¬‰ª (ÕË“π√“¬≈–
‡Õ’¬¥‡æ‘Ë¡‡µ‘¡‰¥È®“°∫∑∂—¥‰ª)
°“√§«∫§ÿ¡®Õ¿“æ
1 ªÿË¡ (·µπ¥Ï∫“¬/‡ª‘¥‡§√◊ËÕß)
• ‡ª‘¥‡§√◊ËÕßÀ“°°¥ªÿË¡π’È
• ª‘¥‡§√◊ËÕßÀ“°°¥ªÿË¡π’ȧȓ߉«È
2 ªÿË¡ MODE
• ‡≈◊Õ°´Õ√Ï∑’Ë®–‡≈Ëπ
3 ªÿË¡ ASPECT
• ‡ª≈’Ë¬π—¥«π¿“æ∫πÀπÈ“®Õ
4 ªÿË¡ MENU
• ‡√’¬°‡¡πŸ ‡æ◊ËÕ‡≈◊Õ°√“¬°“√∫π‡¡πŸ ∑’Ë“¡“√∂ª√—∫‰¥ÈÈ
5 ªÿË¡ /
•
ª√—∫√–¥—∫√“¬°“√∑’ˇ≈◊Õ° À√◊Õ‡≈◊Õ°°“√µ—Èߧ˓∑’ˇÀ¡“–
¡ ”À√—∫√“¬°“√∑’ˇ≈◊Õ°
ªÿË¡§«∫§ÿ¡ DVD/‡§√◊ËÕß√—∫
6 ªÿË¡§«∫§ÿ¡‡§√◊ËÕß√—∫
“¡“√∂§«∫§ÿ¡‰¥È ∂È“‡§√◊ËÕß√—∫„π√∂¬πµÏ∑’ˇ™◊ËÕ¡µËÕ°—
∫®Õ¡Õ𑇵Õ√Ïπ’È ‡ªÁπ‡§√◊ËÕß√—∫¢Õß JVC
Page 16

4
Adjustments / 調整 / 조정 / °“√ª√—∫·µàß
BRIGHT
CONTRAST
TINT
COLOR
IR ON
DIMMER
WHITE LED ON
Using the monitor menu
You can make your own display adjustments using
the menu.
• For the adjustable items, see below.
使用顯示器菜單
您可以使用本菜單進行個人顯示調整。
• 請參閱以下有關可調整項目。
Basic procedure / 基本步驟 / 기본 절차 / ¢—ÈπµÕπ‡∫◊ÈÕßµÈπ
1 1 Call up the menu.
Menu selection goes off if other
operations are done or no operation is
done for about 5 seconds.
Current menu item
當前菜單項目
현재 메뉴 항목
√“¬°“√‡¡πŸª—®®ÿ∫—π
2 2 Select an item you want to
adjust.
모니터 메뉴 사용
메뉴를 사용하여 화면 표시를 원하는 대로 조정할 수
있습니다.
• 조절가능한 항목에 대해서는, 아래를 참조하십시
1 調出菜單。
若已完成其他操作或者
有進行任何操作,菜單選項消失。
오.
5
秒鐘左右沒
1 메뉴를 호출합니다.
메뉴 선택 사항 다른 작업을 하거나
5
초 동안 아무런 조작도 하지 않으
면꺼집니다.
°“√„™È‡¡πŸ‡¡πŸ∫π®Õ¡Õ𑇵Õ√Ï
∑Ë“π“¡“√∂√È“ßÀπÈ“®Õ¢Õßµπ‡Õß ‚¥¬„™È‡¡π
• ”À√—∫√“¬°“√∑’˪√—∫‰¥È ¥Ÿ∑’˥ȓπ≈Ë“ß
1 ‡√’¬°‡¡πŸ¢÷Èπ¡“
°“√‡≈◊Õ°‡¡πŸ®–ª‘¥‰ª À“°¡’°“√„™Èß“πÕ◊Ëπ
À√◊Õ‰¡Ë¡’°“√„™Èß“πª√–¡“≥ 5 «‘π“∑’
2 選擇想要調整之項目。 2 조정할 항목을 선택합니다. 2 ‡≈◊Õ°√“¬°“√∑’˵ÈÕß°“√ª√—∫·µËß
3 3 Adjust the level of the
selected item (or select an
appropriate setting for the
3 調整所選項目的水平(或為所
選項目選擇合適的設定)。
3 선택한 항목의 레벨을 조정하
거나 해당 항목에 대한 적절
한설정을 선택합니다.
3 ª√—∫√–¥—∫„π√“¬°“√∑’ˇ≈◊Õ°
(À√◊Õµ—È ß§Ë“„ÀȇÀ¡“–¡”À√—
∫√“¬°“√∑’ˇ≈◊Õ°)
selected item).
4 4 Exit from the menu.
Press the button repeatedly until the
menu disappears.
4 退出菜單。
重複按鍵直到菜單消失。
4 메뉴를 종료합니다.
메뉴가 지워질 때까지 버튼을 반복해
서 누릅니다.
4 ÕÕ°®“°‡¡π
°¥ªÿË¡π’È´È”Ê ®π°√–∑—Ë߇¡πŸ∂Ÿ°≈∫ÕÕ°‰ª
Adjustable items on the monitor menu / 顯示器菜單之可調整項目 / 모니터 메뉴의 조정 가능한 항목 / √“¬°“√∑’Ë“¡“√∂ª√—∫·µË߉¥È ∫π‡¡πŸ¢Õ߮աÕ𑇵Õ√
BRIGHT:
CONTRAST:
TINT:
COLOR:
IR*:
DIMMER:
WHITE LED:
Adjust this if the picture is too bright or too dark.
• Adjustable range: –10 to +11
• Initial level: 0 (center)
Control the degree of difference between the
lightest and darkest parts of the picture.
• Adjustable range: –10 to +11
• Initial level: 0 (center)
Adjust this if the human skin color is unnatural.
• Adjustable range: –10 to +11
• Initial level: 0 (center)
Adjust the color of the picture—lighter or darker.
• Adjustable range: –10 to +11
• Initial level: 0 (center)
Set to “ON” when you listen to the playback
sounds using JVC’s optional cordless
headphones KS-HP2.
• Selectable settings: ON, OFF
• Initial setting: ON
Adjust the light of the screen and the white LED
when you turn on the headlights.
• Adjustable range: –5 to +5
• Initial level: 0 (center)
Light on or off the white LED when you turn on
the monitor.
• Selectable settings: ON, OFF
• Initial setting: ON
圖像太亮或太暗時調整此項。
• 可調整範圍:–10 至 +11
• 初始水平:0(中心位置)
控制圖像最亮及最暗部分的不同程度。
• 可調整範圍:–10 至 +11
• 初始水平:0(中心位置)
膚色不自然調整此項。
• 可調整範圍:–10 至 +11
• 初始水平:0(中心位置)
調整圖像色彩—較淡或較濃。
• 可調整範圍:–10 至 +11
• 初始水平:0(中心位置)
使用 JVC 選購的 KS-HP2 型無線耳機收聽播放
源聲音時,將此項設為“ON”。
• 可選設定:ON,OFF
• 初始設定:ON
當您打開前車燈時,調整螢幕亮度及白色 LED
。
• 可調整範圍:–5 至 +5
• 初始水平:0(中心位置)
當您啟動顯示器時,白色 LED 點亮或熄滅。
• 可選設定:ON,OFF
• 初始設定:ON
영상이 너무 밝거나 어두운 경우 조정합니다.
• 조정 가능한 범위: –10 ~ +11
• 초기 레벨: 0 (중앙)
영상의 가장 밝은 부분과 가장 어두운 부분의
차이를 제어합니다.
• 조정 가능한 범위: –10 ~ +11
• 초기 레벨: 0 (중앙)
사람의 피부색이 자연스럽지 않은 경우 조정
합니다.
• 조정 가능한 범위: –10 ~ +11
• 초기 레벨: 0 (중앙)
영상의 색상을 더 흐리거나 진하게 조정합니다.
• 조정 가능한 범위: –10 ~ +11
• 초기 레벨: 0 (중앙)
JVC 무선 헤드폰 KS-HP2 (선택 품목)로 재생
사운드를 듣을 경우 “ON” 으로 설정합니다.
• 선택 가능한 설정: ON, OFF
• 초기 설정: ON
전조등을 켤 때 화면의 밝기와 백색 LED 를 조
정합니다.
• 조정 가능한 범위: –5 ~ +5
• 초기 레벨: 0 (중앙)
모니터를 켤 때 백색 LED 를 켜거나 끕니다.
• 선택 가능한 설정: ON, OFF
• 초기 설정: ON
ª√—∫∑’Ëπ’Ë À“°¿“æ«Ë“ßÀ√◊Õ¡◊¥‡°‘π‰ª
• ™Ë«ß∑’Ë“¡“√∂ª√—∫·µË߉¥È: –10 ∂÷ß +11
• √–¥—∫‡√‘Ë¡µÈπ: 0 (°≈“ß)
§«∫§ÿ¡√–¥—∫§«“¡·µ°µË“ß √–À«Ë“ßË«π∑’Ë«Ë“ß∑’Ëÿ¥
°—∫Ë«π∑’Ë¡◊¥∑’Ëÿ¥¢Õß¿“æ
• ™Ë«ß∑’Ë“¡“√∂ª√—∫·µË߉¥È: –10 ∂÷ß +11
• √–¥—∫‡√‘Ë¡µÈπ: 0 (°≈“ß)
ª√—∫∑’Ëπ’Ë À“°’º‘«¢Õߧπ„π®Õ‰¡Ë‡ªÁπ∏√√¡™“µ‘
• ™Ë«ß∑’Ë“¡“√∂ª√—∫·µË߉¥È: –10 ∂÷ß +11
• √–¥—∫‡√‘Ë¡µÈπ: 0 (°≈“ß)
ª√—∫’¢Õß¿“æó«Ë“ߢ÷ÈπÀ√◊Õ¥”≈ß
• ™Ë«ß∑’Ë“¡“√∂ª√—∫·µË߉¥È: –10 ∂÷ß +11
• √–¥—∫‡√‘Ë¡µÈπ: 0 (°≈“ß)
µ—È߉ª∑’Ë “ON” ‡¡◊ËÕø—߇’¬ß∑’ˇ≈Ëπ ‚¥¬„™ÈÀŸø—߉√È“¬ KS-HP2
´÷Ë߇ªÁπÕÿª°√≥χ√‘¡¢Õß JVC
• °“√µ—Èߧ˓∑’Ë“¡“√∂‡◊Õ∂‰¥ÈÈ: ON, OFF
• °“√µ—Èߧ˓‡√‘Ë¡µÈπ: ON
ª√—∫·ß¢ÕßÀπÈ“®Õ ·≈–‰ø LED ’¢“« ‡¡◊ËÕ‡ª‘¥‰øÀπÈ“√∂
• ™Ë«ß∑’Ë“¡“√∂ª√—∫·µË߉¥È: –5 ∂÷ß +5
• √–¥—∫‡√‘Ë¡µÈπ: 0 (°≈“ß)
‡ª‘¥À√◊Õª‘¥‰ø LED ’¢“« ‡¡◊ËÕ‡ª‘¥®Õ¡Õ𑇵Õ√Ï
• °“√µ—Èߧ˓∑’Ë“¡“√∂‡◊Õ∂‰¥ÈÈ: ON, OFF
• °“√µ—Èߧ˓‡√‘Ë¡µÈπ: ON
* Turn off the headphones before changing the “IR”
setting.
*
更改“IR”設定之前,請先關閉耳機。
* “IR”
설정을 변경하기 전에 헤드폰을 끄십시오.
* ª‘¥ÀŸø—ß°ËÕπ®–‡ª≈’ˬπ§Ë“∑’˵—ÈߢÕß “IR”
Page 17
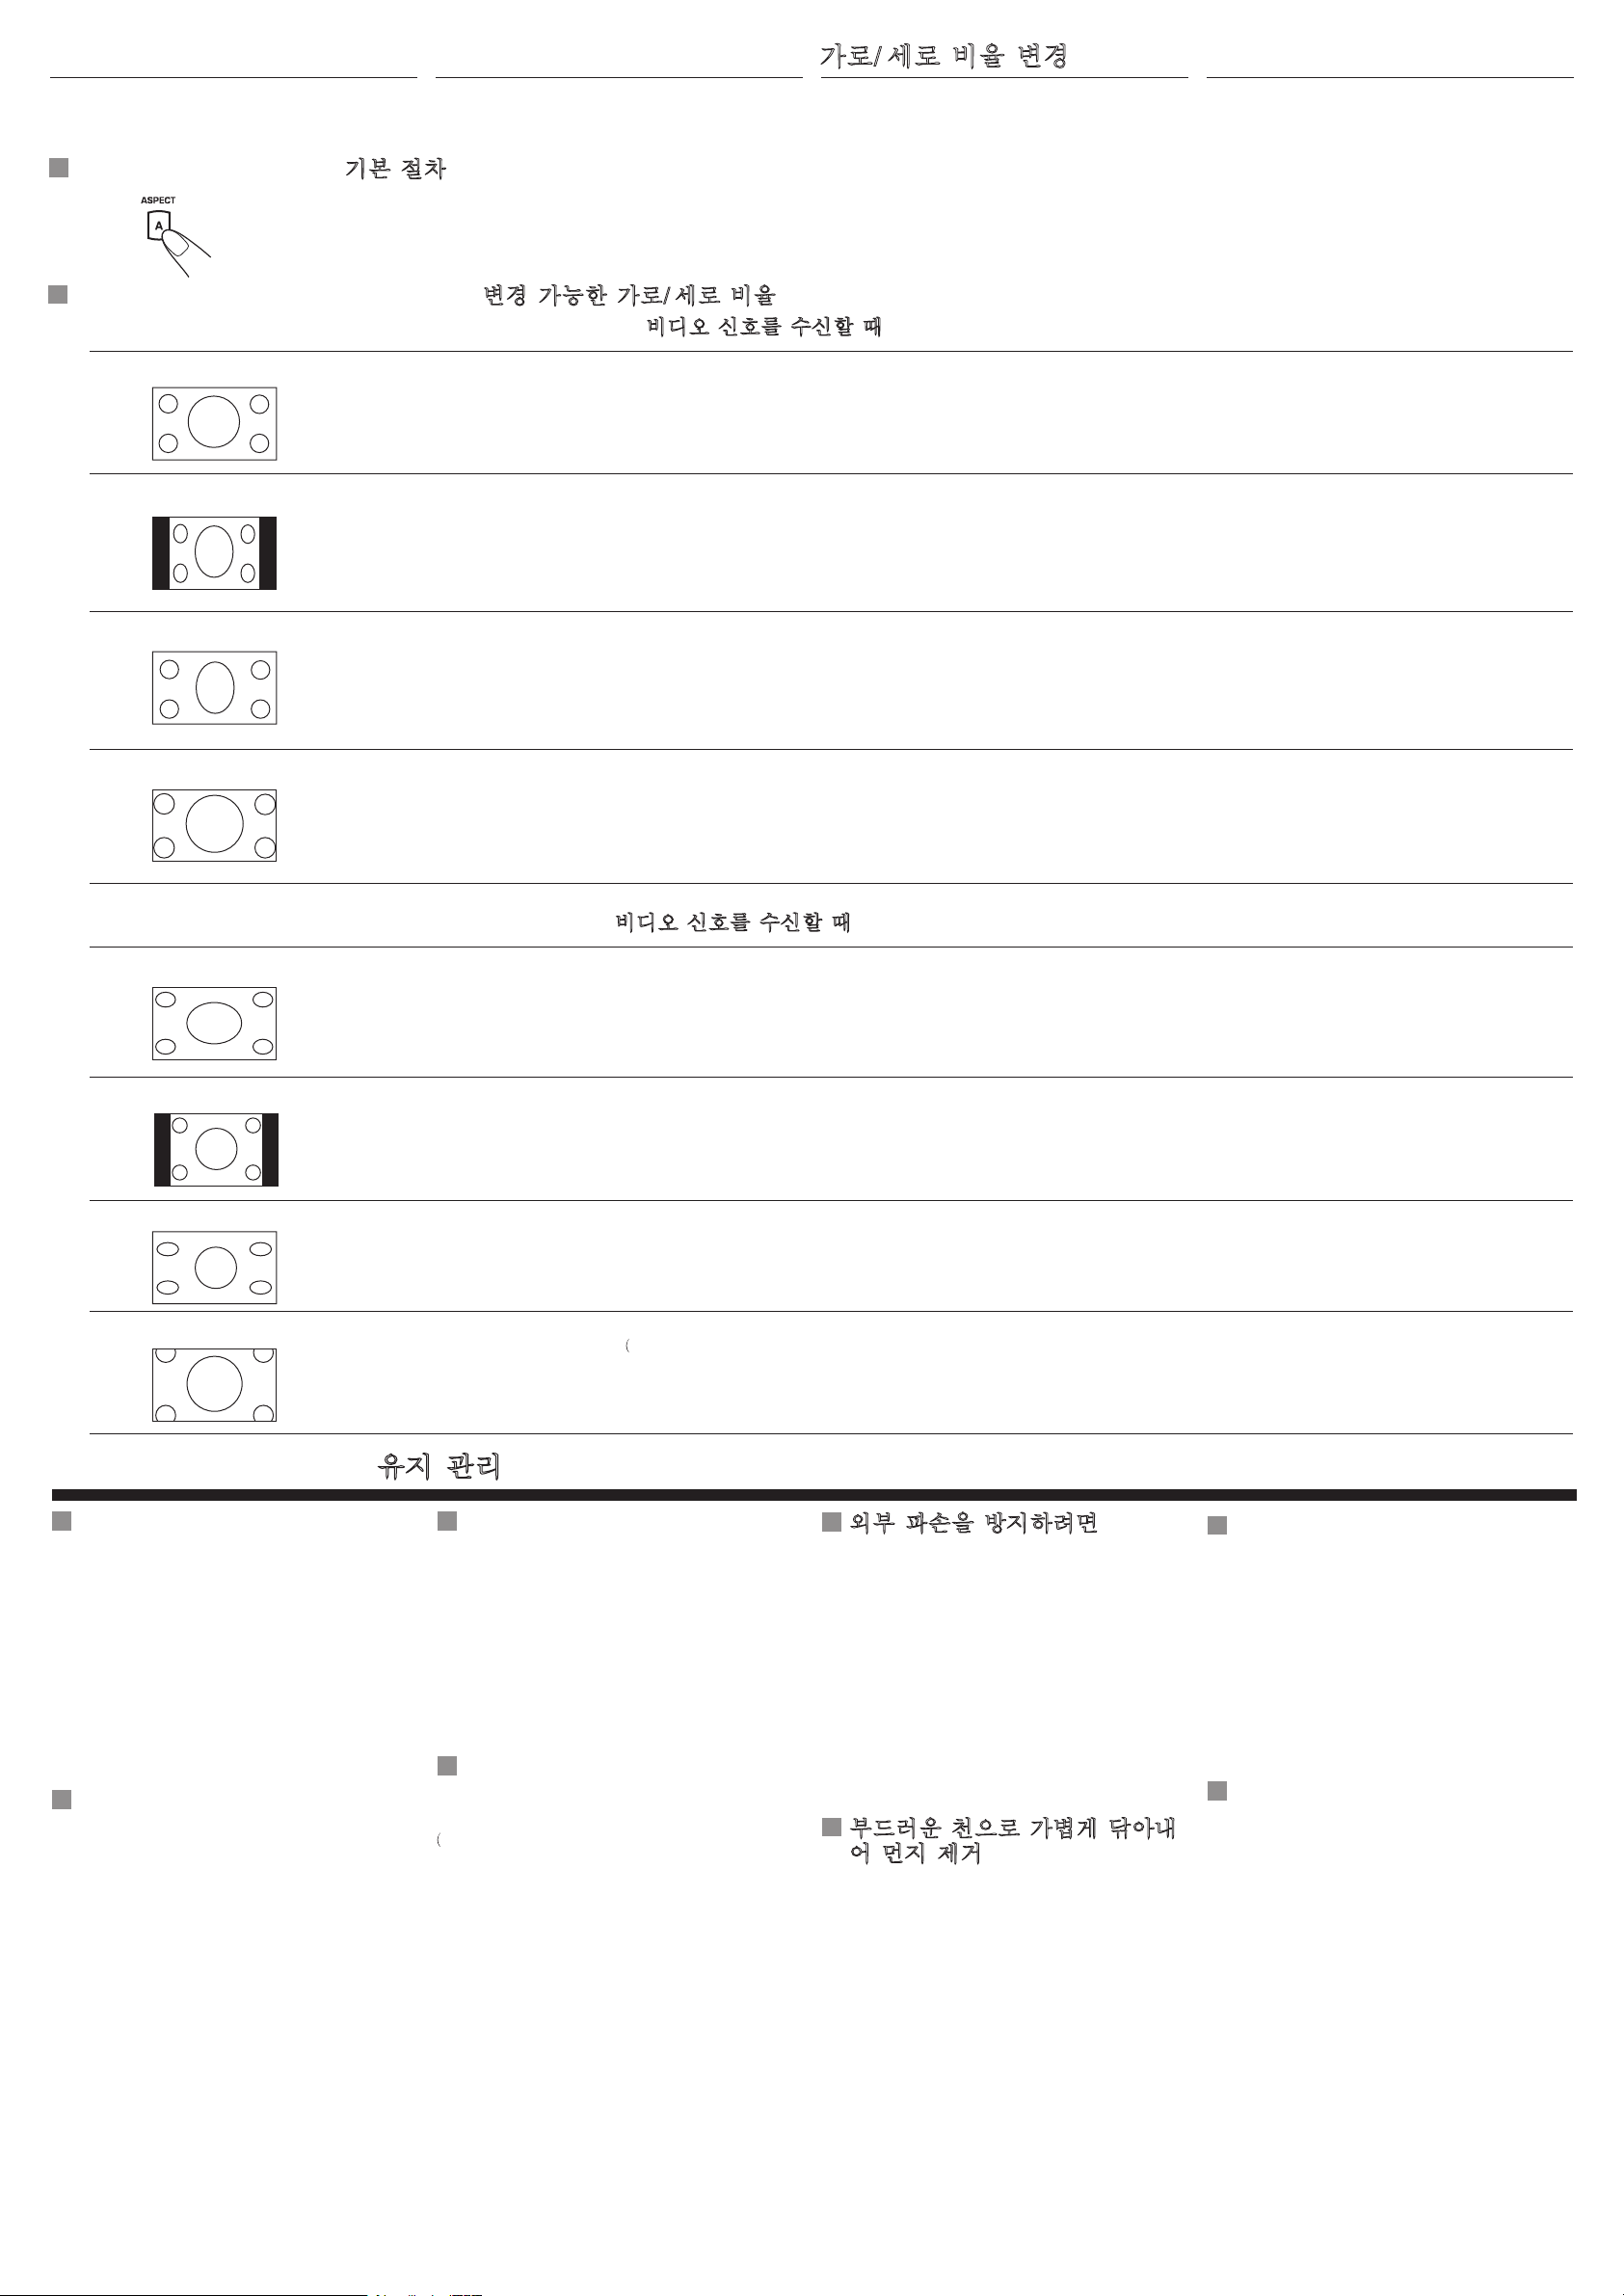
5
Changing the aspect ratio
切換縱橫比
가로/세로 비율 변경
°“√‡ª≈’ˬπ—¥Ë«π¿“æ
You can select an appropriate aspect ratio for the
playback video signals.
您可以為播放視頻信號選擇合適的縱橫比。
재생 비디오 신호에 맞는 적절한 가로/세로 비율을
선택할 수 있습니다.
Basic procedure / 基本步驟 / 기본 절차 / ¢—ÈπµÕπ‡∫◊ÈÕßµÈπ
Each time you press the button, aspect ratio
changes.
您每次按該鍵縱橫比會依次切換。
버튼을 누를 때마다 가로/세로 비율이 바
뀝니다.
Changeable aspect ratio / 可切換之縱橫比 / 변경 가능한 가로/세로 비율 / —¥Ë«π¿“æ∑’Ë“¡“√∂‡ª≈’ˬπ‰¥È
When incoming 16:9 video signal / 當輸入 16:9 視頻信號時 / 16:9 비디오 신호를 수신할 때 / ‡¡◊ËÕ—≠≠“≥«‘¥’‚Õ‡¢È“‡§√◊ËÕ߇ªÁπ 16:9
FULL:
NORMAL:
JUST:
Pictures are fully shown on the screen.
• In some cases, the black bars may be
shown at the top and bottom sides of the
screen.
Pictures are reduced horizontally.
• The black bars will be shown at the left
and right sides of the screen.
• In some cases, the black bars may be
shown also at the top and bottom sides of
the screen.
The middle of pictures are reduced
horizontally, and the left and right sides of
the picture enlarged horizontally.
• In some cases, the black bars may be
shown at the top and bottom sides of the
screen.
圖像占滿螢幕。
• 在某些情況下可能會有黑欄出現在螢幕頂
部和底部。
圖像被橫向縮減。
• 黑欄將會出現在螢幕左部和右部。
• 在某些情況下可能會有黑欄出現在螢幕頂
部和底部。
圖像的中部被橫向縮減,圖像的左部和右部
被橫向放大。
• 在某些情況下可能會有黑欄出現在螢幕頂
部和底部。
영상이 화면에 가득차게 표시됩니다.
• 간혹 화면 위, 아래에 검은 띠가 표시될
수도 있습니다.
영상이 가로로 줄어듭니다.
• 화면 왼쪽과 오른쪽에 검은 띠가 표시됩
니다.
• 간혹 화면 위, 아래에 검은 띠가 표시될
수도 있습니다.
영상이 가로로 늘어납니다. 확장 비율이 화
면 양쪽 방향으로 증가합니다.
• 간혹 화면 위, 아래에 검은 띠가 표시될
수도 있습니다.
∑Ë“π“¡“√∂‡≈◊Õ°—¥Ë«π¿“æ∑’ˇÀ¡“–¡ ”À√—∫—≠≠“≥«‘¥’‚Õ∑’ˇ≈Ëπ‰¥È
·µË≈–§√—Èß∑’Ë°¥ªÿË¡π’È —¥Ë«π¿“æ®–‡ª≈’ˬπ‰ª
¿“淥߇µÁ¡ÀπÈ“®Õ
• ∫“ߧ√—Èß Õ“®¡’·∂∫’¥’·¥ß∑’˥ȓπ∫π ·≈–
≈˓ߢÕßÀπÈ“®Õ
¿“æ®–≈¥¢π“¥≈ß„π·π«πÕπ
• ®–¡’·∂∫’¥”∑’˥ȓπ´È“¬ ·≈–¢«“¢ÕßÀπÈ“®Õ
• ∫“ߧ√—Èß Õ“®¡’·∂∫’¥”·¥ß∑’˥ȓπ∫π
·≈–≈˓ߢÕßÀπÈ“®Õ¥È«¬
à«π°≈“ߢÕß¿“æ®–≈¥≈ß∑“ß·π«πÕπ à«π¥â“π´Ñ“¬·≈–
¥â“π¢«“¢Õß¿“æ®–∂Ÿ°¢¬“¬ÕÕ°∑“ß·π«πÕπ
• ∫“ߧ√—Èß Õ“®¡’·∂∫’¥’·¥ß∑’˥ȓπ∫π ·≈–
≈˓ߢÕßÀπÈ“®Õ
ZOOM:
Pictures are enlarged on the screen so that
no black bars will be shown on the screen.
(The entire picture cannot be shown on the
screen.)
螢幕上的圖像被放大,因而不出現黑欄。
(圖像在螢幕上可能顯示不全。)
검은 띠가 화면에 표시되지 않도록 영상이
확대됩니다. (화면에 전체 영상을 표시할
수없습니다.)
When incoming 4:3 video signal / 當輸入 4:3 視頻信號時 / 4:3 비디오 신호를 수신할 때 / ‡¡◊ËÕ—≠≠“≥«‘¥’ ‚Õ‡¢È“‡§√◊ËÕ߇ªÁπ 4:3
FULL:
NORMAL:
JUST:
Pictures are enlarged horizontally and are
fully shown on the screen.
Pictures are shown at the center of the
screen.
• The black bars will be shown at the left
and right sides of the screen.
Pictures are enlarged horizontally. The
extension ratio increases toward the both
sides of the screen.
圖像被橫向放大並占滿螢幕。
圖像顯示在螢幕的中央。
• 黑欄將會出現在螢幕左部和右部。
圖像被橫向放大並占滿螢幕。其拉伸比向螢
幕兩邊擴展。
영상이 가로 방향으로 확대되어 화면 전체
에 표시됩니다.
영상이 화면 가운데에 표시됩니다.
• 화면 왼쪽과 오른쪽에 검은 띠가 표시됩
니다.
영상이 가로 방향으로 확대되어 화면 전체
에 표시됩니다. 확장 비율이 화면 양쪽 방
향으로 증가합니다.
¿“æ∑’Ë·¥ß®–∂Ÿ°¢¬“¬∫π®Õ¿“æ ‡æ√“–©–π—Èπ®–‰
¡Ë¡’·∑Ëß’¥”ª√“°Ø∫π®Õ¿“æ (¿“æ∑—ÈßÀ¡¥®–
∂Ÿ°·¥ß∫π®Õ¿“æ)
¿“æ∑’Ë·¥ß®–∂Ÿ°¢¬“¬∑“ß·π«πÕπ·∫∫‡µÁ¡ÀπÈ“®Õ
¿“æ∑’Ë·¥ß®–ª√“°Ø∑’Ë°÷Ëß°≈“ߢÕßÀπÈ“®Õ
• ®–¡’·∂∫’¥”∑’˥ȓπ´È“¬ ·≈–¢«“¢ÕßÀπÈ“®Õ
¿“æ∑’Ë·¥ß®–∂Ÿ°¢¬“¬∑“ß·π«πÕπ·∫∫‡µÁ¡ÀπÈ“®Õ
—¥Ë«π∑’Ë¢¬“¬‡æ‘Ë¡ÕÕ°‰ª∑—È ßÕߥȓπ¢ÕßÀπÈ“®Õ
ZOOM:
Pictures are enlarged on the screen so that
no black bars will be shown on the screen.
(The entire picture cannot be shown on the
screen.)
螢幕上的圖像被放大,因而不出現黑欄。
圖像在螢幕上可能顯示不全。)
Maintenance / 保養 / 유지 관리 / °“√¥Ÿ·≈√—°…“
To prevent damage to the exterior
• Do not apply pesticides, benzine, thinner or other
volatile substances to the monitor.
The cabinet surface primarily consists of plastic
materials.
• Do not wipe with benzine, thinner or similar
substances because this will results in discoloration
or removal of the paint.
• When a cloth with a cleansing chemical is used,
follow the caution points.
– Do not leave the unit in contact with rubber or
vinyl products for long periods of time.
– Do not use cleansers which have polishing
granules because this could damage the cabinet.
Clean off dirt by wiping lightly with a
soft cloth
When the cabinet is very dirty, wipe with a well-wrung
cloth dipped in a kitchen cleanser (neutral) thinned by
water and then go over the same surface with a dry
cloth.
(Since there is the possibility of water drops getting
inside of the unit, do not directly apply cleanser to the
surface.)
如何避免損傷外表
• 切勿讓殺蟲劑,苯,稀釋劑或其他揮發性物質濺落到
機器上。
機殼表面主要由塑料製成。
• 切勿以苯,稀釋劑或類似物擦拭機器,因為這些物質
將導致機殼退色或掉漆。
• 當使用布沾上清潔劑擦拭機殼時,請注意以下幾點。
– 切勿讓機器長時間接觸橡膠或塑料製品。
– 切勿使用含有拋光顆粒的清潔濟,否則將損壞機
殼。
請用軟布輕柔地擦去污垢
當機器髒污時,請用一軟布沾上以水稀釋過的廚房用
清潔劑(中性)擦拭,然後再用乾布擦乾。
因為水滴有可能會進入機體,所以請勿將清潔劑直接
抹到機體表面。)
검은 띠가 화면에 표시되지 않도록 영상이
확대됩니다. (화면에 전체 영상을 표시할
수없습니다.)
외부 파손을 방지하려면
• 모니터에 살충제, 벤젠, 시너 또는 기타 휘발성 물
질을 사용하지 마십시오.
캐비닛 표면은 주로 플라스틱 재질로 구성되어 있
습니다.
• 페인트가 변색되거나 벗겨질 수 있으므로 벤젠, 시
너 또는 유사한 물질로 닦지 마십시오.
• 화학 세정제를 묻힌 천을 사용할 때는 다음 주의
사항을 따르십시오.
– 장치를 고무나 비닐에 장시간 접촉된 상태로 두
지마십시오.
– 광택제가 포함된 세정제로 캐비닛을 닦으면 캐비
닛이 손상될 수 있으므로 주의하십시오.
부드러운 천으로 가볍게 닦아내
어 먼지 제거
캐비닛이 매우 지저분한 경우에는 주방용 세제
(중성)를 물로 희석시킨 후 천에 묻혀서 닦아낸 후마
른 천으로 닦아주십시오.
(장치 내부에 물이 떨어질 수 있으므로 표면에 직접
세제를 사용하지 마십시오.)
¿“æ∑’Ë·¥ß®–∂Ÿ°¢¬“¬∫π®Õ¿“æ
‡æ√“–©–π—Èπ®–‰¡Ë¡’·∑Ëß’¥”ª√“°Ø∫π®Õ¿“æ
(¿“æ∑—ÈßÀ¡¥®–∂Ÿ°·¥ß∫π®Õ¿“æ)
ªÈÕß°—𧫓¡‡’¬À“¬®“°¿“¬πÕ°
• ‰¡Ë§«√„™È¬“¶Ë“·¡≈ß ‡∫π´’π ∑‘π‡πÕ√Ï À√◊Õ“√√–‡À¬Õ◊Ëπ°—∫‡§√◊ËÕßπ’È
‡π◊ËÕß®“°º‘«¥È“ππÕ°¢Õßµ—«º≈‘µ¿—≥±Ï∑”®“°æ≈“µ‘°
• ‰¡Ë§«√„™È‡∫π´’π, ∑‘π‡πÕ√Ï À√◊Õ“√Õ◊Ëπ∑’Ë¡’≈—°…≥–§≈È“¬°—π
‡π◊ËÕß®“°Õ“®∑”„ÀÈ’º‘«‡°‘¥√Õ¬¥Ë“ßÀ√◊Õ’≈Õ°
• ‡¡◊ËÕ‡™Á¥∑”§«“¡–Õ“¥¥È«¬“√‡§¡’ §«√ªØ‘∫—µ‘µ“¡¢—È πµÕπ¥—ßπ’È
– ‰¡Ë§«√ª≈ËÕ¬„ÀȺ‘«ÀπÈ“¢Õßµ—«‡§√◊ËÕß—¡º—°—∫µ—«∑”§«“¡–
Õ“¥À√◊Õº≈‘µ¿—≥±Ï‰«π‘≈‰«È‡ªÁπ√–¬–‡«≈“π“π
– լ˓„™ÈπÈ”¬“∑”§«“¡–Õ“¥ ∑’Ë¡’°ÈÕπ¢—¥¡—π‡≈Á°Ê ‡æ√“–®–∑”„Àȵ—
«‡§√◊ËÕ߇’À“¬‰¥
«‘∏’∑”§«“¡–Õ“¥‘Ëß°ª√°‚¥¬°“√‡™Á¥
∂Ÿ¥È«¬ºÈ“ÕËÕππÿË¡
‡¡◊ËÕµ—«‡§√◊ËÕß°ª√°¡“°Ê „ÀÈ„™ÈºÈ“™ÿ∫πÈ”¬“∑”§«“¡–Õ“¥„π§√—«
(‡ªÁπ°≈“ß) º¡πÈ”∫‘¥·ÀÈ߇™Á¥∑”§«“¡–Õ“¥ ·≈È«„™ÈºÈ“·ÀÈ߇™Á¥´È”
(‡¡◊ËÕ¡’À¬¥πÈ”´÷¡‡¢â“‰ª„π‡§√◊ËÕß ‰¡à§«√„™âπÈ”¬“∑”§«“¡–
Õ“¥º‘«Àπâ“‚¥¬µ√ß)
Page 18

Troubleshooting / 故障排除 / 문제 해결 /
°“√·°È ‰¢ª—≠À“‡∫◊ÈÕßµÈπ
What appears to be trouble is not always
serious. Check the following points before
calling a service center.
所出現的故障並非總是嚴重問題。在向微修中心求助
之前請先檢查以下几點。
Symptoms / 症狀 / 증상 / Õ“°“√ Causes / 原因 / 원인 /
• Colored spots (red, blue and green) appear on the screen.
• 帶顏色的斑點(紅色、藍色和綠色)在螢幕上出現。
• 빨간색, 파란색, 녹색 반점이 화면에 나타납니다.
• ®ÿ¥’ (·¥ß øÈ“ ·≈–‡¢’¬«) ∑’˪√“°Ø¢÷Èπ∫π®Õ¿“æ
• No picture appears and sound is not heard.
• 不出圖像亦聽不到聲音。
• 영상이 나타나지 않으며 사운드도 들리지 않습니다.
• ‰¡Ë¡’¿“æª√“°Ø ·≈–‰¡Ë‰¥È¬‘π‡’¬ß
• The unit does not work at all.
• 本機完全不能操作。
• 리시버가 전혀 작동하지 는다.
• ‡§••ËÕ߉¡à∑”ß“•
This is a characteristic of liquid crystal panels and is not a malfunction.
此為液晶面板之特徵而非故障。
이는 액정 패널의 특성이며 오작동이 아닙니다.
Õ“°“√‡À≈Ë“π’ȇªÁπ≈—°…≥–‡©æ“–¢Õ ߮շ∫∫§√‘µ—≈‡À≈« ·≈–‰¡Ë„™ËÕ“ °“√º‘¥ª°µ‘„¥Ê
The cord is not connected correctly.
未正確連接導線。
코드가 올바르게 연결되어 있지 않습니다.
“¬µËÕ‰¡Ë∂Ÿ°µÈÕß
Correct input mode is not selected.
未選擇正確的輸入模式。
입력 모드를 잘못 선택했습니다.
‚À¡¥∑’ˇ≈◊Õ°π”‡¢È“Õ“®‰¡Ë∂Ÿ°µÈÕß
The built-in microcomputer may have functioned incorrectly due to
noise, etc.
可能由於噪音等原因導致內置微處理器功能失常。
내장 마이크로 컴퓨터가 소음 등으로 인헤 오쥐동 되었습니다.
√–∫∫‰¡‚§√§Õ¡æ‘«‡µÕ√Ï∑’˵‘¥µ—Èß Õ¬ŸË¿“¬„π Õ“®∑”ß“πº‘¥ª°µ‘ ‡π◊ËÕß®“°‡’¬ß œ≈œ
발생한 문제가 항상 심각한 것은 아닙니다.
서비스 센터에 문의하기 전에 다음 요소를
확인하십시오.
“‡Àµÿ
‘Ëß∑’Ë¥Ÿ‡À¡◊Õπ®–‡ªÁπª—≠À“ Õ“®‰¡Ë√È“¬·√߇¡Õ‰ª ¢Õ„Àȵ√«®Õ∫µ“¡®ÿ¥µË“ßÊ
µËÕ‰ªπ’È °ËÕπ‚∑√À“»Ÿπ¬Ï∫√‘°“√
Remedies / 解決辦法 / 해결 방법 / «‘∏’·°È‰¢
See “Note” on page 2.
請參閱第 2 頁上的“注意”。
2 페이지의“참고”를 참조하십시오.
¥Ÿ “À¡“¬‡Àµ” 2
Connect the cord correctly.
正確連接導線。
코드를 올바르게 연결하십시오.
µËÕ“¬‰¡Ë∂Ÿ°µÈÕß
Select the correct input mode.
選擇正確的輸入模式。
올바른 입력 모드를 선택하십시오.
‡≈◊Õ°‚À¡¥π”‡¢È“„ÀÈ∂Ÿ°µÈÕß
Reset the unit (see page 2).
重設本機(參閱第 2 頁)。
정치를 다시 설정 하십시오 (2 페이지 참조).
µ—È߇§√◊ËÕß„À¡Ë (¥ŸÀπÈ“ 2)
• Cordless headphones (not supplied) do not work.
• 無繩頭戴耳機(另購)失靈。
• 무선 헤드폰(제공되지 않음)이 작동하지 않습니다.
• ÀŸø—߉√È“¬ ( ‰¡Ë‰¥È„ÀÈ¡“æ√ÈÕ¡‡§√◊ËÕß) „™Èß“π‰¡Ë‰¥È
• Howling occurs from the speakers or the headphones.
• 揚聲器或耳機出現異常聲音。
• 스피커나 헤드폰에서 하울링이 발생합니다.
•
®–¡’‡’¬ßÀÕπ®“°≈”‚æß À√◊ÕÀŸø—ß
Specifications / 規格 / 사양 / ¢
WIDESCREEN MONITOR
Screen:
6.5 inch liquid crystal panel
Number of pixel:
280 800 pixels (400 vertical × 234 horizontal × 3)
Drive method:
TFT (Thin Film Transistor) active matrix format
Cordless audio:
Infrared audio transmitter (Support IR receiver
stereo headphones)
L-channel: 2.3 MHz
R-channel: 2.8 MHz
Effective range: 1.5 m
Color system: NTSC/PAL
Dimensions (W × H × D):
Installation size (approx.):
197 mm × 131 mm × 39 mm
(including shroud)
Mass (approx.):
500 g (including shroud)
MONITOR CONNECTION UNIT
Input:
Video:
1 V(p-p), 75
Audio: RCA pin × 2 circuits
1.5 V(rms)
Output:
Display: 13 pin DIN connector
1 V(p-p), 75
Video: RCA pin × 1 circuit
1 V(p-p), 75
Audio: RCA pin × 1 circuit
1.5 V(rms)
Dimensions (W × H × D):
Installation size (approx.):
127 mm × 28 mm × 89 mm
(excluding protections)
Mass (approx.):
160 g
RCA pin × 2 circuits
GENERAL
Power requirement:
Operating voltage:
DC 14.4 V (11 V to 16 V allowance)
Grounding system: Negative ground
Allowable operating temperature:
0°C to +40°C
Allowable storage temperature:
–20°C to +80°C
Design and specifications are subject to change
without notice.
寬屏顯示器
螢幕:
6.5 英吋液晶面板
像素數:
280 800 像素(400 垂直 × 234 水平 × 3)
驅動方法:
TFT(薄膜發射器)有效矩陣電路制式
無繩音頻:
紅外線音頻發射器(支持紅外線接收機立體聲
耳機)
左聲道:2.3 MHz
右聲道:2.8 MHz
有效範圍:1.5 m
顏色制式:NTSC/PAL
體積(寬 × 高 × 深)
安裝尺寸(大約):
197 毫米 × 131 毫米 × 39 毫米
(包括罩蓋)
重量(大約):
500 克(包括罩蓋)
顯示器連接組件
輸入:
視頻: RCA 針型 × 2 電路
1 V(p-p), 75
音頻: RCA 針型 × 2 電路
1.5 V(rms)
輸出:
顯示: 13 支插腳 DIN 連接器
1 V(p-p), 75
視頻: RCA 針型 × 1 電路
1 V(p-p), 75
音頻: RCA 針型 × 1 電路
1.5 V(rms)
體積(寬 × 高 × 深)
安裝尺寸(大約):
127 毫米 × 28 毫米 × 89 毫米
(不包括保護)
重量(大約):
160 克
一般資訊
電源要求:
操作電壓:
直流 14.4 V(11 V 至 16 V 容限)
接地系統:負極接地
允許操作溫度:
0°C 至 +40°C
允許保存溫度:
–20°C 至 +80°C
設計和規格若有變更恕不另行通知。
The battery has lost its charge.
電池電量已耗盡。
배터리가 다 닳았습니다.
·∫µ‡µÕ√’ËÕ“®À¡¥ª√–®ÿ
The sensor is exposed to strong light.
感應器暴曬於強光下。
센서가 강한 빛에 노출되었습니다.
µ—«µ√«®®—∫—≠≠“≥√’‚¡∑Õ“®Õ¬ŸË„π¿“æ·ß∑’˫˓߇°‘π‰ª
It may be caused by a camcorder connected to the monitor.
可能是由於連接至顯示器的可攜式攝像機引起的。
모니터에 연결된 캠코더에 문제가 있을수 있습니다.
Õ“°“√π’ÈÕ“®‡°‘¥®“°‡§√◊ËÕß∫—π∑÷°«‘¥’‚Õ∑’˵ËÕÕ¬ŸË°—∫®Õ¿“æ
Õ¡Ÿ≈®”‡æ“–
È
Install a new battery.
安裝新電池。
새 배터리를 넣으십시오.
„Ë·∫µ‡µÕ√’ËÕ—π„À¡Ë
Do not expose the sensor to strong light.
勿讓感應器暴曬於強光下。
센서를 강한 빛에 노출하지 마십시오.
‰¡Ë§«√„Àȵ—«µ√«®®—∫—≠≠“≥√’‚¡∑ Õ¬Ÿà„π¿“æ·ß∑’˫˓߇°‘π‰ª
Camcorder is now in recording mode. Deactivate the recording mode.
可攜式攝像機處於錄製模式。關閉錄製模式。
캠코더가 레코딩 모드에 있습니다. 레코딩 모드를 해제합니다.
‡§√◊ËÕß∫—π∑÷°«‘¥’‚Õ°”≈—ß Õ¬ŸË„π‚À¡¥∫—π∑÷°¿“æ ª‘¥„™Èß“π‚À¡¥∫—π∑÷°¿“æ
와이드 스크린 모니터
화면:
6.5 인치 액정 패널
픽셀 수:
280 800 픽셀
(400 세로 × 234 가로높이 × 3)
구동 방법:
TFT (Thin Film Transistor) 액티브 매트릭스
형식
무선 오디오:
적외선 오디오 전송기 (IR 수신기 스테레오 헤드
폰 지원)
L-채널: 2.3 MHz
R-채널: 2.8 MHz
유효 범위: 1.5 m
색시스탬: NTSC/PAL
크기 (폭 × 높이 × 넓이):
설치 크기(대략적):
197 mm × 131 mm × 39 mm
(보호대 포함)
무게(대략적):
500 g (보호대 포함)
모니터 연결유닛
입력:
비디오: RCA 핀 × 2 개의 회선
1 V(p-p), 75
오디오: RCA 핀 × 2 개의 회선
1.5 V(rms)
출력:
디스플레이: 13 핀 DIN 커넥터
1 V(p-p), 75
비디오: RCA 핀 × 1 개의 회선
1 V(p-p), 75
오디오: RCA 핀 × 1 개의 회선
1.5 V(rms)
크기 (폭 × 높이 × 넓이):
설치 크기(대략적):
127 mm × 28 mm × 89 mm
(프로젝션 제외)
무게 (대략적):
160 g
일반 사항
전원 요구 사항:
작동 전압:
DC 14.4 V (11 V ~ 16 V 공차)
접지 시스템: 네거티브 접지
허용되는 작동 온도:
0°C ~ +40°C
허용되는 보관 온도:
–20°C ~ +80°C
디자인과 사양은 예고 없이 변경될 수 있습니다.
¡Õ𑇵Õ√Ϯհ«È“ß
®Õ¿“æ:
®Õ·∫∫§√‘µ—≈‡À≈«¢π“¥ 6.5 π‘È«
®”π«πæ‘°‡´≈:
280 800
æ‘°‡´≈ (·π«µ—Èß
400
x ·π«πÕπ 234 x 3)
«‘∏’∑”ß“π:
√–∫∫ TFT ·∫∫·ºß (µ—«µÈ“π∑“π·∫∫ø‘≈Ï¡∫“ß)
√–∫∫°“√ø—ß·∫∫‰√È“¬:
µ—«Ëߺ˓π audio ·∫∫Õ‘πø√“‡√¥ (√Õß√—∫°“√„™Èß“π°—∫ÀŸø—
‡µÕ√‘‚Õ∑’Ë¡’Õÿª°√≥Ï√—∫—≠≠“≥ IR)
ß
™ËÕß´È“¬
: 2.3 MHz
™ËÕߢ«“: 2.8 MHz
™Ë«ß°“√√—∫ø—߇’¬ß∑’Ë¡’ª√–‘∑∏‘¿“æ§◊Õ: 1.5 ‡¡µ√
√–∫∫’: NTSC/PAL
¢π“¥ (°«È“ß x Ÿß x ≈÷°):
¢π“¥µ‘¥µ—Èß (ª√–¡“≥):
197 ¡¡ x 131 ¡¡ x 39 ¡¡
(√«¡·ºËπ√ÕßÀ≈—ß)
πÈ”Àπ—° (ª√–¡“≥):
500 °. (√«¡·ºËπ√ÕßÀ≈—ß)
Õÿª°√≥χ™◊ËÕ¡µËÕ®Õ¿“æ
Õ‘πæÿµ:
«‘¥’‚Õ: RCA ‡¢Á¡ x 2 ·ºß«ß®√
1 V(p-p), 75
ÕÕ¥‘‚Õ: RCA ‡¢Á¡ x 2 ·ºß«ß®√
1.5 V(rms)
¢“ÕÕ°:
®Õ·¥ßº≈: ¢—È«µËÕ DIN 13 ¢“
1 V(p-p), 75
«‘¥’‚Õ: RCA ‡¢Á¡ x 1 ‡¥’ˬ« 1 V(p-p), 75
ÕÕ¥‘‚Õ: RCA ‡¢Á¡ x 1 ‡¥’ˬ« 1.5 V(rms)
¢π“¥ (°«È“ß x Ÿß x ≈÷°):
¢π“¥µ‘¥µ—Èß (ª√–¡“≥):
127 ¡¡ x 28 ¡¡ x 89 ¡¡
(‰¡Ë√«¡Ë«π∑’ˬ◊ËπÕÕ°¡“)
πÈ”Àπ—° (ª√–¡“≥):
160 °.
∑—Ë«‰ª
æ≈—ßß“π∑’Ë„™È
·√ߥ—π‰øøÈ“∑’Ë„™È
DC 14.4 V (“¡“√∂„™È‰¥Èµ—Èß·µË 11 V ∂÷ß 16 V)
√–∫∫°“√µàÕ“¬¥‘π: √–∫∫‡π°“∑’ø°√“«π¥Ï
Õÿ≥À¿Ÿ¡‘°“√∑”ß“π∑’Ë„™È:
0°C ∂÷ß +40°C
Õÿ≥À¿Ÿ¡‘°“√‡°Á∫√—°…“:
–20°C ∂÷ß +80°C
√Ÿª·∫∫·≈–¢ÈÕ¡Ÿ≈®”‡æ“– Õ“®‡ª≈’ˬπ·ª≈߉¥È ‚¥¬‰¡ËµÈÕß·®Èß„ÀÈ∑√“∫≈Ë«ßÀπÈ“
:
6
Page 19

KV-MH6510
Installation/Connection Manual
Manual de instalación/conexión
Manuel d’installation/raccordement
LVT1327-007A
[J]
0505MNMMDWJEIN
EN, SP, FR
ENGLISH
WARNING
Installation requires some special knowledge.
Do not install the monitor system yourself. Consult a
dealer having special knowledge of this kind for safe
and reliable installation.
• DO NOT INSTALL THE MONITOR IN A LOCATION WHICH
OBSTRUCTS DRIVING, VISIBILITY OR WHICH IS PROHIBITED
BY APPLICABLE LAWS AND REGULATIONS.
If the monitor is installed in a location which obstructs forward
visibility or operation of the air bag or other safety equipment or
which interferes with operation of the vehicle, it may cause an
accident.
• NEVER USE BOLTS OR NUTS FROM THE VEHICLE’S
SAFETY DEVICES FOR INSTALLATION.
If bolts or nuts from the steering wheel, brakes or other safety
devices are used for installation of the monitor, it may cause an
accident.
• ATTACH THE WIRES CORRECTLY.
If the wiring is not correctly performed, it may cause a fi re or an
accident. In particular, be sure to run and secure the lead wire
so that it does not get tangled with a screw or the moving portion
of a seat rail.
• USE WITH DC 12 V NEGATIVE GROUND VEHICLES.
This monitor system is only for use in a DC 12 V negative ground
vehicle.
It cannot be used in large trucks or diesel vehicles which are DC
24 V vehicles.
If it is used in the wrong type of vehicle, it may cause a fi re or
accident.
• To prevent short circuits, we recommend that you disconnect
the battery’s negative terminal and make all electrical connections
before installing the unit. If you are not sure how to install this
unit correctly, have it installed by a qualifi ed technician.
• Avoid installing the monitor connection unit in the following
places:
– Where it would hinder your safe driving.
– Where it would be exposed to direct sunlight or heat directly
from the heater or placed in an extremely hot place.
– Where it would be subject to rain, water splashes or excessive
humidity.
– Where it would be subject to dust.
– Where it would be positioned on an unstable place.
– Where it could damage the car’s fi ttings.
– Where proper ventilation would not be maintained, such as
under a fl oor mat.
CAUTION
Since there may be legal regulations defi ning the permissible
installation locations for the color monitor which differ by
country or by state, be sure to install the color monitor in a
location complying with any such laws.
ADVERTENCIA
La instalación requiere cierto conocimiento especial.
No instale el sistema del monitor por sí mismo. Para
una instalación segura y confiable, consulte con un
concesionario que tenga conocimientos especiales en
esta área.
• NO INSTALE EL MONITOR EN UN LUGAR QUE IMPIDA EL
MANEJO O LA VISIBILIDAD, NI DONDE LOS PROHIBAN LAS
LEYES Y REGLAMENTOS APLICABLES.
Si el monitor se instala en un lugar que obstruye la visibilidad
hacia adelante o la operación de una bolsa de aire u otro equipo
de seguridad, o que interfi ere con la operación del vehículo,
cerca de la palanca de cambios o pedal del freno por ejemplo,
podrá causarse un accidente.
• NUNCA UTILICE PERNOS O TUERCAS DE LOS
DISPOSITIVOS DE SEGURIDAD DEL VEHÍCULO PARA
HACER LA INSTALACIÓN.
Si los pernos o tuercas del volante, frenos u otros dispositivos
de seguridad se utilizan para instalar el monitor podrá causarse
un accidente.
• REALICE EL CABLEADO CORRECTAMENTE.
Si no se hace bien el cableado puede producirse un incendio
o un accidente. En particular, asegúrese de instalar el cable
conductor para que éste no quede enredado en un tornillo ni
en la parte móvil del raíl del asiento.
• UTILICE EL MONITOR EN VEHÍCULOS DE 12 V CC CON
PUESTA A TIERRA NEGATIVA.
Este monitor ha sido diseñado para ser utilizado solamente en
vehículos de 12 V CC con puesta a tierra negativa.
No puede utilizarse en camiones grandes ni vehículos diesel
de 24 V CC.
Si se utiliza en el tipo equivocado de vehículo se puede causar
un incendio o accidente.
• Para evitar cortocircuitos, se recomienda desconectar el
terminal negativo de la batería y realizar todas las conexiones
eléctricas antes de instalar la unidad. Si tiene dudas sobre
cómo realizar la instalación correctamente, déjela en manos
de un técnico cualifi cado.
• Evite instalar la unidad de conexión del monitor en los
siguientes lugares:
– Donde pueda constituir un obstáculo para la conducción.
– Donde pueda quedar expuesto a la luz solar directa o al calor
directo de un calefactor, o en un lugar muy caliente.
– Donde pueda mojarse debido a la lluvia, etc., o en un lugar
excesivamente húmedo.
– En un lugar polvoriento.
– En un sitio inestable.
– Donde pueda producir daños en los herrajes del automóvil.
– En lugares donde no pueda obtenerse una ventilación
adecuada, como debajo de la alfombra del piso.
PRECAUCION
Dependiendo de los estados, pueden haber reglamentos
locales que determinan los lugares de instalación permisibles
para el monitor de color; por lo tanto, asegúrese de instalar el
monitor en un sitio que cumpla con tales reglamentos.
FRANÇAISESPAÑOL
AVERTISSEMENT
L’installation nécessite certaines connaissances
spéciales.
N’installez pas le moniteur vous-même. Consultez un
revendeur possédant les connaissances spéciales
nécessaires pour une installation correcte et sûre.
• N’INSTALLEZ PAS LE MONITEUR DANS UN ENDROIT QUI
GÊNE LA CONDUITE, LA VISIBILITÉ OU QUI EST INTERDIT
PAR LE CODE DE LA ROUTE ET LES RÈGLEMENTS.
Si le moniteur était installé à un emplacement gênant la visibilité
avant, ou le déploiement du sac à air, et autres dispositifs de
sécurité, ou à un emplacement gênant pour la conduite du
véhicule, comme près du levier des vitesses ou de la pédale
du frein, cela risquerait de provoquer des accidents.
• NE JAMAIS UTILISER POUR L’INSTALLATION DES
BOULONS OU DES ÉCROUS PROVENANT DES DISPOSITIFS
DE SÉCURITÉ DU VÉHICULE.
Si l’on utilisait pour l’utilisation du moniteur des boulons et des
écrous cannibalisés du volant, des freins ou autres dispositifs
de sécurités, cela risquerait de provoquer des accidents.
• ATTACHER LES CORDONS CORRECTEMENT.
Si le câblage n’est pas exécuté correctement, cela risque de
provoquer un incendie ou autre accident. Veiller, en particulier,
à tirer et attacher les fi ls en sorte qu’ils me s’accrochent pas à
une vis ou ne se coincent dans les parties mobiles des rails des
sièges.
• USAGE SUR LES VÉHICULES DE 12 V CC AVEC NÉGATIF
À LA MASSE.
Ce moniteur ne peut être utilisé que sur les véhicules de 12 V
CC avec négatif à la masse.
Il ne peut pas être utilisé sur les gros camions ou les véhicules
diesel de 24 V CC.
S’il était utilisé sur un type de véhicule inadéquat cela risquerait
de provoquer un incendie ou autres accidents.
• Pour éviter les courts-circuits, nous recommandons que
vous déconnectiez la borne négative de la batterie et réalisiez
toutes les connexions électriques avant d’installer l’appareil. Si
vous n’êtes pas sûr de savoir comment installer cet appareil
correctement, faites-le installer par un technicien qualifi é.
• Évitez d’installer l’unité de connexion du moniteur dans les
endroits suivants:
– Où il peut gêner la conduite de la voiture.
– Où il est exposé à la lumière directe du soleil, à la chaleur
directe du chauffage ou placé dans un endroit très chaud.
– Où il est sujet à la pluie, aux éclaboussures ou à une humidité
excessive.
– Où il est sujet à la poussière.
– Où il est positionné dans un endroit instable.
– Où il peut endommager les accessoires de la voiture.
– Où une ventilation correcte ne peut pas être maintenue,
comme sous un tapis de sol.
ATTENTION
Il peut y avoir des réglementations défi nissant les emplacements
d’installation autorisés pour un moniteur couleur et celles-ci
peuvent varier d’une région à l’autre. Assurez-vous d’installer
le moniteur dans un endroit conforme à ces lois.
– 1 –
Page 20

Parts list for installation and connection
1
2
3
5
4
The following parts are provided with this unit.
After checking them, please set them correctly.
Lista de piezas para instalación y conexión
Con esta unidad se suministran las siguientes piezas.
Después de inspeccionarlas, colóquelas correctamente.
Liste des pièces pour l’installation et
raccordement
Les pièces suivantes sont fournies avec cet appareil.
Après vérifi cation, veuillez les placer correctement.
Wide color monitor (center unit and shroud)
Monitor color de pantalla ancha
(unidad central y refuerzo)
Moniteur couleur à écran large
(unité centrale et socle de montage au plafond)
System cord (3 m) (9.8 ft)
Cordón del sistema (3 m) (9.8 pies)
Cordon de système (3 m) (9.8 pieds)
Trim plate
Placa de guarnición
Plaque d’assanblage
Power cord
Cordón de alimentación
Cordon d’alimentation
Paper template
Plantilla de papel
Modèle en papier
Connector cover
Cubierta del conector
Couvercle du connecteur
Monitor connection unit
Unidad de conexión del monitor
Unité de connexion du moniteur
Screws–M2 x 6 mm (1/4")
Tornillos–M2 x 6 mm (1/4 pulgada)
Vis–M2 x 6 mm (1/4 po.)
Monitor connection unit / Unidad de conexión del monitor / Unité de connexion du moniteur
Front
Lado delantero
Avant
1 TO MONITOR (13 PIN) connector
2 AV 2 (INPUT 2) jacks
• VIDEO/AUDIO L (left)/AUDIO R (right)
3 AV 1 (INPUT 1) jacks
• VIDEO/AUDIO L (left)/AUDIO R (right)
4 AV OUT jacks
• VIDEO/AUDIO L (left)/AUDIO R (right)
5 Power supply connector
1 Conector TO MONITOR (13 PIN)
2 Jacks AV 2 (INPUT 2)
• VIDEO/AUDIO L (izquierdo)/AUDIO R (derecho)
3 Jacks AV 1 (INPUT 1)
• VIDEO/AUDIO L (izquierdo)/AUDIO R (derecho)
4 Jacks AV OUT
• VIDEO/AUDIO L (izquierdo)/AUDIO R (derecho)
5 Conector de la fuente de alimentación
Back
Lado trasero
Arrière
1 Connecteur TO MONITOR (13 PIN)
2 Prises AV 2 (INPUT 2)
• VIDEO/AUDIO L (gauche)/AUDIO R (droit)
3 Prises AV 1 (INPUT 1)
• VIDEO/AUDIO L (gauche)/AUDIO R (droit)
4 Prises AV OUT
• VIDEO/AUDIO L (gauche)/AUDIO R (droit)
5 Connecteur d’alimentation
– 2 –
Page 21

INSTALLATION
• The following illustration shows a typical installation. However,
you should make adjustments corresponding to your specifi c
car. If you have any questions or require information regarding
installation kits, consult your JVC car audio dealer or a company
supplying kits.
INSTALACION
• La siguiente ilustración muestra una instalación típica. Sin
embargo usted deberá efectuar los ajustes correspondientes
a su automóvil. Si tiene alguna pregunta o necesita información
acerca de las herramientas para instalación, consulte con su
concesionario de JVC de equipos de audio para automóviles
o a una compañía que suministra tales herramientas.
INSTALLATION
• L’illustration suivante est un exemple d’installation typique.
Cependant, vous devez faire les ajustements correspondant
à votre voiture particulière. Si vous avez des questions
ou avez besoin d’information sur des kits d’installation,
consulter votre revendeur d’autoradios JVC ou une compagnie
d’approvisionnement.
Mounting the color monitor
It is recommended to have the monitor system installed by
a qualifi ed technician.
Before mounting the monitor to the headrest:
• Perform the required external connections fi rst.
• Using the supplied paper pattern, mark the area to be cut out
of the headrest, then carefully cut it.
Mark the area to be cut out, and carefully cut
it.
Marque el área que se va a recortar, y corte
con cuidado.
Marquez la zone à couper et coupez-la avec
précaution.
Paper template
Plantilla de papel
Modèle en papier
• For safety, use neither a sharp-pointed screw nor a long
screw which will protrude more than 5 mm (1/4") from the
back of the installation plate.
• Para fi nes de seguridad, no utilice tornillos de punta
afi lada ni tornillos que sobresalgan mas de 5 mm
(1/4”) del lado trasero de la placa de instalación.
• Pour des raisons de sécurité, n’utilisez jamais une vis
pointue ni une vis longue qui dépasse de 5 mm
(1/4 po.) de l’arrière de la plaque d’installation.
Headrest
Reposacabezas
Repose-tête
Montaje del monitor de color
Se recomienda que el sistema de monitor sea instalado por
un técnico cualifi cado.
Antes de instalar el monitor en el techo reposacabezas:
•
Efectúe primero las conexiones externas requeridas.
• Utilizando el patrón de papel suministrado, marque el área que
se va a recortar en el reposacabezas, y corte con cuidado.
Trim plate (if required to fi t the shroud to the rear surface of the headrest)
Placa de guarnición (si es necesario acoplar el refuerzo a la superfi cie trasera del
Installation plate (not supplied)
Placa de instalación (no suministrada)
Plaque d’installation (non fournie)
System cord (from the
monitor connection unit)
Cordón del sistema (desde
la unidad de conexión del
monitor)
Cordon de système
(à partir de l’unité de
connexion)
When disconnecting, pull the connector while pressing (A).
• Do not pull the cord when disconnecting. Otherwise, the connector or the monitor may be
Para desconectarlo, tire del conector y, al mismo tiempo, presione en (A).
• No tire del cordón cuando efectúe la desconexión, ya que se podría dañar el conector o el
Pour débrancher, tirez et appuyez simultanément sur le connecteur (A).
• Lors de la déconnexion, ne tirez pas sur le cordon. Ceci risquerait d’endommager le
reposacabezas)
Plaque d’assanblage (S’il est nécessaire de monter le socle de montage sur la surface
arrière du repose-tête.)
(A)
damaged.
monitor.
connecteur ou le moniteur.
Montage du moniteur couleur
Il est recommandé de faire installer le système de moniteur
par un technicien qualifi é.
Avant de fi xer le moniteur au repose-tête:
• Réalisez d’abord les connexions extérieures nécessaires.
• En utilisant le modèle en papier fourni, marquez la zone à
couper sur le repose-tête, puis coupez-la avec précaution.
Shroud
Refuerzo
Socle de montage
au plafond
1
*
(A)
Screws (not supplied)
Tornillos (no suministrados)
Vis (non fournis)
Center unit
Unidad central
Unité centrale
*1 Fix the connector
with the connector
cover after
connection.
1
*
Fije el conector
con la cubierta
del conector una
vez realizada la
conexión.
1
Une fois le
*
branchement
effectué, raccordez
le connecteur
au couvercle du
connecteur.
TV tuner, etc.
Sintonizador de TV, etc.
Tuner de télévision, etc.
Car receiver, etc.
Receptor de automóvil, etc.
Récepteur d'autoradio, etc.
Monitor connection unit
Unidad de conexión del monitor
Unité de connexion du moniteur
CAUTION / PRECAUCION / ATTENTION:
• Take preventative measures to avoid unexpected disconnection of the cord and damage to the
cord by being caught somewhere. This trouble may happen while adjusting the headrest position
or while moving or reclining the seat.
• Tome las medidas de prevención necesarias para evitar que el cordón se desconecte imprevistamente
y que quede enganchado en algún lugar. Esto podría producirse al mover el reposacabezas, o al
mover o reclinar el asiento.
• Prenez des mesures préventives pour éviter que le cordon soit déconnecté accidentellement ou
coincé quelque part—Cela peut se produire quand vous bougez le repose-tête, ou quand vous
bougez ou inclinez le siège.
– 3 –
Page 22

ENGLISH ESPAÑOL FRANÇAIS
ELECTRICAL CONNECTIONS
To prevent short circuits, we recommend that you disconnect the
battery’s negative terminal and make all electrical connections
before installing the unit. If you are not sure how to install this
unit correctly, have it installed by a qualifi ed technician.
Note:
This unit is designed to operate on 12 V DC, NEGATIVE ground
electrical systems. If your vehicle does not have this system, a
voltage inverter is required, which can be purchased at JVC car
audio dealers.
• Replace the fuse with one of the specifi ed ratings. If the fuse
blows frequently, consult your JVC car audio dealer.
CONEXIONES ELECTRICAS
Para evitar cortocircuitos, recomendamos que desconecte el
terminal negativo de la batería y que efectúe todas las conexiones
eléctricas antes de instalar la unidad. Si usted no está seguro
de cómo instalar correctamente la unidad, hágala instalar por un
técnico cualifi cado.
Nota:
Esta unidad está diseñada para funcionar con 12 V de CC, con
sistemas eléctricos de masa NEGATIVA. Si su vehículo no
posee este sistema, será necesario un inversor de tensión, que
puede ser adquirido en los concesionarios de JVC de equipos
de audio para automóviles.
• Reemplace el fusible por uno con la corriente especifi cada.
Si el fusible se quemase frecuentemente, consulte con su
concesionario car audio de JVC.
Typical Connections / Conexiones tipicas / Raccordements typiques
Before connecting: Check the wiring in the vehicle carefully.
Incorrect connection may cause serious damage to this unit.
The leads of the power cord and those of the connector from the
car body may be different in color.
7 Power supply connection
1 Connect the colored leads of the power cord in the following
sequence.
1 Black: ground
2 Yellow: to car battery (constant 12 V)
3 Red: to an accessory terminal
4 Orange with white stripe: to car light control switch
2 Finally connect the wiring harness to the unit.
Antes de la conexión: Verifi que atentamente el conexionado
del vehículo. Una conexión incorrecta podría producir daños
graves en la unidad.
Los conductores del cordón de alimentación y de los conectores
procedentes de la carrocería del vehículo podrían ser diferentes
en color.
7 Conexión de la fuente de alimentación
1 Conecte los conductores de color del cordón de alimentación
en la secuencia siguiente.
1 Negro: a tierra
2 Amarillo: a la batería del automóvil (12 V constantes)
3 Rojo: a un terminal de accesorio
4 Naranja con rayas blancas: al interruptor de control de
las luces del automóvil
2 Por último, conecte el cable de alimentación a la unidad.
RACCORDEMENTS ELECTRIQUES
Pour éviter tout court-circuit, nous vous recommandons de
débrancher la borne négative de la batterie et d’effectuer tous
les raccordements électriques avant d’installer l’appareil. Si l’on
n’est pas sûr de pouvoir installer correctement cet appareil, le faire
installer par un technicien qualifi é.
Remarque:
Cet appareil est conçu pour fonctionner sur des sources de courant
continu de 12 V à masse NEGATIVE. Si votre véhicule n’offre pas
ce type d’alimentation, il vous faut un convertisseur de tension, que
vous pouvez acheter chez un revendeur d’autoradios JVC.
• Remplacer le fusible par un de la valeur précisée. Si le fusible
saute souvent, consulter votre revendeur d’autoradios JVC.
Avant de commencer la connexion: Vérifi ez attentivement
le câblage du véhicule. Une connexion incorrecte peut
endommager sérieusement l’appareil.
Les fi ls du cordon d’alimentation et ceux du connecteur
provenant de la voiture peuvent être de couleur différente.
7 Connexion de l’alimentation
1 Connectez les fi ls de couleur du cordon du plafonnier dans
l’ordre suivant.
1 Noir: à la masse
2 Jaune: à la batterie de la voiture (12 V constant)
3 Rouge: à la prise accessoire
4 Orange avec bande blanche: à l’interrupteur d’éclairange
de la voiture
2 Finalement, connectez le faisceau de fi ls à l’appareil.
2
1
Black / Negro / Noir
2
Yellow*
Amarillo*
Jaune*
Red
Rojo
Rouge
Orange with white stripe
Naranja con rayas blancas
Orange avec bande blanche
2
2
5 A fuse
5 A fusibles
Fusible 5 A
3 A fuse
3 A fusibles
Fusible 3 A
*2 Before checking the operation of this unit prior to installation, this lead must be connected, otherwise
power cannot be turned on.
*2 Antes de comprobar el funcionamiento de esta unidad previa a de la instalación, es necesario conectar
este cable, de lo contrario no se podrá conectar la alimentación.
*2 Pour vérifi er le fonctionnement de cet appareil avant installation, ce fi l doit être raccordé, sinon l’appareil ne
peut pas être mis sous tension.
To metallic body or chassis of the car
A un cuerpo metálico o chasis del automóvil
Vers corps métallique ou châssis du véhicule
To a live terminal in the fuse block connecting to the car battery (bypassing the ignition
switch)
A un terminal activo del bloque de fusibles conectado a la batería del automóvil (desviando
el interruptor de encendido)
A une borne sous tension du porte-fusible connectée à la batterie de la voiture (en dérivant
l’interrupteur d’allumage)
To an accessory terminal in the fuse block
A un terminal accesorio del bloque de fusibles
Vers borne accessoire du porte-fusible
To car light control switch
Al interruptor de control de las luces del automóvil
Á l’interrupteur d’éclairange de la voiture
3
*
3
*
Ignition switch
Interruptor de encendido
Interrupteur d’allumage
Fuse block
Bloque de fusibles
Porte-fusible
*3 Not included with this unit.
*3 No suministrado con esta unidad.
*3 Non fourni avec cet appareil.
Connecting the leads / Conexión de los conductores / Raccordement des fi ls
Twist the core wires when
connecting.
Retuerza los alambres de alma
para conectarlos.
Torsader les âmes des fi ls en les
raccordant.
Solder the core wires to connect them securely.
Suelde los alambres de alma para conectarlos
con fi rmeza.
Soudez les âmes des fi ls pour les raccorder
entre eux de façon sûre.
CAUTION / PRECAUCION / ATTENTION:
• To prevent short-circuit, cover the terminals of the UNUSED leads with insulating
• Para evitar cortocircuitos, cubra los cables NO UTILIZADOS con cinta aislante.
• Pour éviter les court-circuits, couvrir les bornes des fi ls qui ne sont PAS utilisés
tape.
avec de la bande isolante.
– 4 –
Page 23
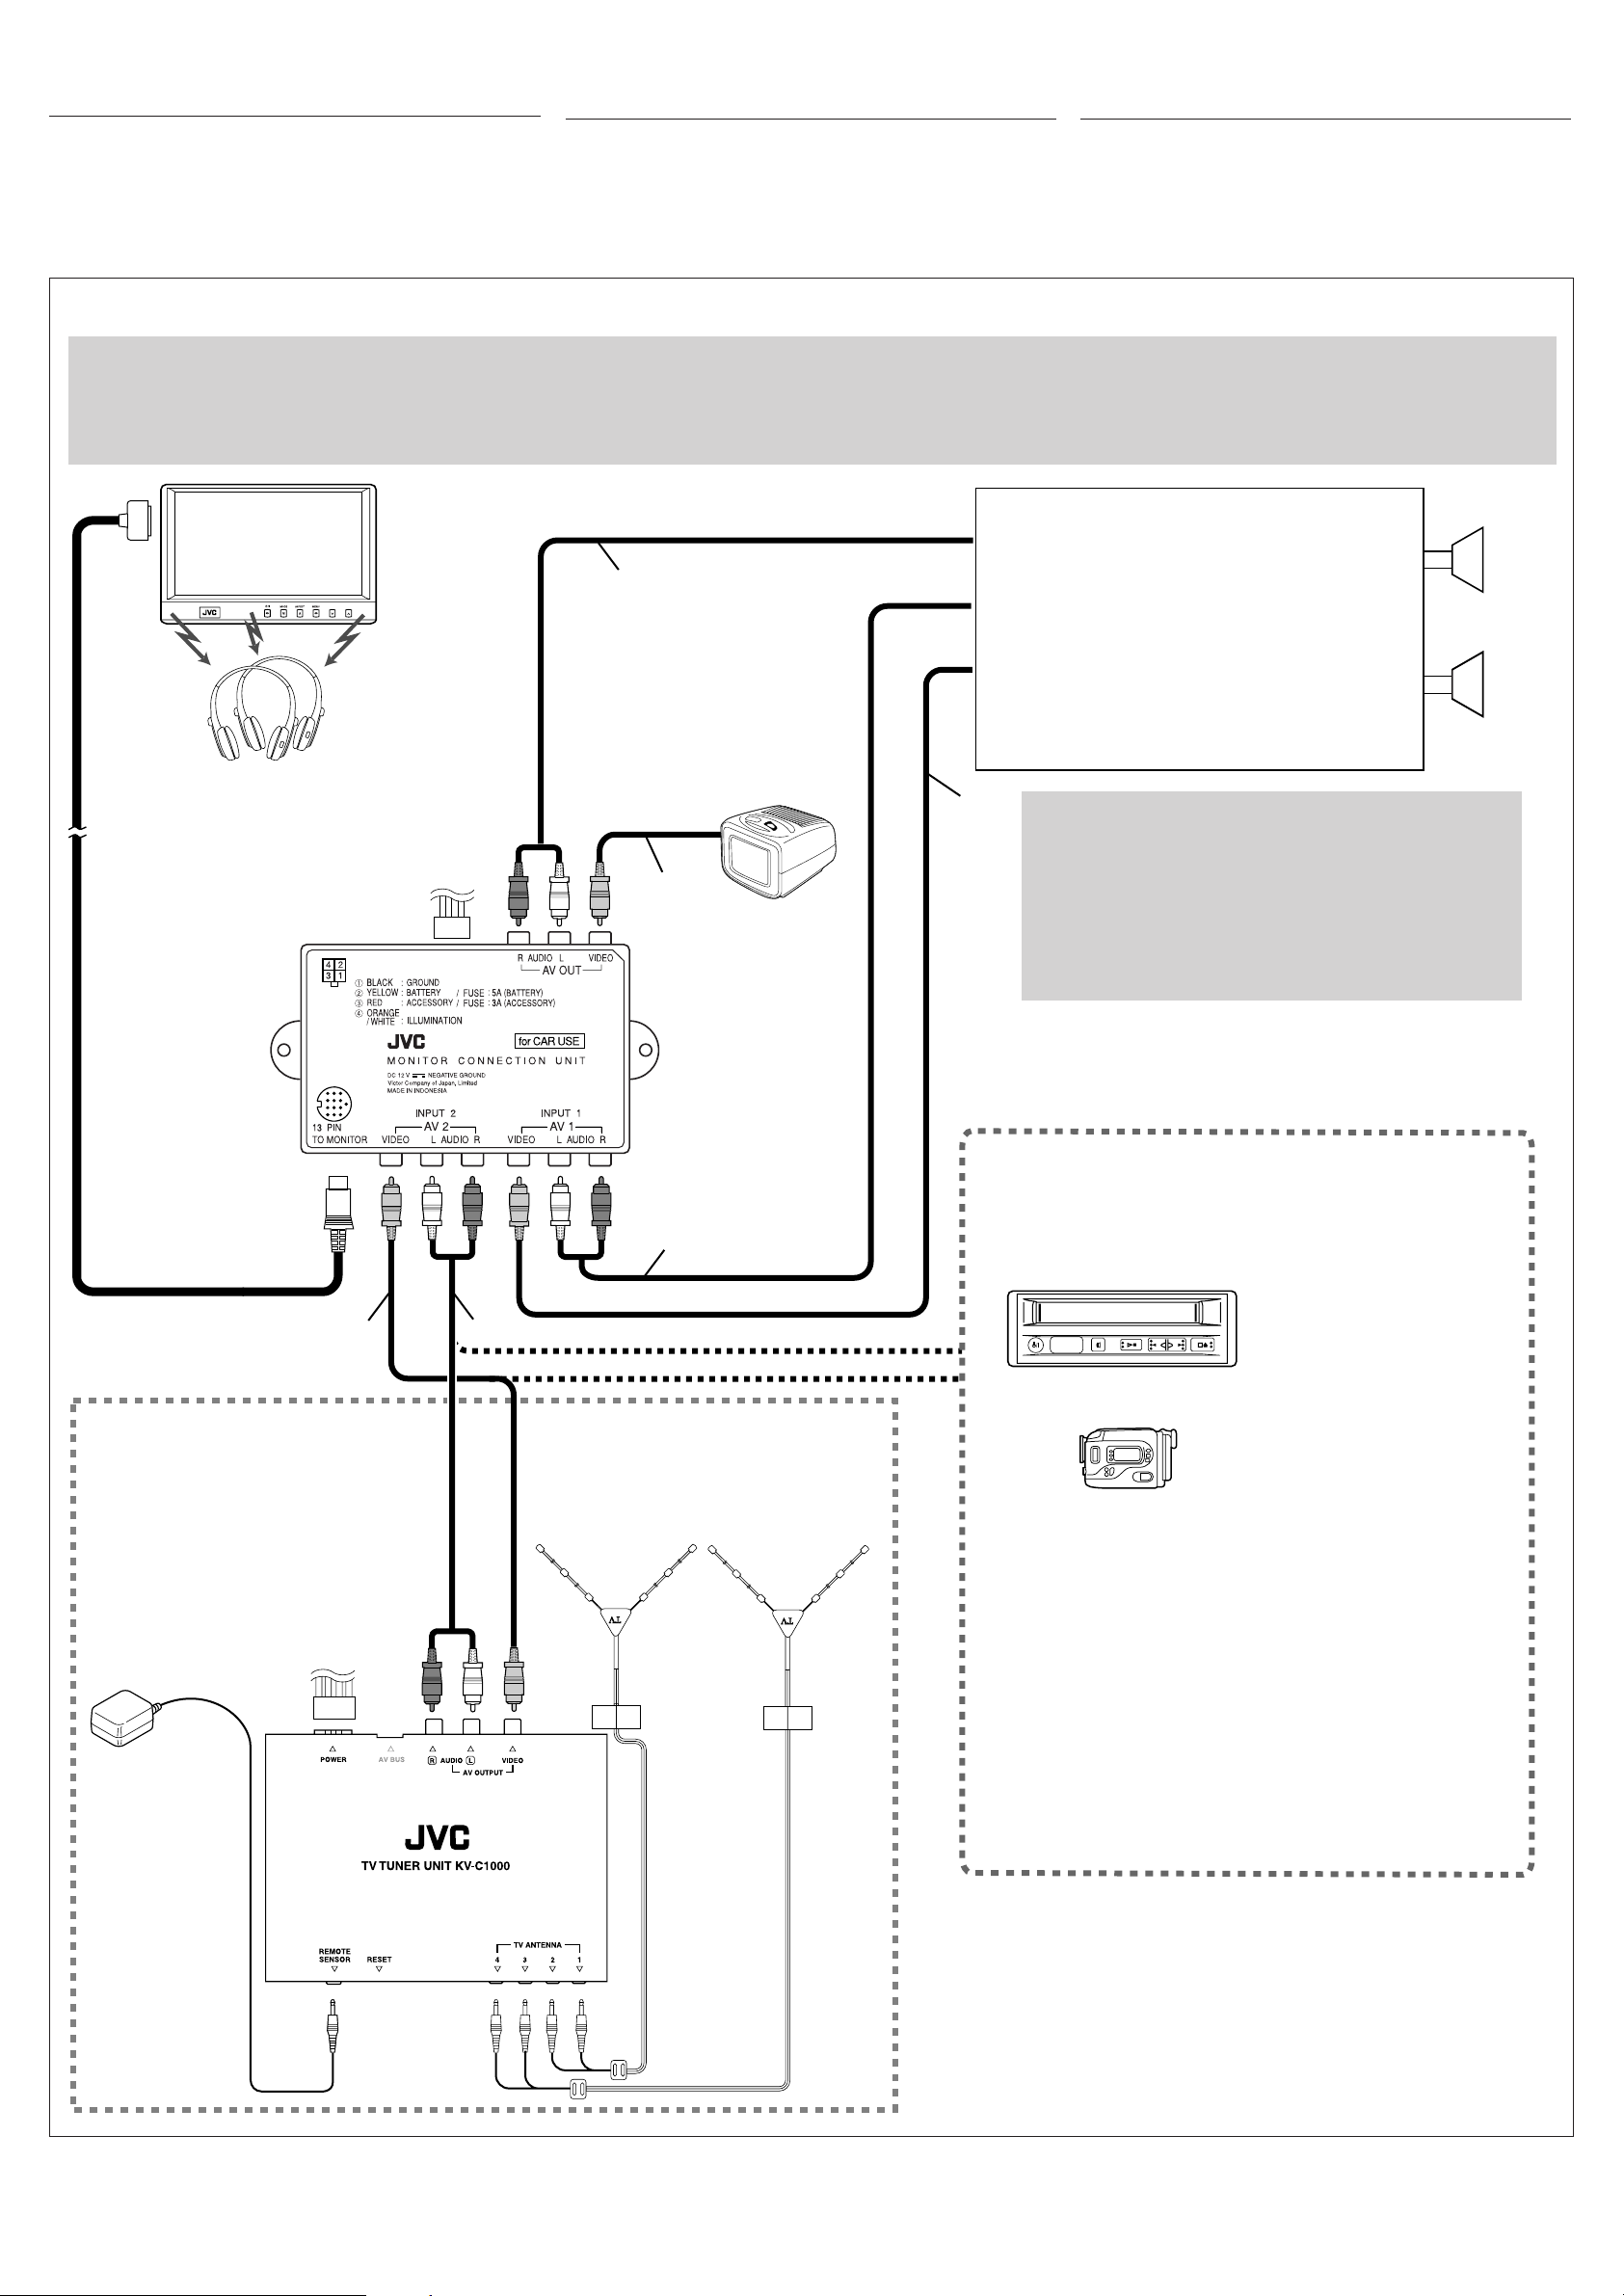
CONNECTING TO THE RECEIVER AND
CONEXION AL RECEPTOR Y A LOS
CONNEXION DE L’AUTORADIO ET DES
THE EXTERNAL COMPONENTS
Connect the monitor to TO MONITOR jack using the system cord
supplied with the unit.
The monitor connection unit provides 2 input circuits and 1 output
circuit. Connect one or two playback sources to AV 1 (INPUT 1)
and/or AV 2 (INPUT 2) and connect reproducing components,
such as a car receiver, to AV OUT.
When the receiver is equipped with the 2nd AUDIO
OUT plug
When increasing the headphones level, fi rst increase
output level of the 2nd AUDIO OUT on the receiver, then
adjust the headphones level on the headphones.
• Refer also to the INSTRUCTIONS of your car receiver.
Wide color
monitor
Monitor color de
pantalla ancha
Moniteur couleur
à écran large
COMPONENTES EXTERNOS
Conecte el monitor al jack TO MONITOR utilizando el cordón del
sistema suministrado con la unidad .
Esta unidad de conexión del monitor posee 2 circuitos de entrada
y 1 circuito de salida. Conecte uno o dos fuentes de reproducción
a AV 1 (INPUT 1) y/o AV 2 (INPUT 2) y conecte los componentes
de reproducción, como un receptor de audio para automóvil a
AV OUT.
Cuando el receptor está equipado con la clavija 2nd
AUDIO OUT
Cuando aumente el nivel de los auriculares, primero aumente
el nivel de salida de 2nd AUDIO OUT en el receptor y, a
continuación, ajuste el nivel de auriculares en los auriculares.
• Consulte también las MANUAL DE INSTRUCCIONES de
su receptor para automóvil.
LINE IN
4
*
2nd AUDIO OUT
APPAREILS EXTÉRIEURS
Connectez le moniteur á la prise TO MONITOR en utilisant le
cordon de système fourni avec cet appareil.
L’unité de connexion du moniteur possède 2 circuits d’entrée et un
circuit de sortie. Connectez une ou deux sources de lecture à la
prise AV 1 (INPUT 1) et/ou à la prise AV 2 (INPUT 2) et connectez
un appareil de traitement du son tel qu’un récepteur d’autoradio
à la prise AV OUT.
Si l’autoradio est muni d’une fi che 2nd AUDIO OUT
Si vous souhaitez augmenter le niveau du casque
d’écoute, augmentez d’abord le niveau de sortie de la prise
2nd AUDIO OUT sur l’autoradio, puis ajustez le niveau du
casque d’écoute sur le casque.
• Référez-vous aussi au MANUEL D’INSTRUCTION de
votre autoradio.
KS-HP2
(not supplied)
(no suministrado)
(non fourni)
System cord (supplied)
Cordón del sistema
(suministrado)
Cordon de système (fourni)
VIDEO OUT
Car receiver (ex. JVC KD-ADV6160)
2nd monitor
Segundo monitor
2d. moniteur
6
*
5
*
4
*
Receptor de automóvil (ej. JVC KD-ADV6160)
Récepteur d’autoradio (ex. JVC KD-ADV6160)
5
*
DO NOT connect the AV 1 and AV 2 plugs on the monitor
connection unit to the LINE OUT or SUBWOOFER plugs
of the car receiver.
NO conecte las clavijas AV 1 y AV 2 de la unidad de conexión
del monitor a las clavijas LINE OUT o SUBWOOFER del
receptor para automóvil.
NE CONNECTEZ PAS les fi ches AV 1 et AV 2 du unité
de connexion du monitor aux fi ches LINE OUT ou
SUBWOOFER de l’autoradio.
Playback source
Fuente de reproducción
Source de lecture
5
*
When using the mobile TV tuner
system KV-C1000
Cuando se utiliza el sistema de
sintonizador de TV móvil KV-C1000
Lors de l’utilisation du système de
tuner de télévision mobile
KV-C1000
Remote sensor unit
(supplied with
KV-C1000)
Unidad de sensor
remoto (suministrada
con KV-C1000)
Capteur de
télécommande
(fournis avec le
KV-C1000)
KV-C1000
VCR (KV-V8 or KZ-V10*
4
*
Antenna elements (supplied with KV-C1000)
Elementos de antena (suministrados con
KV-C1000)
Éléments d’antenne (fournis avec le
KV-C1000)
VCR (KV-V8 o KZ-V10*
Magnétoscope (KV-V8 ou KZ-V10*
Camcorder
Videocámera
Caméscope
6
)
6
)
6
)
*6 Carefully differentiate the power supply cords supplied for KZ-V10
and for the monitor connection unit. Their connectors are the same
in shape, but their wirings are different.
*6 Identifique cuidadosamente los cordones de alimentación
suministrados para el KZ-V10 y para la unidad de conexión del
monitor. Si bien sus conectores son aparentemente iguales, sus
conexionados son diferentes.
6
*
Prenez soin de bien distinguer les cordons d’alimentation fournis
pour les KZ-V10 et ceux de l’unité de connexion du moniteur. Leurs
connecteurs ont la même forme mais leur câblage est différent.
*4 RCA pin plug cord (not supplied)
*4 Cable con clavija monopolar RCA (no suministrado)
4
*
Cordon á fi ches cinch (non fourni)
5
Video cord (not supplied)
*
5
*
Cordón de vídeo (no suministrado)
*5 Cordon vidéo (non fourni)
– 5 –
Page 24

When the receiver is NOT equipped with the
2nd AUDIO OUT plug
Wide color
monitor
Monitor color de
pantalla ancha
Moniteur couleur
à écran large
Cuando el receptor NO está equipado con la clavija
2nd AUDIO OUT
LINE IN
4
*
VIDEO OUT
Si l’autoradio N’est PAS muni d’une fi che
2nd AUDIO OUT
Car receiver*7 (ex. JVC KD-DV5100)
Receptor de automóvil
Récepteur d’autoradio*7 (ex. JVC KD-DV5100)
7
*
(ej. JVC KD-DV5100)
KS-HP2
(not supplied)
(no suministrado)
non fourni)
System cord (supplied)
Cordón del sistema
(suministrado)
Cordon de système (fourni)
DO NOT connect the AV 1 and AV 2 plugs on the monitor
6
*
5
*
2nd monitor
Segundo monitor
2d. moniteur
connection unit to the LINE OUT or SUBWOOFER plugs
of the car receiver.
NO conecte las clavijas AV 1 y AV 2 de la unidad de conexión
del monitor a las clavijas LINE OUT o SUBWOOFER del
receptor para automóvil.
NE CONNECTEZ PAS les fi ches AV 1 et AV 2 du unité
de connexion du monitor aux fi ches LINE OUT ou
SUBWOOFER de l’autoradio.
7
*
You cannot listen to the playback sound of the car receiver
through KS-HP2 cordless headphones.
7
*
No se puede escuchar el sonido de reproducción del receptor
de automóvil a través de los auriculares inalámbricos KS-HP2.
*7 Vous ne pouvez pas écouter les sons de lecture du récepteur
d’autoradio avec un casque d’écoute sans fi l KS-HP2.
5
*
4
5
*
*
When using the mobile TV tuner
system KV-C1000
Cuando se utiliza el sistema de
sintonizador de TV móvil KV-C1000
Lors de l’utilisation du système de
tuner de télévision mobile
KV-C1000
Remote sensor unit
(supplied with
KV-C1000)
Unidad de sensor
remoto (suministrada
con KV-C1000)
Capteur de
télécommande
(fournis avec le
KV-C1000)
Antenna elements (supplied with KV-C1000)
Elementos de antena (suministrados con
KV-C1000)
Éléments d’antenne (fournis avec le
KV-C1000)
Playback source
Fuente de reproducción
Source de lecture
6
VCR (KV-V8 or KZ-V10*
VCR (KV-V8 o KZ-V10*6)
Magnétoscope (KV-V8 ou KZ-V10*6)
Camcorder
Videocámera
Caméscope
)
KV-C1000
TROUBLESHOOTING
• The fuse blows.
* Are the red and black leads connected correctly?
• Power cannot be turned on.
* Is the yellow lead connected?
• Picture does not come on screen.
* Is the correct input selected?
• Picture does not appear clearly.
* Is the color monitor installed at the right angle?
• This unit does not work at all.
* Have you reset your unit?
LOCALIZACION DE AVERIAS
• El fusible se quema.
* ¿Están los conductores rojo y negro correctamente
conectados?
• No es posible conectar la alimentación.
* ¿Está el cable amarillo conectado?
• La imagen no aparece en la pantalla.
* ¿Se ha seleccionado la entrada correcta?
• La imagen no aparece con claridad.
* ¿Está el monitor de color instalado en un ángulo correcto?
• La unidad no funciona para nada.
* ¿Reinicializó su unidad?
EN CAS DE DIFFICULTÉS
• Le fusible saute.
* Les fi ls rouge et noir sont-ils racordés correctement?
• L’appareil ne peut pas être mise sous tension.
* Le fi l jaune est-elle raccordée?
• Aucune image n’apparaît sur l’écran.
* L’entrée correcte est-elle choisie?
• L’image n’apparaît pas clairement.
* Le moniteur couleur est-il installé avec un angle correct?
• Cet appareil ne fonctionne pas du tout.
* Avez-vous réinitialisé votre appareil?
– 6 –
Page 25

KV-MH6510
Installation/Connection Manual
Einbau/Anschlußanleitung
Manuel d’installation/raccordement
Handleiding voor installatie/aansluiting
LVT1327-008A
[E]
0505MNMMDWJEIN
EN, GE, FR, NL
ENGLISH
WARNING
Installation requires some special
knowledge.
Do not install the monitor system
yourself. Consult a dealer having special
knowledge of this kind for safe and
reliable installation.
• DO NOT INSTALL THE MONITOR IN A
LOCATION WHICH OBSTRUCTS DRIVING,
VISIBILITY OR WHICH IS PROHIBITED BY
APPLICABLE LAWS AND REGULATIONS.
If the monitor is installed in a location which
obstructs forward visibility or operation of the
air bag or other safety equipment or which
interferes with operation of the vehicle, it may
cause an accident.
• NEVER USE BOLTS OR NUTS FROM
THE VEHICLE’S SAFETY DEVICES FOR
INSTALLATION.
If bolts or nuts from the steering wheel,
brakes or other safety devices are used for
installation of the monitor, it may cause an
accident.
• ATTACH THE WIRES CORRECTLY.
If the wiring is not correctly performed, it may
cause a fi re or an accident. In particular, be
sure to run and secure the lead wire so that
it does not get tangled with a screw or the
moving portion of a seat rail.
• USE WITH DC 12 V NEGATIVE GROUND
VEHICLES.
This monitor system is only for use in a DC 12 V
negative ground vehicle.
It cannot be used in large trucks or diesel
vehicles which are DC 24 V vehicles.
If it is used in the wrong type of vehicle, it may
cause a fi re or accident.
• To prevent short circuits, we recommend
that you disconnect the battery’s negative
terminal and make all electrical connections
before installing the unit. If you are not sure
how to install this unit correctly, have it
installed by a qualifi ed technician.
• Avoid installing the monitor connection
unit in the following places:
– Where it would hinder your safe driving.
– Where it would be exposed to direct sunlight
or heat directly from the heater or placed in
an extremely hot place.
– Where it would be subject to rain, water
splashes or excessive humidity.
– Where it would be subject to dust.
– Where it would be positioned on an unstable
place.
– Where it could damage the car’s fi ttings.
– Where proper ventilation would not be
maintained, such as under a fl oor mat.
CAUTION
Since there may be legal regulations
defi ning the permissible installation
locations for the color monitor which differ
by country or by state, be sure to install the
color monitor in a location complying with
any such laws.
DEUTSCH
WARNUNGEN
Die Installation erfordert entsprechende
Fachkenntnisse.
Installieren Sie das Monitorsystem nicht
selbst. Wenden Sie sich für eine sichere
und fachgerechte Installation an einen
Vertragshändler.
• INSTALLIEREN SIE DEN MONITOR NICHT
AN EINEM ORT, AN DEM DAS FÜHREN
DES FAHRZEUGS ODER DIE SICHT
BEEINT-RÄCHTIGT WIRD ODER DER
AUFGRUND GELTENDER GESETZE UND
VERORDNUNGEN UNZULÄSSIG IST.
Wenn Sie den Monitor an einem Ort
installieren, an dem die Voraussicht oder
der Betrieb des Airbags oder anderer
Sicherheitseinrichtungen des Fahrzeugs
beeinträchtigt wird oder das Führen des
Fahrzeugs gestört wird, kann er die Ursache
für einen Unfall sein.
• VERWENDEN SIE NIEMALS SCHRAUBEN
ODER MUTTERN DER SICHERHEITSEINRICHTUNGEN DES FAHRZEUGS ZUR
INSTALLATION.
Wenn Schrauben oder Muttern des Lenkrads,
der Bremsen oder anderer Sicherheitseinrichtungen zur Installation des Monitors
verwendet werden, kann ein Unfall verursacht
werden.
• BRINGEN SIE DIE DRÄHTE
ORDNUNGSGEMÄSS AN.
Wenn die Verkabelung nicht richtig
durchgeführt wird, entsteht hierdurch
möglicherweise ein Feuer oder Unfall. Achten
Sie insbesondere darauf, das Kabel
so zu verlegen und zu sichern, daß
es sich nicht mit einer Schraube oder
dem beweglichen Teil einer Sitzschiene
verheddert.
• VERWENDEN SIE DAS GERÄT NUR IN
FAHRZEUGEN MIT 12-V-GLEICHSTROMSYSTEM UND NEGATIVER ERDUNG.
Dieser Monitor darf nur in Fahrzeugen mit
einem 12-V-Gleichstromsystem und Negativer
Erdung verwendet werden.
Er darf nicht in großen Lkw oder Dieselfahrzeugen mit 24-V-Gleichstrom-systemen
verwendet werden.
Wenn der Monitor im falschen Fahrzeugtyp
verwendet wird, kann er ein Feuer oder einen
Unfall verursachen.
• Um einen Kurzschluß zu vermeiden,
empfi ehlt es sich, den negativen Pol der
Batterie abzutrennen und alle elektrischen
Anschlüsse vorzunehmen, bevor der Monitor
installiert wird. Wenn Sie sich nicht sicher
sind, wie das Gerät installiert wird, lassen
Sie es von einem qualifi zierten Techniker
einbauen.
• Die Monitor-Anschlußeinheit nicht an den
folgenden Orten installieren:
– an denen die Fahrsicherheit gefährdet
wäre.
– an denen es direkter Sonneneinstrahlung
oder Hitzeeinwirkung durch die Heizung
ausgesetzt wäre. Installieren Sie es auch
nicht an einem extrem heißen Ort.
– an denen es Regen, Wasserspritzern oder
übermäßiger Feuchtigkeit ausgesetzt wäre.
– an denen es Staub ausgesetzt wäre.
– die instabil sind.
– an denen die Fahrzeugarmaturen
beschädigt werden könnten.
– an denen keine ordnungsgemäße Belüftung
aufrechterhalten werden kann, z.B.
unterhalb von Bodenmatten.
FRANÇAIS NEDERLANDS
AVERTISSEMENT
L’installation nécessite certaines
connaissances spéciales.
N’installez pas le moniteur vous-même.
Consultez un revendeur possédant les
connaissances spéciales nécessaires
pour une installation correcte et sûre.
• N’INSTALLEZ PAS LE MONITEUR DANS
UN ENDROIT QUI GÊNE LA CONDUITE,
LA VISIBILITÉ OU QUI EST INTERDIT
PAR LE CODE DE LA ROUTE ET LES
RÈGLEMENTS.
Si le moniteur était installé à un emplacement
gênant la visibilité avant, ou le déploiement du
sac à air, et autres dispositifs de sécurité, ou
à un emplacement gênant pour la conduite du
véhicule, comme près du levier des vitesses
ou de la pédale du frein, cela risquerait de
provoquer des accidents.
• NE JAMAIS UTILISER POUR
L’INSTALLATION DES BOULONS OU DES
ÉCROUS PROVENANT DES DISPOSITIFS
DE SÉCURITÉ DU VÉHICULE.
Si l’on utilisait pour l’utilisation du moniteur
des boulons et des écrous cannibalisés du
volant, des freins ou autres dispositifs de
sécurités, cela risquerait de provoquer des
accidents.
• ATTACHER LES CORDONS
CORRECTEMENT.
Si le câblage n’est pas exécuté correctement,
cela risque de provoquer un incendie ou
autre accident. Veiller, en particulier, à
tirer et attacher les fi ls en sorte qu’ils me
s’accrochent pas à une vis ou ne se coincent
dans les parties mobiles des rails des sièges.
• USAGE SUR LES VÉHICULES DE 12 V CC
AVEC NÉGATIF À LA MASSE.
Ce moniteur ne peut être utilisé que sur
les véhicules de 12 V CC avec négatif à la
masse.
Il ne peut pas être utilisé sur les gros camions
ou les véhicules diesel de 24 V CC.
S’il était utilisé sur un type de véhicule
inadéquat cela risquerait de provoquer un
incendie ou autres accidents.
• Pour éviter les courts-circuits, nous
recommandons que vous déconnectiez la
borne négative de la batterie et réalisiez
toutes les connexions électriques avant
d’installer l’appareil. Si vous n’êtes pas sûr
de savoir comment installer cet appareil
correctement, faites-le installer par un
technicien qualifi é.
• Évitez d’installer l’unité de connexion du
moniteur dans les endroits suivants:
– Où il peut gêner la conduite de la voiture.
– Où il est exposé à la lumière directe du
soleil, à la chaleur directe du chauffage ou
placé dans un endroit très chaud.
– Où il est sujet à la pluie, aux éclaboussures
ou à une humidité excessive.
– Où il est sujet à la poussière.
– Où il est positionné dans un endroit instable.
– Où il peut endommager les accessoires de
la voiture.
– Où une ventilation correcte ne peut pas être
maintenue, comme sous un tapis de sol.
ATTENTION
Il peut y avoir des réglementations
défi nissant les emplacements d’installation
autorisés pour un moniteur couleur et
celles-ci peuvent varier d’une région à
l’autre. Assurez-vous d’installer le moniteur
dans un endroit conforme à ces lois.
WAARSCHUWING
Het installeren vereist een specifi eke
kennis.
Installeer het monitorsysteem derhalve
niet zelf. Raadpleeg de plaats van
aankoop of een vakman die deze
speciale kennis heeft voor het veilig en
betrouwbaar installeren.
• INSTALLEER DE MONITOR NIET OP EEN
PLAATS WAAR DIT HET RIJDEN, OF HET
UITZICHT BELEMMERT, OF WAAR DIT
BIJ WET OF ANDERE REGELGEVING IS
VERBODEN.
Als de monitor op een plaats is geïnstalleerd
waar dit het uitzicht op de weg belemmert,
dit de werking van de airbag of dit andere
veiligheidsvoorzieningen hindert, of waar het
besturen van het voertuig in gevaar wordt gebracht,
kan dit tot een ongeval lijden.
• GEBRUIK NOOIT SCHROEVEN OF
MOEREN VOOR DE INSTALLATIE
DIE NODIG ZIJN VOOR DE
VEILIGHEIDSVOORZIENINGEN VAN DE
AUTO.
Als schroeven of moeren van het stuur, de rem of
andere veiligheidsvoorzieningen worden gebruikt
voor de installatie van de monitor, kan dit tot een
ongeval lijden.
• SLUIT DE BEDRADING OP DE JUISTE
WIJZE AAN.
Als de bedrading verkeerd wordt aangesloten,
kan dit tot brand of een ongeval lijden. Let er met
name op dat de stroomvoorzieningskabel nergens
achter blijft steken of in contact komt met de
bewegende delen van de rails van de stoelen.
• ALLEEN GEBRUIKEN IN COMBINATIE
MET VOERTUIGEN DIE WERKEN MET
EEN NEGATIEVE AARDING VAN 12 V
GELIJKSTROOM.
Dit monitorsysteem is alleen bedoeld voor
voertuigen die zijn gebaseerd op een negatieve
aarding van 12 V gelijkstroom.
Het systeem kan niet worden gebruikt in
vrachtwagens of diesels, die met 24 V gelijkstroom
werken.
Wanneer dit systeem in een verkeerd type voertuig
wordt gebruikt, kan dit tot brand of een ongeval
lijden.
• Ter voorkoming van kortsluiting, raden we
aan dat u de negatieve aansluiting van de accu
losmaakt en daarna alle benodigde verbindingen
tot stand brengt alvorens de eenheid te installeren.
Als u niet zeker weet hoe u de eenheid moet
installeren, kunt u dit beter door een erkend
vakman laten doen.
• Installeer het monitor-aansluitgedeelte niet
op de volgende plaatsen:
– waar deze een gevaar vormt voor het besturen
van de auto.
– waar deze wordt blootgesteld aan direct zonlicht,
een verwarming of een andere hittebron.
– waar deze wordt blootgesteld aan regen,
spatwater of extreme vochtigheid.
– waar deze wordt blootgesteld aan stof.
– waar deze op een instabiele ondergrond komt te
staan.
– waar deze de auto kan beschadigen.
– waar geen ventilatie is, zoals onder een vloermat.
LET OP!
Mogelijk zijn er in uw land of regio wetten
of bepalingen die de installatie van de
kleurenmonitor op bepaalde plaatsen in de auto
verbieden. Installeer de kleurenmonitor altijd in
overeenstemming met dergelijke regelgeving.
VORSICHT
Da es möglicherweise gesetzliche
Vorschriften gibt, mit denen zulässige
Installationsorte für den Farbmonitor
geregelt werden und die von Staat zu Staat
oder Bundesland zu Bundesland unterschiedlich sein können, vergewissern Sie
sich, daß Sie den Farbmonitor an einem
Ort installieren, der mit den gesetzlichen
Vorschriften im Einklang steht.
– 1 –
Page 26

Parts list for installation and
1
2
3
5
4
connection
The following parts are provided with this unit.
After checking them, please set them correctly.
Teileliste für den Einbau und
Anschluß
Die folgenden Teile werden zusammen mit diesem
Gerät geliefert.
Nach ihrer Überprüfung, die Teile richtig einsetzen.
Liste des pièces pour l’installation et
raccordement
Les pièces suivantes sont fournies avec cet appareil.
Après vérifi cation, veuillez les placer correctement.
Lijst van onderdelen die u bij
installatie en aansluiting nodig
hebt
De volgende onderdelen worden bij het apparaat
geleverd.
Installeer ze op de juiste wijze, nadat u ze hebt
gecontroleerd.
Wide color monitor (center unit and shroud)
Breitbild-Farbmonitor
(Mittlere Einheit und Abschirmung)
Moniteur couleur à écran large
(unité centrale et socle de montage au plafond)
Breedkleur-monitor (centrale toestel en versteviging)
System cord (3 m)
Systemkabel (3 m)
Cordon de système (3 m)
Systeemsnoer (3 m)
Trim plate
Frontrahmen
Plaque d’assemblage
Sierplaat
Power cord
Spannunsgversorgungskabel
Cordon d’alimentation
Electriciteitskabel
Paper template
Papierschablone
Modèle en papier
Papieren sjabloon
Connector cover
Steckerabdeckung
Couvercle du connecteur
Aansluitingskapje
Monitor connection unit
Monitor-Anschlußeinheit
Unité de connexion du moniteur
Aansluitgedeelte van de monitor
Screws–M2 x 6 mm
Schrauben–M2 x 6 mm
Vis–M2 x 6 mm
Schroef–M2 x 6 mm
Monitor connection unit / Monitor-Anschlußeinheit / Unité de connexion du moniteur / Aansluitgedeelte van de monitor
Back
Rückseite
Arrière
Achter
1 TO MONITOR (13 PIN) aansluiting
2 AV 2 (INPUT 2) aansluitingen
• VIDEO/AUDIO L (links)/AUDIO R (rechts)
3 AV 1 (INPUT 1) aansluitingen
• VIDEO/AUDIO L (links)/AUDIO R (rechts)
4 AV OUT aansluitingen
• VIDEO/AUDIO L (links)/AUDIO R (rechts)
5 Aansluiting voor stroomtoevoer
1 TO MONITOR (13 PIN) connector
2 AV 2 (INPUT 2) jacks
• VIDEO/AUDIO L (left)/AUDIO R (right)
3 AV 1 (INPUT 1) jacks
• VIDEO/AUDIO L (left)/AUDIO R (right)
4 AV OUT jacks
• VIDEO/AUDIO L (left)/AUDIO R (right)
5 Power supply connector
Front
Vorderseite
Avant
Voor
1 TO MONITOR (13 PIN) Anschluß
2 AV 2 (INPUT 2) Anschlüsse
• VIDEO/AUDIO L (links)/AUDIO R (rechts)
3 AV 1 (INPUT 1) Anschlüsse
• VIDEO/AUDIO L (links)/AUDIO R (rechts)
4 AV OUT Anschlüsse
• VIDEO/AUDIO L (links)/AUDIO R (rechts)
5 Stromversorgungsanschluß
1 Connecteur TO MONITOR (13 PIN)
2 Prises AV 2 (INPUT 2)
• VIDEO/AUDIO L (gauche)/AUDIO R (droit)
3 Prises AV 1 (INPUT 1)
• VIDEO/AUDIO L (gauche)/AUDIO R (droit)
4 Prises AV OUT
• VIDEO/AUDIO L (gauche)/AUDIO R (droit)
5 Connecteur d’alimentation
– 2 –
Page 27
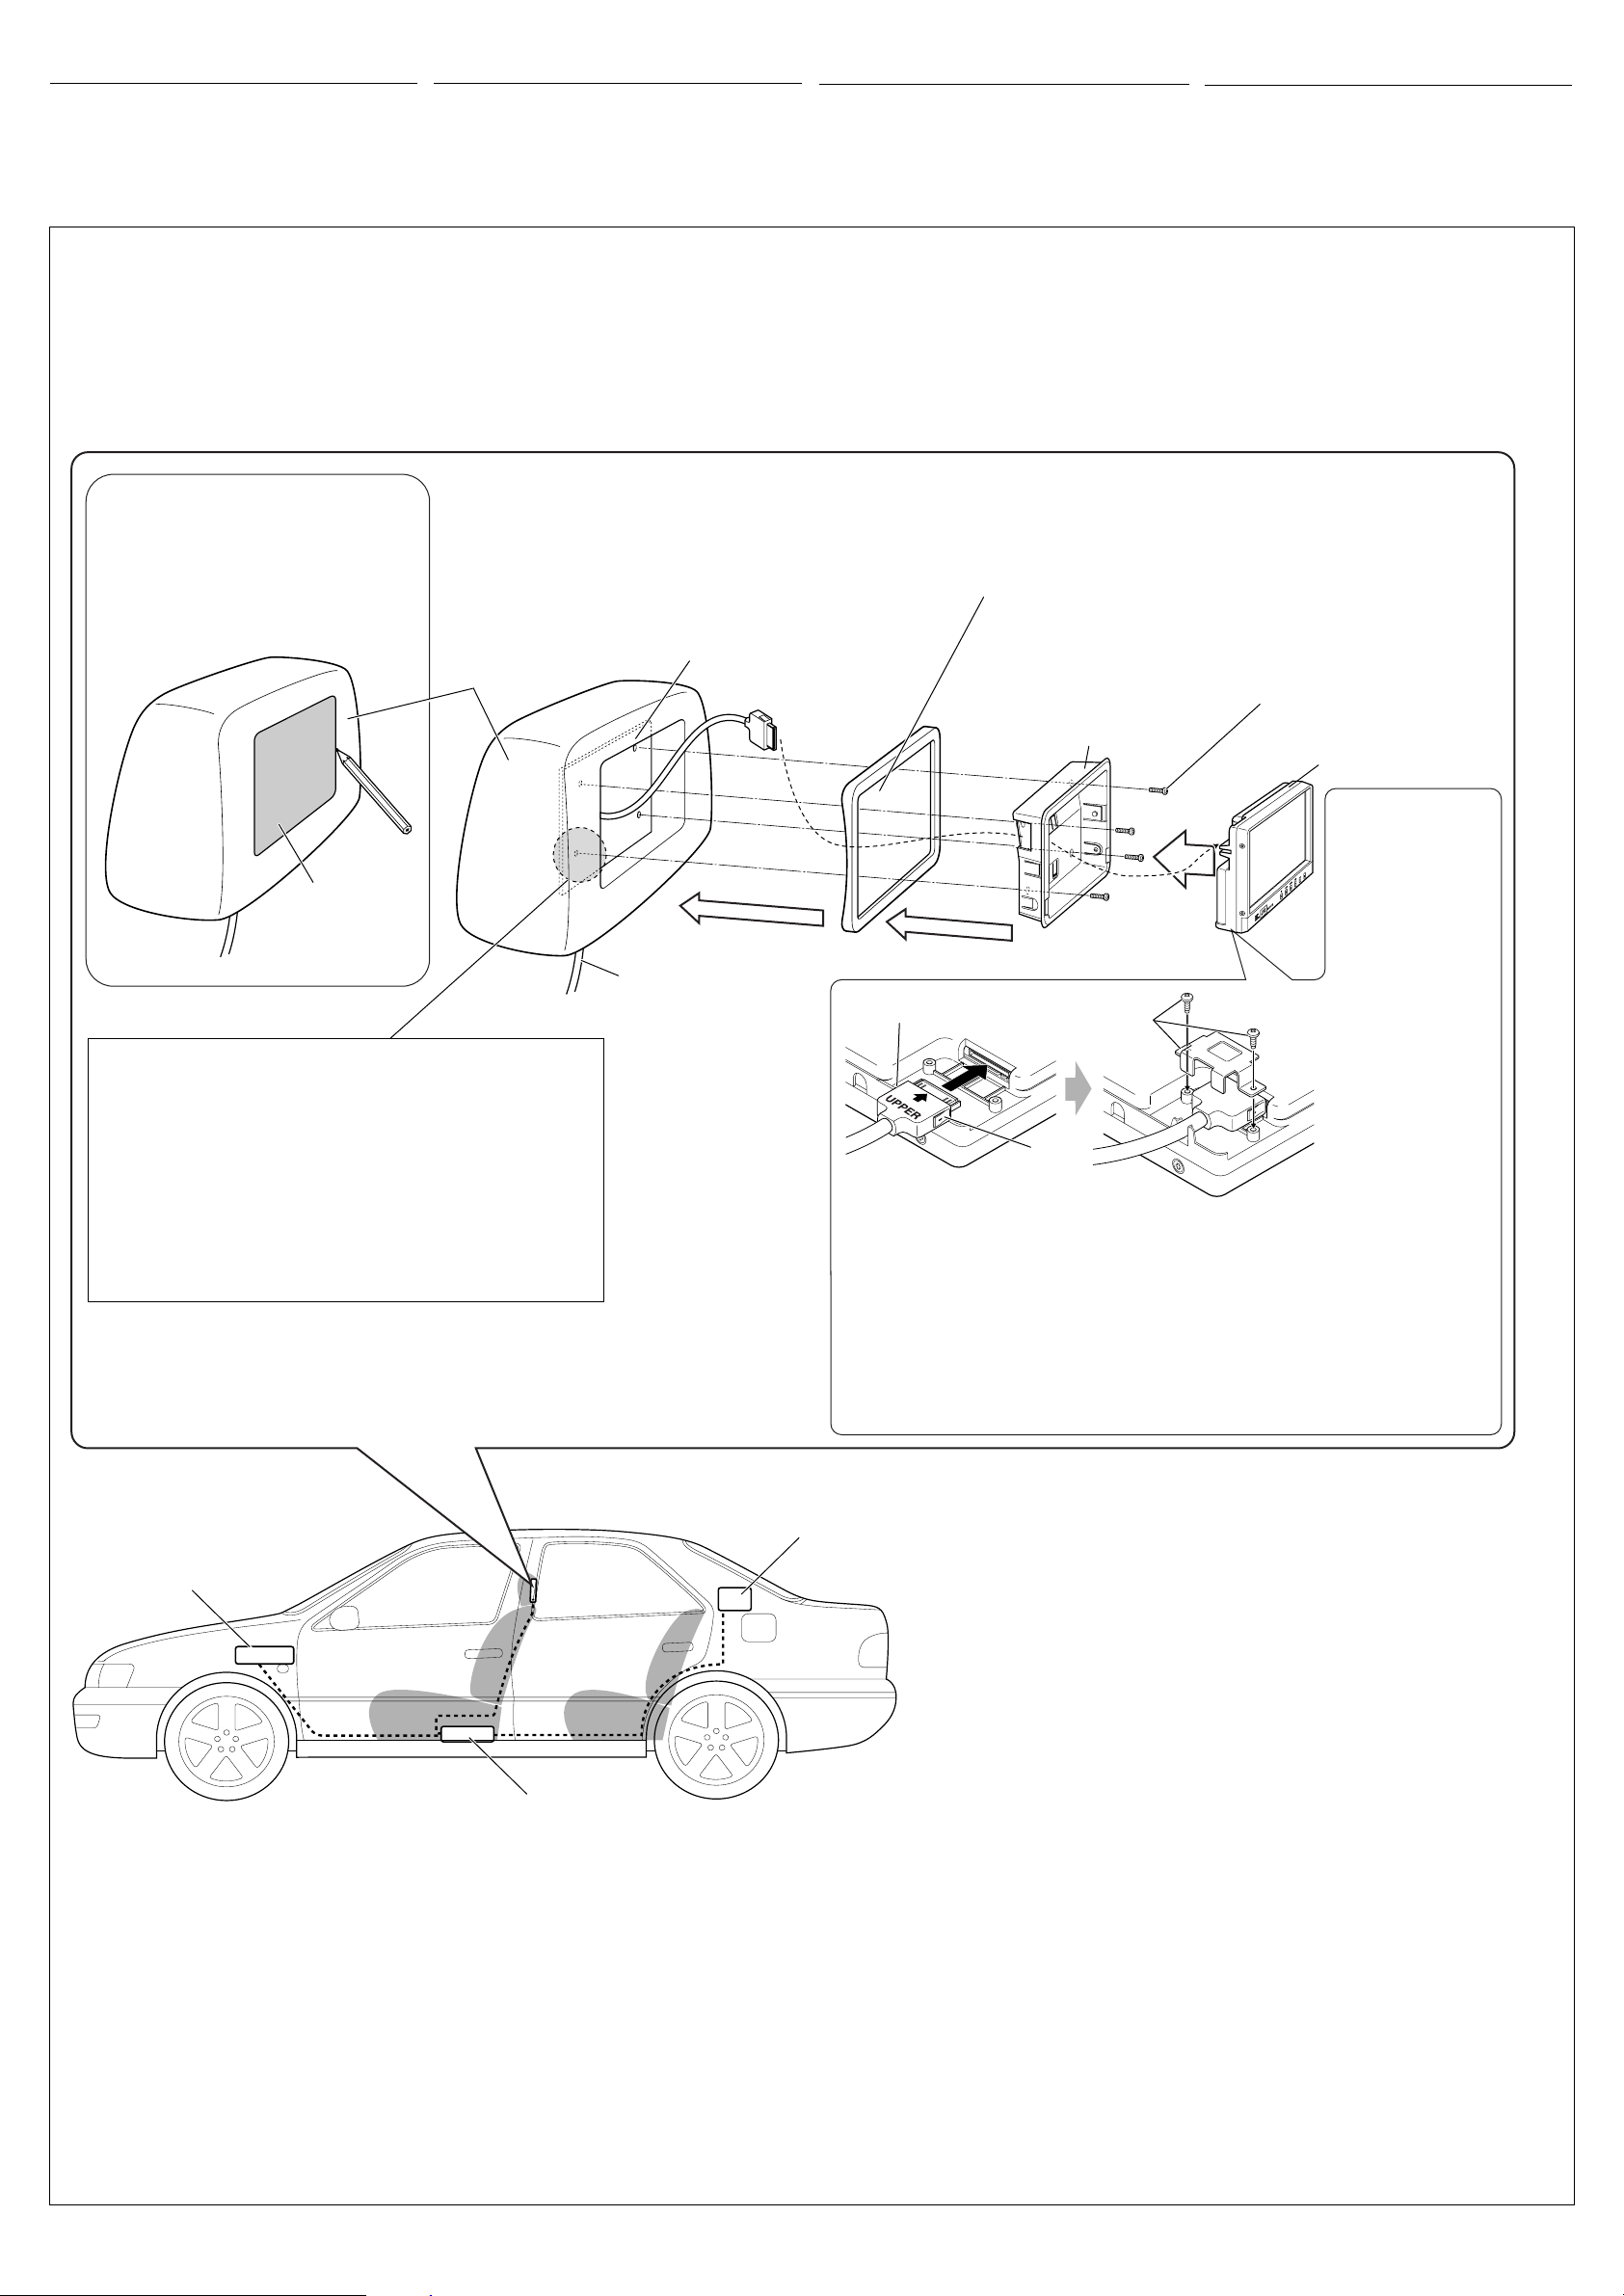
INSTALLATION
• The following illustration shows a typical
installation. However, you should make adjustments
corresponding to your specifi c car. If you have
any questions or require information regarding
installation kits, consult your JVC IN-CAR
ENTERTAINMENT dealer or a company supplying
kits.
EINBAU
• Die folgende Abbildung zeigt einen typischen
Einbau. Dennoch müssen Sie entsprechend Ihrem
jeweiligen Auto Anpassungen vornehmen. Bei
irgendwelchen Fragen oder wenn Sie Informationen
hinsichtlich des Einbausatzes brauchen, wenden
Sie sich an ihren
ein Unternehmen das diese Einbausätze vertreibt.
JVC-Autoradiofachhändler
oder
INSTALLATION
•
L’ illustration suivante est un exemple d’installation
typique. Cependant, vous devez faire les ajustements
correspondant à votre voiture particulière. Si vous
avez des questions ou avez besoin d’information
sur des kits d’installation, consulter votre
revendeur d’autoradios JVC ou une compagnie
d’approvisionnement.
INSTALLATIE
• Op de volgende afbeelding kunt u zien hoe de installatie,
normaal gesproken, in zijn werk gaat. U moet echter bij
de installatie rekening houden met de bijzonderheden
van uw eigen auto. Neem bij vragen of voor meer
bijzonderheden over inbouwpakketten contact op met uw
JVC auto audiohandelaar of een dealer of een bedrijf dat
inbouwpakketten levert.
Mounting the color monitor
It is recommended to have the monitor system
installed by a qualifi ed technician.
Before mounting the monitor to the headrest:
• Perform the required external connections fi rst.
• Using the supplied paper pattern, mark the area to
be cut out of the headrest, then carefully cut it.
Mark the area to be cut out, and carefully cut
it.
Markieren Sie den Bereich, der ausgeschnitten
werden soll und schneiden Sie den Bereich
vorsichtig aus.
Marquez la zone à couper et coupez-la avec
précaution.
Markeer het uit te snijden gedeelte en snijd vervolgens
voorzichtig uit.
Paper template
Papierschablone
Modèle en papier
Papieren sjabloon
Monitor befestigen
Es wird empfohlen, daß das Monitorsystem durch
einen qualifi zierten Techniker installiert wird.
Vor der Installation des Monitors an der Decke
Kopfstütze:
• Schließen Sie die externen Anschlüsse zuerst an.
• Markieren Sie mit Hilfe der mitgelieferten
Papierschablone den Bereich auf der Kopfstütze,
der ausgeschnitten werden soll und schneiden Sie
den Bereich vorsichtig aus.
Headrest
Kopfstütze
Repose-tête
Hoofdsteun
• For safety, use neither a sharp-pointed screw nor a long
screw which will protrude more than 5 mm from the back
of the installation plate.
• Aus Sicherheitsgründen verwenden Sie weder eine spitze
Schraube noch eine lange Schraube, die mehr als 5 mm
aus der Rückseite der Montageplatte hervorsteht.
• Pour des raisons de sécurité, n’utilisez jamais une vis
pointue ni une vis longue qui dépasse de plus de
5 mm de l’arrière de la plaque d’installation.
• Gebruik voor de veiligheid beslist geen schroef met
scherpe punt of een lange schroef die meer dan 5 mm
vanaf de achterkant van de installatieplaat zou uitsteken.
Installation plate (not supplied)
Montageplatte (nicht mitgeliefert)
Plaque d’installation (non fournis)
Installatieplaat (niet bijgeleverd)
System cord (from the
monitor connection unit)
Systemkabel (vom
Monitoranschluss)
Cordon de système
(à partir de l’unité de
connexion)
Systeemsnoer (vanaf het
aansluitgedeelte van de
monitor)
Montage du moniteur couleur
Il est recommandé de faire installer le système de
moniteur par un technicien qualifi é.
Avant de fi xer le moniteur au repose-tête:
• Réalisez d’abord les connexions extérieures
nécessaires.
• En utilisant le modèle en papier fourni, marquez la
zone à couper sur le repose-tête, puis coupez-la
avec précaution.
Trim plate (if required to fi t the shroud to the rear surface of the headrest)
Frontrahmen (wenn zur Befestigung der Abschirmung an der Hinterseite der Kopfstütze notwendig)
Plaque d’assemblage (s’il est nécessaire de monter le socle de montage sur la surface arrière du
repose-tête)
Sierplaat (indien de versterking aan de achterkant van de hoofdsteun moet worden bevestigd)
Shroud
Abschirmung
Socle de montage au
plafond au plafond
Versteviging
(A)
*1
Bevestigen van de kleurenmonitor
Laat bij voorkeur het monitorsysteem door een
erkend technicus installeren.
Alvorens de monitor aan het plafond te hoofdsteun:
• Maak eerst de vereiste externe verbindingen.
• Gebruik het bijgeleverde papierpatroon, markeer het
uit te snijden gedeelte van de hoofdsteun en snijd het
gemarkeerde gedeelte vervolgens uit.
Screws (not supplied)
Schrauben (nicht mitgeliefert)
Vis (non fournis)
Schroeven (niet bijgeleverd)
Center unit
Mittlere Einheit
Unité centrale
Centrale toestel
1
Fix the connector
*
with the connector
cover after
connection.
1
Steckverbinder-
*
Abdeckung nach
dem Anschluss
am Steckverbinder
anbringen.
1
*
Une fois le
branchement
effectué, raccordez
le connecteur
au couvercle du
connecteur.
*1 Plaats na het aansluiten
het stekkerkapje over
de stekker.
(A)
When disconnecting, pull the connector while pressing (A).
• Do not pull the cord when disconnecting. Otherwise, the connector or the monitor may be
damaged.
Zum Trennen des Anschlusses seitlich am Steckverbinder (A) drücken und Steckverbinder
abziehen.
• Nicht am Kabel ziehen, um den Anschluss zu trennen. Dadurch können Steckverbinder
oder Bildschirm beschädigt werden.
Pour débrancher, tirez et appuyez simultanément sur le connecteur (A).
• Lors de la déconnexion, ne tirez pas sur le cordon. Ceci risquerait d’endommager le
connecteur ou le moniteur.
Trek voor loskoppelen aan de stekker terwijl u op (A) drukt.
• Trek niet aan het snoer wanneer u de stekker uittrekt. Dit kan schade toebrengen aan de stekker of
de monitor.
TV tuner, etc.
TV tuner usw.
Car receiver, etc.
Autoreciever usw.
Recepteur d’autoradio, etc.
Autoradio-ontvanger, enz.
Monitor connection unit
Monitor-Anschlußeinheit
Unité de connexion du moniteur
Aansluitgedeelte van de monitor
Tuner de télévision, etc.
TV tuner, enz.
CAUTION / VORSICHT / ATTENTION / LET OP!:
• Take preventative measures to avoid unexpected disconnection of the cord and damage to the cord by being caught somewhere.
This trouble may happen while adjusting the headrest position or while moving or reclining the seat.
• Stellen Sie sicher, dass das Kabel nicht unbeabsichtigt abgezogen und eingeklemmt werden kann—Dies kann geschehen, wenn
die Kopfstütze bewegt, der Sitz verschoben oder die Rückenlehne nach hinten bewegt wird.
• Prenez des mesures préventives pour éviter que le cordon soit déconnecté accidentellement ou coincé quelque part—Cela peut
se produire quand vous bougez le repose-tête, ou quand vous bougez ou inclinez le siège.
• Neem voorzorgsmaatregelen zodat het snoer niet onverwachts los kan schieten en ergens tussen kan worden vastgekneld—Het
snoer zou anders namelijk los kunnen schieten bij het verstellen van de hoofdsteun of het verplaatsen of verstellen van de stoel.
How to detach the center unit from the shroud
So entfernen Sie die mittlere Einheit von der
Abschirmung
Comment détacher l’unité centrale du socle de montage
Verwijderen van het centrale toestel van de versteviging
1 Press the top end of the center unit it clicks. The bottom end of
the center unit comes out.
2 Hold the bottom end and pull out the center unit.
1 Auf den oberen Rand der Zentraleinheit drücken, bis ein
Klicken hörbar ist. Der untere Rand der Zentraleinheit wird
dadurch herausgedrückt.
2 Am unteren Rand festhalten und die Zentraleinheit
herausziehen.
1 Appuyez sur la partie
supérieure de l’unité
centrale jusqu’au déclic.
La partie inférieure de
l’unité centrale se
dégage.
2 Maintenez la par tie
inférieure et extrayez
l’unité centrale.
1 Druk op het bovenste deel van
de middelste eenheid todat u een
klik voelt. Het onderste deel van
de middelste eenheid komt naar voren.
2 Pak het onderste deel vast en trek de
middelste eenheid uit de houder.
– 3 –
Page 28
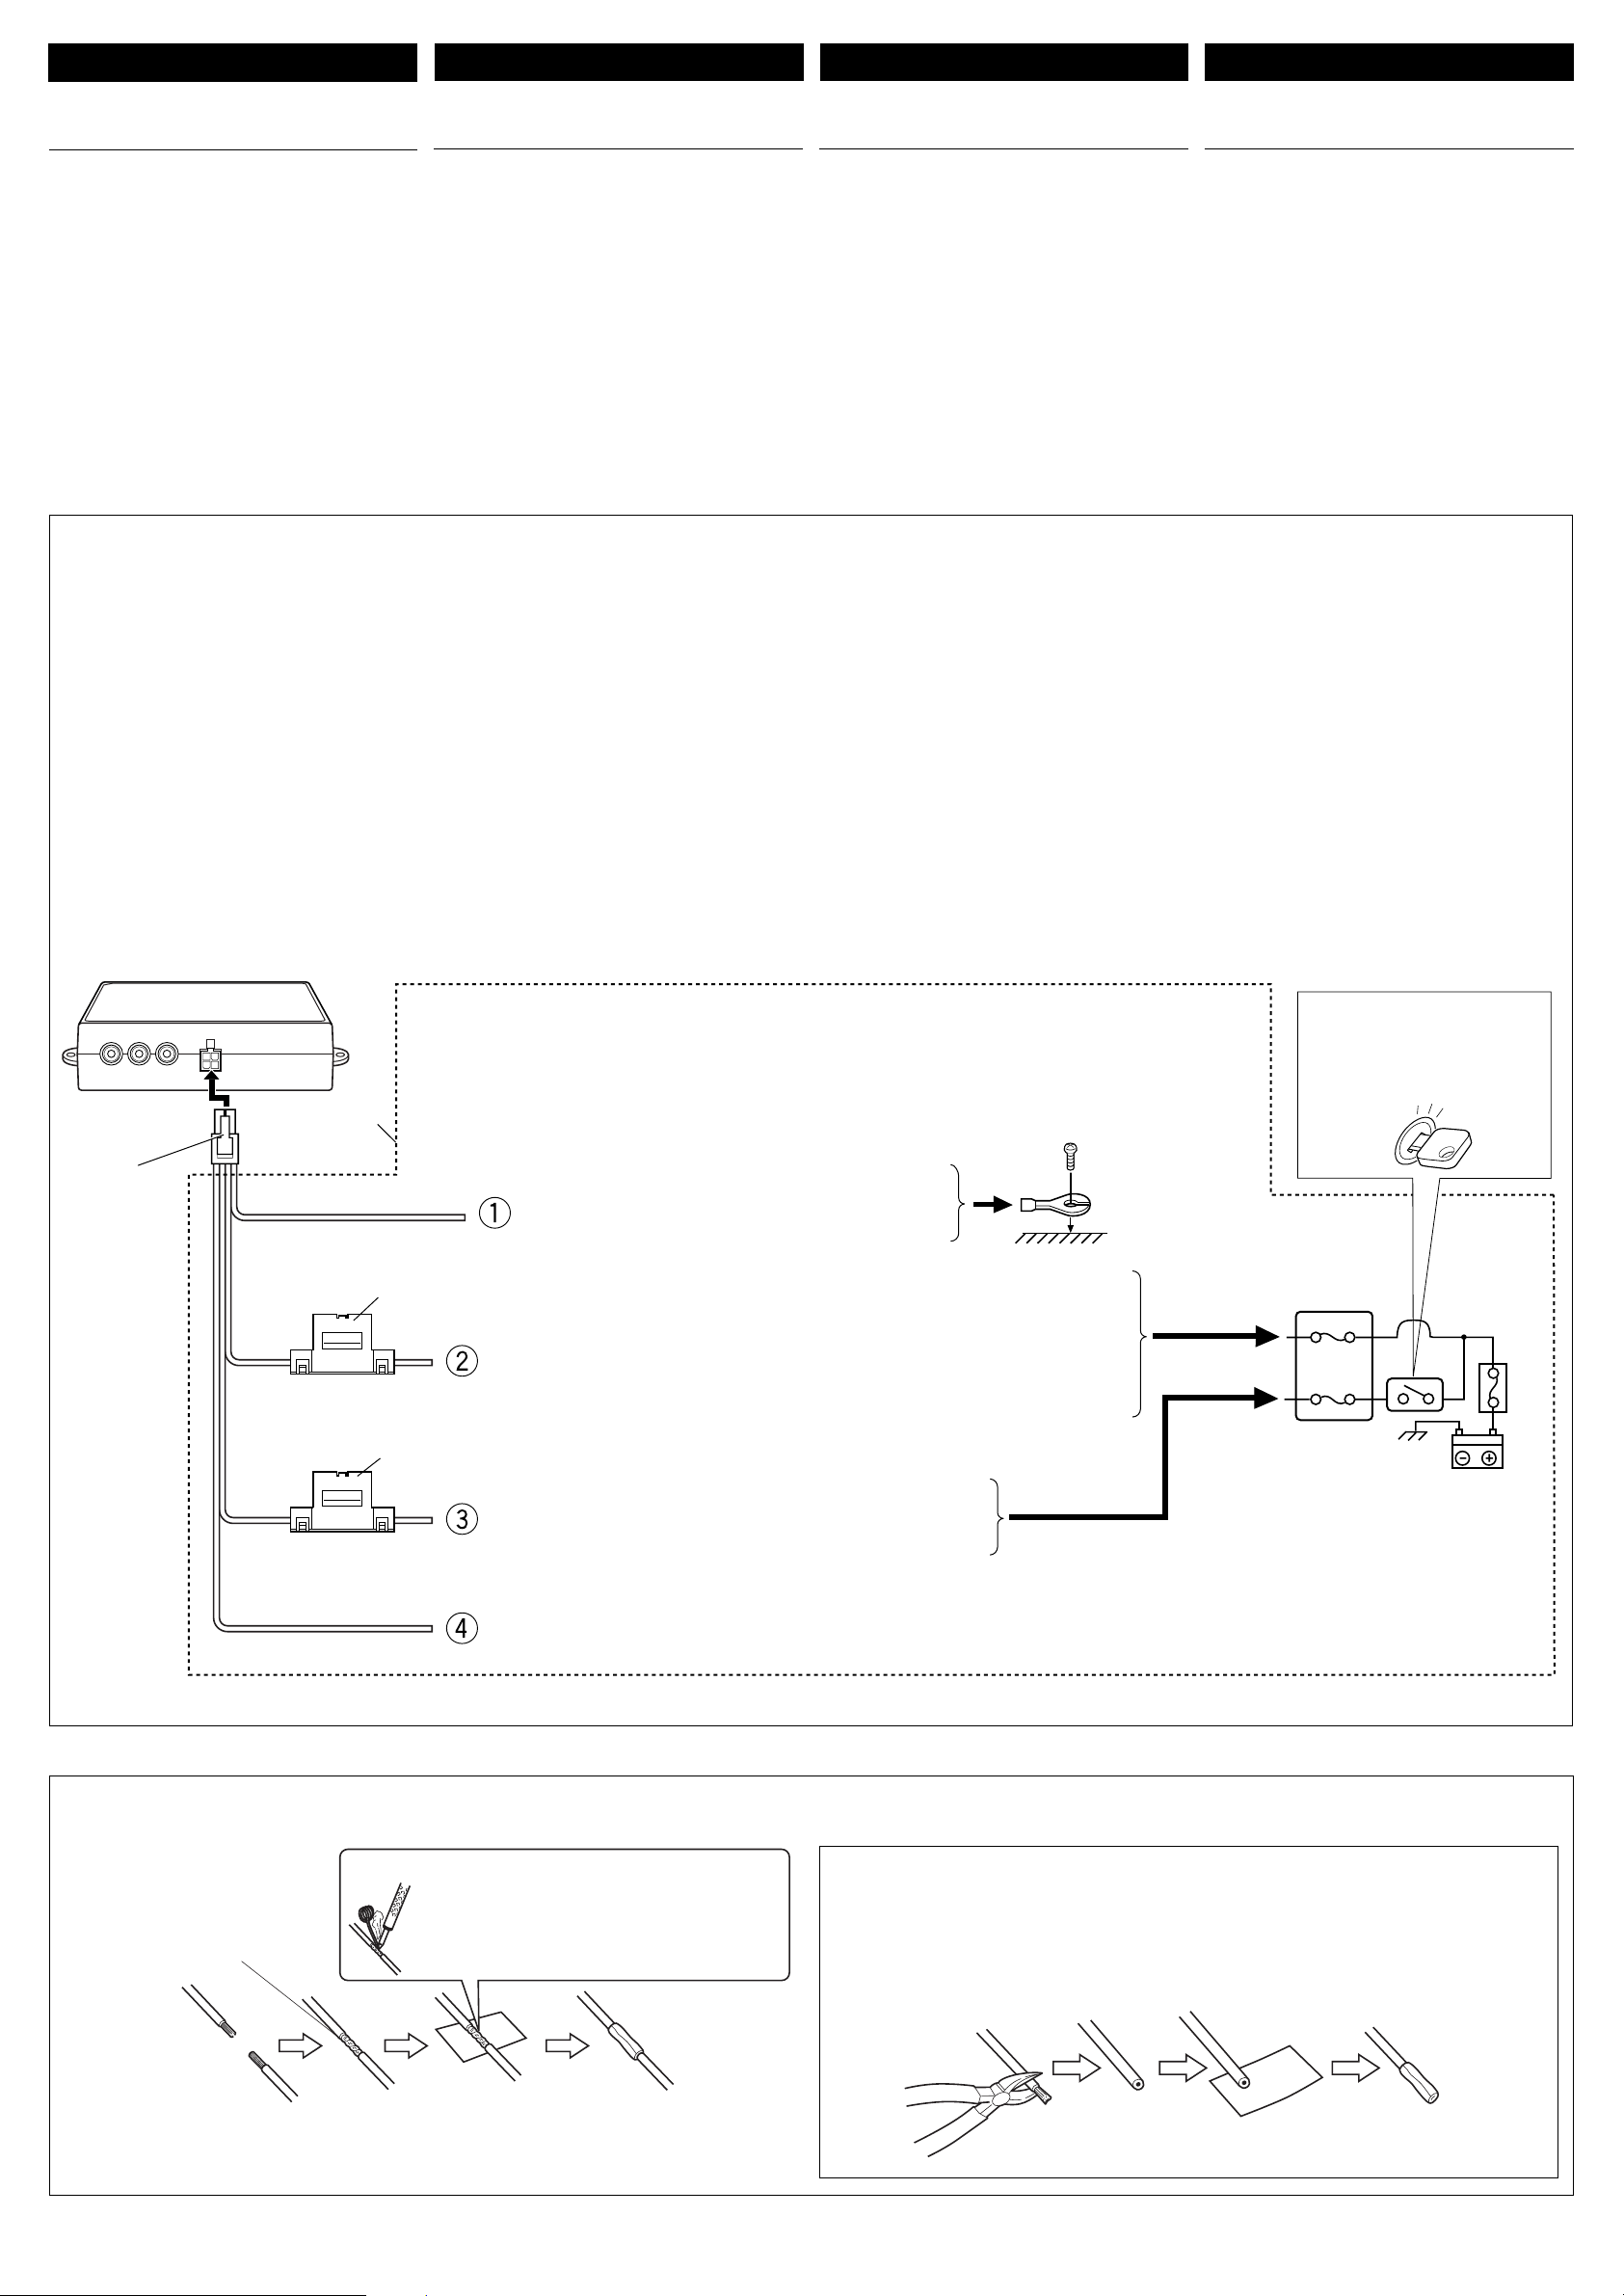
ENGLISH
DEUTSCH FRANÇAIS NEDERLANDS
ELECTRICAL CONNECTIONS
To prevent short circuits, we recommend that you
disconnect the battery’s negative terminal and make
all electrical connections before installing the unit. If
you are not sure how to install this unit correctly, have
it installed by a qualifi ed technician.
Note:
This unit is designed to operate on 12 V DC,
NEGATIVE ground electrical systems. If your
vehicle does not have this system, a voltage inverter
is required, which can be purchased at JVC IN-CAR
ENTERTAINMENT dealers.
• Replace the fuse with one of the specifi ed ratings. If
the fuse blows frequently, consult your JVC IN-CAR
ENTERTAINMENT dealer.
a
Typical Connections / Typische Anschlüsse / Raccordements typiques / Normale verbindingen
Before connecting: Check the wiring in the vehicle
carefully. Incorrect connection may cause serious
damage to this unit.
The leads of the power cord and those of the
connector from the car body may be different in
color.
7 Power supply connection
1 Connect the colored leads of the power cord in
the following sequence.
1 Black: ground
2 Yellow: to car battery (constant 12 V)
3 Red: to an accessory terminal
4 Orange with white stripe: to car light control
switch
2 Finally connect the wiring harness to the unit.
ELEKTRISCHE ANSCHLÜSSE
Zur Vermeidung von Kurzschlüssen empfehlen wir,
daß Sie den negativen Batterieanschluß abtrennen
und alle elektrischen Anschlüsse herstellen, bevor
das Gerät eingebaut wird. Sind Sie sich über den
richtigen Einbau des Geräts nicht sicher, lassen Sie
es von einem qualifi zierten Techniker einbauen.
Hinweis:
Dieses Gerät ist für den Betrieb in elektrischen
Anlagen mit 12 V Gleichstrom und (–) Erdung
ausgelegt. Verfügt Ihr Fahrzeug nicht über diese
Anlage, ist ein Spannungsinverter erforderlich, der
bei JVC-Autoradiofachhändler erworben werden
kann.
• Die Sicherung mit einer der entsprechenden
Nennleistung ersetzen. Brennt die Sicherung
häufi g durch, wenden Sie sich an ihren JVCAutoradiofachhändler.
Vor dem Anschließen: Die Verdrahtung im Fahrzeug
sorgfältig überprüfen. Falsche Anschlüsse können
ernsthafte Schäden am Gerät hervorrufen.
Die Kabel von Stromversorgung und der Anschluss
zur Fahrzeugmasse haben möglicherweise
unterschiedliche Farben.
7 Stromversorgungsanschluß
1 Schließen Sie die farbigen Leitungen des
Stromversorgungskabels in der folgenden
Reihenfolge an:
1 Schwarz: an Erde
2 Gelb: an die Autobatterie (12 V Gleichstrom)
3 Rot: an den Hilfsanschluß
4 Orange mit weißem Streifen: Zum Autobeieuc
htungssteuerung-Schalter
2 Schließen Sie zum Schluß den Kabelbaum an das
Gerät an.
RACCORDEMENTS ELECTRIQUES
Pour éviter tout court-circuit, nous vous
recommandons de débrancher la borne négative
de la batterie et d’effectuer tous les raccordements
électriques avant d’installer l’appareil. Si l’on n’est pas
sûr de pouvoir installer correctement cet appareil, le
faire installer par un technicien qualifi é.
Remarque:
Cet appareil est conçu pour fonctionner sur des
sources de courant continu de 12 V à masse
NEGATIVE. Si votre véhicule n’offre pas ce type
d’alimentation, il vous faut un convertisseur de
tension, que vous pouvez acheter chez un revendeur
d’autoradios JVC.
• Remplacer le fusible par un de la valeur précisée. Si
le fusible saute souvent, consulter votre revendeur
d’autoradios JVC
Avant de commencer la connexion: Vérifi ez
attentivement le câblage du véhicule. Une connexion
incorrecte peut endommager sérieusement l’appareil.
Les fi ls du cordon d’alimentation et ceux du
connecteur provenant de la voiture peuvent être de
couleur différente.
7 Connexion de l’alimentation
1 Connectez les fi ls de couleur du cordon
d’alimentation duplafonnier dans l’ordre suivant.
1 Noir: à la masse
2 Jaune: à la batterie de la voiture (12 V
constant)
3 Rouge: à la prise accessoire
4 Orange avec bande blanche: au commutateur
d’éclairage de la voiture
2 Finalement, connectez le faisceau de fi ls à
l’appareil.
.
ELEKTRISCHE VERBINDINGEN
Om kortsluiting te voorkomen adviseren wij u om de
minpool van de accu los te maken en alle elektrische
verbindingen tot stand te brengen voordat u het apparaat
in de auto installeert. Als u niet zeker weet hoe u dit
apparaat moet installeren, kunt u dit beter door een daartoe
gekwalifi ceerde technicus laten doen.
Opmerking:
Dit apparaat mag worden gebruikt bij elektrische systemen
die werken op 12 V gelijkstroom met negatieve
aarding. Als uw auto niet is uitgerust met een dergelijk
systeem, is een spanningsomzetter vereist. Dit instrument
kan worden aangeschaft bij JVC auto audiohandelaar.
• Vervang de zekering door een exemplaar met het
aangegeven vermogen. Als de zekering vaak doorslaat,
moet u uw JVC auto audiohandelaar raadplegen.
Alvorens de verbindingen tot stand te brengen:
Moet u de bedrading in de auto zorgvuldig. Het apparaat
kan door verkeerde verbindingen ernstige schade
oplopen.
De draden van het stroomsnoer en die van de
aansluitingen in de auto zijn mogelijk verschillend van
kleur.
7 Aansluiten van de stroomtoevoer
1 Sluit de gekleurde draden van het voedingssnoer in de
onderstaande volgorde aan:
1 Zwart: aarde
2 Geel: naar de accu van de auto (constant 12 V)
3 Rood: naar het aansluitpunt van een accessoire
4 Oranje met witte streep: naar autoverlichtingsch
akelaar
2 Sluit tot slot de bedrading naar de eenheid aan.
2
*2 Before checking the operation of this unit prior to installation, this lead must be connected, otherwise power cannot be
*2 Vor der Überprüfung der Funktionsfähigkeit des Geräts vor dem Einbau, muß diese Leitung angeschlossen werden, da
*2 Pour vérifi er le fonctionnement de cet appareil avant installation, ce fi l doit être raccordé, sinon l’appareil ne peut pas
*2 Voordat u controleert of het apparaat werkt (alvorens het te installeren), moet deze draad aangesloten zijn. Als dit niet het geval is,
1
Black / Schwarz / Noir / Zwart
2
Yellow*
2
Gelb*
2
Jaune*
2
Geel*
Red
Rot
Rouge
Rood
Orange with white stripe
Orange mit weißem Streifen
Orange avec bande blanche
Oranje met witte streep
5 A fuse
5 A-Sicherung
Fusible 5 A
5 A zekering
3 A fuse
3 A-Sicherung
Fusible 3 A
3 A zekering
turned on.
sonst die Stromversorgung nicht eingeschaltet werden kann.
être mis sous tension.
kan de stroom niet worden ingeschakeld.
To metallic body or chassis of the car
Zur Metallkarosserie oder zum Fahrwerk des Fahrzeugs
Vers corps métallique ou châssis du véhicule
Naar de metalen ombouw of chassis van de auto
To a live terminal in the fuse block connecting to the car battery (bypassing the ignition
switch)
Zu einem stromführenden Anschluß im Sicherungsblock, der an die Autobatterie
angeschlossen ist (Umgehen des Zündschalters)
A une borne sous tension du porte-fusible connectée à la batterie de la voiture (en
dérivant l’interrupteur d’allumage)
Naar een aansluiting in het zekeringenblok die op de accu is aangesloten (waarbij de ontsteking
wordt omzeilt)
To an accessory terminal in the fuse block
Zu einem Hilfsanschluß im Sicherungsblock
Vers borne accessoire du porte-fusible
Naar de aansluiting voor een accessoire in het zekeringenblok
To car light control switch
Zum Autobeleuchtungssteuerung-Schalter
À l’interrupteur d’éclairage de la voiture
Naar schakelaar van autoverlichting
Ignition switch
Zündschalter
Interrupteur d’allumage
Contactschakelaar
3
*
3
*
Fuse block
Sicherungsblock
Porte-fusible
Zekeringblok
*3 Not included with this unit.
*3 Wird nicht mit Gerät mitgeliefert.
*3 Non fourni avec cet appareil.
*3 Niet bij het apparaat inbegrepen.
Connecting the leads / Anschließen der Leitungen / Raccordement des fi ls / Aansluiting van de gekleurde draden
Twist the core wires when connecting.
Die Kerndrähte beim Anschließen
verdrehen.
Torsader les âmes des fi ls en les
raccordant.
Draai de kerndraden om elkaar heen
wanneer u ze wilt aansluiten.
Solder the core wires to connect them securely.
Die Kerndrähte anlöten, um sie fest anzuschließen.
Souder les âmes des fi ls pour les raccorder entre
eux de façon sûre.
Soldeer de kerndraden zodat ze stevig vast zitten.
CAUTION / VORSICHT / ATTENTION / LET OP!:
• To prevent short-circuit, cover the terminals of the UNUSED leads with insulating tape.
• Zur Vermeidung eines Kurzschlusses die Anschlußklemmen der NICHT VERWENDETEN
Leitungen mit Isolierklebeband umwickeln.
• Pour éviter les court-circuits, couvrir les bornes des fi ls qui ne sont PAS utilisés avec de la
bande isolante.
• Om kortsluiting te voorkomen, moet u de aansluitklemmen van ONGEBRUIKTE gekleurde
draden met isolatieband bedekken.
– 4 –
Page 29

CONNECTING TO THE RECEIVER AND
ANSCHLIESSEN AN RECEIVER
CONNEXION DE L’AUTORADIO
VERBINDEN MET EEN RECEIVER
THE EXTERNAL COMPONENTS
Connect the monitor to TO MONITOR jack using the
system cord supplied with the unit.
The monitor connection unit provides 2 input circuits
and 1 output circuit. Connect one or two playback
sources to AV 1 (INPUT 1) and/or AV 2 (INPUT 2)
and connect reproducing components, such as a car
receiver, to AV OUT.
When the receiver is equipped with
the 2nd AUDIO OUT plug
When increasing the headphones level, fi rst
increase output level of the 2nd AUDIO OUT on
the receiver, then adjust the headphones level
on the headphones.
• Refer also to the INSTRUCTIONS of your car
receiver.
Wide color monitor
BreitbildFarbmonitor
Moniteur couleur à
écran large
Breedkleur-monitor
UND EXTERNER KOMPONENTEN
Schließen Sie den Monitor an die Buchse mit
der Bezeichnung TO MONITOR mit Hilfe des
Systemkabels an (im Lieferumfang enthalten).
Die Monitor-Anschlußeinheit stellt zwei 2 Eingangsund einen Ausgangskreis zur Verfügung. Schließen
Sie eine oder zwei Wiedergabesignalquellen an
AV 1 (INPUT 1) und/oder AV 2 (INPUT 2) und eine
Reproduktionskomponente, z.B. einen Autoreceiver,
an AV OUT.
Wenn der Receiver mit dem 2nd AUDIO
OUT Stecker ausgestattet ist
Beim Höherstellen der Kopfhörerlautstärke
steigern Sie zunächst den Ausgangspegel des
2nd AUDIO OUT am Receiver und stellen dann
die Kopfhörerlautstärke am Kopfhörer ein.
• Siehe auch BEDIENUNGSANLEITUNG des
Fahrzeug-Receivers.
4
*
ET DES APPAREILS EXTÉRIEURS
Connectez le moniteur à la prise TO MONITOR en
utilisant le cordon de système fourni avec cet appareil.
L’unité de connexion du moniteur possède 2 circuits
d’entrée et un circuit de sortie. Connectez une ou
deux sources de lecture à la prise AV 1 (INPUT 1) et/
ou à la prise AV 2 (INPUT 2) et connectez un appareil
de traitement du son tel qu’un récepteur d’autoradio à
la AV OUT.
Si l’autoradio est muni d’une fi che 2nd
AUDIO OUT
Si vous souhaitez augmenter le niveau du casque
d’écoute, augmentez d’abord le niveau de sortie
de la prise 2nd AUDIO OUT sur l’autoradio,
puis ajustez le niveau du casque d’écoute sur le
casque.
• Référez-vous aussi au MANUEL
D’INSTRUCTION de votre autoradio.
LINE IN
2nd AUDIO OUT
EN EXTERNE COMPONENTEN
Verbind de monitor met de TO MONITOR aansluiting met
gebruik van het bij dit toestel bijgeleverde systeemsnoer.
Het monitor-aansluitgedeelte heeft 2 ingangscircuits en 1
uitgangscircuit. Sluit 1 of 2 afspeelbronnen aan op de AV
1 (INPUT 1)-bus en/of AV 2 (INPUT 2)-bus, en sluit een
reproductiebron, zoals een autoradio-ontvanger, aan op de
AV OUT.
Indien de receiver een 2nd AUDIO OUT
aansluiting heeft
Voor het verhogen van het niveau van de
hoofdtelefoon, moet u eerst het uitgangsniveau van
de 2nd AUDIO OUT aansluiting van de receiver
verhogen.
• Zie tevens de GEBRUIKSAANWIJZING van uw
Autoradio-ontvanger.
KS-HP2
(not supplied)
(nicht mitgeliefert)
(non fourni)
(niet meegeleverd)
System cord (supplied)
Systemkabel (gehört zum
Lieferumfang)
Cordon de système (fourni)
Systeemsnoer (meegeleverd)
VIDEO OUT
Car receiver (ex. JVC KD-DV6101)
2nd monitor
Zweiter Monitor
2d. moniteur
2e monitor
6
*
5
*
4
*
5
*
4
*
Autoreciever (z.B. JVC KD-DV6101)
Recepteur d’autoradio (ex. JVC KD-DV6101)
Autoradio-ontvanger (bijv. JVC KD-DV6101)
5
*
DO NOT connect the AV 1 and AV 2 plugs on the monitor
connection unit to the LINE OUT or SUBWOOFER plugs of the car
receiver.
Schließen Sie NICHT die Stecker AV 1 und AV 2 am MonitorAnschlußeinheit an die Stecker LINE OUT oder SUBWOOFER am
Fahrzeug-Receiver an.
NE CONNECTEZ PAS les fi ches AV 1 et AV 2 du unité de connexion
du moniteur aux fi ches LINE OUT ou SUBWOOFER de l’autoradio.
Verbind de AV 1 en AV 2 aansluitingen van de aansluitgedeelte van de
monitor NIET met de LINE OUT of SUBWOOFER aansluitingen van de
auto-receiver.
Playback source
Wiedergabesignalquelle
Source de lecture
Afspeelbron
6
VCR (KV-V8 or KV-V10*
Videorecorder (KV-V8 oder KV-V10*6)
Magnétoscope (KV-V8 ou KV-V10*6)
Videorecorder (KV-V8 of KV-V10*6)
)
When using the mobile TV tuner system
KV-C1001
Bei Verwendung des mobilen TV-TunerSystems KV-C1001
Lors de l’utilisation du système de
tuner de télévision mobile
KV-C1001
Bij gebruik van het draagbare
KV-C1001 TV-tunersysteem
Remote sensor unit
(supplied with
KV-C1001)
Fernbedienungssenso
reinheit (mit KV-C1001
mitgeliefert)
Capteur de
télécommande
(fourni avec le
KV-C1001)
Afstandsbedieningssensor
(bijgeleverd bij de
KV-C1001)
KV-C1001
Aerial elements (supplied with KV-C1001)
Antennenelemente (mit KV-C1001 mitgeliefert)
Éléments d’antenne (fournis avec le KV-C1001)
Antenne-elementen (bijgeleverd bij de KV-C1001)
Camcorder
Camcorder
Caméscope
Camcorder
6
Carefully differentiate the power supply cords supplied for KV-V10 and for
*
the monitor connection unit. Their connectors are the same in shape, but
their wirings are different.
6
Halten Sie die Stromversorgungskabel für KV-V10 und Monitor-
*
Anschlußeinheit gut auseinander. Die Steckverbinder haben die gleiche
Form, die Anschlußbelegung ist jedoch unterschiedlich.
6
Prenez soin de bien distinguer les cordons d’alimentation fournis pour les
*
KV-V10 et ceux de l’unité de connexion du moniteur. Leurs connecteurs
ont la même forme mais leur câblage est différent.
6
Zorg dat er een duidelijke onderscheid is tussen de stroomsnoeren die bij de KV-V10
*
en het monitor-aansluitgedeelte zijn geleverd. De stekkers zijn hetzelfde qua vorm,
maar de bedrading is verschillend.
*4 RCA pin plug cord (not supplied)
*4 RCA-Klinkensteckerkabel (nicht mitgeliefert)
*4 Cordon á fi ches cinch (non fourni)
*4 RCA-penstekkeresnoer (niet meegeleverd)
*5 Video cord (not supplied)
*5 Videokabel (nicht mitgeliefert)
5
Cordon vidéo (non fourni)
*
5
*
Vi deosnoer (niet meegeleverd)
– 5 –
Page 30

When the receiver is NOT equipped
with the 2nd AUDIO OUT plug
KS-HP2
(not supplied)
(nicht mitgeliefert)
(non fourni)
(niet meegeleverd)
System cord (supplied)
Systemkabel (gehört zum
Lieferumfang)
Cordon de système (fourni)
Systeemsnoer (meegeleverd)
Wenn der Receiver NICHT mit dem 2nd
AUDIO OUT Stecker ausgestattet ist
Wide color monitor
BreitbildFarbmonitor
Moniteur couleur à
écran large
Breedkleur-monitor
4
*
6
*
5
*
5
*
Si l’autoradio n’est PAS muni de fi ches
2nd AUDIO OUT
2nd monitor
Zweiter Monitor
2d. moniteur
2e monitor
Indien de receiver GEEN 2nd AUDIO
OUT aansluiting heeft
Car receiver*7 (ex. JVC KD-DV5101)
LINE IN
VIDEO OUT
DO NOT connect the AV 1 and AV 2 plugs on the monitor
connection unit to the LINE OUT or SUBWOOFER plugs of the car
receiver.
Schließen Sie NICHT die Stecker AV 1 und AV 2 am MonitorAnschlußeinheit an die Stecker LINE OUT oder SUBWOOFER am
Fahrzeug-Receiver an.
NE CONNECTEZ PAS les fi ches AV 1 et AV 2 du unité de connexion
du moniteur aux fi ches LINE OUT ou SUBWOOFER de l’autoradio.
Verbind de AV 1 en AV 2 aansluitingen van de aansluitgedeelte van de
monitor NIET met de LINE OUT of SUBWOOFER aansluitingen van de
auto-receiver.
7
You cannot listen to the playback sound of the car receiver through
*
KS-HP2 cordless headphones.
7
*
Der Wiedergabeklang des Auto-Empfängers kann nicht über die
kabellosen KS-HP2-Kopfhörer empfangen werden.
7
Vous ne pouvez pas écouter les sons de lecture du récepteur
*
d’autoradio avec un casque d’écoute sans fi l KS-HP2.
7
U kunt niet met KS-HP2 snoerloze koptelefoons naar de autoradio luisteren.
*
Autoreciever*7 (z.B. JVC KD-DV5101)
Recepteur d’autoradio*7 (ex. JVC
KD-DV5101)
Autoradio-ontvanger*7 (bijv. JVC
KD-DV5101)
5
*
When using the mobile TV tuner system
KV-C1001
Bei Verwendung des mobilen TV-TunerSystems KV-C1001
Lors de l’utilisation du système de
tuner de télévision mobile
KV-C1001
Bij gebruik van het draagbare
KV-C1001 TV-tunersysteem
Remote sensor unit
(supplied with
KV-C1001)
Fernbedienungssenso
reinheit (mit KV-C1001
mitgeliefert)
Capteur de
télécommande
(fourni avec le
KV-C1001)
Afstandsbedieningssensor
(bijgeleverd bij de
KV-C1001)
KV-C1001
4
*
Playback source
Wiedergabesignalquelle
Source de lecture
Aerial elements (supplied with KV-C1001)
Antennenelemente (mit KV-C1001 mitgeliefert)
Éléments d’antenne (fournis avec le KV-C1001)
Antenne-elementen (bijgeleverd bij de KV-C1001)
Afspeelbron
VCR (KV-V8 or KV-V10*
Videorecorder (KV-V8 oder KV-V10*
Magnétoscope (KV-V8 ou KV-V10*6)
Videorecorder (KV-V8 of KV-V10*
Camcorder
Camcorder
Caméscope
Camcorder
6
)
6
)
6
)
TROUBLESHOOTING
• The fuse blows.
* Are the red and black leads connected correctly?
• Power cannot be turned on.
* Is the yellow lead connected?
• Picture does not come on screen.
* Is the correct input selected?
• Picture does not appear clearly.
* Is the color monitor installed at the right angle?
• This unit does not work at all.
* Have you reset your unit?
FEHLERSUCHE
• Die Sicherung brennt durch.
* Sind das rote und das schwarze Kabel
ordnungsgemäß angeschlossen?
• Die Stromversorgung kann nicht eingeschaltet
werden.
* Ist das gelbe Kabel angeschlossen?
• Auf dem Bildschirm erscheint kein Bild.
* Wurde der richtige Eingang ausgewählt?
• Das Bild scheint nicht klar zu sein.
* Ist der Farbmonitor im richtigen Winkel installiert?
• Dieses Gerät funktioniert überhaupt nicht.
* Haben Sie Ihr Gerät zurückgesetzt?
EN CAS DE DIFFICULTÉS
• Le fusible saute.
* Les fi ls rouge et noir sont-ils racordés
correctement?
• L’appareil ne peut pas être mise sous tension.
* Le fi l jaune est-elle raccordée?
• Aucune image n’apparaît sur l’écran.
* L’entrée correcte est-elle choisie?
• L’image n’apparaît pas clairement.
* Le moniteur couleur est-il installé avec un angle
correct?
• Cet appareil ne fonctionne pas du tout.
* Avez-vous réinitialisé votre appareil?
– 6 –
PROBLEMEN OPLOSSEN
• De zekering brandt door.
* Zijn de rode en zwarte kabels goed aangesloten?
• De stroom kan niet worden ingeschakeld.
* Is de gele kabel aangesloten?
• Er is geen beeld op het scherm.
* Is de juiste ingang gekozen?
• Het beeld is niet helder.
* Is de kleurenmonitor onder de juiste hoek geïnstalleerd?
• Toestel werkt geheel niet.
* Heeft u het toestel teruggesteld?
Page 31

KV-MH6510
Installation/Connection Manual
安裝/連接手冊
설 치/연 결 설명서
°“√µ‘¥µ—Èß/§ŸË¡◊Õ°“√µ‘¥µ—Èß
LVT1327-010A
[U]
ENGLISH
WARNING
Installation requires some special knowledge.
Do not install the monitor system yourself.
Consult a dealer having special knowledge of
this kind for safe and reliable installation.
• DO NOT INSTALL THE MONITOR IN A LOCATION
WHICH OBSTRUCTS DRIVING, VISIBILITY OR
WHICH IS PROHIBITED BY APPLICABLE LAWS
AND REGULATIONS.
If the monitor is installed in a location which obstructs
forward visibility or operation of the air bag or other
safety equipment or which interferes with operation
of the vehicle, it may cause an accident.
• NEVER USE BOLTS OR NUTS FROM
THE VEHICLE’S SAFETY DEVICES FOR
INSTALLATION.
If bolts or nuts from the steering wheel, brakes or other
safety devices are used for installation of the monitor,
it may cause an accident.
• ATTACH THE WIRES CORRECTLY.
If the wiring is not correctly performed, it may cause
a fire or an accident. In particular, be sure to run and
secure the lead wire so that it does not get tangled
with a screw or the moving portion of a seat rail.
• USE WITH DC 12 V NEGATIVE GROUND
VEHICLES.
This monitor system is only for use in a DC 12 V
negative ground vehicle.
It cannot be used in large trucks or diesel vehicles
which are DC 24 V vehicles.
If it is used in the wrong type of vehicle, it may cause
a fire or accident.
• To prevent short circuits, we recommend that you
disconnect the battery’s negative terminal and make
all electrical connections before installing the unit. If
you are not sure how to install this unit correctly, have
it installed by a qualified technician.
• Avoid installing the monitor connection unit in the
following places:
– Where it would hinder your safe driving.
– Where it would be exposed to direct sunlight or heat
directly from the heater or placed in an extremely
hot place.
– Where it would be subject to rain, water splashes
or excessive humidity.
– Where it would be subject to dust.
– Where it would be positioned on an unstable place.
– Where it could damage the car’s fittings.
– Where proper ventilation would not be maintained,
such as under a floor mat.
中文
警告
必須要有安裝方面特殊的知識方可進行安裝工作。
請勿自行安裝監視器系統。為安全起見和可靠的安裝,
請洽詢有專門知識的經銷商。
• 請勿將監視器安裝在妨礙駕駛,影響視線,阻礙空氣
袋等保險裝置功能或違反交通法律和規則之處。
若將監視器裝在諸如影響前方視線,影響氣袋和其它安
全裝置的操作以及妨礙車輛操縱之處時,可能會導致事
故的發生。
• 切勿使用車輛安全裝置上的螺栓和螺母來進行安裝。
若使用輪胎轉向器,制動器或其它安全裝置上的螺栓和
螺母來安裝監視器時,可能會導致事故的發生。
•
正確連接導線。
若沒有正確接線,可能會導致火災或意外。特別一定要
注意伸展和保護引線,使其與螺絲釘或座位把手的移動
部位不發生纏結。
• 請使用帶直流 12 V 負極接地的車輛。
此監視器系統僅限於直流
此監視器系統不能用直流
或柴油機。
若將其用錯車型,可能導致火災或事故的發生。
• 為了防止短路,
本機之前做好所有電線的連接。若您不能確保正確安裝
本機,請求助合格的技術人員進行連接。
• 請勿在下列地點安裝監視器:
–
妨礙安全駕駛之處。
–
暴露於陽光直射或散熱源直接散熱處以及高溫處。
–
易受雨淋,濺水或過度潮濕之處。
–
易落塵埃之處。
–
不牢固之處。
–
損傷車輛零件之處。
–
通風不良之處請務進行安裝。
建議您拔掉電池的負極端子並在安裝
12 V
負極接地的車輛。
24 V
的負極接地的大型卡車
한국어
경 고
설치하려면 약간의 전문 지식이 요합니다. 모니
터 시스템은 직접 설치하지 마 시오. 안전하고 올
바른 설치를 위해 관련 전문 지식을 갖춘 대리점
에 문의 하 시오.
•
운전에 방해가 되거나 시야를 가리거나 에어백 등의
안전장치에 방해가 되는 위치, 또는 법적으로 위배되
는 위치에 모니터를 설치하지 마 시오.
전방의 시야를 가리거나 에어백 또는 기타 안전장치
의 작동에 장애가 되거나 차량의 운행을 방해하는
장소에 모니터를 설치하면 사고가 발생할 수 있습니
다.
• 설치 시 차량 안전 장치의 볼트나 트를 사용하지
마 시오.
운전대, 브레이크 또는 기타 안전 장치의 볼트나 트
를 사용하여 모니터를 설치하면 사고가 발생할 수 있
습니다.
• 와이어를 정확히 연결하 시오.
배선이 올바르지 으면 화재나 사고가 발생할 수 있
습니다. 특히, 리드 와이어는 나사 또는 좌석 레일
의 이동부와 엉키지 도록 배선하여 고정시켜야합니
다.
• DC 12 V 음극 접지 차량에 사용하 시오.
이 모니터 시스템은 DC 12 V 음극 접지 차량에만
사용할 수 있습니다.
DC 24 V 차량인 대형 화물차나 디젤 차량에는 사
용할 수 없습니다.
적합하지 은 차종에서 사용하면 화재나 사고가 발
생할 수 있습니다.
• 단락을 방지하기 위해 장치를 설치하기 전에 배터
리의 음 단자를 단절시키고 전원을 연결하는 것이
좋습니다. 장치를 설치하는 방법을 잘 모르면 숙련
된 기술자에게 맡기 시오.
• 다음과 같은 장소에 모니터를 설치하지 마 시오:
– 안전한 주행을 방해하는 장소.
– 직사광선이나 히터의 열에 직접 노출되거나 온도
가 매우 높은 장소.
– 비와 물에 노출될 수 있거나 습도가 매우 높은
장소.
– 먼지가 많은 장소.
– 요동이 심한 장소.
– 자동차의 피팅을 손상시킬 수 있는 장소.
– 통풍이 충분하지 은 곳.
0505MNMMDWJEIN
EN, CT, KO, TH
‰∑¬
§”‡µ◊Õπ
ºŸÈ∑”°“√µ‘¥µ—Èß®”‡ªÁπµÈÕß¡’§«“¡√ŸÈ§«“¡™”π“≠
լ˓µ‘¥µ—Èß™ÿ¥®Õ¿“æ¥È«¬µ—«∑Ë“π‡Õß ‚ª√¥ª√÷°…“°—∫µ—«·∑π®”ÀπË
“¬∑’Ë¡’§«“¡√ŸÈ„π¥È“ππ’È ∑—Èßπ’ȇæ◊ËÕ°“√µ‘¥µ—Èß∑’˪≈Õ¥¿—¬·≈–‡™◊ËÕ„®‰¥
• լ˓µ‘¥µ—È߮աÕ𑇵Õ√Ï „πµ”·ÀπËß∑’ËÕ“®°’¥¢«“ß°“√¢—∫¢’Ë
∑—»π«‘—¬ °“√∑”ß“π¢ÕßÕÿª°√≥Ïπ‘√¿—¬ ‡™Ëπ ·Õ√Ï·∫§ À√◊Õµ”·
ÀπËß∑’ËÀÈ“¡¡‘„Àȵ‘¥µ—Èß µ“¡°ÆÀ¡“¬ À√◊Õ√–‡’∫’¬∫∑’Ë „™È∫—ߧ—∫
¬„π°“√¡Õ߇ÀÁπ¿“æ¢È“ßÀπÈ“ À√◊Õ¢—¥¢«“ß°“√∑”ß“π¢Õß∂ÿß≈¡π‘
√¿—¬ À√◊ÕÕÿª°√≥Ïπ‘√¿—¬Õ◊ËπÊ À√◊Õ∑’Ë¢—¥¢«“ß°“√∑”ß“π¢Õß√∂¬πµÏ
Õ“®°ËÕ„Àȇ°‘¥Õÿ∫—µ‘‡Àµÿ‰¥È
• ÀÈ“¡π”≈—°‡°≈’¬«À√◊Õµ—«πÁÕµ®“°Õÿª°√≥Ïπ‘√¿—
¬¢Õß√∂¬πµÏ¡“„™È„π°“√µ‘¥µ—Èß
À“°¡’°“√π”≈—°‡°≈’¬«À√◊Õµ—«πÁÕµ®“°æ«ß¡“≈—¬
‡∫√°À√◊ÕÕÿª°√≥Ïπ‘√¿—¬Õ◊ËπÊ ¡“„™È„π°“√µ‘¥µ—È߮տ“æ
Õ“®°ËÕ„Àȇ°‘¥Õÿ∫—µ‘‡Àµÿ‰¥È
• µËÕ“¬‰ø„ÀÈ∂Ÿ°µÈÕß
À“°“¬‰ø∑”ß“π‰¡Ë∂Ÿ°µÈÕß Õ“®∑”„Àȇ°‘¥‰ø‰À¡ÈÀ√◊ÕÕÿ∫—µ‘‡Àµÿ‰¥È
§«√µ√«®Õ∫„ÀÈ·πË„®«Ë“‰¥È‡¥‘π·≈–µËÕ“¬‰øլ˓߷πËπÀπ“
‡æ◊ËÕ∑’Ë“¬‰ø®–‰¡Ëæ—π°—∫πÁÕµ À√◊Õ√“ß∑’Ëπ—Ëß∑’ˇ≈◊ËÕπ‰ª¡“‰¥È
•
„™È°—∫√∂∑’˵ËÕ“¬¥‘π¢—È«≈∫°√–·µ√ß¢π“¥ 12 V
™ÿ¥®Õ¿“æπ’È„™È‰¥È°—∫√∂∑’˵ËÕ“¬¥‘π¢—È«≈∫°√–·µ√ß¢π“¥ 12 V
‡∑Ë“π—Èπ ‰¡Ë“¡“√∂„™È‰¥È° ∫√∂∫√√∑ÿ°¢π“¥„À≠ËÀ√◊Õ√∂¬πµÏ¥’‡´≈
∑’Ë„™È‰øøÈ“°√–·µ√ß¢π“¥ 24 V À“°π”‰ª„™È°—∫√∂º‘¥ª√–‡¿∑
Õ“®°ËÕ„Àȇ°‘¥‰ø‰À¡ÈÀ√◊ÕÕÿ∫—µ‘‡Àµÿ‰¥È
• ‡æ◊ËÕªÈÕß°—π‰øøÈ“≈—¥«ß®√
¢Õ·π–π”„ÀÈ∂Õ¥¢—È«“¬‰ø≈∫¢Õß·∫µ‡µÕ√’ËÕÕ°°ËÕπ
·≈–∑”°“√‡™◊ËÕ¡µËÕ‰øøÈ“∑—ÈßÀ¡¥°ËÕ𵑥µ—Èß™ÿ¥®Õ¿“æ
À“°‰¡Ë·πË„®«‘∏’°“√µ‘¥µ—Èß∑’Ë∂Ÿ°µÈÕß
‚ª√¥„Àș˓ߺŸÈ™”π“≠µ‘¥µ—Èß„ÀÈ
• À≈’°‡≈’ˬ߰“√µ‘¥µ—È߮տ“æ„π®ÿ¥µËÕ‰ªπ’È:
– µ”·ÀπËß∑’ËÕ“®‡ªÁπÕÿª√√§µËÕ°“√¢—∫¢’Ë∑’˪≈Õ¥¿—¬
– µ”·ÀπËß∑’Ë√—∫·ßÕ“∑‘µ¬Ï‚¥¬µ√ßÀ√◊Õ‰¥È√—
∫§«“¡√ÈÕπ®“°‡§√◊ËÕß∑”§«“¡√ÈÕπ À√◊Õ„πµ”·ÀπËß∑’Ë√ÈÕπ®—¥
– µ”·ÀπËß∑’ËÕ“®∂Ÿ°Ωπ πÈ”“¥À√◊Õ¡’§«“¡™◊ÈπŸß
– µ”·ÀπËß∑’ËÕ“®—¡º—ΩÿËπ≈–ÕÕß
– µ”·ÀπËß∑’˵—ÈßÕ¬ŸË„π®ÿ¥∑’ˉ¡Ë¡—Ëπ§ß
– µ”·ÀπËß∑’ËÕ“®√ȓߧ«“¡‡’¬À“¬„ÀÈ°—∫Õÿª°√≥Ï√∂¬πµÏ
– „π∑’Ë∑’Ë¡’Õ“°“»∂Ë“¬‡∑‰¡Ë–¥«°
È
CAUTION
Since there may be legal regulations defining
the permissible installation locations for the color
monitor which differ by country or by state, be sure
to install the color monitor in a location complying
with any such laws.
注意
各個國家或洲有其法律規定允許安裝監視器的地點,
因此務必安裝彩色監視器於符合法律規定的地點。
주의
국가나 주에 따라 모니터의 적정 설치장소에 관한
법적규정이 있을 수 있으므로, 이러한 규정에 준하
는 장소에 칼라 모니터를 설치하시기 바랍니다.
¢ÈÕ§«√√–«—ß
‡π◊ËÕß®“°Õ“®¡’°Æ√–‡∫’¬∫∑“ß°ÆÀ¡“¬ °”Àπ¥µ”·ÀπËß∑’ˇÀ¡“–
¡„π°“√µ‘¥µ—È߮տ“æ ´÷Ëß·µ°µË“ß°—π„π·µË≈–ª√–‡∑» À√◊Õ·µË≈–
√—∞ ¥Ÿ„ÀÈ·πË„®«Ë“‰¥Èµ‘¥µ—È߮տ“æ’ ‰«È„πµ”·ÀπËßµ“¡∑’Ë°ÆÀ¡“¬¥—
ß°≈Ë“«°”Àπ¥È
– 1 –
Page 32

Parts list for installation and
5
4
1
2
3
connection
The following parts are provided with this unit.
After checking them, please set them correctly.
安裝和連接用零件表
本機 備有下 列零件,在檢 查這些 零件之後,請正 確
組裝。
설치 및 연결용 부품 목록
다음 부품들이 장치와 함께 제공됩니다.
확인 후 올바르게 설정하 시오.
√“¬°“√™‘ÈπË«π”À√—∫°“√µ‘¥µ—Èß·≈–°“√‡™◊ËÕ¡µËÕ
™‘ÈπË«πµËÕ‰ªπ’ȉ¥È®—¥‡µ√’¬¡‰«È„ÀÈæ√ÈÕ¡°—∫™ÿ¥®Õ¿“æ
À≈—ß®“°µ√«®Õ∫·≈È« ‚ª√¥µ‘¥µ—Èß„πµ”·ÀπËß∑’Ë∂Ÿ°µÈÕß
Wide color monitor (center unit and shroud)
寬彩色顯示器(中央組件和罩蓋)
와이드 컬러 모니터 (센터유닛 및 보호대)
®Õ¿“æ’®Õ°«È“ß (µ—«‡§√◊ËÕß·≈–·ºËπ√ÕßÀ≈—ß)
System cord (3 m)
系統電纜(3 公尺)
시스템 코드 (3 m)
“¬µËÕ√–∫∫ (3 ¡)
Trim plate
裝飾框
트림 플레이트
·ºËπ‚≈À–¢Õ∫·µËß
Power cord
電源線
전원 코드
“¬‰ø
Paper template
紙模板
종이 형판
·ºËπ°√–¥“…·∫∫
Connector cover
連接器蓋子
커넥터 커버
Ω“§√Õ∫¢—È«µËÕ
Monitor connection unit
顯示器連接組件
모니터 연결 유닛
Õÿª°√≥χ™◊ËÕ¡µËÕ®Õ¿“æ
Screws–M2 x 6 mm
螺絲釘
–M2 x 6 毫米
나사–M2 x 6 mm
πÁÕµ–M2 x 6 ¡¡
Monitor connection unit / 顯示器連接組件 / 모니터 연결 유닛 / Õÿª°√≥χ™◊ËÕ¡µËÕ®Õ¿“æ
Front
前面
전면
¥È“πÀπÈ“
1 TO MONITOR (13 PIN) connector
2 AV 2 (INPUT 2) jacks
• VIDEO/AUDIO L (left)/AUDIO R (right)
3 AV 1 (INPUT 1) jacks
• VIDEO/AUDIO L (left)/AUDIO R (right)
4 AV OUT jacks
• VIDEO/AUDIO L (left)/AUDIO R (right)
5 Power supply connector
1 TO MONITOR
2 AV 2 (INPUT 2)
• VIDEO/AUDIO L
/AUDIO R
3 AV 1 (INPUT 1)
• VIDEO/AUDIO L
/AUDIO R
4 AV OUT
• VIDEO/AUDIO L
/AUDIO R
5
電源連接器
(右音頻)
(右音頻)
插座
(右音頻)
(至顯示器)(13支插腳)插座
音頻視頻 2(輸入
(視頻/左音頻)
音頻視頻 1(輸入
(視頻/左音頻)
(視頻/左音頻)
2
1
)插座
)插座
1 TO MONITOR (13 핀) 커넥터
2 AV 2 (INPUT 2) 잭
3 AV 1 (INPUT 1) 잭
4 AV OUT 잭
5 전원공급 커넥터
• VIDEO/AUDIO L (
• VIDEO/AUDIO L (왼쪽)/AUDIO R (왼쪽)
• VIDEO/AUDIO L (
왼쪽)/AUDIO R (왼쪽)
왼쪽)/AUDIO R (왼쪽)
Back
後面
후면
¥È“πÀ≈—ß
1 TO MONITOR (¢—È«µËÕ®Õ¿“æ) (13 ¢“)
2 ¢—È« AV 2 (INPUT 2)
• VIDEO/AUDIO L (´È“¬)/AUDIO R (¢«“)
3 ¢—È« AV 1 (INPUT 1)
• VIDEO/AUDIO L (´È“¬)/AUDIO R (¢«“)
4 ¢—È« AV OUT
• VIDEO/AUDIO L (´È“¬)/AUDIO R (¢«“)
5 ¢—È«µËÕ“¬‰ø
– 2 –
Page 33

INSTALLATION
安裝
설치
°“√µ‘¥µ—Èß
• The following illustration shows a typical
installation. However, you should make adjustments
corresponding to your specific car. If you have
any questions or require information regarding
installation kits, consult your JVC car audio dealer
or a company supplying kits.
Mounting the color monitor
It is recommended to have the monitor system
installed by a qualified technician.
Before mounting the monitor to the headrest:
• Perform the required external connections first.
• Using the supplied paper pattern, mark the area to
be cut out of the headrest, then carefully cut it.
Mark the area to be cut out, and carefully cut it.
劃上要切割的部分,然後仔細地將之切開。
떼어 낼 부위을 표시한 다음, 조심스럽게 떼
어 냅니다.
∑”‡§√◊ËÕßÀ¡“¬„π∫√‘‡«≥∑’Ë®–µ—¥ ®“°π—Èπ®÷ߧËÕ¬Ê µ—¥
•
下面的圖解表示了典型的安裝程式。然而,您應當做
些適當的調整,以便適應您自己的汽車。如果您有問
題,或需要有關配套元件的資料,請向
分銷商或配套元件供應公司詢問。
裝上彩色顯示器
我們建議您由合格技工安裝監視器系統。安裝監視器
於車頂之前。
將顯示器裝上頭墊之前:
• 先進行必需的外銜連接。
• 使用提供的紙樣,在頭墊上劃上要切割的部分,然後
仔細地將之切開。
Headrest
頭墊
헤드레스트
æπ—°æ‘ß»’√…–
Paper template
紙模板
종이 형판
·ºËπ°√–¥“…·∫∫
• For safety, use neither a sharp-pointed screw nor a long
screw which will protrude more than 5 mm from the back of
the installation plate.
• 為安全起見,在安裝板後面不要使用尖嘴螺絲或長嘴螺絲以避免插
入超過 5 毫米。
•
안전을 위하여, 끝이 뾰족한 나사나 설치용 플레이트 뒷면으로 5
mm
이상 삐져나올 수 있는 긴 나사는 사용하지 말아 주십시오.
• ‡æ◊ËÕ§«“¡ª≈Õ¥¿—¬ ‚ª√¥Õ¬Ë“„™È°√Ÿª≈“¬·À≈¡ À√◊Õ°√Ÿ¬“« ´÷Ëß®–¬◊ËπÕÕ°¡“‡°‘π
5 ¡¡ ®“°¥È“πÀ≈—ߢÕß·ºß”À√—∫µ‘¥µ—Èß
JVC
汽車音響
Installation plate (not supplied)
安裝板(沒有提供)
설치용 플레이트 (제공되지 않음)
·ºß”À√—∫µ‘¥µ—Èß ( ‰¡Ë‰¥È„ÀÈ¡“æ√ÈÕ¡‡§√◊ËÕß)
System cord
(from the monitor
connection unit)
系統電纜
(由顯示器的連接組件)
시스템 코드
(모니터 연결유닛용)
“¬µËÕ√–∫∫
(®“°Õÿª°√≥χ™◊ËÕ¡µËÕ®Õ¿“æ)
• 다음 그림은 가장 일반적인 설치 방법을 보여줍니
다. 그러나 자동차에 따라 몇 가지 조정이 필요합
니다. 설치 키트에 대해 질문이 있거나 정보가 필
요하면 JVC 자동차 오디오 대리점이나 하십로 문의
하십시오.
컬러 모니터 장착하기
자격을 갖춘 기술자가 모니터 시스템을 설치하는 것
이 좋습니다.
모니터를 헤드레스트에 장착하기 전에:
• 필요한 외장연결을 먼저 합니다.
• 제공된 종이 형판을 사용하여, 헤드레스트의 떼어
낼 부위을 표시한 다음, 조심스럽게 떼어 냅니다.
Trim plate (if required to fit the shroud to the rear surface of the headrest)
裝飾框(如果需要將罩蓋裝在頭墊的後方)
트림 플레이트 (헤드레스트의 후면 표면에 보호대를 설치할 때 사용함)
·ºËπ‚≈À–¢Õ∫·µËß (À“°®”‡ªÁπµÈÕßµ‘¥µ—Èß·ºËπ√Õß∑’˥ȓπÀ≈—ߢÕßæπ—°æ‘ß»’√…–)
Shroud
罩蓋
보호대
·ºËπ√ÕßÀ≈—ß
• ¿“æª√–°Õ∫µËÕ‰ªπ’È·¥ß°“√µ‘¥µ—Èßµ“¡ª°µ‘ լ˓߉√°Áµ“¡
∑Ë“π§«√∑”°“√ª√—∫µ”·ÀπËß„ÀȇÀ¡“–¡°—∫√∂¢Õß∑Ë“π À“°¡’§”∂“¡
À√◊ÕµÈÕß°“√¢ÈÕ¡Ÿ≈‡°’ˬ«°—∫™ÿ¥°“√µ‘¥µ—Èß ‚ª√¥ª√÷°…“µ—«·∑π®”ÀπË“¬
JVC À√◊ÕÕË“π®“°§ŸË¡◊Õ∑’Ë„ÀÈ¡“æ√ÈÕ¡°—π
°“√µ‘¥µ—È߮Ւ
µËÕ‰ªπ’È®–‡ªÁπµ—«Õ¬Ë“ßÀπ÷ËߢÕß√Ÿª·∫∫°“√µ‘¥µ—Èß
°“√µ‘¥µ—Èß™ÿ¥®Õ¿“槫√°√–∑”‚¥¬™Ë“ߺŸÈ™”π“≠‡∑Ë“π—Èπ
°ËÕ𵑥µ—È߮տ“æ°—∫∑’Ëæπ—°æ‘ß»’√…–:
• ∑”°“√‡™◊ËÕ¡µËÕ¿“¬πÕ°∑’Ë®”‡ªÁπ°ËÕπ
• „™È°√–¥“…·∫∫∑’Ë„ÀÈ¡“æ√ÈÕ¡‡§√◊ËÕß∑”‡§√◊ËÕßÀ¡“¬„π∫√‘‡«≥∑’Ë®–µ—
¥∫πæπ—°æ‘ß»’√…– ®“°π—Èπ®÷ߧËÕ¬Ê µ—¥
Screws (not supplied)
螺絲釘(沒有提供)
나사 (제공되지 않음)
°√Ÿ (‰¡Ë‰¥È„ÀÈ¡“æ√ÈÕ¡‡§√◊ËÕß)
Center unit
中央組件
센터유닛
µ—«‡§√◊ËÕß
*1 Fix the connector with
the connector cover
after connection.
*1 在連接以後將連接器及
連接器蓋子裝好。
*1 연결을 완료한 후 커
넥터 커버를 사 용하
여 커넥터를 고정시킵
니다
1
*
ª√–°Õ∫Ω“§√Õ∫¢—È«µËÕ
(A)
(A)
When disconnecting, pull the connector while pressing (A).
1
*
∑’Ë¢—È«µËÕ„ÀÈ·πËπÀ≈—
ß®“°‡™◊ËÕ¡µËÕ‡√Á®
• Do not pull the cord when disconnecting. Otherwise, the connector or the monitor may be
damaged.
拆開時,按
•
拆開時不要拉扯繩子。否則,連接器或螢幕可能會被損壞。
연결을 제거하려면, (A) 부위를 누른 상태에서 커넥터를 당깁니다.
(A)
同時拉開連接器。
• 연결을 제거할 때 코드를 잡아 당기지 마 시오, 커넥터나 모니터가 훼손될 수 있습니다.
‡¡◊ËÕ®–∂Õ¥·¬° „ÀÈ¥÷ߢ—È«µËÕ¢≥–∑’Ë°¥∑’˵”·ÀπËß (A)
• լ˓¥÷ß“¬‰ø‡¡◊ËÕ®–∂Õ¥¢—È«µËÕ ¡‘©–π—ÈπÕ“®∑”„ÀÈ¢—È«µËÕÀ√◊Õ®Õ¿“懒¬À“¬‰¥È
.
TV tuner, etc
Car receiver, etc.
汽車接收器等
차량 수신기 등
電視調諧器,等等
TV 튜너 등
‡§√◊ËÕß√—∫‚∑√∑—»πÏ œ≈œ
‡§√◊ËÕß√—∫ —≠≠“≥∫π√∂¬πµÏ œ≈œ
Monitor connection unit
顯示器連接組件
모니터 연결 유닛
Õÿª°√≥χ™◊ËÕ¡µËÕ®Õ¿“æ
CAUTION / 注意 / 주의 / ¢ÈÕ§«√√–«—ß:
• Take preventative measures to avoid unexpected disconnection of the cord and damage to the cord by being caught
somewhere. This trouble may happen while adjusting the headrest position or while moving or reclining the seat.
• 做足預防措施以避免因不小心在某處鈎着而截斷和損壞電纜。這情形可能會在調整頭墊位置或在移動或斜倚位子時發生。
코드가 어딘가에 끼어서 갑자기 연결이 단절되거나 코드가 훼손되는 일이 없도록 주의하십시오. 헤드레스트의 위치를 조절하거
•
나 좌석을 움직이거나 뒤로 젖힐 때 이런 일이 일어나기 쉽습니다.
¥”‡π‘π¡“µ√°“√ªÈÕß°—π ‡æ◊ËÕÀ≈’°‡≈’ˬ߉¡Ë„ÀÈ“¬∑’˵ËÕ‰«ÈÀ≈ÿ¥ ‚¥¬‰¡Ë§“¥§‘¥ ·≈–‰¡Ë „ÀÈ“¬‰ø‡’¬À“¬ ‚¥¬‰ª‡°’ˬ«µ‘¥∑’Ë „¥∑’ËÀπ÷Ëß ª—≠À“π’ÈÕ“®‡°‘¥¢÷Èπ‰¥È ¢≥–ª√—
•
∫µ”·ÀπËßæπ—°æ‘ß»’√…– À√◊Õ¢≥–‡≈◊ËÕπÀ√◊Õ‡Õπ‡∫“–∑’Ëπ—Ëß
– 3 –
Page 34

ENGLISH
中文
한국어
‰∑¬
ELECTRICAL CONNECTIONS
To prevent short circuits, we recommend that you
disconnect the battery’s negative terminal and make
all electrical connections before installing the unit. If
you are not sure how to install this unit correctly, have
it installed by a qualified technician.
Note:
This unit is designed to operate on 12 V DC, NEGATIVE
ground electrical systems. If your vehicle does not
have this system, a voltage inverter is required, which
can be purchased at JVC car audio dealers.
• Replace the fuse with one of the specified ratings. If
the fuse blows frequently, consult your JVC car audio
dealer.
電路連接
為防止短路,建議在安裝本機之前,斷開電池的負極,並
把所有電路都連接好。如果您不能確定如何正確地安裝本
機,應請合格的技術人員來安裝。
注意:
本機僅可使用
的車輛沒有這一電源系統,則需要一個電壓變換器,可以
在
JVC
•
把保險絲更換為額定負荷值的保險絲。如果保險絲經常
燒壞,請向
直流 12 V、負極接地的電源系統
汽車音響分銷商處買到。
JVC
汽車音響分銷商詢問。
Typical Connections / 典型連接 / 일반적인 연결 / °“√‡™◊ËÕ¡µËÕ·∫∫∑—Ë«‰ª
Before connecting: Check the wiring in the vehicle
carefully. Incorrect connection may cause serious
damage to this unit.
The leads of the power cord and those of the connector
from the car body may be different in color.
7 Power supply connection
1 Connect the colored leads of the power cord in the
following sequence.
1 Black: ground
2 Yellow: to car battery (constant 12 V)
3 Red: to an accessory terminal
4 Orange with white stripe: to car light control
switch.
連接之前:
導致本機嚴重損傷。
主電源線的那些來自車身的連接電線的顏色可能不同。
7 電源連接
1
2
請仔細檢查汽車內的接線。錯誤的接線可能
根據以下次序連接電源線的顏色電線。
1
黑色: 接地
2
黃色: 接至汽車電池(恆定
3
紅色: 接至附屬的端子
4
橙色帶有白色條紋: 接至汽車燈控制開關
最後將導線連接到本機。
2 Finally connect the wiring harness to the unit.
12 V
)
。如果您
전기 연결
전선의 단락을 방지하기 위해, 장치를 설치하기 전에
배터리의 음극 단자를 분리한 후 모든 전기 연결을 수
행하십시오. 정확한 장치 설치 방법을 잘 모르면 공인
기술자에게 설치를 의뢰하십시오.
참고:
이 장치는 12 V DC, 네거티브 접지 전기 시스템. 에서만
사용하도록 설계되었습니다. 차량에 이 전기 시스템이
없으면 변압기 가 필요합니다. 이러한 변압기는 JVC 자
동차 오디오 판매점에서 구입할 수 있습니다.
• 퓨즈 교체 시 지정된 정격 퓨즈만 사용하십시오. 퓨
즈가 자주 끊어지면 JVC 자동차 오디오 판매점에 문
의하십시오.
연결하기 전에: 차량의 배선을 철저히 점검합니다.
잘못 연결하면 장치에 심각한 문제가 발생할 수도 있
습니다. 전원코드 선과 자동차의 커넥터 선의 색상은
서로 다를 수도 있습니다.
7 전원공급 연결
1 전원코드의 컬러선을 아래의 순서대로 연결합니
다.
1 검정색: 접지
2 노란색: 자동차 배터리에 연결 (12 V 고정)
3 빨강색: 액세서리 단자에 연결
4 흰색 줄이 간 오렌지색: 자동차의 전등 조절
스위치에 연결
2 마지막으로 배선을 장치에 연결합니다.
°“√‡™◊ËÕ¡µËÕ‰øøÈ“
‡æ◊ËÕªÈÕß°—π‰øøÈ“≈—¥«ß®√
¢Õ·π–π”„ÀÈ∑Ë“π∂Õ¥¢—È«“¬‰ø≈∫¢Õß·∫µ‡µÕ√’ËÕÕ°°ËÕ
π ·≈–∑”°“√‡™◊ËÕ¡µËÕ‰øøÈ“∑—ÈßÀ¡¥°ËÕ𵑥µ—Èß™ÿ¥®Õ¿“æ
À“°‰¡Ë·πË„®«‘∏’°“√µ‘¥µ—Èß∑’Ë∂Ÿ°µÈÕß ‚ª√¥„Àș˓ߺŸÈ™”π“≠µ‘¥µ—Èß„ÀÈ
À¡“¬‡Àµÿ:
™ÿ¥®Õ¿“æπ’È∂Ÿ°ÕÕ°·∫∫¡“„ÀÈ∑”ß“π°—∫
√–∫∫‰øøÈ“¢—È«≈∫∑’˵ËÕ“¬≈ߥ‘π°√–·µ√ß¢π“¥ 12 V
À“°√∂¢Õß∑Ë“π‰¡Ë‰¥È„™È√–∫∫π’È ®”‡ªÁπµÈÕß„™ÈÕ‘π‡«Õ√χµÕ√Ï´÷Ëß“¡
“√∂À“´◊ÈÕ‰¥È∑’˵—«·∑π®”ÀπË“¬‡§√◊ËÕß JVC
• ‡ª≈’ˬπø‘«Ï‚¥¬„™È§Ë“„¥§Ë“Àπ÷Ë߇©æ“–µËÕ‰ªπ’È À“°ø‘«Ï¢“¥∫ËÕ¬
‚ª√¥ª√÷°…“µ—«·∑π®”ÀπË“¬‡§√◊ËÕß JVC
°ËÕπ°“√‡™◊ËÕ¡µËÕ: ‚ª√¥µ√«®Õ∫°“√‡¥‘𓬉ø„π√∂լ˓ß√Õ∫
§Õ∫ °“√µËÕ“¬‰ø∑’ˉ¡Ë∂Ÿ°µÈÕßÕ“®√ȓߧ«“¡‡’¬À“¬¢—Èπ√ÿπ·√ß„ÀÈ°—
∫™ÿ¥®Õ¿“æπ’ȉ¥È
“¬‰ø ·≈–“¬µËÕ®“°¢—È«∑’˵—«√∂ Õ“®¡’’·µ°µË“ß°—π
7 °“√µËÕ“¬‰ø
1 µËÕ“¬‰ø∑’ˇªÁπ’ °—∫·∫µ‡µÕ√’Ë√∂¬πµÏ «‘µ™Ï§«∫§ÿ¡‰ø√∂¬πµÏ
·≈–‡´Áπ‡´Õ√Ï∑’˪√–µŸ µ“¡≈”¥—∫¥—ßπ’È
1 ’¥”: µËÕ°—∫“¬¥‘π
2 ’‡À≈◊Õß: µËÕ°—∫·∫µ‡µÕ√’Ë√∂ (·∫∫§ß∑’Ë ¢π“¥ 12 V)
3 ’·¥ß: µËÕ°—∫Õÿª°√≥Ï
4 ’È¡·∂∫¢“«: †«‘µ´Ï§«•§ÿ¡‰ø¢Õß••¬•µ•Ï
2 ¢—Èπÿ¥∑È“¬„ÀȵËÕ¡—¥“¬‰ø‡¢È“°—∫™ÿ¥®Õ¿“æ
2
1
Black /
黑色
/ 검정색 / ’¥”
2
Yellow*
2
黃色
*
2
노란색*
2
’‡À≈◊Õß*
Red
紅色
빨강색
’·¥ß
Orange with white stripe
橙色帶有白色條紋
흰색 줄이 간 오렌지색
’È¡·∂∫¢“«
5 A fuse
5 A
5 A 퓨즈
ø‘«Ï 5 A
3 A fuse
3 A
3 A 퓨즈
ø‘«Ï 3 A
*2 Before checking the operation of this unit prior to installation, this lead must be connected, otherwise power cannot be
turned on.
*2
在安裝本機和進行工作狀況檢查之前,請務必連接此導線接頭,否則不能開啟電源。
*2 설치 전 장치의 작동을 점검하기 전에 이 도선을 연결해 야합니다. 그렇지 않으면 전원이 켜지지 않습니다.
2
*
µÈÕßµËÕ†“¬‰ø•’È°ËÕ•∑’Ë®–µ•«®†Õ•°“•∑”ß“•¢Õß ™ÿ¥®Õ¿“æ°ËÕ•°“•µ‘¥µ—Èß¡‘‡™Ë••—È• ªÿË¡‡ª‘¥/ª‘¥®–‰¡Ë∑”ß“•
3
To metallic body or chassis of the car
接至金屬體或汽車底盤
자동차의 금속 본체 또는 섀시에 연결됨
*
3
*
µËÕ‡¢È“°—∫‚§√ß‚≈À–À√◊Õ·™´’¢Õß√∂
保險絲
To a live terminal in the fuse block connecting to the car battery (bypassing the ignition switch)
接至與汽車電池相連接的保險絲單元內的未使用的端子(用於旁路點火開關)
자동차 배터리에 연결하는 퓨즈 블록의 작동 단자에 연결됨 (점화 스위치 우회)
µËÕ‰ª¬—ߢ—È«∫«°∑’ËÕ¬ŸË„π°≈ËÕßø‘«Ï∑’ˇ¥‘𓬉ø‰ª¬—ß·∫µ‡µÕ√’Ë√∂¬πµÏ ( ‰¡ËºË“π«‘µ™Ïµ“√Ï∑‡§√◊ËÕ߬πµÏ)
保險絲
To an accessory terminal in the fuse block
接至保險絲單元內的附屬端子
퓨즈 블록의 액세서리 단자에 연결됨
µËÕ‡¢È“°—∫Õÿª°√≥Ï„π°≈ËÕßø‘«Ï
To car light control switch
接至汽車燈控制開關
자동차의 전등 조절 스위치에 연결
*3 Not included with this unit.
*3 不包含在本機內。
*3 이 장치에 포함되지 않음.
3
*
‰¡Ë√«¡™ÿ¥®Õ¿“æπ’È
†«‘µ´Ï§«•§ÿ¡‰ø¢Õß••¬•µ•Ï
Ignition switch
點火開關
점화 스위치
«‘µ™Ïµ“√Ï∑‡§√◊ËÕ߬πµÏ
Fuse block
保險絲單元
퓨즈 블록
°≈ËÕßø‘«Ï
Connecting the leads / 連接電線 / 리드 연결 / °“√‡™◊ËÕ¡µËÕ“¬‰ø
Twist the core wires when connecting.
連接時彎曲電線芯心。
연결할 때 코어 전선을 꼬으십시오.
¡È«π“¬‰øÀ≈—°¢≥–‡™◊ËÕ¡µËÕ
Solder the core wires to connect them securely.
銜接電線芯心以將它們穩固連接。
코어 전선들이 안전하게 연결되도록 납땜합니다.
∫—¥°√’“¬‰øÀ≈—°‡¢È“¥È«¬°—πլ˓߷πËπÀπ“
CAUTION / 注意 / 주의 / ¢ÈÕ§«√√–«—ß:
• To prevent short-circuit, cover the terminals of the UNUSED leads with insulating tape.
• 為免電源短路,用絕緣帶包裹不使用電線的終端。
• 전선이 단락되지 않도록 사용하지 않는 도선의 단자에 절연 테이프를 붙이십시오.
• §«√„™È‡∑ªæ—π√Õ∫ª≈“¬“¬‰ø∑’ˉ¡Ë‰¥È„™È ‡æ◊ËÕªÈÕß°—π‰øøÈ“≈—¥«ß®√
– 4 –
Page 35

CONNECTING TO THE
RECEIVER AND EXTERNAL
連接到接收器和外部設
차 량 수신기와 외 장
µËÕ°—∫‡§√◊ËÕß√—∫ ·≈–
COMPONENTS
Connect the monitor to TO MONITOR jack using the
system cord supplied with the unit.
The monitor connection unit provides 2 input circuits and
1 output circuit. Connect one or two playback sources
to AV 1 (INPUT 1) and/or AV 2 (INPUT 2) and connect
reproducing components, such as a car receiver, to
AV OUT.
When the receiver is equipped with the 2nd
AUDIO OUT plug
When increasing the headphones level, first increase
output level of the 2nd AUDIO OUT on the receiver,
then adjust the headphones level on the headphone.
• Refer also to the INSTRUCTIONS of your car
receiver.
Wide color
monitor
寬彩色顯示器
와이드 컬러
모니터
®Õ’®Õ°«È“ß
KS-HP2
(not supplied)
(沒有配備)
(제공되지 않음)
(‰¡Ë‰¥È„ÀÈ¡“æ•ÈÕ¡‡§••)
備
用系統提供的電纜將顯示器連接至
顯示器)插座。
顯示器連接組件提供
一個或兩個播放音源至
(輸入 1)以及/或者
汽車接收器等放音組件至
當接收器配備有
若想提高耳機音量水平,首先應提高接收器上
OUT
輸出接口的音量,然後再調整耳機的音量水平。
· 請參閱您的汽車接收器的說明書。
2
個輸入電路和1個輸出電路。連接
AV 1(INPUT 1
AV 2(INPUT 2
AV OUT
2nd AUDIO OUT
*
TO MONITOR.
)(音頻視頻 1)
)(輸入 2)並連接
(音頻視頻輸出)。
接口時
4
2nd monitor
第二監視器
보조 모니터
®Õ¿“æ∑’ËÕß
(至
2nd AUDIO
기 기 연결하기
본 장치에 제공된 시스템 코드를 사용하여 모니터를
TO MONITOR
모니터 연결유닛에는 2 개의 입력회로와
로가 있습니다. 하나 또는 두 개의 음원을 AV 1 (INPUT
1) 그리고/또는 AV 2 (INPUT 2)
기 등과 같은 재현용 기기를 AV OUT
리시버에 제 2nd AUDIO OUT 플러그가 있을때
헤드폰의 레벨을 높이려면, 먼저 리시버에 있는 제
2nd AUDIO OUT 의 출력레벨을 높인 다음, 헤드폰에
있는 헤드폰 레벨을 조절합니다.
•귀하의 카 리시버의 설명서도 참조하시기 바
랍니다.
잭에 연결합니다.
에 연결하고, 차량 수신
1 개의 출력회
에 연결합니다.
LINE IN
2nd AUDIO OUT
VIDEO OUT
Car receiver (ex. JVC KD-DV6103/KD-DV6104/KD-DV6105/KD-DV6108)
汽車接收器(例如 JVC KD-DV6103/KD-DV6104/KD-DV6105/KD-DV6108)
차량 수신기 (예 JVC KD-DV6103/KD-DV6104/KD-DV6105/KD-DV6108)
‡§√◊ËÕß√—∫—≠≠“≥∫π√∂¬πµ (µ—«Õ¬ËÂß JVC KD-DV6103/KD-DV6104/KD-DV6105/KD-DV6108)
5
*
DO NOT connect the AV 1 and AV 2 plugs on the
the LINE OUT or SUBWOOFER plugs of the car receiver.
Õÿa°√≥Ï¿“¬πÕ°
µËÕ®Õ¿“æ°—∫¢—È« TO MONITOR ‚¥¬„™È“¬µËÕ√–
∫∫∑’Ë„ÀÈ¡“æ√ÈÕ¡‡§√◊ËÕß
Õÿª°√≥χ™◊ËÕ¡µËÕ®Õ¿“æ¡’«ß®√√—∫—≠≠“≥‡¢È“ 2 «ß®√ ·≈–
¡’«ß®√Ëß—≠≠“≥ÕÕ° 1 «ß®√ µËÕÕÿª°√≥Ï∑’Ë„™È‡≈Ëπ 1 À√◊Õ 2
‡§√◊ËÕß°—∫ AV 1 (INPUT 1) ·≈–/À√◊Õ AV 2 (INPUT 2)
·≈È«®÷ßµËÕÕÿª°√≥Ï¿“¬πÕ° ‡™Ë𠇧√◊ËÕ߇≈Ëπ„π√∂¬πµÏ°—∫ AV OUT
‡¡◊ËÕµàÕ“¬ 2nd AUDIO OUT ‡¢â“°—∫‡§√◊ËÕß√—∫—≠≠“≥
‡¡◊ËÕµâÕß°“√‡æ‘Ë¡√–¥—∫‡ ’¬ß¢ÕßÀŸøíß „Àâ‡æ‘Ë¡√–¥—∫‡ ’¬ß∑’ˇ§√◊ËÕß√—∫ —
≠≠“≥µ√ßTMàÕß 2nd AUDIO OUT ®“°π—Èπa√—∫√–¥—∫‡ ’¬ß∑’ËÀŸøíß
•¥Ÿ√“¬≈–‡Õ’¬¥®“° 秔·π–π”é ¢Õ߇§√◊ËÕß√—∫ —
≠≠“≥¢Õß√∂¢Õß∑à“π
monitor connection unit to
System cord (supplied)
系統電纜(有提供)
시스템 코드 (제공됨)
“¬µËÕ√–∫∫ („ÀÈ¡“æ√ÈÕ¡‡§√◊ËÕß)
5
*
When using the mobile TV tuner
system KV-C1000/KV-C1001/
KV-C1008/
當使用流動電視條頻器系統
KV-C1001/KV-C1008/
KV-C1000/
KV-C1000/KV-C1001/KV-C1008 모바
일 TV 튜너시스템을 사용할 경우/
‡¡◊ËÕ„™È√–∫∫‡§√◊ËÕß√—∫‚∑√∑—»πω√È“¬ KV-C1000/
KV-C1001/KV-C1008
Remote sensor unit
(supplied with
KV-C1000/KV-C1001/
KV-C1008 )
遙控器組件
(隨
KV-C1000/
KV-C1001/KV-C1008
提供)
원격센서 유닛
(KV-C1000/
KV-C1001/KV-C1008
에 제공됨)
Õÿª°√≥Ï√’‚¡∑‡´Áπ‡´Õ√Ï
( „ÀÈ¡“æ√ÈÕ¡√ÿËπ KV-C1000/
KV-C1001/KV-C1008 )
KV-C1000
KV-C1
KV-C1
001
008
不要將
6
*
5
*
顯示器連接組件
SUBWOOFER 或 LINE OUT 接口。
모니터 연결 유닛의 AV 1 과 AV 2 플러그를 카 리시버에 있는
SUBWOOFER 플러그의 LINE OUT 에연결하지 마십시오.
上的 AV 1 和 AV 2 插頭連接到汽車接收器的
Õÿª°√≥χ™◊ËÕ¡µËÕ®Õ¿“æ AV 1 ·≈– AV 2 ∫π®Õ¿“æ °—∫¢—È« LINE OUT ¢Õßa≈—Í°
SUBWOOFER ∫π‡§√◊ ËÕß√—∫∑’˵‘¥µ—Èß„π√∂¬πµÏ
Playback source
播放源
재생 소스
4
*
4
*
Antenna elements (supplied with KV-C1000/
KV-C1001/KV-C1008)
天線元件(隨 KV-C1000/KV-C1001/KV-C1008 提供)
안테나 (KV-C1000/KV-C1001/KV-C1008 에 제공됨)
·À≈Ëß—≠≠“≥¿“æ
VCR (KV-V8 or KZ-V10*6)
錄影機(
VCR (KV-V8 또는 KZ-V10*6)
«’´’Õ“√å (KV-V8 À√◊Õ KZ-V10*
KV-V8 或 KZ-V10*6)
6
Camcorder
攝影機
캠코더
·§¡§Õ√χ¥Õ√Ï
)
Ë«πª√–°Õ∫¢Õß“¬Õ“°“» ( „ÀÈ¡“æ√ÈÕ¡ KV-C1000/
KV-C1001/KV-C1008)
*6 Carefully differentiate the power supply cords supplied for KZ-V10 and for
the monitor connection unit. Their connectors are the same in shape, but
their wirings are different.
*6 仔細分辨供
狀相同,但是接線則不一樣。
*6 KZ-V10 에 제공된 전원공급 코드와 모니터 연결유닛의 코드를 잘 분별하
시기 바랍니다. 이 두 커넥터는 모양은 같지만 배선은 다릅니다.
6
*
·¬°“¬‰ø∑’Ë„ÀÈ¡“æ√ÈÕ¡ KZ-V10 ·≈–“¬‰ø¢ÕßÕÿª°√≥χ™◊ËÕ¡µËÕ®Õ¿“æլ˓ß√–«—ß
KZ-V10
和顯示器連接組件使用的電源電纜和。他們的連接器的形
¢—È«µËÕ¢ÕßÕÿª°√≥Ï∑—ÈßÕß¡’¢π“¥‡∑Ë“°—π ·µË‡¥‘π“¬µË“ß°—π
*4 RCA pin plug cord (not supplied)
*4
RCA
針式插塞導線(沒有配備)
*4 RCA 핀 플러그 코드(제공되지 않음)
4
*
“¬µËÕa≈—Í°∑’Ë¡’¢“·∫∫ RCA ( ‰¡Ë ‰¥È„ÀÈ¡“æ√ÈÕ¡‡§√◊ËÕß)
*5 Video cord (not supplied)
*5 影像電線 (沒有配備)
*5 비디오 코드 (제공되지 않음)
5
*
“¬«‘¥’‚Õ ( ‰¡Ë ‰¥È„ÀÈ¡“æ√ÈÕ¡‡§√◊ËÕß)
– 5 –
Page 36

When the receiver is NOT equipped
with the 2nd AUDIO OUT plug
Wide color
monitor
寬彩色顯示器
와이드 컬러
모니터
®Õ’®Õ°«È“ß
KS-HP2
(not supplied)
(沒有配備)
(제공되지 않음)
(‰¡Ë‰¥È„ÀÈ¡“æ•ÈÕ¡‡§••)
當接收器沒有配備
6
*
2nd AUDIO OUT
4
*
5
*
接口時
2nd monitor
第二監視器
보조 모니터
®Õ¿“æ∑’ËÕß
리시버에 제 2nd AUDIO OUT 플러그가 없을
때
Car receiver*7 (ex. JVC KD-DV5103/KD-DV5104/
KD-DV5105/ KD-DV5108)
LINE IN
VIDEO OUT
汽車接收器*7(例如 JVC KD-DV5103/KD-DV5104/
KD-DV5105/KD-DV5108)
차량 수신기*7 (예 JVC KD-DV5103/KD-DV5104/
KD-DV5105/KD-DV5108)
‡§√◊ËÕß√—∫—≠≠“≥∫π√∂¬πµ
KD-DV5104/ KD-DV5105/KD-DV5108
DO NOT connect the AV 1 and AV 2 plugs on the monitor connection unit to
the LINE OUT or SUBWOOFER plugs of the car receiver.
不要將
顯示器連接組件
SUBWOOFER 或 LINE OUT 接口。
모니터 연결 유닛의 AV 1 과 AV 2 플러그를 카 리시버에 있는
SUBWOOFER 플러그의 LINE OUT 에연결하지 마십시오.
上的 AV 1 和 AV 2 插頭連接到汽車接收器的
‡¡◊ËÕ‰¡à‰¥âµàÕ“¬ 2nd AUDIO OUT ‡¢â“°—∫‡§√◊ËÕß√—∫—
≠≠“≥
*7
(µ—«Õ¬ËÂß
JVC KD-DV5103/
)
System cord (supplied)
系統電纜(有提供)
시스템 코드 (제공됨)
“¬µËÕ√–∫∫ („ÀÈ¡“æ√ÈÕ¡‡§√◊ËÕß)
5
*
When using the mobile TV tuner
system KV-C1000/KV-C1001/
KV-C1008/
當使用流動電視條頻器系統
KV-C1001/KV-C1008/
KV-C1000/KV-C1001/KV-C1008 모바
일 TV 튜너시스템을 사용할 경우/
‡¡◊ËÕ„™È√–∫∫‡§√◊ËÕß√—∫‚∑√∑—»πω√È“¬
KV-C1001/KV-C100
KV-C1000/
KV-C1000/
8
Õÿª°√≥χ™◊ËÕ¡µËÕ®Õ¿“æ AV 1 ·≈– AV 2 ∫π®Õ¿“æ °—∫¢—È« LINE OUT ¢Õßa≈—Í°
SUBWOOFER ∫π‡§√◊ ËÕß√—∫∑’˵‘¥µ—Èß„π√∂¬πµÏ
7
*
You cannot listen to the playback sound of the car receiver through KS-HP2
cordless headphones.
7
*
您不能使用無線耳機收聽汽車接收器所播放的聲音。
7
*
KS-HP2의 무선 헤드폰으로 자동차 수신기의 재생 사운드를 들을 수는 없
5
*
4
*
Antenna elements (supplied with KV-C1000/
KV-C1001/KV-C1008)
天線元件(隨 KV-C1000/ KV-C1001/KV-C1008 提供)
안테나 ( KV-C1000/KV-C1001/KV-C1008 에 제공됨)
Ë«πª√–°Õ∫¢Õß“¬Õ“°“» ( „ÀÈ¡“æ√ÈÕ¡ KV-C1000/
KV-C1001/KV-C1008)
습니다.
7
*
∑Ë“π‰¡Ë“¡“√∂√—∫ø—߇’¬ß®“°‡§√◊ËÕß√—∫—≠≠“≥„π√∂¬πµÏºË“πÀŸø—߉√È“¬ KS-HP2
Playback source
播放源
재생 소스
·À≈Ëß—≠≠“≥¿“æ
VCR (KV-V8 or KZ-V10*6)
錄影機(
VCR (KV-V8 또는 KZ-V10*6)
«’´’Õ“√å (KV-V8 À√◊Õ KZ-V10*
KV-V8 或 KZ-V10*6)
6
)
Remote sensor unit
(supplied with
KV- C10 00/KV-C1 001 /
KV-C1008)
遙控器組件
(隨
KV-C1000/
KV-C1001 / K V-C1 0 0 8
提供)
원격센서 유닛
(KV-C1000/KV-C1001/
KV-C1008 에 제공됨)
Õÿª°√≥Ï√’‚¡∑‡´Áπ‡´Õ√Ï
( „ÀÈ¡“æ√ÈÕ¡√ÿËπ KV-C1000/
KV-C1001/KV-C1008)
TROUBLESHOOTING
KV-C1000
001
KV-C1
008
KV-C1
故障排除
Camcorder
攝影機
캠코더
·§¡§Õ√χ¥Õ√Ï
문제해결
°“√·°È‰¢ª—≠À“‡∫◊ÈÕßµÈπ
• The fuse blows.
* Are the red and black leads connected correctly?
• Power cannot be turned on.
* Is the yellow lead connected?
• Picture does not come on screen.
* Is the correct input selected?
• Picture does not appear clearly.
* Is the color monitor installed at the right angle?
• This unit does not work at all.
* Have you reset your unit?
•
保險絲燒斷。
*
紅色和黑色導線接頭是否正確連接?
•
電源不能接通。
*
黃色導線接頭是否接上?
•
熒幕不出畫面。
*
檢查是否選擇正確輸入?
• 圖片顯示不清楚。
*
彩色顯示器是否被安裝在直角?
•
本機完全不能操作。
*
您是否已經重置您的機組?
• 퓨즈가 끊겼습니다.
* 빨강색 및 검정색 리드가 올바르게 연결되어 있습니
까?
• 전원을 켤 수 없습니다.
* 노란색 리드가 연결되어 있습니까?
• 스크린에 그림이 나타나지 않습니다.
* 선택한 입력이 올바릅니까?
• 화면이 선명하게 나오지 않습니다.
* 컬러모니터가 올바른 각도로 설치되었습니까?
• 리시버가 전 혀 작동하지 는 다.
* 리시버를 리세트하였습니까?
– 6 –
• ø‘«Ï¢“¥
* µËÕ“¬‰ø’·¥ß·≈–¥”լ˓ß∂Ÿ°µÈÕßÀ√◊Õ‰¡Ë?
• ‰¡Ë“¡“√∂‡ª‘¥ªÿË¡‡ª‘¥/ª‘¥‰¥È
* µËÕ“¬‰ø’‡À≈◊Õß·≈È«„™ËÀ√◊Õ‰¡Ë?
• ¿“扡˪√“°Ø∫π®Õ
* ‡≈◊Õ°Õ‘πæÿµ∂Ÿ°µÈÕßÀ√◊Õ‰¡Ë?
• ¿“æ∑’˪√“°Ø∫π®Õ‰¡Ë™—¥
* µ‘¥µ—È߮Ւ„π¡ÿ¡∑’Ë∂Ÿ°µÈÕßÀ√◊Õ‰¡Ë?
• ‡§••ËÕ߉¡à∑”ß“•
* ∑Ë“π‰¥Èµ—È߇§√◊ËÕß„À¡ËÀÈ√◊Õ¬—ß
 Loading...