

Page 1
DIGITAL TV TUNER UNIT
KV-DT2000
ENGLISH
For installation and connections, refer to the separate manual.
INSTRUCTIONS
GET0313-001A
[E]
Page 2

Thank you for purchasing a JVC product.
Please read all instructions carefully before operation, to ensure your complete
understanding and to obtain the best possible performance from the unit.
Contents
Controls and features ................................................................................................. 5
Operations and Settings ............................................................................................. 7
ENGLISH
Troubleshooting ......................................................................................................... 12
Maintenance ............................................................................................................... 13
Specifications ............................................................................................................. 13
Wir danken Ihnen für den Kauf eines JVC Produkts.
Bitte lesen Sie die Anleitung vollständig durch, bevor Sie das Gerät in Betrieb nehmen,
um sicherzustellen, daß Sie alles vollständig verstehen und die bestmögliche Leistung des
Geräts erhalten.
Inhalt
Bedienungselemente und Merkmale .......................................................................... 15
Bedienungen und Einstellungen ................................................................................ 17
DEUTSCH
Störungssuche ............................................................................................................ 22
Wartung ..................................................................................................................... 23
Technische Daten ....................................................................................................... 23
Merci pour avoir acheté un produit JVC.
Veuillez lire attentivement toutes les instructions avant d’utiliser l’appareil afin de bien
comprendre son fonctionnement et d’obtenir les meilleures performances possibles.
Table des matières
Commandes et caractéristiques .................................................................................. 25
Opérations et réglages ................................................................................................ 27
FRANÇAIS
Guide de dépannage ................................................................................................... 32
Entretien ..................................................................................................................... 33
Spécifications ............................................................................................................. 33
Hartelijk dank voor de aanschaf van dit JVC-product!
Wij verzoeken u de gebruiksaanwijzing goed door te lezen voordat u het apparaat gaat
gebruiken. Zo krijgt u een volledig inzicht in de functies van het apparaat en kunt u de
mogelijkheden optimaal benutten.
Inhoud
Bedieningsorganen en functies .................................................................................. 35
Bedieningen en instellingen ....................................................................................... 37
Oplossen van problemen ............................................................................................ 42
NEDERLANDS
Onderhoud ................................................................................................................. 43
Technische gegevens ................................................................................................. 43
2
Page 3

Muchas gracias por la compra de un producto JVC.
Como primer paso, por favor lea detenidamente este manual para comprender a fondo
todas las instrucciones y obtener un máximo disfrute de esta unidad.
Contenido
Controles y características ......................................................................................... 45
Operaciones y ajustes ................................................................................................ 47
ESPAÑOL
Localización de averías .............................................................................................. 52
Mantenimiento ........................................................................................................... 53
Especificaciones ........................................................................................................ 53
Per I’Italia:
“Si dichiara che il questo prodotto di marca JVC è conforme alle prescrizioni del
Decreto Ministeriale n.548 del 28/08/95 pubblicato sulla Gazzetta Ufficiale della
Repubblica Italiana n.301 del 28/12/95”.
La ringraziamo per aver acquistato un prodotto JVC.
La invitiamo a leggere le presenti istruzioni prima di utilizzare l’apparecchio in modo da
poterne sfruttare al meglio le prestazioni.
Indice
ITALIANO
Comandi e funzioni .................................................................................................... 55
Operazioni e impostazioni ......................................................................................... 57
Guida e rimedi in caso di problemi di funzionameto ................................................ 62
Manutenzione ............................................................................................................ 63
Specifiche .................................................................................................................. 63
Tack för att du köpt en JVC produkt.
Var snäll och läs noga alla instruktioner innan du använder den, så att du vet hur den ska
skötas och kan få ut mesta möjliga av den.
Innehållsförteckning
Reglage och funktioner .............................................................................................. 65
Funktioner och inställningar ...................................................................................... 67
SVENSKA
Felsökning ................................................................................................................. 72
Underhåll ................................................................................................................... 73
Specifikationer ........................................................................................................... 73
DVB is a registered trademark of the DVB Project
DVB ist eine eingetragene Marke der DVB Project
DVB est une marque déposée du DVB Project
3
Page 4

WARNINGS:
• IF YOU NEED TO OPERATE THE UNIT WHILE DRIVING, BE SURE TO LOOK AHEAD
CAREFULLY OR YOU MAY BE INVOLVED IN A TRAFFIC ACCIDENT.
• USE WITH DC 12 V NEGATIVE GROUND VEHICLES.
ENGLISH
If your vehicle does not have this system, a voltage inverter is required, which can be
purchased at a JVC IN-CAR ENTERTAINMENT dealer.
• DO NOT INSTALL THE MONITOR IN A LOCATION WHICH OBSTRUCTS DRIVING AND
VISIBILITY, OR WHERE APPLICABLE LAWS AND REGULATIONS PROHIBIT THE
INSTALLATION.
• NEVER USE BOLTS OR NUTS FROM THE VEHICLE’S SAFETY DEVICES FOR
INSTALLATION.
If bolts or nuts from the steering wheel, brakes, or other safety devices are used for installation,
it may cause an accident.
• CONNECT THE WIRES CORRECTLY.
If the wiring is not correctly connected, it may cause a fire or an accident. In particular, be
sure to run and secure the lead wire so that it does not get tangled with a screw or the moving
portion of a seat rail.
To prevent short circuits, it is recommended that you disconnect the battery’s negative terminal
and make all electrical connections before installing the unit. If you are not sure how to install
this unit correctly, have it installed by a qualified technician.
•
AVOID INSTALLING THE UNIT IN THE FOLLOWING PLACES:
– Where it would hinder your safe driving.
– Where it would be exposed to direct sunlight or heat directly from the heater, or placed in an
extremely hot place.
– Where it would be subject to rain, water splashes or excessive humidity.
– Where it would be subject to dust.
– Where it would be positioned in a unstable location.
– Where it could damage the car’s fittings.
– Where proper ventilation would not be maintained, such as under a floor mat.
– Where it would be located near flammable objects (since heat is generated inside the unit).
For safety....
• Do not raise the volume level too much, as
this will block outside sounds, making driving
dangerous.
• Stop the car before performing any
complicated operations.
4
Temperature inside the car....
If you have parked the car for a long time in
hot or cold weather, wait until the temperature
in the car becomes normal before operating the
unit.
Page 5
Controls and features
KV-DT2000 functions together with the
supplied remote controller—RM-RK520.
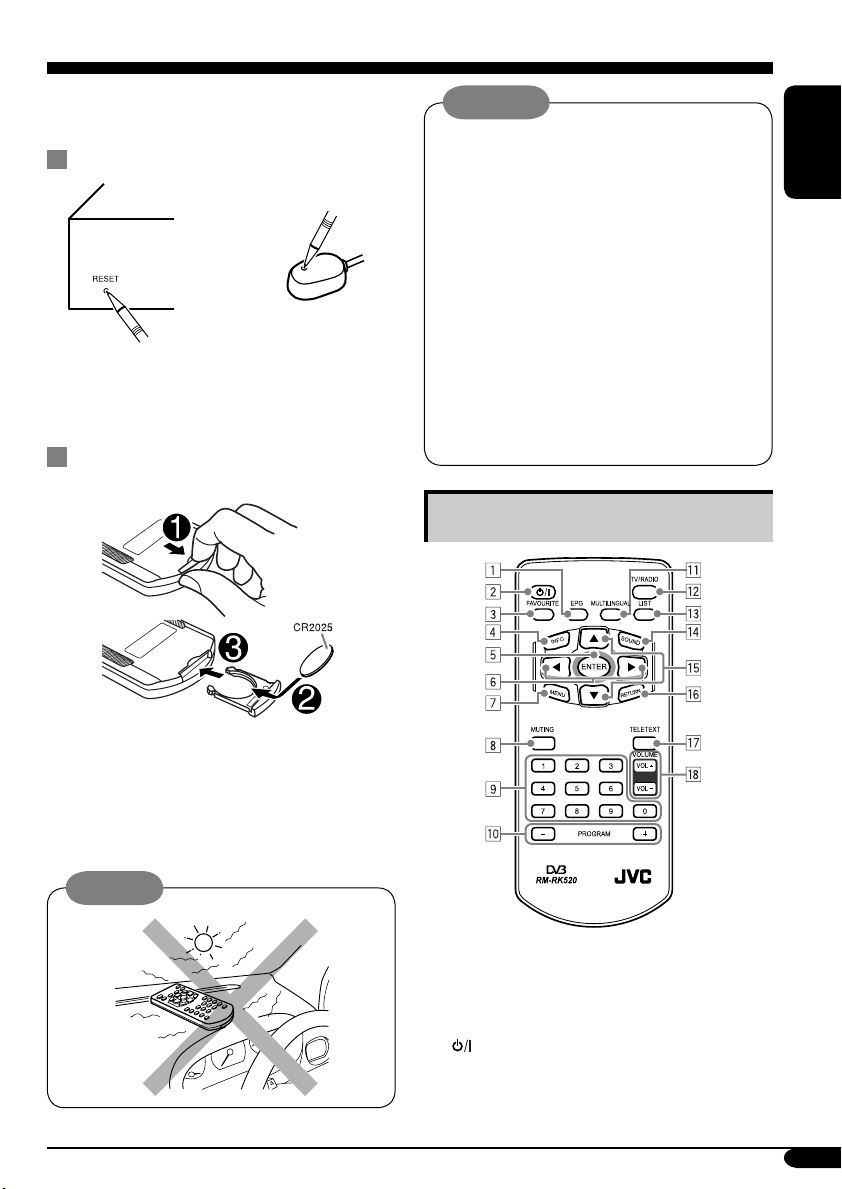
How to reset your unit
or
(On the unit)
This will reset the microcomputer. Your preset
adjustments will also be erased.
(On the external
remote sensor)
Installing the lithium coin battery
(CR2025)
Warning:
• Do not install any battery other than
CR2025 or its equivalent; otherwise, it
may explode.
• Store the battery in a place where children
cannot reach to avoid risk of accident.
• To prevent the battery from over-heating,
cracking, or starting a fire:
– Do not recharge, short, disassemble,
heat the battery, or dispose of it in a fire.
– Do not leave the battery with other
metallic materials.
– Do not poke the battery with tweezers or
similar tools.
– Wrap the battery with tape and insulate
when throwing away or saving it.
Main elements and features
ENGLISH
When operating, aim the remote controller
directly at the remote sensor. Make sure
there is no obstacle in between.
• For connecting the remote sensor, refer to
the Installation/connection manual (separate
volume).
Caution:
1 EPG (Electronic Program Guide) button*
• Shows the TV program list sent by
broadcast site. Press 5/∞/2/3 to scroll
to the desired channel and program.
2
(standby/on) button
• Turns the power on or off.
To be continued....
5
Page 6

3 FAVOURITE button*
• Shows the Favourite CH (CHannel) list
(see Category grouping on page 10). Press
5/∞ to scroll to the desired channel, then
ENGLISH
press ENTER.
• Resets to factory default setting if pressed
and held while in the Main Menu screen.
4 INFO button
• Shows the present/following program
information, and clock.
5 ENTER button
• While in setting mode, selects the
highlighted function.
• While in TV mode, displays the CH
(CHannel) List.
6 2 (left) / 3 (right) buttons
• While in setting mode:
3 (right): Scroll to the right.
2 (left): Scroll to the left.
• While in TV mode, adjusts the volume
level.
7 MENU button
• Shows the main menu. Press 5/∞/2/3 to
scroll to the desired submenu, then press
ENTER.
8 MUTING button
• Mutes the sound.
9 Number (0 – 9) buttons
• Use for numeric entries, eg. program
numbers, teletext page numbers, etc.
p PROGRAM +/– buttons
• While in TV mode, selects the TV
programs.
• While in radio mode, selects the radio
programs.
• While in teletext page, moves the teletext
page up and down.
q MULTILINGUAL button*
• Selects the broadcast language if the
selected program is broadcast in multilanguage. Press 2/3 to scroll to the
desired option, then press ENTER.
w TV/RADIO button
• Changes between the TV mode and radio
mode. When radio mode is selected, only
radio channels can be tuned in.
e LIST button*
• Selects the desired Service List (see page
11). Press 2/3 to scroll to the desired
option, then press ENTER.
r SOUND button
• Select the appropriate sound system
(AUTO, STEREO, MONO, Right-Both,
Left-Both) for listening. Press SOUND
repeatedly or 2/3 to scroll to the desired
option, then press ENTER.
t 5 (up) / ∞ (down) buttons
• While in setting mode, scrolls the
selection menu up and down.
• While in TV mode, selects the TV
programs.
• While in radio mode, selects the radio
programs.
• While in teletext page, moves the teletext
page up and down.
y RETURN button
• While in setting mode, returns to the
previous menu level.
u TELETEXT button
• Shows the teletext page if the TV station
sends teletext signals. Press the number
buttons to enter the desired teletext page.
i VOL +/– buttons
• Adjusts the volume level.
* Also functions as the color buttons (red,
green, yellow, and blue) to navigate within
the teletext page.
The availability of some functions depends
on:
• Services provided by the local
broadcasters.
• Compatibilities of the monitor/display
units used.
6
Page 7

Operations and Settings
Basic operations
Before operating the digital TV tuner, make
sure all the connections are correctly connected
and installed.
For watching TV programs:
1 Turn on the monitor and this unit.
• The program from the previous channel
(program position) will be shown if
a service list is available; otherwise,
“No Channel” will be shown.
2 Select the input on the monitor to
which this unit is connected.
3 Press 5/∞ or PROGRAM +/– to
select your desired program.
• You can also select the program from
the CH (CHannel) List menu by pressing
ENTER (see page 9).
4 Press VOL +/– to adjust the volume.
TV icon
For listening to the radio:
1 Turn on the monitor and this unit.
2 Press TV/RADIO to go to radio
mode.
• If there is no radio program available,
“No Channel” will be shown.
3 Press 5/∞ or PROGRAM +/– to
select your desired program.
• You can also select the program from
the CH (CHannel) List menu by pressing
ENTER (see page 9).
• A JVC logo screen appears.
4 Press VOL +/– to adjust the volume.
Radio icon
ENGLISH
While watching TV programs/
Listening to the radio
Operations Press
To display the program
list sent by broadcast site
To change the audio
language
To display or exit from
Teletext (only for TV
programs)
To show your favourite
channels
• To register the channels, see
Category grouping on page
10.
To display the available
service list
To show the program
information
To select the sound
modes (AUTO,
STEREO, MONO,
Right-Both, Left-Both)
7
Page 8

Setting the digital TV tuner
The adjustable items are grouped into six
categories in the Main Menu:
ENGLISH
• STB (Set Top Box) Setting
• CH (CHannel) List
• CH (CHannel) Edit
• CH (CHannel) Scan
• Manual Scan
• Multi CH (CHannel)
2 Select the desired
submenu.
3 Activate the selection.
• To return to the Main
Menu, press RETURN.
4 Select an item to adjust.
Basic procedure:
1 Enter the Main Menu.
Selected submenu
Submenu
Operational instructions
(changes accordingly
when a different submenu
is selected)
Headings
Unavailable
submenu will not
be highlighted.
STB (Set Top Box) Setting
You can set to show or use the functions listed below.
5 Select an option to
adjust, if any.
6 Repeat steps 4 and 5 to select and
adjust the other items.
To return to the TV program
Press RETURN repeatedly.
To turn off the power of this unit
Press (standby/on).
Available functions
Selected options
8
Available options
Operational instructions
Page 9

Available functions/options
On-Screen Display language
English [Default], German, French, Spanish, Italian
Broadcast audio language
English [Default], German, French, Spanish, Italian
Matching the monitor type
4 × 3 [Default], 16 × 9
Matching the display type
Full Screen [Default], Auto
TV system that matches your local broadcasters
Auto, PAL [Default], NTSC
OSD display time
2S (seconds), 5S [Default], 8S, 10S, 30S
OSD transparency level
0 — 7 (as the number increases, the transparency level increases) [1: Default]
Technical information
Sys V1.1 [Default]
CH (CHannel) List
You can list all the available programs on this unit to select a program to watch while in TV mode.
However, if the Category column of the programs show “$” symbols, you cannot watch these
programs on this unit. These programs are Scrambled Programs (Pay TV).
• Press TV/RADIO to select radio mode. A JVC logo screen appears and you can select the radio
services by pressing 5/∞ or PROGRAM +/–.
ENGLISH
Program numbers
and names
Category (see Category
grouping on page 10)
Operational instructions
To show the CH List directly while watching a TV program
• To return to the TV program, press ENTER again or RETURN.
Small window display
Technical information of
the selected program
9
Page 10

CH (CHannel) Edit
You can edit the program name, group the program, and also sort the available programs. If
Scrambled Programs ($) are shown, you cannot edit nor delete these programs.
• To sort the programs, press MULTILINGUAL to highlight the program you want to move. Then,
ENGLISH
press 5/∞ to move the highlighted program within the list. Press MULTILINGUAL again to exit
from this mode.
• To select Service List you want to display, press LIST repeatedly to scroll through all the
available services.
• To delete one or all the channels, press FAVOURITE, then follow the instructions on the monitor.
Service List
• Select the option you want
Program numbers
and names
Category
Operational instructions
Editing the channel status....
Press 5/∞ to select the program to edit, then press ENTER.
Program name
Category
grouping
To change the character, press 5/∞.
To move to the previous/next character, press 2/3.
To delete a character, press FAVOURITE.
To finish editing, press ENTER.
Press ENTER repeatedly to select the category.
• There are six different categories available—entertainment (
movie (
), musical ( ), sport ( ), romance ( ), and news ( ).
Only the categorized programs will be shown in the Favourite CH (CHannel)
list.
to display on this list.
Small window display
),
CH (CHannel) Scan
You can search for the specified program/channel.
Available functions
Selected option
Signal strength and
quality indicators
10
Available options
Operational instructions
Page 11

Available functions/options
Store the programs you frequently watch to the specified service group so that you can
access to the network without scanning through the spectrum every time when you
travel. (See also page 10 to select the available Service List.)
• You can also store the programs to your own specified groups (up to 17 groups) in
the Service List besides the pre-defined groups (Home, Office, and Travel).
Press and hold EPG until “New” appears, then change to your own specified name.
(See “Program Name” on page 10 for entering your specified name.)
To delete a group, select the desired group using 5/∞, then press and hold
FAVOURITE.
Home [Default], Offi ce, Travel (cannot be deleted nor edited)
Automatically searches for the entire VHF and UHF spectrum for available services.
Press ENTER to activate the search. (DO NOT press any button on the remote
controller during search.)
Spectrum [Default]
Manual Scan
You can search for a program by specifying the frequency and bandwidth.
ENGLISH
Available functions
Selected option
Signal strength and
quality indicators
Available functions/options
Select the place where you are now staying (see page 10 for the available Service
List).
Select a frequency for auto searching.
• You can also use the number buttons to enter the frequency. Press ENTER to
confirm.
174.000 MHz — 858.000 MHz [474.000 MHz : Default]
Select an appropriate bandwidth.
6 MHz, 7 MHz, 8 MHz [Default]
Select “Scan CH” after setting the above functions correctly. Press ENTER to start
scanning.
Spectrum [Default]
Service List (see page 10)
• Select the option you want
to display on this list.
Available options
Operation instructions
11
Page 12

Multi CH (CHannel) display
You can browse through all the available programs, up to nine programs at a time.
ENGLISH
After a few seconds....
Blank windows The windows will start
showing snapshots of different
channels in sequence.
Troubleshooting
What appears to be trouble is not always serious. Check the following points before calling a service
center.
Symptoms Remedies/Causes
• The unit does not work at all. • Reset the unit (see page 5).
• Check the cords and connections.
• “No Channel” appears on the monitor. No channels have been preset.
• No picture appears when you switch
between functions.
• Only sound can be heard and no
picture is shown on the monitor.
• Monitor shows discontinuous,
glitches, or mosaic pictures.
• Only picture is shown on the monitor
and no sound can be heard.
• The monitor screen goes blank and
teletext page does not appear.
• No pictures appear on the Multi CH
(Channel) display.
Wait for a few seconds for the unit to return to TV
mode.
• Check the video cables connection.
• This unit might be in radio mode. Press TV/RADIO
to enter TV mode.
This is not a malfunction. Some broadcasters
are using MPEG-2 signals which are subject to
interference.
• Adjust the sound to the optimum level.
• Make sure the mute function is not activated (see
page 5).
• Check the audio cables connection.
• Wait for a few seconds for transmission time.
• The monitor does not support teletext function.
• Check with your local broadcaster for availability of
this service.
There may be no broadcast signal.
12
Page 13

Maintenance
• Turn off the power supply, then wipe with dry soft cloth. For more stubborn stains, wipe with
slightly damp cloth and follow with a dry soft cloth immediately. Once in a while, clean with a
light cleaning agent like alcohol or highly diluted thinner.
• Be careful with the following when maintaining the unit.
– Be careful not to make any scratches on the surfaces when cleaning it.
– Do not use a wet cloth for cleaning.
– Do not use strong volatile substance like benzene and thinner.
– Do not use strong acidic detergent, alkaline detergent, and detergent composed of organic
substances.
– Read precautions carefully when using a chemically processed duster.
Specifications
ENGLISH
Processor and Memory
CPU: 32 Bit RISC MIPS
Flash Memory: 2 MB
SDRAM: 8 MB
Digital TV Tuner Unit
Channel Plan: CCIR (Consultative Committee
for International Radio)
Compliance to DVB-T ETSI EN300744
Frequency Range:
VHF 174 MHz to 230 MHz
(CH05 to CH12)
UHF 470 MHz to 862 MHz
(CH21 to CH69)
Input Impedance: 75 Ω
Sensitivity: 16 dBµV to 85 dBµV
Demodulator: Anti-Doppler Enhanced
Demodulator Chip
FFT: 2 K and 8 K
Modulation: QPSK, 16QAM, 64QAM
COFDM
Bandwidth: 6 MHz; 7 MHz; 8 MHz
Guard Interval: 1/4; 1/8; 1/16; 1/32
Code Rate: 1/2; 2/3; 3/4; 5/6; 7/8
Frequency Offset: ± 175 kHz
Dimensions (approx.):
166 mm (W) × 45 mm (H) × 196 mm (D)
Mass (approx.): 1.0 kg (excluding acessories)
Terminals
Antenna Input: F-Type × 2 (IEC 169-24)
Video: RCA pin × 2; 1 V (p-p), 75 Ω
Unbalanced
Audio: RCA pin × 2; 1 V (rms)
RJ45 × 1: External Remote Sensor Unit
Power Connector × 1: BATTERY,
ACCESSORY, GROUND
Reset Button: For Hardware Reset (at the
front casing and the external
remote sensor unit)
Power Supply
Operating Voltage: DC 12 V (10 V to 30 V
allowable voltage range)
Power Consumption: 8.5 W
Grounding System: Negative Ground
Safety: Short Circuit & Reverse Polarity
Protection
Operating Environment
Operating Temperature: –10°C to +70°C
Operating Relative Humidity: 20% to 95%
Storage Temperature: – 30°C to +85°C
Storage Relative Humidity: 10% to 95%
Design and specifications are subject to change
without notice.
13
Page 14

Having TROUBLE with operation?
Please reset your unit
Refer to page of How to reset your unit
EN
© 2005 Victor Company of Japan, Limited
0905DTSMDTJES
 Loading...