

Page 1
KV-V10
Installation/Connection Manual
Handbuch für Installierung und Anschluß
Manuel d’installation/raccordement
VNN3802-T211
[E]
Printed in Japan
0798MNMUBNOZK
JVC
EN, GE, FR
ENGLISH
INSTALLATION
Installation of this unit requires experience and
should be done by a qualified technician. In
addition, for safety reasons, installing this unit in
the trunk of your car is recommended.
Before installation
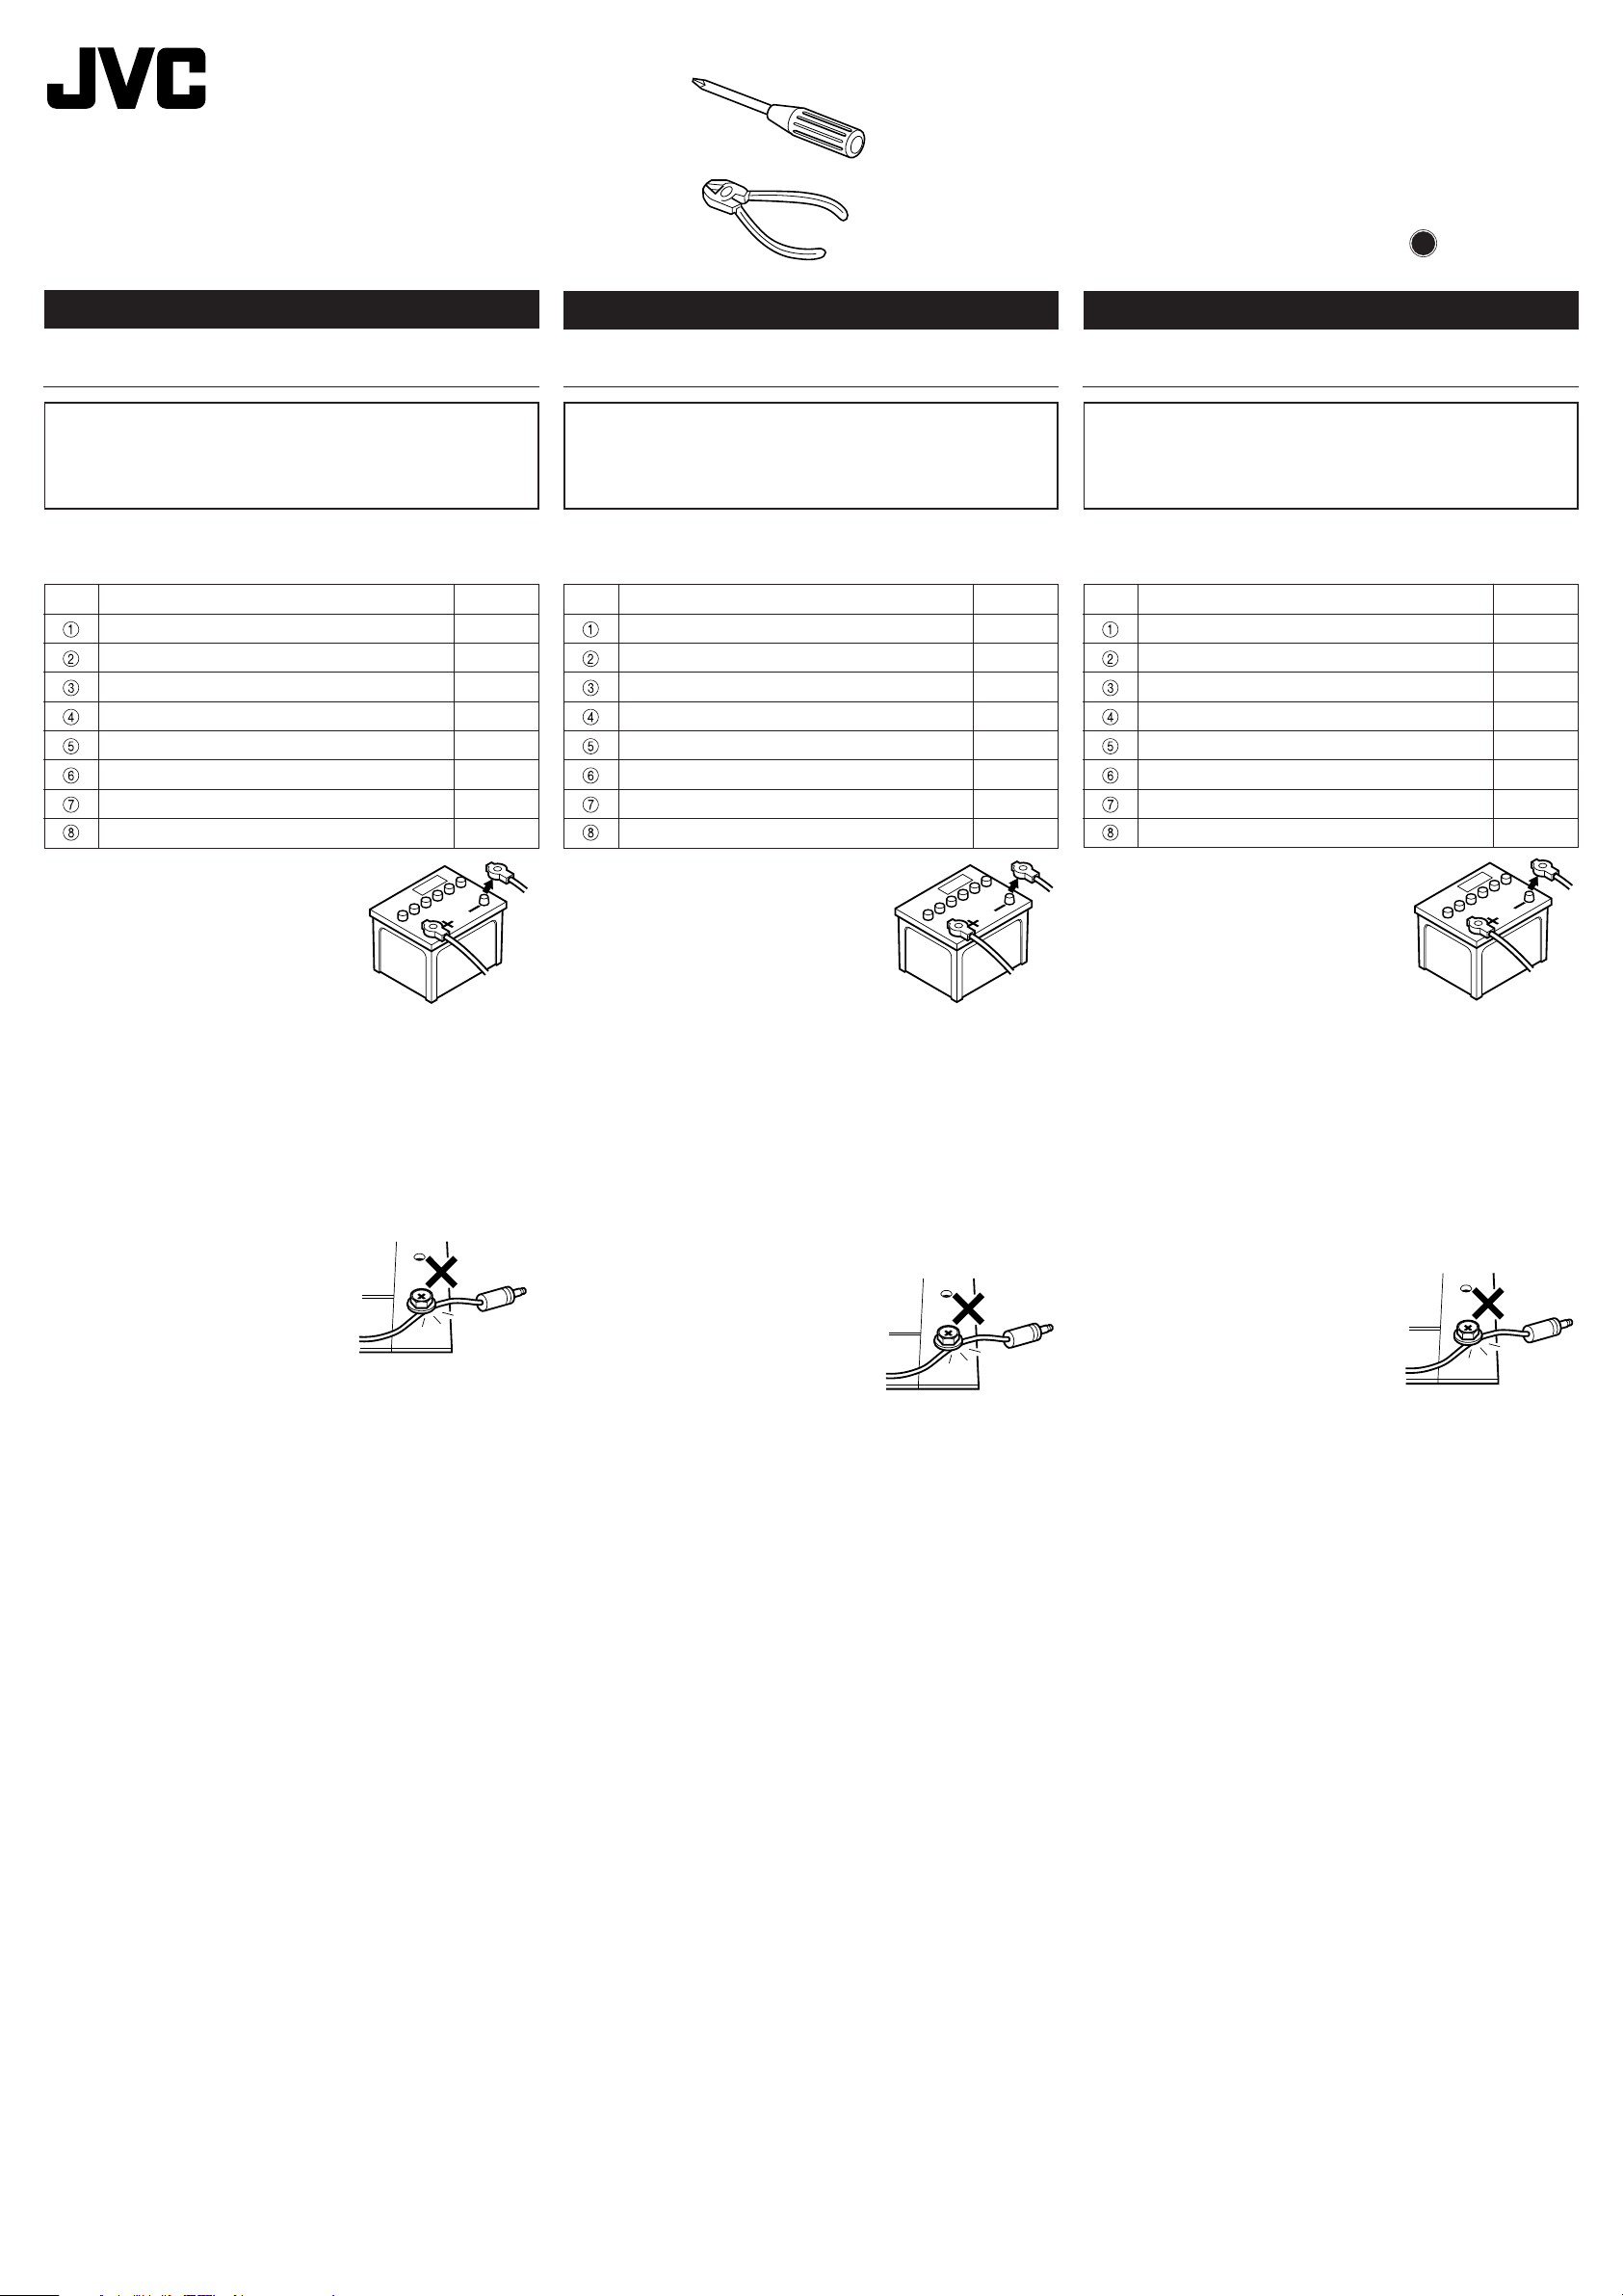
◆ Parts List ◆
No. Name Qty
Mounting bracket 2
Tapping screw (φ5 × 20 mm) 4
Screw (M5 × 8 mm) 4
Velcro tape 2 sets
Power cord (5 m/16.7 ft. long) 1
AV cord (5 m/16.7 ft. long) 1
Remote sensor unit (5 m/16.7 ft. long) 1
Remote control data cord (5 m/16.7 ft. long) 1
DEUTSCH
INSTALLIERUNG
Installieren dieses Gerätes erfordert Erfahrung und
sollte nur durch einen qualifizierten Techniker
durchgeführt werden Zusätzlich wird aus
Sicherheitsgründen empfohlen, dieses Gerät im
Kofferraum Ihres Wagens zu installieren.
Vor der Installierung
◆ Teileliste ◆
Nr. Name Anzahl
Befestigungswinkel 2
Blechschraube (φ5 × 20 mm) 4
Schraube (M5 × 8 mm) 4
Klettenband 2 Satz
Stromversorgungskabel (5 m) 1
AV-Kabel (5 m lang) 1
Fernbedienungs-Sensoreinheit (5 m lang) 1
Fernbedienungs-Datenkabel (5 m lang) 1
FRANÇAIS
INSTALLATION
L'installation de cet appareil exige une maind'oeuvre spécialisée et ne peut être faite que par un
technicien qualifié. En outre, des motifs de sécurité
recomandent d'installer cet appareil dans le coffre
de votre voiture.
Avant d’installer
◆ Liste des pièces ◆
No. Appellation Qté.
Support de montage 2
Vis autotaraudeuse (φ 5 × 20 mm) 4
Vis (M5 × 8 mm) 4
Bande Velcro 2 jeux
Cordon d’alimentation (long. 5 m) 1
Cordon audio vidéo (long. 5 m) 1
Unité de capteur de télécommande (long. 5 m)
Cordon de données de télécommande (long. 5 m)
1
1
• To prevent short-circuiting during
installation, be sure to disconnect the
negative (–) side of the battery.
• To ensure safe driving, install the unit in a place where it does
not obstruct your driving and where the heat radiation of the unit
is maximized.
• When the installation place has been determined, make sure
that the cord is long enough to reach the unit.
• Before final mounting of the unit, temporarily connect all cords
to see that the unit works correctly.
• For installation, be sure to use the parts (screws, etc.) supplied
with the unit correctly as specified and firmly mount the unit.
Using parts which do not meet specifications may cause internal
components to be damaged or the unit come loose.
• When tightening screws or nuts, be
careful not to catch other cords or
cables.
• When installation on your car is particularly difficult, contact your
dealer.
Caution:
• When installing the unit, be sure to park your car on level ground
with the parking brake applied and the engine key turned OFF.
• This unit is dedicated for use in “12 Volts DC, NEGATIVE-ground”
cars.
It cannot be used with 24 Volts cars such as large buses.
Installation procedure
<Precautions for Installation>
• Avoid installing in the following places:
- Where the unit may obstructs your driving
- Where large temperature rises may occur, for example, due to exposure
to direct sunlight (on rear tray, dash board, etc.) or hot air from heater
vents
- Where the rain may blow in, water splashes, or condensation is high
- Dusty places
- Where there is a danger that the unit may cause injury to passengers
when the car is stopped suddenly
• The unit should be the installed at an angle of 90˚ or less with
respect to the horizontal line.
• For installation, be sure to use the parts (screws, etc.) supplied
with the unit correctly as specified and firmly mount the unit.
Using parts which do not meet specifications may cause internal
components to be damaged or the unit to come loose.
Avoid installing the unit using only Velcro tape.
Installing the unit with the right-hand side in a raised position
may cause damage.
• When installation into your car is difficult or requires some
additional work such as drilling a hole in the car body, contact
your nearest car dealer.
Note: To take the KV-V10 out of your car, remove it together
with the mounting brackets. Leaving the mounting brackets
attached to the car body may cause injury.
• Achten Sie darauf, das Kabel vom
Minuspol der Batterie abzutrennen, um
Kurzschluß während der Installierung zu
verhüten.
• Installieren Sie das Gerät für sicheres Fahren an einem Platz,
an dem es Sie beim Fahren nicht behindert und an dem maximale
Wärmeabstrahlung für das Gerät möglich ist.
• Stellen Sie nach Entscheidung des Installationsortes sicher , daß
das Kabel lang genug ist, um das Gerät zu erreichen.
• Schließen Sie vor der endgültigen Installierung des Gerätes alle
Kabel vorläufig an, um sicherzustellen, daß das Gerät korrekt
funktioniert.
• V erwenden Sie zur Installierung die mit dem Gerät mitgelieferten
T eile (Schrauben usw.) korrekt wie angegeben, und bringen Sie
das Gerät fest an. T eile, die nicht den Festlegungen entsprechen,
können Komponenten im Inneren beschädigen oder es kann zu
Lockerung des Gerätes kommen.
• Achten Sie beim Anziehen von
Schrauben und Muttern darauf, daß
keine Kabel oder Leitungen
eingeklemmt werden.
• Wenn die Installierung in Ihrem Auto besonders schwierig ist, so
wenden Sie sich bitte an Ihren Händler.
Vorsichtshinweise:
• Parken Sie Ihren Wagen zum Installieren des Gerätes auf
ebenem Boden mit angezogener Handbremse und
ausgeschalteter Zündung.
• Dieses Gerät ist nur für Installierung in Autos mit 12 V Gleichstrom
und negativer Masse.
Es kann nicht in Fahrzeugen mit 24 V, wie z.B. große Busse,
verwendet werden.
Installierungsverfahren
<Vorsichtshinweise für die Installierung>
• Vermeiden Sie Installierung an den folgenden Plätzen:
- Plätze, an denen das Gerät Sie beim Fahren behindert.
- Plätze, an denen es zu großen Temperaturanstiegen kommen kann,
z.B. durch direkte Sonneneinstrahlung (hintere Gepäckablage,
Armaturenbrett usw.) oder durch heiße Luft von Heizungsauslässen.
- Plätze, an denen Wasser eindringen oder auf das Gerät spritzen kann,
oder an denen starke Kondensation auftritt.
- Staubige Plätze.
- Plätze,an denen die Gefahr besteht, daß das Gerät bei plötzlichem
Halt Mitfahrer verletzen kann.
• Das Gerät sollte in einem Winkel von 90° oder weniger zur
Horizontalen installiert werden.
• V erwenden Sie zur Installierung die mit dem Gerät mitgelieferten
T eile (Schrauben usw.) korrekt wie angegeben, und bringen Sie
das Gerät fest an. T eile, die nicht den Festlegungen entsprechen,
können Komponenten im Inneren beschädigen oder es kann zu
Lockerung des Gerätes kommen.
Installieren Sie das Gerät nicht nur mit Klettenband.
Installieren des Gerätes mit angehobener rechter Seite kann
Beschädigung verursachen.
• Wenn die Installierung in Ihrem Auto schwierig ist oder zusätzliche
Arbeiten wie Bohren von Löchern im Autokörper erfordert, so
wenden Sie sich bitte an Ihren Autohändler.
Hinweis:
entfernen Sie es zusammen mit den Befestigungswinkeln. Wenn
nur die Befestigungswinkel im Auto gelassen werden, kann es zu
Verletzungen kommen.
Wenn Sie das KV-V10 aus Ihrem Wagen entfernen, so
• Afin d’éviter le court-circuit en cours
d’installation, veiller à déconnecter la
cosse de la borne négative (–) de la
batterie.
• Pour votre sécurité en conduite, choisir pour installer l’appareil un
emplacement qui ne viendra pas gêner la conduite et qui permette
également à l’appareil un maximum de dissipation thermique.
• Une fois qu’on a choisi l’emplacement d’installation, s’assurer
que le cordon a la longueur suffisante pour atteindre l’appareil.
• Avant de procéder au montage final de l’appareil, connecter
provisoirement tous les cordons pour vérifier si tout
fonctionne correctement dans l’appareil.
• Pour l’installation veiller à utiliser correctement les pièces (vis,
etc.) fournies avec l’appareil et fixer fermement l’appareil en
place. L’utilisation de pièces non conformes aux spécifications
risque d’endommager les éléments internes ou de détacher
l’appareil de son support.
• Lors du serrage des vis ou des
boulons, prendre garde à ne pas
coincer d’autres cordons ou câbles.
• Si le montage de l’appareil sur votre voiture vous pose
particulièrement des problèmes, voyez votre revendeur.
Avertissement!
• Avant d’installer l’appareil veiller à garer la voiture sur un
terrain plat, et ne pas oublier de serrer le frein à main ni de
couper le contact avec la clé sur OFF (Arrêt).
• Cet appareil est destiné à une utilisation sur les voitures à
courant de “12V C.C., masse négative”. Il ne peut pas être
utilisé sur les véhicules de 24V, tels que les gros autobus.
Procédure d’installation
<Précautions à prendre pour l’installation>
• Éviter l’installation aux emplacements suivants:
- Aux emplacements où la présence de l’appareil risque de gêner
la bonne conduite du véhicule.
- Aux emplacements sujets à de fortes élévations de températures,
par exemple, des emplacements très exposés au soleil (plage
arrière, tableau de bord, etc.) ou à l’écoulement d’air chaud du
chauffage près des volets de ventilation.
- Aux emplacements où il y a risque d’infiltration de pluie,
éclaboussements d’eau, ou dans des zones à forte condensation
d’humidité.
- Aux endroits poussiéreux.
- Là où la présence de l’appareil risque de blesser les passagers en
cas d’arrêt brusque du véhicule.
• L’appareil doit s’installer suivant un angle de 90˚, ou inférieur,
par rapport à l’horizontale.
• Pour l’installation, veiller à n’utiliser que les pièces (vis, etc.)
fournies avec l’appareil et comme spécifié par les directives
et à ce que l’appareil soit fixé fermement. L’utilisation de pièces
non conformes aux spécifications risque d’endommager les
éléments internes ou de détacher l’appareil de son support.
Ne pas installer l’appareil en se bornant à utiliser uniquement
de la bande Velcro.
L’installation de l’appareil avec le flanc droit en position relevée
risque d’endommager celui-ci.
• Si l’installation sur votre véhicule s’avère compliquée ou exige
quelques aménagements complémentaires tels que la
perforation de la carrosserie, voyez votre revendeur ou le
concessionnaire automobile le plus proche.
Remarque: Pour emporter le KV-V10 de la voiture, enlever celuici avec ses pattes de fixation. L’on risque de se blesser si l’on
laisse les pattes de fixation attachées à la carrosserie.
Page 2
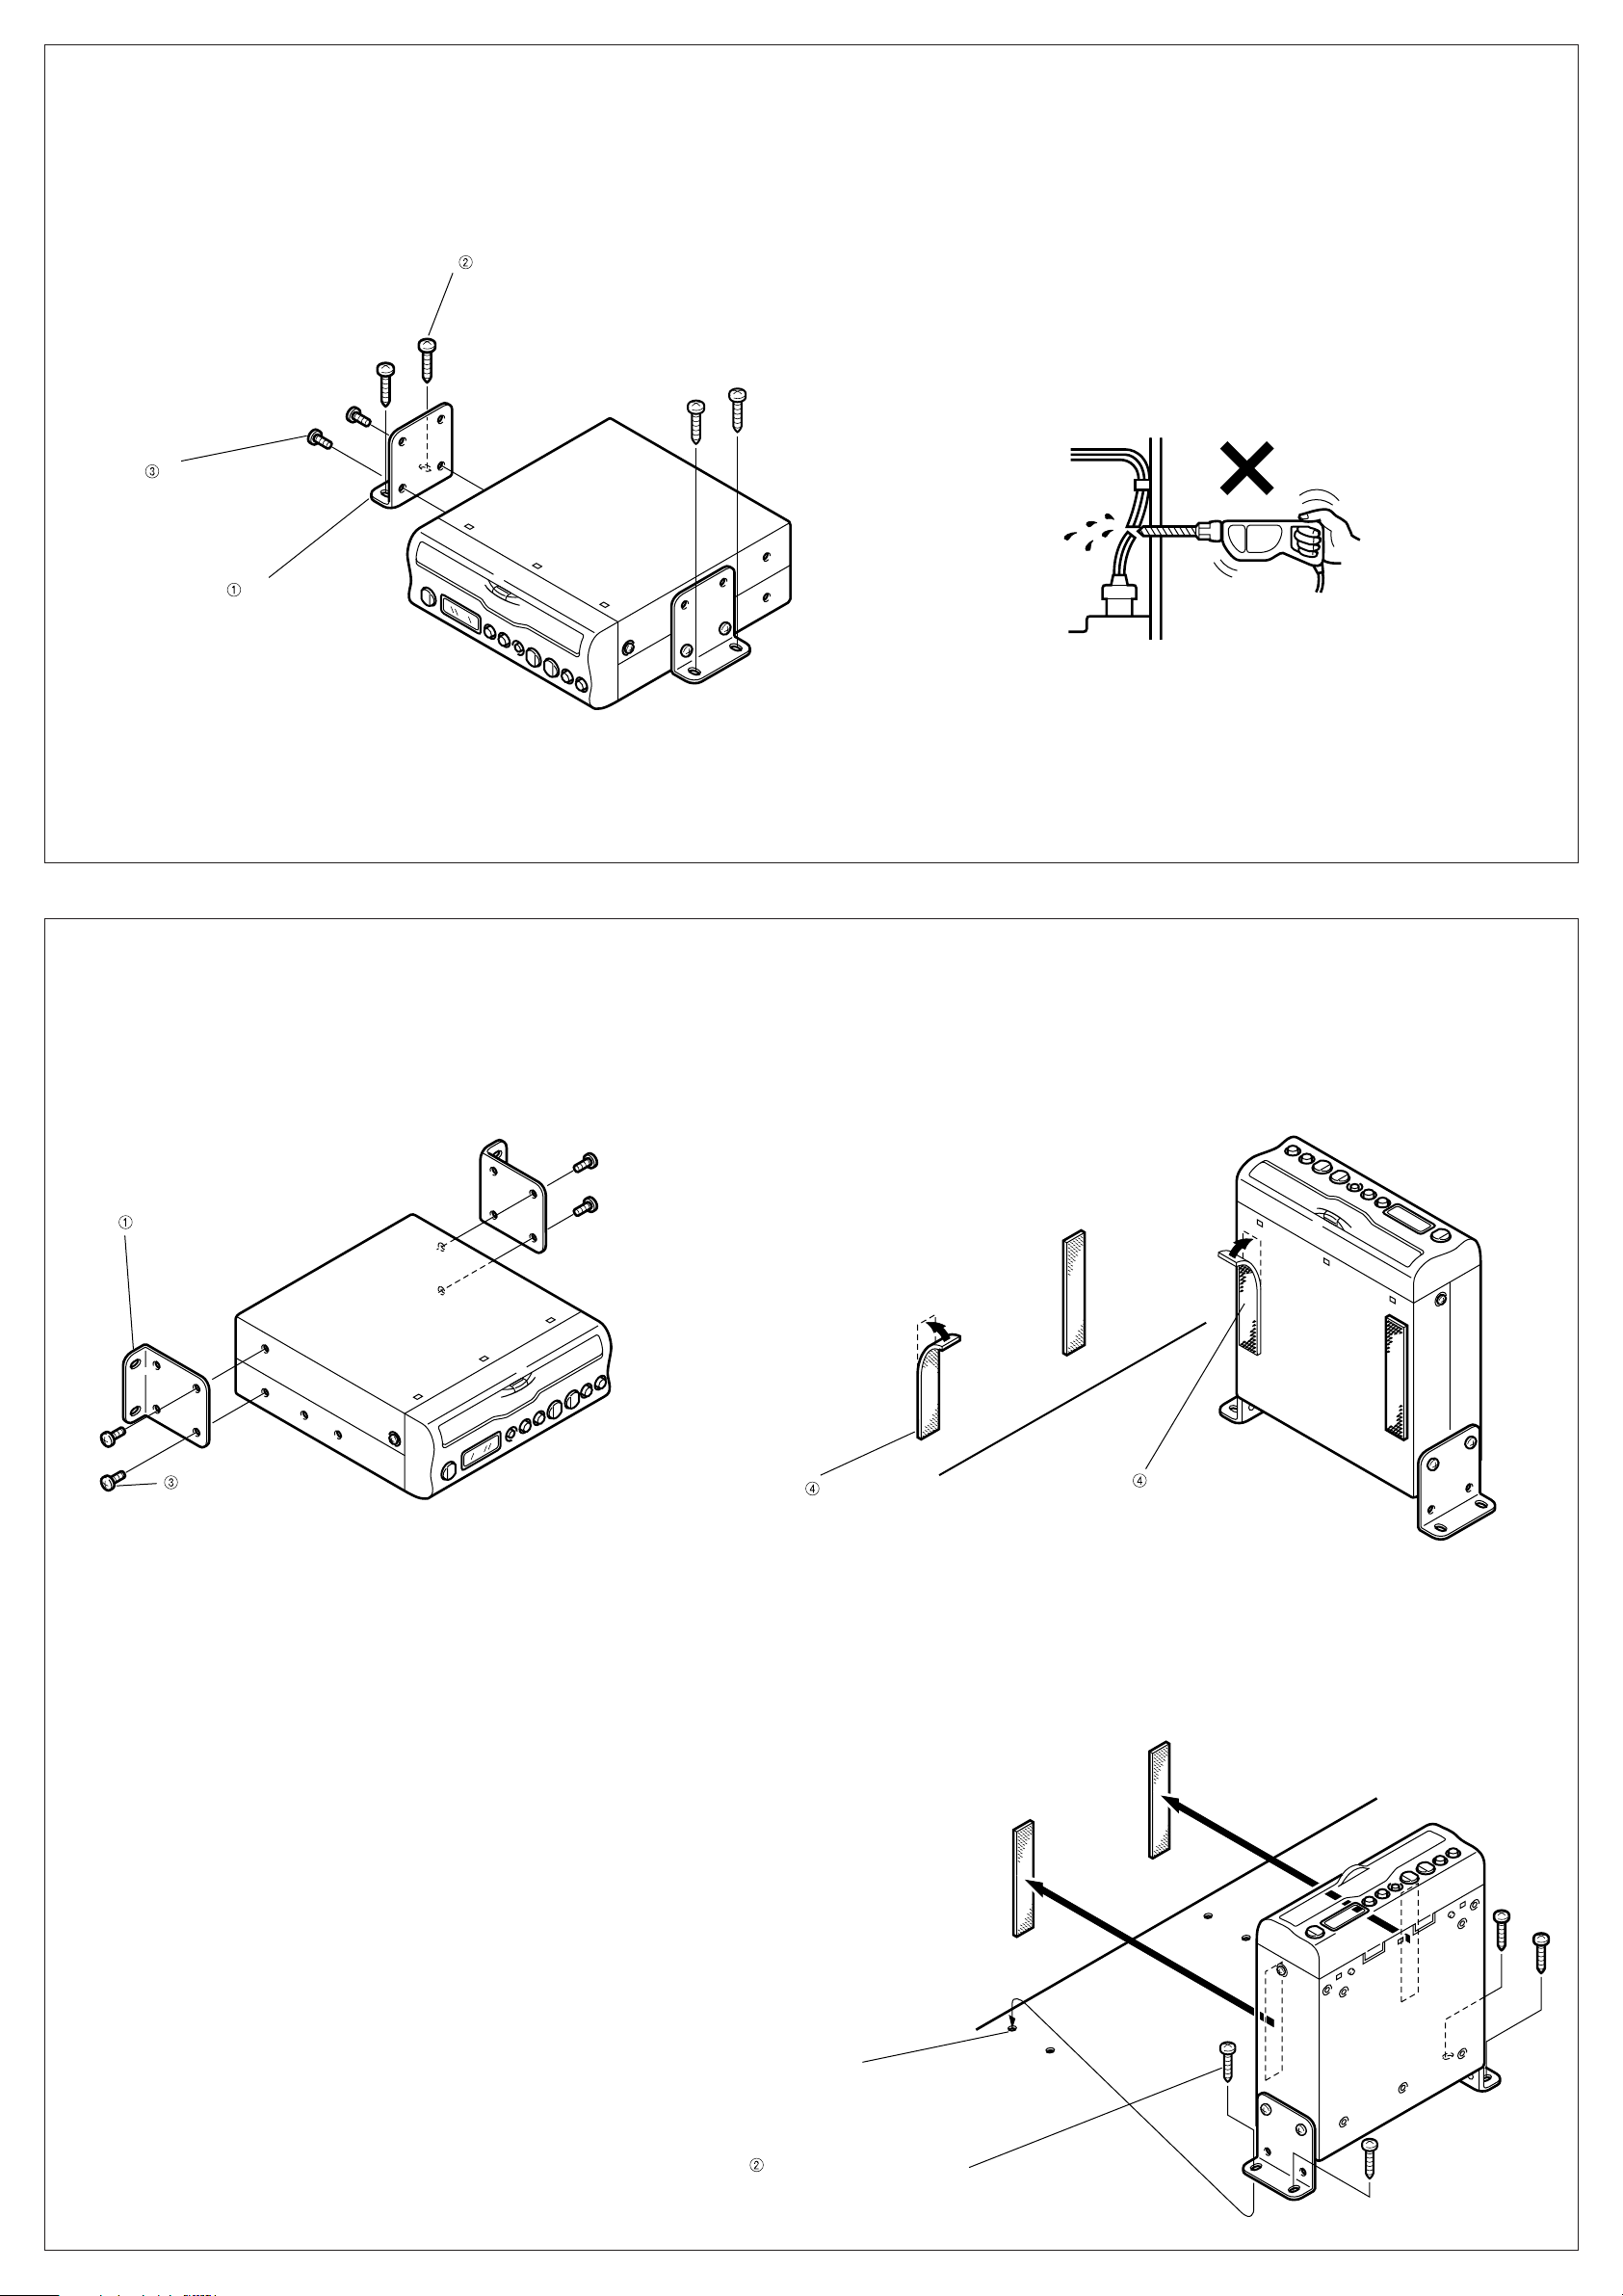
◆ For horizontal installation ◆
(on console, inside trunk, etc.)
◆ Für horizontale Installierung ◆
(An der Konsole, im Kofferraum usw.)
◆ Pour l’installation horizontale ◆
(sur une console, dans le coffre, etc.)
Screw (M5 × 8 mm)
Schraube (M5 × 8 mm)
Vis (M5 × 8 mm)
Mounting bracket
Befestigungswinkel
Support de montage
Tapping screw (φ5 × 20 mm)
(Prepared hole: φ4 to φ4.4)
Blechschraube (φ 5 × 20 mm)
(Vorgebohrtes Loch: φ 4 bis φ4,4 mm)
Vis autotaraudeuse (φ5 × 20 mm)
(Trou préforé: φ4 à φ4,4 mm)
When drilling a hole in the trunk, take special precautions not to damage the
fuel tank, cables, etc.
Wenn Sie im Kofferraum ein Loch bohren, so achten Sie besonders darauf,
nicht den Kraftstofftank oder Kabel usw. zu beschädigen.
Veiller absolument à ne pas endommager le réservoir de carburant ou des
câbles, etc., lorsqu’on perce un trou dans le coffre.
◆ For Vertical Installation (inside the trunk , etc.) ◆
• Velcro tape is used to prevent the video deck from vibrating
excessively due to the vibration of the car body. Stick the
tape at the place on the car body where you want to mount
the unit.
1
Mount the brackets to the unit.
Bringen Sie die Befestigungswinkel am Gerät an.
Attacher les pattes de fixation à l’appareil.
Mounting bracket
Befestigungswinkel
Support de montage
Screw (M5 × 8 mm)
Schraube (M5 × 8 mm)
Vis (M5 × 8 mm)
◆ Für vertikale Installierung (im Kofferraum usw.) ◆
• Klettenband wird verwendet, um übermäßige Vibration des
Videogerätes durch Vibrationen des Autos zu verhüten. Kleben
Sie das Klettenband an dem Platz des Autokörpers an, an dem
Sie das Gerät anbringen wollen.
2
Apply the Velcro tape to the unit.
Bringen Sie das Klettenband am Gerät an.
Appliquer la bande Velcro sur l’appareil.
Peel off the backing paper and
apply the Velcro tape.
Ziehen Sie das Schutzpapier ab
und bringen Sie da Klettenband an.
Enlever le papier de protection
de la bande Velcro.
Velcro tape (rough front side)
Remove dust and dirt before applying
Klettenband (rauhe Vorderseite)
Entfernen Sie Staub und Schmutz vor
der Anbringung.
Bande Velcro (côté avant rugueux)
Débarrasser poussières et saletés
avant l’application.
◆ Pour l’installation verticale (dans le coffre, etc.) ◆
• Le bande Velcro sert à amortir les vibrations excessives de
la carrosserie pour qu’elles ne se transmettent pas à la
platine vidéo. Coller le ruban sur l’emplacement de la
carrosserie où l’on désire monter l’appareil.
Trunk wall, etc.
Kofferraumwand usw.
Paroi du coffre, etc.
Velcro tape (soft front side)
Remove dust and dirt before
applying.
Klettenband (weiche Vorderseite)
Entfernen Sie Staub und Schmutz
vor der Anbringung.
Bande Velcro (côté avant doux)
Débarrasser poussières et saletés
avant l’application.
3
Mount the unit.
Bringen Sie das Gerät an.
Fixer l’appareil en place
Prepared hole (φ4 to φ4.4)
Vorgebohrtes Loch (φ 4 bis φ 4,4)
(Trou préforé: φ4 à φ4,4)
Tapping screw (φ5 × 20 mm)
Blechschraube (φ 5 × 20 mm)
Vis autotaraudeuse (φ 5 × 20 mm)
Page 3

OUTPUTINPUT
DC INPUT
DC 12V
REMOTE
CONTROL
SENSOR INPUT
VIDEO
AUDIO
21
L
R
AUDIO
MONO
(L+R)
6A
6A
2
1
Connection of the Cords
Anschluß der Kabel
Connexions des cordons
◆ Connecting the Audio Video Cord ◆
Be sure to use the AV cord supplied as an accessory.
to video camera, etc.
Zu Videokamera usw.
Vers la caméra vidéo, etc.
L
◆ Anschluß des AV-Kabels ◆
Bitte verwenden Sie das mitgelieferte AV-Kabel.
OUTPUTINPUT
VIDEO
AUDIO
DC INPUT
DC 12V
L
L
R
21
AUDIO
MONO
(L+R)
REMOTE
CONTROL
SENSOR INPUT
◆ Connexion du cordon audio-vidéo◆
Utiliser seulement le cordon audio-vidéo fourni comme
accessoire.
to the mobile color monitor system or the
audio-video input terminal of a stereo
audio-video TV
Zu einem mobilen Farbmonitorsystem
oder den AV-Eingangsbuchsen eines
Stereo-Audio-Video-Fernsehers
Vers le système de moniteur TV
couleur mobile ou la borne d’entrée
audio-vidéo d’un moniteur TV audiovidéo stéréophonique.
L
L
R
AV cord (sold separately)
R
AV-Kabel (separat verkauft)
Cordon audio-vidéo (vendu séparément)
Note: For connection to a “monaural” audio-video TV, use
“OUTPUT 2”.
◆ Connecting the Power Cord ◆
To directly connect to the power supply of your car.
Hinweis:
Verwenden Sie „OUTPUT-2“ für anschluß an einen
monauralen Audio-Video-Fernseher .
◆ Anschluß des Stromversorgungskabels ◆
Für direkten Anschluß an die Stromversorgung Ihres Autos.
R
AV cord (supplied as an accessory)
R
A V-Kabel (als Zubehör mitgeliefert)
Cordon audio-vidéo (fourni comme accessoire)
Remarque: Utiliser “OUTPUT 2” pour la connexion à une TV
audio-vidéo monaurale.
◆ Branchement du cordon d’alimentation ◆
Pour brancher directement sur l’alimentation de la voiture.
• To metallic body or chassis of the car.
An den Metallkörper oder das Chassis des Autos
Vers la carrosserie métallique ou le châssis de la voiture.
• To an accessory terminal in the fuse block.
An eine Zubehörklemme des Sicherungsblocks
Vers une borne accessoire dans le bloc à fusibles.
• To a live terminal in the fuse block connecting to the car
battery (bypassing the ignition switch)
An eine unter Spannung stehende, mit der Autobatterie
verbundene Klemme des Sicherungsblocks (unter
Umgehung des Zündschlüssels)
Vers une borne active dans le bloc à fusibles branché
sur la batterie de la voiture (mettant hors circuit le
contacteur d’allumage).
Note: Before turning the engine key OFF , be sure to set the unit
in stop mode. Turning the engine key OFF during operation of
the unit may cause damage to the video tape or the failure of the
unit.
Power cord
Stromversorgungskabel
Cordon d’alimentation.
Hinweis:
Black
Schwarz
Red
Rot
Yellow
Rouge
Gelb
Noir
Jaune
Fuse (6 A)
Sicherung (6 A)
Fusible (6A)
Bringen Sie das Gerät in Stoppmodus, bevor Sie den
Zündschlüssel ausschalten. Ausschalten des Zündschlüssels
während Betrieb des Gerätes kann Beschädigung des
Videobandes oder Versagen des Gerätes verursachen.
Removing the connector
Abziehen des Anschlusses
Débranchement du coupleur.
Remarque: Toujours mettre l’appareil sur le mode arrêt avant
de couper le contact moteur (clé sur OFF).
Si l’on coupe le contact moteur (clé sur OFF) lorsque l’appareil
fonctionne cela risque d’endommager la bande vidéo ou
d’occasionner des pannes à l’appareil.
Page 4

◆ Connecting the Remote Sensor Unit ◆
This sensor unit is used when the unit is installed in a place, in
the trunk for example, where the supplied remote controller
accessory does not work.
◆ Anschluß der Fernbedienungs-Sensoreinheit ◆
Diese Sensoreinheit wird verwendet, wenn das Gerät an einem
Platz installiert ist, an dem die mitgelieferte Fernbedienung nicht
wirksam ist, z.B. im Kofferraum.
◆ Connexion de l’unité de télécommande ◆
Cette unité de capteur est utilisée lorsque l’appareil est
installé dans un emplacement, le coffre de la voiture, par
exemple, où l’accessoire du module de télécommande fourni
demeure inopérant.
DC INPUT
DC 12V
VIDEO
AUDIO
OUTPUTINPUT
21
Remove the backing paper and stick the unit on to a
cleaned mounting service, such as the dash board,
etc.
L
R
AUDIO
MONO
(L+R)
REMOTE
CONTROL
SENSOR INPUT
Entfernen Sie das Schutzpapier und kleben Sie die
Einheit auf eine gesäuberte Oberfläche, z.B. das
Armaturenbrett usw.
Retirer le papier de protection et coller l’unité sur
une surface de fixation qui aura été préalablement
nettoyée, telle que le tableau de bord., etc.
Dash board, etc.
Armaturenbrett usw.
Tableau de bord, etc.
Range of remote controller
Remote sensor unit
Fernbedienungs-Sensoreinheit
Unité de l’unité de télécommande
reception
Bereich des
Fernbedienungsempfangs
Champ du Module de
télécommande.
◆ Connecting the Remote Control Data Cord ◆
Used to connect the JVC AV control receiver, etc.
For connecting method, see the instruction manual for the AV
control receiver.
OUTPUTINPUT
VIDEO
L
AUDIO
DC INPUT
DC 12V
R
◆ Anschluß des Fernbedienungs-Datenkabels ◆
Dies dient zum Anschluß eines JVC-AV-Steuerempfängers usw.
Beziehen Sie sich für die Anschlußmethode auf die
Bedienungsanleitung für den AV-Steuerempfänger.
21
AUDIO
MONO
(L+R)
REMOTE
CONTROL
SENSOR INPUT
◆
Connexion du cordon de données de télécommande
◆
Sert à connecter le récepteur de commande AV-JVC, etc.
Pour la méthode de raccord, voir le mode d’emploi du
récepteur de commande AV.
JVC AV control receiver (KD-SX1000R etc.)
JVC-AV-Steuerempfänger (KD-SX1000R usw.)
Récepteur de commande audio-vidéo JVC (KD-SX1000R etc.)
<When Wiring Has Been Completed>
• Reconnect the disconnected terminal of the battery as before
and check the operation of electrical equipment, such as the
brake lamp, lights, horn and blinkers.
◆ Fuse Replacement ◆
• Use a 6 A (ampere) fuse for the power cord. If the fuse blows
soon after replacement, contact your dealer. Be sure not to use
fuses of greater than 6 A capacity.
Fuse (6 A)
Remote control data cord
Fernbedienungs-Datenkabel
Cordon de données de télécommande
<Nach Beendigung der Verdrahtung>
• Schließen Sie das abgetrennte Batteriekabel wieder wie
ursprünglich an und überprüfen Sie den Betrieb der elektrischen
Ausrüstung, wie z.B. Bremsleuchten, Scheinwerfer, Hupe und
Blinker.
◆ Auswechseln der Sicherung ◆
• Verwenden Sie eine Sicherung von 6 A (Ampere) für das
Stromversorgungskabel. Wenn die Sicherung kurz nach dem
Auswechseln durchbrennt, so wenden Sie sich bitte an Ihren
Händler. V erwenden Sie auf keinen Fall eine Sicherung mit einer
größeren Kapazität als 6 A.
<Une fois le câblage terminé>
• Rebrancher la cosse de borne de batterie qui avait été
déconnectée au début des opérations de montage et vérifier
le fonctionnement de l’équipement électrique, tel que feux
de stop, phares, avertisseur et feux clignotants.
◆ Remplacement des fusibles ◆
• Utiliser un fusible de 6A (ampères) pour le cordon
d’alimentation. Si le fusible saute assez rapidement après
avoir été renouvelé, voyez votre revendeur. Ne jamais utiliser
de fusibles d’une capacité supérieure à 6A.
Sicherung (6 A)
Fusible (6A)
 Loading...