

Page 1
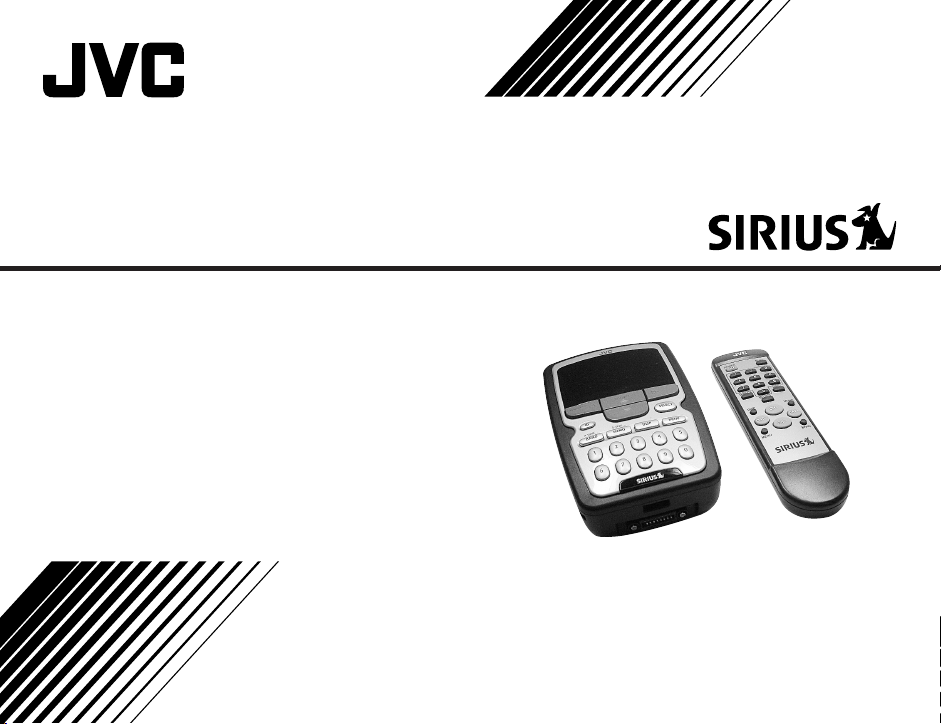
SIRIUS® Radio
KT-SR1000
INSTRUCTIONS
LVT1194-001A
[J]
Page 2
INFORMATION
This equipment has been tested and found to comply with the limits for a Class B digital device,
pursuant to Part 15 of the FCC Rules. These limits are designed to provide reasonable protection against
harmful interference in a residential installation. This equipment generates, uses, and can radiate radio
frequency energy and, if not installed and used in accordance with the instructions, may cause harmful
interference to radio communications. However, there is no guarantee that interference will not occur in
a particular installation. If this equipment does cause harmful interference to radio or television
reception, which can be determined by turning the equipment off and on, the user is encouraged to try to
correct the interference by one or more of the following measures:
– Reorient or relocate the receiving antenna.
– Increase the separation between the equipment and receiver.
– Connect the equipment into an outlet on a circuit different from that to which the receiver is con-
nected.
– Consult the dealer or an experienced radio/TV technician for help.
Changes or modifications not expressly approved by the Manufacturer for compliance could void the
user’s authority to operate the equipment.
2
Page 3
CONGRATULATIONS!
Your new JVC SIRIUS® Radio KT-SR1000, called “JVC Plug-In–Play (PnP),” lets you enjoy SIRIUS Satellite
Radio’s digital entertainment streams anywhere you’ve installed one of our KS-K6003 Home Docking Kit and
KS-K6002/KS-K6001 Car Docking Kit (sold separately). Use this manual to familiarize yourself with all of
JVC PnP’s features and capabilities.
For the latest information about this and other JVC PnP products, visit the JVC Web site at
<www.jvcmobile.com>.
Table of Contents
Safety Precautions ...................................................... 4
Box Contents .............................................................. 5
Installation: Preparation.............................................. 6
Installation in Your Car with KS-K6002/KS-K6001 ......
Installation in a Home with KS-K6003 ....................11
JVC PnP’s Controls and Features............................. 12
Activating your SIRIUS Subscription ......................14
Basic Operation ........................................................ 15
Selecting Music ................................................. 16
Direct Tuning .....................................................17
Presetting the Desired Streams ..........................17
Enlarging the Indications—Display Button ...... 19
S-Seek Function—Memory Button ...................20
Menu Options Settings ............................................. 22
Basic Setting Procedure ..................................... 23
1 Sirius ID ........................................................23
7
2 Display Settings ............................................ 23
3 Confirmation Tone Options .......................... 24
4 FM Transmitter Options ............................... 24
5 Add or Skip ...................................................24
6 Lock Options ................................................ 25
7 Audio Level Options ..................................... 26
8 Antenna Aiming Options .............................. 27
9 Memory Options ...........................................27
0 Time Based Features ..................................... 28
- Factory Default ............................................. 30
Specifications ........................................................... 31
Troubleshooting ........................................................ 31
3
Page 4
Safety Precautions
WARNINGS:
Take the following precautions to prevent traffic
accidents and avoid personal injury:
• Installation must be performed according to this
installation manual. JVC is not responsible for
issues arising from installations not performed
according to the procedures in this manual.
• Do not install the unit where it may obstruct your
view through the windshield or of your vehicle’s
indicator displays.
• Do not install the unit where it may hinder the
function of safety devices such as an airbag.
Doing so may prevent the airbag from functioning
properly in the event of an accident.
• The installation and use suggestions contained in
this manual are subject to any restrictions or
limitations that may be imposed by applicable
law—the purchaser should check applicable law for
any restrictions or limitations before installing and/
or operating this unit.
• Failure to follow these safety instructions and
warnings may result in a serious accident.
4
WARNINGS:
Take the following precautions to prevent fire and
avoid personal injury:
• To avoid short circuits, never put or leave any
metallic objects (coins, tools, etc.) inside the unit.
• If the unit emits smoke or strange smells, turn the
power off immediately and consult your dealer.
• Do not drop the unit or subject it to strong shocks.
• If the LCD display becomes damaged or broken, do
not touch the liquid crystal fluid. The fluid may be
dangerous to your health or even fatal. If the liquid
crystal fluid contacts your body or clothing,
immediately wash it off with soap and water.
WARNING:
Do not operate the unit in a way that might divert your
attention from driving safely. As a driver, you alone
are responsible for safely operating your vehicle in
accordance with traffic safety laws at all times.
Page 5
Box Contents
CAUTIONS:
Take the following precautions to keep the unit in
proper working order:
• Be sure the unit is connected to a 12 V DC power
supply with a negative ground connection.
• Do not install the unit where it will be exposed to
high levels of humidity, moisture, or dust.
• When replacing a fuse, use only a new one with the
proper rating. Using a fuse with the wrong rating
may cause the unit to malfunction.
• To prevent a short circuit when replacing a fuse,
first unplug the cigarette lighter adapter from the
cigarette lighter.
• When drilling holes to mount the unit, make sure
not to damage wiring or other systems.
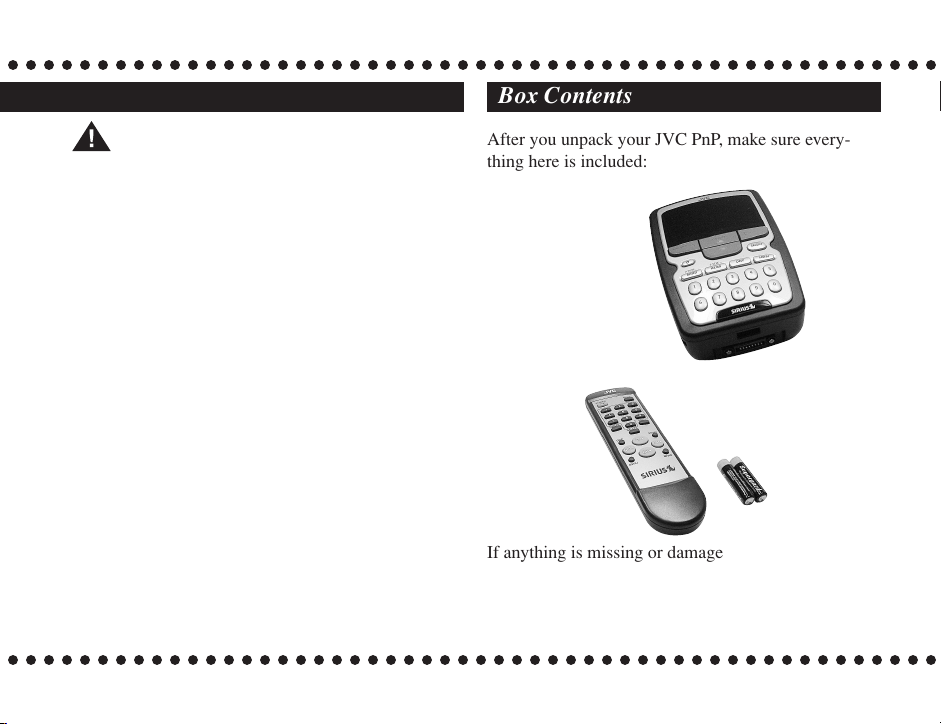
After you unpack your JVC PnP, make sure everything here is included:
SIRIUS® Radio
Remote Controller
Battery
If anything is missing or damaged, or if your JVC PnP
fails to operate, notify your shipper immediately. It is
recommended that you keep the original packaging in
case you need to ship your JVC PnP in the future.
5
Page 6
Installation: Preparation
To use your JVC PnP in your car or at home, it is required to separately purchase one of the following kits—
KS-K6002/KS-K6001 Car Docking Kit, or KS-K6003 Home Docking Kit.
KS-K6002 includes...
• Installation
• Car Docking Cradle—with the built-in wireless FM
transmitter.
• Suction Cup Mount
• Cigarette Lighter Adapter
• Magnetic Roof-mount SIRIUS Antenna
KS-K6001 includes...
• Installation
• Car Docking Cradle
• Suction Cup Mount
• Cigarette Lighter Adapter
• Magnetic Roof-mount SIRIUS Antenna
• Audio cord
• Cassette Adapter
Note: KS-K6002 does not include any connecting
cord; however, you can also use an optional audio
cord or cassette adapter to send the signals to your car
stereo.
6
KS-K6003 includes...
• Installation
• Home Docking Cradle
• SIRIUS Antenna
• Power Supply
• AC Power Cord
• Audio cord
CAUTION:
Do not put JVC PnP in the cradle until you have
completed the installation unless it is required for
testing.
Page 7
Installation in Your Car with KS-K6002/KS-K6001
CAUTION:
Do not plug the cigarette lighter adapter into the cigarette lighter until you have completed the
installation.
2
Installing in your car
For more illustrated explanations, refer to the
Installations supplied for your Car Docking Kit.
1
Determine where you want to mount JVC PnP.
• Do not install JVC PnP where it may obstruct
your view through the windshield or your view
of your car’s indicator displays.
• Do not install JVC PnP where it will hinder your
access to the car’s controls.
• Do not install JVC PnP where it may hinder the
function of safety devices such as an airbag.
Doing so may prevent the airbag from
functioning properly in the event of an accident.
• Find a location that provides good visibility of
and access to JVC PnP’s front panel.
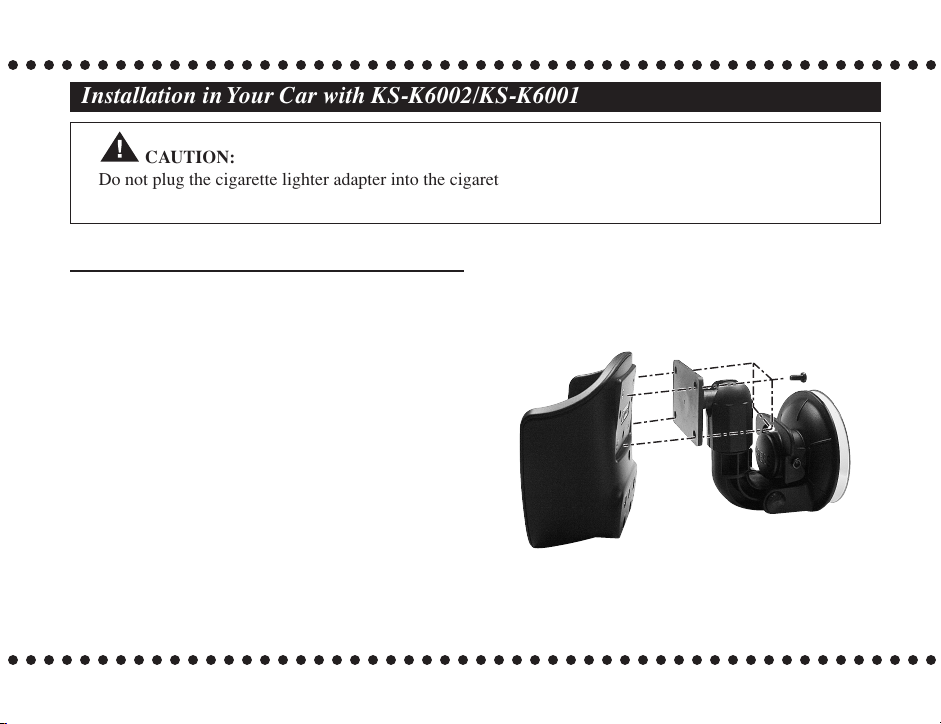
Assemble the supplied suction cup mount to
JVC PnP using the supplied screws.
• When using other screws, use the screws of less
than 8 mm long with a diameter of 4 mm.
3
Plug the cigarette lighter adapter into the back
of the cradle—DC 12 V.
To be continued...
7
Page 8
Installation in Your Car with KS-K6002/KS-K6001 (continued)
4
For KS-K6001:
A If your car stereo does not have a line input
(LINE IN or AUX)...
Plug the cassette adapter into the back of
the cradle—AUDIO OUT.
B If your car stereo has a line input (LINE IN
or AUX)...
Plug the supplied audio cable into the back
of the cradle—AUDIO OUT.
• Plug the audio cable’s white (L ch) and red
(R ch) connectors into your car stereo.
For KS-K6002:
Activate the FM signal transmitter (see
page 24), and set the FM frequency output
selector to select one of the following
frequencies—88.1 MHz, 88.3 MHz,
88.5 MHz, and 88.7 MHz.
• It is recommended to preset the frequency
selected by the FM frequency output
selector into your car stereo so you can
easily tune in to the frequency.
8
Finding the Best Antenna Mounting
Location
1
Temporarily plug the antenna into the back of
the cradle—SAT (MAIN) until it is firmly
seated.
2
Find an antenna location on a metal surface of
your car—at least 30 cm × 30 cm (12 inches ×
12 inches), and at least 15 cm (6 inches) from a
window.
• The antenna’s powerful magnet will secure it to
the metal surface.
• Best reception is achieved with the antenna
mounted on the roof or trunk for convertibles.
• If your car has a roof rack or skid ribs, it may be
necessary to mount the antenna off-center.
3
Temporarily plug the cigarette lighter adapter
into the cigarette lighter.
Page 9

4
Slide JVC PnP all the way into the cradle so
.
that the connector at the bottom of the unit
makes proper contact in the cradle.
5
Press the (POWER) button to turn on your
JVC PnP.
• If your JVC PnP has been properly connected
and the antenna is receiving the SIRIUS signal,
you will hear audio.
• If your JVC PnP has not been properly
connected, “Antenna Error” will appear on the
display of your JVC PnP.
Re-orient the antenna until you hear audio (see
“8 Antenna Aiming Options” on page 27).
– Make sure your car is not in garage, or
somewhere the satellite signal could be
blocked.
Running the Antenna Cable
Before routing the antenna cable, confirm that the
antenna is mounted in a good location.
1
Turn off your JVC PnP then remove it from the
cradle.
2
Unplug the cigarette lighter adapter from the
cigarette lighter and the antenna from the
cradle.
9
Page 10
Installation in Your Car with KS-K6002/KS-K6001 (continued)
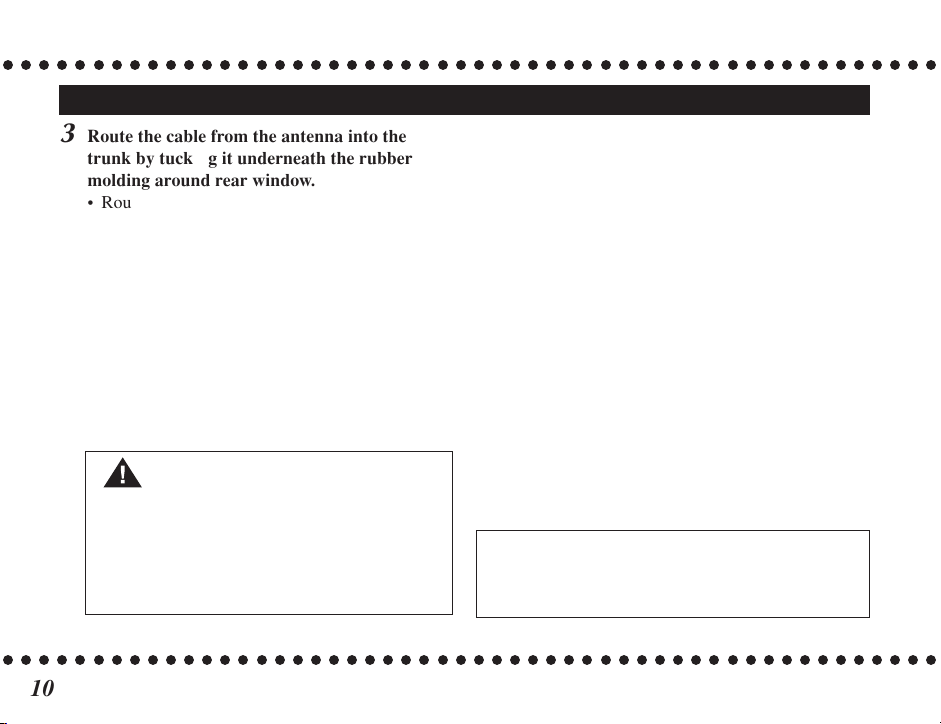
3
Route the cable from the antenna into the
trunk by tucking it underneath the rubber
molding around rear window.
• Route the cable from the lowest point of the rear
window. Take advantage of any existing cable
channels or wiring conduits.
• For SUVs, minivans & 5-door vehicles, bring
the cable into the car under the rubber molding
for the tailgate, and continue under the interior
trim.
4
From the trunk, route the cable around the
passenger compartment and to the back of the
cradle.
CAUTION:
• Do not pull the cable across sharp edges that
could damage it.
• Do not route the cable nearby areas where it
could become tangled in driver’s and
passenger’s feet.
5
Plug the antenna into the antenna into the back
of the cradle—SAT (MAIN) until it is firmly
secured.
6
Plug the cigarette lighter adapter into the
cigarette lighter.
7
Attach the SIRIUS antenna to the metal
surface of the car, such as roof of your car.
• You can use the supplied double-side adhesive
tape to attach the antenna cord firmly.
Note: It is strongly recommended to unplug the
cigarette lighter adapter after you turn off the car
ignition.
10
Page 11

Installation in a Home with KS-K6003
Installation in a Home
For more illustrated explanations, refer to the
Installations supplied for your Home Docking Kit.
1
Plug the audio cable’s mini connector into the
back of the cradle—AUDIO OUT.
2
Plug the audio cable’s white (L ch) and red (R
ch) connectors into your audio system.
3
Plug the AC cord into the power supply.
4
Plug the power supply into the back of the
cradle—DC 12 V.
5
Plug the antenna into the back of the cradle—
ANT until it is firmly seated.
6
Place the included antenna near a window.
• Use the map on the next column as a general
placement guideline—some experimentation
may be needed to obtain the best results.
SIRIUS Satellite map
Due to the paths of SIRIUS satellites over the US, the
best location for the antenna in your home depends on
where you live. Use the map below as a general
placement guideline.
1 : Place the antenna at an EAST-facing
Area
window.
Area 2 : Place the antenna OUTSIDE, away from any
overhead obstructions.
3 : Place the antenna at a WEST-facing window.
Area
Area 4 : Place the antenna at a NORTH- or EAST-
facing window.
5 : Place the antenna at a NORTH-facing
Area
window.
Area 6 : Place the antenna at a WEST- or NORTH-
facing window.
1 2 3
4 5 6
N
WE
S
11
Page 12

JVC PnP’s Controls and Features
SIRIUS® Radio
1
2
3
4
12
CATEGORY
P.TUNE S-SEEK
BAND
1 5432
6 0987
CHANNEL
SELECT
MEMO DISP MENU
Remote controller
5
6
7
8
9
2q
9
p
6
8
7
POWER MUTE
1
2
4
5
7
8
DIRECT PREV
0
SELECT
DISP MEMO
CH+
CAT+ CAT–
CH–
MENU BAND
3
6
9
w
4
5
3
Page 13

1 Main display
2 (POWER)
Turns on and off the power.
3 BAND (P.TUNE)
Selects the 3 bands of stream presets; enters and
exits from the Preset Tuning Mode.
4 MEMO (memory) (S-SEEK)
Stores and recalls the Artist/Song Title
information.
5 CHANNEL 5 / ∞ (CH + / –),
CATEGORY @ / # (CAT – / +)
Navigate through streams, categories, and Menu
screens.
6 SELECT
On the menu and stream list screens: Selects an
•
item highlighted.
On the Normal Operation or Preset Tuning
•
Mode screens: Only on the main unit—returns
to the previous stream if pressed and held. Also
enables access to streams directly by number
keys.
7 MENU
Enters and exits from the Menu Options settings.
8 DISP (display)
Changes text size of the artist name and song title
if pressed. Also alternates the Normal Operation
screen and the Stream List if pressed and held.
9 Number (0 – 9) keys
Enters the stream numbers or preset numbers
directly.
p DIRECT
Enables access to streams directly by number keys.
q MUTE
Mutes sounds.
w PREV (Previous)
Returns to previous stream.
Installing Batteries in the Remote
1. Remove the battery cover on the back of the remote
control.
2. Install two AAA batteries.
3. Replace the battery cover.
13
Page 14

Activating your SIRIUS Subscription
Before you can listen to JVC PnP, you must subscribe
to SIRIUS Satellite Radio’s service.
1. Make sure that JVC PnP is properly connected and
that its antenna is oriented to receive the SIRIUS
satellite signal (see Installation sections for details).
2. Press (POWER) to turn on your JVC PnP.
After displaying the SIRIUS logo, JVC PnP
updates all Sirius channels. “UPDATING
STREAMS” appears on the top line and “X%
Completed” (0%-20%-40%-60%-80%-100%)
appears on the bottom line as the updating goes on.
Note: Do not press any button or perform any
operation until updating has been completed.
Once all updated SIRIUS channel streams are
received, “Call 1-888-539-SIRIUS to Subscribe”
appears on the display and JVC PnP now tunes in to
the SIRIUS Satellite Radio’s Preview Channel
(Ch184).
• You cannot tune in to any other channels until
you activate your SIRIUS subscription.
3. Press MENU to enter the Menu Options settings.
4. Press 5 (CH + on the remote controller) or
∞ (CH–) until “Sirius ID” is highlighted, then press
SELECT.
Now your unit’s unique 12-digit SIRIUS ID
Number appears on the display.
• This SIRIUS ID number is also printed on your
JVC PnP packaging.
• Write the number down and have your credit card
handy.
5. Contact SIRIUS on the Internet at <http://
activate.siriusradio.com/>.
• Follow the prompts to activate your subscription.
• You can also call SIRIUS toll-free at 1-888-539SIRIUS (7474).
Removing your JVC PnP from the docking
cradle
From the Car Docking Cradle: press the release
button on the underside of the unit and gently slide
JVC PnP out of the cradle.
From the Home Docking Cradle: gently slide JVC
PnP out of the cradle.
14
Page 15

Basic Operation
After you have successfully activated your SIRIUS subscription, the Normal Operation screen will appear:
Press CHANNEL 5 / ∞ (or CH + / – on the remote controller) to select streams.
• The selected stream will automatically play, and the name and artist of the currently playing song will scroll
across the display.
If you want to listen to a different entertainment category...
1. Press CHANNEL 5 / ∞ (or CH + / – on the
remote controller) once to activate the Category
Selection screen.
2. Press CATEGORY # / @ (or CAT + / – on the
remote controller) repeatedly to scroll through
music and entertainment categories.
3. When the category (ex. Rock) you want is
highlighted, press CHANNEL 5 / ∞ (or CH + / –)
to highlight the stream you want to hear, then press
SELECT.
The display returns to the Normal Operation screen
for that stream.
• To go back to the previously selected stream,
press and hold SELECT on the main unit, or
press PREV (previous) on the remote controller.
Category Selection screen
Normal Operation screen
To turn off the power, press
(POWER).
15
Page 16

Selecting Music
Your JVC PnP has three ways to search for and select
music: by stream, by artist, and by song.
Selecting Music by Stream (Stream List)
1. Press and hold DISP (display) for about 2 seconds
while in the Normal Operation mode.
The Stream List screen (below) appears, showing
all available streams regardless of category.
• To cancel the operation, press and hold DISP
(display) again.
2. Press CHANNEL 5 / ∞ (or CH + / –) repeatedly
to select a stream, then press SELECT.
Selecting Music by Artist (Artist List)
1. Press and hold DISP (display) for about 2 seconds
while in the Normal Operation mode.
• To cancel the operation, press and hold DISP
(display) again.
2. Press DISP (display) once again.
The Artist List screen (below) will appear, showing
all currently playing artists regardless of category.
• If composer information is available for a stream,
it will be displayed along with the artist name.
3. Press CHANNEL 5 / ∞ (or CH + / –) repeatedly
to select an artist, then press SELECT.
The display returns to the Normal Operation screen
for that stream.
• If you stop on a stream, it will play without
pressing SELECT.
16
The display returns to the Normal Operation screen
for that stream.
Page 17

Selecting Music by Song Title (Song Title List)
1. Press and hold DISP (display) for about 2 seconds
while in the Normal Operation mode.
• To cancel the operation, press and hold DISP
(display) again.
2. Press DISP (display) twice again.
The Song Title List screen (below) appears,
showing all currently playing songs regardless of
category.
3. Press CHANNEL 5 / ∞ (or CH + / –) repeatedly to
select a song, then press SELECT.
The display returns to the Normal Operation screen
for that stream.
Direct Tuning
Streams can also be directly accessed.
1. Press SELECT on the main unit (or DIRECT on
the remote controller).
2. Press the number keys (0 – 9) to enter the desired
stream number (3 digits).
Presetting the Desired Streams
You can store up to 10 of your favorite streams into
each of 3 bands (A, B, and C)—total 30 streams.
1. Press BAND to activate the preset band you want.
The selected band is shown in the lower left corner
of the Normal Operation screen.
2. Select the stream you want to preset (see “Basic
Operation” and “Selecting Music”).
To be continued...
17
Page 18

3. Hold the number keys (0 – 9) you want to store the
stream in for about 2 seconds.
The selected preset number flashes and then
remain lit on the display to show that it has been
memorized.
• If the preset button already has a stream stored in
it, it will be replaced with the new stream.
Tuning into Stream Presets
1. Press BAND to activate the preset band you want.
The selected band is shown in the lower left corner
of the Normal Operation screen.
2. Press the number keys (0 – 9) to select the desired
preset stream.
Searching for a Preset Stream
You can search for a preset stream using the list.
1. Press and hold BAND while in the Normal
Operation mode.
JVC PnP enters Preset Tuning Mode.
• Each time you press and hold the button, the
Normal Operation screen and the Preset Tuning
Mode screen alternate.
Normal Operation
2. Press and hold DISP (display) until the Preset
Stream List screen appears.
Preset Stream List
Preset Tuning Mode
18
Page 19

3. Press DISP (display) repeatedly until the desired
Preset Stream List screen appears.
• Each time you press the button, the Preset lists
changes from “Stream List”, “Artist List,” then
“Song Title List.”
Artist List Song Title List
4. Press CHANNEL 5 / ∞ (or CH + / –) repeatedly
to select your desired item, then press SELECT.
Enlarging the Indications—Display Button
You can enlarge the artist name and song title shown
on the Normal Operation screen or the Preset Tuning
Mode screen.
• This feature is useful when viewing the display at a
distance.
Press DISP (display).
The artist name and song title are enlarged and may
start scrolling if it cannot be shown entirely at a time.
To resume the Normal Operation screen (or Preset
Tuning Mode screen), press DISP (display) again.
Notes:
• Pressing and holding DISP (display) will enter the
Stream List mode (and exit from it).
• Pressing DISP (display) repeatedly while in the
Stream List mode changes the list type—“Stream
List”, “Artist List,” and “Song Title List”.
19
Page 20

S-Seek Function—Memory Button
You can store the current Program Definition Text
(PDT: Artist Name and Song title) with a total of 30
Artist/Song Title combinations, then by using the
stored information, you can make your JVC PnP
search the current incoming Sirius signal and alert you
when a saved song is being played—S-Seek function.
To store the information
While your JVC PnP is showing either of the
following screens, press MEMO (memory).
If you have already stored the same PDT...
JVC PnP checks the data already stored in memory,
and compares with the newly selected PDT.
If it has been already stored, no entry will be made
newly to avoid duplication.
If you have already stored 30 PDTs...
“S-Seek Full” will flash on the display for a while,
then the “Replace-Cancel” screen appears.
Normal Operation
The current program data information is stored in
memory.
Preset Tuning Mode
20
1. Press CHANNEL 5 / ∞ (or CH + / –) to select
either “Replace” or “Cancel”, then press SELECT.
• Replace: To select the information to be
overwritten with the new Artist/Song Title.
After pressing SELECT, the following screen
appears (on the next page).
Page 21

Press CHANNEL 5 / ∞ (or CH + / –) to select
unnecessary information (PDT), then press
SELECT.
It will be replaced with the new information.
• Cancel: Not to store a new information.
The original screen will be resumed.
How S-Seek function works
Each time JVC PnP is turned on, it automatically
searches the incoming signal to determine if a match
exists between the signal and the PDTs stored in
memory (except the ones with “S-Seek” set to “Off”:
see the next page).
• If one or more matches are found, “S-Seek Alert”
appears for a while, and a beep tone sounds.
Play of the current selection will continue until a
new selection is made.
Then the S-Seek Alert List screen which displays
the current matches appears.
• Press CHANNEL 5 / ∞ (or CH + / –) to select
the Artist/Song Title on the S-Seek Alert List
screen, then press SELECT.
Note: If no operation is done for about 10
seconds, JVC PnP automatically exits from the
S-Seek Alert List screen.
To delete or deactivate the PDT for S-Seek
1. Press and hold MEMO for about 3 seconds.
The most newly stored information appears on the
display.
To be continued...
21
Page 22

2. Press CHANNEL 5 / ∞ (or CH + / –) repeatedly
to select an unnecessary PDT, then press SELECT.
The following screen appears.
• S-Seek: To deactivate the PDT for S-Seek
function
After pressing SELECT, the S-Seek Setting
screen appears.
– Select “Off” (to deactivate the PDT for S-Seek)
or “On” (to activate the PDT for S-Seek) by
using CHANNEL 5 / ∞ (or CH + / –) then
SELECT.
Menu Options Settings
3. Press CHANNEL 5 / ∞ (or CH + / –) to select
either “Delete” or “S-Seek”, then press SELECT.
• Delete: To delete an unnecessary PDT.
After pressing SELECT, the Delete Confirmation
screen appears.
– Select “Ye s ” (to delete) or “No” (to cancel
deletion) by using CHANNEL 5 / ∞ (or CH +
/ –) then SELECT.
22
The following options are available on the Menu
Options screen—
1 Sirius ID
2 Display Settings
3 Confirmation Tone Options
4 FM Transmitter Options
5 Add or Skip
6 Lock Options
7 Audio Level Options
8 Antenna Aiming Options
9 Memory Options
0 Time Based Features
- Factory Default
Page 23

Basic Setting Procedure
1. Press MENU.
The Menu Options List screen appears on the
display.
2. Press CHANNEL 5 / ∞ (or CH + / –) repeatedly
to select an desired item, then press SELECT.
The selected Option Setting screen appears.
3. Set the Option Setting as you like following the
instruction described in each section that follows.
To exit from this mode, press MENU as many times
as required.
Note: If no operation is done for about 10
seconds, JVC PnP automatically exits from the
Menu Options screen.
1 Sirius ID
Displays your 12 digit Sirius ID number. No
adjustments are allowed in this mode.
To exit from this option, press MENU or SELECT.
2 Display Settings
The following adjustments are possible on this submenu screen—
• Contrast Control
• Dimming Control
• Font Type
Contrast Control: A horizontal bar graph is
displayed. Press CATEGORY # / @ (or CAT + / –)
to adjust the contrast, then press SELECT.
• You can also use CHANNEL 5 / ∞ (or CH + / –)
for adjustment.
23
Page 24

Dimming Control: Press CHANNEL 5 / ∞ (or CH
+ / –) to select either “Manual” or “Automatic”, then
press SELECT.
• Manual: A horizontal bar graph is displayed. Press
CATEGORY # / @ (or CAT + / –) to adjust the
display brightness manually, then press SELECT.
(You can also use CHANNEL 5 / ∞ (or CH + / –)
for adjustment.)
• Automatic: The low dimming limit “L” and high
dimming limit “H” will always maintain a
minimum separation of the settings.
– Adjust the low dimming limit “L” and high
dimming limit “H” using CATEGORY # / @ (or
CAT + / –).
– Toggle between “L” and “H” using CHANNEL
5 / ∞ (or CH + / –).
– Confirm all settings using SELECT.
Font Type: Press CHANNEL 5 / ∞ (or CH + / –) to
select the font type shown on the display, then press
SELECT.
3 Confirmation Tone Options
Press CHANNEL 5 / ∞ (or CH + / –) to select either
“On” or “Off”, then press SELECT.
• On: To activate the confirmation beep when you
(POWER) or some operation buttons.
press
• Off: To deactivate the confirmation beep.
4 FM Transmitter Options
This option functions only when your JVC PnP is
connected to the Car Docking Kit KS-K6002.
Press CHANNEL 5 / ∞ (or CH + / –) to select either
“On” or “Off”, then press SELECT.
• FM On: To activate the FM transmitter.
• FM Off: To deactivate the FM transmitter.
Note: It is recommended that you select “FM Off”
if you have connected your JVC PnP using a
audio cord or cassette adapter.
5 Add or Skip
You can skip unwanted streams while tuning.
Upon entering this mode, a stream list appears with
the currently playing stream highlighted.
24
Page 25

Press CHANNEL 5 / ∞ (or CH + / –) to select a
stream you want to skip then press SELECT.
“Skip” appears, next to the stream, on the screen.
To activated skipped stream again, repeat the same
procedure and delete “Skip”.
Note: Skipped streams can be accessed by
entering the stream number directly using the
number keys.
6 Lock Options
You can prohibit access to the particular streams.
When you try to tune in to these prohibited streams,
your JVC PnP asks you to enter the access code.
Lock/Unlock
Upon entering “Lock/Unlock” for the first time, you
are asked to enter the 4-digit code that is used to lock/
unlock stream access.
Press “0” key four time to enter the default access
code—0000.
From the second entries into this mode, a stream list
appears with the currently playing stream highlighted.
Press CHANNEL 5 / ∞ (or CH + / –) to select a
stream you want to lock, then press SELECT.
“Lock” appears, next to the stream, on the screen.
To activated locked stream again, repeat the same
procedure and delete “Lock”.
Note: Locked streams can be accessed by entering
the stream number directly using the number keys.
25
Page 26

Edit Code
You can change the access code (default code—0000)
as you like.
1. Upon entering this mode, press the number keys (0
– 9) to enter the current access code (4-digit:
default code—0000).
The “New Code” screen appears.
2. Press the number keys (0 – 9) to enter your new
access code (4 digit).
The confirmation screen appears.
3. Press the number keys (0 – 9) to enter your new
access code (4 digit) again.
The access code is now changed.
7 Audio Level Options
You can adjust the audio level and gain at the same
time when you feel that the sound through your JVC
PnP is too small or too loud.
Upon entering this mode, a horizontal bar graph is
displayed.
Press CHANNEL 5 / ∞ (or CH + / –) to adjust the
audio level and gain, then press SELECT.
You can also use CATEGORY # / @ (or CAT + / –)
•
for adjustment.
26
Page 27

8 Antenna Aiming Options
This is required to be adjusted only when you use
your JVC PnP at home.
You can ensure optimum reception when locating the
SIRIUS antenna.
Upon entering this mode, two horizontal bar graphs
are displayed.
The satellite signal strength level is displayed on the
SAT graph while the terrestrial signal strength level is
displayed on the TER graph. The current reception
levels are shown on the graphs.
Move the antenna location so that the level indication
on the bar graph moves as close to the right end as
possible
To exit this option, press MENU or SELECT.
Note: Terrestrial repeaters are typically used in
large urban areas where satellite signal reception
is not stable.
• Terrestrial signals (TER) may not be available in
your residential area.
9 Memory Options
You can activate or deactivate S-Seek Function. In
addition, you can delete all stored PDT (see page 20)
at a time.
The following adjustments are possible on this submenu screen—“Automatic Memory Search” and
“Clear All Memory”.
Automatic Memory Search: Press CHANNEL 5 /
∞ (or CH + / –) to select either “On” or “Off”, then
press SELECT.
• On: To activate the S-Seek Function.
• Off: To deactivate the S-Seek Function.
Clear All Memory: Press CHANNEL 5 / ∞ (or CH
+ / –) to select either “Ye s” or “No”, then press
SELECT.
• Yes: To erase all stored PDTs.
• No: To cancel the erasure.
27
Page 28

0 Time Based Features
The following adjustments are possible on this submenu screen—
• Clock
• Alarm Clock
• Program Alert
• Auto Shutdown
• Sleep Mode
Clock
When entering this menu option, you can set up the
clock shown on the display.
The clock data is provided via the SIRIUS Satellite
stream, and will be updated automatically.
Format:
Press CHANNEL 5 / ∞ (or CH + / –) to select either
“12 Hour (default)” or “24 Hour” system, then press
SELECT.
Time Zone:
Press CHANNEL 5 / ∞ (or CH + / –) to select your
residential area from one of the following time zone,
then press SELECT.
(GMT –9:00) Alaska
(GMT –8:00) Pacific
(GMT –7:00) Mountain
(GMT –6:00) Central
(GMT –5:00) Eastern
(GMT –4:00) Atlantic
(GMT –3:30) Newfndlnd (Newfoundland)
Daylight Savings Time (DST) Observance:
Activate this function if your area is subject to DST.
Press CHANNEL 5 / ∞ (or CH + / –) to select either
“DST Observed (default)” or “DST Not Observed”,
then press SELECT.
28
Page 29

Alarm Clock
You can set your JVC PnP to turn on at a specific
time.
The last selected stream prior to shutdown will be
played when the Alarm turns on your JVC PnP.
Set Alarm:
Press CHANNEL 5 / ∞ (or CH + / –) to select either
“Alarm On” or “Alarm Off (default)”, then press
SELECT.
Alarm Time (default—12:00pm):
Press CATEGORY # / @ (or CAT + / –) to set the
hour, press CHANNEL 5 / ∞ (or CH + / –) to set the
minute, then press SELECT.
AM or PM will switch automatically as you advance
the time.
Note: If your JVC PnP cannot receive the SIRIUS
signals (satellite and terrestrial) correctly when the
alarm time comes, you may hear a series of alarm
tones.
Program Alert
You can program your JVC PnP to switch to a
specified stream at a specified time.
• To use your programmed setting, make sure to
set “Program Alert” to “Program Alert On”.
The following settings are possible on this sub-menu
screen—
• Time/Day (default—12:00pm/Monday)
• Stream (default—Currently Playing Stream)
• Program Alert (default—Off)
Time/Day:
Press CHANNEL 5 / ∞ (or CH + / –) to select either
“Time” or “Day”, then press SELECT.
• Time: To set the time.
Press CATEGORY # / @ (or CAT + / –) to set the
hour, then press CHANNEL 5 / ∞ (or CH + / –) to
set the minute, then press SELECT.
AM or PM will switch automatically as you
advance the time.
• Day: To set the day.
Press CATEGORY # / @ (or CAT + / –) to select
the day—Monday, Tuesday, Wednesday, Thursday,
Friday, Saturday or Sunday, then press SELECT.
Make sure to set both “Time” and “Day” correctly.
29
Page 30

Stream:
Press CHANNEL 5 / ∞ (or CH + / –) to select a
stream on the stream list shown on the screen, press
SELECT.
Program Alert:
Press CHANNEL 5 / ∞ (or CH + / –) to select either
“Program Alert On” or “Program Alert Off”, press
SELECT.
Auto Shutdown
You can make your JVC PnP shut off automatically if
no operation is done for about one hour.
A beep tone sounds just one minute before your JVC
PnP shuts off, and the “Cancel Auto Shutdown”
screen will be shown (see note below).
To activate (or deactivate) Auto Shutdown
Press CHANNEL 5 / ∞ (or CH + / –) to select
“Enabled” (or “Disabled”), then press SELECT.
Note: When the “Cancel Auto Shutdown” screen
is shown on the display, pressing SELECT will
temporarily cancels Auto Shutdown.
Sleep Mode
You can specify the time until your JVC PnP shuts
off—“Sleep Off”, “15 minutes”, “30 minutes”, “45
minutes” and “60 minutes”.
Press CHANNEL 5 / ∞ (or CH + / –) to select the
time, then press SELECT.
Your JVC PnP will now turn off after the selected
time has passed.
• If “Sleep Off” is selected, Sleep Mode is canceled.
- Factory Default
You can reset the following items to the default
settings.
Press CHANNEL 5 / ∞ (or CH + / –) to select “Ye s ”
(to reset) or “No” (to cancel the reset), then press
SELECT.
30
Page 31

• Contrast Control—50%
• Dimming Control—Automatic
• FM Transmitter Options—FM On
• Output Level—70%
• Auto Memory Search—On
• Clock: Format—12 Hour
• Clock: Time Zone—Eastern
• Clock: Daylight Savings Time—DST Observed
All preset streams and stored PDTs are also erased,
and all skipped streams becomes unskipped (locked
streams remain locked).
Specifications
Audio Output: 650 mV RMS Maximum
(10 kΩ)
Fuse: 3A Slow Blow
Power Supply: 10 V – 16V, Negative Ground, DC
Dimensions (W/H/D):
138 mm × 92 mm × 48 mm
(5 3/8 inches × 3 5/8 inches × 1 7/8 inches)
Troubleshooting
Your JVC PnP does not turn on.
] The fuse is blown.
] Power is not supplied properly. Check the power
cable connection.
No sound can be heard.
] Audio cord or cassette adapter is not correctly
connected.
“Antenna Error” appears on the display.
] Antenna is not connected firmly.
“Call 1-888-539-SIRIUS to Subscribe” appears on
the display.
] SIRIUS subscription has not been made.
“Invalid Channel” appears on the display.
] Stream tuned is invalid. Select a different stream.
31
Page 32

KT-SR1000
http://www.jvcmobile.c
Technical Support & Customer Satisfaction Survey.
Having TROUBLE with operation?
USA ONLY
Call 1-800-252-5722
http://www.jvc.com
We can help you!
EN
© 2003 VICTOR COMPANY OF JAPAN, LIMITED
Visit us on-line for
US RESIDENTS ONLY
VICTOR COMPANY OF JAPAN, LIMITED
om
1203MNMMDWKRI
SIRIUS
®
Radio
 Loading...