

Page 1
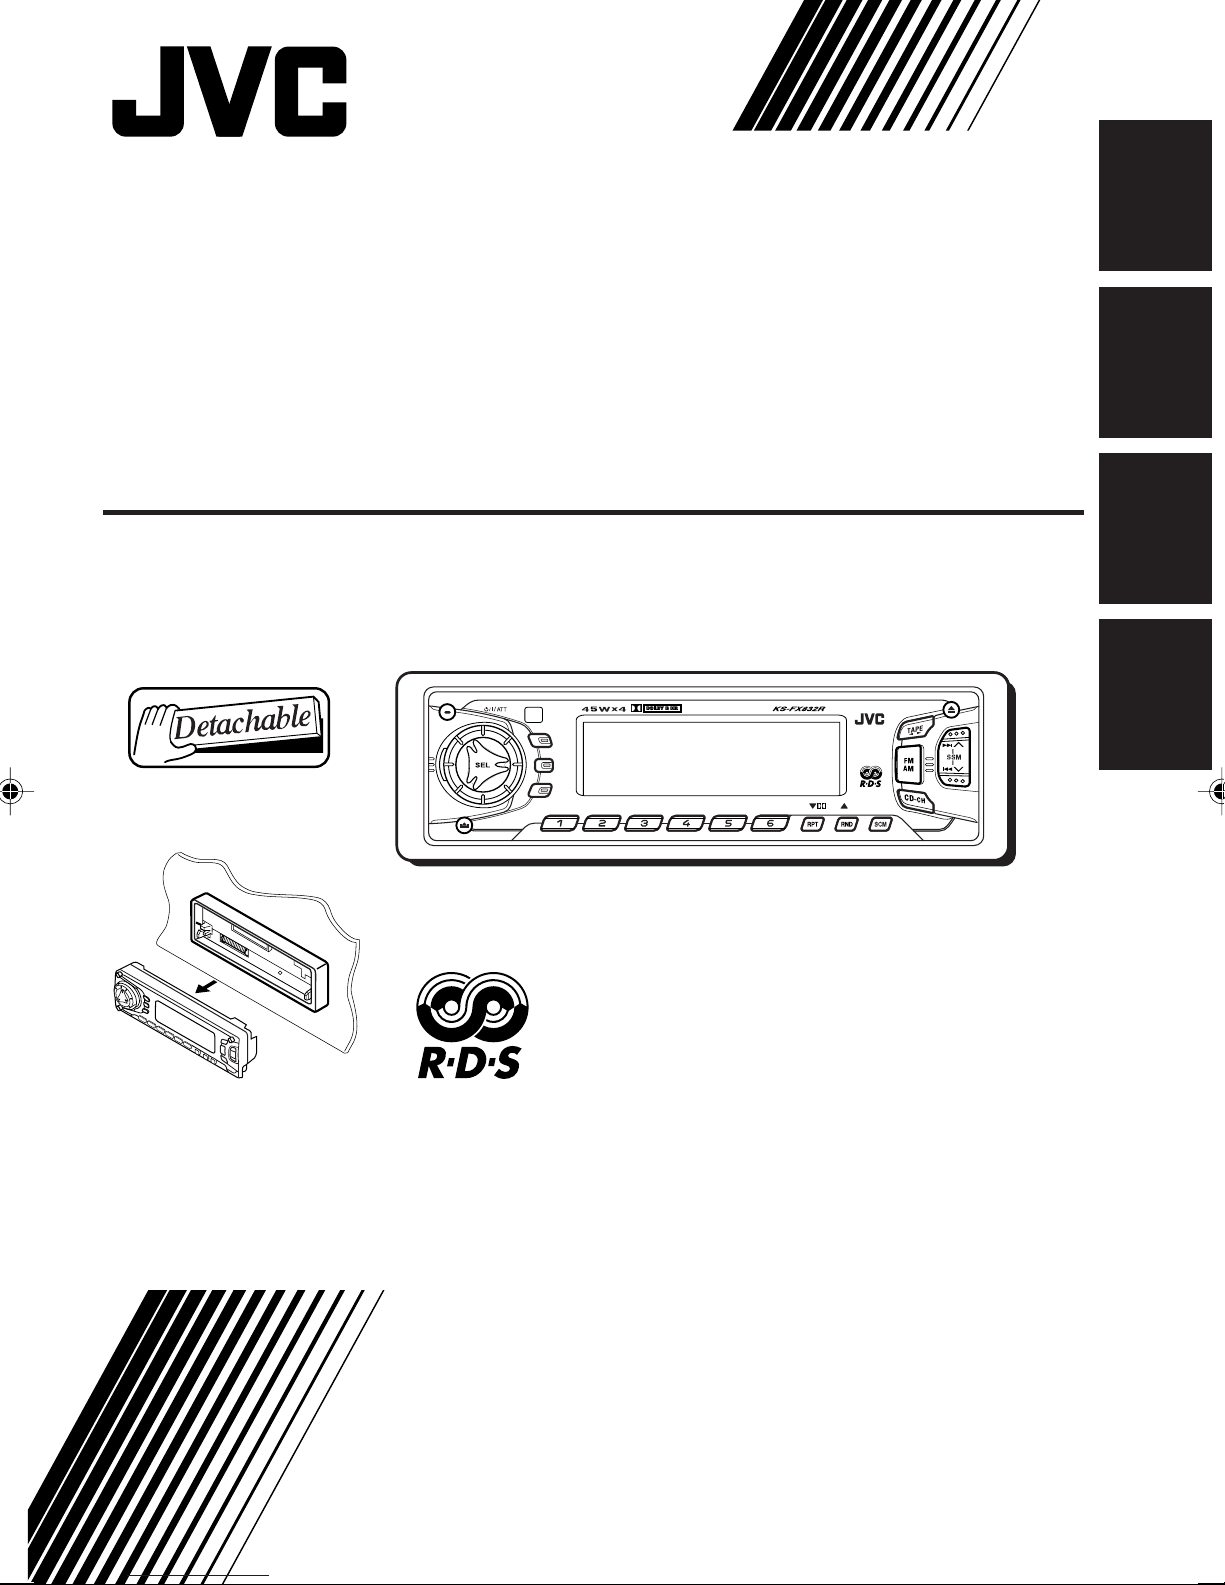
CASSETTE RECEIVER
ENGLISH
CASSETTEN-RECEIVER
RADIOCASSETTE
RADIO/CASSETTESPELER
KS-FX832R
DEUTSCH
FRANÇAIS
DISP
TP
RDS
PTY
8 9 10 1 1 127
DAB
MO
NEDERLANDS
For installation and connections, refer to the separate manual.
Für den Einbau und die Anschlüsse siehe das eigenständige Handbuch.
Pour l’installation et les raccordements, se référer au manuel séparé.
Bijzonderheden over de installatie en aansluiting v an het apparaat vindt u in de desbetreffende
handleiding.
INSTRUCTIONS
BEDIENUNGSANLEITUNG
MANUEL D’INSTRUCTIONS
GEBRUIKSAANWIJZING
GET0083-001A
[E/EX]
Page 2
Thank you f or purchasing a JVC product. Please read all instructions carefully before operation,
to ensure your complete understanding and to obtain the best possible performance from the unit.
CONTENTS
How to reset your unit............................... 2
ENGLISH
LOCATION OF THE BUTTONS............ 3
Control panel ........................................... 3
BASIC OPERATIONS ...................... 4
Turning on the power ................................ 4
RADIO BASIC OPERATIONS ............. 5
Listening to the radio ................................ 5
Storing stations in memory ....................... 6
Tuning into a preset station ...................... 7
RDS OPERATIONS ........................ 8
What you can do with RDS....................... 8
Other convenient RDS functions and
adjustments........................................... 11
TAPE OPERATIONS ....................... 14
Listening to a cassette.............................. 14
Finding the beginning of a tune ................ 15
Other convenient tape functions............... 16
SOUND ADJUSTMENTS .................. 17
Adjusting the sound ................................. 17
Using the sound control memory (SCM) ... 18
Storing your own sound adjustments ....... 19
OTHER MAIN FUNCTIONS ............... 20
Setting the clock ...................................... 20
Changing the general settings (PSM) ...... 20
Detaching the control panel...................... 23
CD CHANGER OPERATIONS ............. 24
Playing CDs ............................................. 24
Selecting CD playback modes.................. 25
EXTERNAL COMPONENT OPERA TIONS... 26
Playing an external component ................ 26
DAB TUNER OPERATIONS ............... 27
Tuning into an ensemble and one of the
services ................................................. 27
Storing DAB services in memory ............. 29
Tuning into a preset DAB service ............. 30
What you can do more with DAB.............. 30
USING THE REMOTE CONTROLLER ..... 31
Location of the buttons ............................. 32
MAINTENANCE ............................ 33
TROUBLESHOOTING...................... 34
SPECIFICATIONS .......................... 35
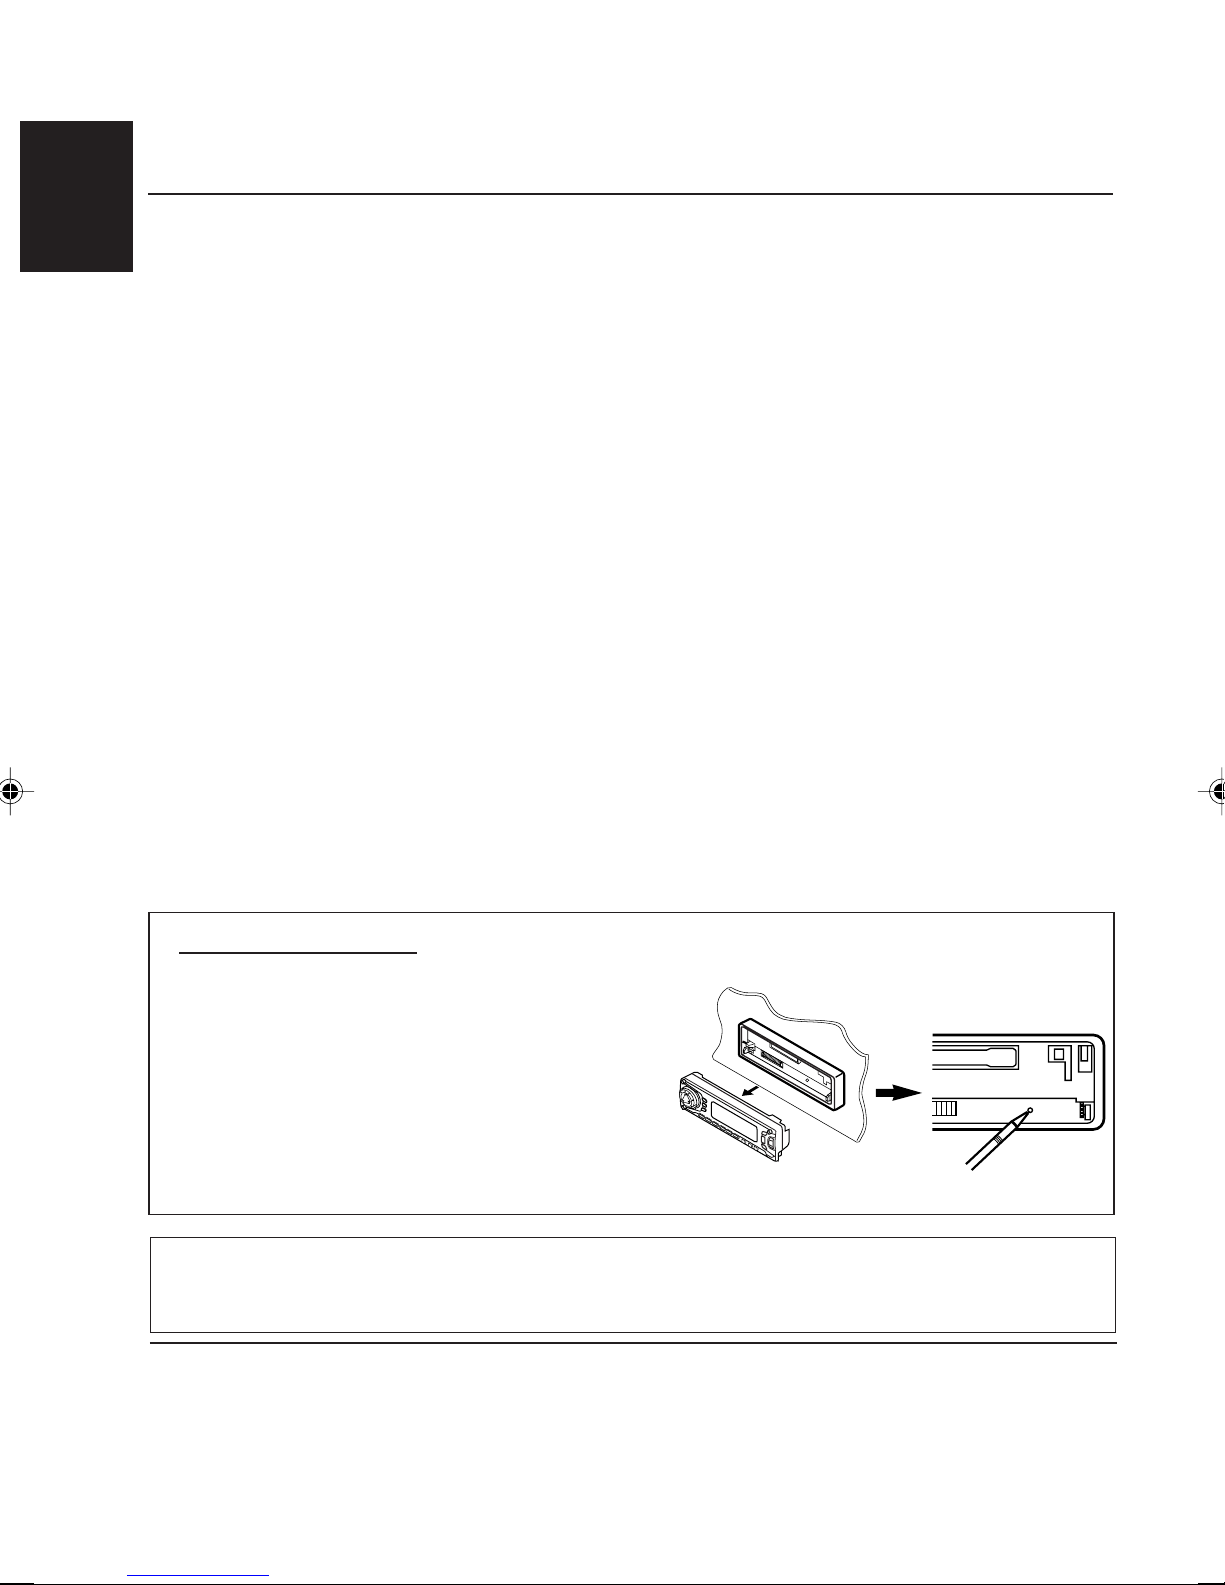
How to reset your unit
After detaching the control panel, press the reset
button on the panel holder using a ball-point pen
or similar tool.
This will reset the built-in microcomputer.
Note:
Your preset adjustments – such as preset channels or
sound adjustments – will also be erased.
Note:
For security reasons, a numbered ID card is provided with this unit, and the same ID number is imprinted on
the unit’s chassis. Keep the card in a safe place, as it will help the authorities to identify your unit if stolen.
BEFORE USE
*
*
For safety ....
• Do not raise the volume level too much, as this will
block outside sounds, making driving dangerous.
• Stop the car before performing any complicated
operations.
2
Temperature inside the car....
If you have parked the car for a long time in hot or
cold weather, wait until the temperature in the car
becomes normal before operating the unit.
Page 3
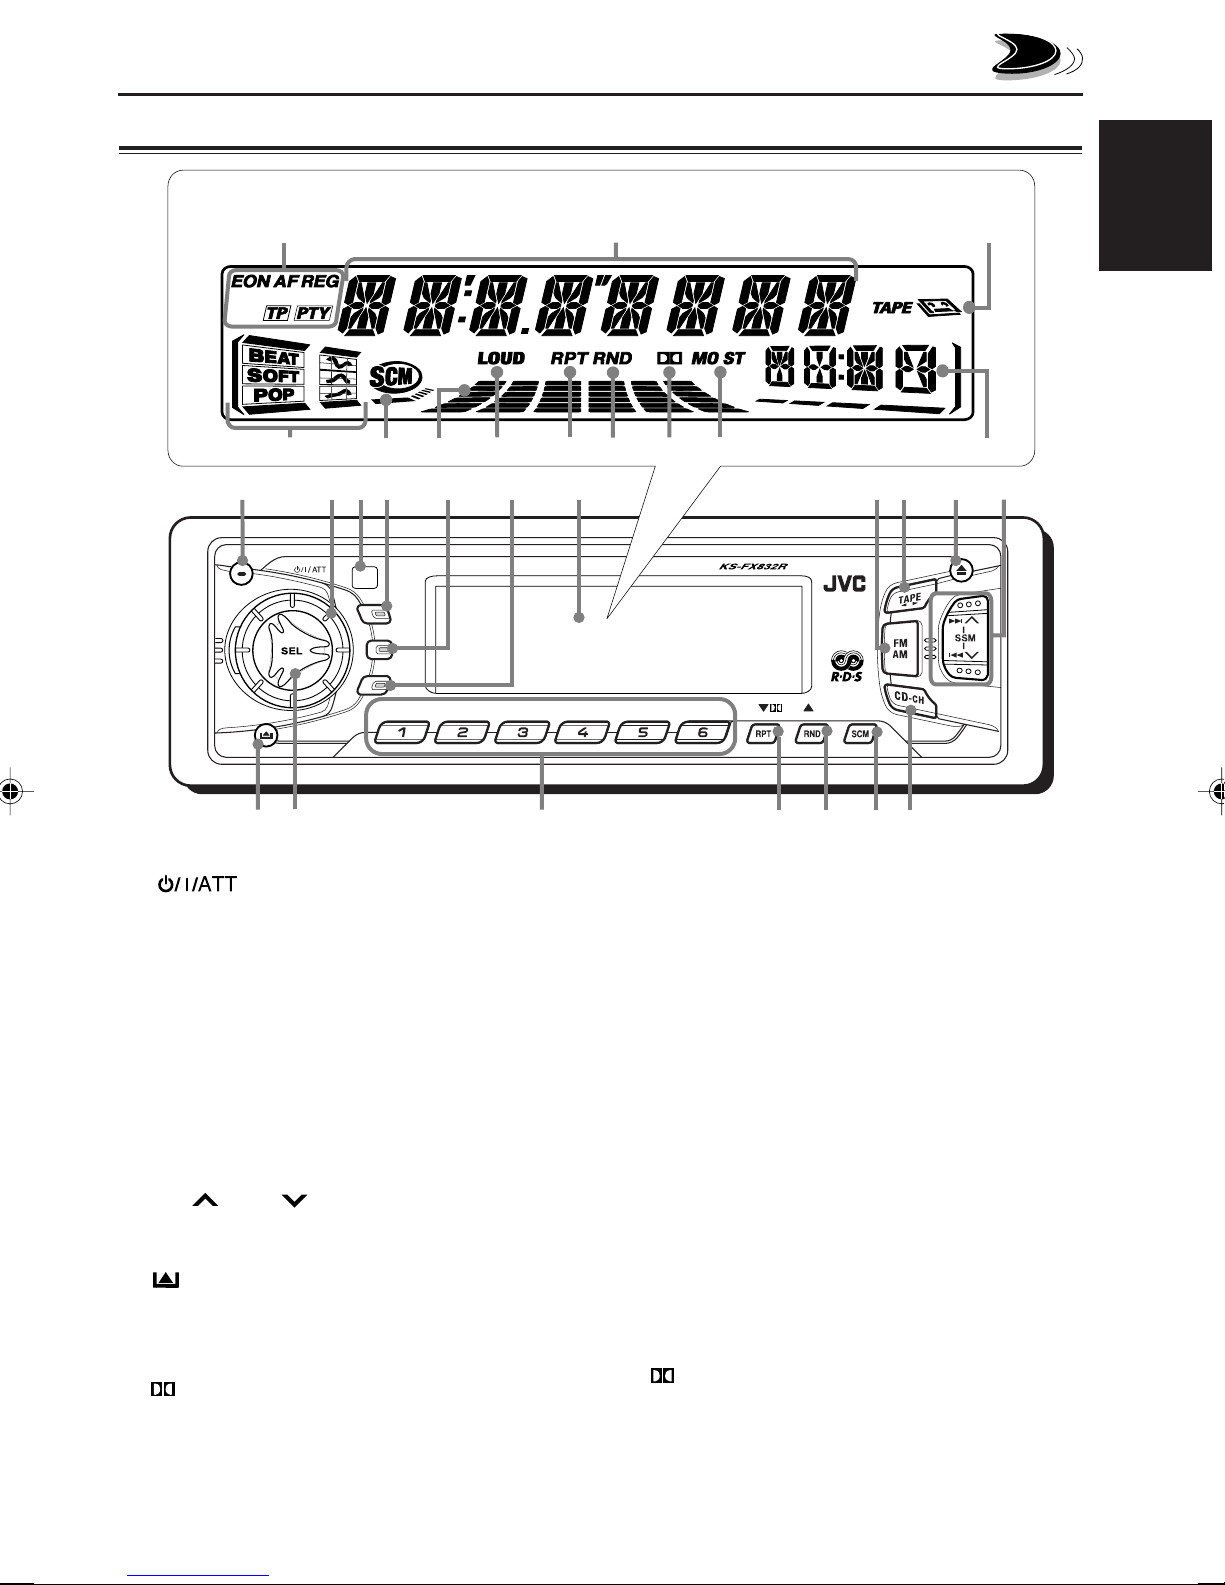
Control panel
Display window
LOCATION OF THE BUTTONS
o;
sklhg
DISP
TP
RDS
PTY
5
6
8 9 10 11 127
1
3
4
2
j
7
MO
DAB
8
9
a
ENGLISH
/fd
q
p
e
w
1 (standby/on/attenuator) button
2 Control dial
3 Remote sensor
4 DISP (display) button
5 TP (traffic programme)
RDS (radio data system) button
6 PTY (programme type) button
7 Display window
8 FM AM button
• Also functions as the DAB button.
9 TAPE 23 button
p 0 (eject) button
q ¢ / 4 buttons
• Also function as SSM buttons when pressed
together.
w (control panel release) button
e SEL (select) button
r Number buttons
t RPT (repeat) button
(Dolby B) button
• Also functions as ∞ (DAB service selection).
yurt
y RND (random)
MO (monaural) button
• Also functions as 5 (DAB service selection).
u SCM (sound control memory) button
i CD-CH (CD changer) button
i
Display window
o RDS indicators
EON, AF, REG, TP, PTY
; Main display
a TAPE indicator
s Sound mode indicators
BEAT, SOFT, POP
d SCM indicator
f Volume (or audio) level indicator
g LOUD indicator
h RPT (repeat) indicator
j RND (random) indicator
k (Dolby B) indicator
l Tuner reception indicators
MO (monaural), ST (stereo)
/ Source/clock display
3
Page 4

BASIC OPERATIONS
ENGLISH
1
Turning on the power
1
Turn on the power.
Note on One-Touch Operation:
When you select a source in step 2 below, the
power automatically comes on. You do not have
to press this button to turn on the power.
2
Select the source.
3
DISP
TP
RDS
PTY
8 9 10 11 127
DAB
MO
2
3
Adjust the volume.
To increase the volume.
To decrease the volume.
Volume level appears.
To operate the tuner (FM or AM),
see pages 5 – 13.
To operate the tape,
see pages 14 – 16.
To operate the CD changer,
see pages 24 – 25.
To operate the external component,
see page 26.
To operate the DAB tuner,
see pages 27 – 30.
Volume or audio level (see page 22) indicator
4
Adjust the sound as you want.
(See pages 17 – 19.)
To drop the volume in a moment
Press briefly while listening to any
source. “ATT” starts flashing on the display, and
the volume level will drop in a moment.
To resume the previous volume level, press the
button briefly again.
• If you turn the control dial clockwise, you can
also restore the sound.
To turn off the power
Press and hold until “SEE YOU” appears
on the display.
Note:
When you use this unit for the first time, set the built-in
clock correctl y, see page 20.
4
Page 5
RADIO BASIC OPERATIONS
DISP
TP
RDS
PTY
8 9 10 11 127
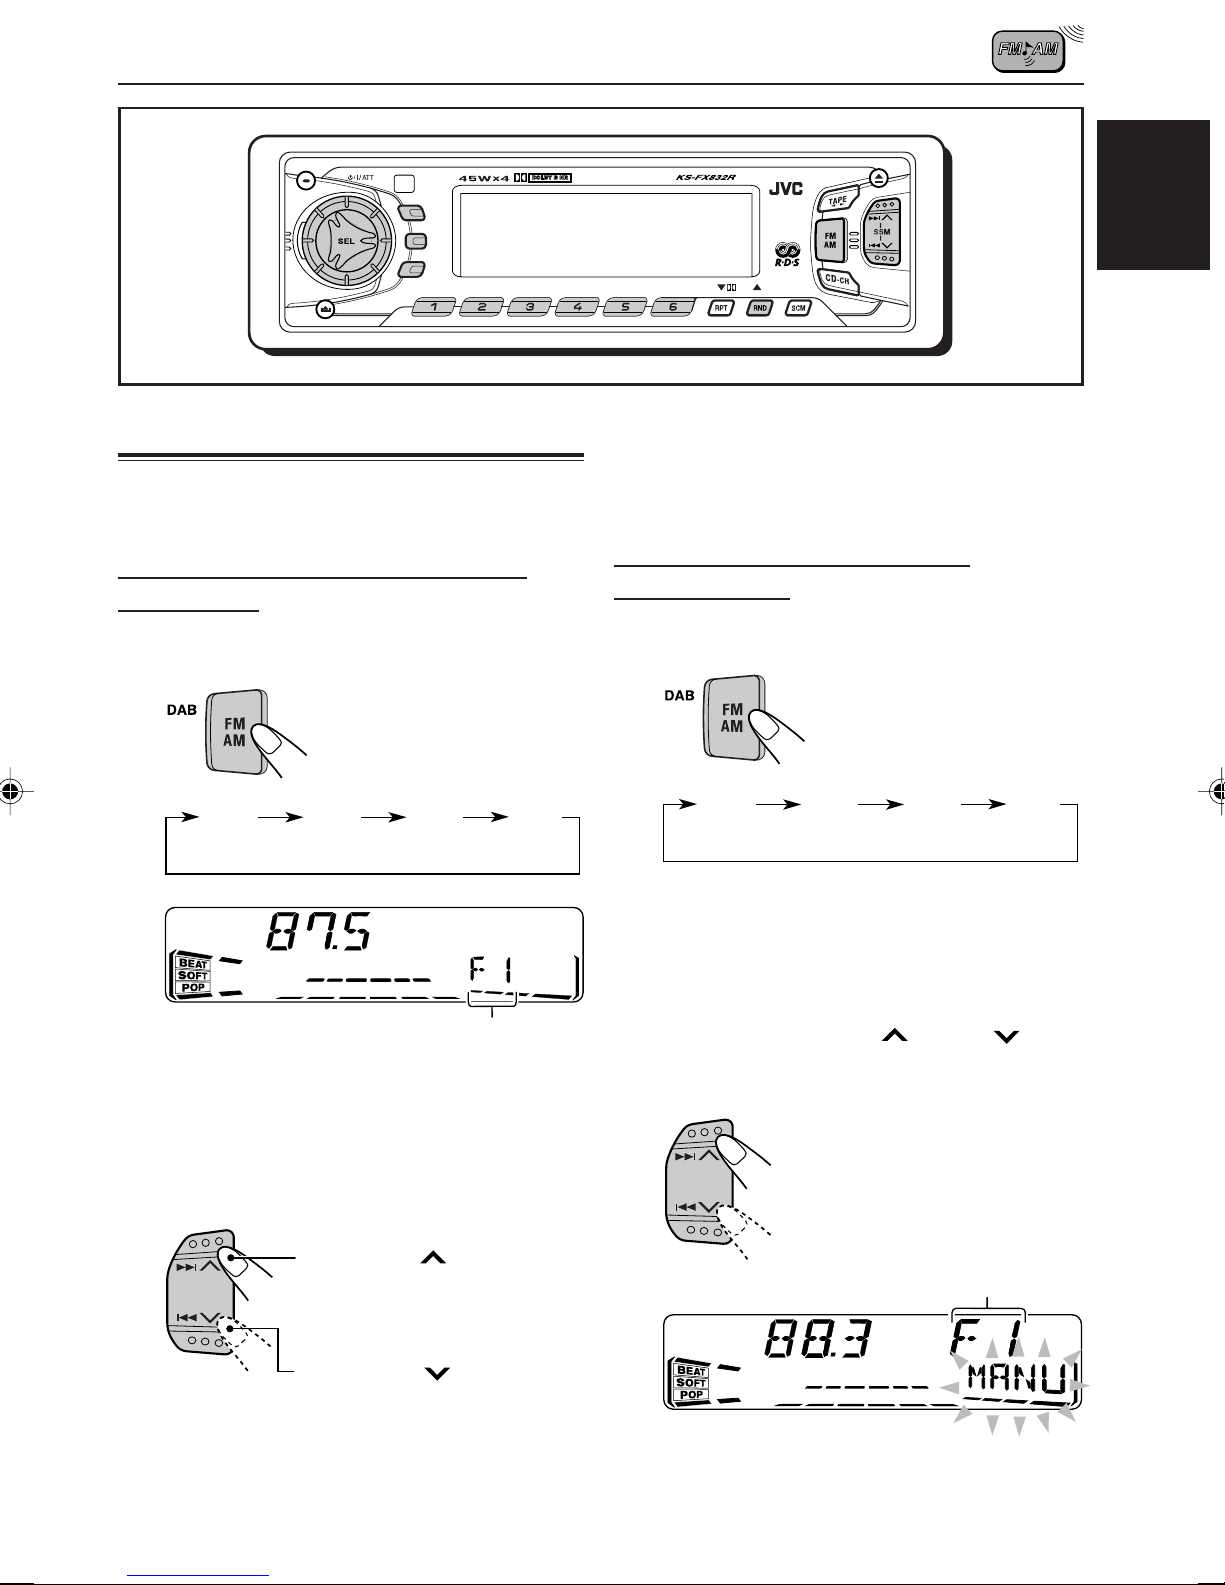
Listening to the radio
You can use either automatic searching or manual
searching to tune into a particular station.
Searching a station automatically:
Auto search
1
Select the band (FM1 – 3, AM).
DAB
MO
T o stop searching before a station is received,
press the same button you have pressed for
searching.
Searching a station manually:
Manual search
1
Select the band (FM1 – 3, AM).
ENGLISH
F1 F2 F3 AM
(FM1) (FM2) (FM3)
Selected band appears.
Note:
This receiver has three FM bands (FM1, FM2,
FM3). You can use any one of them to listen to an
FM broadcast.
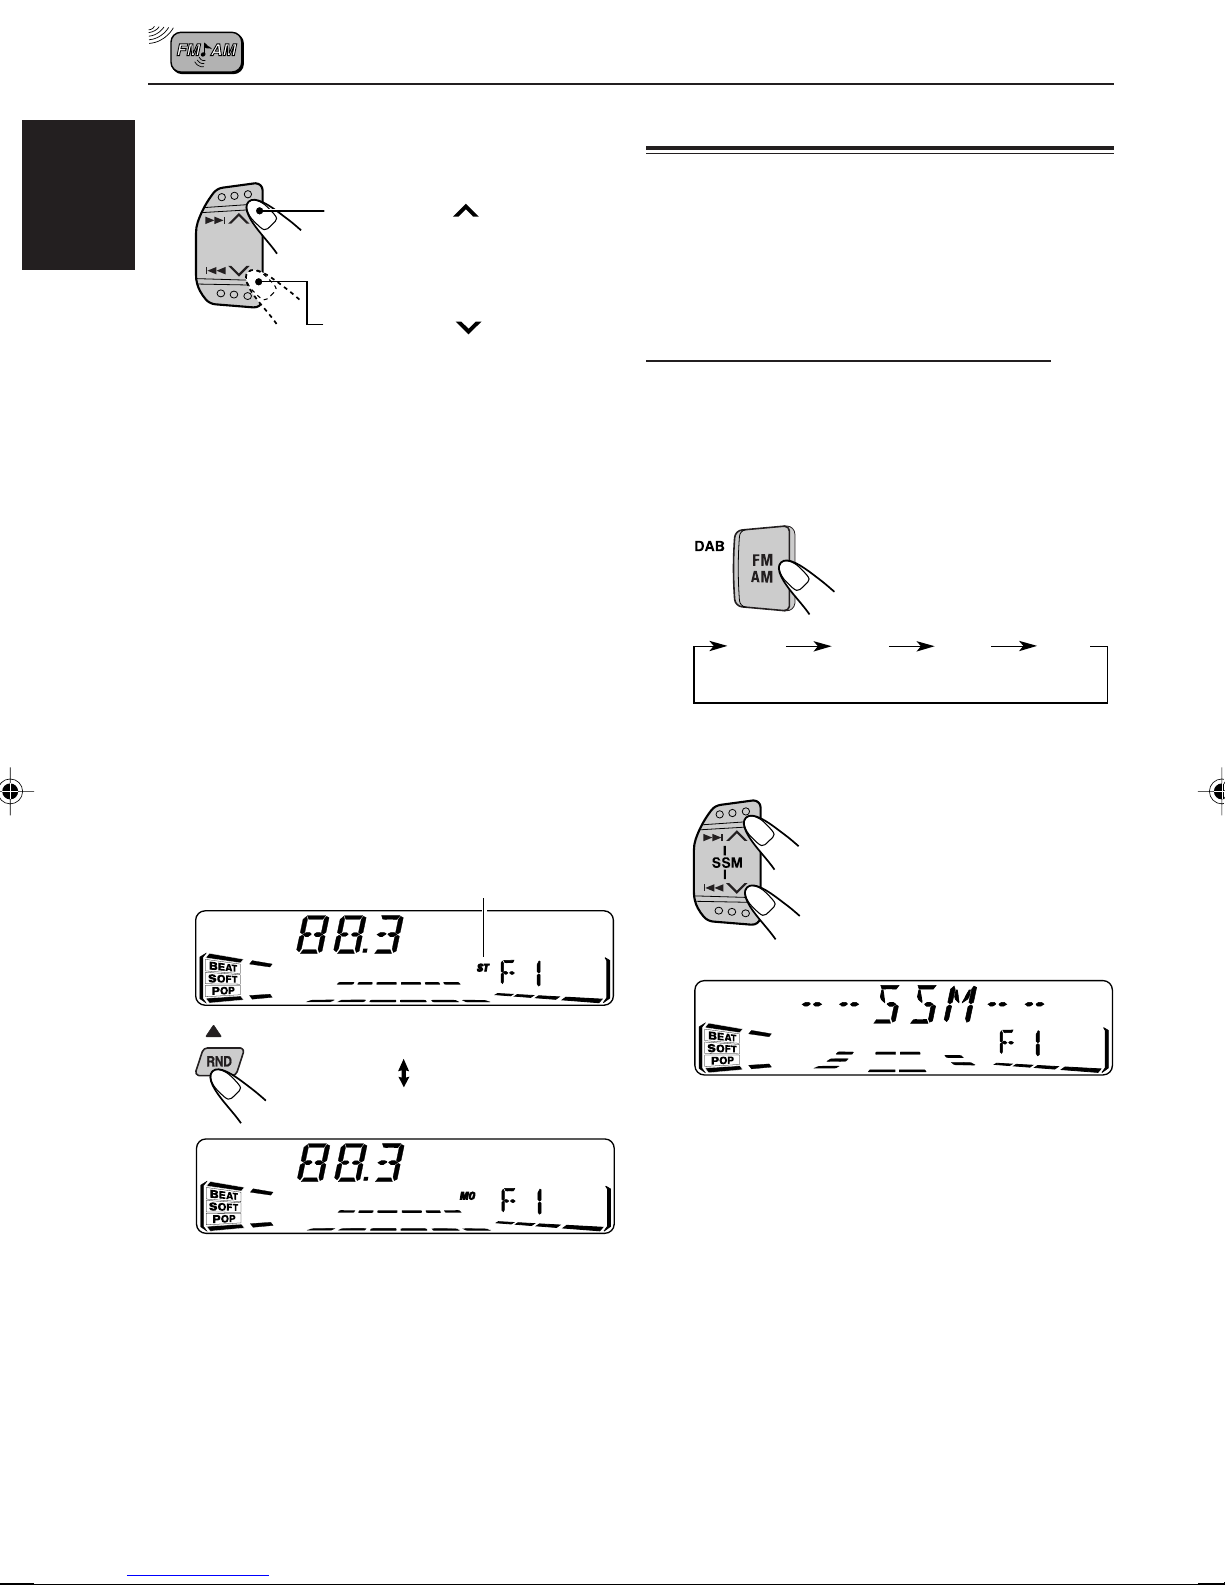
2
Start searching a station.
Press ¢ to search
stations of higher
frequencies.
Press 4 to search
stations of lower
frequencies.
F1 F2 F3 AM
(FM1) (FM2) (FM3)
Note:
This receiver has three FM bands (FM1, FM2,
FM3). You can use any one of them to listen to an
FM broadcast.
2
Press and hold ¢ or 4 until
“MANU (manual)” starts flashing on
the display.
Selected band appears.
When a station is received, searching
stops.
CONTINUED ON THE NEXT PAGE
5
Page 6
3
Tune into a station you want while
“MANU” is flashing.
Press ¢ to tune
ENGLISH
• If you release your finger from the button,
the manual mode will automatically turn off
after 5 seconds.
• If you hold down the button, the frequency
keeps changing (in 50 kHz intervals for FM
and 9 kHz intervals for AM – MW/LW) until
you release the button.
into stations of higher
frequencies.
Press 4 to tune
into stations of lower
frequencies.
When an FM stereo broadcast is hard to
receive:
Storing stations in memory
You can use one of the following two methods to
store broadcasting stations in memory.
• Automatic preset of FM stations: SSM (Strongstation Sequential Memory)
• Manual preset of both FM and AM stations
FM station automatic preset: SSM
Y ou can preset 6 local FM stations in each FM band
(FM1, FM2 and FM3).
1
Select the FM band (FM1 – 3) you want
to store FM stations into.
Each time you press the
button, the FM band
changes as follows:
F1 F2 F3 AM
(FM1) (FM2) (FM3)
Press MO RND (monaural/random) while
listening to an FM stereo broadcast.
• Each time you press the button, the MO
indicator lights up and goes off alternately.
Lights up when receiving
an FM broadcast in stereo.
MO
When the MO indicator is lit on the display, the
sound you hear becomes monaural but the
reception will be improved (the ST indicator
goes off).
2
Press and hold both buttons for more
than 2 seconds.
“SSM” appears, then disappears when automatic
preset is over.
Local FM stations with the strongest signals are
searched and stored automatically in the band
number you have selected (FM1, FM2 or FM3).
These stations are preset in the number buttons —
No.1 (lowest frequency) to No .6 (highest frequency).
When automatic preset is over, the station stored
in number button 1 will be automatically tuned into.
6
Page 7
Manual preset
Y ou can preset up to 6 stations in each band (FM1,
FM2, FM3 and AM) manually.
4
Repeat the above procedure to store
other stations into other preset
numbers.
Ex.: Storing an FM station of 88.3 MHz into the
preset number 1 of the FM1 band
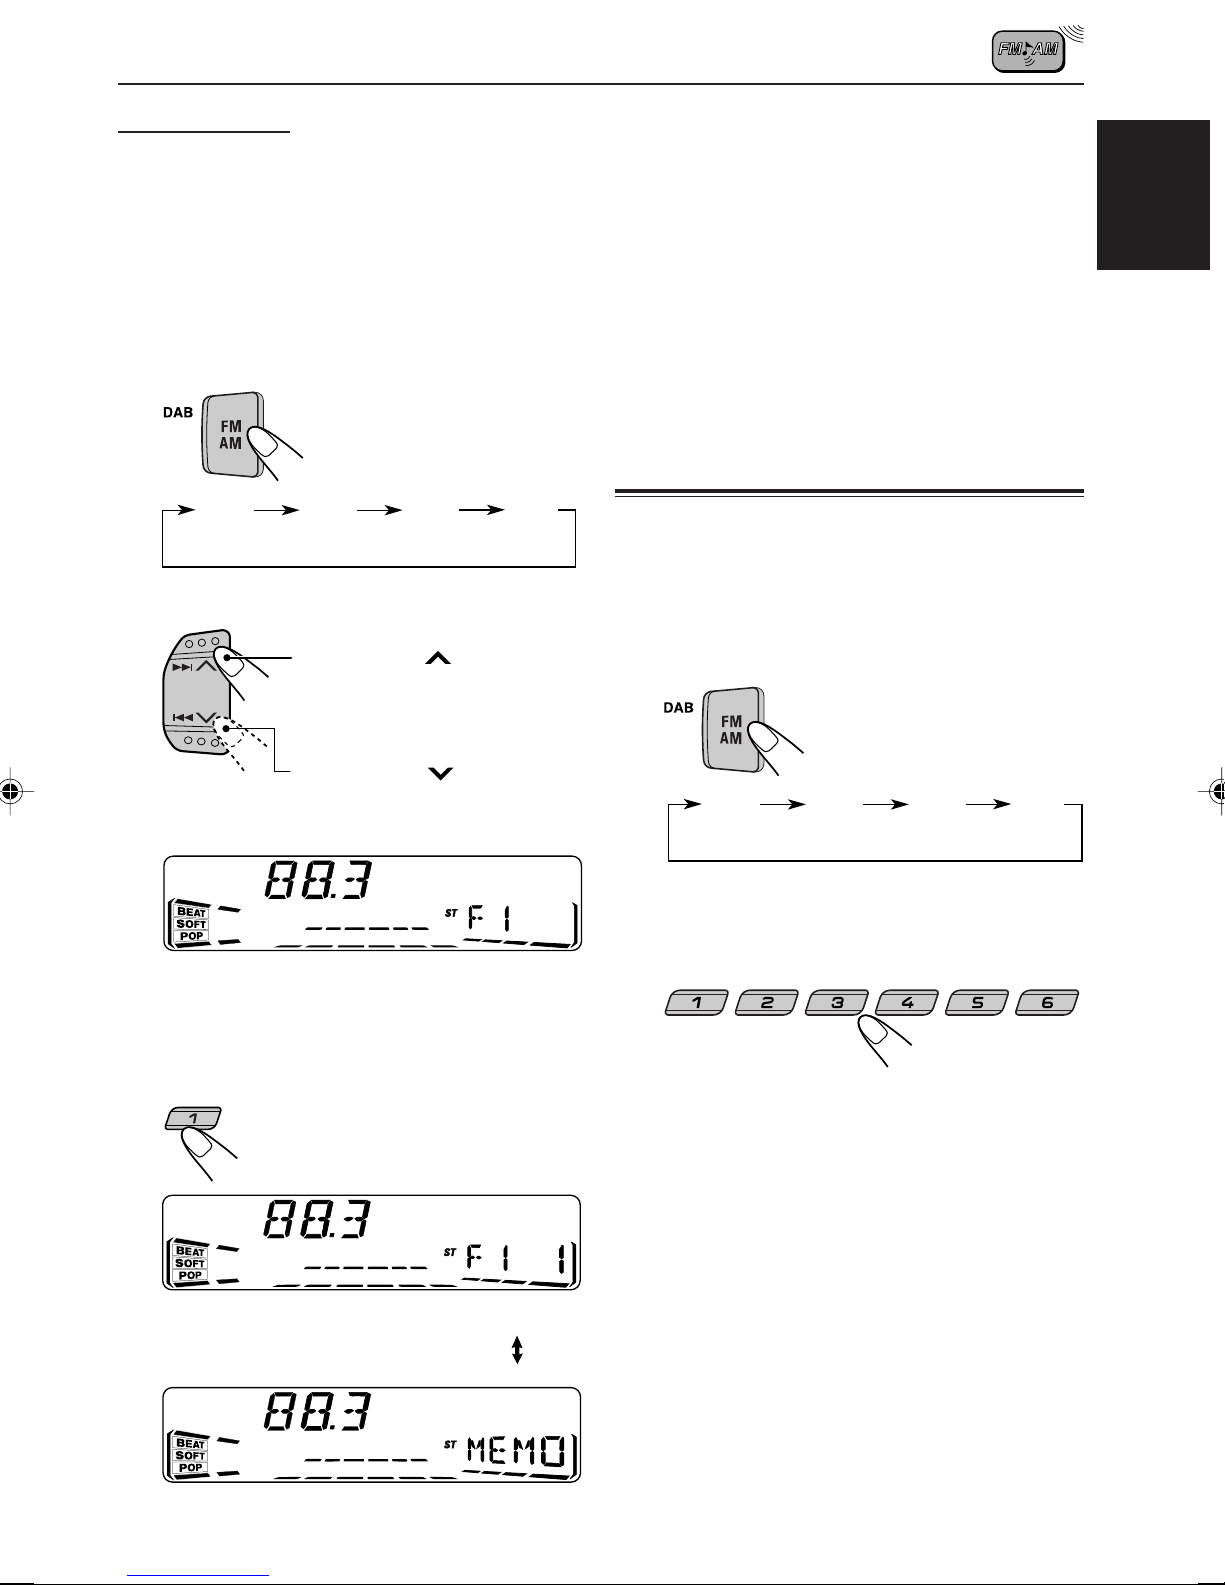
1
Select the band (FM1 – 3, AM) you
want to store stations into (in this
example, FM1).
Each time you press the
button, the FM band
changes as follows:
F1 F2 F3 AM
(FM1) (FM2) (FM3)
2
Tune into a station of 88.3 MHz.
Press ¢ to tune
into stations of higher
frequencies.
Press 4 to tune
into stations of lower
frequencies.
Notes:
• A previously pr eset station is erased when a new station
is stored in the same preset number.
• Preset stations are erased when the power supply to
the memory circuit is interrupted (for example , during
battery replacement). If this occurs, pr eset the stations
again.
Tuning into a preset station
You can easily tune into a preset station.
Remember that you must store stations first. If you
have not stored them yet, see “Storing stations in
memory” on page 6.
1
Select the band (FM1 – 3, AM).
F1 F2 F3 AM
(FM1) (FM2) (FM3)
ENGLISH
3
Press and hold the number button (in
this example, 1) for more than 2
seconds.
7
Selected band/preset number and
“MEMO” (memory) appear
alternately for a while.
2
Select the number (1 – 6) for the preset
station you want.
8 9 10 11 127
7
Page 8
RDS OPERATIONS
What you can do with RDS
RDS (Radio Data System) allows FM stations to
send an additional signal along with their regular
programme signals. For e xample, the stations send
ENGLISH
their station names, as well as information about
what type of programme they broadcast, such as
sports or music, etc.
Another advantage of RDS function is called
Enhanced Other Networks. The EON indicator lights
up while receiving an FM station with the Enhanced
Other Networks data. By using the Enhanced Other
Networks data sent from a station, you can tune
into a different station of a different network
broadcasting your favourite programme or traffic
announcement while listening to another
programme or to another source such as tape.
By receiving the RDS data, this unit can do the
following:
• Tracing the same programme automatically
(Network-Tracking Reception)
• Standby Reception of TA (Traffic Announcement)
or your favorite programme
• PTY (Programme Type) search
• Programme search
• And some other functions
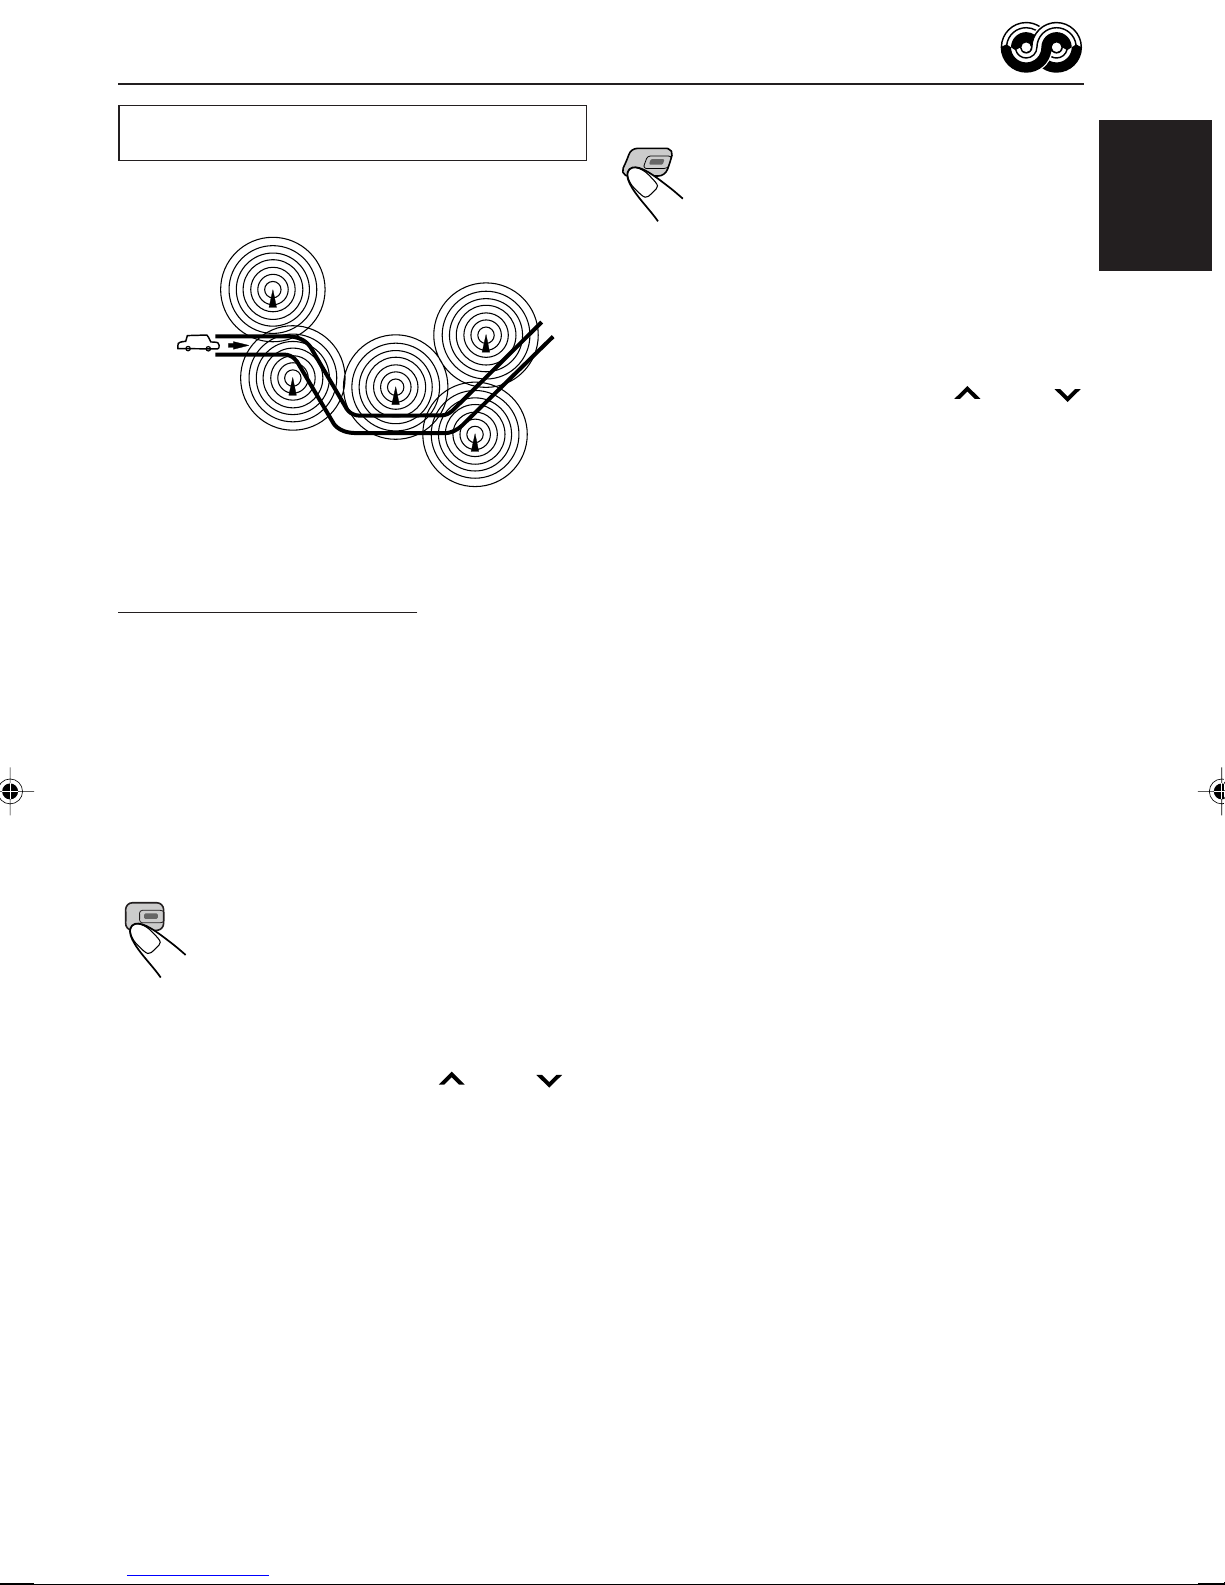
Tracing the same programme
automatically (Network-Tracking
Reception)
When driving in an area where FM reception is not
good, the tuner built in this unit automatically tunes
into another RDS station, broadcasting the same
programme with stronger signals. So, you can
continue to listen to the same programme in its
finest reception, no matter where you drive.
(See the illustration on the next page.)
Two types of the RDS data are used to make
Network-Tracking Reception work correctly — PI
(Programme Identification) and AF (Alternative
Frequency).
Without receiving these data correctly from the RDS
station you are listening to, Network-Tracking
Reception will not operate.
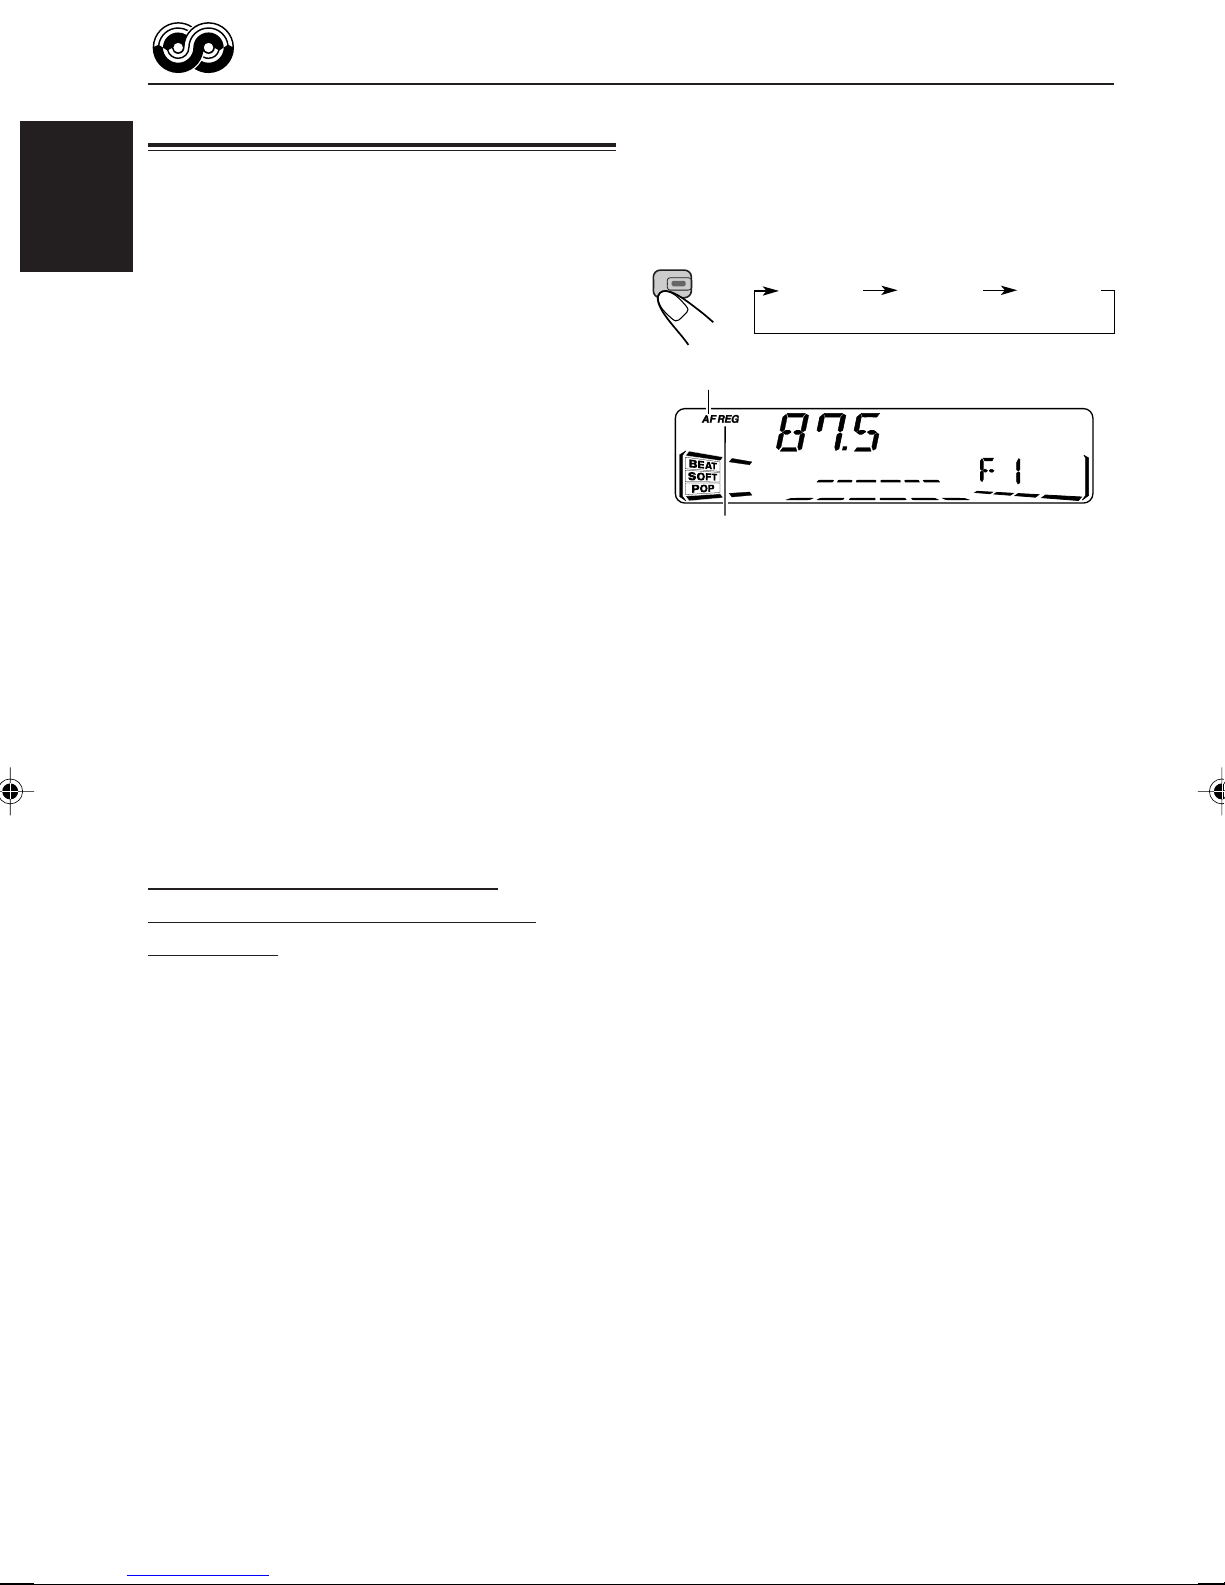
To use Network-Tracking Reception, press and
hold TP RDS (Traffic Programme/Radio Data
System) for more than 1 second. Each time you
press and hold the button, Network-Tracking
Reception modes change as follows:
TP
RDS
AF indicator
REG indicator
Mode 1
The AF indicator lights up but the REG indicator
does not.
Network-Tracking Reception is activated with
Regionalization set to “off.”
Switches to another station within the same
network when the receiving signals from the
current station become weak.
• In this mode, the programme may differ from the one
currently received.
Mode 2
Both the AF indicator and the REG indicator light
up.
Network-Tracking Reception is activated with
Regionalization set to “on.”
Switches to another station, within the same
network, broadcasting the same programme
when the receiving signals from the current
station become weak.
Mode 3
Neither the AF indicator nor the REG indicator
lights up.
Network-Tracking Reception is deactivated.
Note:
If a DAB tuner is connected and Alternative Reception
(for DAB services) is activated, Network-Tracking
Reception is also activated automatically. On the
other hand, Network-Tracking Reception cannot be
deactivated without deactivating Alternative
Reception. (See page 30.)
Mode 1
Mode 2 Mode 3
8
Page 9
The same programme can be received on
different frequencies.
Programme 1
broadcasting
on frequency A
Programme 1
broadcasting
on frequency B
Programme 1
broadcasting
on frequency C
Programme 1
broadcasting
on frequency E
Programme 1
broadcasting
on frequency D
Using Standby Reception
PTY Standby Reception
When you press PTY while listening
PTY
to an FM station, the PTY indicator is
lit during reception of a PTY station
and the PTY standby mode is
engaged. The selected PTY name
stored on page 10 flashes for 5
seconds.
• When the station being received is not a PTY station,
the PTY indicator flashes. Press ¢ or 4
to engage the PTY standby mode. “SEARCH” appears
on the display, and PTY station sear c h starts. When a
PTY station is tuned into, the PTY indicator is lit.
7 If you are listening to a tape or other connected
components and wish to listen to a selected PTY
broadcast, press PTY to enter the PTY standby
mode. (The PTY indicator lights up.)
ENGLISH
Standby Reception allows the unit to switch
temporarily to your favourite programme (PTY:
Programme Type) and Traffic Announcement (TA)
from the current source (another FM station, tape
or other connected components).
• Standby Reception will not work if you are listening
to an AM station.
TA Standby Reception
TP
When you press TP RDS while listening
RDS
to an FM station, the TP indicator is lit
during reception of a TP (Traffic
Programme) station and the TA standby
mode is engaged.
• When the station being received is not a TP station,
the TP indicator flashes. Press ¢ or 4 to
engage the T A standby mode. “SEARCH” appears on
the display, and TP station search starts. When a TP
station is tuned into, the TP indicator is lit.
7 If you are listening to a tape or other connected
components and wish to listen to a TP station,
press TP RDS to enter the TA standby mode. (The
TP indicator lights up.)
If the selected PTY programme starts broadcasting
while the PTY standby mode is active , the selected
PTY name appears and the playback source
changes to the FM band. The selected PTY
programme can then be heard.
T o deactivate the PTY standby mode, press PTY
again.
If a traffic programme starts broadcasting while the
T A standb y mode is active, “TRAFFIC” appears and
the playback source changes to the FM band. The
volume increases to the preset T A volume le vel (see
page 12) and the traffic programme can be heard.
To deactivate the TA standby mode, press TP
RDS again.
9
Page 10

Selecting your favorite programme for
PTY Standby Reception
You can select your favor ite programme for PTY
Standby Reception to store in memory.
When shipped from the factory, “NEWS” is stored
ENGLISH
as the programme type for PTY Standb y Reception.
1
Press and hold SEL (select) for more
than 2 seconds so that one of the
PSM items appears on the display.
(PSM: see page 21.)
2
Select “PTY STBY (standby)” if not
shown on the display.
Searching your favorite programme
You can search one of your 6 favorite programme
types stored in memory.
When shipped from the factory, the following 6
programme types hav e been stored in the number
buttons (1 to 6).
To store your favorite programme types, see
below.
To search your favorite programme type, see
page 11.
1
POP M
45
CLASSICS
2
ROCK M EASY M
AFFAIRS
To store your favorite programme types
1
Press and hold SEL (select) for more
than 2 seconds so that one of the PSM
items appears on the display.
(PSM: see page 21.)
3
6
VARIED
3
Select one of twenty-nine PTY codes.
(See page 13.)
Selected code name
appears on the display
and is stored into memory.
4
Press SEL (select) to finish the setting.
2
Select “PTY SRCH (search)” if not
shown on the display.
3
Select one of twenty-nine PTY codes.
(See page 13.)
Selected code name
appears on the display.
• If the code already stored
in memory is selected, it
will flash on the display.
10
Page 11

4
Press and hold the number button for
more than 2 seconds to store the PTY
code selected into the preset number
you want.
8 9 10 11 127
The selected code name and “MEMO”
(memory) appear alternately on the display.
• If there is a station broadcasting a programme of
the same PTY code as you selected, that station
is tuned into.
• If there is no station broadcasting a programme
of the same PTY code as you selected, the
station will not change.
Note:
In some areas, the PTY search will not work correctly.
ENGLISH
5
Press SEL (select) to finish the setting.
To search your favorite programme type
1
Press and hold PTY (programme type)
for more than 1 second while listening
to an FM station.
PTY
The last selected PTY code appears.
2
Select one of the PTY codes stored in
the preset number buttons (1 to 6).
8 9 10 11 127
Ex.: When “ROCK M” is stored in preset
number button 2
PTY search for your favorite programme
starts after 5 seconds.
Other convenient RDS functions
and adjustments
Automatic selection of the station
when using the number buttons
Usually when you press the number button, the
preset station is tuned into.
Howev er, when the preset station is an RDS station,
something different will happen. If the signals from
that preset station are not sufficient for good
reception, this unit, using the AF data, tunes into
another frequency broadcasting the same
programme as the original preset station is
broadcasting (Programme search).
• The unit takes some time to tune into another
station using Programme search.
T o activate prog ramme search, follow the procedure
below .
• See also “Changing the general settings (PSM)”
on page 20.
1 Press and hold SEL (select) for more than 2
seconds so that one of the PSM items appears
on the display.
2 Press ¢ or 4 to select
“P(Programme)-SEARCH.”
3 Turn the control dial clockwise to select “ON.”
Now programme search is activated.
4 Press SEL (select) to finish the setting.
To cancel programme search, repeat the same
procedure and select “OFF” in step 3 by turning
the control dial counterclockwise.
11
Page 12

Changing the display mode while
listening to an FM station
You can change the initial indication on the display
to station name (PS NAME) or station frequency
(FREQ) while listening to an FM RDS station.
ENGLISH
• See also “Changing the general settings (PSM)”
on page 20.
Setting the TA volume level
You can preset the volume level for TA Standby
Reception. When a traffic programme is received,
the volume lev el automatically changes to the preset
level.
• See also “Changing the general settings (PSM)”
on page 20.
1 Press and hold SEL (select) for more than 2
seconds so that one of the PSM items appears
on the display.
2 Press ¢ or 4 to select “TU DISP
(tuner display).”
3 T urn the control dial to set to the desired indication
(“PS NAME” or “FREQ”).
4 Press SEL (select) to finish the setting.
Note:
By pressing DISP, you can change the display while
listening to an FM RDS station only.
Each time you press the b utton, the following information
appears on the display:
Station frequency
(FREQ)
Programme type
(PTY)
Station name
(PS NAME)
• Then, the display goes back to the original indication
in several seconds.
1 Press and hold SEL (select) for more than 2
seconds so that one of the PSM items appears
on the display.
2 Press ¢ or 4 to select “TA VOL.”
3 Turn the control dial to set to the desired volume.
You can set it from “VOL 00” to “VOL 50.”
4 Press SEL (select) to finish the setting.
Automatic clock adjustment
When shipped from the factory, the clock built in
this unit is set to be readjusted automatically using
the CT (Clock Time) data in the RDS signal.
If you do not want to use automatic clock
adjustment, follow the procedure below.
• See also “Changing the general settings (PSM)”
on page 20.
1 Press and hold SEL (select) for more than 2
seconds so that one of the PSM items appears
on the display.
2 Press ¢ or 4 to select “AUTO ADJ
(adjustment).”
3 Turn the control dial counterclockwise to select
“OFF.”
Now automatic clock adjustment is canceled.
4 Press SEL (select) to finish the setting.
T o reactivate clock adjustment, repeat the same
procedure and select “ON” in step 3 b y turning the
control dial clockwise.
12
Note:
You must stay tuned to the same station for more than 2
minutes after setting “AUT O ADJ” to “ON.” Otherwise,
the clock time will not be adjusted. (This is because the
unit takes up to 2 minutes to capture the CT data in the
RDS signal.)
Page 13

PTY codes
NEWS: News
AFFAIRS: Topical programmes expanding
on current news or affairs
INFO: Programmes which impart advice
on a wide variety of topics
SPORT: Sport events
EDUCATE: Educational programmes
DRAMA: Radio plays
CULTURE: Programmes on national or
regional culture
SCIENCE: Programmes on natural science
and technology
VARIED: Other programmes like comedies
or ceremonies
POP M: Pop music
ROCK M: Rock music
EASY M: Easy-listening music
LIGHT M: Light music
CLASSICS: Classical music
OTHER M: Other music
WEATHER: Weather information
FINANCE: Reports on commerce, trading,
the Stock Market, etc.
CHILDREN: Entertainment programmes for
children
SOCIAL: Programmes on social activities
RELIGION: Programmes dealing with any
aspect of belief or faith, or the
nature of existence or ethics
PHONE IN: Programmes where people can
express their views either by
phone or in a public forum
TRAVEL: Programmes about travel
destinations, package tours, and
travel ideas and opportunities
LEISURE: Programmes concerned with
recreational activities such as
gardening, cooking, fishing, etc.
JAZZ: Jazz music
COUNTRY: Country music
NATION M: Current popular music from
another nation or region, in that
country’s language
OLDIES: Classic pop music
FOLK M: Folk music
DOCUMENT: Programmes dealing with factual
matters, presented in an
investigative style
ENGLISH
13
Page 14

TAPE OPERATIONS
ENGLISH
Listening to a cassette
You can play back type 1 (normal) tapes.
1
Open the control panel.
2
Insert a cassette into the cassette
compartment.
The unit turns on and
tape play starts
automatically.
3
Close the control panel by hand.
TAPE indicator appears.
DISP
TP
RDS
PTY
8 9 10 11 127
DAB
MO
To stop play and eject the cassette
Press 0.
Tape play stops and the cassette automatically
ejects from the cassette compartment. The source
changes to the previously selected one.
If you change the source, tape play also stops
(without ejecting the cassette this time).
• You can eject the cassette while the unit is turned
off by pressing 0.
To fast-forward and rewind a tape
Press ¢ for more than
1 second to fast-f orward the tape.
When the tape reaches its end,
the tape is reversed and pla yback
starts from the beginning of the
other side.
Press 4 for more than
1 second to rewind the tape.
When the tape reaches its end,
playback of the same side starts.
4
Select the tape direction.
Each time you press T APE 23,
the tape direction changes
alternately forward ( )
and rev erse ( ).
Note on One-Touch Operation:
When a cassette is already in the cassette
compartment, select tape as the source by
pressing TAPE 23 to start tape play.
14
To stop fast forward and rewind at any
position on the tape, press TAPE 23.
Tape play starts from that position on the tape.
Notes:
• When one side of the tape reaches its end during
play, the other side of the tape automatically starts
playing. (Auto Reverse)
• When the tape reaches its end while fast-forwarding,
the tape direction will be changed automatically.
Page 15

To play back tapes recorded with the
Dolby B NR
Press and hold RPT (Dolby B/repeat) to set
the Dolby B NR* system.
The indicator lights up, and “DOLBY B”
appears on the display for several seconds.
To cancel the Dolby B NR, press and hold
RPT (Dolby B/repeat) again so that the
indicator goes off.
*Manufactured under license from Dolby
Laboratories.
“Dolby” and the double-D symbol are
trademarks of Dolby Laboratories.
Prohibiting cassette ejection
You can prohibit cassette ejection and “lock” a
cassette in the cassette compartment.
Press and hold TAPE 23 and for more
than 2 seconds.
“NO EJECT” flashes on the display for about 5
seconds, and the cassette is “locked.”
Finding the beginning of a tune
Multi Music Scan allows you to automatically start
playback from the beginning of a specified tune.
You can specify up to 9 tunes ahead of or before
the current tune.
During playback
Specify how many tunes ahead of or
before the current tune the one you want
is located.
Press ¢ to locate a tune
ahead of the current tune on the
cassette.
Press 4 to locate a tune
before the current tune on the
cassette.
ENGLISH
To cancel the prohibition and “unlock” the
cassette, press and hold TAPE 23 and
for more than 2 seconds again.
“EJECT OK” flashes for about 5 seconds, and this
time the cassette is “unlocked.”
Note:
If you press 0 while cassette ejection is prohibited,
the display panel flips down, but the cassette continues
to play and cannot be ejected.
Each time you press the buttons, the number
changes up to ±9.
When the beginning of the specified tune is
located, playback starts automatically.
Notes:
• While locating a specified tune:
– If the tape is rewound to its beginning, playback
starts from the beginning of that side.
– If the tape is fast-forwarded to the end, it is
reversed and played from the beginning of the
other side.
• In the following cases, the Multi Music Scan
function may not operate correctly:
– Tapes with tunes having long pianissimo passages
(very quiet parts) or non-recorded portions
between tunes.
– Tapes with short non-recorded sections.
– Tapes with high level of noise or humming
between tunes.
– The Dolby NR setting does not match. For
example, if Dolby B NR is on and the tape was
recorded with no Dolby NR.
15
Page 16

Other convenient tape functions
Skipping the blank portions on the tape
Playing the current tune repeatedly
You can play the current tune repeatedly (Repeat
Play).
You can skip blank portions between the tunes
ENGLISH
(Blank Skip).
When this function is on, the unit skips blank
portions of 15 seconds or more, fast-forwards to
the next tune, then starts playing it.
• See also “Changing the general settings (PSM)”
on page 20.
1
Press and hold SEL (select) for more
than 2 seconds so that one of the
PSM items appears on the display.
(PSM: see page 21.)
2
Press ¢ or 4 to select
“B. SKIP (blank skip).”
Press RPT (repeat/Dolby B) while
playing a tune you want to hear over
again.
Each time you briefly press the
button, Repeat Play turns on and
off alternately.
Lights up when Repeat Play is turned on.
When the tune has been played, the tape is
automatically rewound to the beginning of that
tune and the same tune will be played again.
To cancel Repeat Play, press RPT again so
that the RPT indicator goes off.
3
Turn the control dial clockwise to
select “ON.”
Now Blank Skip is
activated.
4
Press SEL (select) to finish the setting.
To cancel Blank Skip, repeat the same
procedure and select “OFF” in step 3 by turning
the control dial counterclockwise.
Note:
In the following cases, Blank Skip and Repeat Play
may not operate correctly:
– Tapes with tunes having long pianissimo passages
(very quiet parts) or non-recorded portions during
tunes.
– Tapes with short non-recorded sections.
– Tapes with high level noise or humming between
tunes.
– The Dolby NR setting does not match. For example,
if Dolby B NR is on and the tape was recorded with
no Dolby NR.
16
Page 17

Adjusting the sound
SOUND ADJUSTMENTS
2
Adjust the level.
You can adjust the sound characteristics to your
preference.
1
Select the item you want to adjust.
Each time you press the button,
the adjustable items change as
follows:
BAS
(bass)
VOL
(volume)
Indication To do: Range
BAS Adjust the bass. –06 (min.)
TRE Adjust the treble. –06 (min.)
TRE
(treble)
LOUD
(loudness)
FAD
(fader)
BAL
(balance)
|
+06 (max.)
|
+06 (max.)
To increase the level.
ENGLISH
To decrease the level.
Equalization pattern changes as you adjust the
bass or treble.
Note:
Normally, the control dial works as the volume
control. So you do not have to select “VOL” to adjust
the volume level.
FAD* Adjust the front R06 (Rear only)
and rear speaker |
balance. F06 (Front only)
BAL Adjust the left L06 (Left only)
and right speaker |
balance. R06 (Right only)
LOUD Boost low and high
frequencies to
produce a wellbalanced sound
at low volume
level.
VOL Adjust the volume. 00 (min.)
* If you are using a two-speaker system, set the fader
level to “00.”
LOUD ON
|
LOUD OFF
|
50 (max.)
17
Page 18

Using the sound control memory
(SCM)
You can select and store a preset sound
ENGLISH
adjustment suitable for each playback source
(Advanced SCM).
Selecting and storing the sound modes
Once you select a sound mode, it is stored in
memory. It will be recalled ever y time you select
the same source and will be shown on the display.
A sound mode can be stored for each of the
following sources — FM1, FM2, FM3, AM, tape
and external components.
• If you do not want to store the sound mode
separately for each playback source, but want
to use the same sound mode for all the sources,
see “To cancel Advanced SCM – SCM LINK” on
page 22.
Select the sound mode you want.
Indication For: Preset values
BAS TRE LOUD
SCM OFF (Flat sound) 00 00 ON
BEAT Rock or disco +02 00 ON
music
SOFT Quiet +01 –03 OFF
background
music
POP Light music +04 +01 OFF
Recalling the sound modes
When “SCM LINK” is set to “LINK ON,”
select the source.
Each time you change the
playback source, the SCM
indicator flashes on the display.
Ex.: When you select “BEAT”
Each time you press the button, the sound mode
changes as follows:
SCM OFF
(BEAT) (SOFT) (POP)
• When “SCM LINK” is set to “LINK ON,” the
selected sound mode can be stored in memory
for the current source and the eff ect applies only
to the current source.
• When “SCM LINK” is set to “LINK OFF,” the
selected sound mode effect applies to any source .
The sound mode stored in memory for the
selected source is recalled.
Notes:
• You can adjust each sound mode to your preference,
and store it in memory.
If you want to adjust and store your original sound
mode, see “Storing your own sound adjustments”
on page 19.
• To adjust the bass and treble reinforcement levels or
to turn on/off the loudness function temporarily, see
page 17. (Your adjustments will be canceled if
another source is selected.)
18
Page 19

Storing your own sound
adjustments
You can adjust the sound modes (BEAT, SOFT,
POP) to your preference and store your own
adjustments in memory.
• There is a time limit in doing the following
procedure. If the setting is canceled before you
finish, start from step 1 again.
1
Call up the sound mode you want to
adjust.
• See page 18 for details.
Ex.: When you select “BEAT”
2
Select “BAS (bass)”, “TRE (treble)” or
“LOUD (loudness).”
4
Repeat steps 2 and 3 to adjust the
other items.
5
Press and hold SCM until the sound
mode you have selected in step 1
flashes on the display.
Your adjustment made for the
selected sound mode is stored in
memory.
6
Repeat the same procedure to store
other sound modes.
To reset to the factory settings
Repeat the same procedure and reassign the
preset values listed in the table on page 18.
ENGLISH
Ex.: When you adjust “TRE” (treble)
3
Adjust the bass or treble level or turn
the loudness function ON/OFF.
• See page 17 for details.
Equalization pattern changes as you adjust the
bass or treble.
19
Page 20

OTHER MAIN FUNCTIONS
Setting the clock
Y ou can also set the cloc k system to either 24 hours
or 12 hours.
1
ENGLISH
Press and hold SEL (select) for more
than 2 seconds so that one of the PSM
items appears on the display.
(See page 21.)
2
Set the hour.
1 Select “CLOCK H (hour)” if not shown on
the display.
2 Adjust the hour.
1
2
To check the current clock time while the unit
is turned off, press DISP (display).
The power turns on, the clock time is shown for 5
seconds, then the power turns off.
Changing the general settings
(PSM)
You can change the items listed on the next page
by using the PSM (Preferred Setting Mode) control.
Basic Procedure
1
Press and hold SEL (select) for more
than 2 seconds so that one of the PSM
items appears on the display.
(See page 21.)
3
Set the minute.
1 Select “CLOCK M (minute).”
2 Adjust the minute.
1
4
Set the clock system.
1 Select “24H/12H. ”
2 Select “24H” or “12H.”
12
5
Press SEL (select) to finish the setting.
2
2
Select the PSM item you want to
adjust. (See page 21.)
3
Adjust the PSM item selected.
4
Repeat steps 2 and 3 to adjust the
other PSM items if necessary.
5
Press SEL (select) to finish the setting.
20
Page 21

Preferred Setting Mode (PSM) items
1
CLOCK H Hour adjustment
CLOCK M Minute adjustment
SCM LINK Sound control
24H/12H 24/12-hour time
AUTO ADJ Automatic clock
CLOCK Clock display
TU DISP Tuner display
PTY STBY PTY standby
PTY SRCH PTY search
TA VOL Traffic announcement
2
Select.Hold.
memory linkage
display
setting
volume
3
Set.
Counterclockwise
Back Advance
LINK OFF 18, 22LINK ON
12H
OFF
OFF
FREQ PS NAME
29 programme types
(see pages 10 and 13.)
VOL 00 – VOL 50
Clockwise
AdvanceBack
LINK ON
24H
ON
ON
Factory-preset
settings
0:00 20
24H
ON
ON
PS NAME
NEWS
(See page 10.)
See
page
20
12
22
12
10
10
12VOL 20
ENGLISH
P-SEARCH Programme search
DAB AF* Alternative frequency
search
LEVEL Level display
TEL Telephone muting
B. SKIP Blank skip
EXT IN** External component
• Press SEL (select) to finish the setting.
* Displayed only when the DAB tuner is connected.
** Displayed only when one of the following sources is selected – FM, AM and Tape.
OFF
AUDIO 1
OFF
MUTING 1
OFF
CHANGER LINE IN CHANGER 22, 26
ON
AF ONAF OFF
AUDIO 2
MUTING 2
OFF
AUDIO 2 22
OFF 22
OFFOFF ON 16
11
30AF ON
21
Page 22

To cancel Advanced SCM – SCM LINK
To select the telephone muting – TEL
You can cancel the Advanced SCM (Sound Control
Memory), and unlink the sound modes and the
playback sources.
When shipped from the factory, a different sound
ENGLISH
mode can be stored in memory for each source so
that you can change the sound modes simply by
changing the sources.
• LINK ON: Advanced SCM (different sound
modes for different sources).
• LINK OFF: Conventional SCM (one sound
mode for all sources).
To set the clock display – CLOCK
You can set the clock to be shown on the display
when the unit is turned on.
When shipped from the factory, the clock is set to
be shown on the display.
• ON: Clock display is turned on.
• OFF: Clock display is turned off. When
“OFF” is selected, the current
source name or station band
appears instead of the clock display
(except when “EXT–LINE IN” is
selected as the source).
To select the level meter – LEVEL
This mode is used when a cellular phone system is
connected. Depending on the phone system used,
select either “MUTING 1” or “MUTING 2, ” whichever
mutes the sounds from this unit.
When shipped from the factory, this mode is
deactivated.
• MUTING 1: Select this if this setting can mute
the sounds.
• MUTING 2: Select this if this setting can mute
the sounds.
• OFF: Cancels the telephone muting.
To select the external component to use
– EXT IN
You can connect the external component to the CD
changer jack on the rear using the Line Input Adaptor
KS-U57 (not supplied).
To use the external component as the playback
source through this unit, you need to select which
component – CD changer or external component
– to use.
When shipped from the factory, CD changer is
selected as the external component.
• LINE IN: To use the external component other
than CD changer.
• CHANGER: To use the CD changer.
You can select the level display according to your
preference.
When shipped from the factory, “AUDIO 2” is
selected.
• AUDIO 1:
• AUDIO 2:
• OFF:
Level meter illuminates from bottom
to top.
Alternates level meter (moves from
bottom to top) and illumination
display.
Erases the audio level indicator.
Note:
For connecting the Line Input Adaptor KS-U57 and the
external component, r efer to the Installation/Connection
Manual (separate volume).
22
Page 23

Detaching the control panel
You can detach the contol panel when leaving the
car.
When detaching or attaching the control panel,
be careful not to damage the connectors on the
back of the control panel and on the panel holder .
Detaching the control panel
Before detaching the control panel, be sure to turn
off the power.
1
Unlock the control panel.
Attaching the control panel
1
Insert the right side of the control panel
into the groove on the panel holder .
2
Press the left side of the control panel
to fix it to the panel holder.
ENGLISH
2
Pull the control panel out of the unit.
3
Put the detached control panel into the
provided case.
Note on cleaning the connectors:
If you frequently detach the control panel, the
connectors will deteriorate.
T o minimize this possibility, periodically wipe the
connectors with a cotton swab or cloth moistened
with alcohol, being careful not to damage the
connectors.
Connectors
23
Page 24

CD CHANGER OPERATIONS
DISP
TP
ENGLISH
RDS
PTY
8 9 10 11 127
We recommend that you use one of the CH-X series
with your unit.
If you have another CD automatic changer , consult
your JVC IN-CAR ENTERTAINMENT dealer for
connections.
• For example, if your CD automatic changer is one of
the KD-MK series, you need a cord (KS-U15K) for
connecting it to this unit.
Before operating your CD automatic changer:
• Refer also to the Instructions supplied with your
CD changer.
• If no discs are in the magazine of the CD
changer or the discs are inserted upside down,
“NO DISC” will appear on the display. If this
happens, remove the magazine and set the
discs correctly.
• If “RESET 1” – “RESET 8” appears on the
display, something is wrong with the
connection between this unit and the CD
changer. If this happens, chec k the connection
and make sure the cords are connected firmly .
Then, press the reset button of the CD
changer.
DAB
MO
Playing CDs
Select the CD automatic changer (CD-CH).
Playback starts from the first track
of the first disc.
All tracks of all discs are play ed back.
Elapsed playing time
* When “CLOCK” is set to “ON” (see page 22),
disc number will soon change to clock time.
Note on One-Touch Operation:
When you press CD-CH, the power automatically turns
on. You do not have to press to turn on the
power.
Track number
Disc number*
24
To fast-forward or reverse the track
Press and hold ¢ , while
playing a CD, to fast-forward the
track.
Press and hold 4 , while
playing a CD, to reverse the
track.
Page 25

To go to the next track or the previous tracks
Selecting CD playback modes
Press ¢ briefly, while
playing a CD, to go ahead to
the beginning of the next track.
Each time you press the button
consecutively, the beginning of
the next track is located and
played back.
Press 4 briefly, while
playing a CD, to go back to the
beginning of the current track.
Each time you press the button
consecutively, the beginning of
the previous tracks is located
and played back.
To go to a particular disc directly
Press the number button corresponding to the disc
number to start its playback (while the CD changer
is playing).
8 9 10 11 127
To play back tracks at random (Random Play)
MO
Mode
RND1 Lights All tracks of the current
(random1) disc, then the tracks of
RND2 Flashes All tracks of all discs
(random2) inserted in the magazine.
Each time you press RND MO
(random/monaural), CD random play
mode changes as follows:
RND1
RND2
Canceled
RND
Indicator
Plays at random
the next disc and so on.
To play back tracks repeatedly (Repeat Play)
Each time you press RPT
(repeat/Dolby B), CD repeat play
mode changes as follows:
ENGLISH
• To select a disc number from 1 – 6:
Press 1 (7) – 6 (12) briefly.
• To select a disc number from 7 – 12:
Press and hold 1 (7) – 6 (12) for more than 1
second.
Elapsed playing time
Ex.: When disc number 3 is selected
Track number
Disc number
RPT1 RPT2
Canceled
Mode
RPT1 Lights The current track (or
(repeat1) specified track).
RPT2 Flashes All tracks of the current
(repeat2) disc (or specified disc).
RPT
Indicator
Plays repeatedly
25
Page 26

EXTERNAL COMPONENT OPERATIONS
DISP
TP
ENGLISH
RDS
PTY
8 9 10 11 127
Playing an external component
You can connect the external component to the
CD changer jack on the rear using the Line Input
Adaptor KS-U57 (not supplied).
Preparations:
• For connecting the Line Input Adaptor KS-U57 and
the external component, refer to the Installation/
Connection Manual (separate volume).
• Before operating the external component using the
following procedure, select the external input
correctly. (See “To select the external component to
use – EXT IN” on page 22.)
DAB
MO
2
Turn on the connected component
and start playing the source.
3
Adjust the volume.
4
Adjust the sound characteristics
you want. (See page 17.)
1
Select the external component
(CD-CH).
• If “LINE IN” does not appear on the display, see
page 22 and select the external input (“LINE IN”).
• Displayed only when one of the following
sources is selected – FM, AM and Tape.
Note on One-Touch Operation:
When you press CD-CH, the power automatically
comes on. You do not have to press to turn
on the power.
26
Page 27

DAB TUNER OPERATIONS
FM/AMDAB
DISP
TP
RDS
PTY
8 9 10 11 127
We recommend that you use DAB (Digital Audio
Broadcasting) tuner KT-DB1500 with your unit.
If you have another DAB tuner, consult your JVC
IN-CAR ENTERTAINMENT dealer.
• Refer also to the Instructions supplied with your
DAB tuner.
What is DAB system?
DAB is one of the digital radio broadcasting
systems availab le today . It can deliver CD quality
sound without any annoying interference and
signal distortion. Furthermore, it can carry text,
pictures and data.
In contrast to FM broadcast, where each
programme is transmitted on its own frequency,
DAB combines several programmes (called
“services”) to form one “ensemble.”
With the DAB tuner connected with this unit,
you can enjoy these DAB services.
DAB
MO
Tuning into an ensemble and
one of the services
A typical ensemble has 6 or more programmes
(services) broadcast at the same time. After tuning
into an ensemble, you can select a service you
want to listen to.
Before you start....
Press DAB (FM AM) briefly if tape, CD changer or
external component is the current source.
1
Select the DAB tuner.
Each time you press and
hold the button, the DAB
tuner and the FM/AM tuner
are alternately selected.
ENGLISH
2
Select the DAB band (DAB1, DAB2
or DAB3).
Each time you press the
button, the DAB band
changes as follows:
D1
(DAB 1)
Note:
This receiver has thr ee DAB bands (D AB1, DAB2,
DAB3). You can use any one of them to tune into
an ensemble.
CONTINUED ON THE NEXT PAGE
D2
(DAB 2)
D3
(DAB 3)
27
Page 28

3
Ensemble name
Service name
Channel number
Frequency
Start searching an ensemble.
ENGLISH
When an ensemble is received, searching
stops.
To stop searching before an ensemble is
received, press the same button you have
pressed for searching.
4
Select a service you want to listen to.
MO
Press ¢ to search
ensembles of higher
frequencies.
Press 4 to search
ensembles of lower
frequencies.
Press 5 (RND MO) to select
the next service.
To change the display information while
tuning into an ensemble
Normally service name is shown on the display.
If you want to change the display information,
press DISP.
Each time you press the button, the following
information appears on the display for a while.
To tune into a particular ensemble without
searching:
Press ∞ (RPT ) to select the
previous service.
1 Press and hold DAB (FM AM) to select DAB
tuner as the source.
2 Press DAB (FM AM) repeatedly to select the
DAB band (DAB1, DAB2 or DAB3).
3 Press and hold ¢ or 4 for more
than 1 second.
4 Press ¢ or 4 repeatedly until the
ensemble you want is reached.
• If you hold down the button, the frequency
keeps changing until you release the button.
To restore the FM/AM tuner
Press and hold DAB (FM AM) again.
28
Page 29

Storing DAB services in
memory
You can preset up to 6 DAB services in each
DAB band (DAB1, DAB2 and DAB3) manually.
1
Select the DAB tuner.
Each time you press and
hold the button, the DAB
tuner and the FM/AM tuner
are alternately selected.
FM/AMDAB
2
Select the DAB band (DAB1, DAB2
or DAB3) you want.
Each time you press the
button, the DAB band
changes as follows:
5
Press and hold the number button
(in this example, 1) you want to
store the selected service into for
more than 2 seconds.
7
Selected band/preset number and
“MEMO” (memory) appear
alternately for a while.
ENGLISH
D1
(DAB 1)
3
Tune into an ensemble you want.
4
Select a service of the ensemble you
want.
MO
Press 5 (RND MO) to select
the next service.
Press ∞ (RPT ) to select the
previous service.
D2
(DAB 2)
D3
(DAB 3)
6
Repeat the above procedure to store
other DAB services into other preset
numbers.
Notes:
• A previously pr eset DAB service is er ased when a new
DAB service is stored in the same preset number.
• Preset DAB ser vices are erased when the power supply
to the memory circuit is interrupted (for example,
during battery replacement). If this occurs, preset the
DAB services again.
29
Page 30

Tuning into a preset DAB
service
You can easily tune into a preset DAB service.
ENGLISH
Remember that you must store services first. If
you have not stored them yet, see page 29.
1
Select the DAB tuner.
Each time you press and
hold the button, the DAB
tuner and the FM/AM tuner
are alternately selected.
FM/AMDAB
2
Select the DAB band (DAB1, DAB2
or DAB3) you want.
Each time you press the
button, the DAB band
changes as follows:
D1
(DAB 1)
D2
(DAB 2)
D3
(DAB 3)
What you can do more with DAB
Tracing the same programme automatically
(Alternative Reception)
You can keep listening to the same programme.
• While receiving a DAB service:
When driving in an area where a service cannot
be received, this unit automatically tunes into
another ensemble or FM RDS station,
broadcasting the same programme.
• While receiving an FM RDS station:
When driving in an area where a DAB service is
broadcasting the same programme as the FM
RDS station is broadcasting, this unit
automatically tunes into the DAB service.
Note:
When reception switches between DAB and FM, the
listening volume level may increase or decrease
inconveniently. This change in the volume level results
from unequal audio injection levels a t br oadcaster site,
but not from the malfunction of this unit.
To use Alternative Reception
3
Select the number (1 – 6) for the
preset DAB service you want.
8 9 10 11 127
When shipped from the factory, Alternative
Reception is activated.
1 Press and hold SEL (select) for more than 2
seconds so that one of the PSM items appears
on the display.
2 Press ¢ or 4 to select “DAB AF”
(alternative frequency).
3 Turn the control dial to select the desired mode.
• AF ON: Traces the programme among DAB
services and FM RDS stations
— Alternative Reception. The AF
indicator lights up on the display
(see page 8).
• AF OFF:Deactivates Alternative Reception.
Note:
When Alternative Reception (for DAB services) is
activated, Network-Tracking Reception (for RDS
stations: see page 8) is also activated automatically .
On the other hand, Network-Tracking Reception
cannot be deactivated without deactivating
Alternative Reception.
4 Press SEL (select) to finish the setting.
30
Page 31

USING THE REMOTE CONTROLLER
This unit can also be remotely controlled as
instructed here (with an optionally purchased
remote controller). We recommend that you
use remote controller RM-RK31 or RM-RK50
with your unit.
(Example: When you are using RM-RK31)
Before using the remote controller:
• Aim the remote controller directly at the remote
sensor on the main unit. Make sure there is no
obstacle in between.
Remote sensor
DISP
TP
RDS
PTY
89107
2. Place the battery.
Slide the battery into the holder with the + side
facing upwards so that the battery is fixed in
the holder.
Lithium coin battery
(product number:
CR2025)
3. Return the battery holder.
Insert again the battery holder pushing it until
you hear a clicking sound.
(back side)
ENGLISH
• Do not expose the remote sensor to strong
light (direct sunlight or artificial lighting).
Installing the battery
When the controllable range or effectiv eness of the
remote controller decreases, replace the battery.
1. Remove the battery holder.
1) Push out the battery holder in the direction
indicated by the arrow using a ball-point
pen or a similar tool.
2) Remove the battery holder.
(back side)
1)
2)
WARNING:
• Store the battery in a place where children cannot
reach.
If a child accidentally swallows the battery,
consult a doctor immediately.
• Do not recharge, short, disassemble or heat the
battery or dispose it in a fire.
Doing any of these things may cause the battery to
give off heat, crack or start a fire.
• Do not leave the battery with other metallic
materials.
Doing this may cause the battery to give off heat,
crack or start a fire.
• When throwing away or saving the battery, wrap it
in tape and insulate; otherwise, the battery may
start to give off heat, crack or start a fire.
• Do not poke the battery with tweezers or similar
tools.
Doing this may cause the battery to give off heat,
crack or start a fire.
31
Page 32

Location of the buttons
RM-RK31
ENGLISH
5
1
2
3
4
1 • Turns on the unit if pressed when the unit is
turned off.
• T urns off the unit if pressed and held until “SEE
YOU” appears on the display.
• Drops the volume lev el in a moment if pressed
briefly .
Press again to resume the volume.
2 • Functions as the BAND button while listening
to the FM broadcast (or the DAB tuner).
Each time you press the button, the band
changes.
• Functions as the DISC + button while listening
to the CD changer.
Each time you press the button, the disc
number increases, and the selected disc starts
playing.
• Functions as the PROG button while listening
to a tape.
Each time you press the button, the tape
direction changes alternately.
6
7
3 • Functions as the PRESET button while
listening to the radio (or the DAB tuner).
Each time you press the button, the preset
station (or service) number increases, and the
selected station (or service) is tuned into.
• Functions as the DISC – button while
listening to the CD changer.
Each time you press the button, the disc
number decreases, and the selected disc
starts playing.
4 Functions the same as the control dial on the
main unit.
NOTE:
5 Selects the sound mode.
Each time you press the button, the mode
changes.
6 Selects the source.
Each time you press the button, the source
changes.
7 • Searches stations while listening to the radio.
• Selects services while listening to the DAB
• Searches ensembles while listening to the
• Functions as the fast forward/rewind buttons
• Fast-f orwards or re v erses the track if pressed
• Skips to the beginning of the next track or goes
This button does not function for the
preferred setting mode adjustment.
tuner if pressed briefly.
DAB tuner if pressed f or more than 1 second.
or multi music scan buttons while listening to
a tape.
and held while listening to a CD.
back to the beginning of the current (or
previous tracks) if pressed briefly while
listening to a CD.
32
Page 33

MAINTENANCE
This unit requires very little attention, but you will
be able to extend the life of the unit if you follow
the instructions below.
To clean the head
• Clean the heads after every 10 hours of use using
a wet-type head cleaning tape (available at an
audio store).
When the head becomes dirty, you may realize
the following symptoms:
– Sound quality is reduced.
– Sound level decreases.
– Sound drops out.
• Do not play dirty or dusty tapes.
• Do not touch the highly-polished head with any
metallic or magnetic tools.
CAUTION:
• Do not play the cassettes with peeling labels;
otherwise, they can damage the unit.
• Tighten tapes to remove slack since loose tape
may become entangled with the mechanism.
• Do not leave a cassette in the cassette
compartment after use, as the tape may become
slack.
The function below is also provided to ensure the
longer life of this unit.
Ignition key-off release/Ignition key-on
play
• Turning off the ignition key with a cassette in the
compartment automatically releases the tape
from the unit’s tapehead.
• Turning on the ignition key with a cassette in the
compartment starts playback automatically if you
turned off the ignition during tape play.
ENGLISH
To keep the tape clean
• Always store the cassettes in their storage cases
after use.
• Do not store cassettes in the following places:
– Subject to direct sunlight
– With high humidity
– At extremely hot temperatures
33
Page 34

TROUBLESHOOTING
What appears to be trouble is not always serious. Check the following points before calling a service
center.
Symptoms
• A cassette tape cannot be
ENGLISH
inserted.
• A cassette tape cannot be
ejected.
• Cassette tapes become hot.
• Tape sound is at very low
level and sound quality is
degraded.
• Sound is sometimes
interrupted.
• Sound cannot be heard from
the speakers.
• SSM (Strong-station
Sequential Memory)
automatic preset does not
work.
Causes
You have tried to insert a
cassette in the wrong way.
Cassette ejection is prohibited.
This is not a malfunction.
The tape head is dirty.
Connections are not good.
The volume is turned to the
minimum level.
Connections are incorrect.
Signals are too weak.
Remedies
Insert the cassette with the
exposed tape facing right.
Press and hold TAPE 23 and
for more than two seconds.
Clean it with a head cleaning tape.
Check the cords and connections.
Adjust it to the optimum level.
Check the cords and connections.
Store stations manually.
• Static noise while listening to
the radio.
• “NO DISC” appears on the
display.
• “NO MAG” appears on the
display.
• “RESET 8” appears on the
display.
• “RESET 1” – “RESET 7”
appears on the display.
• This unit does not work at all.
• The CD changer does not
work at all.
The antenna is not connected
firmly.
No CD is in the magazine.
CDs are inserted incorrectly.
No magazine is loaded in the
CD changer.
This unit is not connected to a
CD changer correctly.
The built-in microcomputer may
function incorrectly due to
noise, etc.
Connect the antenna firmly.
Insert CDs into the magazine.
Insert them correctly.
Insert the magazine.
Connect this unit and the CD
changer correctly and press the
reset button of the CD changer.
Press the reset button of the CD
changer.
Press the reset button on the panel
holder. (The cloc k setting and preset
stations stored in memory are
erased.) (See page 2.)
34
Page 35

SPECIFICATIONS
AUDIO AMPLIFIER SECTION
Maximum Power Output:
Front: 45 W per channel
Rear: 45 W per channel
Continuous Power Output (RMS):
Front: 17 W per channel into 4 Ω, 40 Hz
to 20 000 Hz at no more than
0.8% total harmonic distortion.
Rear: 17 W per channel into 4 Ω, 40 Hz
to 20 000 Hz at no more than
0.8% total harmonic distortion.
Load Impedance: 4 Ω (4 Ω to 8 Ω allowance)
Tone Control Range:
Bass: ±10 dB at 100 Hz
Treble: ±10 dB at 10 kHz
Frequency Response: 40 Hz to 20000 Hz
Signal-to-Noise Ratio: 70 dB
Line-Out Level/Impedance:
2.0 V/20 kΩ load (250 nWb/m)
TUNER SECTION
CASSETTE DECK SECTION
Wow & Flutter: 0.11% (WRMS)
Fast-Wind Time: 100 sec. (C-60)
Frequency Response (Dolby B NR OFF):
30 Hz to 16 000 Hz (Normal tape)
Signal-to-Noise Ratio: (Normal tape)
(Dolby B NR ON): 65 dB
(Dolby B NR OFF): 56 dB
Stereo Separation: 40 dB
GENERAL
Power Requirement:
Operating Voltage: DC 14.4 V
(11 V to 16 V allowance)
Grounding System: Negative ground
Allowable Operating Temperature: 0°C to +40°C
Dimensions (W × H × D):
Installation Size: 182 mm × 52 mm × 150 mm
Panel Size: 188 mm × 58 mm × 14 mm
Mass: 1.4 kg (excluding accessories)
ENGLISH
Frequency Range:
FM: 87.5 MHz to 108.0 MHz
AM: (MW)522 kHz to 1 620 kHz
(LW) 144 kHz to 279 kHz
[FM Tuner]
Usable Sensitivity: 11.3 dBf (1.0 µV/75 Ω)
50 dB Quieting Sensitivity:
16.3 dBf (1.8 µV/75 Ω)
Alternate Channel Selectivity (400 kHz):
65 dB
Frequency Response: 40 Hz to 15000 Hz
Stereo Separation: 30 dB
Capture Ratio: 1.5 dB
[MW Tuner]
Sensitivity: 20 µV
Selectivity: 35 dB
[LW Tuner]
Sensitivity: 50 µV
Design and specifications subject to change without
notice.
35
Page 36

Having TROUBLE with operation?
Please reset your unit
Refer to page of How to reset your unit
Haben Sie PROBLEME mit dem Betrieb?
Bitte setzen Sie Ihr Gerät zurück
Siehe Seite Zurücksetzen des Geräts
Vous avez des PROBLÈMES de fonctionnement?
Réinitialisez votre appareil
Référez-vous à la page intitulée Comment réinitialiser votre appareil
Hebt u PROBLEMEN met de bediening?
Zie de pagina met de paragraaf Het apparaat terugstellen
EN, GE, FR, NL
Stel het apparaat terug
VICTOR COMPANY OF JAPAN, LIMITED
1101KKSMDTJEIN
JVC
 Loading...