

Page 1
CASSETTE RECEIVER
РЕСИВЕР С КАССЕТНЫМ ПРОИГРЫВАТЕЛЕМ
KS-FX915R/KS-FX815
KS-FX915R
ENGLISH
РУССКИЙ
For installation and
connections, refer to the
separate manual.
Указания по установке
и выполнению
соединений приводятся
в отдельной
инструкции.
DISP
TP
RDS
PTY
8 9 10 11 127
KS-FX915R
DAB
MO
KS-FX815
LOUD
DISP
SCAN
8 9 10 11 127
В соответствии с Законом Российской Федерации “О защите прав
потребителей” срок службы (г одности) данного товара “по истечении
которого он может представлять опасность для жизни, здоровья
потребителя, причинять вре д его имуществу или окружающей сре де”
составляет семь (7) лет со дня произво дства. Этот срок является
временем, в течение которого потребитель данног о товара может
безопасно им пользова ться при у словии соблю дения инструкции по
эк сплуатации данного товара, проводя необходимое обслуживание,
включающее замену р асходных ма териалов и/или соответствующее
ремонтное обеспечение в специализированном сервисном центре.
Дополнительные к осметические материалы к данному товар у,
поставляемые вместе с ним, могут хр аниться в течение дв ух (2) лет со
дня его производства.
Срок службы (г одности), кроме срока хранения дополнительных
косметических материалов, упомянутых в пре дыдущих дв ух пунктах, не
затрагивает никаких других прав потребителя, в частности, гарантийного
свидетельства JV C, которое он может получить в соответствии с зак оном
о правах потребителя или других законов, связанных с ним.
KS-FX815
MO
INSTRUCTIONS
ИНСТРУКЦИИ ПО ЭКСПЛУАТАЦИИ
GET0018-001A
[EE]
Page 2
Thank you for purchasing a JVC product. Please read all instructions carefully before operation,
to ensure your complete understanding and to obtain the best possible performance from the unit.
CONTENTS
How to reset your unit............................... 2
LOCATION OF THE BUTTONS............ 3
ENGLISH
Control panel ........................................... 3
Remote controller (only for KS-FX915R)... 4
Preparing the remote controller
(only for KS-FX915R)............................. 5
BASIC OPERATIONS ...................... 6
Turning on the power ................................ 6
RADIO BASIC OPERATIONS ............. 7
Listening to the radio ................................ 7
Storing stations in memory....................... 8
Tuning into a preset station ...................... 9
Other convenient tuner functions
(only for KS-FX815)............................... 9
RDS OPERATIONS (only for KS-FX915R) .... 10
What you can do with RDS EON.............. 10
Other convenient RDS functions and
adjustments........................................... 13
TAPE OPERATIONS ....................... 16
Listening to a cassette.............................. 16
Finding the beginning of a tune ................ 17
Other convenient tape functions............... 18
SOUND ADJUSTMENTS .................. 19
Adjusting the sound ................................. 19
Turning on/off the loudness function
(only for KS-FX815)............................... 19
Using the sound control memory.............. 20
Storing your own sound adjustments ....... 21
OTHER MAIN FUNCTIONS ............... 22
Setting the clock ...................................... 22
Changing the general settings (PSM) ...... 22
Detaching the control panel...................... 25
CD CHANGER OPERATIONS ............. 26
Playing CDs ............................................. 26
Selecting CD playback modes.................. 27
EXTERNAL COMPONENT OPERATIONS... 28
Playing an external component ................ 28
DAB TUNER OPERATIONS
(only for KS-FX915R) ................................ 29
Tuning into an ensemble and one of the
services ................................................. 29
Storing DAB services in memory ............. 31
Tuning into a preset DAB service ............. 32
What you can do more with DAB.............. 32
MAINTENANCE ............................ 33
TROUBLESHOOTING...................... 34
SPECIFICATIONS .......................... 35
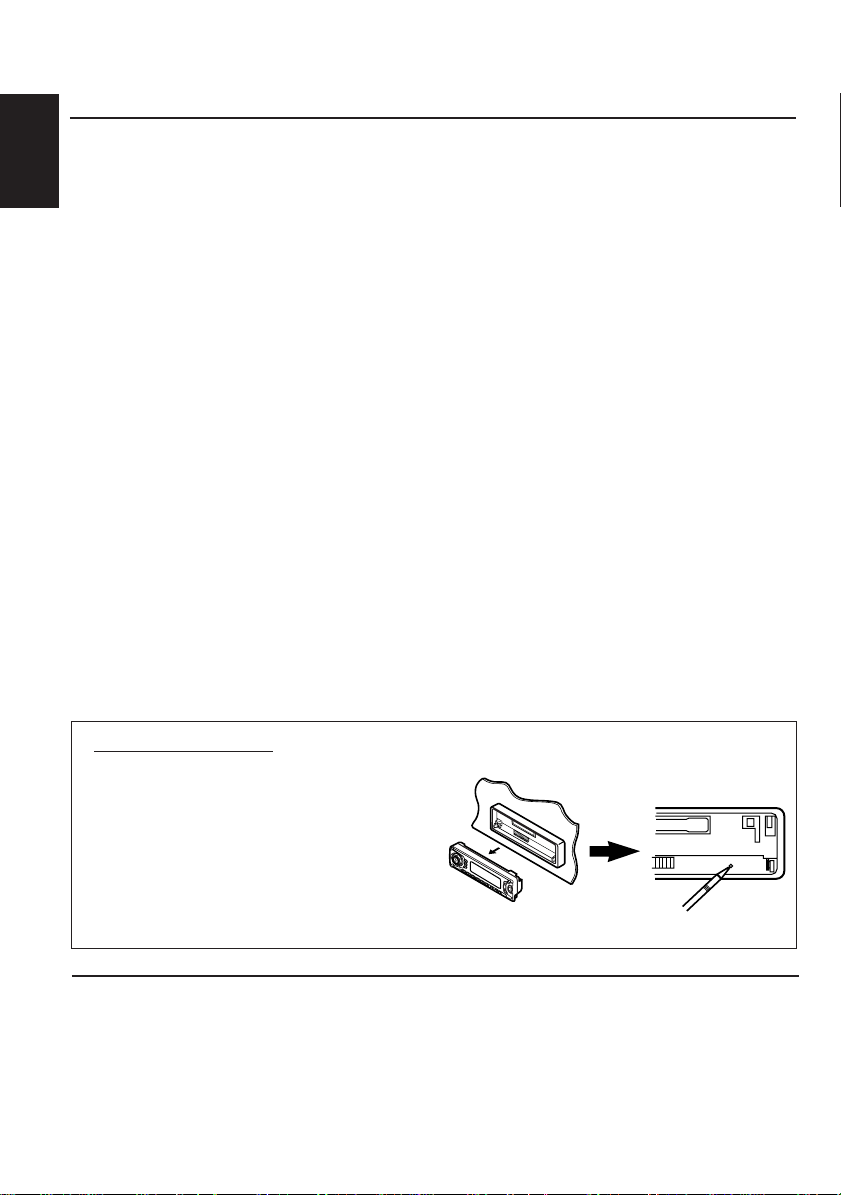
How to reset your unit
After detaching the control panel, press the reset
button on the panel holder using a ball-point pen
or similar tool.
This will reset the built-in microcomputer.
Note:
Your preset adjustments – such as preset channels or
sound adjustments – will also be erased.
BEFORE USE
*
For safety....
• Do not raise the volume level too much, as this will
block outside sounds, making driving dangerous.
• Stop the car before performing any complicated
operations.
2
*
Temperature inside the car....
If you have parked the car for a long time in hot or
cold weather, wait until the temperature in the car
becomes normal before operating the unit.
Page 3
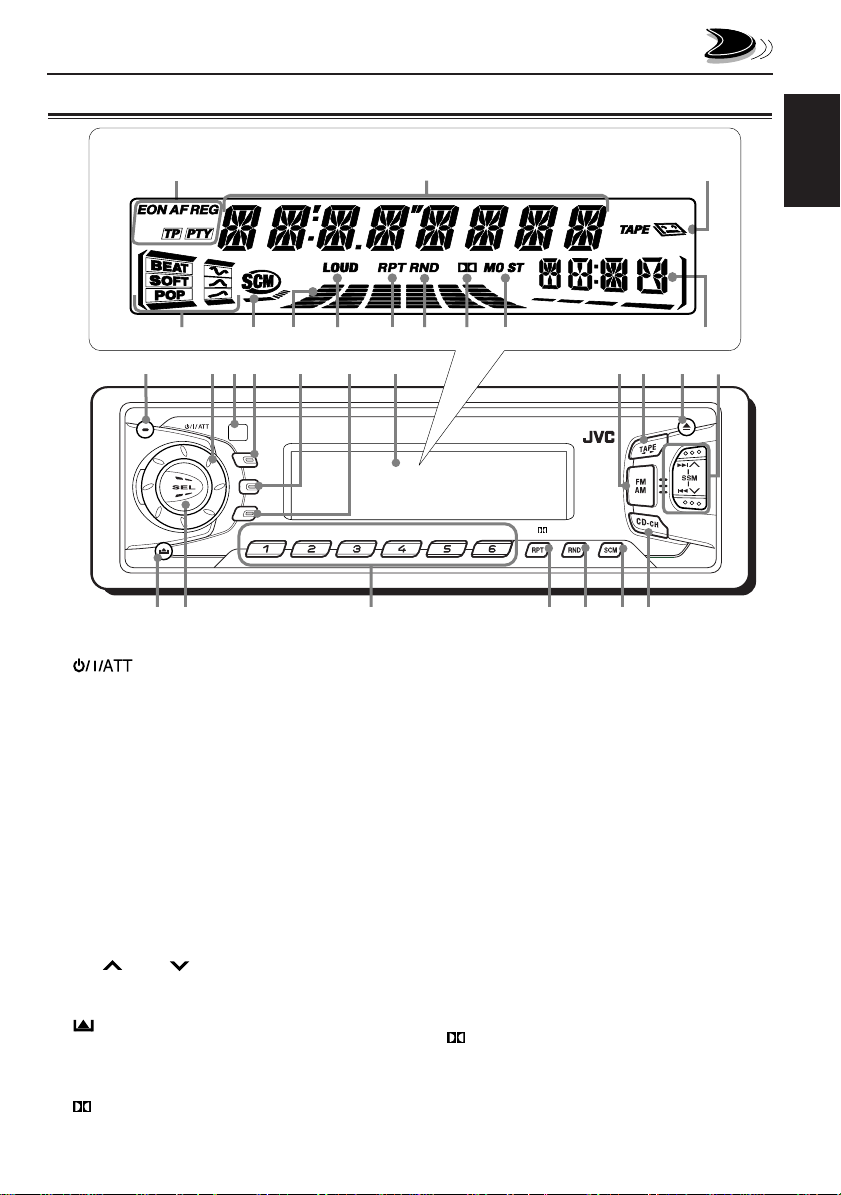
Control panel
Display window
o;
LOCATION OF THE BUTTONS
a
ENGLISH
sdf klhg
1
w
1 (standby/on/attenuator) button
2 Control dial
3 Remote sensor*
4 DISP (display) button (KS-FX915R)
LOUD (loudness) button (KS-FX815)
5 TP (traffic programme) button (KS-FX915R)
RDS (radio data system) button (KS-FX915R)
DISP (display) button (KS-FX815)
6 PTY (programme type) button (KS-FX915R)
SCAN button (KS-FX815)
7 Display window
8 FM AM button
• Also functions as the DAB button.*
9 TAPE 23 button
p 0 (eject) button
q ¢ / 4 buttons
•
Also functions as SSM buttons when pressed
together.
w (control panel release) button
e SEL (select) button
r Number buttons
t RPT (repeat) button
(Dolby B) button
• Also functions as ∞ (DAB service selection).*
24
e
3
5
8 9 10 1 1 127
6
j /
7
t
y RND (random) button
MO (monaural) button
• Also functions as 5 (DAB service selection).*
u SCM (sound control memory) button
i CD-CH (CD changer) button
8
MO
yur
9
i
p
q
Display window
o RDS indicators*
EON, AF, REG, TP, PTY
; Main display
a TAPE indicator
s Sound mode indicators
BEAT, SOFT, POP
d SCM indicator
f Volume (or audio) level indicator
g LOUD indicator
h RPT (repeat) indicator
j RND (random) indicator
k (Dolby B) indicator
l Tuner reception indicators
MO (monaural), ST (stereo)
/ Source/clock display
* only for KS-FX915R
3
Page 4
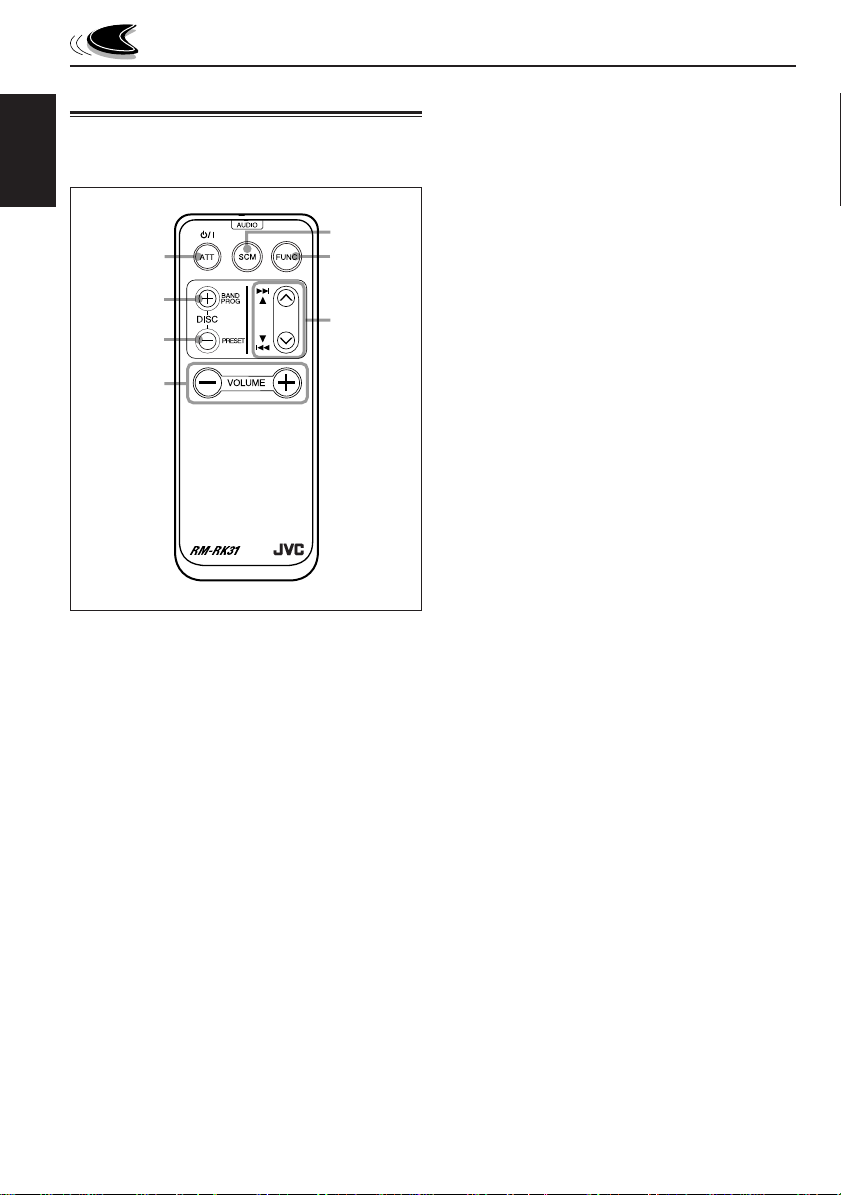
Remote controller
(only for KS-FX915R)
This section is only for KS-FX915R.
ENGLISH
5
1
2
3
4
1 • Turns on the unit if pressed when the unit is
turned off.
• Turns off the unit if pressed and held until “SEE
YOU” appears on the display.
• Drops the volume level in a moment if pressed
briefly.
Press again to resume the volume.
2 • Functions as the BAND button while listening
to the FM broadcast (or the DAB tuner).
Each time you press the button, the band
changes.
• Functions as the DISC + button while listening
to the CD changer.
Each time you press the button, the disc
number increases, and the selected disc starts
playing.
• Functions as the PROG button while listening
to a tape.
Each time you press the button, the tape
direction changes alternately.
6
7
3 • Functions as the PRESET button while
listening to the radio (or the DAB tuner).
Each time you press the button, the preset
station (or service) number increases, and the
selected station (or service) is tuned into.
• Functions as the DISC – button while
listening to the CD changer.
Each time you press the button, the disc
number decreases, and the selected disc
starts playing.
4 Functions the same as the control dial on the
main unit.
NOTE:
This button does not function for the
preferred setting mode adjustment.
5 Selects the sound mode.
Each time you press the button, the mode
changes.
6 Selects the source.
Each time you press the button, the source
changes.
7 • Searches stations while listening to the radio.
• Selects services while listening to the DAB
tuner if pressed briefly.
• Searches ensembles while listening to the
DAB tuner if pressed for more than 1 second.
• Functions as the fast forward/rewind buttons
or multi music scan buttons while listening to
a tape.
• Fast-forwards or reverses the track if pressed
and held while listening to a CD.
• Skips to the beginning of the next track or goes
back to the beginning of the current (or
previous tracks) if pressed briefly while
listening to a CD.
4
Page 5

Preparing the remote controller
(only for KS-FX915R)
This section is only for KS-FX915R.
Before using the remote controller:
• Aim the remote controller directly at the remote
sensor on the main unit. Make sure there is no
obstacle in between.
Remote sensor
DISP
TP
RDS
PTY
8 9 10 117
• Do not expose the remote sensor to strong
light (direct sunlight or artificial lighting).
Installing the battery
When the controllable range or effectiveness of the
remote controller decreases, replace the battery.
1. Remove the battery holder.
1) Push out the battery holder in the direction
indicated by the arrow using a ball-point
pen or a similar tool.
2) Remove the battery holder.
(back side)
1)
2)
2. Place the battery.
Slide the battery into the holder with the + side
facing upwards so that the battery is fixed in
the holder.
Lithium coin battery
(product number:
CR2025)
3. Return the battery holder.
Insert again the battery holder pushing it until
you hear a clicking sound.
(back side)
WARNING:
• Store the battery in a place where children cannot
reach.
If a child accidentally swallows the battery,
consult a doctor immediately.
• Do not recharge, short, disassemble or heat the
battery or dispose it in a fire.
Doing any of these things may cause the battery to
give off heat, crack or start a fire.
• Do not leave the battery with other metallic
materials.
Doing this may cause the battery to give off heat,
crack or start a fire.
• When throwing away or saving the battery, wrap it
in tape and insulate; otherwise, the battery may
start to give off heat, crack or start a fire.
• Do not poke the battery with tweezers or similar
tools.
Doing this may cause the battery to give off heat,
crack or start a fire.
ENGLISH
5
Page 6
BASIC OPERATIONS
ENGLISH
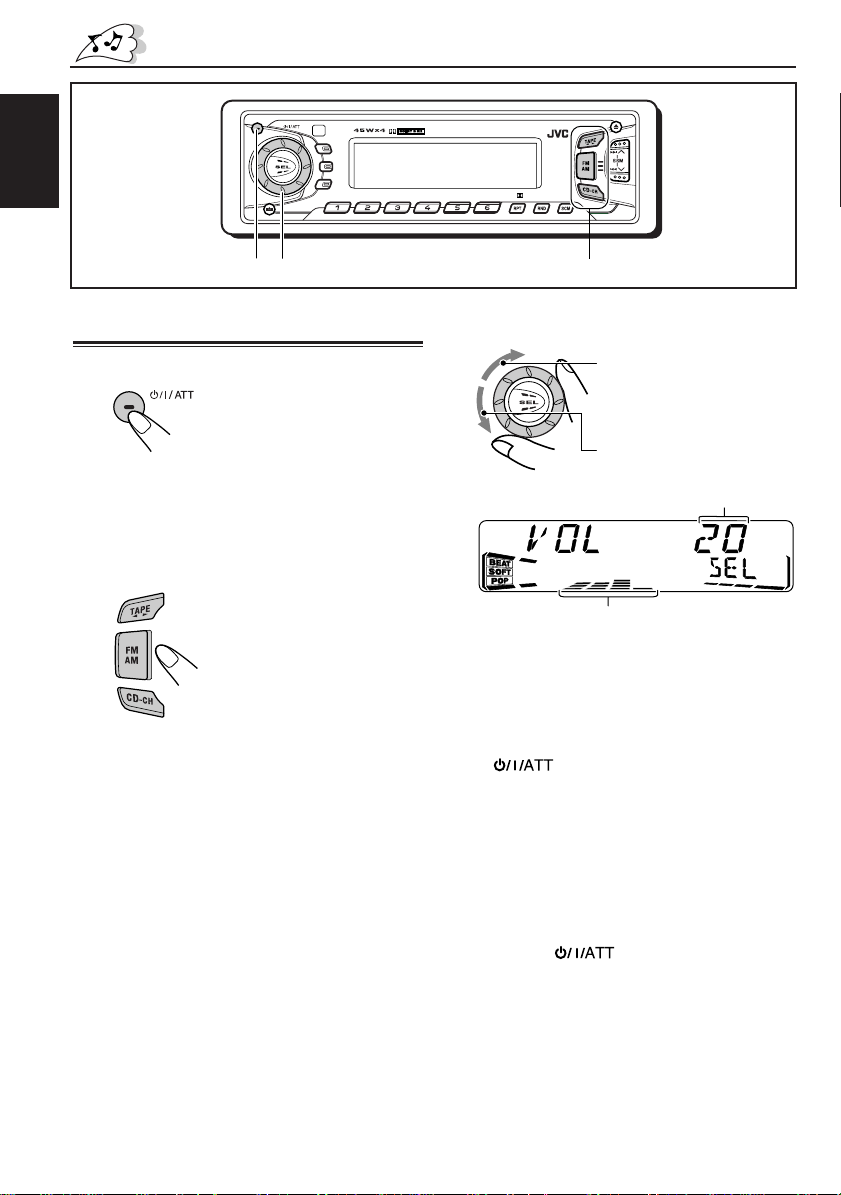
Turning on the power
1
Turn on the power.
Note on One-Touch Operation:
When you select a source in step 2 below, the
power automatically comes on. You do not have
to press this button to turn on the power.
2
Select the source.
To operate the tuner (FM or AM),
see pages 7 – 15.
To operate the tape,
see pages 16 – 18.
To operate the CD changer,
see pages 26 – 27.
To operate the external component,
see page 28.
To operate the DAB tuner*,
see pages 29 – 32.
* Only for KS-FX915R
123
8 9 10 11 127
3
Adjust the volume.
4
Adjust the sound as you want.
MO
To increase the volume.
To decrease the volume.
Volume level appears.
Volume or audio level (see page 24) indicator
(See page 19.)
To drop the volume in a moment
Press briefly while listening to any
source. “ATT” starts flashing on the display, and
the volume level will drop in a moment.
T o resume the previous volume level, press the
button briefly again.
• If you turn the control dial clockwise, you can
also restore the sound.
To turn off the power
Press and hold until “SEE YOU” appears
on the display.
Note:
When you use this unit for the first time, set the built-in
clock correctly, see page 22.
6
Page 7
RADIO BASIC OPERATIONS
8 9 10 11 127
MO
ENGLISH
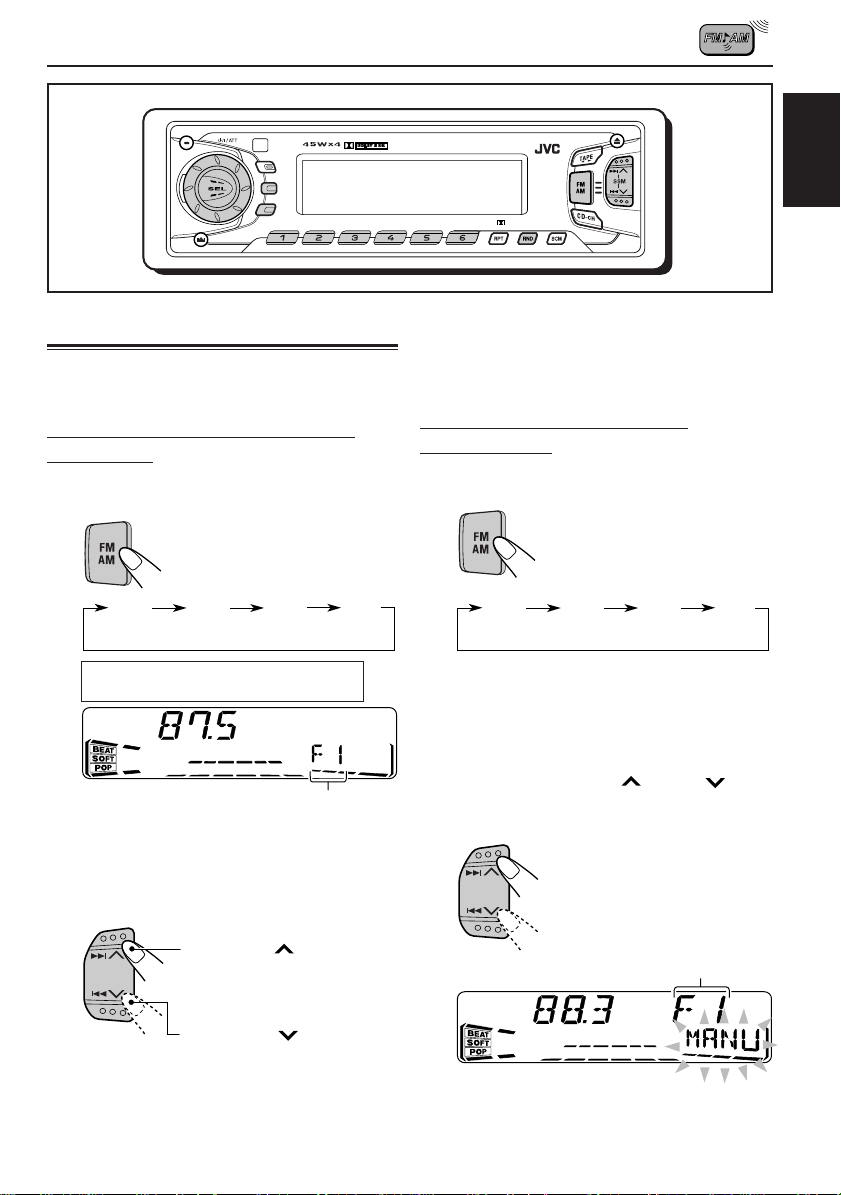
Listening to the radio
Y ou can use either automatic searching or manual
searching to tune into a particular station.
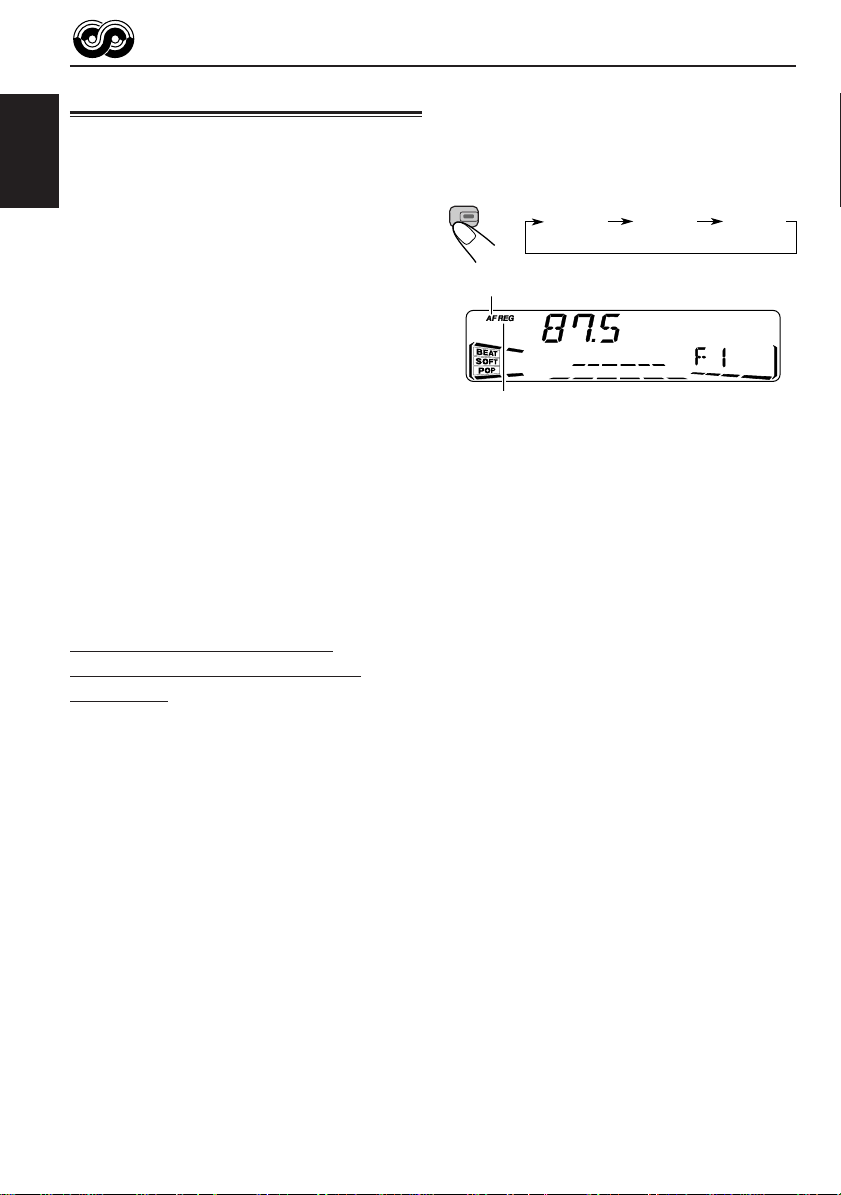
Searching a station automatically:
Auto search
1
Select the band (FM1 – 3, AM).
F1 F2 F3 AM
(FM1) (FM2) (FM3)
FM1 and FM2: 87.5 MHz – 108.0 MHz
FM3: 65 MHz – 74 MHz
Note:
This receiver has three FM bands (FM1, FM2,
FM3). You can use any one of them to listen to an
FM broadcast.
Selected band appears.
To stop searching before a station is received,
press the same button you have pressed for
searching.
Searching a station manually:
Manual search
1
Select the band (FM1 – 3, AM).
F1 F2 F3 AM
(FM1) (FM2) (FM3)
Note:
This receiver has three FM bands (FM1, FM2,
FM3). You can use any one of them to listen to an
FM broadcast.
2
Press and hold ¢ or 4 until
“MANU” (manual) starts flashing on
the display.
2
Start searching a station.
Press ¢ to search
stations of higher
frequencies.
Press 4 to search
stations of lower
frequencies.
When a station is received, searching
stops.
Selected band appears.
CONTINUED ON THE NEXT P AGE
7
Page 8
3
Tune into a station you want while
“MANU” is flashing.
Press ¢ to tune
ENGLISH
• If you release your finger from the button,
the manual mode will automatically turn off
after 5 seconds.
• If you hold down the button, the frequency
keeps changing (in 50 kHz intervals
(87.5 MHz – 108 MHz), in 30 kHz intervals
(65 MHz – 74 MHz) for FM and 9 kHz intervals
for AM – MW/L W) until you release the button.
into stations of higher
frequencies.
Press 4 to tune
into stations of lower
frequencies.
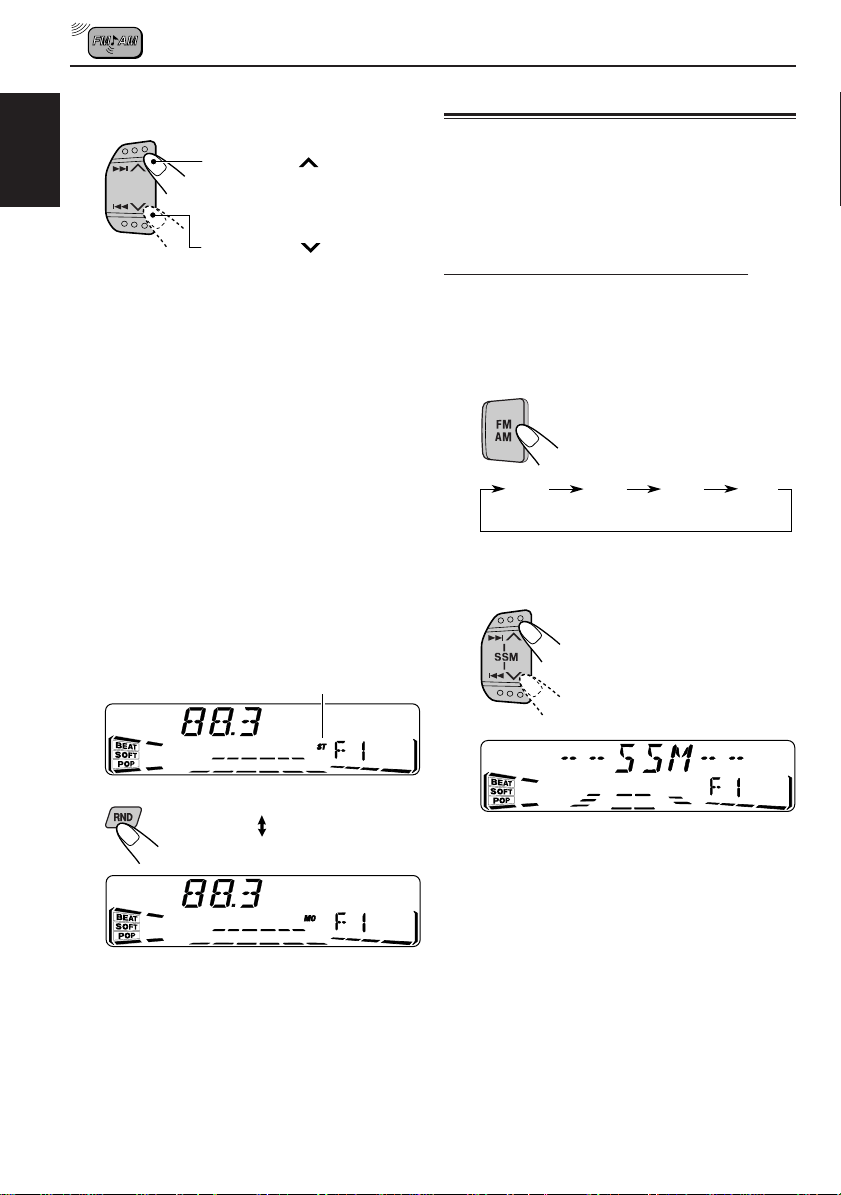
When an FM stereo broadcast is hard to
receive:
Press MO RND (monaural/random) while
listening to an FM stereo broadcast.
• Each time you press the button, the MO
indicator lights up and goes off alternately.
Lights up when receiving
an FM broadcast in stereo.
Storing stations in memory
You can use one of the following two methods to
store broadcasting stations in memory.
• Automatic preset of FM stations: SSM (Strongstation Sequential Memory)
• Manual preset of both FM and AM stations
FM station automatic preset: SSM
Y ou can preset 6 local FM stations in each FM band
(FM1, FM2 and FM3).
1
Select the FM band (FM1 – 3) you want
to store FM stations into.
Each time you press the
button, the FM band
changes as follows:
F1 F2 F3 AM
(FM1) (FM2) (FM3)
2
Press and hold both buttons for more
than 2 seconds.
MO
When the MO indicator is lit on the display, the
sound you hear becomes monaural but the
reception will be improved (the ST indicator
goes off).
8
“SSM” appears, then disappears when automatic
preset is over.
Local FM stations with the strongest signals are
searched and stored automatically in the band
number you have selected (FM1, FM2 or FM3).
These stations are preset in the number buttons —
No.1 (lowest frequency) to No.6 (highest frequency).
When automatic preset is over, the station stored
in number button 1 will be automatically tuned into.
Page 9
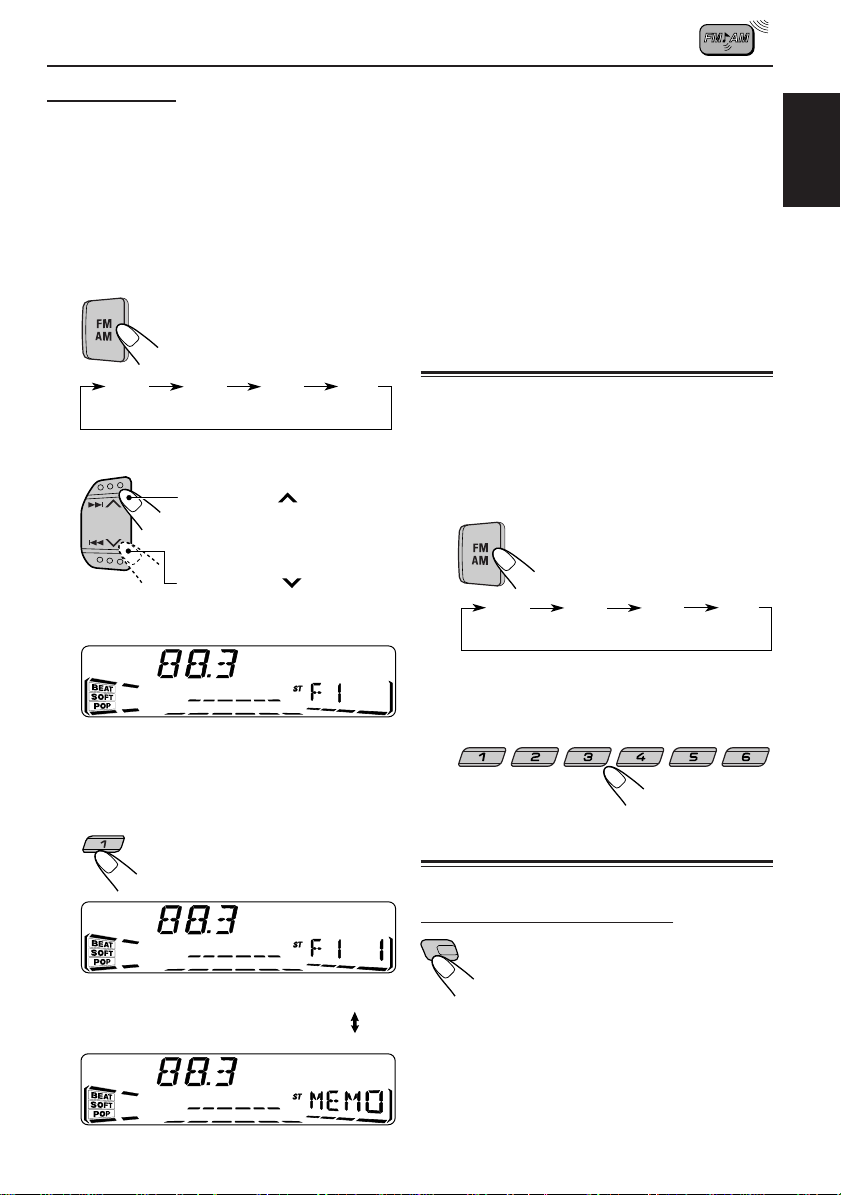
Manual preset
Y ou can preset up to 6 stations in each band (FM1,
FM2, FM3 and AM) manually.
Ex.: Storing an FM station of 88.3 MHz into the
preset number 1 of the FM1 band
1
Select the band (FM1 – 3, AM) you
want to store stations into (in this
example, FM1).
Each time you press the
button, the FM band
changes as follows:
F1 F2 F3 AM
(FM1) (FM2) (FM3)
2
Tune into a station of 88.3 MHz.
4
Repeat the above procedure to store
other stations into other preset
numbers.
Notes:
• A previously preset station is erased when a new station
is stored in the same preset number.
• Preset stations are erased when the power supply to
the memory circuit is interrupted (for example, during
battery replacement). If this occurs, pr eset the stations
again.
Tuning into a preset station
You can easily tune into a preset station.
Remember that you must store stations first. If you
have not stored them yet, see “Storing stations in
memory” on page 8.
ENGLISH
Press ¢ to tune
into stations of higher
frequencies.
Press 4 to tune
into stations of lower
frequencies.
3
Press and hold the number button (in
this example, 1) for more than 2
seconds.
7
Selected band/preset number and
“MEMO” (memory) appear
alternately for a while.
1
Select the band (FM1 – 3, AM).
F1 F2 F3 AM
(FM1) (FM2) (FM3)
2
Select the number (1 – 6) for the preset
station you want.
8 9 10 11 127
Other convenient tuner functions
(only for KS-FX815)
Scanning broadcast stations
When you press SCAN while listening
SCAN
to the radio, station scanning starts.
Each time a broadcast is tuned into,
scanning stops for about 5 seconds
(tuned frequency number flashes on the
display), and you can check what
program is now being broadcast.
7 If you want to listen to that program, press the
same button again to stop scanning.
9
Page 10
RDS OPERATIONS (only for KS-FX915R)
What you can do with RDS EON
RDS (Radio Data System) allows FM stations to
send an additional signal along with their regular
programme signals. For example, the stations send
ENGLISH
their station names, as well as information about
what type of programme they broadcast, such as
sports or music, etc.
Another advantage of RDS function is called “EON
(Enhanced Other Networks).” The EON indicator
lights up while receiving an FM station with the EON
data. By using the EON data sent from a station,
you can tune into a different station of a different
network broadcasting your favorite programme or
traffic announcement while listening to another
programme or to another source such as tape.
By receiving the RDS data, this unit can do the
following:
• Tracing the same programme automatically
(Network-Tracking Reception)
• Standby Reception of T A (Traf fic Announcement)
or your favorite programme
• PTY (Programme T ype) search
• Programme search
• And some other functions
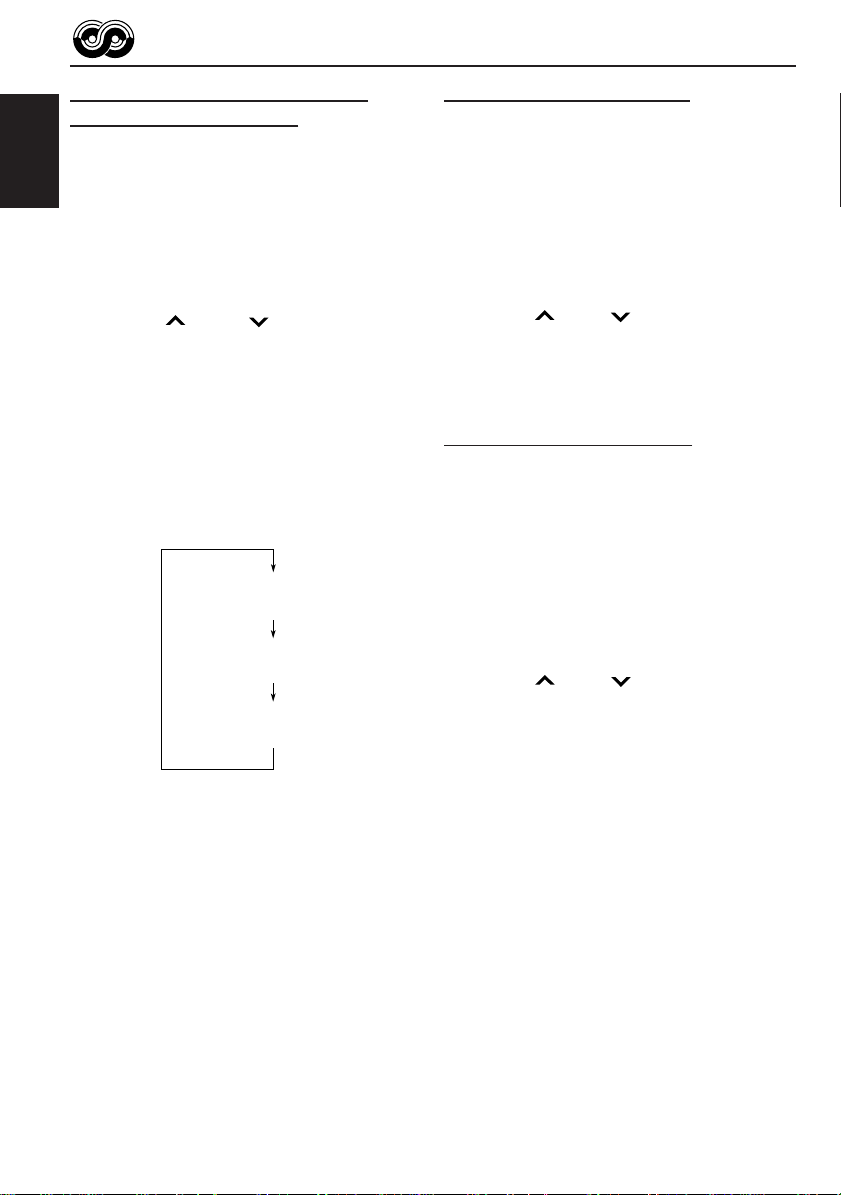
Tracing the same programme
automatically (Network-Tracking
Reception)
When driving in an area where FM reception is not
good, the tuner built in this unit automatically tunes
into another RDS station, broadcasting the same
programme with stronger signals. So, you can
continue to listen to the same programme in its
finest reception, no matter where you drive.
(See the illustration on the next page.)
Two types of the RDS data are used to make
Network-Tracking Reception work correctly — PI
(Programme Identification) and AF (Alternative
Frequency).
Without receiving these data correctly from the RDS
station you are listening to, Network-Tracking
Reception will not operate.
To use Network-Tracking Reception, press and
hold TP RDS (Traffic Programme/Radio Data
System) for more than 1 second. Each time you
press and hold the button, Network-Tracking
Reception modes change as follows:
TP
RDS
AF indicator
REG indicator
Mode 1
The AF indicator lights up but the REG indicator
does not.
Network-Tracking Reception is activated with
Regionalization set to “off.”
Switches to another station within the same
network when the receiving signals from the
current station become weak.
• In this mode, the programme may differ from the one
currently received.
Mode 2
Both the AF indicator and the REG indicator light
up.
Network-Tracking Reception is activated with
Regionalization set to “on.”
Switches to another station, within the same
network, broadcasting the same programme
when the receiving signals from the current
station become weak.
Mode 3
Neither the AF indicator nor the REG indicator
lights up.
Network-Tracking Reception is deactivated.
Mode 1
Mode 2 Mode 3
10
Page 11
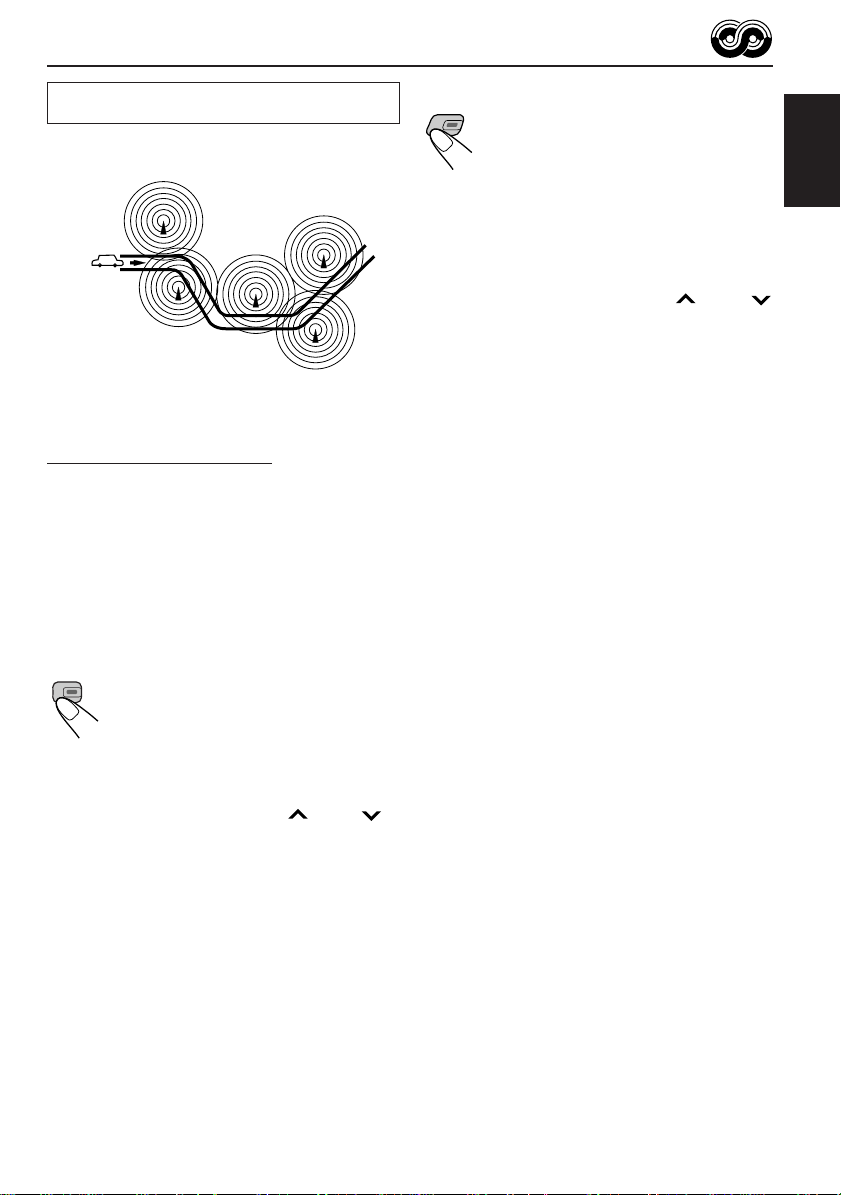
The same programme can be received on
different frequencies.
Programme 1
broadcasting
on frequency A
Programme 1
broadcasting
on frequency B
Programme 1
broadcasting
on frequency C
Programme 1
broadcasting
on frequency E
Programme 1
broadcasting
on frequency D
Using Standby Reception
Standby Reception allows the unit to switch
temporarily to your favorite programme (PTY:
Programme Type) and Traffic Announcement (TA)
from the current source (another FM station, tape
or other connected components).
• Standby Reception will not work if you are listening
to an AM station.
TA Standby Reception
TP
When you press TP RDS while listening
RDS
to an FM station, the TP indicator is lit
during reception of a TP (Traffic
Programme) station and the T A standby
mode is engaged.
• When the station being received is not a TP station,
the TP indicator flashes. Press ¢ or 4 to
engage the TA standby mode. “SEARCH” appears on
the display, and TP station search starts. When a TP
station is tuned into, the TP indicator is lit.
7 If you are listening to a tape or other connected
components and wish to listen to a TP station,
press TP RDS to enter the T A standby mode. (The
TP indicator lights up.)
PTY Standby Reception
When you press PTY while listening
PTY
to an FM station, the PTY indicator is
lit during reception of a PTY station
and the PTY standby mode is
engaged. The selected PTY name
stored on page 12 flashes for 5
seconds.
• When the station being received is not a PTY station,
the PTY indicator flashes. Press ¢ or 4
to engage the PTY standby mode. “SEARCH” appears
on the display, and PTY station sear c h starts. When a
PTY station is tuned into, the PTY indicator is lit.
7 If you are listening to a tape or other connected
components and wish to listen to a selected PTY
broadcast, press PTY to enter the PTY standby
mode. (The PTY indicator lights up.)
If the selected PTY programme starts broadcasting
while the PTY standby mode is active, the selected
PTY name appears and the playback source
changes to the FM band. The selected PTY
programme can then be heard.
To deactivate the PTY standby mode, press PTY
again.
ENGLISH
If a traffic programme starts broadcasting while the
TA standby mode is active, “TRAFFIC” appears and
the playback source changes to the FM band. The
volume increases to the preset T A volume level (see
page 14) and the traffic programme can be heard.
To deactivate the TA standby mode, press TP
RDS again.
11
Page 12
Selecting your favorite programme for
PTY Standby Reception
You can select your favorite programme for PTY
Standby Reception to store in memory.
When shipped from the factory, “NEWS” is stored
ENGLISH
as the programme type for PTY Standby Reception.
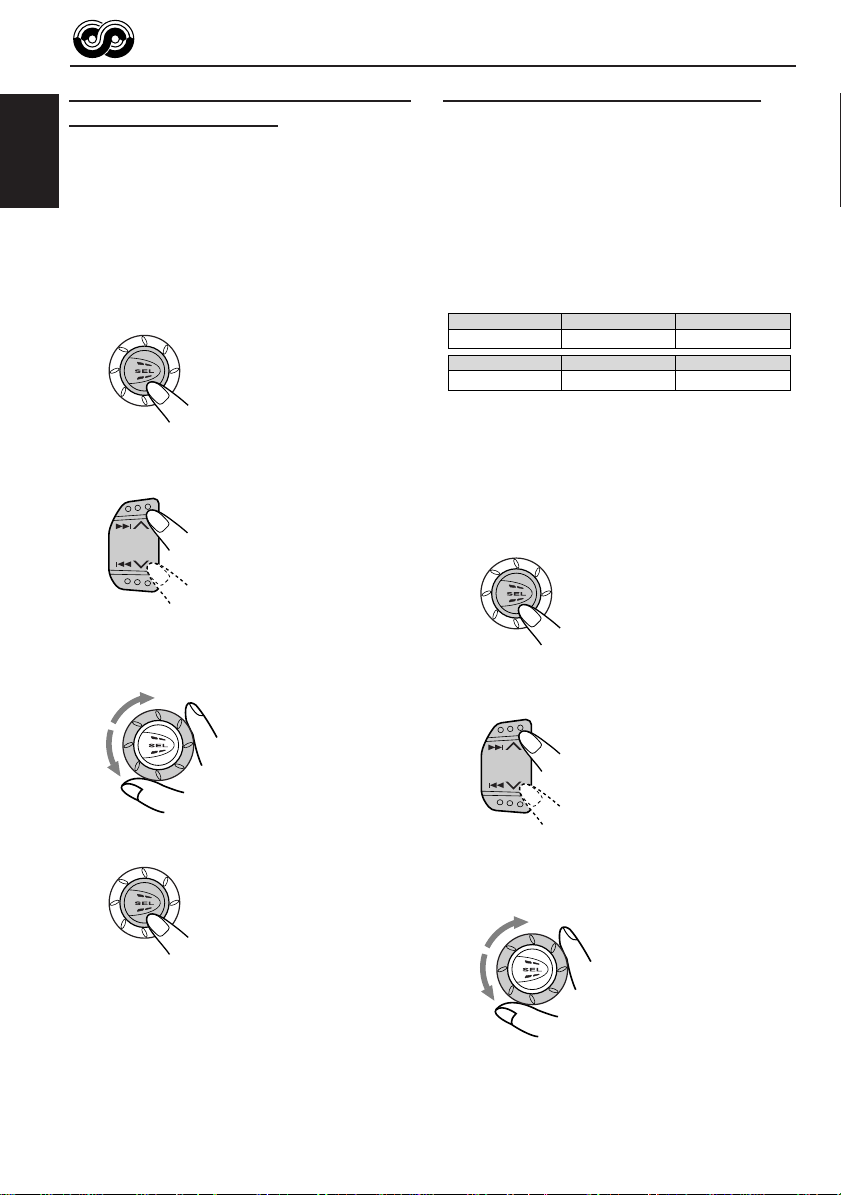
1
Press and hold SEL (select) for more
than 2 seconds so that one of the
PSM items appears on the display.
(PSM: see page 23.)
2
Select “PTY STBY” (standby) if not
shown on the display.
3
Select one of twenty-nine PTY codes.
(See page 15.)
Selected code name
appears on the display
and is stored into memory.
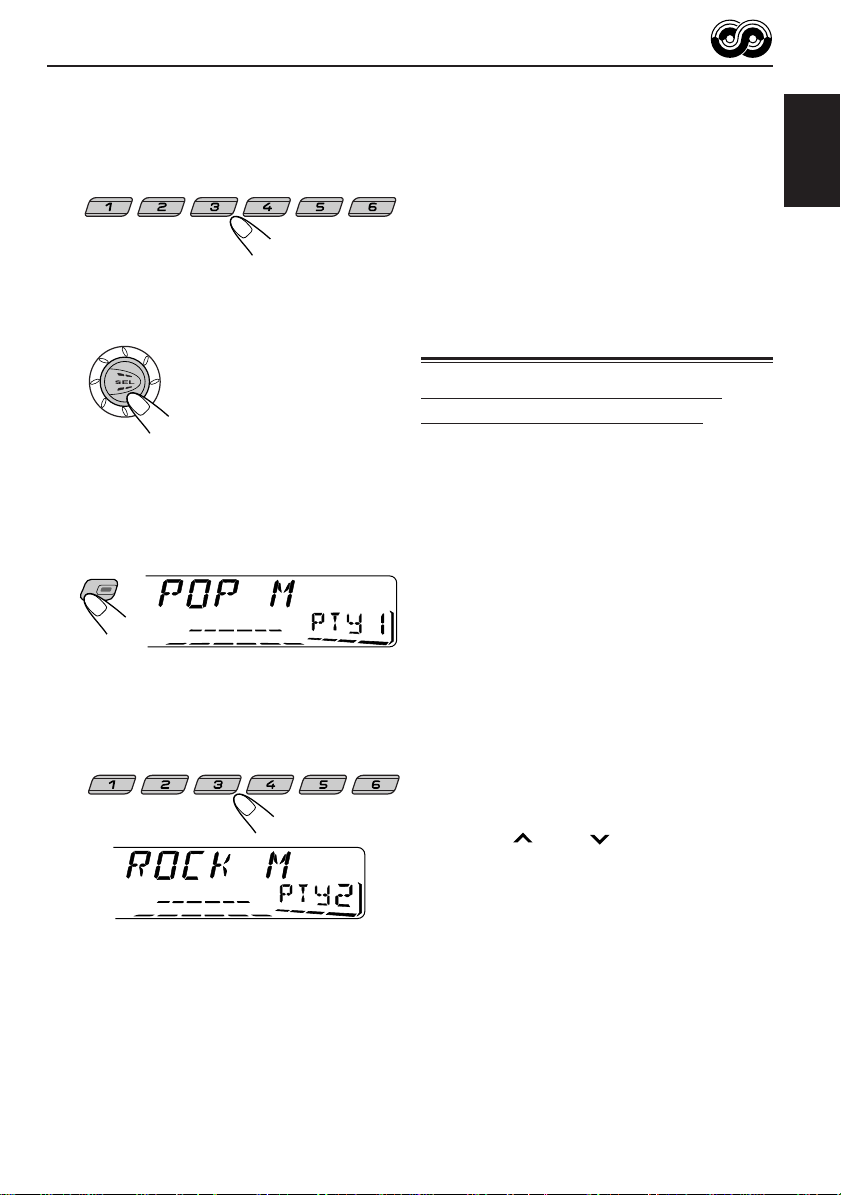
Searching your favorite programme
You can search one of your 6 favorite programme
types stored in memory.
When shipped from the factory, the following 6
programme types have been stored in the number
buttons (1 to 6).
To store your favorite programme types, see
below.
To search your favorite programme type, see
page 13.
1
POP M
45
CLASSICS
2
ROCK M EASY M
AFFAIRS
To store your favorite programme types
1
Press and hold SEL (select) for more
than 2 seconds so that one of the PSM
items appears on the display.
(PSM: see page 23.)
2
Select “PTY SRCH” (search) if not
shown on the display.
3
6
VARIED
12
4
Press SEL (select) to finish the setting.
3
Select one of twenty-nine PTY codes.
(See page 15.)
Selected code name
appears on the display.
• If the code already stored
in memory is selected, it
will flash on the display.
Page 13
4
Press and hold the number button for
more than 2 seconds to store the PTY
code selected into the preset number
you want.
The selected code name and “MEMO”
(memory) appear alternately on the display.
5
Press SEL (select) to finish the setting.
8 9 10 11 127
To search your favorite programme type
1
Press and hold PTY (programme type)
for more than 1 second while listening
to an FM station.
PTY
The last selected PTY code appears.
2
Select one of the PTY codes stored in
the preset number buttons (1 to 6).
8 9 10 11 127
Ex.: When “ROCK M” is stored in preset
number button 2
PTY search for your favorite programme
starts after 5 seconds.
• If there is a station broadcasting a programme of
the same PTY code as you selected, that station
is tuned into.
• If there is no station broadcasting a programme
of the same PTY code as you selected, the
station will not change.
Note:
In some areas, the PTY search will not work correctly.
Other convenient RDS functions and adjustments
Automatic selection of the station
when using the number buttons
Usually when you press the number button, the
preset station is tuned into.
However, when the preset station is an RDS station,
something different will happen. If the signals from
that preset station are not sufficient for good
reception, this unit, using the AF data, tunes into
another frequency broadcasting the same
programme as the original preset station is
broadcasting. (Programme search)
• The unit takes some time to tune into another
station using Programme search.
T o activate programme search, follow the procedure
below.
• See also “Changing the general settings (PSM)”
on page 22.
1 Press and hold SEL (select) for more than 2
seconds so that one of the PSM items appears
on the display.
2 Press ¢ or 4 to select
“P(Programme)-SEARCH.”
3 Turn the control dial clockwise to select “ON.”
Now programme search is activated.
4 Press SEL (select) to finish the setting.
To cancel programme search, repeat the same
procedure and select “OFF” in step 3 by turning
the control dial counterclockwise.
ENGLISH
13
Page 14
Changing the display mode while
listening to an FM station
Y ou can change the initial indication on the display
to station name (PS NAME) or station frequency
(FREQ) while listening to an FM RDS station.
ENGLISH
• See also “Changing the general settings (PSM)”
on page 22.
1 Press and hold SEL (select) for more than 2
seconds so that one of the PSM items appears
on the display.
2 Press ¢ or 4 to select “TU DISP”
(tuner display).
3 Turn the control dial to set to the desired indication
(“PS NAME” or “FREQ”).
4 Press SEL (select) to finish the setting.
Setting the TA volume level
You can preset the volume level for TA Standby
Reception. When a traffic programme is received,
the volume level automatically changes to the preset
level.
• See also “Changing the general settings (PSM)”
on page 22.
1 Press and hold SEL (select) for more than 2
seconds so that one of the PSM items appears
on the display.
2 Press ¢ or 4 to select “TA VOL.”
3 Turn the control dial to set to the desired volume.
You can set it from “VOL 00” to “VOL 50.”
4 Press SEL (select) to finish the setting.
Note:
By pressing DISP, you can also change the display while
listening to an FM RDS station.
Each time you press the button, the following information
appears on the display:
Station frequency
(FREQ)
Programme type
(PTY)
Station name
(PS NAME)
• Then, the display goes back to the original indication
in several seconds.
Automatic clock adjustment
When shipped from the factory, the clock built in
this unit is set to be readjusted automatically using
the CT (Clock Time) data in the RDS signal.
If you do not want to use automatic clock
adjustment, follow the procedure below.
• See also “Changing the general settings (PSM)”
on page 22.
1 Press and hold SEL (select) for more than 2
seconds so that one of the PSM items appears
on the display.
2 Press ¢ or 4 to select “AUTO ADJ.”
3 Turn the control dial counterclockwise to select
“OFF.”
Now automatic clock adjustment is canceled.
4 Press SEL (select) to finish the setting.
To reactivate clock adjustment, repeat the same
procedure and select “ON” in step 3 by turning the
control dial clockwise.
Note:
Y ou must stay tuned to the same station for more than 2
minutes after setting “AUTO ADJ” to “ON.” Otherwise,
the clock time will not be adjusted. (This is because the
unit takes up to 2 minutes to capture the CT data in the
RDS signal.)
14
Page 15

PTY codes
NEWS: News
AFFAIRS: Topical programmes expanding
on current news or affairs
INFO: Programmes which impart advice
on a wide variety of topics
SPORT: Sport events
EDUCATE: Educational programmes
DRAMA: Radio plays
CULTURE: Programmes on national or
regional culture
SCIENCE: Programmes on natural science
and technology
VARIED: Other programmes like comedies
or ceremonies
POP M: Pop music
ROCK M: Rock music
EASY M: Easy-listening music
LIGHT M: Light music
CLASSICS: Classical music
OTHER M: Other music
WEA THER: Weather information
FINANCE: Reports on commerce, trading,
the Stock Market, etc.
CHILDREN: Entertainment programmes for
children
SOCIAL: Programmes on social activities
RELIGION: Programmes dealing with any
aspect of belief or faith, or the
nature of existence or ethics
PHONE IN: Programmes where people can
express their views either by
phone or in a public forum
TRAVEL: Programmes about travel
destinations, package tours, and
travel ideas and opportunities
LEISURE: Programmes concerned with
recreational activities such as
gardening, cooking, fishing, etc.
JAZZ: Jazz music
COUNTRY: Country music
NATION M: Current popular music from
another nation or region, in that
country’s language
OLDIES: Classic pop music
FOLK M: Folk music
DOCUMENT: Programmes dealing with factual
matters, presented in an
investigative style
ENGLISH
15
Page 16
ENGLISH
TAPE OPERATIONS
8 9 10 11 127
MO
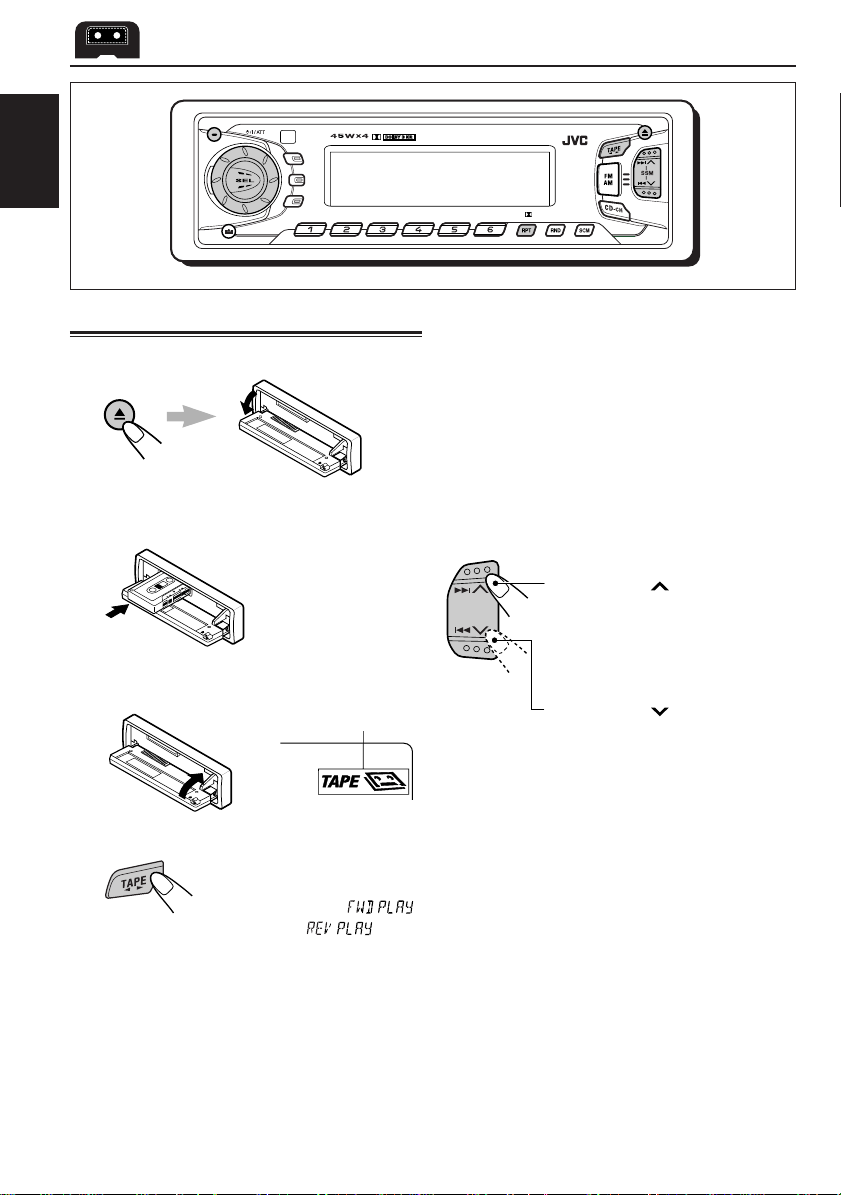
Listening to a cassette
1
Open the control panel.
2
Insert a cassette into the cassette
compartment.
The unit turns on and
tape play starts
automatically.
3
Close the control panel by hand.
TAPE indicator appears.
4
Select the tape direction.
Each time you press TAPE
23, the tape direction changes
alternately forward ( )
and reverse ( ).
Note on One-Touch Operation:
When a cassette is already in the cassette
compartment, select tape as the source by
pressing TAPE 23 to start tape play.
To stop play and eject the cassette
Press 0 briefly.
Tape play stops and the cassette automatically
ejects from the cassette compartment. The source
changes to the previously selected one.
If you change the source, tape play also stops
(without ejecting the cassette this time).
• Y ou can eject the cassette while the unit is turned
off by pressing 0.
To fast-forward and rewind a tape
Press ¢ for more than
1 second to fast-forward the tape.
When the tape reaches its end,
the tape is reversed and playback
starts from the beginning of the
other side.
Press 4 for more than
1 second to rewind the tape.
When the tape reaches its end,
playback of the same side starts.
To stop fast forward and rewind at any
position on the tape, press TAPE 23.
Tape play starts from that position on the tape.
Notes:
• When one side of the tape reaches its end during
play, the other side of the tape automatically starts
playing. (Auto Reverse)
• When the tape reaches its end while fast-forwarding,
the tape direction will be changed automatically.
16
Page 17
To play back tapes recorded with the
Dolby B NR
Press and hold RPT (Dolby B/repeat) to set
the Dolby B NR* system.
The indicator lights up, and “DOLBY B”
appears on the display for several seconds.
To cancel the Dolby B NR, press and hold
RPT (Dolby B/repeat) again so that the
indicator goes off.
*Dolby noise reduction is manufactured under
license from Dolby Laboratories Licensing
Corporation.
“DOLBY” and the double-D symbol are
trademarks of Dolby Laboratories Licensing
Corporation.
Prohibiting cassette ejection
You can prohibit cassette ejection and “lock” a
cassette in the cassette compartment.
Press and hold TAPE 23 and for more
than 2 seconds.
“NO EJECT” flashes on the display for about 5
seconds, and the cassette is “locked.”
To cancel the prohibition and “unlock” the
cassette, press and hold T APE 23 and
for more than 2 seconds again.
“EJECT OK” flashes for about 5 seconds, and this
time the cassette is “unlocked.”
Note:
If you press 0 while cassette ejection is prohibited,
the display panel flips down, but the cassette continues
to play and cannot be ejected.
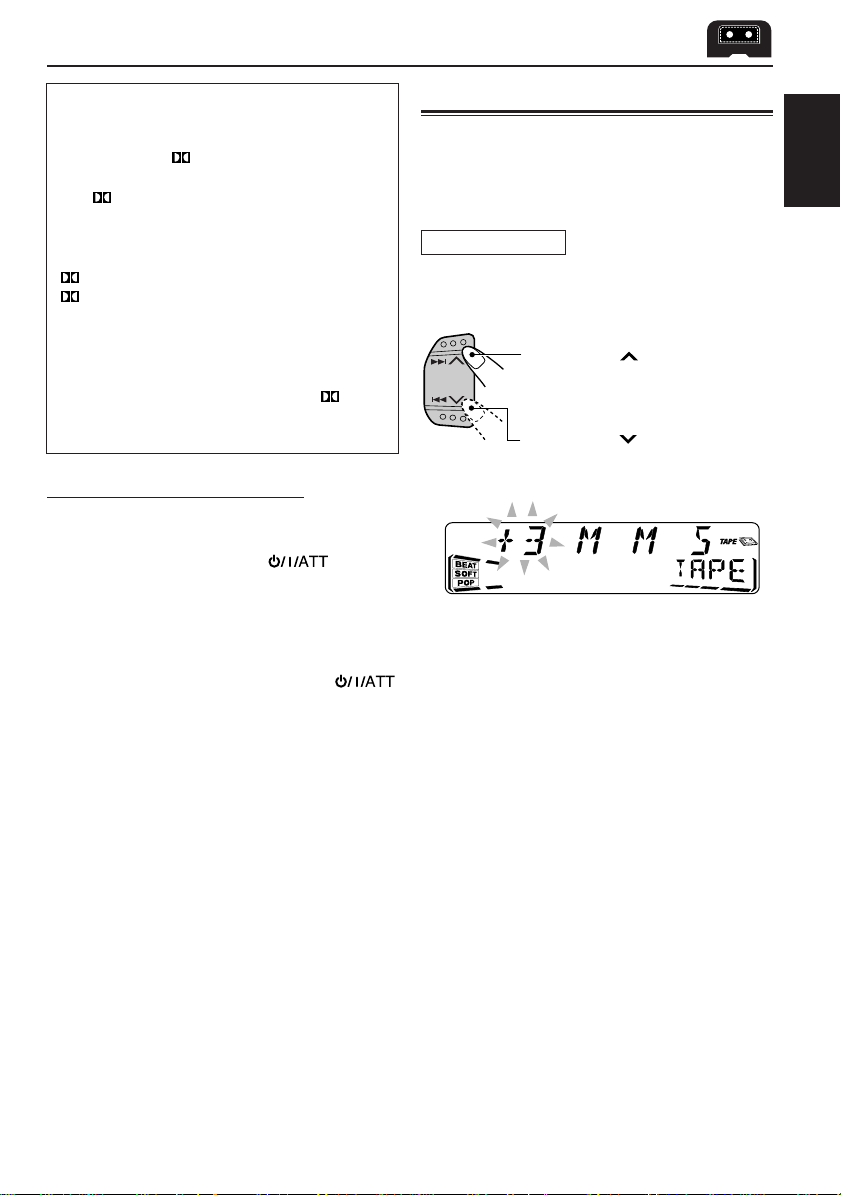
Finding the beginning of a tune
Multi Music Scan allows you to automatically start
playback from the beginning of a specified tune.
You can specify up to 9 tunes ahead of or before
the current tune.
During playback
Specify how many tunes ahead of or
before the current tune the one you want
is located.
Press ¢ to locate a tune
ahead of the current tune on the
cassette.
Press 4 to locate a tune
before the current tune on the
cassette.
Each time you press the buttons, the number
changes up to ±9.
When the beginning of the specified tune is
located, playback starts automatically.
Notes:
• While locating a specified tune:
– If the tape is rewound to its beginning, playback
starts from the beginning of that side.
– If the tape is fast-forwarded to the end, it is
reversed and played from the beginning of the
other side.
• In the following cases, the Multi Music Scan
function may not operate correctly:
– Tapes with tunes having long pianissimo passages
(very quiet parts) or non-recorded portions
between tunes.
– Tapes with short non-recorded sections.
– Tapes with high level of noise or humming
between tunes.
– The Dolby NR setting does not match. For
example, if Dolby B NR is on and the tape was
recorded with no Dolby NR.
ENGLISH
17
Page 18
Other convenient tape functions
Skipping the blank portions on the tape
You can skip blank portions between the tunes
ENGLISH
(Blank Skip).
When this function is on, the unit skips blank
portions of 15 seconds or more, fast-forwards to
the next tune, then starts playing it.
• See also “Changing the general settings (PSM)”
on page 22.
1
Press and hold SEL (select) for more
than 2 seconds so that one of the
PSM items appears on the display.
(PSM: see page 23.)
2
Press ¢ or 4 to select
“B. SKIP” (blank skip).
3
Turn the control dial clockwise to
select “ON.”
Now Blank Skip is
activated.
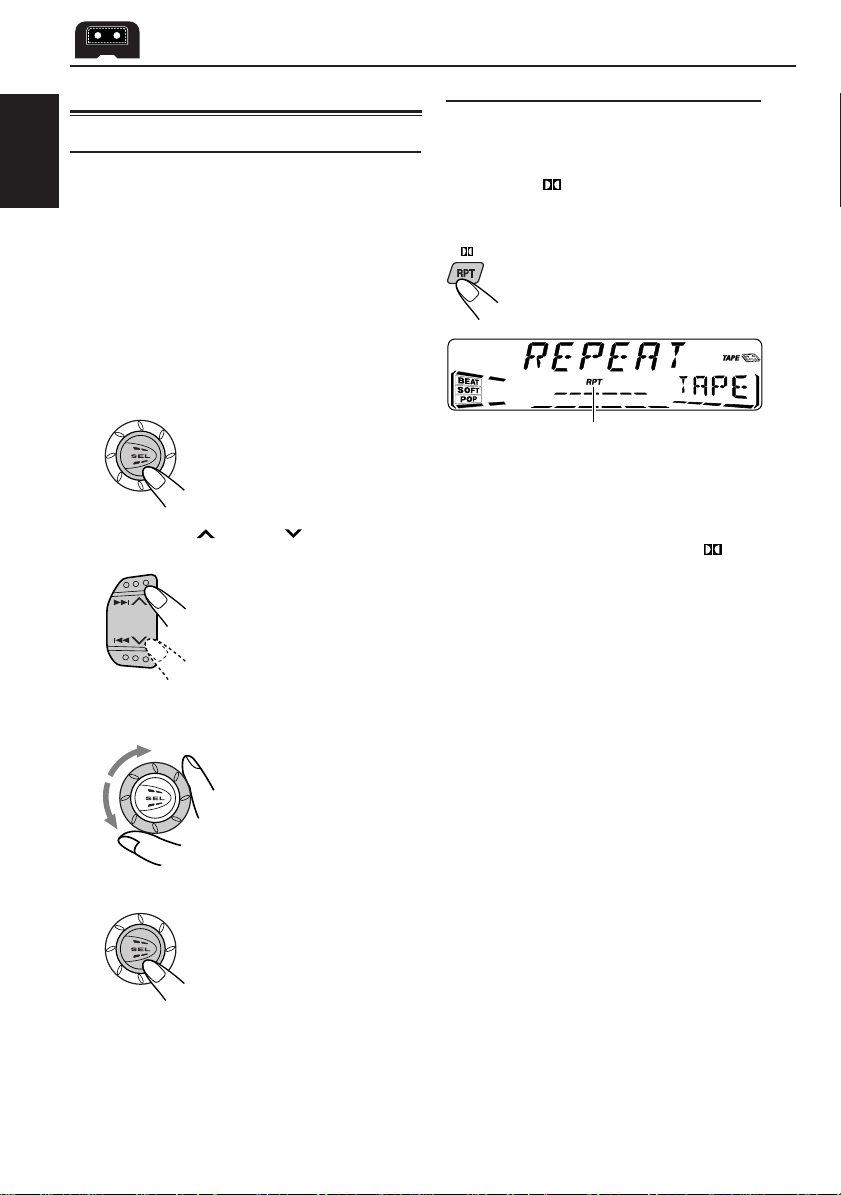
Playing the current tune repeatedly
You can play the current tune repeatedly (Repeat
Play).
Press RPT (repeat/Dolby B) while
playing a tune you want to hear over
again.
Each time you briefly press the
button, Repeat Play turns on and
off alternately.
Lights up when Repeat Play is turned on.
When the tune has been played, the tape is
automatically rewound to the beginning of that
tune and the same tune will be played again.
To cancel Repeat Play, press RPT again so
that the RPT indicator goes off.
Note:
In the following cases, Blank Skip and Repeat Play
may not operate correctly:
– Tapes with tunes having long pianissimo passages
(very quiet parts) or non-recorded portions during
tunes.
– Tapes with short non-recorded sections.
– Tapes with high level noise or humming between
tunes.
– The Dolby NR setting does not match. For example,
if Dolby B NR is on and the tape was recorded with
no Dolby NR.
4
Press SEL (select) to finish the setting.
To cancel Blank Skip, repeat the same
procedure and select “OFF” in step 3 by turning
the control dial counterclockwise.
18
Page 19
SOUND ADJUSTMENTS
Adjusting the sound
You can adjust the sound characteristics to your
preference.
1
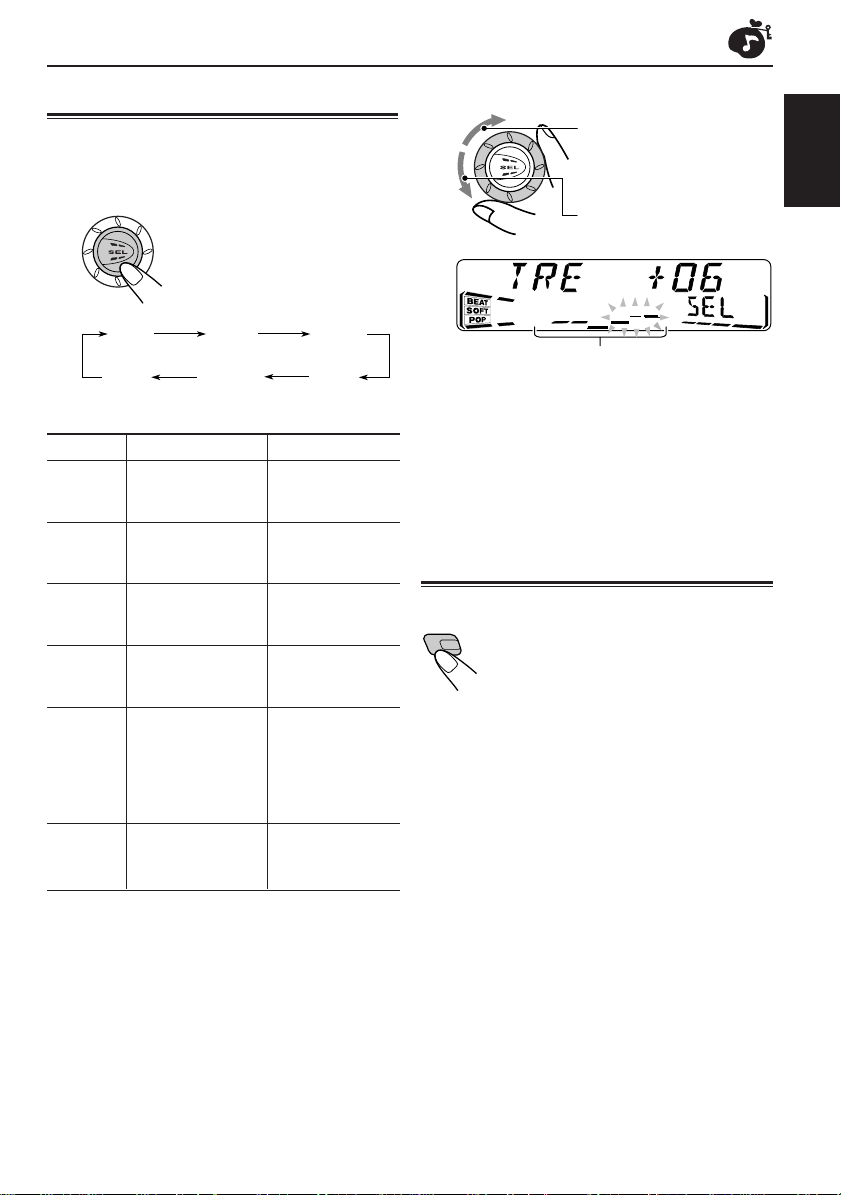
Select the item you want to adjust.
Each time you press the button,
the adjustable items change as
follows:
2
Adjust the level.
T o increase the level.
ENGLISH
To decrease the level.
BAS
(bass)
VOL
(volume)
Indication To do: Range
BAS Adjust the bass. –06 (min.)
TRE Adjust the treble. –06 (min.)
FAD* Adjust the front R06 (Rear only)
BAL Adjust the left L06 (Left only)
LOUD** Boost low and high
(only for frequencies to
KS-FX915R
VOL Adjust the volume. 00 (min.)
and rear speaker |
balance. F06 (Front only)
and right speaker |
balance. R06 (Right only)
) produce a well-
balanced sound
at low volume
level.
TRE
(treble)
LOUD**
(loudness)
FAD
(fader)
BAL
(balance)
|
+06 (max.)
|
+06 (max.)
LOUD ON
|
LOUD OFF
|
50 (max.)
Equalization pattern changes as you adjust the
bass or treble.
Note:
Normally, the control dial works as the volume
control. So you do not have to select “VOL” to adjust
the volume level.
Turning on/off the loudness function
(only for KS-FX815)
The human ear is less sensitive to
LOUD
low and high frequencies at low
volumes. The loudness function can
boost these frequencies to produce
a well-balanced sound at low
volume levels.
Each time you press LOUD, the
loudness function turns on/off
alternatively.
* If you are using a two-speaker system, set the fader
level to “00.”
**only for KS-FX915R
19
Page 20
Using the sound control memory
You can select and store a preset sound
adjustment suitable for each playback source
(Advanced SCM).
ENGLISH
Selecting and storing the sound modes
Once you select a sound mode, it is stored in
memory. It will be recalled every time you select
the same source and will be shown on the display.
A sound mode can be stored for each of the
following sources — FM1, FM2, FM3, AM, tape
and external components.
• If you do not want to store the sound mode
separately for each playback source, but want
to use the same sound mode for all the sources,
see “T o cancel Advanced SCM – SCM LINK” on
page 24.
Indication For: Preset values
BAS TRE LOUD
BEAT Rock or disco +02 00 ON
music
SOFT Quiet +01 –03 OFF
background
music
POP Light music +04 +01 OFF
SCM OFF (Flat sound) 00 00 ON
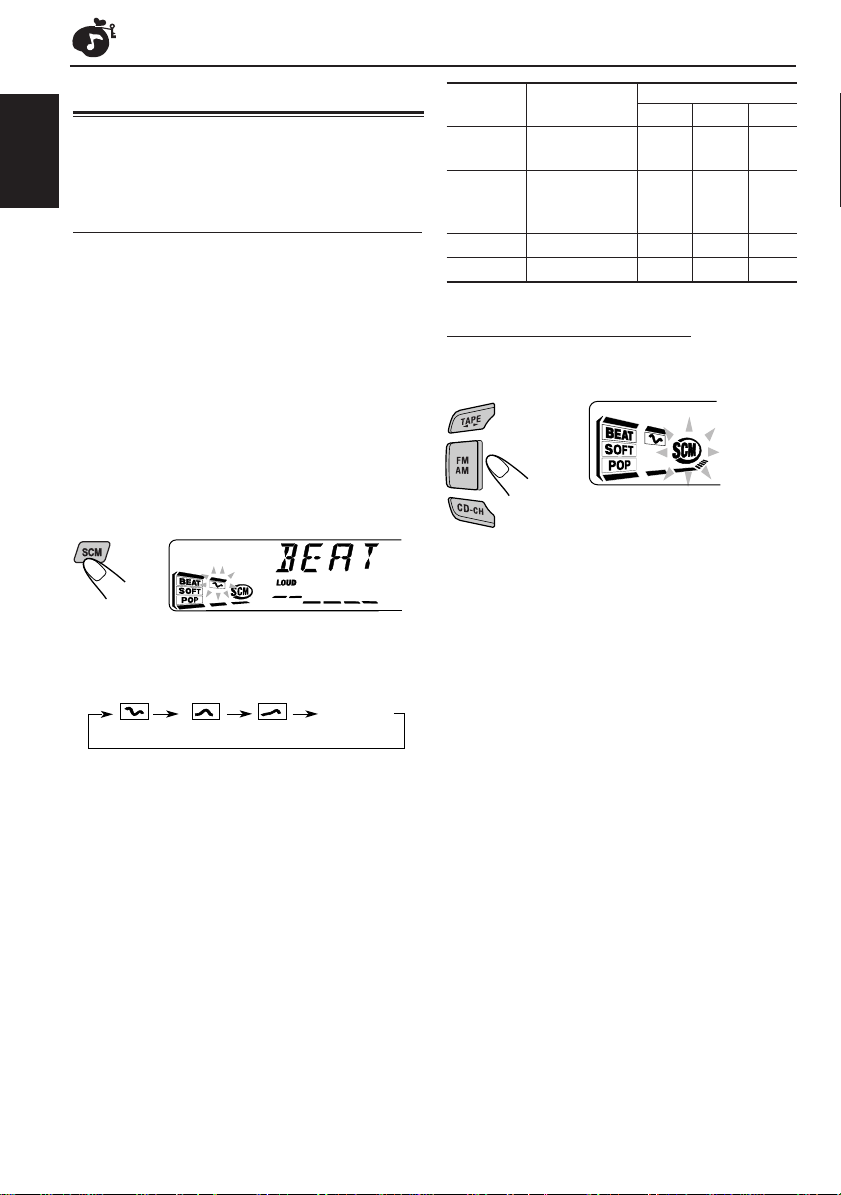
Recalling the sound modes
When “SCM LINK” is set to “LINK ON,”
select the source.
Select the sound mode you want.
Ex.: When you select “BEAT”
Each time you press the button, the sound mode
changes as follows:
(BEAT) (SOFT) (POP)
• When “SCM LINK” is set to “LINK ON,” the
selected sound mode can be stored in memory
for the current source and the effect applies only
to the current source. Each time you change the
playback source, the SCM indicator flashes on
the display.
• When “SCM LINK” is set to “LINK OFF,” the
selected sound mode effect applies to any source.
SCM OFF
Each time you change the
playback source, the SCM
indicator flashes on the display.
The sound mode stored in memory for the
selected source is recalled.
Notes:
• You can adjust each sound mode to your preference,
and store it in memory.
If you want to adjust and store your original sound
mode, see “Storing your own sound adjustments”
on page 21.
• To adjust the bass and treble reinforcement levels or
to turn on/off the loudness function temporarily, see
page 19. (Your adjustments will be canceled if
another source is selected.)
20
Page 21
Storing your own sound adjustments
You can adjust the sound modes (BEAT, SOFT,
POP) to your preference and store your own
adjustments in memory.
• There is a time limit in doing the following
procedure. If the setting is canceled before you
finish, start from step 1 again.
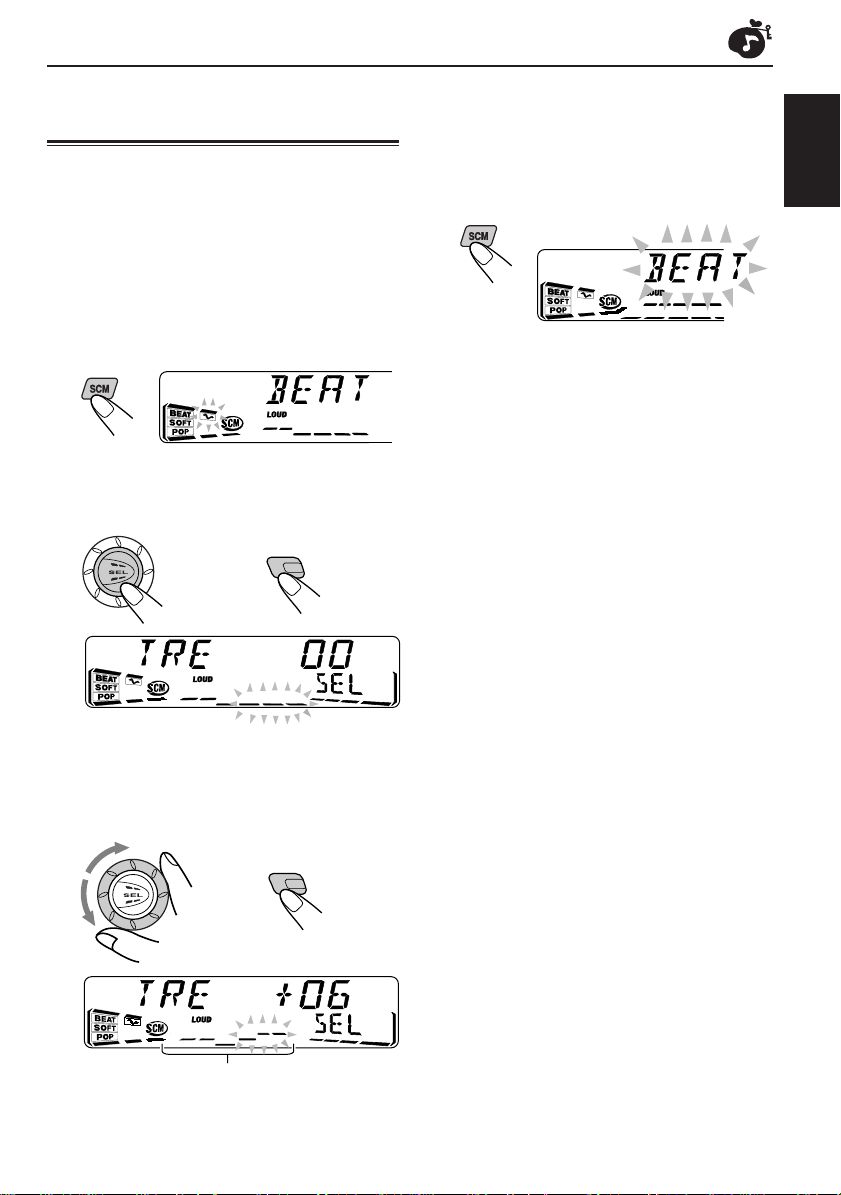
1
Call up the sound mode you want to
adjust.
• See page 20 for details.
Ex.: When you select “BEAT”
2
Select “BAS” (bass), “TRE” (treble) or
“LOUD” (loudness).
(For KS-FX815)
LOUD
4
Repeat steps 2 and 3 to adjust the
other items.
5
Press and hold SCM until the sound
mode you have selected in step 1
flashes on the display.
Y our adjustment made for the
selected sound mode is stored in
memory.
6
Repeat the same procedure to store
other sound modes.
To reset to the factory settings
Repeat the same procedure and reassign the
preset values listed in the table on page 20.
ENGLISH
Ex.: When you adjust “TRE” (treble)
3
Adjust the bass or treble level or turn
the loudness function ON/OFF.
• See page 19 for details.
(For KS-FX815)
LOUD
Equalization pattern changes as you adjust the
bass or treble.
21
Page 22

OTHER MAIN FUNCTIONS
Setting the clock
Y ou can also set the clock system to either 24 hours
or 12 hours. (only for KS-FX915R)
1
Press and hold SEL (select) for more
ENGLISH
than 2 seconds so that one of the PSM
items appears on the display.
(See page 23.)
2
Set the hour.
1 Select “CLOCK H” if not shown on the
display.
2 Adjust the hour.
1
3
Set the minute.
1 Select “CLOCK M.”
2 Adjust the minute.
1
2
2
To check the current clock time while the unit
is turned off, press DISP (display).
The power turns on, the clock time is shown for 5
seconds, then the power turns off.
Changing the general settings (PSM)
You can change the items listed on the next page
by using the PSM (Preferred Setting Mode) control.
Basic Procedure
1
Press and hold SEL (select) for more
than 2 seconds so that one of the PSM
items appears on the display.
(See page 23.)
2
Select the PSM item you want to
adjust. (See page 23.)
22
4
Set the clock system.
(only for KS-FX915R)
1 Select “24H/12H.”
2 Select “24H” or “12H.”
1
5
Press SEL (select) to finish the setting.
2
3
Adjust the PSM item selected.
4
Repeat steps 2 and 3 to adjust the
other PSM items if necessary.
5
Press SEL (select) to finish the setting.
Page 23

Preferred Setting Mode (PSM) items
1
CLOCK H Hour adjustment
CLOCK M Minute adjustment
SCM LINK Sound control
24H/12H* 24/12-hour time
AUTO ADJ* Automatic clock
CLOCK* Clock display
TU DISP* Tuner display
PTY STBY* PTY standby
PTY SRCH* PTY search
TA VOL* Traffic announcement
P-SEARCH* Programme search
DAB AF*
LEVEL Level display
DIMMER* Dimmer mode
TEL Telephone muting
BEEP* Key-touch tone
B. SKIP Blank skip
EXT IN** External component
1
2
Select.Hold.
memory linkage
display
setting
volume
Alternative frequency
search
3
Set.
Counterclockwise
Back Advance
LINK OFF
12H
OFF
OFF
FREQ PS NAME
29 programme types
(see pages 12 and 15.)
VOL 00 – VOL 50
OFF
AUDIO 1
AUTO
MUTING 1
OFF
CHANGER LINE IN
OFF
ON
OFF
Clockwise
AdvanceBack
LINK ON
24H
ON
ON
ON
AF ONAF OFF
AUDIO 2
OFF
MUTING 2
ON
Factory-preset
settings
0:00 22
24H
ON
ON
PS NAME
NEWS
(See page 12.)
OFF
AUDIO 2 24
AUTO 24
OFF 24
ON
OFFOFF ON
CHANGER
See
page
20, 24LINK ON
22
14
24
14
12
12
14VOL 20
13
32AF ON
24
18
24, 28
ENGLISH
• Press SEL (select) to finish the setting.
* These functions are applicable only to KS-FX915R.
*1Displayed only when the DAB tuner is connected.
** Displayed only when one of the following sources is selected – FM, AM and Tape.
23
Page 24

To cancel Advanced SCM – SCM LINK
Y ou can cancel the Advanced SCM (Sound Control
Memory), and unlink the sound modes and the
playback sources.
When shipped from the factory, a different sound
ENGLISH
mode can be stored in memory for each source so
that you can change the sound modes simply by
changing the sources.
• LINK ON: Advanced SCM (different sound
• LINK OFF: Conventional SCM (one sound mode
modes for different sources).
for all sources).
To set the clock display – CLOCK
(Only for KS-FX915R)
You can set the clock to be shown on the display
when the unit is turned on.
When shipped from the factory, the clock is set to
be shown on the display.
• ON: Clock display is turned on.
• OFF: Clock display is turned off. When
“OFF” is selected, the current source
name or station band appears
instead of the clock
when
“EXT–LINE IN” is selected as
the source).
display (except
To select the level meter – LEVEL
Y ou can select the level display according to your
preference.
When shipped from the factory, “AUDIO 2” is
selected.
• AUDIO 1:
• AUDIO 2:
• OFF:
Level meter illuminates from bottom
to top.
Alternates level meter (moves from
bottom to top) and illumination display.
Erases the audio level indicator.
To select the dimmer mode – DIMMER
(Only for KS-FX915R)
When you turn on the car head lights, the display
automatically dims (Auto Dimmer.)
When shipped from the factory, Auto Dimmer
mode is activated.
• AUTO: Activates Auto Dimmer.
• OFF: Cancels Auto Dimmer .
• ON: Always dims the display.
Note:
Auto Dimmer equipped with this unit may not work
correctly on some vehicles, particularly on those
having a control dial for dimming.
In this case, set the dimmer mode to “ON” or “OFF.”
To select the telephone muting – TEL
This mode is used when a cellular phone system is
connected. Depending on the phone system used,
select either “MUTING 1” or “MUTING 2,” whichever
mutes the sounds from this unit.
When shipped from the factory, this mode is
deactivated.
• MUTING 1: Select this if this setting can mute
the sounds.
• MUTING 2: Select this if this setting can mute
the sounds.
• OFF: Cancels the telephone muting.
To turn on/off the key-touch tone – BEEP
(Only for KS-FX915R)
You can deactivate the key-touch tone if you do not
want it to beep each time you press a button. When
shipped from the factory, the key-touch tone is
activated.
• ON: Activates the key-touch tone.
• OFF: Deactivates the key-touch tone.
To select the external component to use
– EXT IN
Y ou can connect the external component to the CD
changer jack on the rear using the Line Input Adaptor
KS-U57 (not supplied).
To use the external component as the playback
source through this unit, you need to select which
component – CD changer or external component
– to use.
When shipped from the factory, CD changer is
selected as the external component.
• LINE IN: To use the external component other
than CD changer.
• CHANGER: To use the CD changer .
Note:
For connecting the Line Input Adaptor KS-U57 and the
external component, refer to the Installation/Connection
Manual (separate volume).
24
Page 25

Detaching the control panel
Y ou can detach the contol panel when leaving the
car.
When detaching or attaching the control panel,
be careful not to damage the connectors on the
back of the control panel and on the panel holder.
Detaching the control panel
Before detaching the control panel, be sure to turn
off the power.
1
Unlock the control panel.
2
Pull the control panel out of the unit.
Attaching the control panel
1
Insert the right side of the control panel
into the groove on the panel holder.
2
Press the left side of the control panel
to fix it to the panel holder.
Note on cleaning the connectors:
If you frequently detach the control panel, the
connectors will deteriorate.
T o minimize this possibility , periodically wipe the
connectors with a cotton swab or cloth moistened
with alcohol, being careful not to damage the
connectors.
ENGLISH
3
Put the detached control panel into the
provided case.
Connectors
25
Page 26

ENGLISH
CD CHANGER OPERATIONS
8 9 10 11 127
MO
We recommend that you use one of the CH-X series
with your unit.
If you have another CD automatic changer, consult
your JVC IN-CAR ENTERTAINMENT dealer for
connections.
• For example, if your CD automatic changer is one of
the KD-MK series, you need a cord (KS-U15K) for
connecting it to this unit.
Before operating your CD automatic changer:
• Refer also to the Instructions supplied with your
CD changer.
• If no discs are in the magazine of the CD
changer or the discs are inserted upside down,
“NO DISC” will appear on the display. If this
happens, remove the magazine and set the
discs correctly.
• If “RESET 1” – “RESET 8” appears on the
display, something is wrong with the
connection between this unit and the CD
changer. If this happens, check the connection
and make sure the cords are connected firmly.
Then, press the reset button of the CD
changer.
Playing CDs
Select the CD automatic changer (CD-CH).
Playback starts from the first track
of the first disc.
All tracks of all discs are played back.
Elapsed playing time
* When “CLOCK” is set to “ON” (see page 24),
disc number will soon change to clock time.
(only for KS-FX915R)
Note on One-Touch Operation:
When you press CD-CH, the power automatically turns
on. You do not have to press to turn on the
power.
To fast-forward or reverse the track
Press and hold ¢ , while
playing a CD, to fast-forward the
track.
Track number
Disc number*
26
Press and hold 4 , while
playing a CD, to reverse the
track.
Page 27

To go to the next track or the previous tracks
Press ¢ briefly, while
playing a CD, to go ahead to
the beginning of the next track.
Each time you press the button
consecutively, the beginning of
the next track is located and
played back.
Press 4 briefly, while
playing a CD, to go back to the
beginning of the current track.
Each time you press the button
consecutively, the beginning of
the previous tracks is located
and played back.
To go to a particular disc directly
Press the number button corresponding to the disc
number to start its playback (while the CD changer
is playing).
8 9 10 11 127
• To select a disc number from 1 – 6:
Press 1 (7) – 6 (12) briefly.
• To select a disc number from 7 – 12:
Press and hold 1 (7) – 6 (12) for more than 1
second.
Elapsed playing time
Track number
Selecting CD playback modes
To play back tracks at random (Random Play)
MO
Mode
RND1 Lights All tracks of the current
(random1) disc, then the tracks of
RND2 Flashes All tracks of all discs
(random2) inserted in the magazine.
To play back tracks repeatedly (Repeat Play)
Mode
RPT1 Lights The current track (or
(repeat1) specified track).
RPT2 Flashes All tracks of the current
(repeat2) disc (or specified disc).
Each time you press RND MO
(random/monaural), CD random play
mode changes as follows:
RND1
RND2
Canceled
RND
Indicator
Each time you press RPT
(repeat/Dolby B), CD repeat play
mode changes as follows:
Plays at random
the next disc and so on.
RPT1 RPT2
Canceled
RPT
Indicator
Plays repeatedly
ENGLISH
Ex.: When disc number 3 is selected
Disc number
27
Page 28

EXTERNAL COMPONENT OPERATIONS
ENGLISH
8 9 10 11 127
Playing an external component
You can connect the external component to the
CD changer jack on the rear using the Line Input
Adaptor KS-U57 (not supplied).
Preparations:
• For connecting the Line Input Adaptor KS-U57 and
the external component, refer to the Installation/
Connection Manual (separate volume).
• Before operating the external component using the
following procedure, select the external input
correctly. (See “To select the external component to
use – EXT IN” on page 24.)
1
Select the external component
(CD-CH).
MO
2
Turn on the connected component
and start playing the source.
3
Adjust the volume.
4
Adjust the sound characteristics
you want. (See page 19.)
• If “LINE IN” does not appear on the display, see
page 24 and select the external input (“LINE IN”).
• Displayed only when one of the following
sources is selected – FM, AM and Tape.
Note on One-Touch Operation:
When you press CD-CH, the power automatically
comes on. You do not have to press to turn
on the power.
28
Page 29

DAB TUNER OPERATIONS (only for KS-FX915R)
FM/AMDAB
KS-FX915R
DISP
TP
RDS
PTY
8 9 10 11 127
DAB
MO
ENGLISH
We recommend that you use DAB (Digital Audio
Broadcasting) tuner KT-DB1500 with your unit.
If you have another DAB tuner, consult your JVC
IN-CAR ENTERTAINMENT dealer.
• Refer also to the Instructions supplied with your
DAB tuner.
What is DAB system?
DAB is one of the digital radio broadcasting
systems available today. It can deliver CD quality
sound without any annoying interference and
signal distortion. Furthermore, it can carry text,
pictures and data.
In contrast to FM broadcast, where each
programme is transmitted on its own frequency,
DAB combines several programmes (called
“services”) to form one “ensemble.”
With the DAB tuner connected with this unit,
you can enjoy these DAB services.
Tuning into an ensemble and one of the services
A typical ensemble has 6 or more programmes
(services) broadcast at the same time. After tuning
into an ensemble, you can select a service you
want to listen to.
Before you start....
Press DAB (FM AM) briefly if tape, CD changer or
external component is the current source.
1
Select the DAB tuner.
Each time you press and
hold the button, the DAB
tuner and the FM/AM tuner
are alternately selected.
2
Select the DAB band (DAB1, DAB2
or DAB3).
Each time you press the
button, the DAB band
changes as follows:
D1
(DAB 1)
D2
(DAB 2)
D3
(DAB 3)
Note:
This receiver has three D AB bands (D AB1, DAB2,
DAB3). You can use any one of them to tune into
an ensemble.
CONTINUED ON THE NEXT PAGE
29
Page 30

3
Ensemble name
Service name
Channel number
Frequency
Start searching an ensemble.
Press ¢ to search
ensembles of higher
ENGLISH
When an ensemble is received, searching
stops.
To stop searching before an ensemble is
received, press the same button you have
pressed for searching.
4
Select a service you want to listen to.
MO
frequencies.
Press 4 to search
ensembles of lower
frequencies.
Press 5 (RND MO) to select
the next service.
Press ∞ (RPT ) to select the
previous service.
To change the display information while
tuning into an ensemble
Normally service name is shown on the display.
If you want to change the display information,
press DISP.
Each time you press the button, the following
information appears on the display for a while.
To tune into a particular ensemble without
searching:
1 Press and hold DAB (FM AM) to select DAB
tuner as the source.
2 Press DAB (FM AM) repeatedly to select the
DAB band (DAB1, DAB2 or DAB3).
3 Press and hold ¢ or 4 for more
than 1 second.
4 Press ¢ or 4 repeatedly until the
ensemble you want is reached.
• If you hold down the button, the frequency
keeps changing until you release the button.
30
To restore the FM/AM tuner
Press and hold DAB (FM AM) again.
Page 31

Storing DAB services in memory
You can preset up to 6 DAB services in each
DAB band (DAB1, DAB2 and DAB3) manually.
1
Select the DAB tuner.
Each time you press and
hold the button, the DAB
tuner and the FM/AM tuner
are alternately selected.
FM/AMDAB
2
Select the DAB band (DAB1, DAB2
or DAB3) you want.
Each time you press the
button, the DAB band
changes as follows:
5
Press and hold the number button
(in this example, 1) you want to
store the selected service into for
more than 2 seconds.
7
Selected band/preset number
and “MEMO” (memory) appear
alternately for a while.
ENGLISH
D1
(DAB 1)
3
Tune into an ensemble you want.
4
Select a service of the ensemble you
want.
MO
Press 5 (RND MO) to select
the next service.
Press ∞ (RPT ) to select the
previous service.
D2
(DAB 2)
D3
(DAB 3)
6
Repeat the above procedure to store
other DAB services into other preset
numbers.
Notes:
• A previously preset DAB service is erased when a ne w
DAB service is stored in the same preset number.
• Preset DAB services are erased when the power supply
to the memory circuit is interrupted (for example,
during battery replacement). If this occurs, pr eset the
DAB services again.
31
Page 32

Tuning into a preset DAB service
You can easily tune into a preset DAB service.
ENGLISH
Remember that you must store services first. If
you have not stored them yet, see page 31.
1
Select the DAB tuner.
Each time you press and
hold the button, the DAB
tuner and the FM/AM tuner
are alternately selected.
FM/AMDAB
2
Select the DAB band (DAB1, DAB2
or DAB3) you want.
Each time you press the
button, the DAB band
changes as follows:
D1
(DAB 1)
3
Select the number (1 – 6) for the
preset DAB service you want.
8 9 10 11 127
D2
(DAB 2)
D3
(DAB 3)
What you can do more with DAB
Tracing the same program automatically
(Alternative Reception)
Y ou can keep listening to the same program.
• While receiving a DAB service:
When driving in an area where a service cannot
be received, this unit automatically tunes in
another ensemble or FM RDS station,
broadcasting the same program.
• While receiving an FM RDS station:
When driving in an area where a DAB service is
broadcasting the same program as the FM RDS
station is broadcasting, this unit automatically
tunes into the DAB service.
Note:
When reception switches between DAB and FM, the
listening volume level may increase or decrease
inconveniently. This change in the volume level results
from unequal audio injection levels at br oadcaster site ,
but not from the malfunction of this unit.
To use Alternative Reception
When shipped from the factory, Alternative
Reception is activated.
1 Press and hold SEL (select) for more than 2
seconds so that one of the PSM items appears
on the display.
2 Press ¢ or 4 to select “DAB AF”
(alternative frequency).
3 Turn the control dial to select the desired mode.
• AF ON: Traces the program among DAB
services and FM RDS stations
— Alternative Reception. The AF
indicator lights up on the display
(see page 10).
• AF OFF:Deactivates Alternative Reception
Note:
When Alternative Reception (for DAB services) is
activated, Network-Tracking Reception (for RDS
stations: see page 10) is also activated automatically.
On the other hand, Network-Tracking Reception
cannot be deactivated without deactivating
Alternative Reception.
4 Press SEL (select) to finish the setting.
32
Page 33

MAINTENANCE
This unit requires very little attention, but you will
be able to extend the life of the unit if you follow
the instructions below.
To clean the heads
• Clean the heads after every 10 hours of use using
a wet-type head cleaning tape (available at an
audio store).
When the head becomes dirty, you may realize
the following symptoms:
– Sound quality is reduced.
– Sound level decreases.
– Sound drops out.
• Do not play dirty or dusty tapes.
• Do not touch the highly-polished head with any
metallic or magnetic tools.
CAUTION:
• Do not play the cassettes with peeling labels;
otherwise, they can damage the unit.
• Tighten tapes to remove slack since loose tape
may become entangled with the mechanism.
• Do not leave a cassette in the cassette
compartment after use, as the tape may become
slack.
The function below is also provided to ensure the
longer life of this unit.
Ignition key-off release/Ignition key-on
play
• Turning off the ignition key with a cassette in the
compartment automatically releases the tape
from the unit's tapehead.
• Turning on the ignition key with a cassette in the
compartment starts playback automatically if you
turned off the ignition during tape play.
ENGLISH
To keep the tape clean
• Always store the cassettes to their storage cases
after use.
• Do not store cassettes in the following places:
– Subject to direct sunlight
– With high humidity
– At extremely hot temperatures
33
Page 34

TROUBLESHOOTING
What appears to be trouble is not always serious. Check the following points before calling a service
center.
Symptoms
• A cassette tape cannot be
inserted.
ENGLISH
• A cassette tape cannot be
ejected.
Causes
You have tried to insert a
cassette in the wrong way.
Cassette ejection is prohibited.
Insert the cassette with the
exposed tape facing right.
Press and hold TAPE 23 and
Remedies
for more than two seconds.
• Cassette tapes become hot.
• Tape sound is at very low
level and sound quality is
degraded.
• Sound is sometimes
interrupted.
• Sound cannot be heard from
the speakers.
• SSM (Strong-station
Sequential Memory)
automatic preset does not
work.
• Static noise while listening to
the radio.
• “NO DISC” appears on the
display.
• “NO MAG” appears on the
display.
• “RESET 8” appears on the
display.
• “RESET 1” – “RESET 7”
appears on the display.
This is not a malfunction.
The tape head is dirty.
Connections are not good.
The volume is turned to the
minimum level.
Connections are incorrect.
Signals are too weak.
The antenna is not connected
firmly.
No CD is in the magazine.
CDs are inserted incorrectly.
No magazine is loaded in the
CD changer.
This unit is not connected to a
CD changer correctly.
Clean it with a head cleaning tape.
Check the cords and connections.
Adjust it to the optimum level.
Check the cords and connections.
Store stations manually.
Connect the antenna firmly.
Insert CDs into the magazine.
Insert them correctly.
Insert the magazine.
Connect this unit and the CD
changer correctly and press the
reset button of the CD changer.
Press the reset button of the CD
changer.
• This unit does not work at all.
• The CD changer does not
work at all.
34
The built-in microcomputer may
function incorrectly due to
noise, etc.
Press the reset button on the panel
holder. (The clock setting and preset
stations stored in memory are
erased.) (See page 2.)
Page 35

SPECIFICATIONS
AUDIO AMPLIFIER SECTION
Maximum Power Output:
Front: 45 W per channel
Rear: 45 W per channel
Continuous Power Output (RMS):
Front: 17 W per channel into 4 Ω, 40 Hz
to 20 000 Hz at no more than
0.8% total harmonic distortion.
Rear: 17 W per channel into 4 Ω, 40 Hz
to 20 000 Hz at no more than
0.8% total harmonic distortion.
Load Impedance: 4 Ω (4 Ω to 8 Ω allowance)
Tone Control Range:
Bass: ±10 dB at 100 Hz
Treble: ±10 dB at 10 kHz
Frequency Response: 40 Hz to 20000 Hz
Signal-to-Noise Ratio: 70 dB
Line-Out Level/Impedance:
2.0 V/20 kΩ load (250 nWb/m)
TUNER SECTION
Frequency Range:
FM1/FM2: 87.5 MHz to 108.0 MHz
FM3: 65 MHz to 74 MHz
AM: (MW) 522 kHz to 1 620 kHz
(LW) 144 kHz to 279 kHz
[FM Tuner]
Usable Sensitivity: 11.3 dBf (1.0 µV/75 Ω)
50 dB Quieting Sensitivity:
16.3 dBf (1.8 µV/75 Ω)
Alternate Channel Selectivity (400 kHz):
65 dB
Frequency Response: 40 Hz to 15000 Hz
Stereo Separation: 30 dB
Capture Ratio: 1.5 dB
CASSETTE DECK SECTION
Wow & Flutter: 0.11% (WRMS)
Fast-Wind Time: 100 sec. (C-60)
Frequency Response (Dolby B NR OFF):
30 Hz to 16 000 Hz (Normal tape)
Signal-to-Noise Ratio: (Normal tape)
(Dolby B NR ON): 65 dB
(Dolby B NR OFF): 56 dB
Stereo Separation: 40 dB
GENERAL
Power Requirement:
Operating Voltage: DC 14.4 V
(11 V to 16 V allowance)
Grounding System: Negative ground
Allowable Operating Temperature: 0°C to +40°C
Dimensions (W × H × D):
Installation Size: 182 mm × 52 mm × 150 mm
Panel Size: 188 mm × 58 mm × 14 mm
Mass: 1.4 kg (excluding accessories)
Design and specifications subject to change without
notice.
ENGLISH
[MW Tuner]
Sensitivity: 20 µV
Selectivity: 35 dB
[LW Tuner]
Sensitivity: 50 µV
35
Page 36

Мы благодарим Вас за приобретение изделия JVC. Перед началом эксплуатации ознакомьтесь,
пожалуйста, с этой инструкцией целиком для достижения наилучших результатов при
эксплуатации устройства.
СОДЕРЖАНИЕ
Перезагрузка Вашего устройства ........ 2
РАСПОЛОЖЕНИЕ ОРГАНОВ УПРАВЛЕНИЯ .. 3
Панель управления ................................ 3
Пульт дистанционного управления
(только для KS-FX915R) ...................... 4
Подготовка пульта дистанционного
управления к работе
(только для KS-FX915R) ..................... 5
ОСНОВНЫЕ ОПЕРАЦИИ ........................... 6
РУССКИЙ
Включение питания ............................... 6
ОСНОВНЫЕ ФУНКЦИИ ПРИЕМНИКА..... 7
Прослушивание радио ........................... 7
Сохранение настроек на радиостанции
в памяти ............................................... 8
Настройка на запрограммированную
станцию ................................................ 9
Прочие удобные функции приемника
(только для KS-FX815) ....................... 9
ФУНКЦИИ RDS (ТОЛЬКО ДЛЯ KS-FX915R) ...... 10
Что Вы можете сделать при помощи
RDS EON .............................................. 10
Другие удобные функции RDS .............. 13
ФУНКЦИИ ПРОИГРЫВАТЕЛЯ КАССЕТ .. 16
Прослушивание кассеты ....................... 16
Поиск начала композиции .................... 17
Прочие удобные функии проигрывателя
кассет ................................................... 18
НАСТРОЙКИ ЗВУЧАНИЯ .......................... 19
Настройка звучания .............................. 19
Включение/выключение функции ком-
пенсации громкости
(только для KS-FX815) .................... 19
Использование Памяти Управления
Звучанием ........................................ 20
Сохранение Ваших настроек звучания ... 21
ПРОЧИЕ ОСНОВНЫЕ ФУНКЦИИ ......... 22
Настройка часов ................................ 22
Изменение основных настроек (PSM) ... 22
Отсоединение панели управления... 25
ЭКСПЛУАТАЦИЯ УСТРОЙСТВА
СМЕНЫ КОМПАКТ-ДИСКОВ ................. 26
Воспроизведение компакт-дисков ... 26
Выбор режима воспроизведения
компакт-дисков ............................... 27
ЭКСПЛУАТАЦИЯ ВНЕШНИХ УСТРОЙСТВ .. 28
Воспроизведение звука на внешнем
устройстве ....................................... 28
ЭКСПЛУАТАЦИЯ DAB ТЮНЕРА
(ТОЛЬКО ДЛЯ KS-FX915R) ................................... 29
Настройка на блок трансляций и
одну из служб .................................. 29
Сохранение служб DAB в памяти ..... 31
Настройка на запрограммированную
службу DAB ...................................... 32
Что Вы можете сделать еще при
помощи DAB........................................ 32
ТЕХНИЧЕСКОЕ ОБСЛУЖИВАНИЕ ...... 33
ВОЗМОЖНЫЕ НЕИСПРАВНОСТИ ....... 34
ТЕХНИЧЕСКИЕ ХАРАКТЕРИСТИКИ ... 35
Перезагрузка Вашего устройства
После отсоединения панели управления нажмите кнопку перезагрузки, расположенную на
держателе панели, при помощи шариковой
ручки или другого подобного инструмента.
Это приведет к перезагрузке встроенного
микрокомпьютера.
Примечание:
Выполненные Вами настройки – например, запрограммированные каналы или настройки звучания, –
также будут удалены.
ПЕРЕД НАЧАЛОМ ЭКСПЛУАТАЦИИ
*Для Вашей безопасности....
• Не устанавливайте слишком высокий уровень
громкости, так как это приведет к заглушению
внешних звуков и сделает управление опасным.
• Остановите машину при выполнении каких-либо
сложных операций.
2
*Tмпература внутри машины....
Если Вы припарковали автомобиль на долгое время
в чрезмерно жаркую или холодную погоду, перед
началом эксплуатации этого устройства
выждите, пока температура в машине не придет в
норму.
Page 37

РАСПОЛОЖЕНИЕ ОРГАНОВ УПРАВЛЕНИЯ
Панель управления
Окно дисплея
o;
a
sdf klhg
1
w
1 Кнопка (ождание/включено/
приглушение)
2 Диск настройки
3 Сенсор дистанционного управления*
4 Кнопка DISP (дисплей) (KS-FX915R)
Кнопка LOUD (компенсация громкости)
(KS-FX815)
5 Кнопка TP (передача сообщений о
дорожном движении) (KS-FX915R)
RDS (система радио информации) (KS-FX915R)
Кнопка DISP (дисплей) (KS-FX815)
6 Кнопка PTY (тип передачи) (KS-FX915R)
Кнопка SCAN (KS-FX815)
7 Окно дисплея
8 Кнопка FM AM
• Функционирует также как кнопка DAB.*
9 Кнопка TAPE 23
p Кнопка 0 (выброс)
q Кнопки ¢
•
При совместном нажатии функционируют
также как кнопки SSM.
w Кнопка (освобождения панели управления)
e Кнопка SEL (выбор)
r Цифровые кнопки
t Кнопка RPT (повтор)
Кнопка
• Также функционирует как ∞ (выбор службы
DAB).*
(Dolby B)
24
e
/ 4
3
5
8 9 10 11 127
6
7
j /
РУССКИЙ
p
q
9
8
MO
yur
t
y Кнопка RND (произвольный режим)
Кнопка MO (моно)
• Также функционирует как ∞ (выбор службы
DAB).*
u Кнопка SCM (память управления
звучанием)
i Кнопка CD-CH (устройство для смены
компакт-дисков)
i
Окно дисплея
o Индикаторы RDS*
EON, AF, REG, TP, PTY
; Основной дисплей
a Индикатор TAPE
s Индикаторы режима звучания
BEAT, SOFT, POP
d Индикатор SCM
f Индикатор уровня громкости (или звука)
g Индикатор LOUD
h Индикатор RPT (повтор)
j Индикатор RND (произвольный режим)
k Индикатор
l Индикаторы режима приема тюнера
MO (моно), ST (стерео)
/ Источник сигнала/часы
* только для KS-FX915R
(Dolby B)
3
Page 38

Пульт дистанционного
управления
(только для KS-FX915R)
Этот раздел только для KS-FX915R.
5
1
РУССКИЙ
2
3
4
1 • Если эта кнопка нажата, когда питание
устройства отключено, устройство
включается.
• Если эта кнопка удерживается нажатой во
время отображения сообщения “SEE YOU”,
устройство отключается.
• При кратком нажатии кнопки звук мгновенно приглушается.
Нажмите кнопку снова для восстановления исходной громкости.
2 • Функционирует также, как и кнопка BAND
во время прослушивания радиопередачи
в диапазоне FM (или тюнера DAB).
После каждого нажатия кнопки меняется
частотный диапазон.
• Функционирует также, как и кнопка DISC
+ во время прослушивания устройства для
смены компакт-дисков.
После каждого нажатия кнопки номер диска возрастает, и начинается воспроизведение выбранного диска.
• Функционирует как кнопка PROG при прослушивании кассеты.
После каждого нажатия кнопки направление
движения пленки попеременно меняется.
4
6
7
3 • Функционирует также, как и кнопка PRE-
SET во время прослушивания радио (или
тюнера DAB).
После каждого нажатия кнопки номер запрограммированной станции (или службы)
возрастает, и производится настройка на
выбранную станцию (или службу).
• Функционирует также, как и кнопка
DISC – во время прослушивания
устройства для смены компакт-дисков.
После каждого нажатия кнопки номер
диска убывает, и начинается
воспроизведение выбранного диска.
4 Функционирует, как диск управления на
основном устройстве.
ПРИМЕЧАНИЕ: Эта кнопка не функционирует в режиме
изменения основных настроек.
5 Служит для выбора режима звучания.
После каждого нажатия кнопки режим звучания меняется.
6 Служит для выбора источника сигнала.
После каждого нажатия кнопки источник
сигнала меняется.
7 • Поиск станции во время прослушивания
радио.
• При кратком нажатии во время прослушивания тюнера DAB – выбор службы.
• Поиск блоков трансляций во время прослушивания тюнера DAB, если кнопка
удерживается нажатой в течение секунды
и более.
• Функционируют как кнопки перемотки
вперед/назад или музыкального поиска во
время прослушивания кассеты.
• Перемотка вперед или назад, если кнопка
нажата и удерживается во время прослушивания компакт-диска.
• Переход к началу следующего фрагмента
или возвращение к началу текущего (или
предыдущего) фрагмента при кратком нажатии во время прослушивания компактдиска.
Page 39

Подготовка пульта дистанционного управления к работе
(только для KS-FX915R)
2. Установите батарейку.
Поместите батарейку в отсек для батарейки
стороной + вверх, таким образом, чтобы батарейка была зафиксирована в держателе.
Этот раздел только для KS-FX915R.
Перед началом использования пульта дистанционного управления:
• Наводите пульт дистанционного управления точно на сенсор дистанционного управления на основном устройстве. Убедитесь в
том, между ними нет препятствий.
Сенсор дистанционного управления
3. Установите держатель батарейки на
место.
Установите держатель батарейки на место,
нажимая на него до тех пор, пока не
услышите щелчок.
Плоская литиевая
батарейка (номер
изделия CR2025)
РУССКИЙ
DISP
TP
RDS
PTY
8 9 10 117
• Не подставляйте сенсор дистанционного
управления под яркий свет (прямой солнечный свет или искусственное освещение).
Установка батарейки
Если эксплуатационная дистанция или эффективность пульта дистанционного управления
снизилась, замените батарейку.
1. Удалите держатель батарейки.
1) Вытолкните держатель батарейки,
нажимая на него в направлении
стрелки шариковой ручкой или другим
подобным инструментом.
2) Удалите держатель батарейки.
(обратная сторона)
1)
2)
(обратная сторона)
ПРЕДУПРЕЖДЕНИЕ:
• Храните батарейки вне досягаемости детей.
Если ребенок проглотил батарейку, немедленно
обратитесь к врачу.
• Не заряжайте, не закорачивайте, не разбирайте и не нагревайте батарейку, а также не бросайте ее в огонь.
Это может привести к выделению тепла,
повреждению или возгоранию батарейки.
• Не смешивайте батарейки и другие металлические предметы.
Это может привести к выделению тепла,
повреждению или возгоранию батарейки.
• При выбрасывании или хранении батарейки заверните ее в изоляционную ленту. В противном
случае возможно выделение тепла, повреждение
или возгорание батарейки.
• Не берите батарейку пинцетом или другим
подобным инструментом.
Это может привести к выделению тепла,
повреждению или возгоранию батарейки.
5
Page 40

ОСНОВНЫЕ ОПЕРАЦИИ
123
РУССКИЙ
Включение питания
1
Включите питание.
Примечание, касающееся управления “одним
нажатием”:
Если Вы выбираете источник сигнала в
пункте 2 ниже, питание включается
автоматически. Вам не нужно нажимать эту
кнопку для включения питания.
2
Выберите источник сигнала.
Для получения информации по управле-
нию приемником (FM или AM),
см. страницы 7 – 15.
Для получения информации по управле-
нию проигрывателем кассет,
см. страницы 16 – 18.
Для получения информации по управле-
нию устройством для смены
компакт-дисков,
см. страницы 26 – 27.
Для получения информации по управле-
нию внешним устройством,
см. страницы 28.
Для получения информации по управле-
нию тюнером DAB*,
см. страницы 29 – 32.
6
* Только для KS-FX915R
8 9 10 11 127
3
Настройте громкость.
4
Отрегулируйте звучание.
MO
Для увеличения
громкости.
Для уменьшения
громкости.
Появляется индикатор уровня громкости.
Индикатор уровня громкости или звука
(см.страницу 24)
(См. страницу 19.)
Для немедленного приглушения звука
Кратко нажмите кнопку во время
прослушивания любого источника сигнала. На
дисплее начнет мигать “АТТ” и уровень
громкости мгновенно упадет.
Для восстановления исходной громкости
звука кратко нажмите кнопку снова.
• Вы также можете восстановить исходную
громкость звука, повернув диск по часовой
стрелке.
Для отключения питания
Нажмите кнопку и удерживайте до
тех пор, пока на дисплее не появится “SEE
YOU”.
Примечание:
При первом использовании этого устройства
настройте встроенные часы (см. страницу 22).
Page 41

ОСНОВНЫЕ ФУНКЦИИ ПРИЕМНИКА
8 9 10 11 127
Прослушивание радио
Для настройки на желаемую радиостанцию Вы
можете воспользоваться как автоматическим,
так и ручным поиском.
Поиск радиостанции автоматически:
Aвтоматический поиск
1
Выберите диапазон (FM1 – 3, AM).
F1 F2 F3 AM
(FM1) (FM2) (FM3)
FM1 и FM2: 87,5 MГц – 108,0 MГц
FM3: 65 MГц – 74 MГц
MO
Для прекращения поиска перед окончанием настройки на станцию нажмите ту же
кнопку, которую Вы использовали для начала
поиска
Поиск радиостанции вручную:
Ручной поиск
1
Выберите диапазон (FM1 – 3, AM).
F1 F2 F3 AM
(FM1) (FM2) (FM3)
Примечание:
Этот приемник имеет три диапазона приема
FM (FM1, FM2 и FM3). Для прослушивания
радиопередач FM Вы можете пользоваться
любым из них.
РУССКИЙ
Появляется выбранный диапазон.
Примечание:
Этот приемник имеет три диапазона приема
FM (FM1, FM2 и FM3). Для прослушивания
радиопередач FM Вы можете пользоваться
любым из них.
2
Начните поиск радиостанции.
Нажмите кнопку ¢
для поиска на более
высоких частотах.
Нажмите кнопку 4
для поиска на более
низких частотах.
После осуществления настройки на
станцию поиск прекратится.
2
Нажмите и удерживайте нажатой
кнопку ¢ или 4 до тех пор,
пока на дисплее не замигает “MANU”
(ручная).
Здесь отображается
выбранный диапазон вещания.
ПРОДОЛЖЕНИЕ НА СЛЕДУЮЩЕЙ СТРАНИЦЕ
7
Page 42

3
Настройтесь на желаемую радиостанцию, пока на дисплее мигает
“MANU”.
Сохранение настроек на
радиостанции в памяти
Нажмите кнопку ¢
для поиска станции на
более высоких частотах.
Нажмите кнопку 4
для поиска станции на
РУССКИЙ
• Если Вы отпустите кнопку, режим ручной
настройки отключится автоматически по
истечение 5 секунд.
• Если Вы будете удерживать кнопку нажатой, частота начнет меняться (с шагом 50
кГц (87,5 МГц – 108 МГц), 30 кГц (65 МГц –
74 МГц) и 9 кГц для АМ - MW/LW) до тех
пор, пока Вы не отпустите кнопку.
балее низких частотах.
Если стереофоническая передача FM
принимается плохо:
Нажмите кнопку MO RND (монофонический/
случайный) во время прослушивания
стереофонической передачи FM.
• После каждого нажатия кнопки индикатор
МО попеременно загорается и гаснет.
Загорается, когда передача FM принимается в стереофоническом режиме.
Для сохранения настроек на радиостанции в памяти Вы можете воспользоваться одним из двух
следующих методов.
• Автоматическое программирование радиостанций FM: SSM (Последовательное сохранение в памяти настроек на радиостанции с
наиболее сильным сигналом)
• Ручное программирование радиостанций FM и АМ
Автоматическое программирование радиостанций FM: SSM
Вы можете запрограммировать до 6 местных
радиостанций FM в каждом диапазоне FM
(FM1, FM2 и FM3).
1
Выберите FM диапазон (FM1 – 3), в
котором ведет трансляции желаемая радиостанция.
После каждого нажатия
кнопки диапазон приема FM
меняется таким образом:
F1 F2 F3 AM
(FM1) (FM2) (FM3)
2
Нажмите и удерживайте обе кнопки
нажатыми в течение 2 и более секунд.
MO
Когда на дисплее горит индикатор МО,
приемник воспроизводит монофонический
звук, но качество приема улучшается
(индикатор ST не горит).
8
Появится “SSM”, а затем, когда автоматическое
программирование закончится, исчезнет.
Местные радиостанции FM с наиболее сильным
сигналом в выбранном диапазоне (FM1, FM2
или FM3) будут найдены и сохранены в памяти
автоматически. Эти станции будут присвоены
цифровым кнопкам - от №1 (самая низкая частота) до № 6 (самая высокая частота).
По окончании автоматического программирования приемник автоматически настроится
на станцию, сохраненную под номером 1.
Page 43

Ручная настройка
Вы можете запрограммировать до 6 радиостанций в каждом диапазоне FM (FM1, FM2,
FM3 и АМ) вручную.
ПРИМЕР: Сохранение радиостанции FM 88,3
1
Мгц под номером 1 диапазона FM1.
Выберите диапазон (FM1 – 3, AM), в
котором Вы желаете сохранять радиостанции (в этом примере FM1).
После каждого нажатия
кнопки диапазон приема FM
меняется таким образом:
4
Повторяйте процедуру для настройки и программирования остальных
радиостанций.
Примечания:
• При программировании новой станции, станция,
запрограммированная под тем же номером, стирается.
• Запрограммированные радиостанции стираются
из памяти, когда прерывается подача питания
(например, во время замены аккумулятора). В этом
случае запрограммируйте станции снова.
Настройка на запрограммиро-
РУССКИЙ
ванную станцию
F1 F2 F3 AM
(FM1) (FM2) (FM3)
2
Настройтесь на станцию 88,3 MГц.
Нажмите кнопку ¢
для поиска станции на
более высоких частотах.
Нажмите кнопку 4
для поиска станции на
балее низких частотах.
3
Нажмите и удерживайте цифровую
кнопку (в этом примере 1) в течение 2 секунд или более.
7
Выбранный диапазон/номер
программы и “MEMO” (память) на
несколько секунд появятся на
дисплее.
Вы можете легко настроиться на запрограммированную станцию.
Запомните, что сначала Вы должны сохранить настройки на радиостанции в памяти.
Если Вы еще этого не сделали, обратитесь к
разделу “Сохранение настроек на радиостанции в памяти” на странице 8.
1
Выберите желаемый диапазон
(FM1 – 3, AM).
F1 F2 F3 AM
(FM1) (FM2) (FM3)
2
Выберите номер, под которым будет запрограммирована радиостанция (1 – 6).
8 9 10 11 127
- .
Прочие удобные функции приемника
(только для KS-FX815)
Просмотр доступных радиостанций
SCAN
Если Вы нажмете кнопку SCAN во
время прослушивания радио,
начнется просмотр радиостанций.
Всякий раз после того, как приемник настроится на радиостанцию,
поиск прекращается приблизительно на 5 секунд (на дисплее
мигает частота текущей радиостанции), и Вы можете оценить
транслируемую передачу.
7 Если Вы желаете слушать эту передачу, на-
жмите ту же кнопку снова для прекращения просмотра.
9
Page 44

ФУНКЦИИ RDS (ТОЛЬКО ДЛЯ KS-FX915R)
Что Вы можете сделать при
помощи RDS EON
RDS (система радио информации) позволяет
радиостанциям FM посылать дополнительные
сигналы совместно с обычными сигналами.
Например, станция передает свое название, а
также информацию о типе передаваемой
программы, например, спортивная программа,
музыкальная и пр.
Другим преимуществом RDS является система EON (Расширенная сеть трансляций). При
РУССКИЙ
приеме радиостанции FM с системой EON загорается индикатор EON. При помощи данных
EON, транслируемых радиостанцией, Вы можете настроиться на другую станцию, принадлежащую другой сети вещания, передающую
Вашу любимую программу или сообщения о
дорожном движении во время прослушивания
другой передачи или другого источника
сигнала, например, кассеты.
При приеме сигналов RDS устройство может
выполнять следующее:
• Автоматически отслеживать одну и ту же
программу (сетевой прием)
• Находится в режиме ожидания ТА (сообщений о дорожном движении) или Вашей
любимой передачи
• Осуществлять поиск PTY (передачи выбранного типа)
• Осуществлять поиск передачи
• А также выполнять некоторые другие
функции
Для включения режима сетевого приема
нажмите кнопку TP RDS (программы о
дорожном движении/Система Радио
Информации) и удерживайте ее в течение
секунды или дольше. Всякий раз после того,
как Вы нажимаете и удерживаете кнопку,
режим сетевого приема переключается
следующим образом:
TP
RDS
Индикатор AF
Индикатор REG
Mode 1 (Режим 1)
Индикатор AF горит, а индикатор REG не
горит.
Режим сетевого приема включен, а функция
регионального поиска отключена.
Когда принимаемый сигнал слабеет, приемник
автоматически переключается на другую
станцию в той же сети вещания.
• В этом режиме программа, на которую переклю-
чается приемник, может отличаться от
предыдущей.
Mode 1
(Режим 1) (Режим 2) (Режим 3)
Mode 2 Mode 3
Автоматическое отслеживание одной
и той же программы (сетевой прием)
Если Вы выехали в область, где качество
приема FM неудовлетворительно, встроенный
приемник автоматически настраивается на
другую станцию RDS в той же сети вещания с
более сильным сигналом, которая передает
ту же программу. Таким образом, Вы можете
продолжать прослушивание той же программы с более высоким качествам, независимо
от того, где Вы находитесь (см. иллюстрацию
на следующей странице).
Для обеспечения правильной работы Сетевого Приема используются два типа сигналов
RDS — PI (идентификация программы) и AF
(альтернативная частота).
Если эта информация не принимается должным образом при приеме радиостанции RDS,
режим Сетевого Приема работать не может.
10
Mode 2 (Режим 2)
Горят оба индикатора, AF и REG.
Режим сетевого приема включен, как и
режим регионального поиска.
Когда принимаемый сигнал слабеет, приемник
автоматически переключается на другую
станцию в той же сети вещания, передающую
эту же программу.
Mode 3 (Режим 3)
Индикаторы AF и REG не горят.
Функция Сетевого Приема отключена.
Page 45

Одна и та же программа может быть принята
на различных частотах.
Программа 1
транслируется
на частоте A
Программа 1
транслируется
на частоте E
Если передача ТА начинается, когда режим
ожидания ТА включен, на дисплее отображается “TRAFFIC” и включается режим FM.
Громкость возрастет до установленного
уровня громкости при приеме сообщений о
дорожном движении (см. страницу 14), и
начинается прием программы ТА.
Для отключения режима ожидания ТА
нажмите кнопку ТР RDS снова.
Программа 1
транслируется
на частоте B
Программа 1
транслируется
на частоте C
Программа 1
транслируется
на частоте D
Использование режима Ожидания
Приема
Режим Ожидания Приема позволяет Вам
временно переключаться на Вашу любимую
программу (PTY: тип программы) или на
Сообщение о Дорожном Движении (ТА) с
текущего источника сигнала (другой
радиостанции FM, кассетного проигрывателя
или другого подключенного устройства).
• Во время прослушивания радио станции АМ режим
Ожидания Приема не работает.
Режим ожидания приема TA
TP
Если в режиме FM кратко нажата
RDS
кнопка TP RDS, во время приема
станции TP (программа о дорожном
движении) загорается индикатор ТР
и запускается режим ожидания TA.
• Если принимаемая станция не является станцией
TP, индикатор TP мигает. Нажмите кнопку ¢
или 4 для вызова режима ожидания TA.
На дисплее появляется “SEARCH”, и начинается
поиск станции TР. После настройки на станцию
TР загорается индикатор TP.
7 Если Вы прослушиваете кассету или звук от
другого подключенного устройства и желаете
начать прослушивание передачи TA, нажмите
кнопку TP RDS для вызова режима ожидания
TA. (Загорается индикатор TP.)
Режим ожидания приема PTY
Если в режиме FM кратко нажата
PTY
кнопка PTY, индикатор PTY
загорается во время приема
станции PTY и запускается режим
ожидания PTY. Название
выбранного PTY (см. страницу 12)
мигает в течение 5 секунд.
• Когда принимаемая станция не является станцией
PTY, индикатор PTY мигает. Нажмите кнопку ¢
или 4 для вызова режима ожидания PTY.
На дисплее появляется “SEARCH”, и начинается
поиск станции PTY. После настройки на станцию
PTY загорается индикатор PTY.
7 Если Вы прослушиваете кассету или звук от
другого подключенного устройства и желаете
начать прослушивание выбранной передачи
PTY, нажмите кнопку PTY для вызова режима
ожидания PTY. (Загорается индикатор PTY.)
Если передача PTY начинается, когда режим
ожидания PTY включен, на дисплее
отображается название выбранной PTY, и
включается режим FM. Затем начинается
прием передачи, соответствующей
выбранному PTY.
Для отключения режима ожидания PTY
нажмите кнопку PTY снова.
РУССКИЙ
11
Page 46

Выбор Вашей любимой передачи для
режима ожидания приема PTY
Вы можете выбрать и сохранить в памяти Вашу любимую программу для режима ожидания приема PTY.
При поставке с фабрики в памяти устройства
в качестве типа передачи для режима ожидания приема PTY хранятся “NEWS” (новости).
1
Нажмите кнопку SEL (выбор) и
удерживайте в течение 2 секунд
РУССКИЙ
до тех пор, пока на экране не появится один из пунктов PSM (См .на
страницу 23)
2
Выберите “PTY STBY” (ожидание),
если это не отображается на
дисплее.
Поиск Вашей любимой передачи
Вы можете осуществить поиск одной из шести
программ, хранящихся в памяти.
При поставке с фабрики, в памяти хранятся
следующие шесть программ. Они соответствуют цифровым кнопкам с 1 по 6.
Для получения информации о сохранении
в памяти типов Ваших любимых передач,
обратитесь к нижеследующему разделу.
Для получения информации о поиске Вашей любимой программы см. страницу 13.
1
POP M
45
CLASSICS
2
ROCK M EASY M
AFFAIRS
Для сохранения Вашего любимого типа
программы
1
Нажмите кнопку SEL (выбор) и
удерживайте до тех пор, пока на экране не появится один из пунктов
PSM. (PSM: см. страницу 23)
3
6
VARIED
12
3
Выберите один из 29-ти кодов PTY.
(См. страницу 15.)
Выбранное кодовое
название появляется на
дисплее и заносится в
память.
4
Нажмите кнопку SEL (выбор) для
завершения процедуры настройки.
2
Выберите “PTY SRCH” (поиск), если
это не отображено на дисплее.
3
Выберите один из 29-ти кодов PTY.
(См. страницу 15.)
Выбранное кодовое
название появляется на
дисплее.
• Если выбран кодовый
номер, уже хранящийся
в памяти, он замигает
на дисплее.
Page 47

4
Нажмите желаемую цифровую
кнопку и удерживайте в течение 2
секунд для сохранения в памяти
выбранного PTY под запрограммированным кодовым номером.
8 9 10 11 127
На дисплее попеременно замигают выбранный кодовый номер и “MEMO” (память).
5
Нажмите кнопку SEL (выбор) для
завершения процедуры настройки.
Поиск передачи желаемого типа
1
Нажмите и удерживайте в течение
секунды кнопку PTY (тип программы) во время прослушивания
радиостанции FM.
PTY
На дисплее появляется последний
выбранный код PTY.
2
Выберите желаемый код PTY при
помощи цифровых кнопок (от 1 дo 6).
8 9 10 11 127
Пример:Когда кнопке 2 присвоено
“ROCK M”.
Поиск станции, передающей Вашу любимую передачу, начинается через 5 секунд.
• При обнаружении радиостанции, транслирующей передачу, код PTY которой совпадает
с введенным Вами кодом, приемник настраивается на эту станцию.
• Если радиостанция, транслирующая передачу, код PTY которой совпадает с введенным Вами кодом, не обнаружена, принимаемая радиостанция не изменится.
Примечание:
В некоторых регионах функция поиска PTY не
работает должным образом.
Другие удобные функции RDS
Автоматический выбор станции при
помощи цифровых кнопок
Как правило, при нажатии цифровой кнопки
осуществляется настройка на запрограммированную радиостанцию.
Тем не менее, если запрограммированная
радиостанция является радиостанцией RDS,
может произойти что-то другое. Если сигналы, принимаемые от этой запрограммированной радиостанции, не могут обеспечить
качественного приема, устройство при
помощи данных AF начинает поиск другой
радиостанции, передающей ту же передачу.
(Поиск передачи.)
• Настройка на другую радиостанцию при помощи функции Поиска Передачи может занять
некоторое время.
Для включения функции Поиска Передачи
выполните следующую процедуру.
• Ознакомьтесь также с разделом “Изменение
основных настроек (PSM)” на странице 22.
1 Нажмите кнопку SEL (выбор) и удерживайте
до тех пор, пока на экране не появится один
из пунктов PSM.
2 При помощи кнопки ¢ или 4
выберите “P-SEARCH” (поиск передачи).
3 Поверните диск настройки по часовой
стрелке для выбора “ON” (включено).
Теперь функция Поиска Передачи включена.
4 Нажмите кнопку SEL (выбор) для
завершения процедуры настройки.
Для отключения функции Поиска Передачи повторите эту же процедуру, выбрав “OFF”
(отключено) в пункте 3 поворотом диска
настройки против часовой стрелки.
13
РУССКИЙ
Page 48

Изменение режима дисплея при
прослушивании радиостанции FM
Во время прослушивания радиостанции FM
RDS Вы можете изменить индикацию на
дисплее: включить отображение либо
названия станции (PS NAME), либо частоты
(FREQ).
• См. также раздел “Изменение основных
настроек (PSM)” на странице 22.
1 Нажмите кнопку SEL (выбор) и удерживайте
РУССКИЙ
до тех пор, пока на экране не появится один
из пунктов PSM.
2 При помощи кнопок ¢ или 4 выбе-
рите “TU DISP” (дисплей тюнера).
3 Выберите желаемый режим (отображение
названия станции “PS NAME” или частоты
“FREQ”) при помощи диска управления.
4 Нажмите кнопку SEL (выбор) для
завершения процедуры настройки.
Примечание:
При нажатии кнопки DISP Вы также можете
изменить режим дисплея во время прослушивания
радиостанции FM RDS.
После каждого нажатия кнопки в нижней части
дисплея появляется следующая информация:
Частота вещания станции
• Через некоторое время дисплей возвращается в
исходный режим.
14
(FREQ)
Тип передачи
(PTY)
Название станции
(PS NAME)
Настройка громкости сообщений о
дорожном движении TA
Вы можете настроить уровень громкости для
сообщений о дорожном движении TA. При приеме сообщений о дорожном движении, громкость автоматически будет приведена в соответствие с запрограммированным уровнем.
• См. также раздел “Изменение основных
настроек (PSM) на странице 22.
1 Нажмите кнопку SEL (выбор) и удерживайте
до тех пор, пока на экране не появится один
из пунктов PSM.
2 При помощи кнопок ¢ или 4
выберите “TA VOL.”
3 Выберите желаемый уровень громкости при
помощи диска управления.
Уровень громкости настраивается в пределах
от “VOL 00” до “VOL 50”.
4 Нажмите кнопку SEL (выбор) для заверше-
ния процедуры настройки.
Aвтоматическая настройка часов
При поставке с фабрики встроенные часы
запрограммированы на автоматическую
настройку при помощи сигналов точного
времени СТ (точное время) в сигнале RDS.
Если Вы не желаете использовать автоматическую настройку часов, выполните приведенную ниже процедуру.
• См. также раздел “Изменение основных
настроек (PSM)” на странице 22.
1 Нажмите кнопку SEL (выбор) и удерживайте
до тех пор, пока на экране не появится один
из пунктов PSM.
2 При помощи кнопок ¢ или 4
выберите “AUTO ADJ.”
3 Выберите “OFF” (отключено) при помощи
поворота диска управления против часовой
стрелки.
Теперь функция автоматической настройки
часов отключена.
4 Нажмите кнопку SEL (выбор) для заверше-
ния процедуры настройки.
Для повторного включения функция автоматической настройки часов повторите эту
же процедуру и выберите “ON” в пункте 3, повернув диск управления по часовой стрелке.
Примечание:
Настройка часов при помощи данных СТ занимает
около двух минут после включения “ON” параметра “AUTO ADJ” (автоматическая настройка).
Таким образом, Вы должны принимать радиостанцию непрерывно в течение двух минут; в противном случае часы настроены не будут. (Это связано
с тем, что прием данных СТ из сигнала RDS занимает около двух минут.)
Page 49

Коды PTY
NEWS: Новости
AFFAIRS: Тематические передачи о те-
кущих новостях или событиях
INFO: Программы, посвященные
советам по широкому спектру
тем
SPORT: Спортивные события
EDUCATE: Образовательные программы
DRAMA: Радио постановки
CULTURE: Программы, посвященные лю-
бым вопросам национальной и
местной культуры
SCIENCE: Программы о естественных
науках и технике
VARIED: Прочие передачи, например,
комедии или церемонии
POP M: Популярная музыка
ROCK M: Рок-музыка
EASY M: Легкая для прослушивания
музыка
LIGHT M: Легкая музыка
CLASSICS: Классическая музыка
OTHER M: Музыка других типов
WEATHER: Информация о погоде
FINANCE: Репортажи о рынке, коммер-
ции, торговле и пр.
CHILDREN: Детские развлекательные
программы
SOCIAL: Социальные программы
RELIGION: Программы, касающиеся
любых аспектов веры,
природы бытия или этики
PHONE IN: Программы, где слушатели
могут высказать свою точку
зрения по телефону или
публично
TRAVEL: Программы о путешествиях
LEISURE: Программы о различных хобби
и активном досуге, например, о
садоводстве, кулинарии,
рыбной ловле и пр.
JAZZ: Джазовая музыка
COUNTRY: Музыка кантри
NATION M: Современная популярная
музыка другой страны или
региона, на языке этой страны
OLDIES: Музыка в тиле “ретро”
FOLK M: Народная музыка
DOCUMENT: Передачи, основанные на
реальных событиях,
представленные в форме
расследования
РУССКИЙ
15
Page 50

ФУНКЦИИ ПРОИГРЫВАТЕЛЯ КАССЕТ
Прослушивание кассеты
РУССКИЙ
1
Oткройте панель управления.
2
Установите кассеты в отсек для
кассеты.
Устройство включится и воспроизведение
кассеты начнется
автоматически.
3
Закройте панель управления
рукой.
Появится индикатор TAPE.
4
Выберите направление
воспроизведения.
После каждого нажатия
кнопки TAPE 23, направление воспроизведения
16
будет меняться: вперед
(
(
Примечание, касающиеся управления “одним
нажатием”:
Если кассета уже установлена в отсек для кассеты, нажатие кнопки TAPE 23 включает
устройство и начинает воспроизведение
автоматически.
) или назад
).
8 9 10 11 127
MO
Для прекращения воспроизведения и
удаления кассеты
Кратко нажмите кнопку 0.
Воспроизведение кассеты прекращается, и
кассета автоматически выдвинется из отсека
для кассеты. Источник сигнала переключится
на предыдущий.
При изменении источника сигнала воспроизведение кассеты также останавливается (без
выброса кассеты).
• Вы можете удалить кассету нажатием кнопки
0, когда устройство выключено.
Перемотка пленки вперед и назад
Нажмите кнопку ¢ и удерживайте в течение 1 секунды для перемотки кассеты вперед.
Когда пленка заканчивается, автоматически начинается воспроизведение другой стороны кассеты.
Нажмите кнопку 4 и удерживайте в течение 1 секунды для перемотки кассеты назад.
Когда пленка заканчивается, автоматически начинается воспроиз-
ведение текущей стороны
Для прекращения перемотки в любой
точке, нажмите кнопку TAPE 23.
Воспроизведение кассеты начинается с той
точки, в которой была прекращена перемотка.
Примечания:
• Когда одна сторона воспроизводимой кассеты за-
канчивается, автоматически начинается воспроизведение другой стороны (Автоматический
Реверс)
• Если при перемотке кассеты вперед заканчивает-
ся пленка, направление движения пленки переключается автоматически.
.
Page 51

Воспроизведение кассет, записанных в
режиме Dolby B NR
Нажмите и удерживайте кнопку RPT
(Dolby B/повтор) для включения системы
Dolby B NR*.
Загорится индикатор
секунд на дисплее появится сообщение
“DOLBY B”.
Для отключения системя Dolby B NR
нажмите и удерживайте кнопку
(Dolby B/повтор) снова, чтобы индикатор
исчез.
* Система Долби для снижения шума, изго-
товленная по лицензии фирмы Долби
Лабораториз Лайсенсинг Корпорэйшн.
Слово DOLBY, ДОЛБИ и состоящий из
двух букв D символ
ными фирмы Долби Лабораториз
Лайсенсинг Корпорэйшн.
и на несколько
RPT
являются товар-
Запрет на выброс кассеты
Вы можете установить запрет на выброс
кассеты и “запереть” кассету в отсеке для
кассет.
Нажмите и удерживайте кнопки TAPE 23
и
На дисплее в течение 5 секунд будет мигать
“NO EJECT” и кассета будет “заперта.”
Для отмены запрета и освобождения кассеты нажмите и удерживайте кнопки TAPE 23
и
На дисплее снова в течение 5 секунд будет мигать
“EJECT OK”и кассета будет “освобождена.”
Примечание:
Если Вы нажмете кнопку 0, когда выброс кассеты
запрещен, панель дисплея сместится вниз, но
кассета не будет выброшена, и воспроизведение
кассеты будет продолжено.
в течение 2 и более секунд.
в течение 2 и более секунд снова.
Поиск начала комозиции
Функция Музыкального Поиска позволяет
Вам автоматически начать воспроизведение
желаемой композиции с начала. Вы можете
указать до 9 композиций перед или после
текущей композиции.
Во время воспроизведения
Укажите, сколько композиций до или после
текущей композиции следует пропустить.
Нажмите кнопку ¢
поиска композиции, следующей
за текущей.
Нажмите кнопку 4 для
поиска предшествующей
композиции.
После каждого нажатия кнопок номер
меняется в пределах ±9.
После обнаружения начала желаемой
композиции воспроизведение начинается
автоматически.
Примечания:
• При поиске желаемой композиции:
– Если кассета перемоталась в начало, воспроиз-
ведение начинается с начала текущей
стороны.
– Если кассета домоталась до конца, воспроизве-
дение начинается с начала противоположной
стороны.
• В следующих случаях функция Музыкального
Поиска может не работать должным образом:
– Если внутри композиций имеют место
длинные промежутки очень тихой записи или
не записанные части.
– Если кассета имеет короткие незаписанные
промежутки.
– Если между композициями имеют место
сильные помехи или гул.
– Если значения функции Dolby NR не совпадают.
Например, если функция Dolby B NR включена
при использовании кассеты, при записи
которой не использовалась функция Dolby NR.
для
РУССКИЙ
17
Page 52

Прочие удобные функции
проигрывателя кассет
Пропуск незаписанной части кассеты
Вы можете пропустить незаписанные промежутки между композициями (функция пропуска пустых промежутков).
Когда эта функция включена, устройство пропускает незаписанные промежутки длинной
от 15 секунд и более, перематывая кассету к
началу следующей композиции и затем включая воспроизведение.
РУССКИЙ
• Ознакомьтесь также с разделом “Изменение
основных настроек (PSM)” на странице 22.
1
Нажмите кнопку SEL (выбор) и
удерживайте до тех пор, пока на
экране не появится один из пунктов PSM. (PSM: см. страницу 23.)
Повторное воспроизведение текущей
композиции
Вы можете осуществить повторное воспроизведение текущей композиции (Повторное
Воспроизведение).
Нажмите кнопку RPT (повтор/
Dolby B) во время воспроизведения
композиции, которую Вы желаете
прослушать снова.
После каждого краткого
нажатия кнопки функция
повторного воспроизведения
попеременно включается и
выключается.
Загорается, когда функция Повторного
Воспроизведения включена.
2
При помощи кнопок ¢ или
4 для выбора “B. SKIP”
(пропуск пустых промежутков).
3
Поверните диск настройки по часовой
стрелке для выбора “ON” (включено).
Теперь функция
пропуска пустых
промежутков включена.
4
Нажмите кнопку SEL (выбор) для
завершения процедуры настройки.
Для отключения функции Пропуска
пустых промежутков повторите эту же
процедуру, выбрав “OFF” (отключено) в
пункте 3 поворотом диска настройки против
18
часовой стрелки.
После завершения воспроизведения композиции кассета автоматически перематывается на начало этой композиции, и воспроизведение этой композиции начинается заново.
Для отключения Повторного
Воспроизведения нажмите кнопку RPT
для того, чтобы с дисплея исчез индикатор
RPT.
Примечание:
В следующих случаях функции Пропуска Незаписанных Промежутков и Повторного Воспроизведения могут не работать должным образом:
– Если внутри композиций имеют место длинные
промежутки очень тихой записи или незаписанные части.
– Если кассета имеет короткие незаписанные
промежутки.
– Если между композициями имеют место сильные
помехи или гул.
– Если значения функции Dolby NR не совпадают.
Например, если функция Dolby B NR включена
при использовании кассеты, при записи которой
не использовалась функция Dolby NR.
Page 53

НАСТРОЙКИ ЗВУЧАНИЯ
Настройка звучания
Вы можете настраивать характеристики
звучания по Вашему вкусу.
1
Выберите настраиваемый параметр.
После каждого нажатия
кнопки настраиваемые
параметры переключаются в
такой последовательности:
2
Настройте уровень выбранного
параметра.
Для увеличения уровня.
Для снижения уровня.
BAS TRE FAD
(низкие частоты) (высокие частоты)
VOL LOUD**
(громкость)
Индикация Для чего:
BAS Настройка низких
TRE
FAD* Настройка баланса
BAL Настройка баланса
LOUD**
(только для
KS-X915R)
VOL
* Если Вы используете систему из двух громкогово-
рителей, установите уровень затухания в “00”.
Форсирование низких и высоких частот для получения
сбалансированного
звучания на низкой
громкости.
(компенсация
громкости)
частот.
Настройка высоких
частот.
фронтальных и
тыловых громкоговорителей.
левых и правых
громкоговорителей.
Настройка
громкости.
(затухание)
BAL
(баланс)
Диапазон
–06 (мин)
+06 (макс)
–06 (мин)
+06 (макс)
R06 (только
тыловые)
F06 (только
фронтальные)
L06 (только
левые)
R06 (только
правые)
LOUD ON
|
LOUD OFF
00 (мин)
50 (макс)
РУССКИЙ
По мере настройки уровня низких или высоких
частот графическое отображение эквализации
меняется.
Примечание:
В обычном режиме диск настройки служит для регулирования громкости. Таким образом, для настройки громкости Вам не нужно выбирать “VOL”.
Включение/выключение функции компенсации громкости
(только для KS-FX815)
Человеческое ухо менее
LOUD
чувствительно к звуку с низкой и
высокой частотой при низкой
громкости. Функция компенсации
громкости предназначена для
форсирования низких и высоких
частот, что приводит к получению
сбалансированного звучания на
низкой громкости.
После каждого нажатия кнопки
LOUD функция компенсации
громкости попеременно
включается и выключается.
** только для KS-FX915R
19
Page 54

Использование Памяти
Управления Звучанием
Вы можете выбирать и сохранять в памяти
настроенные режимы звучания для каждого
источника сигнала (усовершенствованная
функция SCM).
Выбор и сохранение режимов звучания
После выбора режима звучания он сохраняется в памяти. Этот режим будет вызван из па-
РУССКИЙ
мяти и отображен на дисплее при следующем
включении данного источника сигнала.
Вы можете сохранить звуковой режим для
каждого из следующих источников сигнала —
FM1, FM2, FM3, AM, кассетного проигрывателя и внешних устройств.
• Если Вы не желаете сохранять звуковые режимы для каждого источника сигнала по отдельности, а желаете использовать один
режим звучания для всех источников сигнала,
см. раздел “Отключение Усовершенствованной функции SCM – SCM LINK” на странице 24.
Выберите желаемый режим звучания.
Пример: Когда Вы выбрали “BEAT”
После каждого нажатия кнопки режим
звучания меняется в следующем порядке:
(BEAT) (SOFT) (POP)
• Если функция “SCM LINK” настроена как
“LINK ON”, выбранный режим звучания может
быть сохранен в памяти для текущего
источника сигнала, и этот режим будет
действовать только для текущего источника
сигнала. При каждом изменении источника
сигнала на дисплее мигает индикатор SCM.
• Если функция “SCM LINK” настроена как
“LINK OFF”, выбранный режим звучания будет
действовать для всех источников сигнала.
SCM OFF
Индикация
BEAT Рок или дис- +02 00 ON
SOFT Спокойная +01 –03 OFF
POP
SCM OFF
Для чего: Запрогр. значения
BAS TRE LOUD
ко музыка
фоновая
музыка
Легкая музыка
(Ровный звук)
+04 +01 OFF
00 00 ON
Загрузка режимов звучания
Когда функция “SCM LINK” настроена
как “LINK ON”, выберите источник
сигнала.
При каждом изменении
источника сигнала на дисплее
мигает индикатор SCM.
Будет вызван режим звучания, сохраненный
для текущего источника сигнала.
Примечания:
• Вы можете отрегулировать запрограммированные режимы звучания и сохранить их в памяти.
Если Вы желаете создать и сохранить Ваш режим звучания, см. раздел “Сохранение Ваших
настроек звучания” на странице 21
• Для получения информации о настройке уровня
усиления низких и высоких частот или о
временном включении/выключении функции
компенсации громкости см. страницу 19. (При
выборе другого источника сигнала выполненные
Вами настройки будут отменены.)
20
Page 55

Сохранение Ваших настроек
3
звучания
Вы можете настроить режим звучания (BEAT,
SOFT, POP) в соответствии с Вашими
вкусами и сохранить настройки в памяти.
• Время выполнения этой процедуры ограничено. Если режим настройки отключился
прежде чем Вы завершили процедуру настройки, начните снова с пункта 1.
1
Вызовите режим звучания, который
Вы желаете настраивать.
• Для получения более подробной
информации см. страницу 20.
Пример: Когда Вы выбрали “BEAT”
2
Выберите “BAS” (низкие частоты),
“TRE” (высокие частоты) или
“LOUD” (компенсация громкости).
(Для KS-FX815)
LOUD
4
5
Настройте уровень высоких или низких частот, или включите/выключите (ON/OFF) функцию компенсации
громкости.
• Для получения более подробной
информации см. страницу 19.
(Для KS-FX815)
LOUD
РУССКИЙ
По мере настройки уровня низких или высоких
частот графическое отображение эквализации
меняется.
Повторите пункты 2 и 3 для настройки других параметров.
Нажмите и удерживайте кнопку
SCM до тех пор, пока выбранный
Вами в пункте 1 режим звучания не
замигает на дисплее.
Пример: Когда Вы настраиваете “TRE” (низкие
частоты)
Ваши настройки параметров
выбранного режима звучания
сохранены в памяти.
6
Повторите ту же процедуру для
настройки других режимов
звучания.
Для восстановления фабричных значений
Повторите те же процедуры и установите
значения согласно списку фабричных
значений, приведенных в таблице на
странице 20.
21
Page 56

ПРОЧИЕ ОСНОВНЫЕ ФУНКЦИИ
Настройка часов
Вы можете также выбрать систему отображения времени: 24-х часовую или 12-ти часовую.
(Только для KS-FX915R).
1
Нажмите кнопку SEL (выбор) и
удерживайте в течение двух секунд,
пока на дисплее не появится один
из пунктов PSM. (См. страницу 23.)
РУССКИЙ
2
Настройте час.
1 Выберите “CLOCK H” (час), если это
не отображается на дисплее.
2 Настройте час.
1
3
Настройте минуту.
1 Выберите “CLOCK M” (минута).
2 Настройте минуту.
1
2
2
Для проверки текущего времени, когда
устройство отключено, нажмите кнопку DISP
(дисплей).
Питание включится, на дисплее на 5 секунд
появится текущее время, затем питание
отключится снова.
Изменение основных настроек (PSM)
Вы можете изменить параметры, приведенные
на следующей странице, при помощи режима
PSM (Режим Пользовательской Настройки).
Основная процедура
1
Нажмите кнопку SEL (выбор) и
удерживайте в течение двух секунд,
пока на дисплее не появится один
из пунктов PSM. (См. страницу 23.)
2
Выберите параметр PSM, который
Вы желаете настроить. (См. страницу 23.)
22
4
Выберите режим отображения
времени. (только для KS-FX915R)
1 Выберите “24H/12H.”
2 Выберите “24H” или “12H.”
1
5
Нажмите кнопку SEL (выбор) для
завершения процедуры настройки.
2
3
Настройте параметр PSM
выбранный выше.
4
Повторит пункты 2 и 3 для настройки других параметров PSM, если
это необходимо.
5
Нажмите кнопку SEL (выбор) для
завершения процедуры настройки.
Page 57

Параметры Режима Пользовательских Настроек (PSM)
1
CLOCK H Hастройка часа
CLOCK M Настройка минуты
SCM LINK
24H/12H* Переключение системы
AUTO ADJ*
CLOCK* Отображение часов
TU DISP* Режим дисплея тюнера
PTY STBY* Режим ожидания PTY
PTY SRCH* Поиск PTY
TA VO L* Громкость сообщений о
P-SEARCH* Поиск передачи
DAB AF*
1
2
Выбор.Удерживайте.
Настройка присвоения
звуковых полей источникам сигнала
отображения времени 24/
12-часовая
Aвтомат. настройка часов
дорожном движении
Поиск на альтернативных частотах
3
Настройка.
Против часовой
стрелки
Назад Вперед
LINK OFF
12H
OFF
OFF
FREQ PS NAME
29 типов программ
(см. страницы 12 и 15.)
VOL 00 – VOL 50
OFF
По часовой
стрелке
ВпередНазад
LINK ON
24H
ON
ON
ON
AF ONAF OFF
Фабричная
настройка
0:00 22
24H
ON
ON
PS NAME
NEWS
(см. стр. 12.)
OFF
20, 24LINK ON
См.
стр.
22
14
24
14
12
12
14VOL 20
13
32AF ON
РУССКИЙ
OFF
ON
OFF
AUDIO 2
OFF
MUTING 2
ON
LINE IN
AUDIO 2 24
AUTO
OFF 24
ON
OFFOFF ON
CHANGER
24, 28
LEVEL Отображение уровня
DIMMER* Режим затемнения
TEL Отключение звука при
BEEP* Звуковой сигнал при
B. SKIP
EXT IN**
• Нажмите кнопку SEL (выбор) после завершения настройки.
* Этими функциями оборудована только модель KS-FX915R.
1
Отображается только в том случае, если подключен тюнер DAB.
*
** Отображается только в том случае, если выбран один из следующих источников сигнала: FM, AM
или кассетный проигрыватель.
использовании сотового
телефона
нажатии кнопки
Пропуск незаписанных
промежутков
Внешнее устройство
AUDIO 1
AUTO
MUTING 1
OFF
CHANGER
24
24
18
23
Page 58

Отключение Усовершенствованной
функции SCM – SCM LINK
Вы можете отключить Усовершенствованную
функцию SCM (сохранение звуковых полей в
памяти) и отделить режимы звучания от
источников сигнала.
При поставке с фабрики в памяти могут храниться различные режимы звучания для разных
источников сигнала, и Вы можете менять
режимы звучания, просто переключая источники сигнала.
• LINK ON: Усовершенствованная функция
РУССКИЙ
• LINK OFF: Обычная функция SCM (один ре-
SCM (различные режимы звучания
для разных источников сигнала).
жим звучания для всех источников
сигнала).
Выбор отображения часов – CLOCK
(Только для KS-FX915R)
Вы можете выбрать информацию, отображаемую на экране, когда устройство включено.
При поставке с фабрики выбрано отображение
часов.
• ON: Отображение часов включено.
• OFF: Отображение часов выключено.
Когда выбрано “OFF”, на дисплее
вместо часов отображается название текущего источника сигнала или
диапазон вещания радиостанции.
(кроме случая, когда в качестве
источника выбрано “EXT–LINE IN”).
Выбор отображения уровня – LEVEL
Вы можете настроить отображение уровня в
соответствии с Вашими предпочтениями.
При поставке устройства с фабрики выбран
режим “AUDIO 2”.
• AUDIO 1:
• AUDIO 2: Попеременно отображается уровень
• OFF:
Индикация уровня звука подсвечивается снизу вверх.
звука (перемещается снизу вверх) и
подсвеченный дисплей.
Индикация уровня звука исчезает.
Выбор режима затемнения – DIMMER
(Только для KS-FX915R)
Когда Вы зажигаете огни автомобиля, дисплей
автоматически затемняется (Функция
Автоматического Затемнения).
При поставке с фабрики функция
автоматического затемнения включена.
• AUTO: Включение функции
• OFF: Отключение автоматического
• ON: Дисплей всегда затемнен.
24
Автоматического Затемнения.
затемнения.
Примечание:
На некоторых автомобилях, особенно на тех, которые
оборудованы диском управления затемнением, функция
Автоматического Затемнения может не работать.
В этом случае, установите режим затемнения как
“ON” (включено) или “OFF” (выключено).
Снижение громкости при использовании
сотового телефона – TEL
Этот режим используется при подключении
сотового телефона. В зависимости от системы
используемого телефона выберите либо “MUTING 1”, либо “MUTING 2”, и проверьте, какое из
значений приводит к отключению звука.
При поставке с фабрики этот режим отключен.
• MUTING 1: Выберите этот режим, если он
приводит к отключению звука.
• MUTING 2: Выберите этот режим, если он
приводит к отключению звука.
• OFF: Отключение функции снижения
громкости при использовании
сотового телефона.
Включение/выключение звукового сигнала
при нажатии кнопок – BEEP
(Только для KS-FX915R)
Вы можете отключить звуковой сигнал при
нажатии кнопок, если Вы не хотите, чтобы он
звучал. При поставке устройства с фабрики
звуковой сигнал включен.
• ON: Включение звукового сигнала при
нажатии кнопки.
• OFF: Отключение звукового сигнала при
нажатии кнопки.
Выбор используемого внешнего устройства
– EXT IN
Вы можете подключить внешнее устройство к
гнезду устройства для смены компакт-дисков на
задней панели при помощи Адаптера Линейного
Входа KS-U57 (не входит в комплект).
Для использования внешнего устройства в
качестве источника сигнала для этого
устройства Вы должны выбрать используемый
компонент – устройство для смены компактдисков или внешнее устройство.
При поставке с фабрики в качестве внешнего
устройства выбрано устройство для смены
компакт-дисков.
• LINE IN: Для использования внешнего устройства, отличного от устройства для
смены компакт-дисков.
• CHANGER: Для использования устройства
для смены компакт-дисков.
Примечание:
Для получения информации о подключении Адаптера
Линейного Входа KS-U57 и внешнего устройства
ознакомьтесь с отдельным руководством по
установке/подключению.
Page 59

Отсоединение панели
управления
Вы можете отсоединить панель управления,
когда покидаете машину.
При отсоединении или установке панели
управления соблюдайте осторожность, чтобы
не повредить разъемы на задней части
панели управления и на держателе панели.
Как присоединить панель управления
1
Вставьте левую сторону панели
управления в паз на держателе
панели.
Как отсоединить панель управления
Перед отсоединением панели управления не
забудьте выключить питание.
1
Освободите панель управления.
2
Вытащите панель управления из
устройства.
3
Поместите панель управления в
полученный в комплекте футляр.
2
Примечание по чистке контактов:
Если Вы часто отделяете панель управления,
контакты могут прийти в негодность.
Для сведения к минимуму такой возможности,
периодически протирайте контакты ватой
или тканью, смоченной в спирте, стараясь не
повредить контакты.
РУССКИЙ
Нажмите на правую сторону
панели управления для того,
чтобы надеть панель на
держатель.
Контакты
25
Page 60

ЭКСПЛУАТАЦИЯ УСТРОЙСТВА СМЕНЫ
КОМПАКТ-ДИСКОВ
РУССКИЙ
Мы рекомендуем Вам использовать устройство
серии СН-Х совместно с Вашим устройством.
Если Вы пользуетесь другим устройством для
автоматической смены компакт-дисков,
обратитесь к Вашему дилеру JVC IN-CAR ENTERTAINMENT для получения информации о
подключении.
• Например, если Вы пользуетесь устройством для
автоматической смены компакт-дисков серии KDMK, Вам необходим кабель (KS-U15K) для
подключения к этом устройству.
Перед началом эксплуатации устройства
для автоматической смены компакт-дисков:
• Ознакомьтесь с инструкцией, полученной
с устройством для автоматической смены
компакт-дисков.
• Если в магазине устройства для автоматической смены компакт-дисков нет дисков, или диски установлены вверх ногами,
на дисплее появляется “NO DISC”. В этом
случае удалите магазин установите диски
правильно.
• Если на дисплее появилось сообщение
“RESET1 - RESET8”, это значит, что устройство для автоматической смены компакт-дисков подключено неправильно. В
этом случае проверьте соединение,
правильно подключите соединительные
кабели. Затем нажмите кнопку перезагрузки на устройстве для автоматической
смены компакт-дисков.
26
8 9 10 11 127
MO
Воспроизведение компактдисков
Выберите устройство для автоматической смены компакт-дисков (CD-CH).
Воспроизведение начинается с
первого фрагмента на первом
диске.
Воспроизводятся все фрагменты на всех дисках.
Время, прошедшее с
начала воспроизведения
* Когда параметр “CLOCK” (часы) установлен
как “ON” (включен; см. стр. 24), номер
диска вскоре сменяется изображением
часов. (только для KS-FX915R)
Примечание по управлению “одним нажатием”:
Когда Вы нажимаете кнопка CD-CH, питание включается автоматически. Вам не нужно нажимать
кнопку
для включения питания.
Для перемотки фрагмента вперед и назад
Нажмите и удерживайте кнопку ¢ , во время воспроизведения компакт-диска для
перемотки фрагмента вперед.
Нажмите и удерживайте кнопку 4 , во время воспроизведения компакт-диска для
перемотки фрагмента назад.
Номер фрагмента
Номер диска*
Page 61

Для перехода к следующему или предыдущему фрагменту
Выбор режима воспроизведения компакт-дисков
Кратко нажмите кнопку ¢
во время воспроизведения компакт-диска для перехода к началу следующего
фрагмента. После каждого
нажатия будет найдено и начнет воспроизводиться начало
следующего фрагмента.
Кратко нажмите кнопку 4
во время воспроизведения
компакт-диска для перехода к
началу текущего фрагмента.
После каждого нажатия будет
найдено и начнет воспроизводиться начало предыдущего
фрагмента.
Для прямого перехода к определенному
диску
Нажмите цифровую кнопку, соответствующую номеру желаемого диска для начала его
воспроизведения (во время работы
устройства для смены компакт-дисков).
8 9 10 11 127
• Для выбора диска под номером 1 – 6:
Кратко нажмите кнопку 1 (7) – 6 (12).
• Для выбора диска под номером 7 – 12:
Нажмите и удерживайте в течение секунды
кнопку 1 (7) – 6 (12).
Время, прошедшее с
начала воспроизведения
Номер фрагмента
Для воспроизведения фрагментов в
случайной последовательности (Случайное
воспроизведение)
MO
Режим
RND1 Горит Все фрагменты на те-
RND2 Мигает Все фрагменты на всех
После каждого нажатия
кнопки RND МО (Случайный/
Монофонический) во время
воспроизведения компактдиска режим случайного
воспроизведения компактдиска переключается
следующим образом:
RND1
Отмена
Canceled
Индикатор
RND
Воспроизведение
кущем диске воспроизводятся случайно, затем на следующем
диске и т. д.
дисках в магазине воспроизводятся в случайной последовательности.
РУССКИЙ
RND2
Для повторного воспроизведения фрагментов (Повторное воспроизведение)
После каждого нажатия кнопки
RPT
повторного воспроизведения
компакт-диска переключается
следующим образом:
(Повтор/Dolby B), режим
RPT1 RPT2
Отмена
Canceled
Пример: Выбор диска номер 3
Номер диска
Режим
RPT1 Горит Воспроизводится пов-
RPT2 Мигает Все фрагменты на те-
Индикатор
RND
Воспроизведение
торно текущий фрагмент (или указанный
фрагмент).
кущем (или на выбранном) диске воспроизводятся повторно.
27
Page 62

ЭКСПЛУАТАЦИЯ ВНЕШНИХ УСТРОЙСТВ
8 9 10 11 127
РУССКИЙ
Воспроизведение звука на
внешнем устройстве
Вы можете подключить внешнее устройство к
гнезду устройства для смены компакт-дисков
на задней панели при помощи Адаптера Линейного Входа KS-U57 (не входит в комплект).
Подготовка:
• При подключении Адаптера Линейного Входа
KS-U57 и внешнего устройства ознакомьтесь с
отдельным руководством по установке/
подключению.
• Перед началом использования внешнего устройства при помощи приведенной ниже процедуры
настройте внешний вход. (См. раздел “Выбор
используемого внешнего устройства – EXT IN” на
стр. 24.)
1
Выберите внешнее устройство
(CD-CH).
MO
2
Включите подключенное устройство и начните воспроизведение.
3
Настройте громкость звука.
4
Настройте характеристики
звучания. (См. страницу 19.)
• Если на дисплее не отображается “LINE IN”,
см. страницу 24 и выберите внешний вход
(“LINE IN”).
• Отображается только в том случае, если
выбран один из следующих источников сигнала – FM, AM или проигрыватель кассет.
Примечание по управлению “одним нажатием”:
Когда Вы нажимаете CD-CH, питание включается автоматически. Вы не должны нажимать
кнопку
28
для включения питания.
Page 63

ЭКСПЛУАТАЦИЯ DAB ТЮНЕРА
DISP
TP
RDS
PTY
8 9 10 11 127
(только для KS-FX915R)
KS-FX915R
DAB
MO
Мы рекомендуем Вам воспользоваться
тюнером DAB (цифровая аудио трансляция)
KT-DB1500 совместно с этим устройством.
Если Вы пользуетесь тюнером DAB другой
модели, обратитесь к Вашему дилеру JVC INCAR ENTERTAINMENT.
• Ознакомьтесь также с инструкциями для
Вашего тюнера DAB.
Что такое система DAB?
DAB - это одна из современных систем
цифрового радиовещания. Эта система
может передавать звук с качеством
компакт-дисков без помех и искажения
сигнала. Более того, она может передавать
текст, изображения и информацию.
В отличие от трансляций FM, где каждая
программа транслируется на своей частоте, DAB совмещает несколько программ
(называемых “службами”) в одном “блоке
трансляций”.
Когда к этому устройству подключен
тюнер DAB, Вы можете воспользоваться
службами DAB.
Настройка на блок трансляций и одну из служб
Типичный блок трансляций состоит из 6 или
более программ (служб), транслируемых одновременно. После настройки на блок трансляций Вы можете выбрать желаемую службу.
Перед тем, как начать....
Кратко нажмите кнопку DAB (FM AM), если в
качестве источника сигнала Вы выбрали
кассету, устройство для смены компактдисков или дополнительное устройство.
1
Выберите тюнер DAB.
Всякий раз после того,
как Вы нажимаете и удерживаете в течение секунды кнопку, попеременно
выбираются тюнер DAB и
тюнер FM/AM.
FM/AMDAB
2
Выберите диапазон вещания DAB
(DAB1, DAB2 или DAB3).
При каждом нажатии этой
кнопки, диапазон DAB
меняется следующим
образом.
D1
(DAB 1)
D2
(DAB 2)
D3
(DAB 3)
РУССКИЙ
.
Примечание:
Этот приемник имеет три диапазона приема
DAB (DAB1, DAB2, DAB3). Для настройки на
блок трансляций Вы можете воспользоваться
любым из них.
ПРОДОЛЖЕНИЕ НА СЛЕДУЮЩЕЙ СТРАНИЦЕ
29
Page 64

3
Начните поиск блока трансляций.
Нажмите кнопку ¢
для поиска блока
трансляций на более
высокой частоте.
Нажмите кнопку 4
для поиска блока
трансляций на более
низкой частоте.
После приема блока трансляций поиск
РУССКИЙ
прекращается.
Для прекращения поиска перед окончанием настройки на блок трансляций
нажмите ту же кнопку, которую Вы
использовали для начала поиска.
4
Выберите желаемую службу.
MO
Нажмите кнопку 5 (RND MO)
для выбора следующей
службы.
Нажмите кнопку ∞ (RPT )
для выбора предыдущей
службы.
Изменение информации на дисплее во
время настройки на блок трансляций
Как правило, на дисплее отображается
название службы.
Если Вы желаете изменить режим дисплея,
нажмите кнопку DISP.
После каждого нажатия кнопки на дисплее
на некоторое время появляется следующая
информация.
Название службы
Название блока трансляций
Номер канала
Частота
Для настройки на желаемый блок
трансляций без поиска:
1 Нажмите и удерживайте кнопку DAB (FM
AM) для выбора тюнера DAB в качестве
источника сигнала.
2 Последовательно нажимайте кнопку DAB
(FM AM) для выбора диапазона DAB (DAB1,
DAB2 или DAB3).
3 Нажмите кнопку ¢
удерживайте ее в течение секунды.
4 Последовательно нажимайте кнопку ¢
или 4 до тех пор, пока не найдете
желаемый блок трансляций.
• Если Вы будете удерживать кнопку
нажатой, частота будет меняться до тех
пор, пока Вы не отпустите кнопку.
или 4 и
30
Для переключения на тюнер FM/AM
Нажмите кнопку DAB (FM AM) и удерживайте
ее снова.
Page 65

Сохранение служб DAB в
памяти
Вы можете запрограммировать до 6 служб
DAB в каждом диапазоне DAB (DAB1, DAB2
или DAB3) вручную.
1
Выберите тюнер DAB.
Всякий раз после того,
как Вы нажимаете и
удерживаете в течение
секунды кнопку, попеременно выбираются тюнер
DAB или тюнер FM/AM.
FM/AMDAB
2
Выберите диапазон вещания DAB
band (DAB1, DAB2 или DAB3).
После каждого нажатия
кнопки диапазон DAB
переключается
следующим образом:
D1
(DAB 1)
D2
(DAB 2)
D3
(DAB 3)
5
Нажмите цифровую кнопку (в
этом примере 1) и удерживайте ее
в течение 2 или более секунд для
сохранения в памяти выбранной
службы.
7
Выбранный диапазон/номер
программы и “MEMO”
(память) будут попеременно
мигать.
6
Повторите процедуру для
настройки и программирования
остальных служб DAB.
РУССКИЙ
3
Настройтесь на желаемый блок
трансляций.
4
Выберите желаемую службу из
блока трансляций.
MO
Нажмите кнопку 5 (RND MO)
для выбора следующей
службы.
Нажмите кнопку ∞ (RPT )
для выбора предыдущей
службы.
Примечания:
• При программировании новой службы DAB, служба,
запрограммированная под тем же номером,
стирается.
• Запрограммированные службы DAB стираются из
памяти, когда прерывается подача питания
(например, во время замены аккумулятора). В этом
случае запрограммируйте службы DAB снова.
31
Page 66

Настройка на запрограммированную службу DAB
Вы можете легко настроиться на запрограммированную службу DAB.
Запомните, что сначала Вы должны сохранить запрограммированные службы в памяти. Если Вы еще этого не сделали, см.
страницу 31.
1
Выберите тюнер DAB.
РУССКИЙ
2
Выберите диапазон вещания DAB
Всякий раз после того,
как Вы нажимаете и удерживаете кнопку, попеременно выбираются тюнер
DAB или тюнер FM/AM.
FM/AMDAB
(DAB1, DAB2 or DAB3).
После каждого нажатия
кнопки диапазон DAB
переключается
следующим образом:
D1
(DAB 1)
3
Выберите номер запрограммиро-
D2
(DAB 2)
D3
(DAB 3)
ванной службы DAB (1 – 6).
8 9 10 11 127
Что Вы можете сделать еще
при помощи DAB
Автоматическое отслеживание одной и
той же передачи (Альтернативный прием)
Вы можете продолжать прослушивание одной
и той же передачи.
• Во время приема службы DAB:
При перемещении в область, где эта служба
не принимается, это устройство автоматически настраивается на другой блок трансляций или станцию FM RDS, транслирующую
эту программу.
32
• Во время приема станции FM RDS:
При перемещении в область, где принимается
служба DAB, транслирующая такие программы, как cтанции FM RDS, это устройство
автоматически настраивается на эту службу
DAB.
Примечание:
При переключении приема на DAB или FM может
измениться уровень громкости. Это изменение
уровня громкости связано с различными уровнями
транслируемого звука и не свидетельствует о
неисправности устройства.
Использование функции Альтернативного
Приема
При поставке с фабрики функция
Альтернативного Приема включена.
1 Нажмите кнопку SEL (выбор) и удерживайте
в течение 2 секунд до тех пор, пока на дисплее не появится один из пунктов PSM.
2 При помощи кнопок ¢ или 4
выберите режим “DAB AF” (альтернативная
частота).
3 Выберите желаемый режим при помощи
диска управления.
• AF ON: Функция Альтернативного приема
отслеживает передачи среди
служб DAB и радиостанций FM
RDS. На дисплее горит индикатор
AF (см. страницу 10).
• AF OFF:Функция Альтернативного приема
отключена
Примечание:
Когда включается функция Альтернативного
приема (для служб DAB), функция Автоматического отслеживания передачи для
радиостанций RDS (см. страницу 10) также
включается автоматически. С другой стороны,
функция Автоматического отслеживания
передачи не может быть отключена без
отключения функции Альтернативного приема.
4 Нажмите кнопку SEL (выбор) для заверше-
ния процедуры настройки.
Page 67

ТЕХНИЧЕСКОЕ ОБСЛУЖИВАНИЕ
Это устройство требует минимум обслуживания, но если Вы будете следовать приведенным ниже инструкциям, срок службы устройства увеличится.
Чистка головок
• Очищайте головки после каждых 10 часов
использования при помощи чистящей кассеты
влажного типа (продаются в магазинах аудио
товаров).
Загрязнение головок приводит к следующим эффектам:
– Падает качество звучания.
– Уменьшается громкость.
– Звук выпадает.
• Не используйте грязные или пыльные
кассеты.
• Не прикасайтесь к сверхгладкой головке
металлическими или намагниченными
предметами.
ПРЕДОСТЕРЕЖЕНИЕ:
• Не используйте кассеты с отставшими
этикетками; это может привести к
повреждению устройства.
• Подтягивайте пленку для устранения
провисания, так как провисшая пленка может
намотаться на механизм.
• После использования не оставляйте кассету в
отсеке для кассеты, так как это может
привести к провисанию пленки.
РУССКИЙ
Нижеследующая функция также служит для
продления срока функционирования
устройства
Выброс кассеты при включении зажигания/воспроизведение при включенном зажигании
• Когда Вы выключаете зажигание при установленной кассете, устройство автоматически
отодвигает головку от пленки.
• Когда Вы включаете зажигание при установленной кассете, воспроизведение начинается
автоматически.
Поддержание чистоты кассет
• После использования складывайте кассеты
в их футляры.
• Не храните кассеты в следующих местах:
– Под прямыми лучами солнца
– В местах с повышенной влажностью
– При чрезмерно высокой температуре
33
Page 68

ВОЗМОЖНЫЕ НЕИСПРАВНОСТИ
То, что поначалу представляется неисправностью, может не представлять серьезной
проблемы. Перед обращением в центр обслуживания проверьте следующее.
Рекомендуемые мерыПричиныСимптомы
• Кассета не вставляется. Вы пытаетесь вставить
кассету не той стороной.
• Кассета не удаляется. Выброс кассеты запрещен. Нажмите и удерживайте кнопки
• Кассета нагревается.
РУССКИЙ
• Кассета воспроизводится
очень тихо, и при этом
качество воспроизведения
значительно упало.
• Звук иногда прерывается. Соединения не надежны.
• Звук не выводится из
громкоговорителей.
• Не работает функция SSM
(Последовательная память о
станциях с сильным сигналом).
• Во время прослушивания
радио имеют место
статические помехи.
• На дисплее появляется
“NO DISC”.
• На дисплее появляется
“NO MAG”.
• На дисплее появляется
“RESET 8”.
• На дисплее появляется
“RESET 1 – RESET 7”.
• Устройство не работает
совсем.
• Устройство для смены
компакт-дисков не
работает совсем.
Это не свидетельствует о
неисправности.
Загрязнилась головка. Очистите ее при помощи
Регулятор громкости установлен на минимальное значение.
Неправильное подключение.
Сигналы слишком слабые. Настройте станции вручную.
Антенна подключена
ненадежно.
В магазине нет компактдисков.
Компакт-диски установлены
неправильно.
В устройство для смены
компакт-дисков не
установлен магазин.
Устройство подключено к
устройству для смены
компакт-дисков
неправильно.
Встроенный микропроцессор
функционирует неправильно
по причине помех и др.
34
Вставляйте кассету таким
образом, чтобы пленка была
направлена направо.
ТАРЕ 23 и
двух и более секунд.
чистящей кассеты.
Проверьте кабели и разъемы.
Настройте громкость.
Проверьте кабели и разъемы.
Подключите антенну надежно.
Установите компакт-диски в
магазин.
Установите компакт-диски
правильно.
Установите магазин.
Подключите устройство для
смены компакт-дисков
правильно и нажмите кнопку
перезагрузки на устройстве для
смены компакт-дисков.
Нажмите кнопку перезагрузки
на устройстве для смены
компакт-дисков.
Нажмите кнопку перезагрузки
на держателе панели управления. (Настройки часов и запрограммированные радиостанции,
хранящиеся в памяти, будут
удалены.) (см. стр. 2.)
в течение
Page 69

ТЕХНИЧЕСКИЕ ХАРАКТЕРИСТИКИ
Секция аудио усилителя
Максимальная выходная мощность:
Фронтальные: 45 Вт на канал
Тыловые: 45 Вт на канал
Номинальная выходная мощность (RMS):
Фронтальные: 17 Вт на канал в 4 Ω, от 40
Тыловые: 17 Вт на канал в 4 Ω, от 40
Сопротивление нагрузки: 4 Ω (от 4 Ω дo 8 Ω
приемлемо)
Диапазон управления тональностью:
Низкие частоты: ±10 дБ при 100 Гц
Высокие частоты: ±10 дБ при 10 кГц
Частотный диапазон: от 40 Гц дo 20000 Гц
Соотношение сигнал/шум: 70 дБ
Уровень линейного выхода/сопротивление:
2,0 V/20 кΩ нагрузка (250 nWb/m)
Гц до 20000 Гц при не
более чем 0,8%
гармонических искажений.
Гц дo 20000 Гц при не
более чем 0,8%
гармонических искажений.
СЕКЦИЯ ТЮНЕРА
Частотный диапазон:
FM1/FM2: от 87,5 МГц дo 108,0 MГц
FM3: от 65 MГц дo 74 MГц
AM: (MW) от 522 кГц дo 1
(LW) от 144 кГц дo 279 кГц
620 кГц
Секция кассетной деки
Коэффициент детонации: 0,11% (WRMS)
Время перемотки: 100 с. (С-60)
Частотный диапазон (Dolby B NR OFF):
от 30 Гц дo 16000 Гц (обычная
кассета)
Соотношение сигнал/шум: (обычная кассета)
(Dolby B NR ON): 65 дБ
(Dolby B NR OFF): 56 дБ
Стерео разделение: 40 дБ
РУССКИЙ
ОБЩИЕ ХАРАКТЕРИСТИКИ
Требования к питанию:
Эксплуатационное напряжение:
DC 14,4 В
(приемлемо от 11 В дo
16 В)
Система заземления: минус на массе
Эксплуатационная температура: 0°C дo +40°C
Размеры (Ш х В х Д):
Размер установки: 182 мм × 52 мм × 150 мм
Размер панели: 188 мм × 58 мм × 14 мм
Масса: 1,4 кг (исключая принадлежности)
Дизайн и технические характеристики могут
меняться без дополнительного уведомления.
[Тюнер FM]
Чувствительность: 11,3 дБф (1,0 мкВ/75 Ω)
50 дБ чувствительность затухания:
16,3 дБф (1,8 мкВ/75 Ω)
Альтернативная избирательность каналов
(400 кГц): 65 дБ
Частотный диапазон: от 40 Гц до 15000 Гц
Стерео разделение: 30 дБ
Коэффициент захвата: 1,5 дБ
[Тюнер MW]
Чувствительность: 20 мкВ
Избирательность: 35 дБ
[Тюнер LW]
Чувствительность: 50 мкВ
35
Page 70

Having TROUBLE with operation?
Please reset your unit
Refer to page of How to reset your unit
Затруднения при эксплуатации?
Пожалуйста, перезагрузите Ваше устройство
Для получения информации о перезагрузке Вашего устройства
обратитесь на соответствующую страницу
EN, RU
VICTOR COMPANY OF JAPAN, LIMITED
0101AOMCAPJES
JVC
 Loading...