

Page 1
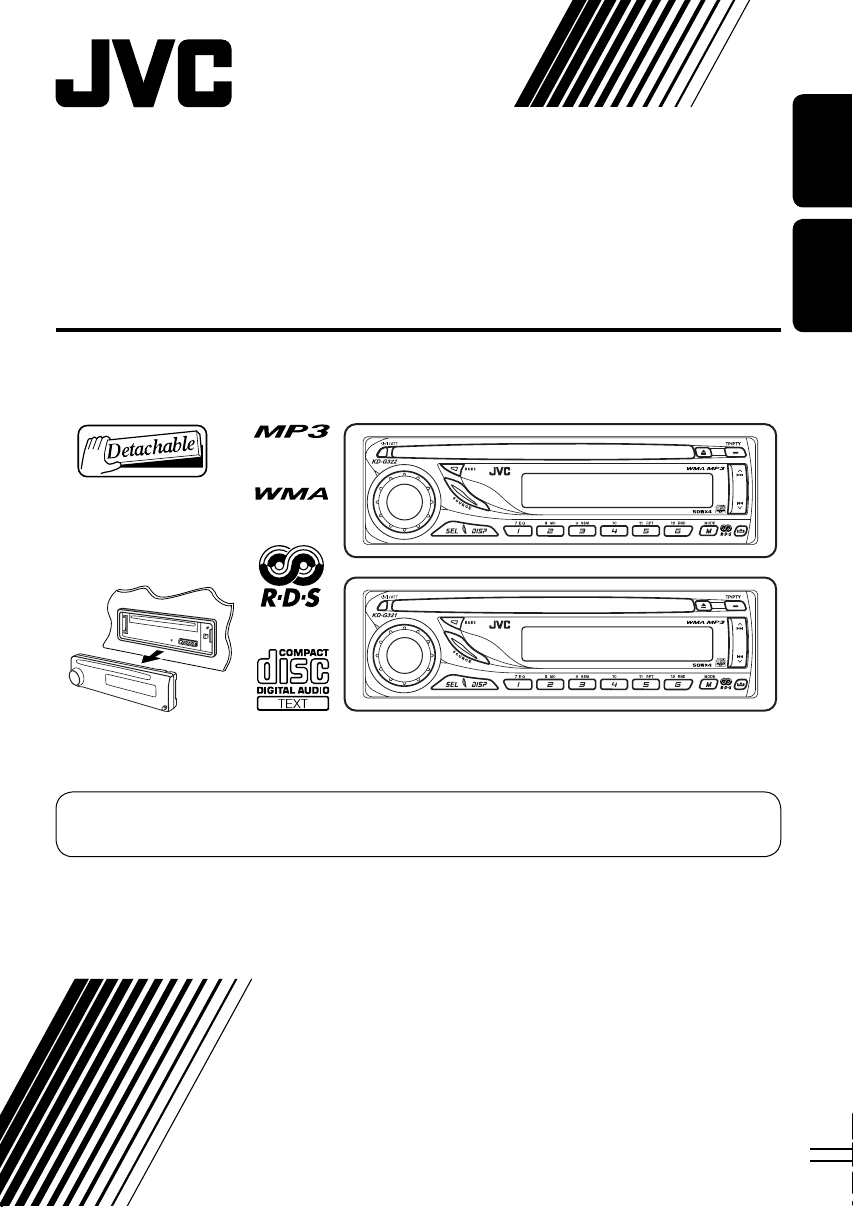
CD RECEIVER
RECEPTEUR CD
KD-G322/KD-G321
ENGLISH
FRANÇAIS
KD-G322
KD-G321
For canceling the display demonstration, see page 5.
Pour annuler la démonstration des affichages, référez-vous à la page 5.
For installation and connections, refer to the separate manual.
Pour l’installation et les raccordements, se référer au manuel séparé.
INSTRUCTIONS
MANUEL D’INSTRUCTIONS
GET0344-003A
[EX/EU]
Page 2
Thank you for purchasing a JVC product.
Please read all instructions carefully before operation, to ensure your complete understanding and to
obtain the best possible performance from the unit.
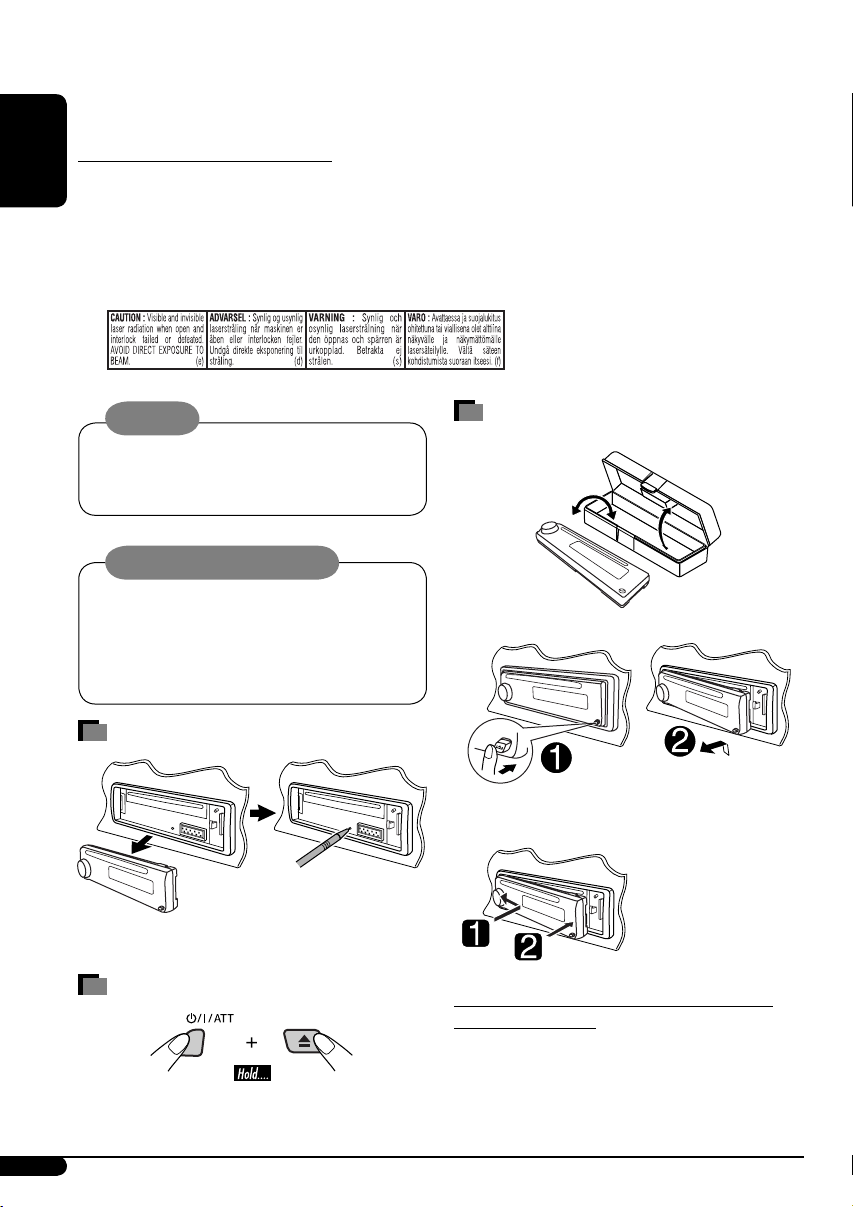
IMPORTANT FOR LASER PRODUCTS
1. CLASS 1 LASER PRODUCT
ENGLISH
2. CAUTION: Do not open the top cover. There are no user serviceable parts inside the unit; leave
all servicing to qualified service personnel.
3. CAUTION: Visible and invisible laser radiation when open and interlock failed or defeated.
Avoid direct exposure to beam.
4. REPRODUCTION OF LABEL: CAUTION LABEL, PLACED OUTSIDE THE UNIT.
Warning:
If you need to operate the unit while driving,
be sure to look ahead carefully or you may be
involved in a traffic accident.
Caution on volume setting:
Discs produce very little noise compared
with other sources. Lower the volume
before playing a disc to avoid damaging
the speakers by the sudden increase of the
output level.
How to reset your unit
• Your preset adjustments will also be erased.
How to forcibly eject a disc
• If this does not work, reset your unit.
• Be careful not to drop the disc when it ejects.
How to detach/attach the control
panel
Detaching...
Attaching...
Note: Only for [EX] model users in UK and
European countries
For security reasons, a numbered ID card
is provided with this unit, and the same ID
number is imprinted on the unit’s chassis.
Keep the card in a safe place, as it will help the
authorities to identify your unit if stolen.
2
Page 3

How to read this manual
• Button operations are mainly explained with
the illustrations in the table below.
•
is used to indicate an indicator is
displayed for the corresponding operation.
• Some related tips and notes are explained in
“More about this unit” (see pages 15 – 17).
Press briefly.
Press repeatedly.
Press either
one.
Press and hold until your
desired response begins.
Press and hold both
buttons at the same time.
How to use the M MODE button
If you press M MODE, the unit goes into
functions mode, then the number buttons
and
¢/4 buttons work as different
function buttons.
CONTENTS
Control panel — KD-G322 and KD-G321 ........ 4
Getting started ................................. 5
Basic operations .................................................... 5
Radio operations .............................. 6
FM RDS operations ............................ 7
Searching for your favorite FM RDS programme ... 7
Disc operations ................................. 9
Playing a disc in the unit ...................................... 9
Sound adjustments ........................... 11
General settings — PSM ................... 12
Maintenance .................................... 14
More about this unit ......................... 15
Troubleshooting ............................... 17
Specifications ................................... 19
ENGLISH
Ex.: When number button 2 works as
MO (monaural) button.
Time countdown indicator
To use these buttons for their original
functions again after pressing M MODE, wait
for 5 seconds without pressing any of these
buttons until the functions mode is cleared or
press M MODE again.
This unit is equipped with the steering wheel
remote control function.
• See the Installation/Connection Manual
(separate volume) for connection.
For safety...
• Do not raise the volume level too much, as
this will block outside sounds, making driving
dangerous.
• Stop the car before performing any
complicated operations.
Temperature inside the car...
If you have parked the car for a long time in hot
or cold weather, wait until the temperature in
the car becomes normal before operating the
unit.
3
Page 4
Control panel — KD-G612/KD-G611/KD-G511
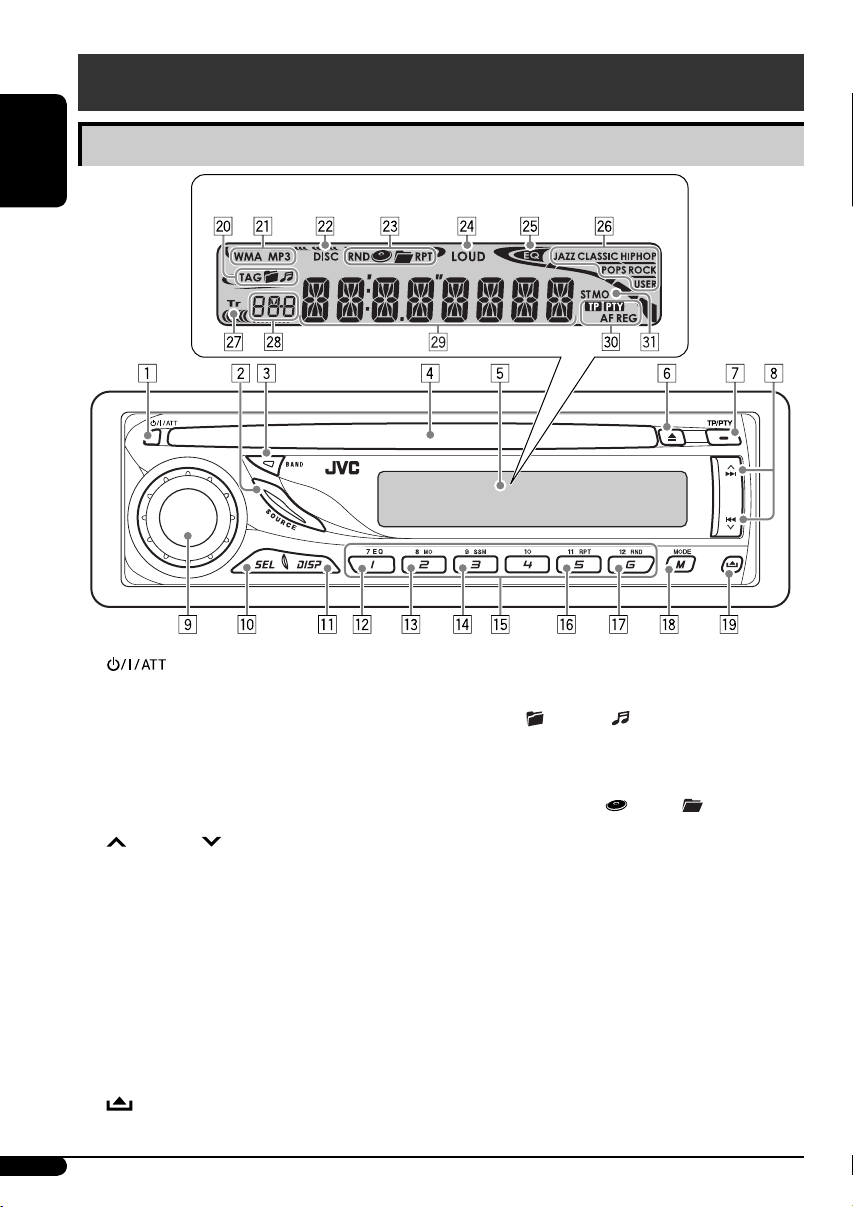
Control panel — KD-G322 and KD-G321
Parts identification
ENGLISH
1 (standby/on/attenuator) button
2 SOURCE button
3 BAND button
4 Loading slot
5 Display window
6 0 (eject) button
7 TP/PTY (traffic programme/programme
type) button
8
¢/4 buttons
9 Control dial
p SEL (select) button
q DISP (display) button
w EQ (equalizer) button
e MO (monaural) button
r SSM (Strong-station Sequential Memory)
button
t Number buttons
y RPT (repeat) button
u RND (random) button
i M MODE button
o
(control panel release) button
Display window
Display window
; Disc information indicators—TAG (ID3
Tag),
a Disc type indicators—WMA, MP3
s DISC indicator
d Playback mode / item indicators—
RND (random),
RPT (repeat)
f LOUD (loudness) indicator
g EQ (equalizer) indicator
h Sound mode (C-EQ: custom equalizer)
indicators—JAZZ, CLASSIC, HIP HOP,
POPS, ROCK, USER
j Tr (track) indicator
k Source display / Volume level indicator /
Time countdown indicator
l Main display
/ RDS indicators—TP, PTY, AF, REG
z Tuner reception indicators—ST (stereo),
MO (monaural)
(folder), (track/file)
(disc), (folder),
4
Page 5
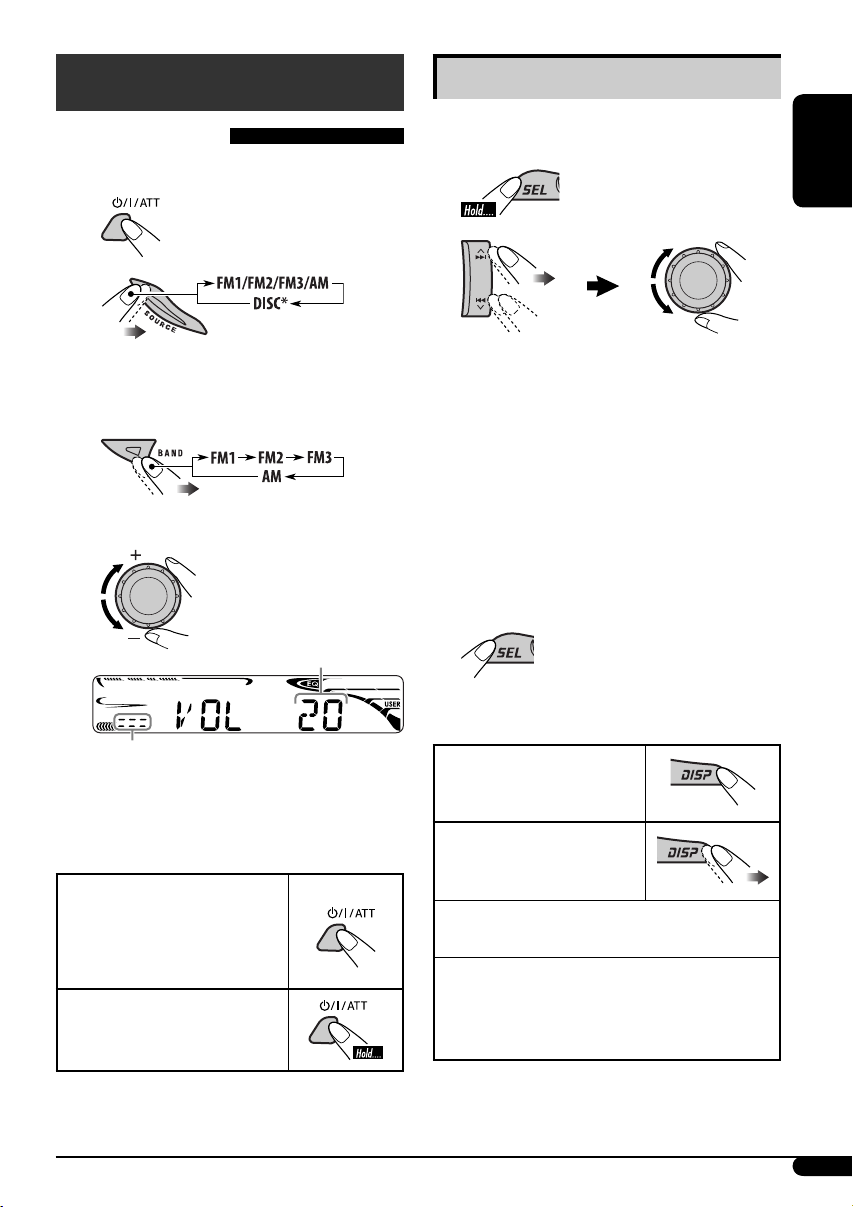
Getting started
Basic operations
~ Turn on the power.
Ÿ
Basic settings
• See also “General settings — PSM” on pages
12 and 13.
1
ENGLISH
2
* You cannot select “DISC” as the playback
source if there is no disc in the unit.
! For FM/AM tuner
⁄ Adjust the volume.
Volume level appears.
Volume level indicator
@ Adjust the sound as you want. (See
page 11.)
To drop the volume in a
moment (ATT)
To restore the sound, press
it again.
To turn off the power
1 Canceling the display
demonstrations
Select “DEMO,” then “DEMO OFF.”
2 Setting the clock
Select “CLOCK H” (hour), then adjust
the hour.
Select “CLOCK M” (minute), then
adjust the minute.
Select “24H/12H,” then “24H” (hour) or
“12H” (hour).
3 Finish the procedure.
To check the current clock time while...
The power is turned off
Listening to...
An FM (non-RDS) or AM station:
Frequency Ô Clock
An FM RDS station:
Station name (PS) = Station Frequency =
Programme type (PTY) = Clock = (back to
the beginning)
5
Page 6
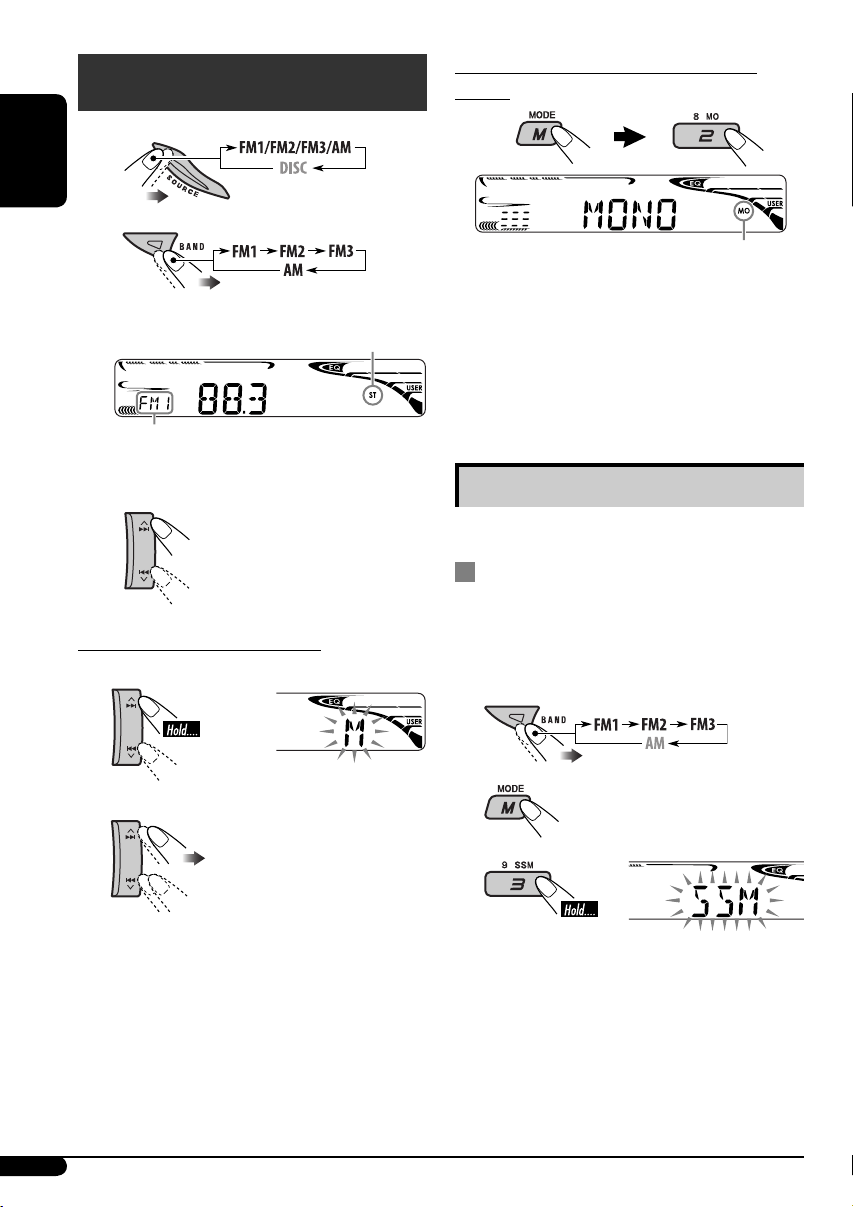
Radio operations
~
ENGLISH
When an FM stereo broadcast is hard to
receive
Ÿ
Lights up when receiving an FM stereo
broadcast with sufficient signal strength.
Selected band appears.
! Start searching for a station.
When a station is received,
searching stops.
To stop searching, press the
same button again.
To tune in to a station manually
In step ! above...
1
2 Select the desired station frequencies.
Lights up when monaural mode is activated.
Reception improves, but stereo effect will be
lost.
To restore the stereo effect, repeat the same
procedure. “MONO OFF” appears and the MO
indicator goes off.
Storing stations in memory
You can preset six stations for each band.
FM station automatic presetting —
SSM (Strong-station Sequential
Memory)
1 Select the FM band (FM1 – FM3) you
want to store into.
2
3
“SSM” flashes, then disappears when
automatic presetting is over.
Local FM stations with the strongest signals are
searched and stored automatically in the FM
band.
6
Page 7

Manual presetting
Ex.: Storing FM station of 92.5 MHz into preset
number 4 of the FM1 band.
1
2
3
Preset number flashes for a while.
Listening to a preset station
1
2 Select the preset station (1 – 6) you
want.
FM RDS operations
What you can do with RDS
RDS (Radio Data System) allows FM stations
to send an additional signal along with their
regular programme signals.
By receiving the RDS data, this unit can do the
following:
•
Programme Type (PTY) Search (see the
following)
• TA (Traffic Announcement) and PTY
Standby Receptions (see pages 8 and 13)
•
Tracing the same programme automatically
—Network-Tracking Reception (see page 9)
• Programme Search (see page 13)
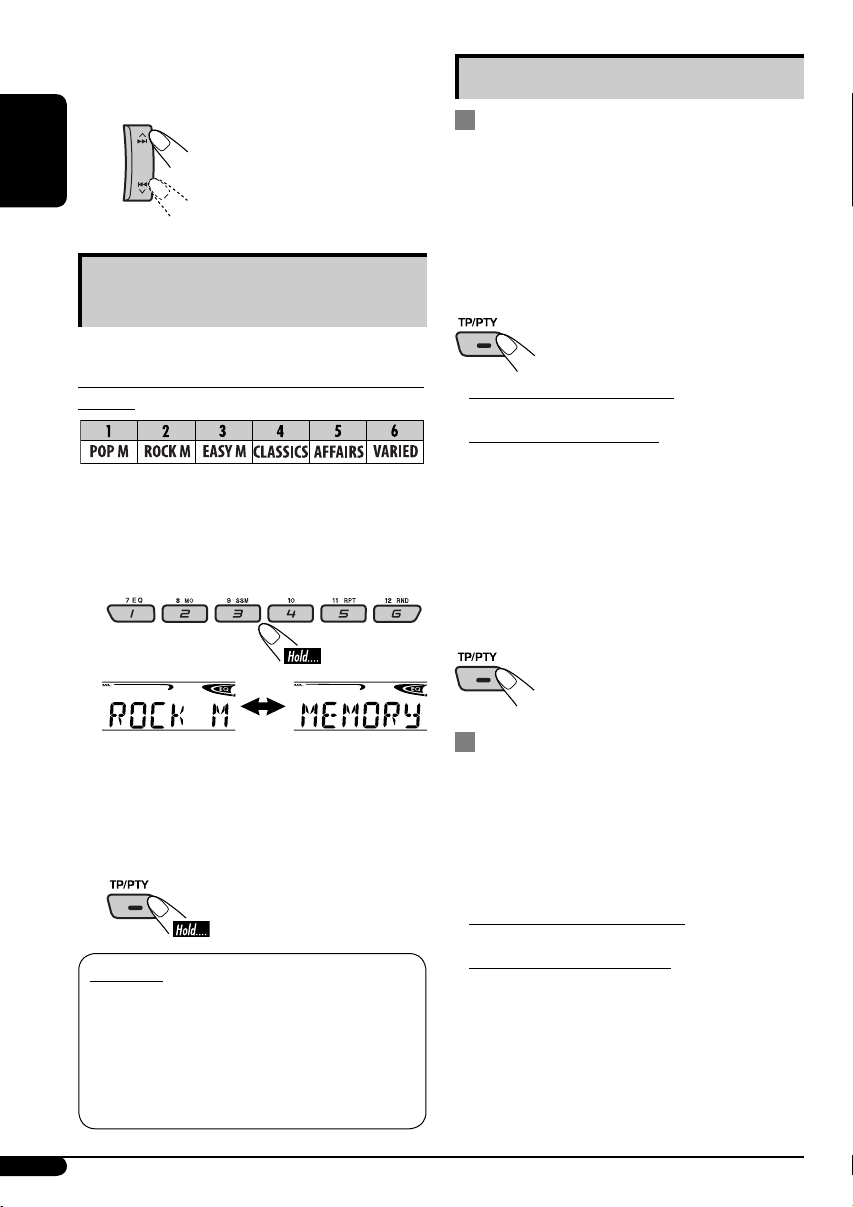
Searching for your favorite
FM RDS programme
You can tune in to a station broadcasting your
favorite programme by searching for a PTY
code.
• To store your favorite programme types, see
page 8.
~ The last selected PTY
code appears.
ENGLISH
Ÿ Select one of your favorite
programme types.
or
Select one of the PTY codes (see
page 8).
To be continued...
7
Page 8
! Start searching for your favorite
programme.
If there is a station
broadcasting a programme
ENGLISH
Storing your favorite programme
You can store six favorite programme types.
Preset programme types in the number buttons
(1 to 6):
1 Select a PTY code (see page 7).
2 Select the preset number (1 – 6) you
want to store into.
of the same PTY code as you
have selected, that station is
tuned in.
types
Using the standby receptions
TA Standby Reception
TA Standby Reception allows the unit to switch
temporarily to Traffic Announcement (TA)
from any source other than AM.
The volume changes to the preset TA volume
level if the current level is lower than the preset
level (see page 13).
To activate TA Standby Reception
The TP (Traffic Programme)
indicator either lights up or
flashes.
• If the TP indicator lights up, TA Standby
Reception is activated.
• If the TP indicator flashes, TA Standby
Reception is not yet activated. (This occurs
when you are listening to an FM station
without the RDS signals required for TA
Standby Reception.)
To activate TA Standby Reception, tune in to
another station providing these signals. The
TP indicator will stop flashing and remain lit.
To deactivate the TA Standby Reception
The TP indicator goes off.
Ex.: When “ROCK M” is selected
3 Repeat steps 1 and 2 to store other
PTY codes into other preset numbers.
4 Finish the procedure.
PTY codes
NEWS, AFFAIRS, INFO, SPORT, EDUCATE, DRAMA, CULTURE,
SCIENCE, VARIED, POP M (music), ROCK M (music), EASY
M (music), LIGHT M (music), CLASSICS, OTHER M (music),
WEATHER, FINANCE, CHILDREN, SOCIAL, RELIGION, PHONE
IN, TRAVEL, LEISURE, JAZZ, COUNTRY, NATION M (music),
OLDIES, FOLK M (music), DOCUMENT
8
PTY Standby Reception
PTY Standby Reception allows the unit to
switch temporarily to your favorite PTY
programme from any source other than AM.
To activate and select your favorite PTY code
for PTY Standby Reception, see page 13.
The PTY indicator either lights up or flashes.
• If the PTY indicator lights up, PTY Standby
Reception is activated.
• If the PTY indicator flashes, PTY Standby
Reception is not yet activated.
To activate PTY Standby Reception, tune in
to another station providing these signals. The
PTY indicator will stop flashing and remain lit.
To deactivate the PTY Standby Reception,
select “OFF” for the PTY code (see page 13).
The PTY indicator goes off.
Page 9
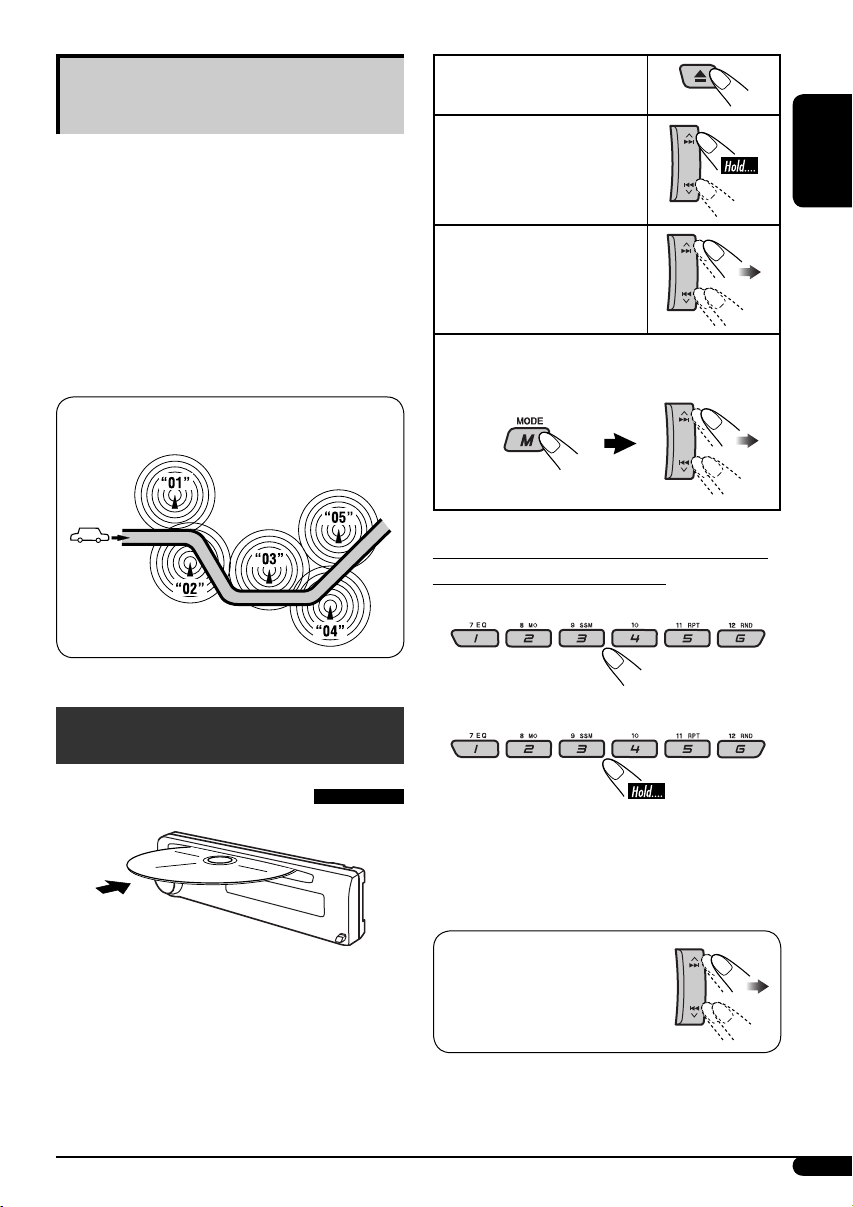
Tracing the same programme—
Network-Tracking Reception
When driving in an area where FM reception
is not sufficient enough, this unit automatically
tunes in to another FM RDS station of the
same network, possibly broadcasting the same
programme with stronger signals (see the
illustration below).
When shipped from the factory, NetworkTracking Reception is activated.
To change the Network-Tracking Reception
setting, see “AF-REG” on page 12.
Programme A broadcasting on different frequency areas
(01 – 05)
To stop play and eject
the disc
To fast-forward or
reverse the track
ENGLISH
To go to the next or
previous tracks
To go to the next or previous folders (only
for MP3 or WMA discs)
To locate a particular track (for CD) or folder
(for MP3 or WMA discs) directly
To select a number from 01 – 06:
Disc operations
Playing a disc in the unit
All tracks will be played repeatedly until you
change the source or eject the disc.
To select a number from 07 – 12:
• To use direct folder access on MP3/WMA
discs, it is required that folders are assigned
with 2-digit numbers at the beginning of their
folder names—01, 02, 03, and so on.
To select a particular track in
a folder (for MP3 or WMA
disc):
9
Page 10
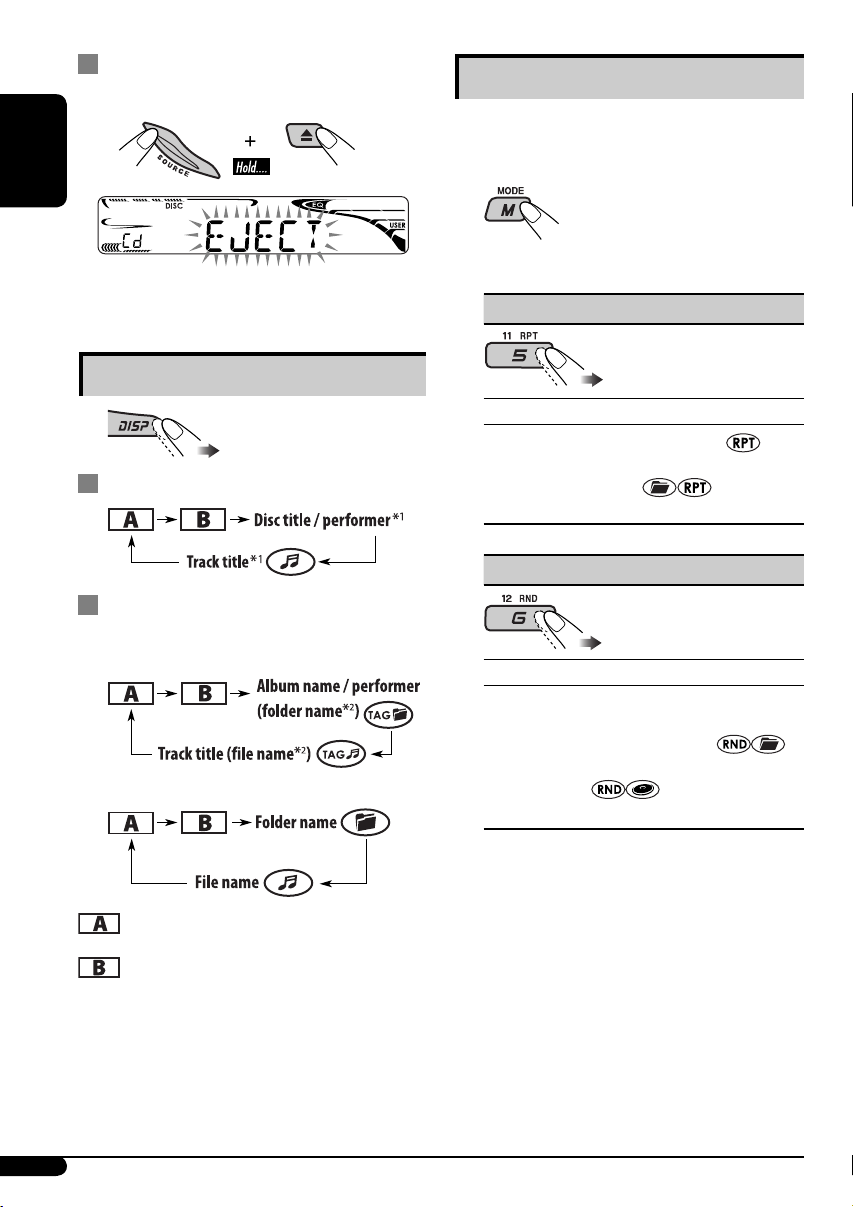
Prohibiting disc ejection
You can lock a disc in the loading slot.
Selecting the playback modes
You can use only one of the following playback
modes at a time.
ENGLISH
To cancel the prohibition, repeat the same
procedure.
Changing the display information
While playing an audio CD or a CD Text
While playing an MP3 or a WMA disc
• When “TAG DISP” is set to “TAG ON”
(see page 13)
• When “TAG DISP” is set to “TAG OFF”
1
2 Select your desired playback mode.
7 Repeat play
Mode Plays repeatedly
TRK RPT : The current track.
FLDR RPT*3 : All tracks of the current
folder.
RPT OFF : Cancels.
7 Random play
Mode Plays at random
FLDR RND*3 : All tracks of the current
folder, then tracks of the next
folder and so on.
DISC RND : All tracks of the current disc.
RND OFF : Cancels.
3
*
Only while playing an MP3 or a WMA
disc.
: Elapsed playing time with the current
track number
: Clock with the current track number
1
*
If the current disc is an audio CD,
“NO NAME” appears.
2
*
If an MP3/WMA file does not have ID3 tags,
folder name and file name appear. In this
case, the TAG indicator will not light up.
10
Page 11
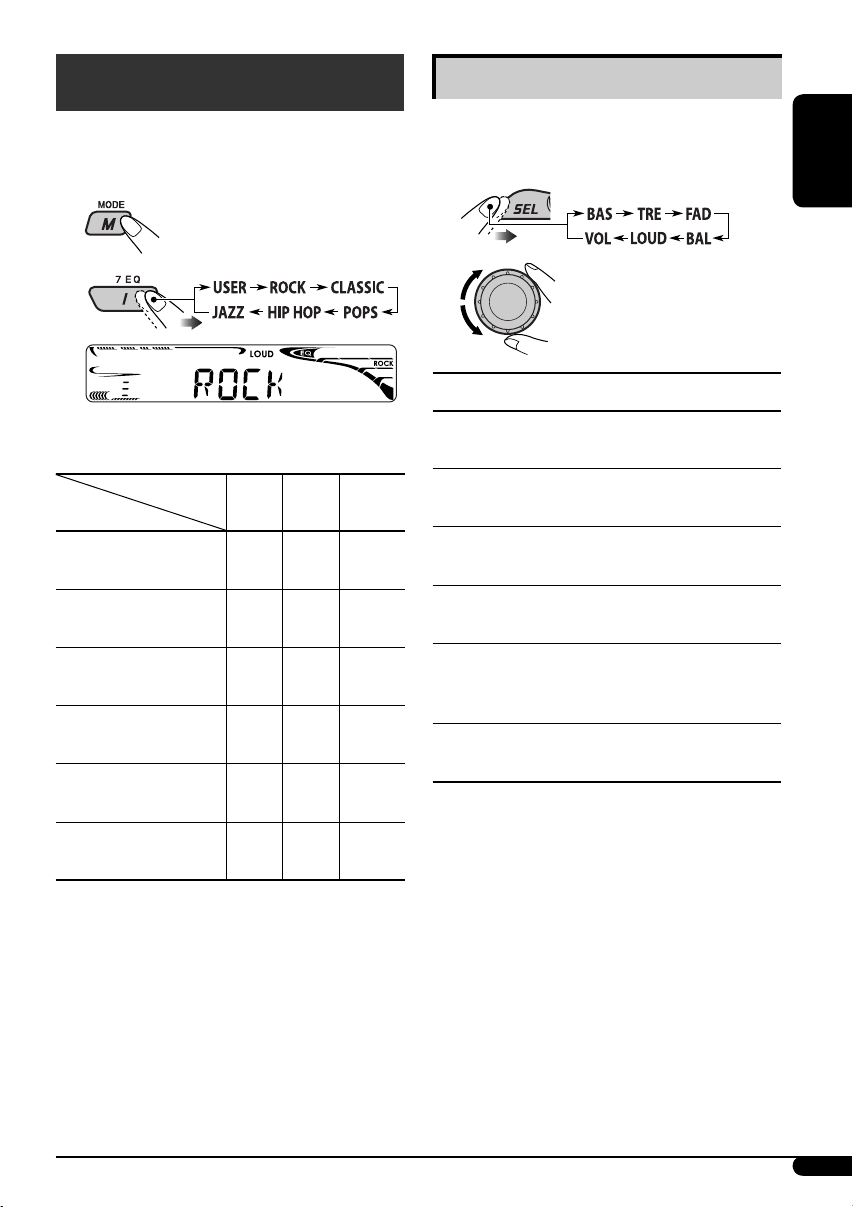
Sound adjustments
You can select a preset sound mode suitable to
the music genre (C-EQ: custom equalizer).
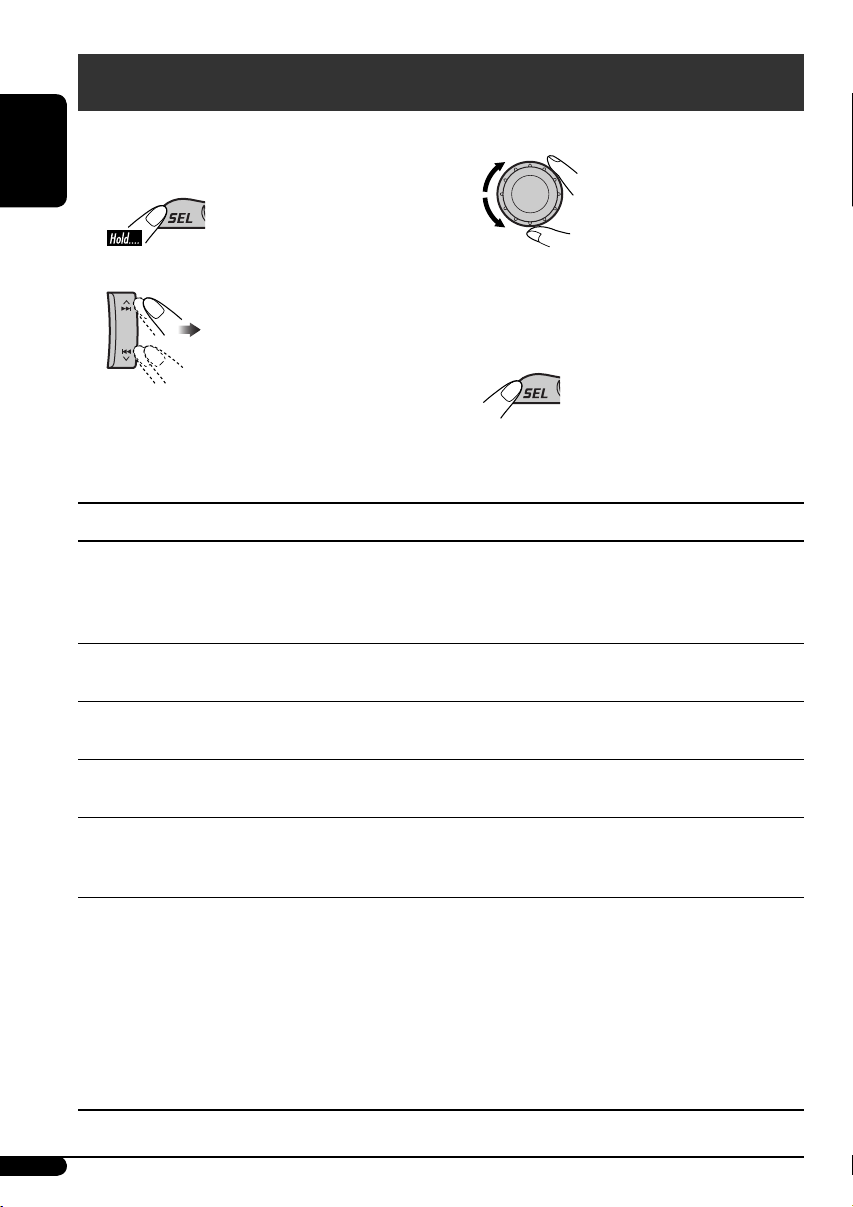
Adjusting the sound
You can adjust the sound characteristics to your
preference.
1
2
Ex.: When “ROCK” is selected
Preset values
Indication (For)
USER
(Flat sound)
ROCK
(Rock or disco music)
CLASSIC
(Classical music)
POPS
(Light music)
HIP HOP
(Funk or rap music)
JAZZ
(Jazz music)
BAS TRE LOUD
(bass) (treble)
00 00 OFF
+03 +01 ON
+01 –02 OFF
+04 +01 OFF
+02 00 ON
+02 +03 OFF
(loudness)
1
2
Indication, [Range]
BAS*4 (bass), [–06 to +06]
Adjust the bass.
4
TRE*
(treble), [–06 to +06]
Adjust the treble.
FAD*5 (fader), [R06 to F06]
Adjust the front and rear speaker balance.
BAL (balance), [L06 to R06]
Adjust the left and right speaker balance.
LOUD*4 (loudness), [LOUD ON or LOUD OFF]
Boost low and high frequencies to produce a
well-balanced sound at low volume level.
VOL (volume), [00 to 30 or 50*
Adjust the volume.
*4 When you adjust the bass, treble, or loudness,
the adjustment you have made is stored for
the currently selected sound mode (C-EQ)
including “USER.”
5
*
If you are using a two-speaker system, set the
fader level to “00.”
6
*
Depending on the amplifier gain control
setting. (See page 13 for details.)
6
]
ENGLISH
11
Page 12
General settings — PSM
You can change PSM (Preferred Setting Mode)
items listed in the table that follows.
ENGLISH
1
2 Select a PSM item.
3 Adjust the PSM item selected.
4 Repeat steps 2 and 3 to adjust other
PSM items if necessary.
5 Finish the procedure.
Indications Selectable settings, [reference page]
DEMO
Display demonstration
CLOCK H
Hour adjustment
DEMO ON : [Initial]; Display demonstration will be activated
automatically if no operation is done for about
20 seconds, [5].
DEMO OFF : Cancels.
0 – 23 (1 – 12), [5]
[Initial: 0 (0:00)]
CLOCK M
Minute adjustment
24H/12H
Time display mode
CLK ADJ
Clock adjustment
AF-REG
Alternative frequency/
regionalization reception
12
00 – 59, [5]
[Initial: 00 (0:00)]
12H O 24H, [5]
[Initial: 24H]
AUTO : [Initial]; The built-in clock is automatically adjusted
using the CT (clock time) data in the RDS signal.
OFF : Cancels.
When the received signals from the current FM RDS station become
weak...
AF : [Initial]; Switches to another station (the programme
may differ from the one currently received), [9].
• The AF indicator lights up.
AF REG : Switches to another station broadcasting the same
programme.
• The AF and REG indicators light up.
OFF : Cancels.
Page 13

Indications Selectable settings, [reference page]
PTY-STBY
PTY standby
TA VOL
Traffic announcement
volume
P-SEARCH
Programme search
DIMMER
Dimmer
TEL
Telephone muting
SCROLL*
2
Scroll
TAG DISP
Tag display
Activates PTY Standby Reception with one of the PTY codes, [8].
OFF [Initial]
[Initial: VOL 15]; VOL 00 — VOL 30 or 50*
=
PTY codes, [8] = (back to the beginning)
1
, [8]
ON : Using the AF data, the unit tunes in to another
frequency broadcasting the same programme as the
original preset RDS station is if the preset station signals
are not sufficient.
OFF : [Initial]; Cancels.
ON : Dims the display illumination of this unit.
OFF : [Initial]; Cancels.
MUTING 1/MUTING 2 : Select either one which mutes the sounds
while using a cellular phone.
OFF : [Initial]; Cancels.
ONCE : [Initial]; Scrolls the disc information once.
AUTO :
Repeats scrolling (5-second intervals in between).
OFF : Cancels.
• Pressing DISP for more than one second can scroll the display
regardless of the setting.
TAG ON : [Initial]; Shows the ID3 tag while playing MP3/WMA
tracks, [10].
TAG OFF : Cancels.
ENGLISH
AMP GAIN
Amplifier gain control
You can change the maximum volume level of this unit.
LOW PWR : VOL 00 – VOL 30 (Select this if the maximum power
of the speaker is less than 50 W to prevent them from
damaging the speaker.)
HIGH PWR : [Initial]; VOL 00 – VOL 50
IF BAND
Intermediate frequency
band
AUTO : [Initial]; Increase the tuner selectivity to reduce
interference noises between close stations. (Stereo effect
may be lost.)
WIDE : Subject to the interference noises from adjacent
stations, but sound quality will not be degraded and
maintains the stereo effect.
1
*
Depends on the amplifier gain control.
2
*
Some characters or symbols will not be shown correctly (or will be blanked) on the display.
13
Page 14

Maintenance
How to clean the connectors
Frequent detachment will deteriorate the
connectors.
ENGLISH
To minimize this possibility, periodically wipe
the connectors with a cotton swab or cloth
moistened with alcohol, being careful not to
damage the connectors.
Connector
To keep discs clean
A dirty disc may not play correctly.
If a disc does become dirty, wipe it
with a soft cloth in a straight line
from center to edge.
• Do not use any solvent (for example,
conventional record cleaner, spray, thinner,
benzine, etc.) to clean discs.
To play new discs
New discs may have some rough
spots around the inner and outer
edges. If such a disc is used, this
unit may reject the disc.
To remove these rough spots, rub the edges
with a pencil or ball-point pen, etc.
Moisture condensation
Moisture may condense on the lens inside the
CD player in the following cases:
• After starting the heater in the car.
• If it becomes very humid inside the car.
Should this occur, the CD player may
malfunction. In this case, eject the disc and
leave the unit turned on for a few hours until
the moisture evaporates.
How to handle discs
When removing a disc from
its case, press down the center
holder of the case and lift the
disc out, holding it by the edges.
• Always hold the disc by the
edges. Do not touch its recording surface.
When storing a disc into its case, gently insert
the disc around the center holder (with the
printed surface facing up).
• Make sure to store discs into the cases after
use.
Center holder
Do not use the following discs:
Warped disc
Sticker
Disc
Sticker residue
Stick-on label
14
Page 15

More about this unit
Basic operations
Turning on the power
• By pressing SOURCE on the unit, you can
also turn on the power. If the source is ready,
playback also starts.
Turning off the power
• If you turn off the power while listening to a
disc, disc play will start from where playback
has been stopped previously, next time you
turn on the power.
Tuner operations
Storing stations in memory
• During SSM search...
– All previously stored stations are erased and
stations are stored newly.
– Received stations are preset in No. 1 (lowest
frequency) to No. 6 (highest frequency).
– When SSM is over, the station stored in
No. 1 will be automatically tuned in.
• When storing a station manually, the
previously preset station is erased when a new
station is stored in the same preset number.
• When Alternative Frequency Reception
is activated (with AF selected), NetworkTracking Reception is also activated
automatically. On the other hand, NetworkTracking Reception cannot be deactivated
without deactivating Alternative Frequency
Reception. (See page 12.)
• If you want to know more about RDS, visit
«http://www.rds.org.uk».
Disc operations
Caution for DualDisc playback
• The Non-DVD side of a “DualDisc” does
not comply with the “Compact Disc Digital
Audio” standard. Therefore, the use of NonDVD side of a DualDisc on this product may
not be recommended.
General
• This unit has been designed to reproduce
CDs/CD Texts, and CD-Rs (Recordable)/
CD-RWs (Rewritable) in audio CD (CD-DA),
MP3 and WMA formats.
• MP3 and WMA “tracks” (words “file”
and “track” are used interchangeably) are
recorded in “folders.”
• When a disc has been loaded, selecting
“DISC” for the playback source starts disc
play.
ENGLISH
FM RDS operations
• Network-Tracking Reception requires
two types of RDS signals—PI (Programme
Identification) and AF (Alternative
Frequency) to work correctly. Without
receiving these data correctly, NetworkTracking Reception will not operate correctly.
• If a Traffic Announcement is received by
TA Standby Reception, the volume level
automatically changes to the preset level (TA
VOL) if the current level is lower than the
preset level.
Inserting a disc
• When a disc is inserted upside down, the disc
automatically ejects.
• Do not insert 8 cm discs (single CD) and
unusual shape discs (heart, flower, etc.) into
the loading slot.
Playing a disc
• While fast-forwarding or reversing on
an MP3 or WMA disc, you can only hear
intermittent sounds.
To be continued...
15
Page 16

Playing a CD-R or CD-RW
• Use only “finalized” CD-Rs or CD-RWs.
• This unit can play back only files of the same
type which are first detected if a disc includes
both audio CD (CD-DA) files and MP3/
WMA files.
ENGLISH
• This unit can play back multi-session discs;
however, unclosed sessions will be skipped
while playing.
• Some CD-Rs or CD-RWs may not play
back on this unit because of their disc
characteristics, or for the following reasons:
– Discs are dirty or scratched.
– Moisture condensation occurs on the lens
inside the unit.
– The pickup lens inside the unit is dirty.
– CD-R/CD-RW on which the files are
written with “Packet Write” method.
– There are improper recording conditions
(missing data, etc.) or media conditions
(stained, scratched, warped, etc.).
• CD-RWs may require a longer readout time
since the reflectance of CD-RWs is lower than
that of regular CDs.
• Do not use the following CD-Rs or CD-RWs:
– Discs with stickers, labels, or protective seal
stuck to the surface.
– Discs on which labels can be directly
printed by an ink jet printer.
Using these discs under high temperatures or
high humidities may cause malfunctions or
damage to the unit.
Playing an MP3/WMA disc
• This unit can play back MP3/WMA files
with the extension code <.mp3> or <.wma>
(regardless of the letter case—upper/lower).
• This unit can show the names of albums,
artists (performer), and ID3 Tag (Version
1.0, 1.1, 2.2, 2.3, or 2.4) for MP3 files and for
WMA files.
• This unit can display only one-byte
characters. No other characters can be
correctly displayed.
• This unit can play back MP3/WMA files
meeting the conditions below:
– Bit rate: 8 kbps — 320 kbps
– Sampling frequency:
48 kHz, 44.1 kHz, 32 kHz (for MPEG-1)
24 kHz, 22.05 kHz, 16 kHz (for MPEG-2)
– Disc format: ISO 9660 Level 1/ Level 2,
Romeo, Joliet, Windows long file name
• The maximum number of characters for file/
folder names vary among the disc format used
(includes 4 extension characters—<.mp3> or
<.wma>).
– ISO 9660 Level 1: up to 12 characters
– ISO 9660 Level 2: up to 31 characters
– Romeo: up to 128 characters
– Joliet: up to 64 characters
– Windows long file name: up to 128
characters
• This unit can recognize a total of 512 files, of
200 folders, and of 8 hierarchies.
• This unit can play back files recorded in VBR
(variable bit rate).
Files recorded in VBR have a discrepancy
in elapsed time display, and do not show
the actual elapsed time. Especially, after
performing the search function, this
difference becomes noticeable.
• This unit cannot play back the following files:
– MP3 files encoded with MP3i and
MP3 PRO format.
– MP3 files encoded in an inappropriate
format.
– MP3 files encoded with Layer 1/2.
– WMA files encoded with lossless,
professional, and voice format.
– WMA files which are not based upon
Windows Media
– WMA files copy-protected with DRM.
– Files which have the data such as WAVE,
ATRAC3, etc.
• The search function works but search speed is
not constant.
Audio.
®
16
Page 17

Changing the source
• If you change the source, playback also stops
(without ejecting the disc).
Next time you select “DISC” for the playback
source, disc play starts from where it has been
stopped previously.
General settings—PSM
• If you change the “AMP GAIN” setting from
“HIGH PWR” to “LOW PWR” while the
volume level is set higher than “VOL 30,” the
unit automatically changes the volume level to
“VOL 30.”
Ejecting a disc
• If the ejected disc is not removed within
15 seconds, the disc is automatically inserted
again into the loading slot to protect it from
dust. (Disc will not play this time.)
Troubleshooting
What appears to be trouble is not always serious. Check the following points before calling a service
center.
Symptoms Remedies/Causes
ENGLISH
• Sound cannot be heard from the
speakers.
General
• The unit does not work at all. Reset the unit (see page 2).
• SSM automatic presetting does not
work.
FM/AM
• Static noise while listening to the radio. Connect the aerial firmly.
• Disc cannot be played back. Insert the disc correctly.
• CD-R/CD-RW cannot be played back.
• Tracks on the CD-R/CD-RW cannot be
skipped.
• Disc can be neither played back nor
ejected.
Disc playback
• Disc sound is sometimes interrupted. • Stop playback while driving on rough roads.
• “NO DISC” appears on the display. Insert a playable disc into the loading slot.
• Adjust the volume to the optimum level.
• Check the cords and connections.
Store stations manually.
• Insert a finalized CD-R/CD-RW.
•
Finalize the CD-R/CD-RW with the component
which you used for recording.
• Unlock the disc (see page 10).
• Eject the disc forcibly (see page 2).
• Change the disc.
• Check the cords and connections.
To be continued...
17
Page 18

• Disc cannot be played back. • Use a disc with MP3/WMA tracks recorded in
ENGLISH
• Noise is generated. Skip to another track or change the disc. (Do not
Symptoms Remedies/Causes
the format compliant with ISO 9660 Level 1,
Level 2, Romeo, or Joliet.
• Add the extension code <.mp3> or <.wma> to
the file names.
add the extension code <.mp3> or <.wma> to nonMP3 or WMA tracks.)
• A longer readout time is required
(“CHECK” keeps flashing on the
display).
• Tracks do not play back in the order
MP3/WMA playback
you have intended them to play.
• Elapsed playing time is not correct. This sometimes occurs during play. This is caused
• “NO FILES” appears on the display. Insert a disc that contains MP3/WMA tracks.
• Correct characters are not displayed
(e.g. album name).
• Microsoft and Windows Media are either registered trademarks or trademarks of Microsoft
Corporation in the United States and/or other countries.
Do not use too many hierarchies and folders.
Playback order is determined when the files are
recorded.
by how the tracks are recorded on the disc.
This unit can only display alphabets (upper case),
numbers, and a limited number of symbols.
18
Page 19

Specifications
AUDIO AMPLIFIER SECTION
Maximum Power Output:
Front: 50 W per channel
Rear: 50 W per channel
Continuous Power Output (RMS):
Front: 19 W per channel into 4 Ω, 40 Hz
to 20 000 Hz at no more than 0.8%
total harmonic distortion.
Rear: 19 W per channel into 4 Ω, 40 Hz
to 20 000 Hz at no more than 0.8%
total harmonic distortion.
Load Impedance: 4 Ω (4 Ω to 8 Ω allowance)
Tone Control Range:
Bass: ±10 dB at 100 Hz
Treble: ±10 dB at 10 kHz
Frequency Response: 40 Hz to 20 000 Hz
Signal-to-Noise Ratio: 70 dB
Line-Out Level/Impedance:
2.5 V/20 kΩ load (full scale)
Output Impedance: 1 kΩ
Other terminals: Steering wheel remote input
TUNER SECTION
Frequency Range:
FM: 87.5 MHz to 108.0 MHz
AM: (MW) 522 kHz to 1 620 kHz
(LW) 144 kHz to 279 kHz
[FM Tuner]
Usable Sensitivity: 11.3 dBf (1.0 μV/75 Ω)
50 dB Quieting Sensitivity:
16.3 dBf (1.8 μV/75 Ω)
Alternate Channel Selectivity (400 kHz): 65 dB
Frequency Response: 40 Hz to 15 000 Hz
Stereo Separation: 30 dB
Capture Ratio: 1.5 dB
[MW Tuner]
Sensitivity: 20 μV
Selectivity: 35 dB
[LW Tuner]
Sensitivity: 50 μV
CD PLAYER SECTION
Type: Compact disc player
Signal Detection System: Non-contact optical
pickup (semiconductor laser)
Number of Channels: 2 channels (stereo)
Frequency Response: 5 Hz to 20 000 Hz
Dynamic Range: 96 dB
Signal-to-Noise Ratio: 98 dB
Wow and Flutter: Less than measurable limit
MP3 Decoding Format:
MPEG1/2 Audio Layer 3
Max. Bit Rate: 320 kbps
WMA (Windows Media
Format:
Max. Bit Rate: 192 kbps
Audio) Decoding
®
GENERAL
Power Requirement:
Operating Voltage:
DC 14.4 V (11 V to 16 V allowance)
Grounding System: Negative ground
Allowable Operating Temperature:
0°C to +40°C
Dimensions (W × H × D):
Installation Size (approx.):
182 mm × 52 mm × 150 mm
Panel Size (approx.):
188 mm × 58 mm × 11 mm
Mass (approx.):
1.2 kg (excluding accessories)
Design and specifications are subject to change
without notice.
ENGLISH
19
Page 20

Veuillez lire attentivement toutes les instructions avant d’utiliser l’appareil afin de bien comprendre
son fonctionnement et d’obtenir les meilleures performances possibles.
Merci pour avoir acheté un produit JVC.
IMPORTANT POUR PRODUITS LASER
1. PRODUIT LASER CLASSE 1
2. ATTENTION: N’ouvrez pas le couvercle supérieur. Il n’y a aucune pièce réparable par
l’utilisateur à l’intérieur de l’appareil; confiez toute réparation à un personnel qualifié.
3. ATTENTION: Risque de radiations laser visible et invisible quand l’appareil est ouvert et que
le système de verrouillage ne fonctionne pas ou a été mis hors service. Évitez toute exposition
directe au rayon.
4. REPRODUCTION DE L’ÉTIQUETTE: ÉTIQUETTE DE PRÉCAUTION PLACÉE À
L’EXTÉRIEUR DE L’APPAREIL.
FRANÇAIS
Avertissement:
Si vous souhaitez opérer l’appareil pendant
que vous conduisez, assurez-vous de bien
regarder devant vous afin de ne pas causer
un accident de la circulation.
Précautions sur le réglage du volume:
Les disques produisent très peut de bruit
par rapport aux autres sources. Réduisez le
volume avant de reproduire un disque afin
d’éviter d’endommager les enceintes par la
soudaine augmentation du niveau de sortie.
Comment réinitialiser votre appareil
• Vos ajustements préréglés sont aussi effacés.
Comment forcer l’éjection d’un disque
• Si cela ne fonctionne pas, essayez de
réinitialiser l’autoradio.
• Faites attention de ne pas faire tomber le
disque quand il est éjecté.
2
Comment détacher/attacher le
panneau de commande
Détachement...
Attachement...
Remarque: Uniquement pour les utilisateurs du
modèle [EX] au Royaume Uni et dans les pays
européens
Pour des raisons de sécurité, une carte
d’identification numérotée est fournie avec cet
appareil, et le même numéro d’identification est
imprimé sur le châssis de l’appareil. Conserver
cette carte dans un endroit sûr, elle pourra aider
les autorités pour identifier votre appareil en cas
de vol.
Page 21

Comment lire ce manuel
• L’utilisation des touches est principalement
expliquée avec des illustrations dans le tableau
ci-dessous.
•
est utilisé pour indiquer un indicateur
affiché pour l’opération correspondante.
• Certains conseils et remarques sont donnés
dans la section “Pour en savoir plus à propos
de cet autoradio” (voir les pages 15 à 17).
Appuyez brièvement.
Appuyez répétitivement.
Appuyez sur
une de ces
touches.
Maintenez pressée jusqu’à
ce que vous obteniez la
réponse souhaitée.
Maintenez pressées les deux
touches en même temps.
TABLE DES MATIERES
Panneau de commande —
KD-G322 et KD-G321 ................................ 4
Pour commencer ............................... 5
Opérations de base ................................................ 5
Fonctionnement de la radio .............. 6
Utilisation du système FM RDS ........... 7
Recherche de votre programme FM RDS préféré ... 7
Opérations des disques ..................... 9
Lecture d’un disque dans l’autoradio ................... 9
Ajustements sonores ......................... 11
Réglages généraux — PSM ............... 12
Entretien ......................................... 14
Pour en savoir plus à propos de cet
autoradio ...................................... 15
Guide de dépannage ......................... 17
Spécifications ................................... 19
FRANÇAIS
Comment utiliser la touche M MODE
Si vous appuyez sur M MODE, l’autoradio entre
en mode de fonction, et les touches numériques
et les touches
comme touches de fonction.
Ex. : Quand la touche numérique 2 fonctionne
comme touche MO (monophonique).
Indicateur de compte à rebours
Pour utiliser à nouveau ces touches pour leurs
fonctions originales après avoir appuyé sur
M MODE, attendez 5 secondes sans appuyer
sur aucune de ces touches jusqu’à ce que le
mode de fonction soit annulé ou appuyez de
nouveau sur M MODE.
¢/4 fonctionnent
L’autoradio est muni d’une fonction de
télécommande de volant.
• Référez-vous au Manuel d’installation/
raccordement (volume séparé) pour les
connexion.
Pour sécurité...
• N’augmentez pas trop le volume car cela
bloquerait les sons de l’extérieur rendant la
conduite dangereuse.
• Arrêtez la voiture avant de réaliser toute
opération compliquée.
Température à l’intérieur de la voiture...
Si votre voiture est restée garée pendant
longtemps dans un climat chaud ou froid,
attendez que la température à l’intérieur de la
voiture redevienne normale avant d’utiliser
l’appareil.
3
Page 22

Panneau de commande — KD-G322 et KD-G321
Identification des parties
Fenêtre d’affichage
FRANÇAIS
1 Touche (attente/sous tension/
atténuation)
2 Touche SOURCE
3 Touche BAND
4 Fente d’insertion
5 Fenêtre d’affichage
6 Touche 0 (éjection)
7
Touche TP/PTY (programme d’informations
routières/type de programme)
8 Touches ¢/4
9 Molette de commande
p Touche SEL (sélection)
q Touche DISP (affichage)
w Touche EQ (égaliseur)
e Touche MO (monophonique)
r Touche SSM (Mémorisation automatique
séquentielle des stations puissantes)
t Touches numériques
y Touche RPT (répétition)
u Touche RND (aléatoire)
i Touche M MODE
o Touche
commande)
(libération du panneau de
4
Fenêtre d’affichage
; Indicateurs d’informations du disque—
TAG (balise ID3),
fichier)
a Indicateurs de type de disque—WMA, MP3
s Indicateur DISC
d Indicateurs de mode de lecture / indicateurs
d’option—RND (aléatoire),
(dossier), RPT (répétition)
f Indicateur LOUD (loudness)
g Indicateur EQ (égaliseur)
h Indicateurs de mode sonore (C-EQ:
égaliseur personnalisé)—JAZZ, CLASSIC,
HIP HOP, POPS, ROCK, USER
j Indicateur Tr (plage)
k Indicateur d’affichage de la source / niveau
de volume / Indicateur de compte à rebours
l Affichage principal
/ Indicateurs RDS—TP, PTY, AF, REG
z Indicateurs de réception du tuner—
ST (stéréo), MO (monophonique)
(dossier), (plage/
(disque),
Page 23

Pour commencer
Opérations de base
~ Mise sous tension de l’appareil.
Ÿ
* Vous ne pouvez pas choisir “DISC ”
comme source de lecture s’il n’y a pas de
disque dans l’appareil.
! Pour le tuner FM/AM
⁄ Ajustez le volume.
Réglages de base
• Référez-vous aussi aux “Réglages généraux
— PSM” aux pages 12 et 13.
1
2
FRANÇAIS
1 Annulation de la démonstration
des affichages
Choisissez “DEMO”, puis “DEMO
OFF”.
2 Réglage de l’horloge
Choisissez “CLOCK H” (heures), puis
ajustez les heures.
Choisissez “CLOCK M” (minutes), puis
ajustez les minutes.
Choisissez “24H/12H”, puis choisissez
“24H” (heures) ou “12H” (heures).
3 Terminez la procédure.
Le niveau de volume apparaît.
Indicateur de niveau de volume
@ Ajustez le son comme vous le
souhaitez. (Voir page 11.)
Pour couper le volume
momentanément (ATT)
Pour rétablir le son, appuyez
de nouveau sur la touche.
Pour mettre l’appareil hors
tension
Pour vérifier l’heure actuelle pendant...
L’appareil est mis hors
tension
Écoute d’une...
Station FM (non RDS) ou une station AM:
Fréquence Ô Horloge
Station FM RDS:
Nom de la station (PS) = Fréquence de la
station = Type de programme (PTY) =
Horloge = (retour au début)
5
Page 24

Fonctionnement de la
radio
~
Ÿ
FRANÇAIS
S’allume lors de la réception d’une émission FM
stereo avec un signal suffisamment fort.
Quand une émission FM stéréo est difficile à
recevoir
S’allume quand le mode monophonique est mis en service.
La réception est améliorée, mais l’effet stéréo est
perdu.
Pour rétablir l’effet stéréo, répétez la
même procédure. “MONO OFF” apparaît et
l’indicateur MO s’éteint.
La bande choisie apparaît.
! Démarrez la recherche d’une
station.
Quand une station est reçue, la
recherche s’arrête.
Pour arrêter la recherche,
appuyez de nouveau sur la
même touche.
Pour accorder une station manuellement
À l’étape ! ci-dessus...
1
2 Choisissez la fréquence de station
souhaitée.
Mémorisation des stations
Vous pouvez prérégler six stations pour chaque
bande.
Préréglage automatique des
stations FM —SSM (Mémorisation
automatique séquentielle des stations
puissantes)
1 Choisissez la bande FM (FM1
– FM3) pour laquelle vous souhaitez
mémoriser les stations.
2
3
“SSM” clignote, puis disparaît quand le
préréglage automatique est terminé.
Les stations FM locale avec les signaux les
plus forts sont recherchées et mémorisées
automatiquement dans la bande FM.
6
Page 25

Préréglage manuel
Ex. : Mémorisation de la station FM de
fréquence 92,5 MHz sur le numéro de
préréglage 4 de la bande FM1.
1
2
3
Le numéro de préréglage clignote
un instant.
Utilisation du système FM
RDS
Présentation du système RDS
Le système RDS (Radio Data System)
permet aux stations FM d’envoyer un signal
additionnel en même temps que le signal de
leur programme ordinaire.
En recevant les données RDS, cet autoradio
peut effectuer ce qui suit:
• Recherche de type de programme (PTY) (voir
ci-après)
• Attente de réception TA (informations
routières) et PTY (voir pages 8 et 13)
• Poursuite du même programme
automatiquement—Poursuite de réception en
réseau (voir page 9)
• Recherche de programme (voir page 13)
FRANÇAIS
Écoute d’une station préréglée
1
2 Choisissez la station préréglée (1 – 6)
souhaitée.
Recherche de votre programme
FM RDS préféré
Vous pouvez accorder une station diffusant
votre programme préféré en effectuant une
recherche par code PTY.
• Pour mémoriser votre type de programme
préféré, référez-vous la page 8.
~ Les derniers codes PTY
choisis apparaissent.
Ÿ Choisissez un de vos types de
programme préféré.
ou
Choisissez un des codes PTY (voir
page 8).
À suivre...
7
Page 26

! Démarrez la recherche de votre
programme préféré.
S’il y a une station diffusant un
programme du code PTY que
vous avez choisi, la station est
accordée.
Mémorisation de vos types de
programme préférés
Vous pouvez mémoriser six de vos types de
FRANÇAIS
programme préféré.
Préréglez les types de programme sur les
touches numériques (1 – 6):
1 Choisissez un code PTY (voir page 7).
2 Choisissez le numéro de préréglage
(1 – 6) sur lequel vous souhaitez
mémoriser le code.
Utilisation de l’attente de réception
Attente de réception TA
L’attente de réception TA permet à l’appareil
de commuter temporairement sur des
informations routières (TA) à partir de
n’importe quelle source autre que AM.
Le volume change sur le niveau de volume
TA préréglé si le niveau actuel est inférieur au
niveau préréglé (voir page 13).
Pour mettre en service l’attente de
réception TA
L’indicateur TP (programme
d’informations routières) s’allume
ou clignote.
• Si l’indicateur TP s’allume, c’est que l’attente
de réception TA est en service.
• Si l’indicateur TP clignote, c’est que l’attente
de réception TA n’est pas encore en service.
(Cela se produit quand vous écoutez une
station FM sans les signaux RDS nécessaires à
l’attente de réception TA).
Pour mettre en service l’attente de réception
TA, accordez une autre station diffusant ces
signaux. L’indicateur TP s’arrête de clignoter
et reste allumé.
Pour mettre hors service l’attente de
réception TA
L’indicateur TP s’éteint.
Ex. : Quand “ROCK M” est choisi
3 Répétez les étapes 1 et 2 pour
mémoriser d’autres codes PTY sur des
autres numéros de préréglage.
4 Terminez la procédure.
Codes PTY
NEWS, AFFAIRS, INFO, SPORT, EDUCATE, DRAMA, CULTURE,
SCIENCE, VARIED, POP M (musique), ROCK M (musique),
EASY M (musique), LIGHT M (musique), CLASSICS, OTHER
M (musique), WEATHER, FINANCE, CHILDREN, SOCIAL,
RELIGION, PHONE IN, TRAVEL, LEISURE, JAZZ, COUNTRY,
NATION M (musique), OLDIES, FOLK M (musique),
DOCUMENT
8
Attente de réception PTY
L’attente de réception PTY permet à l’appareil
de commuter temporairement sur votre
programme PTY préféré à partir de n’importe
quelle source sauf AM.
Pour mettre en service et choisir votre code
PTY préféré pour l’attente de réception PTY,
référez-vous à la page 13.
L’indicateur PTY s’allume ou clignote.
• Si l’indicateur PTY s’allume, c’est que l’attente
de réception PTY est en service.
• Si l’indicateur PTY clignote, c’est que l’attente
de réception PTY n’est pas encore en service.
Pour mettre en service l’attente de réception
PTY, accordez une autre station diffusant ces
signaux. L’indicateur PTY s’arrête de clignoter
et reste allumé.
Pour mettre hors service l’attente de réception
PTY, choisissez “OFF” pour le code PTY (référez-
vous à la page 13). L’indicateur PTY s’éteint.
Page 27

Poursuite du même programme—
Poursuite de réception en réseau
Lorsque vous conduisez dans une région où la
réception FM n’est pas suffisamment forte, cet
autoradio accorde automatiquement une autre
station FM RDS du même réseau, susceptible
de diffuser le même programme avec un signal
plus fort (voir l’illustration ci-dessous).
Pour arrêter la lecture et
éjecter le disque
Pour faire avancer ou
reculer rapidement la
plage
Pour aller aux plages
suivantes ou précédentes
À l’expédition de l’usine, la poursuite de
réception en réseau est en service.
Pour changer le réglage de la poursuite de
réception en réseau, référez-vous à “AF-REG”
à la page 12.
Programme A diffusé sur une zone de fréquence différente
(01 – 05)
Opérations des disques
Lecture d’un disque dans
l’autoradio
Pour aller aux dossiers suivants ou
précédents (seulement pour les disques
MP3 ou WMA)
Pour localiser directement une plage
particulière (pour les CD) ou un dossier
particulier (pour les disques MP3 ou WMA)
Pour choisir un numéro compris entre 01 et 06:
Pour choisir un numéro compris entre 07 et 12:
• Pour utiliser l’accès direct aux dossiers sur
un disque MP3/WMA, il faut qu’un numéro
de 2 chiffres soit affecté au début du nom des
dossiers—01, 02, 03, etc.
FRANÇAIS
Toutes les plages sont reproduites
répétitivement jusqu’à ce que vous changiez la
source ou éjectiez le disque.
Pour choisir une plage
particulière dans un dossier
(pour les disques MP3 ou
WMA):
9
Page 28

Interdiction de l’éjection du disque
Vous pouvez verrouiller un disque dans la fente
d’insertion.
Pour annuler l’interdiction, répétez la même
procédure.
FRANÇAIS
Changement des informations sur
l’affichage
Lors de la lecture d’un CD ou d’un CD
Text
Lors de la lecture d’un disque MP3 ou
WMA
• Quand “TAG DISP” est réglé sur “TAG
ON” (voir page 13)
• Quand “TAG DISP” est réglé sur “TAG
OFF”
: Durée de lecture écoulée avec la plage
actuelle
: Horloge avec le numéro de la plage
actuelle
1
Si le disque actuel est un CD audio, “NO
*
NAME” apparaît.
2
*
Si un fichier MP3/WMA n’a pas de balises
ID3, le nom du dossier et le nom du fichier
apparaissent. Dans ce cas, l’indicateur TAG
ne s’allume pas.
10
Sélection des modes de lecture
Vous pouvez utiliser un des modes de lecture
suivants à la fois.
1
2 Choisissez le mode de lecture
souhaité.
7 Lecture répétée
Mode Reproduit répétitivement
TRK RPT : La plage actuelle.
FLDR RPT*
RPT OFF : Annulation.
7 Lecture aléatoire
Mode Reproduit dans un ordre
aléatoire
FLDR RND*3 : Toutes les plages du dossier
DISC RND : Toutes les plages du disque
RND OFF : Annulation.
3
*
Uniquement lors de la lecture d’un disque
MP3 ou WMA.
3
: Toutes les plages du dossier
actuel.
actuel, puis les plages du
dossier suivant, etc.
actuel.
Page 29

Ajustements sonores
Vous pouvez sélectionner un mode sonore
préréglé adapté à votre genre de musique
(C-EQ: égaliseur personnalisé).
1
Ajustement du son
Vous pouvez ajuster les caractéristiques du son
comme vous le souhaitez.
1
2
2
Ex. : Quand “ROCK” est choisi
Valeurs
préréglées
Indication (Pour)
USER
(Pas d’effet)
ROCK
(Musique rock ou disco)
CLASSIC
(Musique classique)
POPS
(Musique légère)
HIP HOP
(Musique funk ou rap)
JAZZ
(Musique jazz)
BAS
(graves)
TRE
(aigus)
(loudness)
00 00 OFF
+03 +01 ON
+01 –02 OFF
+04 +01 OFF
+02 00 ON
+02 +03 OFF
LOUD
Indication, [Plage]
BAS*4 (graves), [–06 à +06]
Ajuste les graves.
4
TRE*
(aigus), [–06 à +06]
Ajuste les aigus.
FAD*5 (fader), [R06 à F06]
Ajustez la balance avant-arrière des enceintes.
BAL (balance), [L06 à R06]
Ajustez la balance gauche-droite des enceintes.
4
LOUD*
OFF]
Accentue les basses et hautes fréquences pour
produire un son plus équilibré aux faibles
niveaux de volume.
VOL (volume), [00 à 30 ou 50*
Ajuste le volume.
*4
*5 Si vous utilisez un système à deux enceintes,
*
(loudness), [LOUD ON ou LOUD
6
]
Quand vous ajustez les graves, les aigus ou
le loudness, les ajustements réalisés sont
mémorisés pour le mode sonore actuel (C-EQ),
y compris “USER”.
réglez le niveau du fader sur “00”.
6
Dépend du réglage de commande de gain
de l’amplificateur. (Voir page 13 pour les
détails.)
FRANÇAIS
11
Page 30

Réglages généraux — PSM
Vous pouvez changer les options PSM (mode
des réglages préférés) de la table suivante.
3 Ajustez l’option PSM choisie.
1
2 Choisissez une option PSM.
FRANÇAIS
4 Répétez les étapes 2 et 3 pour ajuster
les autres options PSM si nécessaire.
5 Terminez la procédure.
Indications Réglages pouvant être choisis, [page de référence]
DEMO
Démonstration des
affichages
CLOCK H
Ajustement des heures
CLOCK M
Ajustement des minutes
DEMO ON : [Réglage initial]; La démonstration des affichages entre
en service si aucune opération n’est réalisée pendant
environ 20 secondes, [5].
DEMO OFF : Annulation.
0 – 23 (1 – 12), [5]
[Réglage initial: 0 (0:00)]
00 – 59, [5]
[Réglage initial: 00 (0:00)]
24H/12H
Mode d’affichage de
l’heure
CLK ADJ
Ajustement de l’horloge
AF-REG
Fréquence alternative/
réception régionale
12
12H O 24H, [5]
[Réglage initial: 24H]
AUTO : [Réglage initial]; L’horloge intégré est ajustée
automatiquement en utilisant les données CT (horloge)
comprises dans le signal RDS.
OFF : Annulation.
Quand les signaux reçus de la station FM RDS actuelle deviennent
faibles...
AF : [Réglage initial]; Commute sur une autre station (le
programme peut différer du programme actuellement
reçu), [9].
• L’indicateur AF s’allume.
AF REG : Commute sur une autre station diffusant le même
programme.
• Les indicateurs AF et REG s’allument.
OFF : Annulation.
Page 31

Indications Réglages pouvant être choisis, [page de référence]
PTY-STBY
Attente PTY
TA VOL
Volume des
informations routières
P-SEARCH
Recherche de
programme
DIMMER
Gradateur
TEL
Sourdine téléphonique
SCROLL*
2
Scroll
TAG DISP
Affichage des balises
Met en service l’attente de réception PTY avec un des codes PTY, [8].
OFF [Réglage initial]
[Réglage initial: VOL 15]; VOL 00 à VOL 30 ou 50*
=
codes PTY, [8] = (retour au début)
1
, [8]
ON : En utilisant les données AF, l’autoradio accorde une
même station diffusant le même programme que celui
diffusé par la station RDS originale si les signaux de la
station ne sont pas suffisants.
OFF : [Réglage initial]; Annulation.
ON : Assombrit l’éclairage de cet appareil.
OFF : [Réglage initial]; Annulation.
MUTING 1/MUTING 2 : Choisissez le mode qui permet de couper le
son lors de l’utilisation d’un téléphone cellulaire.
OFF : [Réglage initial]; Annulation.
ONCE : [Réglage initial]; Fait défiler une fois les informations du
disque.
AUTO :
Répète le défilement (avec un intervalle de 5 secondes).
OFF : Annulation.
• Appuyer sur DISP pendant plus d’une seconde peut faire défiler
l’affichage quelque que soit le réglage utilisé.
TAG ON : [Réglage initial]; Affiche les balises ID3 lors de la lecture
d’une plage MP3/WMA, [10].
TAG OFF : Annulation.
FRANÇAIS
AMP GAIN
Commande du gain de
l’amplificateur
Vous pouvez changer le niveau de volume maximum de cet
autoradio.
LOW PWR : VOL 00 – VOL 30 (Choisissez ce réglage si la puissance
maximum des enceintes est inférieure à 50 W pour
éviter tout dommage.)
HIGH PWR : [Réglage initial]; VOL 00 – VOL 50
IF BAND
Bande de la fréquence
intermédiaire
AUTO : [Réglage initial]; Augmente la sélectivité du tuner pour
réduire les interférences entre les stations proches.
(L’effet stéréo peut être perdu.)
WIDE : Il y a des interférences des stations adjacentes, mais la
qualité du son n’est pas dégradée et l’effet stéréo n’est
pas perdu.
1
*
Dépend de la commande de gain de l’amplificateur.
2
*
Certains caractères ou symboles n’apparaissent pas correctement (ou un blanc apparaît leur place)
sur l’affichage.
13
Page 32

Entretien
Comment nettoyer les connecteurs
Un détachement fréquent détériorera les
connecteurs.
Pour minimiser ce problème, frottez
périodiquement les connecteurs avec un
coton tige ou un chiffon imprégné d’alcool,
en faisant attention de ne pas endommager les
connecteurs.
FRANÇAIS
Connecteur
Condensation d’humidité
De la condensation peut se produire sur la
lentille à l’intérieur du lecteur CD dans les cas
suivants:
• Après le démarrage du chauffage dans la
voiture.
• Si l’intérieur de la voiture devient très humide.
Si cela se produit, le lecteur CD risque de ne
pas fonctionner correctement. Dans ce cas,
éjectez le disque et laissez l’autoradio sous
tension pendant quelques heures jusqu’à ce que
l’humidité s’évapore.
Comment manipuler les disques
Pour retirer un disque de sa
boîte, faites pression vers le
centre du boîtier et soulevez
légèrement le disque en el
tenant par ses bords.
• Tenez toujours le disque par ses bords. Ne
touchez pas la surface enregistrée.
Pour remettre un disque dans sa boîte,
insérez-le délicatement sur le support central
(avec la surface imprimée dirigée vers le haut).
• Conservez les disques dans leur boîte quand
vous ne les utilisez pas.
Support central
Pour garder les disques propres
Un disque sale peut ne pas être
reproduit correctement.
Si un disque est sale, essuyez-le
avec un chiffon doux, en ligne
droite du centre vers les bords.
• N’utilisez pas de solvant (par exemple, un
nettoyant conventionnel pour disque vinyle,
un vaporisateur, un diluant, du bezène, etc.)
pour nettoyer les disques.
Pour reproduire un disque neuf
Les disques neufs ont parfois des
ebarbures sur le bord intérieur
et extérieur. Si un tel disque est
utilisé, cet autoradio risque de le
rejeter.
Pour retirer ces ebarbures, frotter les bords avec
un crayon, un stylo, etc.
N’utilisez pas les disques suivants:
Disque gondolé
Autocollant
Disque
Reste d’étiquette
Étiquette
autocollante
14
Page 33

Pour en savoir plus à
propos de cet autoradio
Opérations de base
Mise sous tension de l’appareil
•
En appuyant sur SOURCE sur l’autoradio, vous
pouvez aussi mettre l’appareil sous tension. Si la
source est prête, la lecture démarre aussi.
Mise hors tension de l’appareil
• Si vous mettez l’appareil hors tension pendant
l’écoute d’un disque, la lecture du disque
reprendra à partir du point où la lecture a
été interrompue la prochaine fois que vous
mettez l’appareil sous tension.
Fonctionnement du tuner
Mémorisation des stations
• Pendant la recherche SSM...
– Toutes les stations précédemment
mémorisées sont effacées et remplacées par
des nouvelles.
– Les stations reçues sont préréglées sur
les No 1 (fréquence la plus basse) à No 6
(fréquence la plus haute).
– Quand la recherche SSM est terminée, la
station mémorisée sur le No 1 est accordée
automatiquement.
•
Lors de la mémorisation manuelle d’une
station, la station précédemment mémorisée
est effacée quand une nouvelle station est
mémorisée sur le même numéro de préréglage.
Utilisation du système FM RDS
• La poursuite de réception en réseau
nécessite deux types de signaux RDS
—PI (identification du programme) et AF
(fréquence alternative) pour fonctionner
correctement. Si ces données ne sont reçues
correctement, la poursuite de réception en
réseau ne fonctionne pas correctement.
• Si une annonce d’informations routières est
reçue pendant l’attente de réception TA, le
niveau de volume change automatiquement
sur le niveau préréglé (TA VOL) si le niveau
actuel est inférieur au niveau préréglé.
• Quand la recherche de fréquence alternative
est mise en service (avec AF choisi), la
poursuite de réception en réseau est
aussi mise automatiquement en service.
Inversement, la poursuite de réception en
réseau ne peut pas être mise hors service sans
mettre hors service la recherche de fréquence
alternative. (Voir page 12.)
• Si vous souhaitez en savoir plus sur le système
RDS, visitez le site «http://www.rds.org.uk».
Opérations des disques
Précautions pour la lecture de disques à
double face
• La face non DVD d’un disque à “DualDisc”
n’est pas compatible avec le standard
“Compact Disc Digital Audio”. Par
conséquent, l’utilisation de la face non DVD
d’un disque à double face sur cet appareil n’est
pas recommandée.
Généralités
• Cet autoradio est conçu pour reproduire les
CD/CD Text et les CD-R (enregistrables)/
CD-RW (réinscriptibles) au format CD audio
(CD-DA), MP3 et WMA.
• Les “plages” MP3 et WMA (les termes
“fichier” et “plage” sont utilisés de façon
interchangeable) sont enregistrées dans des
“dossiers”.
• Quand un disque est en place, choisir “DISC”
comme source de lecture démarre la lecture
du disque.
Insertion d’un disque
• Quand un disque est inséré à l’envers, il est
éjecté automatiquement.
• N’insérez pas de disque de 8 cm (CD Single)
ou de forme spéciale (en cœur, fleur, etc.)
dans la fente d’insertion.
Lecture d’un disque
• Lors de l’avance ou du retour rapide d’un
disque MP3 ou WMA, vous ne pouvez
entendre que des sons intermittents.
FRANÇAIS
À suivre...
15
Page 34

Lecture d’un CD-R ou CD-RW
• Utilisez uniquement des CD-R ou CD-RW
“finalisés”.
• Cet autoradio peut uniquement reproduire les
fichiers du même type que le premier fichier
détecté sur le disque si un disque comprend à
la fois des fichiers CD audio (CD-DA) et des
fichiers MP3/WMA.
• Cet autoradio peut reproduire les disques
multi-session; mais les sessions non fermée
sont sautées lors de la lecture.
• Certains CD-R ou CD-RW ne peuvent pas
être reproduits sur cet appareil à cause de
FRANÇAIS
leurs caractéristiques ou des raisons suivantes:
– Les disques sont sales ou rayés.
– De l’humidité s’est condensée sur la lentille
à l’intérieur de l’autoradio.
– La lentille du capteur à l’intérieur de
l’autoradio est sale.
– Ce sont des CD-R/CD-RW sur lesquels des
fichiers ont été écrits par paquet.
– Les conditions de l’enregistrement (données
manquantes, etc.) ou du support (tâche,
rayure, gondolage) sont incorrectes.
• Les CD-RW nécessite un temps
d’initialisation plus long à cause de leur indice
de réflexion plus faible que celui des CD
ordinaires.
• N’utilisez pas les CD-R ou CD-RW suivants:
– Disques avec des autocollants, des étiquettes
ou un sceau protecteur collés à leur surface.
– Disques sur lesquels une étiquette peut être
imprimée directement avec une imprimante
à jet d’encre.
Utiliser de tels disques par haute température
ou humidité peut entraîner un mauvais
fonctionnement ou endommager l’appareil.
Lecture d’un disque MP3/WMA
• Cet autoradio peut reproduire les fichiers
MP3/WMA portant le code d’extension
<.mp3> ou <.wma> (quel que soit la casse des
lettres—majuscules/minuscules).
• Cet autoradio peut afficher le nom de l’album,
l’artiste (interprète) et les balises ID3 (version
1,0, 1,1, 2,2, 2,3, ou 2,4) pour les fichiers MP3
et pour les fichiers WMA.
• Cet autoradio peut afficher uniquement les
caractères d’un octet. Les autres caractères ne
peuvent pas être affichés correctement.
• Cet autoradio peut reproduire les fichiers
MP3/WMA respectant les conditions
suivantes:
– Débit binaire: 8 kbps à 320 kbps
– Fréquence d’échantillonnage:
48 kHz, 44,1 kHz, 32 kHz (pour MPEG-1)
24 kHz, 22,05 kHz, 16 kHz (pour MPEG-2)
– Format du disque: ISO 9660 Level 1/ Level
2, Romeo, Joliet, nom de fichier long
Windows
• Le nombre maximum de caractères pour les
noms de fichier/dossier vraie selon le format
du disque utilisé (et inclus les 4 caractères de
l’extension—<.mp3> ou <.wma>).
– ISO 9660 Level 1: 12 caractères maximum
– ISO 9660 Level 2: 31 caractères maximum
– Romeo: 128 caractères maximum
– Joliet: 64 caractères maximum
– Nom long de fichier Windows: 128
caractères maximum
• Cet appareil peut reconnaître un maximum
de 512 fichiers, 200 dossiers et 8 hiérarchies.
• Cet auroradio peut reproduire les fichiers
enregistrés au mode VBR (débit binaire
variable).
Les fichiers enregistrés au mode VBR
affichent une durée écoulée différente et
ne montrent pas la durée écoulée actuelle
correcte. Et plus spécialement, après avoir
réalisé une recherche, cette différence devient
importante.
• Cet autoradio ne peut pas reproduire les
fichiers suivants:
– Fichiers MP3 codés au format MP3i et
MP3 PRO.
– Fichiers MP3 codés dans un format
inapproprié.
– Fichiers MP3 codés avec Layer 1/2.
– Fichiers WMA codés sans perte,
professionnels et formats vocaux.
– Fichiers WMA qui ne sont pas basés sur
Windows Media
– Fichiers au format WMA protégés contre la
copie avec DRM.
– Fichiers qui contiennent des données telles
que WAVE, ATRAC3, etc.
• La fonction de recherche fonctionne mais la
vitesse de recherche n’est pas constante.
Audio.
®
16
Page 35

Changement de la source
• Si vous changez la source, la lecture s’arrête
aussi (sans éjecter le disque).
La prochaine fois que vous choisissez “DISC”
comme source de lecture, la lecture du disque
reprend à partir de l’endroit où elle a été
interrompue.
Réglages généraux — PSM
• Si vous changez le réglage “AMP GAIN” de
“HIGH PWR” sur “LOW PWR” alors que le
niveau de volume est réglé au dessus de
“VOL 30”, l’autoradio change
automatiquement le volume sur “VOL 30”.
Éjection d’un disque
• Si le disque éjecté n’est pas retiré avant 15
secondes, il est réinséré automatiquement
dans la fente d’insertion pour le protéger de la
poussière. (Le disque n’est pas reproduit cette
fois).
Guide de dépannage
Ce qui apparaît être un problème n’est pas toujours sérieux. Vérifiez les points suivants avant
d’appeler un centre de service.
Symptôme Remèdes/Causes
• Aucun son n’est entendu des enceintes. • Ajustez le volume sur le niveau optimum.
• Vérifiez les cordons et les connexions.
•
Cet autoradio ne fonctionne pas du tout.
Généralités
Réinitialisez l’autoradio (voir page 2).
FRANÇAIS
• Le préréglage automatique SSM ne
fonctionne pas.
FM/AM
•
Bruit statique pendant l’écoute de la radio.
• Le disque ne peut pas être reproduit. Insérez le disque correctement.
• Le CD-R/CD-RW ne peut pas être
reproduit.
• Les plages sur les le CD-R/CD-RW ne
peuvent pas être sautées.
• Le disque ne peut pas être reproduit ni
éjecté.
• Le son du disque est parfois
Lecture de disque
interrompu.
• “NO DISC” apparaît sur l’affichage. Insérez un disque reproductible dans la fente
Mémorises les stations manuellement.
Connectez l’antenne solidement.
• Insérez un CD-R/CD-RW finalisé.
• Finalisez le CD-R/CD-RW avec l’appareil que
vous avez utilisé pour l’enregistrement.
• Déverrouillez le disque (voir page 10).
• Forcez l’éjection du disque (voir page 2).
• Arrêtez la lecture lorsque vous conduisez sur
une route accidentée.
• Changez le disque.
• Vérifiez les cordons et les connexions.
d’insertion.
À suivre...
17
Page 36

Symptôme Remèdes/Causes
• Le disque ne peut pas être reproduit. • Utilisez un disque avec des plages MP3/WMA
enregistrées dans un format compatible avec ISO
9660 Niveau 1, Niveau 2, Romeo ou Joliet.
• Ajoutez le code d’extension <.mp3> ou <.wma>
aux noms de fichier.
• Du bruit est produit. Sautez à une autre plage ou changez le disque.
(N’ajoutez pas le code d’extension <.mp3> ou
<.wma> à des plages non MP3 ou WMA).
FRANÇAIS
• Un temps d’initialisation plus long
est requis (“CHECK” continue de
clignoter sur l’affichage).
• Les pages ne sont par reproduites dans
l’ordre dans lequel vous vouliez les
reproduire.
Lecture MP3/WMA
• La durée de lecture écoulée n’est
pascorrecte.
• “NO FILES” apparaît sur l’affichage. Insérez un disque contenant des plages MP3/
• Les caractères corrects ne sont pas
affichés (ex.: nom de l’album).
• Microsoft et Windows Media est une marque déposée ou une marque de commerce de Microsoft
Corporation aux États-Unis et/ou dans les autres pays.
N’utilisez pas trop de hiérarchies et de dossiers.
L’ordre de lecture est déterminé quand les fichiers
sont enregistrés.
Cela se produit quelque fois pendant la lecture.
C’est causé par la façon don’t les plages ont été
enregistrées sur le disque.
WMA.
Cet appareil peut uniquement afficher les lettres
de l’alphabet (majuscules), les chiffres et un
nombre limité de symboles.
18
Page 37

Spécifications
SECTION DE L’AMPLIFICATEUR AUDIO
Puissance de sortie maximum:
Avant: 50 W par canal
Arrière: 50 W par canal
Puissance de sortie en mode continu (RMS):
Avant: 19 W par canal pour 4 Ω, 40 Hz à
20 000 Hz avec moins de 0,8% de
distorsion harmonique totale.
Arrière: 19 W par canal pour 4 Ω, 40 Hz à
20 000 Hz avec moins de 0,8% de
distorsion harmonique totale.
Impédance de charge:
4 Ω (4 Ω à 8 Ω admissible)
Plage de commande de tonalité:
Graves: ±10 dB à 100 Hz
Aigus: ±10 dB à 10 kHz
Réponse en fréquence: 40 Hz à 20 000 Hz
Rapport signal sur bruit: 70 dB
Niveau de sortie de ligne/Impédance:
2,5 V/20 kΩ en charge (pleine échelle)
Impédance de sortie: 1 kΩ
Autres prises:
Entrée pour la télécommande de volant
SECTION DU TUNER
Plage de fréquences:
FM: 87,5 MHz à 108,0 MHz
AM: (PO) 522 kHz à 1 620 kHz
(GO) 144 kHz à 279 kHz
[Tuner FM]
Sensibilité utile: 11,3 dBf (1,0 µV/75 Ω)
Sensibilité utile à 50 dB:
16,3 dBf (1,8 µV/75 Ω)
Sélectivité de canal alterné (400 kHz): 65 dB
Réponse en fréquence: 40 Hz à 15 000 Hz
Séparation stéréo: 30 dB
Rapport de synchronisation: 1,5 dB
[Tuner PO]
Sensibilité: 20 μV
Sélectivité: 35 dB
[Tuner GO]
Sensibilité: 50 μV
SECTION DU LECTEUR CD
Type: Lecteur de disque compact
Système de détection du signal: Capteur optique
sans contact (laser semi-conducteur)
Nombre de canaux: 2 canaux (stéréo)
Réponse en fréquence: 5 Hz à 20 000 Hz
Plage dynamique: 96 dB
Rapport signal sur bruit: 98 dB
Pleurage et scintillement:
Inférieur à la limite mesurable
Format de décodage MP3:
MPEG1/2 Audio Layer 3
Débit binaire maximum: 320 kbps
Format de décodage WMA (Windows Media
Audio):
Débit binaire maximum: 192 kbps
®
GÉNÉRALITÉS
Alimentation:
Tension de fonctionnement:
CC 14,4 V (11 V à 16 V admissibles)
Système de mise à la masse: Masse négative
Températures de fonctionnement admissibles:
0°C à +40°C
Dimensions (L × H × P):
Taille d’installation (approx.):
182 mm × 52 mm × 150 mm
Taille du panneau (approx.):
188 mm × 58 mm × 11 mm
Masse (approx.):
1,2 kg (sans les accessoires)
La conception et les spécifications sont sujettes à
changement sans notification.
FRANÇAIS
19
Page 38

Having TROUBLE with operation?
Please reset your unit
Refer to page of How to reset your unit
Vous avez des PROBLÈMES de
fonctionnement?
Réinitialisez votre appareil
Référez-vous à la page intitulée Comment réinitialiser votre appareil
EN, FR
© 2005 Victor Company of Japan, Limited
1105DTSMDTJEIN
 Loading...