

Page 1
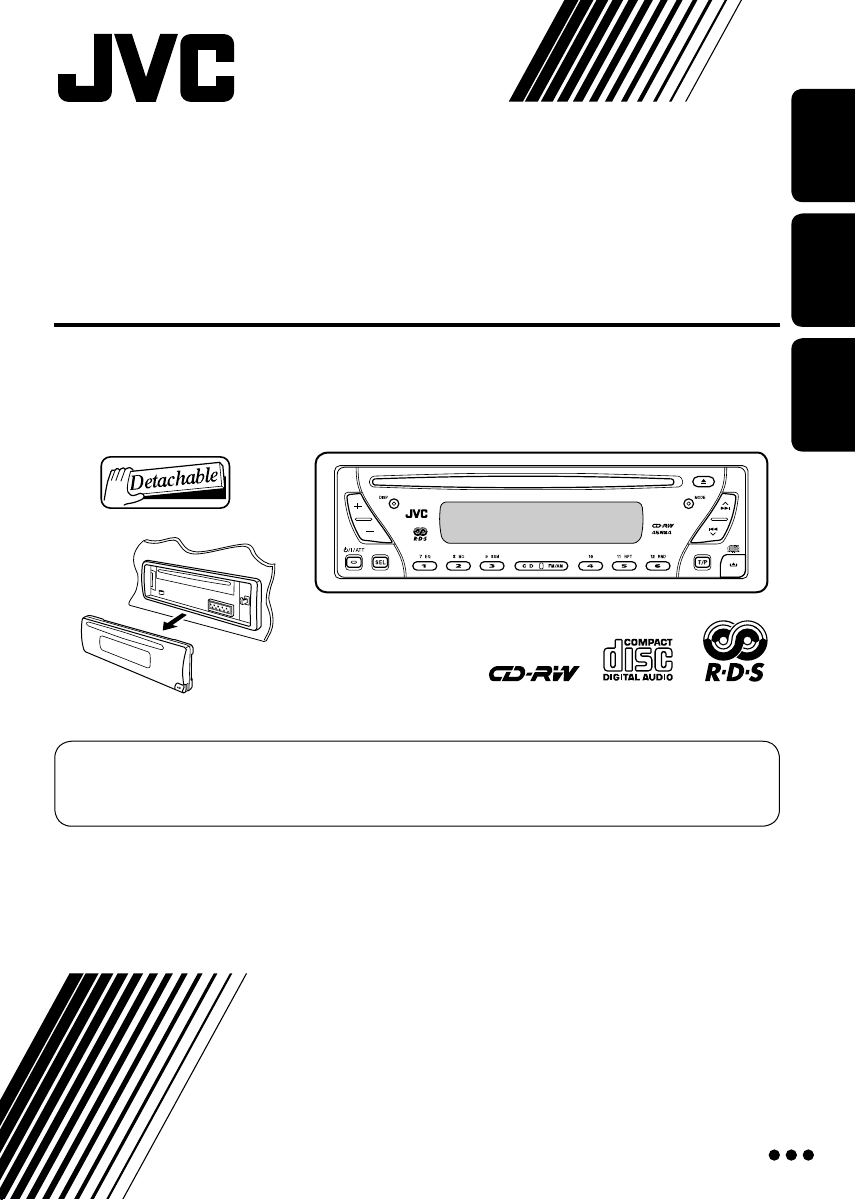
CD RECEIVER
CD-RECEIVER
РЕСИВЕР С ПРОИГРЫВАТЕЛЕМ КОМПАКТ-ДИСКОВ
KD-S1501/KD-G152/KD-G151
For canceling the display demonstration, see page 7.
Zum Abbrechen der Displaydemonstration siehe Seite 7.
Информацию об отмене демонстрации функций дисплея см. на стр. 7.
ENGLISHDEUTSCH
РУCCKИЙ
For installation and connections, refer to the separate manual.
Für den Einbau und die Anschlüsse siehe das eigenständige Handbuch.
Указания по установке и выполнению соединений приводятся в отдельной инструкции.
INSTRUCTIONS
BEDIENUNGSANLEITUNG
ИНСТРУКЦИИ ПО ЭКСПЛУАТАЦИИ
GET0287-006A
[EY]
Page 2
Thank you for purchasing a JVC product.
Please read all instructions carefully before operation, to ensure your complete understanding and to
obtain the best possible performance from the unit.
ENGLISH
IMPORTANT FOR LASER PRODUCTS
1. CLASS 1 LASER PRODUCT
2. CAUTION : Do not open the top cover. There are no user serviceable parts inside the unit; leave
all servicing to qualified service personnel.
3. CAUTION: Visible and invisible laser radiation when open and interlock failed or defeated.
Avoid direct exposure to beam.
4. REPRODUCTION OF LABEL: CAUTION LABEL, PLACED OUTSIDE THE UNIT.
Warning:
If you need to operate the receiver while
driving, be sure to look ahead carefully or
you may be involved in a traffic accident.
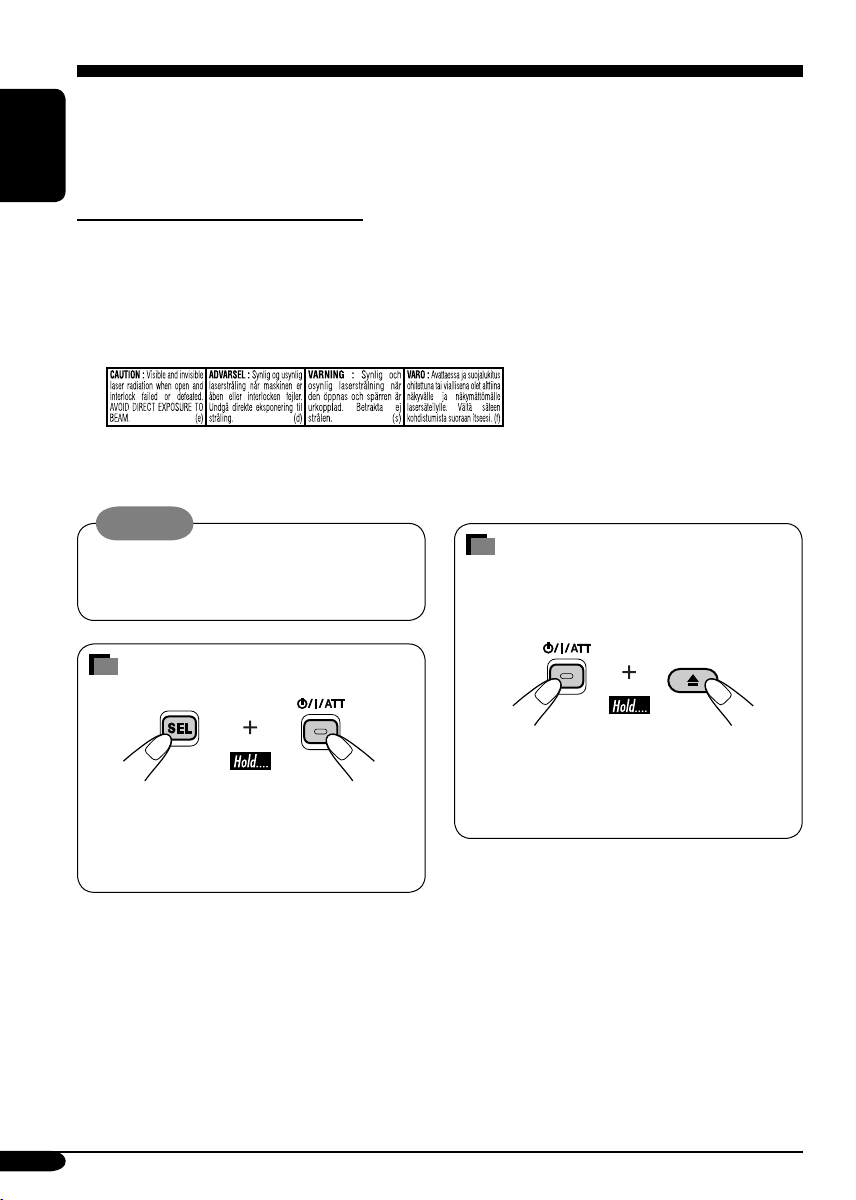
How to forcibly eject a disc
If a disc cannot be recognized by the
receiver or cannot be ejected, ejects the disc
as follows.
How to reset your unit
• If this does not work, try to reset your
receiver.
• This will reset the microcomputer. Your
preset adjustments will also be erased.
• If a disc is loaded, it will eject. Be careful
not to drop the disc.
For security reasons, a numbered ID card is provided with this receiver, and the same ID number is
imprinted on the receiver’s chassis. Keep the card in a safe place, as it will help the authorities to
identify your receiver if stolen.
2
• Be careful not to drop the disc when it
ejects.
Page 3

Contents
How to reset your unit ........................... 2
How to forcibly eject a disc ................... 2
How to read this manual ........................ 4
How to use the MODE button ............... 4
Control panel — KD-S1501/
KD-G152/KD-G151 ................... 5
Parts identification ................................. 5
Getting started ....................... 6
Basic operations .................................. 6
Canceling the display demonstrations ... 7
Setting the clock .................................... 7
Radio operations ................... 8
Listening to the radio ........................... 8
Storing stations in memory .................... 9
Listening to a preset station ................... 9
FM RDS operations ................. 10
Searching for your favorite FM RDS
programme
Storing your favorite programmes ......... 11
Using the standby receptions ................. 11
Tracking the same programme
—Network-Tracking Reception ........ 12
....................................... 10
Disc operations ...................... 13
Playing a disc ..................................... 13
Selecting the playback modes ................ 14
Sound adjustments ................ 15
Selecting preset sound modes
(C-EQ: custom equalizer) .................. 15
Adjusting the sound ............................... 16
General settings — PSM ......... 17
Basic procedure ..................................... 17
Detaching the control
panel .................................. 19
Maintenance .......................... 20
More about this receiver ........ 21
Troubleshooting ..................... 22
Specifications ......................... 23
ENGLISH
*For safety....
• Do not raise the volume level too much, as
this will block outside sounds, making driving
dangerous.
• Stop the car before performing any
complicated operations.
*Temperature inside the car....
If you have parked the car for a long time in
hot or cold weather, wait until the temperature
in the car becomes normal before operating the
unit.
3
Page 4
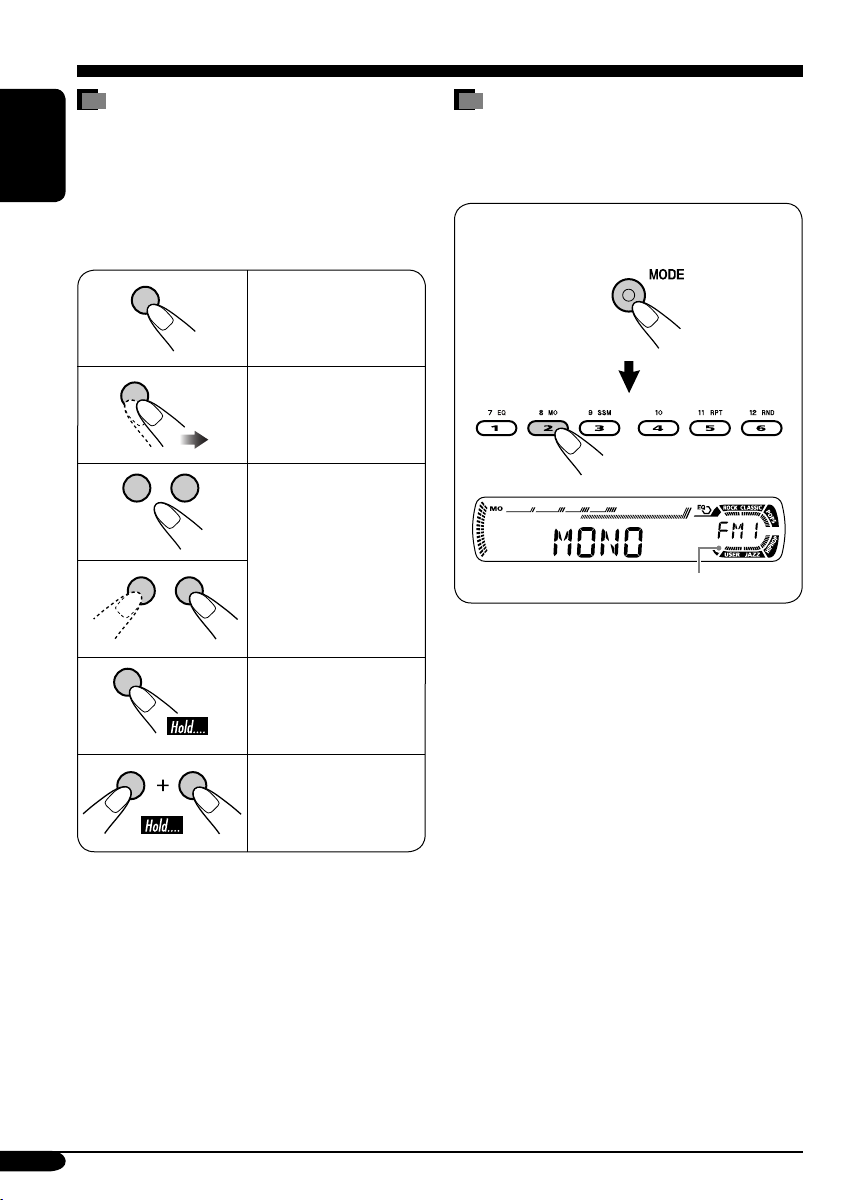
How to read this manual
The following methods are used to made the
explanations simple and easy-to-understand:
• Some related tips and notes are explained in
ENGLISH
“More about this receiver” (see page 21).
• Button operations are mainly explained with
the illustrations as follows:
Press briefly.
Press repeatedly.
Press either one.
Press and hold until
your desired response
begins.
How to use the MODE button
If you press MODE, the receiver goes into
functions mode, then the number buttons work
as different function buttons.
Ex.: When number button 2 works as
MO (monaural) button.
Time countdown indicator
To use these buttons for original functions
again after pressing MODE, wait for
5 seconds without pressing any of these buttons
until the functions mode is cleared.
• Pressing MODE again also clears the
functions mode.
Press and hold both
buttons at the same
time.
4
Page 5
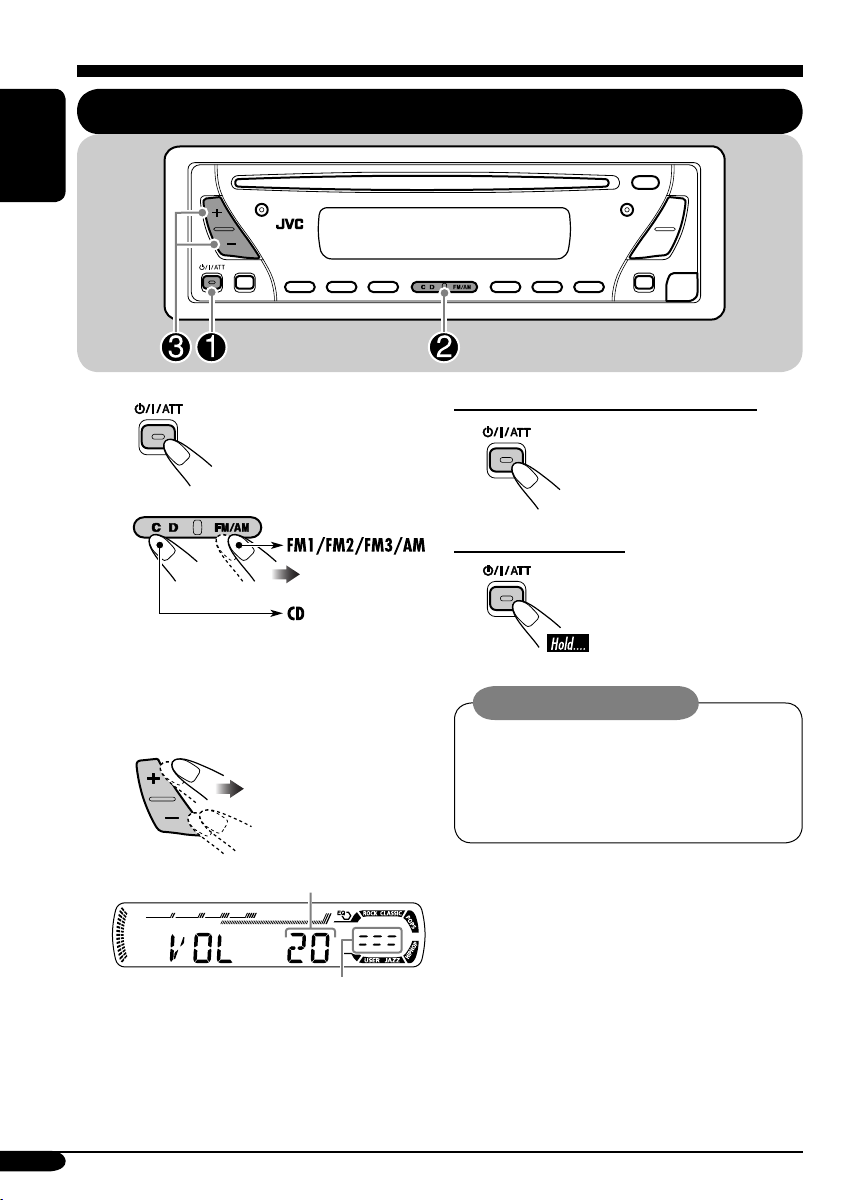
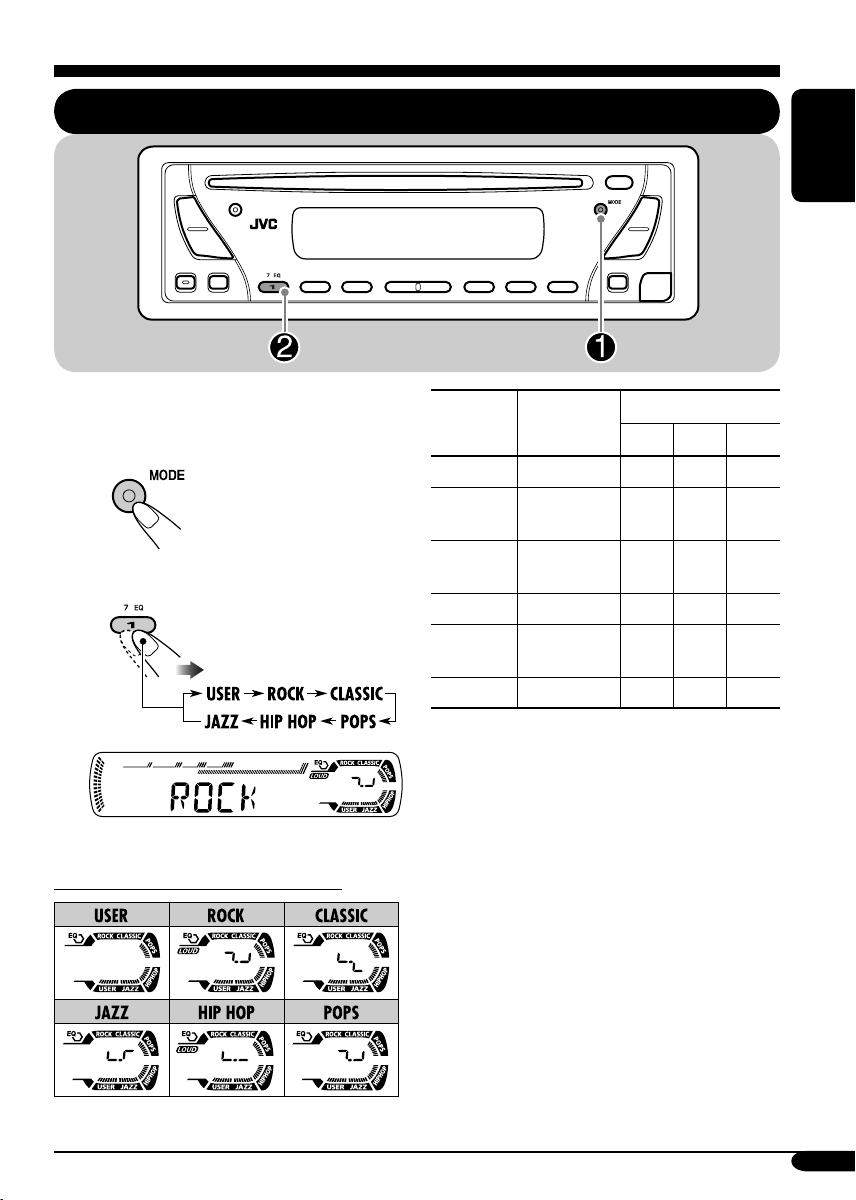
Control panel — KD-S1501/KD-G152/KD-G151
Parts identification
Display window
1 +/– buttons
2 DISP (display) button
3 Loading slot
4 Display window
5 MODE button
6 0 (eject) button
7
¢/4 buttons
8
9 SEL (select) button
p EQ (equalizer) button
q MO (monaural) button
w SSM (Strong-station Sequential Memory)
e CD button
r FM/AM button
t RPT (repeat) button
y RND (random) button
u T/P (traffic programme/programme type)
i
o Number buttons
(standby/on/attenuator) button
button
button
(control panel release) button
Display window
; Tuner reception indicators
MO (monaural), ST (stereo)
a RDS indicators
TP, PTY, AF, REG
s CD indicator
d RND
f RPT (repeat) indicator
g LOUD (loudness) indicator
h EQ (equalizer) indicator
j Sound mode (C-EQ: custom equalizer)
indicators
ROCK, CLASSIC, POPS, HIP HOP, JAZZ,
USER
•
k Main display
l Source display
Volume level indicator
(disc random) indicator
also works as the time countdown
indicator.
ENGLISH
5
Page 6
Getting started
ENGLISH
Basic operations
~
Ÿ
You cannot select “CD” as the playback
source if there is no disc in the loading
slot.
!
Volume level appears.
To drop the volume in a moment (ATT)
To restore the sound, press it
again.
To turn off the power
Caution on volume setting:
Discs produce very little noise compared
with other sources. Lower the volume
before playing a disc to avoid damaging
the speakers by the sudden increase of the
output level.
Volume level indicator
⁄ Adjust the sound as you want.
(See pages 15 and 16.)
6
Page 7
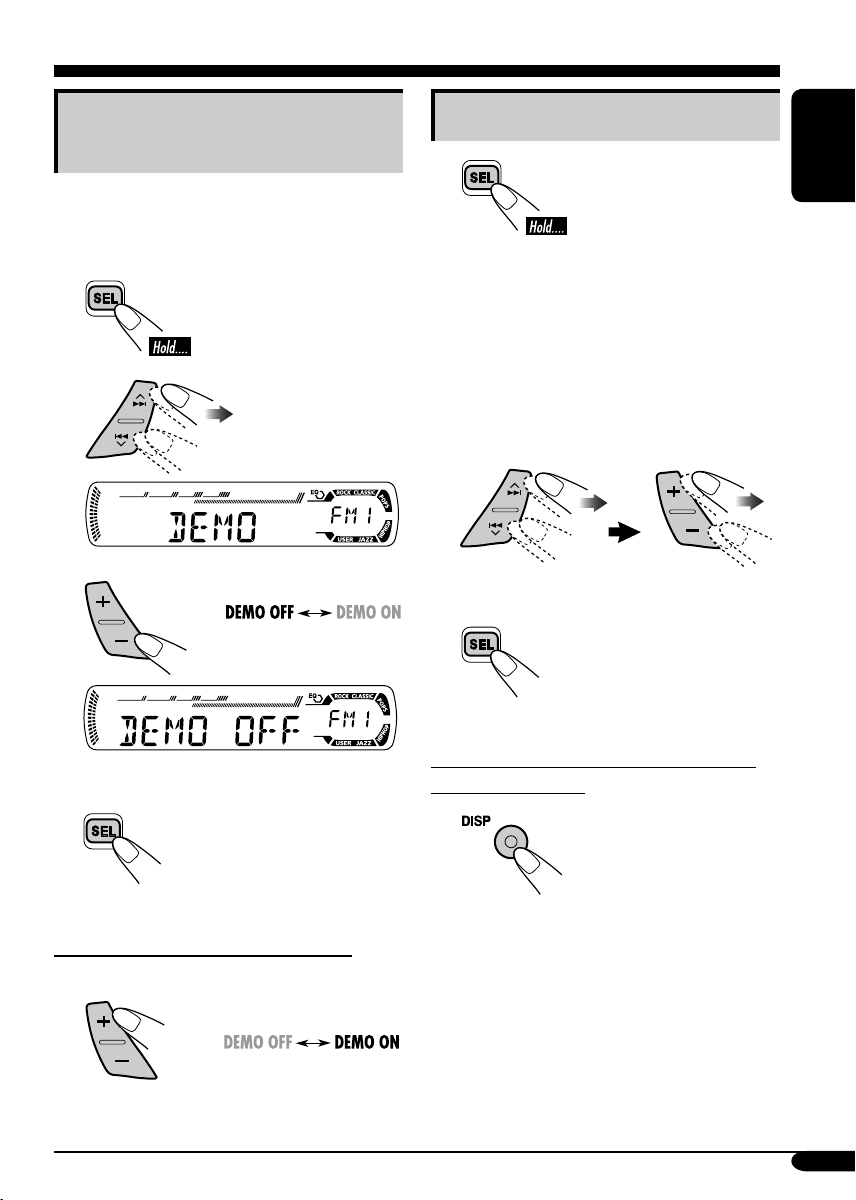
Canceling the display
demonstrations
If no operations are done for about 20 seconds,
display demonstration starts.
[Initial: DEMO ON]—see page 17.
1
2
Setting the clock
1
2
Set the hour, minute, and clock
system.
1 Select “CLOCK H” (hour), then
adjust the hour.
2 Select “CLOCK M” (minute),
then adjust the minute.
3 Select “24H/12H,” then select
“24H” (hour) or “12H” (hour).
ENGLISH
3
Finish the procedure.
4
To activate the display demonstration
In step 3 above...
3 Finish the procedure.
To check the current clock time when the
power is turned off
7
Page 8
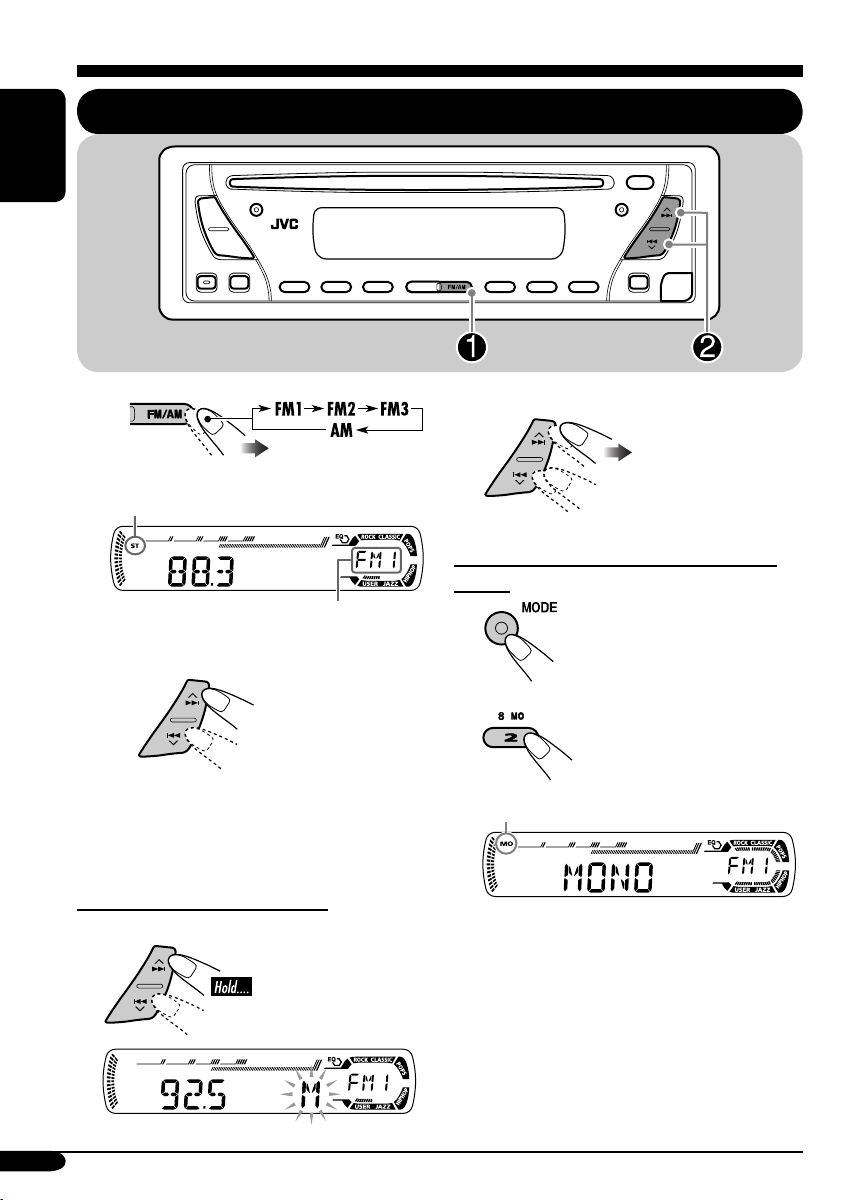
Radio operations
Listening to the radio
ENGLISH
~
Lights up when receiving an FM stereo
broadcast with sufficient signal strength.
Selected band appears.
2 Select the desired station frequencies.
When an FM stereo broadcast is hard to
receive
1
Ÿ Start searching for a station.
When a station is received, searching
stops.
To stop searching, press the same
button again.
To tune in to a station manually
In step Ÿ above...
1
8
2
Lights up when monaural mode is activated.
Reception improves, but stereo effect will
be lost.
To restore the stereo effect, repeat the same
procedure. “MONO OFF” appears and the MO
indicator goes off.
Page 9
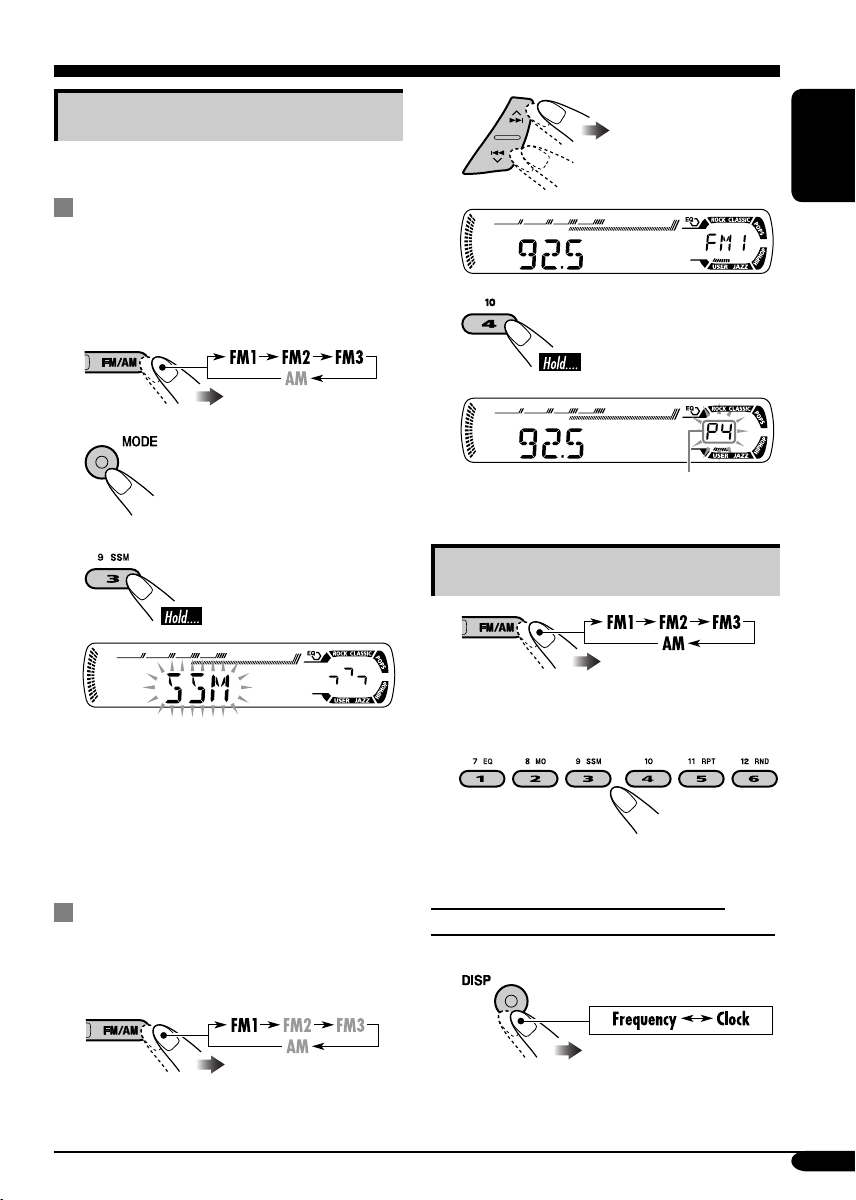
Storing stations in memory
You can preset six stations for each band.
FM station automatic presetting —
SSM (Strong-station Sequential
Memory)
Select the FM band (FM1 – FM3)
1
you want to store into.
2
2
ENGLISH
3
Preset number flashes for a while.
3
“SSM” flashes, then disappears when
automatic presetting is over.
Local FM stations with the strongest signals are
searched and stored automatically in the FM
band.
Manual presetting
Ex.: Storing FM station of 92.5 MHz into the
preset number 4 of the FM1 band.
1
Listening to a preset station
1
Select the preset station (1 – 6) you
2
want.
To check the current clock time while
listening to an FM (non-RDS) or AM station
• For FM RDS stations, see page 12.
9
Page 10
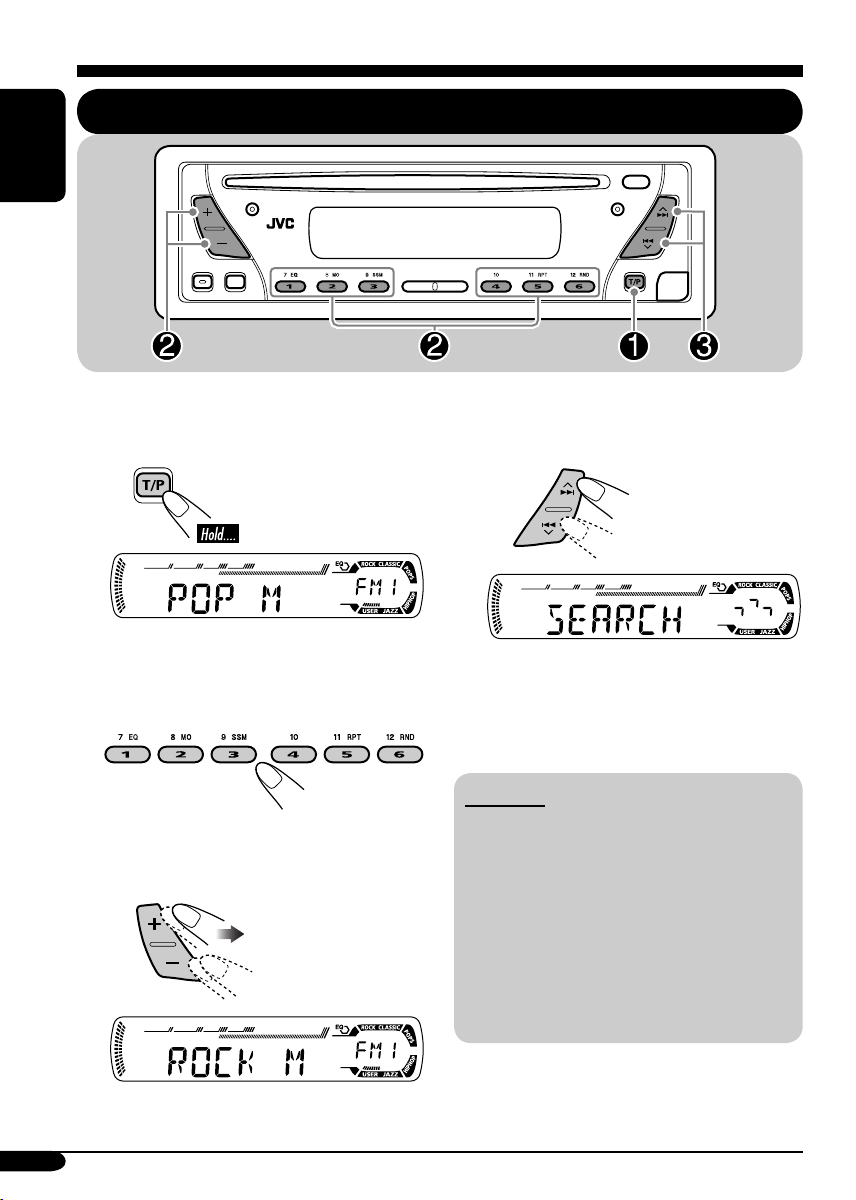
FM RDS operations
Searching for your favorite FM RDS programme
ENGLISH
You can tune in to a station broadcasting your
favorite programme by searching for a PTY code.
~
! Start searching for your favorite
programme.
The last selected PTY code appears.
Ÿ Select one of your favorite
programme type.
or
Select one of the twenty-nine PTY
codes.
Ex.: When “ROCK M” is selected
10
If there is a station broadcasting a
programme of the same PTY code as
you have selected, that station is tuned
in.
PTY codes
NEWS, AFFAIRS, INFO, SPORT,
EDUCATE, DRAMA, CULTURE,
SCIENCE, VARIED, POP M (music),
ROCK M (music), EASY M (music),
LIGHT M (music), CLASSICS, OTHER
M (music), WEATHER, FINANCE,
CHILDREN, SOCIAL, RELIGION,
PHONE IN, TRAVEL, LEISURE, JAZZ,
COUNTRY, NATION M (music), OLDIES,
FOLK M (music), DOCUMENT
Page 11
What you can do with RDS
RDS (Radio Data System) allows FM
stations to send an additional signal along
with their regular programme signals.
By receiving the RDS data, this receiver can
do the following:
•
Programme Type (PTY) Search (see page 10)
• Standby Reception of Traffic
Announcement —TA (see the following) or
your favorite programme (PTY) (see pages
12 and 18)
•
Tracing the same programme automatically
—Network-Tracking Reception (see page 12)
• Programme Search (see page 18)
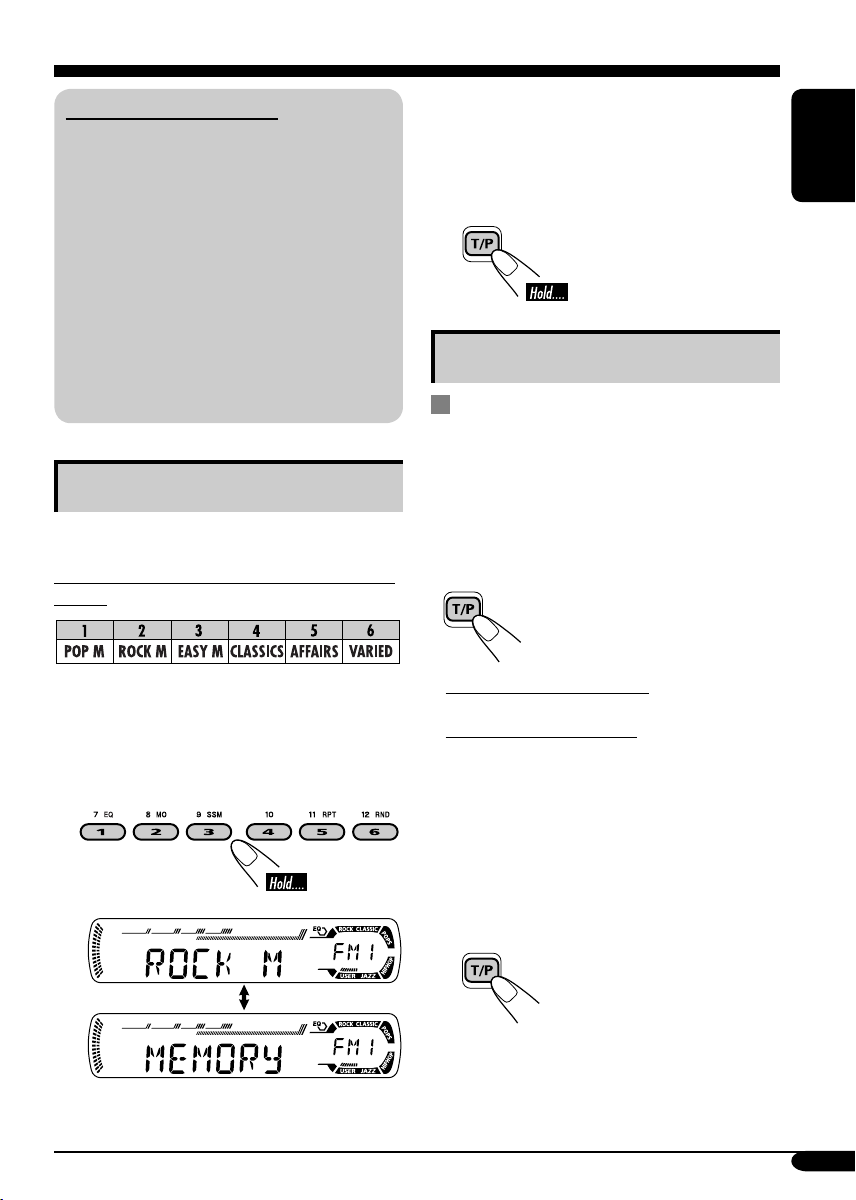
Storing your favorite programmes
You can store six favorite programme types.
3 Repeat steps 1 and 2 to store
other PTY codes into other preset
numbers.
ENGLISH
4 Finish the procedure.
Using the standby receptions
TA Standby Reception
TA Standby Reception allows the receiver to
switch temporarily to Traffic Announcement
(TA) from any source other than AM.
The volume changes to the preset TA volume
level (see page 18).
Preset programme types in the number buttons
(1 – 6):
1 Perform steps ~ and Ÿ on page 10 to
select a PTY code.
2 Select the preset number (1 – 6) you
want to store into.
Ex.: When “ROCK M” is selected
To activate TA Standby Reception
The TP indicator either
lights up or flashes.
• If the TP indicator lights up, TA Standby
Reception is activated.
• If the TP indicator flashes, TA Standby
Reception is not yet activated. (This occurs
when you are listening to an FM station
without the RDS signals required for TA
Standby Reception.)
To activate TA Standby Reception, tune in to
another station providing these signals. The
TP indicator will stop flashing and remain lit.
To deactivate the TA Standby Reception
The TP indicator goes off.
11
Page 12

PTY Standby Reception
PTY Standby Reception allows the receiver
to switch temporarily to your favorite PTY
programme from any source other than AM.
ENGLISH
To activate and select your favorite PTY
code for PTY Standby Reception, see page
18.
The PTY indicator either lights up or flashes.
• If the PTY indicator lights up, PTY Standby
Reception is activated.
• If the PTY indicator flashes, PTY Standby
Reception is not yet activated.
To activate PTY Standby Reception, tune in
to another station providing these signals. The
PTY indicator will stop flashing and remain
lit.
To deactivate the PTY Standby Reception,
select “OFF” for the PTY code (see page 18).
The PTY indicator goes off.
Tracking the same programme—
Network-Tracking Reception
When driving in an area where FM reception
is not sufficient enough, this receiver
automatically tunes in to another FM RDS
station of the same network, possibly
broadcasting the same programme with stronger
signals (see the illustration below).
When shipped from the factory, NetworkTracking Reception is activated.
To change the Network-Tracking Reception
setting, see page 18.
Programme A broadcasting on different
frequency areas (01 – 05)
12
To check the current clock time while
listening to an FM RDS station
Page 13
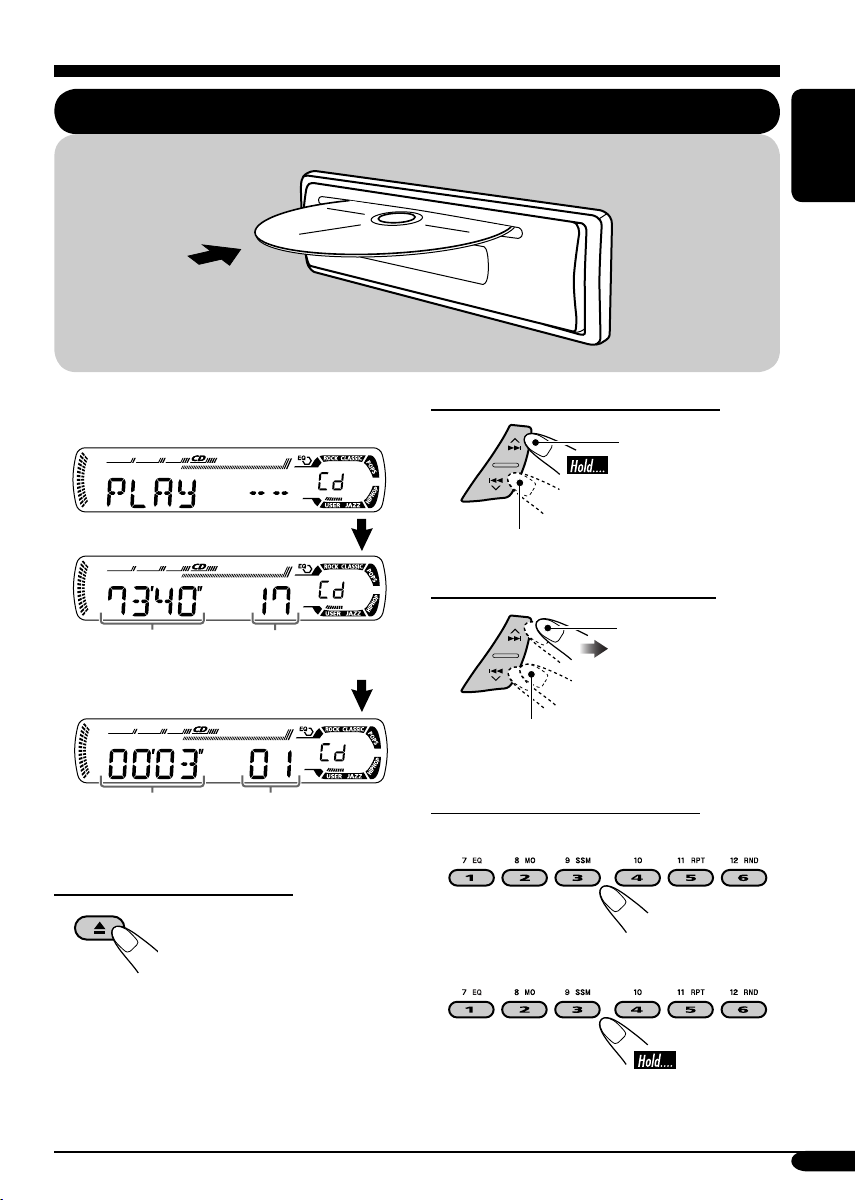
Disc operations
Playing a disc
ENGLISH
All tracks will be played repeatedly until you
change the source or eject the disc.
Total playing time of
the inserted disc
Elapsed playing
time
Total track number
of the inserted disc
Current track
number
To stop play and eject the disc
To fast-forward or reverse the track
Fast-forwards.
Reverses.
To go to the next or previous tracks
To the following
tracks.
To the beginning of the current track, then
the previous tracks.
To go to a particular track directly
To select a number from 01 – 06:
To select a number from 07 – 12:
13
Page 14
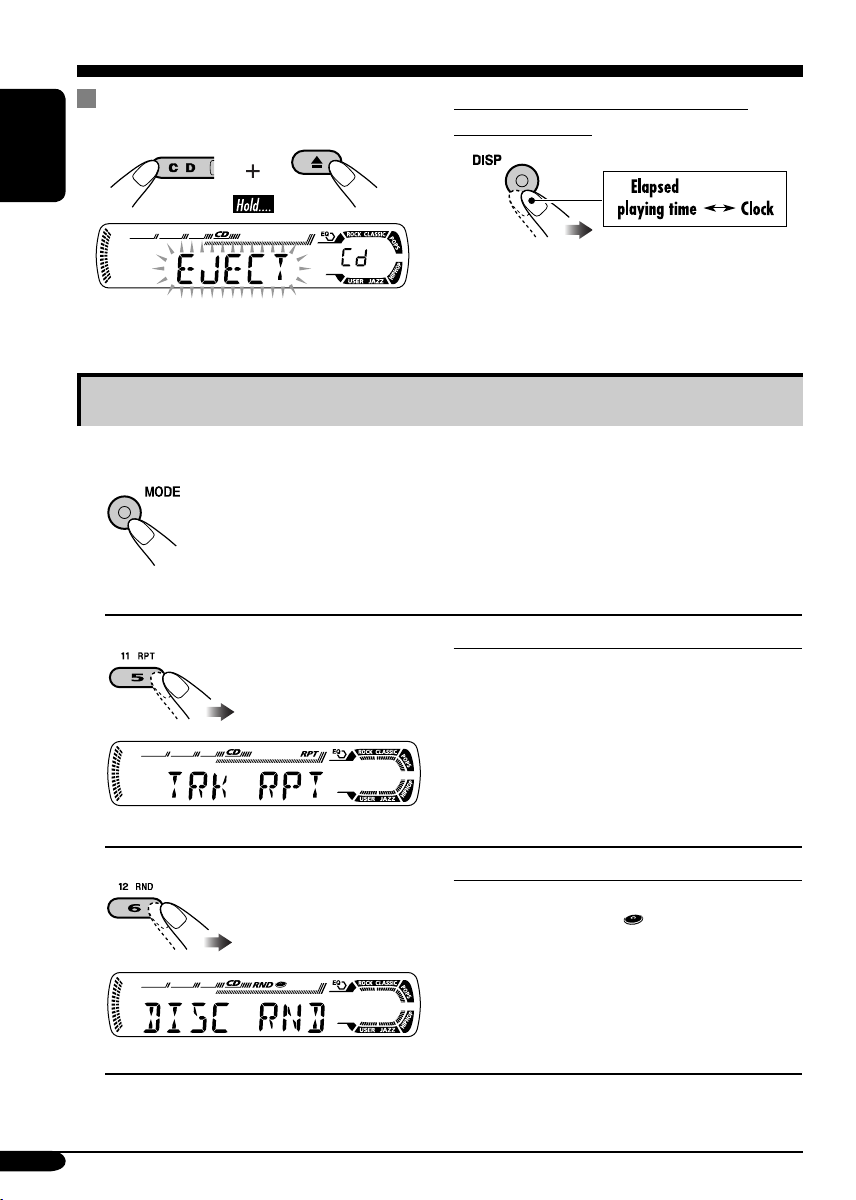
Prohibiting disc ejection
You can lock a disc in the loading slot.
To check the current clock time while
listening to a disc
ENGLISH
To cancel the prohibition, repeat the same
procedure.
Selecting the playback modes
You can use only one of the following playback modes at a time.
1
2 Select your desired playback mode.
14
Repeat play
Ex.: When “TRK RPT” is selected
Random play
Ex.: When “DISC RND” is selected
Mode Plays repeatedly
TRK RPT: The current track.
• RPT lights up.
RPT OFF: Cancels.
Mode Plays at random
DISC RND: All tracks of the current disc.
• RND
RND OFF: Cancels.
lights up.
Page 15
Sound adjustments
Selecting preset sound modes (C-EQ: custom equalizer)
ENGLISH
You can select a preset sound mode suitable to
the music genre.
~
Ÿ
Ex.: When “ROCK” is selected
Indication pattern for each sound mode:
Indication For:
USER (Flat sound) 00 00 OFF
ROCK Rock or
disco music
CLASSIC Classical
music
POPS Light music +04 +01 OFF
HIP HOP Funk or rap
music
JAZZ Jazz music +02 +03 OFF
1
*
BAS: Bass
2
*
TRE: Treble
3
*
LOUD: Loudness
1
TRE
*
2
LOUD
*
BAS
+03 +01 ON
+01 –02 OFF
+02 00 ON
Preset values
3
*
15
Page 16
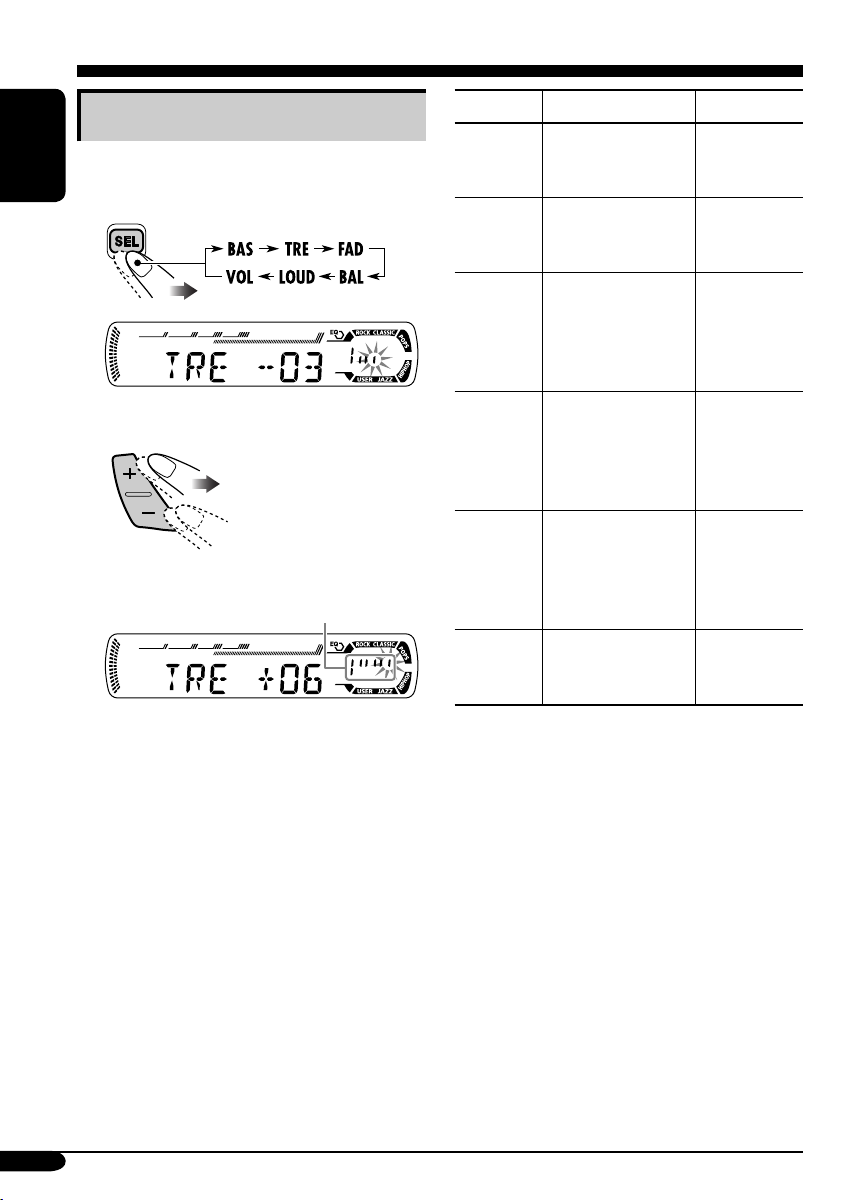
Adjusting the sound
You can adjust the sound characteristics to your
preference.
ENGLISH
1
Ex.: When “TRE” is selected
2
Indication pattern changes as
you adjust the level.
Indication To do: Range
BAS*1
(bass)
TRE*
(treble)
FAD*
(fader)
BAL
(balance)
LOUD*
(loudness)
VOL*
(volume)
Adjust the bass. –06 (min.)
1
Adjust the treble. –06 (min.)
2
Adjust the front
and rear speaker
balance.
Adjust the left
and right speaker
balance.
1
Boost low and
high frequencies
to produce a wellbalanced sound at
low volume level.
3
Adjust the volume. 00 (min.) to
to
+06 (max.)
to
+06 (max.)
R06 (Rear
only)
to
F06 (Front
only)
L06 (Left
only)
to
R06 (Right
only)
LOUD ON
LOUD OFF
30 or 50
(max.)*
J
4
16
*1 When you adjust the bass, treble, or
loudness, the adjustment you have made is
stored for the currently selected sound mode
(C-EQ) including “USER.”
2
*
If you are using a two-speaker system, set
the fader level to “00.”
3
*
Normally the +/– buttons work as the volume
control. So you do not have to select “VOL”
to adjust the volume level.
4
*
Depending on the amplifier gain control
setting. (See page 18 for details.)
Page 17
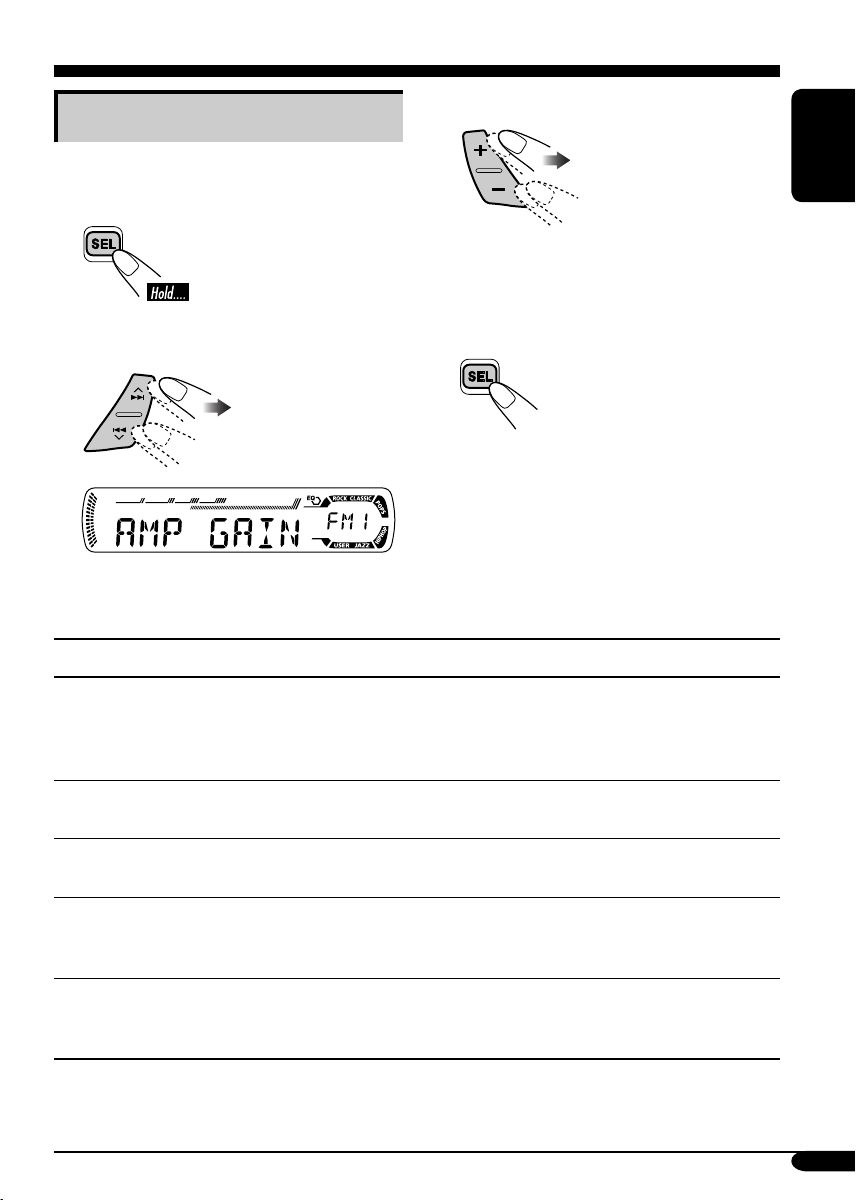
General settings — PSM
Basic procedure
3 Adjust the PSM item selected.
You can change PSM (Preferred Setting Mode)
items listed on the table that follows.
1
4 Repeat steps 2 and 3 to adjust the
other PSM items if necessary.
2
Select a PSM item.
Ex.: When you select “AMP GAIN”
Indications Selectable settings, [reference page]
5 Finish the procedure.
ENGLISH
DEMO
Display demonstration
CLOCK H
Hour adjustment
CLOCK M
Minute adjustment
24H/12H
24 hours or 12 hours time
display
CLK ADJ
Automatic clock setting
DEMO ON: [Initial]; Display demonstration will be activated
automatically if no operation is done for about
20 seconds, [7].
DEMO OFF: Cancels.
0 – 23 (1 – 12), [7]
[Initial: 0 (0:00)]
00 – 59, [7]
[Initial: 00 (0:00)]
12H O 24H, [7]
[Initial: 24H]
AUTO: [Initial]; The built-in clock is automatically adjusted
using the CT (clock time) data in the RDS signal.
OFF: Cancels.
To be continued....
17
Page 18

Indications Selectable settings, [reference page]
AF-REG
Alternative frequency/
ENGLISH
regionalization reception
PTY-STBY
PTY standby
TA VOL
Traffic announcement
volume
P-SEARCH
Programme search
ILL SW*
2
Illumination switch
2
TEL*
Telephone muting
When the received signals from the current station become weak....
AF: [Initial]; Switches to another station (the programme
may differ from the one currently received), [12].
• The AF indicator lights up.
AF REG: Switches to another station broadcasting the same
programme.
• The AF and REG indicators light up.
OFF: Cancels.
Activates PTY Standby Reception with one of the 29 PTY codes,
[12].
OFF [Initial]
[Initial: VOL 20]; VOL 00 – VOL 30 or 50*
=
PTY codes, [10] = (back to the beginning)
1
, [11]
ON: Using the AF data, the receiver tunes in to another
frequency broadcasting the same programme as the
original preset RDS station is if the preset station
signals are not sufficient.
OFF: [Initial]; Cancels.
You can select the button illumination according to your
preference.
RED O GREEN
[Initial: RED]
MUTING 1/MUTING 2: Select either one which mutes the
sounds while using the cellular phone.
OFF: [Initial]; Cancels.
AMP GAIN
Amplifier gain control
1
*
Depends on the amplifier gain control.
2
*
Only for KD-S1501.
18
You can change the maximum volume level of this receiver.
LOW PWR: VOL 00 – VOL 30 (Select this if the maximum
power of the speaker is less than 45 W to prevent
them from damaging the speaker.)
HIGH PWR: [Initial]; VOL 00 – VOL 50
Page 19
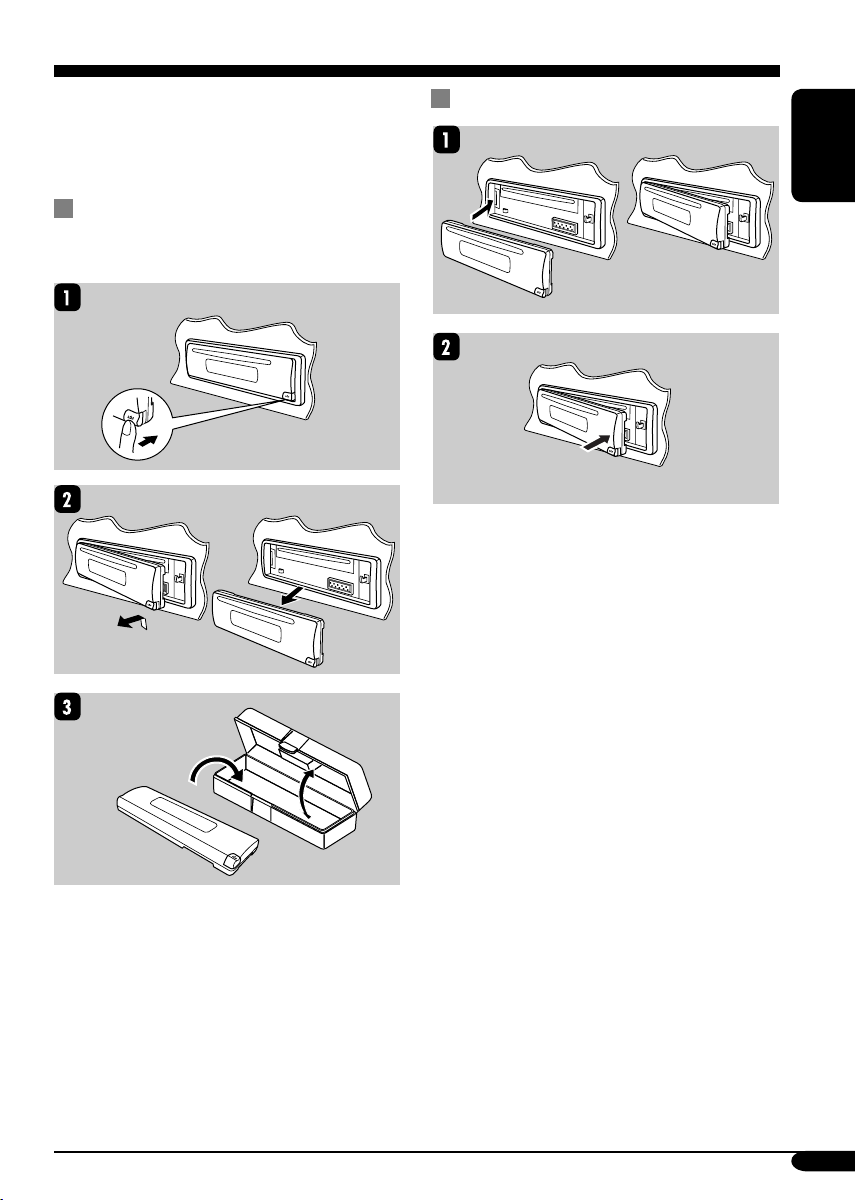
Detaching the control panel
When detaching or attaching the control panel,
be careful not to damage the connectors on
the back of the control panel and on the panel
holder.
Detaching the control panel
Before detaching the control panel, be sure to
turn off the power.
Attaching the control panel
ENGLISH
19
Page 20

Maintenance
How to clean the connectors
Frequent detachment will deteriorate the
connectors.
To minimize this possibility, periodically wipe
ENGLISH
the connectors with a cotton swab or cloth
moistened with alcohol, being careful not to
damage the connectors.
Connector
Moisture condensation
Moisture may condense on the lens inside the
CD player in the following cases:
• After starting the heater in the car.
• If it becomes very humid inside the car.
Should this occur, the CD player may
malfunction. In this case, eject the disc and
leave the receiver turned on for a few hours
until the moisture evaporates.
To keep discs clean
A dirty disc may not play correctly.
If a disc does become dirty, wipe
it with a soft cloth in a straight line
from center to edge.
• Do not use any solvent (for
example, conventional record cleaner, spray,
thinner, benzine, etc.) to clean discs.
To play new discs
New discs may have some rough
spots around the inner and outer
edges. If such a disc is used, this
receiver may reject the disc.
To remove these rough spots, rub the edges
with a pencil or ball-point pen, etc.
How to handle discs
When removing a disc from
its case, press down the center
holder of the case and lift the
disc out, holding it by the
edges.
• Always hold the disc by the edges. Do not
touch its recording surface.
When storing a disc into its case, gently insert
the disc around the center holder (with the
printed surface facing up).
• Make sure to store discs into the cases after
use.
Do not use the following discs:
Warped
disc
20
Center holder
Sticker
Sticker
residue
Disc
Stick-on
label
Page 21

More about this receiver
Basic operations
Turning off the power
• If you turn off the power while listening to a
disc, disc play will start from where playback
has been stopped previously, next time you
turn on the power.
Tuner operations
Storing stations in memory
• During SSM search...
– All previously stored stations are erased and
stations are stored newly.
– Received stations are preset in No. 1 (lowest
frequency) to No. 6 (highest frequency).
– When SSM is over, the station stored in
No. 1 will be automatically tuned in.
• When storing a station manually, a previously
preset station is erased when a new station is
stored in the same preset number.
FM RDS operations
• Network-Tracking Reception requires two
types of RDS signals—PI (Programme
Identification) and AF (Alternative
Frequency) to work correctly. Without
receiving these data correctly, NetworkTracking Reception will not operate.
• If a Traffic Announcement is received, the
volume level (TA Volume) automatically
changes to the preset level.
Disc operations
General
• This receiver has been designed to reproduce
CDs, and CD-Rs (Recordable)/CD-RWs
(Rewritable) in audio CD (CD-DA) format.
• When a disc has been loaded, selecting “CD”
for the playback source starts disc play.
Inserting a disc
• When a disc is inserted upside down, the disc
automatically ejects.
• Do not insert 8 cm discs (single CD) and
unusual shape discs (heart, flower, etc.) into
the loading slot.
Playing a CD-R or CD-RW
• Use only “finalized” CD-Rs or CD-RWs.
• This receiver can play back multi-session
discs; however, unclosed sessions will be
skipped while playing.
• Some CD-Rs or CD-RWs may not play
back on this receiver because of their disc
characteristics, and for the following causes:
– Discs are dirty or scratched.
– Moisture condensation occurs on the lens
inside the receiver.
– The pickup lens inside the receiver is dirty.
– CD-R or CD-RW on which the files are
written with “Packet Write” method.
– There are improper recording conditions
(missing data, etc.) or media conditions
(stain, scratch, warp, etc.).
• CD-RWs may require a longer readout time
since the reflectance of CD-RWs is lower
than that of regular CDs.
• Do not use the following CD-Rs or CD-RWs:
– Discs with stickers, labels, or protective seal
stuck to the surface.
– Discs on which labels can be directly
printed by an ink jet printer.
Using these discs under high temperatures or
high humidities may cause malfunctions or
damages to discs.
Changing the source
• If you change the source, playback also stops
(without ejecting the disc).
Next time you select “CD” for the playback
source, disc play starts from where it has been
stopped previously.
Ejecting a disc
• If the ejected disc is not removed within
15 seconds, the disc is automatically inserted
again into the loading slot to prevent it from
dust. (Disc will not play this time.)
General settings—PSM
• If you change the “AMP GAIN” setting from
“HIGH PWR” to “LOW PWR” while the
volume level is set higher than “VOL 30,” the
receiver automatically changes the volume
level to “VOL 30.”
ENGLISH
21
Page 22

Troubleshooting
What appears to be trouble is not always serious. Check the following points before calling a service
center.
ENGLISH
• Sound cannot be heard
General
• This receiver does not
• SSM automatic presetting
• Static noise while listening
FM/AM
• Disc automatically ejects. Disc is inserted upside
• CD-R/CD-RW cannot be
• Tracks on the CD-R/
• Disc can be neither played
Symptoms Causes Remedies
from the speakers.
work at all.
does not work.
to the radio.
played back.
CD-RW cannot be
skipped.
back nor ejected.
The volume level is set to
the minimum level.
Connections are incorrect. Check the cords and
The built-in microcomputer
may have functioned
incorrectly due to noise, etc.
Signals are too weak. Store stations manually.
The aerial is not connected
firmly.
down.
CD-R/CD-RW is not
finalized.
Disc is locked. Unlock the disc (see page
Adjust it to the optimum
level.
connections.
Reset the receiver (see page
2).
Connect the aerial firmly.
Insert the disc correctly.
• Insert a finalized CD-R/
CD-RW.
• Finalize the CD-R/
CD-RW with the
component which you
used for recording.
14).
22
Disc playback
• Disc sound is sometimes
interrupted.
• “NO DISC” appears on
the display.
The CD player may have
functioned incorrectly.
You are driving on rough
roads.
Disc is scratched. Change the disc.
Connections are incorrect. Check the cords and
No disc is in the loading
slot.
Disc is inserted incorrectly. Insert the disc correctly.
Eject the disc forcibly (see
page 2).
Stop playback while driving
on rough roads.
connections.
Insert a disc into the loading
slot.
Page 23

Specifications
AUDIO AMPLIFIER SECTION
Maximum Power Output:
Front: 45 W per channel
Rear: 45 W per channel
Continuous Power Output (RMS):
Front: 17 W per channel into 4 Ω, 40 Hz
to 20 000 Hz at no more than 0.8%
total harmonic distortion.
Rear: 17 W per channel into 4 Ω, 40 Hz
to 20 000 Hz at no more than 0.8%
total harmonic distortion.
Load Impedance: 4 Ω (4 Ω to 8 Ω allowance)
Tone Control Range:
Bass: ±10 dB at 100 Hz
Treble: ±10 dB at 10 kHz
Frequency Response: 40 Hz to 20 000 Hz
Signal-to-Noise Ratio: 70 dB
Line-Out Level/Impedance:
2.0 V/20 kΩ load (full scale)
Output Impedance: 1 kΩ
TUNER SECTION
Frequency Range:
FM: 87.5 MHz to 108.0 MHz
AM: (MW) 522 kHz to 1 620 kHz
(LW) 144 kHz to 279 kHz
CD PLAYER SECTION
Type: Compact disc player
Signal Detection System: Non-contact optical
pickup (semiconductor laser)
Number of channels: 2 channels (stereo)
Frequency Response: 5 Hz to 20 000 Hz
Dynamic Range: 96 dB
Signal-to-Noise Ratio: 98 dB
Wow and Flutter: Less than measurable limit
GENERAL
Power Requirement:
Operating Voltage:
DC 14.4 V (11 V to 16 V allowance)
Grounding System: Negative ground
Allowable Operating Temperature:
0°C to +40°C
Dimensions (W × H × D):
Installation Size (approx.):
182 mm × 52 mm × 150 mm
Panel Size (approx.):
188 mm × 58 mm × 11 mm
Mass (approx.):
1.3 kg (excluding accessories)
ENGLISH
[FM Tuner]
Usable Sensitivity: 11.3 dBf (1.0 µV/75 Ω)
50 dB Quieting Sensitivity:
16.3 dBf (1.8 µV/75 Ω)
Alternate Channel Selectivity (400 kHz): 65 dB
Frequency Response: 40 Hz to 15 000 Hz
Stereo Separation: 30 dB
Capture Ratio: 1.5 dB
[MW Tuner]
Sensitivity: 20 µV
Selectivity: 35 dB
[LW Tuner]
Sensitivity: 50 µV
Design and specifications are subject to change
without notice.
23
Page 24

Wir danken Ihnen für den Kauf eines JVC Produkts.
Bitte lesen Sie die Anleitung vollständig durch, bevor Sie das Gerät in Betrieb nehmen, um
sicherzustellen, daß Sie alles vollständig verstehen und die bestmögliche Leistung des Geräts
erhalten.
WICHTIG FÜR LASER-PRODUKTE
1. LASER-PRODUKT DER KLASSE 1
2. ACHTUNG: Die obere Abdeckung nicht öffnen. Das Gerät enthält keine Teile, die vom
Benutzer gewartet werden können. Wartungen nur von qualifiziertem Fachpersonal durchführen
lassen.
DEUTSCH
3. ACHTUNG: Sichtbare und unsichtbare Laserstrahlung bei offenem Gerät und Defekt oder
Umgehen der Verriegelung. Setzen Sie sich dem Strahl nicht direkt aus.
4. ANBRINGEN DES ETIKETTS: WARNHINWEIS-ETIKETT, AUSSEN AM GERÄT
ANGEBRACHT.
Warnung:
Wenn Sie den Receiver beim Fahren
bedienen müssen, dürfen Sie nicht den Blick
von der Straße nehmen, da sonst die Gefahr
von Verkehrsunfällen besteht.
Zwangsweises Ausschieben
einer Disk
Wenn eine Disk vom Receiver nicht erkannt
wird oder nicht ausgeschoben kann, können
Sie zwangsweisen Ausschub wie folgt
ausführen.
Zurücksetzen des Geräts
• Wenn das nicht funktioniert, führen Sie
• Dadurch wird der Mikrocomputer
zurückgesetzt. Ihre vorgegebenen
Einstellungen werden ebenfalls gelöscht.
• Wenn eine Disk eingelegt ist, wird sie
ausgeschoben. Achten Sie darauf, die Disk
nicht fallenzulassen.
Aus Sicherheitsgründen wird eine nummerierte ID-Karte mit diesem Receiver mitgeliefert, und die
gleiche ID-Nummer ist auf dem Chassis des Receivers aufgedruckt. Die Karte muss an sicherer
Stelle aufbewahrt werden, da sie den Behörden bei der Identifikation des Receivers im Falle eines
Diebstahls helfen kann.
2
einen Reset am Receiver aus.
• Achten Sie darauf, die ausgeschobene Disk
nicht fallen zu lassen.
Page 25

Inhalt
Zurücksetzen des Geräts ........................ 2
Zwangsweises Ausschieben einer Disk
Wie Sie diese Anleitung lesen ............... 4
Wie Sie die MODE-Taste verwenden ... 4
... 2
Bedienfeld — KD-S1501/
KD-G152/KD-G151 ................... 5
Beschreibung der Teile .......................... 5
Erste Schritte .......................... 6
Grundlegende Bedienung ...................... 6
Abbrechen der Display-
Demonstrationen ................................ 7
Einstellung der Uhr ................................ 7
Bedienung des Tuners ............ 8
Rundfunkempfang ............................... 8
Speichern von Sendern .......................... 9
Hören eines Festsenders ........................ 9
UKW-RDS-Funktionen ............. 10
Suche nach bevorzugten UKW-RDS-
Sendungen ....................................... 10
Speichern Ihrer Lieblingsprogramme
Verwenden des Standbyempfangs ......... 11
Verfolgen des gleichen Programms
—
Network-Tracking-Empfang
....... 11
........... 12
Bedienung der Disk ................ 13
Wiedergabe einer Disk ........................ 13
Auswählen von Wiedergabemodi .......... 14
Klangeinstellungen ................ 15
Wählen der vorgegebenen Klangmodi
(C-EQ: Spezieller Equalizer) .............. 15
Einstellen des Klangs ............................. 16
Allgemeine Einstellungen
— PSM ................................. 17
Grundlegendes Verfahren ...................... 17
Abnehmen des Bedienfelds .... 19
Wartung ................................ 20
Weitere Informationen zu
Ihrem Receiver .................... 21
Störungssuche ........................ 22
Technische Daten ................... 23
DEUTSCH
*Für die Sicherheit....
• Die Lautstärke nicht zu laut stellen, da
dadurch Außengeräusche überdeckt und das
Autofahren gefährlich wird.
• Das Auto vor dem Durchführen von
komplizierten Bedienschritten anhalten.
*Temperatur im Auto....
Wenn Sie das Auto für lange Zeit in heißem
oder kaltem Wetter parken, bitte warten, bis
sich die Temperatur im Auto sich normalisiert
hat, bevor Sie das Gerät einschalten.
3
Page 26

Wie Sie diese Anleitung lesen
Die folgenden Methoden werden eingesetzt, um
die Erklärungen einfach und leichtverständlich
zu gestalten:
• Einige zugehörige Tipps und Hinweise
werden unter „Weitere Informationen zu
Ihrem Receiver“ gegeben (siehe Seite 21).
• Tastenfunktionen werden im Wesentlichen
mit den folgenden Abbildungen erläutert:
DEUTSCH
Kurz drücken.
Wiederholt drücken.
Eine davon drücken.
Gedrückt halten,
bis die gewünschte
Reaktion beginnt.
Halten Sie die beide
Tasten gleichzeitig
gedrückt.
Wie Sie die MODE-Taste
verwenden
Wenn Sie MODE drücken, schaltet
der Receiver auf Funktion-Modus, und
die Zifferntasten arbeiten als andere
Funktionstasten.
Beisp.: Wenn die Zifferntaste 2 als
MO (Mono)-Taste fungiert.
Zeit-Countdown-Anzeige
Um diese Tasten wieder für die
ursprünglichen Funktionen zu verwenden,
nachdem MODE gedrückt wurde, warten
Sie 5 Sekunden, ohne eine dieser Tasten zu
drücken, bis der Funktion-Modus wieder
aufgehoben ist.
• Durch erneutes Drücken von MODE wird der
Funktion-Modus ebenfalls aufgehoben.
4
Page 27

Bedienfeld — KD-S1501/KD-G152/KD-G151
Beschreibung der Teile
Displayfenster
DEUTSCH
1 +/– -Tasten
2 DISP (Display)-Taste
3 Ladeschlitz
4 Displayfenster
5 MODE-Taste
6 0 (Auswurf)-Taste
7
¢/4 -Tasten
8 (Standby/Ein/Dämpfung)-Taste
9 SEL (Wählen)-Taste
p EQ (Equalizer)-Taste
q MO (Mono)-Taste
w SSM (Sequentieller Speicher für starke
Sender)-Taste
e CD-Taste
r FM/AM-Taste
t RPT (Wiederholung)-Taste
y RND (Zufall)-Taste
u T/P (Verkehrsprogramm/Programmtyp)
-Taste
i
(Bedienfeld-Freigabe)-Taste
o Zifferntasten
Displayfenster
; Tuner-Empfangsanzeigen
MO (Mono), ST (Stereo)
a RDS-Anzeigen
TP, PTY, AF, REG
s CD-Anzeige
d RND
f RPT (Wiederholung)-Anzeige
g LOUD (Loudness)-Anzeige
h EQ (Equalizer)-Anzeige
j Sound-Modus (C-EQ: Spezieller
Equalizer)-Anzeigen
ROCK, CLASSIC, POPS, HIP HOP, JAZZ,
USER
•
k Hauptdisplay
l Quellenanzeige
Lautstärkepegelanzeige
(Disk-Zufall)-Anzeige
fungiert auch als Zeit-Countdown-
Anzeige.
5
Page 28

Erste Schritte
DEUTSCH
Grundlegende Bedienung
~
Ÿ
Sie können nicht „CD“ als
Wiedergabequelle wählen, wenn keine
Disk im Ladeschlitz ist.
!
Hier erscheint der Lautstärkepegel.
Lautstärkepegelanzeige
Zum abrupten Senken der Lautstärke (ATT)
Um die Lautstärke wieder
anzuheben, drücken Sie die
Taste erneut.
Zum Ausschalten des Geräts
Achtung bei der Lautstärkeeinstellung:
Disks erzeugen im Vergleich zu anderen
Tonträgern sehr wenig Rauschen. Senken
Sie die Lautstärke vor dem Abspielen einer
Disk, um Beschädigung der Lautsprecher
durch plötzliche Tonspitzen zu vermeiden.
⁄ Stellen Sie den Klang nach
Wunsch ein. (Siehe Seite 15 und
16).
6
Page 29

Abbrechen der Display-
Demonstrationen
Wenn ca. 20 Sekunden lang keine Bedienung
erfolgt, startet die Display-Demonstration.
[Anfänglich: DEMO ON]—siehe Seite 17.
1
2
3
Einstellung der Uhr
1
2
Stellen Sie Stunde, Minute und
Zeitformat ein.
1 Wählen Sie „CLOCK H“
(Stunde), und stellen Sie dann
die Stunde ein.
2 Wählen Sie „CLOCK M“
(Minute), und stellen Sie die
Minute ein.
3 Wählen Sie „24H/12H“, wählen
Sie dann „24H“ (Stunde) oder
„12H“ (Stunde).
3 Beenden Sie den Vorgang.
DEUTSCH
Beenden Sie den Vorgang.
4
Zur Aktivierung der Display-Demonstration
Im obigen Schritt 3...
Zum Prüfen der aktuellen Uhrzeit, wenn
das Gerät ausgeschaltet ist
7
Page 30

Bedienung des Tuners
Rundfunkempfang
DEUTSCH
~
Leuchtet auf, wenn eine UKWStereosendung mit ausreichender
Signalstärke empfangen wird.
Der gewählte Wellenbereich erscheint.
Ÿ Starten Sie den Sendersuchlauf.
2 Wählen Sie die gewünschten
Empfangsfrequenzen.
Wenn Sie Schwierigkeiten haben, eine
UKW-Sendung in Stereo zu empfangen
1
Wenn ein Sender empfangen wird,
stoppt der Suchlauf.
Um den Suchlauf zu stoppen,
betätigen Sie die Taste erneut.
So stellen Sie manuell Sender ein
Im obigen Schritt Ÿ...
1
8
2
Leuchtet auf, wenn Mono-Modus aktiviert ist.
Der Empfang wird besser, jedoch geht der
Stereo-Effekt verloren.
Zum Wiederherstellen des Stereoeffekts
wiederholen Sie das gleiche Verfahren.
„
MONO OFF“ erscheint, und die MO-Anzeige
erlischt.
Page 31

Speichern von Sendern
Sie können für jedes Frequenzband bis zu sechs
Sender voreinstellen.
Automatische Voreinstellung von
UKW-Sendern—SSM (Sequentieller
Speicher für starke Sender)
Wählen Sie den UKW-
1
Frequenzbereich (FM1 – FM3), auf
dem Sie speichern möchten.
2
3
DEUTSCH
2
3
„SSM“ blinkt, und verschwindet wenn die
automatische Voreinstellung ausgeführt ist.
Die lokalen UKW-Sender im ausgewählten
Frequenzband mit den stärksten Signalen
werden automatisch als Festsender gespeichert.
Manuelle Voreinstellung
Beisp.: Speichern des UKW-Senders 92,5 MHz
unter der Festsendernummer 4 des
Frequenzbands FM1.
Die Festsendernummer blinkt eine Zeit lang.
Hören eines Festsenders
1
2 Wählen Sie den gewünschten
Festsender (1 – 6).
Zum Prüfen der aktuellen Uhrzeit beim
Hören eines UKW-Senders (nicht RDS) oder
AM-Senders
• Für UKW RDS-Sender siehe Seite 12.
1
9
Page 32

UKW-RDS-Funktionen
Suche nach bevorzugten UKW-RDS-Sendungen
DEUTSCH
Um eine bestimmte Sendung einzustellen,
können Sie nach deren PTY-Code suchen.
~
! Beginnen Sie die Suche nach
Ihrer bevorzugten Sendung.
Der zuletzt gewählte PTY-Code erscheint.
Ÿ Wählen Sie einen ihres
gewünschten Programmtyps.
oder
Wählen Sie einen der 29 PTY-
Codes.
Beisp.: Wenn „ROCK M“ gewählt ist
10
Wenn ein Sender (oder Dienst) eine
Sendung mit dem PTY-Code ausstrahlt,
den Sie gewählt haben, wird dieser
Sender (oder Dienst) eingestellt.
PTY-Codes
NEWS, AFFAIRS, INFO, SPORT,
EDUCATE
SCIENCE, VARIED, POP M (Musik),
ROCK M (Musik)
LIGHT M (Musik)
OTHER M (Musik)
CHILDREN
PHONE IN
COUNTRY
FOLK M (Musik)
,
DRAMA, CULTURE,
,
EASY M (Musik),
,
CLASSICS,
,
WEATHER, FINANCE,
,
SOCIAL, RELIGION,
,
TRAVEL, LEISURE, JAZZ,
,
NATION M (Musik), OLDIES,
,
DOCUMENT
Page 33

Funktionen von RDS
Das RDS-Verfahren (Radio Data System)
ermöglicht UKW-Sendern, außer dem
Programmsignal weitere Informationen zu
versenden.
Beim Empfang von RDS-Daten sind auf dem
Receiver folgende Funktionen verfügbar:
•
Programmtypsuche (PTY-Suchlauf) (siehe
Seite 10)
• Standby-Empfang von Verkehrsansagen
—TA (siehe Folgendes) oder Ihres
Lieblingsprogramms (PTY) (siehe Seiten
12 und 18)
Automatische Verfolgung des gleichen
•
Programs—Network-Tracking-Empfang
(siehe Seite 12)
• Programmsuche (siehe Seite 18)
Speichern Ihrer Lieblingsprogramme
Sie können sechs bevorzugte Programmtypen
speichern.
Speichern Sie Programmtypen unter den
Zifferntasten (1 – 6):
3 Wiederholen Sie die Schritte 1 bis 2,
um weiteren PTY-Codes
Festsendernummern zuzuweisen.
4 Beenden Sie den Vorgang.
DEUTSCH
Verwenden des Standbyempfangs
TA-Standbyempfang
Verkehrsdurchsagen-Standby erlaubt es dem
Receiver, von allen Signalquellen außer AM
kurzzeitig auf Verkehrsdurchsagen (TA)
umzuschalten.
Die Lautstärke schaltet auf den voreingestellten
TA-Lautstärkepegel um (siehe Seite 18).
So aktivieren Sie den TA-Standbyempfang
Die TP-Anzeige leuchtet auf
oder blinkt.
1 Führen Sie die Schritte ~ und Ÿ auf
Seite 10 aus, um einen PTY-Code zu
wählen.
2 Wählen Sie die gewünschte
Festsendernummer (1 – 6) zur
Speicherung.
Beisp.: Wenn „ROCK M“ gewählt ist
• Wenn die TP-Anzeige aufleuchtet, ist der TAStandbyempfang aktiviert.
• Wenn die TP-Anzeige blinkt, ist der TAStandbyempfang noch nicht aktiviert.
(Dies ist der Fall, wenn Sie einen UKWSender hören, bei dem die für den TAStandbyempfang erforderlichen RDS-Signale
nicht mitgesendet werden).
Zum Aktivieren des TA-Standbyempfangs
müssen Sie einen anderen Sender einstellen,
bei dem diese Signale mitgesendet werden.
Ist dies der Fall, geht die TP-Anzeige von
Blinken auf Dauerleuchten über.
So deaktivieren Sie den TAStandbyempfang
Die TP-Anzeige erlischt.
11
Page 34

PTY-Standbyempfang
PTY-Standby erlaubt es dem Receiver, von der
aktuellen Signalquelle außer AM kurzzeitig auf
Ihr bevorzugtes PTY-Programm umzuschalten.
Zum Aktivieren und Wählen
Ihres bevorzugten PTY-Codes für
Standbyempfang siehe Seite 18.
Die PTY-Anzeige leuchtet auf oder blinkt.
DEUTSCH
• Wenn die PTY-Anzeige aufleuchtet, ist der
PTY-Standbyempfang aktiviert.
• Wenn die PTY-Anzeige blinkt, ist der PTYStandbyempfang noch nicht aktiviert.
Zum Aktivieren des PTY-Standbyempfangs
müssen Sie einen anderen Sender einstellen,
bei dem diese Signale mitgesendet werden.
Die PTY-Anzeige geht von Blinken auf
Dauerleuchten über.
Zum Deaktivieren des PTYStandbyempfangs wählen Sie „OFF“ für den
PTY-Code (siehe Seite 18). Die PTY-Anzeige
erlischt.
Verfolgen des gleichen Programms
—Network-Tracking-Empfang
Wenn Sie in einem Bereich unterwegs sind,
in dem kein guter UKW-Empfang möglich
ist, sucht dieser Receiver automatisch nach
anderen Frequenzen, auf denen das UKW-RDSProgramm möglicherweise besser empfangen
werden kann (siehe Abbildung unten).
Bei Versand ab Werk ist der Network-TrackingEmpfang aktiviert.
Zum Ändern der Einstellung für den
Network-Tracking-Empfang siehe Seite 18.
Programm A wird in unterschiedlichen
Frequenzbereichen ausgestrahlt (01 – 05)
12
Zum Prüfen der aktuellen Uhrzeit beim
Hören eines UKW-RDS-Senders
Page 35

Bedienung der Disk
Wiedergabe einer Disk
DEUTSCH
Alle Titel werden wiederholt abgespielt, bis
Sie die Quelle umschalten oder die Disk
ausschieben.
Gesamte Spielzeit
der eingesetzten
Disk
Verstrichene
Spielzeit
Gesamte Titelzahl
der eingesetzten
Disk
Aktuelle
Titelnummer
Zum Stoppen der Wiedergabe und
Auswerfen der Disk
So spulen Sie Titel vor oder zurück
Vorspulen.
Rückspulen.
So springen Sie zum nächsten oder zum
vorherigen Titel
Zu den folgenden
Titeln.
Zum Anfang des laufenden Titels,
anschließend der vorhergehenden Titel.
Direkt zu einem bestimmten Titel gehen
Zum Wählen einer Zahl von 01 – 06:
Zum Wählen einer Zahl von 07 – 12:
13
Page 36

Auswurfsperre
Sie können für die eingelegte Disk eine
Auswurfsperre aktivieren.
Zum Prüfen der aktuellen Uhrzeit beim
Hören einer Disk
DEUTSCH
Zum Aufheben der Sperre, das gleiche
Verfahren wiederholen.
Auswählen von Wiedergabemodi
Sie können jeweils einen der folgenden Wiedergabe-Modi verwenden.
1
2 Wählen Sie Ihren gewünschten Wiedergabemodus.
14
Wiederholungswiedergabe
Beisp.: Wenn „TRK RPT“ gewählt ist
Zufallswiedergabe
Beisp.: Wenn „DISC RND“ gewählt ist
Modus Wiederholt die Wiedergabe
TRK RPT: Aktuelle Titel.
• RPT leuchtet auf.
RPT OFF: Hebt auf.
Modus
DISC RND: Alle Titel auf der aktuellen
• RND
RND OFF: Hebt auf.
Spielt in zufälliger Reihenfolge ab
Disk.
leuchtet auf.
Page 37

Klangeinstellungen
Wählen der vorgegebenen Klangmodi (C-EQ: Spezieller Equalizer)
DEUTSCH
Sie können eine Vorwahl-Klangmodus wählen,
der dem Musikgenre entspricht.
~
Ÿ
Beisp.: Wenn „ROCK“ gewählt ist
Anzeigemuster für jeden Klangmodus:
Anzeige Für:
USER
ROCK
CLASSIC
POPS
HIP HOP
JAZZ
1
BAS: Tiefen
*
2
*
TRE: Höhen
3
*
LOUD: Loudness
(Unbeeinflusster
Klang)
Rock- oder
Discomusik
Klassische
Musik
Leichte Musik
Funk oder Rap
Jazz-Musik
Vorgabewerte
1
2
*
TRE
*
LOUD
BAS
00 00 OFF
+03 +01 ON
+01 –02 OFF
+04 +01 OFF
+02 00 ON
+02 +03 OFF
3
*
15
Page 38

Einstellen des Klangs
Sie können die Klangeigenschaften nach
Wunsch einstellen.
1
DEUTSCH
Beisp.: Wenn „TRE“ gewählt ist
2
Das Anzeigemuster wechselt,
während Sie den Pegel einstellen.
Anzeige Funktion Bereich
BAS*1
(Tiefen)
1
TRE*
(Höhen)
2
FAD*
(Fader)
BAL
(Balance)
LOUD*
(Loudness)
VOL*3
(Lautstärke)
*1 Wenn Sie Tiefen, Höhen oder Loudness
einstellen, werden die vorgenommenen
Einstellungen für den aktuell gewählten
Klangmodus (C-EQ) einschließlich „USER“
gespeichert.
2
*
Wenn Sie eine Anlage mit zwei
Lautsprechern verwenden, stellen Sie den
Fader-Pegel auf „00“.
3
*
Normalerweise dienen die Tasten +
und – als Lautstärke-Regelungstasten.
Deshalb brauchen Sie nicht „VOL“ zur
Lautstärkeeinstellung zu wählen.
4
*
Je nach Verstärker-
Verstärkungsgradeinstellung. (Weitere
Informationen finden Sie auf Seite 18).
Stellen Sie die
Tiefen ein.
Stellen Sie die
Höhen ein.
Stellen Sie die
Balance zwischen
vorderen und
hinteren
Lautsprechern ein.
Stellen Sie die
Balance zwischen
linken und rechten
Lautsprechern ein.
1
Verstärken Sie
niedrige und
hohe Frequenzen
um eine gute
Klangwirkung
auch bei niedriger
Lautstärke zu
erhalten.
Stellen Sie die
Lautstärke ein.
–06 (min.)
bis
+06 (max.)
–06 (min.)
bis
+06 (max.)
R06 (nur
hinten)
bis
F06 (nur
vorne)
L06 (nur
links)
bis
R06 (nur
rechts)
LOUD ON
LOUD OFF
00 (min.) bis
30 oder 50
(max.)*
J
4
16
Page 39

Allgemeine Einstellungen — PSM
Grundlegendes Verfahren
Sie können die PSM (Preferred Setting Mode)Gegenstände in der nachstehenden Tabelle
anpassen.
3 Stellen Sie den gewählten PSM-
Gegenstand ein.
1
4 Wiederholen Sie die Schritte 2 und 3
zur Einstellung der anderen PSMGegenstände, wenn erforderlich.
2
Wählen Sie einen PSM-Gegenstand.
5 Beenden Sie den Vorgang.
Beisp.: Wenn Sie „AMP GAIN“ wählen
Anzeigen Wählbare Einstellungen, [Bezugsseite]
DEUTSCH
DEMO
Display-Demonstration
CLOCK H
Stundeneinstellung
CLOCK M
Minuteneinstellung
24H/12H
24-Stunden- oder 12-
Stunden-Zeitanzeigeformat
CLK ADJ
Uhreinstellung
DEMO ON: [Anfänglich]; Display-Demonstration wird
automatisch aktiviert, wenn 20 Sekunden lang
keine Bedienung erfolgt, [7].
DEMO OFF: Hebt auf.
0 – 23 (1 – 12), [7]
[Anfänglich: 0 (0:00)]
00 – 59, [7]
[Anfänglich: 00 (0:00)]
12H O 24H, [7]
[Anfänglich: 24H]
AUTO: [Anfänglich]; Die eingebaute Uhr wird automatisch mit
den CT-Daten (Uhrzeit) im RDS-Signal eingestellt.
OFF: Hebt auf.
Fortsetzung nächste Seite....
17
Page 40

Anzeigen Wählbare Einstellungen, [Bezugsseite]
AF-REG
Alternativ-Frequenzen/
Regionalisierung-Empfang
DEUTSCH
PTY-STBY
PTY-Standby
TA VOL
Verkehrsansage-Lautstärke
P-SEARCH
Programmsuchlauf
ILL SW*
Beleuchtungsschalter
TEL*
2
2
Telefon stummschalten
Wenn die vom aktuellen Sender empfangenen Signale schwach
werden....
AF: [Anfänglich]; Schaltet zu einem anderen Sender um
(dabei handelt es sich möglicherweise nicht um die
aktuell empfangene Sendung), [12].
• Die AF-Anzeige leuchtet auf.
AF REG: Schaltet auf eine andere Frequenz mit demselben
Programm um.
• Die AF- und REG-Anzeigen leuchten auf.
OFF: Hebt auf.
Aktiviert PTY-Standbyempfang mit einem der 29 PTY-Codes,
[12].
OFF [Anfänglich]
[Anfänglich: VOL 20]; VOL 00 – VOL 30 oder 50*
=
PTY-Codes, [10] = (
zurück zum Anfang
1
, [11]
ON: Unter Verwendung der AF-Daten stimmt der
Receiver eine andere Frequenz ab, auf der das gleiche
Program wie beim ursprünglich eingestellten RDSSender ausgestrahlt wird, wenn die Signalstärke des
Festsenders nicht ausreicht.
OFF: [Anfänglich]; Hebt auf.
Sie können die Tastenbeleuchtung nach Wunsch wählen.
RED O GREEN
[Anfänglich: RED]
MUTING 1/MUTING 2: Eine Einstellung wählen, bei
der der Ton bei Verwendung des Mobiltelefons
stummgeschaltet ist.
OFF: [Anfänglich]; Hebt auf.
)
AMP GAIN
(Lautsprecherverstärkung)
Sie können den maximalen Lautstärkepegel auf diesem Receiver
einstellen.
LOW PWR:
VerstärkerVerstärkungsgradregelung
HIGH PWR: [Anfänglich]; VOL 00 – VOL 50
1
*
Je nach Verstärker-Verstärkungsgradeinstellung.
2
*
Nur für KD-S1501.
18
VOL 00 – VOL 30 (Wählen Sie dies, wenn die
Maximalleistung des Lautsprechers weniger als 45 W
beträgt, um Schäden zu verhindern).
Page 41

Abnehmen des Bedienfelds
Beim Abnehmen oder Anbringen des
Bedienfelds achten Sie darauf, nicht die
Steckverbinder an der Rückseite des
Bedienfelds und am Bedienfeldhalter zu
beschädigen.
Abnehmen des Bedienfelds
Vor dem Abnehmen des Bedienfeld immer die
Stromversorgung ausschalten.
Anbringen des Bedienfelds
DEUTSCH
19
Page 42

Wartung
Reinigen der Anschlüsse
Durch häufiges Einstecken und Abtrennen
werden die Anschlüsse verschlissen.
Um diese Gefahr zu minimieren, sollten Sie die
Anschlüsse mit einem mit Alkohol befeuchteten
Wattetupfer oder Lappen reinigen, wobei darauf
geachtet werden muss, die Anschlusskontakte
nicht zu beschädigen.
DEUTSCH
Anschlüsse
Feuchtigkeitskondensation
Auf der Linse im Inneren des CD-Players kann
sich in den folgenden Fällen Kondensation
absetzen:
• Nach dem Einschalten der Heizung im Auto.
• Wenn es sehr feucht im Auto wird.
In diesem Fall können Fehlfunktionen im
CD-Player auftreten. In diesem Fall entnehmen
Sie die Disk und lassen den Receiver einige
Stunden lang eingeschaltet, bis die Feuchtigkeit
verflogen ist.
Sauberhalten der Disks
Eine verschmutzte Disk lässt
sich möglicherweise nicht richtig
abspielen.
Wenn eine Disk verschmutzt
wird, wischen Sie diese mit einem
weichen Lappen gerade von der Mitte nach
außen hin ab.
• Verwenden Sie keine Lösungsmittel (z.B.
Schallplattenreiniger, Spray, Terpentin,
Benzol usw.) zur Reinigung von Disks.
Wiedergabe neuer Disks
Neue Disks haben möglicherweise
rauhe Stellen an den Innen- und
Außenrändern. Wenn solch eine
Disk verwendet wird, kann sie
von diesem Receiver abgewiesen
werden.
Um solche rauhen Stellen zu beseitigen,
reiben Sie die Ränder mit einem Bleistift,
Kugelschreiber usw.
Umgang mit Disks
Beim Entnehmen einer
Disk aus ihrer Hülle immer
den Mittenhalter der Hülle
eindrücken und die Disk an den
Rändern haltend herausheben.
• Die Disk immer an den Rändern halten.
Berühren Sie nicht die Aufnahmeoberfläche.
Beim Einsetzen einer Disk in ihre Hülle die
Disk vorsichtig um den Mittenhalter eindrücken
(mit der beschrifteten Seite nach oben weisend).
• Denken Sie immer daran, die Disks nach
der Verwendung wieder in ihren Hüllen
abzulegen.
Disks mit folgenden Mängeln dürfen nicht verwendet werden:
Verzogene
Disk
20
Mittenhalter
Aufkleber
Aufkleberrest
Disk
Aufklebetikett
Page 43

Weitere Informationen zu Ihrem Receiver
•
Grundlegende Bedienung
Ausschalten
• Wenn Sie das Gerät beim Hören einer Disk
ausschalten, startet die Disk-Wiedergabe beim
nächsten Einschalten von der Stelle, wo die
Wiedergabe vorher abgebrochen wurde.
Bedienung des Tuners
Speichern von Sendern
• Während des SSM-Suchlaufs...
– Alle vorher gespeicherten Sender werden
gelöscht, und Sender werden neu gespeichert.
–
Empfangene Sender werden in Nr. 1
(niedrigste Frequenz) bis Nr. 6 (höchste
Frequenz) abgelegt.
– Wenn SSM beendet ist, wird automatisch
der in Nr. 1 gespeicherte Sender abgerufen.
• Beim manuellen Speichern eines Senders
wird ein vorher vorgewählter Sender gelöscht,
wenn ein neuer Sender unter der gleichen
Festsendernummer gespeichert wird.
UKW-RDS-Funktionen
•
Netzwerk-Tracking-Empfang erfordert zwei Typen
von RDS-Signalen—PI (Programmkennung) und
AF (Alternativfrequenz) zur richtigen Funktion.
Ohne richtigen Empfang dieser Daten arbeitet
Netzwerk-Tracking-Empfang nicht.
•
Wenn eine Verkehrsansage empfangen wird,
wird die Lautstärke (TA-Lautstärke) automatisch
auf den voreingestellten Lautstärkepegel
umgeschaltet.
Bedienung der Disk
Allgemeines
• Dieser Receiver wurde dafür konstruiert,
CDs und CD-Rs (bespielbar)/CD-RWs
(überschreibbar) in den Formaten Audio-CD
(CD-DA), abzuspielen.
• Wenn eine Disk eingelegt ist, wird durch
Wählen von „CD“ als Wiedergabequelle die
Disk-Wiedergabe gestartet.
Einsetzen einer Disk
• Wenn eine Disk umgekehrt herum eingesetzt
ist, wird sie automatisch ausgeschoben.
Legen Sie keine 8-cm-Disks (Single-CDs) und
•
solche mit ungewöhnlichen Formen (Herzen,
Blumen usw.) in den Ladeschlitz ein.
Wiedergabe einer CD-R oder CD-RW
• Verwenden Sie nur „finalisierte“ CD-Rs oder
CD-RWs.
Dieser Receiver kann Multi-Session-Disks
abspielen; nicht abgeschlossene Sessions
werden aber bei der Wiedergabe übersprungen.
• Manche CD-Rs oder CD-RWs können
sich auf diesem Receiver aufgrund ihrer
Disk-Eigenschaften oder aus den folgenden
Gründen nicht abspielen lassen:
– Disks sind schmutzig oder zerkratzt.
– Kondensationsbildung tritt auf der Linse im
Receiver auf.
Die Tonabnehmerlinse im Receiver ist
–
verschmutzt.
– CD-R oder CD-RW, auf der die Dateien in der
„Packet Write“-Methode aufgezeichnet sind.
– Es liegen falsche Aufnahmebedingungen
(fehlende Daten usw.) oder Medienbedingungen
(Flecken, Kratzer, Verwellungen usw.) vor.
• CD-RWs können eine längere Auslesezeit
erfordern, da die Reflektanz von CD-RWs
niedriger als die normaler CDs ist.
• Verwenden Sie nicht die folgenden CD-Rs
oder CD-RWs:
– Disks mit Aufklebern, Etiketten oder
Schutzsiegeln auf der Oberfläche.
– Disks, auf denen Beschriftungen direkt
mit einem Tintenstrahldrucker aufgedruckt
werden können.
Bei Verwendung solcher Disks bei hohen
Temperaturen oder hoher Luftfeuchtigkeit
können Fehlfunktionen oder Schäden an den
Disks verursacht werden.
Ändern der Quelle
• Wenn Sie die Quelle ändern, stoppt die
Wiedergabe ebenfalls (ohne dass die Disk
ausgeworfen wird).
Wenn Sie zum nächsten Mal „CD“ als
Wiedergabequelle wählen, startet die
Disk-Widdergabe von der Stelle, wo die
Wiedergabe vorher abgebrochen wurde.
Auswerfen einer Disk
• Wenn die ausgeworfene Disk nicht innerhalb
von 15 Sekunden entfernt wird, wird die
Disk automatisch wieder in den Ladeschlitz
eingezogen, um sie vor Staub zu schützen.
(Die Disk wird dabei nicht abgespielt).
Allgemeine Einstellungen—PSM
•
Wenn Sie die Einstellung von „AMP GAIN“
von „HIGH PWR“ auf „LOW PWR“ umstellen,
während Sie mit einem Lautstärkepegel von
mehr als „VOL 30“ hören, schaltet der Receiver
automatisch den Lautstärkepegel auf „VOL 30“
um.
DEUTSCH
21
Page 44

Störungssuche
Was wie eine Betriebsstörung erscheint, muss nicht immer ein ernstes Problem darstellen. Gehen
Sie die folgenden Prüfpunkte durch, bevor Sie sich an den Kundendienst wenden.
Symptome Ursachen Abhilfen
• Es kommt kein Ton von
DEUTSCH
• Dieser Receiver
Allgemeines
• SSM automatische
• Statikrauschen beim
UKW/AM
• Die Disk wird automatisch
• CD-R/CD-RW kann nicht
• Titel auf der CD-R/
• Die Disk kann weder
den Lautsprechern.
funktioniert überhaupt
nicht.
Vorwahl funktioniert nicht.
Radiohören.
ausgeschoben.
wiedergegeben werden.
CD-RW können nicht
übersprungen werden.
abgespielt noch
ausgeschoben werden.
Die Lautstärke ist auf
Minimalpegel eingestellt.
Verbindungen sind falsch. Prüfen Sie die Kabel und
Der eingebaute
Microcomputer kann
aufgrund von Rauschen usw.
falsch funktioniert haben.
Signale sind zu schwach. Speichern Sie die Sender
Die Antenne ist nicht fest
angeschlossen.
Die Disk wurde verkehrt
herum eingelegt.
Die CD-R/CD-RW ist nicht
finalisiert.
Disk ist gesperrt. Die Disk freigeben (siehe
Der CD-Spieler kann
fehlerhaft gearbeitet haben.
Stellen Sie auf optimalen
Pegel ein.
Verbindungen.
Nehmen Sie einen Reset am
Receiver vor (siehe Seite 2).
manuell.
Schließen Sie das
Antennenkabel fest an.
Setzen Sie die Disk richtig
ein.
• Setzen Sie eine finalisierte
CD-R/CD-RW ein.
• Finalisieren Sie die
CD-R/CD-RW mit dem zur
Aufnahme verwendeten
Gerät.
Seite 14).
Die Disk gezwungen
ausschieben (siehe Seite 2).
22
• Der Disk-Klang ist
Disk-Wiedergabe
manchmal unterbrochen.
• „NO DISC“ erscheint im
Display.
Sie fahren auf einer
holperigen Straße.
Disk ist zerkratzt. Wechseln Sie die Disk.
Verbindungen sind falsch. Prüfen Sie die Kabel und
Keine Disk im Ladeschlitz. Setzen Sie eine Disk in den
Disk ist falsch eingesetzt. Setzen Sie die Disk richtig
Stoppen Sie die Wiedergabe
beim Fahren auf einer
holperigen Straße.
Verbindungen.
Ladeschlitz ein.
ein.
Page 45

Technische Daten
AUDIO-VERSTÄRKERSEKTION
Max. Ausgangsleistung:
Vorne: 45 W pro Kanal
Hinten: 45 W pro Kanal
Sinus-Ausgangsleistung (eff.):
Vorne: 17 W pro Kanal an 4 Ω, 40 Hz
bis 20 000 Hz bei nicht mehr als
0,8% Klirrfaktor.
Hinten: 17 W pro Kanal an 4 Ω, 40 Hz
bis 20 000 Hz bei nicht mehr als
0,8% Klirrfaktor.
Lastimpedanz: 4 Ω (4 Ω bis 8 Ω Toleranz)
Klang-Steuerbereich:
Tiefen: ±10 dB bei 100 Hz
Höhen: ±10 dB bei 10 kHz
Frequenzgang: 40 Hz bis 20 000 Hz
Signal-Rauschabstand: 70 dB
Line-Out Pegel/Impedanz:
2,0 V/20 kΩ Last (volle Skala)
Ausgangsimpedanz: 1 kΩ
TUNER-SEKTION
Frequenzgang:
UKW: 87,5 MHz bis 108,0 MHz
AM: (MW) 522 kHz bis 1 620 kHz
(LW) 144 kHz bis 279 kHz
CD-SPIELER-SEKTION
Typ: CD-Spieler
Signalerkennungssystem: Kontaktfreier
optischer Tonabnehmer (Halbleiterlaser)
Kanäle: 2 Kanäle (Stereo)
Frequenzgang: 5 Hz bis 20 000 Hz
Dynamikumfang: 96 dB
Signal-Rauschabstand: 98 dB
Gleichlaufschwankungen: Unter der Messgrenze
DEUTSCH
ALLGEMEINES
Betriebsstromanforderungen:
Betriebsspannung:
DC 14,4 V (11 V bis 16 V Toleranz)
Erdungssystem: Negative Masse
Zulässige Betriebstemperatur:
0°C bis +40°C
Abmessungen (B × H × T):
Einbaugröße (ca.):
182 mm × 52 mm × 150 mm
Tafelgröße (ca.):
188 mm × 58 mm × 11 mm
Gewicht (ca.):
1,3 kg (ohne Zubehör)
[UKW-Tuner]
Nutzbare Empfindlichkeit: 11,3 dBf (1,0 µV/75 Ω)
50 dB Geräuschberuhigung:
16,3 dBf (1,8 µV/75 Ω)
Ausweichkanalabstimmschärfe (400 kHz): 65 dB
Frequenzgang: 40 Hz bis 15 000 Hz
Übersprechdämpfung: 30 dB
Gleichwellenselektion: 1,5 dB
[MW-Tuner]
Empfindlichkeit: 20 µV
Trennschärfe: 35 dB
[LW-Tuner]
Empfindlichkeit: 50 µV
Änderungen bei Design und technischen Daten
bleiben vorbehalten.
23
Page 46

Перед тем, как приступать к эксплуатации, пожалуйста, внимательно прочитайте все
инструкции с тем, чтобы полностью изучить и обеспечить оптимальную работу этого
Благодарим Вас за приобретение изделия JVC.
устройства.
ВАЖНО ДЛЯ ЛАЗЕРНОЙ АППАРАТУРЫ
1. ЛАЗЕРНАЯ АППАРАТУРА КЛАССА 1
2. ПРЕДУПРЕЖДЕНИЕ: Не открывайте верхнюю крышку. Внутри устройства нет
частей, которые пользователь может отремонтировать. Ремонт должен осуществляться
квалифицированным обслуживающим персоналом.
3. ПРЕДУПРЕЖДЕНИЕ: Видимое и невидимое лазерное излучение при открытом
устройстве, отказе или нарушении блокировки. Избегайте прямого воздействия
излучения.
4. ЭТИКЕТКА: ПРЕДУПРЕЖДАЮЩАЯ ЭТИКЕТКА, РАЗМЕЩЕННАЯ НА НАРУЖНОЙ
СТОРОНЕ УСТРОЙСТВА.
РУCCKИЙ
Предупреждение:
Если приемник используется во время
поездки на автомобиле, следует, не
отвлекаясь, следить за дорогой, иначе
может произойти дорожно-транспортное
происшествие.
Принудительное извлечение
диска
Если диск не распознается приемником
или не извлекается, извлеките диск
следующим образом.
Как перенастроить Ваше
устройство
• Если это не поможет, попробуйте
перенастроить приемник.
• Будьте осторожны, не уроните диск при
извлечении.
• При этом перезапустится
микропроцессор. Запрограммированные
настройки будут также удалены.
• Если диск загружен, он будет извлечен.
Будьте осторожны, не уроните диск.
В целях безопасности данное устройство поставляется с пронумерованной
идентификационной карточкой, и тот же самый идентификационный номер отпечатан на
шасси устройства. Храните эту карточку в безопасном месте, поскольку она может помочь
властям идентифицировать Ваше устройство в случае его кражи.
2
Page 47

Содержание
Как перенастроить Ваше устройство
Принудительное извлечение диска .... 2
Как пользоваться данным
руководством ..................................... 4
Как пользоваться кнопкой MODE ..... 4
... 2
Панель управления — KD-S1501/
KD-G152/KD-G151 ............................ 5
Расположение кнопок .......................... 5
Начало работы ............................. 6
Основные операции .................................... 6
Отмена демонстрации функций
дисплея
................................................ 7
Настройка часов .................................... 7
Операции с радиоприемником
... 8
Прослушивание радио ................................ 8
Сохранение радиостанций .................. 9
Прослушивание запрограммированной
радиостанции
...................................... 9
Операции с FM RDS ..................... 10
Поиск любимой программы FM RDS ........ 10
Сохранение любимых программ ........ 11
Использование функции резервного
приема ................................................. 11
Отслеживание той же программы
(сеть-отслеживающий прием) ........ 12
Операции с дисками ................... 13
Воспроизведение диска ............................. 13
Выбор режимов воспроизведения ..... 14
Настройки звучания .................... 15
Выбор запрограммированных режимов
звучания (C-EQ: настраиваемый
эквалайзер) ............................................... 15
Настройка звучания ............................. 16
Общие настройки — PSM ........... 17
Стандартная процедура ....................... 17
Отсоединение панели
управления ................................ 19
Обслуживание ............................. 20
Дополнительная информация
о приемнике .............................. 21
Устранение проблем ................... 22
Технические характеристики .... 23
РУCCKИЙ
*Для Вашей безопасности....
• Не повышайте слишком сильно
громкость, поскольку в результате этого
заглушаются внешние звуки, что делает
опасным управление автомобилем.
• Остановите автомобиль перед тем, как
выполнять любые сложные операции.
*Температура внутри автомобиля....
Если Вы припарковали Ваш автомобиль на
длительное время в жаркую или холодную
погоду, перед тем, как включать это
устройство, подождите до тех пор, пока
температура в автомобиле не придет в
норму.
3
Page 48

Как пользоваться данным
руководством
Для того, чтобы сделать объяснения
простыми и понятными, используются
следующие методы:
• Некоторые советы и примечания
приведены в разделе “Дополнительная
информация о приемнике” (см. стр. 21).
• Операции, выполняемые с
использованием кнопок, в основном,
описаны с помощью иллюстраций,
например:
Нажать
РУCCKИЙ
кратковременно.
Нажать
неоднократно.
Как пользоваться кнопкой MODE
При нажатии кнопки MODE приемник
переходит в режим настройки функций,
после чего нумерованные кнопки работают
как кнопки различных функций.
Пример: Нумерованная кнопка 2
работает как кнопка МО
(монофонический).
Нажать любую из
указанных.
Нажать и
удерживать
до получения
необходимого
результата.
Нажмите и
удерживайте
нажатыми
обе кнопки
одновременно.
4
Индикатор обратного отсчета времени
Чтобы снова вернуть первоначальные
функции этих кнопок после нажатия
кнопки MODE, подождите 5 секунд, не
нажимая кнопок, пока режим функций не
будет сброшен.
• Повторное нажатие кнопки MODE также
сбрасывает режим функций.
Page 49

Панель управления — KD-S1501/KD-G152/KD-G151
Расположение кнопок
Окно дисплея
РУCCKИЙ
1 Кнопки +/–
2 Кнопка DISP (дисплей)
3 Загрузочный отсек
4 Окно дисплея
5 Кнопка MODE
6 Кнопка 0 (извлечение)
7 Кнопки
8 Кнопка
работающий/аттенюатор)
9 Кнопка SEL (выбор)
p Кнопка EQ (эквалайзер)
q Кнопка MO (монофонический)
w Кнопка SSM (Strong-station Sequential
Memory—последовательная память для
радиостанций с устойчивым сигналом)
e Кнопка CD
r Кнопка FM/AM
t Кнопка RPT (повторное
воспроизведение)
y Кнопка RND (произвольное
воспроизведение)
u Кнопка T/P (программа движения
транспорта/тип программы)
i Кнопка
o Нумерованные кнопки
¢/4
(резервный/
(снятие панели управления)
Окно дисплея
; Индикаторы приема тюнера
MO (монофонический), ST (стерео)
a Индикаторы RDS
TP, PTY, AF, REG
s Индикатор CD
d Индикатор RND
воспроизведение)
f Индикатор RPT (повторное
воспроизведение)
g Индикатор LOUD (громкость)
h Индикатор EQ (эквалайзер)
j Индикаторы режимов звучания (C-EQ:
настраиваемый эквалайзер)
ROCK, CLASSIC, POPS, HIP HOP, JAZZ,
USER
также работает как индикатор
•
обратного отсчета времени.
k Основной дисплей
l Отображение источника
Индикатор уровня громкости
(произвольное
5
Page 50

Начало работы
Основные операции
~
РУCCKИЙ
Ÿ
Вы не можете выбрать “CD” в
качестве источника воспроизведения,
если диск в загрузочном отсеке
отсутствует.
!
Мгновенное снижение громкости (ATT)
Для восстановления звука
нажмите еще раз.
Выключение питания
Предостережение, касающееся
настройки громкости:
По сравнению с другими источниками
звука диски создают незначительный
шум. Уменьшите громкость перед
воспроизведением диска, чтобы
предотвратить повреждение динамиков
из-за внезапного повышения уровня
громкости на выходе.
Отображается уровень громкости.
Индикатор уровня громкости
⁄ Настройка необходимого звука.
(См. страницы 15 и 16).
6
Page 51

Отмена демонстрации функций
дисплея
Если в течение 20 секунд не будет выполнено
операций, начнется демонстрация функций
дисплея.
[По умолчанию: DEMO ON]—см. стр. 17.
1
2
1
2 Установите час, минуту и формат
времени—12- или 24-часовой.
1 Выберите “CLOCK H” (час) и
настройте час.
2 Выберите “CLOCK M” (минута)
и настройте минуту.
3 Выберите “24H/12H”, затем
выберите “24H” (час) или “12H”
(час).
Настройка часов
РУCCKИЙ
3
3 Завершите процедуру.
Просмотр текущего времени на часах при
4
Завершите процедуру.
Включение демонстрации функций дисплея
В действии 3 выше...
выключенном питании
7
Page 52

Операции с радиоприемником
Прослушивание радио
2 Выберите частоты желаемых
~
РУCCKИЙ
Данный индикатор отображается при
приеме стереосигнала FM-передачи
достаточной силы.
При слабом стереофоническом
радиовещании на частоте FM
Появится выбранный диапазон.
1
радиостанций.
Ÿ Начните поиск радиостанции.
При обнаружении радиостанции
поиск прекращается.
Чтобы остановить поиск, нажмите
эту же кнопку еще раз.
Настройка на радиостанцию вручную
В действии Ÿ выше...
1
8
2
Загорается при включении
монофонического режима.
Прием улучшается, но стереоэффект
будет потерян.
Для восстановления эффекта стерео
повторите данную процедуру. Появляется
надпись “MONO OFF”, а индикатор MO
исчезает.
Page 53

Сохранение радиостанций
Для каждого диапазона частот можно
запрограммировать 6 радиостанций.
Автоматическое программирование
2
FM-радиостанций—SSM (Strong-station
Sequential Memory—последовательная
память для радиостанций с
3
устойчивым сигналом)
1 Выберите необходимый диапазон
FM (FM1 – FM3) для сохранения.
2
3
1
РУCCKИЙ
Запрограммированный номер
мигает некоторое время.
Прослушивание
запрограммированной
радиостанции
На дисплее мигает надпись “SSM”,
которая исчезает по завершении
автоматического программирования.
Осуществляется поиск местных FMрадиостанций с наиболее сильными
сигналами и их автоматическое сохранение
в диапазоне FM.
Программирование вручную
Пример: Сохранение FM-радиостанции
с частотой 92,5 МГц для
запрограммированного канала с
номером 4 диапазона FM1.
1
2 Выберите необходимую
радиостанцию (1 – 6).
Просмотр текущего времени на часах во
время прослушивания радиостанции FM (не
RDS) или AM
• Информацию для радиостанций FM RDS
см. на стр. 12.
9
Page 54

Операции с FM RDS
Поиск любимой программы FM RDS
Посредством поиска кода PTY можно
настроиться на радиостанцию, передающую
Вашу любимую программу.
РУCCKИЙ
~
! Запустите поиск любимой
программы.
Появляется последний выбранный
код PTY.
Ÿ Выберите один из типов
любимых типов программ.
или
Выберите один из двадцати
девяти кодов PTY.
Пример: Если выбрано “ROCK M”
10
Если есть радиостанция, передающая
в эфир программу того же кода
PTY, что был Вами выбран,
осуществляется настройка на эту
радиостанцию.
Коды PTY
NEWS, AFFAIRS, INFO, SPORT, EDUCATE,
DRAMA, CULTURE, SCIENCE, VARIED,
POP M (музыка), ROCK M (музыка),
EASY M (музыка), LIGHT M (музыка),
CLASSICS, OTHER M (музыка),
WEATHER, FINANCE, CHILDREN,
SOCIAL, RELIGION, PHONE IN, TRAVEL,
LEISURE, JAZZ, COUNTRY, NATION M
(музыка), OLDIES, FOLK M (музыка),
DOCUMENT
Page 55

Что можно делать с помощью RDS
Система RDS (Radio Data System)
позволяет FM-радиостанциям отправлять
дополнительный сигнал вместе с
обычными сигналами программ.
При приеме данных RDS приемник может
выполнять следующие операции:
•
Поиск типа программы (PTY) (см. стр. 10)
•
Резервный прием сообщений о движении
на дорогах—TA (см. далее) или любимой
программы (PTY) (см. стр. 12 и 18)
• Автоматическое отслеживание той же
программы—сеть-отслеживающий
прием (см. стр. 12)
• Поиск программы (см. стр. 18)
3 Повторите действия 1 и 2 для
сохранения других кодов PTY для
других запрограммированных
номеров.
4 Завершите процедуру.
Резервный прием TA
Сохранение любимых программ
Можно сохранить шесть типов любимых
программ.
Для программирования типов программ
используйте нумерованные кнопки (1 – 6):
Резервный прием TA позволяет временно
переключаться на передачу сообщений
о движении на дорогах (TA) с любого
источника, кроме радиостанции AM.
Громкость меняется на запрограммированный
уровень громкости TA (см. стр. 18).
Включение функции резервного
приема TA
1 Для выбора кода PTY выполните
действия ~ и Ÿ на стр. 10.
Использование функции
резервного приема
РУCCKИЙ
Индикатор TP либо
загорается, либо мигает.
2 Выберите запрограммированный
номер (1 – 6) для которого
необходимо выполнить сохранение.
Пример: Если выбрано “ROCK M”
• Если индикатор TP загорается, функция
резервного приема TA включена.
• Если индикатор TP мигает, функция
резервного приема TA еще не включена.
(Это происходит при прослушивании
FM-радиостанции без RDS-сигналов,
необходимых для резервного приема TA).
Для активации резервного приема
TA настройте приемник на другую
радиостанцию, обеспечивающую
соответствующие сигналы. Индикатор TP
прекратит мигать и будет гореть.
Отключение функции резервного
приема TA
Индикатор TP гаснет.
11
Page 56

Резервный прием PTY
Резервный прием PTY позволяет приемнику
временно переключаться на любимую
программу с любого источника, кроме
радиостанции AM.
Информацию об активации и выборе
предпочитаемого кода PTY для функции
резервного приема PTY см. на стр. 18.
Индикатор PTY либо загорается, либо
мигает.
• Если индикатор PTY загорается, функция
резервного приема PTY включена.
• Если индикатор PTY мигает, функция
резервного приема PTY еще не включена.
РУCCKИЙ
Для включения функции резервного
приема PTY настройте приемник на
другую радиостанцию, обеспечивающую
соответствующие сигналы. Индикатор
PTY прекратит мигать и будет гореть.
Для отключения резервного приема PTY
выберите “OFF” для кода PTY (см. стр. 18).
Индикатор PTY гаснет.
Отслеживание той же программы
(сеть-отслеживающий прием)
При поездке по региону, где невозможен
качественный прием в диапазоне FM,
данный приемник автоматически
настраивается на другую радиостанцию
FM RDS в той же сети, которая может
передавать в эфир ту же программу с
помощью более сильных сигналов (см.
иллюстрацию ниже).
В настройках, установленных на заводеизготовителе, сеть-отслеживающий прием
включен.
Информацию об изменении параметров
сеть-отслеживающего приема см. на стр.
18.
Радиовещание программы А в других
диапазонах частот (01 – 05)
12
Просмотр текущего времени на часах во
время прослушивания радиостанции FM
RDS
Page 57

Операции с дисками
Воспроизведение диска
Все дорожки будут воспроизводиться
последовательно до тех пор, пока не
произойдет смена источника или не будет
извлечен диск.
Быстрая перемотка дорожки вперед или
назад
Прокрутка назад.
Переход к следующим/предыдущим
дорожкам
Общее время
воспроизведения
вставленного
диска
Общее количество
дорожек
вставленного
диска
Переход к началу текущей дорожки, а
затем к предыдущим дорожкам.
Непосредственный переход к определенной
Истекшее время
воспроизведения
Номер текущей
дорожки
дорожке
Выбор номера 01 – 06:
Останов воспроизведения и извлечение
диска
Выбор номера 07 – 12:
РУCCKИЙ
Прокрутка вперед.
К следующим
дорожкам.
13
Page 58

Запрещение извлечения диска
Можно заблокировать диск в загрузочном
отсеке.
Для отмены блокировки повторите эту же
процедуру.
Просмотр текущего времени на часах во
время прослушивания диска
Выбор режимов воспроизведения
РУCCKИЙ
В одно и то же время возможна работа только в одном из следующих режимов
воспроизведения.
1
2 Выберите необходимый режим воспроизведения.
14
Повторное воспроизведение
Пример: Если выбрано “TRK RPT”
Воспроизведение в произвольном
порядке
Пример: Если выбрано “DISC RND”
Режим
TRK RPT: Текущая дорожка.
RPT OFF: Отмена.
Повторное воспроизведение
• Загорается индикатор RPT.
Режим Воспроизведение в
произвольном порядке
DISC RND: Для всех дорожек на диске.
• Загорается индикатор
RND
RND OFF: Отмена.
.
Page 59

Настройки звучания
Выбор запрограммированных режимов звучания (C-EQ: настраиваемый эквалайзер)
Можно выбрать режим звучания,
соответствующий музыкальному жанру.
~
Ÿ
Пример: Если выбран “ROCK”
Шаблон индикации для каждого режима
звучания:
Индикатор Для:
USER
ROCK Музыка в
CLASSIC
POPS Легкая
HIP HOP Музыка в
JAZZ Джазовая
1
*
BAS: Низкие частоты
2
*
TRE: Верхние частоты
3
*
LOUD: Громкость
(Бемольный
звук)
стиле рок
или диско
Классическая
музыка
музыка
стиле фанк
или рэп
музыка.
Запрограммиров-
анные настройки
1
2
*
TRE
*
BAS
00 00 OFF
+03 +01 ON
+01 –02 OFF
+04 +01 OFF
+02 00 ON
+02 +03 OFF
LOUD
*
3
РУCCKИЙ
15
Page 60

Настройка звучания
Характеристики звучания можно настроить
по своему желанию.
1
Пример: Если выбрано “TRE”
2
РУCCKИЙ
Шаблон индикации изменяется
при настройке уровня.
Индикатор
1
*
BAS
(низкие
частоты)
1
*
TRE
(верхние
частоты)
2
*
FAD
(микшер)
Действие Диапазон
Настройте низкие
частоты.
Настройте
верхние частоты.
Настройка
баланса передних
и задних
динамиков.
–06 (мин.)
до
+06 (макс.)
–06 (мин.)
до
+06 (макс.)
R06 (только
задние)
до
F06 (только
передние)
BAL
(баланс)
Настройка
баланса левых
и правых
динамиков.
L06 (только
левые)
до
R06 (только
правые)
1
*
LOUD
(громкость)
Увеличьте низкие
и высокие частоты
для получения
LOUD ON
J
LOUD OFF
хорошо
сбалансированного
звучания при
низком уровне
громкости.
3
*
VOL
(громкость)
Настройте
громкость.
От 00 (мин.)
до
30 до 50
(макс.)
1
*
При настройке верхних и нижних частот
или громкости выполненная настройка
сохраняется для текущего выбранного
режима звучания (C-EQ), включая режим
“USER” (пользовательский).
2
*
При использовании системы с двумя
динамиками установите для микшера
уровень “00”.
3
*
Обычно кнопки +/– функционируют в
качестве регулятора громкости. Поэтому
нет необходимости выбирать “VOL” для
настройки уровня громкости.
4
*
В зависимости от настройки регулятора
усиления. (Подробнее см. на стр. 18).
4
*
16
Page 61

Общие настройки — PSM
Стандартная процедура
Можно изменять параметры PSM
(предпочитаемый режим настройки),
которые перечислены в таблице ниже.
3 Настройте выбранный параметр
PSM.
1
4 Повторите действия 2 и 3 для
настройки других параметров PSM,
если необходимо.
2
Выберите параметр PSM.
5 Завершите процедуру.
Пример: Если выбрано “AMP GAIN”
Индикация Выбираемые настройки, [страница для справки]
РУCCKИЙ
DEMO
Демонстрация функций
дисплея
CLOCK H
Настройка часа
CLOCK M
Настройка минуты
24H/12H
Отображение времени
в 24-часовом или 12часовом формате
CLK ADJ
Настройка часов
DEMO ON: [По умолчанию]; Если в течение 20 секунд
не будет выполнено операций, начнется
демонстрация функций дисплея, [7].
DEMO OFF: Отмена.
0 – 23 (1 – 12), [7]
[По умолчанию: 0 (0:00)]
00 – 59, [7]
[По умолчанию: 00 (0:00)]
12H O 24H, [7]
[По умолчанию: 24H]
AUTO: [По умолчанию]; Встроенные часы автоматически
настраиваются с помощью данных CT (время на
часах) в сигнале RDS.
OFF: Отмена.
Продолжение на следующей странице....
17
Page 62

Индикация Выбираемые настройки, [страница для справки]
AF-REG
Прием на
альтернативных
частотах/прием
региональных передач
PTY-STBY
Резервный PTY
РУCCKИЙ
TA VOL
Громкость передачи
сообщений о движении
на дорогах
P-SEARCH
Поиск программ
ILL SW*
TEL*
2
Переключатель
подсветки
2
Отключение звука
телефона
Когда принимаемые от текущей радиостанции сигналы
становятся слабыми....
AF: [По умолчанию]; Переключение на другую
радиостанцию (программа может отличаться от
принимаемой в настоящее время), [12].
• Загорается индикатор AF.
AF REG: Переключение на другую радиостанцию,
передающую ту же программу.
• Загораются индикаторы AF и REG.
OFF: Отмена.
Включение функции резервного приема PTY с помощью
одного из 29 кодов PTY, [12].
OFF [По умолчанию]
[По умолчанию: VOL 20]; VOL 00 – VOL 30 или 50*
=
Коды PTY, [10] = (возврат в начало)
1
, [11]
ON: Используя данные AF, приемник настраивается
на другую частоту, передающую ту же программу,
прием которой осуществляется на первоначальной
запрограммированной радиостанции RDS
если уровень сигналов запрограммированной
радиостанции недостаточен.
OFF: [По умолчанию]; Отмена.
Подсветку кнопок можно выбрать в соответствии со своими
предпочтениями.
RED O GREEN
[По умолчанию: RED]
MUTING 1/MUTING 2: Выберите любой из параметров,
обеспечивающий отключение звука при
использовании сотового телефона.
OFF: [По умолчанию]; Отмена.
AMP GAIN
Регулятор усиления
Можно изменить максимальный уровень громкости данного
приемника.
LOW PWR: VOL 00 – VOL 30
HIGH PWR: [По умолчанию]; VOL 00 – VOL 50
1
*
Зависит от использования регулятора усиления.
2
*
Только для модели KD-S1501.
18
(Выберите этот параметр для
предотвращения повреждения динамика, если
максимальная мощность динамика меньше 45 Вт).
Page 63

Отсоединение панели управления
При отсоединении или подсоединении
панели управления следует соблюдать
меры предосторожности во избежание
повреждения разъемов в задней части
панели управления и на ее держателе.
Подключение панели управления
Отсоединение панели управления
Прежде чем отсоединить панель
управления, обязательно отключите подачу
питания.
РУCCKИЙ
19
Page 64

Обслуживание
Очистка разъемов
При частом отсоединении разъемы
загрязняются.
Чтобы снизить уровень загрязнения,
периодически проводите очистку разъемов
с помощью ватных валиков или ткани,
смоченных спиртом, соблюдая при этом
меры предосторожности во избежание
повреждения разъемов.
РУCCKИЙ
Разъем
Конденсация влаги
Влага может конденсироваться на линзе
внутри проигрывателя компакт-дисков в
следующих случаях:
• После включения автомобильного
обогревателя.
• При повышении влажности внутри
автомобиля.
Конденсация влаги может привести к
неисправности проигрывателя компактдисков. В этом случае извлеките диск
и оставьте приемник включенным на
несколько часов, чтобы испарилась влага.
Хранение дисков в чистом виде
Воспроизведение грязного диска
может быть некорректным.
Если диск загрязнится, протрите
его мягкой тканью по прямой
линии от центра к краю.
• Не используйте растворитель (например,
обычное средство для чистки кассет,
распыляемые средства, разбавитель,
бензин и т. д.) для чистки дисков.
Прослушивание новых дисков
Вблизи внутреннего и внешнего
краев новых дисков иногда
бывают грубые выступы. Такой
диск не может быть загружен в
приемник.
Чтобы удалить такие пятна, потрите их
карандашом или шариковой ручкой и т. д.
Как обращаться с дисками
При извлечении диска из
футляра нажмите на
центральный держатель
футляра и снимите диск,
удерживая его за края.
• Всегда удерживайте диск за
края. Не прикасайтесь к поверхности, на
которой находится запись.
Чтобы поместить диск в футляр, аккуратно
установите диск на центральный держатель
(стороной с изображением вверх).
• После прослушивания обязательно
помещайте диски в футляры.
Не используйте следующие диски:
Изогнувшийся
диск
20
Центральный
держатель
Диск с
наклейкой
Диски с
остатками
наклейки
Диск
Диск с
наклеиваемой
этикеткой
Page 65

Дополнительная информация о приемнике
Основные операции
Выключение питания
•
Если питание отключается во время
прослушивания диска, при последующем
включении питания воспроизведение диска
начнется с того места, где оно было остановлено.
Операции с тюнером
Сохранение радиостанций
•
Во время поиска SSM...
–
Все ранее сохраненные радиостанции
удаляются, и сохранение радиостанций будет
выполняться заново.
–
Выполняется программирование принимаемых
радиостанций для кнопок № 1 (наименьшая
частота) - № 6 (наибольшая частота).
–
По завершении использования функции SSM
будет выполнена автоматическая настройка на
радиостанцию, сохраненную под номером 1.
•
В режиме сохранения радиостанций вручную
ранее запрограммированная радиостанция
удаляется, если сохранение новой радиостанции
выполняется с использованием того же
запрограммированного номера.
Операции с FM RDS
•
Для правильной работы функции сетьотслеживающего приема требуется два типа
сигналов RDS — PI (идентификация программы)
и AF (альтернативная частота). Если прием
указанных данных осуществляется неправильно,
функция сеть-отслеживающего приема не будет
работать.
•
Если осуществляется прием сообщений о
движении на дорогах, уровень громкости
(громкость TA) автоматически меняется на
запрограммированный.
Операции с дисками
Общие сведения
•
Данный приемник предназначен для
воспроизведения компакт-дисков, а также дисков
однократной или многократной записи в формате
звукового компакт-диска (CD-DA).
•
Если диск загружен, при выборе “CD” в качестве
источника начинается воспроизведение диска.
Установка диска
•
Если диск вставлен неправильной стороной, он
автоматически извлекается.
•
Не устанавливайте диски диаметром 8 см
(компакт-диски с одиночными композициями) и
диски необычной формы (сердце, цветок и т.д.) в
загрузочный отсек.
Воспроизведение компакт-дисков
однократной и многократной записи
•
Используйте только “завершенные” компакт-
диски однократной и многократной записи.
•
На данном приемнике возможно воспроизведение
дисков с несколькими сеансами записи; однако,
незавершенные сеансы будут пропускаться при
воспроизведении.
•
Некоторые компакт-диски однократной или
многократной записи не воспроизводятся на
данном приемнике в связи с их особенностями, а
также по следующим причинам:
– Диски загрязнены или поцарапаны;
–
На линзе внутри приемника присутствует
конденсат влаги;
–
Линза звукоснимателя загрязнена;
–
При записи файлов на компакт-диск
однократной или многократной записи
использовался метод пакетной записи;
–
Некорректное состояние записи (отсутствие
данных и т.д.) или носителя (пятно, царапина,
деформация и т.д.).
•
Для считывания дисков многократной записи
может потребоваться больше времени, так как
они имеют меньшую отражательную способность
по сравнению с обычными компакт-дисками.
•
Не используйте следующие компакт-диски
однократной или многократной записи:
–
Диски с наклейками, этикетками или
защитными пленками на поверхности;
–
Диски, на которых можно печатать этикетки с
помощью струйного принтера.
Использование этих дисков при высоких
температурах или высокой влажности может
привести к их неисправности или повреждению.
РУCCKИЙ
Смена источника звука
•
При смене источника сигнала воспроизведение
прекращается (извлечения диска не происходит).
При повторном выборе “CD” в качестве
источника звука воспроизведение диска начнется
с того места, где оно было остановлено.
Извлечение диска
•
Если в течение 15 секунд извлеченный диск не
будет вынут, он автоматически помещается
обратно в загрузочный отсек в целях защиты от
загрязнения. (Воспроизведение диска при этом не
начинается).
Общие настройки—PSM
•
Если для элемента “AMP GAIN” настройка “HIGH
PWR” меняется на “LOW PWR” и при этом для
уровня громкости установлено значение больше
“VOL 30”, приемник автоматически меняет
уровень громкости на “VOL 30”.
21
Page 66

Устранение проблем
Не всякое нарушение в работе устройства является результатом его неисправности. Перед
обращением в сервисный центр проверьте следующее.
Симптомы Причины Способы устранения
• Не слышен звук
динамиков.
• Приемник не работает. Встроенный
Общие сведения
РУCCKИЙ
• Автоматическое
программирование SSM
не работает.
FM/AM
• Статические помехи при
прослушивании радио.
• Диск автоматически
извлекается.
• Не воспроизводятся
компакт-диски
однократной и
многократной записи.
• Не осуществляется
переход на дорожки
компакт-дисков
однократной
и многократной записи.
• Диск не может быть
воспроизведен и или
извлечен.
Воспроизведение диска
• Звук, записанный
на диске, иногда
прерывается.
• На дисплее появляется
надпись “NO DISC” (нет
диска).
Установлен на минимальный
уровень громкости.
Неправильные
соединения.
микрокомпьютер
может неправильно
функционировать из-за
шума и т.п.
Слишком слабые сигналы. Сохраните радиостанции
Антенна вставлена
неплотно.
Диск вставлен
неправильной стороной.
Сеанс компакт-диска
однократной или
многократной записи не
завершен.
Диск заблокирован. Снимите блокировку с
Возможно, проигрыватель
компакт-дисков работает
неправильно.
Неровная дорога. Остановите
Диск поцарапан. Смените диск.
Неправильные соединения.
Нет диска в загрузочном
отсеке.
Неправильно вставлен диск.
Отрегулируйте до
оптимального уровня.
Проверьте кабели и
соединения.
Перенастройте приемник
(см. стр. 2).
вручную.
Плотно подсоедините
антенну.
Вставьте диск правильно.
• Вставьте компактдиск однократной или
многократной записи с
закрытым сеансом.
• Закройте сеанс компактдиска однократной или
многократной записи с
помощью устройства,
которое использовалось
для записи.
диска (см. стр. 14).
Принудительно извлеките
диск (см. стр. 2).
воспроизведение на время
езды по неровной дороге.
Проверьте кабели и соединения.
Поместите диск в
загрузочный отсек.
Вставьте диск правильно.
22
Page 67

Технические характеристики
БЛОК УСИЛИТЕЛЕЙ ЗВУКА
Максимальная выходная мощность:
Передние: 45 Вт на каждый канал
Задние: 45 Вт на каждый канал
Длительная выходная мощность (RMS):
Передние: 17 Вт на канал в при 4 Ω,
от 40 Гц до 20 000 Гц и не
более чем 0,8% общего
гармонического искажения.
Задние: 17 Вт на канал в при 4 Ω, от
40 Гц до 20 000 Гц и не
более чем 0,8% общего
гармонического искажения.
Импеданс нагрузки:
Диапазон настройки тембра:
Низкие частоты: ±10 дБ при 100 Гц
Верхние частоты: ±10 дБ при 10 кГц
Частотная характеристика:
от 40 Гц до 20 000 Гц
Отношение сигнал/помеха: 70 дБ
Уровень линейного выхода/полное
сопротивление:
нагрузка 2,0 В/20 kΩ (полная шкала)
Импеданс выходного сигнала: 1 kΩ
4 Ω (допустимо от 4 Ω до 8 Ω)
Число каналов: 2 канала (стерео)
Частотная характеристика: от 5 Гц до 20 000 Гц
Динамический диапазон: 96 дБ
Отношение сигнал/помеха: 98 дБ
Коэффициент детонации: в пределах допусков
измерительной аппаратуры
ОБЩИЕ ТРЕБОВАНИЯ
Электрическое питание:
Рабочее напряжение:
постоянное напряжение 14,4 В
(допустимо от 11 В до 16 В)
Система заземления: отрицательное заземление
Допустимая рабочая температура:
0°C до +40°C
Габариты, мм (Ш × В × Г)
Монтажный размер (прибл.):
182 мм × 52 мм × 150 мм
Размер панели (прибл.):
188 мм × 58 мм × 11 мм
Масса (прибл.):
1,3 кг (без дополнительных
принадлежностей)
Конструкция и технические требования могут
быть изменены без уведомления.
БЛОК РАДИОПРИЕМНИКА
Диапазон частот:
FM: от 87,5 МГц до 108,0 МГц
AM: (СВ) от 522 кГц до 1 620 кГц
(ДВ) от 144 кГц до 279 кГц
[Радиоприемник в диапазоне FM]
Полезная чувствительность:
11,3 dBf (1,0 µВ/75 Ω)
50 дБ пороговая чувствительность:
16,3 dBf (1,8 µВ/75 Ω)
Альтернативная отстройка (400 кГц): 65 дБ
Частотная характеристика:
от 40 Гц до 15 000 Гц
Разделение стереоканалов: 30 дБ
Коэффициент захвата: 1,5 дБ
[Радиоприемник в диапазоне CB]
Чувствительность: 20 µВ
Избирательность: 35 дБ
[Радиоприемник в диапазоне ДB]
Чувствительность: 50 µВ
БЛОК ПРОИГРЫВАТЕЛЯ КОМПАКТ-
ДИСКОВ
Тип: проигрыватель компакт-дисков
Система обнаружение сигнала:
бесконтактное оптическое считывание
(полупроводниковый лазер)
В соответствии с Законом Российской
Федерации “О защите прав потре бителей” срок
службы (годности) данного товара “по истечении
которого он может представлять опасность
для жизни, здоровья потребителя, причинять
вред его имуществу или окружающей среде”
составляет семь (7) лет со дня производства.
Этот срок является временем, в течение которого
потребитель данного товара может безопасно им
пользоваться при условии соблюдения ин струк ции
по эксплуатации данного товара, проводя
необходимое обслуживание, включающее замену
расходных материалов и/или соответствующее
ремонтное обеспечение в специализированном
сервисном центре.
Дополнительные косметические материалы
к данному товару, поставляе мые вместе с ним,
могут храниться в течение двух (2) лет со дня его
производства.
Срок службы (годности), кроме срока
хранения дополнительных космети ческих
материалов, упомянутых в предыдущих двух
пунктах, не затрагивает никаких других прав
потребителя, в частности, гарантийного
свидетельства JVC, которое он может получить в
соответствии с законом о правах
потребителя или других законов, связанных с ним.
РУCCKИЙ
23
Page 68

Having TROUBLE with operation?
Please reset your unit
Refer to page of How to reset your unit
Haben Sie PROBLEME mit dem Betrieb?
Bitte setzen Sie Ihr Gerät zurück
Siehe Seite Zurücksetzen des Geräts
Затруднения при эксплуатации?
Пожалуйста, перезагрузите Ваше устройство
Для получения информации о перезагрузке Вашего
устройства обратитесь на соответствующую страницу
EN, GE, RU
© 2004 Victor Company of Japan, Limited
1004DTSMDTJEIN
 Loading...