

Page 1
POWER
SP
VCR
MENU
CH
OK
REC
REW PLAY FF
PAUSESTOP/EJECT
VIDEO (MONO)L—AUDIO—R
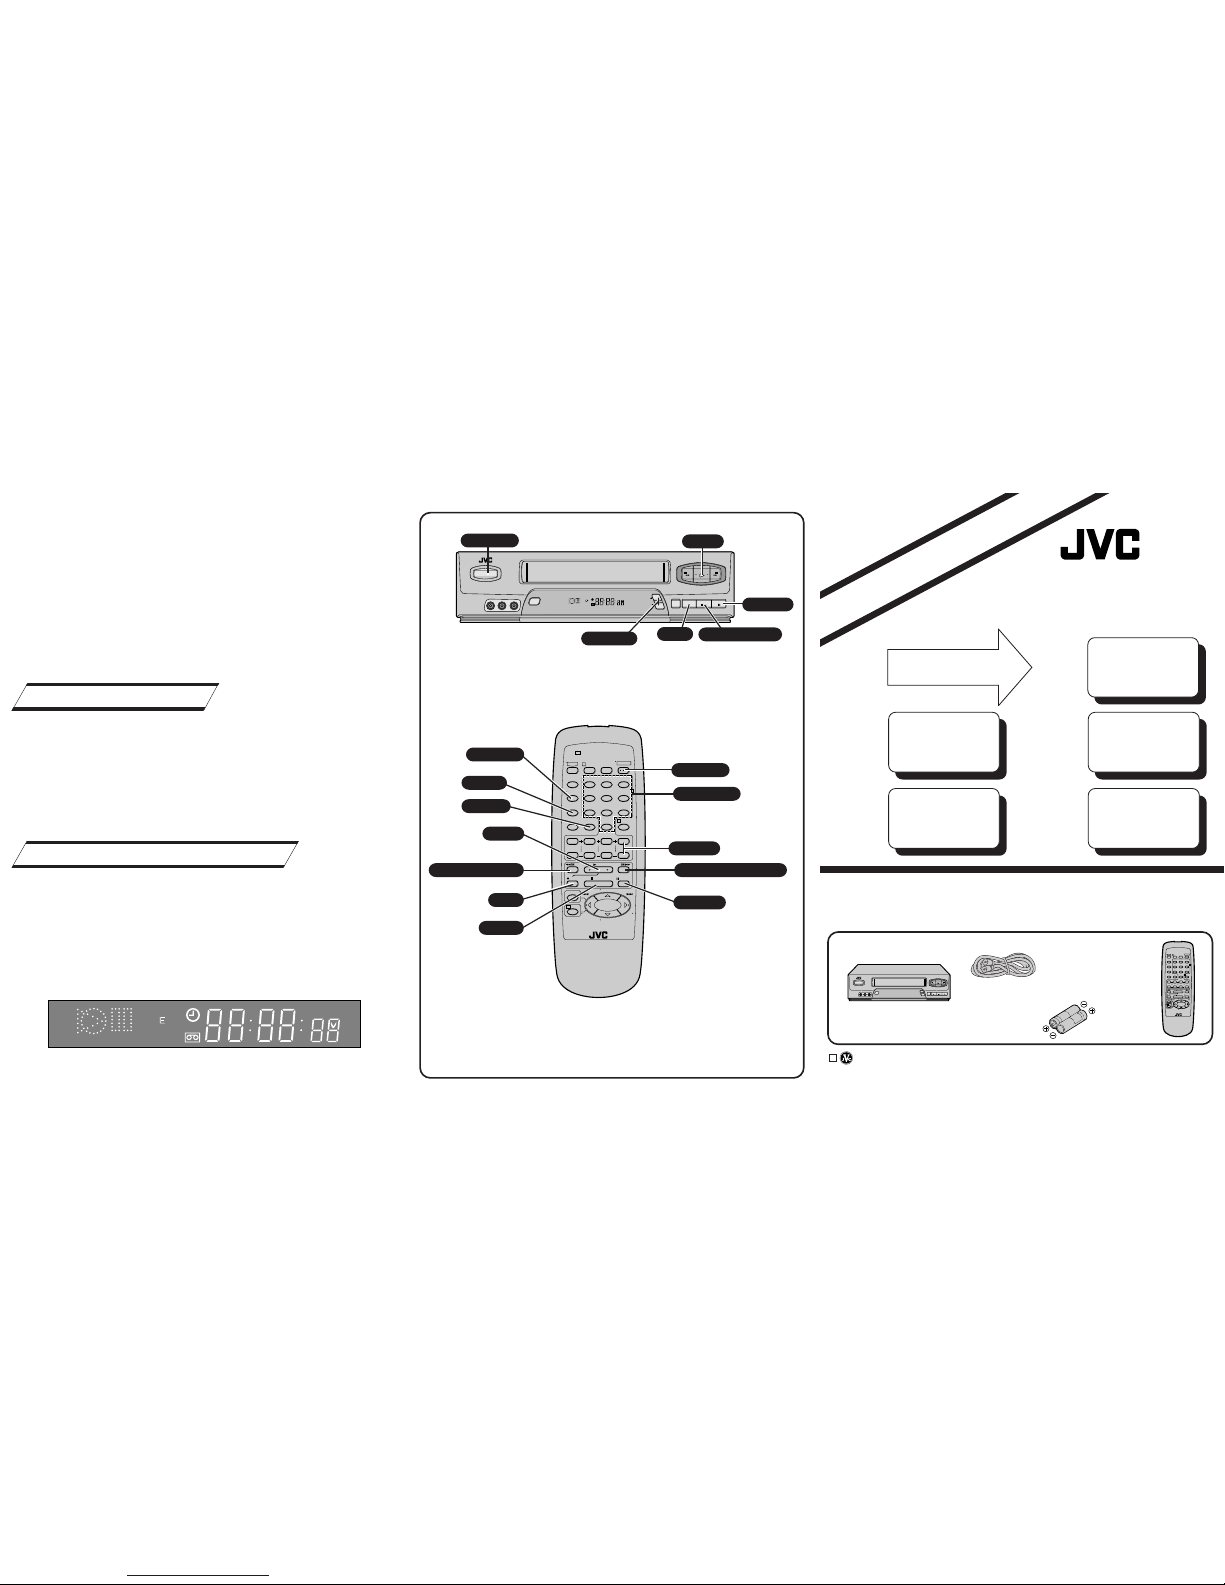
QUICK START*
A GUIDE TO EASY SET UP AND USE
CHECK
PACKAGE
CONTENTS
1
1
The Path To Enjoyment
Starts Here . . .
Dear Customer,
Thank you for purchasing
this JVC Video Cassette
Recorder.
SET CLOCK
AND
TUNER
3
3
SITUATE AND
CONNECT
VCR
2
2
5
5
4
4
RECORD
A
PROGRAM
PLAY BACK
A
TAPE
1
1
MAKE SURE THAT YOUR PACKAGE
CONTAINS:
* Please refer to the HR-A51U’s instruction manual for more
detailed information.
4
4 WATCH A RECORDED PROGRAM
MONO/Hi-Fi/SUPER VHS
VIDEO CASSETTE RECORDERS
U
Printed in Malaysia
0599 IYV
*MW*
PJ
COPYRIGHT © 1999 VICTOR COMPANY OF JAPAN, LTD.
VIDEO CASSETTE
RECORDER
123
45
0
6
7 8 9
1
2
4
3
–
+
LPT0296-002A
* You can use the available buttons on the remote control or on the VCR.
1 Load a cassette with the label facing out and the window facing up.
2 Press REW or FF (remote) to find program start point.
3 Press PLAY to start playback.
4 Press STOP (remote) or STOP/EJECT (VCR), then press STOP/EJECT to remove the
cassette.
b–INST ANT TIMER RECORDING
a–BASIC RECORDING
5
5
RECORD A PROGRAM
* You cannot perform ITR using the remote control.
1 Press REC to start recording.
2 Press REC to engage ITR. “0:30” appears in the VCR display.
3 To extend duration in increments of 30 minutes, press REC as many times as necessary.
* You can use the available buttons on the remote control or on the VCR.
1 Load a cassette as above.
2 Press CH, or press the appropriate NUMBER keys (remote) and press ENTER (remote),
to select the recording channel.
3 Press SP/EP (remote) to set the recording speed.
4 Press REC and PLAY together (remote) or REC (VCR) to start recording.
5 Press PAUSE to stop recording temporarily, and press PLAY to resume.
6 Press STOP or STOP/EJECT, then press STOP/EJECT to remove the cassette.
SP P
VCR
POWER PLAY
RF CABLE (F-TYPE)
“AA” BATTERY x 2
INFRARED
REMOTE
CONTROL
UNIT
STOP/EJECT
PAUSE
REC
CH
䊱
䊲
PROG.
CHECK
PROG.
TV operation – Press and hold
TV button, then press POWER,
TV CH +/–, VOL +/–, TV/VCR
POWER
TV
12 3
45
0
AUX
6
78
DAILY 9WEEKLY
DISPLAY
TV/VCR
SP/EP
CANCEL
START
REW FF
PLAY
REC
MENU
OK
STOP
TV CH +
TV CH –
TV
+ VOL
TV
VOL –
PAUSE
STOP DATE CH
C.RESET OSD
ENTER
TIMER
1
2
4
3
SHUTTLE PLUSSHUTTLE PLUS
LP20034-020
–
+
REC
POWER
CH
+/–
PLAY
FF (Fast-Forward)
PAUSE
TV/VCR
SP/EP
ENTER
STOP
NUMBER
REW (Rewind)
Page 2
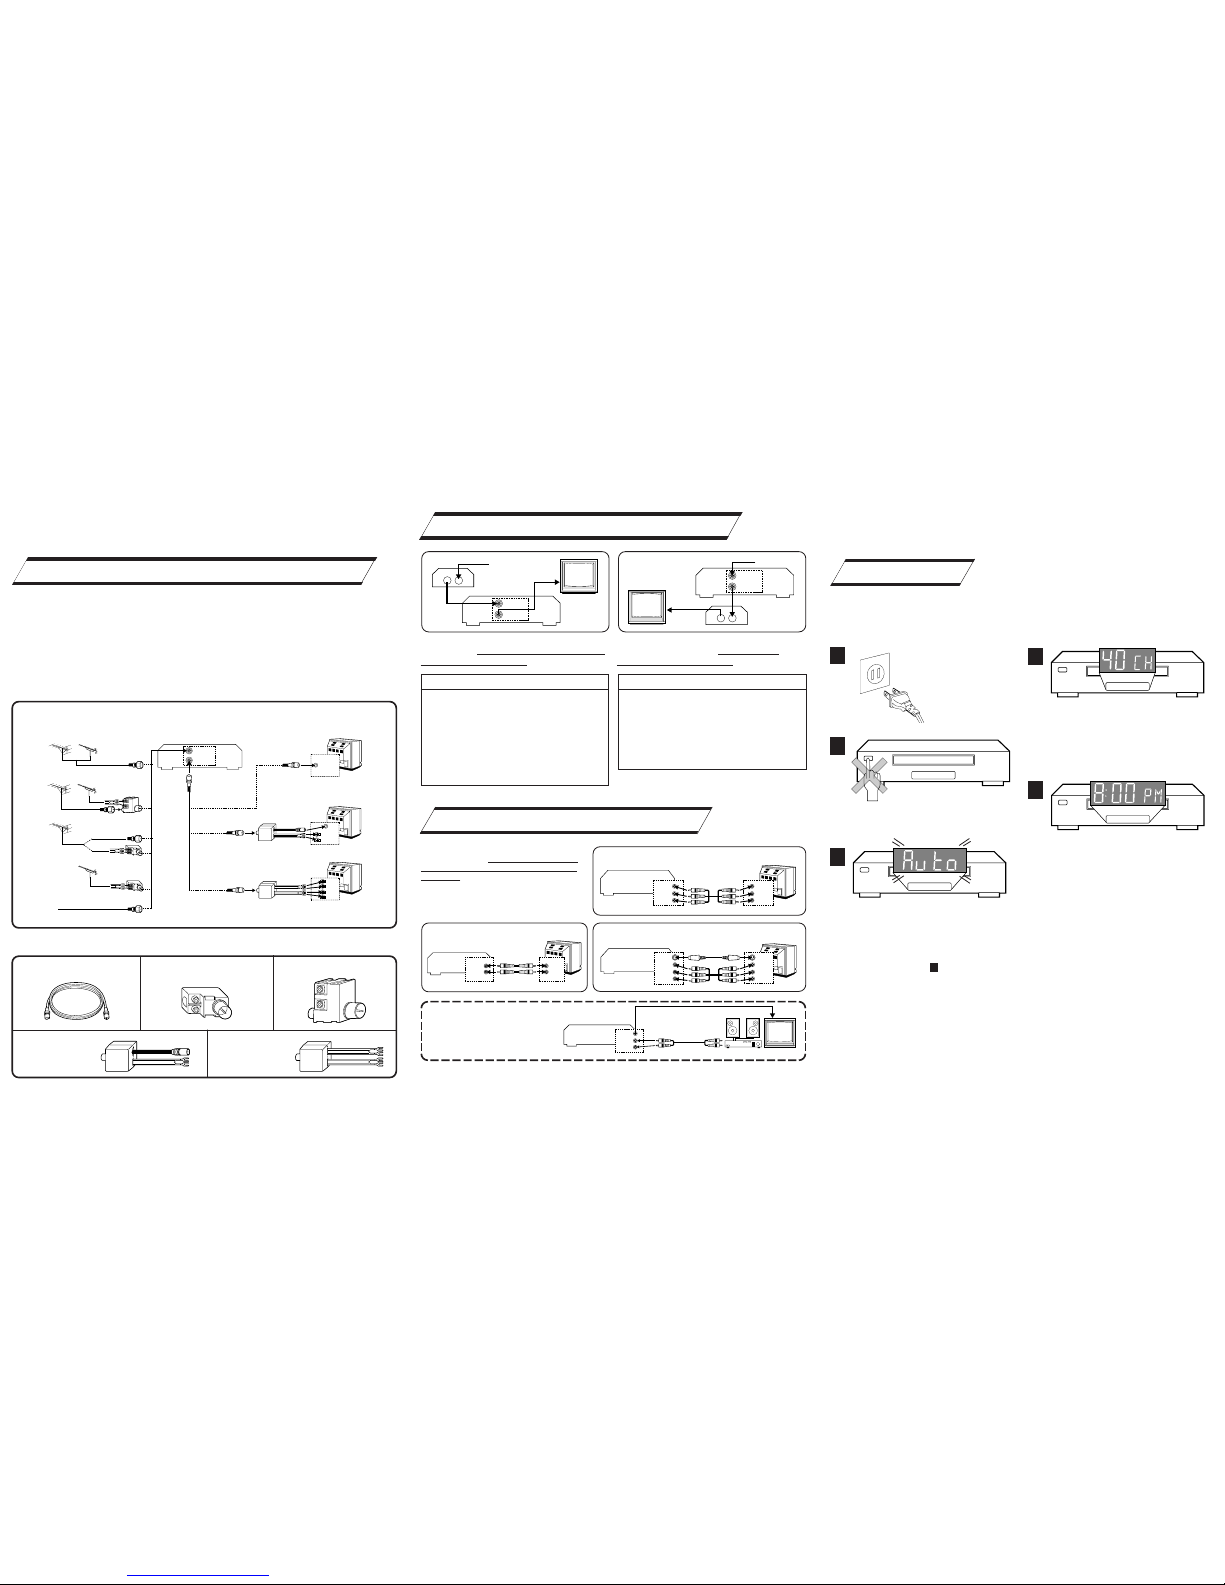
ANT. IN
RF OUT
VHF/UHF
VHF
VHF
UHF
UHF
a–BASIC ANTENNA/CABLE CONNECTION
SITUATE AND CONNECT YOUR
NEW VCR
2
2
b–CATV CONVERTER CONNECTION
PLUG & PLAY
3
3
SET YOUR VCR'S CLOCK AND
TUNER
1 Place the VCR on a stable, horizontal
surface.
2 Disconnect your antenna or cable line
from your TV.
3 Connect your antenna to your VCR.
4 Connect your VCR to your TV.
䡲 Antenna Splitter 䡲 Antenna Splitter
䡲 VHF/UHF Antenna Mixer
䡲 RF Cable
䡲 300-75 ohm Matching
Transformer
● CONNECTORS WHICH ARE OR MAY BE REQUIRED:
CABLE TV LINE
Note:
Exact connector positions and names may differ.
UHF ONLY
VHF ONLY
SEPARATE VHF/UHF
COMBINED VHF/UHF
Back of VCR (example only) Back of TV (example only)
RF CONNECTION
5 After completing the basic connections:
● If you’re using a Cable Box, . . .
. . . go to 2b (CATV CONVERTER
CONNECTION) .
● If you’re using an AV connection, . . .
. . . go to 2c (AUDIO/VIDEO
CONNECTIONS).
● If you’re using an RF connection, . . .
. . . go directly to 3 (PLUG & PLAY).
CATV Input
From
Cable
Box
To TV
Cable
Box
TV
VCR
With this connection you can view/record any
cable channel including scrambled channels to
which you have subscribed.
CATV Input
From VCR
Cable
Box
To TV
TV
VCR
With this connection, you can view one
scrambled cable channel while recording
another unscrambled channel.
To watch TV with this type of connection
1
Press TV/VCR on remote to engage VIDEO
mode.
2 Tune TV to VCR output channel
(3, 4 or AV mode).
3 Tune VCR to Cable Box output channel.
4 Select desired channel on Cable Box.
•You can only view the channel you’re
recording.
•You cannot change channels with the
VCR remote control.
To watch TV with this type of connection
1
Press CH or NUMBER keys to select desired
channel for recording.
2 Press TV/VCR to engage TV mode.
3 Tune TV to Cable Box output channel.
4 Select desired channel on Cable Box.
•You cannot record scrambled channels.
•To play back a tape, you must tune the Cable
Box to the VCR output channel.
c–AUDIO/VIDEO CONNECTIONS
To Listen To VCR Sound Through A
Component Stereo Audio System,
Connect As Shown
AV connection methods differ from one type
of VCR to another. First, for any TV and VCR
type, connect your VCR to your TV using RF
connection. Then make AV connections
following one of the methods pictured to the
right.
After making the connections, go to 3
(PLUG
& PLAY)
.
MONAURAL VHS VCR 佡 AV TV
VIDEO OUT
AUDIO OUT
VIDEO IN
AUDIO IN
SUPER VHS VCR 佡 AV STEREO TV WITH S-VIDEO
INPUT TERMINALS
VIDEO IN
S-VIDEO IN
VIDEO OUT
S-VIDEO OUT
R
AUDIO INAUDIO OUT
L
R
L
Hi-Fi VHS VCR 佡 AV STEREO TV
VIDEO INVIDEO OUT
R
AUDIO INAUDIO OUT
L
R
L
AMP
VCR
TV
Monaural deck owners:
Connect to VCR's AUDIO
OUT
The VCR's clock and tuner channels are set automatically when the VCR is plugged into the AC
outlet.
If you use a cable box, Plug & Play will not function; set the clock and tuner channels manually.
(
墌 pg.11 – 15 of the HR-A51U’s instruction manual)
1
Plug the VCR into the
AC outlet.
2
Don’t press any buttons on the VCR or remote
during auto setup.
3
“AUTO” blinks while the VCR automatically
sets the clock using information provided by
the local PBS channel.
NOTES:
● If the time displayed in is incorrect, perform the Semi-Auto or Manual Clock Set procedure
(refer to page 12 or 13 of the HR-A51U’s instruction manual). Auto channel set has already
taken place, and is not affected.
● There are some PBS channels that do not transmit clock setting data. If your antenna cable is
properly connected and “– – : – –” is displayed, perform the Manual Clock Set procedure (refer
to page 13 of the HR-A51U’s instruction manual). Auto channel setting has not yet taken place,
so please also perform the “Set Receivable Channels” procedure (refer to page 14 of the HRA51U’s instruction manual).
5
4
During auto channel setting, the channel
numbers are displayed as they are scanned and
set. Receivable channels are automatically
assigned to CH buttons, and non-receivable
channels are skipped.
5
When setting is complete, the VCR displays the
current time. You can now use your VCR.
INOUT
ANT. IN
RF OUT
INOUT
ANT. IN
RF OUT
VIDEO OUT
AUDIO OUT
R
L
 Loading...