

Page 1
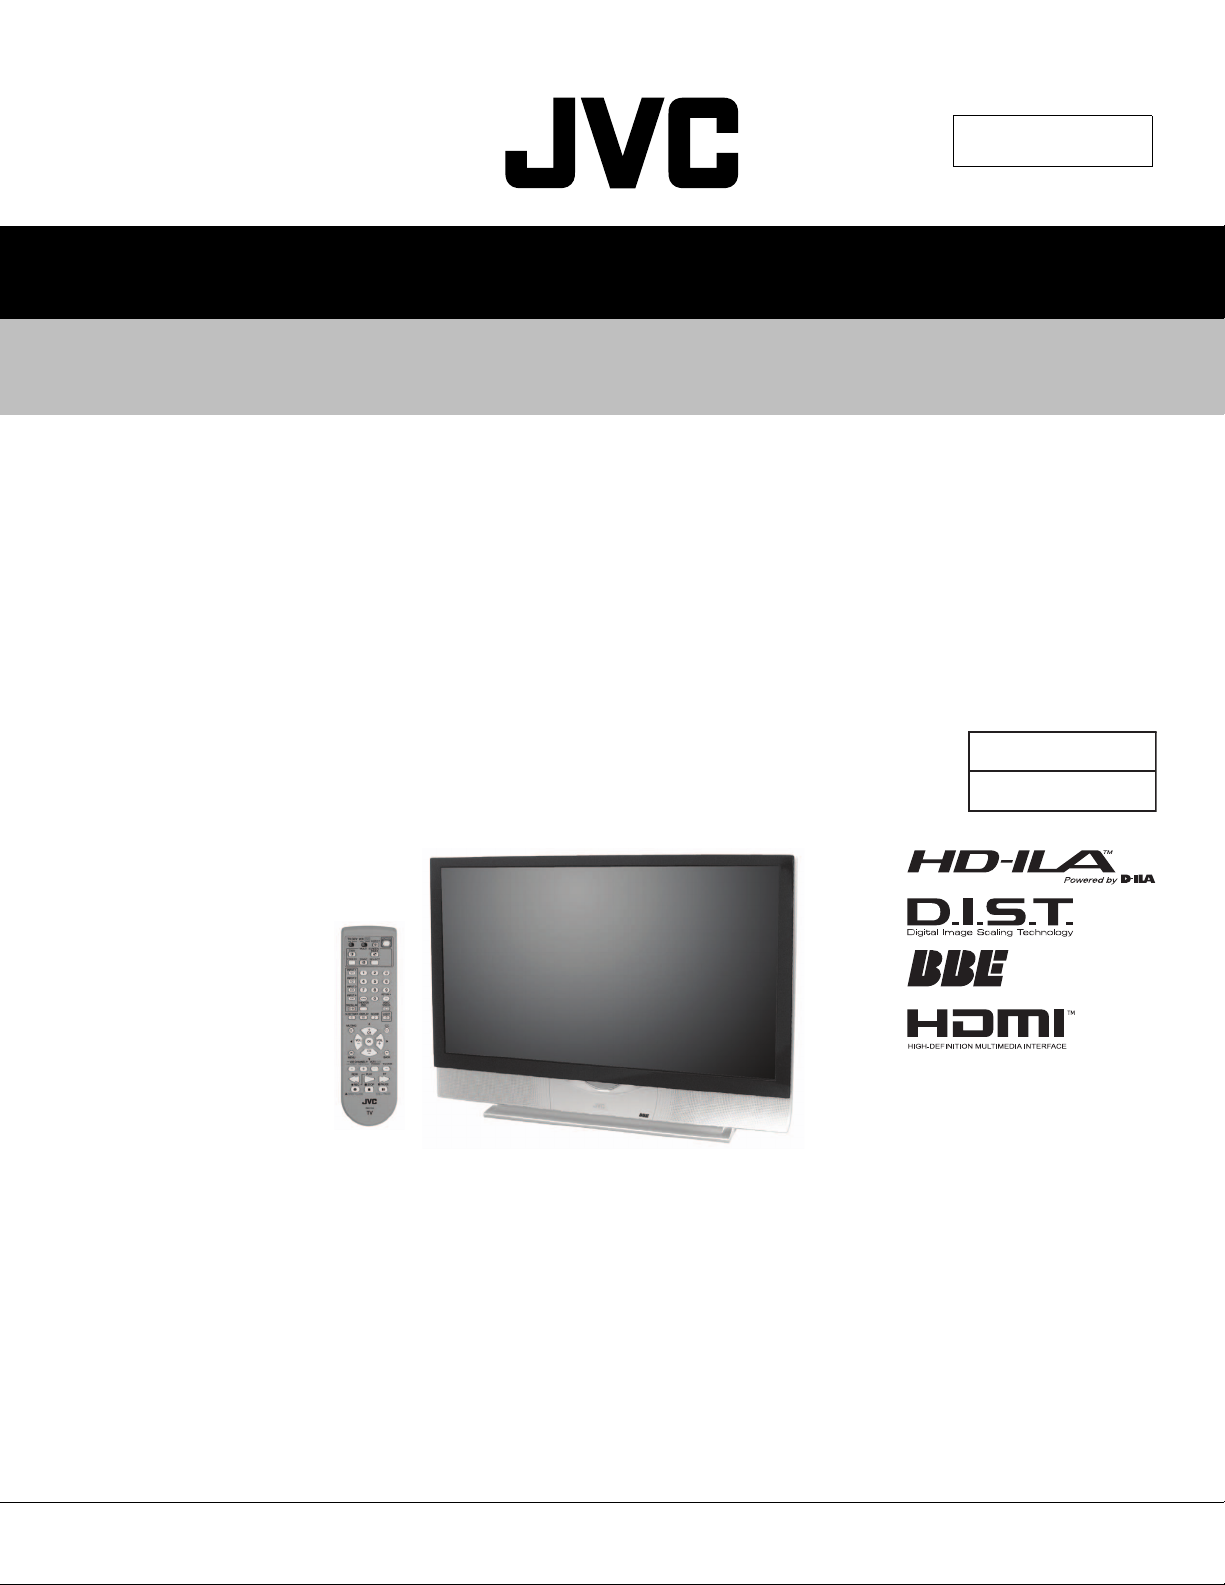
52096200302
REVISED
SERVICE MANUAL
REAR PROJECTION TELEVISION
HD-52Z575, HD-52Z585, HD-61Z575, HD-61Z585
BASIC CHASSIS
T A B L E O F C O N T E N T S
1 PRECAUTIONS . . . . . . . . . . . . . . . . . . . . . . . . . . . . . . . . . . . . . . . . . . . . . . . . . . . . . . . . . . . . . . . . . . . . . . . 1-3
2 SPECIFIC SERVICE INSTRUCTIONS . . . . . . . . . . . . . . . . . . . . . . . . . . . . . . . . . . . . . . . . . . . . . . . . . . . . . . 1-7
3 DISASSEMBLY . . . . . . . . . . . . . . . . . . . . . . . . . . . . . . . . . . . . . . . . . . . . . . . . . . . . . . . . . . . . . . . . . . . . . . 1-11
4 ADJUSTMENTS . . . . . . . . . . . . . . . . . . . . . . . . . . . . . . . . . . . . . . . . . . . . . . . . . . . . . . . . . . . . . . . . . . . . . . 1-23
5 TROUBLESHOOTING . . . . . . . . . . . . . . . . . . . . . . . . . . . . . . . . . . . . . . . . . . . . . . . . . . . . . . . . . . . . . . . . . 1-34
RP2
COPYRIGHT © 2004 Victor Company of Japan, Limited.
No.YA092B
2004/8
Page 2

SPECIFICATION
Contents
Items
Dimensions (W x H x D) 126.4cm x 91.4cm x 41.2cm
(49-7/8" x 36 x 16-1/4")
Mass 37.8kg (84lbs) 44.3kg (98lbs)
TV RF System CCIR (M)
Color System NTSC
Sound System BTSC (Multi Channel Sound)
Teletext System Closed Caption (T1-T4 / CC1-CC4)
VHF Low
VHF High
TV Receiving
Channels and
Frequency
TV / CATV Total Channel 180 Channels
Intermediate
Frequency
Color Sub Carrier 3.58MHz
Power Input AC120V, 60Hz
Power Consumption 195W (Max)
Projection Source 110W High-pressure mercury lamp
Projection Device D-ILA device (Reflection active matrix type LCD) x 3(R / G /B)
Resolution Total=H:1312 x V:800 [ Effective =H:1280 x V:720 ]
Screen Transparent screen (unitized fresnel lens / lenticular lens), aspect ratio 16:9
Screen Size 52" (132cm) Measured diagonally
Speaker 10cm round x 2 (Oblique corn)
Audio Power Output 10W+10W
Antenna Terminal (VHF/UHF) 75Ω unbalanced, coaxial, F-type connector x 1
External Input
[INPUT-1/2/3/4]
Digital Input Video
Audio Output (VARI/FIX) VARI : More than 0 to 1000mV(rms) (+2.2dBs)
Sub woofer Output More than 0 to 1000mV(rms) (+2.2dBs) (RCA pin jack x1)
Center channel Input 500mV(rms) (-4dBs), high impedance (RCA pin jack x1)
AV Compulink lll 3.5mm mini jack x 1
Remote Control Unit RM-C15G (AA/R6/UM-3 battery x 2)
Design & specifications are subject to change without notice.
1-2 (No.YA092B)
Component Video
Video IF
Sound IF
S-Video
[INPUT-1/3/4]
[INPUT-1/2]
720p/1080i
480p/480i
54MHz~88MHz (02ch~06ch)
174MHz~216MHz (07ch~13ch)
UHF
470MHz~806MHz (14ch~69ch)
CATV 54MHz~804MHz
Low Band : 02~06 by 02~06
High Band : 07~13 by 07~13
Mid Band : A~I by 14~22
Super Band : J~W by 23~36
Hyper Band : W+1~W+28 by 37~64
Ultra Band : W+29~W+84 by 65~94, 100~125
Sub Mid Band : A-8, A-4~A-1 by 01, 96~99
45.75MHz
41.25MHz (4.5MHz)
H:115.1cm(45-3/8") x V:64.8cm(25-5/8")
Video
1V(p-p), 75 Ω, negative sync (RCA pin jack x 4)
Audio
500mV(rms) (-4dBs), high impedance (RCA pin jack x 8)
Mini-DIN 4pin connector x 3
Y: 1V(p-p), positive, 75Ω, negative sync
C: 0.286V(p-p) (burst signal)
RCA pin jack x 6
Y: 1V(p-p), (Sync signal : ±0.35V, 3-value sync.), 75Ω
Pb/Pr : ±0.35V, 75Ω
Y: 1V(p-p), positive (negative sync), 75Ω
Pb/Pr : 0.7V(p-p), 75Ω
HDMI connector x 1
(This Digital-in terminal is not compatible with picture signals of personal computer.)
HDMI connector
Audio
Digital : HDMI connector
Analog : 500mV(rms) (-4dBs), high impedance (RCA pin jack x 2)
FIX : 500mV(rms) (-4dBs), low impedance (1kHz when modulated 100%)
(RCA pin jack x 2)
HD-52Z575
HD-52Z585
HD-61Z575
HD-61Z585
145.6cm x 104.2cm x 47cm
(57-3/8" x 41 x 18-1/2")
61" (155cm) Measured diagonally
H:135cm(53-1/4") x V:76cm(30")
Page 3
SECTION 1
PRECAUTIONS
1.1 SAFETY PRECAUTIONS
(1) The design of this product contains special hardware, many circuits
and components specially for safety purposes. For continued
protection, no changes should be made to the original design unless
authorized in writing by the manufacturer. Replacement parts must
be identical to those used in the original circuits. Service should be
performed by qualified personnel only.
(2) Alterations of the design or circuitry of the products should not be
made. Any design alterations or additions will void the manufacturer's
warranty and will further relieve the manufacturer of responsibility for
personal injury or property damage resulting therefrom.
(3) Many electrical and mechanical parts in the products have special
safety-related characteristics. These characteristics are often not
evident from visual inspection nor can the protection afforded by them
necessarily be obtained by using replacement components rated for
higher voltage, wattage, etc. Replacement parts that have these
special safety characteristics are identified in the parts list of Service
manual. Electrical components having such features are
identified by shading on the schematics and by ( ) on the parts
list in Service manual. The use of a substitute replacement which
does not have the same safety characteristics as the recommended
replacement part shown in the parts list of Service manual may cause
shock, fire, or other hazards.
(4) Use isolation transformer when hot chassis.
The chassis and any sub-chassis contained in some products are
connected to one side of the AC power line. An isolation transformer
of adequate capacity should be inserted between the product and the
AC power supply point while performing any service on some
products when the HOT chassis is exposed.
(5) Don't short between the LIVE side ground and ISOLATED
(NEUTRAL) side ground or EARTH side ground when repairing.
Some model's power circuit is partly different in the GND. The
difference of the GND is shown by the LIVE : ( ) side GND, the
ISOLATED(NEUTRAL) : ( ) side GND and EARTH : ( ) side GND.
Don't short between the LIVE side GND and ISOLATED(NEUTRAL)
side GND or EARTH side GND and never measure with a measuring
apparatus (oscilloscope etc.) the LIVE side GND and
ISOLATED(NEUTRAL) side GND or EARTH side GND at the same
time.
If above note will not be kept, a fuse or any parts will be broken.
(6) The high voltage applied to the picture tube must conform with that
specified in Service manual. Excessive high voltage can cause an
increase in X-Ray emission, arcing and possible component damage,
therefore operation under excessive high voltage conditions should
be kept to a minimum, or should be prevented. If severe arcing
occurs, remove the AC power immediately and determine the cause
by visual inspection (incorrect installation, cracked or melted high
voltage harness, poor soldering, etc.). To maintain the proper
minimum level of soft X-Ray emission, components in the high
voltage circuitry including the picture tube must be the exact
replacements or alternatives approved by the manufacturer of the
complete product.
(7) If any repair has been made to the chassis, it is recommended that
the B1 setting should be checked or adjusted (See ADJUSTMENT
OF B1 POWER SUPPLY).
(8) Do not check high voltage by drawing an arc. Use a high voltage
meter or a high voltage probe with a VTVM. Discharge the picture
tube before attempting meter connection, by connecting a clip lead to
the ground frame and connecting the other end of the lead through a
10kΩ 2W resistor to the anode button.
(9) When service is required, observe the original lead dress. Extra
precaution should be given to assure correct lead dress in the high
voltage circuit area. Where a short circuit has occurred, those
components that indicate evidence of overheating should be
replaced. Always use the manufacturer's replacement components.
(10) Isolation Check
(Safety for Electrical Shock Hazard) After re-assembling the
product, always perform an isolation check on the exposed metal
parts of the cabinet (antenna terminals, video/audio input and output
terminals, Control knobs, metal cabinet, screwheads, earphone jack,
control shafts, etc.) to be sure the product is safe to operate without
danger of electrical shock.
a) Dielectric Strength Test
The isolation between the AC primary circuit and all metal
parts exposed to the user, particularly any exposed metal part
having a return path to the chassis should withstand a voltage
of 1100V AC (r.m.s.) for a period of one second.
(. . . . Withstand a voltage of 1100V AC (r.m.s.) to an appliance
rated up to 120V, and 3000V AC (r.m.s.) to an appliance rated
200V or more, for a period of one second.)
This method of test requires test equipment not generally
found in the service trade.
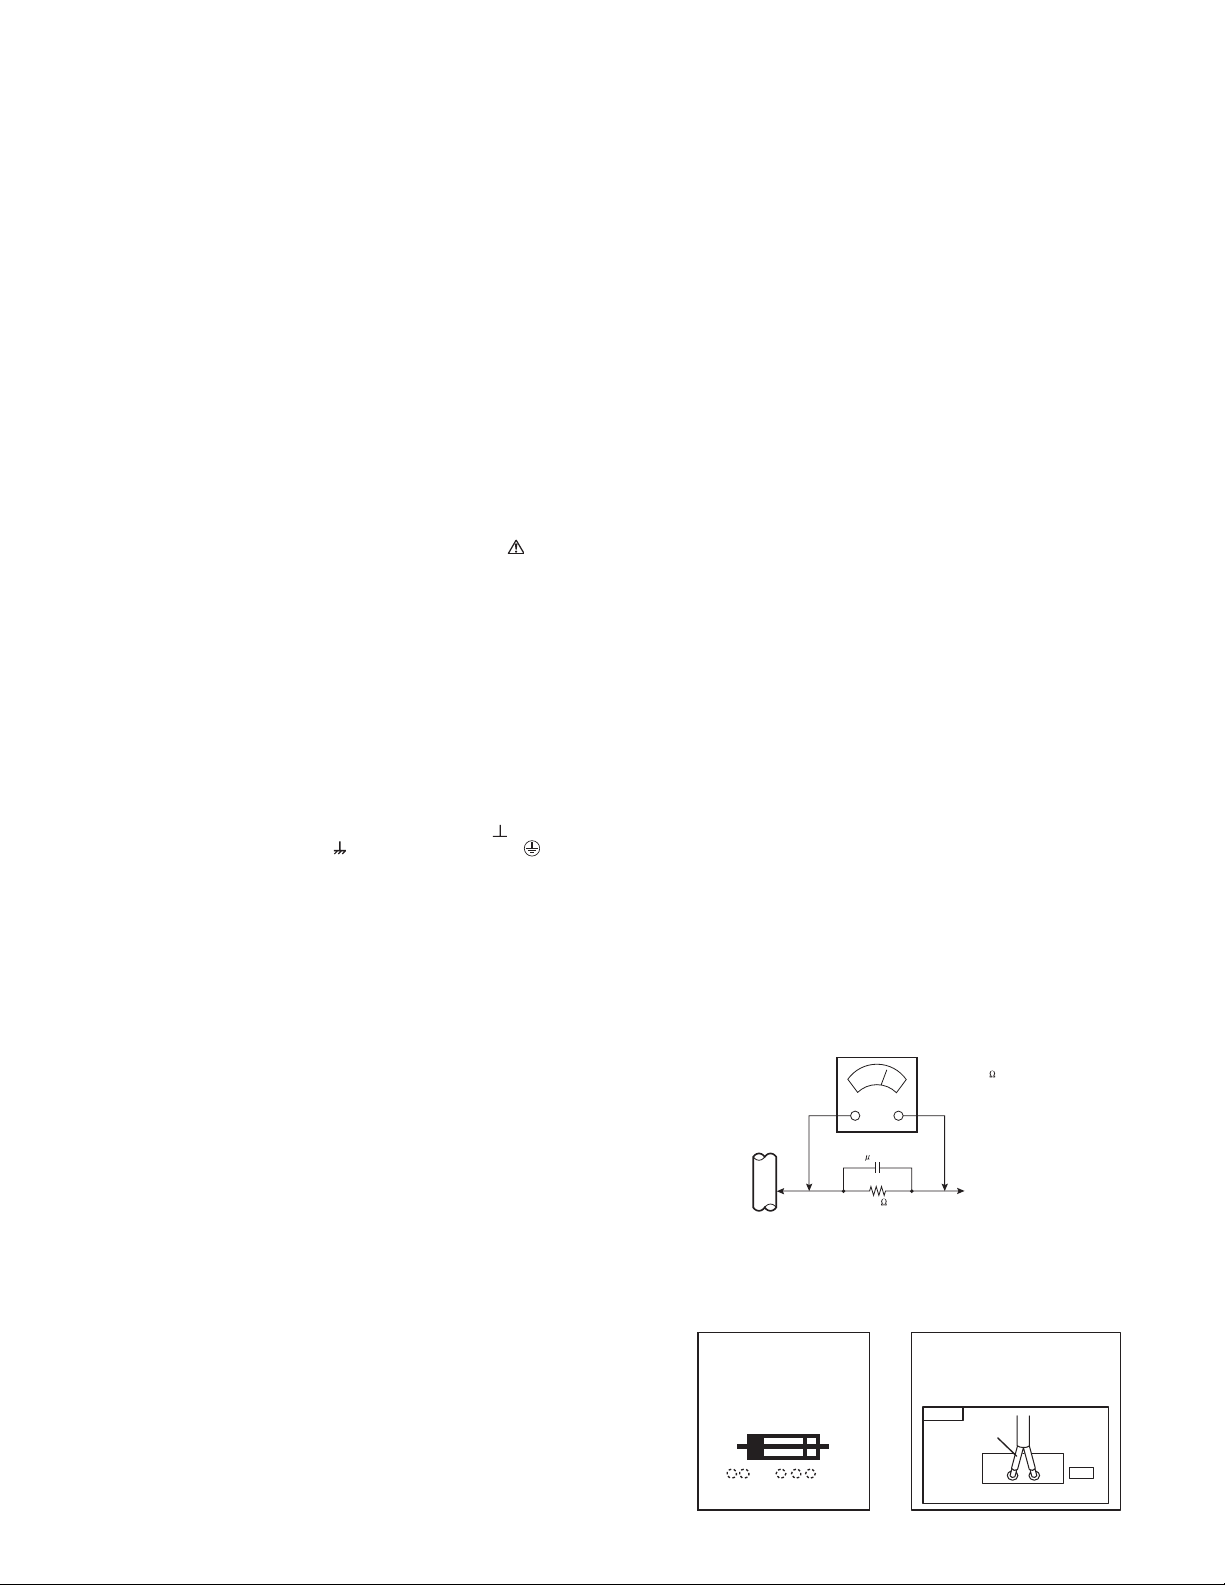
b) Leakage Current Check
Plug the AC line cord directly into the AC outlet (do not use a
line isolation transformer during this check.). Using a "Leakage
Current Tester", measure the leakage current from each
exposed metal part of the cabinet, particularly any exposed
metal part having a return path to the chassis, to a known good
earth ground (water pipe, etc.). Any leakage current must not
exceed 0.5mA AC (r.m.s.). However, in tropical area, this must
not exceed 0.2mA AC (r.m.s).
• Alternate Check Method
Plug the AC line cord directly into the AC outlet (do not use
a line isolation transformer during this check.). Use an AC
voltmeter having 1000
following manner. Connect a 1500
Ω per volt or more sensitivity in the
Ω 10W resistor paralleled
by a 0.15µF AC-type capacitor between an exposed metal
part and a known good earth ground (water pipe, etc.).
Measure the AC voltage across the resistor with the AC
voltmeter. Move the resistor connection to each exposed
metal part, particularly any exposed metal part having a
return path to the chassis, and measure the AC voltage
across the resistor. Now, reverse the plug in the AC outlet
and repeat each measurement. Any voltage measured
must not exceed 0.75V AC (r.m.s.). This corresponds to
0.5mA AC (r.m.s.).
However, in tropical area, this must not exceed 0.3V AC
(r.m.s.). This corresponds to 0.2mA AC (r.m.s.).
AC VOLTMETER
(HAVING 1000 /V,
OR MORE SENSITIVITY)
0.15 F AC-TYPE
PLACE THIS PROBE
GOOD EARTH GROUND
1500 10W
ON EACH EXPOSED
ME TAL PART
(11) High voltage hold down circuit check.
After repair of the high voltage hold down circuit, this circuit shall be
checked to operate correctly.
See item "How to check the high voltage hold down circuit".
This mark shows a fast
operating fuse, the
letters indicated below
show the rating.
A V
POWER CORD
REPLACEMENT WARNING.
Connecting the white line side of power
cord to "WHT" character side.
PWB
White line side
WHT
PW
(No.YA092B)1-3
Page 4
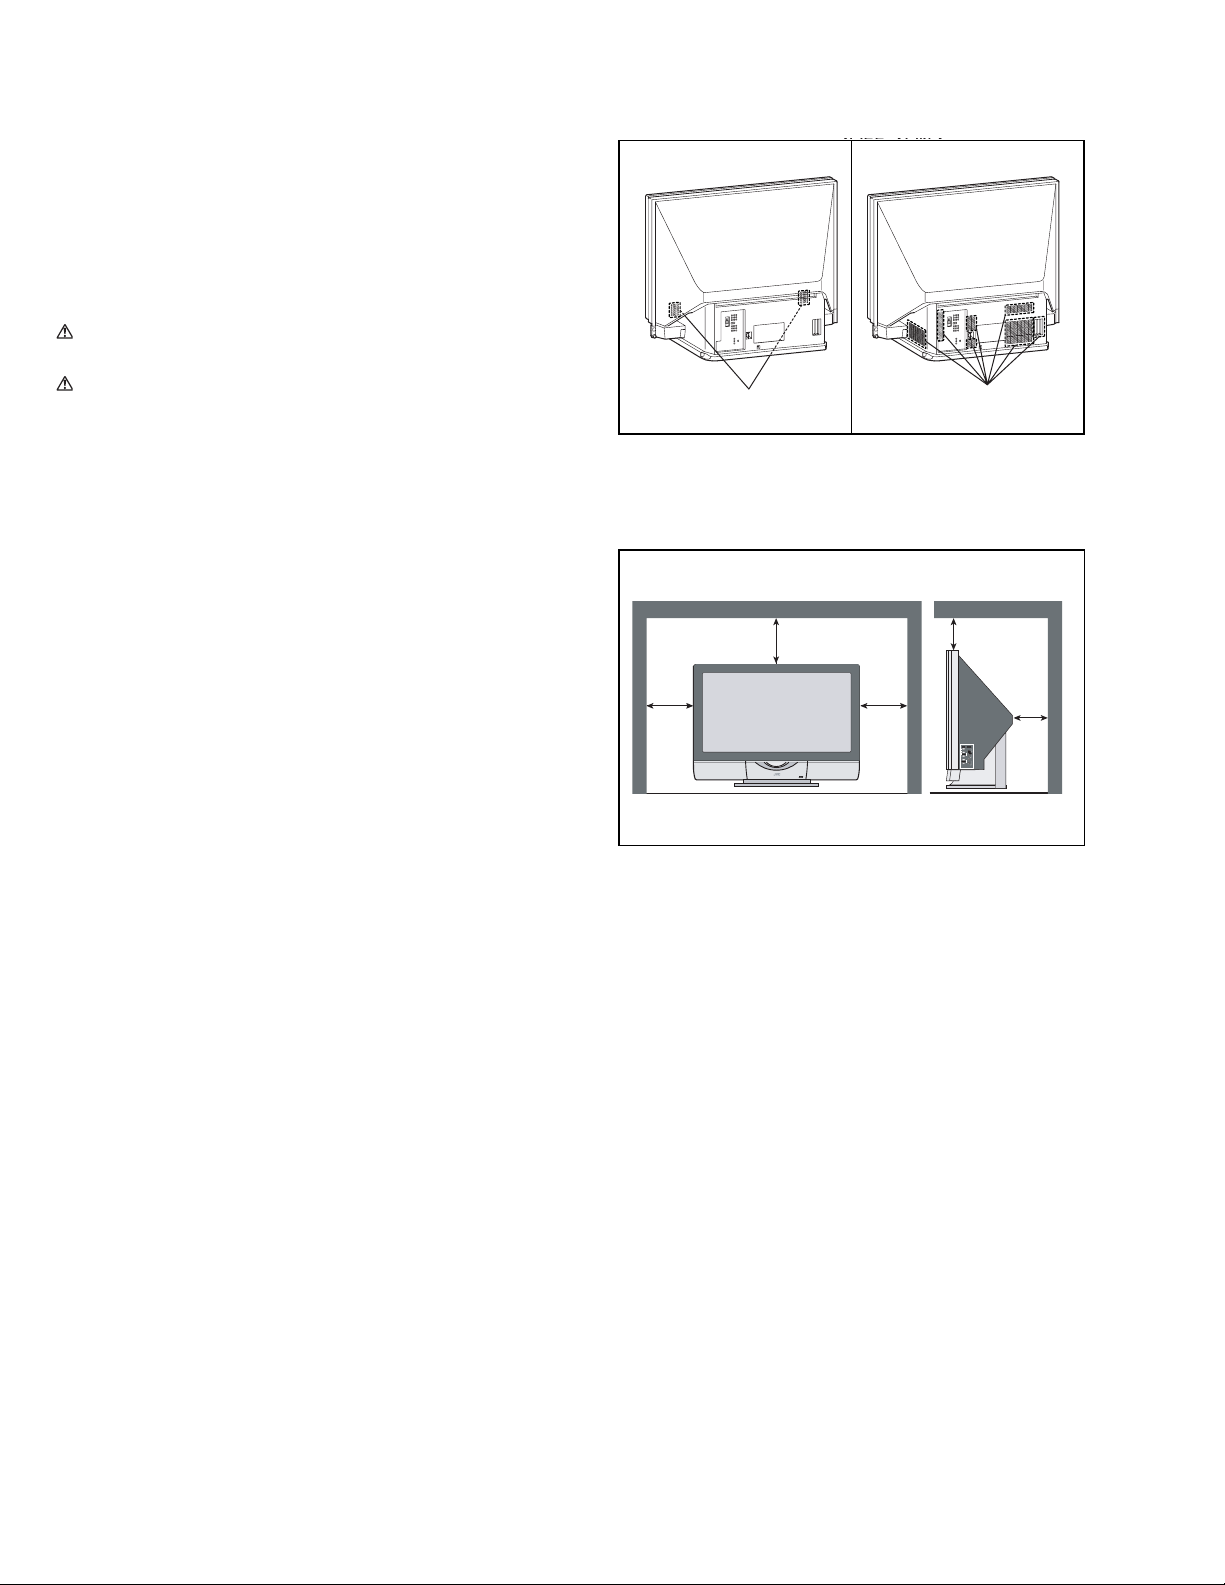
1.2 INSTALLATION
OFF ON
1.2.1 HEAT DISSIPATION
If the heat dissipation vent behind this unit is blocked, cooling
efficiency may deteriorate and temperature inside the unit will
rise. The temperature sensor that protects the unit will be
activated when internal temperature exceeds the predetermined
level and power will be turned off automatically.
Therefore, please make sure pay attention not to block the heat
dissipation vent as well as the ventilation outlet behind the unit
and ensure that there is room for ventilation around it.
Do not put foreign objects near the ventilation holes as
this can result in fire or electrical hazards.
Do not block the ventilation holes as this may cause the
internal temperature to rise and possibly result fire.
1.2.2 INSTALLATION REQUIREMENTS
Ensure that the minimal distance is maintained, as specified
below, between the unit with and the surrounding walls, as well
as the floor etc.
Install the unit on stable flooring.
Take precautionary measures to prevent the unit from tipping in
order to protect against accidents and earthquakes.
CAUTION FOR INSTALLATION
• Do not tilt the TV towards the left or right, or toward the back.
• Install the TV in a corner on the floor so as to keep cords out
of the way.
• The TV will generate a slight amount of heat during operation.
Ensure that sufficient space is available around the TV to
allow satisfactory cooling.
150mm
Intake hole
VENTILATION POSITION
200mm
150mm
Exhaust hole
200mm
50mm
1-4 (No.YA092B)
Page 5
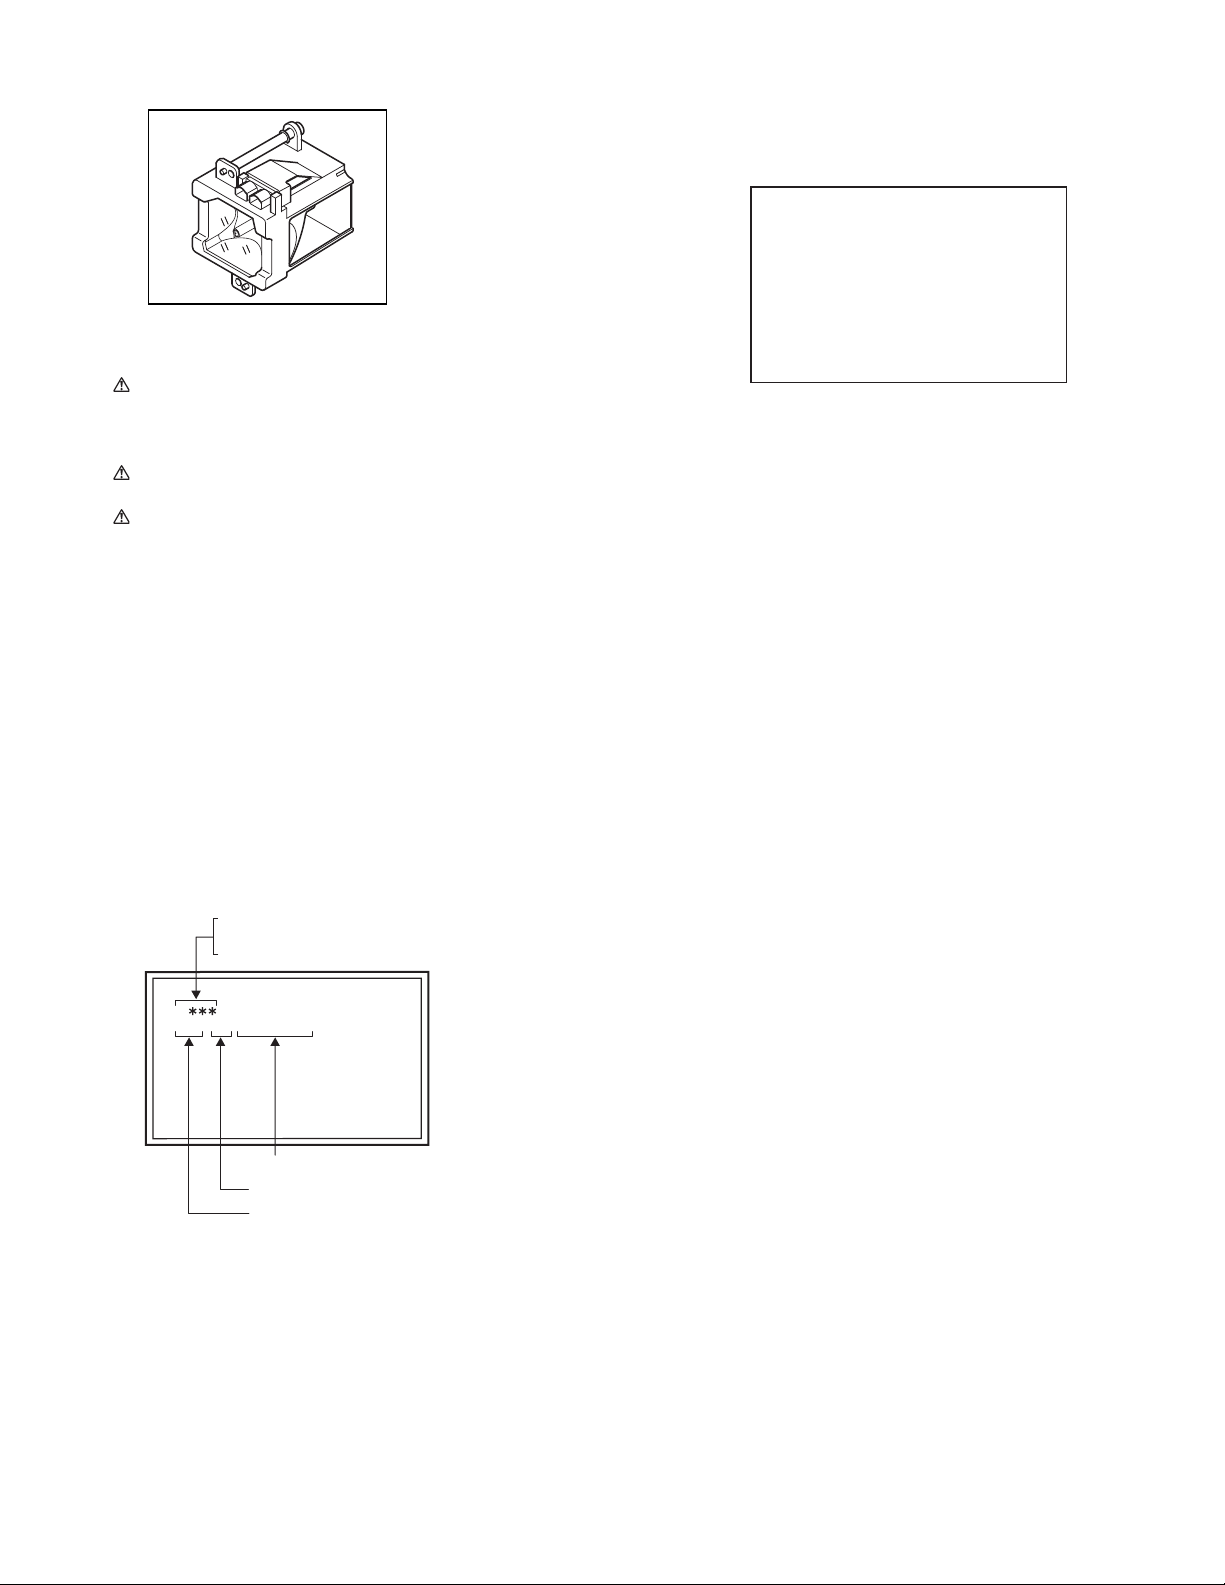
1.3 LAMP UNIT HANDLING CAUTION
LAMP UNIT : TS-CL110UAA
1.3.1 PRECAUTION FOR LAMP UNIT
The lamp emits high intensity white, ultraviolet and infrared
light. Do not look directly at the light during service.
Also, do not touch the lamp directly as it presents a burn
hazard.
Handle with extra care. This lamp emits high heat and
contains high-pressure during use.
Do not give any impact as this may cause the broken lamp.
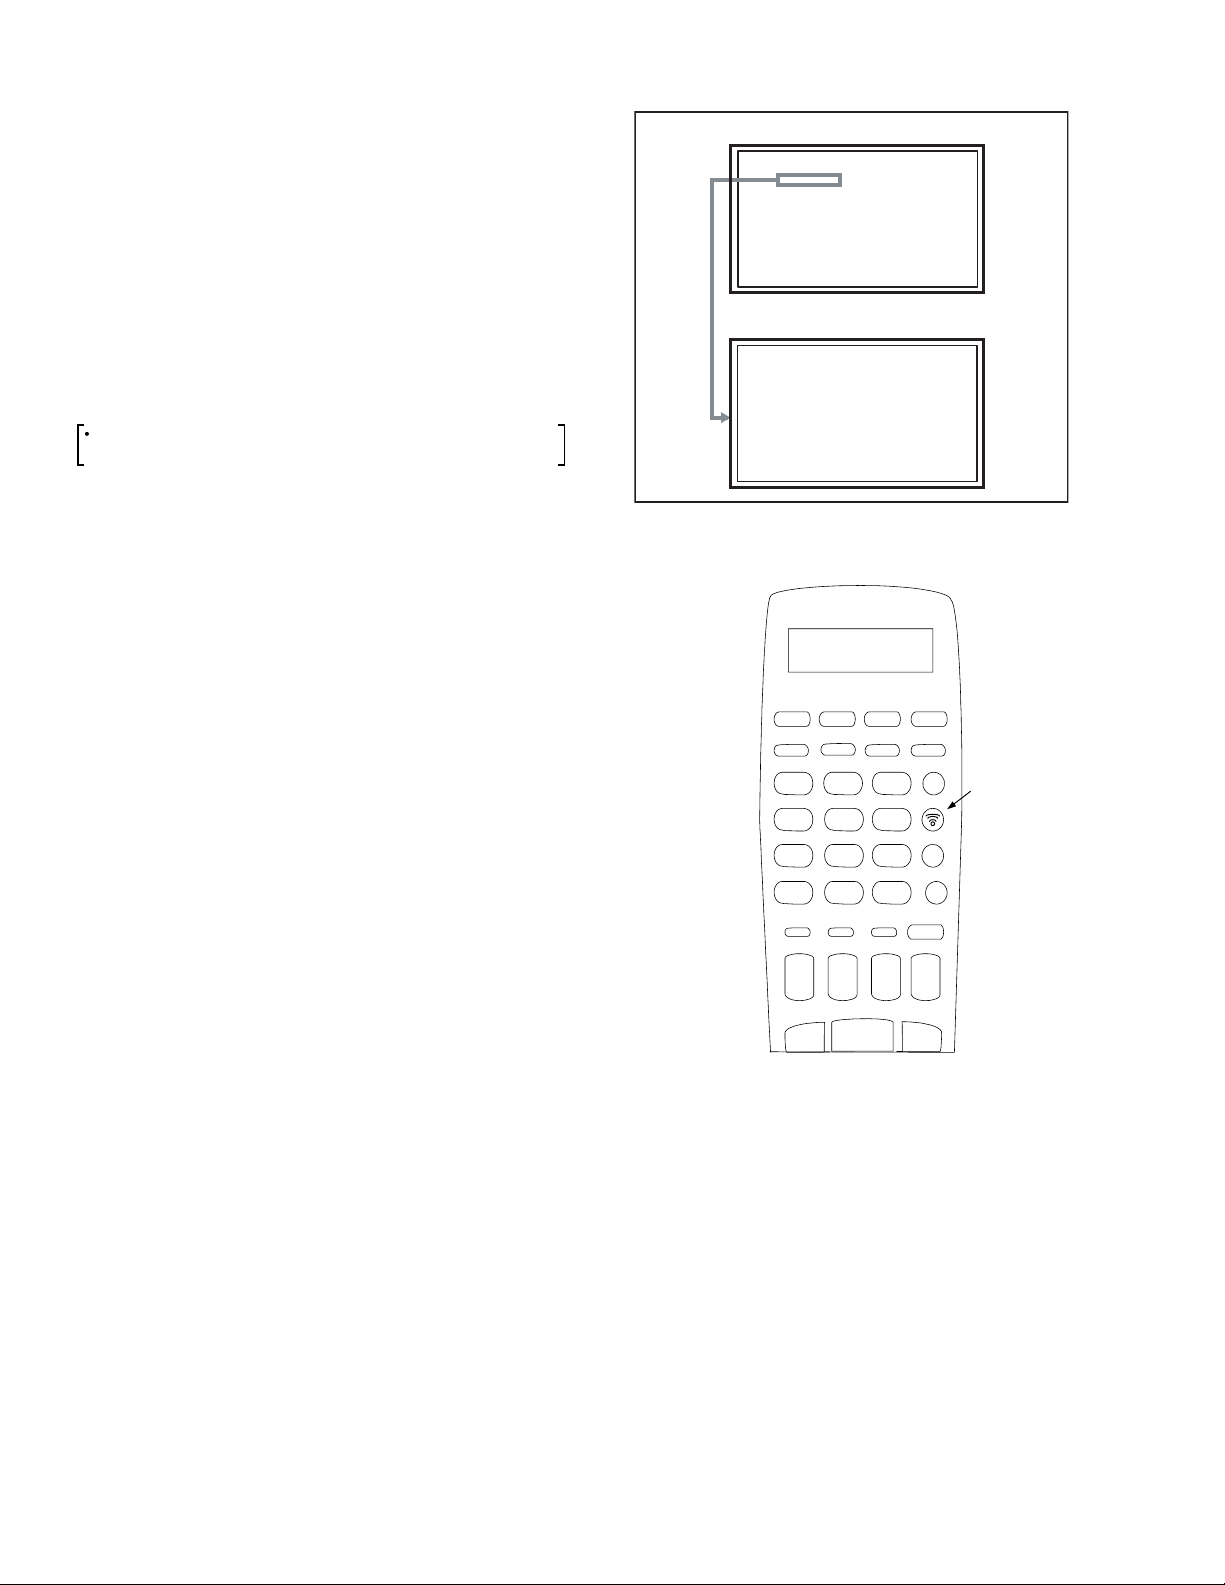
1.3.2 HOW TO CONFIRM LAMP OPERATING TIME
(1) Set to 0 minutes using the [SLEEP TIMER] key.
(2) Press the [VIDEO STATUS] key and [DISPLAY] key
simultaneously, then enter the SERVICE MODE.
(3) When the Main Menu is displayed, press [4] key to enter
the setting display for designing.
(4) Press [CH+] / [CH-] key to select the addresses (items).
NOTE :
• Confirmation of the information can be done by selecting
addresses (items) below.
Display position is in the far right side in the 2nd row from
the top, as displayed below.
NOTE :
• This message will appear every time turn on the TV, when
the lamp needs to be replaced. Press the [OK] key to make
the message disappear, or replace the lamp.
LAMP NEEDS TO BE REPLACED.
REFER TO OWNER'S MANUAL FOR
REPLACEMENT INSTRUCTIONS.
AFTER REPLACING THE LAMP,
PLEASE RESET TIMER IN THE TV
MENU.
PRESS OK, IF YOU DO NOT WAN
TO SEE THIS MESSAGE AGAIN.
Fig.1 LAMP REPLACEMENT MESSAGE
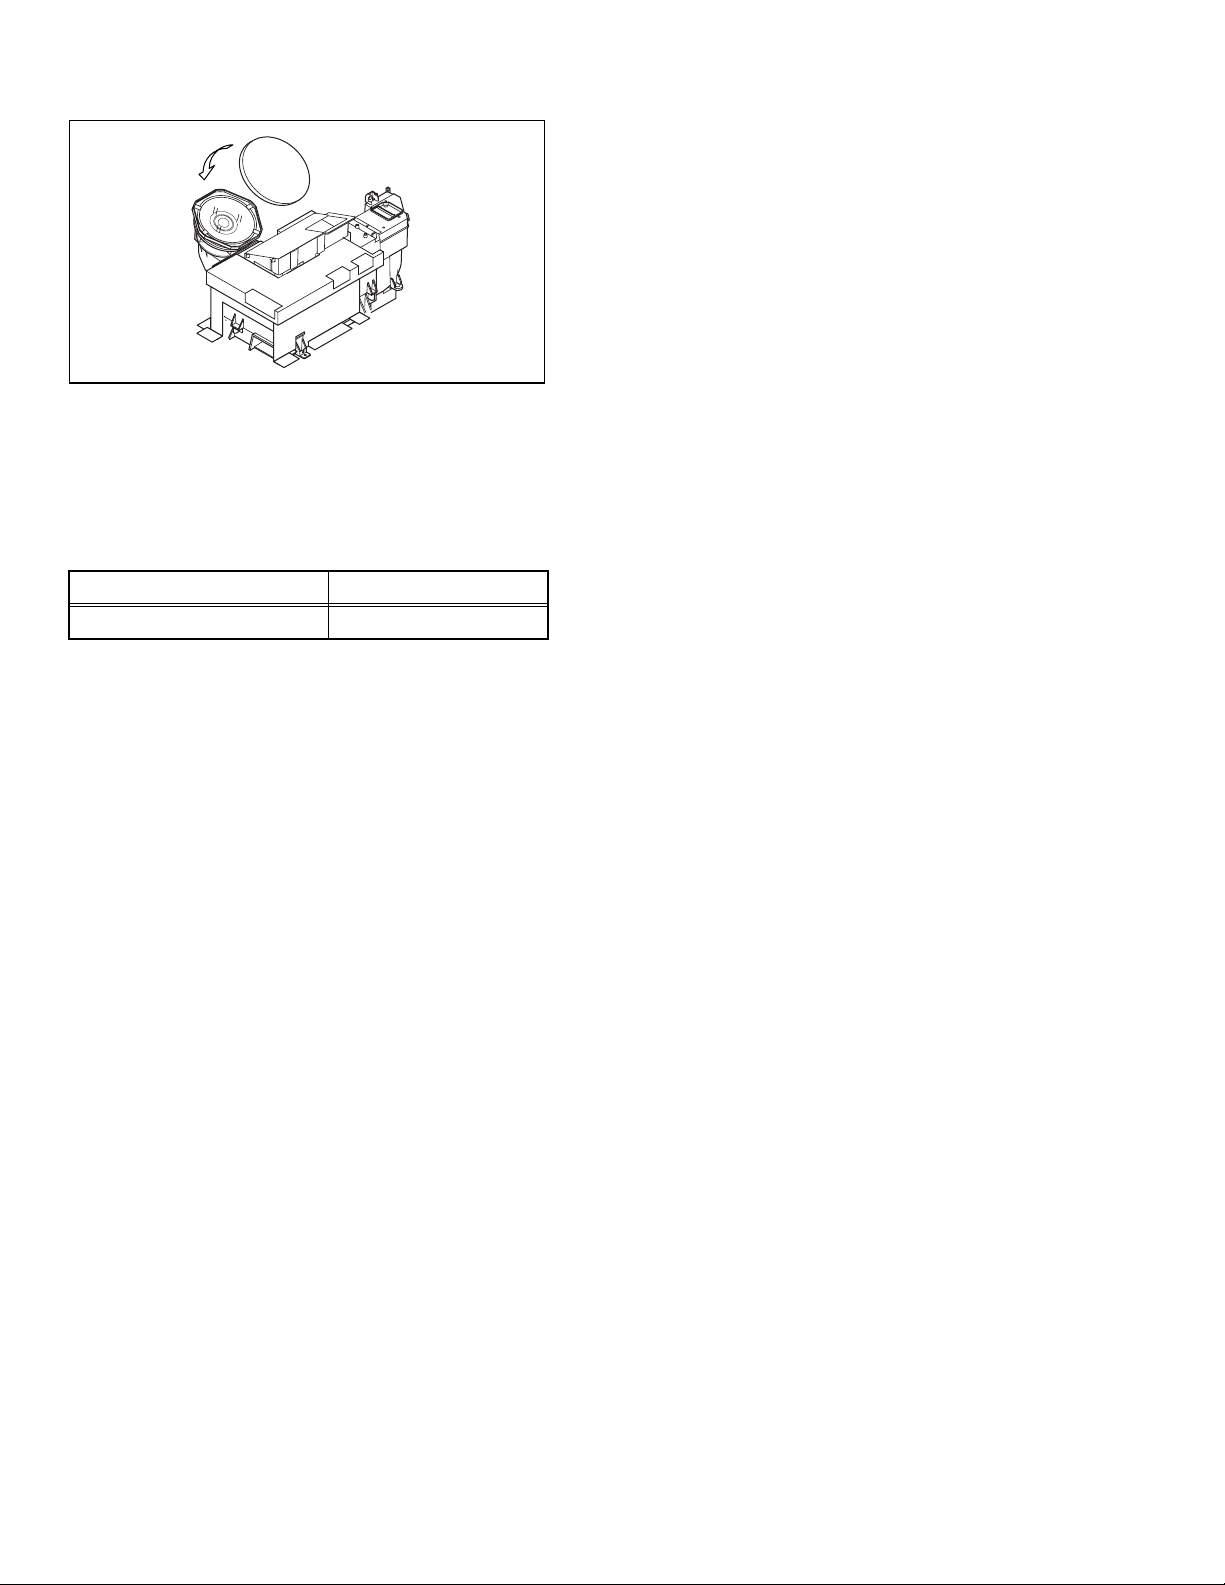
1.3.5 HOW TO REPLACE THE LAMP UNIT
Refer to the [USERS GUIDE] for a detailed operating
description.
(1) Turn off the TV power with power key.
(2) Disconnect the power cord from the AC outlet.
(3) Loosen 1 screw from the rear side, then take out the the left
speaker panel.
(4) Loosen 1 screw then take out the lamp cover.
(5) Loosen 2 screws then take out the lamp unit.
(6) Install the new lamp unit.
(7) Re-install the lamp cover.
(8) Re-install the left speaker panel.
(9) Re-install the screw to the rear panel.
NOTE :
• After installing the new lamp unit, do not forget to reset the
lamp timer.
1.3.3 LAMP OPERATING TIME
• MAXIMUM COUNT TIME : 65535 hours
< D070 > Lamp operating time high byte
< D071 > Lamp operating time low byte
D 00
001 00 0000 0001
Operating time in binary number notation
Operating time in hexadecimal number notation
Operating time in decimal number notation
1.3.4 LAMP UNIT REPLACEMENT
(1) The lamp replacement message will appear when need to
change the lamp. After replace the lamp, need to reset the
timer which is built into TV.
(2) Life of the lamp unit is about 5000 hours over. Lamp use
time can be check at the lamp message MENU.
(3) If Fig.1 message appears when turn the TV on, need to
replace the lamp.
(4) Use the lamp timer reset only after replacing the lamp.
1.3.6 HOW TO RESET THE LAMP TIMER
Refer to the [USERS GUIDE] for a detailed operating
description.
(1) Press the [MENU] key to select CLOCK / TIMERS.
(2) Select the <LAMP TIMER RESET> with [
] / [] keys.
(3) Enter the <LAMP TIMER RESET> mode the message will
appears.
(4) Press the [OK] key while the above message appears on
the screen.
(5) Turn off the power, then turn on the power.
(6) The lamp timer has now been reset, as before the 1.3.2
HOW TO CONFIRMATION LAMP OPERATING TIME.
1.3.7 PRECAUTION FOR REPLACEMENT
Do not replace the LAMP UNIT immediately after the
projector has been used.
The temperature of the LAMP UNIT is still high and could
cause a burn.
Allow a cooling period of 1 hour or more before performing
replacement.
Before starting LAMP UNIT replacement work, turn off the
MAIN POWER switch, and disconnect the AC power cord
plug from the wall outlet.
If touched, the lamp glass surface may rupture and burns
may result. Do not touch the glass portion or metal portion.
Handle only plastic handle.
The replaced old lamp can be discarded in the same manner
as a fluorescent lamp. Check local ordinances and dispose
of the used lamp as prescribed.
(No.YA092B)1-5
Page 6
1.4 SERVICE PARTS KIT INSTRUCTIONS
OPTICAL / DRIVE ASS'Y : TS-COP5A-SAA
Due to the character of this product, these OPTICAL /
DRIVE ASS’Y are prepared.
Please note these OPTICAL /DRIVE ASS’Y when
replacing or ordering the parts.
1.4.1 PART NUMBER AND CONSTRUCTION
Kit parts number Kit part name
TS-COP5A-SAA OPTICAL / DRIVE ASS’Y
1.4.2 OPTICAL / DRIVE ASS’Y CONSTRUCTION
(1) OPTICAL BLOCK
(Included HD-ILA DEVICE, PROJECTION LENS)
(2) OPTICAL BASE
(3) MAIN DRIVE PWB ASS’Y
This PWB is mounted with 2 memory ICs saved with
adjustment, setting data of the drive circuit.
(4) SHIELD TAPE
* The following parts are not included in the kit.
1) REMOTE SENSOR PWB ASS’Y
2) FAN CONTROL PWB ASS’Y
3) LAMP UNIT
4) FRONT SHADE BRACKET
5) SHADE COVER
1.5 SCREEN HANDLING CAUTIONS
1.5.1 SCREEN STORAGE
Store the SCREEN ASS'Y in a standing position in order to
avoid deformation. If the screen is stored horizontally, there is
risk of deforming the screen face.
When necessary to place the SCREEN ASS'Y horizontally,
position the screen side upwards and sure to place spacers
between the screen and resting site (floor or stand etc.) to
prevent the screen from sagging.
1.5.2 SCREEN SURFACE
Since the screen surface is easily scratched or soiled, use ample
care when handling.
1.5.3 PRECAUTIONS FOR CLEANING AND REPLACEMENT
The SCREEN ASS’Y is made from the lenticular lens and
fresnel lens.
The anti static proceeding and the surface of the lenticular lens.
Rubbing the surface with something hard, the coating may
peel off.
When the screen is dirty, gently wipe it with a soft cloth.
If the screen is very dirty, wipe it down with a cloth dipped in
a diluted kitchen cleaner (neutrality detergent) and
thoroughly wrung-out.
Then wipe immediately after with clean, dry cloth.
Never use the organic solvent such as the alcohol or benzine.
The SCREEN ASS’Y replacement is required if the coating
was peel off.
Alkaline detergent or acidity detergent can not be be used.
The notched side of the lenticular lens and the fresnel lens
are faced each other.
Do not rub the screen when cleaning it or replaceing it.
Rubbing the screen may cause of the scratch of the screen
by its notch.
1.4.3 PRECAUTION FOR USING
(1) In the case of the following defects/problems, replace this
kit (OPTICAL/DRIVE ASS'Y)
1) Picture defect caused by optical system/D-ILA device
related parts.
2) Picture defect caused by drive circuit.
(2) The MAIN DRIVE PWB ASS’Y is mounted with 2 memory
ICs [IC3741/IC3742] saved with adjustment/setting data
(GAMMA, SHADING, etc.) of the drive circuit.
The data of this memory IC is in the optimal state according
to individual D-ILA devices and each section of the
OPTICAL BLOCK.
(3) When replace the MAIN DRIVE PWB ASS’Y, take off the 2
memory ICs from the original board and replace with new
one. When replace the MAIN DRIVE PWB ASS’Y, do same
manner. Replace 2 memory ICs.
(4) When installing this kit (OPTICAL/DRIVE ASS'Y) to the
set, first mount the FRONT SHADE BRACKET and
SHADE COVER (with cushion) to the kit (lens section).
(5) After the replacement of the OPTICAL BLOCK, projection
lens focus adjustment and drive convergence / projection
adjustment are required.
1-6 (No.YA092B)
Page 7
SECTION 2
SPECIFIC SERVICE INSTRUCTIONS
2.1 TECHNICAL INFORMATION
2.1.1 DIFFERENCE LIST
Items HD-52Z575 / HD-61Z575 HD-52Z585 / HD-61Z585
SMART SOUND Non Built-in
SMART CAPTION Non Built-in
FRONT CABINET Silver Black
2.1.2 PROJECTION UNIT
R DEVICE
G DEVICE
2.1.3 IMAGE LIGHT FLOW
DEVICE UNIT SECTION
Projection
light
BRG
Mirror
B DEVICE
Lamp unit
Incident light
(TOP VIEW)
FRONT
2.1.5 D-ILA DEVICE STRUCTURE
R / G / B DEVICE (SIDE VIEW)
Back
Plane
Flat film
Reflective pixel
electrode
Liquid
crystal
PIXEL VIEW (FRONT VIEW)
Glass
substrate
Incident light
Projection light
FRONT
Transparent
electrode
B
Device
R
Device
Device
G
MirrorMirror
BRG
2.1.4 D-ILA DEVICE SPECIFICATION
Item Content
Resolution H:1312 x V:800
Pixel number about 3200000
Pixel size H :12.0
µm x V :12.0µm
Aspect ratio 16 : 9
Contrast ratio 1000 : 1
Aperture ratio 93% or more
Effective pixel measurement 0.7 inch
Incident
light
12.0 µm
Pixel
12.0 µm
(No.YA092B)1-7
Page 8
2.1.6 MAIN CPU PIN FUNCTION (IC7601 : M306V7FGF-088FP) [DIGITAL SIGNAL PWB ASS’Y]
Pin Port Pin name I/O Function
1 VHOLD1 VHOLD1 I Data slice for main screen closed caption
2 HFLT1 HFLT1 I/O LPF for main screen closed caption video input
3 P9.4 O Not used
4 P9.3 O Not used
5 P9.2 DIGRO O R [0] for OSD
6 P9.1 TB1IN I AC power for timer clock
7 P9.0 REMO I Remote control
8 BYTE BYTE I Data bus width select [L = 16bit (fixed)]
9 CNVss CNVss I CPU programming mode select [Normal = L]
10 P8.7 DIGGO O G [0] for OSD
11 P8.6 DIGBO O B [0] for OSD
12 RESET RESET I Reset for main CPU [Reset = L]
13 XOUT XOUT O System clock osillation (crystal) : 16MHz
14 Vss Vss - GND
15 XIN XIN I System clock osillation (crystal) : 16MHz
16 VccI VccI I 3.3V stand-by power supply
17 OSC1 OSC1 I Clock for OSD
18 OSC2 OSC2 O Not used : Clock for OSD
19 P8.3 INT1 I AV COMPULINK control
20 P8.2 INT0 I Request for sub(chassis) CPU communication
21 OUT1 OUT1 O Ys (blanking) for OSD
22 OUT2 OUT2 O YM (transparence) for OSD
23 P7.7 O Not used
24 P7.6 O Not used
25 P7.5 O Not used
26 P7.4 O Not used
27 P7.3 CTA2/RTS2 O Not used : Digital tuner control
28 P7.2 CLK2 O Not used : Digital tuner control
29 P7.1 RxD2 I Not used : Digital tuner control
30 P7.0 TxD2 O Not used : Digital tuner control
31 P6.7 SDA2 I/O Not used
32 DIGR1 DIGR1 O R [1] for OSD
33 DIGG1 DIGG1 O G [1] for OSD
34 DIGB1 DIGB1 O B [1] for OSD
35 P6.3 TxDO I Data receive (serial) for external programming
36 P6.2 RxDO O Data transmission (serial) for external programming
37 P6.1 CLKO I Clock for external programming
38 P6.0 RTSO O Busy for external programming [Operation = H]
39 P5.7 I Not used
40 P5.6 O Not used
41 HOLD HOLD I CPU programming mode select [Normal = H]
42 P5.4 O Not used
43 P5.3 O Not used
44 P5.2 O Not used
45 P5.1 O Not used
46 P5.0 WR O CPU programming mode select [Normal = L]
47 P4.7 MICON_TX O Data transmission for sub(chassis) CPU
48 P4.6 MICON_RX I Data receive for sub(chassis) CPU communication
49 P4.5 MI_CLK I Clock for sub(chassis) CPU communication (serial)
50 P4.4 O Not used
(serial data)
communication (serial)
(serial)
Pin Port Pin name I/O Function
51 P4.3 O Not used
52 P4.2 O Not used
53 P4.1 O Not used
54 P4.0 O Not used
55 P3.7 O Not used
56 P3.6 O Not used
57 P3.5 O Not used
58 P3.4 O Not used
59 P3.3 O Not used
60 P3.2 O Not used
61 P3.1 O Not used
62 HSYNC HSYNC I H. sync for OSD
63 P3.0 O Not used
64 VSYNC VSYNC I V. sync for OSD
65 P2.7 O Not used
66 P2.6 O Not used
67 P2.5 O Not used
68 P2.4 O Not used
69 P2.3 O Not used
70 P2.2 O Not used
71 P2.1 O Not used
72 P2.0 O Not used
73 P1.7 O Not used
74 P1.6 O Not used
75 P1.5 O Not used
76 P1.4 O Not used
77 P1.3 O Not used
78 P1.2 O Not used
79 P1.1 O Not used
80 P1.0 O Not used
81 P0.7 O Not used
82 P0.6 O Not used
83 P0.5 O Not used
84 P0.4 WAKE O Reset for sub(chassis) CPU
85 P0.3 CARD_DET I Not used : Card detection for ATSC digital tuner
86 P0.2 POWER_SW I Not used : Power switch (mechanical) detection
87 P0.1 SDA0 I/O Data for Inter IC (serial) bus control : memory
88 P0.0 SCL0 O Clock for Inter IC (serial) bus control : memory
89 P10.7 DIGR2 O R [2] for OSD
90 P10.6 DIGG2 O G [2] for OSD
91 P10.5 DIGB2 O B [2] for OSD
92 P10.4 O Not used
93 P10.3 KEY1 I Key scan data for front control button
94 P10.2 KEY0 I Key scan data for front control button
95 VHOLD2 VHOLD2 I Data slice for sub screen closed caption
96 HLF2 HLF2 I/O LPF for sub screen closed caption video input
97 CVIN2 CVIN2 I Video(Y) for sub screen closed caption
98 TVSETB TVSETB I Test terminal [L Fixed]
99 VCCE VCCE I 5V stand-by power supply
100 CVIN1 CVIN1 I Video(Y) for main screen closed caption
(MENU/CH+/CH-) KEY2
(VOL+/VOL-) KEY1
1-8 (No.YA092B)
Page 9
2.1.7 SUB (CHASSIS) CPU PIN FUNCTION (IC7001 : MN102H60KPA) [DIGITAL SIGNAL PWB ASS’Y]
Pin Port Pin name I/O Function
1 P60 LB PRO O Not use
2 P61 P MU O Picture muting [Muting = H]
3 P62/FUNC LED JP_CSB O Not use (NC)
4 P63 A MU O Audio muting [Muting = H]
5 P50 M MU O Audio muting (for AUDIO OUT) [Muting = H]
6 P51/PC SW PC SEL O Not use : RGB(PC) INPUT select
7 P52/DIMMER
LED
8 P53/BL ON ILA0 O Not use : LCD back light lighting
9 P54/BL 5060 ILA1 O Not use : LCD panel overshoot refresh timing
10 P55 ILA2 O Not use
11 P56 POW LED O POWER LED lighting [ON = H]
12 P57 WORD O Not use
13 SBT2 MI_CK I Clock for SUB (OSD) CPU communication
14 SBI2 MI_TX I Data rece ive for SUB (OSD) CPU communication
15 SBO2 MI_RX O Data transmission for SUB (OSD) CPU
16 P23/REQ MI_REQ O Data request for SUB (OSD) CPU communication
17 VDD 3.3V I 3.3V power supply
18 PB0 FOSC O Not use (NC)
19 VSS GND Ground
20 XI 3.3V I Not use : Low speed oscillatior
21 XO O Not use : Low speed oscillatior
22 VDD 3.3V I 3.3V power supply
23 OSCI OSCI I System clock osillation (crystal) : 16MHz
24 OSCO OSCO O System clock osillation (crystal) : 16MHz
25 MODE 3.3V I Single chip mode
26 P24 BS1.5CTL O Not use : Digital tuner power / reset control
27 P25 A92 RST O Reset for IC1001(3D YC SEP / COLOR
28 P26 BS RST O Not use: Reset for Digital tuner power / reset
29 P27 LIP RST O Not use: Reset for Sound delay (Lip sync)
30 KI0 SOFT_OFF O Not use
31 KI1 VMUTE I No use : Picture muting request from digital tuner
32 KI2 VOUTENB O No use : Video cutoff for digital tuner
33 P33 MDR CON I No use : System cable connection monitor for PDP
34 AVDD 3.3V I 3.3V power supply
35 P34 O Not use : Digital tuner power control
36 P35 DSYNC SW2 O Sync select for DIGITAL-IN [Cotrolled with 99-pin]
37 P36 LB_POW O Not use : Power control for low bias line
38 P37 O Not use (NC)
39 P40 HOTPLUG I Not use : Video communiation monitor for receiver
40 P41 MECA SW I Mechanical monitor for POWER switch
41 P42 MAIN POW O Main power control [ON = L]
42 P43 VARI/FIX O AUDIO OUT output mode select [VARI ABLE = L]
43 VREF- I Not use
44 AN4/EE AFT2 I Not use : AFT voltage for sub tuner
45 AN5 AFT1 I AFT voltage for VHF/UHF tuner
46 AN6 KEY2 I Key scan data for front switc (MENU/CH+/CH-)
47 AN7 KEY1 I Key scan data for front switch (VOL+/VOL-)
48 P80 O Not use (NC)
49 P81 O Not use (NC)
50 TM0IO AC IN I AC power pulse for timer clock
ON_TIMER O POWER INDICATOR (LED) brightness
[LOW = L]
communication
[Request = L]
DEMODULAT) [Reset = H]
control
unit (PDP)
[Push = L]
Pin Port Pin name I/O Function
51 SBI3 BS TXD O Not use : Data transmission for digital tuner
52 SBO3 BS RXD I Not use : Data receive for digital tuner
53 P85 O Not use (NC)
54 VREF+ 3.3V I 3.3V power supply
55 SBI4 PDP TX O Data transmission for SUB (DRIVE) CPU
56 SBO4 PDP RX I Data receive for SUB (DRIVE) CPU
57 P90 SDA0 I/O Data for Inter IC (serial) bus : EEP-ROM (IC7002)
58 P91 SCL0 O Clock for Inter IC (serial) bus : EEP-ROM (IC7002)
59 P92 SDA DVI I/O Not use : Data for Inter IC (serial) bus for panel
60 P93 SCL DVI O Not use : Clock for Inter IC (serial) bus for panel
61 AVSS GND Ground
62 AN0/DIN PH DIGII_PHOT I Photo sensor for DIGITAL-IN illegal copy
63 AN1 ATSC REC I Not use
64 AN2 I Not use
65 AN3 I Not use
66 VDD 3.3V I 3.3V power supply
67 P70/DIN PRO DIGI_PRO O for DIGITAL-IN (HDMI)
68 P71 O Not use (NC)
69 P72 O Not use (NC)
70 P73 SYNC SEL O Not use : Sync select for digital tuner
71 SBI1 O Not use (NC)
72 SBO1 O Not use (NC)
73 * SBD5 I/O Not use : Data for writing on board
74 * SBT5 I Not use : Clock for writing on board
75 NMI 3.3V I 3.3V power supply
76 IRQ0 COMP I AV COMPULINK áV control
77 IRQ1 REMOCON I Remote control
78 IRQ2 V SYNC I V. sync pulse
79 IRQ3 WAKEUP SHM I Reset for sub(chassis) CPU
80 IRQ4 POWERGOOD I Power error detection [NG = H]
81 PA5/REC
LED
82 VDD RST I Reset for MAIN CPU [Reset = L]
83 RST 3.3V I 3.3V power supply
84 P00 SCL3A O Clock for Inter IC (serial) bus control :
85 P01 SDA3A I/O Data for Inter IC (serial) bus control :
86 P02 SCL3B O Clock for Inter IC (serial) bus control :
87 P03 SDA3B I/O Data for Inter IC (serial) bus control :
88 P04/DIN SEL DIGI_SYNCSEL O Not use
89 P05 LR SW O for DIGITAL-IN (HDMI)
90 P06/DIN INT DIGI_INT I Reset for HDMI process [Reset = ]
91 P07 DVI RST O Not use : Reset for DVI format conversion
92 VSS GND Ground
93 P10 SCL5055 O Clock for Inter IC (serial) bus :
94 P11/BS CLK
SEL
95 P12 SDA5055 I/O Data for Inter IC (serial) bus :
96 P13 OSD MODE SEL O Not use : OSD mode select
97 P14 O Not use (NC)
98 P15 15K/OTH O Main video select [Fixed H]
99 P16 DSYNC SW1 O Sync select for DIGITAL-IN [Cotrolled with 36-pin]
100 P17 JCC5057 BUSY I Busy monitor for JCC5057 (New DIST process)
LAMP LED O LAMP LED lighting [Lighting = H]
VFORMATSEL O Not use : Digital tuner clock control
communication
communication
communication
communication
communication
communication
protection
(connect CN01P : for Frash ROM type)
(connect CN01P : for Frash ROM type)
JCC5055 (DIST process)
JCC5055 (DIST process)
(No.YA092B)1-9
Page 10
2.1.8 SYSTEM RESET
LOB OK FAN OK
SYNC M:OK S:OK HD:NG
TIM OK
MSM OK DIGI 0000
MEM OK AVSW OK
YC OK AIO OK
TUN OK GCR NG 1
IP OK RGB OK 8
DVI OK HDMI OK
SERVICE MENU
1.ADJUST
2.SELF_CHK
3.I2C STOP
When the DIGITAL SIGNAL PWB is replaced or the DIGITAL
INPUT is not normal, reset the SYSTEM SETTING using
the following procedure.
(1) Set to 0 minutes using the [SLEEP TIMER] key.
(2) Press the [VIDEO STATUS] key and [DISPLAY] key
simultaneously
(3) When the
to enter the SERVICE MODE.
Service Menu is displayed, press [2] key to
enter the self check mode.
(4) Turn off the power by pressing the [POWER] key on the
remote control unit.
When DIGITAL INPUT does not function normal using the
method above mentioned, perform the following operation.
Remote control unit (with LC display) [LP20873-009] will
be required for this operation.
(1) Take out the batteries from the remote control unit.
(2) Insert the batteries while pressing and holding [4], [5] and
[6] keys simultaneously.
(3) While viewing the LC display of the remote control unit
(LP20873-009), set the value to [0] using the [START
DEBUT + ] / [START DEBUT - ] keys.
(4) In the same manner, set the value to [3] using the [STOP
FIN + ] / [STOP FIN - ] keys.
(5) In the same manner, set the value to [6] using the [DATE + ]
/ [DATE - ] keys.
(6) In the same manner, set the value to [C] using the [PR + ]
/ [PR - ] keys.
(7) When completed with all of the above settings, press the
[Transmission] key.
MAIN MENU SCREEN
SERVICE MENU
1.ADJUST
2.SELF_CHK
3.I2C STOP
SELF CHECK MODE SCREEN
LOB OK FAN OK
SYNC M:OK S:OK HD:NG
TIM OK
MSM OK DIGI 0000
MEM OK AVSW OK
YC OK AIO OK
TUN OK GCR NG 1
IP OK RGB OK 8
DVI OK HDMI OK
03-6C
23
1
6
54
Transmitt
Button
7
START
DUBIT
9
8
0
+
+
-
STOP
FIN
+
+
DATE
PR
-
-
-
1-10 (No.YA092B)
Page 11
SECTION 3
DISASSEMBLY
3.1 DISASSEMBLY PROCEDURE
• Make sure that the power cord plug is pull out from the AC wall
outlet.
• Wait until the LAMP UNIT has cool down is completely.
• While not in repair service, place the chassis back its original
position.
CAUTION AT DISASSEMBLY
• Pay extra attention in the following matter when turning the
power on with the BODY COVER removed.
(1) Prior to disassembly, unplug the power cord from the AC
outlet without fail. (Turn the power "off".)
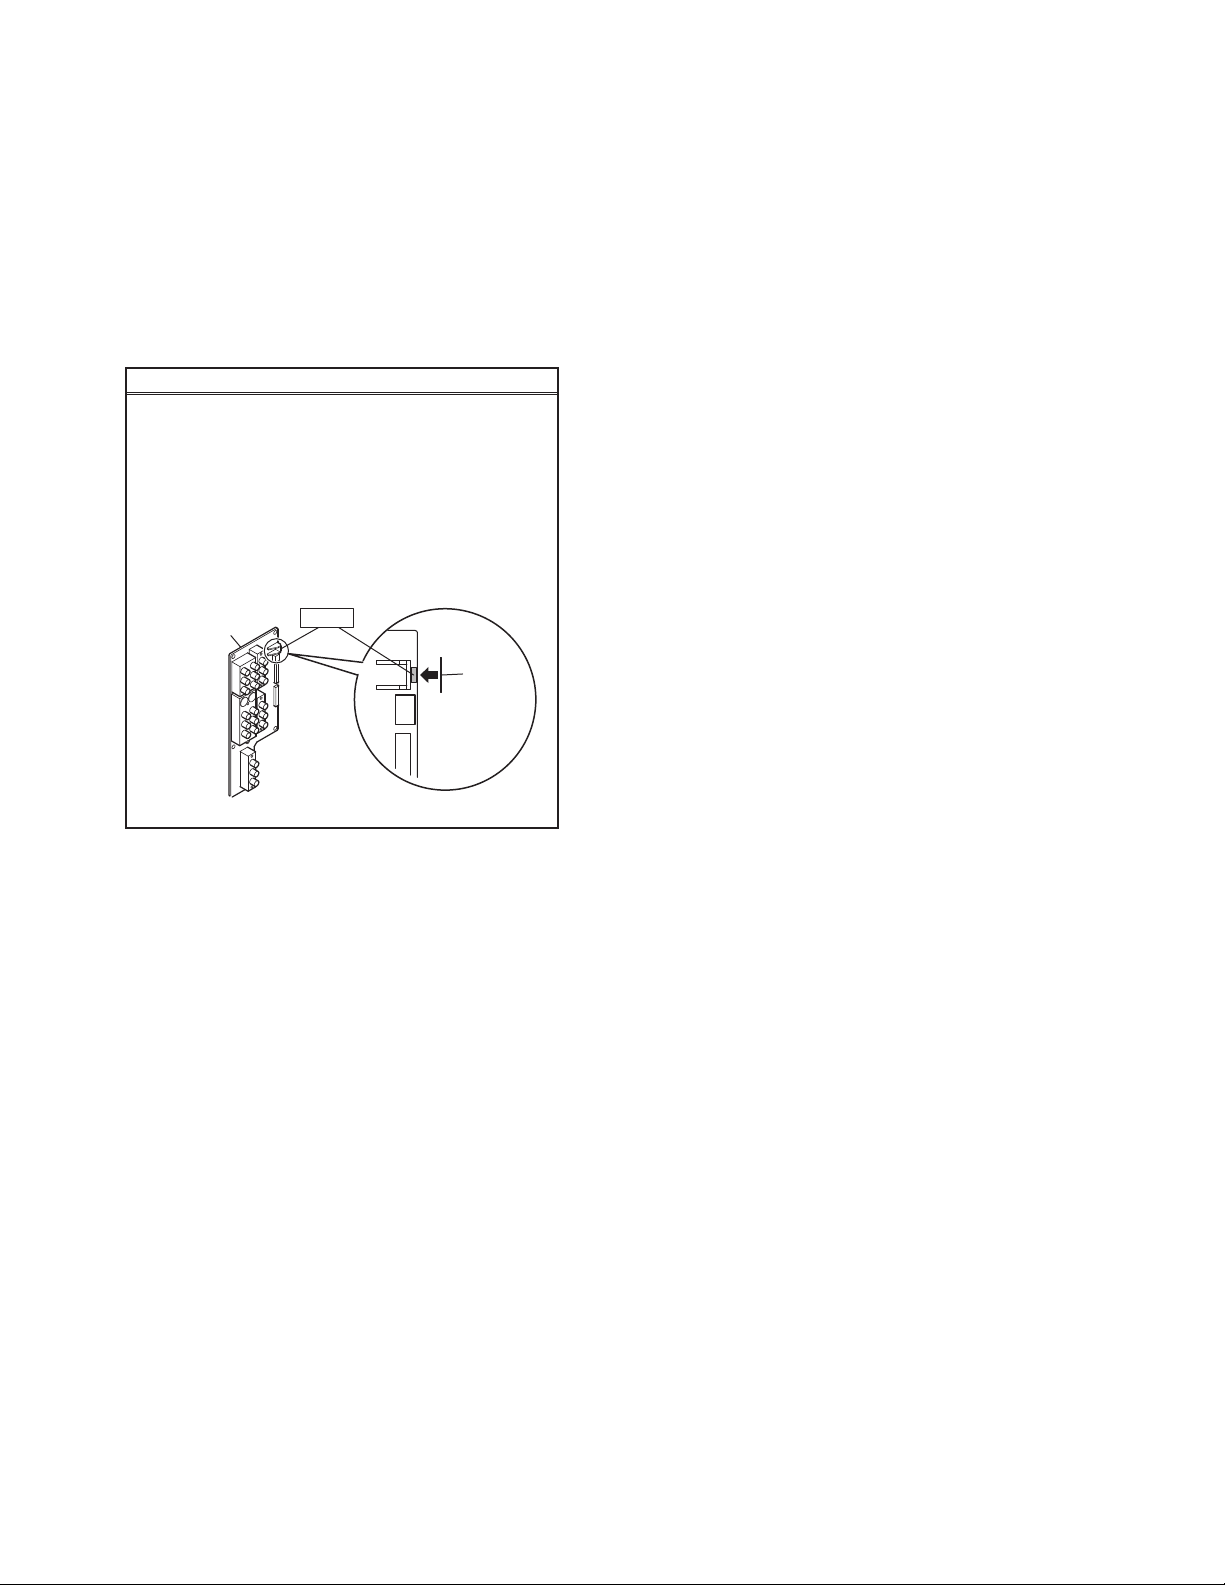
(2) Make sure that the REAR JACK PWB: IC2081 is
completely covered with black masking tape. (Fig.1)
(3) Make sure to remove the masking of REAR JACK:
IC2081 when attaching the BODY COVER.
(4) Do not turn the power on until the BODY COVER is
attached properly, after the masking is removed.
3.1.5 FRONT LED PWB
• Take out the SPEAKER GRILL.
• Take out the FRONT PANEL.
(1) Remove 2 screws [ F ] from rear side of FRONT PANEL.
(2) Take out the FRONT LED PWB.
3.1.6 FILTER COVER
• Take out the SCREEN BLOCK.
(1) Remove 2 screws [ G ].
(2) Take out the FILTER COVER.
• Remove the both side FILTER COVER same manner.
3.1.7 CENTER COVER
• Take out the SPEAKER GRILL.
• Take out the FRONT PANEL.
(1) Remove 2 screws [ H ].
(2) Take out the CENTER COVER.
REAR JACK PWB
IC2081
Fig.1
Masking
tape
<FRONT SIDE>
3.1.1 SPEAKER GRILL (L & R)
(1) Remove 1 screw [ A ] from right rear side.
(2) Remove 1 screw [ B ] from left rear side.
(3) Take out the SPEAKER GRILL (L& R).
3.1.2 SPEAKER
• Take out the SPEAKER GRILL.
(1) Remove 4 screws [ C ].
(2) Take out the SPEAKER.
* Remove the both side SPEAKER same manner.
3.1.3 FRONT PANEL
• Take out the SPEAKER GRILL.
(1) Remove 4 screws [ D ].
(2) Take out the FRONT PANEL.
3.1.4 LAMP COVER
• Take out the SPEAKER GRILL of LEFT SIDE.
(1) Remove 1 screw [ E ].
(2) Take out the LAMP COVER.
NOTE :
• Do not leave the LAMP COVER removed for long time to
prevent dirt and dust form covering the lens.
• Make sure that the LAMP COVER is completely installed.
3.1.8 SCREEN BLOCK
• Take out the SPEAKER GRILL.
• Take out the FRONT PANEL.
(1) Remove the 4 screws [ I ].
(2) Remove 10 screws [ J ] from rear side.
(3) Take out the SCREEN BLOCK.
CAUTION :
• Place the SCREEN BLOCK on a flat table without fail.
• Because of the large size, at least 2 parsons are
recommended for removal and reassemble.
• Use care not to scratch the screen during work.
• During assembly, be sure to engage the left and right tabs
with the cabinet mounting positions.
• When supporting the SCREEN BLOCK, avoid grasping the
top of the screen panel, instead grasp the left and right
areas.
• Do not leave the SCREEN BLOCK removed for long time
to prevent soiling from dust.
3.1.9 SCREEN ASS’Y
• Take out the SCREEN BLOCK.
[HD-52Z575 / HD-52Z585]
(1) Remove 20 screws [ K ] from FRONT CABINET.
[HD-61Z575 / HD-61Z585]
(1) Remove 24 screws [ K ] from FRONT CABINET.
(2) Take out the SCREEN ASS’Y.
3.1.10 FRONT PANEL
• Take out the SCREEN BLOCK.
[HD-52Z575 / HD-52Z585]
(1) Remove 16 screws [ L ] from FRONT CABINET.
[HD-61Z575 / HD-61Z585]
(1) Remove 20 screws [ L ] from FRONT CABINET.
(2) Take out the FRONT PANEL.
(No.YA092B)1-11
Page 12
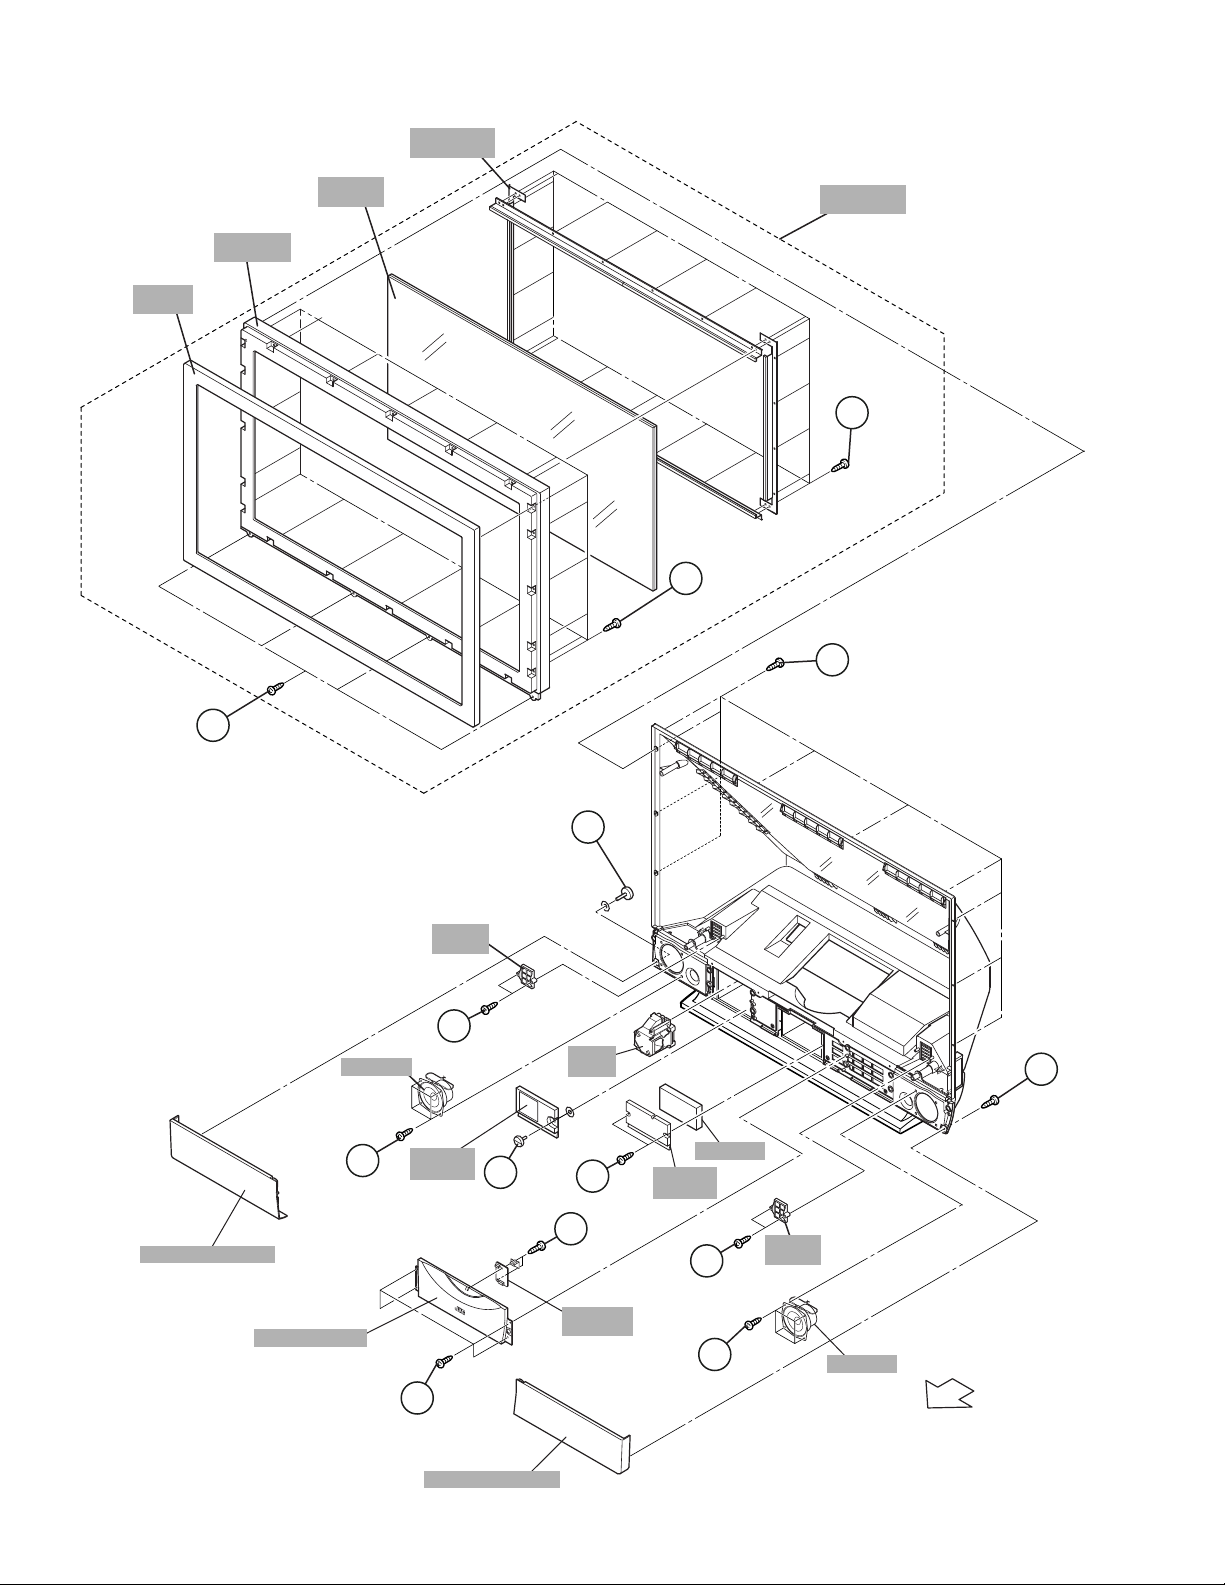
SCREEN
BRACKET
FRONT
PANEL
FRONT
CABINET
I
(x4)
SCREEN
ASSY
(52V: x16)
L
(61V: x20)
SCREEN
BLOCK
K
J
(x10)
(52V: x20)
(61V: x24)
SPEAKER GRILL(L)
SPEAKER
FRONT PANEL
B
(x1)
FILTER
COVER
G
(x2)
(x4)
LAMP
COVER
E
C
(x1)
LAMP
UNIT
H
(x2)
F
(x2)
FRONT
LED PWB
CUSHION
CENTER
PANEL
A
(x1)
FILTER
C
(x2)
(x4)
COVER
SPEAKER
G
D
(x4)
FRONT
1-12 (No.YA092B)
SPEAKER GRILL(R)
Page 13

<FRONT INNER SIDE>
3.1.11 MIRROR
• Take out the SPEAKER GRILL both side.
• Take out the FRONT PANEL.
• Take out the SCREEN BLOCK.
(1) Remove 12 screws [ A ] attaching the MIRROR HOLDER
of the upper, left and right side.
(2) Raise slightly to disengage of the MIRROR from the bottom
holder.
(3) Take out the MIRROR.
NOTE :
• Do not touch the front of the MIRROR.
• Do not shock the front of the MIRROR.
• Because of the large size, at least 2 persons are
recommended for removal and reassemble.
3.1.12 SIDE CONTROL BASE
• Take out the SCREEN BLOCK.
(1) Remove 4 screws [ B ].
(2) Take out the SIDE CONTROL BASE.
FRONT INNER SIDE VIEW
3.1.13 SIDE CONTROL PWB
• Take out the SCREEN BLOCK.
• Take out the SIDE CONTROL BASE.
(1) Remove 4 screws [ C ] from rear side of SIDE CONTROL
BASE.
(2) Take out the SIDE CONTROL PWB.
3.1.14 BACK COVER
• Take out the FRONT PANEL.
• Take out the SCREEN BLOCK.
(1) Remove 13 screws [ D ].
(2) Remove 2 screws [ E ] from rear side.
(3) Slightly pull for backside to disengage of the BACK
COVER from hooks.
(4) Take out the BACK COVER.
NOTE :
• Because of the large size, at least 2 persons are
recommended for removal and reassemble.
A
(x6)
A
(x3)
MIRROR
HOLDER
MIRROR
STICK
SHEET
A
(x3)
FRONT
MIRROR
HOLDER
MIRROR
HOLDER
SIDE CONTROL
PWB
C
(x4)
BACK COVER
E
(x2)
D
(x13)
BODY
OPERATION
SHEET
B
(x4)
SIDE CONTROL
BASE
(No.YA092B)1-13
Page 14

<BODY SIDE>
3.1.15 BODY COVER
(1) Remove 9 screws [ A ] (BODY).
(2) Remove 6 screws [ B ] (AV TERMINAL BOARD).
(3) Take out the BODY COVER.
NOTE :
• Do not leave the BODY COVER removed for long time to
prevent soiling from dust.
CAUTION :
Before starting the work, be sure to read the following
written instructions on the printed CAUTION on the AV
TERMINAL BOARD.
AV TERMINAL BOARD
-----------------------------
-------------------------
--------------------------------------
-----------------------------------
----------------------------------
---------------------------------
------------------------------
----------------------------
------------------------------
---------------------------------
-------------------------------
-----------------------------------
------------------------------
--------
----------------------------
-------------------
-----------------------------------
-------------------------
-----------------------------------
3.1.16 BODY BRACKET
• Take out the BODY COVER.
(1) Remove 4 screws [ C ].
(2) Take out the BODY BRACKET.
3.1.17 MAIN UNIT
• Take out the BODY COVER.
• Take out the BODY BRACKET.
(1) Remove 2 screws [ D ].
(2) Take out the TOP SHADE BRACKET.
(3) Take out the connector [FJ:12pin], [SW:4pin], [SPR:2pin
(black)], [SPL:2pin(white)], [FL:7pin].
(4) Remove 2 screws [ E ] from rear side.
(5) Pull out the MAIN UNIT rear side.
CAUTION
• Except for confirmation of projection images on the
screen and audio output through the speakers, the
removed MAIN UNIT is still workable in the same state as
if it is still built in the TV set. Therefore, the MAIN UNIT can
be removed, if necessary, for board diagnosis, electric
testing, etc. apart from confirmation of screen images and
audio output.
• Do not leave the MAIN UNIT removed for long time to
prevent soiling from dust.
• Because of the large size, at least 2 persons are
recommended for removal and reassemble.
• When carrying the MAIN UNIT, use care not to drop, shock
or shake it.
• Do not stain or damage the projection lens.
• Do not look directly at the light during service.
• Do not touch the lamp directly as it presents a burn
hazard.
NOTE :
• When not performing repair work, attach the cap on the
lens to preventing dust from covering.
• When mounting to the set, make sure the front of the lens
is in contact with the cushion on the set (body) side.
• Make sure that FRONT LED PWB connector is completely
connect to the RECEIVER PWB connector (CN10FL).
• When wire clamps are removed during work, use care to
restore them precisely to their original positions.
Performance can be affected if these are not returned to the
original positions.
BACK COVER
TOP SHADE
BRACKET
D
(x2)
MAIN UNIT
BODY
COVER
BODY
BRACKET
A
(BODY)
C
(x4)
E
(x2)
AV TERMINAL BOARD
FRONT
BODY SIDE VIEW
(x9)
B
(x6)
AV TERMINAL
BOARD
1-14 (No.YA092B)
BODY
Page 15

<INNER PWB SIDE>
3.1.18 AV TERMINAL BOARD
• Take out the BODY COVER.
(1) Remove 5 screws [ A ].
(2) Remove 1 screw [ B ].
(3) Pull out the POWER CORD CLAMP.
(4) Remove the nut [ C ] attaching the ANTENNA TERMINAL.
(5) Take out the AV TERMINAL BOARD.
3.1.19 SUB DRIVE PWB
• Take out the BODY COVER.
• Take out the BODY BRACKET.
• Take out the MAIN UNIT.
(1) Remove 4 screws [ D ].
(2) Take out the PWB HOLDER.
(3) Disconnect the connector [CN401] and [CN402].
(4) Remove 6 screws [ E ].
(5) Take out the SUB DRIVE PWB.
3.1.20 POWER PWB
• Take out the BODY COVER.
• Take out the BODY BRACKET.
• Take out the MAIN UNIT.
(1) Remove 1 screw [ F ].
(2) Take out the POWER PWB BRACKET.
(3) Disconnect the connector [CN90BL], [CN90SE],
[CN90AA], [CN90B], [CN90DD] and [CN90G].
(4) Remove 5 screws [ G ].
(5) Take out the POWER PWB.
3.1.21 DIGITAL SIGNAL PWB
• Take out the BODY COVER.
• Take out the BODY BRACKET.
• Take out the MAIN UNIT.
• Take out the AV TERMINAL BOARD.
• Take out the PWB HOLDER
(1) Disconnect the connector [CN001], [CN002], [CN003],
[CN0FC] and [CN0LV2].
(2) Remove 1 screw [ H ] attaching the earth wire.
(3) Remove 1 screw [ I ].
(4) Remove the both side SHIELD COVER.
(5) Take out the DIGITAL SIGNAL PWB.
CAUTION:
Make sure to perform the "SYSTEM SETTING" on page 1-10,
when DIGITAL SIGNAL PWB is replaced.
3.1.22 RECEIVER PWB
• Take out the BODY COVER.
• Take out the BODY BRACKET.
• Take out the MAIN UNIT.
• Take out the AV TERMINAL BOARD.
• Take out the PWB HOLDER
(1) Remove 1 screw [ J ].
(2) Take out the ANALOG PWB BRACKET with PWB.
(RECEIVER PWB / ANALOG SIGNAL PWB / REGULATOR
PWB)
(3) Disconnect the connector [CN10FC], [CN10PH], [CN100R],
[CN10PH], [CN100A], [CN100T], [CN100F], [CN10FJ],
[CN10FL], [CN10SW], [CN10AA] and [CN10SP].
(4) Remove 4 screws [ K ].
(5) Take out the RECEIVER PWB.
3.1.23 ANALOG SIGNAL PWB
• Take out the BODY COVER.
• Take out the BODY BRACKET.
• Take out the MAIN UNIT.
• Take out the AV TERMINAL BOARD.
• Take out the PWB HOLDER
• Take out the RECEIVER PWB.
(1) Disconnect the connector [CN001], [CN002], [CN00D],
[CN0J1], [CN0J2], [CN00T], [CN00F] and [CN00G].
(2) Remove 2 screws [ L ].
(3) Take out the ANALOG SIGNAL PWB.
3.1.24 REGULATOR PWB
• Take out the BODY COVER.
• Take out the BODY BRACKET.
• Take out the MAIN UNIT.
• Take out the AV TERMINAL BOARD.
• Take out the PWB HOLDER
• Take out the RECEIVER PWB.
(1) Disconnect the connector [CN20D], [CN203] and [CN20B].
(2) Remove 4 screws [ M ].
(3) Take out the REGULATOR PWB.
3.1.25 REAR JACK PWB
• Take out the BODY COVER.
• Take out the BODY BRACKET.
• Take out the MAIN UNIT.
• Take out the AV TERMINAL BOARD.
(1) Disconnect the connector [CNPH], [CNJ0J1] and
[CNJ0J2].
(2) Remove 2 screws [ N ].
(3) Take out the REAR JACK PWB.
(No.YA092B)1-15
Page 16

FRONT
BODY
FRONT
RECEIVER
PWB
K
(x4)
E
(x6)
D
(x4)
PWB HOLDER
EARTH
WIRE
H
(x1)
I
(x1)
SUB DRIVE
PWB
J
(x1)
ANALOG PWB
BRACKET
SHIELD
COVER
ANALOG SIGNAL
REGULATOR
PWB
PWB
REAR JACK
PWB
L
(x2)
M
(x4)
N
(x2)
POWER PWB
1-16 (No.YA092B)
DIGITAL SIGNAL
G
(x5)
PWB
EARTH
WIRE
F
(x1)
UNIT BASE
POWER PWB
BRACKET
POWER CORD
CLAMP
ANTENNA
TERMINAL
POWER CORD
AV TERMINAL
BOARD
B
(x1)
A
(x5)
C
(x1)
Page 17

<OPTICAL SIDE>
3.1.26 LAMP FAN DUCT & THERMOSTAT
• Take out the BODY COVER.
• Take out the BODY BRACKET.
• Take out the MAIN UNIT.
(1) Remove 4 screws [ A ].
(2) Take out the LAMP FAN DUCT.
(3) Remove 2 screws [ B ].
(4) Take out the THERMOSTAT.
3.1.27 FAN CONTROL PWB
• Take out the BODY COVER.
• Take out the BODY BRACKET.
• Take out the MAIN UNIT.
(1) Disconnect the connector [CN801:7pin (MAIN DRIVE
PWB)], [CN802:3pin (OPTICAL BLOCK COOLING FAN)],
[CN803:3pin (LAMP COOLING FAN)] and [CN804:4pin
(LAMP BALLAST UNIT)].
(2) Remove 1 screw [ C ].
(3) Take out the FAN CONTROL PWB.
3.1.28 REMOTE SENSOR PWB
• Take out the BODY COVER.
• Take out the BODY BRACKET.
• Take out the MAIN UNIT.
(1) Remove 1 screw [ D ].
(2) Take out the REMOTE SENSOR PWB.
3.1.29 OPTICAL / DRIVE ASS’Y
• Take out the BODY COVER.
• Take out the BODY BRACKET.
• Take out the MAIN UNIT.
(1) Remove 2 screws [ E ].
(2) Take out the SHADE COVER.
(3) Remove 2 screws [ F ].
(4) Take out the FRONT SHADE BRACKET.
(5) Remove 7 screws [ G ].
(6) Slightly raise and take out the OPTICAL / DRIVE ASS’Y.
(7) Peel off the shield (copper film) tapes.
NOTE :
• The OPTICAL / DRIVE ASS’Y contains precision optical
components.
Handle carefully and avoid imparting strong shock.
• OPTICAL / DRIVE ASS’Y construction
1) Optical block :
(D-ILA device, PBS, Field lens, Integrater, Mirror etc.)
2) Projection lens
3) Optical base
4) MAIN DRIVE PWB ASS’Y
5) Top duct
6) Shield tape
• When not performing repair work, attach the cap on the
lens to preventing dust from covering.
• When mounting to the set, make sure the front of the lens
side is in contact with the cushion on the body side.
• When installing this kit (OPTICAL/DRIVE ASS'Y) to the set,
first mount the FRONT SHADE BRACKET and SHADE
COVER (with cushion) to the kit (lens section).
• Do not leave the OPTICAL / DRIVE ASS’Y removed for
long time to prevent soiling from dust.
3.1.30 MAIN DRIVE PWB
• Take out the BODY COVER.
• Take out the BODY BRACKET.
• Take out the MAIN UNIT.
(1) Take out the TOP DUCT PLATE.
(2) Remove 2 screws [ H ].
(3) Take out the TOP DUCT.
(4) Take out the SHIELD TOP CASE.
(5) Remove 4 screws [ I ].
(6) Take out the MAIN DRIVE PWB.
(7) Take out the SHIELD PLATE.
(8) Slightly raise and take out the OPTICAL BLOCK.
3.1.31 OPTICAL BLOCK COOLING FAN
• Take out the BODY COVER.
• Take out the BODY BRACKET.
• Take out the MAIN UNIT.
(1) Remove 3 screws [ J ].
(2) Take out the SIROCCO TOP CASE.
(3) Remove 3 screws [ K ].
(4) Take out the OPTICAL BLOCK COOLING FAN.
3.1.32 LAMP COOLING FAN
• Take out the BODY COVER.
• Take out the BODY BRACKET.
• Take out the MAIN UNIT.
(1) Remove 2 screws [ L ].
(2) Take out the LAMP FAN BRACKET ASSY.
(3) Remove 4 screws [ M ].
(4) Take out the LAMP COOLING FAN.
3.1.33 LAMP BALLAST UNIT COOLING FAN
• Take out the BODY COVER.
• Take out the BODY BRACKET.
• Take out the MAIN UNIT.
(1) Remove 3 screws [ N ].
(2) Remove 4 screws [ O ].
(3) Take out the COOLING FAN (LAMP BALLAST UNIT).
3.1.34 LAMP BALLAST UNIT
• Take out the BODY COVER.
• Take out the BODY BRACKET.
• Take out the MAIN UNIT.
• Take out the LAMP BALLAST UNIT COOLING FAN.
(1) Take out the wire of LAMP BALLAST UNIT.
(2) Remove 4 screws [ P ].
(3) Take out the BALLAST BRACKET BOTTOM.
(4) Remove 4 screws [ Q ].
(5) Take out the BALLAST COVER.
(6) Take out the LAMP BALLAST UNIT.
3.1.35 LAMP COVER SW PWB
• Take out the BODY COVER.
• Take out the BODY BRACKET.
• Take out the MAIN UNIT.
(1) Remove 1 screw [ R ].
(2) Take out the LAMP COVER SW PWB.
(No.YA092B)1-17
Page 18

<OPTICAL SIDE VIEW>
FRONT
FRONT SHADE
BRACKET
BODY
FRONT
H
(x2)
TOP DUCT PLATE
TOP DUCT
SHIELD TOP
CASE
I
REMOTE SENSOR
PWB
SHADE
COVER
D
(x1)
LAMP UNIT
E
(x2)
F
(x2)
C
(x1)
FAN CONTROL
PWB
(x4)
FRONT
B
(x2)
MAIN DRIVE
PWB
SHIELD PLATE
OPTICAL BLOCK
SIROCCO
TOP CASE
OPTICAL BLOCK
COOLING FAN
OPTICAL / DRIVE
ASS'Y
TEMP SENSOR
PWB
K
(x3)
J
(x3)
BRACKET ASSY
LAMP
COOLING FAN
M
(x4)
LAMP COVER
SW PWB
LAMP FAN
R
(x1)
THERMOSTAT
G
(x7)
A
(x4)
LAMP FAN
DUCT
N
(x3)
L
(x2)
BALLAST BRACKET
TOP
COOLING FAN
(LAMP BALLAST UNIT)
P
(x4)
O
(x4)
Q
(x4)
BALLAST BRACKET
BOTTOM
BALLAST
COVER
LAMP BALLAST
UNIT
1-18 (No.YA092B)
UNIT BASE
Page 19

3.1.36 SHIELD PLATE ATTACHMENT PROCESS
• Take out the TOP DUCT / TOP DUCT PLATE.
• Take out the MAIN DRIVE PWB with SHIELD TOP CASE.
< Assembly >
(1) Copper film case with laminate surface to be top.
(2) Fold 9 points as shown in [ A ] an arrow view Fig.1.
( )
1 ~ 9
(3) Attach the double-faced tapes [ B ] as shown in Fig.1.
(4) Stick the tape [ C ] as shown in Fig.1.
(5) Make copper film case to be SHIELD PLATE (box-shape).
< Attachment >
(6) Install the SHIELD PLATE (box-shape).
(7) Install the MAIN DRIVE PWB.
(8) Install 4 screws [ D ] to MAIN DRIVE PWB.
(9) Install the SHIELD TOP CASE .
(10) Attach the shield (copper film) tapes 6 positions [ E ] and
[ F ] as shown in Fig.2 and Fig.5.
(11) Install the TOP DUCT.
(12) Install 2 screws [ G ] as shown in Fig.5.
(13) Install the TOP DUCT PLATE as shown in Fig.5.
(14) Attach the shield (copper film) tapes 4 positions [ H ] and
[ I ] as shown in Fig.3 and Fig.5.
(15) Then attach the shield (copper film) tapes 11 positions [ J ]
[ K ], [ L ],and [ M ] as shown in Fig.4 and Fig.5.
<ASSEMBLY PROCESS>
A
B
(x2)
OPTICAL
BLOCK
SHIELD PLATE
C
(x1)
B
(x1)
SHIELD PLATE
FRONT
Fig.1
FRONT
FRONT
SHIELD PLATE
K
(x3)
D
(x4)
M
(x3)
(x1)
<ASSEMBLY and ATTACHMENT PROCESS>
TOP DUCT PLATE
H
(x2)
(x1)
F
(x3)
G
E
E
I
(x3)
TOP DUCT
(x2)
SHIELD TOP
CASE
MAIN DRIVE
PWB
MAIN DRIVE
PWB
DUCT TOP
E
(x2)
L
(x1)
K
(x2)
L
(x1)
UNIT BASE
BRACKET
SHIELD
PLATE
OPTICAL
BLOCK
F
(x3)
SHIELD PLATE
I
(x3)
SHIELD PLATE
M
(x3)
E
(x1)
FRONT
MAIN DRIVE
PWB
H
(x1)
FRONT
Fig.2
Fig.3
L
Fig.5
J
(x1)
OPTICAL BLOCK
FRONT
K
(x1)
L
(x1)
J
(x1)
K
Fig.4
(No.YA092B)1-19
Page 20

3.2 MEMORY IC REPLACEMENT
3.2.1 MEMORY IC
This memory IC stores data for proper operation of the video and
Drive circuits.
When replacing, be sure to use an IC containing this (initial
value) data.
3.2.2 MEMORY IC REPLACEMENT PROCEDURE
1. Power off
Switch off the power and disconnect the power cord from
the wall outlet.
2. Replace the memory IC
Initial value must be entered into the new IC.
3. Power on
Connect the power cord to the wall outlet and switch on the
power.
4. SERVICE MENU setting
Before entering the SERVICE MENU, confirm that the setting
of TV/CATV SW of the REMOTE CONTROL UNIT is at the
"TV" side and the setting of VCR/DVD SW of the REMOTE
CONTROL UNIT is at the "VCR" side. If the switches have not
been properly set, you cannot enter the SERVICE MENU.
1) Press [SLEEP TIMER] key and while the indication of
SLEEP TIMER 0 MIN is being displayed, press
[DISPLAY] key and [VIDEO STATUS] key (Fig.2)
simultaneously.
2) The SERVICE MENU screen of Fig.1 is displayed.
3) Verify what to set in the SERVICE MENU, and set
whatever is necessary (Fig.1).
Refer to the SERVICE ADJUSTMENT for setting.
4) Press the [BACK] key to return the SERVICE MENU.
5. Receive channel setting
Refer to the OPERATING INSTRUCTIONS (USER'S
GUIDE) and set the receive channels (Channels Preset) as
described.
SERVICE MENU SCREEN
SERVICE MENU
1. ADJUST
2. SELF-CHECK
3. I2C STOP
Fig.1
3.2.3 SERVICE MENU SETTING ITEMS
Setting item Item No. Remark
1.ADJUST
VIDEO SYSTEM S001~S039
AUDIO SYSTEM T001~T010
PANEL CONTROL SYSTEM P001~P010
DRIVE SYSTEM D001~D187
SYSTEM SETTING Z001~Z010
Adjust
Do not adjust
(Fixed value)
6. User settings
Check the user setting items according to after page.
Where these do not agree, refer to the OPERATING
INSTRUCTIONS (USER'S GUIDE) and set the items as
described.
TV / CATV
(Set toTV)
Number key
SLEEP TIMER
(Skip / Enter the SERVICE MENU)
MUTING
FUNCTION
(Value setting key)
MENU
(Come out SERVICE MENU key )
(Memory key)
TV
CATV VCR DVD
MULTI SCREEN
TWIN
FREEZE
SWAP SELECT
INPUT 1
V1
123
INPUT 2
V2
456
INPUT 3
V3
789
INPUT 4
TUNE
V4
THEATER
DIGITAL-IN
PRO
D-IN
SLEEP TIMER
DISPLAY
+
MUTING
VOL VOL
MENU
VCR CHANNEL
PREV NEXT
REW
REC PAUSE
OPEN CLOSE
RM-C15G
Fig.2
CH
OK
CH
VCR / DVD
STOP
ASPECT
INDEX
0
SOUND
POWER
POWER
RETURN+
VIDEO
STATUS
LIGHT
C.C.
BACK
TV / VCR
FFPLAY
STILL PAUSE
POWER
VCR/DVD
(Set to VCR)
SERVICE MENU
ITEM SELECT KEY
1 3
TV
VIDEO STATUS
DISPLAY
C.C.
(Enter the SERVICE MENU)
FUNCTION
(SERVICE ITEM select key)
BACK
(Return key)
9
&
1-20 (No.YA092B)
Page 21

3.2.4 SETTING OF FACTORY SHIPMENT
3.2.4.1 BUTTON OPERATION
Setting item Setting position
POWER OFF
INPUT TV
CHANNEL CABLE-02
VOLUME 10
3.2.4.3 REMOTE CONTROL MENU OPERATION
(1) PICTURE ADJUST[ 1 ]
Setting item STANDARD DYNAMIC THEATER GAME
TINT
COLOR
PICTURE
BRIGHT
DETAIL
COLOR TEMPERATURE
NTSC / 525i / 525p
1125i / 750p
NTSC / 525i / 525p
1125i / 750p
NTSC / 525i / 525p
1125i / 750p
NTSC / 525i / 525p
1125i / 750p
NTSC / 525i / 525p
1125i / 750p
NTSC / 525i / 525p
1125i / 750p
3.2.4.2 REMOTE CONTROL DIRECT OPERATION
Setting item Setting position
INPUT TV
CHANNEL CABLE-02
VOLUME 10
MUTING OFF
DISPLAY OFF
SOUND A.H.S OFF
BBE ON
SMART SOUND OFF
[HD-52Z585 / HD-61Z585]
ASPECT REGULAR
CLOSED CAPTION (C.C) OFF
VIDEO STATUS DYNAMIC
TWIN PICTURE SOURCE LEFT SIDE : CA02
RIGHT SIDE : INPUT1
00 00 00 00
00 00 00 00
00 00 00 00
00 00 00 00
00 +10 00 -10
00 +10 00 -10
00 00 00 00
00 00 00 00
00 +05 00 00
00 +05 00 00
LOW HIGHT HIGHT HIGHT
LOW HIGHT LOW HIGHT
(2) PICTURE ADJUST [ 2 ] (3) SOUND ADJUST (4) CLOCK / TIMERS
Setting item
Setting
position
Setting item
Setting
position
Setting item
Setting
position
DIG. NOISE CLEAR OFF TREBLE 00 SET CLOCK (Unnecessary to set)
NATURAL CINEMA AUTO BASS 00 ON / OFF TIMER NO
COLOR MANAGEMENT ON BALANCE 00
DYNAMIC GAMMA ON MTS STEREO
(5) INITIAL SETUP
Setting item Setting position Setting item Setting position
CENTER CH INPUT OFF POWER INDICATOR HIGH
DIGITAL-IN SIZE-1 (at 480p signal input) LANGUAGE ENG
DIGITAL-IN AUDIO DIGITAL CLOSED CAPTION OFF (CAPTION-CC1-T1)
TV SPEAKER ON AUTO SHUT OFF OFF
AUDIO OUT FIX XDS ID ON
NOISE MUTING ON AUTO TUNER SET UP Unnecessary to set
FRONT PANEL LOCK OFF CHANNEL SUMMARY ---- (Unnecessary to set)
V1 SMART INPUT OFF V-CHIP OFF
VIDEO INPUT LABEL --- (Blank) SET LOCK CODE (0000) (Unnecessary to set)
POSITION ADJUSTMENT Center AUTO DEMO OFF
(No.YA092B)1-21
Page 22

3.3 REPLACEMENT OF CHIP COMPONENT
3.3.1 CAUTIONS
(1) Avoid heating for more than 3 seconds.
(2) Do not rub the electrodes and the resist parts of the pattern.
(3) When removing a chip part, melt the solder adequately.
(4) Do not reuse a chip part after removing it.
3.3.2 SOLDERING IRON
(1) Use a high insulation soldering iron with a thin pointed end of it.
(2) A 30w soldering iron is recommended for easily removing parts.
3.3.3 REPLACEMENT STEPS
1. How to remove Chip parts
[Resistors, capacitors, etc.]
(1) As shown in the figure, push the part with tweezers and
alternately melt the solder at each end.
2. How to install Chip parts
[Resistors, capacitors, etc.]
(1) Apply solder to the pattern as indicated in the figure.
(2) Grasp the chip part with tweezers and place it on the
solder. Then heat and melt the solder at both ends of the
chip part.
(2) Shift with the tweezers and remove the chip part.
[Transistors, diodes, variable resistors, etc.]
(1) Apply extra solder to each lead.
SOLDER
SOLDER
(2) As shown in the figure, push the part with tweezers and
alternately melt the solder at each lead. Shift and remove
the chip part.
Note :
After removing the part, remove remaining solder from the
pattern.
[Transistors, diodes, variable resistors, etc.]
(1) Apply solder to the pattern as indicated in the figure.
(2) Grasp the chip part with tweezers and place it on the
solder.
(3) First solder lead A as indicated in the figure.
A
B
C
(4) Then solder leads B and C.
A
B
C
1-22 (No.YA092B)
Page 23

SECTION 4
ADJUSTMENTS
4.1 ADJUSTMENT PREPARATION
(1) You can make the necessary adjustments for this unit
with either the remote control unit or with the
adjustment equipment and parts as given below.
(2) Adjustment with the remote control unit is made on the
basis of the initial setting values, however, the new
setting values which set the screen to its optimum
condition may differ from the initial settings.
(3) Make sure that AC power is turned on correctly.
(4) Turn on the power for the set and test equipment before
use, and start the adjustment procedures after waiting at
least 30 minutes.
(5) Unless otherwise specified, prepare the most suitable
reception or input signal for adjustment.
(6) Never touch any adjustment parts, which are not specified
in the list for this variable resistors, transformers, trimmer
capacitors, etc.
4.2 PRESETTING BEFORE ADJUSTMENT
Unless otherwise specified in the adjustment instructions,
preset the following functions with the remote control unit.
Setting item Settings position
VIDEO STATUS STANDARD
PICTURE
(TINT / COLOR / BRIGHT/PICTURE /
DETAIL)
COLOR TEMPERATURE
DIG. NOISE CLEAR OFF
COLOR MANAGEMENT ON
DYNAMIC GAMMA ON
SOUND
(BASS / TREBLE / BALANCE)
MTS STEREO
BBE OFF
A.H.S OFF
SMART SOUND
ASPECT FULL
All 00
LOW
All 00
OFF
[HD-52Z585 / HD-61Z585]
4.3 MEASURING INSTRUMENT AND FIXTURES
1) DC voltmeter (or Digital voltmeter)
2) Oscilloscope
3) Signal generator (Pattern generator)
[ NTSC / 525i / 750p / 1125i / DIGITAL]
4) TV audio multiplex signal generator
5) Remote control unit
4.4 ADJUSTMENT ITEMS
OPTICAL BLOCK / DRIVE CIRCUIT
• LENS FOCUS adjustment
• DRIVE CONVERGENCE adjustment
• DRIVE CENTER POSITION adjustment
VIDEO CIRCUIT
• 525i A-D OFFSET adjustment
• 1125i BRIGHTNESS adjustment
• 1125i A-D OFFSET adjustment
• SUB SCREEN A-D OFFSET adjustment
• WHITE BALANCE (HIGHT LIGHT)
MTS CIRCUIT
• MTS INPUT LEVEL adjustment
• MTS SEPARATION adjustment
(No.YA092B)1-23
Page 24

4.5 BASIC OPERATION OF THE SERVICE MENU
Operate the SERVICE MENU with the remote control unit.
4.5.1 HOW TO ENTER THE SERVICE MENU
(1) Press the [SLEEP TIMER] key and while indication of
"SLEEP TIMER 0 MIN." is being displayed, press
[DISPLAY] key and [VIDEO STATUS] key simultaneously,
and the SERVICE MENU screen of Fig.1 will be displayed.
4.5.2 SELECT THE SERVICE MENU ITEM
(1) When the SERVICE MENU is displayed, press any key of
the [1] / [2] / [3] / [9] keys to enter the corresponding menu
mode.
4.5.3 SELECT THE SETTING ITEM & SETTING VALUE
(1) Select the service item using the [FUNCTION (
(2) Set the value using the [FUNCTION (
/)] key.
/)] key.
4.5.4 SETTING OF THE OPTICAL BLOCK / DRIVE CIRCUIT
(1) R/B mode (DRIVE / CONVERGENCE) adjust
Set the R mode value using the [FUNCTION (
/)] key
Set the B mode value using the [FUNCTION (/)] key
(2) RGB BOX mode (DRIVE CENTER POSITION) adjust
Set the horizontal center position value using the
[FUNCTION (
/)] key
Set the vertical center position value using the [FUNCTION
(/)] key
4.5.5 MEMORIZED SETTING VALUE
(1) Press the [MUTING] key to memorize the adjustment value.
If not to do it, adjustment data is not memorized to the
memory IC. And if exit the adjustment mode before
memorize the data, the adjustment which your changed
value is canceled.
(2) Adjustment data is applied at once in OPTICAL BLOCK /
DRIVE CIRCUIT adjustment mode.
CAUTION
Individual items 1, 2 and 3 on the SERVICE MENU screen
(Fig.1) are selected by the Number key (Fig.2).
When selecting each item on the SERVICE MENU, if [4] ~
[8] keys other than [1], [2], [3] and [9] keys are pressed by
mistake, another screen that is not the SERVICE MENU will
appear. In such a case, press the [BACK] key immediately
and return to the SERVICE MENU screen.
Do not press the [MUTING] key.
SERVICE MENU
1. ADJUST
2. SELF-CHECK
3. I2C STOP
TV / CATV
(Set toTV)
SLEEP TIMER
(Skip / Enter the SERVICE MENU)
MUTING (Memory key)
FUNCTION
(Value setting key)
MENU
(Come out SERVICE MENU key )
SERVICE MENU
Fig.1
KEY FUNCTION
CATV VCR DVD
ASPECT
MULTI SCREEN
INDEX
SWAP SELECT
V1
123
V2
456
V3
789
TUNE
0
V4
THEATER
PRO
DISPLAY
SOUND
+
CH
VOL VOL
OK
CH
VCR / DVD
PREV NEXT
POWER
REW
STOP
REC PAUSE
RM-C15G
POWER
RETURN+
VIDEO
STATUS
LIGHT
BACK
TV / VCR
FFPLAY
STILL PAUSE
TV
C.C.
C.C.
TV
TWIN
FREEZE
INPUT 1
INPUT 2
INPUT 3
INPUT 4
DIGITAL-IN
D-IN
SLEEP TIMER
MUTING
MENU
VCR CHANNEL
OPEN CLOSE
Fig.2
POWER
VCR/DVD
(Set to VCR)
1 32
9
SERVICE MENU
item select
VIDEO STATUS
DISPLAY
(Enter the SERVICE MENU)
FUNCTION
(SERVICE ITEM select key)
BACK
(Return key)
4.5.6 HOW TO EXIT THE SERVICE MENU
Press the [MENU] key to exit the SERVICE MENU.
1-24 (No.YA092B)
Page 25

4.5.7 DESCRIPTION OF STATUS DISPLAY
The status display on the upper part of the SERVICE MENU
screen is common.
(1) SIGNAL SYSTEM
(OSD) (EXPLAIN)
NTSC3 : NTSC3.58
NTSC4 : NTSC4.48
525I : 525i
525P : 525p
750P : 750p
1125I6 : 1125i 60Hz
RGB5 : RGB 525i
D525I : digital 525i
D525P : digital 525p
D1256I6 : digital 1125i 60Hz
H525I : HDMI 525i
H525P : HDMI 525p
H750P : HDMI 750p
H1125I6 : HDMI 1125i 60Hz
(2) ASPECT
SINGLE
1409 : FULL
1609 : PANORAMA
1609S : CINEMA
FULL : REGULAR
TWIN / INDEX
FRZ : TWIN
STD : INDEX (12CH)
(3) VIDEO STATUS
STD : STANDARD
DYN : DYNAMIC
TH : THEATER
GAME : GAME
(4) WHITE BALANCE
H : HIGH
M: LOW
SETTING
ITEM No.
SIGNAL
SYSTEM
SETTING
ITEM
ASPECT
SERVICE MENU
SERVICE MENU
1. ADJUST
2. SELF-CHECK
3. I2C STOP
STATUS DISPLAY
S001
NTSC3 FULL TH H
PREPARE
[1. ADJUST ] MENU
SETTING
VALUE
WHITE
BALANCE
VIDEO
STATUS
4.5.8 SETTING OF THE SERVICE MENUS
4.5.8.1 [1.ADJUST]
Do not change settings of items that are not
included in the "ADJUSTMENT PROCEDURE".
[Function (/)] key
For scrolling up/down the setting items.
S001... T001... P001... D001... Z001
[SLEEP TIMER] key
For switching to the next items.
S001 T001 P001 D001 Z001
[Function ( /)] key
For scrolling up/down the setting values.
4.5.8.2 [2.SELF CHECK]
Refer to “SECTION 5 TROUBLESHOOTING”
2
4.5.8.3 [3.I
C STOP]
Setting for this item is not required in servicing
4.5.8.4 [9] RGB BOX PATTERN
Adjustment of DRIVE CIRCUIT (CONVERGENCE /
CENTER POSITION)
RGB BOX
pattern
Indicated
R/B mode
& RGB mode
[9] RGB BOX PATTERN
(No.YA092B)1-25
Page 26

4.6 INITIAL SETTING VALUE OF SERVICE MENU
(1) Adjustment of the SERVICE MENU is made on the basis of the initial setting values; however, the new setting values which set
the screen in its optimum condition may differ from the initial setting.
(2) Do not change the initial setting values of the setting items NOT LISTED IN ADJUSTMENT.
CAUTION:
Never change the initial setting value any adjustments except for those that are designated in the adjustment procedures.
In case where you have made undesignated adjustments by mistake, never press the [MUTING] key on the remote control unit.
Whenever you had not pressed the [MUTING] key, you would be able to recover the initial value by switching the [POWER] key.
4.6.1 [1.ADJUST]
VIDEO SYSTEM
Item No. Item name Variable range Setting value
AUDIO SYSTEM
Item No. Item name Variable range Setting value
S001 PREPARE 0~31 0
S002 NTSC BL 0~15 1
S003 NTSC CNT 0~255 44
S004 NT CR OF 0~15 4
S005 NT CB OF 0~15 4
S006 525i BL 0~15 1
S007 525i CNT 0~255 44
S008 5i CB OF 0~15 0
S009 5i CR OF 0~15 0
S010 5i CR GN 0~15 4
S011 5i CB GN 0~15 4
S012 HD BL 0~63 0
S013 HD CB OF 0~63 0
S014 HD CR OF 0~63 0
S015 RT CONT 0~15 7
S016 RT CB OF 0~15 2
S017 RT CR OF 0~15 5
S018 RT CL GA 0~15 4
S019 PC CL MB 0~7 0
S020 PC CL LB 0~255 0
S021 PC CL MR 0~3 0
S022 PC CL LR 0~255 0
S023 (NO DISPLAY) 0~255 0
S024 (NO DISPLAY) 0~255 0
S025 (NO DISPLAY) 0~255 0
S026 (NO DISPLAY) 0~255 0
S027 (NO DISPLAY) 0~255 0
S028 (NO DISPLAY) 0~255 0
S029 (NO DISPLAY) 0~255 0
S030 R DRIVE 0~255 0
S031 G DRIVE 0~255 0
S032 B DRIVE 0~255 0
S033 (NO DISPLAY) 0~255 0
S034 (NO DISPLAY) 0~255 0
S035 (NO DISPLAY) 0~255 0
S036 (NO DISPLAY) 0~255 0
S037 (NO DISPLAY) 0~255 0
S038 (NO DISPLAY) 0~255 0
S039 ILA COM 0~255 0
T001 IN LEVEL 0~255 007
T002 LOW SEP 0~255 037
T003 HIGH SEP 0~255 033
T004 AFC 0~255 0 (Fixed)
T005 (NO DISPLAY) 0~255 0 (Fixed)
T006 ATT V ON 0~1 0 (Fixed)
T007 ATT U ON 0~1 0 (Fixed)
T008 ATT C ON 0~1 0 (Fixed)
T009 (NO DISPLAY) 0~255 0 (Fixed)
T010 (NO DISPLAY) 0~255 0 (Fixed)
PANEL CONTROL SYSTEM [Do not adjust : All fixed]
Item No. Item name Variable range Setting value
P001 TM HOR H 0~255 0
P002 TM HOR L 0~255 0
P003 TM MIN 0~255 0
P004 TEMP 0~255 0
P005 (NO DISPLAY) 0~255 0
P006 (NO DISPLAY) 0~255 0
P007 (NO DISPLAY) 0~255 0
P008 (NO DISPLAY) 0~255 0
P009 (NO DISPLAY) 0~255 0
P010 (NO DISPLAY) 0~255 0
DRIVE SYSTEM [Do not adjust : All fixed]
Item No. Item name Variable range Setting value
D001 SLV GN 0~3F 00
D002 SLVH GN 0~3F 00
D003 SLH GN 0~3F 00
D004 SLV Pf 0~03 00
D005 SLH Pf H 0~01 00
D006 SLH Pf L 0~03 00
D007 SL EGCON 0~3F 00
D008 SL EGONF 0~01 00
D009 SL CRGON 0~3F 00
D010 SL CRGON 0~01 00
D011 SL ON OF 0~01 00
1-26 (No.YA092B)
Page 27

Item No. Item name Variable range Setting value
D012 SV GN 0~3F 00
D013 SVH GN 0~3F 00
D014 SH GN 0~3F 00
D015 SV Pf 0~03 00
D016 SV Pf H 0~01 00
D017 SV Pf L 0~03 00
D018 SYL CON 0~3F 00
D019 SYL CONF 0~01 00
D020 SYH CON 0~3F 00
D021 SYH CONF 0~01 00
D022 SC CON 0~3F 00
D023 SC CNONF 0~01 00
D024 SPM BLC 0~3F 00
D025 SPM BLCO 0~01 00
D026 SLIM 0~3F 00
D027 SLIMONF 0~01 00
D028 SCRG 0~3F 00
D029 SRGONF 0~01 00
D030 S ONF 0~01 00
D031 pb GN 0~3F 00
D032 pb Pf H 0~01 00
D033 pb Pf L 0~03 00
D034 pb CRG 0~3F 00
D035 pb CRGON 0~01 00
D036 pb ONF 0~01 00
D037 pr GN 0~3F 00
D038 pr Pf H 0~01 00
D039 pr Pf H 0~03 00
D040 pr CRG 0~3F 00
D041 pr CRGON 0~01 00
D042 pr ONF 0~01 00
D043 ENH ONF 0~01 00
D044 (NO DISPLAY) 0~FF 00
D045 (NO DISPLAY) 0~FF 00
D046 (NO DISPLAY) 0~FF 00
D047 (NO DISPLAY) 0~FF 00
D048 (NO DISPLAY) 0~FF 00
D049 (NO DISPLAY) 0~FF 00
D050 (NO DISPLAY) 0~FF 00
D051 (NO DISPLAY) 0~FF 00
D052 (NO DISPLAY) 0~FF 00
D053 (NO DISPLAY) 0~FF 00
D054 (NO DISPLAY) 0~FF 00
D055 (NO DISPLAY) 0~FF 00
D056 (NO DISPLAY) 0~FF 00
D057 (NO DISPLAY) 0~FF 00
D058 (NO DISPLAY) 0~FF 00
D059 (NO DISPLAY) 0~FF 00
Item No. Item name Variable range Setting value
D060 (NO DISPLAY) 0~FF 00
D061 (NO DISPLAY) 0~FF 00
D062 (NO DISPLAY) 0~FF 00
D063 (NO DISPLAY) 0~FF 00
D064 (NO DISPLAY) 0~FF 00
D065 (NO DISPLAY) 0~FF 00
D066 (NO DISPLAY) 0~FF 00
D067 (NO DISPLAY) 0~FF 00
D068 (NO DISPLAY) 0~FF 00
D069 (NO DISPLAY) 0~FF 00
D070 (NO DISPLAY) 0~FF 00
D071 (NO DISPLAY) 0~FF 00
D072 (NO DISPLAY) 0~FF 00
D073 (NO DISPLAY) 0~FF 00
D074 (NO DISPLAY) 0~FF 00
D075 (NO DISPLAY) 0~FF 00
D076 (NO DISPLAY) 0~FF 00
D077 (NO DISPLAY) 0~FF 00
D078 (NO DISPLAY) 0~FF 00
D079 (NO DISPLAY) 0~FF 00
D080 (NO DISPLAY) 0~FF 00
D081 (NO DISPLAY) 0~FF 00
D082 (NO DISPLAY) 0~FF 00
D083 (NO DISPLAY) 0~FF 00
D084 (NO DISPLAY) 0~FF 00
D085 (NO DISPLAY) 0~FF 00
D086 (NO DISPLAY) 0~FF 00
D087 (NO DISPLAY) 0~FF 00
D088 (NO DISPLAY) 0~FF 00
D089 (NO DISPLAY) 0~FF 00
D090 (NO DISPLAY) 0~FF 00
D091 (NO DISPLAY) 0~FF 00
D092 (NO DISPLAY) 0~FF 00
D093 (NO DISPLAY) 0~FF 00
D094 (NO DISPLAY) 0~FF 00
D095 (NO DISPLAY) 0~FF 00
D096 (NO DISPLAY) 0~FF 00
D097 (NO DISPLAY) 0~FF 00
D098 (NO DISPLAY) 0~FF 00
D099 (NO DISPLAY) 0~FF 00
D100 (NO DISPLAY) 0~FF 00
D101 (NO DISPLAY) 0~FF 00
D102 (NO DISPLAY) 0~FF 00
D103 (NO DISPLAY) 0~FF 00
D104 (NO DISPLAY) 0~FF 00
D105 (NO DISPLAY) 0~FF 00
D106 (NO DISPLAY) 0~FF 00
D107 (NO DISPLAY) 0~FF 00
(No.YA092B)1-27
Page 28

Item No. Item name Variable range Setting value
Item No. Item name Variable range Setting value
D108 (NO DISPLAY) 0~FF 00
D109 (NO DISPLAY) 0~FF 00
D110 (NO DISPLAY) 0~FF 00
D111 (N O DI SP LAY) 0~FF 00
D112 (NO DISPLAY) 0~FF 00
D113 (NO DISPLAY) 0~FF 00
D114 (NO DISPLAY) 0~FF 00
D115 (NO DISPLAY) 0~FF 00
D116 (NO DISPLAY) 0~FF 00
D117 (NO DISPLAY) 0~FF 00
D118 (NO DISPLAY) 0~FF 00
D119 (NO DISPLAY) 0~FF 00
D120 (NO DISPLAY) 0~FF 00
D121 (NO DISPLAY) 0~FF 00
D122 (NO DISPLAY) 0~FF 00
D123 (NO DISPLAY) 0~FF 00
D124 (NO DISPLAY) 0~FF 00
D125 (NO DISPLAY) 0~FF 00
D126 (NO DISPLAY) 0~FF 00
D127 (NO DISPLAY) 0~FF 00
D128 (NO DISPLAY) 0~FF 00
D129 (NO DISPLAY) 0~FF 00
D130 (NO DISPLAY) 0~FF 00
D131 (NO DISPLAY) 0~FF 00
D132 (NO DISPLAY) 0~FF 00
D133 (NO DISPLAY) 0~FF 00
D134 (NO DISPLAY) 0~FF 00
D135 (NO DISPLAY) 0~FF 00
D136 (NO DISPLAY) 0~FF 00
D137 (NO DISPLAY) 0~FF 00
D138 (NO DISPLAY) 0~FF 00
D139 (NO DISPLAY) 0~FF 00
D140 (NO DISPLAY) 0~FF 00
D141 (NO DISPLAY) 0~FF 00
D142 (NO DISPLAY) 0~FF 00
D143 (NO DISPLAY) 0~FF 00
D144 (NO DISPLAY) 0~FF 00
D145 (NO DISPLAY) 0~FF 00
D146 (NO DISPLAY) 0~FF 00
D147 (NO DISPLAY) 0~FF 00
D148 (NO DISPLAY) 0~FF 00
D149 (NO DISPLAY) 0~FF 00
D150 (NO DISPLAY) 0~FF 00
D151 (NO DISPLAY) 0~FF 00
D152 (NO DISPLAY) 0~FF 00
D153 ENH ONF 0~FF 00
D154 (NO DISPLAY) 0~FF 00
D155 (NO DISPLAY) 0~FF 00
D156 (NO DISPLAY) 0~FF 00
D157 (NO DISPLAY) 0~FF 00
D158 (NO DISPLAY) 0~FF 00
D159 (NO DISPLAY) 0~FF 00
D160 (NO DISPLAY) 0~FF 00
D161 (NO DISPLAY) 0~FF 00
D162 (NO DISPLAY) 0~FF 00
D163 (NO DISPLAY) 0~FF 00
D164 (NO DISPLAY) 0~FF 00
D165 (NO DISPLAY) 0~FF 00
D166 (NO DISPLAY) 0~FF 00
D167 (NO DISPLAY) 0~FF 00
D168 (NO DISPLAY) 0~FF 00
D169 (NO DISPLAY) 0~FF 00
D170 (NO DISPLAY) 0~FF 00
D171 (NO DISPLAY) 0~FF 00
D172 (NO DISPLAY) 0~FF 00
D173 (NO DISPLAY) 0~FF 00
D174 (NO DISPLAY) 0~FF 00
D175 (NO DISPLAY) 0~FF 00
D176 (NO DISPLAY) 0~FF 00
D177 (NO DISPLAY) 0~FF 00
D178 (NO DISPLAY) 0~FF 00
D179 (NO DISPLAY) 0~FF 00
D180 (NO DISPLAY) 0~FF 00
D181 (NO DISPLAY) 0~FF 00
D182 (NO DISPLAY) 0~FF 00
D183 (NO DISPLAY) 0~FF 00
D184 (NO DISPLAY) 0~FF 00
D185 (NO DISPLAY) 0~FF 00
D186 (NO DISPLAY) 0~FF 00
D187 (NO DISPLAY) 0~FF 00
SYSTEM SETTING [Do not adjust : All fixed]
Item
No.
Z001 (NO DISPLAY) 0~0F 00
Z002 (NO DISPLAY) 0~0F 00
Z003 (NO DISPLAY) 0~0F 00
Z004 (NO DISPLAY) 0~FF 00
Z005 (NO DISPLAY) 0~FF 00
Z006 (NO DISPLAY) 0~FF 00
Z007 (NO DISPLAY) 0~FF 00
Z008 (NO DISPLAY) 0~FF 00
Z009 (NO DISPLAY) 0~FF 00
Z010 (NO DISPLAY) 0~FF 00
Item name Variable range Setting value
1-28 (No.YA092B)
Page 29

4.7 ADJUSTMENT PROCEDURE
4.7.1 OPTICAL BLOCK / DRIVE CIRCUIT
Item
LENS FOCUS
adjustment
Measuring
instrument
Hexagon
wrench
Test point Adjustment part Description
FOCUS
knob
Focus lock screw
FOCUS knob
[PROJECTION LENS]
Projection lens
(1) Take out the FRONT PANEL, SPEAKER GRILL
(L / R), CENTER PANEL and cushions.
(2) Display the MENU screen.
(3) Loosen the FOCUS LOCK screw.
(4) Adjust the FOCUS knob so that the center screen
may become the best focus.
(5) Fix the focus lock screw by using the Hexagon
wrench.
• On this occasion, hold the FOCUS knob with your left
hand.
(6) Confirm the whole focus of the best screen
(7) Install the FRONT PANEL, SPEAKER GRILL (L / R).
BODY COVER and cushions.
DRIVE
CONVERGENCE
adjustment
(Adjust)
(Fixed)
(Adjust)
Cross pattern
Adjustment
COLOR mode
Remote
control unit
(R)
(G)
(B)
(Fixed)
(Adjust) (Adjust)
(R)
(G)(B)
R
RGB BOX PATTERN
[REMOTE CONTROL UNIT KEY FUNCTION]
SLEEP TIMER :
R / B data reset /
SERVICE MENU setting
VOL - :
R / B move to Left side
by 1 pixel
MENU :
(Return to normal MENU)
INPUT 2
V2
456
INPUT 3
V3
789
INPUT 4
TUNE
V4
THEATER
DIGITAL-IN
DIGITAL-IN
PRO
D-IN
D-IN
SLEEP TIMER
DISPLAY
+
MUTING
CH
VOL VOL
OK
CH
MENU
VCR CHANNEL
PREV NEXT
REW
REC PAUSE
STOP
OPEN CLOSE
0
SOUND
VCR / DVD
POWER
RETURN+
TV
VIDEO
STATUS
LIGHT
C.C.
C.C.
BACK
TV / VCR
FFPLAY
STILL PAUSE
• Use the inner RGB box pattern.
(1) Set the [SLEEP TIMER] key to 0 min.
(2) Press the [DISPLAY] key and the [VIDEO STATUS]
key simultaneously.
(3) Press the [9] key to display the RGB box pattern.
(4) Select the R mode by pressing the [DISPLAY] key.
(5) Adjust the R mode to setting as same as G mode by
pressing the [CH ]+ / [CH -] key.
(6) Select the B mode pressing by the [DISPLAY] key.
(7) Adjust the B mode to setting as same as G mode by
pressing the [VOL] - / [VOL +] key.
(8) Check to see that the cross pattern is white. If the
cross pattern is not white, readjust (5) to (6).
Note
• G mode : FIXED mode (Can not remove)
• Setting data : Memorized at once.
9 : RGB BOX PATTERN
DISPLAY : OSD ON/OFF
select : R B RGB
CH + : R / B up position
1 pixel
VOL +: R / B move to
right side by 1 pixel
BACK: Return to
SERVICE MENU
CH - : R / B Down position
by 1 pixel
(No.YA092B)1-29
Page 30

Item
DRIVE CENTER
POSITION
adjustment
Center-cross
pattern
Measuring
instrument
Signal
generator
Remote
control unit
Test point Adjustment part Description
(1) Input the center-cross signal pattern.
(2) Set the [SLEEP TIMER] to 0 min.
(3) Press the [DISPLAY] key and the [VIDEO STATUS]
key simultaneously.
(4) Press the [9] key to display the RGB box pattern.
(5) Press the [DISPLAY] key twice to select the RGB
mode.
(6) Adjust the center-cross screen to be same on top
and bottom (A=B) by pressing the [CH +] / [CH -] key.
CD
(7) Adjust the center-cross screen to be same on left
and right (C=D) by pressing the [VOL +] / [VOL -]
key.
Note
A
• Setting data : Memorized at once.
Cross pattern
Indicated
RGB mode
RGB
RGB BOX PATTERN
[REMOTE CONTROL UNIT KEY FUNCTION]
SLEEP TIMER :
R / B data reset /
SERVICE MENU setting
VOL - :
R / B/RGB move to Left side
by 1 pixel
MENU :
(Return to normal MENU)
INPUT 2
V2
456
INPUT 3
V3
789
INPUT 4
TUNE
V4
THEATER
DIGITAL-IN
DIGITAL-IN
PRO
D-IN
D-IN
SLEEP TIMER
DISPLAY
+
MUTING
VOL VOL
MENU
VCR CHANNEL
PREV NEXT
REW
REC PAUSE
OPEN CLOSE
B
CH
OK
CH
STOP
0
SOUND
VCR / DVD
POWER
STILL PAUSE
RETURN+
TV
VIDEO
STATUS
LIGHT
C.C.
C.C.
BACK
TV / VCR
FFPLAY
9 : RGB BOX PATTERN
DISPLAY : OSD ON/OFF
select : R B RGB
CH + : R / B/RGB up position
1 pixel
VOL +: R / B/RGB move to
right side by 1 pixel
BACK: Return to
SERVICE MENU
CH - : R / B/RGB Down position
by 1 pixel
1-30 (No.YA092B)
Page 31

4.7.2 VIDEO CIRCUIT
Item
525i
A-D OFFSET
Measuring
instrument
Signal
generator
adjustment
Remote
control unit
Test point Adjustment part Description
[1. ADJUST]
S001: PREPARE
S008: 5i CB OF
(525i Cb offset)
S009: 5i CR OF
(525i Cr offset)
(1) Input a 525i ramp pattern from COMPONENT
VIDEO INPUT terminal.
(2) Set VIDEO STATUS to [STANDARD].
(3) Set ASPECT to [FULL].
(4) Set COLOR TEMPERATURE to [LOW].
(5) Select [1.ADJUST] from the SERVICE MENU.
(6) Adjust < S001 >(PREPARE) from 000 to 008, goes
into the [525i Cb offset] adjustment setting mode.
(7) Adjust < S008 > (525i Cb offset) and < S009 > (525i
Cr offset) to sets the lose gap (red line, green line
and blue line) which disappears the colors at both
ends of the center screen.
(8) Press the [MUTING] key to memorized the set
value.
(9) Repeat from (6) and (7), then check to see that both
ends color to white.
(10) Adjust < S001 > from 008 to 000, it change
to the normal mode.
1125i
BRIGHTNESS
adjustment
Disappears the color at both ends.
Signal
generator
Remote
control unit
[1. ADJUST]
S001:PREPARE
S012:HD BL
(1125i brightness)
S030:R DRIVE
(Red drive)
S031:G DRIVE
(Green drive)
S032:B DRIVE
(Blue drive)
Adjust the white area of 0% part largest.
(1) Input a 1125i gray scale pattern from COMPONENT
VIDEO INPUT terminal.
(2) Set VIDEO STATUS to [STANDARD].
(3) Set ASPECT to [FULL].
(4) Set COLOR TEMPERATURE to [LOW].
(5) Select [1.ADJUST] from the SERVICE MENU.
(6) Adjust < S030 > (Red drive), < S031 > (Green drive)
and < S032 > (Blue drive) to set the values [128].
(7) Adjust < S001 > (PREPARE) from 000 to 012,
it goes to [A/D offset] adjustment mode.
(8) Adjust < S012 > (HDBL) to set the 0% black part in
the upper half of the screen to be largest.
(9) Press the [MUTING] key to memorized the set
value.
(10) Adjust < S001 > from 012 to 000, it change
to the normal mode.
<AD offset adjustment mode>
(No.YA092B)1-31
Page 32

Item
1125i
A-D OFFSET
adjustment
Measuring
instrument
Test point Adjustment part Description
Signal
generator
Remote
control unit
Minimize the red and blue noises
in the upper half of the screen.
(No color or lightest color)
[1. ADJUST]
S001:PREPARE
S013:HD CB OF
(1125i Cb offset)
S014:HD CR OF
(1125i Cr offset)
S030:R DRIVE
(Red drive)
S031:G DRIVE
(Green drive)
S032:B DRIVE
(Blue drive)
(1) Input a 1125i 30% all white pattern signal from
COMPONENT VIDEO INPUT terminal.
(2) Set VIDEO STATUS to [STANDARD].
(3) Set ASPECT to [FULL].
(4) Set COLOR TEMPERATURE to [LOW].
(5) Select [1.ADJUST] from the SERVICE MENU.
(6) Adjust < S030 > (Red drive), < S031 > (Green drive)
and < S032 > (Blue drive) to set the values [128].
(7) Adjust < S001 > (PREPARE) from 000 to 013,
it goes to [Cb offset] adjustment mode.
(8) Adjust < S013 > (1125i Cb offset) to minimize the
blue noise in the upper half of the screen.
(9) Adjust < S014 > (1125i Cr offset) to minimize the red
noise in the upper half of the screen.
(10) Press the [MUTING] key to memorized the set
value.
(11) Repeat from (8) to (10) then adjust the adjustment
screen lightest color.
(12) Adjust < S001 > (PREPARE) from 013 to 000,
it change to the normal mode.
SUB SCREEN
A-D OFFSET
adjustment
Signal
generator
Remote
control unit
[1. ADJUST]
S001:PREPARE
S016:RT CB OF
(Sub screen Cb offset)
S017:RT CR OF
(Sub screen Cr offset)
S030:R DRIVE
(Red drive)
S031:G DRIVE
(Green drive)
S032:B DRIVE
(Blue drive)
(1) Set VIDEO STATUS to [STANDARD].
(2) Set ASPECT to [FULL].
(3) Set COLOR TEMPERATURE to [LOW].
(4) Set MULTI SCREEN to [TWIN].
(5) Set the LEFT screen to VIDEO-1 mode (No signal).
(6) Receive a NTSC 30% all white signal on the RIGHT
screen from RF(TV).
(7) Select [1.ADJUST] from the SERVICE MENU.
(8) Adjust < S030 > (Red drive), < S031 > (Green drive)
and < S032 > (Blue drive) to set the values [128].
(9) Adjust < S001 > (PREPARE) from 000 to 016,
it goes to [Sub-screen Cb offset] adjust mode.
(10) Adjust < S016 > (Sub-screen Cb offset) to minimize
the blue noise in the upper half of the screen.
If you select < S016 >, the screen automatically turn
to adjust mode.
Set the 0% black part to be brightest.Video no signal.
(11) Adjust < S017 > (Sub-screen Cr offset) to minimize
the red noise in the upper half of the screen.
(12) Press the [MUTING] key to memorized the set
value.
(13) Adjust < S001 > (PREPARE) from 016 to 000,
it change to the normal mode.
1-32 (No.YA092B)
VIDEO-1
<No signal>
TV (RF)
<30% all white>
Page 33

Item
WHITE
BALANCE
(High light)
adjustment
Measuring
instrument
Signal
generator
Remote
control unit
Test point Adjustment part Description
[1. ADJUST]
S030:R DRIVE
(Red drive)
S031:G DRIVE
(Green drive)
S032:B DRIVE
(Blue drive)
(1) Receive a NTSC all-white (75% white) pattern
signal.
(2) Set VIDEO STATUS to [STANDARD].
(3) Set ASPECT to [FULL].
(4) Set COLOR TEMPERATURE to [LOW].
(5) Select [1.ADJUST] from the SERVICE MENU.
(6) Fix one of < S030 > (Red drive), < S031 > (Green
drive) or < S032 > (Blue drive). Then, lower the other
two that are not fixed so that the all-white screen is
equally white throughout.
(7) Adjust one or more of < S030 > (R.DRIVE), < 031 >
(G DRIVE) and < 032 > (B DRIVE) to set values [128].
(8) Check that white balance is properly tracked from
low light to high light. If the white balance tracking is
deviated, adjust to correct it.
(9) Press the [MUTING] key to memorized the set
value.
4.7.3 MTS CIRUT
Item
MTS INPUT
LEVEL
adjustment
MTS
SEPARATION
adjustment
L-Channel
signal waveform
1 cycle
Measuring
instrument
Remote
control unit
TV audio
multiplex
Oscilloscope
Remote
control unit
Test point Adjustment part Description
[1. ADJUST]
T001:IN LEVEL
(1) Select the [1.ADJUST] from the SERVICE MENU.
(2) Select the <T001> (IN LEVEL).
(3) Set the <T001> (IN LEVEL) to initial setting value.
(4) Press the [MUTING] key to memorized the set
value.
[1. ADJUST]
T002: LOW SEP
T003: HIGH SEP
(1) Input stereo L signal (300Hz) from the TV audio
multiplex signal generator to the antenna terminal.
(2) Connect an oscilloscope to L OUTPUT pin of the
AUDIO OUT, and display one cycle portion of the
300Hz signal.
(3) Change the connection of the oscilloscope to R
OUTPUT pin of the AUDIO OUT, and enlarge the
voltage axis.
(4) Select <T002> (LOW SEP.).
(5) Set the initial setting value of <T002> (LOW SEP.).
R-Channel
crosstalk portion
Minimum
(6) Adjust <T002> (LOW SEP.) so that the stroke
element of the 300Hz signal will become minimum.
(7) Change the signal to 3kHz, and similarly adjust
<T003> (HIGH SEP.).
(8) Press the [MUTING] key to memorized the set
value.
(No.YA092B)1-33
Page 34

SECTION 5
TROUBLESHOOTING
5.1 SELF-CHECK FEATURE
5.1.1 OUTLINE
This unit comes with the SELF-CHECK feature, which checks
the operational state of the circuit and displays/saves it during
failure. SELF-CHECK is performed when power is turned on, and
information input to the main microcomputer is monitored at all
time. SELF-CHECK is displayed in 2 ways via screen display and
LED flashes. Failure detection is based on input state of I
and the various control lines connected to the main
microcomputer.
5.1.2 HOW TO ENTER THE SELF-CHECK DISPLAY SCREEN
Before entering the SELF-CHECK display mode, confirm that the
setting of TV / CATV SW of the REMOTE CONTROL UNIT is at
the "TV" side and the setting of VCR / DVD SW is at the "VCR"
side. If the switches have not been properly set, you cannot enter
the SELF-CHECK display mode.
(1) Press the [SLEEP TIMER] key and set it to 0 minutes.
(2) Press the [VIDEO STATUS] key and [DISPLAY] key
simultaneously, then enter the SERVICE MENU.
(3) Press the [2] key to enter the SELF-CHECK mode.
5.1.3 HOW TO EXIT THE SELF-CHECK DISPLAY SCREEN
TO SAVE FAILURE HISTORY :
Turn off the power by unplugging the AC power cord plug when
in the SELF-CHECK mode.
2C bus
<SERVICE MENU SCREEN>
SERVICE MENU
1. ADJUST
2. SELF-CHECK
3. I2C STOP
Fig.1
< SELF-CHECK SCREEN >
LOB FAN OK
SYNC S:OK HD:OK
TIM
MSM DIGI OK
MEM AVSW OK
YC AIO OK
TUN GCR OK
IP
DVI HDMI OK
OK
M:OK
OK
OK
OK
OK
OK
OK
OK
RGB NG 2
TO CLEAR (RESET) FAILURE HISTORY :
Turn off the power by pressing the [POWER] key on the remote
control unit when in the SELF-CHECK display screen.
5.1.4 FAILURE HISTORY
Failure history can be counted up to 9 times for each item. When
the number exceeds 9, display will remain as 9. Failure history
will be stored in the memory unless it has been deleted.
NOTE :
Only SYNC (with/without sync signals) will be neither counted
nor stored.
5.1.5 POINTS TO NOTE WHEN USING THE SELF-CHECK
FEATURE
In addition to circuit failures (abnormal operation), the following
cases may also be SELF-CHECK as "Abnormal" and displayed
and counted as "NG".
(1) Temporary defective transmissions across circuits due to
pulse interruptions.
(2) Misalignment in the on/off timing of power for I
2
C bus
(VCC) when turning on/off the main power.
SELF-CHECK may be impeded if a large number of items are
displayed as "NG". As such, start SELF-CHECK only after 3
seconds in the case of receivers and 5 seconds in the case of
panels upon turning on the power. If recurrences are expected,
ensure to clear (reset) the failure history and record the new
SELF-CHECK results.
Item Item
CHECK
Normality : OK
Abnormality : NG
Fig.2
1-34 (No.YA092B)
Page 35

5.1.6 DETAILS
Self-check is performed for the following items.
Check item Display Description of detection
Low bias line short
protection
LOB Low bias line (9V / 5V) short protector
activated.
Confirm the operation of the low bais
Diagnosis
signal (line)
Protector Detection starts 3 seconds upon power
on Turns off power if NG is detected
within 400ms.
protection circuit.
[Q2802 /Q2801] (REGULATOR PWB)
Fan lock (stop) FAN Confirmation of operating stop of heat
cooling fan.
[IC8005 : 1 / 2 / 4 / 5-pin]
Protector Detection starts 3 seconds upon power
on Turns off power if NG is detected
within 250ms.
(FAN CONTROL PWB)
AC timer clock TIM Not used ---
Presence of sync signal
SYNC Confirmation of presence of video sync
SDA Confirmation of presence of video sync
signal.
---
signal.
M : Main sync signal
S : Sub sync signal
HD : Component sync signal
[IC201] (ANALOG SIGNAL PWB)
MAIN CPU
communication
MSM Confirmation of ACK (response) signal
which used sync communications with
Chassis CPU.
[IC7601] (DIGITAL SIGNAL PWB)
WAKE If it checks whenever sync
communication with SHM performed and
no reply of ACK signal an error will be
counted.
Digital tuner DIGI Not used --- ---
Memory for chassis CPU
MEM Confirmation of reply of ACK signal which
2
C communication.
used I
[IC7602] (DIGITAL SIGNAL PWB)
AV switch AVSW Same as above
SDA
SDA Same as above
If checks whenever I2C communication
is performed and no reply of ACK signal
an error will be counted.
[IC501] (ANALOG SIGNAL PWB)
3D YC separation
YC Same as above
[IC1001] (DIGITAL SIGNAL PWB)
Audio process
AIO Same as above
[IC1140] (RECEIVER PWB)
RF tuner TUN Same as above
[TU1101] (RECEIVER PWB)
Ghost reduction GCR Not used ---
DIST process IP Confirmation of reply of ACK signal which
2
C communication.
used I
SDA If checks whenever I2C communication
[IC3001] (DIGITAL SIGNAL PWB)
---
is performed and no reply of ACK signal
an error will be counted.
RGB process RGB Same as above
[IC4001] ((DIGITAL SIGNAL PWB)
DVI transmission DVI Not used --- ---
Digital input receive HDMI Confirmation of reply of ACK signal which
2
C communication.
used I
[IC8001] (DIGITAL SIGNAL PWB)
SDA If checks whenever I
performed and no reply of ACK signal
an error will be counted.
Means of detection
2
communication is
(No.YA092B)1-35
Page 36

5.1.7 DISPLAY METHOD WHEN RASTER IS NOT AVAILABLE
In a state where a display screen does not appear due to the failure of this unit, the POWER LED (blue) and LAMP LED (orange) can
light up and display a trouble mode.
The factors in case the power is forcibly shut down at the time of failure are memorized and those are displayed.
Check item Contents
Lamp does not light up Detection of lamp return (LAMP_RTN) signals output
depending on the status of the lamp supply electric
current monitored constantly within the lamp ballast unit.
(H = Off)
[LAMP BALLAST UNIT : CN200 [3pin] ]
Lamp goes out Detection of lamp return (LAMP_RTN) signals output
depending on the status of the lamp supply electric
current monitored constantly within the lamp ballast unit.
(H = Off)
[LAMP BALLAST UNIT : CN200 [3pin] ]
Abnormal DD CPU circuit Detection of serial communication error between MAIN
DRIVE PWB and RECEIVER PWB.
[IC3701 [5 / 7pin] ] (MAIN DRIVE PWB)
Fan lock (stop) Detection of LOCK signals outputting the operation
(circuit) status of the cooling fan. (H=Abnormal)
[IC8005 : 1 / 2 / 4 / 5-pin] (FAN CONTROL PWB)
Lamp cover open Detection of the interlock switch status for the lamp cover.
(H = Abnormal)
[S0201] (LAMP COVER SW PWB)
Abnormal D-ILA DEVICE
temperature
Detection of abnormal inner cabinet temperature. (53°C)
[ IC2001] (TEMPERATURE SENSOR PWB)
Classifi-
cations
3
3
0.1 sec interval
Simultaneously
0.1 sec interval
Simultaneously
LED flash cycle
POWER LED LAMP LED
0.1 sec interval
Simultaneously
0.1 sec interval
Simultaneously
2 -------------------- 0.5 sec interval
1
3
1
0.5 sec interval
Alternately
0.1 sec interval
Simultaneously
0.5 sec interval
Alternately
0.5 sec interval
Alternately
0.1 sec interval
Simultaneously
0.5 sec interval
Alternately
EXPLANATION ON ACTION
If NG is detected on an item being diagnosed, turn off the power on this unit. As soon as the power goes off, turn on and off POWER
LED and LAMP LED immediately. After the power is shut down, it becomes impossible to turn on the power until the power cable
is either plugged in or unplugged from the AC outlet.
When [1] and [3] take place at the same time, give priority to [1], and [2] will not take place simultaneously with [1] and [3].
1-36 (No.YA092B)
Page 37

JVC SERVICE & ENGINEERING COMPANY OF AMERICA
DIVISION OF JVC AMERICAS CORP.
www.jvcservice.com(US Only)
JVC CANADA INC.
Head office : 21 Finchdene Square Scarborough, Ontario M1X 1A7 (416)293-1311
(No.YA092B)
Printed in Japan
WPC
 Loading...