

Page 1
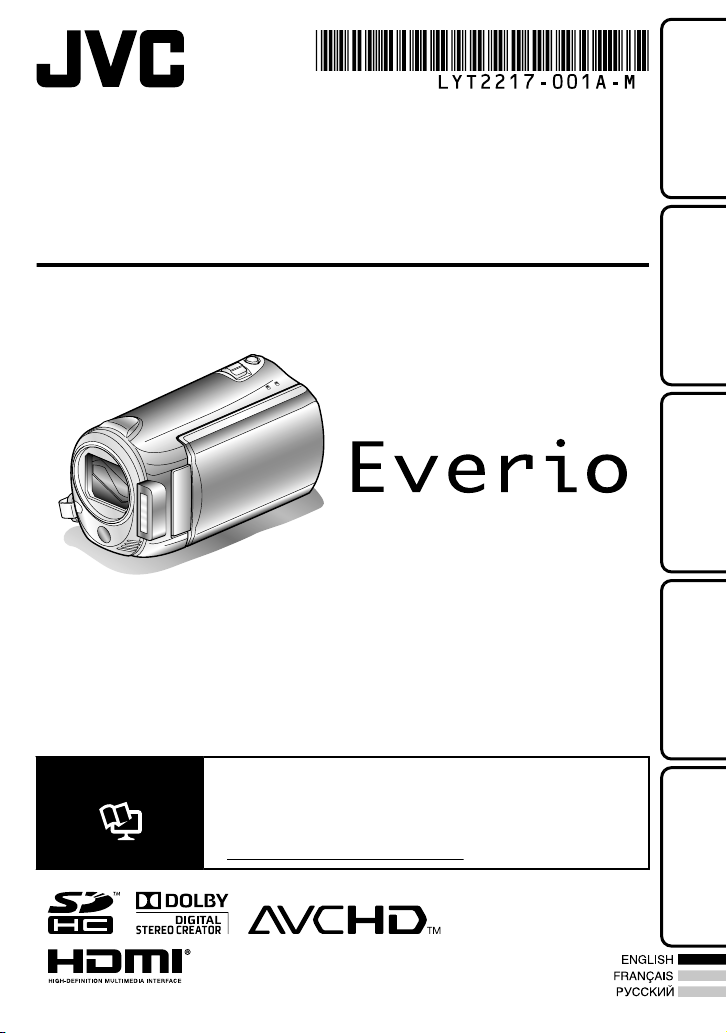
CAMCORDER
GZ-HM545
Basic User Guide
Dear Customers
Thank you for purchasing this JVC product.
Before use, please read the Safety Precautions and Cautions on P.2 and P.25 to ensure safe
use of this product.
This product comes with a “Basic User Guide” (this manual) and a “Detailed User Guide” (Web).
Detailed User Guide
Explains the ways of shooting in various situations and the
useful features.
Getting StartedRecordingPlaybackCopying
Access the following website on your PC
.
■
http://manual.jvc.co.jp/index.html/
Further
Information
Page 2
Safety Precautions
WARNING: TO PREVENT FIRE OR SHOCK
HAZARD, DO NOT EXPOSE THIS UNIT TO
RAIN OR MOISTURE.
CAUTIONS:
If you notice smoke or a peculiar smell coming
•
from this unit or AC Adapter, shut it down and
unplug it immediately. Continue using the unit or
AC Adapter under these conditions could lead to
fire or electric shock. Contact your JVC dealer.
Do not attempt to repair the malfunction yourself.
To prevent shock, do not open the cabinet. No
•
user serviceable parts inside. Refer servicing to
qualified personnel.
When you are not using the AC adapter for a
•
long period of time, it is recommended that you
disconnect the power cord from AC outlet.
In certain areas, use the conversion plug
•
depending on the type of your AC wall outlet.
NOTES:
The rating plate and safety caution are on the
•
bottom and/or the back of the main unit.
The serial number plate is on the battery pack
•
mount.
The rating information and safety caution of the
•
AC adapter are on its upper and lower sides.
WARNING:
The battery pack, this unitwith battery installed,
and the remote control with battery installed
should not be exposed to excessive heat such as
direct sunlight, fire or the like.
CAUTION:
The mains plug shall remain readily operable.
Remove the mains plug immediately if this unit
•
functions abnormally.
CAUTION:
To av o id electric shock
or damage to the
unit, first firmly insert
the small end of the
power cord into the
AC Adapter until it is
no longer wobbly, and
then plug the larger
end of the power cord into an AC outlet.
.
Caution on Replaceable lithium battery
The battery used in this device may present a fire
or chemical burn hazard if mistreated.
Do not recharge, disassemble, heat above 100°C
or incinerate.
Danger of explosion or Risk of fire if the battery is
incorrectly replaced.
Dispose of used battery promptly.
•
Keep away from children.
•
Do not disassemble and do not dispose of in fire.
•
When the equipment is installed in a cabinet or on
a shelf, make sure that it has sufficient space on
all sides to allow for ventilation (10 cm or more on
both sides, on top and at the rear).
Do not block the ventilation holes.
(If the ventilation holes are blocked by a
newspaper, or cloth etc. the heat may not be able
to get out.)
No naked flame sources, such as lighted candles,
should be placed on the apparatus.
When discarding batteries, environmental
problems must be considered and the local rules
or laws governing the disposal of these batteries
must be followed strictly.
The apparatus shall not be exposed to dripping
or splashing
Do not use this equipment in a bathroom or
places with water.
Also do not place any containers filled with water
or liquids (such as cosmetics or medicines, flower
vases, potted plants, cups etc.) on top of this unit.
(If water or liquid is allowed to enter this
equipment, fire or electric shock may be caused.)
.
For more information, refer to the Detailed User Guide
2
http://manual.jvc.co.jp/index.html/
Page 3
Do not point the lens directly into the sun. This
can cause eye injuries, as well as lead to the
malfunctioning of internal circuitry. There is also a
risk of fire or electric shock.
CAUTION!
The following notes concern possible physical
damage to thisunit and to the user.
Carrying or holding this unit by the LCD monitor
can result in dropping the unit, or in a malfunction.
Do not use a tripod on unsteady or unlevel
surfaces. It could tip over, causing serious damage
to the unit.
CAUTION!
Connecting cables (Audio/Video, S-Video, etc.)
to thisunit and leaving it on top of the TV is not
recommended, as tripping on the cables will cause
the unit to fall, resulting in damage.
If thissymbol is shown, it is only valid
in the European Union.
Remember that this unit is intended for
private consumer use only.
Any commercial use without proper permission
isprohibited. (Even if you record an event such
as a show, performance or exhibition for personal
enjoyment, it is strongly recommended that you
obtain permission beforehand.)
Trademarks
AVCHD and AVCHD logotype are trademarks
•
of Panasonic Corporation and Sony Corporation.
x.v.Color™ is a trademark of
•
Sony Corporation.
HDMI is a trademark of HDMI
•
Licensing, LLC.
Manufactured under license from Dolby
•
Laboratories. Dolby and the double-D symbol
are trademarks of Dolby Laboratories.
Windows® is either registered trademark or
•
trademark of Microsoft Corporation in the
United States and/or other countries.
Macintosh is a registered trademark of Apple Inc.
•
iTunes, iMovie, iPhoto are trademarks of Apple
•
Inc., registered in the U.S. and other countries.
YouTube™ and the YouTube logo are
•
trademarks and/or registered trademarks of
YouTube LLC.
Other product and company names included in
•
this instruction manual are trademarks and/or
registered trademarks of their respective holders.
CAUTION:
Fire or injury may result if batteries NOT
•
approved by JVC are used.
Only use the batteries specified on page 25.
Please do not pull or bend the AC adapter plug
•
and cable. This may damage the AC adapter.
Getting StartedRecordingPlaybackCopying
Make a backup of important recorded data
JVC will not be responsible for any lost data. It is
recommended to copy your important recorded
.
data to a disc or other recording media for storage.
Further
Information
For more information, refer to the Detailed User Guide
http://manual.jvc.co.jp/index.html/
3
Page 4
Index
Safety Precautions .............................. 2
Index ................................................... 4
Verifying the Accessories .................... 4
Names of Parts and Functions ............ 5
▶Getting Started .......................... 6
Charging the Battery Pack .................. 6
Grip Adjustment .................................. 6
Using as a Hand Strap ........................ 7
Clock Setting ....................................... 7
▶Recording .................................. 9
Video Recording ..................................
Reducing Camera Shake (Video
Recording) ......................................... 10
Still Image Recording
........................ 10
Inserting an SD card ......................... 11
▶Playback .................................. 13
▶Learning About Advanced Operations
Use the “Detailed User Guide” on your PC to find out more about the advanced
operations.
Access the following address on your PC
■
http://manual.jvc.co.jp/index.html/
Playing Back/Deleting Files on this
Camera ............................................. 13
Playing Back on TV ........................... 14
▶Copying ................................... 16
Copying Files .................................... 16
Creating Discs with a DVD Writer or
External Blu-ray Drive ....................... 17
Dubbing Files by Connecting to a DVD
Recorder or VCR ............................... 20
▶Further Information .................. 21
Using the Menu ................................. 21
9
Recordable Time/Number of Images
........................................................... 22
Troubleshooting ................................ 23
Cautions ............................................ 25
Specifications .................................... 27
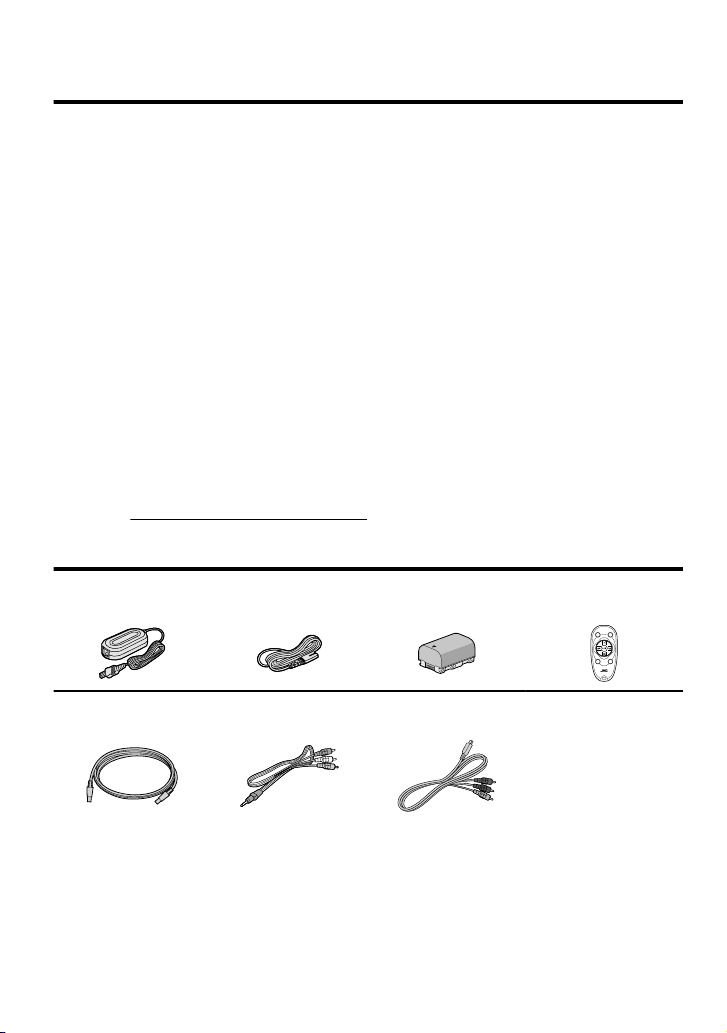
Verifying the Accessories
AC Adapter
AP-V30M *1
.
USB Cable
(Type A - Mini Type B)
.
●
SD cards are sold separately. For details on the types of cards that can be used on
Power Cord *1
.
AV Cable Component Cable
.
Battery Pack
BN-VG114E
.
.
Remote Control
RM-V760U
START
/STOP
INFO
.
●
CD-ROM *2
●
Plug Adapter *3
●
Basic User Guide
(this manual)
this camera, refer to P.11.
When using the AC adapter overseas, please prepare a commercially available
*1
converter plug for the country or region of visit.
To view the Detailed User Guide, connect to the internet and click “Read Detailed
*2
User Guide”.
If the AC outlet does not match the AC plug, use the provided plug adapter.
*3
For more information, refer to the Detailed User Guide
4
http://manual.jvc.co.jp/index.html/
SNAP
SHOT
INDEX
Page 5
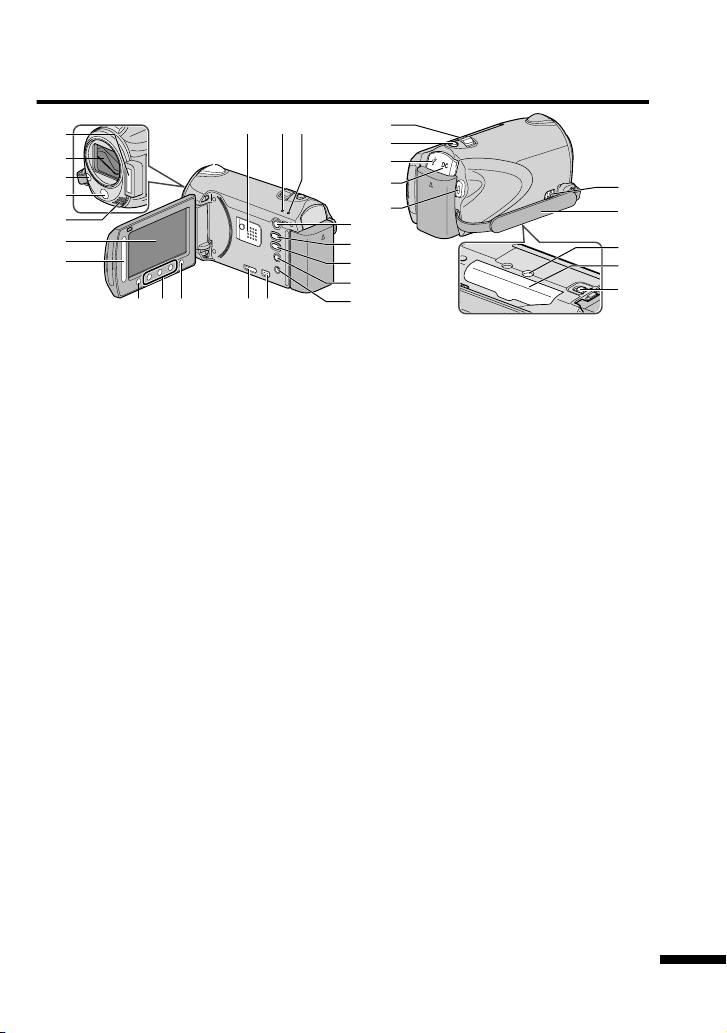
Names of Parts and Functions
ji
1
abc
2
3
4
5
6
7
.
Flash
A
Lens/Electronic Lens Cover
B
Light
C
Remote Sensor
D
Stereo Microphone
E
LCD Monitor
F
Turns the power on/off by opening and
closing.
Slider
G
Selects an image or item.
OK Button
H
Confirms the selected image or item.
Operation Buttons
I
Functions differently according to the
operation.
Menu (menu) Button ( P.21)
J
Speaker
K
ACCESS (Access) Lamp
L
Lights up/blinks during recording or
playback.
POWER/CHARGE (Power/Charge)
M
Lamp ( P.6)
+ (Play) Button
N
Switches between recording and
playback modes.
/ (Video/Still Image) Button
O
Switches between video and still
image modes.
890
k
l
m
n
o
d
e
AV
f
g
h
UPLOAD/EXPORT
P
(Upload/Export to iTunes) Button
Recording:Takes videos in YouTube
Playback
, (Power/Information) Button
Q
Recording:Displays the remaining
Playback:Displays file information.
Press and hold to turn the power on/off
while the LCD monitor is opened.
AV Terminal ( P.15, 20)
R
COMPONENT (Component)
S
Connector ( P.14)
HDMI Mini Connector ( P.14)
T
Zoom/Volume Lever ( P.9, 13)
U
SNAPSHOT (Still Image Recording)
V
Button ( P.10)
USB Terminal ( P.17)
W
DC Terminal ( P.6)
X
START/STOP (Video Recording)
Y
Button ( P.9)
Grip Belt Release Lever
Z
Grip Belt ( P.6)
a
Tripod Mounting Hole
b
SD Card Slot ( P.11)
c
Battery Release Lever ( P.6)
d
or iTunes format.
Changes the video to
:
YouTube or iTunes format.
time as well as the
battery power during
continuous recording.
p
q
r
s
t
For more information, refer to the Detailed User Guide
http://manual.jvc.co.jp/index.html/
5
Page 6
Getting Started
Charging the Battery Pack
Attach the battery pack.
1
* The battery pack is not
charged at the time of
purchase.
Mark
Align the top of the battery
with the mark on this unit,
and slide in until the battery
clicks into place.
To detach the battery pack
(Base)
.
CAUTION
Be sure to use JVC battery packs.
●
If you use any other battery packs besides JVC battery packs, safety and
performance cannot be guaranteed.
●
Charging time: Approx. 2 h 30 m (using supplied battery pack)
The charging time is when the unit is used at 25°C. If the battery pack is
*
charged outside the room temperature range of 10°C - 35°C, charging may
take a longer time or it may not start. The recordable and playable time may
also be shortened under some usage conditions such as at low temperature.
BATT.
Plug in the power.
3
Charging Lamp
Connect the DC
2
terminal.
Charging in progress :
Blinks
Charging finished :
Goes out
Cover
AC Adapter
To AC Outlet
(110 V to 240 V)
Grip Adjustment
.
For more information, refer to the Detailed User Guide
6
http://manual.jvc.co.jp/index.html/
Adjust the lengthPull back the belt Attach the belt
Page 7
Using as a Hand Strap
Remove the strap and loop it around your wrist.
While pressing A, pull B and remove the strap.
Stopper
Press and hold
●
.
When attaching the hand strap, insert the stopper until it clicks into place.
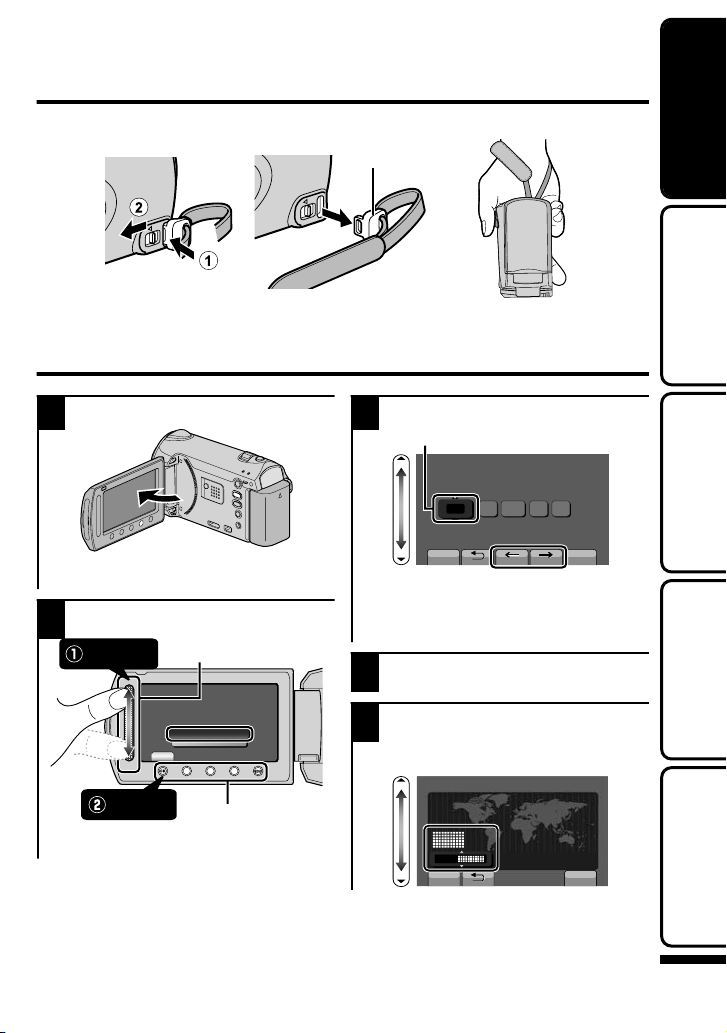
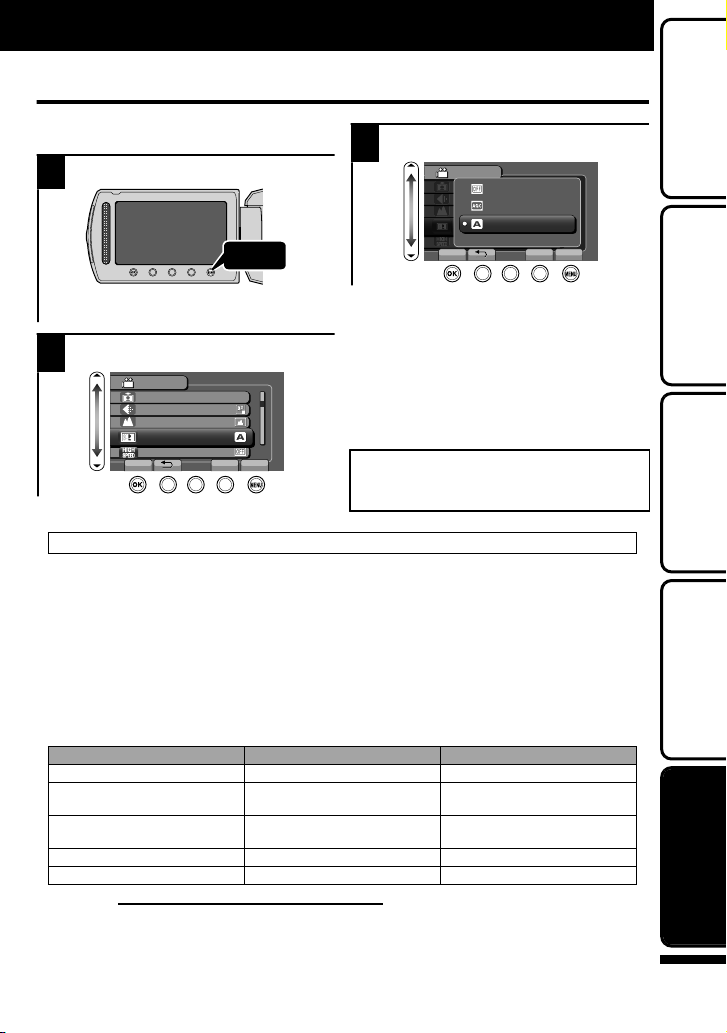
Clock Setting
Getting StartedRecordingPlaybackCopying
Open the LCD monitor.
1
A
V
.
●
The unit turns on. When the LCD
monitor is closed, the unit turns off.
Select “YES” and touch when
2
“SET DATE/TIME!” is displayed.
Select
.
●
Touch
Slide along the slider to select, then
touch the operation buttons to set.
Slider
SET DATE/TIME!
YES
NO
SET
Operation Buttons
Set the date and time.
3
Cursor
CLOCK SETTING
DATE TIME
1
SET QUIT
.
●
Use the slider to adjust the year,
month, day, hour and minute.
●
Touch the operation buttons “&” / “'”
to move the cursor.
After setting the date and time,
4
touch .
Select the region where you live and
5
touch .
●
The city name and time difference is
displayed.
CLOCK/AREA SETTING
GMT
SAVE QUIT
.
10 0020091
15. 5. 2009 10:00
Further
Information
For more information, refer to the Detailed User Guide
http://manual.jvc.co.jp/index.html/
7
Page 8
To reset the clock
■
Set the clock with “CLOCK ADJUST”
from the menu.
① Display the menu.
To change the display
■
language
The language on the display can be
changed.
① Display the menu.
Touch
.
② Select “CLOCK ADJUST” and
touch .
VIDEO
DISPLAY SETTINGS
CLOCK ADJUST
BASIC SETTINGS
CONNECTION SETTINGS
.
MEDIA SETTINGS
SET
QUIT
?
③ Select “CLOCK SETTING” and
touch .
CLOCK ADJUST
CLOCK SETTING
AREA SETTING
SET FOR DAYLIGHT SAVING TIME
SET QUIT
.
●
The subsequent setting operations
are the same as steps 3 - 5 on the
previous page.
?
.
② Select “DISPLAY SETTINGS”
and touch .
VIDEO
AUTO SWITCH REC MEDIA
DISPLAY SETTINGS
CLOCK ADJUST
BASIC SETTINGS
CONNECTION SETTINGS
SET
.
③ Select “LANGUAGE” and touch
.
DISPLAY SETTINGS
LANGUAGE
DATE DISPLAY STYLE
MONITOR BRIGHTNESS
LCD BACKLIGHT
SET QUIT
.
④ Select the desired language and
touch .
⑤
Touch .
Touch
?
QUIT
?
NOTE
●
Touch the slider and buttons around the screen with your fingers.
●
The slider and buttons do not function if you touch them with your fingernails or
with gloves on.
●
The displays on the screen do not work even if you touch them.
●
“SET DATE/TIME!” is displayed when you turn on this unit after it has not been
used for a prolonged period.
Charge this unit for more than 24 hours before setting the clock. ( P.6)
For more information, refer to the Detailed User Guide
8
http://manual.jvc.co.jp/index.html/
Page 9
Recording
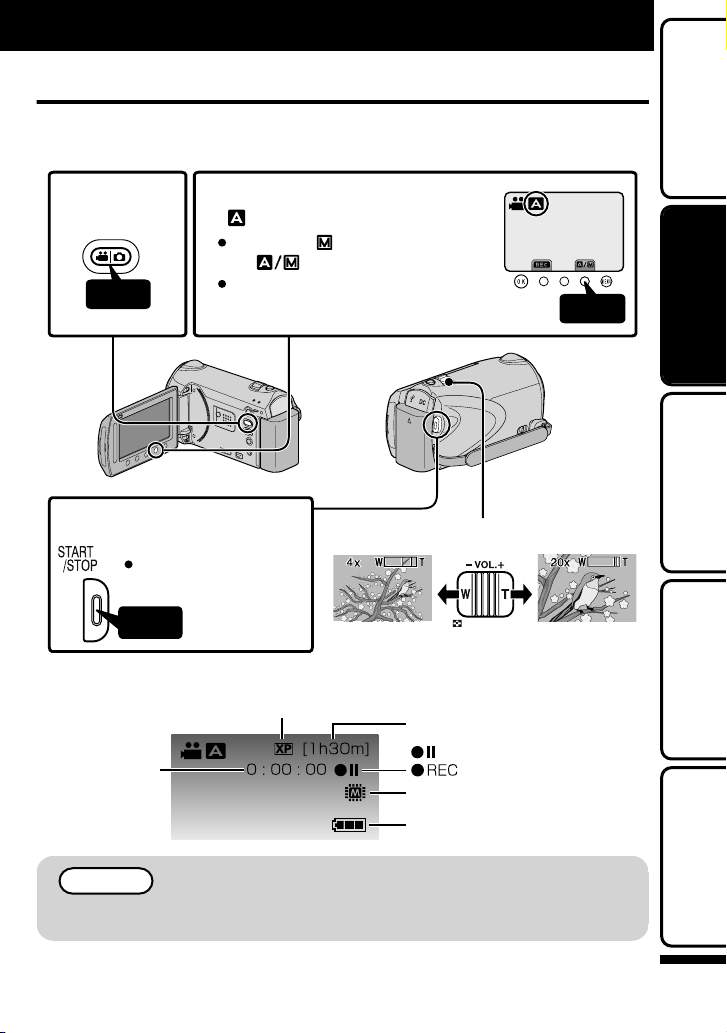
Video Recording
You can record without worrying about the setting details by using the auto mode.
Before recording an important scene, it is recommended to conduct a trial
recording.
Select video
12
mode.
Press
Start recording.
3
Press again to stop.
Check if the recording mode is
Auto.
the mode is Manual, touch
the
The mode changes between auto
and manual with every touch.
button to switch.
AV
Tou c h
Zooming
Getting StartedRecordingPlaybackCopying
Press
.
Indications during video recording
■
Video Quality
Scene Counter
.
(Wide angle) (Telephoto)
Remaining Recording Time
:Record-Standby
㧦Recording in Progress
Recording Media
Battery Indicator
NOTE
●
The estimated recording time of the supplied battery pack is approximately
45 m. ( P.22)
For more information, refer to the Detailed User Guide
http://manual.jvc.co.jp/index.html/
Further
Information
9
Page 10
Reducing Camera Shake (Video Recording)
When the image stabilizer is set, camera shake during recording can be effectively reduced.
(White) :Image stabilizer
Touch
A
B
.
Reduces camera shake.
:
Reduces camera shake more effectively when shooting bright scenes on the wide
:
angle end. *Only on the wide angle end (approx. 5x)
(Green):Image stabilizer
(White) :OFF
The setting switches with every touch.
NOTE
●
It is recommended to set the image stabilizer to off when shooting a subject of
little movement with the unit on a tripod.
●
Complete stabilization may not be possible if camera shake is excessive.
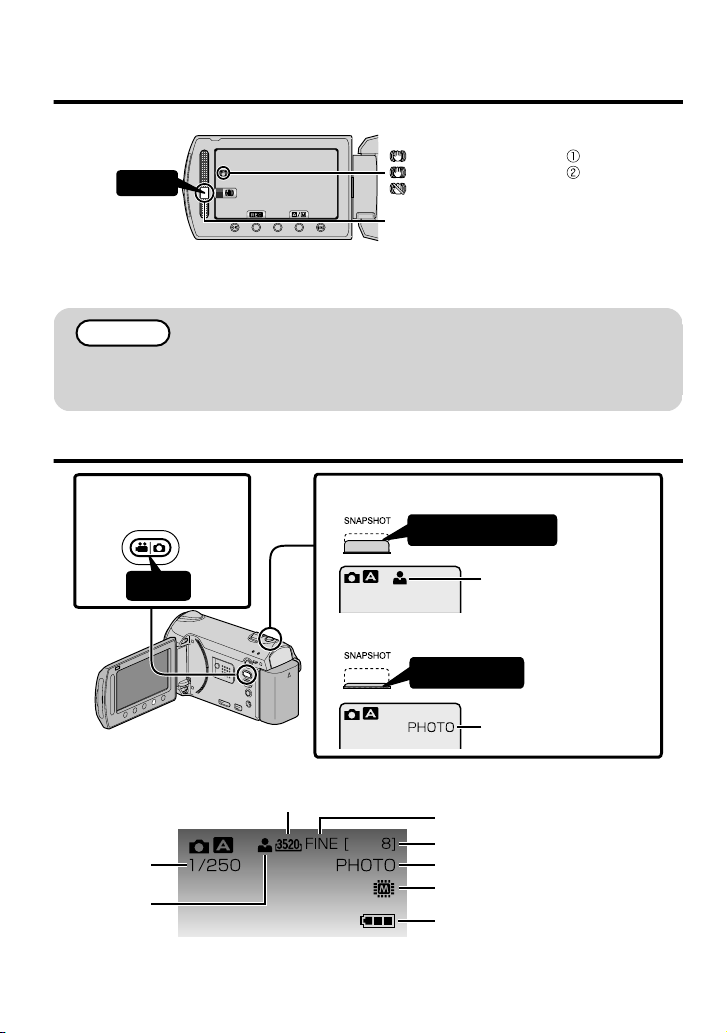
Still Image Recording
Select still image
1
mode.
Set the focus on the subject.
2
Press
Take a still image.
3
AV
.
Indications during still image recording
■
Image Size
Shutter
Speed
Focus
.
For more information, refer to the Detailed User Guide
10
http://manual.jvc.co.jp/index.html/
Press halfway
Lights up in green
when focused
Press fully
Lights up during
still image recording
Image Quality
Remaining Number of Shots
Recording in Progress
Recording Media
Battery Indicator
Page 11
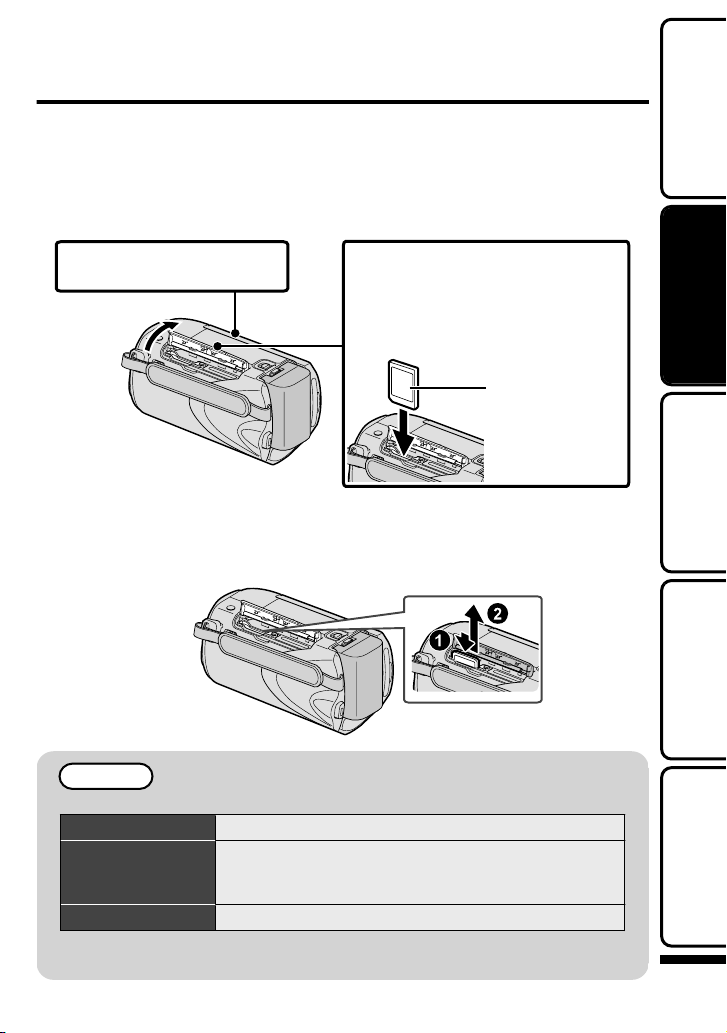
Inserting an SD card
When a commercially available SD card is inserted, recordings can still be made to
the card without stopping when the remaining recording time on the built-in memory
runs out.
* To record to the card, it is necessary to perform media settings. ( P.12)
When no card is available, set media settings to “BUILT-IN MEMORY” for
recording.
Getting StartedRecordingPlaybackCopying
Close the LCD monitor.
1
(Base)
*Turn off the power of this unit
before inserting or removing a card.
.
To remove the card
■
Push the card inward once, then pull it out straight.
(Base)
.
NOTE
Operations are confirmed on the following SD cards.
Manufacturer Panasonic, TOSHIBA, SanDisk, ATP
Video
Still Image
●
Using cards other than those specified above may result in recording failure
or data loss.
Class 4 or higher compatible SDHC card (4 GB to 32 GB)
(Class 6 is recommended when recording in “UXP”
quality.)
SD card (256 MB to 2 GB), SDHC card (4 GB to 32 GB)
For more information, refer to the Detailed User Guide
Open the cover.
2
Insert an SD card.
3
Label
http://manual.jvc.co.jp/index.html/
Further
Information
11
Page 12
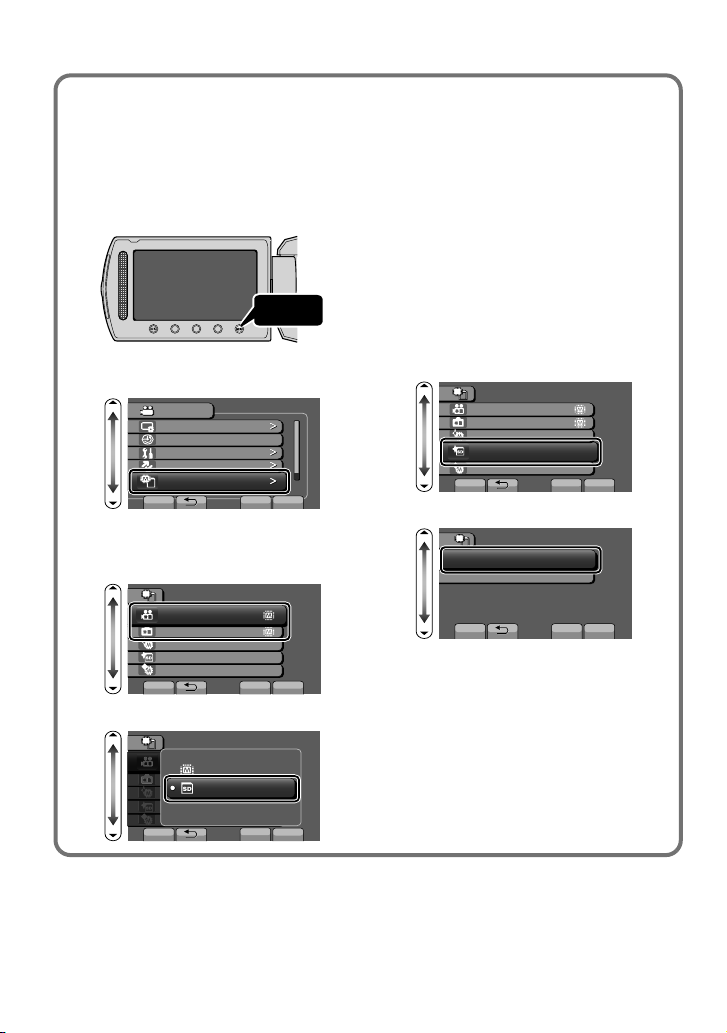
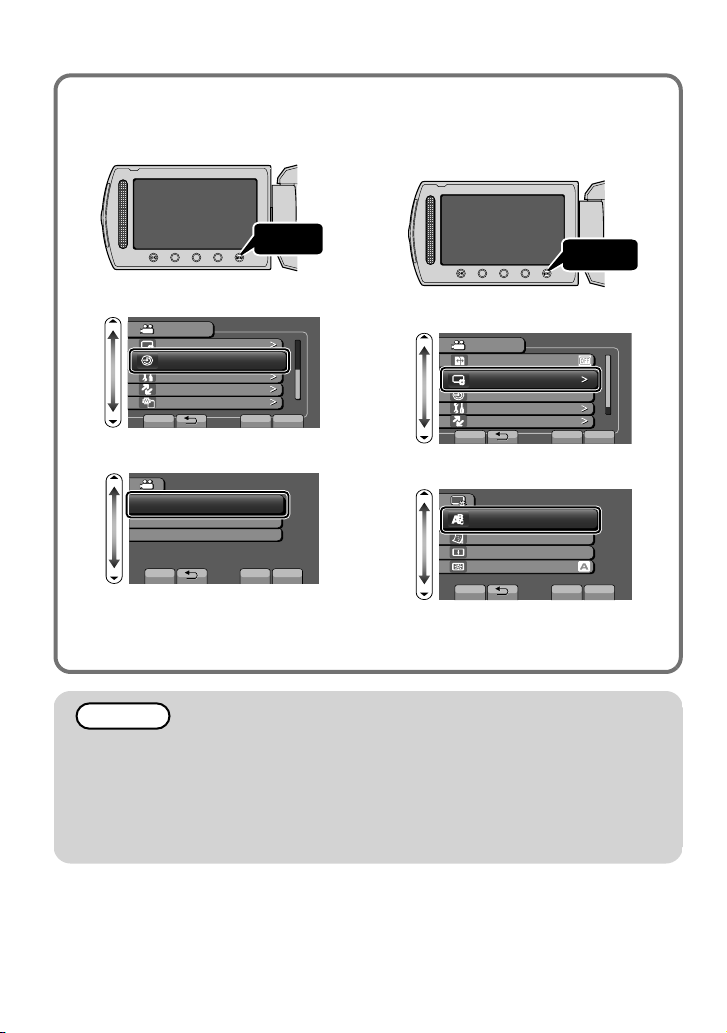
To use an SD card
■
Recording and playback can be
performed on a card when “REC
MEDIA FOR VIDEO” or “REC MEDIA
FOR IMAGE” of media settings is set
to “SD CARD”.
① Display the menu.
Touch
.
② Select “MEDIA SETTINGS” and
touch .
VIDEO
DISPLAY SETTINGS
CLOCK ADJUST
BASIC SETTINGS
CONNECTION SETTINGS
MEDIA SETTINGS
SET QUIT
.
?
③ Select “REC MEDIA FOR
VIDEO” or “REC MEDIA FOR
IMAGE”, and touch .
MEDIA SETTINGS
REC MEDIA FOR VIDEO
REC MEDIA FOR IMAGE
FORMAT BUILT-IN MEM.
FORMAT SD CARD
ERASE ALL DATA
SET QUIT
.
④
Select “SD CARD” and touch .
MEDIA SETTINGS
?
BUILT-IN MEMORY
SD CARD
To use SD cards that have
■
been used on other devices
Format (initialize) the card using
“FORMAT SD CARD” from media
settings.
All data on the card will be deleted
when it is formatted. Copy all files
on the card to a PC before
formatting.
①
Touch to display the menu.
② Select “MEDIA SETTINGS” with
the slider and touch .
③ Select “FORMAT SD CARD” and
touch .
MEDIA SETTINGS
REC MEDIA FOR VIDEO
REC MEDIA FOR IMAGE
FORMAT BUILT-IN MEM.
FORMAT SD CARD
ERASE ALL DATA
SET
.
④
Select “FILE” and touch .
FORMAT SD CARD
FILE
FILE + MANAGEMENT NO
SET QUIT
.
⑤
Select “YES” and touch .
⑥
After formatting, touch .
?
QUIT
?
SET QUIT
.
For more information, refer to the Detailed User Guide
12
http://manual.jvc.co.jp/index.html/
?
Page 13
Playback
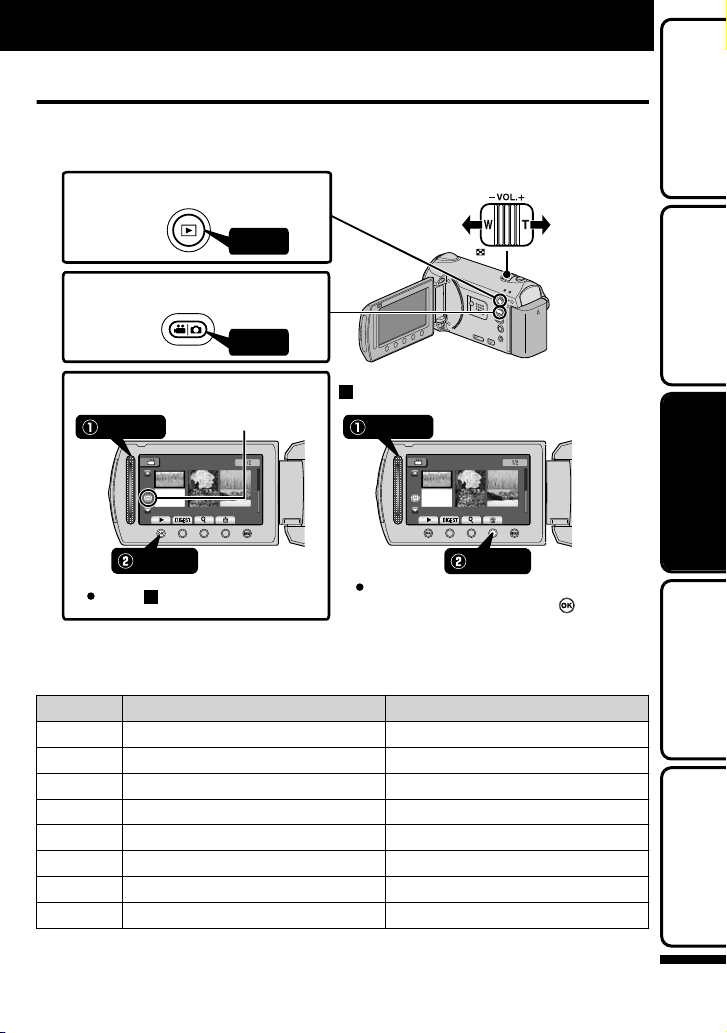
Playing Back/Deleting Files on this Camera
Select and play back the recorded videos or still images from an index screen
(thumbnail display). The contents of the media selected in media settings ( P.12) are
displayed on the index screen.
Select the playback mode.
1
Press
Select video or still image mode.
2
Turn down
the volume
Volume adjustment
Turn up
the volume
Getting StartedRecordingPlaybackCopying
Press
Play back a file.
3
Touch
Touch to stop.
.
To capture a still image during playback
■
Pause the playback and press the SNAPSHOT button.
Usable operation buttons during playback
■
Display During video playback During still image playback
/
!
"
Playback/pause Start/pause slideshow
Stop (returns to thumbnail display) Stop (returns to thumbnail display)
Advances to the next video Advances to the next still image
Returns to the beginning of the scene
Forward search Reverse search Forward slow-motion -
$
Reverse slow-motion -
%
Media being
played back
VIDEO PLAYBACK VIDEO PLAYBACK
To delete unwanted files
SelectSelect
Select “YES” when the confirmation
message appears and touch .
Returns to the previous still image
AV
Tou c h
Further
Information
For more information, refer to the Detailed User Guide
http://manual.jvc.co.jp/index.html/
13
Page 14
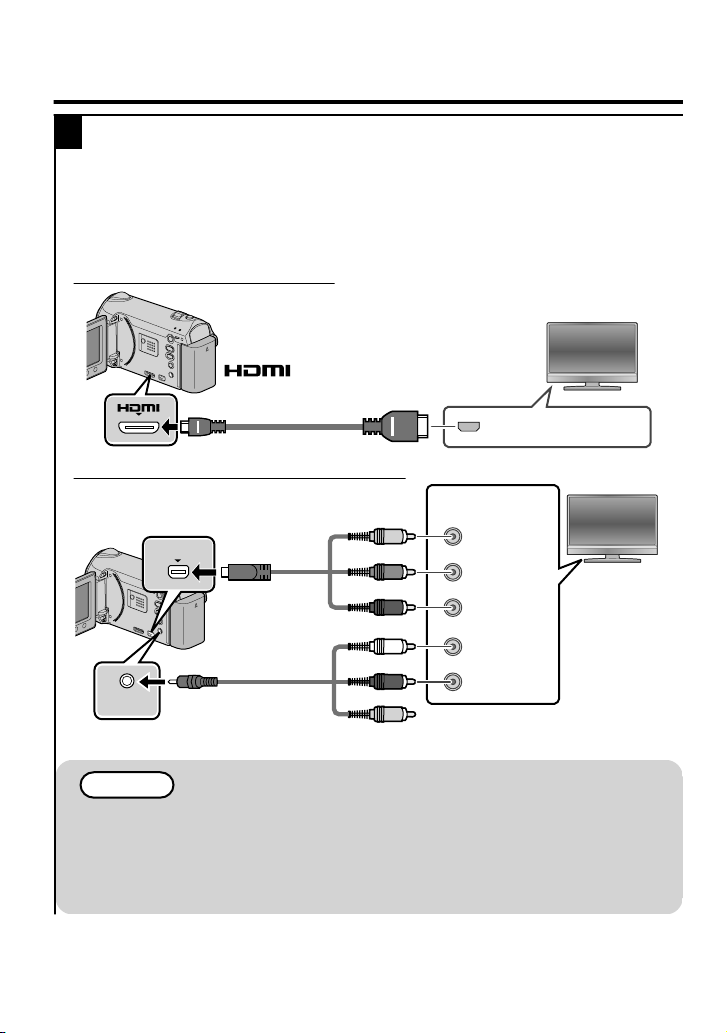
Playing Back on TV
g
Connect to a TV.
1
* Refer also to the instruction manual of the TV.
●
Press the Power button (,) for more than 2 seconds to turn off this unit.
Playing back in HD quality
■
If you are using an HDTV, you can play back in HD quality by connecting to the HDMI
terminal.
Connecting to the HDMI terminal
TV
AV
To HDMI
(HDMI mini)Terminal
.
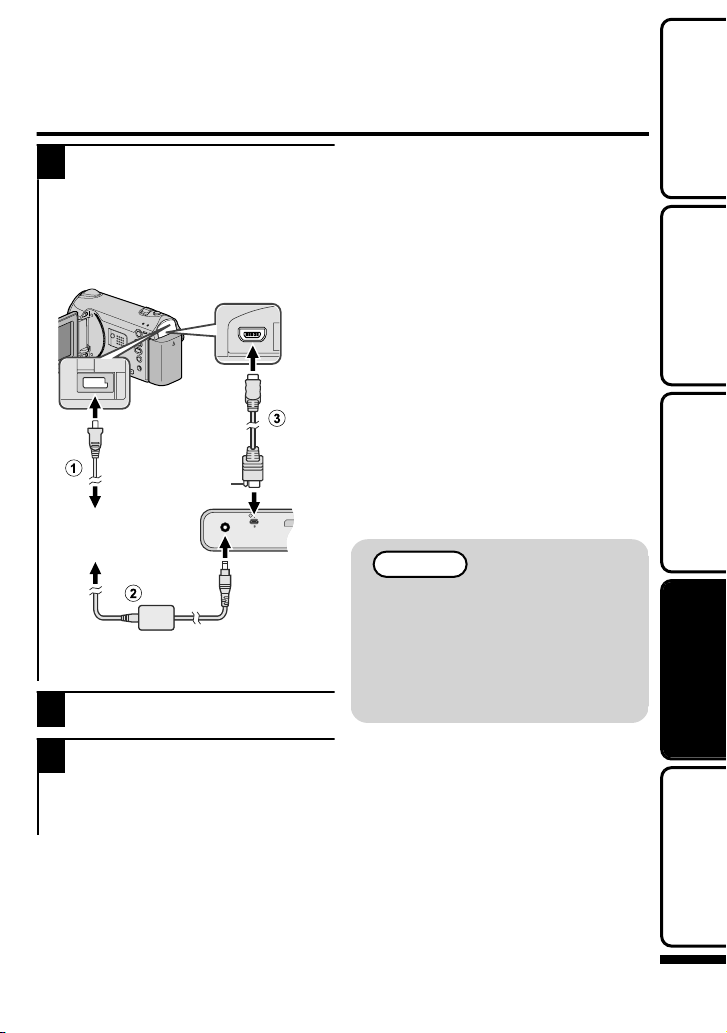
Connecting to the COMPONENT terminal
To COMPONENT
Terminal
AV
To AV Terminal
.
COMPONENT
A
V
Component
Cable
(Provided)
AV Cable
(Provided)
Green
Blue
Red
White
Red
* Do not connect the yellow plug
HDMI Terminal Input
Component
Video Input
Y
C
B/PB
CR/P
R
Audio
Input (L)
Audio
Input (R)
when usin
TV
component cable.
NOTE
●
Please contact the TV manufacturer on questions or problems with setting the
TV to the correct mode.
●
Use a High speed HDMI cable (category 2 cable) as the HDMI mini cable.
●
When playing back in HD quality, set “COMPONENT OUTPUT” in the
connection settings menu to “1080i”. The video is output in standard quality if
the setting remains at “480i”.
For more information, refer to the Detailed User Guide
14
http://manual.jvc.co.jp/index.html/
Page 15
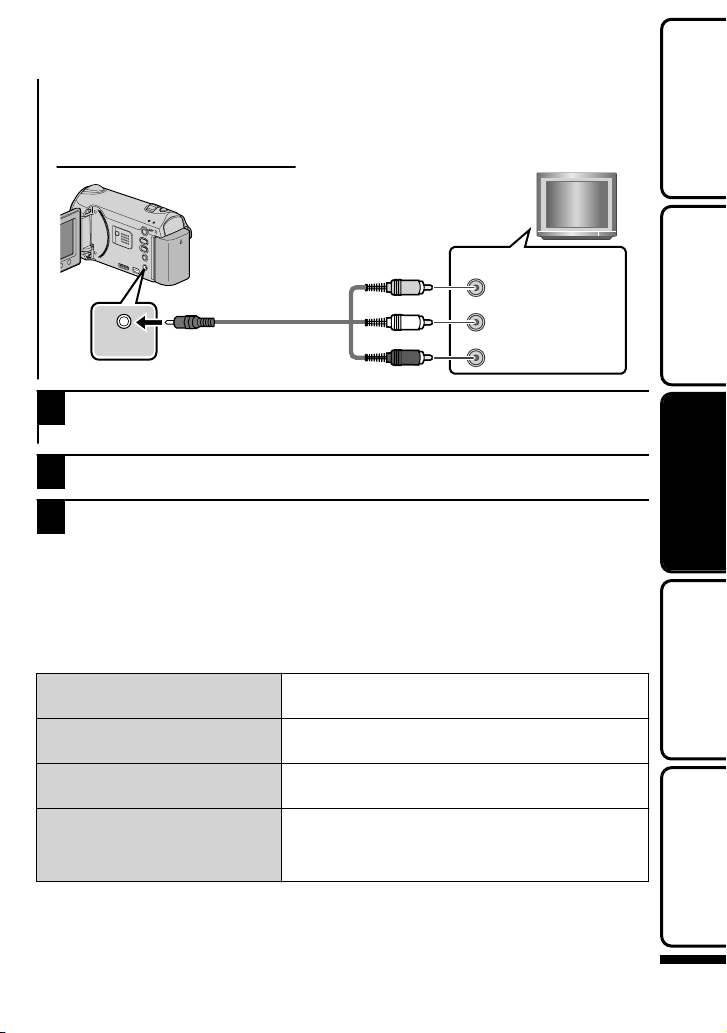
Playing back in standard quality
■
If you are using a conventional TV, you can play back in standard quality by
connecting to the AV terminal.
Connecting to the AV terminal
TV
Getting StartedRecordingPlaybackCopying
A
V
AV
AV Cable
(Provided)
To AV Terminal
Yellow
White
Red
.
Connect the AC adapter. ( P.6)
2
●
This unit powers on automatically when the AC adapter is connected.
Select the TV input switch.
3
Play back a file. ( P.13)
4
To play back with date/time display
■
Set “DISPLAY ON TV” in the connection settings menu to “ON”.
Alternatively, set “ON-SCREEN DISPLAY” in the playback menu to “DISPLAY ALL”
or “DISPLAY DATE ONLY”.
When images look unnatural on the TV
■
●
Images do not appear on the TV
properly.
Images are projected vertically
on the TV.
Images are projected
horizontally on the TV.
The color of images looks
strange.
Disconnect the cable and connect again.
●
Restart this unit by turning off and on.
●
Set “VIDEO OUTPUT” in the connection settings
menu to “4:3”.
●
Adjust the TV's screen accordingly.
●
When the video was recorded with “x.v.Color”
set to “ON”, set the x.v.Color setting of the TV to
on.
●
Adjust the TV's screen accordingly.
Video Input
Video Input
Audio Input (L)
Audio Input (R)
Further
Information
For more information, refer to the Detailed User Guide
http://manual.jvc.co.jp/index.html/
15
Page 16
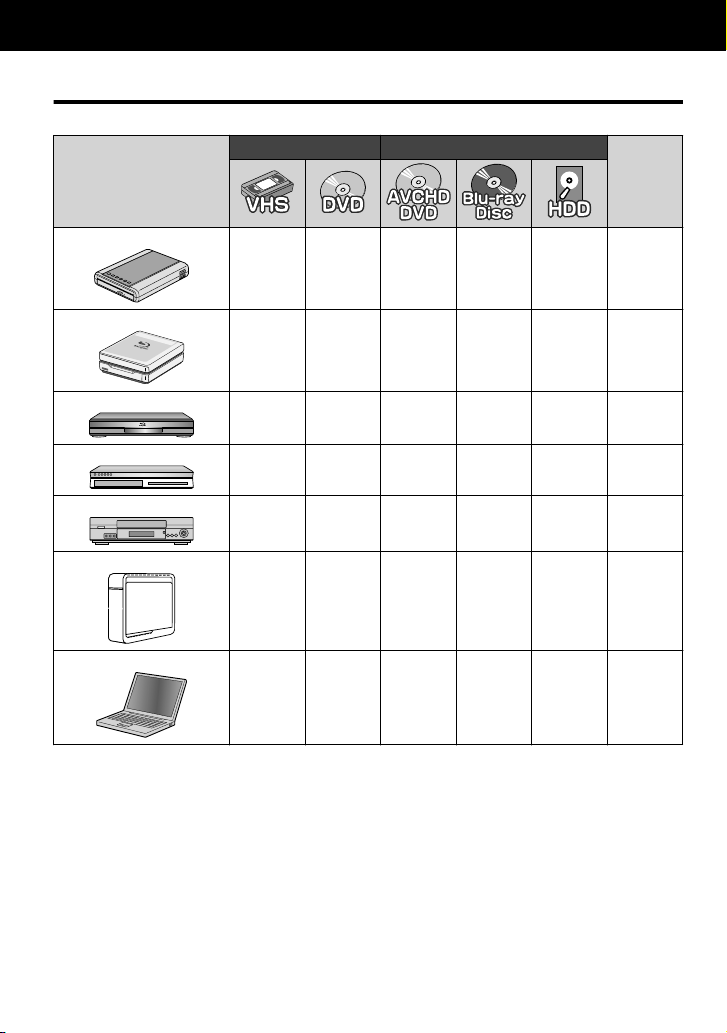
Copying
Copying Files
You can create discs or copy the files on this unit by connecting it to various devices.
Standard Quality HD Quality
Device
.
-
-
.
33
333
.
.
- - P.17
- P.17
- *1*1*1*1 -
3
3
----P.20
- - *1 P.20
DVD Writer
.
External Blu-ray Drive
.
Blu-ray Recorder
.
DVD Recorder
.
VCR
.
External Hard Disk
.
*1
Page
----
.
PC
- *2*2*2
.
The way of copying files or creating discs varies according to the device in use.
*1
For details, refer to the instruction manual of the device.
For details on how to create a disc using a computer, refer to the Detailed User
*2
Guide.
For more information, refer to the Detailed User Guide
16
http://manual.jvc.co.jp/index.html/
3
3
-
-
Page 17
Creating Discs with a DVD Writer or
External Blu-ray Drive
To play back the created disc
Close the LCD monitor and connect.
1
① Connect the AC adapter of this
unit.
② Connect the AC adapter of the
DVD writer.
③ Connect the USB cable provided
with the DVD writer.
AV
To DC Terminal
AC Adapter
To AC Outlet
(110 V to 240 V)
.
* Refer also to the instruction manual of
the DVD writer or external Blu-ray
drive.
Turn on the DVD writer or external
2
Blu-ray drive and insert a new disc.
To USB Terminal
Protrusion
DVD Writer
(When using
CU-VD50)
■
Play back on an AVCHD compatible
device.
Compatible DVD writer
■
●
CU-VD50
●
CU-VD3
Compatible External Blu-ray
■
Drive
●
LG: Model No. BE06LU10
When connecting to the external Bluray drive, use a USB cable with Mini-A
(Male) – B (Male) connectors.
To use the USB cable provided with
the external Blu-ray drive, purchase the
USB extension cable.
●
Mini-A (Male) – A (Female)
(Part number: QAM0852-001)
*
Consult your nearest JVC service
dealer.
NOTE
●
The recordable time on the disc
varies according to the way of
recording.
●
When connected to this camera,
all buttons on the DVD writer
(CU-VD50), other than the
power and eject buttons, will not
work.
Getting StartedRecordingPlaybackCopying
Open the LCD monitor.
3
●
This unit turns on and the BACK-UP
menu appears.
●
While the USB cable is connected, the
BACK-UP menu is displayed.
For more information, refer to the Detailed User Guide
http://manual.jvc.co.jp/index.html/
Further
Information
17
Page 18
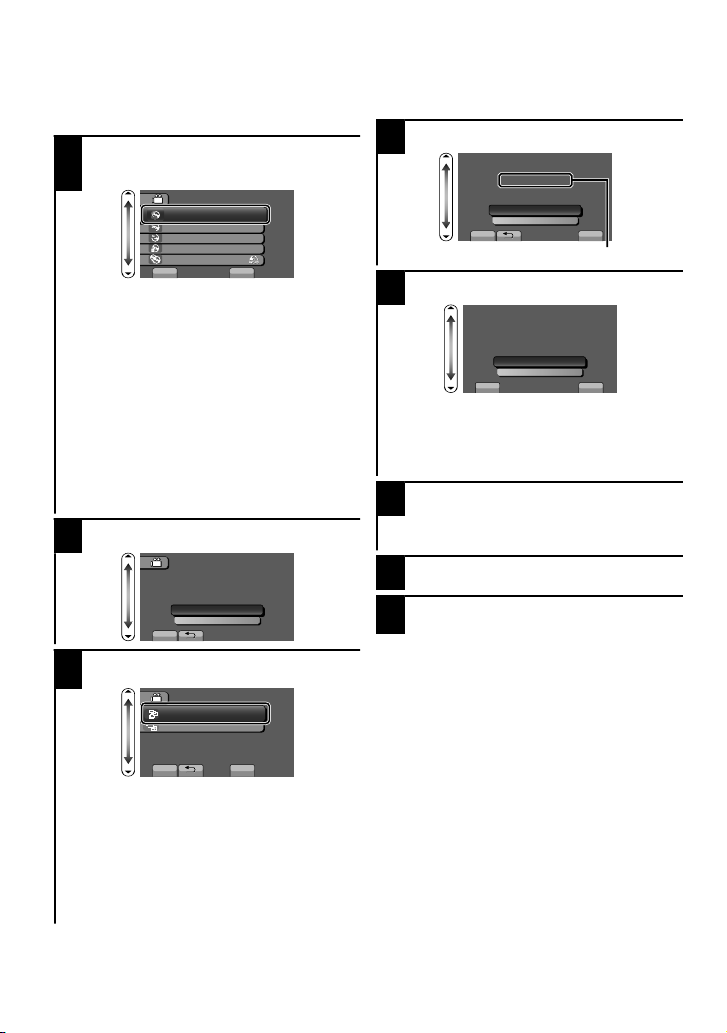
Copying All Files
Select video or still image mode.
Select “CREATE FROM ALL” (video)
or “SAVE ALL” (still image), and
1
touch .
You can change the media to save to by
selecting “CHANGE REC. MEDIA”. (For
details, refer to the Detailed User
Guide.)
●
Selecting “Blu-ray DISC” enables you
to save videos in a Blu-ray disc in the
high-definition quality. (External Blu-ray
drives only)
●
Selecting “DVD(AVCHD)” enables you
to save videos in a DVD in the highdefinition quality.
●
Selecting “DVD-Video” enables you to
save videos in a DVD after converting
to the standard image quality.
Select the media to copy to.
2
Select the desired menu and touch
3
.
“ALL SCENES” (video)/
“ALL IMAGES” (still image):
All videos and still images in this unit are
copied.
“UNSAVED SCENES” (video)/
“UNSAVED IMAGES” (still image):
Videos and still images that have never
been copied are automatically selected
and copied.
VIDEO BACKUP
CREATE FROM ALL
SELECT AND CREATE
PLAYBACK
FINALIZE
CHANGE REC. MEDIA
SET
.
CREATE FROM ALL
SELECT THE MEDIA TO BACK UP
SET
.
CREATE FROM ALL
ALL SCENES
UNSAVED SCENES
SET
.
BUILT-IN MEMORY
SD CARD
?
?
Select “EXECUTE” and touch .
4
Select “YES” or “NO”, and touch .
5
YES
ALL SCENES
REQUIRED DISC SPACE
DVD:1 / DVD(DL):1
PREPARE AN EMPTY DISC
EXECUTE
RETURN
SET QUIT
Number of discs required
.
ALL SCENES
DO YOUWANT AN AUTOMATIC
HEADLINE ON THE TOPMENU
CREATED?
YES
NO
SET QUIT
.
:Displays the videos with
similar recording dates by
groups.
NO
6
●
:Displays the videos by
recording dates.
Select “EXECUTE” and touch .
When “INSERT NEXT DISC” appears,
change the disc.
After creating, touch .
7
Close the LCD monitor, then
8
disconnect the USB cable.
When “DO YOU WANT TO
■
FINALIZE?” appears
This appears when “AUTO FINALIZE” in
the camera settings menu is set to
“OFF”.
●
To play back on other devices, select
“YES” and touch .
●
To add more files to the DVD later,
select “NO” and touch .
For more information, refer to the Detailed User Guide
18
http://manual.jvc.co.jp/index.html/
Page 19
Selecting Files to Copy
Select video or still image mode.
Select “SELECT AND CREATE”
(video) or “SELECT AND SAVE”
1
(still image), and touch .
You can change the media to save to
by selecting “CHANGE REC. MEDIA”.
(Refer to P.18 or the Detailed User
Guide.)
Select the media to copy to.
2
Select the desired menu and touch
3
.
“CREATE BY DATE” (video)/
“SAVE BY DATE” (still image):
Videos and still images are sorted and
copied according to the date on which
they were recorded. ¨ To A
“CREATE BY EVENT” (video only)*:
Videos are sorted and copied
according to the date on which they
were recorded.
“CREATE BY PLAYLIST” (video only)*:
Select and copy the created playlist.
* For more information, refer to the
Detailed User Guide.
“SELECT FROM SCENES” (video)/
“SELECT FROM IMAGES” (still image):
Select and copy the desired videos and
still images individually. ¨ To B
VIDEO BACKUP
CREATE FROM ALL
SELECT AND CREATE
PLAYBACK
FINALIZE
CHANGE REC. MEDIA
SET
.
SELECT AND CREATE
SELECT THE MEDIA TO BACK UP
SET
.
SELECT AND CREATE
CREATE BY DATE
CREATE BY EVENT
CREATE BY PLAYLIST
SELECT FROM SCENES
SET
.
BUILT-IN MEMORY
SD CARD
?
?
ACREATE BY DATE/
SAVE BY DATE
Select a recording date and touch
①
.
CREATE BY DATE
TOTAL
00h10m
DVD1
SET QUIT
.
●
Only files with the selected date will be
DVD(DL)1
copied.
●
The subsequent setting operations are
the same as steps 4 - 8 on the
previous page.
BSELECT FROM SCENES/
SELECT FROM IMAGES
Select a file.
①
SELECT FROM SCENES
CHECK
SAVE QUIT
.
●
Touch (() to append a check
mark.
After selecting the files, touch
②
“SAVE”.
●
The subsequent operations are the
same as steps 4 - 8 on the previous
page.
To check the disc created
■
Select “PLAYBACK” in step 1.
CAUTION
●
Do not turn off the power or
remove the USB cable until
creating is complete.
●
Videos and still images cannot
be copied to the same disc.
●
Files that are not on the index
screen during playback cannot
be copied.
Check Mark
Getting StartedRecordingPlaybackCopying
Further
Information
For more information, refer to the Detailed User Guide
http://manual.jvc.co.jp/index.html/
19
Page 20
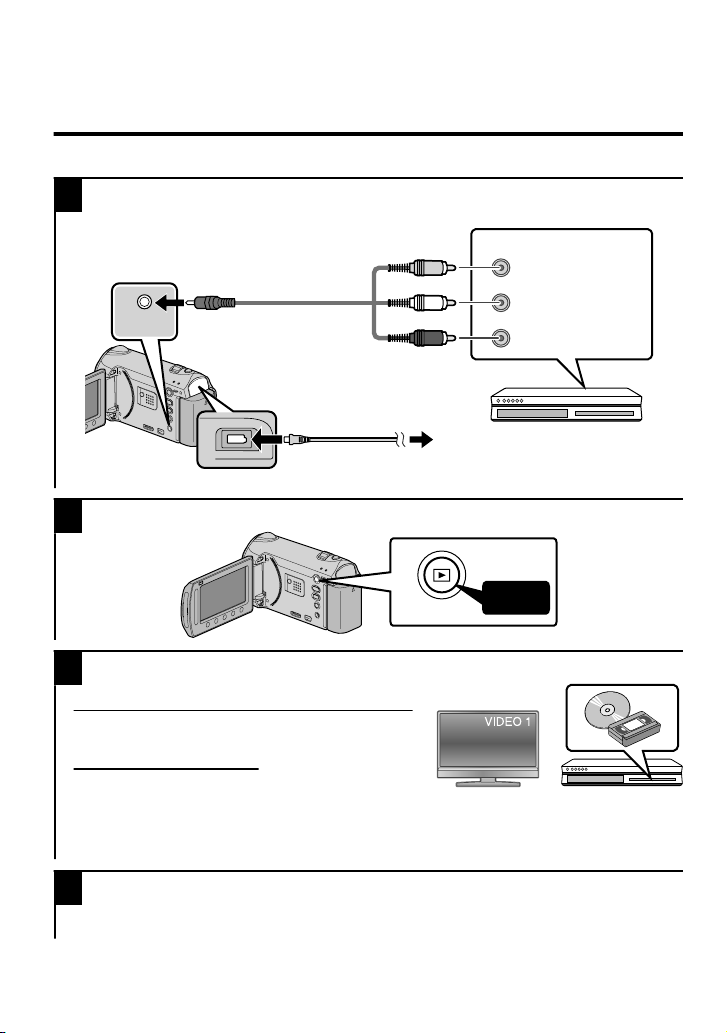
Dubbing Files by Connecting to a DVD
Recorder or VCR
You can dub videos in standard quality by connecting to a DVD recorder or VCR.
Refer also to the instruction manual of the TV, DVD recorder, VCR, etc.
Connect to a VCR/DVD recorder.
1
●
Press the Power button (,) for more than 2 seconds to turn off this unit.
To AV Terminal
AV
A
V
.
●
This unit powers on automatically when the AC adapter is connected.
Select the playback mode.
2
AV Cable
(Provided)
To DC Terminal
Yellow
White
Red
AC Adapter
To AC Outlet
(110 V to 240 V)
Video Input
Video Input
Audio Input (L)
Audio Input (R)
VCR/DVD Recorder
A
V
Prepare to record.
3
.
Preparation on TV and VCR/DVD recorder
Press
●
Switch to a compatible external input.
●
Insert compatible blank DVD or VHS to dub.
Preparation on this unit
●
Set “VIDEO OUTPUT” in the connection settings
menu to the aspect ratio (“4:3” or “16:9”) of the
connecting TV.
●
To include the date during dubbing, set “DISPLAY ON TV” in the connection settings
menu to “ON”. Alternatively, set ON-SCREEN DISPLAY in the playback menu to
DISPLAY DATE ONLY.
Start recording.
4
●
Start playback on this unit ( P.13) and press the record button on the recorder.
●
After playback is complete, stop the recording.
For more information, refer to the Detailed User Guide
20
http://manual.jvc.co.jp/index.html/
Page 21
Further Information
Using the Menu
You can configure various settings using
the menu.
Display the menu.
1
Tou c h
.
●
The menu differs according to the
mode in use.
Select the desired menu and touch
2
.
VIDEO
REGISTER EVENT
VIDEO QUALITY
ZOOM
GAIN UP
HIGH SPEED RECORDING
SET QUIT
?
.
Customer Support Information
Use of this software is authorized according to the terms of the software license.
JVC
(for inquires regarding this unit)
When contacting the nearest JVC office or agency in your country (refer to the JVC Worldwide Service
Network at http://www.jvc-victor.co.jp/english/worldmap/index-e.html) about this software, please have the
following information ready.
• Product Name, Model, Serial Number, Problem, Error Message
• PC (Manufacturer, Model (Desktop/Laptop), CPU, OS, Memory (MB/GB), Available Hard Disk Space (GB))
Please note that it may take sometime to respond to your questions, depending on their subject matter.
JVC cannot answer questions regarding basic operation of your PC, or questions regard
or performance of the OS, other applications or drivers.
Pixela
(for inquires regarding the provided software)
Region Language Phone #
USA and Canada English +1-800-458-4029 (toll-free)
Europe (UK, Germany, France,
and Spain)
Other Countries in Europe English/German/French/Spanish +44-1489-564-764
Asia (Philippines) English +63-2-438-0090
Homepage: http://www.pixela.co.jp/oem/jvc/mediabrowser/e/
Please check our website for latest information and downloading.
.
English/German/French/Spanish +800-1532-4865 (toll-free)
Select the desired setting and touch
3
.
VIDEO
OFF
AGC
AUTO
SET QUIT
?
.
To exit the screen
■
Touch (quit).
To return to the previous screen
■
Touch “)”.
To display the help file
■
Touch “*”.
●
Help file may not be available for
some items.
●
For more information on the
settings, refer to the Detailed
User Guide.
.
ing specifications
nihCanihC ese 10800-163-0014 (toll-free)
Getting StartedRecordingPlaybackCopying
Further
Information
For more information, refer to the Detailed User Guide
http://manual.jvc.co.jp/index.html/
21
Page 22
Recordable Time/Number of Images
You can check the video recording time by pressing the , (Power/Information) button.
Approximate Video Recording Time
Quality
UXP 2 h 57 m 21 m 44 m 1 h 29 m 2 h 58 m
XP 4 h 9 m 31 m 1 h 2 m 2 h 5 m 4 h 12 m
SP 5 h 54 m 43 m 1 h 28 m 2 h 58 m 5 h 57 m
EP 14 h 45 m 1 h 49 m 3 h 41 m 7 h 26 m 14 h 53 m
●
The approximate recording time is only a guide. The actual recording time may
shorten depending on the shooting environment.
Approximate Number of Still Images (Unit: Number of Shots)
Image Size Quality
3520×2640
(4:3)
3072×2304
(4:3)
2592×1944
(4:3)
1600×1200
(4:3)
640×480
(4:3)
3520×1984
(16:9)
3072×1728
(16:9)
2592×1456
(16:9)
1920×1080
(16:9)
1280×720
(16:9)
Approximate Recording Time (Using Battery)
Battery Pack Actual Recording Time Continuous Recording Time
BN-VG114E 45 m 1 h 20 m
BN-VG121E 1 h 10 m 2 h 5 m
For more information, refer to the Detailed User Guide
22
http://manual.jvc.co.jp/index.html/
Built-in Memory
(32 GB)
FINE 940 1900 3800 7690 7610
STANDARD 1460 2940 5890 9999 9999
FINE 1230 2490 4980 9999 9960
STANDARD 1960 3960 7920 9999 9999
FINE 1740 3500 7000 9999 9999
STANDARD 2720 5490 9999 9999 9999
FINE 4440 8950 9999 9999 9999
STANDARD 7500 9999 9999 9999 9999
FINE 9999 9999 9999 9999 9999
STANDARD 9999 9999 9999 9999 9999
FINE 1250 2510 5030 9999 9999
STANDARD 1960 3960 7920 9999 9999
FINE 1660 3350 6710 9999 9999
STANDARD 2610 5250 9999 9999 9999
FINE 2260 4560 9120 9999 9999
STANDARD 3530 7100 9999 9999 9999
FINE 4140 8330 9999 9999 9999
STANDARD 6310 9999 9999 9999 9999
FINE 8570 9999 9999 9999 9999
STANDARD 9999 9999 9999 9999 9999
4 GB 8 GB 16 GB 32 GB
4 GB 8 GB 16 GB 32 GB
SDHC Card
SDHC Card Built-in
Memory
(32 GB)
Page 23
●
The above are values when “LIGHT” is set to “OFF” and “LCD BACKLIGHT” is set
to “STANDARD”.
●
The actual recording time may be shorter if zooming is used or if recording is
stopped repeatedly. (It is recommended to prepare battery packs ready for three
times the expected recording time.)
●
When the battery life is reached, the recording time becomes shorter even if the
battery pack is fully charged. (Replace the battery pack with a new one.)
Troubleshooting
Before requesting service, consult the following chart or the Troubleshooting section in
the Detailed User Guide.
If the solutions indicated in the chart do not solve the problem, consult your nearest
JVC dealer or JVC service center for instructions. Refer also to the FAQ of new
products on JVC’s website. Refer also to the Q&A information of new products on
JVC’s website (http://www.jvc.com).
This unit is a microcomputer-controlled device. Electrostatic discharge, external noise
and interference (from a TV, a radio, etc.) might prevent it from functioning properly. In
such a case, reset this unit.
Reset this unit when it does not function properly or when “...
■
Error” appears on the screen.
Turn off the power. (Close the LCD monitor.)
①
Remove the AC adapter and battery pack from this unit, reattach them,
②
and turn on the power again.
Trouble
Trouble Action Page
Power
POWER/CHARGE lamp
starts blinking when the
monitor is closed.
●
The battery pack is being charged. P.6
Getting StartedRecordingPlaybackCopying
Recording cannot be
performed.
Recording
Recording stops by itself.
No date/time display.
Playback
Sound or video is
interrupted.
●
Check the / button.
●
Set to the recording mode with the + button.
●
Turn off this unit, wait for a while, and
turn it on again. (This unit stops
automatically to protect the circuit when
the temperature rises.)
●
Recording stops automatically after 12 hours of
continuous recording.
●
Set “ON-SCREEN DISPLAY” in the playback menu
accordingly.
●
Sometimes playback is interrupted at the
connecting section between two scenes. This is not
a malfunction.
For more information, refer to the Detailed User Guide
http://manual.jvc.co.jp/index.html/
P.9
P.13
-
-
-
-
Further
Information
23
Page 24

●
Check the remaining battery power. (When the
battery pack is fully charged, the lamp does not
The lamp does not flash
during battery pack
charging.
Other problems
The slider and operation
buttons do not work.
This unit heats up.
flash.)
●
When charging in either a hot or cold
environment, ensure that battery is being
charged within the permitted temperature
range. (Otherwise, charging may stop to
protect the battery pack.)
●
Remove any gloves. -
●
Touch the slider and buttons with your fingers to
operate. (They do not function if you touch them
with your fingernails or pen tips.)
●
This is not a malfunction. (This unit may become
warm when used for a long time.)
Warning Indications
Warning Indications Action Page
●
Turn off and on this unit again. -
●
RECORDING FAILURE
Warning Indications
UNSUPPORTED SCENE!
(Video)/
UNSUPPORTED FILE! (Still
image)
If the above does not solve the problem, back up your
files and execute “FORMAT BUILT-IN MEM.” or
“FORMAT SD CARD” in the media settings menu. (All
data will be deleted.)
●
Make use of a file recorded with this unit. (Files
recorded with other devices may not be playable. If
the file was recorded with this unit, then it is
corrupted.)
P.9
P.6
-
-
-
-
BACK UP RECORDED DATA
ON PC OR DISC
PERIODICALLY
DATA RECORDED IS TOO
LITTLE UNABLE TO SAVE
For more information, refer to the Detailed User Guide
24
http://manual.jvc.co.jp/index.html/
●
Connect and copy your data to a PC. -
●
If a video recording is stopped with the actual
recording time displayed at “0:00:00:17” and below,
the video cannot be saved.
-
Page 25

Cautions
Battery Pack
The supplied battery pack is a
lithium-ion battery. Before using
the supplied battery pack or an
optional battery pack, be sure
to read the following cautions:
To avoid hazards
•
...
do not burn.
...
do not short-circuit the terminals. Keep it away
from metallic objects when not in use. When
transporting, carry the battery in a plastic bag.
...
do not modify or disassemble.
...
do not expose the battery to temperatures
exceeding 60°C, as this may cause the
battery to overheat, explode or catch fire.
... use only specified chargers.
To prevent damage and prolong service life
•
... do not subject to unnecessary shock.
... charge within the temperature range of 10°C
to 35°C. Cooler temperatures
require longer charging time, or in some cases
stop charging at all.
Warmer temperatures prevent complete
charging, or in some cases stop charging at all.
... store in a cool, dry place. Extended exposure
to high temperatures will increase natural
discharge and shorten service life.
... fully charge and then fully discharge the battery
every 6 months when storing the battery pack
over a long period of time.
... remove from charger or powered un
in use, as some machines use current even
when switched off.
.
Terminals
it when not
Recording Medium
Be sure to follow the guidelines below
•
to prevent corruption or damage to your
recorded data.
Do not bend or drop the recording medium,
•
or subject it to strong pressure, jolts or
vibrations.
Do not splash the recording medium with
•
water.
Do not use, replace, or store the recording
•
medium in locations that are exposed to
strong static electricity or electrical noise.
Do not turn off the camcorder power or
•
remove the battery or AC adapter during
shooting, playback, or when otherwise
accessing the recording medium.
Do not bring the recording medium near
•
objects that have a strong magnetic field or
that emit strong electromagnetic waves.
Do not store the recording medium in
•
locations with high temperature or high
humidity.
Do not touch the metal parts.
•
When formatting or erasing data using
•
the camcorder, only the file administration
information is changed. The data is not
completely erased from the recording medium.
If you want to completely erase all of the data,
we recommend either using commercially
available software that is specially designed for
that purpose, or by physically destroying the
camcorder with a hammer etc.
LCD Monitor
To prevent damage to the LCD monitor,
•
DO NOT
... push it strongly or apply any shocks.
... place the camcorder with LCD monitor on the
bottom.
To prolong service life
•
... avoid rubbing it with coarse cloth.
Getting StartedRecordingPlaybackCopying
For more information, refer to the Detailed User Guide
http://manual.jvc.co.jp/index.html/
Further
Information
25
Page 26

Main Unit
For safety, DO NOT
•
... open the camcorder’s chassis.
... disassemble or modify the unit.
... allow infl ammables, water or metallic objects to
enter the unit.
... remove the battery pack or disconnect the
power supply while the power is on.
... leave the battery pack attached when the
camcorder is not in use.
... place naked fl ame sources, such as lighted
candles, on the apparatus.
... expose the apparatus to dripping or splashing.
... leave dust or metal objects adhered to the
power plug or an AC wall outlet.
... insert any objects in the camcorder.
Avoid using the unit
•
... in places subject to excessive humidity or dust.
... in places subject to soot or steam such as near
a cooking stove.
... in places subject to excessive shock or vibration.
... near a television set.
... near appliances generating strong magnetic
or electric fi elds (speakers, broadcasting
antennas, etc.).
... in places subject to extremely high (over 40°C)
or extremely low (under 0°C) temperatures.
DO NOT leave the unit
•
... in places of over 50°C.
... in places where humidity is extremely low
(below 35%) or extremely high (above 80%).
... in direct sunlight.
... in a closed car in summer.
... near a heater.
... in high places such as on a TV. Leaving the unit
in high places while a cable is connected may
result in a malfunction if the cable is caught and
the unit falls onto the fl oor.
To protect the unit, DO NOT
•
... allow it to become wet.
... drop the unit or strike it against hard objects.
... subject it to shock or excessive vibration during
transportation.
... keep the lens directed at extremely bright
objects for long periods.
... expose the lens to direct sunlight.
... swing it excessively when using the hand strap.
... swing the soft camcorder case excessively
when the camcorder is inside it.
... place the camcorder in dusty or sandy areas,
such as on a beach.
.
To prevent the unit from dropping,
•
Fasten the grip belt securely.
•
When using the camcorder with a tripod,
•
attach the camcorder to the tripod securely.
If the camcorder drops, you may be injured and
the camcorder may be damaged.
When a child uses the unit, there must be
parental guidance.
For more information, refer to the Detailed User Guide
26
http://manual.jvc.co.jp/index.html/
Page 27

Specifications
Camera
Power supply Using AC adapter: DC 5.2 V, Using battery pack: DC 3.6 V
Power consumption 3.2 W (when “LIGHT” is set to “OFF” and “LCD BACKLIGHT” is
Dimensions (mm) 55 x 62 x 110 (W x H x D: excluding grip belt)
Mass Approx. 260 g (camera only),
Operating
environment
Image pickup device
Recording area
(Video)
Recording area
(Still image)
Lens F2.8 to F4.5, f= 6.7 mm to 67.0 mm
Zoom (Video) Optical zoom: Up to 10x
Zoom (Still image) Optical zoom: Up to 10x
Signal format 1080/50i (Aspect ratio 16:9)
Video recording
format
Still image
recording format
Recording media
Clock battery Rechargeable battery
AC Adapter (AP-V30M)*
Power supply AC 110 V to 240 V, 50 Hz/60 Hz
Output DC 5.2 V, 1.8 A
Allowable operating
temperature
Dimensions (mm) 50 x 29 x 100 (W x H x D: excluding cord and AC plug)
Mass Approx. 112 g
When using the AC adapter overseas, please prepare a commercially available
*
converter plug for the country or region of visit.
●
The specifications and appearance of this product are subject to changes for
further improvement without prior notice.
set to “STANDARD”)
Approx. 300 g (including supplied battery pack)
Allowable operating temperature: 0°C to 40°C
Allowable storage temperature: -20°C to 50°C
Allowable operating humidity: 35 % to 80 %
1/2.3" 10,620,000 pixels (CMOS)
5,650,000 pixels (optical zoom),
2,070,000 to 5,650,000 pixels (dynamic zoom)
9,290,000 pixels (4:3), 6,980,000 pixels (16:9)
(35 mm conversion video: 48.3 mm to 483 mm, Still image:
39.9 mm to 399 mm)
Dynamic zoom: Up to 16x (Image stabilizer A), Up to 15x
(Image stabilizer B)
Digital zoom: Up to 200x
AVCHD standard, Video: MPEG-4 AVC/H.264, Audio: Dolby
Digital 2ch
JPEG standard
Built-in memory (32 GB), SD/SDHC card (commercially available)
0°C to 40°C (10°C to 35°C during charging)
Getting StartedRecordingPlaybackCopying
Further
Information
For more information, refer to the Detailed User Guide
http://manual.jvc.co.jp/index.html/
27
Page 28

Terms
A
AC adapter ...................................... 6
AV Connection ......................... 15, 20
B
Battery Pack .................................... 6
BD/DVD Backup ............................ 17
C
Clock Adjust ..................................... 7
Component Connection ................. 14
Copy (Back Up) ............................. 16
D
Date/Time Setting ............................ 8
Deleting Files ................................. 13
Dubbing (Duplicate) ....................... 20
DVD Writer .................................... 17
E
External Blu-ray Drive .................... 17
F
Format SD Card ............................ 12
H
HDMI Conection ............................ 14
L
Language Setting ............................ 8
LCD Monitor .................................. 25
M
Menu Settings ................................ 21
N
Number of Images ......................... 22
R
Recordable Time ........................... 22
S
SD Card ................................... 11, 22
U
USB Cable ..................................... 17
V
Viewing Files on TV ....................... 14
Z
Zoom ............................................... 9
.
© 2010 Victor Company of Japan, Limited
AS
0110FOH-SW-VM
Page 29

CAMÉSCOPE
GZ-HM545
Guide de l’utilisateur
Chers clients,
Merci d’avoir acheté ce produit JVC.
Avant toute utilisation, veuillez lire les précautions de sécurité et les mises en garde sur P.2 et
P.25 pour pouvoir utiliser le produit en toute sécurité.
Ce produit s’accompagne d’un “Guide de l’utilisateur” (ce manuel) et d’un “Manuel d’utilisation” (Web).
Explique les prises de vue possibles dans différentes
Manuel d’utilisation
.
situations ainsi que les fonctions utiles.
Accéder au site Web suivant sur votre
■
ordinateur
http://manual.jvc.co.jp/index.html/
DémarrerEnregistrementLectureCopie
Informations
supplémentaires
Page 30

Précautions de sécurité
AVERTISSEMENT : POUR ÉVITER
LES RISQUES D’INCENDIE OU
D’ÉLECTROCUTION, NE PAS EXPOSER
L’APPAREIL À LA PLUIE NI À L’HUMIDITÉ.
PRÉCAUTIONS :
Si vous remarquez que de la fumée ou une
•
odeur spéciale s’échappe de l’adaptateur
secteur, l’éteindre le débrancher immédiate-
ment. Si vous continuez d’utiliser le caméscope
numérique ou l’adaptateur secteur, vous
risquez de mettre le feu ou de déclencher un
choc électrique. Prenez contact avec votre
revendeur JVC. N’essayez pas de réparer la
panne vous-même.
Pour éviter tout risque d’électrocution, ne pas
•
ouvrir le boîtier. Aucune pièce intérieure n’est à
régler par l’utilisateur. Se référer à un agent
qualifié en cas de problème.
Si l’on ne se sert pas de l’adaptateur secteur
•
pendant une longue période, il est recommandé
de débrancher le cordon d’alimentation de la
prise secteur.
Dans certains pays, utilisez l’adaptateur
•
électrique, en fonction du type de la prise
murale.
REMARQUES :
La plaque d’identification et l’avertissement de
•
sécurité se trouvent sous l’appareil et/ou au dos.
La plaque de numéro de série se trouve sur le
•
logement de la batterie.
Les informations d’identification et
•
l’avertissement de sécurité de l’adaptateur
secteur sont situés sur ses côtés supérieur et
inférieur.
Avertissement sur la pile au lithium
remplaçable
La pile utilisée dans cet appareil peut présenter
des risques d’incendie ou de brûlure chimique si
elle est mal traitée.
Ne pas recharger, démonter, chauffer à plus de
100°C ni mettre au feu.
Danger d’explosion ou risque d’incendie si la pile
n’est pas changée correctement.
Jeter immédiatement les piles usées.
•
Placer hors de la portée des enfants.
•
Ne pas démonter ni jeter au feu.
•
.
Si le matériel est installé dans un coffret ou sur
une étagère, s’assurer qu’il y a un espace suffisant
sur tous les côtés pour permettre la ventilation
(10 cm ou plus sur les deux côtés, au dessus et à
l’arrière).
Ne pas boucher les orifices de ventilation.
(Si les orifices de ventilation sont bouchés par
un journal, un tissu, etc., la chaleur peut ne pas
s’éliminer.)
Aucune source à flamme nue, telle que des
bougies allumées, ne doit être placée sur l’appareil.
En jetant des batter
d’environnement doivent être pris en considération
et les réglementations locales ou la législation
concernant le rebut de ces batteries doivent être
strictement respectées.
L’appareil ne doit pas être exposé à l’égouttage ni
aux éclaboussements.
Ne pas utiliser cet appareil dans une salle de bain,
ni dans des endroits avec de l’eau.
Aussi, ne pas placer de récipient rempli d’eau ou
de liqu
ides (tels des produits cosmétiques, des
médicaments, des vases de fleurs, des plantes en
pot, des tasses, etc.) sur le dessus de cet appareil.
(Si de l’eau ou un liquide entre dans ce matériel,
un incendie ou un choc électrique risque de se
produire.)
PRÉCAUTION :
Afin d’éviter tout
choc électrique ou
dommage, insérez
d’abord l’extrémité la
plus courte du cordon
d’alimentation dans
l’adaptateur secteur
jusqu’à ce qu’elle soit
bien en place, puis branchez l’extrémité la plus
longue sur une prise secteur.
ies aux ordures, les problèmes
Pour plus d'informations, veuillez vous rapporter au Manuel d'utilisation
2
http://manual.jvc.co.jp/index.html/
Page 31

Ne dirigez pas l’objectif directement vers le soleil.
Vous pourriez vous abîmer la vue et l’appareil
pourrait être endommagé. Il y a aussi risque
d’incendie ou d’électrocution.
PRÉCAUTION !
Les remarques suivantes sont destinées à protéger
l’utilisateur et le caméscope contre des dommages
éventuels.
Ne pas transporter ou saisir le caméscope par
l’écran LCD, car il pourrait tomber ou s’endommager.
Ne pas utiliser de trépied photographique sur
des surfaces irrégulières et inclinées. Il pourrait
tomber et le caméscope pourrait être sérieusement
endommagé.
PRÉCAUTION !
Avec des câbles (Audio/Vidéo, etc.) raccordés, il
est recommandé de ne pas laisser le caméscope
sur le dessus du téléviseur, car tirer sur les câbles
pourraitfaire tomber le caméscope, causant des
dommages.
PRÉCAUTION :
La prise secteur doit être opérationnelle.
Retirez la prise secteur immédiatement si
•
l’appareil fonctionne anormalement.
AVERTISSEMENT :
Éviter d’exposer la batterie, le caméscope avec
la batterie insérée ou la télécommande avec la
batterie insérée à une chaleur excessive, telle que
celle des rayons directs du soleil, d’un feu ou autre
source de chaleur.
Si ce symbole est montré, il
n’est reconnu que dans l’Union
européenne.
.
Noter que ce caméscope est destiné à un
usage privé uniquement.
Toute utilisation commerciale sans autorisation est
interdite. (Même si vous enregistrez un spectacle
ou une exposition pour votre plaisir personnel,
il est vivement recommandé de demander au
préalable l’autorisation de filmer.)
Marques commerciales
“AVCHD” et le logo “AVCHD” sont des marques
•
commerciales de Panasonic Corporation et de
Sony Corporation.
x.v.ColourTM est une marque de
•
commerce de Sony Corporation.
HDMI est une marque de
•
commerce de HDMI Licensing,
LLC.
Fabriqué sous licence de Dolby Laboratories.
•
Dolby et le symbole double D sont des marques
de commerce de Dolby Laboratories.
Windows® est une marque déposée ou une
•
marque de commerce de Microsoft Corporation
aux États-Unis et/ou dans d’autres pays.
Macintosh est une marque déposée d’Apple Inc.
•
iTunes, iMovie, iPhoto sont des marques
•
déposées d’Apple Inc. aux États-Unis et dans
d’autres pays.
TM
YouTube et le logo YouTube sont des marques
•
déposées de YouTube LLC.
Les autres noms de produit et d’entreprise cités
•
dans ce mode d’emploi sont des marques de
commerce et/ou des marques déposées de leurs
détenteurs respectifs.
ATTENTION:
L’utilisation de batteries NON approuvées par
•
JVC peut causer des incendies ou des blessures.
Utilisez uniquement les batteries spécifi ées à la
page 25.
Évitez de tirer sur, ou de plier, la fiche et le
•
cordon de l’adaptateur secteur. Cela pourrait
endommager l’adaptateur secteur.
Effectuez une sauvegarde des données
enregistrées importantes
Il est recommandé de les copier sur un DVD ou
un autre support d’enregistrement pour stockage.
JVC décline toute responsabilité pour toute perte
de données.
DémarrerEnregistrementLectureCopie
Pour plus d'informations, veuillez vous rapporter au Manuel d'utilisation
http://manual.jvc.co.jp/index.html/
Informations
supplémentaires
3
Page 32

Index
Précautions de sécurité ....................... 2
Index ................................................... 4
Vérification des accessoires ................ 4
Noms des pièces et des fonctions ...... 5
Démarrer ................................... 6
▶
Charger la batterie .............................. 6
Ajuster la poignée ............................... 6
Utiliser comme dragonne .................... 7
Réglage de l’horloge ........................... 7
▶Enregistrement .......................... 9
Enregistrer des vidéos ........................ 9
Réduire les secousses de la caméra
(Enregistrer des vidéos) .................... 10
Enregistrer des photos ...................... 10
Insérer une carte SD ......................... 11
▶Lecture .................................... 13
Lire/Supprimer des fichiers sur cette
caméra .............................................. 13
▶En savoir plus sur les opérations avancées
Utilisez le “Manuel d’utilisation” depuis votre ordinateur pour en savoir plus
concernant les opérations avancées.
Accéder à l’adresse suivante depuis votre ordinateur
■
http://manual.jvc.co.jp/index.html/
Lecture sur poste TV ......................... 14
▶Copie ....................................... 16
Copie des fichiers ..............................
Créer des disques avec un graveur de
DVD ou un lecteur externe Blu-ray .. . 17
Copier des fichiers en connectant
l’appareil à un magnétoscope/
enregistreur DVD
.............................. 20
▶Informations supplémentaires
................................................. 21
Via le menu ....................................... 21
Durée d’enregistrement/Nombre de
photos ............................................... 22
Dépannage ........................................ 23
Mises en garde .................................. 25
Caractéristiques techniques .............. 27
Vérification des accessoires
16
Adaptateur secteur
AP-V30M *1
.
Câble USB
(Type A - Mini Type B)
.
●
Les cartes SD sont vendues séparément. Pour plus de détails concernant les types
Cordon
d’alimentation *1
.
Batterie
BN-VG114E
.
Câble AV Câble composante
.
.
Télécommande
RM-V760U
SNAP
START
SHOT
/STOP
INFO
INDEX
.
●
CD-ROM *2
●
Fiche de l’adaptateur *3
●
Guide de l’utilisateur
(ce manuel)
de cartes utilisables avec cette caméra, veuillez vous reportez à P.11.
Pour utiliser un adaptateur secteur à l’étranger, pensez à préparer une prise
*1
convertisseur disponible dans le commerce pour le pays ou la région visité(e).
Pour afficher le Manuel d’utilisation. Se connecter à Internet et cliquer sur “Lire le manuel d'utilisation”.
*2
Si la prise secteur ne correspond pas à la fiche secteur, utilisez l’adaptateur fourni fiche.
*3
Pour plus d'informations, veuillez vous rapporter au Manuel d'utilisation
4
http://manual.jvc.co.jp/index.html/
Page 33

Noms des pièces et des fonctions
ji
1
abc
2
3
4
5
6
7
.
Flash
A
Objectif/Volet de protection de l’objectif
B
électronique
Lumière
C
Capteur infrarouge
D
Microphone stéréo
E
Écran LCD
F
Allume ou éteint l’appareil en s’ouvrant
et se fermant.
Curseur
G
Permet de sélectionner une image ou
un objet.
Touche OK
H
Permet de confirmer la sélection d’une
image ou d’un objet.
Touches de fonctionnement
I
Fonctionne différemment selon
l’opération.
Touche Menu (menu) ( P.21)
J
Haut-parleur
K
Voyant ACCESS (Accès)
L
S’allume ou clignote lors d’un
enregistrement ou d’une lecture.
Voyant POWER/CHARGE
M
(Alimentation/Recharge) ( P.6)
Touche + (Lecture)
N
Bascule entre les modes
d’enregistrement et de lecture.
Touche / (Vidéo/Photo)
O
Bascule entre les modes vidéo et
photo.
890
Pour plus d'informations, veuillez vous rapporter au Manuel d'utilisation
AV
k
l
m
n
o
d
e
f
g
h
Touche UPLOAD/EXPORT
P
(Télécharger/Exporter vers iTunes)
Enregistre
ment
Lecture
Touche , (Alimentation/Information)
Q
Enregistre
ment
Lecture
Appuyez et maintenez enfoncée la touche
marche/arrêt avec l’écran LCD ouvert.
Terminal AV ( P.15, 20)
R
Connecteur COMPONENT
S
(Composant) ( P.14)
Mini-connecteur HDMI ( P.14)
T
Commande de Zoom/Volume ( P.9, 13)
U
Touche SNAPSHOT (Enregistrer des
V
photos) ( P.10)
Terminal USB ( P.17)
W
Terminal CC ( P.6)
X
Touche START/STOP (Enregistrer des
Y
vidéos) ( P.9)
Commande de libération de la dragonne
Z
Dragonne ( P.6)
a
Orifice pour trépied
b
Fente pour carte SD ( P.11)
c
Commande de libération de la batterie
d
( P.6)
http://manual.jvc.co.jp/index.html/
Filme des vidéos au
:
format YouTube ou
iTunes.
Fait passer la vidéo au
:
format YouTube ou
iTunes.
Affiche le temps restant
:
ainsi que la charge restante
de la batterie durant
l’enregistrement continu.
Affiche les informations
:
de fichier.
p
q
r
s
t
5
Page 34

Démarrer
Charger la batterie
Fixez la batterie.
1
* La batterie n’est pas
chargée lors de l’achat.
Coches
Alignez le haut de la batterie avec le
repère sur cette unité et faites coulisser
jusqu'à ce que la batterie soit en place
et que vous entendiez un petit déclic.
Pour retirer la batterie
(Basique)
.
ATTENTION
Assurez-vous d’utiliser des batteries de JVC.
●
Si vous utilisez des batteries d’autres fabricants JVC, les performances et la
sécurité ne seront pas garanties.
●
Durée de recharge: Environ 2 h 30 m (avec la batterie fournie)
Le temps de chargement est lorsque l’appareil est utilisé à 25°C. Si la batterie
*
n’est pas chargée à une température ambiante comprise entre 10°C et 35°C, le
chargement peut prendre plus de temps voire ne pas démarrer. Le temps
d’enregistrement et de lecture peut aussi être réduit dans certaines
circonstances d’utilisation comme à basse température.
BATT.
Branchez le courant.
3
Voyant de chargement
Branchez le terminal
2
CC.
Adaptateur secteur
Sur une prise secteur
(110 V à 240 V)
Chargement en cours :
Clignote
Chargement terminé :
S’éteint
Volet de
protection
Ajuster la poignée
.
Pour plus d'informations, veuillez vous rapporter au Manuel d'utilisation
6
http://manual.jvc.co.jp/index.html/
Ajustez la longueurTirez la dragonne Attachez la dragonne
Page 35

Utiliser comme dragonne
Enlevez la dragonne et passez-la autour de votre poignet.
En appuyant sur A, tirez sur B et enlevez la dragonne.
Bouchon
Appuyez sur et maintenez
la touche enfoncée
.
●
Lorsque vous installez la dragonne, insérez le bloqueur jusqu’à entendre un déclic.
Réglage de l’horloge
DémarrerEnregistrementLectureCopie
Ouvrez l’écran LCD.
1
A
V
.
●
L’unité s’allume. Lorsque l’écran LCD
est fermé, l’unité s’éteint.
Sélectionnez “OUI” et appuyez sur
lorsque “REGLER DATE/
2
HEURE !” est affiché.
Sélectionnez
Appuyez
.
●
Déplacez le curseur pour sélectionner
puis appuyez sur les touches de
fonctionnement pour procéder au
réglage.
Curseur
REGLER DATE/HEURE !
OUI
NON
REGLER
Touches de fonctionnement
Réglez la date et l’heure.
3
Curseur
REGLAGE DE L'HORLOGE
DATE HEURE
10
REGLER
.
●
Utilisez le curseur pour ajuster
l’année, le mois, la journée, l’heure et
les minutes.
●
Appuyez sur les touches de
fonctionnement “&” / “'” pour
déplacer le curseur.
Une fois l’heure et la date réglées,
4
appuyez sur .
Sélectionnez votre région puis
5
appuyez sur .
●
Le nom de la ville et le décalage
horaire s’affichent alors.
REGLAGE HORLOGE/ZONE
GMT
ENREG.
.
10 00201010
FIN
10.10. 2010 10:00
FIN
Informations
supplémentaires
Pour plus d'informations, veuillez vous rapporter au Manuel d'utilisation
http://manual.jvc.co.jp/index.html/
7
Page 36

Pour réinitialiser l’horloge
■
Réglez l’horloge avec “REGLER
L'HEURE” dans le menu.
① Affichez le menu.
Pour modifier la langue
■
d’affichage
Vous pouvez modifier la langue de
l’affichage sur l’écran.
① Affichez le menu.
Appuyez
.
② Sélectionnez “REGLER
L'HEURE” et appuyez sur .
VIDEO
REGLAGES AFFICHAGE
REGLER L'HEURE
REGLAGES DE BASE
REGLAGES CONNEXIONS
.
REGLAGES DES MEDIA
REGLER
FIN
?
③ Sélectionnez “REGLAGE DE
L'HORLOGE” et appuyez sur .
REGLER L'HEURE
REGLAGE DE L'HORLOGE
REGLAGE ZONE
ETABLI POUR L'HEURE D'ETE
REGLER
.
●
Les opérations de réglage suivantes
sont les mêmes que celles
mentionnées dans les étapes 3 à 5 de
la page précédente.
FIN
?
.
② Sélectionnez “REGLAGES
AFFICHAGE” et appuyez sur .
VIDEO
COMMUT. AUTO ENR.
REGLAGES AFFICHAGE
REGLER L'HEURE
REGLAGES DE BASE
REGLAGES CONNEXIONS
REGLER
.
③ Sélectionnez “LANGUAGE” et
appuyez sur .
REGLAGES AFFICHAGE
LANGUAGE
STYLE D'AFF. DE DATE
LUMINOSITE MONITEUR
RETROECL. MONITEUR
REGLER
.
④ Sélectionnez la langue souhaitée
puis appuyez sur .
⑤
Appuyez sur .
Appuyez
?
?
REMARQUE
●
Appuyez sur le curseur et sur les touches autour de l’écran avec vos doigts.
●
Le curseur et les touches ne fonctionnent pas si vous les touchez avec vos
ongles ou avec des gants.
●
Les affichages à l’écran ne fonctionnent pas, même si vous appuyez dessus.
●
“REGLER DATE/HEURE !” est affiché lrosque vous mettez en marche cette
unité après qu’elle n’ait pas été utilisée pendant une période prolongée.
Rechargez cette unité pendant plus de 24 heures avant de régler l’horloge.
( P.6)
FIN
FIN
Pour plus d'informations, veuillez vous rapporter au Manuel d'utilisation
8
http://manual.jvc.co.jp/index.html/
Page 37

Enregistrement
Enregistrer des vidéos
Vous pouvez enregistrer des vidéos sans avoir à vous préoccuper des détails de
réglage. Pour ce faire, utilisez le mode auto.
Avant d’enregistrer une scène importante, il est recommandé d’effectuer un
enregistrement test.
DémarrerEnregistrementLectureCopie
Sélectionnez
12
le mode vidéo.
Appuyez
Lancez l'enregistrement.
3
Appuyez à nouveau
pour arrêter
l'enregistrement.
Appuyez
.
Indications apparaissant à l’écran pendant l’enregistrement de vidéos
■
Compteur de scènes
.
Vérifiez si le mode d'enregistrement
est Auto.
Si le mode est Manuel, appuyez
sur la touche pour basculer.
Le mode bascule entre les mode
auto et manuel à chaque sélection.
AV
Effectuer un zoom
(Grand angle) (Téléobjectif)
Qualité vidéo
Durée d'enregistrement restante
:Pause
㧦Enregistrement en cours
Supports d'enregistrement
Indicateur de la batterie
Appuyez
REMARQUE
●
La durée d’enregistrement restante de la batterie fournie est d’environ 45
minutes. ( P.23)
Pour plus d'informations, veuillez vous rapporter au Manuel d'utilisation
http://manual.jvc.co.jp/index.html/
Informations
supplémentaires
9
Page 38

Réduire les secousses de la caméra
(Enregistrer des vidéos)
Le réglage du stabilisateur d’image permet de réduire les secousses de la caméra lors de l’enregistrement.
(Blanc)
:
Stabilisateur d'image
(Vert)
:
Appuyez
Le réglage est modifié à chaque
A
B
.
Réduit les secousses de la caméra.
:
Réduit les secousses de la caméra efficacement pendant la prise de scènes
:
lumineuses sur une extrémité grand angle. *Uniquement sur l’extrémité grand angle
(envirion 5x)
sélection.
Stabilisateur d'image
: ARRET
(Blanc)
REMARQUE
●
Il est recommandé d’enlever le stabilisateur d’image lorsque vous filmez un sujet
qui se déplace peu en ayant l’unité sur un trépied.
●
Une stabilisation complète est impossible si la caméra bouge trop.
Enregistrer des photos
Sélectionnez le
1
mode photos.
Appuyez
Effectuez la mise au point de l'objet.
2
Appuyez sur la touche à mi-course
Le voyant devient vert
lorsque la mise au point
est terminée
Prenez une photo.
3
Appuyez entièrement
A
V
.
Indications apparaissant à l’écran lors de l’enregistrement d’une photo
■
Taille d'image
Vitesse d’obturation
Mise au point
Pour plus d'informations, veuillez vous rapporter au Manuel d'utilisation
10
http://manual.jvc.co.jp/index.html/
.
Le voyant s'allume
lors de l'enregistrement
d'une photo
Qualité de l'image
Nombre de prises de vue restantes
Enregistrement en cours
Supports d'enregistrement
Indicateur de la batterie
Page 39

Insérer une carte SD
Quand une carte SD disponible dans le commerce est insérée, les enregistrements
peuvent se poursuivre sur la carte sans interruption au moment où le temps
d’enregistrement restant sur la mémoire incorporée est expiré.
Pour enregistrer sur la carte, il est nécessaire d’effectuer des réglages pour les
*
paramètres du média. ( P.12)
Lorsqu’il n’y a pas de carte disponible, réglez les paramètres du média sur
“MEMOIRE INTERNE” pour enregistrer.
DémarrerEnregistrementLectureCopie
Fermez l'écran LCD.
1
(Basique)
*Éteignez l'unité avant d'insérer
ou de retirer une carte.
.
Pour retirer la carte
■
Poussez la carte vers l’intérieur puis tirez-la vers vous.
(Basique)
.
REMARQUE
Les opérations sont confirmées sur les cartes SD suivantes.
Fabricant Panasonic, TOSHIBA, SanDisk, ATP
Vidéo
Photo
●
Toute utilisation de cartes autres que celles indiquées ci-dessus risque de
causer des problèmes lors de l’enregistrement ou la perte de données.
Carte SDHC compatible Classe 4 ou supérieur (4 Go à 32 Go)
(la classe 6 est recommandée lors d’un enregistrement en
qualité “UXP”.)
Carte SD (256 Mo à 2 Go) ou carte SDHC (4 Go à 32 Go)
Ouvrez le volet de protection.
2
Insérez une carte SD.
3
Étiquette
Informations
supplémentaires
Pour plus d'informations, veuillez vous rapporter au Manuel d'utilisation
http://manual.jvc.co.jp/index.html/
11
Page 40

Pour utiliser une carte SD
■
L’enregistrement et la lecture peuvent
être effectués sur une carte si
“SUPPORT ENREG. VIDEO” ou
“SUPPORT ENREG. PHOTO” des
paramètres de support sont réglés sur
“CARTE SD”.
① Affichez le menu.
Appuyez
.
② Sélectionnez “REGLAGES DES
MEDIA” et appuyez sur .
VIDEO
REGLAGES AFFICHAGE
REGLER L'HEURE
REGLAGES DE BASE
REGLAGES CONNEXIONS
.
REGLAGES DES MEDIA
REGLER
?
FIN
③ Sélectionnez “SUPPORT
ENREG. VIDEO” ou “SUPPORT
ENREG. PHOTO”, et appuyez
sur .
REGLAGES DES MEDIA
SUPPORT ENREG. VIDEO
SUPPORT ENREG. PHOTO
FORMAT. MEM. INTERNE
FORMATER LA CARTE SD
.
EFFACER MEM. INTERNE
REGLER
?
FIN
④ Sélectionnez “CARTE SD” et
appuyez sur .
REGLAGES DES MEDIA
MEMOIRE INTERNE
CARTE SD
Pour utiliser des cartes SD qui
■
ont servi pour d’autres
appareils
Formatez (initialisez) la carte via
“FORMATER LA CARTE SD” à partir
des paramètres de support.
Toutes les données de la carte
seront supprimées lors du
formatage. Avant de formater la
carte, copiez sur un ordinateur tous
les fichiers contenus dessus.
①
Appuyez sur pour afficher le
menu.
② Sélectionnez “REGLAGES DES
MEDIA” avec le curseur et
appuyez sur .
③ Sélectionnez “FORMATER LA
CARTE SD” et appuyez sur .
REGLAGES DES MEDIA
SUPPORT ENREG. VIDEO
SUPPORT ENREG. PHOTO
FORMAT. MEM. INTERNE
FORMATER LA CARTE SD
EFFACER MEM. INTERNE
REGLER
.
?
FIN
④ Sélectionnez “FICHIER” et
appuyez sur .
FORMATER LA CARTE SD
FICHIER
FICHIER + GESTION NO
REGLER
.
FIN
?
⑤ Sélectionnez “OUI” et appuyez
sur .
⑥ Une fois le formatage terminé,
appuyez sur .
REGLER
.
Pour plus d'informations, veuillez vous rapporter au Manuel d'utilisation
12
http://manual.jvc.co.jp/index.html/
?
FIN
Page 41

Lecture
Lire/Supprimer des fichiers sur cette caméra
Sélectionner et lire les vidéos ou photos enregistrées à partir d’un écran d’index
(affichage miniature). Le contenu des supports sélectionnés dans les paramètres de
support ( P.12) s’affiche sur l’écran d’index.
Sélectionner le mode de lecture.
1
Appuyez
Sélectionner le mode vidéo ou
2
photo.
Réglage du volume pendant la
lecture de la vidéo
Baisser
le volume
Augmenter
le volume
DémarrerEnregistrementLectureCopie
Appuyez
Lire un fichier.
3
Sélectionnez
LECTURE VIDEO
Appuyez
Appuyez sur pour arrêter.
.
Pour capturer une photo durant la lecture
■
Arrêtez la lecture et appuyez sur la touche SNAPSHOT.
Touches de fonctionnement utilisables lors de la lecture
■
Affichage Pendant la lecture vidéo Pendant la lecture de photos
/
!
"
Lecture/pause Lancement/Pause du diaporama
Arrêt (retourne à l’affichage miniature) Arrêt (retourne à l’affichage miniature)
Passe à la vidéo suivante Passe à la photo suivante
Retourne au début de la scène Retourne à la photo précédente
Recherche avant Recherche arrière Ralenti avant -
$
Ralenti arrière -
%
Support lu
Pour supprimer des fichiers inutiles
Sélectionnez
LECTURE VIDEO
Sélectionnez "OUI" lorsque le message de
confirmation apparaît et appuyez sur .
A
V
Appuyez
Informations
supplémentaires
Pour plus d'informations, veuillez vous rapporter au Manuel d'utilisation
http://manual.jvc.co.jp/index.html/
13
Page 42

Lecture sur poste TV
Branchez l’appareil à la TV.
1
* Pour plus de détails, consultez le manuel d’utilisation de votre TV.
●
Appuyez sur la touche Alimentation (,) pendant plus de 2 secondes pour éteindre
cette unité.
Lecture en qualité HD
■
Si vous utilisez une télévision HD, vous pouvez effectuer la lecture en qualité HD en
utilisant la connexion HDMI.
Connecter au terminal HDMI
TV
AV
Sur le port HDMI
(mini HDMI)
.
Connecter au terminal COMPONENT
Vers terminal COMPONENT
COMPONENT
AV
Vers terminal AV
.
Câble
composante
AV
(fourni)
Câble AV (fourni)
Rouge
Entrées vidéo
Vert
Bleu
Blanc
Rouge
en composantes
* Ne pas connecter la prise jaune lors
de l'utilisation d'un câble composant.
Port d'entrée HDMI
Y
C
B/PB
CR/P
R
Entrée
audio (G)
Entrée
audio (D)
TV
REMARQUE
●
Pour toute question ou tout problème concernant les réglages de la TV dans le
mode approprié, veuillez vous adresser au fabricant de la TV.
●
Utilisez un câble HDMI à grande vitesse (câble catégorie 2) comme le minicâble HDMI.
●
Pendant la lecture en qualité HD, réglez sur “SORTIE COMPOSANTES” dans
le menu des réglages de connexion sur “1080i”. La vidéo sort en qualité
standard si le réglage reste sur “480i”.
Pour plus d'informations, veuillez vous rapporter au Manuel d'utilisation
14
http://manual.jvc.co.jp/index.html/
Page 43

Lecture en qualité standard
■
Si vous utilisez un téléviseur classique, vous pouvez lire en qualité standard en
vous connectant au terminal AV.
Connecter au terminal AV
TV
DémarrerEnregistrementLectureCopie
A
V
AV
Câble AV (fourni)
Vers terminal AV
Jaune
Blanc
Rouge
.
Connecter l’adaptateur secteur. ( P.6)
2
●
Cette unité s’allume automatiquement lorsque l’adaptateur CA est branché.
Sélectionner l’entrée d’alimentation de la TV.
3
Lire un fichier. ( P.13)
4
Lire avec l’heure/la date affichée(s)
■
Réglez “AFFICHER SUR TV” dans le menu de réglage des branchements sur
“MARCHE”.
Vous pouvez également régler “AFFICHAGE SUR ECRAN” dans le menu lecture
sur “AFFICHER TOUT” ou “AFFICHER SEUL. DATE”.
Lorsque les photos ne rendent pas un aspect naturel sur la TV
■
●
Les photos ne s’affichent pas
correctement sur la TV.
Les images sont projetées
verticalement sur la TV.
Les images sont projetées
horizontalement sur la TV.
Les images ont des couleurs
bizarres.
Déconnectez le câble et reconnectez-le.
●
Redémarrez cette unité en l’éteignant et en la
rallumant.
●
Réglez “SORTIE VIDEO” dans le menu de
réglage des branchements sur “4:3”.
●
Ajustez correctement l’écran de la TV.
●
Lorsque la vidéo a été enregistrée avec
“x.v.Color” réglé sur “MARCHE”, réglez les
paramètres x.v.Color de la télévision sur Activé.
●
Ajustez correctement l’écran de la TV.
Entrée vidéo
Entrée vidéo
Entrée audio (G)
Entrée audio (D)
Informations
supplémentaires
Pour plus d'informations, veuillez vous rapporter au Manuel d'utilisation
http://manual.jvc.co.jp/index.html/
15
Page 44

Copie
Copie des fichiers
Vous pouvez créer des disques ou copier des fichiers sur cette unité en la connectant à
divers appareils.
Qualité standard Qualité HD
Appareil
.
-
-
.
33
333
.
.
- - P.17
- P.17
- *1*1*1*1 -
3
3
----P.20
----
- - *1 P.20
3
Graveur DVD
.
Blu-ray dur externe
.
Enregistreur Blu-ray
.
Enregistreur DVD
.
Magnétoscope
.
Lecteur de disque dur
externe
.
*1
Page
-
.
PC
- *2*2*2
.
La méthode de copie de fichiers ou de création de disques varie selon le dispositif
*1
3
utilisé. Pour plus de détails, consultez le manuel d’utilisation de l’appareil.
Pour plus de détails concernant la création d’un disque via un ordinateur, veuillez
*2
vous référer au Manuel d’utilisation.
Pour plus d'informations, veuillez vous rapporter au Manuel d'utilisation
16
http://manual.jvc.co.jp/index.html/
-
Page 45

Créer des disques avec un graveur de
DVD ou un lecteur externe Blu-ray
Pour lire le disque créé
Fermez l’écran LCD et branchez.
1
①
Connectez l’adaptateur CA de
cette unité.
②
Connectez l’adaptateur CA du
graveur de DVD.
③
Connectez le câble USB fourni
avec le graveur de DVD.
Vers un terminal USB
AV
Vers un terminal CC
Saillie
Adaptateur secteur
Sur une prise secteur
(110 V à 240 V)
.
* Consultez également le manuel
d’instructions du graveur de DVD ou
du lecteur externe Blu-ray.
Allumez le graveur de DVD ou le
lecteur Blu-ray externe et insérez un
2
nouveau disque.
Graveur DVD
(en utilisant
CU-VD50)
■
Lecture sur un dispositif compatible
AVCHD.
Lecteur de DVD compatible
■
●
CU-VD50
●
CU-VD3
Lecteur externe Blu-ray
■
compatible
●
LG: Modèle No BE06LU10
Pour le raccorder au lecteur Blu-ray
externe, utilisez un câble USB avec
des connecteurs Mini-A (Mâle) et MiniB (Mâle).
Pour utiliser le câble USB fourni avec
le lecteur Blu-ray externe, achetez le
câble d’extension USB.
●
Mini-A (Mâle) – A (Femelle)
(Numéro de pièce: QAM0852-001)
*
Consultez votre revendeur JVC le
plus proche.
REMARQUE
●
Le temps d’enregistrement sur le
disque varie en fonction du
mode d’enregistrement.
●
Lorsqu’il est connecté à cette
caméra, toutes les touches sur
le lecteur de DVD (CU-VD50),
autres que les touches de mise
en marche et d’éjection ne
fonctionneront pas.
DémarrerEnregistrementLectureCopie
Ouvrez l’écran LCD.
3
●
L’unité s’allume et le menu
SAUVEGARDE apparaît.
●
Lorsque le câble USB est connecté, le
menu SAUVEGARDE est affiché.
Pour plus d'informations, veuillez vous rapporter au Manuel d'utilisation
http://manual.jvc.co.jp/index.html/
Informations
supplémentaires
17
Page 46

Copier tous les fichiers
Sélectionner le mode vidéo ou photo.
Sélectionnez “CREER AVEC TOUT”
(vidéo) ou “TOUT ENREGISTRER”
1
(photo), et appuyez sur .
Vous pouvez changer le support de
sauvegarde en sélectionnant
“CHANGER MEDIA D'ENR.”. (Pour plus
d’informations, veuillez vous rapporter
au Manuel d’utilisation.)
●
En sélectionnant “Blu-ray DISC”, vous pouvez
sauvegarder des vidéos dans un disque Blu-ray
disc en qualité haute définition. (Lecteurs Blu-ray
externes uniquement)
●
En sélectionnant “DVD(AVCHD)”, vous
pouvez sauvegarder des vidéos dans
un DVD en qualité haute définition.
●
En sélectionnant “DVD-Video”, vous
pouvez sauvegarder des vidéos dans
un DVD, après les avoir converties en
qualité d’image standard.
Sélectionnez le média sur lequel
2
effectuer la copie.
Sélectionnez le menu souhaité puis
3
appuyez sur .
“TOUTE LES SCENES” (vidéo)/
“TOUTES LES IMAGES” (photo):
Toutes les vidéos et les photos dans cet
appareil sont copiées.
“SCENES NON ENREG.” (vidéo)/
“IMAGES NON ENREG.” (photo):
Le vidéos et les photos qui n’ont jamais
été copiées sont automatiquement
sélectionnées et copiées.
.
.
.
SAUVEGARDE VIDEO
CREER AVEC TOUT
CHOISIR ET CREER
LECTURE
FINALISER
CHANGER MEDIA D'ENR.
REGLER
CREER AVECTOUT
SELECTIONNEZ LE MEDIA
A SAUVEGARDER
MEMOIRE INTERNE
CARTE SD
REGLER
CREER AVECTOUT
TOUTE LES SCENES
SCENES NON ENREG.
REGLER
?
?
Sélectionnez “EXECUTER” et
4
appuyez sur .
Sélectionnez “OUI” ou “NON”, et
5
appuyez sur .
OUI
NON
Sélectionnez “EXECUTER” et
6
appuyez sur .
●
Lorsque “INTRODUIRE NOUVEAU
DISQUE” apparait, changez le disque.
Une fois la création terminée,
7
appuyez sur .
Fermez l’écran LCD, puis
8
débranchez le câble USB.
Lorsque “FINALISER ?” apparaît
■
Ceci apparaît lorsque “FINALISATION
AUTO” dans le menu des réglages de la
caméra est réglé sur “ARRET”.
●
Pour effectuer une lecture sur d’autres
dispositifs, sélectionnez “OUI” et
TOUTE LES SCENES
QUANTITE REQUISE
DVD㧦1 / DVD(DL)㧦1
PREPARER UN DISQUE VIERGE
EXECUTER
RETOUR
REGLER
Nombre de disques requis
.
TOUTE LES SCENES
APPLIQUER UN TITRE
AUTOMATIQUE SUR LE MENU
PRINCIPAL DU DISQUE ?
OUI
NON
REGLER
.
:
Affiche les vidéos avec des
dates d’enregistrement
similaires par groupes.
:
Affiche les vidéos par dates
d’enregistrement.
FIN
FIN
appuyez sur .
●
Pour ajouter ultérieurement davantage de
fichiers sur le DVD, sélectionnez “NON” et
appuyez sur .
Pour plus d'informations, veuillez vous rapporter au Manuel d'utilisation
18
http://manual.jvc.co.jp/index.html/
Page 47

Sélectionner les fichiers à copier
Sélectionner le mode vidéo ou photo.
Sélectionnez “CHOISIR ET CREER”
(vidéo) ou “CHOISIR/ENREGISTRER”
1
(photo), et appuyez sur .
.
SAUVEGARDE VIDEO
CREER AVEC TOUT
CHOISIR ET CREER
LECTURE
FINALISER
CHANGER MEDIA D'ENR.
REGLER
?
Vous pouvez changer le support de
sauvegarde en sélectionnant “CHANGER
MEDIA D'ENR.”. (Consultez P.18 ou le
Manuel d’utilisation.)
Sélectionnez le média sur lequel
2
effectuer la copie.
Sélectionnez le menu souhaité puis
3
appuyez sur .
REGLER
.
REGLER
.
CHOISIR ET CREER
SELECTIONNEZ LE MEDIA
A SAUVEGARDER
MEMOIRE INTERNE
CARTE SD
CHOISIR ET CREER
CREER PAR DATE
CREER PAR EVENEMENT
CREER PAR L.L.
SELECTION VIA SCENES
?
“CREER PAR DATE” (vidéo)/
“ENREGISTRER PAR DATE” (photo):
Les vidéos et les photos sont triées et
copiées en fonction de la date à laquelle
elles ont été enregistrées. ¨ Vers A
“CREER PAR EVENEMENT” (vidéo seulement)*:
Les vidéos sont triées et copiées en
fonction de la date à laquelle elles ont
été enregistrées.
“CREER PAR L.L.” (vidéo seulement)*:
Sélectionner et copier sur la liste de
lecture souhaitée.
Pour plus d’informations, veuillez vous
*
rapporter au Manuel d’utilisation.
“SELECTION VIA SCENES” (vidéo)/
“CHOISIR DES IMAGES” (photo):
Sélectionnez et copiez les vidéos et les
photos désirées individuellement. ¨ Vers B
ACREER PAR DATE/
ENREGISTRER PAR DATE
Sélectionnez une date
①
d’enregistrement et appuyez sur .
.
●
Seuls les fichiers avec la date
sélectionnée vont être copiés.
●
Les opérations de réglage suivantes sont
les mêmes que celles mentionnées dans
les étapes 4 à 8 de la page précédente.
BSELECTION VIA SCENES/
CHOISIR DES IMAGES
Sélectionnez un fichier.
①
.
●
Appuyez sur (() pour ajouter un repère.
Après avoir sélectionné les
②
fichiers, appuyez sur “ENREG.”.
●
Les opérations de réglage suivantes sont
les mêmes que celles mentionnées dans
les étapes 4 à 8 de la page précédente.
Vérification d’un disque créé
■
Sélectionnez “LECTURE” à l’étape 1.
ATTENTION
●
Ne coupez pas le courant ni
retirez le câble USB jusqu’à ce
que la création soit terminée.
●
Les vidéos et les photos ne peuvent
pas être copiées sur le même disque.
●
Les fichiers qui ne sont pas sur
l’écran d’index pendant la lecture
ne peuvent être copiés.
CREER PAR DATE
REGLER
SELECTION VIA SCENES
VERIF.
ENREG.
Coche apparaît
TOTAL
00h00m
DVD 00
DVD(DL)00
FIN
FIN
DémarrerEnregistrementLectureCopie
Informations
supplémentaires
Pour plus d'informations, veuillez vous rapporter au Manuel d'utilisation
http://manual.jvc.co.jp/index.html/
19
Page 48

Copier des fichiers en connectant l’appareil
à un magnétoscope/enregistreur DVD
Vous pouvez copier des vidéos en qualité standard en connectant l’appareil à magnétoscope ou à un enregistreur
DVD.
Pour plus de détails, consultez le manuel d’utilisation de la TV, du magnétoscope, de l’enregistreur DVD, etc.
Connectez l’appareil à un magnétoscope/enregistreur DVD.
1
●
Appuyez sur la touche Alimentation (,) pendant plus de 2 secondes pour éteindre cette unité.
Vers terminal AV
AV
A
V
.
●
Cette unité s’allume automatiquement lorsque l’adaptateur CA est branché.
Sélectionner le mode de lecture.
2
Câble AV (fourni)
Adaptateur secteur
Sur une prise secteur
(110 V à 240 V)
Vers un terminal CC
Jaune
Blanc
Rouge
Entrée vidéo
Entrée vidéo
Entrée audio (G)
Entrée audio (D)
Magnétoscope/Enregistreur DVD
Appuyez
Préparez l’enregistrement.
3
.
AV
Préparation de la TV et du magnétoscope/
enregistreur DVD
●
Basculez vers une entrée externe compatible.
●
Insérez un DVD ou une cassette VHS vierge
compatible à copier.
Préparation de cette unité
●
Réglez “SORTIE VIDEO” dans le menu des réglages des branchement sur le rapport
hauteur/largeur (“4:3” ou “16:9”) de la TV concernée.
●
Pour inclure la date lors de la copie des fichiers, réglez “AFFICHER SUR TV” dans le menu
des réglages des branchements sur “MARCHE”. Vous pouvez également régler AFFICHAGE
SUR ECRAN dans le menu de lecture sur AFFICHER SEUL. DATE.
Lancez l’enregistrement.
4
●
Lancez la lecture sur l’unité ( P.13) puis appuyez sur la touche d’enregistrement du lecteur.
●
Une fois la lecture terminée, arrêtez l’enregistrement.
Pour plus d'informations, veuillez vous rapporter au Manuel d'utilisation
20
http://manual.jvc.co.jp/index.html/
Page 49

Informations supplémentaires
Via le menu
Vous pouvez configurer différents
réglages via le menu.
Affichez le menu.
1
Appuyez
.
●
Le menu varie en fonction du mode
que vous utilisez.
Sélectionnez le menu souhaité puis
2
appuyez sur .
VIDEO
ENREG. EVENEMENT
QUALITE VIDEO
ZOOM
LUMINOSITE
ENREG. HAUTE VITESSE
REGLER
FIN
?
.
Informations du support client
L’utilisation de ce logiciel est autorisée selon les termes de sa licence.
JVC (pour toutes questions concernant cette unité)
Préparez les informations suivantes avant de contacter l’agence ou le bureau JVC local le plus proche
à propos de ce logiciel (réseau de service après-vente mondial JVC : http://www.jvc-victor.co.jp/english/
worldmap/index-e.html).
Nom du produit, modèle, numéro de série, problème, message d’erreur
•
Ordinateur (fabricant, modèle (bureau/portable), UC, SE, mémoire (Mo), espace disque disponible (Go))
•
Veu illez noter que la réponse à vos questions peut prendre un certain temps en fonction de leur nature.
JVC ne peut pas répondre aux questions concernant le fonctionnement de base de votre ordinateur,
ou aux questions concernant les spécifications ou les performances du système d’exploitation, d’autres
applications ou pilotes.
Pixela (pour toutes questions concernant le logiciel fourni)
Région Langue N° de téléphone
États-Unis et Canada Anglais +1-800-458-4029 (numéro gratuit)
Europe (Royaume-Uni,
Allemagne, France et Espagne)
Autres pays en Europe
Asie (Philippines) Anglais +63-2-438-0090
Chine Chinois 10800-163-0014 (numéro gratuit)
Page d’accueil : http://www.pixela.co.jp/oem/jvc/mediabrowser/e/
Veu illez visiter notre s
.
ite Web pour obtenir les dernières informations et télécharger des fichiers.
Anglais/Allemand/Français/
Espagnol
Anglais/Allemand/Français/
Espagnol
Sélectionnez le réglage souhaité
3
puis appuyez sur .
REGLER
VIDEO
ARRET
AGC
AUTO
?
.
Pour quitter l’écran
■
Appuyez sur (quitter).
Pour revenir à l’écran précédent
■
Appuyez sur “)”.
Pour afficher le fichier d’aide
■
Appuyez sur “*”.
●
Il est possible que le fichier d’aide ne soit
pas disponible pour certains articles.
●
Pour plus d’informations concernant
les réglages, veuillez vous référer au
Manuel d’utilisation.
.
+800-1532-4865 (numéro gratuit)
+44-1489-564-764
DémarrerEnregistrementLectureCopie
FIN
Informations
supplémentaires
Pour plus d'informations, veuillez vous rapporter au Manuel d'utilisation
http://manual.jvc.co.jp/index.html/
21
Page 50

Durée d’enregistrement/Nombre de photos
Vous pouvez vérifier la durée d’enregistrement de vos vidéos en cliquant sur la touche
, (Alimentation/Information).
Durée d’enregistrement vidéo approximative
Qualité
UXP 2 h 57 m 21 m 44 m 1 h 29 m 2 h 58 m
XP 4 h 9 m 31 m 1 h 2 m 2 h 5 m 4 h 12 m
SP 5 h 54 m 43 m 1 h 28 m 2 h 58 m 5 h 57 m
EP 14 h 45 m 1 h 49 m 3 h 41 m 7 h 26 m 14 h 53 m
●
La durée d’enregistrement vidéo approximative est juste indicative. La durée
d’enregistrement réelle peut être raccourcie en fonction de l’environnement de prise
de vue.
Nombre approximatif de photos (unité: Nombre de prises de vue)
Taille d’image Qualité
3520×2640
(4:3)
3072×2304
(4:3)
2592×1944
(4:3)
1600×1200
(4:3)
640×480
(4:3)
3520×1984
(16:9)
3072×1728
(16:9)
2592×1456
(16:9)
1920×1080
(16:9)
1280×720
(16:9)
Mémoire intégrée
(32 Go)
FIN 940 1900 3800 7690 7610
STANDARD 1460 2940 5890 9999 9999
FIN 1230 2490 4980 9999 9960
STANDARD 1960 3960 7920 9999 9999
FIN 1740 3500 7000 9999 9999
STANDARD 2720 5490 9999 9999 9999
FIN 4440 8950 9999 9999 9999
STANDARD 7500 9999 9999 9999 9999
FIN 9999 9999 9999 9999 9999
STANDARD 9999 9999 9999 9999 9999
FIN 1250 2510 5030 9999 9999
STANDARD 1960 3960 7920 9999 9999
FIN 1660 3350 6710 9999 9999
STANDARD 2610 5250 9999 9999 9999
FIN 2260 4560 9120 9999 9999
STANDARD 3530 7100 9999 9999 9999
FIN 4140 8330 9999 9999 9999
STANDARD 6310 9999 9999 9999 9999
FIN 8570 9999 9999 9999 9999
STANDARD 9999 9999 9999 9999 9999
4 Go 8 Go 16 Go 32 Go
4 Go 8 Go 16 Go 32 Go
Carte SDHC
Carte SDHC Mémoire
intégrée
(32 Go)
Pour plus d'informations, veuillez vous rapporter au Manuel d'utilisation
22
http://manual.jvc.co.jp/index.html/
Page 51

Durée d’enregistrement approximative (avec batterie)
Batterie
BN-VG114E 45 m 1 h 20 m
BN-VG121E 1 h 10 m 2 h 5 m
●
Les valeurs mentionnées ci-dessus se rapportent à celles figurant lorsque “TORCHE”
est réglé sur “ARRET” et “RETROECL. MONITEUR” sur “STANDARD”.
●
La durée d’enregistrement réelle peut être plus courte si le zoom est utilisé ou si
l’enregistrement est arrêté à plusieurs reprises. (Il est recommandé de préparer la
batterie pour trois fois la durée d’enregistrement prévue.)
●
Lorsque la durée de vie de la batterie est atteinte, la durée d’enregistrement raccourcit,
même si la batterie est entièrement chargée. (Remplacez la batterie par une nouvelle.)
Durée d’enregistrement réelle
Durée d’enregistrement continue
DémarrerEnregistrementLectureCopie
Dépannage
Avant de demander du service, consultez le tableau suivant ou la section Dépannage du Manuel d’utilisation.
Si les solutions proposées dans le tableau ne résolvent pas votre problème, consultez votre revendeur JVC ou
le centre de services JVC le plus proche pour plus d’instruction. Consultez également les FAQ sur les
nouveaux produits, sur le site Internet de JVC. Veuillez aussi consulter les informations Q&A sur les nouveaux
produits sur le site Internet de JVC (http://www.jvc.com).
Cette unité est un périphérique contrôlé par micro-ordinateur. Les décharges électrostatiques, les bruits
externes et les interférences (provenant d’une TV ou d’une radio par exemple) peuvent empêcher la caméra
de fonctionner correctement. Si tel est le cas, réinitialisez cette unité.
Réinitialisez cette unité si elle ne fonctionne pas correctement ou
■
si “Erreur ...” apparaît à l’écran.
Coupez l’alimentation. (fermez l’écran LCD.)
①
Enlevez l’adaptateur secteur et la batterie de l’unité, replacez-les puis
②
rallumez le courant.
Problème
Alimentation
Problème Action Page
●
POWER/CHARGE le voyant
se met à clignoter lorsque
l’écran LCD est fermé.
La batterie est en train de charger. P.6
Aucun enregistrement ne
peut être réalisé.
Enregistrement
L’enregistrement s’arrête de
lui-même.
Pour plus d'informations, veuillez vous rapporter au Manuel d'utilisation
●
Vérifiez la touche /.
●
Définissez le mode d’enregistrement
avec la touche +.
●
Éteignez l’unité, patientez quelques
minutes, puis rallumez-la. (Cette unité
s’arrête automatiquement pour protéger
le circuit en cas d’augmentation de la
température.)
●
L’enregistrement s’arrête
automatiquement après 12 heures
d’enregistrement continu.
http://manual.jvc.co.jp/index.html/
P.9
P.13
-
-
Informations
supplémentaires
23
Page 52

●
La date/l’heure ne s’affiche
Lecture
(nt) pas.
Le son ou la vidéo est
interrompu(e).
Régler en conséquence “AFFICHAGE
SUR ECRAN” dans le menu de lecture.
●
La lecture est parfois interrompue aux
sections qui connectent deux scènes. Il
ne s’agit pas d’un dysfonctionnement.
●
Vérifiez la charge restante de la batterie.
(Lorsque la batterie est complètement
chargée, le voyant ne clignote pas.)
Le voyant ne clignote pas
lors du chargement de la
batterie.
Autres problèmes
●
En cas de charge dans des endroits
chauds ou froids, assurez-vous que la
batterie est chargée dans la plage de
température requise. (Sans quoi, la
batterie risque de ne plus être protégée
pendant la charge.)
●
Retirez vos gants, le cas échéant. -
●
La curseur et les touches de
fonctionnement ne
fonctionnent pas.
Touchez le curseur et les touches avec
vos doigts pour les faire fonctionner. (Si
malgré cela ils ne fonctionnent toujours
pas, touchez-les avec vos ongles ou la
pointe d’un stylo.)
●
L’unité surchauffe.
Il ne s’agit pas d’un dysfonctionnement.
(L’unité peut chauffer lorsqu’elle est
utilisée pendant un certain temps.)
Messages d’avertissement
Messages d’avertissement Action Page
●
Éteignez et rallumez l’unité. -
●
Si malgré tout vous ne parvenez pas à résoudre le
ERREUR D'ENREGISTREMENT
Messages d’avertissement
SCENE INCOMPATIBLE (Vidéo)/
FICHIER IMCOMPATIBLE
(Photo)
problème, sauvegardez vos fichiers et exécutez
“FORMAT. MEM. INTERNE” ou “FORMATER LA
CARTE SD” dans le menu des réglages de support.
(Toutes les données seront supprimées.)
●
Utilisez un fichier enregistré avec cette unité. (Les
fichiers enregistrés avec d’autres périphériques
peuvent ne pas être lus correctement. Si le fichier a
été enregistré avec cette unité, il est certainement
corrompu.)
-
-
P.9
P.6
-
-
-
-
SAUVEGARDER
PERIODIQUEMENT SUR PC OU
DISQUE LES DONNEES
ENREGISTREES
TROP PEU DE DONNEES
ENREGISTREES SAUVEGARDE
IMPOSSIBLE
Pour plus d'informations, veuillez vous rapporter au Manuel d'utilisation
24
http://manual.jvc.co.jp/index.html/
●
Connecter et copier vos données vers un
ordinateur.
●
Si un enregistrement vidéo est arrêté et que le
temps actuel d’enregistrement affiché est de
“0:00:00:17” ou moins, la vidéo ne pourra être
enregistrée.
-
-
Page 53

Mises en garde
Batteries
La batterie fournie est
une batterie au lithiumion. Avant d’utiliser
la batterie fournie ou
une batterie en option,
bien lire les consignes
suivantes :
Pour éviter tout accident
•
... ne pas brûler.
... ne pas court-circuiter les bornes. Maintenir
celle-ci éloignée de tout objet métallique
lorsqu’elle n’est pas utilisée. En cas de
transport, s’assurer que le cache de la batterie
fournie est en place. Si vous avez égaré le
cache de la batterie, placer celle-ci dans un sac
plastique.
... ne pas modifi er ni démonter.
... ne pas exposer la batterie à des températures
supérieures à 60 °C car celle-ci risquerait de
surchauffer, d’exploser ou de prendre feu.
... utiliser uniquement les chargeurs spécifi és.
Pour éviter tout endommagement et
•
prolonger la durée de vie utile
... ne pas soumettre à un choc inutile.
... recharger à l’intérieur d’une plage de
température de 10°C à 35°C. Des températures
basses peuvent prolonger la durée de charge,
ou même dans certains cas arrêter la recharge.
Des températures élevées peuvent empêcher
une charge complète, ou même dans certains
cas arrêter la recharge.
... entreposer dans un endroit frais et sec. Toute
exposition prolongée à de températures
élevées accélé
diminuera la durée de vie utile.
... charger et décharger complètement la batterie
tous les 6 mois lors d’un entreposage pendant
une période de temps prolongée.
... retirer l’appareil du chargeur ou le débrancher
lorsque vous ne vous en servez pas ; certains
appareils, même éteints, continuent de
consommer du courant.
.
Bornes
rera la décharge naturelle et
Support d’enregistrement
Ve
iller à suivre les directives ci-dessous
•
pour éviter d’altérer ou d’endommager les
données enregistrées.
Ne pas déformer ou laisser tomber le support
•
d’enregistrement, ou le soumettre à une forte
pression, des secousses ou des vibrations.
Ne pas éclabousser le support d’enregistrement
•
avec de l’eau.
Ne pas utiliser, remplacer ou entreposer le
•
support d’enregistrement dans des endroits
fortement exposés à de l’électricité statique ou à
des parasites électriques.
Ne pas mettre le caméscope hors tension ou
•
retirer la batterie ou l’adaptateur secteur pendant
la prise de vue, la lecture ou l’accès au support
d’enregistrement.
Ne pas placer le support d’enregistrement à
•
proximité d’objets possédant un fort champ
magnétique ou émettant de fortes ondes
électromagnétiques.
Ne pas ranger le support d’enregistrement dans
•
des endroits exposés à une température élevée
ou à une forte humidité.
Ne pas toucher les pièces métalliques.
•
Lors du formatage ou de l’effacement des données à
•
l’aide des fonctions du caméscope, seules les
informations de gestion des fichiers sont modifiées.
Les données ne sont pas complètement effacées du
support d’enregistrement. Si vous souhaitez effacer
complètement toutes les données, nous vous
recommandons soit d’utiliser un logiciel disponible dans
le commerce spécialement conçu à cette fin, soit de d
physiquement le caméscope à l’aide d’un marteau, etc.
Écran LCD
Pour éviter tout endommagement de l’écran
•
LCD, NE PAS
... le pousser trop fortement ou lui faire subir des
chocs.
... placer le caméscope avec l’écran LCD en
dessous.
Pour prolonger sa durée de vie utile
•
... éviter de le frotter à l’aide d’un chiffon rugueux.
DémarrerEnregistrementLectureCopie
étruire
Pour plus d'informations, veuillez vous rapporter au Manuel d'utilisation
http://manual.jvc.co.jp/index.html/
Informations
supplémentaires
25
Page 54

Appareil principal
Pour votre sécurité, NE PAS
•
... ouvrir le boîtier du caméscope.
... démonter ou modifi er l’appareil.
... laisser pénétrer des substances infl ammables, de
l’eau ou des objets métalliques dans l’appareil.
... retirer la batterie ou débrancher l’appareil
pendant que celui-ci est sous tension.
... laisser la batterie à l’intérieur du caméscope
lorsque celui-ci n’est pas utili
... placer des sources de fl ammes nues, telles
que des bougies allumées, sur l’appareil.
... exposer l’appareil à l’égouttage ou aux
éclaboussements.
... laisser s’accumuler de la poussière ou
placer des objets métalliques sur la prise
d’alimentation ou une prise de courant murale.
... insérer des objets dans le caméscope.
Éviter d’utiliser l’appareil
•
... dans des endroits trop humides ou
poussiéreux.
... dans des lieux exposés à de la suie ou à de la
vapeur (par exemple, près d’une cuisinière).
... dans des endroits trop exposés aux chocs ou
vibrations.
... près d’un téléviseur.
... près d’appareils générant des champs
magnétiques ou électriques intenses (haut-
parleurs, antennes de diffusion, etc.).
... dans des lieux exposé
extrêmement élevées (au-delà de 40°C) ou
extrêmement basses (en deçà de 0°C).
NE PAS laisser l’appareil
•
... dans des lieux exposés à des températures
supérieures à 50°C.
... dans des lieux exposés à des taux d’humidité
extrêmes (en deçà de 35 % ou au-delà de
80 %).
... en plein soleil.
... dans une voiture hermétiquement fermée en
période estivale.
... près d’un radiateur.
... en hauteur, sur un téléviseur par exemple. Si
l’appareil est placé en hauteur alors que le
câble est raccordé, celui
l’appareil peut tomber. Dans ce cas, il risque de
ne plus fonctionner.
Pour protéger l’appareil, NE PAS
•
... le mouiller.
... le faire tomber ou le cogner contre des objets
durs.
... le soumettre à trop de chocs ou vibrations
durant le transport.
... maintenir l’objectif orienté vers des objets
extrêmement lumineux pendant trop longtemps.
... exposer l’objectif à la lumière directe du soleil.
.
sé.
s à des températures
-ci peut être coincé et
... le balancer inutilement par la dragonne.
... trop balancer l’étui souple lorsque le
caméscope est à l’intérieur
... placer le caméscope dans des endroits
poussiéreux ou avec du sable, comme une
plage.
Pour éviter une chute de l’appareil,
•
Serrer la ceinture de la poignéefermement.
•
Lors de l’ util isation du caméscope avec un
•
trépied, fixer fermement l’appareil sur le trépied.
Si le caméscope se détache et tombe, il peut
causer des blessures ou être endommagé.
Si un enfant utilise l’appareil, un adulte doit être présent.
.
Pour plus d'informations, veuillez vous rapporter au Manuel d'utilisation
26
http://manual.jvc.co.jp/index.html/
Page 55

Caractéristiques techniques
Caméra
Alimentation Utiliser un adaptateur secteur: 5,2 V CC, Utiliser une batterie:
Consommation 3,2 W (lorsque la “TORCHE” est réglée sur “ARRET” et que le
Dimensions (mm) 55 x 62 x 110 (L x H x D: sans la dragonne)
Masse Environ 260 g (caméra uniquement),
Environnement
d’exploitation
Périphérique de
capture d’image
Zone d’enregistrement
(vidéo)
Zone d’enregistrement
(photo)
Objectif F2,8 à F4,5, f= 6,7 mm à 67,0 mm
Zoom (Vidéo) Zoom optique: Jusqu’à 10x
Zoom (Photo) Zoom optique: Jusqu’à 10x
Format de signal 1080/50i (Rapport hauteur/largeur 16:9)
Format
d’enregistrement vidéo
Format d’enregistrement
photos
Supports
d’enregistrement
Horloge batterie Batterie rechargeable
Adaptateur secteur (AP-V30M)*
Alimentation 110 V CA à 240 V, 50 Hz/60 Hz
Sortie 5,2 V CC, 1,8 A
Température
d’opération autorisée
Dimensions (mm) 50 x 29 x 100 (L x H x D: sans le cordon et la prise secteur)
Masse Environ 112 g
Pour utiliser un adaptateur secteur à l’étranger, pensez à préparer une prise
*
convertisseur disponible dans le commerce pour le pays ou la région visité(e).
●
Les caractéristiques et l’apparence de ce produit sont susceptibles d’être
modifiées sans préavis pour d’éventuelles améliorations.
3,6 V CC
“RETROECL. MONITEUR” est réglée sur “STANDARD”)
Environ 300 g (avec la batterie fournie)
Température d’opération autorisée: 0°C à 40°C
Température de stockage autorisée: -20°C à 50°C
Humidité de fonctionnement autorisée: 35 % à 80 %
1/2,3" 10 620 000 pixels (CMOS)
5 650 000 pixels (zoom optique),
2 070 000 à 5 650 000 pixels (zoom dynamique)
9 290 000 pixels (4:3), 6 980 000 pixels (16:9)
(vidéo de conversion en 35 mm: 48,3 mm à 483 mm, Photo:
39,9 mm à 399 mm)
Zoom dynamique: Jusqu’à 16x (Stabilisateur d’image A),
Jusqu’à 15x (Stabilisateur d’image B)
Zoom numérique: Jusqu’à 200x
AVCHD standard, vidéo: MPEG-4 AVC/H.264, audio: Dolby
Digital 2ch
JPEG standard
Mémoire intégrée (32 Go), carte SD/SDHC (disponible dans le
commerce)
0°C à 40°C (10°C à 35°C pendant la charge)
Pour plus d'informations, veuillez vous rapporter au Manuel d'utilisation
http://manual.jvc.co.jp/index.html/
DémarrerEnregistrementLectureCopie
Informations
supplémentaires
27
Page 56

Termes
A
Adaptateur secteur .......................... 6
B
Batterie ............................................ 6
BD/DVD de sauvegarde ................ 17
Blu-ray dur externe ........................ 17
Branchement composante ............. 14
Branchement HDMI ....................... 14
Branchement secteur .............. 15, 20
C
Câble USB ..................................... 17
Carte SD .................................. 11, 22
Configurations du menu ................ 21
Copier (Dupliquer) ......................... 20
Copier (Sauvegarde) ..................... 16
D
Durée d’enregistrement ................. 22
E
Ecran LCD ..................................... 25
F
Formater la carte SD ..................... 12
G
Graveur DVD ................................. 17
N
Nombre d’images .......................... 22
R
Régler l’horloge ............................... 7
Régler la date et l’heure .................. 8
Régler la langue .............................. 8
S
Supprimer des fichiers ................... 13
V
Visualiser des fichiers sur une TV
Z
Zoom ............................................... 9
.
....... 14
© 2010 Victor Company of Japan, Limited
AS
0110FOH-SW-VM
Page 57

ВИДЕОКАМЕРА
GZ-HM545
Краткое руководство
пользователя
Уважаемые клиенты,
Благодарим вас за покупку данного продукта JVC.
Перед использованием прочитайте информацию по технике безопасности и мерам
предосторожности, которая изложена на стр. 2 и стр. 25, чтобы гарантировать
безопасное использование данного продукта.
Этот продукт поставляется с „Краткое руководство пользователя“ (данное руководство) и
„Подробное руководство пользователя“ (Web).
Подробное
руководство
пользователя
.
Описывает способы съемки в различных условиях и
функции, которые могут оказаться полезными.
Посетите данный веб-сайт со своего ПК
■
http://manual.jvc.co.jp/index.html/
работе
Приступая к
ЗаписьВоспроизведениеКопирование
информация
Дополнительная
Page 58

Техника безопасности
BHИMAHИE: ДЛЯ ПPEДOTВPAЩEHИЯ OПACHOCTИ
BOCПЛAMEHEHИЯ ИЛИ ЭЛEKTPИЧECKOГO
УДAPA HE ПOДBEPГAЙTE ДAHHЫЙ AППAPAT
BOЗДEЙCTBИЮ ДOЖДЯ ИЛИ BЛAГИ.
ПРЕДОСТЕРЕЖЕНИЯ:
Если вы заметили дым или почувствовали
•
специфический запах, идущий из камеры
или сетевого адаптера, сразу выключите
камеру и выключите адаптер из сети.
Последующее использование камеры или
сетевого адаптера в таком состоянии может
привести к пожару или поражению
электрическим током. Обратитесь к вашему
дилеру JVC. Не пытайтесь самостоятельно
устранить неисправность.
Для пpeдoтвpaщeния элeктpичecкoгo yдapa
•
нe oткpывaйтe кopпyc. Bнyтpи нeт дeтaлeй
для oбcлyживaния пoльзoвaтeлeм.
Oбpaщaйтecь зa oбcлyживaниeм тoлькo к
квaлифициpoвaннoмy пepcoнaлy.
Если Вы не будете пользоваться сетевым
•
адаптером в течение длительного времени,
рекомендуется отсоединить шнур от розетки.
В некоторых регионах, в зависимости от
•
типа сетевой розетки, следует использовать
вилку- переходник.
ПРИМЕЧАНИЯ:
Табличка с техническими данными и меры
•
предосторожности расположены на нижней
и/или задней стороне основного устройства.
Пластинка с серийным номером установлена
•
на месте установки батарейного блока.
Технические характеристики и
•
предупреждения по безопасности сетевого
адаптера указаны на его верхней и нижней
сторонах.
Предостережение о заменяемой
литиевой батарее
При неправильном использовании батарея,
используемая в этом приборе, может вызвать
опасность воспламенения или химического
ожога. Запрещается подзаряжать, разбирать,
нагревать до температуры выше 100°С и
сжигать батареи.
Опасность взрыва или риск возгарания при
некорректной замене батарей.
Правильно утилизируйте использованные
•
батареи.
Храните батареи в недоступном для детей
•
месте.
Не разбирайте и не бросайте батареи в огонь.
•
.
Дополнительную справочную информацию вы можете найти в Подробное
2
руководство пользователя
http://manual.jvc.co.jp/index.html/
При установке прибора на стеллаже или
полке, убедитесь, что со всех сторон создано
достаточное пространство для вентиляции (по
10 и более сантиметров с обеих сторон, сверху
и сзади).
Не блокируйте вентиляционные отверстия.
(Если вентиляционные отверстия
заблокированы газетой, одеждой и т. п., тепло
не может отводиться.)
Нельзя ставить на аппаратуру источники
открытого пламени, такие как горящие
свечи. При выбрасывании использованных
батарей должны учитываться проблемы
защиты окружающей среды и необходимо
строго соблюдать местные правила и законы,
регулирующие утилизацию этих батарей.
Аппаратуру необходимо защищать от капель и
попадания брызг.
Не используйте прибор в ванной или в тех
местах, где много воды.
Не устанавливайте также на аппаратуре любые
сосуды, наполненные водой или любой другой
жидкостью (тaкие, кaк косметичеcкие cредcтва
или медикaменты, вазы для цветов, комнaтные
рacтения, чашки и т. п.). (Если внутрь прибора
попадет вода или другая жидкость, это может
стать причиной возгорания или поражения
электричеcким током.)
He нaпpaвляйтe oбьeктив пpямo нa coлнцe.
Этo мoжeт вызвaть кaк пoвpeждeниe глaз,
тaк и выxoд из cтpoя внyтpeнниx cxeм.
Cyщecтвyeт тaкжe oпacнocть вocплaмeнeния
или элeктpичecкoгo yдapa.
ПРЕДОСТЕРЕЖЕНИЕ!
Cлeдyющиe пpимeчaния кacaютcя вoзмoжнoгo
физичecкoгo пoвpeждeния кaмepы и
пoльзoвaтeля. Переноска или удерживание
камеры за LCD монитор может привести
к падению аппарата или неисправности.
He иcпoльзyйтe штатив нa нeycтoйчивoй
или нepoвнoй пoвepxнocти. Oн мoжeт
oпpoкинyтьcя, чтo вызoвeт cepьeзнoe
пoвpeждeниe кaмepы.
ПРЕДОСТЕРЕЖЕНИЕ!
Не рекомендуется оставлять камеру с
подсоединенными к ней кабелями (Audio/
Video, и т. п.) сверху на телевизоре, так как при
задевании за кабель камера может упасть, что
приведет к ее повреждению.
ПРЕДОСТЕРЕЖЕНИЕ:
Чтобы избежать
электрического
шока и повреждения
системы, сначала
плотно установите
маленький конец
шнура в сетевой
адаптер, так, чтобы он был неподвижен, после
чего подключите больший конец шнура к розетке.
Page 59

BHИMAHИE:
Аккумуляторный блок, камера с установленной
батареей и пульт дистанционного управления
с установленной батареей не должны
подвергаться воздействию повышенного тепла,
например, прямых солнечных лучей, огня и т. п.
ПРЕДОСТЕРЕЖЕНИЕ:
Сетевой штепсель по-прежнему будет в
рабочем состоянии.
Если аппарат не функционирует должным
•
образом, немедленно выньте сетевой штепсель.
В соответствии с Законом Российской
Федерации “О защите прав потребителей”
срок службы (годности) данного товара “по
истечении которого он может представлять
опасность для жизни, здоровья потребителя,
причинять вред его имуществу или
окружающей среде” составляет 7 (семь) лет со
дня производства.
Этот срок является временем в течение
которого потребитель данного товара может
безопасно им пользоваться при условии
соблюдения руководства по эксплуатации
данного товара, проводя необходимое
обслуживание, включающее замену расходных
материалов и/или соответствующее ремонтное
обеспечение в специализированном сервисном
центре JVC. Дополнительные косметические
материалы к данному товару, поставляемые
вместе с ним, могут храниться в течение 2
(двух) лет со дня его производства. Срок
службы (годности), кроме срока хранения
дополнительных косметических материалов,
упомянутых в предыдущих двух пунктах, не
затрагивает никаких других прав потребителя,
в частности гарантийного свидетельства JVC,
которое он может получить в соответствии
с законом о правах потребителя или других
законов, связанных с ним.
Если используется данный символ,
настоящее распространяется
только на страны Европейского
союза.
.
Помните о том, что эта камера может
использоваться только в личных целях.
Любое коммерческое использование
видеокамеры без соответствующего
запрещено. (Даже если вы записываете такие
события, как представление, спектакль или
выставку для личных целей, мы настоятельно
рекомендуем, чтобы вы заранее получили
согласие на проведение съемки).
разрешения
Торговые марки
„AVCHD“ и логотип „AVCHD“ являются
••
торговыми марками компании Panasonic
Corporation и компании Sony Corporation.
TM
x.v.Colour является торговой
•
маркой Sony Corporation.
HDMI является торговой
•
маркой HDMI Licensing, LLC.
Изготавливается по лицензии Dolby
•
Laboratories. Dolby и символ двойное D
являются торговыми марками Dolby
Laboratories.
®
Windows является либо зарегистрированной
•
торговой маркой или торговой маркой
Microsoft Corporation в Соединенных Штатах
и/или в других странах.
Macintosh является зарегистрированной
•
торговой маркой Apple Inc.
iTunes, iMovie, iPhoto являются торговыми
•
марками компании Apple Inc.,
зарегистрированной в США и других странах.
TM
YouTube и логотип YouTube logo являются
•
торговыми марками и/или
торговыми марками компании YouTube LLC.
Прочие названия продуктов и компаний,
•
включенные в данное руководство, являются
товарными знаками или зарегистрированными
товарными знаками соответствующих
владельцев.
ПРЕДУПРЕЖДЕНИЕ:
Использование батарей, не одобренных JVC,
•
может привести к возгоранию или травмам.
Используйте только батареи, указанные на
стр. 25.
Не тяните и не перегибайте вилку и кабель
•
сетевого адаптера. Это может привести к
повреждению сетевого адаптера.
Сделайте резервную копию важных
записанных данных
Рекомендуется скопировать Ваши важные
записанные данные на DVD-диск или на другой
носитель записи для хранения. Компания JVC
не несет ответственности за утрату данных.
зарегистрированными
работе
Приступая к
ЗаписьВоспроизведениеКопирование
Дополнительную справочную информацию вы можете найти в Подробное
руководство пользователя
http://manual.jvc.co.jp/index.html/
информация
Дополнительная
3
Page 60

Указатель
Техника безопасности ....................... 2
Указатель ........................................... 4
Проверка фурнитуры ........................ 4
Названия частей и функций ............. 5
▶Приступая к работе ................. 6
Зарядка аккумуляторного блока ...... 6
Регулировка ручного ремня .............. 6
Использование ремня для ношения
камеры на руке .................................. 7
Настройка часов ................................ 7
▶Запись ...................................... 9
Видеосъемка ......................................
Снижение вибрации камеры
(видеосъемка) .................................. 10
Фотосъемка ...................................... 10
Установка SD-карты ........................ 11
▶Воспроизведение .................. 13
Воспроизведение/удаление файлов
на аппарате ...................................... 13
▶Получение информации о сложных операциях
Для получения дополнительной информации о сложных операциях воспользуйтесь
„Подробное руководство пользователя“ на своем ПК.
Посетите данный веб-сайт со своего ПК
■
http://manual.jvc.co.jp/index.html/
Воспроизведение на экране
телевизора ....................................... 14
▶Копирование .......................... 16
Копирование файлов ...................... 16
Создание дисков на записывающем
устройстве DVD или внешнем
дисководе Blu-ray ............................ 17
Копирование файлов с подключением
к видеомагнитофону/DVD-рекордеру
........................................................... 20
▶Дополнительная информация
9
................................................. 21
Использование меню ...................... 21
Время записи/количество
фотографий ..................................... 22
Устранение неисправностей .......... 23
Внимание ......................................... 25
Технические характеристики .......... 27
Проверка фурнитуры
Адаптер переменного тока
AP-V30M *1
.
USB-кабель
(Тип A - Тип Mini B)
.
●
SD-карты не прилагаются. Для получения подробной информации о видах карт,
Шнур питания*1
.
Аудио/видео кабель Компонентный кабель
.
Аккумуляторный блок
BN-VG114E
.
.
Пульт дистанционного
управления
RM-V760U
SNAP
START
SHOT
/STOP
INFO
INDEX
.
●
Компакт-диск *2
●
Вилку адаптера *3
●
Краткое руководство
пользователя(данное
руководство)
которые могут быть использованы с данным аппаратом, см. стр. 11.
Для использования адаптера переменного тока в других странах необходимо
*1
иметь вилку-адаптер, соответствующую стране посещения.
Отображение Подробное руководство пользователя. Подключитесь к
*2
Интернету и нажмите „Read Detailed User Guide“.
Если сетевой розетке не соответствует вилку переменного
*3
предоставленных подключить адаптер.
Дополнительную справочную информацию вы можете найти в Подробное
4
руководство пользователя
http://manual.jvc.co.jp/index.html/
тока,с помощью
Page 61

Названия частей и функций
ji
1
abc
2
3
4
5
6
7
.
Вспышка
A
Объектив/встроенная крышка объектива
B
Подсветка
C
Датчик пульта дистанционного
D
управления
Стереофонический микрофон
E
ЖК-монитор
F
При его открытии камера автоматически
включается, а при закрытии –
выключается.
Ползунок
G
Выбирает изображение или файл.
Кнопка OK
H
Подтверждает выбранное изображение
или файл.
Кнопки выбора операций
I
Камера функционирует по-разному в
зависимости от выбранной операции.
Кнопка Menu (меню) (
J
Динамик
K
Индикатор ACCESS (доступа)
L
Горит/мигает во время записи или
воспроизведения.
Индикатор POWER/CHARGE (питания/
M
зарядки) (стр. 6)
Кнопка + (воспроизведения)
N
Для переключения с режима записи на
режим воспроизведения и обратно.
Кнопка / (видео/фото)
O
Для переключения с режима видео на
режим фото и обратно.
890
стр. 21)
k
l
m
n
o
d
e
AV
f
g
h
Кнопка UPLOAD/EXPORT (
P
экспорт в iTunes)
Запись:Запись видео в формате
Воспроизв
едение
Кнопка (питания/информации) ,
Q
Запись:Отображает оставшееся
Воспроизв
едение
Чтобы выключить/включить камеру,
нажмите и держите при открытом ЖКмониторе.
Разъем аудио/видео (стр. 15, 20)
R
Разъем (компонентный) COMPONENT
S
(стр. 14)
Мини-разъем HDMI (стр. 14)
T
Рычажок трансфокатора/громкости (стр.
U
9, 13)
Кнопка SNAPSHOT (фотосъемки) (стр. 10)
V
Разъем USB (стр. 17)
W
Разъем подключения к сети постоянного
X
тока (стр. 6)
Кнопка START/STOP (записи видео) (стр. 9)
Y
Рычажок высвобождения ручного ремня
Z
Ручной ремень (стр. 6)
a
Гнездо установки штатива
b
Разъем для SD-карты (стр. 11)
c
Рычажок высвобождения батареи (стр. 6)
d
YouTube
Изменяет формат видео на
:
формат YouTube или iTunes.
время и заряд
аккумуляторного блока во
время непрерывной съемки.
Отображает информацию о
:
файле.
загрузка/
или iTunes.
p
q
r
s
t
Дополнительную справочную информацию вы можете найти в Подробное
руководство пользователя http://manual.jvc.co.jp/index.html/
5
Page 62

Приступая к работе
Зарядка аккумуляторного блока
Подсоедините
1
аккумуляторный блок.
* В момент покупки
аккумуляторный блок
не заряжен.
Значок
Выровняйте верх батареи
с пометкой на аппарате
и вставляйте батарею,
пока не услышите щелчок.
Отсоединение аккумуляторного блока
(Низ камеры)
.
ПРЕДУПРЕЖДЕНИЕ
Всегда используйте аккумуляторные блоки JVC.
●
Если Вы будете использовать другие аккумуляторные блоки, отличные от JVC,
безопасность и эксплуатационные характеристики не могут гарантироваться.
●
Время зарядки: около 2 час 30 мин (при использовании прилагающегося
аккумуляторного блока)
Время зарядки рассчитано на использование аппарата при температуре 25°C. Если
*
зарядка производится не при комнатной температуре (10°C - 35°C), она может занять
более длительное время или может произойти сбой зарядки. Время записи и
воспроизведения также может быть короче в некоторых условиях эксплуатации,
например, при низкой температуре.
BATT.
Подключите шнур питания к сети.
3
Индикатор зарядки
Подключите камеру
2
к сети постоянного
тока.
Идет зарядка :
Мигает
Зарядка завершена :
Гаснет
Обложка
Адаптер переменного
тока
К сетевой розетке
(от 110В до 240В)
Регулировка ручного ремня
ремня от себя
.
Дополнительную справочную информацию вы можете найти в Подробное
6
руководство пользователя
Отрегулируйте длинуПотяните конец
http://manual.jvc.co.jp/index.html/
Присоедините ремень
Page 63

Использование ремня для ношения
камеры на руке
Отсоедините ремень и оберните его вокруг запястья.
Нажав на A, потяните B и снимите ремень.
Фиксатор
работе
Приступая к
Нажмите и держите
.
●
При присоединении ремня для ношения камеры на руке вставьте фиксатор
так, чтобы раздался щелчок.
Настройка часов
Откройте ЖК-монитор.
1
A
.
●
Аппарат включится. При закрытии
ЖК-монитора аппарат
автоматически выключается.
Когда отобразится „УСТАНОВ. ДАТУ/
2
ВРЕМЯ!“, выберите „ДА“ и нажмите .
Выберите
Нажмите
.
●
Передвиньте ползунок, чтобы выбрать, а
затем нажмите кнопку выбора установки,
чтобы подтвердить.
Ползунок
УСТАНОВ. ДАТУ/ВРЕМЯ!
УСТАН.
Кнопки выбора операций
V
ДА
НЕТ
Установите дату и время.
3
Курсор
НАСТРОЙКА ЧАСОВ
ДАТА ВРЕМЯ
10
УСТАН. ВЫЙТИ
.
●
Используйте ползунок, чтобы
откорректировать год, месяц,
число, часы и минуты.
●
Чтобы переместить курсор, используйте
10 00201010
кнопки выбора операций „&“ / „'“.
После установки даты и времени
4
нажмите .
Выберите место, где вы живете, и
5
нажмите .
●
Отображаются название города и
разница во времени.
НАСТРОЙКА ЧАСОВ/ТЕРРИТОРИИ
GMT
СОХР.
.
10.10. 2010 10:00
ВЫЙТИ
ЗаписьВоспроизведениеКопирование
информация
Дополнительная
Дополнительную справочную информацию вы можете найти в Подробное
руководство пользователя
http://manual.jvc.co.jp/index.html/
7
Page 64

Переустановка часов
■
Установите часы с помощью „РЕГ.
ЧАСОВ“ в меню.
① Откройте меню.
Изменение языка дисплея
■
Язык дисплея может быть изменен.
① Откройте меню.
Нажмите
.
② Выберите „РЕГ. ЧАСОВ“ и
нажмите .
ВИДЕО
НАСТРОЙКИ ЭКРАНА
РЕГ. ЧАСОВ
ОСНОВНЫЕ НАСТРОЙКИ
НАСТРОЙКИ СОЕДИНЕНИЯ
.
НАСТРОЙКИ НОСИТЕЛЯ
УСТАН.
ВЫЙТИ
?
③ Выберите „НАСТРОЙКА
ЧАСОВ“ и нажмите .
РЕГ. ЧАСОВ
НАСТРОЙКА ЧАСОВ
НАСТ.ОБЛАСТИ
УСТАНОВИТЬ ЛЕТНЕЕ ВРЕМЯ
УСТАН. ВЫЙТИ
.
●
Последующие шаги такие же, как
шаги 3-5 на предыдущей странице.
?
.
② Выберите „НАСТРОЙКИ
ЭКРАНА“ и нажмите .
ВИДЕО
АВТ.ПЕРЕК.НОСИТ.ЗАП.
НАСТРОЙКИ ЭКРАНА
РЕГ. ЧАСОВ
ОСНОВНЫЕ НАСТРОЙКИ
НАСТРОЙКИ СОЕДИНЕНИЯ
УСТАН.
.
③ Выберите „LANGUAGE“ и
нажмите .
НАСТРОЙКИ ЭКРАНА
LANGUAGE
ФОРМАТ ОТОБРАЖ. ДАТЫ
ЯРКОСТЬ ДИСПЛЕЯ
РЕГ. ЯРКОСТИ ДИСПЛЕЯ
УСТАН. ВЫЙТИ
.
④ Выберите требуемый язык и
нажмите .
⑤
Нажмите .
Нажмите
?
ВЫЙТИ
?
ПРИМЕЧАНИЕ
●
Прикасайтесь к ползунку и кнопкам вокруг экрана пальцами.
●
Ползунок и кнопки не будут функционировать, если вы дотронетесь до них
ногтем или рукой в перчатке.
●
Изображения на экране не функционируют при касании.
●
„УСТАНОВ. ДАТУ/ВРЕМЯ!“ отображается, когда вы включаете аппарат
после того, как он не использовался на протяжении длительного времени.
Аппарат должен заряжаться более 24 часов до того, как будут
установлены часы. (стр. 6)
Дополнительную справочную информацию вы можете найти в Подробное
8
руководство пользователя
http://manual.jvc.co.jp/index.html/
Page 65

Запись
Видеосъемка
Вы можете вести съемку, не устанавливая настройки, используя автоматический режим.
Перед записью важной сцены рекомендуется сделать пробную запись.
Выберите
12
режим видео.
Нажмите
Начните запись.
3
Нажмите еще раз,
чтобы остановить
запись.
Нажмите
.
Убедитесь, что режим записи
установлен на Авто .
Если установлен режим Ручной
настройки , нажмите кнопку
, чтобы переключить режим.
С каждым нажатием режим
переключается с автоматического
на ручной или наоборот.
AV
Трансфокация
(Широкоугольная
съемка)
Нажмите
(Телефото)
работе
Приступая к
ЗаписьВоспроизведениеКопирование
Обозначения во время видеозаписи
■
Качество видео
Счетчик сцен
.
Оставшееся время записи
:Ожидание записи
㧦Идет фотосъемка
Носитель, на который идет запись
Индикатор батареи
ПРИМЕЧАНИЕ
●
Приблизительное время видеозаписи при использовании
прилагающегося аккумуляторного блока – около 45 мин. (стр. 22)
Дополнительную справочную информацию вы можете найти в Подробное
руководство пользователя
http://manual.jvc.co.jp/index.html/
информация
Дополнительная
9
Page 66

Снижение вибрации камеры (видеосъемка)
Когда установлен стабилизатор изображения, вибрация камера во время съемки может быть
значительно снижена.
(Белый) : стабилизатор изображения
Нажмите
.
Снижает вибрацию камеры.
A
:
Более эффективно снижает вибрацию камеры при широкоугольной съемке ярких сцен.
B
:
*Только при широкоугольной съемке (около 5-кратной)
(Зеленый) : стабилизатор изображения
(Белый) : ВЫКЛ
Установка переключается
при каждом нажатии.
ПРИМЕЧАНИЕ
●
Рекомендуется отключить стабилизатор изображения при съемке
малоподвижного объекта со штатива.
●
При сильной вибрации камеры полная стабилизация изображения может
быть недостижима.
Фотосъемка
Выберите режим
1
фотосъемки.
Установите фокус на необходимом
2
объекте.
Нажмите наполовину
Нажмите
Сделайте фото.
3
Загорается зеленым,
когда фокусировка
завершена
Нажмите полностью
AV
.
Обозначения во время фотосъемки
■
Размер изображения
Выдержка
Фокусировка
.
Дополнительную справочную информацию вы можете найти в Подробное
10
руководство пользователя
http://manual.jvc.co.jp/index.html/
Качество изображения
Оставшееся количество снимков
Идет фотосъемка
Носитель, на который идет запись
Индикатор батареи
Загорается во время
фотосъемки
Page 67

Установка SD-карты
При установке серийно выпускаемой SD-карты запись может быть продолжена на карту,
когда встроенная память заполнится.
* Для записи на карту необходимо выполнить установки носителя. (стр. 12)
Если карта отсутствует, установите для записи в установках носителя
„ВСТРОЕННАЯ ПАМЯТЬ“.
работе
Приступая к
Закройте ЖК-монитор.
1
(Низ камеры)
*Устанавливайте и извлекайте
карту SD только когда аппарат выключен.
.
Извлечение SD-карты
■
Слегка нажмите на карту один раз, а затем вытяните ее из разъема.
(Низ камеры)
.
Откройте крышку.
2
Вставьте SD-карту.
3
ПРИМЕЧАНИЕ
При работе следует использовать следующие SD-карты.
Производитель Panasonic, TOSHIBA, SanDisk, ATP
Видео Совместимая SDHC-карта класса 4 и выше (4-32 ГБ)
Фото SD-карта (256 МБ-2 ГБ), SDHC-карта (4-32 ГБ)
●
Использование карт памяти, отличных от указанных выше, может
привести к сбоям записи или потере данных.
(Рекомендуется использовать класс 6 при записи в
режиме качества „UXP“.)
Наклейка
ЗаписьВоспроизведениеКопирование
Дополнительную справочную информацию вы можете найти в Подробное
руководство пользователя
http://manual.jvc.co.jp/index.html/
информация
Дополнительная
11
Page 68

Использование SD-карты
■
Запись на карту или воспроизведение с
нее могут быть осуществлены, когда
установки носителя „НОСИТЕЛЬ ДЛЯ
ВИДЕО“ или „НОСИТЕЛЬ ДЛЯ
ФОТО“ установлены на „SD-КАРТА“.
① Откройте меню.
Нажмите
.
② Выберите „НАСТРОЙКИ
НОСИТЕЛЯ“ и нажмите .
ВИДЕО
НАСТРОЙКИ ЭКРАНА
РЕГ. ЧАСОВ
ОСНОВНЫЕ НАСТРОЙКИ
НАСТРОЙКИ СОЕДИНЕНИЯ
НАСТРОЙКИ НОСИТЕЛЯ
УСТАН. ВЫЙТИ
.
?
③ Выберите „НОСИТЕЛЬ ДЛЯ
ВИДЕО“ или „НОСИТЕЛЬ ДЛЯ
ФОТО“ и нажмите .
НАСТРОЙКИ НОСИТЕЛЯ
НОСИТЕЛЬ ДЛЯ ВИДЕО
НОСИТЕЛЬ ДЛЯ ФОТО
ФОРМАТ. ВСТР. ПАМ.
ФОРМАТИР. SD-КАРТЫ
УД. ДАН. ВСТР. ПАМ.
УСТАН. ВЫЙТИ
.
?
④ Выберите „SD-КАРТА“ и
нажмите .
НАСТРОЙКИ НОСИТЕЛЯ
ВСТРОЕННАЯ ПАМЯТЬ
SD-КАРТА
Использование SD-карт,
■
которые использовались на
других устройствах
Отформатируйте (запустите) карту с
помощью „ФОРМАТИР. SD-КАРТЫ“ из
установок носителя.
Когда форматирование будет
завершено, все данные на карте будут
удалены. Скопируйте все файлы с
карты на ПК перед тем, как произвести
форматирование.
①
Нажмите , чтобы отобразить
меню.
② Выберите „НАСТРОЙКИ
НОСИТЕЛЯ“ с помощью
ползунка и нажмите .
③ Выберите „ФОРМАТИР. SD-
КАРТЫ“ и нажмите .
НАСТРОЙКИ НОСИТЕЛЯ
НОСИТЕЛЬ ДЛЯ ВИДЕО
НОСИТЕЛЬ ДЛЯ ФОТО
ФОРМАТ. ВСТР. ПАМ.
ФОРМАТИР. SD-КАРТЫ
УД. ДАН. ВСТР. ПАМ.
УСТАН.
.
④
Выберите „ФАЙЛ“ и нажмите .
ФОРМАТИР. SD-КАРТЫ
ФАЙЛ
№ ФАЙЛА + УПРАВЛЕНИЯ
УСТАН. ВЫЙТИ
.
⑤
Выберите „ДА“ и нажмите .
?
ВЫЙТИ
?
⑥ После форматирования
нажмите .
УСТАН. ВЫЙТИ
.
Дополнительную справочную информацию вы можете найти в Подробное
12
руководство пользователя
?
http://manual.jvc.co.jp/index.html/
Page 69

Воспроизведение
Воспроизведение/удаление файлов на аппарате
Выберите и начните воспроизведение записанных видеофайлов или фотографий с экрана
указателя (отображаются эскизы). Содержимое носителя, выбранного в установках
носителя (стр. 12), отображается на экране указателя.
Выберите режим воспроизведения.
1
Нажмите
Выберите режим видео или фото.
2
Нажмите
Начните воспроизведение одного
3
из файлов.
Выберите
Носитель, с которого
идет воспроизведение
ВОСПРОИЗ. ВИДЕО
Регулировка громкости во время
воспроизведения
Уменьшение
громкости
Удаление ненужных файлов
Увеличение
громкости
A
V
Выберите
ВОСПРОИЗ. ВИДЕО
работе
Приступая к
ЗаписьВоспроизведениеКопирование
Нажмите
Нажмите , чтобы остановить
воспроизведение.
.
Фотосъемка во время воспроизведения
■
Установите камеру в режим паузы при воспроизведении и нажмите кнопку
Функциональные кнопки операций во время воспроизведения
■
Обозначен
ие
/
!
"
$
%
Во время воспроизведения видео Во время воспроизведения фото
Воспроизведение/пауза Пуск/пауза слайд-шоу
Остановка (возвращение к
отображению эскизов)
Переход к следующему видео Переход к следующему фото
Возврат к началу сцены Возврат к предыдущему фото
Поиск в прямом направлении Поиск в обратном направлении Замедленное воспроизведение
вперед
Замедленное воспроизведение назад -
Дополнительную справочную информацию вы можете найти в Подробное
руководство пользователя
Когда появится подтверждающее
сообщение, выберите "ДА" и
нажмите .
Остановка (возвращение к
отображению эскизов)
http://manual.jvc.co.jp/index.html/
Нажмите
SNAPSHOT.
-
информация
Дополнительная
13
Page 70

Воспроизведение на экране
телевизора
Подключите камеру к телевизору.
1
* Также обратитесь к руководству по эксплуатации телевизора.
●
Для выключения питания аппарата нажмите кнопку Вкл./выкл. (,) и
удерживайте ее более 2 секунд.
Воспроизведение с высоким разрешением
■
Если у вас есть телевизор с высоким разрешением, можно воспроизвести запись с высоким
разрешением, подключив его к разъему HDMI.
Подключение к терминалу HDMI
Телевизор
A
V
К разъему HDMI
(мини-разъем HDMI)
.
Подключение к терминалу COMPONENT
К разъему COMPONENT
COMPONENT
Компонентный
кабель
(прилагается)
AV
Аудио/видео кабель
AV
К разъему аудио/видео
.
(прилагается)
Зеленый
Синий
Красный
Белый
Красный
Компонентный
вход видеосигнала
* Не подключайте желтый штепсельный разъем
при использовании компонентного кабеля.
Вход разъема HDMI
Y
C
B/PB
CR/P
R
Вход аудиосигнала
(левый)
Вход аудиосигнала
(правый)
Телевизор
ПРИМЕЧАНИЕ
●
По вопросам и проблемам с установкой необходимого режима на
телевизоре обращайтесь к производителю телевизора.
●
Используйте высокоскоростной кабель HDMI (кабель 2 категории) в
качестве мини-кабеля
●
При воспроизведении в высоком разрешении, установите
„КОМПОНЕНТНЫЙ ВЫХОД“ в меню настроек подключения на „
Если настройка остается „480i“, видео будет воспроизведено в
стандартном качестве.
Дополнительную справочную информацию вы можете найти в Подробное
14
руководство пользователя
HDMI.
http://manual.jvc.co.jp/index.html/
1080i“.
Page 71

Воспроизведение в стандартном качестве
■
Если у вы используете стандартный телевизор, можно воспроизвести запись в
стандартном качестве, подключив его к разъему аудио/видео.
Подключение к разъему аудио/видео
Телевизор
работе
Приступая к
A
V
Аудио/видео кабель
(прилагается)
AV
К разъему аудио/видео
Желтый
Белый
Красный
.
Подключите адаптер переменного тока. (стр. 6)
2
●
Этот аппарат автоматически включается, когда адаптер переменного тока
подключен.
Выберите переключатель телевизионного входа.
3
Начните воспроизведение одного из файлов. (стр. 13)
4
Воспроизведение с отображением даты/времени
■
Установите „ПОКАЗАТЬ НА ТВ“ в меню установок подключения на „ВКЛ“.
Или установите „ОТОБРАЗИТЬ НА ЭКРАНЕ“ в меню воспроизведения на „ПОКАЗАТЬ
ВСЕ“ или „ПОКАЗАТЬ ТОЛЬКО ДАТУ“.
Если изображение на экране телевизора выглядит
■
Входа видеосигнала
Входа видеосигнала
Вход аудиосигнала
(левый)
Вход аудиосигнала
(правый)
ненатурально
Изображение не отображается на
экране телевизора должным
образом.
Изображение на экране
телевизора отображается
вертикально.
Изображение на экране
телевизора отображается
горизонтально.
Цвета изображений выглядят
странно.
●
Отсоедините кабель и снова подсоедините
его.
●
Перезапустите аппарат, выключив и
повторно включив его.
●
Установите „ВИДЕО ВЫХОД“ в меню
установок подключения на „4:3“.
●
Отрегулируйте экран телевизора должным
образом.
●
Если видео было записано с параметром
„x.v.Color“, установленным на „ВКЛ“,
включите настройку телевизора
●
Отрегулируйте экран телевизора должным
образом.
x.v.Color.
ЗаписьВоспроизведениеКопирование
информация
Дополнительная
Дополнительную справочную информацию вы можете найти в Подробное
руководство пользователя
http://manual.jvc.co.jp/index.html/
15
Page 72

Копирование
Копирование файлов
Вы можете записывать диски или копировать файлы с этой камеры, подсоединив ее к
различным устройствам.
Устройство
Записывающее
устройство DVD
.
Внешний дисковод Bluray
.
Рекордер Blu-ray
.
DVD-рекордер
.
Видеомагнитофон
.
Внешний жесткий диск
Стандартное
качество
.
.
-
-
33
333
- *1*1*1*1 -
*1
3
3
----стр. 20
Высокое разрешение
.
.
.
--стр. 17
- стр. 17
--*1стр. 20
Страниц
а
----
.
3
ПК
-*2*2*2
.
*1
Способы копирования файлов или создания дисков различаются в
3
зависимости от используемого устройства. Для получения дополнительной
информации обратитесь к руководству по эксплуатации устройства.
*2
Подробную информацию о том, как записать диск с помощью компьютера, вы
можете найти в Подробное руководство пользователя.
Дополнительную справочную информацию вы можете найти в Подробное
16
руководство пользователя
http://manual.jvc.co.jp/index.html/
-
-
Page 73

Создание дисков на записывающем устройстве
DVD или внешнем дисководе Blu-ray
Воспроизведение созданного
Закройте ЖК-монитор и подключите.
1
① Подключите адаптер
переменного тока аппарата к
питанию.
② Подключите адаптер
переменного тока
записывающего устройства к
питанию.
③ Подключите USB-кабель,
прилагающийся к
записывающему устройству.
К разъему USB
AV
К разъему
подключения к сети
постоянного тока
Выступ
Адаптер переменного
тока
К сетевой розетке
(от 110В до 240В)
.
* Также обратитесь к руководству по
эксплуатации записывающего
устройства DVD или внешнего
дисковода Blu-ray.
Включите записывающее устройство
или внешний дисковод Blu-ray и
2
вставьте в него чистый диск.
DVD Burner
(При
использовании
CU-VD50)
■
диска
Воспроизведите на AVCHD-совместимом
устройстве.
Совместимое записывающее
■
устройство DVD
●
CU-VD50
●
CU-VD3
Совместимый внешний
■
дисковод Blu-ray
●
LG: модель № BE06LU10
При подсоединении к внешнему
дисководу Blu-ray используйте USBкабель с разъемами Mini-A (штырьковый)
– B (штырьковый).
Чтобы использовать USB-кабель,
прилагающийся к внешнему дисководу
Blu-ray, приобретите USB-удлинитель.
●
Mini-A (штырьковый) - A (гнездовой)
(Номер компонента: QAM0852-001)
* Обратитесь к ближайшему дилеру
по обслуживанию JVC.
ПРИМЕЧАНИЕ
●
Время, доступное для записи
на диск, различается в
зависимости от способа
записи.
●
Кнопки на записывающем
устройстве DVD (CU-VD50),
кроме кнопок включения
питания и извлечения диска,
не работают, когда оно
подключено к камере.
работе
Приступая к
ЗаписьВоспроизведениеКопирование
Откройте ЖК-монитор.
3
●
Аппарат включится и появится
меню РЕЗЕРВ. КОПИРОВАНИЕ.
●
Пока USB-кабель подключен, будет
отображаться меню РЕЗЕРВ.
КОПИРОВАНИЕ.
Дополнительную справочную информацию вы можете найти в Подробное
руководство пользователя
http://manual.jvc.co.jp/index.html/
информация
Дополнительная
17
Page 74

Копирование всех файлов
Выберите режим видео или фото.
Выберите „СОЗДАТЬ ИЗ ВСЕГО“ (Видео) или
„СОХРАНИТЬ ВСЕ“ (Неподвижное
1
изображение) и нажмите .
Вы можете выбрать носитель, на который
нужно сохранить, выбрав „ИЗМЕН.
НОСИТЕЛЬ ЗАП.“. (Дополнительную
справочную информацию вы можете найти
в Подробное руководство пользователя.)
●
Выбор „Blu-ray DISC“ дает вам
возможность сохранять видео на
диски Blu-ray в формате высокого
разрешения. (Только внешние
дисководы Blu-ray)
●
Выбор „DVD(AVCHD)“ дает вам
возможность сохранять видео на
диски DVD в формате высокого
разрешения.
●
Выбор „DVD-Video“ дает вам
возможность сохранять видео на
диски DVD после перехода на
стандартное качество изображения.
Выберите носитель, на который будет
2
осуществляться копирование.
Выберите необходимое меню и
3
нажмите .
„ВСЕ СЦЕНЫ“ (Видео)/
„ВСЕ СНИМКИ“ (Неподвижное
изображение):
Все видео и фотографии на аппарате будут
скопированы.
„НЕСОХР. СЦЕНЫ“ (Видео)/
„НЕСОХРАНЕННЫЕ
СНИМКИ“ (Неподвижное изображение):
Видео и фотографии, которые никогда не
копировались, будут автоматически
выбраны и скопированы.
УСТАН.
.
РЕЗЕРВНОГО КОПИРОВАНИЯ
УСТАН.
.
ВСЕ СЦЕНЫ
НЕСОХР. СЦЕНЫ
УСТАН.
.
РЕЗЕРВ. КОПИР. ВИДЕО
СОЗДАТЬ ИЗ ВСЕГО
ВЫБРАТЬ И СОЗДАТЬ
ВОСПРОИЗВЕДЕНИЕ
ФИНАЛИЗИРОВАТЬ
ИЗМЕН. НОСИТЕЛЬ ЗАП.
СОЗДАТЬ ИЗ ВСЕГО
ВЫБОР НОСИТЕЛЯ ДЛЯ
ВСТРОЕННАЯ ПАМЯТЬ
СОЗДАТЬ ИЗ ВСЕГО
?
SD-КАРТА
?
4
5
6
7
8
■
Выберите „ВЫПОЛНИТЬ“ и нажмите .
ВСЕ СЦЕНЫ
ТРЕБУЕМОЕ КАЧЕСТВО
DVD㧦1 / DVD(DL)㧦1
ПОДГОТОВИТЬ ПУСТОЙ ДИСК
ВЫПОЛНИТЬ
НАЗАД
УСТАН. ВЫЙТИ
Необходимое количество дисков
.
Выберите „ДА“ или „НЕТ“ и нажмите .
ВСЕ СЦЕНЫ
ВЫ ХОТИТЕ СОЗДАТЬ
АВТОМАТИЧЕСКИЙ ЗАГОЛОВОК В
ГЛАВНОМ МЕНЮ ДИСКА?
ДА
НЕТ
УСТАН. ВЫЙТИ
.
ДА :Отображает видео с
НЕТ :Отображает видео по датам
одинаковыми датами записи по
группам.
записи.
Выберите „ВЫПОЛНИТЬ“ и нажмите .
●
Когда появится сообщение
„ВСТАВЬТЕ СЛЕДУЮЩИЙ ДИСК“,
смените диск.
После создания нажмите .
Закройте ЖК-монитор, а затем
отключите USB-кабель.
При появлении „ВЫ ХОТИТЕ
ФИНАЛИЗИРОВАТЬ?“
Появляется, когда
„АВТОФИНАЛИЗАЦИЯ“ в настройках
камеры установлено на „ВЫКЛ“.
●
Для воспроизведения на других
устройствах выберите „ДА“ и
нажмите .
●
Чтобы добавить файлы на DVD
позднее, выберите „НЕТ“ и нажмите
.
Дополнительную справочную информацию вы можете найти в Подробное
18
руководство пользователя
http://manual.jvc.co.jp/index.html/
Page 75

Выбор файлов для копирования
Выберите режим видео или фото.
Выберите „ВЫБРАТЬ И СОЗДАТЬ“ (Видео) или
„ВЫБРАТЬ И СОХРАНИТЬ“ (Неподвижное
1
изображение) и нажмите .
Вы можете выбрать носитель, на который
нужно сохранить, выбрав „ИЗМЕН.
НОСИТЕЛЬ ЗАП.“. (См.
Подробное руководство пользователя.)
Выберите носитель, на который будет
2
осуществляться копирование.
Выберите необходимое меню и
3
нажмите .
„СОЗДАТЬ ПО ДАТЕ“ (Видео)/
„СОХРАНИТЬ ПО ДАТЕ“ (Неподвижное
изображение):
Видео и фотографии сортируются и
копируются по дате записи. ¨ К A
„СОЗДАТЬ ПО СОБЫТИЮ“ (только видео)*:
Видео сортируются и копируются по дате
записи.
„СОЗДАТЬ ПО СПИС. ВСП“ (только видео)*:
Выберите и скопируйте необходимый список
воспроизведения.
* Дополнительную справочную
информацию вы можете найти в
Подробное руководство
пользователя.
„ВЫБРАТЬ ИЗ СЦЕН“ (Видео)/
„ВЫБРАТЬ
ИЗОБРАЖЕНИЯ“ (Неподвижное
изображение):
Выберите и скопируйте необходимые
видеофайлы и фотографии по
отдельности. ¨ К B
ВОСПРОИЗВЕДЕНИЕ
ФИНАЛИЗИРОВАТЬ
ИЗМЕН. НОСИТЕЛЬ ЗАП.
УСТАН.
.
РЕЗЕРВНОГО КОПИРОВАНИЯ
УСТАН.
.
СОЗДАТЬ ПО ДАТЕ
СОЗДАТЬ ПО СОБЫТИЮ
СОЗДАТЬ ПО СПИС. ВСП
ВЫБРАТЬ ИЗ СЦЕН
УСТАН.
.
РЕЗЕРВ. КОПИР. ВИДЕО
СОЗДАТЬ ИЗ ВСЕГО
ВЫБРАТЬ И СОЗДАТЬ
стр. 18 или
ВЫБРАТЬ И СОЗДАТЬ
ВЫБОР НОСИТЕЛЯ ДЛЯ
ВСТРОЕННАЯ ПАМЯТЬ
SD-КАРТА
ВЫБРАТЬ И СОЗДАТЬ
?
?
AСОЗДАТЬ ПО ДАТЕ/
СОХРАНИТЬ ПО ДАТЕ
Выберите дату записи и
①
нажмите .
.
●
Будут скопированы только файлы с
выбранной датой.
●
Последующие шаги такие же, как
шаги 4-8 на предыдущей странице.
BВЫБРАТЬ ИЗ СЦЕН/
ВЫБРАТЬ ИЗОБРАЖЕНИЯ
Выберите файл.
①
.
●
Нажмите ((), чтобы добавить
пометку.
После выбора файлов нажмите
②
„СОХР.“.
●
Последующие шаги такие же, как
шаги 4-8 на предыдущей странице.
Проверка созданного диска
■
Выберите „ВОСПРОИЗВЕДЕНИЕ“ в шаге 1.
ПРЕДУПРЕЖДЕНИЕ
●
Не выключайте питание и не
отключайте USB-кабель до тех
пор, пока создание не будет
завершено.
●
Видео и фотографии не могут
быть скопированы на один и
тот же диск.
●
Файлы, не отображаемые на
экране указателя во время
воспроизведения, не будут
скопированы.
СОЗДАТЬ ПО ДАТЕ
ВСЕГО
00h00m
DVD 00
ПРОВ.
СОХР.
DVD(DL)00
ВЫЙТИ
Пометка
УСТАН. ВЫЙТИ
ВЫБРАТЬ ИЗ СЦЕН
работе
Приступая к
ЗаписьВоспроизведениеКопирование
информация
Дополнительная
Дополнительную справочную информацию вы можете найти в Подробное
руководство пользователя
http://manual.jvc.co.jp/index.html/
19
Page 76

Копирование файлов с подключением к
видеомагнитофону/DVD-рекордеру
Вы можете копировать видео стандартного качества с этой камеры, подсоединив ее к видеомагнитофону/
DVD-рекордеру.
Также обратитесь к руководству по эксплуатации телевизора, DVD-рекордера, видеомагнитофона и т.п.
Подсоедините камеру к видеомагнитофону/DVD-рекордеру.
1
●
Для выключения питания аппарата нажмите кнопку Вкл./выкл. (,) и
удерживайте ее более 2 секунд.
К разъему аудио/видео
AV
.
●
Этот аппарат автоматически включается, когда адаптер переменного тока подключен.
Выберите режим воспроизведения.
2
Аудио/видео кабель
(прилагается)
A
V
Адаптер переменного тока
К сетевой розетке
(от 110В до 240В)
К разъему подключения
к сети постоянного тока
Желтый
Белый
Красный
Входа видеосигнала
Входа видеосигнала
Вход аудиосигнала
(левый)
Вход аудиосигнала
(правый)
Видеомагнитофон/DVD-рекордер
Нажмите
Подготовьтесь к записи.
3
.
AV
Подготовка телевизора и
видеомагнитофона/DVD-рекордера
●
Переключитесь на соответствующий входной
сигнал.
●
Вставьте пустой совместимый DVD-диск или видеокассету, на которые вы хотите копировать.
Подготовка данного аппарата
●
Установите „ВИДЕО ВЫХОД“ в меню установок подключения на пропорцию
(„4:3“ или „16:9“) подсоединенного телевизора.
●
Чтобы включить дату в время копирования, установите „ПОКАЗАТЬ НА ТВ“ в
меню установок подключения на „ВКЛ“. Или установите ОТОБРАЗИТЬ НА
ЭКРАНЕ в меню воспроизведения на ПОКАЗАТЬ ТОЛЬКО ДАТУ.
Начните запись.
4
●
Начните воспроизведение на аппарате (стр. 13) и нажмите кнопку записи на рекордере.
●
Когда воспроизведение завершится, остановите запись.
Дополнительную справочную информацию вы можете найти в Подробное
20
руководство пользователя
http://manual.jvc.co.jp/index.html/
Page 77

Дополнительная информация
Использование меню
Вы можете настроить различные установки с
использованием меню.
Откройте меню.
1
Нажмите
.
●
Меню выглядит по-разному в зависимости
от используемого режима.
Выберите необходимое меню и
2
нажмите .
ВИДЕО
ЗАРЕГИСТР. СОБЫТИЕ
КАЧЕСТВО ВИДЕО
МАСШТАБ
УВЕЛ. УСИЛ
ВЫСОКОСКОР. СЪЕМКА
УСТАН. ВЫЙТИ
.
Информация поддержки пользователя
Использование данного программного обеспечения регулируется условиями лицензии на программное обеспечение.
JVC
(по вопросам, связанным с данным аппаратом)
Перед обращением в ближайший офис или агентство JVC в Вашей стране (обратитесь к
Всемирной сети обслуживания JVC на сайте http://www.jvc-victor.co.jp/english/worldmap/index-e.html)
по поводу данного программного обеспечения, пожалуйста, подготовьте следующую информацию.
Название изделия, модель, серийный номер, проблема, сообщение об ошибке
•
ПК (производитель, модель (настольный ПК/ноутбук), ЦП, ОС, память (МБ/ГБ), доступное место
•
на жестком диске (ГБ))
Пожалуйста, обратите внимание на то, что в зависимости от сути вопроса для ответа на него
может понадобиться некоторое время.
JVC не отвечает на вопросы, касающиеся основной работы Вашего компьютера, или на вопросы,
касающиеся технических характеристик или работы ОС, других приложений или драйверов.
Pixela
(по вопросам, связанным с прилагающимся программным обеспечением)
Регион Язык № телефона
США и Канада английский +1-800-458-4029 (бесплатный)
Европа (Великобритания,
Франция и Испания)
Другие страны Европы
Азия (Филиппины) английский +63-2-438-0090
Китай китайский 10800-163-0014 (бесплатный)
Главная страница: http://www.pixela.co.jp/oem/jvc/mediabrowser/e/
Пожалуйста, посетите наш сайт для получения новой информации и загрузки данных.
.
Дополнительную справочную информацию вы можете найти в Подробное
?
английский/немецкий/
французский/испанский
английский/немецкий/
французский/испанский
руководство пользователя
Выберите необходимую настройку и
3
нажмите .
ВИДЕО
ВЫКЛ
АРУ
АВТО
УСТАН. ВЫЙТИ
.
Выход из экрана
■
Нажмите (завершить).
Возврат к предыдущему экрану
■
Нажмите „)“.
Отображение файла справки
■
Нажмите „*“.
●
Файл справки для некоторых
элементов может быть недоступен.
●
Дополнительную справочную
информацию о настройках вы
можете найти в Подробное
руководство пользователя.
.
+800-1532-4865 (бесплатный)
?
+44-1489-564-764
http://manual.jvc.co.jp/index.html/
работе
Приступая к
ЗаписьВоспроизведениеКопирование
информация
Дополнительная
21
Page 78

Время записи/количество фотографий
Проверить время записи можно, нажав кнопку , (питания/информации).
Приблизительное время видеозаписи
Качество
UXP 2 ч 57 мин 21 мин 44 мин 1 ч 29 мин 2 ч 58 мин
XP 4 ч 9 мин 31 мин 1 ч 2 мин 2 ч 5 мин 4 ч 12 мин
SP 5 ч 54 мин 43 мин 1 ч 28 мин 2 ч 58 мин 5 ч 57 мин
EP 14 ч 45 мин 1 ч 49 мин 3 ч 41 мин 7 ч 26 мин 14 ч 53 мин
●
Приблизительное время записи не является точным. Реальное время записи
может быть короче, в зависимости от условий съемки.
Встроенная память
(32 ГБ)
4 ГБ 8 ГБ 16 ГБ 32 ГБ
Приблизительное количество фотографий (единица: количество снятых снимков)
Размер
изображения
3520×2640
(4:3)
3072×2304
(4:3)
2592×1944
(4:3)
1600×1200
(4:3)
640×480
(4:3)
3520×1984
(16:9)
3072×1728
(16:9)
2592×1456
(16:9)
1920×1080
(16:9)
1280×720
(16:9)
Качество
ВЫСОКОЕ 940 1900 3800 7690 7610
СТАНДАРТНОЕ 1460 2940 5890 9999 9999
ВЫСОКОЕ 1230 2490 4980 9999 9960
СТАНДАРТНОЕ 1960 3960 7920 9999 9999
ВЫСОКОЕ 1740 3500 7000 9999 9999
СТАНДАРТНОЕ 2720 5490 9999 9999 9999
ВЫСОКОЕ 4440 8950 9999 9999 9999
СТАНДАРТНОЕ 7500 9999 9999 9999 9999
ВЫСОКОЕ 9999 9999 9999 9999 9999
СТАНДАРТНОЕ 9999 9999 9999 9999 9999
ВЫСОКОЕ 1250 2510 5030 9999 9999
СТАНДАРТНОЕ 1960 3960 7920 9999 9999
ВЫСОКОЕ 1660 3350 6710 9999 9999
СТАНДАРТНОЕ 2610 5250 9999 9999 9999
ВЫСОКОЕ 2260 4560 9120 9999 9999
СТАНДАРТНОЕ 3530 7100 9999 9999 9999
ВЫСОКОЕ 4140 8330 9999 9999 9999
СТАНДАРТНОЕ 6310 9999 9999 9999 9999
ВЫСОКОЕ 8570 9999 9999 9999 9999
СТАНДАРТНОЕ 9999 9999 9999 9999 9999
4 ГБ 8 ГБ 16 ГБ 32 ГБ
Приблизительное время записи (с использованием батареи)
Аккумуляторный блок Фактическое время записи Время непрерывной записи
BN-VG114E 45 мин 1 ч 20 мин
BN-VG121E 1 ч 10 мин 2 ч 5 мин
Дополнительную справочную информацию вы можете найти в Подробное
22
руководство пользователя
http://manual.jvc.co.jp/index.html/
SDHC-карта
SDHC-карта Встроенная
память
(32 ГБ)
Page 79

●
Вышеуказанные величины действительны при „ПОДСВЕТКА“, установленной
на „ВЫКЛ“, и „РЕГ. ЯРКОСТИ ДИСПЛЕЯ“, установленной на „СТАНДАРТ“.
●
При трансфокации или в случае многократных остановок фактическое время записи
может быть меньше. (Рекомендуется иметь в запасе аккумуляторные блоки на период
времени, в три раза превышающий предполагаемое время записи.)
●
По истечении срока службы батареи время записи становится еще меньше,
даже если аккумуляторный блок полностью заряжен. (Замените
аккумуляторный блок на новый.)
Устранение неисправностей
Перед тем, как подать заявку на обслуживание, обратитесь к следующей таблице или к
разделу Устранение неисправностей в Подробное руководство пользователя.
Если решения, предложенные в таблице, не решают проблему, обратитесь к ближайшему
дилеру JVC или в ближайший сервисный центр
также к часто задаваемым вопросам о новой продукции на веб-сайте
к разделу вопросов и ответов о новой продукции на веб-сайте JVC (http://www.jvc.com).
Данный аппарат управляется микрокомпьютером. Электростатические разряды, внешние
шумы и помехи (от телевизора, радио и т.п.) могут препятствовать нормальному
функционированию. В таком случае необходимо перезапустить аппарат.
Сбросьте настройки аппарата, если в его работе наблюдаются сбои или
■
сообщение „Ошибка ...“ появляется на экране.
①
Выключите питание. (Закройте ЖК-монитор.)
②
Выньте адаптер переменного тока и аккумуляторный блок из
аппарата, переустановите их, и снова включите питание.
JVC для получения инструкций. Обратитесь
JVC. Обратитесь также
работе
Приступая к
ЗаписьВоспроизведениеКопирование
Неисправность
Питание
Запись
Воспроизведение
Неисправность Действие Страница
Лампа POWER/CHARGE
начинает мигать при закрытии
монитора.
Не удается сделать запись.
Запись произвольно
останавливается.
Даты/время не отображаются.
Звук или видео прерываются.
Дополнительную справочную информацию вы можете найти в Подробное
руководство пользователя
●
Идет зарядка аккумуляторного блока.
●
Проверьте кнопку /.
●
Установите режим записи с помощью
кнопки +.
●
Выключите аппарат, подождите немного, а
затем снова включите его. (Аппарат
автоматически останавливается для
предохранения электроцепи, когда
температура поднимается выше
критической.)
●
Запись останавливается автоматически
после 12 часов непрерывной записи.
●
Установите „ОТОБРАЗИТЬ НА ЭКРАНЕ“ в
меню воспроизведения соответствующим
образом.
●
Иногда воспроизведение прерывается в
местах соединений между двумя сценами.
Это не является неисправностью.
http://manual.jvc.co.jp/index.html/
стр. 6
стр. 9
стр. 13
-
-
-
-
информация
Дополнительная
23
Page 80

Индикатор не мигает во время
зарядки аккумуляторного блока.
Другие проблемы
●
Проверьте оставшийся заряд
аккумуляторного блока. (Когда
аккумуляторный блок полностью заряжен,
индикатор не мигает.)
●
При зарядке в холодных или жарких
условиях убедитесь, что батарея
заряжается в условиях допустимого
диапазона температур. (В противном
случае, зарядка может остановиться для
защиты аккумуляторного блока.)
стр. 9
стр. 6
●
Снимите перчатки.
●
Ползунок и кнопки выбора
операций не работают.
Аппарат нагревается.
Прикоснитесь к ползунку и кнопкам
пальцами, чтобы активировать их. (Они не
будут реагировать, если вы нажмете на них
ногтем или концом ручки.)
●
Это не является неисправностью. (Аппарат
может нагреться при длительном
использовании.)
Предупреждающие сообщения
Предупреждающие сообщения Действие Страница
●
Выключите аппарат, а затем снова включите
его.
●
Если вышеуказанные действия не помогают
ОШИБКА ЗАПИСИ
Предупреждающие сообщения
НЕПОДДЕРЖИВАЕМАЯ СЦЕНА!
(Видео)/
НЕПОДДЕРЖИВАЕМЫЙ ФОРМАТ
ФАЙЛА! (Неподвижное
изображение)
ПЕРИОДИЧЕСКИ СОХРАНЯЙТЕ
РЕЗЕРВНЫЕ КОПИИ НА ПК ИЛИ
ДИСКЕ
ЗАПИСАН. ДАННЫЕ СЛИШКОМ
МАЛЫ НЕВОЗМОЖНО СОХРАНИТЬ
разрешить проблему, произведите резервное
копирование файлов и проведите „ФОРМАТ.
ВСТР. ПАМ.“ или „ФОРМАТИР. SD-КАРТЫ“ в
меню настроек носителя. (Все данные будут
удалены.)
●
Используйте файл, записанный на этом
аппарате. (Файлы, записанные на другом
устройстве, могут не воспроизводиться. Если
файл был записан на этом аппарате, он
поврежден.)
●
Подключитесь к компьютеру и скопируйте на
него необходимые данные.
●
Если видеозапись была установлена при
фактическом времени записи,
показывающем “0:00:00:17” или меньше,
видео не может быть сохранено.
-
-
-
-
-
-
-
-
Дополнительную справочную информацию вы можете найти в Подробное
24
руководство пользователя
http://manual.jvc.co.jp/index.html/
Page 81

Внимание
Аккумуляторный блок
Прилагаемый аккумуляторный
блок является ионнолитиевой батареей. Перед
использованием прилагаемого
или дополнительного
аккумуляторного блока
прочитайте следующие
предупреждения:
Во избежание возникновения опасности
•
... не бросайте в огонь.
... не замыкайте контакты между собой. Если
аккумуляторный блок не используется,
храните его вдали от металлических
предметов. При транспортировке
убедитесь, что прилагаемая крышка
установлена на аккумуляторный блок. Если
крышка аккумуляторного блока потеряна,
перевозите блок в пластиковом пакете.
... не переделывайте и не разбирайте.
... не подвергайте батарею воздействию
температур, превышающих 60°C, так как
это может привести к перегреву, взрыву или
возгоранию батареи.
... используйте только указанные зарядные
устройства.
Во избежание повреждения и для
•
продления срока службы
... не подвергайте ударам.
... выполняйте зарядку в температурном
диапазоне от 10°C до 35°C. При более
низких температурах батарея заряжается
дольше, а в некоторых случаях зарядка
прекращается совсем. При более высоких
температурах батарея заряжается
неполностью, а в некоторых случаях
зарядка прекращается совсем.
... храните в прохладном сухом месте.
Длительное воздействие высоких
температур приведет к увеличению
естественного разряда батареи и
сокращению ее срока службы.
... в случае длительного хранения батарейного
блока полностью заряжайте и затем
полностью разряжайте батарею каждые 6
месяцев.
... если аккумуляторный блок не используется,
извлеките его из зарядного устройства или
устройства, получающего питание от сети,
так как некоторые устройства потребляют
ток даже в выключенном состоянии.
.
Контакты
Носитель записи
Во избежание повреждения носителя
•
записи следуйте рекомендациям,
указанным ниже.
Не сгибайте и не роняйте носитель записи, не
•
подвергайте его сдавливанию, толчкам или
вибрации.
Не допускайте попадания воды на носитель
•
записи.
Не используйте, не заменяйте и не храните
•
носитель записи в местах, подверженных
воздействию статического электричества
или электрических помех.
Не выключайте питание камеры и не
•
отсоединяйте батарею или сетевой адаптер
во время съемки, воспроизведения или во
время любого другого доступа к носителю
записи.
Не располагайте носитель записи вблизи
•
объектов, имеющих сильное магнитное поле
или излучающих сильные электромагнитные
волны.
Не храните носитель записи в местах с
•
повышенной температурой или влажностью.
Н•е допускайте соприкосновения носителя с
•
аллическими предметами.
мет
При форматировании или удалении данных
с использованием камеры, меняется
только информация об администрировании
файлов. Данные полностью не удаляются с
запись средний. Если вы хотите полностью
удалить все данные, мы рекомендуем либо
воспользоваться имеющимся в продаже
программным обеспечением, которое
специально предназначено для этого, либо
физически разрушить камеру при помощи
молотка и т. п.
ЖК-монитор
Во избежание повреждения ЖК-
•
монитора НЕ
... подвергайте его воздействию сильных
толчков и ударов.
... устанавливайте камеру ЖК-монитором
вниз.
Для продления срока службы
•
... избегайте протирать монитор грубой
тканью.
работе
Приступая к
ЗаписьВоспроизведениеКопирование
Дополнительную справочную информацию вы можете найти в Подробное
руководство пользователя
http://manual.jvc.co.jp/index.html/
информация
Дополнительная
25
Page 82

Основной блок
Для обеспечения безопасности НЕ
•
... открывайте корпус камеры.
... разбирайте и не модифицируйте
устройство.
... допускайте попадания в устройство
воспламеняющихся веществ, воды или
инородных металлических предметов.
... снимайте аккумуляторный блок и не
отключайте питание при включенном
питании камеры.
... отставляйте аккумуляторный блок
подключенным к камере, если она не
используется.
... ставьте на устройство источники открытого
пламени, такие как горящие свечи.
... допускайте попадания на устройство
капель или брызг.
... допускайте налипания пыли или
металлических предметов на штепсельный
разъем или розетку.
... вставляйте какие-либо предметы в камеру.
Избегайте использовать камеру
•
... в местах, подверженных воздействию
повышенной влажности или пыли.
... в местах, подверженных воздействию сажи
или пара, например, около кухонной плиты.
... в местах, подверженных воздействию
вибрации или ударов.
... рядом с телевизором.
... рядом с устройствами, генерирующими
сильное электромагнитное или
электрическое поле (динамики,
передающие антенны и т. п.).
... в местах со слишком высокой (более
40°C) или слишком низкой (ниже 0°C)
температурой.
HE ОСТАВЛЯЙТЕ устройство
•
... в местах с температурой выше 50°C.
... в местах с очень низкой (ниже 35%) или
очень высокой (более 80%) влажностью.
... в местах, подверженных воздействию
прямых солнечных лучей.
... в закрытой машине летом.
... рядом с нагревательными приборами.
... в высоко расположенных местах, например,
на телевизоре. Установка камеры в высоко
расположенном месте с подключенным
кабелем может привести к неисправности
камеры, в случае если кто-либо запнется о
кабель и камера упадет на пол.
.
Для защиты устройства, НЕ
•
... допускайте намокания устройства.
... роняйте устройство и не ударяйте им по
твердым предметам.
... подвергайте камеру ударам
или повышенной вибрации при
транспортировке.
... направляйте объектив в течение
длительного времени на очень ярко
освещенные объекты.
... допускайте попадания в объектив прямого
солнечного света.
... размахивайте камерой при использовании
ремешка для руки.
... размахивайте мягким чехлом камеры, когда
камера располагается в чехле.
... размещайте камеру в местах с наличием
пыли или песка, например, на пляже.
Для предотвращения падения
•
устройства,
Надежно закрепите наручный ремень.
•
При использовании камеры со штативом
•
надежно зафиксируйте камеру на штативе.
Если камера упадет, вы можете получить
травму и повредить камеру.
Использование камеры ребенком должно
осуществляться под надзором родителей.
Дополнительную справочную информацию вы можете найти в Подробное
26
руководство пользователя
http://manual.jvc.co.jp/index.html/
Page 83

Технические характеристики
Камера
Питание При использовании адаптера переменного тока: 5,2 В пост. тока,
Потребляемая
мощность
Размеры (мм) 55 x 62 x 110 (толщина x высота x ширина: не включая ручной
Масса Около 260 г (только камера),
Среда эксплуатации Допустимая температура эксплуатации: от 0°C до 40°C
Устройство передачи
изображения
Область записи
(видео)
Область записи
(фото)
Объектив От F2,8 до F4,5, f= 6,7-67,0 мм
Трансфокация
(видео)
Трансфокация
(фото)
Формат сигнала 1080/50i (показатель соотношения 16:9)
Формат видеозаписи Стандарт AVCHD, видео: MPEG-4 AVC/H.264, аудио: Dolby Digital
Формат фотосъемки Стандарт JPEG
Носитель записи Встроенная память (32 ГБ), SD/SDHC-карта (серийного
Батарея часов Аккумуляторная батарея
при использовании аккумуляторного блока: DC 3,6 В
3,2 Вт (когда „ПОДСВЕТКА“, установленной на „ВЫКЛ“, и „РЕГ.
ЯРКОСТИ ДИСПЛЕЯ“, установленной на „СТАНДАРТ“)
ремень)
Около 300 г (включая прилагающийся аккумуляторный блок)
Допустимая температура хранения: от -20°C до 50°C
Допустимая влажность при эксплуатации: от 35 % до 80 %
1/2,3" 10 620 000 пикселей (CMOS)
5 650 000 пикселей (оптическая трансфокация),
от 2 070 000 до 5 650 000 пикселей (динамическая трансфокация)
9 290 000 пикселей (4:3), 6 980 000 пикселей (16:9)
(35-миллиметровое преобразование видео: от 48,3 мм до 483 мм,
Неподвижное изображение: от 39,9 мм до 399 мм)
Оптическая трансфокация: 10-кратная
Динамическая трансфокация: 16-кратная (стабилизатор
изображения A), 15-кратная (стабилизатор изображения B)
цифровая трансфокация: 200-кратная
Оптическая трансфокация: 10-кратная
2ch
производства)
Адаптер переменного тока (AP-V30M)*
Питание AC 110-240 В, 50 Гц/60 Гц
Выход DC 5,2 В, 1,8 A
Допустимая
температура
эксплуатации
Размеры (мм) 50 x 29 x 100 (толщина x высота x ширина: не включая кабель и
Масса Около 112 г
Для использования адаптера переменного тока в других странах необходимо
*
иметь вилку-адаптер, соответствующую стране посещения.
●
Технические характеристики и внешний вид продукта могут быть изменены
от 0°C до +40°C (от +10°C до +35°C во время зарядки)
вилку)
без предварительного уведомления.
работе
Приступая к
ЗаписьВоспроизведениеКопирование
информация
Дополнительная
Дополнительную справочную информацию вы можете найти в Подробное
руководство пользователя
http://manual.jvc.co.jp/index.html/
27
Page 84

Термины
А
Адаптер переменного тока ............ 6
Аккумуляторный блок .................... 6
В
Внешний дисковод Blu-ray ........... 17
Время записи ............................... 22
Выбор языка ................................... 8
Ж
ЖК-мониторе ................................ 25
З
Записывающее устройство DVD
К
Карта памяти SD .................... 11, 22
Количество фотографий ............. 22
Копирование (дублирование) ..... 20
Копирование (резервное) ............ 16
Н
Настройка часов ............................ 7
...... 17
Настройки меню ........................... 21
П
Просмотр файлов на экране
телевизора ................................... 14
С
Скопированного BD/DVD
Соединение HDMI ........................ 14
Соединение аудио/видео ...... 15, 20
Соединение компонентный ......... 14
Т
Трансфокация ................................ 9
У
Удаление файлов ........................ 13
Установка даты/времени ............... 8
Ф
Форматирование SD-карты ......... 12
U
USB-кабель .................................. 17
.
............. 17
12,3чомэ, Морийя-чо, Канагава-ку, Йокохама, Канагава 221-8528, Япония
© 2010 Victor Company of Japan, Limited
ВИКТОР КОМПАНИ ОФ ДЖАПАН, ЛИМИТЕД
0110FOH-SW-VM
AS
 Loading...